Embed Size (px)
Citation preview
CSS Tool 3.0 User Documentation
Canon
Version : 0.2 Status : Draft Date : 10-10-2008
Code : Author : Wouter van Dee

Index
0. CHANGES IN HISTORY .......................................................................................................................... 5
1. INTRODUCTION....................................................................................................................................... 6 1.1 GOAL.................................................................................................................................................... 6 1.2 SCOPE................................................................................................................................................... 6 1.3 RELATION TO OTHER DOCUMENTS........................................................................................................ 6 1.4 REFERENCE .......................................................................................................................................... 6 1.5 DEFINITIONS AND ABBREVIATIONS....................................................................................................... 6
2. APPLICATION AND ROLE EXPLANATION....................................................................................... 7
3. LOGGING INTO THE APPLICATION USING THE WEB................................................................. 8 3.1 GENERAL EXPLANATION ...................................................................................................................... 8 3.2 LOGGING IN.......................................................................................................................................... 8 3.3 HELP .................................................................................................................................................. 10
4. LOGGING INTO THE APPLICATION USING THE REMEDY USER TOOL .............................. 13 4.1 GENERAL EXPLANATION .................................................................................................................... 13 4.2 CONFIGURING REMEDY USER TOOL................................................................................................... 13 4.3 LOGGING IN........................................................................................................................................ 15
5. SUBMITTER INFORMATION .............................................................................................................. 16 5.1 THE CALL MODULE ............................................................................................................................ 16
5.1.1 General Explanation..................................................................................................................... 16 5.1.2 Submitting a call ........................................................................................................................... 17 5.1.3 Searching for calls ........................................................................................................................ 31 5.1.4 Call explanation............................................................................................................................ 32 5.1.5 Add a Me Too to a call.................................................................................................................. 39 5.1.6 Add a suggestion to a call............................................................................................................. 41 5.1.7 Events............................................................................................................................................ 43
5.2 THE TASK MODULE ............................................................................................................................ 49 5.2.1 General explanation ..................................................................................................................... 49 5.2.2 Searching for tasks ....................................................................................................................... 49 5.2.3 Task Explanation .......................................................................................................................... 51
5.3 THE KNOWLEDGE MODULE ................................................................................................................ 54 5.3.1 General Explanation..................................................................................................................... 54 5.3.2 Creating Knowledge Base Articles ............................................................................................... 54 5.3.3 Searching Knowledge Base Articles ............................................................................................. 57 5.3.4 Knowledge Base Explanation ....................................................................................................... 60
5.4 THE PARTS MODULE........................................................................................................................... 63 5.4.1 General Explanation..................................................................................................................... 63 5.4.2 Create a part request .................................................................................................................... 63 5.4.3 Searching part requests ................................................................................................................ 66 5.4.4 Part Setup Explanation................................................................................................................. 68
6. ASSIGNED PERSON INFORMATION ................................................................................................ 73 6.1 THE CALL MODULE ............................................................................................................................ 73
6.1.1 General Explanation..................................................................................................................... 73 6.1.2 Searching for calls ........................................................................................................................ 74 6.1.3 Working with calls ........................................................................................................................ 76 6.1.4 Call explanation............................................................................................................................ 96 6.1.5 Attachments................................................................................................................................. 104 6.1.6 Events.......................................................................................................................................... 109 6.1.7 Me Too’s ..................................................................................................................................... 109 6.1.8 Suggestions ................................................................................................................................. 111

6.2 THE TASK MODULE .......................................................................................................................... 113 6.2.1 General explanation ................................................................................................................... 113 6.2.2 Creating Tasks ............................................................................................................................ 113 6.2.3 Searching for tasks ..................................................................................................................... 116 6.2.4 Working with tasks...................................................................................................................... 117 6.2.5 Task Explanation ........................................................................................................................ 118
6.3 THE KNOWLEDGE MODULE .............................................................................................................. 121 6.3.1 General Explanation................................................................................................................... 121 6.3.2 Creating Knowledge Base Articles ............................................................................................. 121 6.3.3 Searching Knowledge Base Articles ........................................................................................... 124 6.3.4 Working with knowledge base articles........................................................................................ 126 6.3.5 Knowledge Base Explanation ..................................................................................................... 128
6.4 THE PARTS MODULE......................................................................................................................... 131 6.4.1 General Explanation................................................................................................................... 131 6.4.2 Create a part request .................................................................................................................. 131 6.4.3 Searching part requests .............................................................................................................. 134 6.4.4 Part Setup Explanation............................................................................................................... 136
7. CALL DISPATCHER INFORMATION.............................................................................................. 141 7.1 THE CALL MODULE .......................................................................................................................... 141
7.1.1 General Explanation................................................................................................................... 141 7.1.2 Searching for calls ...................................................................................................................... 142 7.1.3 Working with calls ...................................................................................................................... 143 7.1.4 Call explanation.......................................................................................................................... 149 7.1.5 Attachments................................................................................................................................. 156 7.1.6 Events.......................................................................................................................................... 160 7.1.7 Knowledge .................................................................................................................................. 161
7.2 THE TASK MODULE .......................................................................................................................... 167 7.2.1 General explanation ................................................................................................................... 167 7.2.2 Creating Tasks ............................................................................................................................ 167 7.2.3 Searching for tasks ..................................................................................................................... 169 7.2.4 Working with tasks...................................................................................................................... 170 7.2.5 Task Explanation ........................................................................................................................ 171
7.3 THE KNOWLEDGE MODULE .............................................................................................................. 174 7.3.1 General Explanation................................................................................................................... 174 7.3.2 Creating Knowledge Base Articles ............................................................................................. 174 7.3.3 Searching Knowledge Base Articles ........................................................................................... 175 7.3.4 Working with knowledge base articles........................................................................................ 178 7.3.5 Knowledge Base Explanation ..................................................................................................... 179
7.4 THE PARTS MODULE......................................................................................................................... 182 7.4.1 General Explanation................................................................................................................... 182 7.4.2 Searching part requests .............................................................................................................. 182 7.4.3 Part Setup Explanation............................................................................................................... 184
8. USER MANAGER INFORMATION ................................................................................................... 190 8.1 THE USER MODULE ........................................................................................................................... 190
8.1.1 General explanation ................................................................................................................... 190 8.1.2 Creating user accounts ............................................................................................................... 190 8.1.3 Searching / modifying user accounts .......................................................................................... 194 8.1.4 User explanation......................................................................................................................... 196
9. THE USER PROFILE............................................................................................................................ 203 9.1 GENERAL EXPLANATION.................................................................................................................. 203 9.2 CHECK YOUR OWN ACCOUNT ........................................................................................................... 203 9.3 MY PROFILE EXPLANATION.............................................................................................................. 204
9.3.1 User Details page ....................................................................................................................... 204 9.3.2 Groups page................................................................................................................................ 205 9.3.3 Knowledge page.......................................................................................................................... 206 9.3.4 Activities page............................................................................................................................. 207
9.4 CHANGE YOUR ACCOUNT ................................................................................................................. 210

9.5 PASSWORD PROBLEMS...................................................................................................................... 212 9.5.1 Password Reset ........................................................................................................................... 212 9.5.2 Password Change on the web ..................................................................................................... 215 9.5.3 Password change in the user tool ............................................................................................... 217
9.6 FIND GROUP MEMBERS.................................................................................................................... 219 10. SEARCHING...................................................................................................................................... 222
10.1 SEARCHING VIA THE WEBSITE .......................................................................................................... 222 10.1.1 Quick Search.......................................................................................................................... 222 10.1.2 Submitted Items...................................................................................................................... 225 10.1.3 My Products ........................................................................................................................... 226 10.1.4 Assigned items........................................................................................................................ 228 10.1.5 All open calls.......................................................................................................................... 229
10.2 SEARCHING VIA THE USER TOOL....................................................................................................... 230 10.2.1 All open Calls......................................................................................................................... 231 10.2.2 My Open Calls ....................................................................................................................... 232 10.2.3 All Open Parts........................................................................................................................ 232 10.2.4 My Products ........................................................................................................................... 233 10.2.5 Knowledge Base..................................................................................................................... 234 10.2.6 Quick Search.......................................................................................................................... 236
11. REWARDS ......................................................................................................................................... 241 11.1 PROVIDING REWARDS ON A CALL. .................................................................................................... 241 11.2 PROVIDING REWARDS ON A SUGGESTION ......................................................................................... 242 11.3 VIEWING THE REWARDS ................................................................................................................... 245
12. FORUM............................................................................................................................................... 246 12.1 GENERAL EXPLANATION .................................................................................................................. 246 12.2 USING THE FORUM............................................................................................................................ 247
12.2.1 Adding messages .................................................................................................................... 249 12.2.2 Adding replies ........................................................................................................................ 250 12.2.3 Subscribing to topics.............................................................................................................. 252
12.3 ADMINISTERING THE FORUM ............................................................................................................ 254 13. NOTIFICATIONS ............................................................................................................................. 255
13.1 SUBMITTER NOTIFICATIONS.............................................................................................................. 255 13.2 ASSIGNED GROUP NOTIFICATIONS ON CALL ..................................................................................... 256 13.3 CALL DISPATCHER NOTIFICATIONS ON CALL.................................................................................... 256 13.4 ASSIGNED PERSON NOTIFICATIONS ON CALL .................................................................................... 257 13.5 NOTIFICATIONS ON USER MANAGEMENT.......................................................................................... 258
14. LOGGING OUT THE APPLICATION........................................................................................... 259 14.1 LOGGING OUT OF THE WEB ............................................................................................................... 259 14.2 LOGGING OUT OF THE USER TOOL..................................................................................................... 260

0. Changes in history Version Status Date Author Description 0.1 Draft 10-10-2008 W. van Dee Created Document

1. Introduction
1.1 Goal This document is written to give a better understanding about the CSS Tool version 2.5 from a users view. This document will explain the complete CSS application from a submitter, assigned person and call dispatcher point of view.
1.2 Scope The scope for this document is the users of the Remedy system with submitter, assigned person (assigned group) or the call dispatcher permissions.
1.3 Relation to other documents There are no relations to other documents.
1.4 Reference Nr. Reference
1.5 Definitions and abbreviations Definition Description ‘Field’ Field names [Button] Button names Click here URL names Abbreviation Description PSS Product Support Specialist. PSSE Product Support Specialist Europe TL Team Leader Submitter The creator of a ticket Call Dispatcher The responsible dispatcher of a ticket Assigned Group The group that is assigned on a ticket Assigned Person The person that will work on the ticket

2. Application and role explanation AN EXPLANATION ABOUT THE APPLICATION AND THE PSS ROLE For this document we will use the PSS user. This user is just created for documenting reasons and is not an actual user on the system. This user has all the permission that a user with a PSS role will have. UITLEG APPLICATIE EN ROLLEN BEKNOPT

3. Logging into the application using the web
3.1 General explanation All users with the PSS role will use the web to log into the application. The address of the website is https://css.canon-europe.com/. When this URL is inserted in the web browser the following page will be displayed.
Besides the ‘User Name’ and ‘Password’ fields there are three buttons that are displayed on the login page.
• The [Login] button is used to log into the server when the ‘User Name’ and ‘Password’ fields are filled.
• The [Clear] button is used to clear the ‘User Name’ and ‘Password’ fields • The [Help] button will open the help window that is described in chapter 3.3
3.2 Logging in When the correct user name and the password are provided in the corresponding fields the [Login] button can be used to log into the application. After the user is logged in, a window will appear where all applications for the logged in user are shown. Most of the times there will only be one application, but it is also possible that the user will have permission on more applications. The correct application can be selected in the table field. When the application is selected, the messages for that application will be displayed. Important notes and comments will be inserted into these messages and are available for the users of that application.

When the correct application is selected, the [Start] button can be used to open the application. When the provided user name or password is incorrect an error message will appear.
The user is not logged in and can use the [Back] button to try it again.

3.3 Help On the login page there is also a [Help] button that can be used to open the help pages. A pop-up window will appear to show the help topics for the Remedy applications.
The first help screen will display the general information of the applications that are available on the Remedy server. In this user documentation we will only explain the CSS Tool. The SRC Tool is not explained in this document. The second screen will contain some of the error messages that can be received while working with the application.
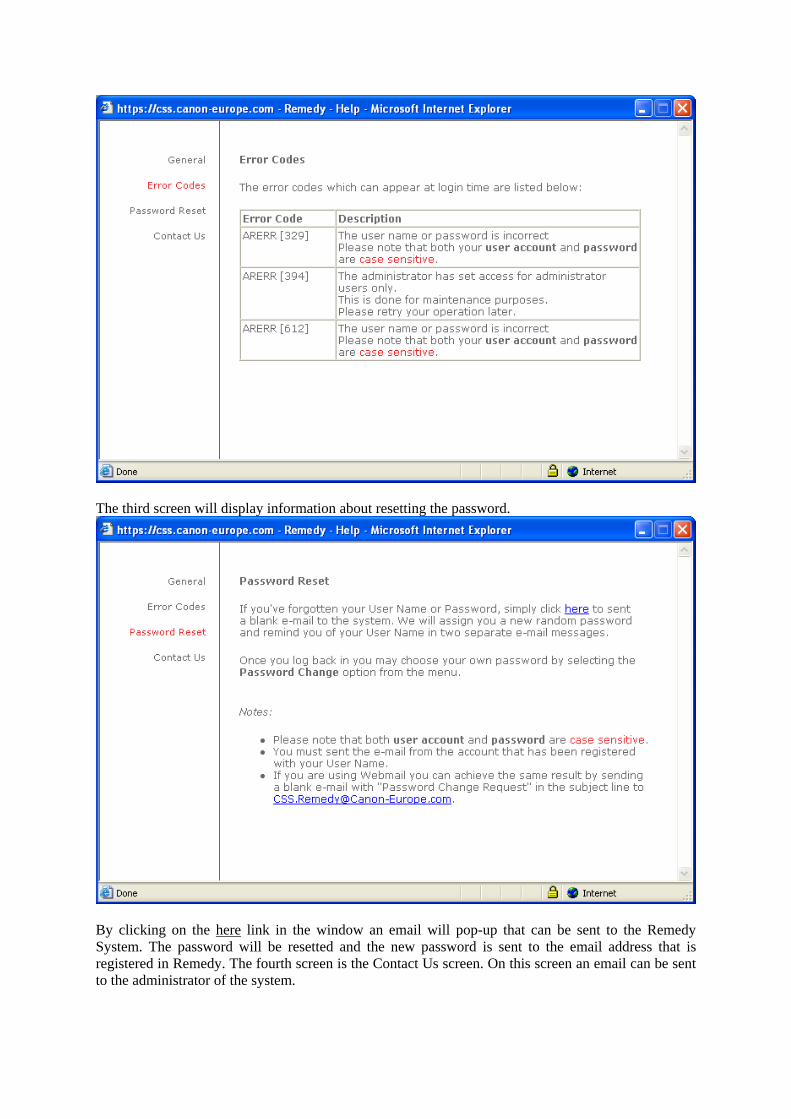
The third screen will display information about resetting the password.
By clicking on the here link in the window an email will pop-up that can be sent to the Remedy System. The password will be resetted and the new password is sent to the email address that is registered in Remedy. The fourth screen is the Contact Us screen. On this screen an email can be sent to the administrator of the system.


4. Logging into the application using the Remedy User tool
4.1 General explanation All users with the TL role will use the user tool to log into the application. The servername of the remedy server is CIDC-AMS1-APP1. The server is running on a specified port number which is used to connect to the server through a firewall. In this chapter we will explain how the Remedy User Tool can be configured and used.
4.2 Configuring Remedy User Tool After the user tool is installed you need to configure the user tool to connect to the correct server.
1. Open the Remedy User Tool When the Remedy User Tool is installed in the default location the application will be available through the start menu.
The user tool will open

2. Fill in your user name and password If you have already set the server name you can use the [OK] button to log in. If you have not configured the server (also not during installation of the user tool) you need to use the [Accounts] button to open the server settings
3. Click on the [Accounts] button The accounts window will open. Use the [Add] button to add the correct server.
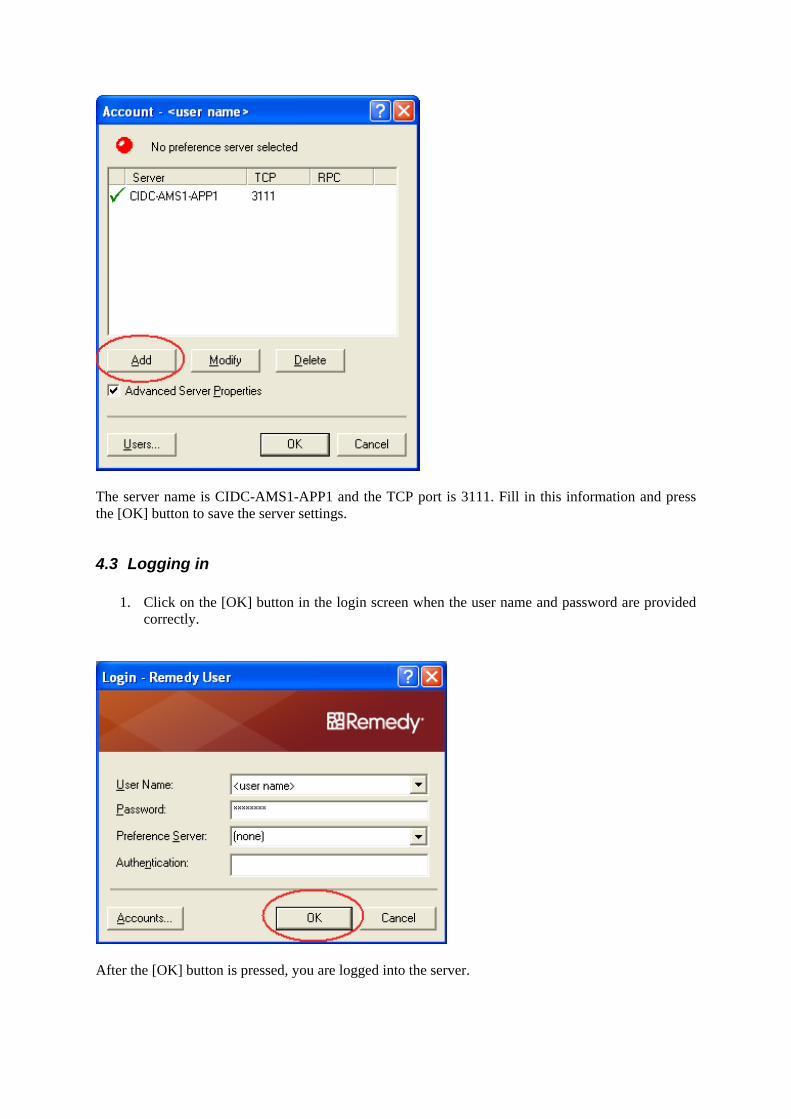
The server name is CIDC-AMS1-APP1 and the TCP port is 3111. Fill in this information and press the [OK] button to save the server settings.
4.3 Logging in
1. Click on the [OK] button in the login screen when the user name and password are provided correctly.
After the [OK] button is pressed, you are logged into the server.

5. Submitter information
5.1 The Call module
5.1.1 General Explanation When you are logged in, the following screen will be displayed.
The links menu on the left side of the window is permission dependent. Some PSS users will also have a PSSE role and will therefore be able to see more menu items then a PSS. The PSS users will at least have the shown menu. The first screen that is displayed is all the calls that are submitted by you.

5.1.2 Submitting a call When you want to submit a call the New link behind the Call text can be selected from the menu. This link will open the screen where a call can be submitted. Because of the fact that the creation of calls is done in steps you will see the first step.
In the first step of the call the Call Details need to be provided. Your name and company code are filled in automatically. Also the call type is automatically set to Call.
1. Select the ‘Product/Service’
The ‘Service’ menu is filled with all products that are supported by Canon Europe. When you have selected the correct ‘Product/Service’, the ‘Group’ and ‘Product Name’ are filled in by the system.
2. If necessary, fill in the ‘Category’ The category is used to better determine the problem at hand. Also the knowledge check (that is done later on in the process) will display more accurate knowledge. In this example the ‘Category’ field will be empty.
3. Fill in the ‘Affected Quantity’ The ‘Affected Quantity’ will store the number of affected machines. The ‘All’ checkbox will be checked when the affected quantity are all machines in the region. If the ‘Affected Quantity’ is filled with 4 machines, the urgency of the call can be low. When the four affected machines are all

machines in the region there is a problem with 100% of the machines. Then the urgency of the call will probably set to high.
4. Check the ‘All’ checkbox when the affected quantity equals all machines in the region
When a call is submitted, you can check if there is knowledge about this product name, product group or category by clicking on the [Knowledge Check] button.

5. Click on the [Knowledge Check] button A pop-up window will appear that will display all knowledge for the product name. When a category is filled in on the call this category will be transferred onto the knowledge check window.
In this example all knowledge for the product name iR2200 is shown. When the ‘Category’ and/or ‘Sub Category’ field is filled with a value, the table will automatically display the knowledge for the product name and (sub-) category. With the [Clear Category] button, the category and sub category fields will be empty again and all knowledge for the product name is shown. With the [Clear Sub Category] button only the ‘Sub Category’ field will be cleared and all knowledge for the product name and category will be displayed When a knowledge base article that might solve the issue is selected in the table, the [View] button can be used to view the article. The [Refresh] button performs the selected search again and can be used to check if there are any new knowledge base items based on the specified criteria.

When you find knowledge that solves the problem, it is not needed to log the call.
6. Check if there are any open calls for the selected product by pressing the [Check Open Calls] button.

The table only shows basic call information, all call details can be viewed by clicking the [View Call] button. It is possible that you find out that the issue is already logged in the system. When this is the case it is not needed to log a call. Instead you need to log a Me Too that is attached to an existing call. The assigned person for that call will receive a notification that a Me Too has been logged. When the call is solved you will receive a notification with the solution. How to submit a Me Too is explained in chapter 5.1.5. When there are no knowledge base items or existing calls regarding the issue the call must be logged further:
7. Click on the [Next] button to open step 2 The required fields on the page need to be filled. If a required field is empty when the [Next] button is selected, an error message is shown to fill all required fields. The second step is the Problem step. In this step you can closely describe the issue.
8. Fill in the ‘Short Description’ field with a short description of the problem.
9. Fill in the ‘Detailed Description’ field with a more detailed explanation of the problem. 10. The fields ‘Serial Number(s)’, ‘Lot. No’ and ‘Counter’ are not required fields. They can be
filled in if the information is available but it is possible to complete the procedure without these values.

When some information is not provided in the first step, you can use the [Back] button to go to the first step.
11. Click on the [Next] button to open the third step. When one of the two fields is not filled an error message will appear to fill all fields before pressing the [Next] button. The third step is the Environment step. All information about the environment of the machine can be provided in the third step.
The only field that is required in this step is the ‘Configuration/Environment’ field.
12. Fill all the necessary fields with the Environment properties. When some information is not provided in the second step, you can use the [Back] button to go back to the previous step.

13. Click on the [Next] button to go to step four In the fourth step the actions that are already done can be provided. The more details are mentioned in these actions the better the assigned person can resolve the issue.
14. Fill in the ‘Actions taken so far’ When you already have replicated the problem it is wise to provide this in the call. This will help the assigned person in solving the call.
15. Fill in the ‘Problem Replicated Locally’ field When some information is not provided in the third step, you can use the [Back] button to go back to the previous step.
16. Click on the [Next] button go to the fifth step The fifth step is the Expectations step. You can provide the expectations on the call and provide the urgency and severity.

17. Provide the expectations in the ‘Expectations’ field 18. Provide the ‘Severity’ and ‘Urgency’
When the severity or urgency is set to High the ‘Why high’ field will be displayed. In the ‘Why High’ field the reason must be provided why this call has a high severity or urgency. The ‘Why High’ field is not shown when neither the severity nor the urgency is set to High. Attached to the urgency are timer records. These timers are created for the assigned person, the team leader and the coordinator. These three roles will receive notifications when the call is not picked up in time. When some information is not provided in the fourth step, you can use the [Back] button to go back to the previous step.

19. Click on the [Next] button to go to the sixth step. In the sixth step you can add attachments to the call. For example; if you want to log a call about a printing problem it might be wise to add an attachment with a document that is printed on the defective machine.
Keep in mind that the maximum attachment size (per attachment) can be 5 Mb.
20. Use the [Add] button to add an attachment A pop-up window will appear where the attachment name can be provided.

21. Click on the [Add] button. When the add button is selected the location of the attachment can be provided.
22. Click on the [Browse] button. A Windows overview of the local machine is displayed and the correct attachment can be selected.

23. Select the correct attachment and press the [Open] button. When the selected attachment is too big for the attachment field (bigger then 5 Mb) the following error is displayed.
When the attachment is the correct size the attachment is uploaded and displayed in the previous window.

24. Press the [OK] button to close this window and attach the file to the call.

25. To view the attachment click on the [View] button. The attachment window will open again but with different buttons.
You can use the [Display] button to display the attachment. The [Save to Disk] button will save the attachment to your local disk. The [Cancel] button will close the window. When some information is not provided in the fifth step, you can use the [Back] button to go back to the previous step.
26. Click on the [Next] button to go to the seventh and final step. The final step is an overview of all provided information per step. When information is not provided correctly you can go back to this step and provide the correct information. All other information will still be stored and does not need to be filled in again.

If the information is not filled in correctly you can use the [Back] button to go to the correct step, make the changes and come back to the final step.
27. If all information is correct, click on the [Submit] button to submit the call. The call will be submitted.
You will receive an email with the information about the call. In this email also the call ID (that is created by the system) will be mentioned.

5.1.3 Searching for calls There are a few ways to search for tickets in the system. In the menu you will see a couple of searching links, like ‘Quick Search’, ‘Submitted Items’ and ‘My Products’. These links will be handled in chapter 10.1. In this chapter an explanation is provided about searching for calls by pressing the Search link behind the Call heading.
When you have clicked on the Search link the call form will open in search mode. It is now possible to provide data in one or more fields and press the [Search] button. The calls that will meet the search criteria will be shown in the result table field. Example: When you fill in your user name in the ‘Submitter’ field and press the [Search] button, all your submitted calls will be displayed.

The selected call is the call that was logged in chapter 5.1.2. You cannot change any fields on this call. The Assigned group on the call will be responsible for the call and therefore will assign a person that will work on this incident. If you want to search again you can click on the [Clear Search] button. The search view will be displayed and a new search criterion can be provided.
5.1.4 Call explanation In this chapter an explanation is provided about the fields and data that you can see on your calls. First of all a description of the right box will be provided, after that all pages will be discussed.
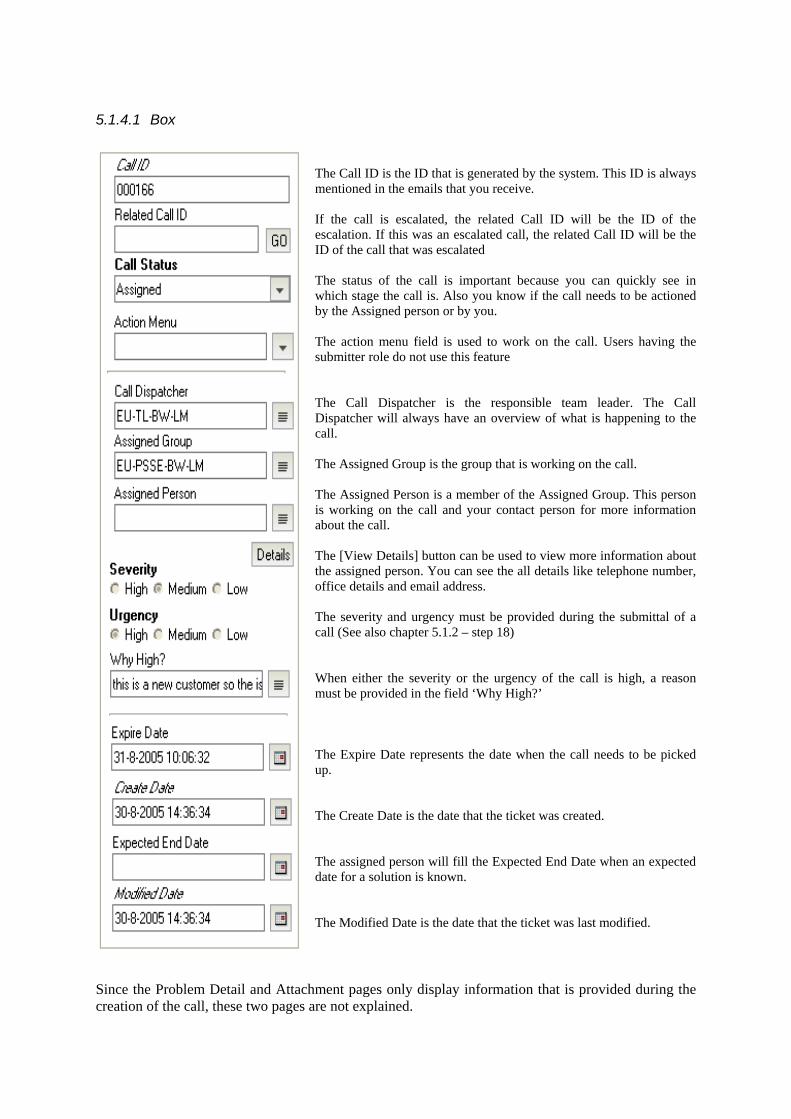
5.1.4.1 Box The Call ID is the ID that is generated by the system. This ID is always mentioned in the emails that you receive. If the call is escalated, the related Call ID will be the ID of the escalation. If this was an escalated call, the related Call ID will be the ID of the call that was escalated The status of the call is important because you can quickly see in which stage the call is. Also you know if the call needs to be actioned by the Assigned person or by you. The action menu field is used to work on the call. Users having the submitter role do not use this feature The Call Dispatcher is the responsible team leader. The Call Dispatcher will always have an overview of what is happening to the call. The Assigned Group is the group that is working on the call. The Assigned Person is a member of the Assigned Group. This person is working on the call and your contact person for more information about the call. The [View Details] button can be used to view more information about the assigned person. You can see the all details like telephone number, office details and email address. The severity and urgency must be provided during the submittal of a call (See also chapter 5.1.2 – step 18) When either the severity or the urgency of the call is high, a reason must be provided in the field ‘Why High?’ The Expire Date represents the date when the call needs to be picked up. The Create Date is the date that the ticket was created. The assigned person will fill the Expected End Date when an expected date for a solution is known. The Modified Date is the date that the ticket was last modified.
Since the Problem Detail and Attachment pages only display information that is provided during the creation of the call, these two pages are not explained.

5.1.4.2 Call Action Page When the assigned person works on the call, events are created for each action that is done. These events are created for the administrator to be able to report on the calls and timers and for you to see which actions are already taken to solve the incident.
It is possible that one or more events are created by default. This depends on how the administrator has configured the events. Usually there will be one system-generated event indicating the submittal of the call. Because these actions are done automatically by the system when the call is submitted, these actions are already available despite the fact that the assigned person has done no actions yet. When you select an action in the table field the ‘Action Details’ field is filled with the details that are provided by the system or the assigned person. Further event details can be viewed by double clicking on an event in the table. Viewing actions and the [Add Update] button are discussed in chapter 5.1.7

5.1.4.3 Me Too / Sugg Page On the Me Too / Sugg Page it is possible for another PSS to submit a Me Too or a Suggestion. All members of the PSS role have the possibility to check the calls. When a PSS has a problem and a call is already logged for this problem, he/she needs to log a Me Too. The assigned person on the call will receive an email that more people have the problem.
When the call is created, a Me Too is also created. This Me Too is an Original Call Me Too. When another member of the PSS role logs a Me Too the type will be Exact or Slight Variation. The Quantities of the Me Too’s are added up and displayed in the ‘Total Affected Qty’ field. A detailed explanation about Me Too’s is provided in chapter 5.1.5. When a member of the PSS role checks a call and knows the solution a suggestion can be provided by this PSS. A detailed explanation about logging suggestions is mentioned in chapter 5.1.6.

5.1.4.4 Escalation page When an Assigned Person is not able to solve the problem, an escalation is created to the manufacturer. These escalations are shown on the Escalation page. You cannot do anything with these escalations and can only be worked on by the Manufacturer, Team Leader and Assigned Person. You can only view the escalation.
On the same page also the tasks are displayed. When an assigned person needs to have help from a technology group he/she can create a task for this group. Technology groups are groups of people that will have specific knowledge about e.g. Linux or Windows. You can see the tasks that are created and the status of those tasks.

5.1.4.5 Timers Page On the Timers page the created timers are displayed. You can see when the call is logged, when the call needs to be picked up, which alerts are attached to these timers and who will receive these alerts.
When an alert is sent you can see that the status of the alert is changed from New to Sent. When the call is picked up by the Assigned Person or Assigned by the Call Dispatcher the status of the timers and alarms is set to Closed. The alerts that were already sent will remain on the Sent status. This is done for reporting reasons.

5.1.4.6 Closing Details page On the Closing Details page all information about the solution is provided. When the assigned person has used a knowledge base article to solve the incident, this article is shown in the table field. The ‘Closing Data’ field will display the solution that is provided by the assigned person. This solution might solve the problem and needs to be tested by you. You will receive an email with this solution.
If the assigned person uses a knowledge base article, you can use the [View KB Article] button to view the complete knowledge base article. When you select the knowledge base article you will already see the solution in the ‘Knowledge Solution’ field. The [Provide Reward] button will be explained in chapter 11.

5.1.5 Add a Me Too to a call When you have a problem that you want to submit in Remedy, it is possible to check the open calls. If there already is an open call with the same (or almost the same) issue it is wise to log a Me Too. The Me Too is attached to the existing call and the assigned person will receive an email that a Me Too has been added to the incident. It is possible that the assigned person decides to raise the urgency of the incident because more people have the problem. You can search for incidents by using one of the search methods described in chapter 5.1.2 or chapter 10.1. When the correct incident is found the Me Too can be added by using the [New] button.
In this example a Me Too is added to the call that is logged in chapter 5.1.2.
1. Click on the [Me Too] button You will see a pop-up window where the correct Me Too information can be provided.

The ‘Similarity’ field can be filled with Exact or Slight Variation. Again the ‘Affected Quantity’ field can be filled and the ‘All’ checkbox can be checked. In the ‘Extra Information/Details’ you can provide the information that is important for the assigned person on the call. The [Cancel] button will close the window without taking any actions.
2. Fill in all necessary fields and press the [OK] button The window will close and the Me Too is added to the call. An email is sent to the assigned person to notify him/her that a Me Too is logged. Also the ‘Total Affected Qty’ field is updated with the correct value.
By using the [View] button you can view the selected Me Too. You will then see the same fields as you see on adding a Me Too.

5.1.6 Add a suggestion to a call Just as it is possible to add a Me Too, you can also add a suggestion.
1. Click on the [Suggestion] button to add a suggestion
When you press the [Suggestion] button above the suggestion table a pop-up window will open where you can provide the details for the suggestion.

You can add an attachment to the suggestion. This works the same way as adding an attachment on the call (chapter 5.1.2 point 19 through 24). In this example no attachment is added. The window can be closed without taking any actions by clicking the [Cancel] button.
2. Click on the [OK] button to add the suggestion to the call
When the suggestion is added the suggestion table on the call will show the suggestion. An email will be sent to the assigned person and the submitter of the call. The submitter can then try the solution of the suggestion and reply to the assigned person.

You can use the [View] button to view the added suggestion.
5.1.7 Events On the Events page all events for the call are displayed. These events represent the actions that are taken on the call. By checking the events you can see which actions are already taken on the call, what is expected from the assigned person or form you and which actions still need to be done to solve the call. As the submitter of the call it is possible that the assigned person needs more information form you or provides a solution that you need to check. For both actions you need to provide an answer, either to provide the information to the assigned person or to let the assigned person know that the solution solved the issue. Both events can be answered by using the [Provide Answer] button on the Event page.

You can only provide answers to the ‘Request information from customer’ and ‘Call is Solved’ actions. If you select an action that does not need to have an answer you will receive an error.
When you select the correct action this error is not displayed.

1. Click on the [Provide Answer] button A window will appear where the question is shown and you can provide the answer.
Also on the events it is possible for you to add an attachment (e.g. log files). The attachments can be added by pressing the [Add] button. An explanation about adding attachments is provided in chapter 5.1.2 point 19 through 24. When you select the [Close] button, the window will close and no actions will be done on the call. The answer to the question will not be added to the call.
2. Click on the [OK] button to provide the answer to the question When the answer is provided the assigned person will receive an email notification with the provided answer. On the call you will see a new event with the answer.

Event-, question- or answer details can be viewed by double clicking on an event in the table. This will also allow you to save or view attachment files which were attached to the action. It is possible that you have solved the incident yourself or you have extra information that is important for this incident. You can then use the [Add Update] button to add an update to the call. When you press this button you can let the assigned person know that you have extra information for him/her.
1. Click on the [Add Update] button The event window will open and the information can be provided in the corresponding fields.

As you can notice an attachment is added to the event.
2. Fill in the necessary field and add an attachment if needed. When you click on the [Close] button, the window will close and no additional actions are taken on the call.
3. Click on the [OK] button to add the update to the call. An extra event will be displayed on the call. Notice that the attachment column displays “Yes”. The assigned person can quickly see which events contain attachments and which events don’t. When the event update is added, the assigned person will receive an email that an update has been added.


5.2 The Task module
5.2.1 General explanation When you have logged an incident, a member of the assigned group will take ownership of the incident. This assigned person will work on the call and try to obtain a solution. Sometimes it is possible that specific knowledge is required to solve the call. This is not knowledge about the product, but about some technologies that are related to the call. For example: A printer is not printing correctly from a Linux Red Hat machine. The assigned person can check the printer and try to find anything wrong with it. If the printer is working fine, the problem seems to be related to Linux. If the assigned person has no knowledge about Linux, he/she can create a task for the Linux team. This team consists of different people from different offices with Linux knowledge. Only the assigned person on the call is able to request help with a task and therefore a PSS cannot create tasks. Although a PSS cannot submit a task, he or she can search for tasks that are created by the assigned person on the call.
5.2.2 Searching for tasks When an assigned person has created a task it is possible for you to search for that task.

When you want to search for tasks just click on the Search link behind the Task text in the left menu. The task form will open and you can use the fields to search for specific tasks.
1. Fill in the correct fields that you want to search on. If all fields are left empty you will be able to find all requests. When the search is performed all tasks that are conform the search criteria will be displayed in the results list.

5.2.3 Task Explanation
5.2.3.1 Box
The action menu is not used by users with the submitter role The attached Call ID will represent the call that is related to this task The call dispatcher is responsible for the call A member of the assigned group is working on the call The assigned person is the contact person for you
5.2.3.2 Task Details page The Task Details page will show more details about the product and submitter of the task. The reason why this task was logged is mentioned in the description fields. Also the urgency is shown on this page.

5.2.3.3 Information page On the Information page the assigned person can add notes and the solution. This solution will be emailed to the assigned person on the call when the task is solved.
Notes are added automatically by the system, but it is also possible for the assigned person on the task to add notes manually. You can view the notes by clicking on the button. NOTE: THE ‘NOTES’ FIELD WILL ALWAYS BE EMPTY. YOU ALWAYS NEED TO PRESS THE BUTTON BEFORE THE NOTES ARE DISPLAYED.
1. Click on the button


5.3 The Knowledge module
5.3.1 General Explanation Knowledge is used in different ways in the system. During the time that you work with a call you will be able to check the knowledge in the database. Also it is possible for you to create knowledge when a call is closed. These actions that can be done on the knowledge module are described in this chapter.
5.3.2 Creating Knowledge Base Articles When you have gained knowledge and you think it is wise to have that knowledge in the knowledge database you need to create a knowledge base article. Click on the New link behind the KB text in the menu on the website.
1. Click on the New link behind the KB text in the menu The first step for creating a knowledge base item is shown

The values on this page are filled automatically based on your user settings. Note that no personal user information will be stored in the article, only the region will be used to localize the knowledge base article.
2. Click the [Next] button to describe the problem In this step general information about the knowledge base item needs to be provided. These details include a title, a more detailed description about the problem and the cause for the problem
3. Click the [Next] button to provide a solution for the problem In this step the user must provide some kind of solution or workaround for the problem

4. Click the [Next] button to provide some additional information about the problem
On this page you can provide the affected product or service that applies to the knowledge base article, as well as the category, sub category and the serial number range for all the serial numbers that will be infected with the problem. You must also specify which level of expertise is needed to be able to view the knowledge base article.
5. Click the [Next] button to proceed to the final step The fifth and final step consists of adding attachments that might be useful to support the knowledge base article, for instance a document containing the steps needed to replicate the problem.

6. Click on the [Submit] button to submit this knowledge base article. Now you will see a dialog box confirming you have successfully submitted the knowledge base article. The article must be reviewed first before it is visible in the knowledge base.
5.3.3 Searching Knowledge Base Articles It is also possible for you to search for knowledge base articles. You can use the quick search to search for articles and you can open the form in search mode. The quick search option is explained in chapter 10.1.1. Searching directly using the knowledge base form is explained in this chapter. When you are logged into the server you are able to select the Search link behind the KB text.

When you have clicked on the Search link a search form will open. It is now possible to provide data in one or more fields and press the [Search] button. The articles that will meet the search criteria will be shown in the result table field. You must provide both a Product Group and a Product Name before any results are visible.
You can view a knowledge base article by selecting an entry from the table and clicking on the [View] button

Clicking the [Close] button will close the window, so you can perform another search or view another knowledge base article.

5.3.4 Knowledge Base Explanation When the knowledge base is opened you will see a couple of pages and the box on top of the screen. This subchapter will explain the knowledge base article in more detail.
5.3.4.1 Box It does not matter on which page you are, the information in the box is always shown.
In the box you will see the Knowledge Base ID. This ID is generated by the system and is used in the communication because it is a unique key. Another system-generated field is the ‘Create Date’. This field indicates the date and time at which the knowledge base article was submitted (not approved). The ‘Type’ field will be filled with either Internal or External to note that the knowledge can only be used internally or also externally. The status is set with Assigned when the ticket is submitted. The assigned group (that is mentioned in the ‘Assigned Group’ field) will have the possibility to either accept or decline the Knowledge Base Article. Declined articles are not visible anymore and the approved knowledge can be viewed and used. Also there is a field ‘Region’. This field is not yet used in version 3.0. However, version 3.1 will include features that make it possible to localize the application. In version 3.1 the ‘Region’ field will indicate the language in which the article was written. For now, this field will always have the value ‘EU’, indicating that the article is written in the English language.

5.3.4.2 Details Page On the details page, all details for the knowledge base article are displayed.
The information is the same when logging an article. The ‘Problem’, ‘Cause’ and ‘Solution’ fields are used to solve issues with the same problem as is mentioned in the ‘Problem’ field. The ‘Product / Service’, ‘Category’ and ‘Sub category’ fields are used to better determine in which category the article needs to be. Also for searching the articles, the category can be used to filter knowledge. The ‘Level of Expertise’ field displays the expertise level that is needed to use the knowledge base article.

5.3.4.3 Information page The Information page displays the same fields as on submit.
The ‘Effected Serial/Lot numbers’ field is filled with the range of affected serial numbers. Any attachments that are attached to the article are also displayed on this page.

5.4 The Parts module
5.4.1 General Explanation When you need to order a part, you need to check the parts database to find out the part number so it can be ordered. Some parts in the parts database cannot be ordered since there is no part number attached to these parts. When you want to order a part that has no part number attached you need to log a parts setup request in Remedy.
5.4.2 Create a part request When you want to setup a part in the parts database you need to log a Parts Setup Request in Remedy. Click on the New link behind the Parts text in the menu on the website.
1. Click on the New link behind the Parts text in the menu The Part Setup request form is shown
The user details are filled in automatically. As you can see in the text you need to check the parts catalogue, the service bulletins, S-Plus, SPEED and the TSS Website before logging the part setup request. The default value for ‘Call Type’ is Part Setup Request. It is also possible to log a request for ROM programming by selecting “ROM Programming” from the menu

Depending on your permissions it is possible that the menu has more options, but these options are always available.
2. Click the [Next] button to go to the second step.
First the type of request needs to be provided. There are three options. A – Option A is chosen when a part needs to be delivered with high priority and the part number does not need to be set up. B – Option B is selected when the part does not need to be delivered; only the part number needs to be set up in the parts database. C – Option C is used when the part needs to be shipped and the part number needs to be set up in the parts database. Furthermore the product needs to be provided in the ‘Product / Service’ field. If the part is needed for multiple items of the selected product/service, than you can specify the quantity in the field ‘Affected Quantity’. This field is ignored if the type of request is “B” (the part only needs to be set up in the database) The [Back] button can be used to go to the previous step.

3. Click the [Next] button to go to the second step when all fields are filled. On the third step the part details can be provided. Also the attachments can be added. If you request a part setup remember to always attach the page of the part catalogue that displays the needed part.
The [Back] button can be used to go to the previous step.
4. Click on the [Submit] button to submit the part setup request. A message will confirm that you have successfully submitted the part request

5.4.3 Searching part requests It is also possible for you to search for part setup requests. You can use the quick search to search for part setup requests and you can open the form in search mode. The quick search option is explained in chapter 10.1.1. Searching directly on the parts form is explained in this chapter. When you are logged into the server you are able to select the Search link behind the Parts text.
When you have clicked on the Search link the parts form will open in search mode. It is now possible to provide data in one or more fields and press the [Search] button. The part requests that will meet the search criteria will be shown in the result table field. Example: When you fill in your user name in the ‘Submitter’ field and press the [Search] button, all your submitted part setup request will be displayed.

The selected part request is the request that was logged in chapter 7.2. You cannot change any fields on this request. The Assigned group on the request will be responsible for the part setup and therefore will assign a person that will work on this ticket. If you want to search again you can click on the [Clear Search] button. The search view will be displayed and a new search criterion can be provided.
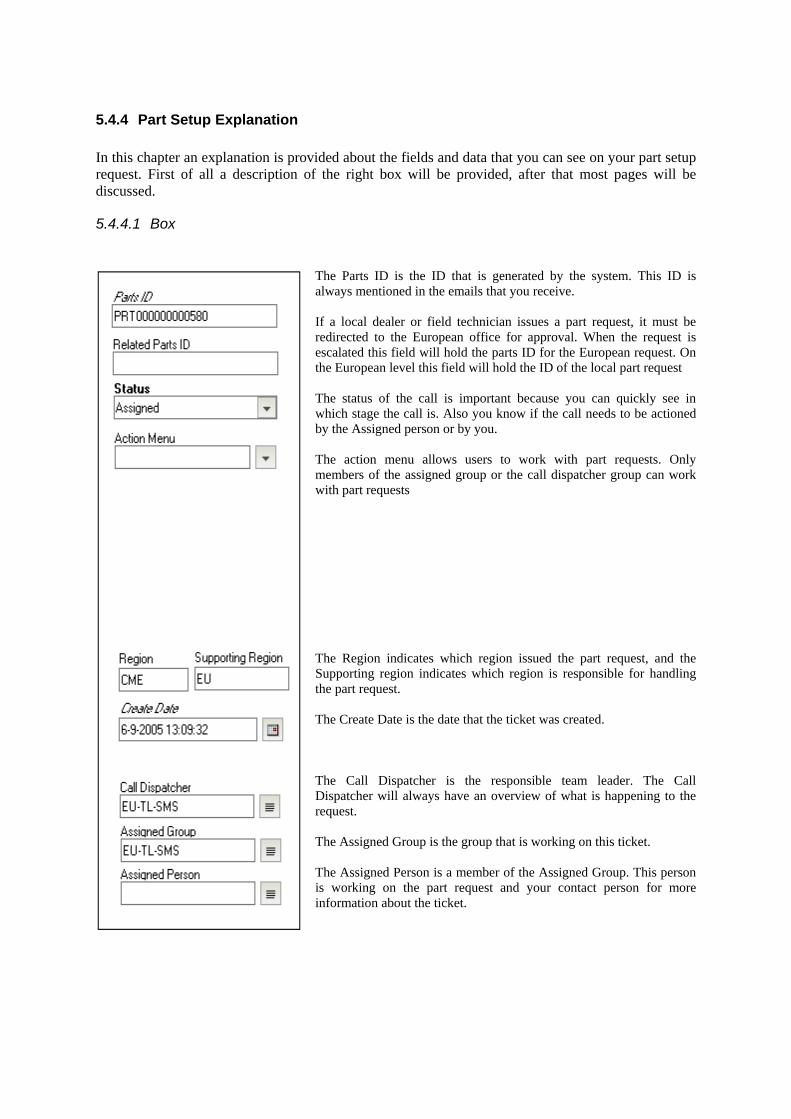
5.4.4 Part Setup Explanation In this chapter an explanation is provided about the fields and data that you can see on your part setup request. First of all a description of the right box will be provided, after that most pages will be discussed.
5.4.4.1 Box
The Parts ID is the ID that is generated by the system. This ID is always mentioned in the emails that you receive. If a local dealer or field technician issues a part request, it must be redirected to the European office for approval. When the request is escalated this field will hold the parts ID for the European request. On the European level this field will hold the ID of the local part request The status of the call is important because you can quickly see in which stage the call is. Also you know if the call needs to be actioned by the Assigned person or by you. The action menu allows users to work with part requests. Only members of the assigned group or the call dispatcher group can work with part requests The Region indicates which region issued the part request, and the Supporting region indicates which region is responsible for handling the part request. The Create Date is the date that the ticket was created. The Call Dispatcher is the responsible team leader. The Call Dispatcher will always have an overview of what is happening to the request. The Assigned Group is the group that is working on this ticket. The Assigned Person is a member of the Assigned Group. This person is working on the part request and your contact person for more information about the ticket.

5.4.4.2 Attachment Page The Attachment page is the first page that is visible on the part setup request. On the attachment page the parts catalogue page that displays the part is attached to the ticket.
It is possible to add extra attachments or view the attached files.

5.4.4.3 Actions Page When the assigned person works on the request, events are created for each action that is done. These events are created for the administrator to be able to report on the part setup requests and for you to see which actions are already taken to solve the incident.
It is possible that one or more events are created by default. This depends on how the administrator has configured the events. Usually there will be one system-generated event indicating the submittal of the part request. Because these actions are done automatically by the system when the call is submitted, these actions are already available despite the fact that the assigned person has done no actions yet. Further event details can be viewed by double clicking on an event in the table. If you are the submitter of the part request you have the opportunity to add an event using the [Add Update] button. If you are not the submitter you will not have this option.

5.4.4.4 Escalation page When an Assigned Person needs more help on the part request, an escalation is created to the appropriate party. These escalations are shown on the Escalation page.

5.4.4.5 Closing Details page On the closing details page the solution is provided. The solution might be that the part is set up or that this part cannot be ordered. When the assigned person solves the part request the solution needs to be filled.

6. Assigned Person information
6.1 The Call module
6.1.1 General Explanation When you are logged in, the following screen will be displayed.
The links menu on the left side of the window is permission dependent. Some PSS users will also have a PSSE or PSS+ role and will therefore some users will be able to see more menu items then others. The first screen that is displayed is all the calls that are submitted by you.

6.1.2 Searching for calls There are a few ways to search for tickets in the system. In the menu you will see a couple of searching links, like ‘Quick Search’, ‘Submitted Items’ and ‘My Products’. These links will be handled in chapter 9.1. In this chapter an explanation is provided about searching for calls by pressing the Search link behind the Call heading.
When you have clicked on the Search link the call form will open in search mode. It is now possible to provide data in one or more fields and press the [Search] button. The calls that will meet the search criteria will be shown in the result table field. Example: When you fill in your user name in the ‘Submitter’ field and press the [Search] button, all your submitted calls will be displayed.
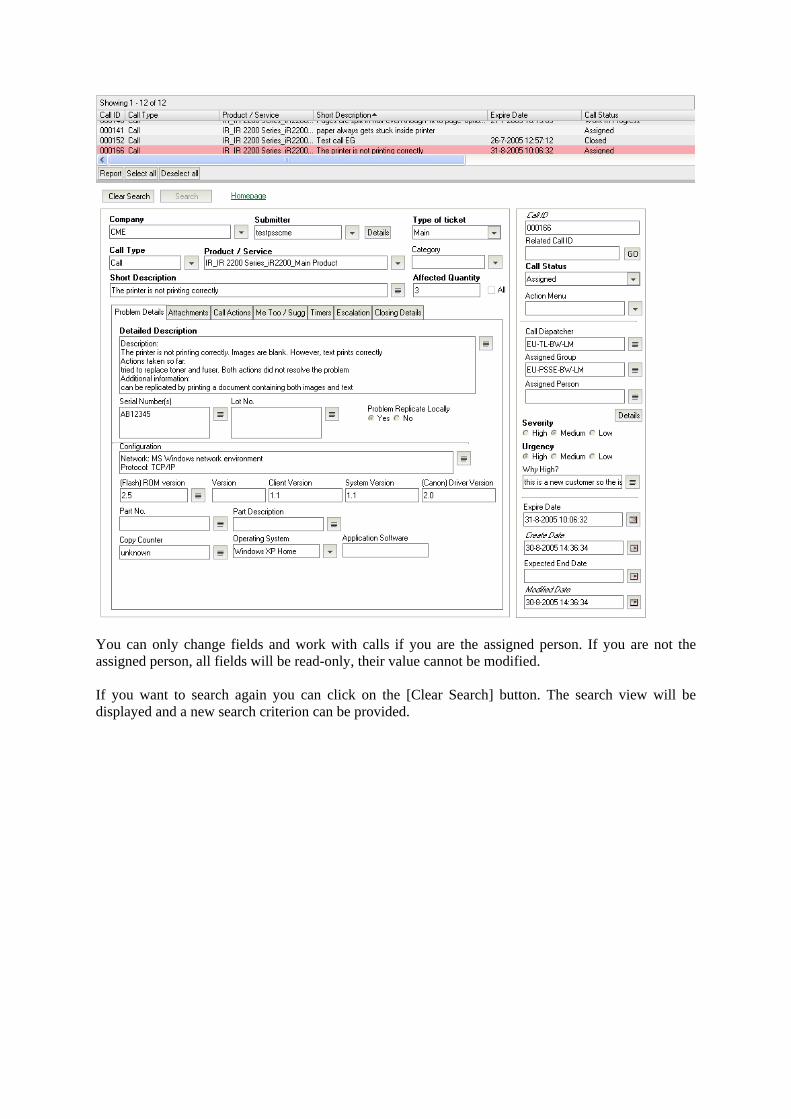
You can only change fields and work with calls if you are the assigned person. If you are not the assigned person, all fields will be read-only, their value cannot be modified. If you want to search again you can click on the [Clear Search] button. The search view will be displayed and a new search criterion can be provided.

6.1.3 Working with calls As a member of the assigned group, you will have the possibility to work on the calls. You can work on the call by making use of the ‘Action Menu’ field. When you have the correct permissions you will have actions in the action menu that can be selected, the actions will trigger workflow that will change the status of the call and create events.
6.1.3.1 Process When you are working with calls you will be able to select different actions. Each action will trigger workflow that will set the call to a new status and create events. Below you will see the process that is in place for the call management module. The yellow blocks represent the status of the call while the grey blocks display the different actions that can be selected when the call is in the status.
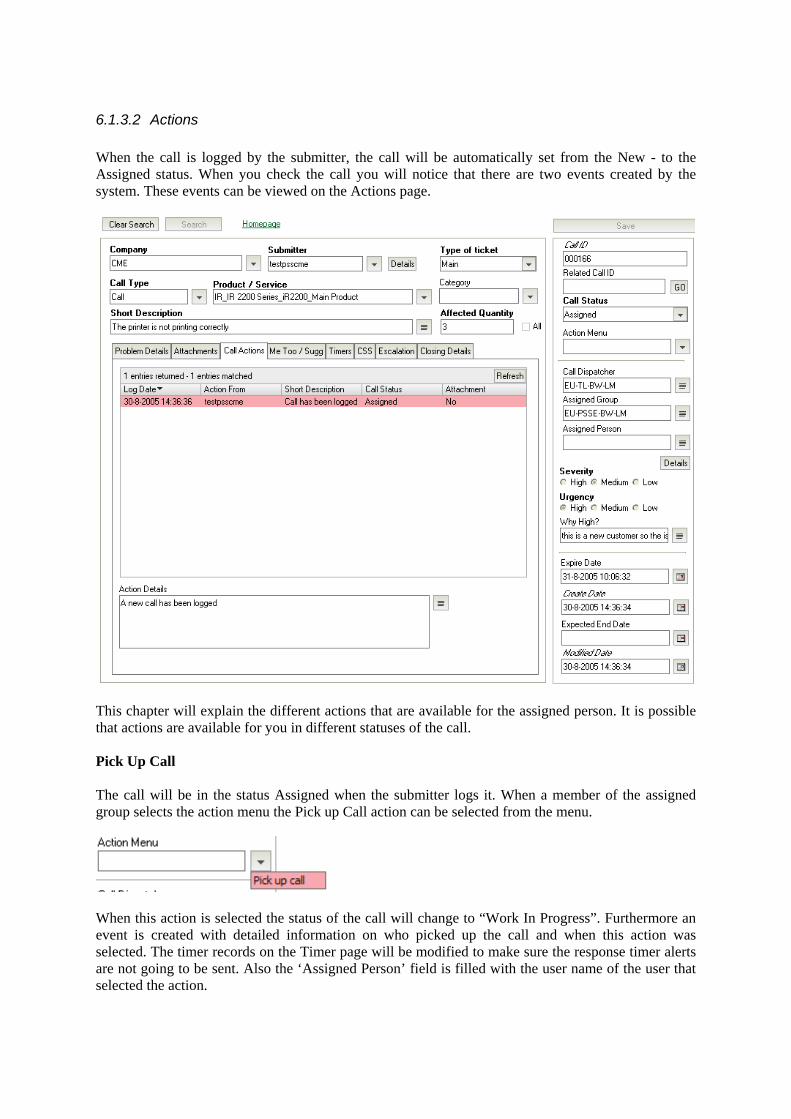
6.1.3.2 Actions When the call is logged by the submitter, the call will be automatically set from the New - to the Assigned status. When you check the call you will notice that there are two events created by the system. These events can be viewed on the Actions page.
This chapter will explain the different actions that are available for the assigned person. It is possible that actions are available for you in different statuses of the call. Pick Up Call The call will be in the status Assigned when the submitter logs it. When a member of the assigned group selects the action menu the Pick up Call action can be selected from the menu.
When this action is selected the status of the call will change to “Work In Progress”. Furthermore an event is created with detailed information on who picked up the call and when this action was selected. The timer records on the Timer page will be modified to make sure the response timer alerts are not going to be sent. Also the ‘Assigned Person’ field is filled with the user name of the user that selected the action.

Request to customer When the call is set to the “Work In Progress” status the action menu will display a lot more actions. On of these actions is “Request to Customer”. This action will be selected when the assigned person needs to have more information from the customer.
When the action is selected and the call is saved, a pop-up window will appear where you can fill in the question.
When you click on the [OK] button the status of the call will change to “Customer”, an event is created and the submitter of the call receives an email notification with the question. The submitter of the call event can use the event to reply on the question that is asked by you.

Answer Received When the submitter of the call receives the notification that you need more information, he or she can open the incident and select the “Requesting information from Customer” event. When the submitter opens this event, an answer can be provided to the asked question. This procedure is explained in the PSS documentation. When the answer is provided, you will receive an email that an answer to the question has been submitted. You can open the answer and check it. After that you will be able to select the “Answer Received” action.
When you select the action the status of the call will be changed from “Customer” to “Work In Progress”. No event will be created because the submitter already created an event when the question was answered. Update to Customer When the submitter of the call wants to receive an update on the call it is possible for you to sent one. Select the “Update to customer” action from the menu. An update is sent via email with the provided information.
When the action is selected and the call is saved a pop-up window will appear where the information can be provided. Clicking the [OK] button will send the information to the submitter of the call.

The status of the call will still be the same as it was. An event is created to show that an update to the customer was provided. Update to Manufacturer It is also possible that a manufacturer that is working or helping on the call wants to receive an update on the call. Select the “Update to manufacturer” action from the menu. An update is sent via email with the provided information.
After the action is selected and the call has been saved a pop-up window will appear where the information can be provided. The correct manufacturer needs to be selected from the Email menu. The [OK] button will sent the information to the selected manufacturer.

The status of the call will still be the same as it was. An event is created to show that an update to the manufacturer was provided. Put On Wait Sometimes a call can only be solved by installing a new patch. If the patch is not available yet you can put the call to Pending. Before the call can be set to the Pending status, you need to fill in the ‘Expected End Date’ field. This field will be sent to the submitter in the email notification
When the action “Put on Wait is used, a pop-up window will appear. In this pop-up window the reason why the call is set to Pending needs to be provided.

When you press the [OK] button, a notification is sent to the submitter of the call with the reason why the call is set to Pending. Also the expected end date of the call will be mentioned in this email. An event is created and attached to the call. Continue Call When the call is set to the Pending status and it needs to be worked on again you can select the “Continue Call” action.
This action will put the status of the call on “Work In Progress” again and an event is created and attached to the call. Action Update When you want to add information to the call without sending emails or triggering workflow you can select the “Action Update” action from the menu.
When this action is selected a pop-up window will be opened and the information can be filled in.

When the information is entered, the [OK] button can be used to submit the event. An event will be created and can be viewed by the submitter. No emails will be sent when this action is used. Escalate There is a possibility that the assigned person cannot solve the call on his own. In this case the assigned person can escalate the call. The escalation mechanism works differently for PSSE users and PSS+ users, therefore the mechanism will be explained for both roles separately, starting with the explanation for PSSE users. Escalations by PSSE users Whenever a PSSE user escalates a call, it will be escalated to a manufacturer. You will be able to do this by selecting the “Escalate” action.

When you have selected the action and saved the call, a window will appear where the escalation details can be provided.
When you select the correct manufacturer from the menu either the email address for the manufacturer or the Internet location for the manufacturers support portal is put in the ‘Escalate Email’ or ‘Escalate_URL’ field, respectively.
After the manufacturer is selected from the menu the ‘Approve by TL’ field is set. If the escalation for the selected manufacturers needs to be approved by a team leader, this field is automatically set to “Yes”. The team leader needs to approve the escalation before it is escalated to the selected manufacturer.

When no approval is needed for the selected manufacturer the ‘Approve by TL’ field will be set to “No”. The escalation will then be sent to the manufacturer without approval of the team leader. If no approval is needed for the escalation, but you are not sure if the escalation is correct you can set the field to “Yes”. The TL then still needs to approve the escalation before it is sent to the manufacturer. For the above shown escalation the team leader needs to approve the escalation. You can click on the [Save] button and the escalation will be logged. On the “Escalation” page on the call you can see the escalation and the status. For this escalation the status is set to “Waiting for Approval” since the escalation still needs to be approved by the team leader.
When the team leader has approved the escalation, the status of the escalation will change from “Waiting for Approval” to “Escalated”. If no approval from the team leader is needed the status will immediately change to “Escalated”. You can see this in the escalation table on the call and you will receive an email notification when your escalation is approved. You will know that the escalation is then escalated to the correct manufacturer.

You are able to view the escalation by clicking on the [View] button after selecting the correct escalation.

In this particular case the manufacturer is contacted by Email. All Email communication will be visible on the Communication page
The selected escalation e-mail contains the escalation description as supplied while creating the escalation. The e-mail is sent to the manufacturers e-mail address. If the manufacturer replies to the message, the reply will show up in the ‘Incoming’ table.

To view incoming e-mail regarding the escalation you must first select the reply in the table and then click on the [View] button.

Escalations by PSS+ users Whenever a PSS+ user escalates a call, it will be escalated to the European level. A call will be created which team leaders and PSSE users on the European level will handle. You will be able to do this by selecting the “Escalate” action.
When you have selected the action and saved the call, a window will appear where the escalation details can be provided. This window is the same window as when submitting a call through the web interface, as described in chapter 5.1.2. All known fields will be copied from the original callincluding any added attachment(s). To indicate that this is an escalation, a text message is displayed on top of the page

When all steps for submitting the call are completed you will receive a confirmation message
The escalation will now be visible on the ‘Escalation’ page on the call
You can view the escalation progress by clicking on the [View] button

Approved answer
After communicating with the manufacturer or after the escalated call to the European level has been solved, eventually the outcome will be an approved answer from the manufacturer or the European level. When this is the case, the call status must be changed to ‘Work in Progress’ again, since the assigned person can work on the call again. This is done by choosing the action ‘Approved answer’ from the action menu. This action is only available when the call status is set to ‘Escalated’ and is available for the assigned person and the call dispatcher.

Create Task When you are working on the call it is possible that you cannot solve the call because certain specific knowledge is needed. For example: A printer is not printing correctly on Linux. You have checked the printer and there are no problems with the machine. The problem seems to be related to the Linux software. It is then possible to create a task for the Linux technology group. To do this, select the “Create Task” from the action menu.
The task window will appear where the correct task information can be provided.
When all information is filled in the [OK] button can be used to submit the task. An event will be created, but the status of the call won’t change. The task that is created can be viewed on the Escalation page.

When you are a member of a technology group you will receive a notification when a task is received. How to work on a task is explained in chapter 6.2.4. Solve When you think the problem is solved and you want the submitter to check the solution you can select the action “Solve”.
You need to fill in the closing details with the possible solution. The closing details are sent to the submitter of the call with the question if the submitter can check the solution and let you know if the problem is fixed. All the tasks that are related to the call need to be closed before the call can be solved. If there are open tasks and you try to solve the call you will receive an error message.

If the closing details are not filled when the call is solved you will receive the following error:
When you have filled in the ‘Closing data’ field an event is created, an email is sent and the status is set to “Solved”. Solution Rejected The submitter of the call has received an email with the possible solution. The submitter will check the solution and uses the “Provide Answer” button to let you know if the solution worked or not. If the solution did not work you can select the “Solution Rejected” button.
An event is created to indicate that the submitter of the call rejected the solution. The status of the call is set to “Work in Progress” again.

Close When the solution solved the problem of the submitter you can close the call. When you select the “Close” action the call will be set to the “Closed” status.
When the call is closed you need to provide some extra information on the pop-up window. You can select to send a notification to the whole specialist group for the product of the call and you can specify if you want to create a knowledge base article for the call. In this example both options are going to be selected. The pop-up window is shown in the next picture.
You can see to which specialist group the email is send. In this case the PSS-BW-LM will receive the notification. When the ‘Knowledge Base Article’ field is set to “Yes”, the knowledge base form will appear when the [OK] button is pushed. For more information about submitting knowledge base articles please refer to chapter 6.3

6.1.4 Call explanation In this chapter an explanation is provided about the fields and data that you can see on your calls. First of all a description of the right box will be provided, after that all pages will be discussed.
6.1.4.1 Box The Call ID is the ID that is generated by the system. This ID is always mentioned in the emails that you receive. If the call is escalated, the related Call ID will be the ID of the escalation. If this was an escalated call, the related Call ID will be the ID of the call that was escalated The status of the call is important because you can quickly see in which stage the call is. Also you know if the call needs to be actioned by the Assigned person or by you. The action menu field is used to work on the call. By selecting actions from the menu, the call will go through different statuses and events are created. The Call Dispatcher is the responsible team leader. The Call Dispatcher will always have an overview of what is happening to the call. The Assigned Group is the group that is working on the call. The Assigned Person is a member of the Assigned Group. This person is working on the call and your contact person for more information about the call. The [View Details] button can be used to view more information about the assigned person. You can see the all details like telephone number, office details and email address. The severity and urgency must be provided during the submittal of a call (See also chapter 5.1.2 – step 18) When either the severity or the urgency of the call is high, a reason must be provided in the field ‘Why High?’ The Expire Date represents the date when the call needs to be picked up. The Create Date is the date that the ticket was created. The assigned person will fill the Expected End Date when an expected date for a solution is known. The Modified Date is the date that the ticket was last modified.

Since the Problem Detail and Attachment pages only display information that is provided during the creation of the call, these two pages are not explained.
6.1.4.2 Call Action Page When the assigned person works on the call, events are created for each action that is done. These events are created for the administrator to be able to report on the calls and timers and for you to see which actions are already taken to solve the incident.
It is possible that one or more events are created by default. This depends on how the administrator has configured the events. Usually there will be one system-generated event indicating the submittal of the call. Because these actions are done automatically by the system when the call is submitted, these actions are already available despite the fact that the assigned person has done no actions yet. When you select an action in the table field the ‘Action Details’ field is filled with the details that are provided by the system or the assigned person. Further event details can be viewed by double clicking on an event in the table. More information about actions can be found in chapter 6.1.6
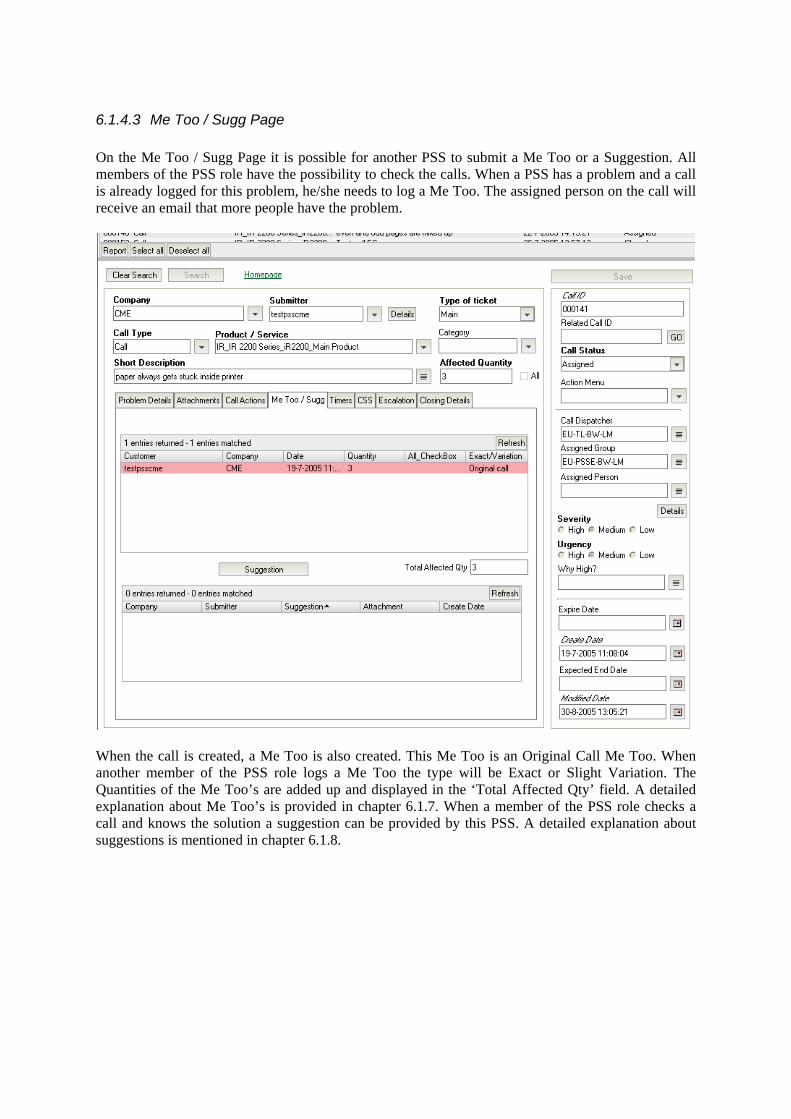
6.1.4.3 Me Too / Sugg Page On the Me Too / Sugg Page it is possible for another PSS to submit a Me Too or a Suggestion. All members of the PSS role have the possibility to check the calls. When a PSS has a problem and a call is already logged for this problem, he/she needs to log a Me Too. The assigned person on the call will receive an email that more people have the problem.
When the call is created, a Me Too is also created. This Me Too is an Original Call Me Too. When another member of the PSS role logs a Me Too the type will be Exact or Slight Variation. The Quantities of the Me Too’s are added up and displayed in the ‘Total Affected Qty’ field. A detailed explanation about Me Too’s is provided in chapter 6.1.7. When a member of the PSS role checks a call and knows the solution a suggestion can be provided by this PSS. A detailed explanation about suggestions is mentioned in chapter 6.1.8.

6.1.4.4 CSS Page The CSS page is only visible for the assigned group members and the call dispatcher. The submitter of the call cannot see this page. On the page the ‘Internal Eyes’ field is displayed. This field can be used to add notes that cannot be viewed by the submitter. Also some extra fields are available for reporting.
The ‘Problem Description’, ‘Cause’ and ‘Temporary Measure’ fields can be filled with information that will be displayed in the reporting. The ‘Include in Report’ field needs to be set to “Yes” to show these fields in the reports.

6.1.4.5 Escalation page (PSSE) When an Assigned Person having the PSSE role is not able to solve the problem, an escalation is created to the manufacturer. These escalations are shown on the Escalation page. You cannot do anything with these escalations and can only be worked on by the Manufacturer, Team Leader and Assigned Person. You can only view the escalation.
On the same page also the tasks are displayed. When an assigned person needs help from a technology group he or she can create a task for this group. Technology groups are groups of people that will have specific knowledge about e.g. Linux or Windows. You can see the tasks that are created and the status of those tasks.

6.1.4.6 Escalation page (PSS+) When an Assigned Person having the PSS+ role is not able to solve the problem, an escalation is created to the European level. These escalations are shown on the Escalation page. You cannot do anything with these escalations and can only be worked on by users on the European level. PSS+ users do not have the possibility to create tasks for technology groups
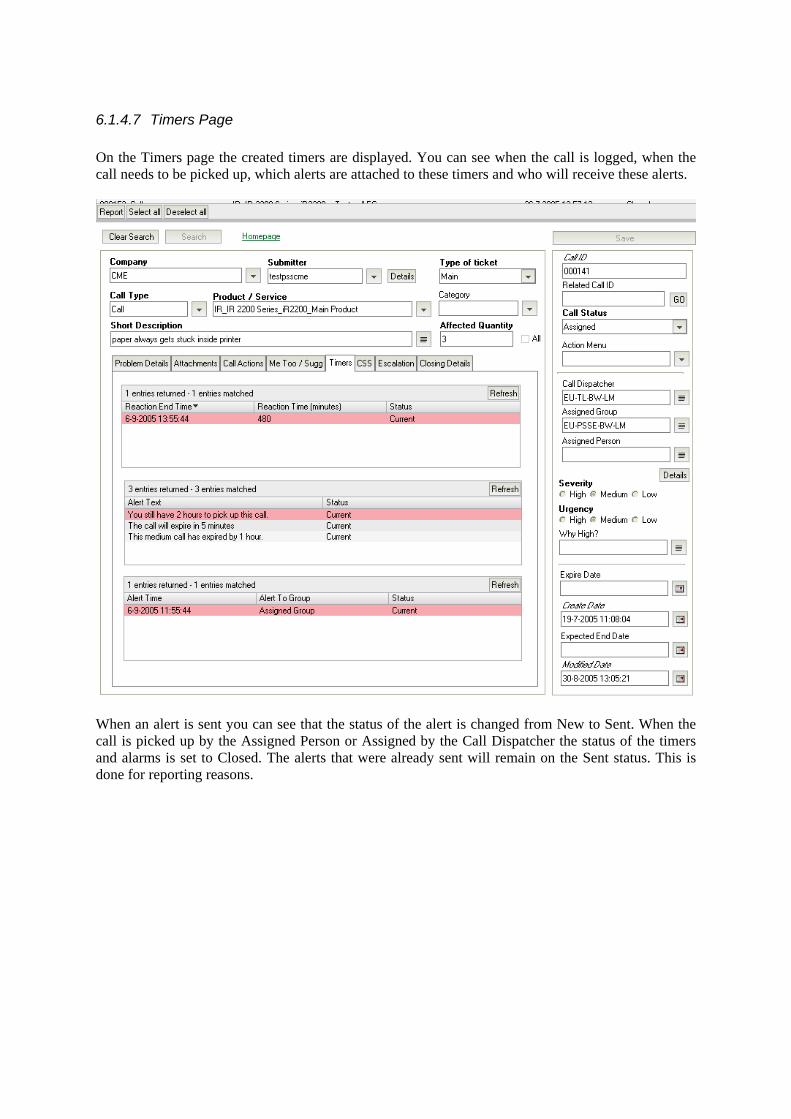
6.1.4.7 Timers Page On the Timers page the created timers are displayed. You can see when the call is logged, when the call needs to be picked up, which alerts are attached to these timers and who will receive these alerts.
When an alert is sent you can see that the status of the alert is changed from New to Sent. When the call is picked up by the Assigned Person or Assigned by the Call Dispatcher the status of the timers and alarms is set to Closed. The alerts that were already sent will remain on the Sent status. This is done for reporting reasons.

6.1.4.8 Closing Details page On the Closing Details page all information about the solution is provided. When the assigned person has used a knowledge base article to solve the incident, this article is shown in the table field. The ‘Closing Data’ field will display the solution that is provided by the assigned person. This solution might solve the problem and needs to be tested by you. You will receive an email with this solution.
If a knowledge base article was used, you can use the [View KB Article] button to view the complete knowledge base article. When you select the knowledge base article you will already see the solution in the ‘Knowledge Solution’ field.

6.1.5 Attachments On the attachment page you will have the possibility to add, view and remove attachments.
6.1.5.1 Add an attachment To add an attachment, click on the [Add] button. The attachment form will open and the attachment can be added.
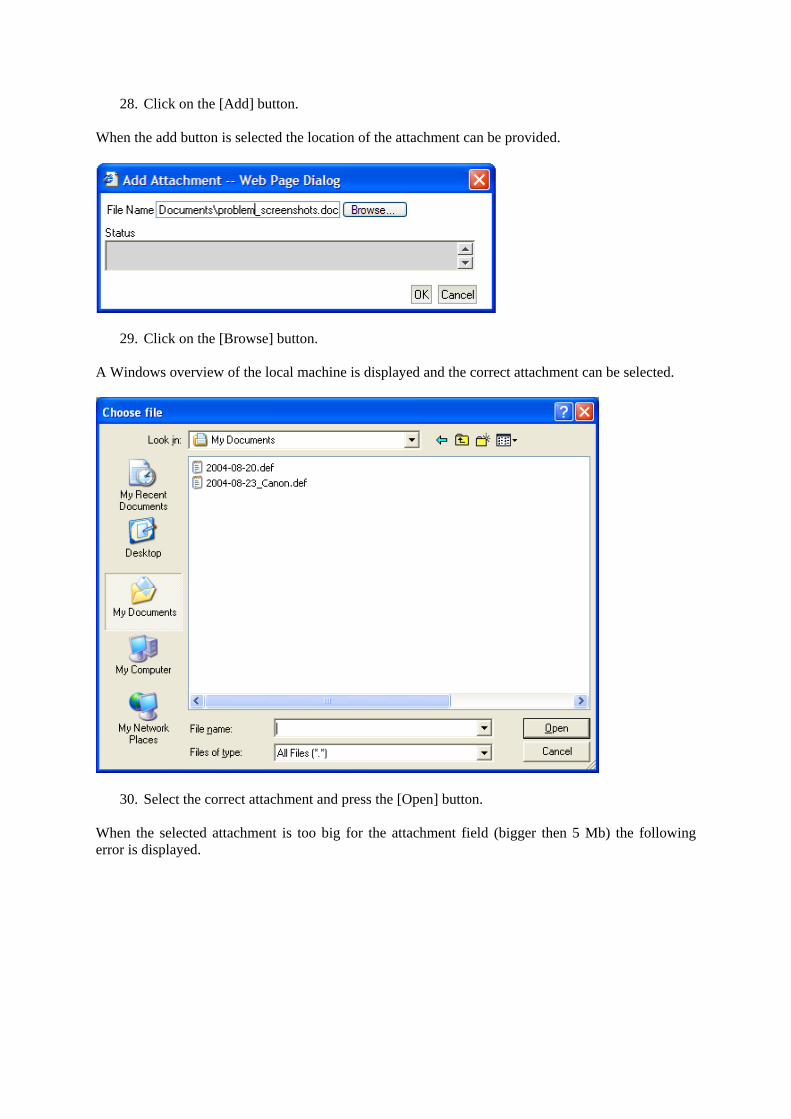
28. Click on the [Add] button. When the add button is selected the location of the attachment can be provided.
29. Click on the [Browse] button. A Windows overview of the local machine is displayed and the correct attachment can be selected.
30. Select the correct attachment and press the [Open] button. When the selected attachment is too big for the attachment field (bigger then 5 Mb) the following error is displayed.

When the attachment is the correct size the attachment is uploaded and displayed in the previous window.
31. Press the [OK] button to close this window and attach the file to the call. The table on the attachment page will display the attachment that you have added.

6.1.5.2 View an attachment If you want to view an attachment that was added to the call you can select the attachment in the table field and press the [View] button.
By clicking the [Display] button the attachment will be displayed.

6.1.5.3 Removing the attachment You will also have the possibility to remove an attachment. To remove an attachment press the [Remove] button.
When the attachment is removed the table will be empty.
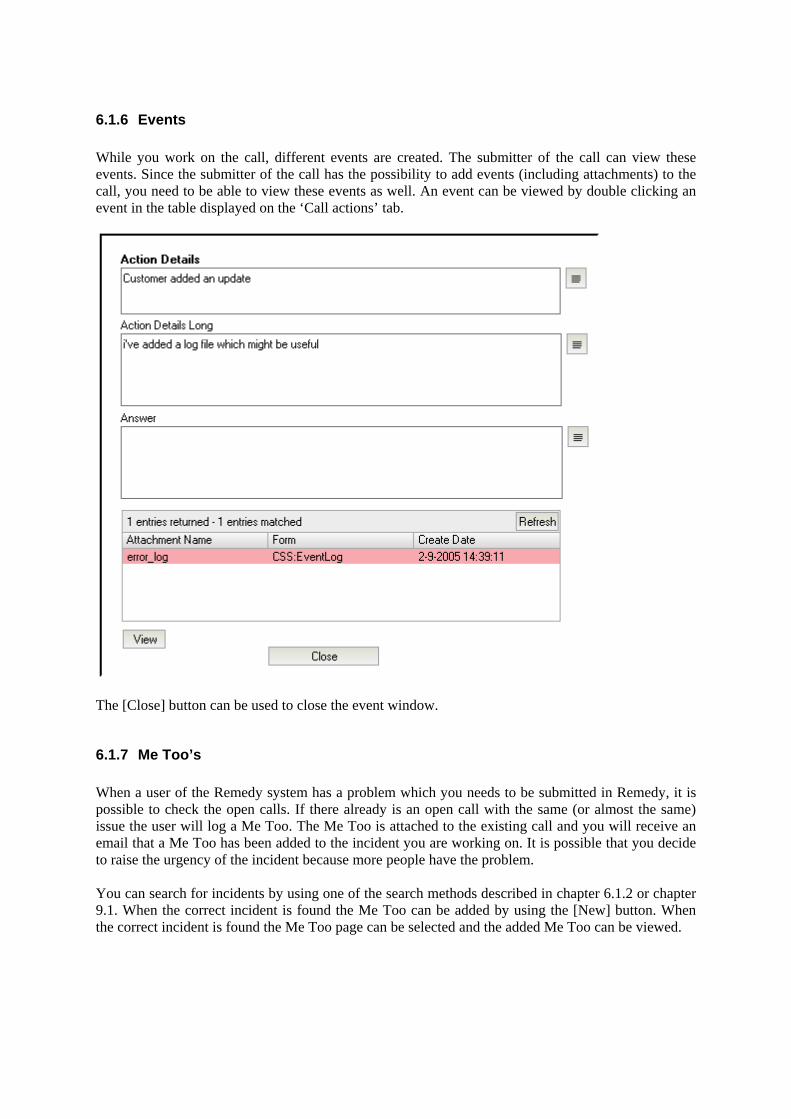
6.1.6 Events While you work on the call, different events are created. The submitter of the call can view these events. Since the submitter of the call has the possibility to add events (including attachments) to the call, you need to be able to view these events as well. An event can be viewed by double clicking an event in the table displayed on the ‘Call actions’ tab.
The [Close] button can be used to close the event window.
6.1.7 Me Too’s When a user of the Remedy system has a problem which you needs to be submitted in Remedy, it is possible to check the open calls. If there already is an open call with the same (or almost the same) issue the user will log a Me Too. The Me Too is attached to the existing call and you will receive an email that a Me Too has been added to the incident you are working on. It is possible that you decide to raise the urgency of the incident because more people have the problem. You can search for incidents by using one of the search methods described in chapter 6.1.2 or chapter 9.1. When the correct incident is found the Me Too can be added by using the [New] button. When the correct incident is found the Me Too page can be selected and the added Me Too can be viewed.
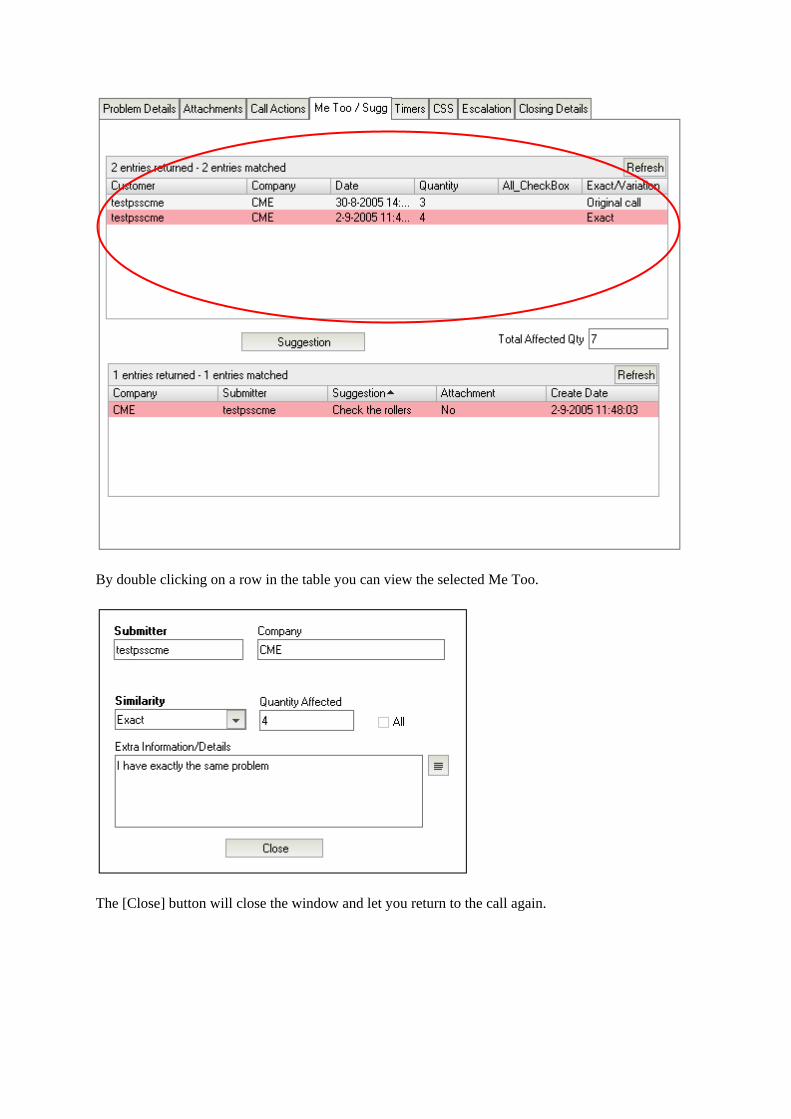
By double clicking on a row in the table you can view the selected Me Too.
The [Close] button will close the window and let you return to the call again.
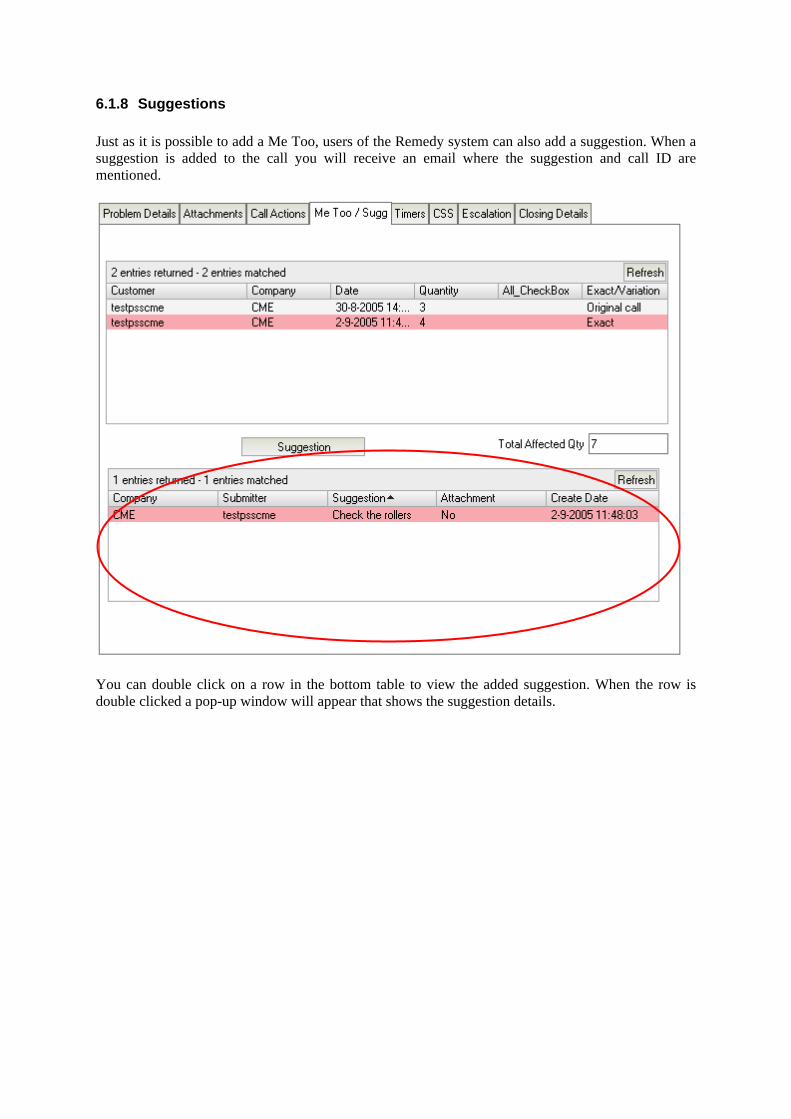
6.1.8 Suggestions Just as it is possible to add a Me Too, users of the Remedy system can also add a suggestion. When a suggestion is added to the call you will receive an email where the suggestion and call ID are mentioned.
You can double click on a row in the bottom table to view the added suggestion. When the row is double clicked a pop-up window will appear that shows the suggestion details.

You don’t need to send an email to the submitter of the call. If a suggestion is logged the submitter of the call will automatically receive an email with the unofficial solution.

6.2 The Task module
6.2.1 General explanation When you have logged an incident, a member of the assigned group will take ownership of the incident. This assigned person will work on the call and try to obtain a solution. Sometimes it is possible that specific knowledge is required to solve the call. This is not knowledge about the product, but about some technologies that are related to the call. For example: A printer is not printing correctly from a Linux RedHat machine. The assigned person can check the printer and try to find anything wrong with it. If the printer is working fine, the problem seems to be related to Linux. If the assigned person has no knowledge about Linux, he/she can create a task for the Linux team. This team consists of different people from different offices with Linux knowledge. Only the assigned person on the call is able to request help with a task and therefore a PSS cannot create tasks. Although a PSS cannot submit a task, he or she can search for tasks that are created by the assigned person on the call.
6.2.2 Creating Tasks A task is created when the assigned person on the call needs to have more information from a technology group. Therefore it is only possible to create task from a call. To create a task the call status needs to be in “Work in Progress”. The action menu will then contain the “Create Task” action.
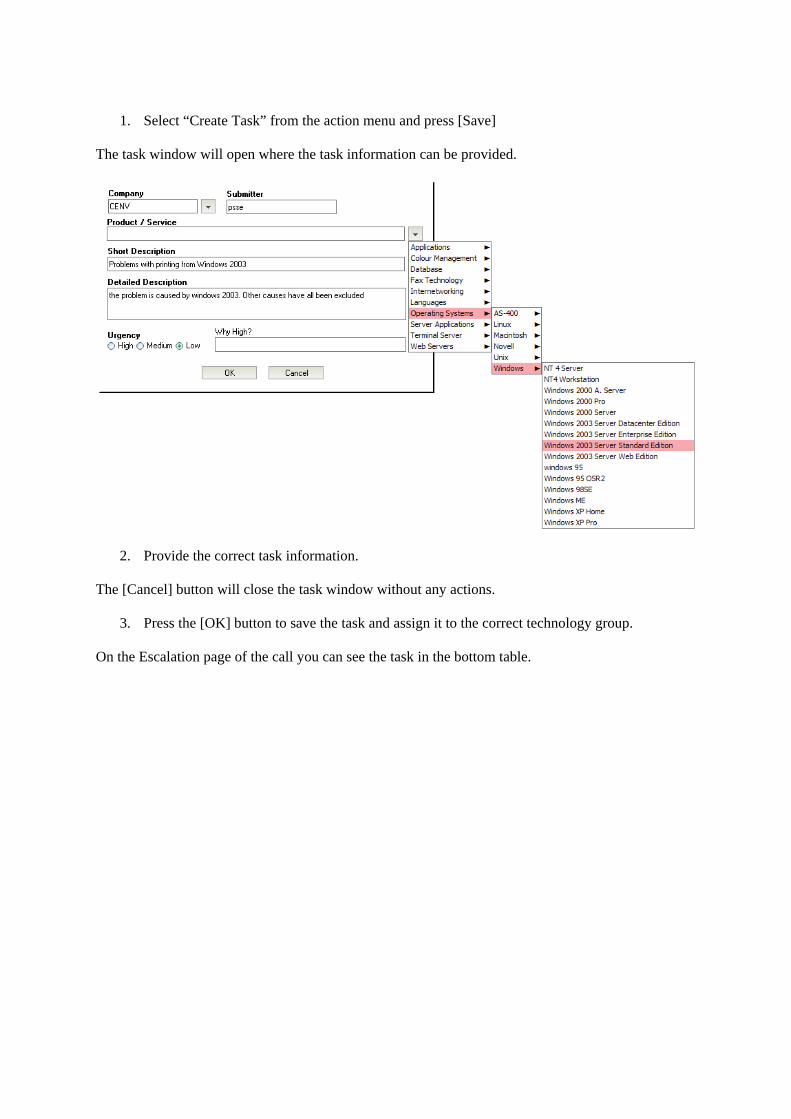
1. Select “Create Task” from the action menu and press [Save]
The task window will open where the task information can be provided.
2. Provide the correct task information. The [Cancel] button will close the task window without any actions.
3. Press the [OK] button to save the task and assign it to the correct technology group. On the Escalation page of the call you can see the task in the bottom table.


6.2.3 Searching for tasks When an assigned person has created a task it is possible for you to search for that task.
When you want to search for tasks just click on the Search link behind the Task text in the left menu. The task form will open and you can use the fields to search for specific tasks.
2. Fill in the correct fields that you want to search on. If all fields are left empty you will be able to find all requests. When the search is performed all tasks that are conform the search criteria will be displayed in the results list.

6.2.4 Working with tasks When you have searched for the task you will be able to work on it by making use of the action menu on the task box. The action menu contains actions which will allow you to follow a predetermined process of handling task requests.

6.2.5 Task Explanation
6.2.5.1 Box The action menu field is used to work on the task. By selecting actions from the menu, the task will go through different statuses. The attached Call ID will represent the call that is related to this task The call dispatcher is responsible for the call A member of the assigned group is working on the call The assigned person is the contact person for you
6.2.5.2 Task Details page The Task Details page will show more details about the product and submitter of the task. The reason why this task was logged is mentioned in the description fields. Also the urgency is shown on this page.

6.2.5.3 Information page On the Information page the assigned person can add notes and the solution. This solution will be emailed to the assigned person on the call when the task is solved.
Notes are added automatically by the system, but it is also possible for the assigned person on the task to add notes manually. You can view the notes by clicking on the button. NOTE: THE ‘NOTES’ FIELD WILL ALWAYS BE EMPTY. YOU ALWAYS NEED TO PRESS THE BUTTON BEFORE THE NOTES ARE DISPLAYED.
2. Click on the button


6.3 The Knowledge module
6.3.1 General Explanation Knowledge is used in different ways in the system. During the time that you work with a call you will be able to check the knowledge in the database. Also it is possible for you to create knowledge when a call is closed. These actions that can be done on the knowledge module are described in this chapter.
6.3.2 Creating Knowledge Base Articles When you have gained knowledge and you think it is wise to have that knowledge in the knowledge database you need to create a knowledge base article. Click on the New link behind the KB text in the menu on the website.
7. Click on the New link behind the KB text in the menu The first step for creating a knowledge base item is shown

The values on this page are filled automatically based on your user settings. Note that no personal user information will be stored in the article, only the region will be used to localize the knowledge base article.
8. Click the [Next] button to describe the problem In this step general information about the knowledge base item needs to be provided. These details include a title, a more detailed description about the problem and the cause for the problem
9. Click the [Next] button to provide a solution for the problem In this step the user must provide some kind of solution or workaround for the problem

10. Click the [Next] button to provide some additional information about the problem
On this page you can provide the affected product or service that applies to the knowledge base article, as well as the category, sub category and the serial number range for all the serial numbers that will be infected with the problem. You must also specify which level of expertise is needed to be able to view the knowledge base article.
11. Click the [Next] button to proceed to the final step The fifth and last step consists of adding attachments that might be useful to support the knowledge base article, for instance a document containing the steps needed to replicate the problem.
12. Click on the [Submit] button to submit this knowledge base article.

Now you will see a dialog box confirming you have successfully submitted the knowledge base article. The article must be reviewed first before it is visible in the knowledge base.
6.3.3 Searching Knowledge Base Articles It is also possible for you to search for knowledge base articles. You can use the quick search to search for articles and you can open the form in search mode. The quick search option is explained in chapter 9.1.1. Searching directly using the knowledge base form is explained in this chapter. When you are logged into the server you are able to select the Search link behind the KB text.
When you have clicked on the Search link a search form will open. It is now possible to provide data in one or more fields and press the [Search] button. The articles that will meet the search criteria will be shown in the result table field. You must provide both a Product Group and a Product Name before any results are visible.
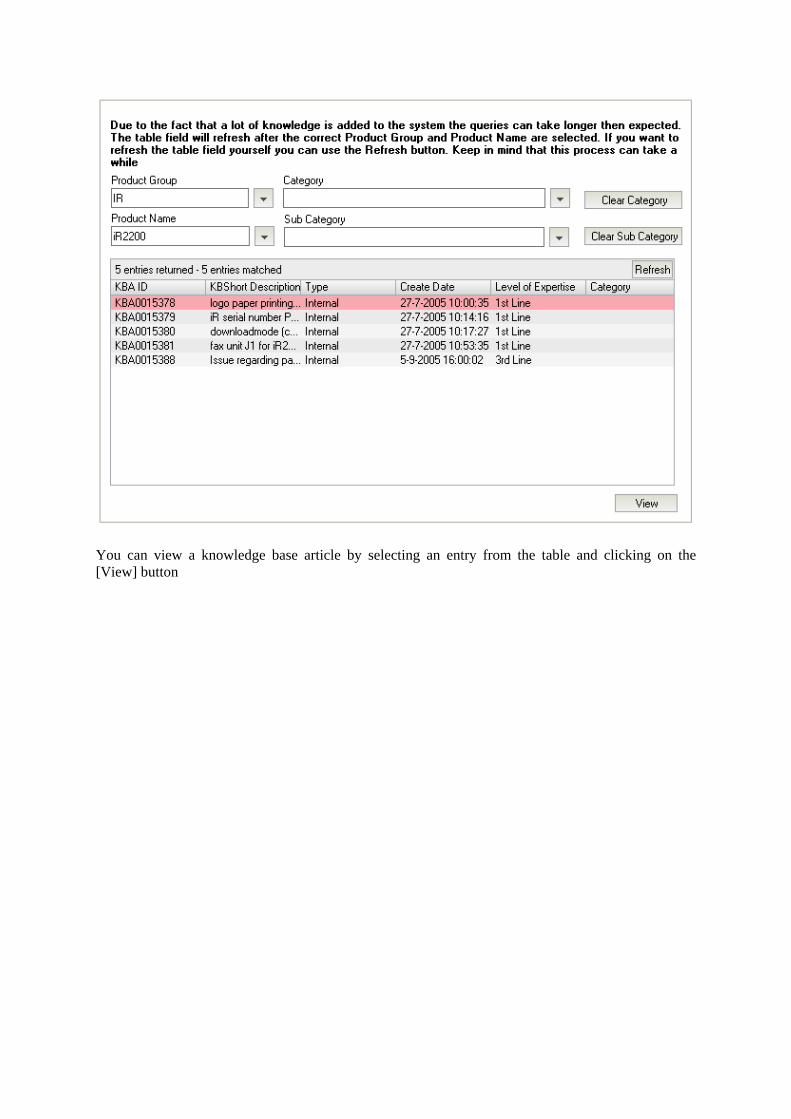
You can view a knowledge base article by selecting an entry from the table and clicking on the [View] button

Clicking the [Close] button will close the window, so you can perform another search or view another knowledge base article.
6.3.4 Working with knowledge base articles When a knowledge base article is logged and assigned to your group you will receive a notification via email. You will then be able to either accept the knowledge or decline it. When the knowledge is accepted it will be in the “Accepted” status and users can find the knowledge. When you decline the knowledge it is not possible for a user to see the knowledge article. Only knowledge administrators can see the declined knowledge. Accepting a knowledge base article can only be done by a member of the assigned group or by the assigned call dispatcher. However, if the user that submitted the article was a member of the assigned group, he cannot approve or decline the knowledge. In this case either another group member or the assigned call dispatcher can approve or decline the article.

When the knowledge is submitted you can open the knowledge base article by clicking on the link in the email or by searching the knowledge article as is explained in the previous chapter.
1. Open the knowledge base article.
The [Decline] button will set the ‘Status’ field to “Declined”.
2. Click on the [Accept] button The status of the knowledge base article will be set to Approved and the article will be visible to users.

6.3.5 Knowledge Base Explanation When the knowledge base is opened you will see a couple of pages and the box on top of the screen. This subchapter will explain the knowledge base article in more detail.
6.3.5.1 Box It does not matter on which page you are, the information in the box is always shown.
In the box you will see the Knowledge Base ID. This ID is generated by the system and is used in the communication because it is a unique key. Another system-generated field is the ‘Create Date’. This field indicates the date and time at which the knowledge base article was submitted (not approved). The ‘Type’ field will be filled with either Internal or External to note that the knowledge can only be used internally or also externally. The status is set with Assigned when the ticket is submitted. The assigned group (that is mentioned in the ‘Assigned Group’ field) will have the possibility to either accept or decline the Knowledge Base Article. Declined articles are not visible anymore and the approved knowledge can be viewed and used. Also there is a field ‘Region’. This field is not yet used in version 3.0. However, version 3.1 will include features that make it possible to localize the application. In version 3.1 the ‘Region’ field will indicate the language in which the article was written. For now, this field will always have the value ‘EU’, indicating that the article is written in the English language.

6.3.5.2 Details Page On the details page, all details for the knowledge base article are displayed.
The information is the same when logging an article. The ‘Problem’, ‘Cause’ and ‘Solution’ fields are used to solve issues with the same problem as is mentioned in the ‘Problem’ field. The ‘Product / Service’, ‘Category’ and ‘Sub category’ fields are used to better determine in which category the article needs to be. Also for searching the articles, the category can be used to filter knowledge. The ‘Level of Expertise’ field displays the expertise level that is needed to use the knowledge base article.

6.3.5.3 Information page The Information page displays the same fields as on submit.
The ‘Effected Serial/Lot Numbers’ field is filled with the range of affected serial numbers. Any attachments that are attached to the article are also displayed on this page.

6.4 The Parts module
6.4.1 General Explanation When you need to order a part, you need to check the parts database to find out the part number so it can be ordered. Some parts in the parts database cannot be ordered since there is no part number attached to these parts. When you want to order a part that has no part number attached you need to log a parts setup request in Remedy.
6.4.2 Create a part request When you want to setup a part in the parts database you need to log a Parts Setup Request in Remedy. Click on the New link behind the Parts text in the menu on the website.
5. Click on the New link behind the Parts text in the menu The Part Setup request form is shown
The user details are filled in automatically. As you can see in the text you need to check the parts catalogue, the service bulletins, S-Plus, SPEED and the TSS Website before logging the part setup request. The default value for ‘Call Type’ is Part Setup Request. It is also possible to log a request for ROM programming by selecting “ROM Programming” from the menu

Depending on your permissions it is possible that the menu has more options, but these options are always available.
6. Click the [Next] button to go to the second step.
First the type of request needs to be provided. There are three options. A – Option A is chosen when a part needs to be delivered with high priority and the part number does not need to be set up. B – Option B is selected when the part does not need to be delivered; only the part number needs to be set up in the parts database. C – Option C is used when the part needs to be shipped and the part number needs to be set up in the parts database. Furthermore the product needs to be provided in the ‘Product / Service’ field. If the part is needed for multiple items of the selected product/service, than you can specify the quantity in the field ‘Affected Quantity’. This field is ignored if the type of request is “B” (the part only needs to be set up in the database) The [Back] button can be used to go to the previous step.

7. Click the [Next] button to go to the second step when all fields are filled. On the third step the part details can be provided. Also the attachments can be added. If you request a part setup remember to always attach the page of the part catalogue that displays the needed part.
The [Back] button can be used to go to the previous step.
8. Click on the [Submit] button to submit the part setup request. A message will confirm that you have successfully submitted the part request

6.4.3 Searching part requests It is also possible for you to search for part setup requests. You can use the quick search to search for part setup requests and you can open the form in search mode. The quick search option is explained in chapter 9.1.1. Searching directly on the parts form is explained in this chapter. When you are logged into the server you are able to select the Search link behind the Parts text.
When you have clicked on the Search link the parts form will open in search mode. It is now possible to provide data in one or more fields and press the [Search] button. The part requests that will meet the search criteria will be shown in the result table field. Example: When you fill in your user name in the ‘Submitter’ field and press the [Search] button, all your submitted part setup request will be displayed.

The selected part request is the request that was logged in chapter 6.4.2. You cannot change any fields on this request. The Assigned group on the request will be responsible for the part setup and therefore will assign a person that will work on this ticket. If you want to search again you can click on the [Clear Search] button. The search view will be displayed and a new search criterion can be provided.

6.4.4 Part Setup Explanation In this chapter an explanation is provided about the fields and data that you can see on your part setup request. First of all a description of the right box will be provided, after that most pages will be discussed.
6.4.4.1 Box
The Parts ID is the ID that is generated by the system. This ID is always mentioned in the emails that you receive. If a local dealer or field technician issues a part request, it must be redirected to the European office for approval. When the request is escalated this field will hold the parts ID for the European request. On the European level this field will hold the ID of the local part request. The status of the call is important because you can quickly see in which stage the call is. Also you know if the call needs to be actioned by the Assigned person or by you. The action menu allows users to work with part requests. Only members of the assigned group or the call dispatcher group can work with part requests. The Region indicates which region issued the part request, and the Supporting region indicates which region is responsible for handling the part request. The Create Date is the date that the ticket was created. The Call Dispatcher is the responsible team leader. The Call Dispatcher will always have an overview of what is happening to the request. The Assigned Group is the group that is working on this ticket. The Assigned Person is a member of the Assigned Group. This person is working on the part request and your contact person for more information about the ticket.

6.4.4.2 Attachment Page The Attachment page is the first page that is visible on the part setup request. On the attachment page the parts catalogue page that displays the part is attached to the ticket.
It is possible to add extra attachments or view the attached files.

6.4.4.3 Actions Page When the assigned person works on the request, events are created for each action that is done. These events are created for the administrator to be able to report on the part setup requests and for you to see which actions are already taken to solve the incident.
It is possible that one or more events are created by default. This depends on how the administrator has configured the events. Usually there will be one system-generated event indicating the submittal of the part request. Because these actions are done automatically by the system when the call is submitted, these actions are already available despite the fact that the assigned person has done no actions yet. Further event details can be viewed by double clicking on an event in the table. If you are the submitter of the part request you have the opportunity to add an event using the [Add Update] button. If you are not the submitter you will not have this option.

6.4.4.4 Escalation page When an Assigned Person needs more help on the part request, an escalation is created to the appropriate party. These escalations are shown on the Escalation page. These escalations are created in the system and can only be viewed by you.

6.4.4.5 Closing Details page On the closing details page the solution is provided. The solution might be that the part is set up or that this part cannot be ordered. When the assigned person solves the part request the solution needs to be filled.

7. Call Dispatcher information
7.1 The Call module
7.1.1 General Explanation When you are logged in, you can open the call form by using the File – Open – Object list (or Ctrl O) from the menu. The following list will be displayed.
You can open the calls form by selecting the CSS:Main form. Select the [Search] button to open the form in search mode.
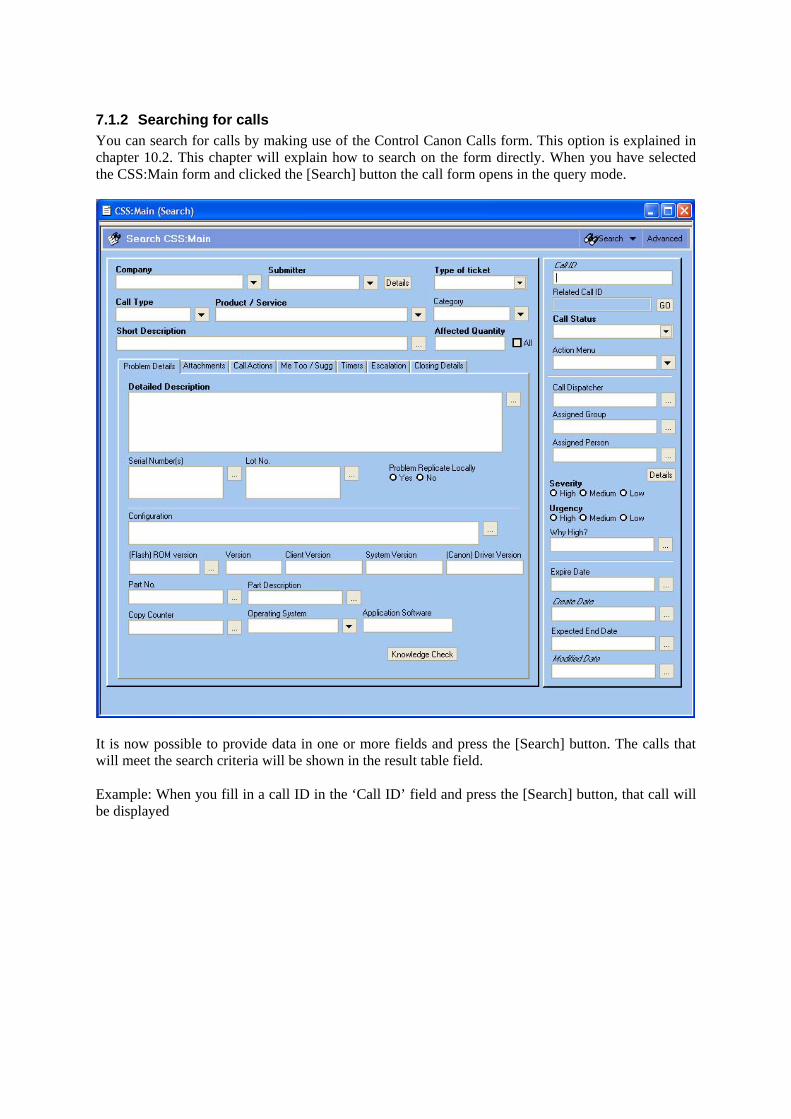
7.1.2 Searching for calls You can search for calls by making use of the Control Canon Calls form. This option is explained in chapter 10.2. This chapter will explain how to search on the form directly. When you have selected the CSS:Main form and clicked the [Search] button the call form opens in the query mode.
It is now possible to provide data in one or more fields and press the [Search] button. The calls that will meet the search criteria will be shown in the result table field. Example: When you fill in a call ID in the ‘Call ID’ field and press the [Search] button, that call will be displayed

7.1.3 Working with calls As a member of the call dispatcher group, you will have the possibility to select actions on the calls. You can work on the call by making use of the ‘Action Menu’ field. When you have the correct permissions you will have actions in the action menu that can be selected, the actions will trigger workflow that will change the status of the call and create events.
7.1.3.1 Process When you are working with calls you will be able to select different actions. Each action will trigger workflow that will set the call to a new status and create events. Below you will see the process that is in place for the call management module. The yellow blocks represent the status of the call while the grey blocks display the different actions that can be selected when the call is in the status.

7.1.3.2 Actions When the call is logged by the submitter, the call will be automatically set from the New - to the Assigned status. When you check the call you will notice that there are two events created by the system. These events can be viewed on the Actions page.
This chapter will explain the different actions that are available for the assigned person. It is possible that actions are available for you in different statuses of the call. Assign to Person When the call is in the “Assigned” status you are able to select two actions. The first action is “Assign to Person”. This action will be available in all statuses.

As a call dispatcher you will be able to assign the call to someone from the assigned group. Also it is possible to take the call away from the assigned person and assign it to someone else. If the assigned person is sick you are able to let someone else work on the call. If you select the action the system will check all the members of the assigned group. If there is only one person in the group, this person will automatically be assigned to the call. When there are more then one members in the group you will see a list of all members and you can select the correct one. When the call is assigned it is automatically set to “Work in Progress” Transfer Call It is possible that the call is not correctly assigned because the submitter has chosen the wrong service or product. Therefore it is possible for you to transfer the call to the correct group. First you need to change the ‘Service / Product’ field to the correct value.
When the correct value is selected you can choose “Transfer Call” from the action menu.
The ‘Call Dispatcher’ and ‘Assigned Group’ fields will change to the correct values.

Approve Escalation It is possible that the assigned person on the call has added an escalation. For some manufacturers the escalation is escalated immediately, but sometimes it is needed that you approve the escalation before it is sent to the manufacturer. When the assigned person logs an escalation you will receive a notification that an escalation is added that needs to be approved. If you open the correct call and click on the Escalation page you are able to see the escalation.
You can use the [View] button to check the escalation and either approve or decline it by using the corresponding buttons. When you approve the escalation the status will change from “Waiting for Approval” to “Escalated”. When the manufacturer provides an answer on the escalation you will receive a notification that you need to check the answer and approve or decline it. You can approve or decline the answer by viewing the escalation when you receive the notification.

DIT KLOPT NIET HET ESCALATIE NAAR EEN MANUFACTURER MECHANISME WERKT NU ANDERS, MET COMMUNICATION. TEKST MOET NOG WORDEN AANGEPAST
Use the [Approve Answer] or [Reject Answer] to approve or decline the answer. To notify the assigned person on the call you need to select the “Approved Answer” action from the menu.
When you select the action from the menu, the assigned person on the call will receive a notification that an approved answer is provided for the escalation. Also the call will be set to “Work in Progress”. The assigned person can work on the call when you approve the answer of the manufacturer. Reject Escalation When the assigned person has provided an escalation you are able to check the escalation and either approve or decline it. The previous chapter explains how to accept the escalation. This chapter will explain how to decline the escalation. When the escalation is submitted, you will receive a notification. You can open the correct call and select the Escalation page. The escalation will be shown in the table. Select the correct escalation and press the [View] button. The escalation will be shown and you can check the ticket. When you think that the escalation needs to be declined you can click on the [Decline] button

When you click on the [Decline] button a window will appear where the reason for reject can be provided. After the reason is filled in the [Reject Escalation] button can be selected to reject the escalation. The escalation is set to the rejected status and the assigned person will receive a notification that the escalation has been rejected (with the reason for reject).

7.1.4 Call explanation In this chapter an explanation is provided about the fields and data that you can see on your calls. First of all a description of the right box will be provided, after that all pages will be discussed.
7.1.4.1 Box - The Call ID is the ID that is generated by the system. This ID is always mentioned in the emails that you receive. -If the call is escalated, the related Call ID will be the ID of the escalation. If this was an escalated call, the related Call ID will be the ID of the call that was escalated. - The status of the call is important because you can quickly see in which stage the call is. Also you know if the call needs to be actioned by the Assigned person or by you. - The action menu field is used to work on the call. By selecting actions from the menu, the call will go throught different statusses and events are created. - The Call Dispatcher is the responsible team leader. The Call Dispatcher will always have an oveerview of what is happening to the call. - The Assigned Group is the group that is working on the call. - The Assigned Person is a member of the Assigned Group. This person is working on the call and your contact person for more information about the call. - The [View Details] button can be used to view more information about the assigned person. You can see the all details like telephone number, office details and email address. -The severity and urgency (and optional the reason for a high setting) must be provided during the submittal of a call (See also chapter 5.1.2 – step 18) - The Expire Date represents the date when the call needs to be picked up. - The Create Date is the date that the ticket was created. - The Expected End Date will be filled by the assigned person when an expected date for a solution is known. - The Modified Date is the date that the ticket was last modified.

Since the Problem Detail and Attachment pages only display information that is provided during the creation of the call, these two pages are not explained.
7.1.4.2 Call Action Page When the assigned person works on the call, events are created for each action that is done. These events are created for the administrator to be able to report on the calls and timers and for you to see which actions are already taken to solve the incident.
It is possible that one or more events are created by default. This depends on how the administrator has configured the events. Usually there will be one system-generated event indicating the submittal of the call. Because these actions are done automatically by the system when the call is submitted, these actions are already available despite the fact that the assigned person has done no actions yet. When you select an action in the table field the ‘Action Details’ field id filled with the details that are provided by the system or the assigned person. Further event details can be viewed by double clicking on an event in the table.

7.1.4.3 Me Too / Sugg Page On the Me Too / Sugg Page it is possible for another PSS to submit a Me Too or a Suggestion. All members of the PSS role have the possibility to check the calls. When a PSS has a problem and a call is already logged for this problem, he/she needs to log a Me Too. The assigned person on the call will receive an email that more people have the problem.
When the call is created, a Me Too is also created. This Me Too is an Original Call Me Too. When another member of the PSS role logs a Me Too the type will be Exact or Slight Variation. The Quantities of the Me Too’s are added up and displayed in the ‘Total Affected Qty’ field. A detailed explanation about Me Too’s is provided in chapter 5.1.5. When a member of the PSS role checks a call and knows the solution a suggestion can be provided by this PSS. A detailed explanation about logging suggestions is mentioned in chapter 5.1.6.

7.1.4.4 Timers Page On the Timers page the created timers are displayed. You can see when the call is logged, when the call needs to be picked up, which alerts are attached to these timers and who will receive these alerts.
When an alert is sent you can see that the status of the alert is changed from New to Sent. When the call is picked up by the Assigned Person or Assigned by the Call Dispatcher the status of the timers and alarms is set to Closed. The alerts that were already sent will remain on the Sent status. This is done for reporting reasons.

7.1.4.5 CSS Page The CSS page is only visible for the assigned group members and the call dispatcher. The submitter of the call cannot see this page. On the page the ‘Internal Eyes’ field is displayed. This field can be used to add notes that cannot be viewed by the submitter. Also some extra fields are available for reporting.
The ‘Problem Description’, ‘Cause’ and ‘Manufacturer feedback’ fields can be filled with information that will be displayed in the reporting. The ‘Include in Report’ field needs to be set to “Yes” to show these fields in the reports.

7.1.4.6 Escalation page When an Assigned Person is not able to solve the problem, an escalation is created to the manufacturer. These escalations are shown on the Escalation page. You cannot do anything with these escalations and can only be worked on by the Manufacturer, Team Leader and Assigned Person. You can only view the escalation.
On the same page also the tasks are displayed. When an assigned person needs to have help from a technology group he/she can create a task for this group. Technology groups are groups of people that will have specific knowledge about e.g. Linux or Windows. You can see the tasks that are created and the status of those tasks.
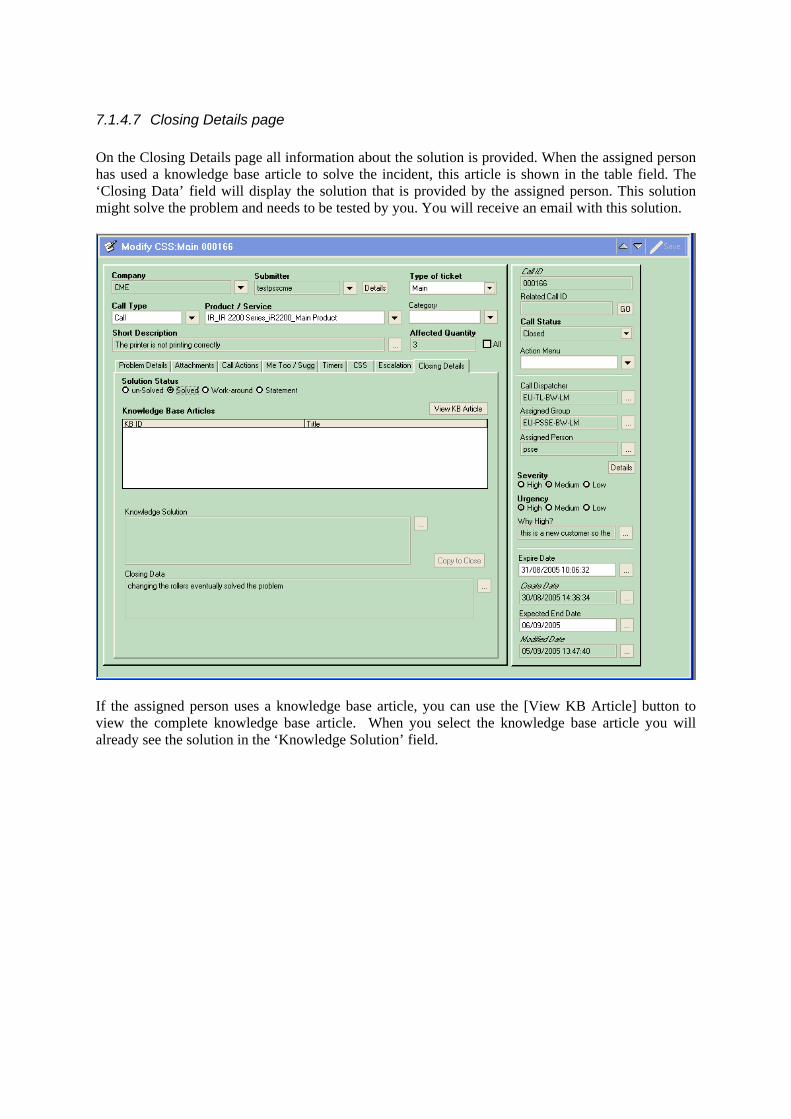
7.1.4.7 Closing Details page On the Closing Details page all information about the solution is provided. When the assigned person has used a knowledge base article to solve the incident, this article is shown in the table field. The ‘Closing Data’ field will display the solution that is provided by the assigned person. This solution might solve the problem and needs to be tested by you. You will receive an email with this solution.
If the assigned person uses a knowledge base article, you can use the [View KB Article] button to view the complete knowledge base article. When you select the knowledge base article you will already see the solution in the ‘Knowledge Solution’ field.

7.1.5 Attachments On the attachment page you will have the possibility to add, view and remove attachments.
7.1.5.1 Add an attachment To add an attachment click on the [Add] button. The attachment form will open and the attachment can be added.
32. Click on the File Name column and press the right mouse button. 33. Select “Add” from the menu.
When the “Add” item is selected the location of the attachment can be provided.

34. Select the correct attachment and press the [Open] button. When the selected attachment is too big for the attachment field (bigger then 5 Mb) the following error is displayed.
When the attachment is the correct size the attachment is uploaded and displayed in the previous window.

35. Press the [OK] button to close this window and attach the file to the call. The table on the attachment page will display the attachment that you have added.

7.1.5.2 View an attachment If you want to view an attachment that was added to the call you can select the attachment in the table field and press the [View] button.
Click on the attachment with the right mouse button and select “Display” from the menu to view the attachment.

7.1.5.3 Removing the attachment You will also have the possibility to remove an attachment. Removing an attachment can be done by pressing the [Remove] button.
When the attachment is removed the table will be empty.
7.1.6 Events While you work on the call, different events are created. The submitter of the call can view these events. Since the submitter of the call has the possibility to add events to the call, you need to be able to view these events as well. Therefore you are able to double click on the events that are displayed in the table on the Call Actions page.

The [Close] button can be used to close the event window.
7.1.7 Knowledge When you are the call dispatcher on the call, you will be able to either view knowledge. In the next chapters we will explain how you can view knowledge from a call.
7.1.7.1 Viewing a knowledge base article from a call When you have opened the call that you want to work on you are able to view knowledge for the product of the call. To view knowledge that might solve the incident you can use the [Knowledge Check] button. 1. Click on [Knowledge Check] button A pop-up window will appear that will display all knowledge for the product name. When a category is filled in on the call this category will be transferred onto the knowledge check window.

In this example all knowledge for the product name iR2200 is shown. When the ‘Category’ field is filled with a value, the table will automatically display the knowledge for the product name and category. If the query still returns too many records it is also possible to specify a sub category to narrow the search even further.

With the [Clear Category] button, both the category and sub category fields will be empty again and all knowledge for the product name is shown. The same goes for the [Clear Sub Category] button, which will only clear the sub category field and show all knowledge for the product name and category. When a knowledge base article that might solve the issue is selected in the table, the [View] button can be used to view the article.

When a knowledge base article is found that can be used to solve the issue, you can use the [Use] button to relate the knowledge article to the call.

After the [Use] button is clicked the selected knowledge base article will be attached to the call. If you open the Closing Details page on the call you can see the attached knowledge base article.
When you select the knowledge base article the knowledge solution will be shown in the ‘Knowledge Solution’ field. By pressing the [Copy to Close] button, the knowledge article solution is copied to the ‘Closing Data’ field.

After you select the “Solve” action the call will be solved and the Closing Data will be sent to the submitter as an email.

7.2 The Task module
7.2.1 General explanation When you have logged an incident, a member of the assigned group will take ownership of the incident. This assigned person will work on the call and try to obtain a solution. Sometimes it is possible that specific knowledge is required to solve the call. This is not knowledge about the product, but about some technologies that are related to the call. For example: A printer is not printing correctly from a Linux RedHat machine. The assigned person can check the printer and try to find anything wrong with it. If the printer is working fine, the problem seems to be related to Linux. If the assigned person has no knowledge about Linux, he/she can create a task for the Linux team. This team consists of different people from different offices with Linux knowledge. Only the assigned person on the call is able to request help with a task and therefore a PSS cannot create tasks. Although a PSS cannot submit a task, he or she can search for tasks that are created by the assigned person on the call.
7.2.2 Creating Tasks Creating a task can only be done from a call by selecting the “Create task” action. Only an assigned person can select this action. You can therefore not create a task but only view tasks. This chapter is only added to this document to show that you will receive an error when you open the task form in submit mode. The error will appear when you select the [New] button on the form list or when you press F2 when the task form is in search mode.


7.2.3 Searching for tasks When an assigned person has created a task it is possible for you to search for that task.
When you want to search for tasks just click on the Search link behind the Task text in the left menu. The task form will open and you can use the fields to search for specific tasks.
3. Fill in the correct fields that you want to search on. If all fields are left empty you will be able to find all requests. When the search is performed all tasks that are conform the search criteria will be displayed in the results list.

7.2.4 Working with tasks The only person that has permissions to work with tasks is the assigned person. Therefore you will not have any actions in the action menu. You are able check the fields and progress of the task.
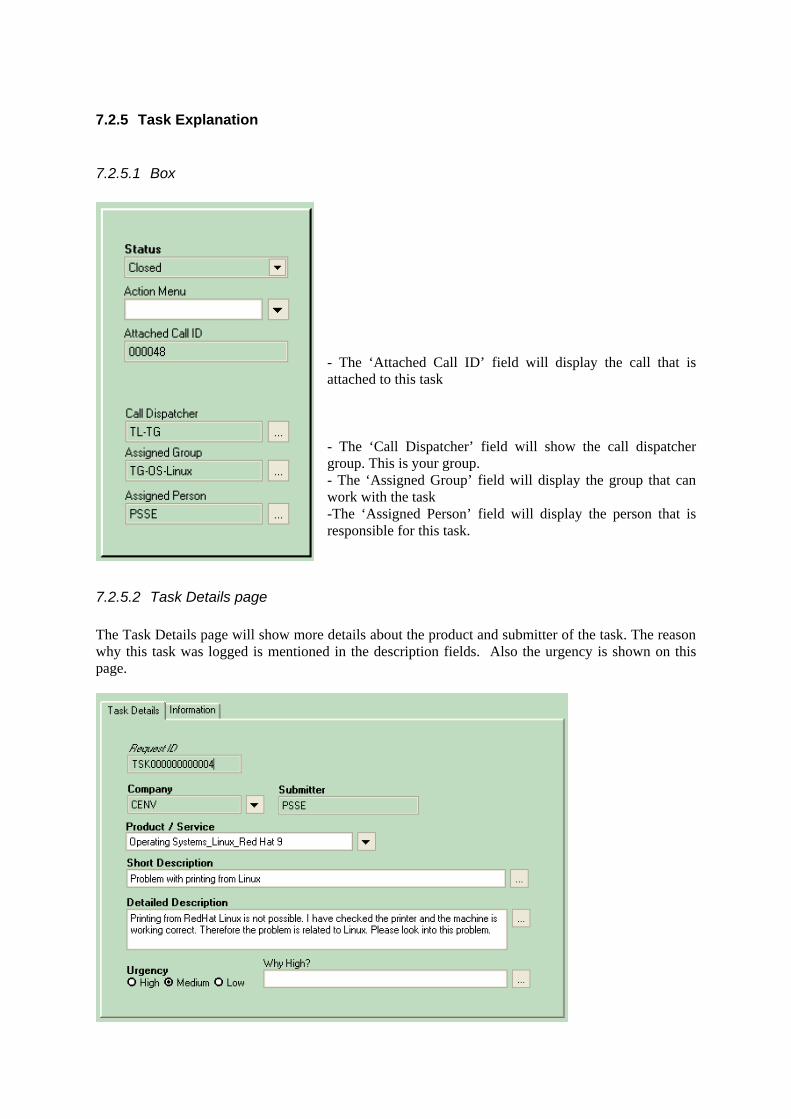
7.2.5 Task Explanation
7.2.5.1 Box
- The ‘Attached Call ID’ field will display the call that is attached to this task - The ‘Call Dispatcher’ field will show the call dispatcher group. This is your group. - The ‘Assigned Group’ field will display the group that can work with the task -The ‘Assigned Person’ field will display the person that is responsible for this task.
7.2.5.2 Task Details page The Task Details page will show more details about the product and submitter of the task. The reason why this task was logged is mentioned in the description fields. Also the urgency is shown on this page.

7.2.5.3 Information page On the Information page the assigned person can add notes and the solution. This solution will be emailed to the assigned person on the call when the task is solved.
Notes are added automatically by the system, but it is also possible for the assigned person on the task to add notes manually. You can view the notes by clicking on the button. NOTE: THE ‘NOTES’ FIELD WILL ALWAYS BE EMPTY. YOU ALWAYS NEED TO PRESS THE BUTTON BEFORE THE NOTES ARE DISPLAYED.
13. Click on the button


7.3 The Knowledge module
7.3.1 General Explanation Knowledge is used in different ways in the system. During the time that you work with a call you will be able to check the knowledge in the database. Also it is possible for you to create knowledge when a call is closed. These actions that can be done on the knowledge module are described in this chapter.
7.3.2 Creating Knowledge Base Articles When you have gained knowledge and you think it is wise to have that knowledge in the knowledge database you need to create a knowledge base article. Click on the New link behind the KB text in the menu on the website.
9. Click on the New link behind the KB text in the menu The Knowledge Base form is shown

On the first page the details for the knowledge base article needs to be provided. These details are problem, cause and solution. Also the product, category and sub category need to be filled in on the article. Finally the level of expertise needs to be provided.
10. Click the Information page to fill in the extra information.
On the information page you can provide the serial number range for all the serial numbers that will be infected with the problem. Also attachments can be added to the knowledge base article.
11. Click on the [Save] button to submit this knowledge base article.
7.3.3 Searching Knowledge Base Articles It is also possible for you to search for knowledge base articles. You can use the quick search to search for articles and you can open the form in search mode. The quick search option is explained in chapter 10.2.6. Searching directly on the knowledge base form is explained in this chapter. When you are logged into the server you are able to select the Search link behind the KB text.
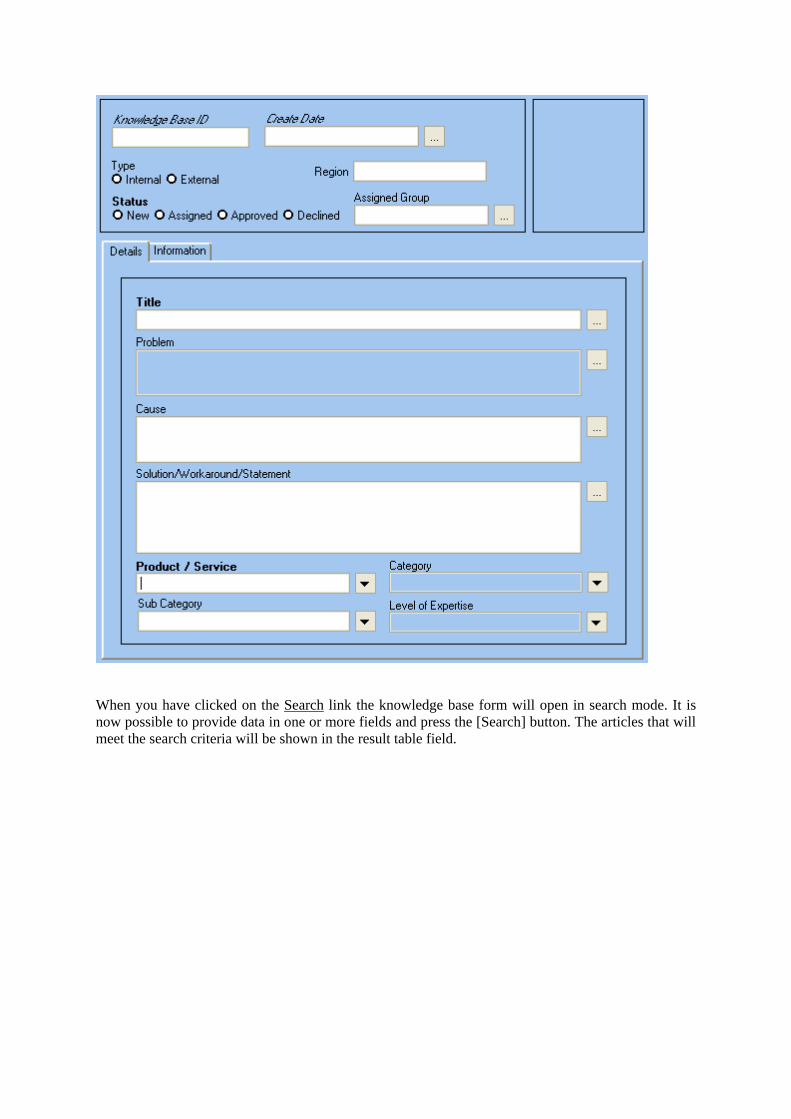
When you have clicked on the Search link the knowledge base form will open in search mode. It is now possible to provide data in one or more fields and press the [Search] button. The articles that will meet the search criteria will be shown in the result table field.

The Assigned group on the request will be responsible for the part setup and therefore will assign a person that will work on this ticket. If you want to search again you can click on the [Clear Search] button. The search view will be displayed and a new search criterion can be provided.

7.3.4 Working with knowledge base articles When a knowledge base article is logged and assigned to your group you will receive a notification via email. You will then be able to either accept the knowledge or decline it. When the knowledge is accepted it will be in the “Accepted” status and users can find the knowledge. When you decline the knowledge it is not possible for a user to see the knowledge article. Only knowledge administrators can see the declined knowledge. When the knowledge is submitted you can open the knowledge base article by clicking on the link in the email or by searching the knowledge article as is explained in the previous chapter.
3. Open the knowledge base article.
The [Decline] button will set the ‘Status’ field to “Declined”.
4. Click on the [Accept] button The status of the knowledge base article will be set to Approved and the article will be visible to users.

7.3.5 Knowledge Base Explanation When the knowledge base is opened you will see a couple of pages and the box on top of the screen. This subchapter will explain the knowledge base article in more detail.
7.3.5.1 Box It does not matter on which page you are, the information in the box is always shown.
In the box you will see the Knowledge Base ID. This ID is generated by the system and is used in the communication because it is a unique key. The ‘Type’ field will be filled with either Internal or External to note that the knowledge can only be used internally or also externally. The status is set with Assigned when the ticket is submitted. The assigned group (that is mentioned in the ‘Assigned Group’ field) will have the possibility to either accept or decline the Knowledge Base Article. Declined articles are not visible anymore and the approved knowledge can be viewed and used. Also there is a field ‘Region’. This field is not yet used in version 3.0. However, version 3.1 will include features that make it possible to localize the application. In version 3.1 the ‘Region’ field will indicate the language in which the article was written. For now, this field will always have the value ‘EU’, indicating that the article is written in the English language.

7.3.5.2 Details Page On the details page, all details for the knowledge base article are displayed.
The information is the same when logging an article. The ‘Problem’, ‘Cause’ and ‘Solution’ fields are used to solve issues with the same problem as is mentioned in the ‘Problem’ field. The ‘Product / Service’, ‘Category’ and ‘Sub category’ fields are used to better determine in which category the article needs to be. Also for searching the articles, the category can be used to filter knowledge. The ‘Level of Expertise’ field displays the expertise level that is needed to use the knowledge base article.

7.3.5.3 Information page The Information page displays the same fields as on submit.
The ‘Serialnumber Range’ field is filled with the range of affected serial numbers. Any attachments that are attached to the article are also displayed on this page.

7.4 The Parts module
7.4.1 General Explanation When you need to order a part, you need to check the parts database to find out the part number so it can be ordered. Some parts in the parts database cannot be ordered since there is no part number attached to these parts. When you want to order a part that has no part number attached you need to log a parts setup request in Remedy.
7.4.2 Searching part requests It is also possible for you to search for part setup requests. You can use the quick search to search for part setup requests and you can open the form in search mode. The quick search option is explained in chapter 10.2.6. Searching directly on the parts form is explained in this chapter. When you are logged into the server you are able to select the Search link behind the Parts text.
When you have clicked on the Search link the parts form will open in search mode. It is now possible to provide data in one or more fields and press the [Search] button. The part requests that will meet the search criteria will be shown in the result table field.
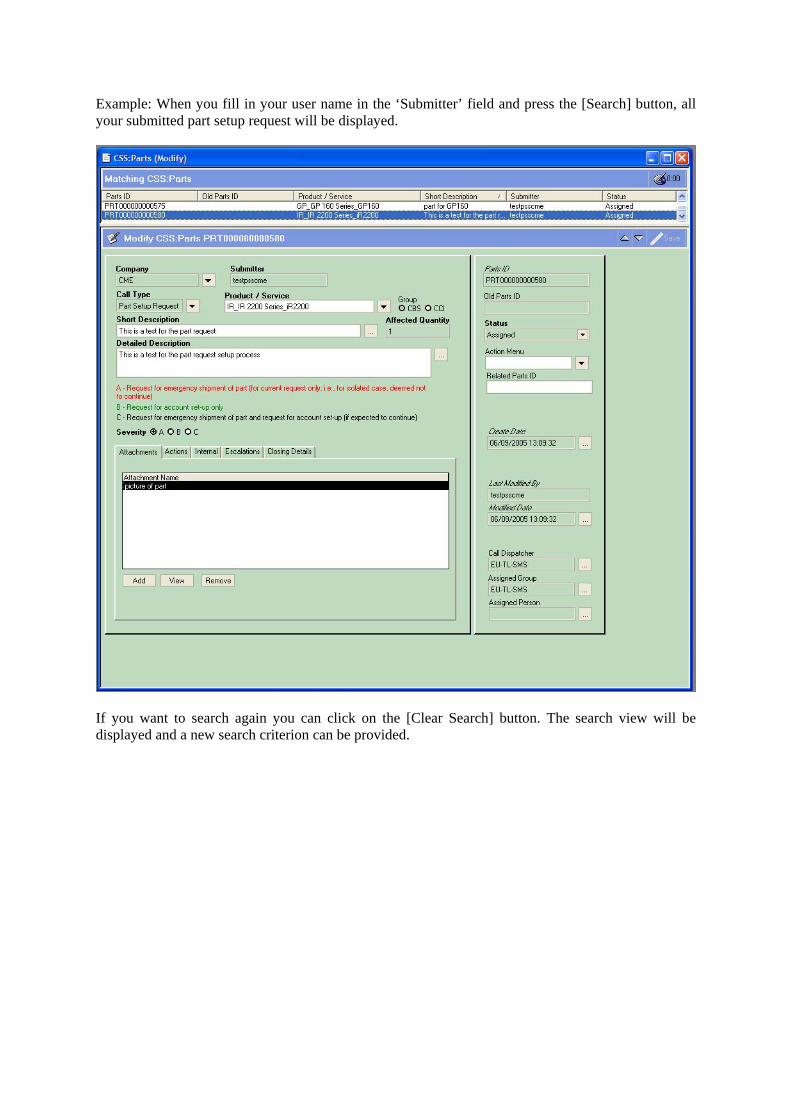
Example: When you fill in your user name in the ‘Submitter’ field and press the [Search] button, all your submitted part setup request will be displayed.
If you want to search again you can click on the [Clear Search] button. The search view will be displayed and a new search criterion can be provided.

7.4.3 Part Setup Explanation In this chapter an explanation is provided about the fields and data that you can see on your part setup request. First of all a description of the right box will be provided, after that most pages will be discussed.
7.4.3.1 Box
-The Parts ID is the ID that is generated by the system. This ID is always mentioned in the emails that you receive. -In an earlier version of CSS parts were stored in the call form. These parts had a different Parts ID. Since the migration to the new version the Parts ID has changed, while there are still customers who only know the old ID. This field holds the old ID (if there is one) so parts can also be found based on the old ID. -The status of the call is important because you can quickly see in which stage the call is. Also you know if the call needs to be actioned by the Assigned person or by you. -The action menu allows the assigned person to work with part requests. -If a local dealer or field technician issues a part request, it must be redirected to the European office for approval. When the request is escalated this field will hold the parts ID for the European request. On the European level this field will hold the ID of the local part request. -The Create Date is the date that the ticket was created. -‘Last Modified By’ indicates which user modified the ticket last. -The Modified Date is the date that the ticket was last modified. -The Call Dispatcher is the responsible team leader. The Call Dispatcher will always have an overview of what is happening to the request. -The Assigned Group is the group that is working on this ticket. -The Assigned Person is a member of the Assigned Group. This person is working on the part request and your contact person for more information about the ticket.
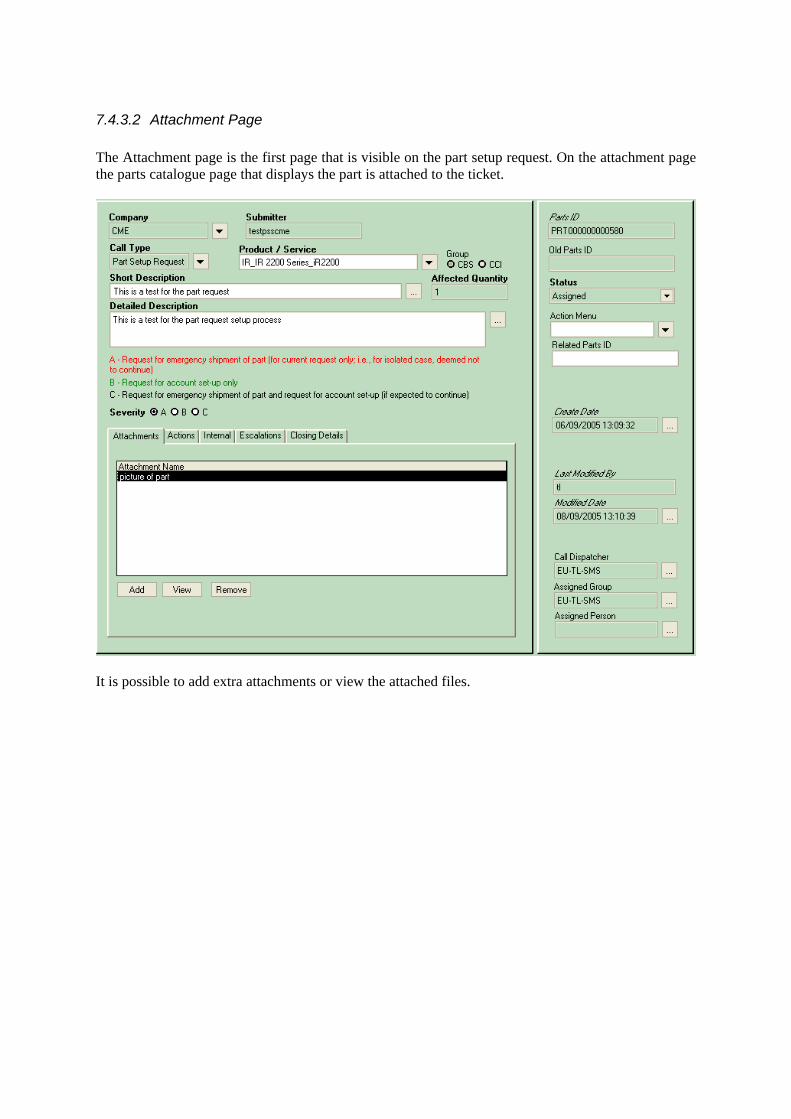
7.4.3.2 Attachment Page The Attachment page is the first page that is visible on the part setup request. On the attachment page the parts catalogue page that displays the part is attached to the ticket.
It is possible to add extra attachments or view the attached files.

7.4.3.3 Actions Page When the assigned person works on the request, events are created for each action that is done. These events are created for the administrator to be able to report on the part setup requests and for you to see which actions are already taken to solve the incident.
It is possible that one or more events are created by default. This depends on how the administrator has configured the events. Usually there will be one system-generated event indicating the submittal of the part request. Because these actions are done automatically by the system when the call is submitted, these actions are already available despite the fact that the assigned person has done no actions yet. When you select an action in the table field the ‘Action Details’ field id filled with the details that are provided by the system or the assigned person. Further event details can be viewed by double clicking on an event in the table.

7.4.3.4 Internal Page On the Internal page you are able to provide information that is only available for internal users. The only users who can view these notes are the users that can work with parts.
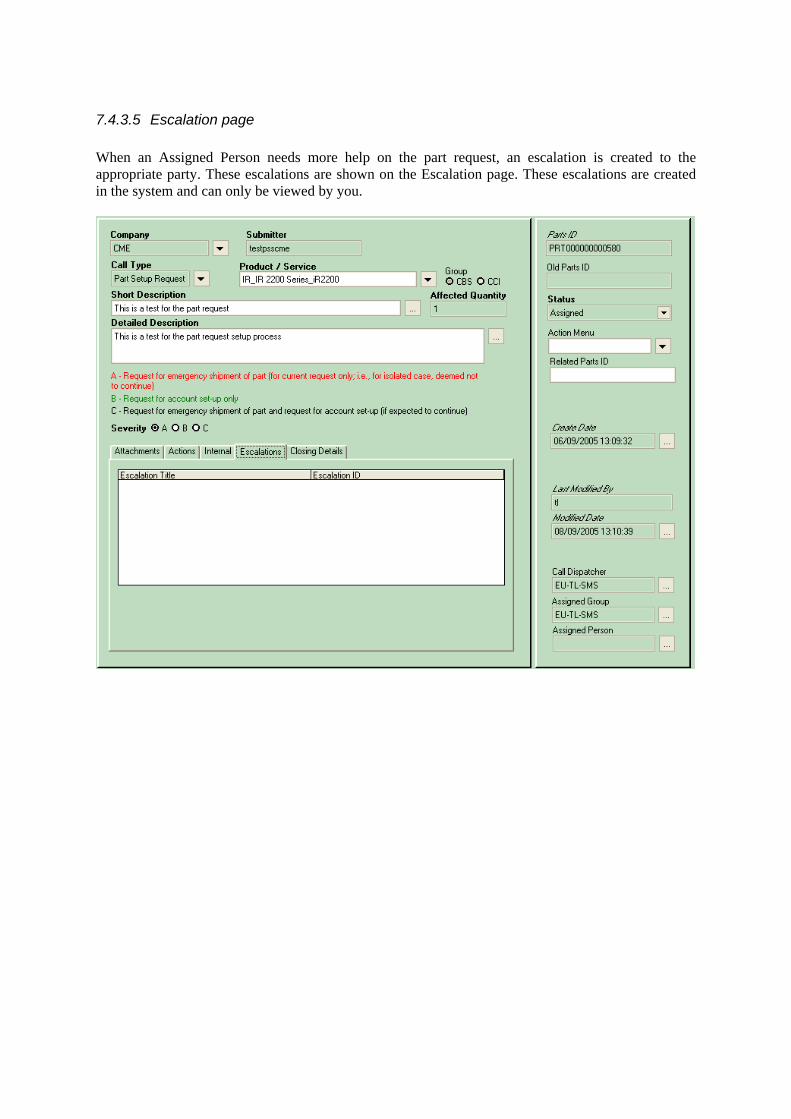
7.4.3.5 Escalation page When an Assigned Person needs more help on the part request, an escalation is created to the appropriate party. These escalations are shown on the Escalation page. These escalations are created in the system and can only be viewed by you.

7.4.3.6 Closing Details page On the closing details page the solution is provided. The solution might be that the part is set up or that this part cannot be ordered. When the assigned person solves the part request the solution needs to be filled.

8. User manager information The User Manager is a separate role for managing access to the system. Only users with the User Manager role can add, modify or delete accounts. The only exception to this is the user’s password; every user can change his or her own password without the interference of a user manager. This function is explained in chapter 10.5.2. If a user wants to change profile details other than the password they can submit an account change request. There are two types of user managers: Local user managers and European user managers. There are no differences in functionality, however local user managers are only able to manage user accounts of dealers and field technicians working for the local office. They cannot alter any accounts for users on the European level or PSS(+) users. European user managers can manage all user accounts except for administrator accounts. Managing user accounts can only be done from within the user tool. This chapter will use a European user manager to explain the user management options.
8.1 The user module
8.1.1 General explanation The user module allows you to create, modify and delete user accounts. The module consists of several forms, which will allow you to perform these tasks. Users can also request to change his or her profile details. The user manager can monitor these change requests and perform the necessary changes.
8.1.2 Creating user accounts User accounts can be created from within the User Management form. It does not matter whether the form is opened in New-mode or Search-mode, the form is a display-only form, meaning that no data on the form is stored in the database.

Suppose the office in Hungary has trained a new Product Support Specialist, which will be using the CSS tool to submit calls, knowledge and part requests. To create the account, you must first specify a login name for the new user. The login name must be unique; it is impossible to create two accounts with the same login name. If you don’t specify a login name you will see an error
To specify a login name, type the new login name into the corresponding field and click on the [Create Account] button.

If you click on the [Create Account] button without specifying the new login name you will receive an error message.
When the login name hasn’t been used yet the account will be created and you need to specify the account details.

After all fields have been filled in you can click on the [Save] button to modify the user details. In order to modify the user you must fill in a value in all fields having bold labels. For more information about these and other fields please refer to chapter 8.1.4: You cannot save the record if one or more required fields still has the value ‘-‘. When this is the case, you will see an error message.
Once the record has been saved the user is ready to use the specified applications.
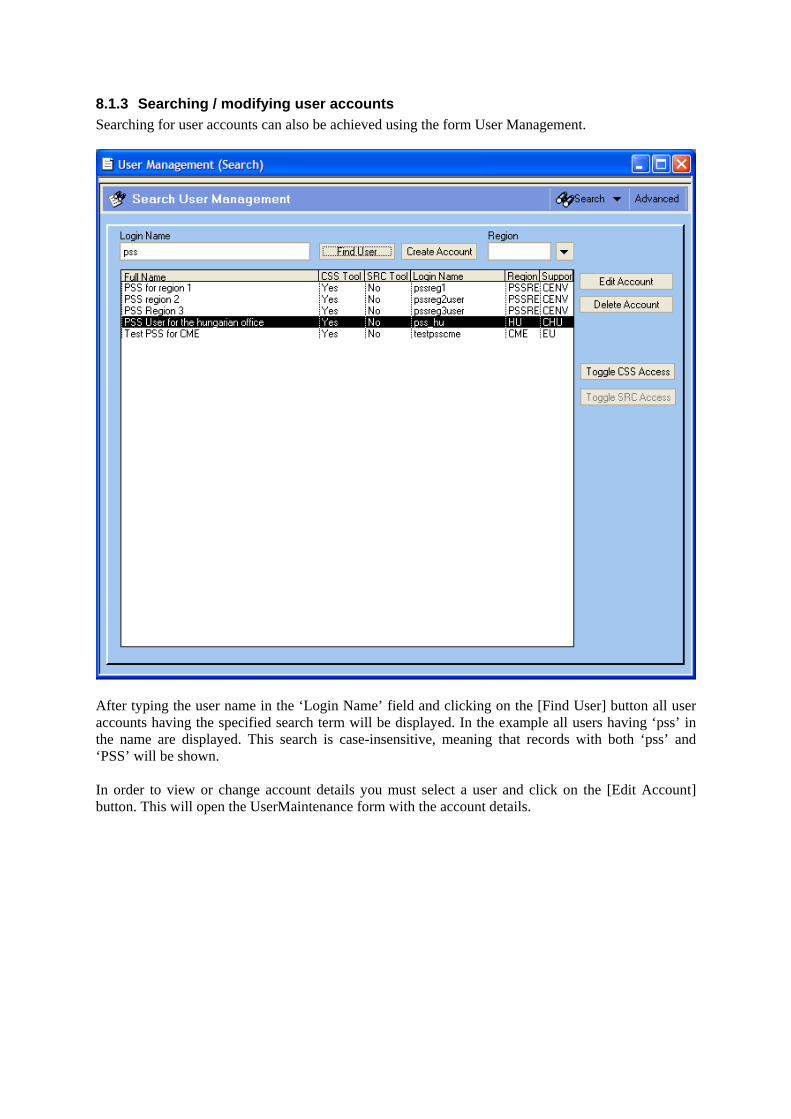
8.1.3 Searching / modifying user accounts Searching for user accounts can also be achieved using the form User Management.
After typing the user name in the ‘Login Name’ field and clicking on the [Find User] button all user accounts having the specified search term will be displayed. In the example all users having ‘pss’ in the name are displayed. This search is case-insensitive, meaning that records with both ‘pss’ and ‘PSS’ will be shown. In order to view or change account details you must select a user and click on the [Edit Account] button. This will open the UserMaintenance form with the account details.
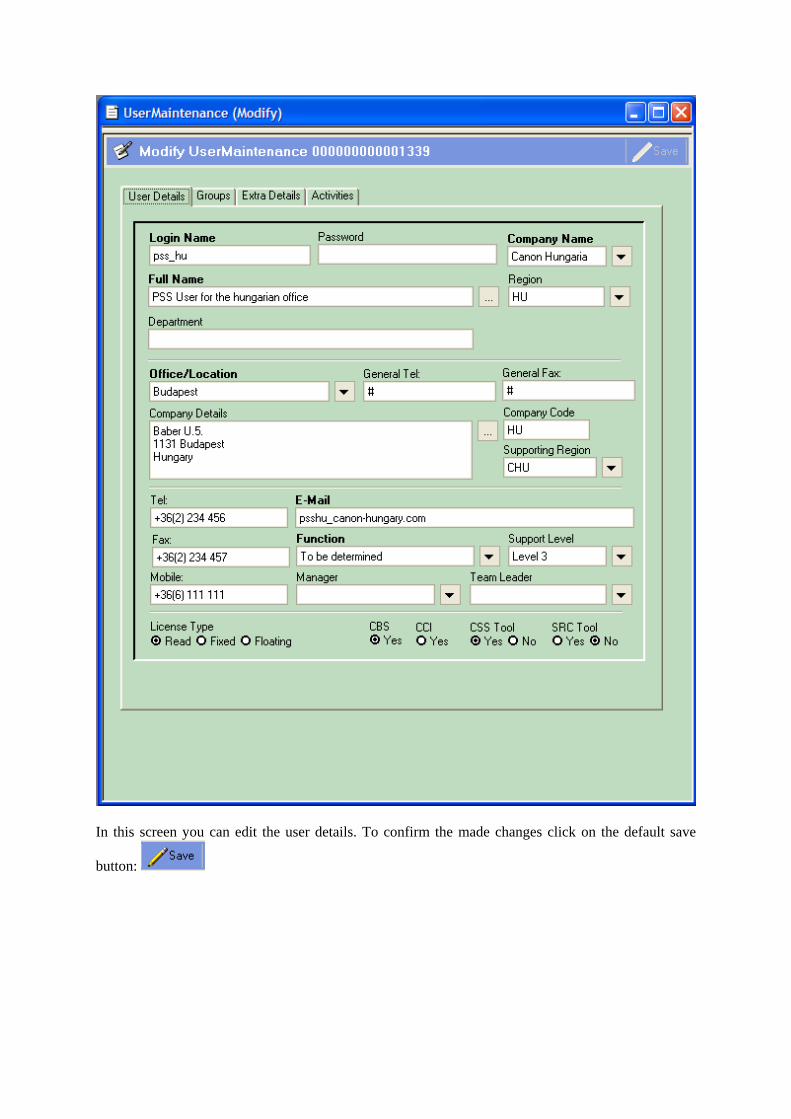
In this screen you can edit the user details. To confirm the made changes click on the default save
button:

8.1.4 User explanation In this chapter an explanation is provided about the fields and data that you can see on your user request. Each page on the UserMaintenance form will be discussed in a separate paragraph.
8.1.4.1 User details page The user details page holds general information about the user
The fields on this page are divided in four sections, all separated by a horizontal ruler. In the top section you will find the basic user information like Login Name, Company name and Region:

Note: The password field on this form is NOT masked, meaning that you can verify whether or not you have entered the right password for the user. Also, when you open an existing user record the password field will always be empty even though the user has a password. If you leave this field empty while editing details, saving the record won’t change the password of the user. If you do specify a new value than this will be the new password. The section below displays information about the office the user is working for, like contact details and support region:
The third section holds specific user details, like contact information, function, support level and managers. You don’t necessarily have to use the menu attached to the ‘Function’ field to specify a function. If there is no suitable value in the menu, you can also type in a value manually.
The bottom section contains authentication information, where you can specify the type of license, the application(s) the user can access and the product group. Users having a read-license will only be able to view or submit records; they cannot modify existing records. A fixed license will allow users to modify records, and is assigned to a single person. Only that person will be able to make use of the license. Finally, a floating license also allows users to modify records. However, the license is not assigned to a single person. A floating license is assigned as soon as a user logs in. When all floating licenses have been assigned the user will be given a read-license until a floating license is available again. Floating licenses are released as soon as a user logs out or is inactive for 1 hour.

8.1.4.2 Groups page
On this page you can specify the user’s permissions within the application. Using this page you can add or remove roles, products, assignee groups and technology groups. To add a role or group to one of the tables, first select a value from the menu on the left side and click on the [Add] button.

After adding or removing roles, you must ALWAYS click on the [Generate] button in the bottom-right section of the screen to confirm the made changes. If you try to modify the record without regenerating the group list you will receive an error.
Role Roles control which actions are available to the user. For instance, a PSS user can submit new calls and part requests, but only users having the PSS+, PSSE or TL role can work with them. Product The product table contains relevant products for the selected user. For users having the PSS role, the list will consist of products for which they want to receive notifications. Whenever a call regarding the product is solved, the assigned person can specify whether or not a notification is sent to the specialist group. For the PSS+, PSSE and TL roles the product table contains all products the user can work on. Only calls for products in this table can be accessed by persons having the mentioned roles. Assignee group It is possible to screen certain groups from certain calls. This only applies to local dealers and manufacturers. Users operating on the European level will always see every call in the system. When for instance a dealer is added to the system he shouldn’t be able to view calls submitted on the European level. By adding an assignee group to the table for a user he or she will only see calls belonging to the specific group. Technology The technology table contains technology groups of which the user is a member.
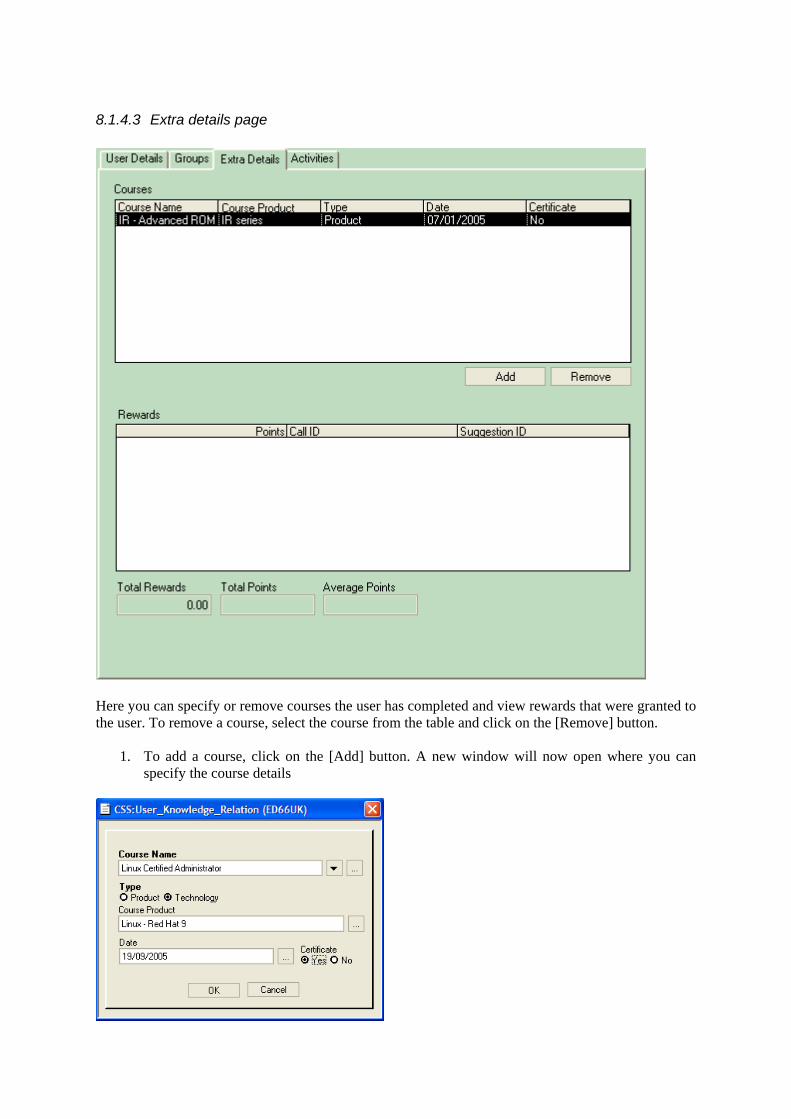
8.1.4.3 Extra details page
Here you can specify or remove courses the user has completed and view rewards that were granted to the user. To remove a course, select the course from the table and click on the [Remove] button.
1. To add a course, click on the [Add] button. A new window will now open where you can specify the course details
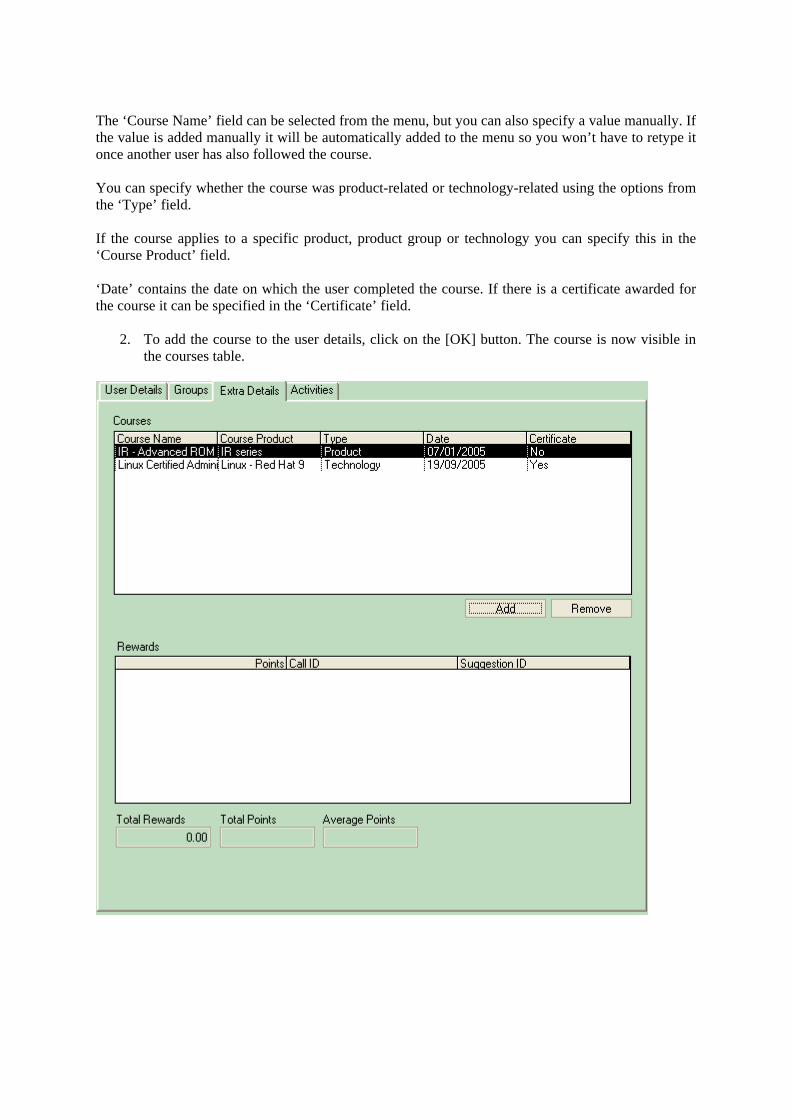
The ‘Course Name’ field can be selected from the menu, but you can also specify a value manually. If the value is added manually it will be automatically added to the menu so you won’t have to retype it once another user has also followed the course. You can specify whether the course was product-related or technology-related using the options from the ‘Type’ field. If the course applies to a specific product, product group or technology you can specify this in the ‘Course Product’ field. ‘Date’ contains the date on which the user completed the course. If there is a certificate awarded for the course it can be specified in the ‘Certificate’ field.
2. To add the course to the user details, click on the [OK] button. The course is now visible in the courses table.

8.1.4.4 Activities page Users can add activities to their profile using the web interface. These activities can be viewed here
You can filter activities by choosing a value from the ‘Show’ menu. You can choose to see all activities, past activities only or future activities only.
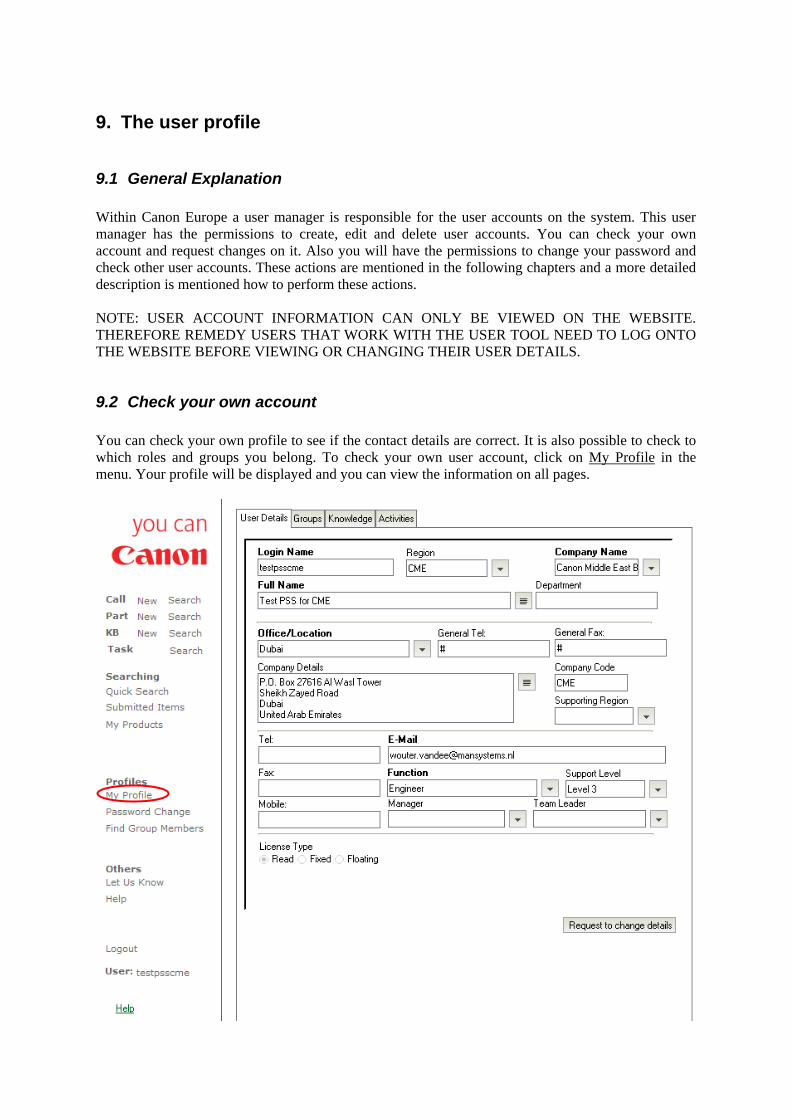
9. The user profile
9.1 General Explanation Within Canon Europe a user manager is responsible for the user accounts on the system. This user manager has the permissions to create, edit and delete user accounts. You can check your own account and request changes on it. Also you will have the permissions to change your password and check other user accounts. These actions are mentioned in the following chapters and a more detailed description is mentioned how to perform these actions. NOTE: USER ACCOUNT INFORMATION CAN ONLY BE VIEWED ON THE WEBSITE. THEREFORE REMEDY USERS THAT WORK WITH THE USER TOOL NEED TO LOG ONTO THE WEBSITE BEFORE VIEWING OR CHANGING THEIR USER DETAILS.
9.2 Check your own account You can check your own profile to see if the contact details are correct. It is also possible to check to which roles and groups you belong. To check your own user account, click on My Profile in the menu. Your profile will be displayed and you can view the information on all pages.

9.3 My Profile explanation
9.3.1 User Details page The first page of the profile is the User Details page. On this page you will be able to see your user details like ‘Login Name’, ‘Company Name’, ‘Full Name’ and ‘Department’. Also the office details are shown on this page. Furthermore your contact details are displayed. The ‘License Type’ field contains the type of license you have. For a member of the PSS role the license type can be set to Read. This means that you don’t have the permissions to modify requests in the system. You will only be able to submit tickets and search for them. A member of the PSS role does not need to have a write license (Fixed or Floating license type) since a Read license will by sufficient enough to do PSS work.
The [Request to change details] button is used to change the user details. An explanation on changing your details is provided in chapter 9.4.

9.3.2 Groups page The Groups page will display all information about your roles within the application and the groups that you are a member of. These roles and groups are shown in different tables and can be changed by the user manager.
The first table is the Roles table. All your roles in the application will be displayed in this table. The second table displays the products that you support. The third table is the technology table. This table will hold all technology groups for tasks. This table will not show any entries when you are a PSS. Members of the PSS role do not work on tasks and therefore will not have any technology groups.
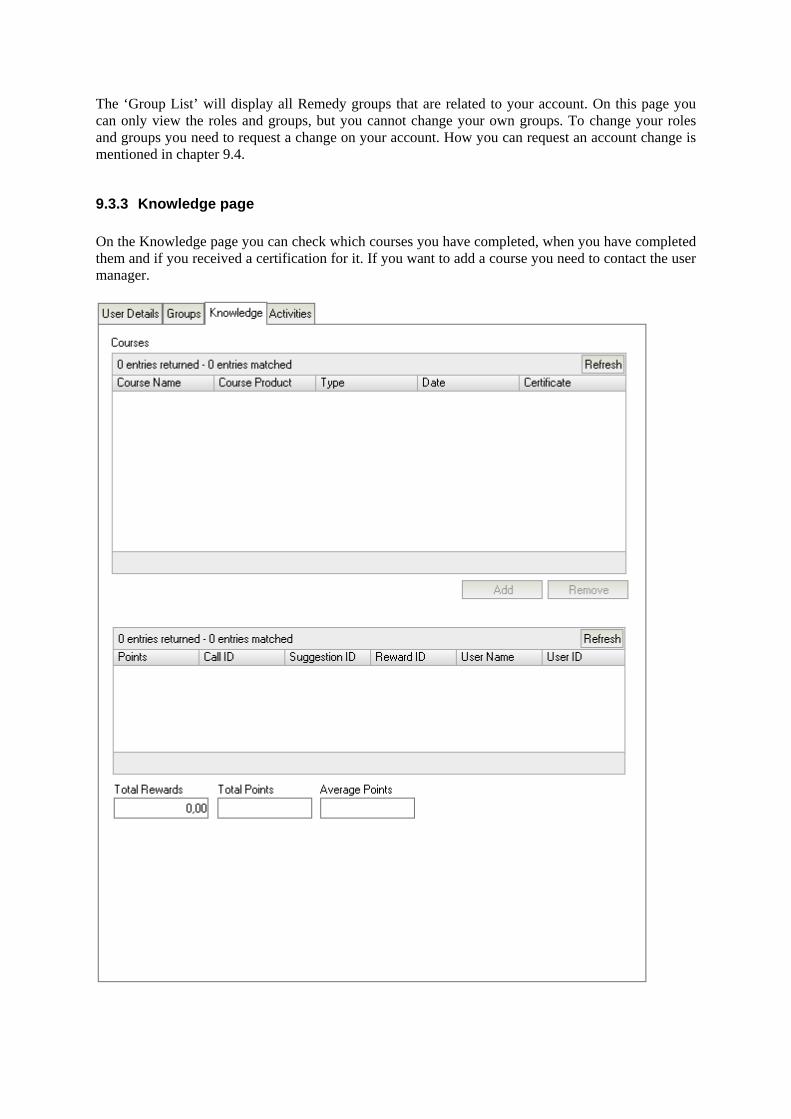
The ‘Group List’ will display all Remedy groups that are related to your account. On this page you can only view the roles and groups, but you cannot change your own groups. To change your roles and groups you need to request a change on your account. How you can request an account change is mentioned in chapter 9.4.
9.3.3 Knowledge page On the Knowledge page you can check which courses you have completed, when you have completed them and if you received a certification for it. If you want to add a course you need to contact the user manager.

Submitters of incidents can provide rewards to the assigned person on the call or to submitters of suggestions. If you have submitted a suggestion to a call it is possible that the submitter of that call provides a reward for the suggestion. These rewards will be shown in the second table. The ‘Total Rewards’ field will be filled with the number of received rewards, the ‘Total Points’ will be filled with the calculation of all the points that were added to your account and the ‘Average Points’ field will be filled with the average of point that you have received. More information about receiving and submitting rewards is mentioned in chapter 11.
9.3.4 Activities page On the Activities page you can provide your all you activities. These activities can be holidays or training and can be viewed by all users of the Remedy system. Therefore everybody knows when you are in and when you are out of the office.

9.3.4.1 Add Activity When you want to add an activity you can press the [Add Activity] button.
1. Click on the [Add Activity] button A pop-up window will appear and the activity information can be provided.
In the menu you can provide the type of activity.
2. When the fields are filled you can click on the [Save] button The window will disappear and the activity is submitted. The activity will be shown in the table. The table will only display activities that are current or in the future. The activities that are in the past will still be in the system, but are not displayed in the table. To view the past activities you can select Past from the ‘Show’ field.

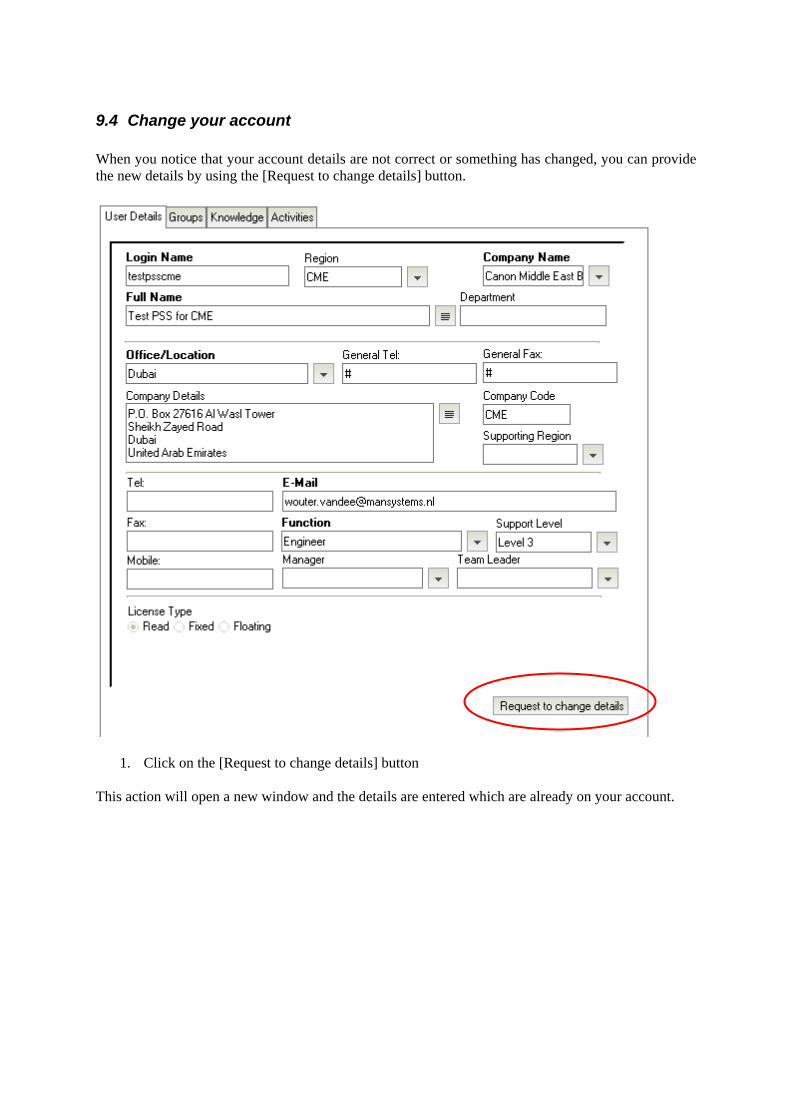
9.4 Change your account When you notice that your account details are not correct or something has changed, you can provide the new details by using the [Request to change details] button.
1. Click on the [Request to change details] button This action will open a new window and the details are entered which are already on your account.
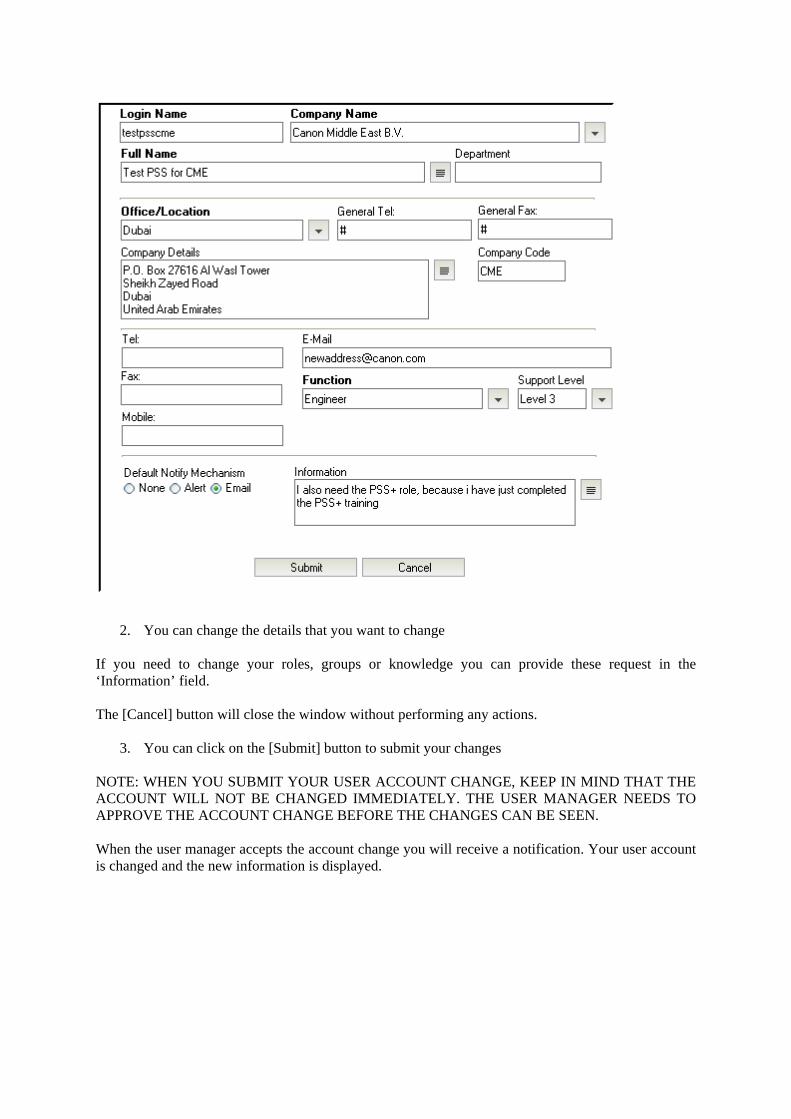
2. You can change the details that you want to change If you need to change your roles, groups or knowledge you can provide these request in the ‘Information’ field. The [Cancel] button will close the window without performing any actions.
3. You can click on the [Submit] button to submit your changes NOTE: WHEN YOU SUBMIT YOUR USER ACCOUNT CHANGE, KEEP IN MIND THAT THE ACCOUNT WILL NOT BE CHANGED IMMEDIATELY. THE USER MANAGER NEEDS TO APPROVE THE ACCOUNT CHANGE BEFORE THE CHANGES CAN BE SEEN. When the user manager accepts the account change you will receive a notification. Your user account is changed and the new information is displayed.
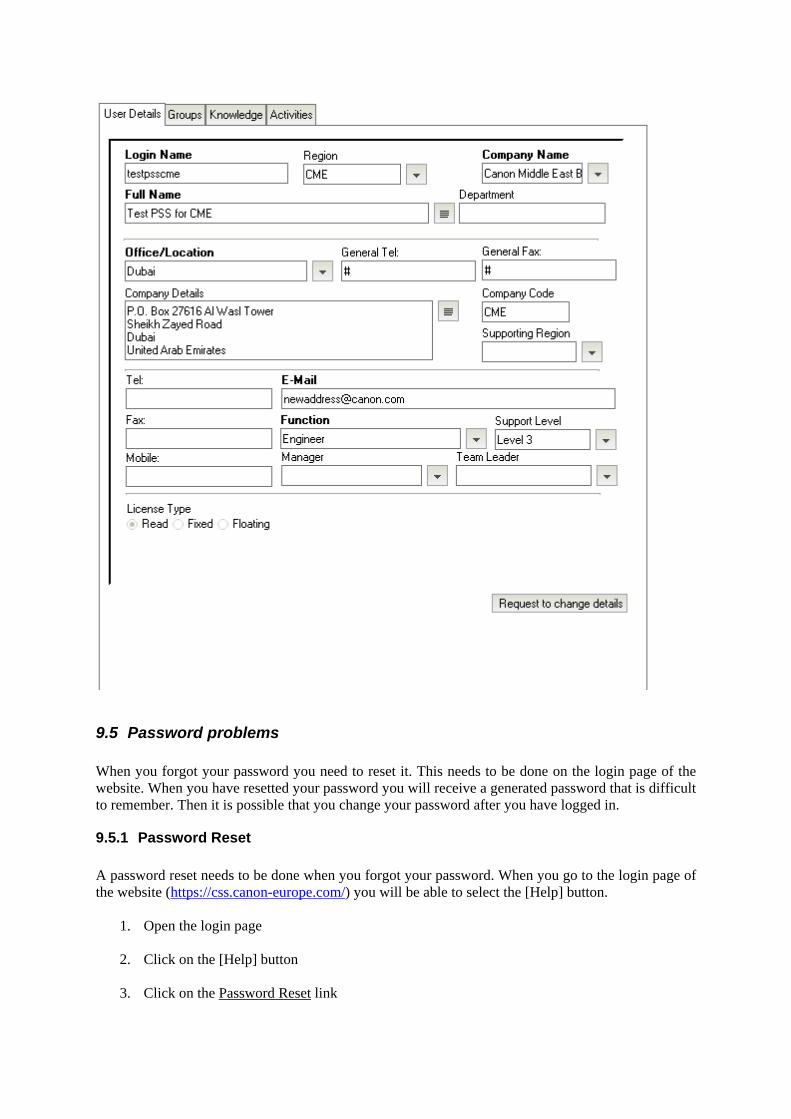
9.5 Password problems When you forgot your password you need to reset it. This needs to be done on the login page of the website. When you have resetted your password you will receive a generated password that is difficult to remember. Then it is possible that you change your password after you have logged in.
9.5.1 Password Reset A password reset needs to be done when you forgot your password. When you go to the login page of the website (https://css.canon-europe.com/) you will be able to select the [Help] button.
1. Open the login page 2. Click on the [Help] button
3. Click on the Password Reset link

The help window will display the Password Reset help screen.
4. Click on the here link to open an email window with the ‘Subject’ and the ‘To’ address already filled in.

5. Click on the [Send] button to send the email to the Remedy system. NOTE: KEEP IN MIND THAT THE EMAIL MUST BE SENT FROM THE EMAIL ADDRESS THAT IS REGISTERED IN REMEDY. The email address of the incoming email is checked and the password that is related to that user account with the email address is changed. Two emails are sent back to the email address of the changed user account. One email contains the login name and the second email contains the new password. The new login information is sent in two emails for security reasons.

9.5.2 Password Change on the web When you want to change your password it is needed that you first login the website.
1. Log into the website and select the Password Change link
2. Fill in the new password The old password is not needed since you are already logged in the website. NOTE: THE NEW PASSWORD NEEDS TO BE BETWEEN 6 AND 30 CHARACTER.
3. Click on the [OK] button when you have entered the correct password You are asked for the same password again.
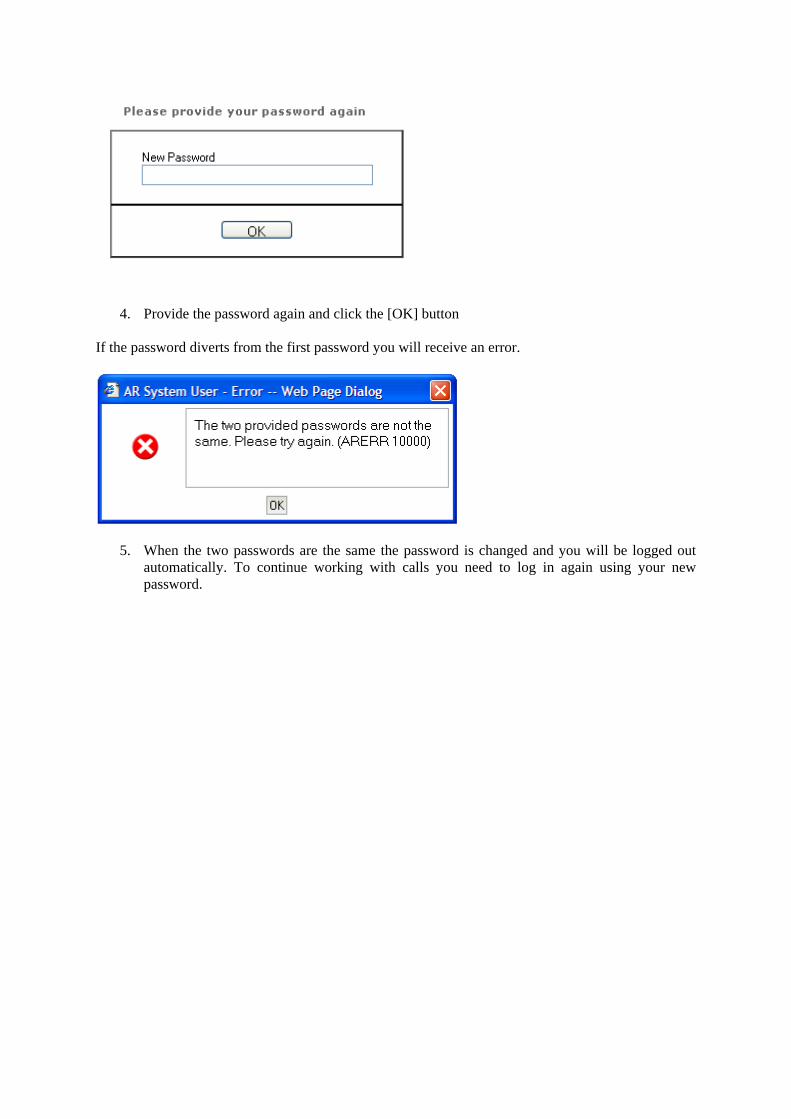
4. Provide the password again and click the [OK] button If the password diverts from the first password you will receive an error.
5. When the two passwords are the same the password is changed and you will be logged out automatically. To continue working with calls you need to log in again using your new password.

9.5.3 Password change in the user tool Once you are logged on to the user tool you need to open
1. Log into the website and select the Password Change link
2. Fill in the new password The old password is not needed since you are already logged in the website. NOTE: THE NEW PASSWORD NEEDS TO BE BETWEEN 6 AND 30 CHARACTER.
3. Click on the [OK] button when you have entered the correct password You are asked for the same password again.

4. Provide the password again and click the [OK] button If the password diverts from the first password you will receive an error.
5. When the two passwords are the same the password is changed and you need to re-login the website again.

9.6 Find Group Members It is possible for you to check the members of the groups in the system. This might be handy if you have logged a call and you want to contact someone from the assigned group. To check the members of a group you can select the Find Group Members link.
1. Select the correct group from the menu When the group is selected, the table will refresh and the users are shown.

2. Select the correct user and press the [View Selected user] button The user details for that user are shown.
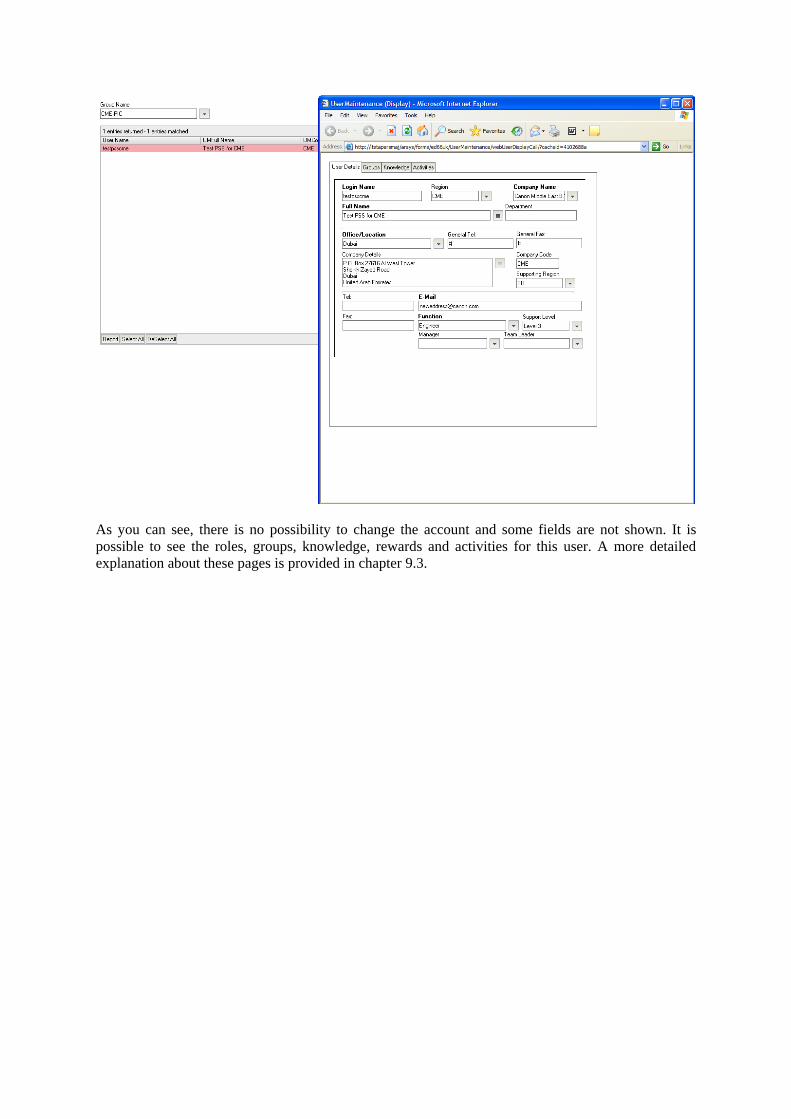
As you can see, there is no possibility to change the account and some fields are not shown. It is possible to see the roles, groups, knowledge, rewards and activities for this user. A more detailed explanation about these pages is provided in chapter 9.3.

10. Searching
10.1 Searching via the website There are a few ways of searching in the application. The four search possibilities that are mentioned behind Call, Tasks, Knowledge and Parts can be used to search on the forms directly.
These options are mentioned in the chapters about these modules. There are three more options for the PSS to search. There is a possibility to do a quick search. The quick search will result in all incidents, knowledge base articles and part requests that meet your search criteria. If you want to have an overview of all your submitted calls you can select the My Submitted Calls link in the menu. The last option to search for calls is the My Products search option in the menu. You can select the product and see all calls for that product. The three options are explained in this chapter.
10.1.1 Quick Search When you want to do a quick search on Calls, Knowledge and Parts you can select the Quick Search link in the menu.
The ‘Search Criteria’ bar can be filled with words that you want to search on. Then the ‘Search For Match’ field can be filled with either an OR search or an AND search. Also, by using synonyms you can search for similar terms to the ones you enter.
1. Fill in the ‘Search Criteria’ field with the words you want to search on.

2. Click on the [Search] button to search the requests
In the above-mentioned example the ‘Search Criteria’ field was filled with “test fusing”. Because the AND function is selected both test and printing need to be mentioned on the tickets. The system will convert all search terms to uppercase letters. This is done to optimize the results. Without the conversion it is possible that some records aren’t shown just because the terms are in a different case. As you can see, there are no tickets where test and printing are mentioned in any of the fields. If you change this search from AND to OR and click on the [Search] button again, all tickets where either test or printing is mentioned in the fields will be displayed in the table.

It is also possible to use synonyms when searching for tickets. Synonyms will be provided by an administrator and are used to optimize the results for a specific search. Some keywords tend to have synonyms for the same word. For instance, some users prefer to use the term ‘Fusing’ over ‘Fixing’, while others prefer ‘Fixing’. If this is the case then some users won’t find any knowledge because they are using the wrong synonym. When there are any synonyms that apply to any of the search terms you’ve entered, then the synonym will be visible in the table in the top-right section of the screen.
To use the synonym just double click on it, this will replace the search term by its synonym and will show all records using the new search terms

10.1.2 Submitted Items You can quickly see which calls you have submitted and the details about the call. Click on the Submitted Items link to open your submitted calls that are not closed.

When you log into the server you will see the same view. If you click on the Call ID of the call it will be opened and all the details can be viewed.
10.1.3 My Products When you want to see all open calls that are related to your products you can select the My Products link in the menu.
You can select the product from the ‘Group’ menu. The menu will only display your products. When you select the product from the menu the table will refresh and show all open calls for the selected product.

This works the same way for part requests: by selecting a group from the menu all open part requests for that group will be shown

10.1.4 Assigned items When you want to see calls or part requests that are assigned to you, you can click the link [Assigned Items] in the links menu. Calls and part requests can be viewed by double clicking on a row in the table.
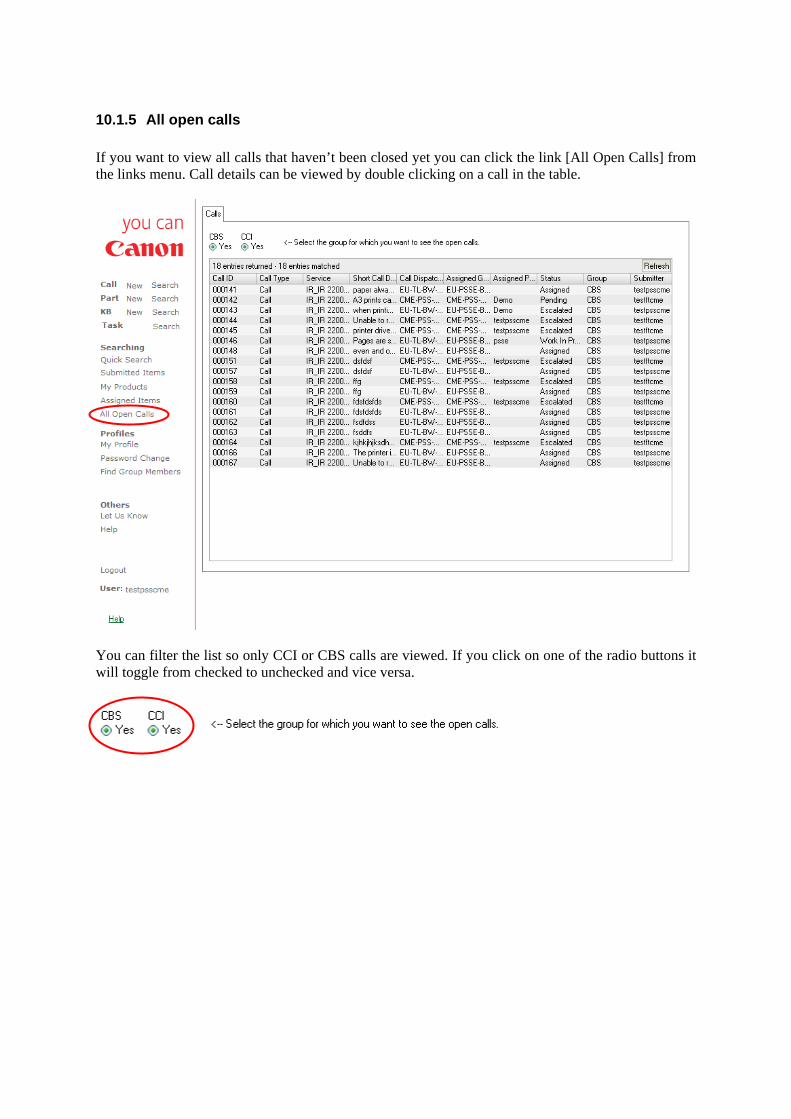
10.1.5 All open calls If you want to view all calls that haven’t been closed yet you can click the link [All Open Calls] from the links menu. Call details can be viewed by double clicking on a call in the table.
You can filter the list so only CCI or CBS calls are viewed. If you click on one of the radio buttons it will toggle from checked to unchecked and vice versa.

10.2 Searching via the user tool Most Remedy users will use the web to submit, search and work with tickets. For the users that are working with the Remedy user tool, this chapter will explain the search possibilities from the user tool. It is always possible to search on the forms directly by using the [Search] button in the objects list.
How to use this search option is described in the chapters that explain the modules. This chapter will explain the other ways to search in the CSS application. To use the search option, first you need to open the ‘Control Canon Calls’ form. On this form you will see different pages that represent the different search options.

10.2.1 All open Calls When you click on the ‘All Open Calls’ page you will see all open calls in the system. By default your group is selected and the calls for your group are displayed.
When you want to see the open calls for the other group you just select the other radio button. All

open calls can be viewed by selecting both groups. When you select the radio button the table will refresh automatically.
10.2.2 My Open Calls It is possible for you to see all your open calls. When you click on the ‘My Open Calls’ page, all open calls where you are the assigned person or the submitter will be displayed.
By double clicking on the table the call will be opened. In this example no open calls are in the system for the logged in user.
10.2.3 All Open Parts The page ‘All Open Parts’ will show all open part requests. You can view a specific part request by double clicking on a row in the table

10.2.4 My Products When you want to find all the calls for products that are related to your account, you can click on the ‘My Products’ page.
Select the product of which you want to see the open calls from the menu. The table will refresh when the calls will be displayed.
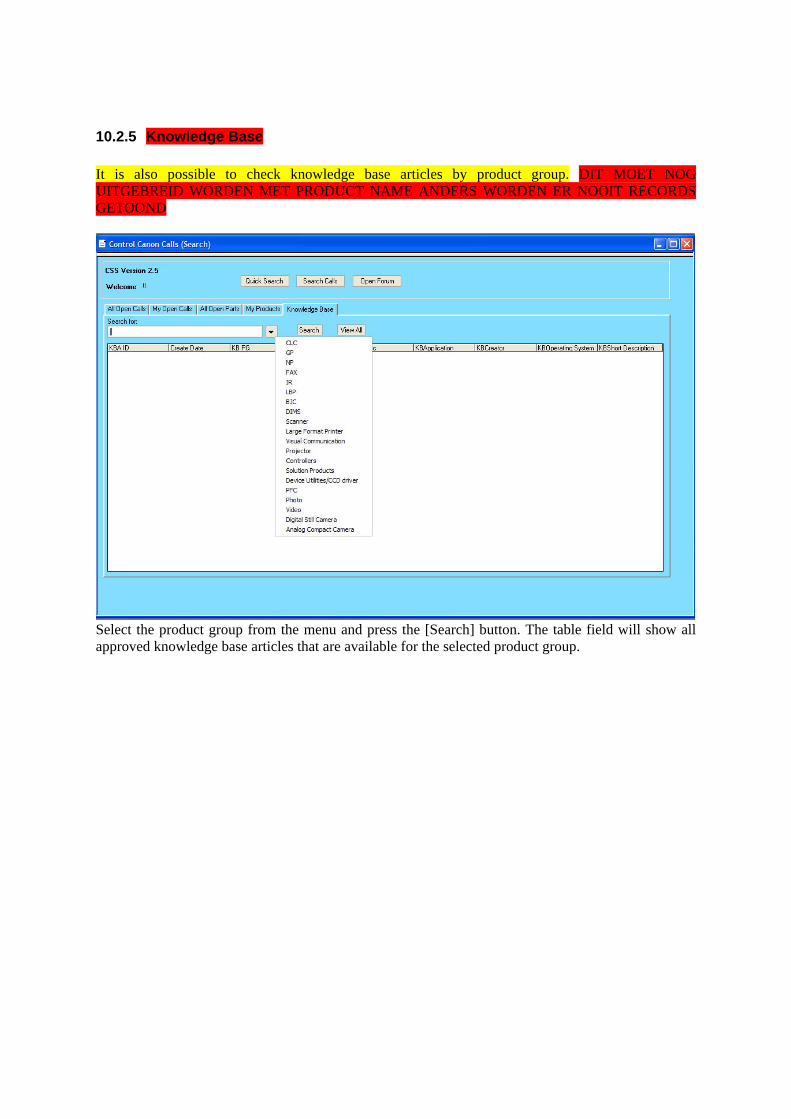
10.2.5 Knowledge Base It is also possible to check knowledge base articles by product group. DIT MOET NOG UITGEBREID WORDEN MET PRODUCT NAME ANDERS WORDEN ER NOOIT RECORDS GETOOND
Select the product group from the menu and press the [Search] button. The table field will show all approved knowledge base articles that are available for the selected product group.

The [View All] button will show all approved knowledge base articles.

10.2.6 Quick Search It is also possible for you to use the quick search functionality to quickly search for calls, knowledge base articles and part requests by using one search criterion. Just click on the [Quick Search] button on the Control Canon Calls form.
The Quick Search form will be opened. DEZE SCREENSHOTS ZIJN NOG NIET VERVANGEN, DE TEKST IS WEL REEDS AANGEPAST AAN DE NIEUWE SITUATIE

The ‘Search Criteria’ bar can be filled with words that you want to search on. Then the ‘Search For Match’ field can be filled with either an OR search or an AND search. Also, by using synonyms you can search for similar terms to the ones you enter.
3. Fill in the ‘Search Criteria’ field with the words you want to search on.
4. Click on the [Search] button to search the requests

In the above-mentioned example the ‘Search Criteria’ field was filled with “test fusing”. Because the AND function is selected both test and printing need to be mentioned on the tickets. The system will convert all search terms to uppercase letters. This is done to optimize the results. Without the conversion it is possible that some records aren’t shown just because the terms are in a different case. As you can see, there are no tickets where test and printing are mentioned in any of the fields. If you change this search from AND to OR and click on the [Search] button again, all tickets where either test or printing is mentioned in the fields will be displayed in the table.

It is also possible to use synonyms when searching for tickets. Synonyms will be provided by an administrator and are used to optimize the results for a specific search. Some keywords tend to have synonyms for the same word. For instance, some users prefer to use the term ‘Fusing’ over ‘Fixing’, while others prefer ‘Fixing’. If this is the case then some users won’t find any knowledge because they are using the wrong synonym. When there are any synonyms that apply to any of the search terms you’ve entered, then the synonym will be visible in the table in the top-right section of the screen.
To use the synonym just double click on it, this will replace the search term by its synonym and will show all records using the new search terms


11. Rewards When an incident is solved, you will have the possibility to provide a reward for the call. When providing a reward you can give a number between 1 and 10 (where 1 is bad and 10 is good) for the provided service, the quality of the solution and the communication with the assigned person. These rewards will be added to the assigned persons user account and can be viewed by everybody. Also it is possible for you to receive rewards. You have the possibility to add suggestions to an incident with possible solutions for the problem. The submitter of the incident will try the solution and can provide rewards for the suggestion.
11.1 Providing rewards on a call. When the assigned person has solved the call it is possible to add a reward to the call. This can be done in the following way.
1. Open the call.
2. Go to the Closing Details page

3. Click on the [Provide Reward] button A window will be opened where the rewards can be provided.
The [Cancel] button will close the window without attaching a reward to the assigned person.
4. Click on the [OK] button The rewards window will be closed and the reward is added to the assigned person.
11.2 Providing rewards on a suggestion When a user of the Remedy system has added a suggestion to the call it is possible to add a reward to that suggestion. This can be done in the following way.
1. Open the call
2. Go to the Me Too / Sugg page

3. Double click on a row in the bottom table to view the suggestion

4. Click on the [Provide Reward] button to open the reward window
The [Cancel] button will close the window without attaching a reward to the assigned person.
5. Click on the [OK] button The rewards window will be closed and the reward is added to the person that provided the suggestion.

11.3 Viewing the rewards When you are viewing the details of a user in the Remedy system, you will also have the possibility to view the rewards that this person has received. In this example we will check the account of the assigned person. The rewards are shown on the Knowledge page.
As you can see, there is one reward for call 000166. There were 8 points provided which means that the average points are set to 8. All rewards that are received for calls and suggestions are shown in this table.
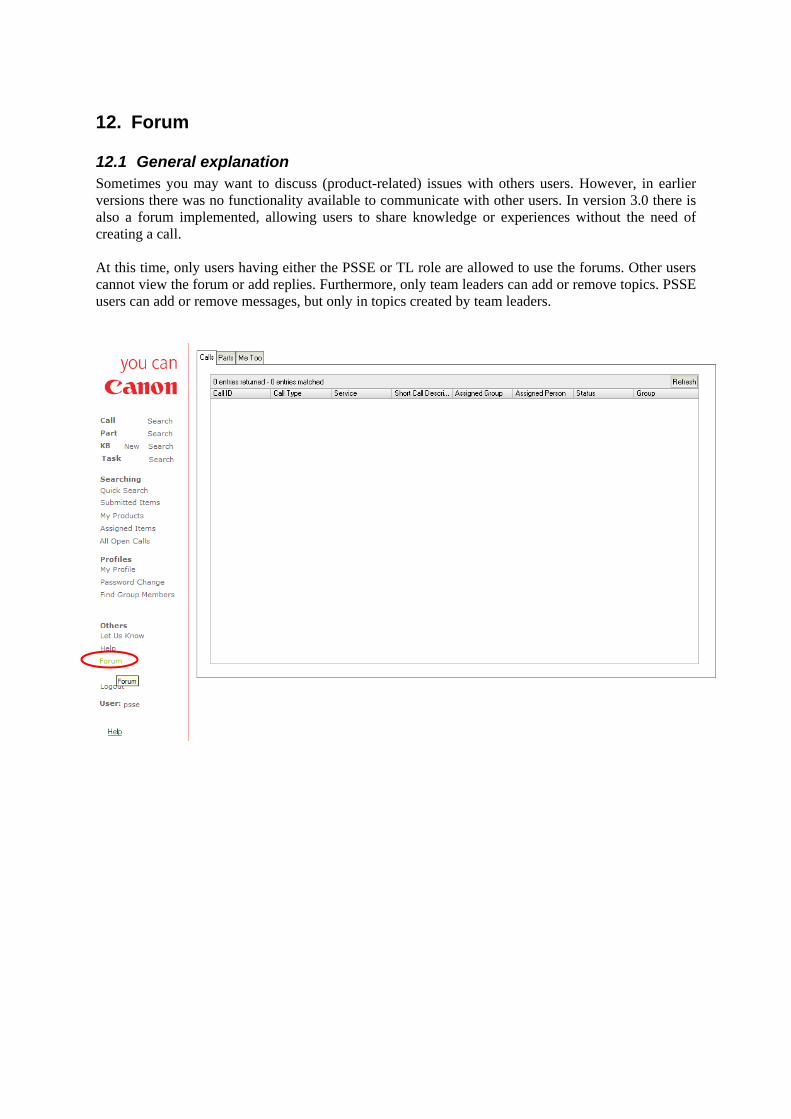
12. Forum
12.1 General explanation Sometimes you may want to discuss (product-related) issues with others users. However, in earlier versions there was no functionality available to communicate with other users. In version 3.0 there is also a forum implemented, allowing users to share knowledge or experiences without the need of creating a call. At this time, only users having either the PSSE or TL role are allowed to use the forums. Other users cannot view the forum or add replies. Furthermore, only team leaders can add or remove topics. PSSE users can add or remove messages, but only in topics created by team leaders.

12.2 Using the forum Once you are logged on to the CSS tool click on the [Forum] link in the links menu to bring up the forum.
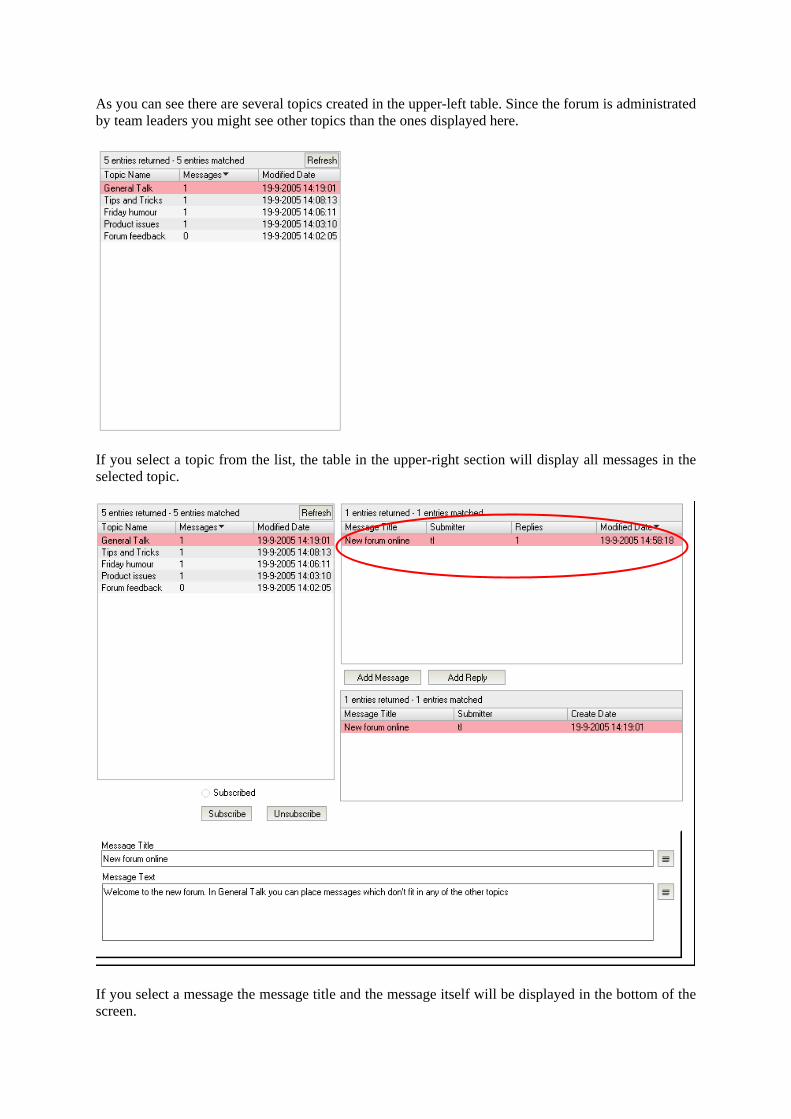
As you can see there are several topics created in the upper-left table. Since the forum is administrated by team leaders you might see other topics than the ones displayed here.
If you select a topic from the list, the table in the upper-right section will display all messages in the selected topic.
If you select a message the message title and the message itself will be displayed in the bottom of the screen.
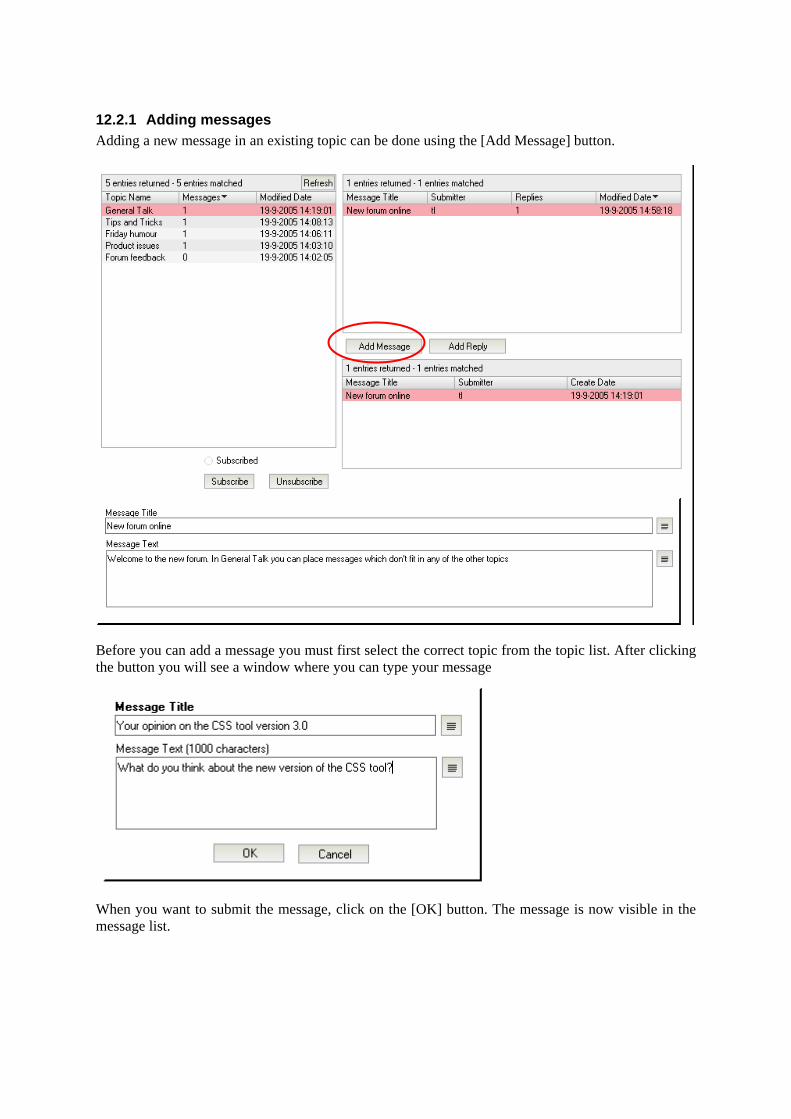
12.2.1 Adding messages Adding a new message in an existing topic can be done using the [Add Message] button.
Before you can add a message you must first select the correct topic from the topic list. After clicking the button you will see a window where you can type your message
When you want to submit the message, click on the [OK] button. The message is now visible in the message list.

12.2.2 Adding replies You can add a reply to a message by clicking the [Add Reply] button.

A window will be opened where you can add the reply.
When you click on the [OK] button the reply will be submitted and will be visible in the table below the topic messages.

12.2.3 Subscribing to topics You can also subscribe yourself to a topic. If you subscribe yourself to a topic you will receive an e-mail whenever there is a new message or reply in the selected topic.
If you click on the [Subscribe] button you will see a confirmation message

If you are subscribed to a topic you will see that the radio button ‘Subscribed’ underneath the topic list is checked.
To unsubscribe yourself from a topic you can click on the [Unsubscribe] button. You will again see a confirmation message

12.3 Administering the forum If you are a team leader then you can administer the forum. Only as a team leader you can add or remove topics and remove messages. Administering the forum can be done from the same screen where you browse the forums. If you open the forum you will see more buttons as opposed to chapter 12.2.
You can add new topics using the [Add Topic] button. You will need to specify the topic title in a new window
If you want to remove a topic you must first select the topic from the list and click on the [Remove Topic] button. Be careful with this feature, you won’t see any confirmation message; all messages in the topic will be gone immediately. You can also remove individual messages using the [Remove message] button. Make sure you have selected the right message before clicking the button, since there won’t be a confirmation message. If there were any replies to the message, they will also be removed.
13. Notifications As user of the Remedy system you will be receiving notifications and alerts on your email address. This chapter will explain which notifications you will receive and when you receive them.
13.1 Submitter notifications As the submitter of a call you will receive a couple of notifications, mostly when the assigned person performs an action and the status of the call changes. The following notifications are received on the call.
1. Submitting a new call. When you have submitted a new call an email is send to you where all call information is provided. This email will show you the call id and the assigned group and team leader.
2. Call is set on Pending by the assigned person
When the assigned person puts the call to pending (wait) you will receive a notification that the call is set to pending. The email will also show the reason why the call is set to pending.
3. Update on the call is send by the assigned person
If you need to know the status or last action on your call, you can request an update on the call. The assigned person will select the ‘Update to Customer’ action and an email is send to you with the update.
4. Assigned person needs more information
When the assigned person needs more information to solve the call, the assigned person will send a notification to you with the request for more (detailed) information. The information that is needed will be shown in the email notification.
5. Call is solved by the assigned person
When the call is solved by the assigned person you will receive a notification with the solution to the problem. You can then check the solution and provide an answer.
6. Call is solved for more then a week
If the call is in the solved status for more then a week, you and the assigned person will receive a notification to check the solution and provide the answer or to start working on the call again.
7. All specialist are mailed when call is closed
When a call is closed the assigned person has the possibility to send a notification to the Specialist group (PSS group) for that product. The assigned person will do this if the call is interesting for all specialists. All PSS members will receive the notification to check the call.
8. You have logged a suggestion If you add a suggestion to a call you will receive a notification with the suggestion details.
9. A suggestion is added to a call that is logged by you
Your calls in the system are viewable by all PSS members. If a suggestion is added to your call you will receive a notification with an unofficial solution.

10. You have logged a Me Too If you have logged a Me Too for a call you will receive a notification with all me too details.
11. The call for which you have logged a Me Too is closed.
When the assigned person closes a call for which you have logged a me too, you will receive a notification that the call is closed and that the solution might also solve your problem.
12. A suggestion has been logged for a call for which you have logged a Me Too
When a suggestion is submitted for a call that is logged, the submitter of the call will receive a notification with a possible solution. If you have added a Me Too to that call the suggestion might also solve your issue. Therefore you will receive a notification as well.
13.2 Assigned Group notifications on call
1. Expiration of response timers When a call is logged, timers are set for that call. When the response timers are about to expire the assigned group will receive a notification to start working on the call.
2. Alert on new call When a new call is logged the group that is assigned to the call will receive a notification.
3. Alert on transfer call
When a call is assigned to the wrong group, the call dispatcher has the permission to transfer the call to the correct group. The correct group will then receive a notification about the call.
4. Alert on new knowledge base article
When a new knowledge base article is logged, the group that is assigned to the knowledge article will receive a notification to either accept or decline the knowledge.
5. Alert on new task
When a new task is submitted the assigned group on the task will be notified to work on the task.
13.3 Call Dispatcher notifications on call
1. Check work in progress During the time that a call is in the “Work in Progress” status a timer will be set. When the call is in the “Work in Progress” status for more then four days, the call dispatcher will receive a notification to check the call.
2. Expiration of response timers
When a call is logged, timers are set for that call. When the response timers are about to expire the call dispatcher group will receive a notification to check the call.
3. Call has been picked up
The call needs to be picked up by the assigned group after the call is logged. When this is not done in time, the call dispatcher can assign the call to a member of the assigned group. When a member picks up the call, the call dispatcher will receive a notification that the call has been picked up.

4. New escalation When a new escalation is submitted by the assigned person on the call and the escalation needs to be approved, the call dispatcher will receive a notification that the escalation needs to be checked.
5. New escalation answer
When the manufacturer replies to an escalation the call dispatcher needs to approve or decline the answer. Therefore the call dispatcher will receive a notification when the manufacturer provides an answer.
13.4 Assigned person notifications on call
1. Check work in progress During the time that a call is in the “Work in Progress” status a timer will be set. When the call is in the “Work in Progress” status for more then four days, the call dispatcher will receive a notification to check the call.
2. Expiration of response timers When a call is logged, timers are set for that call. When the response timers are about to expire the call dispatcher group will receive a notification to check the call.
3. New suggestion When a new suggestion is logged the assigned person on the call will receive a notification with the suggestion details. The assigned person can then check the suggestion details by clicking on the link in the email or by opening the call and selecting the suggestion on the Me Too / Sugg page.
4. Reply from customer
When the assigned person has requested information from the submitter of the call, the submitter can use the [Provide Answer] button on the call to add the reply to the question. When the submitter provides the answer, the assigned person will receive a notification with the answer details.
5. Customer update
On the call there is a [Add Update] button. This button can be used by the submitter to add an action to the call. When the submitter adds an action, the assigned person will receive a notification to check the action.
6. Assign to person
When the call dispatcher notice that the call is almost expired it is possible for the call dispatcher to assign the call to a member of the assigned group. When the call dispatcher assigns the call to a user, this user will receive a notification that the call is assigned to him/her.
7. Solved check
When the call is in the solved status for over a week, the assigned person is notified that the call needs to be checked. Either the call needs to be worked on because the solution is rejected or the call can be closed.
8. Approved escalation answer
When the answer to an escalation is provided by the manufacturer and approved by the call dispatcher, the assigned person receives a notification that the call is in the “Work in progress” status again.

13.5 Notifications on User management As described in chapters 9.4 and 9.5 it is possible for you to check your login name or to reset/change your password. When these actions are done you will receive a notification.
1. Send your login name to your email address When you do not remember your login name it is possible to send an email via the website. The email is send to the Remedy server with a certain subject and the Remedy system will check the email address and sends back the email with the login name.
2. Send emails on a password reset
When you request a password reset via the website you need to send an email to the Remedy server. The Remedy server picks up this email and sends back two emails. One email contains your login name and the second email contains your password. Your login information is send in two separate emails for security reasons
3. Send emails on a new account.
When your account is created in the Remedy system you will receive two emails with your login information. The first email contains your login name and the second email contains your password. The login information is sent in two separate emails for security reasons.

14. Logging out the application
14.1 Logging out of the web It is always wise to log out of the application when you are done with your work. By logging out of the application the cache settings are renewed and therefore it is unlikely that problems occur. Logging out of the application can be done by choosing the Logout link from the menu.
The Logout link will log you out and confirm this with a message screen.

You can click the [Close] button to close the web browser window. When you press the [Close] button you will be asked if you really want to close the web browser. When you click on the [Yes] button the cache will be reset and you can log in by going to the login page (https://css.canon-europe.com).
14.2 Logging out of the user tool To log out of the user tool you don’t have to select a logout button. You can just close the user tool and you are automatically logged out.


![[Maths] 6.3.1 algebras de boole](https://img.pdfslide.net/doc/110x75/555cde11d8b42a4f2b8b55a4/maths-631-algebras-de-boole.jpg)