Embed Size (px)
Citation preview

Dynamics 365 for
Customer Service
Greg Degruy P20 Enterprise Walkthrough

P a g e | 2
Content
Kicking Off ............................................................................................................................................ 6
Define your Customer Service Standards ........................................................................................ 8
Making a Standard SLA .......................................................................................................................... 8
The Service Calendar ............................................................................................................................ 18
Got tons of Cases, need to Manage them ...................................................................................... 24
Case Records ......................................................................................................................................... 24
How to Make a Case ............................................................................................................................ 25
Sell this to a Customer! Check it! .................................................................................................. 29
New Interactive Service Hub ............................................................................................................ 32
What is it? .............................................................................................................................................. 32
Getting to the Interactive Service Hub .............................................................................................. 32
Capturing Knowledge Articles ......................................................................................................... 35
What are they? ...................................................................................................................................... 35
Making a Knowledge Article ............................................................................................................... 35
Don’t forget these Links ................................................................................................................... 43

STOP!
On the Next Page
5 D365 Customer Service principles
Read and Commit these to memory

P a g e | 4
1. Omni-channel
Customer need help, they seek help from social media, email, phone calls etc.
2. Self-service & communities
Some customers find the answers themselves, googlebining or exploring community forums.
3. Agent Enablement
Sometimes they can’t find the answer , so bring in a human to help.
4. Knowledge
For common questions and answers it’s important to collect the data for future use.
5. Service Intelligence
Intelligence service as a Service as a Solution as a Service.
?

P a g e | 5

P a g e | 6
Kicking Off
Customer Service in D365
1. If at any point you see the dialog below, just hit Don’t Send and continue with
the exercise.
2. Make sure you’ve watched the Customer Service Pitch for D365
a. https://microsoft.sharepoint.com/sites/infopedia/Media/details/AEVD-3-
114282
b. This way you can connect the One OCP Message we want to give to our
customers to the exercise . . . or let the writer of the exercise know they
did a poor job relating the message to you :P.
i. When in doubt always go back to the Page 3 for the Customer
Service Principles before the Cheeto... ummmm.
3. Make sure you’ve completed our first Hands on lab to set up your Dynamics 365
Demo Tenant as we’re going use your personal tenant through the exercises.
4. Navigate to your tenant URL.
5. At the top left of your portal, click the drop down arrow next to “Dynamics 365”
at 1, then the Customer Service App that comes with some sample data with
this demo tenant at 2.

P a g e | 7
6. {INSERT OTHER PRERQES HERE POSSIBLY}

P a g e | 8
Define your Customer Service Standards
Making a Standard SLA
Note
You will need the Customer Service Manager, System Administrator, or System Customizer
security role or equivalent permissions to create an SLA.
The demo tenant you made in the hands on lab to cerate your demo tenant will have already
provisioned the right security permissions for you.
1. Using the Site Map, click on Service at the top, go to Settings > Service
Management.
2. Go to Service Level Agreements under Service Terms.
3. To create a new SLA, on the command bar, click the New button in the top left.
4. You'll see the Create SLA dialog box. Type a name for the SLA (like
DaBombDotComSLA), and then in the Entity drop-down list, select Case. If case
is already in the box, no need to hit the drop down list.

P a g e | 9
Note
You can only create a standard SLA for the Case entity.
5. Fill in your information:
o Applicable From. Select the case field that specifies the date and time
from which the SLA items will be calculated.
o For example, if you click the Created On field, the calculations for service
level agreements will start from the time the case is created.
Note
You can have multiple SLA KPIs (Key Performance Indicator – no shortage of acronyms here
:P) within one SLA. The start time for different SLA KPIs within an SLA is set at the SLA level and
can't be different across SLA KPIs. The start time is determined by the Applicable From field
value.
o Business Hours. Leave this blank.
This is useful in the SLA time-tracking calculations. If a business hours
record (customer service schedule) isn’t selected, the work hours are
considered to be 24 x 7.
o SLA Type. Select Standard.
o Allow Pause and Resume. Select Do Not Allow. Because standard SLAs
do not support pausing and resuming of SLAs, you can set this field
to Allow only when you’re creating an enhanced SLA.
6. Click Save in the top left.
7. To add SLA details, in the SLA Details section, click the Add button and a new
window will open that is the SLA item form. Move onto to step 8 after the
loooooon note below.
P a g e | 10
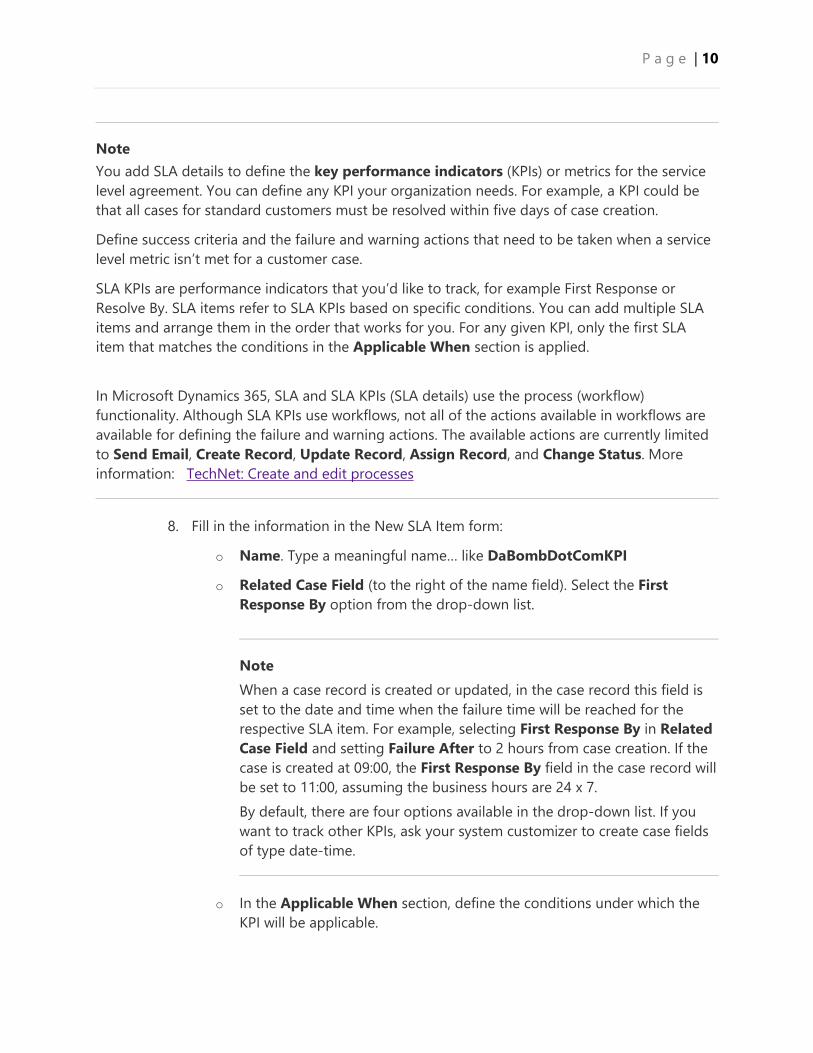
Note
You add SLA details to define the key performance indicators (KPIs) or metrics for the service
level agreement. You can define any KPI your organization needs. For example, a KPI could be
that all cases for standard customers must be resolved within five days of case creation.
Define success criteria and the failure and warning actions that need to be taken when a service
level metric isn’t met for a customer case.
SLA KPIs are performance indicators that you’d like to track, for example First Response or
Resolve By. SLA items refer to SLA KPIs based on specific conditions. You can add multiple SLA
items and arrange them in the order that works for you. For any given KPI, only the first SLA
item that matches the conditions in the Applicable When section is applied.
In Microsoft Dynamics 365, SLA and SLA KPIs (SLA details) use the process (workflow)
functionality. Although SLA KPIs use workflows, not all of the actions available in workflows are
available for defining the failure and warning actions. The available actions are currently limited
to Send Email, Create Record, Update Record, Assign Record, and Change Status. More
information: TechNet: Create and edit processes
8. Fill in the information in the New SLA Item form:
o Name. Type a meaningful name… like DaBombDotComKPI
o Related Case Field (to the right of the name field). Select the First
Response By option from the drop-down list.
Note
When a case record is created or updated, in the case record this field is
set to the date and time when the failure time will be reached for the
respective SLA item. For example, selecting First Response By in Related
Case Field and setting Failure After to 2 hours from case creation. If the
case is created at 09:00, the First Response By field in the case record will
be set to 11:00, assuming the business hours are 24 x 7.
By default, there are four options available in the drop-down list. If you
want to track other KPIs, ask your system customizer to create case fields
of type date-time.
o In the Applicable When section, define the conditions under which the
KPI will be applicable.

P a g e | 11
Follow this example by choosing the “Select“ text to open the drop down
options, like in the START screenshot below. Do this until you have a
table like the FINAL screensho below.
If you get stuck see below for a few pointers
START
• Pointer 1: That last column is weird… to add the value there you’ll
need to select the button with the 3 dots […] seen below
• Pointer 2: This will open a Select Values screen, where you’ll first need
to click on your 1 option then hit double arrow button 2 >> and then
hit OK. That was exhausting even for me :P.
• Pointer 3:

P a g e | 12
• -
FINAL
Note
If there are multiple clauses, and you don’t use AND or OR grouping, by default the clauses will
use the AND grouping.
o In the Success Criteria section, specify the conditions to define when the
KPI will be considered as met. For example, the conditions could be as
shown here.

P a g e | 13
Note
Before you specify the SLA failure and warning actions, save the SLA item record.
o Under SLA Item Failure, in the Failure After drop-down list, select 1
hour.
This is when the SLA items will be considered as failed. In this
guide the KPI will be considered as failed if the first response is
not done within 1 hour of case creation. 1 hour is calculated based
on the value in date/time field that you select in the Applicable
From field of the SLA record.
SUPER IMPORTANT Note
If you don’t see options to configure the next steps
Options should look like this
Hit Save & Close and then in the SLA Details from your Dynamics Portal click the SLA you’ve
just created.

P a g e | 14
If you do you see these options then I guess this note wasn’t that important ☹ sorry ‘bout that
o In the Failure Actions section, click Add Step, and choose Update
Record. Then select Case in the drop down box and click the Set
Properties button. ANOTHER WINDOW 😅.
• Click on the Summary and Enhanced SLA Details text once the
window opens to minimize all that unneeded noise. Now in the
new case record window, change the value of the Escalated field
under 2 Additional Details to “Yes”, and then hit Save and Close
at the ‘top.
o Under SLA Item Warning, in the Warn After drop-down list, select
30mins.
o In the Warning Actions section, click Add Step, and then click Send
Email. Then select Create New Message and click Set Properties.
ANOTHER WINDOW 😒.
• Now in the email record, type the email details, and . . . so many
details

P a g e | 15
o In the From field you should be able to type in an email
address.
o In the To field you’ll need to first click the small magnifying
glass icon then look up a record.
.
Then 1 click on a record, click 2 Select, and finally 3 click
Add and the windows will close brining you back to the
email form and fields.
o Leave cc ot bcc blank.
o Add a Subject line like ”WE ARE DABOMB”.
o Type some text in the email body
• Details should look something like this on the next page once
finished

P a g e | 16
• Then click Save and Close.
Note
The time for failure and warning is calculated after considering the business hours selected in
the SLA record. If a business hours record (customer service schedule) isn’t selected, the work
hours are considered to be 24 x 7.
Important
Make sure that you don't have too many SLA Items in an SLA, because that can directly impact
the create and update operations on the record on which the SLA is applied or re-evaluated. We
recommend you not have more than 15 SLA items in an SLA record for performance reasons.
9. You should be back on the SLA Item page now and that’s really hit. A long rough
road, but now we’ve dot some automatic email logic wired into our SLA.

P a g e | 17
10. Click Save and Close and should be brought back to the D365 Page for your
SLA, in my case DaBombDotCom.

P a g e | 18
11. That’s it! Let’s move on the next exercise, 1 click the arrow next to Dynamics 365
and then 2 the click Customer Service.
The Service Calendar
* This will be mainly a point and click showcase so you’re aware of the Service
Calendar.
In the Service calendar, you can do the following:
• View your organization's daily, weekly, and monthly schedule of
appointments and service activities.
• View work schedules and service activity schedules for a variety of
resources.
• Create new appointments and schedule service activities.
• Change the status of an existing service activity.
• Search for conflicts in the schedule.
You can’t customize the Service calendar or change the default view with the
application. However, you can ask your system administrator to change the colors
of the time blocks.
1. You should now be on this page

P a g e | 19
2. Go to 1 Service > 3 Service Calendar.
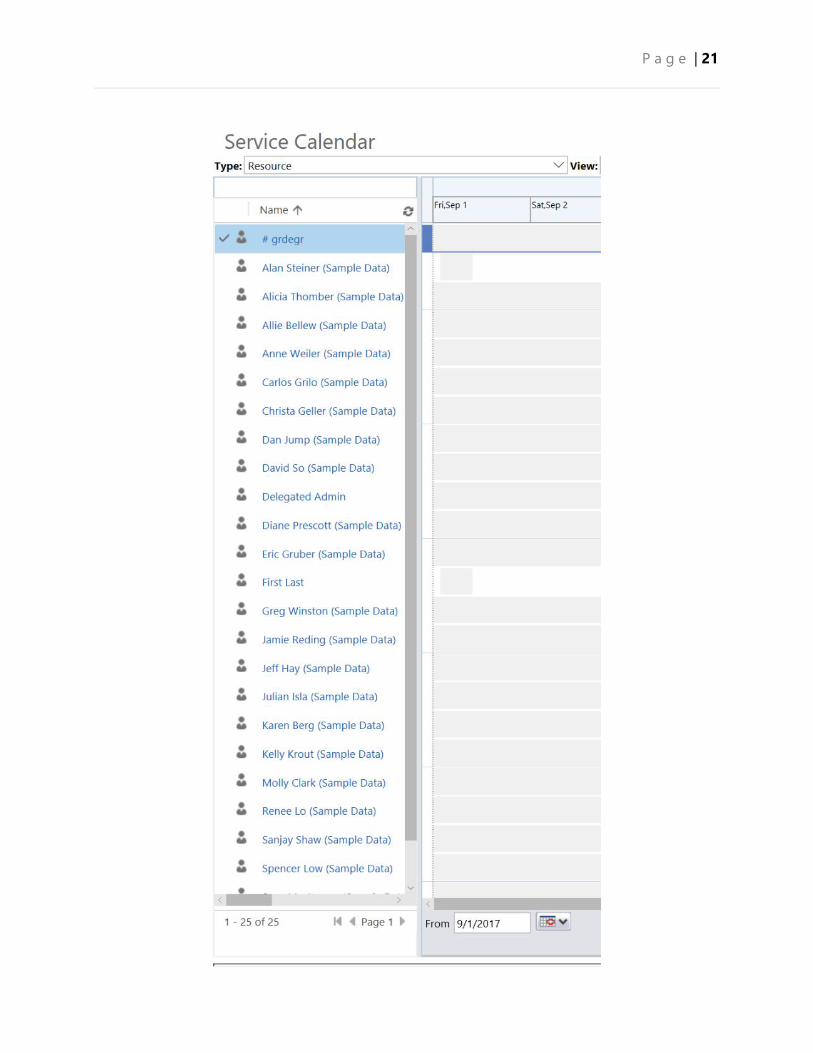
3. To view the details of any resource, appointment, or service activity, select the
record in the list to the left of the calendar. Notice I have the type Resource
selected.

P a g e | 20
All Records will be on the left hand side
P a g e | 21

P a g e | 22
4. The Calendar pane appears on the right side of the calendar. It can be collapsed
or expanded. To change the date, click a date in the calendar. Use the arrows on
either side of the month to change the month displayed.
5. To change the number of days that are displayed in the linear calendar, click any
of the calendar options in the Calendar pane.
6. Not much to show on this exercise, unless you want to walkthrough another form
and windows insides windows insides windows 😭. Let’s move onto something
new.

P a g e | 23
P a g e | 24
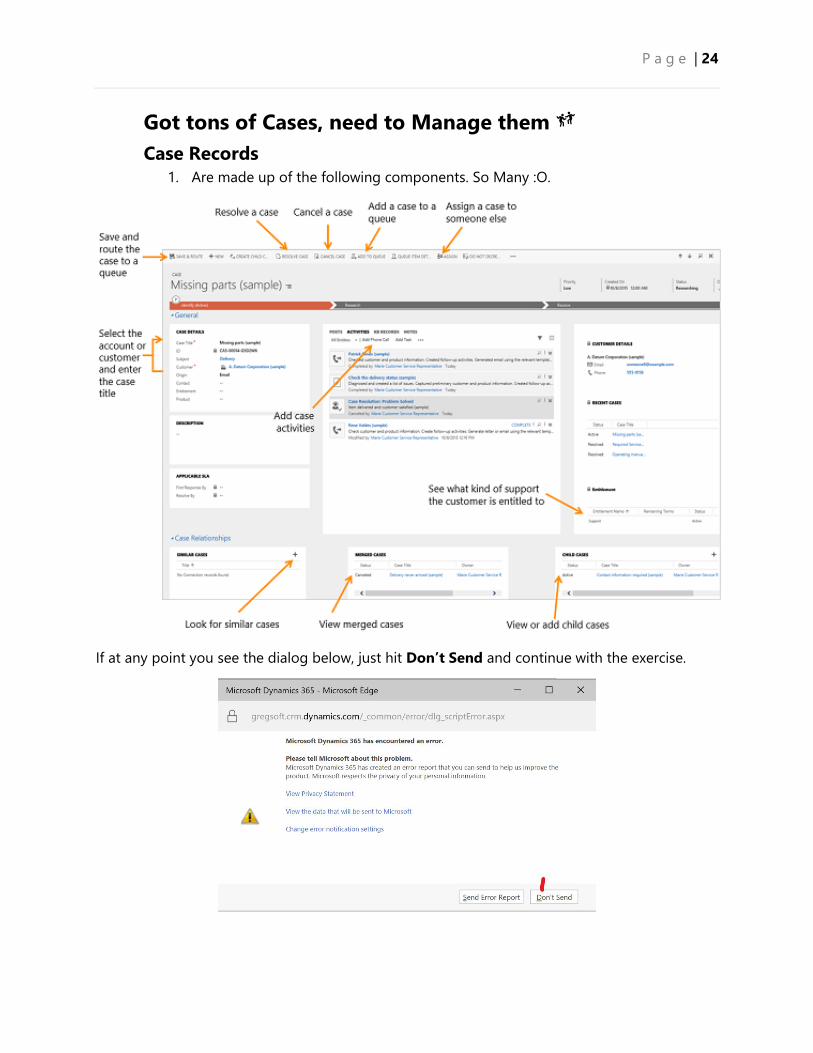
Got tons of Cases, need to Manage them
Case Records
1. Are made up of the following components. So Many :O.
If at any point you see the dialog below, just hit Don’t Send and continue with the exercise.

P a g e | 25
How to Make a Case
1. Go to Service > Cases.
2. You should now be on the My Active Cases page
3. Click New Case.

P a g e | 26
4. Give a Case Title like “Customer needs there sink fixed.”
5. Find the customer: Also notice how the case has 4 stages: Identify, Qualify,
Research and Resolve and also marks the active stage with the time the case has
been in that stage.
a. Click the Customer lookup button.
And select “Adventure Works”

P a g e | 27
When you select an existing customer, the customer details will show the
contact details on the right hand side of the page, along with recent cases
and activities for the customer. VERY USEFULE, it looks like this
CLICK SAVE NOW, important because whenever you switch tabs or move a document over
your browser window the browser will remove any unsaved information immediately ☹

P a g e | 28
6. Click the Contact lookup button and select Ryan Gregg for the case or
click New in the inline lookup results to create a new contact record.
7. Click Save and Route
Important
This feature was introduced in CRM Online 2015 Update and CRM 2015 (on-premises).
For more information on getting this feature visit Find your Dynamics 365 administrator or
support person.
Before you create a new case in a real scenario, ALWAYS check if there is an existing case:
1. From the Identify area of the process bar, click the Find Case lookup button and then
select a case from the list of cases.
2. If a case doesn’t exist, click New in the inline lookup results to create a new case record.
*the docs seem outdated here as even I couldn’t find this process bar.

P a g e | 29
Note
o If your manager has set default entitlements for a customer, a default entitlement is
automatically associated with a case when:
▪ A case is created
▪ A case is updated and the customer, contact, or product field has changed
o When a case is created and an entitlement is applied to it (or when the case gets
resolved), the entitlement terms from the associated entitlement are decremented.
However, if you don’t want the entitlement terms to be decremented for a case, from the
command bar click Do not decrement entitlement terms.
Sell this to a Customer! Check it!
* Not an exercise 😊
1. 1 click the dots in the top right menu of your case, click 2 Process, and click 3 edit
process to visit the new Process Explorer.
2. Brand new Process Explorer. BAM!
3. Look at it. The most up to date feature I’ve seen in Dynamics so far AND it uses
the new 2017 Microsoft design Language. The same design that will one day be
used with all of our partners :O!??!?!
4. Play around the explorer if you’d like before moving onto the next exercise.

P a g e | 30

P a g e | 31

P a g e | 32
New Interactive Service Hub
What is it?
We bring to you a new intuitive and interactive experience for managing your
customer service in the Dynamics 365 interactive service hub. It’s loaded with
richer dashboards and redesigned forms that pull together key information so
you can focus on what’s more important and get things done faster.
Getting to the Interactive Service Hub
1. Click the drop down arrow next to “Services” at 1, then click Settings at 2,
and finally click Interactive Service Hub under “Application” at 3.
2. Great! You’ve made it to the New Interactive Service Hub.

P a g e | 33
3. Next we’ll go through Knowledge Articles (from my hands on work it seems like they
can only be found in the Interactive Service Hub portal for some reason :/. So don’t
leave that page!

P a g e | 34

P a g e | 35
Capturing Knowledge Articles
What are they?
Turn your customer questions, issues, and feedback into knowledge articles,
so other service reps can benefit from them. Add images and videos to your
articles to explain things better and make the articles engaging.
If at any point you see the dialog below, just hit Don’t Send and continue with
the exercise.
Making a Knowledge Article
1. Make sure that you have Create and Read permissions on the Knowledge Article
entity. By default, these permissions are added to the Knowledge Manager,
Customer Service Manager, or Customer Service Representative role.
2. In the interactive service hub, go to Service > Knowledge Articles.
3. On the command bar, click New.
You’ll be on the Content tab of the knowledge article.

P a g e | 36
4. In the Article Content section, fill in the following details:
o Title. Type a descriptive title that communicates the subject and purpose
of the article in a concise manner.
o Keywords. Type keywords for the article. These keywords are used for
searching the knowledge base for articles. Separate keywords with
commas.
o Description. Type a short overview of the article. This appears in the
search results and is used for search engine optimization.
5. In the Content section, add the content for your knowledge article.
Note
As soon as you click inside the editor space, the rich text editor command bar
appears. Use the command bar options to format and style your content. More
information: Use the rich text editor to create knowledge articles and emails

P a g e | 37
6. On the process bar, click Author.
7. In the Article Subject drop-down list, choose the subject of the article to help
with article searches.
8. In the Assign Primary Author drop-down list, choose a person who is
responsible for maintaining the article content. By default, the user who creates
the article is the primary author.
9. When you’re done adding the content, click Save.
Posts about knowledge article-related activities will begin appearing in
the Timeline section.
Use the rich text editor to create knowledge articles and emails
Create rich and well-formatted content for email or knowledge articles using the new
rich text editor in the interactive service hub. The editor brings common word processor
features like advanced styling, linking, find and replace, and insert images and tables.
You can choose a specific format or style for the content you’re writing.
Command Use
1. Formatting
Styles
Apply predefined sets of formatting features to make it easier to keep
the presentation of the text consistent. To make the choice easier, the
style names are displayed in a style that they represent, giving you a
preview of what the text will look like.
Note
This option is available in the expanded mode only.
2. Paragraph
Format
Apply predefined block-level combinations of various formatting
options. A paragraph format can only be applied to a block-level
element, like a paragraph or a div element.

P a g e | 38
Note
This option is available in the expanded mode only.
3. Font Name Choose a font for the selected text.
4. Font size Choose a font size for the selected text.
5. Bold Apply bold formatting to the selected text.
6. Italic Apply italic formatting to the selected text.
7. Underline Underline the selected text.
8. Strikethrough Mark selected text for deletion.
9. Text Color Choose a text color for the selected text.
10. Background
Color
Choose a background color for the selected text.
11. Align Left Left align the text. When you align your text left, the paragraph is
aligned with the left margin and the text is ragged on the right side.
Note
This option is available in the expanded mode only.
12. Center Center align the text. When you center align the text, the paragraph is
aligned symmetrically along the vertical axis and the text is ragged on
the both sides.
Note
This option is available in the expanded mode only.

P a g e | 39
13. Align Right Right align the text. When you align your text right, the paragraph is
aligned with the right margin and the text is ragged on the left side.
Note
This option is available in the expanded mode only.
14.
Insert/Remove
Numbered List
Create a numbered list.
15.
Insert/Remove
Bulleted List
Create a bulleted list.
16. Increase
Indent
Increase the margin on the left side of text.
17. Decrease
Indent
Decrease the margin on the left side of the text.
18. Paste as Plain
Text
Paste the clipboard data as plain text, without the source formatting
and styling.
19. Paste From
Word
Paste content from Microsoft Office Word with the original content
formatting. This will retain:
• Spacing and line breaks
• Ordered and unordered lists
• Tables
• Font styles and colors
Note
Images won’t be copied from Word
Microsoft Office Word.

P a g e | 40
20. Insert Table Insert a table, and specify the table properties.
21. Image Insert an image.
1. Choose Insert Image.
2. In the Image Info tab, specify the web address of the image,
and also specify properties to define how the image will appear
in the email or article.
Note
If the image is located on the external server, use the full
absolute path. If the image is located on a local server, you can
use a relative path.
3. If you want the image to be a clickable link, in the Link tab, add
a URL for the image. You can also specify if you want the
targeted page to open in a new window, topmost window, same
window, or parent window.
4. To configure additional image options, use the Advanced tab.
This is meant for advanced users with knowledge of HTML and
CSS, and lets you change the presentation of the image.
o ID. Type a unique identifier for an image element in the
document (id attribute).
o Language Direction. Choose the direction of the text.
o Language Code. Type the language of the image
element specified.
o Long Description URL. Type the web address of an
HTML page containing a longer description of the image.
o Stylesheet Classes. Enter the class of the image element
(class attribute). Note that an image element might be
assigned more than one class. If this is the case, separate
class names with spaces.
o Advisory Title. Enter the text of the tooltip that is shown
when the mouse cursor hovers over the image.
P a g e | 41
o Style. Enter the CSS style definitions. Note that each
value must end with a semicolon and individual
properties should be separated with spaces.
22. Link Add clickable hyperlinks or email addresses to your documents. In
the Link dialog box choose the type of link you’d like to insert.
The Link Info tab allows you to choose the link type as well as set the
link protocol and URL.
The Target tab is only available for the URL link type. It specifies the
location where the link will open after you click it.
23. Unlink When you place the cursor on a link, the Unlink button on the toolbar
becomes active. Click the button to remove the link and make it plain
text.
24. Anchor You can add anchors in document text. After you add anchors, you can
link to these anchors for easier navigation.
To add an anchor:
1. Place the cursor where you want to insert an anchor, and then
on the toolbar, click the Anchor button.
The Anchor Properties dialog box opens.
2. Ente a name for the anchor, and then click OK.
The Anchor button appears in the area where you created
the anchor.
You can now use the Link button to link to your anchor.
25. Embed
Media
To embed videos into your content:
1. Place the cursor where you want to insert the video, and then on
the toolbar, click the Embed Media button.
The Embed Video dialog box opens.
2. Enter the embed link of the video provided by the video hosting
provider, and then click OK.
26. Create Div
Container
Create a div container to apply formatting to a larger document
fragment that extends beyond one block.

P a g e | 42
The General tab lets you manually add a stylesheet class that is applied
to the div element.
The Advanced tab lets you configure additional div element options
such as assigning it an ID, a language code, a text direction, an advisory
title, or CSS style properties.
Note
This option is available in the expanded mode only.
27. Source Open the HTML source code for the content.
To embed videos and IFrames, video and iframe tags can be used in
HTML source code mode.
Important
You can’t use client-side code (script tags or JavaScript) in articles and emails. If you want to
associate CSS or JavaScript, use web resources.

P a g e | 43
Don’t forget these Links • Home Page for all Dynamics 365 Enterprise Edition Docs (
https://docs.microsoft.com/en-us/dynamics365/#pivot=main&panel=enterprise )
• User Guide ( https://www.microsoft.com/en-us/dynamics/crm-customer-
center/dynamics-365-for-customer-service-user-s-guide.aspx )
▪ * ALL of the information in this walkthrough was
pulled through the user guide. This is the same
guide partner’s, PTS, CSA, & PTA teams should
reference to troubleshoot issues in doing all the
things in D365.
• Everyone love’s Pitch Decks (
https://microsoft.sharepoint.com/sites/infopedia/Media/details/AEVD-3-114282 )
▪ This is where I captured the 5 guiding principles.