Embed Size (px)
Citation preview
Customizing your IBM WebSphere Portal 7.0.0.2 Web experience using the new theme framework
Jon Lidaka ([email protected]), IBM
September 2012
© Copyright IBM Corporation 2012. All Rights Reserved.
Summary: This detailed, step-by-step guide explains how to customize your IBM WebSphere Portal 7.0.0.2 Web experience by using the new modularized theme framework.
Table of Contents1 Introduction..........................................................................................................................12 Inline theme customization..................................................................................................2
2.1 Activating edit mode.....................................................................................................32.2 Create a new page.......................................................................................................42.3 The customization shelf...............................................................................................72.4 Adding content.............................................................................................................72.5 Changing the layout...................................................................................................102.6 Changing the style.....................................................................................................112.7 Drag and drop............................................................................................................12
3 Connecting to WebDAV.....................................................................................................133.1 Connecting to the theme administration entry points.................................................143.2 Connecting to theme filestore entry point...................................................................17
4 Customizing your Web experience....................................................................................194.1 Create a new theme...................................................................................................194.2 Create a new skin......................................................................................................234.3 Create a layout...........................................................................................................274.4 Create a style.............................................................................................................304.5 Change the logo........................................................................................................324.6 Create a dynamic-content spot..................................................................................38
5 Theme optimization...........................................................................................................415.1 Setting the theme profile............................................................................................415.2 Create a custom profile..............................................................................................44
6 Debugging.........................................................................................................................496.1 Theme optimization debugging..................................................................................496.2 Development mode....................................................................................................52
7 Conclusion.........................................................................................................................528 Resources.........................................................................................................................529 Author biography...............................................................................................................53
1
1 IntroductionIn this white paper we explore the process for customizing your Web experience and using the new theme optimization features within IBM® WebSphere® Portal 7.0.0.2.
The exercise is separated into the following sections:
(1) Introduction(2) Overview of the out-of-box inline theme customization features(3) How to connect to the WebDAV entry points(4) Basics of a custom Web experience: creating a theme, skin, layout and style, etc.(5) Theme optimization features using profiles and modules(6) Debugging
Sections 1, 2, 3 and 4 are independent of one another. If you are already familiar with the out-of-box inline customization features and connecting to WebDAV, it is recommended to start with Section 4. If you are familiar with the basics of creating a custom Web experience and would like to learn more about the new features in 7.0.0.2, then start with Section 5.
What you will learnAt the end of this exercise, you will have an understanding of the theme customization features available out-of-box as well as the process for creating a new Web experience. You should also be able to re-brand the theme and provide a new “look and feel.”
You can do this exercise at home with a freshly installed WebSphere Portal 7.0.0.2 with Cumulative Fix (CF) 12 applied. For sections that require images or icons, you can substitute your own custom images and icons.
Formatting/hintsThe following color codes are used in this paper:
Blue: A file or directoryPurple: A command to be executed
NOTE: These colors are helpful to see the different types quickly, but they are not necessary to understanding the meaning. So if you are using black and white, that will work as well.
Our server name here is localhost. Replace these server names with your local host name on which WebSphere Portal is installed.
EnvironmentWe use WebSphere Portal 7.0.0.2 with CF12 installed on IBM WebSphere Application Server (WAS) 7.0. Apache Derby is configured as the underlying database management system, and the Portal 7.0.0.2 theme is applied as the default. The files required for the lab are provided as a download to this paper.
2 Inline theme customizationThe Portal 7.0.0.2 theme is new and is built by use of many similar aspects from the Page Builder architecture. There are many inline customization features integrated with the Page Builder architecture, many of which you activate by placing the page into Edit mode (by default, when you navigate to a page, it is in View mode.
2

This section guides you through the process of using the inline customization features. Figure 1 shows the Page Builder theme out-of-box in View mode.
Figure 1. WebSphere Portal 7.0.0.2 theme
2.1 Activating edit mode1. Select the page mode toggle in the header of the theme (highlighted in red in figure 2).
Figure 2. Page mode toggle
2. This puts the page into Edit mode, and new items are displayed on the page (see figure 3). The edit mode of a page exposes the inline customization features of the theme. The controls displayed are for the customization shelf, hidden content container, alternate portlet modes, drag and drop, and page creation from the actions menu.
3

Figure 3. Edit mode controls
2.2 Create a new pageCreate a sibling page:1. Put the page in Edit mode and open the Actions menu (see figure 4).
Figure 4. Actions menu button
2. Select the New Sibling Page option from the menu (see figure 5).
Figure 5. New Sibling Page option
4
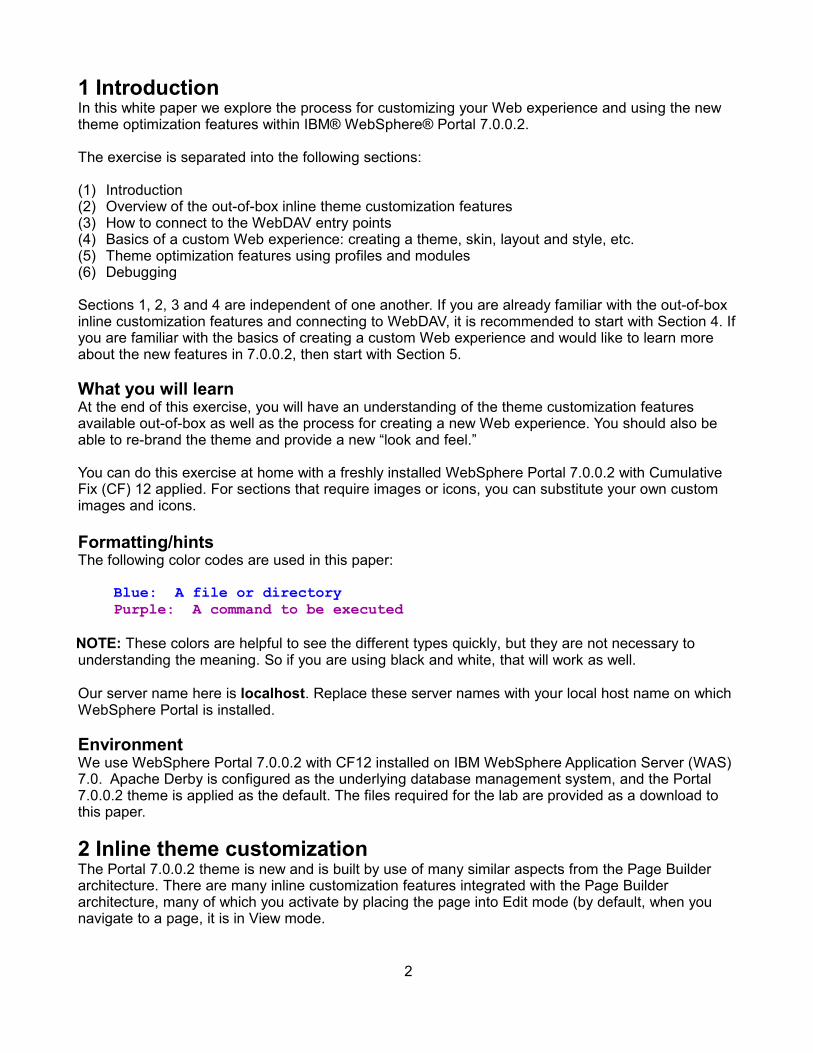
3. In the Create Page window, name the new peer page and, if you have permissions, you have the option to create a public or private page (see figure 6).
Figure 6. Create Page window
4. Name your new page and click the Create Page button (see figure 7).
Figure 7. Create Page button
5. A window displays, communicating that the page is being created and, when done, the new page will display on the primary level of navigation and will become the selected page (see figure 8).
5

Figure 8. New “Lab Page” displaying
Create a child page:1. Open the Actions menu (recall figure 4); select New Child Page from the menu (see figure 9).
Figure 9. New Child Page option
2. In the Create Page window, name the new child and, if you have permissions, you have the option to create a public or private page. Name your new page and click Create Page.
3. A window displays, communicating that the page is being created and, when done, the new child page displays in the secondary navigation and becomes the selected page (see figure 10).
Figure 10. New Lab Child Page displaying
6

2.3 The customization shelf1. Put the page into Edit mode; click the Customize button on the page toolbar (see figure 11).
Figure 11. Customize button
The customization shelf displays above the toolbar (see figure 13), from which you can customize the page by using the Add Content, Change Style, and Change Layout actions.
Figure 13. Customization shelf
2.4 Adding content1. Put the page in Edit mode and click the Customize button; once the customization shelf displays,
the Add Content tab is shown by default. 2. You can select a category from the menu on the left-hand side of the shelf; for this exercise,
select All (see figure 14), to display all portlets and widgets that can be added to the page.
Figure 14. All Content tab
7
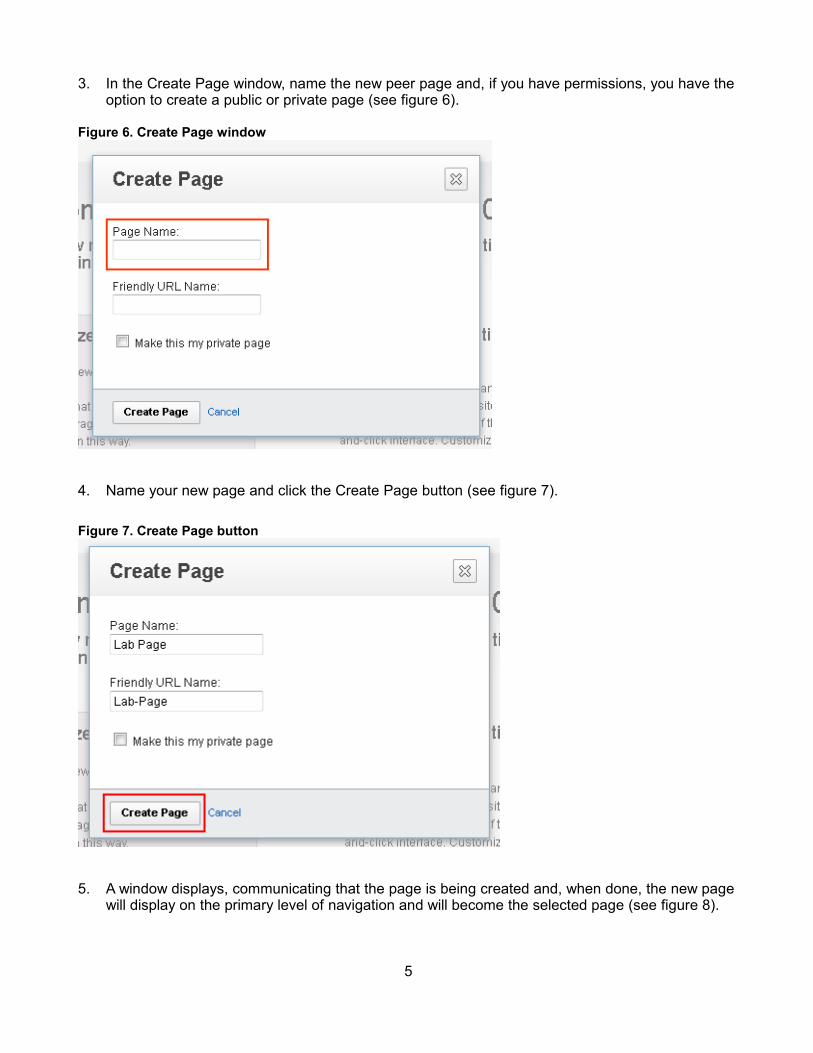
3. The portlets and widgets display in the main panel of the shelf. Click the Add-to-page plus-sign icon on the item you want to add to the page; in this case, click the icon for the “About WebSphere Portal” item (see figure 15).
Figure 15. About WebSphere Portal
The item you add to the page displays in Preview mode in the main container in the layout (see figure 16).
Figure 16. Item in Preview mode
4. The shelf also allows you to search for content instead of going through content page by page. Type “world” within the search box and press Enter to view the results (see figure 17).
Figure 17. Search “world”
This displays one result, the World Clock portlet (see figure 18).
8

Figure 18. World Clock portlet
5. An alternative way to add an item to the page is to use drag and drop. Hover over the “World Clock” item in the search results; the move icon appears (see figure 19), as long as you are not over the plus icon or the title (the title can be selected to view additional details).
Figure 19. Move icon
6. Drag the portlet from the shelf to a container in the layout; notice a preview outline appears within the container, confirming it is valid to drop the item from the shelf to the page (see figure 20).
Figure 20. Dragging portlet from shelf to container
7. After you have added two portlets, using the two methods from the shelf, click the Save & Exit button (see figure 21) to persist the changes to the layout, and exit Edit mode. This synchronizes the page area so that you can see all content (see figure 22).
9
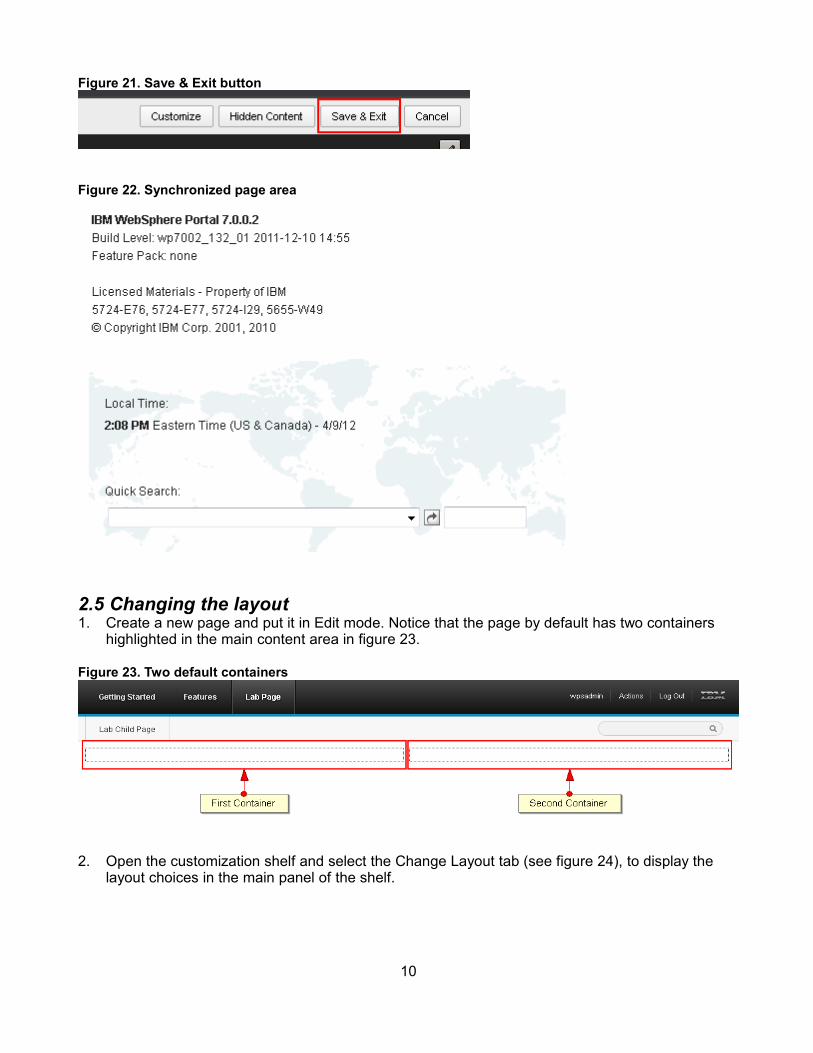
Figure 21. Save & Exit button
Figure 22. Synchronized page area
2.5 Changing the layout1. Create a new page and put it in Edit mode. Notice that the page by default has two containers
highlighted in the main content area in figure 23.
Figure 23. Two default containers
2. Open the customization shelf and select the Change Layout tab (see figure 24), to display the layout choices in the main panel of the shelf.
10
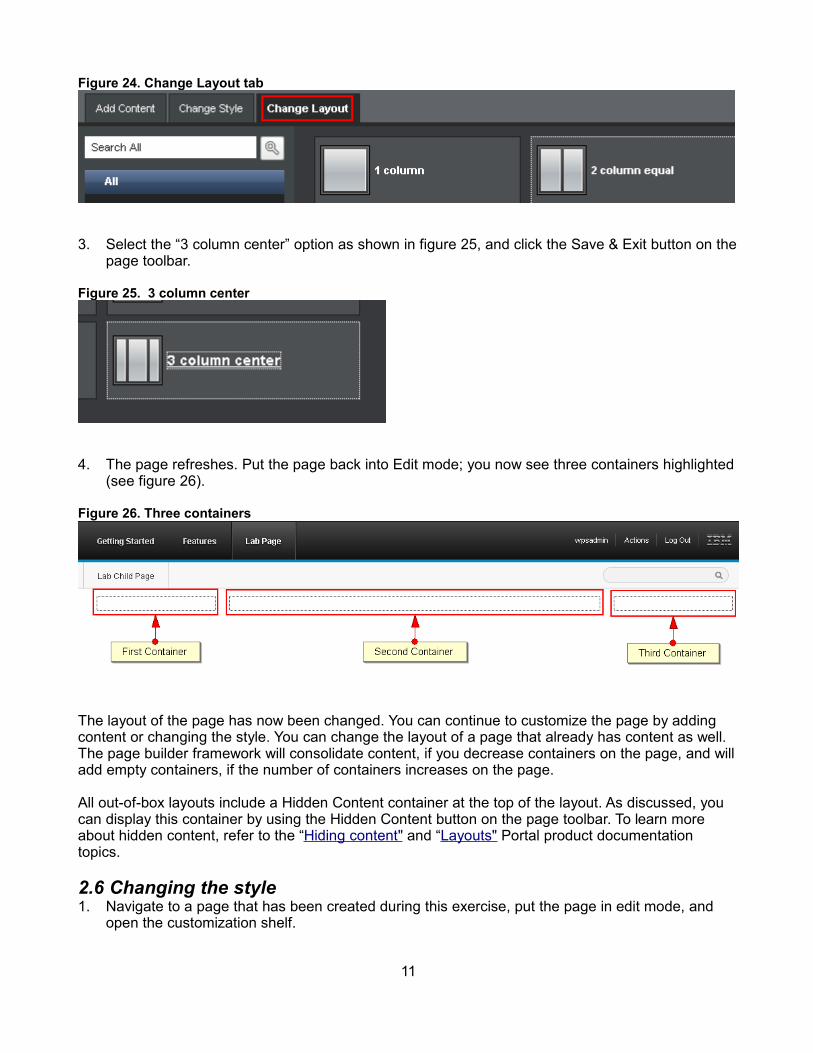
Figure 24. Change Layout tab
3. Select the “3 column center” option as shown in figure 25, and click the Save & Exit button on the page toolbar.
Figure 25. 3 column center
4. The page refreshes. Put the page back into Edit mode; you now see three containers highlighted (see figure 26).
Figure 26. Three containers
The layout of the page has now been changed. You can continue to customize the page by adding content or changing the style. You can change the layout of a page that already has content as well. The page builder framework will consolidate content, if you decrease containers on the page, and will add empty containers, if the number of containers increases on the page.
All out-of-box layouts include a Hidden Content container at the top of the layout. As discussed, you can display this container by using the Hidden Content button on the page toolbar. To learn more about hidden content, refer to the “Hiding content" and “Layouts" Portal product documentation topics.
2.6 Changing the style1. Navigate to a page that has been created during this exercise, put the page in edit mode, and
open the customization shelf.
11
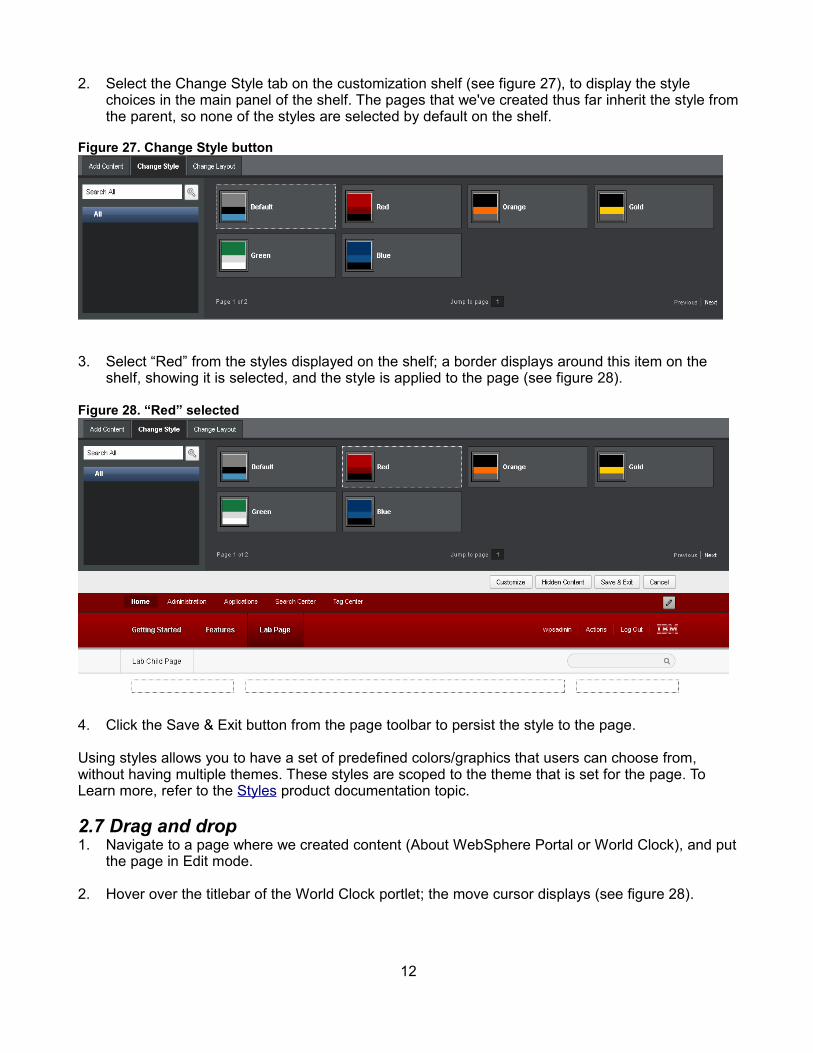
2. Select the Change Style tab on the customization shelf (see figure 27), to display the style choices in the main panel of the shelf. The pages that we've created thus far inherit the style from the parent, so none of the styles are selected by default on the shelf.
Figure 27. Change Style button
3. Select “Red” from the styles displayed on the shelf; a border displays around this item on the shelf, showing it is selected, and the style is applied to the page (see figure 28).
Figure 28. “Red” selected
4. Click the Save & Exit button from the page toolbar to persist the style to the page.
Using styles allows you to have a set of predefined colors/graphics that users can choose from, without having multiple themes. These styles are scoped to the theme that is set for the page. To Learn more, refer to the Styles product documentation topic.
2.7 Drag and drop1. Navigate to a page where we created content (About WebSphere Portal or World Clock), and put
the page in Edit mode.
2. Hover over the titlebar of the World Clock portlet; the move cursor displays (see figure 28).
12
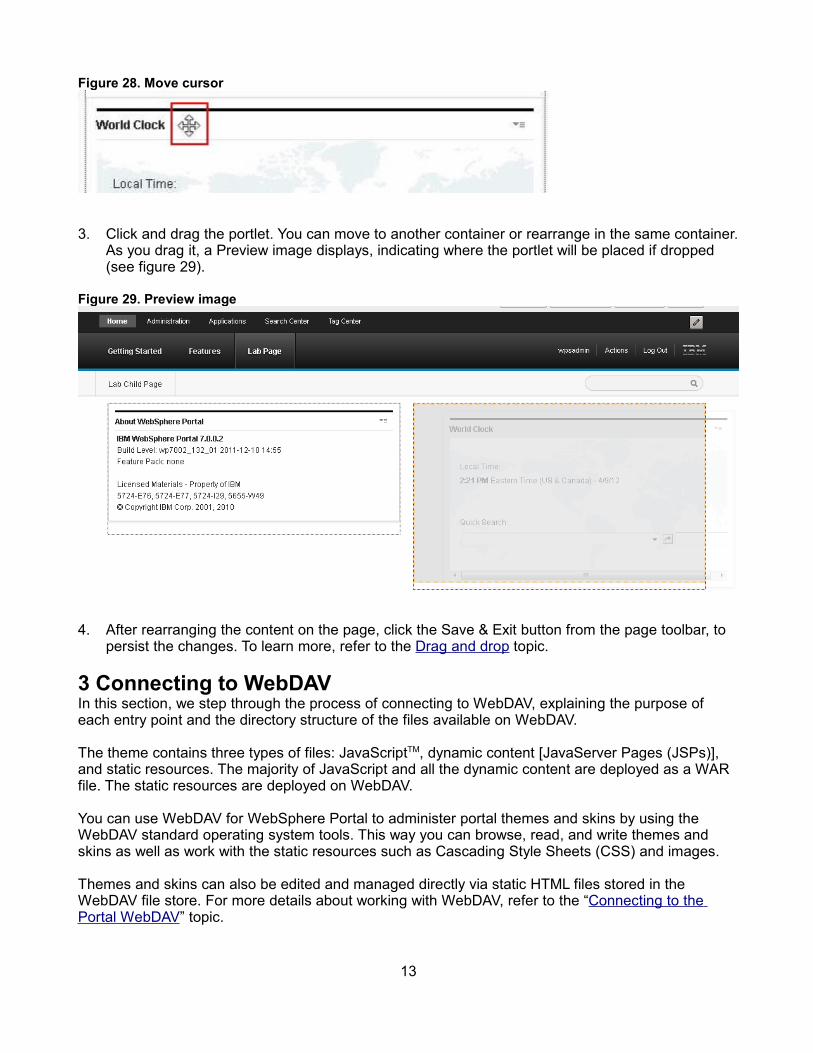
Figure 28. Move cursor
3. Click and drag the portlet. You can move to another container or rearrange in the same container. As you drag it, a Preview image displays, indicating where the portlet will be placed if dropped (see figure 29).
Figure 29. Preview image
4. After rearranging the content on the page, click the Save & Exit button from the page toolbar, to persist the changes. To learn more, refer to the Drag and drop topic.
3 Connecting to WebDAVIn this section, we step through the process of connecting to WebDAV, explaining the purpose of each entry point and the directory structure of the files available on WebDAV.
The theme contains three types of files: JavaScriptTM, dynamic content [JavaServer Pages (JSPs)], and static resources. The majority of JavaScript and all the dynamic content are deployed as a WAR file. The static resources are deployed on WebDAV.
You can use WebDAV for WebSphere Portal to administer portal themes and skins by using the WebDAV standard operating system tools. This way you can browse, read, and write themes and skins as well as work with the static resources such as Cascading Style Sheets (CSS) and images.
Themes and skins can also be edited and managed directly via static HTML files stored in the WebDAV file store. For more details about working with WebDAV, refer to the “Connecting to the Portal WebDAV” topic.
13
3.1 Connecting to the theme administration entry pointsThe themelist entry point is for working with themes from an administrative perspective, such as creating a new theme, deleting a theme, working the metadata, or modifying the title.
Connecting to the themelist entry point:1. Go to the desktop of the virtual image and launch AnyClient, using the “AnyClient (for WebDAV)”
icon (see figure 30).
Figure 30. AnyClient desktop icon
2. Once AnyClient is launched, select File --- Site Manager (see figure 31).
Figure 31. AnyClient window
3. The Connect window displays; click the New button in the bottom left-hand corner (see figure 32).
14

Figure 32. Connect window
4. This creates a new entry under Site Manager, called “New Site”; double-click on the New Site title and rename it “wp themelist” (see figure 33).
Figure 33. wp themelist
5. The form shown in figure 34 will be enabled; fill in the fields using these values:
• Host: http://localhost:10039/wps/mycontenthandler/dav/themelist/• Username: wpsadmin• Password: wpsadmin• Protocol: WebDAV
15
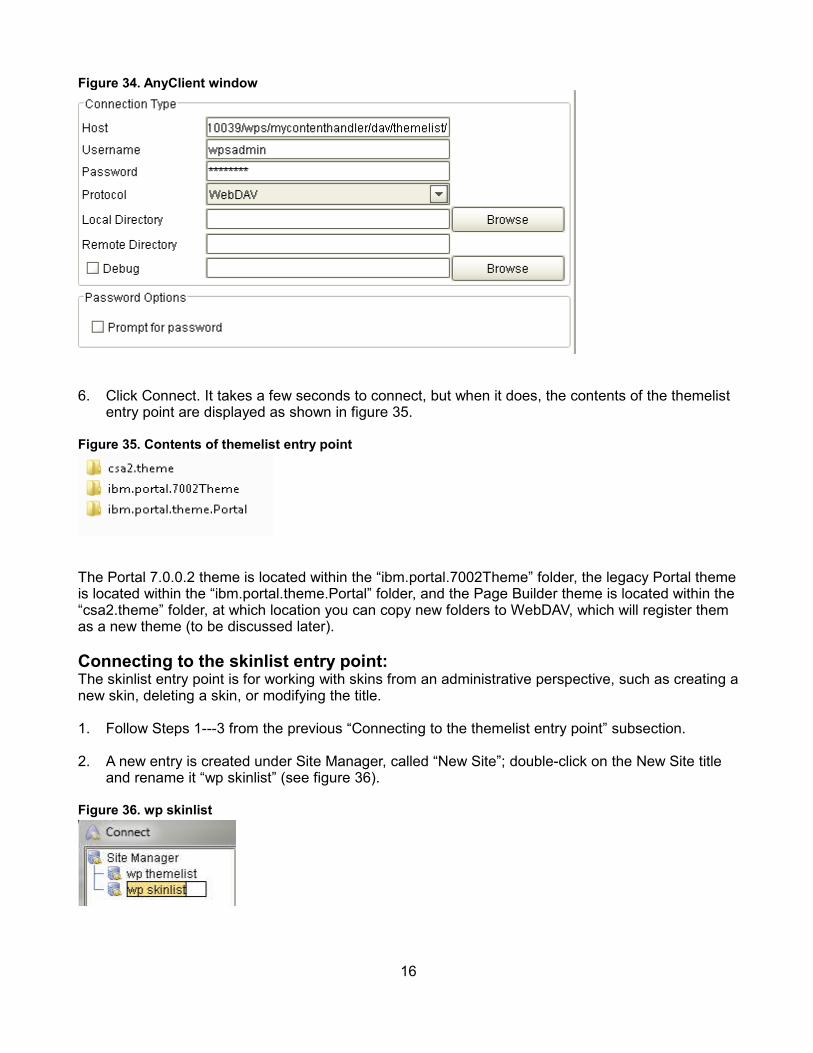
Figure 34. AnyClient window
6. Click Connect. It takes a few seconds to connect, but when it does, the contents of the themelist entry point are displayed as shown in figure 35.
Figure 35. Contents of themelist entry point
The Portal 7.0.0.2 theme is located within the “ibm.portal.7002Theme” folder, the legacy Portal theme is located within the “ibm.portal.theme.Portal” folder, and the Page Builder theme is located within the “csa2.theme” folder, at which location you can copy new folders to WebDAV, which will register them as a new theme (to be discussed later).
Connecting to the skinlist entry point:The skinlist entry point is for working with skins from an administrative perspective, such as creating a new skin, deleting a skin, or modifying the title.
1. Follow Steps 1---3 from the previous “Connecting to the themelist entry point” subsection.
2. A new entry is created under Site Manager, called “New Site”; double-click on the New Site title and rename it “wp skinlist” (see figure 36).
Figure 36. wp skinlist
16
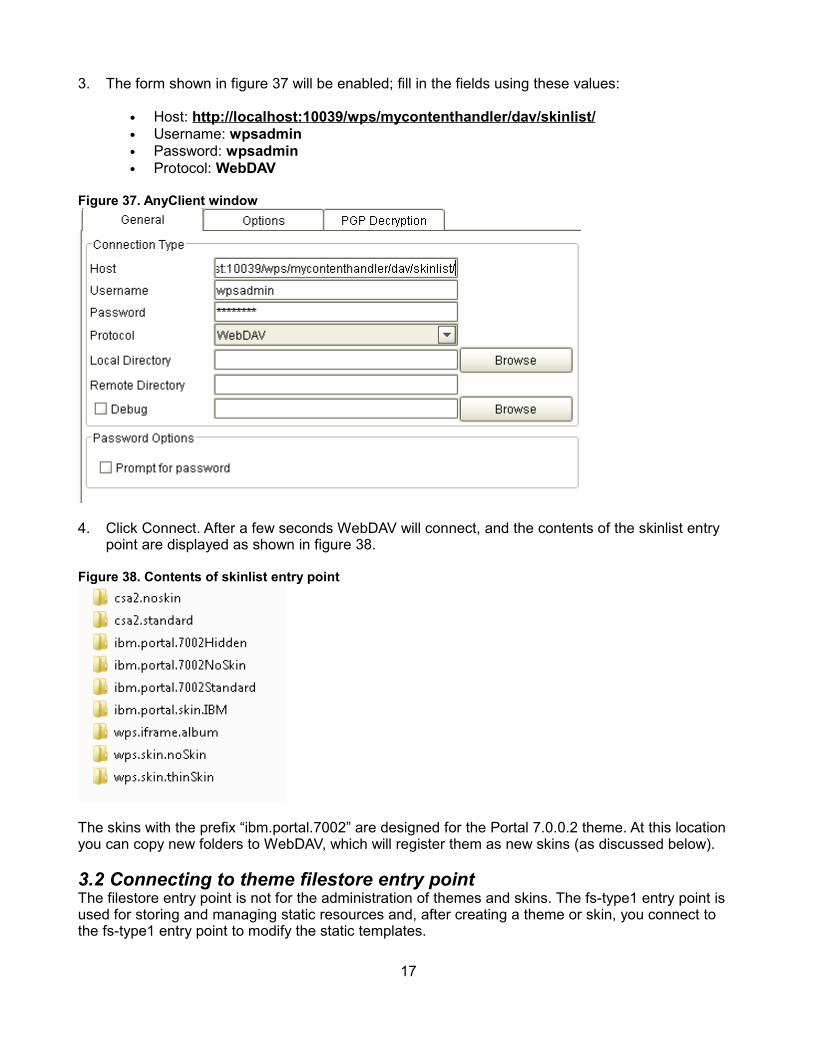
3. The form shown in figure 37 will be enabled; fill in the fields using these values:
• Host: http://localhost:10039/wps/mycontenthandler/dav/skinlist/• Username: wpsadmin• Password: wpsadmin• Protocol: WebDAV
Figure 37. AnyClient window
4. Click Connect. After a few seconds WebDAV will connect, and the contents of the skinlist entry point are displayed as shown in figure 38.
Figure 38. Contents of skinlist entry point
The skins with the prefix “ibm.portal.7002” are designed for the Portal 7.0.0.2 theme. At this location you can copy new folders to WebDAV, which will register them as new skins (as discussed below).
3.2 Connecting to theme filestore entry pointThe filestore entry point is not for the administration of themes and skins. The fs-type1 entry point is used for storing and managing static resources and, after creating a theme or skin, you connect to the fs-type1 entry point to modify the static templates.
17

1. Follow Steps 1--3 from the previous “Connecting to the skinlist entry point” subsection.
2. A new entry is created under Site Manager, called “New Site”; double-click on the New Site title and rename it “wp filestore.”
3. The form shown in figure 39 will be enabled, fill in the fields using these values:
• Host: http://localhost:10039/wps/mycontenthandler/dav/fs-type1/• Username: wpsadmin• Password: wpsadmin• Protocol: WebDAV
Figure 39. WebDrive window
4. Click Connect. After a few seconds, it will connect, after which the window in figure 40 displays the contents of the fs-type1 entry point.
Figure 40. Contents of fs-type1 entry point
The folders displayed in the above figure for the fs-type1 entry point store static resources for the theme framework (WebDAV prevents the deletion of these folders) and are defined as follows:
18
• /themes. Use this folder to store resources that are associated with themes, such as theme templates. You can also use it to store nested skins. Each subfolder represents one theme.
• /skins. Use this folder to store global skins. Typically, each subfolder of this folder represents one global skin.
• /layout-templates. Use this folder to store templates for layouts that can be used across themes. Typically, each subfolder represents one layout template. In this paper we scope the layouts to a theme, as discussed above.
• /common-resources. Use this folder to share common resources between different themes, so that they can be managed in a single place.
• /iwidgets. Use this folder to place widgets in. They are automatically deployed into the portal.
4 Customizing your Web experienceThe theme consists of a collection of static HTML templates that can inject server-side logic using dynamic-content spots. The introduction of WebDAV provides a logical separation of static and dynamic resources that allows for easy customization of themes, skins, and layouts.
Styles have been further optimized for performance and ease of customization by exploitation of the latest CSS3 features for linear gradients, drop shadows, and rounded corners. These new features give you flexibility to build extraordinary Web experiences.
4.1 Create a new themeThe best way to start creating your own custom theme is by copying an existing theme. This ensures that your theme has all the required elements for it to function.
NOTE: Do not modify the themes directly, as the themes can be updated by service fix packs and override your changes.
Create a new theme:1. Mount the “themelist” WebDAV entry point with your WebDAV client:
http://localhost:10039/wps/mycontenthandler/dav/themelist
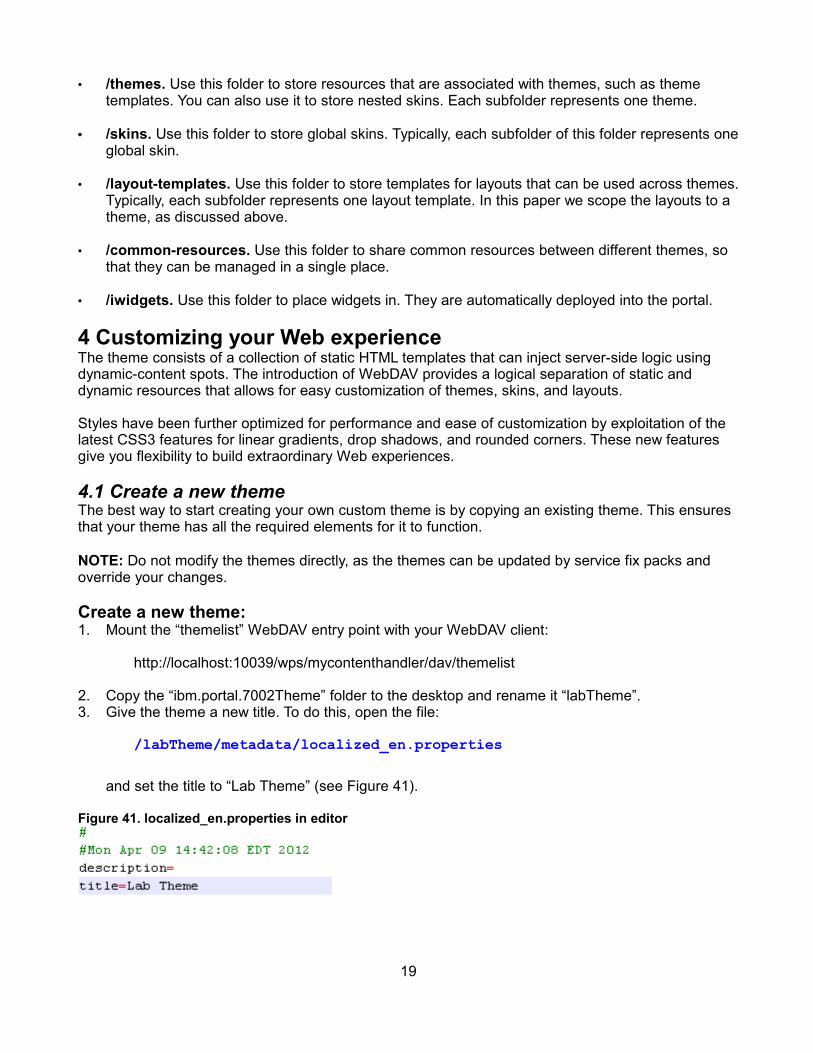
2. Copy the “ibm.portal.7002Theme” folder to the desktop and rename it “labTheme”.3. Give the theme a new title. To do this, open the file:
/labTheme/metadata/localized_en.properties
and set the title to “Lab Theme” (see Figure 41).
Figure 41. localized_en.properties in editor
19

NOTE: You can right-click on the file and select Edit with Notepad++. If you do not change the title, you will receive multiple themes with the same title in selection lists.
4. Open theme template file, located here: /labTheme/nls/theme_en.htmlNOTE: The theme.html file in the root directory of the theme redirects to a localized template located in the “nls” folder. You must modify the localized template for the changes to render. To learn more about theme templates, refer to “Working with Page Builder theme templates (theme.html)” and “Removing template localization for the theme and skin.”
5. Directly under the <body> element, insert a <div> element with the text “Lab Theme” inside to identify this new theme (see figure 42).
Figure 42. theme_en.html identification <div> in editor
When you apply this theme to a page, the identifying <div> will display and confirm that you applied the new theme since everything else will be the same as the Portal 7.0.0.2 theme.
6. Copy the “labTheme” folder back to the /themelist/ folder (see figure 43).
Figure 43. labTheme folder copied
• After the folder is done copying to WebDAV, your new theme is now defined in the Portal database. You can assign the theme to pages as required. To customize your theme, you can edit the theme files in WebDAV.
• To perform administrative customization (title, description, metadata), continue to use the /themelist/ entry point. To customize the templates and static resources, use the /fs-type1/ entry point.
• At this point your theme is still pointing to the same Default.jsp and dynamic content spots as the out-of-box Portal 7.0.0.2 theme.
At this time no skin is assigned to the theme, and if applied to a page, the fallback skin would be displayed. It is a best practice to assign a skin as the default:
1. Select Administration as shown in figure 44.
20
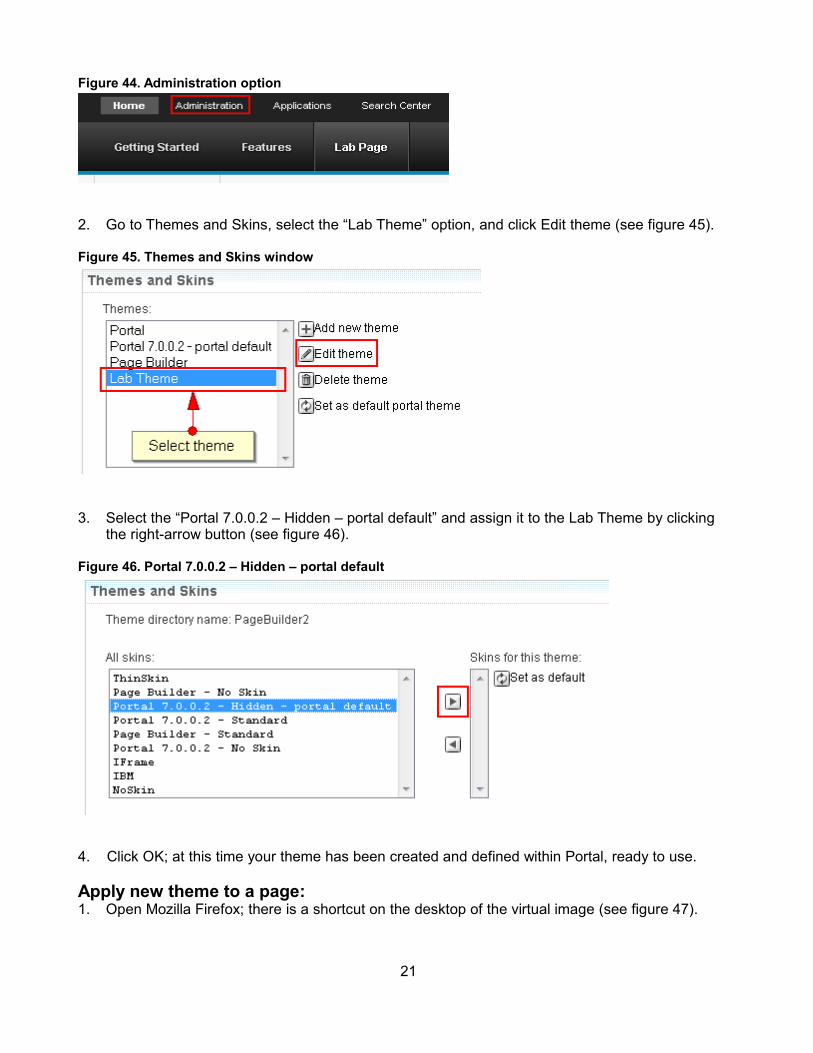
Figure 44. Administration option
2. Go to Themes and Skins, select the “Lab Theme” option, and click Edit theme (see figure 45).
Figure 45. Themes and Skins window
3. Select the “Portal 7.0.0.2 – Hidden – portal default” and assign it to the Lab Theme by clicking the right-arrow button (see figure 46).
Figure 46. Portal 7.0.0.2 – Hidden – portal default
4. Click OK; at this time your theme has been created and defined within Portal, ready to use.
Apply new theme to a page:1. Open Mozilla Firefox; there is a shortcut on the desktop of the virtual image (see figure 47).
21

Figure 47. Firefox shortcut
2. Go to http://localhost:10039/wps/portal3. Log in with username “wpsadmin” and password “wpsadmin”.4. Create a new page, open the Actions menu, and select Edit Page Properties (see figure 48).
Figure 48. Edit Page Properties
5. Under the Theme menu, select “Lab Theme” (see figure 49).
Figure 49. Lab Theme
6. Submit your changes by clicking OK. The new theme is now applied to the page and should look like that shown in figure 50.
Figure 50. New theme
You are now able to make updates to the theme template from WebDAV and, after the changes are persisted back to WebDAV, you can refresh the page to render the modifications.
It is not required that you keep the Lab Theme <div> element in the template; it was put in the template so that it was easy to distinguish between this theme and the default, out-of-box theme. To learn more, refer to “Copying the theme.”
22
4.2 Create a new skinYou can create skins to implement a custom look and feel. A successful approach to creating custom skins is copying an existing skin and then adding images and other custom resources. Copying either the Portal 7.0.0.2 Hidden or Standard skin is the best way to ensure that your custom skin contains all the required elements.
The Portal 7.0.0.2 – Hidden skin does not display any decorations in Page View mode, but it will display a titlebar and actions menu when in Edit mode. This skin was created for IBM Web Content Manager (WCM) content. The Portal 7.0.0.2 – Standard skin always displays a titlebar and actions menu, regardless of page mode.
NOTE: Do not modify the Portal 7.0.0.2 skins directly, as this theme can be updated by service fix packs and override your changes.
Create a new skin:1. Mount the skinlist WebDAV entry point with your WebDAV client:
http://localhost:10039/wps/mycontenthandler/dav/skinlist
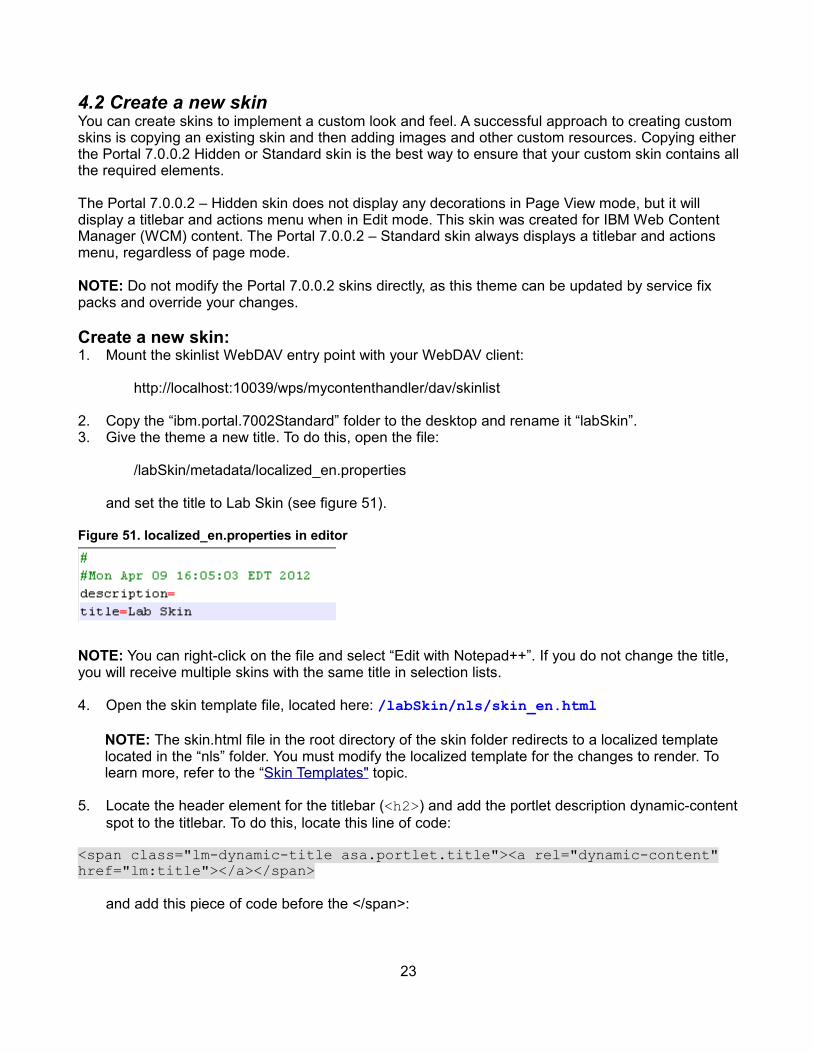
2. Copy the “ibm.portal.7002Standard” folder to the desktop and rename it “labSkin”.3. Give the theme a new title. To do this, open the file:
/labSkin/metadata/localized_en.properties
and set the title to Lab Skin (see figure 51).
Figure 51. localized_en.properties in editor
NOTE: You can right-click on the file and select “Edit with Notepad++”. If you do not change the title, you will receive multiple skins with the same title in selection lists.
4. Open the skin template file, located here: /labSkin/nls/skin_en.htmlNOTE: The skin.html file in the root directory of the skin folder redirects to a localized template located in the “nls” folder. You must modify the localized template for the changes to render. To learn more, refer to the “Skin Templates" topic.
5. Locate the header element for the titlebar (<h2>) and add the portlet description dynamic-content spot to the titlebar. To do this, locate this line of code:
<span class="lm-dynamic-title asa.portlet.title"><a rel="dynamic-content" href="lm:title"></a></span>
and add this piece of code before the </span>:
23

<br /><a rel="dynamic-content" href="lm:description"></a>
Figure 52 shows what the source code should look like after you add the new line of code.
Figure 52. Modified source code
When you apply this skin to a layout control the titlebar description will display and confirm that you applied the new skin since everything else will be the same as the Page Builder standard skin.
6. Copy the labSkin folder back to the /skinlist/ folder (see figure 53).
Figure 53. labSkin folder copied
After the folder is done copying to WebDAV your new skin is now defined in the Portal database. You can assign the skin to layout controls as required. For more information, refer to the “Create a skin” topic.
Apply new skin to a layout control:1. Open Firefox and go to http://localhost:10039/wps/portal2. Log in with username “wpsadmin” and password “wpsadmin”3. Select Administration and then select Themes and Skins on the left-hand navigation.4. Select Lab Theme from the Themes list, and click the Edit theme button (see figure 54).
24
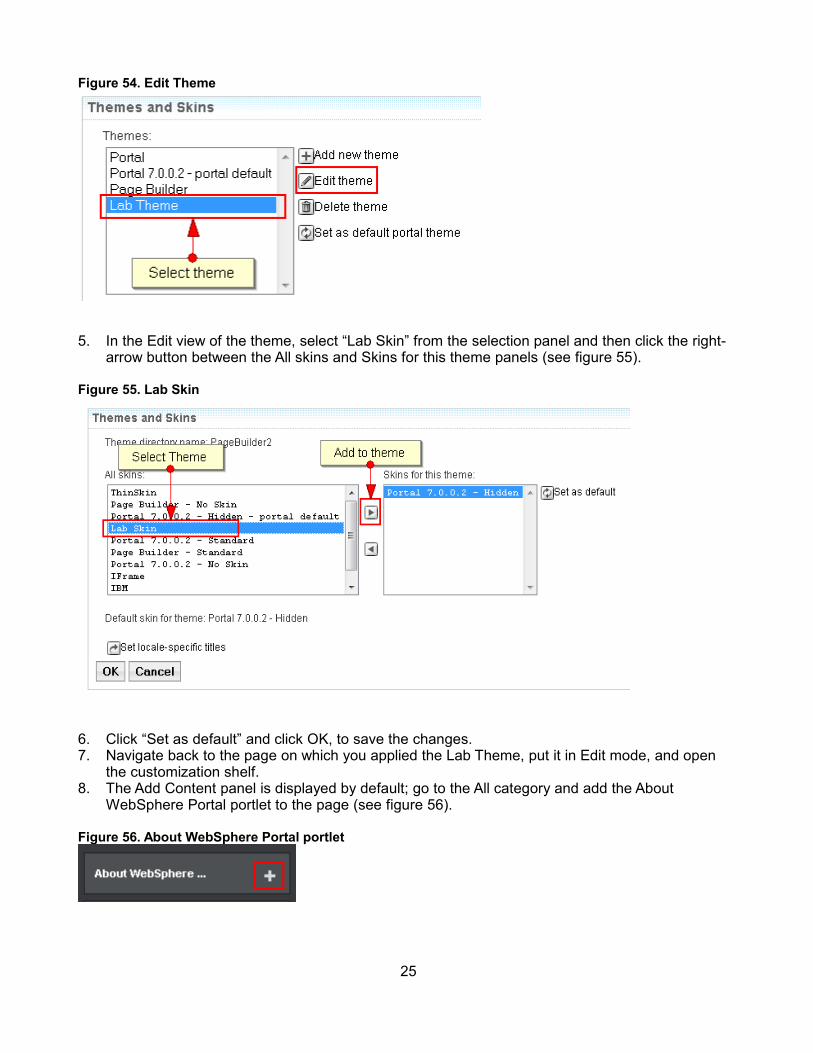
Figure 54. Edit Theme
5. In the Edit view of the theme, select “Lab Skin” from the selection panel and then click the right-arrow button between the All skins and Skins for this theme panels (see figure 55).
Figure 55. Lab Skin
6. Click “Set as default” and click OK, to save the changes.7. Navigate back to the page on which you applied the Lab Theme, put it in Edit mode, and open
the customization shelf.8. The Add Content panel is displayed by default; go to the All category and add the About
WebSphere Portal portlet to the page (see figure 56).
Figure 56. About WebSphere Portal portlet
25
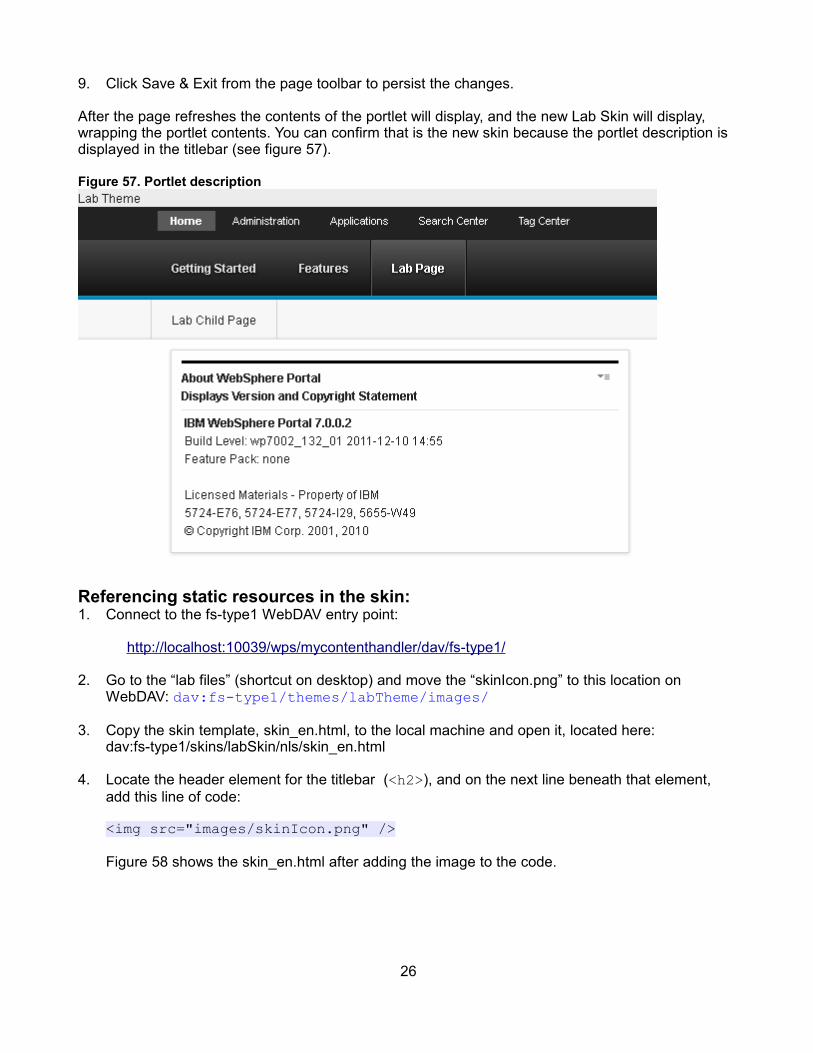
9. Click Save & Exit from the page toolbar to persist the changes.
After the page refreshes the contents of the portlet will display, and the new Lab Skin will display, wrapping the portlet contents. You can confirm that is the new skin because the portlet description is displayed in the titlebar (see figure 57).
Figure 57. Portlet description
Referencing static resources in the skin:1. Connect to the fs-type1 WebDAV entry point:
http://localhost:10039/wps/mycontenthandler/dav/fs-type1/
2. Go to the “lab files” (shortcut on desktop) and move the “skinIcon.png” to this location on WebDAV: dav:fs-type1/themes/labTheme/images/
3. Copy the skin template, skin_en.html, to the local machine and open it, located here:dav:fs-type1/skins/labSkin/nls/skin_en.html
4. Locate the header element for the titlebar (<h2>), and on the next line beneath that element, add this line of code:
<img src="images/skinIcon.png" />
Figure 58 shows the skin_en.html after adding the image to the code.
26
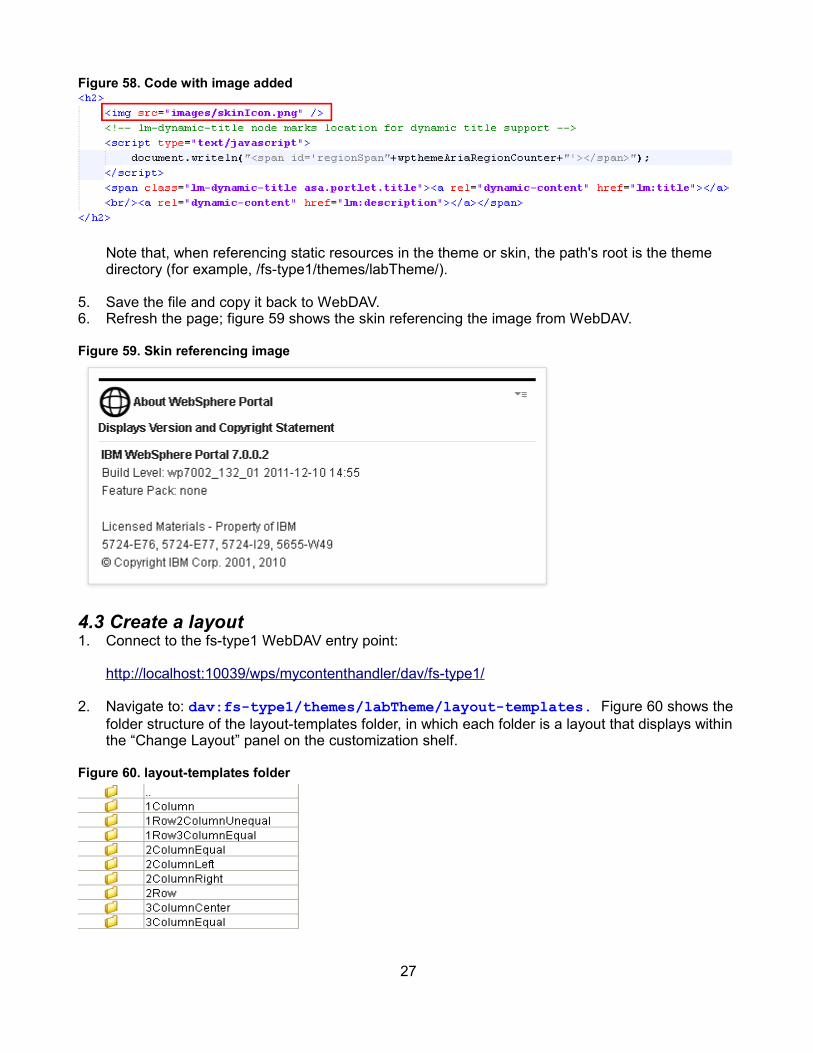
Figure 58. Code with image added
Note that, when referencing static resources in the theme or skin, the path's root is the theme directory (for example, /fs-type1/themes/labTheme/).
5. Save the file and copy it back to WebDAV. 6. Refresh the page; figure 59 shows the skin referencing the image from WebDAV.
Figure 59. Skin referencing image
4.3 Create a layout1. Connect to the fs-type1 WebDAV entry point:
http://localhost:10039/wps/mycontenthandler/dav/fs-type1/
2. Navigate to: dav:fs-type1/themes/labTheme/layout-templates. Figure 60 shows the folder structure of the layout-templates folder, in which each folder is a layout that displays within the “Change Layout” panel on the customization shelf.
Figure 60. layout-templates folder
27
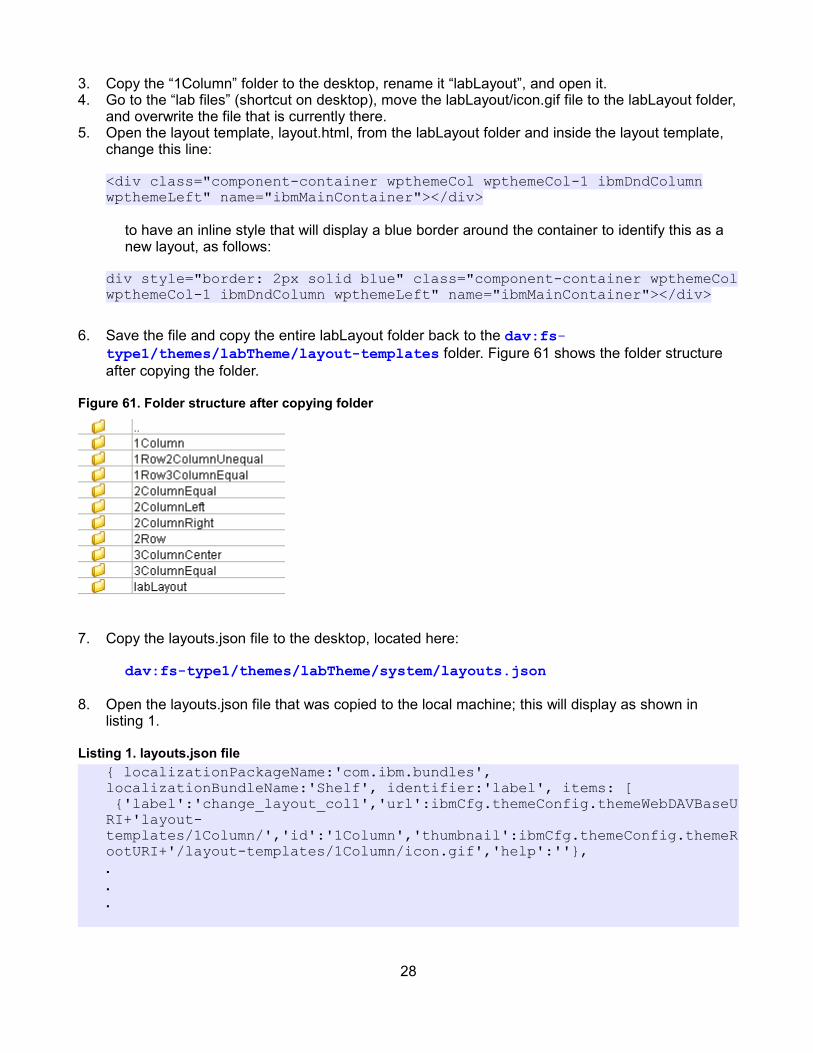
3. Copy the “1Column” folder to the desktop, rename it “labLayout”, and open it.4. Go to the “lab files” (shortcut on desktop), move the labLayout/icon.gif file to the labLayout folder,
and overwrite the file that is currently there.5. Open the layout template, layout.html, from the labLayout folder and inside the layout template,
change this line:
<div class="component-container wpthemeCol wpthemeCol-1 ibmDndColumn wpthemeLeft" name="ibmMainContainer"></div>
to have an inline style that will display a blue border around the container to identify this as a new layout, as follows:
div style="border: 2px solid blue" class="component-container wpthemeCol wpthemeCol-1 ibmDndColumn wpthemeLeft" name="ibmMainContainer"></div>
6. Save the file and copy the entire labLayout folder back to the dav:fs-type1/themes/labTheme/layout-templates folder. Figure 61 shows the folder structure after copying the folder.
Figure 61. Folder structure after copying folder
7. Copy the layouts.json file to the desktop, located here:
dav:fs-type1/themes/labTheme/system/layouts.json8. Open the layouts.json file that was copied to the local machine; this will display as shown in
listing 1.
Listing 1. layouts.json file { localizationPackageName:'com.ibm.bundles', localizationBundleName:'Shelf', identifier:'label', items: [ {'label':'change_layout_col1','url':ibmCfg.themeConfig.themeWebDAVBaseURI+'layout-templates/1Column/','id':'1Column','thumbnail':ibmCfg.themeConfig.themeRootURI+'/layout-templates/1Column/icon.gif','help':''},...
28
9. Copy the first line from the “items” array, shown here:
{'label':'change_layout_col1','url':ibmCfg.themeConfig.themeWebDAVBaseURI+'layout-templates/1Column/','id':'1Column','thumbnail':ibmCfg.themeConfig.themeRootURI+'/layout-templates/1Column/icon.gif','help':''},
10. Paste as first line in the “items” array, such as shown in listing 2.
Listing 2. One Column layout duplicated in layouts.json file{ localizationPackageName:'com.ibm.bundles', localizationBundleName:'Shelf', identifier:'label', items: [ {'label':'change_layout_col1','url':ibmCfg.themeConfig.themeWebDAVBaseURI+'layout-templates/1Column/','id':'1Column','thumbnail':ibmCfg.themeConfig.themeRootURI+'/layout-templates/1Column/icon.gif','help':''}, {'label':'change_layout_col1','url':ibmCfg.themeConfig.themeWebDAVBaseURI+'layout-templates/1Column/','id':'1Column','thumbnail':ibmCfg.themeConfig.themeRootURI+'/layout-templates/1Column/icon.gif','help':''},
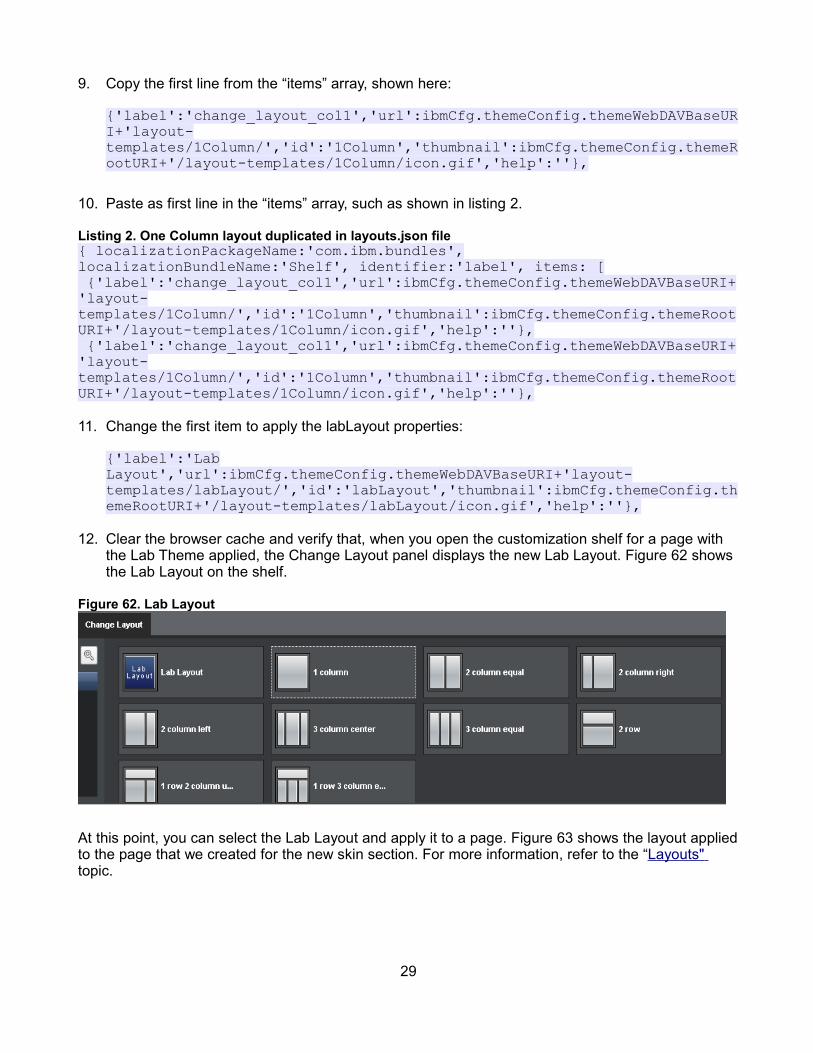
11. Change the first item to apply the labLayout properties:
{'label':'Lab Layout','url':ibmCfg.themeConfig.themeWebDAVBaseURI+'layout-templates/labLayout/','id':'labLayout','thumbnail':ibmCfg.themeConfig.themeRootURI+'/layout-templates/labLayout/icon.gif','help':''},
12. Clear the browser cache and verify that, when you open the customization shelf for a page with the Lab Theme applied, the Change Layout panel displays the new Lab Layout. Figure 62 shows the Lab Layout on the shelf.
Figure 62. Lab Layout
At this point, you can select the Lab Layout and apply it to a page. Figure 63 shows the layout applied to the page that we created for the new skin section. For more information, refer to the “Layouts" topic.
29

Figure 63. Layout applied to the page
4.4 Create a style 1. Connect to the fs-type1 WebDAV entry point, using
http://localhost:10039/wps/mycontenthandler/dav/fs-type1/
2. Navigate to dav:fs-type1/themes/labTheme/css. Figure 64 shows the folder structure of the css folder. The folders contain styles that are displayed when selecting them from the Change Style panel on the customization shelf.
Figure 64. css folder structure
3. Create a new folder on the desktop named “lab”.4. Go to the “lab files” and copy the file named labStyle/icon.gif to the lab folder.5. Create a new file inside the lab folder named lab.css, and open “lab.css”.6. Place the code in listing 3 inside the lab.css file. Copying these lines of code will override any
styles that are in the default styles, and for this lab this is easiest way to create a new look.
30
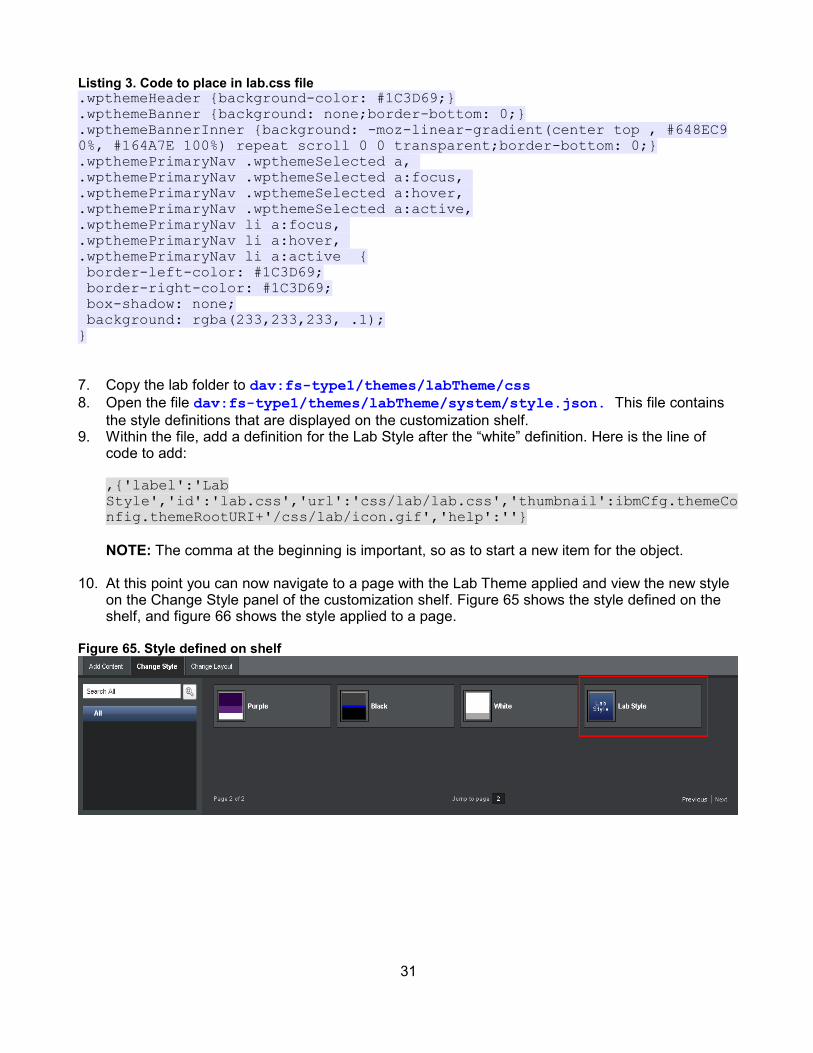
Listing 3. Code to place in lab.css file.wpthemeHeader {background-color: #1C3D69;}.wpthemeBanner {background: none;border-bottom: 0;}.wpthemeBannerInner {background: -moz-linear-gradient(center top , #648EC9 0%, #164A7E 100%) repeat scroll 0 0 transparent;border-bottom: 0;}.wpthemePrimaryNav .wpthemeSelected a, .wpthemePrimaryNav .wpthemeSelected a:focus, .wpthemePrimaryNav .wpthemeSelected a:hover, .wpthemePrimaryNav .wpthemeSelected a:active,.wpthemePrimaryNav li a:focus, .wpthemePrimaryNav li a:hover, .wpthemePrimaryNav li a:active { border-left-color: #1C3D69; border-right-color: #1C3D69; box-shadow: none; background: rgba(233,233,233, .1);}
7. Copy the lab folder to dav:fs-type1/themes/labTheme/css8. Open the file dav:fs-type1/themes/labTheme/system/style.json. This file contains
the style definitions that are displayed on the customization shelf.9. Within the file, add a definition for the Lab Style after the “white” definition. Here is the line of
code to add:
,{'label':'Lab Style','id':'lab.css','url':'css/lab/lab.css','thumbnail':ibmCfg.themeConfig.themeRootURI+'/css/lab/icon.gif','help':''}
NOTE: The comma at the beginning is important, so as to start a new item for the object.
10. At this point you can now navigate to a page with the Lab Theme applied and view the new style on the Change Style panel of the customization shelf. Figure 65 shows the style defined on the shelf, and figure 66 shows the style applied to a page.
Figure 65. Style defined on shelf
31

Figure 66. Style applied to page
For more information, refer to the “Creating a theme” topic.
4.5 Change the logo
Changing the default IBM logoOut of the box, an IBM logo is displayed next to the common actions of the theme, but you can easily change this logo:
1. Navigate to a page or create a page with the Lab Theme applied and, using the customization shelf, change the style to “Lab Style”. Save the page.
2. Open Firebug by clicking the “bug” icon in the bottom right-hand corner of Firefox.3. Select the inspector tool from the Firebug toolbar in the upper left-hand corner of the Firebug
panel (see figure 67).
Figure 67. Inspector tool icon
4. As you hover over elements on the page, you will see a blue highlight around the element, and the HTML panel in Firebug displays the element information.
5. Hover over the IBM logo in the top right-hand corner of the theme (see figure 68) and click it. This stops the Inspector from continuing to the next element, and the information will persist in the Firebug panel.
32
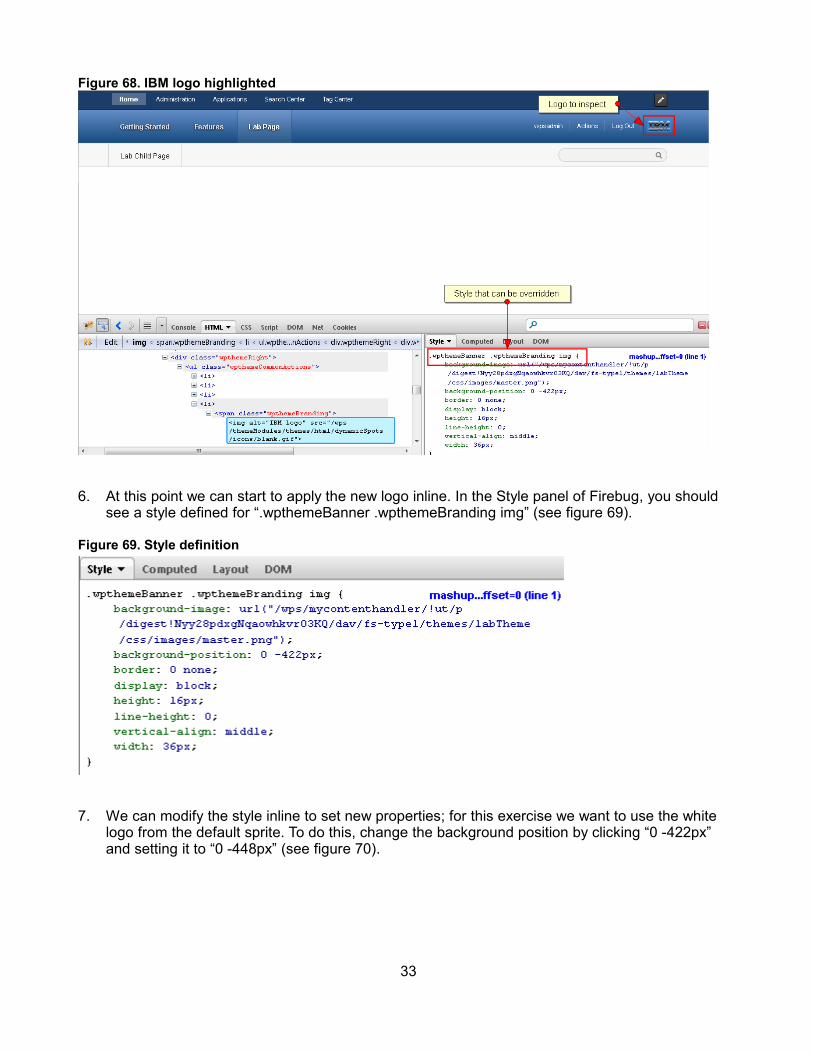
Figure 68. IBM logo highlighted
6. At this point we can start to apply the new logo inline. In the Style panel of Firebug, you should see a style defined for “.wpthemeBanner .wpthemeBranding img” (see figure 69).
Figure 69. Style definition
7. We can modify the style inline to set new properties; for this exercise we want to use the white logo from the default sprite. To do this, change the background position by clicking “0 -422px” and setting it to “0 -448px” (see figure 70).
33

Figure 70. Change background position
The white IBM logo displays (see figure 81).
Figure 81. White IBM logo
8. At this point you can now copy the style override to Lab Style. Copy the “Lab Style” source from WebDAV to the local machine: dav:fs-type1/themes/labTheme/css/lab/lab.css
9. Place the following line of code at the end of the file, taken from the Firebug panel:.wpthemeBanner .wpthemeBranding img {background-position: 0 -448px;}
10. Copy lab.css back to WebDAV. Refresh the page; you will see the white logo is now displayed in the theme.
You should now be familiar with using the Firebug inspector tool and how easy it is to modify the style and customize a logo. You can change the background image, size, and other attributes to accommodate your company's re-branding. If you have no need for a logo in the place where the IBM branding is located, you can add the attribute “display: none” so it won't display.
Display and change the logo default header locationThe IBM logo that was modified in the beginning of this exercise is in an abnormal location for branding. Most re-branding requires a logo in the top left corner of the theme. Out of box we have an element that is already in place that can be customized.
1. Go to the lab files and copy the file named “labLogo.png” to this location on WebDAV:dav:fs-type1/themes/labTheme/css/images/
2. Open the lab.css file that you copied to your local machine and copy this line of code to the bottom of the file: .wpthemeLogo { display: block;}
3. Copy the lab.css file to WebDAV and refresh the page; you now see a WebSphere Portal logo displayed in the top header (see figure 82).
34
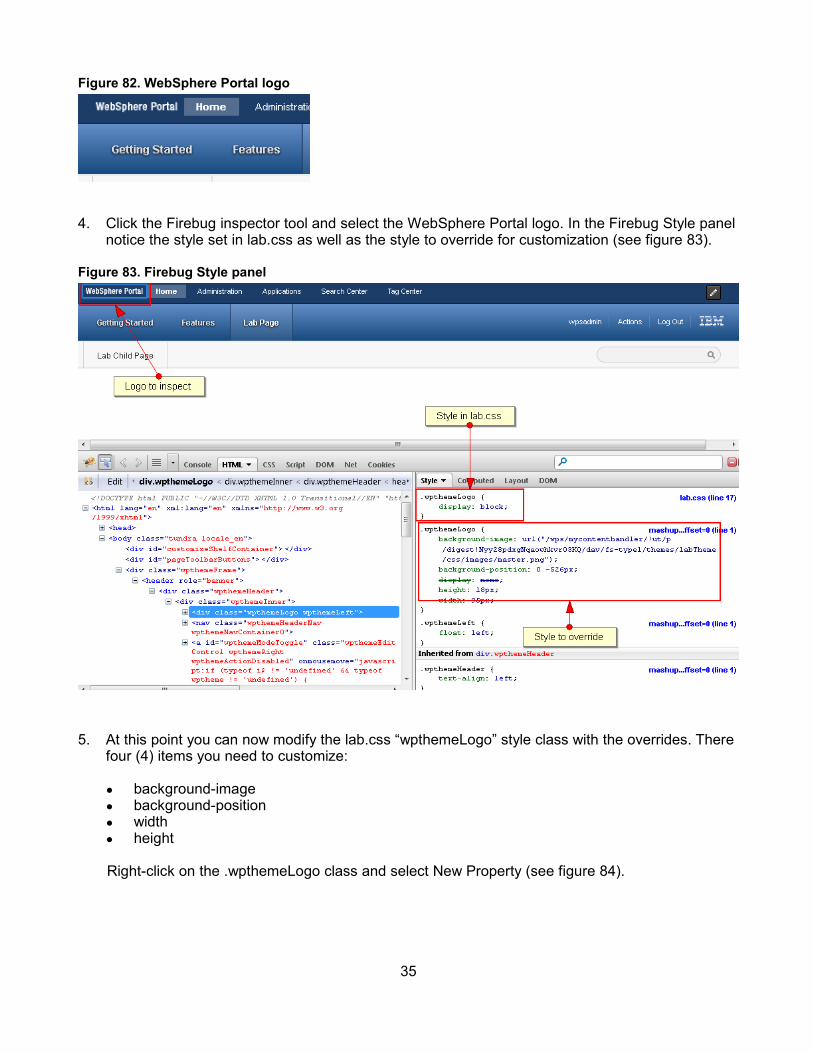
Figure 82. WebSphere Portal logo
4. Click the Firebug inspector tool and select the WebSphere Portal logo. In the Firebug Style panel notice the style set in lab.css as well as the style to override for customization (see figure 83).
Figure 83. Firebug Style panel
5. At this point you can now modify the lab.css “wpthemeLogo” style class with the overrides. There four (4) items you need to customize:
● background-image● background-position● width● height
Right-click on the .wpthemeLogo class and select New Property (see figure 84).
35
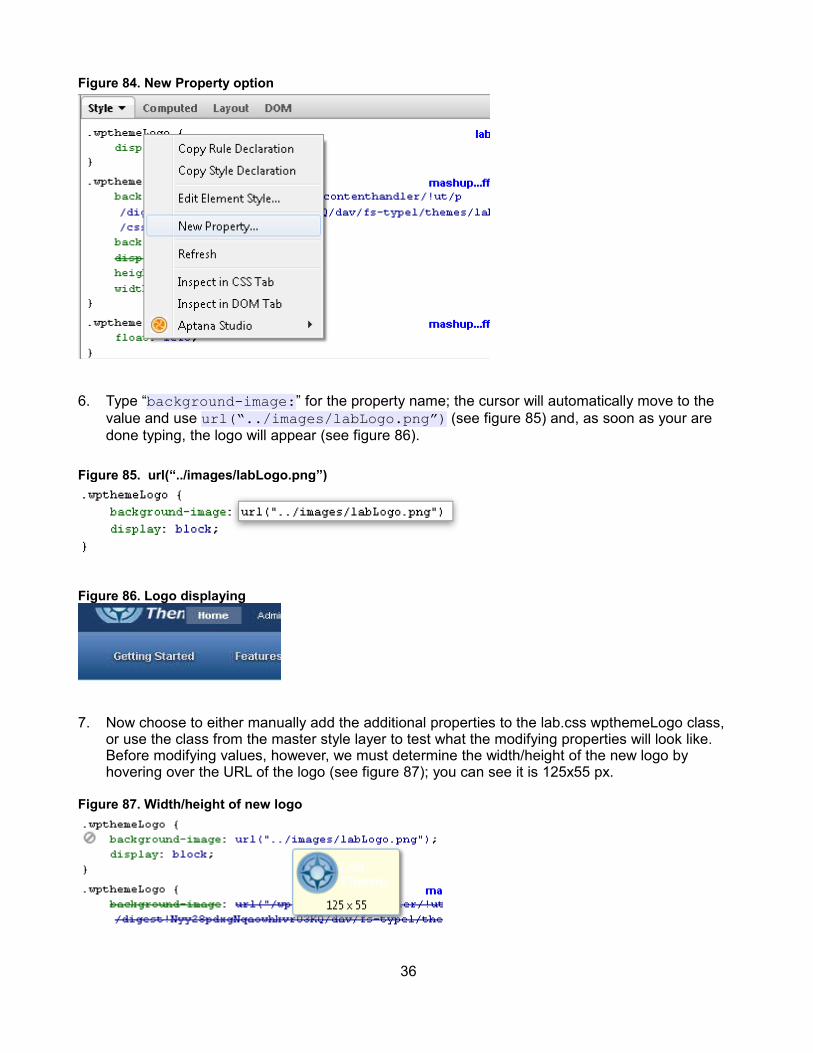
Figure 84. New Property option
6. Type “background-image:” for the property name; the cursor will automatically move to the value and use url(“../images/labLogo.png”) (see figure 85) and, as soon as your are done typing, the logo will appear (see figure 86).
Figure 85. url(“../images/labLogo.png”)
Figure 86. Logo displaying
7. Now choose to either manually add the additional properties to the lab.css wpthemeLogo class, or use the class from the master style layer to test what the modifying properties will look like. Before modifying values, however, we must determine the width/height of the new logo by hovering over the URL of the logo (see figure 87); you can see it is 125x55 px.
Figure 87. Width/height of new logo
36

To add the additional properties you can right-click on the lab.css wpthemeLogo, as you did in the previous step, and fill in the values.
To modify the wpthemeLogo from the master style layer, you can click directly on the property such as “width” and type a new value or use the arrow keys to increase/decrease the value (see figure 88. The width of the logo should be set to 125px, and the height set to 55px.
Figure 88. Modify from master style layer
Firebug also makes it simple to enable/disable classes that are already defined for an element: Just click the “ ” sign that is displayed to the left-hand side of the property name as you hover over it. This comes in handy for the “background-position” property as our lab logo does not require this property (see figure 89).
Figure 89. Enable/disable classes
8. At the end of the modification process we will come up with the style definition for the wpthemeLogo. Copy the code in listing 4 into lab.css and overwrite the previous definition for wpthemeLogo.
Listing 4. Code to copy into lab.css.wpthemeLogo{ display: block; background-position: 0 0; background-image: url("../images/labLogo.png"); width: 125px; height: 55px;}
9. Copy lab.css back to WebDAV and refresh the page; the new logo is displayed in the header (see figure 90).
37
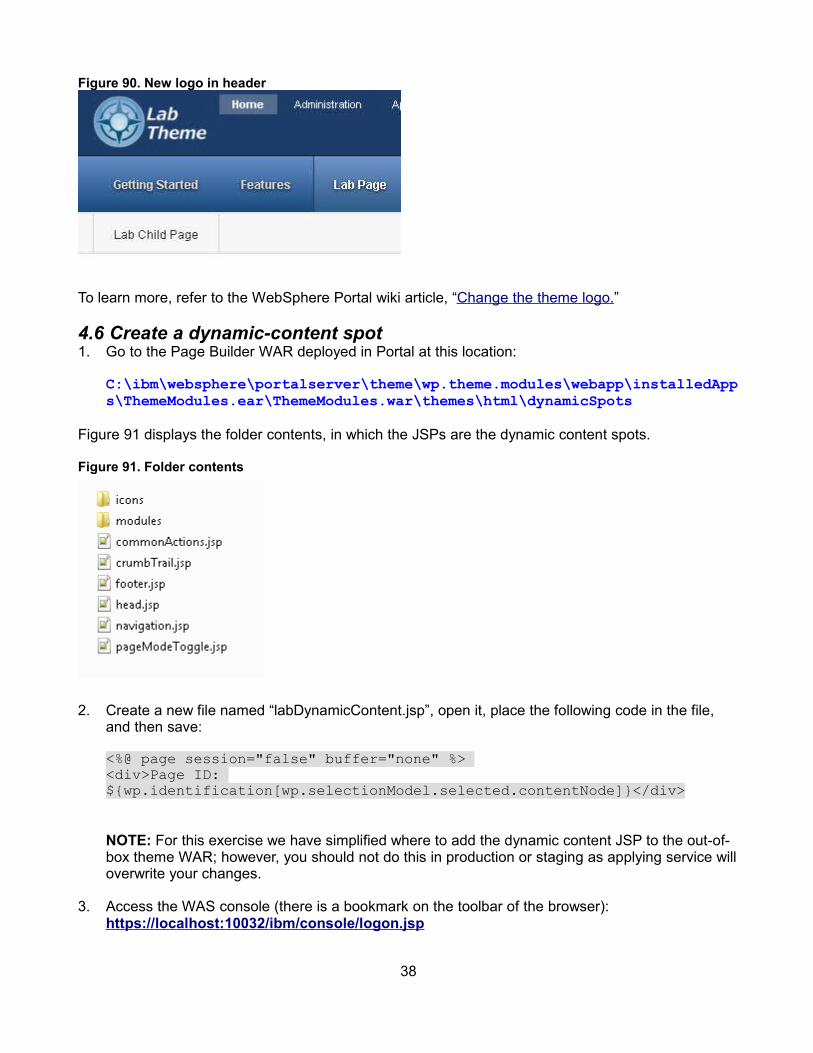
Figure 90. New logo in header
To learn more, refer to the WebSphere Portal wiki article, “Change the theme logo.”
4.6 Create a dynamic-content spot 1. Go to the Page Builder WAR deployed in Portal at this location:
C:\ibm\websphere\portalserver\theme\wp.theme.modules\webapp\installedApps\ThemeModules.ear\ThemeModules.war\themes\html\dynamicSpots
Figure 91 displays the folder contents, in which the JSPs are the dynamic content spots.
Figure 91. Folder contents
2. Create a new file named “labDynamicContent.jsp”, open it, place the following code in the file, and then save:
<%@ page session="false" buffer="none" %> <div>Page ID: ${wp.identification[wp.selectionModel.selected.contentNode]}</div>
NOTE: For this exercise we have simplified where to add the dynamic content JSP to the out-of-box theme WAR; however, you should not do this in production or staging as applying service will overwrite your changes.
3. Access the WAS console (there is a bookmark on the toolbar of the browser):https://localhost:10032/ibm/console/logon.jsp
38

4. Log in using “wpsadmin” for both the servername and password.5. Navigate to Resources --- Resource Environment --- Resource environment providers ---
WP DynamicContentSpotMappings.6. Select “Custom properties” on the right-hand side of the window (see figure 92).
Figure 92. Custom properties option
7. Click the New button, as shown in figure 93, and enter the name “labDynamicContent” as the ID of the mapping.
Figure 93. New button
8. Enter the following value as the URI of the dynamic content:
res:/wps/themeModules/themes/html/dynamicSpots/labDynamicContent.jsp
Figure 94 shows the properties set for the Resource Environment Provider (REP).
39
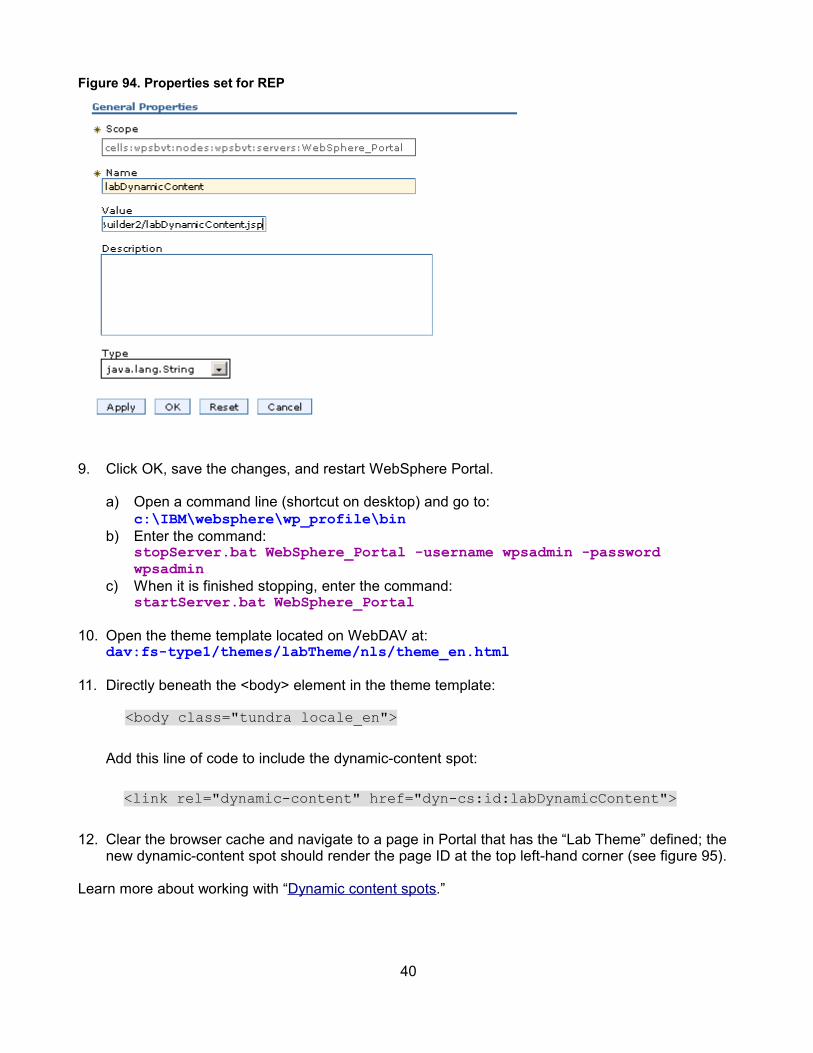
Figure 94. Properties set for REP
9. Click OK, save the changes, and restart WebSphere Portal.
a) Open a command line (shortcut on desktop) and go to: c:\IBM\websphere\wp_profile\bin
b) Enter the command:stopServer.bat WebSphere_Portal -username wpsadmin -password wpsadmin
c) When it is finished stopping, enter the command:startServer.bat WebSphere_Portal
10. Open the theme template located on WebDAV at:dav:fs-type1/themes/labTheme/nls/theme_en.html
11. Directly beneath the <body> element in the theme template:
<body class="tundra locale_en">
Add this line of code to include the dynamic-content spot:
<link rel="dynamic-content" href="dyn-cs:id:labDynamicContent">
12. Clear the browser cache and navigate to a page in Portal that has the “Lab Theme” defined; the new dynamic-content spot should render the page ID at the top left-hand corner (see figure 95).
Learn more about working with “Dynamic content spots.”
40
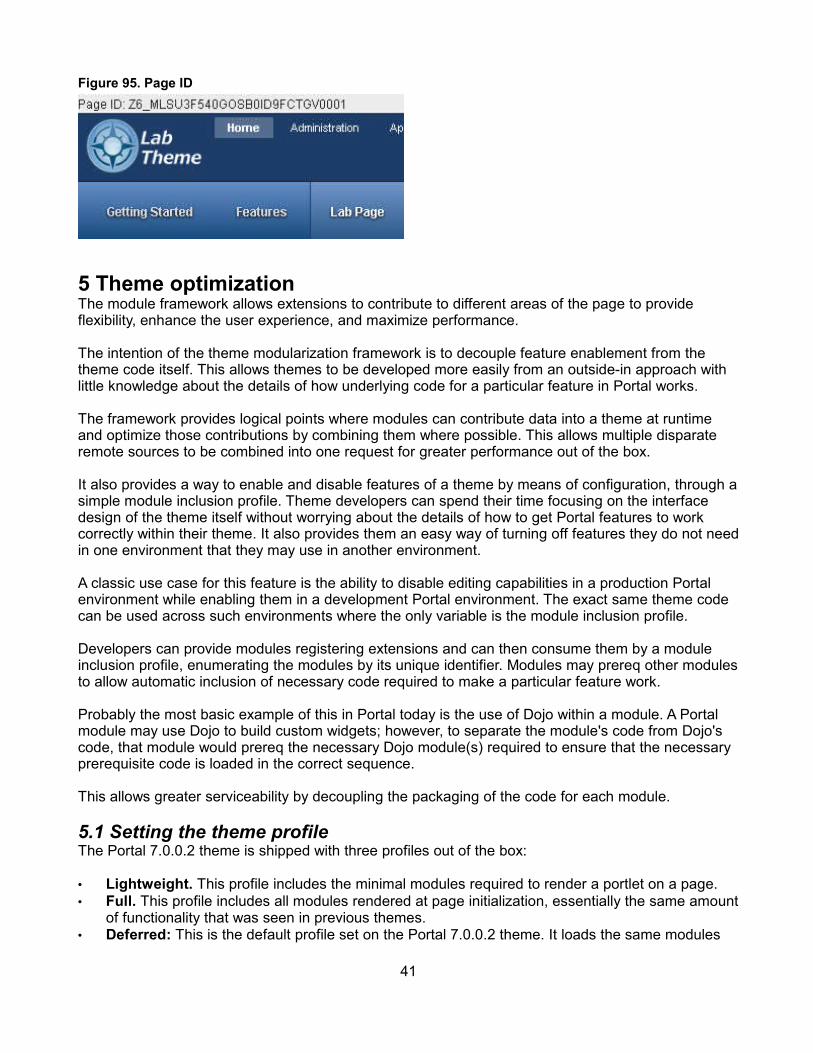
Figure 95. Page ID
5 Theme optimizationThe module framework allows extensions to contribute to different areas of the page to provide flexibility, enhance the user experience, and maximize performance.
The intention of the theme modularization framework is to decouple feature enablement from the theme code itself. This allows themes to be developed more easily from an outside-in approach with little knowledge about the details of how underlying code for a particular feature in Portal works.
The framework provides logical points where modules can contribute data into a theme at runtime and optimize those contributions by combining them where possible. This allows multiple disparate remote sources to be combined into one request for greater performance out of the box.
It also provides a way to enable and disable features of a theme by means of configuration, through a simple module inclusion profile. Theme developers can spend their time focusing on the interface design of the theme itself without worrying about the details of how to get Portal features to work correctly within their theme. It also provides them an easy way of turning off features they do not need in one environment that they may use in another environment.
A classic use case for this feature is the ability to disable editing capabilities in a production Portal environment while enabling them in a development Portal environment. The exact same theme code can be used across such environments where the only variable is the module inclusion profile.
Developers can provide modules registering extensions and can then consume them by a module inclusion profile, enumerating the modules by its unique identifier. Modules may prereq other modules to allow automatic inclusion of necessary code required to make a particular feature work.
Probably the most basic example of this in Portal today is the use of Dojo within a module. A Portal module may use Dojo to build custom widgets; however, to separate the module's code from Dojo's code, that module would prereq the necessary Dojo module(s) required to ensure that the necessary prerequisite code is loaded in the correct sequence.
This allows greater serviceability by decoupling the packaging of the code for each module.
5.1 Setting the theme profileThe Portal 7.0.0.2 theme is shipped with three profiles out of the box:
• Lightweight. This profile includes the minimal modules required to render a portlet on a page.• Full. This profile includes all modules rendered at page initialization, essentially the same amount
of functionality that was seen in previous themes.• Deferred: This is the default profile set on the Portal 7.0.0.2 theme. It loads the same modules
41

as the lightweight profile in View mode, but when entering Edit mode or opening the Actions menu, it will load the deferred modules as well.
You set the default theme profile by using theme metadata key “resourceaggregation.profile”:
<parameter name="resourceaggregation.profile" type="string" update="set"><![CDATA[profiles/profile_deferred.json]]></parameter>
You have the ability to override the profile set for the theme on a per-page basis, using page metadata. The profiles are located on WebDAV at this location:
dav:fs-type1/themes/labTheme/profiles
Setting a profile on a page1. Navigate to a page or create a page with the Lab Theme applied.2. Open the Actions menu and select Edit Page Properties (see figure 96).
Figure 96. Edit Page Properties option
3. Expand the Advanced Properties section (see figure 97).
42
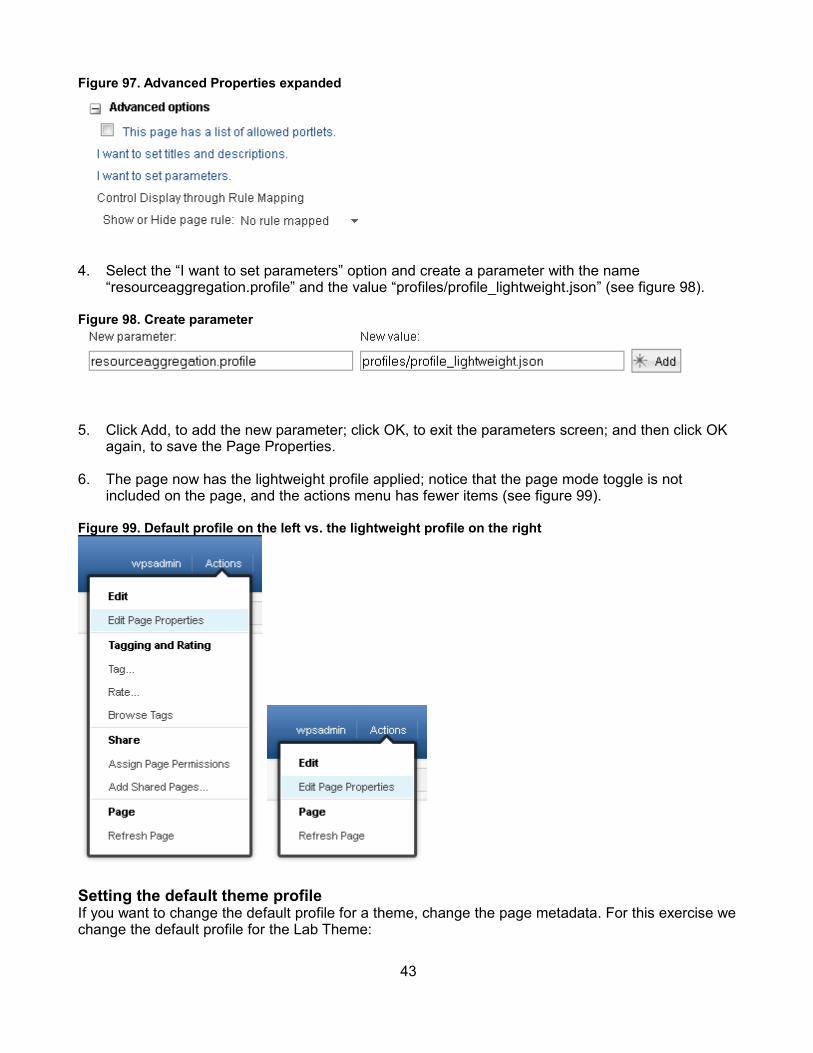
Figure 97. Advanced Properties expanded
4. Select the “I want to set parameters” option and create a parameter with the name “resourceaggregation.profile” and the value “profiles/profile_lightweight.json” (see figure 98).
Figure 98. Create parameter
5. Click Add, to add the new parameter; click OK, to exit the parameters screen; and then click OK again, to save the Page Properties.
6. The page now has the lightweight profile applied; notice that the page mode toggle is not included on the page, and the actions menu has fewer items (see figure 99).
Figure 99. Default profile on the left vs. the lightweight profile on the right
Setting the default theme profileIf you want to change the default profile for a theme, change the page metadata. For this exercise we change the default profile for the Lab Theme:
43
1. Connect to the themelist entry point on WebDAV:
http://localhost:10039/wps/mycontenthandler/dav/themelist/2. Open the labTheme folder and copy the metadata.properties file to your local drive. Edit the local
copy of the file and modify it to point to a different profile; for this exercise we use the lightweight profile:
resourceaggregation.profile=profiles/profile_lightweight.json
3. Copy the metadata.properties file back into the labTheme folder on WebDAV.4. Navigate to any page created with the labTheme; it will have the lightweight profile applied. Note
that the page mode toggle is not included on the page, and the Actions menu has fewer items.
To Learn more, refer to “Changing the theme profile”.
5.2 Create a custom profile 1. Connect to the fs-type1 WebDAV entry point:
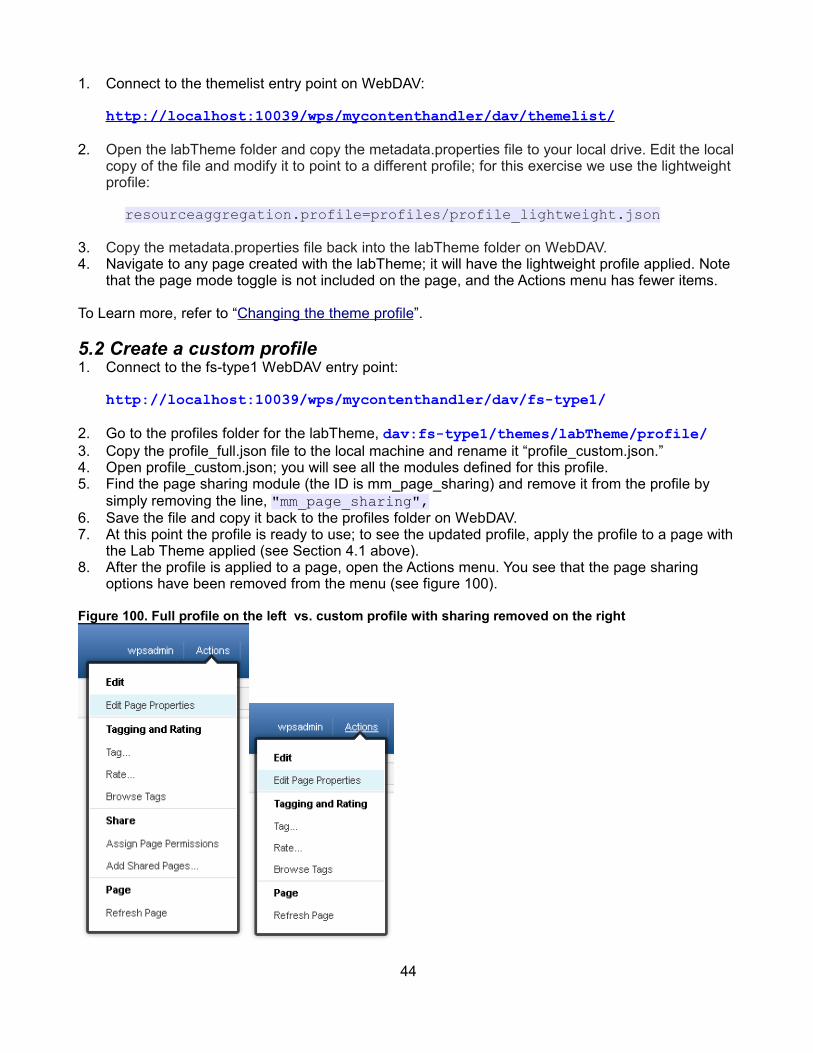
http://localhost:10039/wps/mycontenthandler/dav/fs-type1/2. Go to the profiles folder for the labTheme, dav:fs-type1/themes/labTheme/profile/ 3. Copy the profile_full.json file to the local machine and rename it “profile_custom.json.”4. Open profile_custom.json; you will see all the modules defined for this profile.5. Find the page sharing module (the ID is mm_page_sharing) and remove it from the profile by
simply removing the line, "mm_page_sharing",6. Save the file and copy it back to the profiles folder on WebDAV.7. At this point the profile is ready to use; to see the updated profile, apply the profile to a page with
the Lab Theme applied (see Section 4.1 above).8. After the profile is applied to a page, open the Actions menu. You see that the page sharing
options have been removed from the menu (see figure 100).
Figure 100. Full profile on the left vs. custom profile with sharing removed on the right
44
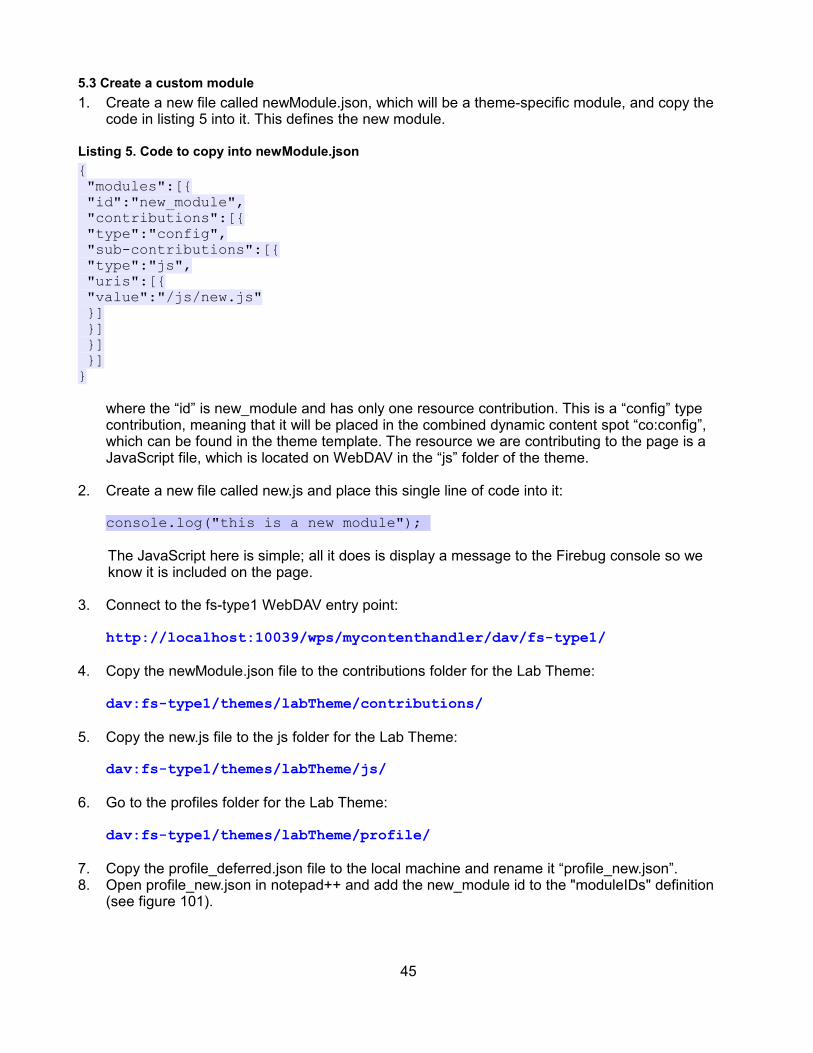
5.3 Create a custom module1. Create a new file called newModule.json, which will be a theme-specific module, and copy the
code in listing 5 into it. This defines the new module.
Listing 5. Code to copy into newModule.json{ "modules":[{ "id":"new_module", "contributions":[{ "type":"config", "sub-contributions":[{ "type":"js", "uris":[{ "value":"/js/new.js" }] }] }] }]}
where the “id” is new_module and has only one resource contribution. This is a “config” type contribution, meaning that it will be placed in the combined dynamic content spot “co:config”, which can be found in the theme template. The resource we are contributing to the page is a JavaScript file, which is located on WebDAV in the “js” folder of the theme.
2. Create a new file called new.js and place this single line of code into it:
console.log("this is a new module");
The JavaScript here is simple; all it does is display a message to the Firebug console so we know it is included on the page.
3. Connect to the fs-type1 WebDAV entry point:
http://localhost:10039/wps/mycontenthandler/dav/fs-type1/4. Copy the newModule.json file to the contributions folder for the Lab Theme:
dav:fs-type1/themes/labTheme/contributions/5. Copy the new.js file to the js folder for the Lab Theme:
dav:fs-type1/themes/labTheme/js/6. Go to the profiles folder for the Lab Theme:
dav:fs-type1/themes/labTheme/profile/7. Copy the profile_deferred.json file to the local machine and rename it “profile_new.json”.8. Open profile_new.json in notepad++ and add the new_module id to the "moduleIDs" definition
(see figure 101).
45
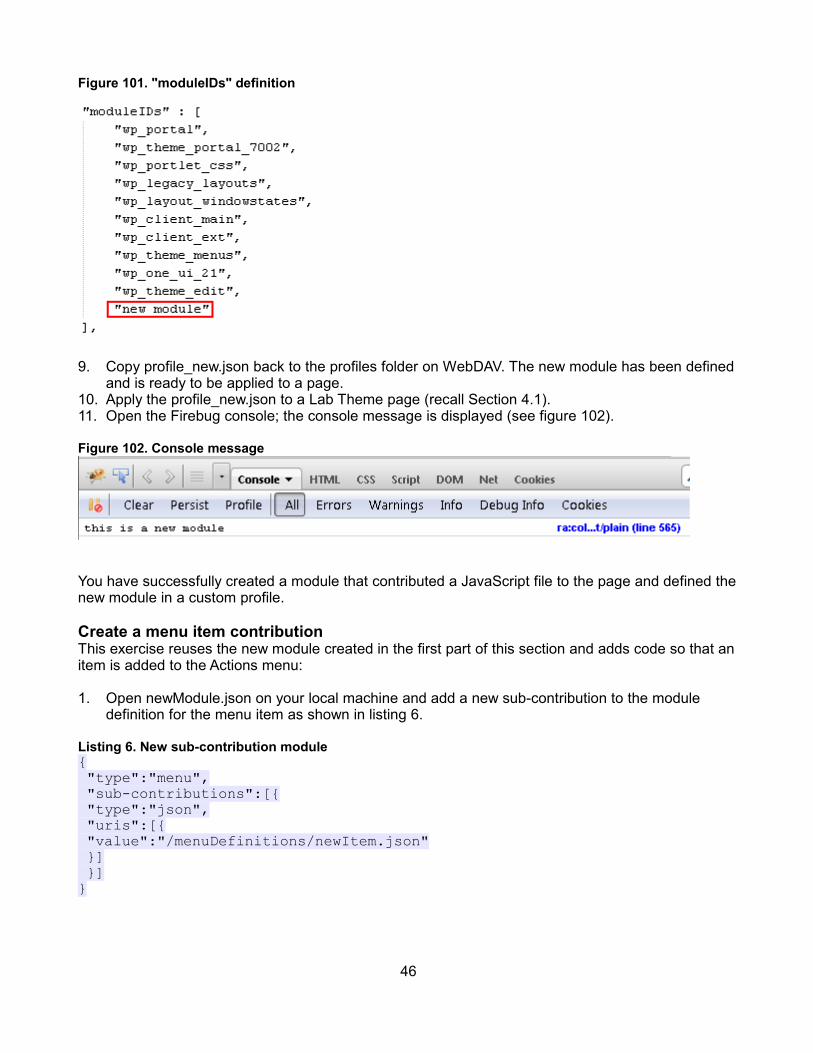
Figure 101. "moduleIDs" definition
9. Copy profile_new.json back to the profiles folder on WebDAV. The new module has been defined and is ready to be applied to a page.
10. Apply the profile_new.json to a Lab Theme page (recall Section 4.1).11. Open the Firebug console; the console message is displayed (see figure 102).
Figure 102. Console message
You have successfully created a module that contributed a JavaScript file to the page and defined the new module in a custom profile.
Create a menu item contribution This exercise reuses the new module created in the first part of this section and adds code so that an item is added to the Actions menu:
1. Open newModule.json on your local machine and add a new sub-contribution to the module definition for the menu item as shown in listing 6.
Listing 6. New sub-contribution module{ "type":"menu", "sub-contributions":[{ "type":"json", "uris":[{ "value":"/menuDefinitions/newItem.json" }] }]}
46
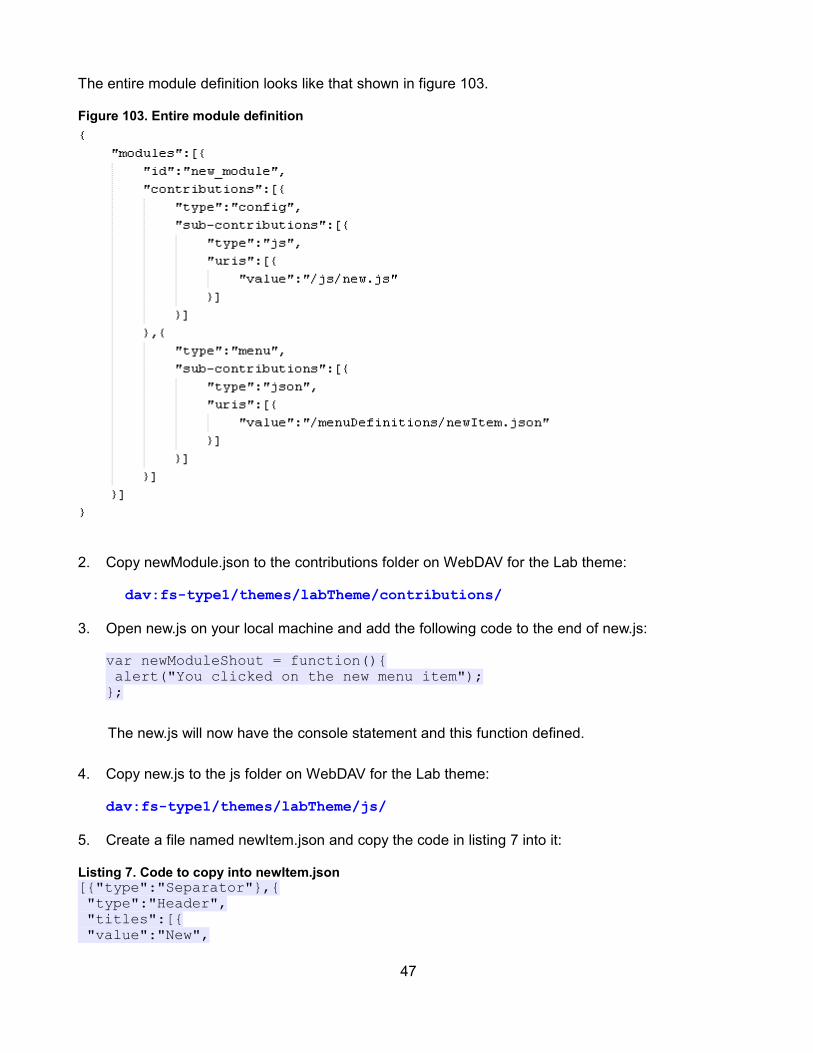
The entire module definition looks like that shown in figure 103.
Figure 103. Entire module definition
2. Copy newModule.json to the contributions folder on WebDAV for the Lab theme:
dav:fs-type1/themes/labTheme/contributions/3. Open new.js on your local machine and add the following code to the end of new.js:
var newModuleShout = function(){ alert("You clicked on the new menu item");};
The new.js will now have the console statement and this function defined.
4. Copy new.js to the js folder on WebDAV for the Lab theme:
dav:fs-type1/themes/labTheme/js/5. Create a file named newItem.json and copy the code in listing 7 into it:
Listing 7. Code to copy into newItem.json[{"type":"Separator"},{ "type":"Header", "titles":[{ "value":"New",
47

"lang":"en" }]},{ "type":"StaticMenuitem", "id":"new_module", "actionFn":"newModuleShout", "titles":[{ "value":"Click Me", "lang":"en" }]}]
This code is a JSON menu contribution and defines a menu separator, a new menu heading titled “New”, and a menu item titled “Click Me” that will display a message.
6. Copy newItem.json to the menuDefinitions folder for the Lab Theme:
dav:fs-type1/themes/labTheme/menuDefinitions/7. Copy pageActions.json to your local machine:
dav:fs-type1/themes/labTheme/menuDefinitions/pageActions.json8. Reference the new_module in the page actions JSON definition so it will add the menu
contribution; it will be at the end of the file like this:
,{"type":"ModuleRef","id":"new_module"}]
Be careful to add the comma before a new page action item, and note also that the bracket ] is the last character in the file, so make sure what is shown here is truly the end of the file, and do not duplicate brackets.
9. Copy pageActions.json back to the menuDefinitions folder on WebDAV for the LabTheme.10. Clear browser cache, refresh the page with the profile_new.json applied, and open the Actions
menu.11. Notice the new menu item on which you can click and receive a message (see figure 104).
48

Figure 104. New Click Me menu item
To learn more, refer to “Modules”.
6 Debugging
6.1 Theme optimization debuggingWith the new theme optimization framework combining resources and requests, it makes it difficult to know where an error occurs. There is a simple process you can perform to load resources from their actual location, to see where the errors are originating.
To enable debugging for theme optimization, follow these steps:
1. Log in to WebSphere Portal, using “wpsadmin” for both the username and password.2. Navigate to Administration --- Enable Tracing and set the following trace string (see figure 105):
com.ibm.wps.resourceaggregator.CombinerDataSource.RemoteDebug=all
49
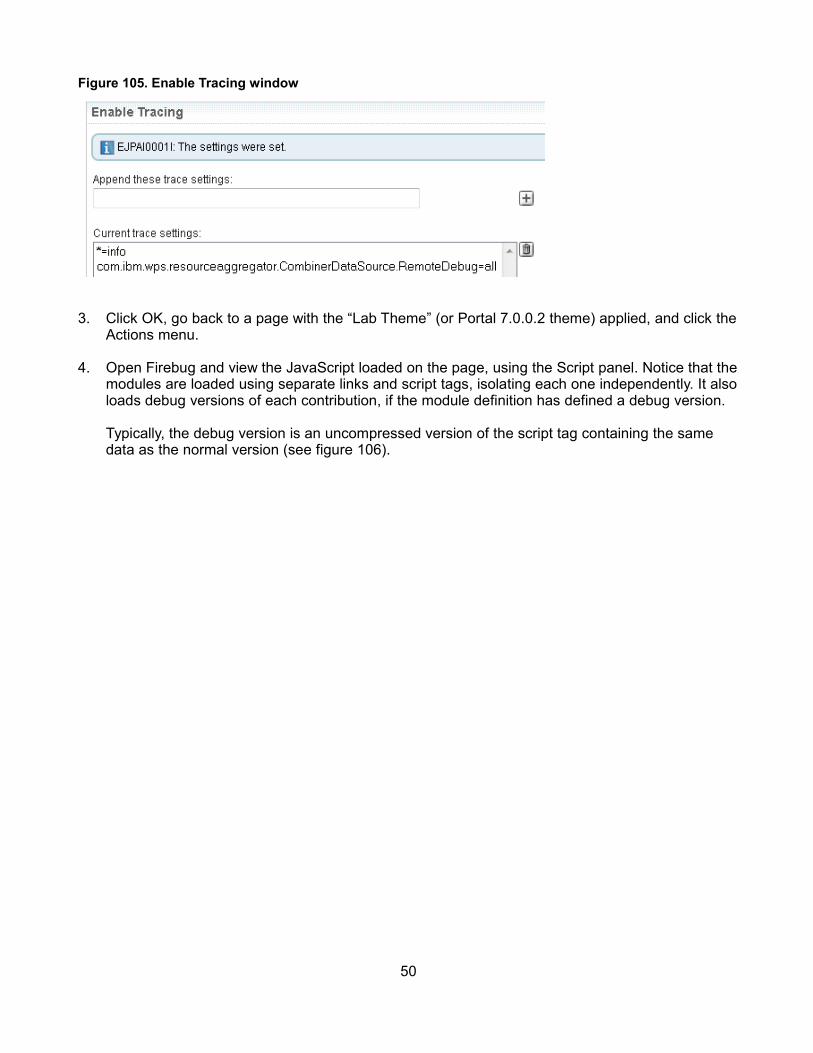
Figure 105. Enable Tracing window
3. Click OK, go back to a page with the “Lab Theme” (or Portal 7.0.0.2 theme) applied, and click the Actions menu.
4. Open Firebug and view the JavaScript loaded on the page, using the Script panel. Notice that the modules are loaded using separate links and script tags, isolating each one independently. It also loads debug versions of each contribution, if the module definition has defined a debug version.
Typically, the debug version is an uncompressed version of the script tag containing the same data as the normal version (see figure 106).
50

Figure 106. Uncompressed file versions
When you use the Firebug inspector tool to look at the logo, you notice that the CSS file location is not a combiner resource, but an actual CSS file (see figure 107).
51

Figure 107. CSS file directly named
Using both separate links and uncompressed script tags makes it easier to debug a running Portal environment from the browser. This debugging for theme optimization is enabled for all users. To learn more, refer to “Debugging.”
6.2 Development modeUsually the profiles and contributions are determined once, when the Portal server is started, and then they are used unchanged. For performance reasons, updates to the system are not included until a server restart occurs. By enabling development mode, we can see the changes immediately, and during this exercise development mode was already enabled.
For future development efforts you can enable development mode by setting the resourceaggregation.development.mode property to “true” within the WP ConfigService REP (found in the WAS console via Resources --- Resource Environment --- Resource Environment Providers.)
7 ConclusionYou should now be familiar with the concepts of theme architecture, usage, and customization. Using WebDAV, you can easily create new themes and skins along with the components such as styles and layouts. This paper also discussed the new theme optimization features that can be used to easily add and remove theme aspects to create a customized Web experience and increase performance.
8 ResourcesDeveloping Themes for WebSphere Portal:http://www-10.lotus.com/ldd/portalwiki.nsf/xpViewCategories.xsp?lookupName=Developing%20an%20Exceptional%20Web%20Experience
IBM WebSphere Portal Family wiki:http://www-10.lotus.com/ldd/portalwiki.nsf
IBM Portal and Lotus Web Content Management product documentation:http://www.ibm.com/developerworks/websphere/zones/portal/proddoc.html#v61infocenters
52

developerWorks® WebSphere Portal zone:http://www.ibm.com/developerworks/websphere/zones/portal/
developerWorks white paper, “Customizing your IBM WebSphere Portal Web experience using Page Builder: A step-by-step guide”: http://www.ibm.com/developerworks/websphere/zones/portal/proddoc/portaltheme/
9 Author biographyJon Lidaka is a Front-end Engineer at IBM's Research Triangle Park Development Lab. During his time in Portal development he has primarily contributed to theme development with a focus on accessibility and globalization, also contributing to components including the administration portlets and Web application integrator. Jon has spoken at multiple IBM conferences on user interface design and optimizing user interfaces for mobile devices.
Trademarks• developerWorks, IBM, and WebSphere are trademarks or registered trademarks of IBM Corporation in the
United States, other countries, or both.
• Java and all Java-based trademarks and logos are trademarks or registered trademarks of Sun Microsystems, Inc. in the United States, other countries, or both.
• Other company, product, or service names may be trademarks or service marks of others.
53