Embed Size (px)
Citation preview

CCCYYYBBBEEERRROOOAAAMMM IIINNNSSSTTTAAALLLLLLAAATTTIIIOOONNN GGGUUUIIIDDDEEE
VVVEEERRRSSSIIIOOONNN::: 777

IMPORTANT NOTICE Elitecore has supplied this Information believing it to be accurate and reliable at the time of printing, but is presented without warranty of any kind, expressed or implied. Users must take full responsibility for their application of any products. Elitecore assumes no responsibility for any errors that may appear in this document. Elitecore reserves the right, without notice to make changes in product design or specifications. Information is subject to change without notice.
SOFTWARE LICENSE
The software described in this document is furnished under the terms of Elitecore’s software license agreement. Please read these terms and conditions carefully before using the software. By using this software, you agree to be bound by the terms and conditions of this license. If you do not agree with the terms of this license, promptly return the unused software and manual (with proof of payment) to the place of purchase for a full refund.
LIMITED WARRANTY
Software: Elitecore warrants for a period of ninety (90) days from the date of shipment from Elitecore: (1) the media on which the Software is furnished will be free of defects in materials and workmanship under normal use; and (2) the Software substantially conforms to its published specifications except for the foregoing, the software is provided AS IS. This limited warranty extends only to the customer as the original licenses. Customers exclusive remedy and the entire liability of Elitecore and its suppliers under this warranty will be, at Elitecore or its service center’s option, repair, replacement, or refund of the software if reported (or, upon, request, returned) to the party supplying the software to the customer. In no event does Elitecore warrant that the Software is error free, or that the customer will be able to operate the software without problems or interruptions.
DISCLAIMER OF WARRANTY
Except as specified in this warranty, all expressed or implied conditions, representations, and warranties including, without limitation, any implied warranty or merchantability, fitness for a particular purpose, non-infringement or arising from a course of dealing, usage, or trade practice, and hereby excluded to the extent allowed by applicable law. In no event will Elitecore or its supplier be liable for any lost revenue, profit, or data, or for special, indirect, consequential, incidental, or punitive damages however caused and regardless of the theory of liability arising out of the use of or inability to use the product even if Elitecore or its suppliers have been advised of the possibility of such damages. In the event shall Elitecore’s or its supplier’s liability to the customer, whether in contract, tort (including negligence) or otherwise, exceed the price paid by the customer. The foregoing limitations shall apply even if the above stated warranty fails of its essential purpose. In no event shall Elitecore or its supplier be liable for any indirect, special, consequential, or incidental damages, including, without limitation, lost profits or loss or damage to data arising out of the use or inability to use this manual, even if Elitecore or its suppliers have been advised of the possibility of such damages.
RESTRICTED RIGHTS
Copyright 2000 Elitecore Technologies Ltd. All rights reserved. Cyberoam, Cyberoam logo are trademark of Elitecore Technologies Ltd. Information supplies by Elitecore Technologies Ltd. Is believed to be accurate and reliable at the time of printing, but Elitecore Technologies assumes no responsibility for any errors that may appear in this documents. Elitecore Technologies reserves the right, without notice, to make changes in product design or specifications. Information is subject to change without notice
Corporate Headquarters
Elitecore Technologies Ltd. 904 Silicon Tower, Off. C.G. Road, Ahmedabad – 380015, INDIA www.cyberoam.com

Cyberoam Installation Guide
About this guide Welcome to the Installation & Registration guide Guide of Cyberoam, eLitecore Technologies Ltd.’s integrated Internet Security Solution. The Cyberoam Installation & Registration guide tells you everything you need to know to install and register Cyberoam.
Objective This guide aims to help the user to understand the installation, configuration and deployment options of Cyberoam and deciding on mode for installation and configuring Cyberoam as per the mode of installation selected. Users may go through the document in a sequential manner to gain a thorough understanding of the installation and configuration procedures. This guide will help the user to 1. Understand the two Deployment modes 2. Install 3. Configure 4. Register Cyberoam
Guide Sets
Guide Describes
Installation & Registration Guide Installation & registration process User Guide Part I – Getting Started How to start using Cyberoam Part II – Management Management and Customization of Cyberoam Detailed statistics – Reports Detailed reports Console Guide Console Management Windows Client Guide Installation & configuration of Cyberoam Windows Client Linux Client Guide Installation & configuration of Cyberoam Linux Client HTTP Client Guide Installation & configuration of Cyberoam HTTP Client Analytical Tool Guide Using the Analytical tool for diagnosing and
troubleshooting common problems Cyberoan - LDAP Integration guide
Configuration for integrating LDAP with Cyberoam for external authentication
Cyberoam – ADS Integration Guide
Configuration for integrating ADS with Cyberoam for external authentication
Data transfer Management Guide Configuration and Management of user based data transfer policy
Mail Management Configuration and Management of Mail server Multi Link Manager User Guide Configuration of Multiple Gateways, load balancing and
failover VPN Management Implementing and managing VPN Printer Usage Management Guide Configuration and Management of user based printing
quota policy Printer Installation and Configuration Guide
Installation and Configuration of Elitecore Print Manager

Cyberoam Installation Guide
Technical Support You may direct all questions, comments, or requests concerning the software you purchased, your registration status, or similar issues to Customer care/service department at the following address: Corporate Office eLitecore Technologies Ltd. 904, Silicon Tower Off C.G. Road Ahmedabad 380015 Gujarat, India. Phone: +91-79-26405600 Fax: +91-79-26462200 Web site: www.elitecore.com Cyberoam contact: Technical support (Corporate Office): +91-79-26400707 Email: [email protected] Web site: www.cyberoam.com Visit www.cyberoam.com for the regional and latest contact information.

Cyberoam Installation Guide
Notation conventions Material in this manual is presented in text, screen displays, or command-line notation.
Item Convention Example Server Machine where Cyberoam Software - Server component is installed
Client Machine where Cyberoam Software - Client component is installed
User The end user
Username Username uniquely identifies the user of the system
Topic titles Shaded font
typefaces Introduction Subtitles Bold and
Black typefaces
Notation conventions
Navigation link
Bold typeface Group Management → Groups → Create it means, to open the required page click on Group management then on Groups and finally click Create tab
Name of a particular parameter or field or command button text
Lowercase italic type
Enter policy name, replace policy name with the specific name of a policy Or Click Name to select where Name denotes command button text which is to be clicked
Cross references
Hyperlink in different color
Refer to Customizing User database Clicking on the link will open the particular topic
Notes & points to remember
Bold typeface between the black borders
Note
Prerequisites Bold typefaces between the black borders
Prerequisite • Prerequisite details • Prerequisite details

Cyberoam Installation Guide
7300-10-9/20/2005 6
Contents
ABOUT THIS GUIDE ......................................................................................................................................... 3 OBJECTIVE .......................................................................................................................................................... 3 GUIDE SETS......................................................................................................................................................... 3 TECHNICAL SUPPORT .......................................................................................................................................... 4 NOTATION CONVENTIONS.................................................................................................................................... 5
DEPLOYMENT OVERVIEW ............................................................................................................................ 7 INSTALLATION.................................................................................................................................................. 8
PLAN CYBEROAM DEPLOYMENT ......................................................................................................................... 8 Decision Matrix for selecting the deployment mode....................................................................................... 8
HARDWARE REQUIREMENT.......................................................................... ERROR! BOOKMARK NOT DEFINED. INSTALLING CYBEROAM.................................................................................................................................... 11 CONFIGURING CYBEROAM - RUNNING POST INSTALLATION WIZARD............................................................... 14
Installation of Cyberoam as Bridge.............................................................................................................. 14 Installation of Cyberoam as Gateway........................................................................................................... 18
REGISTRATION ............................................................................................................................................... 22 Demo registration......................................................................................................................................... 22
ONLINE REGISTRATION...................................................................................................................................... 23 MANUAL REGISTRATION ................................................................................................................................... 25

Cyberoam Installation Guide
7300-10-9/20/2005 7
Deployment Overview There are two deployment options available for the Cyberoam installation enabling users of different network configurations to fully utilize the features of the Cyberoam. Each has a different configuration procedure. This guide describes the installation and the configuration procedure required for each mode. Sequence for installing and configuring Cyberoam 1. Plan the Cyberoam deployment mode 2. Install 3. Configure - Running Post Installation Wizard for Transparent mode 4. Configure - Running Post Installation Wizard for Route mode 5. Register Cyberoam
Installing Cyberoam is an automated task and performs all the installation related tasks. Post Installation wizard is the step-by-step guide to configure Cyberoam.
Cyberoam Installation Guide
7300-10-9/20/2005 8
Installation
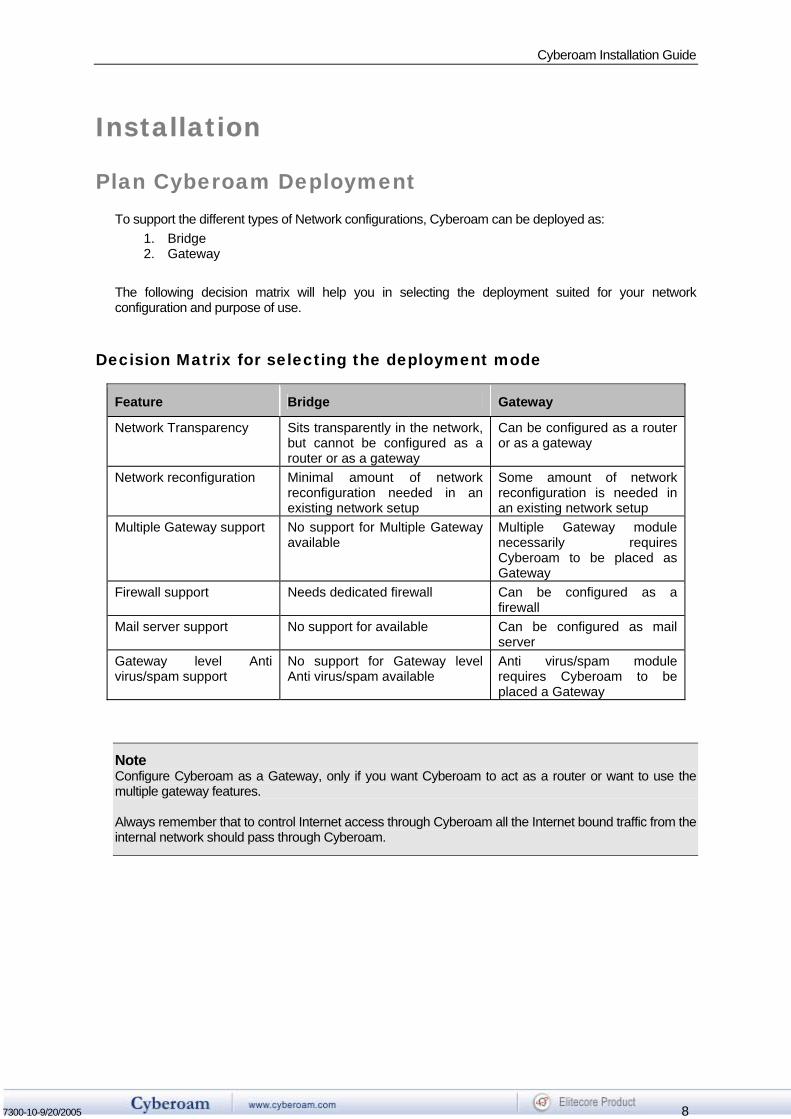
Plan Cyberoam Deployment To support the different types of Network configurations, Cyberoam can be deployed as:
1. Bridge 2. Gateway
The following decision matrix will help you in selecting the deployment suited for your network configuration and purpose of use.
Decision Matrix for selecting the deployment mode
Feature Bridge Gateway
Network Transparency Sits transparently in the network, but cannot be configured as a router or as a gateway
Can be configured as a router or as a gateway
Network reconfiguration Minimal amount of network reconfiguration needed in an existing network setup
Some amount of network reconfiguration is needed in an existing network setup
Multiple Gateway support No support for Multiple Gateway available
Multiple Gateway module necessarily requires Cyberoam to be placed as Gateway
Firewall support Needs dedicated firewall Can be configured as a firewall
Mail server support No support for available Can be configured as mail server
Gateway level Anti virus/spam support
No support for Gateway level Anti virus/spam available
Anti virus/spam module requires Cyberoam to be placed a Gateway
Note Configure Cyberoam as a Gateway, only if you want Cyberoam to act as a router or want to use the multiple gateway features. Always remember that to control Internet access through Cyberoam all the Internet bound traffic from the internal network should pass through Cyberoam.

Cyberoam Installation Guide
7300-10-9/20/2005 9
Following figures explains the general case of physical placement of Cyberoam in the existing network setup.
Crossover Cable A crossover cable is a cable that is used to interconnect two computers by "crossing over" (reversing) their respective PIN contacts without the use of a hub or switch. The ends on a crossover cable are different from each other, whereas a normal 'straight through' cable has identical ends.
Placement of Cyberoam as Bridge
Hub /Switch
Router/Firewall
Crossover Cableconnection
Internal LAN
Hub /Switch
Router/Firewall
Hub /Switch
Using Crossover Cable Using Hub/Switch
Internal LAN

Cyberoam Installation Guide
7300-10-9/20/2005 10
Placement of Cyberoam as Gateway
Internal LAN
Hub /Switch
Cyberoam
Router/Firewall
Hub /Switch

Cyberoam Installation Guide
7300-10-9/20/2005 11
Installing Cyberoam Once the mode of installation has been decided and the required hardware as per specifications has been arranged, you can proceed with the installation. Steps of Installation 1. Installing Cyberoam software 2. Configuring Cyberoam for network access - Running the Post Installation Wizard
Before starting installation, remember to change the BIOS settings to ‘Boot from CD ROM’. Insert the Cyberoam Installation CD into the CD drive, and reboot the machine to start installation of Cyberoam. As soon as the computer boots up, the Welcome screen comes up with a boot prompt.
Installation checklist Ensure that there is no necessary data on the installation Hard Disk as Cyberoam Installation process formats the Hard disk, which will erase all the data on Hard Disk Before starting installation, remember to change the BIOS settings to ‘Boot from CD ROM’
Confirm your consent for installation by pressing <Enter> key on the keyboard.
Cyberoam installation process will format hard disk and install the required packages.

Cyberoam Installation Guide
7300-10-9/20/2005 12

Cyberoam Installation Guide
7300-10-9/20/2005 13
A ‘Congratulations screen’ will be displayed on the completion of Installation prompting you to reboot the system. The CD ROM will be automatically ejected from CD drive; system will reboot and start Cyberoam.
Note Please remove the CD ROM from the CD drive before rebooting the system
You are now through installing Cyberoam. When you first log on to the console “Cyberoam Post Installation wizard” will be launched. Follow the steps as described in next section of the documentation.

Cyberoam Installation Guide
7300-10-9/20/2005 14
Configuring Cyberoam - Running Post Installation Wizard
Once the system is rebooted after Installation, you will begin with configuration of Network using Post Installation Wizard. The Post Installation Wizard will guide you step-by-step through configuration of the network parameters like IP address, subnet mask, and default gateway for Cyberoam. Post installation wizard also provides help for each screen. Press Alt+F2 to open the help window Press Alt+F1 to return to post installation wizard screen After the successful Installation of Cyberoam, console screen will prompt for password. Step 1: Enter default password ‘admin’ and press <Enter>
Installation of Cyberoam as Bridge
Step 2: Post installation wizard will start with the following screen. Before you configure Cyberoam as Bridge, press Alt+F2 to get more information on placement of Cyberoam. Press Alt+F3 to view the recommended placement diagram of Cyberoam (as Bridge) in the existing network. Press Alt+F4 to view the recommended placement diagram of Cyberoam (as Gateway) in the existing network. For configuring Cyberoam as Bridge, type ‘b’ or ‘B’ followed and press <Enter>

Cyberoam Installation Guide
7300-10-9/20/2005 15
Step 3: Set Bridge IP address i.e. IP address by which you wish to manage Cyberoam through telnet console as well as the Web console By default internal interface is set as eth0 and external interface is set as eth1, modify if required.
Step 4: Automatically detects and displays the current Ethernet configuration of all the Internal Networks defined. Add or delete the defined networks.
Step 5: Set Gateway for Cyberoam i.e. IP address of Gateway. All the traffic will be routed to the IP address defined in this screen

Cyberoam Installation Guide
7300-10-9/20/2005 16
Step 6: Update time zone and current date, if not properly set
Step 7: Set Administrator Email Id. Please enter the correct Email Id as it will be used by Cyberoam to send system alerts.
Step 8: After the system has been configured successfully, the configured details will be displayed.

Cyberoam Installation Guide
7300-10-9/20/2005 17
Confirm the above details and proceed to register your copy of Cyberoam.
Cyberoam Installation Guide
7300-10-9/20/2005 18
Installation of Cyberoam as Gateway
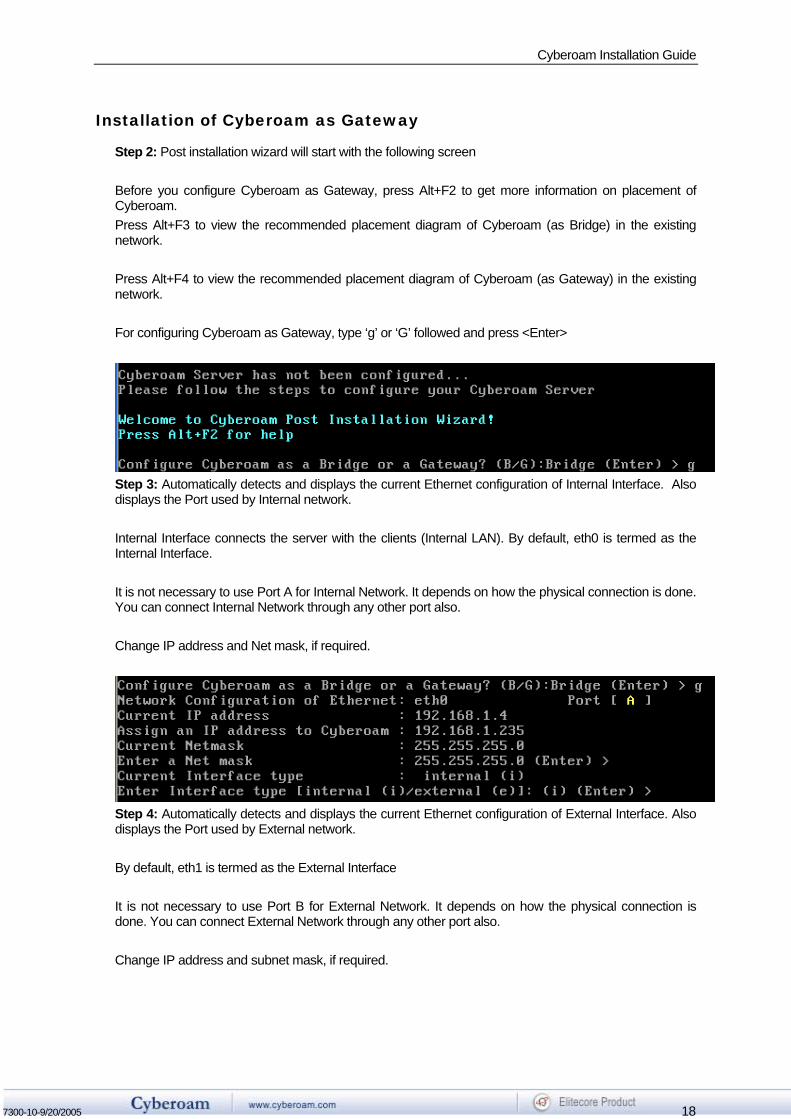
Step 2: Post installation wizard will start with the following screen Before you configure Cyberoam as Gateway, press Alt+F2 to get more information on placement of Cyberoam. Press Alt+F3 to view the recommended placement diagram of Cyberoam (as Bridge) in the existing network. Press Alt+F4 to view the recommended placement diagram of Cyberoam (as Gateway) in the existing network. For configuring Cyberoam as Gateway, type ‘g’ or ‘G’ followed and press <Enter>
Step 3: Automatically detects and displays the current Ethernet configuration of Internal Interface. Also displays the Port used by Internal network. Internal Interface connects the server with the clients (Internal LAN). By default, eth0 is termed as the Internal Interface. It is not necessary to use Port A for Internal Network. It depends on how the physical connection is done. You can connect Internal Network through any other port also. Change IP address and Net mask, if required.
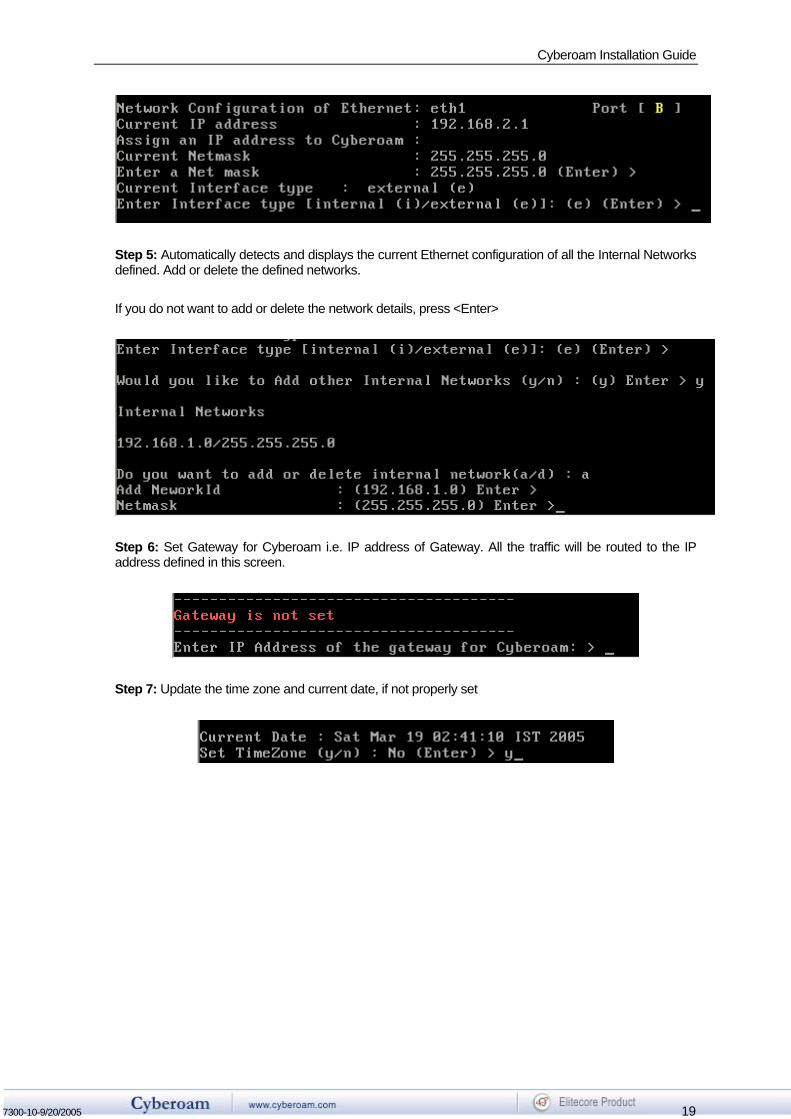
Step 4: Automatically detects and displays the current Ethernet configuration of External Interface. Also displays the Port used by External network. By default, eth1 is termed as the External Interface It is not necessary to use Port B for External Network. It depends on how the physical connection is done. You can connect External Network through any other port also. Change IP address and subnet mask, if required.
Cyberoam Installation Guide
7300-10-9/20/2005 19
Step 5: Automatically detects and displays the current Ethernet configuration of all the Internal Networks defined. Add or delete the defined networks. If you do not want to add or delete the network details, press <Enter>
Step 6: Set Gateway for Cyberoam i.e. IP address of Gateway. All the traffic will be routed to the IP address defined in this screen.
Step 7: Update the time zone and current date, if not properly set

Cyberoam Installation Guide
7300-10-9/20/2005 20
Step 8: Enter Administrator Email Id. Please enter the correct Email Id as it will be used to by Cyberoam to send system alerts.
Step 9: If the system is configured successfully, configuration details will be displayed.

Cyberoam Installation Guide
7300-10-9/20/2005 21
Confirm the details and proceed to register your copy of Cyberoam. This finishes the installation and initial configuration of Cyberoam.
Note Please note the Web address for accessing Cyberoam Web Management console. Use this address for registering your copy of Cyberoam.
Once you have configured Cyberoam, connect to Cyberoam using a web browser by typing in the following URL: http://<Internal IP Address> for registering your copy of Cyberoam. The login prompt appears again, login as User ‘cyberoam’ using the password ‘cyber’
If your system is connected to Internet, use Online registration method otherwise use Manual registration method for registering. For details, refer to Registration.
Cyberoam Installation Guide
7300-10-9/20/2005 22
Registration Register Cyberoam software copy before use. In order to enable all the functionalities, you will have to register the copy of Cyberoam. Registration is based on number of Live Current Users in the system. You are prompted to register the copy of Cyberoam software, if logged on for the first time after Installation. For registering your copy of Cyberoam: 1. Use manual or online registration process if you have purchased Cyberoam 2. Use demo registration process if you have demo version of Cyberoam
By default, demo registration page is opened.
Demo registration
If you have purchased Cyberoam, you can register Cyberoam as ‘Demo’ or ‘Licensed’ version. You will require license keys for registering as a ‘Licensed’ version while for ‘Demo’ version, license keys are not required. Even if you have not purchased Cyberoam, you can register ‘Demo’ version. Demo copy of Cyberoam can also be registered online only. Cyberoam server contacts central registration site of Cyberoam with the registration details and registers your Cyberoam copy for further use. Registration of Cyberoam as ‘Demo’ will allow you to use all the features of Cyberoam for 15 days i.e. copy will expire after 15 days. Select Help → Register Cyberoam → Online Demo Registration and follow the same procedure as described for Online registration to register Cyberoam as Demo copy.

Cyberoam Installation Guide
7300-10-9/20/2005 23
Online registration Licensed version of Cyberoam can be registered online. Online Registration is the default mode of registration. The Cyberoam server contacts the central registration site of Cyberoam with the registration details and registers the Cyberoam server for further use. Prerequisite • The Cyberoam should be able to reach cyberoamregistration.elitecore.com for registration. If you
are not able to contact cyberoamregistration.elitecore.com check out the Internet connectivity using ping and trace route tools.
Note Register Cyberoam through proxy server if Cyberoam is behind proxy server.
Select Help → Register Cyberoam → Online Registration

Cyberoam Installation Guide
7300-10-9/20/2005 24
Screen Elements Description
Cyberoam Registration form Public key Displays Public key Product ID Provide Product ID specified on a sticker on backside
of CD case Unique ID Provide Unique ID specified on a sticker on backside of
CD case Company name Provide name of the company under whose name
Cyberoam software is to be registered Contact person Provide Contact person in the company Address, City, State, Country, Zip, Phone, Email Id, Fax
Provide complete address, phone number, Email Id & Fax number of the Company
User License (Only for demo registration)
Provide total number of Users who can concurrently log on
External Proxy server information (Only if HTTP proxy server is used to connect to Web) Proxy server Provide HTTP proxy server setting (name or IP
address) to connect to Cyberoam registration server Proxy Port Provide Port on which proxy server runs if different than
default port (80) User name Provide Username with which to log on to proxy server
(if configured) Password Provide Password (if configured) Register button Registers the Cyberoam copy Cancel Cancels the current operation
After successful registration Cyberoam will display the ‘About’ page along with the registration information.

Cyberoam Installation Guide
7300-10-9/20/2005 25
Manual registration Licensed version of Cyberoam can be registered manually also. Use Manual Registration, if the Cyberoam machine is not directly connected to the Internet. Apart from Public key, Product ID and Unique ID, Manual registration requires License key and User license details for registration. To obtain the License key, go to the Central registration site at URL www.cyberoam.com/cyberoam/jsp/registration/registration.jsp
Licence Key details
Screen Elements Description
Public key Displayed on the Manual Registration form of the Cyberoam software. Copy the public key from the Manual registration form and paste it in the text box
Company Name Provide name of the company under whose name Cyberoam software is to be registered
Contact person Provide Contact person in the company Address, City, State, Country, Zip, Phone no, Email Id, Fax no.
Provide complete address, phone number, Email Id & Fax number of the Company
Model Select the product type

Cyberoam Installation Guide
7300-10-9/20/2005 26
Product ID Provide Product ID specified on a sticker on backside of CD case Unique ID Provide Unique ID specified on a sticker on backside of CD case Submit button Submits the request for Licence key Select Help → Register Cyberoam → Manual Registration
Screen Elements Description
Cyberoam Manual Registration Form Public key Displays Public key Product ID Provide Product ID specified on a sticker on backside
of CD case Unique ID Provide Unique ID specified on a sticker on backside of
CD case License key
Click the Cyberoam registration site link to obtain the license key and follow the steps as described in the above section For further details, refer to License Key details
User License
Provide total number of Users who can concurrently log on
Company name Provide name of the company under whose name Cyberoam software is to be registered
Contact person Provide Contact person in the company Address, City, State, Country, Zip, Phone, Email Id, Fax
Provide complete address, phone number, Email Id & Fax number of the Company

Cyberoam Installation Guide
7300-10-9/20/2005 27
Register button Registers the Cyberoam software copy Cancel Cancels the current operation
The Central registration site at URL www.cyberoam.com/cyberoam/jsp/registration/registration.jsp will be contacted with the information entered where the copy of Cyberoam is registered. After successful registration Cyberoam will display the ‘About’ page along with the registration information.
Note After the successful registration 1. Logout from Cyberoam Web Console 2. Log on to Cyberoam Text Administration Console via TELNET and Restart Management services 3. Re-login to Cyberoam Web Administration Console to start using Cyberoam with all the features Refer to Cyberoam User guide – Getting Started section for further details on how to start using Cyberoam.