Embed Size (px)
Citation preview
Cyberoam Console Guide
Document Version 1.0-10.6.6.042-24/11/2017
Version 10
Cyberoam Console Guide
Important Notice
Cyberoam Technologies Pvt. Ltd. has supplied this Information believing it to be accurate and reliable at the time of printing,
but is presented without warranty of any kind, expressed or implied. Users must take full responsibility for their application of any products. Cyberoam Technologies Pvt. Ltd. assumes no responsibility for any errors that may appear in this document.
Cyberoam Technologies Pvt. Ltd. reserves the right, without notice to make changes in product design or specifications. Information is subject to change without notice.
USER’S LICENSE
Use of this product and document is subject to acceptance of the terms and conditions of Cyberoam End User License Agreement (EULA) and Warranty Policy for Cyberoam UTM Appliances.
You will find the copy of the EULA at http://www.cyberoam.com/documents/EULA.html and the Warranty Policy for Cyberoam
Security Appliances at http://ikb.cyberoam.com.
RESTRICTED RIGHTS Copyright 1999 - 2015 Cyberoam Technologies Private Ltd. All rights reserved. Cyberoam, Cyberoam logo are trademark of
Cyberoam Technologies Pvt. Ltd.
Corporate Headquarters Cyberoam House,
Saigulshan Complex, Opp. Sanskruti, Beside White House, Panchwati Cross Road,
Ahmedabad - 380006, GUJARAT, INDIA. Tel: +91-79-66216666
Web site: www.cyberoam.com
Cyberoam Console Guide
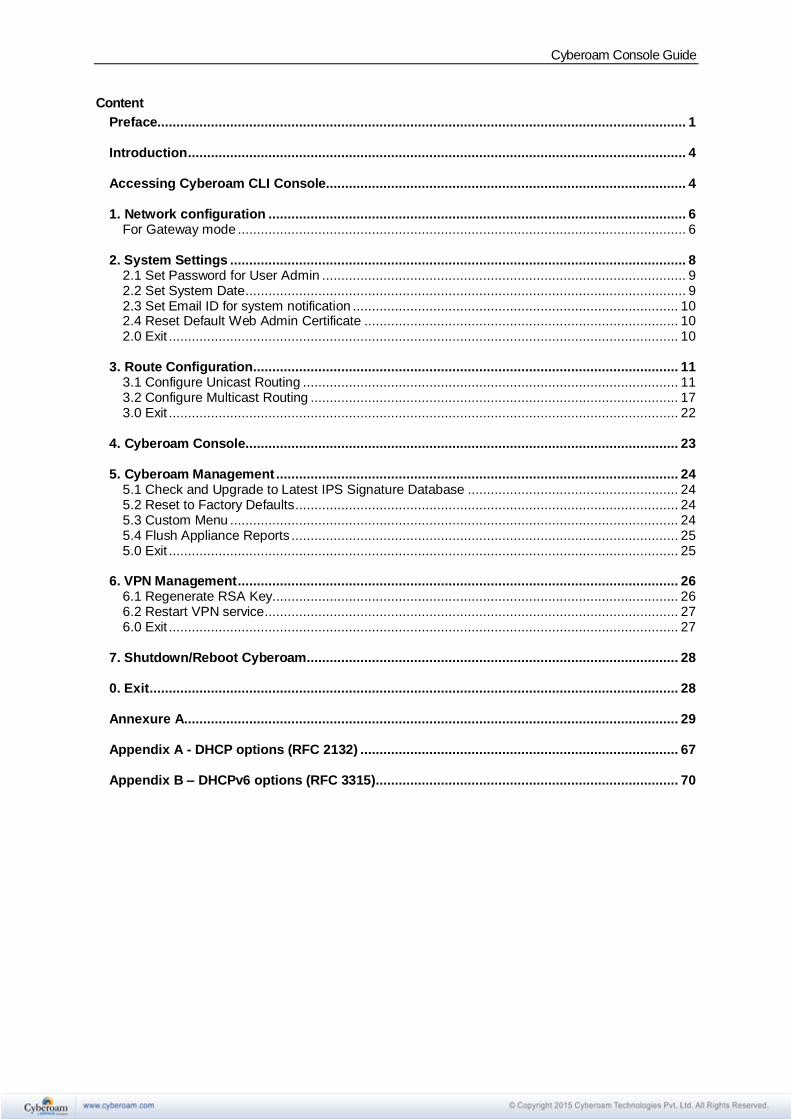
Content
Preface.......................................................................................................................................... 1 Introduction .................................................................................................................................. 4 Accessing Cyberoam CLI Console.............................................................................................. 4 1. Network configuration ............................................................................................................. 6
For Gateway mode ..................................................................................................................... 6 2. System Settings ....................................................................................................................... 8
2.1 Set Password for User Admin ............................................................................................... 9 2.2 Set System Date ................................................................................................................... 9 2.3 Set Email ID for system notification ..................................................................................... 10 2.4 Reset Default Web Admin Certificate .................................................................................. 10 2.0 Exit ..................................................................................................................................... 10
3. Route Configuration ............................................................................................................... 11
3.1 Configure Unicast Routing .................................................................................................. 11 3.2 Configure Multicast Routing ................................................................................................ 17 3.0 Exit ..................................................................................................................................... 22
4. Cyberoam Console................................................................................................................. 23 5. Cyberoam Management ......................................................................................................... 24
5.1 Check and Upgrade to Latest IPS Signature Database ....................................................... 24 5.2 Reset to Factory Defaults.................................................................................................... 24 5.3 Custom Menu ..................................................................................................................... 24 5.4 Flush Appliance Reports ..................................................................................................... 25 5.0 Exit ..................................................................................................................................... 25
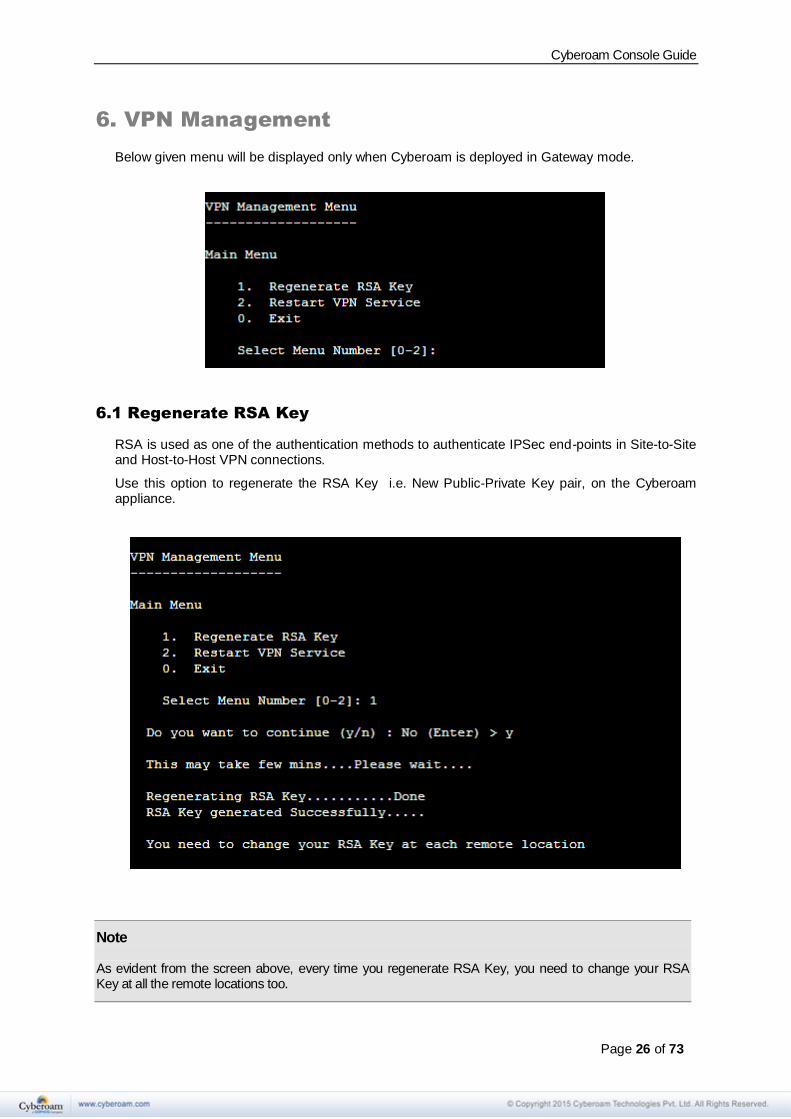
6. VPN Management ................................................................................................................... 26
6.1 Regenerate RSA Key.......................................................................................................... 26 6.2 Restart VPN service............................................................................................................ 27 6.0 Exit ..................................................................................................................................... 27
7. Shutdown/Reboot Cyberoam................................................................................................. 28 0. Exit .......................................................................................................................................... 28 Annexure A................................................................................................................................. 29 Appendix A - DHCP options (RFC 2132) ................................................................................... 67 Appendix B – DHCPv6 options (RFC 3315)............................................................................... 70
Cyberoam Console Guide
Page 1 of 73
Preface
Welcome to Cyberoam’s – Console guide.
Cyberoam is an Identity-based Security Appliance. Cyberoam’s solution is purpose-built to meet the security needs of corporate, government organizations, and educational institutions.
Cyberoam’s perfect blend of best-of-breed solutions includes user based Firewall, Content filtering, Anti Virus, Anti Spam, Intrusion Prevention System (IPS), and VPN – IPSec and SSL.
Cyberoam provides increased LAN security by providing separate port for connecting to the publicly accessible servers like Web server, Mail server, FTP server etc. hosted in DMZ which are visible to the external world and still have firewall protection.
Cyberoam Console guide helps you administer, monitor and manage Cyberoam appliance with the help of Console.
Note that by default, Cyberoam Console password is ‘admin’. It is recommended to change the default password immediately after deployment.
Guide Audience
Cyberoam Console Guide provides functional and technical information of the Cyberoam Software. This Guide is written to serve as a technical reference and describes features that are specific to the Console.
Guide also provides the brief summary on using the Console commands.
This guide is intended for the Network Administrators and Support personnel who perform the following tasks:
• Configure System & Network
• Manage and maintain Network
• Manage various services
• Troubleshooting
This guide is intended for reference purpose and readers are expected to possess basic-to-advanced knowledge of systems networking.
Note The Corporate and individual names, data and images in this guide are for demonstration purpose only and do not reflect the real data.
If you are new to Cyberoam, use this guide along with the ‘Cyberoam User Guide’
Cyberoam Console Guide
Page 2 of 73
Technical Support
You may direct all questions, comments, or requests concerning the software you purchased, your registration status, or similar issues to Customer care/service department at the following address:
Corporate Office
Cyberoam House,
Saigulshan Complex, Opp. Sanskruti,
Beside White House, Panchwati Cross Road,
Ahmedabad - 380006, GUJARAT, INDIA.
Tel: +91-79-66216666
Web site: www.cyberoam.com
Cyberoam contact:
Technical support (Corporate Office): +91-79- 26400707
Email: [email protected]
Web site: www.cyberoam.com
Visit www.cyberoam.com for the regional and latest contact information.
Cyberoam Console Guide
Page 3 of 73
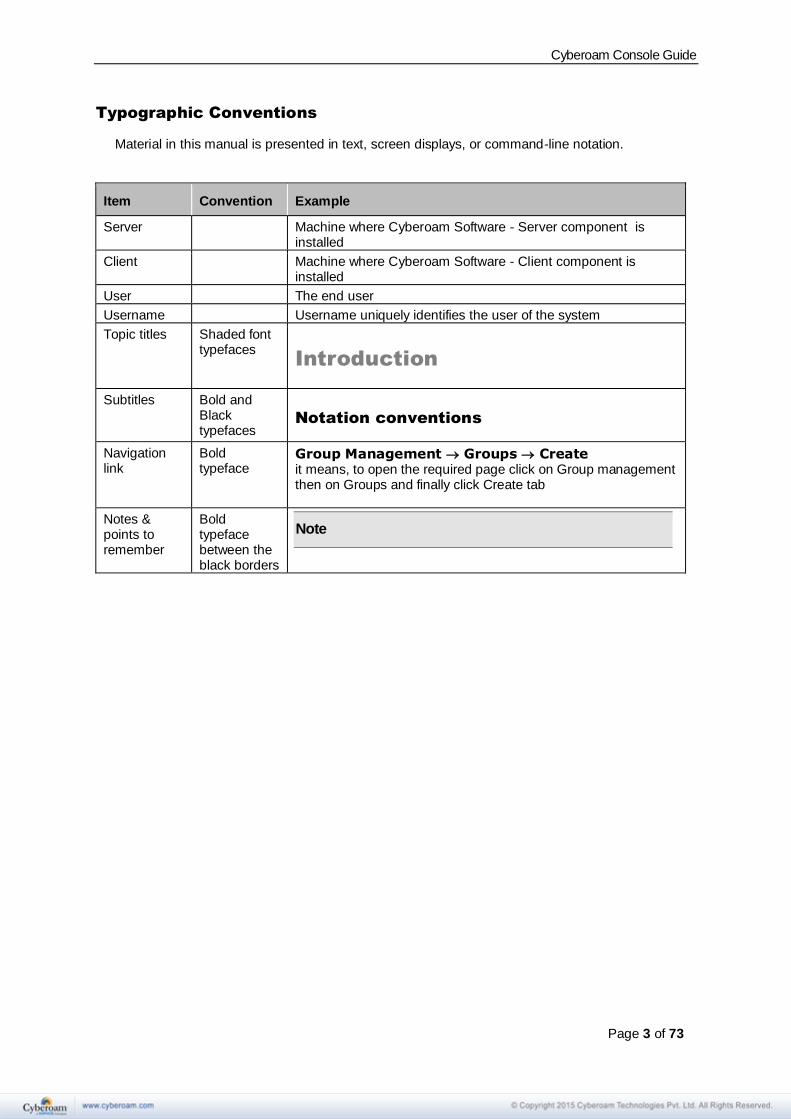
Typographic Conventions
Material in this manual is presented in text, screen displays, or command-line notation.
Item Convention Example
Server Machine where Cyberoam Software - Server component is installed
Client Machine where Cyberoam Software - Client component is installed
User The end user
Username Username uniquely identifies the user of the system
Topic titles Shaded font typefaces
Introduction
Subtitles Bold and Black typefaces
Notation conventions
Navigation link
Bold typeface
Group Management Groups Create it means, to open the required page click on Group management then on Groups and finally click Create tab
Notes & points to remember
Bold typeface between the black borders
Note
Cyberoam Console Guide
Page 4 of 73
Introduction
Cyberoam CLI console provides a collection of tools to administer, monitor and control certain Cyberoam components.
Accessing Cyberoam CLI Console
Two ways to access Cyberoam CLI console:
Connecting over Serial RS232 - attaching a keyboard and monitor directly to the Cyberoam Remote connection - a) Using remote login utility – TELNET b) Using SSH client
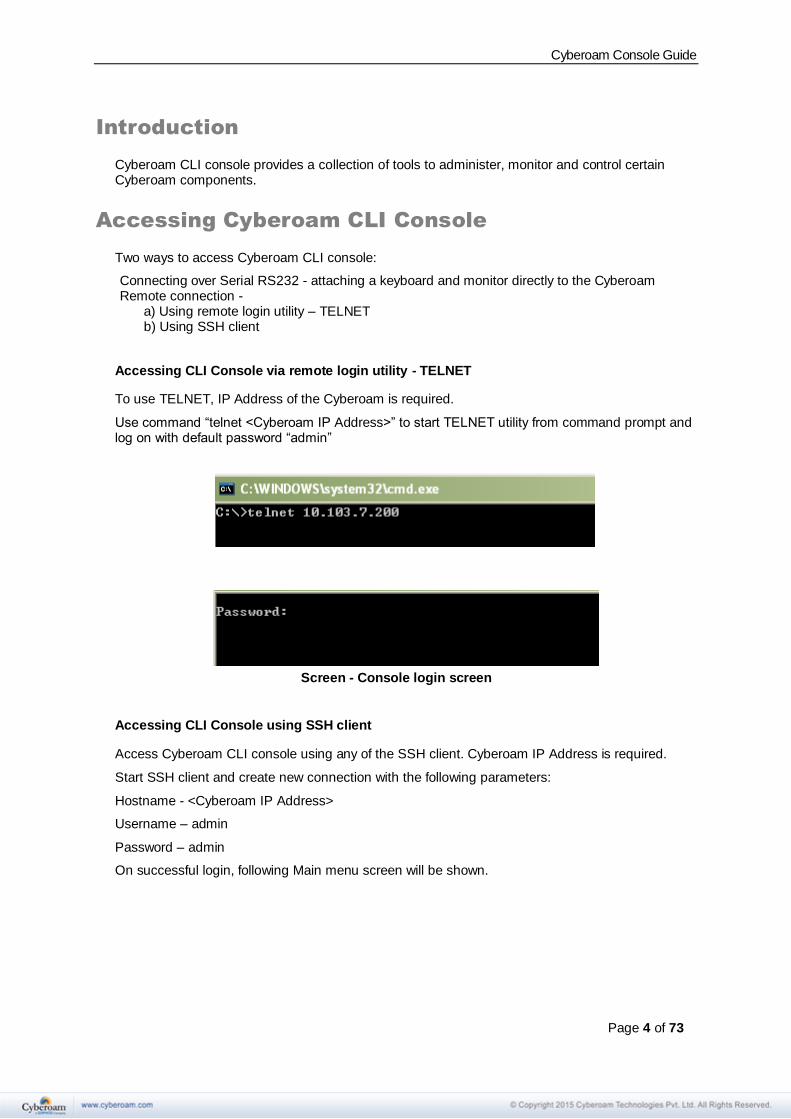
Accessing CLI Console via remote login utility - TELNET
To use TELNET, IP Address of the Cyberoam is required.
Use command “telnet <Cyberoam IP Address>” to start TELNET utility from command prompt and log on with default password “admin”
Screen - Console login screen
Accessing CLI Console using SSH client
Access Cyberoam CLI console using any of the SSH client. Cyberoam IP Address is required.
Start SSH client and create new connection with the following parameters:
Hostname - <Cyberoam IP Address>
Username – admin
Password – admin
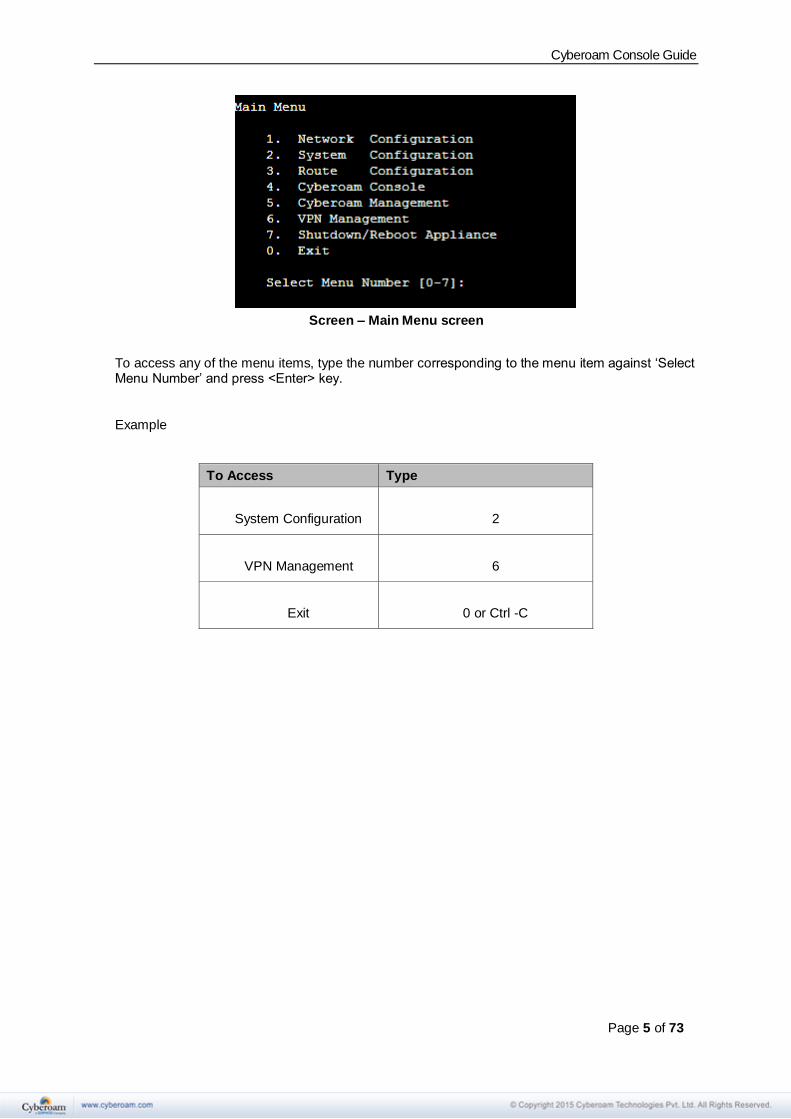
On successful login, following Main menu screen will be shown.
Cyberoam Console Guide
Page 5 of 73
Screen – Main Menu screen
To access any of the menu items, type the number corresponding to the menu item against ‘Select Menu Number’ and press <Enter> key.
Example
To Access Type
System Configuration
2
VPN Management
6
Exit
0 or Ctrl -C
Cyberoam Console Guide
Page 6 of 73
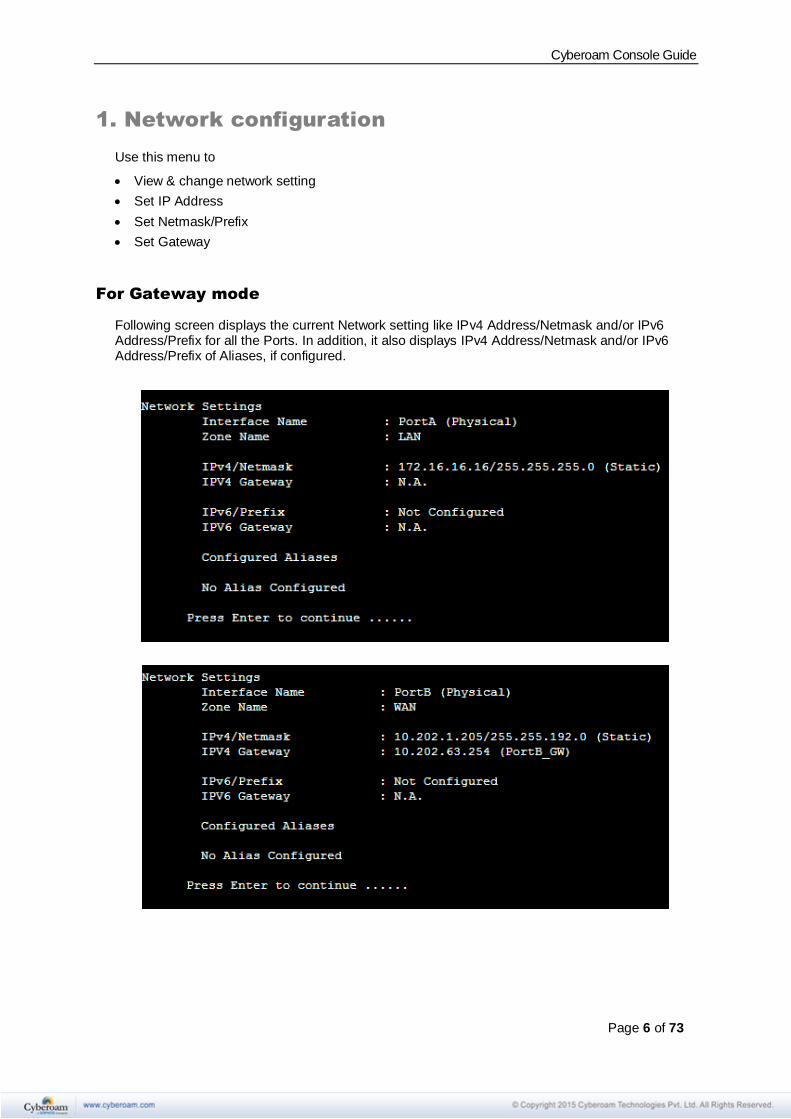
1. Network configuration
Use this menu to
• View & change network setting
• Set IP Address
• Set Netmask/Prefix
• Set Gateway
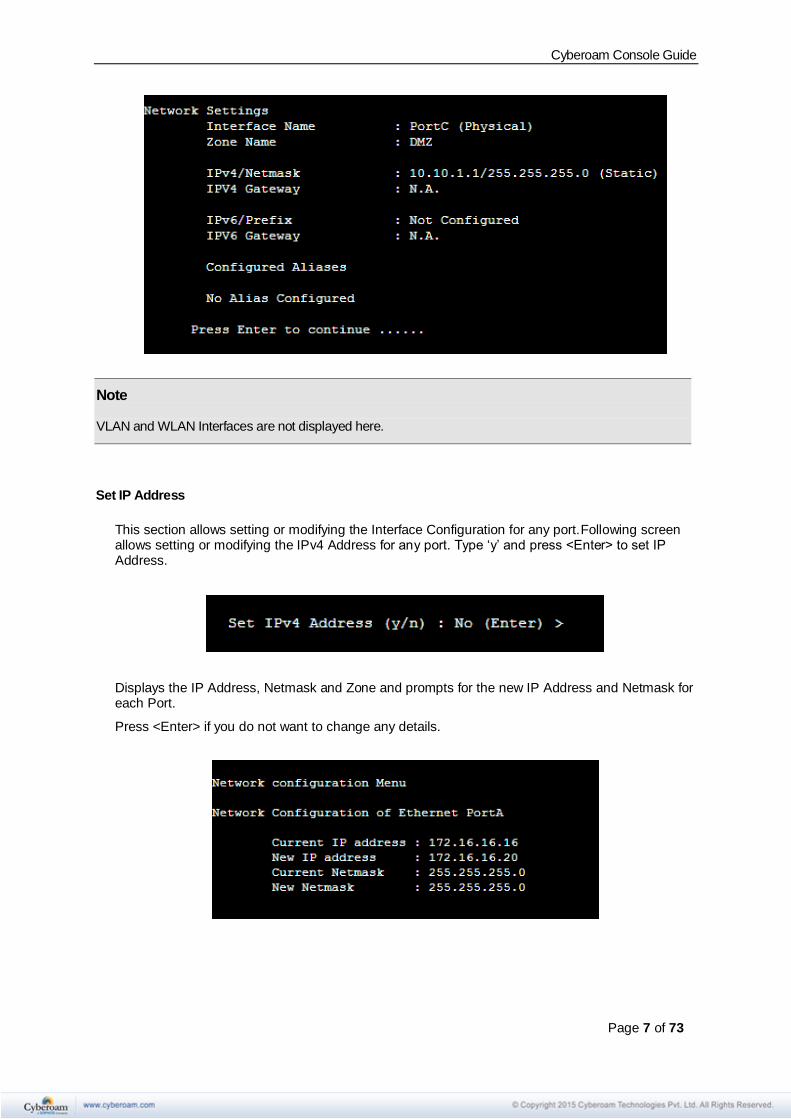
For Gateway mode
Following screen displays the current Network setting like IPv4 Address/Netmask and/or IPv6 Address/Prefix for all the Ports. In addition, it also displays IPv4 Address/Netmask and/or IPv6 Address/Prefix of Aliases, if configured.
Cyberoam Console Guide
Page 7 of 73
Note VLAN and WLAN Interfaces are not displayed here.
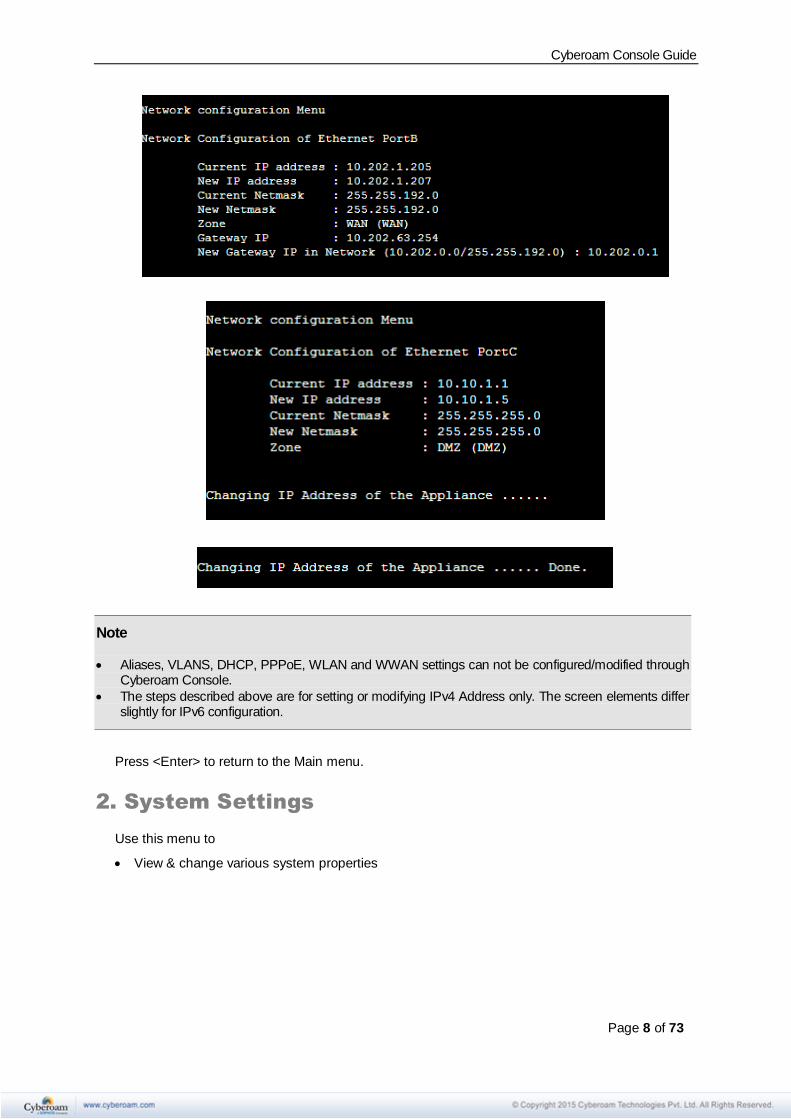
Set IP Address
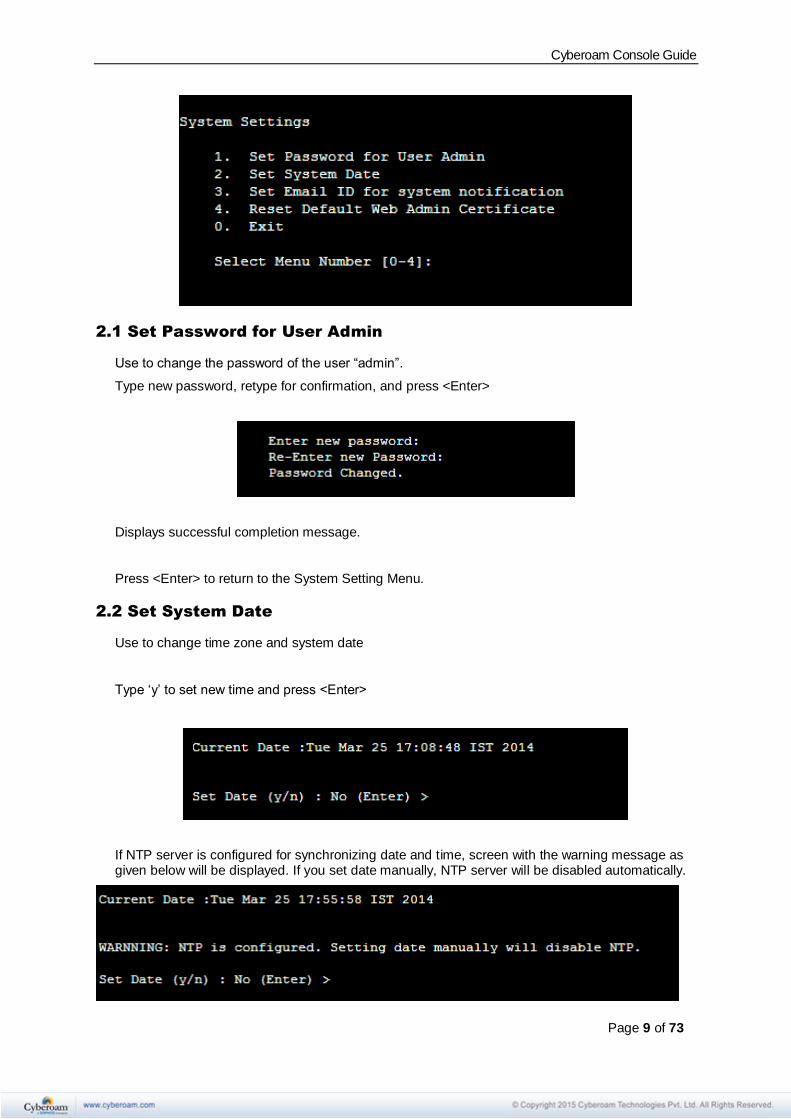
This section allows setting or modifying the Interface Configuration for any port.Following screen allows setting or modifying the IPv4 Address for any port. Type ‘y’ and press <Enter> to set IP Address.
Displays the IP Address, Netmask and Zone and prompts for the new IP Address and Netmask for each Port.
Press <Enter> if you do not want to change any details.
Cyberoam Console Guide
Page 8 of 73
Note
• Aliases, VLANS, DHCP, PPPoE, WLAN and WWAN settings can not be configured/modified through Cyberoam Console.
• The steps described above are for setting or modifying IPv4 Address only. The screen elements differ slightly for IPv6 configuration.
Press <Enter> to return to the Main menu.
2. System Settings
Use this menu to
• View & change various system properties
Cyberoam Console Guide
Page 9 of 73
2.1 Set Password for User Admin
Use to change the password of the user “admin”.
Type new password, retype for confirmation, and press <Enter>
Displays successful completion message.
Press <Enter> to return to the System Setting Menu.
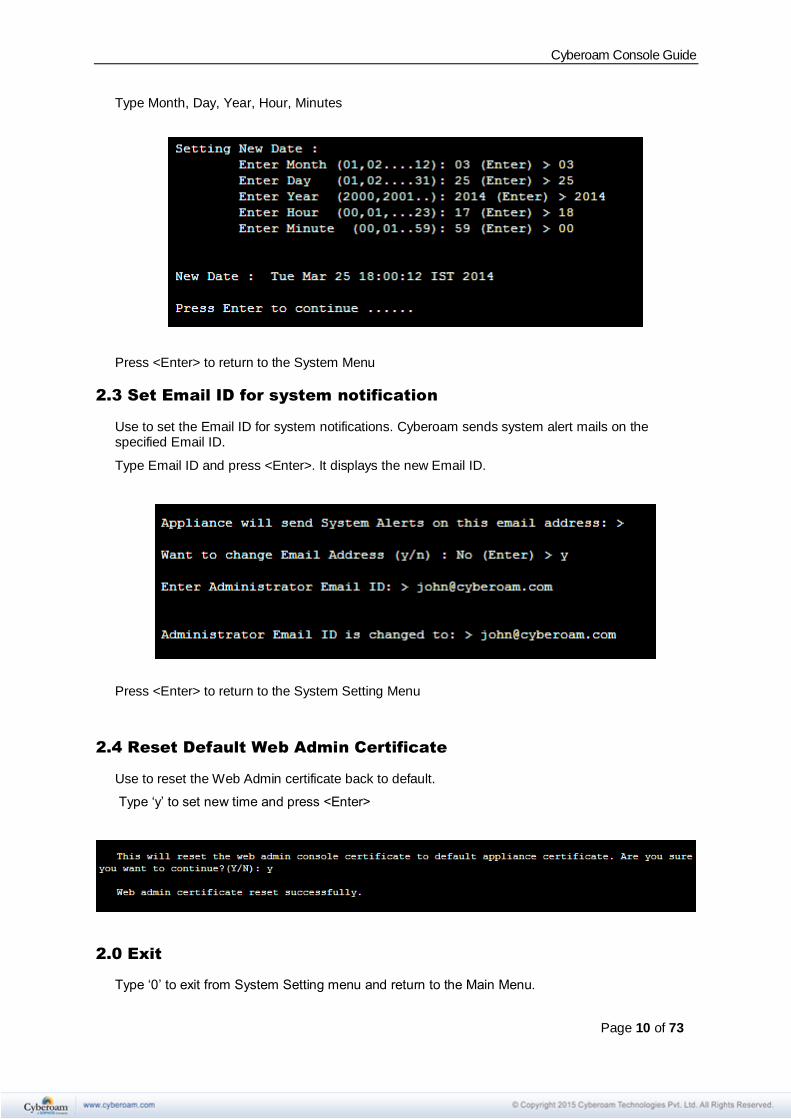
2.2 Set System Date
Use to change time zone and system date
Type ‘y’ to set new time and press <Enter>
If NTP server is configured for synchronizing date and time, screen with the warning message as given below will be displayed. If you set date manually, NTP server will be disabled automatically.
Cyberoam Console Guide
Page 10 of 73
Type Month, Day, Year, Hour, Minutes
Press <Enter> to return to the System Menu
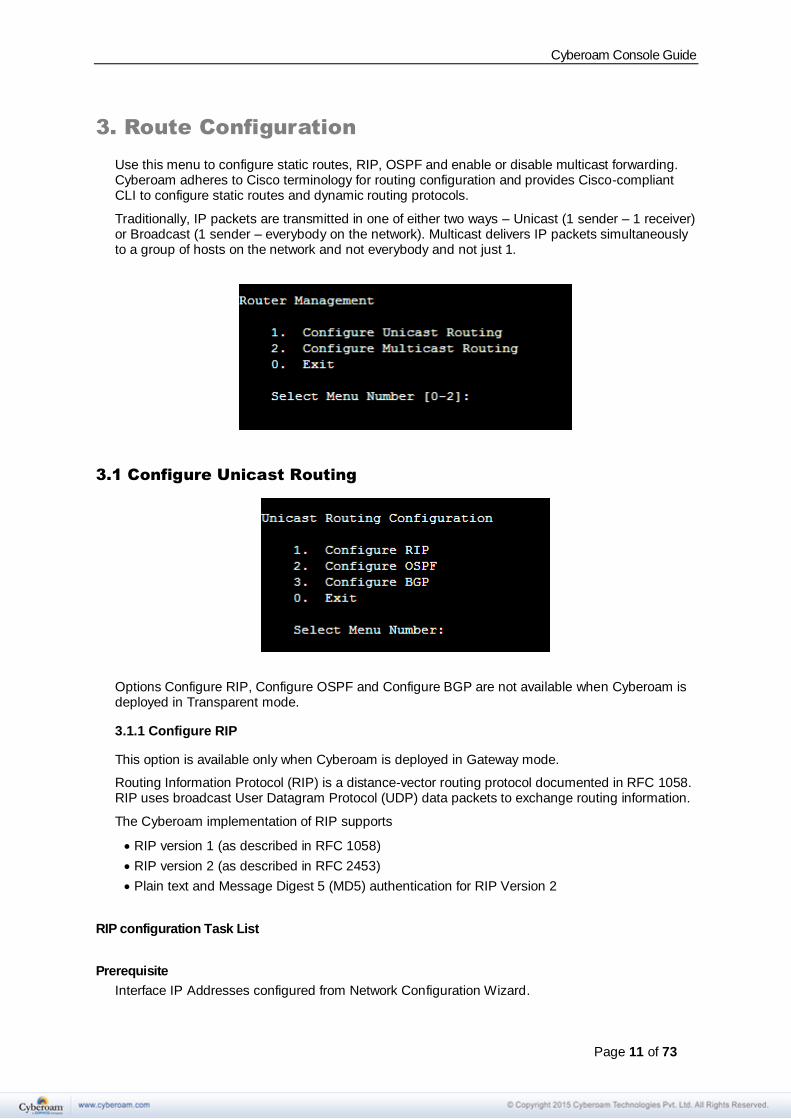
2.3 Set Email ID for system notification
Use to set the Email ID for system notifications. Cyberoam sends system alert mails on the specified Email ID.
Type Email ID and press <Enter>. It displays the new Email ID.
Press <Enter> to return to the System Setting Menu
2.4 Reset Default Web Admin Certificate
Use to reset the Web Admin certificate back to default.
Type ‘y’ to set new time and press <Enter>
2.0 Exit
Type ‘0’ to exit from System Setting menu and return to the Main Menu.
Cyberoam Console Guide
Page 11 of 73
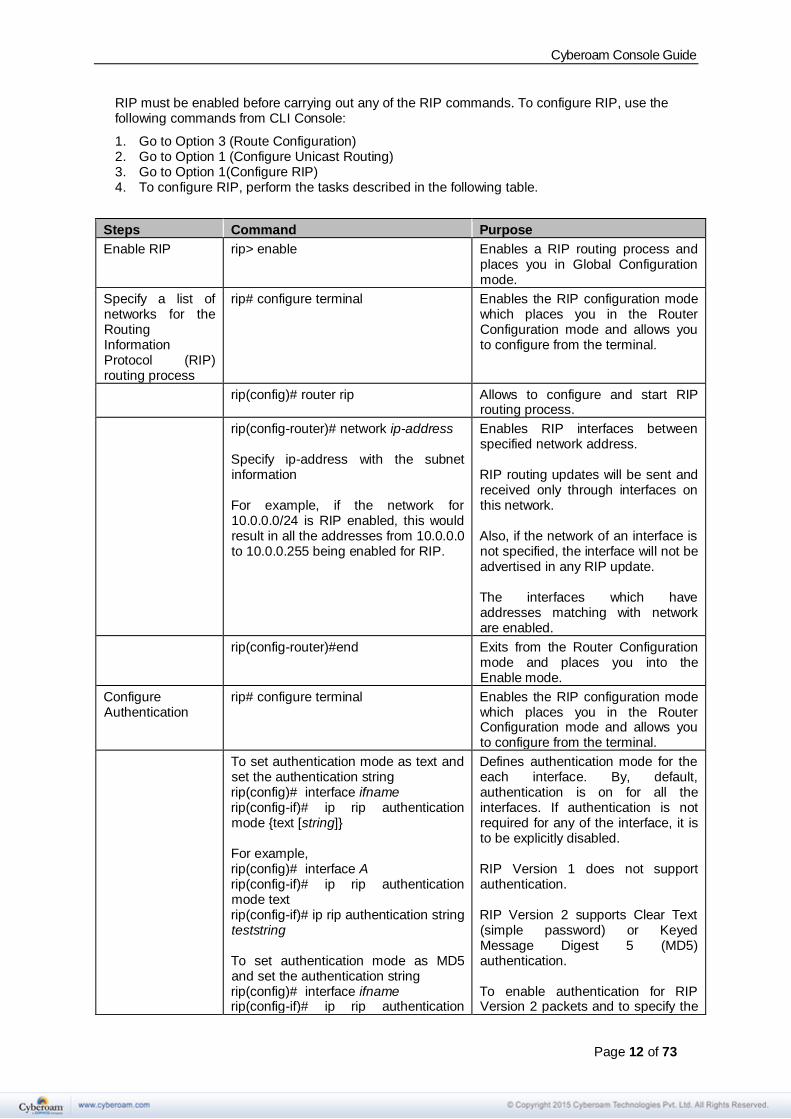
3. Route Configuration
Use this menu to configure static routes, RIP, OSPF and enable or disable multicast forwarding. Cyberoam adheres to Cisco terminology for routing configuration and provides Cisco-compliant CLI to configure static routes and dynamic routing protocols.
Traditionally, IP packets are transmitted in one of either two ways – Unicast (1 sender – 1 receiver) or Broadcast (1 sender – everybody on the network). Multicast delivers IP packets simultaneously to a group of hosts on the network and not everybody and not just 1.
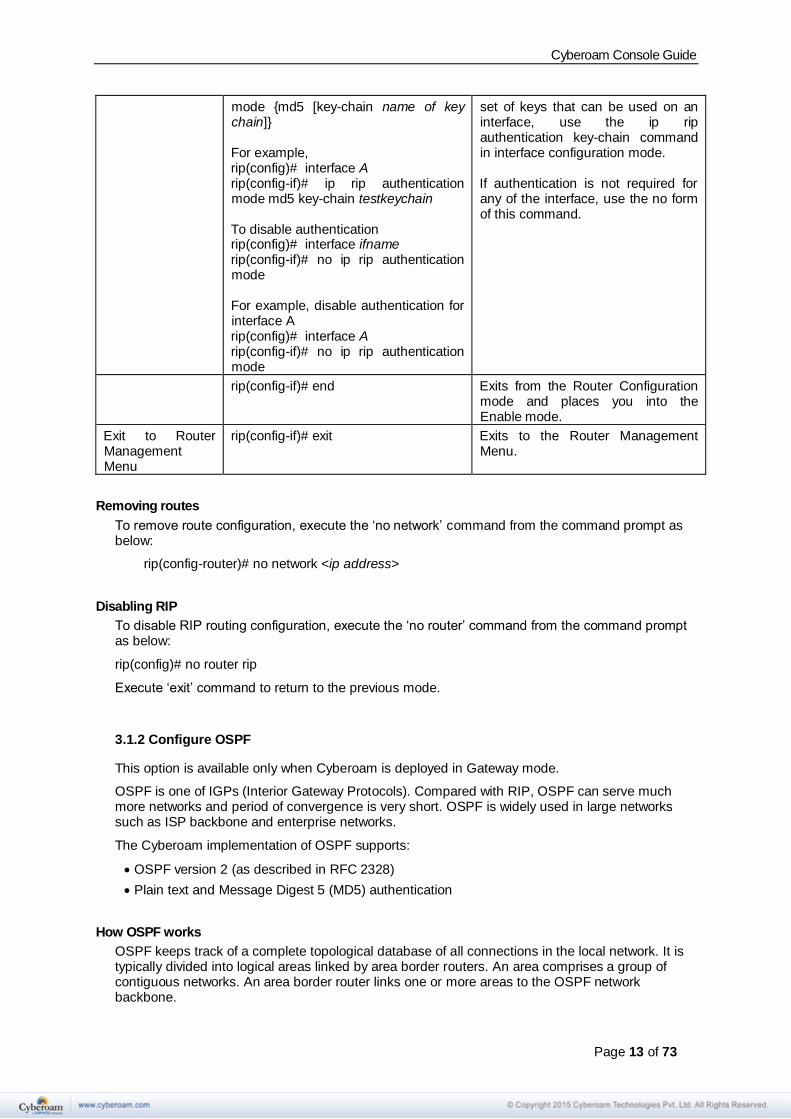
3.1 Configure Unicast Routing
Options Configure RIP, Configure OSPF and Configure BGP are not available when Cyberoam is deployed in Transparent mode.
3.1.1 Configure RIP
This option is available only when Cyberoam is deployed in Gateway mode.
Routing Information Protocol (RIP) is a distance-vector routing protocol documented in RFC 1058. RIP uses broadcast User Datagram Protocol (UDP) data packets to exchange routing information.
The Cyberoam implementation of RIP supports
• RIP version 1 (as described in RFC 1058)
• RIP version 2 (as described in RFC 2453)
• Plain text and Message Digest 5 (MD5) authentication for RIP Version 2
RIP configuration Task List
Prerequisite
Interface IP Addresses configured from Network Configuration Wizard.
Cyberoam Console Guide
Page 12 of 73
RIP must be enabled before carrying out any of the RIP commands. To configure RIP, use the following commands from CLI Console:
1. Go to Option 3 (Route Configuration) 2. Go to Option 1 (Configure Unicast Routing) 3. Go to Option 1(Configure RIP) 4. To configure RIP, perform the tasks described in the following table.
Steps Command Purpose
Enable RIP
rip> enable Enables a RIP routing process and places you in Global Configuration mode.
Specify a list of networks for the Routing Information Protocol (RIP) routing process
rip# configure terminal Enables the RIP configuration mode which places you in the Router Configuration mode and allows you to configure from the terminal.
rip(config)# router rip Allows to configure and start RIP routing process.
rip(config-router)# network ip-address Specify ip-address with the subnet information For example, if the network for 10.0.0.0/24 is RIP enabled, this would result in all the addresses from 10.0.0.0 to 10.0.0.255 being enabled for RIP.
Enables RIP interfaces between specified network address. RIP routing updates will be sent and received only through interfaces on this network. Also, if the network of an interface is not specified, the interface will not be advertised in any RIP update. The interfaces which have addresses matching with network are enabled.
rip(config-router)#end Exits from the Router Configuration mode and places you into the Enable mode.
Configure Authentication
rip# configure terminal Enables the RIP configuration mode which places you in the Router Configuration mode and allows you to configure from the terminal.
To set authentication mode as text and set the authentication string rip(config)# interface ifname rip(config-if)# ip rip authentication mode {text [string]} For example, rip(config)# interface A rip(config-if)# ip rip authentication mode text rip(config-if)# ip rip authentication string teststring To set authentication mode as MD5 and set the authentication string rip(config)# interface ifname rip(config-if)# ip rip authentication
Defines authentication mode for the each interface. By, default, authentication is on for all the interfaces. If authentication is not required for any of the interface, it is to be explicitly disabled. RIP Version 1 does not support authentication. RIP Version 2 supports Clear Text (simple password) or Keyed Message Digest 5 (MD5) authentication. To enable authentication for RIP Version 2 packets and to specify the
Cyberoam Console Guide
Page 13 of 73
mode {md5 [key-chain name of key chain]} For example, rip(config)# interface A rip(config-if)# ip rip authentication mode md5 key-chain testkeychain To disable authentication rip(config)# interface ifname rip(config-if)# no ip rip authentication mode For example, disable authentication for interface A rip(config)# interface A rip(config-if)# no ip rip authentication mode
set of keys that can be used on an interface, use the ip rip authentication key-chain command in interface configuration mode. If authentication is not required for any of the interface, use the no form of this command.
rip(config-if)# end Exits from the Router Configuration mode and places you into the Enable mode.
Exit to Router Management Menu
rip(config-if)# exit Exits to the Router Management Menu.
Removing routes
To remove route configuration, execute the ‘no network’ command from the command prompt as below:
rip(config-router)# no network <ip address>
Disabling RIP
To disable RIP routing configuration, execute the ‘no router’ command from the command prompt as below:
rip(config)# no router rip
Execute ‘exit’ command to return to the previous mode.
3.1.2 Configure OSPF
This option is available only when Cyberoam is deployed in Gateway mode.
OSPF is one of IGPs (Interior Gateway Protocols). Compared with RIP, OSPF can serve much more networks and period of convergence is very short. OSPF is widely used in large networks such as ISP backbone and enterprise networks.
The Cyberoam implementation of OSPF supports:
• OSPF version 2 (as described in RFC 2328)
• Plain text and Message Digest 5 (MD5) authentication
How OSPF works
OSPF keeps track of a complete topological database of all connections in the local network. It is typically divided into logical areas linked by area border routers. An area comprises a group of contiguous networks. An area border router links one or more areas to the OSPF network backbone.
Cyberoam Console Guide
Page 14 of 73
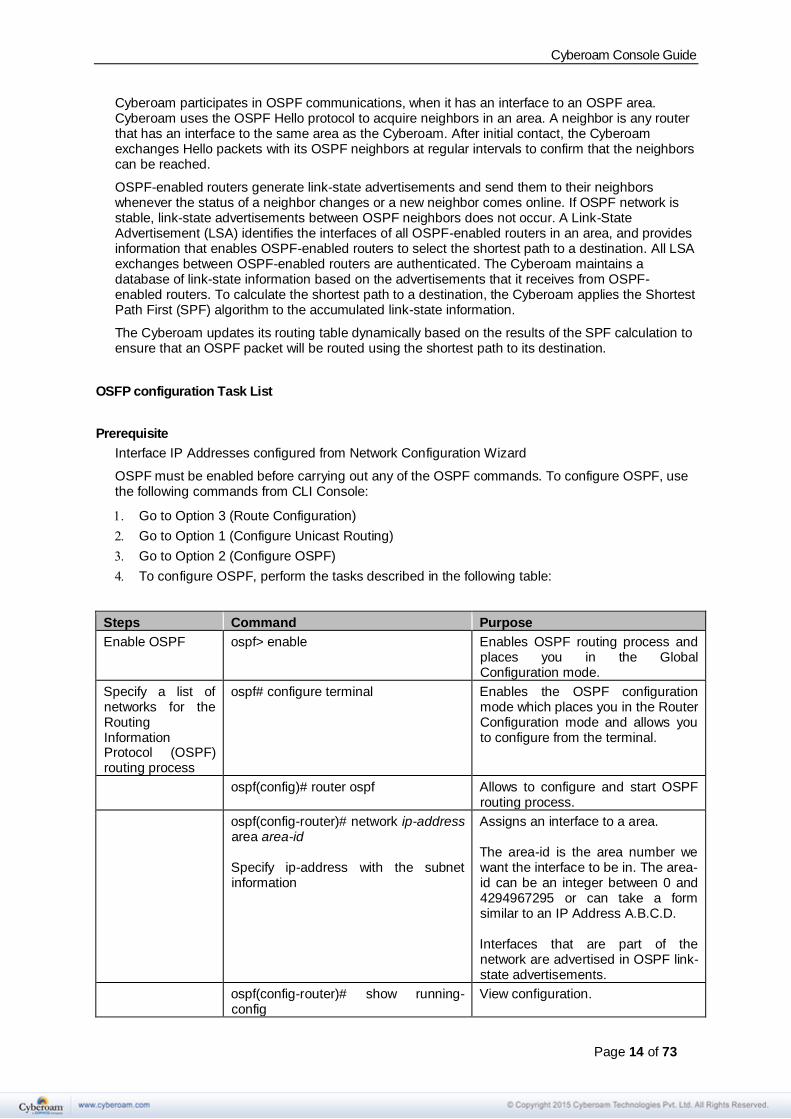
Cyberoam participates in OSPF communications, when it has an interface to an OSPF area. Cyberoam uses the OSPF Hello protocol to acquire neighbors in an area. A neighbor is any router that has an interface to the same area as the Cyberoam. After initial contact, the Cyberoam exchanges Hello packets with its OSPF neighbors at regular intervals to confirm that the neighbors can be reached.
OSPF-enabled routers generate link-state advertisements and send them to their neighbors whenever the status of a neighbor changes or a new neighbor comes online. If OSPF network is stable, link-state advertisements between OSPF neighbors does not occur. A Link-State Advertisement (LSA) identifies the interfaces of all OSPF-enabled routers in an area, and provides information that enables OSPF-enabled routers to select the shortest path to a destination. All LSA exchanges between OSPF-enabled routers are authenticated. The Cyberoam maintains a database of link-state information based on the advertisements that it receives from OSPF-enabled routers. To calculate the shortest path to a destination, the Cyberoam applies the Shortest Path First (SPF) algorithm to the accumulated link-state information.
The Cyberoam updates its routing table dynamically based on the results of the SPF calculation to ensure that an OSPF packet will be routed using the shortest path to its destination.
OSFP configuration Task List
Prerequisite
Interface IP Addresses configured from Network Configuration Wizard
OSPF must be enabled before carrying out any of the OSPF commands. To configure OSPF, use the following commands from CLI Console:
Go to Option 3 (Route Configuration)
Go to Option 1 (Configure Unicast Routing)
Go to Option 2 (Configure OSPF)
To configure OSPF, perform the tasks described in the following table:
Steps Command Purpose
Enable OSPF
ospf> enable Enables OSPF routing process and places you in the Global Configuration mode.
Specify a list of networks for the Routing Information Protocol (OSPF) routing process
ospf# configure terminal Enables the OSPF configuration mode which places you in the Router Configuration mode and allows you to configure from the terminal.
ospf(config)# router ospf Allows to configure and start OSPF routing process.
ospf(config-router)# network ip-address area area-id Specify ip-address with the subnet information
Assigns an interface to a area. The area-id is the area number we want the interface to be in. The area-id can be an integer between 0 and 4294967295 or can take a form similar to an IP Address A.B.C.D. Interfaces that are part of the network are advertised in OSPF link-state advertisements.
ospf(config-router)# show running-config
View configuration.
Cyberoam Console Guide
Page 15 of 73
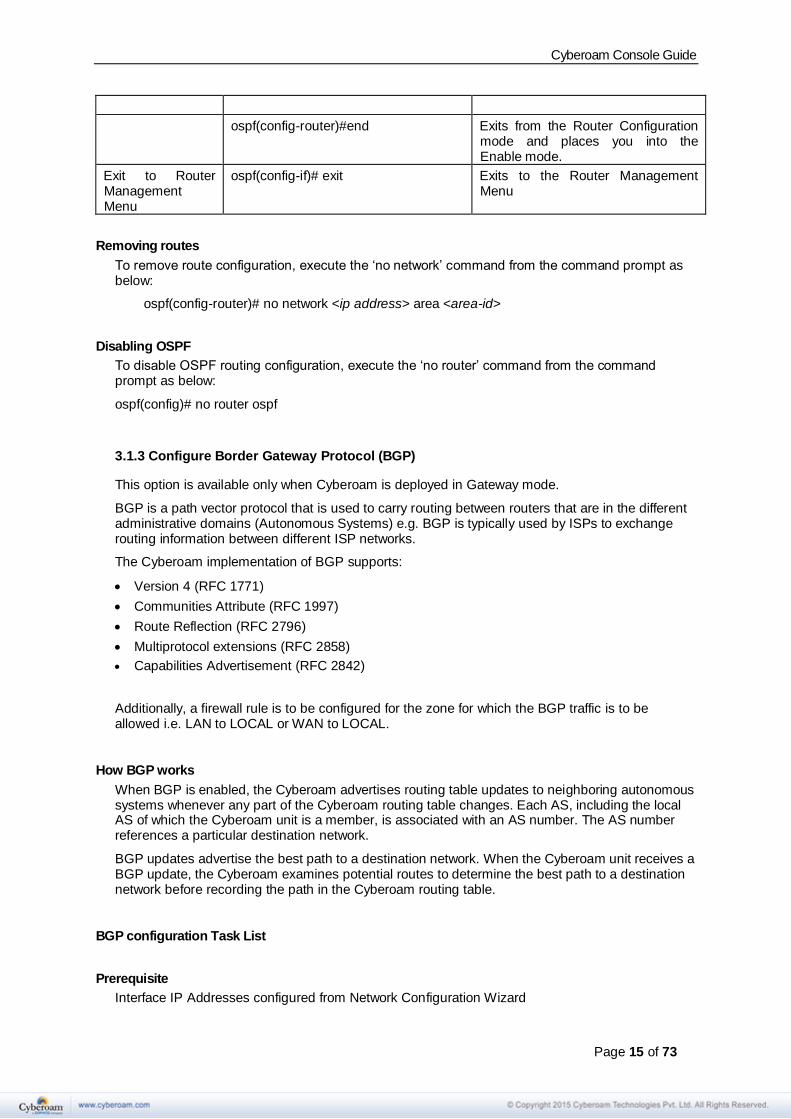
ospf(config-router)#end Exits from the Router Configuration mode and places you into the Enable mode.
Exit to Router Management Menu
ospf(config-if)# exit Exits to the Router Management Menu
Removing routes
To remove route configuration, execute the ‘no network’ command from the command prompt as below:
ospf(config-router)# no network <ip address> area <area-id>
Disabling OSPF
To disable OSPF routing configuration, execute the ‘no router’ command from the command prompt as below:
ospf(config)# no router ospf
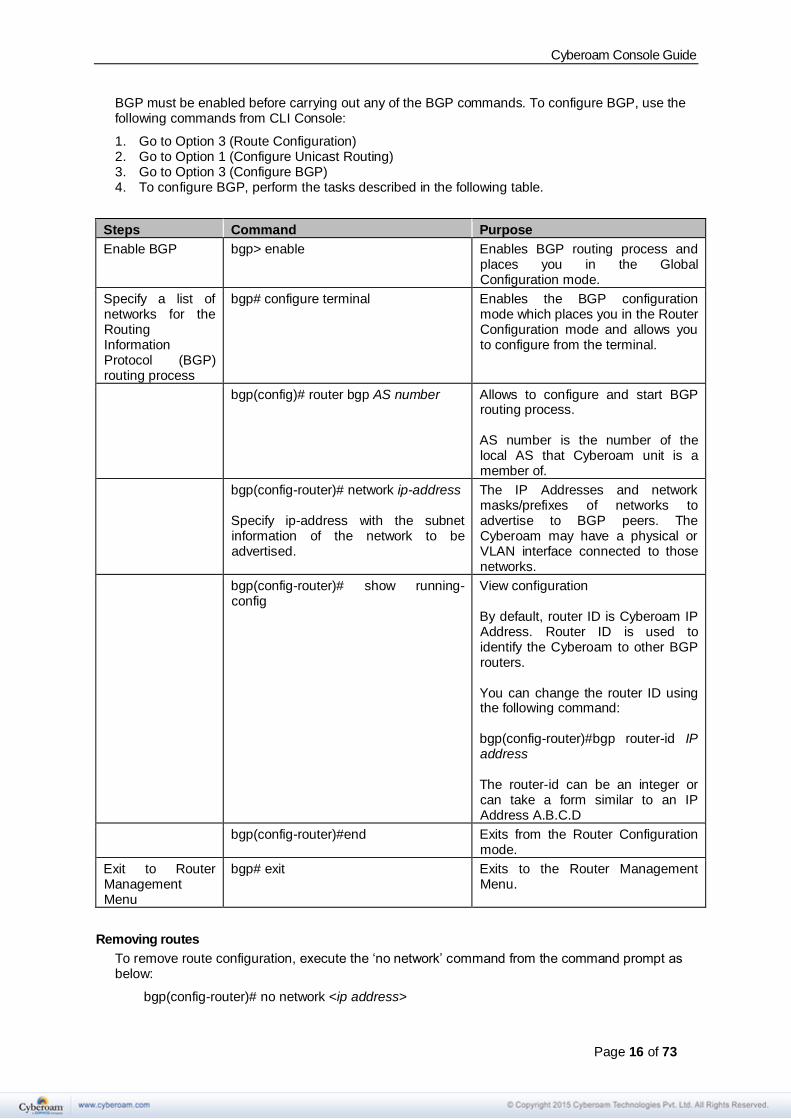
3.1.3 Configure Border Gateway Protocol (BGP)
This option is available only when Cyberoam is deployed in Gateway mode.
BGP is a path vector protocol that is used to carry routing between routers that are in the different administrative domains (Autonomous Systems) e.g. BGP is typically used by ISPs to exchange routing information between different ISP networks.
The Cyberoam implementation of BGP supports:
• Version 4 (RFC 1771)
• Communities Attribute (RFC 1997)
• Route Reflection (RFC 2796)
• Multiprotocol extensions (RFC 2858)
• Capabilities Advertisement (RFC 2842)
Additionally, a firewall rule is to be configured for the zone for which the BGP traffic is to be allowed i.e. LAN to LOCAL or WAN to LOCAL.
How BGP works
When BGP is enabled, the Cyberoam advertises routing table updates to neighboring autonomous systems whenever any part of the Cyberoam routing table changes. Each AS, including the local AS of which the Cyberoam unit is a member, is associated with an AS number. The AS number references a particular destination network.
BGP updates advertise the best path to a destination network. When the Cyberoam unit receives a BGP update, the Cyberoam examines potential routes to determine the best path to a destination network before recording the path in the Cyberoam routing table.
BGP configuration Task List
Prerequisite
Interface IP Addresses configured from Network Configuration Wizard
Cyberoam Console Guide
Page 16 of 73
BGP must be enabled before carrying out any of the BGP commands. To configure BGP, use the following commands from CLI Console:
1. Go to Option 3 (Route Configuration) 2. Go to Option 1 (Configure Unicast Routing) 3. Go to Option 3 (Configure BGP) 4. To configure BGP, perform the tasks described in the following table.
Steps Command Purpose
Enable BGP
bgp> enable Enables BGP routing process and places you in the Global Configuration mode.
Specify a list of networks for the Routing Information Protocol (BGP) routing process
bgp# configure terminal Enables the BGP configuration mode which places you in the Router Configuration mode and allows you to configure from the terminal.
bgp(config)# router bgp AS number
Allows to configure and start BGP routing process. AS number is the number of the local AS that Cyberoam unit is a member of.
bgp(config-router)# network ip-address Specify ip-address with the subnet information of the network to be advertised.
The IP Addresses and network masks/prefixes of networks to advertise to BGP peers. The Cyberoam may have a physical or VLAN interface connected to those networks.
bgp(config-router)# show running-config
View configuration By default, router ID is Cyberoam IP Address. Router ID is used to identify the Cyberoam to other BGP routers. You can change the router ID using the following command: bgp(config-router)#bgp router-id IP address The router-id can be an integer or can take a form similar to an IP Address A.B.C.D
bgp(config-router)#end Exits from the Router Configuration mode.
Exit to Router Management Menu
bgp# exit Exits to the Router Management Menu.
Removing routes
To remove route configuration, execute the ‘no network’ command from the command prompt as below:
bgp(config-router)# no network <ip address>
Cyberoam Console Guide
Page 17 of 73
Disabling BGP
To disable BGP routing configuration, execute the ‘no router’ command from the command prompt as below:
bgp(config)# no router bgp AS number
3.1.0 Exit
Type ‘0’ to exit from Unicast Routing configuration menu and return to Router Management.
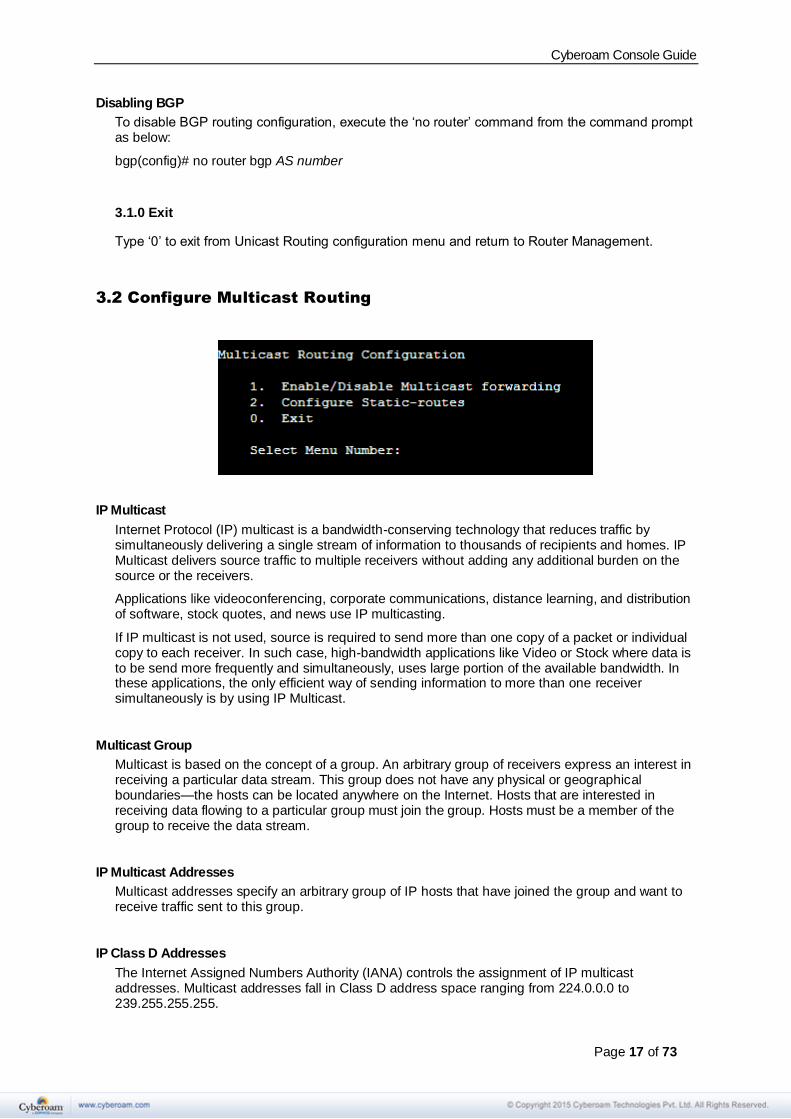
3.2 Configure Multicast Routing
IP Multicast
Internet Protocol (IP) multicast is a bandwidth-conserving technology that reduces traffic by simultaneously delivering a single stream of information to thousands of recipients and homes. IP Multicast delivers source traffic to multiple receivers without adding any additional burden on the source or the receivers.
Applications like videoconferencing, corporate communications, distance learning, and distribution of software, stock quotes, and news use IP multicasting.
If IP multicast is not used, source is required to send more than one copy of a packet or individual copy to each receiver. In such case, high-bandwidth applications like Video or Stock where data is to be send more frequently and simultaneously, uses large portion of the available bandwidth. In these applications, the only efficient way of sending information to more than one receiver simultaneously is by using IP Multicast.
Multicast Group
Multicast is based on the concept of a group. An arbitrary group of receivers express an interest in receiving a particular data stream. This group does not have any physical or geographical boundaries—the hosts can be located anywhere on the Internet. Hosts that are interested in receiving data flowing to a particular group must join the group. Hosts must be a member of the group to receive the data stream.
IP Multicast Addresses
Multicast addresses specify an arbitrary group of IP hosts that have joined the group and want to receive traffic sent to this group.
IP Class D Addresses
The Internet Assigned Numbers Authority (IANA) controls the assignment of IP multicast addresses. Multicast addresses fall in Class D address space ranging from 224.0.0.0 to 239.255.255.255.
Cyberoam Console Guide
Page 18 of 73
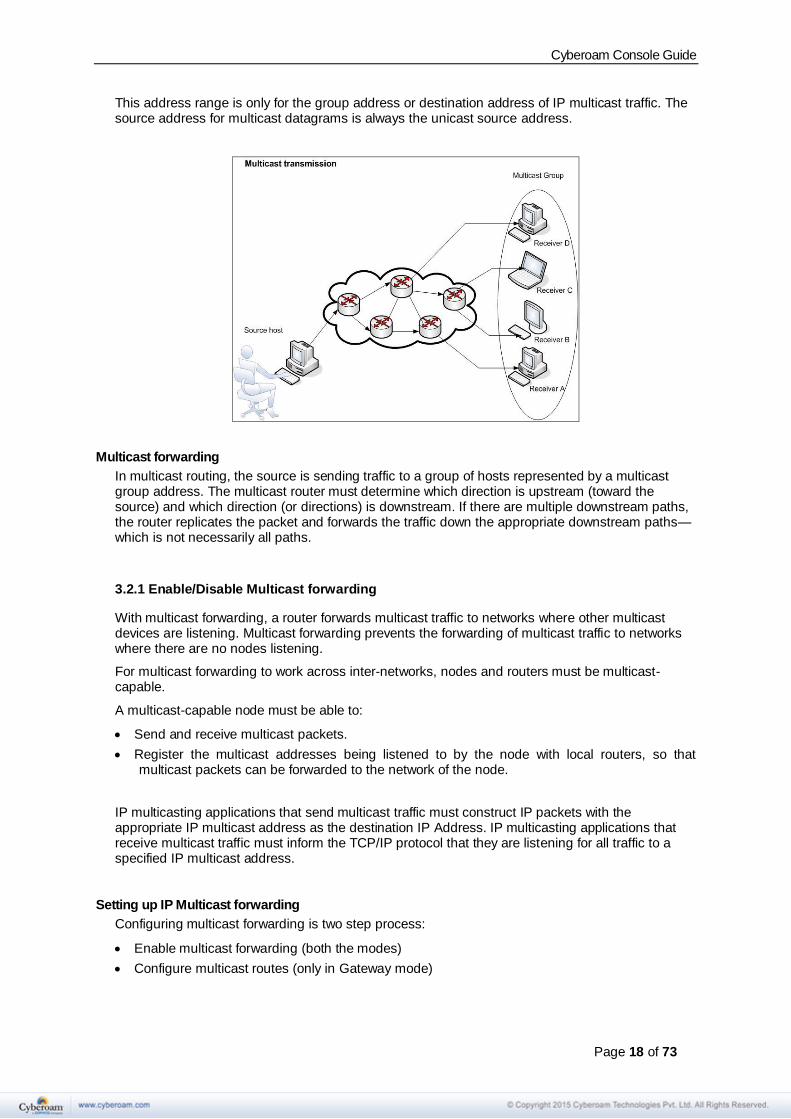
This address range is only for the group address or destination address of IP multicast traffic. The source address for multicast datagrams is always the unicast source address.
Multicast forwarding
In multicast routing, the source is sending traffic to a group of hosts represented by a multicast group address. The multicast router must determine which direction is upstream (toward the source) and which direction (or directions) is downstream. If there are multiple downstream paths, the router replicates the packet and forwards the traffic down the appropriate downstream paths—which is not necessarily all paths.
3.2.1 Enable/Disable Multicast forwarding
With multicast forwarding, a router forwards multicast traffic to networks where other multicast devices are listening. Multicast forwarding prevents the forwarding of multicast traffic to networks where there are no nodes listening.
For multicast forwarding to work across inter-networks, nodes and routers must be multicast-capable.
A multicast-capable node must be able to:
• Send and receive multicast packets.
• Register the multicast addresses being listened to by the node with local routers, so that multicast packets can be forwarded to the network of the node.
IP multicasting applications that send multicast traffic must construct IP packets with the appropriate IP multicast address as the destination IP Address. IP multicasting applications that receive multicast traffic must inform the TCP/IP protocol that they are listening for all traffic to a specified IP multicast address.
Setting up IP Multicast forwarding
Configuring multicast forwarding is two step process:
• Enable multicast forwarding (both the modes)
• Configure multicast routes (only in Gateway mode)
Cyberoam Console Guide
Page 19 of 73
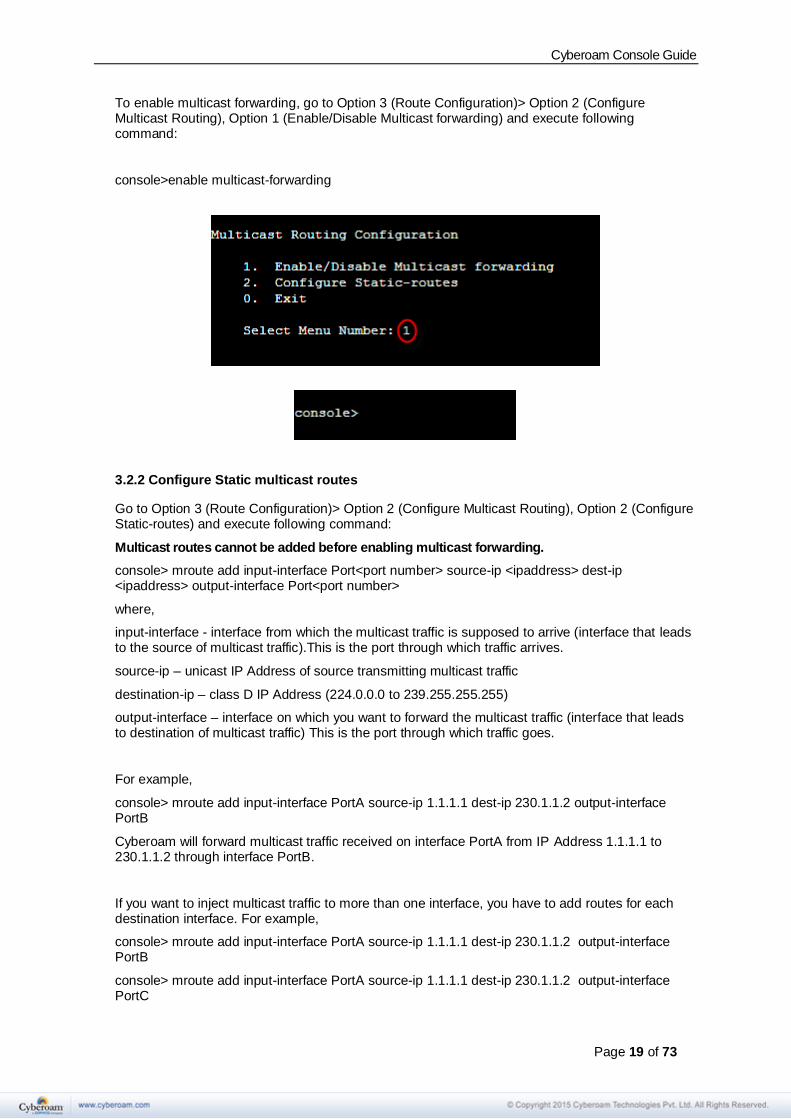
To enable multicast forwarding, go to Option 3 (Route Configuration)> Option 2 (Configure Multicast Routing), Option 1 (Enable/Disable Multicast forwarding) and execute following command:
console>enable multicast-forwarding
3.2.2 Configure Static multicast routes
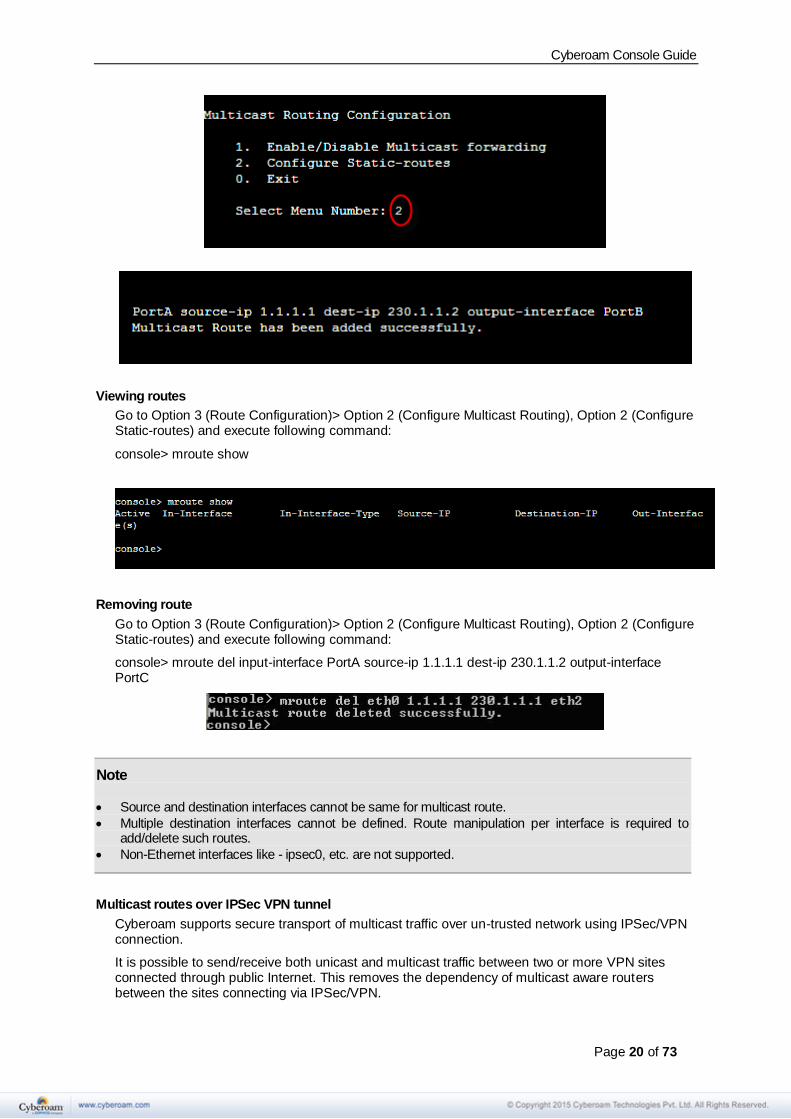
Go to Option 3 (Route Configuration)> Option 2 (Configure Multicast Routing), Option 2 (Configure Static-routes) and execute following command:
Multicast routes cannot be added before enabling multicast forwarding.
console> mroute add input-interface Port<port number> source-ip <ipaddress> dest-ip <ipaddress> output-interface Port<port number>
where,
input-interface - interface from which the multicast traffic is supposed to arrive (interface that leads to the source of multicast traffic).This is the port through which traffic arrives.
source-ip – unicast IP Address of source transmitting multicast traffic
destination-ip – class D IP Address (224.0.0.0 to 239.255.255.255)
output-interface – interface on which you want to forward the multicast traffic (interface that leads to destination of multicast traffic) This is the port through which traffic goes.
For example,
console> mroute add input-interface PortA source-ip 1.1.1.1 dest-ip 230.1.1.2 output-interface PortB
Cyberoam will forward multicast traffic received on interface PortA from IP Address 1.1.1.1 to 230.1.1.2 through interface PortB.
If you want to inject multicast traffic to more than one interface, you have to add routes for each destination interface. For example,
console> mroute add input-interface PortA source-ip 1.1.1.1 dest-ip 230.1.1.2 output-interface PortB
console> mroute add input-interface PortA source-ip 1.1.1.1 dest-ip 230.1.1.2 output-interface PortC
Cyberoam Console Guide
Page 20 of 73
Viewing routes
Go to Option 3 (Route Configuration)> Option 2 (Configure Multicast Routing), Option 2 (Configure Static-routes) and execute following command:
console> mroute show
Removing route
Go to Option 3 (Route Configuration)> Option 2 (Configure Multicast Routing), Option 2 (Configure Static-routes) and execute following command:
console> mroute del input-interface PortA source-ip 1.1.1.1 dest-ip 230.1.1.2 output-interface PortC
Note
• Source and destination interfaces cannot be same for multicast route.
• Multiple destination interfaces cannot be defined. Route manipulation per interface is required to add/delete such routes.
• Non-Ethernet interfaces like - ipsec0, etc. are not supported.
Multicast routes over IPSec VPN tunnel
Cyberoam supports secure transport of multicast traffic over un-trusted network using IPSec/VPN connection.
It is possible to send/receive both unicast and multicast traffic between two or more VPN sites connected through public Internet. This removes the dependency of multicast aware routers between the sites connecting via IPSec/VPN.
Cyberoam Console Guide
Page 21 of 73
Any unicast host wanting to access a multicast host shall require to be configured as a explicit host (with netmask /32) in VPN configuration.
Go to Option 3 (Route Configuration)> Option 2 (Configure Multicast Routing), Option 2 (Configure Static-routes) and execute following command:
CLI Commands
1. Command: mroute add input-interface Port<port number> source-ip <ipaddress> dest-ip <ipaddress> output-interface Port<port number>
To forward multicast traffic coming from a given interface to another interface
E.G. mroute add input-interface PortA source-ip 192.168.1.2 dest-ip 239.0.0.55 output-interface PortB
2. Command: mroute add input-interface Port<port number> source-ip <ipaddress> dest-ip <ipaddress> output-tunnel gre name <gre tunnel name>
To forward multicast traffic coming from a given interface to GRE tunnel.
E.G. mroute add input-interface PortA source-ip 192.168.1.2 dest-ip 239.0.0.55 output-tunnel gre name Elitecore
3. Command: mroute add input-interface Port<port number> source-ip <ipaddress> dest-ip <ipaddress> output-tunnel ipsec
To forward multicast traffic coming from a given interface to IPSec tunnels. Cyberoam automatically selects the appropriate tunnel to be used depending upon the Local Network and Remote Network configuration.
E.G. mroute add input-interface PortA source-ip 192.168.1.2 dest-ip 239.0.0.55 output-tunnel ipsec
4. Command: mroute add input-tunnel ipsec name <ipsec connection name> source-ip <ipaddress> dest-ip <ipaddress> output-interface Port<port number>
To forward multicast traffic coming from IPSec tunnel to an interface.
E.G. mroute add input-tunnel ipsec name Net2Net source-ip 192.168.1.2 dest-ip 239.0.0.55 output-interface PortB
5. Command: mroute add input-tunnel ipsec name <ipsec connection name> source-ip <ipaddress> dest-ip <ipaddress> output-tunnel ipsec
To forward multicast traffic coming from a given IPSec tunnel to other IPSec tunnels. Cyberoam automatically selects the appropriate tunnel to be used depending upon the Local Network and Remote Network configuration
E.G. mroute add input-tunnel ipsec name Net2Net source-ip 192.168.1.2 dest-ip 239.0.0.55 output-tunnel ipsec
6. Command: mroute add input-tunnel ipsec name <ipsec connection name> source-ip <ipaddress> dest-ip <ipaddress> output-tunnel gre name <gre tunnel name>
To forward multicast traffic coming from a given IPSec tunnel to GRE tunnel.
E.G. mroute add input-tunnel ipsec name Net2Net source-ip 192.168.1.2 dest-ip 239.0.0.55 output-tunnel gre name Elitecore
Cyberoam Console Guide
Page 22 of 73
7. Command: mroute add input-tunnel gre name <gre tunnel name> source-ip <ipaddress> dest-ip <ipaddress> output-interface Port<port number>
To forward multicast traffic coming from a GRE tunnel to an interface.
E.G. mroute add input-tunnel gre name Elitecore source-ip 192.168.1.2 dest-ip 239.0.0.55 output-interface PortB
8. Command: mroute add input-tunnel gre name <gre tunnel name> source-ip <ipaddress> dest-ip <ipaddress> output-tunnel gre name <gre tunnel name>
To forward multicast traffic coming from a GRE tunnel to another GRE tunnel.
E.G. mroute add input-tunnel gre name Elitecore source-ip 192.168.1.2 dest-ip 239.0.0.55 output-tunnel gre name Terminal1
9. Command: mroute add input-tunnel gre name <gre tunnel name> source-ip <ipaddress> dest-ip <ipaddress> output-tunnel ipsec
To forward multicast traffic coming from a given GRE tunnel to IPSec tunnels. Cyberoam automatically selects the appropriate tunnel to be used depending upon the Local Network and Remote Network configuration.
E.G. mroute add input-tunnel gre name Elitecore source-ip 192.168.1.2 dest-ip 239.0.0.55 output-tunnel ipsec
10. Command: mroute del source-ip <ipaddress> dest-ip <ipaddress>
To delete multicast route
E.G. mroute del source-ip 192.168.1.2 dest-ip 239.0.0.
Known Behavior CLI shows only static interfaces as input and output interface whereas Web Admin Console shows both, static as well as dynamic interfaces (PPPoE, DHCP).
3.2.0 Exit
Type ‘0’ to exit from Multicast Routing Configuration menu and return to Router Management.
3.0 Exit
Type ‘0’ to exit from Routing tables menu and return to Main Menu.
Cyberoam Console Guide
Page 23 of 73
4. Cyberoam Console
Use to perform various checks and view logs for troubleshooting.
Generally, when using command line help, one has to remember parameters/arguments of the command and has to go to the help and check for the parameters. Users using command line for the first time face difficulty in such situations.
To remove the above difficulty, Cyberoam has inbuilt help at the command prompt itself.
Press ‘Tab’ or ‘?’ to view the list of commands supported
Type command and then press tab to view the list of argument(s) supported or required. For example after typing ping press tab, it shows what all parameters are required or allowed.
Type command and then press ‘?’ to view the list of argument(s) supported with its description. For example after typing ping, press question mark, it shows what all parameters are required or allowed, along with description.
Type Exit to return to the Main menu.
Note Refer to Annexure A for the detailed help on various commands supported.
Cyberoam Console Guide
Page 24 of 73
5. Cyberoam Management
Use this menu to
• Check and Upgrade to latest IPS Signatures
• Reset to Factory Defaults
• Custom Menu
• Flush Appliance Reports
5.1 Check and Upgrade to Latest IPS Signature Database
Use to check and upgrade latest IPS database.
5.2 Reset to Factory Defaults
This option resets all the customized configurations to their original state. All customization done after the initial deployment will be deleted including network configuration, HTTP proxy cache, passwords, groups, users and policies.
5.3 Custom Menu
This option is used for client specific customization.
Cyberoam Console Guide
Page 25 of 73
5.4 Flush Appliance Reports
This option will flush all the Cyberoam-iView reports. This will make appliance inaccessible for some time as flushing reports takes time.
Note This option is not available in Cyberoam model CR 15i, CR 15wi, CR 15iNG and CR 15wiNG.
5.0 Exit
Type ‘0’ to exit from Cyberoam Management menu and return to Main menu
Cyberoam Console Guide
Page 26 of 73
6. VPN Management
Below given menu will be displayed only when Cyberoam is deployed in Gateway mode.
6.1 Regenerate RSA Key
RSA is used as one of the authentication methods to authenticate IPSec end-points in Site-to-Site and Host-to-Host VPN connections.
Use this option to regenerate the RSA Key i.e. New Public-Private Key pair, on the Cyberoam appliance.
Note As evident from the screen above, every time you regenerate RSA Key, you need to change your RSA Key at all the remote locations too.
Cyberoam Console Guide
Page 27 of 73
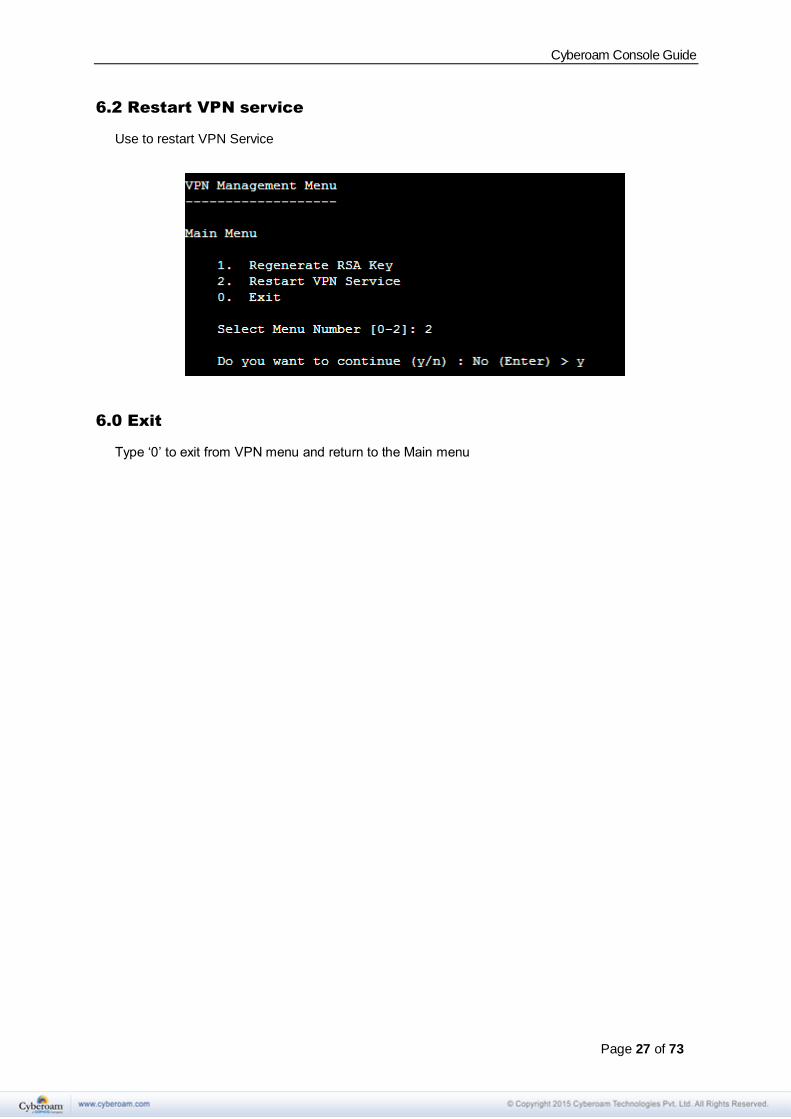
6.2 Restart VPN service
Use to restart VPN Service
6.0 Exit
Type ‘0’ to exit from VPN menu and return to the Main menu
Cyberoam Console Guide
Page 28 of 73
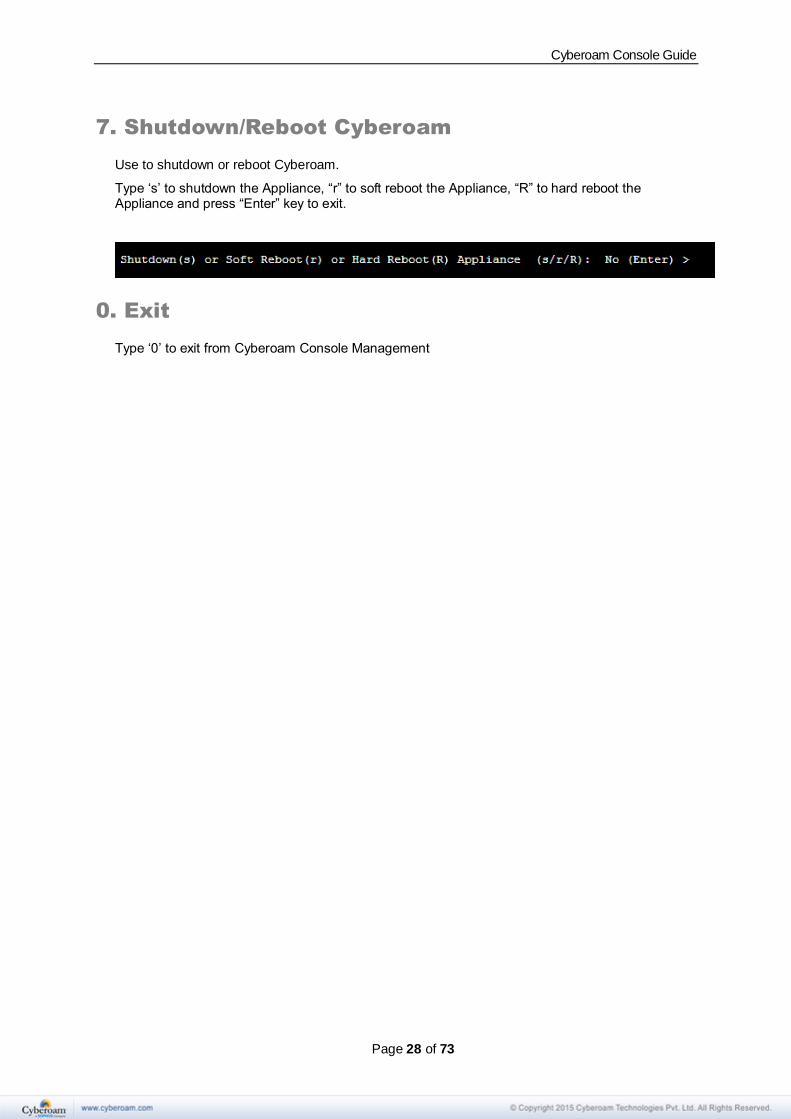
7. Shutdown/Reboot Cyberoam
Use to shutdown or reboot Cyberoam.
Type ‘s’ to shutdown the Appliance, “r” to soft reboot the Appliance, “R” to hard reboot the Appliance and press “Enter” key to exit.
0. Exit
Type ‘0’ to exit from Cyberoam Console Management
Cyberoam Console Guide
Page 29 of 73
Annexure A
clear
Clears the screen
Syntax
clear
cyberoam
Cyberoam Management
Syntax
cyberoam [appliance_access | application_classification | auth | bridge | cr-vlan-tag | dhcp | dhcpv6 | diagnostics | disover-mode | firewall acceleration | fsck-on-nextboot | gre | ha | ips_autoupgrade | ipsec_route | link_failover | ntlm_auth | restart | route_precedence | shutdown | system_modules | wwan | serial_dialin]
Parameter list & description
Keywords & Variables Description
appliance_access [disable | enable | show]
To override or bypass the configured Appliance Access and allow access to all the Cyberoam services. Disable to re-apply Appliance Access. Default – Disabled. Enable and disable event will be logged in Admin Logs.
application_classification [off | on | show | microapp_discovery { on | off | show } ]
If application_classification is enabled, traffic will be categorized on the basis of application, and traffic discovery live connections that is displayed on Web Admin Console, will be displayed based on the application. Once application_classification is enabled, you can enable microapp_discovery, which will identify and classify microapps used within web browsers. If application_classification is disabled, traffic will be categorized on port-based applications, and traffic discovery based on applications will not display any signature-based application.
Cyberoam Console Guide
Page 30 of 73
Default – ON
Note
• application_classification must be ON to enable Micro App_Discovery.
• Enabling Micro App Discovery using the CLI command will classify Microapps but they cannot be blocked. To block Microapps, one needs to enable HTTPS scanning for Microapps using the Web Admin Console.
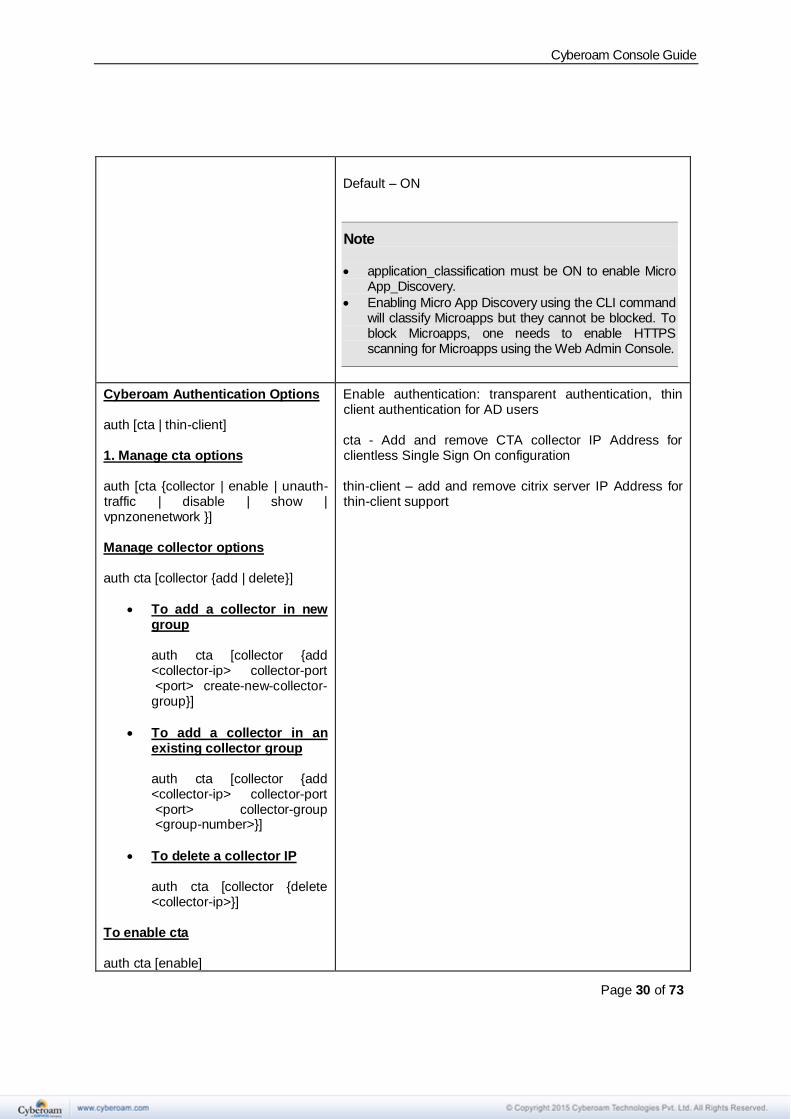
Cyberoam Authentication Options auth [cta | thin-client] 1. Manage cta options auth [cta {collector | enable | unauth-traffic | disable | show | vpnzonenetwork }] Manage collector options auth cta [collector {add | delete}]
• To add a collector in new group auth cta [collector {add <collector-ip> collector-port <port> create-new-collector-group}]
• To add a collector in an existing collector group auth cta [collector {add <collector-ip> collector-port <port> collector-group <group-number>}]
• To delete a collector IP auth cta [collector {delete <collector-ip>}]
To enable cta auth cta [enable]
Enable authentication: transparent authentication, thin client authentication for AD users cta - Add and remove CTA collector IP Address for clientless Single Sign On configuration thin-client – add and remove citrix server IP Address for thin-client support
Cyberoam Console Guide
Page 31 of 73
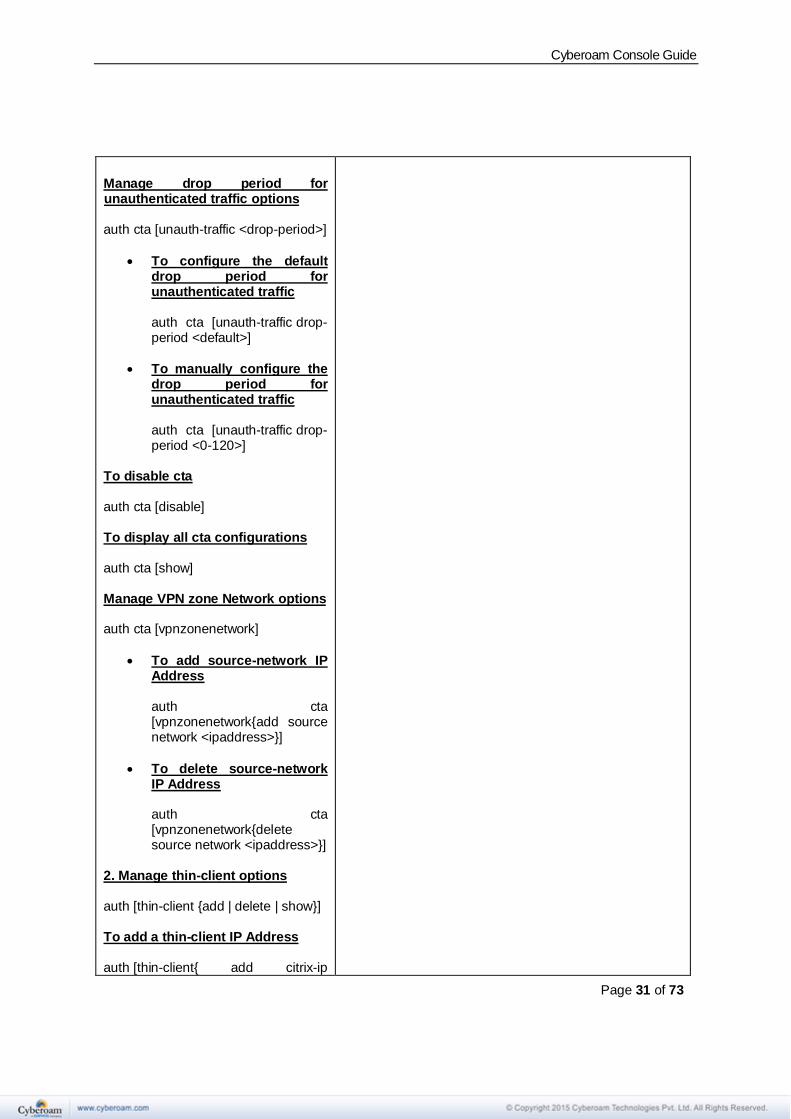
Manage drop period for unauthenticated traffic options auth cta [unauth-traffic <drop-period>]
• To configure the default drop period for unauthenticated traffic
auth cta [unauth-traffic drop-period <default>]
• To manually configure the drop period for unauthenticated traffic
auth cta [unauth-traffic drop-period <0-120>]
To disable cta auth cta [disable] To display all cta configurations auth cta [show] Manage VPN zone Network options auth cta [vpnzonenetwork]
• To add source-network IP Address
auth cta [vpnzonenetwork{add source network <ipaddress>}]
• To delete source-network IP Address
auth cta [vpnzonenetwork{delete source network <ipaddress>}]
2. Manage thin-client options auth [thin-client {add | delete | show}] To add a thin-client IP Address auth [thin-client{ add citrix-ip
Cyberoam Console Guide
Page 32 of 73
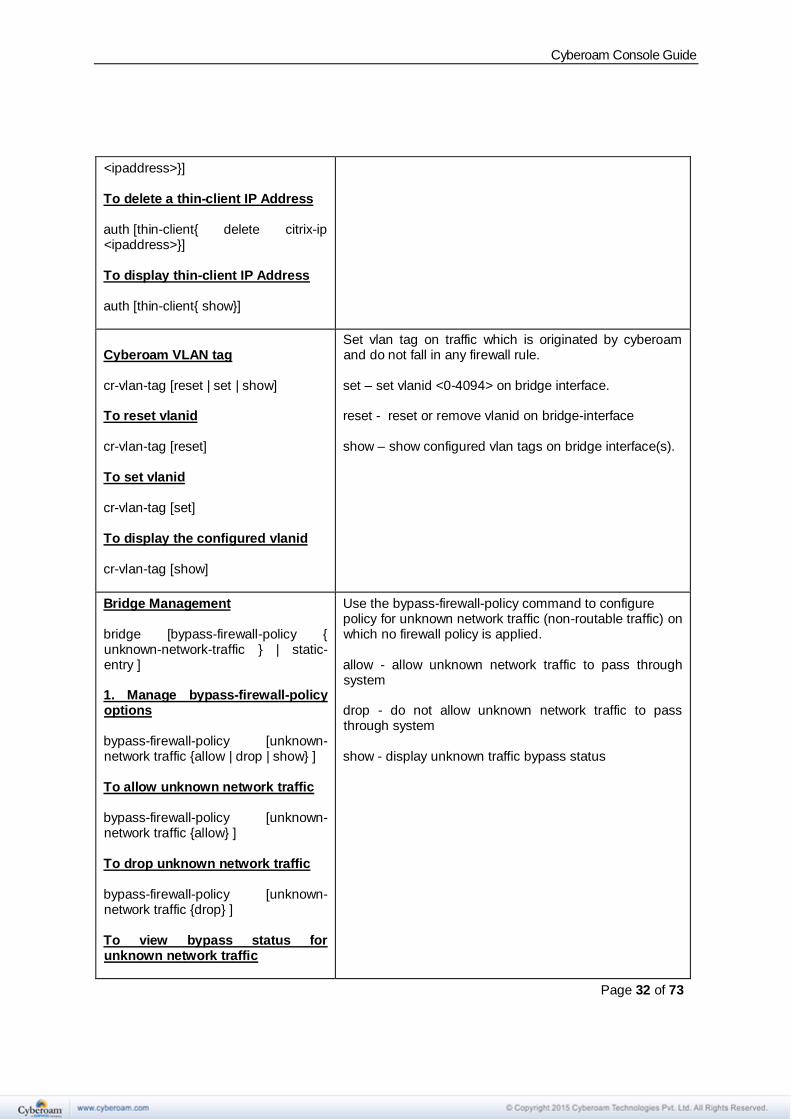
<ipaddress>}] To delete a thin-client IP Address auth [thin-client{ delete citrix-ip <ipaddress>}] To display thin-client IP Address auth [thin-client{ show}]
Cyberoam VLAN tag cr-vlan-tag [reset | set | show] To reset vlanid cr-vlan-tag [reset] To set vlanid cr-vlan-tag [set] To display the configured vlanid cr-vlan-tag [show]
Set vlan tag on traffic which is originated by cyberoam and do not fall in any firewall rule. set – set vlanid <0-4094> on bridge interface. reset - reset or remove vlanid on bridge-interface show – show configured vlan tags on bridge interface(s).
Bridge Management bridge [bypass-firewall-policy { unknown-network-traffic } | static-entry ] 1. Manage bypass-firewall-policy options bypass-firewall-policy [unknown-network traffic {allow | drop | show} ] To allow unknown network traffic bypass-firewall-policy [unknown-network traffic {allow} ] To drop unknown network traffic bypass-firewall-policy [unknown-network traffic {drop} ] To view bypass status for unknown network traffic
Use the bypass-firewall-policy command to configure policy for unknown network traffic (non-routable traffic) on which no firewall policy is applied. allow - allow unknown network traffic to pass through system drop - do not allow unknown network traffic to pass through system show - display unknown traffic bypass status
Cyberoam Console Guide
Page 33 of 73
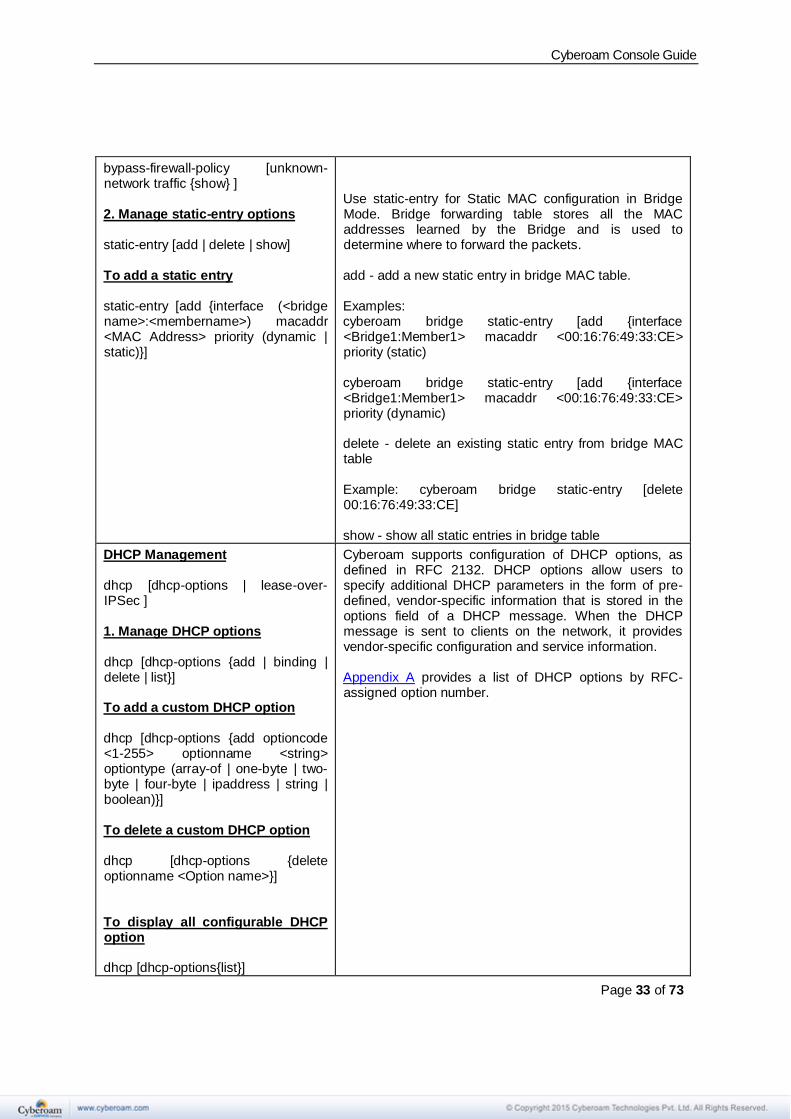
bypass-firewall-policy [unknown-network traffic {show} ] 2. Manage static-entry options static-entry [add | delete | show] To add a static entry static-entry [add {interface (<bridge name>:<membername>) macaddr <MAC Address> priority (dynamic | static)}]
Use static-entry for Static MAC configuration in Bridge Mode. Bridge forwarding table stores all the MAC addresses learned by the Bridge and is used to determine where to forward the packets. add - add a new static entry in bridge MAC table. Examples: cyberoam bridge static-entry [add {interface <Bridge1:Member1> macaddr <00:16:76:49:33:CE> priority (static) cyberoam bridge static-entry [add {interface <Bridge1:Member1> macaddr <00:16:76:49:33:CE> priority (dynamic) delete - delete an existing static entry from bridge MAC table Example: cyberoam bridge static-entry [delete 00:16:76:49:33:CE] show - show all static entries in bridge table
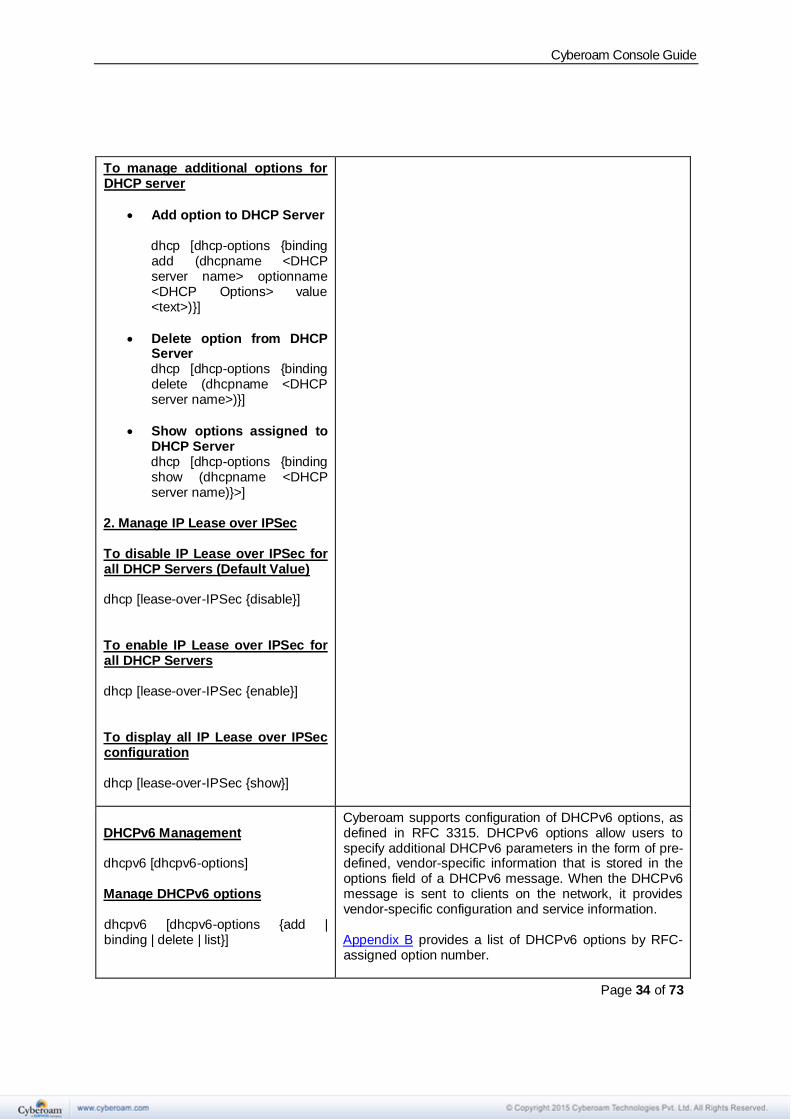
DHCP Management dhcp [dhcp-options | lease-over-IPSec ] 1. Manage DHCP options dhcp [dhcp-options {add | binding | delete | list}] To add a custom DHCP option dhcp [dhcp-options {add optioncode <1-255> optionname <string> optiontype (array-of | one-byte | two-byte | four-byte | ipaddress | string | boolean)}] To delete a custom DHCP option dhcp [dhcp-options {delete optionname <Option name>}] To display all configurable DHCP option dhcp [dhcp-options{list}]
Cyberoam supports configuration of DHCP options, as defined in RFC 2132. DHCP options allow users to specify additional DHCP parameters in the form of pre-defined, vendor-specific information that is stored in the options field of a DHCP message. When the DHCP message is sent to clients on the network, it provides vendor-specific configuration and service information. Appendix A provides a list of DHCP options by RFC-assigned option number.
Cyberoam Console Guide
Page 34 of 73
To manage additional options for DHCP server
• Add option to DHCP Server dhcp [dhcp-options {binding add (dhcpname <DHCP server name> optionname <DHCP Options> value <text>)}]
• Delete option from DHCP Server dhcp [dhcp-options {binding delete (dhcpname <DHCP server name>)}]
• Show options assigned to DHCP Server dhcp [dhcp-options {binding show (dhcpname <DHCP server name)}>]
2. Manage IP Lease over IPSec To disable IP Lease over IPSec for all DHCP Servers (Default Value) dhcp [lease-over-IPSec {disable}] To enable IP Lease over IPSec for all DHCP Servers dhcp [lease-over-IPSec {enable}] To display all IP Lease over IPSec configuration dhcp [lease-over-IPSec {show}]
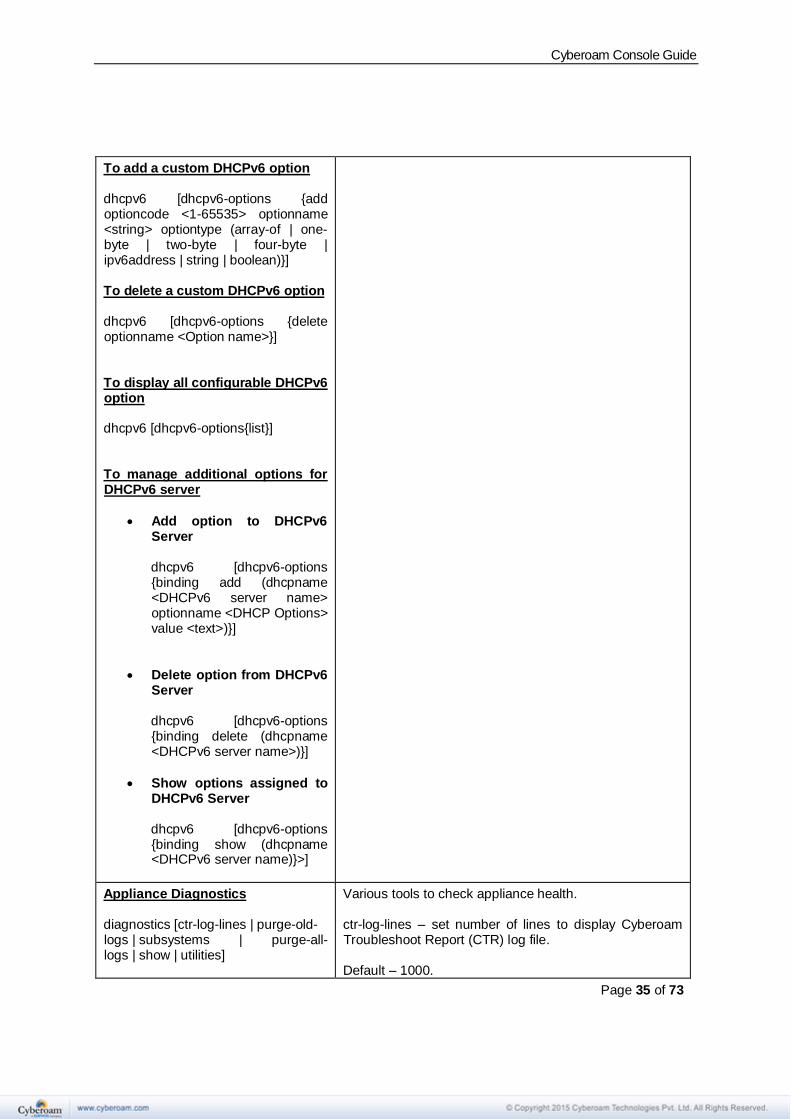
DHCPv6 Management dhcpv6 [dhcpv6-options] Manage DHCPv6 options dhcpv6 [dhcpv6-options {add | binding | delete | list}]
Cyberoam supports configuration of DHCPv6 options, as defined in RFC 3315. DHCPv6 options allow users to specify additional DHCPv6 parameters in the form of pre-defined, vendor-specific information that is stored in the options field of a DHCPv6 message. When the DHCPv6 message is sent to clients on the network, it provides vendor-specific configuration and service information. Appendix B provides a list of DHCPv6 options by RFC-assigned option number.
Cyberoam Console Guide
Page 35 of 73
To add a custom DHCPv6 option dhcpv6 [dhcpv6-options {add optioncode <1-65535> optionname <string> optiontype (array-of | one-byte | two-byte | four-byte | ipv6address | string | boolean)}] To delete a custom DHCPv6 option dhcpv6 [dhcpv6-options {delete optionname <Option name>}] To display all configurable DHCPv6 option dhcpv6 [dhcpv6-options{list}] To manage additional options for DHCPv6 server
• Add option to DHCPv6 Server dhcpv6 [dhcpv6-options {binding add (dhcpname <DHCPv6 server name> optionname <DHCP Options> value <text>)}]
• Delete option from DHCPv6 Server dhcpv6 [dhcpv6-options {binding delete (dhcpname <DHCPv6 server name>)}]
• Show options assigned to DHCPv6 Server dhcpv6 [dhcpv6-options {binding show (dhcpname <DHCPv6 server name)}>]
Appliance Diagnostics diagnostics [ctr-log-lines | purge-old-logs | subsystems | purge-all-logs | show | utilities]
Various tools to check appliance health. ctr-log-lines – set number of lines to display Cyberoam Troubleshoot Report (CTR) log file. Default – 1000.
Cyberoam Console Guide
Page 36 of 73
1. To take last n lines for Cyberoam Troubleshoot Report (CTR) diagnostics [ctr-log-lines <250-10000 >] 2. To truncate all rotated logs diagnostics [purge-old-logs] 3. To configure Subsystems diagnostics [subsystems {Access-Server | Bwm | CSC | IM | IPSEngine | LoggingDaemon | Msyncd | POPIMAPFTPDeamon | Pktcapd | SMTPD | SSLVPN | SSLVPN-RPD | WebProxy | Wifiauthd}] Manage Access Server options diagnostics [subsystems {Access-Server (debug | purge-log | purge-old-log)}]
• Enable/Disable Access Server debug
diagnostics [subsystems {Access-Server debug <off | on>}]
• To truncate all logs
diagnostics [purge-log]
• To truncate all rotated logs
diagnostics [purge-old-log] Manage CSC options diagnostics [subsystems {CSC (debug | purge-log | purge-old-log)}]
• Toggle CSC debug mode
diagnostics [subsystems {CSC debug <off | on>}]
• To truncate all logs
diagnostics [subsystems {CSC (purge-log)}]
purge-old-logs – purge all rotated log files subsystems – configure each subsystem individually. Configuration options include: debug, purge-logs and purge-old-logs purge-all-logs – truncate all log files show – view diagnostics statistics utilities – view utilities statistics
Cyberoam Console Guide
Page 37 of 73
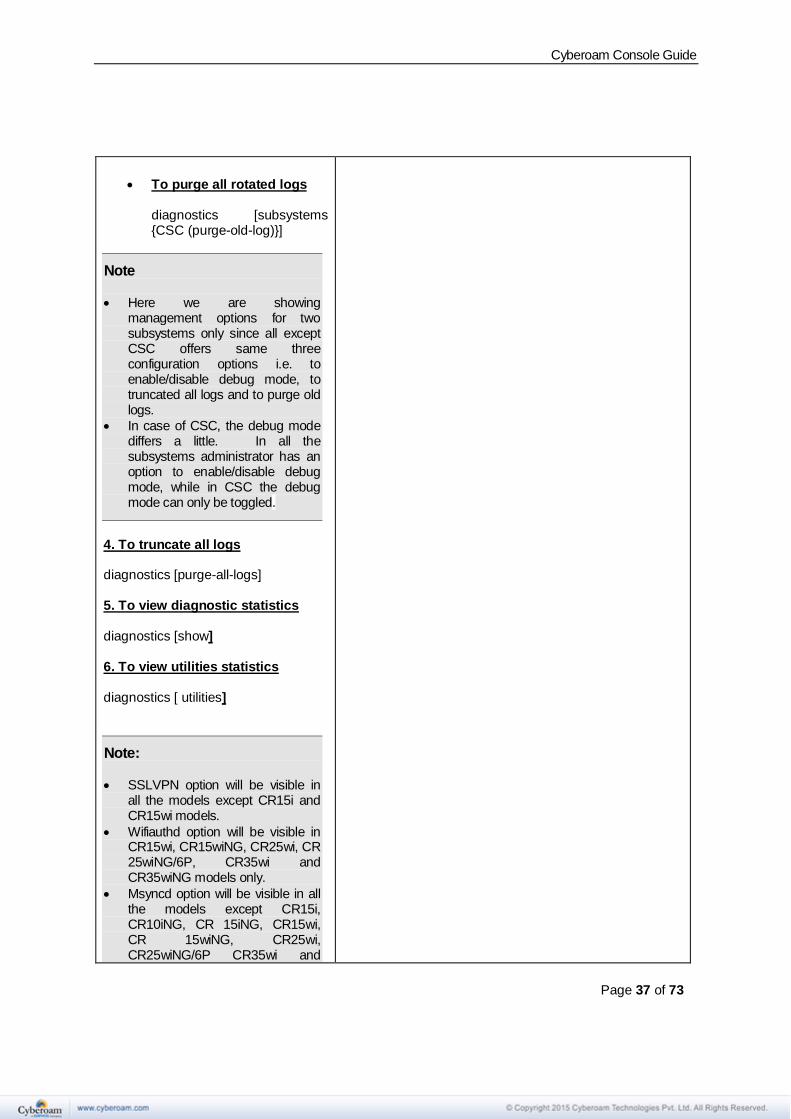
• To purge all rotated logs
diagnostics [subsystems {CSC (purge-old-log)}]
Note
• Here we are showing management options for two subsystems only since all except CSC offers same three configuration options i.e. to enable/disable debug mode, to truncated all logs and to purge old logs.
• In case of CSC, the debug mode differs a little. In all the subsystems administrator has an option to enable/disable debug mode, while in CSC the debug mode can only be toggled.
4. To truncate all logs diagnostics [purge-all-logs] 5. To view diagnostic statistics diagnostics [show] 6. To view utilities statistics diagnostics [ utilities]
Note:
• SSLVPN option will be visible in all the models except CR15i and CR15wi models.
• Wifiauthd option will be visible in CR15wi, CR15wiNG, CR25wi, CR 25wiNG/6P, CR35wi and CR35wiNG models only.
• Msyncd option will be visible in all the models except CR15i, CR10iNG, CR 15iNG, CR15wi, CR 15wiNG, CR25wi, CR25wiNG/6P CR35wi and
Cyberoam Console Guide
Page 38 of 73
CR35wiNG models.
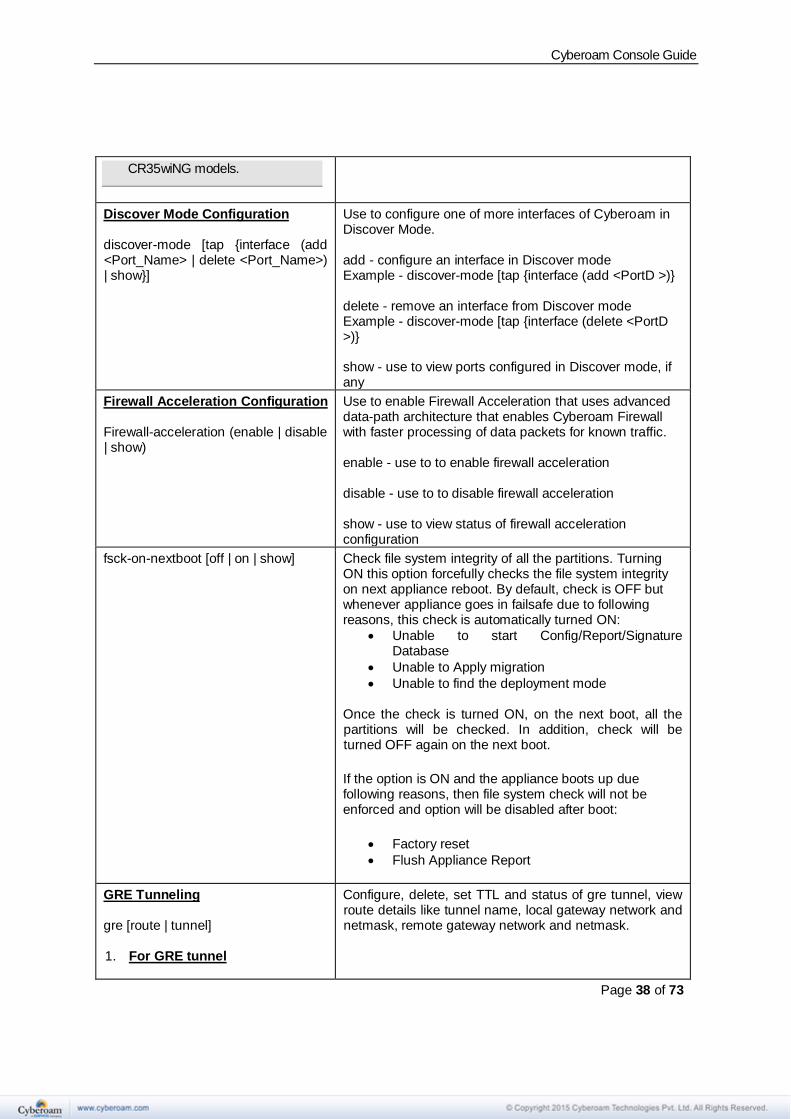
Discover Mode Configuration discover-mode [tap {interface (add <Port_Name> | delete <Port_Name>) | show}]
Use to configure one of more interfaces of Cyberoam in Discover Mode. add - configure an interface in Discover mode Example - discover-mode [tap {interface (add <PortD >)} delete - remove an interface from Discover mode Example - discover-mode [tap {interface (delete <PortD >)} show - use to view ports configured in Discover mode, if any
Firewall Acceleration Configuration Firewall-acceleration (enable | disable | show)
Use to enable Firewall Acceleration that uses advanced data-path architecture that enables Cyberoam Firewall with faster processing of data packets for known traffic. enable - use to to enable firewall acceleration disable - use to to disable firewall acceleration show - use to view status of firewall acceleration configuration
fsck-on-nextboot [off | on | show] Check file system integrity of all the partitions. Turning ON this option forcefully checks the file system integrity on next appliance reboot. By default, check is OFF but whenever appliance goes in failsafe due to following reasons, this check is automatically turned ON:
• Unable to start Config/Report/Signature Database
• Unable to Apply migration
• Unable to find the deployment mode Once the check is turned ON, on the next boot, all the partitions will be checked. In addition, check will be turned OFF again on the next boot.
If the option is ON and the appliance boots up due following reasons, then file system check will not be enforced and option will be disabled after boot:
• Factory reset
• Flush Appliance Report
GRE Tunneling gre [route | tunnel]
1. For GRE tunnel
Configure, delete, set TTL and status of gre tunnel, view route details like tunnel name, local gateway network and netmask, remote gateway network and netmask.
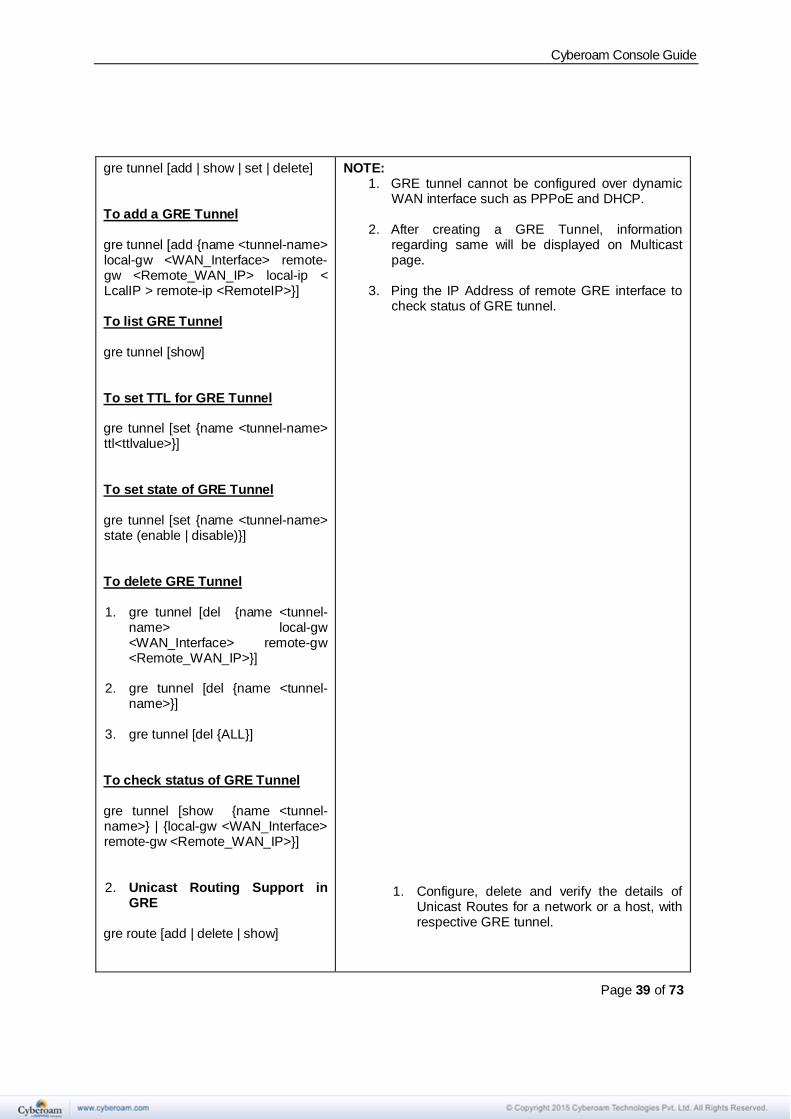
Cyberoam Console Guide
Page 39 of 73
gre tunnel [add | show | set | delete] To add a GRE Tunnel gre tunnel [add {name <tunnel-name> local-gw <WAN_Interface> remote-gw <Remote_WAN_IP> local-ip < LcalIP > remote-ip <RemoteIP>}] To list GRE Tunnel gre tunnel [show] To set TTL for GRE Tunnel gre tunnel [set {name <tunnel-name> ttl<ttlvalue>}] To set state of GRE Tunnel gre tunnel [set {name <tunnel-name> state (enable | disable)}] To delete GRE Tunnel 1. gre tunnel [del {name <tunnel-
name> local-gw <WAN_Interface> remote-gw <Remote_WAN_IP>}]
2. gre tunnel [del {name <tunnel-name>}]
3. gre tunnel [del {ALL}]
To check status of GRE Tunnel gre tunnel [show {name <tunnel-name>} | {local-gw <WAN_Interface> remote-gw <Remote_WAN_IP>}] 2. Unicast Routing Support in
GRE gre route [add | delete | show]
NOTE: 1. GRE tunnel cannot be configured over dynamic
WAN interface such as PPPoE and DHCP.
2. After creating a GRE Tunnel, information regarding same will be displayed on Multicast page.
3. Ping the IP Address of remote GRE interface to
check status of GRE tunnel.
1. Configure, delete and verify the details of Unicast Routes for a network or a host, with respective GRE tunnel.
Cyberoam Console Guide
Page 40 of 73
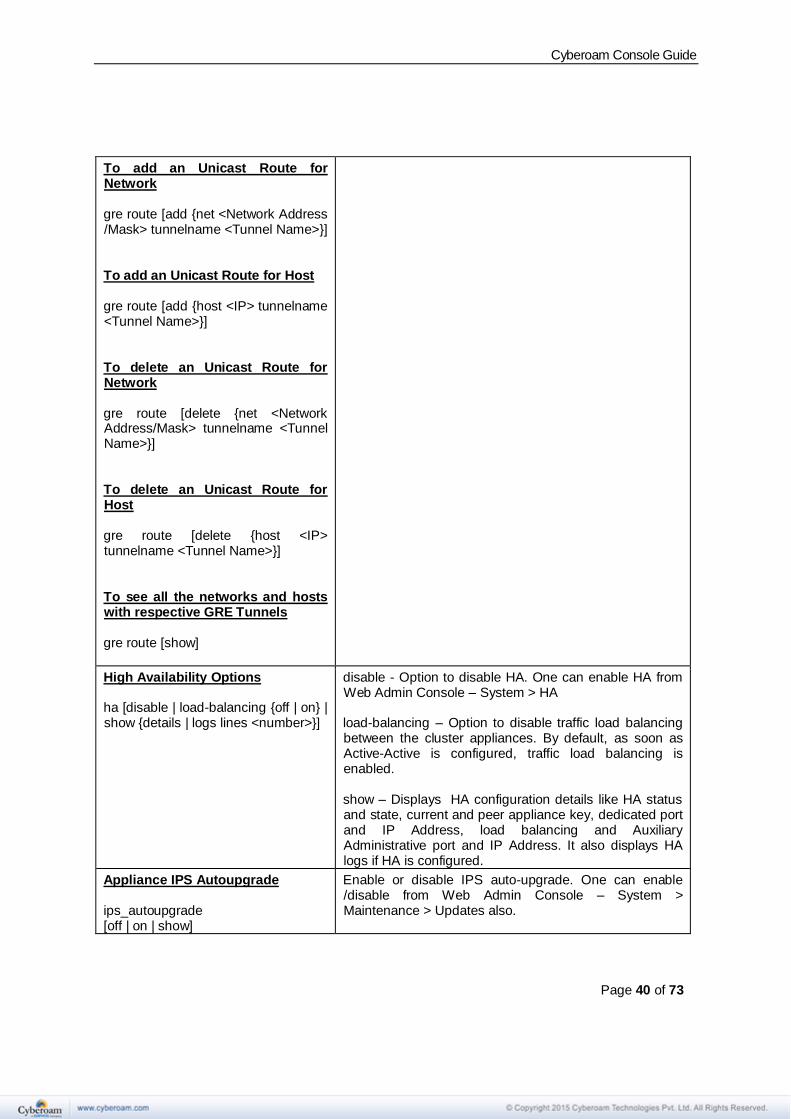
To add an Unicast Route for Network gre route [add {net <Network Address /Mask> tunnelname <Tunnel Name>}] To add an Unicast Route for Host gre route [add {host <IP> tunnelname <Tunnel Name>}] To delete an Unicast Route for Network gre route [delete {net <Network Address/Mask> tunnelname <Tunnel Name>}] To delete an Unicast Route for Host gre route [delete {host <IP> tunnelname <Tunnel Name>}] To see all the networks and hosts with respective GRE Tunnels gre route [show]
High Availability Options ha [disable | load-balancing {off | on} | show {details | logs lines <number>}]
disable - Option to disable HA. One can enable HA from Web Admin Console – System > HA load-balancing – Option to disable traffic load balancing between the cluster appliances. By default, as soon as Active-Active is configured, traffic load balancing is enabled. show – Displays HA configuration details like HA status and state, current and peer appliance key, dedicated port and IP Address, load balancing and Auxiliary Administrative port and IP Address. It also displays HA logs if HA is configured.
Appliance IPS Autoupgrade ips_autoupgrade [off | on | show]
Enable or disable IPS auto-upgrade. One can enable /disable from Web Admin Console – System > Maintenance > Updates also.

Cyberoam Console Guide
Page 41 of 73
Manage Static IPSec Routes ipsec_route [add | del | show] To add an IPSec Route for Host ipsec_route [add {host <IP> tunnelname <Tunnel Name>}] To add an IPSec Route for Network ipsec_route [add {net <Network Address/Mask> tunnelname <Tunnel Name>}] To delete an IPSec Route for Host ipsec_route [del {host <IP> tunnelname <Tunnel Name>}] To detele an IPSec Route for Network ipsec_route [del {net <Network Address/Mask> tunnelname <Tunnel Name>}] To see all the networks and hosts with respective IPSec Tunnels ipsec_route [show]
Configure IPSec routes and view route details like tunnel name, host/network and netmask
Manage link failover over VPN link_failover [add | del | show] 1. Manage Add Link Fail-over options link_failover [add {primarylink Port <Port Name> backuplink (gre | vpn)}] To configure GRE Tunnel as a Backup link using PING link_failover [add {primarylink Port <Port Number> backuplink gre tunnel <gre tunnel name> monitor PING host <ip address>}] To configure GRE Tunnel as a Backup link using TCP
VPN can be configured as a Backup link. With this, whenever primary link fails, traffic will be tunneled through VPN connection and traffic will be routed again through the primary link once it is UP again.

Cyberoam Console Guide
Page 42 of 73
link_failover [add {primarylink Port <Port Number> backuplink gre tunnel <gre tunnel name> monitor TCP host <ip address> Port <Port Number>}] To configure an IPSec/VPN connection as a Backup link using PING link_failover [add {primarylink Port <Port Number> backuplink vpn tunnel <ipsec connection name> monitor PING host <ip address>}] To configure an IPSec/VPN connection as a Backup link using TCP link_failover [add {primarylink Port <Port Number> backuplink vpn tunnel <vpn connection name> monitor TCP host <ip address> Port <Port Number>}] 2. To delete link failover configuration link_failover del primarylink <Port name> 3. To display all link failover configuration link_failover [show]
Nested Group support for NTLM Authentication Cyberoam ntlm_auth nested_group_support [off | on | show]
Use to configure Nested Group Support for NTLM Authentication. on - use to enable Nested Group Support for NTLM Authentication off - use to disable Nested Group Support for NTLM Authentication show - use to view status of Nested Group configuration
restart [all ] Restart Cyberoam
Manage Route Precedence route_precedence [set | show] 1. Manage Set Route Precedence options route_precedence [set {static | vpn}]
Set the route precedence
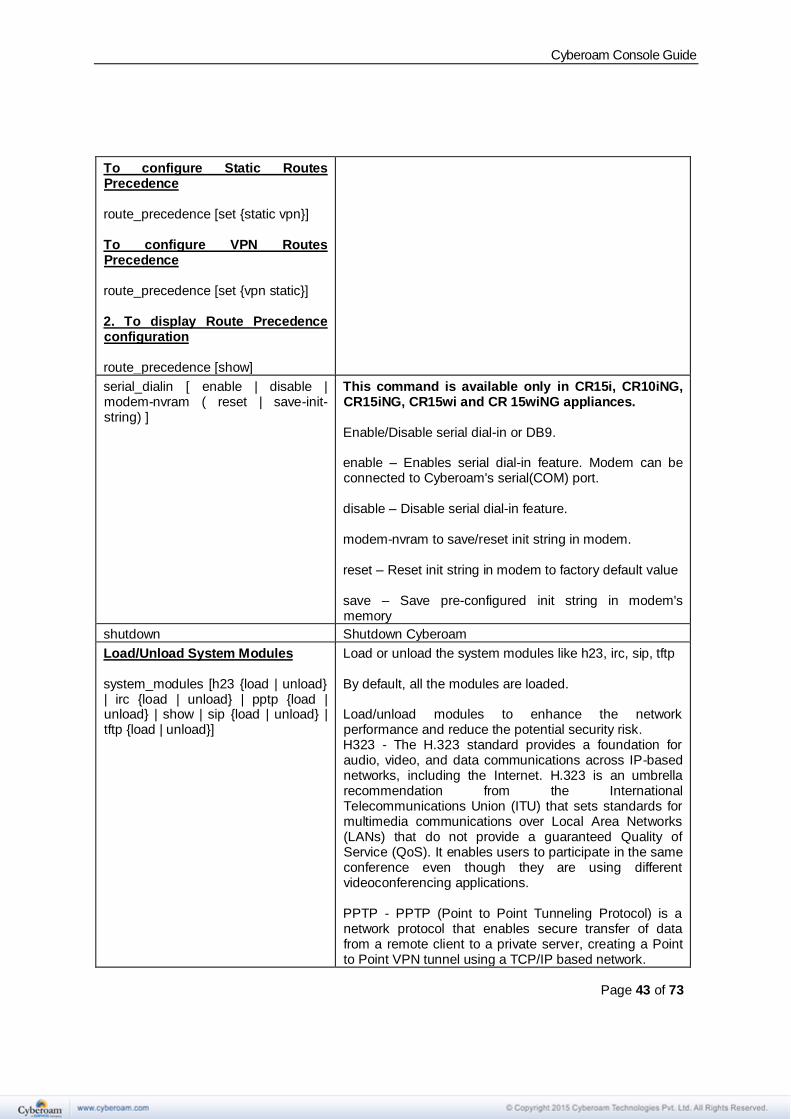
Cyberoam Console Guide
Page 43 of 73
To configure Static Routes Precedence route_precedence [set {static vpn}] To configure VPN Routes Precedence route_precedence [set {vpn static}] 2. To display Route Precedence configuration route_precedence [show]
serial_dialin [ enable | disable | modem-nvram ( reset | save-init-string) ]
This command is available only in CR15i, CR10iNG, CR15iNG, CR15wi and CR 15wiNG appliances. Enable/Disable serial dial-in or DB9. enable – Enables serial dial-in feature. Modem can be connected to Cyberoam's serial(COM) port. disable – Disable serial dial-in feature. modem-nvram to save/reset init string in modem. reset – Reset init string in modem to factory default value save – Save pre-configured init string in modem's memory
shutdown Shutdown Cyberoam
Load/Unload System Modules system_modules [h23 {load | unload} | irc {load | unload} | pptp {load | unload} | show | sip {load | unload} | tftp {load | unload}]
Load or unload the system modules like h23, irc, sip, tftp By default, all the modules are loaded. Load/unload modules to enhance the network performance and reduce the potential security risk. H323 - The H.323 standard provides a foundation for audio, video, and data communications across IP-based networks, including the Internet. H.323 is an umbrella recommendation from the International Telecommunications Union (ITU) that sets standards for multimedia communications over Local Area Networks (LANs) that do not provide a guaranteed Quality of Service (QoS). It enables users to participate in the same conference even though they are using different videoconferencing applications. PPTP - PPTP (Point to Point Tunneling Protocol) is a network protocol that enables secure transfer of data from a remote client to a private server, creating a Point to Point VPN tunnel using a TCP/IP based network.
Cyberoam Console Guide
Page 44 of 73
IRC - IRC (Internet Relay Chat) is a multi-user, multi-channel chatting system based on a client-server model. Single Server links with many other servers to make up an IRC network, which transport messages from one user (client) to another. In this manner, people from all over the world can talk to each other live and simultaneously. DoS attacks are very common as it is an open network and with no control on file sharing, performance is affected. SIP – SIP (Session Initiation Protocol) is a signaling protocol which enables the controlling of media communications such as VOIP. The protocol is generally used for maintaining unicast and multicast sessions consisting of several media systems. SIP is a text based and TCP/IP supported Application layer protocol. TFTP - Trivial File Transfer Protocol (TFTP) is a simple form of the File Transfer Protocol (FTP). TFTP uses the User Datagram Protocol (UDP) and provides no security features.
Wireless WAN wwan [disable | enable | query | set | show ] 1. To disable WWAN wwan [disable] 2. To enable WWAN wwan [enable] 3. Manage WWAN Query options wwan [query {serialport <serial pot number> ATcommand <at command string>}] 4. Manage WWAN Set options wwan [set {disconnect-on-systemdown (off | on)}] 5. To display WWAN configuration wwan [show]
Enable or disable wireless WAN and view information of the Wi-Fi modem information (if plugged - in) Wireless WAN menu will be available on Web Admin Console only when wwan is enabled from CLI.
Cyberoam Console Guide
Page 45 of 73
dnslookup
Query Internet domain name servers for hostname resolving
Syntax
dnslookup [host {<ipaddress> | <string> }]
Parameter list & description
Keywords & Variables Description
host [<ipaddress> | <string> ]
Host to be searched
server [ <ipaddress> [host]]
Internet name or address of the name server
Dnslookup6
Query Internet domain name servers for IPv6 hostname resolving.
Syntax
Dnslookup6 [host {<ipaddress6> | <string> }]
Parameter list & description
Keywords & Variables Description
Host [<ipaddress6> | <string> ]
Host to be searched
server [ <ipaddress6> [host]]
Internet name or address of the name server
ping
Sends ICMP ECHO_REQUEST packets to network hosts
Syntax
ping [<ipaddress> | <string> | count | interface | quiet | size | sourceip | timeout]
Parameter list & description
Keywords & Variables Description
Ipaddress IP Address to be pinged
String Domain to be pinged
count <number> Stop sending packets after count
Cyberoam Console Guide
Page 46 of 73
interface [Port <port ID> ]
Set outgoing interface
Quiet Display the summary at startup and end
size <number> Number of data bytes to be sent
sourceip <ipaddress> IP Address of the source
timeout <number> Stop sending packets and exit after specified time
ping6
Sends ICMPv6 ECHO_REQUEST packets to network hosts
Syntax
ping [<ipaddress6> | count | interface | quiet | size]
Parameter list & description
Keywords & Variables Description
Ipaddress6 IPv6 Address to be pinged
count <number> Stop sending packets after count
interface [Port <port ID> ]
Set outgoing interface
Quiet Display the summary at startup and end
size <number> Number of data bytes to be sent
route
Use to view / manipulate the IP routing table. Route manipulates the kernel’s IP routing tables. Its primary use is to set up temporary routes to specific hosts or networks via an interface. When the add or del options are used, route modifies the routing tables. Without these options, route displays the current contents of the routing tables.
Syntax
diagnostics [utilities {route (flush-cache | lookup)}]
Parameter list & description
Keywords & Variables Description
flush-cache Flush entire route cache
lookup Route lookup
route6
Cyberoam Console Guide
Page 47 of 73
Use to view / manipulate the IP routing table. Route manipulates the kernel’s IP routing tables. Its primary use is to set up temporary routes to specific hosts or networks via an interface. When the add or del options are used, route modifies the routing tables. Without these options, route displays the current contents of the routing tables.
Syntax
diagnostics [utilities {route6 (flush-cache | lookup)}]
Parameter list & description
Keywords & Variables Description
flush-cache Flush entire route cache
lookup Route lookup
traceroute
Use to trace the path taken by a packet from the source system to the destination system, over the Internet.
The Internet is a large and complex aggregation of network hardware, connected together by gateways. Tracking the route one's packets follow (or finding the miscreant gateway that is discarding your packets) can be difficult. Traceroute utilizes the IP protocol `time to live (TTL)' field and attempts to elicit an ICMP TIME_EXCEEDED response from each gateway along the path to some host.
Syntax
traceroute [ <ipaddress> | <string> | first-ttl | icmp | max-ttl | no-frag | probes | source | timeout | tos]
Keywords & Variables Description
<ipaddress> [size <number>]
Set the IP Address to be traced
<string> [size <number>]
Set the domain to be traced
first-ttl Set the initial time-to-live used in the first outgoing probe packet
icmp Use ICMP ECHO instead of UDP datagrams
max-ttl Set the max time-to-live
no-frag Set the 'don't fragment' bit
probes Probes are sent at each ttl. Default - 3
source Use given IP Address as source address
timeout Set the timeout -in seconds for a response to a probe -
Cyberoam Console Guide
Page 48 of 73
default 5
tos Set the type-of-service
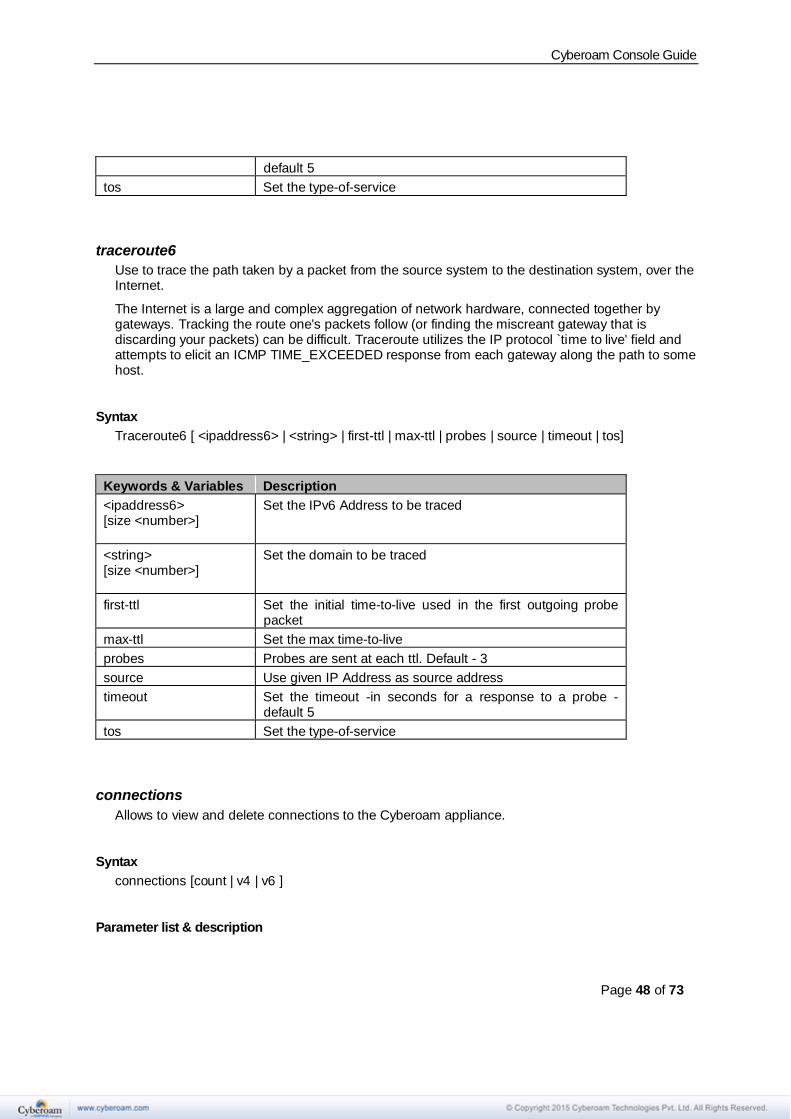
traceroute6
Use to trace the path taken by a packet from the source system to the destination system, over the Internet.
The Internet is a large and complex aggregation of network hardware, connected together by gateways. Tracking the route one's packets follow (or finding the miscreant gateway that is discarding your packets) can be difficult. Traceroute utilizes the IP protocol `time to live' field and attempts to elicit an ICMP TIME_EXCEEDED response from each gateway along the path to some host.
Syntax
Traceroute6 [ <ipaddress6> | <string> | first-ttl | max-ttl | probes | source | timeout | tos]
Keywords & Variables Description
<ipaddress6> [size <number>]
Set the IPv6 Address to be traced
<string> [size <number>]
Set the domain to be traced
first-ttl Set the initial time-to-live used in the first outgoing probe packet
max-ttl Set the max time-to-live
probes Probes are sent at each ttl. Default - 3
source Use given IP Address as source address
timeout Set the timeout -in seconds for a response to a probe -default 5
tos Set the type-of-service
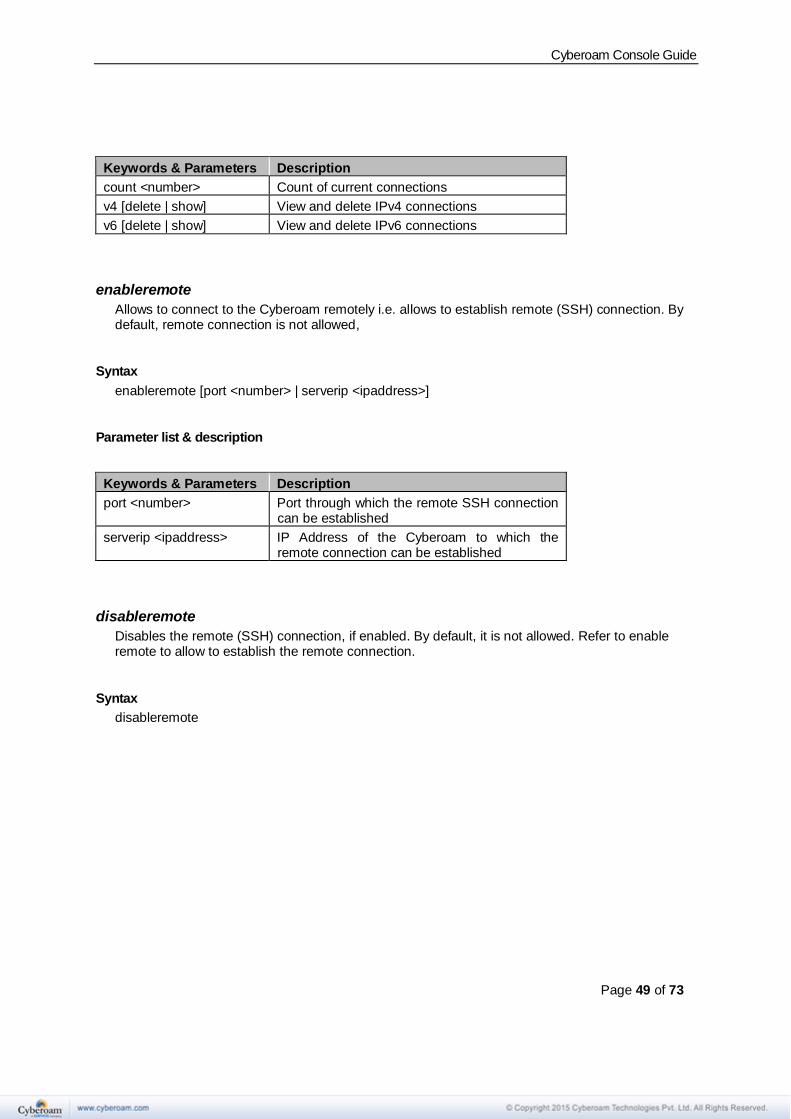
connections
Allows to view and delete connections to the Cyberoam appliance.
Syntax
connections [count | v4 | v6 ]
Parameter list & description
Cyberoam Console Guide
Page 49 of 73
Keywords & Parameters Description
count <number> Count of current connections
v4 [delete | show] View and delete IPv4 connections
v6 [delete | show] View and delete IPv6 connections
enableremote
Allows to connect to the Cyberoam remotely i.e. allows to establish remote (SSH) connection. By default, remote connection is not allowed,
Syntax
enableremote [port <number> | serverip <ipaddress>]
Parameter list & description
Keywords & Parameters Description
port <number> Port through which the remote SSH connection can be established
serverip <ipaddress> IP Address of the Cyberoam to which the remote connection can be established
disableremote
Disables the remote (SSH) connection, if enabled. By default, it is not allowed. Refer to enable remote to allow to establish the remote connection.
Syntax
disableremote
Cyberoam Console Guide
Page 50 of 73
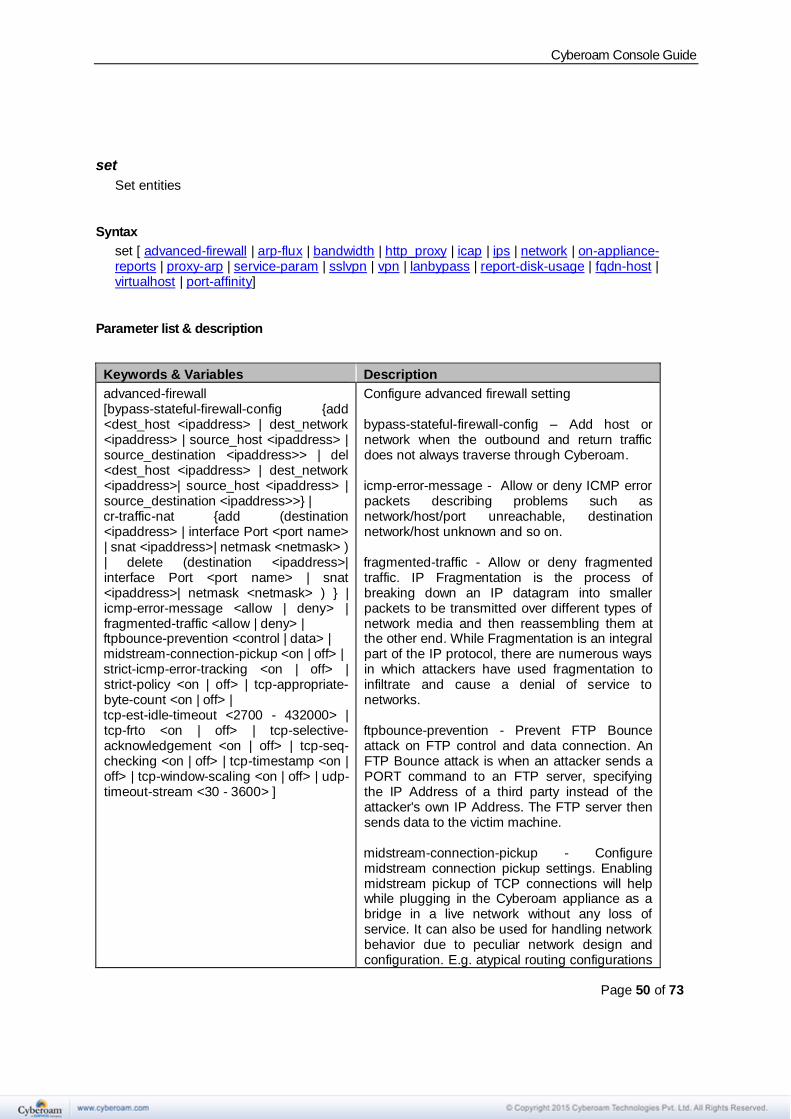
set
Set entities
Syntax
set [ advanced-firewall | arp-flux | bandwidth | http_proxy | icap | ips | network | on-appliance-reports | proxy-arp | service-param | sslvpn | vpn | lanbypass | report-disk-usage | fqdn-host | virtualhost | port-affinity]
Parameter list & description
Keywords & Variables Description
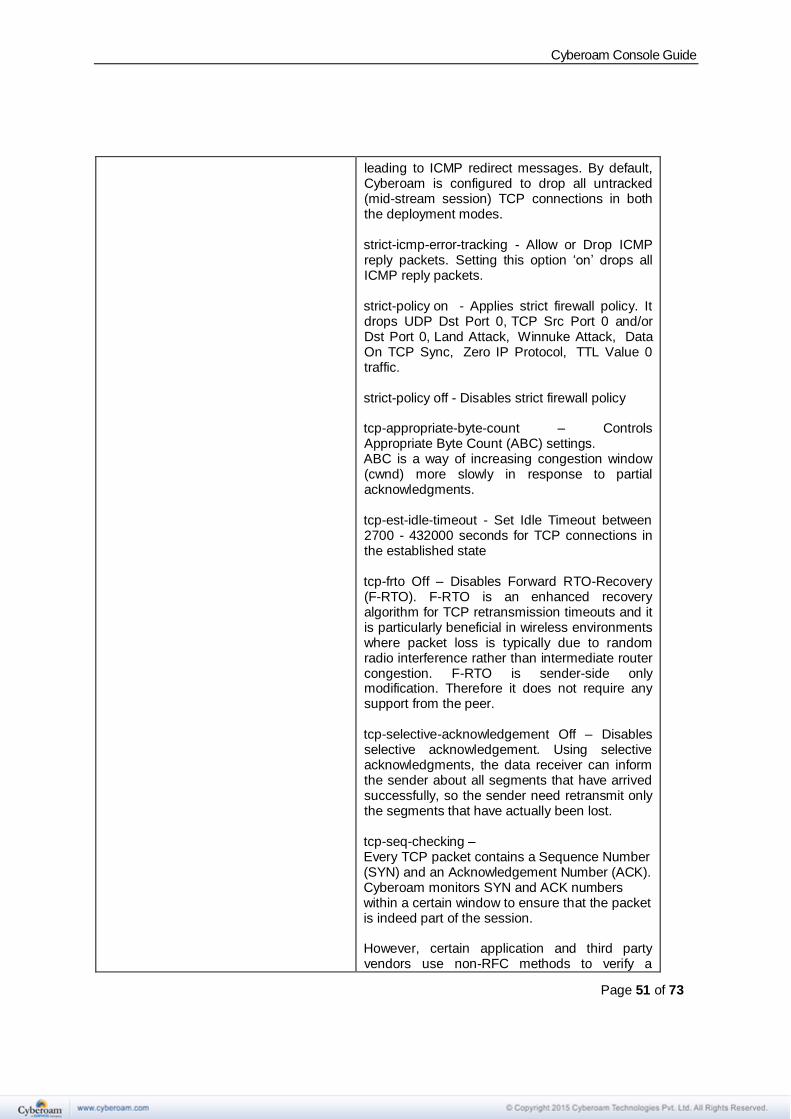
advanced-firewall [bypass-stateful-firewall-config {add <dest_host <ipaddress> | dest_network <ipaddress> | source_host <ipaddress> | source_destination <ipaddress>> | del <dest_host <ipaddress> | dest_network <ipaddress>| source_host <ipaddress> | source_destination <ipaddress>>} | cr-traffic-nat {add (destination <ipaddress> | interface Port <port name> | snat <ipaddress>| netmask <netmask> ) | delete (destination <ipaddress>| interface Port <port name> | snat <ipaddress>| netmask <netmask> ) } | icmp-error-message <allow | deny> | fragmented-traffic <allow | deny> | ftpbounce-prevention <control | data> | midstream-connection-pickup <on | off> | strict-icmp-error-tracking <on | off> | strict-policy <on | off> | tcp-appropriate-byte-count <on | off> | tcp-est-idle-timeout <2700 - 432000> | tcp-frto <on | off> | tcp-selective-acknowledgement <on | off> | tcp-seq-checking <on | off> | tcp-timestamp <on | off> | tcp-window-scaling <on | off> | udp-timeout-stream <30 - 3600> ]
Configure advanced firewall setting bypass-stateful-firewall-config – Add host or network when the outbound and return traffic does not always traverse through Cyberoam. icmp-error-message - Allow or deny ICMP error packets describing problems such as network/host/port unreachable, destination network/host unknown and so on. fragmented-traffic - Allow or deny fragmented traffic. IP Fragmentation is the process of breaking down an IP datagram into smaller packets to be transmitted over different types of network media and then reassembling them at the other end. While Fragmentation is an integral part of the IP protocol, there are numerous ways in which attackers have used fragmentation to infiltrate and cause a denial of service to networks. ftpbounce-prevention - Prevent FTP Bounce attack on FTP control and data connection. An FTP Bounce attack is when an attacker sends a PORT command to an FTP server, specifying the IP Address of a third party instead of the attacker's own IP Address. The FTP server then sends data to the victim machine. midstream-connection-pickup - Configure midstream connection pickup settings. Enabling midstream pickup of TCP connections will help while plugging in the Cyberoam appliance as a bridge in a live network without any loss of service. It can also be used for handling network behavior due to peculiar network design and configuration. E.g. atypical routing configurations
Cyberoam Console Guide
Page 51 of 73
leading to ICMP redirect messages. By default, Cyberoam is configured to drop all untracked (mid-stream session) TCP connections in both the deployment modes. strict-icmp-error-tracking - Allow or Drop ICMP reply packets. Setting this option ‘on’ drops all ICMP reply packets. strict-policy on - Applies strict firewall policy. It drops UDP Dst Port 0, TCP Src Port 0 and/or Dst Port 0, Land Attack, Winnuke Attack, Data On TCP Sync, Zero IP Protocol, TTL Value 0 traffic. strict-policy off - Disables strict firewall policy tcp-appropriate-byte-count – Controls Appropriate Byte Count (ABC) settings. ABC is a way of increasing congestion window (cwnd) more slowly in response to partial acknowledgments. tcp-est-idle-timeout - Set Idle Timeout between 2700 - 432000 seconds for TCP connections in the established state tcp-frto Off – Disables Forward RTO-Recovery (F-RTO). F-RTO is an enhanced recovery algorithm for TCP retransmission timeouts and it is particularly beneficial in wireless environments where packet loss is typically due to random radio interference rather than intermediate router congestion. F-RTO is sender-side only modification. Therefore it does not require any support from the peer. tcp-selective-acknowledgement Off – Disables selective acknowledgement. Using selective acknowledgments, the data receiver can inform the sender about all segments that have arrived successfully, so the sender need retransmit only the segments that have actually been lost. tcp-seq-checking – Every TCP packet contains a Sequence Number (SYN) and an Acknowledgement Number (ACK). Cyberoam monitors SYN and ACK numbers within a certain window to ensure that the packet is indeed part of the session. However, certain application and third party vendors use non-RFC methods to verify a
Cyberoam Console Guide
Page 52 of 73
packet's validity or for some other reason a server may send packets in invalid sequence numbers and expect an acknowledgement. For this reason, Cyberoam offers the ability to disable this feature. Default – ON tcp-timestamp Off – Disables timestamps. Timestamp is an TCP option used to calculate the Round Trip Measurement in a better way than the retransmission timeout method. tcp-window-scaling Off – Disables window scaling. The TCP window scaling increase the TCP receiving window size above its maximum value of 65,535 bytes. udp-timeout-stream - Set up UDP timeout value between 30 - 3600 seconds for established UDP connections. Default - 60 Seconds
arp-flux [ on | off ]
ARP flux occurs when multiple ethernet adaptors, often on a single machine, respond to an ARP query. Due to this, problem with the link layer address to IP Address mapping can occur. Cyberoam may respond to ARP requests from both Ethernet interfaces. On the machine creating the ARP request, these multiple answers can cause confusion. ARP flux affects only when Cyberoam has multiple physical connections to the same medium or broadcast domain. on - Cyberoam may respond to ARP requests from both Ethernet interfaces when Cyberoam has multiple physical connections to the same medium or broadcast domain. off - Cyberoam responds to ARP requests from respective Ethernet interface when Cyberoam has multiple physical connections to the same medium or broadcast domain.
Cyberoam Console Guide
Page 53 of 73
bandwidth [ default-policy {guaranteed <number> burstable <number> priority <number> | graph} | guarantee {enforced | lenient} | max-limit <number>] | [allocation-behavior {normal | realtime}
default-policy and guarantee allows to define the bandwidth restriction on the traffic on which the bandwidth policy is not applied while max-limit allows to define the link bandwidth.
• To set the link bandwidth i.e. bandwidth provided by Service Provider and can be used as “set bandwidth max-limit <number>” and to view the configured limit, use the command “show bandwidth max-limit”.
• To enforce bandwidth restriction on the traffic on which the bandwidth policy is not applied so that guaranteed bandwidth is available to the users to whom the guaranteed bandwidth policy is applied, configure “set bandwidth guarantee enforced”.
• If guarantee is enforced, default bandwidth policy will be applicable to the traffic on which bandwidth policy is not applied. You can set the guaranteed and burstable bandwidth and priority on this traffic. This bandwidth is applicable on Internal (LAN and DMZ) to External zone (WAN and VPN) traffic and External to Internal zone traffic. Default Guaranteed bandwidth = 0 kbps, Burstable bandwidth = max-limit, priority = 7 (lowest). Guaranteed and burstable bandwidth can be defined as “set bandwidth default-policy guaranteed <number> burstable <number> priority <number>”
• If you do not want to enforce the bandwidth restriction on the traffic on which the bandwidth policy is not applied, configure “set bandwidth guarantee lenient”.
• If you want to normally allocate the excess bandwidth after guaranteed bandwidth allocation, configure “set bandwidth allocation-behavior normal”.
• If you want to allocate bandwidth for real time traffic having QoS policy with priority 0 (like VOIP), configure “set bandwidth allocation-behavior realtime”.
http_proxy [ add_via_header <on | off > | dos (add {connection <number> | method (GET <number> | POST <number>) | delete { connection | method (GET | POST ) } | host-entries (add {host-name <string> | delete {host-name<string>} ) |
Set proxy parameters add via header - Default – ON dos – Configure number of HTTP requests per source IP or number of HTTP requests per TCP connection. Number of requests higher than the configured rate is considered as attack and the
Cyberoam Console Guide
Page 54 of 73
traffic from the said source is dropped. One can either configure allowed number of connections or for granular controls can configure allowed number of requests per Method – GET and PUT. Applicable only when Cyberoam is deployed in Transparent mode.
Configure/Modify ICAP Settings 1. Apply Modified Configuration Command: set icap apply-change 2. Configure Request Mode IP Address for ICAP Server Command: set icap edit reqmod IP-address <IP Address> 3. Configure Request Mode Port Number for ICAP Server Command: set icap edit reqmod port<Port Number> 4. Configure Request Mode Service Name for ICAP Server Command: set icap edit reqmod service-name <service name> 5. Reset Request Mode ICAP Server Command: set icap edit reqmod reset 6. Configure Response Mode IP Address for ICAP Server Command: set icap edit respmod IP-address <IP Address> 7. Configure Response Port Number for ICAP Server
For applying the configuration modification executed using Edit commands of Request Mode or Response Mode. For configuring ICAP Server Request Mode IP Address. Example: set icap edit reqmod IP-address 192.168.1.2 For configuring ICAP Server Request Mode Port number. Any port number compatible with Cyberoam and ICAP Server can be configured as Request Port. Example: set icap edit reqmod port 1344 For configuring ICAP Server Request Mode Service Name. Only those services that are offered and configured by ICAP Request Server Administrator are accessible by Cyberoam. Example: set icap edit reqmod service-name xyz All Request Mode parameters, IP Address, port and service-name are reset to respective default value. By default, the value is none. The Request Mode for the respective ICAP Server will be flushed. For configuring ICAP Server Response Mode IP Address. Example: set icap edit respmod IP-address 192.168.1.2 For configuring ICAP Server Response Mode Port number. Any port number compatible with
Cyberoam Console Guide
Page 55 of 73
Command: set icap edit respmod port<Port Number> 8. Configure Response Mode Service Name for ICAP Server Command: set icap edit respmod service-name <service name> 9. Reset Response Mode ICAP Server Command: set icap edit respmod reset 10. Configure Inbound/Outbound Content Body Limit Command: set icap edit options body limit <Bytes> 11. Configure Number of Connections for ICAP Server Command: set icap edit options connections <integer> 12. To Enable/Disable DLP Mode for ICAP Server Command: set icap edit options mode_dlp <on | off>
Cyberoam and ICAP Server can be configured as Response Port. Example: set icap edit respmod port 1344 For configuring ICAP Server Response Mode Service Name. Only those services that are offered and configured by ICAP Response Server Administrator are accessible by Cyberoam. Example: set icap edit respmod service-name xyz All Response Mode parameters, IP Address, port and service-name are reset to respective default value. By default, the value is none. The Response Mode for the respective ICAP Server shall be flushed. To configure the inbound and outbound content body limit in bytes. Example: set icap edit options body limit 10485760 To configure the number of connections supported by ICAP Server. Example: set icap edit options connections 1 For switching on or switching off the DLP mode. Note: ICAP is supported in CR50iNG and above only.
ips Configure IPS settings
Set Network Interface Parameters network [interface-speed | mtu-mss | macaddr | lag-interface] 1. Set Interface Speed Settings network [interface-speed {port <port name> (1000fd | 1000hd | 100fd | 100hd |
Configure network interface parameters interface speed - Speed mismatch between Cyberoam and third party routers and switches can result into errors or collisions on interface, no connection or traffic latency, slow performance. mss – Maximum Segment Size – It defines the
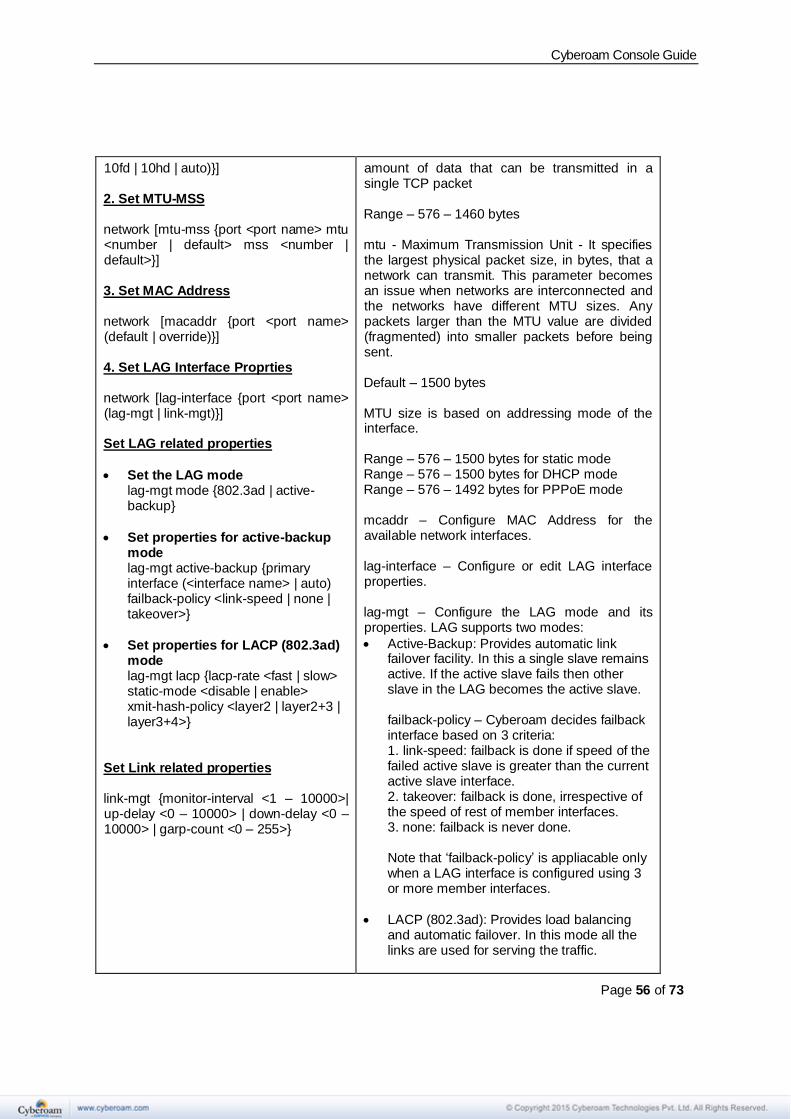
Cyberoam Console Guide
Page 56 of 73
10fd | 10hd | auto)}] 2. Set MTU-MSS network [mtu-mss {port <port name> mtu <number | default> mss <number | default>}] 3. Set MAC Address network [macaddr {port <port name> (default | override)}] 4. Set LAG Interface Proprties network [lag-interface {port <port name> (lag-mgt | link-mgt)}] Set LAG related properties
• Set the LAG mode lag-mgt mode {802.3ad | active-backup}
• Set properties for active-backup mode lag-mgt active-backup {primary interface (<interface name> | auto) failback-policy <link-speed | none | takeover>}
• Set properties for LACP (802.3ad) mode lag-mgt lacp {lacp-rate <fast | slow> static-mode <disable | enable> xmit-hash-policy <layer2 | layer2+3 | layer3+4>}
Set Link related properties link-mgt {monitor-interval <1 – 10000>| up-delay <0 – 10000> | down-delay <0 – 10000> | garp-count <0 – 255>}
amount of data that can be transmitted in a single TCP packet Range – 576 – 1460 bytes mtu - Maximum Transmission Unit - It specifies the largest physical packet size, in bytes, that a network can transmit. This parameter becomes an issue when networks are interconnected and the networks have different MTU sizes. Any packets larger than the MTU value are divided (fragmented) into smaller packets before being sent. Default – 1500 bytes MTU size is based on addressing mode of the interface. Range – 576 – 1500 bytes for static mode Range – 576 – 1500 bytes for DHCP mode Range – 576 – 1492 bytes for PPPoE mode mcaddr – Configure MAC Address for the available network interfaces. lag-interface – Configure or edit LAG interface properties. lag-mgt – Configure the LAG mode and its properties. LAG supports two modes:
• Active-Backup: Provides automatic link failover facility. In this a single slave remains active. If the active slave fails then other slave in the LAG becomes the active slave. failback-policy – Cyberoam decides failback interface based on 3 criteria: 1. link-speed: failback is done if speed of the failed active slave is greater than the current active slave interface. 2. takeover: failback is done, irrespective of the speed of rest of member interfaces. 3. none: failback is never done. Note that ‘failback-policy’ is appliacable only when a LAG interface is configured using 3 or more member interfaces.
• LACP (802.3ad): Provides load balancing and automatic failover. In this mode all the links are used for serving the traffic.
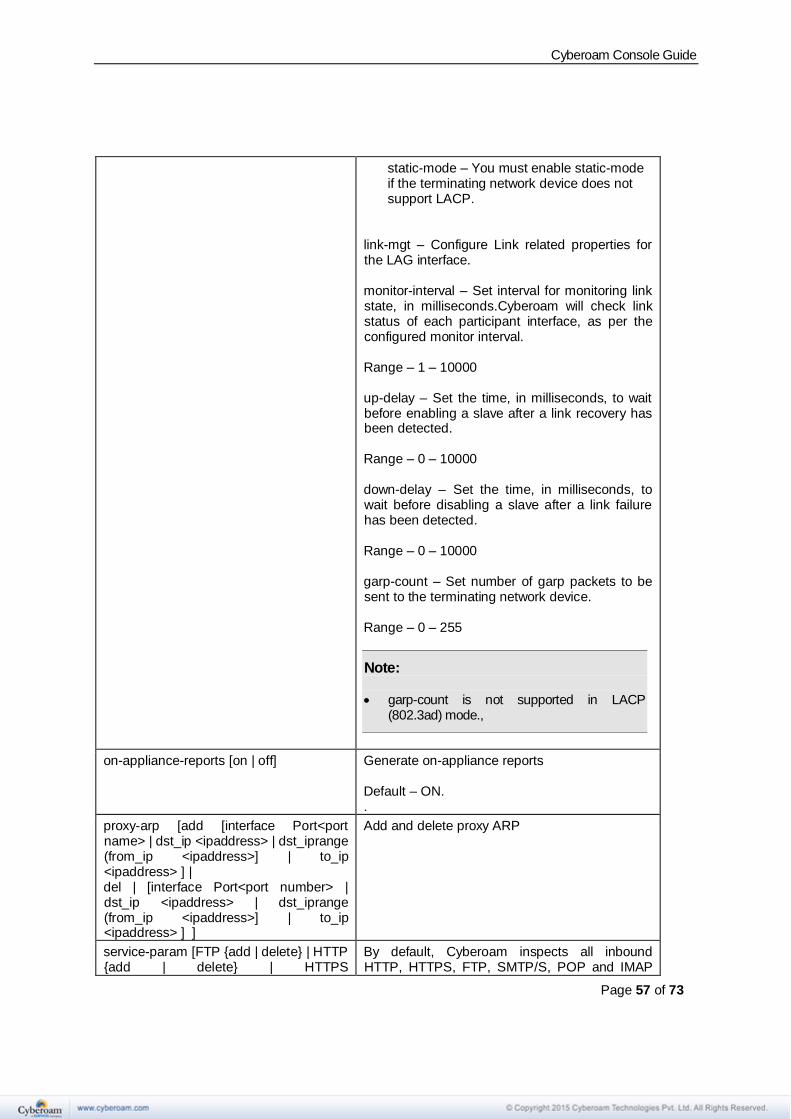
Cyberoam Console Guide
Page 57 of 73
static-mode – You must enable static-mode if the terminating network device does not support LACP.
link-mgt – Configure Link related properties for the LAG interface. monitor-interval – Set interval for monitoring link state, in milliseconds.Cyberoam will check link status of each participant interface, as per the configured monitor interval. Range – 1 – 10000 up-delay – Set the time, in milliseconds, to wait before enabling a slave after a link recovery has been detected. Range – 0 – 10000 down-delay – Set the time, in milliseconds, to wait before disabling a slave after a link failure has been detected. Range – 0 – 10000 garp-count – Set number of garp packets to be sent to the terminating network device. Range – 0 – 255
Note:
• garp-count is not supported in LACP (802.3ad) mode.,
on-appliance-reports [on | off] Generate on-appliance reports Default – ON. .
proxy-arp [add [interface Port<port name> | dst_ip <ipaddress> | dst_iprange (from_ip <ipaddress>] | to_ip <ipaddress> ] | del | [interface Port<port number> | dst_ip <ipaddress> | dst_iprange (from_ip <ipaddress>] | to_ip <ipaddress> ] ]
Add and delete proxy ARP
service-param [FTP {add | delete} | HTTP {add | delete} | HTTPS
By default, Cyberoam inspects all inbound HTTP, HTTPS, FTP, SMTP/S, POP and IMAP
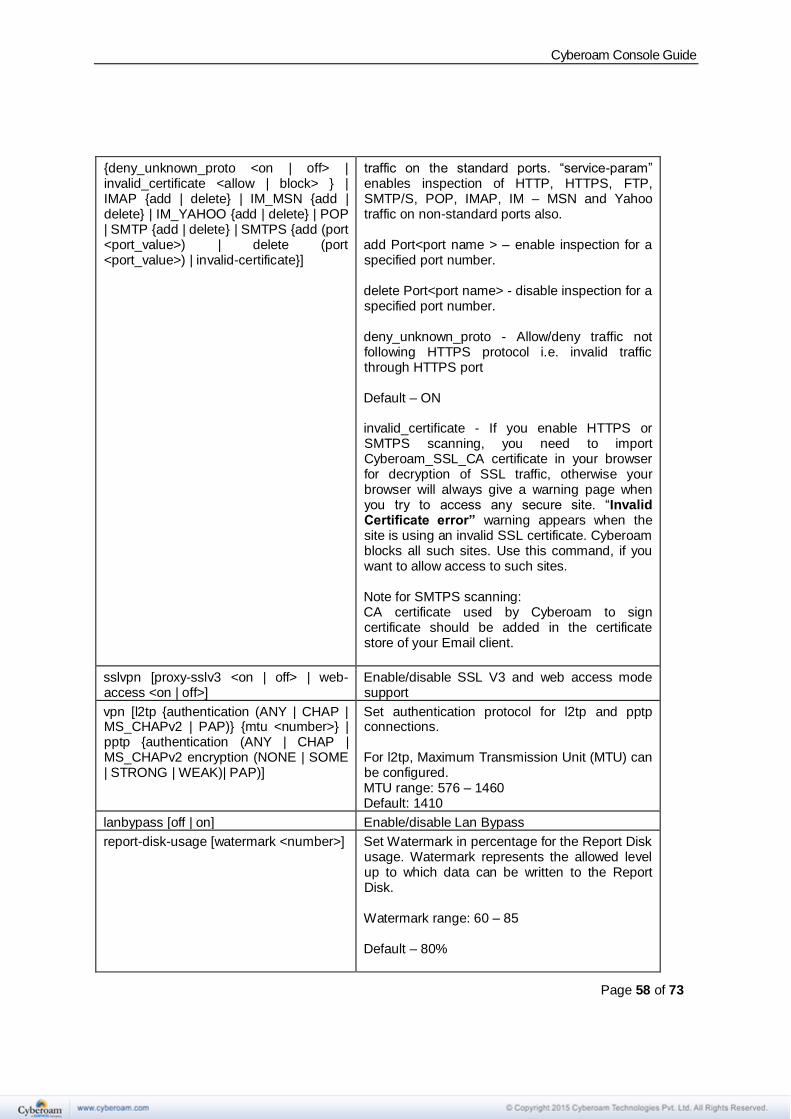
Cyberoam Console Guide
Page 58 of 73
{deny_unknown_proto <on | off> | invalid_certificate <allow | block> } | IMAP {add | delete} | IM_MSN {add | delete} | IM_YAHOO {add | delete} | POP | SMTP {add | delete} | SMTPS {add (port <port_value>) | delete (port <port_value>) | invalid-certificate}]
traffic on the standard ports. “service-param” enables inspection of HTTP, HTTPS, FTP, SMTP/S, POP, IMAP, IM – MSN and Yahoo traffic on non-standard ports also. add Port<port name > – enable inspection for a specified port number. delete Port<port name> - disable inspection for a specified port number. deny_unknown_proto - Allow/deny traffic not following HTTPS protocol i.e. invalid traffic through HTTPS port Default – ON invalid_certificate - If you enable HTTPS or SMTPS scanning, you need to import Cyberoam_SSL_CA certificate in your browser for decryption of SSL traffic, otherwise your browser will always give a warning page when you try to access any secure site. “Invalid Certificate error” warning appears when the site is using an invalid SSL certificate. Cyberoam blocks all such sites. Use this command, if you want to allow access to such sites. Note for SMTPS scanning: CA certificate used by Cyberoam to sign certificate should be added in the certificate store of your Email client.
sslvpn [proxy-sslv3 <on | off> | web-access <on | off>]
Enable/disable SSL V3 and web access mode support
vpn [l2tp {authentication (ANY | CHAP | MS_CHAPv2 | PAP)} {mtu <number>} | pptp {authentication (ANY | CHAP | MS_CHAPv2 encryption (NONE | SOME | STRONG | WEAK)| PAP)]
Set authentication protocol for l2tp and pptp connections. For l2tp, Maximum Transmission Unit (MTU) can be configured. MTU range: 576 – 1460 Default: 1410
lanbypass [off | on] Enable/disable Lan Bypass
report-disk-usage [watermark <number>] Set Watermark in percentage for the Report Disk usage. Watermark represents the allowed level up to which data can be written to the Report Disk. Watermark range: 60 – 85 Default – 80%
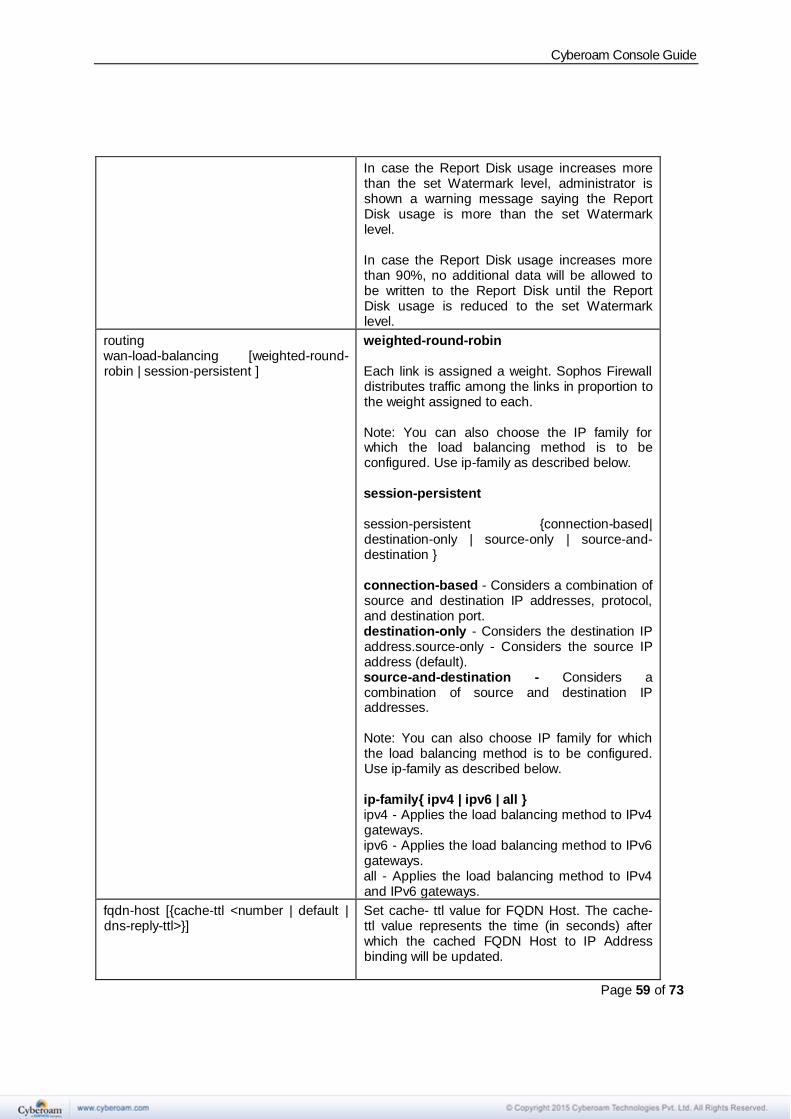
Cyberoam Console Guide
Page 59 of 73
In case the Report Disk usage increases more than the set Watermark level, administrator is shown a warning message saying the Report Disk usage is more than the set Watermark level. In case the Report Disk usage increases more than 90%, no additional data will be allowed to be written to the Report Disk until the Report Disk usage is reduced to the set Watermark level.
routing wan-load-balancing [weighted-round-robin | session-persistent ]
weighted-round-robin Each link is assigned a weight. Sophos Firewall distributes traffic among the links in proportion to the weight assigned to each. Note: You can also choose the IP family for which the load balancing method is to be configured. Use ip-family as described below. session-persistent session-persistent {connection-based| destination-only | source-only | source-and-destination } connection-based - Considers a combination of source and destination IP addresses, protocol, and destination port. destination-only - Considers the destination IP address.source-only - Considers the source IP address (default). source-and-destination - Considers a combination of source and destination IP addresses. Note: You can also choose IP family for which the load balancing method is to be configured. Use ip-family as described below. ip-family{ ipv4 | ipv6 | all } ipv4 - Applies the load balancing method to IPv4 gateways. ipv6 - Applies the load balancing method to IPv6 gateways. all - Applies the load balancing method to IPv4 and IPv6 gateways.
fqdn-host [{cache-ttl <number | default | dns-reply-ttl>}]
Set cache- ttl value for FQDN Host. The cache-ttl value represents the time (in seconds) after which the cached FQDN Host to IP Address binding will be updated.
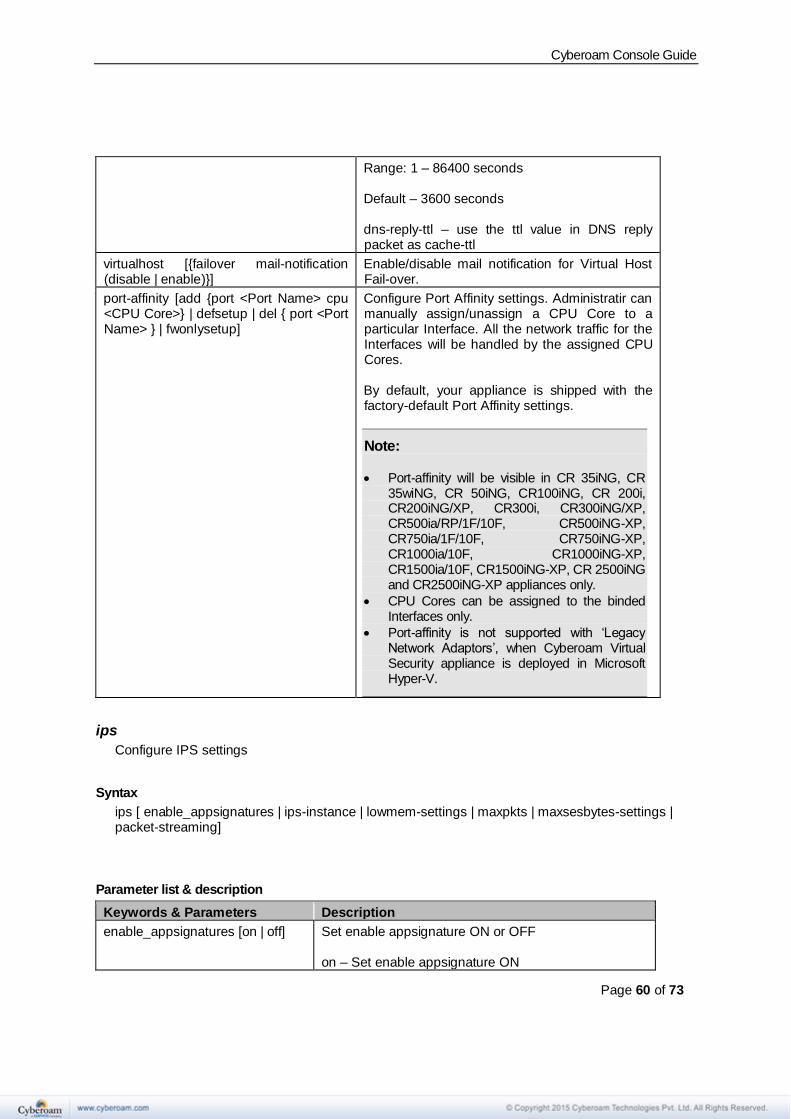
Cyberoam Console Guide
Page 60 of 73
Range: 1 – 86400 seconds Default – 3600 seconds dns-reply-ttl – use the ttl value in DNS reply packet as cache-ttl
virtualhost [{failover mail-notification (disable | enable)}]
Enable/disable mail notification for Virtual Host Fail-over.
port-affinity [add {port <Port Name> cpu <CPU Core>} | defsetup | del { port <Port Name> } | fwonlysetup]
Configure Port Affinity settings. Administratir can manually assign/unassign a CPU Core to a particular Interface. All the network traffic for the Interfaces will be handled by the assigned CPU Cores. By default, your appliance is shipped with the factory-default Port Affinity settings.
Note:
• Port-affinity will be visible in CR 35iNG, CR 35wiNG, CR 50iNG, CR100iNG, CR 200i, CR200iNG/XP, CR300i, CR300iNG/XP, CR500ia/RP/1F/10F, CR500iNG-XP, CR750ia/1F/10F, CR750iNG-XP, CR1000ia/10F, CR1000iNG-XP, CR1500ia/10F, CR1500iNG-XP, CR 2500iNG and CR2500iNG-XP appliances only.
• CPU Cores can be assigned to the binded Interfaces only.
• Port-affinity is not supported with ‘Legacy Network Adaptors’, when Cyberoam Virtual Security appliance is deployed in Microsoft Hyper-V.
ips
Configure IPS settings
Syntax
ips [ enable_appsignatures | ips-instance | lowmem-settings | maxpkts | maxsesbytes-settings | packet-streaming]
Parameter list & description
Keywords & Parameters Description
enable_appsignatures [on | off] Set enable appsignature ON or OFF on – Set enable appsignature ON
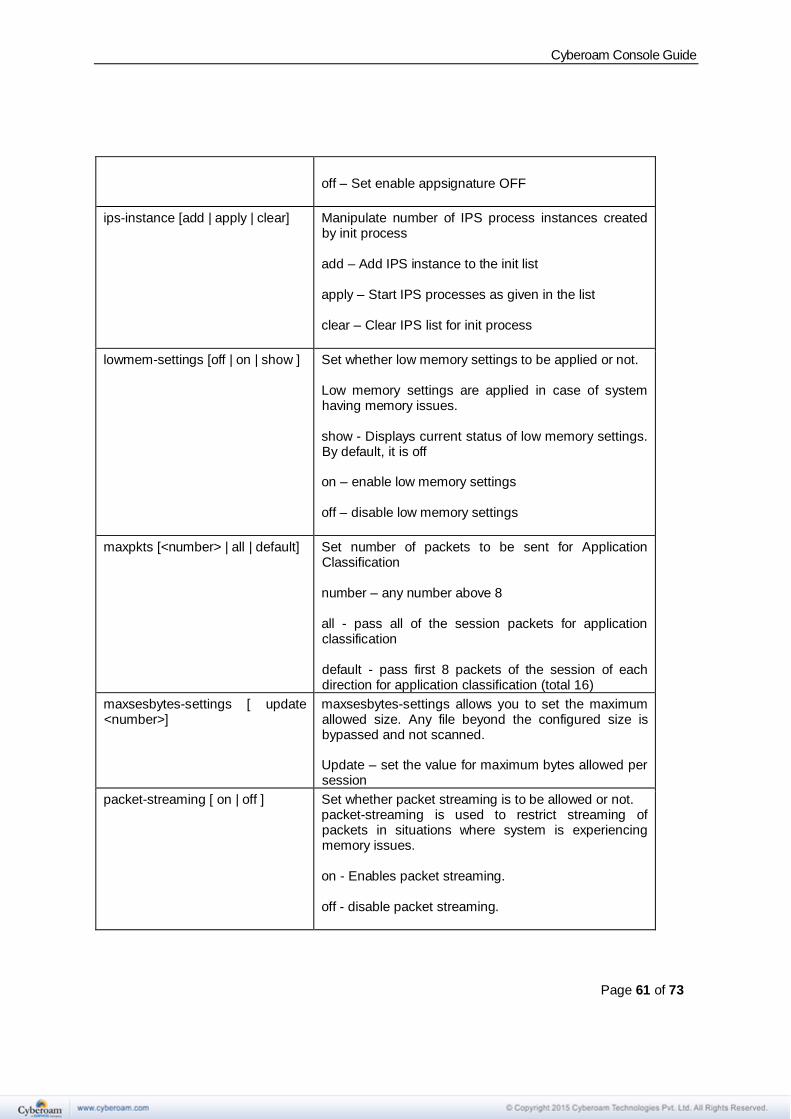
Cyberoam Console Guide
Page 61 of 73
off – Set enable appsignature OFF
ips-instance [add | apply | clear] Manipulate number of IPS process instances created by init process add – Add IPS instance to the init list apply – Start IPS processes as given in the list clear – Clear IPS list for init process
lowmem-settings [off | on | show ] Set whether low memory settings to be applied or not. Low memory settings are applied in case of system having memory issues. show - Displays current status of low memory settings. By default, it is off on – enable low memory settings off – disable low memory settings
maxpkts [<number> | all | default] Set number of packets to be sent for Application Classification number – any number above 8 all - pass all of the session packets for application classification default - pass first 8 packets of the session of each direction for application classification (total 16)
maxsesbytes-settings [ update <number>]
maxsesbytes-settings allows you to set the maximum allowed size. Any file beyond the configured size is bypassed and not scanned. Update – set the value for maximum bytes allowed per session
packet-streaming [ on | off ] Set whether packet streaming is to be allowed or not. packet-streaming is used to restrict streaming of packets in situations where system is experiencing memory issues. on - Enables packet streaming. off - disable packet streaming.
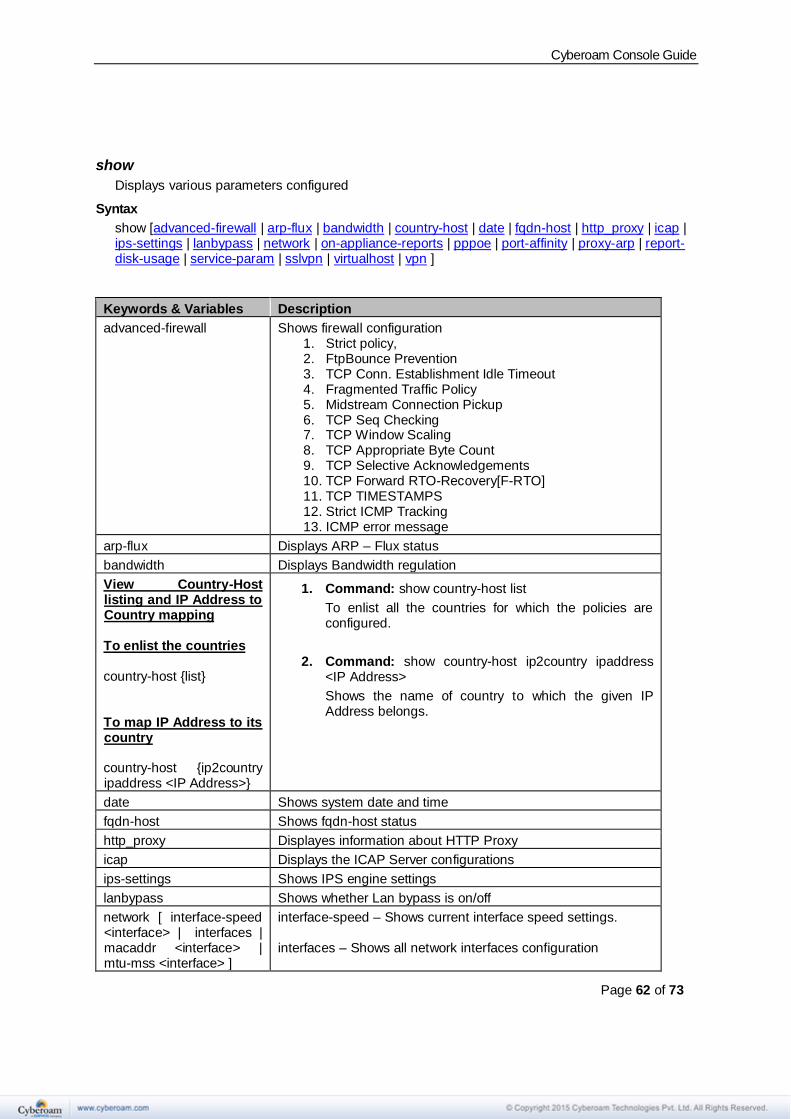
Cyberoam Console Guide
Page 62 of 73
show
Displays various parameters configured
Syntax
show [advanced-firewall | arp-flux | bandwidth | country-host | date | fqdn-host | http_proxy | icap | ips-settings | lanbypass | network | on-appliance-reports | pppoe | port-affinity | proxy-arp | report-disk-usage | service-param | sslvpn | virtualhost | vpn ]
Keywords & Variables Description
advanced-firewall Shows firewall configuration 1. Strict policy, 2. FtpBounce Prevention 3. TCP Conn. Establishment Idle Timeout 4. Fragmented Traffic Policy 5. Midstream Connection Pickup 6. TCP Seq Checking 7. TCP Window Scaling 8. TCP Appropriate Byte Count 9. TCP Selective Acknowledgements 10. TCP Forward RTO-Recovery[F-RTO] 11. TCP TIMESTAMPS 12. Strict ICMP Tracking 13. ICMP error message
arp-flux Displays ARP – Flux status
bandwidth Displays Bandwidth regulation
View Country-Host listing and IP Address to Country mapping To enlist the countries country-host {list} To map IP Address to its country country-host {ip2country ipaddress <IP Address>}
1. Command: show country-host list
To enlist all the countries for which the policies are configured.
2. Command: show country-host ip2country ipaddress <IP Address>
Shows the name of country to which the given IP Address belongs.
date Shows system date and time
fqdn-host Shows fqdn-host status
http_proxy Displayes information about HTTP Proxy
icap Displays the ICAP Server configurations
ips-settings Shows IPS engine settings
lanbypass Shows whether Lan bypass is on/off
network [ interface-speed <interface> | interfaces | macaddr <interface> | mtu-mss <interface> ]
interface-speed – Shows current interface speed settings. interfaces – Shows all network interfaces configuration
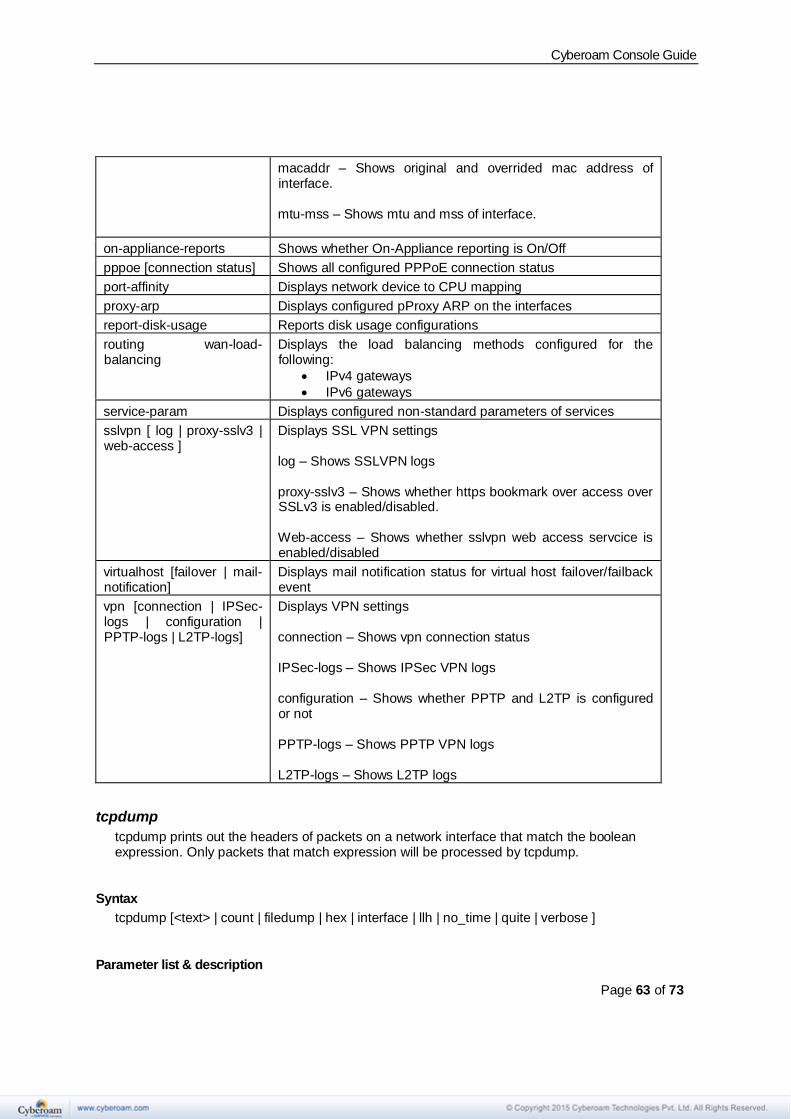
Cyberoam Console Guide
Page 63 of 73
macaddr – Shows original and overrided mac address of interface. mtu-mss – Shows mtu and mss of interface.
on-appliance-reports Shows whether On-Appliance reporting is On/Off
pppoe [connection status] Shows all configured PPPoE connection status
port-affinity Displays network device to CPU mapping
proxy-arp Displays configured pProxy ARP on the interfaces
report-disk-usage Reports disk usage configurations
routing wan-load-balancing
Displays the load balancing methods configured for the following:
• IPv4 gateways
• IPv6 gateways
service-param Displays configured non-standard parameters of services
sslvpn [ log | proxy-sslv3 | web-access ]
Displays SSL VPN settings log – Shows SSLVPN logs proxy-sslv3 – Shows whether https bookmark over access over SSLv3 is enabled/disabled. Web-access – Shows whether sslvpn web access servcice is enabled/disabled
virtualhost [failover | mail-notification]
Displays mail notification status for virtual host failover/failback event
vpn [connection | IPSec-logs | configuration | PPTP-logs | L2TP-logs]
Displays VPN settings connection – Shows vpn connection status IPSec-logs – Shows IPSec VPN logs configuration – Shows whether PPTP and L2TP is configured or not PPTP-logs – Shows PPTP VPN logs L2TP-logs – Shows L2TP logs
tcpdump
tcpdump prints out the headers of packets on a network interface that match the boolean expression. Only packets that match expression will be processed by tcpdump.
Syntax
tcpdump [<text> | count | filedump | hex | interface | llh | no_time | quite | verbose ]
Parameter list & description
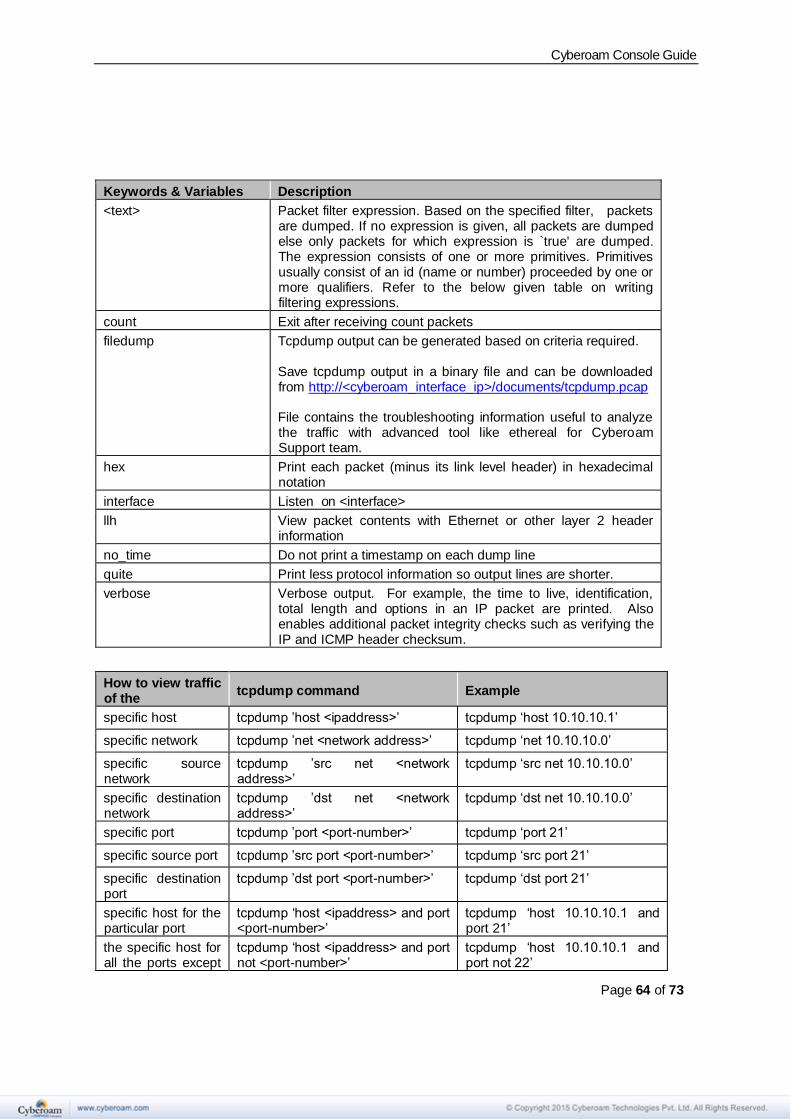
Cyberoam Console Guide
Page 64 of 73
Keywords & Variables Description
<text>
Packet filter expression. Based on the specified filter, packets are dumped. If no expression is given, all packets are dumped else only packets for which expression is `true' are dumped. The expression consists of one or more primitives. Primitives usually consist of an id (name or number) proceeded by one or more qualifiers. Refer to the below given table on writing filtering expressions.
count Exit after receiving count packets
filedump Tcpdump output can be generated based on criteria required. Save tcpdump output in a binary file and can be downloaded from http://<cyberoam_interface_ip>/documents/tcpdump.pcap File contains the troubleshooting information useful to analyze the traffic with advanced tool like ethereal for Cyberoam Support team.
hex Print each packet (minus its link level header) in hexadecimal notation
interface Listen on <interface>
llh View packet contents with Ethernet or other layer 2 header information
no_time Do not print a timestamp on each dump line
quite Print less protocol information so output lines are shorter.
verbose Verbose output. For example, the time to live, identification, total length and options in an IP packet are printed. Also enables additional packet integrity checks such as verifying the IP and ICMP header checksum.
How to view traffic of the
tcpdump command Example
specific host tcpdump ’host <ipaddress>’ tcpdump ‘host 10.10.10.1’
specific network tcpdump ’net <network address>’ tcpdump ‘net 10.10.10.0’
specific source network
tcpdump ’src net <network address>’
tcpdump ‘src net 10.10.10.0’
specific destination network
tcpdump ’dst net <network address>’
tcpdump ‘dst net 10.10.10.0’
specific port tcpdump ’port <port-number>’ tcpdump ‘port 21’
specific source port tcpdump ’src port <port-number>’ tcpdump ‘src port 21’
specific destination port
tcpdump ’dst port <port-number>’ tcpdump ‘dst port 21’
specific host for the particular port
tcpdump ‘host <ipaddress> and port <port-number>’
tcpdump ‘host 10.10.10.1 and port 21’
the specific host for all the ports except
tcpdump ‘host <ipaddress> and port not <port-number>’
tcpdump ‘host 10.10.10.1 and port not 22’
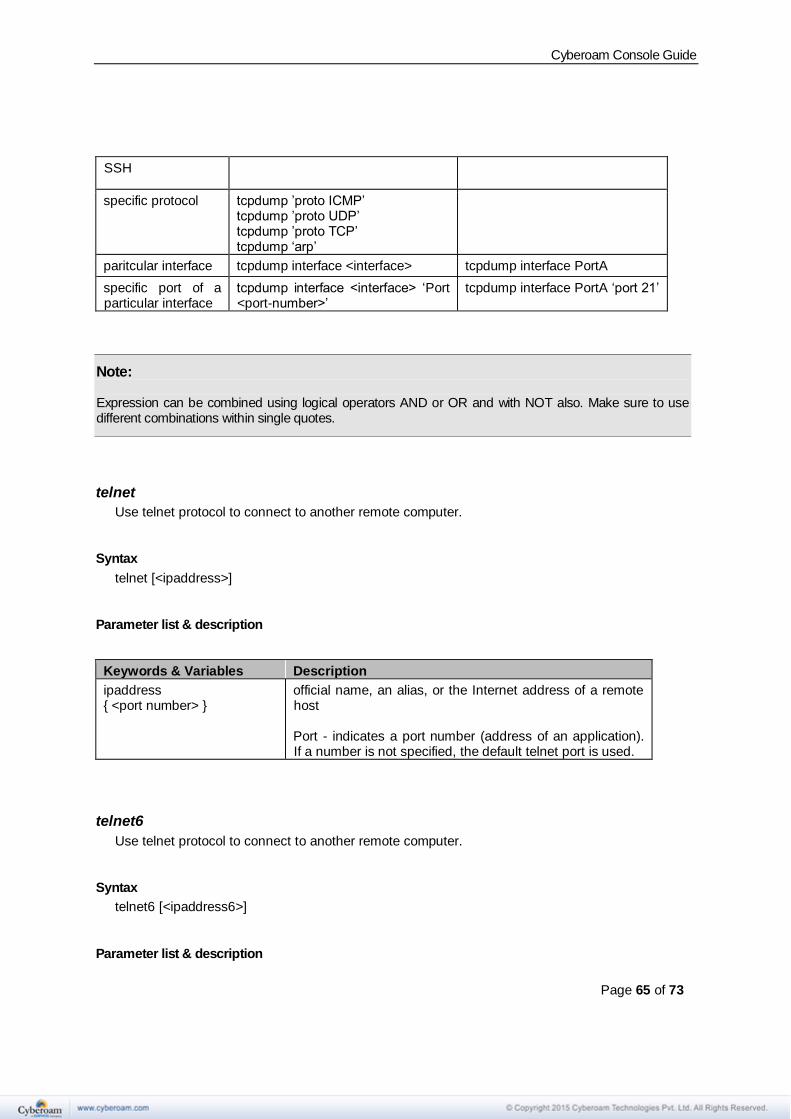
Cyberoam Console Guide
Page 65 of 73
SSH
specific protocol tcpdump ’proto ICMP’ tcpdump ’proto UDP’ tcpdump ’proto TCP’ tcpdump ‘arp’
paritcular interface tcpdump interface <interface> tcpdump interface PortA
specific port of a particular interface
tcpdump interface <interface> ‘Port <port-number>’
tcpdump interface PortA ‘port 21’
Note: Expression can be combined using logical operators AND or OR and with NOT also. Make sure to use different combinations within single quotes.
telnet
Use telnet protocol to connect to another remote computer.
Syntax
telnet [<ipaddress>]
Parameter list & description
Keywords & Variables Description
ipaddress { <port number> }
official name, an alias, or the Internet address of a remote host Port - indicates a port number (address of an application). If a number is not specified, the default telnet port is used.
telnet6
Use telnet protocol to connect to another remote computer.
Syntax
telnet6 [<ipaddress6>]
Parameter list & description
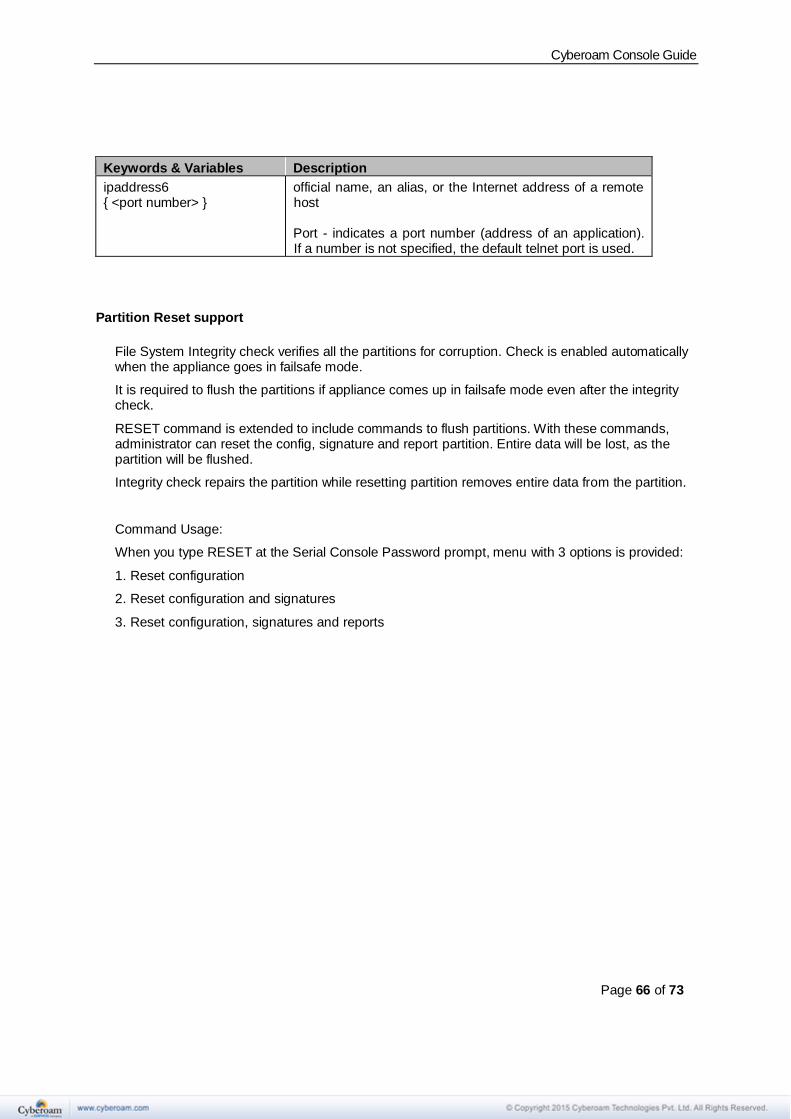
Cyberoam Console Guide
Page 66 of 73
Keywords & Variables Description
ipaddress6 { <port number> }
official name, an alias, or the Internet address of a remote host Port - indicates a port number (address of an application). If a number is not specified, the default telnet port is used.
Partition Reset support
File System Integrity check verifies all the partitions for corruption. Check is enabled automatically when the appliance goes in failsafe mode.
It is required to flush the partitions if appliance comes up in failsafe mode even after the integrity check.
RESET command is extended to include commands to flush partitions. With these commands, administrator can reset the config, signature and report partition. Entire data will be lost, as the partition will be flushed.
Integrity check repairs the partition while resetting partition removes entire data from the partition.
Command Usage:
When you type RESET at the Serial Console Password prompt, menu with 3 options is provided:
1. Reset configuration
2. Reset configuration and signatures
3. Reset configuration, signatures and reports
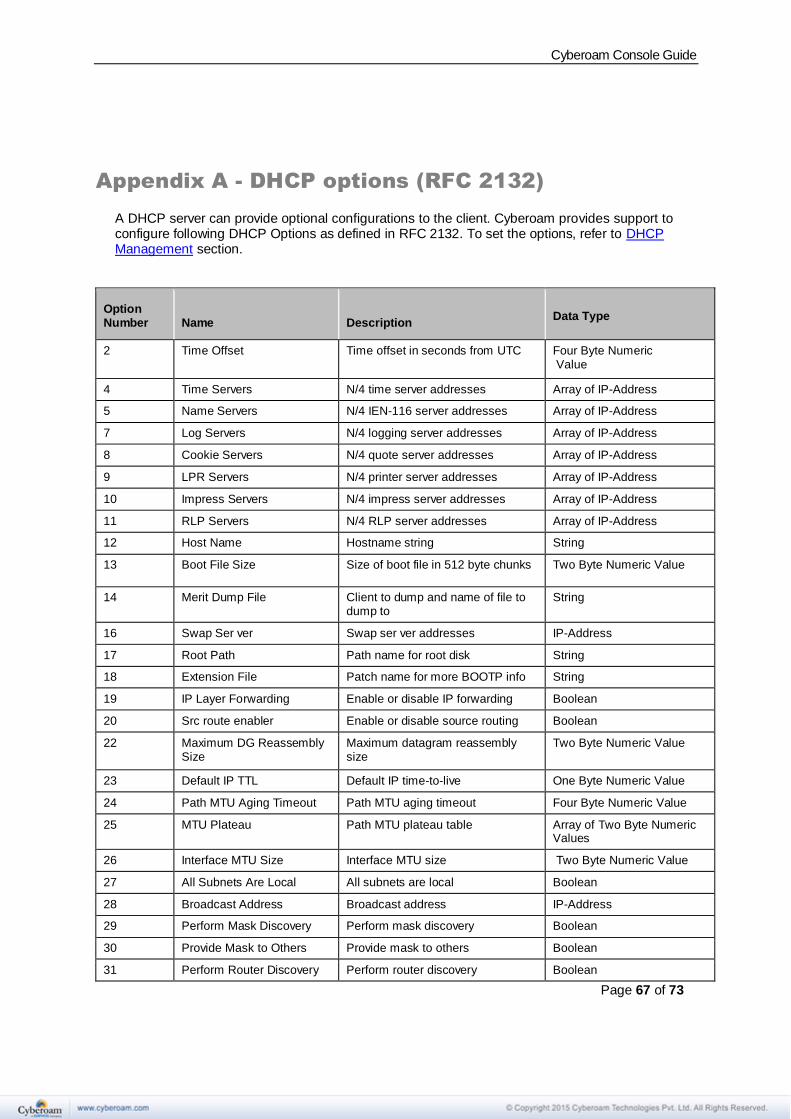
Cyberoam Console Guide
Page 67 of 73
Appendix A - DHCP options (RFC 2132)
A DHCP server can provide optional configurations to the client. Cyberoam provides support to configure following DHCP Options as defined in RFC 2132. To set the options, refer to DHCP Management section.
Option Number
Name
Description
Data Type
2 Time Offset Time offset in seconds from UTC Four Byte Numeric Value
4 Time Servers N/4 time server addresses Array of IP-Address
5 Name Servers N/4 IEN-116 server addresses Array of IP-Address
7 Log Servers N/4 logging server addresses Array of IP-Address
8 Cookie Servers N/4 quote server addresses Array of IP-Address
9 LPR Servers N/4 printer server addresses Array of IP-Address
10 Impress Servers N/4 impress server addresses Array of IP-Address
11 RLP Servers N/4 RLP server addresses Array of IP-Address
12 Host Name Hostname string String
13 Boot File Size Size of boot file in 512 byte chunks Two Byte Numeric Value
14 Merit Dump File Client to dump and name of file to dump to
String
16 Swap Ser ver Swap ser ver addresses IP-Address
17 Root Path Path name for root disk String
18 Extension File Patch name for more BOOTP info String
19 IP Layer Forwarding
Enable or disable IP forwarding Boolean
20 Src route enabler Enable or disable source routing Boolean
22 Maximum DG Reassembly Size
Maximum datagram reassembly size
Two Byte Numeric Value
23 Default IP TTL Default IP time-to-live One Byte Numeric Value
24 Path MTU Aging Timeout Path MTU aging timeout Four Byte Numeric Value
25 MTU Plateau Path MTU plateau table Array of Two Byte Numeric Values
26 Interface MTU Size Interface MTU size Two Byte Numeric Value
27 All Subnets Are Local All subnets are local Boolean
28 Broadcast Address Broadcast address IP-Address
29 Perform Mask Discovery Perform mask discovery Boolean
30 Provide Mask to Others Provide mask to others Boolean
31 Perform Router Discovery Perform router discovery Boolean
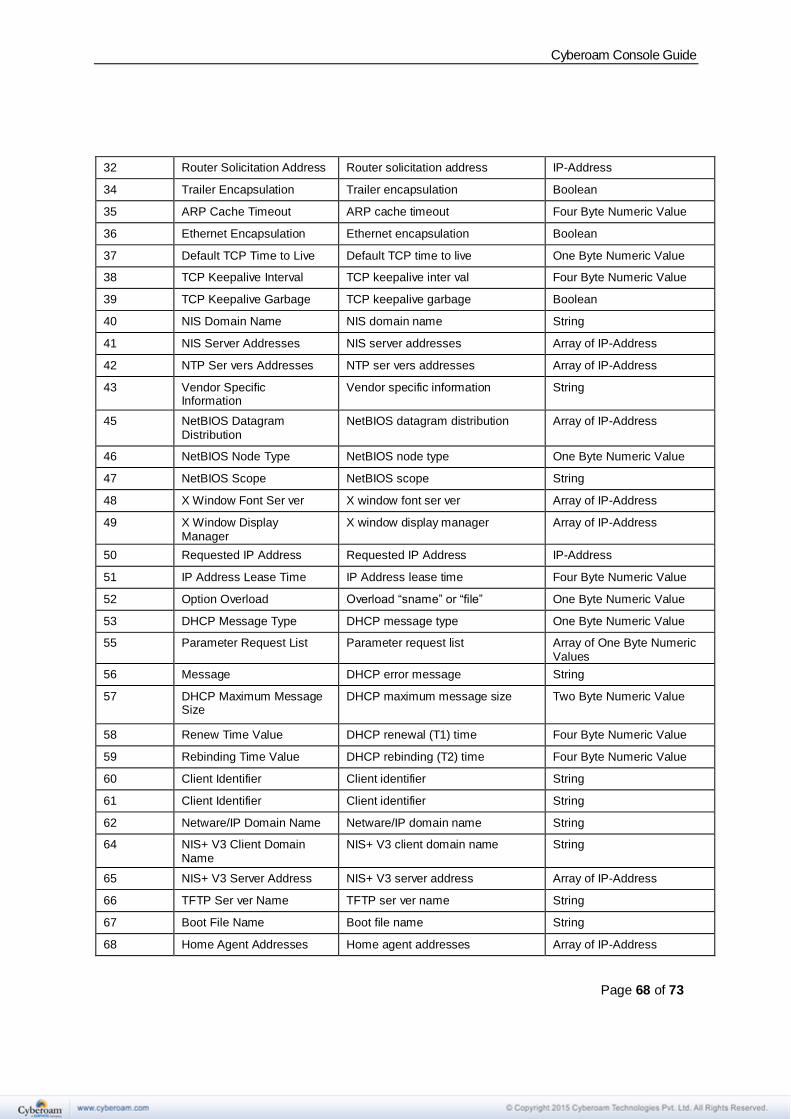
Cyberoam Console Guide
Page 68 of 73
32 Router Solicitation Address Router solicitation address IP-Address
34 Trailer Encapsulation Trailer encapsulation Boolean
35 ARP Cache Timeout ARP cache timeout Four Byte Numeric Value
36 Ethernet Encapsulation Ethernet encapsulation Boolean
37 Default TCP Time to Live Default TCP time to live One Byte Numeric Value
38 TCP Keepalive Interval TCP keepalive inter val Four Byte Numeric Value
39 TCP Keepalive Garbage TCP keepalive garbage Boolean
40 NIS Domain Name NIS domain name String
41 NIS Server Addresses NIS server addresses Array of IP-Address
42 NTP Ser vers Addresses NTP ser vers addresses Array of IP-Address
43 Vendor Specific Information
Vendor specific information String
45 NetBIOS Datagram Distribution
NetBIOS datagram distribution Array of IP-Address
46 NetBIOS Node Type NetBIOS node type One Byte Numeric Value
47 NetBIOS Scope NetBIOS scope String
48 X Window Font Ser ver X window font ser ver Array of IP-Address
49 X Window Display Manager
X window display manager Array of IP-Address
50 Requested IP Address Requested IP Address IP-Address
51 IP Address Lease Time IP Address lease time Four Byte Numeric Value
52 Option Overload Overload “sname” or “file” One Byte Numeric Value
53 DHCP Message Type DHCP message type One Byte Numeric Value
55 Parameter Request List Parameter request list Array of One Byte Numeric Values
56 Message DHCP error message String
57 DHCP Maximum Message Size
DHCP maximum message size Two Byte Numeric Value
58 Renew Time Value DHCP renewal (T1) time Four Byte Numeric Value
59 Rebinding Time Value DHCP rebinding (T2) time Four Byte Numeric Value
60 Client Identifier Client identifier String
61 Client Identifier Client identifier String
62 Netware/IP Domain Name Netware/IP domain name String
64 NIS+ V3 Client Domain Name
NIS+ V3 client domain name String
65 NIS+ V3 Server Address NIS+ V3 server address Array of IP-Address
66 TFTP Ser ver Name TFTP ser ver name String
67 Boot File Name Boot file name String
68 Home Agent Addresses Home agent addresses Array of IP-Address
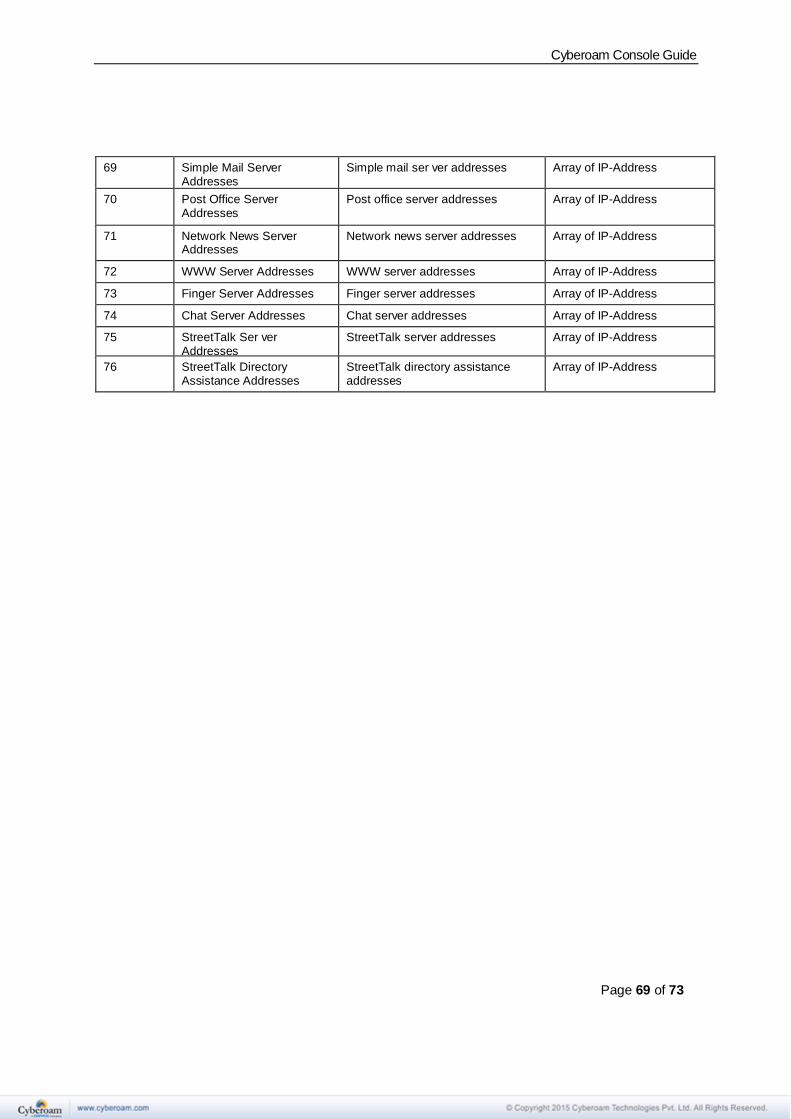
Cyberoam Console Guide
Page 69 of 73
69 Simple Mail Server Addresses
Simple mail ser ver addresses Array of IP-Address
70 Post Office Server Addresses
Post office server addresses Array of IP-Address
71 Network News Server Addresses
Network news server addresses Array of IP-Address
72 WWW Server Addresses WWW server addresses Array of IP-Address
73 Finger Server Addresses Finger server addresses Array of IP-Address
74 Chat Server Addresses Chat server addresses Array of IP-Address
75 StreetTalk Ser ver Addresses
StreetTalk server addresses Array of IP-Address
76 StreetTalk Directory Assistance Addresses
StreetTalk directory assistance addresses
Array of IP-Address
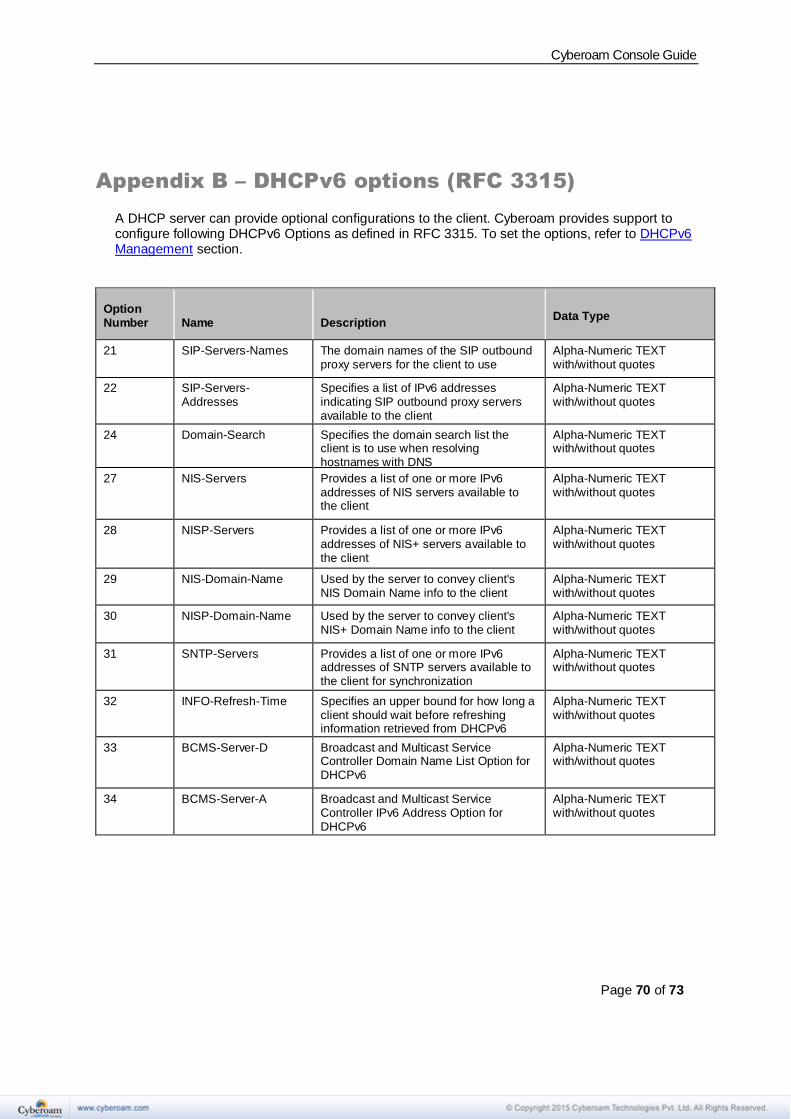
Cyberoam Console Guide
Page 70 of 73
Appendix B – DHCPv6 options (RFC 3315)
A DHCP server can provide optional configurations to the client. Cyberoam provides support to configure following DHCPv6 Options as defined in RFC 3315. To set the options, refer to DHCPv6 Management section.
Option Number
Name
Description
Data Type
21 SIP-Servers-Names The domain names of the SIP outbound proxy servers for the client to use
Alpha-Numeric TEXT with/without quotes
22 SIP-Servers-Addresses
Specifies a list of IPv6 addresses indicating SIP outbound proxy servers available to the client
Alpha-Numeric TEXT with/without quotes
24 Domain-Search Specifies the domain search list the client is to use when resolving hostnames with DNS
Alpha-Numeric TEXT with/without quotes
27 NIS-Servers Provides a list of one or more IPv6 addresses of NIS servers available to the client
Alpha-Numeric TEXT with/without quotes
28 NISP-Servers Provides a list of one or more IPv6 addresses of NIS+ servers available to the client
Alpha-Numeric TEXT with/without quotes
29 NIS-Domain-Name Used by the server to convey client's NIS Domain Name info to the client
Alpha-Numeric TEXT with/without quotes
30 NISP-Domain-Name Used by the server to convey client's NIS+ Domain Name info to the client
Alpha-Numeric TEXT with/without quotes
31 SNTP-Servers Provides a list of one or more IPv6 addresses of SNTP servers available to the client for synchronization
Alpha-Numeric TEXT with/without quotes
32 INFO-Refresh-Time Specifies an upper bound for how long a client should wait before refreshing information retrieved from DHCPv6
Alpha-Numeric TEXT with/without quotes
33 BCMS-Server-D Broadcast and Multicast Service Controller Domain Name List Option for DHCPv6
Alpha-Numeric TEXT with/without quotes
34 BCMS-Server-A Broadcast and Multicast Service Controller IPv6 Address Option for DHCPv6
Alpha-Numeric TEXT with/without quotes