Embed Size (px)
Citation preview
DA-PRP-HSR Expansion Module Software Manual
First Edition, January 2015
www.moxa.com/product
© 2015 Moxa Inc. All rights reserved.
DA-PRP-HSR Expansion Module Software Manual
The software described in this manual is furnished under a license agreement and may be used only in accordance with the terms of that agreement.
Copyright Notice
© 2015 Moxa Inc. All rights reserved.
Trademarks
The MOXA logo is a registered trademark of Moxa Inc. All other trademarks or registered marks in this manual belong to their respective manufacturers.
Disclaimer
Information in this document is subject to change without notice and does not represent a commitment on the part of Moxa.
Moxa provides this document as is, without warranty of any kind, either expressed or implied, including, but not limited to, its particular purpose. Moxa reserves the right to make improvements and/or changes to this manual, or to the products and/or the programs described in this manual, at any time.
Information provided in this manual is intended to be accurate and reliable. However, Moxa assumes no responsibility for its use, or for any infringements on the rights of third parties that may result from its use.
This product might include unintentional technical or typographical errors. Changes are periodically made to the information herein to correct such errors, and these changes are incorporated into new editions of the publication.
Technical Support Contact Information
www.moxa.com/support
Moxa Americas Toll-free: 1-888-669-2872 Tel: +1-714-528-6777 Fax: +1-714-528-6778
Moxa China (Shanghai office) Toll-free: 800-820-5036 Tel: +86-21-5258-9955 Fax: +86-21-5258-5505
Moxa Europe Tel: +49-89-3 70 03 99-0 Fax: +49-89-3 70 03 99-99
Moxa Asia-Pacific Tel: +886-2-8919-1230 Fax: +886-2-8919-1231
Moxa India Tel: +91-80-4172-9088 Fax: +91-80-4132-1045
Table of Contents
1. Introduction ...................................................................................................................................... 1-1 Getting Started .................................................................................................................................. 1-2 LED Indicators .................................................................................................................................... 1-2
2. Software Installation ........................................................................................................................ 2-1 Installing the SNMP Agent.................................................................................................................... 2-2 Installing the SNMP Extension Agent ..................................................................................................... 2-5 Installing the MMS Device Manager ....................................................................................................... 2-7
3. Using the MMS Device Manager ......................................................................................................... 3-1 Starting the MMS Device Manager......................................................................................................... 3-2 Adding a PRP/HSR Device .................................................................................................................... 3-2
Adding a Local PRP/HSR Device ..................................................................................................... 3-2 Adding a Remote PRP/HSR Device ................................................................................................. 3-4
Configuring SNMP V2c Community ........................................................................................................ 3-9 Configuring the Management View ...................................................................................................... 3-10 Log Settings ..................................................................................................................................... 3-10 Configuring Polling Interval ................................................................................................................ 3-11 Exporting an ICD File ........................................................................................................................ 3-12 Upgrading Software .......................................................................................................................... 3-13
1 1. Introduction
Thank you for purchasing Moxa’s DA-PRP-HSR expansion module for the DA-820 series industrial computers.
The DA-PHR-HSR expansion module is compliant with IEC 62439-3 Clause 4 (PRP) and IEC 62439-3 Clause 5 (HSR) to ensure the highest system availability and data integrity for mission-critical applications that require zero-time recovery and redundancy.
With dual Gigabit Ethernet port design, the DA-PRP-HSR provides high performance for redundant network systems. In addition, the DA-PRP-HSR features a built-in native PRP/HSR management middleware with MMS server that allows SCADA to collect IEC 62439-3 registers from multiple devices for easy network diagnosis, troubleshooting, device management, and monitoring.
Moxa’s DA-820 series industrial computer with the DA-PRP/HSR is the ideal solution for power substation automation and process automation systems
This manual shows you how to install the MMS Device Manager and how to use the middleware to manage PRP/HSR devices. Through the MMS protocol, the MMS Device Manager integrates IEC 62439-3 information with SCADA.
The following topics are covered in this chapter:
Getting Started
LED Indicators
Moxa DA-PRP-HSR Expansion Module Introduction
1-2
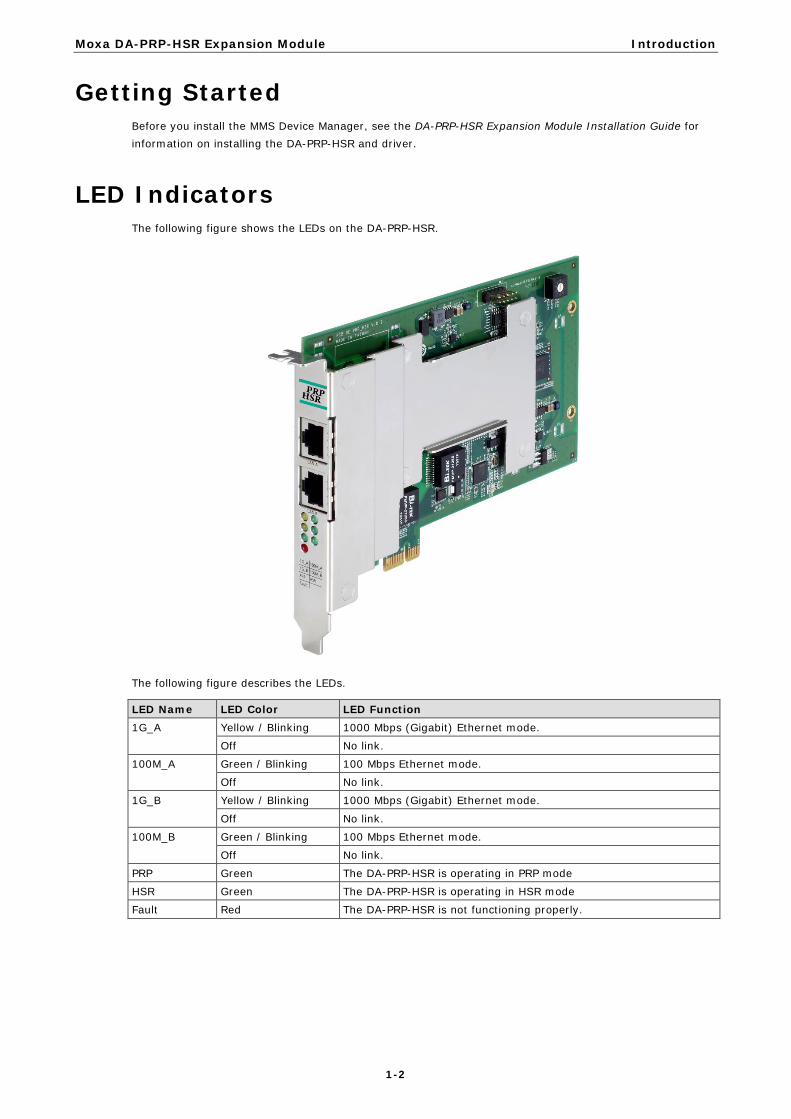
Getting Started Before you install the MMS Device Manager, see the DA-PRP-HSR Expansion Module Installation Guide for information on installing the DA-PRP-HSR and driver.
LED Indicators The following figure shows the LEDs on the DA-PRP-HSR.
The following figure describes the LEDs.
LED Name LED Color LED Function 1G_A Yellow / Blinking 1000 Mbps (Gigabit) Ethernet mode.
Off No link.
100M_A Green / Blinking 100 Mbps Ethernet mode.
Off No link.
1G_B Yellow / Blinking 1000 Mbps (Gigabit) Ethernet mode.
Off No link.
100M_B Green / Blinking 100 Mbps Ethernet mode.
Off No link.
PRP Green The DA-PRP-HSR is operating in PRP mode
HSR Green The DA-PRP-HSR is operating in HSR mode
Fault Red The DA-PRP-HSR is not functioning properly.
2 2. Software Installation
The DA-PRP-HSR driver and utility are supported on Windows 7 and Windows Embedded 7 (32-bit or 64-bit). This chapter describes the installation procedure on Windows Embedded 7.
The following topics are covered in this chapter:
Installing the SNMP Agent
Installing the SNMP Extension Agent
Installing the MMS Device Manager
Moxa DA-PRP-HSR Expansion Module Software Installation
2-2
Installing the SNMP Agent You must install the SNMP agent on the DA-820 computer because the MMS Device Manager uses SNMPV2c to collect information from PRP/HSR devices (for example, Reboxs, PRP/HSR switches, and native PRP/HSR computers).
NOTE Before you install the SNMP agent, make sure that the Windows SNMP service is running.
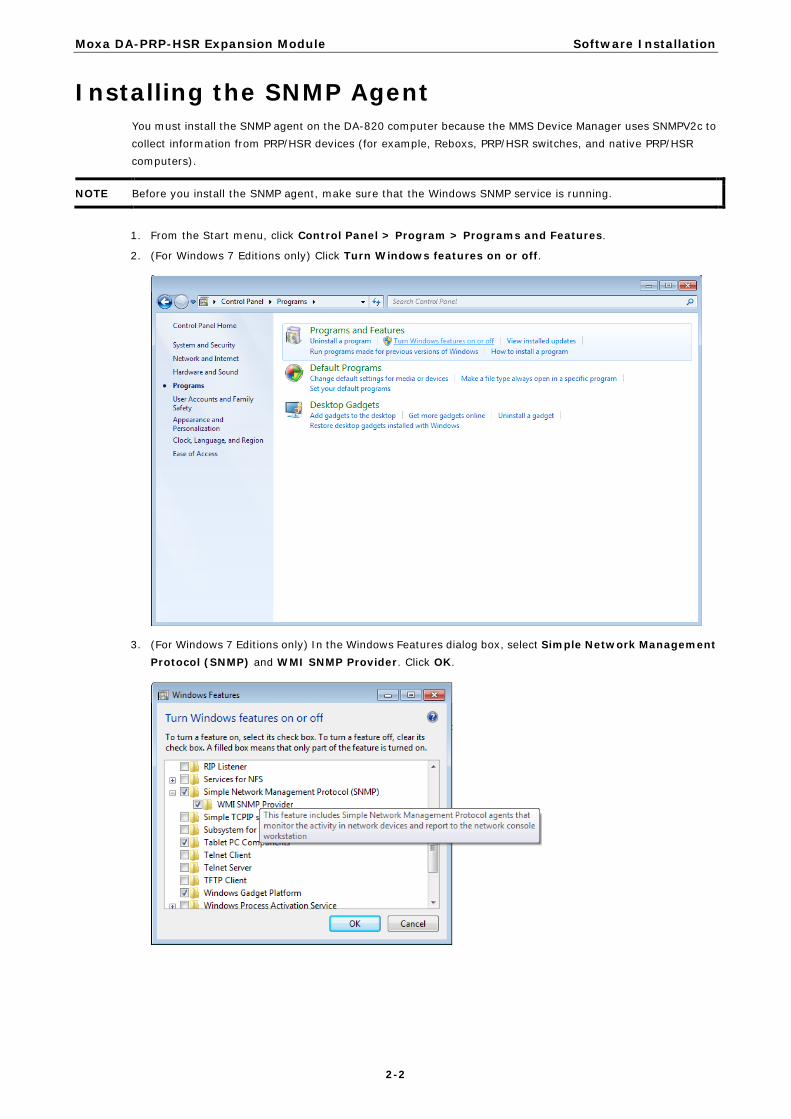
1. From the Start menu, click Control Panel > Program > Programs and Features.
2. (For Windows 7 Editions only) Click Turn Windows features on or off.
3. (For Windows 7 Editions only) In the Windows Features dialog box, select Simple Network Management Protocol (SNMP) and WMI SNMP Provider. Click OK.
Moxa DA-PRP-HSR Expansion Module Software Installation
2-3
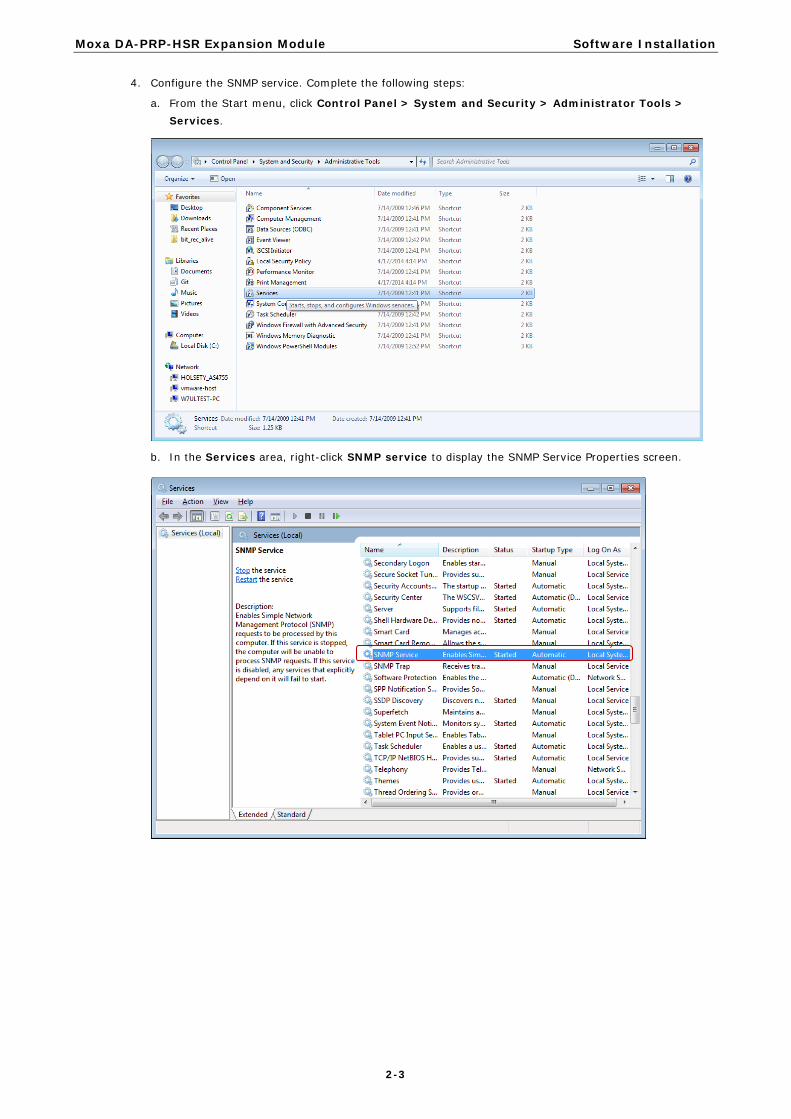
4. Configure the SNMP service. Complete the following steps:
a. From the Start menu, click Control Panel > System and Security > Administrator Tools > Services.
b. In the Services area, right-click SNMP service to display the SNMP Service Properties screen.
Moxa DA-PRP-HSR Expansion Module Software Installation
2-4
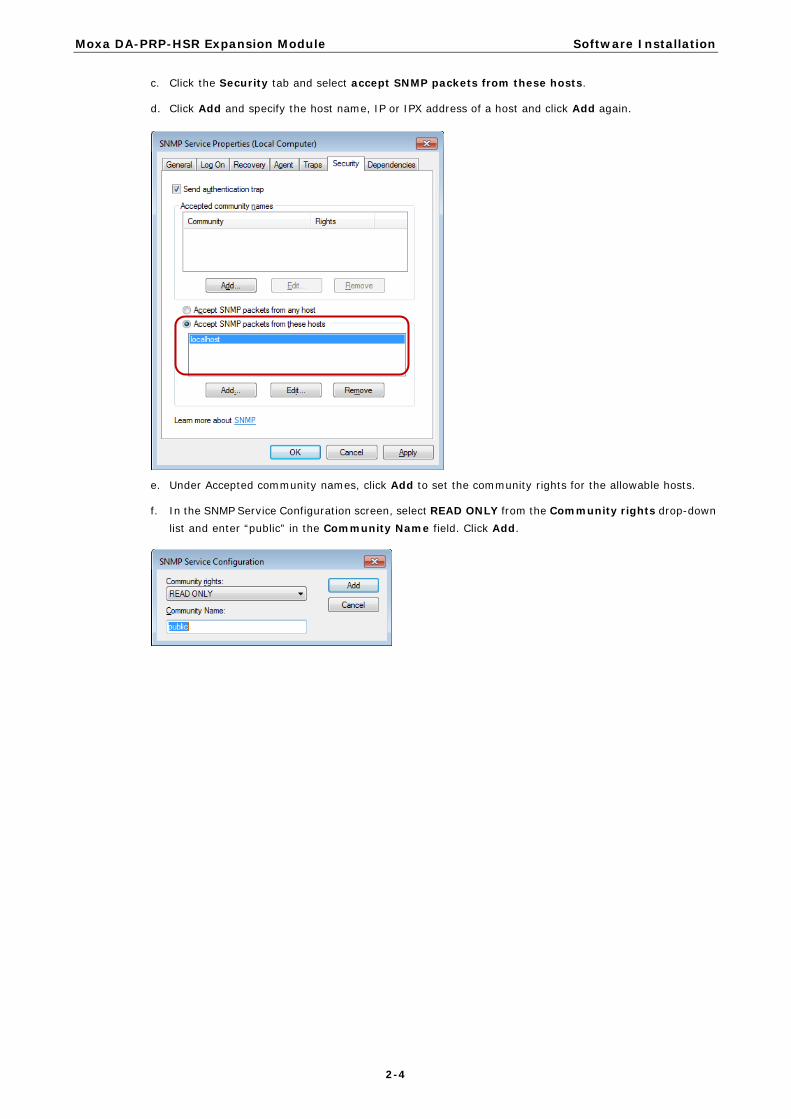
c. Click the Security tab and select accept SNMP packets from these hosts.
d. Click Add and specify the host name, IP or IPX address of a host and click Add again.
e. Under Accepted community names, click Add to set the community rights for the allowable hosts.
f. In the SNMP Service Configuration screen, select READ ONLY from the Community rights drop-down list and enter “public” in the Community Name field. Click Add.
Moxa DA-PRP-HSR Expansion Module Software Installation
2-5
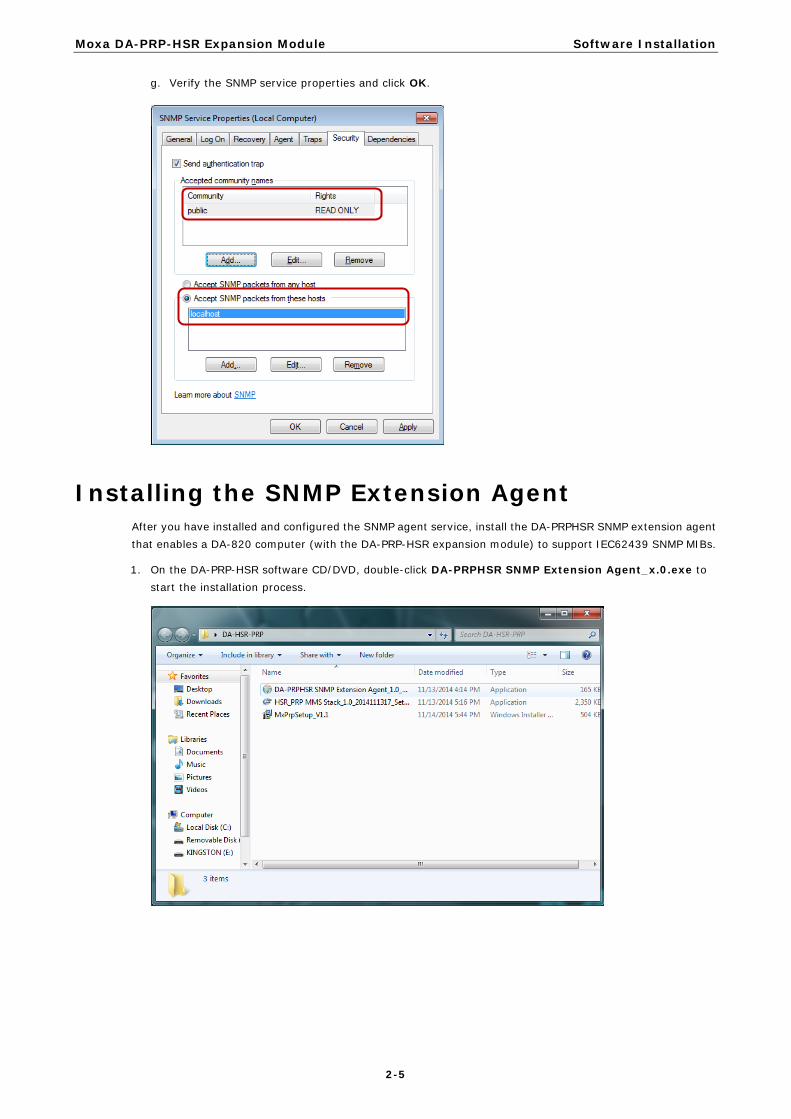
g. Verify the SNMP service properties and click OK.
Installing the SNMP Extension Agent After you have installed and configured the SNMP agent service, install the DA-PRPHSR SNMP extension agent that enables a DA-820 computer (with the DA-PRP-HSR expansion module) to support IEC62439 SNMP MIBs.
1. On the DA-PRP-HSR software CD/DVD, double-click DA-PRPHSR SNMP Extension Agent_x.0.exe to start the installation process.

Moxa DA-PRP-HSR Expansion Module Software Installation
2-6
2. A Welcome screen appears. Click Next.
3. Accept the default destination folder or click Browse to select one. Click Install.
4. Click Finish to complete the installation process.
Moxa DA-PRP-HSR Expansion Module Software Installation
2-7
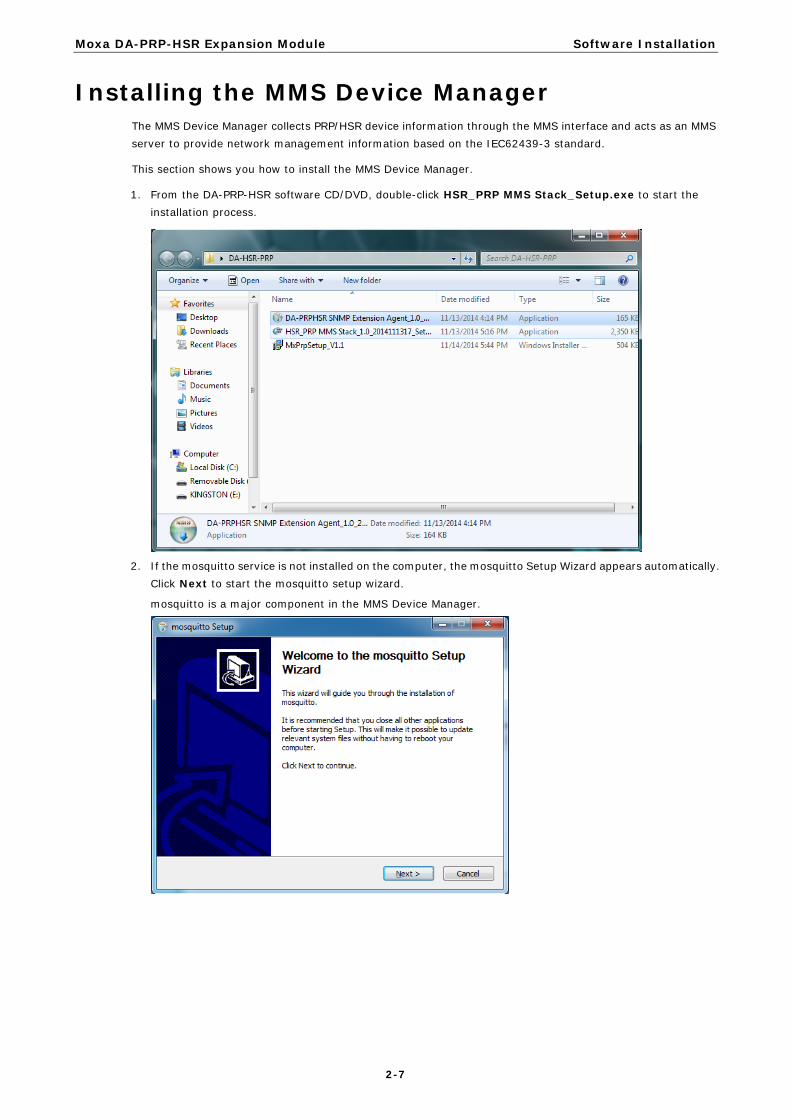
Installing the MMS Device Manager The MMS Device Manager collects PRP/HSR device information through the MMS interface and acts as an MMS server to provide network management information based on the IEC62439-3 standard.
This section shows you how to install the MMS Device Manager.
1. From the DA-PRP-HSR software CD/DVD, double-click HSR_PRP MMS Stack_Setup.exe to start the installation process.
2. If the mosquitto service is not installed on the computer, the mosquitto Setup Wizard appears automatically. Click Next to start the mosquitto setup wizard.
mosquitto is a major component in the MMS Device Manager.

Moxa DA-PRP-HSR Expansion Module Software Installation
2-8
a. Select Service and click Next.
b. Accept the default destination folder or click Browse to select one. Click Install.
c. Click Finish to complete the mosquitto Setup Wizard.
Moxa DA-PRP-HSR Expansion Module Software Installation
2-9
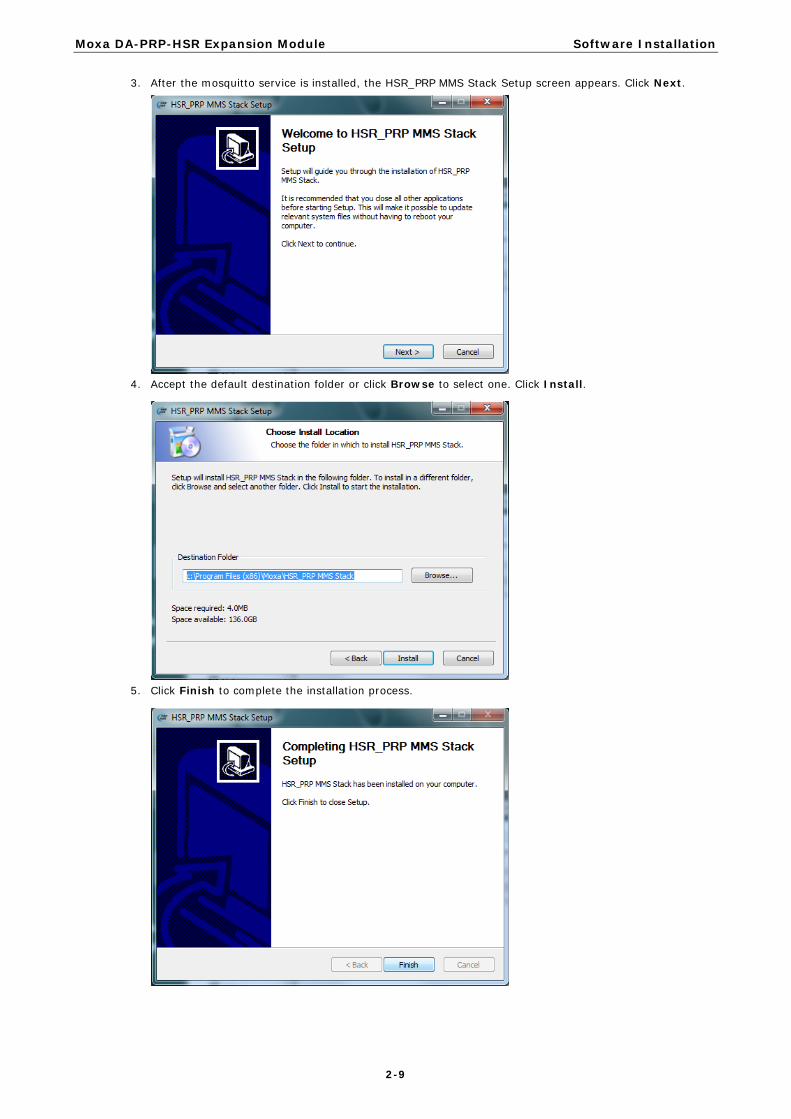
3. After the mosquitto service is installed, the HSR_PRP MMS Stack Setup screen appears. Click Next.
4. Accept the default destination folder or click Browse to select one. Click Install.
5. Click Finish to complete the installation process.
3 3. Using the MMS Device Manager
This chapter describes how to use the MMS Device Manager to manage PRP/HSR devices.
The following topics are covered in this chapter:
Starting the MMS Device Manager
Adding a PRP/HSR Device
Adding a Local PRP/HSR Device
Adding a Remote PRP/HSR Device
Configuring SNMP V2c Community
Configuring the Management View
Log Settings
Configuring Polling Interval
Exporting an ICD File
Upgrading Software
Moxa DA-PRP-HSR Expansion Module Using the MMS Management Middleware
3-2
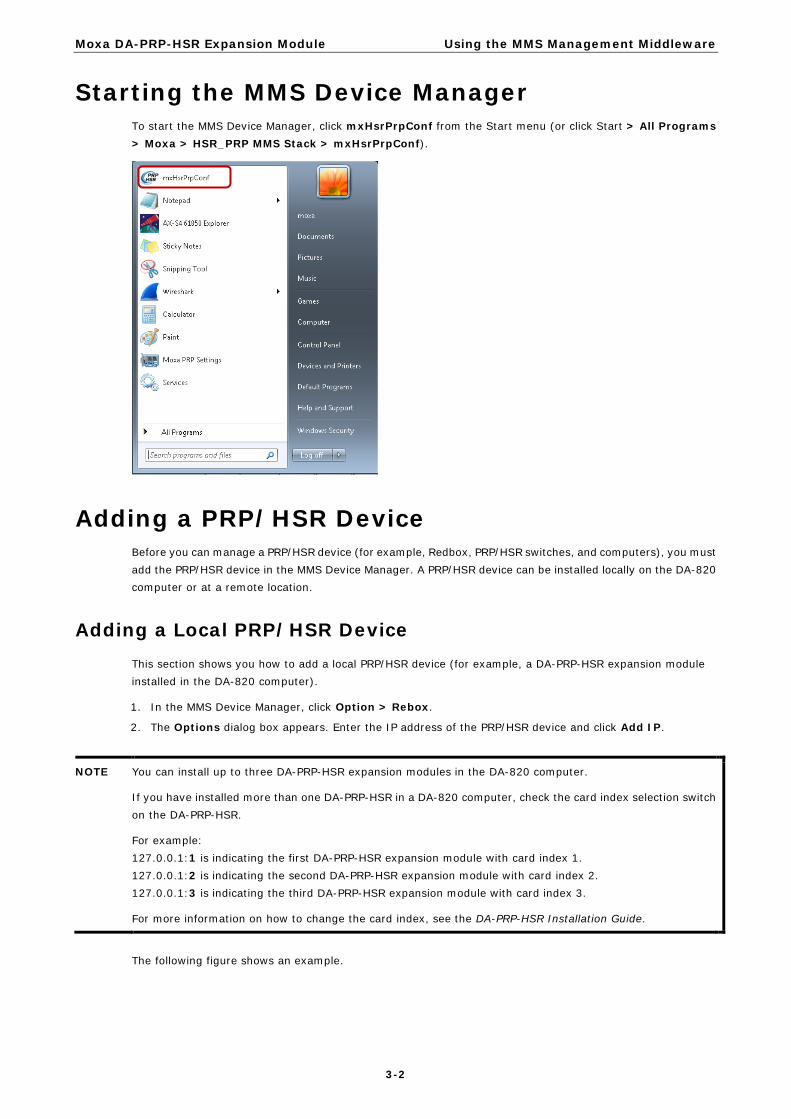
Starting the MMS Device Manager To start the MMS Device Manager, click mxHsrPrpConf from the Start menu (or click Start > All Programs > Moxa > HSR_PRP MMS Stack > mxHsrPrpConf).
Adding a PRP/HSR Device Before you can manage a PRP/HSR device (for example, Redbox, PRP/HSR switches, and computers), you must add the PRP/HSR device in the MMS Device Manager. A PRP/HSR device can be installed locally on the DA-820 computer or at a remote location.
Adding a Local PRP/HSR Device This section shows you how to add a local PRP/HSR device (for example, a DA-PRP-HSR expansion module installed in the DA-820 computer).
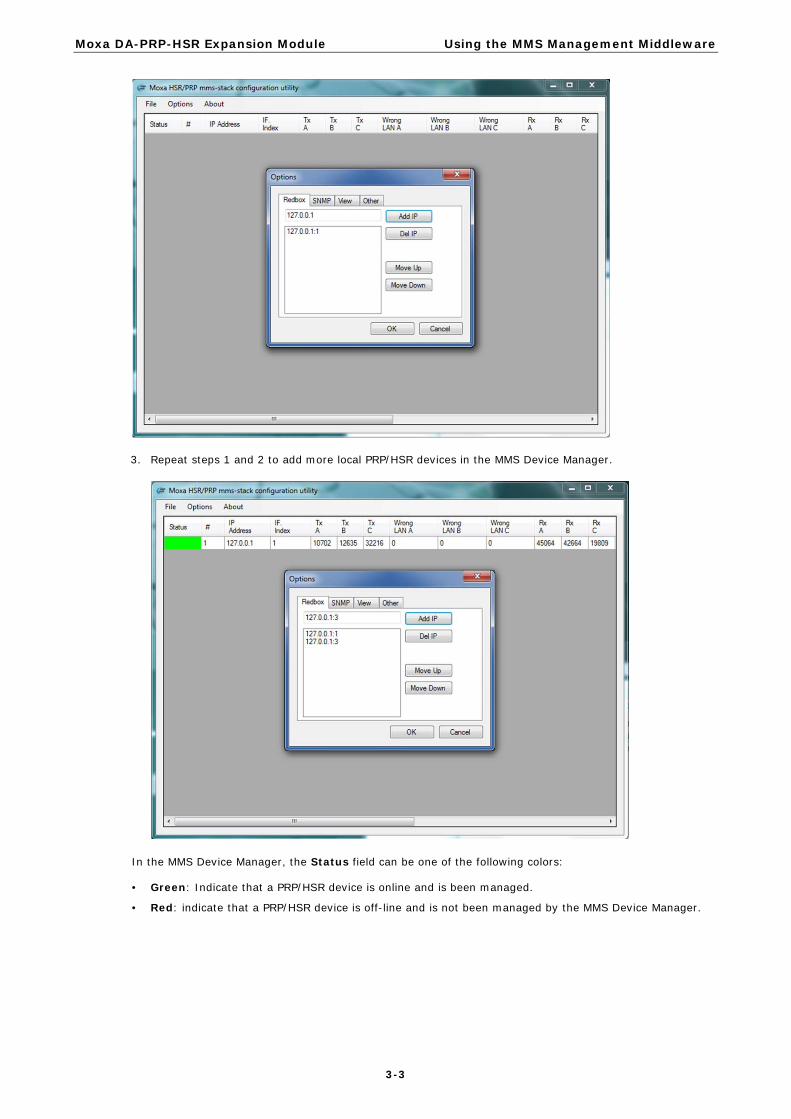
1. In the MMS Device Manager, click Option > Rebox.
2. The Options dialog box appears. Enter the IP address of the PRP/HSR device and click Add IP.
NOTE You can install up to three DA-PRP-HSR expansion modules in the DA-820 computer.
If you have installed more than one DA-PRP-HSR in a DA-820 computer, check the card index selection switch on the DA-PRP-HSR.
For example: 127.0.0.1:1 is indicating the first DA-PRP-HSR expansion module with card index 1. 127.0.0.1:2 is indicating the second DA-PRP-HSR expansion module with card index 2. 127.0.0.1:3 is indicating the third DA-PRP-HSR expansion module with card index 3.
For more information on how to change the card index, see the DA-PRP-HSR Installation Guide.
The following figure shows an example.
Moxa DA-PRP-HSR Expansion Module Using the MMS Management Middleware
3-3
3. Repeat steps 1 and 2 to add more local PRP/HSR devices in the MMS Device Manager.
In the MMS Device Manager, the Status field can be one of the following colors:
• Green: Indicate that a PRP/HSR device is online and is been managed.
• Red: indicate that a PRP/HSR device is off-line and is not been managed by the MMS Device Manager.
Moxa DA-PRP-HSR Expansion Module Using the MMS Management Middleware
3-4
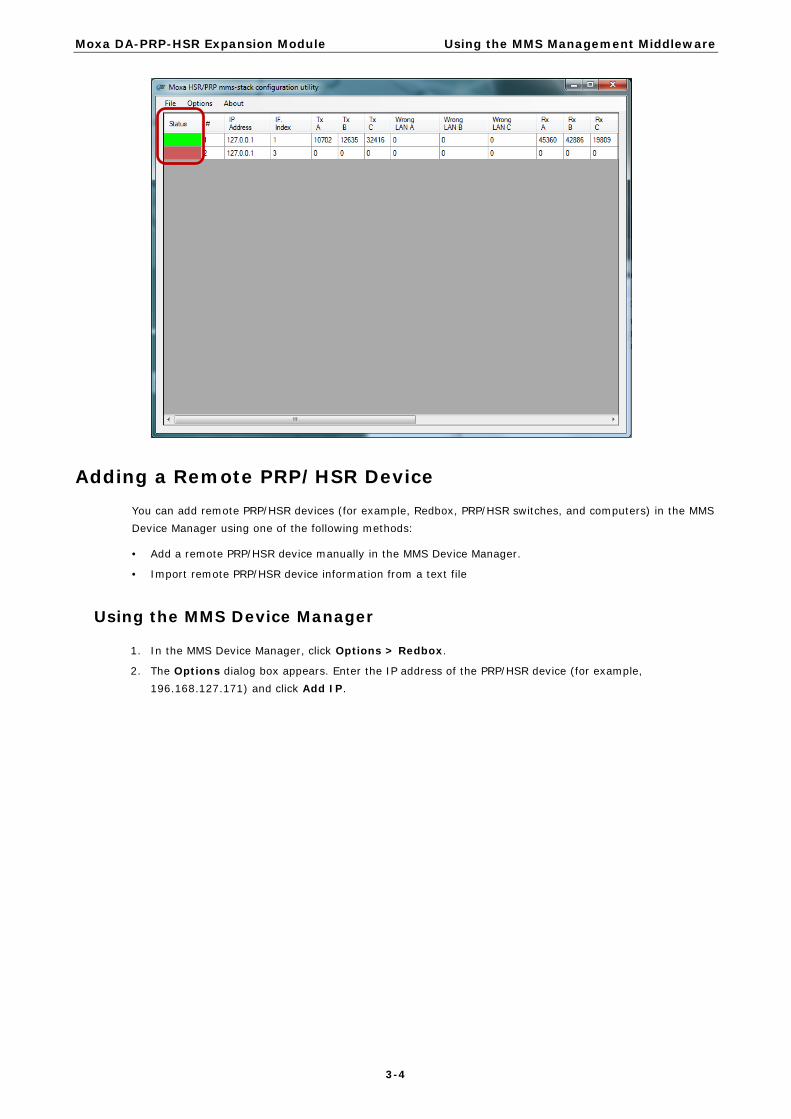
Adding a Remote PRP/HSR Device You can add remote PRP/HSR devices (for example, Redbox, PRP/HSR switches, and computers) in the MMS Device Manager using one of the following methods:
• Add a remote PRP/HSR device manually in the MMS Device Manager.
• Import remote PRP/HSR device information from a text file
Using the MMS Device Manager
1. In the MMS Device Manager, click Options > Redbox.
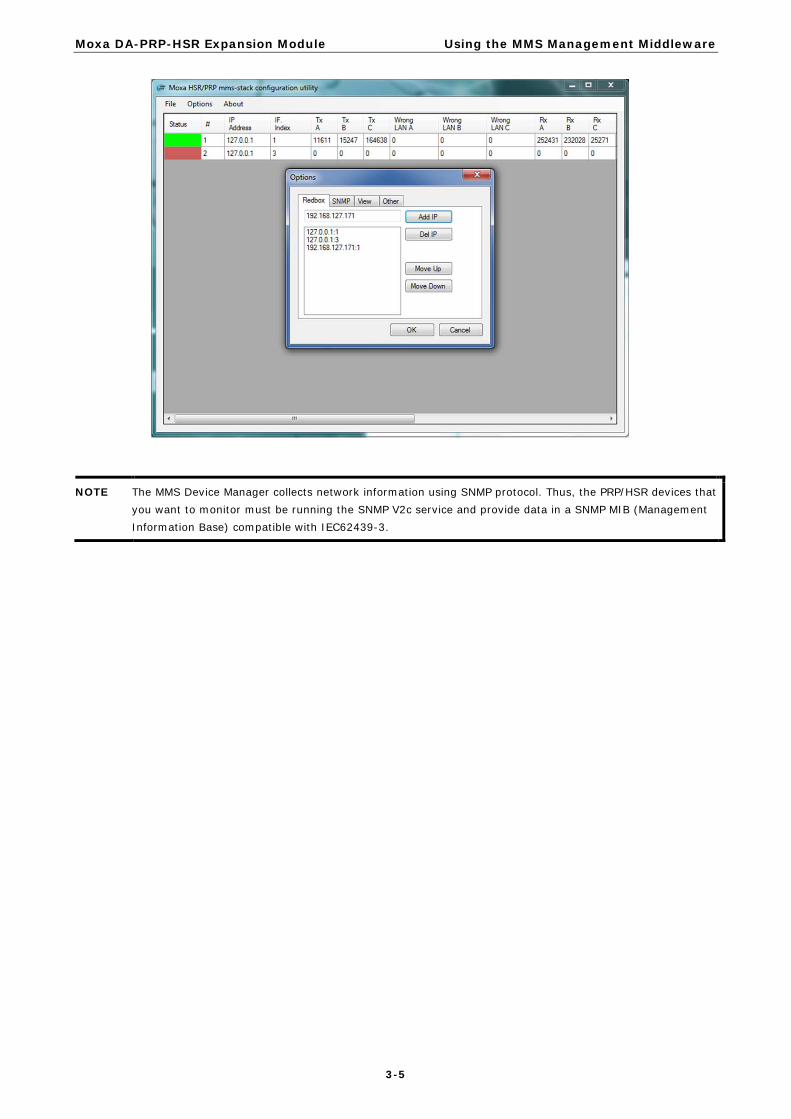
2. The Options dialog box appears. Enter the IP address of the PRP/HSR device (for example, 196.168.127.171) and click Add IP.
Moxa DA-PRP-HSR Expansion Module Using the MMS Management Middleware
3-5
NOTE The MMS Device Manager collects network information using SNMP protocol. Thus, the PRP/HSR devices that you want to monitor must be running the SNMP V2c service and provide data in a SNMP MIB (Management Information Base) compatible with IEC62439-3.
Moxa DA-PRP-HSR Expansion Module Using the MMS Management Middleware
3-6
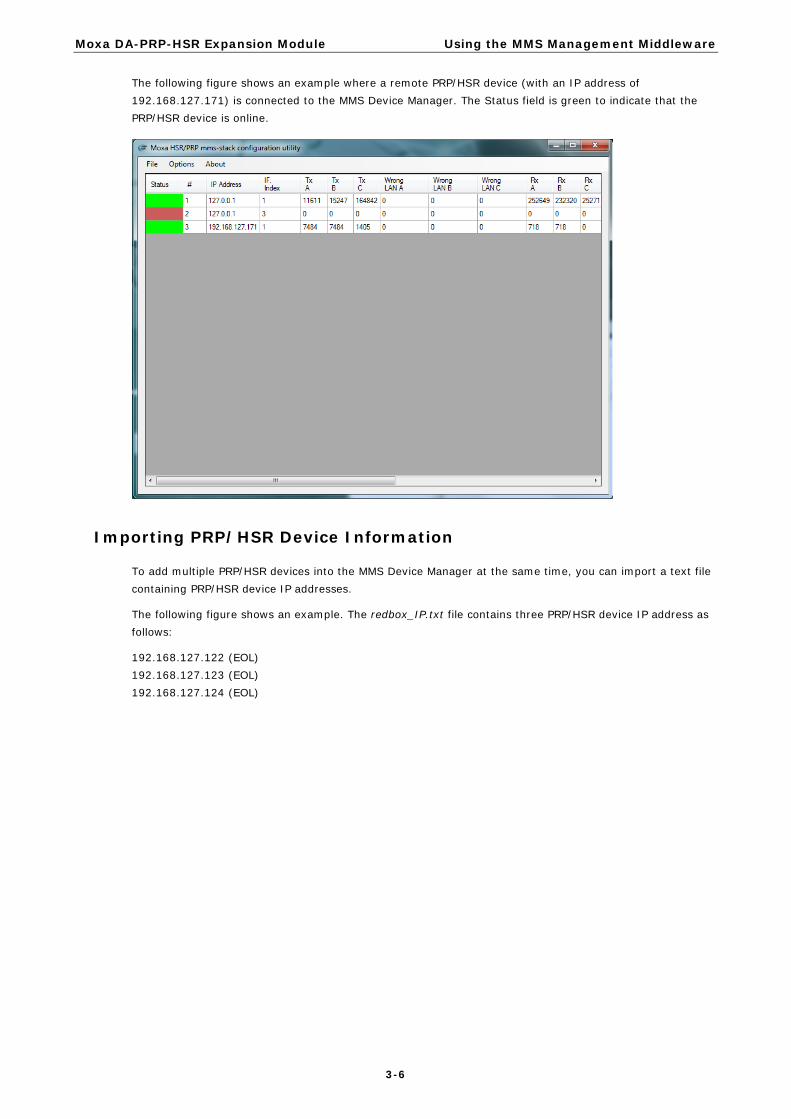
The following figure shows an example where a remote PRP/HSR device (with an IP address of 192.168.127.171) is connected to the MMS Device Manager. The Status field is green to indicate that the PRP/HSR device is online.
Importing PRP/HSR Device Information
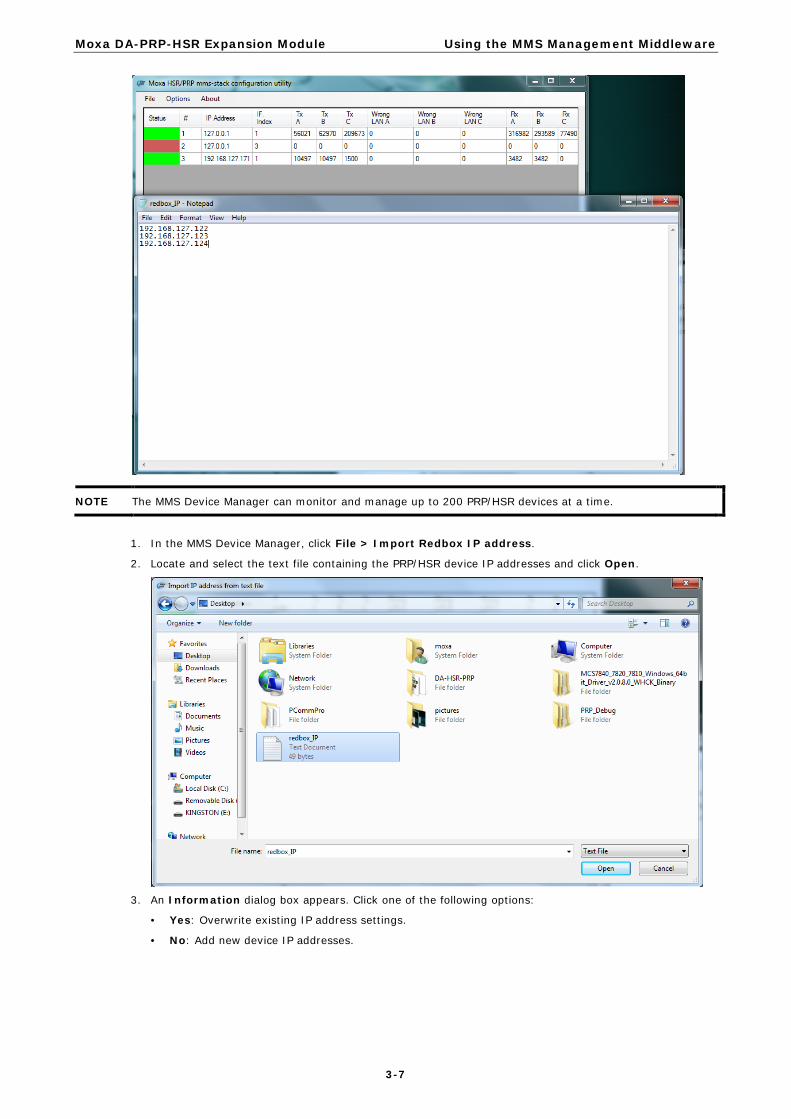
To add multiple PRP/HSR devices into the MMS Device Manager at the same time, you can import a text file containing PRP/HSR device IP addresses.
The following figure shows an example. The redbox_IP.txt file contains three PRP/HSR device IP address as follows: 192.168.127.122 (EOL) 192.168.127.123 (EOL) 192.168.127.124 (EOL)
Moxa DA-PRP-HSR Expansion Module Using the MMS Management Middleware
3-7
NOTE The MMS Device Manager can monitor and manage up to 200 PRP/HSR devices at a time.
1. In the MMS Device Manager, click File > Import Redbox IP address.
2. Locate and select the text file containing the PRP/HSR device IP addresses and click Open.
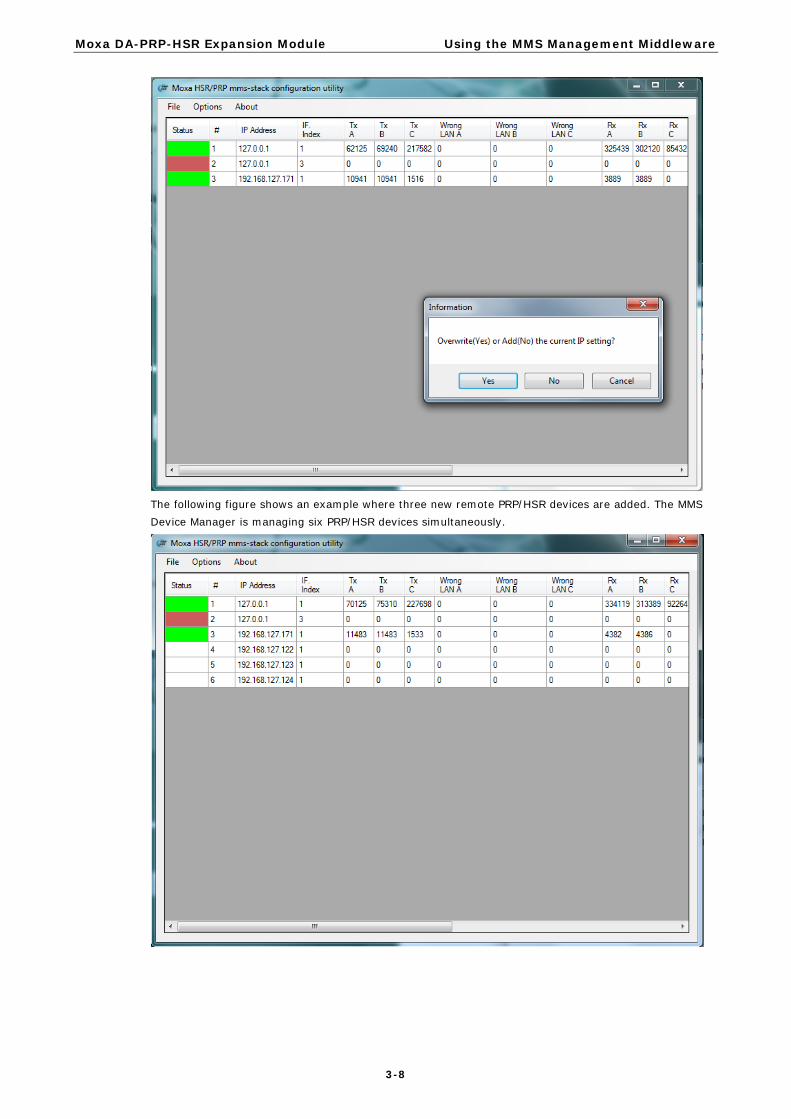
3. An Information dialog box appears. Click one of the following options:
• Yes: Overwrite existing IP address settings.
• No: Add new device IP addresses.
Moxa DA-PRP-HSR Expansion Module Using the MMS Management Middleware
3-8
The following figure shows an example where three new remote PRP/HSR devices are added. The MMS Device Manager is managing six PRP/HSR devices simultaneously.
Moxa DA-PRP-HSR Expansion Module Using the MMS Management Middleware
3-9
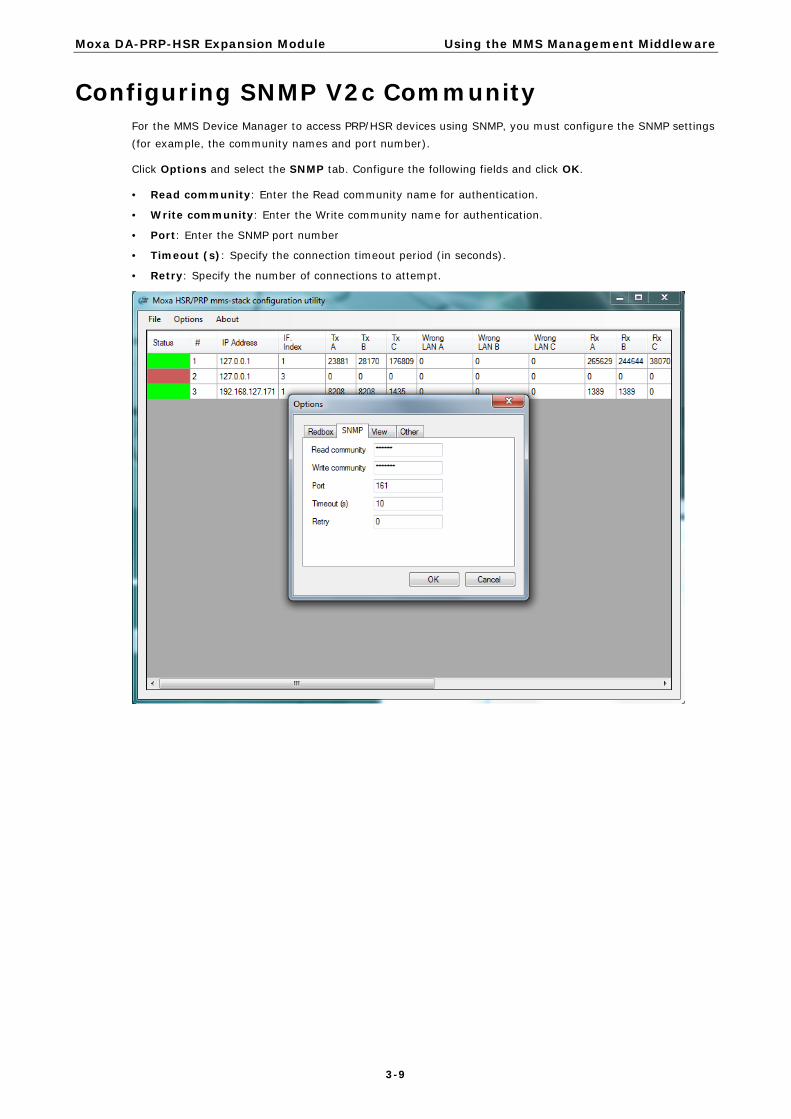
Configuring SNMP V2c Community For the MMS Device Manager to access PRP/HSR devices using SNMP, you must configure the SNMP settings (for example, the community names and port number).
Click Options and select the SNMP tab. Configure the following fields and click OK.
• Read community: Enter the Read community name for authentication.
• Write community: Enter the Write community name for authentication.
• Port: Enter the SNMP port number
• Timeout (s): Specify the connection timeout period (in seconds).
• Retry: Specify the number of connections to attempt.
Moxa DA-PRP-HSR Expansion Module Using the MMS Management Middleware
3-10
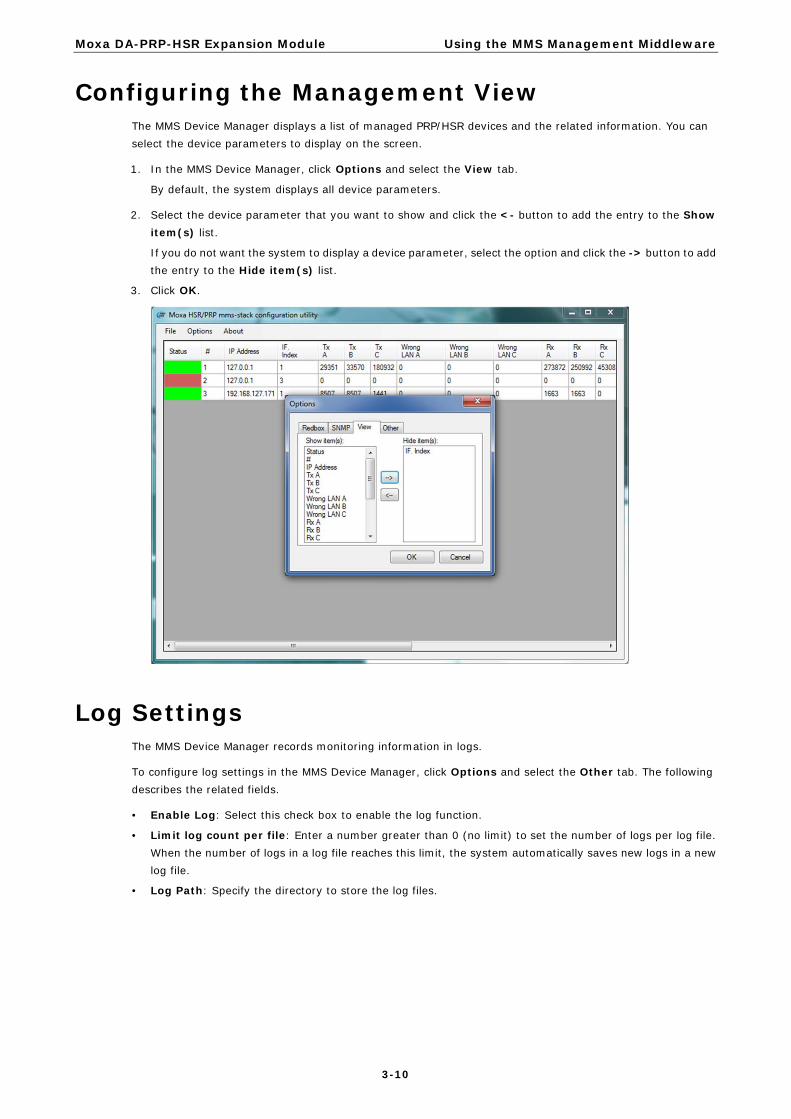
Configuring the Management View The MMS Device Manager displays a list of managed PRP/HSR devices and the related information. You can select the device parameters to display on the screen.
1. In the MMS Device Manager, click Options and select the View tab.
By default, the system displays all device parameters.
2. Select the device parameter that you want to show and click the <- button to add the entry to the Show item(s) list.
If you do not want the system to display a device parameter, select the option and click the -> button to add the entry to the Hide item(s) list.
3. Click OK.
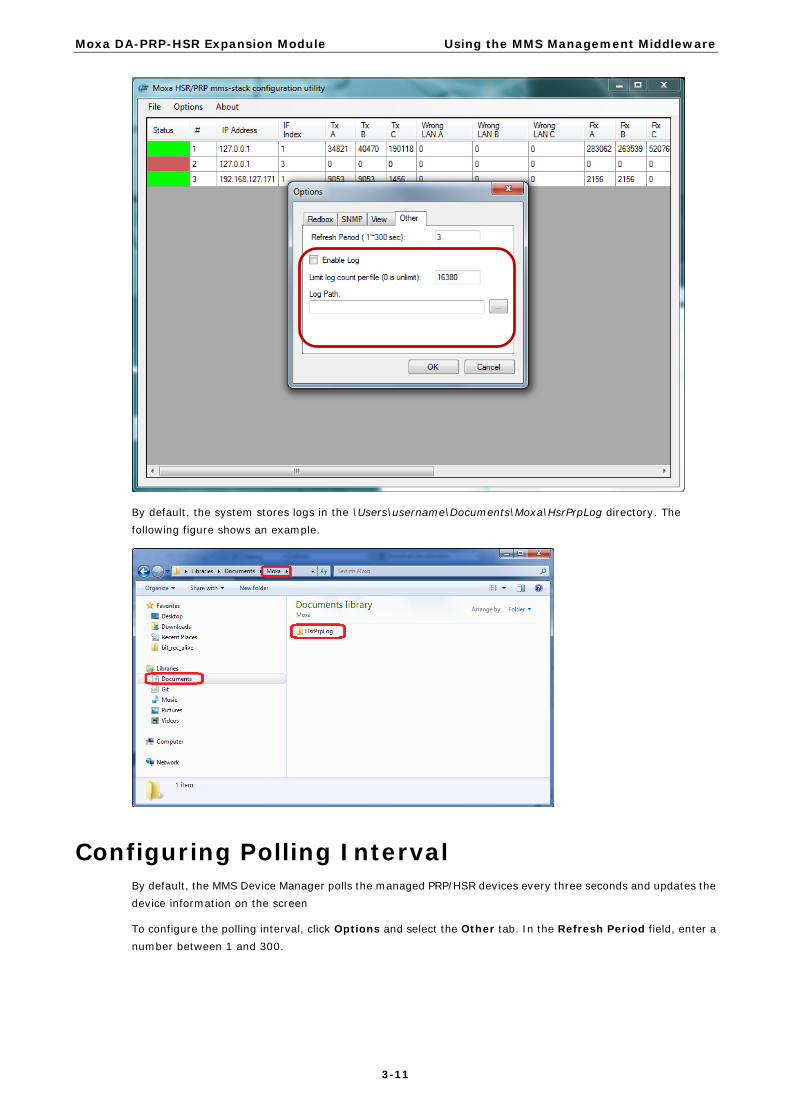
Log Settings The MMS Device Manager records monitoring information in logs.
To configure log settings in the MMS Device Manager, click Options and select the Other tab. The following describes the related fields.
• Enable Log: Select this check box to enable the log function.
• Limit log count per file: Enter a number greater than 0 (no limit) to set the number of logs per log file. When the number of logs in a log file reaches this limit, the system automatically saves new logs in a new log file.
• Log Path: Specify the directory to store the log files.
Moxa DA-PRP-HSR Expansion Module Using the MMS Management Middleware
3-11
By default, the system stores logs in the \Users\username\Documents\Moxa\HsrPrpLog directory. The following figure shows an example.
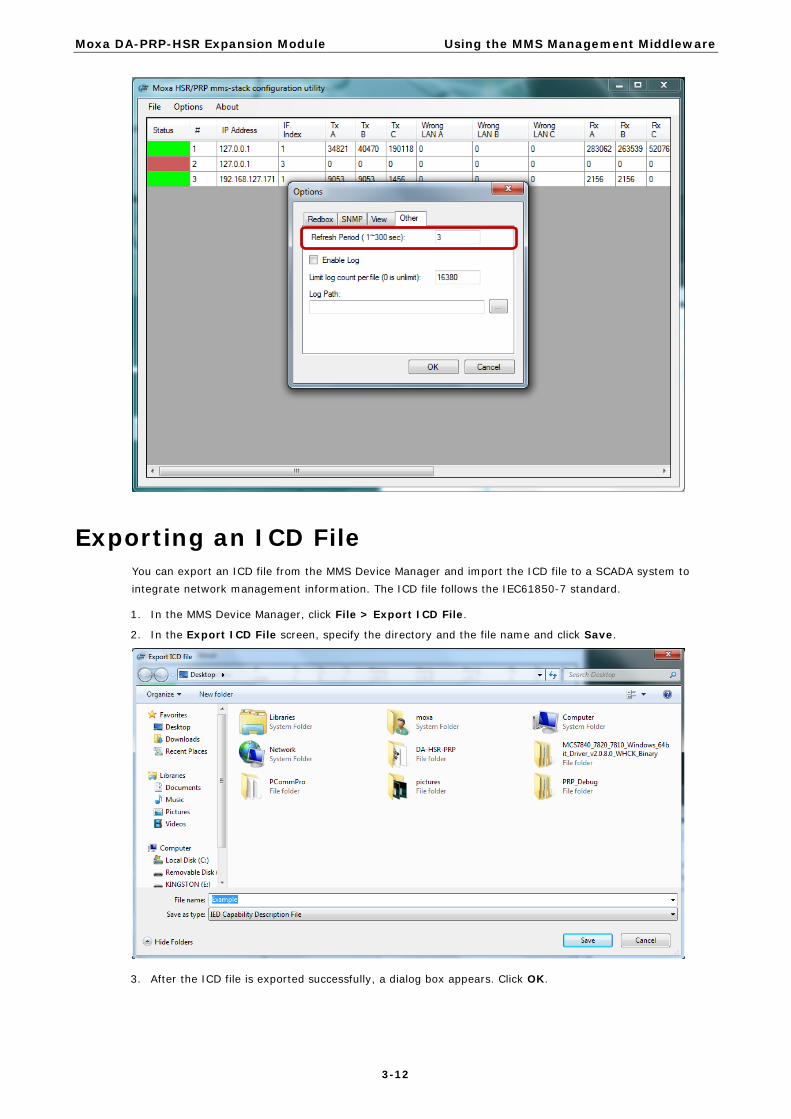
Configuring Polling Interval By default, the MMS Device Manager polls the managed PRP/HSR devices every three seconds and updates the device information on the screen
To configure the polling interval, click Options and select the Other tab. In the Refresh Period field, enter a number between 1 and 300.
Moxa DA-PRP-HSR Expansion Module Using the MMS Management Middleware
3-12
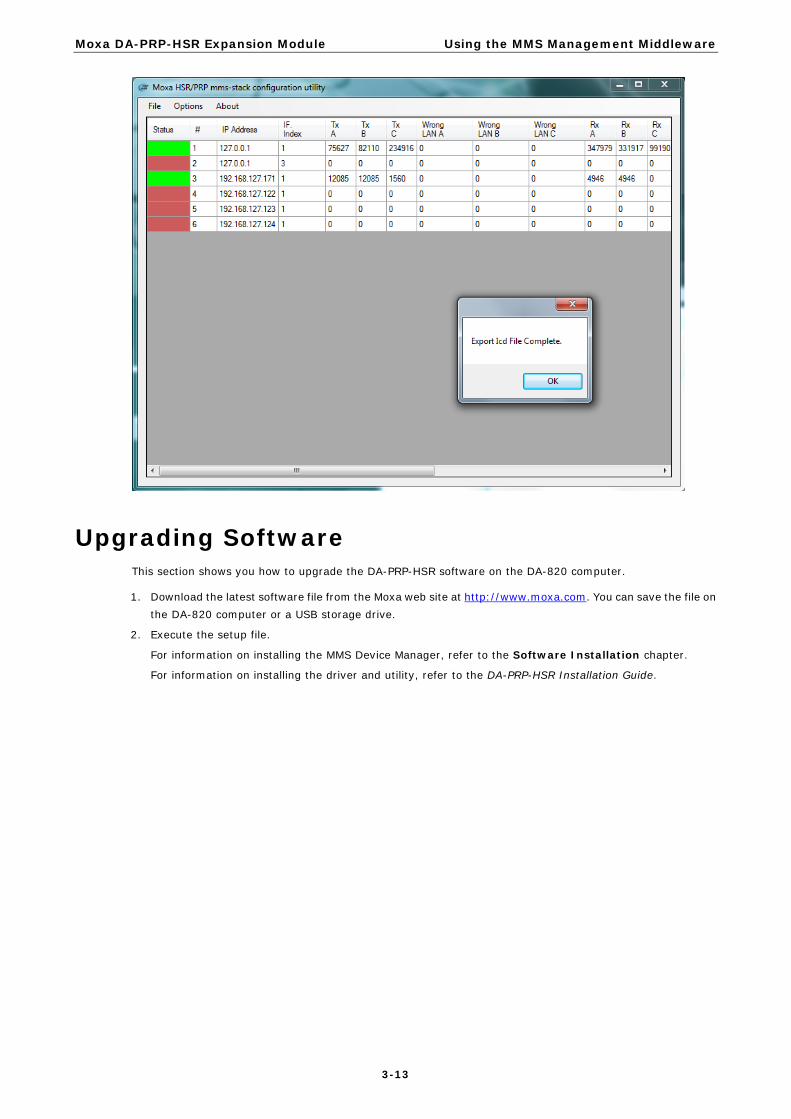
Exporting an ICD File You can export an ICD file from the MMS Device Manager and import the ICD file to a SCADA system to integrate network management information. The ICD file follows the IEC61850-7 standard.
1. In the MMS Device Manager, click File > Export ICD File.
2. In the Export ICD File screen, specify the directory and the file name and click Save.
3. After the ICD file is exported successfully, a dialog box appears. Click OK.
Moxa DA-PRP-HSR Expansion Module Using the MMS Management Middleware
3-13
Upgrading Software This section shows you how to upgrade the DA-PRP-HSR software on the DA-820 computer.
1. Download the latest software file from the Moxa web site at http://www.moxa.com. You can save the file on the DA-820 computer or a USB storage drive.
2. Execute the setup file.
For information on installing the MMS Device Manager, refer to the Software Installation chapter.
For information on installing the driver and utility, refer to the DA-PRP-HSR Installation Guide.