Embed Size (px)
Citation preview
The Timetabler
Daily Organiser & General Access V7TE
Timetabling Solutions Pty Ltd Published: 18/03/2008


The information contained in this document represents the current view of Timetabling Solutions Pty Ltd on the issues discussed as of the date of publication. Because Timetabling Solutions must respond to changing market conditions, it should not be interpreted to be a commitment on the part of Timetabling Solutions, and Timetabling Solutions cannot guarantee the accuracy of any information presented after the date of publication. This White Paper is for informational purposes only. TIMETABLING SOLUTIONS MAKES NO WARRANTIES, EXPRESS, IMPLIED OR STATUTORY, AS TO THE INFORMATION IN THIS DOCUMENT. Complying with all applicable copyright laws is the responsibility of the user. Without limiting the rights under copyright, no part of this document may be reproduced, stored in or introduced into a retrieval system, or transmitted in any form or by any means (electronic, mechanical, photocopying, recording, or otherwise), or for any purpose, without the express written permission of Timetabling Solutions Pty Ltd. Timetabling Solutions may have patents, patent applications, trademarks, copyrights, or other intellectual property rights covering subject matter in this document. Except as expressly provided in any written license agreement from Timetabling Solutions, the furnishing of this document does not give you any license to these patents, trademarks, copyrights, or other intellectual property. © 2008 Timetabling Solutions Pty Ltd. All rights reserved. The names of actual companies and products mentioned herein may be the trademarks of their respective owners.

TABLE OF CONTENTS DAILY ORGANISER Introduction – Overview and Data Set up Overview of The Timetabler Modules Subject Concepts What is a Roll Class? Program Location File Structure Where to Store Your Data When Only One Person Uses The Timetabler When More Than One Person Uses The Timetabler Configure The Timetabler Opening Files for The Timetabler Backup Files Coordination of Data between Programs 1. Setting Up the Daily Organiser What is the Daily Organiser used for? Replacement Types Create a New Daily Organiser File Display Settings Set Day and Date Enter Parameters Cycle Length Unsupervised Classes Enter Teacher Absence Reasons Enter Lesson Cancellation Reasons 2. Teacher Details Teacher Details Cycle Limit and Overall Limit Part Time Teachers Under Allotted Teachers Ineligible Teachers Enter Emergency Teachers Enter Relief Teachers Teacher Load Adjustments 3. Absences and Cancellations Enter Teacher Absences Different Absence Reasons on the Same Day Find Teacher Enter Lesson Cancellations Room Changes Cancel Yard Duty 4. Calendar Activities Calendar Activities with Teachers for Whole Activity Calendar Activities with Teachers for Part of Activity Date Reminders

5. Assign Replacements Replacements Gauge Teacher Requirements Enter Emergency Teacher Availability Assign Replacements Sort Replacement Classes
Teachers in Priority Order Teachers in Uncounted Order Counted Replacements
Last 10 Days Replacement Notes 6. Reports Check Teacher Changes Messages Bulletin 7. Teacher Totals Teacher Totals Reports from One File
Totals for One Teacher Absences for Selected Teachers Replacements for Selected Teachers Absences for Selected Reasons Activities for Selected Reasons
Reports from More Than One File 8. Student Activities Calendar Activities Activities Involving a Roll Class Assign Students to Activity Allocate Remaining Students to Other Classes View Student Lesson Changes Student Timetable Activities Involving an Elective Class View Student Lesson Changes Lesson Cancellations Student Totals 9. Setting up for Next Term, Semester or Year Creating a New File Link to the Timetable Import Parameters Reopen Daily Organiser File
Cont…

TABLE OF CONTENTS (CONT) GENERAL ACCESS 1. Setting Up General Access Install Configure General Access Open Configure General Access
Set Program Location Set Data Location Change Display Settings Change Printer Settings Change Photo Settings Copy Program File and Create Desktop Shortcut
Save General Access Files from Timetable Development Save General Access Files from Daily Organiser Accessing General Access from all Computers on your Network 2. Using General Access Open General Access View Teacher Timetable for Cycle Create Excel Lesson List with Photos Change Display Settings for Timetables View Teacher Timetable for Today Create List of Students View All Teacher Replacements for Today

The Timetabler
Overview Overview and Data File Set Up
Overview of The Timetabler Modules Subject Concepts What is a Roll Class? Program Location File Structure Where to Store Your Data When Only One Person Uses The Timetabler
When More Than One Person Uses The Timetabler Configure The Timetabler Opening Files for The Timetabler Backup Files Coordination of Data between Programs
TIMETABLING SOLUTIONS
THE TIMETABLER Overview, Page 8 of 194 VERSION 7TE
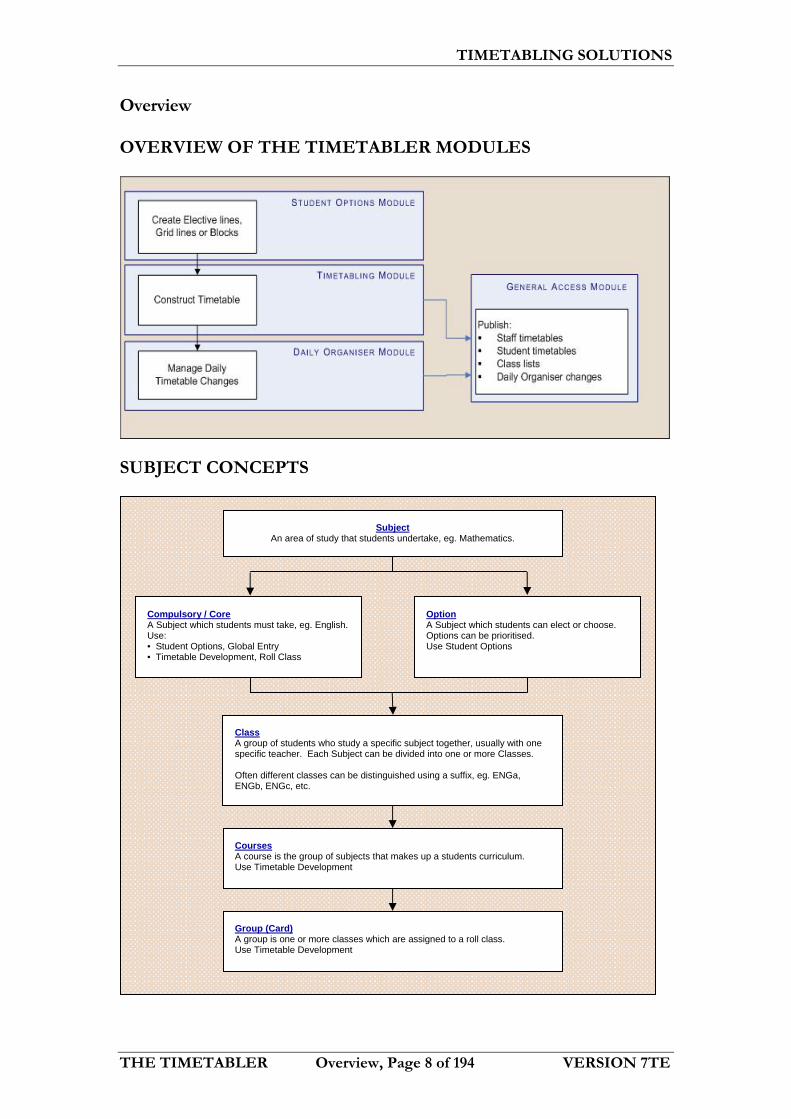
Overview OVERVIEW OF THE TIMETABLER MODULES
SUBJECT CONCEPTS
Group (Card) A group is one or more classes which are assigned to a roll class. Use Timetable Development
Subject An area of study that students undertake, eg. Mathematics.
Compulsory / Core A Subject which students must take, eg. English. Use: • Student Options, Global Entry • Timetable Development, Roll Class
Option A Subject which students can elect or choose. Options can be prioritised. Use Student Options
Courses A course is the group of subjects that makes up a students curriculum. Use Timetable Development
Class A group of students who study a specific subject together, usually with one specific teacher. Each Subject can be divided into one or more Classes. Often different classes can be distinguished using a suffix, eg. ENGa, ENGb, ENGc, etc.

TIMETABLING SOLUTIONS
THE TIMETABLER Overview, Page 9 of 194 VERSION 7TE
WHAT IS A ROLL CLASS? A Roll Class is a concept used within The Timetabler which helps maximise the flexibility within your curriculum structure. A Roll Class is a particular group of students who are together for more than one class. Often at higher year levels the Roll Class is the same as the year level. For example, Year 12 is the same as Roll Class 12. However, at lower year levels this is often not the case. A Roll Class is sometimes referred to as a FORM or a CORE GROUP. The Curriculum Continuum can be used to illustrate this.
Curriculum Continuum
Fully Half Banding Home group/ R-C
Blocking Blocked TT within a TT
R-C R-C R-C 7 7.1 Comp Grap
COM Math1 Eng1 Sci1 7A Eng Sci Wood Art ART Math2 Eng2 Sci2 7B Eng Sci Mus Lote PE Math3 Eng3 Sci3 7C Eng Sci Metal Heco HECO Math4 7.2 Sci4 Eng4 7D Eng Sci PE Mus MAT Math5 Sci5 Eng5 7E Eng Sci Art PE Math6 Student SO & Timetable Timetable Options TT Development Development

TIMETABLING SOLUTIONS
THE TIMETABLER Overview, Page 10 of 194 VERSION 7TE
PROGRAM LOCATION The Timetabler software needs to be installed on computers used by the individuals responsible for managing student programs, constructing the timetable and daily organising. The General Access Module is installed separately from The Timetabler software. Configure General Access needs to be installed on ONLY ONE computer. We recommend that it is installed on the computer used by either the Timetabler or the Daily Organiser. While configuring General Access a read only version of the program is copied to the network. Staff and students open this program through a shortcut which enables them to read the timetable and latest bulletins. FILE STRUCTURE The Timetabler uses separate files to store information. There is one file type for each module. The following table describes the files used for each module. Module File Type Examples Student Options *.sof Usually one file for each year level, or for each group
of students who have the same Option choices e.g. Students Yr11.sof
Timetable Development *.tdf One file for each version of your Timetable e.g. Timetable Semester 1.tdf
Daily Organiser *.dof One file for the year e.g. Daily Organiser 2007.dof or a file for the semester or term e.g. Daily Organiser Semester 1.dof
WHERE TO STORE YOUR DATA We recommend that your Student Options Files(*.sof), Timetable Development Files(*.tdf ) and Daily Organiser Files(*.dof) are all stored in the Timetable Project Folder. Backups should be stored in a separate Backup Folder. The location of the Timetable Project Folder and Backup Folder will depend on the number of users.
TIMETABLING SOLUTIONS
THE TIMETABLER Overview, Page 11 of 194 VERSION 7TE
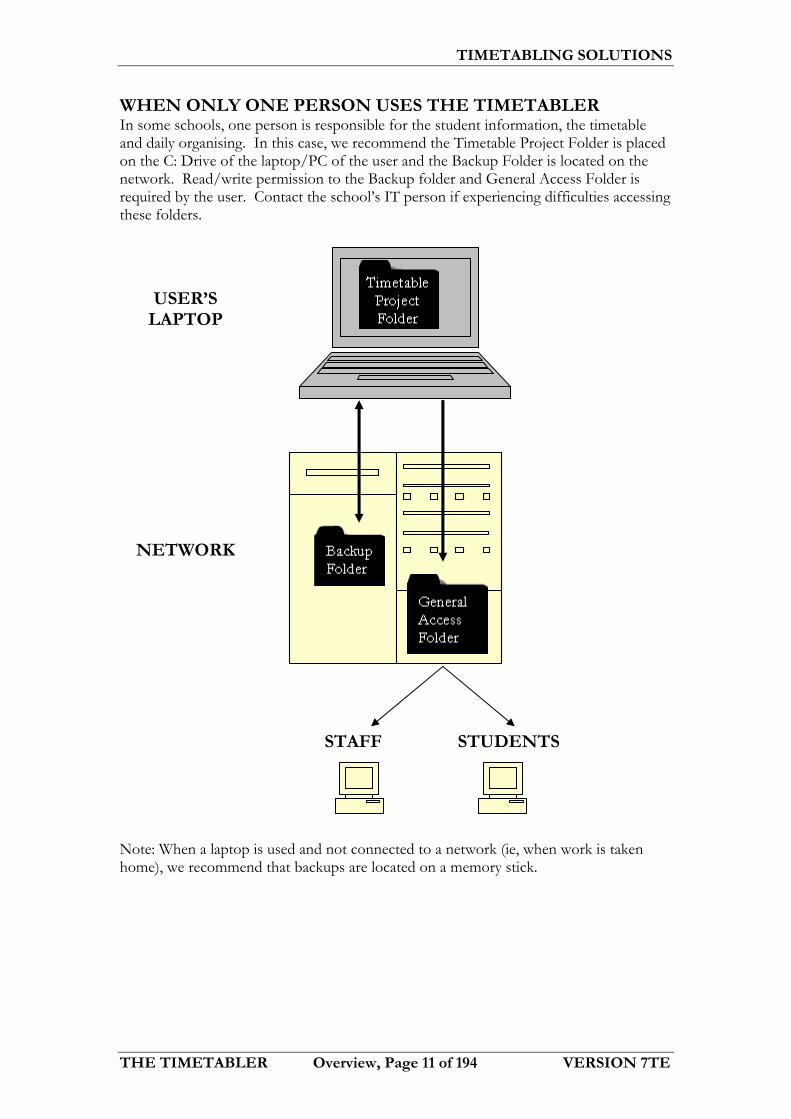
WHEN ONLY ONE PERSON USES THE TIMETABLER In some schools, one person is responsible for the student information, the timetable and daily organising. In this case, we recommend the Timetable Project Folder is placed on the C: Drive of the laptop/PC of the user and the Backup Folder is located on the network. Read/write permission to the Backup folder and General Access Folder is required by the user. Contact the school’s IT person if experiencing difficulties accessing these folders. Note: When a laptop is used and not connected to a network (ie, when work is taken home), we recommend that backups are located on a memory stick.
NETWORK
USER’S LAPTOP
STUDENTS STAFF

TIMETABLING SOLUTIONS
THE TIMETABLER Overview, Page 12 of 194 VERSION 7TE
WHEN MORE THAN ONE PERSON USES THE TIMETABLER In other schools, the role may be divided among several people where one person may be responsible for student programs, one for constructing the timetable and another for daily organising. In this case, to give all users access to the files the Timetabler software needs to be installed on all three computers and the Timetable Project Folder placed on the network. Backup Folders should be located on the individuals’ laptops/PCs. Read/write permission to the Timetable Project Folder is required by all users. Additionally, both the Timetabler and Daily Organiser need permission to write to the General Access Folder. Contact the school’s IT person if experiencing difficulties accessing these files. Note: In this example, each of the three users will have their own backups on their individual computers. Additionally, the Timetable Project Folder is backed up when the school backs up the network each night.
NETWORK
Student Program Coordinator’s Laptop
Timetabler’s Laptop
Daily Organiser’s Laptop
STAFF STUDENTS

TIMETABLING SOLUTIONS
THE TIMETABLER Overview, Page 13 of 194 VERSION 7TE
CONFIGURE THE TIMETABLER There are 2 ways to open The Timetabler Project Manager:
1. Double click on The Timetabler V7TE desktop icon. 2. On the Start menu, click All Programs, Timetabling Solutions, The Timetabler
Version 7TE and The Timetabler V7TE.
Select the display settings that suit your needs
Click Configure V7TE

TIMETABLING SOLUTIONS
THE TIMETABLER Overview, Page 14 of 194 VERSION 7TE
The Timetable Project Folder is the default location for all your Student Options, Timetable Development and Daily Organiser files. Note: You may wish to set the Backup Folder location to a network drive.
Click the Last Used Files tab
Records of the last used files are displayed.
Note: Open last used file on startup is selected by default.
Make sure Open Daily Organiser at today’s date is not selected. If
selected, the program will prompt you for the timetable day
every time the program is opened on a new day.
Click the File Locations tab
Click Browse and select the Timetable Project Folder
…My Documents\Timetable Training Data Overview and
click OK.
Click Browse and select the Folder…My Documents\ Timetable Training Data
Overview. Click Make New Folder, type Backup and click
OK.
Click Browse and select the Folder…My Documents\ Timetable Training Data
Overview. Click Make New Folder, type
Export and click OK. Click Apply to update the
changes.

TIMETABLING SOLUTIONS
THE TIMETABLER Overview, Page 15 of 194 VERSION 7TE
An Information message will be displayed to indicate the zip file has been created successfully. Zip files can be used for backing up data or to attach to an email.
Select the location to place the zip file. We recommend you select Desktop as the file will
be easy to find.
Click Desktop and click OK
Click OK
Click the Archive Data tab
Click Browse and select the file to archive. In this case, select …My Documents\Timetable Training Data Overview\
Students Yr7 Training Data.sof and click Open.
Click Create Zip File

TIMETABLING SOLUTIONS
THE TIMETABLER Overview, Page 16 of 194 VERSION 7TE
OPENING FILES FOR THE TIMETABLER There are 3 methods to open files for The Timetabler.
1. Double click the file 2. Open a module and load the data 3. Open a module and reload the data
Method 1. Double Click the File Locate the file using Windows Explorer and double click on the file name.
Click the Victorian Schools tab
The Victorian Schools configure screen is only
applicable to Victorian Schools wishing to export to VASS
and/or CASES21.
Click OK
Double click the My Computer icon located on
your desktop

TIMETABLING SOLUTIONS
THE TIMETABLER Overview, Page 17 of 194 VERSION 7TE
Click on the folder My Documents
Double click on the folder Timetable Training Data Overview
Double click on the relevant file. In this case, we are opening
a student file.

TIMETABLING SOLUTIONS
THE TIMETABLER Overview, Page 18 of 194 VERSION 7TE
Method 2. Open a Module and Load the Data On the Start menu, click All Programs, Timetabling Solutions, The Timetabler Version 7TE and The Timetabler V7TE.
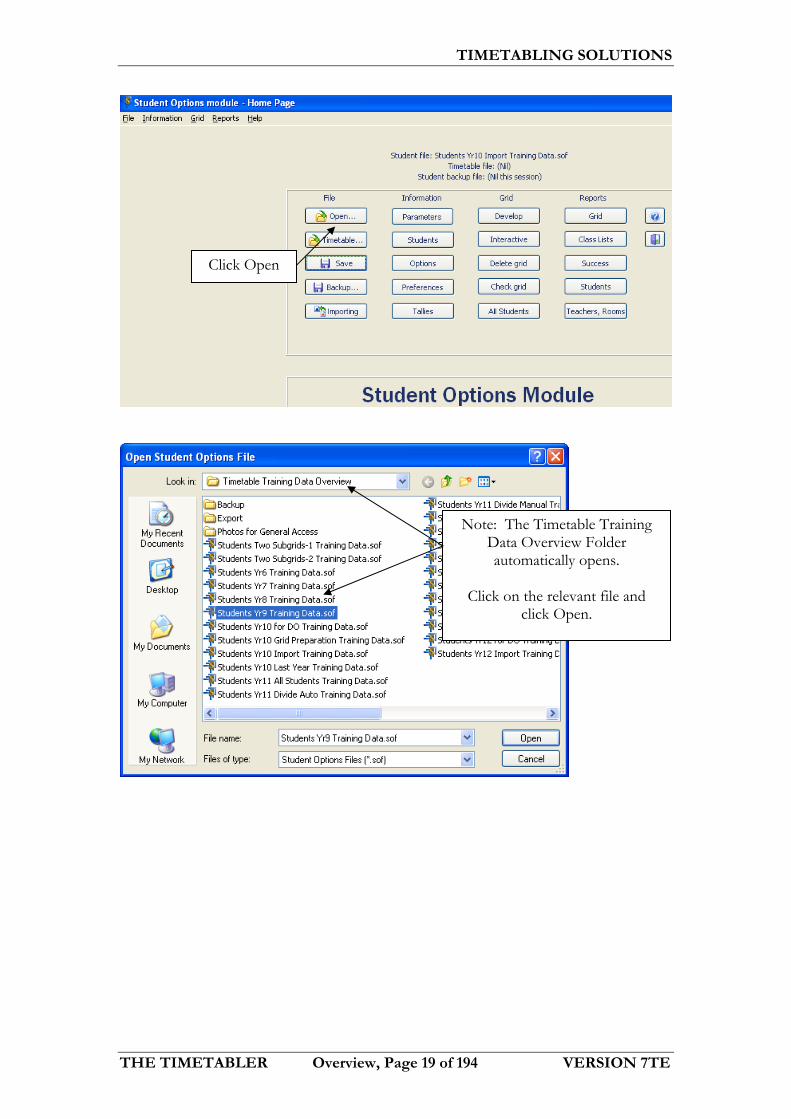
Click the relevant module. In this case, the Student
Options module.
The Student Options module opens
automatically and has loaded the file.
Click Close to exit the
Student Options module.
TIMETABLING SOLUTIONS
THE TIMETABLER Overview, Page 19 of 194 VERSION 7TE
Note: The Timetable Training Data Overview Folder automatically opens.
Click on the relevant file and
click Open.
Click Open

TIMETABLING SOLUTIONS
THE TIMETABLER Overview, Page 20 of 194 VERSION 7TE
Method 3. Open a Module and Reload the data On the Start menu, click All Programs, Timetabling Solutions, The Timetabler Version 7TE and The Timetabler V7TE. As in the previous method, open the relevant module.
Note: The student file has been opened.
On the File menu, click Reopen
Click the file you wish to reopen

TIMETABLING SOLUTIONS
THE TIMETABLER Overview, Page 21 of 194 VERSION 7TE
BACKUP FILES Backup files can be created at any time and we recommend that you backup your files on a regular basis. Auto Backup files are created each time you make a change and save the data - these are written over each time you save. In addition, manual backups can be generated by clicking the Backup button on the Home Page of each module.
Click Backup
When a Backup file is created manually, the files have the date that they were created as part of the file name. Each
time a backup is created this way, a new file name is created.
Click Save
Note, you are taken directly to the Backup folder specified previously.
The two Auto Backup files will only appear if you click Save after making changes. Auto Backup B is created first and is a backup of the data from before you clicked Save. Auto Backup A is created last and is a backup of
the data after you saved.

TIMETABLING SOLUTIONS
THE TIMETABLER Overview, Page 22 of 194 VERSION 7TE
You are given the message that your data has been backed up successfully.
Click OK
The backup file name is now displayed at the top
of the page with the Student file name.
Click Backup
Note: This Backup file has the same name as the previous file, but has a number (1) added to the end. Subsequent Backup files will be numbered (2), (3), etc.
You are also able to edit the name of the backup file to call it a different name. For example, you may like to add the time of day to the end of the file name.
Click Save
You are given the message that your data has been backed up successfully.
Click OK

TIMETABLING SOLUTIONS
THE TIMETABLER Overview, Page 23 of 194 VERSION 7TE
COORDINATION OF DATA BETWEEN PROGRAMS Many programs require similar types of data e.g. Timetabling Programs, Assessment Programs (VASS, Markbook etc) and Student Administration Systems. The Timetabler can have codes of up to 15 alphanumeric characters. Name fields can be up to 40 characters. It is important to be aware of the particular requirements of all the programs that you wish to export to. For example, if your admin system accepts 6 characters for a code, it makes sense to use the same 6 characters for codes in The Timetabler. We recommend that schools develop a process to coordinate the data transfer between these programs. This will save you time as well as ensure the easy connection of one program to another e.g. The Timetabler and VASS or Markbook.
The latest backup file name is now displayed at the top of the page.
Exit out of the Student Options Module


The Timetabler
Daily Organiser V7TE Lesson 1Setting Up the Daily Organiser
What is the Daily Organiser used for? Replacement Types Create a New Daily Organiser File Display Settings Set Day and Date Enter Parameters Cycle Length Unsupervised Classes Enter Teacher Absence Reasons Enter Lesson Cancellation Reasons

TIMETABLING SOLUTIONS
THE TIMETABLER Lesson 1, Page 26 of 194 VERSION 7TE
Lesson 1 WHAT IS THE DAILY ORGANISER USED FOR? The Daily Organiser is used to select replacement teachers to cover events such as teacher absences and to arrange for the cancellation and changing of lessons. It can also be used to amend class lists as a result of an excursion. REPLACEMENT TYPES The Daily Organiser Module can be set up to handle three different types of replacements from within your own staff: “Under allotted”, “In lieu of” and “Extras”. The “Under allotted” category can be used for staff who have fewer than normal teaching duties. These people can be given uncounted replacements before anyone else. “In lieu of” replacements can be given to staff who have lost a class today (probably because of an excursion). You need to use these people on the day that they lost the class. “Extras” can be used for the remaining staff. Often schools have regulations governing this type of replacement e.g. no more than 18 extras per year, or no more than 1 extra over a 10 day cycle. Cycle Limits and Overall Limits can be entered for all teachers. The Daily Organiser Module can also handle short term replacement teachers (Emergency Teachers) and long term replacement teachers (Relief Teachers).
REPLACEMENTS
Employing additional staff Using current staff
Resets at start of Timetable cycle eg every
10 days
Extras Above
normal duties
Resets daily
Counted for a Term or Year.
Total No based on terms of employment
Teachers employed on a daily
basis
Teachers employed on short term contracts
Emergency Teachers
Relief Teachers
CountedUncounted (U/C)
Under allotted
In Lieu of When a class is cancelled

TIMETABLING SOLUTIONS
THE TIMETABLER Lesson 1, Page 27 of 194 VERSION 7TE
CREATE A NEW DAILY ORGANISER FILE A Daily Organiser file can be used for the whole year, a term or a semester. If you use different files for each term or semester they can easily be connected to print totals of staff absences and replacements etc.
Type the name of the file:
Daily Organiser Term 1
Click Save
On the File menu, click New
Click Daily Organiser

TIMETABLING SOLUTIONS
THE TIMETABLER Lesson 1, Page 28 of 194 VERSION 7TE
If you have previously used the Daily Organiser, you will not be prompted to change your timetable.
If this is the case, click Timetable…
If you are prompted to open a timetable file, click on Timetable
Term 1 Training Data.tdf
Click Open
Click on Timetable Term 1 Training Data.tdf
Click Open

TIMETABLING SOLUTIONS
THE TIMETABLER Lesson 1, Page 29 of 194 VERSION 7TE
Recommendation If you expect the timetable is going to change DO NOT work too far ahead. This is because the daily timetable of a teacher may change. You need to connect to the NEW timetable file before you can complete the Daily Organiser work for that future day. DISPLAY SETTINGS Some aspects of the way information is displayed in the Daily Organiser, can be set by the user. This includes whether codes or names are used for teachers and rooms.
The Daily Organiser file and the Timetable
file are displayed
Click the Display icon

TIMETABLING SOLUTIONS
THE TIMETABLER Lesson 1, Page 30 of 194 VERSION 7TE
SET DAY AND DATE Whenever you open a Daily Organiser file it is important that you ensure that you are working on the correct day and date.
Select the settings appropriate for your school. In this case choose these settings.
Note: The left panel will allow you to select codes or full names for each of the items listed. If the boxes are unchecked, codes will be displayed.
To print the replacements in period order, uncheck the List teachers in
alphabetical order item.
Click OK
Click Date

TIMETABLING SOLUTIONS
THE TIMETABLER Lesson 1, Page 31 of 194 VERSION 7TE
Note: The date and day are always displayed at the
bottom of the Home Page.
Click on the drop down box and select today’s date.
Click on Day 1
Click OK
If you are prompted to save
changes, click Yes.
TIMETABLING SOLUTIONS
THE TIMETABLER Lesson 1, Page 32 of 194 VERSION 7TE
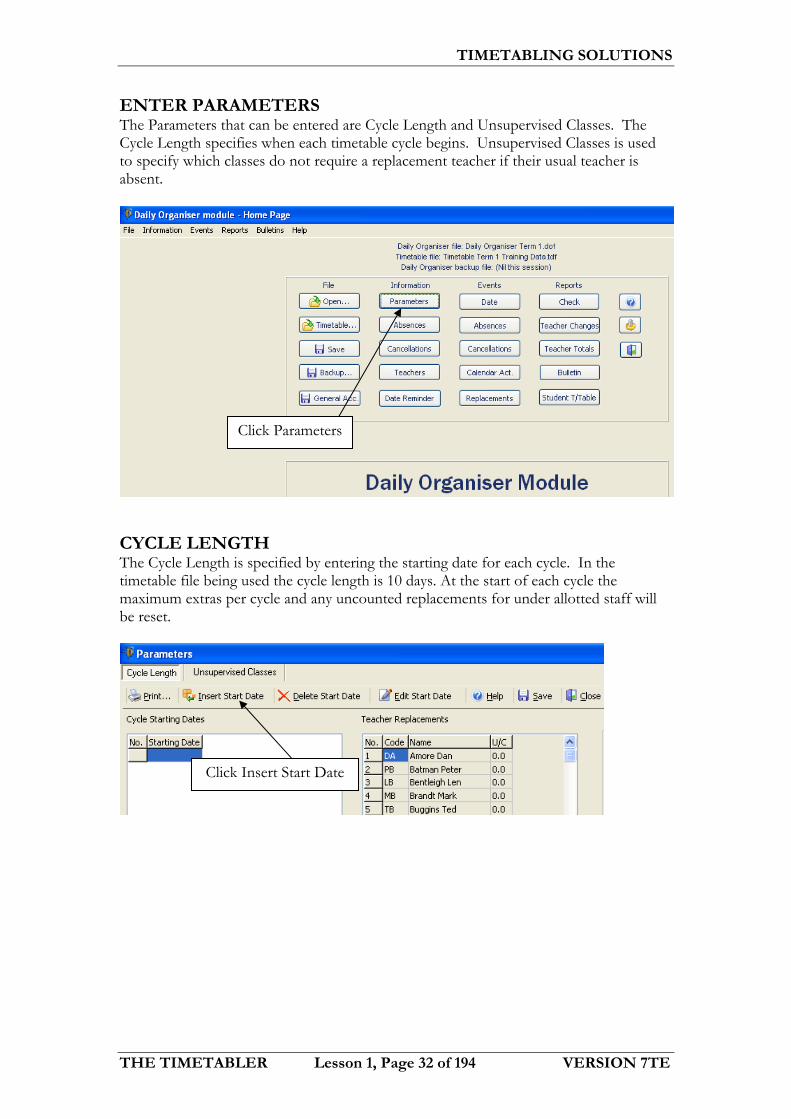
ENTER PARAMETERS The Parameters that can be entered are Cycle Length and Unsupervised Classes. The Cycle Length specifies when each timetable cycle begins. Unsupervised Classes is used to specify which classes do not require a replacement teacher if their usual teacher is absent.
CYCLE LENGTH The Cycle Length is specified by entering the starting date for each cycle. In the timetable file being used the cycle length is 10 days. At the start of each cycle the maximum extras per cycle and any uncounted replacements for under allotted staff will be reset.
Click Insert Start Date
Click Parameters

TIMETABLING SOLUTIONS
THE TIMETABLER Lesson 1, Page 33 of 194 VERSION 7TE
Repeat this process to add another starting date on the Monday two weeks after the first date. Repeat again to add another starting date two weeks after the second date.
UNSUPERVISED CLASSES Unsupervised classes are classes that do not require supervision if their regular teacher is absent. Any classes entered here will not come up on the list of classes requiring a replacement.
Click Insert Roll Class and Class
Starting dates are used to reset the cycle limit and the number of uncounted replacements for each teacher.
Click Unsupervised Classes
Click on the drop down box and select the starting date. In this case select the
Monday of next week.
Click OK

TIMETABLING SOLUTIONS
THE TIMETABLER Lesson 1, Page 34 of 194 VERSION 7TE
Click to move all classes into the
Exclude column.
Click Roll Class 12 and click OK

TIMETABLING SOLUTIONS
THE TIMETABLER Lesson 1, Page 35 of 194 VERSION 7TE
ENTER TEACHER ABSENCE REASONS Absence reasons for teachers are entered so that when staff are absent a reason can be assigned to that absence. This allows for various reports to be generated and tallies of absence reasons created. Each absence reason is given a code and a descriptor. The code is used within the Daily Organiser program and the descriptor appears on reports.
Double click on 12BIOA to move it to the Include column.
This indicates that when the 12BIOA teacher is absent, no replacement is
required for this class.
Click OK
Click Save and Close
Click Absences
TIMETABLING SOLUTIONS
THE TIMETABLER Lesson 1, Page 36 of 194 VERSION 7TE
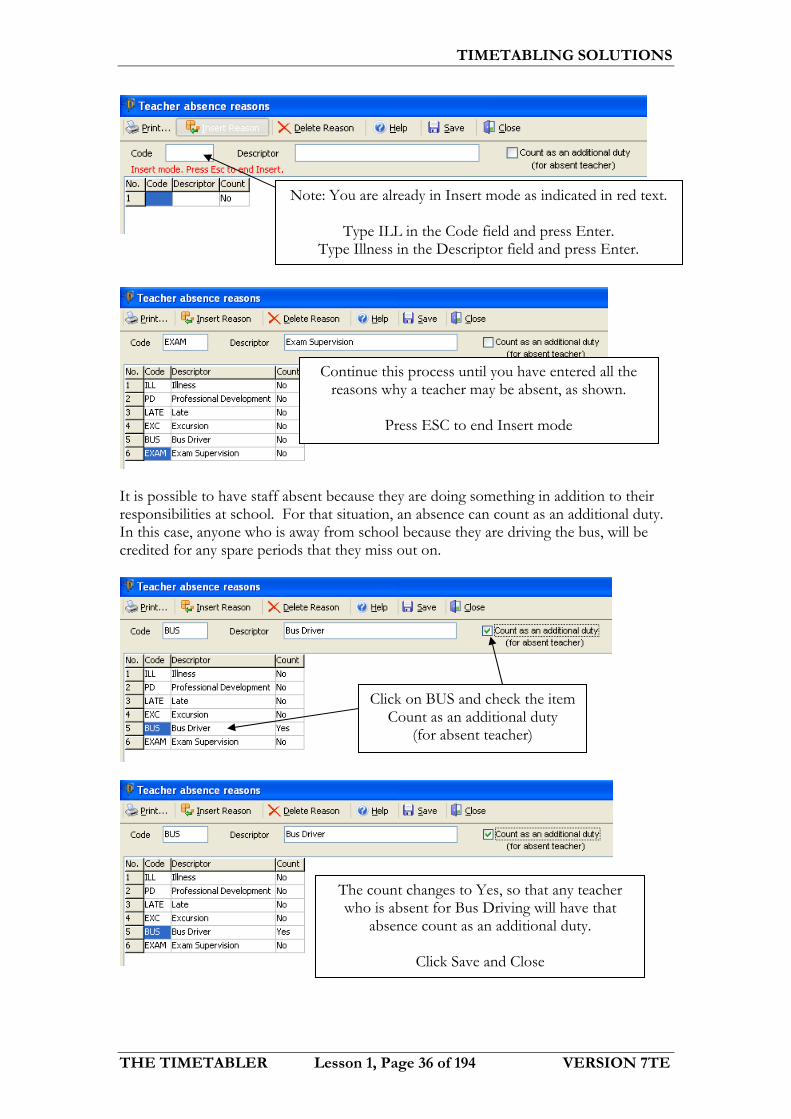
It is possible to have staff absent because they are doing something in addition to their responsibilities at school. For that situation, an absence can count as an additional duty. In this case, anyone who is away from school because they are driving the bus, will be credited for any spare periods that they miss out on.
Continue this process until you have entered all the reasons why a teacher may be absent, as shown.
Press ESC to end Insert mode
Note: You are already in Insert mode as indicated in red text.
Type ILL in the Code field and press Enter. Type Illness in the Descriptor field and press Enter.
The count changes to Yes, so that any teacher who is absent for Bus Driving will have that
absence count as an additional duty.
Click Save and Close
Click on BUS and check the item Count as an additional duty
(for absent teacher)

TIMETABLING SOLUTIONS
THE TIMETABLER Lesson 1, Page 37 of 194 VERSION 7TE
ENTER LESSON CANCELLATION REASONS Cancellation reasons for lessons are entered so that when a lesson is cancelled a reason can be assigned to that cancellation. This allows for various reports to be generated and tallies of cancellation reasons created. As with absence reasons, each cancellation reason is given a code and a descriptor. The code is used within the Daily Organiser program and the descriptor appears on reports.
Backup your file as Lesson 1.dof
Continue this process until you have entered all the reasons why a lesson may be cancelled, as shown.
Press ESC to end Insert mode
Click Save and Close
Click Cancellations
Note: You are already in Insert mode as indicated in red text.
Type CAMP in the Code field and press Enter. Type Camp in the Descriptor field and press Enter.


The Timetabler
Daily Organiser V7TE Lesson 2Teacher Details
Teacher Details Cycle Limit and Overall Limit Part Time Teachers Under Allotted Teachers Ineligible Teachers Enter Emergency Teachers Enter Relief Teachers Teacher Load Adjustments

TIMETABLING SOLUTIONS
THE TIMETABLER Lesson 2, Page 40 of 194 VERSION 7TE
Lesson 2 TEACHER DETAILS Information regarding teacher’s timetables is fed into the Daily Organiser file from the timetable file. Other teacher information such as the number of uncounted replacements, cycle limit and overall limit for counted replacements is entered directly into the Daily Organiser file. Details for Emergency and Relief teachers are also recorded here.
Open the file …My Documents\Timetable Training Data Overview\Daily Organiser Term 1.dof
Click Teachers
The teachers’ details that are read from the timetable file are:
Code, Proposed Load, Actual Load, Surname and First Name.

TIMETABLING SOLUTIONS
THE TIMETABLER Lesson 2, Page 41 of 194 VERSION 7TE
CYCLE LIMIT AND OVERALL LIMIT The Cycle Limit and Overall Limit can be used to set the maximum number of counted replacement classes that a teacher can take. The cycle limit is the maximum number for a timetable cycle. In this example the timetable is a 10 day cycle and the starting dates were defined in Parameters. The overall limit is determined by the length of time that this file will be in use. For example, if a new file is created each semester then the overall limit would be the maximum number of replacements a teacher can take in a semester.
To activate the Cycle Limit and Overall Limit click on Use Limits
Click Yes
Two new columns have been added for Cycle Limit and
Overall Limit.
Double click in the Cycle Limit column for teacher Dan Amore.
New Feature

TIMETABLING SOLUTIONS
THE TIMETABLER Lesson 2, Page 42 of 194 VERSION 7TE
The Quick Edit feature is now available on this display. This feature facilitates the copying of data entered for one teacher to other teachers.
Enter the Cycle Limit and Overall Limit as shown here
Click OK
Click on the 1.0 in the Cycle Limit column
then click Quick Edit.
New Feature

TIMETABLING SOLUTIONS
THE TIMETABLER Lesson 2, Page 43 of 194 VERSION 7TE
The Cycle Limit column changes colour. Use the scroll wheel on the mouse to run down the column and
change all the values to 1.0.
Press Esc when finished
Click on the 10.0 in the Cycle Limit column
then click Quick Edit.
Click on individual cells in this column to change the value to 10.0 for all teachers except for Len Bentleigh, Mark Brandt and Mark Davee. (These are
part time teachers and will be dealt with later.)
Use the scroll wheel on the mouse to give all teachers listed below Mark Davee an overall limit of 10.0
Press Esc when finished

TIMETABLING SOLUTIONS
THE TIMETABLER Lesson 2, Page 44 of 194 VERSION 7TE
PART TIME TEACHERS The Overall Limit can be used in conjunction with Priority to assist with the even distribution of replacement classes between full and part time teachers. The Overall Limit is used to set a maximum number of replacements a part time teacher can be allocated to. The Priority is used as part of an algorithm to sort teachers in priority order on the teacher replacement screen. This will be discussed in more detail in a later lesson. In this example, we will enter details for the following part time teachers: Teacher Load Fraction Overall Limit Priority Len Bentleigh 26.5 0.8 8 80 Mark Brandt 20 0.6 6 60 Mark Davee 17 0.5 5 50 Full Time Teachers 34 1.0 10 100
Double click on the Overall Limit cell for teacher Len Bentleigh
Enter a Priority of 80 and an Overall Limit of 8.0
Click OK

TIMETABLING SOLUTIONS
THE TIMETABLER Lesson 2, Page 45 of 194 VERSION 7TE
UNDER ALLOTTED TEACHERS In many timetables there are a number of teachers who are one or two periods under load. Many schools give teachers who are under load uncounted replacement classes to balance their load.
Use the data in the table on the previous page to enter the Priority and Overall Limit for Mark Brandt and Mark Davee.
Note: This data needs to be entered when a new Daily Organiser file is created at the start of a term, semester or year. It must also be adjusted when changes are made to
teacher loads in the Timetable file.
Note: The teacher Sam Car has a proposed load of 34.0 and an actual load of 32.0. Therefore he is under load.
Double click on Sam Car

TIMETABLING SOLUTIONS
THE TIMETABLER Lesson 2, Page 46 of 194 VERSION 7TE
INELIGIBLE TEACHERS Not all members of staff that are included in the timetable are eligible to take replacements. These fall into two categories
• Staff who do not take counted or uncounted replacements. They can be excluded from appearing on the list of teachers available for a replacement. eg The Principal
• Staff who do not take counted replacements but are available for uncounted replacements when their classes are cancelled. Eg a teacher who is overload.
Insert the number of Uncounted Replacements this person can take,
in this case 2.0. This will reset according to the dates that were
entered previously in Parameters.
Click OK
Note: You need to enter numbers with one decimal place.
Double click on The Principal

TIMETABLING SOLUTIONS
THE TIMETABLER Lesson 2, Page 47 of 194 VERSION 7TE
Click on Eligible to cover for absences to uncheck this item. Then change the Cycle Limit and Overall Limit to 0.0
The Principal will not come up on any list to take a replacement.
Click OK
Note: Hans Verde is 1 period overload. He has a proposed load of 34.0 and an actual load of 35.0.
Double click on his name
Note: The N in the Type column indicates that The Principal will not appear on lists of teachers available for replacements.

TIMETABLING SOLUTIONS
THE TIMETABLER Lesson 2, Page 48 of 194 VERSION 7TE
Change the Cycle Limit and Overall Limit to 0.0
Click OK
Note: The C in the Type column indicates that Hans Verde will appear on lists of teachers available for
replacements with a Cycle and Overall Limit of 0.0. Hans can be used for uncounted classes when his classes
are cancelled.

TIMETABLING SOLUTIONS
THE TIMETABLER Lesson 2, Page 49 of 194 VERSION 7TE
ENTER EMERGENCY TEACHERS Emergency teachers are people that are called into the school on a daily basis to cover the absent staff for that day. You can define Emergency Teachers in two ways. Either use a specific name or use a generic name such as Emergency Teacher 1. Each Emergency Teacher needs to be added one at a time. They will appear at the end of the teachers list. There will be an E in the Type column beside their name to indicate that they are Emergency Teachers.
Click Emergency Teachers
Enter the relevant information for a specific teacher in the white cells
as shown.
You can use the yellow cells to record other relevant details such
as the phone numbers, faculty they prefer to teach and availability.
Click OK
Click Emergency Teachers

TIMETABLING SOLUTIONS
THE TIMETABLER Lesson 2, Page 50 of 194 VERSION 7TE
ENTER RELIEF TEACHERS A Relief Teacher differs from an Emergency Teacher in that a relief is a long term replacement for staff who are absent for a long period such as Long Service Leave. When the Relief Teacher takes the entire load of another teacher, the details can be entered in the Daily Organiser file. However, when the Relief Teacher takes only part of a teacher’s load then the adjustments need to be made in the Timetable file.
Click Relief Teachers
Enter the generic information which can be used for any
Emergency Teacher
Click OK

TIMETABLING SOLUTIONS
THE TIMETABLER Lesson 2, Page 51 of 194 VERSION 7TE
Enter the Relief Teacher as shown here.
Use the drop down box to select the teacher they are replacing, in this case BC. The Relief Teacher will pick up BC’s entire load.
Click OK
Note: The Relief Teacher appears at the bottom of the staff list with an R in the Type column.
When the normal teacher returns, delete the Relief Teacher from this screen.
Click Save and Close

TIMETABLING SOLUTIONS
THE TIMETABLER Lesson 2, Page 52 of 194 VERSION 7TE
TEACHER LOAD ADJUSTMENTS It is possible to make adjustments to the number of counted replacements a teacher has done. For example a teacher offers to help the sports co-ordinator for a day to set up for the Athletics sports and the Principal has agreed that this will count as 3 replacement classes.
On the Events menu, click Teacher Load Adjustments
Click on Dawes Michael and click OK
Click Find Teacher

TIMETABLING SOLUTIONS
THE TIMETABLER Lesson 2, Page 53 of 194 VERSION 7TE
Backup your file as Lesson 2.dof
The cursor will move to Dawes Michael.
Double click in the Count Field.
Type 3.0 and click OK
Click Save and Close
Double click in the Load field and type 3.0 and click OK
Double click in the Notes field, type the reason and click OK.


The Timetabler
Daily Organiser V7TE Lesson 3Absences and Cancellations
Enter Teacher Absences Different Absence Reasons on the Same Day Find Teacher Enter Lesson Cancellations Room Changes Cancel Yard Duty

TIMETABLING SOLUTIONS
THE TIMETABLER Lesson 3, Page 56 of 194 VERSION 7TE
Lesson 3 ENTER TEACHER ABSENCES When setting up the Daily Organiser file, we specified the start of the next cycle to be next Monday. We are now going to prepare the extras for next Tuesday.
Open the file … My Documents\Timetable Training Data Overview\Daily Organiser Term 1.dof
Select the date for Tuesday next week and Day 2.
Click OK
Note: The Timetable date and the Timetable day have now changed at the bottom
of your Home Page.
Click Date
Recommendation If you expect the timetable is going to change in any way DO NOT work too far ahead. You need to connect to the NEW timetable file before you can complete the Daily Organiser work for that future day.

TIMETABLING SOLUTIONS
THE TIMETABLER Lesson 3, Page 57 of 194 VERSION 7TE
Note: The letter “L” stands for Lesson, “M” stands for Meeting and
the “N” stands for Not at School. The “Y” column refers to Yard duty.
Click Absences
To enter a staff absence for a day, click beside the first teacher
and click Select Reason for Day.

TIMETABLING SOLUTIONS
THE TIMETABLER Lesson 3, Page 58 of 194 VERSION 7TE
A list of reasons is displayed
Select the top reason, ILL (Illness) and click OK
The highlighted cells indicate absences. Note: The period values (which can be less than one) are determined in the Timetable Development module.
Click Save
To see the full details of a teacher’s timetable
click on Teacher Timetable

TIMETABLING SOLUTIONS
THE TIMETABLER Lesson 3, Page 59 of 194 VERSION 7TE
Move your cursor to a different cell to see that Ted Buggins has been
made absent for the first lesson only.
To enter a staff absence for a period, either click on the period cell next to the teacher and click on Select Reason for Period or double click on
the cell.
Double click on the first period for Ted Buggins. The list of absence reasons will be displayed.
Select LATE (Late) and click OK.
Details of classes and rooms are shown along with any changes
that you have made.
Click Close

TIMETABLING SOLUTIONS
THE TIMETABLER Lesson 3, Page 60 of 194 VERSION 7TE
DIFFERENT ABSENCE REASONS ON THE SAME DAY A teacher can be made absent for a number of different reasons on the same day.
Double click on period 2. The reason for absence will be
automatically shown as LATE.
Note the different absence codes
To change this, click Edit Reason. Select a different reason from the list, in this case ILL and click OK.

TIMETABLING SOLUTIONS
THE TIMETABLER Lesson 3, Page 61 of 194 VERSION 7TE
FIND TEACHER Any teacher can be selected by using Find Teacher.
Click Find Teacher
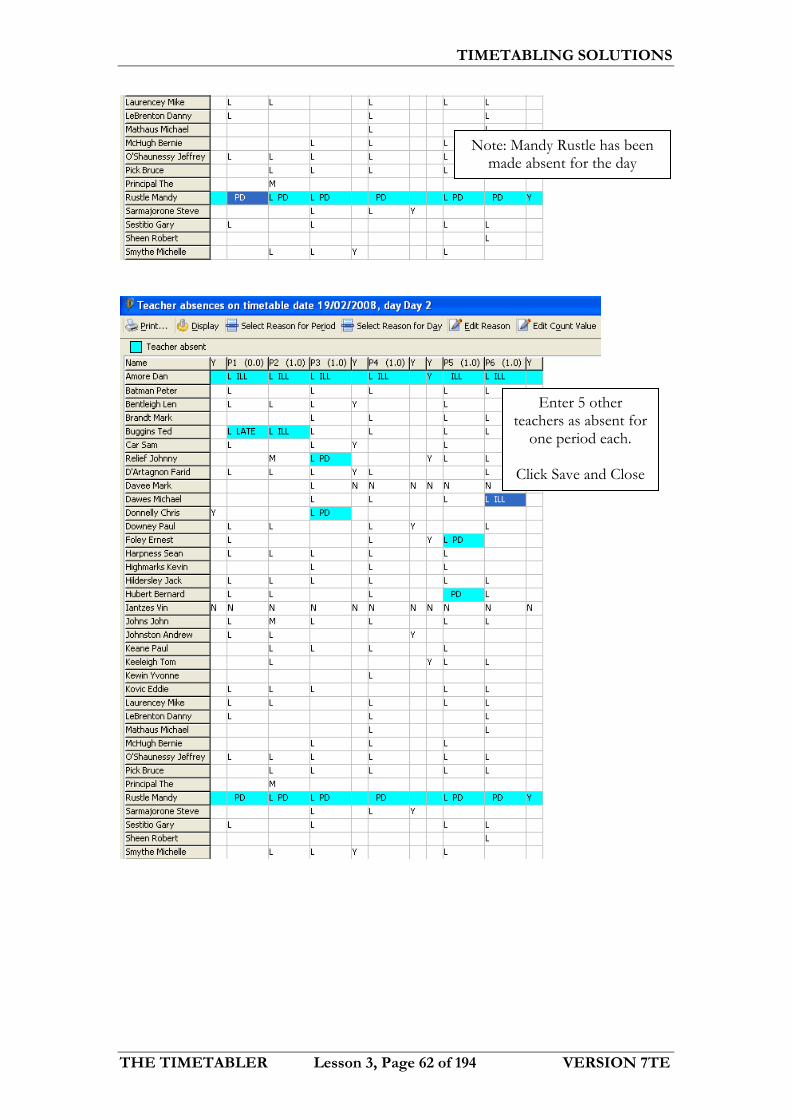
Scroll down and click on Mandy Rustle
Click OK
The cursor will move to Mandy Rustle.
Click on Select Reason for Day. The list of reasons will be displayed. Select PD
(Professional Development) and click OK.
TIMETABLING SOLUTIONS
THE TIMETABLER Lesson 3, Page 62 of 194 VERSION 7TE
Enter 5 other teachers as absent for
one period each.
Click Save and Close
Note: Mandy Rustle has been made absent for the day
TIMETABLING SOLUTIONS
THE TIMETABLER Lesson 3, Page 63 of 194 VERSION 7TE
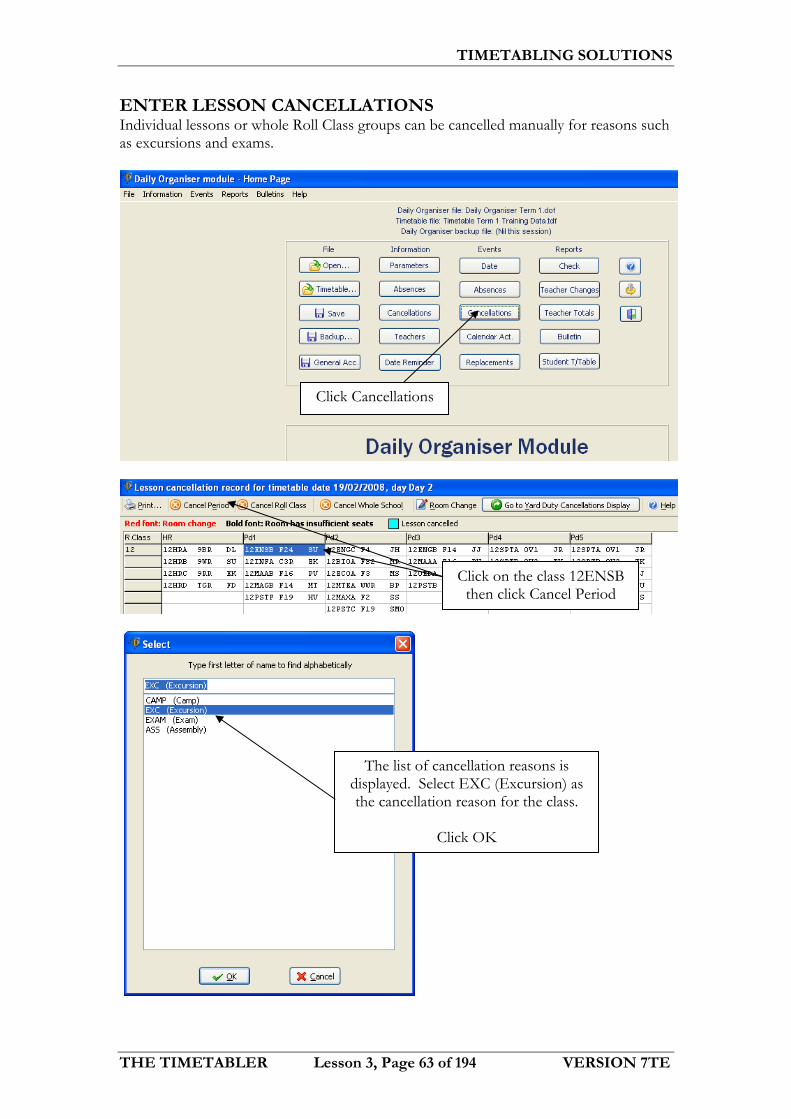
ENTER LESSON CANCELLATIONS Individual lessons or whole Roll Class groups can be cancelled manually for reasons such as excursions and exams.
Click on the class 12ENSB then click Cancel Period
The list of cancellation reasons is displayed. Select EXC (Excursion) as the cancellation reason for the class.
Click OK
Click Cancellations

TIMETABLING SOLUTIONS
THE TIMETABLER Lesson 3, Page 64 of 194 VERSION 7TE
Click in the first cell next to Roll Class 10R and then click Cancel Roll Class.
The list of cancellation reasons are displayed.
Select EXC (Excursion) as the cancellation
reason for the Roll Class.
Click OK
Note: 12ENSB is highlighted blue to indicate
it has been cancelled.
The highlighted section indicates that all classes for Roll Class 10R have been cancelled.
Note: In Pd3 10R is part of a Multi Roll Class Group (block). In this case you would not want to cancel this class as it would
contain students from other Yr10 classes.
TIMETABLING SOLUTIONS
THE TIMETABLER Lesson 3, Page 65 of 194 VERSION 7TE
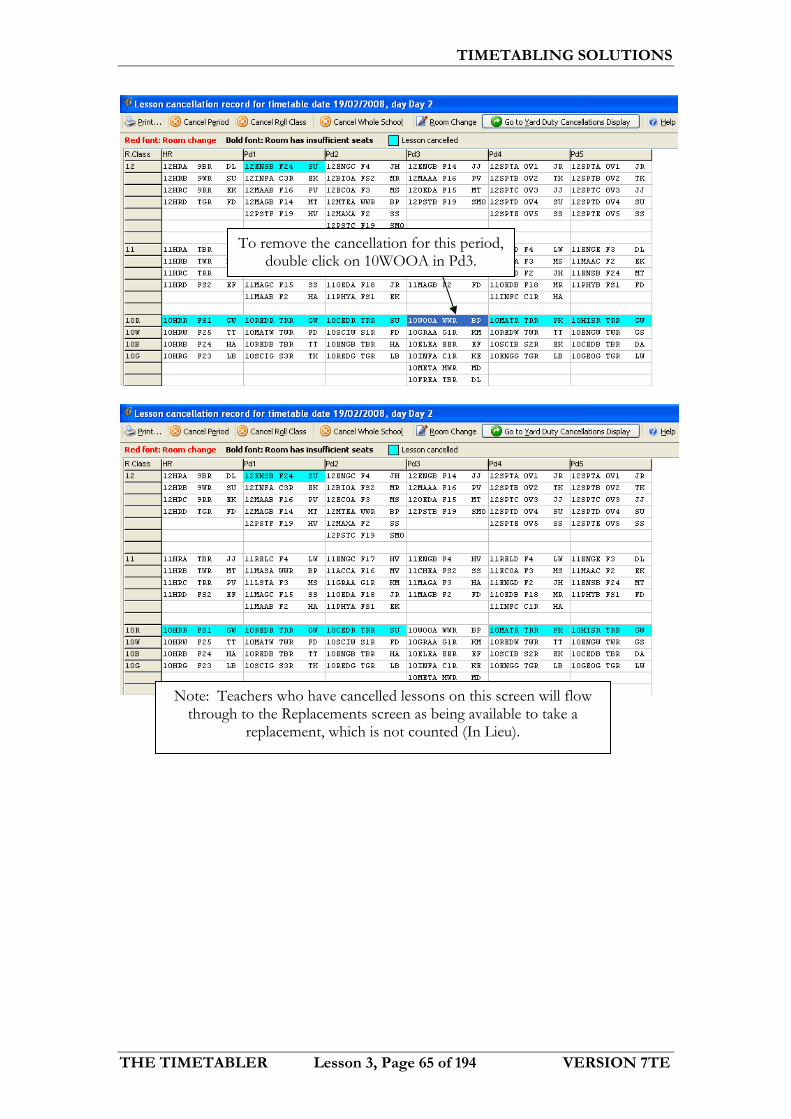
Note: Teachers who have cancelled lessons on this screen will flow through to the Replacements screen as being available to take a
replacement, which is not counted (In Lieu).
To remove the cancellation for this period, double click on 10WOOA in Pd3.

TIMETABLING SOLUTIONS
THE TIMETABLER Lesson 3, Page 66 of 194 VERSION 7TE
ROOM CHANGES Room changes can be made here if a class wishes to use another room for today’s period. E.g. the Year 12 Information Technology class wants to use a classroom for a test.
Move your cursor to a different cell to see that the entry
for this class turns red to indicate there is a change.
This room change is only for the date you are working on.
Click on the class 12INFA and then
click Room Change
Select the first free room, in this case F17.
Click OK

TIMETABLING SOLUTIONS
THE TIMETABLER Lesson 3, Page 67 of 194 VERSION 7TE
CANCEL YARD DUTY If there are areas in your school that are only used by particular year levels, it may be necessary to cancel the Yard Duty if that year level is absent. For example, if the Year 11 students have an exam for the morning, they will still be in the exam for Recess. In that case, there is no need to have a member of staff supervising the Year 11 Courtyard.
Click Go to Yard Duty Cancellations Display
Click on Len Bentleigh in the Yr11 Courtyard at Recess and click Cancel
Yard Duty.
Place your cursor in a different cell so that you can see the
Yard Duty has been cancelled.
Click Close

TIMETABLING SOLUTIONS
THE TIMETABLER Lesson 3, Page 68 of 194 VERSION 7TE
Backup your file as Lesson 3.dof
Click Save and Close

The Timetabler
Daily Organiser V7TE Lesson 4Calendar Activities
Calendar Activities with Teachers for Whole Activity Calendar Activities with Teachers for Part of Activity Date Reminders
TIMETABLING SOLUTIONS
THE TIMETABLER Lesson 4, Page 70 of 194 VERSION 7TE
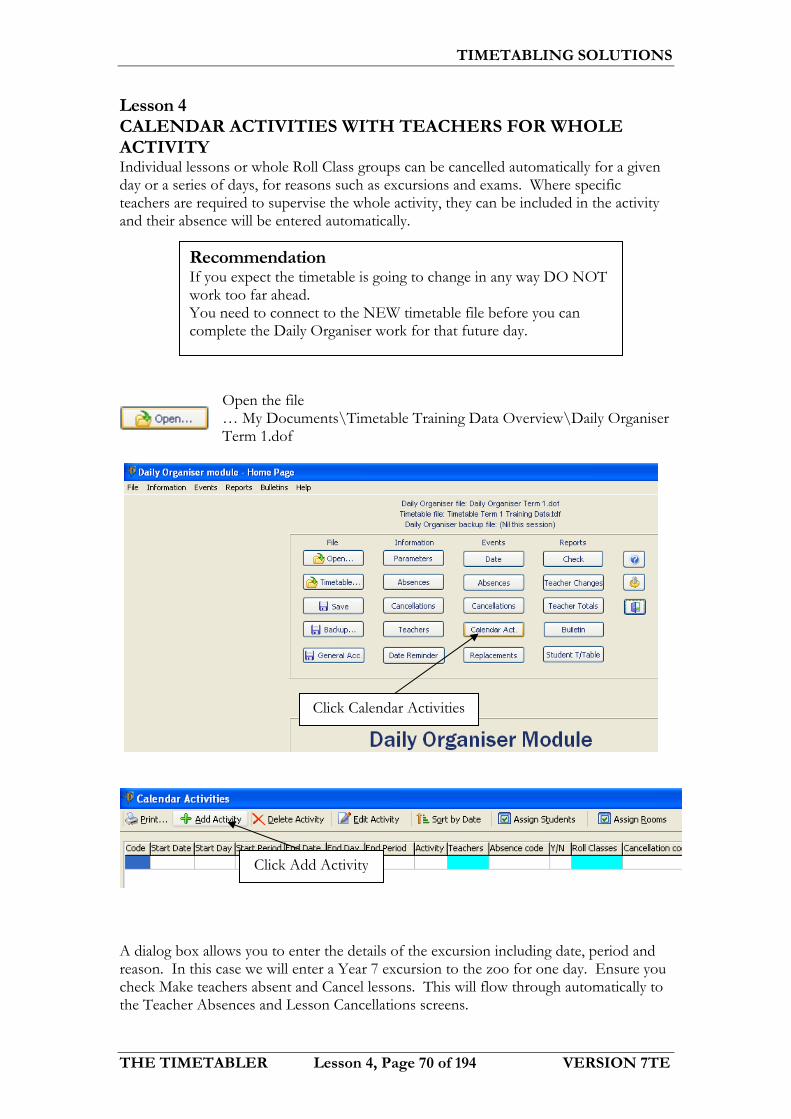
Lesson 4 CALENDAR ACTIVITIES WITH TEACHERS FOR WHOLE ACTIVITY Individual lessons or whole Roll Class groups can be cancelled automatically for a given day or a series of days, for reasons such as excursions and exams. Where specific teachers are required to supervise the whole activity, they can be included in the activity and their absence will be entered automatically.
Open the file … My Documents\Timetable Training Data Overview\Daily Organiser Term 1.dof
A dialog box allows you to enter the details of the excursion including date, period and reason. In this case we will enter a Year 7 excursion to the zoo for one day. Ensure you check Make teachers absent and Cancel lessons. This will flow through automatically to the Teacher Absences and Lesson Cancellations screens.
Click Calendar Activities
Recommendation If you expect the timetable is going to change in any way DO NOT work too far ahead. You need to connect to the NEW timetable file before you can complete the Daily Organiser work for that future day.
Click Add Activity

TIMETABLING SOLUTIONS
THE TIMETABLER Lesson 4, Page 71 of 194 VERSION 7TE
Double click on a teacher to allocate them to this excursion. Include BP and JS.
Click OK
These details will flow automatically
to the Absences screen.
Double click in Teachers to add teachers to the whole excursion
Next Tuesday’s date, the date that we are working on, on has been entered
here by default.
Enter the details of the activity as shown. Use
the drop down boxes or click on the appropriate
settings
Click OK
A message appears indicating that it is
necessary to save in order for the absences to be
recorded for today.
Click OK

TIMETABLING SOLUTIONS
THE TIMETABLER Lesson 4, Page 72 of 194 VERSION 7TE
Double click on 7R to include that roll class
Click OK
Click Save then double click in the Roll Classes cell
Click Absences
A message appears indicating that it is necessary to save in order for the
cancellations to be recorded for today.
Click OK
Click Save and Close.

TIMETABLING SOLUTIONS
THE TIMETABLER Lesson 4, Page 73 of 194 VERSION 7TE
Click Cancellations
Note: The two teachers going on the zoo excursion
have been made absent.
Click Close
TIMETABLING SOLUTIONS
THE TIMETABLER Lesson 4, Page 74 of 194 VERSION 7TE
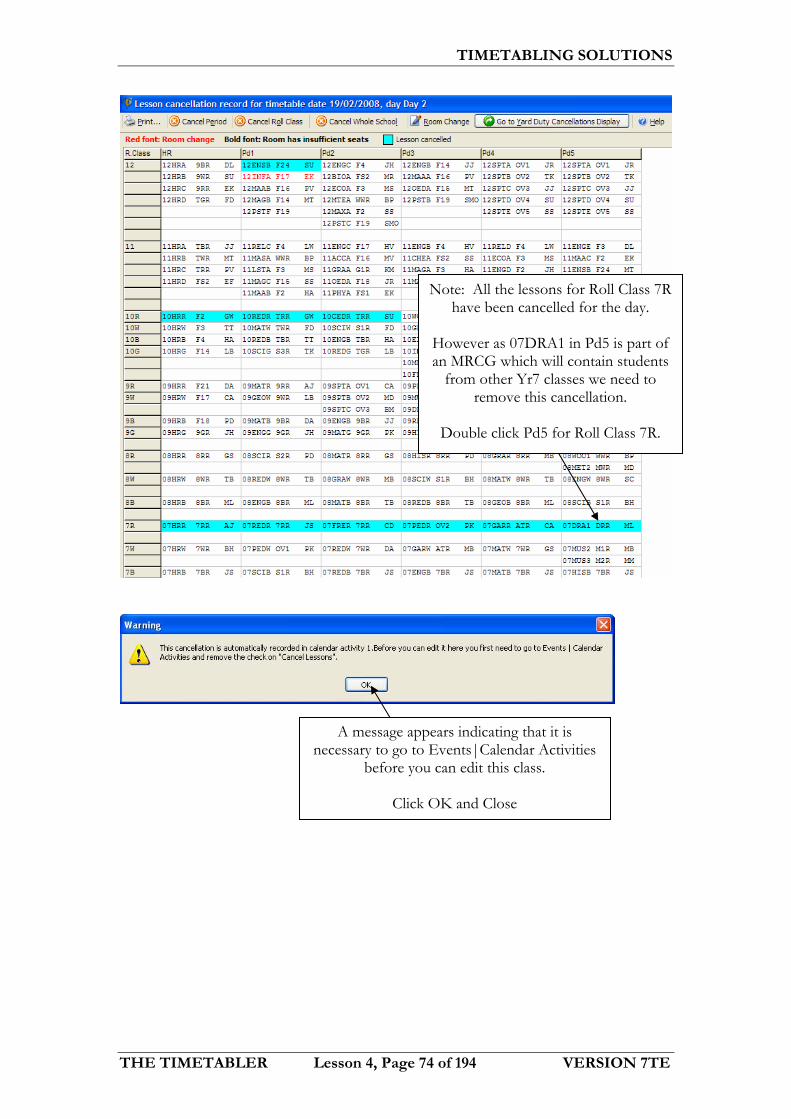
Note: All the lessons for Roll Class 7R have been cancelled for the day.
However as 07DRA1 in Pd5 is part of an MRCG which will contain students
from other Yr7 classes we need to remove this cancellation.
Double click Pd5 for Roll Class 7R.
A message appears indicating that it is necessary to go to Events|Calendar Activities
before you can edit this class.
Click OK and Close

TIMETABLING SOLUTIONS
THE TIMETABLER Lesson 4, Page 75 of 194 VERSION 7TE
Click Calendar Activities
Uncheck the Cancel Lessons box and click OK
Click OK
Click on the Activity then click Edit Activity

TIMETABLING SOLUTIONS
THE TIMETABLER Lesson 4, Page 76 of 194 VERSION 7TE
Click Save and Close
Click Cancellations
Double Click on 07DRA1 to remove the cancellation.
Click Save and Close

TIMETABLING SOLUTIONS
THE TIMETABLER Lesson 4, Page 77 of 194 VERSION 7TE
CALENDAR ACTIVITIES WITH TEACHERS FOR PART OF ACTIVITY Additional teachers can be added to calendar activities on a period by period basis. This feature can be used to cover exam supervisions where it is not necessary to have the same teacher supervising the entire exam. In this example, we will enter the Year 11 English Exam for Roll Class 11 from period 1 to after period 3. That is, including Recess.
Click Add Activity
Click Calendar Activities

TIMETABLING SOLUTIONS
THE TIMETABLER Lesson 4, Page 78 of 194 VERSION 7TE
Include Roll Class 11 and click OK
Double click in the Roll Classes cell
Enter the details as they appear here using next Tuesday’s date. Year 11 will have all lessons cancelled.
Enter the number of additional teachers required and select Room needed.
Click OK

TIMETABLING SOLUTIONS
THE TIMETABLER Lesson 4, Page 79 of 194 VERSION 7TE
Click Save
Roll Class 11 will have all classes cancelled. The teachers that would have normally taken the Yr11 classes will be free to take uncounted replacements.
Double click in the first Room cell
A message appears indicating that it is necessary to save in order for the cancellations to
be recorded for today.
Click OK
Click Assign Rooms

TIMETABLING SOLUTIONS
THE TIMETABLER Lesson 4, Page 80 of 194 VERSION 7TE
Select F21 and click OK
Repeat this process for each period of the activity
When you have assigned the room for both periods, click Save and close back to the Home Page.

TIMETABLING SOLUTIONS
THE TIMETABLER Lesson 4, Page 81 of 194 VERSION 7TE
DATE REMINDERS Date Reminders are used to flash a reminder note on the screen when opening a Daily Organiser File on a particular date.
Click Date Reminder
Click Add Reminder
Note: The red text indicates that you are in Add Mode
Click on the drop down menu to select a date for the reminder.
Double click on next Tuesday’s date

TIMETABLING SOLUTIONS
THE TIMETABLER Lesson 4, Page 82 of 194 VERSION 7TE
Backup your file as Lesson 4.dof
Type your reminder note in the field as shown and press Enter
The reminder has been recorded
Press Esc to end Add Mode
Click Save and Close
To view the reminder, close the Daily Organiser file
then reopen it.
The Date Reminder will appear in an Information box
when you reopen it.
Click OK and Daily Organiser opens.

The Timetabler
Daily Organiser V7TE Lesson 5Assign Replacements
Replacements Gauge Teacher Requirements Enter Emergency Teacher Availability Assign Replacements Sort Replacement Classes
Teachers in Priority Order Teachers in Uncounted Order Counted Replacements
Last 10 days Replacement Notes
TIMETABLING SOLUTIONS
THE TIMETABLER Lesson 5, Page 84 of 194 VERSION 7TE
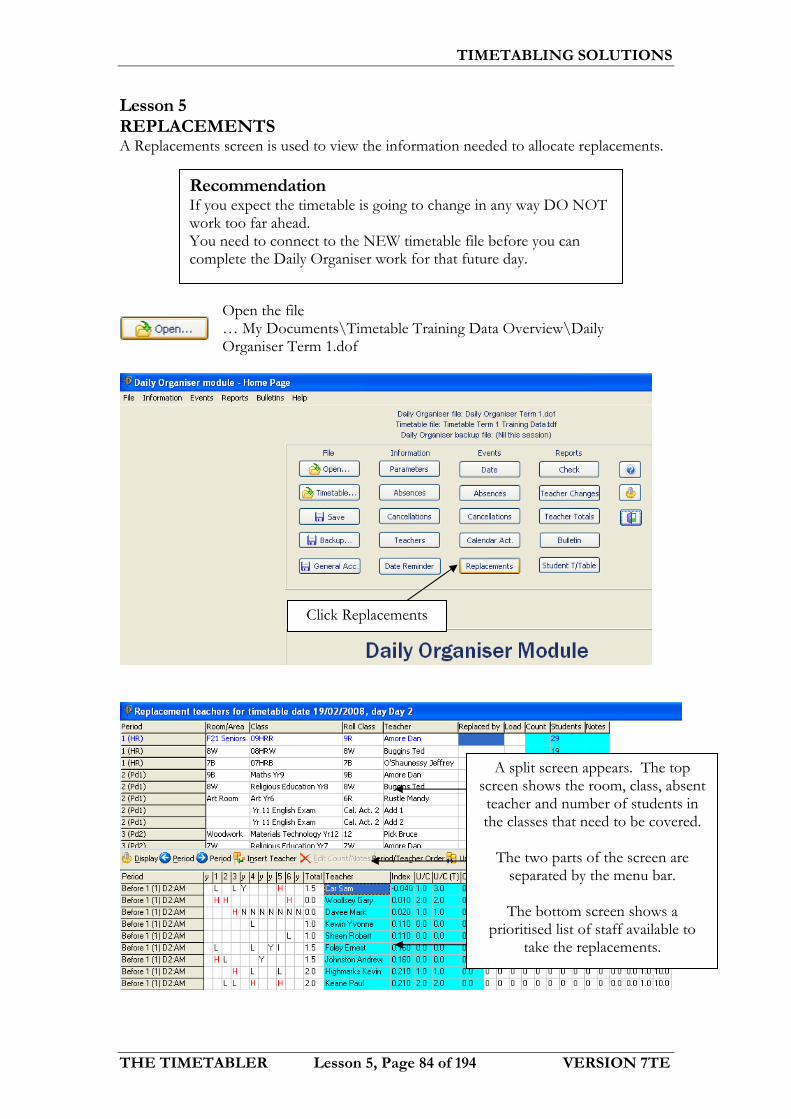
Lesson 5 REPLACEMENTS A Replacements screen is used to view the information needed to allocate replacements.
Open the file … My Documents\Timetable Training Data Overview\Daily Organiser Term 1.dof
A split screen appears. The top screen shows the room, class, absent teacher and number of students in the classes that need to be covered.
The two parts of the screen are
separated by the menu bar.
The bottom screen shows a prioritised list of staff available to
take the replacements.
Click Replacements
Recommendation If you expect the timetable is going to change in any way DO NOT work too far ahead. You need to connect to the NEW timetable file before you can complete the Daily Organiser work for that future day.

TIMETABLING SOLUTIONS
THE TIMETABLER Lesson 5, Page 85 of 194 VERSION 7TE
Click in the Replaced by column beside Maths Yr 9 in 2(Pd1)
Note: The teachers available to
take replacement classes are displayed in the lower section of
the screen.
The teachers in the same faculty as the replacement class are in
bold. Faculties were set up in the Timetable file.
A summary of each teacher’s timetable for today is displayed
Key: L – Lesson N – Not at school H - Had a class (cancelled) Y - Yard duty M – Meeting D - Done (In Lieu) C – Counted replacement
If a teacher is absent when these occur, a
lower case letter is displayed.

TIMETABLING SOLUTIONS
THE TIMETABLER Lesson 5, Page 86 of 194 VERSION 7TE
Details of uncounted
replacements are displayed in these
two columns
A summary of counted
replacements for the last 10 days is
displayed for each Teacher.
The program has calculated a priority index for teachers
Cycle and Overall Limits are
displayed for each teacher New Feature

TIMETABLING SOLUTIONS
THE TIMETABLER Lesson 5, Page 87 of 194 VERSION 7TE
GAUGE TEACHER REQUIREMENTS The Gauge report helps you determine whether you need an Emergency Teacher. It gives a report of the number of cancelled lessons and the number of absent teachers for each period. It also indicates the teachers that are free for each period of the day.
The Replace column lists how many classes need replacing. The Cancel column lists the number of classes cancelled.
The Net column gives the difference between the number of cancelled lessons and the number of replacements required. If there is a 0 in the Net column, each replacement could be covered by a teacher that had a cancelled lesson.
The Free column lists the number of available teachers. Those teachers are listed under Free Teachers. In this example, the staff in the school could be
used for replacements.
Click Close
Click Gauge

TIMETABLING SOLUTIONS
THE TIMETABLER Lesson 5, Page 88 of 194 VERSION 7TE
ENTER EMERGENCY TEACHER AVAILABILITY Although there are a number of staff that are free each period, it is still possible to use Emergency Teachers. By default, Emergency Teachers are not available and will not appear in the list of staff to take replacements unless they are made available.
Click Emergency Teachers
An Emergency Teacher needs to be made available for any particular day. The “N” indicates the Emergency Teacher is not available
to take replacements for those lessons. Click in a cell with an “N” next to Paul Wood, and then click
Available/Unavailable for a Day. This will make him available for the entire day.
Double click on the “N” in period 5 for Teacher 1 Emergency. This will make them available for this period
Repeat this process for period 6 and the Yard Duty after 6.

TIMETABLING SOLUTIONS
THE TIMETABLER Lesson 5, Page 89 of 194 VERSION 7TE
New Feature
ASSIGN REPLACEMENTS The order the data is displayed in both the top and bottom sections of this screen can be sorted to better facilitate the allocation of replacement classes. SORT REPLACEMENT CLASSES When assigning replacements the replacement classes can be displayed in period order or teacher order. This is useful when you want to allocate all classes from an absent teacher to the one emergency teacher.
Note: Paul Wood is available all day and Teacher 1 Emergency is available from period 5 onwards.
Click Save and Close
Note: Paul Wood is now at the top of the list of available teachers in the lower section of the screen.
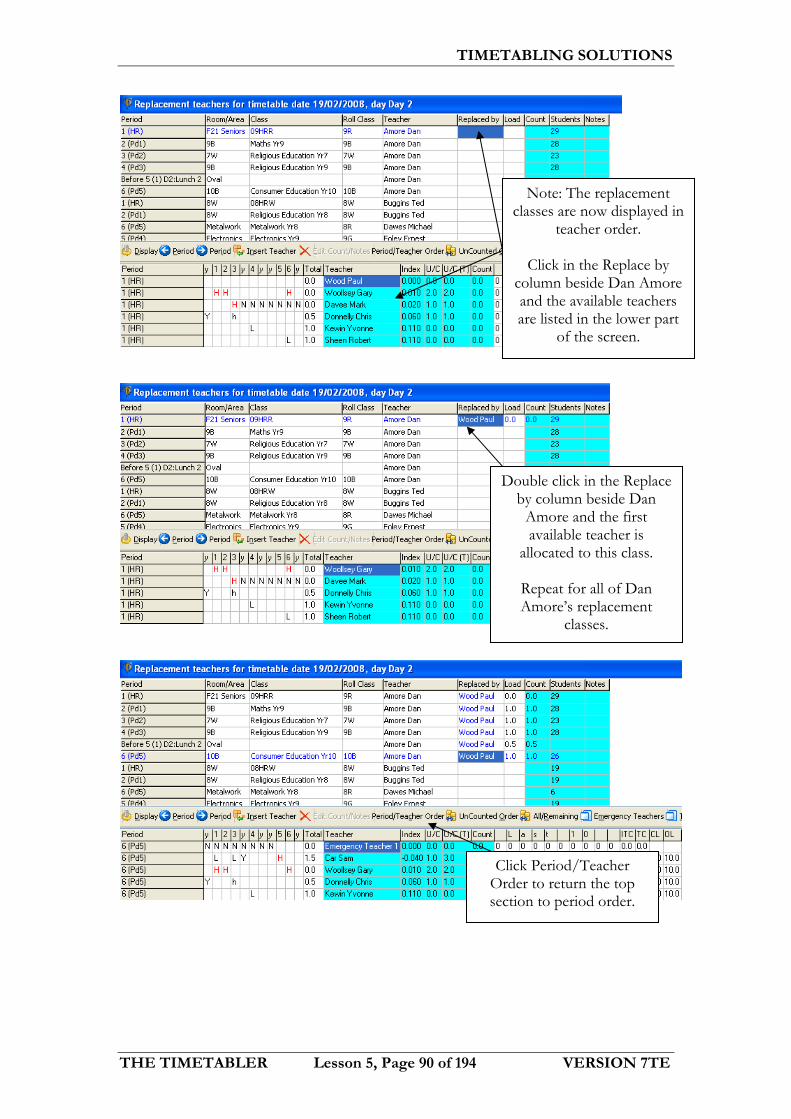
Note: The replacement classes are displayed in
period order.
To change this to teacher order click Period/Teacher
Order.
TIMETABLING SOLUTIONS
THE TIMETABLER Lesson 5, Page 90 of 194 VERSION 7TE
Note: The replacement classes are now displayed in
teacher order.
Click in the Replace by column beside Dan Amore and the available teachers are listed in the lower part
of the screen.
Double click in the Replace by column beside Dan
Amore and the first available teacher is
allocated to this class.
Repeat for all of Dan Amore’s replacement
classes.
Click Period/Teacher Order to return the top section to period order.

TIMETABLING SOLUTIONS
THE TIMETABLER Lesson 5, Page 91 of 194 VERSION 7TE
TEACHERS IN PRIORITY ORDER When using Priority Order, the staff that are eligible to take extras are listed according to the Index. The Index calculation uses an algorithm which takes into account the priority percentage, the number of uncounted replacements, the total number of replacements taken to date, in lieu’s, and the number of lessons scheduled for today in determining an ordered electronic list of possible candidates to take a replacement. Those with a higher priority and higher number of uncounted replacements will appear at the top of the list.
Teachers available for replacements are listed in Index order in this display. If the order on your screen differs, click UnCounted Order.
To allocate the teacher at the top of the list, double click in the Replaced by cell.
Use this method to allocate all the 1(HR) classes
Click in the Replaced by column beside Ted
Buggins and the available teachers for 1(HR) are
listed in the lower part of the screen.

TIMETABLING SOLUTIONS
THE TIMETABLER Lesson 5, Page 92 of 194 VERSION 7TE
Click in the Replaced by column beside Ted Buggins and the available teachers for 2(Pd1) are listed in the lower part of the screen.
If you wish to use a teacher who is not at the top of the list, double click
on the teacher’s name in the bottom panel.
Double click on Gary Woollsey to allocate him to this class.
Note: The additional teachers required for the Yr11 English Exam are treated as replacements. This enables you to use any member of staff that is free for that period, including Emergency Teachers, to supervise the exam.

TIMETABLING SOLUTIONS
THE TIMETABLER Lesson 5, Page 93 of 194 VERSION 7TE
TEACHERS IN UNCOUNTED ORDER When the Replacement teachers are displayed in uncounted order, the teachers with the most underload (over a cycle) or in lieu (today) are placed at the top.
The U/C (T) column includes both the total number of uncounted replacements left to take for the current
cycle and the total number left to take today.
The total number of uncounted replacements left to take for the current cycle resets at the start of each
cycle. These dates were set in Parameters.
Note: The teachers are now sorted in order of the teachers with the
highest U/C (T).
The U/C column indicates the total number of
uncounted replacements left to take for today. This
resets daily.
Click on Uncounted Order, and then click on the Replaced by
column beside Mandy Rustle.

TIMETABLING SOLUTIONS
THE TIMETABLER Lesson 5, Page 94 of 194 VERSION 7TE
Note: The difference between U/C and U/C (T) columns. Look at the teacher, Simon Summersby. He has 2 cancelled lessons today
(indicated by red H’s) and so his uncounted lessons for today (in the U/C column) is 2.0 and his total uncounted lessons (in the U/C (T) column) is also 2.0.
Compare this to Sam Car, who is normally 2 periods under allotted and has 1.5 cancelled lessons today. This gives Sam a 1.5 in the U/C and 3.5 in U/C (T).
Double click to allocate the next replacement to
Sam Car
TIMETABLING SOLUTIONS
THE TIMETABLER Lesson 5, Page 95 of 194 VERSION 7TE
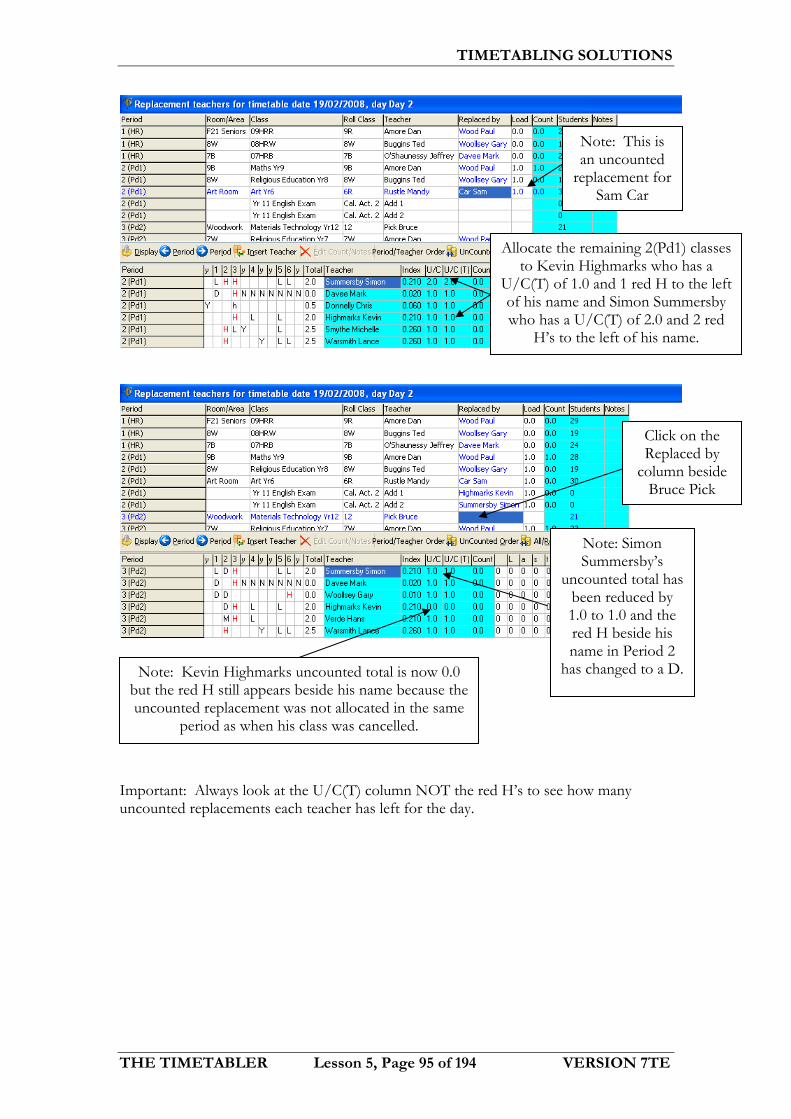
Important: Always look at the U/C(T) column NOT the red H’s to see how many uncounted replacements each teacher has left for the day.
Allocate the remaining 2(Pd1) classes to Kevin Highmarks who has a
U/C(T) of 1.0 and 1 red H to the left of his name and Simon Summersby who has a U/C(T) of 2.0 and 2 red
H’s to the left of his name.
Click on the Replaced by
column beside Bruce Pick
Note: This is an uncounted
replacement for Sam Car
Note: Kevin Highmarks uncounted total is now 0.0 but the red H still appears beside his name because the uncounted replacement was not allocated in the same
period as when his class was cancelled.
Note: Simon Summersby’s
uncounted total has been reduced by 1.0 to 1.0 and the red H beside his name in Period 2
has changed to a D.

TIMETABLING SOLUTIONS
THE TIMETABLER Lesson 5, Page 96 of 194 VERSION 7TE
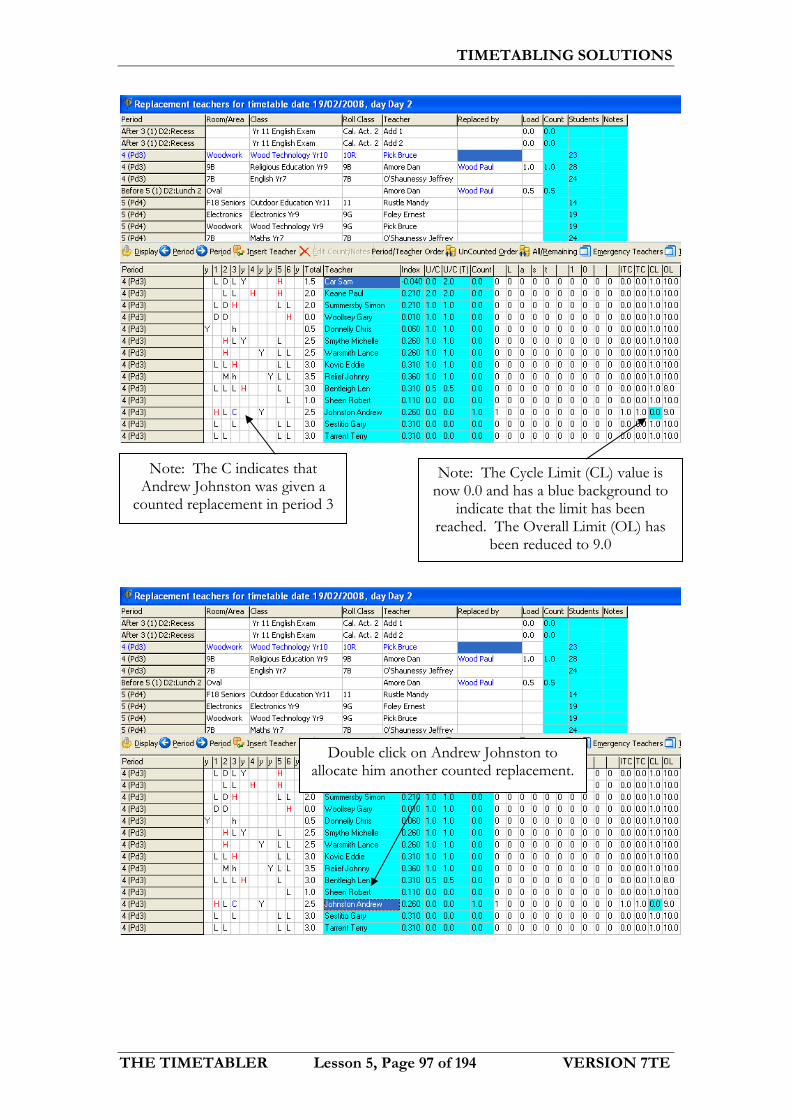
COUNTED REPLACEMENTS When you allocate a counted replacement to a teacher, the cycle limit and overall limit columns are automatically updated. If a teacher reaches their limit the background colour for the cell changes to blue.
Click in the next empty cell and double click to
allocate the next replacement class
to Andrew Johnston
Use the scroll bar in the top part of the screen to move down to a 4(Pd3) replacement class and
click on it
TIMETABLING SOLUTIONS
THE TIMETABLER Lesson 5, Page 97 of 194 VERSION 7TE
Note: The C indicates that Andrew Johnston was given a
counted replacement in period 3
Note: The Cycle Limit (CL) value is now 0.0 and has a blue background to
indicate that the limit has been reached. The Overall Limit (OL) has
been reduced to 9.0
Double click on Andrew Johnston to allocate him another counted replacement.

TIMETABLING SOLUTIONS
THE TIMETABLER Lesson 5, Page 98 of 194 VERSION 7TE
Replace all classes for the day using a combination of counted and uncounted
replacements.
When all replacement classes have been allocated use the scroll bar in the top part of the screen to go back to the first class.
Click All/Remaining
The top section of the screen is blank indicting that all classes have been allocated
Click All/Remaining
A message appears warning you that you are going to exceed his cycle limit.
Click Yes

TIMETABLING SOLUTIONS
THE TIMETABLER Lesson 5, Page 99 of 194 VERSION 7TE
LAST 10 DAYS The number of counted or uncounted extras done by a teacher over the last 10 days can be displayed.
The number of counted replacements done in the last 10 days is displayed.
The first column shows the number of counted replacements for today.
Click Display
Place a tick beside Display uncounted (on Last 10 days)
and click OK.

TIMETABLING SOLUTIONS
THE TIMETABLER Lesson 5, Page 100 of 194 VERSION 7TE
Note: The number of uncounted replacements done in the last 10 days is displayed under Last 10 (u).
The first column now shows the number of uncounted replacements for today.
Change the display back to counted

TIMETABLING SOLUTIONS
THE TIMETABLER Lesson 5, Page 101 of 194 VERSION 7TE
REPLACEMENT NOTES This allows the absent teacher to leave notes for the replacement teacher.
Backup your file as Lesson 5.dof
Click Save and Close
Double click in the Notes cell beside 9B Maths
Type LHS p90, RHS p91 and click OK


The Timetabler
Daily Organiser V7TE Lesson 6Reports
Check Teacher Changes Messages Bulletin

TIMETABLING SOLUTIONS
THE TIMETABLER Lesson 6, Page 104 of 194 VERSION 7TE
Lesson 6 CHECK The Check screen lists a number of items for your information. You should make sure there are no real problems before printing the Bulletin.
Open the file … My Documents\Timetable Training Data Overview\Daily Organiser Term 1.dof
Click Check
Check the replacements and changes carefully for
any problems.
Note: Any classes that you included in Parameters as not requiring supervisions
are listed here
Scroll down to the bottom of the screen
If you receive a Date Reminder, click OK
TIMETABLING SOLUTIONS
THE TIMETABLER Lesson 6, Page 105 of 194 VERSION 7TE
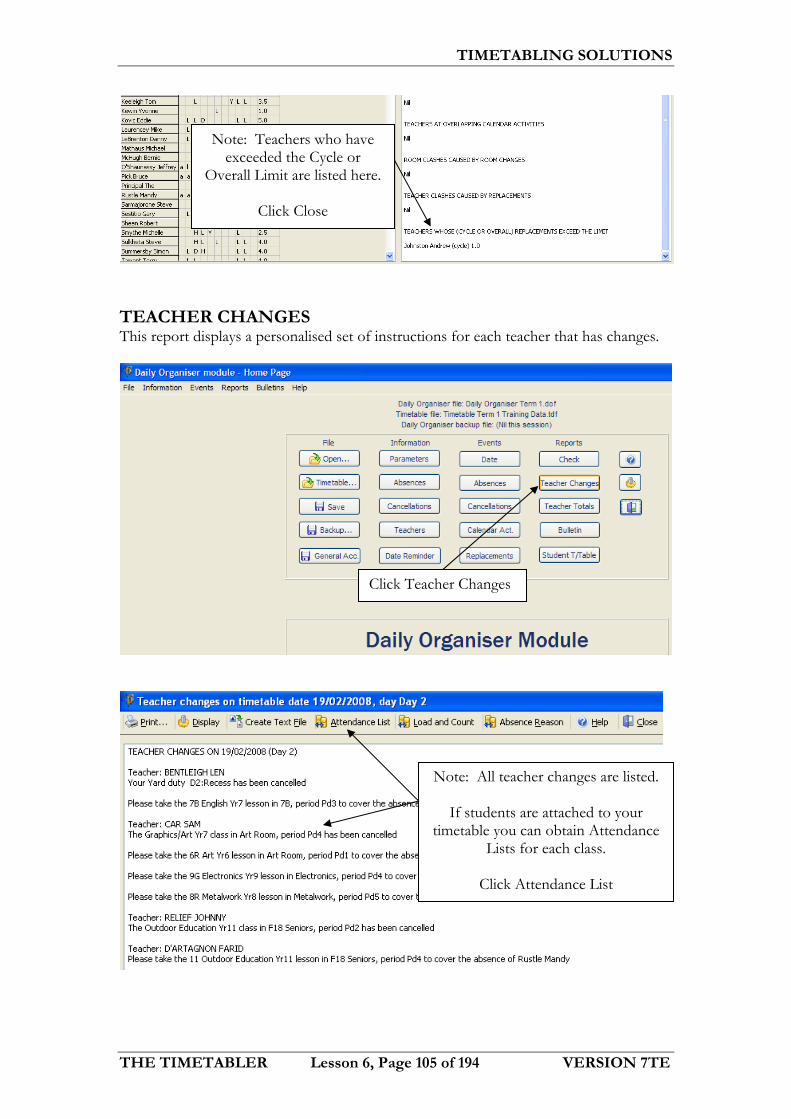
TEACHER CHANGES This report displays a personalised set of instructions for each teacher that has changes.
Click Teacher Changes
Note: All teacher changes are listed.
If students are attached to your timetable you can obtain Attendance
Lists for each class.
Click Attendance List
Note: Teachers who have exceeded the Cycle or
Overall Limit are listed here.
Click Close

TIMETABLING SOLUTIONS
THE TIMETABLER Lesson 6, Page 106 of 194 VERSION 7TE
MESSAGES This item provides the opportunity to add a text message to the bulletin.
Note: There are a number of Reports located on the Reports menu to provide
information relevant to your school.
On the Bulletins menu, click Messages
You will then see a class list for each replacement.
Click Close
TIMETABLING SOLUTIONS
THE TIMETABLER Lesson 6, Page 107 of 194 VERSION 7TE
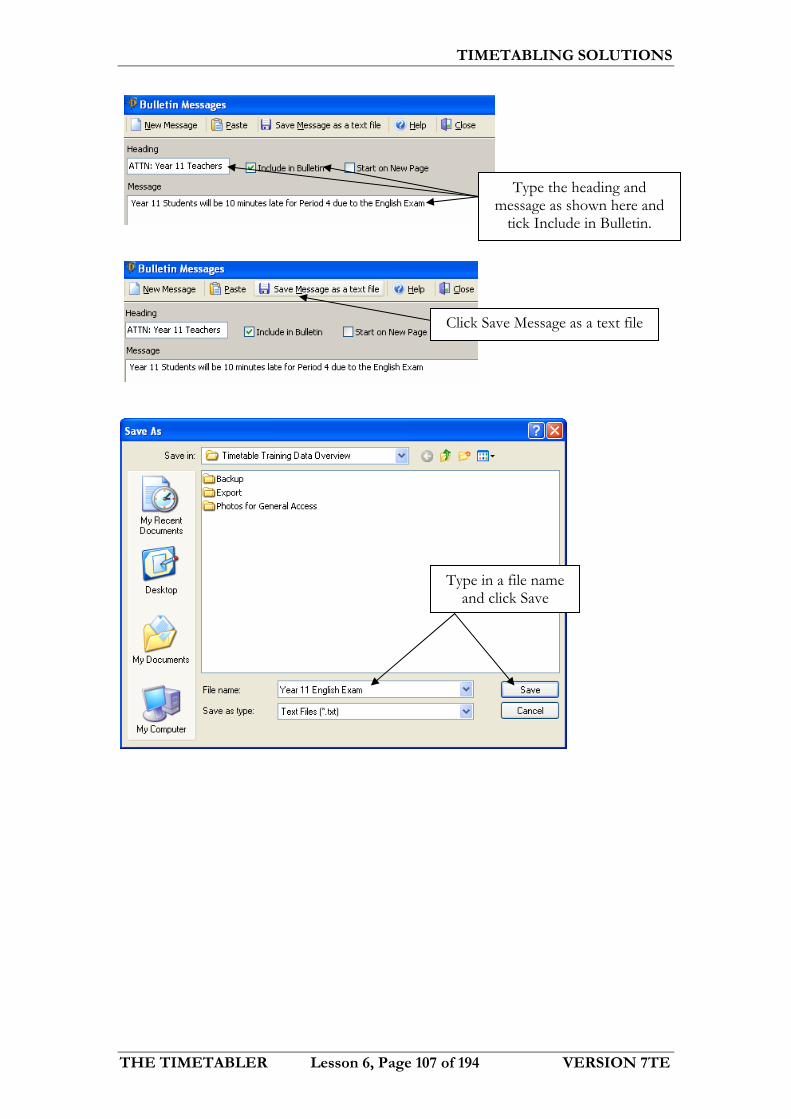
Type in a file name and click Save
Type the heading and message as shown here and
tick Include in Bulletin.
Click Save Message as a text file

TIMETABLING SOLUTIONS
THE TIMETABLER Lesson 6, Page 108 of 194 VERSION 7TE
BULLETIN A bulletin is a summary report you can post on a notice board or send to the General Access module.
Click Close
Click Bulletin

TIMETABLING SOLUTIONS
THE TIMETABLER Lesson 6, Page 109 of 194 VERSION 7TE
Click Yes
You will be able to easily edit the Bulletin using the Word
features.
Exit Word and do not save
Select the printer settings and tick the individual reports you would like
included on this Bulletin.
Click Word

TIMETABLING SOLUTIONS
THE TIMETABLER Lesson 6, Page 110 of 194 VERSION 7TE
Backup your file as Lesson 6.dof
Click Close

The Timetabler
Daily Organiser V7TE Lesson 7Teacher Totals
Teacher Totals Reports from One File
Totals for One Teacher Absences for Selected Teachers Replacements for Selected Teachers Absences for Selected Reasons Activities for Selected Reasons
Reports from More Than One File

TIMETABLING SOLUTIONS
THE TIMETABLER Lesson 7, Page 112 of 194 VERSION 7TE
Lesson 7 TEACHER TOTALS This item lists the number of absences, replacements etc. that have been taken by each teacher over a specified period of time in a specified file. This can be used to get a total report for one day from a single file or for a year or more from multiple files. REPORTS FROM ONE FILE In this case, we will look at the totals relating to the data from Term 4 Last Year.
Open the file … My Documents\Timetable Training Data Overview\Daily Organiser Term 1.dof
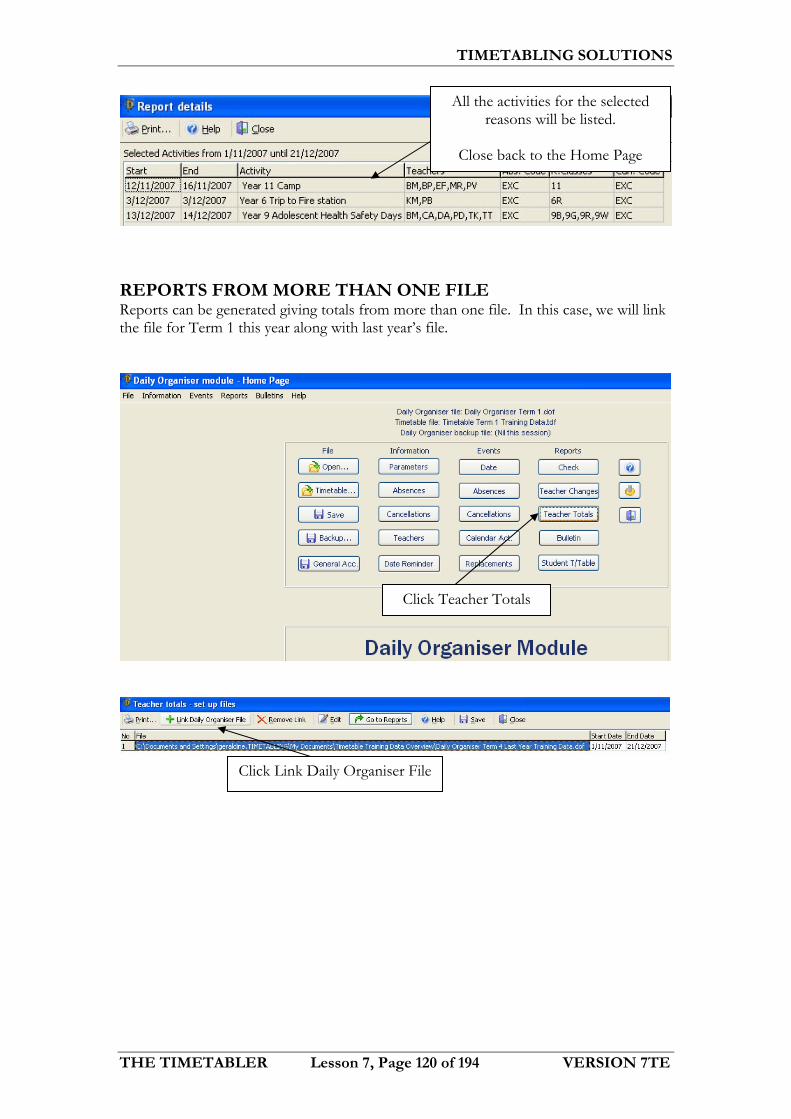
Click Link Daily Organiser File
Click Teacher Totals
If you receive a Date Reminder, click OK

TIMETABLING SOLUTIONS
THE TIMETABLER Lesson 7, Page 113 of 194 VERSION 7TE
The file you have linked will be displayed
Click Go to Reports
Select Daily Organiser Term 4 Last Year Training Data.dof
Click Open
Use the drop down arrows to define a date range for this file.
Enter the dates shown here
Click OK

TIMETABLING SOLUTIONS
THE TIMETABLER Lesson 7, Page 114 of 194 VERSION 7TE
TOTALS FOR ONE TEACHER The total absences or replacements for each teacher can be seen on the screen. To see the details, double click on the number. Alternatively, click on the number and click on the Teacher (Column) button.
Double click in the Periods Absent (T) column to see the
total absences for Dan Amore.
Periods Absent (C) shows only those absences that counted. Periods Absent (T) includes all absences.
The Days Absent indicates the number of days that
teacher was absent. Note: If a teacher is absent for 1 period on a day it is recorded as 1 day in this
column.
If prompted to save, click Yes
This displays all of the absences for Dan Amore for the selected time frame.
Click Close

TIMETABLING SOLUTIONS
THE TIMETABLER Lesson 7, Page 115 of 194 VERSION 7TE
ABSENCES FOR SELECTED TEACHERS A report of the absences for a particular group of teachers can be created.
Leave all staff in the Include column and
click OK.
This report shows absences for the selected teachers over the selected
time frame.
Click Close
To view details of absences for selected staff, click Absences.
TIMETABLING SOLUTIONS
THE TIMETABLER Lesson 7, Page 116 of 194 VERSION 7TE
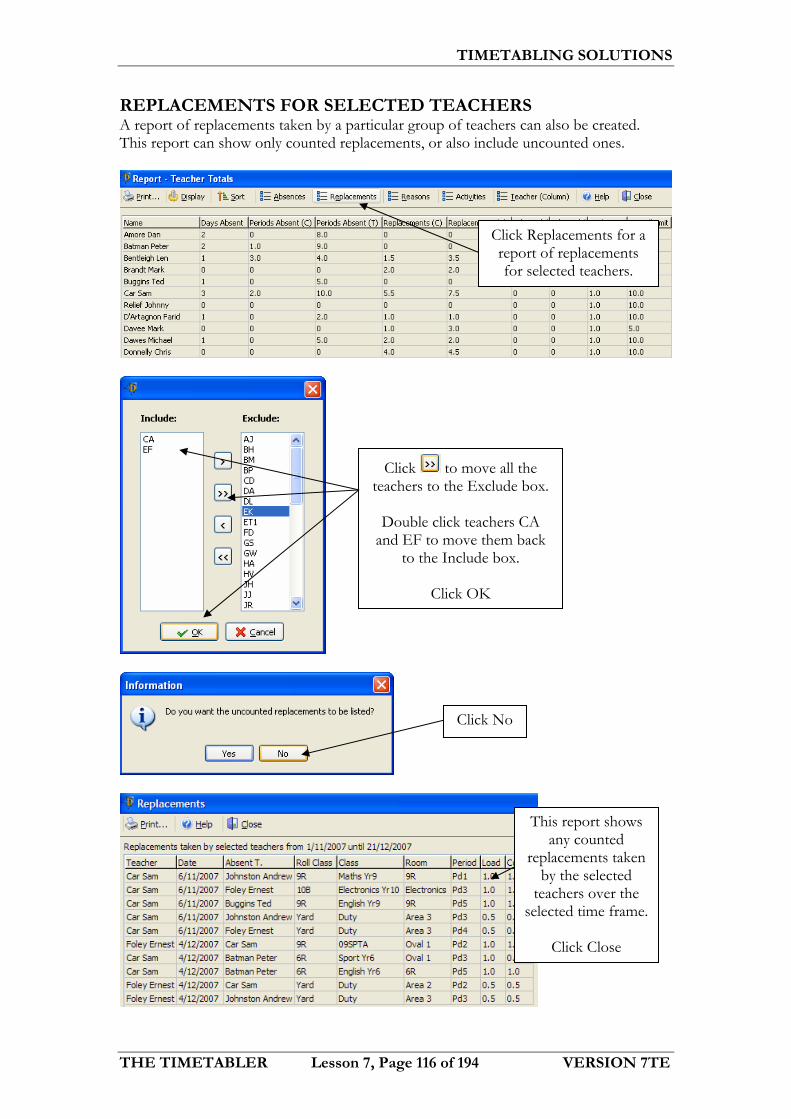
REPLACEMENTS FOR SELECTED TEACHERS A report of replacements taken by a particular group of teachers can also be created. This report can show only counted replacements, or also include uncounted ones.
Click to move all the teachers to the Exclude box.
Double click teachers CA
and EF to move them back to the Include box.
Click OK
Click No
Click Replacements for a report of replacements for selected teachers.
This report shows any counted
replacements taken by the selected
teachers over the selected time frame.
Click Close

TIMETABLING SOLUTIONS
THE TIMETABLER Lesson 7, Page 117 of 194 VERSION 7TE
Click to move all the teachers to the Exclude box.
Move teachers CA and EF back to the Include box.
Click OK
Click Yes
This report shows any counted and uncounted replacements taken by the selected teachers over the selected time frame.
Click Close
Click Replacements

TIMETABLING SOLUTIONS
THE TIMETABLER Lesson 7, Page 118 of 194 VERSION 7TE
ABSENCES FOR SELECTED REASONS It is also possible to create a report showing how many staff were absent for particular reasons.
All teachers that have been absent on excursions will be listed.
Click Close
Click Reasons to see a list of teachers absent for
selected reasons.
Click to move all the reasons to the Exclude column.
Double click EXC to move it to
the Include column and click OK.

TIMETABLING SOLUTIONS
THE TIMETABLER Lesson 7, Page 119 of 194 VERSION 7TE
ACTIVITIES FOR SELECTED REASONS A report showing the activities for particular reasons can also be generated.
Click Yes
All the teacher absence reasons will be listed. Leave all the reasons in the Include
column and click OK.
All the lesson cancellation reasons will be listed. Leave all the reasons in the Include
column and click OK.
Click Activities to see a report of activities for selected reasons.
TIMETABLING SOLUTIONS
THE TIMETABLER Lesson 7, Page 120 of 194 VERSION 7TE
REPORTS FROM MORE THAN ONE FILE Reports can be generated giving totals from more than one file. In this case, we will link the file for Term 1 this year along with last year’s file.
Click Link Daily Organiser File
Click Teacher Totals
All the activities for the selected reasons will be listed.
Close back to the Home Page

TIMETABLING SOLUTIONS
THE TIMETABLER Lesson 7, Page 121 of 194 VERSION 7TE
Select Daily Organiser Term 1.dof
Click Open
Use the drop down arrows to define a date range for
this file.
Select a start date two weeks in the past and an
end date two weeks in the future from the drop down
lists.
Click OK
The file you have linked will be displayed.
Click Go to Reports

TIMETABLING SOLUTIONS
THE TIMETABLER Lesson 7, Page 122 of 194 VERSION 7TE
Any report you choose now will include data from both of the files that you have linked
Backup your file as Lesson 7.dof
If prompted to save, click Yes
Double click in the Days Absent column to see the total absences
for Dan Amore.
Note: The list now includes data from both Daily Organiser files.
Click Close

The Timetabler
Daily Organiser V7TE Lesson 8Student Activities
Calendar Activities Activities Involving a Roll Class
Assign Students to Activity Allocate Remaining Students to Other Classes View Student Lesson Changes Student Timetable
Activities Involving an Elective Class
View Student Lesson Changes Lesson Cancellations
Student Totals

TIMETABLING SOLUTIONS
THE TIMETABLER Lesson 8, Page 124 of 194 VERSION 7TE
Lesson 8 CALENDAR ACTIVITIES Calendar Activities are used to manage student excursions. As well as cancelling classes and allocating teachers which has been previously covered, you can also organise which students are attending; allocate students not attending to other classes and print modified timetables for them. ACTIVITIES INVOLVING A ROLL CLASS Enter details of the activity such as day and date, roll class attending, teachers attending and classes that need to be cancelled.
Open the file … My Documents\Timetable Training Data Overview\Daily Organiser Term 1.dof
Click Calendar Act.
Note: There have already been two calendar activities added to the file: the 7R trip to the Zoo and the Year 11 English Exam
If you receive a Date Reminder, click OK

TIMETABLING SOLUTIONS
THE TIMETABLER Lesson 8, Page 125 of 194 VERSION 7TE
ASSIGN STUDENTS TO ACTIVITY If the entire Roll Class is not attending the activity, the details of the students who are attending the activity can be entered. In this exercise, not all students will be attending the 7R Zoo Trip.
Select the particular excursion, in this case 7R Zoo Trip.
Click OK
Click Add Activity and Students to select the students going on this excursion.
Click anywhere on the 7R Zoo Trip excursion (Calendar Activity 1) and
click Assign Students.

TIMETABLING SOLUTIONS
THE TIMETABLER Lesson 8, Page 126 of 194 VERSION 7TE
The students from the Roll Class 7R are displayed in the
Exclude column.
Double click or use the arrows to move
students who are going on this excursion into the Include column. Leave the 6 students
that appear here in the Exclude column.
Click OK
A summary of the students going on the excursion to the Zoo is displayed.
Click Save and close back to the Home Page
TIMETABLING SOLUTIONS
THE TIMETABLER Lesson 8, Page 127 of 194 VERSION 7TE
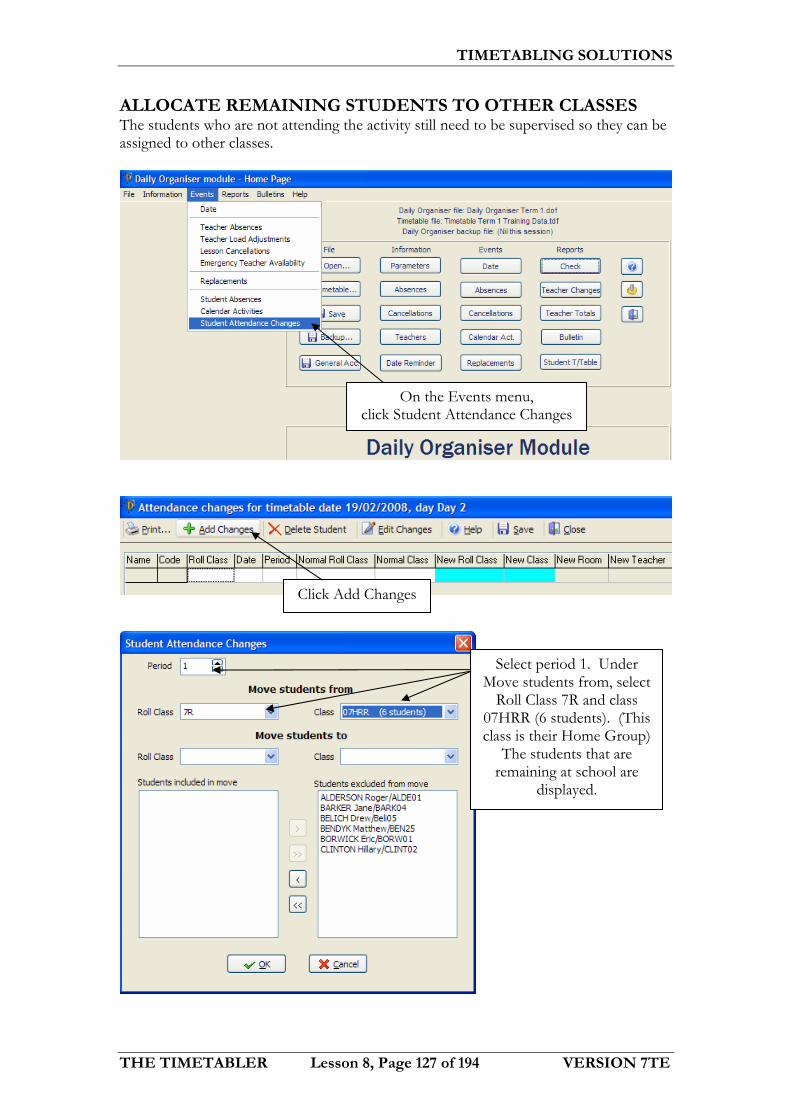
ALLOCATE REMAINING STUDENTS TO OTHER CLASSES The students who are not attending the activity still need to be supervised so they can be assigned to other classes.
Click Add Changes
Select period 1. Under Move students from, select
Roll Class 7R and class 07HRR (6 students). (This class is their Home Group)
The students that are remaining at school are
displayed.
On the Events menu, click Student Attendance Changes

TIMETABLING SOLUTIONS
THE TIMETABLER Lesson 8, Page 128 of 194 VERSION 7TE
These changes need to be done on a period by period basis, class by class.
A summary of student class changes is displayed.
Click Save and Close
Under Move students to, select the Roll Class and Class that you want to move these students to. In this case, there are 6 students from 07HRR that will now be in 07HRW (7W Home Group) for
period 1.
Double click or use the arrows to move students from the Exclude column to the Include column.
Click OK
TIMETABLING SOLUTIONS
THE TIMETABLER Lesson 8, Page 129 of 194 VERSION 7TE
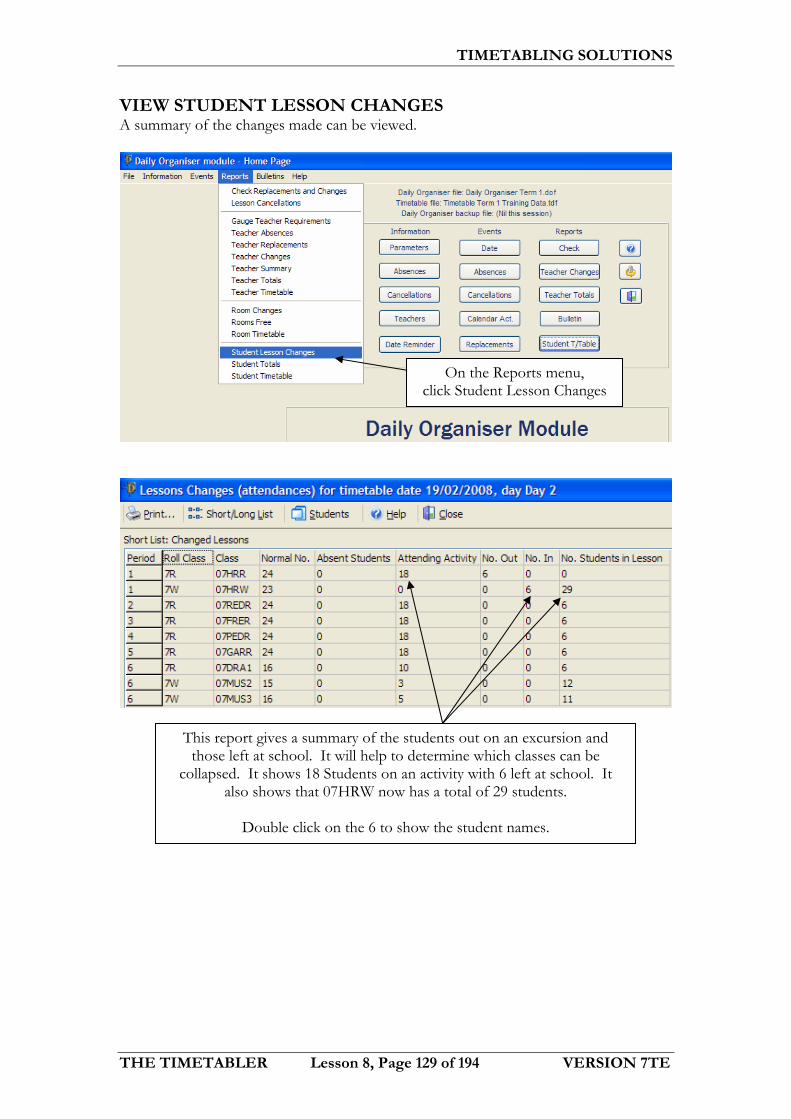
VIEW STUDENT LESSON CHANGES A summary of the changes made can be viewed.
On the Reports menu, click Student Lesson Changes
This report gives a summary of the students out on an excursion and those left at school. It will help to determine which classes can be
collapsed. It shows 18 Students on an activity with 6 left at school. It also shows that 07HRW now has a total of 29 students.
Double click on the 6 to show the student names.

TIMETABLING SOLUTIONS
THE TIMETABLER Lesson 8, Page 130 of 194 VERSION 7TE
It is also possible to produce a class roll for the class that has had students moved into it.
This shows the 6 students that are
going into 07HRW.
Click Close
Double click on the 29
In the Number of additional columns
field type 5
Click Print

TIMETABLING SOLUTIONS
THE TIMETABLER Lesson 8, Page 131 of 194 VERSION 7TE
Click Preview
The list of students attending 07HRW is
displayed
Close back to the Home Page

TIMETABLING SOLUTIONS
THE TIMETABLER Lesson 8, Page 132 of 194 VERSION 7TE
STUDENT TIMETABLE This function is also available in the General Access module for all staff to use.
This displays the names of all students.
Type the first three letters of the student’s name to bring them to the top of the list, in
this case ALD
Double click on Roger ALDERSON
The change of class is displayed
Click Close
Click Student T/Table

TIMETABLING SOLUTIONS
THE TIMETABLER Lesson 8, Page 133 of 194 VERSION 7TE
ACTIVITIES INVOLVING ELECTIVE CLASSES A similar procedure is followed when the class attending the activity is an elective class rather than an entire Roll Class.
Click Calendar Act.
Click Add Activity
Use the drop down lists to enter the details as displayed here using
next Tuesday’s date. Note: Do not select
Cancel lessons.
Click OK

TIMETABLING SOLUTIONS
THE TIMETABLER Lesson 8, Page 134 of 194 VERSION 7TE
Double click in the Teachers cell
Include the teacher JJ and click OK
Click Save then double click in the Roll Classes cell
Include the Roll Class 12 and click OK
Click OK

TIMETABLING SOLUTIONS
THE TIMETABLER Lesson 8, Page 135 of 194 VERSION 7TE
Click on the 12ENGB Theatre Excursion and
click OK
Click Add Activity and Students
Click Assign Students

TIMETABLING SOLUTIONS
THE TIMETABLER Lesson 8, Page 136 of 194 VERSION 7TE
Select Class
A drop down box called
Select a Class will appear
Using the drop down menu, click 12ENGB
The 25 students studying
12ENGB are now included
Click OK
Note: The Yr12 students are added
below the Yr7 activity
Click Close

TIMETABLING SOLUTIONS
THE TIMETABLER Lesson 8, Page 137 of 194 VERSION 7TE
VIEW STUDENT LESSON CHANGES The summary of the changes made can be viewed to determine if any classes can be cancelled or collapsed.
Click Save and Close
Note: In period 1 the 25 students attending the 12ENGB Excursion have come from 4 different classes.
On the Reports menu, click Student Lesson Changes
However, in period 4 the 25 students have come from the same
class, 12ENGB.
The No. of Students in Lesson column
can be used to decide whether classes
should be collapsed
Click Close

TIMETABLING SOLUTIONS
THE TIMETABLER Lesson 8, Page 138 of 194 VERSION 7TE
LESSON CANCELLATIONS The class 12ENGB and any other classes that are being collapsed need to be cancelled manually. This is done in Lesson Cancellations.
Click EXC (Excursion) and click OK
Click Save and Close
Click Cancellations
Double click on the class 12ENGB

TIMETABLING SOLUTIONS
THE TIMETABLER Lesson 8, Page 139 of 194 VERSION 7TE
STUDENT TOTALS Student totals can be used to view a summary or list of students’ attendance at activities on a Roll Class or individual student basis.
Click Link Daily Organiser File
Click on Daily Organiser Term 1.dof
Click Open
On the Reports menu, click Student Totals

TIMETABLING SOLUTIONS
THE TIMETABLER Lesson 8, Page 140 of 194 VERSION 7TE
The Student Totals screen is displayed
Double click on 108 in the Activities column
Click Yes
Select the range of dates. In this case, next Tuesday’s date.
Click OK
Click Go to Reports

TIMETABLING SOLUTIONS
THE TIMETABLER Lesson 8, Page 141 of 194 VERSION 7TE
Backup your file as Lesson 8.dof
Select Paul Crouch and click OK
A summary of all Paul Crouch’s activities is displayed
Close back to the Home Page


The Timetabler
Daily Organiser V7TE Lesson 9Setting up for Next Term, Semester or Year
Creating a New File Link to the Timetable Import Parameters Reopen Daily Organiser File

TIMETABLING SOLUTIONS
THE TIMETABLER Lesson 9, Page 144 of 194 VERSION 7TE
Lesson 9 CREATING A NEW FILE It is recommended that a new Daily Organiser file be started for each term, semester or year depending on the size of your school. As reports can be generated across a number of files, it is not necessary to keep all of the information for the year in a single Daily Organiser file.
Open the file … My Documents\Timetable Training Data Overview\Daily Organiser Term 1.dof
On the File menu, click New
If you receive a Date Reminder, click OK
TIMETABLING SOLUTIONS
THE TIMETABLER Lesson 9, Page 145 of 194 VERSION 7TE
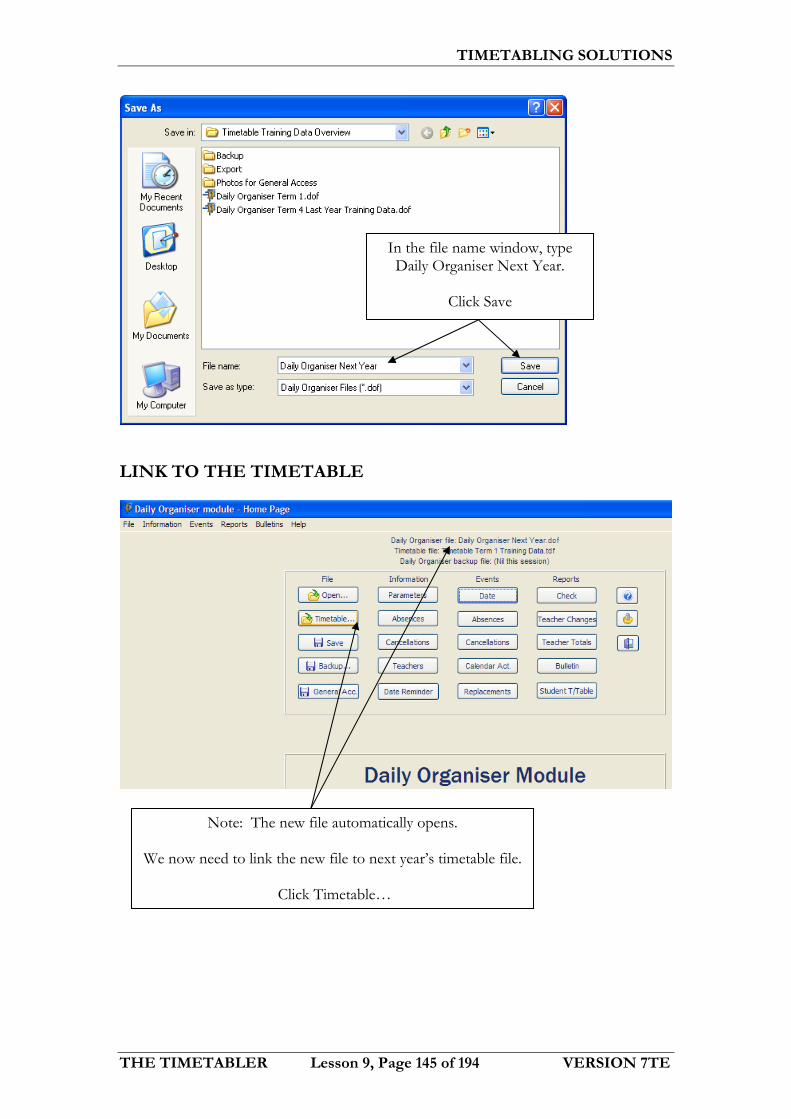
LINK TO THE TIMETABLE
In the file name window, type Daily Organiser Next Year.
Click Save
Note: The new file automatically opens.
We now need to link the new file to next year’s timetable file.
Click Timetable…

TIMETABLING SOLUTIONS
THE TIMETABLER Lesson 9, Page 146 of 194 VERSION 7TE
We are now linked to the new timetable file
Select the file Timetable May Training Data.tdf
Click Open

TIMETABLING SOLUTIONS
THE TIMETABLER Lesson 9, Page 147 of 194 VERSION 7TE
IMPORT PARAMETERS Information that has been entered in another Daily Organiser file can be imported. That is, Start Dates, Unsupervised Lessons, Absence Reasons and Cancellation Reasons. Emergency Teachers and Relief Teachers are also imported along with any details entered on the teachers screen in the previous Daily Organiser file. This includes address details, whether staff are eligible for extras and their number of uncounted and counted replacements. It is important to check that the teacher information is still correct for the new file. For example, a teacher that was underload this year may not be underload next year and their uncounted replacements value needs to be changed.
On the file menu, click Import Parameters…
Select the file Daily Organiser
Term 1.dof
Click Open
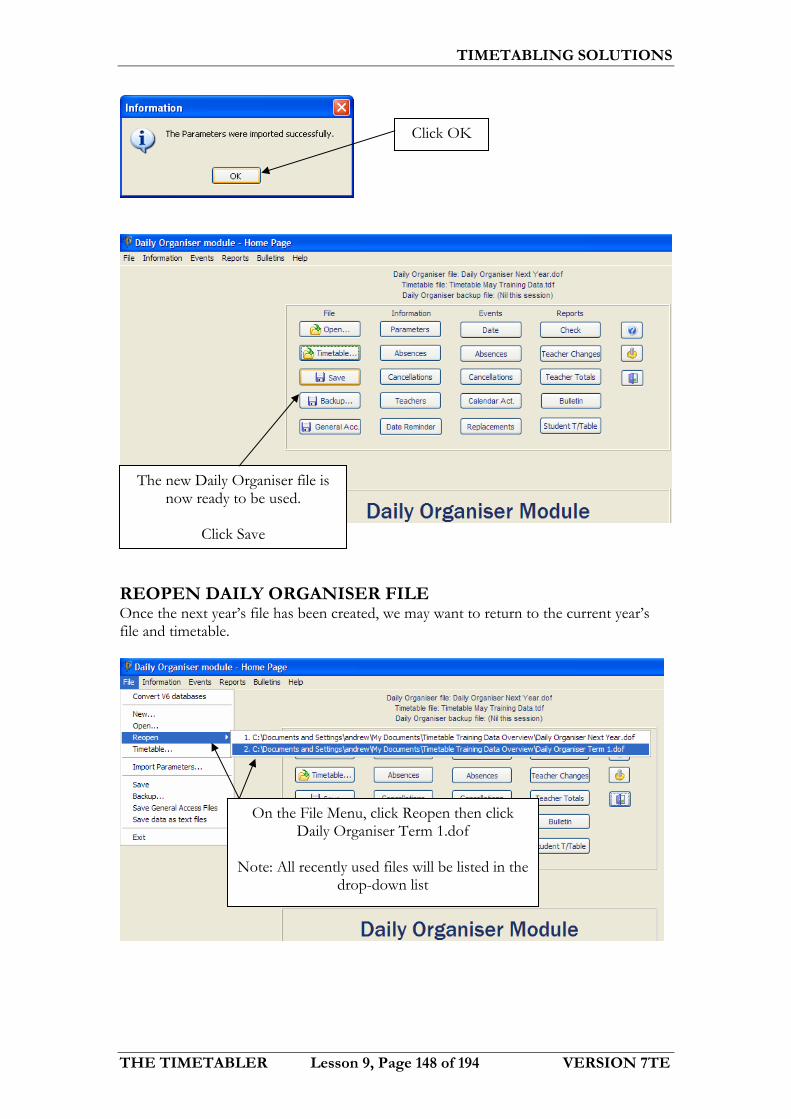
TIMETABLING SOLUTIONS
THE TIMETABLER Lesson 9, Page 148 of 194 VERSION 7TE
REOPEN DAILY ORGANISER FILE Once the next year’s file has been created, we may want to return to the current year’s file and timetable.
Click OK
The new Daily Organiser file is now ready to be used.
Click Save
On the File Menu, click Reopen then click Daily Organiser Term 1.dof
Note: All recently used files will be listed in the
drop-down list

TIMETABLING SOLUTIONS
THE TIMETABLER Lesson 9, Page 149 of 194 VERSION 7TE
Backup your file as Lesson 9.dof
If the date reminder appears, click OK
Check that the timetable date
is next Tuesday’s date
and that the Timetable day
is Day 2


General Access V7TE

The Timetabler
General Access V7TE Lesson 1Setting Up General Access
Install Configure General Access Open Configure General Access
Set Program Location Set Data Location Change Display Settings Change Printer Settings Change Photo Settings Copy Program File and Create Desktop Shortcut
Save General Access Files from Timetable Development Save General Access Files from Daily Organiser Accessing General Access from all Computers on your Network

TIMETABLING SOLUTIONS
THE TIMETABLER Lesson 1, Page 154 of 194 VERSION 7TE
Lesson 1 INSTALL CONFIGURE GENERAL ACCESS General Access is installed separately from The Timetabler Version 7TE and the settings are entered through Configure General Access. This is located on the Version 7TE CD. Note, Configure General Access needs to be installed on ONLY ONE computer in your school. We recommend that it is installed on the computer used by the Timetabler OR Daily Organiser. Load the CD in your CD drive and the installation screen will appear.
Click Install General Access
Click Next

TIMETABLING SOLUTIONS
THE TIMETABLER Lesson 1, Page 155 of 194 VERSION 7TE
Select I accept the terms of the license agreement
and click Next.
Click Install
Untick Launch General Access for The Timetabler
Version 7TE and click Finish.

TIMETABLING SOLUTIONS
THE TIMETABLER Lesson 1, Page 156 of 194 VERSION 7TE
OPEN CONFIGURE GENERAL ACCESS If Configure General Access has already been installed, you can access the program from the Start menu.
Click All Programs
Click Timetabling Solutions
Click Start

TIMETABLING SOLUTIONS
THE TIMETABLER Lesson 1, Page 157 of 194 VERSION 7TE
SET PROGRAM LOCATION The first item to specify in Configure General Access is the program location. This will be a shared folder on the school network. In this example, we are going to configure General Access to the C drive.
Click Configure General Access
Click on the folder icon to browse for the program location.
Note: You must browse for the
folder, you cannot type the path in the Program Location box.
Click The Timetabler Version 7TE

TIMETABLING SOLUTIONS
THE TIMETABLER Lesson 1, Page 158 of 194 VERSION 7TE
Click My Documents, Timetable Training Data Overview and then click
Make New Folder.
The Program Location has been set.
Type General Access and click OK.

TIMETABLING SOLUTIONS
THE TIMETABLER Lesson 1, Page 159 of 194 VERSION 7TE
SET DATA LOCATION It is also necessary to specify the data location. This will also be a shared folder on your school network. We recommend having the program and the data in the same location.
Click My Documents, Timetable Training Data Overview and then
click General Access.
Click OK
Click on the folder icon to browse for the data location.
Note: You must browse for the
folder, you cannot type the path in the Data Location box.

TIMETABLING SOLUTIONS
THE TIMETABLER Lesson 1, Page 160 of 194 VERSION 7TE
The Data Location has
been set.

TIMETABLING SOLUTIONS
THE TIMETABLER Lesson 1, Page 161 of 194 VERSION 7TE
CHANGE DISPLAY SETTINGS There are a number of options for displaying information in General Access which can be set by the user.
The settings selected here will be the default displays for timetables
and for students.
Individual users can change their own settings but they will revert to the defaults set here each time
they open General Access.
Click Display Settings

TIMETABLING SOLUTIONS
THE TIMETABLER Lesson 1, Page 162 of 194 VERSION 7TE
CHANGE PRINTER SETTINGS The printer settings are for the fonts that are used in all printouts in General Access.
Click Printer Settings
The settings selected here will be the default fonts for any
printouts from General Access.
Individual users can change their own settings but they will revert to the defaults set here each time
they open General Access.

TIMETABLING SOLUTIONS
THE TIMETABLER Lesson 1, Page 163 of 194 VERSION 7TE
CHANGE PHOTO SETTINGS It is possible to link teacher and student photos to the General Access module. When an individual timetable is selected, the photo of that person will appear on the screen. There is also the facility to print class lists to Excel with student photos. Note: the photos need to be named with the code of the teacher or student and the file type must be JPEG. For example, a student with the code WOOD01 would have a student photo, WOOD01.jpg. The photos should be stored in a shared network folder but in this example, we will select a folder on the C drive.
Click Photo Settings
Click on the folder icon to browse for the photo
location.
Note: You must browse for the folder, you cannot type
the path in the Photo Location box.

TIMETABLING SOLUTIONS
THE TIMETABLER Lesson 1, Page 164 of 194 VERSION 7TE
Click on My Documents
Click on Photos for General Access
and click OK.
Click on Timetable Training Data Overview

TIMETABLING SOLUTIONS
THE TIMETABLER Lesson 1, Page 165 of 194 VERSION 7TE
COPY PROGRAM FILE AND CREATE DESKTOP SHORTCUT These two steps need to be completed after all other settings have been entered.
Click Folder Locations
The Photo Location has been set. Note:
There are other display settings for photos for
you to select.

TIMETABLING SOLUTIONS
THE TIMETABLER Lesson 1, Page 166 of 194 VERSION 7TE
Note, each time you run a General Access update you will need to recopy the program file to your network location in Configure General Access.
Click OK
Click Copy Program File

TIMETABLING SOLUTIONS
THE TIMETABLER Lesson 1, Page 167 of 194 VERSION 7TE
Click OK
Click Create Desktop Shortcut
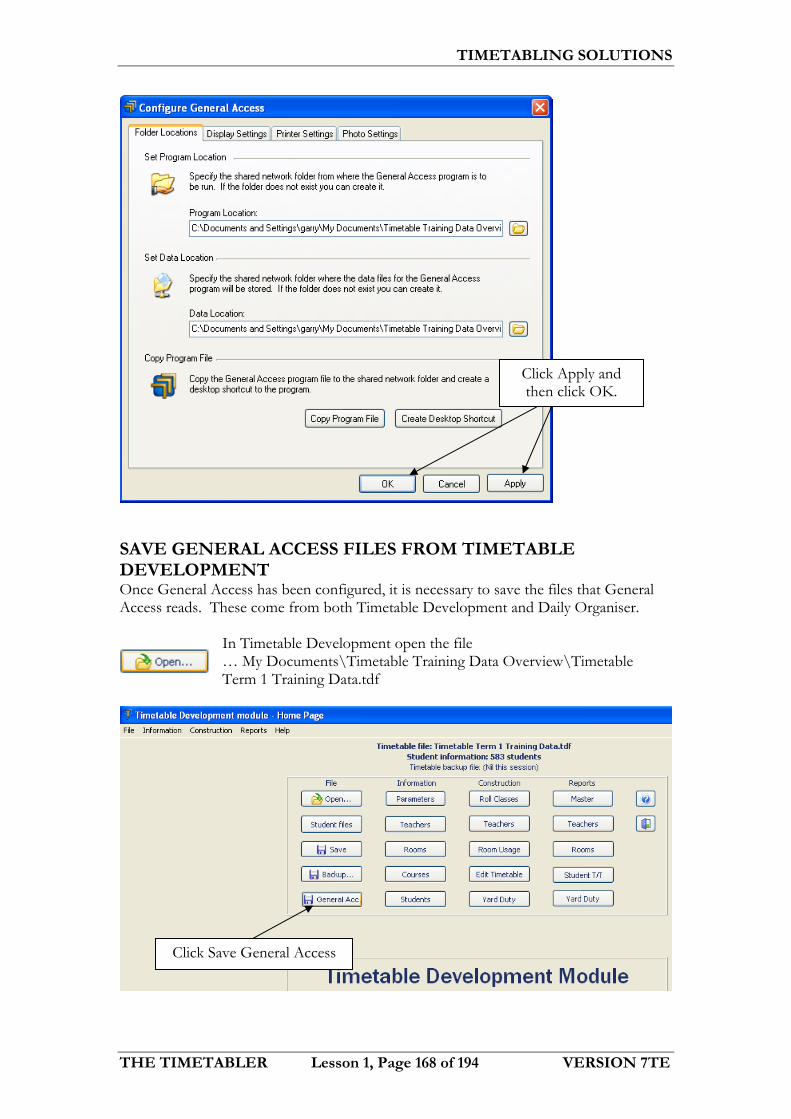
TIMETABLING SOLUTIONS
THE TIMETABLER Lesson 1, Page 168 of 194 VERSION 7TE
SAVE GENERAL ACCESS FILES FROM TIMETABLE DEVELOPMENT Once General Access has been configured, it is necessary to save the files that General Access reads. These come from both Timetable Development and Daily Organiser.
In Timetable Development open the file … My Documents\Timetable Training Data Overview\Timetable Term 1 Training Data.tdf
Click Apply and then click OK.
Click Save General Access

TIMETABLING SOLUTIONS
THE TIMETABLER Lesson 1, Page 169 of 194 VERSION 7TE
The data location specified in Configure General Access will appear.
Click OK
A message will indicate that the files have been saved.
Click OK
Exit the program

TIMETABLING SOLUTIONS
THE TIMETABLER Lesson 1, Page 170 of 194 VERSION 7TE
SAVE GENERAL ACCESS FILES FROM DAILY ORGANISER General Access files must also be saved from Daily Organiser so that today’s changes can be seen by all staff.
In Daily Organiser open the file … My Documents\Timetable Training Data Overview\Daily Organiser Term 1.dof
Ensure that you are looking at next
Tuesday’s date and Day 2.
Click OK
Click Date
Click OK

TIMETABLING SOLUTIONS
THE TIMETABLER Lesson 1, Page 171 of 194 VERSION 7TE
The data location specified in Configure General Access will appear.
Click OK
Click Bulletin
Click Save General Access
A message will indicate that the files have been saved.
Click OK

TIMETABLING SOLUTIONS
THE TIMETABLER Lesson 1, Page 172 of 194 VERSION 7TE
ACCESSING GENERAL ACCESS FROM ALL COMPUTERS ON YOUR NETWORK The General Access module can provide read only access to student, teacher and room timetables on all computers connected to your network. To allow access your Information Systems Manager will need to place a shortcut to the TTFind.exe program (located in the Program Location you set previously in Configure General Access) on all computers on the network that you wish to have General Access.
Click Word
Note: The Word document opens. This has been automatically saved to
your General Access folder.
Close back to the Home Page then exit the program.
Click Yes

The Timetabler
General Access V7TE Lesson 2Using General Access
Open General Access View Teacher Timetable for Cycle Create Excel Lesson List with Photos Change Display Settings for Timetables View Teacher Timetable for Today View Student Timetable for Today Create List of Students View All Teacher Replacements for Today

TIMETABLING SOLUTIONS
THE TIMETABLER Lesson 2, Page 174 of 194 VERSION 7TE
Lesson 2 OPEN GENERAL ACCESS
Double click on the shortcut to General Access
on your desktop
The buttons on the second row access information related to
the whole cycle, from Timetable Development
The top row of buttons access information related
to today, from Daily Organiser
The General Access module will open
The following message
appears because we exported next Tuesday’s data
If you correctly export the current day’s data, you do
not get this message
Click OK

TIMETABLING SOLUTIONS
THE TIMETABLER Lesson 2, Page 175 of 194 VERSION 7TE
VIEW TEACHER TIMETABLE FOR CYCLE Individual teacher timetables can be viewed in the General Access module.
Click Teacher Timetable
The bottom two rows of buttons access various information from both Daily Organiser and Timetable Development. There is also the facility to read Word
files or Excel files saved in the General Access data location and to generate various student lists
The Display settings are the two buttons on the left hand side of the bottom row.

TIMETABLING SOLUTIONS
THE TIMETABLER Lesson 2, Page 176 of 194 VERSION 7TE
Paul Downey’s timetable is displayed with his photo at the top.
Double click on Day 2, Pd1 Science to view the Lesson List.
Select Paul Downey and click OK

TIMETABLING SOLUTIONS
THE TIMETABLER Lesson 2, Page 177 of 194 VERSION 7TE
CREATE EXCEL LESSON LIST WITH PHOTOS When photos are linked to General Access, lesson lists with student photos can be created.
Click Print
Change the Size to Quarter
Click Excel Photo

TIMETABLING SOLUTIONS
THE TIMETABLER Lesson 2, Page 178 of 194 VERSION 7TE
An Excel file of the class with any photos that are present is generated.
Close out of Excel without Saving.
Change the Photo Size back to Eighth
Click Close

TIMETABLING SOLUTIONS
THE TIMETABLER Lesson 2, Page 179 of 194 VERSION 7TE
CHANGE DISPLAY SETTINGS FOR TIMETABLES The display settings can be changed from the timetable screen or from the Home Page.
Untick the top three items so codes will be
displayed
Click OK
Click Close
Click Timetable

TIMETABLING SOLUTIONS
THE TIMETABLER Lesson 2, Page 180 of 194 VERSION 7TE
VIEW TEACHER TIMETABLE FOR TODAY
Codes are now displayed for classes
and rooms.
Click Close
Click Find Teacher

TIMETABLING SOLUTIONS
THE TIMETABLER Lesson 2, Page 181 of 194 VERSION 7TE
Scroll to the bottom of the list and select Paul Wood (an emergency teacher).
Click OK
Paul Wood’s timetable is displayed. Note: Codes are displayed for classes,
rooms and teachers
Click All Attendance Lists
The attendance lists for Paul Wood’s classes are displayed and could be
printed.
Click Close

TIMETABLING SOLUTIONS
THE TIMETABLER Lesson 2, Page 182 of 194 VERSION 7TE
VIEW STUDENT TIMETABLE FOR TODAY
Click Close
Click Find Student
Select Roger ALDERSON
Click OK

TIMETABLING SOLUTIONS
THE TIMETABLER Lesson 2, Page 183 of 194 VERSION 7TE
Roger Alderson’s timetable is displayed.
Note: Codes are displayed for classes, rooms and teachers
Click Timetable
Select Full Teacher, Subject and Room Names
Click OK
Click Close

TIMETABLING SOLUTIONS
THE TIMETABLER Lesson 2, Page 184 of 194 VERSION 7TE
CREATE LIST OF STUDENTS Student lists can be created based on any information that is entered in The Timetabler. For example, a list of all the girls in Year 12 that are in Blue House could be created.
Select Gender, Year Level and House
and then click OK.
Click Students
Click Student Lists

TIMETABLING SOLUTIONS
THE TIMETABLER Lesson 2, Page 185 of 194 VERSION 7TE
All students are included initially.
Check that the Incl is selected
as we are going to include students who are Female with
Year Level 12 and whose House is BLUE. Anyone else
will be excluded.
Select Gender and F from the drop down list.
All Males are now excluded.
Note: There are 193 female students in the school.
Select Year Level and 12 from the drop down list.

TIMETABLING SOLUTIONS
THE TIMETABLER Lesson 2, Page 186 of 194 VERSION 7TE
14 students are left in the Include column.
Click OK
Note: There are 61 female students in Yr12.
Select House and BLUE from the drop down list.

TIMETABLING SOLUTIONS
THE TIMETABLER Lesson 2, Page 187 of 194 VERSION 7TE
VIEW ALL TEACHER REPLACEMENTS FOR TODAY
This list of the female Year 12 students in Blue House could be printed.
Click Close
Click Bulletin Items
Click Teacher Replacements and click OK

TIMETABLING SOLUTIONS
THE TIMETABLER Lesson 2, Page 188 of 194 VERSION 7TE
The teacher replacements for today are displayed
Click Close
Click Exit

The Timetabler
Glossary V7TE
Glossary

TIMETABLING SOLUTIONS
THE TIMETABLER Glossary, Page 190 of 194 VERSION 7TE
GLOSSARY
Banding A blocking arrangement which allows students to rotate around different classes. This can be described as a timetable within the main timetable. Students are divided into secondary core groups.
Block A group of subjects that are timetabled at the same time. Often referred to as a line. These may be option choices (electives), streamed classes, a band or simultaneous groups that are divided on the basis of sex, eg Physical Education.
Calendar Activity An event involving students or staff, eg, an excursion or a teacher absence.
Card Same as Class Group. Used to refer to pieces of cardboard that timetablers would use to represent classes, blocks, lines, teachers and rooms. These pieces of card would be colour coded to represent different faculties. The timetable would be constructed by placing these pieces of card on a pin board. The Timetabler is based on this process.
Clash Two or more groups/cards that have been allocated at the same time, which share a common teacher or room.
Clash Matrix A two dimensional display showing the potential clashes of teachers, rooms or room usage records (RURs) applicable to each pair of roll classes. The Timetabler has a function which will quickly determine any impossible teacher or room allocations.
Class The division of a subject into one or more groups of students. Multiple classes are often distinguished using a suffix, eg, ENGa, ENGb, ENGc, etc.
Compromise A change in the staffing, room or curriculum in order to make progress with the timetable construction.
Conflict Matrix A two dimensional display showing the student conflicts applicable to each pair of subjects if those subjects were put on the same line.
Constraint A restriction placed on the construction of a timetable, eg, requirement for a specialist room or the availability of a part time teacher, or the only time sport may be held.
Construction Term used to describe the process of developing a timetable. Sometimes called allocating or scheduling.
Core Subjects The part of the curriculum which is compulsory for all students (as distinct from options or electives).

TIMETABLING SOLUTIONS
THE TIMETABLER Glossary, Page 191 of 194 VERSION 7TE
Courses The curriculum of a roll class including the subjects, teachers and rooms for the cycle.
Course Group See Course.
Curriculum The structure of subjects or classes of study that is arranged by the school, to be staffed, roomed and timetabled.
Cycle The number of days a timetable runs before repeating, eg, 5 day cycle, 10 day cycle.
Database A database is a collection of information that's related to a particular subject or purpose. For example, one database in the Student Options module can represent the whole school, a Year Level or a Roll Class. Although there can be many student database files, a student should be in only one database file. In the Timetable Development module, one database can represent the Term 1 Timetable.
Degrees of Freedom A measure of the difficulty of placing a group or a card. The Timetabler (using the Look ahead test) calculates the most difficult card or group placement at any particular time. This should be scheduled before other cards or groups. This is sometimes referred to as flexibility or tightness.
Double Two periods of a subject allocated on a day that are consecutive.
Double sighting Two periods of a subject allocated on a day that are not consecutive.
Elective A non compulsory subject that students can choose or elect to study.
Emergency Teacher A teacher that is employed on a casual basis to take lessons of staff that are absent.
Exam File Often called an Exam Grid. It is the process of using Grid or Elective lines as the basis for an Exam timetable. Each elective line represents an Exam time period.
File A database.
Floating Day An unspecified day off for a part time teacher.
Global Entry A function in Student Options that enables all students to be assigned a subject on the basis of Year level, Roll Class, Gender, House or Home Group.

TIMETABLING SOLUTIONS
THE TIMETABLER Glossary, Page 192 of 194 VERSION 7TE
Grid A Grid is a series of blocks or lines of subjects that are grouped together to accommodate student subject choices. Subjects that are in a particular block or line will run together and thus students can only choose ONE subject from a block or line. These lines can be called elective lines, grid lines or blocks.
Grid Create A function in Student Options that creates a set of grid lines automatically so that as many students as possible can study as many of their subject choices as possible. This can be based on many factors such as: Joins, Exclusive joins and Resource constraints.
Grid Line A group of subjects that occur on the timetable at the same time. Sometimes referred to as a block or line.
Interactive Assign Manually assigning student preferences to classes.
Lesson See Period.
Line See Grid Line.
Look ahead test A function in Timetable Development which considers all constraints and determines the most difficult card or group to schedule. It also calculates if a card placement makes the remaining scheduling impossible.
Meeting A timetabled activity that involves teachers but not students.
Multi-Campus A school can be split into different sites in different locations. Usually the Senior school residing on one campus and the Junior school on another campus. The person who constructs the timetable needs to take into account staff and students who move between campuses, as there is travel time involved. The Timetabler assists with the placement of cards, taking into account the movement of teachers and student between campuses.
Multi-Lesson Group (MLG) A group with more than one class.
Multi-Roll Class Group (MRCG) A group that involves more than one Roll Class.
Option A subject which a student nominates as a preference, i.e., not compulsory. Also referred to as an elective subject. Student Options can prioritise these options.
Period A time slot within a day where subjects are allocated.
Preference A student's choice of an option (non-compulsory subject) usually placed in order of highest to lowest priority.

TIMETABLING SOLUTIONS
THE TIMETABLER Glossary, Page 193 of 194 VERSION 7TE
Prerequisite The requirement necessary to study a particular subject.
Replacement An extra duty assigned to a teacher to replace the absence of another teacher.
Reserve Preference An alternate or backup subject choice of a student which is a lower priority than other preferences.
Resource Constraint Usually refers to teachers or rooms which will effect the construction of elective lines in Student Options. For example, a resource constraint of 1 science lab will mean only one science subject per elective line is possible.
Restrict Assign A function in Student Options that enables a set of rules to be defined before students are assigned into classes. For example, students can be allocated to 2 or less Art subjects. This is a higher priority than any preference order a student may have asked for.
Roll Class A Roll Class is a particular group of students who are timetabled together for more than one class. Often at higher Year levels the Roll Class is the same as the Year level. For example, Year 12 is the same as Roll Class 12. However, at lower year levels this is often not the case. A Roll Class is sometimes referred to as a form or core group.
Room Usage Record (RUR) A rule which governs how a room or a group of rooms is utilised. These rules can be prioritised. The rule can have classes or teachers as its focus.
Scheduling Term used to describe the process of developing a timetable. Often called Construction.
Semester Half of a school year.
Single Class Group A group or card with a single subject. Sometimes called a Single Lesson Group.
Single Lesson Group (SLG) See Single Class Group.
Sites When a school's grounds are split into two or more parts, often referred to as campuses. Sometimes staff are required to commute between these sites and will require time to do so.
Skew A function in Timetable Development which measures the extent to which individual staff are allocated subjects on the timetable, biased to particular days. In a 10 day cycle, the skew function also measures the bias between weeks.

TIMETABLING SOLUTIONS
THE TIMETABLER Glossary, Page 194 of 194 VERSION 7TE
Split Double A double which runs over a recess or lunch break.
Spread (daily) Refers to whether subjects are timetabled on the basis of singles, doubles, triples or quadruples. The Timetabler indicates a spread problem when this can not be achieved. For example, a school requires classes to be timetabled using singles. When one class needs a double this is a spread problem.
Spread (over timetable cycle) Typically the way a class is spread over a 2 week cycle, eg 5 periods week 1 and 5 periods week 2. The Timetabler will indicate a spread problem if there is 3 periods week 1 and 7 periods week 2.
Streaming A block or line of the same subject where students are arranged into classes according to their ability. This is sometimes called ability grouping or setting.
Sub-grid A grid that is split into more than one part. This is used to control student elective choices over multiple semesters, terms or years.
Subject An area of study which may be compulsory (core) or optional (elective).
Tagging Arranging classes in a line or block into sub categories. Students are only allowed to be placed in classes from a particular sub category. Each sub category is connected with another sub category from another line.
Tightening Decrease in the Degrees of Freedom, usually caused by defining more constraints.
Units The weighting of an option or subject.
Unscheduled Duty A duty a teacher or staff member undertakes that is not timetabled, but is part of their teaching load. Eg Head of Arts, Co-ordinator of Yr10.
Zip File A database that is compressed to reduce the size of a file in order to transfer the data via email or disk etc