Embed Size (px)
Citation preview
SANDIA REPORT SAND2013-4029 Unlimited Release Printed May 2013
DAKOTA JAGUAR 3.0 User's Manual Brian M. Adams Lara Bauman Ethan Chan Sophia Lefantzi Joseph Ruthruff Prepared by Sandia National Laboratories Albuquerque, New Mexico 87185 and Livermore, California 94550
Sandia National Laboratories is a multi-program laboratory managed and operated by Sandia Corporation, a wholly owned subsidiary of Lockheed Martin Corporation, for the U.S. Department of Energy's National Nuclear Security Administration under contract DE-AC04-94AL85000. Approved for public release; further dissemination unlimited.

Issued by Sandia National Laboratories, operated for the United States Department of Energy by Sandia Corporation. NOTICE: This report was prepared as an account of work sponsored by an agency of the United States Government. Neither the United States Government, nor any agency thereof, nor any of their employees, nor any of their contractors, subcontractors, or their employees, make any warranty, express or implied, or assume any legal liability or responsibility for the accuracy, completeness, or usefulness of any information, apparatus, product, or process disclosed, or represent that its use would not infringe privately owned rights. Reference herein to any specific commercial product, process, or service by trade name, trademark, manufacturer, or otherwise, does not necessarily constitute or imply its endorsement, recommendation, or favoring by the United States Government, any agency thereof, or any of their contractors or subcontractors. The views and opinions expressed herein do not necessarily state or reflect those of the United States Government, any agency thereof, or any of their contractors. Printed in the United States of America. This report has been reproduced directly from the best available copy. Available to DOE and DOE contractors from U.S. Department of Energy Office of Scientific and Technical Information P.O. Box 62 Oak Ridge, TN 37831 Telephone: (865) 576-8401 Facsimile: (865) 576-5728 E-Mail: [email protected] Online ordering: http://www.osti.gov/bridge Available to the public from U.S. Department of Commerce National Technical Information Service 5285 Port Royal Rd. Springfield, VA 22161 Telephone: (800) 553-6847 Facsimile: (703) 605-6900 E-Mail: [email protected] Online order: http://www.ntis.gov/help/ordermethods.asp?loc=7-4-0#online
3
SAND2013-4029 Unlimited Release Printed May 2013
DAKOTA JAGUAR 3.0 USER’S MANUAL
Brian M. Adams Lara Bauman Ethan Chan
Sophia Lefantzi Joseph Ruthruff
Optimization and Uncertainty Quantification
Sandia National Laboratories P.O. Box 5800
Albuquerque, NM 87185-MS1318
Quantitative Modeling and Analysis Sandia National Laboratories
P.O. Box 969 Livermore, CA 94551-MS9155
Abstract
JAGUAR (JAva GUi for Applied Research) is a Java software tool providing an advanced text editor and graphical user interface (GUI) to manipulate DAKOTA (Design Analysis Kit for Optimization and Terascale Applications) input specifications. This document
focuses on the features necessary to use JAGUAR.

4
5
CONTENTS
1: Introduction ................................................................................................................................. 7
2: Downloading and Installing JAGUAR ........................................................................................... 9
3: Running JAGUAR for the First Time ........................................................................................... 11
4: Text Editors ................................................................................................................................ 15
5: Graphical Editors ........................................................................................................................ 21
6: DAKOTA Execution ..................................................................................................................... 29
7: Visualization ............................................................................................................................... 33
8: Sensitivity Analysis Wizard ......................................................................................................... 37
9: DAKOTA Study Wizard ............................................................................................................... 41
10: Generating Input Files from Templates ................................................................................... 45
11: JAGUAR Brief Usage Tutorial ................................................................................................... 47
12: Troubleshooting ....................................................................................................................... 53
Distribution .................................................................................................................................... 54
FIGURES
Figure 1: File listing for JAGUAR installation package .................................................................... 10
Figure 2: JAGUAR Welcome screen ............................................................................................... 11
Figure 3: Preferences for file locations and user interface behavior ............................................. 12
Figure 4: A sample JAGUAR cheatsheet. ........................................................................................ 12
Figure 5: JAGUAR text editor ......................................................................................................... 15
Figure 6: Warnings and errors in the text editor ........................................................................... 16
Figure 7: Keyword tooltip example ................................................................................................ 16
Figure 8: Autocompleting an existing keyword ............................................................................. 16
Figure 9: Autocompleting from scratch ......................................................................................... 16
Figure 10: Keywords valid at different levels ................................................................................. 17
Figure 11: Effect of automatic text formatting ........................................................................... 18
Figure 12: Compacting top‐level sections ...................................................................................... 19
Figure 13: “Define Problem” portion of the JAGUAR graphical editor .......................................... 21
Figure 14: Content selected from left is displayed on the right .................................................... 22
Figure 15: A hierarchy of possible configurable settings for MODEL. ........................................... 22
Figure 16: Display of elements from a selected strategy instance. ............................................... 23
Figure 17: Different element types in JAGUAR. ............................................................................. 23
Figure 18 Method category drop down list and corresponding method choices ......................... 24
Figure 19: JAGUAR toolbar for running DAKOTA or toggling several options ............................... 24
Figure 20: Documentation/Reference ........................................................................................... 25
6
Figure 21: Example of whole line and trailing comments in the source view ............................... 25
Figure 22: An in‐line comment rendered in GUI ............................................................................ 26
Figure 23: JAGUAR with push‐up elements enabled (default) ...................................................... 26
Figure 24: JAGUAR with push‐up elements disabled ..................................................................... 27
Figure 25: JAGUAR not hiding disabled elements .......................................................................... 27
Figure 26: JAGUAR hiding disabled elements ................................................................................ 27
Figure 27: The JAGUAR “Execute Problem” tab for running DAKOTA. .......................................... 29
Figure 28: Running DAKOTA .......................................................................................................... 30
Figure 29: Manual override DAKOTA command ............................................................................ 31
Figure 30: Visualize DAKOTA output results and charts ................................................................ 33
Figure 31: Iteration History Plots ................................................................................................... 34
Figure 32: Input/Output Scatter Plots ........................................................................................... 34
Figure 33: DAKOTA run status, tabular graphic file and export options ........................................ 35
Figure 34: The splash page for the JAGUAR Sensitivity Analysis Wizard. ...................................... 37
Figure 35: Pre‐run phase: variables specification .......................................................................... 38
Figure 36: Pre‐run phase: run matrix and save options................................................................. 39
Figure 37: Specifying the DAKOTA input file and data file for post‐run mode. ............................. 40
Figure 38: Open As Plain Text ........................................................................................................ 41
Figure 39: Creating parameter from file ........................................................................................ 41
Figure 40: Specifying parameter name .......................................................................................... 41
Figure 41: Parameter replacement ................................................................................................ 42
Figure 42: DAKOTA study wizard ................................................................................................... 42
Figure 43: Specifying the variable types ........................................................................................ 43
Figure 44: Characterizing variables ................................................................................................ 43
Figure 45: DAKOTA Study Template .............................................................................................. 44
Figure 46: Scheduling Scheme ....................................................................................................... 44
Figure 47: A list of DAKOTA input file templates available in JAGUAR. ......................................... 45
Figure 48: Specifying a location for saving an input file generated from a template. ................... 46
Figure 49: JAGUAR Save As Template window. ............................................................................. 46
Figure 50: Sample JAGUAR Preferences for tutorial. ..................................................................... 47
Figure 51: Filtered list of DAKOTA input file templates ................................................................. 48
Figure 52: rosenbrock_2d input file ............................................................................................... 49
Figure 53: “Updated” rosenbrock_2d template input file after using the format option ............. 50
Figure 54: Ctrl‐Space Auto‐completing keywords in the text editor. ............................................ 50
Figure 55: Text error detailed message. ........................................................................................ 51
Figure 56: Text editor auto‐completion of partial words. ............................................................. 51
Figure 57: Rosenbrock Fixed DAKOTA Template. .......................................................................... 52
Figure 58: Enabling JAGUAR Error Log. .......................................................................................... 53
7
1: Introduction
JAGUAR (JAva GUi for Applied Research) is a Java software tool for automatically rendering a
graphical user interface (GUI) from a structured input specification. The dynamically‐generated
interface enables users to create, edit, and externally execute analysis application input files and
then view the results. JAGUAR is built on top of the Eclipse Framework as an Eclipse Rich Client
(http://wiki.eclipse.org/Rich_Client_Platform/FAQ) product, providing it the look, feel, and
features of Eclipse Applications.
JAGUAR serves as a GUI for DAKOTA (Design Analysis Kit for Optimization and Terascale
Applications). It parses a DAKOTA NIDR (New Input Deck Reader) input specification and
presents the user with linked graphical and plain text representations of problem set‐up and
option specification for DAKOTA studies. After the data have been input by the user, JAGUAR
generates one or more input files for DAKOTA; it can also execute DAKOTA, capturing and
(eventually) interpreting the results.
JAGUAR 3.0 is available in 32‐ and 64‐bit platforms for Windows, Mac (Intel processors), and
Linux. JAGUAR’s core source and binary distributions are under the Eclipse Public License 1.0.
Feature changelog
Jaguar 3.0
Added support for DAKOTA 5.3
DAKOTA study wizard using aprepro variable parameterization. Job submission
integration on select JAGUAR distributions.
Visualize tabular graphics file through graphical charts and exporting to Excel
Outline views allows easy reordering of sections and grammar view for quick lookup
Expanded online and local support for DAKOTA documentation location
Jaguar 2.1
Added support for DAKOTA 5.2
Synchronized autocompleting text and hierarchical graphical editors with error checking
Cheatsheets to demonstrate the flow of creating an input deck from scratch
Templates for the most common DAKOTA studies
Sensitivity analysis wizard to quickly generate a screening study
Ability to launch DAKOTA to check input decks or perform complete studies
Help links to the DAKOTA reference manual for most keywords
Automatic updating to work with your installed version of DAKOTA (5.0 or newer)

8
9
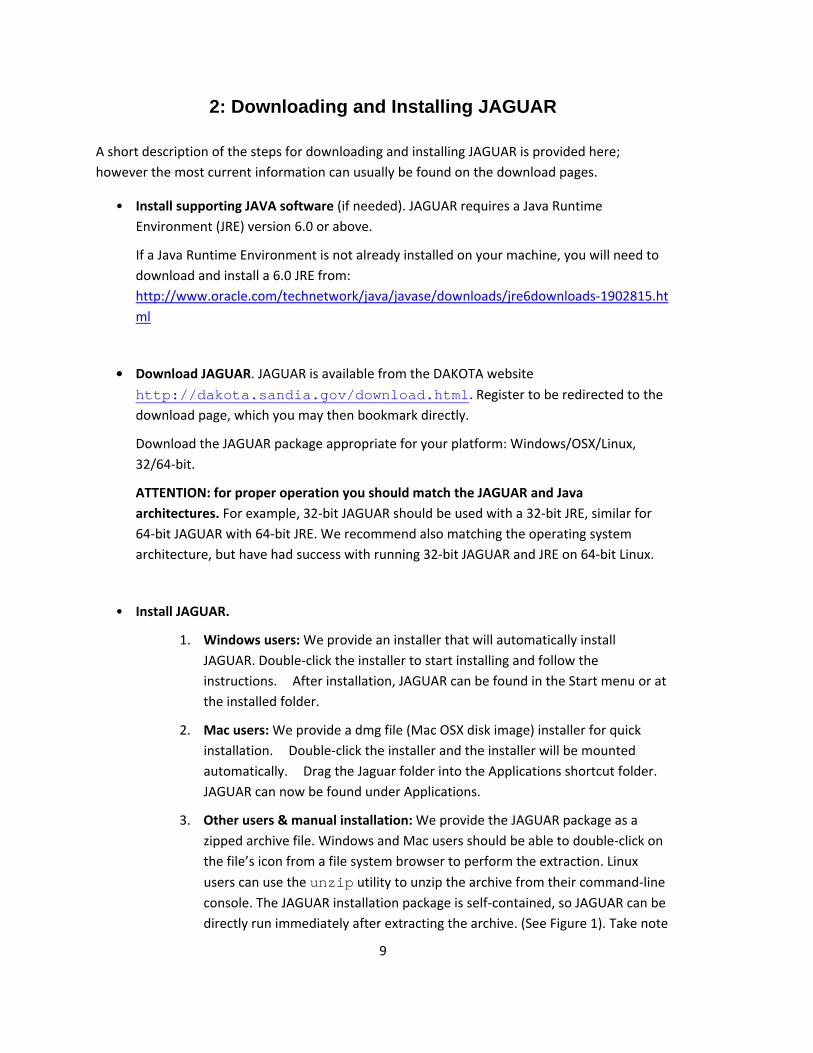
2: Downloading and Installing JAGUAR
A short description of the steps for downloading and installing JAGUAR is provided here;
however the most current information can usually be found on the download pages.
• Install supporting JAVA software (if needed). JAGUAR requires a Java Runtime
Environment (JRE) version 6.0 or above.
If a Java Runtime Environment is not already installed on your machine, you will need to
download and install a 6.0 JRE from:
http://www.oracle.com/technetwork/java/javase/downloads/jre6downloads‐1902815.ht
ml
• Download JAGUAR. JAGUAR is available from the DAKOTA website
http://dakota.sandia.gov/download.html. Register to be redirected to the download page, which you may then bookmark directly.
Download the JAGUAR package appropriate for your platform: Windows/OSX/Linux,
32/64‐bit.
ATTENTION: for proper operation you should match the JAGUAR and Java
architectures. For example, 32‐bit JAGUAR should be used with a 32‐bit JRE, similar for
64‐bit JAGUAR with 64‐bit JRE. We recommend also matching the operating system
architecture, but have had success with running 32‐bit JAGUAR and JRE on 64‐bit Linux.
• Install JAGUAR.
1. Windows users: We provide an installer that will automatically install
JAGUAR. Double‐click the installer to start installing and follow the
instructions. After installation, JAGUAR can be found in the Start menu or at
the installed folder.
2. Mac users: We provide a dmg file (Mac OSX disk image) installer for quick
installation. Double‐click the installer and the installer will be mounted
automatically. Drag the Jaguar folder into the Applications shortcut folder.
JAGUAR can now be found under Applications.
3. Other users & manual installation: We provide the JAGUAR package as a
zipped archive file. Windows and Mac users should be able to double‐click on
the file’s icon from a file system browser to perform the extraction. Linux
users can use the unzip utility to unzip the archive from their command‐line
console. The JAGUAR installation package is self‐contained, so JAGUAR can be
directly run immediately after extracting the archive. (See Figure 1). Take note
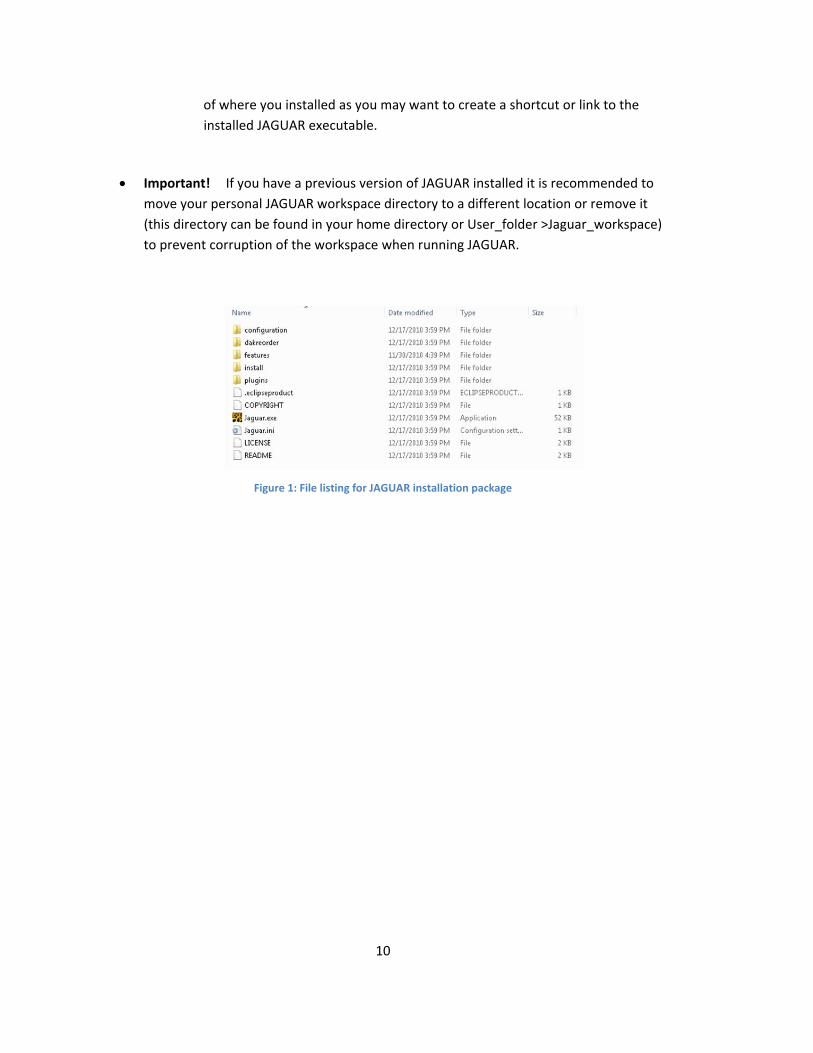
10
of where you installed as you may want to create a shortcut or link to the
installed JAGUAR executable.
Important! If you have a previous version of JAGUAR installed it is recommended to
move your personal JAGUAR workspace directory to a different location or remove it
(this directory can be found in your home directory or User_folder >Jaguar_workspace)
to prevent corruption of the workspace when running JAGUAR.
Figure 1: File listing for JAGUAR installation package
11
3: Running JAGUAR for the First Time
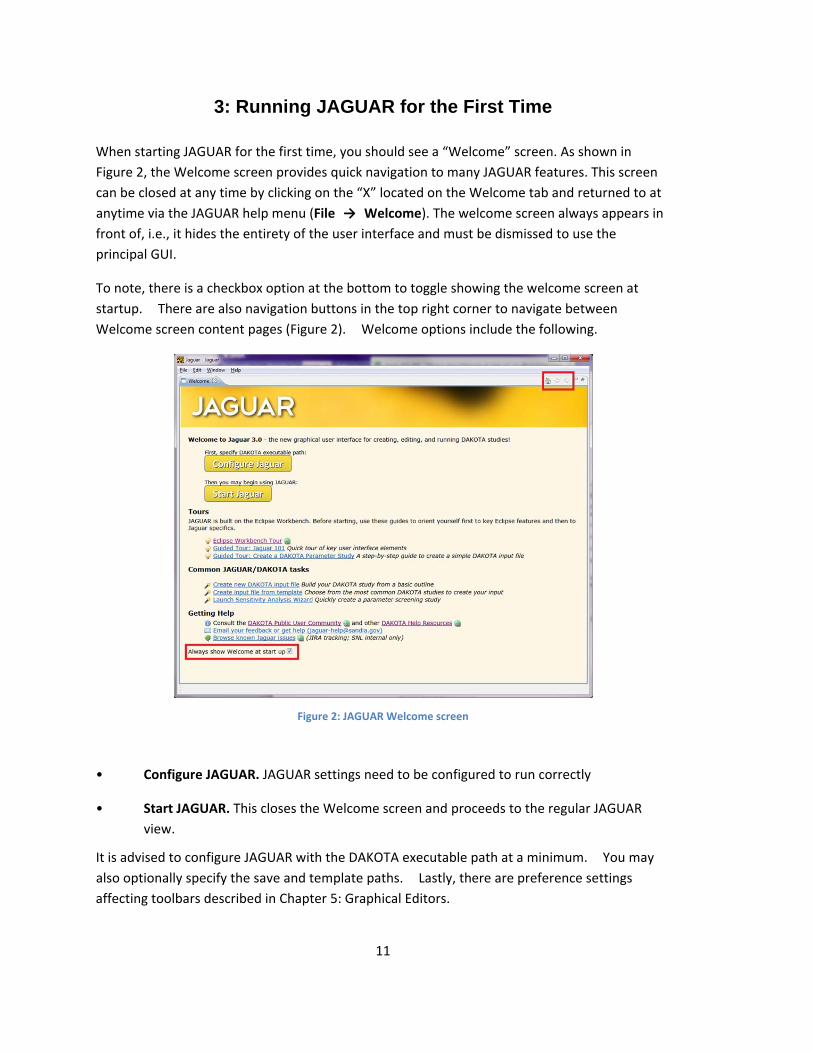
When starting JAGUAR for the first time, you should see a “Welcome” screen. As shown in
Figure 2, the Welcome screen provides quick navigation to many JAGUAR features. This screen
can be closed at any time by clicking on the “X” located on the Welcome tab and returned to at
anytime via the JAGUAR help menu (File → Welcome). The welcome screen always appears in
front of, i.e., it hides the entirety of the user interface and must be dismissed to use the
principal GUI.
To note, there is a checkbox option at the bottom to toggle showing the welcome screen at
startup. There are also navigation buttons in the top right corner to navigate between
Welcome screen content pages (Figure 2). Welcome options include the following.
Figure 2: JAGUAR Welcome screen
• Configure JAGUAR. JAGUAR settings need to be configured to run correctly
• Start JAGUAR. This closes the Welcome screen and proceeds to the regular JAGUAR
view.
It is advised to configure JAGUAR with the DAKOTA executable path at a minimum. You may
also optionally specify the save and template paths. Lastly, there are preference settings
affecting toolbars described in Chapter 5: Graphical Editors.
12
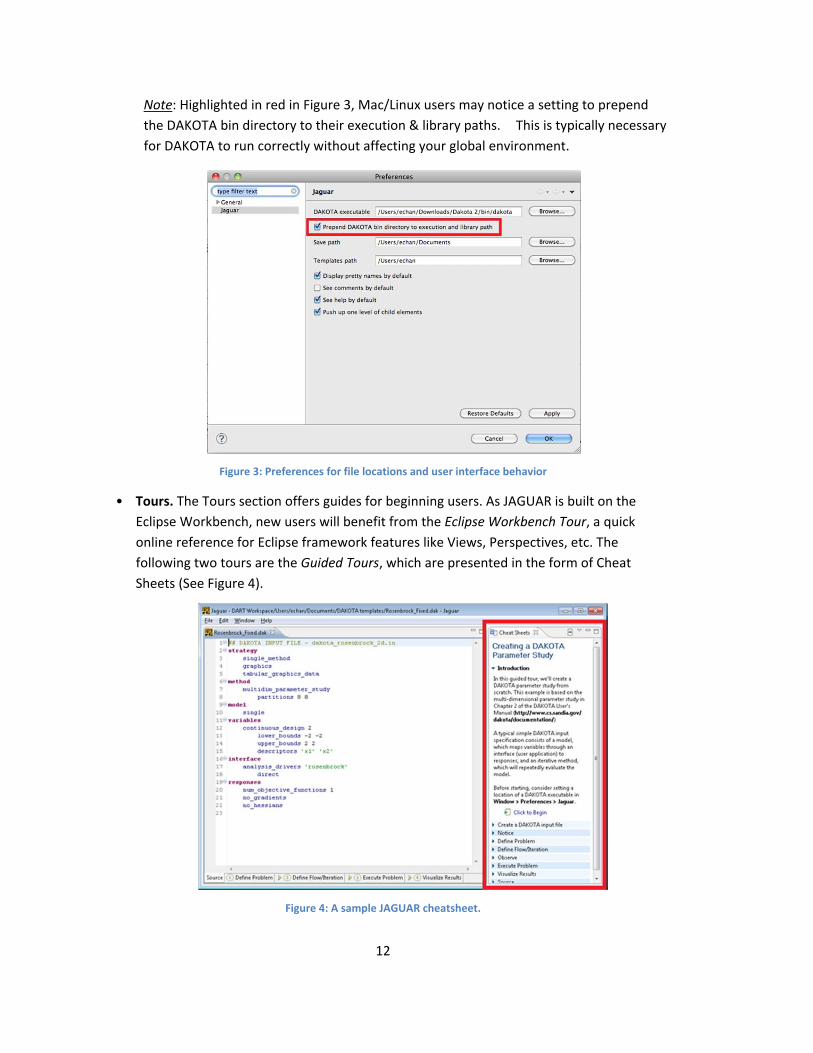
Note: Highlighted in red in Figure 3, Mac/Linux users may notice a setting to prepend
the DAKOTA bin directory to their execution & library paths. This is typically necessary
for DAKOTA to run correctly without affecting your global environment.
Figure 3: Preferences for file locations and user interface behavior
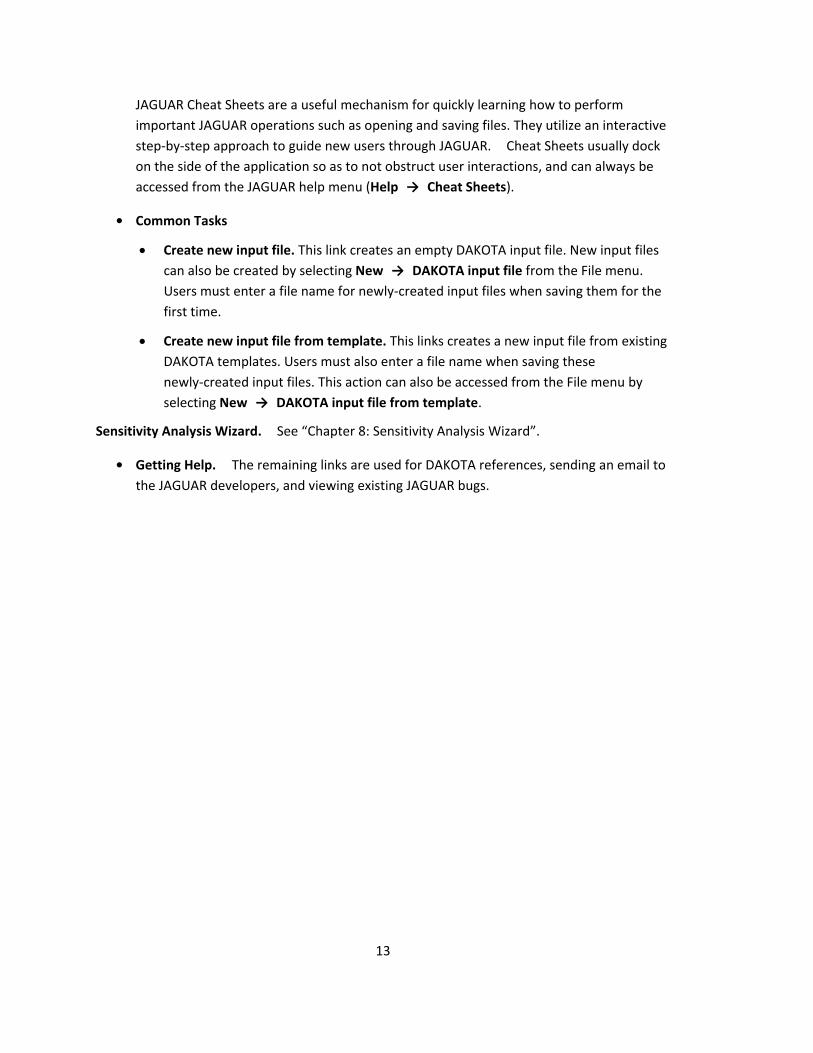
• Tours. The Tours section offers guides for beginning users. As JAGUAR is built on the
Eclipse Workbench, new users will benefit from the Eclipse Workbench Tour, a quick
online reference for Eclipse framework features like Views, Perspectives, etc. The
following two tours are the Guided Tours, which are presented in the form of Cheat
Sheets (See Figure 4).
Figure 4: A sample JAGUAR cheatsheet.
13
JAGUAR Cheat Sheets are a useful mechanism for quickly learning how to perform
important JAGUAR operations such as opening and saving files. They utilize an interactive
step‐by‐step approach to guide new users through JAGUAR. Cheat Sheets usually dock
on the side of the application so as to not obstruct user interactions, and can always be
accessed from the JAGUAR help menu (Help → Cheat Sheets).
• Common Tasks
Create new input file. This link creates an empty DAKOTA input file. New input files
can also be created by selecting New → DAKOTA input file from the File menu.
Users must enter a file name for newly‐created input files when saving them for the
first time.
Create new input file from template. This links creates a new input file from existing
DAKOTA templates. Users must also enter a file name when saving these
newly‐created input files. This action can also be accessed from the File menu by
selecting New → DAKOTA input file from template.
Sensitivity Analysis Wizard. See “Chapter 8: Sensitivity Analysis Wizard”.
• Getting Help. The remaining links are used for DAKOTA references, sending an email to
the JAGUAR developers, and viewing existing JAGUAR bugs.

14
15
4: Text Editors
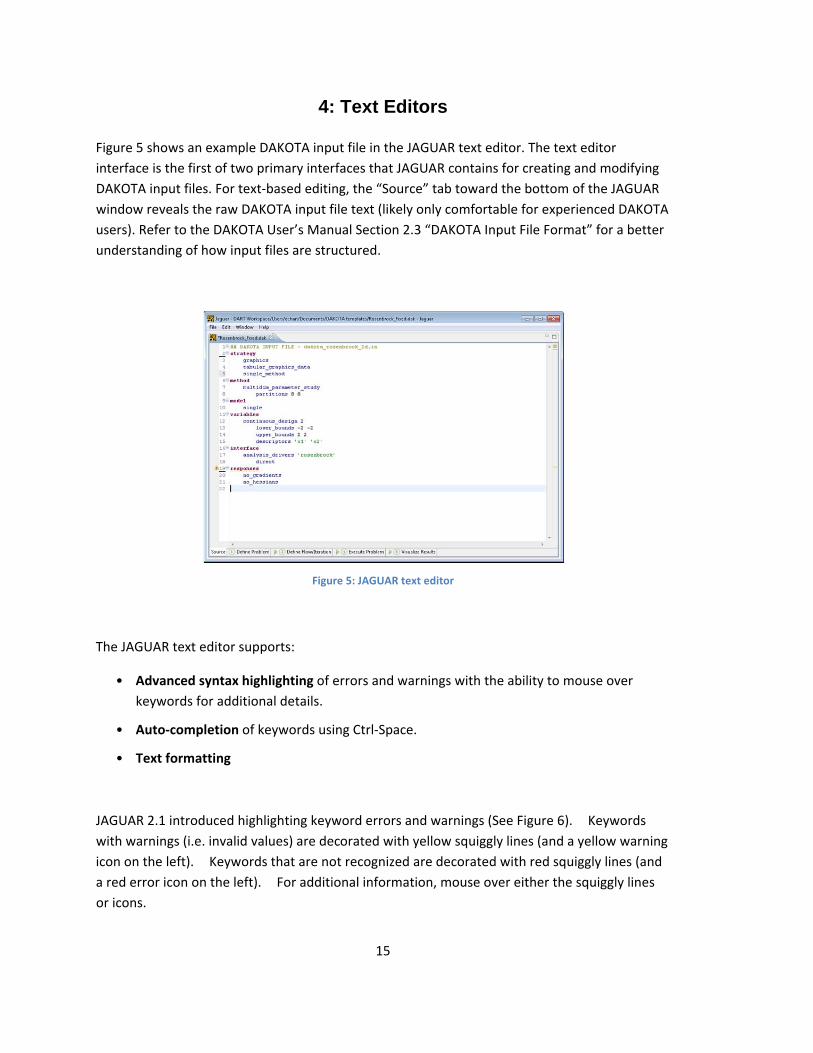
Figure 5 shows an example DAKOTA input file in the JAGUAR text editor. The text editor
interface is the first of two primary interfaces that JAGUAR contains for creating and modifying
DAKOTA input files. For text‐based editing, the “Source” tab toward the bottom of the JAGUAR
window reveals the raw DAKOTA input file text (likely only comfortable for experienced DAKOTA
users). Refer to the DAKOTA User’s Manual Section 2.3 “DAKOTA Input File Format” for a better
understanding of how input files are structured.
Figure 5: JAGUAR text editor
The JAGUAR text editor supports:
• Advanced syntax highlighting of errors and warnings with the ability to mouse over
keywords for additional details.
• Auto‐completion of keywords using Ctrl‐Space.
• Text formatting
JAGUAR 2.1 introduced highlighting keyword errors and warnings (See Figure 6). Keywords
with warnings (i.e. invalid values) are decorated with yellow squiggly lines (and a yellow warning
icon on the left). Keywords that are not recognized are decorated with red squiggly lines (and
a red error icon on the left). For additional information, mouse over either the squiggly lines
or icons.
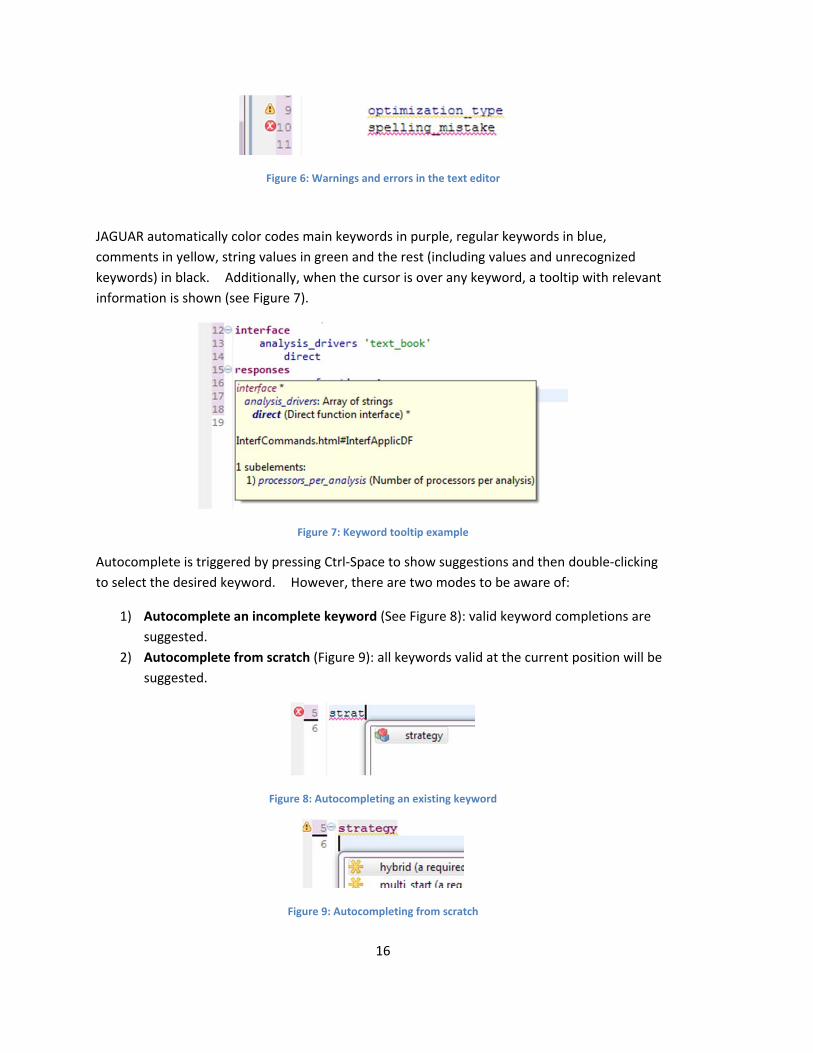
16
Figure 6: Warnings and errors in the text editor
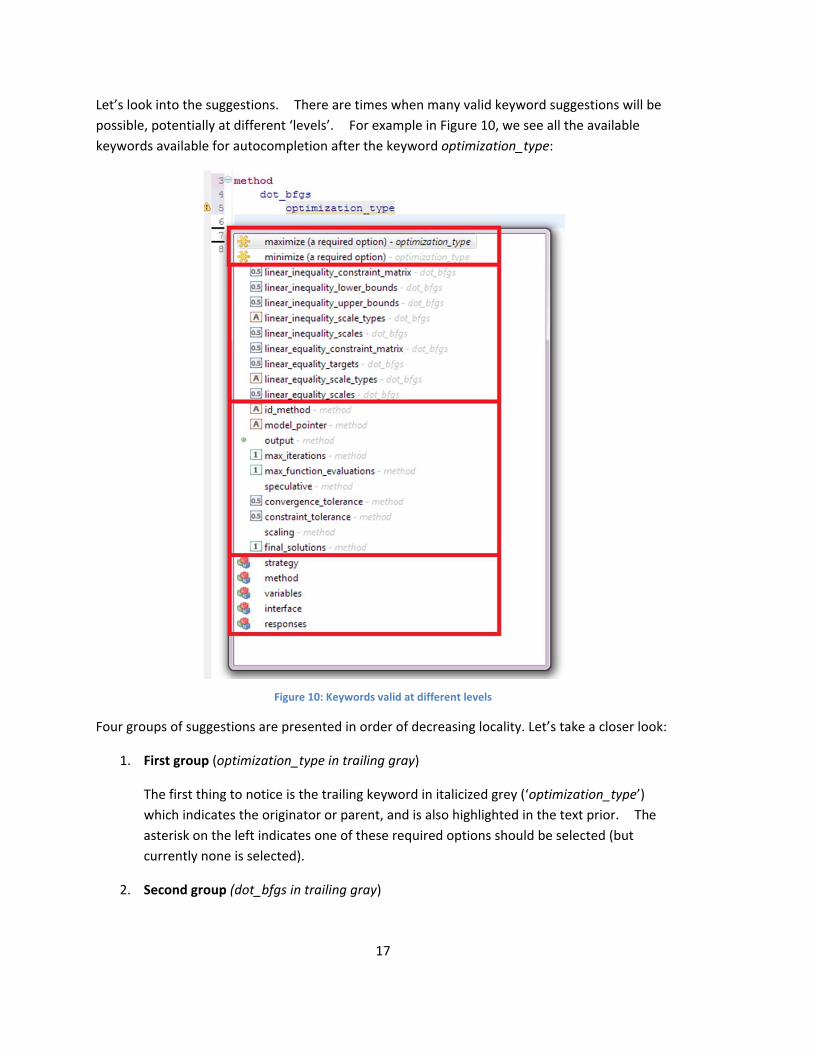
JAGUAR automatically color codes main keywords in purple, regular keywords in blue,
comments in yellow, string values in green and the rest (including values and unrecognized
keywords) in black. Additionally, when the cursor is over any keyword, a tooltip with relevant
information is shown (see Figure 7).
Figure 7: Keyword tooltip example
Autocomplete is triggered by pressing Ctrl‐Space to show suggestions and then double‐clicking
to select the desired keyword. However, there are two modes to be aware of:
1) Autocomplete an incomplete keyword (See Figure 8): valid keyword completions are
suggested.
2) Autocomplete from scratch (Figure 9): all keywords valid at the current position will be
suggested.
Figure 8: Autocompleting an existing keyword
Figure 9: Autocompleting from scratch
17
Let’s look into the suggestions. There are times when many valid keyword suggestions will be
possible, potentially at different ‘levels’. For example in Figure 10, we see all the available
keywords available for autocompletion after the keyword optimization_type:
Figure 10: Keywords valid at different levels
Four groups of suggestions are presented in order of decreasing locality. Let’s take a closer look:
1. First group (optimization_type in trailing gray)
The first thing to notice is the trailing keyword in italicized grey (‘optimization_type’)
which indicates the originator or parent, and is also highlighted in the text prior. The
asterisk on the left indicates one of these required options should be selected (but
currently none is selected).
2. Second group (dot_bfgs in trailing gray)
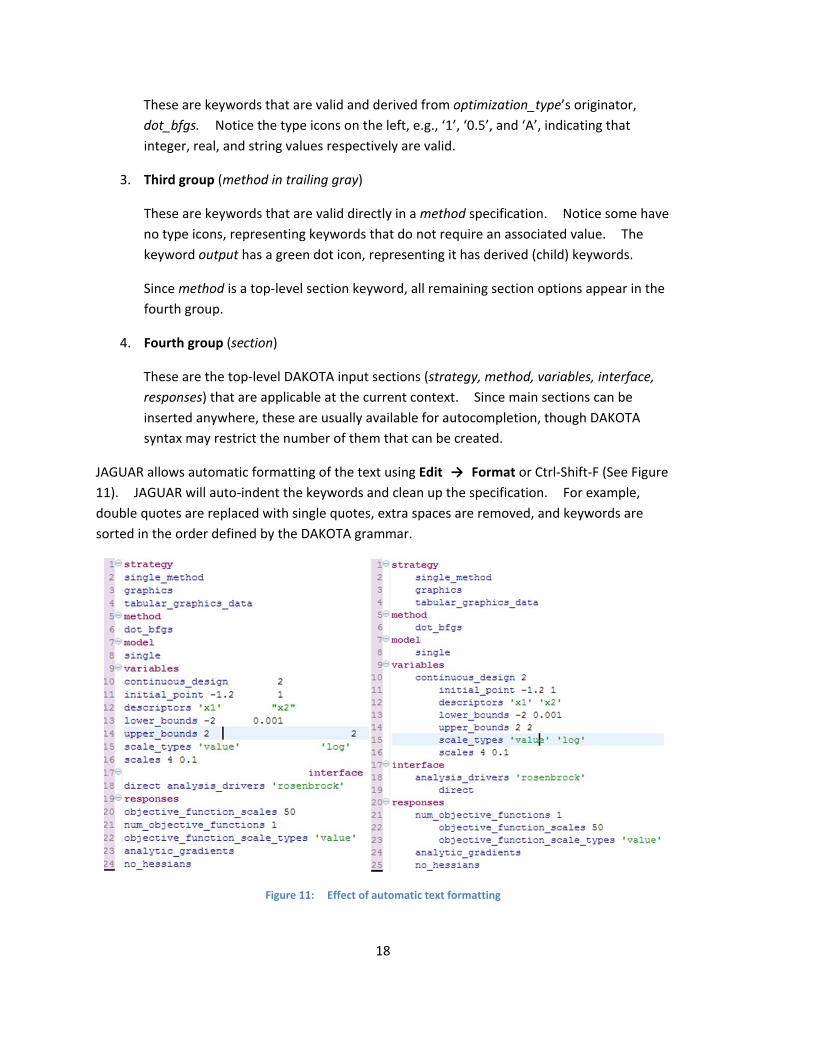
18
These are keywords that are valid and derived from optimization_type’s originator,
dot_bfgs. Notice the type icons on the left, e.g., ‘1’, ‘0.5’, and ‘A’, indicating that
integer, real, and string values respectively are valid.
3. Third group (method in trailing gray)
These are keywords that are valid directly in a method specification. Notice some have
no type icons, representing keywords that do not require an associated value. The
keyword output has a green dot icon, representing it has derived (child) keywords.
Since method is a top‐level section keyword, all remaining section options appear in the
fourth group.
4. Fourth group (section)
These are the top‐level DAKOTA input sections (strategy, method, variables, interface,
responses) that are applicable at the current context. Since main sections can be
inserted anywhere, these are usually available for autocompletion, though DAKOTA
syntax may restrict the number of them that can be created.
JAGUAR allows automatic formatting of the text using Edit → Format or Ctrl‐Shift‐F (See Figure
11). JAGUAR will auto‐indent the keywords and clean up the specification. For example,
double quotes are replaced with single quotes, extra spaces are removed, and keywords are
sorted in the order defined by the DAKOTA grammar.
Figure 11: Effect of automatic text formatting
19
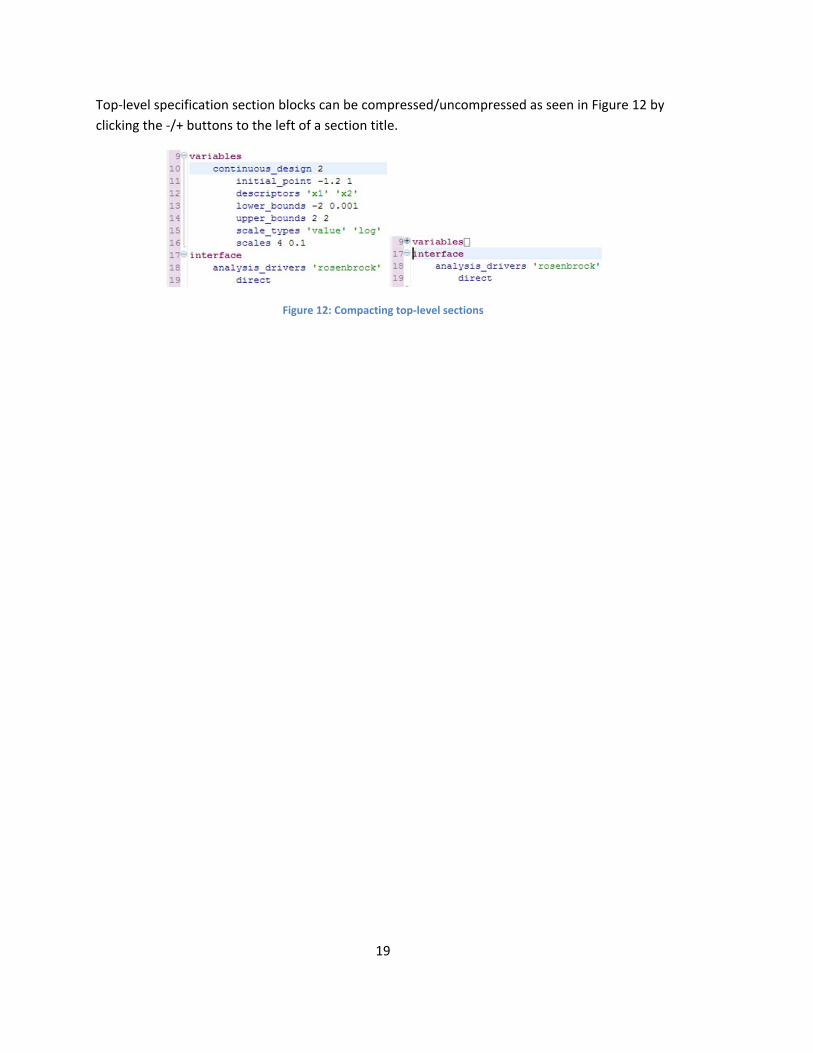
Top‐level specification section blocks can be compressed/uncompressed as seen in Figure 12 by
clicking the ‐/+ buttons to the left of a section title.
Figure 12: Compacting top‐level sections

20
21
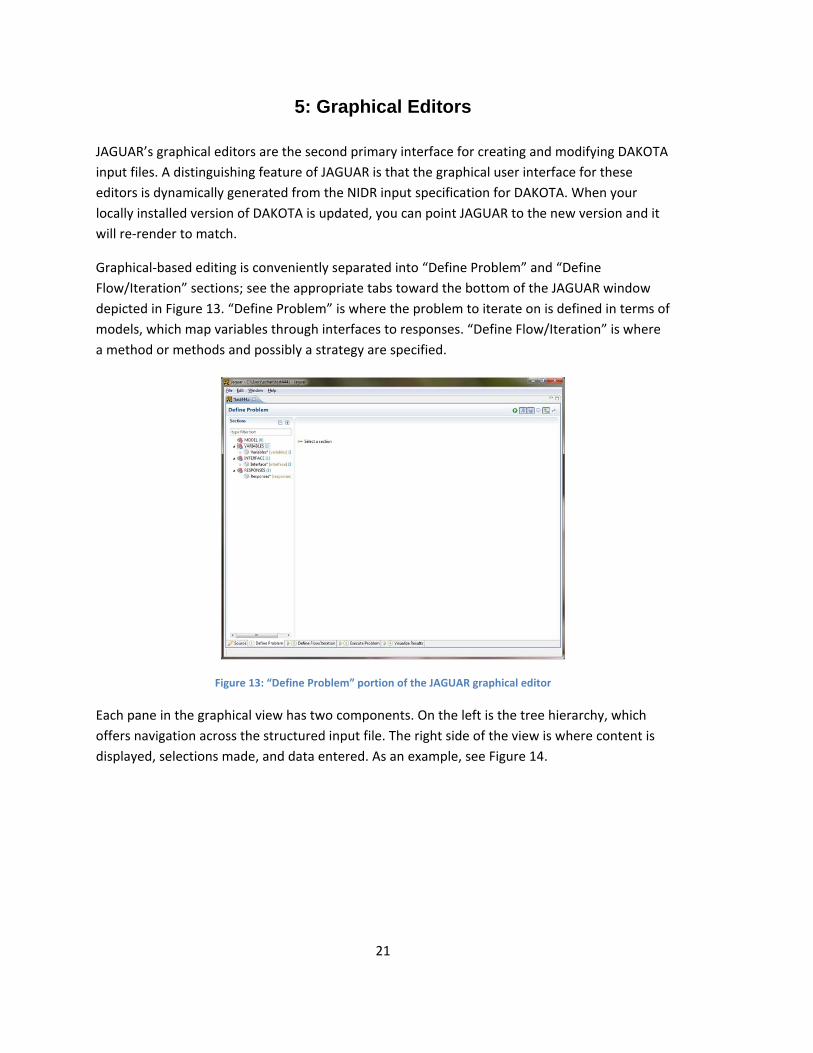
5: Graphical Editors
JAGUAR’s graphical editors are the second primary interface for creating and modifying DAKOTA
input files. A distinguishing feature of JAGUAR is that the graphical user interface for these
editors is dynamically generated from the NIDR input specification for DAKOTA. When your
locally installed version of DAKOTA is updated, you can point JAGUAR to the new version and it
will re‐render to match.
Graphical‐based editing is conveniently separated into “Define Problem” and “Define
Flow/Iteration” sections; see the appropriate tabs toward the bottom of the JAGUAR window
depicted in Figure 13. “Define Problem” is where the problem to iterate on is defined in terms of
models, which map variables through interfaces to responses. “Define Flow/Iteration” is where
a method or methods and possibly a strategy are specified.
Figure 13: “Define Problem” portion of the JAGUAR graphical editor
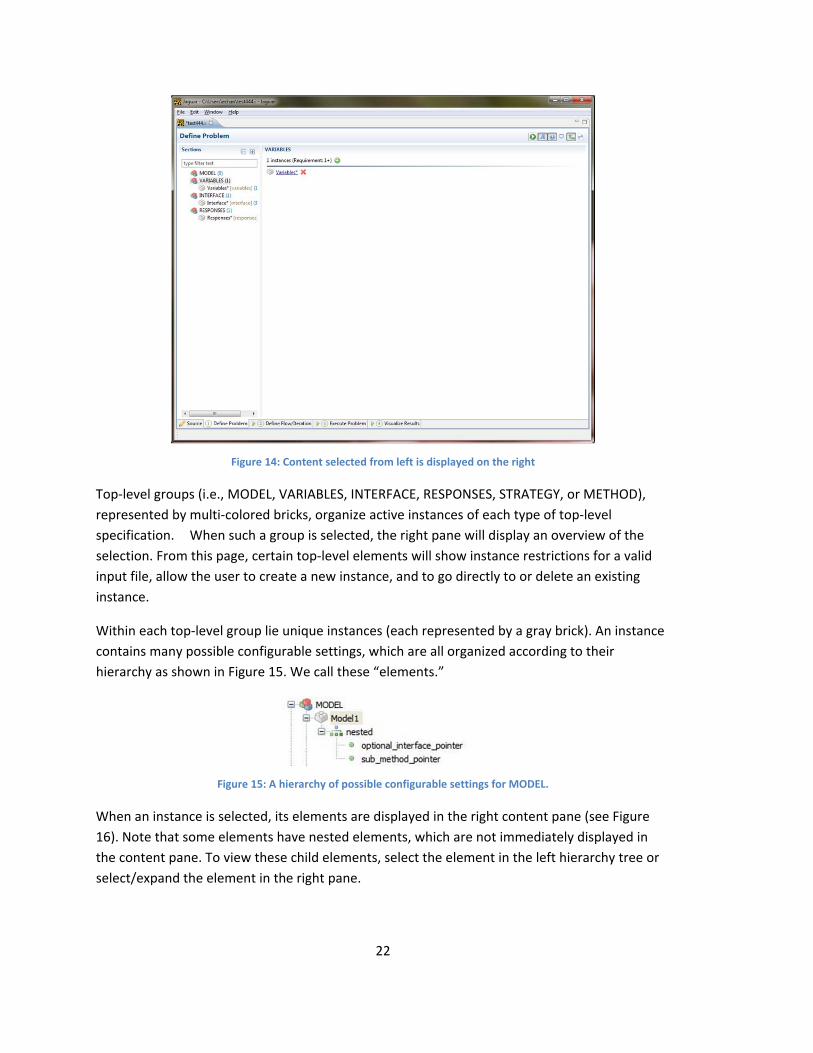
Each pane in the graphical view has two components. On the left is the tree hierarchy, which
offers navigation across the structured input file. The right side of the view is where content is
displayed, selections made, and data entered. As an example, see Figure 14.
22
Figure 14: Content selected from left is displayed on the right
Top‐level groups (i.e., MODEL, VARIABLES, INTERFACE, RESPONSES, STRATEGY, or METHOD),
represented by multi‐colored bricks, organize active instances of each type of top‐level
specification. When such a group is selected, the right pane will display an overview of the
selection. From this page, certain top‐level elements will show instance restrictions for a valid
input file, allow the user to create a new instance, and to go directly to or delete an existing
instance.
Within each top‐level group lie unique instances (each represented by a gray brick). An instance
contains many possible configurable settings, which are all organized according to their
hierarchy as shown in Figure 15. We call these “elements.”
Figure 15: A hierarchy of possible configurable settings for MODEL.
When an instance is selected, its elements are displayed in the right content pane (see Figure
16). Note that some elements have nested elements, which are not immediately displayed in
the content pane. To view these child elements, select the element in the left hierarchy tree or
select/expand the element in the right pane.
23
Figure 16: Display of elements from a selected strategy instance.
There are five basic types of elements in JAGUAR.
1. Element without a value. In Figure 17, notice the checkbox to the left of the element;
this allows the user to enable and disable the element. Only enabled elements are
represented in the text input file, which can be viewed in the “Source” representation
(JAGUAR text editor). Required elements cannot be disabled.
Figure 17: Different element types in JAGUAR.
2. Element with a value allows users to set values of type Integer, Real, String, or a
space‐delimited list of any of these.
24
3. Nested elements supported in JAGUAR are indicated by a green bullet and the presence
of a hyperlink. Selecting a hyperlink is one way to view the nested element in the
right‐side content pane.
4. Drop‐down lists are indicated by a choice icon. When the list is selected, it behaves like
one of the former three element types. The first element of a drop‐down list functions
as a header text to guide the user’s selection of an appropriate element below. Asterisks
also indicate the default list element.
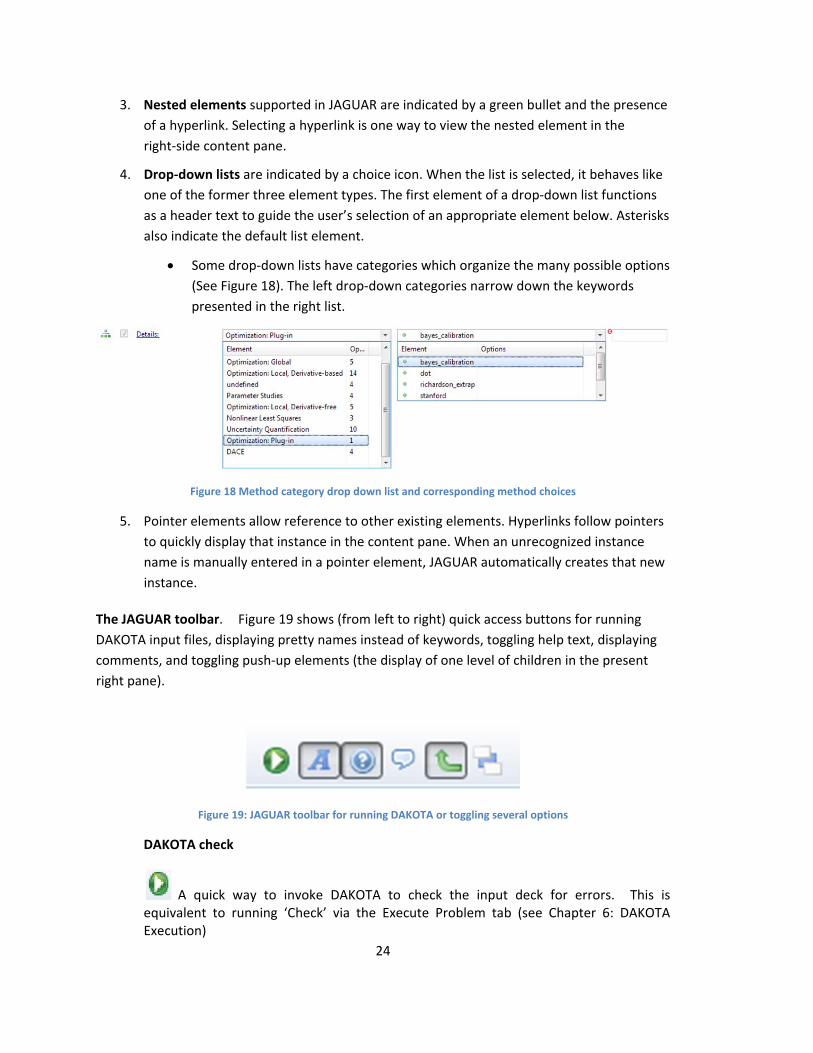
Some drop‐down lists have categories which organize the many possible options
(See Figure 18). The left drop‐down categories narrow down the keywords
presented in the right list.
Figure 18 Method category drop down list and corresponding method choices
5. Pointer elements allow reference to other existing elements. Hyperlinks follow pointers
to quickly display that instance in the content pane. When an unrecognized instance
name is manually entered in a pointer element, JAGUAR automatically creates that new
instance.
The JAGUAR toolbar. Figure 19 shows (from left to right) quick access buttons for running
DAKOTA input files, displaying pretty names instead of keywords, toggling help text, displaying
comments, and toggling push‐up elements (the display of one level of children in the present
right pane).
Figure 19: JAGUAR toolbar for running DAKOTA or toggling several options
DAKOTA check
A quick way to invoke DAKOTA to check the input deck for errors. This is equivalent to running ‘Check’ via the Execute Problem tab (see Chapter 6: DAKOTA Execution)
25
Pretty name
Each element in the grammar has a ‘name’ and a ‘pretty name’. The ‘name’ is
the actual text used in the input deck (formal DAKOTA keyword), whereas the pretty
name is a user‐friendly description of the element.
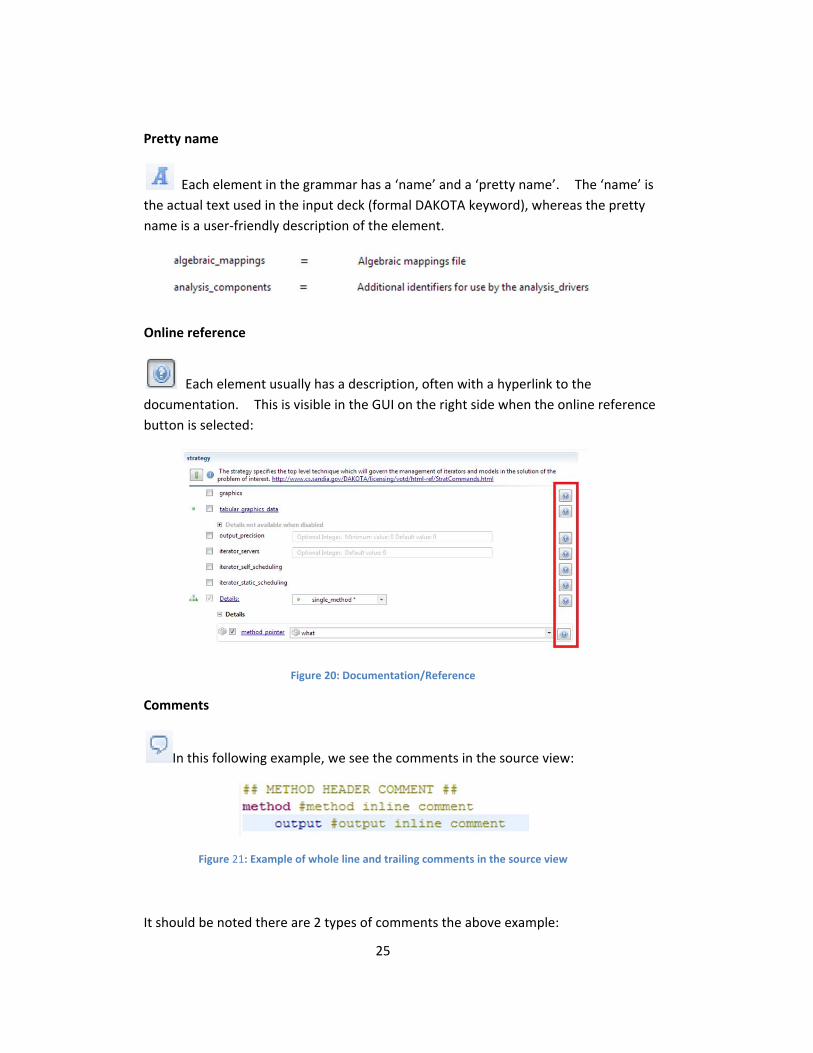
Online reference
Each element usually has a description, often with a hyperlink to the
documentation. This is visible in the GUI on the right side when the online reference
button is selected:
Figure 20: Documentation/Reference
Comments
In this following example, we see the comments in the source view:
Figure 21: Example of whole line and trailing comments in the source view
It should be noted there are 2 types of comments the above example:

26
1. Inline (on the same line as a keyword)
2. Before (standalone comments, multiple counts allowed)
Currently comments can be rendered and edited in the GUI (See Figure 22), but new
comments can only be added from the source view.
Figure 22: An in‐line comment rendered in GUI
Push up
The JAGUAR GUI is simplified by pushup elements. These elements can be
displayed in the current pane instead diving deeper in the tree to see them. This helps
show the larger context in one view. Pushup elements can be collapsed by clicking on
‘Details’. Figure 23 and Figure 24 show JAGUAR with push‐up elements on (default)
and off, respectively.
Figure 23: JAGUAR with push‐up elements enabled (default)

27
Figure 24: JAGUAR with push‐up elements disabled
Hiding disabled elements
To reduce the clutter by only showing the current elements, this toggle hides all
disabled elements.
Figure 25: JAGUAR not hiding disabled elements
Figure 26: JAGUAR hiding disabled elements

28
29
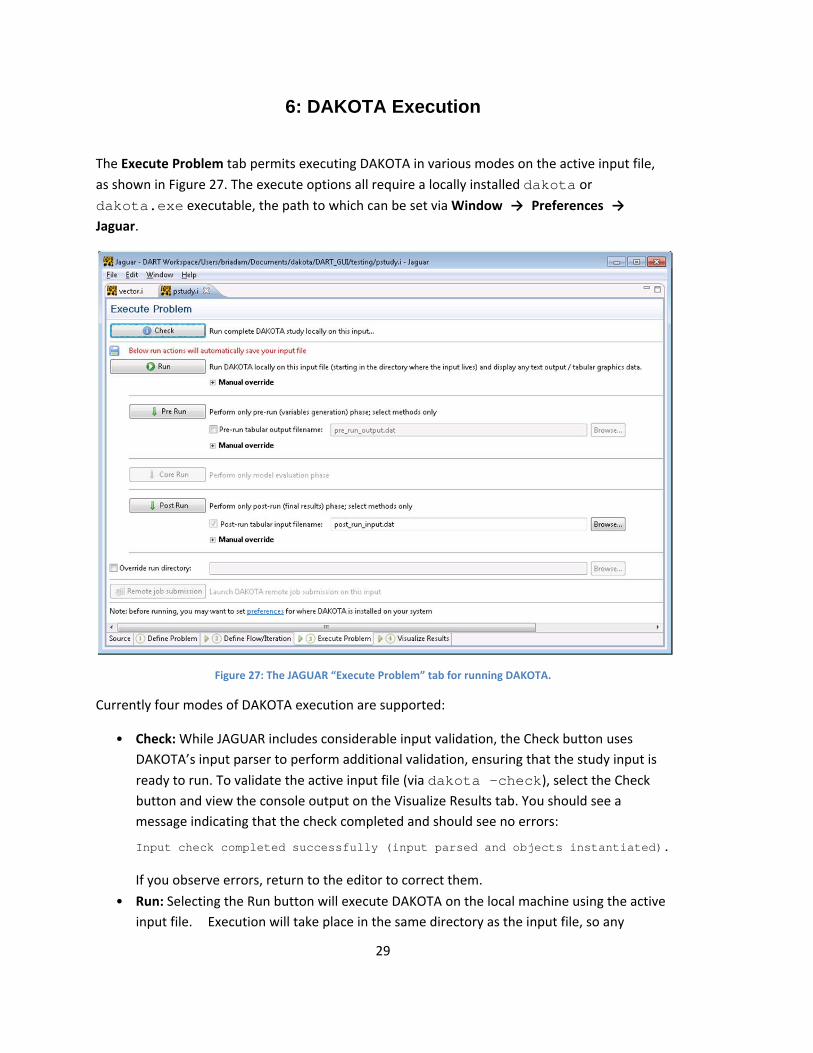
6: DAKOTA Execution
The Execute Problem tab permits executing DAKOTA in various modes on the active input file,
as shown in Figure 27. The execute options all require a locally installed dakota or
dakota.exe executable, the path to which can be set via Window → Preferences →
Jaguar.
Figure 27: The JAGUAR “Execute Problem” tab for running DAKOTA.
Currently four modes of DAKOTA execution are supported:
• Check: While JAGUAR includes considerable input validation, the Check button uses
DAKOTA’s input parser to perform additional validation, ensuring that the study input is
ready to run. To validate the active input file (via dakota -check), select the Check button and view the console output on the Visualize Results tab. You should see a
message indicating that the check completed and should see no errors:
Input check completed successfully (input parsed and objects instantiated). If you observe errors, return to the editor to correct them.
• Run: Selecting the Run button will execute DAKOTA on the local machine using the active
input file. Execution will take place in the same directory as the input file, so any
30
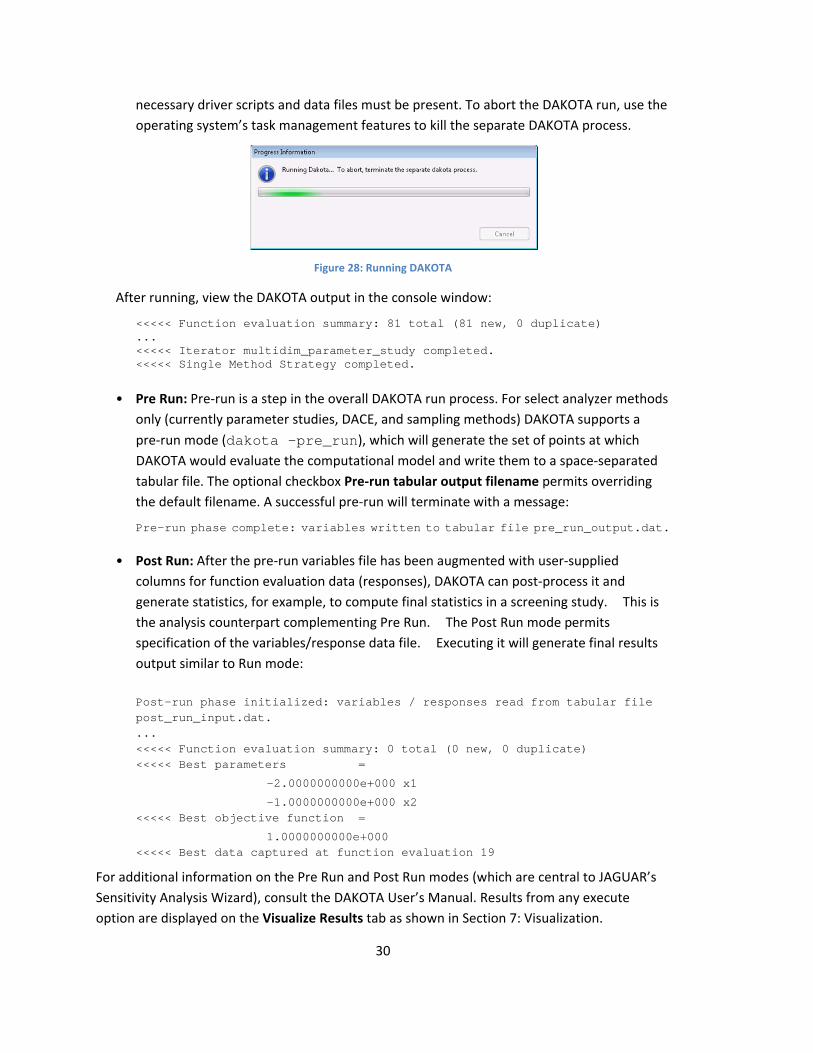
necessary driver scripts and data files must be present. To abort the DAKOTA run, use the
operating system’s task management features to kill the separate DAKOTA process.
Figure 28: Running DAKOTA
After running, view the DAKOTA output in the console window:
<<<<< Function evaluation summary: 81 total (81 new, 0 duplicate) ... <<<<< Iterator multidim_parameter_study completed. <<<<< Single Method Strategy completed.
• Pre Run: Pre‐run is a step in the overall DAKOTA run process. For select analyzer methods
only (currently parameter studies, DACE, and sampling methods) DAKOTA supports a
pre‐run mode (dakota -pre_run), which will generate the set of points at which DAKOTA would evaluate the computational model and write them to a space‐separated
tabular file. The optional checkbox Pre‐run tabular output filename permits overriding
the default filename. A successful pre‐run will terminate with a message:
Pre-run phase complete: variables written to tabular file pre_run_output.dat.
• Post Run: After the pre‐run variables file has been augmented with user‐supplied
columns for function evaluation data (responses), DAKOTA can post‐process it and
generate statistics, for example, to compute final statistics in a screening study. This is
the analysis counterpart complementing Pre Run. The Post Run mode permits
specification of the variables/response data file. Executing it will generate final results
output similar to Run mode:
Post-run phase initialized: variables / responses read from tabular file post_run_input.dat. ... <<<<< Function evaluation summary: 0 total (0 new, 0 duplicate) <<<<< Best parameters =
-2.0000000000e+000 x1
-1.0000000000e+000 x2 <<<<< Best objective function =
1.0000000000e+000 <<<<< Best data captured at function evaluation 19
For additional information on the Pre Run and Post Run modes (which are central to JAGUAR’s
Sensitivity Analysis Wizard), consult the DAKOTA User’s Manual. Results from any execute
option are displayed on the Visualize Results tab as shown in Section 7: Visualization.
31
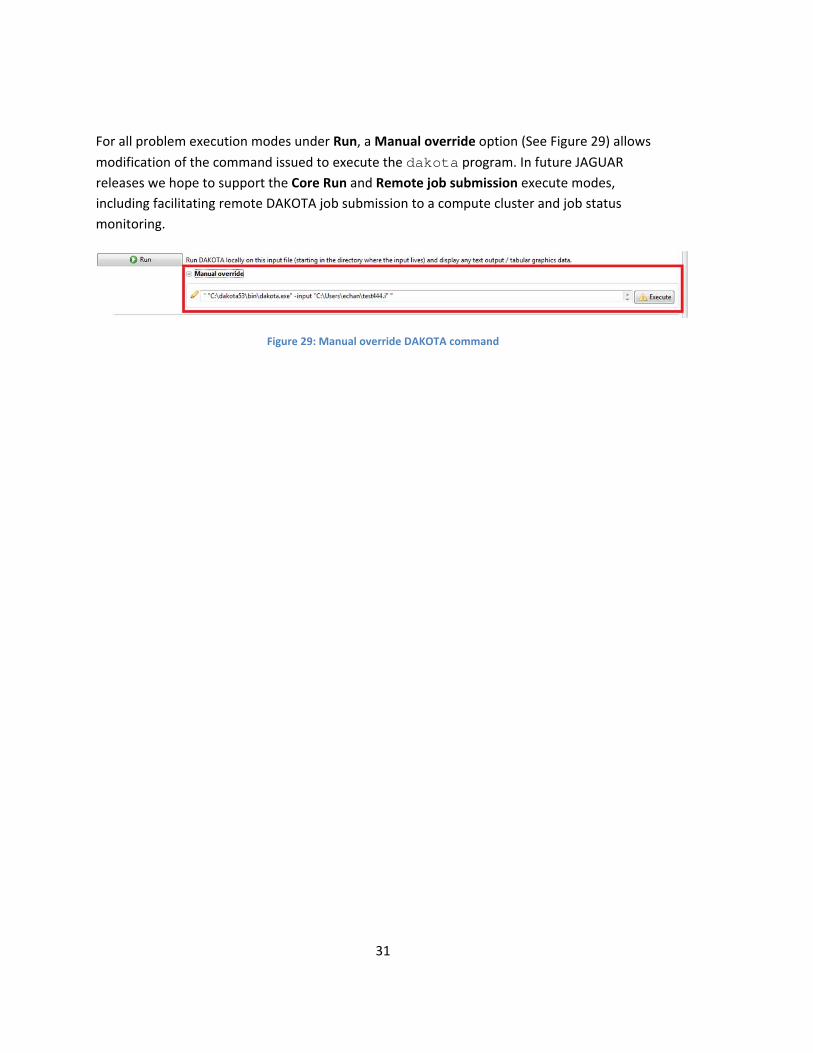
For all problem execution modes under Run, a Manual override option (See Figure 29) allows
modification of the command issued to execute the dakota program. In future JAGUAR
releases we hope to support the Core Run and Remote job submission execute modes,
including facilitating remote DAKOTA job submission to a compute cluster and job status
monitoring.
Figure 29: Manual override DAKOTA command

32
33
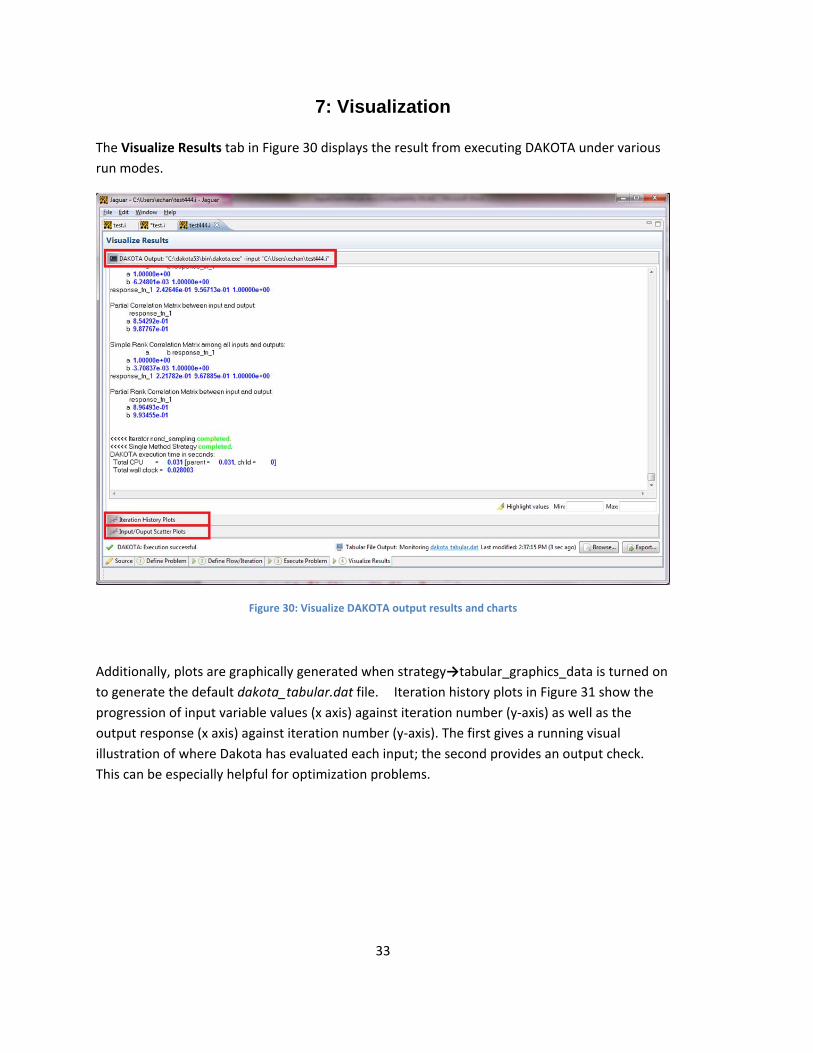
7: Visualization
The Visualize Results tab in Figure 30 displays the result from executing DAKOTA under various
run modes.
Figure 30: Visualize DAKOTA output results and charts
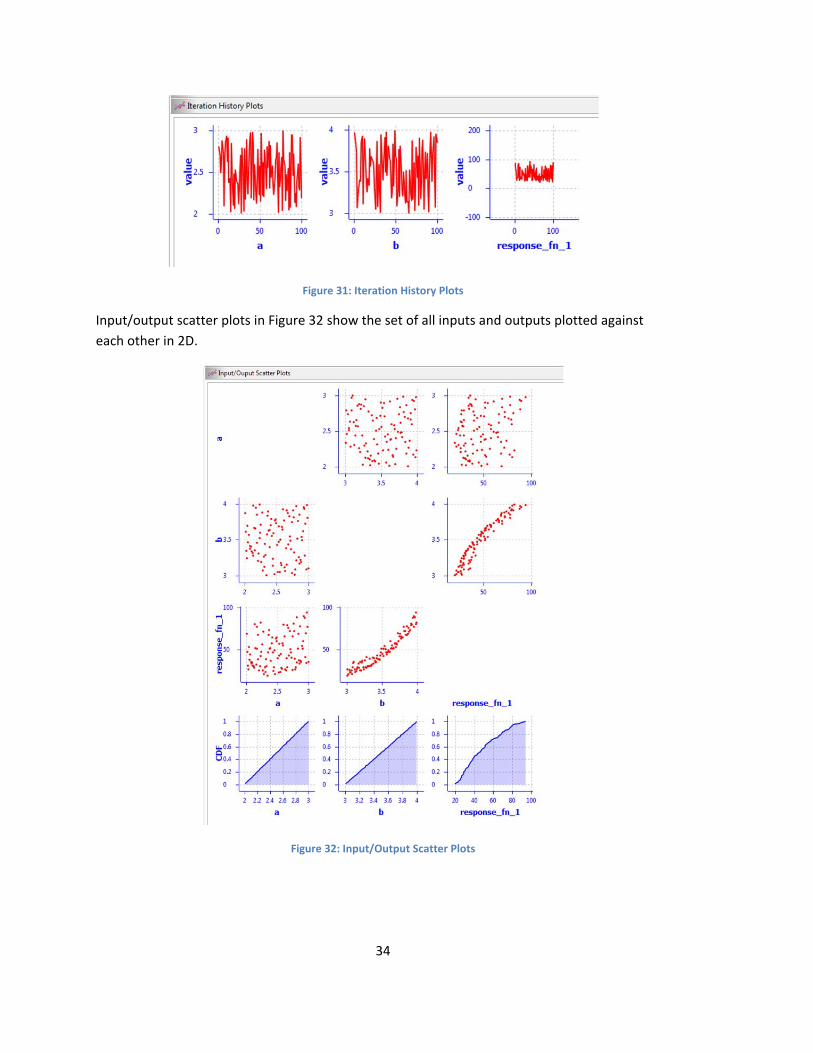
Additionally, plots are graphically generated when strategy→tabular_graphics_data is turned on
to generate the default dakota_tabular.dat file. Iteration history plots in Figure 31 show the
progression of input variable values (x axis) against iteration number (y‐axis) as well as the
output response (x axis) against iteration number (y‐axis). The first gives a running visual
illustration of where Dakota has evaluated each input; the second provides an output check.
This can be especially helpful for optimization problems.
34
Figure 31: Iteration History Plots
Input/output scatter plots in Figure 32 show the set of all inputs and outputs plotted against
each other in 2D.
Figure 32: Input/Output Scatter Plots

35
The graphical charts can be saved by selecting the “Save Plot…” button in the bottom right
corner.
Below the plots is the status bar (Figure 33), showing the DAKOTA run status on the left, the raw
tabular graphic file in the middle, and option to specify an existing tabular file to plot, and to
export the tabular file to Excel.
Figure 33: DAKOTA run status, tabular graphic file and export options

36
37
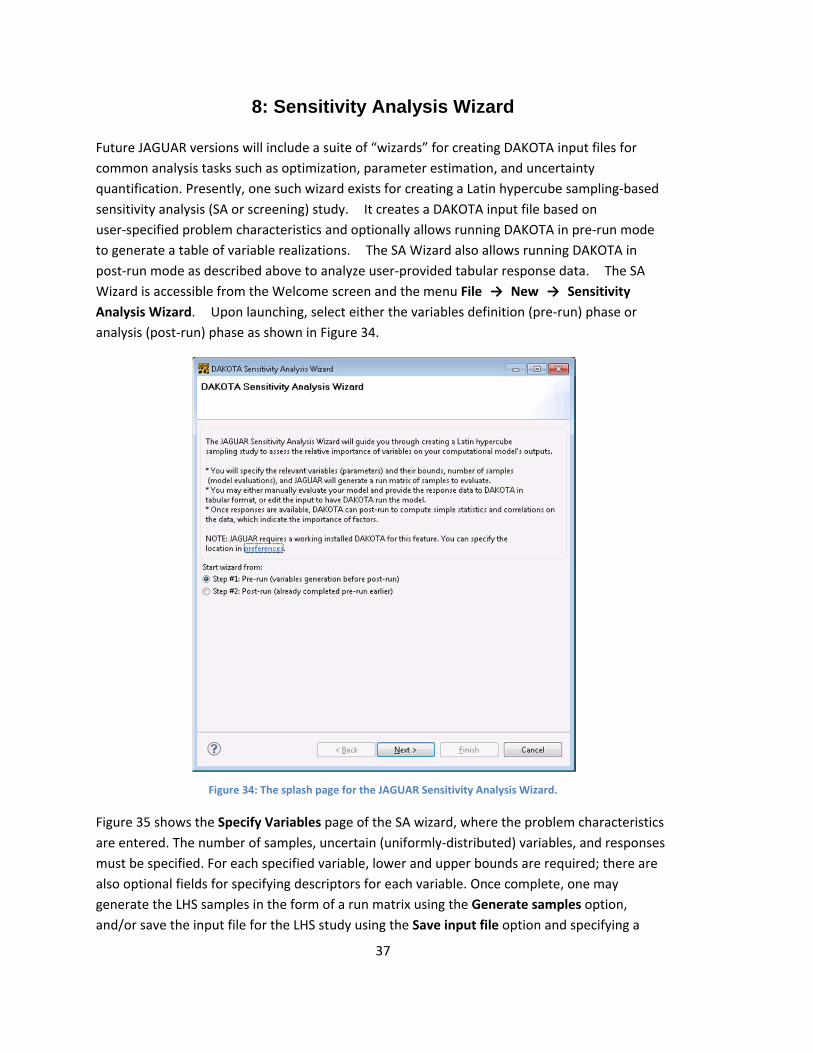
8: Sensitivity Analysis Wizard
Future JAGUAR versions will include a suite of “wizards” for creating DAKOTA input files for
common analysis tasks such as optimization, parameter estimation, and uncertainty
quantification. Presently, one such wizard exists for creating a Latin hypercube sampling‐based
sensitivity analysis (SA or screening) study. It creates a DAKOTA input file based on
user‐specified problem characteristics and optionally allows running DAKOTA in pre‐run mode
to generate a table of variable realizations. The SA Wizard also allows running DAKOTA in
post‐run mode as described above to analyze user‐provided tabular response data. The SA
Wizard is accessible from the Welcome screen and the menu File → New → Sensitivity
Analysis Wizard. Upon launching, select either the variables definition (pre‐run) phase or
analysis (post‐run) phase as shown in Figure 34.
Figure 34: The splash page for the JAGUAR Sensitivity Analysis Wizard.
Figure 35 shows the Specify Variables page of the SA wizard, where the problem characteristics
are entered. The number of samples, uncertain (uniformly‐distributed) variables, and responses
must be specified. For each specified variable, lower and upper bounds are required; there are
also optional fields for specifying descriptors for each variable. Once complete, one may
generate the LHS samples in the form of a run matrix using the Generate samples option,
and/or save the input file for the LHS study using the Save input file option and specifying a
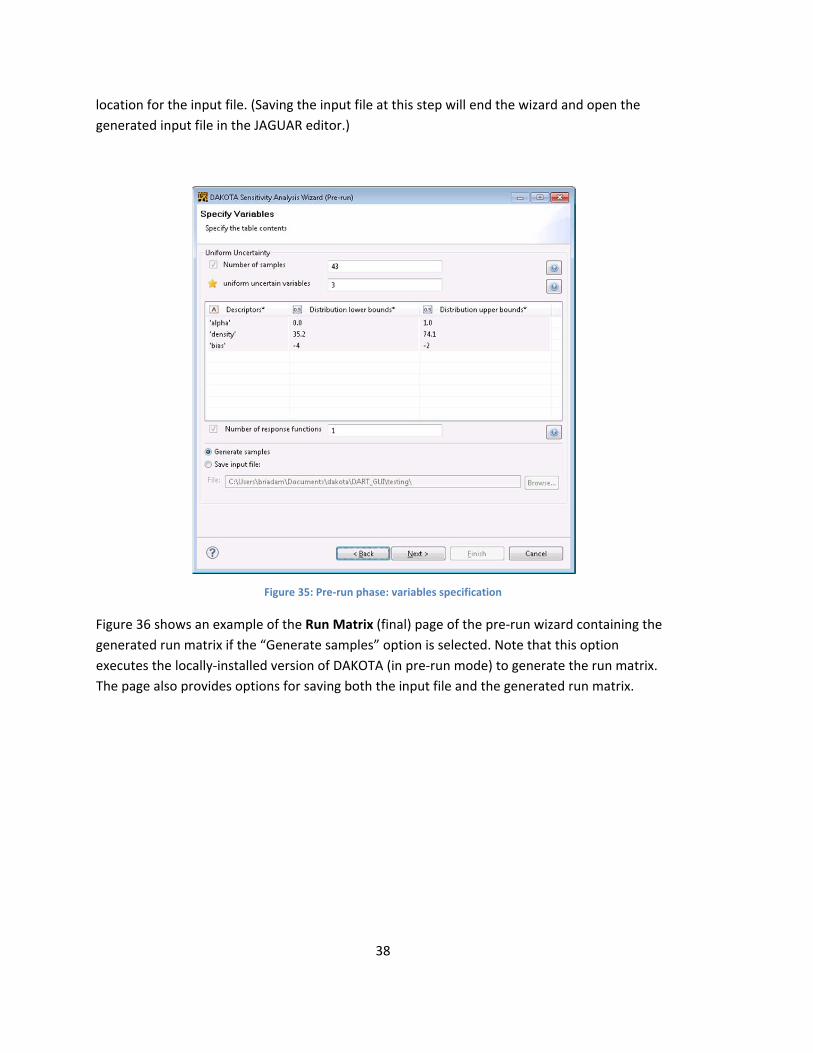
38
location for the input file. (Saving the input file at this step will end the wizard and open the
generated input file in the JAGUAR editor.)
Figure 35: Pre‐run phase: variables specification
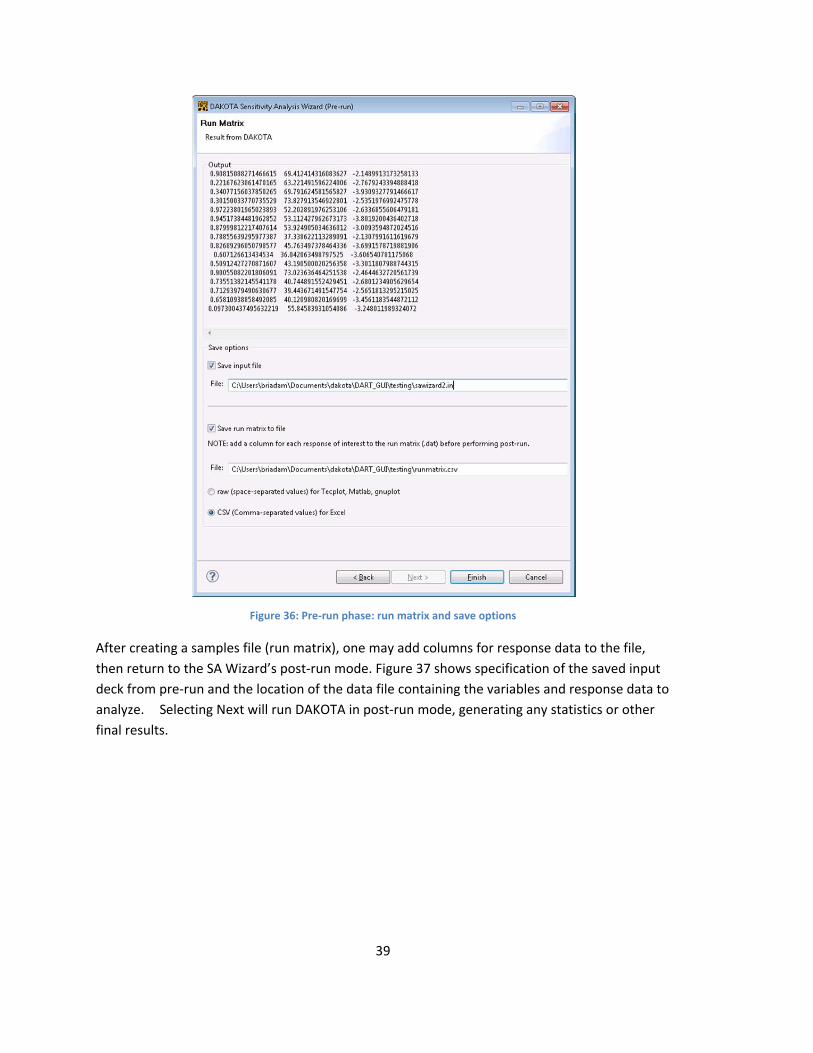
Figure 36 shows an example of the Run Matrix (final) page of the pre‐run wizard containing the
generated run matrix if the “Generate samples” option is selected. Note that this option
executes the locally‐installed version of DAKOTA (in pre‐run mode) to generate the run matrix.
The page also provides options for saving both the input file and the generated run matrix.
39
Figure 36: Pre‐run phase: run matrix and save options
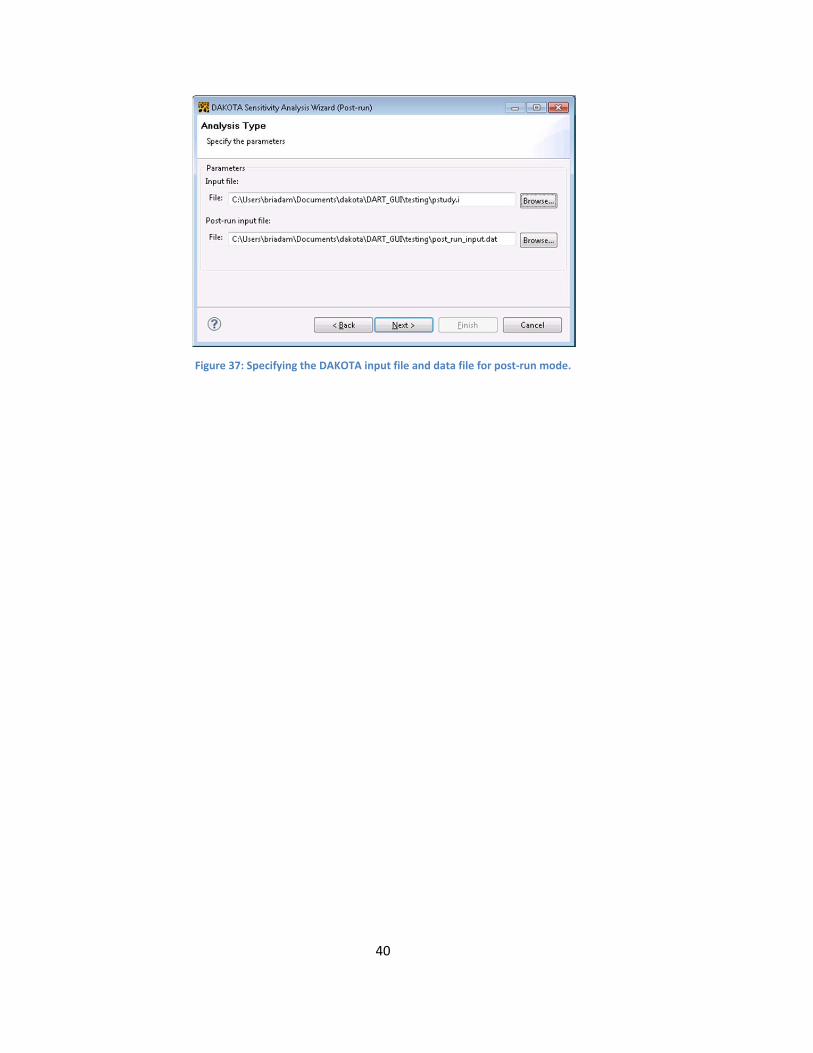
After creating a samples file (run matrix), one may add columns for response data to the file,
then return to the SA Wizard’s post‐run mode. Figure 37 shows specification of the saved input
deck from pre‐run and the location of the data file containing the variables and response data to
analyze. Selecting Next will run DAKOTA in post‐run mode, generating any statistics or other
final results.
40
Figure 37: Specifying the DAKOTA input file and data file for post‐run mode.
41
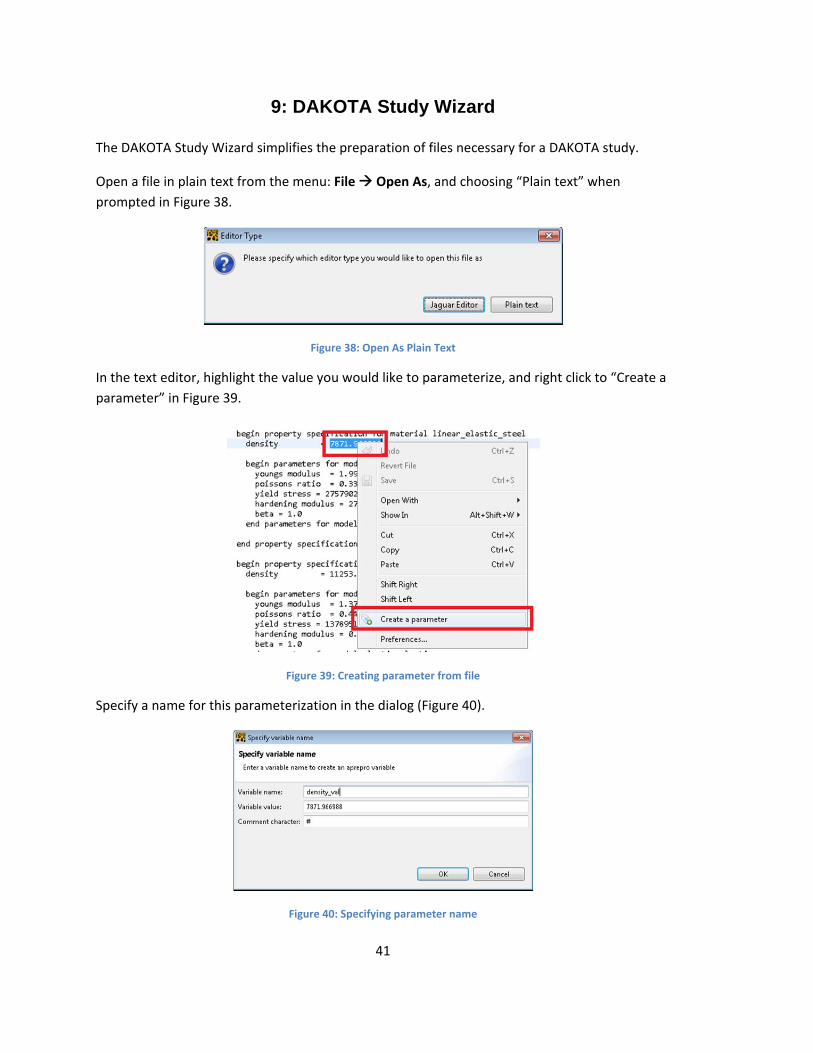
9: DAKOTA Study Wizard
The DAKOTA Study Wizard simplifies the preparation of files necessary for a DAKOTA study.
Open a file in plain text from the menu: File Open As, and choosing “Plain text” when
prompted in Figure 38.
Figure 38: Open As Plain Text
In the text editor, highlight the value you would like to parameterize, and right click to “Create a
parameter” in Figure 39.
Figure 39: Creating parameter from file
Specify a name for this parameterization in the dialog (Figure 40).
Figure 40: Specifying parameter name
42
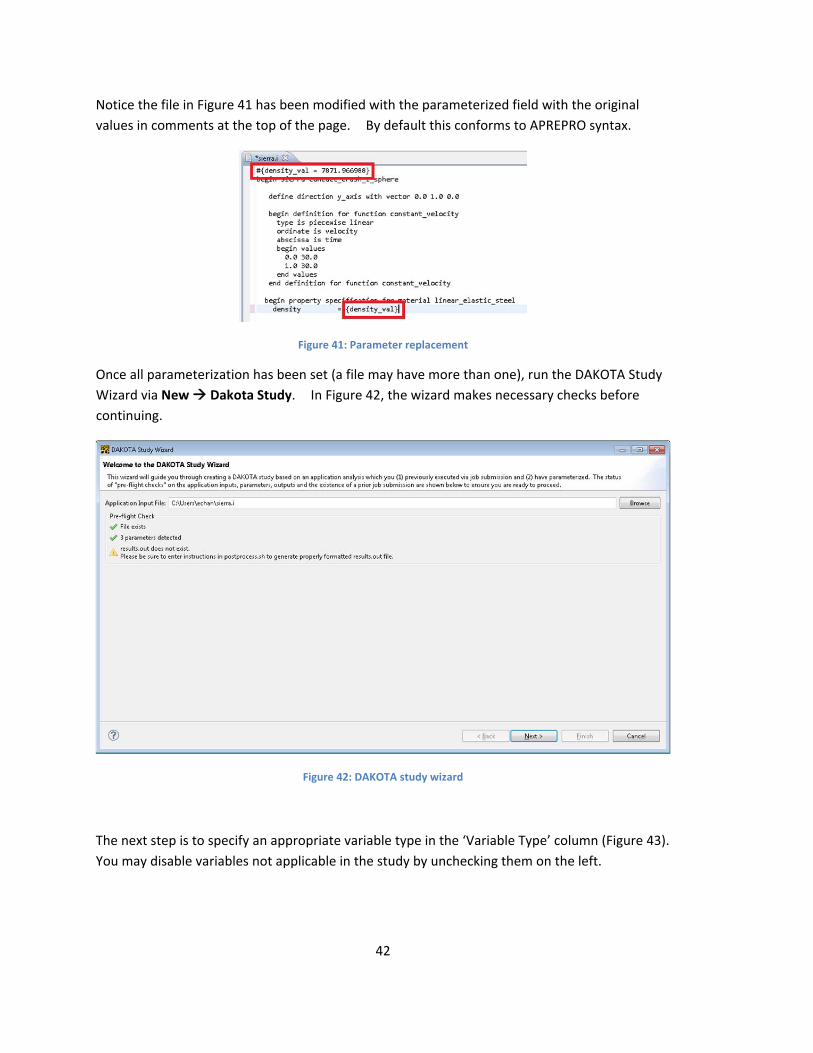
Notice the file in Figure 41 has been modified with the parameterized field with the original
values in comments at the top of the page. By default this conforms to APREPRO syntax.
Figure 41: Parameter replacement
Once all parameterization has been set (a file may have more than one), run the DAKOTA Study
Wizard via New Dakota Study. In Figure 42, the wizard makes necessary checks before
continuing.
Figure 42: DAKOTA study wizard
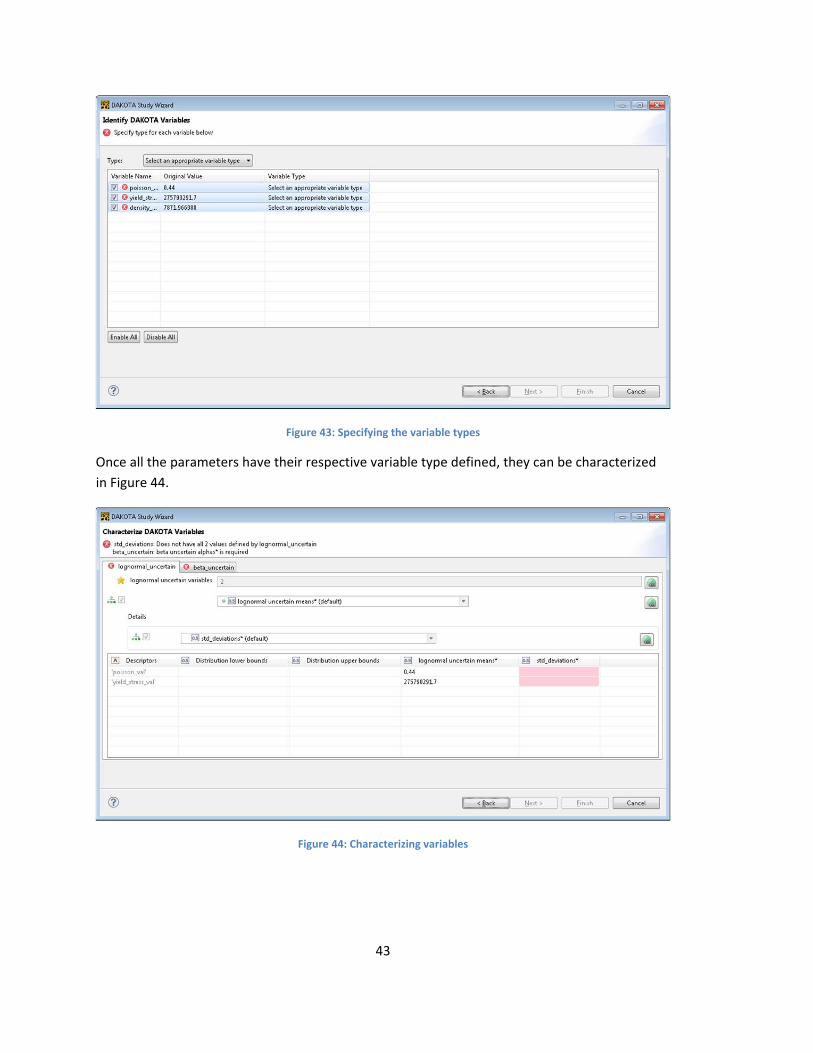
The next step is to specify an appropriate variable type in the ‘Variable Type’ column (Figure 43).
You may disable variables not applicable in the study by unchecking them on the left.
43
Figure 43: Specifying the variable types
Once all the parameters have their respective variable type defined, they can be characterized
in Figure 44.
Figure 44: Characterizing variables
44
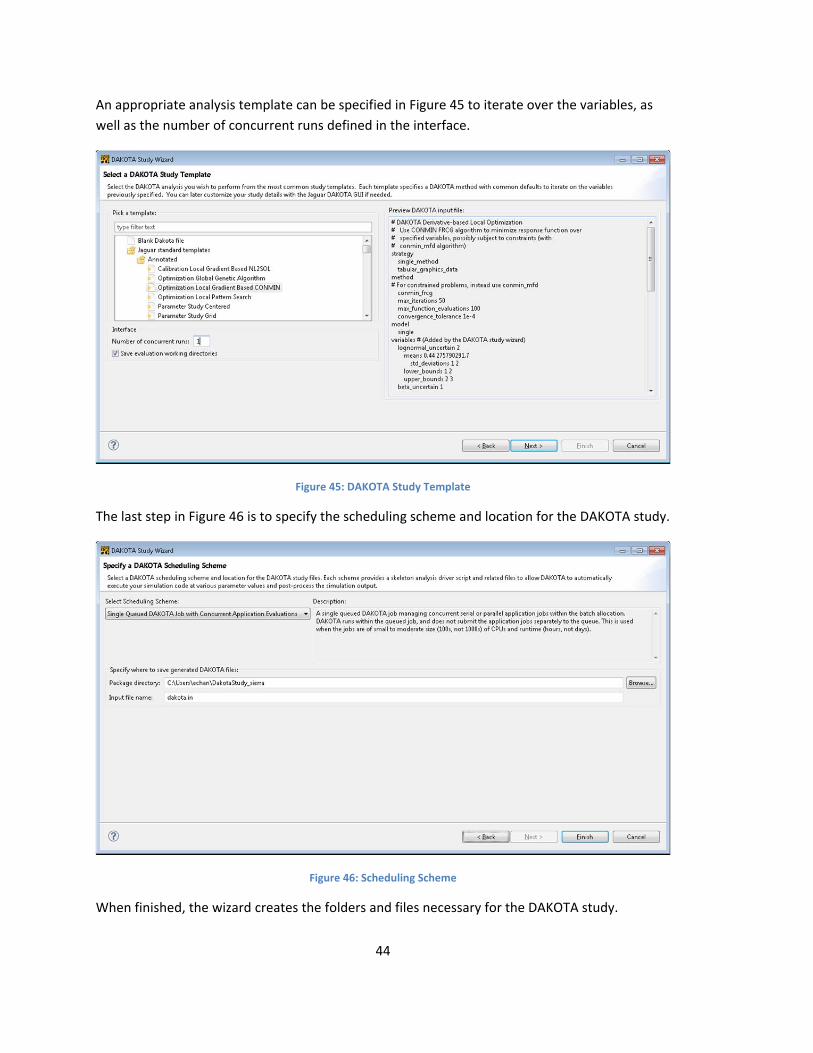
An appropriate analysis template can be specified in Figure 45 to iterate over the variables, as
well as the number of concurrent runs defined in the interface.
Figure 45: DAKOTA Study Template
The last step in Figure 46 is to specify the scheduling scheme and location for the DAKOTA study.
Figure 46: Scheduling Scheme
When finished, the wizard creates the folders and files necessary for the DAKOTA study.
45
10: Generating Input Files from Templates
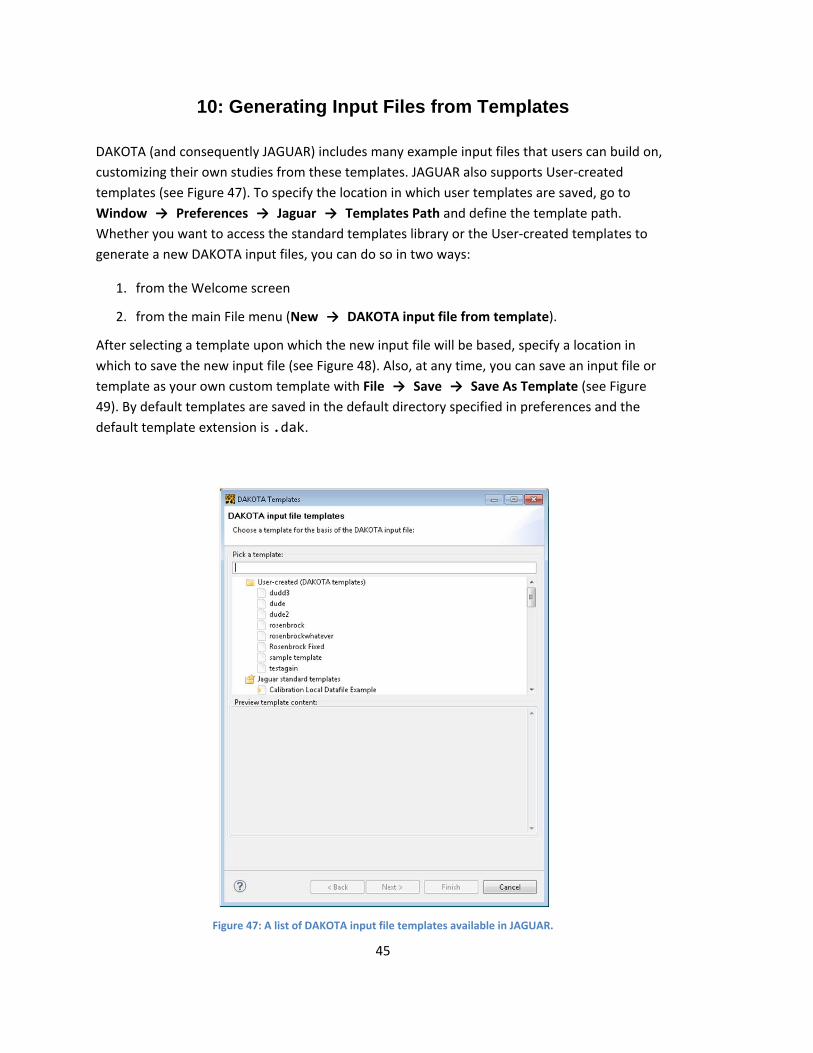
DAKOTA (and consequently JAGUAR) includes many example input files that users can build on,
customizing their own studies from these templates. JAGUAR also supports User‐created
templates (see Figure 47). To specify the location in which user templates are saved, go to
Window → Preferences → Jaguar → Templates Path and define the template path.
Whether you want to access the standard templates library or the User‐created templates to
generate a new DAKOTA input files, you can do so in two ways:
1. from the Welcome screen
2. from the main File menu (New → DAKOTA input file from template).
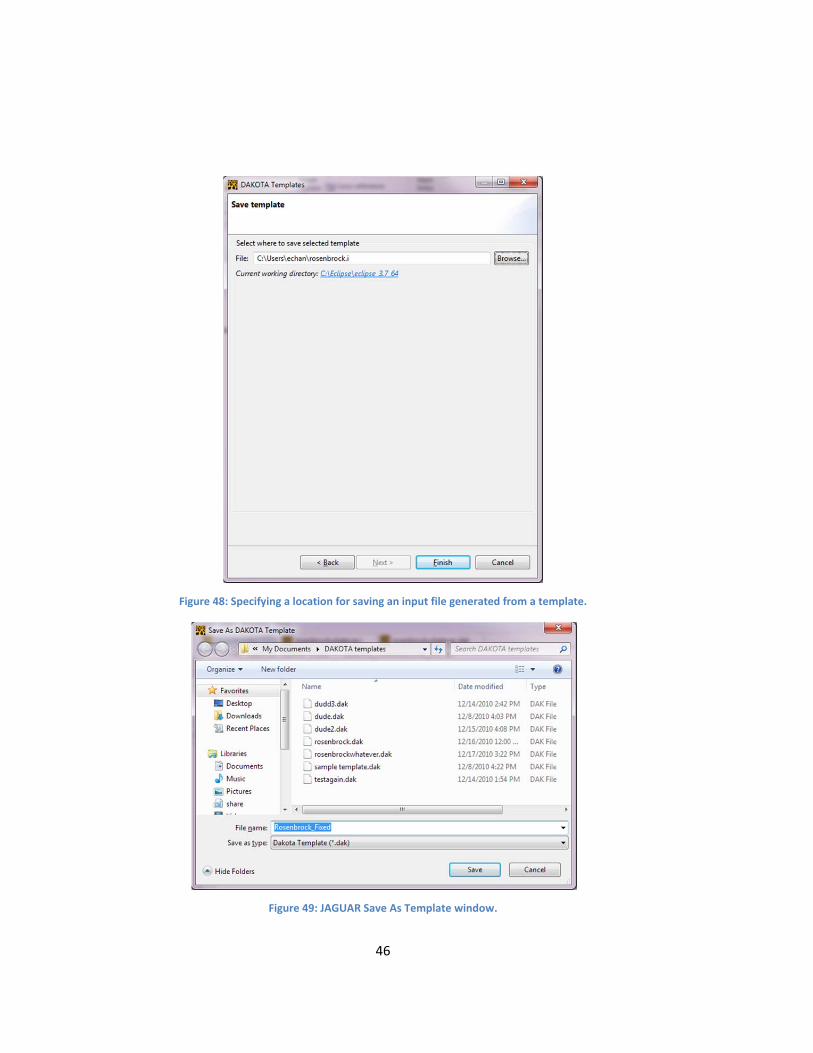
After selecting a template upon which the new input file will be based, specify a location in
which to save the new input file (see Figure 48). Also, at any time, you can save an input file or
template as your own custom template with File → Save → Save As Template (see Figure
49). By default templates are saved in the default directory specified in preferences and the
default template extension is .dak.
Figure 47: A list of DAKOTA input file templates available in JAGUAR.
46
Figure 48: Specifying a location for saving an input file generated from a template.
Figure 49: JAGUAR Save As Template window.
47
11: JAGUAR Brief Usage Tutorial
To quickly familiarize yourself with JAGUAR’s basics, follow the steps here which refer to the
simple dakota input file example dakota_rosenbrock_2d.in found in the
examples/tutorial directory of a DAKOTA distribution.
Start JAGUAR.
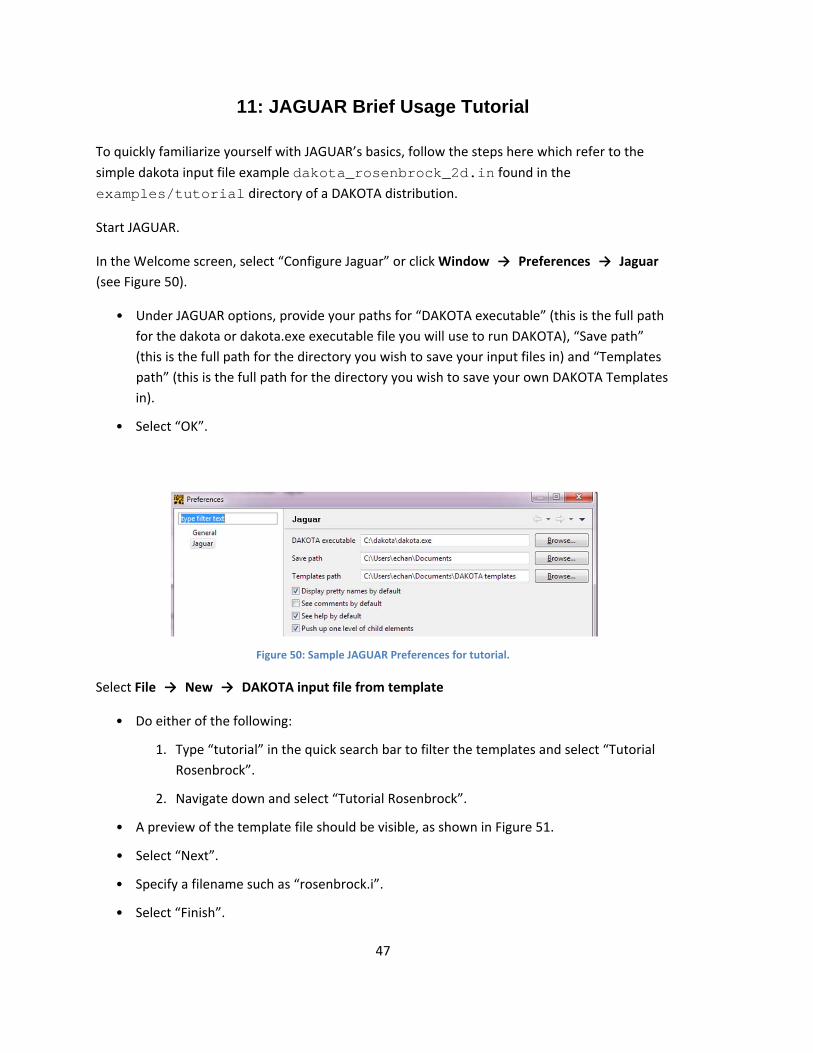
In the Welcome screen, select “Configure Jaguar” or click Window → Preferences → Jaguar
(see Figure 50).
• Under JAGUAR options, provide your paths for “DAKOTA executable” (this is the full path
for the dakota or dakota.exe executable file you will use to run DAKOTA), “Save path”
(this is the full path for the directory you wish to save your input files in) and “Templates
path” (this is the full path for the directory you wish to save your own DAKOTA Templates
in).
• Select “OK”.
Figure 50: Sample JAGUAR Preferences for tutorial.
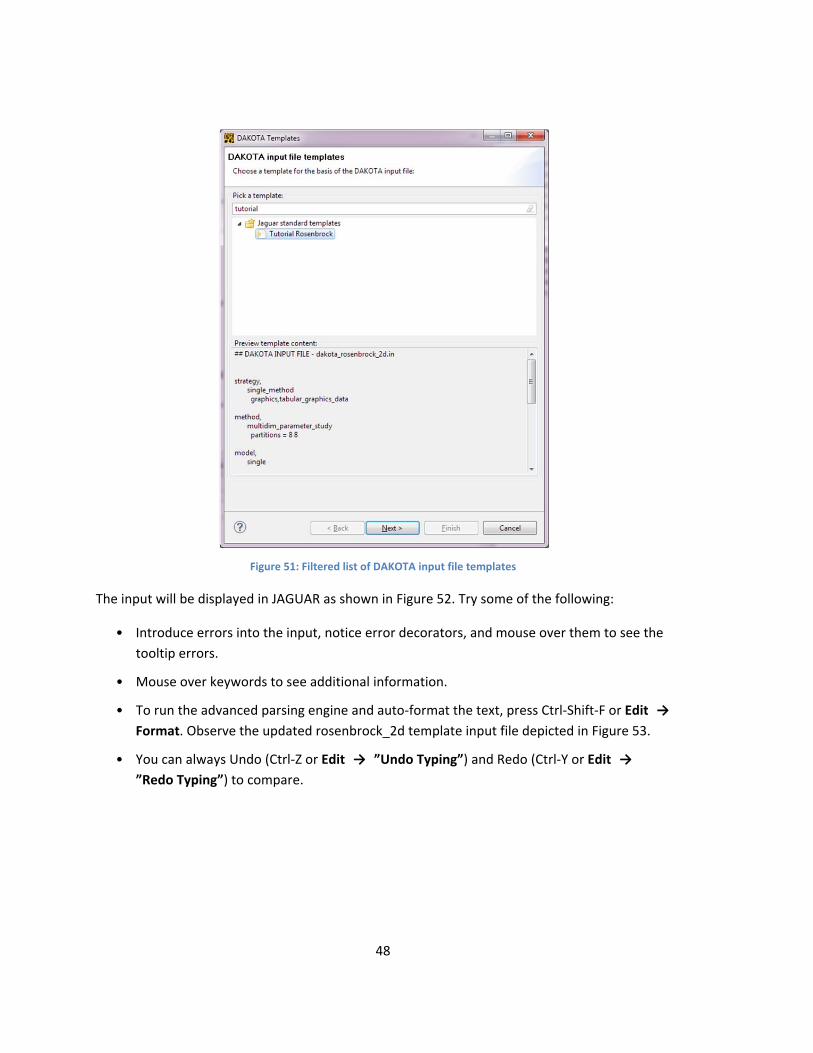
Select File → New → DAKOTA input file from template
• Do either of the following:
1. Type “tutorial” in the quick search bar to filter the templates and select “Tutorial
Rosenbrock”.
2. Navigate down and select “Tutorial Rosenbrock”.
• A preview of the template file should be visible, as shown in Figure 51.
• Select “Next”.
• Specify a filename such as “rosenbrock.i”.
• Select “Finish”.
48
Figure 51: Filtered list of DAKOTA input file templates
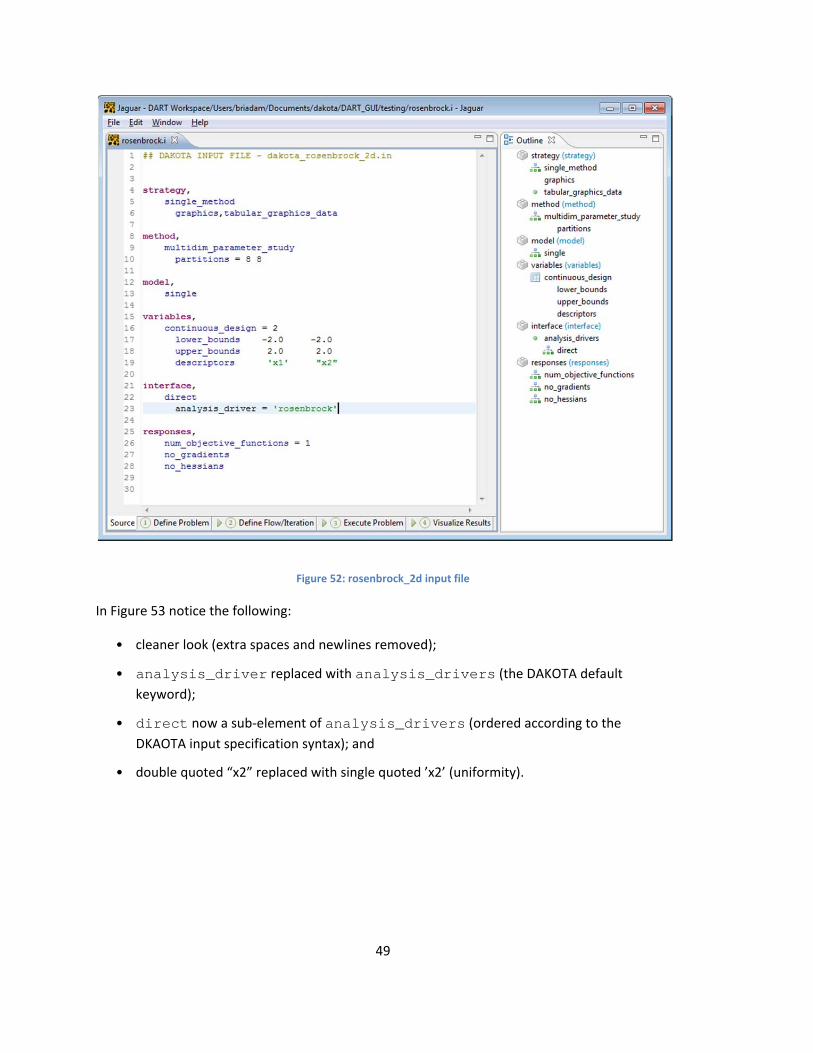
The input will be displayed in JAGUAR as shown in Figure 52. Try some of the following:
• Introduce errors into the input, notice error decorators, and mouse over them to see the
tooltip errors.
• Mouse over keywords to see additional information.
• To run the advanced parsing engine and auto‐format the text, press Ctrl‐Shift‐F or Edit →
Format. Observe the updated rosenbrock_2d template input file depicted in Figure 53.
• You can always Undo (Ctrl‐Z or Edit → ”Undo Typing”) and Redo (Ctrl‐Y or Edit →
”Redo Typing”) to compare.
49
Figure 52: rosenbrock_2d input file
In Figure 53 notice the following:
• cleaner look (extra spaces and newlines removed);
• analysis_driver replaced with analysis_drivers (the DAKOTA default keyword);
• direct now a sub‐element of analysis_drivers (ordered according to the DKAOTA input specification syntax); and
• double quoted “x2” replaced with single quoted ’x2’ (uniformity).
50
Figure 53: “Updated” rosenbrock_2d template input file after using the format option
To execute DAKOTA to perform this two‐dimensional parameter study, select the tab “(3)
Execute Problem” at the bottom (see previously in Figure 27). Click “Check”. Notice the
following output (for reference see Figure 30Error! Reference source not found.):
• actual DAKOTA command (in green) that just ran, followed by. • actual DAKOTA command (in green) that just ran, followed by.
• output of DAKOTA’s check mode.
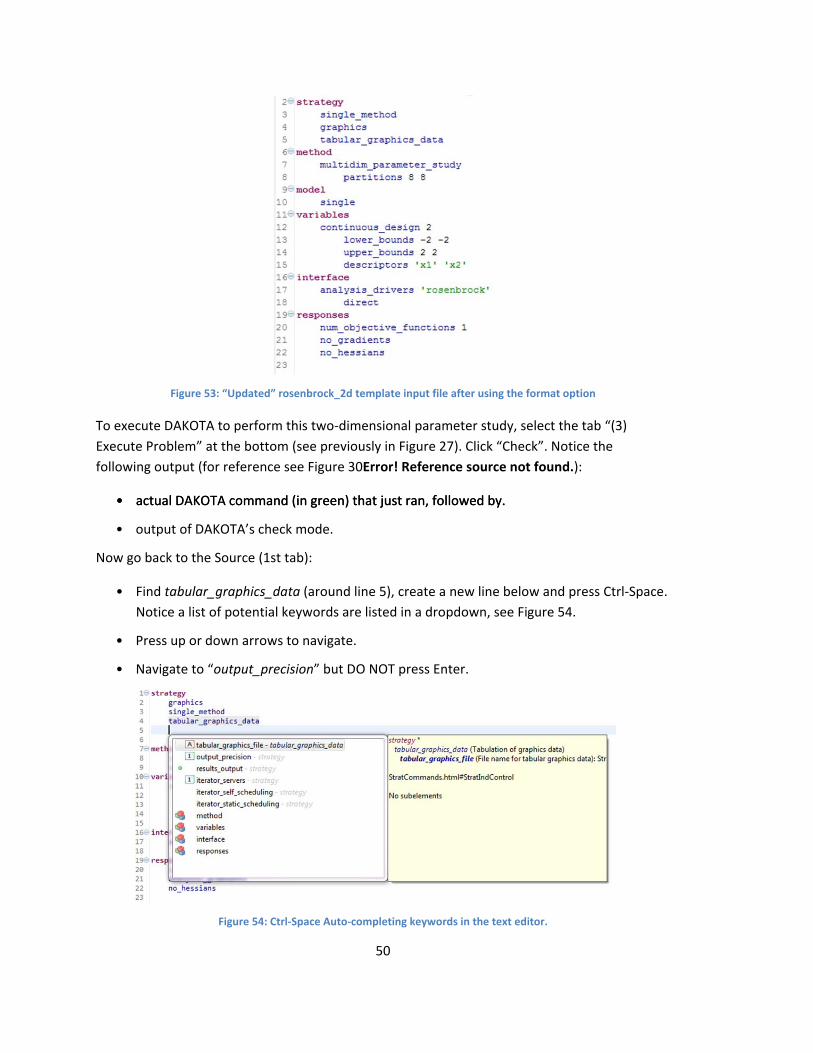
Now go back to the Source (1st tab):
• Find tabular_graphics_data (around line 5), create a new line below and press Ctrl‐Space.
Notice a list of potential keywords are listed in a dropdown, see Figure 54.
• Press up or down arrows to navigate.
• Navigate to “output_precision” but DO NOT press Enter.
Figure 54: Ctrl‐Space Auto‐completing keywords in the text editor.
51
• Notice that strategy is highlighted in the text, and also listed next to output_precision.
Auto‐completing keywords are reverse sorted, so that keywords at the top are the closest
context‐matching keywords. This helps you discover relevant keywords.
• Select output_precision by double clicking.
• Notice auto‐complete types in an equal “=” for you to remind you to enter a value and a
yellow triangle with exclamation appears indicating missing data.
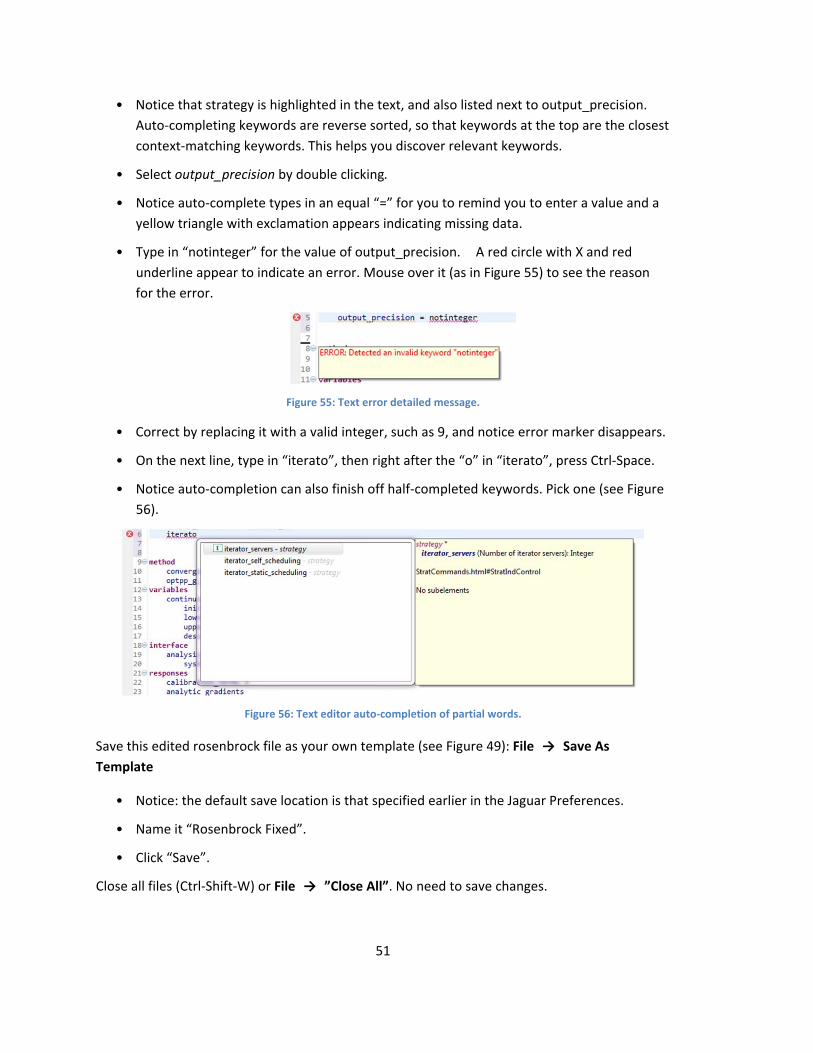
• Type in “notinteger” for the value of output_precision. A red circle with X and red
underline appear to indicate an error. Mouse over it (as in Figure 55) to see the reason
for the error.
Figure 55: Text error detailed message.
• Correct by replacing it with a valid integer, such as 9, and notice error marker disappears.
• On the next line, type in “iterato”, then right after the “o” in “iterato”, press Ctrl‐Space.
• Notice auto‐completion can also finish off half‐completed keywords. Pick one (see Figure
56).
Figure 56: Text editor auto‐completion of partial words.
Save this edited rosenbrock file as your own template (see Figure 49): File → Save As
Template
• Notice: the default save location is that specified earlier in the Jaguar Preferences.
• Name it “Rosenbrock Fixed”.
• Click “Save”.
Close all files (Ctrl‐Shift‐W) or File → ”Close All”. No need to save changes.
52
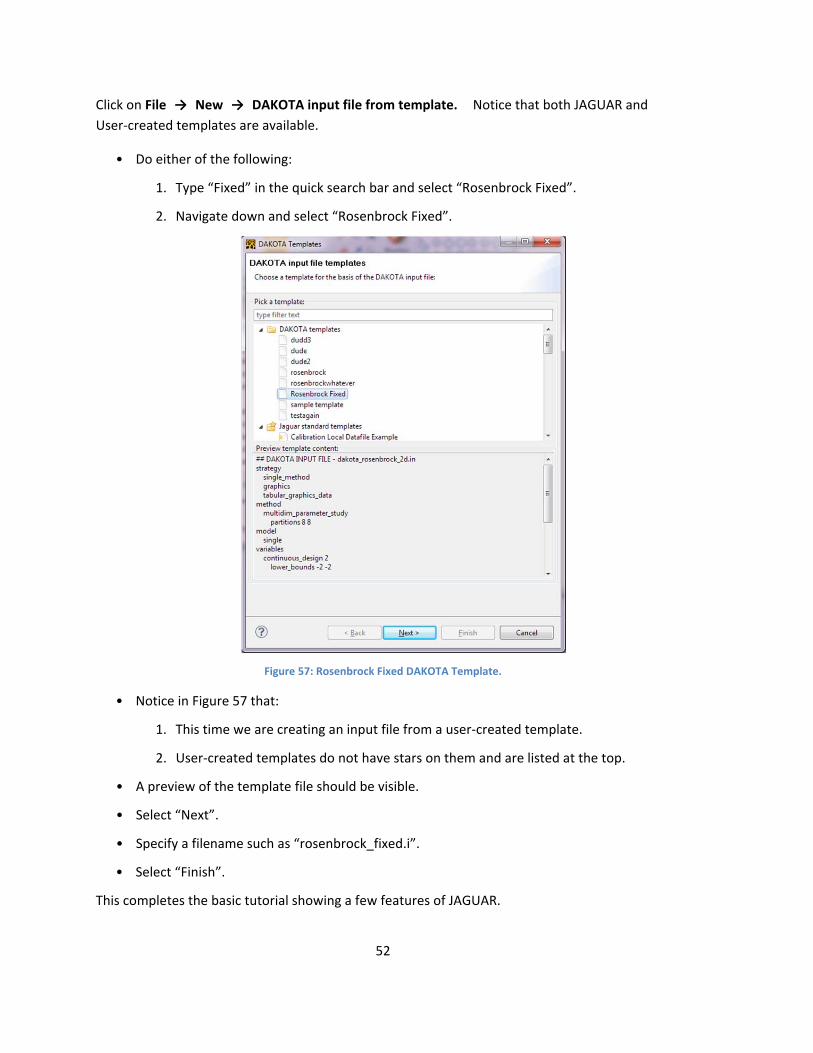
Click on File → New → DAKOTA input file from template. Notice that both JAGUAR and
User‐created templates are available.
• Do either of the following:
1. Type “Fixed” in the quick search bar and select “Rosenbrock Fixed”.
2. Navigate down and select “Rosenbrock Fixed”.
Figure 57: Rosenbrock Fixed DAKOTA Template.
• Notice in Figure 57 that:
1. This time we are creating an input file from a user‐created template.
2. User‐created templates do not have stars on them and are listed at the top.
• A preview of the template file should be visible.
• Select “Next”.
• Specify a filename such as “rosenbrock_fixed.i”.
• Select “Finish”.
This completes the basic tutorial showing a few features of JAGUAR.

53
12: Troubleshooting
In case of unresolvable errors, review the current JAGUAR FAQ linked from the download page
and the DAKOTA web pages. The most common troubleshooting options are excerpted here for
convenience:
1. Check for sufficient Java version: In a terminal or Command Prompt type “java ‐version”.
You should have at least Java 1.6.
2. If there exists a corrupted JAGUAR workspace, remove the workspace (User_folder >
Jaguar_workspace) and configuration (User_folder > .jaguar‐configuration).
3. If some window views are missing or if they are incorrectly positioned, restore the
default view by selecting: WindowReset Window Layout
4. Enable Error Log: WindowShow ViewError Log (see Figure 58). This view will
provide detailed logging of anything that went wrong inside JAGUAR.
Figure 58: Enabling JAGUAR Error Log.
Send any errors listed to our support email jaguar‐[email protected].

54
Distribution
1 MS0899 Technical Library 9536 (electronic copy)

55