Embed Size (px)
DESCRIPTION
Navicat Software
Citation preview
Data Management Tools 1
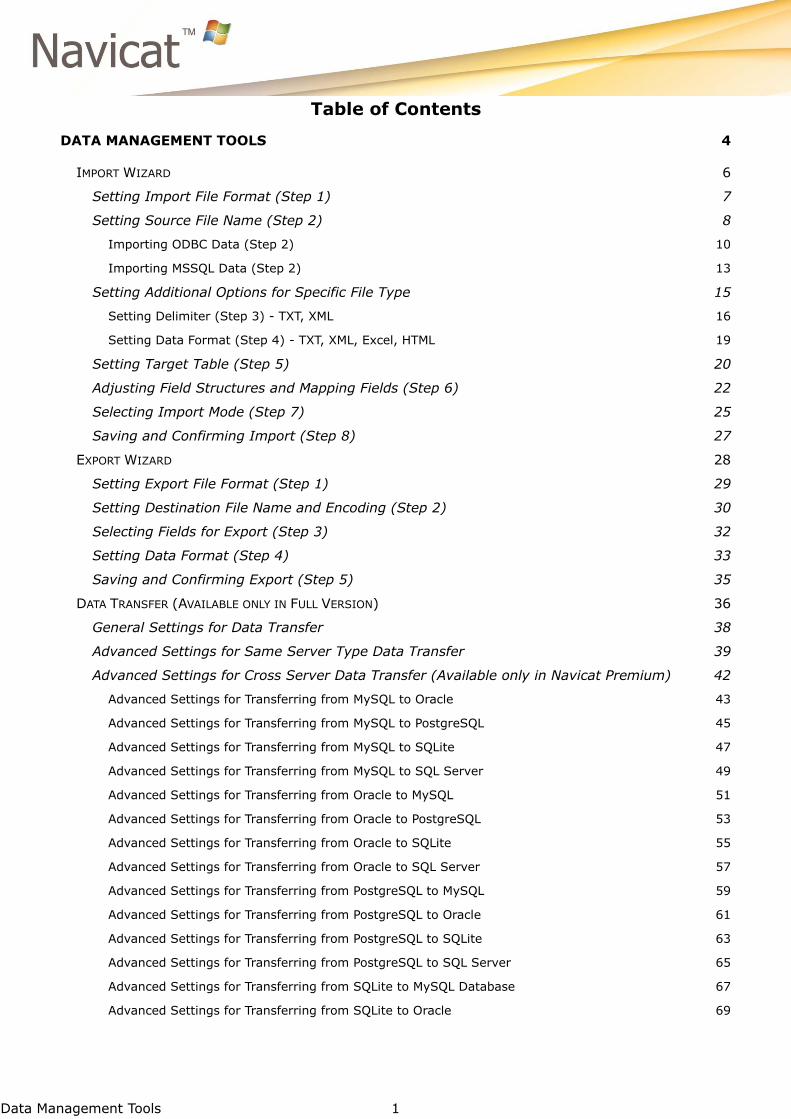
Table of Contents
DATA MANAGEMENT TOOLS 4
IMPORT WIZARD 6
Setting Import File Format (Step 1) 7
Setting Source File Name (Step 2) 8
Importing ODBC Data (Step 2) 10
Importing MSSQL Data (Step 2) 13
Setting Additional Options for Specific File Type 15
Setting Delimiter (Step 3) - TXT, XML 16
Setting Data Format (Step 4) - TXT, XML, Excel, HTML 19
Setting Target Table (Step 5) 20
Adjusting Field Structures and Mapping Fields (Step 6) 22
Selecting Import Mode (Step 7) 25
Saving and Confirming Import (Step 8) 27
EXPORT WIZARD 28
Setting Export File Format (Step 1) 29
Setting Destination File Name and Encoding (Step 2) 30
Selecting Fields for Export (Step 3) 32
Setting Data Format (Step 4) 33
Saving and Confirming Export (Step 5) 35
DATA TRANSFER (AVAILABLE ONLY IN FULL VERSION) 36
General Settings for Data Transfer 38
Advanced Settings for Same Server Type Data Transfer 39
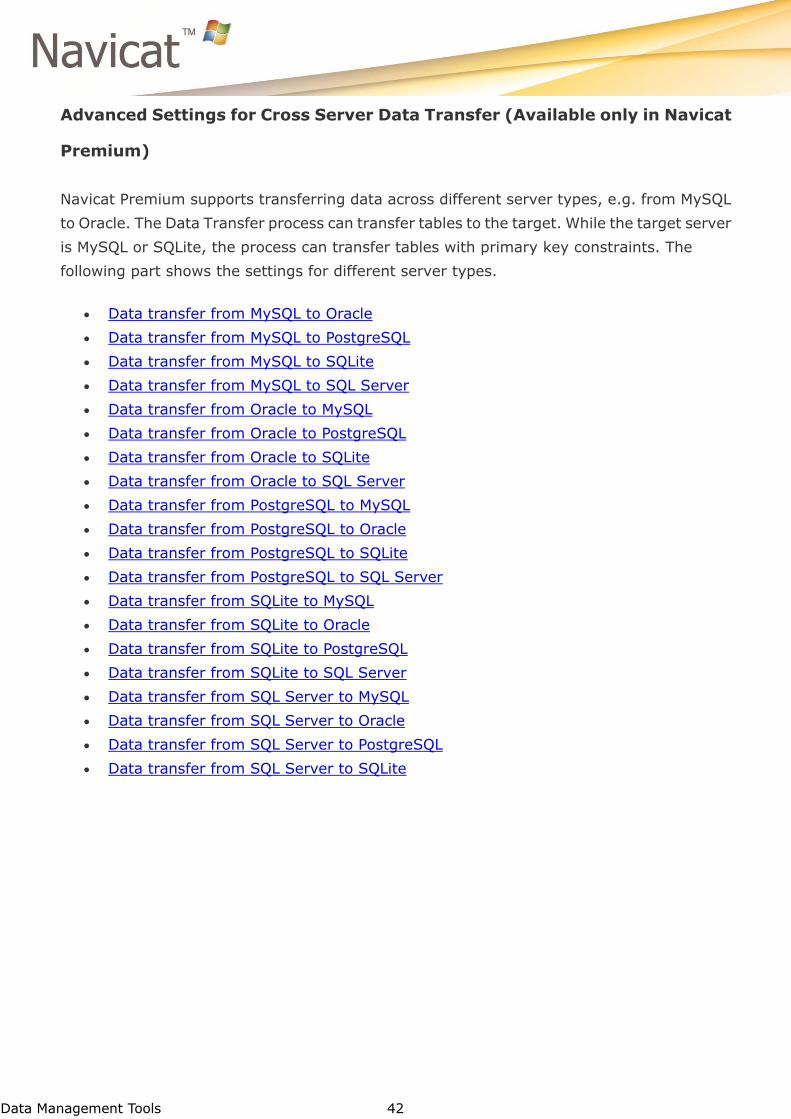
Advanced Settings for Cross Server Data Transfer (Available only in Navicat Premium) 42
Advanced Settings for Transferring from MySQL to Oracle 43
Advanced Settings for Transferring from MySQL to PostgreSQL 45
Advanced Settings for Transferring from MySQL to SQLite 47
Advanced Settings for Transferring from MySQL to SQL Server 49
Advanced Settings for Transferring from Oracle to MySQL 51
Advanced Settings for Transferring from Oracle to PostgreSQL 53
Advanced Settings for Transferring from Oracle to SQLite 55
Advanced Settings for Transferring from Oracle to SQL Server 57
Advanced Settings for Transferring from PostgreSQL to MySQL 59
Advanced Settings for Transferring from PostgreSQL to Oracle 61
Advanced Settings for Transferring from PostgreSQL to SQLite 63
Advanced Settings for Transferring from PostgreSQL to SQL Server 65
Advanced Settings for Transferring from SQLite to MySQL Database 67
Advanced Settings for Transferring from SQLite to Oracle 69
Data Management Tools 2
Advanced Settings for Transferring from SQLite to PostgreSQL 71
Advanced Settings for Transferring from SQLite to SQL Server 73
Advanced Settings for Transferring from SQL Server to MySQL 75
Advanced Settings for Transferring from SQL Server to Oracle 77
Advanced Settings for Transferring from SQL Server to PostgreSQL 79
Advanced Settings for Transferring from SQL Server to SQLite 81
Data Transfer Message Log 83
DATA SYNCHRONIZATION (AVAILABLE ONLY IN FULL VERSION) 84
General Settings for Data Synchronization 87
Advanced Settings for Data Synchronization 88
Data Synchronization Message Log 89
STRUCTURE SYNCHRONIZATION (AVAILABLE ONLY IN FULL VERSION & ONLY FOR MYSQL, ORACLE, POSTGRESQL
AND SQL SERVER) 90
General Settings for MySQL Structure Synchronization 92
General Settings for Oracle Structure Synchronization 94
General Settings for PostgreSQL Structure Synchronization 96
General Settings for SQL Server Structure Synchronization 98
Structure Synchronization Result 100
Structure Synchronization Message Log 102
BACKUP/RESTORE (AVAILABLE ONLY IN FULL VERSION & ONLY FOR MYSQL, POSTGRESQL AND SQLITE) 103
Backup 106
General Settings for Backup 107
Object Selection for Backup 108
Advanced Settings for Backup 109
Backup Message Log 110
Restore 111
General Settings for Restore 112
Object Selection for Restore 113
Advanced Settings for Restore 114
Restore Message Log 116
Extract SQL 117
BATCH JOB/SCHEDULE (AVAILABLE ONLY IN FULL VERSION) 118
General Settings for Batch Job/Schedule 122
Setting Report Printing 124
Advanced Settings for Batch Job/Schedule 125
Batch Job/Schedule Message Log 126
Batch Job Converter (Available only in Navicat Premium) 127
Selecting Batch Jobs 128
Data Management Tools 3
Setting Convert Options 129
Starting Convert 130
CONSOLE 131
MySQL Console 132
Example of Using MySQL Console 134
Oracle Console 135
Example of Using Oracle Console 137
PostgreSQL Console 138
Example of Using PostgreSQL Console 140
SQLite Console 141
Example of Using SQLite Console 143
SQL Server Console 144
Example of Using SQL Server Console 146
DUMP SQL FILE 147
EXECUTE SQL FILE 148
PRINT DATABASE/SCHEMA/TABLE STRUCTURE (AVAILABLE ONLY IN FULL VERSION) 149
LOG FILES 150
Data Management Tools 4
Data Management Tools
Navicat provides a number of powerful tools for working with the databases.
The following tools are available:
Import Wizard
Imports data from DBF, TXT, CSV, HTML, Excel, Access, XML, ODBC and more.
Export Wizard
Exports data to various formats, including DBF, TXT, CSV, HTML, Word, Excel, Access, XML,
RTF and more.
Data Transfer
Transfers tables/views/procedures/functions/sequences/events between
databases/schemas or to plain text file.
Data Synchronization
Synchronizes data in different databases/schemas to be kept up-to-date so that each
repository contains the same information.
Structure Synchronization
Compares the structure of two similar databases/schemas and produces a set of alter
statements for MySQL, Oracle, PostgreSQL and SQL Server.
Backup/Restore
Allows you to backup/restore your databases/schemas for MySQL, PostgreSQL and SQLite.
Batch Job/Schedule
Allows you to schedule a batch job which being executed at a specified time and support
e-mail notification service.
Console
Provides interactive text-based screen for user query input and result output from MySQL,
Oracle, PostgreSQL, SQLite and SQL Server.
Dump SQL File
Dumps database/schema/table(s) to SQL file.
Data Management Tools 5
Execute SQL File
Executes SQL file.
Print Structure
Prints database/schema/table structure.
Log Files
Keeps track on the actions (e.g. SQL statements being executed) which have been
performed in Navicat.
Data Management Tools 6
Import Wizard
Import Wizard allows you to import data to a table from DBF, TXT, CSV, HTML, Excel,
Access, XML, ODBC and more. You can save your settings as a profile for setting schedule.
Note: Navicat Essentials version supports to import text-based files, such as TXT, CSV, HTML
and XML file.
Note: You can drag a supported file to the table pane or a database/schema in the connection
tree. Navicat will popup the import wizard. (If existing table is highlighted, Navicat will
import the file to the highlighted table, otherwise, import the file to a new table)
To open the Import Wizard, click Import Wizard from the table object pane toolbar.
Setting Import File Format (Step 1)
Selecting Source File Name (Step 2)
Setting Additional Options for Specific File Type
Setting Target Table (Step 5)
Adjusting Field Structures and Mapping Fields (Step 6)
Selecting Import Mode (Step 7)
Saving and Confirming Import (Step 8)
To run a saved import profile from the command line
Create and save the import profile.
Start Navicat from command line, type the command (see Command for details)

Data Management Tools 7
Setting Import File Format (Step 1)
Select one of the available import types for the source file.
Note: Navicat Essentials only supports importing from TXT, CSV, HTML and XML file.
Note: The Excel file format is according to the Microsoft Office version installed in your
computer.
Data Management Tools 8
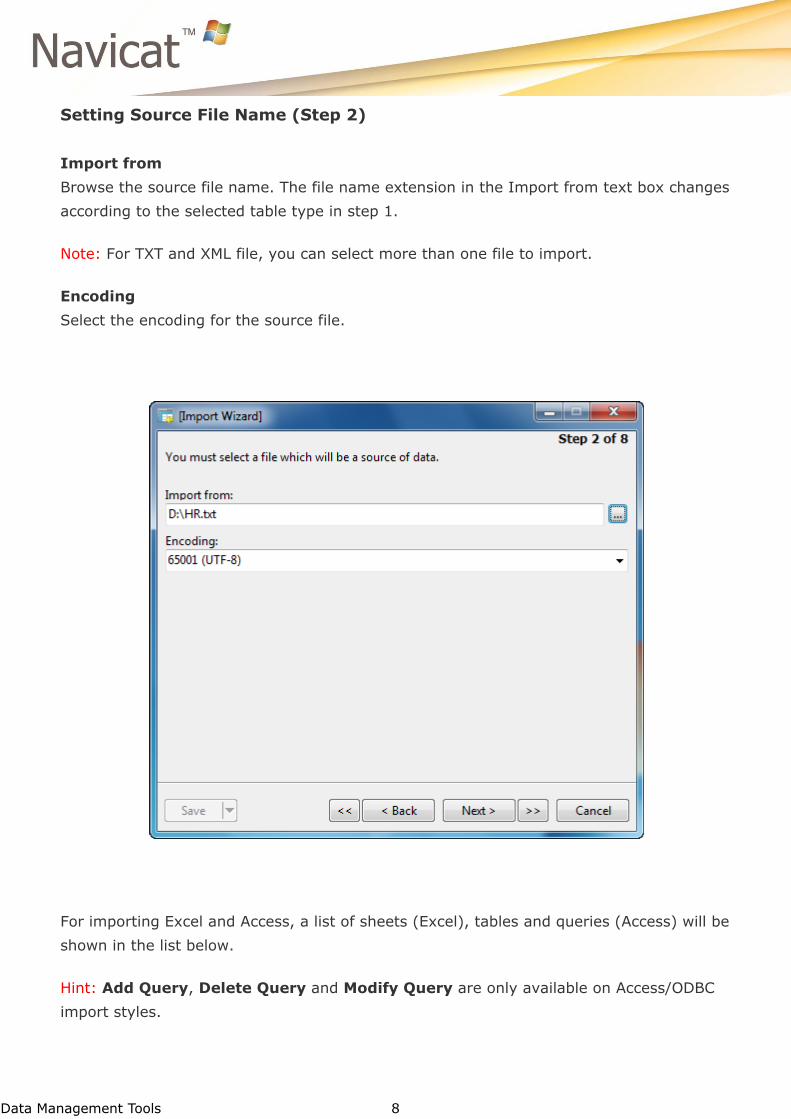
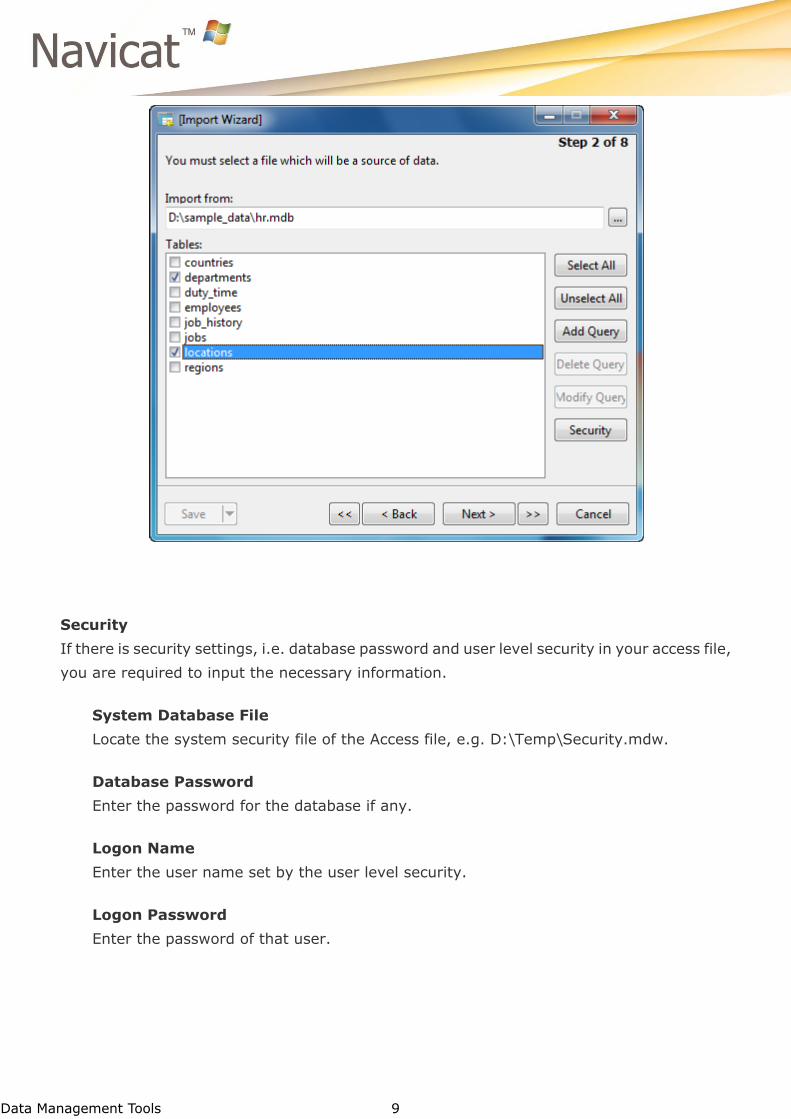
Setting Source File Name (Step 2)
Import from
Browse the source file name. The file name extension in the Import from text box changes
according to the selected table type in step 1.
Note: For TXT and XML file, you can select more than one file to import.
Encoding
Select the encoding for the source file.
For importing Excel and Access, a list of sheets (Excel), tables and queries (Access) will be
shown in the list below.
Hint: Add Query, Delete Query and Modify Query are only available on Access/ODBC
import styles.
Data Management Tools 9
Security
If there is security settings, i.e. database password and user level security in your access file,
you are required to input the necessary information.
System Database File
Locate the system security file of the Access file, e.g. D:\Temp\Security.mdw.
Database Password
Enter the password for the database if any.
Logon Name
Enter the user name set by the user level security.
Logon Password
Enter the password of that user.

Data Management Tools 10
Importing ODBC Data (Step 2)
Setting Up an ODBC Data Source Connection
1. On the Control Panel, select Administrative Tools.
2. Select Data Sources (ODBC).
3. Select User DSN tab.
4. Click Add.
5. Select the correct ODBC driver you wish, such as Oracle and click Finish.
Data Management Tools 11
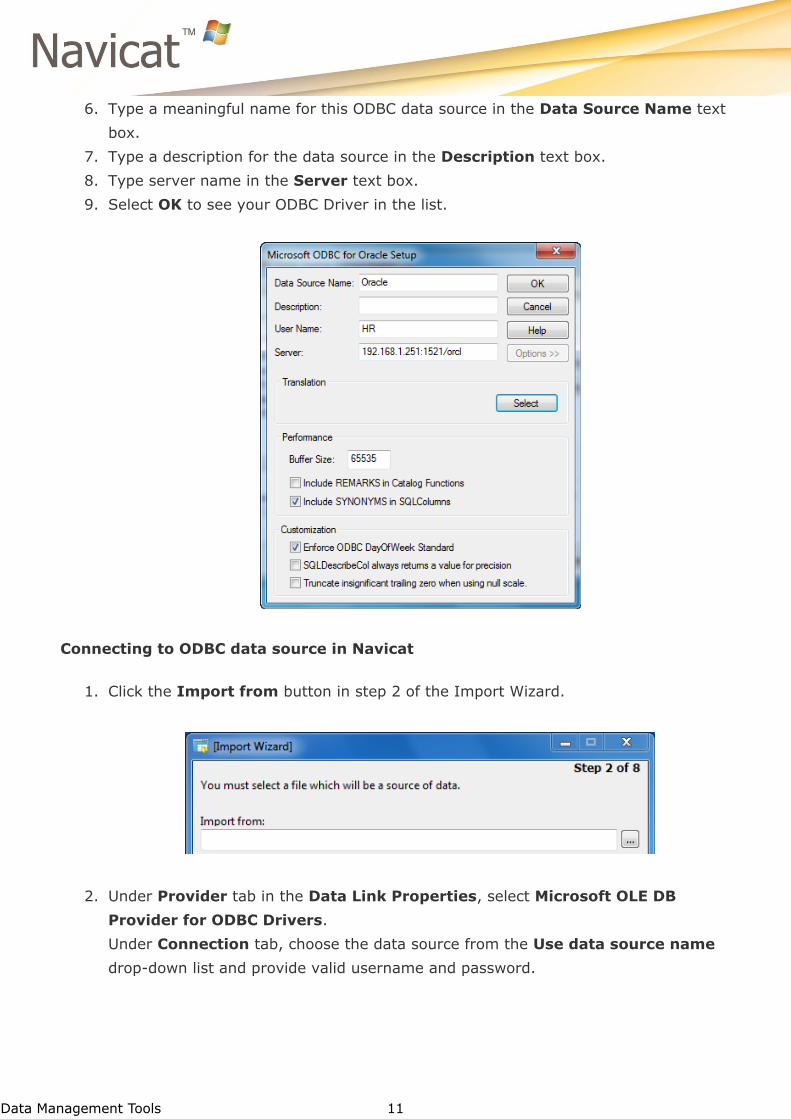
6. Type a meaningful name for this ODBC data source in the Data Source Name text
box.
7. Type a description for the data source in the Description text box.
8. Type server name in the Server text box.
9. Select OK to see your ODBC Driver in the list.
Connecting to ODBC data source in Navicat
1. Click the Import from button in step 2 of the Import Wizard.
2. Under Provider tab in the Data Link Properties, select Microsoft OLE DB
Provider for ODBC Drivers.
Under Connection tab, choose the data source from the Use data source name
drop-down list and provide valid username and password.
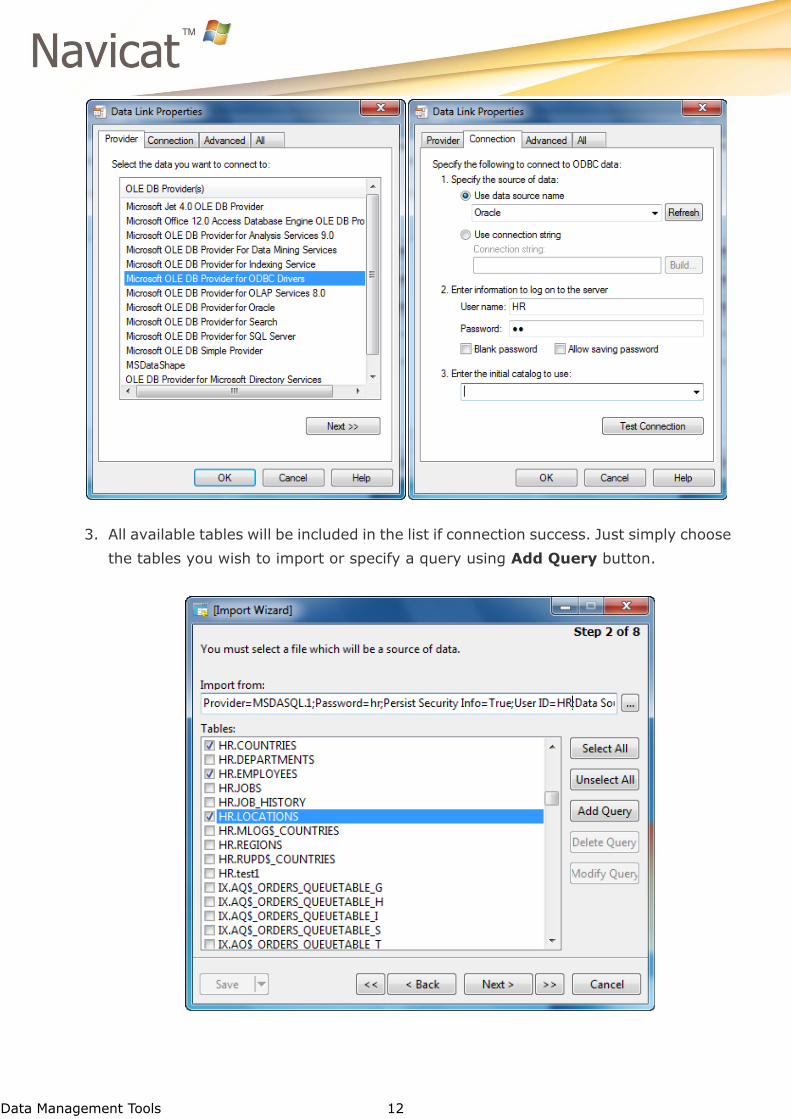
Data Management Tools 12
3. All available tables will be included in the list if connection success. Just simply choose
the tables you wish to import or specify a query using Add Query button.
Data Management Tools 13
Importing MSSQL Data (Step 2)
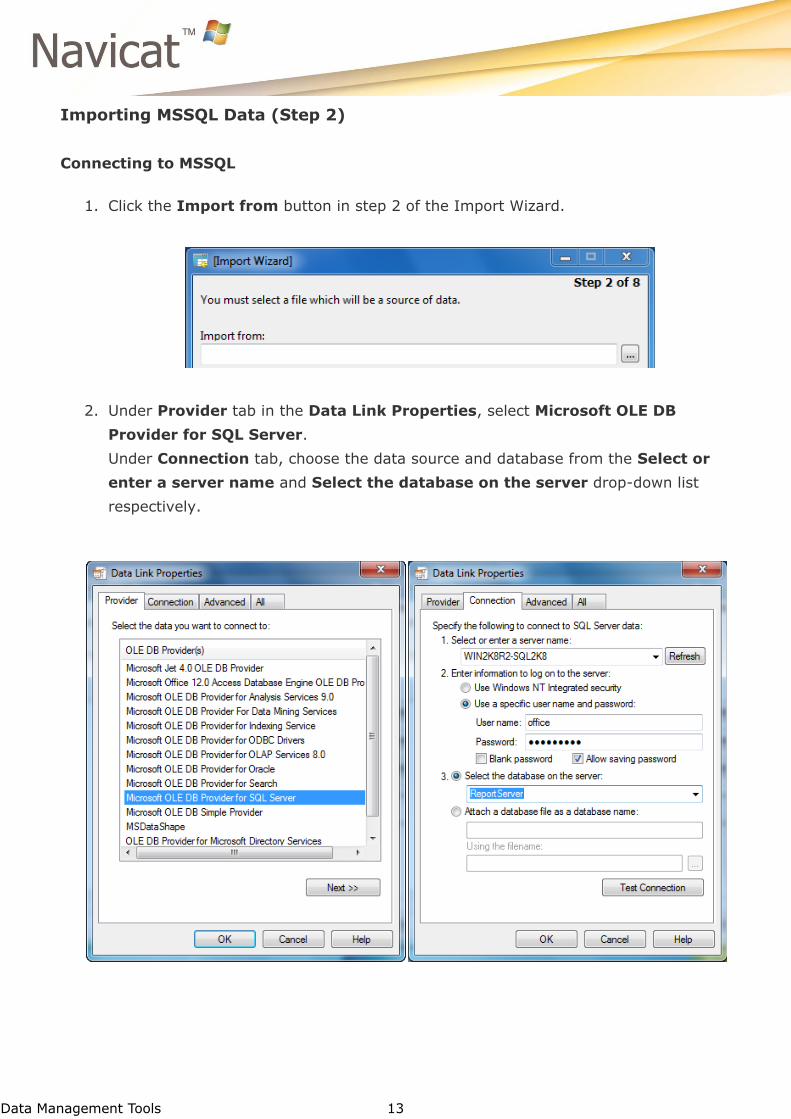
Connecting to MSSQL
1. Click the Import from button in step 2 of the Import Wizard.
2. Under Provider tab in the Data Link Properties, select Microsoft OLE DB
Provider for SQL Server.
Under Connection tab, choose the data source and database from the Select or
enter a server name and Select the database on the server drop-down list
respectively.

Data Management Tools 14
3. All available tables will be included in the list if connection success. Just simply choose
the tables you wish to import or specify a query using Add Query button.

Data Management Tools 15
Setting Additional Options for Specific File Type
Additional options specifies for file type.
Setting Delimiter (Step 3) - TXT, XML
Setting Data Format (Step 4) - TXT, XML, Excel, HTML
Data Management Tools 16
Setting Delimiter (Step 3) - TXT, XML
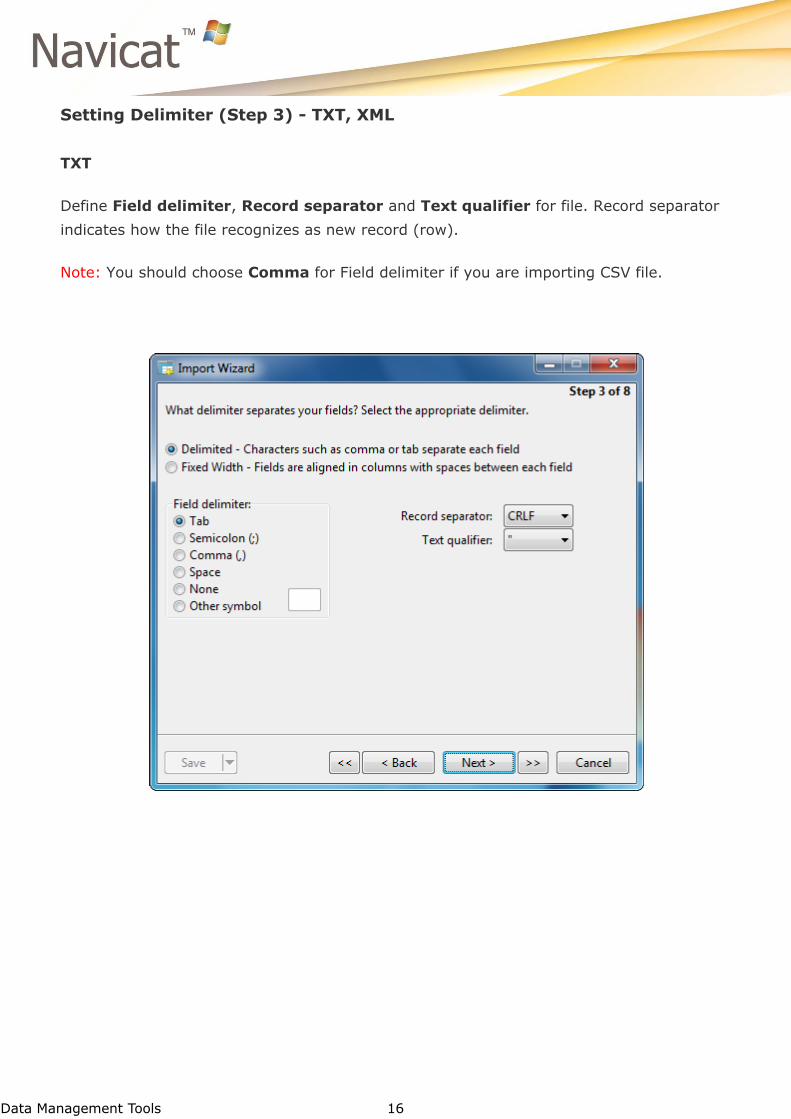
TXT
Define Field delimiter, Record separator and Text qualifier for file. Record separator
indicates how the file recognizes as new record (row).
Note: You should choose Comma for Field delimiter if you are importing CSV file.
Data Management Tools 17
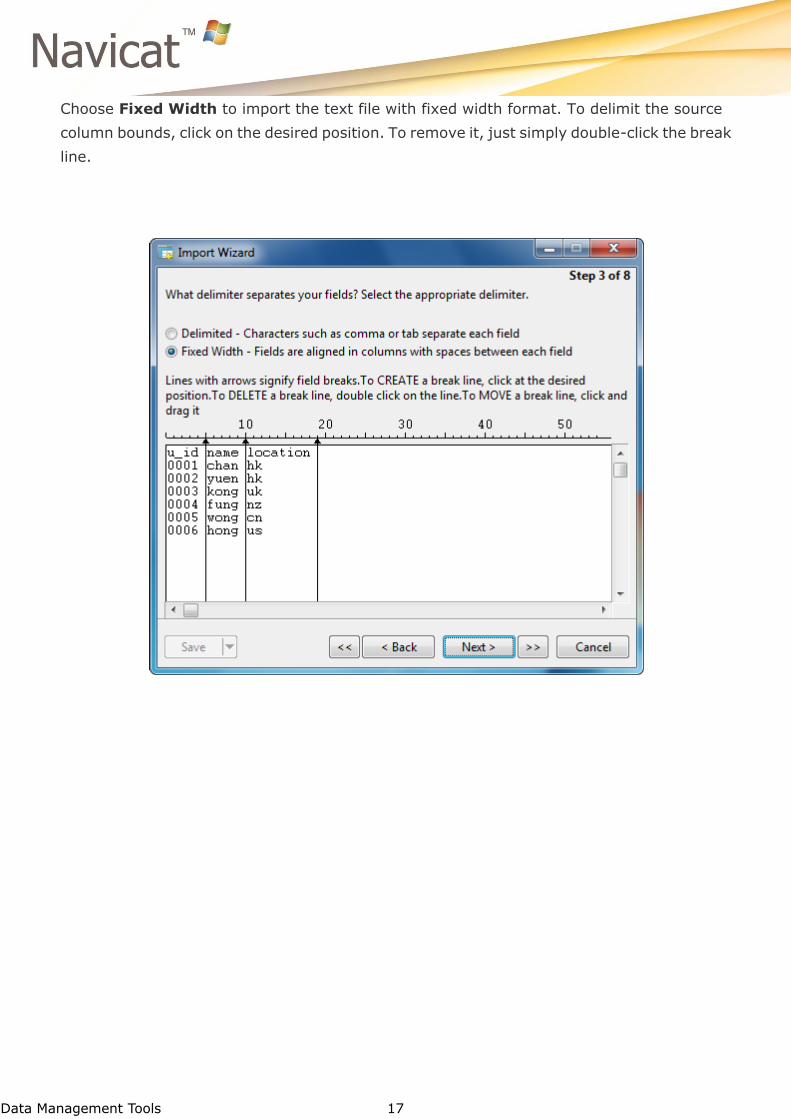
Choose Fixed Width to import the text file with fixed width format. To delimit the source
column bounds, click on the desired position. To remove it, just simply double-click the break
line.
Data Management Tools 18
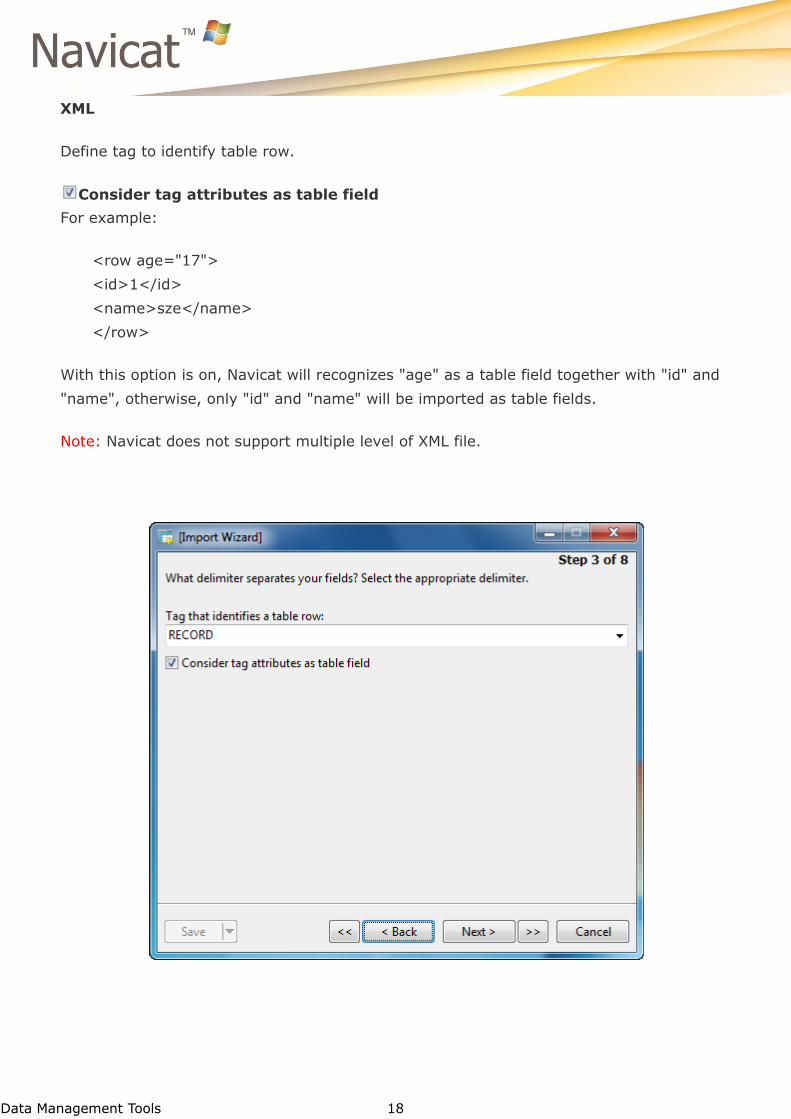
XML
Define tag to identify table row.
Consider tag attributes as table field
For example:
<row age="17">
<id>1</id>
<name>sze</name>
</row>
With this option is on, Navicat will recognizes "age" as a table field together with "id" and
"name", otherwise, only "id" and "name" will be imported as table fields.
Note: Navicat does not support multiple level of XML file.
Data Management Tools 19
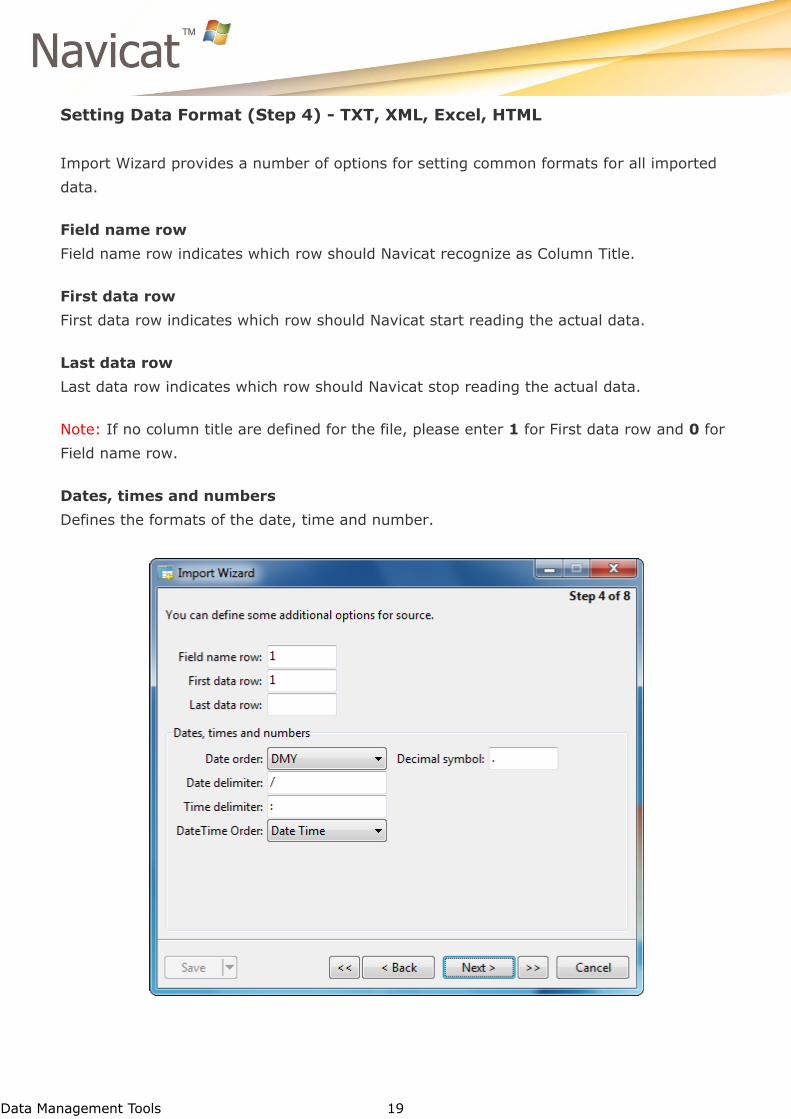
Setting Data Format (Step 4) - TXT, XML, Excel, HTML
Import Wizard provides a number of options for setting common formats for all imported
data.
Field name row
Field name row indicates which row should Navicat recognize as Column Title.
First data row
First data row indicates which row should Navicat start reading the actual data.
Last data row
Last data row indicates which row should Navicat stop reading the actual data.
Note: If no column title are defined for the file, please enter 1 for First data row and 0 for
Field name row.
Dates, times and numbers
Defines the formats of the date, time and number.
Data Management Tools 20
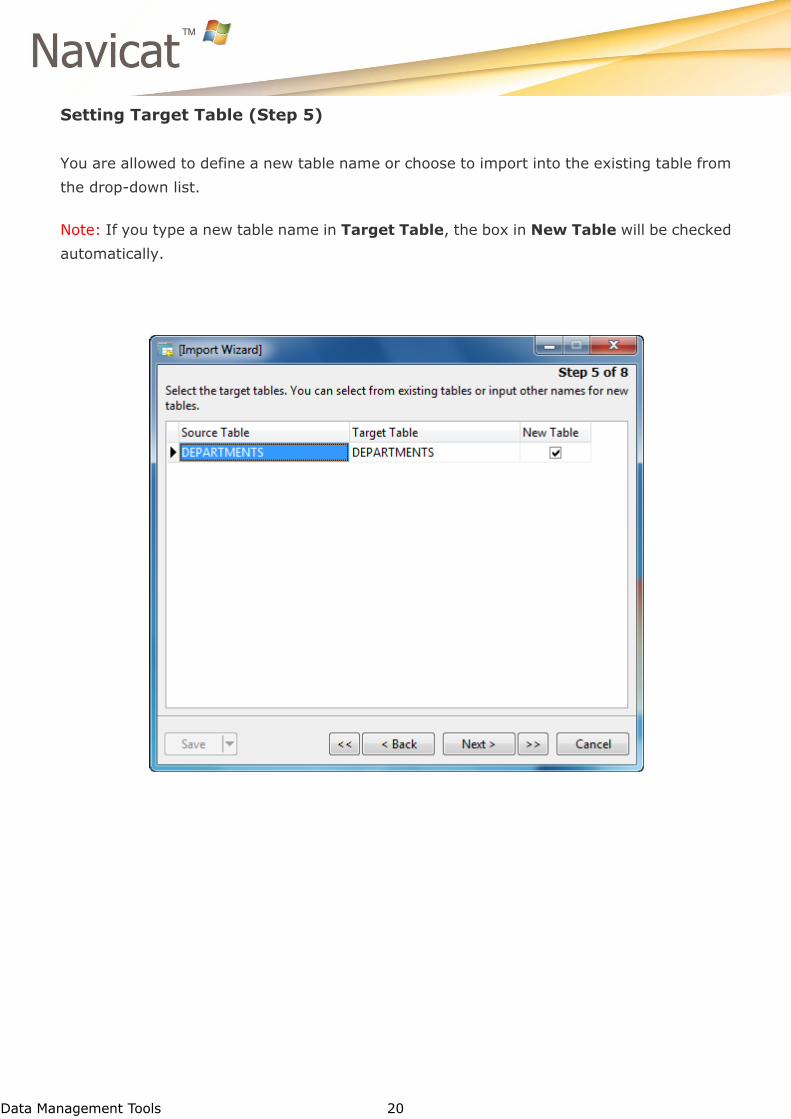
Setting Target Table (Step 5)
You are allowed to define a new table name or choose to import into the existing table from
the drop-down list.
Note: If you type a new table name in Target Table, the box in New Table will be checked
automatically.
Data Management Tools 21
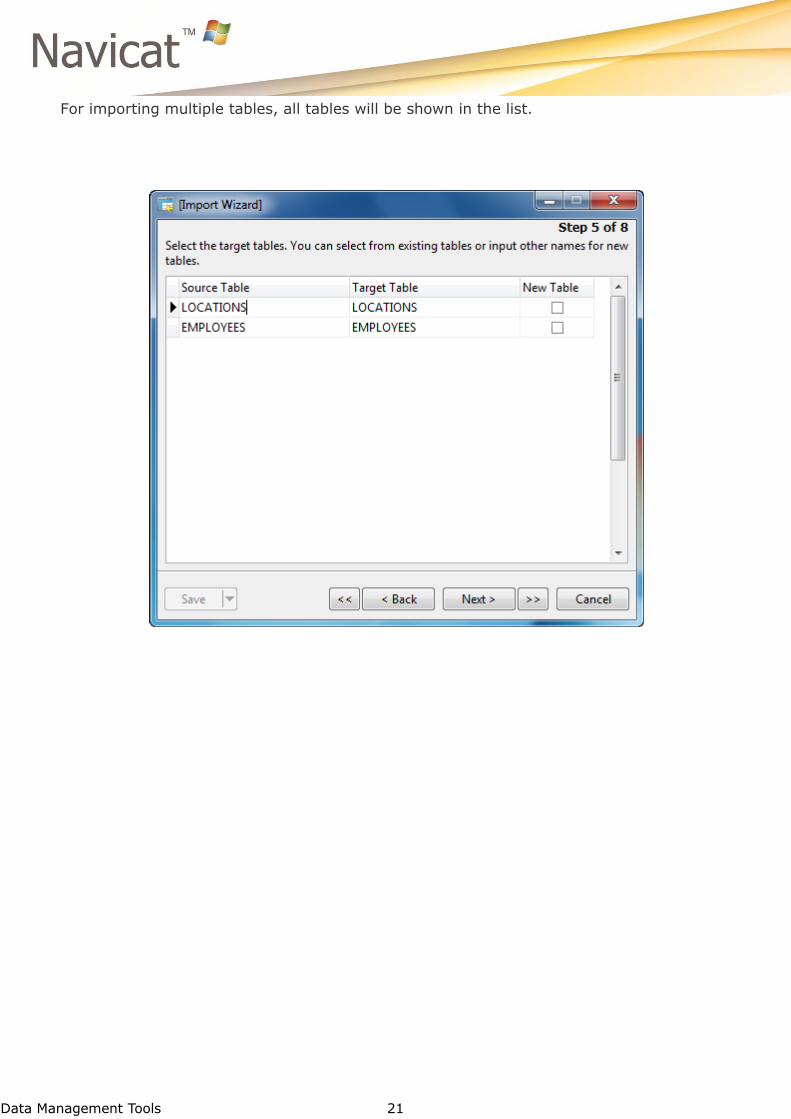
For importing multiple tables, all tables will be shown in the list.

Data Management Tools 22
Adjusting Field Structures and Mapping Fields (Step 6)
Navicat will make assumption on the field types and length in the source table. You are
allowed to choose your desired type from the drop-down list.
Hint: For importing multiple tables, select the other tables from the Source Table
drop-down list.
If you are importing your data into the existing table, then you might need to map the source
field names manually to the destination table or just simply right-click and select Smart
Match All, Direct Match All and Unmatch All from the popup menu for quick mapping.
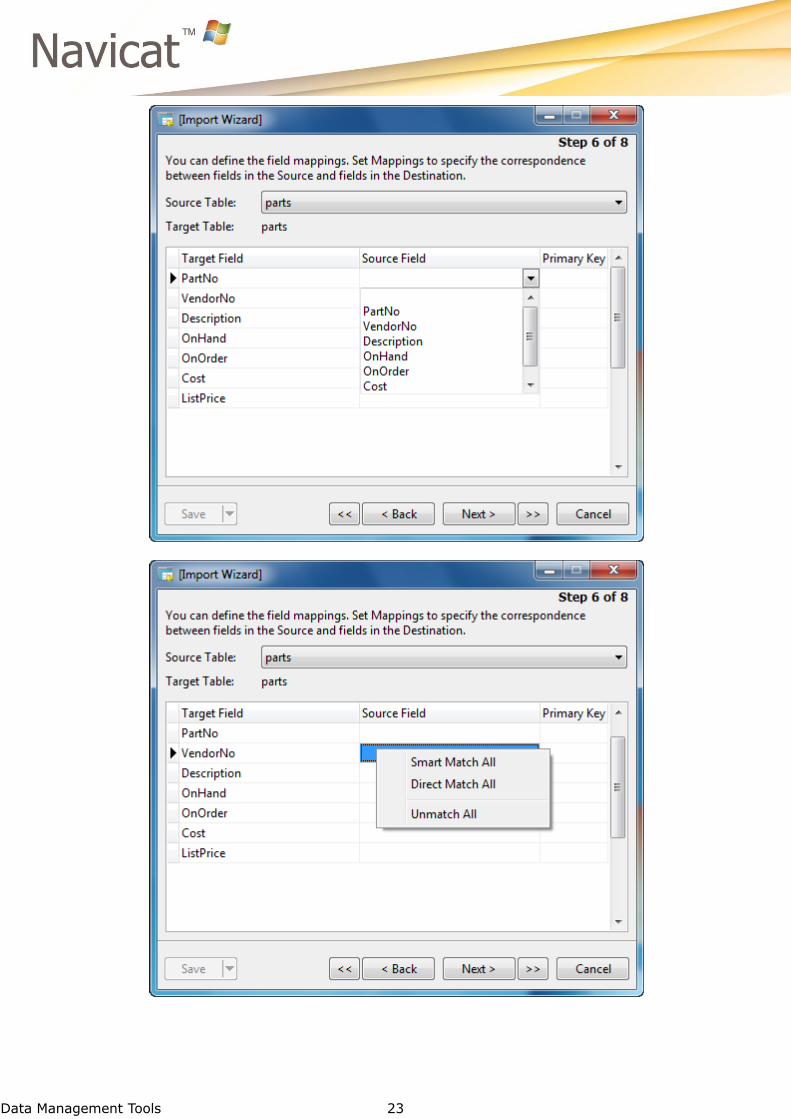
Data Management Tools 23
Data Management Tools 24
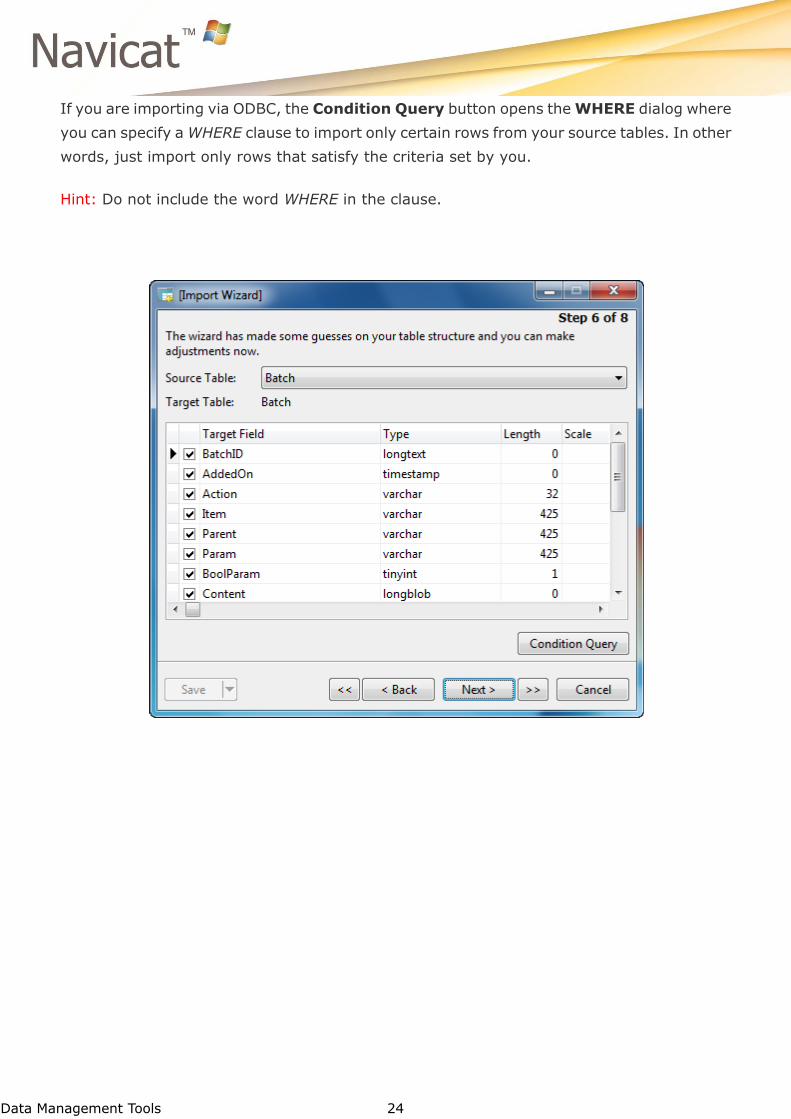
If you are importing via ODBC, the Condition Query button opens the WHERE dialog where
you can specify a WHERE clause to import only certain rows from your source tables. In other
words, just import only rows that satisfy the criteria set by you.
Hint: Do not include the word WHERE in the clause.
Data Management Tools 25
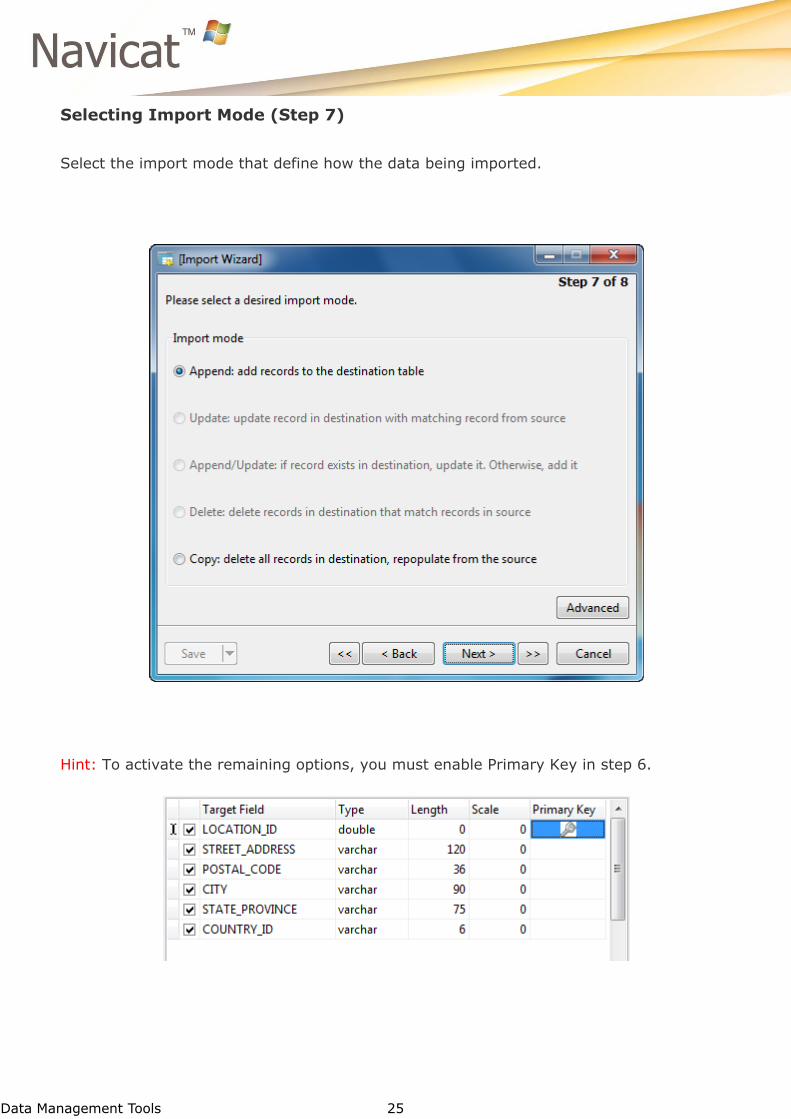
Selecting Import Mode (Step 7)
Select the import mode that define how the data being imported.
Hint: To activate the remaining options, you must enable Primary Key in step 6.
Data Management Tools 26
Advanced
Run multiple queries in each execution (Available only for PostgreSQL and
SQL Server)
Checks this option if you want to run multiple queries in each execution.
Use extended insert statements (Available only for MySQL)
Inserts records using extended insert syntax.
Example:
INSERT INTO `users` VALUES ('1', 'Peter McKindsy', '23'), ('2', 'Johnson Ryne',
'56'), ('0', 'Katherine', '23');
Use empty string as NULL
Imports NULL value if the source data field contains empty string.
Use Foreign Key constraint (Available only for MySQL)
Adds foreign key if there is foreign key relations between tables.
Continue on error
Ignores errors that are encountered during the import process.
Include Unique, Index and Foreign Key
Includes Unique, Index and foreign key during the import process.
Note: Support only when file type is MS Access database or ODBC.
Create Auto Increment Fields (Available only for MySQL and PostgreSQL)
Creates Auto Increment Fields during the import process.
Note: Support only when file type is MS Access database, Paradox file or DBase file.
Import Deleted Records
Import the deleted records in the DBase file during the import process.
Note: Support only when file type is DBase file.
Data Management Tools 27
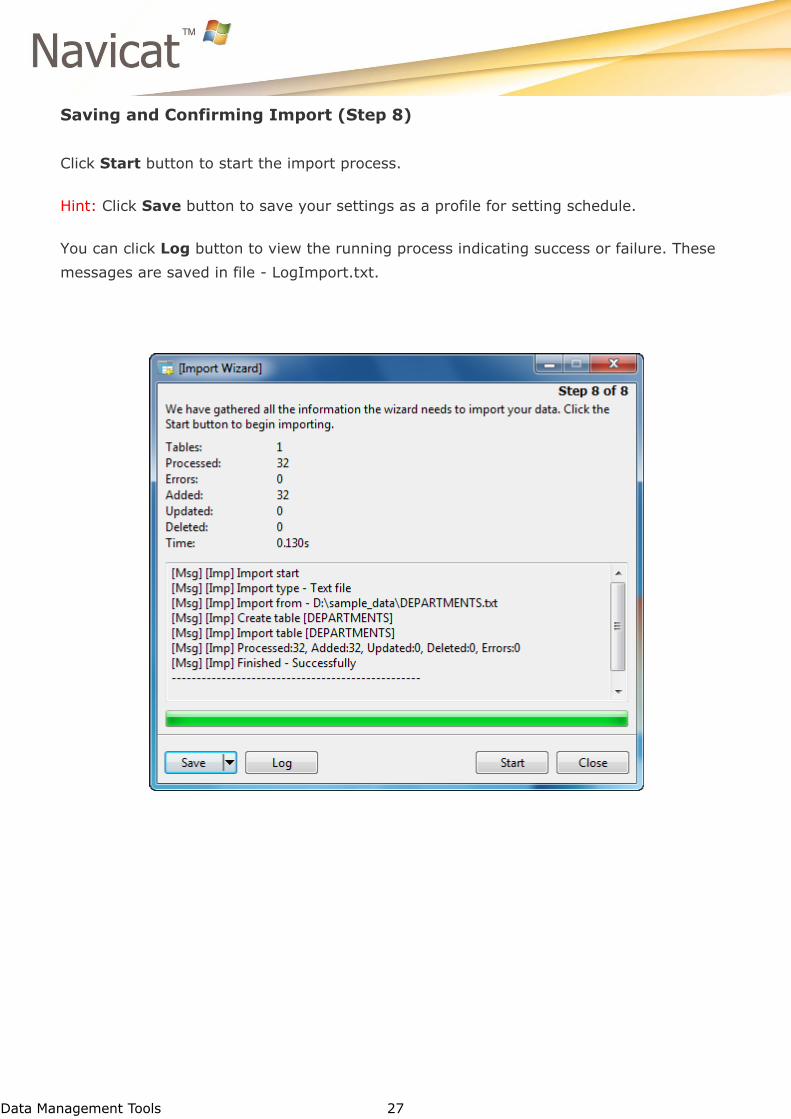
Saving and Confirming Import (Step 8)
Click Start button to start the import process.
Hint: Click Save button to save your settings as a profile for setting schedule.
You can click Log button to view the running process indicating success or failure. These
messages are saved in file - LogImport.txt.

Data Management Tools 28
Export Wizard
Export Wizard allows you to export data from table, view, or query result to any available
format. You can save your settings as a profile for setting schedule.
Note: Navicat Essentials version supports to export text-based files, such as TXT, CSV, HTML
and XML file.
To open the Export Wizard, click Export Wizard from the table object pane toolbar.
Settings Export File Format (Step 1)
Setting Destination File Name and Encoding (Step 2)
Selecting Fields for Export (Step 3)
Setting Data Format (Step 4)
Saving and Confirming Export (Step 5)
To run a saved export profile from the command line
Create and save the export profile.
Start Navicat from command line, type the command (see Command for details)
Data Management Tools 29
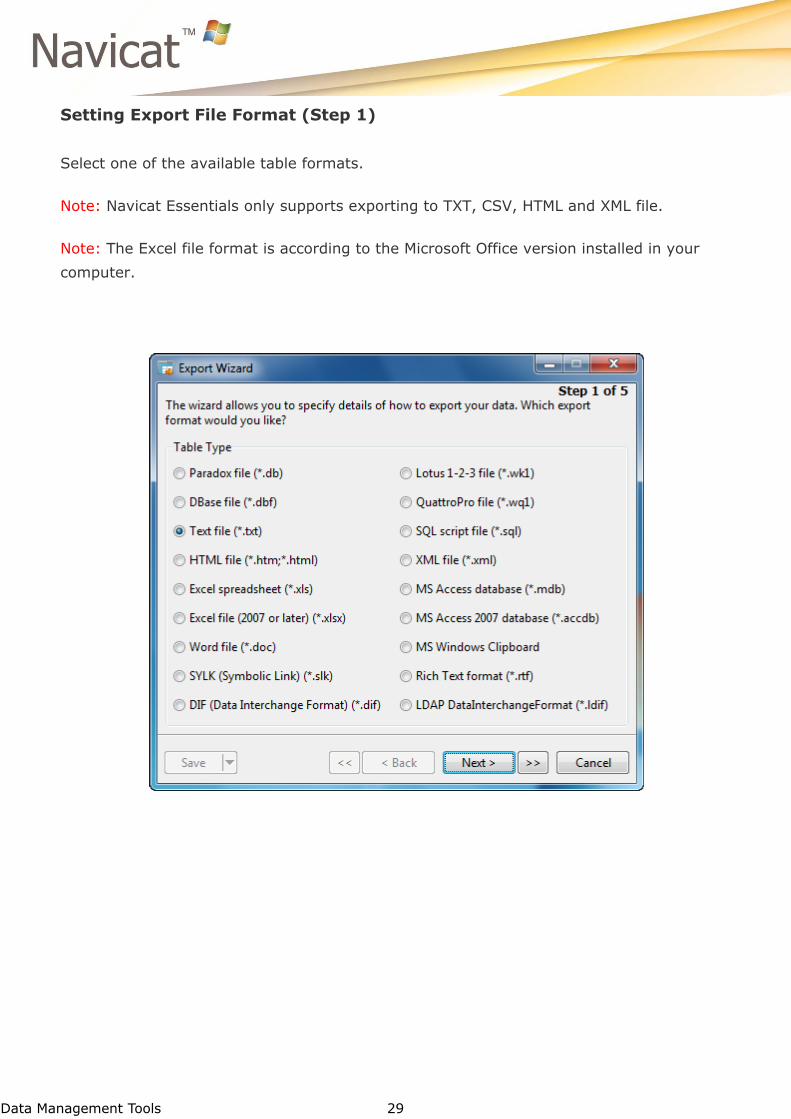
Setting Export File Format (Step 1)
Select one of the available table formats.
Note: Navicat Essentials only supports exporting to TXT, CSV, HTML and XML file.
Note: The Excel file format is according to the Microsoft Office version installed in your
computer.
Data Management Tools 30
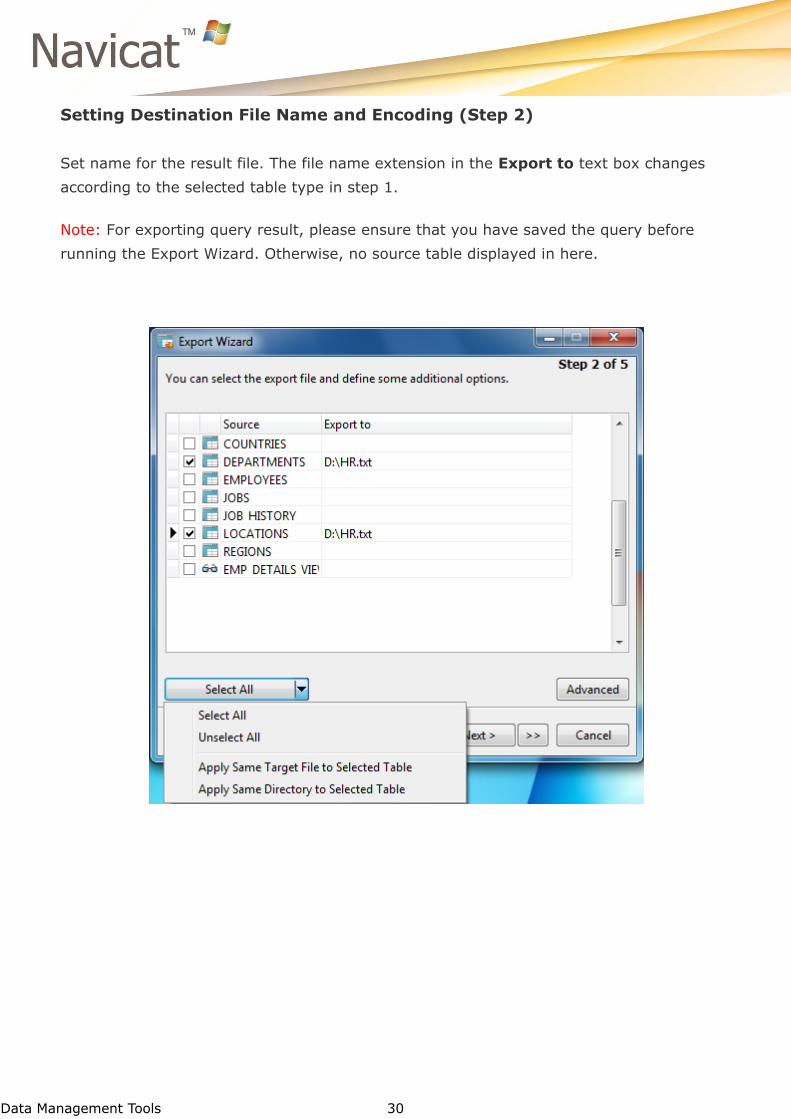
Setting Destination File Name and Encoding (Step 2)
Set name for the result file. The file name extension in the Export to text box changes
according to the selected table type in step 1.
Note: For exporting query result, please ensure that you have saved the query before
running the Export Wizard. Otherwise, no source table displayed in here.
Data Management Tools 31
Select All
In Vista or above, you can select/unselect all exported tables by simply right-click and
select Select All or Unselect All from the popup menu or from Select All button for
quick mapping.
If you are exporting selected tables into the same target file, you can just simply
right-click and select Apply Same Target File to Selected Table from the popup
menu or from Select All button for quick mapping.
If you are exporting selected tables into the same directory, you can just simply
right-click and select Apply Same Directory to Selected Table from the popup menu
or from Select All button for quick mapping.
Advanced
Encoding
Select the encoding for the exported file.
Add timestamp
Checks this option if you want your file name specifies the timestamp of the export is run.
Select the date/time format from the drop-down list.
Data Management Tools 32
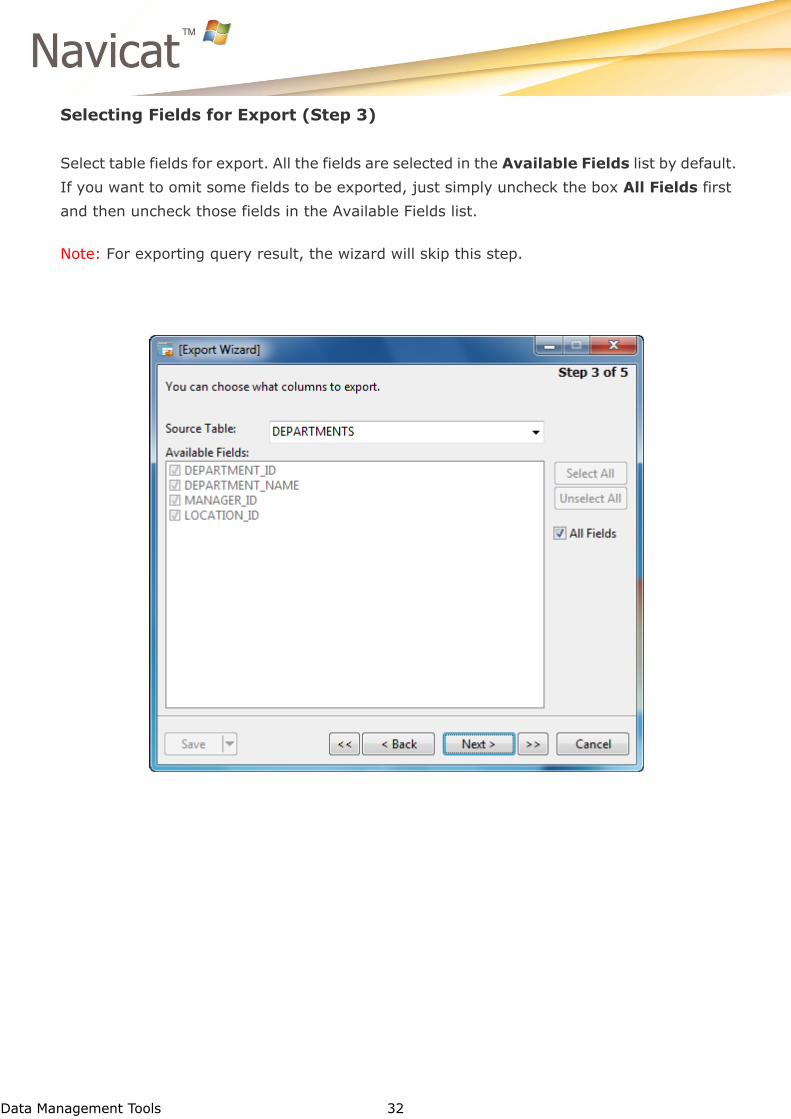
Selecting Fields for Export (Step 3)
Select table fields for export. All the fields are selected in the Available Fields list by default.
If you want to omit some fields to be exported, just simply uncheck the box All Fields first
and then uncheck those fields in the Available Fields list.
Note: For exporting query result, the wizard will skip this step.
Data Management Tools 33
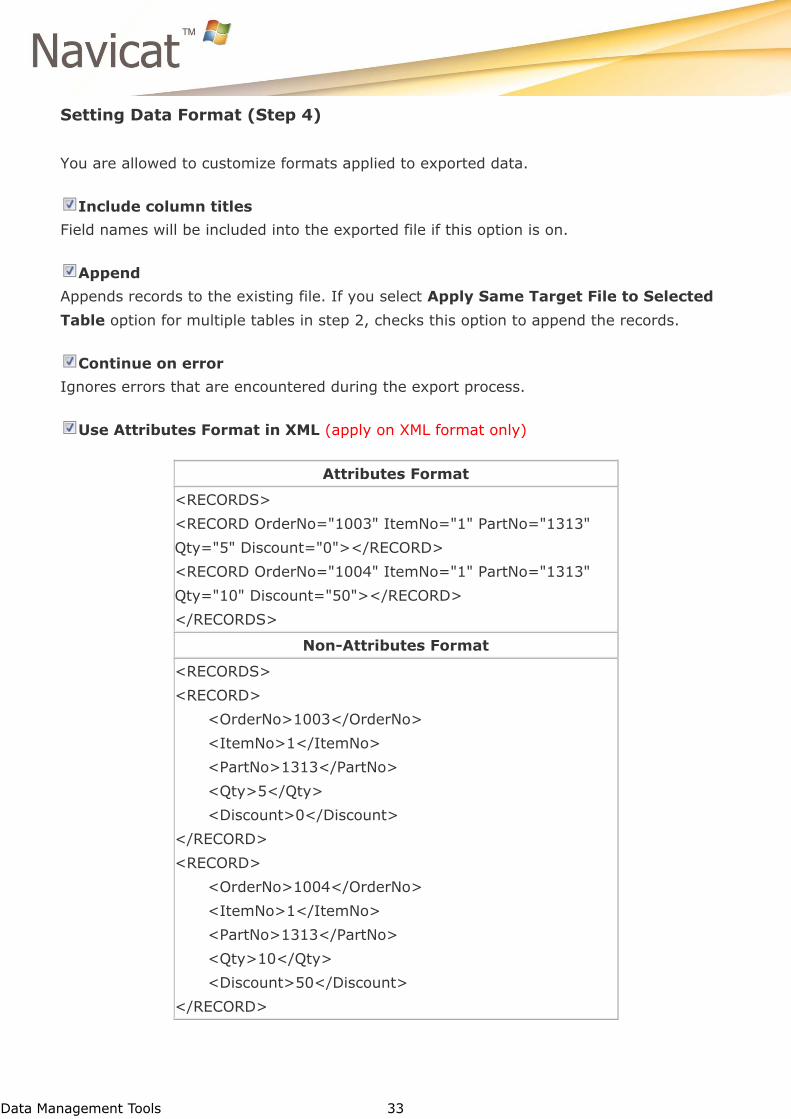
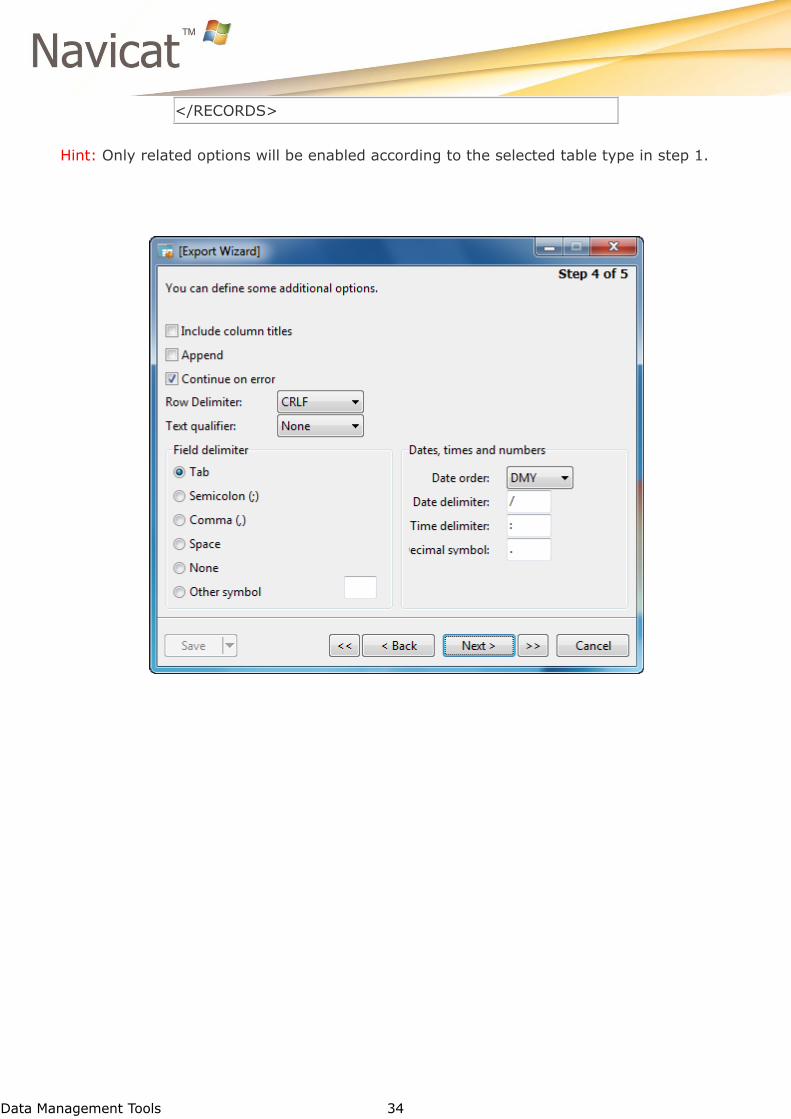
Setting Data Format (Step 4)
You are allowed to customize formats applied to exported data.
Include column titles
Field names will be included into the exported file if this option is on.
Append
Appends records to the existing file. If you select Apply Same Target File to Selected
Table option for multiple tables in step 2, checks this option to append the records.
Continue on error
Ignores errors that are encountered during the export process.
Use Attributes Format in XML (apply on XML format only)
Attributes Format
<RECORDS>
<RECORD OrderNo="1003" ItemNo="1" PartNo="1313"
Qty="5" Discount="0"></RECORD>
<RECORD OrderNo="1004" ItemNo="1" PartNo="1313"
Qty="10" Discount="50"></RECORD>
</RECORDS>
Non-Attributes Format
<RECORDS>
<RECORD>
<OrderNo>1003</OrderNo>
<ItemNo>1</ItemNo>
<PartNo>1313</PartNo>
<Qty>5</Qty>
<Discount>0</Discount>
</RECORD>
<RECORD>
<OrderNo>1004</OrderNo>
<ItemNo>1</ItemNo>
<PartNo>1313</PartNo>
<Qty>10</Qty>
<Discount>50</Discount>
</RECORD>
Data Management Tools 34
</RECORDS>
Hint: Only related options will be enabled according to the selected table type in step 1.

Data Management Tools 35
Saving and Confirming Export (Step 5)
Click Start button to start the export process.
Hint: Click Save button to save your settings as a profile for setting schedule.
You can view the running process indicating success or failure. These messages are saved in
file - LogExport.txt.
Click the Open button to open the log file or the exported file.
Data Management Tools 36
Data Transfer (Available only in Full Version)
Navicat allows you to transfer tables/views/functions/sequences/events from one
database/schema to another database/schema, or to a sql file. The target database/schema
can be on the same server as the source database/schema or on another server. It also
allows you to save a profile for easy retrieval and running of data transfer between
databases/schemas. You can also invoke data transfer from the command line, which makes
it possible to schedule data transfer between databases/schemas. You can save your
settings as a profile for setting schedule.
Simply open the data transfer and use the data transfer toolbar, which allows you to create,
save and delete the data transfer.
Create Data Transfer
To create a new data transfer
Select Tools -> Data Transfer... from the main menu or just select New from
the toolbar above.
Edit data transfer properties on the appropriate tabs.
To create a new data transfer with modification as one of the existing data transfer profiles
Select Tools -> Data Transfer... from the main menu
Select the data transfer for modifying from the drop-down list.
Modify data transfer properties on the appropriate tabs.
Click Save As.
Hint: To create new data transfer, you can also right-click the Database node in the
navigation pane and select the Data Transfer... from the popup menu.
Edit Data Transfer
To edit the existing data transfer
Select Tools -> Data Transfer... from the main menu.
Select the data transfer for modifying from the drop-down list.
Modify data transfer properties on the appropriate tabs.
Data Management Tools 37
Run Data Transfer
To run a data transfer
Create a new data transfer/open the existing one.
Click Start.
To run a saved data transfer profile from the command line
Create and save the data transfer profile.
Start Navicat from command line, type the command (see Command for details)
Delete Data Transfer
To delete a data transfer
Select Tools -> Data Transfer... from the main menu.
Select the data transfer from the drop-down list.
Click the Delete from the toolbar.
Confirm deleting in the dialog window.
Data Management Tools 38
General Settings for Data Transfer
The following instruction guides you through the process of setting up a data transfer.
Customize options according to your needs. See drag and drop (MySQL, Oracle, PostgreSQL,
SQLite or SQL Server).
Source
Defines connection, database and schema for the source.
All the objects are selected in the Database Objects list by default. If you do not want some
objects to be transferred, just simply uncheck them.
With this option is on, only the checked objects will be transferred. However, if you
add any new objects in the source database/schema after you create your data transfer
profile, the newly added objects will not be transferred unless you manually modify the
Database Objects list.
Chooses this option if you wish all the objects being transferred to the target
database/schema, all newly added objects will also be transferred without amending the
data transfer profile.
Target
Connection
Transfers your selected objects directly to the other database/schema. Chooses the
connection and database/schema you wish to transfer to.
File
Transfers your selected objects directly to a text file. You can select different SQL
Format and Encoding for the file.
Data Management Tools 39
Advanced Settings for Same Server Type Data Transfer
Table Options
Create tables
Creates tables in the target database with this option is on.
Supposes this option is unchecked and tables already exist in the target database, then
all data will be appended to the destination tables.
Include indexes
Includes indexes in the table with this option is on.
Include foreign key constraints
Includes foreign keys in the table with this option is on.
Include engine/table type (Available only for MySQL)
Includes table type with this option is on.
Include character set (Available only for MySQL)
Includes character set in the table with this option is on.
Include auto increment (Available only for MySQL, SQLite and SQL
Server)
Includes auto increment in the table with this option is on.
Include other table options (Available only for MySQL)
Includes other options in the table with this option is on.
Include unique constraints (Available only for Oracle, PostgreSQL,
SQLite and SQL Server)
Includes uniques in the table with this option is on.
Include rules (Available only for PostgreSQL)
Includes rules in the table with this option is on.
Include check constraints (Available only for Oracle, PostgreSQL, SQLite
and SQL Server)
Includes checks in the table with this option is on.
Data Management Tools 40
Include triggers
Includes triggers in the table with this option is on.
Include excludes (Available only for PostgreSQL)
Includes exclusion constraints in the table with this option is on.
Record Options
Insert records
Check this option if you require all records to be transferred to the destination
database/schema.
Lock target tables (Available only for MySQL, PostgreSQL and SQL
Server)
Locks the tables in the target database/schema during the data transfer process.
Use transaction
Check this option if you use transaction during the data transfer process.
Use complete insert statements (Available only for MySQL, Oracle,
PostgreSQL and SQLite)
Inserts records using complete insert syntax.
Example:
INSERT INTO `users` (`ID Number`, `User Name`, `User Age`) VALUES ('1',
'Peter McKindsy', '23');
INSERT INTO `users` (`ID Number`, `User Name`, `User Age`) VALUES ('2',
'Johnson Ryne', '56');
INSERT INTO `users` (`ID Number`, `User Name`, `User Age`) VALUES ('0',
'katherine', '23');
Use extended insert statements (Available only for MySQL)
Inserts records using extended insert syntax.
Example:
INSERT INTO ̀ users` VALUES ('1', 'Peter McKindsy', '23'), ('2', 'Johnson Ryne',
'56'), ('0', 'Katherine', '23');

Data Management Tools 41
Use delayed insert statements (Available only for MySQL)
Inserts records using DELAYED insert SQL statements.
Example:
INSERT DELAYED INTO `users` VALUES ('1', 'Peter McKindsy', '23');
INSERT DELAYED INTO `users` VALUES ('2', 'Johnson Ryne', '56');
INSERT DELAYED INTO `users` VALUES ('0', 'katherine', '23');
Run multiple insert statements (Available only for PostgreSQL and SQL
Server)
Check this option if you want to run multiple insert statements in each execution,
which will make the data transfer process faster.
Use hexadecimal format for BLOB (Available only for MySQL, PostgreSQL,
SQLite and SQL Server)
Inserts BLOB data as hexadecimal format.
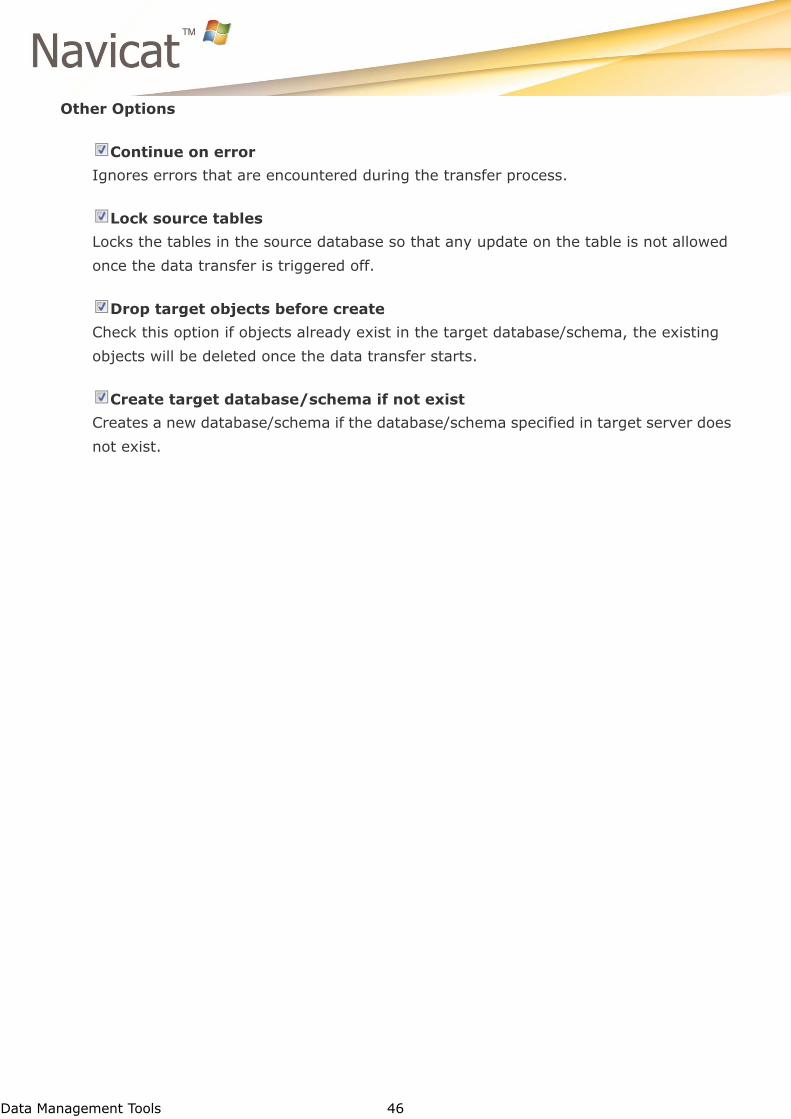
Other Options
Continue on error
Ignores errors that are encountered during the transfer process.
Lock source tables (Available only for MySQL, Oracle, PostgreSQL and SQL
Server)
Locks the tables in the source database so that any update on the table is not allowed
once the data transfer is triggered off.
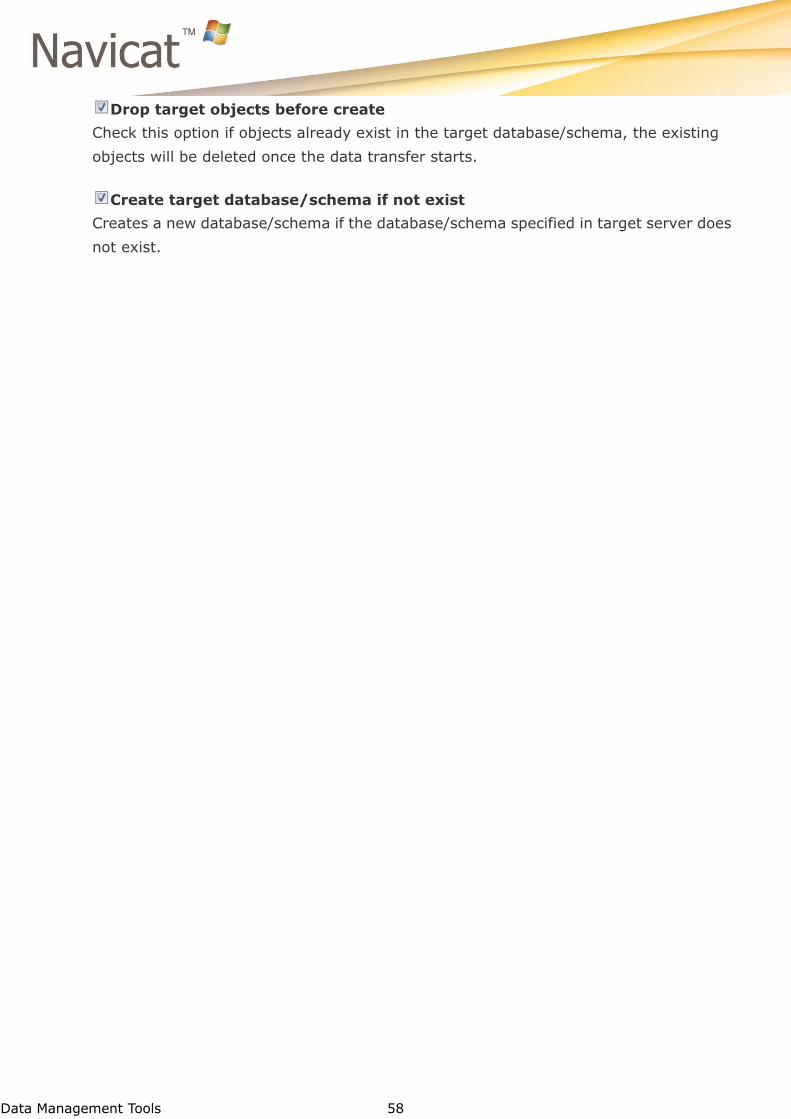
Drop target objects before create
Check this option if objects already exist in the target database/schema, the existing
objects will be deleted once the data transfer starts.
Create target database/schema if not exist (Available only for MySQL,
Oracle, PostgreSQL and SQL Server)
Creates a new database/schema if the database/schema specified in target server does
not exist.
Use DDL from SHOW CREATE TABLE (Available only for MySQL)
If this option is on, DDL will be used from show create table.
Use DDL from sqlite_master (Available only for SQLite)
If this option is on, DDL will be used from the SQLITE_MASTER table.
Data Management Tools 42
Advanced Settings for Cross Server Data Transfer (Available only in Navicat
Premium)
Navicat Premium supports transferring data across different server types, e.g. from MySQL
to Oracle. The Data Transfer process can transfer tables to the target. While the target server
is MySQL or SQLite, the process can transfer tables with primary key constraints. The
following part shows the settings for different server types.
Data transfer from MySQL to Oracle
Data transfer from MySQL to PostgreSQL
Data transfer from MySQL to SQLite
Data transfer from MySQL to SQL Server
Data transfer from Oracle to MySQL
Data transfer from Oracle to PostgreSQL
Data transfer from Oracle to SQLite
Data transfer from Oracle to SQL Server
Data transfer from PostgreSQL to MySQL
Data transfer from PostgreSQL to Oracle
Data transfer from PostgreSQL to SQLite
Data transfer from PostgreSQL to SQL Server
Data transfer from SQLite to MySQL
Data transfer from SQLite to Oracle
Data transfer from SQLite to PostgreSQL
Data transfer from SQLite to SQL Server
Data transfer from SQL Server to MySQL
Data transfer from SQL Server to Oracle
Data transfer from SQL Server to PostgreSQL
Data transfer from SQL Server to SQLite

Data Management Tools 43
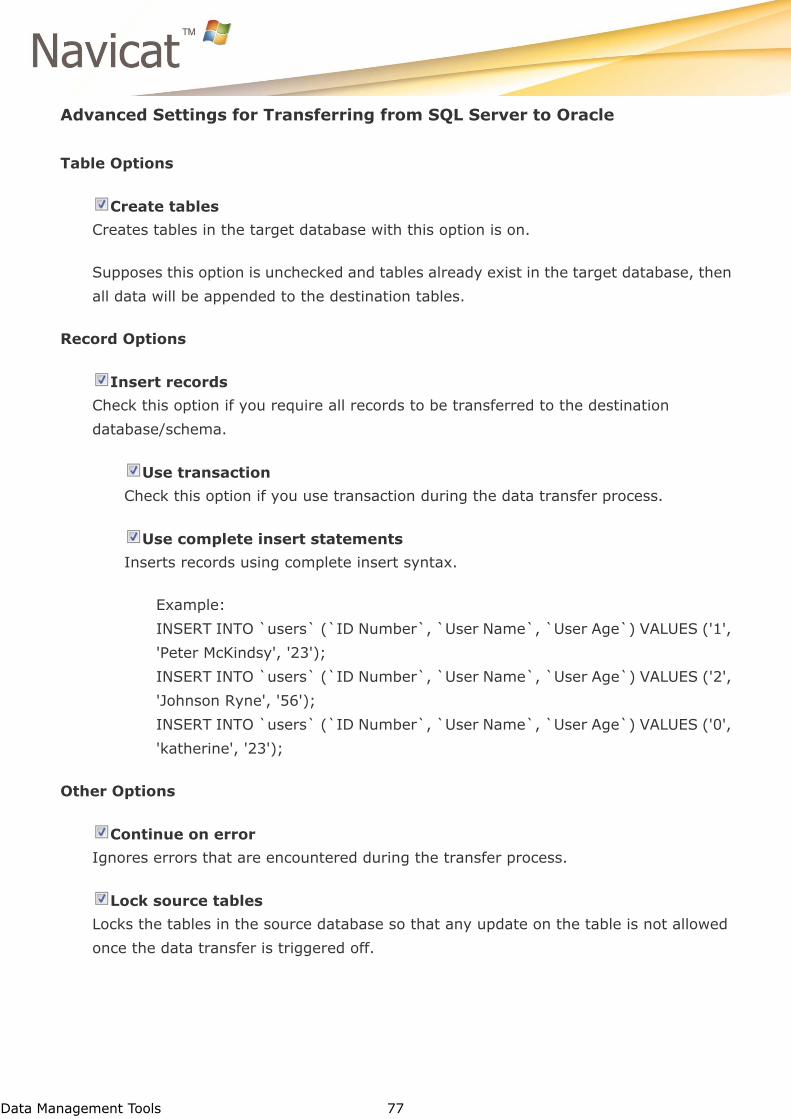
Advanced Settings for Transferring from MySQL to Oracle
Table Options
Create tables
Creates tables in the target database with this option is on.
Supposes this option is unchecked and tables already exist in the target database, then
all data will be appended to the destination tables.
Record Options
Insert records
Check this option if you require all records to be transferred to the destination
database/schema.
Use transaction
Check this option if you use transaction during the data transfer process.
Use complete insert statements
Inserts records using complete insert syntax.
Example:
INSERT INTO `users` (`ID Number`, `User Name`, `User Age`) VALUES ('1',
'Peter McKindsy', '23');
INSERT INTO `users` (`ID Number`, `User Name`, `User Age`) VALUES ('2',
'Johnson Ryne', '56');
INSERT INTO `users` (`ID Number`, `User Name`, `User Age`) VALUES ('0',
'katherine', '23');
Other Options
Continue on error
Ignores errors that are encountered during the transfer process.
Lock source tables
Locks the tables in the source database so that any update on the table is not allowed
once the data transfer is triggered off.

Data Management Tools 44
Drop target objects before create
Check this option if objects already exist in the target database/schema, the existing
objects will be deleted once the data transfer starts.
Create target database/schema if not exist
Creates a new database/schema if the database/schema specified in target server does
not exist.

Data Management Tools 45
Advanced Settings for Transferring from MySQL to PostgreSQL
Table Options
Create tables
Creates tables in the target database with this option is on.
Supposes this option is unchecked and tables already exist in the target database, then
all data will be appended to the destination tables.
Record Options
Insert records
Check this option if you require all records to be transferred to the destination
database/schema.
Lock target tables
Locks the tables in the target database/schema during the data transfer process.
Use transaction
Check this option if you use transaction during the data transfer process.
Use complete insert statements
Inserts records using complete insert syntax.
Example:
INSERT INTO `users` (`ID Number`, `User Name`, `User Age`) VALUES ('1',
'Peter McKindsy', '23');
INSERT INTO `users` (`ID Number`, `User Name`, `User Age`) VALUES ('2',
'Johnson Ryne', '56');
INSERT INTO `users` (`ID Number`, `User Name`, `User Age`) VALUES ('0',
'katherine', '23');
Run multiple insert statements
Check this option if you want to run multiple insert statements in each execution,
which will make the data transfer process faster.
Use hexadecimal format for BLOB
Inserts BLOB data as hexadecimal format.
Data Management Tools 46
Other Options
Continue on error
Ignores errors that are encountered during the transfer process.
Lock source tables
Locks the tables in the source database so that any update on the table is not allowed
once the data transfer is triggered off.
Drop target objects before create
Check this option if objects already exist in the target database/schema, the existing
objects will be deleted once the data transfer starts.
Create target database/schema if not exist
Creates a new database/schema if the database/schema specified in target server does
not exist.

Data Management Tools 47
Advanced Settings for Transferring from MySQL to SQLite
Table Options
Create tables
Creates tables in the target database with this option is on.
Supposes this option is unchecked and tables already exist in the target database, then
all data will be appended to the destination tables.
Record Options
Insert records
Check this option if you require all records to be transferred to the destination
database/schema.
Use transaction
Check this option if you use transaction during the data transfer process.
Use complete insert statements
Inserts records using complete insert syntax.
Example:
INSERT INTO `users` (`ID Number`, `User Name`, `User Age`) VALUES ('1',
'Peter McKindsy', '23');
INSERT INTO `users` (`ID Number`, `User Name`, `User Age`) VALUES ('2',
'Johnson Ryne', '56');
INSERT INTO `users` (`ID Number`, `User Name`, `User Age`) VALUES ('0',
'katherine', '23');
Use hexadecimal format for BLOB
Inserts BLOB data as hexadecimal format.

Data Management Tools 48
Other Options
Continue on error
Ignores errors that are encountered during the transfer process.
Drop target objects before create
Check this option if objects already exist in the target database/schema, the existing
objects will be deleted once the data transfer starts.
Data Management Tools 49
Advanced Settings for Transferring from MySQL to SQL Server
Table Options
Create tables
Creates tables in the target database with this option is on.
Supposes this option is unchecked and tables already exist in the target database, then
all data will be appended to the destination tables.
Record Options
Insert records
Check this option if you require all records to be transferred to the destination
database/schema.
Lock target tables
Locks the tables in the target database/schema during the data transfer process.
Use transaction
Check this option if you use transaction during the data transfer process.
Run multiple insert statements
Check this option if you want to run multiple insert statements in each execution,
which will make the data transfer process faster.
Use hexadecimal format for BLOB
Inserts BLOB data as hexadecimal format.
Other Options
Continue on error
Ignores errors that are encountered during the transfer process.
Lock source tables
Locks the tables in the source database so that any update on the table is not allowed
once the data transfer is triggered off.

Data Management Tools 50
Drop target objects before create
Check this option if objects already exist in the target database/schema, the existing
objects will be deleted once the data transfer starts.
Create target database/schema if not exist
Creates a new database/schema if the database/schema specified in target server does
not exist.

Data Management Tools 51
Advanced Settings for Transferring from Oracle to MySQL
Table Options
Create tables
Creates tables in the target database with this option is on.
Supposes this option is unchecked and tables already exist in the target database, then
all data will be appended to the destination tables.
Record Options
Insert records
Check this option if you require all records to be transferred to the destination
database/schema.
Lock target tables
Locks the tables in the target database/schema during the data transfer process.
Use transaction
Check this option if you use transaction during the data transfer process.
Use complete insert statements
Inserts records using complete insert syntax.
Example:
INSERT INTO `users` (`ID Number`, `User Name`, `User Age`) VALUES ('1',
'Peter McKindsy', '23');
INSERT INTO `users` (`ID Number`, `User Name`, `User Age`) VALUES ('2',
'Johnson Ryne', '56');
INSERT INTO `users` (`ID Number`, `User Name`, `User Age`) VALUES ('0',
'katherine', '23');
Use extended insert statements
Inserts records using extended insert syntax.
Example:
INSERT INTO ̀ users` VALUES ('1', 'Peter McKindsy', '23'), ('2', 'Johnson Ryne',
'56'), ('0', 'Katherine', '23');

Data Management Tools 52
Use delayed insert statements
Inserts records using DELAYED insert SQL statements.
Example:
INSERT DELAYED INTO `users` VALUES ('1', 'Peter McKindsy', '23');
INSERT DELAYED INTO `users` VALUES ('2', 'Johnson Ryne', '56');
INSERT DELAYED INTO `users` VALUES ('0', 'katherine', '23');
Use hexadecimal format for BLOB
Inserts BLOB data as hexadecimal format.
Other Options
Continue on error
Ignores errors that are encountered during the transfer process.
Lock source tables
Locks the tables in the source database so that any update on the table is not allowed
once the data transfer is triggered off.
Drop target objects before create
Check this option if objects already exist in the target database/schema, the existing
objects will be deleted once the data transfer starts.
Create target database/schema if not exist
Creates a new database/schema if the database/schema specified in target server does
not exist.
Data Management Tools 53
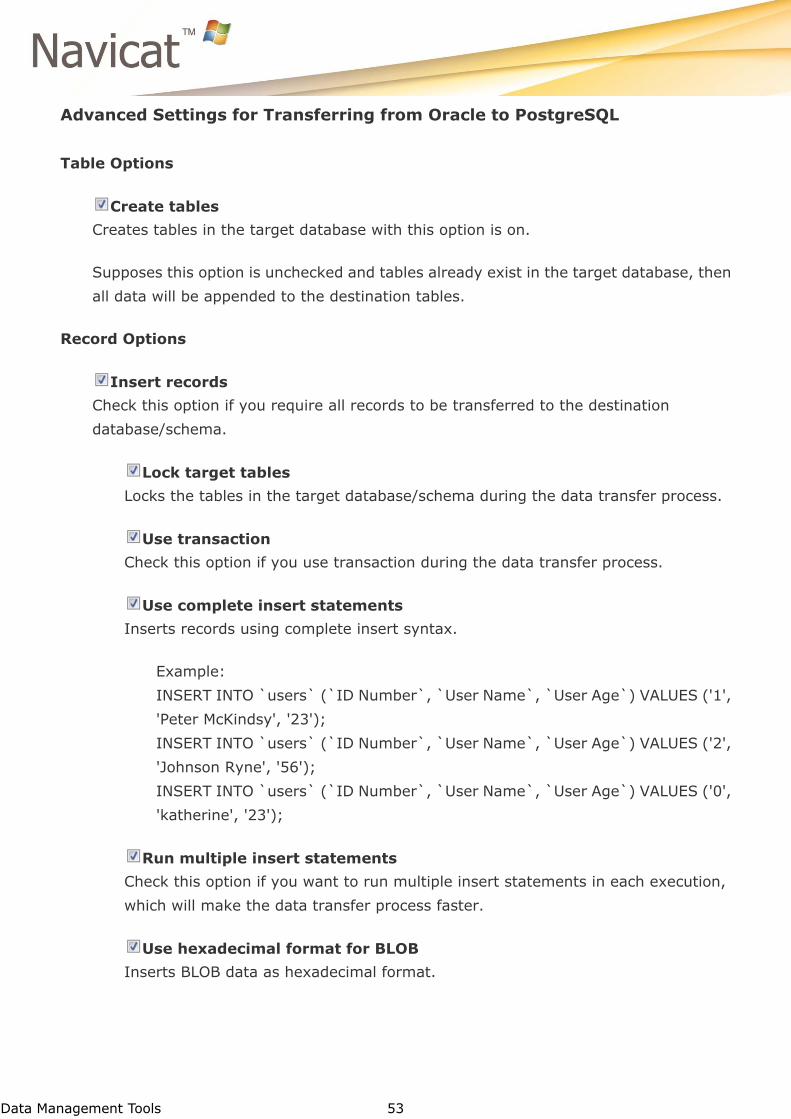
Advanced Settings for Transferring from Oracle to PostgreSQL
Table Options
Create tables
Creates tables in the target database with this option is on.
Supposes this option is unchecked and tables already exist in the target database, then
all data will be appended to the destination tables.
Record Options
Insert records
Check this option if you require all records to be transferred to the destination
database/schema.
Lock target tables
Locks the tables in the target database/schema during the data transfer process.
Use transaction
Check this option if you use transaction during the data transfer process.
Use complete insert statements
Inserts records using complete insert syntax.
Example:
INSERT INTO `users` (`ID Number`, `User Name`, `User Age`) VALUES ('1',
'Peter McKindsy', '23');
INSERT INTO `users` (`ID Number`, `User Name`, `User Age`) VALUES ('2',
'Johnson Ryne', '56');
INSERT INTO `users` (`ID Number`, `User Name`, `User Age`) VALUES ('0',
'katherine', '23');
Run multiple insert statements
Check this option if you want to run multiple insert statements in each execution,
which will make the data transfer process faster.
Use hexadecimal format for BLOB
Inserts BLOB data as hexadecimal format.

Data Management Tools 54
Other Options
Continue on error
Ignores errors that are encountered during the transfer process.
Lock source tables
Locks the tables in the source database so that any update on the table is not allowed
once the data transfer is triggered off.
Drop target objects before create
Check this option if objects already exist in the target database/schema, the existing
objects will be deleted once the data transfer starts.
Create target database/schema if not exist
Creates a new database/schema if the database/schema specified in target server does
not exist.

Data Management Tools 55
Advanced Settings for Transferring from Oracle to SQLite
Table Options
Create tables
Creates tables in the target database with this option is on.
Supposes this option is unchecked and tables already exist in the target database, then
all data will be appended to the destination tables.
Record Options
Insert records
Check this option if you require all records to be transferred to the destination
database/schema.
Use transaction
Check this option if you use transaction during the data transfer process.
Use complete insert statements
Inserts records using complete insert syntax.
Example:
INSERT INTO `users` (`ID Number`, `User Name`, `User Age`) VALUES ('1',
'Peter McKindsy', '23');
INSERT INTO `users` (`ID Number`, `User Name`, `User Age`) VALUES ('2',
'Johnson Ryne', '56');
INSERT INTO `users` (`ID Number`, `User Name`, `User Age`) VALUES ('0',
'katherine', '23');
Use hexadecimal format for BLOB
Inserts BLOB data as hexadecimal format.

Data Management Tools 56
Other Options
Continue on error
Ignores errors that are encountered during the transfer process.
Drop target objects before create
Check this option if objects already exist in the target database/schema, the existing
objects will be deleted once the data transfer starts.

Data Management Tools 57
Advanced Settings for Transferring from Oracle to SQL Server
Table Options
Create tables
Creates tables in the target database with this option is on.
Supposes this option is unchecked and tables already exist in the target database, then
all data will be appended to the destination tables.
Record Options
Insert records
Check this option if you require all records to be transferred to the destination
database/schema.
Lock target tables
Locks the tables in the target database/schema during the data transfer process.
Use transaction
Check this option if you use transaction during the data transfer process.
Run multiple insert statements
Check this option if you want to run multiple insert statements in each execution,
which will make the data transfer process faster.
Use hexadecimal format for BLOB
Inserts BLOB data as hexadecimal format.
Other Options
Continue on error
Ignores errors that are encountered during the transfer process.
Lock source tables
Locks the tables in the source database so that any update on the table is not allowed
once the data transfer is triggered off.
Data Management Tools 58
Drop target objects before create
Check this option if objects already exist in the target database/schema, the existing
objects will be deleted once the data transfer starts.
Create target database/schema if not exist
Creates a new database/schema if the database/schema specified in target server does
not exist.
Data Management Tools 59
Advanced Settings for Transferring from PostgreSQL to MySQL
Table Options
Create tables
Creates tables in the target database with this option is on.
Supposes this option is unchecked and tables already exist in the target database, then
all data will be appended to the destination tables.
Record Options
Insert records
Check this option if you require all records to be transferred to the destination
database/schema.
Lock target tables
Locks the tables in the target database/schema during the data transfer process.
Use transaction
Check this option if you use transaction during the data transfer process.
Use complete insert statements
Inserts records using complete insert syntax.
Example:
INSERT INTO `users` (`ID Number`, `User Name`, `User Age`) VALUES ('1',
'Peter McKindsy', '23');
INSERT INTO `users` (`ID Number`, `User Name`, `User Age`) VALUES ('2',
'Johnson Ryne', '56');
INSERT INTO `users` (`ID Number`, `User Name`, `User Age`) VALUES ('0',
'katherine', '23');
Use extended insert statements
Inserts records using extended insert syntax.
Example:
INSERT INTO ̀ users` VALUES ('1', 'Peter McKindsy', '23'), ('2', 'Johnson Ryne',
'56'), ('0', 'Katherine', '23');

Data Management Tools 60
Use delayed insert statements
Inserts records using DELAYED insert SQL statements.
Example:
INSERT DELAYED INTO `users` VALUES ('1', 'Peter McKindsy', '23');
INSERT DELAYED INTO `users` VALUES ('2', 'Johnson Ryne', '56');
INSERT DELAYED INTO `users` VALUES ('0', 'katherine', '23');
Use hexadecimal format for BLOB
Inserts BLOB data as hexadecimal format.
Other Options
Continue on error
Ignores errors that are encountered during the transfer process.
Lock source tables
Locks the tables in the source database so that any update on the table is not allowed
once the data transfer is triggered off.
Drop target objects before create
Check this option if objects already exist in the target database/schema, the existing
objects will be deleted once the data transfer starts.
Create target database/schema if not exist
Creates a new database/schema if the database/schema specified in target server does
not exist.
Data Management Tools 61
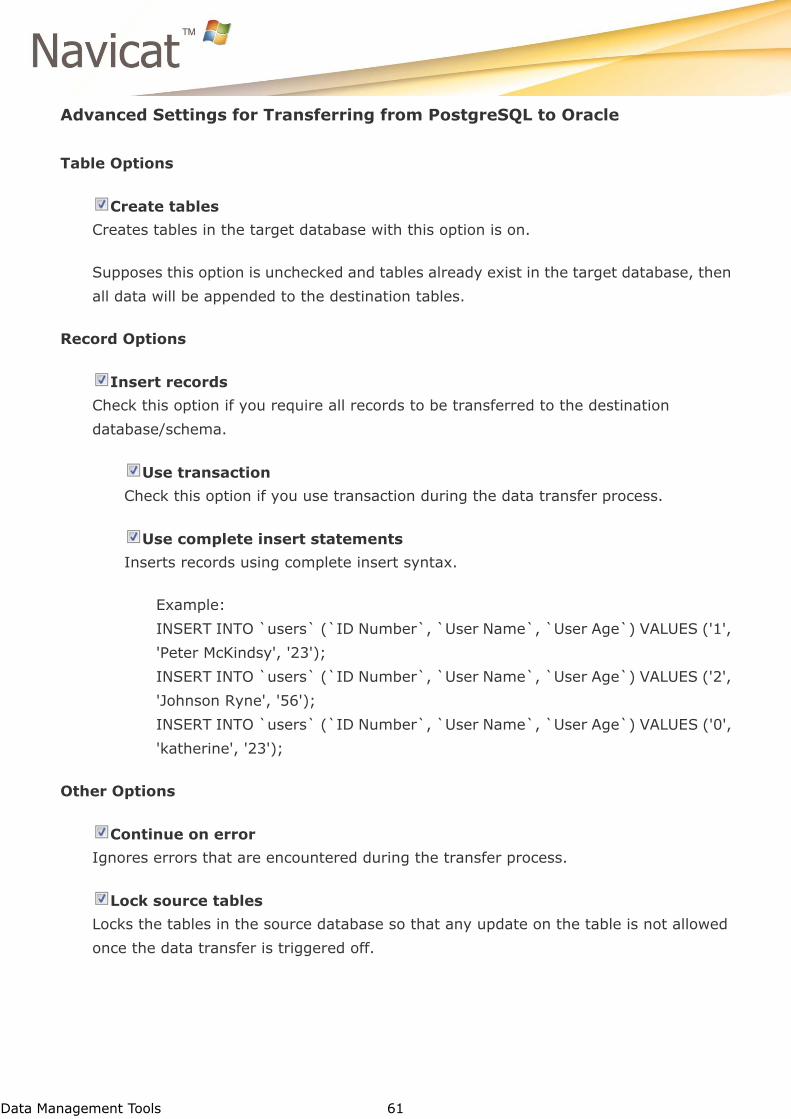
Advanced Settings for Transferring from PostgreSQL to Oracle
Table Options
Create tables
Creates tables in the target database with this option is on.
Supposes this option is unchecked and tables already exist in the target database, then
all data will be appended to the destination tables.
Record Options
Insert records
Check this option if you require all records to be transferred to the destination
database/schema.
Use transaction
Check this option if you use transaction during the data transfer process.
Use complete insert statements
Inserts records using complete insert syntax.
Example:
INSERT INTO `users` (`ID Number`, `User Name`, `User Age`) VALUES ('1',
'Peter McKindsy', '23');
INSERT INTO `users` (`ID Number`, `User Name`, `User Age`) VALUES ('2',
'Johnson Ryne', '56');
INSERT INTO `users` (`ID Number`, `User Name`, `User Age`) VALUES ('0',
'katherine', '23');
Other Options
Continue on error
Ignores errors that are encountered during the transfer process.
Lock source tables
Locks the tables in the source database so that any update on the table is not allowed
once the data transfer is triggered off.

Data Management Tools 62
Drop target objects before create
Check this option if objects already exist in the target database/schema, the existing
objects will be deleted once the data transfer starts.
Create target database/schema if not exist
Creates a new database/schema if the database/schema specified in target server does
not exist.
Data Management Tools 63
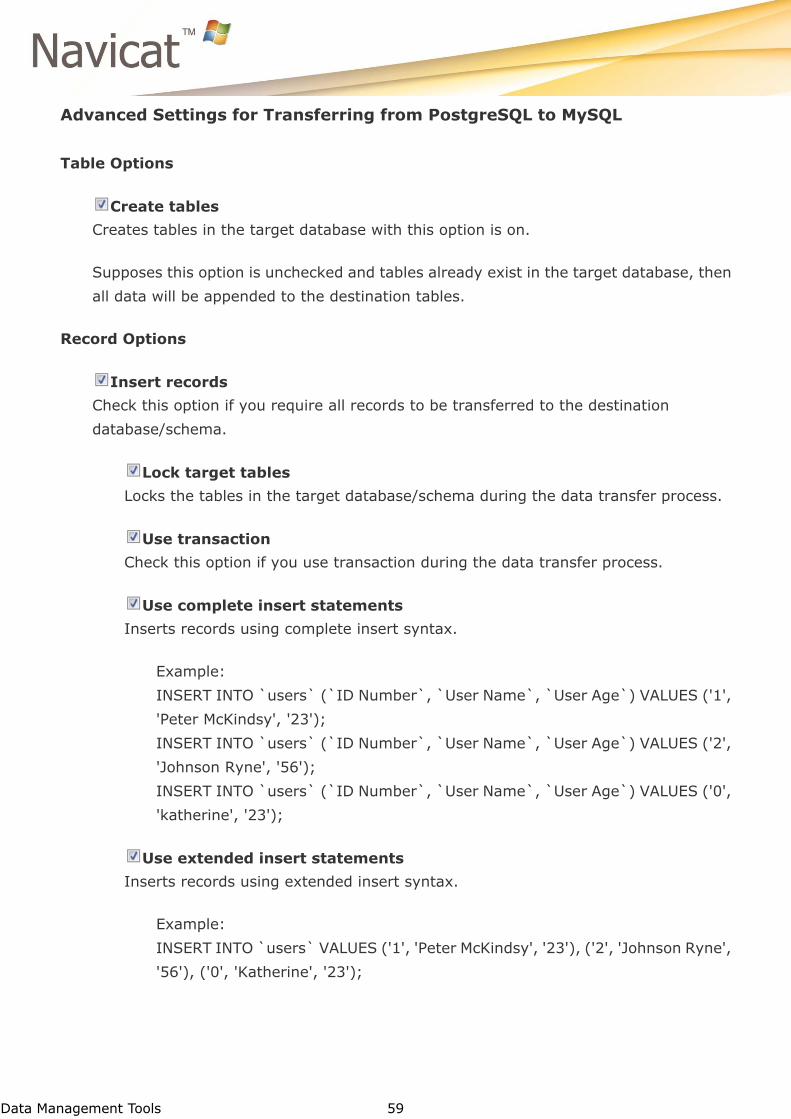
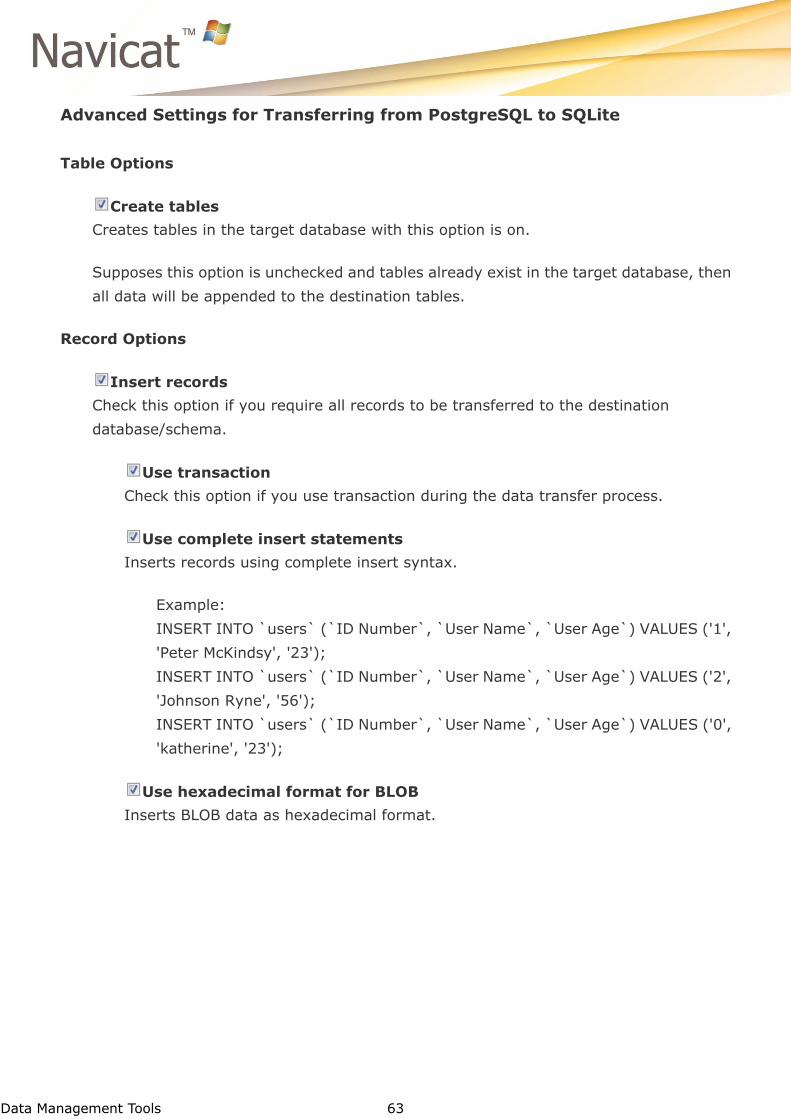
Advanced Settings for Transferring from PostgreSQL to SQLite
Table Options
Create tables
Creates tables in the target database with this option is on.
Supposes this option is unchecked and tables already exist in the target database, then
all data will be appended to the destination tables.
Record Options
Insert records
Check this option if you require all records to be transferred to the destination
database/schema.
Use transaction
Check this option if you use transaction during the data transfer process.
Use complete insert statements
Inserts records using complete insert syntax.
Example:
INSERT INTO `users` (`ID Number`, `User Name`, `User Age`) VALUES ('1',
'Peter McKindsy', '23');
INSERT INTO `users` (`ID Number`, `User Name`, `User Age`) VALUES ('2',
'Johnson Ryne', '56');
INSERT INTO `users` (`ID Number`, `User Name`, `User Age`) VALUES ('0',
'katherine', '23');
Use hexadecimal format for BLOB
Inserts BLOB data as hexadecimal format.

Data Management Tools 64
Other Options
Continue on error
Ignores errors that are encountered during the transfer process.
Drop target objects before create
Check this option if objects already exist in the target database/schema, the existing
objects will be deleted once the data transfer starts.
Data Management Tools 65
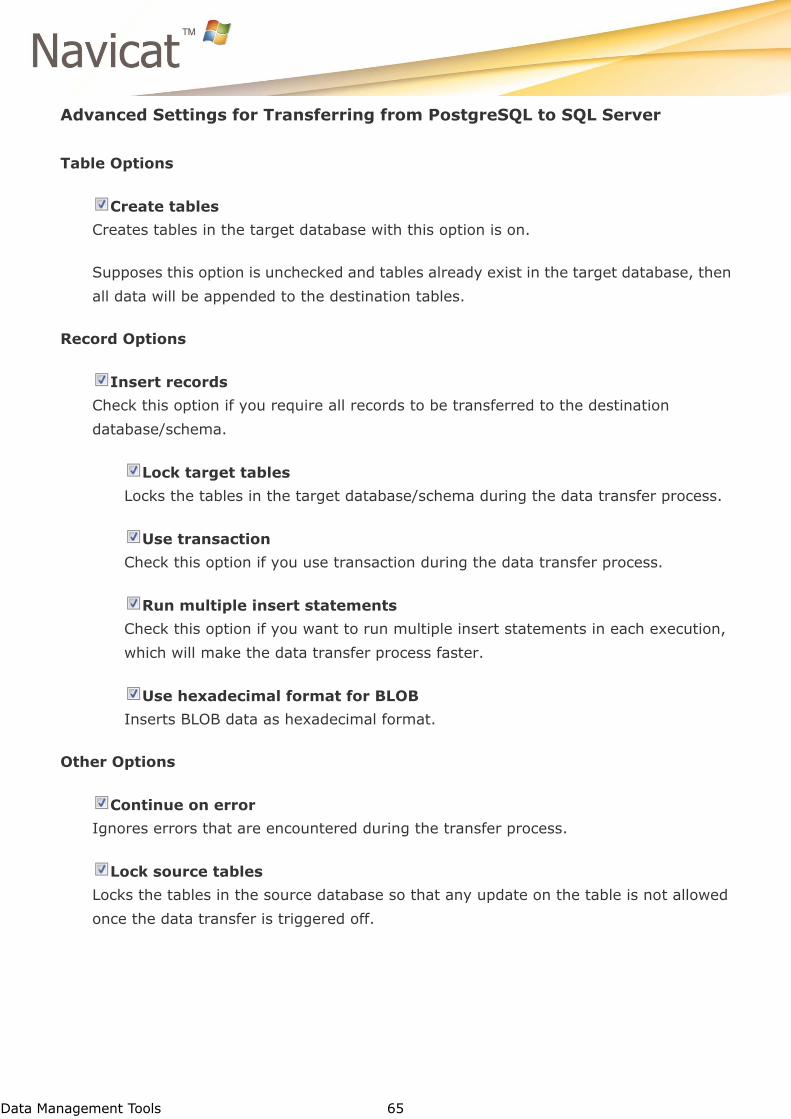
Advanced Settings for Transferring from PostgreSQL to SQL Server
Table Options
Create tables
Creates tables in the target database with this option is on.
Supposes this option is unchecked and tables already exist in the target database, then
all data will be appended to the destination tables.
Record Options
Insert records
Check this option if you require all records to be transferred to the destination
database/schema.
Lock target tables
Locks the tables in the target database/schema during the data transfer process.
Use transaction
Check this option if you use transaction during the data transfer process.
Run multiple insert statements
Check this option if you want to run multiple insert statements in each execution,
which will make the data transfer process faster.
Use hexadecimal format for BLOB
Inserts BLOB data as hexadecimal format.
Other Options
Continue on error
Ignores errors that are encountered during the transfer process.
Lock source tables
Locks the tables in the source database so that any update on the table is not allowed
once the data transfer is triggered off.

Data Management Tools 66
Drop target objects before create
Check this option if objects already exist in the target database/schema, the existing
objects will be deleted once the data transfer starts.
Create target database/schema if not exist
Creates a new database/schema if the database/schema specified in target server does
not exist.

Data Management Tools 67
Advanced Settings for Transferring from SQLite to MySQL Database
Table Options
Create tables
Creates tables in the target database with this option is on.
Supposes this option is unchecked and tables already exist in the target database, then
all data will be appended to the destination tables.
Record Options
Insert records
Check this option if you require all records to be transferred to the destination
database/schema.
Lock target tables
Locks the tables in the target database/schema during the data transfer process.
Use transaction
Check this option if you use transaction during the data transfer process.
Use complete insert statements
Inserts records using complete insert syntax.
Example:
INSERT INTO `users` (`ID Number`, `User Name`, `User Age`) VALUES ('1',
'Peter McKindsy', '23');
INSERT INTO `users` (`ID Number`, `User Name`, `User Age`) VALUES ('2',
'Johnson Ryne', '56');
INSERT INTO `users` (`ID Number`, `User Name`, `User Age`) VALUES ('0',
'katherine', '23');
Use extended insert statements
Inserts records using extended insert syntax.
Example:
INSERT INTO ̀ users` VALUES ('1', 'Peter McKindsy', '23'), ('2', 'Johnson Ryne',
'56'), ('0', 'Katherine', '23');
Data Management Tools 68
Use delayed insert statements
Inserts records using DELAYED insert SQL statements.
Example:
INSERT DELAYED INTO `users` VALUES ('1', 'Peter McKindsy', '23');
INSERT DELAYED INTO `users` VALUES ('2', 'Johnson Ryne', '56');
INSERT DELAYED INTO `users` VALUES ('0', 'katherine', '23');
Use hexadecimal format for BLOB
Inserts BLOB data as hexadecimal format.
Other Options
Continue on errors
Ignores errors that are encountered during the transfer process.
Lock source tables
Locks the tables in the source database so that any update on the table is not allowed
once the data transfer is triggered off.
Drop target objects before create
Check this option if objects already exist in the target database/schema, the existing
objects will be deleted once the data transfer starts.
Create target database/schema if not exist
Creates a new database/schema if the database/schema specified in target server does
not exist.
Data Management Tools 69
Advanced Settings for Transferring from SQLite to Oracle
Table Options
Create tables
Creates tables in the target database with this option is on.
Supposes this option is unchecked and tables already exist in the target database, then
all data will be appended to the destination tables.
Record Options
Insert records
Check this option if you require all records to be transferred to the destination
database/schema.
Use transaction
Check this option if you use transaction during the data transfer process.
Use complete insert statements
Inserts records using complete insert syntax.
Example:
INSERT INTO `users` (`ID Number`, `User Name`, `User Age`) VALUES ('1',
'Peter McKindsy', '23');
INSERT INTO `users` (`ID Number`, `User Name`, `User Age`) VALUES ('2',
'Johnson Ryne', '56');
INSERT INTO `users` (`ID Number`, `User Name`, `User Age`) VALUES ('0',
'katherine', '23');
Other Options
Continue on error
Ignores errors that are encountered during the transfer process.
Lock source tables
Locks the tables in the source database so that any update on the table is not allowed
once the data transfer is triggered off.

Data Management Tools 70
Drop target objects before create
Check this option if objects already exist in the target database/schema, the existing
objects will be deleted once the data transfer starts.
Create target database/schema if not exist
Creates a new database/schema if the database/schema specified in target server does
not exist.

Data Management Tools 71
Advanced Settings for Transferring from SQLite to PostgreSQL
Table Options
Create tables
Creates tables in the target database with this option is on.
Supposes this option is unchecked and tables already exist in the target database, then
all data will be appended to the destination tables.
Record Options
Insert records
Check this option if you require all records to be transferred to the destination
database/schema.
Lock target tables
Locks the tables in the target database/schema during the data transfer process.
Use transaction
Check this option if you use transaction during the data transfer process.
Use complete insert statements
Inserts records using complete insert syntax.
Example:
INSERT INTO `users` (`ID Number`, `User Name`, `User Age`) VALUES ('1',
'Peter McKindsy', '23');
INSERT INTO `users` (`ID Number`, `User Name`, `User Age`) VALUES ('2',
'Johnson Ryne', '56');
INSERT INTO `users` (`ID Number`, `User Name`, `User Age`) VALUES ('0',
'katherine', '23');
Run multiple insert statements
Check this option if you want to run multiple insert statements in each execution,
which will make the data transfer process faster.
Use hexadecimal format for BLOB
Inserts BLOB data as hexadecimal format.

Data Management Tools 72
Other Options
Continue on error
Ignores errors that are encountered during the transfer process.
Lock source tables
Locks the tables in the source database so that any update on the table is not allowed
once the data transfer is triggered off.
Drop target objects before create
Check this option if objects already exist in the target database/schema, the existing
objects will be deleted once the data transfer starts.
Create target database/schema if not exist
Creates a new database/schema if the database/schema specified in target server does
not exist.

Data Management Tools 73
Advanced Settings for Transferring from SQLite to SQL Server
Table Options
Create tables
Creates tables in the target database with this option is on.
Supposes this option is unchecked and tables already exist in the target database, then
all data will be appended to the destination tables.
Record Options
Insert records
Check this option if you require all records to be transferred to the destination
database/schema.
Lock target tables
Locks the tables in the target database/schema during the data transfer process.
Use transaction
Check this option if you use transaction during the data transfer process.
Run multiple insert statements
Check this option if you want to run multiple insert statements in each execution,
which will make the data transfer process faster.
Use hexadecimal format for BLOB
Inserts BLOB data as hexadecimal format.
Other Options
Continue on error
Ignores errors that are encountered during the transfer process.
Lock source tables
Locks the tables in the source database so that any update on the table is not allowed
once the data transfer is triggered off.

Data Management Tools 74
Drop target objects before create
Check this option if objects already exist in the target database/schema, the existing
objects will be deleted once the data transfer starts.
Create target database/schema if not exist
Creates a new database/schema if the database/schema specified in target server does
not exist.
Data Management Tools 75
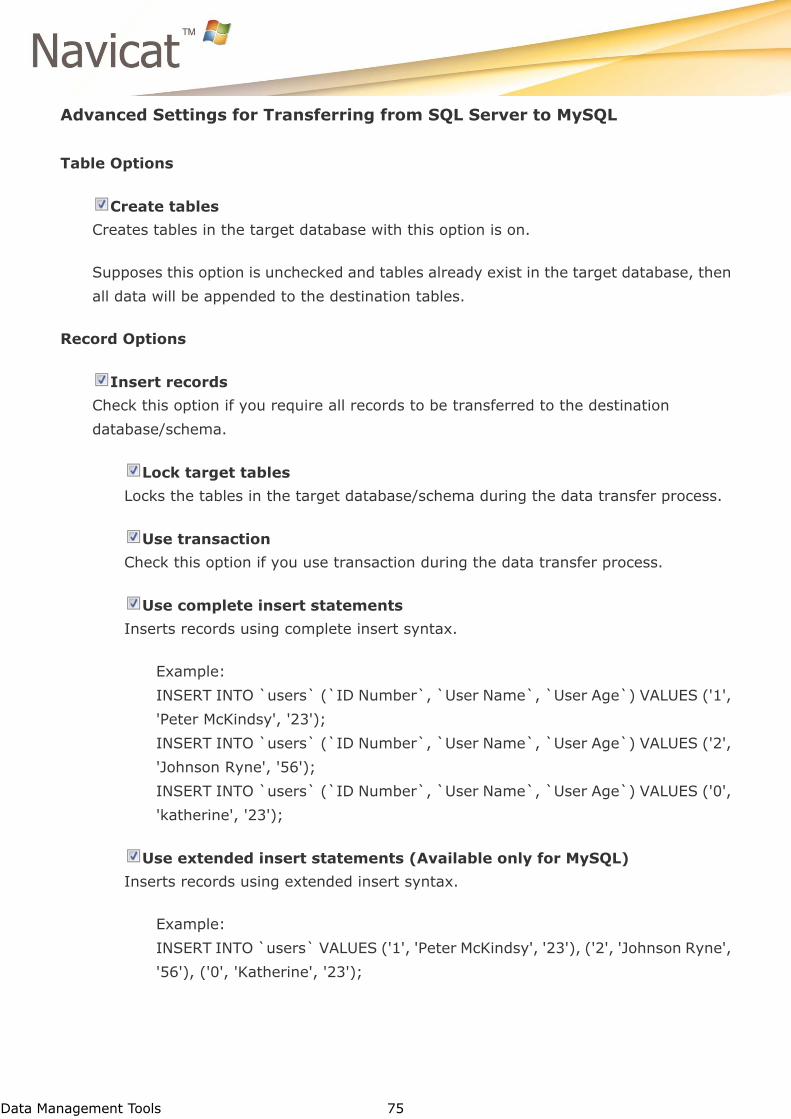
Advanced Settings for Transferring from SQL Server to MySQL
Table Options
Create tables
Creates tables in the target database with this option is on.
Supposes this option is unchecked and tables already exist in the target database, then
all data will be appended to the destination tables.
Record Options
Insert records
Check this option if you require all records to be transferred to the destination
database/schema.
Lock target tables
Locks the tables in the target database/schema during the data transfer process.
Use transaction
Check this option if you use transaction during the data transfer process.
Use complete insert statements
Inserts records using complete insert syntax.
Example:
INSERT INTO `users` (`ID Number`, `User Name`, `User Age`) VALUES ('1',
'Peter McKindsy', '23');
INSERT INTO `users` (`ID Number`, `User Name`, `User Age`) VALUES ('2',
'Johnson Ryne', '56');
INSERT INTO `users` (`ID Number`, `User Name`, `User Age`) VALUES ('0',
'katherine', '23');
Use extended insert statements (Available only for MySQL)
Inserts records using extended insert syntax.
Example:
INSERT INTO ̀ users` VALUES ('1', 'Peter McKindsy', '23'), ('2', 'Johnson Ryne',
'56'), ('0', 'Katherine', '23');

Data Management Tools 76
Use delayed insert statements (Available only for MySQL)
Inserts records using DELAYED insert SQL statements.
Example:
INSERT DELAYED INTO `users` VALUES ('1', 'Peter McKindsy', '23');
INSERT DELAYED INTO `users` VALUES ('2', 'Johnson Ryne', '56');
INSERT DELAYED INTO `users` VALUES ('0', 'katherine', '23');
Use hexadecimal format for BLOB
Inserts BLOB data as hexadecimal format.
Other Options
Continue on error
Ignores errors that are encountered during the transfer process.
Lock source tables
Locks the tables in the source database so that any update on the table is not allowed
once the data transfer is triggered off.
Drop target objects before create
Check this option if objects already exist in the target database/schema, the existing
objects will be deleted once the data transfer starts.
Create target database/schema if not exist
Creates a new database/schema if the database/schema specified in target server does
not exist.
Data Management Tools 77
Advanced Settings for Transferring from SQL Server to Oracle
Table Options
Create tables
Creates tables in the target database with this option is on.
Supposes this option is unchecked and tables already exist in the target database, then
all data will be appended to the destination tables.
Record Options
Insert records
Check this option if you require all records to be transferred to the destination
database/schema.
Use transaction
Check this option if you use transaction during the data transfer process.
Use complete insert statements
Inserts records using complete insert syntax.
Example:
INSERT INTO `users` (`ID Number`, `User Name`, `User Age`) VALUES ('1',
'Peter McKindsy', '23');
INSERT INTO `users` (`ID Number`, `User Name`, `User Age`) VALUES ('2',
'Johnson Ryne', '56');
INSERT INTO `users` (`ID Number`, `User Name`, `User Age`) VALUES ('0',
'katherine', '23');
Other Options
Continue on error
Ignores errors that are encountered during the transfer process.
Lock source tables
Locks the tables in the source database so that any update on the table is not allowed
once the data transfer is triggered off.

Data Management Tools 78
Drop target objects before create
Check this option if objects already exist in the target database/schema, the existing
objects will be deleted once the data transfer starts.
Create target database/schema if not exist
Creates a new database/schema if the database/schema specified in target server does
not exist.

Data Management Tools 79
Advanced Settings for Transferring from SQL Server to PostgreSQL
Table Options
Create tables
Creates tables in the target database with this option is on.
Supposes this option is unchecked and tables already exist in the target database, then
all data will be appended to the destination tables.
Record Options
Insert records
Check this option if you require all records to be transferred to the destination
database/schema.
Lock target tables
Locks the tables in the target database/schema during the data transfer process.
Use transaction
Check this option if you use transaction during the data transfer process.
Use complete insert statements
Inserts records using complete insert syntax.
Example:
INSERT INTO `users` (`ID Number`, `User Name`, `User Age`) VALUES ('1',
'Peter McKindsy', '23');
INSERT INTO `users` (`ID Number`, `User Name`, `User Age`) VALUES ('2',
'Johnson Ryne', '56');
INSERT INTO `users` (`ID Number`, `User Name`, `User Age`) VALUES ('0',
'katherine', '23');
Run multiple insert statements
Check this option if you want to run multiple insert statements in each execution,
which will make the data transfer process faster.
Use hexadecimal format for BLOB
Inserts BLOB data as hexadecimal format.

Data Management Tools 80
Other Options
Continue on error
Ignores errors that are encountered during the transfer process.
Lock source tables
Locks the tables in the source database so that any update on the table is not allowed
once the data transfer is triggered off.
Drop target objects before create
Check this option if objects already exist in the target database/schema, the existing
objects will be deleted once the data transfer starts.
Create target database/schema if not exist
Creates a new database/schema if the database/schema specified in target server does
not exist.

Data Management Tools 81
Advanced Settings for Transferring from SQL Server to SQLite
Table Options
Create tables
Creates tables in the target database with this option is on.
Supposes this option is unchecked and tables already exist in the target database, then
all data will be appended to the destination tables.
Record Options
Insert records
Check this option if you require all records to be transferred to the destination
database/schema.
Use transaction
Check this option if you use transaction during the data transfer process.
Use complete insert statements
Inserts records using complete insert syntax.
Example:
INSERT INTO `users` (`ID Number`, `User Name`, `User Age`) VALUES ('1',
'Peter McKindsy', '23');
INSERT INTO `users` (`ID Number`, `User Name`, `User Age`) VALUES ('2',
'Johnson Ryne', '56');
INSERT INTO `users` (`ID Number`, `User Name`, `User Age`) VALUES ('0',
'katherine', '23');
Use hexadecimal format for BLOB
Inserts BLOB data as hexadecimal format.
Data Management Tools 82
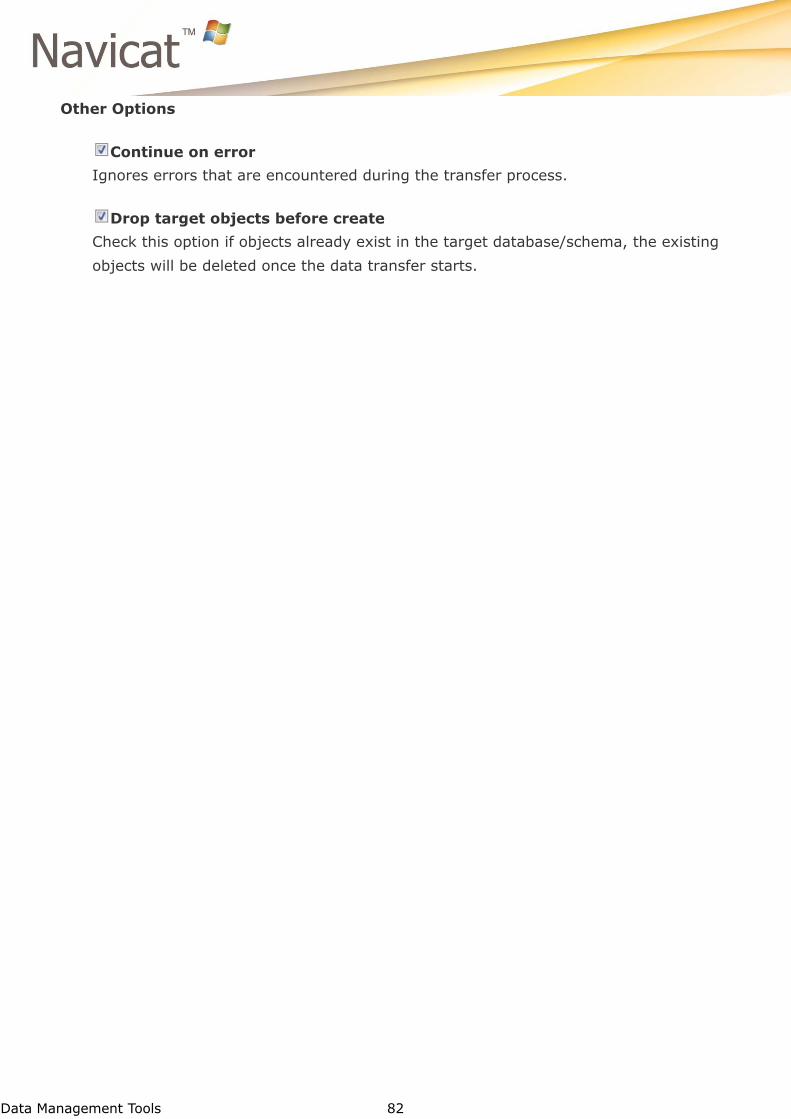
Other Options
Continue on error
Ignores errors that are encountered during the transfer process.
Drop target objects before create
Check this option if objects already exist in the target database/schema, the existing
objects will be deleted once the data transfer starts.
Data Management Tools 83
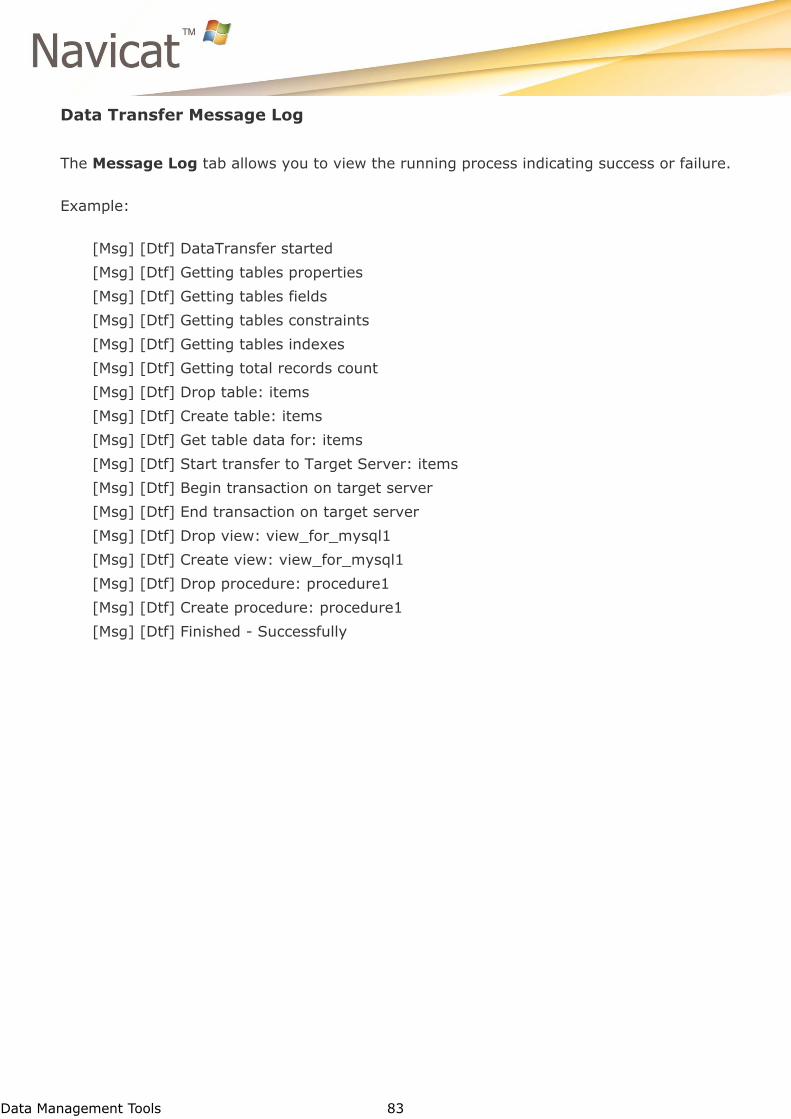
Data Transfer Message Log
The Message Log tab allows you to view the running process indicating success or failure.
Example:
[Msg] [Dtf] DataTransfer started
[Msg] [Dtf] Getting tables properties
[Msg] [Dtf] Getting tables fields
[Msg] [Dtf] Getting tables constraints
[Msg] [Dtf] Getting tables indexes
[Msg] [Dtf] Getting total records count
[Msg] [Dtf] Drop table: items
[Msg] [Dtf] Create table: items
[Msg] [Dtf] Get table data for: items
[Msg] [Dtf] Start transfer to Target Server: items
[Msg] [Dtf] Begin transaction on target server
[Msg] [Dtf] End transaction on target server
[Msg] [Dtf] Drop view: view_for_mysql1
[Msg] [Dtf] Create view: view_for_mysql1
[Msg] [Dtf] Drop procedure: procedure1
[Msg] [Dtf] Create procedure: procedure1
[Msg] [Dtf] Finished - Successfully

Data Management Tools 84
Data Synchronization (Available only in Full Version)
Navicat allows you to transfer data from one database/schema to another database/schema
with detailed analytical process. In other words, Navicat provides the ability for data in
different databases/schemas to be kept up-to-date so that each repository contains the
same information. The target database/schema can be on the same server as the source
database/schema or on another server. You are not only authorized to rollback the
transferring process, but also insert, delete and update records to the destination. You can
also save your settings as a data synchronization profile for setting schedule. Same as Data
Transfer, Data Synchronization can be invoked from the command line.
Note:
For Oracle Database:
BLOB, CLOB, NCLOB, LONG and LONG RAW data are skipped during the data
synchronization process.
TIMESTAMP primary key cannot synchronize (insert, update) with Database Link to 9i
server.
RAW primary key cannot synchronize (insert, update, delete) with Database Link to
any server, without error.
Note: Only SQL Server 2005 or above supports data synchronization.
Just simply open the data synchronization and use the data synchronization toolbar, allowing
you to create, save and delete the data synchronization.
Create Data Synchronization
To create a new data synchronization
Select Tools -> Data Synchronization... from the main menu or just select
New from the toolbar above.
Edit data synchronization properties on the appropriate tabs.
Data Management Tools 85
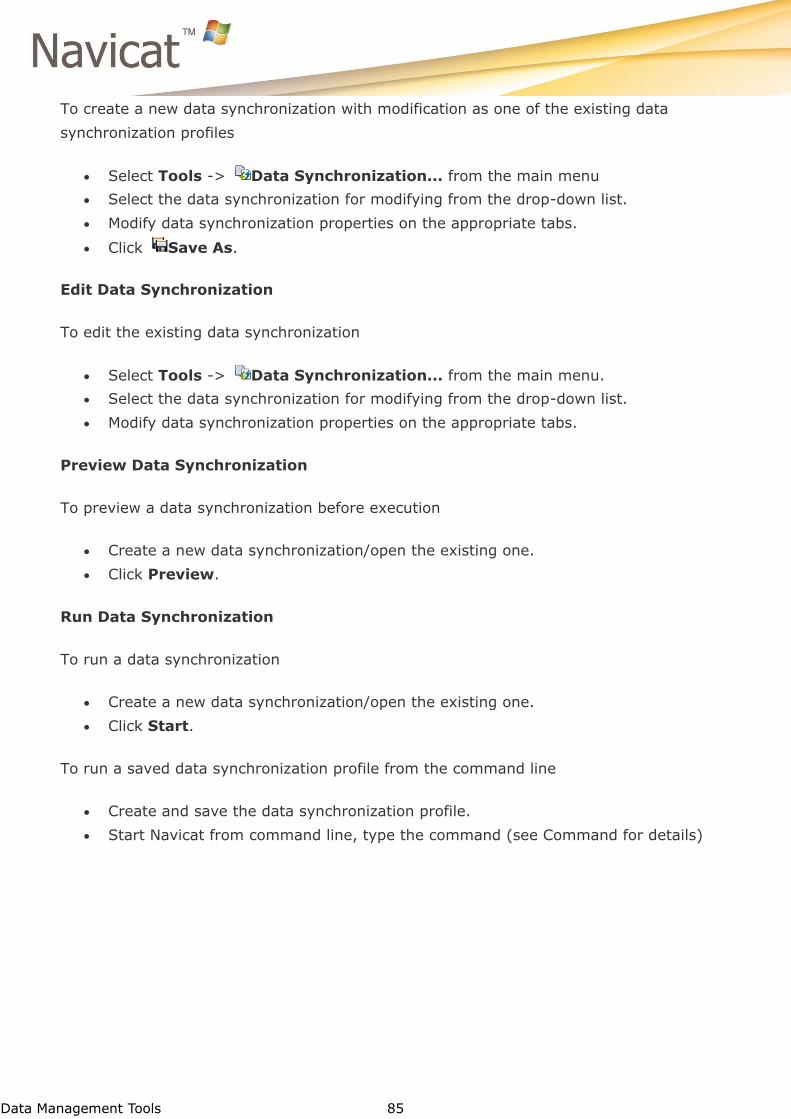
To create a new data synchronization with modification as one of the existing data
synchronization profiles
Select Tools -> Data Synchronization... from the main menu
Select the data synchronization for modifying from the drop-down list.
Modify data synchronization properties on the appropriate tabs.
Click Save As.
Edit Data Synchronization
To edit the existing data synchronization
Select Tools -> Data Synchronization... from the main menu.
Select the data synchronization for modifying from the drop-down list.
Modify data synchronization properties on the appropriate tabs.
Preview Data Synchronization
To preview a data synchronization before execution
Create a new data synchronization/open the existing one.
Click Preview.
Run Data Synchronization
To run a data synchronization
Create a new data synchronization/open the existing one.
Click Start.
To run a saved data synchronization profile from the command line
Create and save the data synchronization profile.
Start Navicat from command line, type the command (see Command for details)
Data Management Tools 86
Delete Data Synchronization
To delete a data synchronization
Select Tools -> Data Synchronization... from the main menu.
Select the data synchronization for dropping from the drop-down list.
Click the Delete from the toolbar.
Confirm deleting in the dialog window.

Data Management Tools 87
General Settings for Data Synchronization
The following instruction guides you through the process of setting up a data synchronization.
Customize options according to your needs.
Note: All tables must contain primary key(s) and all table structures must be identical
between the source and target (see Structure Synchronization).
Source
Defines connection, database and schema for the source.
Target
Defines connection, database and schema for the target.
Note: For Oracle server, you need to create Public/Private Database Link to the target
Oracle server database before.
Source Table/Target Table
Only tables which contain identical table names between the source and target are mapped
in the list by default. If you do not want some tables to be synchronized, simply disable them
manually from the drop-down list.
Hint: You can preview the outcome before execution.
Data Management Tools 88
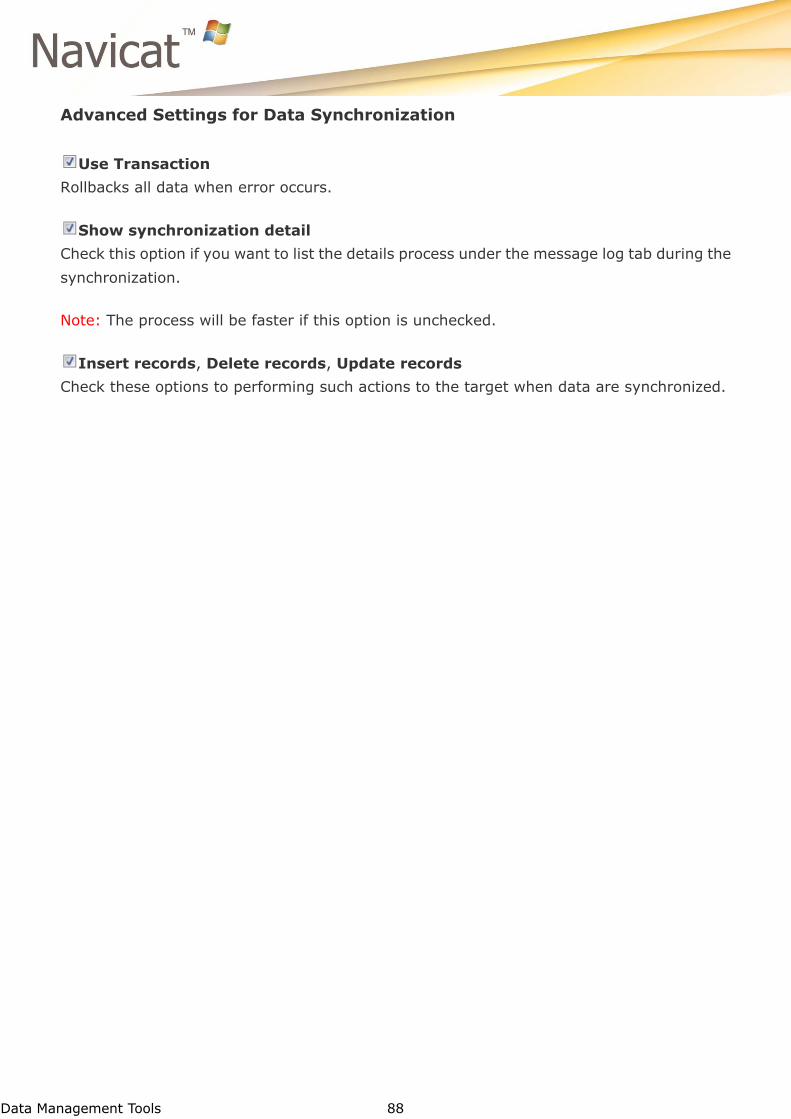
Advanced Settings for Data Synchronization
Use Transaction
Rollbacks all data when error occurs.
Show synchronization detail
Check this option if you want to list the details process under the message log tab during the
synchronization.
Note: The process will be faster if this option is unchecked.
Insert records, Delete records, Update records
Check these options to performing such actions to the target when data are synchronized.
Data Management Tools 89
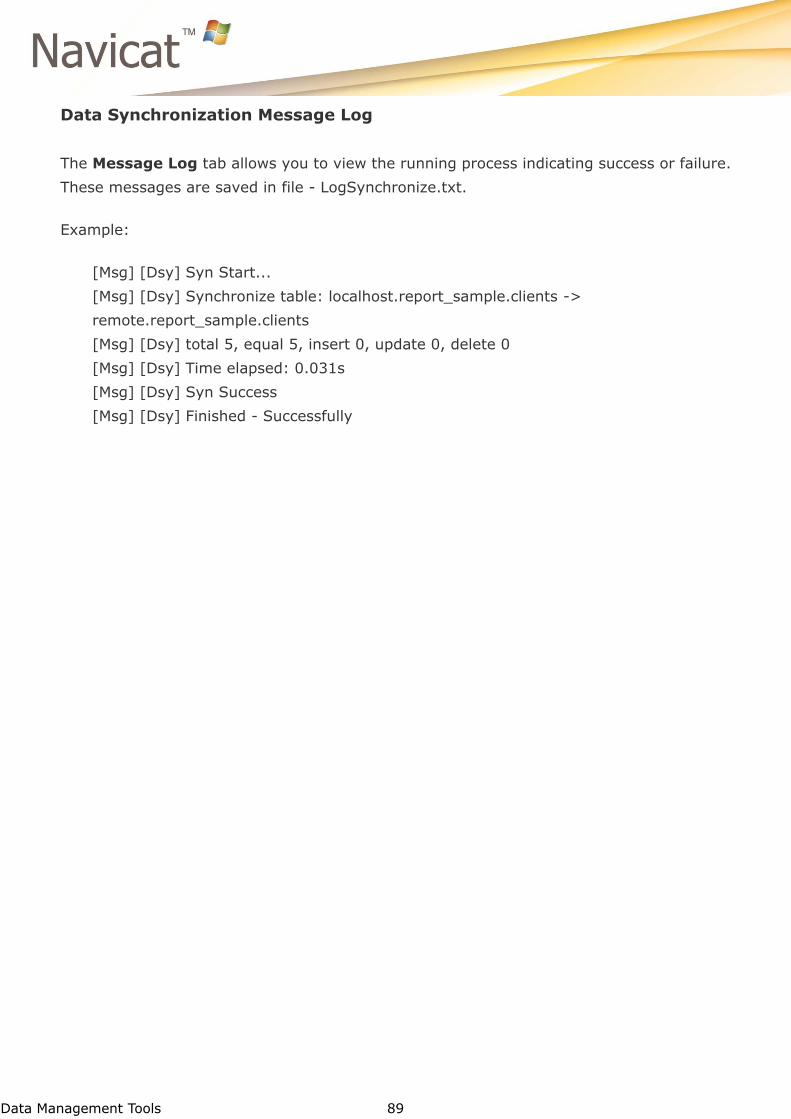
Data Synchronization Message Log
The Message Log tab allows you to view the running process indicating success or failure.
These messages are saved in file - LogSynchronize.txt.
Example:
[Msg] [Dsy] Syn Start...
[Msg] [Dsy] Synchronize table: localhost.report_sample.clients ->
remote.report_sample.clients
[Msg] [Dsy] total 5, equal 5, insert 0, update 0, delete 0
[Msg] [Dsy] Time elapsed: 0.031s
[Msg] [Dsy] Syn Success
[Msg] [Dsy] Finished - Successfully

Data Management Tools 90
Structure Synchronization (Available only in Full version & only for MySQL,
Oracle, PostgreSQL and SQL Server)
Navicat allows you to compare and modify the table structures with detailed analytical
process. In other words, Navicat compares tables between two databases/schemas and
states the differential in structure. The target database/schema can be on the same server
as the source database/schema or on another server.
Open the structure synchronization and use the structure synchronization toolbar, allowing
you to create, save and delete the structure synchronization.
Create Structure Synchronization
To create a new structure synchronization
Select Tools -> Structure Synchronization... from the main menu or just select
New from the toolbar above.
Edit structure synchronization properties on the General tab.
To create a new structure synchronization with modification as one of the existing structure
synchronization profiles
Select Tools -> Structure Synchronization... from the main menu
Select the structure synchronization for modifying from the drop-down list.
Modify structure synchronization properties on the General tab.
Click Save As.
Edit Structure Synchronization
To edit the existing structure synchronization
Select Tools -> Structure Synchronization... from the main menu.
Select the structure synchronization for modifying from the drop-down list.
Modify structure synchronization properties on the General tab.
Data Management Tools 91
Run Structure Synchronization
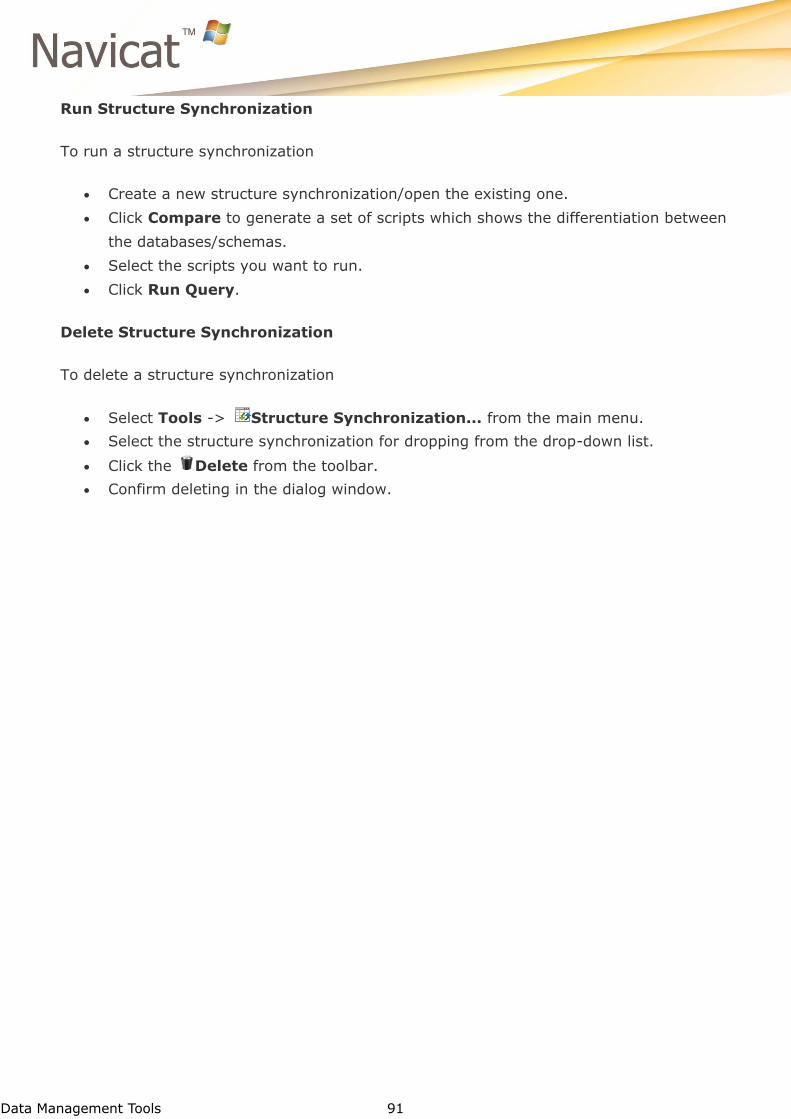
To run a structure synchronization
Create a new structure synchronization/open the existing one.
Click Compare to generate a set of scripts which shows the differentiation between
the databases/schemas.
Select the scripts you want to run.
Click Run Query.
Delete Structure Synchronization
To delete a structure synchronization
Select Tools -> Structure Synchronization... from the main menu.
Select the structure synchronization for dropping from the drop-down list.
Click the Delete from the toolbar.
Confirm deleting in the dialog window.
Data Management Tools 92
General Settings for MySQL Structure Synchronization
The following instruction guides you through the process of setting up a structure
synchronization. Customize options according to your needs.
Source
Defines connection and database for the source.
Target
Defines connection and database for the target.
Compare Options
Compare Tables
Check this option if you want to compare tables between the source and target
databases. Select/unselect the seven options below:
Compare Primary Keys
Check this option if you want to compare table primary keys.
Compare Foreign Keys
Check this option if you want to compare table foreign keys.
Compare Indexes
Check this option if you want to compare indexes.
Compare Triggers
Check this option if you want to compare triggers.
Compare Character Set
Check this option if you want to compare character set of the tables.
Compare Auto Increment Value
Check this option if you want to compare table auto increment values.
Compare Partitions
Check this option if you want to compare table partitions.
Compare Views
Check this option if you want to compare views.

Data Management Tools 93
Compare Functions
Check this option if you want to compare functions.
Compare Events
Check this option if you want to compare events.
Execution Options
SQL for objects to be created
Check this option to include all related SQL statements if new objects will be created in
the target database.
SQL for objects to be changed
Check this option to include all related SQL statements if objects will be changed in the
target database.
SQL for objects to be dropped
Check this option to include all related SQL statements if objects will be dropped from
the target database.
Compare after execution
Compares tables after the synchronization is executed.
Continue on error
Ignores errors that are encountered during the synchronization process.

Data Management Tools 94
General Settings for Oracle Structure Synchronization
The following instruction guides you through the process of setting up a structure
synchronization. Customize options according to your needs.
Source
Defines connection and schema for the source.
Target
Defines connection and schema for the target.
Compare Options
Compare Tables
Check this option if you want to compare tables between the source and target schemas.
Select/unselect the four options below:
Compare Primary Keys
Check this option if you want to compare table primary keys.
Compare Foreign Keys
Check this option if you want to compare table foreign keys.
Compare Uniques
Check this option if you want to compare uniques.
Compare Checks
Check this option if you want to compare checks.
Compare Views
Check this option if you want to compare views.
Compare Functions
Check this option if you want to compare functions.
Compare Indexes
Check this option if you want to compare indexes.
Compare Sequences
Check this option if you want to compare sequences.
Data Management Tools 95
Compare Triggers
Check this option if you want to compare triggers.
Compare Tablespace and Physical Attributes
Check this option if you want to compare tablespace and physical attributes.
Execution Options
SQL for objects to be created
Check this option to include all related SQL statements if new objects will be created in
the target schema.
SQL for objects to be changed
Check this option to include all related SQL statements if objects will be changed in the
target schema.
SQL for objects to be dropped
Check this option to include all related SQL statements if objects will be dropped from
the target schema.
Drop with CASCADE
Check this option if you want to cascade to drop the dependent objects.
Compare after execution
Compares tables after the synchronization is executed.
Continue on error
Ignores errors that are encountered during the synchronization process.
Data Management Tools 96
General Settings for PostgreSQL Structure Synchronization
The following instruction guides you through the process of setting up a structure
synchronization. Customize options according to your needs.
Source
Defines connection, database and schema for the source.
Target
Defines connection, database and schema for the target.
Compare Options
Compare Tables
Check this option if you want to compare tables between the source and target schemas.
Select/unselect the five options below:
Compare Primary Keys
Check this option if you want to compare table primary keys.
Compare Foreign Keys
Check this option if you want to compare table foreign keys.
Compare Uniques
Check this option if you want to compare uniques.
Compare Checks
Check this option if you want to compare checks.
Compare Excludes
Check this option if you want to compare exclude constraints.
Compare Views
Check this option if you want to compare views.
Compare Functions
Check this option if you want to compare functions.
Compare Indexes
Check this option if you want to compare indexes.
Data Management Tools 97
Compare Sequences
Check this option if you want to compare sequences.
Compare Triggers
Check this option if you want to compare triggers.
Compare Rules
Check this option if you want to compare rules.
Execution Options
SQL for objects to be created
Check this option to include all related SQL statements if new objects will be created in
the target database and schema.
SQL for objects to be changed
Check this option to include all related SQL statements if objects will be changed in the
target database and schema.
SQL for objects to be dropped
Check this option to include all related SQL statements if objects will be dropped from
the target database and schema.
Drop with CASCADE
Check this option if you want to cascade to drop the dependent objects.
Compare after execution
Compares tables after the synchronization is executed.
Continue on error
Ignores errors that are encountered during the synchronization process.
Create inheriting parent
Creates tables of inheriting parents during the synchronization process.
Data Management Tools 98
General Settings for SQL Server Structure Synchronization
The following instruction guides you through the process of setting up a structure
synchronization. Customize options according to your needs.
Source
Defines connection, database and schema for the source.
Target
Defines connection, database and schema for the target.
Compare Options
Compare Tables
Check this option if you want to compare tables between the source and target
databases. Select/unselect the six options below:
Compare Primary Keys
Check this option if you want to compare table primary keys.
Compare Foreign Keys
Check this option if you want to compare table foreign keys.
Compare Uniques
Check this option if you want to compare uniques.
Compare Checks
Check this option if you want to compare checks.
Compare Collation
Check this option if you want to compare collation of the tables.
Compare Identity Last Value
Check this option if you want to compare table identity last values.
Compare Views
Check this option if you want to compare views.
Compare Functions
Check this option if you want to compare functions.

Data Management Tools 99
Compare Indexes
Check this option if you want to compare indexes.
Compare Triggers
Check this option if you want to compare triggers.
Compare Storage
Check this option if you want to compare storage.
Execution Options
SQL for objects to be created
Check this option to include all related SQL statements if new objects will be created in
the target database and schema.
SQL for objects to be changed
Check this option to include all related SQL statements if objects will be changed in the
target database and schema.
SQL for objects to be dropped
Check this option to include all related SQL statements if objects will be dropped from
the target database and schema.
Compare after execution
Compares tables after the synchronization is executed.
Continue on error
Ignores errors that are encountered during the synchronization process.
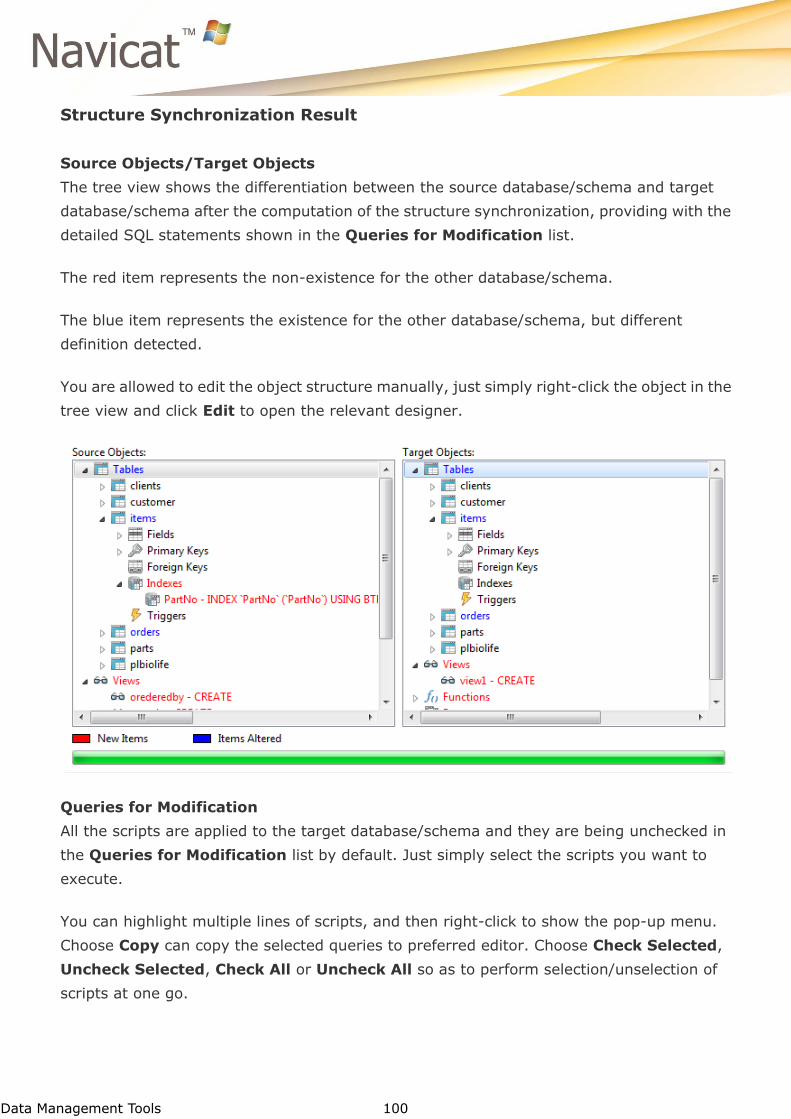
Data Management Tools 100
Structure Synchronization Result
Source Objects/Target Objects
The tree view shows the differentiation between the source database/schema and target
database/schema after the computation of the structure synchronization, providing with the
detailed SQL statements shown in the Queries for Modification list.
The red item represents the non-existence for the other database/schema.
The blue item represents the existence for the other database/schema, but different
definition detected.
You are allowed to edit the object structure manually, just simply right-click the object in the
tree view and click Edit to open the relevant designer.
Queries for Modification
All the scripts are applied to the target database/schema and they are being unchecked in
the Queries for Modification list by default. Just simply select the scripts you want to
execute.
You can highlight multiple lines of scripts, and then right-click to show the pop-up menu.
Choose Copy can copy the selected queries to preferred editor. Choose Check Selected,
Uncheck Selected, Check All or Uncheck All so as to perform selection/unselection of
scripts at one go.

Data Management Tools 101
To view the full SQL statements you selected, right-click the Queries for Modification list
and select Checked Scripts Detail.
Press Run Query to execute the selected query.

Data Management Tools 102
Structure Synchronization Message Log
The Message Log tab allows you to view the running process indicating success or failure.
Example:
[Msg] Starting Synchronization
[Msg] Source Server : Localhost
[Msg] Source Database : report_sample
[Msg] Target Server : Localhost
[Msg] Target Database : report_backup
[Msg] Executing - ALTER Table 'clients' MODIFY COLUMN 'RecordID' int(10) NOT NULL
auto_increment;
[Msg] Completed
[Msg] Synchronization Completed
Data Management Tools 103
Backup/Restore (Available only in Full version & only for MySQL,
PostgreSQL and SQLite)
A secure and reliable server is closely related to performing regular backups, as failures will
probably occur sometimes - caused by attacks, hardware failure, human error, power
outages, etc.
Navicat allows you to backup/restore all tables and records, views and functions for your
database. Backup can be invoked from the command line, which makes it possible to
schedule backups between databases.
Just simply click to open an object pane for Backup. A right-click displays the popup
menu or using the backup object pane toolbar, allowing you to create new, restore, extract
and delete the backup.
Create Backup
To create a new backup
Select anywhere on the object pane.
Click the New Backup from the object pane toolbar.
or
Right-click and select New Backup from the popup menu.
Edit backup properties on the appropriate tabs.
Click Start.
Hint: To create new backup you can also right-click the Backups node of the
navigation pane and select the New Backup from the popup menu.
Edit Backup
To change the name of the backup
Select the backup for editing in the navigation pane/object pane.
Right-click and select the Rename from the popup menu.
Data Management Tools 104
Compress or Decompress Backup
To compress or decompress the backup
Select the backup for compressing or decompressing in the navigation pane/object
pane.
Right-click and select the Compress Backup or Decompress Backup from the
popup menu.
Delete Backup
To delete a backup
Select the backup for deleting in the navigation pane/object pane.
Right-click and select the Delete Backup from the popup menu.
or
Click the Delete Backup from the object pane toolbar.
Confirm deleting in the dialog window.
Restore Backup
To restore a backup to an existing database
Open the database and select the existing backup.
Click the Restore Backup from the object pane toolbar or right-click and select
Restore Backup from the popup menu.
Edit restore options on the appropriate tabs.
Click Start.
Hint: To restore the backup you can also click the Restore Backup from the object
pane toolbar or right-click the Backup node of the navigation pane and select the
Restore Backup from the popup menu.
Data Management Tools 105
To restore a backup to a new database
Create a new database (MySQL, PostgreSQL or SQLite) and click to open an object
pane for Backup.
Click the Restore Backup from the object pane toolbar or right-click anywhere on
the object pane and select Restore Backup from the popup menu.
Browse the backup file.
Edit restore options on the appropriate tabs.
Click Start.
Extract SQL
To extract backup to sql file
Select the backup for extracting in the navigation pane/object pane.
Right-click and select the Extract SQL from the popup menu.
or
Click the Extract SQL from the object pane toolbar.
Edit extract SQL options on the appropriate tabs.
Click Start.
Achieve Backup Information
To achieve a backup information (Name, Group Name and File Size, etc)
Select the backup in the navigation pane/object pane.
Right-click the selected backup and choose Object Information from the popup
menu to view the Object Information.
or
Choose View -> Object Information in the main menu.
Data Management Tools 106
Backup
Backup is the basic Navicat tool for performing regular backups.
General Settings for Backup
Object Selection for Backup
Advanced Settings for Backup
Message Log
Hint: Backup files are stored under Settings Save Path.
To run a backup from the command line
Create and save the backup profile.
Start Navicat from command line, type the command (see Command for details)

Data Management Tools 107
General Settings for Backup
Backup File Option
Comment
Allows you to enter the comment for the backup.
Data Management Tools 108
Object Selection for Backup
You are allowed to choose your preferable database objects, i.e. tables, views, functions,
sequences, events, indexes and triggers you wish to backup.

Data Management Tools 109
Advanced Settings for Backup
Compressed
Check this option if you want to produce smaller backup size.
Hint: compressed (.psc), uncompressed (.psb).
Lock All Tables (Available only for MySQL and PostgreSQL)
Lock all objects while backup is being processed.
Use Single Transaction (InnoDB only) (Available only for MySQL)
If a table uses InnoDB storage engine, with this option is on, Navicat uses transaction before
the backup process starts.
Use specify file name
Define your file name for backup. Otherwise, your backup file will be named as
"2007-05-10 17:38:20" for example.

Data Management Tools 110
Backup Message Log
The Message Log tab allows you to view the running process indicating success or failure.
Example:
[Msg] [Bak] Starting backup...
[Msg] [Bak] Writing file header...
[Msg] [Bak] Writing structure header...
[Msg] [Bak] Writing schema dummy header...
[Msg] [Bak] Writing table clients header...
[Msg] [Bak] Writing table customer header...
[Msg] [Bak] Writing table items header...
[Msg] [Bak] Writing table orders header...
[Msg] [Bak] Writing table parts header...
[Msg] [Bak] Writing table plbiolife header...
[Msg] [Bak] Writing view view_mysql1 header...
[Msg] [Bak] Prepare writing data...
[Msg] [Bak] Writing data...
[Msg] [Bak] Writing table clients data...
[Msg] [Bak] Writing table customer data...
[Msg] [Bak] Writing table items data...
[Msg] [Bak] Writing table orders data...
[Msg] [Bak] Writing table parts data...
[Msg] [Bak] Writing table plbiolife data...
[Msg] [Bak] Compressing backup file...
[Msg] [Bak] Finished - Successfully
Data Management Tools 111
Restore
Navicat provides a useful tool for restoring your backup while hardware failure occurs.
General Settings for Restore
Object Selection for Restore
Advanced Settings for Restore
Message Log
Note: You must have Create, Drop and Insert Privileges (MySQL or PostgreSQL) to run the
restore.
Hint: Restore function will firstly drop the selected objects of the database, then recreate the
new objects according to your backup. Finally, inserting the data.

Data Management Tools 112
General Settings for Restore
Backup file information
Comment
Allows you to enter the comment for the restore.

Data Management Tools 113
Object Selection for Restore
You are allowed to choose your preferable database objects, i.e. tables, views, functions,
sequences, events, indexes and triggers you wish to restore.

Data Management Tools 114
Advanced Settings for Restore
Server Options
Use Transaction
Rollbacks all data when error occurs.
Continue on error
Ignores errors that are encountered during the restore process.
Lock tables for write (Available only for MySQL and PostgreSQL)
Locks the tables to prevent user to modify tables during the restore process.
Use extended insert statements (Available only for MySQL)
Inserts records using extended insert syntax.
Example:
INSERT INTO `users` VALUES ('1', 'Peter McKindsy', '23'), ('2', 'Johnson Ryne',
'56'), ('0', 'Katherine', '23');
Run multiple queries in each execution (Available only for PostgreSQL)
Checks this option if you want to run multiple queries in each execution, which will make
the restore process faster.
Object Options
Create tables
Creates tables during the restore process with this option is on.
Create records
Restores records during the restore process with this option is on, otherwise, only table
structures will be restored.
Create indexes (Available only for PostgreSQL)
Creates indexes for the restored table with this option is on.
Create triggers (Available only for MySQL and PostgreSQL)
Creates triggers for the restored table with this option is on.
Overwrite existing tables
Overwrites if tables already exist in the database.
Data Management Tools 115
Overwrite existing views
Overwrites if views already exist in the database.
Overwrite existing functions (Available only for MySQL and PostgreSQL)
Overwrites if functions already exist in the database.
Overwrite existing events (Available only for MySQL)
Overwrites if events already exist in the database.
Overwrite existing sequences (Available only for PostgreSQL)
Overwrites if sequences already exist in the database.
Overwrite existing indexes(Available only for SQLite)
Overwrites if indexes already exist in the database.
Overwrite existing triggers (Available only for SQLite)
Overwrites if triggers already exist in the database.
Insert Auto Increment Values (Available only for SQLite)
Inserts auto increment values in the database.

Data Management Tools 116
Restore Message Log
The Message Log tab allows you to view the running process indicating success or failure.
Example:
[Msg] Decompressing...
[Msg] Table Created: clients
[Msg] Table Created: customer
[Msg] Table Created: items
[Msg] Table Created: orders
[Msg] Table Created: parts
[Msg] Table Created: plbiolife
[Msg] Importing Data...
[Msg] Table Restored: clients
[Msg] Table Restored: customer
[Msg] Table Restored: items
[Msg] Table Restored: orders
[Msg] Table Restored: parts
[Msg] Table Restored: plbiolife
[Msg] Finished successfully
Data Management Tools 117
Extract SQL
You are allowed to extract your backup into a SQL file. See Restore for details.
Example:
[Msg] Decompressing...
[Msg] Table DDL Extracted: clients
[Msg] Table DDL Extracted: customer
[Msg] Table DDL Extracted: items
[Msg] Table DDL Extracted: orders
[Msg] Table DDL Extracted: parts
[Msg] Table DDL Extracted: plbiolife
[Msg] Table Data Extracted: clients
[Msg] Table Data Extracted: customer
[Msg] Table Data Extracted: items
[Msg] Table Data Extracted: orders
[Msg] Table Data Extracted: parts
[Msg] Table Data Extracted: plbiolife
[Msg] Finished - Successfully
Data Management Tools 118
Batch Job/Schedule (Available only in Full Version)
Navicat allows you to create a batch job for setting schedule to execute at one or more
regular intervals, beginning and ending at a specific date and time using Windows Task
Scheduler. Batch job can be created for Query, Report printing, Backup, Data Transfer,
Data Synchronization, Import and Export from MySQL, Oracle, PostgreSQL, SQLite and SQL
Server. You can define a list of actions to be performed within one batch job, either run it
manually or at the specified time/periodically.
Just simply click to open an object pane for Schedule. A right-click displays the popup
menu or using the schedule object pane toolbar, allowing you to create new, edit, open and
delete the selected batch job/schedule.
Create Batch Job
To create a new batch job
Select anywhere on the object pane.
Click the New Batch Job from the object pane toolbar.
or
Right-click and select New Batch Job from the popup menu.
Edit batch job properties on the appropriate tabs.
To create a new batch job with modification as one of the existing batch jobs
Select the batch job for modifying in object pane.
Right-click and select the Design Batch Job from the popup menu.
or
Click the Design Batch Job from the object pane toolbar.
Modify batch job properties on the appropriate tabs.
Click Save As.

Data Management Tools 119
Edit Batch Job
To edit the existing batch job
Select the batch job for editing in the object pane.
Right-click and select the Design Batch Job from the popup menu.
or
Click the Design Batch Job from the object pane toolbar.
Edit batch job properties on the appropriate tabs.
To change the name of the batch job
Select the batch job for editing in the object pane.
Right-click and select the Rename from the popup menu.
Run Batch Job
To run a batch job
Create a new batch job/open the existing one.
Click Start.
To run a saved batch job from the command line
Create and save the batch job.
Start Navicat from command line, type the command (see Command for details)
Delete Batch Job
To delete a batch job
Select the batch job for deleting in the object pane.
Right-click and select the Delete Batch Job from the popup menu.
or
Click the Delete Batch Job from the object pane toolbar.
Confirm deleting in the dialog window.
Data Management Tools 120
Convert Batch Job
To convert a batch job
Right-click and select the Batch Job Converter from the popup menu in the object
pane.
Select the batch jobs.
Set the convert options.
Click Start.
Set Schedule
To set schedule to the batch job
Create and save the batch job/open the existing one.
Select the batch job in the object pane.
Right-click and select the Set Task Schedule from the popup menu.
or
Click the Set Task Schedule from the object pane toolbar.
Set your schedule using Windows Scheduler.
Hint: LogCmd.txt stores all the operations executed, indicating success or failure during the
schedule.
Delete Schedule
To delete a schedule
Select the scheduled batch job in the object pane.
Right-click and select the Delete Task Schedule from the popup menu.
or
Click the Delete Task Schedule from the object pane toolbar.
Confirm deleting in the dialog window.
Data Management Tools 121
Achieve Batch Job Information
To achieve a batch job information (Name, Group name, File and Create Time, etc)
Select the batch job in the object pane.
Right-click the selected batch job and choose Object Information from the popup
menu to view the Object Information.
or
Choose View -> Object Information in the main menu.
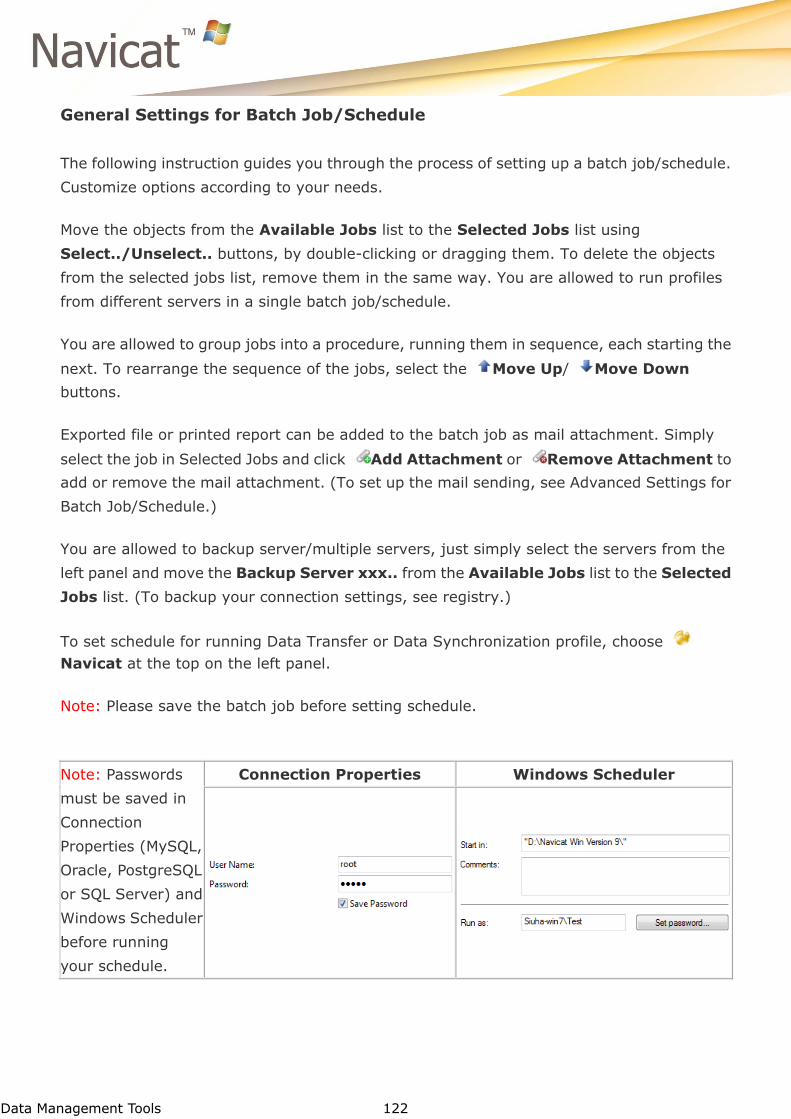
Data Management Tools 122
General Settings for Batch Job/Schedule
The following instruction guides you through the process of setting up a batch job/schedule.
Customize options according to your needs.
Move the objects from the Available Jobs list to the Selected Jobs list using
Select../Unselect.. buttons, by double-clicking or dragging them. To delete the objects
from the selected jobs list, remove them in the same way. You are allowed to run profiles
from different servers in a single batch job/schedule.
You are allowed to group jobs into a procedure, running them in sequence, each starting the
next. To rearrange the sequence of the jobs, select the Move Up/ Move Down
buttons.
Exported file or printed report can be added to the batch job as mail attachment. Simply
select the job in Selected Jobs and click Add Attachment or Remove Attachment to
add or remove the mail attachment. (To set up the mail sending, see Advanced Settings for
Batch Job/Schedule.)
You are allowed to backup server/multiple servers, just simply select the servers from the
left panel and move the Backup Server xxx.. from the Available Jobs list to the Selected
Jobs list. (To backup your connection settings, see registry.)
To set schedule for running Data Transfer or Data Synchronization profile, choose
Navicat at the top on the left panel.
Note: Please save the batch job before setting schedule.
Note: Passwords
must be saved in
Connection
Properties (MySQL,
Oracle, PostgreSQL
or SQL Server) and
Windows Scheduler
before running
your schedule.
Connection Properties Windows Scheduler
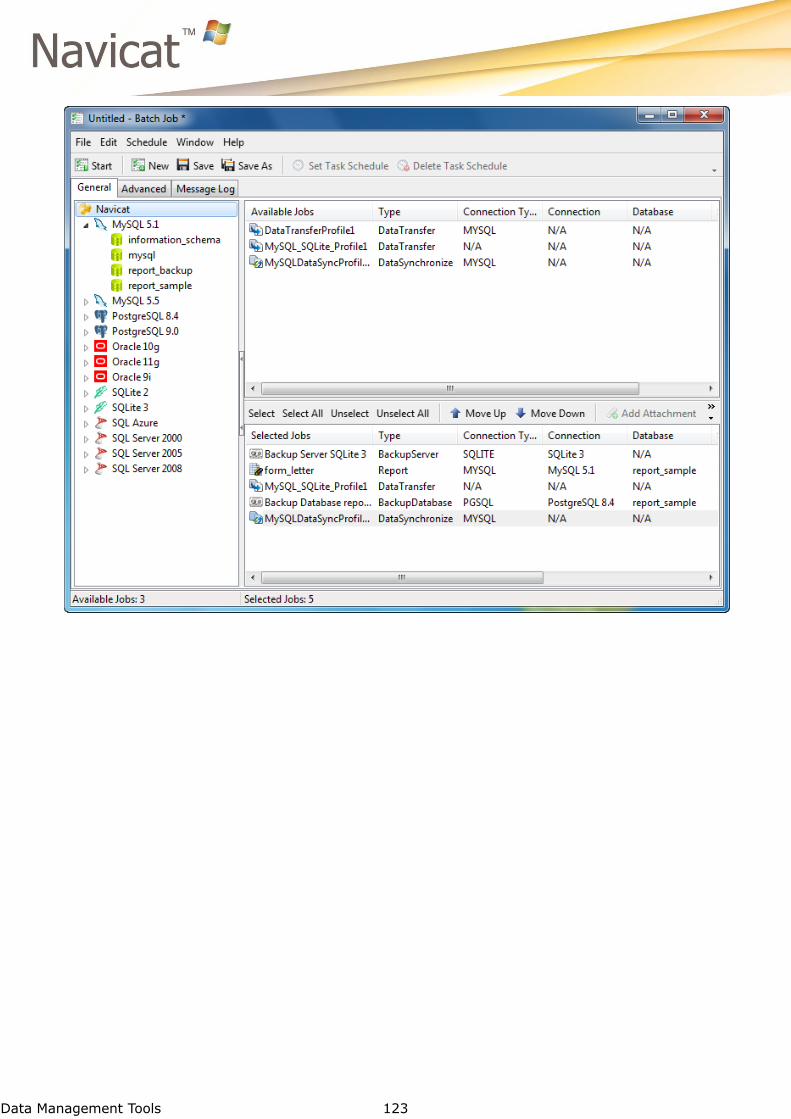
Data Management Tools 123
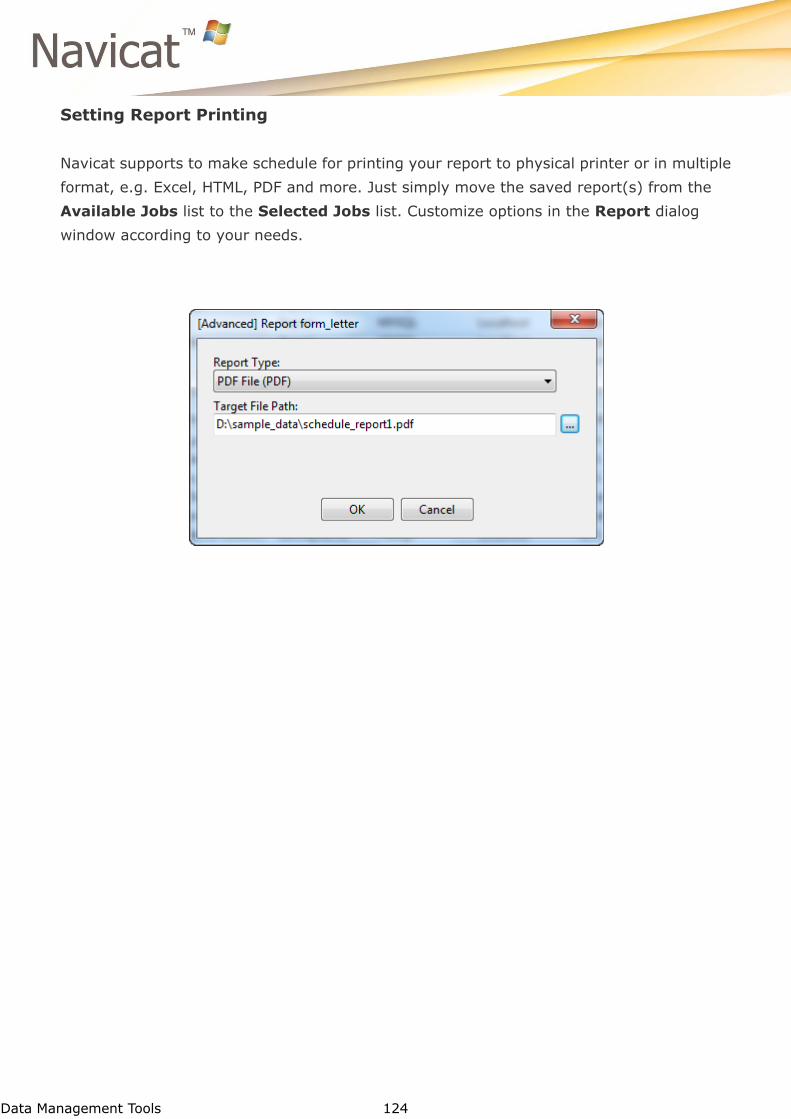
Data Management Tools 124
Setting Report Printing
Navicat supports to make schedule for printing your report to physical printer or in multiple
format, e.g. Excel, HTML, PDF and more. Just simply move the saved report(s) from the
Available Jobs list to the Selected Jobs list. Customize options in the Report dialog
window according to your needs.
Data Management Tools 125
Advanced Settings for Batch Job/Schedule
Navicat allows you to generate and send personalized e-mails with results returned from a
schedule. The resultset(s) can be emailed to multiple recipients.
Send Email
From
Specifies the e-mail address that people should use when sending e-mail to you at this
account. For example, [email protected].
To, CC
Specifies the e-mail address of each recipient, separating them with a comma or a
semicolon (;).
Host (SMTP Server)
Enters your Simple Mail Transfer Protocol (SMTP) server for outgoing messages.
Port
Enters the port number you connect to on your outgoing e-mail (SMTP) server. Default
value is 25.
Use Authentication
Check this option and enter required user name and password if your SMTP server requires
authorization to send email.
Secure Connection
Specifies the connection to use TLS, SSL secure connection or not.
Send test mail
Navicat will send you a test mail indicating success or failure.
Data Management Tools 126
Batch Job/Schedule Message Log
The Message Log tab allows you to view the running process indicating success or failure.
Note: LogCmd.txt stores all the operations executed during the schedule.
Example:
[Msg] Batch job started
[Msg] [Bak] Backup Localhost->report_sample
[Msg] [Bak] Starting backup...
[Msg] [Bak] Writing header...
[Msg] [Bak] Writing Data...
[Msg] [Bak] Compressing Backup File...
[Msg] [Rep] Report Localhost->report_sample->invoice
[Msg] [Rep] Finished - Successfully
[Msg] [Que] Query Localhost->report_sample->query_2
[Msg] [Que] Finished - Successfully
[Msg] Finished - Successfully
Data Management Tools 127
Batch Job Converter (Available only in Navicat Premium)
Navicat Premium allows you to convert saved batch jobs from Navicat for MySQL, Navicat for
Oracle, Navicat for PostgreSQL, Navicat for SQLite and Navicat for SQL Server to it.
A right-click in Schedule object pane and select Batch Job Converter... from the popup
menu to open the batch job converter window.
Selecting batch jobs
Setting convert options
Starting convert
Data Management Tools 128
Selecting Batch Jobs
Select batch jobs to convert.
Select All
You can select all batch jobs by simply selecting Select All button for quick mapping.
In Vista or above, if you select batch jobs from either one Navicat, you can just select
Select All from Navicat for MySQL or Select All from Navicat for PostgreSQL or
Select All from Navicat for Oracle or Select All from Navicat for SQLite or Select
All from Navicat for SQL Server from Select All button for quick mapping.
Unselect All
You can unselect all selected batch jobs easily.
Data Management Tools 129
Setting Convert Options
Options
Delete original batch jobs
Check this option if you want to delete the original batch jobs in Navicat. If the original
batch job is deleted, the scheduled batch job will not work until it is set again in Navicat
Premium or the original application.
Overwrite existing batch jobs
Check this option if you want to overwrite the existing batch jobs in Navicat Premium.
Append when batch job exists
Check this option and enter the name of existing batch job if you want to append the
details to the existing batch jobs in Navicat Premium.
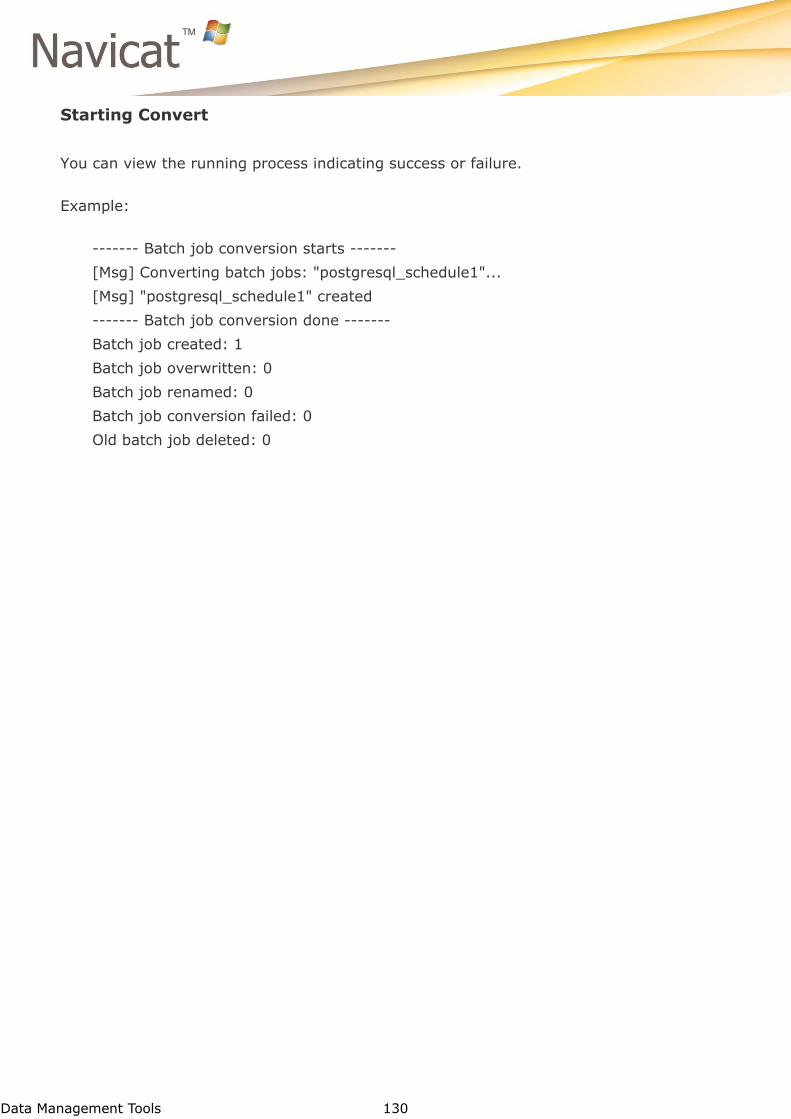
Data Management Tools 130
Starting Convert
You can view the running process indicating success or failure.
Example:
------- Batch job conversion starts -------
[Msg] Converting batch jobs: "postgresql_schedule1"...
[Msg] "postgresql_schedule1" created
------- Batch job conversion done -------
Batch job created: 1
Batch job overwritten: 0
Batch job renamed: 0
Batch job conversion failed: 0
Old batch job deleted: 0
Data Management Tools 131
Console
Navicat provides interactive text-based screen for user query input and result output from
MySQL, Oracle, PostgreSQL, SQLite and SQL Server.
MySQL Console
Oracle Console
PostgreSQL Console
SQLite Console
SQL Server Console

Data Management Tools 132
MySQL Console
MySQL Console allows you to use a command-line interface. In other words, it provides
interactive text-based screen for you to query input and result output from database.
Just simply open the console and use the console toolbar, allowing you to run, save and load
your SQL statements.
Open Console
To open a console window
Open the connection and select Tools -> Console... from the main menu or just
simply press F6.
Edit your SQL statement in the console.
Hint: To create new console you can also right-click the Database node of the navigation
pane and select the Console... from the popup menu.
To open a console window with loading from a text file
Open the connection and select Tools -> Console... from the main menu or just
simply press F6.
Click Load.
Hint: You are allowed to open multiple console windows which each represents different
connection.
Save Statements
To save the SQL statement into text file
Open the connection and select Tools -> Console... from the main menu or just
simply press F6.
Edit your SQL statement in the console.
Click Save.
Data Management Tools 133
Stop Executing
To stop running the SQL statement
Click Stop.
Erase Content
To clear all SQL statements in console window
Click Clear.
Exit Console
To exit a console window
Click the cross button at the main bar.
or
Type quit in the console window and press Enter.

Data Management Tools 134
Example of Using MySQL Console
Basic MySQL query statements
mysql> show databases;
+--------------------+
| Database |
+--------------------+
| information_schema |
| mysql |
| report_backup |
| report_sample |
+--------------------+
4 rows in set
mysql> use report_sample;
Database changed
mysql> show tables;
+-------------------------+
| Tables_in_report_sample |
+-------------------------+
| clients |
| customer |
| items |
| orders |
| parts |
| plbiolife |
+-------------------------+
6 rows in set
mysql> select Description, Cost from parts where PartNo = 2619;
+--------------------+-------+
| Description | Cost |
+--------------------+-------+
| Navigation Compass | 9.177 |
+--------------------+-------+
1 row in set
mysql>
Data Management Tools 135
Oracle Console
Oracle Console (SQL*Plus) allows you to use a command-line interface. In other words, it
provides interactive text-based screen for you to query input and result output from
database.
Note: You have to have SQL*Plus executable in order to get this works. If it cannot be found
under the default path, you are prompted to locate the executable in the pop up.
Downloading
SQL*Plus is included in packages Oracle Client / Oracle Instant Client. You can
download it through -
Oracle Client
http://www.oracle.com/technology/software/products/database/index.html
Oracle Instant Client
http://www.oracle.com/technology/software/tech/oci/instantclient/index.html
Open Console
To open console window
Open the connection and select Tools -> Console... from the main menu or just
simply press F6.
Edit your SQL statement in the console command prompt.
Hint: To open a new console window you can also right-click the Connection/Schema node of
the navigation pane and select the Console... from the popup menu.
Hint: You are allowed to open multiple console windows which represents different
connection each.
Exit Console
To exit console
Click the cross button at the main bar.
or
Type exit or quit in the console window and press Enter.

Data Management Tools 136
See also:
OCI Option
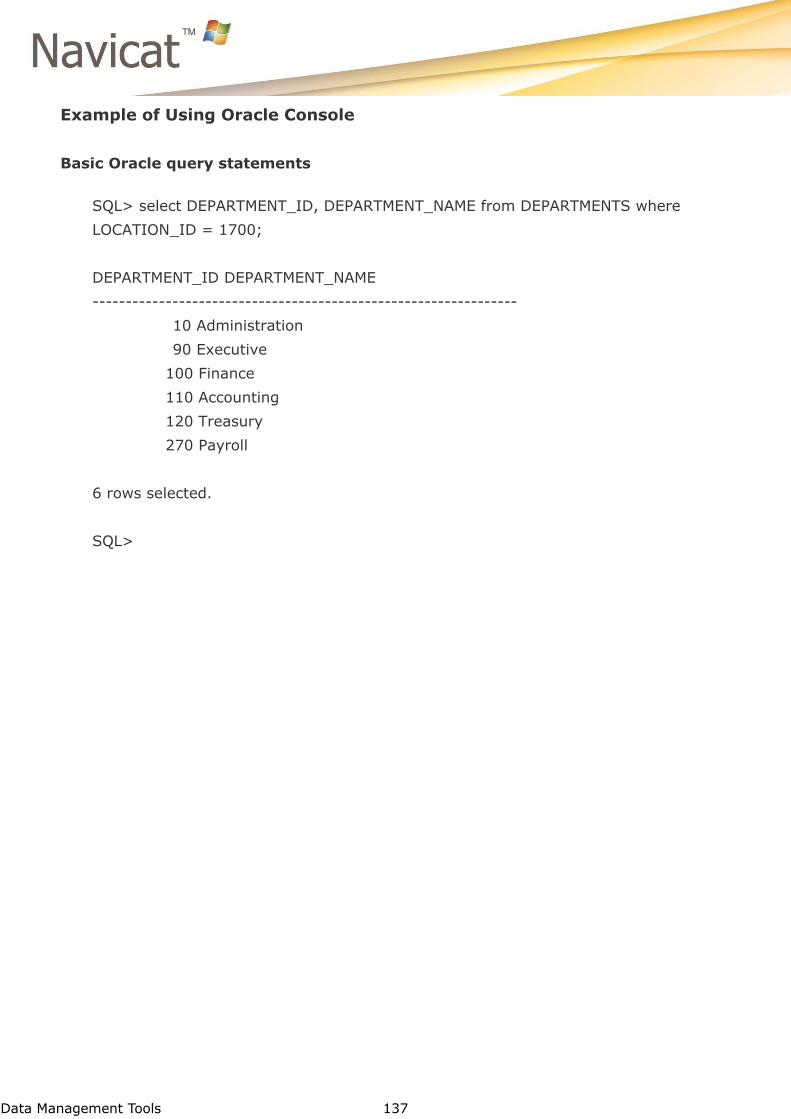
Data Management Tools 137
Example of Using Oracle Console
Basic Oracle query statements
SQL> select DEPARTMENT_ID, DEPARTMENT_NAME from DEPARTMENTS where
LOCATION_ID = 1700;
DEPARTMENT_ID DEPARTMENT_NAME
----------------------------------------------------------------
10 Administration
90 Executive
100 Finance
110 Accounting
120 Treasury
270 Payroll
6 rows selected.
SQL>
Data Management Tools 138
PostgreSQL Console
PostgreSQL Console allows you to use a command-line interface. In other words, it
provides interactive text-based screen for you to query input and result output from
database.
Just simply open the console and use the console toolbar, allowing you to run, save and load
your SQL statements.
Open Console
To open a console window
Open the connection and select Tools -> Console... from the main menu or just
simply press F6.
Edit your SQL statement in the console.
Hint: To create new console you can also right-click the Database/Schema node of the
navigation pane and select the Console... from the popup menu.
To open a console window with loading from a text file
Open the connection and select Tools -> Console... from the main menu or just
simply press F6.
Click Load.
Hint: You are allowed to open multiple console windows which represents different
connection.
Save Statements
To save the SQL statements into text file
Open the connection and select Tools -> Console... from the main menu or just
simply press F6.
Edit your SQL statements in the console.
Click Save.
Browse a destination to save the text file.

Data Management Tools 139
Stop Executing
To stop running the SQL statement
Click Stop.
Erase Content
To clear all SQL statements in console window
Click Clear.
Exit Console
To exit a console window
Click the cross button at the main bar.
or
Type quit in the console window and press Enter.
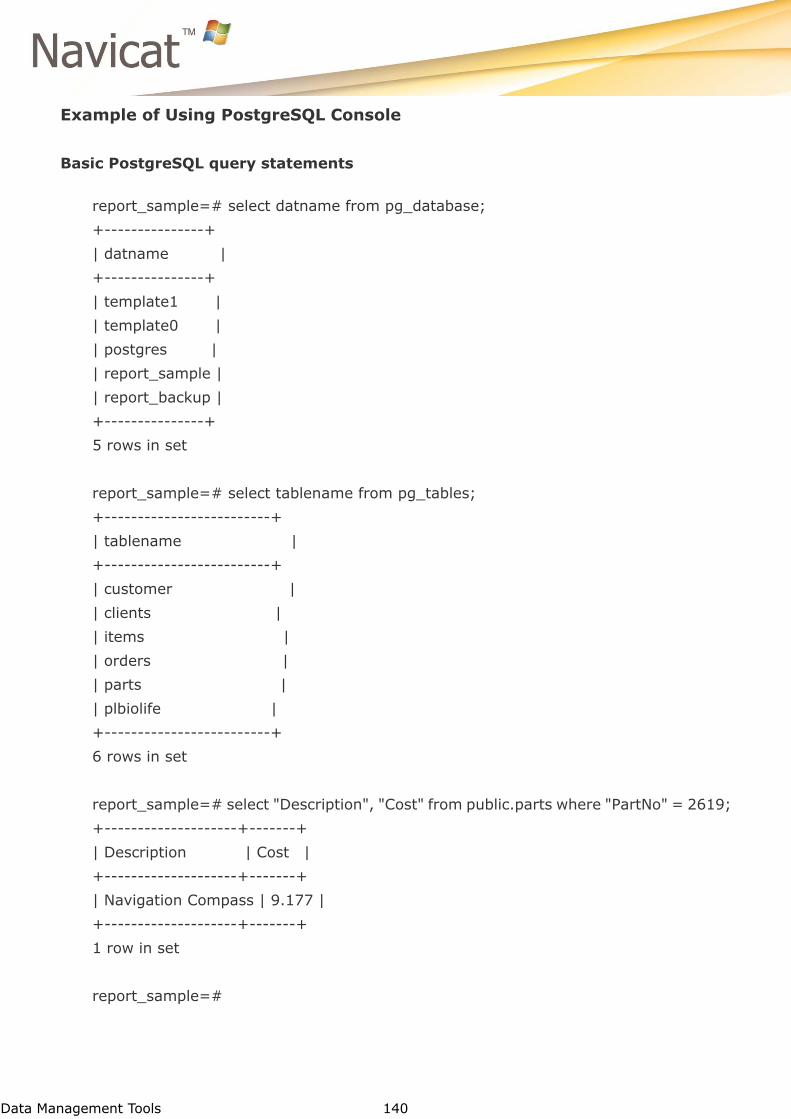
Data Management Tools 140
Example of Using PostgreSQL Console
Basic PostgreSQL query statements
report_sample=# select datname from pg_database;
+---------------+
| datname |
+---------------+
| template1 |
| template0 |
| postgres |
| report_sample |
| report_backup |
+---------------+
5 rows in set
report_sample=# select tablename from pg_tables;
+-------------------------+
| tablename |
+-------------------------+
| customer |
| clients |
| items |
| orders |
| parts |
| plbiolife |
+-------------------------+
6 rows in set
report_sample=# select "Description", "Cost" from public.parts where "PartNo" = 2619;
+--------------------+-------+
| Description | Cost |
+--------------------+-------+
| Navigation Compass | 9.177 |
+--------------------+-------+
1 row in set
report_sample=#
Data Management Tools 141
SQLite Console
SQLite Console allows you to use a command-line interface. In other words, it provides
interactive text-based screen for you to query input and result output from database.
Just simply open the console and use the console toolbar, allowing you to run, save and load
your SQL statements.
Open Console
To open a console window
Open the connection and select Tools -> Console... from the main menu or just
simply press F6.
Edit your SQL statement in the console.
Hint: To create new console you can also right-click the Database node of the navigation
pane and select the Console... from the popup menu.
To open a console window with loading from a text file
Open the connection and select Tools -> Console... from the main menu or just
simply press F6.
Click Load.
Hint: You are allowed to open multiple console windows which each represents different
connection.
Save Statements
To save the SQL statement into text file
Open the connection and select Tools -> Console... from the main menu or just
simply press F6.
Edit your SQL statement in the console.
Click Save.
Data Management Tools 142
Erase Content
To clear all SQL statements in console window
Click Clear.
Exit Console
To exit a console window
Click the cross button at the main bar.
or
Type quit in the console window and press Enter.
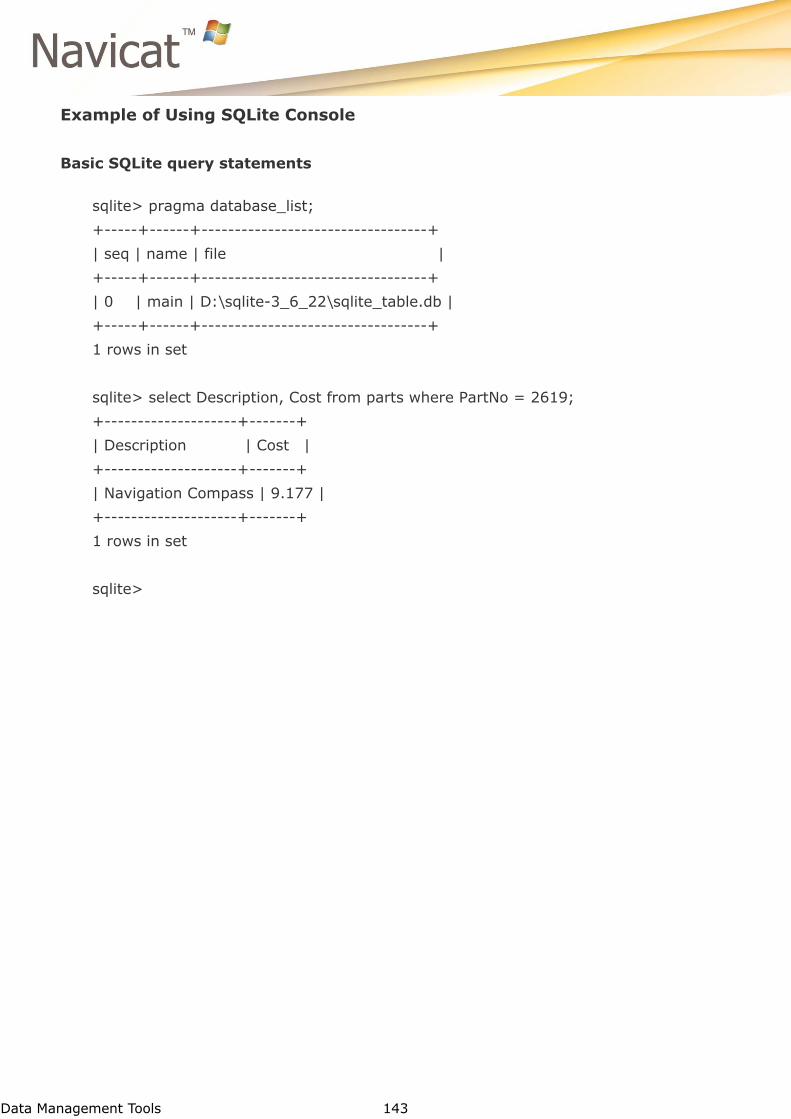
Data Management Tools 143
Example of Using SQLite Console
Basic SQLite query statements
sqlite> pragma database_list;
+-----+------+----------------------------------+
| seq | name | file |
+-----+------+----------------------------------+
| 0 | main | D:\sqlite-3_6_22\sqlite_table.db |
+-----+------+----------------------------------+
1 rows in set
sqlite> select Description, Cost from parts where PartNo = 2619;
+--------------------+-------+
| Description | Cost |
+--------------------+-------+
| Navigation Compass | 9.177 |
+--------------------+-------+
1 rows in set
sqlite>
Data Management Tools 144
SQL Server Console
SQL Server Console allows you to use a command-line interface. In other words, it
provides interactive text-based screen for you to query input and result output from
database.
Just simply open the console and use the console toolbar, allowing you to run, save and load
your SQL statements.
Open Console
To open a console window
Open the connection and select Tools -> Console... from the main menu or just
simply press F6.
Edit your SQL statement in the console.
Hint: To create new console you can also right-click the Database node of the navigation
pane and select the Console... from the popup menu.
To open a console window with loading from a text file
Open the connection and select Tools -> Console... from the main menu or just
simply press F6.
Click Load.
Hint: You are allowed to open multiple console windows which each represents different
connection.
Save Statements
To save the SQL statement into text file
Open the connection and select Tools -> Console... from the main menu or just
simply press F6.
Edit your SQL statement in the console.
Click Save.

Data Management Tools 145
Stop Executing
To stop running the SQL statement
Click Stop.
Erase Content
To clear all SQL statements in console window
Click Clear.
Exit Console
To exit a console window
Click the cross button at the main bar.
or
Type quit in the console window and press Enter.
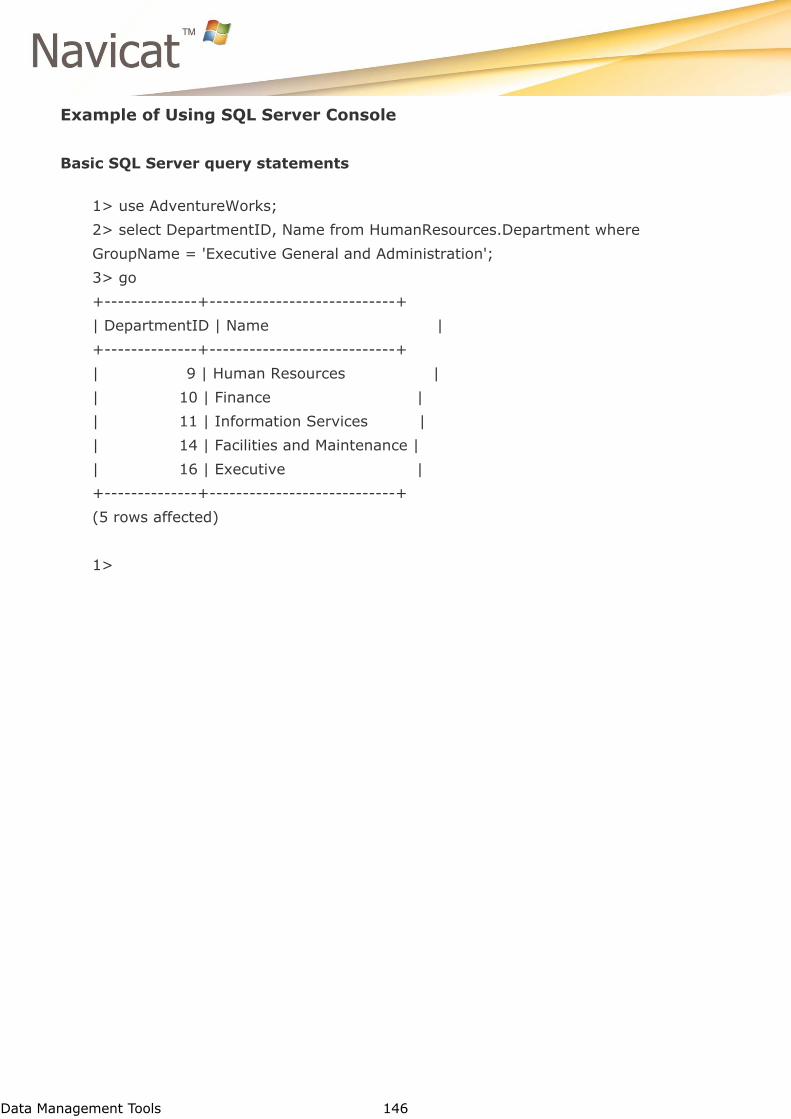
Data Management Tools 146
Example of Using SQL Server Console
Basic SQL Server query statements
1> use AdventureWorks;
2> select DepartmentID, Name from HumanResources.Department where
GroupName = 'Executive General and Administration';
3> go
+--------------+----------------------------+
| DepartmentID | Name |
+--------------+----------------------------+
| 9 | Human Resources |
| 10 | Finance |
| 11 | Information Services |
| 14 | Facilities and Maintenance |
| 16 | Executive |
+--------------+----------------------------+
(5 rows affected)
1>
Data Management Tools 147
Dump SQL File
Navicat allows you to backup your database/schema/table(s) using the Dump SQL File
feature.
Select the database/schema/table(s).
Right-click and select Dump SQL File... from the popup menu.
Save the sql file to your destination.
Data Management Tools 148
Execute SQL File
Navicat allows you to restore your database/execute SQL file using the Execute SQL File
feature.
Select the database/schema.
Right-click and select Execute SQL File... from the popup menu.
Note: You can drag a .sql file to the table pane or a database/schema in the connection tree.
Navicat will popup the Execute SQL File.
Example:
[Msg] Finished - 35 queries executed successfully
Data Management Tools 149
Print Database/Schema/Table Structure (Available only in Full Version)
Navicat allows you to view and print database, schema and table structure. Just simply
right-click the database/schema/table(s) and select Print Database or Print
Schema or Print Tables.

Data Management Tools 150
Log Files
Navicat provides number of log files to keep track on the actions have been performed in
Navicat. Most of the log files are represented as text format, and they are located in the
sub-directory called logs, e.g. C:\Users\Guest\Documents\Navicat\Premium\logs\. You are
allowed to change the log files location under Options.
HttpDump.log
Stores information which response from your HTTP Server.
LogHistory.txt
Stores all SQL statements of all the operations executed over databases and database
objects in Navicat.
Note: This log will be overwritten while Navicat being restarted.
Hint: Simply press Ctrl+H or click Tools > History Log... to open the LogHistory.txt
file in the History Log Viewer.
LogImport.txt
Records detailed information on every error (indicating success or failure) that
occurred during the import process.
LogExport.txt
Records detailed information on every error (indicating success or failure) that
occurred during the export process.
LogSynchronize.txt
Records detailed information on every error (indicating success or failure) that
occurred during the data synchronization process.
Note: This log will be overwritten on each synchronization.
LogCmd.txt
Stores all operations while running schedule.