Embed Size (px)
Citation preview

Database Applications –
Microsoft Access
Lesson 9Designing Special Queries

Queries
You have already learned some of the basics of using queries in previous lessons. You have created simple select queries, select queries with criteria, and used queries to generate data.
In this lesson you will learn about some additional tasks you can accomplish with queries.

More Queries
This lesson will introduceUsing Wildcards in QueriesParameter QueriesTop Values QueriesCrosstab Queries

Queries
Before continuing this lesson, download and open the file called Products 9*.This file can be downloaded from Lesson 9 in
NS Online.Print the Instructions for this tutorial which are
also found in Lesson 9.
*This file is based on a file provided by Cengage with the New Perspectives text but has been modified for use with this lesson.
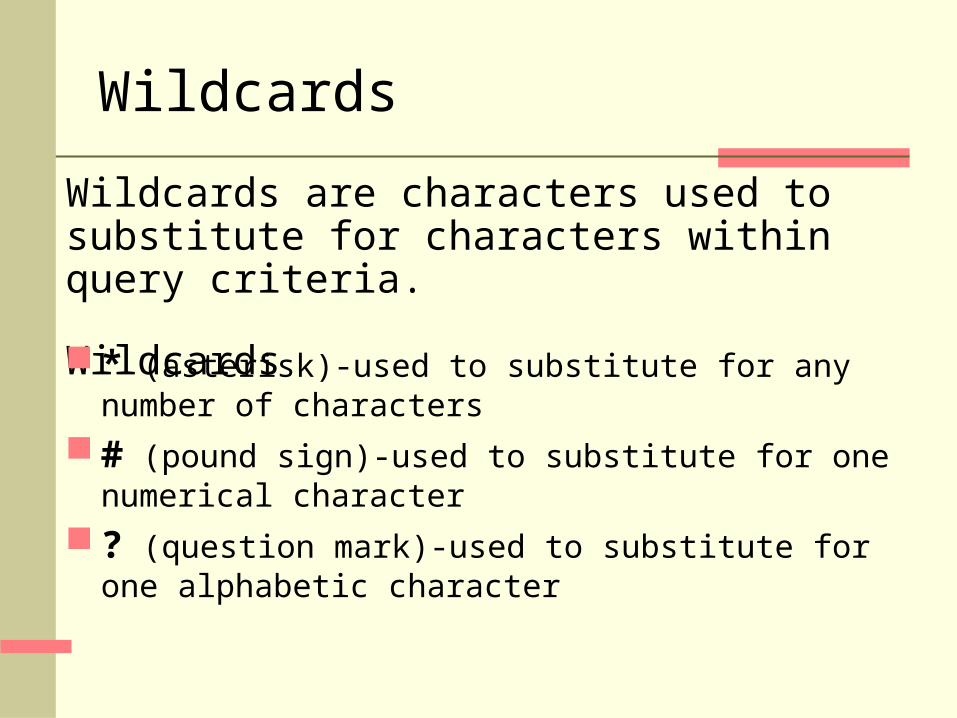
Wildcards
Wildcards are characters used to substitute for characters within query criteria.
Wildcards * (asterisk)-used to substitute for any number of
characters
# (pound sign)-used to substitute for one numerical character
? (question mark)-used to substitute for one alphabetic character
How to Use a Wildcard
Use a wildcard to substitute for miscellaneous or unknown characters in query criteria.Example:Assume that you are a restaurant supply company. You have a database table that contains a list of all restaurants you supply. You would like to isolate all your customers who operate coffee shops so that you can send out a special mailing on a new line of gourmet coffees you are carrying.
How to Use a Wildcard
To do this, you can design a query to retrieve all restaurants with the word “coffee” in the business name. Some of your customers include Coffee International and Naomi’s Coffee House.To find any business with “coffee” as any part of its name, use the * wildcard character and define the Customer Name criteria as follows:
*coffee*Placing the asterisk both before and after the desired results will ensure that both Naomi’s Coffee House (with characters before and after “coffee”) will be selected. Using only an asterisk after “coffee” would pick up only customers such as Coffee International.

* Wildcard – You Try It #1
Switch to the Products 9 file and complete Instruction #1 on the Lesson 9 Tutorial Instruction Sheet.

Results for #1:GardenProducts Query
Notice the different locations of the word “garden” in each company name.
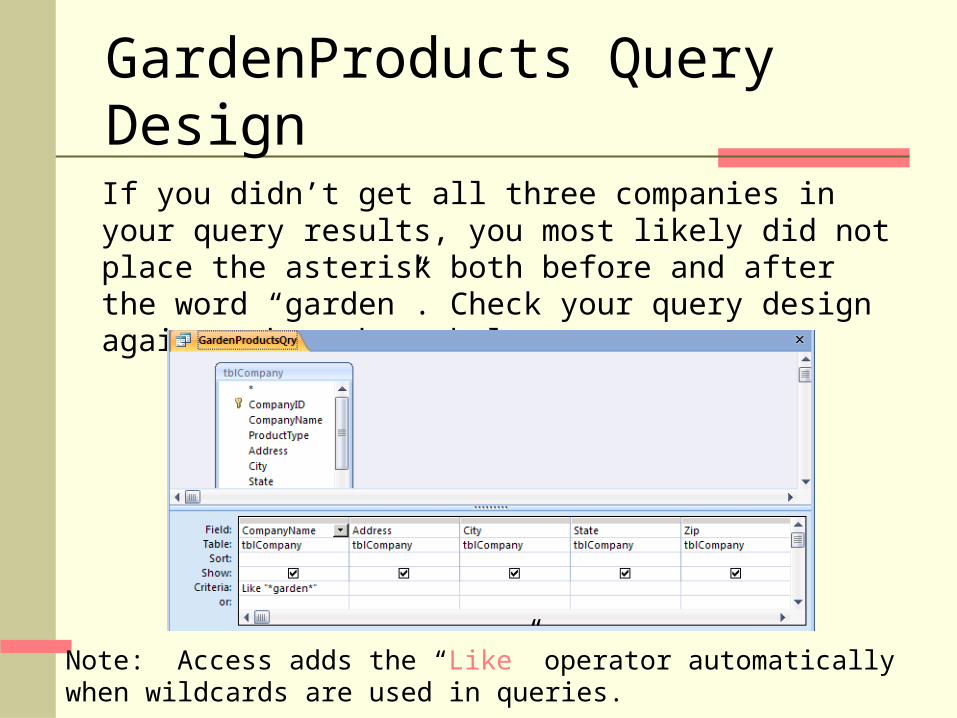
GardenProducts Query DesignIf you didn’t get all three companies in your query results, you most likely did not place the asterisk both before and after the word “garden”. Check your query design against that shown below.
Note: Access adds the “Like” operator automatically when wildcards are used in queries.
Other Wildcards
While the asterisk (*) is the most popular wildcard, remember that you can use the question mark and pound sign for more specific uses.
For example, assume customer numbers are made up of the customer’s first and last initials plus the customer’s five digit zip code. (Under this scheme, my customer number would be LS37209.)

Other Wildcards
If you are looking for all customers in the 37209 zip code area, you could define Customer Number criteria as follows:
??37209
Note that a single question mark is needed for each character you wish to fill in.
The pound sign (#) wild card is used in a similar way to set criteria for numerical fields.

Parameter Queries
A parameter query is a very powerful tool. This type of query allows the user to specify the criteria when the query is run rather than having the criteria built into the query design.
Parameter Queries – An Example
For example, your boss is constantly requesting sales data for different sales regions. You could design and save a query with a specific region entered in the criteria field. However, when your boss requests data from another sales region, you would have to pull up the old query in design view, modify the criteria and run the results.
Another option would be to design and save a query with each sales region in the criteria field. But for a company with many sales regions this could be very cumbersome and potentially confusing.

Parameter Queries – An Example
This is a perfect use for a parameter query. By designing a parameter query, you can let your boss specify the sales region he wants to see when he runs the query.
Creating a Parameter Query
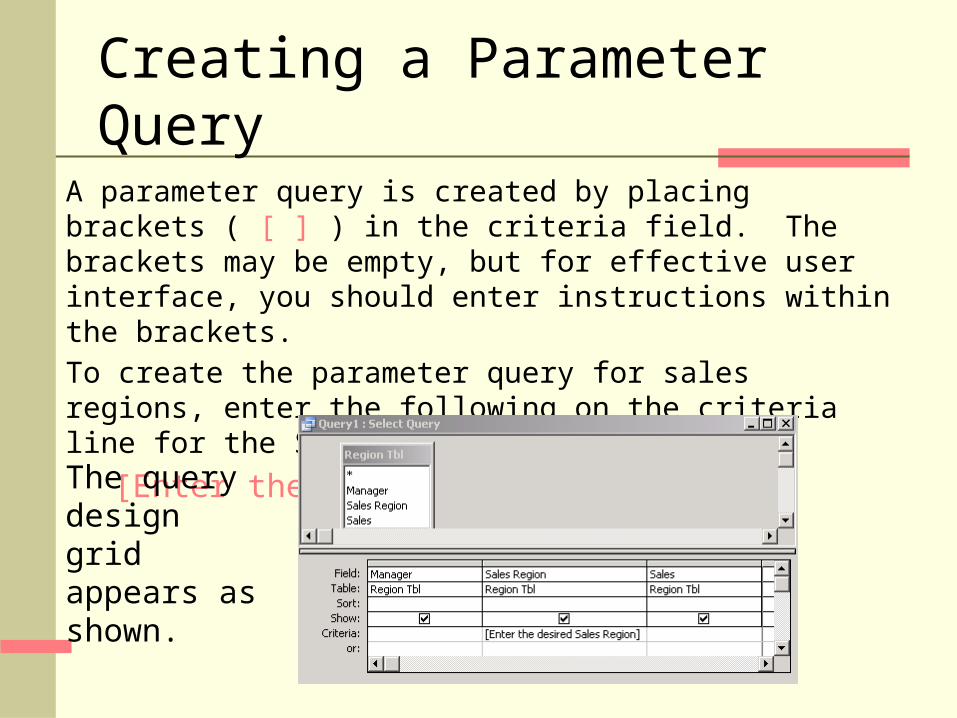
A parameter query is created by placing brackets ( [ ] ) in the criteria field. The brackets may be empty, but for effective user interface, you should enter instructions within the brackets.
To create the parameter query for sales regions, enter the following on the criteria line for the Sales Region
[Enter the desired Sales Region]
The query design grid appears as shown.
Creating a Parameter Query
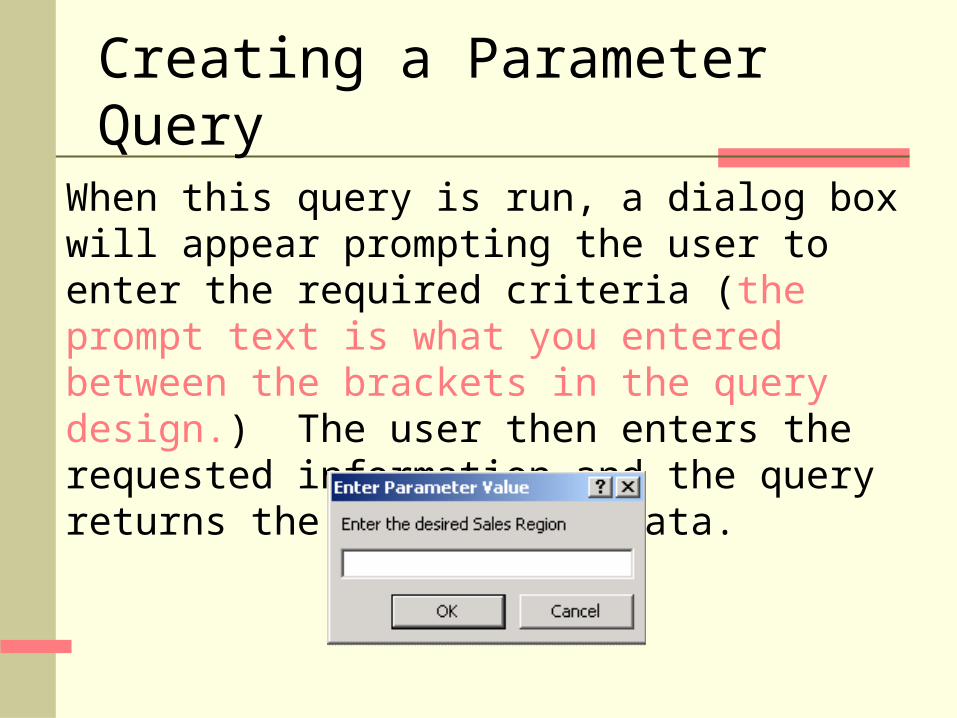
When this query is run, a dialog box will appear prompting the user to enter the required criteria (the prompt text is what you entered between the brackets in the query design.) The user then enters the requested information and the query returns the appropriate data.

Creating a Parameter Query
Note: When creating a parameter query, you must always include the field that the user is to specify in your query design.

Parameter Query – You Try It #2
Switch to the Products 9 file and complete Instruction #2.
Results for #2:Color Parameter Query
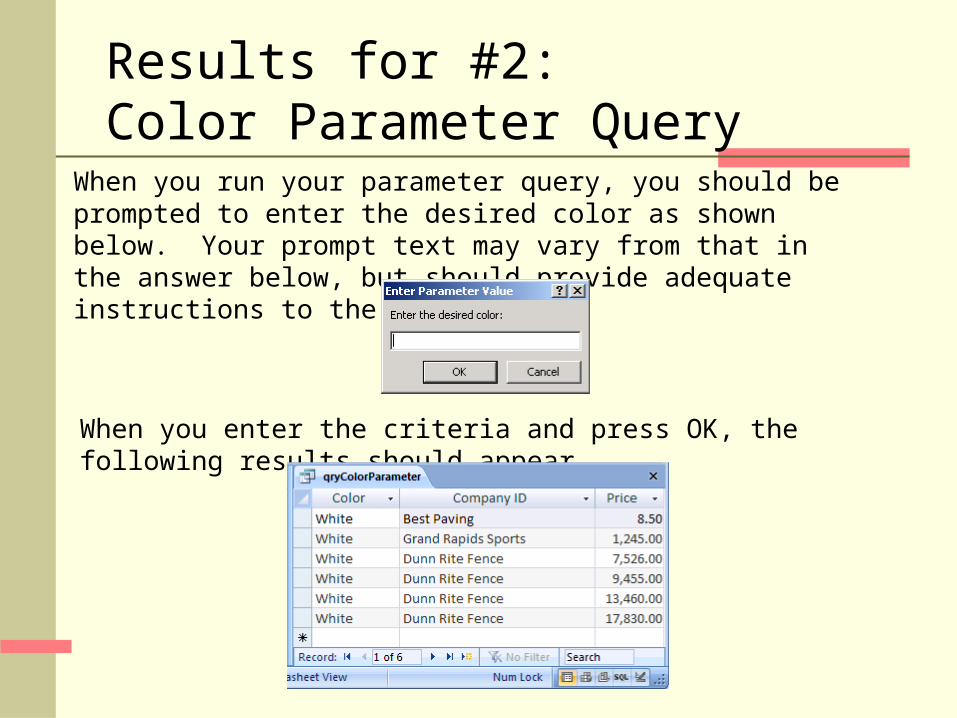
When you run your parameter query, you should be prompted to enter the desired color as shown below. Your prompt text may vary from that in the answer below, but should provide adequate instructions to the user.
When you enter the criteria and press OK, the following results should appear.

Color Parameter Query Design
If you didn’t get the results shown in the previous slide for the Color Parameter Query, check your query design against that below.

Parameter Query – Two or More User ChoicesIn the previous example, the user was able to enter one choice for color. If you want to allow more choices, you add additional parameter prompts in the OR rows.
You may allow as many choices as you like by placing additional prompts in the OR rows. In order for this option to work correctly, you must use slightly different prompt text for each choice as shown below.

Parameter Query – You Try It #3
Switch to the Products 9 file and complete Instruction #3.

Results for #3:Color Parameter Query with Two Prompts
When you run the modified parameter query, you should be prompted twice to enter the desired color choices as shown below. Your prompt text may vary from that in the answer below, but should provide adequate instructions to the user.
After entering the specified criteria for each of the parameter prompts, the following results should appear.
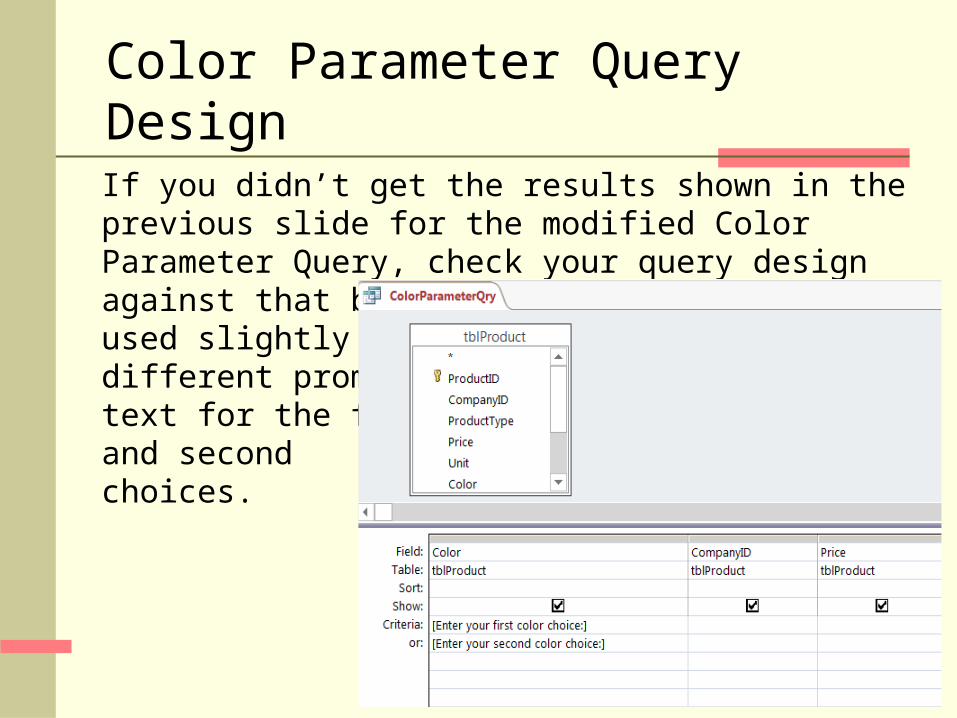
Color Parameter Query Design
If you didn’t get the results shown in the previous slide for the modified Color Parameter Query, check your query design against that below. Make sure that youused slightlydifferent prompttext for the first and second choices.
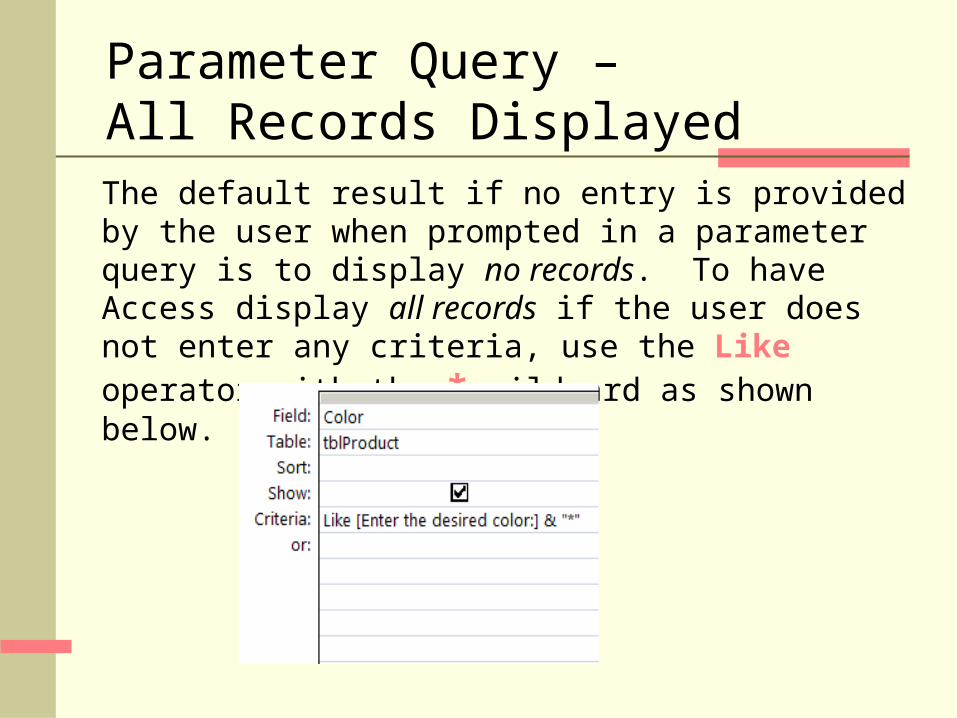
Parameter Query – All Records DisplayedThe default result if no entry is provided by the user when prompted in a parameter query is to display no records. To have Access display all records if the user does not enter any criteria, use the Like operator with the * wildcard as shown below.

Parameter Query – You Try It #4
Switch to the Products 9 file and complete Instruction #4.
Results for #4:Color Parameter Query with No User Input
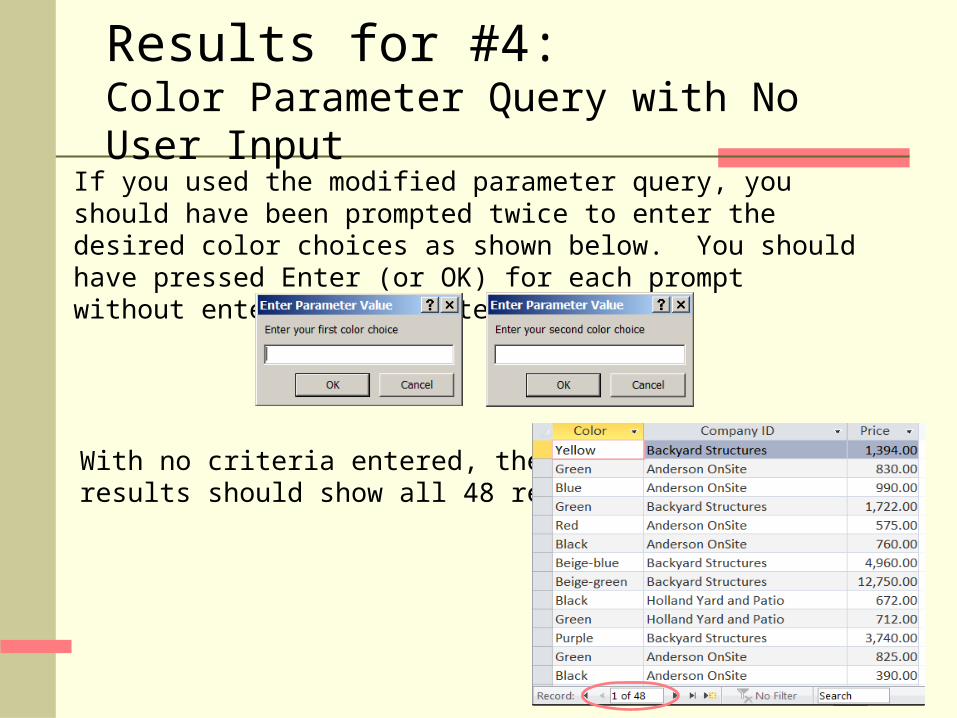
If you used the modified parameter query, you should have been prompted twice to enter the desired color choices as shown below. You should have pressed Enter (or OK) for each prompt without entering any criteria.
With no criteria entered, the query results should show all 48 records.
Color Parameter Query Design
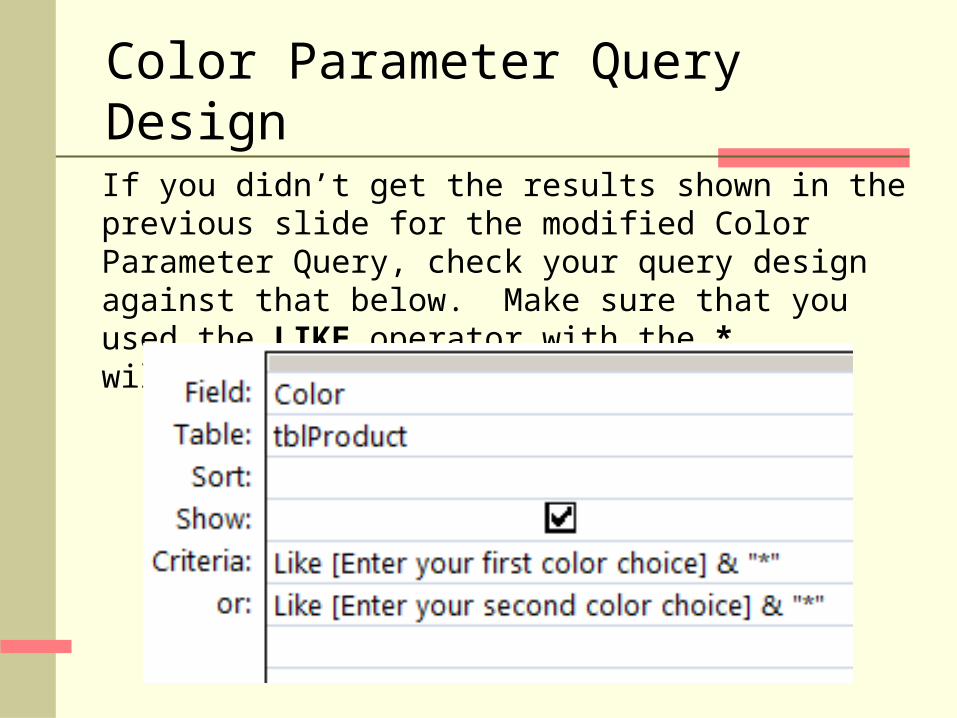
If you didn’t get the results shown in the previous slide for the modified Color Parameter Query, check your query design against that below. Make sure that youused the LIKE operator with the * wildcard.
Top Values Queries
A Top Values query limits the number of records displayed in the query results. The results may be a specific number of records or a percentage.
You might design a top values query toRetrieve the top 10 sales valuesRetrieve the top 10% of salariesRetrieve the bottom 5 salespersons in
productionRetrieve the bottom 5% of salaries

Top Values Query Tool
Find the Top Values property in the Query Setup group on the Design tab.
Top Values Property

Creating a Top Values Query
Follow these steps to create a Top Values query:Add the desired fields to the query design gridWith your cursor in the field for which the top
value is to be set, set the Top Values property to the desired result (for example, if you want the top 5 results, set the Top Values property to 5)
For numerical results, set the Sort criteria to descending if you want the TOP 5 results; set the Sort criteria to ascending if you want the BOTTOM 5 results.
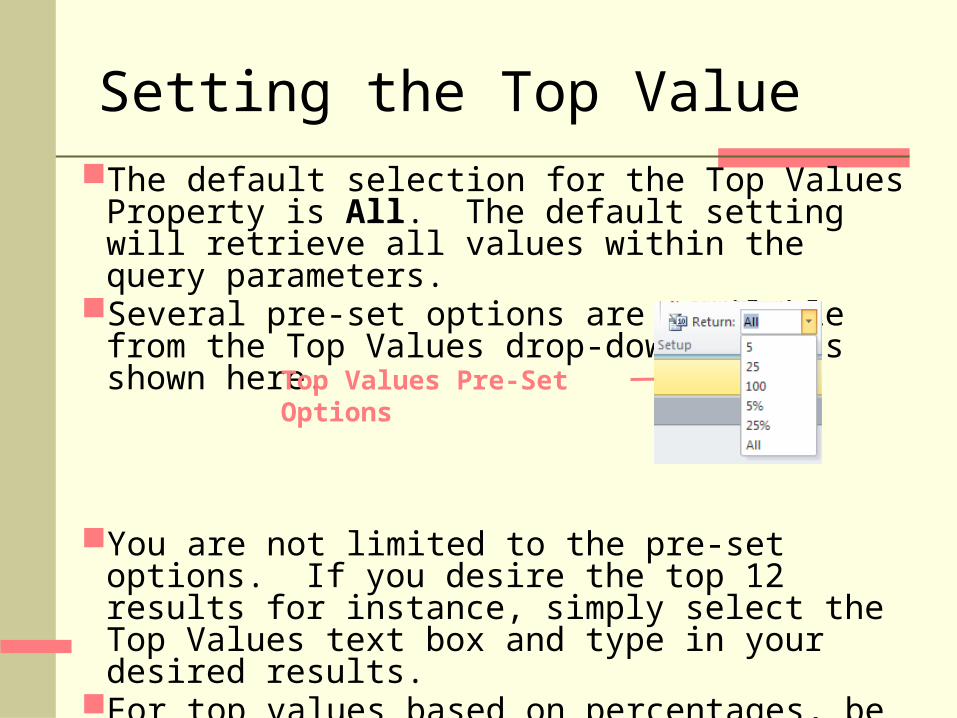
Setting the Top ValueThe default selection for the Top Values Property is
All. The default setting will retrieve all values within the query parameters.
Several pre-set options are available from the Top Values drop-down list as shown here.
You are not limited to the pre-set options. If you desire the top 12 results for instance, simply select the Top Values text box and type in your desired results.
For top values based on percentages, be sure to enter the percent sign with the value. (For example if you want the top 12%, select All in the Top Values text box and type 12%).
Top Values Pre-Set Options

Top Values Query – You Try It #5
Switch to the Products 9 file and complete Instruction #5.
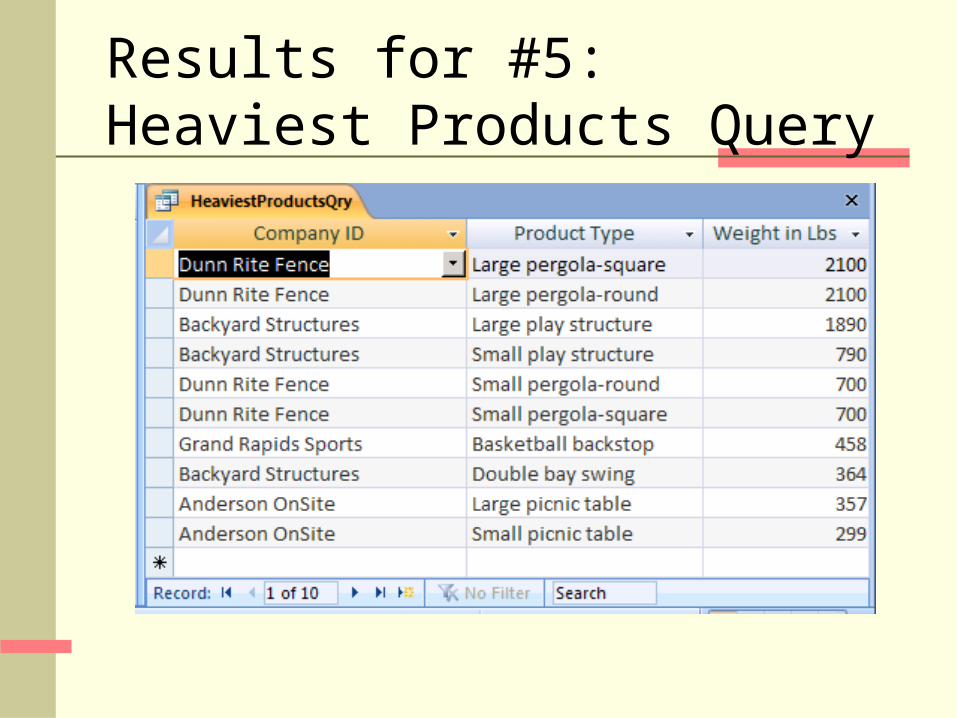
Results for #5:Heaviest Products Query
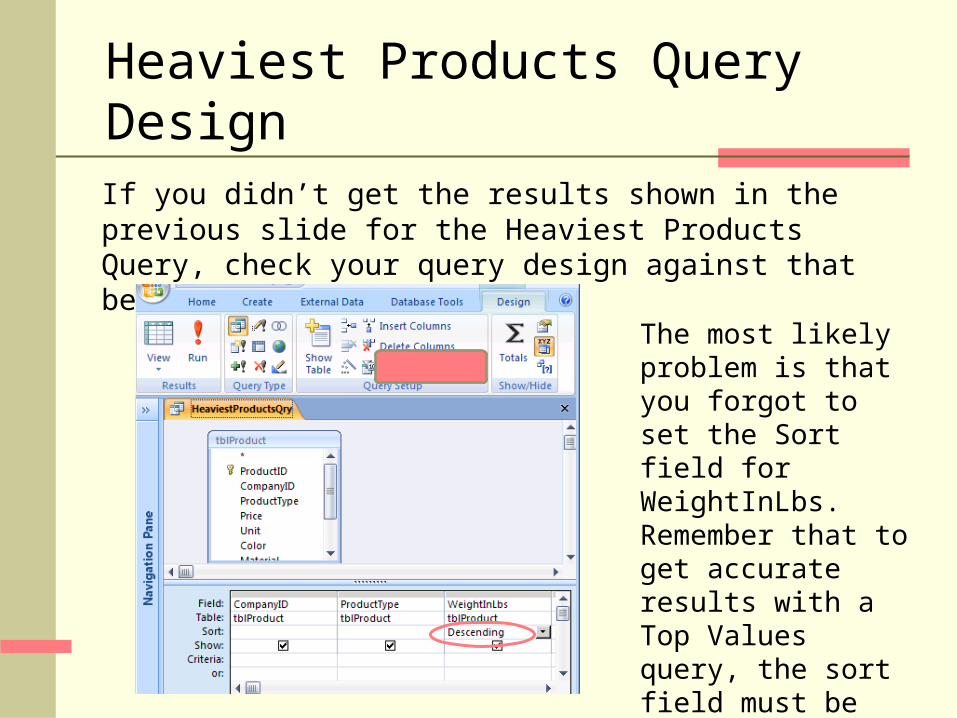
Heaviest Products Query DesignIf you didn’t get the results shown in the previous slide for the Heaviest Products Query, check your query design against that below.
The most likely problem is that you forgot to set the Sort field for WeightInLbs. Remember that to get accurate results with a Top Values query, the sort field must be set for the field on which the top values are based.

Crosstab Query
A crosstab query summarizes data by two data points and presents the data in a spreadsheet format.
You might use a crosstab query to Summarize the total sales by region Find the average salary by department Count the number of products sold by sales
representative

Creating a Crosstab Query
The easiest way to create a crosstab query is with the Crosstab Query Wizard. Click the Query
Wizard button in the Queries group of the Create tab.
In the Query Wizard dialog box, choose Crosstab Query Wizard, then click OK.

Creating a Crosstab Query In the next window, choose the table or query on which to
base the new crosstab query and click Next. In the next window, select the field you want to appear as
the row heading, then click Next. In the next window, select the field you want to appear as
the column heading, then click Next. You will next choose a field to summarize. This will often
be a field that contains numerical data. Add the field to summarize and then choose the function to apply Total = Sum Average = Avg How Many = Count
Click the Next button and save the query.

Crosstab Query – You Try It #6
Switch to the Products 9 file and complete Instruction #6.

Partial Results for #6:Materials Crosstab Query
This screenshot shows only part of the crosstab query results. There are a total of 23 colors.

Renaming Query Fields
Look at the second column of the query datasheet. Access has namedthis column Total Of Price even though you selected the Max function to retrieve the highest priced product in each material category. You cansee in the Powder-coated steel record that your query is working correctlyto return the highest price for this material.
To provide more effective user interface, you need to rename the Total Of Price field.
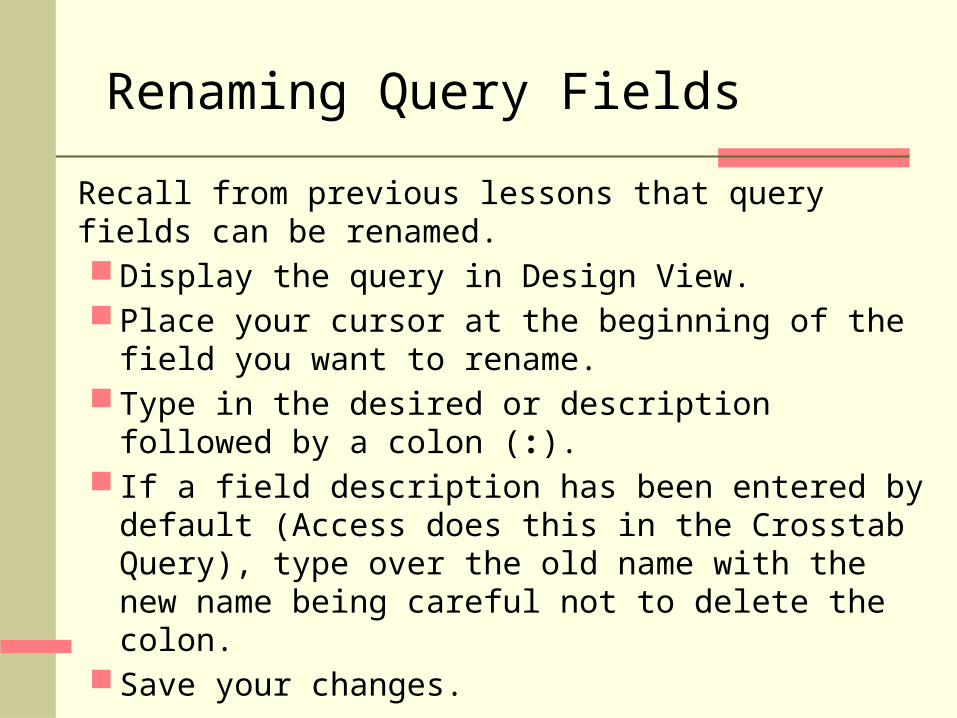
Renaming Query Fields
Recall from previous lessons that query fields can be renamed. Display the query in Design View. Place your cursor at the beginning of the field you want to
rename. Type in the desired or description followed by a colon (:). If a field description has been entered by default (Access
does this in the Crosstab Query), type over the old name with the new name being careful not to delete the colon.
Save your changes.

Renaming a Query Field – You Try It #7
Switch to the Products 9 file and complete Instruction #7.

Results for #7:Renaming a Query FieldThe Materials Crosstab query looked as follows in Design View priorto your change.
The following design change should have been made.
When the query is run, the results look as follows.

End of Lesson
Submit the Products 9 file with the exercises for this lesson.
Complete and submit the assigned exercises.