Embed Size (px)
Citation preview
Suggested for Beginning of Year Review
Teacher’s Toolbox
DAY-BY-DAY INSTRUCTIONAL PLANS
ScienceGrade 8 Toolbox
Created by Michigan Teachers for Michigan Students
St. Clair County Regional Educational Service Agency
499 Range Road PO Box 1500Marysville, Michigan 48040Phone: 810/364-8990 Fax: 810/364-7474www.sccresa.org

Eighth Grade Science Toolbox
Table of Contents
Letter of Introduction...........................................................................................................2
Important Notices................................................................................................................3
How to Read a Lesson Plan Page......................................................................................5
Materials Needed for Lesson Activities...............................................................................6
Fifteen Day Overview..........................................................................................................7
Day 1: A Car in the Sun......................................................................................................8
Day 2: Arrangement and Motion of Molecules..................................................................15
Day 3: Elements, Compounds, and Mixtures...................................................................24
Day 4: Heat Energy..........................................................................................................32
Day 5: Balanced and Unbalanced Forces........................................................................39
Day 6: The Roller Coaster................................................................................................44
Days 7-8: Simple Machines..............................................................................................50
Day 9: Light.......................................................................................................................58
Day 10: Sound..................................................................................................................64
Day 11: Weather and Water............................................................................................69
Day 12: Phases of the Moon and Eclipses......................................................................79
Day 13: Seasons and Other Planets.................................................................................84
Days 14 and 15: Forest Management...............................................................................88
MEAP Practice..................................................................................................................93
18th Grade Science Toolbox St. Clair County RESA 2005

Letter of Introduction
Dear Educators,
While creating this toolbox, we spent a great deal of time worrying. We worried about:
devoting enough time to reviewing the Benchmarks taught in previous grades; being developmentally appropriate; including just the right amount of best practice instructional activities; incorporating to, with, and by into the Day-by-Day lesson plans; interpreting and aligning the Benchmarks accurately; making the lessons interesting and motivating; and addressing the teaching and learning standards within the lessons.
We worried about everything, so you wouldn’t have to worry. We know teaching is a difficult profession at best and even more difficult when faced with increased academic standards and content expectations. We wanted to help you through this transition period by providing this easy to use model designed to prepare Michigan’s students for future statewide assessments.
We realize we are providing a way for you to prepare your students for the MEAP. We also understand the best way for students to prepare for the MEAP is through excellent instruction aligned to a carefully designed curriculum. With changing content expectations and statewide assessments, it has been challenging for schools and districts to keep pace. We offer this toolbox in light of the previous statements. We hope you will find, within these day-by-day lesson plans, instructional strategies, and pedagogical ideas you can use everyday of the school year. If you do, we have done our job. It means we have created more than MEAP preparation materials. It means we have influenced your instruction and possibly your curriculum.
St. Clair County teachers created this toolbox for use by Michigan teachers with Michigan students. It was a time consuming effort we hope other teachers find useful and will appreciate. Sincerely,
Eighth Grade Toolbox Team
Michael Larzelere – Port Huron Area School DistrictSteven Hunt – Yale Public SchoolsCrystal Harris _ St. Clair RESAMonica Hartman – St. Clair County RESAKathy Lentz –Capac Community SchoolsJason Letkiewicz – St. Clair RESAMike Maison – St. Clair RESATracie Stubbs – Algonac Community Schools
28th Grade Science Toolbox St. Clair County RESA 2005
Important Notices
Michigan Curriculum Framework, Science Benchmarks
The science toolboxes are a suggested review at the beginning of the year for Michigan’s fifth grade students. Our emphasis is placed on the constructing and reflecting benchmarks. We embed them in the Physical, Earth and Life Science content standards of the Michigan Curriculum Framework. Use of these toolboxes does not guarantee all benchmarks have been addressed. The benchmarks chosen are the ones that seem to be more difficult for many students.
The lessons are designed to make use of the “to”, “with”, and “by” format. First, you model the skills and strategies for your students. Modeling means explicitly showing how the skill or strategy is completed and all the thinking that goes on during its completion. Second, you help your students practice the skills and strategies. This help can be whole class, small group, or individual guidance. Third, you let your students complete the skills and strategies on their own. This format starts with the activity on Day 2. During this activity, you will model the inquiry process. You will think aloud as you ask the investigation question, make a prediction, graph data, interpret results and draw a conclusion. In the lessons that follow, students will be given opportunities to practice these skills with less and less intervention until they can do them on their own.
Each daily lesson is designed to engage the students for the full science period of 50-60 minutes. Because the toolbox is a review of content taught in fifth through seventh grade, for most of the activity days, the students are not doing the investigations themselves. Rather they are graphing, analyzing, and interpreting data collected by the project teachers or their students. This is not the best way to teach science, but given the time constraints of fifteen days, this is the format we chose. In a few cases, pictures and videos were made of the data collection. The video clips are provided on a separate CD. We invite teachers to extend the full investigation to their students, when time permits.
We hope that some of the ideas presented will be springboards to further inquiry projects after the review period. We look forward to your suggestions and feedback.
38th Grade Science Toolbox St. Clair County RESA 2005
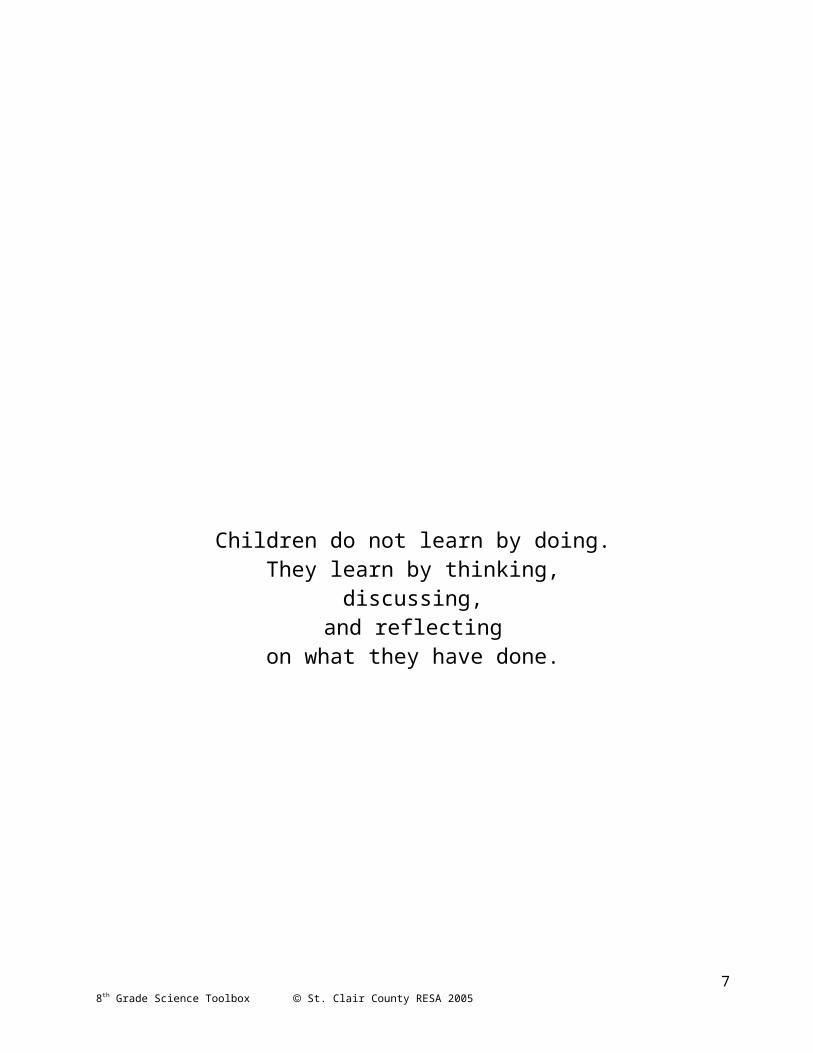
Children do not learn by doing.They learn by thinking,
discussing,and reflecting
on what they have done.
"These materials are produced by St. Clair County Regional Educational Service Agency and are not authorized by the Michigan Department of Education. Please use these materials within the guidelines of the Office of Educational Assessment and Accountability (OEAA) of the Michigan Department Education. These guidelines can be found at: http://www.michigan.gov/documents/Prof_Assessmt_Practices_108570_7.pdf "
48th Grade Science Toolbox St. Clair County RESA 2005
How to Read a Lesson Plan Page
58th Grade Science Toolbox St. Clair County RESA 2005
Materials Needed for Lesson Activities
68th Grade Science Toolbox St. Clair County RESA 2005
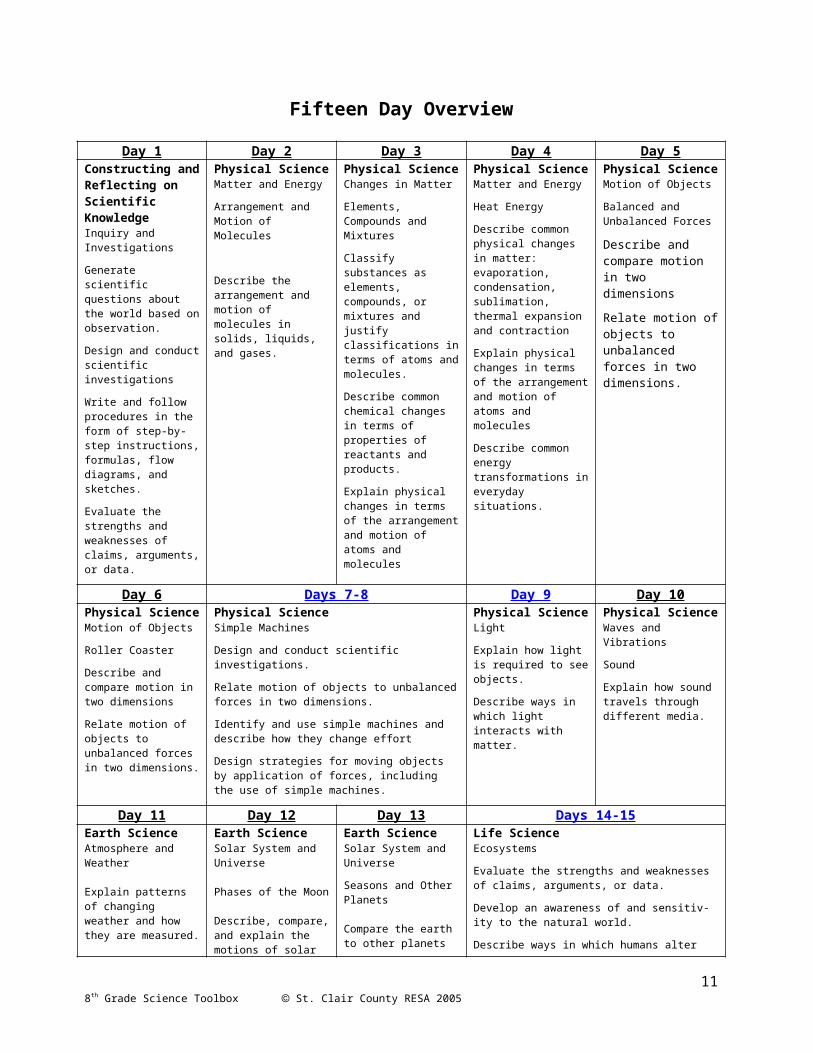
Fifteen Day Overview
Day 1 Day 2 Day 3 Day 4 Day 5Constructing and Reflecting on Scientific KnowledgeInquiry and Investigations
Generate scientific questions about the world based on observation.
Design and conduct scientific investigations
Write and follow procedures in the form of step-by-step instructions, formulas, flow diagrams, and sketches.
Evaluate the strengths and weaknesses of claims, arguments, or data.
Physical ScienceMatter and Energy
Arrangement and Motion of Molecules
Describe the arrangement and motion of molecules in solids, liquids, and gases.
Physical ScienceChanges in Matter
Elements, Compounds and Mixtures
Classify substances as elements, compounds, or mixtures and justify classifications in terms of atoms and molecules.
Describe common chemical changes in terms of properties of reactants and products.
Explain physical changes in terms of the arrangement and motion of atoms and molecules
Physical ScienceMatter and Energy
Heat Energy
Describe common physical changes in matter: evaporation, condensation, sublimation, thermal expansion and contraction
Explain physical changes in terms of the arrangement and motion of atoms and molecules
Describe common energy transformations in everyday situations.
Physical ScienceMotion of Objects
Balanced and Unbalanced Forces
Describe and compare motion in two dimensions
Relate motion of objects to unbalanced forces in two dimensions.
Day 6 Days 7-8 Day 9 Day 10Physical ScienceMotion of Objects
Roller Coaster
Describe and compare motion in two dimensions
Relate motion of objects to unbalanced forces in two dimensions.
Physical ScienceSimple Machines
Design and conduct scientific investigations.
Relate motion of objects to unbalanced forces in two dimensions.
Identify and use simple machines and describe how they change effort
Design strategies for moving objects by application of forces, including the use of simple machines.
Physical Science Light
Explain how light is required to see objects.
Describe ways in which light interacts with matter.
Physical Science Waves and Vibrations
Sound
Explain how sound travels through different media.
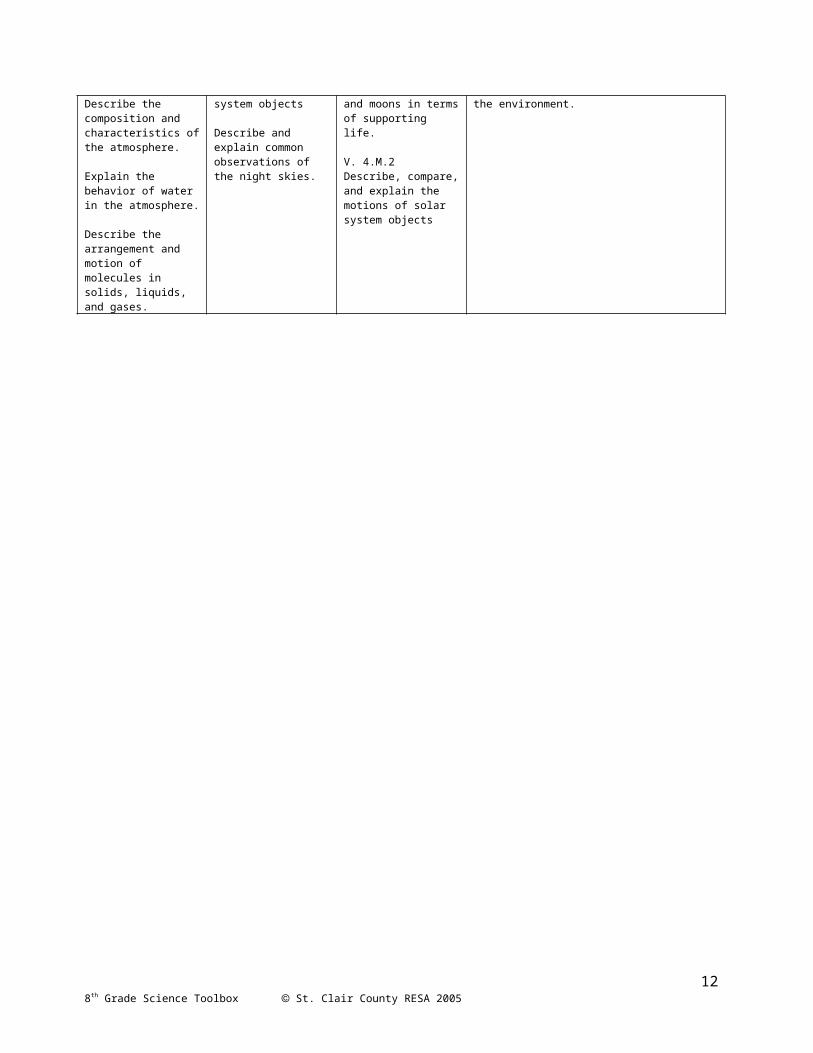
Day 11 Day 12 Day 13 Days 14-15Earth Science Atmosphere and Weather
Explain patterns of changing weather and how they are measured.
Describe the composition and characteristics of the atmosphere.
Explain the behavior of water in the atmosphere.
Describe the arrangement and motion of molecules in solids, liquids, and gases.
Earth Science Solar System and Universe
Phases of the Moon
Describe, compare, and explain the motions of solar system objects
Describe and explain common observations of the night skies.
Earth Science Solar System and Universe
Seasons and Other Planets
Compare the earth to other planets and moons in terms of supporting life.
V. 4.M.2 Describe, compare, and explain the motions of solar system objects
Life ScienceEcosystems
Evaluate the strengths and weaknesses of claims, arguments, or data.
Develop an awareness of and sensitivity to the natural world.
Describe ways in which humans alter the environment.
78th Grade Science Toolbox St. Clair County RESA 2005
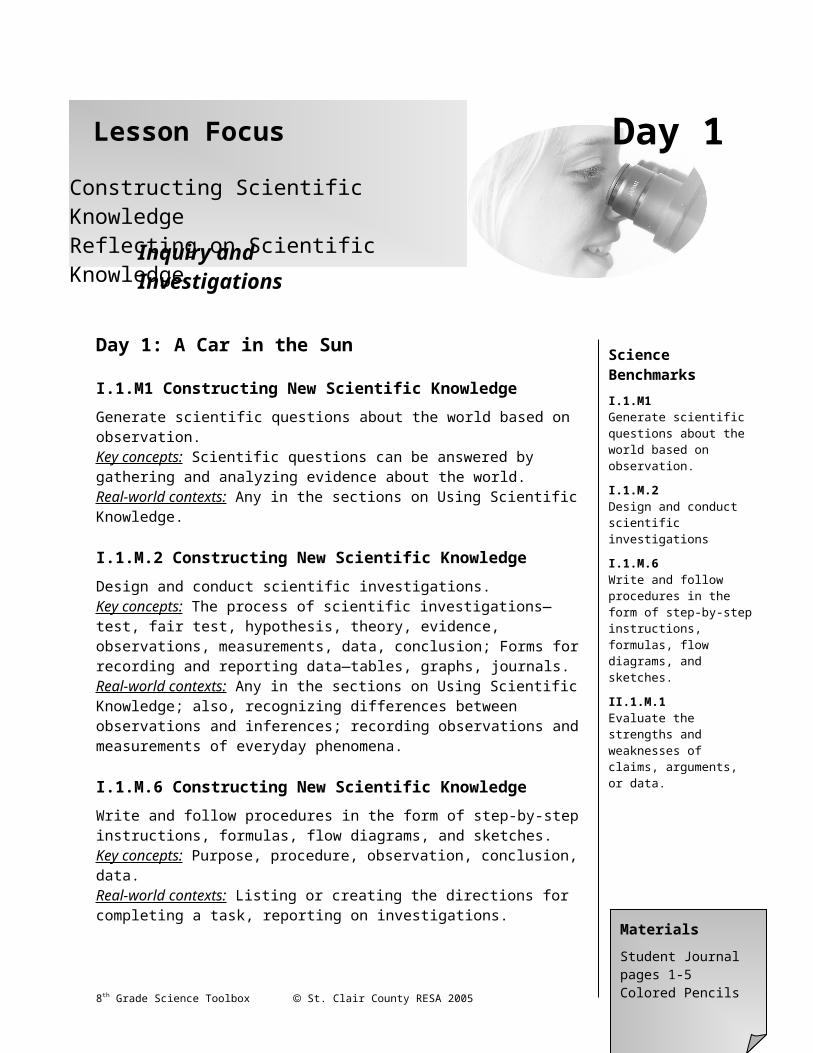
Day 1: A Car in the Sun
I.1.M1 Constructing New Scientific KnowledgeGenerate scientific questions about the world based on observation. Key concepts: Scientific questions can be answered by gathering and analyzing evidence about the world. Real-world contexts: Any in the sections on Using Scientific Knowledge.
I.1.M.2 Constructing New Scientific KnowledgeDesign and conduct scientific investigations. Key concepts: The process of scientific investigations—test, fair test, hypothesis, theory, evidence, observations, measurements, data, conclusion; Forms for recording and reporting data—tables, graphs, journals. Real-world contexts: Any in the sections on Using Scientific Knowledge; also, recognizing differences between observations and inferences; recording observations and measurements of everyday phenomena.
I.1.M.6 Constructing New Scientific KnowledgeWrite and follow procedures in the form of step-by-step instructions, formulas, flow diagrams, and sketches. Key concepts: Purpose, procedure, observation, conclusion, data. Real-world contexts: Listing or creating the directions for completing a task, reporting on investigations.
II.1.M.1 Reflecting on Scientific KnowledgeEvaluate the strengths and weaknesses of claims, arguments, or data. Key concepts: Aspects of arguments such as data, evidence, sampling, alternate explanation, conclusion; inference, observation. Real-world contexts: Deciding between alternate explanations or plans for solving problems; evaluating advertising claims or cases made by interest groups; evaluating sources of references.
88th Grade Science Toolbox St. Clair County RESA 2005
Science BenchmarksI.1.M1 Generate scientific questions about the world based on observation.
I.1.M.2 Design and conduct scientific investigations
I.1.M.6 Write and follow procedures in the form of step-by-step instructions, formulas, flow diagrams, and sketches.
II.1.M.1 Evaluate the strengths and weaknesses of claims, arguments, or data.
Lesson Focus
Inquiry and Investigations
Constructing Scientific KnowledgeReflecting on Scientific Knowledge
Day 1
MaterialsStudent Journal pages 1-5Colored Pencils

LESSONWe start the toolbox with a review of the first two strands of the Michigan Curriculum Framework - Construct New Scientific Knowledge and Reflecting on Scientific Knowledge. These two strands are the foundation of the inquiry process and should be a part of any Life, Earth and Physical Science Lessons. The context of this investigation is a real-world problem involving the greenhouse effect in cars. Students will have an opportunity to ask a question related to the scenario, make a prediction, identify variables that make the investigation a fair test, graph results, analyze data and draw a conclusion. An optional activity to extend the learning is included.
To, With and ByUsing the “to, with and by” format, first model the strategy for the students. Modeling means explicitly showing how the skill or strategy is completed, including the thinking processes that goes on during its completion. Second, help the students practice the skills and strategies. This help can be the whole class, small group, or individual guidance. Third, let students complete the skills and strategies on their own. As you go through the steps of the inquiry in this activity, model the skills and strategies. Make your thinking explicit. In later activities, you will give the students the opportunity to practice the skills with help.
KEY QUESTIONSWhat are the steps in a scientific investigation?How can I design an investigation to solve a real world problem?
PROCEDURE1. Students read the scenario that sets the stage for the investigation.2. Follow the steps through the investigation, modeling them and thinking aloud.
EXTENSIONIf there is time, students should design an investigation to answer one of the research questions they suggest in their reflection.
98th Grade Science Toolbox St. Clair County RESA 2005
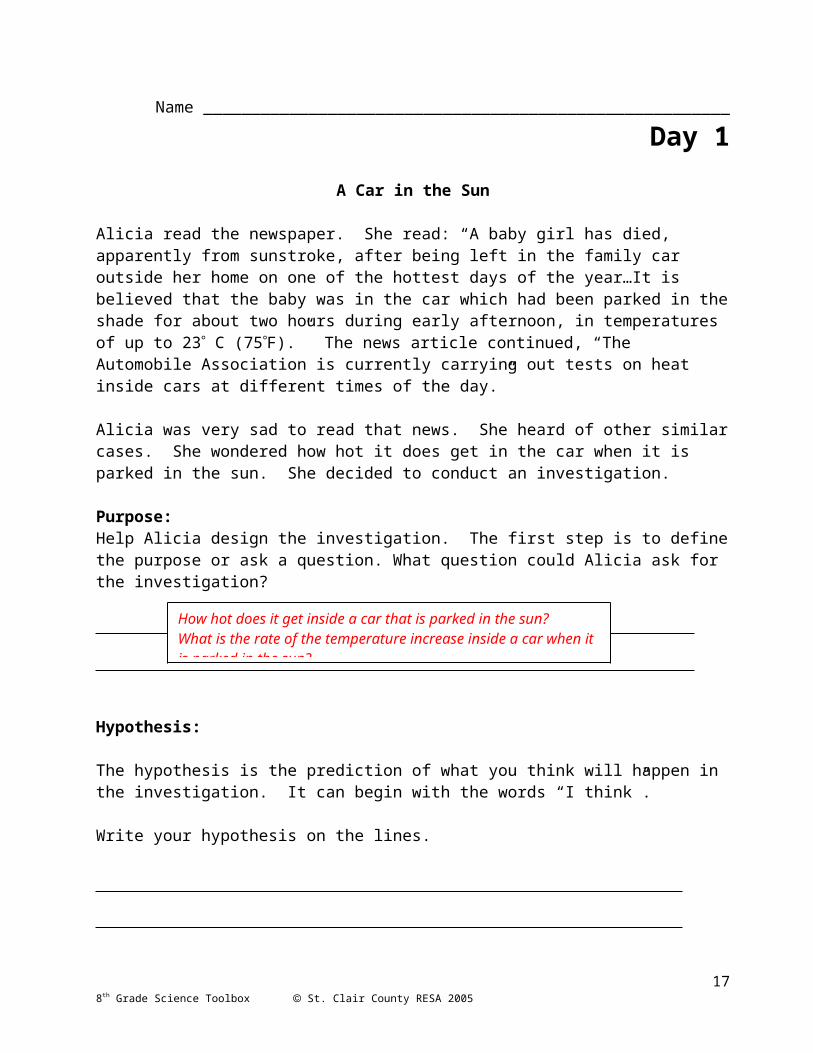
Name _______________________________________________________ Day 1A Car in the Sun
Alicia read the newspaper. She read: “A baby girl has died, apparently from sunstroke, after being left in the family car outside her home on one of the hottest days of the year…It is believed that the baby was in the car which had been parked in the shade for about two hours during early afternoon, in temperatures of up to 23 C (75F).” The news article continued, “The Automobile Association is currently carrying out tests on heat inside cars at different times of the day.” Alicia was very sad to read that news. She heard of other similar cases. She wondered how hot it does get in the car when it is parked in the sun. She decided to conduct an investigation.
Purpose: Help Alicia design the investigation. The first step is to define the purpose or ask a question. What question could Alicia ask for the investigation?
Hypothesis:
The hypothesis is the prediction of what you think will happen in the investigation. It can begin with the words “I think”. Write your hypothesis on the lines.
Next, give a reason for your prediction. Explain your thinking.
I think this because
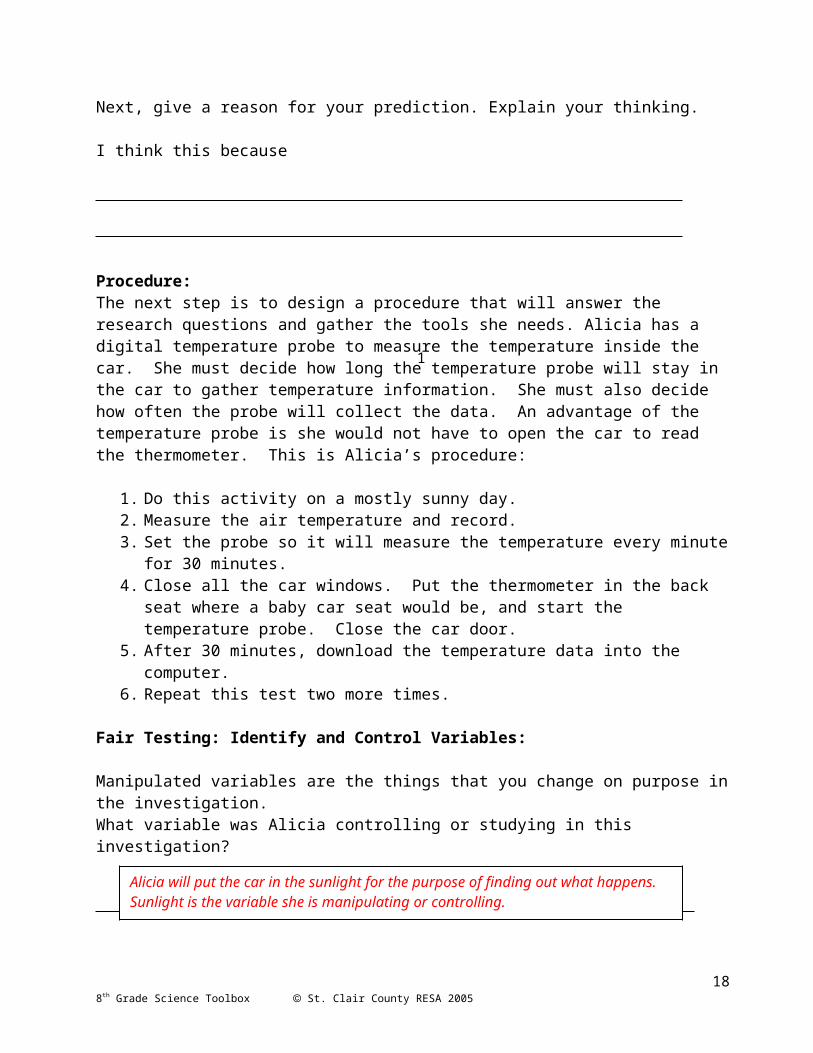
Procedure:The next step is to design a procedure that will answer the research questions and gather the tools she needs. Alicia has a digital temperature probe to measure the temperature
108th Grade Science Toolbox St. Clair County RESA 2005
How hot does it get inside a car that is parked in the sun? What is the rate of the temperature increase inside a car when it is parked in the sun?
1
inside the car. She must decide how long the temperature probe will stay in the car to gather temperature information. She must also decide how often the probe will collect the data. An advantage of the temperature probe is she would not have to open the car to read the thermometer. This is Alicia’s procedure:
1. Do this activity on a mostly sunny day.2. Measure the air temperature and record.3. Set the probe so it will measure the temperature every minute for 30 minutes.4. Close all the car windows. Put the thermometer in the back seat where a baby car
seat would be, and start the temperature probe. Close the car door.5. After 30 minutes, download the temperature data into the computer.6. Repeat this test two more times.
Fair Testing: Identify and Control Variables:
Manipulated variables are the things that you change on purpose in the investigation. What variable was Alicia controlling or studying in this investigation?
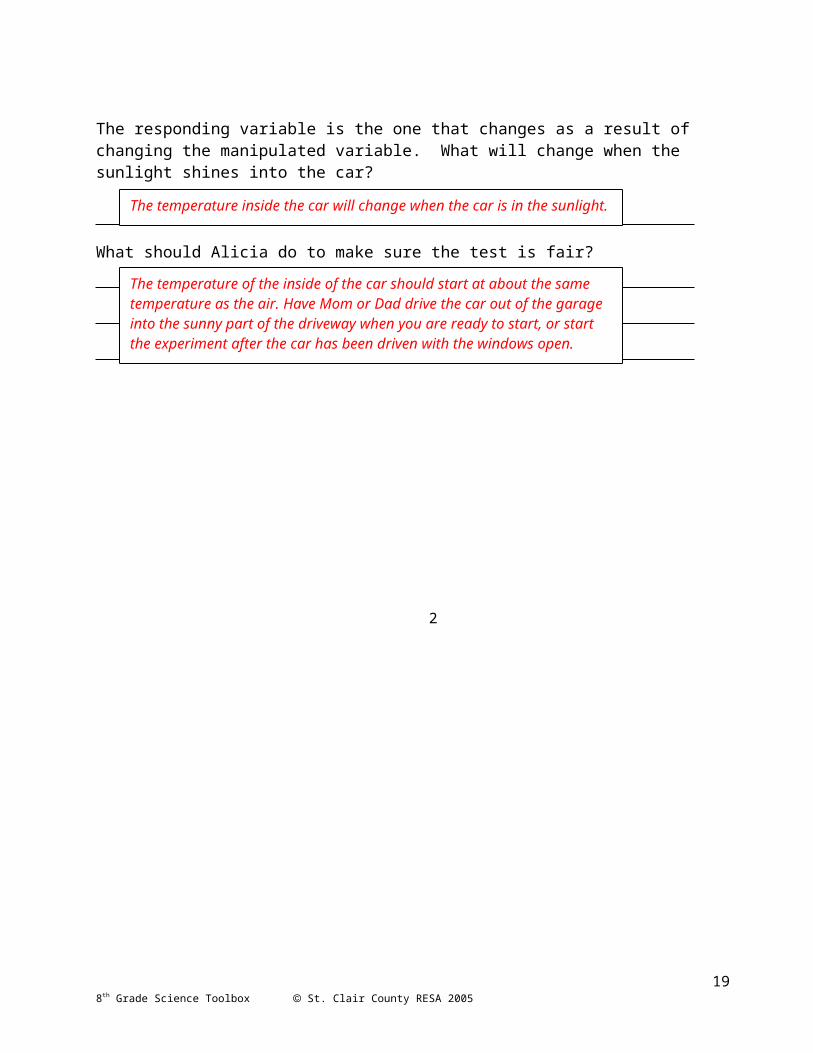
The responding variable is the one that changes as a result of changing the manipulated variable. What will change when the sunlight shines into the car?
What should Alicia do to make sure the test is fair?
118th Grade Science Toolbox St. Clair County RESA 2005
Alicia will put the car in the sunlight for the purpose of finding out what happens. Sunlight is the variable she is manipulating or controlling.
The temperature inside the car will change when the car is in the sunlight.
The temperature of the inside of the car should start at about the same temperature as the air. Have Mom or Dad drive the car out of the garage into the sunny part of the driveway when you are ready to start, or start the experiment after the car has been driven with the windows open.
2
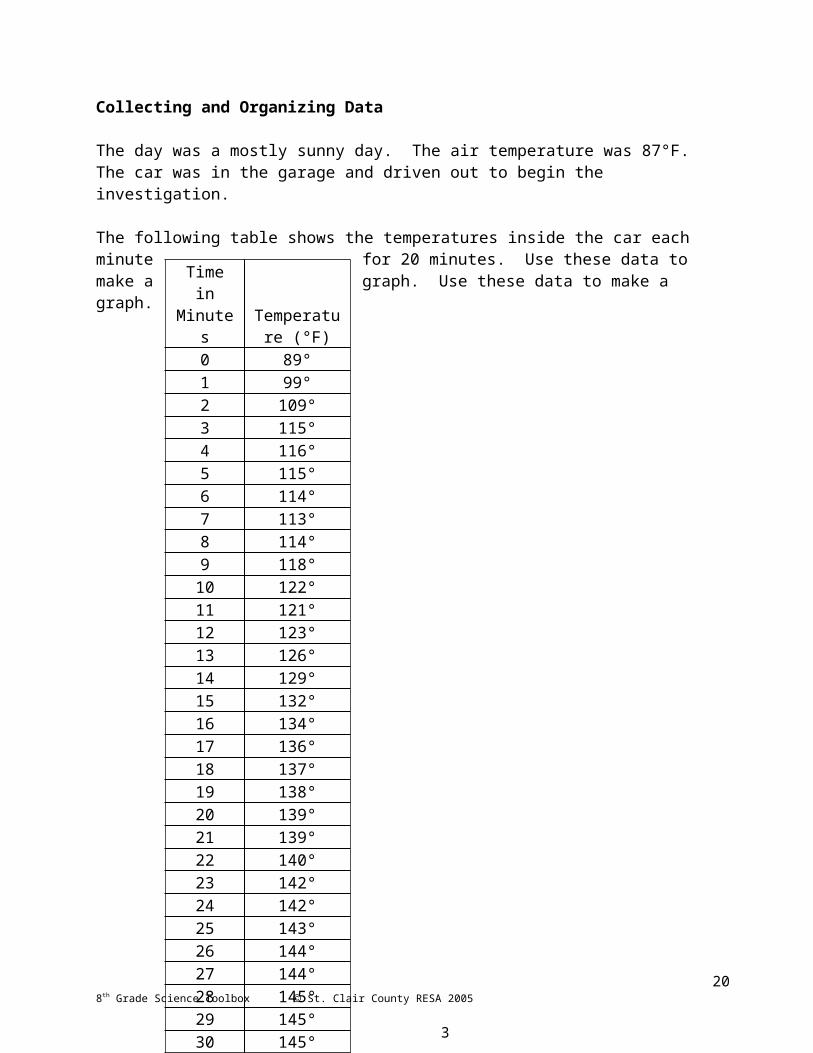
Collecting and Organizing Data
The day was a mostly sunny day. The air temperature was 87°F. The car was in the garage and driven out to begin the investigation.
The following table shows the temperatures inside the car each minute for 20 minutes. Use these data to make a graph. Use these data to make a graph.
128th Grade Science Toolbox St. Clair County RESA 2005
Time in Minutes
Temperature (°F)
0 89° 1 99°2 109°3 115°4 116°5 115°6 114°7 113°8 114°9 118°10 122°11 121°12 123°13 126°14 129°15 132°16 134°17 136°18 137°19 138°20 139°21 139°22 140°23 142°24 142°25 143°26 144°27 144°28 145°29 145°30 145°
3
Temperature inside Car Parked in Sun
Results:What happened? Describe your observations.
138th Grade Science Toolbox St. Clair County RESA 2005
The temperature inside the car was 89°F at the beginning of the investigation. The largest increase in temperature came during the first 3 minutes. During the first and second minute, the temperature went up 10° each. During the third minute, it increased 6°. In the fourth minute, it increased only 1°, and then the temperature started to decrease slightly. This could be due to a passing cloud. It increased by 4° each from the 8th to the 9th minute and the 9th to the 10th minute, and then it decreased again by 1°. After the 11th minute, there was a more gradual increase of 3°, than 2°, and during the last 14 minutes, there was a 1 ° difference or less. After 30 minutes, the temperature in the car was 145°.
4
Conclusion:What do your results tell you? Are there any relationships, patterns or trends in you results?
Can you explain the relationships, patterns or trends in your results? Try to use some science ideas to help you explain what happened.
Reflection:How could Alicia improve this investigation?
What new questions could she investigate?
EXTENSIONDesign an investigation that could study one of your new research questions. Include the question or purpose, hypothesis, materials and procedure.
148th Grade Science Toolbox St. Clair County RESA 2005
The temperature inside the car parked in the sun became uncomfortably hot. It increased the most during the first few minutes and it continued to get hotter after that. The temperature inside a car parked in the sun with closed windows gets very hot in a short period of time. When the temperature outside is 88, it can get to be 145 in less than a half hour.
The sunlight can pass through the car windows because the windows are transparent. Objects inside the car absorb the light energy and the light energy is transformed to heat energy. The molecules in the air and the objects in the car start to move faster. The heat energy cannot get through the windows as easily as the light energy. The heat energy is trapped inside the car (greenhouse effect) and the car gets warmer until it reaches a point where the rate of heat entering the house equals the rate of heat lost by the car (equilibrium).
A passing cloud may have caused the temperature to decrease for a short time during the investigation. Alicia could repeat the experiment to see the affect of clouds.She could set the probe to take more temperature readings, maybe twice or three times a minute instead of once a minute. She could take the temperature readings for a longer period of time. She could do this again on a day where there are no clouds.
What is the rate of temperature increase if the car was parked in the shade?Does the color of the car make a difference?Does the time of day make a difference?Does the temperature of the air make a difference?What would happen if there were no clouds during part of the investigation?What difference would there be if the car had tinted windows?
5

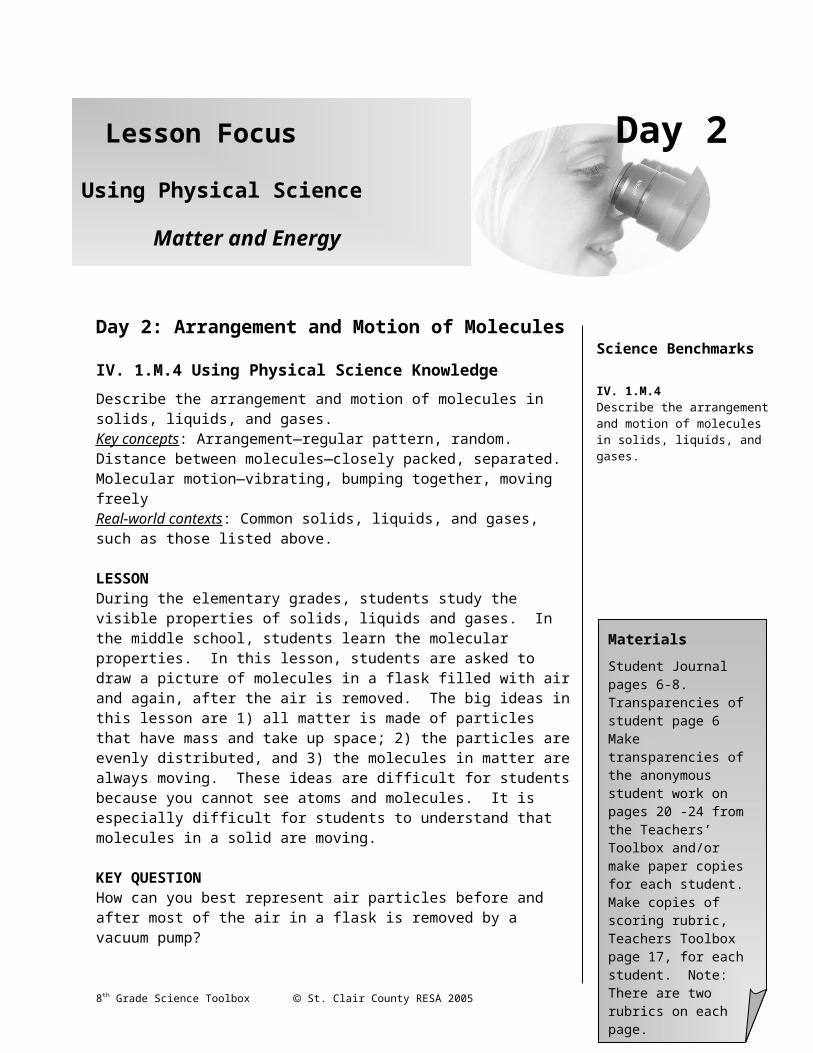
Day 2: Arrangement and Motion of Molecules
IV. 1.M.4 Using Physical Science KnowledgeDescribe the arrangement and motion of molecules in solids, liquids, and gases. Key concepts: Arrangement—regular pattern, random. Distance between molecules—closely packed, separated. Molecular motion—vibrating, bumping together, moving freelyReal-world contexts: Common solids, liquids, and gases, such as those listed above.
LESSONDuring the elementary grades, students study the visible properties of solids, liquids and gases. In the middle school, students learn the molecular properties. In this lesson, students are asked to draw a picture of molecules in a flask filled with air and again, after the air is removed. The big ideas in this lesson are 1) all matter is made of particles that have mass and take up space; 2) the particles are evenly distributed, and 3) the molecules in matter are always moving. These ideas are difficult for students because you cannot see atoms and molecules. It is especially difficult for students to understand that molecules in a solid are moving.
KEY QUESTIONHow can you best represent air particles before and after most of the air in a flask is removed by a vacuum pump?
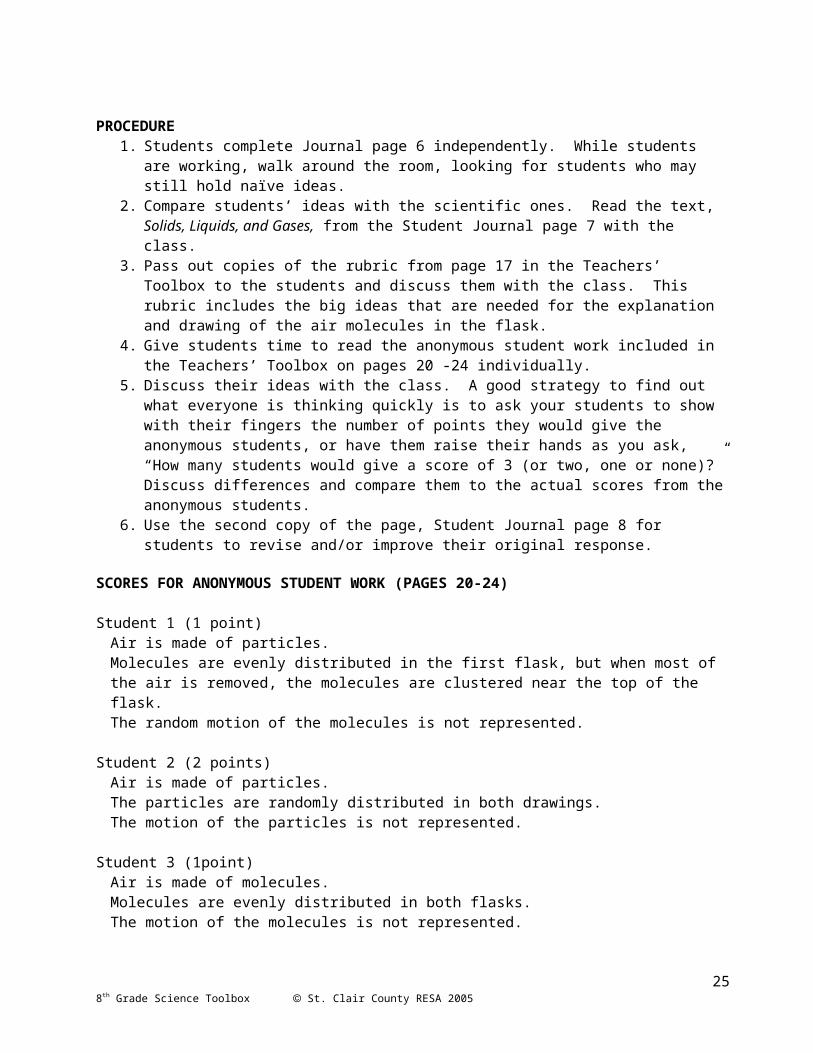
PROCEDURE1. Students complete Journal page 6 independently. While students
are working, walk around the room, looking for students who may still hold naïve ideas.
2. Compare students’ ideas with the scientific ones. Read the text, Solids, Liquids, and Gases, from the Student Journal page 7 with the class.
3. Pass out copies of the rubric from page 17 in the Teachers’ Toolbox to the students and discuss them with the class. This rubric includes the big ideas that are needed for the explanation and drawing of the air molecules in the flask.
4. Give students time to read the anonymous student work included in the Teachers’ Toolbox on pages 20 -24 individually.
158th Grade Science Toolbox St. Clair County RESA 2005
Science Benchmarks
IV. 1.M.4 Describe the arrangement and motion of molecules in solids, liquids, and gases.
Lesson Focus
Matter and Energy
Using Physical Science
Day 2
MaterialsStudent Journal pages 6-8.Transparencies of student page 6Make transparencies of the anonymous student work on pages 20 -24 from the Teachers’ Toolbox and/or make paper copies for each student. Make copies of scoring rubric, Teachers Toolbox page 17, for each student. Note: There are two rubrics on each page.

5. Discuss their ideas with the class. A good strategy to find out what everyone is thinking quickly is to ask your students to show with their fingers the number of points they would give the anonymous students, or have them raise their hands as you ask, “How many students would give a score of 3 (or two, one or none)?” Discuss differences and compare them to the actual scores from the anonymous students.
6. Use the second copy of the page, Student Journal page 8 for students to revise and/or improve their original response.
SCORES FOR ANONYMOUS STUDENT WORK (PAGES 20-24)
Student 1 (1 point)Air is made of particles.Molecules are evenly distributed in the first flask, but when most of the air is removed, the molecules are clustered near the top of the flask. The random motion of the molecules is not represented.
Student 2 (2 points)Air is made of particles.The particles are randomly distributed in both drawings.The motion of the particles is not represented.
Student 3 (1point)Air is made of molecules.Molecules are evenly distributed in both flasks.The motion of the molecules is not represented.
The misconception that the molecules expand when the pressure is reduced is present.
Student 4 (3 points) Air is made of molecules.The molecules are evenly distributed.The motion of molecules is included.
This student also represents the air molecules that moved to the vacuum pump in picture #2.
RESOURCES
http://www.miamisci.org/af/sln/phantom/index.htmlThe Phantom’s Portrait ParlorView a simulation of the motion of molecules in a solid –copper; liquid – water; and a gas – Nitrogen, at different temperatures.
168th Grade Science Toolbox St. Clair County RESA 2005
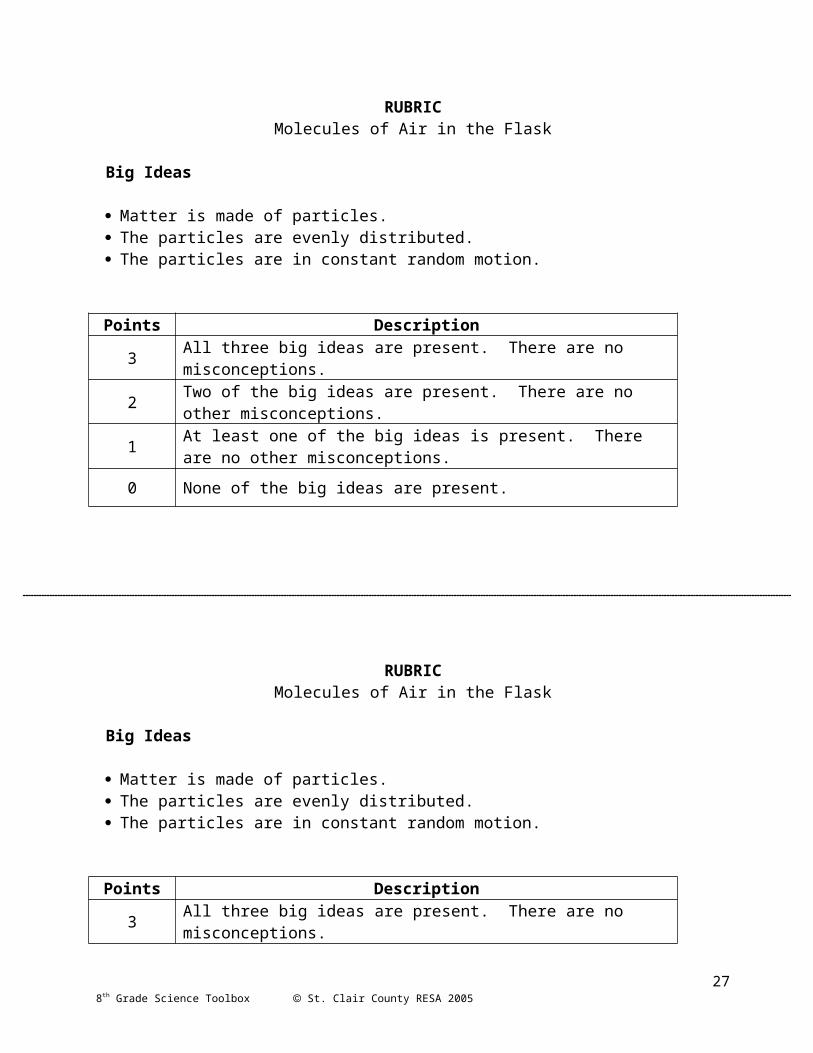
RUBRICMolecules of Air in the Flask
Big Ideas
Matter is made of particles. The particles are evenly distributed. The particles are in constant random motion.
Points Description
3 All three big ideas are present. There are no misconceptions.
2 Two of the big ideas are present. There are no other misconceptions.
1 At least one of the big ideas is present. There are no other misconceptions.
0 None of the big ideas are present.
178th Grade Science Toolbox St. Clair County RESA 2005
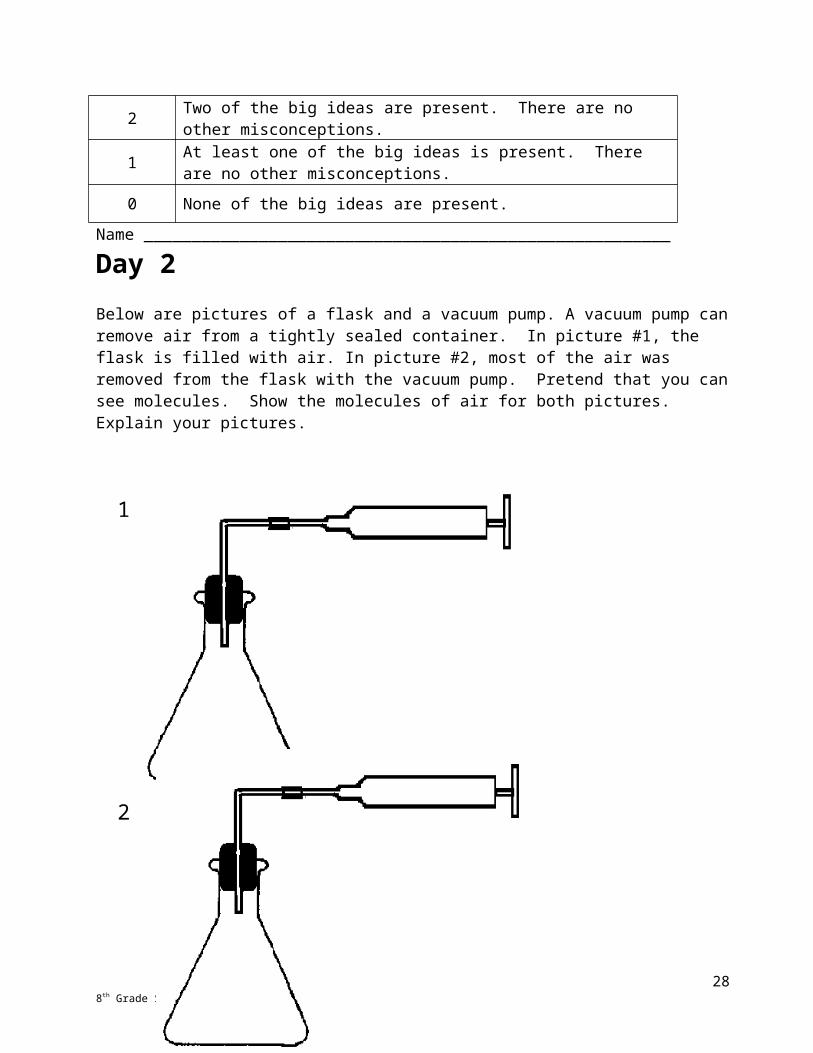
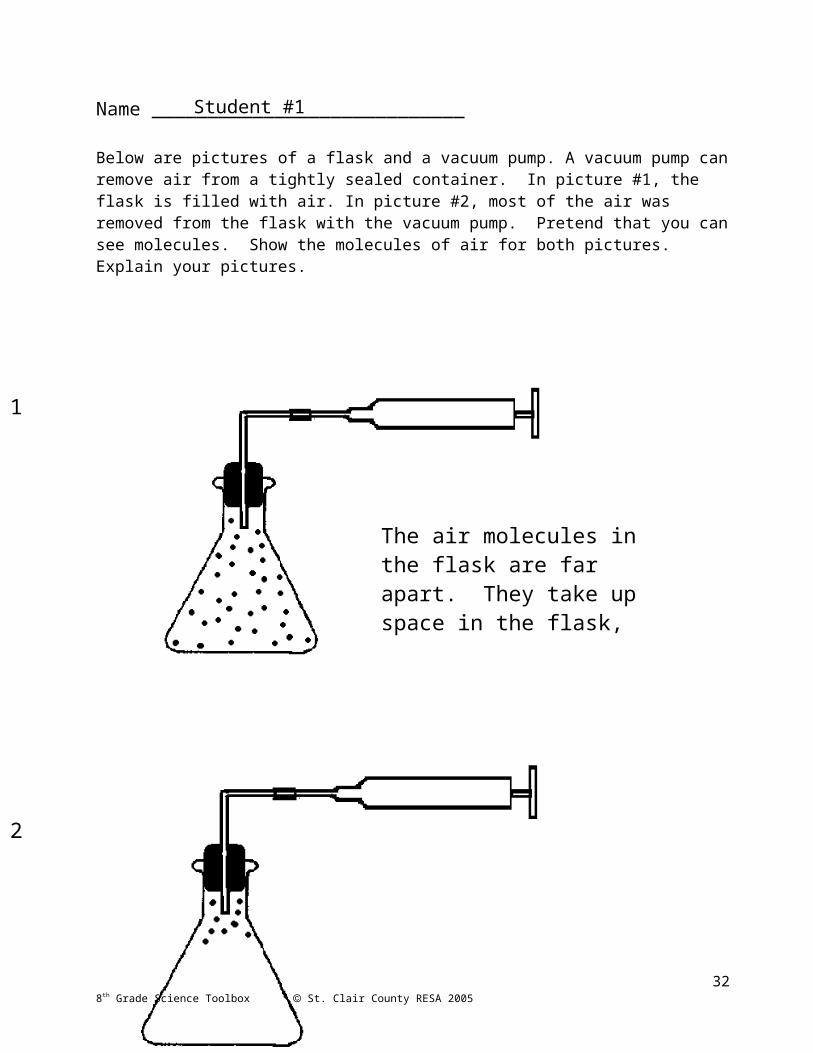
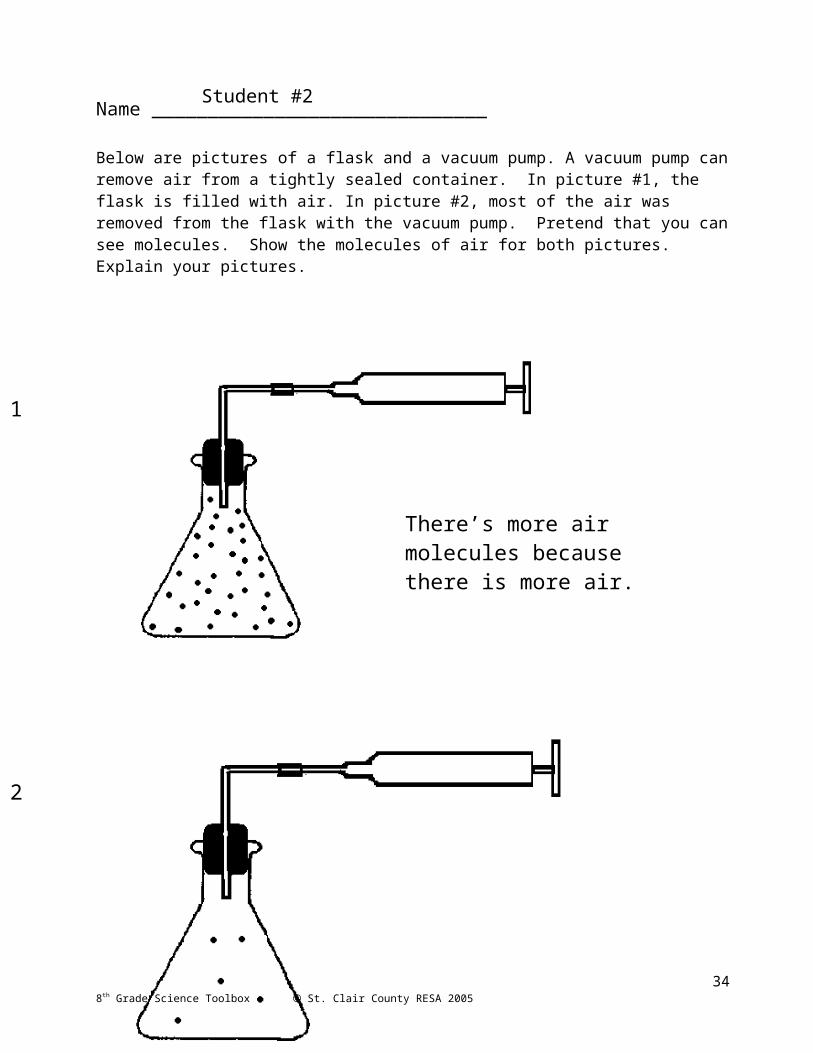
Name _______________________________________________________ Day 2Below are pictures of a flask and a vacuum pump. A vacuum pump can remove air from a tightly sealed container. In picture #1, the flask is filled with air. In picture #2, most of the air was removed from the flask with the vacuum pump. Pretend that you can see molecules. Show the molecules of air for both pictures. Explain your pictures.
188th Grade Science Toolbox St. Clair County RESA 2005
1
2
198th Grade Science Toolbox St. Clair County RESA 2005
6
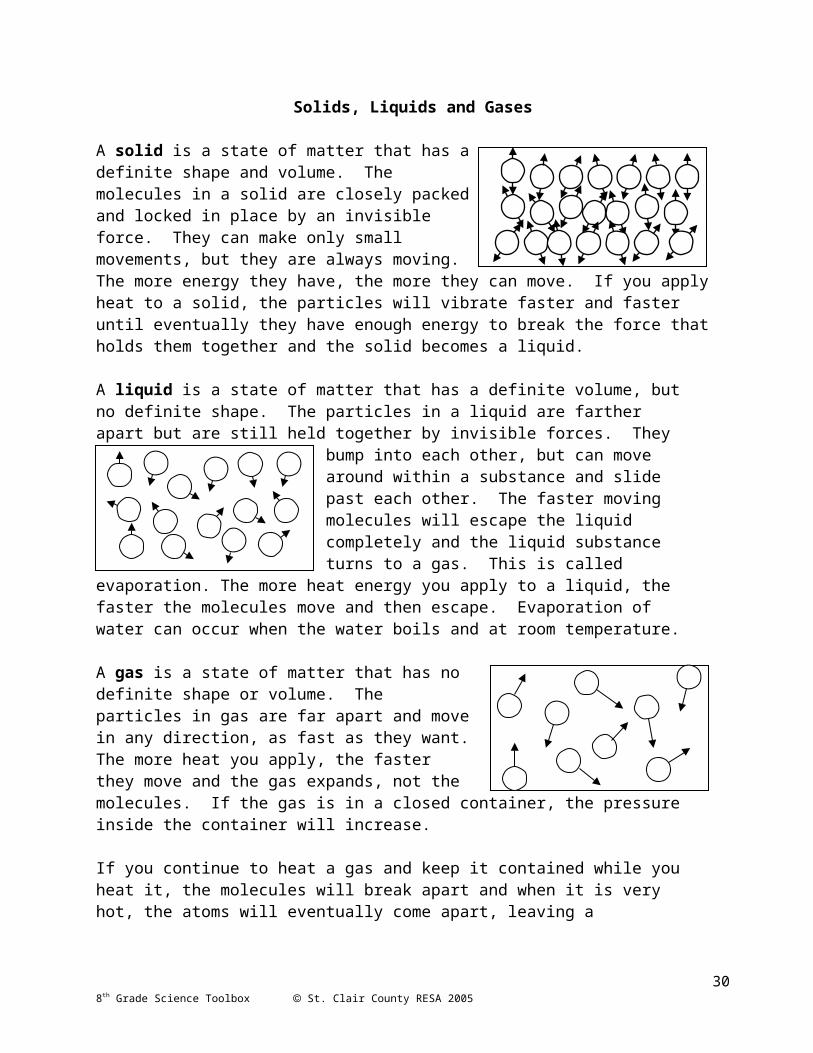
Solids, Liquids and Gases
A solid is a state of matter that has a definite shape and volume. The molecules in a solid are closely packed and locked in place by an invisible force. They can make only small movements, but they are always moving. The more energy they have, the more they can move. If you apply heat to a solid, the particles will vibrate faster and faster until eventually they have enough energy to break the force that holds them together and the solid becomes a liquid.
A liquid is a state of matter that has a definite volume, but no definite shape. The particles in a liquid are farther apart but are still held together by invisible forces. They bump into each other, but can move around within a substance and slide
past each other. The faster moving molecules will escape the liquid completely and the liquid substance turns to a gas. This is called evaporation. The more heat energy you apply to a liquid, the faster the molecules move and then escape. Evaporation of water can occur when the water boils and at room temperature.
A gas is a state of matter that has no definite shape or volume. The particles in gas are far apart and move in any direction, as fast as they want. The more heat you apply, the faster they move and the gas expands, not the molecules. If the gas is in a closed container, the pressure inside the container will increase.
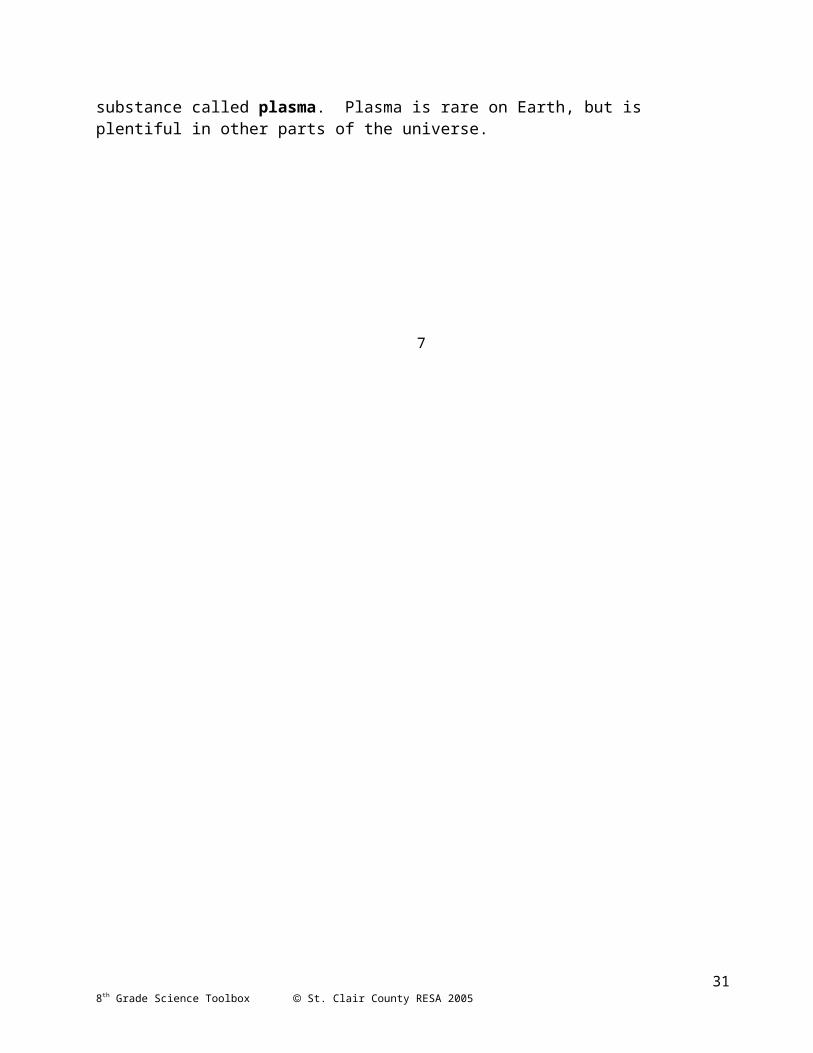
If you continue to heat a gas and keep it contained while you heat it, the molecules will break apart and when it is very hot, the atoms will eventually come apart, leaving a substance called plasma. Plasma is rare on Earth, but is plentiful in other parts of the universe.
208th Grade Science Toolbox St. Clair County RESA 2005
7

Name ____________________________
Below are pictures of a flask and a vacuum pump. A vacuum pump can remove air from a tightly sealed container. In picture #1, the flask is filled with air. In picture #2, most of the air was removed from the flask with the vacuum pump. Pretend that you can see molecules. Show the molecules of air for both pictures. Explain your pictures.
218th Grade Science Toolbox St. Clair County RESA 2005
1
2
The air molecules in the flask are far apart. They take up space in the flask,
The pump took out most of the air. The air molecules that are left move closer together and take up less space.
Student #1

Name ______________________________
Below are pictures of a flask and a vacuum pump. A vacuum pump can remove air from a tightly sealed container. In picture #1, the flask is filled with air. In picture #2, most of the air was removed from the flask with the vacuum pump. Pretend that you can see molecules. Show the molecules of air for both pictures. Explain your pictures.
228th Grade Science Toolbox St. Clair County RESA 2005
2
1
There’s more air molecules because there is more air.
There’s less air molecules because there is less air.
Student #2

Name ______________________________
Below are pictures of a flask and a vacuum pump. A vacuum pump can remove air from a tightly sealed container. In picture #1, the flask is filled with air. In picture #2, most of the air was removed from the flask with the vacuum pump. Pretend that you can see molecules. Show the molecules of air for both pictures. Explain your pictures.
238th Grade Science Toolbox St. Clair County RESA 2005
1
2
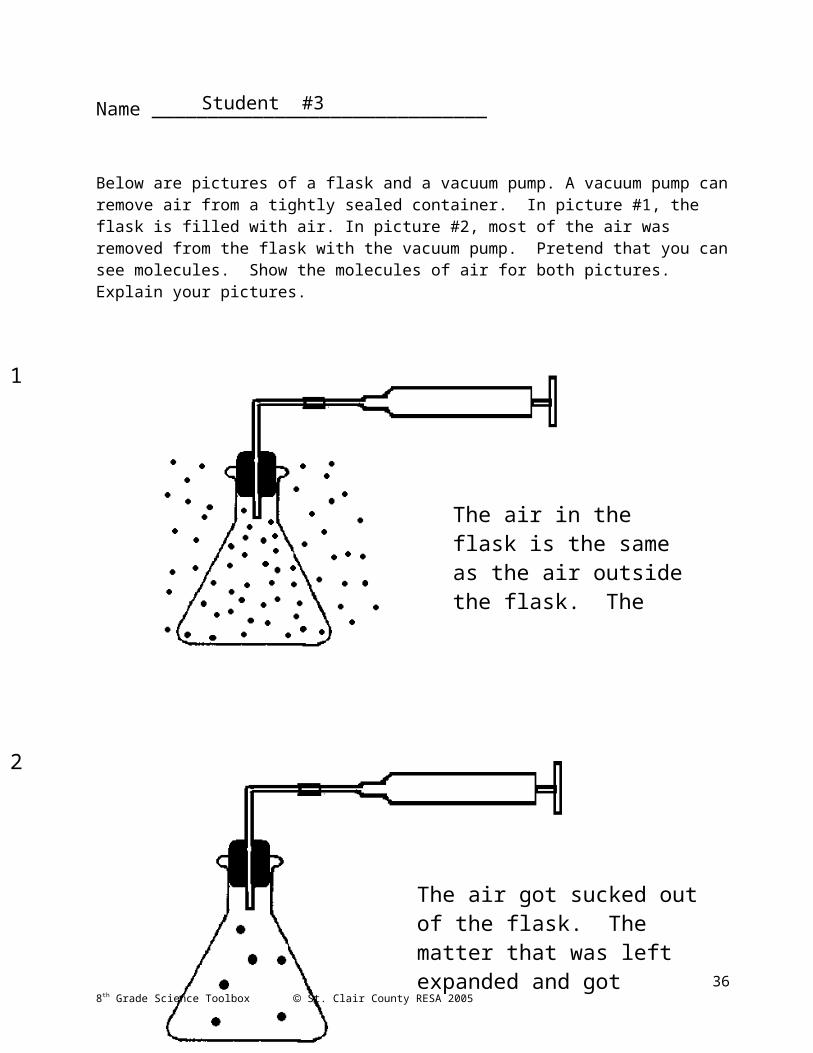
The air in the flask is the same as the air outside the flask. The molecules are normal.
The air got sucked out of the flask. The matter that was left expanded and got further apart. The big dots show the molecules got bigger.
Student #3
Name ______________________________
Below are pictures of a flask and a vacuum pump. A vacuum pump can remove air from a tightly sealed container. In picture #1, the flask is filled with air. In picture #2, most of the air was removed from the flask with the vacuum pump. Pretend that you can see molecules. Show the molecules of air for both pictures. Explain your pictures.
248th Grade Science Toolbox St. Clair County RESA 2005
1
2
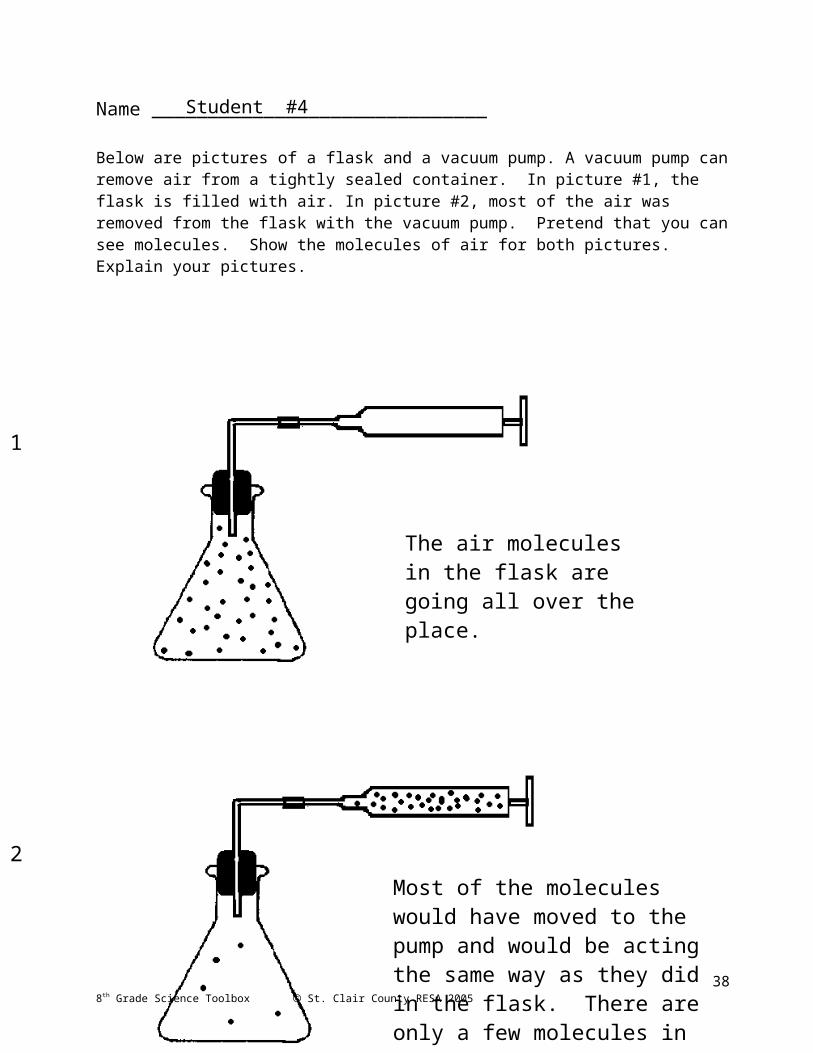
The air molecules in the flask are going all over the place.
Most of the molecules would have moved to the pump and would be acting the same way as they did in the flask. There are only a few molecules in the flask. They would still be moving all over the place.
Student #4
Day 3: Elements, Compounds, and Mixtures
IV. 1.M.3 Using Physical Science Knowledge Classify substances as elements, compounds, or mixtures and justify classifications in terms of atoms and molecules.Key concepts: Element, compound, mixture, molecule, atom.Real-world contexts: Common substances such as those listed above, including—elements, such as copper, aluminum, sulfur, helium, iron; compounds, such as water, salt, sugar, carbon dioxide; mixtures, such as soil, salt and pepper, salt water, air.
IV. 2.M.2 Using Physical Science Knowledge (Changes in Matter)Describe common chemical changes in terms of properties of reactants and products. Key concepts: Common chemical changes—burning, rusting iron, formation of sugars during photosynthesis, acid reacting with metal and other substances. Mass/weight remains constant in closed systems.Real-world contexts: Chemical changes—burning, photosynthesis, digestion, corrosion, acid reactions, common household chemical reactions such as with alkaline drain cleaners.
IV. 2.M.3 Using Physical Science Knowledge (Changes in Matter)Explain physical changes in terms of the arrangement and motion of atoms and molecules. Key concepts: Molecular descriptions of states of matter. Changes in state of matter—melting, freezing, evaporation, condensation; thermal expansion and contraction; Speed of molecular motion—moving faster, slower, vibrate, rotate, unrestricted motion; change in speed of molecular motion with change in temperature. Real-world contexts: States of matter—solid, liquid, gas. Changes in state, such as water evaporating as clothes dry, condensation on cold window panes, disappearance of snow or dry ice without melting; expansion of bridges in hot weather, expansion and contraction of balloons with heating and cooling; solid air fresheners.
258th Grade Science Toolbox St. Clair County RESA 2005
Science BenchmarksIV. 1.MS.3 Classify substances as elements, compounds, or mixtures and justify classifications in terms of atoms and molecules.
IV. 2.M.2 Describe common chemical changes in terms of properties of reactants and products.
IV. 2.M.3 Explain physical changes in terms of the arrangement and motion of atoms and molecules
Lesson Focus
Matter and EnergyChanges in Matter
Using Physical Science
Day 3
MaterialsStudent Journal pages 10-14.
LESSONIn this lesson, students will read about elements, compounds, mixtures and states of matter. The Reciprocal Teaching strategy will be used. They will write notes in a graphic organizer so they will have a record of their ideas which they can revisit as they go through the other days of the toolbox.
RECIPROCAL TEACHING 1
Palincsar (1986) describes the concept of reciprocal teaching:
"Definition: Reciprocal teaching refers to an instructional activity that takes place in the form of a dialogue between teachers and students regarding segments of text. The dialogue is structured by the use of four strategies: summarizing, question generating, clarifying, and predicting. The teacher and students take turns assuming the role of teacher in leading this dialogue. Purpose: The purpose of reciprocal teaching is to facilitate a group effort between teacher and students as well as among students in the task of bringing meaning to the text. Each strategy was selected for the following purpose:
Summarizing provides the opportunity to identify and integrate the most important information in the text. Text can be summarized across sentences, across paragraphs, and across the passage as a whole. When the students first begin the reciprocal teaching procedure, their efforts are generally focused at the sentence and paragraph levels. As they become more proficient, they are able to integrate at the paragraph and passage levels.
Question generating reinforces the summarizing strategy and carries the learner one more step along in the comprehension activity. When students generate questions, they first identify the kind of information that is significant enough to provide the substance for a question. They then pose this information in question form and self-test to ascertain that they can indeed answer their own question. Question generating is a flexible strategy to the extent that students can be taught and encouraged to generate questions at many levels. For example, some school situations require that students master supporting detail information; others require that the students be able to infer or apply new information from text.
Clarifying is an activity that is particularly important when working with students who have a history of comprehension difficulty. These students may believe that the purpose of reading is saying the words correctly; they may not be particularly uncomfortable that the words, and in fact the passage, are not making sense. When the students are asked to clarify, their attention is called to the fact that there may be many reasons why text is difficult to understand (e.g., new vocabulary, unclear reference words, and unfamiliar and perhaps difficult concepts). They are taught to be alert to the effects of such impediments to comprehension and to take the necessary measures to restore meaning (e.g., reread, ask for help).
1 Retrieved from the NCREL website at http://www.ncrel.org/sdrs/areas/issues/students/atrisk/at6lk38.htm
268th Grade Science Toolbox St. Clair County RESA 2005
Predicting occurs when students hypothesize what the author will discuss next in the text. In order to do this successfully, students must activate the relevant background knowledge that they already possess regarding the topic. The students have a purpose for reading: to confirm or disprove their hypotheses. Furthermore, the opportunity has been created for the students to link the new knowledge they will encounter in the text with the knowledge they already possess. The predicting strategy also facilitates use of text structure as students learn that headings, subheadings, and questions imbedded in the text are useful means of anticipating what might occur next.
In summary, each of these strategies was selected as a means of aiding students to construct meaning from text as well as a means of monitoring their reading to ensure that they, in fact, understand what they read.
KEY QUESTIONHow is matter classified?What are the molecular properties of matter?
PROCEDURE1. Use the Reciprocal Reading Strategy as a whole group for each section of the reading.
These strategies include Question, Predict, Clarify, and Summarize. These do not need to follow in any particular order.
2. Students complete the graphic organizer. 3. Use the assessment items on pages 13 and 14 in the student journal.
REFERENCES AND RESOURCES
Palincsar, A.S. (1986). Reciprocal teaching. In Teaching reading as thinking. Oak Brook, IL: North Central Regional Educational Laboratory.
Chem 4 Kids; Matterhttp://www.chem4kids.com/files/matter_intro.html
Minerals. Elements and the Earth’s Crusthttp://www.chemsoc.org/networks/learnnet/jesei/minerals/students.htm
Web site with suggested strategies for note taking.http://www.familyeducation.com/whatworks/item/nogroup-index/0,3002,1-27933,00.html
278th Grade Science Toolbox St. Clair County RESA 2005
Name ________________________________________________________ Day 3
What’s the Matter? Elements, Compounds and Mixtures
Anything that has mass and takes up space is matter. Matter is everywhere. Everything you touch is matter. During the time of Aristotle, people thought everything was made up of a combination of air, fire, water and earth. Today we know that there are a certain number of elements that make up all matter on Earth. Elements are made of tiny particles called atoms. Atoms are composed of a certain number of protons, electrons, and neutrons.
Matter has physical and chemical properties. Color, smell, mass, volume, density, temperature, freezing point and boiling point are examples of physical properties of matter. The way elements combine and react with each other are chemical properties. Matter can change physically and chemically. To understand how matter changes, you need to know something about molecules.
Elements, Compounds, and Mixtures
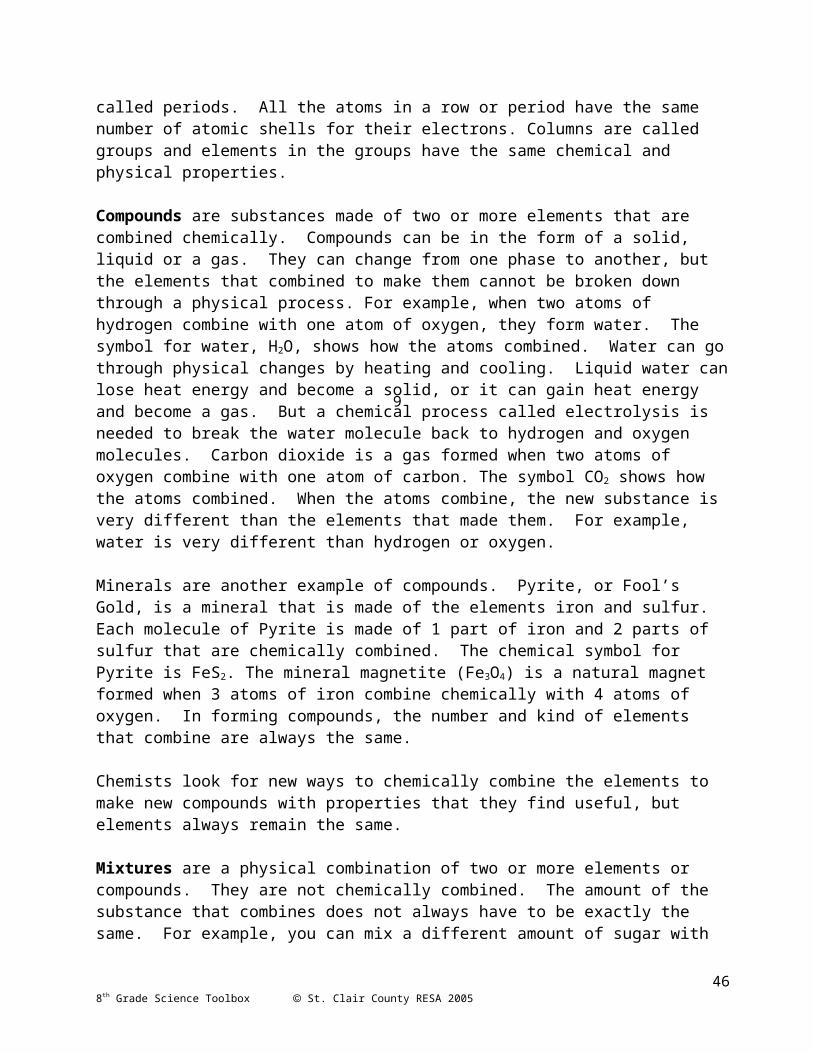
Elements are the building blocks of all matter. They are substances that cannot be broken down or divided by ordinary chemical means. The smallest possible amount of an element is called an atom. We know of over 100 elements. About 92 occur in nature and the rest are man-made. Four of the elements make up 96% of all living matter: carbon, oxygen, hydrogen, and nitrogen. Eight elements make up 99% of the Earth’s crust.
One or two letters represent each element. The elements are arranged in order based on their properties in what we call the Periodic Table. The rows are called periods. All the atoms in a row or period have the same number of atomic shells for their electrons. Columns are called groups and elements in the groups have the same chemical and physical properties.
Compounds are substances made of two or more elements that are combined chemically. Compounds can be in the form of a solid, liquid or a gas. They can change from one phase to another, but the elements that combined to make them cannot be broken down through a physical process. For example, when two atoms of hydrogen combine with one atom of oxygen, they form water. The symbol for water, H2O, shows how the atoms combined. Water can go through physical changes by heating and cooling. Liquid water can lose heat energy and become a solid, or it can gain heat energy and become a gas. But a chemical process called electrolysis is needed to break the water molecule back to hydrogen and oxygen molecules. Carbon dioxide is a gas
288th Grade Science Toolbox St. Clair County RESA 2005
Element PercentageOxygen 47Silicon 28Aluminum 8Iron 5Calcium 3.5Sodium 3Potassium 2.5Magnesium 2All Other 1
Elements Found in the Earth's Crust
9

formed when two atoms of oxygen combine with one atom of carbon. The symbol CO2 shows how the atoms combined. When the atoms combine, the new substance is very different than the elements that made them. For example, water is very different than hydrogen or oxygen.
Minerals are another example of compounds. Pyrite, or Fool’s Gold, is a mineral that is made of the elements iron and sulfur. Each molecule of Pyrite is made of 1 part of iron and 2 parts of sulfur that are chemically combined. The chemical symbol for Pyrite is FeS2. The mineral magnetite (Fe3O4) is a natural magnet formed when 3 atoms of iron combine chemically with 4 atoms of oxygen. In forming compounds, the number and kind of elements that combine are always the same.
Chemists look for new ways to chemically combine the elements to make new compounds with properties that they find useful, but elements always remain the same.
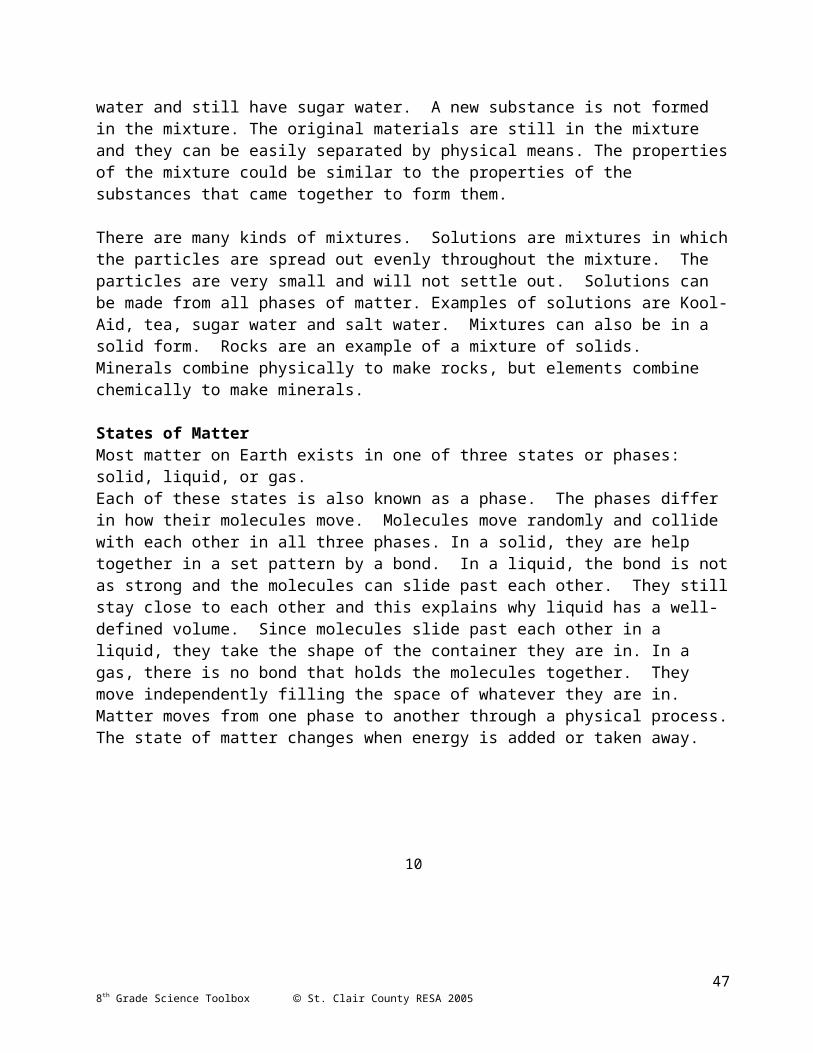
Mixtures are a physical combination of two or more elements or compounds. They are not chemically combined. The amount of the substance that combines does not always have to be exactly the same. For example, you can mix a different amount of sugar with water and still have sugar water. A new substance is not formed in the mixture. The original materials are still in the mixture and they can be easily separated by physical means. The properties of the mixture could be similar to the properties of the substances that came together to form them.
There are many kinds of mixtures. Solutions are mixtures in which the particles are spread out evenly throughout the mixture. The particles are very small and will not settle out. Solutions can be made from all phases of matter. Examples of solutions are Kool-Aid, tea, sugar water and salt water. Mixtures can also be in a solid form. Rocks are an example of a mixture of solids. Minerals combine physically to make rocks, but elements combine chemically to make minerals.
States of MatterMost matter on Earth exists in one of three states or phases: solid, liquid, or gas.Each of these states is also known as a phase. The phases differ in how their molecules move. Molecules move randomly and collide with each other in all three phases. In a solid, they are help together in a set pattern by a bond. In a liquid, the bond is not as strong and the molecules can slide past each other. They still stay close to each other and this explains why liquid has a well-defined volume. Since molecules slide past each other in a liquid, they take the shape of the container they are in. In a gas, there is no bond that holds the molecules together. They move independently filling the space of whatever they are in. Matter moves from one phase to another through a physical process. The state of matter changes when energy is added or taken away.
298th Grade Science Toolbox St. Clair County RESA 2005
10
Organizer for Elements, Compounds and Mixtures
Use this chart to help you organize ideas about elements, compounds and mixtures found in the reading.
State of Matter Molecular Bond Motion of Molecules
Solids Strong bond Molecules move randomly and bump into each other. The bond holds them together.
Liquids Weak bond Molecules move randomly and bump into each other. The weak bond allows them to slide past each other, but they remain close.
Gas No bond Molecules move randomly and bump into each other. With no bond holding them together, they can move freely.
States of Matter
Describe the molecular bond and the motion of molecules in a solid, liquid and gas
308th Grade Science Toolbox St. Clair County RESA 2005
Elements
CompoundsMixtures
Solutions
Over 100 kinds of elements make up all matter. Made of one kind of atom
Made of 2 or more elements chemically
combined
Made of 2 or more elements physically
combined
Made of very small particles that will not settle out and
are spread out evenly throughout
11
Name ______________________________________________________ Day 3
Assessment
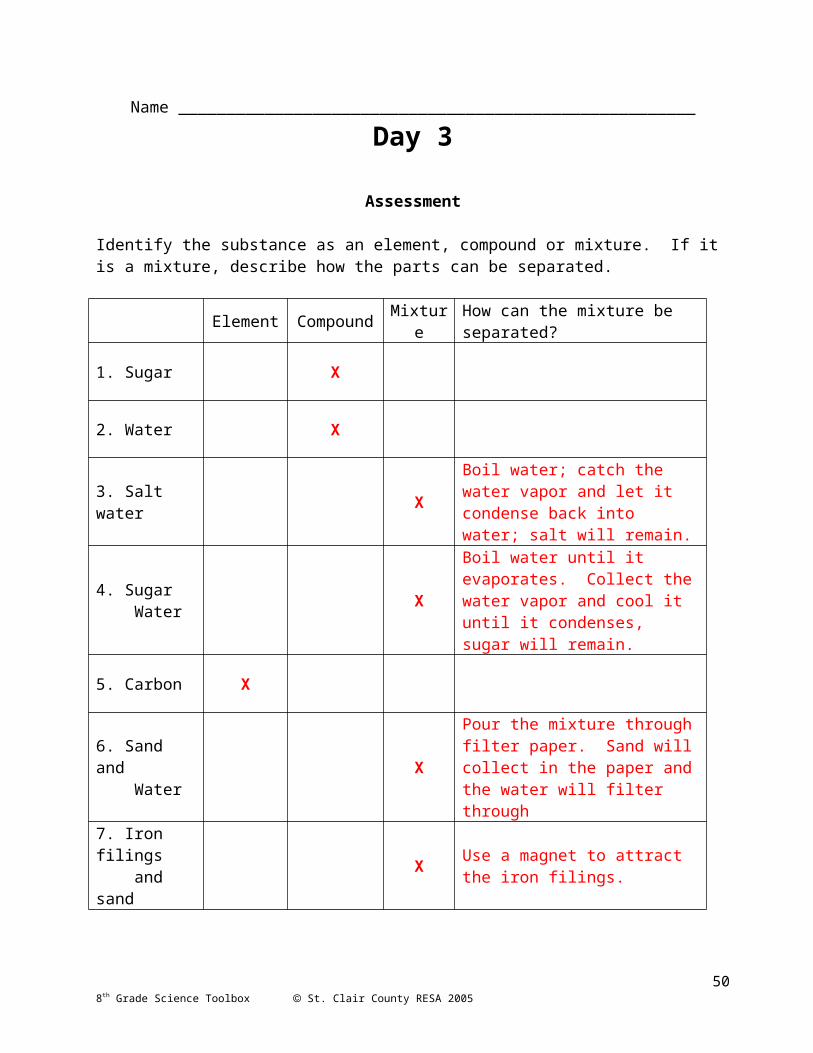
Identify the substance as an element, compound or mixture. If it is a mixture, describe how the parts can be separated.
Element Compound Mixture How can the mixture be separated?
1. Sugar X
2. Water X
3. Salt water XBoil water; catch the water vapor and let it condense back into water; salt will remain.
4. Sugar Water X
Boil water until it evaporates. Collect the water vapor and cool it until it condenses, sugar will remain.
5. Carbon X
6. Sand and Water X
Pour the mixture through filter paper. Sand will collect in the paper and the water will filter through
7. Iron filings and sand X Use a magnet to attract the iron
filings.
8. Oxygen X
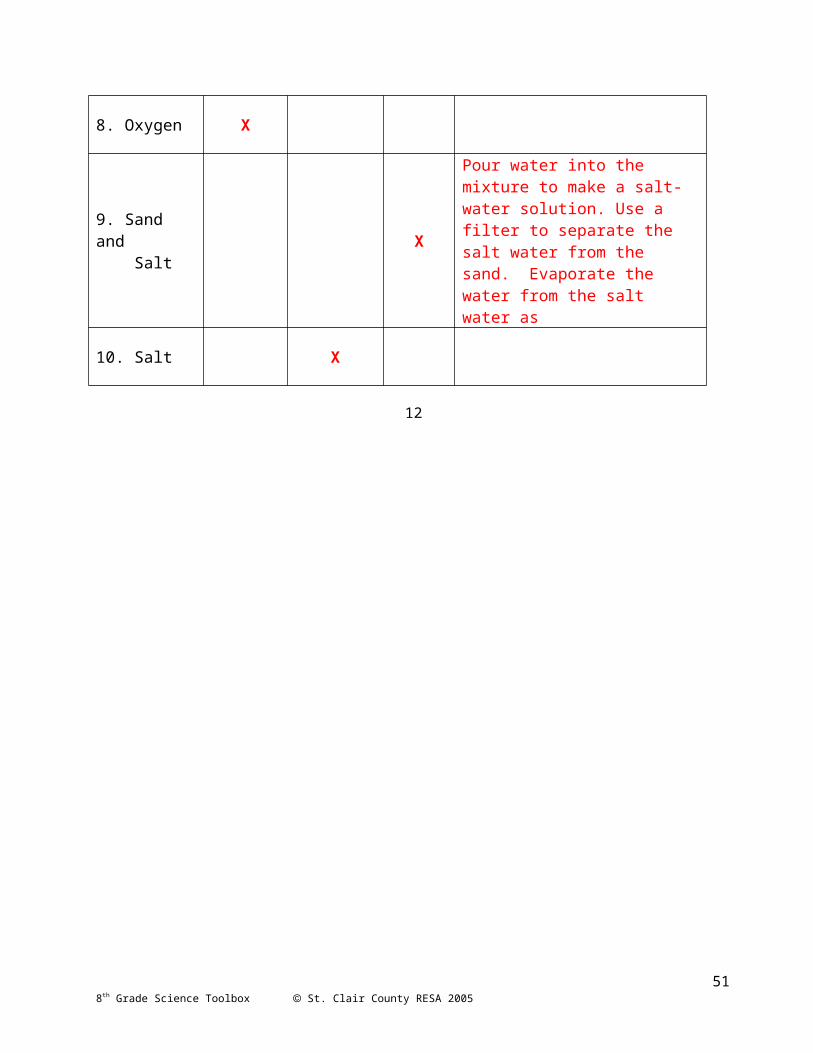
9. Sand and Salt X
Pour water into the mixture to make a salt-water solution. Use a filter to separate the salt water from the sand. Evaporate the water from the salt water as
10. Salt X
318th Grade Science Toolbox St. Clair County RESA 2005
12
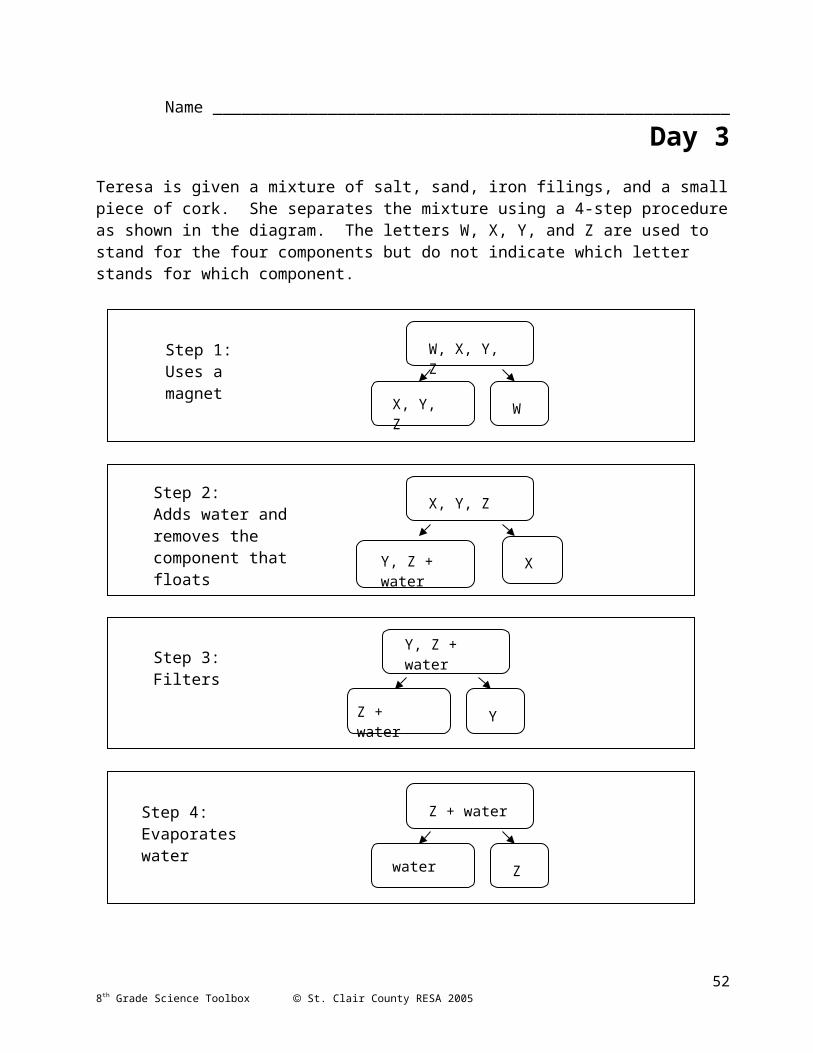
Name ______________________________________________________ Day 3Teresa is given a mixture of salt, sand, iron filings, and a small piece of cork. She separates the mixture using a 4-step procedure as shown in the diagram. The letters W, X, Y, and Z are used to stand for the four components but do not indicate which letter stands for which component.
Identify what each component is by writing salt, sand, iron, or cork in the correct spaces below.
Component W ____________________ Component X ___________________
Component Y ____________________ Component Z ___________________
(TIMSS 2003 Released Items: Eighth Grade Science)
328th Grade Science Toolbox St. Clair County RESA 2005
W, X, Y, Z
W X, Y, Z
Step 1: Uses a magnet
Step 2:Adds water and removes the component that floats
X, Y, Z
X Y, Z + water
Step 3: Filters
Y, Z + water
YZ + water
Step 4: Evaporates water
Z + water
Z water
ironcork
saltsand
13
Day 4: Heat Energy
IV. 2.M.1 Using Physical Science Knowledge Describe common physical changes in matter: evaporation, condensation, sublimation, thermal expansion and contraction. Key concepts: States of matter—solid, liquid, gas. Processes that cause changes of state or thermal effects: heating, cooling, and boiling. Mass/weight remains constant during physical changes in closed systems.Real-world contexts: States of matter—solid, liquid, gas. Changes in state, such as water evaporating as clothes dry, condensation on cold window panes, disappearance of snow or dry ice without melting; expansion of bridges in hot weather, expansion and contraction of balloons with heating and cooling; solid air fresheners.
IV. 2.M.3 Using Physical Science Knowledge Explain physical changes in terms of the arrangement and motion of atoms and molecules. Key concepts: Molecular descriptions of states of matter. Changes in state of matter—melting, freezing, evaporation, condensation; thermal expansion and contraction; Speed of molecular motion—moving faster, slower, vibrate, rotate, unrestricted motion; change in speed of molecular motion with change in temperature. Real-world contexts: Changes in state, such as water evaporating as clothes dry, condensation on cold window panes, disappearance of snow or dry ice without melting; expansion of bridges in hot weather, expansion and contraction of balloons with heating and cooling; solid air fresheners.
IV.2.M.4 Using Physical Science Describe common energy transformations in everyday situations.Key Concepts Forms of energy, including mechanical, heat, sound, light, electrical, magnetic, chemical, food energy. Total amount of energy remains constant in all transformations. Real-world contexts: Motors, generators, power plants, light bulbs, appliances, cars, radios, TV’s, walking, playing a musical instrument, cooking food, batteries, body heat, photosynthesis.
338th Grade Science Toolbox St. Clair County RESA 2005
Science Benchmarks
IV. 2.M.1Describe common physical changes in matter: evaporation, condensation, sublimation, thermal expansion and contraction
IV. 2.M.3 Explain physical changes in terms of the arrangement and motion of atoms and molecules
IV.2.M.4 Describe common energy transformations in everyday situations.
Lesson Focus
Heat Energy
Using Physical Science
Day 4
MaterialsStudent Journal pages 15-18Video, Melting ChocolateColored pencils
Optional:FlaskBalloonHeat source
LESSONStudents will review the motion of molecules and heat energy in the context of melting chocolate chips. A video of this investigation is provided on the CD. They will extend their learning by applying it to another investigation with a balloon on a flask which holds a small amount of water that is heated. If available, the investigation of the balloon and the flask can be performed in the classroom.
KEY QUESTIONBy what pattern will the chocolate chips melt? Why?How can I represent the molecules in a flask with water and a balloon attached when it is heated and cooled?
PROCEDURE1. Read the description of the investigation and the investigation question on Student Journal
page 15. Give students time to make a prediction and write an explanation.2. Watch the video, Melting Chocolate, twice; the first time to get a big picture of what is
happening and the second time to record the time it takes for the chocolate chips to melt. 3. Students make a graph of the data. 4. Discuss the results. Use these questions and the questions from the video:
a. Describe the properties of chocolate before and after it melted. What properties stayed the same? What properties changed? Before: sweet, hard or firm, brown, definite shape, solid. After: sweet, soft, brown, undefined shape, liquid.
b. How did the closeness of the flame affect the chocolate chips? The closer the chocolate chip was to the flame, the faster it melted. The chocolate chip furthest from the flame did not melt.
c. In what direction did the heat energy move? The heat energy moved from the area close to the candle to the area farther away from the candle
d. What can you conclude about how the heat energy moves? Heat energy moves from a warmer area to a cooler area.
e. Describe the molecules of the chocolate chip before and after they were heated. Before the chocolate chip was heated, the molecules of the chocolate chip were arranged in an orderly pattern. They were held together by a molecular force and they were moving in place. When they were heated, the energy they received made them move faster. The molecules remained close, but they were able to slide past each other. The heat energy allowed the chocolate chip to change from a solid state to a liquid state.
f. Describe the molecules in the aluminum foil bridge during the investigation. Aluminum foil is a solid, so the molecules in the aluminum foil remained in an orderly pattern throughout the investigation. The molecules were moving in place. The heat gave them energy which made them vibrate faster and bump into each other harder than before. The molecules did not travel along the foil, but when they bumped their neighbors, they passed the energy on. This is called the conduction of heat. This conduction of heat slowed down as it was passed along the foil because some of the heat energy was passed to the air molecules near the foil bridge.)
5. The balloon and the flask pages can be used as an assessment. They can be completed at a later time.
RESOURCESThe melting chocolate chips activity came from the following resource:AIMS Education Foundation (2004). Hot Chocolate. Popping with Power. (pp. 96-102)
348th Grade Science Toolbox St. Clair County RESA 2005

Name ________________________________________________ Day 4
States of Matter
Most matter on Earth exists in one of three states or phases: solid, liquid, or gas.Each of these states is also known as a phase. The phases differ in how their molecules move. Molecules move randomly and collide with each other in all three phases. In a solid, they are held together in a set pattern by a bond. In a liquid, the bond is not as strong and the molecules can slide past each other. They still stay close to each other and this explains why liquid has a well-defined volume. Since molecules slide past each other in a liquid, they take the shape of the container they are in. In a gas, there is no bond that holds the molecules together. They move independently filling the space of whatever they are in. Matter moves from one phase to another through a physical process. The state of matter changes when energy is added or taken away.
What is Energy?
Energy can be defined as the ability to do work. If an object can be put to work, then it has energy. Applying energy is doing work. In science, work is when you apply a force to an object and it moves.
Objects can have stored or potential energy. When you stretch a rubber band, you store energy in the rubber. You can feel this stored energy when you let it go. It can sting your fingers or zoom across the room. When you jump on a trampoline, as you go down, some of the energy is stored in the springs around the edge of the mat. This energy is used to lift you back up into the air.
When an object moves, the potential energy it has changes to kinetic energy, or energy of movement. The amount of kinetic energy depends on its mass and speed. The kinetic energy of atoms and molecules is sometimes referred to as heat energy.
Heat EnergyOn day 2, we reviewed the motion of molecules. Heat energy is due to the motion of molecules. Heat is related to temperature. An object’s temperature is the measure of the average speed of the atoms and molecules. The higher the temperature, the faster its atoms and molecules move. Heat energy is made up partly of kinetic energy and partly of potential energy. When the atoms move or vibrate, they have kinetic energy because they are moving. They also have potential energy because the spacing between the atoms is changing as they move; as you stretch or squeeze the distance, you store potential energy just like when you stretch or squeeze a spring. So heat energy is due to the motion of individual atoms.
358th Grade Science Toolbox St. Clair County RESA 2005
14
Name ________________________________________________ Day 4Melting Chocolate Chips
Question: By what pattern will the chocolate chips melt? Why?
In this investigation, a foil bridge is made from folding a piece of aluminum foil (24 cm x 30 cm) into a narrow strip and placing it between two 16 ounce metal cans. Five chocolate chips are spread out evenly along the aluminum foil bridge and a small candle is placed under the bridge, under the first chocolate chip. The candle is lit and the time it takes the chocolate chips to melt is measured.
Prediction:
Watch the video (name) Record the amount of time it takes for each chocolate chip to start to melt in the table below. Make a graph of the results.
Results:What happened? Describe your observations and record your results.
368th Grade Science Toolbox St. Clair County RESA 2005
Chip Time1 10 seconds
2 25 seconds
3 45 seconds
4 100 seconds
5
The first chocolate chip close to the flame melted in 10 seconds. The second chip took 25 seconds to start to melt. The third chip took 45 seconds and the fourth chip took 100 seconds. The last chocolate chip did not melt. When the chips melted, they first got soft on the bottom of the chip.
15

Conclusion:What do your results tell you? Are there any patterns?
Explain the patterns using scientific ideas about the motion of molecules and the transfer of heat energy.
What did you find out about the question you were investigating? Was it different from your prediction? Explain.
378th Grade Science Toolbox St. Clair County RESA 2005
Time it Takes for Chocolate Chip to Melt
0102030405060708090
100110
Chip 1 Chip 2 Chip 3 Chip 4 Chip 5
Chip Number
Seco
nds
It took time for the heat energy from the flame needed to melt the chocolate chip to transfer along the foil strip. Although the chips were placed an equal distance apart, it took longer each for each chip to get the heat energy
Heat energy from the flame transferred to the molecules in the foil strip. The molecules in the foil started to move faster making the temperature of the foil bridge higher. The molecules in the foil bumped the molecules in the chocolate, making them move faster. This made the chocolate chip change from a solid to a liquid. It took time for the molecules in the chocolate chips further from the flame to receive enough heat energy to melt. Some of the heat energy transferred to the air molecules and was lost.
The chocolate chips melted in the pattern of increasing time. The further the chip was from the heat source, the longer it took between the chips to melt.
16
Name ________________________________________________ Day 4The Flask and Balloon Part 1
A balloon was placed over the neck of a flask, which had a small amount of water. The flask was placed on a cup warmer. Use pictures and words to explain what happened.
Heat energy from the cup warmer was transferred to the water in the flask. The energy made the molecules in the water move faster, increasing the temperature of the water and the air. As the liquid water molecules moved faster, some escaped the liquid and changed to water vapor molecules. The molecules were free to move and spread out. This increased the pressure inside the flask. Since the balloon was stretchy, the balloon was able to expand.
Note students’ misconceptions: It would be incorrect to say that the hot air rises or the particles expand when heated.
388th Grade Science Toolbox St. Clair County RESA 2005
The molecules in the second flask are moving faster, increasing the pressure inside the flask and balloon and taking up more space.
17

Name ________________________________________________ Day 4The Flask and Balloon Part 2
A balloon was placed over the neck of a heated flask with a small amount of water. The flask was removed from the cup warmer. When the flask cooled, the balloon went into the flask. Explain in words and pictures what happened to the molecules.
The molecules in the first flask were warmer and were moving very fast. They lost energy when they cooled. Some of the water vapor molecules condensed back into liquid water molecules. The molecules in the flask when it was cooled did not take up as much space as they did when they were warmer. The pressure inside the flask decreased. The air pressure outside the flask and balloon pushed the balloon into the flask.
398th Grade Science Toolbox St. Clair County RESA 2005
18

Day 5: Balanced and Unbalanced Forces
IV. 3.M.1 Using Physical Science KnowledgeDescribe and compare motion in two dimensions. Key concepts: Two-dimensional motion—up, down, curved path. Speed, direction, change in speed, change in direction.Real-world contexts: Objects in motion, such as thrown balls, roller coasters, cars on hills, airplanes.
IV. 3.M.2 Using Physical Science KnowledgeRelate motion of objects to unbalanced forces in two dimensions. Key concepts: Changes in motion and common forces—speeding up, slowing down, turning, push, pull, friction, gravity, magnets; Constant motion and balanced forces. Additional forces—attraction, repulsion, action/reaction pair (interaction force), and buoyant force. Size of change is related to strength of unbalanced force and mass of object.Real-world contexts: Changing the direction—changing the direction of a billiard ball, bus turning a corner; changing the speed—car speeding up, a rolling ball slowing down, magnets changing the motion of objects, walking, swimming, jumping, rocket motion, objects resting on a table, tug-of-war.
LESSONThis lesson reviews the concept of balanced and unbalanced forces. Diagrams are used to help students, but if the materials are available, this can be a demonstration or small group lesson. By thinking about each scenario, students can build their own definition
KEY QUESTIONSHow can we relate the motion of objects to unbalanced forces?
PROCEDURE1. For each numbered section 1-4, students will read the scenario,
look at the pictures and predict what happens. Students can discuss their ideas in their small group. Students write the explanation after this discussion. Do not correct students at this time.
2. After students complete the first four scenarios, have a whole group discussion. Students share their ideas and summarize
408th Grade Science Toolbox St. Clair County RESA 2005
Lesson Focus
Motion of Objects
Using Physical Science
Day 5
Science Benchmarks
IV. 3.M.1 Describe and compare motion in two dimensions
IV. 3.M.2 Relate motion of objects to unbalanced forces in two dimensions.
MaterialsStudent Journal Pages 19-21Bricks
Optional:Digital force probes or spring scales to measure the forces.

what happens to the brick. Try to develop a class theory about balanced forces. Suggested responses are given in the Teachers’ Toolbox.
3. Follow a similar procedure for sections 6-9. Students work alone and in small groups. 4. Question 10 requires the students draw a picture and explain what happens. In this case,
focus the attention on when the block is in motion. A force is needed to lift the block up, but once it is lifted shoulder height, the motion stops and the forces are balanced. Give students time to think this through before having a whole group discussion.
5. Share the results for the unbalanced forces section. Develop a class theory for how things move which includes the concepts of balanced and unbalanced forces.
RESOURCES
A project-based curriculum unit for Simple Machines that integrates the use of technology in developing science concepts.Rivet, A., Krajcik, J., & Ganiel, U. (2002). How do machines help me build big things? Ann Arbor, Michigan: Center for Highly Interactive Computing in Education.
418th Grade Science Toolbox St. Clair County RESA 2005
Name ___________________________________________ Day 5
How Do Things Move?
1. Observe a brick on the table. What happens to the brick? Why?
2. The brick is on the table. Attach a force probe to each side of the brick. Push equally hard on both force probes. What happens to the brick? Why?
3. The brick is on the table. Pull equally hard on each side. What happens to the brick? Why?
428th Grade Science Toolbox St. Clair County RESA 2005
The brick does not move. 0 forces are pushing from right or left. The force of the table pushing up balances the gravitational force pulling the brick down.
The brick does not move. The force pushing the brick from the left is equal to the force pushing the brick from the right. These forces are balanced. There are no changes in the forces pushing up or pulling down.
35 N 35 N
The brick does not move. The force pulling the brick from the left is equal to the force pulling the brick from the right. These forces are balanced. There are no changes in the forces pushing up or pulling down.
47 N47 N
438th Grade Science Toolbox St. Clair County RESA 2005
19

4. Attach one force probe to the brick. Suspend the brick in the air. Hold it as still as possible. What happens to the brick?
5. Write a theory about why the brick did not move in these investigations. Include the concepts of force and motion.
6. The brick is on the table with two force probes attached. Pull harder on the right. What happens? Why?
7. Why was the motion to the right?
8. The brick is on the table with 2 force probes attached. Push harder on the right side and lightly on the left. Predict the force. What happens? Why?
448th Grade Science Toolbox St. Clair County RESA 2005
When two forces are equal and are applied in opposite directions, they are balanced and there is no motion.
The brick does not move. The pulling force on the brick was 17 N. This is the same as the gravitational force pulling down on the brick. The forces are balanced and there is no motion.
17 N
17 N
47N25 N The brick moves to the right. The pulling force on the right is greater than the pulling force to the left. The forces are in the opposite direction, but they are not equal. They are unbalanced forces, so the brick moves.
36 N17 N The brick moves to the left. The pushing force on the right is greater than the pushing force to the left. The forces are in the opposite direction, but they are not equal. They are unbalanced forces, so the brick moves.
The forces were opposite in direction, but were not equal. The motion occurs in the direction of the greater applied force.
20

9. Why was the motion to the left?
10. Hold the brick waist high with one force probe attached to the top of the brick. Pull the brick up to your shoulder. Hold it at shoulder level for 10 seconds. The graph using the force probe is pictured below. After 1.42 seconds, the greatest force was measured. It was 16.81 N.
Draw a picture of the brick and the forces acting on the brick between second 1 and 2. Explain what happened to the brick.
11. Write a theory about how things move. Use the concept of balanced and unbalanced forces.
458th Grade Science Toolbox St. Clair County RESA 2005
The forces were opposite in direction, but were not equal. The motion occurs in the direction of the greater applied force.
17 N
Lesser force
The brick moved up because the pulling force upward was greater than the force of gravity pulling down. Like the other examples, the forces are in opposite directions, but are not equal.
If two equal forces are applied in opposite directions, they are balanced forces and the object does not move. When two forces are not equal or not in opposite directions, they are unbalanced and the object moves in the direction of the greater applied force.
21
Day 6: The Roller Coaster
IV. 3.M.1 Using Physical Science KnowledgeDescribe and compare motion in two dimensions. Key concepts: Two-dimensional motion—up, down, curved path. Speed, direction, change in speed, change in direction.Real-world contexts: Objects in motion, such as thrown balls, roller coasters, cars on hills, airplanes.
IV. 3.M.2 Using Physical Science KnowledgeRelate motion of objects to unbalanced forces in two dimensions. Key concepts: Changes in motion and common forces—speeding up, slowing down, turning, push, pull, friction, gravity, magnets. Constant motion and balanced forces. Additional forces—attraction, repulsion, action/reaction pair (interaction force), buoyant force. Size of change is related to strength of unbalanced force and mass of object.Real-world contexts: Changing the direction—changing the direction of a billiard ball, bus turning a corner; changing the speed—car speeding up, a rolling ball slowing down, magnets changing the motion of objects, walking, swimming, jumping, rocket motion, objects resting on a table, tug-of-war.
LESSONIn this lesson, students will review the benchmarks for the motion of objects standard in the context of a roller coaster activity. This activity was done in the classroom of one of the toolbox writers. The data collected is presented in this activity for your students to analyze and interpret. The Roller Coaster lesson can be used as an assessment. It also includes a stem and leaf plot and a scatter plot that is part of the 8th
grade mathematics curriculum.
KEY QUESTIONSHow can we describe and compare the motion of objects? How does the height of the first hill on a roller coaster affect the distance and speed in which a marble travels on the roller coaster path?
PROCEDURE1. Read the context of the investigation with your students and
answer questions they may have about the activity.
468th Grade Science Toolbox St. Clair County RESA 2005
Lesson Focus
Motion of Objects
Using Physical Science
Day 6
Science Benchmarks
IV. 3.M.1 Describe and compare motion in two dimensions
IV. 3.M.2 Relate motion of objects to unbalanced forces in two dimensions.
MaterialsStudent Journal Pages 22-25
2. Students answer the questions independently.3. Students may still have some misconceptions about these concepts. Discuss their
answers as a whole group. 4. The web page listed in the resources section and on the student page will give students
the opportunity to make a virtual roller coaster and read more information about this concept.
RESOURCES
Here is a roller coaster applet. Students can build a virtual roller coaster.http://www.funderstanding.com/k12/coaster/
478th Grade Science Toolbox St. Clair County RESA 2005

Name ______________________________________________ Day 6Roller Coasters
Mike’s class was studying the motion of objects. In class they made a roller coaster from foam tubing. They formed a loop with part of the tube and taped it to the floor. They taped one end of the roller coaster to the wall at different heights from the floor. The first height was taped at 1.4 meters (140cm). The second height was set at 1.2 meters (120 cm). The third height was set at 1 meter (100 cm).
A marble, held in position at the top of the roller coaster, was let go. It rolled down the hill and then up and around the loop. It continued to roll off the foam tubing onto the floor where it eventually came to a stop. The class timed how long it took for the marble to complete the path. They measured the distance the marble traveled on the roller coaster and on the floor after it left the roller coaster. This process was repeated 6 times for each height.
The stem and leaf plots below show the data Mike’s class collected during the roller coaster investigation.
Distance the Marble Rolled (cm) from Different Starting Heights
1. What was the longest distance the marble rolled in Roller Coaster 3?A. 78 cmB. 97 cmC. 267 cmD. 812 cm
488th Grade Science Toolbox St. Clair County RESA 2005
56 7 .88 .1 .29 .2 .6 .7
5 .3 .8 6 .0 .2 .6 .6789
56 .5 .7 .9 7 .0 .0 .489
Answer: B
Roller Coaster 2Height 1.2 m
Roller Coaster 1Height 1.0 m
Roller Coaster 3Height 1.4 m
22
Mike made the following scatter plot of the data collected:
2. What can you conclude about the relationship between the height of the roller coaster and the distance the marble rolls?
A. When the height of the roller coaster increases, the distance the marble rolls decreases.
B. When the height of the roller coaster decreases, the distance the marble rolls increases.
C. When the height of the roller coaster increases, the distance the marble rolls increases.
D. You cannot determine a relationship between the height of the roller coaster and the distance the marble rolls from this type of graph.
According to Newton’s First Law, an object at rest will stay at rest until a force pushes or pulls it and causes it to move. An object in motion will keep moving in a straight line, in the same direction, and at the same speed, unless a force pushes or pulls it, changing its direction and/or speed.
3. What best describes the force that put the marble in motion?
A. An unbalanced forceB. A balanced forceC. A powerful forceD. A frictional force
498th Grade Science Toolbox St. Clair County RESA 2005
Answer: A
Answer: C
23
4. Which statement best describes what changed the direction of the marble at the top of the ramp when it was released?
A. The force of the marble pushing upward was less than the force of gravity pulling the marble downward. This is an unbalanced force.
B. The force of gravity pulling the marble downward was equal to the force of the marble pushing downward. This is a balanced force.
C. The force of gravity pulling the marble downward was less than the force of the marble pushing upward. This is an unbalanced force.
D. The force of gravity pushed the marble downward and the marble did not have an upward force. This is an unbalanced force.
5. What two forces cause the marble to slow down as it goes up a hill?
A. Electrical and magnetic forcesB. Balanced and unbalanced forcesC. Gravity and buoyancyD. Gravity and friction
6. The marble changed its speed, as it was moving along the path after it left the roller coaster. What caused the marble to slow down and stop?
A. The marble’s energy from the roller coaster was used up.B. The frictional forces of the marble rubbing the floor and the air.C. Only the frictional force of the marble rubbing on the floor.D. Only the force of gravity.
7. The marble speeds up when it is on a downhill slope. What force makes the marble speed up?
A. A gravitational forceB. A balanced forceC. A frictional forceD. A buoyant force
8. How was the marble able to roll up through the loop?
A. The force of gravity was less at that part of the roller coaster.B. The force of gravity was greater at that part of the roller coaster.C. Moving objects keep moving unless a force stops them.D. The marble received a boost of energy from rolling down the hill.
508th Grade Science Toolbox St. Clair County RESA 2005
Answer: C
Answer: A
Answer: B
Answer: A
Answer: D
24
9. Which statement is NOT true about the energy in the roller coaster system?
A. Some of the energy is transformed to heat energy.B. Some of the energy is transformed to friction.C. The energy in the roller coaster system decreases as the marble rolls to a stop.D. The total energy in the roller coaster system does not increase or decrease.
10. What can you conclude about the relationship between the speed of the marble and the height of the roller coaster?
A. When the height of the roller coaster increases, the speed of the marble decreases.
B. When the height of the roller coaster decreases, the speed of the marble decreases.
C. When the height of the roller coaster decreases, the speed of the marble increases.
D. The speed of the marble does not depend on the height of the roller coaster.
518th Grade Science Toolbox St. Clair County RESA 2005
Answer: C
Answer: B
25
Lesson Focus
Motion of Objects
Constructing Scientific Knowledge Using Physical Science
Days 7-8: Simple Machines
I.1.M.2 Constructing New Scientific KnowledgeDesign and conduct scientific investigations. Key concepts: The process of scientific investigations—test, fair test, hypothesis, theory, evidence, observations, measurements, data, conclusion. Forms for recording and reporting data—tables, graphs, journals. Real-world contexts: Any in the sections on Using Scientific Knowledge; also, recognizing differences between observations and inferences; recording observations and measurements of everyday phenomena.
IV. 3.M.2 Using Physical Science Knowledge Relate motion of objects to unbalanced forces in two dimensions. Key concepts: Changes in motion and common forces—speeding up, slowing down, turning, push, pull, friction, gravity, magnets. Constant motion and balanced forces; Additional forces—attraction, repulsion, action/reaction pair (interaction force), buoyant force. Size of change is related to strength of unbalanced force and mass of object.Real-world contexts: Changing the direction—changing the direction of a billiard ball, bus turning a corner; changing the speed—car speeding up, a rolling ball slowing down, magnets changing the motion of objects, walking, swimming, jumping, rocket motion, objects resting on a table, tug-of-war.
IV. 3.M.5 Using Physical Science KnowledgeDesign strategies for moving objects by application of forces, including the use of simple machines. Key concepts: Types of simple machines—lever, pulley, screw, inclined plane, wedge, wheel and axle, gear; direction change, force advantage, speed and distance advantage.Real-world contexts: Objects being moved by using simple machines, such as wagons on inclined planes, heavy objects moved by levers, seesaw, cutting with knives or axes.
LESSON
528th Grade Science Toolbox St. Clair County RESA 2005
Science BenchmarksI.1.M.2 Design and conduct scientific investigations.
IV. 3.M.2 Relate motion of objects to unbalanced forces in two dimensions.
Identify and use simple machines and describe how they change effort
IV. 3.M.5 Design strategies for moving objects by application of forces, including the use of simple machines.
Days 7-8
MaterialsStudent Pages 26-31Videos on CD
Simple Machines: Inclined Plane
Simple Machines: Lever
Simple Machines: Pulley
OPTIONAL:BrickSpring ScaleBoard (1 m)Meter tape or ruler2 Pulleys
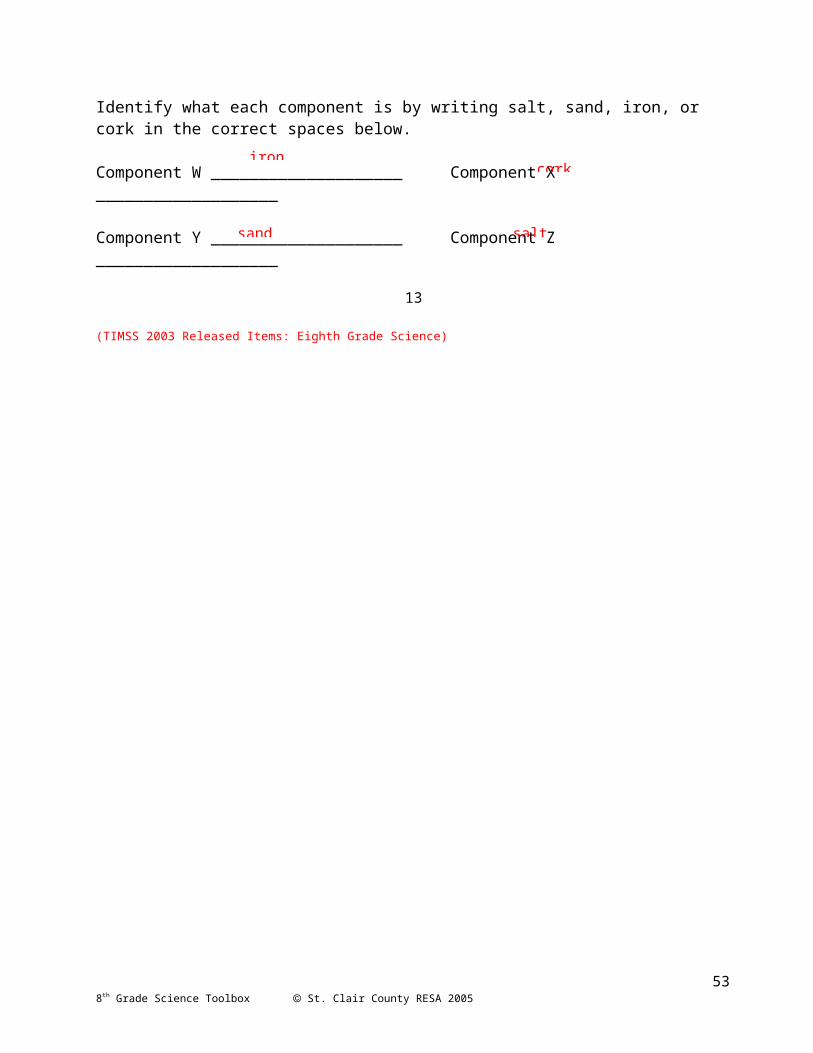
The big concepts for students to understand are: machines are devices that change the direction or magnitude of the applied force. Machines help us by making it easier to apply the unbalanced force needed to move heavy things.
There are six simple machines: the inclined plane, pulley, lever, screw, wedge, and wheel and axle. Some of these are variations of others. The wedge is made of two inclined planes. The screw is an inclined plane that wraps around itself.
The inclined plane reduces the force needed to lift an object. Instead of lifting the object straight up, it is pushed along the inclined plane. The longer the inclined plane, the more gradual the slope and less force is needed. A shorter plane would have a steeper slope and would require more force. The trade-off for an inclined plane is that you have to move the object a longer distance to use less force.
The lever is a rigid object that is usually long and narrow, like a bar or pole. This bar or pole turns or pivots around a fixed point called a fulcrum. There are different kinds of levers, depending on where the fulcrum is and where you apply the force. In a first class lever, the fulcrum is in the middle, between the force and the load. If the fulcrum is close to the load, then less force is needed to lift an object. The trade off is that the pushing end of the lever has to move a greater distance. In a second class lever, the load is in the middle between the fulcrum and the force. Wheel barrows and nut crackers are examples of second class levers. In a third class lever, the force is in the middle. Examples of third class levers are golf clubs, hockey sticks, baseball bats, brooms, rakes, and catapults.
At the beginning of this review, students are asked to think about the pyramids and how simple machines may have been used to help build them. The focus for this review is on three of the simple machines: the inclined plane, the lever and the pulley. As this is meant to be a review, what would take about 9-10 days of hands-on, minds-on classroom instruction is condensed to one day. To make this review process easier for the visual learners, video of the activities are available on the CD. Pictures are also presented on the students’ journal pages.
KEY QUESTIONWhat is the advantage of using simple machines like inclined planes, levers and pulleys?
PROCEDURE1. Read the scenario about the pyramids on their journal page 26. Ask students to think
about how the large slabs of rock were lifted to build them. Tell them they will review some of the advantages of using simple machines.
2. Students record their ideas about how inclined planes are used to lift a brick.3. Watch the video about inclined planes on the CD.4.
RESOURCESSimple Machineshttp://edheads.org/activities/simple-machines/index.htm
Odd MachineIncludes application of gravity and friction conceptshttp://www.edheads.org/activities/odd_machine/index.htm
538th Grade Science Toolbox St. Clair County RESA 2005
An interactive website from the COSI Museum; Focus is on explaining the mechanical advantage of the six simple machines. This one may take awhile to download.http://www.cosi.org/onlineExhibits/simpMach/sm1.html
548th Grade Science Toolbox St. Clair County RESA 2005
Without Inclined Plane With Inclined Plane
Name ___________________________________________ Days 7-8Simple Machines
The pyramids were built from huge slabs of rock like limestone, sandstone and granite. It is believed that the rocks were mined in the quarries that were far from the site where the pyramids were built. They were probably floated down the Nile on barges during the time of the year when the river flooded. Then they were dragged the rest of the way by teams of men or oxen.
Simple machines may have been used to help them move the bricks. What are some of the advantages of using inclined planes, levers, and pulleys?
Inclined Plane
Question: How can an inclined plane help to lift a brick?
Hypothesis: (What do you think and why?)
______________________________________________________________________
______________________________________________________________________
Procedure: Stack four paver bricks (or similar objects) to a height of 24 cm. This will represent the distance we want to lift the brick, as if we were building the pyramids. Tie a string to a larger brick with mortar holes. Measure the force it takes to lift the brick straight up to the top of the stack with a spring scale and record.
Place one end of the inclined plane on top of the stack of paver bricks. Pull the large brick with the spring scale. Measure the force and record.
558th Grade Science Toolbox St. Clair County RESA 2005
26
Results:
Force DistanceWithout inclined plane 19 N 24 cmWith inclined plane 10 N 60 cm
Write the results of this investigation. Use words and the numbers from the data table to describe what happened.
Graph:
Conclusion: The conclusion is a general statement of what you now know about how inclined planes help to lift the brick. It answers the research question using the data on the graph as evidence. Write a conclusion for this investigation on the lines.
568th Grade Science Toolbox St. Clair County RESA 2005
27
A force of 19 N was needed to lift the brick 24 cm straight up. A force of 10 N was needed to lift the brick 24 cm along the inclined plane that was 60 cm long.
More force is needed to lift a brick without the inclined plane, but the brick moves a shorter distance. Less force is needed to lift the brick with an inclined plane, but the brick must move a greater distance.
Lever
Question: How can a lever help to lift a brick?
Hypothesis: (What will happen and why?)
Procedure:If you have a different brick, measure the force needed to lift the brick straight up 24 cm from the table to the top of the stack of paver blocks with the spring scale; record. If you have the same brick, record the results from the Inclined Plane investigation.
Tie the brick to one end of a long narrow strip of wood, 1 meter long. The strip of wood will act as the lever. Stack four paver bricks (or similar objects) to a height of 24 cm next to the lever. This represents the height we want to lift the brick. To be consistent, place a piece of tape on the lever 30 cm from the brick. Put the fulcrum under this marked spot on the lever. Attach a string to the other end of the lever and attach the spring scale to this string.
Pull down on the spring scale until the brick is lifted to the height of the paver bricks, 24 cm. Measure the effort force on the spring scale. Also measure the distance your hand moves as it pulls down on the string.
Results:
Write the results of this investigation. Use words and the numbers from the data table to describe what happened.
578th Grade Science Toolbox St. Clair County RESA 2005
Force DistanceWithout Lever 19 N 24 cm
With Lever 10 N 46 cm
28
A force of 19 N was needed to lift the brick 24 cm without the lever. A force of 10 N was needed to lift the block the same height with the lever, but the distance the effort had to move was 46 cm.
Graph:
Conclusion: The conclusion is a general statement of what you now know about how levers help to lift the brick. It answers the research question using the data on the graph as evidence. Write a conclusion for this investigation on the lines.
Pulley
Question: How can a pulley help you lift a brick?
Hypothesis:
Procedure:If you have a different brick, measure the force needed to lift the brick straight up 24 cm from the table to the top of the stack of paver blocks with the spring scale; record. If you have the same brick, record the results from the Inclined Plane investigation.
588th Grade Science Toolbox St. Clair County RESA 2005
29
A force of 19 N was needed to lift the brick 24 cm straight up. A force of 10 N was needed to lift the brick 24 cm along the inclined plane that was 60 cm long.
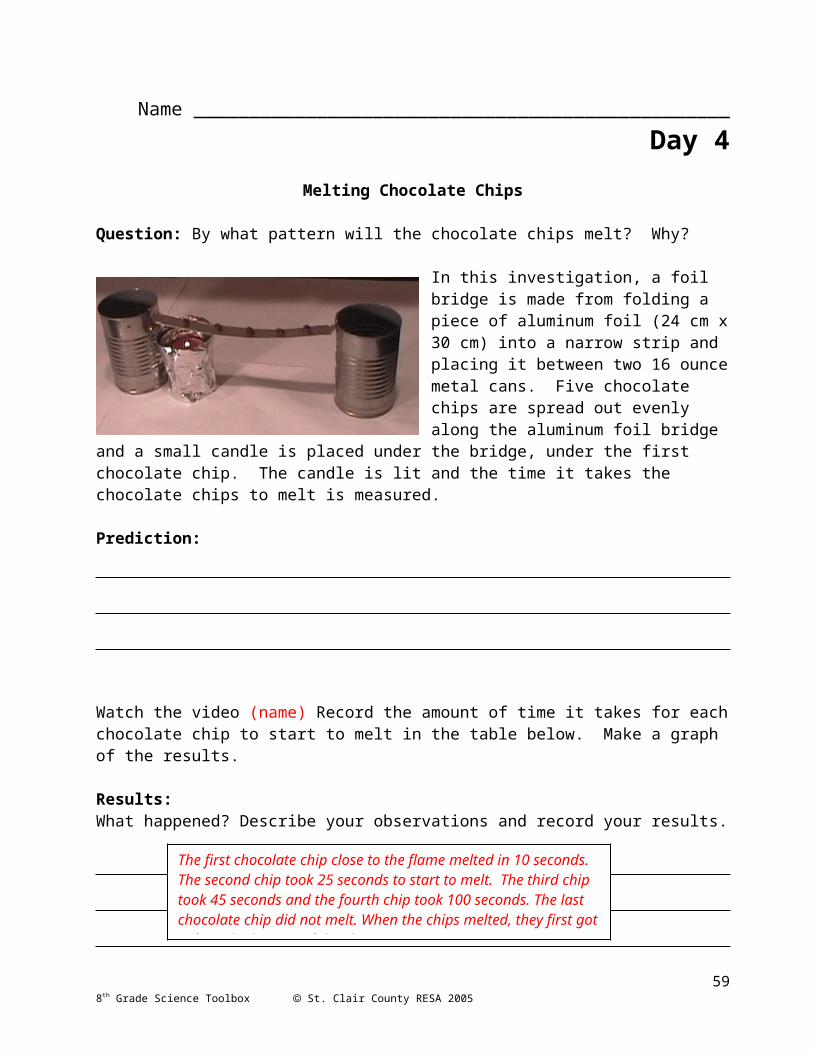
Movable pulley attached to the brick. Fixed pulley at the
top of the ring stand
Single Fixed PulleyStack four paver bricks (or similar objects) to a height of 24 cm to represent the distance we need to move the brick. Attach a pulley to the top of a ring stand. Tie one end of a string to the brick and bring the other end of the string through the pulley at the top of the ring stand. Make a loop on this end of the string and attach the spring scale. Pull the string with the spring scale until the bottom of the brick is even with the top of the stack of paver bricks. Measure and record the force.
Fixed and Movable PulleyAttach one end of the string to the top of the ring stand. Also attach a fixed pulley to the top of the ring stand. Attach a second pulley to the brick as shown in the picture. This will be the movable pulley. Bring the string attached to the top of the ring stand down through the movable pulley. Continue to bring the string back up through the pulley at the top. Tie a loop at this end and attach the spring scale.
Pull the string attached to the spring scale until the brick is lifted 24 cm to the top of the stack of paver bricks. Measure and record the distance your hand moves as you pull the string.
Results:
Write the results of this investigation. Use words and the numbers from the data table to describe what happened.
598th Grade Science Toolbox St. Clair County RESA 2005
Force DistanceWithout a Pulley 19 N 24 cm
With One Fixed Pulley 21 N 24 cmWith a Fixed and a Movable Pulley 11 N 50 cm
30
A force of 19 N was needed to lift the brick up 24 cm without a pulley. A force of 21 N was needed to lift the brick up 24 cm with one pulley. A force of 11 N was needed to lift the brick 24 cm, but the effort force had to pull the string 50 cm.
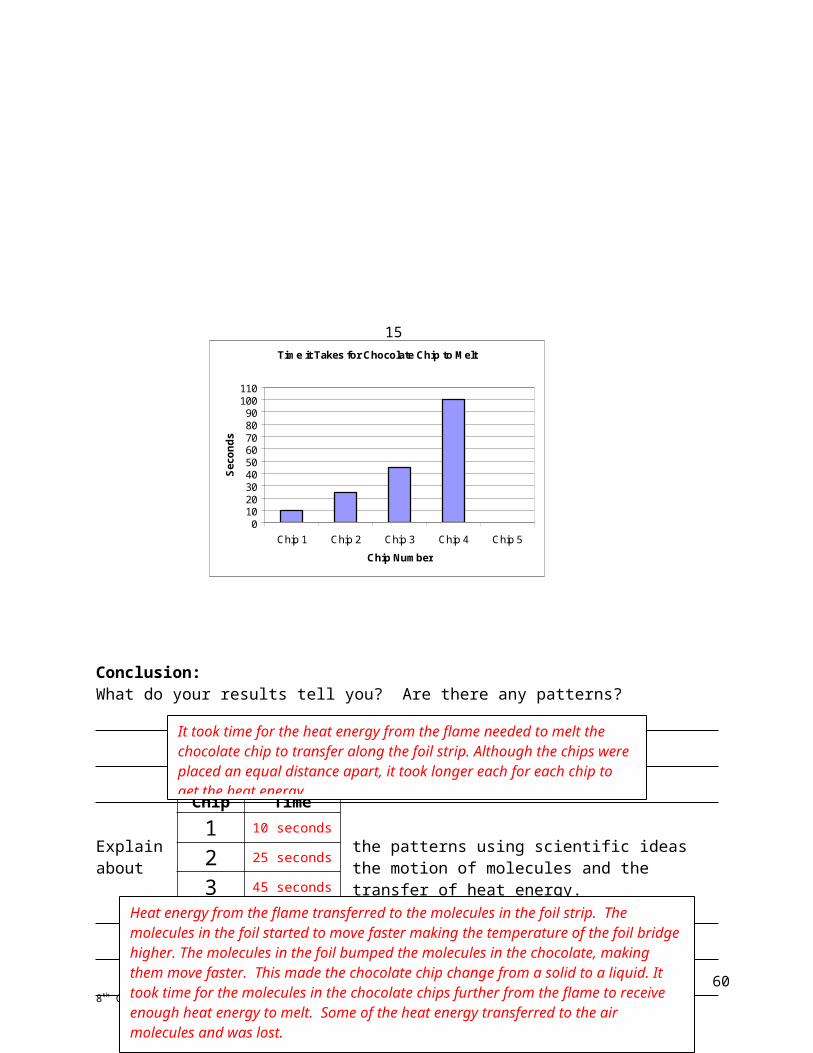
Graph:
Conclusion: Write a general statement of what you now know about how pulleys help to lift the brick. Answer the research question using the data on the graph as evidence.
608th Grade Science Toolbox St. Clair County RESA 2005
31
With one pulley, the effort force to lift the load increased slightly. This was due to the friction. The direction of the force changed. You pulled down to lift the load up.Less force is needed (about one-half the force) to lift the brick with 2 pulleys, but the effort force must move a greater distance.
Day 9: Light
IV. 4.M.3 Using Physical Science Knowledge (Waves and Vibrations)Explain how light is required to see objects. Key concepts: Light source, object, eye as a detector, illumination, path of light, reflection, absorption. Real-world contexts: Seeing common objects in our environment; seeing “through” transparent media, such as windows, water; using flashlights to see in the dark.
IV. 4.M.4 Using Physical Science Knowledge (Waves and Vibrations)Describe ways in which light interacts with matter. Key concepts: Reflection, refraction, absorption, transmission, scattering, medium, lens; Transmission of light—transparent, translucent, opaque. Real-world contexts: Objects that reflect or absorb light, including mirrors; media that transmit light such as clear and frosted glass, clear and cloudy water, clear and smoky air; objects that refract light, including lenses, prisms, and fiber optics; uses of lenses, such as eye, cameras, telescope, microscope, magnifying lens, for magnification and light-gathering.
LESSONThis lesson is a review of the benchmarks for light.
Naïve Conceptions Some students believe:
That light travels from our eyes to the objects we look at rather than from the object to our eyes.
That light can go around things, rather than that light travels only in straight lines
That light travels further in the night than in day That brighter light can travel farther than dim light That nocturnal animals like owls and cats can see in total
darkness
618th Grade Science Toolbox St. Clair County RESA 2005
Science BenchmarksIV. 4.M.3 Explain how light is required to see objects.
IV. 4.M.4 Describe ways in which light interacts with matter.
Lesson Focus
Waves and Vibrations
Using Physical Science
Day 9
MaterialsStudent Journal Pages 32- 35
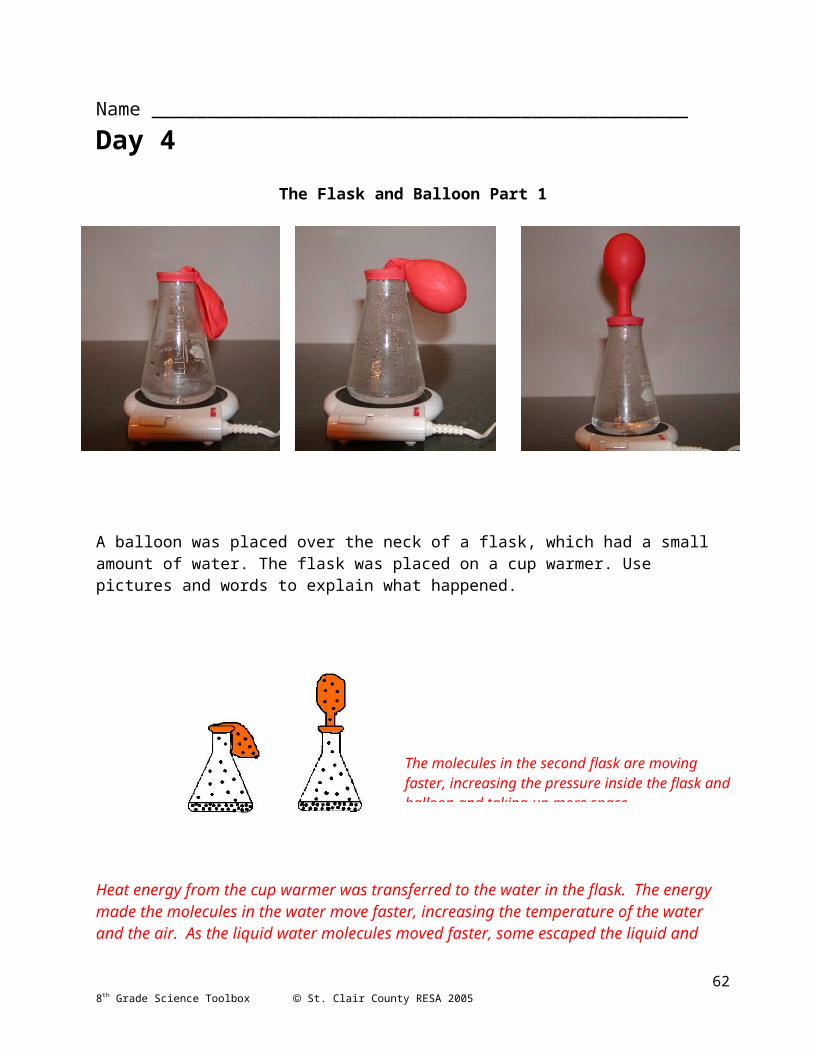
KEY QUESTIONHow are humans able to see things? How does light interact with matter?
PROCEDURE1. Students read Light on pages 32-33. Follow the reciprocal teaching strategies from
pages 25-25, Day 3.2. Students complete the two-column notes organizer to organize the concepts about light
presented in the reading. They can use the suggested outline headings, or use their own loose leaf paper and create their own outline.
RESOURCESAnnenberg: the Science of Light. Teacher Labhttp://www.learner.org/teacherslab/science/light/
Annenberg: Shedding Light on Sciencehttp://www.learner.org/resources/series118.htmlThis is an 8 part series of tapes for Teachers’ Professional Development
How Stuff Works: Lighthttp://science.howstuffworks.com/light.htmThere are quite a few advertisements on this page, but the content is good.
628th Grade Science Toolbox St. Clair County RESA 2005

Name _______________________________________________ Day 9Light
Everything we see, we can see because of light. We see things because they either produce light, like the sun, light bulbs, lasers, lightning bugs and candles, or they reflect light. Light is energy.
Scientists think about light in two ways, the particle theory and the wave theory. In the particle theory, light is thought of as a stream of particles called photons. This theory developed because people saw rays of light streaming through clouds on partly sunny days. The particle theory explains how objects that block the stream of light make shadows. In the wave theory, light travels in waves of different sizes. Waves are arranged in order by size and frequency in what is called the electromagnetic spectrum. The electromagnetic spectrum includes gamma rays, X-rays, ultraviolet, optical or visible light waves, infrared, and radio waves. Gamma waves are the shortest and radio waves are the longest. Human eyes can only see the optical or visible light waves.
The frequency of the waves determines the colors we see. Frequency is the number of complete waves that pass a given point in a certain amount of time. It can also be described as the number of waves per second. Frequency is measured in units called hertz. Red has the shortest frequency of visible light and violet the longest. The longer the frequency is, the greater the energy. Violet has more energy than red.
Light travels in a straight line. It travels at different speeds, depending on the medium it is traveling through. Light travels about 186,000 miles per second in the vacuum of space. It slows down when it travels through air, water, and other transparent materials like glass and diamonds. The denser the material, the slower it travels.
Interactions of Visible Light with Matter
Visible light interacts with materials in different ways. Some materials allow light to pass through. Objects that transmit light, that is, they let nearly all the light pass through, are transparent. Examples of transparent materials are glass, clear water and diamonds. If light is scattered as it passes through a medium and the object is distorted or hazy, the medium is said to be translucent. Examples of translucent materials include sunglasses, waxed paper, frosted glass windows, or smoky air. Objects that do not transmit any light are opaque.
When light reaches matter it can be: Transmitted, or pass through the object with no effect Refracted through the object, which changes speed Reflected off the object Absorbed by the object
A combination of these interactions is possible at one time.
638th Grade Science Toolbox St. Clair County RESA 200532
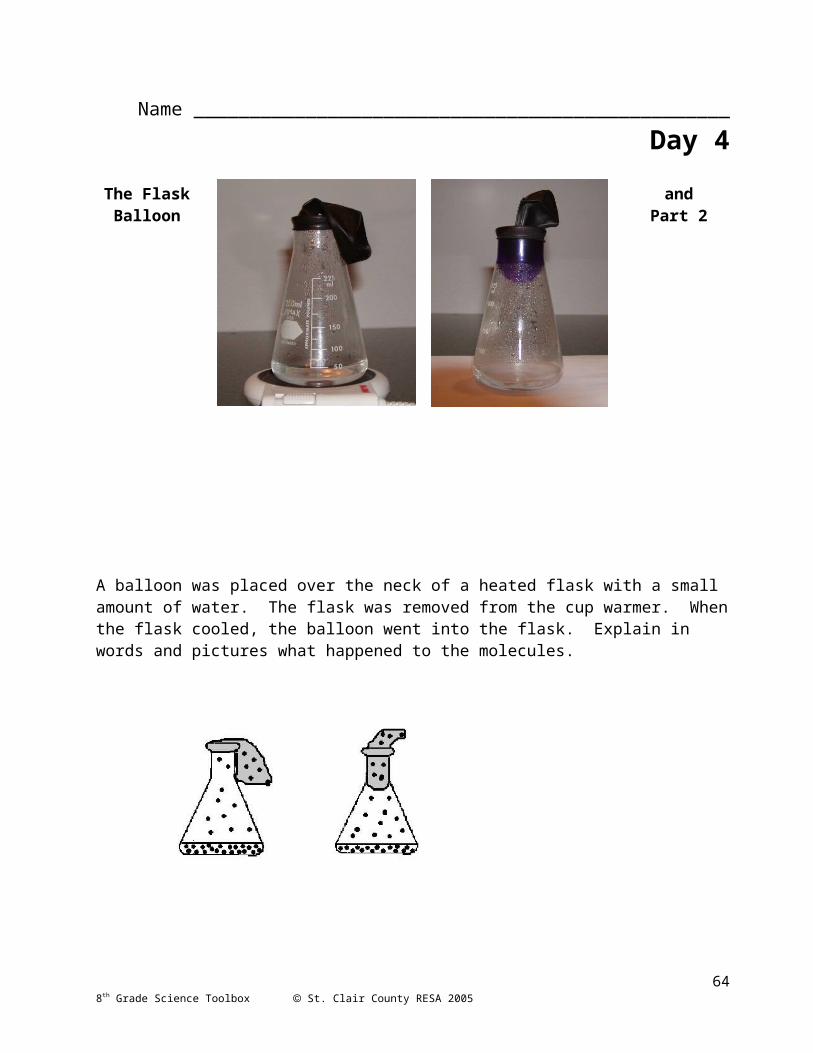
Convex Lens
Reflected Light
Reflected light is light that bounces off something. The law of reflection of light says that the angle at which light bounces off a surface is the same as the angle at which it hits the surface. When light hits a flat, smooth surface like metal or glass, the light energy bounces off in one direction. When light hits a rough surface, it scatters in many directions because the surface is uneven. But a surface can be rough even if it does
not appear to be rough to us. It could be rough to an extremely small photon of light. You can see the uneven surface of paper if you look at paper under a microscope. You are able to see the words on this paper when you look them from any angle because of the way the reflected light is scattered. When that light reaches your eyes, you see it.
Refracted Light
Light travels at different speeds through space, air, water and other transparent materials. When it reaches the boundary between two different kinds of material, it changes speed and in most cases it changes direction. When this happens, we say that light is bent or refracted. You can see this when you look at objects in water. A pencil in a glass of water appears to be bent when you look at the pencil through the side of the glass.
Light is also refracted when it travels through lenses. The bending of light through the curved surface of a lens causes the light rays to come together or spread out. A convex lens causes light to come together. This can produce an image that can be focused on a screen. A concave lens spreads the light out, so an image on a screen cannot be focused.
Absorbed Light
When light is absorbed, almost all of its energy is transferred to the matter it strikes. This absorption of energy causes the atoms and molecules in that matter to move faster and heat up. How fast they speed up depends on the type of material and the arrangement of molecules.
648th Grade Science Toolbox St. Clair County RESA 2005
Concave Lens
Absorbed Light
Reflected Light
33
Interactions
with Matter
Keywords: Notes:
Light I. Light is energy
A. We see because of light
1. Some objects produce their own light
2. Some objects reflect light
B. Particle Theory
1. Light is made of particles called photons
2. This theory explains shadows
C. Wave theory
1. Light travels in waves of different sizes called
frequencies
2. The frequency determines the color
3. Light travels in a straight line
4. It travels at different speeds through different
media (space, air, water, glass)
II. Can light pass through the object?
A. If light passes through, the object is transparent
B. If some light passes through, it is translucent
C. If no light passes through, the object is opaque
III. When light reaches matter it can be:
A. Transmitted
1. Light passes through
B. Reflected
1. Light bounces off at the same angle it hit the
surface
2. If light hits a smooth surface, it bounces off in one
direction
658th Grade Science Toolbox St. Clair County RESA 2005
Cornell Two-Column Notes
3. If light hits a rough surface, it scatters in many
directions
C. Light can be refracted
1. When light reaches the boundary between
different media, it changes speed and in most
cases, direction
2. Refraction makes the light look bent
3. Lenses refract light too
D. Light can be absorbed
1. Absorption causes the atoms and molecules in
matter to move faster and heat up.
2. How fast they speed up depends on the type of
material
668th Grade Science Toolbox St. Clair County RESA 2005
Day 10: Sound
IV. 4.M.1 Using Physical Science Knowledge Explain how sound travels through different media. Key concepts: Media—solids, liquids, gases, vacuum.Real-world contexts: Sounds traveling through solids, such as glass windows, strings, the earth; sound traveling through liquids, such as dolphin and whale communication; sound traveling through gases, such as human hearing, sonic booms.
LESSON
In this activity, students will physically represent sound waves traveling through a solid and a gas. They will watch a video of the bell ringing in a vacuum. They will take a practice assessment on the concepts of light and sound. KEY QUESTIONWhat are sound waves? How do they travel? How do we hear sound? What factors affect sound?
PROCEDURE1. Students simulate a wave as it travels through a solid and a gas.
Students, representing atoms, stand in 2 lines, one behind the other. The same number of students should be in each line. To represent a gas, students stand more than an arm’s length apart. To represent a solid, students stand less than an arm’s length apart. A touch represents a wave. When given a signal, the last student in each line touches the shoulder of the student standing in front on him/her. When that person is touched, he or she touches the person in front of him/her. This “wave” continues until it reaches the first person in line, who raises their arms to show the wave reached the end. The wave will take longer to travel through the line representing the gas because it must travel a longer distance between atoms. The person representing an atom of gas will have to take a step forward to reach the person in front of them. This analogy should help students understand how sound waves travel faster through a solid than through a gas.
2. Watch the video, Bell in a Jar. Complete Student Journal page 36
678th Grade Science Toolbox St. Clair County RESA 2005
Science Benchmarks
IV. 4.M.1 Explain how sound travels through different media.
Lesson Focus
Waves and Vibrations
Using Physical Science
Day 10
MaterialsSoundStudent Journal pages 36 -38Video: Bell in a Jar
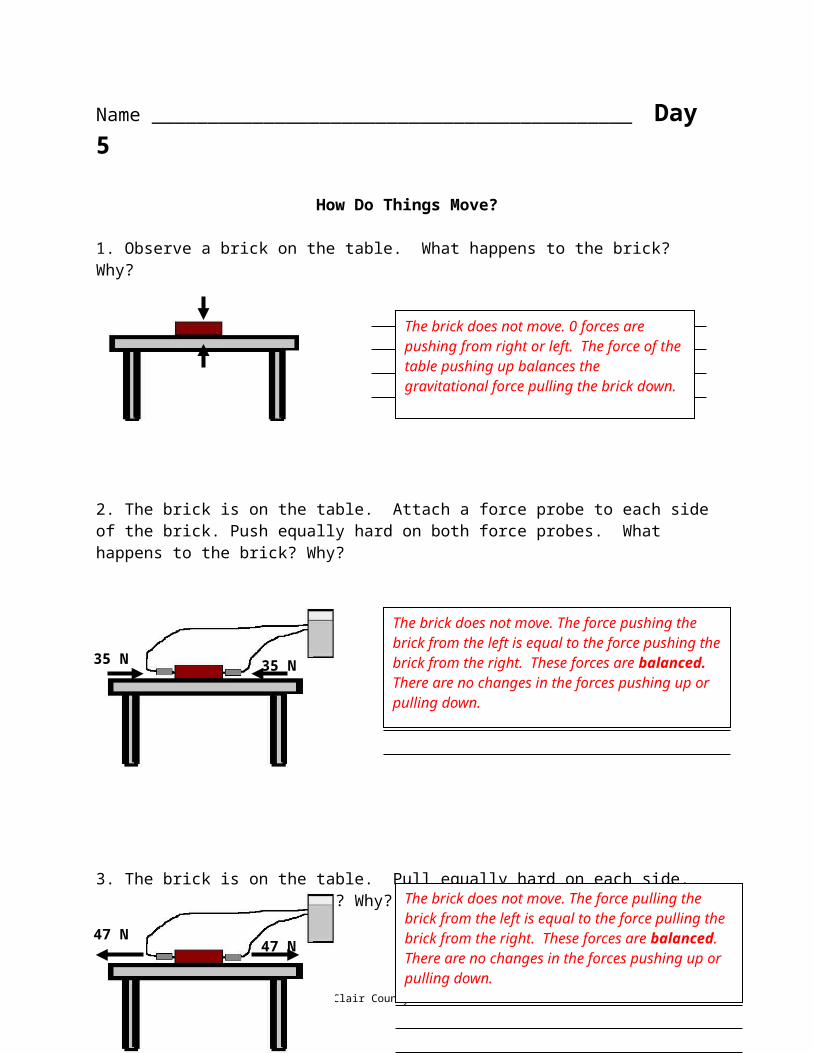
3. Complete Journal pages 37 and 38 as a review of Light.
RESOURCES
http://www.geocities.com/thesciencefiles/sound/energy.html
To better understand the wave activity described in this lesson, watch a video of children in a classroom engaged in the demonstration. This is from the Earth and Space Science Series, Session 3 at about the 30 minute mark. http://www.learner.org/resources/series195.htmlYou can watch the videos on a computer with broadband Internet access. You need to create a free account first.
688th Grade Science Toolbox St. Clair County RESA 2005

Name __________________________________________ Day 10Sound
What makes sound?
What do we need to be able to hear sound?
Watch the video, Bell in a Jar. See if your ideas are the same as the ideas presented in the video.
Describe what happened to the bell in the jar.
What can you conclude about sound?
Can astronauts hear when they are walking in space? Explain.
698th Grade Science Toolbox St. Clair County RESA 2005
You could hear the bell ring when the bell was first placed in the jar. When the vacuum pump removed most of the air, you could not hear the bell very well. The sound of the bell got louder as the air was pumped back into the jar.
Sound is made when something vibrates.The sound waves travel through matter. They can not travel through a vacuum
Astronauts can hear sounds from radio waves because radio waves are part of the electromagnetic spectrum that can travel through space. Sound waves travel through matter. Astronauts can not hear sounds other than what they hear on their radio because there are no air molecules for the sound to travel through in space. Two astronauts’ helmets would have to touch for them to hear each other in space without a radio.
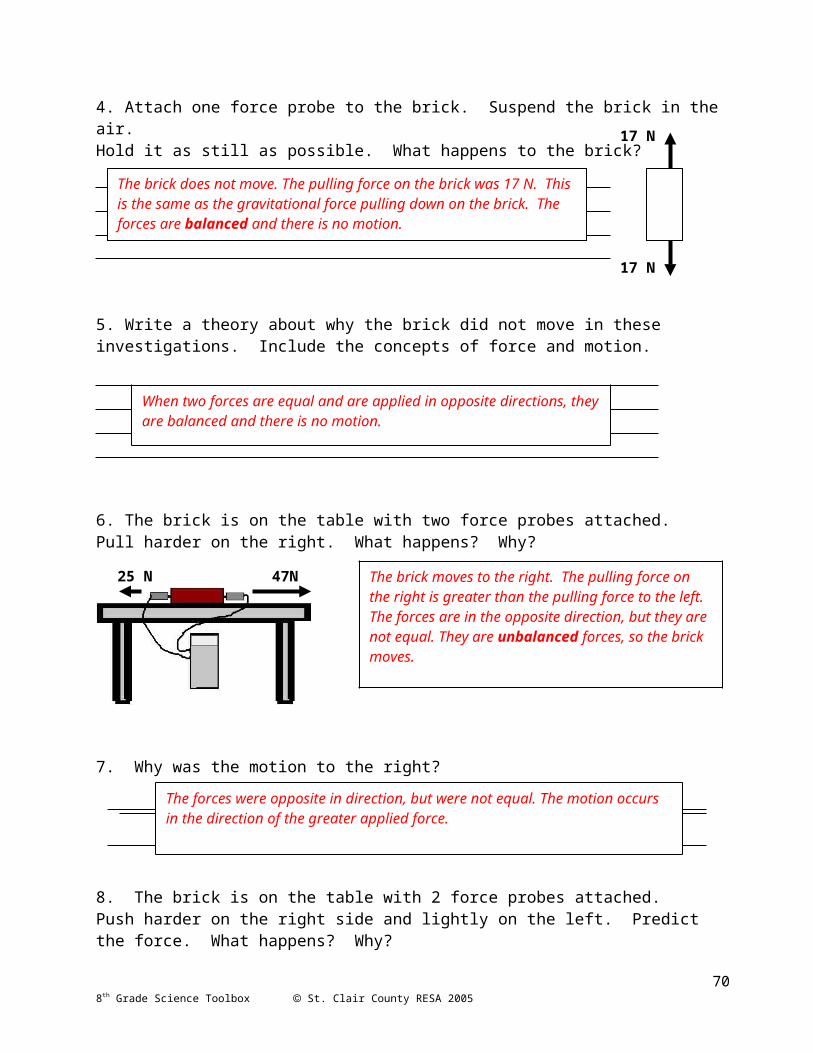
Air
Water
Air
Water
Air
Water
Air
Water
A B
CD
Name ______________________________________________ Day 101. Which diagram shows the refraction of light as it enters water from the air?
2. Draw arrows on the diagrams to show what happens to the light rays when they strike the surfaces as shown below.
708th Grade Science Toolbox St. Clair County RESA 2005
Clear glass Frosted glass
Mirror
Answer: B. Light changes speed when it goes from air into water because light travels faster in matter that is less dense. (It bends at an angle less than the angle of incidence, away from the surface between the two materials.)
Light passes through,Light is scattered.
Light is reflected at the same angle it strikes the mirror. Light is absorbed.
Black cardboard
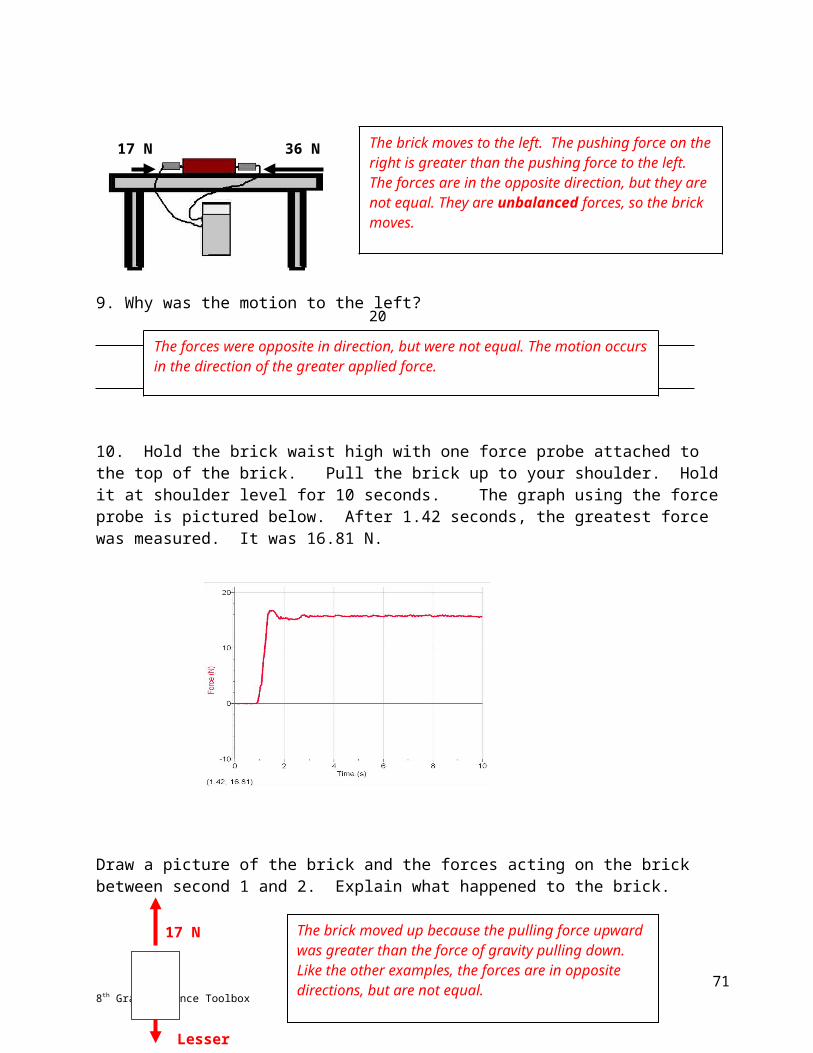
Name ___________________________________________ Day 10How Does Light Help Us See?
Eric is in a room with a cat. There is no window and the door is closed. The only source of light is an electric light bulb on the ceiling.
1. When the light is switched on, how does Eric see the cat? Draw arrows on the diagram and explain.
2. When the light is switched off and there is no light in the room, can Eric see the cat? Explain.
3. When the light is switched off and there is no light in the room, can the cat see Eric? Explain.
______________________________________________________________________
718th Grade Science Toolbox St. Clair County RESA 2005
Light from the bulb bounces off (or reflects off) the cat into Eric’s eye.
No. You can’t see without light. Light rays are needed to form an image in the eye.
No. Cats can’t see without light. Light rays are needed to form an image in the eye.
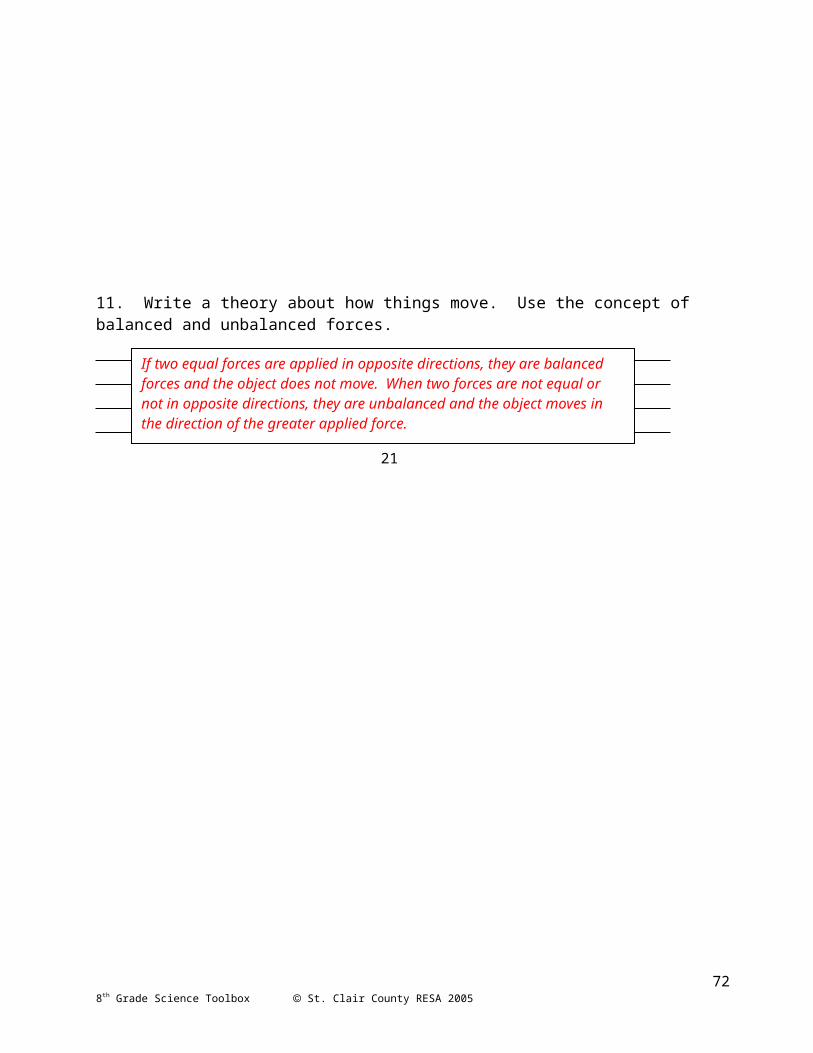
Day 11: Weather and Water
V. 3.M.1 Using Earth Science KnowledgeExplain patterns of changing weather and how they are measured. Key concepts: Weather patterns—cold front, warm front, stationary front, air mass, humidity. Tools: Thermometer, rain gauge, wind direction indicator, anemometer, weather maps, satellite weather images. Real-world contexts: Sudden temperature and cloud formation changes; records, charts, and graphs of weather changes over periods of days; lake effect snow.
V. 3.M.2 Using Earth Science KnowledgeDescribe the composition and characteristics of the atmosphere. Key concepts: Composition—air, molecules, gas, water vapor, dust particles, ozone. Characteristics— air pressure and temperature changes with altitude, humidity. Real-world contexts: Examples of characteristics of the atmosphere, including pressurized cabins in airplanes, demonstrations of air pressure; examples of air-borne particulates, such as smoke, dust, pollen, bacteria; effects of humidity, such as condensation, dew on surfaces, comfort level of humans.
V. 3.M.3 Using Earth Science Knowledge Explain the behavior of water in the atmosphere. Key concepts: Water cycle—evaporation, water vapor, warm air rises, cooling, condensation, clouds; Precipitation—rain, snow, hail, sleet, freezing rain; Relative humidity, dew point, fog. Real-world contexts: Aspects of the water cycle in weather, including clouds, fog, precipitation, evaporating puddles, flooding, droughts.
IV. 1.M.4 Using Physical Science Knowledge (Matter and Energy)Describe the arrangement and motion of molecules in solids, liquids, and gases.
728th Grade Science Toolbox St. Clair County RESA 2005
Science BenchmarksV. 3.M.1 Explain patterns of changing weather and how they are measured.
V. 3.M.2 Describe the composition and characteristics of the atmosphere.
V. 3.M.3 Explain the behavior of water in the atmosphere.
IV. 1.M.4Describe the arrangement and motion of molecules in solids, liquids, and gases.
Lesson Focus
Atmosphere and Weather
Using Earth Science
Day 11
MaterialsStudent Journal pages 39-45Colored PencilsTransparencies of Graphing pages, Student Journal Pages, 44-45Optional: Color transparency of weather maps.
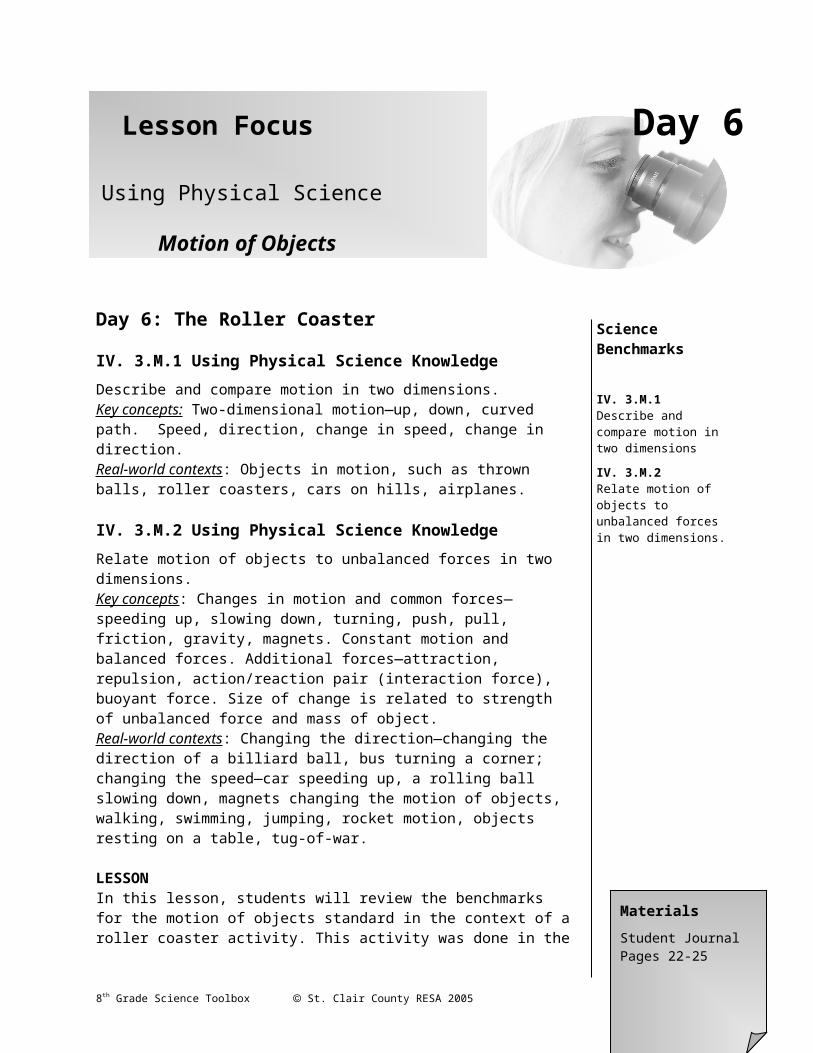
Key concepts: Arrangement—regular pattern, random. Distance between molecules—closely packed, separated; Molecular motion—vibrating, bumping together, moving freely. Real-world contexts: Common solids, liquids, and gases, such as those listed above.
LESSONStudents will have an opportunity to read, construct and interpret weather charts and graphs. They will also draw a picture and explain the water cycle. Information that students are not expected to master but are important for interpreting the graphs is included in the scenario of some of the problems. Students should learn to read all the text as a test taking strategy. There may be information in the text hat could help them answer some questions.
KEY QUESTIONSHow can charts and graphs help interpret weather data and show relationships?What is the water cycle?
PROCEDURE: 1. Students work on the first two questions about dew point and temperature. Information
needed to answer these questions is contained in the text before the question. Discuss answers and strategies for finding the answers.
2. For question 3, students draw a picture that will represent the water cycle. Students should continue answering questions 4 through 9 on their own to give others time to draw and explain. Take time for students to share their drawings of the water cycle. Some students think that water disappears when it evaporates. Listen during their explanations to be sure they understand the science. Students’ responses should include the motion of molecules as reviewed in earlier lessons.
3. In the next set of questions, students construct graphs of the data and describe an interesting pattern from the data of wind speed and air pressure. If there is not enough time during class to do the graphs, students can do these as a homework assignment and they can be discussed the next day.
RESOURCES Weather Underground: http://www.wunderground.com/ Intellicast.com: http://www.intellicast.com/ University of Illinois Online Weather Guide:
http://ww2010.atmos.uiuc.edu/(Gh)/guides/mtr/home.rxml The Weather Channel: http://www.weather.com/maps/ USA Today Weather Maps: http://www.usatoday.com/weather/fronts/latest-fronts-
systems.htm
738th Grade Science Toolbox St. Clair County RESA 2005
Name ______________________________________ Day 11
The graph below shows the temperature and dew point for Detroit on July 16, 2005. Use it to answer questions 1 and 2.
The temperature at which water vapor condenses into liquid is called the dew point temperature. If the air temperature and the dew point temperature are close to each other, dew can form or the weather can be misty, foggy or rainy. Temperatures at or below freezing may cause water vapor to condense as frost instead of dew.
1. Using information from the graph, at what time might there have been dew on the grass or fog in the area? Explain.
2. It rained in Detroit on July 16. According to the graph, at what time did it most likely rain?
748th Grade Science Toolbox St. Clair County RESA 2005
There may have been dew or fog between 5 and 7 in the morning. The temperature and the dew point temperature were close.
It rained between 3 pm and 6 pm because the temperature and the dew point were close.
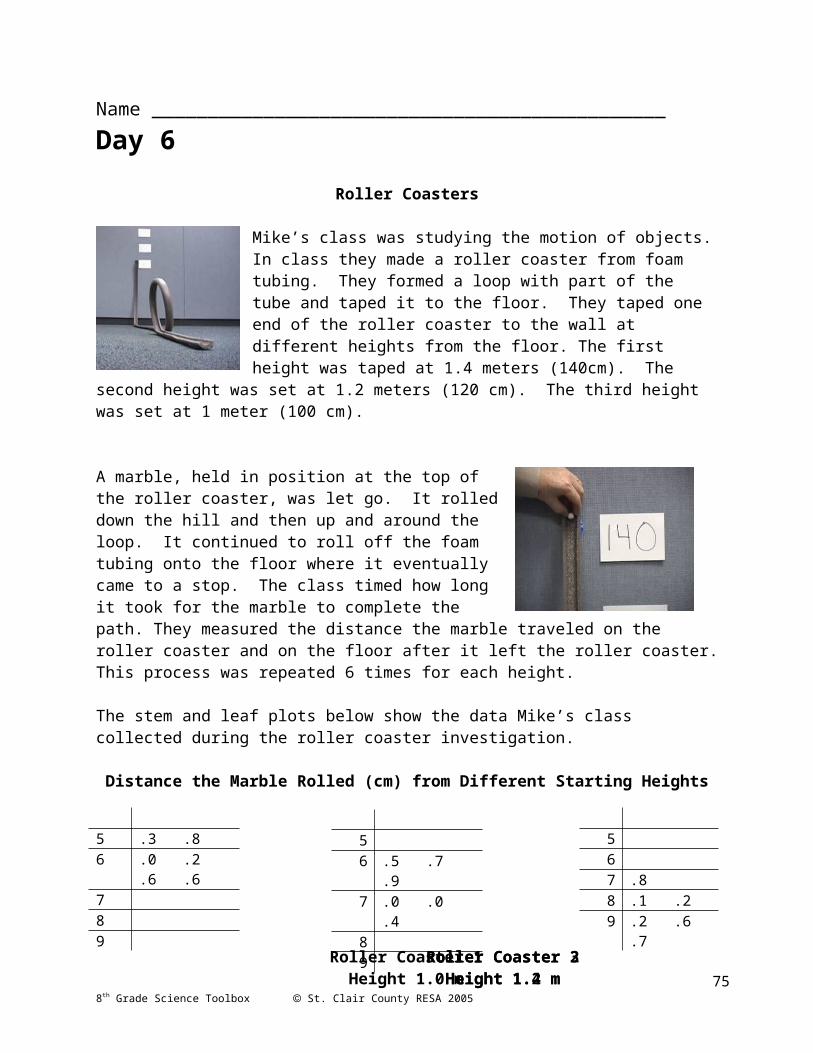
3. Draw a diagram to show how the water that falls as rain in one place may come from another place that is far away. Explain your drawing.
4. The diagram below shows a map of the world with the lines of latitude marked. Which of the following places marked on the map is most likely to have an average yearly temperature similar to location X.
A. Location A
B. Location BC. Location CD. Location D
758th Grade Science Toolbox St. Clair County RESA 2005
Answer: A
A correct response includes 3 steps:
1. Evaporation of water from a source2. Transportation of water as vapor/clouds to another place3. Precipitation in another place
An explanation would refer to the water cycle in which water evaporates into the air. This happens when the molecules are heated, usually from the sun, and move rapidly, breaking the molecular attraction that holds them together. When they escape, they become gas. Eventually, the molecules cool, losing energy, and forming liquid water again. These small drops of water condense on salt or dust particles in the air, forming clouds and are carried away in currents of air to another place. The molecules of water fall from the clouds as precipitation in the form of rain, sleet, or snow.
The following are weather maps from http://www.intellicast.com/ show the weather conditions in the United States at 6:00 pm Eastern Daylight Time on July 18 and July 19, 2005. Use the maps to answer questions 5 – 7.
2
3
5. What statement best describes the weather in Michigan’s Lower Peninsula on July 18?
A. High pressure with clouds and rainB. High pressure with high temperatures and rainC. Storms as a cold front passes through the State
2 Surface Analysis retrieved from http://www.intellicast.com/ July 18, 20053 Surface Analysis retrieved from http://www.intellicast.com/ July 19, 2005
768th Grade Science Toolbox St. Clair County RESA 2005
Date: July 18, 2005 Time: 2100UTC
Date: July 19, 2005 Time: 2100 UTC
Answer: C
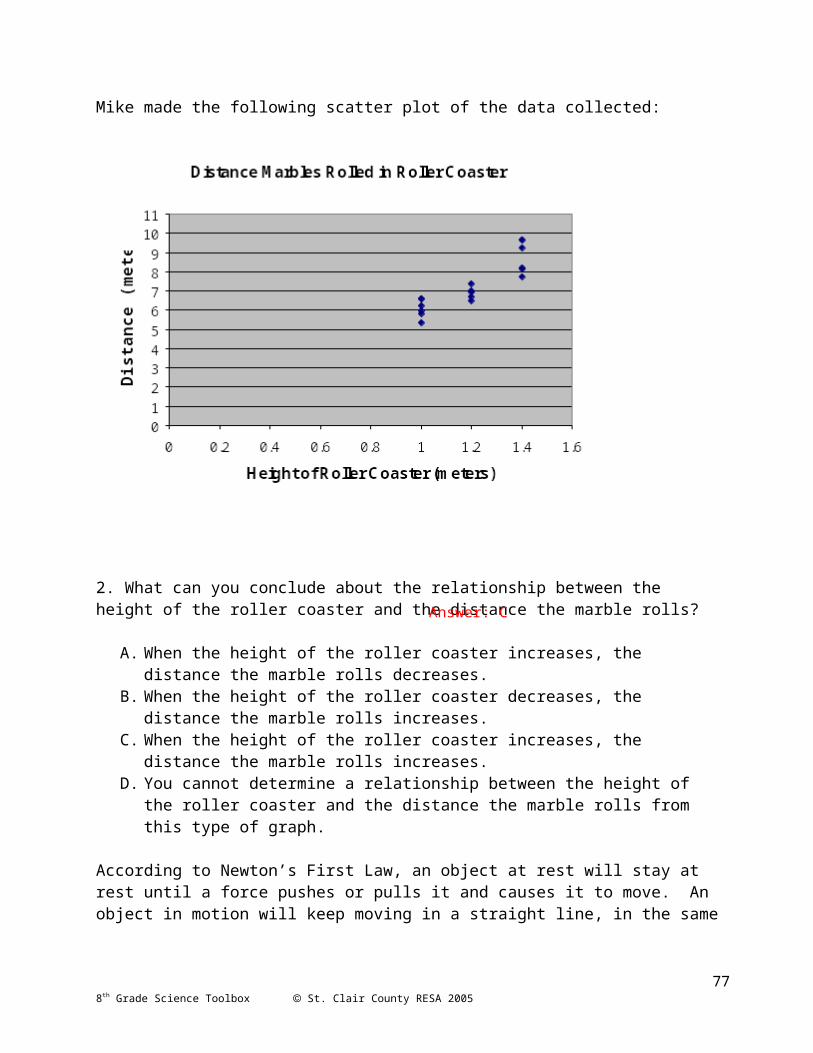
D. Storms as a warm front passes through the State 6. What statement best describes the weather across most of Michigan on July 19 compared to the day before?
A. Higher temperatures with high air pressureB. High pressure with sunny skies and cooler temperatures C. Low pressure with sunny skies and higher temperaturesD. Higher winds and cooler temperatures
7. In which direction did Hurricane Emily move?
A. NorthB. NorthwestC. SouthwestD. South
Below is a tracking map of Hurricane Ivan retrieved from http://www.wunderground.com/hurricane/at200409.asp on July 17, 2005.
.
Saffir-SimpsonHurricane Category
Lowest Air Pressure(millibars)
Wind Speed(miles per hour) Damage
1 980+ 74-95 Minimal
2 979-965 96-110 Moderate
3 964-945 111-130 Extensive
4 944-920 131-155 Extreme
5 below 920 156+ Catastrophic
778th Grade Science Toolbox St. Clair County RESA 2005
Answer: B
Answer: B
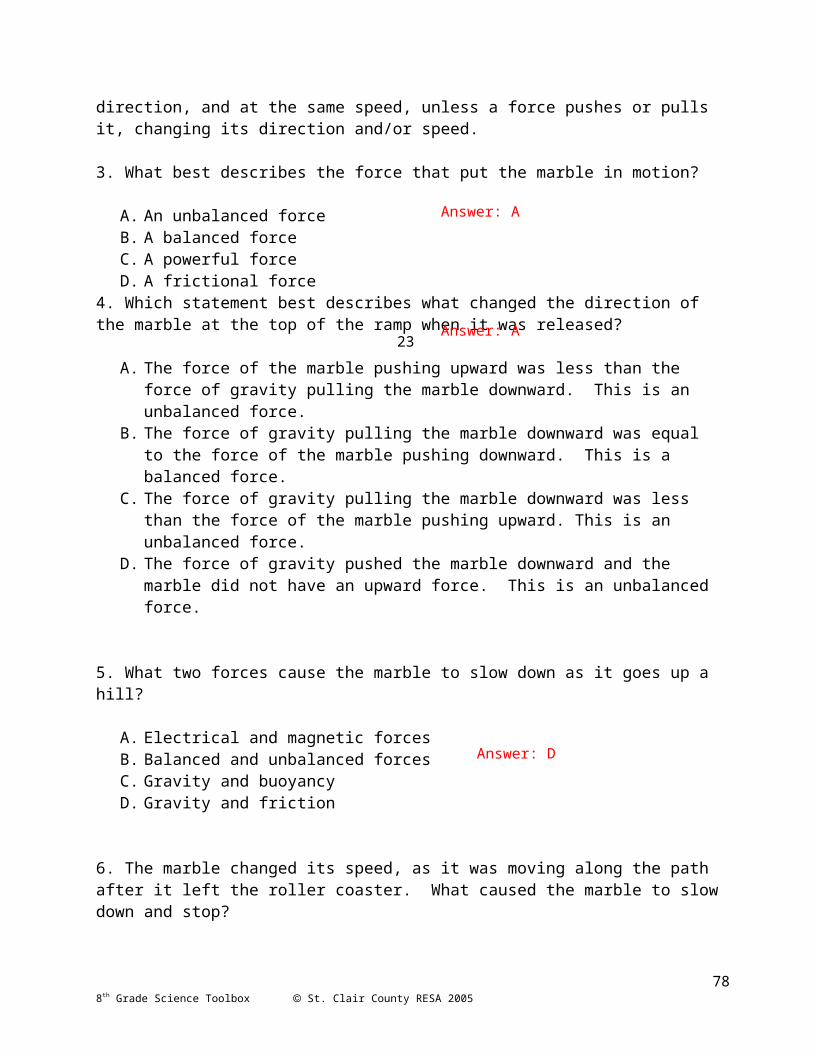
Saffir-Simpson Chart
A storm is classified as a Tropical Depression if the maximum sustained wind speeds are 38 mph or less. It becomes a Tropical Storm if the maximum sustained wind speeds are 39 mph to 73 mph. When the wind speeds reach 74 mph, it is classified as a Hurricane. The chart above lists the hurricane categories according to the Saffir-Simpson Scale.
8. On what date did Tropical Storm Ivan become Hurricane Ivan?
A. September 3B. September 4C. September 5D. September 6
9. According to the chart, on what date did Ivan first become a Category 5 Hurricane?
A. September 9B. September 11C. September 12D. September 13
The chart below shows Ivan’s Wind speed and Air Pressure.
788th Grade Science Toolbox St. Clair County RESA 2005
Hurricane Ivan Tracking Chart
Date Wind(mph)
Air Pressure(mb)
9/2 30 10099/3 50 10009/4 50 9949/5 125 9509/6 105 9589/7 120 9569/8 140 9479/9 150 921
Hurricane Ivan Tracking Chart
Date Wind(mph)
Air Pressure(mb)
9/10 140 9379/11 165 9149/12 150 9169/13 160 9129/14 140 9299/15 135 9399/16 60 9809/17 20 999
Answer: C
Answer: B
10. Use the data from the Hurricane Ivan Tracking Chart to plot the air pressure at the center of the storm. Connect each point. Use a different color pencil for each stage of Ivan from Tropical Depression to Category 5 Hurricane. Use the information in the Saffir-Simpson chart to determine the Hurricane category.
Air Pressure at the Center of Hurricane IvanFrom September 2 – September 17
9/2 9/3 9/4 9/5 9/6 9/7 9/8 9/9 9/10 9/11 9/12 9/13 9/14 9/15 9/16 9/17
11. What relationship is there between the stages of the hurricane and air pressure?
798th Grade Science Toolbox St. Clair County RESA 2005
As the hurricane became stronger, the air pressure decreased.
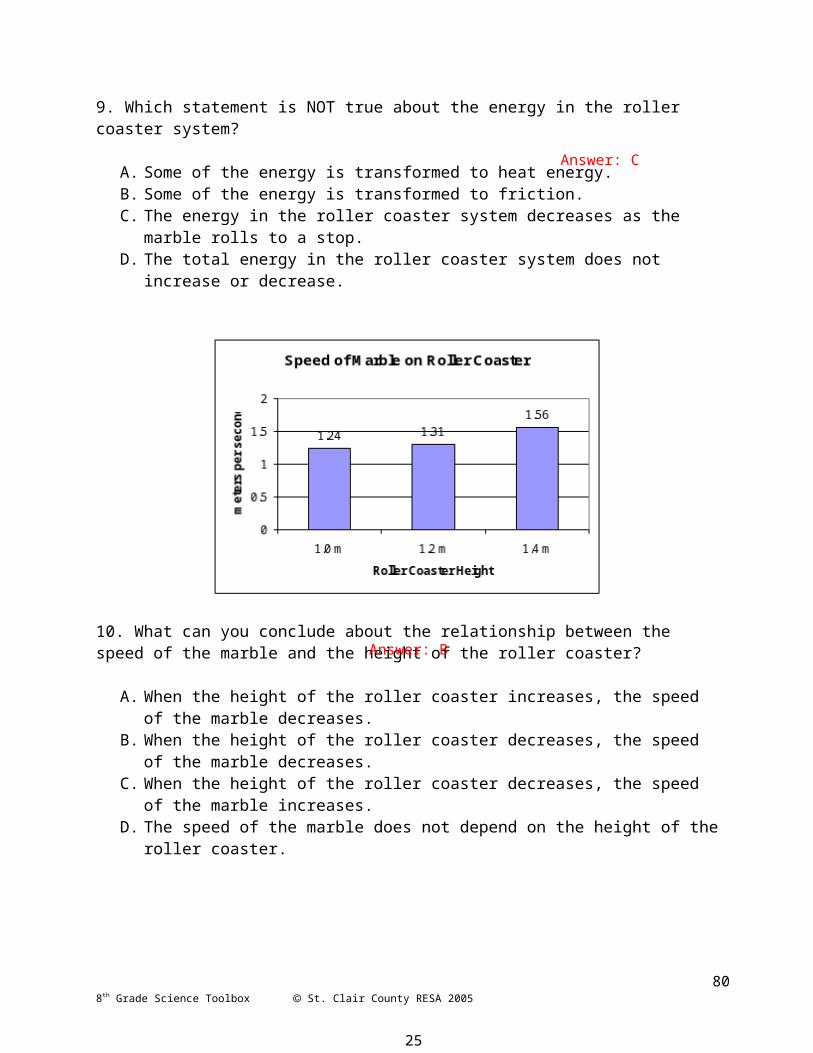
12. Use the data from the Hurricane Ivan Tracking Chart to plot his wind speeds. Connect each point. Use a different color pencil for each stage of a hurricane from Tropical Depression to Category 5.
Maximum Sustained Wind Speeds for Hurricane IvanFrom September 2 – September 17
9/2 9/3 9/4 9/5 9/6 9/7 9/8 9/9 9/10 9/11 9/12 9/13 9/14 9/15 9/16 9/17
13. What relationship is there between the stages of the hurricane and wind speed?
14. Looking at the graphs of air pressure and wind speed, what relationship is there between the air pressure and the wind speed?
808th Grade Science Toolbox St. Clair County RESA 2005
As the hurricane became stronger, the wind speed increased.
As the air pressure decreases, the wind speed increases/

818th Grade Science Toolbox St. Clair County RESA 2005
Day 12: Phases of the Moon and Eclipses
V. 4.M.2 Using Earth Science Knowledge Describe, compare, and explain the motions of solar system objects. Key concepts: Orbit, rotation (spin), axis, gravity, planets, moons, comets, asteroids, seasons. Tilt of the earth on its axis, direct/indirect rays. Real-world contexts: Observations of comet motion over days and weeks, length of day and year on planets, changes in length of daylight and height of sun in sky; changes in daily temperature patterns; summer and winter solstices, spring and fall equinoxes.
V. 4.M.3 Using Earth Science Knowledge Describe and explain common observations of the night skies. Key concepts: Perceived and actual movement of the moon and planets across the sky, moon phases, eclipses, stars and constellations, planets, Milky Way, comets, comet tails, meteors. Sun is light source for all solar system objects (except meteors; friction with atmosphere), emitted light, reflected light Real-world contexts: Outdoor observing of the skies, using telescopes and binoculars when available, as well as “naked-eye” viewing; viewing with robotic telescopes via the World Wide Web; telescopic and spacecraft-based photos of planets, moons, and comets; news reports of planetary and lunar exploration.
LESSONThis is a review lesson of phases of the moon and Lunar and Solar Eclipses. To make these abstract concepts easier to visualize, models will be used. Students will then be given an opportunity to explain their ideas in writing. For these investigations, the room should be as dark as possible. Even a small amount of light from a source other than the lamp will shine on the Styrofoam bulbs and affect the results.
KEY QUESTIONSHow can I model and explain the phases of the moon?How can I model and explain solar and lunar eclipses?
828th Grade Science Toolbox St. Clair County RESA 2005
Science BenchmarksV. 4.M.2 Describe, compare, and explain the motions of solar system objects
V. 4.M.3 Describe and explain common observations of the night skies.
Lesson Focus
Solar System, Galaxy and Universe
Using Earth Science
Day 12
MaterialsStudent Journal pages 46-47Small Styrofoam balls (about 2 inch); one for each studentBarbecue skewers or pencilLamp without a shadeExtension cord for lamp to reach center of the room
PROCEDURE: PHASES OF THE MOON
4. Darken the room as much as possible. Put a lamp in the center of the room. Position the lamp so the bulb is eye level for the students.
5. Give each student a Styrofoam ball and a skewer or pencil. (The pencil makes a larger hole, so a skewer is preferred.) Stick the skewer into the ball.
6. Students stand in a circle facing the lamp. Their heads will represent the Earth. The ball represents the moon. The lamp represents the sun.
7. With all lights out except for the lamp, students hold their ball out in front of them. Since the moon orbits the Earth, the students will move the ball in a circle around their head. The motion needs to be counterclockwise. This models the orbit of the moon. Make sure students understand the moon’s orbital path. Many students believe that the moon stays in one place in relation to the Earth, just like the sun. They think that when the Earth turns and faces the sun, it is day. When the Earth faces the moon it is night. Because the Earth is spinning on its axis, the moon appears to travel across the sky.
8. The Moon rotates in the same amount of time that it takes to revolve around the Earth—27 days, 7 hours, 43 minutes and 11.47 seconds! We always see the same side of the Moon facing us. To better see the phases of the moon in our model, the students will have to turn with the moon’s orbit. The time between two consecutive full moons is 29.5 days. This longer period of time is due to the fact that the Earth is also moving along its orbit as it revolves around the Sun. In reality, Earth would have made about 29 turns during the time it takes the moon to complete one orbit.4
9. Students hold the ball in front of them. The people living on the dark side of the Earth (the students’ backside) cannot see the moon because the moon faces the side of Earth that is having day. When the moon is in this position, it is the new moon. The dark side of the moon is facing the daytime side of the Earth.
10. Take a few steps counterclockwise, while continuing to hold the ball straight out in front of you. The right side of the Styrofoam ball will sparkle a bit as it reflects the light from the lamp. This models the crescent moon.
11. Continue to take a few more steps counterclockwise. When you have made a quarter of a turn from the starting position, you will see a representation of the first quarter moon. The right side of the ball will sparkle as it reflects the light from the lamp.
12. Continue to take steps in the counterclockwise motion and watch an increasing amount of the ball become illuminated. This represents the waxing gibbous moon.
13. When you have made a half turn from the original position, your back will be facing the lamp. The entire side of the ball facing you will be reflecting the light from the lamp. This is a full moon. Since you cannot see the lamp, you are on the nighttime side of the Earth facing the full moon.
14. Continue to move counterclockwise as you continue to hold the ball in front of you. The amount of light reflected off the ball will begin to decrease. You will see the waning gibbous and the last quarter of the moon, the waning crescent, and finally back to the new moon.
15. Be sure to remind students that the Earth and the moon do not complete this path simultaneously.
4 See Teacher Background Information at this web site: http://www.eyeonthesky.org/lessonplans/08sun_moonplayground.html
838th Grade Science Toolbox St. Clair County RESA 2005
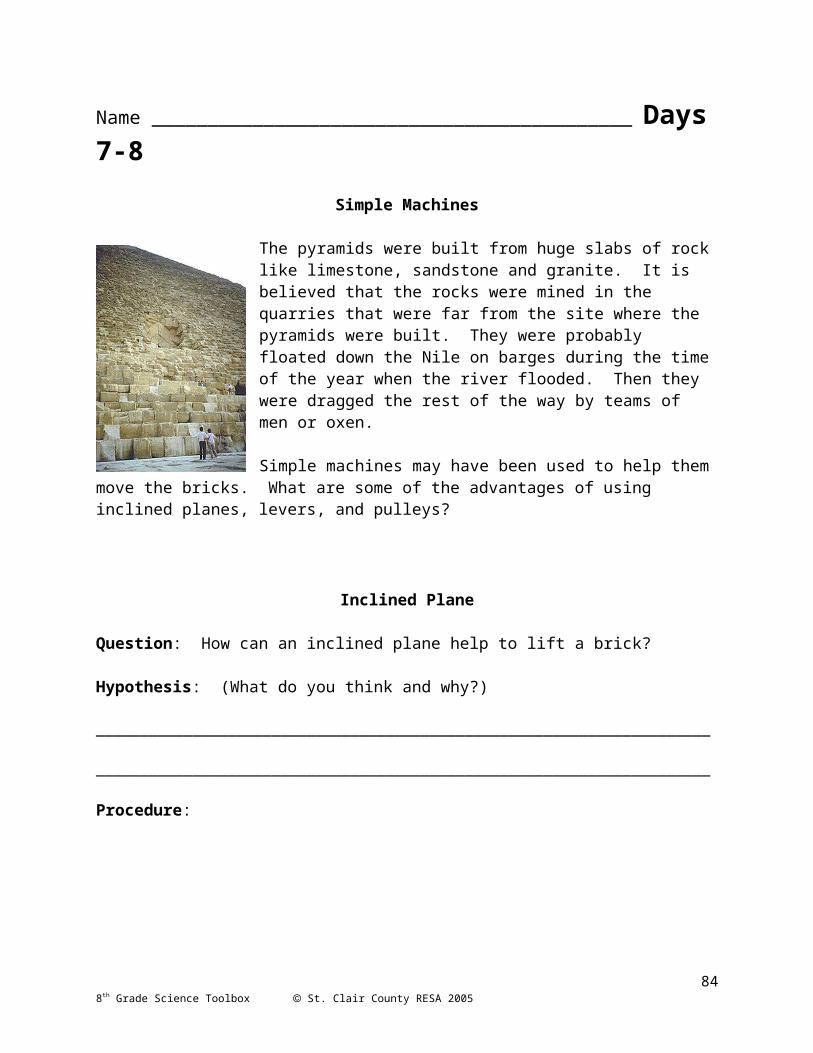
PROCEDURE: SOLAR ECLIPSE\
1. The solar eclipse occurs when the moon is positioned between the sun and the Earth in such a way that the moon blocks the sun and creates a shadow on part of the Earth. The solar eclipse can only occur when there is a new moon.
2. To model the solar eclipse, stand facing the lamp and hold the ball so it covers the light bulb. Look at the faces of the students across from you to see the shadow of the ball on them. If their heads were the Earth, the people living in that shadow would experience the solar eclipse.
PROCEDURE: LUNAR ECLIPSE
1. The lunar eclipse occurs when the Earth is positioned between the sun and the moon so that the Earth blocks the light from the sun and makes a shadow on the moon.
2. To model the lunar eclipse, stand with your back to the lamp. The ball is held straight out in front of you, but you will need to position it so that your head, which represents the Earth, blocks the light from the lamp and makes a shadow on the Styrofoam ball.
RESOURCES
Demonstration of the phases of the moon and the moon’s orbit around the Earthhttp://pmo-sun.uoregon.edu/images/lunarphases.mpg
The current moon phase:http://kids.msfc.nasa.gov/Earth/Moon/Moon.asp
U.S. Naval Observatory: Phases of the MoonIf you continue to scroll down this page, there is a movie that shows the phases of the moon.http://aa.usno.navy.mil/faq/docs/moon_phases.html
Resource for software that helps students understand Moon phases, Seasons, and weather concepts through interactive visualizationshttp://www.riversci.com/
Sneider, C. I. (1986). Earth, Moon, and Stars. Berkeley: Lawrence Hall of Science.A GEMS unit for grades 5-8 that teaches the concepts of a spherical Earth, Moon Phases, and Eclipses
848th Grade Science Toolbox St. Clair County RESA 2005

Name ____________________________________________ Day 12The Moon and Its Phases
1. Explain how we can see the moon.
The moon does not make its own light. The sun shines on the moon and that light is reflected toward the Earth.
2. Describe how the moon appears to change its shape. Use may use pictures to explain.
The part of the moon that is illuminated by the sun changes as the moon orbits the Earth. After the new moon, you see a small crescent shape. The lit part gradually increases until the moon appears full. Then the lit part of the moon gradually decreases until it is a new moon again. This takes about 29 days because it takes the moon about 29 days to complete its orbit around the Earth
858th Grade Science Toolbox St. Clair County RESA 2005

Name ____________________________________________ Day 12Eclipses
Draw the position of the Moon on the diagram below to show what is meant by an eclipse of the Sun, a Solar Eclipse. Explain your drawing.
Crystal: Ungroup the answers for student sheet.
When the Moon comes between the Sun and the Earth and casts a shadow on the Earth, there is a lunar eclipse.
Draw the position of the Moon on the diagram below to show what is meant by an eclipse of the Moon, a Lunar Eclipse. Explain your drawing.
When the Earth comes between the Sun and the Moon, there is a Lunar Eclipse.
868th Grade Science Toolbox St. Clair County RESA 2005
Sun
Earth
Moon
Sun
Earth
Moon
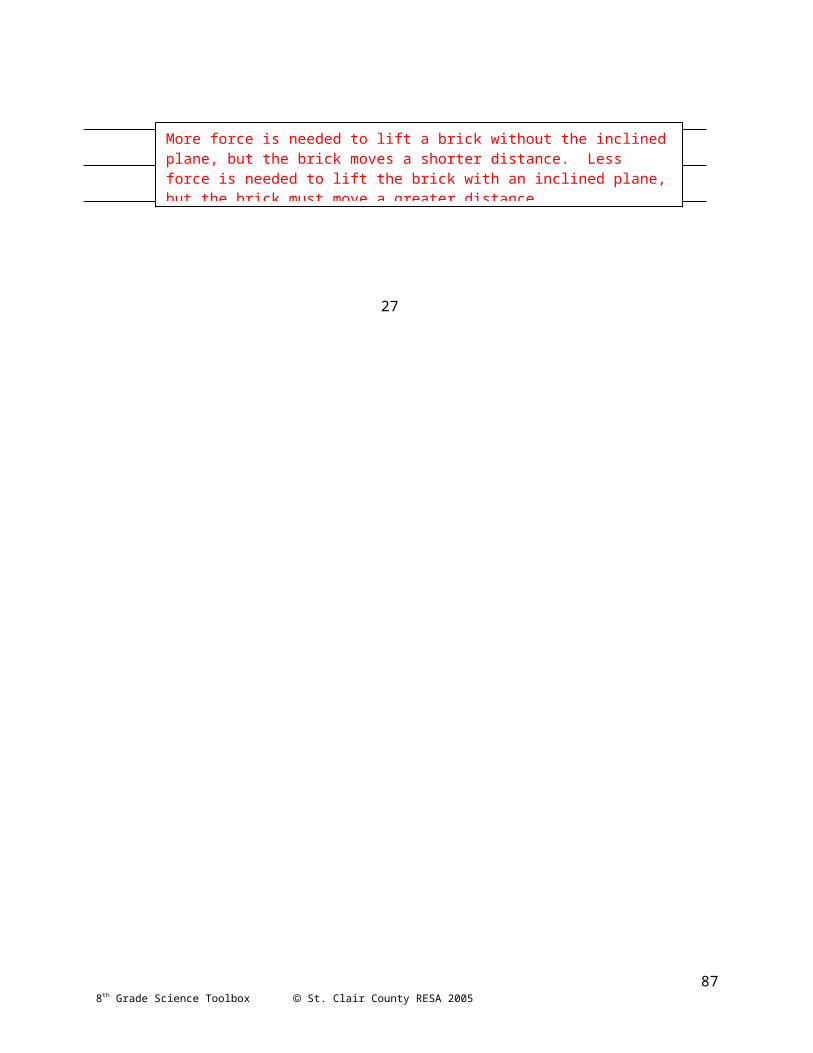
Day 13: Seasons and Other Planets
V. 4.M.1 Using Earth Science Knowledge Compare the earth to other planets and moons in terms of supporting life. Key concepts: Surface conditions—gravity, atmospheres, temperature. Relative distances, relative sizes. Sun produces the light and heat for each planet. Molecules necessary to support life—water, oxygen, nitrogen, carbon; see LC-III.1 m.2 (cell processes), LO-III.2 m.3 (photosynthesis), LEC-III.5 m.2 (light needed for energy). Real-world contexts: Examples of local and extreme conditions on earth vs. conditions on other planets; exploration of planets and their satellites.
V. 4.M.2 Using Earth Science Knowledge Describe, compare, and explain the motions of solar system objects. Key concepts: Orbit, rotation (spin), axis, gravity, planets, moons, comets, asteroids, seasons. Tilt of the earth on its axis, direct/indirect rays. Real-world contexts: Observations of comet motion over days and weeks, length of day and year on planets, changes in length of daylight and height of sun in sky; changes in daily temperature patterns; summer and winter solstices, spring and fall equinoxes.
LESSONStudents will start this lesson by thinking about why there are seasons on Earth. A common misconception is that distance to the sun is the reason for the seasons. Textbooks exaggerate the elliptical orbit of the Earth around the sun. Our orbit around the sun is nearly circular. The Earth-Sun distance varies only by 1.5% and this distance is not significant to be the reason for seasons. Students may believe that we are closer to the sun in the summer, but the Earth is actually closest to the sun on January 2 and farthest on July 4. A more subtle misconception students have is that when the Northern hemisphere is tilted toward the sun, the Northern Hemisphere is closer to the sun. Given the diameter of the Earth is 12,000 kilometers or about 7,900 miles, that difference is even more insignificant.
878th Grade Science Toolbox St. Clair County RESA 2005
Science BenchmarksV. 4.M.1 Compare the earth to other planets and moons in terms of supporting life.
V. 4.M.2 Describe, compare, and explain the motions of solar system objects
Lesson Focus
Solar System, Galaxy and Universe
Using Earth Science
Day 13
MaterialsStudent Pages 48-49Data Projector, Monitor, or computers to show web site visualization models

There are two main factors responsible for seasons on Earth. First, there are more daylight hours where the parts of the Earth are tilted toward the sun. Second, during the summer, the sun’s position is higher in the sky. This increases the angle of incidence of the sunlight and the concentration of light on the ground so the ground gets warmer.
These are complex ideas and it takes time for students to develop the scientific understanding. An excellent resource for a unit that helps students develop these concepts is the GEMS book listed in the Resource section.
The second part of this lesson gives students an opportunity to use what they know to interpret the characteristics of other planets given in a chart.
KEY QUESTIONSWhat causes the seasons?How does the Earth compare to other planets?
PROCEDURE1. Students write a response to the first question on their Journal page.2. Have students share their ideas. List them on the board, but do not judge them at this
time. However, allow students to agree or disagree with each other. If students disagree with another student’s statement, they should state the evidence they have to support their claim.
3. Show the NASA online video from http://kids.msfc.nasa.gov/Earth/Seasons/Seasons.htm. It is a short video. Show it in its entirety the first time. Repeat it and use the controls at the top of the screen to stop the video for discussion. Discuss any of the ideas listed on the board and compare them to the ideas presented in the video.
4. Students compare their own responses and improve or revise them.5.
RESOURCESGould, A., Willard, C., & Pompea, S. (2000). The Real Reasons for Seasons: Sun-Earth Connection. Berkeley, CA: Lawrence Hall of Science.
Online Video Clip: What Causes the Seasons?http://kids.msfc.nasa.gov/Earth/Seasons/Seasons.htm
Resource for software that helps students understand Moon phases, Seasons, and weather concepts through visualizationshttp://www.riversci.com/
888th Grade Science Toolbox St. Clair County RESA 2005

Name ____________________________________________ Day 13Seasons
1. Why do you think it is hotter in the United States in June than in December?
Watch the NASA online video about the seasons at: http://kids.msfc.nasa.gov/Earth/Seasons/Seasons.htm
Compare your ideas to those presented in the video. Discuss them in your class. What ideas are the same as yours? What ideas are different?
Revise or improve your response to the first question.
898th Grade Science Toolbox St. Clair County RESA 2005
Because the Earth is tilted on its axis, the United States receives more hours of sunlight in June. The sun is positioned higher in the sky so the rays of light are more direct.
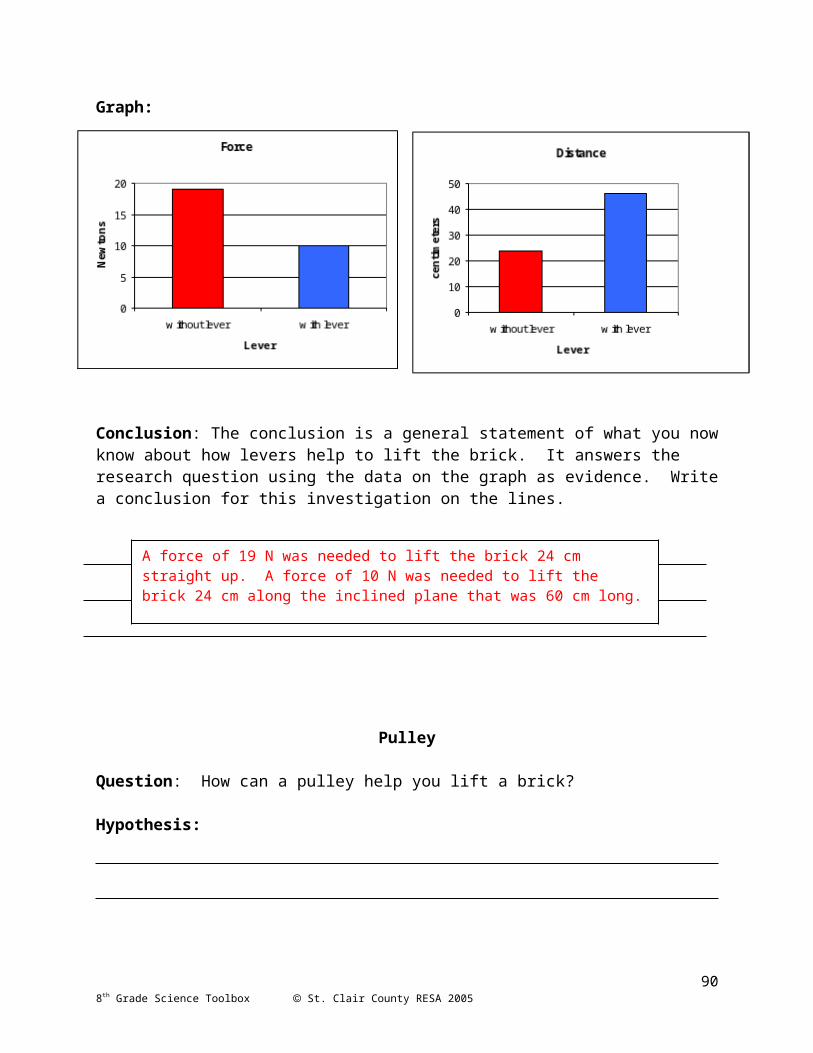
Name ____________________________________________ Day 13
Comparing Earth to the Other Inner Planets
Mean Distance from the Sun
Time to Move around the Sun
Period of Rotation
Main Components of
AtmosphereMercury 57.9 km 88 days 59 days Virtually none
Venus 108.2 km 224.7 days 243 days Carbon Dioxide
Earth 149.6 km 365.3 days 23 hr. 56 min. Nitrogen, Oxygen
Mars 227.9 km 687 days 24 hr. 37 min. Carbon Dioxide
1. Name each planet listed on this chart that has a year shorter than a year on Earth. Explain how you arrived at your answer.
2. Name each planet from this chart with a cycle of light and dark that is shorter than Earth’s cycle of day and night. Which planet’s cycle is similar to Earth’s? Explain how you arrived at your answer.
3. Name each planet from this chart that might support human life. Explain.
908th Grade Science Toolbox St. Clair County RESA 2005
Mercury and Venus have a year that is shorter than Earth’s. The time it takes a planet to move around the sun determines the year. It takes Mercury only 88 days to move around the sun. It takes Venus 224.7 days to move around the sun. It takes Earth 365.3 days.
No planet listed on this chart has a day and night cycle that is shorter than Earth’s. The period of rotation gives the length of a planet’s day and night cycle. Earth’s cycle of day and night is 23 hours and 56 minutes. Mars cycle is similar at 24 hours and 37 minutes.
No planet listed on this chart could support human life. Humans need oxygen to breathe and we are the only inner planet that has oxygen in its atmosphere.Mercury and Venus are closer to Sun and it would be too hot. Mars is farther from the Sun and it would be too cold.
Lesson Focus
Ecosystems
Constructing Scientific KnowledgeUsing LifeScience
Days 14 and 15: Forest Management
II.1.M.1 Reflecting on Scientific KnowledgeEvaluate the strengths and weaknesses of claims, arguments, or data. Key concepts: Aspects of arguments such as data, evidence, sampling, alternate explanation, conclusion; inference, observation. Real-world contexts: Deciding between alternate explanations or plans for solving problems; evaluating advertising claims or cases made by interest groups; evaluating sources of references.
II.1.M.5 Reflecting on Scientific KnowledgeDevelop an awareness of and sensitivity to the natural world. Key concepts: Appreciation of the balance of nature and the effects organisms have on each other, including the effects humans have on the natural world. Real-world contexts: Any in the sections on Using Scientific Knowledge appropriate to middle school.
III. 5.M.6 Using Life Science Knowledge Describe ways in which humans alter the environment. Key concepts: Agriculture, land use, renewable and non-renewable resource development, resource use, solid waste, toxic waste; biodiversity. Real-world contexts: Human activities, such as farming, pollution from manufacturing and other sources, hunting, habitat destruction, land development, reforestation, and species reintroduction.
LESSONWhile change is an integral part of Earth’s natural processes, not all changes occur naturally. The management of forests has been debated well before the Industrial Revolution. Man has impacted the forest ecosystems not only to manage them, but to benefit himself. Forestry is a practice where trees are managed and harvested. Trees are treated as any other agricultural crop, with its goal to provide wood products, such as paper, lumber and charcoal. Logging companies use many different methods to harvest trees, not always
918th Grade Science Toolbox St. Clair County RESA 2005
Science Benchmarks
II.1.M.1 Evaluate the strengths and weaknesses of claims, arguments, or data.
II.1.M.5 Develop an awareness of and sensitivity to the natural world.
III. 5.M.6 Describe ways in which humans alter the environment.
Days 14-15
MaterialsStudent Journal pages 50-52Poster paperMarkers
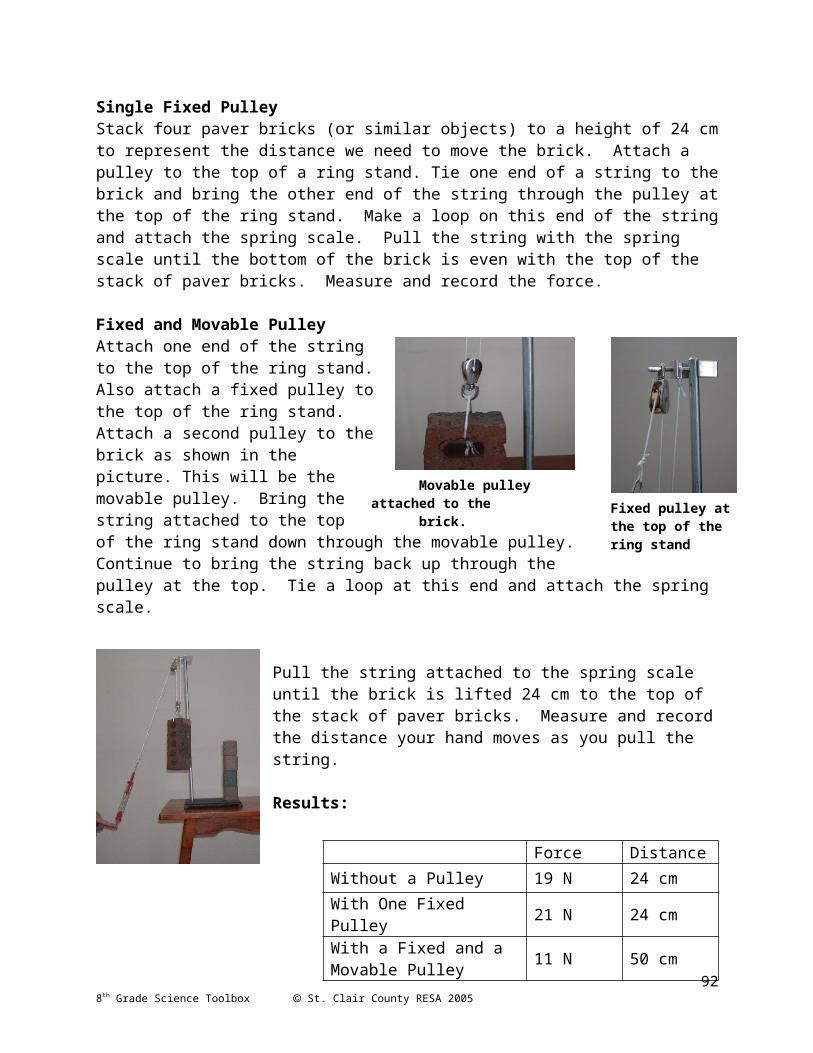
keeping in mind the balance of the forest and the rate of tree growth. Unfortunately when you are dealing with “old-growth” forests, a complete biological ecosystem that contains trees centuries old and hundreds of feet tall, sustainable management is impossible. It takes hundreds of years to replace what has been logged. This is why the management of “old-growth” forests is so controversial. The debate on whether or not to log “old growth” forests, or leave them alone is raging today.
Students will be involved in a discussion of the issues. A compromise may need to be made to reach a decision on how to manage several acres of forest. They will evaluate the options and explore the consequences of their decision.
KEY QUESTION What are the advantages and disadvantages of your decision? How will your decision impact the forest ecosystem? Are there other alternative decisions that can be proposed?
PROCEDURE
1. Explain to students the scenario of today’s lesson. The students will be working as a team for their community. The community has been given a large parcel of “old-growth” forest in their town to do with it as they see fit. Students in their groups must decide how they will manage or use the land and be prepared to share their ideas with the class.
2. Divide students into groups of 4. Each group will read the proposals.3. They will use the discussion questions from the Community Management Assessment
page to evaluate their proposals and prepare a presentation to the class for the next day. They will use poster paper to record their ideas for the presentation.
4. Allow students time to present their posters on Day 15.
ASSESSMENTExamine the students’ decision and their reasoning to see how well they understand the complexity of the decision and how each decision has consequences, both positive and negative, of their own.
OPTIONAL ASSESSMENT: Put a copy of the poem below on the board and have students interpret its meaning.
“The tree which moves some to tears of joy is in the eyes of others only a green thing that stands in the way.” -William Blake
928th Grade Science Toolbox St. Clair County RESA 2005
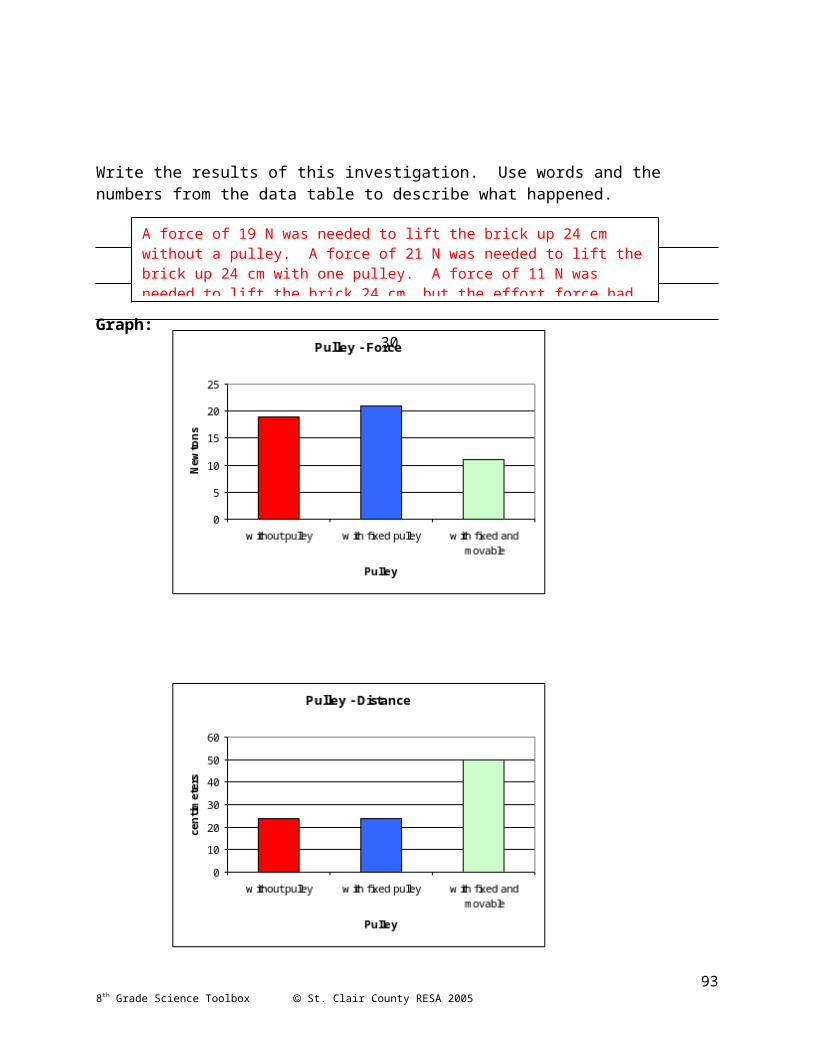
Name _______________________________________ Days 14-15Proposed Management Decision
Your community has been given 250 acres of land just outside of town. Your town is a medium-sized town with the largest business being a lumbering company. Many of the people who live in this town work for the lumbering company. Others work for a computer company in a nearby town. The donated land is completely covered with forest including 100 acres of “old-growth” forest. This old growth forest has enormous trees over 150 years old. There is a pond that is a home to swans and ducks to rest during migration and nest during mating season. Deer, raccoon, foxes, and other animals also make there home there. It is the job of the Community team to decide which proposal would best suit the needs of the community.
Proposal #1 – The town’s local environmental organization wants to keep the land and manage it as a protected natural area. They have proposed building hiking trails, and look out points for avid wildlife watchers. No hunting signs would be posted and the local DNR would help to police the area. The 100 acres of “old-growth” forest would be left as it is, while the other 150 acres would be managed. Dead trees would be cleared to allow room for new seedlings to emerge and grow.
This area is a unique area. It is home to many plants and animals. If the trees are cut down, their habitat will be destroyed.
The town does not need a mall. There are enough stores to meet the needs of the community. If a mall were built, the people who own businesses downtown would go out of business!
There are no forests like this in town. Why should the people of this town sacrifice their natural heritage so some businesses can make a lot of money?
Setting this area aside and maintaining hiking trails would be the best thing for the people of our town,
Proposal #2 – A local developer would like to purchase the 250 acres to build a shopping mall and new homes.
Shopping malls are convenient places to shop, with all the stores indoors and under one roof.
With a wide variety of stores, there would be more competition and this would mean better prices for things the people in the community need.
Malls draw people from a wide area and would mean big money for the town. The money earned from the sale of the land to the developer and from the property
taxes would create revenue for the town to pay for schools, medical clinics, roads, The developer is proposing that part of the 100 acres of “old-growth” forest would be
left alone to provide “forest character” for the new homes built there. The developer assures us that although much of the trees will be cleared, the pond
would be preserved so the wildlife would still have a place for migration and breeding.
938th Grade Science Toolbox St. Clair County RESA 2005
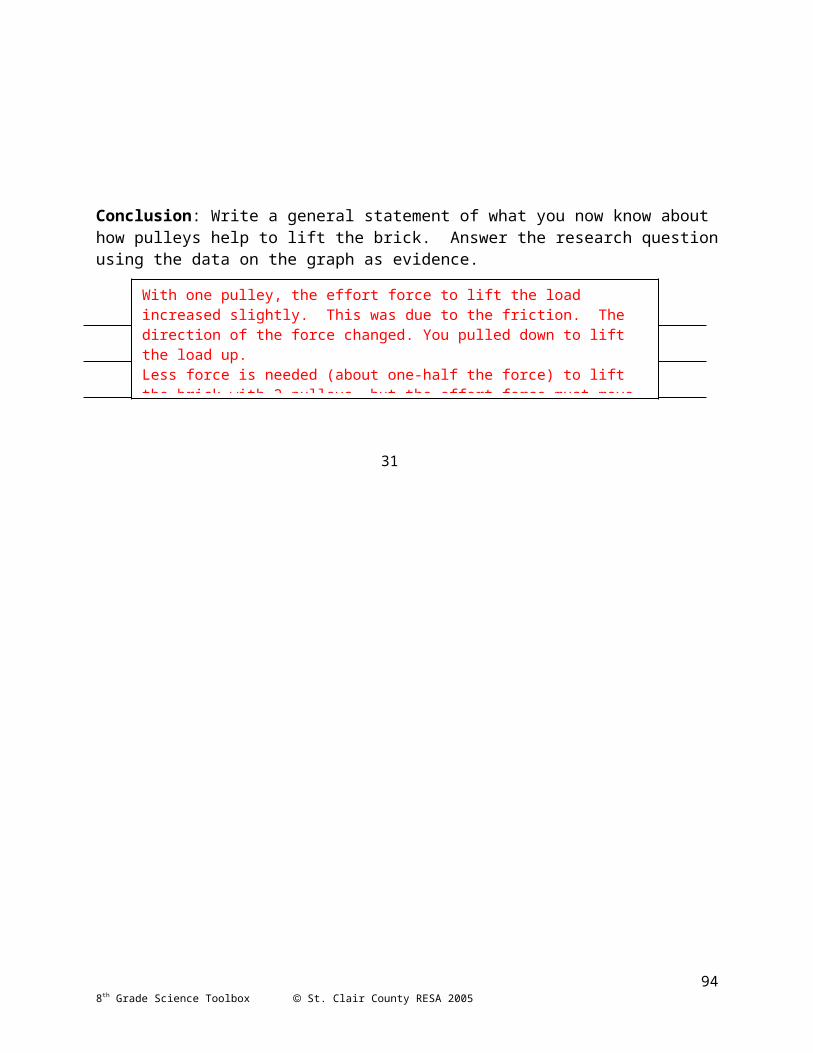
Proposal #3 – The town’s lumber company proposes purchasing the land for commercial and ecological purposes.
This company already has successfully managed other forests near the town. Lumber from their company has been in high demand for construction proposes.
They can provide this lumber at better prices. The lumber company would carefully control the harvesting of the trees. Their
regular practice is to immediately replant the harvested areas with seedlings. They would set aside part of the “old growth” forest and set up a buffer zone to
protect the habitat there. They would allow hiking and other recreation in the forest. The purchase would provide the town with an economic boost. It would provide the
town with the money it needs to balance the budget, provide funds for the local library, school expenses, medical clinics, and road management.
The proposal will create new jobs for foresters, scientists, loggers, truckers and mill workers and this would lower the unemployment rate of the community.
948th Grade Science Toolbox St. Clair County RESA 2005
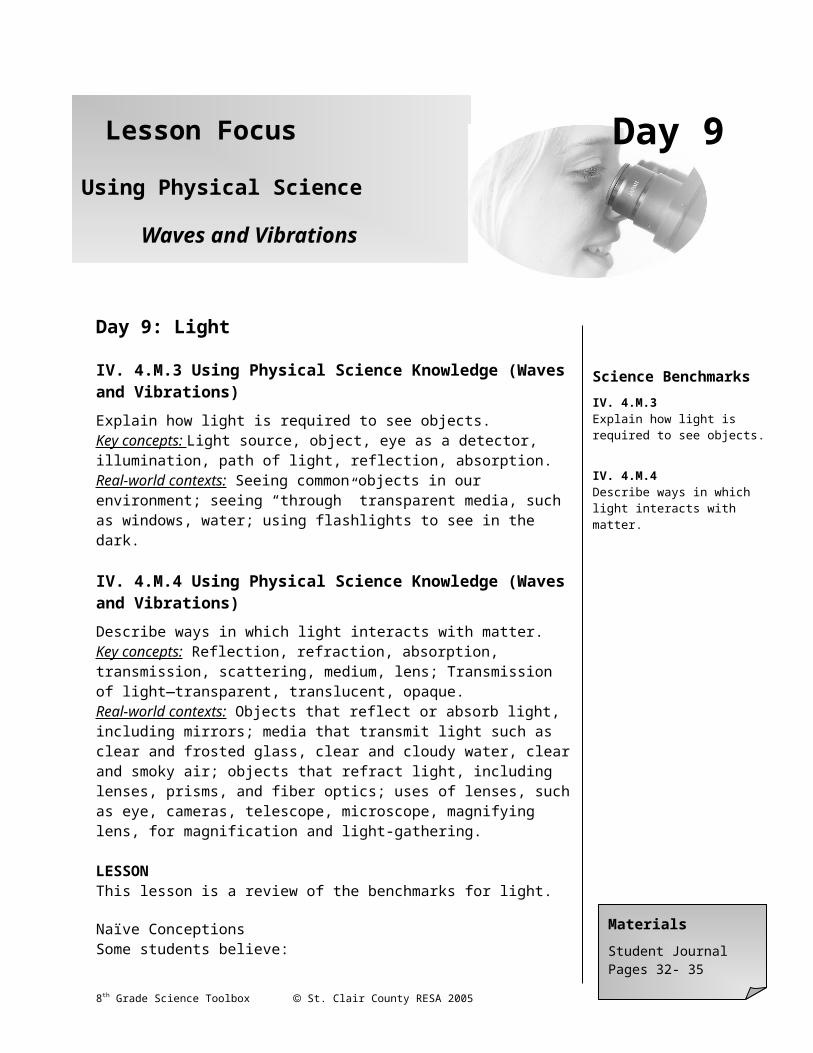
Name ____________________________________ Days 14-15Community Management Assessment
Your community team must work together to decide what to do with this gift of land. You can accept a proposal from one of the three that have been presented. You may also choose to make a compromise or offer another proposal. Each team member must agree with the team’s decision. When making your decision you need to consider the questions below. Keep in mind what is best for the entire community. Be prepared to present your ideas to the class.
1. What facts were presented in the proposal?2. Which statements were opinions?3. What will it cost the town to adopt the proposal?4. What are the advantages and disadvantages of the proposal?5. What negative effects could happen to the community and the
environment?6. Who most benefits from your proposal?7. Are there any changes you would make to either of the proposals?
What is the decision of your Community Team and why?
958th Grade Science Toolbox St. Clair County RESA 2005
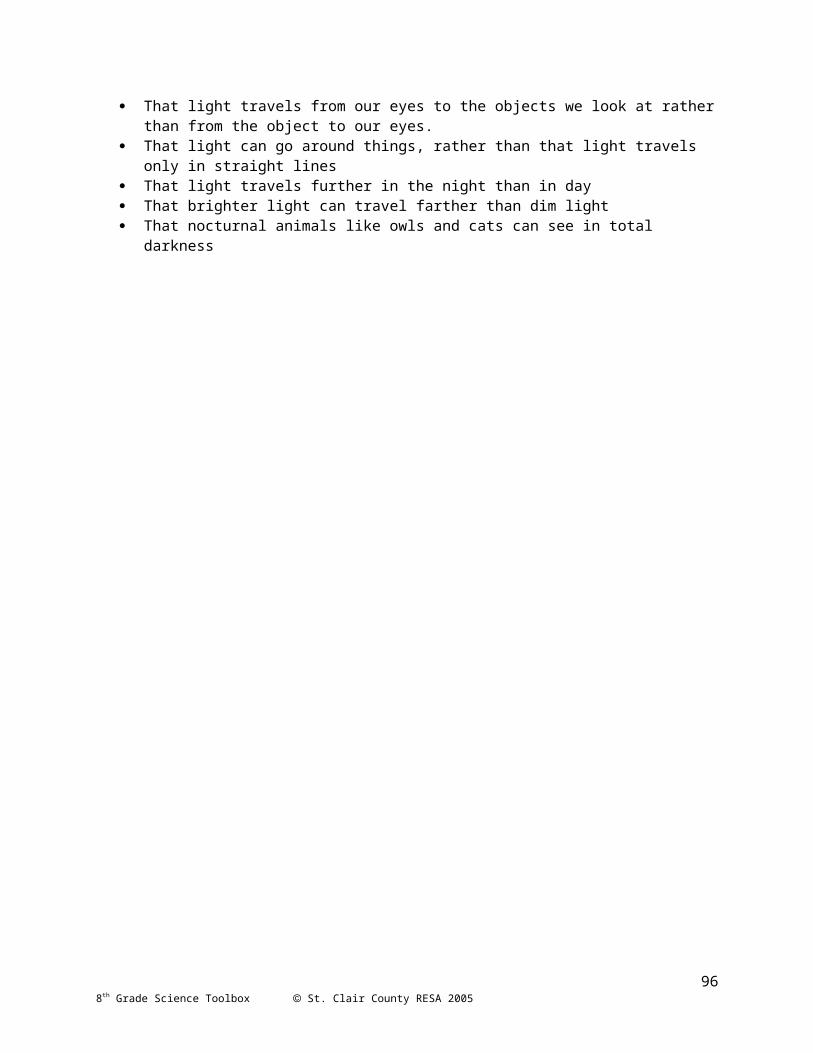
MEAP Practice
968th Grade Science Toolbox St. Clair County RESA 2005