Embed Size (px)
Citation preview
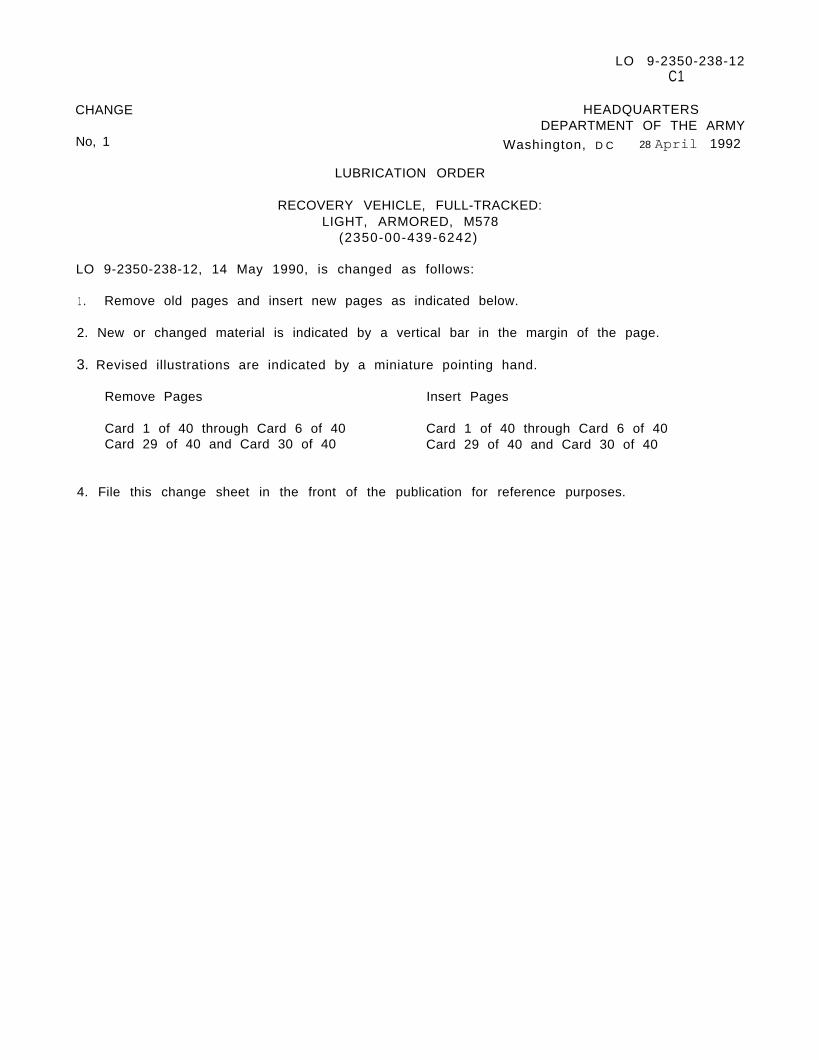
LO 9-2350-238-12C1
CHANGE
No, 1
HEADQUARTERSDEPARTMENT OF THE ARMY
Washington, D C 28 April 1992
LUBRICATION ORDER
RECOVERY VEHICLE, FULL-TRACKED:LIGHT, ARMORED, M578
(2350-00-439-6242)
LO 9-2350-238-12, 14 May 1990, is changed as follows:
1. Remove old pages and insert new pages as indicated below.
2. New or changed material is indicated by a vertical bar in the margin of the page.
3. Revised illustrations are indicated by a miniature pointing hand.
Remove Pages Insert Pages
Card 1 of 40 through Card 6 of 40 Card 1 of 40 through Card 6 of 40Card 29 of 40 and Card 30 of 40 Card 29 of 40 and Card 30 of 40
4. File this change sheet in the front of the publication for reference purposes.

By Order of the Secretary of the Army:
GORDON R. SULLIVANGeneral, United States Army
chief of Staff
Official:
MILTON H. HAMILTON
Administrative Assistant to theSecretary of the Army
01217
DISTRIBUTION:
To be distributed in accordance with DA Form 12-37-E, (Block 1441),Operator and Unit Maintenance requirements for LO 9-2350-238-12.
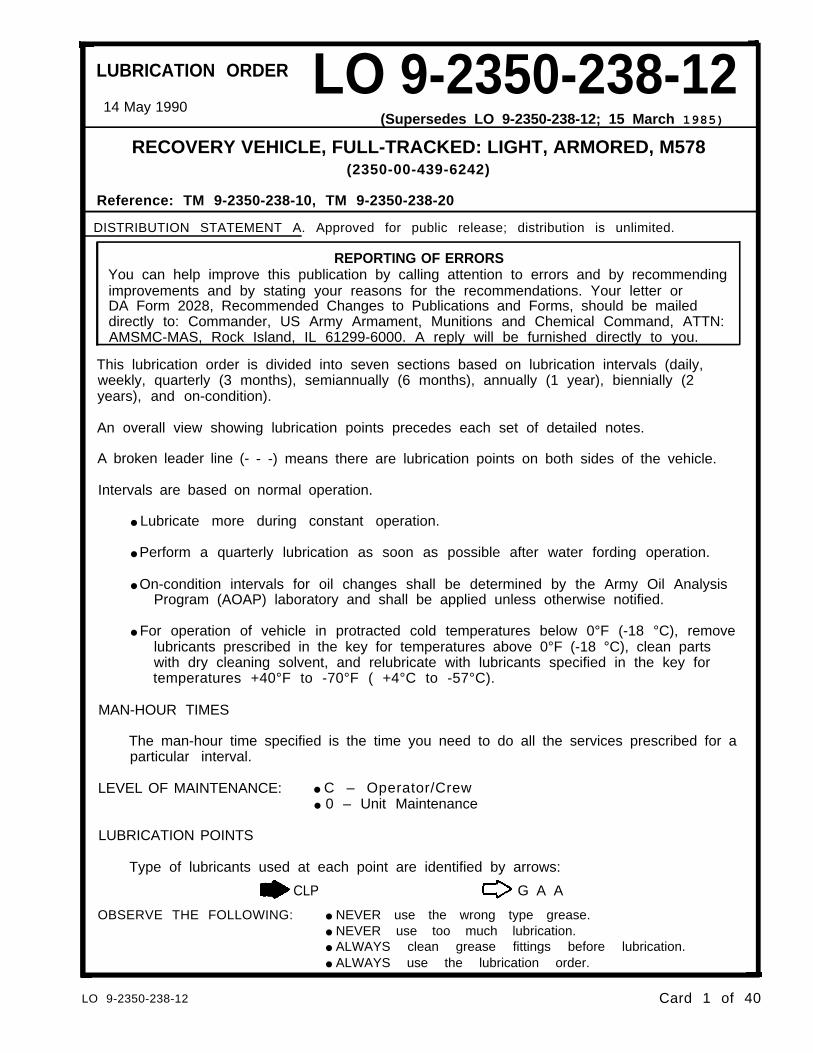
LUBRICATION ORDER LO 9-2350-238-1214 May 1990
(Supersedes LO 9-2350-238-12; 15 March 1985)
RECOVERY VEHICLE, FULL-TRACKED: LIGHT, ARMORED, M578(2350-00-439-6242)
Reference: TM 9-2350-238-10, TM 9-2350-238-20
DISTRIBUTION STATEMENT A. Approved for public release; distribution is unlimited.
REPORTING OF ERRORSYou can help improve this publication by calling attention to errors and by recommendingimprovements and by stating your reasons for the recommendations. Your letter orDA Form 2028, Recommended Changes to Publications and Forms, should be maileddirectly to: Commander, US Army Armament, Munitions and Chemical Command, ATTN:AMSMC-MAS, Rock Island, IL 61299-6000. A reply will be furnished directly to you.
This lubrication order is divided into seven sections based on lubrication intervals (daily,weekly, quarterly (3 months), semiannually (6 months), annually (1 year), biennially (2years), and on-condition).
An overall view showing lubrication points precedes each set of detailed notes.
A broken leader line (- - -) means there are lubrication points on both sides of the vehicle.
Intervals are based on normal operation.
● Lubricate more during constant operation.
● Perform a quarterly lubrication as soon as possible after water fording operation.
● On-condition intervals for oil changes shall be determined by the Army Oil AnalysisProgram (AOAP) laboratory and shall be applied unless otherwise notified.
● For operation of vehicle in protracted cold temperatures below 0°F (-18 °C), removelubricants prescribed in the key for temperatures above 0°F (-18 °C), clean partswith dry cleaning solvent, and relubricate with lubricants specified in the key fortemperatures +40°F to -70°F ( +4°C to -57°C).
MAN-HOUR TIMES
The man-hour time specified is the time you need to do all the services prescribed for aparticular interval.
LEVEL OF MAINTENANCE: ● C – Operator/Crew● 0 – Unit Maintenance
LUBRICATION POINTS
Type of lubricants used at each point are identified by arrows:
CLP G A A
OBSERVE THE FOLLOWING: ● NEVER use the wrong type grease.● NEVER use too much lubrication.● ALWAYS clean grease fittings before lubrication.● ALWAYS use the lubrication order.
LO 9-2350-238-12 Card 1 of 40
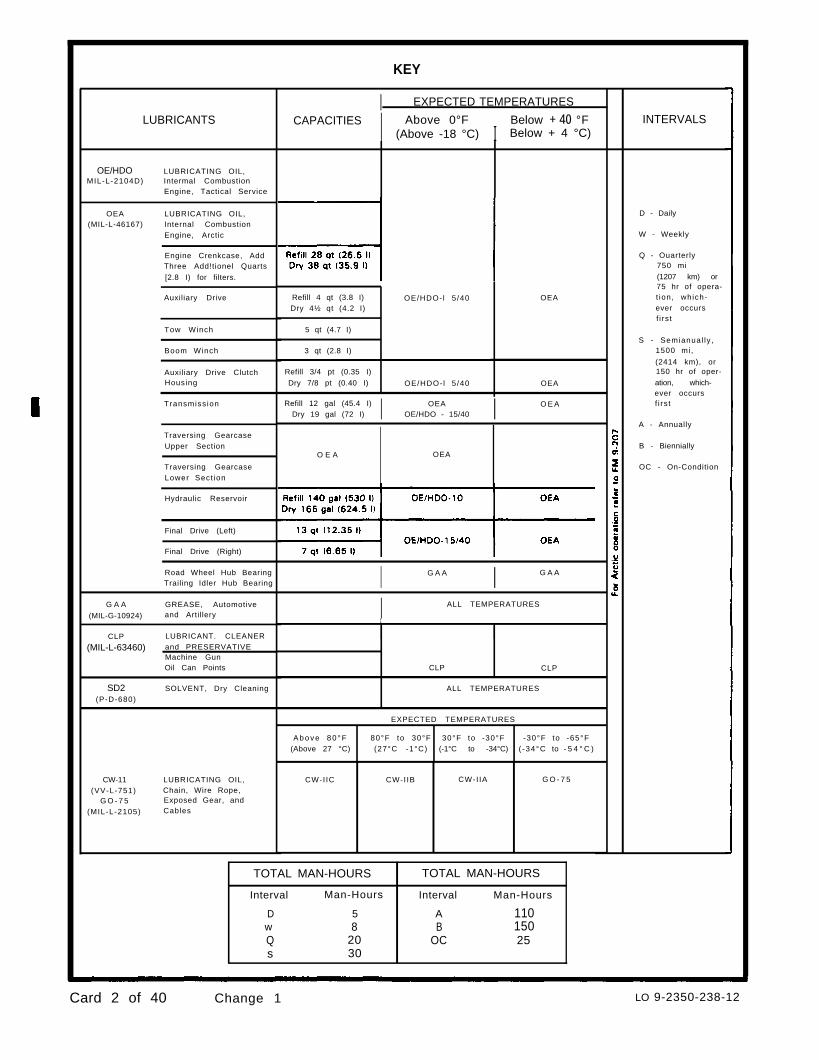
KEY
I EXPECTED TEMPERATURES
LUBRICANTS CAPACITIES I Above 0°F
IBelow + 40 °F
(Above -18 °C) Below + 4 °C)INTERVALS
OE/HDO LUBRICATING OIL,MIL-L-2104D) Intermal Combustion
Engine, Tactical Service
OEA LUBRICATING OIL,(MIL-L-46167) Internal Combustion
Engine, Arctic
Engine Crenkcase, AddThree Add!tionel Quarts
[2.8 I) for filters.
Auxiliary Drive
D - Daily
W - Weekly
Q - Ouarterly750 mi
(1207 km) or75 hr of opera-t ion, which-ever occursf i rst
OEARefill 4 qt (3.8 I) OE/HDO- l 5 /40Dry 4½ qt (4.2 I)
5 qt (4.7 I)
3 qt (2.8 I)
Refill 3/4 pt (0.35 I)
Dry 7/8 pt (0.40 I) OE/HDO- l 5 /40
Tow WinchS - Semianual ly ,
1500 mi,
(2414 km), or150 hr of oper-
ation, which-ever occursf i rst
Boom Winch
Auxiliary Drive ClutchHousing OEA
Transmiss ion Refill 12 gal (45.4 I) I OEA I O E ADry 19 gal (72 I) OE/HDO - 15/40
A - AnnuallyTraversing GearcaseUpper Section B - Biennially
O E A OEA
OC - On-ConditionTraversing GearcaseLower Sect ion
Hydraulic Reservoir
Final Drive (Left)
Final Drive (Right)
Road Wheel Hub BearingTrailing Idler Hub Bearing I G A A I G A A
G A A GREASE, Automotive
(MIL-G-10924) and Artillery I ALL TEMPERATURES
1
I ICLP LUBRICANT. CLEANER
(MIL-L-63460) and PRESERVATIVEMachine GunOil Can Points CLP CLP
ALL TEMPERATURESSD2 SOLVENT, Dry Cleaning(P-D-680)
EXPECTED TEMPERATURES
A b o v e 8 0 ° F 80°F to 30°F 30°F to -30°F -30°F to -65°F(Above 27 °C) (27°C -1°C) (-1°C to -34°C) ( -34°C to - 5 4 ° C )
CW-11 LUBRICATING OIL,(VV-L-751) Chain, Wire Rope,
G O - 7 5 Exposed Gear, and
(MIL-L-2105) Cables
CW-I IC CW-I IB CW-I IA G O - 7 5
TOTAL MAN-HOURS TOTAL MAN-HOURS
Interval Man-Hours Interval Man-Hours
D 5 A 110w 8 B 150Q 20 OC 25s 30
Card 2 of 40 Change 1 LO 9-2350-238-12
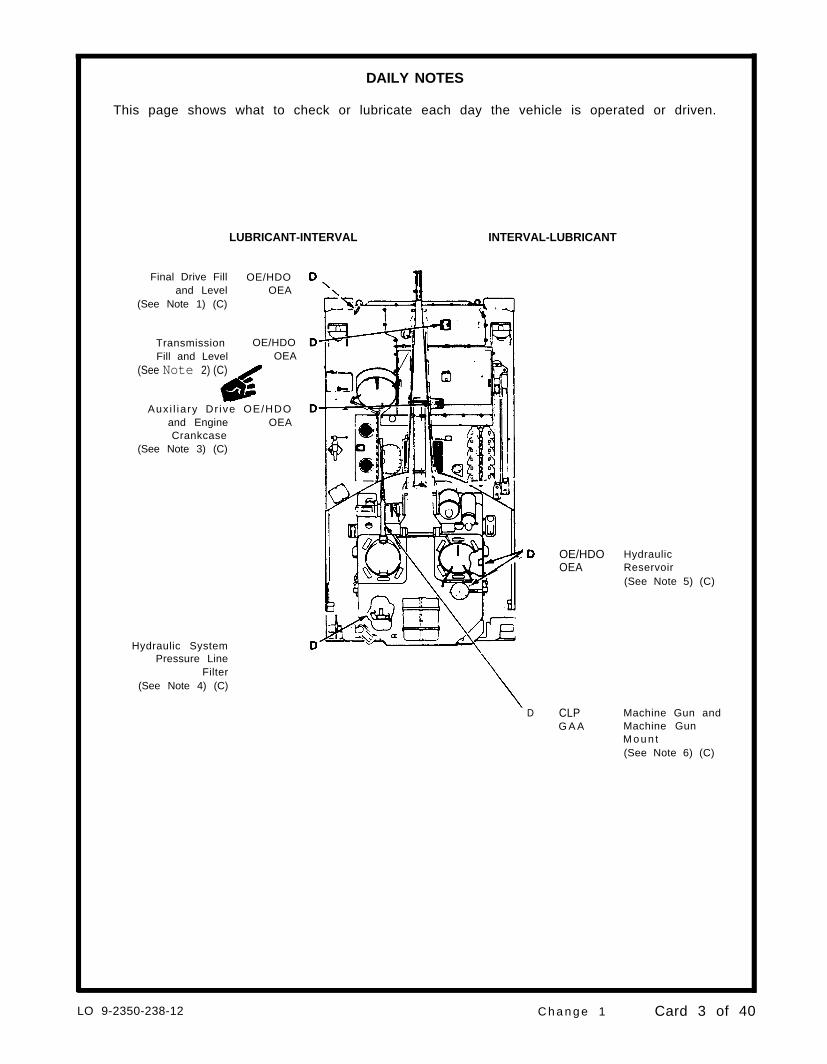
DAILY NOTES
This page shows what to check or lubricate each day the vehicle is operated or driven.
LUBRICANT-INTERVAL
Final Drive Fill OE/HDOand Level OEA
(See Note 1) (C)
Transmission OE/HDOFill and Level OEA
(See Note 2) (C)
Auxi l ia ry Dr ive OE/HDOand Engine OEACrankcase
(See Note 3) (C)
Hydraulic SystemPressure Line
Filter(See Note 4) (C)
INTERVAL-LUBRICANT
OE/HDOOEA
HydraulicReservoir(See Note 5) (C)
D CLPG A A
Machine Gun andMachine GunM o u n t(See Note 6) (C)
LO 9-2350-238-12 C h a n g e 1 Card 3 of 40

DAILY NOTES (CONTINUED)
Note 1
FINAL DRIVE FILL AND LEVEL
Check oil level from outside vehicle. Fill plug access is undertransmission deck.
A R e m o v e l e v e l c h e c k p l u g ( 1 ) .
B Check that oil is level with bottom of opening. If not, removetransmission deck and fill plug (2) in final drive saddle.
C Add oil (OE/HDO or OEA), slowly, until oil flows from checkplug (1) opening.
WARNINGDry cleaning solvent (SD2) is toxic and flammable.Wear protective goggles and gloves and use only inwell-ventilated area.
D Clean level check plug (1) and fill plug (2) with solvent SD2 andinstall.
E Repeat steps A thru D for opposite side.
Note 2
TRANSMISSION FILL AND LEVEL
Access is through door in transmission deck.
CAUTION● Do NOT check oil with engine running.
● Do NOT overfi l l .
NoteAlways think about oil temperature when adding oil.The oil level will vary within OPERATING RANGE dueto oil temperature.
A Check that oil level is within OPERATING RANGE on gage. Donot add or drain oil if in this range. Add oil only when belowADD mark.
B Add or drain oil (OEA or OE/HDO) as required. See Note 44 for drainprocedure.
C Take oil sample every 25 hours of operation or every 60 days,whichever occurs first. Refer to DA PAM 738-750 for samplingrequirements.
Card 4 of 40 Change 1 LO 9-2350-238-12

DAILY NOTES (CONTINUED)
Note 3
AUXILIARY DRIVE AND ENGINE CRANKCASE
Access is through door in engine deck.
A Auxiliary Drive
1 Lift cap (1) and check oil level. Oil should be within FULLand ADD marks on gage (2).
2 Add or drain OE/HDO or OEA, as required.
B Engine Crankcase
NoteAfter overnight stand, oil level may indicate up to3/4 in. (19 mm) over FULL mark. This is normal.
Step 1 deleted
2 Level should be between low (L) and full (F) marks on gage(3). If required, add or drain oil (OE/HDO or OEA).
3 Take oil samples every 25 hours of operation or every 60days, whichever occurs first. Refer to DA PAM 738-750 forsampling requirements.
Note 4
HYDRAULIC SYSTEM PRESSURE LINE FILTER
Make sure no personnel are in turret well before
CAUTIONRelieve hydraulic pressure before disassemblingfilter assembly.
Remove stowage box to gain access into turret wall.
A Check indicator button (1) on filter base (2).
B When button protrudes 1/4 in. (6 mm) the filter is dirty.
WARNINGDry cleaning solvent (SD2) is toxic and flammable.Wear protective goggles and gloves and use only inwell-ventilated area.
C Remove filter element (3) and clean inside of case (4) with sol-vent SD2.
D Dry case (4) and install new filter element (3).
traversing cab.
LO 9-2350-238-12 Change 1 Card 5 of 40

HYDRAULIC RESERVOIR
Check fluid level from inside
A
B
C
DAILY NOTES (CONTINUED)
Note 5
cab, fill from outside of cab.
Check that fluid level registers to at least halfway on level gage(1).
CAUTIONBefore opening filler cap, make sure drain groove(2) is clear of water, dirt, and debris.
Open filler cap (3).
Add fluid (OE/HDO or OEA) through fill hole (4) until it registershalf way on level gage (1).
Note 6
MACHINE GUN AND MACHINE GUN MOUNT
Immediately after firing (or as soon as possible) thoroughly cleanand Iubricate the weapon to maintain reliability and combat effec-tiveness. Follow the procedures Iisted below:
A
B
c
D
E
F
Disassemble the gun into the groups and assemblies. (See TM9-1005-213-10).
NoteDo not dip back plate in any solution; clean withswab or rag and CLP.
Clean all metal surfaces that are subject to powder fouling withCLP. Wipe dry, and lubricate.
Clean bore and chamber with brush or swab, saturated withCLP, until a clean swab can be run through the barrel withoutdetecting any contamination. Wipe dry, and lubricate.
Before assembling, inspect and clean the bolt, bolt locking area,and other areas where firing residue has deposited.
Inspect each component before assembly, to ensure that lubri-cant or preservative (CLP) has been applied.
Clean all surfaces of pintle and mount with CLP; wipe dry andlubricate pintle shaft with GAA.
Card 6 of 40 C h a n g e 1 LO 9-2350-238-12
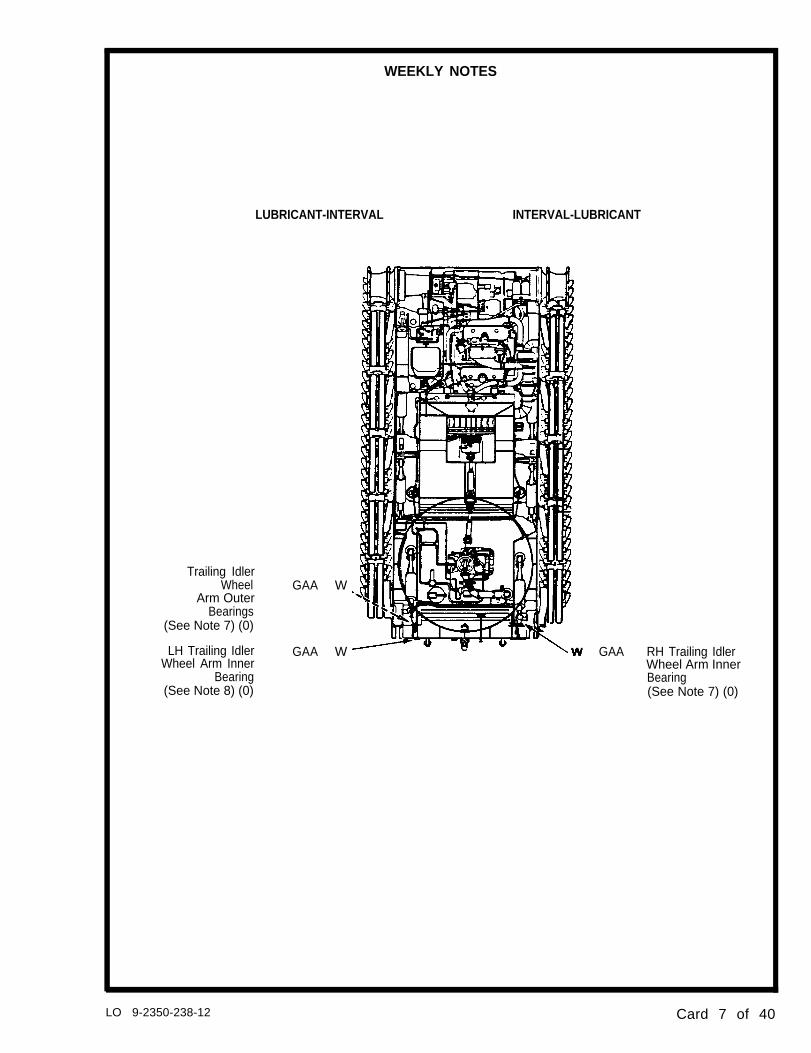
WEEKLY NOTES
Trailing IdlerWheel
Arm OuterBearings
(See Note 7) (0)
LH Trailing IdlerWheel Arm Inner
Bearing(See Note 8) (0)
LUBRICANT-INTERVAL INTERVAL-LUBRICANT
GAA
GAA
W
W GAA RH Trailing IdlerWheel Arm InnerBearing(See Note 7) (0)
LO 9-2350-238-12 Card 7 of 40

WEEKLY NOTES (CONTINUED)
Note 7
TRAILING IDLER WHEEL ARM OUTER BEARINGS AND RHINNER BEARING
A Lubricate both RH and LH trailing idler wheel arm outer bearingswith GAA. Pump grease gun 5 or 6 times to properly lubricatebearings.
B Lubricate RH trailing idler wheel arm inner bearing with GAA.Pump grease gun 5 or 6 times to properly lubricate bearing.
Note 8
LH TRAILING IDLER WHEEL ARM INNER BEARING
Lubricate LH trailing idler wheel arm inner bearing with GAA. Pumpgrease gun 5 or 6 times to properly lubricate bearing.
Card 8 of 40 LO 9-2350-238-12

QUARTERLY NOTES
LUBRICANT-INTERVAL INTERVAL-LUBRICANT
ISERVICED FROM
OUTSIDE VEHICLE I
Tow Cable(See Note 9) (C)
Cupola CoverHold Open Lock
(See Note 10) (0)
Towing Pintle(See Note 11) (0)
Boom and BoomCylinder Hinge
Pins(See Note 14) (0)
Level WindHousing Bearing
(See Note 15) (0)
Tow Cable SingleBlock Bearing
(See Note 16) (0)
Boom SheaveBearing
(See Note 17) (0)
CW-IIGO-75
GAA
GAA
Q
Q
CW-IIGO-75
Q GAA
GAA GAA
GAA
Boom Winch andTow Winch Cables(See Note 12) (C)
Hydraulic ReservoirFilter and StrainerAssembly(See Note 13) (0)
Snatch BlockBearing(See Note 19) (0)
Moldboard HingePins(See Note 20) (0)
Spade Strut HingePins(See Note 21) (0)
Spade CylinderBracket Hinge Pins(See Note 22) (0)
Boom Lift Block GAA QBearing
(See Note 18) (0)
Road Wheel and OE/HDO Q QIdler Wheel Hub
GAA Road Wheel ArmOEA Bearings and Lock-
Bearings GAA(See Note 23) (0)
out Cylinders(See Note 24) (0)
LO 9-2350-238-12 Card 9 of 40
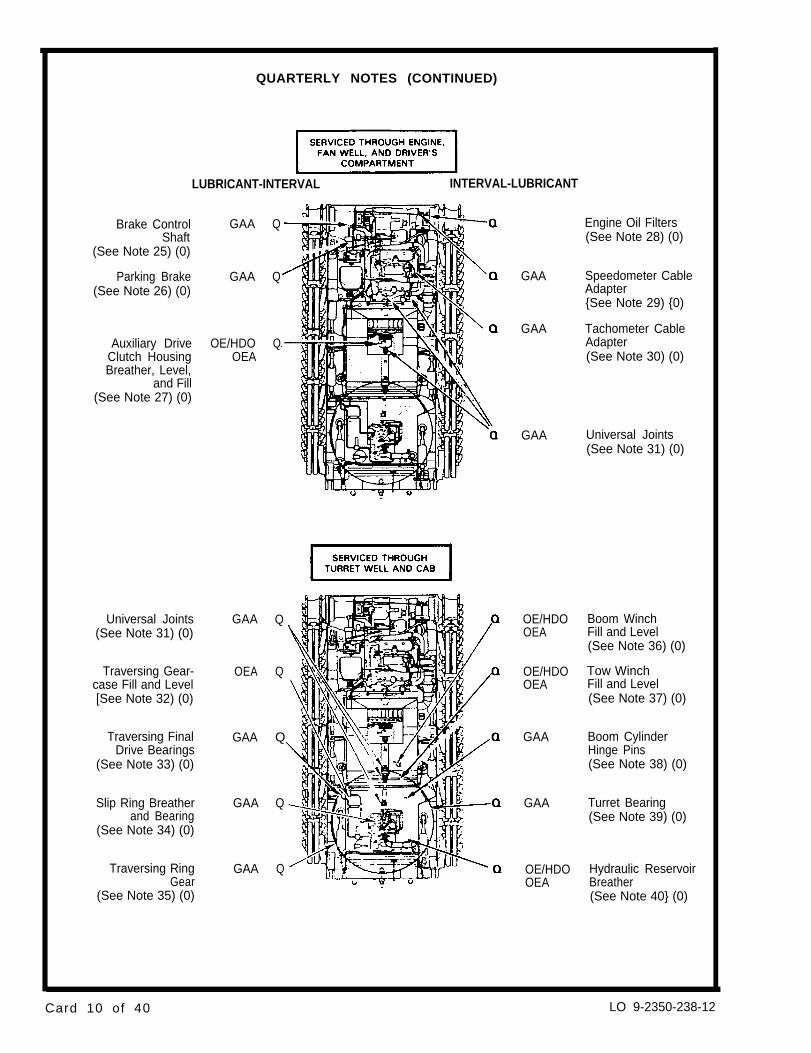
QUARTERLY NOTES (CONTINUED)
LUBRICANT-INTERVAL INTERVAL-LUBRICANT
Engine Oil Filters(See Note 28) (0)
Brake ControlShaft
(See Note 25) (0)
GAA Q
QParking Brake(See Note 26) (0)
GAA GAA
GAA
Speedometer CableAdapter{See Note 29) {0)
Tachometer CableAdapter(See Note 30) (0)
Auxiliary DriveClutch HousingBreather, Level,
and Fill(See Note 27) (0)
OE/HDOOEA
Q
GAA Universal Joints(See Note 31) (0)
Universal Joints(See Note 31) (0)
GAA
OEA
Q
Q
OE/HDOOEA
OE/HDOOEA
Boom WinchFill and Level(See Note 36) (0)
Traversing Gear-case Fill and Level[See Note 32) (0)
Tow WinchFill and Level(See Note 37) (0)
Traversing FinalDrive Bearings
(See Note 33) (0)
GAA Q GAA Boom CylinderHinge Pins(See Note 38) (0)
Slip Ring Breatherand Bearing
(See Note 34) (0)
GAA Q GAA Turret Bearing(See Note 39) (0)
Traversing RingGear
(See Note 35) (0)
GAA Q OE/HDOOEA
Hydraulic ReservoirBreather(See Note 40} (0)
Card 10 of 40 LO 9-2350-238-12

QUARTERLY NOTES (CONTINUED)
Note 9
TOW CABLE
Quarterly, and after each use, clean cable with OE/HDO, OEA, orCLP; oil with lubricating oil, CW-II or GO-75.
Note 10
CUPOLA COVER HOLD OPEN LOCK
Lubricate fitting with GAA.
Note 11
TOWING PINTLE
Lubricate three fittings with GAA.
Note 12
BOOM WINCH AND TOW WINCH CABLES
After each use, clean cable with OE/HDO, OEA, or CLP.
Quarterly.
A Unwind entire cable. BOOM WINCH CABLE
B Brush and soak with OE/HDO, OEA, or CLP.
C Wipe off excess oil, and coat cable and drum withlubricating oil, CW-II or GO-75.
TOW WINCH CABLE
LO 9-2350-238-12 Card 11 o f 40

QUARTERLY NOTES (CONTINUED)
Note 13
HYDRAULIC RESERVOIR FILTER AND STRAINER ASSEMBLY
Service quarterly, when reservoir is drained, or upon indication thatfilter is plugged.
N o t eCrane operator’s control panel indicator will lightwhen hydraulic fluid is bypassing the filter, in-dicating the filter is plugged.
A Open hydraulic reservoir fill cap (1).
B Remove the following items in the order listed below:
1 Six screws (2) and washers (3).
2 Retaining pin (4).
3 Flange (5).
4 Retainer (6).
5 Gaskets (7).
C Rotate T-handle (8) in strainer counterclockwise, several turns,to release strainer assembly.
D Lift filter and strainer assembly from reservoir.
WARNINGDry cleaning solvent (SD2) is toxic and flammable.Wear protective goggles and gloves and use only inwell-ventilated area.
E Clean filter and strainer assembly with solvent SD2.
F Dry and inspect filter and strainer assembly.
G Replace both gaskets (7).
H Install filter and strainer assembly by reversing removal pro-cedure above.
Note 14
BOOM AND BOOM CYLINDER HINGE PINS
Lubricate fittings on both sides of boom with GAA.
Card 12 of 40 LO 9-2350-238-12

QUARTERLY NOTES (CONTINUED)
LO 9-2360-238-12 Card 13 of 40

QUARTERLY NOTES (CONTINUED)
Note 23
ROAD WHEEL AND TRAILING IDLER HUB BEARINGS
N o t eTwo types of hubs are used on road wheels andtrailing idler wheels. One type uses oil (OE/HDO orOEA) for lubrication, the other type uses grease(GAA) for lubrication. Check the road wheel hubsand idler wheel hubs on your vehicle beforelubricating.
A Oil Filled Hubs
Check oil level.
1 Place vehicle on level ground.
2 Remove check plug (1) and observe that oil is level withbottom of hole. Fill if necessary (steps 3 thru 6),
3 Rotate wheel until fill plug (2) and drain plug (3) are aboutvertical.
4 Clean area and remove fill plug (2). OIL FILLED HUBS
5 Fill to bottom of level hole with oil (OE/HDO or OEA). Allowtime for oil to reach oil cavities.
WARNINGDry cleaning solvent (SD2) is toxic and flammable.Wear protective goggles and gloves and use only inwell-ventilated area.
6 Clean fill plug (2) and check plug (1) with solvent SD2 andinstall.
B Grease Filled HubsGREASE FILLED HUBS
1 Lubricate with GAA.
2 Lubricate fitting (1) with GAA until grease comes out ofsafety relief valve (2).
Card 14 of 40 LO 9-2350-238-12

QUARTERLY NOTES (CONTINUED)
Note 24
ROAD WHEEL ARM BEARINGS AND LOCKOUT CYLINDERS
Lubricate road wheel arm bearings and lockout cylinders weekly,with GAA, when operating in muddy or rough environment.Lubricate quarterly, or every 750 mi (1207 km), during normaloperation.
Note 25 Note 26
BRAKE CONTROL SHAFT PARKING BRAKE
A Service at time of powerplant removal.
B Clean with CLP and coat splines with GAA. W A R N I N GBrake pedal is spring Ioaded. Beforeworking in driver’s compartment, blockvehicle tracks end release parking brake.
Coat ratchet teeth with GAA and lubricate con-trols with CLP.
Note 27
AUXILIARY DRIVE CLUTCH HOUSING BREATHER, OIL LEVEL, AND FILL
Clean breather and check oil level.
A Remove fan well cover.
WARNINGDry cleaning solvent (SD2) is toxic and flammable.Wear protective goggles and gloves and use only inwell-ventilated area.
B Remove breather (1), clean with solvent SD2 and install.
C Check that oil level is at FULL mark on gage (2).
D Remove fill plug (3) and fill with oil (OE/HDO or OEA) asnecessary.
E Clean fill plug (3) with solvent SD2 and install.
LO 9-2360-233-12 Card 15 of 40
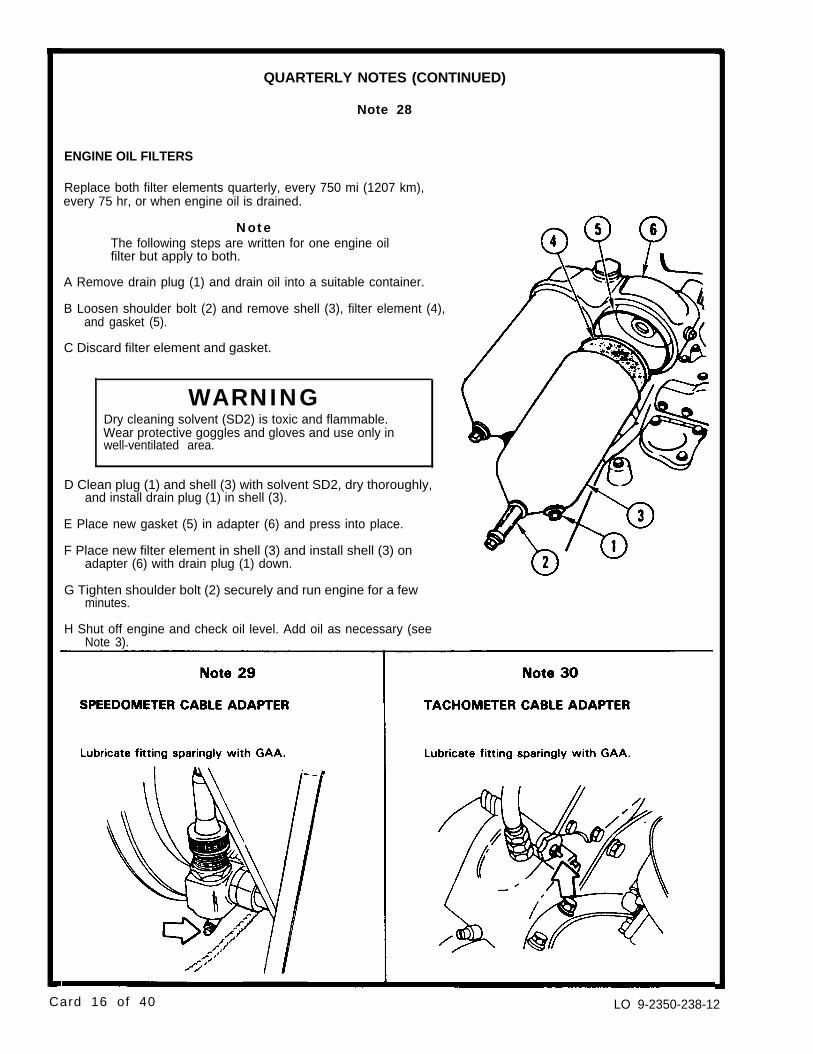
QUARTERLY NOTES (CONTINUED)
Note 28
ENGINE OIL FILTERS
Replace both filter elements quarterly, every 750 mi (1207 km),every 75 hr, or when engine oil is drained.
NoteThe following steps are written for one engine oilfilter but apply to both.
A Remove drain plug (1) and drain oil into a suitable container.
B Loosen shoulder bolt (2) and remove shell (3), filter element (4),and gasket (5).
C Discard filter element and gasket.
WARNINGDry cleaning solvent (SD2) is toxic and flammable.Wear protective goggles and gloves and use only inwell-ventilated area.
D Clean plug (1) and shell (3) with solvent SD2, dry thoroughly,and install drain plug (1) in shell (3).
E Place new gasket (5) in adapter (6) and press into place.
F Place new filter element in shell (3) and install shell (3) onadapter (6) with drain plug (1) down.
G Tighten shoulder bolt (2) securely and run engine for a fewminutes.
H Shut off engine and check oil level. Add oil as necessary (seeNote 3).
Card 16 of 40 LO 9-2350-238-12
QUARTERLY NOTES (CONTINUED)
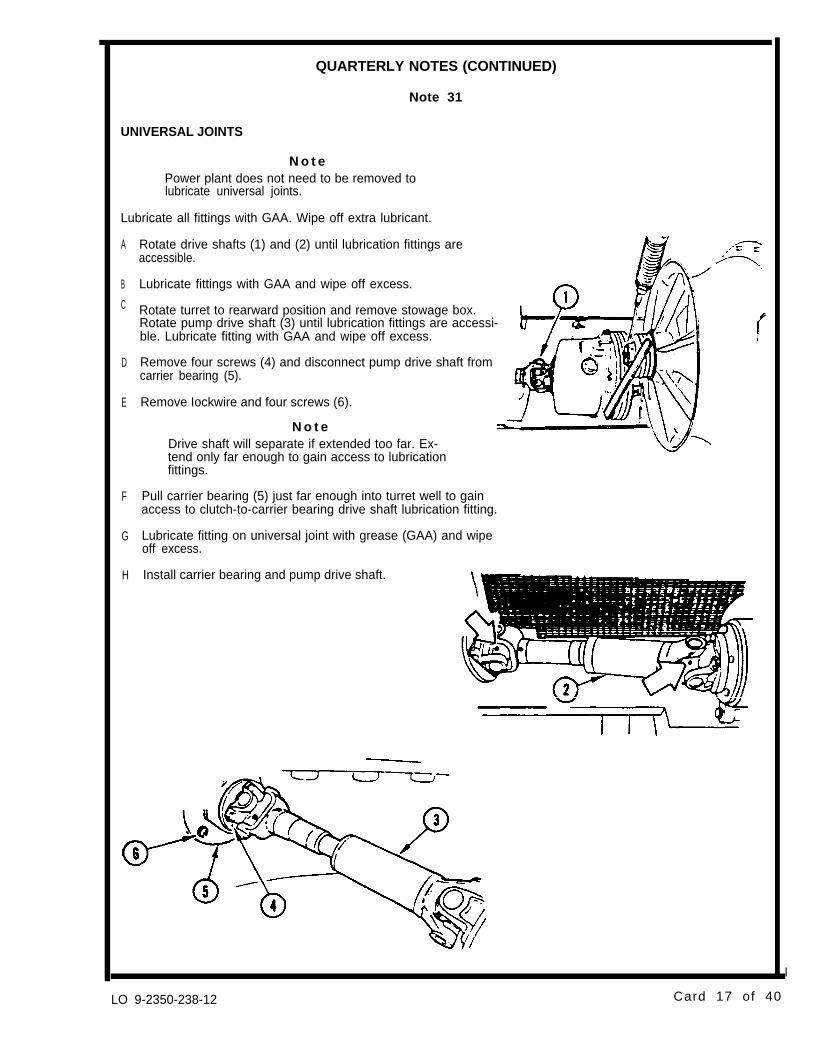
Note 31
UNIVERSAL JOINTS
N o t ePower plant does not need to be removed tolubricate universal joints.
Lubricate all fittings with GAA. Wipe off extra lubricant.
A
B
C
D
E
F
G
H
Rotate drive shafts (1) and (2) until lubrication fittings areaccessible.
Lubricate fittings with GAA and wipe off excess.
Rotate turret to rearward position and remove stowage box.Rotate pump drive shaft (3) until lubrication fittings are accessi-ble. Lubricate fitting with GAA and wipe off excess.
Remove four screws (4) and disconnect pump drive shaft fromcarrier bearing (5).
Remove Iockwire and four screws (6).
N o t eDrive shaft will separate if extended too far. Ex-tend only far enough to gain access to lubricationfittings.
Pull carrier bearing (5) just far enough into turret well to gainaccess to clutch-to-carrier bearing drive shaft lubrication fitting.
Lubricate fitting on universal joint with grease (GAA) and wipeoff excess.
Install carrier bearing and pump drive shaft.
I
LO 9-2350-238-12 Card 17 of 40

QUARTERLY NOTES (CONTINUED)
Note 32
TRAVERSING GEARCASE FILL AND LEVEL
Check oil level of upper and lower sections.
A
B
C
D
E
F
G
Open access door in left floor cover.
To check upper section oil level, remove plug (1) and checkthat oil level is 1/4 in. (6 mm) below top of plug hole.
Fill with oil (OEA) until oil level is 1/4 in. (6 mm) below top ofplug hole.
I WARNING IDry cleaning solvent (SD2) is toxic and flammable.Wear protective goggles and gloves and use only inwell-ventilated area.
Clean plug (1) with solvent SD2 and install.
To check lower section, remove plug dipstick (2) and checkthat oil level indication is at knurled end on dipstick.
Fill with oil (OEA) until oil level indicates on knurled end ofdipstick.
Install plug dipstick (2).
Note 33
TRAVERSING FINAL DRIVE BEARINGS
Lubricate two fittings with GAA.
Card 18 of 40 LO 9-2350-238-12
QUARTERLY NOTES (CONTINUED)
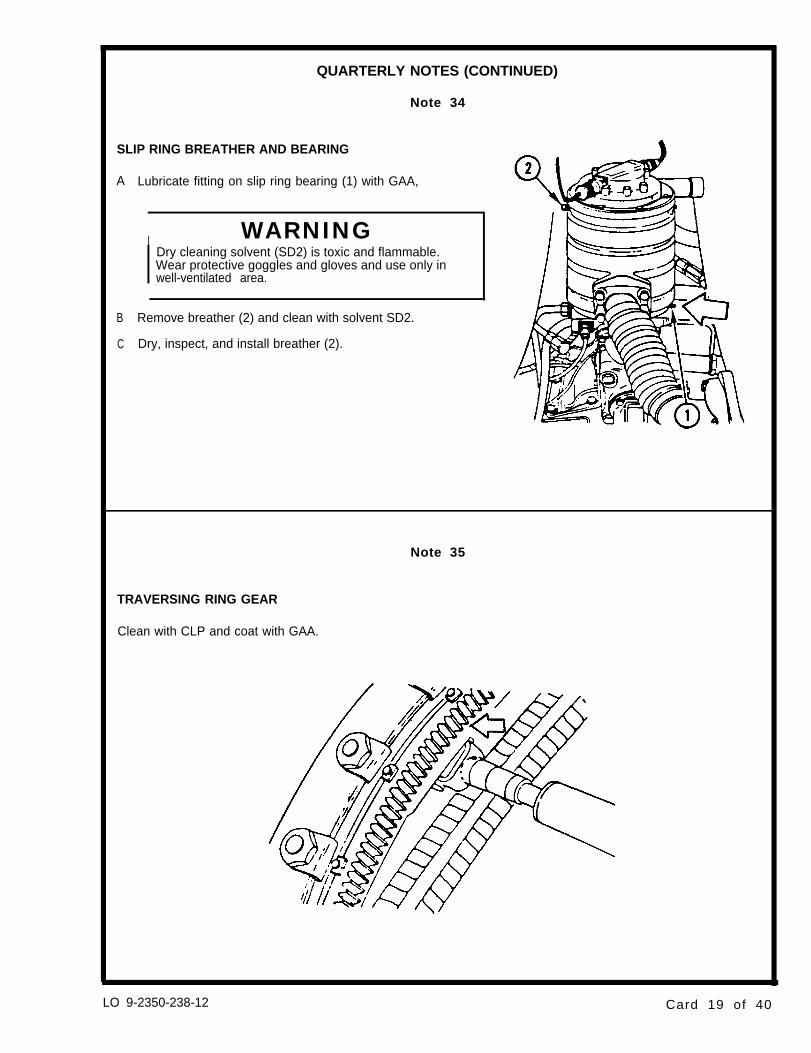
Note 34
SLIP RING BREATHER AND BEARING
A
B
C
Lubricate fitting on slip ring bearing (1) with GAA,
I WARNINGDry cleaning solvent (SD2) is toxic and flammable.Wear protective goggles and gloves and use only inwell-ventilated area.
Remove breather (2) and clean with solvent SD2.
Dry, inspect, and install breather (2).
Note 35
TRAVERSING RING GEAR
Clean with CLP and coat with GAA.
LO 9-2350-238-12 Card 19 of 40

QUARTERLY NOTES (CONTINUED)
Note 36
BOOM WINCH FILL AND LEVEL
Remove boom winch cover to gain access to plugs.
Check oil level.
A Remove fill plug (1) and level plug (2).
B Add oil (OE/HDO or OEA) through fill hole (1) until oil runs outof level plug hole (2).
I WARNINGDry cleaning solvent (SD2) is toxic and flammable.Wear protective goggles and gloves and use only inwell-ventilated area.
C Clean fill plug (1) and level plug (2) with solvent SD2 andinstall.
Note 37
TOW WINCH FILL AND LEVEL
Check oil level.
A Rotate drum until check plug (1) is in horizontal (3 or 9 o’clock)position.
B Remove check plug (1) at motor end of winch.
C Remove fill plug (2) at brake end.
D Add oil (OE/HDO or OEA) through fill hole (2) until oil runs outof check plug hole (1).
I WARNING IDry cleaning solvent (SD2) is toxic and flammable.Wear protective goggles and gloves and use only inwell-ventilated area.
E Clean fill plug (2) and check plug (1) with solvent SD2 andinstall.
Card 20 of 40 LO 9-2350-238-12

QUARTERLY NOTES (CONTINUED)
Note 38
BOOM CYLINDER HINGE PINS
Lubricate two fittings with GAA.
Note 39
TURRET BEARING
WARNINGMake sure no personnel are in turret well beforetraversing cab.
Lubricate quarterly, after 75 hr of operation, or after each cleaningoperation, when turret well is exposed to steam or high-pressurewater.
A Apply GAA to both lubrication fittings (1) until clean grease isobserved at seals (2).
B Wipe away dirty grease that is forced through seals.
C Repeat until only clean grease is observed at seals.
D Traverse cab four complete revolutions, alternating left andright.
Note 40
HYDRAULIC RESERVOIR BREATHER
WARNINGDry cleanrng solvent (SD2) is toxic and flammable.Wear protective goggles and gloves and use only inwell-ventilated area.
A Remove breather (1) and clean with solvent SD2.
B Dry, inspect, dip in oil (OE/HDO-10/OEA), and install.
LO 9-2360-238-12 Card 21 of 40

SEMIANNUAL NOTES
LUBRICANT-INTERVAL INTERVAL-LUBRICANT
Final DriveBreathers
(See Note 41) (0)
Auxiliary DriveDrain
and Fill(See Note 42) (0)
Transmission OilFilter(See Note 44) (0)
Tow WinchBreather
(See Note 43) (0)
OE/HDO Boom Winch andOEA Tow Winch DrumCLP and CableCW-II (See Note 45) (0)
TOW Hooks(See Note 46) (0) Pins
(See Note 49) (0)
(See Note 47) (0)
Hub BearingsFinal Drive OE/HDO S Drain and Fill
Drain and Fill OEA (See Note 50) (0)
Card 22 of 40 LO 9-2350-238-12
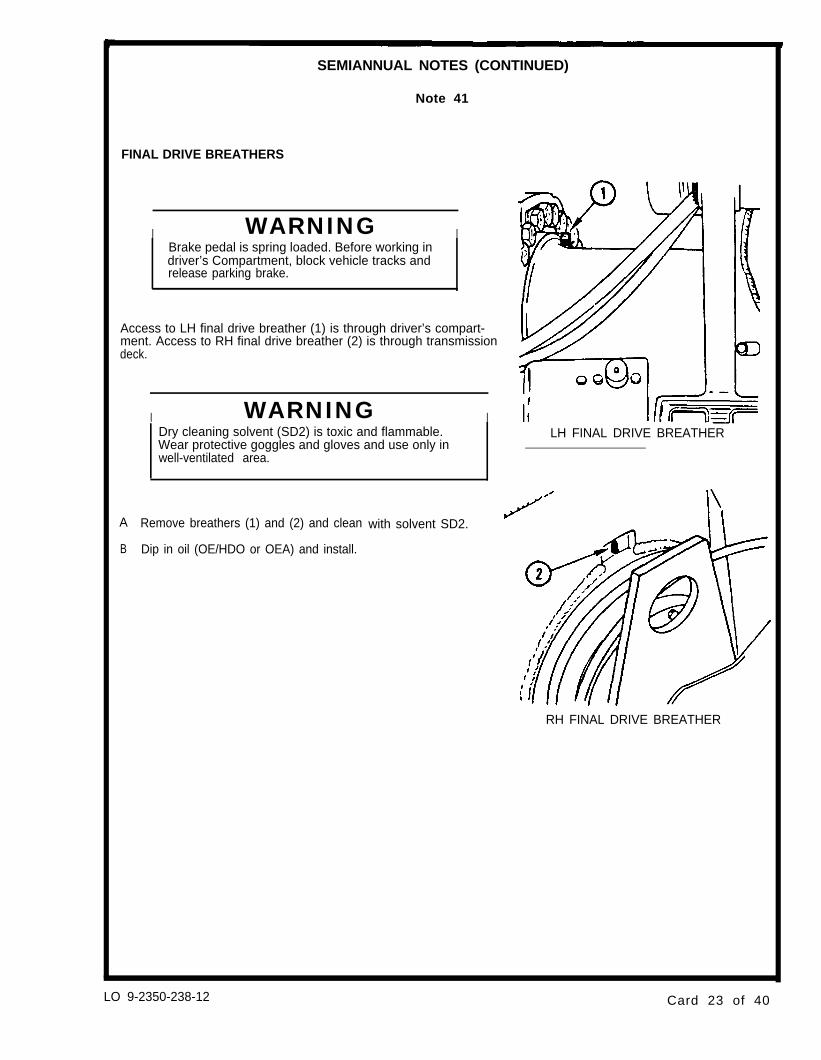
SEMIANNUAL NOTES (CONTINUED)
Note 41
FINAL DRIVE BREATHERS
I WARNING IBrake pedal is spring loaded. Before working indriver’s Compartment, block vehicle tracks andrelease parking brake.
Access to LH final drive breather (1) is through driver’s compart-ment. Access to RH final drive breather (2) is through transmissiondeck.
A
B
I WARNING IDry cleaning solvent (SD2) is toxic and flammable.Wear protective goggles and gloves and use only inwell-ventilated area.
Remove breathers (1) and (2) and clean
Dip in oil (OE/HDO or OEA) and install.
with solvent SD2.
LH FINAL DRIVE BREATHER
RH FINAL DRIVE BREATHER
LO 9-2350-238-12 Card 23 of 40

SEMIANNUAL NOTES (CONTINUED)
Note 42
AUXILIARY DRIVE DRAIN AND FILL
A
B
C
D
E
WARNINGOil will be hot after operation.
N o t eDrain only after operation.
Remove engine crankcase drain cover (1) from bottom of hull.
Remove auxiliary drive drain cap (2) and drain oil into a suitablecontainer.
WARNINGDry cleaning solvent (SD2) is toxic and flammable.Wear protective goggles and gloves and use only inwell-ventilated area.
After draining, clean auxiliary drive drain cap (2) with solventSD2 and install drain cap and engine crankcase drain cover (1).
Open fill cap (3). Fill with oil (OE/HDO or OEA) until oil level iswithin FULL and ADD marks on gage (4).
Clean and close fill cap (3).
Note 43
TOW WINCH BREATHER
I WARNINGDry cleaning solvent (SD2) is toxic and flammable.Wear protective goggles and gloves and use only inwell-ventilated area.
A Remove breather (1) and clean with solvent SD2.
B Dry, inspect, dip in oil (OE/HDO), and install.
I
Card 24 of 40 LO 9-2350-238-12

SEMIANNUAL NOTES (CONTINUED)
Note 44
TRANSMISSION OIL FILTER
Replace filter element every 1500 mi (2414 km), every 150 hr, orsemiannually, whichever occurs first, and each time the transmis-sion oil is drained.
C
A
B
D
E
F
G
H
Remove three screws (1) and three washers (2).
Install two screws (1) in jack screw holes (3).
Tighten screws (1) until filter assembly (4) is loose and removefilter and screws (1).
Remove nut (5), element (6), and packing (7). Discard elementand packing.
WARNINGDry cleaning solvent (SD21 is toxic and flammable.Wear protective goggles and gloves and use only inwell-ventilated area.
Clean parts with solvent SD2 and allow to dry thoroughly.
Install new packing (7), new element (6), and nut (5).
Install filter assembly (4), using three washers (2) and threescrews (1).
Run engine and shift transmission several times to check forleaks.
LO 9-2360-233-12 Card 25 of 40

SEMIANNUAL NOTES (CONTINUED)
Note 45
BOOM WINCH AND TOW WINCH DRUM AND CABLE
Perform the following semiannually if winch or cable has not been used.
A
B
C
Unwind and clean entire cable.
Brush-soak cable and drum with oil (OE/HDO, OEA, or CLP).
Wipe off excess oil and coat cable and drum with lubricatingoil, CW-II.
BOOM AND TOWWINCH CABLES
Note 46
TOW HOOK PINS
A
B
C
D
Remove pins.
r 1
WARNINGDry cleaning solvent (SD2) is toxic and flammable.Wear protective goggles and gloves and use only inwell-ventilated area.
Clean pins with SD2.
Lubricate with GAA and install.
Wipe off excess grease. TOW HOOK
Card 26 of 40 LO 9-2360-238-12

SEMIANNUAL NOTES (CONTINUED)
Note 47
FINAL DRIVE DRAIN AND FILL
WARNINGOil will be hot after operation.
Drain oil from both final drives.
N o t eDrain only after operation.
A Remove level plug (1) and drain plug (2) and drain oil into asuitable container.
WARNINGDry cleaning solvent (SD2) is toxic and flammable.Wear protective goggles and gloves and use only inwell-ventilated area.
B Clean drain plug (2) with solvent SD2 and install.
C Remove fill plug (3) in final drive saddle.
D Slowly add oil (OE/HDO or OEA) through fill plug hole (3) untiloil flows from level plug hole (1).
E Clean plugs (1) and (3) with solvent SD2 and install.
F Repeat steps A thru E for other side.
Note 48
SPADE CYLINDER HINGE PINS
A Remove pins.
WARNINGDry cleaning solvent (SD2) is toxic and flammable.Wear protective goggles and gloves and use only inwell-ventilated area.
B Clean pins with SD2.
C Lubricate with GAA and install.
D Wipe off excess grease. SPADE CYLINDER HINGEPINS
LO 9-2350-238-12 Card 27 of 40

SEMIANNUAL NOTES (CONTINUED)
Note 49
SPADE MOLDBOARD PINS
A
B
C
D
Remove pins.
I WARNINGDrycleaning solvent (SD2) is toxic and flammable.Wear protective goggles and gloves and use only inwell-ventilated area.
Clean pins with SD2.
Lubricate with GAA and install.
Wipe off excess grease.
Note 50
ROAD WHEEL AND IDLER WHEEL HUB BEARINGS DRAINAND FILL
Drain every 1500 mi (2414 km) or semiannually, whichever occurs —first.
A
B
C
D
E
F
Rotate wheel until fill plug (1) and drain plug (2) are aboutvertical.
Remove check plug (3) and drain plug (2) and drain oil into asuitable container.
I WARNINGDry cleaning solvent (SD2) is toxic and flammable.Wear protective goggles and gloves and use only inwell-ventilated area.
Clean drain plug (2) with solvent SD2 and install.
Clean area and remove fill plug (1).
Fill to bottom of level hole with oil (OE/HDO or OEA). Allowtime for oil to reach oil cavities.
Clean check plug (3) and fill plug (1) with solvent SD2 andinstall.
Card 28 of 40 LO 9-2350-238-12
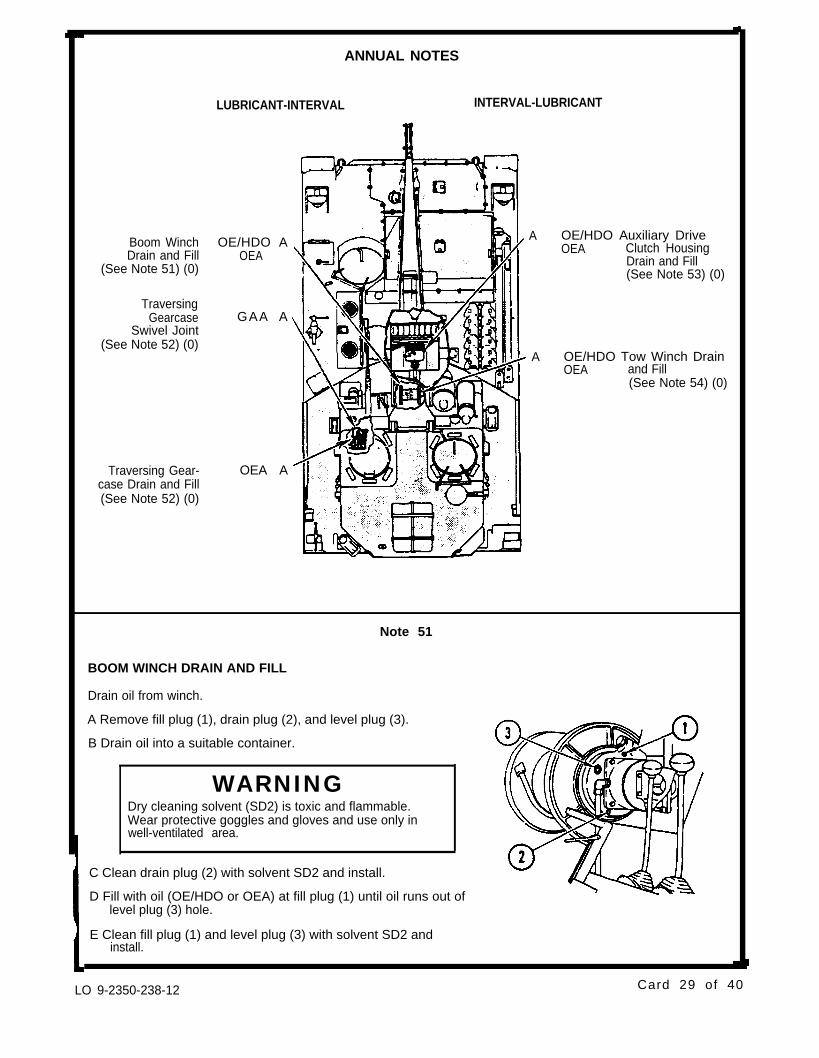
ANNUAL NOTES
LUBRICANT-INTERVAL INTERVAL-LUBRICANT
Boom Winch OE/HDO A A OE/HDO Auxiliary Drive
Drain and Fill OEA OEA Clutch Housing
(See Note 51) (0)Drain and Fill(See Note 53) (0)
TraversingGearcase GAA A
Swivel Joint(See Note 52) (0)
A OE/HDO Tow Winch DrainOEA and Fill
(See Note 54) (0)
Traversing Gear- OEA Acase Drain and Fill(See Note 52) (0)
Note 51
BOOM WINCH DRAIN AND FILL
Drain oil from winch.
A Remove fill plug (1), drain plug (2), and level plug (3).
B Drain oil into a suitable container.
WARNINGDry cleaning solvent (SD2) is toxic and flammable.Wear protective goggles and gloves and use only inwell-ventilated area.
C Clean drain plug (2) with solvent SD2 and install.
D Fill with oil (OE/HDO or OEA) at fill plug (1) until oil runs out oflevel plug (3) hole.
E Clean fill plug (1) and level plug (3) with solvent SD2 andinstall.
LO 9-2350-238-12 Card 29 of 40
ANNUAL NOTES (CONTINUED)
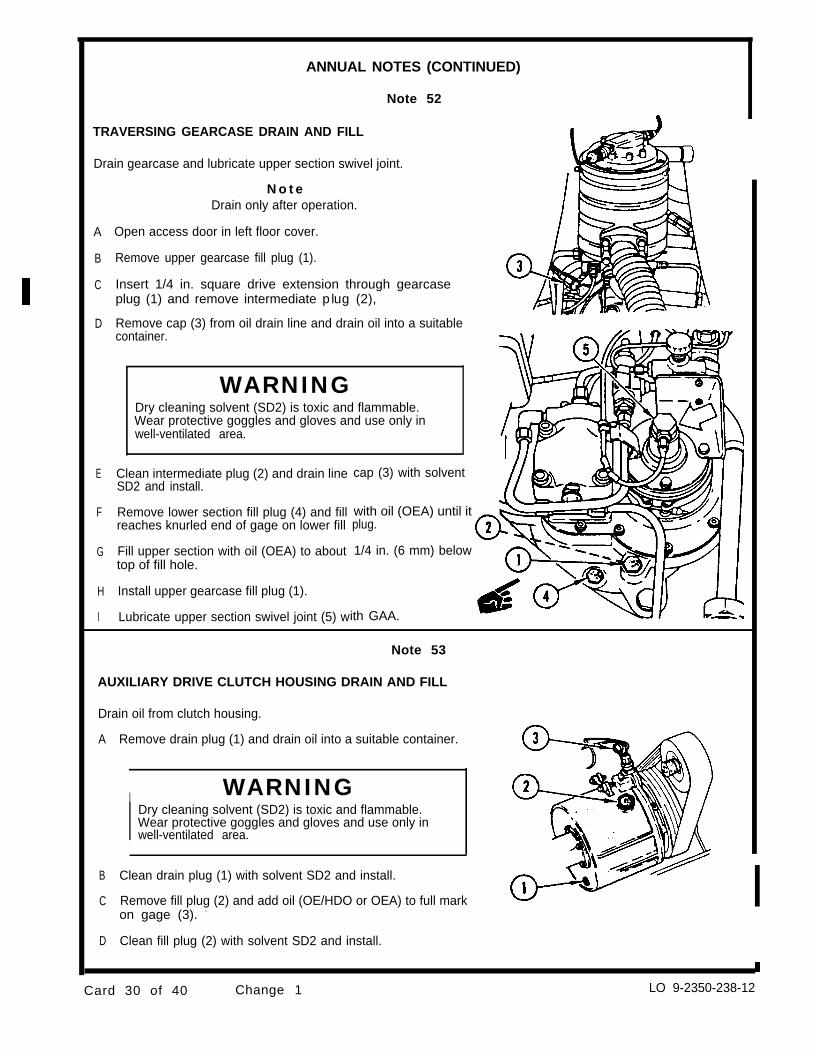
Note 52
TRAVERSING GEARCASE DRAIN AND FILL
Drain gearcase and lubricate upper section swivel joint.
A
B
C
D
E
F
G
H
I
N o t eDrain only after operation.
Open access door in left floor cover.
Remove upper gearcase fill plug (1).
Insert 1/4 in. square drive extension through gearcaseplug (1) and remove intermediate plug (2),
Remove cap (3) from oil drain line and drain oil into a suitablecontainer.
WARNINGDry cleaning solvent (SD2) is toxic and flammable.Wear protective goggles and gloves and use only inwell-ventilated area.
Clean intermediate plug (2) and drain lineSD2 and install.
Remove lower section fill plug (4) and fillreaches knurled end of gage on lower fill
Fill upper section with oil (OEA) to abouttop of fill hole.
Install upper gearcase fill plug (1).
Lubricate upper section swivel joint (5) w
cap (3) with solvent
with oil (OEA) until itplug.
1/4 in. (6 mm) below
ith GAA.
Note 53
AUXILIARY DRIVE CLUTCH HOUSING DRAIN AND FILL
Drain oil from clutch housing.
A
B
C
D
Remove drain plug (1) and drain oil into a suitable container.
I WARNINGDry cleaning solvent (SD2) is toxic and flammable.Wear protective goggles and gloves and use only inwell-ventilated area.
Clean drain plug (1) with solvent SD2 and install.
Remove fill plug (2) and add oil (OE/HDO or OEA) to full markon gage (3). -
Clean fill plug (2) with solvent SD2 and install.
Card 30 of 40 Change 1 LO 9-2350-238-12

ANNUAL NOTES (CONTINUED)
Note 54
TOW WHINCH DRAIN AND F ILL
Drain oil from tow winch.
A Rotate drum until drain and check plugs (1) and (2) are down.
B Remove drain and check plugs (1) and (2) from both ends ofdrum and drain oil into a suitable container.
WARNINGDry cleaning solvent (SD2) is toxic and flammable.Wear protective goggles and gloves and use only inwell-ventilated area.
C Clean drain and check plug (1) with solvent SD2 and install inbrake end.
D Rotate drum until drain and check plug (1) is horizontal (3 or 9o’clock) position.
E Remove fill plug (3) from support bracket.
F Add oil (OE/HDO or OEA) at fill plug (3) opening until oil comesout drain and check plug (2) opening at motor end.
G Clean drain and check plug (2) and fill plug (3) with solventSD2 and install.
\MOTOR END
LO 9-2350-238-12 Card 31 of 40
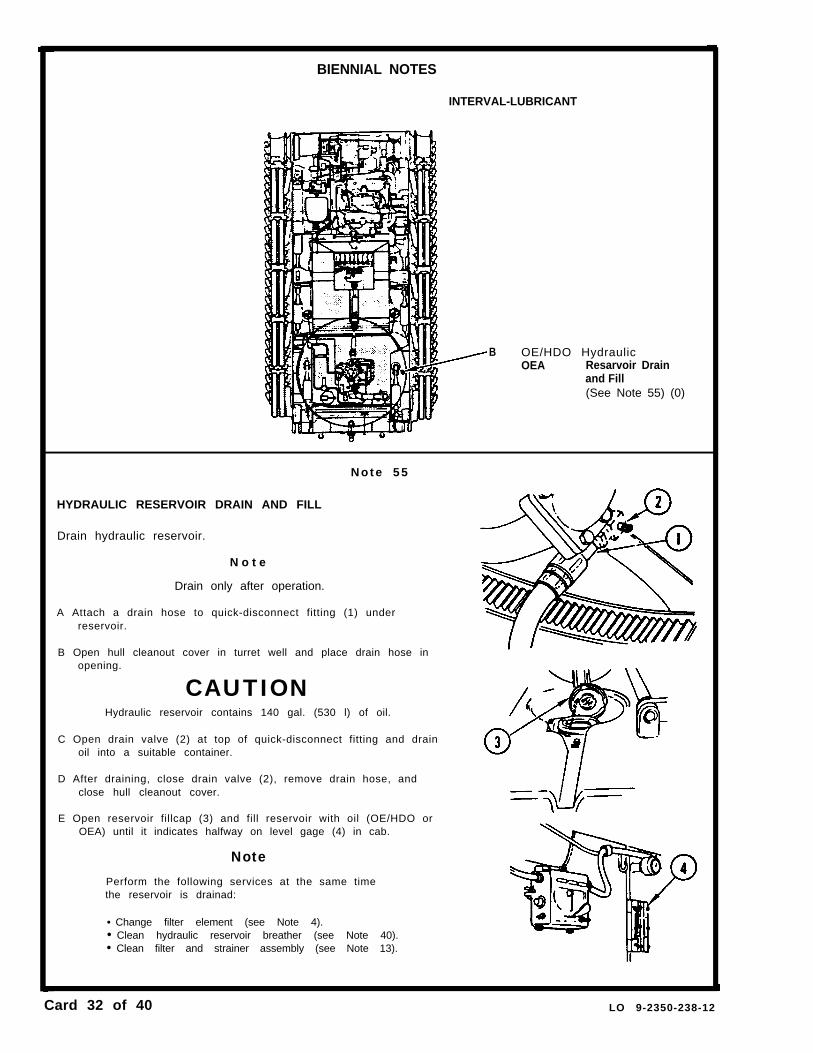
BIENNIAL NOTES
INTERVAL-LUBRICANT
B OE/HDO HydraulicOEA Resarvoir Drain
and Fill(See Note 55) (0)
N o t e 5 5
HYDRAULIC RESERVOIR DRAIN AND FILL
Drain hydraulic reservoir.
N o t e
Drain only after operation.
A Attach a drain hose to quick-disconnect fitting (1) underreservoir.
B Open hull cleanout cover in turret well and place drain hose inopening.
CAUTIONHydraulic reservoir contains 140 gal. (530 l) of oil.
C Open drain valve (2) at top of quick-disconnect fitting and drainoil into a suitable container.
D After draining, close drain valve (2), remove drain hose, andclose hull cleanout cover.
E Open reservoir fillcap (3) and fill reservoir with oil (OE/HDO orOEA) until it indicates halfway on level gage (4) in cab.
Note
Perform the following services at the same timethe reservoir is drainad:
• Change filter element (see Note 4).• Clean hydraulic reservoir breather (see Note 40).• Clean filter and strainer assembly (see Note 13).
Card 32 of 40 LO 9-2350-238-12
ON-CONDITION NOTES
LUBRICANT-INTERVAL INTERVAL-LUBRICANT
Engine Crankcase OE/HDO OC OC OEA TransmissionDrain OEA Drain and Fill
(See Note 56) (0) (See Note 57) (0)
Note 56
ENGINE CRANKCASE DRAIN
N o t eDrain only after operation.
Drain when notifed by the Army Oil Analysis Program (AOAP)laboratory.
If AOAP laboratory support is not available, drain every 1500 mi(2414 km), 150 hr, or semiannually, whichever occurs first. if OEAis used, drain every 750 mi (1207 km), 75 hr, or quarterly,whichever occurs first.
A Move vehicle to level ground.
B Remove cover (1) from bottom of hull and remove drain plug(2) from engine.
C Drain oil into a suitable container.
D Clean drain plug (2) and solvent SD2 and install drain plug andcover (1).
E Replace oil filter elements (see Note 28).
F Refill engine crankcase (see Note 3).
WARNINGDry cleaning solvent (SD2) is toxic and flammable.Wear protective goggles and gloves and use only inwell-ventilated area.
LO 9-2350-238-12 Card 33 of 40

ON-CONDITION NOTS (CONTINUED)
Note 57
TRANSMISSION DRAIN AND FILL
WARNINGOil will be hot after operation.
Drain when notified by the Army Oil Analysis Program (AOAP)laboratory.
If AOAP laboratory support is not available, drain every 1500 mi(2414 km), 150 hr, or semiannually, whichever occurs first. If OEAis used, drain every 750 mi (1207 km), 75 hr, or quarterly,whichever occurs first. Drain only after operation.
A Move vehicle to level ground.
B Remove transmission drain access cover (1) from bottom ofhull, remove transmission drain plug {2) from transmission, anddrain oil into a suitable container.
* d t
WARNINGDry cleaning solvent (SD2) is toxic and flammable.Wear protective goggles and gloves and use only inwell-ventilated area.
C Clean transmission drain plug (2) with solvent SD2 and installdrain plug and access cover (1).
D Replace transmission oil filter (see Note 44),
CAUTIONDo NOT check oil with engine running. Do NOToverfill.
E Add oil (OEA) at transmission fill (3) until oil level is withinOPERATING RANGE on gage (4).
F After filling, run engine at 1600 to 1900 rpm with brakes ap-plied and transmission in fourth gear. Run until oil temperaturegage reaads 180°F (82°C).
G Run engine at 1200 to 1600 rpm for 1 to 3 min with transmis-sion in neutral to stabilize oil temperature between 180°F(82°C) and 200°F (93°C).
H Stop engine and wait 3 to 5 minutes. Check that oil level iswithin OPERATING RANGE on gage (4). Do not add or drain oilif in this range, Add oil only when below ADD mark.
I Add or drain oil as required.
Card 34 of 40 LO 9-2350-238-12
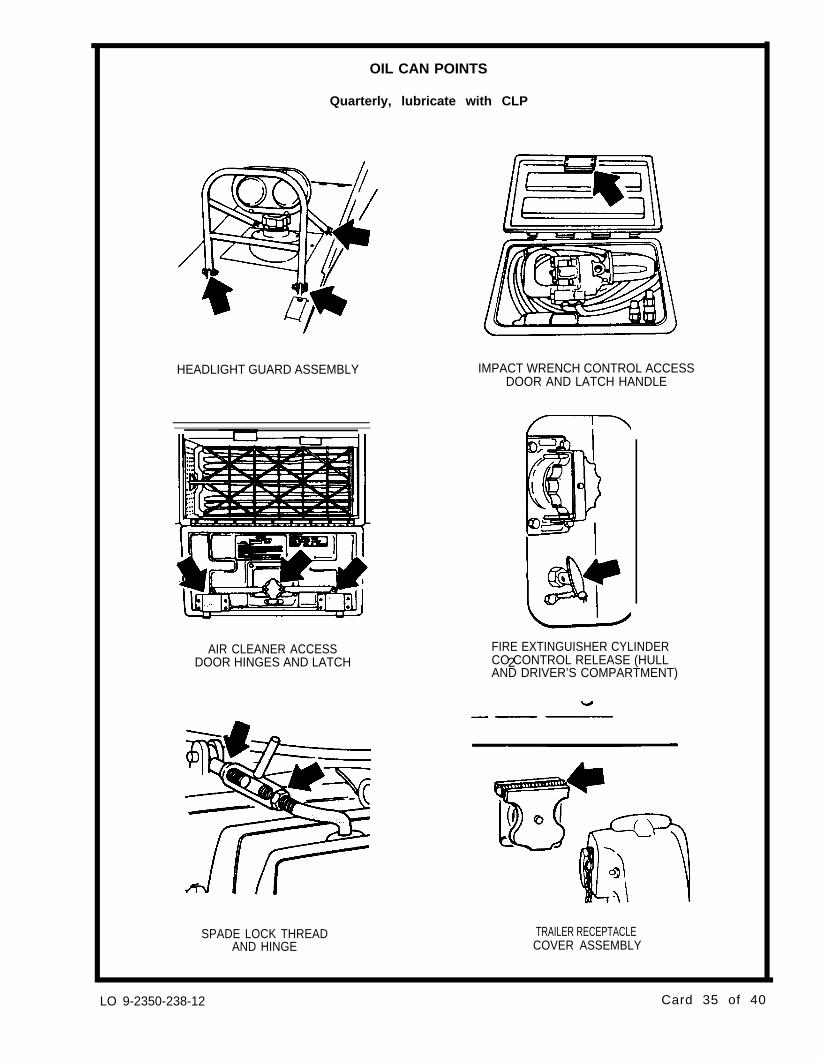
OIL CAN POINTS
Quarterly, lubricate with CLP
HEADLIGHT GUARD ASSEMBLY
AIR CLEANER ACCESSDOOR HINGES AND LATCH
IMPACT WRENCH CONTROL ACCESSDOOR AND LATCH HANDLE
FIRE EXTINGUISHER CYLINDERCO CONTROL RELEASE (HULLAND DRIVER’S COMPARTMENT)
2
SPADE LOCK THREADAND HINGE
TRAILER RECEPTACLECOVER ASSEMBLY
LO 9-2350-238-12 Card 35 of 40
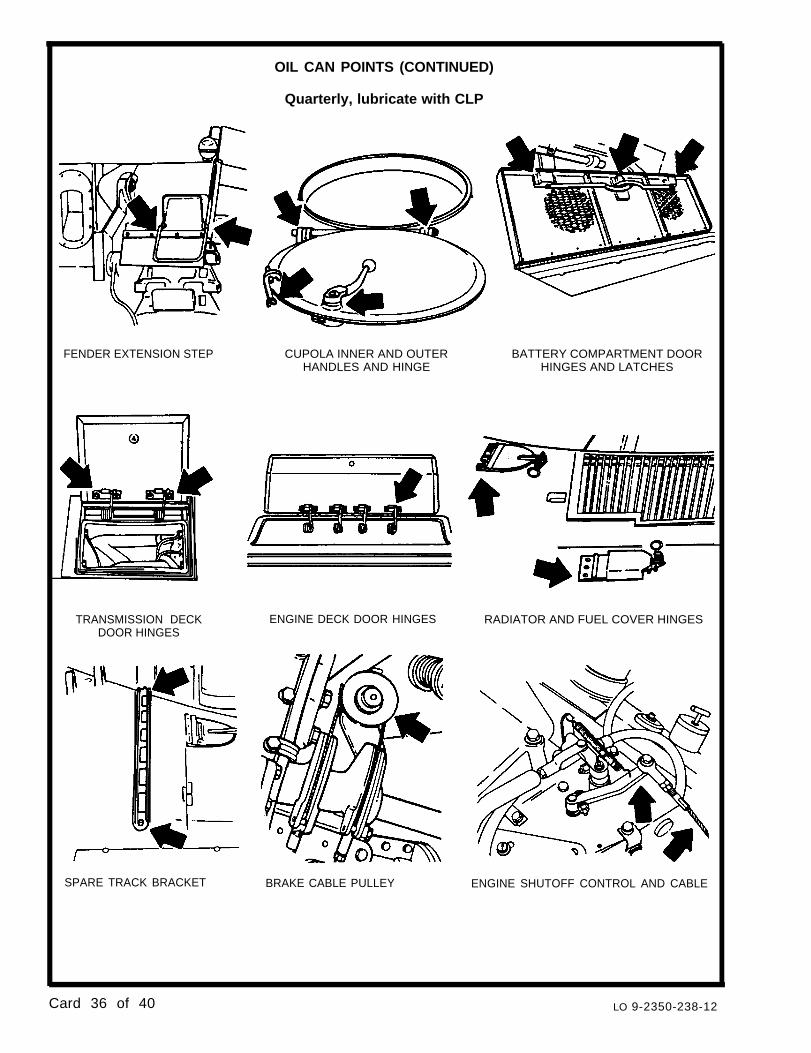
OIL CAN POINTS (CONTINUED)
Quarterly, lubricate with CLP
FENDER EXTENSION STEP CUPOLA INNER AND OUTER BATTERY COMPARTMENT DOORHANDLES AND HINGE HINGES AND LATCHES
TRANSMISSION DECKDOOR HINGES
SPARE TRACK BRACKET
ENGINE DECK DOOR HINGES
BRAKE CABLE PULLEY
RADIATOR AND FUEL COVER HINGES
ENGINE SHUTOFF CONTROL AND CABLE
Card 36 of 40 LO 9-2350-238-12
OIL CAN POINTS (CONTINUED)
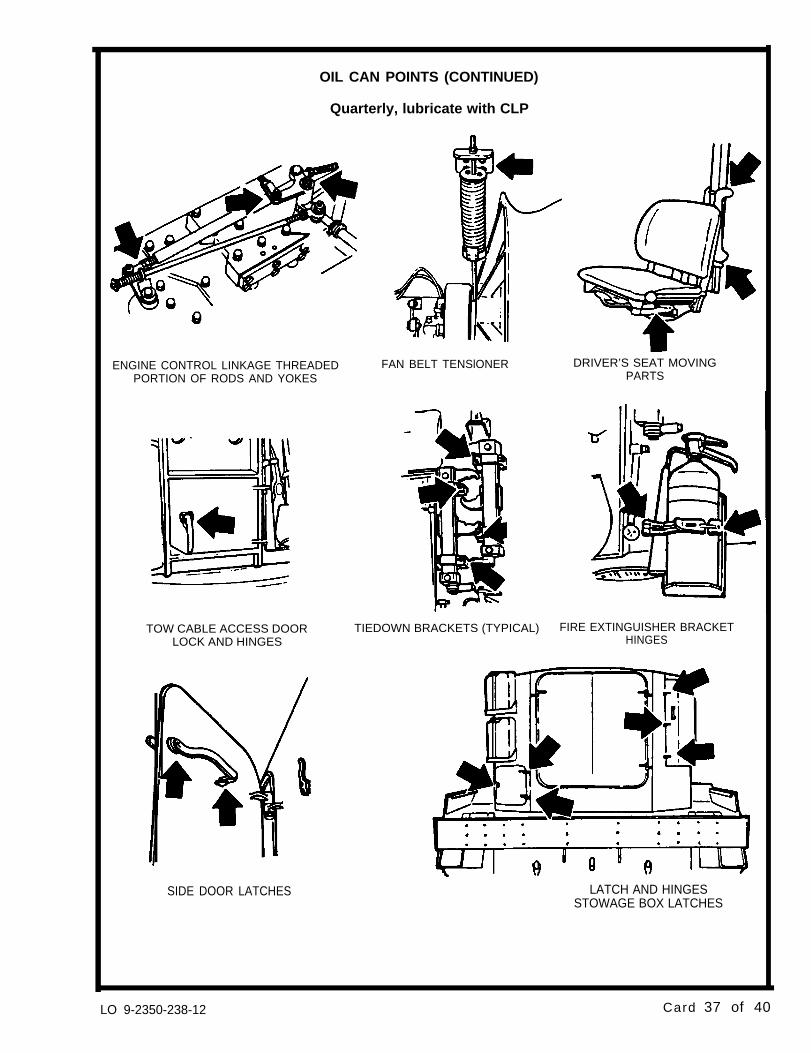
Quarterly, lubricate with CLP
ENGINE CONTROL LINKAGE THREADED FAN BELT TENSlONER DRIVER’S SEAT MOVINGPORTION OF RODS AND YOKES PARTS
TOW CABLE ACCESS DOOR TIEDOWN BRACKETS (TYPICAL) FIRE EXTINGUISHER BRACKETLOCK AND HINGES HINGES
SIDE DOOR LATCHES LATCH AND HINGESSTOWAGE BOX LATCHES
LO 9-2350-238-12 Card 37 of 40

OIL CAN POINTS (CONTINUED)
Quarterly, lubricate with CLP
RIGGER’S CUPOLA RING LOCK MACHINE GUN MOUNT LOCKING PINS
MACHINE GUN MOUNT POST, ALL CRANE OPERATING HAND OPERATED HYDRAULICHINGE, AND PINS CONTROLS (TYPICAL) RAM PUMP
STOWAGE BOX HINGES AND LOCKS BOOM OPERATOR’S AND RIGGER’S REAR DOOR LOCKS ANDAND FIRE EXTINGUISHER BRACKET SEATS MOVING PARTS HINGES
HINGES
Card 38 of 40 LO 9-2350-238-12
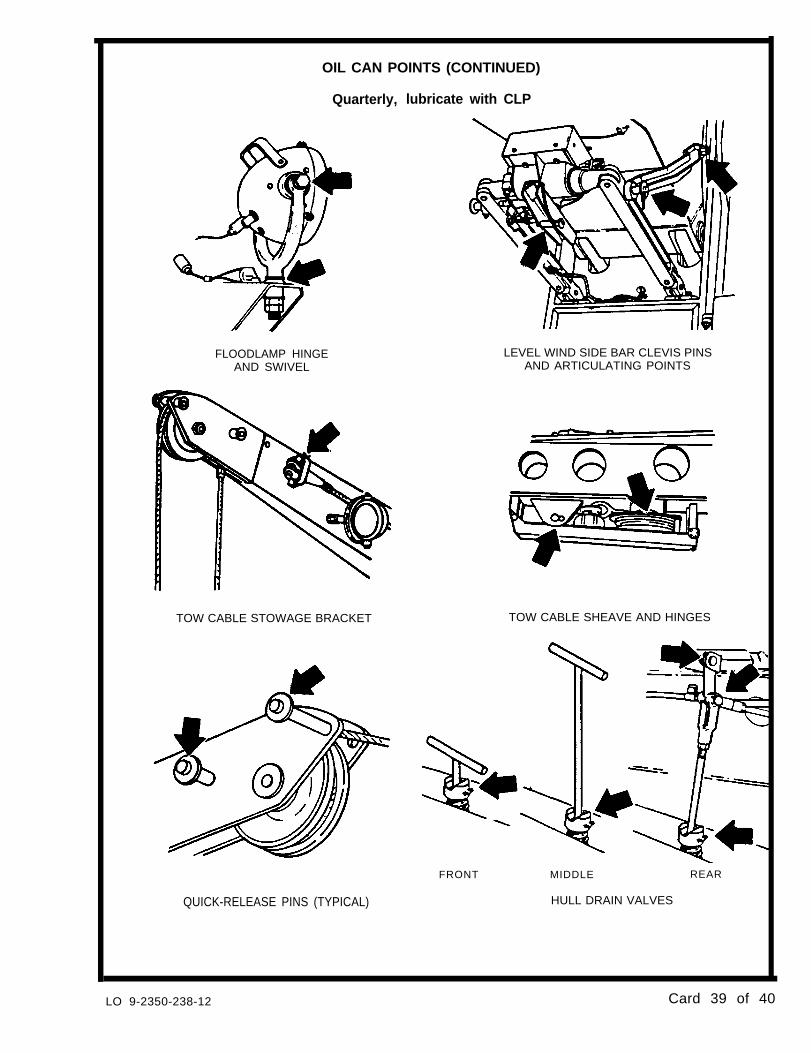
OIL CAN POINTS (CONTINUED)
Quarterly, lubricate with CLP
FLOODLAMP HINGEAND SWIVEL
TOW CABLE STOWAGE BRACKET
QUICK-RELEASE PINS (TYPICAL)
LEVEL WIND SIDE BAR CLEVIS PINSAND ARTICULATING POINTS
TOW CABLE SHEAVE AND HINGES
FRONT MIDDLE REAR
HULL DRAIN VALVES
LO 9-2350-238-12 Card 39 of 40
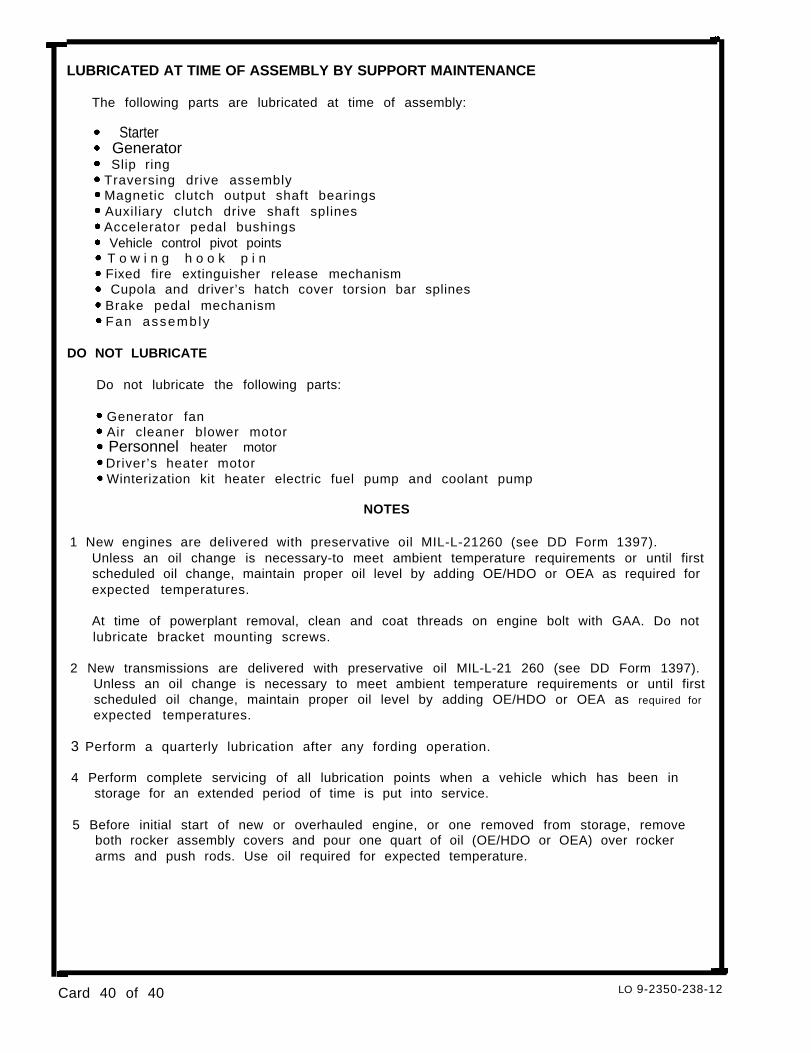
LUBRICATED AT TIME OF ASSEMBLY BY SUPPORT MAINTENANCE
The following parts are lubricated at time of assembly:
Starter Generator Slip ring Traversing drive assembly Magnetic clutch output shaft bearings Auxiliary clutch drive shaft splines Accelerator pedal bushings����� Vehicle control pivot points T o w i n g h o o k p i n Fixed fire extinguisher release mechanism Cupola and driver’s hatch cover torsion bar splines
Brake pedal mechanism Fan assemb ly
DO NOT LUBRICATE
Do not lubricate the following parts:
Generator fan Air cleaner blower motor Personnel heater motor Driver’s heater motor Winterization kit heater electric fuel pump and coolant pump
NOTES
1 New engines are delivered with preservative oil MIL-L-21260 (see DD Form 1397).Unless an oil change is necessary-to meet ambient temperature requirements or until firstscheduled oil change, maintain proper oil level by adding OE/HDO or OEA as required forexpected temperatures.
At time of powerplant removal, clean and coat threads on engine bolt with GAA. Do notlubricate bracket mounting screws.
2 New transmissions are delivered with preservative oil MIL-L-21 260 (see DD Form 1397).Unless an oil change is necessary to meet ambient temperature requirements or until firstscheduled oil change, maintain proper oil level by adding OE/HDO or OEA as required for
expected temperatures.
3 Perform a quarterly lubrication after any fording operation.
4 Perform complete servicing of all lubrication points when a vehicle which has been instorage for an extended period of time is put into service.
5 Before initial start of new or overhauled engine, or one removed from storage, removeboth rocker assembly covers and pour one quart of oil (OE/HDO or OEA) over rockerarms and push rods. Use oil required for expected temperature.
Card 40 of 40 LO 9-2350-238-12

By Order of the Secretary of the Army:
CARL E. VUONOGeneral, United States Army
Chief of Staff
Official:
WILLIAM J. MEEHAN IIBrigadier General, United States Army
The Adjutant General
DISTRIBUTION:
To be distributed in accordance with DA Form 12-37, (Blocks 928, 929),Operator and Unit Maintenance Requirements for Vehicle, Recovery, Light,Full Tracked, M578.

P i n : 0 1 1 8 9 5 . 0 0 0