Embed Size (px)
Citation preview
Application Note
R20AN0418EU0103 Rev.1.03 Page 1 of 27 Feb 7, 2018
Renesas Synergy™ Platform
Debugging Your Application with IAR C-SPY Introduction This Application Note uses the template project SK-S7G2 Synergy™ MCU Group Blinky with ThreadX®. Refer to Getting Started with IAR Embedded Workbench® for Renesas Synergy™ document to create a project through the Synergy Standalone Configurator (SSC).
Contents
1. Initial Settings .......................................................................................................................... 2
2. Debug basics and Live Watch ................................................................................................. 5
3. Conditional and Data Breakpoints ............................................................................................ 8
4. C-SPY Macros ....................................................................................................................... 11
5. PRINTF via SWO and Semihosting ....................................................................................... 12
6. ITM Events ............................................................................................................................ 14
7. Interrupt Logging ................................................................................................................... 18
8. Attach to running target ......................................................................................................... 19
9. ThreadX RTOS plugin ........................................................................................................... 22
10. Stack Analysis during Debug (View > Stack Usage) .............................................................. 24
Website and Support .................................................................................................................... 27
R20AN0418EU0103 Rev.1.03
Feb 7, 2018
Renesas Synergy™ Platform Debugging Your Application with IAR C-SPY
R20AN0418EU0103 Rev.1.03 Page 2 of 27 Feb 7, 2018
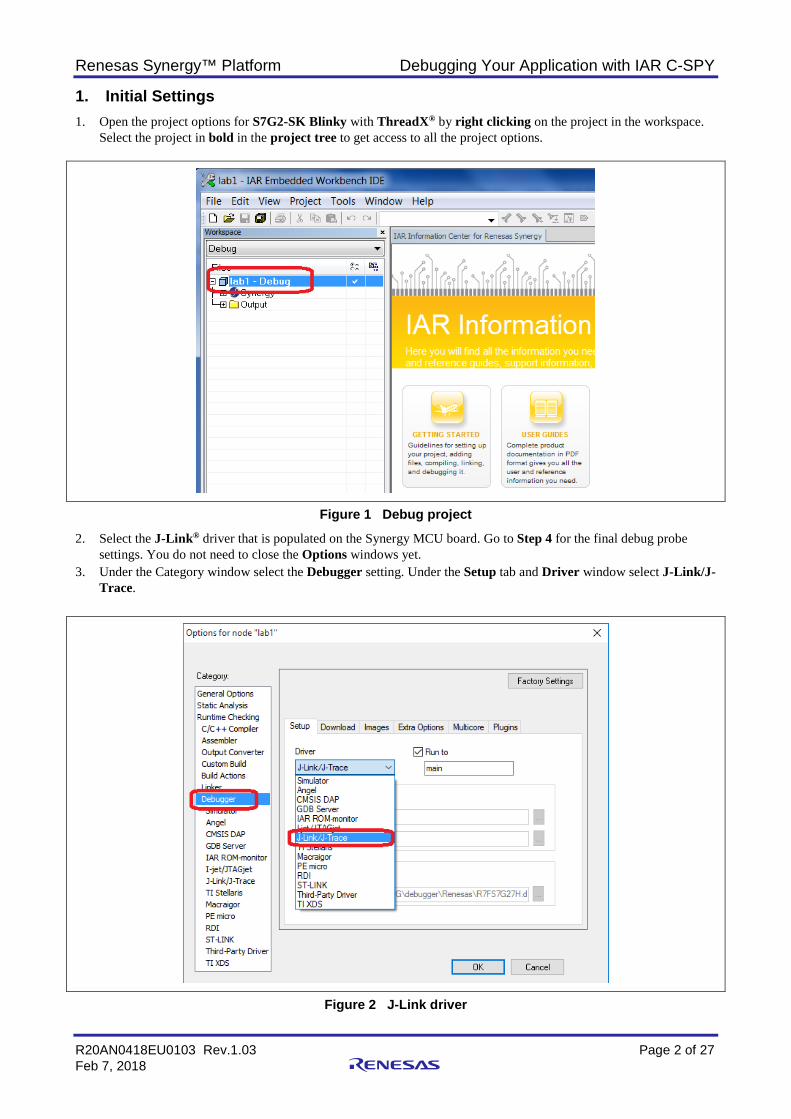
1. Initial Settings 1. Open the project options for S7G2-SK Blinky with ThreadX® by right clicking on the project in the workspace.
Select the project in bold in the project tree to get access to all the project options.
Figure 1 Debug project
2. Select the J-Link® driver that is populated on the Synergy MCU board. Go to Step 4 for the final debug probe settings. You do not need to close the Options windows yet.
3. Under the Category window select the Debugger setting. Under the Setup tab and Driver window select J-Link/J-Trace.
Figure 2 J-Link driver
Renesas Synergy™ Platform Debugging Your Application with IAR C-SPY
R20AN0418EU0103 Rev.1.03 Page 3 of 27 Feb 7, 2018
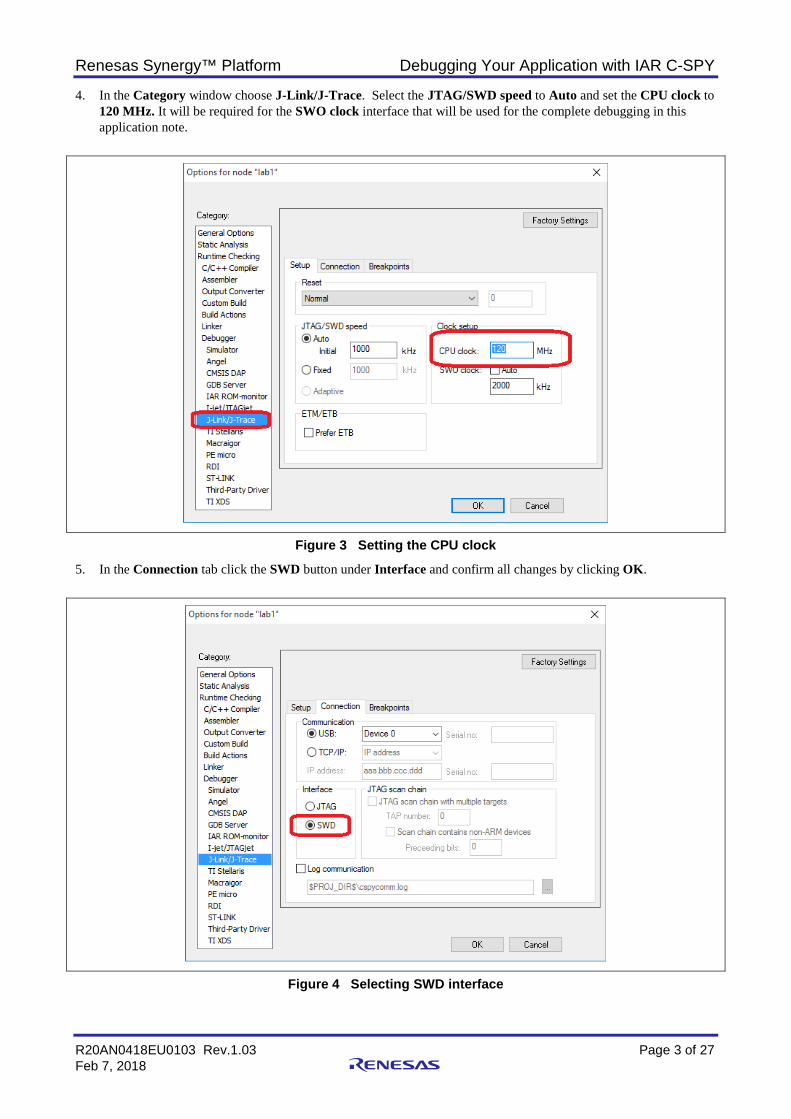
4. In the Category window choose J-Link/J-Trace. Select the JTAG/SWD speed to Auto and set the CPU clock to 120 MHz. It will be required for the SWO clock interface that will be used for the complete debugging in this application note.
Figure 3 Setting the CPU clock
5. In the Connection tab click the SWD button under Interface and confirm all changes by clicking OK.
Figure 4 Selecting SWD interface
Renesas Synergy™ Platform Debugging Your Application with IAR C-SPY
R20AN0418EU0103 Rev.1.03 Page 4 of 27 Feb 7, 2018
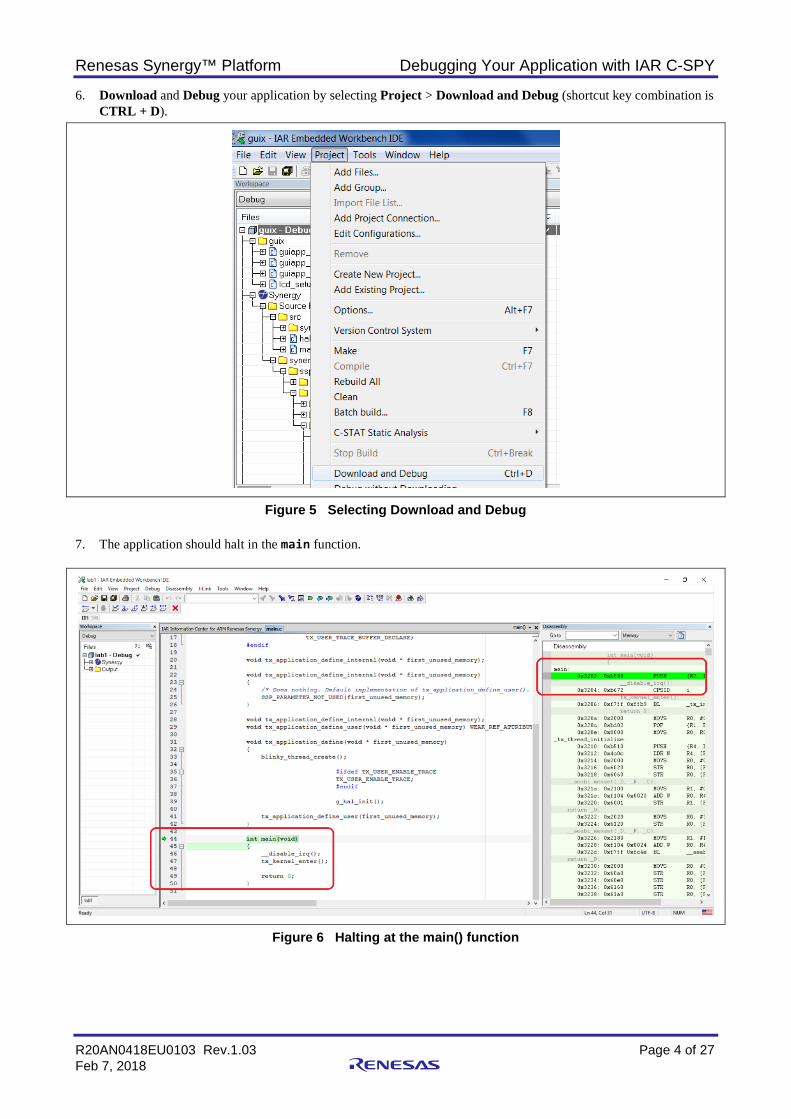
6. Download and Debug your application by selecting Project > Download and Debug (shortcut key combination is CTRL + D).
Figure 5 Selecting Download and Debug 7. The application should halt in the main function.
Figure 6 Halting at the main() function
Renesas Synergy™ Platform Debugging Your Application with IAR C-SPY
R20AN0418EU0103 Rev.1.03 Page 5 of 27 Feb 7, 2018
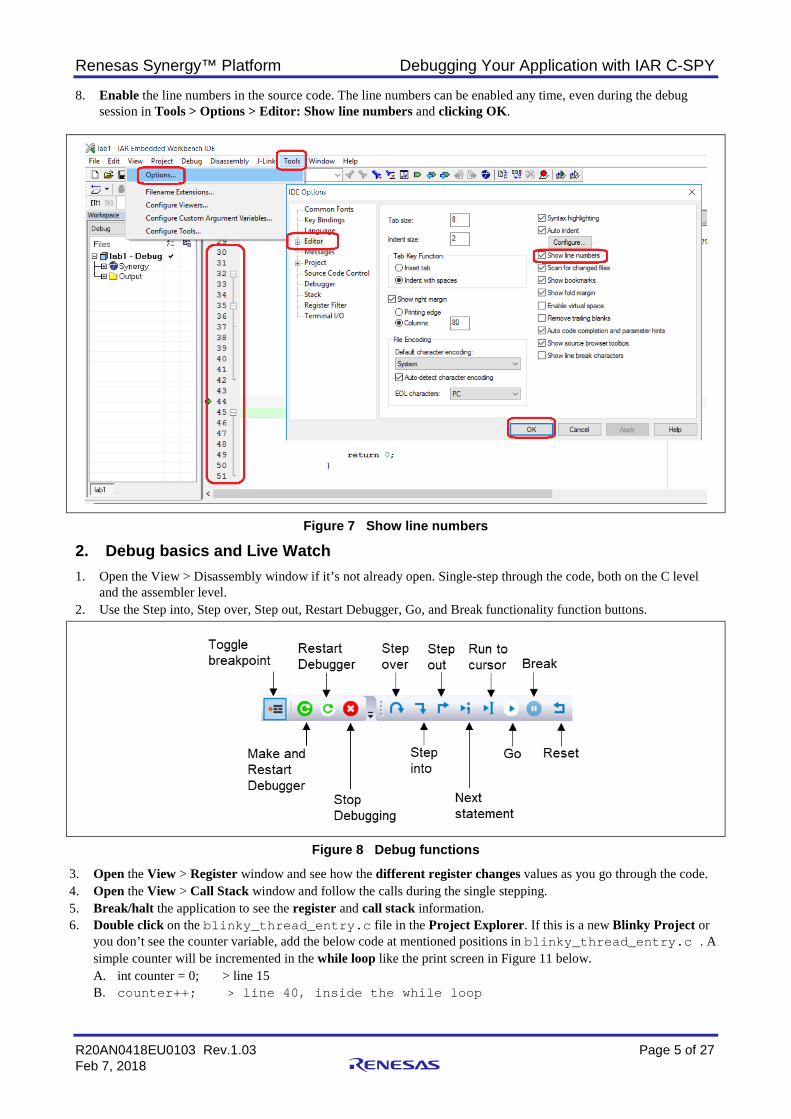
8. Enable the line numbers in the source code. The line numbers can be enabled any time, even during the debug session in Tools > Options > Editor: Show line numbers and clicking OK.
Figure 7 Show line numbers
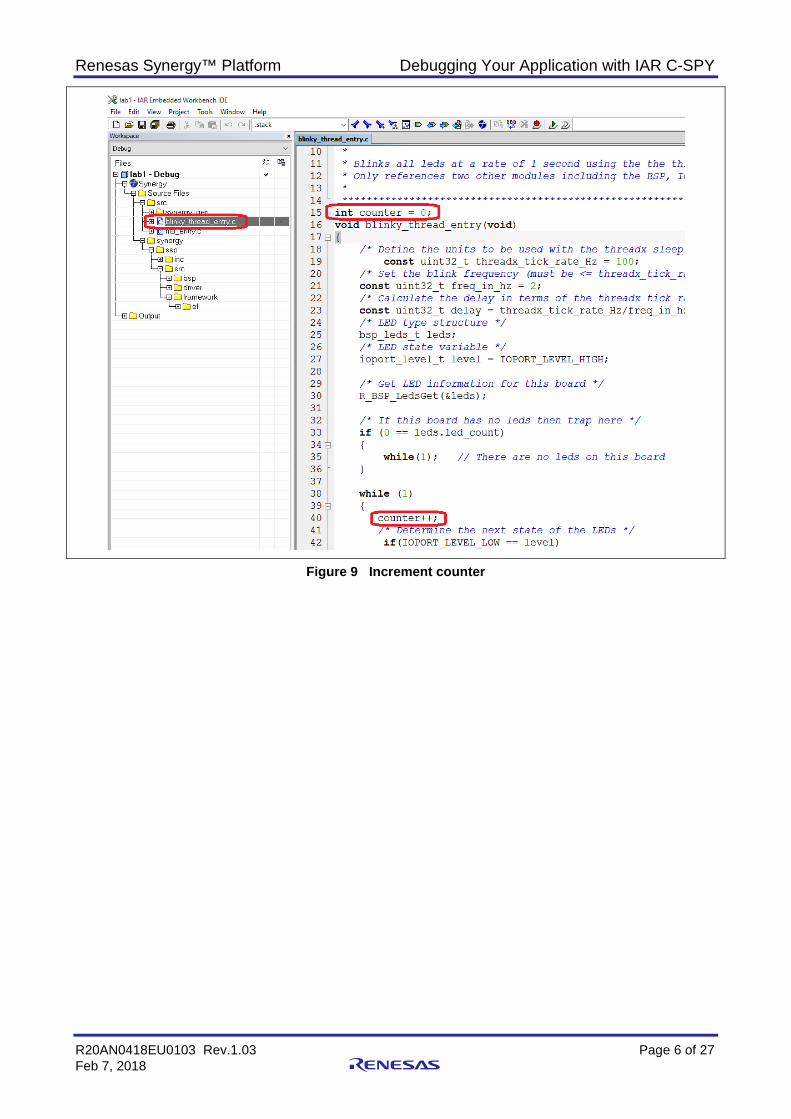
2. Debug basics and Live Watch 1. Open the View > Disassembly window if it’s not already open. Single-step through the code, both on the C level
and the assembler level. 2. Use the Step into, Step over, Step out, Restart Debugger, Go, and Break functionality function buttons.
Figure 8 Debug functions
3. Open the View > Register window and see how the different register changes values as you go through the code. 4. Open the View > Call Stack window and follow the calls during the single stepping. 5. Break/halt the application to see the register and call stack information. 6. Double click on the blinky_thread_entry.c file in the Project Explorer. If this is a new Blinky Project or
you don’t see the counter variable, add the below code at mentioned positions in blinky_thread_entry.c . A simple counter will be incremented in the while loop like the print screen in Figure 11 below. A. int counter = 0; > line 15 B. counter++; > line 40, inside the while loop
Renesas Synergy™ Platform Debugging Your Application with IAR C-SPY
R20AN0418EU0103 Rev.1.03 Page 6 of 27 Feb 7, 2018
Figure 9 Increment counter
Renesas Synergy™ Platform Debugging Your Application with IAR C-SPY
R20AN0418EU0103 Rev.1.03 Page 7 of 27 Feb 7, 2018
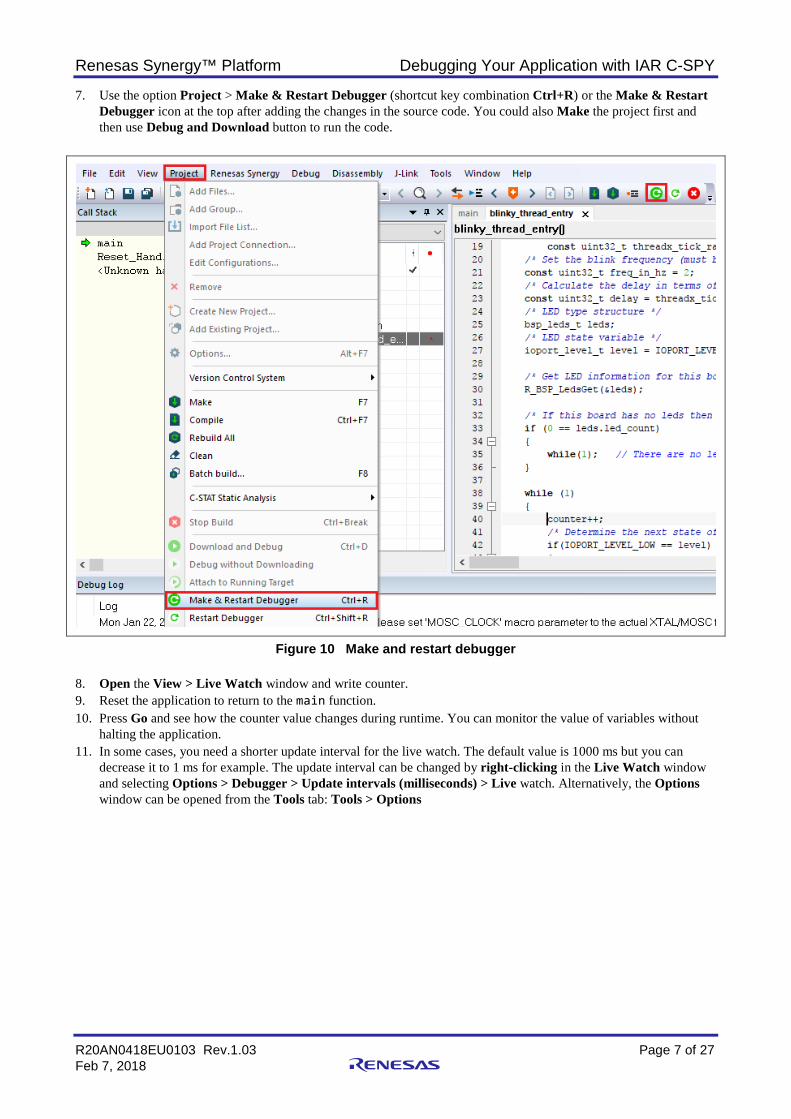
7. Use the option Project > Make & Restart Debugger (shortcut key combination Ctrl+R) or the Make & Restart Debugger icon at the top after adding the changes in the source code. You could also Make the project first and then use Debug and Download button to run the code.
Figure 10 Make and restart debugger 8. Open the View > Live Watch window and write counter. 9. Reset the application to return to the main function. 10. Press Go and see how the counter value changes during runtime. You can monitor the value of variables without
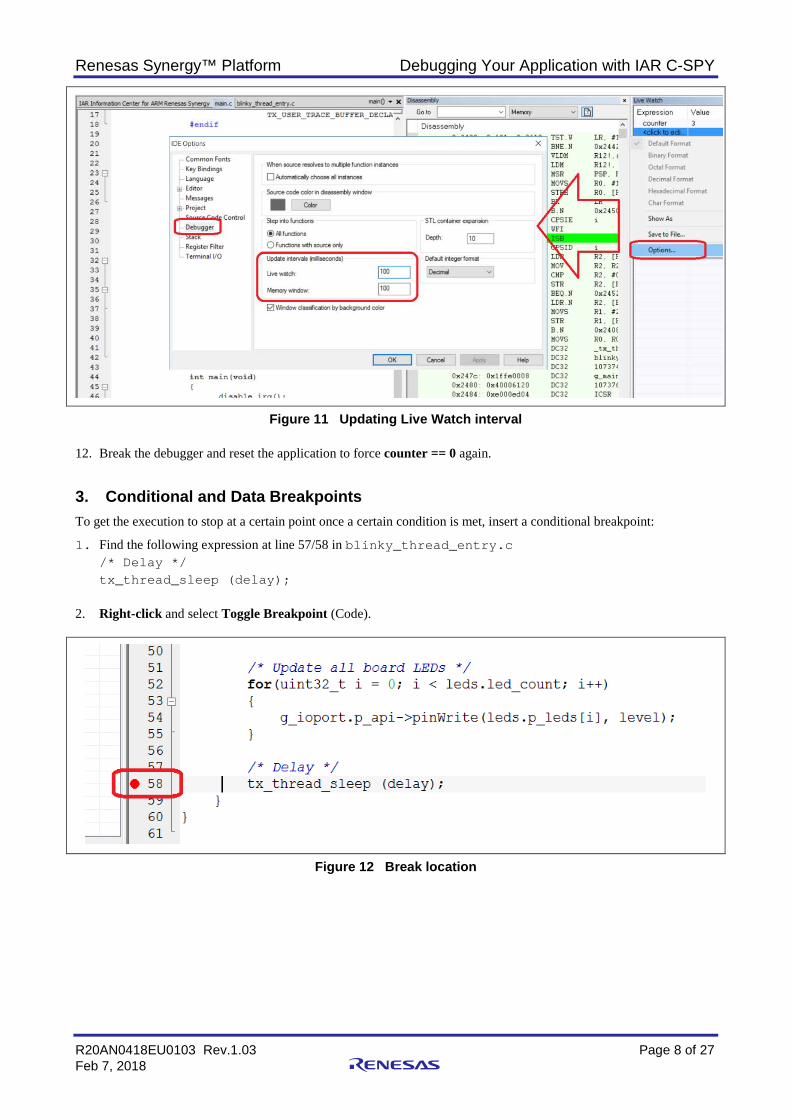
halting the application. 11. In some cases, you need a shorter update interval for the live watch. The default value is 1000 ms but you can
decrease it to 1 ms for example. The update interval can be changed by right-clicking in the Live Watch window and selecting Options > Debugger > Update intervals (milliseconds) > Live watch. Alternatively, the Options window can be opened from the Tools tab: Tools > Options
Renesas Synergy™ Platform Debugging Your Application with IAR C-SPY
R20AN0418EU0103 Rev.1.03 Page 8 of 27 Feb 7, 2018
Figure 11 Updating Live Watch interval 12. Break the debugger and reset the application to force counter == 0 again.
3. Conditional and Data Breakpoints To get the execution to stop at a certain point once a certain condition is met, insert a conditional breakpoint:
1. Find the following expression at line 57/58 in blinky_thread_entry.c /* Delay */ tx_thread_sleep (delay);
2. Right-click and select Toggle Breakpoint (Code).
Figure 12 Break location

Renesas Synergy™ Platform Debugging Your Application with IAR C-SPY
R20AN0418EU0103 Rev.1.03 Page 9 of 27 Feb 7, 2018
3. Right-click again and select Edit Breakpoint. 4. In the Conditions > Expression box, type counter > 10. 5. This will stop execution when the value is over 10.
Figure 13 Stop execution when counter > 10 6. Reset the application to return to main and force counter == 0. 7. Run the program again. Notice the View > Live Watch with the counter changing. The breakpoint will only be
valid when the condition is true. 8. It is not shown, but the execution is stopped, the condition is evaluated, and if it is FALSE then the execution
resumes. The complex breakpoint is intrusive but very powerful. 9. The following types of symbols can be used in expressions:
A. C/C++ symbols B. Assembler symbols (register names and assembler labels) C. C-SPY macro functions D. C-SPY macro variable
10. You can write very complex expressions. These expressions will however need to be evaluated to decide if the expression is true or not, so there is a performance loss.
11. The action box can be used to evaluate another expression when the breakpoint triggers. 12. Remove the conditional breakpoint at line 58. One way of doing this is to open the Breakpoints window (View >
Breakpoints) and remove all existing breakpoints. You can also set new breakpoints in this window.
Renesas Synergy™ Platform Debugging Your Application with IAR C-SPY
R20AN0418EU0103 Rev.1.03 Page 10 of 27 Feb 7, 2018
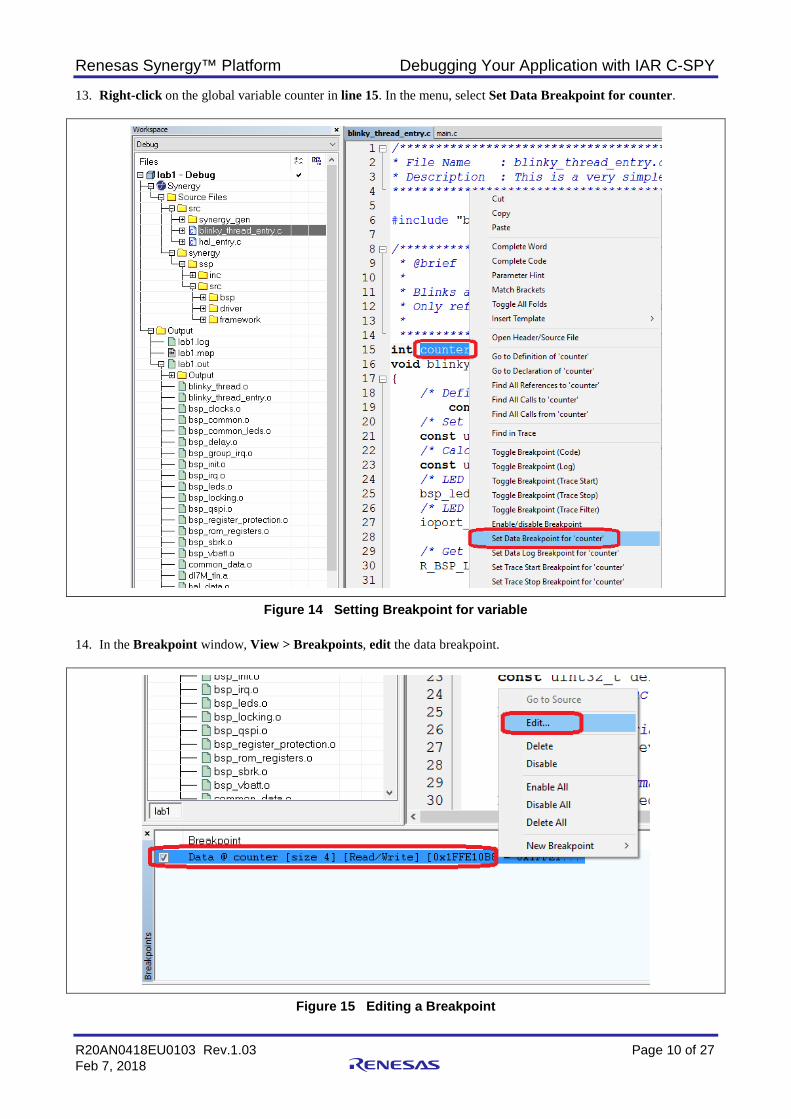
13. Right-click on the global variable counter in line 15. In the menu, select Set Data Breakpoint for counter.
Figure 14 Setting Breakpoint for variable 14. In the Breakpoint window, View > Breakpoints, edit the data breakpoint.
Figure 15 Editing a Breakpoint
Renesas Synergy™ Platform Debugging Your Application with IAR C-SPY
R20AN0418EU0103 Rev.1.03 Page 11 of 27 Feb 7, 2018
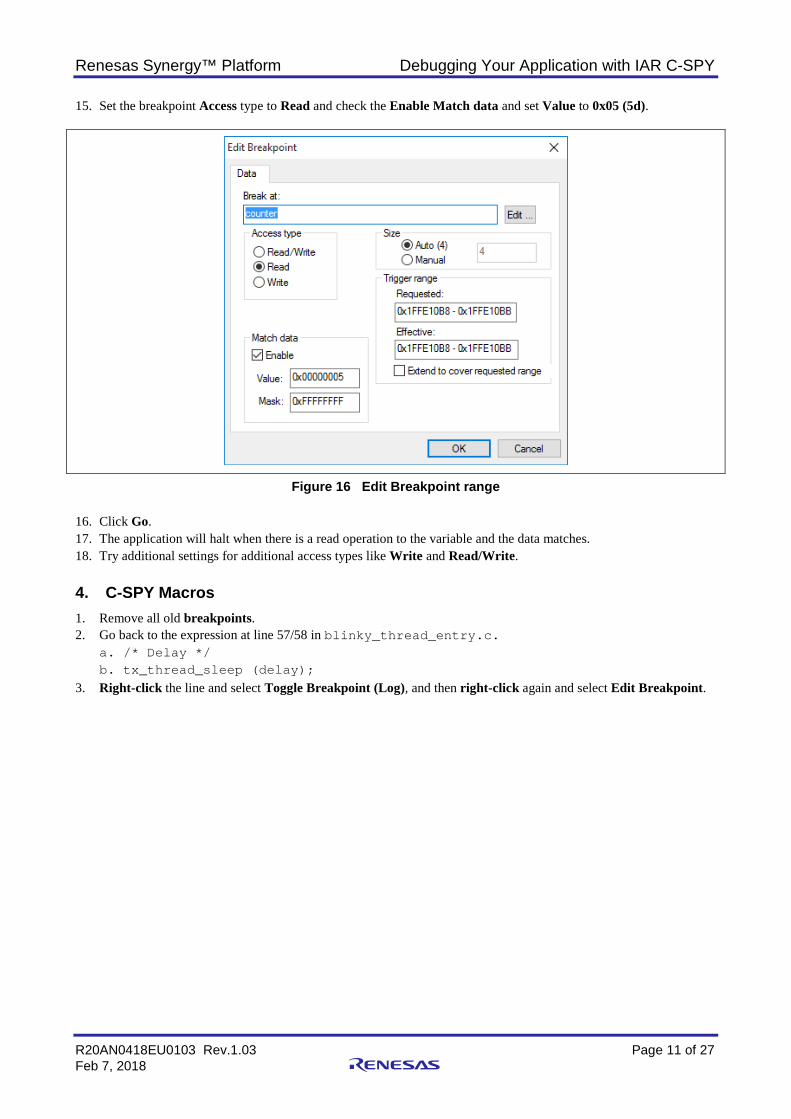
15. Set the breakpoint Access type to Read and check the Enable Match data and set Value to 0x05 (5d).
Figure 16 Edit Breakpoint range 16. Click Go. 17. The application will halt when there is a read operation to the variable and the data matches. 18. Try additional settings for additional access types like Write and Read/Write.
4. C-SPY Macros 1. Remove all old breakpoints. 2. Go back to the expression at line 57/58 in blinky_thread_entry.c.
a. /* Delay */ b. tx_thread_sleep (delay);
3. Right-click the line and select Toggle Breakpoint (Log), and then right-click again and select Edit Breakpoint.
Renesas Synergy™ Platform Debugging Your Application with IAR C-SPY
R20AN0418EU0103 Rev.1.03 Page 12 of 27 Feb 7, 2018
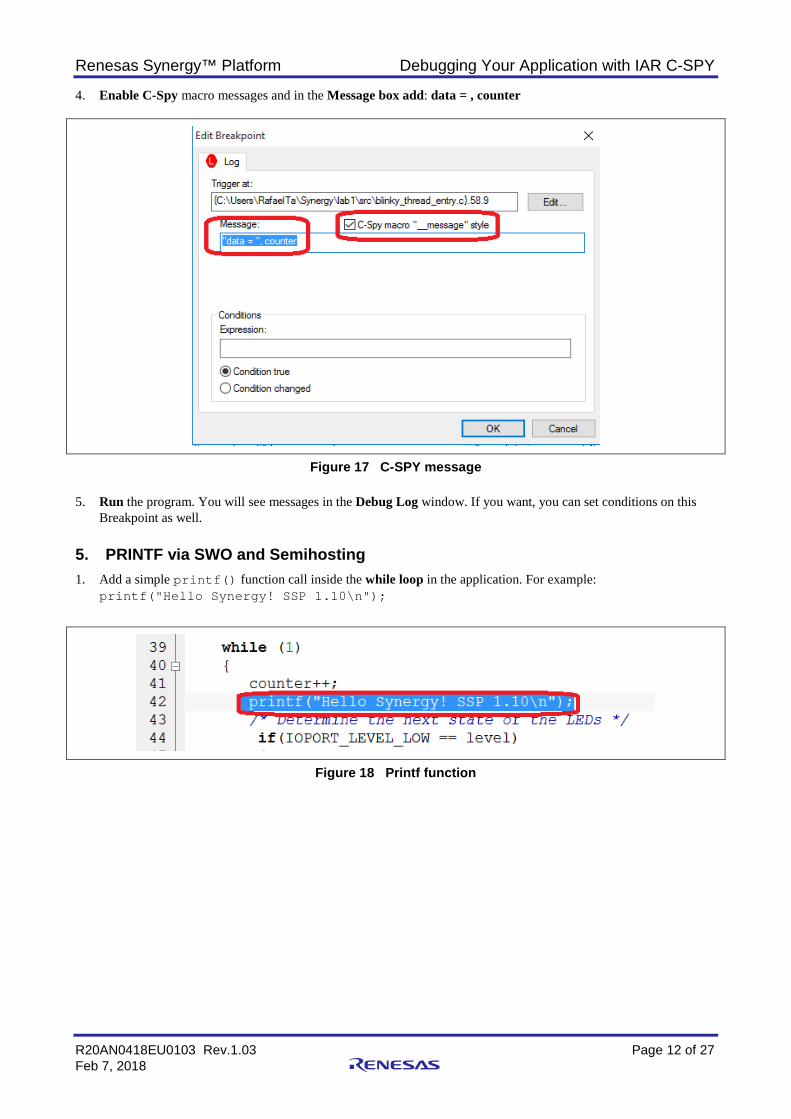
4. Enable C-Spy macro messages and in the Message box add: data = , counter
Figure 17 C-SPY message 5. Run the program. You will see messages in the Debug Log window. If you want, you can set conditions on this
Breakpoint as well.
5. PRINTF via SWO and Semihosting 1. Add a simple printf() function call inside the while loop in the application. For example:
printf("Hello Synergy! SSP 1.10\n");
Figure 18 Printf function
Renesas Synergy™ Platform Debugging Your Application with IAR C-SPY
R20AN0418EU0103 Rev.1.03 Page 13 of 27 Feb 7, 2018
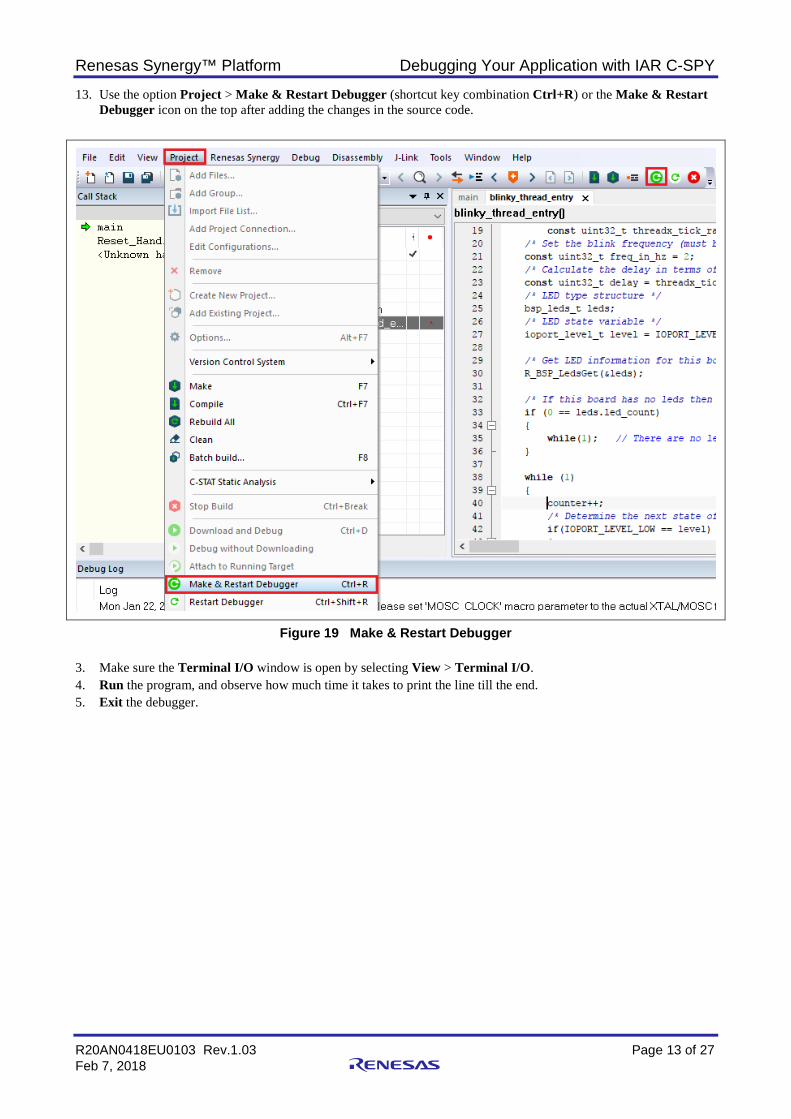
13. Use the option Project > Make & Restart Debugger (shortcut key combination Ctrl+R) or the Make & Restart Debugger icon on the top after adding the changes in the source code.
Figure 19 Make & Restart Debugger 3. Make sure the Terminal I/O window is open by selecting View > Terminal I/O. 4. Run the program, and observe how much time it takes to print the line till the end. 5. Exit the debugger.
Renesas Synergy™ Platform Debugging Your Application with IAR C-SPY
R20AN0418EU0103 Rev.1.03 Page 14 of 27 Feb 7, 2018
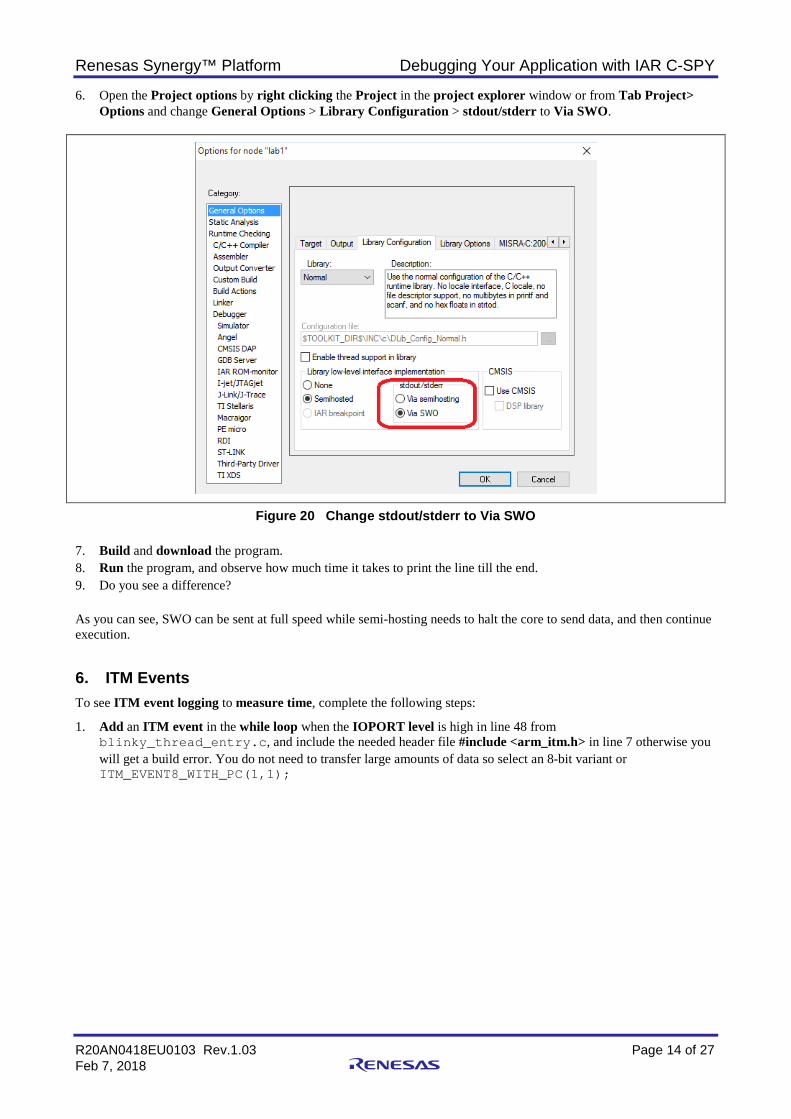
6. Open the Project options by right clicking the Project in the project explorer window or from Tab Project> Options and change General Options > Library Configuration > stdout/stderr to Via SWO.
Figure 20 Change stdout/stderr to Via SWO 7. Build and download the program. 8. Run the program, and observe how much time it takes to print the line till the end. 9. Do you see a difference? As you can see, SWO can be sent at full speed while semi-hosting needs to halt the core to send data, and then continue execution.
6. ITM Events To see ITM event logging to measure time, complete the following steps:
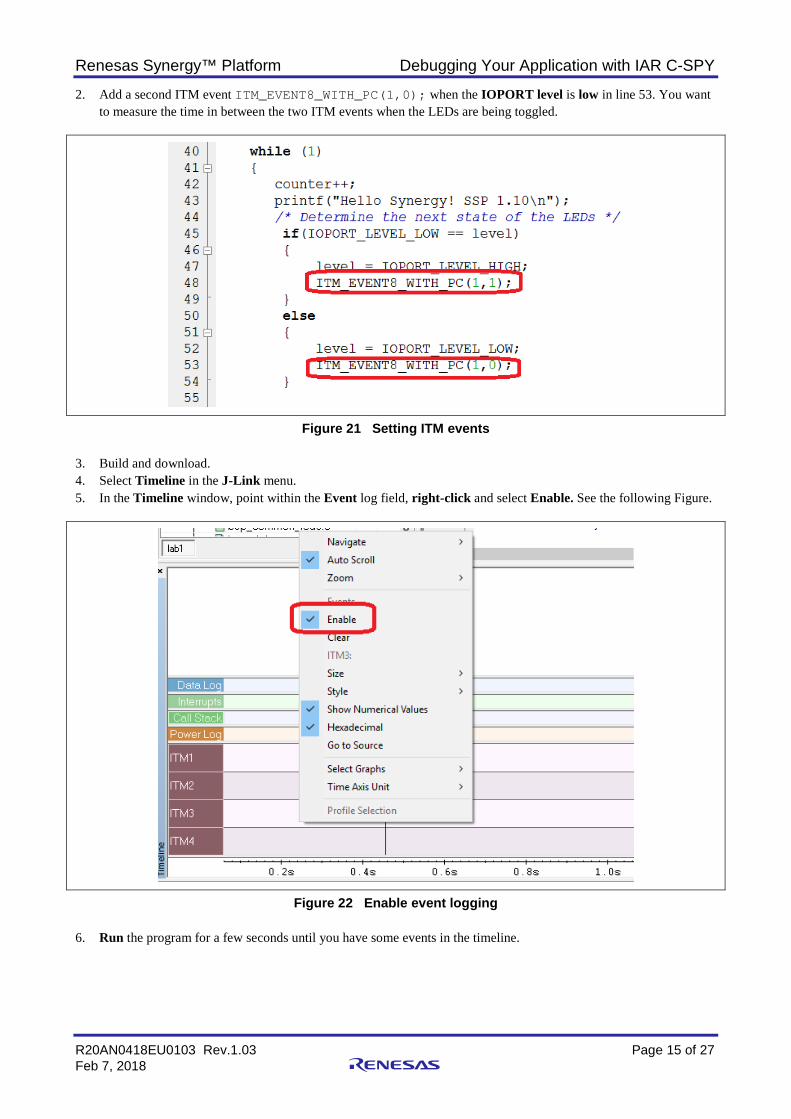
1. Add an ITM event in the while loop when the IOPORT level is high in line 48 from blinky_thread_entry.c, and include the needed header file #include <arm_itm.h> in line 7 otherwise you will get a build error. You do not need to transfer large amounts of data so select an 8-bit variant or ITM_EVENT8_WITH_PC(1,1);
Renesas Synergy™ Platform Debugging Your Application with IAR C-SPY
R20AN0418EU0103 Rev.1.03 Page 15 of 27 Feb 7, 2018
2. Add a second ITM event ITM_EVENT8_WITH_PC(1,0); when the IOPORT level is low in line 53. You want to measure the time in between the two ITM events when the LEDs are being toggled.
Figure 21 Setting ITM events 3. Build and download. 4. Select Timeline in the J-Link menu. 5. In the Timeline window, point within the Event log field, right-click and select Enable. See the following Figure.
Figure 22 Enable event logging 6. Run the program for a few seconds until you have some events in the timeline.
Renesas Synergy™ Platform Debugging Your Application with IAR C-SPY
R20AN0418EU0103 Rev.1.03 Page 16 of 27 Feb 7, 2018
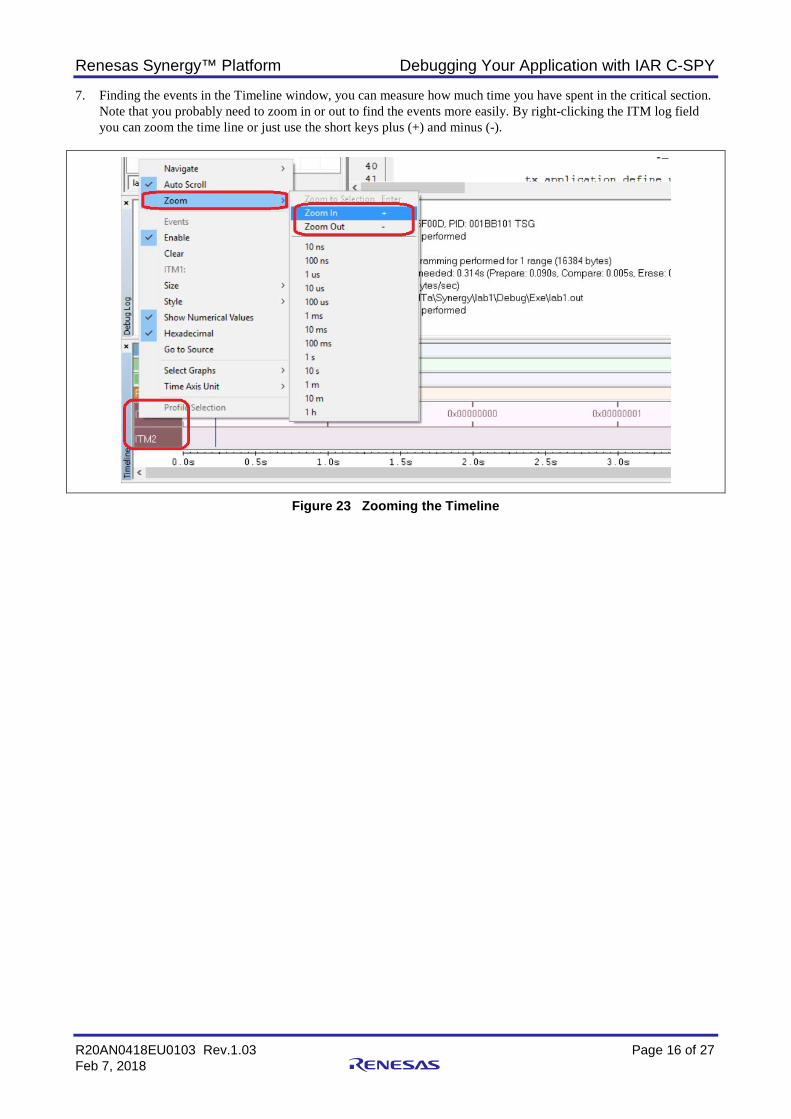
7. Finding the events in the Timeline window, you can measure how much time you have spent in the critical section. Note that you probably need to zoom in or out to find the events more easily. By right-clicking the ITM log field you can zoom the time line or just use the short keys plus (+) and minus (-).
Figure 23 Zooming the Timeline
Renesas Synergy™ Platform Debugging Your Application with IAR C-SPY
R20AN0418EU0103 Rev.1.03 Page 17 of 27 Feb 7, 2018
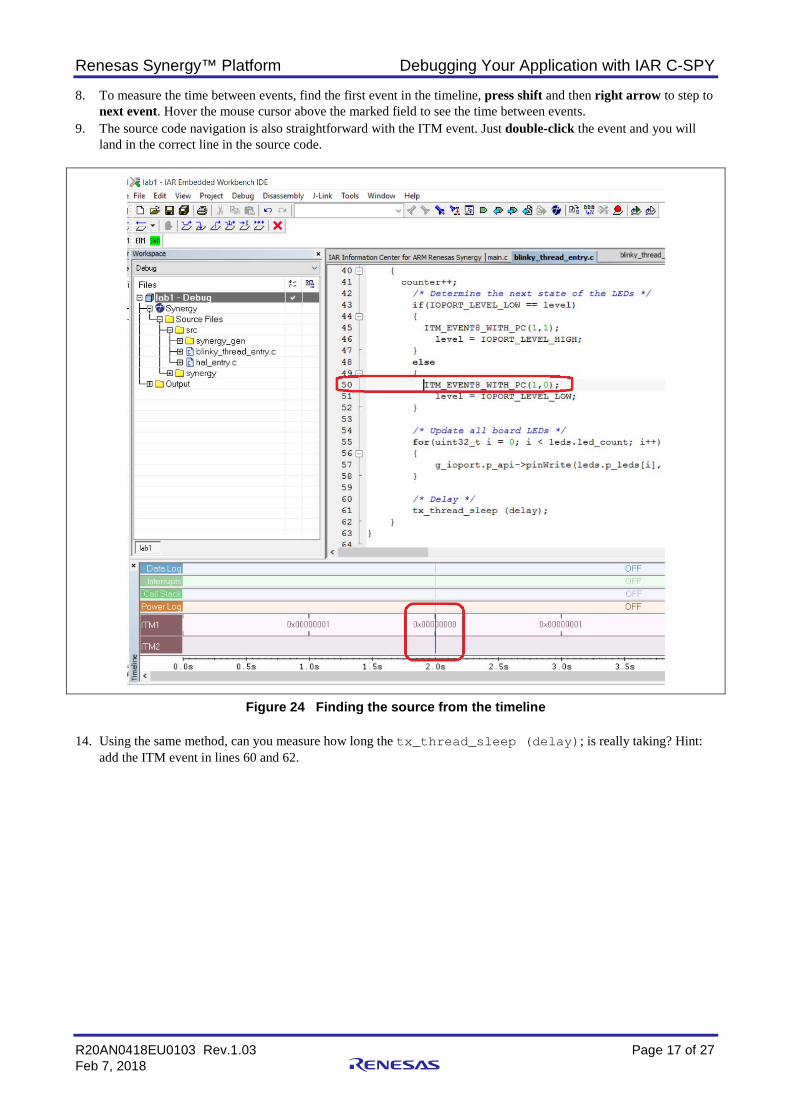
8. To measure the time between events, find the first event in the timeline, press shift and then right arrow to step to next event. Hover the mouse cursor above the marked field to see the time between events.
9. The source code navigation is also straightforward with the ITM event. Just double-click the event and you will land in the correct line in the source code.
Figure 24 Finding the source from the timeline 14. Using the same method, can you measure how long the tx_thread_sleep (delay); is really taking? Hint:
add the ITM event in lines 60 and 62.
Renesas Synergy™ Platform Debugging Your Application with IAR C-SPY
R20AN0418EU0103 Rev.1.03 Page 18 of 27 Feb 7, 2018
Figure 25 Timing the tx_thread_sleep delay
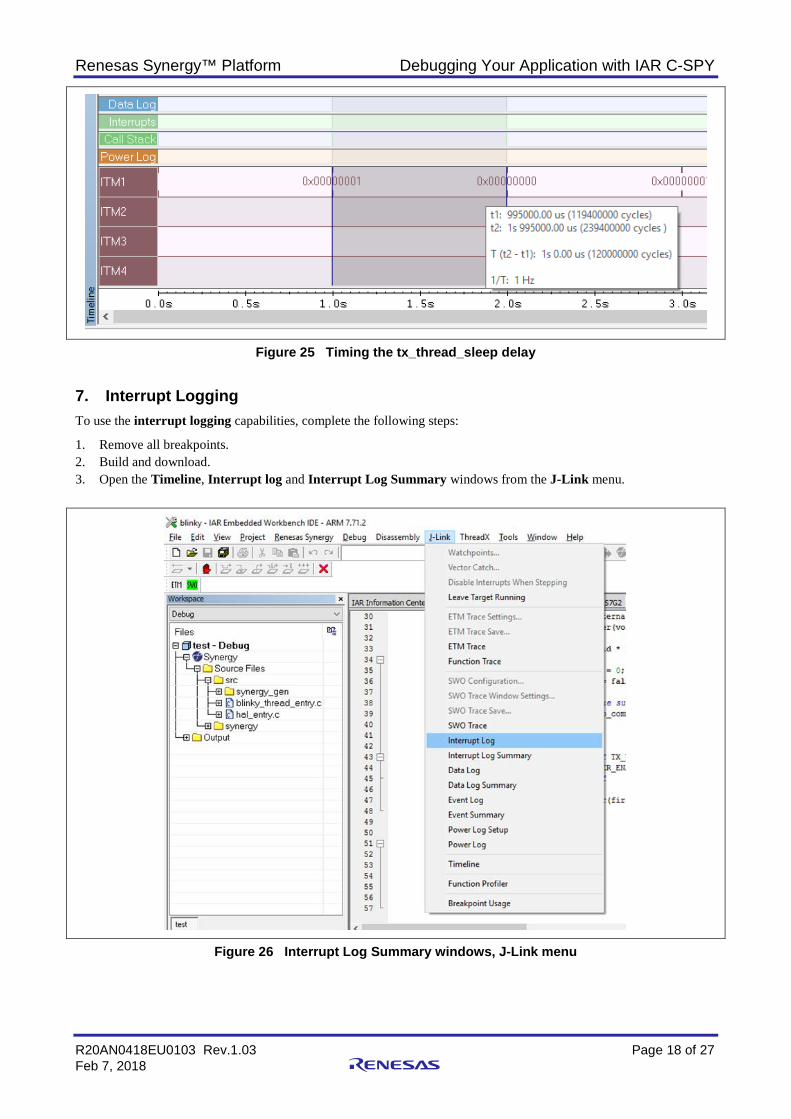
7. Interrupt Logging To use the interrupt logging capabilities, complete the following steps:
1. Remove all breakpoints. 2. Build and download. 3. Open the Timeline, Interrupt log and Interrupt Log Summary windows from the J-Link menu.
Figure 26 Interrupt Log Summary windows, J-Link menu
Renesas Synergy™ Platform Debugging Your Application with IAR C-SPY
R20AN0418EU0103 Rev.1.03 Page 19 of 27 Feb 7, 2018
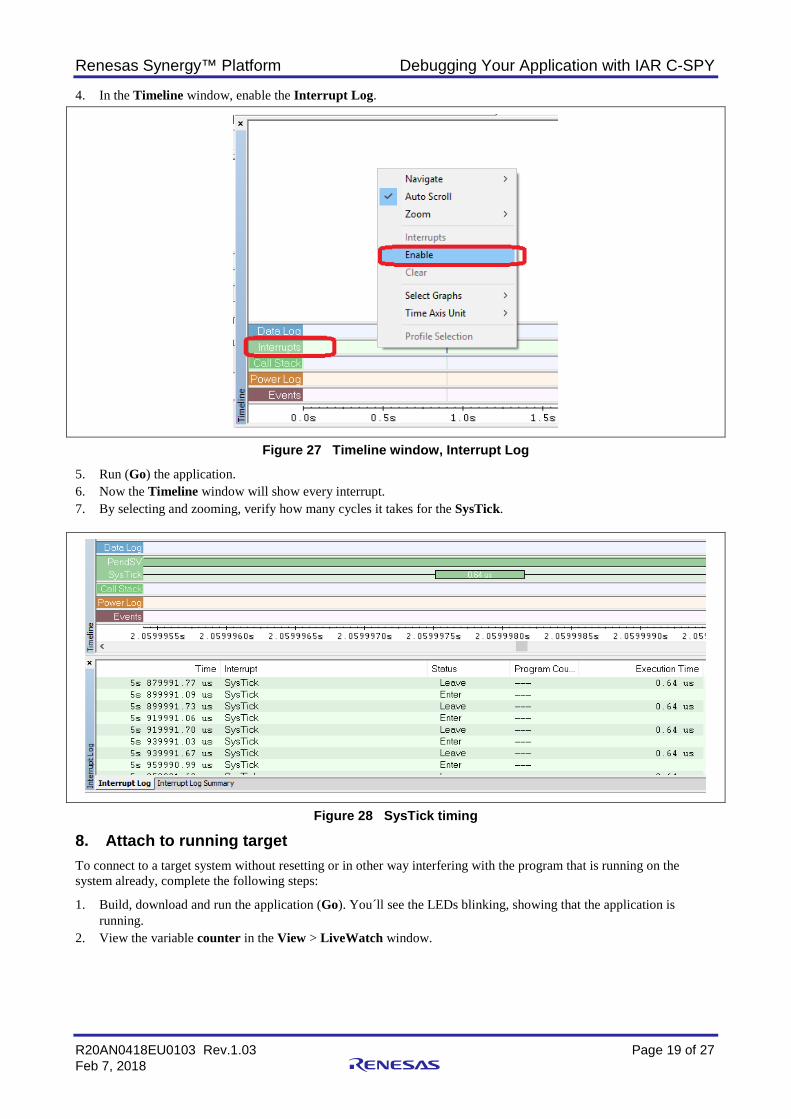
4. In the Timeline window, enable the Interrupt Log.
Figure 27 Timeline window, Interrupt Log
5. Run (Go) the application. 6. Now the Timeline window will show every interrupt. 7. By selecting and zooming, verify how many cycles it takes for the SysTick.
Figure 28 SysTick timing
8. Attach to running target To connect to a target system without resetting or in other way interfering with the program that is running on the system already, complete the following steps:
1. Build, download and run the application (Go). You´ll see the LEDs blinking, showing that the application is running.
2. View the variable counter in the View > LiveWatch window.
Renesas Synergy™ Platform Debugging Your Application with IAR C-SPY
R20AN0418EU0103 Rev.1.03 Page 20 of 27 Feb 7, 2018
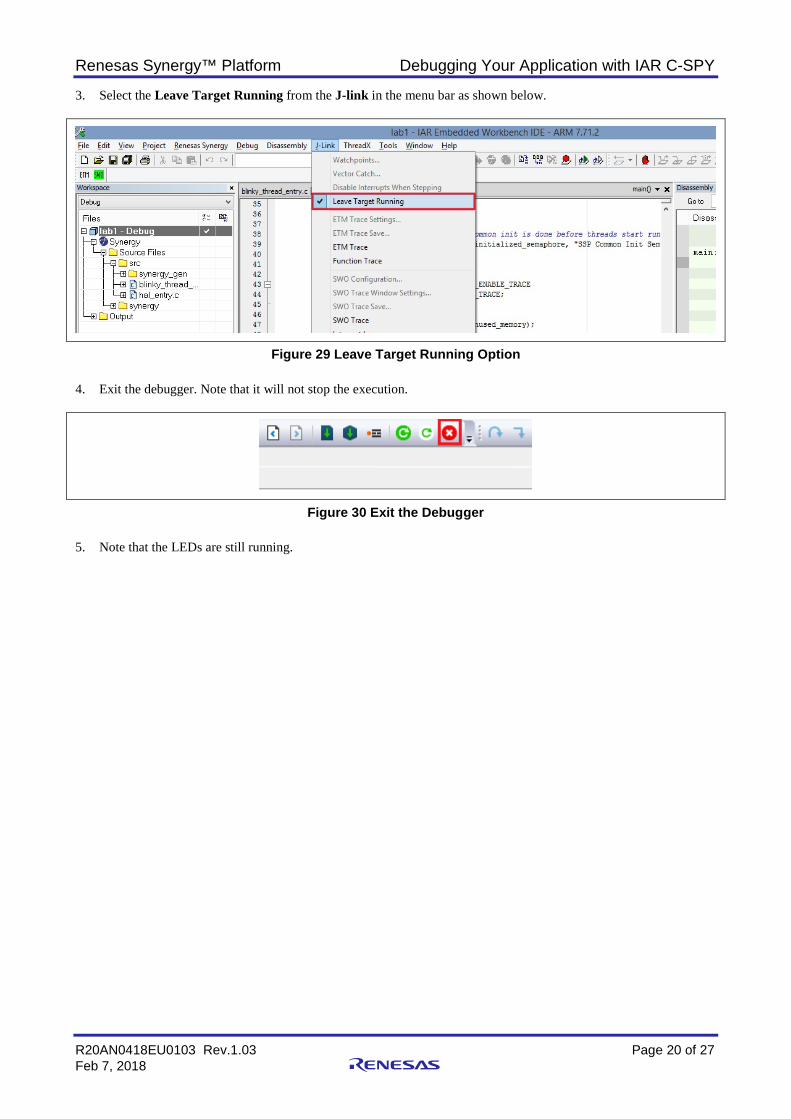
3. Select the Leave Target Running from the J-link in the menu bar as shown below.
Figure 29 Leave Target Running Option 4. Exit the debugger. Note that it will not stop the execution.
Figure 30 Exit the Debugger 5. Note that the LEDs are still running.
Renesas Synergy™ Platform Debugging Your Application with IAR C-SPY
R20AN0418EU0103 Rev.1.03 Page 21 of 27 Feb 7, 2018
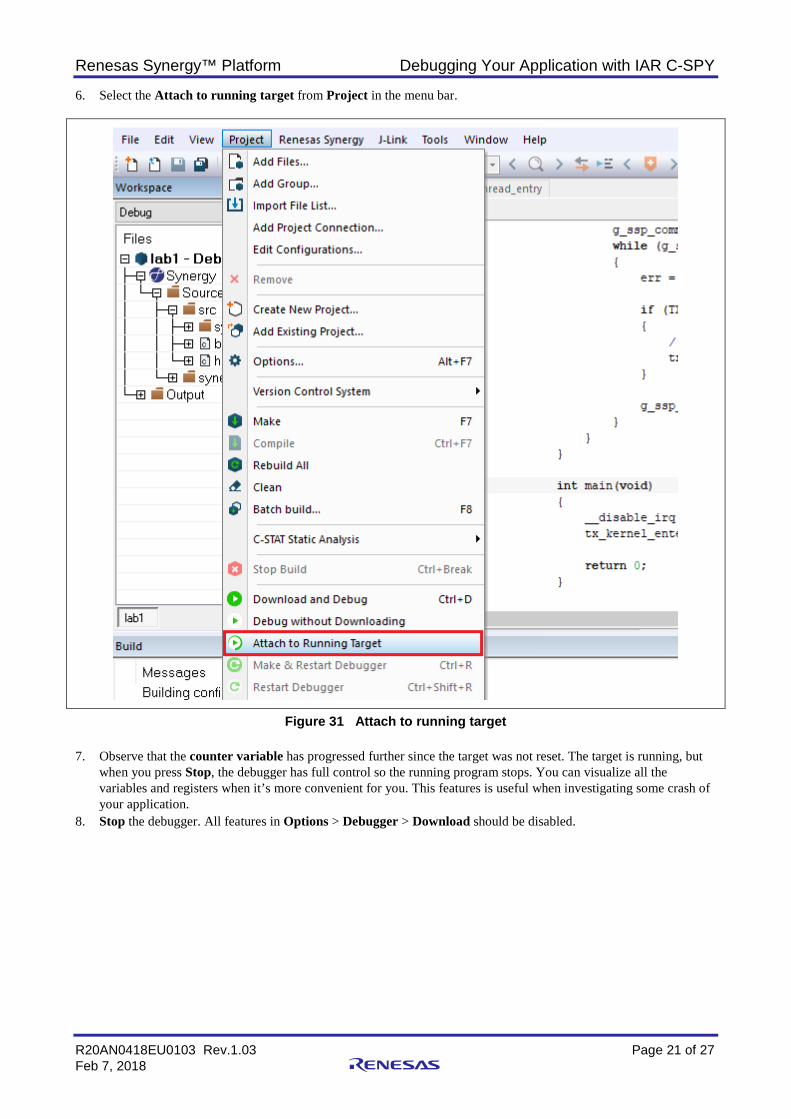
6. Select the Attach to running target from Project in the menu bar.
Figure 31 Attach to running target 7. Observe that the counter variable has progressed further since the target was not reset. The target is running, but
when you press Stop, the debugger has full control so the running program stops. You can visualize all the variables and registers when it’s more convenient for you. This features is useful when investigating some crash of your application.
8. Stop the debugger. All features in Options > Debugger > Download should be disabled.
Renesas Synergy™ Platform Debugging Your Application with IAR C-SPY
R20AN0418EU0103 Rev.1.03 Page 22 of 27 Feb 7, 2018
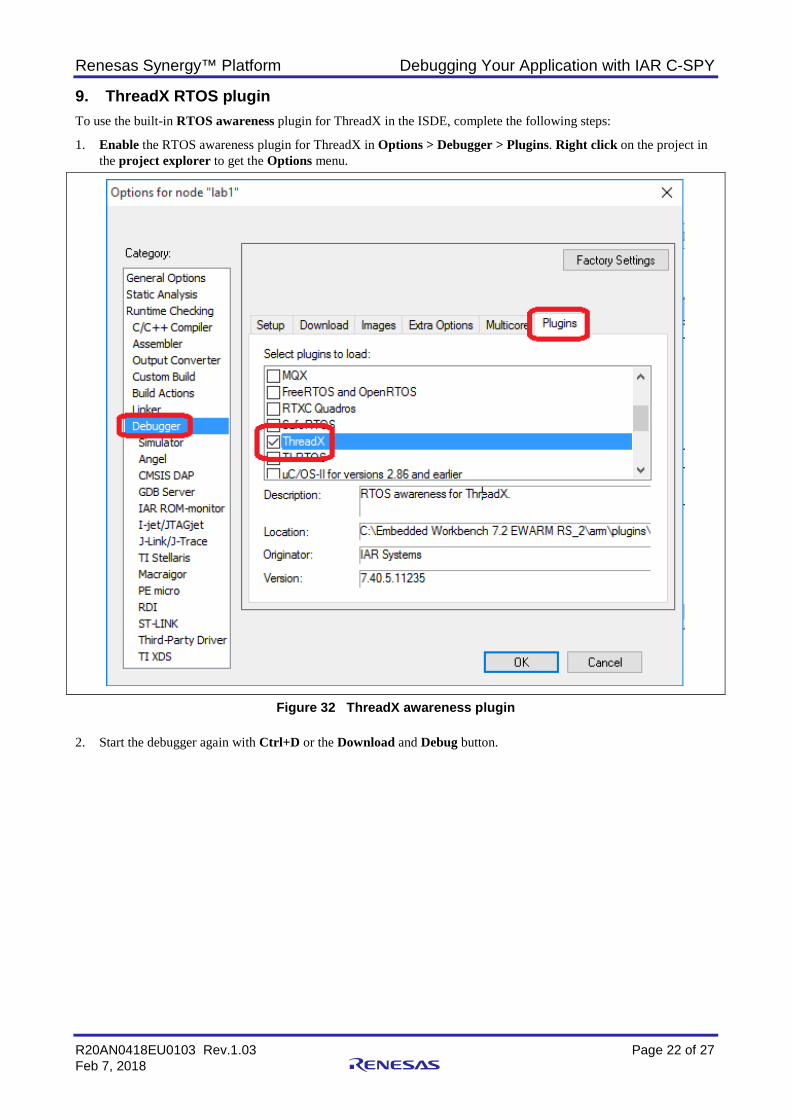
9. ThreadX RTOS plugin To use the built-in RTOS awareness plugin for ThreadX in the ISDE, complete the following steps:
1. Enable the RTOS awareness plugin for ThreadX in Options > Debugger > Plugins. Right click on the project in the project explorer to get the Options menu.
Figure 32 ThreadX awareness plugin 2. Start the debugger again with Ctrl+D or the Download and Debug button.
Renesas Synergy™ Platform Debugging Your Application with IAR C-SPY
R20AN0418EU0103 Rev.1.03 Page 23 of 27 Feb 7, 2018
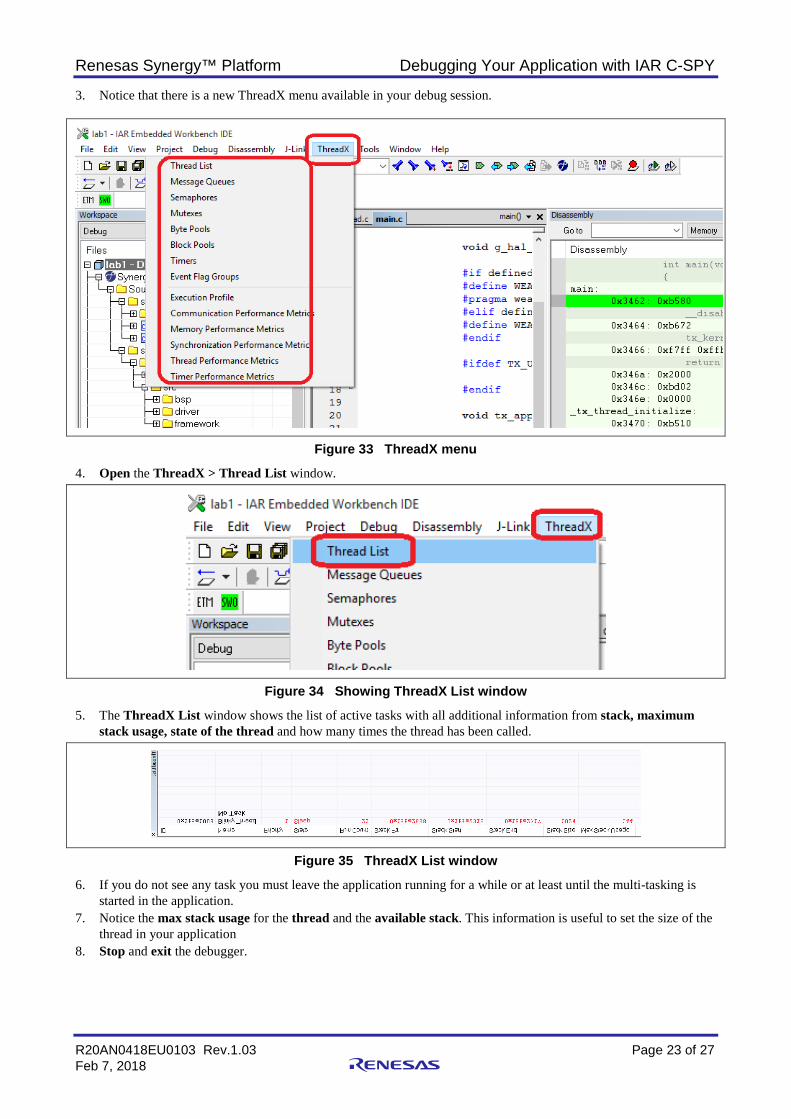
3. Notice that there is a new ThreadX menu available in your debug session.
Figure 33 ThreadX menu
4. Open the ThreadX > Thread List window.
Figure 34 Showing ThreadX List window
5. The ThreadX List window shows the list of active tasks with all additional information from stack, maximum stack usage, state of the thread and how many times the thread has been called.
Figure 35 ThreadX List window
6. If you do not see any task you must leave the application running for a while or at least until the multi-tasking is started in the application.
7. Notice the max stack usage for the thread and the available stack. This information is useful to set the size of the thread in your application
8. Stop and exit the debugger.
Renesas Synergy™ Platform Debugging Your Application with IAR C-SPY
R20AN0418EU0103 Rev.1.03 Page 24 of 27 Feb 7, 2018
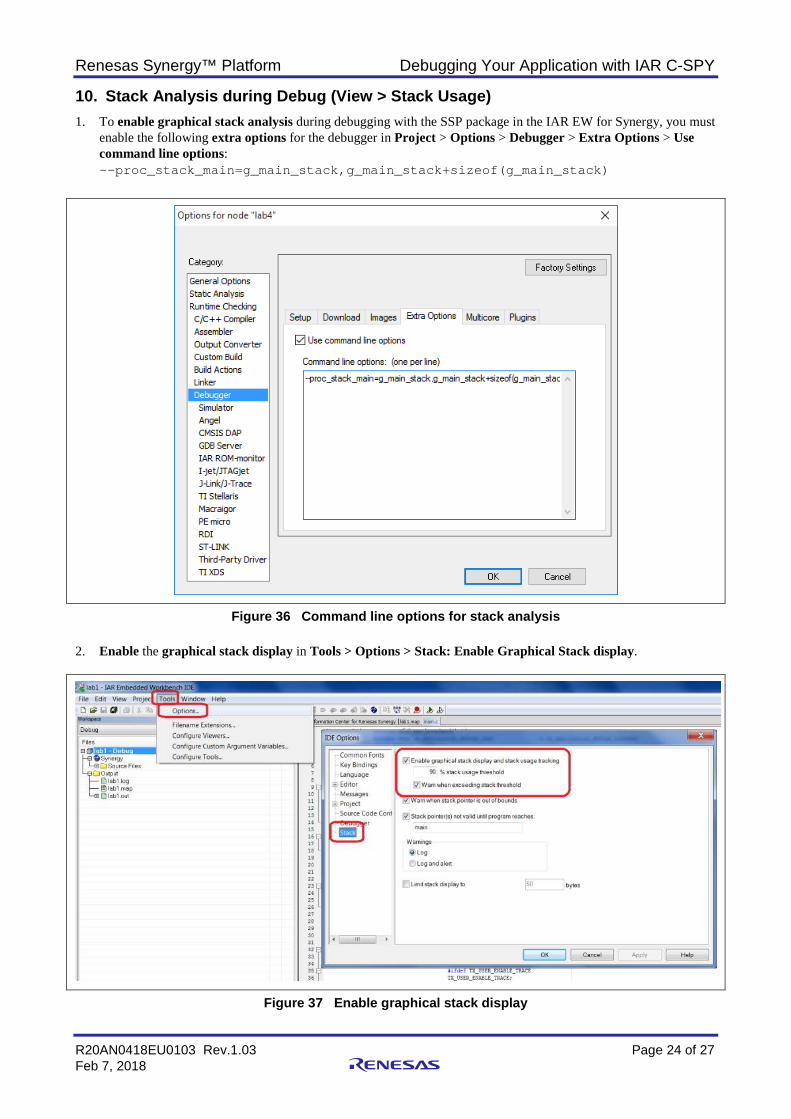
10. Stack Analysis during Debug (View > Stack Usage) 1. To enable graphical stack analysis during debugging with the SSP package in the IAR EW for Synergy, you must
enable the following extra options for the debugger in Project > Options > Debugger > Extra Options > Use command line options: --proc_stack_main=g_main_stack,g_main_stack+sizeof(g_main_stack)
Figure 36 Command line options for stack analysis 2. Enable the graphical stack display in Tools > Options > Stack: Enable Graphical Stack display.
Figure 37 Enable graphical stack display
Renesas Synergy™ Platform Debugging Your Application with IAR C-SPY
R20AN0418EU0103 Rev.1.03 Page 25 of 27 Feb 7, 2018
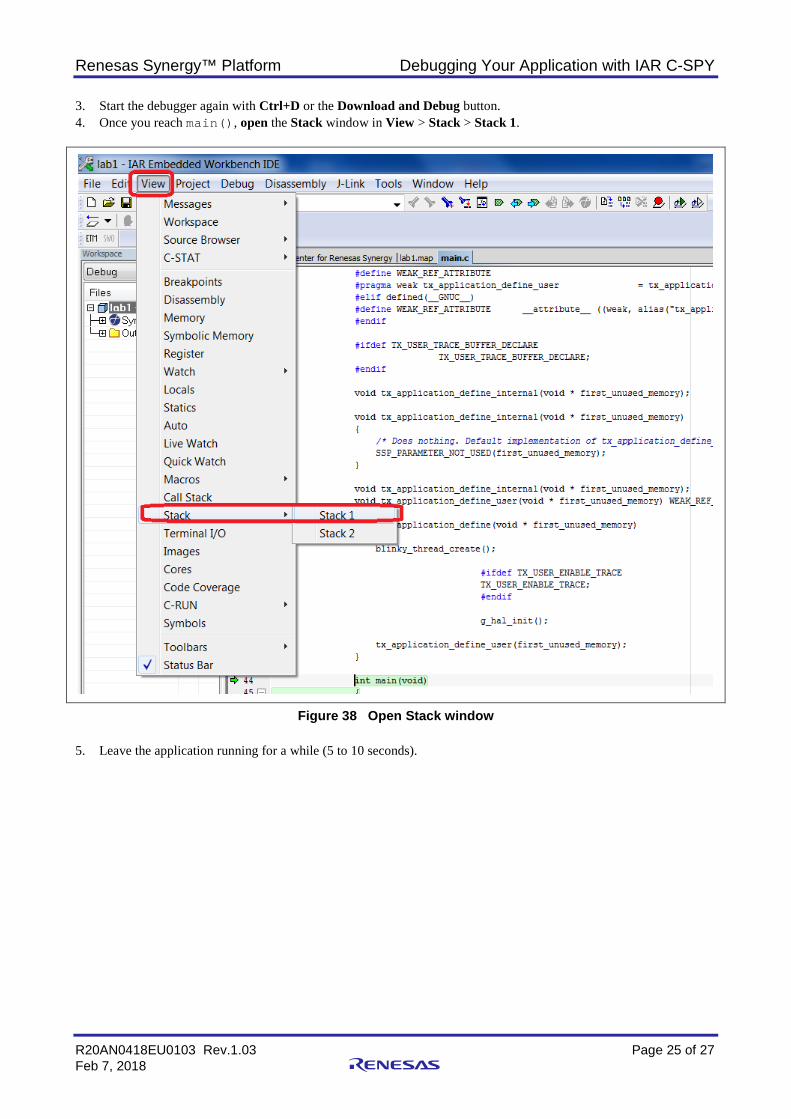
3. Start the debugger again with Ctrl+D or the Download and Debug button. 4. Once you reach main(), open the Stack window in View > Stack > Stack 1.
Figure 38 Open Stack window
5. Leave the application running for a while (5 to 10 seconds).
Renesas Synergy™ Platform Debugging Your Application with IAR C-SPY
R20AN0418EU0103 Rev.1.03 Page 26 of 27 Feb 7, 2018
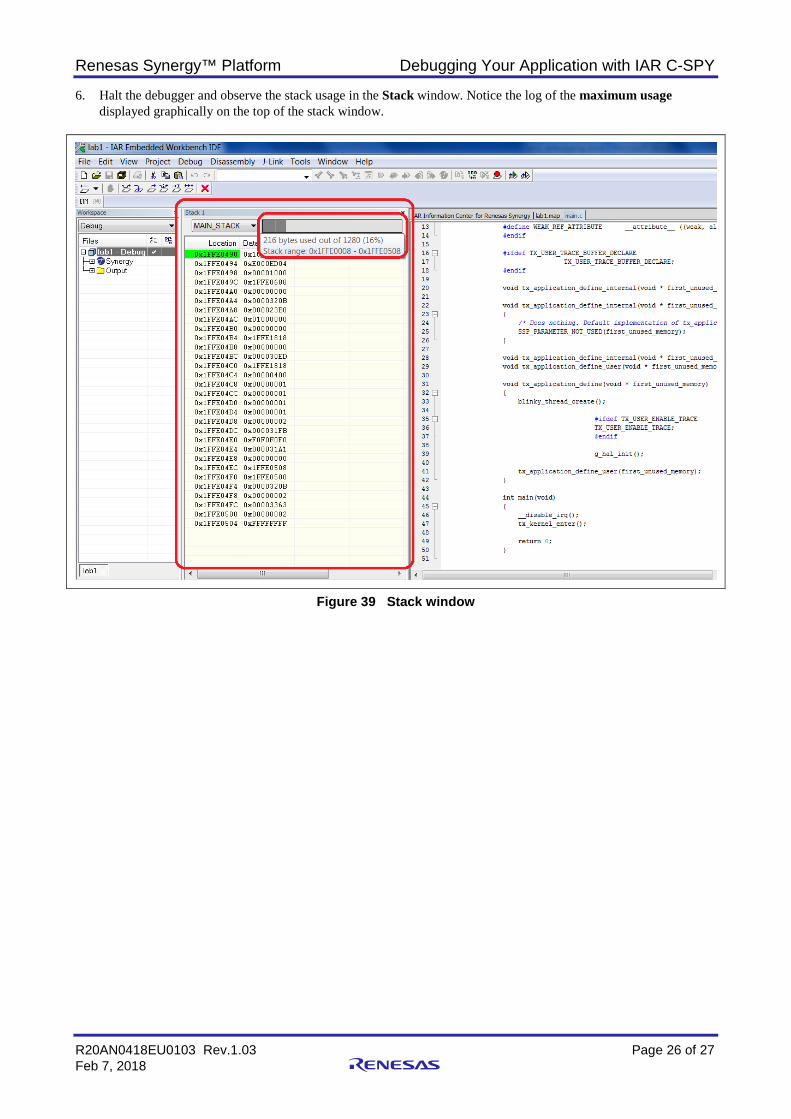
6. Halt the debugger and observe the stack usage in the Stack window. Notice the log of the maximum usage displayed graphically on the top of the stack window.
Figure 39 Stack window
Renesas Synergy™ Platform Debugging Your Application with IAR C-SPY
R20AN0418EU0103 Rev.1.03 Page 27 of 27 Feb 7, 2018
Website and Support Support: https://synergygallery.renesas.com/support
Technical Contact Details:
• America: https://www.renesas.com/en-us/support/contact.html • Europe: https://www.renesas.com/en-eu/support/contact.html • Japan: https://www.renesas.com/ja-jp/support/contact.html
All trademarks and registered trademarks are the property of their respective owners.
Revision History
Rev. Date Description Page Summary
Rev.1.00 Sept 23, 2016 - First revision Rev.1.01 Jul 4, 2017 All Updated for SSP v1.3.0 Rev.1.02 Aug 2, 2017 - Initial release Rev.1.03 Feb 7, 2018 - Updated for SSP v1.4.0
http://www.renesas.comRefer to "http://www.renesas.com/" for the latest and detailed information.
Renesas Electronics America Inc.1001 Murphy Ranch Road, Milpitas, CA 95035, U.S.A.Tel: +1-408-432-8888, Fax: +1-408-434-5351Renesas Electronics Canada Limited9251 Yonge Street, Suite 8309 Richmond Hill, Ontario Canada L4C 9T3Tel: +1-905-237-2004Renesas Electronics Europe LimitedDukes Meadow, Millboard Road, Bourne End, Buckinghamshire, SL8 5FH, U.KTel: +44-1628-651-700, Fax: +44-1628-651-804Renesas Electronics Europe GmbHArcadiastrasse 10, 40472 Düsseldorf, GermanyTel: +49-211-6503-0, Fax: +49-211-6503-1327Renesas Electronics (China) Co., Ltd.Room 1709 Quantum Plaza, No.27 ZhichunLu, Haidian District, Beijing, 100191 P. R. ChinaTel: +86-10-8235-1155, Fax: +86-10-8235-7679Renesas Electronics (Shanghai) Co., Ltd.Unit 301, Tower A, Central Towers, 555 Langao Road, Putuo District, Shanghai, 200333 P. R. ChinaTel: +86-21-2226-0888, Fax: +86-21-2226-0999Renesas Electronics Hong Kong LimitedUnit 1601-1611, 16/F., Tower 2, Grand Century Place, 193 Prince Edward Road West, Mongkok, Kowloon, Hong KongTel: +852-2265-6688, Fax: +852 2886-9022Renesas Electronics Taiwan Co., Ltd.13F, No. 363, Fu Shing North Road, Taipei 10543, TaiwanTel: +886-2-8175-9600, Fax: +886 2-8175-9670Renesas Electronics Singapore Pte. Ltd.80 Bendemeer Road, Unit #06-02 Hyflux Innovation Centre, Singapore 339949Tel: +65-6213-0200, Fax: +65-6213-0300Renesas Electronics Malaysia Sdn.Bhd.Unit 1207, Block B, Menara Amcorp, Amcorp Trade Centre, No. 18, Jln Persiaran Barat, 46050 Petaling Jaya, Selangor Darul Ehsan, MalaysiaTel: +60-3-7955-9390, Fax: +60-3-7955-9510Renesas Electronics India Pvt. Ltd.No.777C, 100 Feet Road, HAL 2nd Stage, Indiranagar, Bangalore 560 038, IndiaTel: +91-80-67208700, Fax: +91-80-67208777Renesas Electronics Korea Co., Ltd.17F, KAMCO Yangjae Tower, 262, Gangnam-daero, Gangnam-gu, Seoul, 06265 KoreaTel: +82-2-558-3737, Fax: +82-2-558-5338
SALES OFFICES
© 2018 Renesas Electronics Corporation. All rights reserved.Colophon 7.0
(Rev.4.0-1 November 2017)
Notice1. Descriptions of circuits, software and other related information in this document are provided only to illustrate the operation of semiconductor products and application examples. You are fully responsible for
the incorporation or any other use of the circuits, software, and information in the design of your product or system. Renesas Electronics disclaims any and all liability for any losses and damages incurred by
you or third parties arising from the use of these circuits, software, or information.
2. Renesas Electronics hereby expressly disclaims any warranties against and liability for infringement or any other claims involving patents, copyrights, or other intellectual property rights of third parties, by or
arising from the use of Renesas Electronics products or technical information described in this document, including but not limited to, the product data, drawings, charts, programs, algorithms, and application
examples.
3. No license, express, implied or otherwise, is granted hereby under any patents, copyrights or other intellectual property rights of Renesas Electronics or others.
4. You shall not alter, modify, copy, or reverse engineer any Renesas Electronics product, whether in whole or in part. Renesas Electronics disclaims any and all liability for any losses or damages incurred by
you or third parties arising from such alteration, modification, copying or reverse engineering.
5. Renesas Electronics products are classified according to the following two quality grades: “Standard” and “High Quality”. The intended applications for each Renesas Electronics product depends on the
product’s quality grade, as indicated below.
"Standard": Computers; office equipment; communications equipment; test and measurement equipment; audio and visual equipment; home electronic appliances; machine tools; personal electronic
equipment; industrial robots; etc.
"High Quality": Transportation equipment (automobiles, trains, ships, etc.); traffic control (traffic lights); large-scale communication equipment; key financial terminal systems; safety control equipment; etc.
Unless expressly designated as a high reliability product or a product for harsh environments in a Renesas Electronics data sheet or other Renesas Electronics document, Renesas Electronics products are
not intended or authorized for use in products or systems that may pose a direct threat to human life or bodily injury (artificial life support devices or systems; surgical implantations; etc.), or may cause
serious property damage (space system; undersea repeaters; nuclear power control systems; aircraft control systems; key plant systems; military equipment; etc.). Renesas Electronics disclaims any and all
liability for any damages or losses incurred by you or any third parties arising from the use of any Renesas Electronics product that is inconsistent with any Renesas Electronics data sheet, user’s manual or
other Renesas Electronics document.
6. When using Renesas Electronics products, refer to the latest product information (data sheets, user’s manuals, application notes, “General Notes for Handling and Using Semiconductor Devices” in the
reliability handbook, etc.), and ensure that usage conditions are within the ranges specified by Renesas Electronics with respect to maximum ratings, operating power supply voltage range, heat dissipation
characteristics, installation, etc. Renesas Electronics disclaims any and all liability for any malfunctions, failure or accident arising out of the use of Renesas Electronics products outside of such specified
ranges.
7. Although Renesas Electronics endeavors to improve the quality and reliability of Renesas Electronics products, semiconductor products have specific characteristics, such as the occurrence of failure at a
certain rate and malfunctions under certain use conditions. Unless designated as a high reliability product or a product for harsh environments in a Renesas Electronics data sheet or other Renesas
Electronics document, Renesas Electronics products are not subject to radiation resistance design. You are responsible for implementing safety measures to guard against the possibility of bodily injury, injury
or damage caused by fire, and/or danger to the public in the event of a failure or malfunction of Renesas Electronics products, such as safety design for hardware and software, including but not limited to
redundancy, fire control and malfunction prevention, appropriate treatment for aging degradation or any other appropriate measures. Because the evaluation of microcomputer software alone is very difficult
and impractical, you are responsible for evaluating the safety of the final products or systems manufactured by you.
8. Please contact a Renesas Electronics sales office for details as to environmental matters such as the environmental compatibility of each Renesas Electronics product. You are responsible for carefully and
sufficiently investigating applicable laws and regulations that regulate the inclusion or use of controlled substances, including without limitation, the EU RoHS Directive, and using Renesas Electronics
products in compliance with all these applicable laws and regulations. Renesas Electronics disclaims any and all liability for damages or losses occurring as a result of your noncompliance with applicable
laws and regulations.
9. Renesas Electronics products and technologies shall not be used for or incorporated into any products or systems whose manufacture, use, or sale is prohibited under any applicable domestic or foreign laws
or regulations. You shall comply with any applicable export control laws and regulations promulgated and administered by the governments of any countries asserting jurisdiction over the parties or
transactions.
10. It is the responsibility of the buyer or distributor of Renesas Electronics products, or any other party who distributes, disposes of, or otherwise sells or transfers the product to a third party, to notify such third
party in advance of the contents and conditions set forth in this document.
11. This document shall not be reprinted, reproduced or duplicated in any form, in whole or in part, without prior written consent of Renesas Electronics.
12. Please contact a Renesas Electronics sales office if you have any questions regarding the information contained in this document or Renesas Electronics products.
(Note 1) “Renesas Electronics” as used in this document means Renesas Electronics Corporation and also includes its directly or indirectly controlled subsidiaries.
(Note 2) “Renesas Electronics product(s)” means any product developed or manufactured by or for Renesas Electronics.