Embed Size (px)
Citation preview

Rev 8/2017 Form: IMPAKENDFU
15) Cure IMPAK for:
5 Hours at 165°F (74°C)
DEFLASKING AND REMOUNTING
1) Deflask.
2) Remove all plaster from around appliance, leaving appliance on
cast. (Figure 18)
3) Grind occlusalindices as necessary.
4) Place cast in hotwater to soften IMPAKand allow appliance tobe removed withoutdamage.
5) Carefully remove softened appliance fromcast. (One method is
to tease a corner away from cast and keep hot waterflowing between appliance and cast while you gentlywork it free.)
Caution: IMPAK is susceptible to tearing during thissuper-softened state. (Figure 19)
6) Once appliance is off cast, you may begin finishingprocedures.
FINISHING1) Keep appliance cool at all times during finishing andpolishing procedures. This can be accomplished by dipping IMPAK into cold water as needed. (Figure 20)2) Finish with acrylic burs, keeping it cool with cold water as mentioned in step 1.
3) Polish on a pumicewheel, using cold water,pumice and Shining Star (PN 301) acrylic first-polish.
4) Finish with Shining Star acrylic final-polish for a high luster.
Note: IMPAK may at first appear cloudy (Figures 21and 22). This will clear in approximately 1 to 3 days,depending on thickness, and yield a bright, finishedappliance.
4
Figure 21 Figure 22
Figure 20
Figure 18
Figure 19
Special NoteSentage Corporation (Minneapolis, MN) owns a U.S.patent (no. 5,338,190; 8/16/94) on a dental applianceand process resembling that described in pages 1-4.
Division of CMP Industries LLC413 North Pearl Street • Albany, New York 12207518.434.3147 • 800.833.2343 • USA/Canada
www.nobilium.com
0 0 8 6 Batch codeManufacturerAuthorized representative in the European Community
EC REP
W A R N I N G - Flammable liquid and vapor.May cause eye and skin irritation. Harmful if absorbed through the skin.Inhalation of vapors and mist may cause respirator irritation and central
nervous systems effects. Use with adequate ventilation.
1. This product is used for fabricating dentures with soft reliners.
2. IMPAK is intended for use by dentist and trained dental technicians.
3. Do not use if patient is known to be allergic to any components of the IMPAK.
4. Thoroughly clean the denture with a denture brush. Use of toothpaste, instead ofdenture cleanser can result in premature wear. Patients who sleep with their dentureand grind their teeth can cause premature wear. Some appliances may have sharpedges when fabricating.
5. It is recommended that prior to insertion, a dental acrylic appliance should be stored and shipped in aqueous solutions and ultrasonically cleaned in 6 oz. (177 ml) of water for three minutes.
DO NOT store a finished dental acrylic appliance above 145°F (63°C)

A HARD MAXILLARY OR MANDIBULARBITE SPLINT WITH SOFT RETENTION*
*See Special Note on Page 4
REQUIREMENTS FROM THE DENTIST
1) A prescription with a design for the appliance.
2) Maxillary and mandibular stone casts.
3) A bite registration in centric relation at the openingdesired for the appliance.
CAST PREPARATION AND WAXING
1) Block out any major interproximal undercuts on themaster cast (the gingival portion of fixed pontics).
2) Duplicate the cast to provide a working model.
3) Articulate the duplicate and opposing casts according to the bite registration.
4) Wrap the coronal portions of teeth using two layersof baseplate wax. If teeth are without undercuts, youmay extend wax into vestibules. Seal edges of baseplate wax to cast. (Figure 1)
5) Use die-lube or other similar material to lubricateteeth in opposing arch. (Figure 2)
6) Add sufficient layers of softened wax to fill the inter-occlusal space when articulator is in the closedposition.
7) Close the articulator and move into working, balancing and protrusive excursions. (Figure 3)
8) Once the excursions are refined, clean wax and lightly flame it.
9) Remove the casts from the articulator.
10) Cover the base of the cast with tin foil or separating mediumto facilitate cast recovery and remounting after processing the appliance. (Figure 4)
FLASKING
1) Use the top half of a maxillary flask for either amaxillary (Figure 5) or a mandibular (Figure 6)appliance.
2) Mix a plaster flasking medium and half fill the topsection of flask.
3) Submerge the cast and wax pattern into flasking medium, covering everything up to 1/8” (3 mm) fromthe occlusal surfaces and incisal edges.
4) Eliminate all undercuts, smooth surfaces and allowmaterial to set. Apply a petrolatum or other separatingmedium to the exposed gypsum. (Figure 7)
Figure 1
Figure 4
Figure 2 Figure 3
Figure 5 Figure 6
IMPAK

--- =
5) Mix another plaster flasking medium and fill the bottom half of flask with plaster.
Note: Vibrate some plaster onto the pattern to preventtrapping of air during the final flasking procedure.(Figure 8)
6) Invert top half of flask onto bottom and press firmlyto extrude all excess plaster. (Figure 9)
BOIL-OUT
1) Place flask in boiling water for 1 to 2 minutes (justlong enough to soften but not liquefy base plate wax).
2) Separate flask halves, remove and discard as muchwax as possible from cast side.
3) Place flask halves into detergent-enhanced boilingwater and complete the wax removal procedure.
4) Important: Rinsemolds thoroughly withclean,boiling water.(Figure 10)
5) Tip flasks on edgeand allow to drain for10 seconds.
6) Apply a mixture tocasts of:
2 Parts NobilShield Tin Foil Substitute to
1 Part Warm Water(Figure 11)
7) Tip flasks on edge and allow to dry and cool.
8) Place a layer of cellophane or plastic sheet on bottom half of flask (the occlusal surface or matrix).
9) Soften a 1/2” (12 mm) wide strip of base plate wax and press it on top of cellophane into occlusalindentation in plaster surface at bottom of flask. Thiswill act as a spacer for the hard acrylic to be packedlater. (Figure 12)
Figure 7
Figure 9
Figure 8
Figure 10
Figure 11
2
10) Trim off excess wax and press flask together.
11) Open flask and check for cuspal indentations. Lightly relieve all such indentations to create a .2 to .3 mm spacing between the cusp tips and hardacrylic. This step will allow for a slight cushion and“forgiveness” factor.
PACKING AND CURINGIMPAK powder to liquid mixing ratio by volume:
2 Parts Powder to 1 Part Liquid
Caution: Material has a limited time of fluidity (30 to60 seconds). Mixing and filling the mold must beaccomplished within this time limit.
Note: Increasing liquid will make the appliance softerand more pliable. Decreasing liquid will make theappliance stiffer. Remember, the IMPAK appliance willalways feel stiffer in the hand than in the mouth atbody temperature.
1) Pour polymer (powder) into monomer (liquid).
2) Stir only until the polymer is wet. This will help prevent the formation of bubbles.
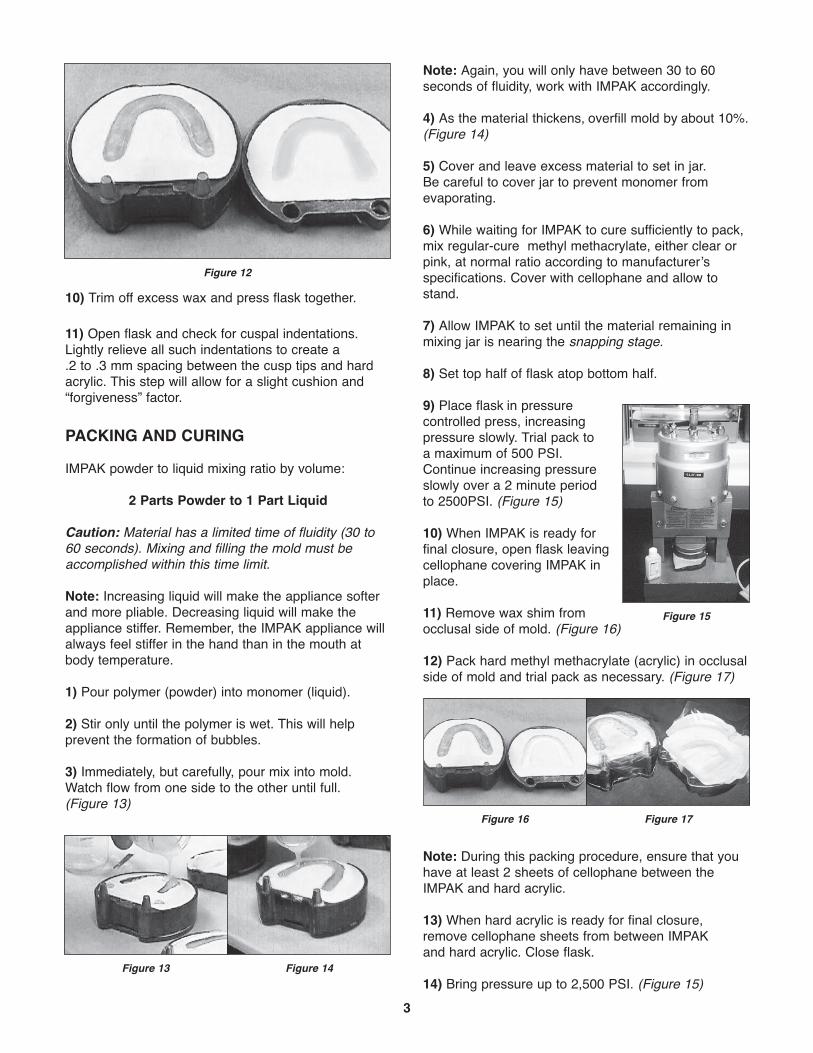
3) Immediately, but carefully, pour mix into mold.Watch flow from one side to the other until full.(Figure 13)
Note: Again, you will only have between 30 to 60 seconds of fluidity, work with IMPAK accordingly.
4) As the material thickens, overfill mold by about 10%.(Figure 14)
5) Cover and leave excess material to set in jar. Be careful to cover jar to prevent monomer from evaporating.
6) While waiting for IMPAK to cure sufficiently to pack,mix regular-cure methyl methacrylate, either clear orpink, at normal ratio according to manufacturer’s specifications. Cover with cellophane and allow tostand.
7) Allow IMPAK to set until the material remaining inmixing jar is nearing the snapping stage.
8) Set top half of flask atop bottom half.
9) Place flask in pressurecontrolled press, increasing pressure slowly. Trial pack to a maximum of 500 PSI.Continue increasing pressureslowly over a 2 minute period to 2500PSI. (Figure 15)
10) When IMPAK is ready forfinal closure, open flask leavingcellophane covering IMPAK inplace.
11) Remove wax shim fromocclusal side of mold. (Figure 16)
12) Pack hard methyl methacrylate (acrylic) in occlusalside of mold and trial pack as necessary. (Figure 17)
Note: During this packing procedure, ensure that youhave at least 2 sheets of cellophane between the IMPAK and hard acrylic.
13) When hard acrylic is ready for final closure,remove cellophane sheets from between IMPAK and hard acrylic. Close flask.
14) Bring pressure up to 2,500 PSI. (Figure 15)3
Figure 13 Figure 14
Figure 16 Figure 17
Figure 15
Figure 12