Embed Size (px)
Citation preview
DELPHI MOBILE VIDEO DVDM-800
USER MANUAL
Important: This manual contains important safety and operating information. Please read and follow the instructions in this manual.
Failure to do so could result in personal injury, death, and/or damage to your DVDM-800 and/or to your vehicle.
8" LCD Overhead Monitor with DVD Player
2
Warning: When using your DVDM-800, it is your soleresponsibility to secure and use the device in a mannerthat will not cause accidents, personal injury or propertydamage, or in any manner obstruct your view or interferewith the operation of vehicle safety equipment.
It is your sole responsibility that this device is properlyinstalled and that these operating instructions are readcarefully, understood, and used consistent with the lawsof operation for any state or country in which you use the device and with common sense. Failure to do so mayresult in an accident and personal injury, death, and/orproperty damage to your DVDM-800 and/or vehicle.
DELPHI DISCLAIMS ALL LIABILITY FOR ANY USE OF THISPRODUCT IN A WAY THAT MAY CAUSE ACCIDENTS,DAMAGE, OR THAT MAY VIOLATE THE LAW.
Warning: The driver should never operate DVDM-800—either by remote control or by using the buttons on the unit—while the vehicle is in motion. Donot let passengers unfasten seatbelts to operate the unit.Only passengers should use the remote control duringvehicle operation. Failure to do so may result in an acci-dent and personal injury, death, and/or property damageto your DVDM-800 and/or to your vehicle.
CAUTION• Use only a soft, dry cloth to clean the out-
side of your DVDM-800 and any peripherals.• Do not use any solvents, chemicals, or
cleaning solutions containing alcohol,ammonia, or abrasives.
• Do not use sprays near your unit.• Refrain from using food or drinks near the
remote control. Spilling food or drinks onthe remote could damage it.
• Keep hands or materials away from the LCDvideo monitor to avoid surface scratches.
• Push the panel buttons gently to avoiddamage to the hinge.
• Close the unit when not in use.• Do not leave the unit’s dome light on while
the vehicle is unattended. The dome lightcould drain the vehicle’s battery.
• When not in use, place the remote controland headphones where they will not bedamaged.
• Before putting on headphones, alwaysadjust the volume setting at the lowestlevel to avoid possible hearing damage.
WELCOMECongratulations on the purchase of your DelphiMobile Video DVDM-800. This unit will providenumerous hours of video entertainment for yourbackseat passengers.
Your DVDM-800 will play DVDs, audio CDs, MP3discs, and video CDs. It is not compatible with CD-I discs, CD-ROMs, DVD-ROMs, laser discs, or minidiscs.
Use this manual to learn how to operate yourDVDM-800 safely and effectively and find outabout the different features.
CONTENTS
Section 1: Unpacking DVDM-800 . . . . . . . . . . . . 3
Section 2: Features . . . . . . . . . . . . . . . . . . . . . . . 3
Section 3: Controls . . . . . . . . . . . . . . . . . . . . . . . 4
Section 4: Getting Started . . . . . . . . . . . . . . . . . 6
Section 5: OSD Commands and Settings . . . . . 7
Section 6: Other Features and Parental Controls . . . . . . . . . . . . . . . 10
Section 7: Troubleshooting . . . . . . . . . . . . . . . . 11
Section 8: Warranty . . . . . . . . . . . . . . . . . . . . . . 12Warning: To reduce the risk of fire or shock hazard,
do not expose DVDM-800 to rain or moisture.
Warning: This product utilizes a laser. Use of controlsor adjustments or performance of procedures other thanthose specified herein may result in hazardous radiationexposure. Do not open cover. Refer servicing to qualifiedservice technician.
This is the safety alert symbol. It is used to alert you topotential personal injury hazards. Obey all safety messagesthat follow this symbol to avoid possible injury or death.
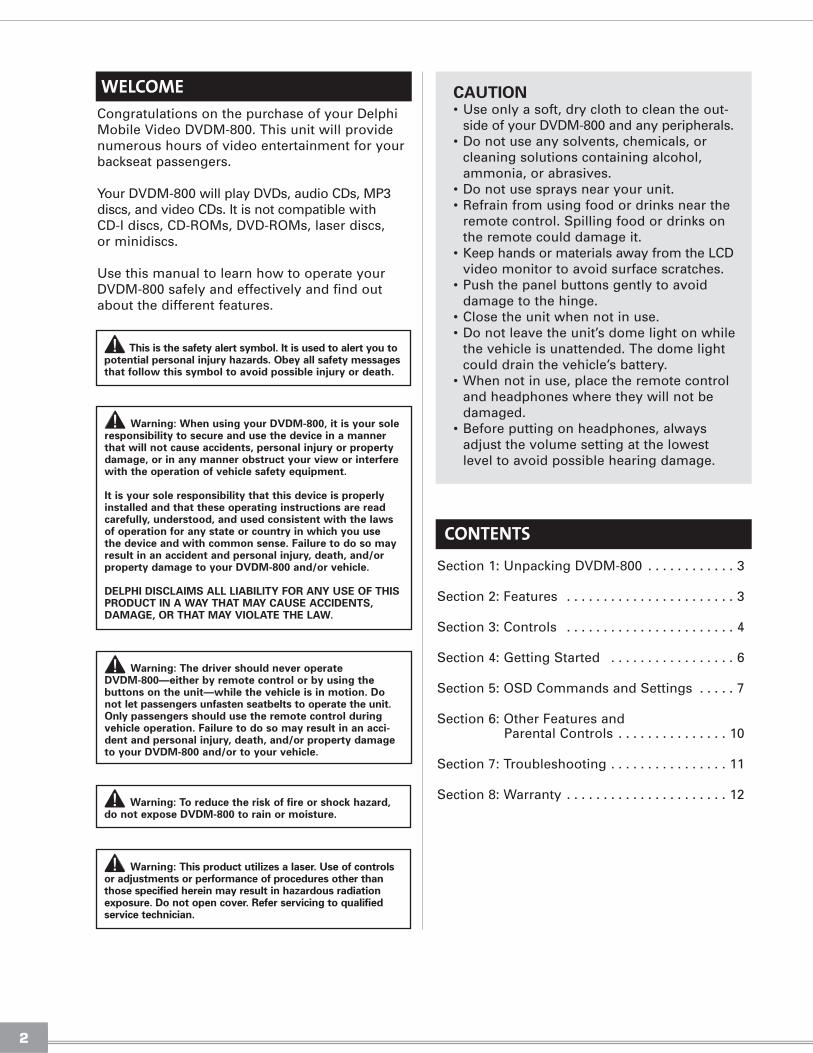
Galvanized steelmounting bracket
9
A/V connection box 6
DVDM-800 unit with DVD player and 8" LCD monitor
1
User Manual and Installation Guide
8
Two sets of wireless headphones (requires 2 AAAbatteries, included)
2
A/V cable 5
Screws andspacers
10Wireless FM transmitter (factory installed)
7
Remote control (requires2 AAA batteries, included)
3
Power cable 4
3
SECTION 1: UNPACKING DVDM-800Here’s what you should find in the DVDM-800 box:
Note: Installation materials sold separately include a shroud for a professional fit. Delphi highly recommends that you contact a professional toensure proper installation. To locate a professional installer in your area, contact your retailer.
It is your sole responsibility that installation is completed properly and will not result in personal injury, death, and/or damage to your DVDM-800 and/or to your vehicle.
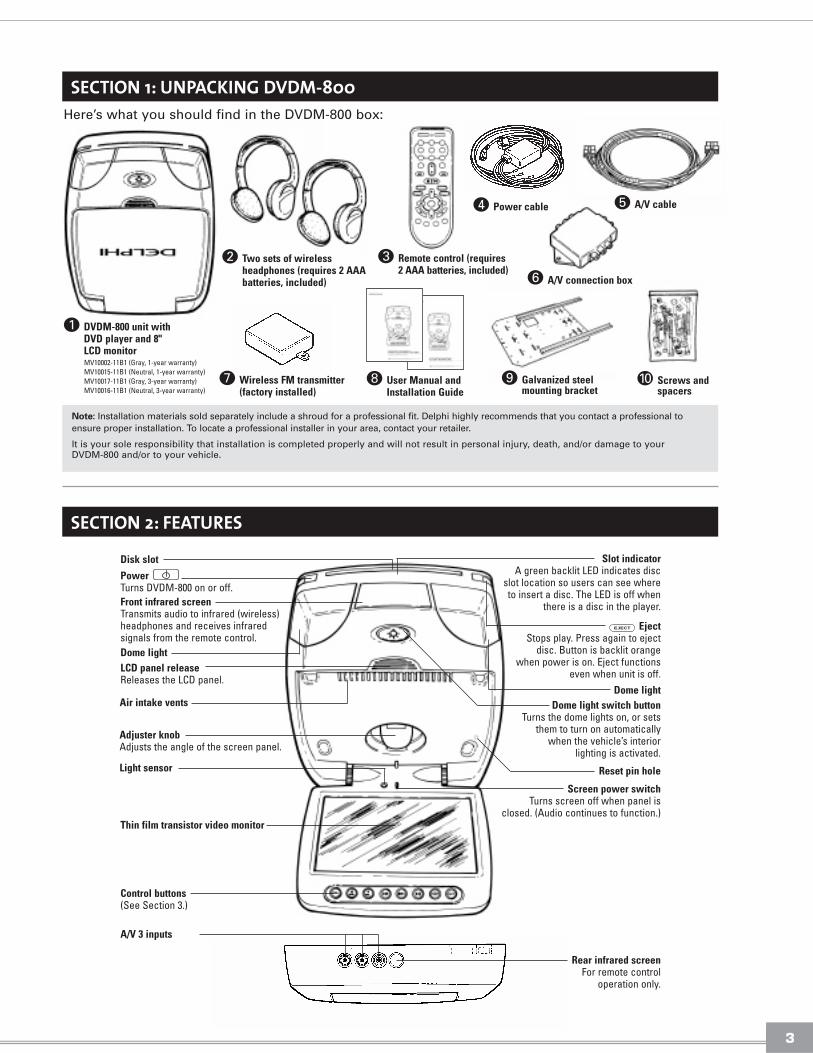
SECTION 2: FEATURES
PowerTurns DVDM-800 on or off.
Dome light
Dome light
Slot indicatorA green backlit LED indicates disc
slot location so users can see whereto insert a disc. The LED is off when
there is a disc in the player.
Screen power switchTurns screen off when panel is
closed. (Audio continues to function.)
EjectStops play. Press again to eject
disc. Button is backlit orange when power is on. Eject functions
even when unit is off.
Dome light switch buttonTurns the dome lights on, or sets
them to turn on automatically when the vehicle’s interior
lighting is activated.
LCD panel releaseReleases the LCD panel.
Air intake vents
Reset pin hole
Adjuster knobAdjusts the angle of the screen panel.
Light sensor
Thin film transistor video monitor
Control buttons(See Section 3.)
Disk slot
A/V 3 inputs
EJECT
Front infrared screenTransmits audio to infrared (wireless)headphones and receives infrared signals from the remote control.
Rear infrared screenFor remote control
operation only.
MV10002-11B1 (Gray, 1-year warranty)MV10015-11B1 (Neutral, 1-year warranty)MV10017-11B1 (Gray, 3-year warranty)MV10016-11B1 (Neutral, 3-year warranty)

4
SECTION 3: CONTROLS
Forward
Pause/play
A/V
Menu
Reverse
Volume down
Volume up
Display
Displays an on-screen display (OSD) menu for control of disc, monitor, FMtransmitter, IR transmitter, and A/V source functions. When in “Display”mode, press again to return to normal play.
• When playing video or audio discs, these buttons increase or decrease thevolume level.
• When in “Display” mode after pushing , these work as navigationaltools to move up and down menu options.
• When playing video or audio discs, pressing this button once returns tothe beginning of the current chapter or track, and pressing it again returnsto previous chapters or tracks.
• When in “Display” mode after pushing , this button works as a navigational tool to move left in menu options.
• Holding the button down during play enters reverse play mode. Continuepressing to go 2X, 4X, 8X, and 15X the normal speed. Pressing at 15Xreturns to normal speed.
• After pressing to pause play, press to reverse one frame. For slowmotion reverse play, hold the button down to go 50% and 75% normalspeed. Press to resume normal play.
• When playing video or audio discs, pressing this button advances to thenext chapter or track.
• When in “Display” mode after pushing , this button works as a navigational tool to move right in menu options.
• Holding the button down during play enters fast forward mode. Continuepressing to go 2X, 4X, 8X, and 15X the normal speed. Pressing at 15Xreturns to normal speed.
• After pressing to pause play, press to advance one frame. For slowmotion play, hold the button down to go 5%, 8%, 12%, 20%, 40%, and 70%normal speed. Press to resume normal play.
• When playing video or audio discs, pressing this button initiates play.Press once to pause play. Press again to resume play.
• When in “Display” mode after pushing , this button functions as an“Enter” button to select options.
Selects A/V 1, A/V 2, A/V 3, or DVD player inputs, i.e. if a video game isplugged into the A/V 2 ports, the A/V 2 option must be selected.
Displays the disc’s main menu. Press again to resume play.
DSPL
DSP
DSP
DSP
DSP
LCD PANEL
5
VOL
CH
CH
OH
HR1 HR2
AUX
EJECTPOWER
2
5 64
7
A / V
8 9
0
31
RET
MUTEMENU
ZO
OM
AUD
REP
SUB
ENTER
DSPL
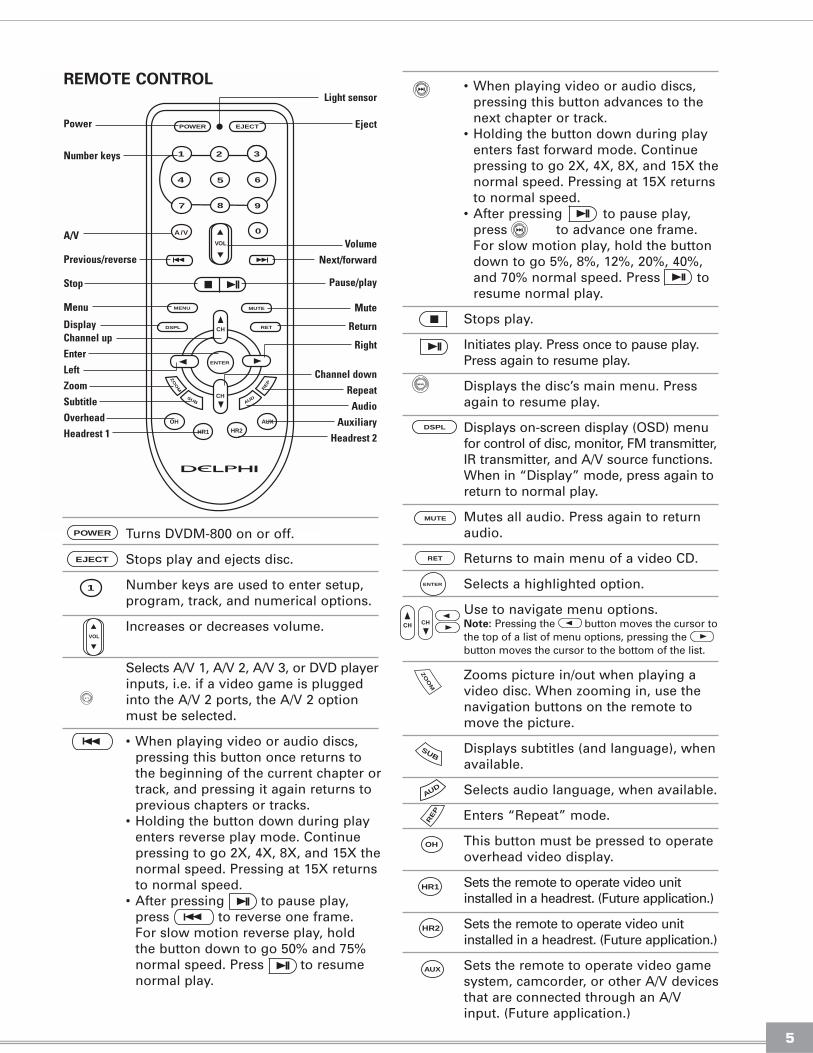
REMOTE CONTROL
Power
Number keys
A/V
Previous/reverse
Stop
Menu
DisplayChannel upEnterLeftZoomSubtitleOverheadHeadrest 1
Eject
VolumeNext/forward
Pause/play
Mute
Return
Right
Channel downRepeat
AudioAuxiliary
Headrest 2
Turns DVDM-800 on or off.
Stops play and ejects disc.
Number keys are used to enter setup,program, track, and numerical options.
Increases or decreases volume.
Selects A/V 1, A/V 2, A/V 3, or DVD playerinputs, i.e. if a video game is pluggedinto the A/V 2 ports, the A/V 2 optionmust be selected.
• When playing video or audio discs,pressing this button once returns tothe beginning of the current chapter ortrack, and pressing it again returns toprevious chapters or tracks.
• Holding the button down during playenters reverse play mode. Continuepressing to go 2X, 4X, 8X, and 15X thenormal speed. Pressing at 15X returnsto normal speed.
• After pressing to pause play,press to reverse one frame. For slow motion reverse play, hold the button down to go 50% and 75% normal speed. Press to resumenormal play.
• When playing video or audio discs,pressing this button advances to thenext chapter or track.
• Holding the button down during playenters fast forward mode. Continuepressing to go 2X, 4X, 8X, and 15X thenormal speed. Pressing at 15X returnsto normal speed.
• After pressing to pause play,press to advance one frame.For slow motion play, hold the buttondown to go 5%, 8%, 12%, 20%, 40%,and 70% normal speed. Press toresume normal play.
Stops play.
Initiates play. Press once to pause play.Press again to resume play.
Displays the disc’s main menu. Pressagain to resume play.
Displays on-screen display (OSD) menufor control of disc, monitor, FM transmitter,IR transmitter, and A/V source functions.When in “Display” mode, press again toreturn to normal play.
Mutes all audio. Press again to returnaudio.
Returns to main menu of a video CD.
Selects a highlighted option.
Use to navigate menu options.Note: Pressing the button moves the cursor tothe top of a list of menu options, pressing thebutton moves the cursor to the bottom of the list.
Zooms picture in/out when playing avideo disc. When zooming in, use thenavigation buttons on the remote tomove the picture.
Displays subtitles (and language), whenavailable.
Selects audio language, when available.
Enters “Repeat” mode.
This button must be pressed to operateoverhead video display.
Sets the remote to operate video unitinstalled in a headrest. (Future application.)
Sets the remote to operate video unitinstalled in a headrest. (Future application.)
Sets the remote to operate video gamesystem, camcorder, or other A/V devicesthat are connected through an A/Vinput. (Future application.)
POWER
EJECT
DSPL
MUTE
ZO
OM
SUB
AUD
REP
OH
HR1
HR2
AUX
ENTER
CH
1
VOL
Light sensor
6
SECTION 4: GETTING STARTED
There are four ways to turn on DVDM-800:• Press the button on the unit.• Press the button on the remote
control.• Lower the screen panel by pressing the release
button.• Insert a disc.
PLAYING A DISC
1. Insert a disc (label side facing up) in theunit’s slot.
Caution: If DVDM-800 is in A/V mode, it will not accept adisc. Do not force the disc into the slot as this coulddamage DVDM-800.
2. DVDM-800 automatically detects whether youhave inserted a DVD, audio CD, a video CD,or a disc containing MP3 files and displaysthe disc’s main menu. Using the navigationbuttons on the screen panel or remote asdescribed in Section 3, select an option.
Note: When playing audio over the vehicle’s audio system,make sure vehicle radio channel selection matches wirelessFM transmitter settings. See page 9.
OPERATING THE REMOTE CONTROL
DVDM-800 incorporates infrared sensors thatrelay signals from the remote control, allowingthe unit to be controlled simply by pointing theremote control at the front or rear infrared screen.Keep dust clear of the infrared screen, as dustmay affect the efficiency of the remote control.
Note: Two AAA batteries must be installed for remote tooperate.
OPERATING HEADPHONES
Your DVDM-800 includes a built-in infrared transmitter for use with Delphi wireless head-phones. The headphones operate on a frequencyfrom 2.3 Mhz to 2.8 Mhz. Adjust the volumeusing the volume control on the headphone.
The wireless headphones must be used within aline of sight from the infrared transmitter.
Note: Two AAA batteries must be installed in each set ofheadphones for operation.
OPERATING THE DOME LIGHTS
The dome lights are integrated into DVDM-800and are controlled by a two-step button. Pressthe button once to turn on the lights. Press againto set them to operate with the rest of the vehicle’s interior lighting system.
Caution: Do not leave the vehicle unattended with the dome light switch in the on position, as this could result in a discharged battery.
ADJUSTING THE SCREEN PANELANGLE
Turn the knob to adjust the viewing angle of thescreen. DVDM-800 has a mechanical memoryand will automatically return to your settingwhen you lower the panel again.
POWER
7
SECTION 5: OSD COMMANDS AND SETTINGS
An on-screen display (OSD) directs you throughvarious setup and adjustments such as pictureshape and quality, as well as FM transmitter, IRtransmitter, and A/V source settings.
USING SUBTITLES
1. From the main OSD menu, select“DVD/VCD/MP3/CD.”
2. Select “Subtitles.” Use the navigation buttons to cycle through the options andselect the language desired. Availability andoptions will vary by disc.
SELECTING AUDIO OPTIONS
1. From the main OSD menu, select“DVD/VCD/MP3/CD.”
2. Select “Audio.” Use the navigation buttons tocycle through the options, which will vary bydisc, and may include options such as stereo,mono, different language pronunciation,Dolby®, and more.
SELECTING TRACK
1. From the main OSD menu, select“DVD/VCD/MP3/CD.”
2. Select “Track.” Use the navigation buttons to highlight the desired chapter or track number. Select “OK” to play that track orchapter.
SELECTING CAMERA ANGLE
1. From the main OSD menu, select“DVD/VCD/MP3/CD.”
2. Select “Angle.” Use the navigation buttonsto cycle through different camera angles,which will vary by disc. (Video only—not alldiscs support this feature.)
USING TITLE SCREEN
1. From the main OSD menu, select“DVD/VCD/MP3/CD.”
2. Select “Title.” The disc’s main menu is displayed. Press or again to clear theOSD menu off the screen, and then use thenavigation buttons to navigate the disc’smain menu normally.
SELECTING ZOOM LEVEL
1. From the main OSD menu, select“DVD/VCD/MP3/CD.”
2. Select “Zoom.” The picture will enlarge 1.5times normal size. Select “Zoom” again toreturn to normal size. When in “Zoom”mode, press or to clear the OSDmenu off the screen, and use the navigationbuttons to move the picture.
All menu options may be selected usingeither the navigation buttons on the screenpanel or remote as described in Section 3.When using the screen panel, select the high-lighted option by pressing . When usingthe remote, select the highlighted option bypressing .
To reach the main OSD menu, press onthe remote control or on the screen panel.
Pressing or again at any time returnsto normal play mode. Using the navigation buttons to select “Exit” returns to the previous menu screen.
Note: Not all of the following features are available for alltypes of media. An invalid symbol appears on the screenwhen you press a button that does not have any functionwith the type of media being played.
ENTER
DSPL
DSPL
DSPL
DSPL
DS
DS
DS
DS
Dolby is a registered trademark of Dolby Laboratories.
8
USING REPEAT
1. From the main OSD menu, select“DVD/VCD/MP3/CD.”
2. Select “Repeat.” Continue pressing on thescreen panel or on the remote to cyclethrough the options.• On a DVD, these options include “Repeat
Disc,” “Repeat Title,” “Repeat Chapter,” or “Repeat Off.”
• On an audio CD, MP3, or video CD, theseoptions include “Repeat Disc,” “RepeatTrack,” or “Repeat Off.”
USING A TO B
1. From the main OSD menu, select“DVD/VCD/MP3/CD.”
2. Selecting “A to B” sets point “A” of a continuous loop play. Pressing again setspoint “B.” DVDM-800 will continue to playthe selected section between these twopoints until “A to B” is selected again, turning the feature off.
USING STATUS MENU
1. From the main OSD menu, select“DVD/VCD/MP3/CD.”
Note: When a disc is stopped, or there is no disc inDVDM-800, selecting “Status” will bring up the unit’smain menu. See Section 6 for more information.
2. When a disc is being played, a number offunctions (which will vary depending on thetype of disc) can be controlled from the“Status” menu. Use the buttons to choosean option.
• Chapter/Track: Change the chapter or trackbeing played by selecting this option andusing the remote’s number keys to enter avalid chapter or track number.
• Title: Change the title being played (if morethan one is available) by selecting thisoption and using the remote’s number keysto enter a valid title number.
• Audio: Change audio language settings byselecting this option. Availability andoptions displayed will vary by disc.
• Subtitle: Change subtitle language byselecting this option. Availability andoptions will vary by disc.
• Angle: Change the camera angle by selectingthis option and using the remote’s numberkeys to enter a valid angle number.Availability and options will vary by disc.
• Time: Use this function to restart play at aspecified point. Use the remote’s numberkeys to enter the desired starting time andpress to begin play from that point.
• Marker: Up to five markers can be pro-grammed, which when selected will beginplay from that point. After selecting thisoption, use the buttons to highlight“Marker 1,” “Marker 2,” “Marker 3,”“Marker 4,” or “Marker 5.” Pressing willprogram a marker at that point. After a markerhas been programmed, select it using the
buttons, and press to begin play fromthat point. Clear all markers by selecting“Clear All Markers.”
• Repeat Mode: Enter “Repeat” mode byselecting this option. Use the buttons toselect “Disc” to repeat the entire disc,“Title” to repeat the current title, or“Chapter” (or “Track”) to repeat the currentchapter or track. When “Repeat” mode isenabled, “Off” appears as an option in themenu; select it to disable “Repeat.” Thedefault setting for “Repeat” is off.
• Time Display: Change the time display settingswith this option. DVDM-800 can display thetime as “Total,” “Total Elapsed,” “TotalRemain,” “Single Elapsed,” “Single Remain,”or “Single.” Highlight your preference andpress .
• Listening Mode: Change the listening modesettings with this option. DVDM-800 cantransmit audio in several different modes,which will vary depending on the type ofdisc being played.
• Play Mode: DVDM-800 can play tracks innormal order, shuffled, or just the first 10seconds of each. Select “Play Mode,” thenuse the buttons to choose between“Normal,” “Shuffle,” or “Intro.”
• Play List: You can program DVDM-800 toplay only tracks selected to a play list. Tocreate or edit a play list:– Select “Play List.” – Use the buttons to highlight “Edit Play
List” and press .– Using the buttons, highlight the tracks
you want included in the list, and press . You may add as many tracks as you
wish to your play list. When finished, pressto return to the “Play List” menu.
ENTER
CH
CH
CH
CH
CH
ENTER
ENTER
ENTER
ENTER
ENTER
DSPL
DSPL
CH
CH
9
To add all tracks to the play list, use the buttons to highlight “Add All Tracks to PlayList” and press to disable or enable the play list.
• MP3 Disc Scan: Scan the disc for MP3 files byselecting this option.
USING RND/INT (RANDOM/INTRO)
1. From the main OSD menu, select“DVD/VCD/MP3/CD.”
2. Select “RND/INT.” Continue to press tocycle through three options:
• “Shuffle” to play all tracks or files in arandom order.
• “Intro” to play the first 10 seconds ofeach track or file on the disc.
• “Normal” to play tracks or files insequential order.
CHANGING SCREEN MODE
1. From the main OSD menu, select “Monitor.”
2. Select “Screen Mode.” Using the navigationbuttons, select the desired screen size: “Full,”“Wide,” or “Normal.”
CHANGING PICTURE MODE
1. From the main OSD menu, select “Monitor,”then select “Picture Mode.”
2. Select “Bright,” “Contrast,” “Color,” or“Tint.” Using the buttons, adjust the settings. A bar graph displays the current settings.
3. DVDM-800 features a light sensor that allowsthe screen to automatically dim the screenwhen in a darker environment. There are fourstages of screen backlight brightness basedon ambient light strength. To turn this featureoff, select “Dimmer,” then use the buttons to select “Auto” or “Off.”
4. To reset picture settings to their factorydefault setting, select “Default.”
CHANGING BUTTON BACKLIGHT LEVEL
Buttons on DVDM-800’s screen panel are backlitin orange, and the brightness level can bechanged.
1. From the main OSD menu, select “Monitor.”
2. Select “Button Backlight.”
3. Select “1,” “2,” “3,” or “4” to change brightness level. To turn off the backlightingfeature, select “Off.”
CHANGING FM TRANSMITTER SETTINGS
The wireless FM transmitter can be used totransmit audio from DVDM-800 to your vehicleradio.
1. From the main OSD menu, select “FMTransmitter.”
2. To change the transmitter frequency, select“Frequency” and use the buttons tocycle through the frequency options rangingfrom 88.1 FM to 97.9 FM. Set your vehicleradio to the same frequency to receive audio.
3. To turn the FM transmitter off, select“Transmitter,” and use the buttons toselect “Off.”
Note: When the FM transmitter is on, broadcast reception ofother channels through your vehicle radio may be poor.Turning off the FM transmitter will restore normal operation.
CHANGING IR TRANSMITTER SETTINGS
DVDM-800 is programmed to transmit infraredsignals to wireless headphones. To turn thiscapability off, from the main OSD menu, select“IR Transmitter.” Select “Transmitter” and usethe buttons to select “On” or “Off.”
CHANGING A/V SOURCE
DVDM-800 is equipped to connect other A/Vsources, such as a video cassette player or videogame system. To select the source of A/V input,from the main OSD menu, select “A/V Source.”Using the buttons, select either “DVD,”“AV1,” “AV2,” or “AV3.”
Note: This function can also be accomplished by using theA/V button on the screen panel or the remote.
CH
ENTER
ENTER
CH
10
SECTION 6: OTHER FEATURES AND PARENTAL CONTROLS
When disc play is stopped, or there is no discinserted, selecting “Status” mode from the“DVD/VCD/MP3/CD” menu brings up a menuallowing you to change language, audio, display,disc, and parental settings. Press to exit ascreen.
CHANGING LANGUAGE SETTINGS
1. Select “Language.”
2. Select “Player Menus,” “Disc Menus,” “DiscAudio,” or “Disc Subtitle.” Use the buttons to scroll through the list of availablelanguages and select your preference.DVDM-800 can display settings in English,French, German, Spanish, Turkish, Japanese,Italian, or Portuguese.
CHANGING AUDIO SETTINGS
1. Select “Audio.”
2. DVDM-800 allows you to change a variety ofaudio settings, including:• Speaker setup: Change settings for front
speakers (“Large” or “Small”), centerspeaker (“On” or “Off”), surround speakers(“On” or “Off”), subwoofer (“On” or “Off”),or speaker distance (front left .5 m to 10 m,front right .5 m to 10 m, or reset todefaults).
• Digital audio out: Dolby Digital • Surround format: Dolby Digital• Dynamic range: Select “Maximum” or
“Compressed.”• Downmix mode: Select “Stereo Normal”
or “Dolby Surround.”• Downsampling: Select “48 kHz Compatible”
or “True 96 kHz.”• Pro Logic® mode: Select “Automatic”
or “All.”
CHANGING DISPLAY SETTINGS
1. Select “Display.”
2. DVDM-800 allows you to change a variety ofdisplay settings, including:• Preferred video standard: Select “Content
Specific,” “NTSC,” or “PAL.”• TV aspect: Select “16:9 Widescreen”
(recommended), “4:3 Letterbox,” or “4:3 Pan & Scan.”
• On-screen info: Select “On” or “Off.”• Component out: Select “RGB” or “YUV.”• Scart output: Select “Disable,”
“Composite,” “S-video,” or “RGB.”• Panel display: Select “Dim,” “Bright,” or
“Dim for Playback.”• Power saving: “Never.”
CHANGING DISC SETTINGS
1. Select “Disc.”
2. DVDM-800 allows you to change certain discplay settings, including:• Autoplay: Select “On” or “Off.”• PBC: Select “On” or “Off.”
CHANGING PARENTAL SETTINGS
1. Select “Parental.”
2. DVDM-800 allows you to change certainparental control features, including:• Country: Set to “USA.”• Parental: Set parental control level to “Off”
or level “G,” “PG,” “PG13,” “R,” or“NC17.”
• Password: You can limit access to DVDM-800 by entering a 4-digit password usingthe number keys on the remote.
CHANGING BACK TO DEFAULT SETTINGS
1. Press , followed by “1,” “2,” “3,” and“4” on the remote control to enter the resetscreen.
2. Press to return to default settings.
3. Press to exit reset screen.
CH
ENTER
Pro Logic is a registered trademark of Dolby Laboratories.
SECTION 7: TROUBLESHOOTING
Poor in-vehicle radio reception:1. Check the condition of the vehicle’s radio antenna.2. Verify that the antenna is fully raised.3. If a wireless FM transmitter has been installed,
make sure FM transmitter is off. Use the status menu in the OSD to turn it off.
Infrared sensor inoperative:1. Verify that the batteries in the remote are fresh. If
not, replace batteries.2. Verify that the remote sensor screen is not
obstructed.3. Verify that the infrared transmitter is in line of
sight with the sensor screen of the unit.
Disc won’t play:1. Verify that disc is inserted with label side up.2. Check the type of disc. This unit only plays DVDs,
audio CDs, MP3s, and video CDs.3. Both the unit and the disc are coded by region. If
the regional codes don’t match, the disc can’t beplayed. This DVD player is region one.
Play starts, but then stops immediately:1. Clean the disc if dirty.2. Allow player to dry out if condensation has
formed.
No sound or distorted sound:1. If you are using infrared headphones, make sure
you turn on the infrared power.2. Make sure the FM transmitter is on and the proper
frequency has been selected for the vehicle radio.3. Make sure your audio selection is correct.
Can’t advance or reverse scan:You can’t advance through the opening credits andwarning information that appears at the beginning ofmovies because the disc is programmed to prohibitthat function.
The “X” icon appears on screen:Check your disc. The feature or action cannot be com-pleted at this time because:1. The disc’s software restricts it.2. The disc’s software doesn’t support the feature.3. The feature is not available at the moment.4. You’ve requested a title or chapter number that is
out of range.
Picture is distorted:1. Check the disc for damage. Try another disc.2. It is normal for some distortion to appear during
forward or reverse scan.
Dome light does not work:Change the bulb.
Unit locked:1. Using a small pin, reset the unit through the reset
pin hole (see page 3).2. Press and hold on the unit or the
button on the remote control for more than threeseconds. The screen will become dark, then flashonce. Release the button. The unit can be poweredon by pressing the or button after thethree-second initialization period.
Your DVDM-800 is designed and built to provide you with trouble-free performance. If it does not appear to be functioning properly, please follow these troubleshooting guidelines.
TECHNICAL INFORMATION
Dimensions . . . . . . . . . . . . . . . . . 12.88" x 2.32" x 10.94" (327.2 mm x 59 mm x 278 mm)
Resolution . . . . . . . . . . . . . . . . . . . . . . . . . . . . 1440 x 234
Pixels . . . . . . . . . . . . . . . . . . . . . . . . . . . . . . . . . . 336,960
Operation temperature . . . . . . . . . . . . . . . -10°C to 60°C
Storage temperature . . . . . . . . . . . . . . . . . -20°C to 70°C
Backlight life . . . . . . . . . . . . . . . . . . . . . . . 10,000 hours
Video display system . . . . . . . . . . . . . NTSC/PAL/AUTO
Headphone audio output . . . . . . . . . 0.03W at 16 ohms
Low-level audio output . . . . . . . . . . . . . . . . . . 620 mvp-p, 1kHz at –15dB
Video output . . . . . . . . . . . . . . . . . . 1.0Vp-p at 75 ohms
Power source . . . . . . . . . . . . . . . . . . . . . . . . . . . . 12V DC
Dome light bulb . . . . . . . . . . . 12V 5W (31 mm x 8 mm)
Caution: Take care to prevent your DVDM-800 fromoverheating. If your unit begins to overheat, an automaticshutdown will be prompted, and the following messagewill appear on your screen:
“Your system has been automatically shut down to prevent overheating and damage to internal components.Please do not operate the system for 30 minutes to allowfor cooling, then power on the system again.”
CONTACTING TECHNICAL SERVICESUPPORT
For additional information in solving problemswith your DVDM-800, contact Delphi at1.877.667.8700 Monday—Friday 8:00 a.m.—4:30 p.m. Eastern Standard time, or visitwww.delphi.com.
POWER
POWER
11
©2004 Delphi Corporation. All rights reserved.DPSS-04-E-026
Delphi Corporation1441 West Long Lake RoadTroy, Michigan 48098-5090 U.S.A.Customer Service: [1] 877.GO DELPHI
www.delphi.com
SECTION 8: WARRANTYDelphi Product & Service Solutions (“Delphi”) warrants all DelphiMobile Video products sold by Delphi (“Products”) to be free of defectsin material and workmanship, subject to the following conditions.
The duration of Delphi’s warranty with respect to Product is limited toone (1) year from the date of sale to the original consumer purchaser.
No other express warranties are made with respect to any Product.All implied warranties, including warranties of merchantability andfitness for a particular purpose are limited to the warranty period setforth above. This warranty is not transferable and applies only to theoriginal consumer purchaser of the Product.
Delphi will, as its sole obligation under this warranty, replace or repair,at its option, any Product that does not conform to this warranty. Underno circumstances will Delphi be liable for any incidental or conse-quential damages under this warranty or any implied warranties.
Delphi will not be responsible for damage resulting from (i) any deviationfrom Delphi’s operating instructions as printed in Delphi’s catalog oron any packaging, labels, or other literature provided with a Product,(ii) installation of a Product in a manner which is inconsistent withDelphi’s written instructions, (iii) alteration or modification of aProduct, (iv) misuse, (v) neglect, (vi) abuse, (vii) accident, (viii) normalwear and tear, (ix) commercial use, (x) service by anyone other than aDelphi authorized repair facility, or (xi) other improper application,installation, or operation of the Product.
HOW YOU (THE CUSTOMER) CAN GET SERVICE
To obtain warranty service after installation, youmust return the defective Product with the originalreceipt to the original place of installation. Fortechnical support or if you have questions, callDelphi at 1.877.667.8700.
If warranty service is needed at any time during
the warranty period, the purchaser will be
required to furnish a sales receipt/proof of
purchase indicating the date of purchase,
amount paid, and place of purchase. Customers
who fail to provide such proof of purchase will
be charged for the repair of any Product.
HOW STATE LAW RELATES TO THEWARRANTY
Some states do not allow limitations on howlong implied warranties last, or the exclusion or the limitation of incidental or consequentialdamages. So the above limitations may notapply to you. This warranty gives you specificlegal rights. You may also have other rights that may vary from state to state.
NO PERSON IS AUTHORIZED BY DELPHI TO
MODIFY OR ADD TO THIS LIMITED WARRANTY.
FCC STATEMENT
This equipment has been tested and found tocomply with the limits for a Class B digitaldevice, pursuant to Part 15 of the FCC rules.These limits are designed to provide reasonableprotection against harmful interference in a normalinstallation. This equipment generates, uses, andcan radiate radio frequency energy and, if notinstalled and used in accordance with theinstructions, may cause harmful interference toradio communications. However, there is noguarantee that interference will not occur in aparticular installation. If this equipment doescause harmful interference to radio or televisionreception, which can be determined by turningthe equipment off and on, the user is encouragedto try to correct the interference by one or moreof the following measures:• Reorient or relocate the receiving antenna• Increase the separation between the equipment
and receiver• Connect the equipment into an output on a
circuit different from that to which the receiveris connected
• Consult the dealer or an experienced electronicstechnician for help
• A shielded cable must be used when connectinga peripheral to the serial ports
Warning: Modifications not expressly approved bythe manufacturer could void the user’s authority to operate the equipment under FCC rules.