Embed Size (px)
Citation preview

DEMOB
Version 1.2.2
Wednesday, December 14, 2016

Demob
Demob Page 2 of 56
Table of Contents Table of Contents .............................................................................. 2 Demob Overview ............................................................................... 3 Manage Demob Settings ................................................................... 4 Tentative Demob ............................................................................... 8
Group Pending Demob .....................................................................15 Group Pending for Rostered Resources ....................................18
Actual Demob ...................................................................................20 Group Actual Demob ........................................................................24
Group Demob for Rostered Resources .........................................25
Demob Reports and Forms from Demob menu ...............................27 Tentative Poster .........................................................................28
Available for Release .................................................................29 Air Travel Request ......................................................................30
ICS 221 Checkout Form .............................................................31 Actual Demob .............................................................................33 Ground Support ..........................................................................34
Demob Reports ................................................................................36 Check-Out Form (ICS221) ............................................................37
Demob Planning Report ................................................................40 Tentative Poster ............................................................................42 Available for Release Report .........................................................43
Air Travel Request .........................................................................45
Last Work Day ...............................................................................48 Actual Demob ................................................................................50 Ground Support .............................................................................52
Glidepath .......................................................................................54 Index ................................................................................................56

Demob
Demob Page 3 of 56
Demob Overview
Manage Demob Settings
Tentative Demob
Group Pending Demob
Actual Demob
Group Actual Demob
Demob Reports and Forms from Demob menu

Demob
Demob Page 4 of 56
Manage Demob Settings Follow the steps in this section to change the Demob Settings:
NOTE: Customizing the Check-Out Form (ICS221) and editing the Air Travel Questions should be done before any resources are demobed from an incident. Edits to settings can be made during the incident.
1. From the Home page click the Incidents button.
2. Select an Incident or an Incident Group.
NOTE: In an Incident Group, one incident will be designated the Primary Incident for the group. Demob settings for the Primary incident will default to all the incidents within the incident group. Once the Primary incident settings default as the Incident Group settings, further edits to Demob Settings can be made by selecting the Incident Group and not the Primary Incident.
3. Select the drop-down arrow next to the Demob button.
4. Select Demob Settings.
5. Select the Customize Check-Out Form tab.

Demob
Demob Page 5 of 56
6. Identify the units to include in each section by clicking the appropriate
checkbox.
7. Change the order in which the unit checkboxes display in each Section by clicking Move Up or Move Down.
8. Identify the units to include in the Other Section by clicking the appropriate checkbox or add/change a label for one or more of the Other fields.
9. Change the order in which the unit checkboxes display in the Other Section by clicking Move Up or Move Down.
10. Click Save.
11. Click the Air Travel Questions tab.
NOTE: Air Travel Questions to be used for each incident should be selected before demob begins. * These questions assist in providing the most accurate and complete information

Demob
Demob Page 6 of 56
to the servicing Dispatch Center about a resource requiring air travel. * These questions can be edited at any time during the incident if needed.
12. To display a question check the Display checkbox.
NOTE: All questions with the Display checkbox checked will appear on the Air Travel Request Form.
NOTE: Standard (default) questions cannot be edited or deleted. A Standard question has a checkmark in the Standard column. Check or Uncheck the Display option for a Standard question to display or not display that question.
13. To change the order in which the questions display, select the question and
click the Move Up or Move Down buttons.
14. To add a custom question, click the Add button. Enter the question in the Add Question text box. (Question must be Yes/No).
15. To edit a custom question, select a question to edit and make the appropriate change in the Edit Question text box.
16. To display a custom question(s), click the Display checkbox.
17. To delete a custom question, select the question and click Delete.
18. Click Save.
19. Click "x" to close the pop-up box.
NOTE: "Yes" responses to the following questions yield these results: * Ground Support question will "show" resource name on the Ground Support Report as needing the incident to provide transportation from the incident to the departure airport. * Resource driving home after a flight should notify the Dispatch Center to avoid flights that will cause the resource to exceed allowable travel hours. Under the Tentative Demob Remarks menu item, the drive time for the resource to reach home can be noted. * Rental car question will provide an additional field asking for the airport from which the vehicle was rented, allowing the Dispatch Center to provide a return flight from that same airport. * Picture ID question should remind Check-In and Demob personnel to double check the Picture ID field on the Demob Data screen. The default name in the field is from ROSS, First Name, Last Name. If it is not the same name on the resource ID that will be used at airport security, enter the name as it appears on the ID card the resource plans to show at the airport. * Hotel Reservation Needed question should notify Dispatch Center to assist

Demob
Demob Page 7 of 56
with hotel reservations if the resource is unable to pay for their hotel room. It is also helpful to add some remarks as to why this needs to be done under the Tentative Demob Remarks tab (this will print on the Air Travel Request Form).

Demob
Demob Page 8 of 56
Tentative Demob Follow the steps in this section to tentatively Demob a resource from an incident:
NOTE: "Resources Selected in the Grid Checkbox" checked (upper right corner of the main screen): When this checkbox is checked, the system will override any other filters, acting solely on those resources selected in the grid. If any of the Demob reports are run with this check box checked, only those resources selected in the grid will appear in the reports. This allows for system override.
1. Click the Demob button.
2. The resource grid displays.
3. Select an existing Resource from the Resources grid.
4. Select the Demob Data tab.
5. Select the Tentative Demob sub-tab.
NOTE: Tentative Poster and Available for Release Report key off resources with Status = P. Status = P is part of the Tentative Demob process.
6. Demobilization Travel Method will default from the Check-In Mobilization
Travel Method. Add/edit this data by using the drop-down list.
If Demobilization Method shows A/R, the field Rental Location should be filled in with the location where the rental vehicle was obtained.
If Demobilization Travel Method is changed to AIR or A/R, an Air Travel Request Form can be generated for flight arrangements.
If the resource came by one travel method, but will return by another method (drove with someone else, but will have to fly back; came with a crew, but got sick and needs a flight home), enter the method they will use for the return travel.
NOTE: If the Demobilization Travel Method is not Air or A/R, the Air Travel and Air Travel Questions tabs will not appear in the menu bar.

Demob
Demob Page 9 of 56
7. Check the Available for Reassignment checkbox if the resource has indicated they are willing to be reassigned to another incident.
This data will appear on the Available for Release and Air Travel Request reports.
8. Enter a Tentative Release Date or select from the calendar. This is the date the resource is available to leave the incident.
This date/time creates the arrangement of data on the Tentative Poster report.
9. Enter a Tentative Release Time. This is the time the resource is available to leave the incident.
Time should be based on the travel needs of the resource to reach their destination. For their release date, follow agency guidelines.
This time/date creates the arrangement of data on the Tentative Poster report.
NOTE: Checkboxes on the screens and Dialogue boxes asking if a checkbox should be checked are informational and do not appear on any report. However, these checkboxes do affect report outputs. * The checkboxes being checked prevents sending duplicate information to dispatch. Should the resource need to be included in another report or another ICS 221 printed, uncheck the box and click Save. OR * Checking the checkbox for Resource Selected in Grid (at the top right of the main screen) will override the checkboxes.
10. Checkout Form Printed check box.
If the user responds "Yes" to the question, "Do you want the system to mark the applicable resource records as Check-Out Form Printed?", the system will check the Checkout Form Printed checkbox. This question only displays the first time an ICS 221 Checkout Form is printed for a resource.
If the ICS 221 Checkout Form will not print for a resource, uncheck the Checkout Form Printed checkbox and click Save to reprint the form.

Demob
Demob Page 10 of 56
A second message box will appear asking: "Do you want the system to include Estimated Date/Time of Arrival and Rest Overnight information in Box 12?" This refers to block 12 (bottom) on the ICS 221 form. Check "Yes" to include the data and format from the resource's record in block 12 when the form is printed. If the data is not included in the resource's record and the checkbox is checked, the format will display in Block 12, which allows a user to hand enter the data.
11. Dispatch Notified checkbox.
When the Available for Release Report is generated, this box will be checked if the user checked "Yes" for all resources that appear on the report. The system passes over all records that have this box automatically checked to avoid duplication in future reports.
A message box will appear asking if this box should be checked.
YES will prevent this resource from being duplicated when another Available for Release Report is generated, which includes this resource's release date range.
NO will allow this resource to be listed again when an Available for Release Report is generated, which includes this resource's release date range. This resource will now appear in the report, provided other report parameters are met. (See Reports for more information).

Demob
Demob Page 11 of 56
12. Select the Tent Demob Remarks sub-tab.
Comments that pertain to making travel arrangements can be entered in the text box.
If the resource has to drive more than 30 minutes home after arrival at the home airport, the drive time for the resource to reach home should be noted here. This additional travel time should be taken into consideration to meet travel regulations.
These remarks will show on the Available for Release Report immediately under this resource's data line.
13. Select the Air Travel sub-tab (tab will only display if Travel Method is AIR or A/R).
Name on Picture ID
Defaults to the ROSS import name if there was a ROSS import or name entered at Check-in. Resource name must show as it appears on the resource's ID that will be used at airport security.
This ID Name will appear on the Air Travel Request Form ensuring the ticket name will match.

Demob
Demob Page 12 of 56
Depart from Jetport (Local to Incident)
Select the Airport Code for the airport being used by the incident as the departure airport.
If the resource has a rental car from a different airport, use that airport code to ensure the vehicle is returned to that same airport.
This information will print on the Air Travel Request Form.
Air Travel to Dispatch:
When saving the record, this checkbox will be checked if YES is clicked in the message box. This will prevent a duplicate Air Travel Request from being generated.
If the Air Travel Request Form needs to be resent, uncheck the box, click the Save button and click the Air Travel Request button.
Itinerary Received from Dispatch:
This checkbox is informational. It can be manually checked to show that a flight itinerary was received from the Dispatch Office. This is an after-the-fact checkmark, done after the Air Travel Request has been sent to Dispatch and a flight received. From this flight itinerary, the following fields can be manually completed:
Airline: Enter airline name
Flight #: Enter first leg flight number.
Flight Time: Enter initial flight time.
NOTE: Airline name and Flight Time will display on the Ground Support Report. Airline Flight # does not display.
Hours and Minutes to Airport:
Shows the hours and minutes it will take to drive from the incident to the selected departure airport. This information will inform the Dispatch Office of the amount of time to allow for travel to the airport before the resource will be available to fly.
This information will print on the Air Travel Request Form.
Leave ICP Time:

Demob
Demob Page 13 of 56
If the resource requires the incident to provide transportation to the airport, enter the time the resource would need to leave the ICP in order to make the flight time.
This time appears on the Ground Support Report, informing Ground Support of when a ride will need to be scheduled.
Special Instructions:
Enter remarks pertinent to travel needs/plans of the resource.
These remarks will appear on the Air Travel Request Form. (EX: Resource has sprained right knee, needs an aisle seat.)
16. Select the Air Travel Questions sub-tab (tab will only display if Travel
Method is AIR or A/R):
NOTE: The following questions are preset in Demob Settings. All questions with the Display checkbox checked in Demob Settings will appear on the Air Travel Request Form.
YES responses to these questions yield the following results:
Ground Support question will display the resource name on the Ground Support Report as needing the incident to provide transportation to the airport.
Resource driving themselves home after a flight should notify the Dispatch Center to avoid flights that will cause the resource to exceed allowable travel hours. Under Special Instructions, note the drive time for the resource to reach home.
Rental car question will provide an additional field asking for the airport from which the car was rented. This allows the Dispatch Center to provide a return flight from that same airport.
Picture ID question should remind Check-in and Demob personnel to double check the Picture ID field on the Demob Data Screen. The default name in the field is the First Name, Last Name fields under Check-In. If this is not the name on the resource ID that will be used at airport security, enter the name as it appears on the ID card. This name will appear on the Air Travel Request Form.

Demob
Demob Page 14 of 56
Hotel reservation needed question should remind Demob Personnel to assist with hotel reservations. It is also helpful to add some remarks as to why this assistance is needed in the Special Instructions box on the Air Travel tab (these remarks will print on the Air Travel Request Form).
Agency credit card indicates the resource can pay for any travel expenses.
Any additional non-standard questions will show on the Air Travel Request Form if the Display checkbox is checked.
17. Click Save or Cancel.

Demob
Demob Page 15 of 56
Group Pending Demob Follow the steps in this section to change a Group of Resource's Status to Pending Demob:
1. Click the Demob button.
2. The Resource grid displays.
3. Select multiple Resources from the Resource grid.
4. Click the Group Pending button.
5. The Group Pending window will display with all of the selected resources. Status "P" is automatically entered when the resource record opens.

Demob
Demob Page 16 of 56
6. Select the Tentative Demob sub-tab.
7. Enter the tentative Demob data for the first Resource.
NOTE: The Tentative Release Date/Time must be entered otherwise the resource will not appear in the Tentative Poster or the Available for Release Report.
8. Edit the Demobilization Travel Method if it is different from the
Mobilization Travel Method originally entered.
9. If Available for Reassignment, click the check box.
10. Enter a Tentative Release Date or select from the calendar.
11. Enter a Tentative Release Time.

Demob
Demob Page 17 of 56
12. Checkout Form Printed checkbox will be checked through a dialogue box when the form is initially printed. To reprint, uncheck the box, save, and reprint the form.
13. Dispatch Notified checkbox will be checked when the Available for Release Report is generated. To resend, uncheck the box, save and run the report again.
14. Click the Tent Demob Remarks sub-tab to enter any remarks. Remarks
will display on the Available for Release report.
15. If the Return Travel Method is AIR or A/R, enter information on the Air Travel sub-tab:
a. Update the Name on Picture ID (system defaults with the Resource Name from Check-In, which may need to be edited).
b. Select Depart from Jetport from the drop-down list.
c. Air Travel To Dispatch check box will be checked when the Air Travel Report is generated. If the Air Travel Request Form needs to be resent, uncheck the box, click the Save button, then click the Air Travel Request button again.
d. If Itinerary Received From Dispatch, click the check box.
e. Enter the Airline name. Airline name will display on the Ground Support report.

Demob
Demob Page 18 of 56
f. Enter the Flight #.
g. Enter the Flight Time.
h. Estimate the travel time to the airport by inputting the Hours To Airport and Minutes To Airport.
i. Enter Leave ICP Time. This time will display on the Ground Support report.
j. Enter any Special Instructions in the box.
NOTE: At this point, it is important to check all the Common and Tentative demob data for the resource before clicking Save/Next as the system will move to the next resource in the list.
16. Click the Save/Next button to open the next Resource and add the
Tentative Demob Data.
17. Repeat steps 7 thru 16 for all Resources in the group.
18. Click Save/Next to save the data and move to the next resource in the grid.
19. After the last Resource in the Group Pending screen has been saved, the system will return to the resources grid.
Group Pending for Rostered Resources
NOTE: Use this feature to change the Status to "P" if several, not all, rostered resources are to be marked Pending. Individual rostered resources can be selected without selecting the entire roster or the Primary record. As an example, half a crew could be Status = P, while the Primary and other half of the crew remains Status = C.
NOTE: If some members of a roster are marked as Status = P and saved,

Demob
Demob Page 19 of 56
AND the status field in the resources grid is filtered for "P", AND the main filter radio button ALL is selected, only Primary or single resource records will show in the filtered information. To see the rostered members marked "P", select the All Personnel radio button filter AND select filter Status = P in the resources grid. If the Primary record and all its rostered resources are to be marked Status = P, click Edit Resource button, change the primary record Status = P which will propagate this change to the subordinate records.

Demob
Demob Page 20 of 56
Actual Demob Follow the steps in this section to Demob a Resource from an incident:
1. Click the Demob button.
2. The Resource grid displays.
3. Select an existing Resource from the Resources grid.
4. Select the Demob Data tab.
5. Select the Actual Demob sub-tab.
NOTE: * The Actual Date and Time the resource is leaving ICP and an Estimated Date and Time the resource plans to arrive at their destination are noted on the Actual Demob Report. * If it will take more than one day to reach their home unit, the Rest Overnight location(s) can be recorded and display on the Actual Demob Report. * Checking the checkbox for Resource Selected in the Grid will override check boxes and print the Actual Demob form.
6. Enter the Actual Release Date and Time.

Demob
Demob Page 21 of 56
Change the Resource Status to "D". Actual Release Date and Time fields will become active. These fields are found in the upper Common Data box in Check-In and Demob.
Enter the actual date/time the resource departs the incident or select from the calendar.
An Actual Release Date indicates that a resource will be included in the Actual Demob Report, as long as the Dispatch Notified checkbox has not been checked.
NOTE: When the user changes a primary Strike Team or Task Force resource’s status to Demobed, the system will leave subordinate Resources rostered to the Primary Resource. The system will also change the Status of the subordinate resources to a Demobed status. This will apply to all levels of rostered resources.

Demob
Demob Page 22 of 56
7. Enter an Estimated Date and Time of Arrival or select from the calendar.
This is an estimate of the date and time the resource plans to arrive at their final destination after leaving the incident. If it will take more than one day, see Rest Overnight instructions below.
8. Dispatch Notified checkbox.
This checkbox will be checked if YES is clicked on the message box which appears when the Actual Demob report is generated. This prevents the resource from being included on subsequent reports.
9. If Rest Overnight, click the checkbox.
When this checkbox is checked, a box shows that allows entry of the location where a resource will be staying.
Click Add to add additional fields for more locations.
Add City/State: Add each city and state for each location the resource indicates they will be staying overnight.
To remove a location, highlight the location and click Remove.
10. Select the Actual Demob Remarks sub-tab.
Comments show under the resource entry on the Actual Demob Report sent to the Dispatch Office. If these remarks pertain to travel arrangement considerations, enter them in Tentative Demob Remarks or Air Travel Remarks.

Demob
Demob Page 23 of 56
11. Click Save or Cancel.

Demob
Demob Page 24 of 56
Group Actual Demob Follow the steps in this section to change a Group of Resources' Status to Demobed.
1. Click the Demob button.
2. The Resource grid displays.
3. Select multiple Resources from the Resource grid.
4. Click the Group Demob button.
5. The Group Demob window will display with all of the selected resources.
Status "D" is automatically entered when the resource record opens.
6. Enter the Actual Release Date and Time in the upper Common Data Screen.
NOTE: The Actual Release Date/Time must be entered to display the resource in the Actual Demob Report. Actual Release Date is a mandatory field.
7. Select the Demob Data tab.
8. Select the Actual Demob sub-tab.
9. Enter the appropriate Demob data for the Resources.
10. Enter an Estimated Date of Arrival or select from the calendar.
11. Enter an Estimated Time of Arrival.
12. Dispatch Notified checkbox will automatically be checked when the Actual Demob report is created.
13. If Rest Overnight is needed, click the checkbox.
14. If Rest Overnight is selected, click the Add Location button to add a City/State for the Resource to Rest Overnight.

Demob
Demob Page 25 of 56
15. Enter any Actual Demob Remarks in the text box from the Actual Demob Remarks sub-tab.
16. Click the Save/Next button to open the next Resource and add the Demob Data.
17. Repeat steps 8 thru 18 for all Resources in the group.
18. Click Save to save the data for the last resource on the screen.
19. After the last resource in the Group Demob screen has been saved, the system will return to the resources grid.
Group Demob for Rostered Resources
NOTE: Use this feature to change the Status to "D" if several, not all, rostered
Demob
Demob Page 26 of 56
resources are to be marked Demobed. Individual rostered resources can be selected without selecting the entire roster or the Primary record. As an example, half a crew could be Status =D, while the Primary record and other half of the crew remains Status = C.
NOTE: If some members of a roster are marked as Status = D and saved, AND the status field in the resources grid is filtered for "D", AND the main filter radio button ALL is selected, only Primary or single resource records will show in the filtered information. To see the rostered members marked "D", select the All Personnel radio button filter AND select filter Status = D in the resources grid. If the Primary record and all its rostered resources are to be marked Status = D, change the Primary record Status to D which will propagate this change to the subordinate records.

Demob
Demob Page 27 of 56
Demob Reports and Forms from Demob menu Follow the steps in this section to generate Demob Forms and Reports using the Demob menu buttons: Demob Forms and Reports General Information Access:
Forms and reports can be accessed through the Demob menu or through the Reports menu.
The Demob screen and the override feature of the Resources Selected in Grid checkbox to access forms and reports, offers more immediate selection of resources.
The Reports screen relies on date ranges and sort parameters to return a broader range of information for the reports.
Printing:
All Reports can be Previewed and Printed. Previewing every report before printing will ensure that the report is returning the desired information.
To print Demob reports/forms for specific resources check the Resource Selected in Grid on the Demob screen, select resources in the grid, then click on the desired report button.
All reports can be saved as a PDF file.
Re-Printing a Form or Report for the same resource:
Dispatch Notified and Checkout Form Printed checkboxes are automatically checked when resources are included in those reports and forms. This eliminates duplication in subsequent reports.
If a resource record form/report needs to be reprinted:
return to the Tentative Demob or Actual Demob subtabs,
select the record,
uncheck the appropriate checkbox,
click Save,
click Resource Selected in Grid checkbox to print only that resource's information again,
click the appropriate form or report,
a checkbox question displays; answer appropriately.
1. Click Demob on the main toolbar.

Demob
Demob Page 28 of 56
2. Select a Demob Form or Report from the toolbar.
Tentative Poster
This report can be printed or made into a poster for distribution or posting throughout the incident to notify resources of their Tentative Release information. This Report:
Creates a page for each different Tentative Release date.
Creates a page for each category of resource: O, E, C, A, within a date.
Arranges the A, E, C resources numerically in their categories by the Request #. O resources are alphabetized by last name.
Groups request #s that have the same Tentative Release time.
Shows incident name and number.
Date/time stamps and numbers each page.
NOTE: Only resources meeting the following requirements are included in this Report:
Resource has a Tentative Release Date and Time
The Status is not Demob (D).
Operation
Resources: Have a Tentative Release Date/Time and Status does NOT = D.
Resources Selected in Grid checkbox is NOT checked.
Filter Status = P to show the potential list for review. (This will only work if the User changes the status of Resources to "P" for Pending Demob).

Demob
Demob Page 29 of 56
Click Tentative Poster to view report.
Click Print icon.
OR
Check Resources Selected in Grid Checkbox.
Highlight all resources in resource grid to appear in the report using the Ctrl key.
Click Tentative Poster to force the system to show those resources in the report.
Click Print icon.
Available for Release
This report is designed for the servicing Dispatch Office. It provides information about resources that have been assigned tentative release dates.
NOTE: Available for Reassignment checkbox has to be checked for Days Left # to display in the report.
This report:
Creates separate pages based on category: E, C, O, A.
Resources are listed numerically by Request #.
Creation date and time are listed on each page.
Report pages are numbered.
Reference # is automatically filled in, incrementing each time a report is generated. This provides a unique number that can be used in conversations between the incident and dispatch, ensuring they are talking about the same page.
Spaces are provided so the user can enter Date/Time Faxed for record keeping.
Tentative Release Remarks specific to a resource will print below that resource’s data.
NOTE: Only resources meeting the following requirements are included in this

Demob
Demob Page 30 of 56
Report:
The resource has a Tentative Release Date and Time.
Status = Pending (P).
Dispatch Notified checkbox is NOT checked. Once a resource name appears on this report, the “Dispatch Notified” checkbox is automatically checked to prevent this record from showing on subsequent reports.
Clicking Yes in the message box will check the Dispatch Notified box.
Operation
Resources Selected in Grid checkbox is NOT checked.
Filter for Status = P to show the potential list for review.
Click Available for Release.
Click Print icon.
OR
Check Resources Selected in Grid checkbox.
Highlight all resources in resource grid to appear in the report with Control key.
Click Available for Release.
Click Print icon.
Air Travel Request
This report is designed for the servicing Dispatch Office. It provides air travel reservation information for resources who need flights. This Report:
Creates separate page for each resource.
Report creation date is listed on each page.
Provides sufficient resource and travel information for Dispatch to provide an airline reservation.

Demob
Demob Page 31 of 56
Notes if the resource is demobing (DEMOB) or would like Dispatch to work on a reassignment (DEMOB Pending Reassignment).
NOTE: Only resources meeting the following requirements are included in this Report:
Status=Pending (P)
Demobilization Travel Method is A/R or Air.
Resource is a person.
Air Travel To Dispatch checkbox is NOT checked. Once a request form has been generated, the “Dispatch Notified” checkbox is automatically checked to prevent a duplicate of this form from being generated.
Clicking Yes in the message box will check the box
Operation
Resources Selected in Grid checkbox is NOT checked.
Click Air Travel Request.
Click Print icon.
OR
Check Resources Selected in Grid checkbox.
Highlight all resources in resource grid to appear in the report with Control key.
Click Air Travel Request.
Click Print icon.
ICS 221 Checkout Form
NOTE: Use the Reports>Plans menu to print large quantities of ICS 221 forms. A sort capability is available under that menu.
This report provides a demob check-out sheet for resources and actual demob information for dispatch purposes. The same Actual Demob information can be sent to the servicing Dispatch Office using the Actual Demob report, minus the

Demob
Demob Page 32 of 56
unit signature portion. Check with the servicing Dispatch Office to discuss which format meets their needs. This Report:
Creates separate page for each resource.
Report creation date is listed on each page.
Provides a form the resource can take to listed functions to “checkout” of the incident.
Provides actual demob information to send to the servicing dispatch office, if required in this format.
Captures resource's actual demob information.
NOTE: Only resources meeting the following requirements are included in this Report:
Status=Pending (P)
Check-Out Form Printed checkbox is NOT checked.
Clicking Yes in the Check-Out Form Printed message box will checkmark the Check-Out Form Printed box to prevent a duplicate of this form from being generated for the same resource.
To add Release Remarks, Estimated Date/time or Arrival and Rest Overnight Information (RON) in Box 12 (Remarks) on the Checkout form, click Yes in the message box.
NOTE:
For Box 12 Remarks (RON data) information to display on the form, it has to be entered in the resources' records, SAVED, and Yes clicked in this message box.
If this information is NOT in the resource's record and Yes is clicked in the box, the FORMAT will NOT display on the ICS 221.

Demob
Demob Page 33 of 56
Operation
Resources Selected in Grid checkbox is NOT checked.
Click Checkout to generate form(s).
Click Print icon.
OR
Check Resources Selected in Grid checkbox.
Highlight all resources in resource grid to create a form with Control key.
Click Checkout.
Click Print icon.
Actual Demob
This report is designed for the servicing Dispatch Office. It provides Actual Demob information about resources released from the incident. This report:
Creates separate pages based on category: E, C, O, A.
Resources are listed sequentially by Request #.
Creation date and time are listed on each page.
Report pages are numbered.
Reference # is automatically filled in, incrementing each time a report is generated. This provides a unique number which can be used in conversations between the incident and dispatch, ensuring they are talking about the same page.
Spaces are provided for Date/Time Faxed to be entered for record keeping.
All RON locations will be listed, only the last RON location will have the Estimated Arrival Time (to the home unit) listed.
Remarks are noted below resource data.

Demob
Demob Page 34 of 56
NOTE: Only resources meeting the following requirements are included in this Report:
The resource has an Actual Release Date.
Dispatch Notified checkbox is NOT checked. Once a resource name appears on this report, the "Dispatch Notified" checkbox is automatically checked to prevent this record from showing on subsequent reports.
Clicking Yes in the message box will check the box.
Operation
Resources Selected in Grid checkbox is NOT checked.
Click Actual Demob.
Click Print icon.
OR
Check Resources Selected in Grid checkbox.
Highlight all resources in resource grid to appear in the report with Control key.
Click Actual Demob.
Click Print icon.
Ground Support
This report is designed for the Ground Support Unit or the servicing Dispatch Office if they are providing ground transportation to an airport. It identifies resources who need transportation to a departure airport providing flight and time information. This Report:
Creates separate pages based on Date transportation is needed.

Demob
Demob Page 35 of 56
Resources are ordered by “Leave ICP Time”.
Creation date and time are listed on each page.
Report pages are numbered.
Shows departure Airport.
Will show departure airline and flight time if that information was entered in each resource’s record. Can be handwritten if needed.
If “Is Ground Support Needed” question in Air Travel Questions is checked YES, without airline information, the resource’s name will still appear on the report. Airline information can be handwritten if needed.
NOTE: Only resources meeting the following requirements are included in this Report:
The resource has a Tentative Release Date/Time.
Status does not = Demobed (D).
Demobilization travel Method is A/R or AIR.
Is Ground Support Needed question in Air Travel Questions is checked YES.
Operation
Resources Selected in Grid checkbox is NOT checked.
Click Ground Support.
Click Print icon.
OR
Check Resources Selected in Grid checkbox.
Highlight all resources in resource grid to appear in the report with Control key.
Click Ground Support.
Click Print icon.

Demob
Demob Page 36 of 56
Demob Reports Follow the steps in this section to print Demob Reports:
NOTE: General Report Characteristics--
All Reports can be Previewed and Printed. Previewing every report before printing will ensure the report is returning the information desired. Readjust the sorts and filters, then preview, until the desired data is returned in the report.
Some reports have buttons to Restore Default settings. This will reset the filter and sort areas back to default status.
Most reports have checkboxes, Drag and Drop or shuttle arrows which move data field selections back and forth. Highlight an item and drag it from Available and drop in Selected or use the arrows.
Every report has an instruction screen which can show or be hidden. Specific requirements for reports/forms are noted in these instructions.
Using as few as possible sort criteria returns better results. Otherwise the criteria may be so limiting that the results are not useful or cannot be returned.
1. Click Reports on the main toolbar.
2. Select Plans from the sub-menu.
3. Select one of the following options to generate the identified report:
Check-Out Form Report (See Check-Out Form Report)
Demob Planning Report (See Demob Planning Report)
Tentative Poster Report (See Tentative Poster Report)
Available For Release (See Available For Release Report)
Air Travel Request (See Air Travel Request Report)
Last Work Day (See Last Work Day Report)
Actual Demob (See Actual Demob Report)
Ground Support (See Ground Support Report)
Demob
Demob Page 37 of 56
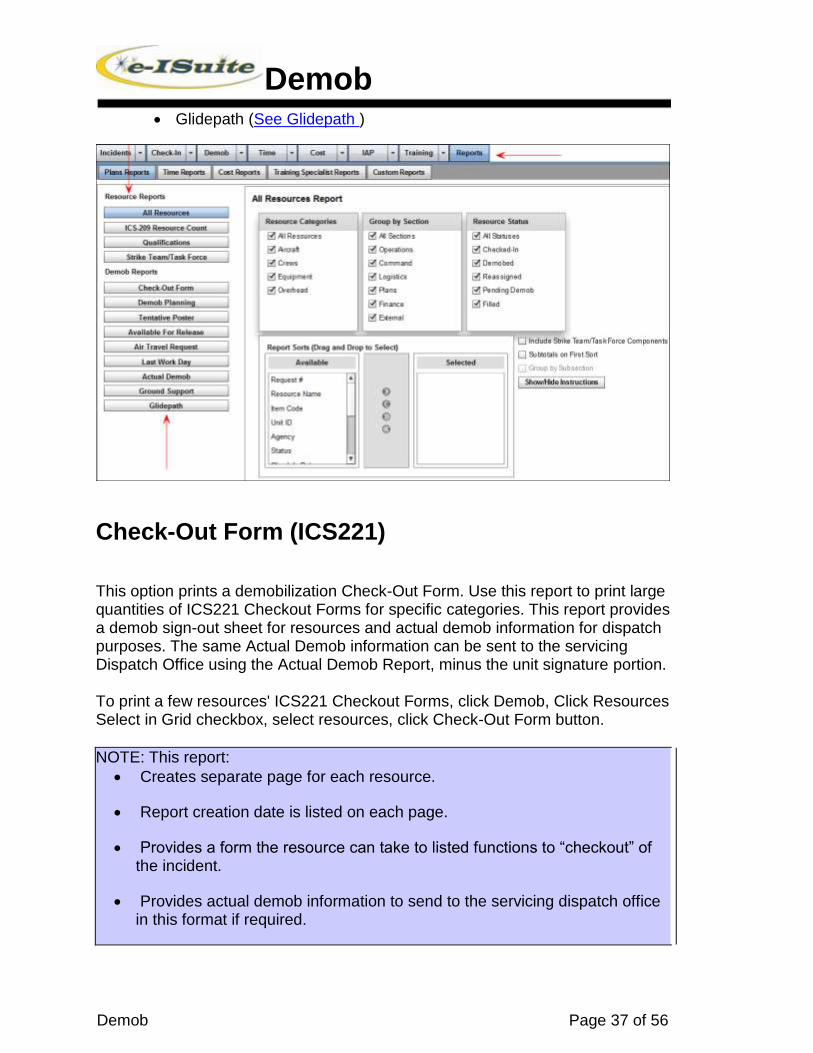
Glidepath (See Glidepath )
Check-Out Form (ICS221)
This option prints a demobilization Check-Out Form. Use this report to print large quantities of ICS221 Checkout Forms for specific categories. This report provides a demob sign-out sheet for resources and actual demob information for dispatch purposes. The same Actual Demob information can be sent to the servicing Dispatch Office using the Actual Demob Report, minus the unit signature portion. To print a few resources' ICS221 Checkout Forms, click Demob, Click Resources Select in Grid checkbox, select resources, click Check-Out Form button.
NOTE: This report:
Creates separate page for each resource.
Report creation date is listed on each page.
Provides a form the resource can take to listed functions to “checkout” of the incident.
Provides actual demob information to send to the servicing dispatch office in this format if required.

Demob
Demob Page 38 of 56
NOTE: Only resources with a Status = Pending (P) and Check-Out Form Printed checkbox is NOT checked will be included. (Clicking Yes in the Check-Out Form Printed message box will checkmark Check-Out Form Printed in that resource's record.)
1. From the report selection panel on the left under Demob Reports, click the
Check-Out Form button.
2. Select data fields from the Available box on the left and click the > arrow to move them to the Selected box. To include all data fields, click the >> arrow.
NOTE: Data fields can also be moved from the Available to the Selected box by dragging and dropping it in the Selected box.
3. To include Strike Team/Task Force Components, click the checkbox.
4. Click Preview to preview the report before printing.

Demob
Demob Page 39 of 56
NOTE:
Once a form has been generated, the “Check-Out Form Printed” checkbox is automatically checked to prevent a duplicate of this form from being generated for the same resource.
If the record needs to be printed again: • return to the Demob process, • select the record, • uncheck the Check-Out Form Printed checkbox, • click Save, • click Resource Selected in Grid checkbox to reprinted only that resource’s ICS 221, • click Checkout Form, • Check-Out Form Printed

Demob
Demob Page 40 of 56
question will be asked again, answer appropriately.
To add Release Remarks, Estimated Date/Time or Arrival and Rest Overnight Information (RON) in Box 12 (Remarks) on the Checkout form, click Yes in this message box.
NOTE:
For Box 12 Remarks information to show on the form, the remarks have to be entered in the resources’ records, SAVED, and Yes clicked in this message box.
If this information is NOT in the resource’s record, and if Yes is clicked in the box, the FORMAT will NOT show.
Demob Planning Report
This option prints a Demob Planning Report. This report contains similar information as the All Resource Report, however fields are more demob specific. The report can be filtered and sorted several ways. Use this report to confirm/add/edit resource information in preparation for demob. The report can be given to incident managers to write in Tentative Release Date/Time and Reassignment information in preparation for demob.
NOTE: This report:
Provides the Category(s), the Section(s), and the Resource Status(s) to be included in the report.
Provides various sorts using the shuttle box to choose how a report will be

Demob
Demob Page 41 of 56
sorted. Use less rather than more sort criteria.
Check the Strike Team/Task Force Components to include subordinate records. The report will contain only Strike Teams and Task Forces that are currently active (e.g., Status = “C” or “P”).
Includes sub-totals for the first sort selected in the shuttle box, click to check the Subtotals on First Sort checkbox. Whatever data field is first in the Selected list, will show sub-totals.
1. From the report selection panel on the left under Demob Reports, click the
Demob Planning Report button.
2. Under Resource Categories, select the Categories to include in the report. Categories can include: All Resources, Aircraft, Crews, Equipment, and Overhead.
3. Under Group by Section, select the sections to include in the report. Sections can include: All Sections, Operations, Command, Logistics, Plans, Finance, and External.
4. Under Resource Status, select the status codes to include in the report. Only Resources with the selected Status Codes will be included in the report. Status options include: All Statuses, Checked-In, Demobed, Reassigned, Pending Demob, Filled.
5. Select the sort options to include in the report from the Report Sorts box and click the > arrow to move them to the Selected box. To include all Sorts, click the >> button.
NOTE: Data fields can also be moved from the Available to the Selected box by dragging and dropping it in the Selected box.
6. To include Strike Team/Task Force Components on the report, click the
Include Strike Team/Task Force Components checkbox.
7. If one or more sorts are selected, include subtotals on the first sort by checking the Subtotals on First Sort checkbox. If this option is checked, the Sub-Total section will show on the report along with the name of the item associated with the sub-total, the total number of records and the total number of personnel associated with the sub-total.
8. Click Preview to preview the report before printing.
9. To Restore Defaults, click the Restore Defaults button.

Demob
Demob Page 42 of 56
Tentative Poster
This option prints a Tentative Poster. This report can be printed or made into a poster format for distribution or posting throughout the incident to notify resources of their Tentative Release information.
NOTE: This report:
Creates a page for each different Tentative Release date.
On that page, creates a separate section for each category of resource: O, E, C, A, within that date.
Groups resources with the same Tentative Release time.
o O resources with the same Tentative Release Time are arranged alphabetically by Last Name.
o E, C, and A resources with the same Tentative Release Time are listed numerically by Request #.

Demob
Demob Page 43 of 56
Shows incident qualification Item Code.
Date/time stamps and numbers each page.
1. From the report selection panel on the left under Demob Reports, click the
Tentative Poster button.
2. Enter a Start Date or select from the calendar to the right.
3. Enter an End Date or select from the calendar to the right.
4. To Include Strike Team/Task Force Components, click the checkbox.
5. Click Preview to preview the report before printing.
NOTE: Only resources meeting the following requirements are included in this Report.
Resource has a Tentative Release Date and Time.
Tentative Release Date is within the specified date range.
The Status is not Demobed (D).
Available for Release Report
This option prints an Available for Release Report. This report is designed to be sent (email/FAX) to the servicing Dispatch Office. It provides information about resources which are being released from the incident. An Available for Release date and time are provided, giving the Dispatch Office a heads up on demobing resources.

Demob
Demob Page 44 of 56
NOTE: This report:
Creates separate pages based on category: E, C, O, A.
Resources are listed numerically by Request #.
Creation date and time are listed on each page.
Report pages are numbered.
Reference # is automatically filled in, incrementing each time a report is generated. This provides a unique number which can be used in conversations between the incident and dispatch, ensuring they are talking about the same page.
Spaces are provided for Date/Time Faxed to be entered for record keeping.
Tentative Release Remarks specific to a resource will print below that resource’s data.
NOTE: Only resources meeting the following requirements are included in this report:
The resource has a Tentative Release Date and Time.
Status = Pending (P).
Dispatch Notified checkbox is NOT checked. Once a resource name appears on this report, the “Dispatch Notified” checkbox is automatically checked to prevent a duplicate of this record from showing on subsequent reports.
o If the record needs to be sent again
o return to the Demob process,
o select the record,
o uncheck the Dispatch Notified checkbox,
o click Save,
OR o click Resource Selected in Grid checkbox to send only that resource’s
release information,
Then

Demob
Demob Page 45 of 56
o click Available for Release,
o Dispatch Notified question will be asked again, answer appropriately.
Clicking Yes in the message box will check the Dispatch Notified box.
1. From the report selection panel on the left under Demob Reports, click the
Available for Release button.
2. For a new report click the New Report radio button.
3. To include Strike Team/Task Force Components, click the checkbox.
4. Click Print/Preview to preview or print the report.
Air Travel Request
This option prints an Air Travel Request Report. This report is designed to be sent (emailed/FAXed) to the servicing Dispatch Office. It provides air travel reservation information for resources who need airline flights.
NOTE: This report:
Creates separate page for each resource.
Report creation date is listed on each page.
Provides sufficient resource and travel information for Dispatch to provide an airline reservation.
Notes if the resource is demobing (DEMOB) or would like Dispatch to work on a reassignment (DEMOB Pending Reassignment). If there is no reassignment, Dispatch can choose to make demob arrangements as

Demob
Demob Page 46 of 56
indicated by the Airline Travel Request data.
o Remaining work days are noted.
o Other Quals are noted.
Special Instructions are noted.
NOTE: Only resources meeting the following requirements are included in this Report:
Status=Pending (P)
Demobilization Travel Method is A/R or Air.
Resource is a person.
Air Travel Dispatch checkbox is NOT checked. Once a request report has been generated, the “Dispatch Notified” checkbox is automatically checked to prevent a duplicate of this form from being generated.
If the record needs to be sent again:
o return to the Demob process,
o select the record,
o uncheck the Dispatch Notified checkbox,
o click Save,
OR o click Resource Selected in Grid checkbox to send only that resource’s
air travel data.
Then o click Air Travel Request,
o Dispatch Notified question will be asked again, answer appropriately.
o Clicking Yes in the message box will check the box.
1. From the report selection panel on the left under Demob Reports, click the
Air Travel Request button.
2. Click Preview to preview the report before printing.

Demob
Demob Page 47 of 56

Demob
Demob Page 48 of 56
Last Work Day
This option prints a Last Work day Report. This report is designed to provide planning information regarding the last work day of assigned resources so replacements can be ordered or different demob arrangements made.
NOTE: This report:
Has several ways is can be grouped.
Can choose all or specific sections to show on the report.
Can include all dates or can be narrowed with a date range.
Can be sorted using Item Code, Name, Request Category, or Request #.
Include or not, Strike Teams/Task Force Components.
Will only show resources which have a Last Work Day computation.
NOTE: Only resources with a Last Work Day computation will show on this report. Using the Check-in or Demob screen, locate resources to add Last Work Day data to enable their record to show in this report.
1. From the report selection panel on the left under Demob Reports, click the
Last Work Day button.
2. Under Grouping, select the Categories to include in the report. Categories can include: Date/Resource Category, Section/Date and Section/ Resource Category/Date.
3. Under Show Sections, select the Categories to be included in the report. Categories can include: All Sections, Operations, Command, Logistics, Plans, Finance, External.
4. Enter the Start Date or select from the calendar to the right.
5. Enter the End Date or select from the calendar to the right.
6. To include all dates, click the Include All Dates checkbox.
7. Select the sort options to include in the report from the Report Sorts box and click the > arrow to move them to the Selected box. To include all Sorts, click the >> button.
NOTE: Data fields can be moved from the Available to the Selected box by

Demob
Demob Page 49 of 56
dragging and dropping it in the Selected box.
8. To include Strike Team/Task Force Components, click the Include Strike
Team/Task Force Components checkbox.
9. Click Preview to preview the report before printing.
10. To restore defaults click the Restore Defaults button.

Demob
Demob Page 50 of 56
Actual Demob
This option prints an Actual Demob report. This report is designed to be sent (email/FAX) to the servicing Dispatch Office. It provides Actual Demob information about resources which have been released from the incident.

Demob
Demob Page 51 of 56
NOTE: This report:
Creates separate pages based on category: E, C, O, A.
Resources are listed numerically by Request #.
Creation date and time are listed on each page.
Report pages are numbered.
Reference # is automatically filled in incrementing each time a report is generated. This provides a unique number which can be used in conversations between the incident and dispatch, ensuring they are talking about the same page.
Spaces are provided for Date/Time Faxed to be entered for record keeping.
All RON locations will be listed, only the last RON location will have the Estimated Arrival Time (to the home unit) listed.
Remarks are noted below resource data.
NOTE: Only resources meeting the following requirements are included in this Report:
The resource has an Actual Release Date
Dispatch Notified checkbox is NOT checked. Once a resource name appears on this report, the “Dispatch Notified” checkbox is automatically checked to prevent this record from showing on subsequent reports.
If the record needs to be sent again:
o return to the Demob process,
o select the record,
o uncheck the Dispatch Notified checkbox,
o click Save,
OR o click Resource Selected in Grid checkbox to send only that resource’s
Actual Demob data.
Then

Demob
Demob Page 52 of 56
o click Actual Demob,
o Dispatch Notified question will be asked again, answer appropriately.
o Clicking Yes in the message box will check the box.
1. From the report selection panel on the left under Demob Reports, click the
Actual Demob button.
2. To Include Strike Team/Task Force Components, click the checkbox.
3. Click Preview to preview the report before printing.
Ground Support
This option prints a Ground Support Report. This report is designed to be sent (hand deliver/email/FAX) to the incident Ground Support Unit or the servicing Dispatch Office if they are providing ground transportation to an airport. It identifies resources who need transportation to an airport providing flight and time information.
NOTE: This report:
Creates separate pages based on Date transportation is needed.
Resources are ordered by “Leave ICP Time”.
Creation date and time are listed on each page.
Report pages are numbered.
Shows departure Airport.
Will show departure airline and flight time if that information was entered in each resource’s record. Can be handwritten if needed.

Demob
Demob Page 53 of 56
If “Is Ground Support Needed” question in Air Travel Questions is checked YES, without airline information, the resource’s name will still appear on the report. Airline information can be handwritten if needed.
NOTE:
Only resources meeting the following requirements are included in this Report:
The resource has a Tentative Release Date/Time.
The Tentative Release Date is within the specified date range.
Status does not = Demobed (D).
Demobilization Travel Method is Air.
Is Ground Support Needed question in Air Travel Questions is checked YES.
1. From the report selection panel on the left under Demob Reports, click the
Ground Support Report button.
2. Enter a Start Date or select from the calendar to the right.
3. Enter an End Date or select from the calendar to the right.
4. To Include Strike Team/Task Force Components, click the checkbox.
5. Click Preview to preview the report before printing.

Demob
Demob Page 54 of 56
Glidepath
This Excel report provides demob information in a color chart format for each section and an overall Summary page. Note: This report:
Requires First Work Day and Length of Assignment data for each resource. The report is generated based on the automatically generated Demob Date for the resource, which in turn is based on the First Work Day and Length of Assignment.
Requires a Start Date and the Number of Days for the report to run. The Number of Days allows a maximum of 30 days.
Provides options to Include All Sections and Categories, Select Section/Categories, or Summary Only.
Can include Strike Team Components.
Sort options are available for selection.
Displays in an Excel spreadsheet with tabs for all Sections. A Summary tab is also generated, based on the options selected.
NOTE: Because of the extensive header cell merges, it is difficult, but not impossible, to sort rows in the report.
1. From the report selection panel on the left under Demob Reports, click Glidepath button.
2. Enter a Start Date or select from the calendar to the right.
3. Enter the Number of Days to include in the report or use the Arrow buttons to change the number.
4. Select an Option to identify the data to include in the report.
5. Select a Sort By option to identify the order in which to print the data on the report.
6. Click Export to Excel to view the report. The report will generate in an Excel spreadsheet format. The report can be manipulated, saved, or printed from Excel. The report format is landscape.

Demob
Demob Page 55 of 56

Demob
Demob Page 56 of 56
Index
D
Demob actual, 20 reports
actual demob, 33 air travel request, 30 available for release, 29 ground support, 34 ICS-221, 31 tentative poster, 28
reports and forms, 27
G
Glidepath, 54 Group Actual Demob, 24 Group Demob for Rostered Resources, 25 Group Pending Demob, 15 Group Pending for Rostered Resources, 18
M
Manage Demob Settings, 4
R
Reports actual demob, 50 air travel request, 45 available for release report, 43 check-out form, 37 demob planning report, 40 glidepath, 54 ground support, 52 last work day, 48 plans reports, 36 tentative poster, 42
T
Tentative, 8