Embed Size (px)
Citation preview
INSTRUCTIONS FOR USEPlease be prepared for your reline. Read ALL the way through BEFORE you begin!
CAUTION. Do not use immediately following extractions. Consult your dentist before using!
Thank you for choosing DenSureFit to travel the road with you through your denture journey. We want you to achieve your best �t possible and we are here to support you. Please feel free to contact us via phone or email for assistance. (844) 682-3368 or help@densure�t.com
YOU are unique. Your denture is unique. Please be aware that DenSureFit is not a “one-size-�ts-all” type of product. Using DenSureFit requires learning, just like the rest of your denture journey. Trial and error is necessary. You must learn the technique that works best for you and how much silicone is required for your situation. This varies between users and may require more trial-and-error for some than others. Use the following application techniques as general starting guidelines. As you continue to use DenSureFit, you will learn what techniques work best for you. Remember, nobody knows your mouth better than you do! And, as your favorite denture wearer likes to say, “Keep smiling, keep trying... and never give up.”
Before you begin your reline, read and “think through” these instructions carefully! Pay close attention to the symbols that alert you to very important parts of the application process. Also, review the “Anatomy of a Denture” as you will need to be able to identify these parts later.
1. CLEAN, RINSE and DRY DENTURE. Ensure your denture is free of any residue left from adhesives or other over-the-counter reline products. LEAVE IN any tissue conditioner or soft reline your dentist may have applied. You may apply DenSureFit over a professional reliner until you can see your dentist. INSERT OPPOSING DENTURE, if you have one. You will need it later to adjust your bite.
2. APPLY PRIMER TO DENTURE. READ before you open primer! Apply primer to hard acrylic denture surfaces AND over soft professional relines. Primer allows the silicone to adhere to the denture. The primer (1 ml) is enough to prime 2 denture bases. One quick dip will absorb approximately ½ ml. This is su�cient to prime one denture plate. SAVE the remaining primer and swab for a future reline! ONLY dip swab into primer ONCE. Do not re-dip.
Open primer vial. Insert swab into the liquid and REMOVE IMMEDIATELY. Replace cap tightly. GENTLY (Do not use sponge aggressively.) apply primer to the entire inside of your denture: WALLS, PALATE, and TROUGH. Also, prime on the RIDGE and slightly over the front of the ridge. Pay close attention to edges! Silicone will not adhere to the hard acrylic denture surface without the primer. The primer lays down a slight tackiness which allows the silicone to adhere to the acrylic.
LET DRY 2 MINUTES.
3. ACTIVATE SILICONE APPLICATOR.
TWIST the clear winged tabs IN THE DIRECTION OF THE BLACK ARROWS
until you hear/feel it SNAP into place.
(CAUTION! Do this ONLY when you are ready to apply the silicone to your denture. Do NOT press the plunger until you are ready to use it! Once silicone is expressed into the tip, it will harden there unless expressed out right away.
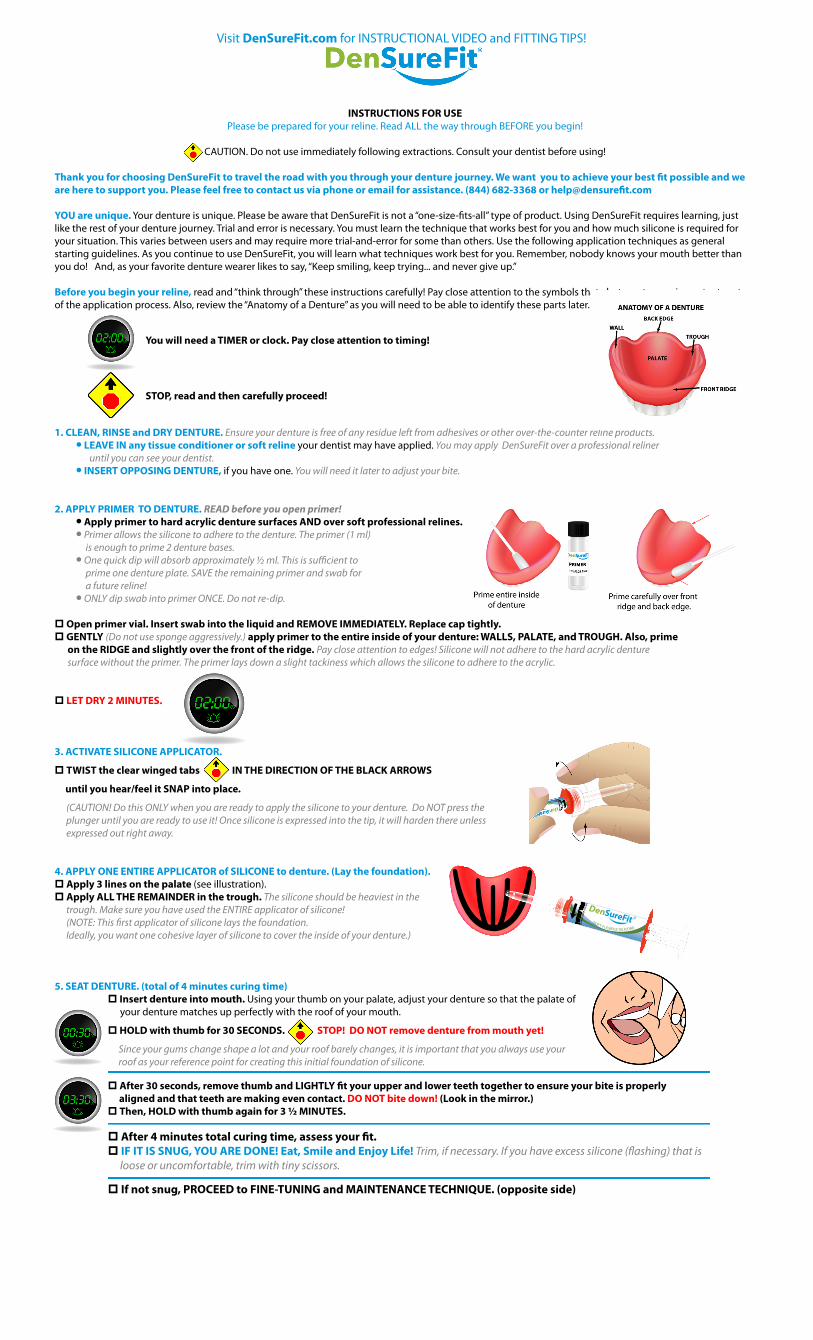
4. APPLY ONE ENTIRE APPLICATOR of SILICONE to denture. (Lay the foundation). Apply 3 lines on the palate (see illustration). Apply ALL THE REMAINDER in the trough. The silicone should be heaviest in the trough. Make sure you have used the ENTIRE applicator of silicone! (NOTE: This �rst applicator of silicone lays the foundation. Ideally, you want one cohesive layer of silicone to cover the inside of your denture.)
5. SEAT DENTURE. (total of 4 minutes curing time) Insert denture into mouth. Using your thumb on your palate, adjust your denture so that the palate of your denture matches up perfectly with the roof of your mouth.
HOLD with thumb for 30 SECONDS. STOP! DO NOT remove denture from mouth yet!
Since your gums change shape a lot and your roof barely changes, it is important that you always use your roof as your reference point for creating this initial foundation of silicone.
After 30 seconds, remove thumb and LIGHTLY �t your upper and lower teeth together to ensure your bite is properly aligned and that teeth are making even contact. DO NOT bite down! (Look in the mirror.) Then, HOLD with thumb again for 3 ½ MINUTES.
After 4 minutes total curing time, assess your �t. IF IT IS SNUG, YOU ARE DONE! Eat, Smile and Enjoy Life! Trim, if necessary. If you have excess silicone (�ashing) that is loose or uncomfortable, trim with tiny scissors.
If not snug, PROCEED to FINE-TUNING and MAINTENANCE TECHNIQUE. (opposite side)
You will need a TIMER or clock. Pay close attention to timing!
STOP, read and then carefully proceed!
Visit DenSureFit.com for INSTRUCTIONAL VIDEO and FITTING TIPS!

FINE-TUNING and MAINTENANCEThis technique may be used both to �ne-tune and to maintain your �t. You may apply more silicone on top of your initial application of DenSureFit immediately following your initial application for additional snugness or weeks after, should your denture become loose. Ensure denture is clean and dry. Insert opposing denture, if you have one. PRIME any areas which may not be covered by DenSureFit silicone (top of WALLS, BACK edge, top and over front of the RIDGE). If silicone travels to these places on this application, you want it to stick! Pay close attention to the edges to prevent lifting of silicone. It is NOT necessary to use primer on top of DenSureFit silicone. DenSureFit silicone will adhere to itself. Let primer dry 2 minutes. Apply an ENTIRE APPLICATOR of silicone to the denture on the RIDGE (slightly on the inside), WALLS and the rest in the TROUGH. If you feel your palate is already snug, no silicone is necessary there. However, If you feel a void on your palate and you can move it back and forth, apply a small amount of silicone to the palate. Be careful not to over-build the palate or it may cause the denture to sit too low. Insert denture into mouth. Adjust to proper position. BITE DOWN LIGHTLY with MEDIUM PRESSURE to ensure your bite is correct. Ensure upper and lower teeth are making proper contact. HOLD THAT POSITION FOR 4 MINUTES. Use the KISS/SMILE TECHNIQUE to smooth any silicone which may seep over your front ridge. Assess �t. IF IT IS SNUG, YOU ARE DONE! Eat, Smile and Enjoy Life! (Trim, if necessary.)
IF STILL NOT SNUG, apply more silicone to the places where you feel voids. You must use your judgement. This time, BITE DOWN FIRMLY for 4 minutes. Use the KISS/SMILE TECHNIQUE. If you are unsure of where to apply more silicone, you might try the FINE-TUNING and MAINTENANCE TECHNIQUE again. YOU ARE DONE! Eat, Smile and Enjoy Life!
Use this KISS/SMILE procedure to smooth and “feather” any silicone which may seep over your front ridge As you hold your bite, suck in and out on your lips and stretch them to smooth any over�ow of silicone that may be around your front ridge.
KISS SMILEWHAT is DenSureFit?DenSureFit is an INNOVATIVE temporary soft denture reline for your UPPER denture. It is designed to reduce, or even eliminate, the need for denture adhesive. Use this product to temporarily improve the comfort and �t of your denture. DenSureFit uses a self-curing soft silicone. As it cures, it adheres to your denture and conforms to your gums and roof of your mouth to create a new customized �t.
For WHOM is DenSureFit IDEAL?Wearers of dentures and partials who…are between regular professional relines and who can normally obtain a secure �t with small to medium amounts of adhesive and who have adequate contour on the palate of their mouth (to be able to get suction)
CARING FOR YOUR NEWLY RELINED DENTUREYou must properly clean your denture daily to prevent odors, discoloration and the growth of bacteria. In order to extend the life of your new liner, use a 3-5 minute denture cleanser and a denture brush. Follow the manufacturer’s directions. Aggressive brushing of the soft silicone liner may shorten the life of your reline.
FREQUENTLY ASKED QUESTIONSQ: How long can I keep DenSureFit in my denture?A: When properly applied, as long as it is comfortable for you, DenSureFit can remain in your denture for weeks or months, depending on individual circum-stance, comfort level and dentist’s advice.Q: I’ve used 2+ applicators of silicone, but my denture still isn’t snug. Why isn’t it snug?A: Remember that DenSureFit uses SUCTION to stay in place, not stickiness. If your palate does not have adequate contour because of bone loss on your gum line, then you may not be able to achieve suction. In this case, DenSureFit can give you an improved and more comfortable �t, but you still may need to use some adhesive or a sprinkling of powder on top of your DenSureFit lining to help it stay in place. Visit your dentist.Q: What if the silicone has separated from my denture?A: Separation is an indication that the denture was not primed properly. Follow Step 2 accurately. Pay close attention, especially to the inside perimeter of your denture where the edges of the silicone will be.Q: When I �rst relined my denture, it was snug. That was not very long ago. Now it is loose. What happened?A: Some denture wearers may have unrealized in�ammation on the gums from ill-�tting dentures. If your gums were in�amed at the time of your initial application of DenSureFit, within days or weeks you may experience reduction of in�ammation of your gums. As this happens, you may experience slight loosening of your denture. This is normal and anticipated. It is your gums that change shape, not the silicone. You can snug your denture up again by adding more silicone to the trough area, directly on top of your previous DenSureFit application. Prime only over any areas that are not covered by silicone.
WARNING! Use of this product may temporarily decrease the discomfort; however, its use will not make the denture �t properly. Special training and tools are needed to repair a denture to �t properly. Dentures that do not �t properly cause irritation and injury to the gums and faster bone loss, which is permanent and may require a complete new denture. Changes in the gums caused by dentures that do not �t properly may require surgery for correction. Continuing irritation and injury may lead to cancer in the mouth. You must see your dentist as soon as possible.WARNING! Not for use immediately following extractions. Consult your dentist before using DenSureFit!WARNING! Not for internal use. Avoid swallowing. Although non-toxic, aspirated silicone can be harmful. Avoid contact with eyes. Seek medical advice if either should occur.WARNING! Primer contains methylene chloride. Use only extra-orally in well-ventilated areas.WARNING! NOT FOR USE on �exible nylon-based dentures such as Flexite® or Valplast®. Not for use on metal partials.CAUTION! Not for use by individuals who are sensitive to silicone products. If signs of silicone sensitivity should develop, remove DenSureFit from your denture immediately. Discontinue use.CAUTION! If your DenSureFit reline is uncomfortable or does not �t properly, do not use it. Consult your dentist.
CONTENTS: 1 primer 0.03 � oz (1ml) 2 applicators silicone 0.08 oz ea (2.4 ml ea) 2 swabs
Visit DenSureFit.com for INSTRUCTIONAL VIDEO and FITTING TIPS!
Manufactured in the USA and South Korea for OTC Dental, 800 NE Tenney Rd. Ste 110-548 Vancouver, WA 98685-2899www.densure�t.com
Rev. 1.0
NO NEED TO KEEP YOUR MOUTH SHUT
Leave a review!
Stay current with new info, videos, contests, TIPS and more!