Embed Size (px)
Citation preview

PTE No. 410 (PDF) Revised 2007
Dental Assisting
Expanded Functions

2
Section 3: Didactic Education: Expanded Functions Table 7 Educational Parameters of the Didactic Component of the Expanded Functions Dental Assistant Curriculum
Unit Title Number of Tasks 17 Aiding in the Administration of Nitrous Oxide / Oxygen
Analgesia 116
18 Finishing and Polishing Amalgam Restorations 80 19 Polishing Composite Restorations 48 20 Coronal Polishing 128 21 Application of Pit and Fissure Sealants 80 22 Obtaining Alginate Impressions 125 23 Temporary Crown Restorations 119 24 Use of High Speed Handpiece to Remove Orthodontic
Adhesives 62
Total 758
3
17.0 Aiding in the Administration of Nitrous Oxide/Oxygen Analgesia
I) Number of Tasks to Master = 116.
II) Intended Outcome: Given information about the properties, effects and uses of nitrous oxide, analgesia versus anesthesia, equipment used in administration of nitrous oxide, administration, legal chart entries and terms related to breathing and respiration, overall the student must demonstrate to at least 85% accuracy on the didactic examination.
III) Tasks:
17.01 Properties of Nitrous Oxide
Name the five properties of nitrous oxide.
True anesthetic. Least potent of all anesthetic gases. Nonirritating, colorless gas with a sweet taste and odor. Travels through the blood stream in a free gas state. Total saturation in the blood occurs within three to five minutes.
17.02 Effects of Nitrous Oxide
Name four pharmacological effects of nitrous oxide.
Total circulation time for one breath of nitrous oxide/oxygen is three to five minutes.
No changes in the heart rate (pulse) or blood pressure. Nonirritating to the lungs. Changes in the respiratory rate are related more to the relaxation of the patient
than to the nitrous oxide itself.
Give the definition of each of the seven terms that relate to breathing or respirations.
Eupnea – Normal breathing. Tachypnea – Rapid breathing. Bradypnea – Slow breathing. Hyperpnea – Over respirations. Hypopnea − Under respiration. Anoxia – Total lack of oxygen. Hypoxia – Decreased oxygen in the tissue.
Name the most common side effect of nitrous oxide.
Nausea.
Name five reasons that increase the incidence of nausea.
4
Prolonged administration or rapid induction. Higher concentrations. Following a heavy meal. Following fasting. Patients with a history of vomiting or motion sickness.
List six adverse reactions of nitrous oxide.
Hypoxia. Bone marrow depression. Pressure/volume effect. Psychological reactions. Fire. Protective reflexes.
17.03 Analgesia versus Anesthesia
Describe the three types of pain control.
Sedation − The calming of a nervous apprehensive patient without loss of consciousness.
Analgesia − Creates a decreased ability(relative anesthesia) or inability to perceive pain.
Anesthesia − Produces a lack of all sensation.
List and describe the four stages of anesthesia.
Analgesia − The patient is conscious and cooperative, pain reaction is decreased.
Delirium − The excitement stage. The patient becomes extremely stimulated, raged and possibly angry.
Surgical − The patient is unconscious and life support is requires, total lack of sensation.
Respiratory paralysis − Death occurs in this stage.
Name the five clinical effects of plane 1 analgesia.
Patient appears normal, relaxed, and awake. Slight tingling in the toes, fingers, tongue, or lips. Patient may giggle. Vital signs remain normal. No definite clinical manifestations.
5
Name the 10 clinical effects of plane 2 analgesia.
Patient may have a dreamy look. Reactions of the patient are slowed. Partial amnesia may occur. Voice will sound "throaty." Patient will feel warm and drowsy. Patient may drift in and out of the environment. Patient may hear pleasant ringing in ears. Vital signs remain normal. Pain is reduced or eliminated but touch and pressure are still perceived. Patient is less aware of surroundings; sounds and smells are dulled.
List the eight clinical effects of plane 3 analgesia.
Patient becomes angry with a hard stare. Patient's mouth tends to close frequently. Patient no longer cooperates. Patient is totally unaware of surroundings. Patient may hallucinate. Patient's chest may feel heavy. Sensation of flying or falling uncontrolled spinning. Pupils may dilate.
17.04 Uses of Nitrous Oxide/Oxygen
List four primary indications for use of nitrous oxide/oxygen.
Patients with fear and anxiety. Patients who are allergic to or refuse local anesthesia. Patients with a prominent gag reflex. Impatient patients.
List six indications for use of nitrous oxide/oxygen with special considerations.
Patients with cardiovascular disease. Patients with cerebrovascular disease. Patients with respiratory disease such as asthma. Patients with hepatic (liver) disease. Patients with seizure disorders. Patients taking tranquilizers, analgesics, antidepressants or hypnotics.

6
List eight contraindications for use of nitrous oxide/oxygen.
Patients with nasal obstructions (common cold, upper respiratory infections, allergies, or deviated nasal septum).
Patients with chronic obstructive pulmonary disease. Patients with debilitating cardiac or cerebrovascular disease. Patients who are pregnant. Patients with psychiatric disorders or compulsive personalities. Claustrophobic patients. Children with severe behavioral problems. Patients who do not want nitrous oxide/oxygen.
17.05 Equipment Used In the Administration of Nitrous Oxide/Oxygen
List four pieces of equipment necessary in the use of nitrous oxide/oxygen.
Nitrous oxide tank (always blue). Oxygen tank (always green). Nitrous oxide/oxygen machine. Breathing apparatus.
Name three types of breathing apparatus.
Full face mask. Nasal hood/with scavenger(recommended). Nasal cannula.
List the eight safety features used on nitrous oxide equipment.
Pin index and diameter index safety system. Minimum oxygen liter flow. Oxygen fail-safe system. Emergency air inlet. Fail-safe alarm. Oxygen flush button. Color coding. Textured knobs.
7
17.06 Administering Nitrous Oxide/Oxygen
List the four steps to prepare the patient.
Complete and review medical history. Obtain vital signs. Discuss procedure with patient. a) sensations expected b) breathe through nose c) obtain consent. Select nosepiece.
List the nine steps that should be followed when administering nitrous oxide.
Begin the flow of oxygen at 8 liters. Place the nosepiece over the patient’s nose. Begin the nitrous oxide at 20% and the oxygen at 85%. Observe the patient for one minute prior to changing dosages. Increase the nitrous oxide by ½ liter and decrease the oxygen by ½ liter until
desired effect is obtained. (Never more than 50% N2O) Maintain 8 liter of gases.
Monitor clinical manifestations closely. Adjust oxygen levels as needed to maintain desired effect. Never leave the patient unattended. Oxygenate the patient three to five minutes until normalcy is regained.
17.07 Legal Chart Entries
List the eight items that should be included in the patients chart entry.
Patient’s vital signs − pre- and post-op. Consent of patient was granted. Routine information including the date, procedure, performed, and post-op
information given. Maximum levels of nitrous oxide used stated in terms of percentages. Length of administration. Any other anesthetics or medications given. Length of oxygenation. Any side effects or complications incurred.
17.08 Minimizing Occupational Exposure
List four primary preventive measures to reduce occupational exposure of N2O in the dental office.

8
Test and maintenance equipment four times per year. Use low leakage techniques. Use devices for collection and disposal of gases. Use an air monitoring system.

9
18.0 Finishing and Polishing Amalgam Restorations
I) Number of Tasks to Master = 74.
II) Intended Outcome: Given information about the principles of amalgam restorations and the amalgam finishing and polishing armentarium, overall the student must demonstrate to at least 85% accuracy on the didactic examination.
III) Tasks:
18.01 Principles of Amalgam Restorations.
List the four major reasons for polishing amalgam restorations.
Prevention of recurrent decay. Prevention of amalgam deterioration. Maintenance of periodontal health. Prevention of occlusal problems.
Explain two reasons why finishing and polishing of amalgam restorations prevents recurrent decay.
By eliminating surface roughness, plaque has less surface area to colonize. The smooth, lustrous finish is easier to clean than an unpolished surface.
List two forms of amalgam deterioration that finishing and polishing can prevent or delay.
Tarnish. Corrosion.
Explain the difference between corrosion and tarnish.
Tarnish is a surface discoloration resulting from the interaction of the metal, oxygen, and sulfides from foods, etc.
Corrosion is a surface, as well as a subsurface, chemical reaction that results in the structural breakdown of the amalgam causing pitting and fracture of the restoration’s margins.

10
List the four embrasures found between teeth.
Occlusal embrasure. Gingival embrasure. Buccal/facial embrasures. Lingual/palatal embrasures.
List six improper contours that can be could found on amalgam restorations.
Over contoured Under contoured. Tight contact. Overhanging margin. High occlusion. Rough.
List seven problems associated with improper contours.
Makes area difficult to clean. Traps plaque. Gingival trauma under function. Gingival inflammation with periodontal pocketing. Pain and sensitivity of teeth. Fracture of tooth or restoration. Misalignment of teeth.
Explain the difference between flashing and ditching.
Flashing: Excess amalgam at the cavosurface margin resulting in the restoration margin being above the cavosurface of the enamel.
Ditching: Insufficient amalgam at the cavosurface margin resulting in the restoration margin being below the cavosurface of the enamel.
List five criteria for serviceable amalgams that indicate polishing.
No fracturing of the restoration or tooth structure. Adequate interproximal tooth contact (class II restorations). Adequate tooth anatomy can be maintained. Margins are flush with cavosurface margin of prep (no ditching, flashing or
open margins). Occlusion can be maintained.

11
Explain the difference between finishing and polishing.
Finishing: The removal of gross surface irregularities by contouring, removing surface discrepancies, defining the anatomy, and smoothing the amalgam surface. This will result in an optimal overall contour, an undetectable transition at the cavosurface margin, and a uniform surface smoothness.
Polishing: The consecutive use of abrasive agents that progress from coarse to very fine in order to produce the smoothest and shiniest surface possible.
18.02 Principles and Precautions of Polishing
A) List four principles of polishing .
(1) Abrasive agents are used from most coarse to most fine. (2) Particle hardness, size and shape determines abrasiveness. (3) The pressure and speed used affect abrasiveness and heat production. (4) Heat production is potentially dangerous to the tooth.
B) List and explain five precautions that must be taken during the polishing procedure.
(1) Maintain functional anatomy by using the instruments in the correct manner.
(a) Start all rotary instruments prior to touching the restoration. (b) Keep instruments moving over the surface. (c) Use short overlapping strokes to minimize friction. (d) Use each instrument only on the surfaces for which it was designed. (e) Be aware of the four surface changes that can be inflicted upon a
restoration while finishing and polishing that will destroy it.
(i) Flattening cusps excessively. (ii) Reducing marginal ridges below the plane of occlusion. (iii) Removing the contact. (iv) Deeply ditching or grooving the restoration.
(2) Avoid improper contouring by understanding the proper tooth anatomy that must be achieved. (3) Prevent damage to the patient’s soft tissue.
(f) Retract the tongue, cheeks and lips during the procedure. (g) Position instruments correctly so they will not abrade the soft tissue. (h) Use a secure grasp and stable fulcrum with each instrument. (i) Rinse all abrasive materials from the mouth after polishing.
(4) Protect the patient from polishing debris.

12
(j) Remove excess abrasive material from the mouth as quickly as possible.
(k) Provide eye protection for the patient. (l) Do not carry instruments or abrasive materials over the patient's
face.
(5) Protect the pulp of the tooth from excess heat.
(a) Use air or water cooling streams whenever possible. (b) Run rotary instruments at the minimum speed that will still be
effective. (c) Use intermittent contact of the rotary instruments to the tooth
surface.
18.03 The Amalgam Finishing and Polishing Armamentarium.
(Note: There is much duplication in the instruments and materials available for finishing and polishing. The operator should strive to select a minimum number that will do the job well, but that will keep the procedure simple and minimize the amount of time necessary to accomplish the procedure.)
(Note: The Idaho State Board of Dentistry has stated that a dental assistant should not operate a high-speed handpiece in any capacity. When using any of the following rotary instruments, it is intended that they be used in a slow-speed handpiece.)
Explain the use for two major types of finishing agents available for amalgam restorations.
Finishing Burs: These burs have 12 or 32 blades. These burs should always be run in reverse to avoid cutting tooth structure. (Idaho State law prohibits the removal of tooth structure by a dental assistant.) They can be used to define and smooth grooves and fossae, smooth cavosurface margins, and smooth the concave areas of the occlusal surface and remove scratches and graininess.
Rotary Disks: These disks range from coarse to very fine and come in a variety of abrasives that vary in hardness. They are used on the convex surfaces of the facial/buccal and lingual/palatal as well as interproximally.
CAUTION: It is often necessary to reverse the direction of the disk while using it interproximally to avoid grabbing which causes loss of control of the disk and can result in hard or soft tissue injury.
Explain the use of the three polishing agents available for amalgam restorations.
13
Pumice: Fine grades of this material are used to remove the largest of the remaining scratches in the surface of the restoration after the finishing procedures are completed. It is mixed with water to form a pumice slurry. Several grits are available and should be used with the principle in mind that one progresses from the coarsest to the finest. It is applied to the amalgam with a rubber prophy cup and results in a satiny shine.
Tin Oxide: This material is the last of the polishing materials to be used in the polishing of amalgam. It can be used by mixing with water or ethyl alcohol, or it can be used dry. It is applied to the amalgam in a rubber prophy cup and results in a mirror like finish.
Shofu® Polishing Points and Cups: These points and cups are rubber rotary instruments designed to be used in place of pumice and tin oxide. They come in three grits named Brownies®, Greenies®, and Super Greenies®. Care should be taken while using them so as not to generate excess heat which can damage the pulp of the tooth and will bring mercury to the surface of the amalgam resulting in diminished shine of the final polish.
List the 16-step sequence for finishing and polishing amalgam restorations.
Review the procedure with the patient. Evaluate restoration to be finished and polished. Check the occlusion of the restoration using articulation paper. Isolate the restoration using rubber dam/cotton roll. Smooth the occlusal cavosurface margins. Smooth the occlusal surface. Smooth proximal cavosurface margins and surface using finishing disks. Smooth facial and lingual surfaces. Polish the restoration using pumice/tin oxide OR abrasive polishing points and
cups. Rinse and evacuate all debris. Evaluate polished amalgam. Recheck the occlusion and final polish. Chart entry.

14
19.0 Polishing Composite Restorations
I) Number of Tasks to Master = 49.
II) Intended Outcome: Given information about the reasons and concerns for polishing composite restorations, filling maintenance, and the basic procedure for polishing composite restorations, overall the student must demonstrate to at least 85% accuracy the didactic examination.
III) Tasks:
19.01 Reasons and Concerns for Polishing Composite Restorations
A) State three reasons why a composite restoration should be polished.
(1) The filling should be highly polished to reduce the surface roughness and make the tooth as cleanable as possible.
(2) The filling should be polished to make it more resistant to food particles adhering to its surface.
(3) The filling should be polished to ensure that its margins are sealed to guard against microleakage between the restoration and the tooth structure.
B) State five criteria for a serviceable composite restoration that can be (indicating) polished.
(1) The interproximal contacts are correctly adapted to the adjacent teeth. (2) The occlusal contact is correct or can be adjusted without adding to or
replacing the restoration. (3) There is no evidence of microleakage at the margins. (4) There is no evidence of ditching or microfracturing at the margins. (5) There is no evidence of impact fracturing.
C) List four principles of polishing.
(1) Abrasive agents are used from most coarse to most fine. (2) Particle hardness, size and shape determines abrasiveness. (3) Clean thoroughly between each abrasive. (4) The pressure and speed used affect abrasiveness and heat production. (5) Heat production is potentially dangerous.
B) List and explain four precautions that must be taken during the polishing procedure.

15
(1) Maintain functional anatomy by using the instruments in the correct manner.
(a) Start all rotary instruments prior to touching the restoration. (b) Keep instruments moving over the surface. (c) Use short overlapping strokes to minimize friction. (d) Use each instrument only on the surfaces for which it was designed. (e) Do not use at an acute angle.
(2) Prevent damage to the patient’s soft tissue.
(a) Retract the tongue, cheeks and lips during the procedure. (b) Position instruments correctly so they will not abrade the soft tissue. (c) Use a secure grasp and stable fulcrum with each instrument. (d) Rinse all abrasive materials from the mouth after polishing.
(3) Protect the patient from polishing debris.
(a) Remove excess abrasive material from the mouth as quickly as possible.
(b) Provide eye protection for the patient. (c) Do not carry instruments or abrasive materials over the patient's
face.
(4) Protect the pulp of the tooth from excess heat.
(a) Use air or water cooling streams whenever possible. (b) Run rotary instruments at the minimum speed that will still be
effective. (c) Use intermittent contact of the rotary instruments to the tooth
surface.
19.02 Filling Maintenance
A) Explain what three parts of a filling must be maintained while polishing to avoid rendering the restoration non-serviceable.
16
(1) The interproximal contacts must be maintained. (2) No centric occlusion or direct intercuspation should occur on the
composite’s occlusal surface. (3) The occlusal anatomy must be maintained as close to the optimal tooth
morphology as possible. (Note: Though the dental assistant can evaluate the occlusal morphology, because the adjustment would require the use of a high speed handpiece and finishing burs or the addition of composite material, the actual adjustment must be performed by the supervising dentist.)
19.03 Basic Procedure for Polishing Composite Restorations
A) List and explain (where applicable) the five step procedure for polishing composite restorations.
(1) The armamentarium is obtained and prepared with the following:.
(a) PPE (b) Slow-speed handpiece. (c) Appropriate mandrels and disks, cups, or points for the particular
system of abrasive polishing materials to be used. (d) Diamond polishing paste. (e) Mouth mirror. (f) Explorer. (g) Air/water syringe. (h) Articulating paper and holder. (i) Finishing strips. (j) White stone. (k) Prophy angle. (l) Prophy cup. (m) 2 x 2 gauze and cotton rolls. (n) Unfilled resin bonding agent or a commercial composite sealer. (o) Curing light.
(2) The restoration is polished (by performing the following 13 steps).
(a) The coarse disk is placed on the mandrel and the convex areas of the restoration are polished until they have reached a uniform smoothness with no obvious deep scratches or gouges.
(b) The coarse points or cups are placed on the mandrel and the concave areas of the restoration are polished to a uniform smoothness with no obvious deep scratches or gouges.
(c) The articulating paper is used to ensure that the optimal occlusal contacts have not been lost.
(d) The medium disk, cup, or point is then used as above, but the result should be significantly more glossy.
(e) The articulating paper is again used to ensure the occlusal contacts
17
are still undisturbed. (f) The fine and very fine disks, cups, or points are then used in order to
achieve the smoothest and glossiest surface possible. (g) Again the articulating paper is used between each grit size. (h) The prophy angle and a prophy cup are attached to the handpiece
and a small amount of the diamond polishing paste is dispensed into a dappen dish and carried to the restoration.
(i) The restoration is then polished to a high luster with the diamond polishing paste.
(j) The restoration is washed. (k) OPTIONAL FINAL STEPS: The restoration and the cavosurface
margins of the restoration are re-etched with 30% to 37% phosphoric acid gel for 15 seconds and thoroughly rinsed with copious amounts of water for 10 seconds.
(l) Unfilled resin (bonding agent) or a commercially prepared composite sealer is brushed over the entire surface of the restoration and the cavosurface margins.
(m) The sealer is then air thinned with the air/water syringe and cured for 10 to 20 seconds with the curing light.
(3) Re-evaluate the restoration polish to ensure it is still serviceable.
(a) The student will again go through the steps of evaluating the restoration as above.
(4) The supervising instructor checks the restoration polish. (5) The patient is released and the procedure is recorded in the patient chart.

18
20.0 Coronal Polishing
I) Number of Tasks to Master = 128.
II) Intended Outcome: Given information about the definitions of polishing, implications of polishing, classification of stain, types of stain, laws and rules of the Idaho State Board of Dentistry, evaluation, assessment, cleaning and polishing agents, abrasion, application of abrasives, commonly used abrasives in dentistry, commercial preparations for polishing, armamentarium and principles of polishing, overall the student must demonstrate to at least 85% accuracy on the didactic examination.
III) Tasks:
20.01 Definitions of Polishing
A) Define coronal or traditional polishing.
(1) The use of a polishing agent on the crowns and root surfaces of teeth to remove bacterial plaque and extrinsic stains.
B) Define selective polishing.
(1) The removal of extrinsic stains from the surfaces of the teeth after instrumentation. Stain removal is for aesthetic reasons.
C) Define the goal of selective polishing.
(1) To remove all the extrinsic stains from the teeth after instrumentation with minimal trauma to hard and soft tissue.
20.02 Implications of Polishing
A) Explain the effect of polishing on the enamel surfaces of demineralized teeth.
(1) Three times more surface enamel is lost polishing on a demineralized surface vs. polishing on intact enamel.
B) Explain why rotary instruments should be used with caution on a patient with a communicable disease.
(1) Aerosols are created during polishing and remain suspended in the air for long periods of time. Greater risk for disease transmission.

19
C) Explain how too much heat production from polishing can damage tooth structure.
(1) Hand pressure applied to the tooth with a rapidly moving rubber cup or brush and dry abrasive, can produce heat causing pain and discomfort for the patient.
D) State two effects that can occur to the gingival tissue from improper polishing techniques.
(1) Particles from the polishing agents can be forced into the sulcus and cause irritation to the tissue if the cup is run at high speeds.
(2) Trauma to the gingiva can result when the rubber cup is placed too close to the gingival margin and run at high speeds. Severe inflammation can occur.
E) Explain how the fluoride-rich surface on a tooth is removed.
(1) The outermost layer of the tooth contains the highest concentration of fluoride. Polishing can remove the fluoride-rich surface over time.
20.03 Classification of Stain
A) Define extrinsic stain.
(1) Extrinsic stain occurs on the surface of the tooth and is associated with plaque.
B) Define intrinsic stain.
(1) Intrinsic stain is incorporated within the tooth structure and may be related to the period of tooth development.
20.04 Types of Stain
A) List four types of extrinsic stains.
(1) Green stain. (2) Black line stain. (3) Tobacco stain. (4) Yellow/ orange stain.

20
B) List three types of intrinsic stain.
(1) Tetracycline stain. (2) Dental fluorosis. (3) Amelogenesis imperfecta.
20.05 Laws and Rules of the Idaho State Board of Dentistry
A) Define the meaning of Dental Assistant from the Idaho Code Statute.
(1) “Dental assistant” is a person who need not be licensed/(regulated) under this chapter, but who is regularly employed by a dentist at his office, who works under the dentist’s direct supervision, and is adequately trained and qualified according to standards established by the board to perform the dental services permitted to be performed by assistants by this chapter and applicable rules of the board.
B) Explain the role of the State Board of Dentistry.
(1) To assure the public health, safety and welfare in the state of Idaho by the licensure and regulation of dentists and dental hygienists.
C) Define the Administrative rule 35. 01. e. and g.v.
(1) Prohibited Duties. Subject to other applicable provisions of these rules and of the Act, dental assistants are hereby prohibited from performing any of the activities specified below: (e.) Any oral prophylaxis. Oral prophylaxis is defined as the removal of plaque, calculus and stains from the exposed and unexposed surfaces of the teeth by scaling and polishing.
(g)The following expanded functions, unless authorized by a Certificate of Registration or certificate or diploma of course completion issued by and approved teaching entity and performed under direct supervision… (v.) Coronal polishing
20.06 Evaluation of Patient
A) List seven contraindications for polishing.
(1) No stain is present. (2) Increased risk of dental caries. (3) Newly erupted teeth. (4) Patient with respiratory problems. (5) Tooth sensitivity. (6) Restorations are present.(i.e. gold, composite)

21
(7) Xerostomia.
B) State seven conditions that would require modification or postponement of the polishing procedure.
(1) Soft, spongy tissue that bleeds with instrumentation or gentle brushing. (2) Root planning or deep subgingival scaling. (3) Poor plaque control by the patient. (4) Herpetic lesion(s). (5) Trauma around the lip area or oral mucosa. (6) Allergies to materials used. (7) Green stain. (8) Orthodontic or fixed appliances.
C) List three reasons why it is important to inform the patient of the procedure.
(1) To provide the rationale for doing the procedure. (2) To inform the patient of the sequence of polishing. (3) To address any patient concerns.
20.07 Assessment of Patient
A) Explain four procedures that should be completed prior to polishing.
(1) Review and update the medical history with the patient. (2) Assess patient’s health and oral conditions. (3) Inform the patient of the procedure and the office philosophy on coronal
or selective polishing. Obtain informed consent from the patient for the procedure.
(4) Check for supragingival calculus.
20.08 Abrasion
A) Define abrasion.
(1) Abrasion is the wearing away of the tooth structure by friction.
B) Explain the rate of abrasion.
(1) The rate of abrasion is dependent upon the composition of the agent and the manner in which the agent is applied.
C) Explain what an abrasive agent does when it is applied to the tooth.
(1) The agent contains abrasive particles that have sharp edges. These particles abrade the tooth surface and produce microscopic scratches and grooves in the tooth structure.
22
D) List three characteristics of abrasive particles.
(1) Shape. (2) Hardness. (3) Particle size.
E) Define how the shapes of the particles affect the rate of abrasion.
(1) Irregularly shaped particles with sharp edges produce deeper grooves and a faster rate of abrasion than rounded particles with dull edges.
F) Define how hardness of an agent affects abrasive quality.
(1) The particles in the agent must be harder than the tooth surface that is to be polished.
G) Explain how the particle size (grit) of an agent affects the abrasive quality.
(1) The finer the abrasive particles, the glossier the surface finish. The larger the particle size, the more abrasive and less ability to polish the surface.
20.10 Application of Abrasives
A) Define the characteristics of an optimum abrasive agent.
(1) The agent should produce a smooth tooth surface. It must not remove tooth structure, surface fluoride, or abrade the gingival tissue.
B) List and explain three considerations when applying an abrasive to the tooth
surface.
(1) Quantity − The more particles applied to the tooth surface each time, the faster the rate of abrasion. (Note: Particles that are mixed with a liquid are proportional to the wetness of the paste. The dryer the mix the more heat produced.)
(2) Speed of application − The faster the speed of application, the faster the rate of abrasion. (Note: When speed is increased, pressure must be reduced. Rapid abrasion increases frictional heat.)
(3) Pressure of application − The heavier the pressure applied to the surface, the faster the rate of abrasion. (Note: Heavy pressure produces frictional heat.)
20.11 Commonly Used Abrasive Agents in Dentistry
A) List four considerations when choosing an abrasive.
(1) Type of surface polishing.

23
(2) Amount of stain present. (3) Moist as possible but transportable. (4) Least abrasive as possible.
B) List eight types of agents that may be used in dentistry.
(1) Silex − Used for stain removal in the superfine form on tooth surfaces. (2) Calcium carbonate (whiting, calcite, chalk) − Used for various polishing
procedures, mildly abrasive, teeth whitening material. (3) Tin oxide (putty, powder, stannic oxide) − Polishing agent for
restorations and teeth. (4) Pumice − Flour pumice is the least abrasive form of pumice and used to
remove stains from enamel only. (Note: fine pumice is mildly abrasive and medium and coarse pumice are not for use on natural teeth.)
(5) Rouge (jeweler’s rouge) − Iron oxide is a red powder sometimes found on paper discs. Used on composite restorations and margins of porcelain and gold restorations.
(6) Emery (corundum) − Not to be used directly on the enamel. Aluminum Oxide is the pure form of emery. Used to polish amalgam and composite restorations.
(7) Diamond Particles − Polishing paste for porcelain surfaces. (8) Zirconium silicate-found in many prophy pastes, does not remove tooth
structure.
20.12 Commercial Preparations for Polishing
A) List the six ingredients in commercially prepared pastes.
(1) Abrasives − 50-60% of the main ingredient. Example: Pumice. (2) Humectant − 20-25%, retains the moisture in the product and stabilizes
the ingredients. Example: Sorbitol. (3) Water − 10-20%, solvent and provides desired consistency. (4) Binder − 1.5-2.0%, prevents separation and helps prevent splatter.
Example: Agar. (5) Sweetener − Artificial and noncariogenic. (6) Flavoring and coloring agents.
B) Explain how commercial pastes are packaged.
(1) Packaged in the form of pastes, powders and tablets. Available in measured amounts in individual packets.
(2) Prophy paste is based on the abrasive quality. Available in various grits.
20.13 Armamentarium
A) Explain the function of the handpiece.

24
(1) Rotary instruments are placed into the handpiece, which is a hand held instrument that requires a power source to operate.
B) State the two classifications of rotary instruments.
(1) Ultra or high speed. (2) Low speed.
C) Explain the purpose of the prophylaxis angle.
(1) The rubber cup or bristle brush is attached into the prophylaxis angle. Angles may be a right angle screw-on type or right angle snap-on type.
D) List and describe the two types of prophylaxis angle attachments.
(1) Rubber cups.
(a) Slip-on(snap-on)/screw-on with ribbed cup. (b) Slip-on(snap-on)/screw-on without ribs.
(2) Bristle brushes.
(a) Slip-on or screw type. (b) Latch-type (mandrel mounted.)
E) State two uses for the rubber cup and brush.
(1) The rubber cup is used for the removal of stains from the facial, lingual and portions of mesial and distal of tooth surfaces. A portion of the inner cup’s edge is used when removing stain.
(2) A bristle brush removes stains from deep pits and grooves on the enamel surface.
F) State two uses for dental tape or floss.
(1) Polishing the interproximal surfaces. (2) Removal of particles from the interproximal areas after polishing.
G) Explain one use for finishing strips.
(1) For stain removal on the proximal surfaces of anterior teeth when removal is of stain is not accomplished by other methods. (Note: only fine or extra fine, narrow finishing strips should only be used on the enamel surfaces of teeth. Appropriate protection for soft tissue should be used.)
H) State one use for bridge threaders.

25
(1) A flossing aid to help guide floss under bridges or around orthodontic appliances.
I) State three uses for the mouth mirror.
(1) Illumination (2) Indirect vision. (3) Retraction of the cheek.
J) State two uses for the explorer.
(1) To check the tooth surface prior to polishing. (2) To differentiate between intrinsic and extrinsic stain on the tooth
surface.
K) Explain the use of hydrogen peroxide for the removal of black line or green stain.
(1) 3% hydrogen peroxide helps to remove black line stain. It is mixed with an equal part of water, applied with a cotton tip applicator for 30 seconds and rinsed prior to polishing.
L) List the 15 components of the armamentarium on the tray set up.
(1) Mouth mirror. (2) Explorer. (3) Dental floss and/or tape. (4) Dappen dish for disclosing solution. (5) Gauze 2 x 2s. (6) Cotton tip applicators. (2) (7) Finger cup for holding prophylaxis paste. (8) Prophylaxis paste/polishing agent. (9) Lip lubricant. (10) Disposable prophylaxis cup and brush. (11) Handpiece (12) Saliva ejector. (13) Waste container or cup for disposal of floss, gauze, etc. (14) Patient bib and chain. (15) Optional: Bridge threaders, abrasive polishing strips, hydrogen peroxide.
20.14 Principles of Polishing
A) State seven principles of polishing.
(1) Use a modified pen grasp. (2) Establish a fulcrum on a hard structure or tooth surface. (3) Apply steady pressure on the rheostat for a slow, even speed(10-13psi). (4) Use the proper strokes (pat wipe, intermittent) and correct sequence.
26
(5) Use correct operator and patient positioning. (6) Use mouth mirror as needed. (7) Maintain proper aseptic techniques and infection control.
B) List the six final results of a coronal polish.
(1) Lustrous shine. (2) Enamel has high gloss which reflects light. (3) All restorations and exposed tooth surfaces are glossy. (4) All extrinsic stain, plaque and debris are removed. (5) The mouth is free of all abrasive and polishing particles. (6) There are no soft tissue lacerations.
C) List the four steps to evaluate a coronal polish.
(1) Apply lip lubricate. (2) Apply disclosing solution with cotton swab. (3) Rinse. (4) Check with mouth mirror and light.
D) List the fourteen criteria used to evaluate a coronal polish procedure and results.
(1) Maintains aseptic technique throughout procedure. (2) Type of stains and deposits determined. (3) Appropriate polishing agent selected. (4) Positions patient for maximum comfort and accessibility. (5) Maintains good posture and operator position. (6) All aids and attachments used as designed. (7) Efficient sequence is used. (8) Uses correct grasp. (9) Maintains stable intraoral fulcrum. (10) Maintains appropriate speed. (11) Correctly adapts cup to tooth contours. (12) Removes all plaque, soft debris and extrinsic stain removed from clinical
crowns. (13) Produces no tissue trauma. (14) Completes procedure in acceptable length of time.
E) Explain the philosophies of traditional polishing vs. selective polishing.
(1) Current literature states that polishing is indicated only on tooth surfaces where stain is present following dental instrumentation.
(2) Offices may still support the traditional approach of polishing all the tooth surfaces for the removal of stain and plaque after dental instrumentation. Patients may prefer this approach if not educated about the current standard of practice for selective polishing.

27
21.0 Application of Pit and Fissure Sealants
I) Number of Tasks to Master = 80.
II) Intended Outcome: Given information about pit and fissure sealants, overall the student must demonstrate to at least 85% accuracy on the didactic examination.
III) Tasks:
21.01 Pit and Fissure Sealants
A) Define sealants.
(1) Pit and fissure sealant-a resin material introduced into the pits and fissures of caries susceptible teeth to act as a physical barrier to bacteria.
(2) Applied to the occlusals of posterior permanent and primary teeth including buccal pits and lingual grooves. The lingual pits of maxillary anterior teeth may also be sealed.
B) List the four characteristics of sealant retention.
(1) Retention requires a strong mechanical bond. (2) 99% effective when retained-no decay will develop underneath. (3) Rates vary greatly. (4) Highest retention on mandibular newly erupted first molars.
C) Describe the three principal types of pit and fissure configurations.
(1) U-type: Wider opening. (2) V-type: Narrower opening. (3) I-type: Bottleneck shape.
D) List two types of sealants.
(1) Filled: Bis GMA - fillers. (2) Unfilled: BisGMA-MMA(most common).
E)
F) List the four characteristics of light cure sealants.
(1) One liquid system no mixing. (2) Operator has control of polymerization. (3) Requires light cure unit(expensive). (4) Short shelf life.
G) List the four characteristics of self cure sealants.
(1) Simple to use.
28
(2) Less expensive-no extra equipment. (3) Once mix has started must complete procedure. (4) Bubbles and incomplete mixing can occur during mix.
H) List nine considerations of acid etching materials.
(1) Creates surface irregularities that increase retention. (2) 30-70% phosphoric acid (35-37% most common). (3) Applied 10-60 seconds.(30-60 seconds most common). (4) Applied 2-3 mm past sealant. (5) Must protect oral tissue, eyes and skin. (6) Liquid dabbed on, gel let set. (7) Contraindicated after fluoride treatment. (8) Etched tooth should appear chalky white, frost, dull. (9) Etched tooth must be protected from saliva.
21.02 Placement of Pit and Fissure Sealants
A) List the five indications for sealant placement.
(1) A deep fissure, fossa, or pit is present, especially if it catches the tip of the explorer.
(2) The fossa selected for sealant placement is well isolated from another fossa with a restoration present.
(3) An intact occlusal surface is present where the contra lateral tooth surface is carious or restored.
(4) No radiographic evidence of decay. (5) Newly erupted teeth.
B) List the four contraindications for placing sealants.
(1) Patient behavior does not permit use of adequate dry field techniques throughout the procedure.
(2) There is an open occlusal carious lesion. (3) Caries, particularly proximal lesions, exist on other surfaces of the same
tooth. (4) A large occlusal restoration is already present.
C) List the five important instructions given to the patient or parent of the child prior to placement of sealants.
(1) Sealants only help prevent caries on the tooth surfaces where the sealants are applied.
(2) Plaque control, fluoride therapy, and sugar discipline are still necessary. (3) Life expectancy of sealants vary from patient to patient.
29
(4) Contact the office if there is any sign of breakage or loss. (5) The sealant will be monitored at each six-month recall appointment.
D) List the three most important ages to seal primary and permanent teeth.
(1) Age 3 to 4 years for primary molars. (2) Age 6 to 8 years for first permanent molars. (3) Age 11 to 13 years for second permanent molars.
Note: These ages correspond with normal eruption patterns
E) Describe the three reasons adults are considered for sealants.
(1) When there is evidence of impending caries susceptibility. For example if a patient is undergoing radiation therapy or other diseased caused treatments.
(2) Drug-induced xerostomia. (3) Excessive intake of sugar.
F) List the 13 armamentarium supplies and instruments needed for placing a sealant.
(1) Basic tray setup including bib and 3-way syringe. (2) Evacuator tips. (3) Isolation materials: 2 x 2 gauze, cotton rolls, cotton pellets, rubber dam
or garmer clamps.and cotton pellets. (4) Slow speed handpiece. (5) Prophylaxis brush. (6) Flour of pumice. (7) Acid etch, brush, or syringe. (8) Sealant material, sealant applicator. (9) Curing light. (10) Dental floss. (11) Articulating paper. (12) Fluoride.
G) List the 15 steps in sealant application.
(1) Confirm the tooth to be sealed. (2) Pumice and rinse tooth. (3) Remove pumice with explorer and rinse again. (4) Isolate tooth. (5) Dry and acid etch tooth for 60 seconds. (6) Rinse for 20-30 seconds. (7) Re-isolate tooth. (8) Dry for 20 seconds and check for an opaque/frost appearance of the
tooth. (9) Apply sealant material to the tooth. (10) Cure. (11) Check for voids or bubbles in the sealant.

30
(12) Check the occlusion for high spots. (13) Apply fluoride to the tooth. (14) Give post operative instructions to patient. (15) Chart entry.
H) Describe the six most common technical errors when placing a sealant.
(1) Contamination by either saliva or calcium phosphate products. (2) Inadequate surface preparation by improper cleansing or application of
the acid etch. (3) Using outdated materials. (4) Air entrapment due to poor placement technique. (5) Over extension of the material beyond the conditioned tooth surface. (6) Incomplete/slow mix or application of self cure sealant.
I) Describe the five steps in checking occlusion.
(1) Dry tooth thoroughly. (2) Place articulation paper on the tooth that has been sealed. (3) Have patient tap teeth together and slide mandible from side to side. (4) If there are heavy markings, use a finishing bur to make any adjustment. (5) If there are only light markings, explain to the patient that the feeling of
“high’ will go away in a few days.
J) State the reason for post sealant fluoride treatment.
(1) The etching process has dehydrated the tooth, therefore, the tooth is subject to injury and bacteria for approximately 24 hours. Fluoride provides the necessary protection for the tooth during this period of time.
K) Record the appropriate sealant procedure in the patient’s chart.
(1) Date and tooth number. (2) Write entry in ink. (3) Student initials record. (4) Instructor initials record of services.
22.0 Obtaining Alginate Impressions
I) Number of Tasks to Master = 125.
II) Intended Outcome: Given information about hydrocolloid impression materials, the armamentarium required to mix alginate, patient preparation, tray selection, preparing impression trays, spatulation technique, loading the mandibular alginate and maxillary impression tray, and seating the trays, overall the student must demonstrate to at least 85% accuracy on the didactic examination.

31
III) Tasks:
22.01 Hydrocolloid Impression Materials
A) Define two types of hydrocolloid.
(1) Irreversible hydrocolloid − A material that has the ability to change from a liquid state (sol) to a semisolid state (gel) but do not have the ability to change from a semisolid to a liquid state.
(2) Reversible hydrocolloid − Have the ability to change from a solid state to a liquid state and back again to a solid state.
B) List four characteristics of alginate impression material.
(1) Irreversible hydrocolloid. (2) Lacks dimensional stability. (3) Sensitive to heat and moisture. (4) Easy to use.
C) Define impression
(1) A negative replica of a dental structure.
D) Explain four reasons for taking alginate impressions.
(1) Study models. (2) Opposing models. (3) Construction of temporary crowns. (4) Working models to build custom trays, bleach trays ect..
E) Name two factors that will affect gel strength.
(1) Water powder ratio. (2) Spatulation time.
F) Name two factors that will affect setting time.
(1) Manufacturer’s properties.
(a) Fast set. (b) Slow set.
(2) Water temperature.
G) Identify two factors that affect dimensional stability.
(1) Syneresis − loss of water. (2) Imbibition − uptake of water.

32
22.02 Armamentarium Required to Mix
A) Identify seven items required to mix alginate
(1) Alginate material. (2) Water measure. (3) Powder scoop. (4) Paper cup or paper towel. (5) Room temperature water. (6) Flexible bowl. (7) Alginate spatula, flexible and broad.
22.03 Patient Preparation
A) List four steps in preparing the patient.
(1) Review the health history. (2) Inspect the mouth. (3) Rinse the mouth. (4) Explain the procedure. (5) Instruct the patient.
22.04 Tray Selection
Identify three purposes of an alginate tray.
Carry material. Control material. Confine material.
Identify four types of trays available.
Disposable styrofoam. Perforated metal. Solid rim-lock metal. Plastic.
Identify three variations in alginate tray coverage.
Full arch, maxillary or mandibular. Anterior only. Right or left quadrant.
List the steps in tray selection.
Put on PPE’s. Inspect the mouth. Try in tray.
33
Use mirror to inspect fit. Ask patient about comfort. Evaluate fit.
List seven requirements in tray selection.
Clears tissue by 3-mm. Long enough to clear the retromolar pad or the tuberosity(1-2mm) while not
touching the incisors. The tray falls 3-mm short of the peripheral turn. Incisors should set in the deepest anterior portion of the tray. The tray sides do not grossly depress any frenum. The patient does not feel excessive pain or pressure.
22.05 Preparing Impression Trays
A) Identify three reasons for installing beading wax.
(1) Patient comfort. (2) Molds periphery of the tray to the vestibule. (3) Prevents the teeth from touching the tray.
B) List three criteria for correctly placed beading wax.
(1) Wax extended around the entire periphery of the tray. (2) Wax does not interfere with tray fit. (3) Three small wax squares placed in the occlusal anterior, and posterior of
left and right.
22.06 Spatulation Technique
A) List in order the 12 steps in mixing alginate.
(1) Read the manufacturer’s directions. (2) Measure required amount of room temperature water. (3) Pour water in bowl (or powder first as indicated by the manufacturer). (4) Fluff alginate powder. (5) Fill powder with scoop, (according to manufacturer’s directions) and
place in a cup or on a paper towel, repeat if required. (6) Replace alginate lid. (7) Combine water and powder as indicated by the manufacturer. (8) Stir the mix to wet all powder particles. (9) Begin spatulation in a stropping motion. Rotate the bowl. Spread the mix
against the sides of the bowl. (10) Gather the mix after 20 seconds and repeat step 9. (11) Mix until the mix is creamy.

34
(12) Gather the mass and load the tray. Total mixing time should not exceed one minute.
22.07 Loading the Mandibular Alginate Tray
A) List the seven steps in loading the mandibular tray.
(1) Have a small cup of water available to smooth the alginate surface. (2) Spatulate alginate according to instructions. (3) Gather alginate on spatula. (4) Wipe half into one side of the tray from the peripheral border and press
into tray. (5) Repeat by wiping the other half into the other side of the tray. (6) Wet finger and smooth the surface of the alginate material. (Optional,
wipe small amount of alginate onto the occlusal surfaces of the mandibular teeth just prior to seating the tray to minimize trapping bubbles)
(7) Loading time should be less than 30 seconds.
22.08 Loading the Maxillary Impression Tray
A) List the seven steps in loading the tray.
(1) Have a small cup of water ready for smoothing tray alginate. (2) Spatulate alginate according to instructions. (3) Remove alginate from the bowl in one mass. (4) Load the tray from the posterior. (5) Press the mass down with the spatula into the anterior. Make sure no
voids are created. (6) Wet fingers and smooth the surface of the alginate. Optional: Wipe alginate onto the occlusal of the teeth to minimize bubbles. Optional: Remove any unwanted material from the palate area to minimize gagging. (7) Loading time should be less than 30 seconds.
22.09 Seating the Trays
A) List the 15 steps in taking the mandibular impression.
(1) Position yourself between eight and nine o’clock. (2) The patient’s shoulder should be at the same height as the operator’s
elbow. (3) Instruct the patient to rinse just prior to taking the impression. (4) Mix and load the tray. (5) Insert the tray. (6) Hold the tray in one hand and, with the other hand retract the cheek.
35
(7) Slide the tray in side-ways until one-half of the tray is in the mouth; then rotate the tray and seat. The handle of the tray should be centered with the nose and perpendicular to the anterior teeth. The anterior portion of the tray must be positioned over the centrals to provide adequate material in the vestibule.
(8) Ask the patient to close slightly. (9) Depress the tray, posterior to anterior. (10) Have the patient elevate the tongue; then depress the tray more. (11) Ask the patient to relax the cheeks and lip. (12) Position the tray by pressing firmly on the occlusal with the index
fingers; place the thumbs under the mandible. (13) Instruct the patient to breathe deeply through the nose. (14) When the material is set, run your fingers around the peripheral border
to break the seal, protect the upper teeth with your index finger of your left hand and remove with one firm movement or snap.
(15) Rinse the impression under water, inspect, spray with disinfectant, wrap in a moist paper towel and place in a baggie.
B) List 11 steps in taking the maxillary impression.
(1) The patient’s shoulder should be positioned at the height of the operator’s elbow.
(2) The operator should be between 9 o'clock and 12 o’clock. (For right-handed operators.)
(3) Insert the loaded tray, holding the tray with one hand and retracting the cheek with the other.
(4) Slide the tray in side-ways until one-half of the tray is in the mouth; then rotate the tray and seat. The handle of the tray should be centered with the nose and perpendicular to the anterior teeth. The anterior portion of the tray must be positioned over the centrals to provide adequate material in the vestibule.
(5) Seat the posterior of the tray firmly first, this will expel the material forward, instead of down the throat.
(6) Continue seating the anterior portion of the tray. (7) Lift the upper lip to free it from the tray. Have the patient relax cheek
and lips. Lift the lip over tray to obtain an impression of muscle attachments and the frenum.
(8) The patient’s head should be tipped forward to prevent flow down the throat.
(9) Instruct the patient to breathe deeply and slowly through the nose. (10) When the material is set, lift the cheeks to break the seal, protect the
opposing teeth, separate with one firm, continuous motion. (11) Follow the same steps as given for the mandibular arch. Rinse, spray,
wrap, bag.
C) List the six steps in creating a tongue space on the mandibular.
36
(1) Mix one scoop of alginate. (2) Wipe it on the middle two fingers of your non-dominate hand. (3) Place the mandibular alginate tray handle towards the heel of the hand,
over the alginate. Use the heel of the hand to support the tray handle. (4) Using moistened fingers of your dominant hand, join the alginate to the
lingual borders of the impression, creating a smooth, flat floor. (5) Hold the tray in place until set. (6) Gently free the fingers, wrap and bag.
D) List the 10 criteria for a completed satisfactory mandibular alginate impression.
(1) The tray was seated so all detail is reproduced, including the teeth, the complete peripheral turn(vestibule and frenum) and a portion of the retromolar pads.
(2) The detail is sharp, not blurred or indistinct. (3) The impression is free of voids in critical areas. (4) The impression is free of large folds of alginate extending into the
patient’s throat. (5) There are no areas where the alginate has pulled away from the tray. (6) The impression is free of rips and tears, except in interproximal areas. (7) The alginate covers the tray (no unwaxed tray is visible through the
alginate). (8) The alginate is free of bulges or depressions that indicate a sub-surface
bubble. (9) The alginate is smooth, not sponge-like or grainy. (10) The tongue space is smooth, flat and does not overlap the impression. (11)
E) List the ten criteria for a satisfactory maxillary impression.
(1) The tray was seated so all detail is reproduced, including the teeth, the complete peripheral turn (vestibule and frenum) and all of the tuberosity.
(2) The detail is sharp, not blurred or indistinct. (3) The impression is free of voids in critical areas. (4) The impression is free of large folds of alginate extending down the
throat. (5) There are no areas where the alginate has pulled away from the tray. (6) The impression is free of rips and tears, except in interproximal areas. (7) The alginate covers the tray (no unwaxed tray is visible through the
alginate). (8) The alginate is free of bulges or depressions that indicate a sub-surface
bubble. (9) The alginate is smooth, not sponge-like or grainy. (10) The palatal arch is complete.
23.0 Temporary Crown Restorations
I) Number of tasks to master = 56.

37
II) Intended Outcome: Given information about the types, materials, uses and techniques of temporary crowns restorations, overall the student must demonstrate to at least 85% accuracy on the didactic examination.
III) Tasks:
23.01 Types, Materials, Uses and Techniques of Temporary Crowns
A) Explain eight reasons why temporary crowns are placed.
(1) To prevent sensitivity in the prepared tooth. (2) To protect the dentin from oral fluids. (3) To maintain occlusion. (4) To prevent fracturing of the finish line or breakdown of the prepared
tooth. (5) To prevent changes in gingival tissue caused by infringement of the
crown margin or by food impaction. (6) To provide for lost function. (7) To maintain aesthetics. (8) To restore or improve the contour of the original tooth.
B) List three types of temporary crowns.
(1) Anatomical metal crowns. a) stainless steel b) aluminum (2) Preformed plastic crown. a) polycarbonate b) cellulose (3) Custom resin crown.
C) List two advantages of the anatomical metal temporary crowns.
(1) Malleability. (2) Low cost.
D) List two disadvantages of the anatomical metal temporary crowns.
(1) Aesthetic appearance. (2) Softness.
E) List four advantages of the preformed plastic temporary crowns.
(1) Aesthetically pleasing to the patient. (2) Easy adaptation for acceptable fit. (3) Some options for tooth shade. (4) Variety of choices of sizes and shapes.
38
F) List three advantages of the custom resin temporary crowns.
(1) Superior fit compared to other temporary crowns. (2) Aesthetically pleasing. (3) Can be made to fit any tooth in the mouth.
G) List two disadvantages of the preformed plastic temporary crowns.
(1) May cause slight open contact. (2) Limited shades.
H) List two disadvantages of the custom resin temporary crowns.
(1) Takes longer time to produce. (2) Initially more difficult to produce.
I) Describe four types of finish/margin lines.
(1) Bevel ledge or slant. (2) Chamfer or slope. (3) Feather or knife edge. (4) Shoulder or ledge. (5)
J) List five properties of acrylic resins.
(1) Toxic- use in ventilated area, (2) Avoid skin contact with monomer. (3) Avoid monomer contact with prepared tooth. (4) Exothermic reaction during cure. (5) Shrinks during cure.
K) Discuss five types of resin materials.
(1) Methyl methacrylate. (2) Light-cure resin. (3) Ethyl/ vinyl methacrylate. (4) Epimine. (5) Composite.
L) Define centric, infra-occlusion, and supra-occlusion.
(1) Centric occlusion. (2) Infra-occlusion. (3) Supra-occlusion.
M) Describe temporary cement.

39
(1) Dental material used to hold temporary restorations in place, to seal and fill margin, and fill empty spaces to support occlusion.
N) Discuss nine criteria for placing a temporary crown.
(1) The crown margin allowance of 0.5-mm short. (2) The cervical margin is smooth. (3) The cervical margin fits snug against to tooth. (4) Facial contour is similar to the natural tooth. (5) Lingual contour is similar to the natural tooth. (6) Occlusal anatomy is accurate. (7) Occlusal plane is accurate(minimum of one centric mark out of four). (8) Interproximal contacts (Floss meets with some resistance). (9) Crown surfaces are smooth surfaces.
O) Discuss six additional techniques for fabricating custom temporary crowns.
(1) Wax molding technique. (2) Putty impression technique. (3) Intraoral molding technique. (4) Vacuum-formed plastic resin tray. (5) Relining aluminum shell crowns. (6) Temp tabs.
P) Discuss the importance of septic techniques that apply to fabricating temporary crowns. (1) To prevent cross-contamination during fabrication of temporary crown. (2) utilize universal precautions.
23.02 Temporary Crown Procedures
A) List the procedure for placing a preformed aluminum temporary crown.
(1) Check occlusion.
(2) Visually and tactually locate the margin line.
(3) Measure the mesiodistal space at the contact area.
(4) Select the appropriate aluminum temporary crown, should be slightly large.
(5) Try-in the crown.
(6) Check the mesiodistal space.

40
(7) Check the facial and lingual contours.
(8) Scribe a trim line for trimming the finish line and trim/contour the crown to fit the preparation. If margin is trimmed short, select another crown.
(9) Reduce the circumference of the crown margin by crimping and smooth the edges of the crown.
(10) Check marginal adaptation of temporary crown with an explorer from the gingival to the occlusal surface.
(11) Check the occlusion and check the interproximal contacts.
(12) Use a ball burnisher to increase the size if needed to accomplish contact.
(13) Smooth the crown.
(14) Cement the temporary crown.
(15) Remove excess cement around the crown margin and excess cement interproximally with floss (removing horizontally).
(16) Make final check for occlusion.
B) List the procedure for placing a Preformed Plastic Temporary Crown
(1) Check the occlusion.
(2) Visually and tactually locate the margin line.
(3) Measure the mesiodistal space at the contact area.
(4) Select the appropriate preformed plastic crown.
(5) Try-in the crown.
(6) Adjust the binding with a round carbide bur if needed.
(7) Adjust the gingival length of the margin and contour of the crown with an acrylic bur.
(8) Lubricate the preparation.
(9) Mix the polymer and monomer.
(10) Fill the crown with the acrylic resin.
(11) Seat the filled crown on the preparation when the material has lost its sheen and is of doughy consistency.

41
(12) Remove crown and trim excess resin with scissors and reseat crown during polymerization process.
(13) Trim the crown margin.
(14) Adjust facial and lingual contours and adjust occlusion/incisal length.
(15) Refine contours and interproximal areas.
(16) Check and adjust the contacts.
(17) Refine and polish the crown surfaces.
(18) Final check of marginal fit, interproximal contacts and occlusion.
(19) Cement the crown on the preparation.
(20) Remove excess cement around the crown margin and excess cement interproximally with floss (removing horizontally).
(21) Final check of occlusion.
C) List the procedure for placing a Custom Resin Temporary Crown .
(1) Check the occlusion.
(2) Take an impression of the unprepared tooth.
(3) Place prepared tooth in the typodont.
(4) Reseat impression to check placement.
(5) Visually and tactilely locate margin.
(6) Lubricate the tooth with vasoline.
(7) Mix resin (if using methyl methacrylate, mix thoroughly, the monomer (liquid) in its pure form is toxic to the tooth.
(8) Place resin mixture in impression and place on typodont with prepared tooth when acrylic has lost sheen and is doughy.
(9) Wait 3-5 minutes.
(10) Remove resin crown from impression and remove marginal excess with scissors.
(11) Reseat crown on prep until hard ( some brands do not require this).

42
(12) Check the contacts with floss, check the marginal adaptation and contours of the crown.
(13) Check occlusion.
(14) Smooth and polish the crown.
(15) Cement the crown.
(16) Remove excess cement around the crown margin and excess cement interproximally with floss (removing horizontally).
(17) Check occlusion.
43
24.0 Use of a High Speed Handpiece to Remove Orthodontic Adhesives
I) Number of Tasks = 62
II) Intended outcome: Given information about the laws and rules of the Idaho state Board of Dentistry, abrasion and use of abrasives, patient and operating positioning, use and cautions of the high speed handpiece, and procedure for use of the high speed handpiece the student must demonstrate at least 85 % accuracy on the didactic examination.
III) Tasks:
24.01 Laws and Rules of the Idaho State Board of Dentistry
D) Define the meaning of Dental Assistant from the Idaho Code Statute.
(1) “Dental assistant” is a person who need not be licensed/(regulated) under this chapter, but who is regularly employed by a dentist at his office, who works under the dentist’s direct supervision, and is adequately trained and qualified according to standards established by the board to perform the dental services permitted to be performed by assistants by this chapter and applicable rules of the board.
E) Explain the role of the State Board of Dentistry.
(1) To assure the public health, safety and welfare in the state of Idaho by the licensure and regulation of dentists and dental hygienists.
F) Define the Administrative rule 35. 01. f. and g.vi.
(1) Prohibited Duties. Subject to other applicable provisions of these rules and of the Act, dental assistants are hereby prohibited from performing any of the activities specified below: (F.) Any intra-oral procedure using a high speed handpiece, except to the extent authorized by a Certificate of Registration or certificate or diploma of course completion issued by an approved entity.
(g)The following expanded functions, unless authorized by a Certificate of Registration or certificate or diploma of course completion issued by and approved teaching entity and performed under direct supervision… (vi.) Use of a high speed handpiece restricted to the removal of orthodontic cement or resin.
24.02 Review Tooth Anatomy
A) Identify and define the following tooth anatomy terms.
44
(1) Enamel (2) Dentin (3) Pulp (4) Root (5) Cementum (6) Cementoenamel Junction (CEJ) (7) Periodontal ligament (8) Gingival
24.03 Abrasion
H) Define abrasion.
(1) Abrasion is the wearing away of the tooth structure by friction.
I) Explain the rate of abrasion.
(1) The rate of abrasion is dependent upon the composition of the agent and the manner in which the agent is applied.
24.04 Use of Abrasives and Finishing Burs
C) Define the characteristics of an optimum abrasive agent.
(1) The agent should produce a smooth tooth surface. It must not remove tooth structure, surface fluoride, or abrade the gingival tissue.
D) List and explain three considerations when using an abrasive on a tooth.
(1) Quantity − The more particles applied to the tooth surface each time, the faster the rate of abrasion. (Note: Particles that are mixed with a liquid are proportional to the wetness of the paste. The dryer the mix the more heat produced.)
(2) Speed of application − The faster the speed of application, the faster the rate of abrasion. (Note: When speed is increased, pressure must be reduced. Rapid abrasion increases frictional heat.)
(3) Pressure of application – The heavier the pressure applied to the surface the faster the rate of abrasion. (Note: Heavy pressure produces frictional heat.)
C) List and explain four precautions that must be taken during the removal procedure.
(1) Maintain functional anatomy by using the instruments in the correct manner.

45
(f) Start all rotary instruments prior to touching the restoration. (g) Keep instruments moving over the surface. (h) Use short overlapping strokes to minimize friction. (i) Use each instrument only on the surfaces for which it was designed. (j) Do not use at an acute angle. (k) Keep area fully illuminated.
(2) Prevent damage to the patient’s soft tissue.
(e) Retract the tongue, cheeks and lips during the procedure. (f) Position instruments correctly so they will not abrade the soft tissue. (g) Use a secure grasp and stable fulcrum with each instrument. (h) Rinse all abrasive materials from the mouth after polishing.
(3) Protect the patient from polishing debris.
(d) Remove excess abrasive material from the mouth as quickly as possible.
(e) Provide eye protection for the patient. (f) Do not carry instruments or abrasive materials over the patient's
face.
(4) Protect the pulp of the tooth from excess heat.
(d) Use air or water cooling streams whenever possible. (e) Use intermittent contact of the rotary instruments to the tooth surface (f) Run rotary instruments at the minimum speed that will still be
effective.
. D) List three types of abrasive/finishing instrument used in resin removal.
(2) Finishing Burs: These burs have 12 or 32 blades.
(3) Diamond burs
(4) Rotary Disks/wheels/points: These disks range from coarse to very fine and come in a variety of abrasives that vary in hardness.
24.05 Patient and Operator Positioning
A) List five aspects of proper patient positioning.
(1) Use proper draping and protective eyewear. (2) Patients’ head is level with the lower half or the operator’s upper arm. (3) The mouth should be fully illuminated. (4) For mandibular teeth, the occlusal plane is parallel to the floor.

46
(5) For maxillary teeth the occlusal plane is at a 45-degree angle to the floor.
B) List four aspects of proper operator positioning.
(1) Wear PPE. (2) The back is straight and shoulders are square. (3) Visual range is 10-14 inches without bending neck. (4) Feet are flat on the floor and thigh are parallel to floor.
24.06 Use of the High Speed Handpiece
A) List six principles used with the high speed handpiece. (3) Use a modified pen grasp. (4) Establish a fulcrum on a hard structure or tooth surface. (5) Apply steady pressure on the rheostat for a slow, even speed. (6) Use the proper stroke.(light continuous sweeping) (7) Use correct operator and patient positioning. (8) Use mouth mirror as needed.
24.07 Precautions for Use of the High Speed Handpiece
(A) List four types of teeth that require special attention. (1) Hypocalcified (2) Hypofluorosed. (3) Decalcified. (4) Soft enamel.
(B) List seven precautions for use of the high speed handpiece.
(1) Use a light sweeping touch. (2) Keep bur parallel to tooth surface. (3) Do not use the tip of the bur. (4) Keep speed as low as possible. (5) Avoid abrading heights of contour. (6) Do not contact soft tissue. (7) Final result must be checked by dentist.
24.08 Procedure for removing Orthodontic adhesives with a High
Speed Handpiece (A) List the steps in removing adhesive on extracted teeth or dentoform.
(1) Place PPE
47
(2) Select abrasive device. (3) Remove gross adhesive. (4) Select polishing device. (5) Check surface with explorer. (6) Have dentist evaluate.
(B) List the steps in gross removal of adhesive/composite in the clinical setting.
(1) Observe adhesive removal by doctor. (2) Seat and drape patient, place protective eyewear. (3) Place assistant PPE. (4) Select abrasive device. (5) Remove composite only with direct supervision by dentist. (6) Final adhesive removed by dentist.
(C) List the steps in complete removal of adhesive/composite in the clinical setting.
(1) Seat and drape patient, place protective eyewear. (2) Place assistant PPE. (3) Select abrasive device. (4) Gross removal of adhesive. (5) Select final abrasive device. (6) Remove final adhesive with direct supervision by dentist. (7) Final check by dentist.

48
Section 4: Clinical Education: Expanded Functions Table 8. Educational Parameters of the Clinical Component of the Expanded Functions Dental Assisting Curriculum: Procedures Unit Title Number of Tasks
10 Finishing and Polishing Amalgam Restorations Procedure
38
11 Polishing Composite Restorations Procedure 29 12 Coronal Polishing Procedure 48 13 Placing a Preformed Aluminum Temporary Crown
Procedure 22
14 Placing a Preformed Plastic Temporary Crown Procedure 27 15 Placing a Custom Resin Temporary Crown Procedure 24 16 Obtaining an Alginate Impression Procedure 57 17 Pit and Fissure Sealants 31 18 Removal of Orthodontic Cements or Resins with a High
Speed Handpiece Procedure 40
Total 316 Note: “Aiding in the Administration of Nitrous Oxide” is listed as an Expanded Function in the Laws and Administrative Rules of the Idaho State Board of Dentistry. There is no clinical component for nitrous oxide. “Obtaining an Alginate Impression” is not listed as an Expanded Function in the Laws and Administrative Rules of the Idaho State Board of Dentistry but has been included in the Clinical Component of the Expanded Functions Dental Assisting Curriculum.

49
10.0 Finishing and Polishing Amalgam Restorations Procedure
I) Tasks to Master = 46.
II) Intended Outcome: Given the necessary supplies and equipment for finishing and polishing amalgam restorations, the student will perform the following tasks on six typodont or natural teeth with 100% accuracy. (Note: Three of the amalgam restorations must be a Class II restoration.)
III) Tasks:
SET UP AND PATIENT PREPARATION
(1) Take universal precautions.
(2) Assemble the finishing and polishing amalgam restorations tray set up. (Note: In an actual office practice you may find some of these items are not used.)
(a) Mouth mirror. (b) Explorer. (c) Cotton pliers. (d) Slow-speed handpiece. (e) Cotton rolls or other isolation materials. (f) Cotton pliers. (g) High volume evacuator. (h) Saliva ejector. (i) 3-way syringe tip. (j) Round finishing bur (#4 or #6). (k) Abrasive rotary disk (medium). (l) Mandrel for the disk. (m) Articulating paper. (n) Articulating paper holder. (o) Dental floss.
(3) Seat the patient. (4) Review the patient’s medical history. Medical history is reviewed with
parent if the patient is a minor.
(5) Explain the dental procedure to the patient.
(6) Add the following 10 items to the above armamentarium list to polish an amalgam restoration with pumice and tin oxide or Shofu® points.
(a) Prophy angle. (b) Two prophy cups. (c) Flour of pumice.

50
(d) Tin oxide powder (anhydrous). (e) Dental tape. (f) Ethyl alcohol. (g) Dappen dish. OR (h) Brownie® points and cups. (i) Greenie® points and cups. (j) Super Greenie® points and cups.
(7) Evaluate the selected restoration for polishing.
(8) Check occlusion.
POLISHING THE RESTORATION
(9) Isolate the tooth with the restoration to be polished by cotton rolls or a rubber dam.
(10) Place the #4 or #6 round finishing bur in the slow speed handpiece and use it to smooth the occlusal cavosurface margins.
(Note: Half of the bur should rest on the enamel and half should rest on the amalgam surface. Movement should be a smooth sweeping stroke of the bur running in reverse and repeated until a satiny, uniform surface is obtained free of deep scratches.)
(11) Smooth the occlusal surface.
(Note: Work in several small areas until the entire surface is uniform using the same sweeping, intermittent stroke.)
(12) Place the mandrel for the rotary abrasive disk in the slow-speed handpiece, attach the disk, and proceed to finish the interproximal areas.
(Note: The handpiece should be set so the disk spins away from the soft tissue to prevent inadvertent gingival injury.)
(13) Smooth the facial and lingual surfaces of the restoration. Use an abrasive disk to smooth the convex surfaces. Use a finishing bur to smooth the concave surfaces.
(14) Mix the flour of pumice to a creamy consistency in a dappen dish.
(15) Using a Prophy cup on a prophy angle, pumice all the restoration surfaces. (Note: The handpiece should be used in intermittent strokes at a slow rate in order to avoid the build-up of friction.)
(16) Determine when the pumicing step is finished by the satiny smooth

51
appearance of the restoration. (Note: The restoration will appear to be uniformly polished to a smooth, burnished appearance with no deep scratches or marring marks present.)
(17) Use the dental tape to pumice the interproximal surfaces of the restoration.
(18) Rinse and floss all the residue of pumice from the mouth.
(Note: Any remaining residue can damage the interproximal surfaces of teeth and can interfere with the polishing procedure.)
(19) Polish with tin oxide powder that has been mixed in a clean dappen dish with water or ethyl alcohol.
(20) Use a new prophy cup to polish the restoration in order to prevent pumice residue in the cup from marring the new amalgam surface.
(21) Use the same stroke that was used during the pumice procedure with the tin oxide but with the hand piece run at a faster speed.
(22) Buff the tin oxide into the interproximal areas with dental tape.
(23) Check the final polish. (Note: The restoration will have a mirror-like finish.)
(24) Rinse the residual tin oxide thoroughly from the mouth.
(25) If it is desired, use dry tin oxide to exact an even higher shine.
OR
(26) Polish with abrasive points and cups. (Note: Shofu® Points and Cups will be used for this procedure; however, there are other rubber or silicone abrasive polishing point and cup systems available.)
(27) Place the Brownie® cup in the hand piece and run at a slow-speed over all convex surfaces of the restoration.
(28) Employ an on-and-off motion while using all abrasive points/cups in order to avoid overheating the tooth.
(29) Place the Brownie® point in the slow-speed handpiece and run in the same manner as the cup in the concave surfaces of the restoration.
(30) Check to make sure that the surface appears velvety smooth, with no individually noticeable scratches.
(31) Rinse thoroughly.
52
(Note: A Greenie® cup (and then point) and then Super Greenie® (and then point)is used in the same fashion that the Brownie® cup and point were used. The surface should again appear uniformly polished with no obvious scratches or pits. It should appear much shinier.)
(Note: If the amalgam is allowed to heat excessively at this point, mercury will rise to the surface which will compromise the final shine and weaken the surface.)
(32) Check to make sure that the restoration has a mirror-like finish.
(33) Clear the oral cavity of all debris from the finishing and polishing procedure.
EVALUATION AND CHARTING
(34) Evaluate the polished tooth to determine if the crucial parts of the filling have been preserved in the polishing procedure.
(35) The date is recorded.
(36) The entry is written in ink.
(37) Student signs record of services.
(38) Instructor will evaluate the polished restoration and initial the record of services.

53
11.0 Polishing Composite Restorations Procedure
I) Number of Tasks to Master = 29.
II) Intended Outcome: Given the necessary supplies and equipment to polish composite restorations, the student will perform the following tasks on six typodont or natural teeth with 100% accuracy. (Note: Three of the composite restorations must be a Class II with an interproximal contact.)
III) Tasks:
SETUP AND PATIENT PREPARATION
(1) Take universal precautions.
(2) Assemble the polishing composite restorations tray set up. (Note: In an actual office practice you may find some of the items are not used)
(a) PPE (b) Mouth mirror. (c) Explorer. (d) Slow-speed handpiece. (e) Appropriate mandrels and disks, cups, or points for the particular
system of abrasive polishing materials to be used. (f) Diamond polishing paste. (g) Air/water syringe. (h) Articulating paper and holder. (i) Finishing strips. (j) White stone. (k) Prophy angle. (l) Prophy cup. (m) 2 x 2 inch gauze. (n) Cotton rolls. (o) Unfilled resin bonding agent or a commercial composite sealer. (p) Curing light.
(3) Seat the patient.
(4) Review the patient’s medical history. Medical history is reviewed with parent if the patient is a minor.
(5) Explain the dental procedure to the patient.
(6) Determine if the restoration is acceptable for polishing.
(7) Check Occlusion
(8)

54
POLISHING PROCEDURE (9) The coarse disk is placed on the mandrel and the convex areas of the
restoration are polished until they have reached a uniform smoothness with no obvious deep scratches or gouges.
(10) The coarse points or cups are placed on the mandrel and the concave
areas of the restoration are polished to a uniform smoothness with no obvious deep scratches or gouges.
(11) Using the articulating paper, check to ensure that the optimal occlusal
contacts have not been lost.
(12) The medium disk and cup or point is then used in a like manner as above. (Note: The result should be significantly more glossy.)
(13) Check to ensure the occlusal contacts are still undisturbed.
(14) Using fine and very fine disks and cups or points to achieve the smoothest and glossiest surface possible.
(15) Check to ensure the occlusal contacts are still undisturbed.
(16) The prophy angle and a prophy cup are attached to the handpiece and a small amount of the diamond polishing paste is dispensed into a dappen dish and carried to the restoration.
(17) The restoration is then polished to a high luster with the diamond polishing paste.
(18) The restoration is rinsed and dried.
18- 20 ARE OPTIONAL STEPS
(19) The restoration and the cavosurface margins of the restoration are re-etched with 30% to 37% phosphoric acid gel for 15 seconds and thoroughly rinsed with copious amounts of water for 10 seconds.
(20) Unfilled resin (bonding agent) or a commercially prepared composite sealer is brushed over the entire surface of the restoration and the cavosurface margins.
(21) The sealer is then air thinned with the air/water syringe and cured for 10 to 20 seconds with the curing light.

55
EVALUATION AND CHARTING
(22) Evaluate the polished tooth to determine if the crucial parts of the filling have been preserved in the polishing procedure.
(23) Check if the interproximal contacts of the restoration have been maintained.
(24) Check that contours have been maintained.
(25) Check if the occlusal contact is adequate in centric occlusion. (26) Check the restoration surface to ensure the polish has been performed
accurately and if there have been any inadvertent gouges or scratches introduced during the polishing process.
(27) The date is recorded.
(28) The entry is written in ink.
(29) Student signs record of services.
(30) Instructor evaluates the polished restoration and initials the record of services.

56
12.0 Coronal Polishing Procedure
I) Number of Tasks to Master = 48.
II) Intended Outcome: Given the required armamentarium, didactic information, and a dental unit, the student will perform the following tasks on three adult patients and three children with mixed dentitions and with 100% accuracy.
(Note: Adult patients must have a minimum of 28 teeth with no supragingival calculus on the teeth, and pedo patients must have at least two fully erupted first molars and no supragingival calculus on the teeth.)
III) Tasks:
PREPARE SET UP
(1) Take universal precautions(PPE etc.). (2) Assemble the coronal polishing tray set up.
(a) Mouth mirror. (b) Explorer. (c) Dental floss and/or tape. (d) Dappen dish for disclosing solution. (e) Gauze 2 x 2s. (f) Cotton tip applicators (2). (g) Finger cup for holding prophylaxis paste. (h) Prophylaxis paste/polishing agent. (i) Lip lubricant. (j) Disposable prophylaxis cup and brush. (k) Handpiece with prophylaxis angle. (l) Saliva ejector. (m) Waste container or cup for disposal of floss, gauze, etc. (n) Patient bib and chain.
PREPARE PATIENT
(3) Seat the patient in the chair. Place bib on the patient. (4) Review the patient’s medical history. Medical history is reviewed with
parent if the patient is a minor. (5) Explain the coronal polishing procedure to the patient. Informed consent
is obtained. (6) Protective eyewear is placed on the patient.
57
(7) Complete a cursory exam on the patient. Check the lips, oral mucosa, and the face for any lesions or trauma that would contraindicate the polishing procedure.
PROCEDURE (8) Apply lip lubricant. Place disclosing solution in a dappen dish and dip
the cotton tip applicator in the solution. Glide the tip over all the surfaces of the teeth.
(9) Using the air/water syringe, place a small amount of water in the
patient’s mouth and have them swish. Use the saliva ejector to remove the water.
(NOTE: do not have the patient close lips on saliva ejector.) (10) Using a mouth mirror, direct and indirect vision, observe the areas where
plaque/stain are present. (11) Fill the rubber cup with the prophylaxis paste or agent of choice, and
place the paste over the tooth surfaces in the quadrant. (12) Begin on the distal surface of the most posterior tooth and move toward
the anterior. (Note: Begin on the maxillary or mandibular arch.) (13) Using a modified pen grasp and a fulcrum, bring the cup close to the
surface of the tooth. (14) Apply steady pressure with the foot to the rheostat using the toe to
activate the rheostat. Adjust the speed by using lighter pressure on the rheostat. (Note: Use the slowest r.p.m., i.e. 10-13 pounds of pressure is sufficient.)
(15) Apply the moving cup to the tooth surface for 1-2 seconds. Use light
pressure on the tooth to cause the cup’s edges to flare slightly. (16) Begin on the gingival third of the tooth and move toward the incisal
third of the tooth using a light brushing motion. (17) Turn the handpiece as required to keep the cup adapted to the tooth
surface as you move toward the distal and mesial interproximal surfaces. (18) Replenish the polishing agent as needed. (19) Move the cup to the next area using a light brushing (pat wipe) motion.

58
(20) Rinse the teeth and gingiva after completing the quadrant. Suction the mouth using the saliva ejector.
(21) Complete polishing on the remaining teeth. (22) Change the prophylaxis angle and replace the rubber cup with a bristle
brush. (23) Working in one quadrant at a time, place a small amount of paste on the
brush and distribute over the occlusal surfaces where plaque or stain are present.
(24) Retract the cheek with the mouth mirror. (25) Using a modified pen grasp, establish a fulcrum and bring the brush in
close contact with the tooth surface. (26) Apply steady pressure with the foot to the rheostat, using the toe to
activate the rheostat. Adjust the speed by using lighter pressure on the rheostat. (Note: Use the slowest speed r.p.m., i.e. 10-13 pounds of pressure is sufficient.)
(27) Apply the moving brush lightly to the occlusal surfaces for
approximately 3-4 seconds. (28) Using a short stroke in a brushing motion, follow the inclined planes of
the cusp as you polish. (29) Continue to move from tooth to tooth to prevent frictional heat. (30) Replenish polishing agent as needed. (31) Rinse the area and mouth frequently. (32) Complete all the occlusal surfaces. (33) Using the air/water syringe, place a small amount of water in the mouth
and have the patient swish. Use the saliva ejector to remove the water. (34) Using waxed or unwaxed floss, floss all the interproximal surfaces.
Change the floss as necessary. If necessary, use finishings strips or bridge threaders.

59
EVALUATE (35) Apply lip lubricant. Place disclosing solution on the teeth using a new
cotton tip applicator. (36) Using the air/water syringe, place a small amount of water in the
patient’s mouth and have the patient swish. Use the saliva ejector to remove the water.
(37) Using a mouth mirror, direct and indirect vision, check for any plaque or stain using the air/water syringe. Follow the same tooth sequence as for polishing.
(38) Direct the tip of the syringe toward the gingival margin of the tooth and
interproximal surfaces. Move the syringe tip over the surface of the tooth using a gentle stream of air. Remain on the tooth to dry the area sufficiently. Note any area(s) of plaque or stain.
(39) Remove areas of plaque or stain using the rubber cup or bristle brush. (40) Using the air/water syringe, place a small amount of water in the
patient’s mouth and have them swish. Use the saliva ejector to remove the water.
(41) Wipe off the area around the patient’s mouth and lips. Apply lip
lubricant. (42) Seat the patient upright. (43) Properly dispose of any gauze, floss, or excess materials. Clean off the
mouth mirror. (44) Aseptic technique is maintained throughout the entire procedure.
CHART THE PROCEDURE
(45) The date is recorded.
(46) The entry is written in ink.
(47) Student signs record of services. (48) Instructor evaluates polish and initials the record of services.

60
13.0 Placing Preformed Aluminum Temporary Crowns Procedure
I) Number of Tasks to Master = 22.
II) Intended Outcome: Given the necessary personnel, supplies, and equipment to fabricate a preformed aluminum temporary crowns, the student will perform the following tasks on two typodont teeth with 100% accuracy.
III) Tasks:
PRELIMINARY PROCEDURES
(1) Take universal precautions(PPE).
(2) Assemble the preformed aluminum temporary crown tray set up. (Note: In an actual office practice you may find some of the items are not used.)
(a) Typodont with prepared tooth. (b) Mouth mirror. (c) Explorer. (d) Articulating paper & holder. (e) Assortment of aluminum crowns. (f) Curved crown and bridge scissors. (g) Contouring pliers. (h) Dental floss. (i) Burnisher. (j) Cotton rolls. (k) Lubricant. (l) Polishing devices. (m) Temporary cement. (n) Mixing pad and spatula.
CROWN PROCEDURE
(3) Check occlusion.
(4) Visually and tactually locate the margin line of the prep.
(5) Measure the mesiodistal space at the contact area.
(6) Select the appropriate aluminum temporary crown (should be slightly large).
(7) Try-in the crown.
(8) Check the mesiodistal space.
(9) Check the facial and lingual contours.
61
(10) Scribe a trim line for trimming the finish line and trim/contour the crown to fit the preparation. NOTE: If margin is trimmed short, select another crown.
(11) Reduce the circumference of the crown margin by crimping and smooth the edges of the crown.
(12) Check marginal adaptation of temporary crown with an explorer from the gingival to the occlusal surface.
(13) Check the occlusion and interproximal contacts if needed.
(14) Use a ball burnisher to increase the size to accomplish contact if needed.
(15) Smooth the crown.
(16) Cement the temporary crown.
(17) Remove excess cement around the crown margin and excess cement interproximally with knotted floss(removing horizontally ).
(18) Make final check for occlusion.
CHARTING AND EVALUATION
(19) The date is recorded.
(20) The entry is written in ink.
(21) Student signs record of services.
(22) Instructor evaluates crown and initials the record of services.

62
14.0 Placing a Preformed Plastic Temporary Crown Procedure
II) Number of Tasks to Master = 26.
III) Intended Outcome: Given the necessary personnel, supplies and equipment to fabricate a preformed plastic temporary crown, the student will perform the following tasks on two anterior typodont teeth with 100% accuracy.
IV) Tasks:
PRELIMINARY PROCEDURES
(1) Take universal precautions(PPE).
(2) Assemble the preformed plastic temporary crown tray set up. (Note: In an actual office practice you may find some of the items are not used.)
(a) Typodont with prepared tooth. (b) Mouth mirror. (c) Explorer. (d) Excavator. (e) Articulating paper & holder. (f) Assortment of preformed polycarbonate temporary crowns. (g) Acrylic/carbide burs. (h) Sharpened soft lead pencil. (i) Curved crown and bridge scissors. (j) Cotton rolls. (k) Lubricant. (l) Dappen dish. (m) Acrylic resin kit. (n) 2 x 2 gauze. (o) Mixing spatula. (p) Polishing devices. (q) Temporary cement. (r) Mixing pad. (s) Dental floss. (t) Boley gauge.
CROWN PROCEDURE
(3) Check the occlusion.
(4) Visually and tactually locate the margin line on prep.
(5) Measure the mesiodistal space at the contact area.
(6) Select the appropriate preformed plastic crown.
63
(7) Try-in the crown.
(8) Adjust the binding with a round carbide bur if needed.
(9) Adjust the gingival length of the margin and contour of the crown with an acrylic bur.
(10) Lubricate the prep with vasoline.
(11) Mix the polymer and monomer.
(12) Fill the crown with the acrylic resin.
(13) Seat the filled crown on the preparation when the material has lost its sheen and is of doughy consistency.
(14) Remove crown and trim excess resin with scissors and reseat crown during polymerization process.
(15) Trim the crown margin.
(16) Adjust facial and lingual contours and adjust occlusion/incisal length.
(17) Refine contours and interproximal areas.
(18) Check and adjust the contacts with floss.
(19) Refine and polish the crown surfaces.
(20) Final check of marginal fit, interproximal contacts and occlusion.
(21) Cement the crown on the preparation.
(22) Remove excess cement around the crown margin and excess cement interproximally with knotted floss (removing horizontally).
(23) Final check of occlusion.
EVALUATION AND CHARTING
(24) The date is recorded.
(25) The entry is written in ink.
(26) Student signs record of services.
(27) Instructor evaluates crown and initials the record of services.

64
15.0 Placing a Custom Resin Temporary Crown Procedure
II) Number of Tasks to Master = 24.
III) Intended Outcome: Given the necessary personnel, supplies and equipment to fabricate a custom resin temporary crown, the student will perform the following tasks on one posterior and one anterior typodont tooth with 100% accuracy.
IV) Tasks:
PRELIMINARY PROCEDURES
(1) Take universal precautions(PPE).
(2) Assemble the custom resin temporary crown tray set up. (Note: In an actual office practice you may find some of the items are not used.)
(a) Typodont with prepared tooth. (b) Mouth mirror. (c) Explorer. (d) Articulating paper & holder. (e) Assortment of quadrant impression trays. (f) Impression material set-up. (g) Mixing impression material armamentarium. (h) Acrylic resin kit. (i) Dappen dish. (j) Curved crown and bridge scissors. (k) Spoon excavator. (l) Assortment of acrylic burs. (m) Polishing devices. (n) Lubricant. (o) Dental floss. (p) Cotton rolls. (q) 2 x 2 gauze. (r) Temporary cement kit. (s) Mixing pad. (t) Lathe (optional). (u) Rag wheel (optional).
CROWN PROCEDURE
(3) Check the occlusion.
(4) Take an impression of the unprepared tooth.
(5) Place prepared tooth in the typodont.

65
(6) Reseat impression to check placement.
(7) Visually and tactually locate the margin line on the prep.
(8) Mix resin (if using methyl methacrylate, mix thoroughly, the monomer (liquid) in its pure form is toxic to the tooth.
(9) Lubricate the tooth with vasoline.
(10) Place resin mixture in impression and place on typodont with prepared tooth when acrylic has lost its sheen and is doughy
(11) Wait 3-5 minutes.
(12) Remove resin crown from impression and examine then remove marginal excess from crown with scissors.
(13) Reseat until hard.(some types do not require this).
(14) Check the contacts with floss, check the marginal adaptation and contours of the crown.
(15) Check occlusion.
(16) Adjust as needed with acrylic bur.
(17) Smooth and polish the crown.
(18) Cement the crown.
(19) Remove excess cement around the crown margin and excess cement interproximally with knotted floss (removing horizontally).
(20) Final check of occlusion.
EVALUATION AND CHARTING
(21) The date is recorded.
(22) The entry is written in ink.
(23) Student signs record of services.
(24) Instructor evaluates crown and initials the record of services.
66
16.0 Obtaining an Alginate Impression Procedure
I) Number of Tasks to Master = 57.
II) Intended Outcome: Given the necessary didactic instruction, supplies and equipment to obtain an alginate impression the student will perform the following tasks on one adult and one child (with mixed dentition) with 100 % accuracy.
III) Tasks:
PRELIMINARY PROCEDURES
(1) Take universal precautions.
(2) Assemble the alginate impression tray set up.
(a) Alginate material. (b) Water measure. (c) Powder scoop. (d) Paper cup. (e) Water. (f) Flexible bowl. (g) Alginate spatula.
(3) Seat the patient and place patient bib.
(4) Review patient’s medical history. If patient is a minor, review medical history with the parent or guardian of the patient.
(5) Explain the procedure to the patient.
(6) Inspect the mouth.
(7) Instruct the patient.
(8) Rinse the mouth.
(9) Prepare tray.
(10) Select maxillary and mandibular trays.
(11) Install the wax on the maxillary and mandibular trays.
ALGINATE PROCEDURE
(12) Measure required amount of room temperature water for the mandibular impression.
(13) Fluff alginate powder.

67
(14) Measure powder as indicated by the manufacturer.
(15) Fill powder with scoop, tap to eliminate air pockets, level and place in a bowl.
(16) Replace alginate lid.
(17) Combine water and powder as indicated by the manufacturer.
(18) Mix until creamy. Total mixing time should not exceed one minute.
(19) Gather the alginate on the spatula.
(20) Load the mandibular tray from the sides in two increments. Wet finger and smooth the surface of the alginate material. (Optional, wipe small amount of alginate onto the occlusal surfaces of the mandibular teeth just prior to seating the tray to minimize trapping bubbles . Note: Loading time should be approximately 30 seconds.)
(21) Instruct the patient to rinse just prior to taking the impression.
(22) Position yourself between 8 and 9 o’clock.
(23) The patient’s shoulder should be at the same height as the operator’s elbow.
(24) Hold the tray in one hand and, with the other hand, retract the cheek.
(25) Insert the loaded tray.
(26) Ask the patient to raise their tongue.
(27) Depress the tray, posterior to anterior.
(28) Ask the patient to relax the cheeks and lip with the index fingers; place the thumbs under the mandible.
(29) Instruct the patient to breathe deeply through their nose.
(30) When the material is set, run your fingers around the peripheral border to break the seal, protect their upper teeth with your index finger of your left hand and remove with one firm movement or snap.
(31) Rinse, disinfect, wrap, and bag.
(32) Measure required amount of room temperature water for maxillary impressions.
(33) Measure powder as indicated by manufacturer.

68
(34) Fill powder with scoop, tap to eliminate air pockets, level and place in bowl.
(35) Replace alginate lid.
(36) Combine water and powder as indicated by the manufacturer.
(37) Mix until creamy. Total mixing time should not exceed one minute.
(38) Gather the alginate on the spatula.
(39) Load the maxillary tray from the back in one increment. Wet finger and smooth the surface of the alginate material. (Optional: Wipe small amount of alginate onto the occlusal surfaces of the maxillary teeth just prior to seating the tray to minimize trapping bubbles. Note: Loading time should be approximately 30 seconds.)
(40) The operator’s elbow should be at the same height as the patient's shoulder.
(41) Position yourself between 9 and 12 o’clock (right handed operators).
(42) Hold the tray in one hand, and with the other hand retract the cheek as you seat the tray.
(43) Seat the posterior of the tray firmly toward the maxillary teeth. (This will expel the material forward instead of down the throat.)
(44) Continue seating the anterior portion of the tray, lifting the upper lip to free it from the tray (the patient should relax cheek and lips).
(45) Instruct the patient to tip head forward to prevent flow down the throat.
(46) When the material is set, lift the cheeks to break the seal, protect the opposing teeth, separate with one firm continuous motion.
(47) Rinse, disinfect, wrap, and bag.
(48) Create a tongue space on the mandibular.
(49) Mix one scoop of alginate.
(50) Wipe it on the middle two fingers of your non-dominate hand.
(51) Place the mandibular alginate tray; handle towards the heel of the hand, over the alginate. Use the heel of the hand to support the tray handle.
(52) Using moistened fingers of your dominant hand, join the alginate to the lingual borders of the impression, creating a smooth, flat floor.
69
(53) Hold the tray in place until set.
(54) Gently free the fingers, wrap and bag.
EVALUATION AND CHARTING
(55) Check for a satisfactory mandibular and maxillary alginate impression.
(a) The tray was seated so all detail is reproduced, including the teeth, the complete peripheral turn and a portion of the retromolar pads and maxillary tuberosity.
(b) The detail is sharp, not blurred or indistinct. (c) The impression is free of voids in critical areas. (d) The impression is free of large folds of alginate extending into the
patient’s throat. (e) There are no areas where the alginate has pulled away from the tray. (f) The impression is free of rips and tears, except in interproximal
areas. (g) The alginate covers the tray (no unwaxed tray is visible through the
alginate). (h) The alginate is free of bulges or depressions that indicate a
sub-surface bubble. (i) The alginate is smooth, not sponge-like or grainy. (j) The tongue space is smooth, flat and does not overlap the impression
(mandibular only). (k) The palatal arch is visible (maxillary only).
(54) The date is recorded. (55) The entry is written in ink. (56) Student signs record of services. (57) Instructor evaluates impressions and initials the record of services.
70
16.0 Pit and Fissure Sealant Procedure
I) Number of Tasks to Master = 31.
II) Intended Outcome: Given the required armamentarium, didactic information and a dental unit, the student will perform the following tasks on three permanent maxillary molars and three permanent mandibular molars with 100% proficiency.
III) Tasks:
PREPARE SET UP
(1) Take universal precautions.
(2) Assemble the pit and fissure sealant tray set up. (Note: In an actual office practice you may find some of the items are not used.)
(a) Patient bib and 3-way syringe. (b) Evacuator tips. (c) Isolation materials: 2x2 gauze, cotton rolls, and cotton
pellets. (d) Rubber dam or Garmer clamps. (e) Slow speed handpiece. (f) Prophylaxis brush. (g) Flour of pumice. (h) Acid etch, brush, or syringe. (i) Sealant material, sealant applicator. (j) Curing light. (k) Dental floss. (l) Articulating paper. (m) Fluoride. PREPARE PATEIENT
(3) Seat the patient in the dental chair and place patient bib.
(4) Review patient’s medical history. If patient is a minor, review medical history with the parent or guardian of the patient.
(5) Explain sealant procedure to the patient.
(6) Protective eyewear is placed on the patient.
(7) Select and check the teeth that have been diagnosed for sealants by a dentist. ** A signed permission slip is mandatory.
71
SEALANT PROCEDURE
(8) Pumice surface(s) of each tooth designated with a disposable prophy brush on a slow speed handpiece.
(9) Using the 3-way syringe, rinse the tooth thoroughly for 15 to 20 seconds.
(10) Check the tooth surface, with an explorer, for any remaining pumice. Remove and rinse again if necessary.
(11) Isolate the tooth by using a rubber dam or cotton rolls with or without a garmer clamp. Dry thoroughly.
(12) Apply acid etch the tooth for 10-60 seconds.(See manufacturers directions).The etch should be applied 2-3 millimeters beyond the area to be sealed. ** Deciduous teeth should be etched for up to 60 additional seconds.
(13) Rinse the tooth for 20-30 seconds using a steady stream of water or spray. Hold the HVE close to the tooth when rinsing off the acid etch.
(14) Re-isolate tooth again (if needed) being careful not to contaminate it with saliva or other debris.
(15) Dry tooth for 20-30 seconds and check etched surface for opaqueness prior to continuing the process.
(16) Apply sealant material to the prepared pits and grooves of the tooth using the technique in which you were taught.
(17) Activate polymerization with the curing light for up to 60 seconds.
(18) Check completed application of the sealant with an explorer.
(19) Re-apply sealant material to any area that did not fully seal or exhibits a ‘bubble’ or other defect. ** Adding more sealant material without re-etching is permissible if tooth remains uncontaminated.
(20) If re-application is necessary, follow the same curing procedure.
(21) Rinse tooth gently with water or wipe with a cotton pellet.
(22) Remove isolation materials.
(23) Check patient’s occlusion with articulating paper.
(24) Inform the patient if the occlusion needs to be adjusted. Adjust occlusion as necessary with a finishing bur in the slow speed handpiece.

72
(25) Apply fluoride to the tooth that has been sealed.
(26) Give post-operative instructions to the patient regarding the importance of evaluating the sealants every six months.
EVALUATION AND CHARTING
(27) Chart the complete procedure in the patient’s chart.
(28) The date is recorded.
(29) The entry is written in ink.
(30) Student signs record of services.
(31) Instructor evaluates sealant and initials the record of services.
73
18.0 Removal of Orthodontic Cements or Resins with a High Speed Handpiece Procedure
IV) Tasks to Master = 40.
V) Intended Outcome: Given the necessary supplies and equipment for removing orthodontic resin cements with a high speed handpiece, the student will perform the following tasks with 100% accuracy. NOTE: THE PROCEDURES FOR RMOVAL OF ORTHODONTIC CEMENTS CAN ONLY BE DONE IN AN OFFICE UNDER DIRECT SUPERVISION OF A DENTIST
VI) Tasks:
SET UP AND PATIENT PREPARATION
(1) Take universal precautions.
(2) Assemble the tray set up. (Note: In an actual office practice you may find some of these items are not used.)
(a) Mouth mirror. (b) Explorer. (c) Cotton pliers. (d) High-speed handpiece. (e) Cotton rolls or other isolation materials. (f) High volume evacuator/saliva ejector. (g) 3-way syringe tip. (h) Appropriate finishing bur (i) Abrasive rotary disk.
(3) Seat and drape the patient. Place protective eyewear.
(4) Explain the dental procedure to the patient.
(5) Place PPE
REMOVING ORTHODONTIC CEMENTS ON A DENTOFORM
(1) Select abrasive device for removal gross removal of cement and place in handpiece.
(2) Using a modified pen grasp and a stable fulcrum, bring the device close to the surface of the tooth.
(3) Apply steady pressure to the foot control to activate the handpiece. (4) Keeping the abrasive device parallel to the tooth surface, remove cement
with a continuous sweeping movement. Use a light touch. (5) Continue removal watching for color and texture changes indicating
approach to enamel. (6) Do not remove to the level of the enamel.
74
(7) Select appropriate adhesive devise(abrasive impregnated rubber point, non-crosscut finishing bur, or other conservative abrasive device) and place in the handpiece.
(8) Using a modified pen grasp and a stable fulcrum, bring the device close to the surface of the tooth.
(9) Apply steady pressure to the foot control to activate the handpiece. Run at near stall speed.
(10) Keeping the abrasive device parallel to the tooth surface remove cement with a continuous sweeping movement. Use a light touch.
(11) Remove the remainder of the adhesive. (12) Check tooth with explorer. (13) Have dentist evaluate procedure.
GROSS REMOVAL ONLY OF ORTHODONTIC CEMENTS ON A PATIENT
(1) While the under direct observation by the dentist. (2) Select abrasive device for removal gross removal of cement and place in
handpiece. (3) Using a modified pen grasp and a stable fulcrum, bring the device close
to the surface of the tooth. (4) Apply steady pressure to the foot control to activate the handpiece. (5) Keeping the abrasive device parallel to the tooth surface, remove cement
with a continuous sweeping movement. Use a light touch. (6) Continue removal watching for color and texture changes indicating
approach to enamel. (7) Do not remove to the level of the enamel. (8) The dentist completes final adhesive removal.
COMPLETE REMOVAL OF ORTHODONTIC CEMENTS ON A PATIENT
(1) While the under direct observation by the dentist. (2) Select abrasive device for removal gross removal of cement and place in
handpiece. (3) Using a modified pen grasp and a stable fulcrum, bring the device close to
the surface of the tooth. (4) Apply steady pressure to the foot control to activate the handpiece. (5) Keeping the abrasive device parallel to the tooth surface, remove cement
with a continuous sweeping movement. Use a light touch. (6) Continue removal watching for color and texture changes indicating
approach to enamel. (7) Do not remove to the level of the enamel. (8) Select appropriate adhesive devise(abrasive impregnated rubber point, non-
crosscut finishing bur, or other conservative abrasive device) and place in the handpiece.

75
(9) Using a modified pen grasp and a stable fulcrum, bring the device close to the surface of the tooth.
(10) Apply steady pressure to the foot control to activate the handpiece. Run at near stall speed.
(11) Keeping the abrasive device parallel to the tooth surface remove cement with a continous sweeping movement. Use a light touch.
(12) Remove the remainder of the adhesive. (13) Check tooth with explorer.
Have dentist evaluate procedure.

76
Table 9. Educational Parameters of the Clinical/Lab Component of the Expanded Functions Dental Assisting Curriculum: Final Skills Evaluation
Unit Title 10 Finishing and Polishing Amalgam Restorations Procedure 11 Polishing Composite Restorations Procedure 12 Coronal Polishing Procedure 13 Placing a Preformed Aluminum Temporary Crown Procedure 14 Placing a Preformed Plastic Temporary Crown Procedure 15 Placing a Preformed Resin Temporary Crown Procedure 16 Obtaining an Alginate Impression Procedure 17 Pit and Fissure Sealants 18 Removal of Orthodontic Cements or Resins with a High Speed Handpiece Procedure

77
Expanded Functions Competency-Based Clinical/Laboratory Evaluation
10.0 Finishing and Polishing Amalgam Restorations Procedure Student Name: _________________________________________________________________ Lab Evaluator: _________________________ Date ______________ Grade: [ ] Pass [ ] Fail CL Evaluator: __________________________ Date ______________ Grade [ ] Pass [ ] Fail Intended Outcome: Given the necessary supplies and equipment for finishing and polishing amalgam restorations, the student will perform the following tasks on six typodont or natural teeth with 100% accuracy. The student will perform the following tasks on one adult tooth with a Class II amalgam restoration on the final laboratory examination. Time allotment: 30 minutes.
Tasks Clinical / Laboratory
Pass Fail
Clinical Examination
Pass Fail 1. Take universal precautions. 2. Assemble the finishing and polishing amalgam
restorations procedure tray set up. (Note: In an actual office practice you may find some of these items are not used.) Mouth mirror. Slow-speed handpiece. Cotton rolls. Cotton pliers. High volume evacuator. Saliva ejector. 3-way syringe. Round finishing bur (#4 or #6). Abrasive rotary disk (medium). Mandrel for the disk. Articulating paper. Articulating paper holder. Dental floss.
3. Seat the patient and place patient bib.

78
Tasks Clinical /
Laboratory Pass Fail
Clinical Examination
Pass Fail 4. Review patient’s medical history. If patient is a
minor, review medical history with the parent or guardian of the patient.
5. Explain the procedure to the patient. 6. Add the following 10 items to the above
armamentarium list to polish an amalgam restoration with pumice and tin oxide/Shofu® points. Prophy angle. Two prophy cups. Flour of pumice. Tin oxide powder (anhydrous). Dental tape. Ethyl alcohol. Dappen dish. OR Brownie® points and cups. Greenie® points and cups. Super Greenie® points and cups.
7. Evaluate the selected restoration for polishing. 8. Check the occlusion by first, drying the teeth, and
then, having the patient tap his teeth together on articulating paper held with the articulating paper holder.
9. Isolate the tooth with the restoration to be polished by cotton rolls or a rubber dam.
10. Place the #4 or #6 round finishing bur in the slow speed handpiece and use it to smooth the occlusal cavosurface margins.
11. Smooth the occlusal surface. 12. Place the mandrel for the rotary abrasive disk in
the slow-speed handpiece, attach the disk, and proceed to finish the interproximal areas.
13. Smooth the facial and lingual surfaces of the restoration. Use and abrasive disk for convex surfaces and a finishing bur for concave surfaces.
14. Mix the flour of pumice to a creamy consistency in a dappen dish.

79
Tasks Clinical / Laboratory
Pass Fail
Clinical Examination
Pass Fail 15. Using a prophy cup on a prophy angle, pumice all
the restoration surfaces.
16. Determine when the pumicing step is finished by the satiny smooth appearance of the restoration.
17. Use the dental tape to pumice the interproximal surfaces of the restoration.
18. Rinse and floss all the residue of pumice from the mouth.
19. Polish with tin oxide powder that has been mixed in a clean dappen dish with water or ethyl alcohol.
20. Use a new prophy cup to polish the restoration in order to prevent pumice residue in the cup from marring the new amalgam surface.
21. Use the same stroke that was used during the pumice procedure with the tin oxide but with the hand piece run at a faster speed.
22. Buff the tin oxide into the interproximal areas with dental tape.
23. Check the final polish. (Note: The restoration will have ahas a mirror-like finish.)
24. Rinse the residual tin oxide thoroughly from the mouth.
25. If it is desired, use dry tin oxide to exact an even higher shine.
OR 26. Polish with abrasive points and cups. 27. Place the Brownie® cup in the hand piece and run
at a slow-speed over all convex surfaces of the restoration.
28. Employ an on-and-off motion while using all abrasive points/cups in order to avoid overheating the tooth.
29. Place the Brownie® point in the slow-speed handpiece and run in the same manner as the cup in the concave surfaces of the restoration.
30. Check to make sure that the surface appears velvety smooth, with no individually noticeable scratches.
31. First, place a Super Greenie® point and then a Super Greenie® cup in the slow speed handpiece and, with the same on-off touch, run at the highest speed possible with the slow-speed handpiece.
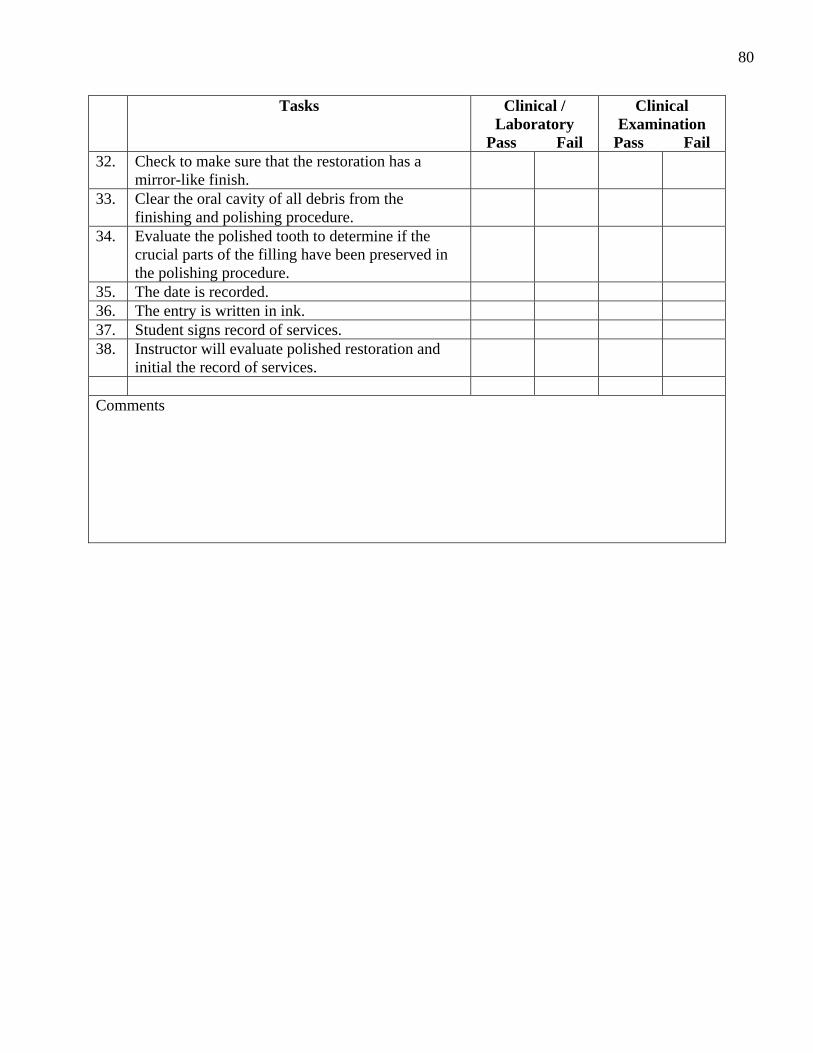
80
Tasks Clinical / Laboratory
Pass Fail
Clinical Examination
Pass Fail 32. Check to make sure that the restoration has a
mirror-like finish.
33. Clear the oral cavity of all debris from the finishing and polishing procedure.
34. Evaluate the polished tooth to determine if the crucial parts of the filling have been preserved in the polishing procedure.
35. The date is recorded. 36. The entry is written in ink. 37. Student signs record of services. 38. Instructor will evaluate polished restoration and
initial the record of services.
Comments
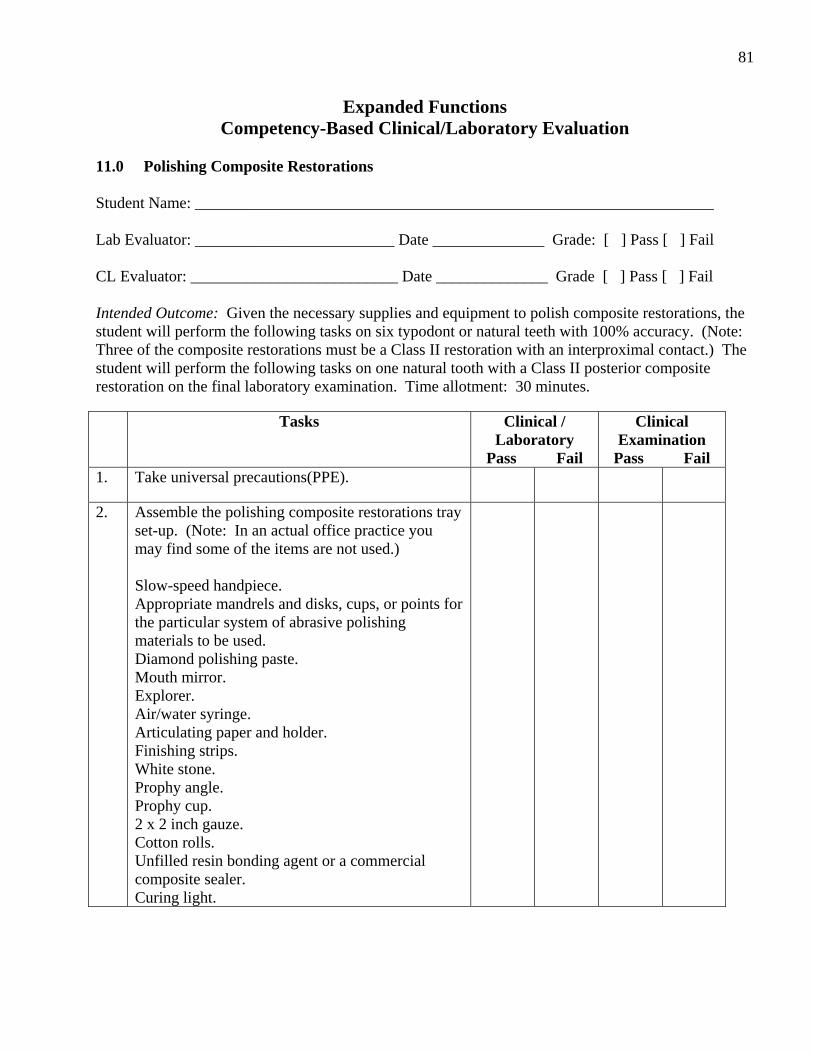
81
Expanded Functions Competency-Based Clinical/Laboratory Evaluation
11.0 Polishing Composite Restorations Student Name: _________________________________________________________________ Lab Evaluator: _________________________ Date ______________ Grade: [ ] Pass [ ] Fail CL Evaluator: __________________________ Date ______________ Grade [ ] Pass [ ] Fail Intended Outcome: Given the necessary supplies and equipment to polish composite restorations, the student will perform the following tasks on six typodont or natural teeth with 100% accuracy. (Note: Three of the composite restorations must be a Class II restoration with an interproximal contact.) The student will perform the following tasks on one natural tooth with a Class II posterior composite restoration on the final laboratory examination. Time allotment: 30 minutes.
Tasks Clinical / Laboratory
Pass Fail
Clinical Examination
Pass Fail 1. Take universal precautions(PPE).
2. Assemble the polishing composite restorations tray set-up. (Note: In an actual office practice you may find some of the items are not used.) Slow-speed handpiece. Appropriate mandrels and disks, cups, or points for the particular system of abrasive polishing materials to be used. Diamond polishing paste. Mouth mirror. Explorer. Air/water syringe. Articulating paper and holder. Finishing strips. White stone. Prophy angle. Prophy cup. 2 x 2 inch gauze. Cotton rolls. Unfilled resin bonding agent or a commercial composite sealer. Curing light.

82
Tasks Clinical /
Laboratory Pass Fail
Clinical Examination
Pass Fail 3. Seat the patient in the dental chair and place
patient bib.
4. Review patient’s medical history. If patient is a minor, review medical history with the parent or guardian of the patient.
5. Explain the procedure to the patient. 6. Determine if the restoration is acceptable for
polishing.
7. Check occlusion. 8. 9 10. 8. The coarse disk is placed on the mandrel and the
convex areas of the restoration are polished until they have reached a uniform smoothness with no obvious deep scratches or gouges.
9. The coarse points or cups are placed on the mandrel and the concave areas of the restoration are polished to a uniform smoothness with no obvious deep scratches or gouges.
10. Using the articulating paper, check to ensure that the optimal occlusal contacts have not been lost.
11. The medium disk and cup or point is then used in a like manner as above.
12. Check to ensure the occlusal contacts are still undisturbed.
13. Using fine and very fine disks and cups or points to achieve the smoothest and glossiest surface possible.
14. Check to ensure the occlusal contacts are still undisturbed.
15. The prophy angle and a prophy cup are attached to the handpiece and a small amount of the diamond polishing paste is dispensed into a dappen dish and carried to the restoration.
16. The restoration is then polished to a high luster with the diamond polishing paste.
17. The restoration is rinsed and dried.
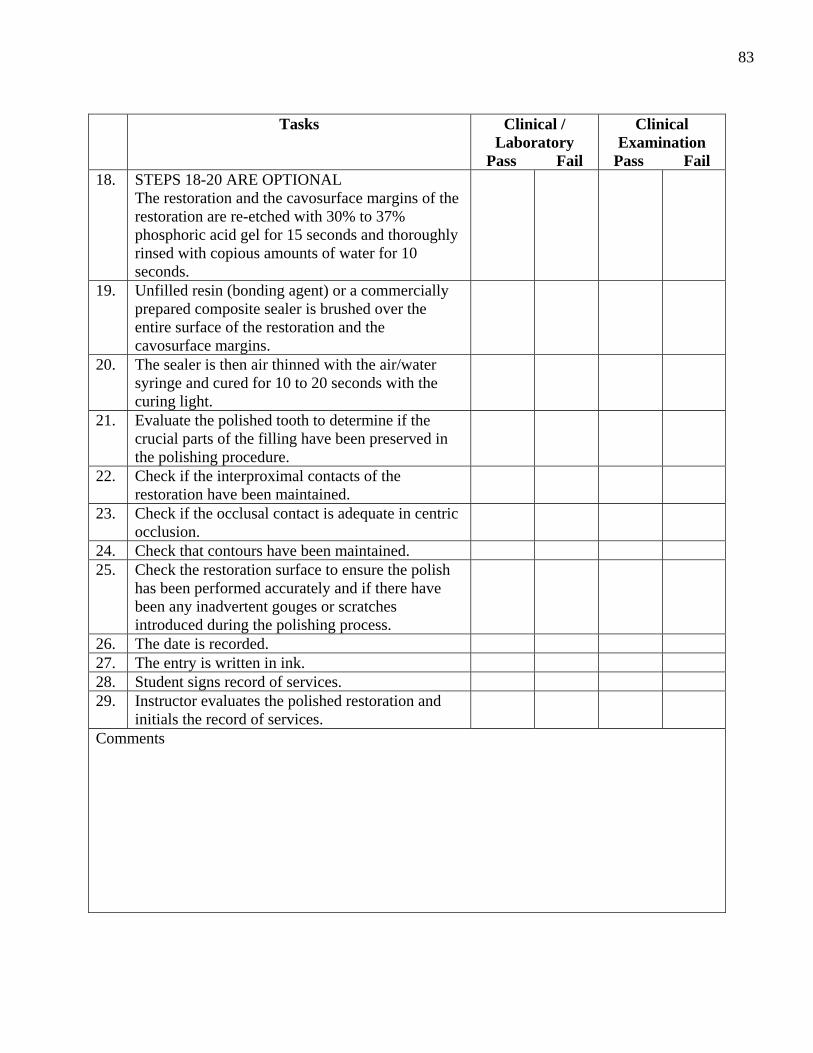
83
Tasks Clinical /
Laboratory Pass Fail
Clinical Examination
Pass Fail 18. STEPS 18-20 ARE OPTIONAL
The restoration and the cavosurface margins of the restoration are re-etched with 30% to 37% phosphoric acid gel for 15 seconds and thoroughly rinsed with copious amounts of water for 10 seconds.
19. Unfilled resin (bonding agent) or a commercially prepared composite sealer is brushed over the entire surface of the restoration and the cavosurface margins.
20. The sealer is then air thinned with the air/water syringe and cured for 10 to 20 seconds with the curing light.
21. Evaluate the polished tooth to determine if the crucial parts of the filling have been preserved in the polishing procedure.
22. Check if the interproximal contacts of the restoration have been maintained.
23. Check if the occlusal contact is adequate in centric occlusion.
24. Check that contours have been maintained. 25. Check the restoration surface to ensure the polish
has been performed accurately and if there have been any inadvertent gouges or scratches introduced during the polishing process.
26. The date is recorded. 27. The entry is written in ink. 28. Student signs record of services. 29. Instructor evaluates the polished restoration and
initials the record of services.
Comments
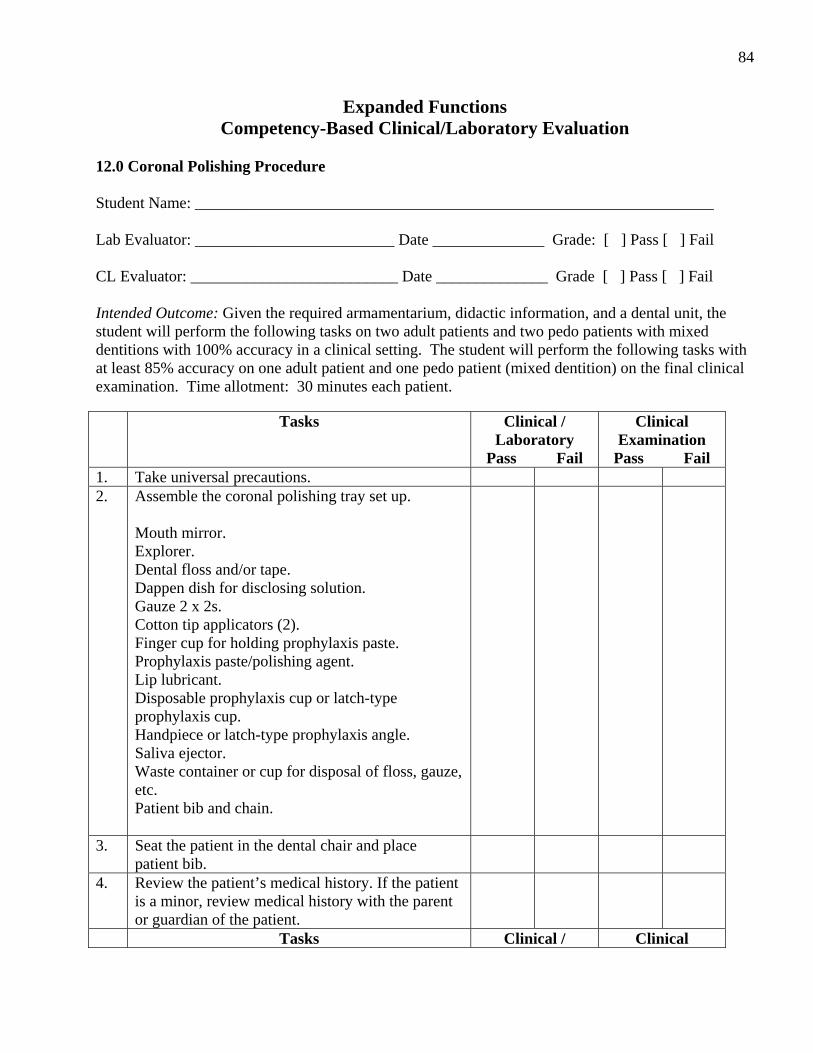
84
Expanded Functions Competency-Based Clinical/Laboratory Evaluation
12.0 Coronal Polishing Procedure Student Name: _________________________________________________________________ Lab Evaluator: _________________________ Date ______________ Grade: [ ] Pass [ ] Fail CL Evaluator: __________________________ Date ______________ Grade [ ] Pass [ ] Fail Intended Outcome: Given the required armamentarium, didactic information, and a dental unit, the student will perform the following tasks on two adult patients and two pedo patients with mixed dentitions with 100% accuracy in a clinical setting. The student will perform the following tasks with at least 85% accuracy on one adult patient and one pedo patient (mixed dentition) on the final clinical examination. Time allotment: 30 minutes each patient.
Tasks Clinical / Laboratory
Pass Fail
Clinical Examination
Pass Fail 1. Take universal precautions. 2. Assemble the coronal polishing tray set up.
Mouth mirror. Explorer. Dental floss and/or tape. Dappen dish for disclosing solution. Gauze 2 x 2s. Cotton tip applicators (2). Finger cup for holding prophylaxis paste. Prophylaxis paste/polishing agent. Lip lubricant. Disposable prophylaxis cup or latch-type prophylaxis cup. Handpiece or latch-type prophylaxis angle. Saliva ejector. Waste container or cup for disposal of floss, gauze, etc. Patient bib and chain.
3. Seat the patient in the dental chair and place patient bib.
4. Review the patient’s medical history. If the patient is a minor, review medical history with the parent or guardian of the patient.
Tasks Clinical / Clinical
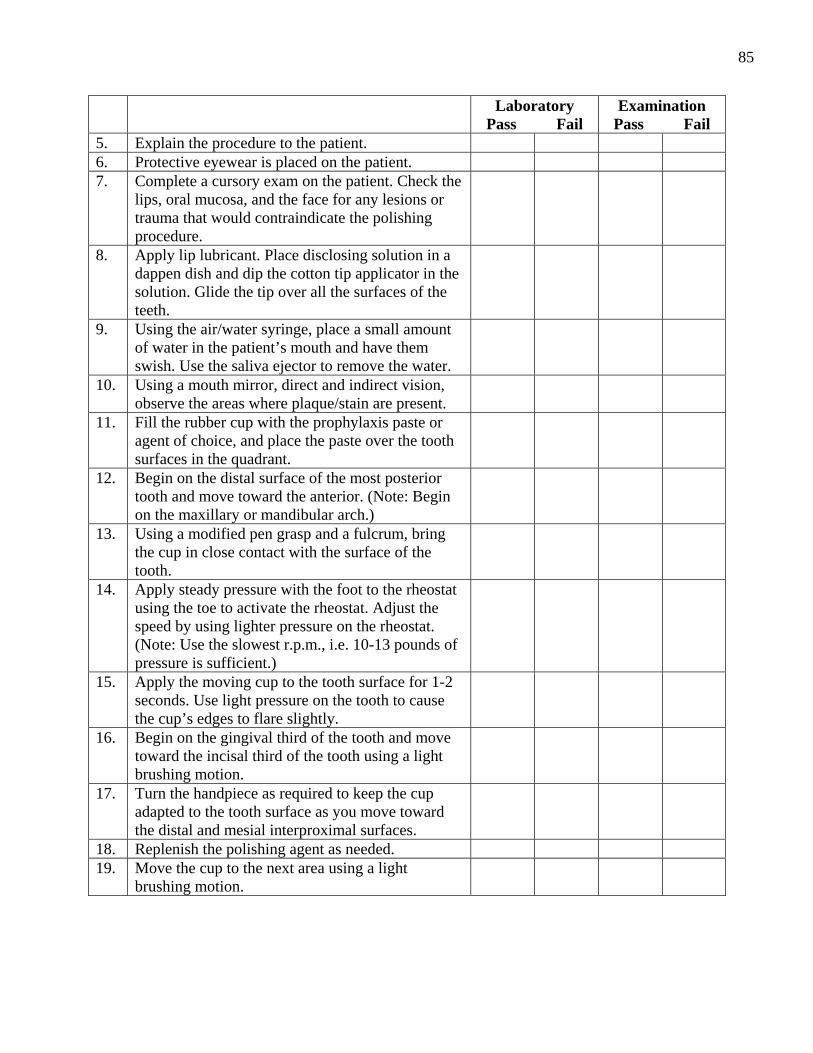
85
Laboratory Pass Fail
Examination Pass Fail
5. Explain the procedure to the patient. 6. Protective eyewear is placed on the patient. 7. Complete a cursory exam on the patient. Check the
lips, oral mucosa, and the face for any lesions or trauma that would contraindicate the polishing procedure.
8. Apply lip lubricant. Place disclosing solution in a dappen dish and dip the cotton tip applicator in the solution. Glide the tip over all the surfaces of the teeth.
9. Using the air/water syringe, place a small amount of water in the patient’s mouth and have them swish. Use the saliva ejector to remove the water.
10. Using a mouth mirror, direct and indirect vision, observe the areas where plaque/stain are present.
11. Fill the rubber cup with the prophylaxis paste or agent of choice, and place the paste over the tooth surfaces in the quadrant.
12. Begin on the distal surface of the most posterior tooth and move toward the anterior. (Note: Begin on the maxillary or mandibular arch.)
13. Using a modified pen grasp and a fulcrum, bring the cup in close contact with the surface of the tooth.
14. Apply steady pressure with the foot to the rheostat using the toe to activate the rheostat. Adjust the speed by using lighter pressure on the rheostat. (Note: Use the slowest r.p.m., i.e. 10-13 pounds of pressure is sufficient.)
15. Apply the moving cup to the tooth surface for 1-2 seconds. Use light pressure on the tooth to cause the cup’s edges to flare slightly.
16. Begin on the gingival third of the tooth and move toward the incisal third of the tooth using a light brushing motion.
17. Turn the handpiece as required to keep the cup adapted to the tooth surface as you move toward the distal and mesial interproximal surfaces.
18. Replenish the polishing agent as needed. 19. Move the cup to the next area using a light
brushing motion.

86
Tasks Clinical /
Laboratory Pass Fail
Clinical Examination
Pass Fail 20. Rinse the teeth and gingiva after completing the
quadrant. Suction the mouth using the saliva ejector.
21. Complete polishing on the remaining teeth. 22. Change the prophylaxis angle and replace the
rubber cup with a bristle brush.
23. Working in one quadrant at a time, place a small amount of paste on the brush and distribute over the occlusal surfaces where plaque or stain are present.
24. Retract the cheek with the mouth mirror. 25. Using a modified pen grasp, establish a fulcrum
and bring the brush in close contact with the tooth surface.
26. Apply steady pressure with the foot to the rheostat, using the toe to activate the rheostat. Adjust the speed by using lighter pressure on the rheostat. (Note: Use the slowest speed r.p.m., i.e. 10-13 pounds of pressure is sufficient.)
27. Apply the moving brush lightly to the occlusal surfaces for approximately 3-4 seconds.
28. Using a short stroke in a brushing motion, follow the inclined planes of the cusp as you polish.
29. Continue to move from tooth to tooth to prevent frictional heat.
30. Replenish polishing agent as needed. 31. Rinse the area and mouth frequently. 32. Complete all the occlusal surfaces. 33. Using the air/water syringe, place a small amount
of water in the mouth and have the patient swish. Use the saliva ejector to remove the water.
34. Using waxed or unwaxed floss, floss all the interproximal surfaces. Change the floss as necessary. If necessary, use finishings strips or bridge threaders.
35. Apply lip lubricant. Place disclosing solution on the teeth using a new cotton tip applicator.
36. Using the air /water syringe, place a small amount of water in the patient’s mouth and have the patient swish. Use the saliva ejector to remove the water.
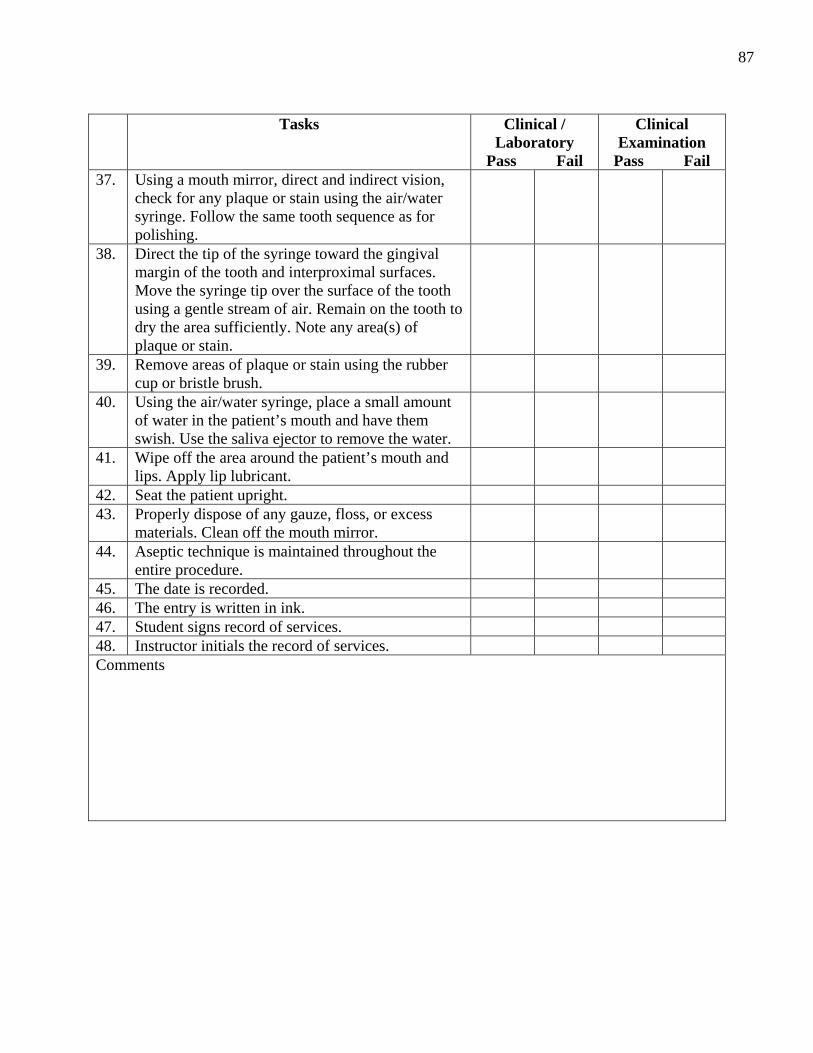
87
Tasks Clinical /
Laboratory Pass Fail
Clinical Examination
Pass Fail 37. Using a mouth mirror, direct and indirect vision,
check for any plaque or stain using the air/water syringe. Follow the same tooth sequence as for polishing.
38. Direct the tip of the syringe toward the gingival margin of the tooth and interproximal surfaces. Move the syringe tip over the surface of the tooth using a gentle stream of air. Remain on the tooth to dry the area sufficiently. Note any area(s) of plaque or stain.
39. Remove areas of plaque or stain using the rubber cup or bristle brush.
40. Using the air/water syringe, place a small amount of water in the patient’s mouth and have them swish. Use the saliva ejector to remove the water.
41. Wipe off the area around the patient’s mouth and lips. Apply lip lubricant.
42. Seat the patient upright. 43. Properly dispose of any gauze, floss, or excess
materials. Clean off the mouth mirror.
44. Aseptic technique is maintained throughout the entire procedure.
45. The date is recorded. 46. The entry is written in ink. 47. Student signs record of services. 48. Instructor initials the record of services. Comments

88
Expanded Functions Competency-Based Clinical/Laboratory Evaluation
13.0 Placing Preformed Aluminum Temporary Crowns Procedure Student Name: _________________________________________________________________ Lab Evaluator: _________________________ Date ______________ Grade: [ ] Pass [ ] Fail CL Evaluator: __________________________ Date ______________ Grade [ ] Pass [ ] Fail Intended Outcome: Given the necessary personnel, supplies and equipment to fabricate a preformed aluminum temporary crown, the student will perform the following tasks on two typodont teeth with 100% accuracy in a laboratory setting. The student will perform the following tasks on a typodont tooth with at least 85% accuracy on the final laboratory examination. Time allotment: 1 hour.
Tasks Clinical / Laboratory
Pass Fail
Clinical Examination
Pass Fail 1. Take universal precautions. 2. Assemble the preformed aluminum temporary
crown tray set up. (Note: In an actual office practice you may find some of these items are not used.) Typodont with prepared tooth. Mouth mirror. Explorer. Articulating paper & holder. Assortment of aluminum crowns. Curved crown and bridge scissors. Contouring pliers. Dental floss. Burnisher. Cotton rolls. Lubricant. Polishing devices. Temporary cement. Mixing pad and spatula.
3. Check occlusion. 4. Visually and tactually locate the margin line.
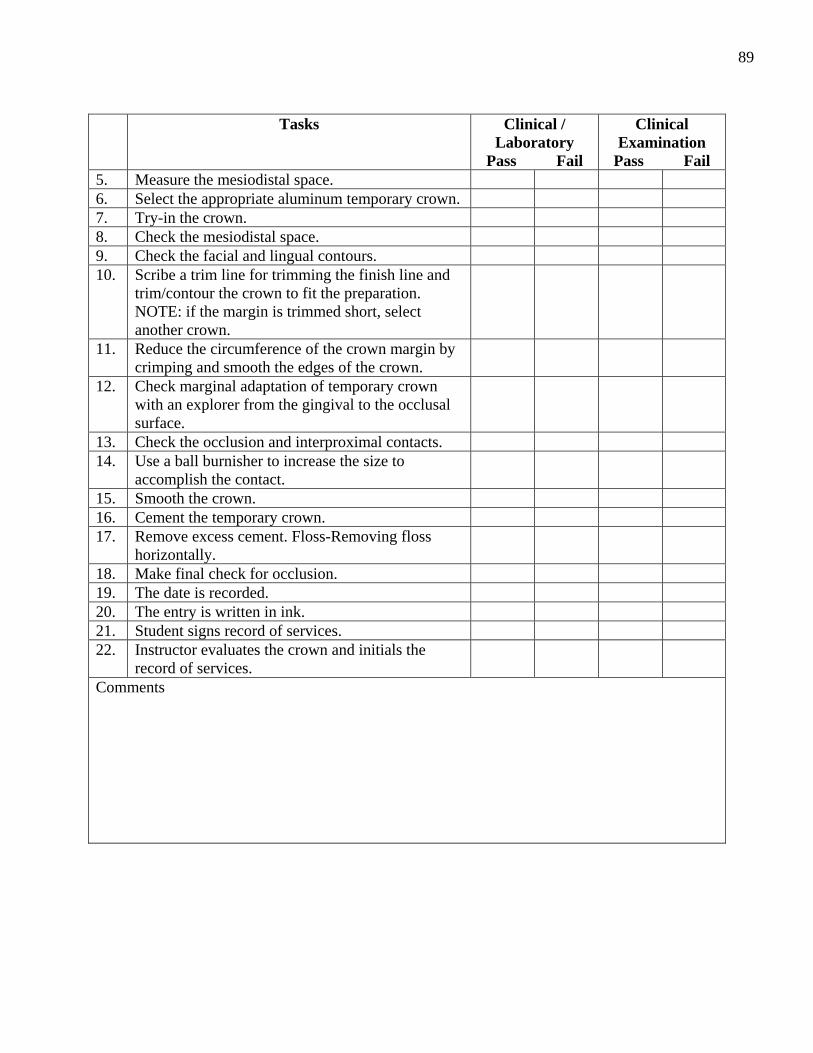
89
Tasks Clinical /
Laboratory Pass Fail
Clinical Examination
Pass Fail 5. Measure the mesiodistal space. 6. Select the appropriate aluminum temporary crown. 7. Try-in the crown. 8. Check the mesiodistal space. 9. Check the facial and lingual contours. 10. Scribe a trim line for trimming the finish line and
trim/contour the crown to fit the preparation. NOTE: if the margin is trimmed short, select another crown.
11. Reduce the circumference of the crown margin by crimping and smooth the edges of the crown.
12. Check marginal adaptation of temporary crown with an explorer from the gingival to the occlusal surface.
13. Check the occlusion and interproximal contacts. 14. Use a ball burnisher to increase the size to
accomplish the contact.
15. Smooth the crown. 16. Cement the temporary crown. 17. Remove excess cement. Floss-Removing floss
horizontally.
18. Make final check for occlusion. 19. The date is recorded. 20. The entry is written in ink. 21. Student signs record of services. 22. Instructor evaluates the crown and initials the
record of services.
Comments

90
Expanded Functions Competency-Based Clinical/Laboratory Evaluation
14.0 Placing a Preformed Plastic Temporary Crown Procedure Student Name: ______________________________________________________________ Lab Evaluator: ______________________ Date ______________ Grade: [ ] Pass [ ] Fail CL Evaluator: _______________________ Date ______________ Grade [ ] Pass [ ] Fail Intended Outcome: Given the necessary personnel, supplies and equipment to fabricate a preformed plastic temporary crown, the student will perform the following tasks on two posterior typodont teeth with 100% accuracy in a laboratory setting. The student will perform the following tasks on two anterior typodont teeth with at least 85% accuracy on the final laboratory examination. Time allotment: 1 hour.
Tasks Clinical / Laboratory
Pass Fail
Clinical Examination
Pass Fail 1. Take universal precautions. 2. Assemble the preformed plastic temporary crown
tray set up. (Note: In an actual office practice you may find some of these items are not used.) Typodont with prepared tooth. Mouth mirror. Explorer. Excavator. Articulating paper & holder. Assortment of preformed polycarbonate temporary crowns. Acrylic/carbide burs. Sharpened soft lead pencil. Curved crown and bridge scissors. Cotton rolls. Lubricant. Dappen dish. Acrylic resin kit. 2 x 2 gauze. Mixing spatula. Polishing devices. Temporary cement. Mixing pad. Dental floss. Boley gauge.

91
Tasks Clinical / Laboratory
Pass Fail
Clinical Examination
Pass Fail 3. Check occlusion. 4. Visually and tactually locate the margin line. 5. Measure the mesiodistal space at the contact area. 6. Select the appropriate preformed plastic crown. 7. Try-in the crown. 8. Adjust the binding with a round carbide bur if
needed.
9. Adjust the gingival length of the margin and contour of the crown with an acrylic bur.
10. Lubricate the preparation with vasoline. 11. Mix the polymer and monomer creating an
exothermic reaction.
12. Fill the crown with the acrylic resin. 13. Seat the filled crown on the preparation when the
material has lost its sheen and is of doughy consistency.
14. Remove the crown and trim excess resin with scissors and reseat crown during polymerization process.
15. Trim the crown margin. 16. Adjust facial and lingual contours and adjust
occlusion/incisal length.
17. Refine contours and interproximal areas. 18. Check and adjust the contacts with floss. 19. Refine and polish the crown surfaces. 20. Final check of marginal fit, interproximal contacts
and occlusion.
21. Cement the crown on the preparation. 22. Remove excess cement around the crown margin
and excess cement interproximally with floss (removing vertically).
23. Final check of occlusion. 24. The date is recorded. 25. The entry is written in ink. 26. Student signs record of services. 27. Instructor evaluates the crown and initials the
record of services.
Comments.

92
Expanded Functions Competency-Based Clinical/Laboratory Evaluation
15.0 Placing a Custom Resin Temporary Crown Procedure Student Name: ______________________________________________________________ Lab Evaluator: ______________________ Date ______________ Grade: [ ] Pass [ ] Fail CL Evaluator: _______________________ Date ______________ Grade [ ] Pass [ ] Fail Intended Outcome: Given the necessary personnel, supplies and equipment to fabricate a custom resin temporary crown, the student will perform the following tasks on one posterior and one anterior typodont tooth with 100% accuracy in a laboratory setting. The student will perform the following tasks on one anterior typodont tooth with at least 85% accuracy on the final laboratory examination. Time allotment: 1 hour.
Tasks Clinical / Laboratory
Pass Fail
Clinical Examination
Pass Fail 1. Take universal precautions. 2. Assemble the custom resin temporary crown tray
set up. (Note: In an actual office practice you may find some of these items are not used.) Typodont with prepared tooth. Mouth mirror. Explorer. Articulating paper & holder. Assortment of quadrant impression trays. Impression material set-up. Mixing impression material armamentarium. Acrylic resin kit. Dappen dish. Curved crown and bridge scissors. Spoon excavator. Assortment of acrylic burs. Polishing devices. Lubricant. Dental floss. Cotton rolls. 2 x 2 gauze. Temporary cement kit. Mixing pad. Lathe (optional). Rag wheel (optional).
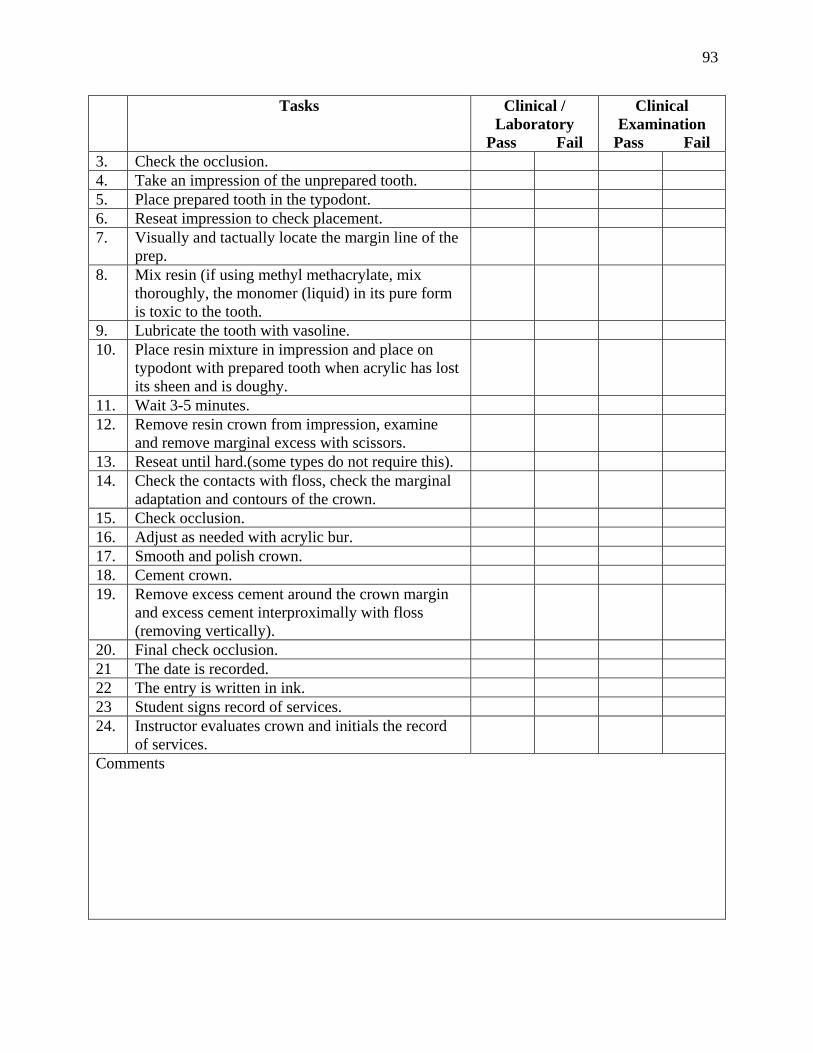
93
Tasks Clinical / Laboratory
Pass Fail
Clinical Examination
Pass Fail 3. Check the occlusion. 4. Take an impression of the unprepared tooth. 5. Place prepared tooth in the typodont. 6. Reseat impression to check placement. 7. Visually and tactually locate the margin line of the
prep.
8. Mix resin (if using methyl methacrylate, mix thoroughly, the monomer (liquid) in its pure form is toxic to the tooth.
9. Lubricate the tooth with vasoline. 10.
Place resin mixture in impression and place on typodont with prepared tooth when acrylic has lost its sheen and is doughy.
11. Wait 3-5 minutes. 12. Remove resin crown from impression, examine
and remove marginal excess with scissors.
13. Reseat until hard.(some types do not require this). 14. Check the contacts with floss, check the marginal
adaptation and contours of the crown.
15. Check occlusion. 16. Adjust as needed with acrylic bur. 17. Smooth and polish crown. 18. Cement crown. 19. Remove excess cement around the crown margin
and excess cement interproximally with floss (removing vertically).
20. Final check occlusion. 21 The date is recorded. 22 The entry is written in ink. 23 Student signs record of services. 24. Instructor evaluates crown and initials the record
of services.
Comments
94
Expanded Functions Competency-Based Clinical/Laboratory Evaluation
16.0 Obtaining an Alginate Impression Procedure Student Name: ______________________________________________________________ Lab Evaluator: ______________________ Date ______________ Grade: [ ] Pass [ ] Fail CL Evaluator: _______________________ Date ______________ Grade [ ] Pass [ ] Fail Intended Outcome: Given the necessary didactic instruction, supplies and equipment to obtain an alginate impression, the student will perform the following tasks on a partner with 100% accuracy in a clinical setting. The student will perform the following tasks on two adult patients with at least 85% accuracy on the final clinical examination. Time allotment: 50 minutes.
Tasks Clinical / Laboratory
Pass Fail
Clinical Examination
Pass Fail 1. Take universal precautions. 2. Assemble the alginate impression tray set up.
Alginate material. Water measure. Powder scoop. Paper cup. Water. Flexible bowl. Alginate spatula.
3. Seat the patient and place patient bib. 4. Review patient’s medical history. If patient is a
minor, review medical history with the parent or guardian of the patient.
5. Explain the procedure to the patient. 6. Inspect the mouth. 7. Instruct the patient. 8. Rinse the mouth. 9. Prepare tray. 10. Select maxillary and mandibular trays. 11. Install the wax on the maxillary and mandibular
trays.
12. Measure required amount of room temperature water mandibular impression.
95
Tasks Clinical / Laboratory
Pass Fail
Clinical Examination
Pass Fail 13. Fluff alginate powder. 14. Measure powder as indicated by the manufacturer. 15. Fill powder with scoop, tap to eliminate air
pockets, level and place in a bowl.
16. Replace alginate lid. 17. Combine water and powder as indicated by the
manufacturer.
18. Mix until creamy. Total mixing time should not exceed one minute.
19. Gather the alginate on the spatula. 20. Load tray from the sides in two increments. Wet
finger and smooth the surface of the alginate material. (Optional, wipe small amount of alginate onto the occlusal surfaces of the mandibular teeth just prior to seating the tray to minimize trapping bubbles . Note: Loading time should be approximately 30 seconds.)
21. Instruct the patient to rinse just prior to taking the impression.
22. Position yourself between 8 and 9 o’clock. 23. The patient’s shoulder should be at the same height
as the operator’s elbow.
24. Hold the tray in one hand and, with the other hand retract the cheek.
25. Insert the loaded tray. 26. Ask the patient to raise their tongue. 27. Depress the tray, posterior to anterior. 28. Ask the patient to relax the cheeks and lip with the
index fingers; place the thumbs under the mandible.
29. Instruct the patient to breathe deeply through their nose.
30. When the material is set, run your fingers around the peripheral border to break the seal, protect their upper teeth with your index finger of your left hand and remove with one firm movement or snap.
31. Measure required amount of room temperature water for maxillary impressions.
32. Measure powder as indicated by manufacturer. 33. Fill powder with scoop, tap to eliminate air
pockets, level and place in bowl.
34. Replace alginate lid. Tasks Clinical / Clinical

96
Laboratory Pass Fail
Examination Pass Fail
35. Combine water and powder as indicated by the manufacturer.
36. Mix until creamy. Total mixing time should not exceed one minute.
37. Gather the alginate on the spatula. 38. Load the tray from the back in one or two
increments. Wet finger and smooth the surface of the alginate material. (Optional: Wipe small amount of alginate onto the occlusal surfaces of the maxillary teeth just prior to seating the tray to minimize trapping bubbles. Note: Loading time should be approximately 30 seconds.)
39. The operator’s elbow should be at the same height as the patient's shoulder.
40. Position yourself between 9 and 12 o’clock (right handed operators).
41. Hold the tray in one hand, and with the other hand retract the cheek as you seat the tray.
42. Seat the posterior of the tray firmly toward the maxillary teeth. (This will expel the material forward instead of down the throat.)
43. Continue seating the anterior portion of the tray, lifting the upper lip to free it from the tray (the patient should relax cheek and lips).
44. Instruct the patient to tip head forward to prevent flow down the throat.
45. When the material is set, lift the cheeks to break the seal, protect the opposing teeth, separate with one firm continuous motion.
46. Create a tongue space on the mandibular. 47. Mix one scoop of alginate. 48. Wipe it on the middle two fingers of your non-
dominate hand.
49. Place the mandibular alginate tray; handle towards the heel of the hand, over the alginate. Use the heel of the hand to support the tray handle.
50. Using moistened fingers of your dominant hand, join the alginate to the lingual borders of the impression, creating a smooth, flat floor.
51. Hold the tray in place until set. 52. Gently free the fingers, wrap, and bag.

97
Tasks Clinical /
Laboratory Pass Fail
Clinical Examination
Pass Fail 53. Check for a satisfactory maxillary and mandibular
alginate impression.
54. The date is recorded. 55. The entry is written in ink. 56. Student signs record of services. 57. Instructor initials the record of services. Comments
98
Expanded Functions
Competency-Based Clinical/Laboratory Evaluation 17.0 Pit and Fissure Sealants Student Name: ______________________________________________________________ Lab Evaluator: ______________________ Date ______________ Grade: [ ] Pass [ ] Fail CL Evaluator: _______________________ Date ______________ Grade [ ] Pass [ ] Fail Intended Outcome: Given the required armamentarium, didactic information and a dental unit, the student will perform the following tasks on three permanent maxillary molars and three permanent mandibular molars with 100% proficiency. The student will perform the following tasks on one permanent molar tooth with at least 85% accuracy on the final clinical examination. Time allotment: 30 minutes.
Tasks Clinical / Laboratory
Pass Fail
Clinical Examination
Pass Fail 1. Take universal precautions 2. Assemble the pit and fissure procedure tray set up
(Note: In an actual office practice you may find some of these items are not used): Patient bib and 3-way syringe Evacuator tips Isolation materials: 2x2 gauze, cotton rolls, and cotton pellets Rubber dam or Garmer clamps Slow speed handpiece Prophylaxis brush Flour of pumice Acid etch, brush, or syringe Sealant material, sealant applicator Curring light Dental floss Articulating paper Fluoride
3. Seat the patient and place patient bib 4. Review patient’s medical history. If patient is a
minor, review medical history with the parent or guardian of the patient
5. Explain the procedure to the patient 6. Protective eyewear is placed on the patient
99
Tasks Clinical / Laboratory
Pass Fail
Clinical Examination
Pass Fail 8. Pumice surface(s) of each tooth designated with a
disposable prophy brush on a slow speed handpiece
9. Using the 3-way syringe, rinse the tooth thoroughly for 15-20 seconds
10. Check the tooth surface, with an explorer, for any remaining pumice. Remove and rinse again if necessary.
11. Re-isolate the tooth as needed and dry thoroughly 12. Apply acid etch to the tooth for 20-60 seconds.
The etch should be applied 2-3 millimeters beyond the area to be sealed. **Deciduous teeth should be etched for up to 60 seconds
13. Rinse the tooth for 20-30 seconds using a steady stream of water or spray. Hold the HVE close to the tooth when rinsing off the acid etch
14. Re-isolate tooth again (if needed) being careful not to contaminate it with saliva or other debris
15. Dry tooth for 10-20 seconds and check etched surface for opaqueness prior to continuing the process
16. Apply sealant material to the prepared pits and grooves of the tooth using the technique in which you were taught
17. Activate polymerization with the curing light for up to 60 seconds
18. Check completed application of the sealant with an explorer
19. Re-apply sealant material to any area that did not fully seal or exhibits a ‘bubble’ or other defect. **Adding more sealant material without re-etching is permissible if tooth remains uncontaminated
20. If re-application is necessary, follow the same curing procedure
21. Rinse tooth gently with water or a cotton pellet 22. Remove isolation materials 23. Check patient’s occlusion with articulating paper 24. Inform the patient if the occlusion needs to be
adjusted. Adjust occlusion as necessary with a finishing bur in the slow speed handpiece
25. Apply fluoride to the tooth that has been sealed 26. Give post-operative instructions to the patient
regarding the importance of evaluating the sealants

100
every six months. 27. Chart the complete procedure in the patient’s chart 28. The date is recorded 29. The entry is written in ink 30. Student signs record of services 31. Instructor initials the record of services. Comments
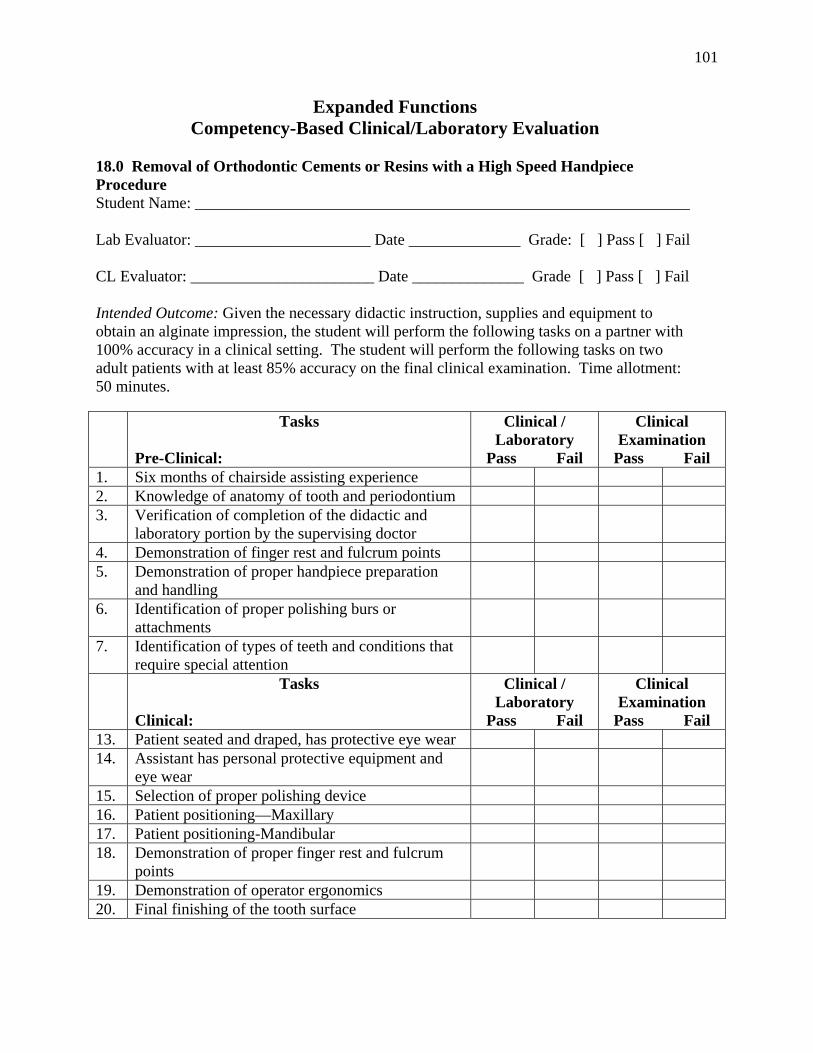
101
Expanded Functions Competency-Based Clinical/Laboratory Evaluation
18.0 Removal of Orthodontic Cements or Resins with a High Speed Handpiece Procedure Student Name: ______________________________________________________________ Lab Evaluator: ______________________ Date ______________ Grade: [ ] Pass [ ] Fail CL Evaluator: _______________________ Date ______________ Grade [ ] Pass [ ] Fail Intended Outcome: Given the necessary didactic instruction, supplies and equipment to obtain an alginate impression, the student will perform the following tasks on a partner with 100% accuracy in a clinical setting. The student will perform the following tasks on two adult patients with at least 85% accuracy on the final clinical examination. Time allotment: 50 minutes.
Tasks
Pre-Clinical:
Clinical / Laboratory
Pass Fail
Clinical Examination
Pass Fail 1. Six months of chairside assisting experience 2. Knowledge of anatomy of tooth and periodontium 3. Verification of completion of the didactic and
laboratory portion by the supervising doctor
4. Demonstration of finger rest and fulcrum points 5. Demonstration of proper handpiece preparation
and handling
6. Identification of proper polishing burs or attachments
7. Identification of types of teeth and conditions that require special attention
Tasks
Clinical:
Clinical / Laboratory
Pass Fail
Clinical Examination
Pass Fail 13. Patient seated and draped, has protective eye wear 14. Assistant has personal protective equipment and
eye wear
15. Selection of proper polishing device 16. Patient positioning—Maxillary 17. Patient positioning-Mandibular 18. Demonstration of proper finger rest and fulcrum
points
19. Demonstration of operator ergonomics 20. Final finishing of the tooth surface

102
EXPANDED FUNCTIONS
COMPETENCY-BASED CLINICAL FINAL EVALUATION
10.0 Polishing an Amalgam Restoration- Product Student Name_________________________________________ Date ________________ Evaluator____________________________________________ Grade________________ Intended Outcome: Given the necessary personnel, supplies and equipment to polish a class II posterior amalgam restoration , the student will perform the following tasks on one typodont or natural tooth with 85% accuracy on the final examination (16 points out of 18). Time allotment 30 minutes. Grading Criteria: 2 = Acceptable 1 = Improvable 0 = unacceptable 1.
Crown contact the adjacent teeth Mesial/Distal
2.
Contours are maintained in the same plane as adjacent teeth Facial Lingual Occlusal/Incisal
3.
Restoration is smooth, no gouges or scratches.
4. No ditching or microfractures at the margins.
5. No damage to adjacent teeth or tissue.
6. Restoration is highly polished.
7. All excess abrasive is removed.
TOTAL
Comments:

103
EXPANDED FUNCTIONS
COMPETENCY-BASED CLINICAL FINAL EVALUATION
11.0 Polishing a Composite Restoration- Product Student Name_________________________________________ Date ________________ Evaluator____________________________________________ Grade________________ Intended Outcome: Given the necessary personnel, supplies and equipment to polish a class II posterior composite restoration , the student will perform the following tasks on one typodont or natural tooth with 85% accuracy on the final examination (16 points out of 18). Time allotment 30 minutes. Grading Criteria: 2 = Acceptable 1 = Improvable 0 = unacceptable 1.
Crown contact the adjacent teeth Mesial/Distal
2.
Contours are maintained in the same plane as adjacent teeth Facial Lingual Occlusal/Incisal
3.
Restoration is smooth, no gouges or scratches.
4. No ditching or microfractures at the margins.
5. No damage to adjacent teeth or tissue.
6. Restoration is highly polished.
7. All excess abrasive is removed.
TOTAL
Comments:
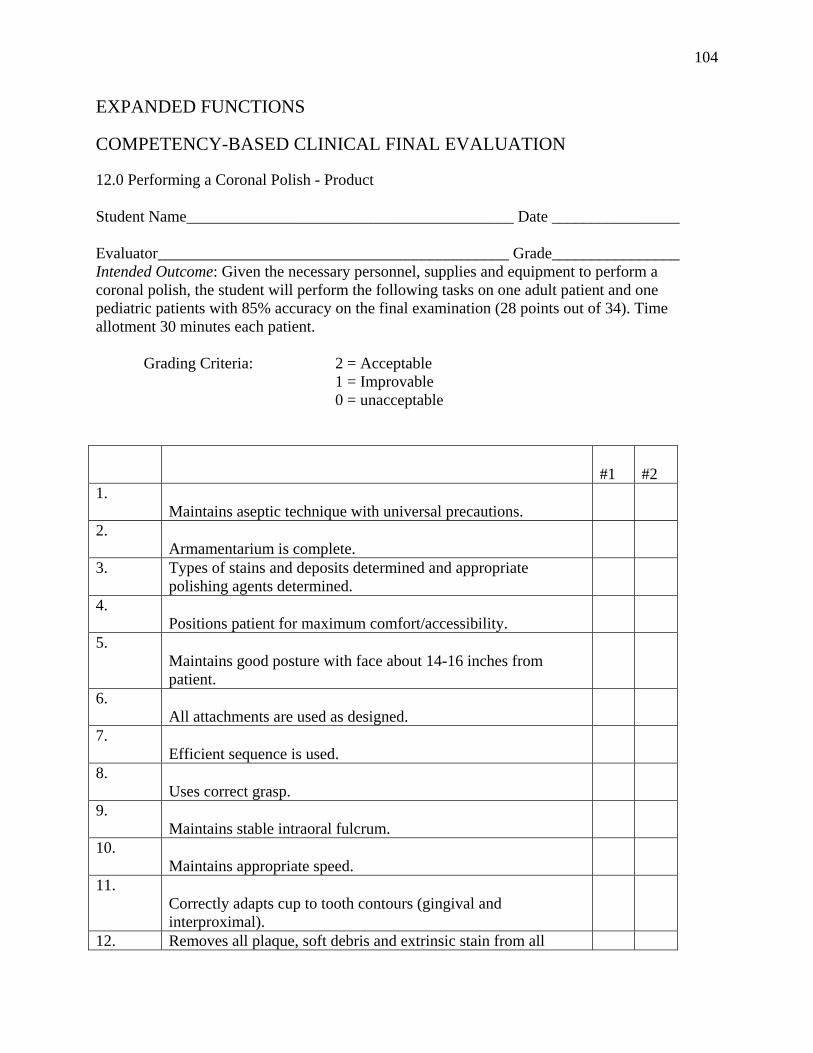
104
EXPANDED FUNCTIONS
COMPETENCY-BASED CLINICAL FINAL EVALUATION
12.0 Performing a Coronal Polish - Product Student Name_________________________________________ Date ________________ Evaluator____________________________________________ Grade________________ Intended Outcome: Given the necessary personnel, supplies and equipment to perform a coronal polish, the student will perform the following tasks on one adult patient and one pediatric patients with 85% accuracy on the final examination (28 points out of 34). Time allotment 30 minutes each patient. Grading Criteria: 2 = Acceptable 1 = Improvable 0 = unacceptable
#1
#2
1.
Maintains aseptic technique with universal precautions.
2.
Armamentarium is complete.
3.
Types of stains and deposits determined and appropriate polishing agents determined.
4.
Positions patient for maximum comfort/accessibility.
5.
Maintains good posture with face about 14-16 inches from patient.
6.
All attachments are used as designed.
7.
Efficient sequence is used.
8.
Uses correct grasp.
9.
Maintains stable intraoral fulcrum.
10.
Maintains appropriate speed.
11.
Correctly adapts cup to tooth contours (gingival and interproximal).
12. Removes all plaque, soft debris and extrinsic stain from all

105
clinical crowns. **This step is required to pass procedure.**
13.
Produces no tissue trauma.
14.
Complete chart entry.
TOTAL
Comments:

106
COMPETENCY-BASED CLINICAL FINAL EVALUATION
13.0 Placing Preformed Aluminum Temporary Crowns -Product Student Name_________________________________________ Date ________________ Evaluator____________________________________________ Grade________________ Intended Outcome: Given the necessary personnel, supplies and equipment to fabricate a preformed aluminum temporary crown, the student will perform the following tasks on one molar typodont tooth with 85% accuracy on the final examination (17 points out of 20). Time allotment: 45 minutes. Grading Criteria points: 2 = Acceptable 1 = Improvable 0 = unacceptable
1.
Crown contacts with the adjacent teeth Mesial Distal
2.
Contours are in the same plane as adjacent teeth Facial Lingual Occlusal
3.
Crown margins are no more than .05mm short of the preparation line Buccal /Lingual Interproximal
4. Crown fits snuggly against the finish line
5. At least one centric mark is consistent with adjacent teeth.
6. Crown surfaces are smooth
TOTAL
Comments:

107
EXPANDED FUNCTIONS
COMPETENCY-BASED CLINICAL FINAL EVALUATION
14.0 Placing Preformed Plastic Temporary Crowns Product Student Name_________________________________________ Date ________________ Evaluator____________________________________________ Grade________________ Intended Outcome: Given the necessary personnel, supplies and equipment to fabricate a preformed plastic temporary crown, the student will perform the following tasks on one anterior typodont tooth with 85% accuracy on the final examination (17 points out of 20). Time allotment 45 minutes. Grading Criteria: 2 = Acceptable 1 = Improvable 0 = unacceptable
1.
Crown contacts with the adjacent teeth Mesial Distal
2.
Contours are in the same plane as adjacent teeth Facial Lingual Occlusal/Incisal
3.
Crown margins are no more than .05mm short of the preparation line Buccal /Lingual Interproximal
4. Crown finish line is tapered
5. At least one centric mark is consistent with adjacent teeth.
6. Crown surfaces are smooth
TOTAL
Comments:
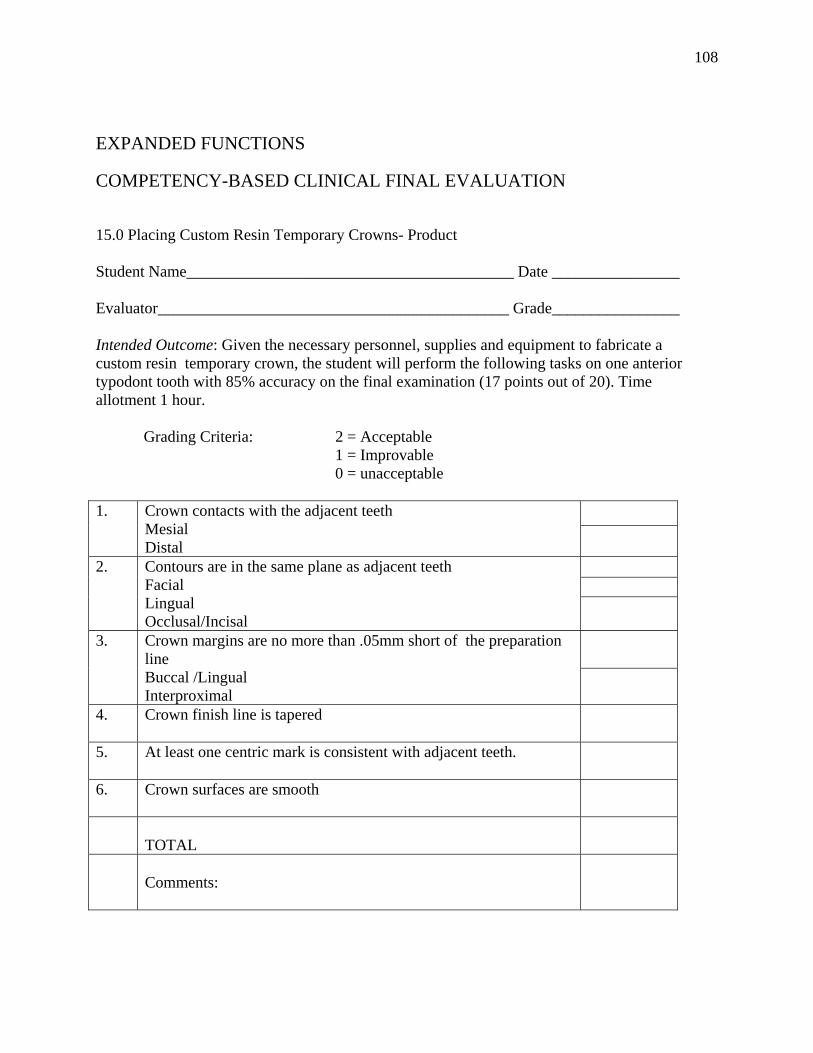
108
EXPANDED FUNCTIONS
COMPETENCY-BASED CLINICAL FINAL EVALUATION
15.0 Placing Custom Resin Temporary Crowns- Product Student Name_________________________________________ Date ________________ Evaluator____________________________________________ Grade________________ Intended Outcome: Given the necessary personnel, supplies and equipment to fabricate a custom resin temporary crown, the student will perform the following tasks on one anterior typodont tooth with 85% accuracy on the final examination (17 points out of 20). Time allotment 1 hour. Grading Criteria: 2 = Acceptable 1 = Improvable 0 = unacceptable
1.
Crown contacts with the adjacent teeth Mesial Distal
2.
Contours are in the same plane as adjacent teeth Facial Lingual Occlusal/Incisal
3.
Crown margins are no more than .05mm short of the preparation line Buccal /Lingual Interproximal
4. Crown finish line is tapered
5. At least one centric mark is consistent with adjacent teeth.
6. Crown surfaces are smooth
TOTAL
Comments:

109
EXPANDED FUNCTIONS
COMPETENCY-BASED CLINICAL FINAL EVALUATION
16.0 Obtaining Alginate Impressions - Product Student Name_________________________________________ Date ________________ Evaluator____________________________________________ Grade________________ Intended Outcome: Given the necessary personnel, supplies and equipment to obtain alginate impressions , the student will perform the following tasks on two adult patients 85% accuracy on the final examination (68 points out of 80). Time allotment 1hour minutes. Grading Criteria: 2 = Acceptable 1 = Improvable 0 = unacceptable
MANDIBULAR
#1 #2
1.
All detail is reproduced, including the complete peripheral turn and a portion of retromolar pads
2.
The detail is sharp, not blurred of indistinct
3.
Impression is free of voids in critical areas.
4.
Impression is free of large folds of alginate.
5.
There are no areas where the alginate has pulled away from the tray.
6.
Impression is free of bulges or depressions that indicate a subsurface bubble.
7.
Alginate thoroughly covers the tray, (no unwaxed tray is visible through the alginate).
8.
Impression is free of rips and tears except in interproximal areas.
9.
The alginate is smooth and sponge-like.
10.
The tongue space is smooth , flat and does not overlay the impression.

110
MAXILLARY #1
#2
11. All detail is reproduced, including the complete peripheral turn and the tuberosity.
12. The detail is sharp, not blurred of indistinct
13. Impression is free of voids in critical areas.
14. Impression is free of large folds of alginate.
15. There are no areas where the alginate has pulled away from the tray.
16.
Impression is free of bulges or depressions that indicate a subsurface bubble.
17.
Alginate thoroughly covers the tray, (no unwaxed tray is visible through the alginate).
18.
Impression is free of rips and tears except in interproximal areas.
19.
The alginate is smooth and sponge-like.
20. The complete palatal arch is visible.
TOTAL
Comments:
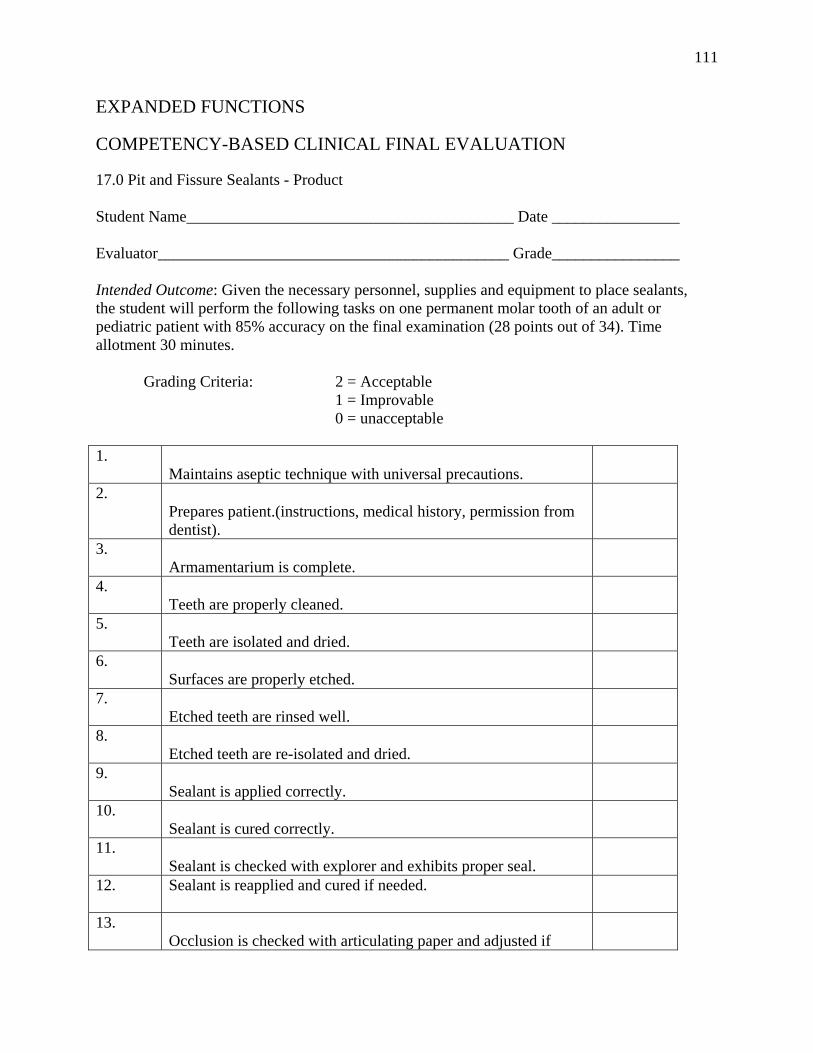
111
EXPANDED FUNCTIONS
COMPETENCY-BASED CLINICAL FINAL EVALUATION
17.0 Pit and Fissure Sealants - Product Student Name_________________________________________ Date ________________ Evaluator____________________________________________ Grade________________ Intended Outcome: Given the necessary personnel, supplies and equipment to place sealants, the student will perform the following tasks on one permanent molar tooth of an adult or pediatric patient with 85% accuracy on the final examination (28 points out of 34). Time allotment 30 minutes. Grading Criteria: 2 = Acceptable 1 = Improvable 0 = unacceptable 1.
Maintains aseptic technique with universal precautions.
2.
Prepares patient.(instructions, medical history, permission from dentist).
3.
Armamentarium is complete.
4.
Teeth are properly cleaned.
5.
Teeth are isolated and dried.
6.
Surfaces are properly etched.
7.
Etched teeth are rinsed well.
8.
Etched teeth are re-isolated and dried.
9.
Sealant is applied correctly.
10.
Sealant is cured correctly.
11.
Sealant is checked with explorer and exhibits proper seal.
12.
Sealant is reapplied and cured if needed.
13.
Occlusion is checked with articulating paper and adjusted if
112
needed. 14.
Fluoride is applied to sealed teeth.
15. Patient is given post-operative instructions.
16. Sealants are charted and recorded accurately.
TOTAL
Comments:
113
Idaho State Orthodontic Society High Speed Handpiece Evaluation and Certification
Part I – Evaluation Information Supervising Doctor: ______________________________________________ Location of Evaluation: ___________________________________________ Assistant to be Certified: __________________________________________ Date of Evaluation: _______________________________________________ Doctor Providing Evaluation: _______________________________________
114
Consent Form
From Dentist
Expanded Functions
The following information must be completed and signed by a dentist prior to any treatment by the student. Treatment will not be allowed if consent is not obtained. A visual examination must also have been completed by a dentist prior to the student performing any of the following procedures: Coronal Polishing (no visual or supragingival calculus is present) Pit and Fissure Sealants Finishing and Polishing Amalgam and Composite Restorations Name of patient ________________________________________________________________
Date _________________________________________________________________________
Date of examination by dentist _____________________________________________________
Treatment/procedure(s) to be completed by student_____________________________________
_____________________________________________________________________________
Tooth and number_______________________________________________________________
Clinical or laboratory setting? Yes No
Final examination Yes No
I, __________________________________, (name of authorizing dentist) have examined the following
patient, ____________________________________ , and authorize the following treatment
_______________________________________. I understand the treatment/ procedure will be completed by
_________________________ (name of student) under the supervision of an instructor/dentist for the purpose
of gaining clinical competency or testing.
Signature of instructor ____________________________________________________
Signature of examiner(s) __________________________________________________
______________________________________________________________________ (Testing purposes only)

115
Patient Consent for Treatment
The following services are performed by a dental assistant under the direct supervision of a licensed dentist. The services performed by the dental assistant are required for his/her preparation to become certified in expanded function in the State of Idaho. Prior to treatment, any questions pertaining to these services will be answered by the supervising dentist or the dental hygienist employed in the office. Place a check by any services you wish to receive. ______ Placement and removal of temporary restorations. ______ Mechanical polishing of restorations. ______ Monitoring of nitrous oxide. The dental assistant will not initiate or regulate the flow of nitrous oxide. ______ Application of pit and fissure sealants. ______ Coronal polishing. This would be applicable only after examination by a
dentist and removal of calculus by a dentist or dental hygienist. I have read and understand the preceding paragraph. This Consent for Treatment is hereby fully, freely, and voluntarily executed by me on: ______ _____________________________(or by:)____________________________ Date Individual Parent or Guardian
(if under 19 years of age)

116
References for Fundamentals
1. Bowen, Denise. Aiding in the Administration of Nitrous Oxide / Oxygen Analgesia: A
Self-Study Module, Vo. Ed. #172 B. (IDPTE, Boise, Idaho, June 1982). pp 1–32. 2. Herzog, Anita. Radiation Health Protection: A Self Study Module, Vo. Ed. #197.
(IDPTE, Boise, Idaho, June, 1982). pp. 1–18 3. Paarmann, Carlene. Radiation Control and Safety for Dental Assistants: A Guide for
Instructors, Vo. Ed. # 197. (IDPTE, Boise, Idaho, June, 1982). pp. 1-11 4. Fundamentals of Dental Assisting and Expanded Functions: Curriculum Guide. (IDPTE,
Boise, Idaho, March, 1992). Modules 1-7 5. Guidelines for the Dentist When Supervising Dental Assistants on Independent Study of
Expanded Functions: A Supplement to Modules of Training on Expanded Functions for Dental Assistants. (IDPTE, Boise, Idaho, 1993). pp. 1-42
Required Text for Fundamentals
Robinson, Debi., MS. Ehrlich and Torres Essentials of Dental Assisting, 3rd ed. Philadelphia W.B. Saunders Company, 2001.

117
Additional Resources for Fundamentals
1. Anderson, James., M.D. Grant’s Atlas of Anatomy, 8th ed. Baltimore: Williams and
Wilkins, 1983. 2. Aaring, Joen Lannucci., Dental Radiography Principles and Techniques, 2nd ed.
Philadelphia: W.B. Saunders, 2000. 3. Phillips, Ralph W., M.S., Skinner’s Science of Dental Materials, 9th ed. Philadelphia:
W.B. Saunders Company, 1991. 4. Wilkins, Esther., M.S., Clinical Practice of the Dental Hygienist, 8th ed. Philadelphia:
Lippincott Williams and Wilkins, 1999.
118
References for Expanded Functions
1. Bowen, Denise. Aiding in the Administration of Nitrous Oxide / Oxygen Analgesia: A Self-Study Module, Vo. Ed. #172 B. (IDPTE, Boise, Idaho, June 1982). pp 1–32.
2. Herzog, Anita. Radiation Health Protection: A Self Study Module, Vo. Ed. #197.
(IDPTE, Boise, Idaho, June, 1982). pp. 1–18 3. Paarmann, Carlene. Radiation Control and Safety for Dental Assistants: A Guide for
Instructors, Vo. Ed. # 197. (IDPTE, Boise, Idaho, June, 1982). pp. 1-11 4. Fundamentals of Dental Assisting and Expanded Functions: Curriculum Guide. (IDPTE,
Boise, Idaho, March, 1992). Modules 1-7 5. Guidelines for the Dentist When Supervising Dental Assistants on Independent Study of
Expanded Functions: A Supplement to Modules of Training on Expanded Functions for Dental Assistants. (IDPTE, Boise, Idaho, 1993). pp. 1-42
Required Text for Expanded Functions
Bowen, Denise. Aiding in the Administration of Nitrous Oxide / Oxygen Analgesia: A Self-
Study Module, Vo. Ed. #172 B. (IDPTE, Boise, Idaho, June 1982 edited and revised January 2005).
Paarmann, Carlene, Polishing Amagam Restorations : A Self-Study Module (IDPTE, Boise,
Idaho, June 1991, edited and revised June 2005 by Terrie Beckman). Kawamura, Carole. Coronal Polishing for Dental Assistants (IDPTE, Boise, Idaho, Edited
and revised January 2004 by Anita Herzog.). Paarman, Carline. Application of Pit and Fissure Sealants (IDPTE, Boise Idaho, Edited and
Revised by Anita Herzog August 2004). Spain, Luann, Temporary Crown Restorations (IDPTE, Boise, Idaho edited and revised June
2005 by Terrie Beckman). Christie, Carole R. Taking Alginate Impressions for Study Casts: A self-study Module, (IDPTE, Boise, Idaho, June 1991, edited and revised June 2005 by Terrie Beckman).
119
Additional Resources for Expanded Functions
1. Anderson, James., M.D. Grant’s Atlas of Anatomy, 8th ed. Baltimore: Williams and Wilkins, 1983.
2. Aaring, Joen Lannucci., Dental Radiography Principles and Techniques, 2nd ed.
Philadelphia: W.B. Saunders, 2000. 3. Phillips, Ralph W., M.S., Skinner’s Science of Dental Materials, 9th ed. Philadelphia:
W.B. Saunders Company, 1991. 4. Wilkins, Esther., M.S., Clinical Practice of the Dental Hygienist, 8th ed. Philadelphia:
Lippincott Williams and Wilkins, 1999.

120
Fundamentals of Dental Assisting
Clinical Education Observation Report Student Name: ____________________________________ Date: ______________________ Dentist’s Name and Phone Number: ______________________________________________ Supervisor Name: _____________________________________________________________ Total Hours at this Facility: _____________________________________________________ Students will observe procedures before going to the dentist’s office to observe, review these areas of observation to facilitate awareness and maximize benefits from the time you spend there.
CLINICAL OR ADMINISTRATIVE AREA: 1. What new terminology did you learn? 2. What Aseptic Techniques did you observe? 3. What procedures did you observe? (Amalgam, composite, etc.) 4. What procedures did you most enjoy observing/doing? 5. What procedures did you assist the dentist with? 6. Describe the professional atmosphere that you encountered. 7. What new information or techniques did you learn? 8. What was the patient greeting process? 9. What type of appointment schedule was used? (Computer or Appointment book?)
121
10. Additional observations or comments. Supervisor: Please complete the following information. Your comments are welcome. 1. Did this student arrive at your office on time? 2. Did the student display a positive attitude? 3. Did the student display a professional appearance and conduct? 4. Was this student willing to learn? 5. Did the student participate in any clinical experience? Please list: 6. Additional observations or comments: If you have any questions, please call:

122
Clinical Observation The following is a list of required observations to be completed during the Fundamentals of Dental Assisting Fundamentals course. The student is required to observe 30 hours in a dental office during working hours. Arrangements are to be made with the dental office prior to the observation visit. Depending upon the schedule and the dental practice, a student may be able to observe all the procedures in one visit. A student may visit more than one office to complete this requirement. Observations Infection Control Procedures ____ Universal Precautions (setting up and breaking down of two operatories, infection control procedures used) ____ Disinfection and Sterilization of Instruments (protocol used in the office, cold sterilization, autoclave) ____ Biohazard Waste (disposal of biohazard materials, location of biohazard container) Health History ____ Reviewing a Medical/Dental History (observed on two patients) ____ Taking Blood Pressure Operative (observe the entire procedure) ____ Greeting and Seating the Patient ____ Observing Four Injections (one maxillary and one mandibular) ____ Four Amalgam Procedures ____ Four Composite Procedures ____ Four Crown Procedures ____ Two Root Canal Procedures ____ One Extraction Procedure
123
Preventive ____ Patient Education Instructions (information that is presented to the patient during the hygiene appointment) ____ Dental Prophylaxis ____ Root Planing Radiographs ____ Taking Bitewing x-rays ____ Taking Panoramic x-ray ____ Taking Periapical x-ray ____ Developing one set of bitewing x-rays ____ Mounting one set of bitewing x-rays Miscellaneous ____ Taking an Alginate impressions ____ Pouring up an Alginate impression ____ Mixing plaster and pouring up plaster models ____ Rescheduling two patients for dental procedures (this can be the front office,
dental assistant or dental hygienist) ____ Job responsibilities of the dental personnel Dentist Name and Office Location ________________ Date of Observation ________________ Time (hours) Observing ________________