Embed Size (px)
DESCRIPTION
Photography for Designers
Citation preview

last light
polarpanorma
Issue 1 • January 2013
chasing the
in 5 easy steps
sunset
Create your own little world with this easy step by step guide

2 • Designfreebies Magazine • www.designfreebies.org Designfreebies Magazine • www.designfreebies.org • 3
Contents
04 photographers Quote Imogen Cunningham
06 shoot the night The joys of night photography
10 last light Chasing sunsets
14 lightroom Editing tips Recover all those lost bits 16 pictures of photographers Photoception
20 Why You need a 50mm F/1.4 Best value for money lens around?
24 polar panorama A simple 5 step how to guide
tim Westtim-west.tumblr.com
In tHIs IssUe
“When I was on trips I used to put Polaroid’s in a container with sea
water, sand and pebbles. I’d swirl it all around to get scratches. It’s this
random element that I call ‘the drip’. It’s the drip which might splash
onto the other side of the canvas when you’re working on a paint-
ing and make you think ‘that is good’, possibly leading you to explore
other things. My whole life is spent in search of the drip; it can change
everything.”
– David Bailey
I think this quote by David Bailey summarises very nicely a lot of
designers relationship with photography and art in general. As much
as we sometimes want that exact, precise, OCD - ridden piece of work
some of the time; the rest of the time we are looking for ‘the drip’. That
little something extra. I think this is what makes this industry so inter-
esting and unique. The amount of scope that there is for improvisation
and pure unhindered creativity.
LAST LIGHT
POLARPANORMAHOW TO
Issue 1 • January 2013
CHASING THE
IN 5 EASY STEPS
SUNSET
Create your own little world with this easy step by step guide

4 • Designfreebies Magazine • www.designfreebies.org Designfreebies Magazine • www.designfreebies.org • 5
Whic
h of
my
phot
ogra
phs
is m
y fav
orite
?Th
e on
e I’m
goin
gto
take
tom
orro
w-Im
ogen
Cun
ning
ham
ca
no
n 5
50
d
ef
-s 1
0-2
2m
m @
10
mm
1/6
0 s
ec
@ f
/20
iso
10
0

6 • Designfreebies Magazine • www.designfreebies.org Designfreebies Magazine • www.designfreebies.org • 7
The photograph above was taken outside T13 skate park in Belfast, just down the road
from the new Titanic building. I had been in attending a graff’ and public art event
called Whitewash wich is held in various venues across Northern Ireland on a roughly
bi-monthly basis. A friend of mine was creating a public art piece on the subject ‘Love
is?’. Scary stuff I know. This building was a fantastic location for such an event as not
only do you get to watch various artists from all disciplines doing their thing but as
an added bonus you can watch skaters and BMX riders hitting half pipes, with various
levels of expertise if you get bored. So, from a photographers point of view, there was
a lot that you could point your camera at inside the building. I took many photographs
and had a great eveving. Then the time came around to help my friend pack up his
gear and go home. That was until I walked outside and as happens so many times,
I got massively distracted by the various colourful hues hanging in the evening sky.
shoot the night
canon 550d
ef 50mm f/1.4
4 secs @ f/4.5
iso 200
Andy Warhol, probably among many other people said “The idea of waiting for some-thing makes it more exciting”I would have to agree.
...is something that harks back to the highly romanticised idea of dropping a freshly exposed piece of photographic paper into the devel-oping solution in the dark room.”
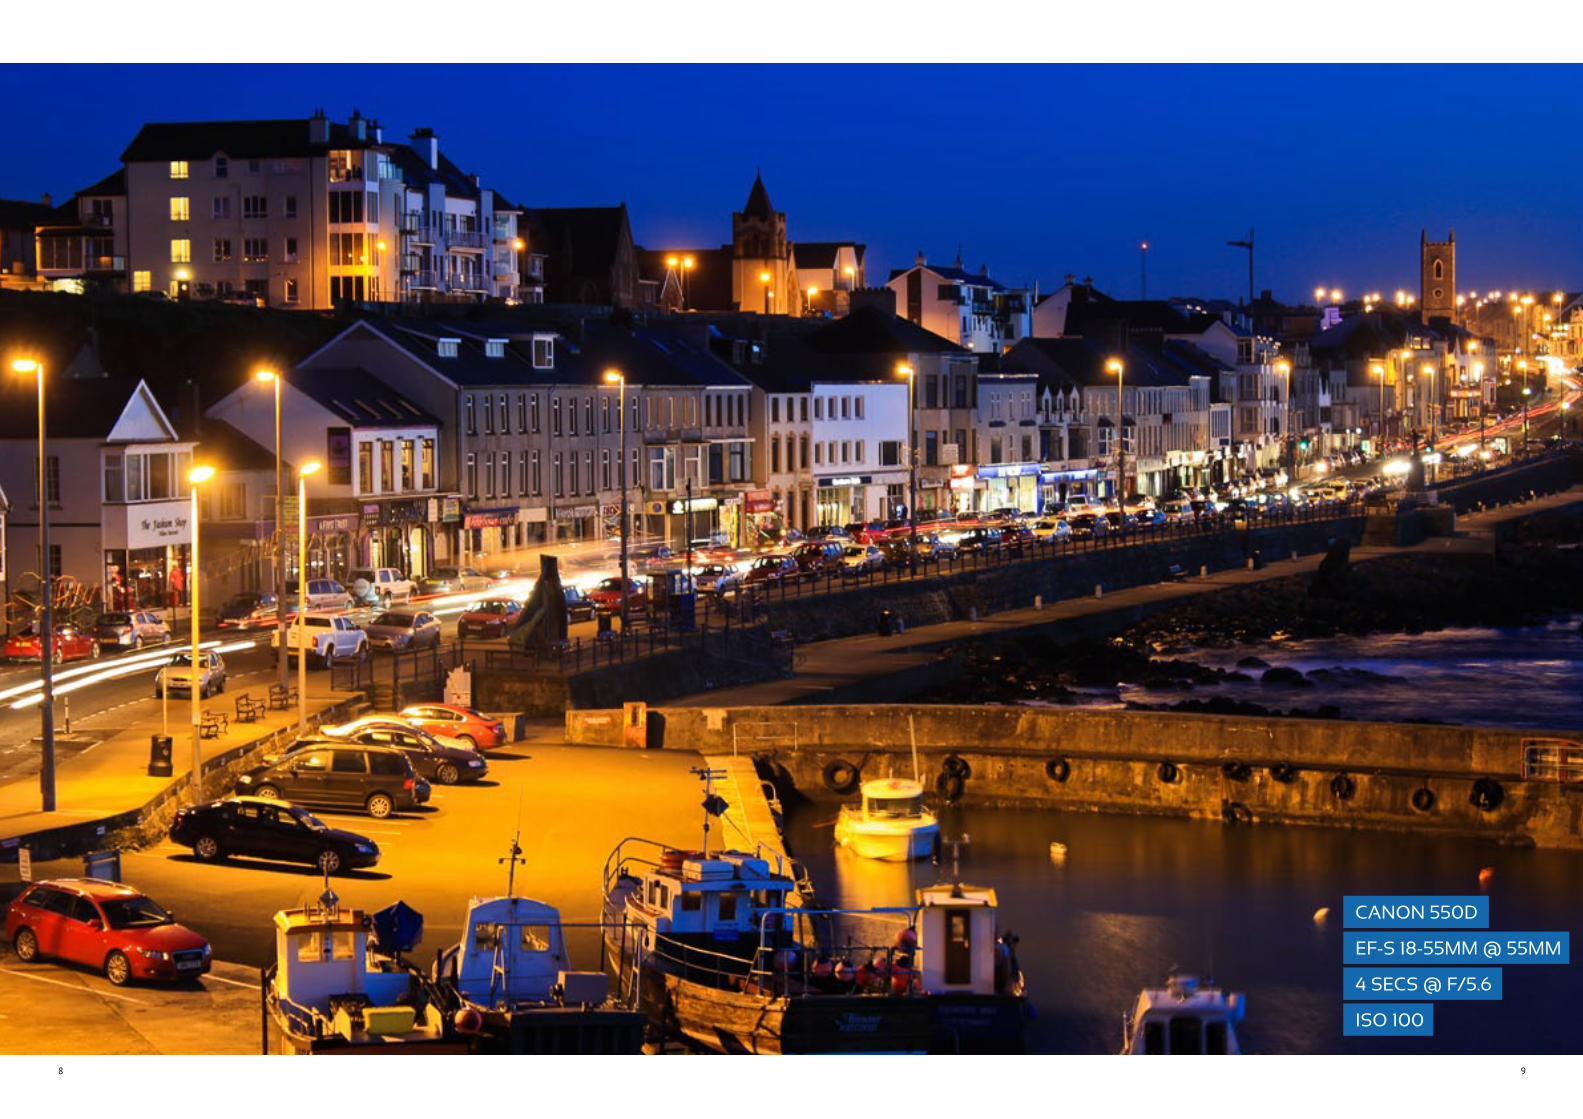
Shooting skies in particular is something
that I love to do at night. I think a big
part of the enjoyment of night photog-
raphy is the waiting and anticipation
between pressing the shutter and even-
tually seeing the image after however
many seconds the shutter was required
to stay open. This can get particularly
bad (or good hopefully) when shooting
star trails. If I shoot a star trail, the single
exposure time could be easily 40 minutes
or more. Having waited 40 minutes for
the image to be made upon the camera’s
sensor, I will then have to wait the same
amount of time again to see the image
once the camera has processed it. For
a start, knowing this will make me be
extremely careful when I’m setting up
the composition, so that mistakes are as
limited as possible. I think this is good
practise in general, as it makes you think
a bit more about your composition and
camera set-up. This process of waiting
to see what the image will look like I
believe is something that harks back to
the highly romanticised idea of dropping
a freshly exposed piece of photographic
paper into the developing solution in
the dark room. Then there was the wait.
How is it going to look? Did I expose it
for long enough? When you finally do
everthing right and there before your
very eyes appears a beautifully exposed
image, that’s a feeling that I haven’t been
able to match since. But long exposure
night time photography is pretty close.
8 • Designfreebies Magazine • www.designfreebies.org Designfreebies Magazine • www.designfreebies.org • 9
canon 550d
ef-s 18-55mm @ 55mm
4 secs @ f/5.6
iso 100

10 • Designfreebies Magazine • www.designfreebies.org Designfreebies Magazine • www.designfreebies.org • 11
he number of times that
I have been late to vari-
ous places of work and
education because I have
become distracted by a great looking
sunrise or sunset on the way is quite
ridiculous. This feeling that it may look
differently better from the other side of
the road or if that big ugly cloud would
pass over, is something that grips me and
I will not be able to stop untill I have
explored every conceivable angle, con-
ceding only as the sun drops beyond the
horizon for another day.
This is something that I am sure is expe-
rienced by photographers from every-
genre. I was recently reading a book
called ‘Between the Hedges’ by the high-
ly successful road racing photographer
Stephen Davison and he had the follow-
ing to say on the subject:
“If you cannot see a picture you will
never be able to take a picture. This skill
cannot be taught. There is something
that must be felt when you look at a
scene, something inside yourself that
makes you feel the photograph. Chasing
that feeling is what photography is all
about.”
The photograph on the left was taken at
the underpass of Moira train station. This
was not a premeditated shoot in any way.
I was driving over the motorway bridge
on my way home and noticing the sun
was setting, I thought that I’d pull in at
my nearest convenience. The train sta-
tion was that nearest convenience and I
literally walked right into this scene, sun
curling around the brick work and all.
If I had to give one tip to held in caturing
sunset photographs like this, it would be
to consider your metering. Evaluative/
Average metering modes do a very good
job of metering scenes with moderate
contrast, i.e. scenes with a relatively con-
stant amount of light present across the
whole composition. As sunset images are
about the most contrast filled scenes you
will find, I go to a different meteing mode
wich on both Canon and Nikon cam-
eras is called Spot Metering. What this
mode does is measure the light intensity
around a very small circular area (about
2%) of your total viewfinder area, based
around your active AF (auto focus) point.
In essence what you then have is what
I like to think of as an eye-dropper tool
for selecting your perfect exposure. Pick
an element of the scene, half press the
shutter to meter, lock the exposure, re-
compose and shoot.
Last LIgHtchasing the sunset
t canon 550d
ef-s 18-55mm @ 18mm
1/15 sec @ f/5.6
iso 100
Learn how to drive while staring out of the passenger window as you chase the sun-set half way around the countryside.
...conceding only as the sun drops beyond the horizon foranother day.”

12 • Designfreebies Magazine • www.designfreebies.org Designfreebies Magazine • www.designfreebies.org • 13
canon 550d
ef-s 10-22mm @ 22mm
1/250 secs @ f/8
iso 100

14 • Designfreebies Magazine • www.designfreebies.org Designfreebies Magazine • www.designfreebies.org • 15
irst things first. If you have
ever had a conversation
with a professional pho-
tographer and you asked
them for tips, I would be willing to bet a
fair bit that one suggestion would have
been ‘shoot in raw’. I heard this a few
times and for a good while my thoughts
were that I was already doing enough
editing to my JPEGs, never mind having
a bunch of additional options to worry
about. How wrong I was. Having seen
the errors of my ways, I know shoot pretty
much exclusively in RAW format. One
exception is if I’m shooting something
like sports photography as most DSLR
cameras can shoot a higher frame rate
when shooting JPEGs due to their smaller
file sizes. That said everything about
editing your photographs taken in RAW
format becomes easier, quicker and with
minimum loss of detail. One of RAW’s
most simple joys is the ability to choose
the WB (white balance) during editing
without affecting quality whatsoever. An
example of this being highly useful is if
you have been shooting indoors, in tung-
sten light and then go outside and forget
to change the WB setting. You can simply
change it in Lightroom or your preffered
program during editing. One of the main
reasons that I choose to use Lightroom
when it comes to photo editing is the
way in which the program is set up to
manage a typical photographers work-
flow. Along the top you will see this in
the following format - Library > Develop
> Map > Book > Slideshow > Print > Web
. This workflow incorporates pretty much
everything you will ever need to do to
your images.
LIgHtroomediting tips
f
canon 550d
ef-s 10-22mm @ 10mm
20 secs @ f/5.6
iso 200
Recover all those little lost bits. . . .
As for the before and after images shown
here, I thing the difference is very notable
and there are very few steps required in
achieving this difference. The first thing
to do is amend the WB. As this was
shot in RAW format, I could amend the
balance to suit how the scene looked.
There are no presets for moonlight that
I’ve ever came across either in-camera or
during editing. There is however a func-
tion within Lightroom to manually adjust
the WB on two seperate scales. These
are temperature on a blue > yellow scale
and tint on a green > magenta scale.
Having amended this to match the way
the scene looked as well as I could, the
next step was to increase the exposure
by a fifth of a stop and amend the crop
angle slightly to straighten the scene.
Next, I recovered some of the backed-up
blacks using the black clipping tool and
all that left was a little tweak of the clar-
ity, which really helps lift some detail out
of the clouds, especially the reflections
on the water. Finish with a very slight
tweak of the vibrance and saturation.
”If you have ever had a conversation with a professional photog-rapher and you asked them for tips, I would be willing to bet a fair bit that one sugges-tion would have been ‘shoot in raw’.

16 • Designfreebies Magazine • www.designfreebies.org Designfreebies Magazine • www.designfreebies.org • 17
aybe this is something that designers and aspir-
ing photographers already do but I haven’t seen it
myself that often. Taking photos of people taking
photos is something I think can be very helpful
as well as being something I really enjoy doing
and I will tell you why. First of all, I’m sure that many of us
have been out shooting
whatever photograph it
is we need and we’re
just not getting any-
where. The lighting is
a little to bright or a
little too dim. Perhaps
it’s too cold or blowy
and your tripod keeps
falling over. Give up
and go home you say?
Never. Instead, turning
your camera on your
photographer buddy
can be a great way of
letting your ‘photogra-
pher’s eye’ engage with a totally different type of subject. I find
this to be similar to writers block or any other form of ‘getting
nowhere’ in a creative capacity. Nine times out of ten, letting
yourself just do anything that is losely related to your creative
endeavour but with no restrictions and hence no pressure can
be hugely liberating and may just pop that block right out. In
the particular instance above, I was shooting some images of
the sun setting over Lough Neagh and the conditions were theo-
retically perfect but each composition seemed boring and very
‘stereotypical landscape’. However, having turned my camera on
my photographer buddy (my Dad in this instance) for a number
of shots in a different frame of mind, I was then able to turn the
camera back a few minutes later on the scene that I’d been trying
to capture and shoot a
successful image. The
second reason why
I enjoy taking these
types of photographs
is that when it comes
to stock imagery, I like
whenever humanly pos-
sible to use a photo-
graph that I have taken
myself, no matter how
ridiculous the subject
matter. I’m sure most
creatives would agree
it’s a lot more satisfying
to create as much of
any publication as you can by yourself. I have found that good
images of photographers in action are quite difficult to come by.
Especially natural looking ones, taken out and about in the real
world. For this reason, I find it extremely useful to have my own
little assortment of images like this. It makes it even better that
I don’t have to go out of my way at all to capture them. Why not
give it a go the next time your out snappin’.
take pICtUres ofphotographersNext time your out shooting and you get bored of the subject, don’t go home. Try turning the camera on your photographer buddy instead.
canon 550d
ef-s 18-55mm @ 18mm
1/500 sec @ f/3.5
iso 100
m

canon 550d
ef-s 18-55mm @ 18mm
1/50 sec @ f/3.5
iso 100
18 • Designfreebies Magazine • www.designfreebies.org Designfreebies Magazine • www.designfreebies.org • 19

20 • Designfreebies Magazine • www.designfreebies.org Designfreebies Magazine • www.designfreebies.org • 21
I think one of the first things that many people find interesting about photography is the concept of depth of field...more importantly the ability the photographer has to change it...”
I think one of the first things that many
people find interesting about photog-
raphy is the concept of depth of field.
More importantly, the ability that the
photographer has to change it. This
was certainly the case for me. I found
the idea of being able to isolate my
subject and throw the background and/
or foreground out of focus a very exciting
prospect. With that in mind, I give unto
you the best tool available to do this - the
50mm F/1.4 prime lens (prime meaning
a lens with fixed focal length). This lens
costs around £280, possibly less if you
shop around. Yes, there is an even wider
aperture available - you can purchase an
F/1.2 Prime lens if you want to spend an
extra one thousand pounds. For a mere
half a stop difference this seems a touch
excessive to me. When fully open the
F/1.4 can create some amazing bokeh
(out of focus elements) and as you begin
stopping it down you will notice the
fantastic clarity that comes with prime
lenses. Give yourself some time to get
used to the tricky focussing with such a
shallow depth of field and this lens will
reward like no other at this price.
Why you need a 50mm f/1.4
Is this the best value for money lens that you can buy today?
fine build quality
great image quality
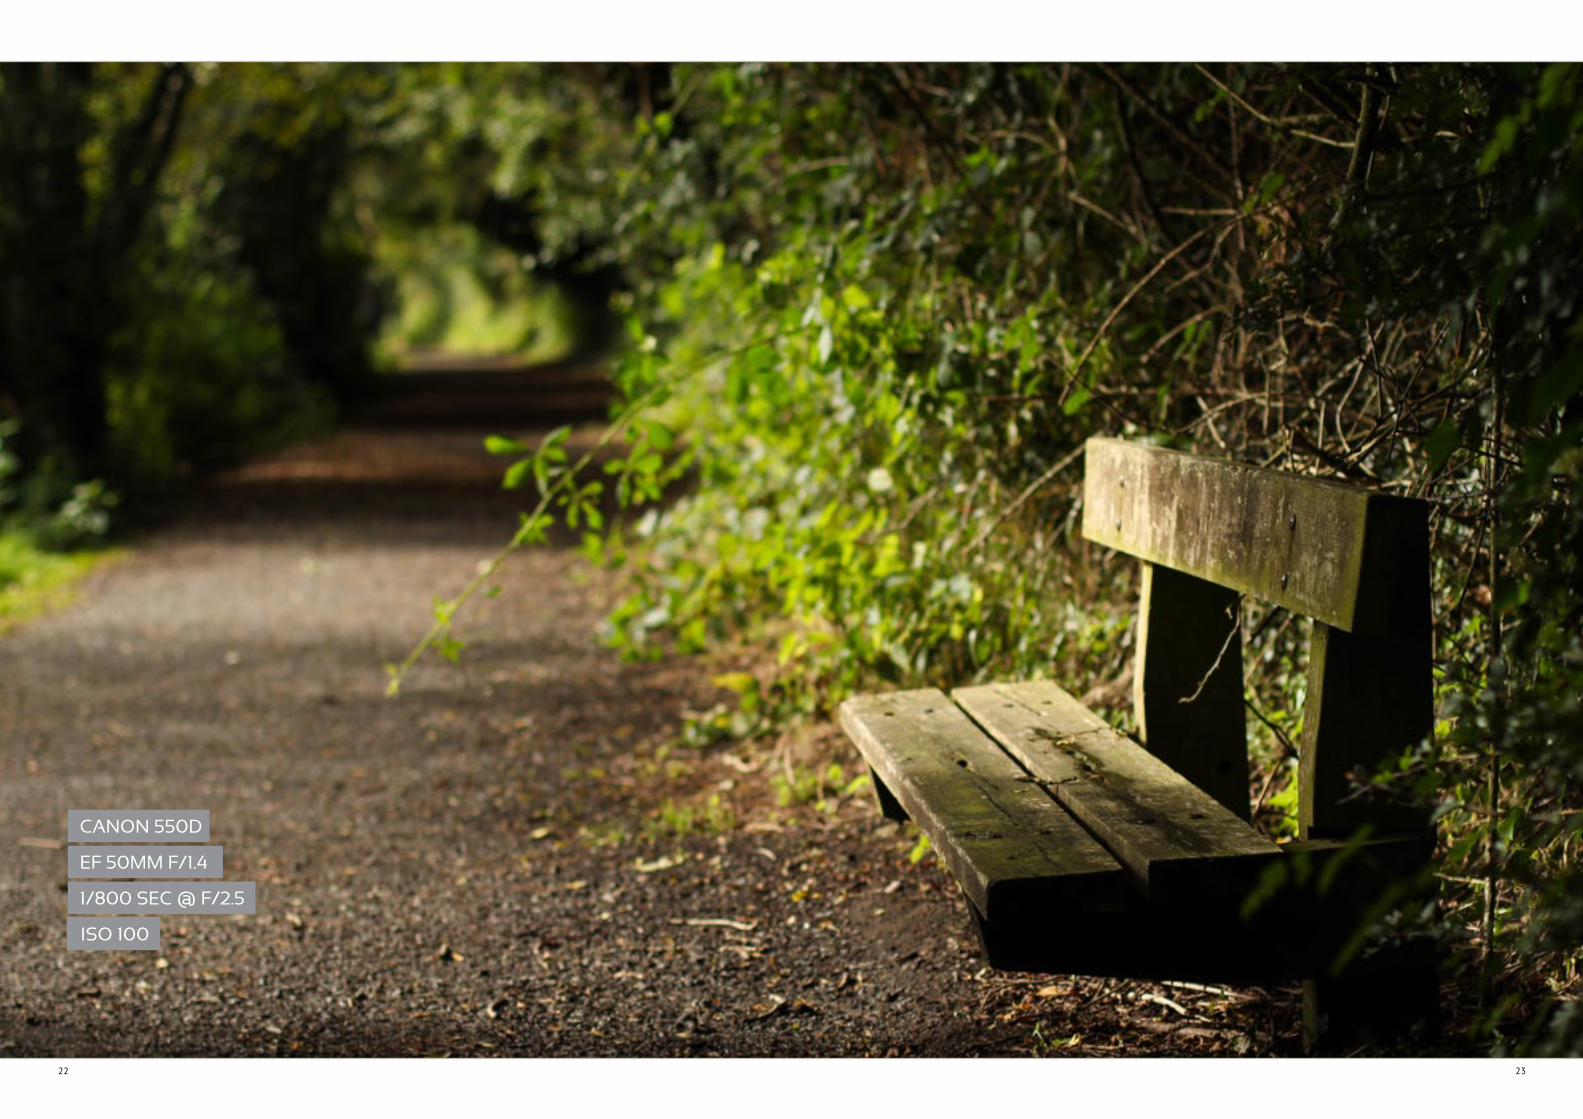
canon 550d
ef 50mm f/1.4
1/800 sec @ f/2.5
iso 100
22 • Designfreebies Magazine • www.designfreebies.org Designfreebies Magazine • www.designfreebies.org • 23

24 • Designfreebies Magazine • www.designfreebies.org Designfreebies Magazine • www.designfreebies.org • 25
he first time I came across this particular creative
photography project, it was in a book, the name of
which I do not recall but whatever way they went
about explaining it made it seem like expert levels
of Photoshop skills would be required. I immediately wrote it off
and that was the last I heard of Polar Panoramas for a while. I
came across them again some time later, on Flickr and thought
I had to give them a go. As you will no doubt be glad to hear,
the Photoshop skills required are extemely basic and the results
are excellent with just a little bit of care. Basically, you take a
series of images as you would for a standard panorama - but for
maximum impact take images that cover 360 degrees, all the
way round a centre point. You can do a Polar Panorama with
a standard three or four shot panorama photograph but they’re
just not as good as they will incorporate less detail.
What you will need to do this, is preferably a DSLR but really
any camera with a manual mode would be sufficient, which is
something some of the more advanced point and shoot cameras
now have. The reason you require a manual mode is because if
the exposure changes, even slightly between shots then this can
show up very obviously when you stitch the images together - for
example you will see different shades of blue in the sky, etc. The
only other thing you really need is a tripod, so you can ascertain
a constant centre point for your panorama.
This series of images was taken in Castle Gardens in Lisburn. I
placed the tripod at the back of the park, near to the Cathedral.
This positon gets a look over the old walls and if you look
closely you can actually see some of the Union Bridge area of
Lisburn City toward the bottom of the picture.
poLar panoramahoW to guide
t
create your oWn little World in five simple
steps. just folloW this easy guide
If you look closely you can actually see some of the Union Bridge area of Lisburn City toward the bottom of the picture.”
canon 550d
ef-s 10-22mm @ 10mm
1/80 sec @ f13 (x11)
iso 100

26 • Designfreebies Magazine • www.designfreebies.org Designfreebies Magazine • www.designfreebies.org • 27
1.
2.
3. 4. 5.

28 • Designfreebies Magazine • www.designfreebies.org Designfreebies Magazine • www.designfreebies.org • 29
Stage one is the hardest part of the
process, so it’s nice to get it out of the
way first! This stage involves picking
your location and going and shooting
your panorama. One thing to consider
when chosing your location is to try and
find somewhere with a common foreground as this becomes
the centre of the picture and hence experiences the greatest
levels of distortion. It also helps in the same respect to have
a similar top third of the image. A standard blue sky is perfect.
Next, you will set up your tripod and take a few test shots to
establish an exposure that will work for all your shots. Lock this
exposure and shoot, overlapping each frame by around a third.
canon 550d
ef-s 10-22mm @ 10mm
5 secs @ f/3.5
iso 100
If you can’t think of a good location you can always try the back garden
Next you need to bring your images into
a photo - stitching application such as
Photomerge in Photoshop. This is found
under File > Automate > Photomerge. I
find Photomerge a very simple tool to
use, it’s simply a case of dragging the
required files in, pressing go and the software does the hard
work for you. What you will then have is a full 360 degree pan-
orama of your location in standard panorama format. This is a
pretty cool looking image too so save a copy at this stage for
future reference. The next stages will turn this image into your
own little planet.
Stage three is just two very simple pro-
cesses. Firstly, you will need to turn your
image into a square. The easiest way
to do this is to go into Image > Image
Size and simply change the height value
to match the width. This will turn your
panorama into a weird looking squashed square. The second
thing to do at this stage is to filp your image upside down. This
is done by going to Image > Image Rotation > 180 degrees. This
is your panorama set up for the the magic of the next stage!
Next we simply apply the polar coordi-
nates filter which can be found under
Filter > Distort > Polar Coordinates.
Ensure the option Rectangular to Polar
is checked at the bottom of the Polar
Coordinated dialog box. At this stage
your little planet should be taking shape nicely. However you
will notice a few ragged edges, which we will deal with in the
final stage.
Nearly there! This is the clean up stage
to make your little world look a bit more
hospitable. This primarily requires use
of the clone stamp tool to clean up the
messy bits. You can be as patient as you
like here but of course the more patient
you are the better it’s going to look. When this is done, I took
my image into Lightroom and treating it just like any other pho-
tograph, tweaked the exposure, contrast and saturation slightly.
And you’re done - you have created your own little world!
The scope for creativity with this little tutorial is of course end-
less. You could even try it indoors! This one I made up of a
series of images taken inside a bedroom. It’s an absurd looking
image that can capture every wall in a room and place it inside
a square!
3.
2.
1.
5.
4.