Embed Size (px)
Citation preview

Deploy Dual Stack FreeBSD 10.3 Instance in AWS
Lawrence E. Hughes Sixscape Communications Pte Ltd.
13 July 2017
This assumes you have already created an AWS account and a dual stack VPC on AWS.
Log in to your AWS account at aws.amazon.com and sign into the console:
Click Launch a virtual machine
Click Get Started
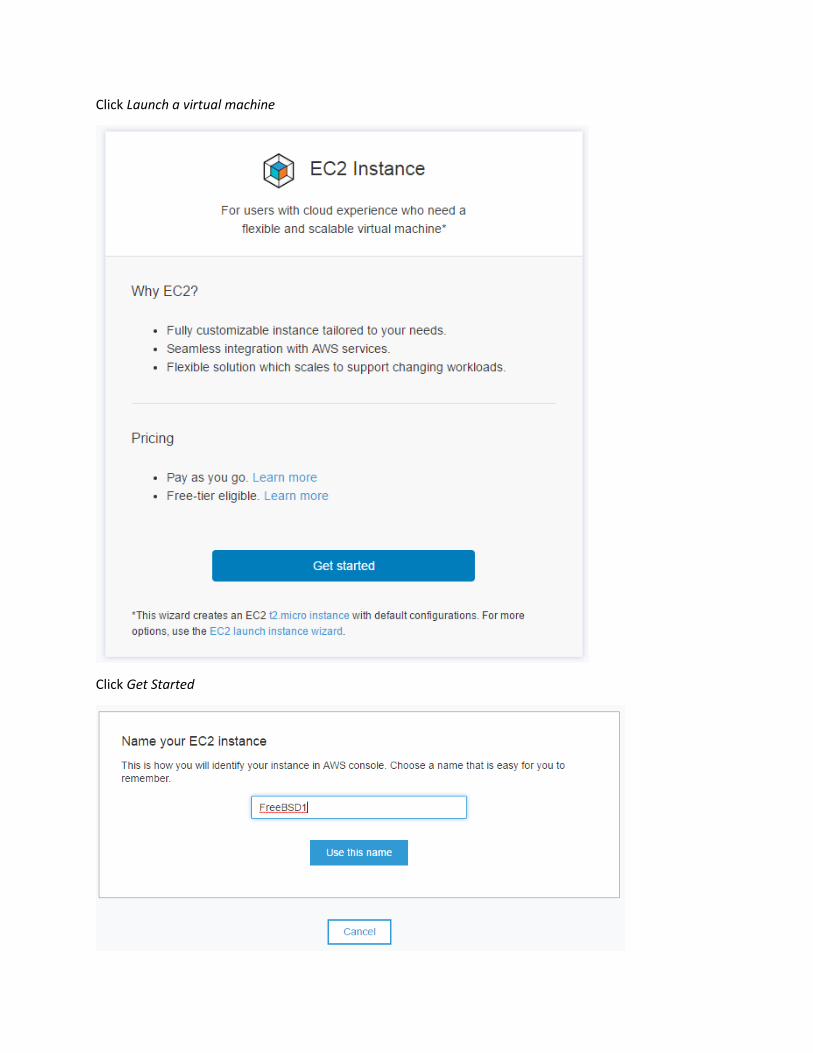
Provide a name for this instance and click Use this name
Click advanced EC2 Launch instance wizard
FreeBSD is not included in the basic AMIs. Click AWS Marketplace
Enter FreeBSD and click the spyglass icon

Click the Select button for FreeBSD10
Review pricing, click Continue (at bottom of screen)
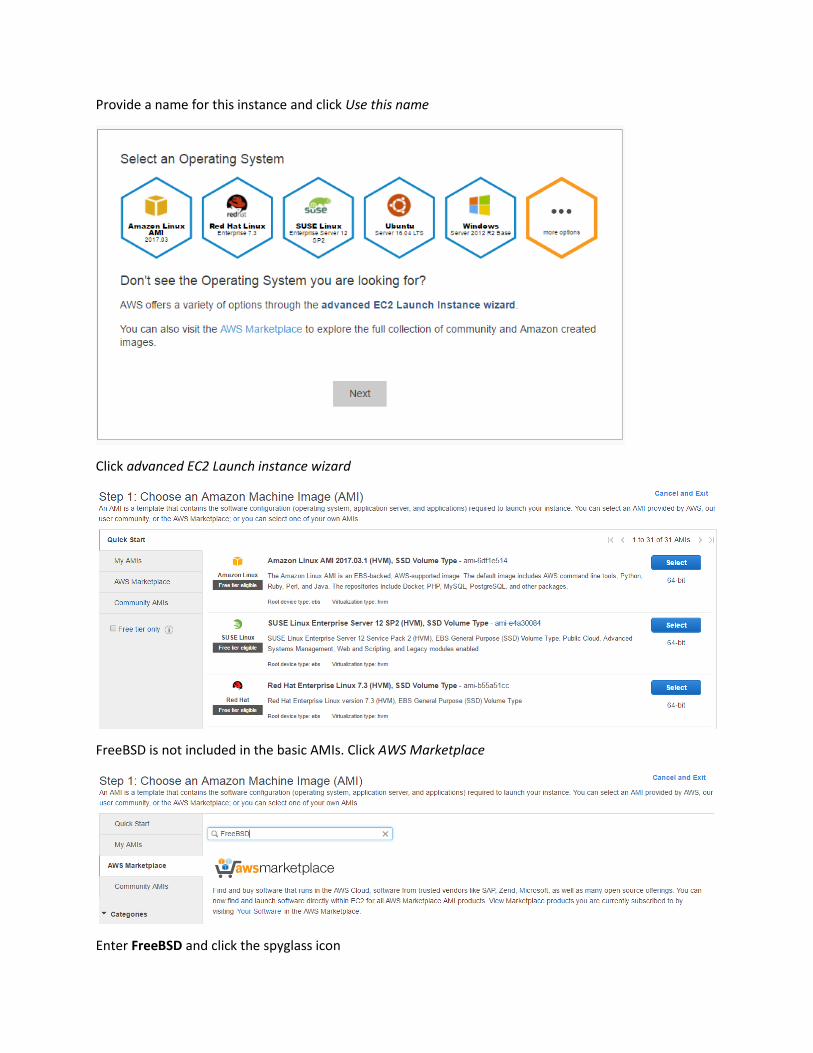
Accept default choice (t2.micro), click Next: Configure Instance Details (at bottom of screen)
Click Launch Instance
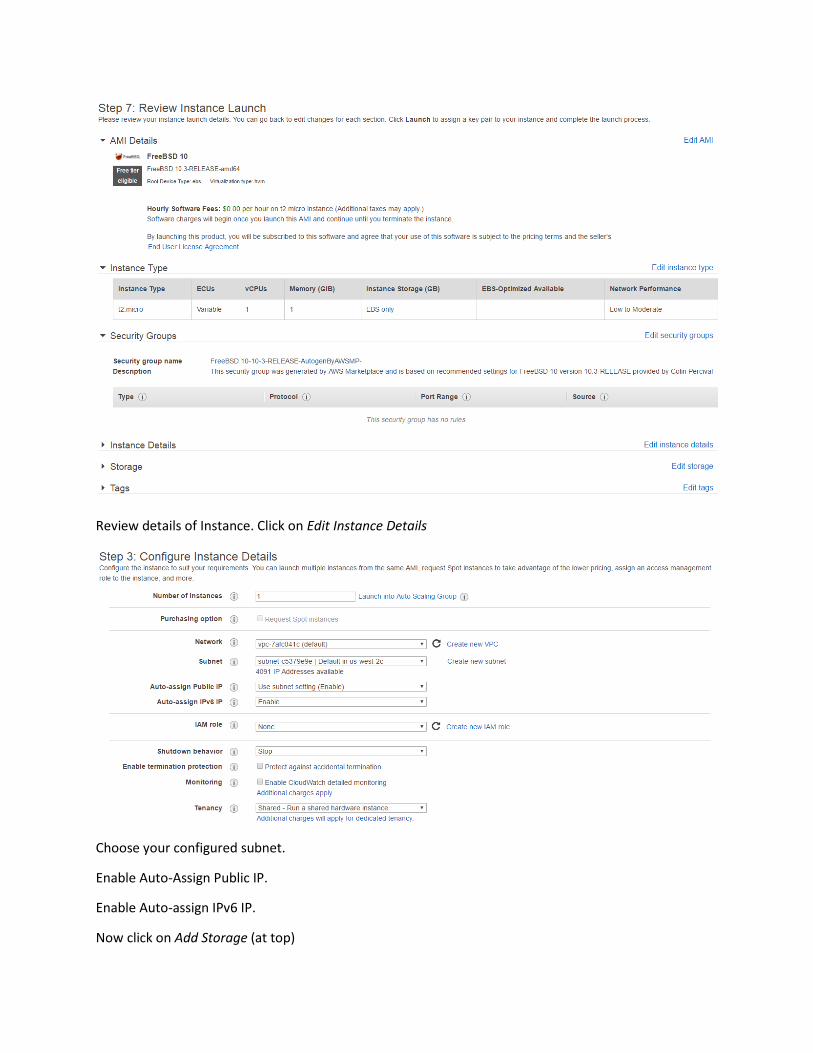
Review details of Instance. Click on Edit Instance Details
Choose your configured subnet.
Enable Auto-Assign Public IP.
Enable Auto-assign IPv6 IP.
Now click on Add Storage (at top)
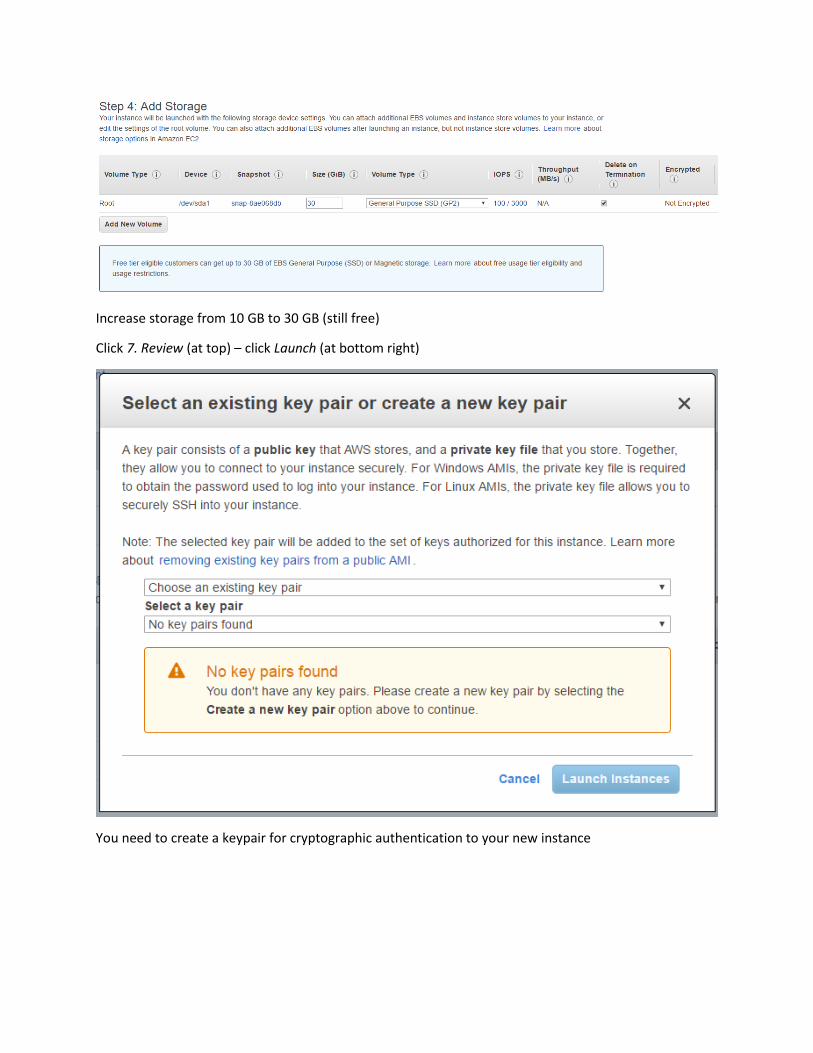
Increase storage from 10 GB to 30 GB (still free)
Click 7. Review (at top) – click Launch (at bottom right)
You need to create a keypair for cryptographic authentication to your new instance
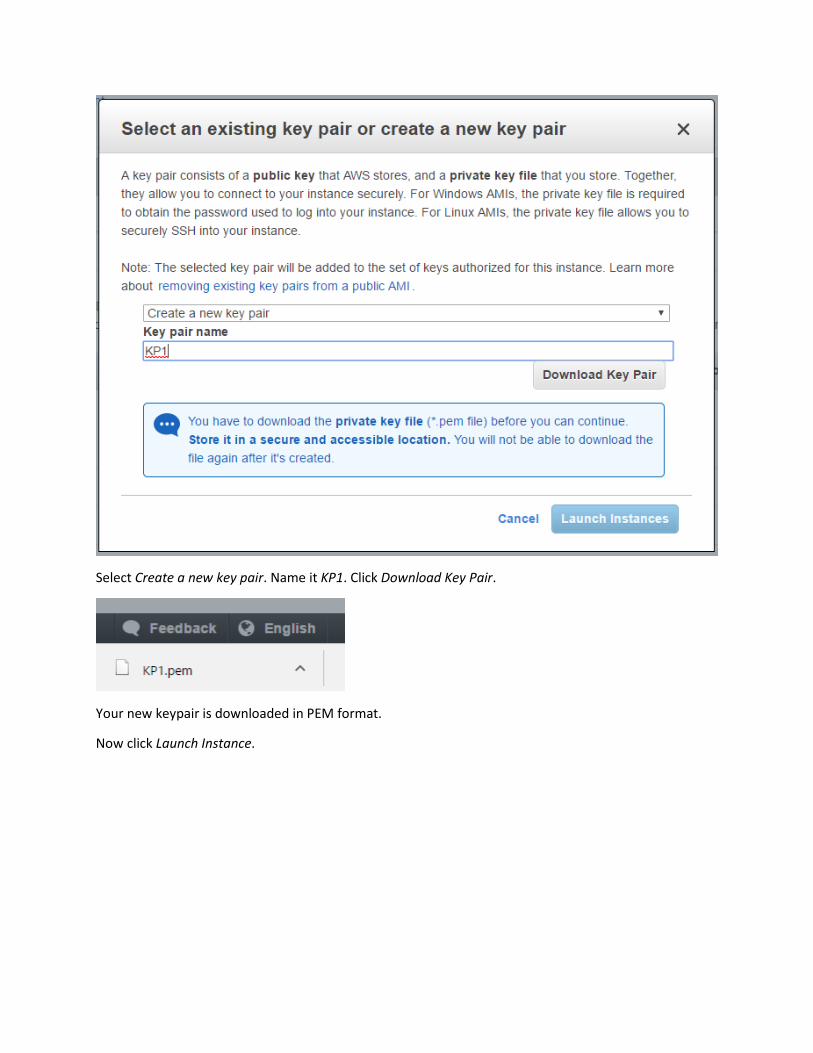
Select Create a new key pair. Name it KP1. Click Download Key Pair.
Your new keypair is downloaded in PEM format.
Now click Launch Instance.
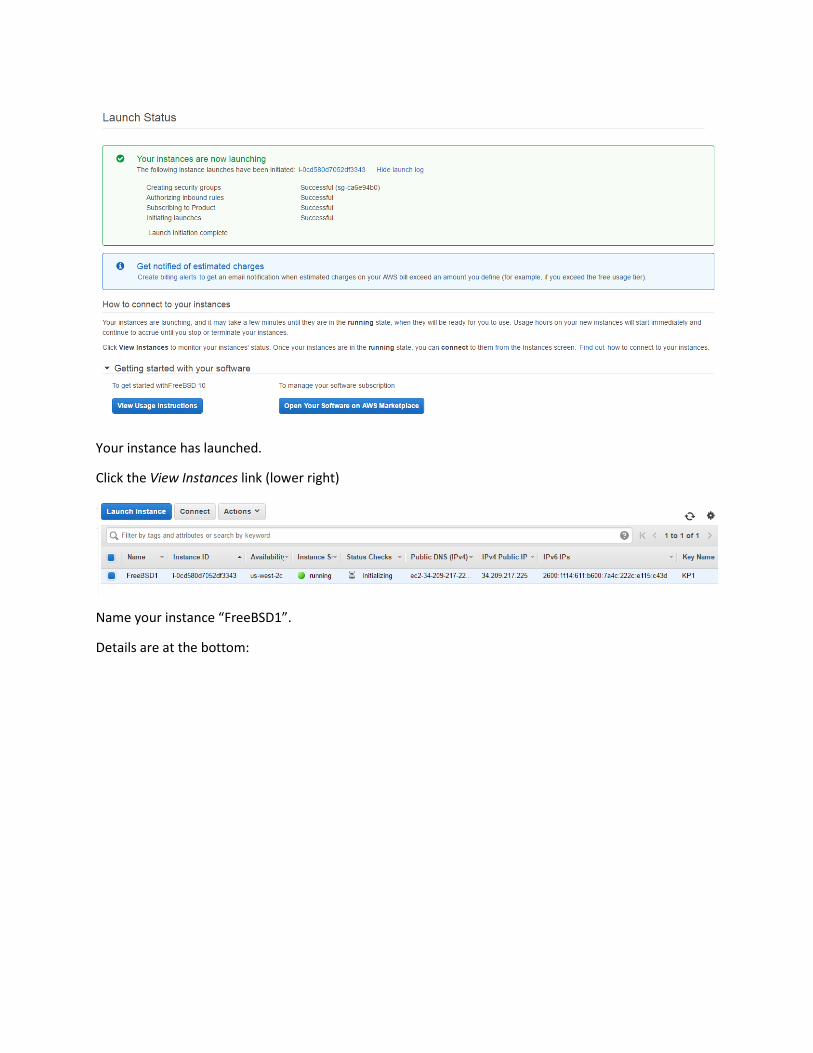
Your instance has launched.
Click the View Instances link (lower right)
Name your instance “FreeBSD1”.
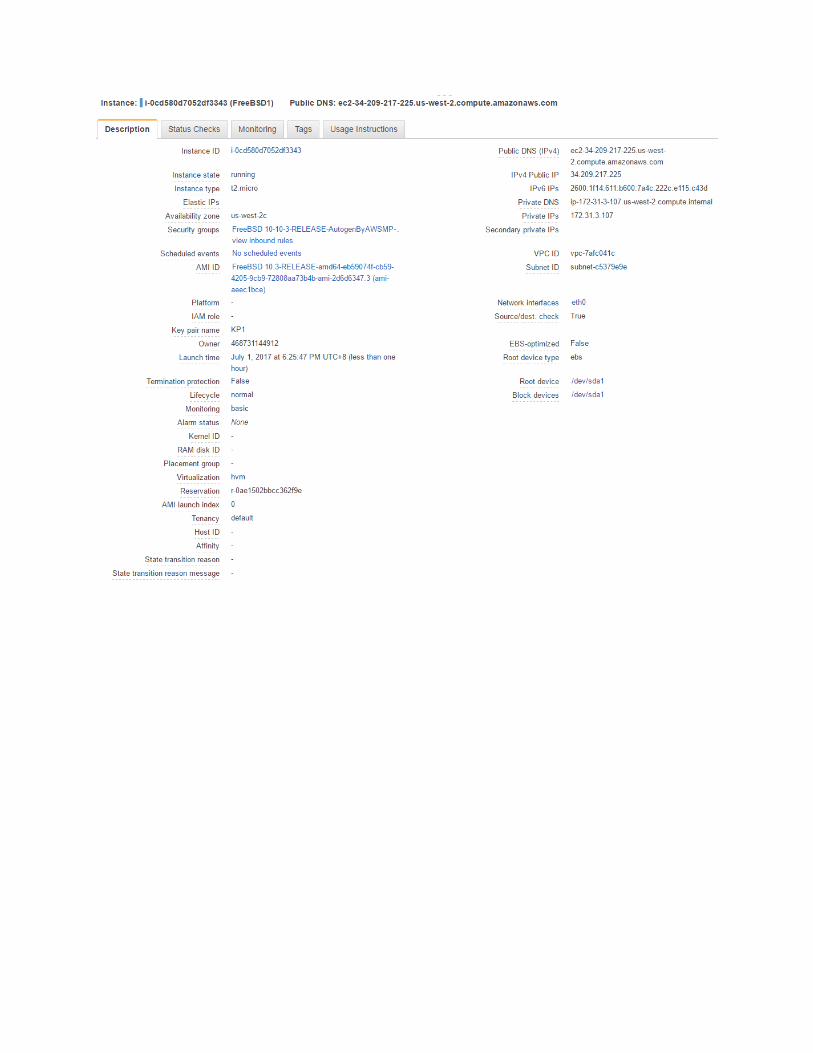
Details are at the bottom:
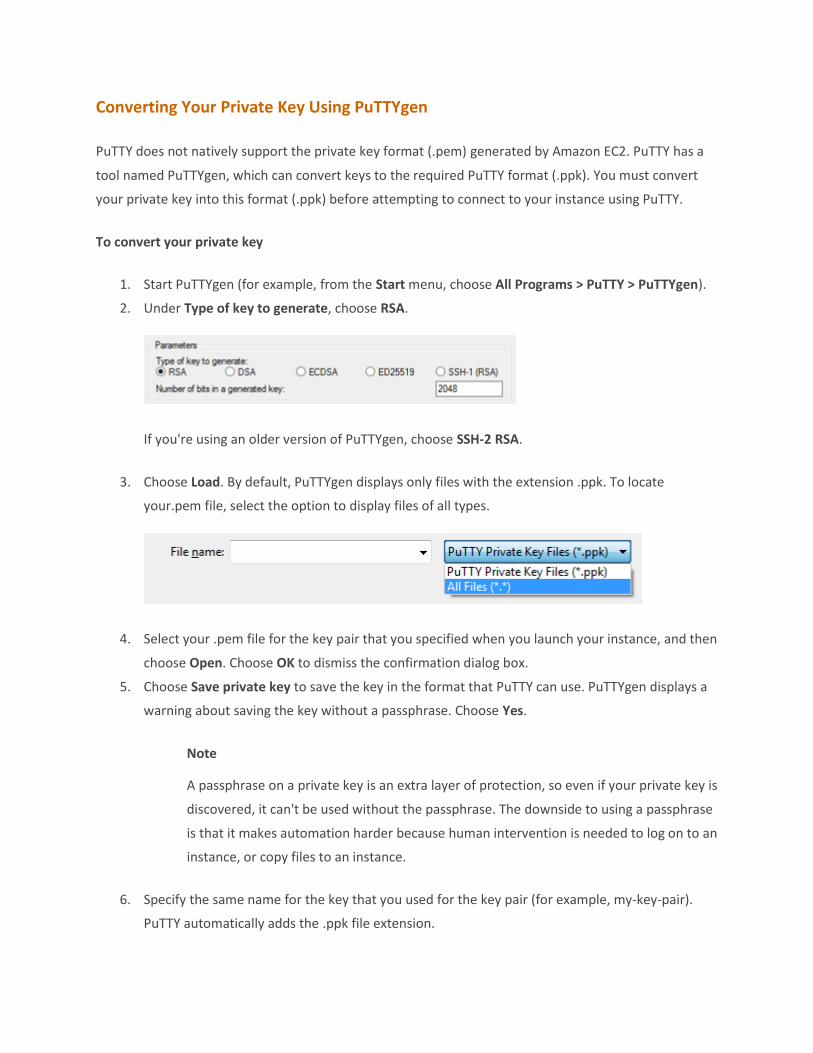
Converting Your Private Key Using PuTTYgen
PuTTY does not natively support the private key format (.pem) generated by Amazon EC2. PuTTY has a
tool named PuTTYgen, which can convert keys to the required PuTTY format (.ppk). You must convert
your private key into this format (.ppk) before attempting to connect to your instance using PuTTY.
To convert your private key
1. Start PuTTYgen (for example, from the Start menu, choose All Programs > PuTTY > PuTTYgen).
2. Under Type of key to generate, choose RSA.
If you're using an older version of PuTTYgen, choose SSH-2 RSA.
3. Choose Load. By default, PuTTYgen displays only files with the extension .ppk. To locate
your.pem file, select the option to display files of all types.
4. Select your .pem file for the key pair that you specified when you launch your instance, and then
choose Open. Choose OK to dismiss the confirmation dialog box.
5. Choose Save private key to save the key in the format that PuTTY can use. PuTTYgen displays a
warning about saving the key without a passphrase. Choose Yes.
Note
A passphrase on a private key is an extra layer of protection, so even if your private key is
discovered, it can't be used without the passphrase. The downside to using a passphrase
is that it makes automation harder because human intervention is needed to log on to an
instance, or copy files to an instance.
6. Specify the same name for the key that you used for the key pair (for example, my-key-pair).
PuTTY automatically adds the .ppk file extension.
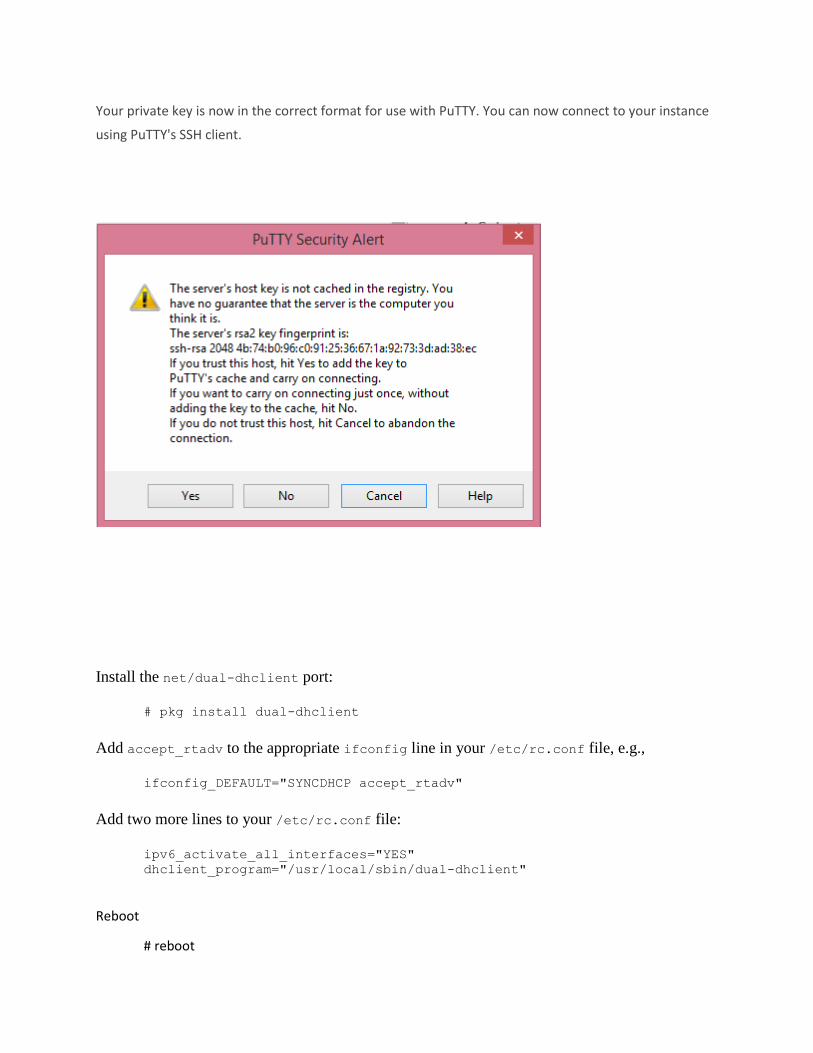
Your private key is now in the correct format for use with PuTTY. You can now connect to your instance
using PuTTY's SSH client.
Install the net/dual-dhclient port:
# pkg install dual-dhclient
Add accept_rtadv to the appropriate ifconfig line in your /etc/rc.conf file, e.g.,
ifconfig_DEFAULT="SYNCDHCP accept_rtadv"
Add two more lines to your /etc/rc.conf file:
ipv6_activate_all_interfaces="YES"
dhclient_program="/usr/local/sbin/dual-dhclient"
Reboot
# reboot
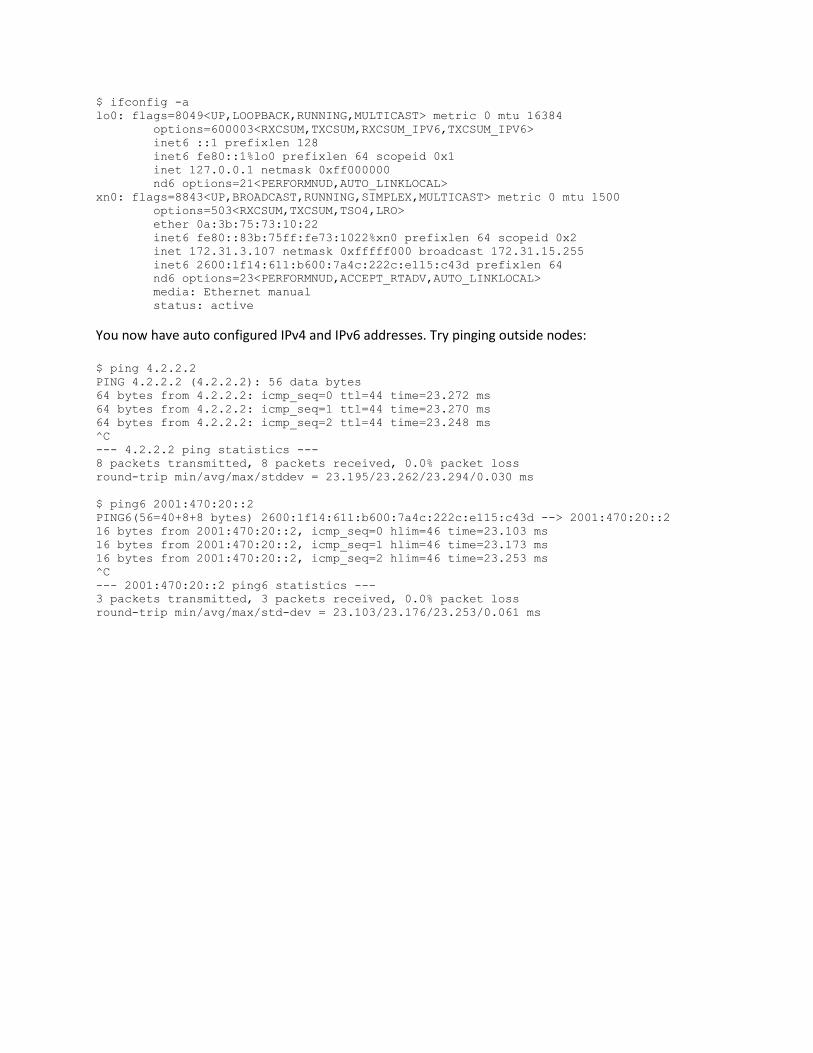
$ ifconfig -a
lo0: flags=8049<UP,LOOPBACK,RUNNING,MULTICAST> metric 0 mtu 16384
options=600003<RXCSUM,TXCSUM,RXCSUM_IPV6,TXCSUM_IPV6>
inet6 ::1 prefixlen 128
inet6 fe80::1%lo0 prefixlen 64 scopeid 0x1
inet 127.0.0.1 netmask 0xff000000
nd6 options=21<PERFORMNUD,AUTO_LINKLOCAL>
xn0: flags=8843<UP,BROADCAST,RUNNING,SIMPLEX,MULTICAST> metric 0 mtu 1500
options=503<RXCSUM,TXCSUM,TSO4,LRO>
ether 0a:3b:75:73:10:22
inet6 fe80::83b:75ff:fe73:1022%xn0 prefixlen 64 scopeid 0x2
inet 172.31.3.107 netmask 0xfffff000 broadcast 172.31.15.255
inet6 2600:1f14:611:b600:7a4c:222c:e115:c43d prefixlen 64
nd6 options=23<PERFORMNUD,ACCEPT_RTADV,AUTO_LINKLOCAL>
media: Ethernet manual
status: active
You now have auto configured IPv4 and IPv6 addresses. Try pinging outside nodes: $ ping 4.2.2.2
PING 4.2.2.2 (4.2.2.2): 56 data bytes
64 bytes from 4.2.2.2: icmp_seq=0 ttl=44 time=23.272 ms
64 bytes from 4.2.2.2: icmp_seq=1 ttl=44 time=23.270 ms
64 bytes from 4.2.2.2: icmp_seq=2 ttl=44 time=23.248 ms
^C
--- 4.2.2.2 ping statistics ---
8 packets transmitted, 8 packets received, 0.0% packet loss
round-trip min/avg/max/stddev = 23.195/23.262/23.294/0.030 ms
$ ping6 2001:470:20::2
PING6(56=40+8+8 bytes) 2600:1f14:611:b600:7a4c:222c:e115:c43d --> 2001:470:20::2
16 bytes from 2001:470:20::2, icmp_seq=0 hlim=46 time=23.103 ms
16 bytes from 2001:470:20::2, icmp_seq=1 hlim=46 time=23.173 ms
16 bytes from 2001:470:20::2, icmp_seq=2 hlim=46 time=23.253 ms
^C
--- 2001:470:20::2 ping6 statistics ---
3 packets transmitted, 3 packets received, 0.0% packet loss
round-trip min/avg/max/std-dev = 23.103/23.176/23.253/0.061 ms