Embed Size (px)
Citation preview
Deploying a System Manually
• General Concepts for System Deployment, page 1
• Installation Checklist, page 4
• Required Information For a Manual Deployment, page 5
• Deploying the OVA File From the VMware vSphere Client, page 6
• Selecting Your Language for Setup, page 9
• Confirming the Deployment, page 9
• Confirming the Size of Your System, page 10
• Choosing What System to Install, page 10
• Choosing the Type of Deployment, page 10
• Adding Public Access, page 11
• Entering the Public VIP Address, page 13
• Entering the Private VIP Address, page 13
• WebEx Site and WebEx Administration URLs, page 14
• Entering the WebEx Common Site and Administration Site URLs, page 15
• Confirming that the Network is Configured Correctly, page 15
• Deploying Virtual Machines, page 16
• Checking the System, page 16
General Concepts for System DeploymentSystem Sizes
Systems are identified by the number of concurrent users supported:
• 50 concurrent users (also known as a micro system)
◦Typically supports a company between 500 and 1000 employees
Cisco WebEx Meetings Server Administration Guide Release 2.5 1
◦Primary system [(without High Availability (HA)] comprises an Admin virtual machine, and anoptional Internet Reverse Proxy (IRP) machine.
• 250 concurrent users (also known as a small system)
◦Typically supports a company between 2500 and 5000 employees
◦Primary system (without HA) comprises an Admin virtual machine, a Media virtual machine, andan optional Internet Reverse Proxy (IRP) machine.
• 800 concurrent users (also known as a medium system)
◦Typically supports a company between 8000 and 16,000 employees.
◦Primary system (without HA) comprises an Admin virtual machine, a Media virtual machine, andan optional Internet Reverse Proxy (IRP) machine.
• 2000 concurrent users (also known as a large system)
◦Typically supports a company between 20,000 and 40,000 employees.
◦Primary system (without HA) comprises an Admin virtual machine, 3 Media virtual machines, 2Web machines, and an optional Internet Reverse Proxy (IRP) machine.
Terms Used During the Deployment
WebEx Site URL—Secure HTTP URL for users to host and attend meetings in a single-data centerenvironment.
WebEx Administration URL—Secure HTTP URL for administrators to configure, monitor, and managethe system in a single-data center environment.
Public VIP—virtual IP address for the WebEx site URL.
Private VIP—virtual IP address for the Administration site URL or the virtual IP address for the WebEx siteURL (for internal users only, if you have a split-horizon DNS).
WebEx Common URL—used by the DNS to redirect the user to the data center where the user performsmeeting-related tasks, such as scheduling or hosting meetings. Which data center DNS chooses is transparentto the user. The WebEx Common URL is simply a convenient location for a user to enter the system. If a datacenter goes down, nothing changes for the user, including the URL used to access meetings, because the DNSwill redirect the user to the surviving data center.
Administration Common URL—is often referenced as simply the Administration URL. It is used by theDNS to redirect an administrator to the management data center to where the administrator logs into thesystem. Which data center the DNS chooses is transparent to the administrator (however, the string in theURL bar changes depending on which data center the administrator is using to access the system). TheAdministration Common URL is simply a convenient target an administrator uses to enter the system.
Administration Local URLs—are specific to each data center in a Multi-data Center (MDC) system. Whenlogging in through the Administration CommonURL, the DNS redirects the administrator to the AdministrationLocal URL for the management data center. Any system modifications, such as assigning a license to a user,are performed on the management data center and replicated to all data centers in the MDC system.
An administrator can choose a specific data center to modify fromwithin the CWMS application, but selectinganother data center to modify does not change the Administration Local URL, because the administrator'saccess to the system remains with the data center chosen by the DNS when the administrator logged into the
Cisco WebEx Meetings Server Administration Guide Release 2.52
Deploying a System ManuallyGeneral Concepts for System Deployment
system. The administrator's modifications to another data center in the MDC system pass through themanagement data center chosen by the DNS to the target data center.
A MDC system will have a minimum of two Administration Local URLs, one for every data center in thesystem.
Local URLs that are specific to each data center.
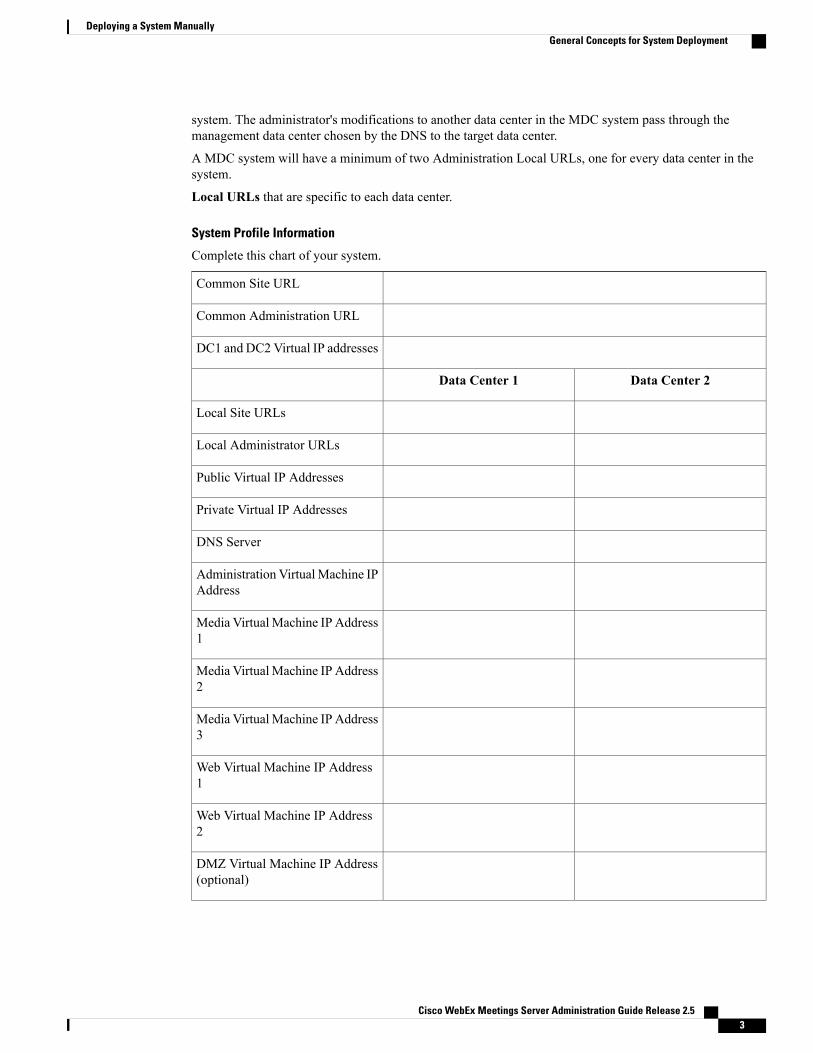
System Profile Information
Complete this chart of your system.
Common Site URL
Common Administration URL
DC1 and DC2Virtual IP addresses
Data Center 2Data Center 1
Local Site URLs
Local Administrator URLs
Public Virtual IP Addresses
Private Virtual IP Addresses
DNS Server
Administration VirtualMachine IPAddress
Media VirtualMachine IP Address1
Media VirtualMachine IP Address2
Media VirtualMachine IP Address3
Web Virtual Machine IP Address1
Web Virtual Machine IP Address2
DMZ Virtual Machine IP Address(optional)
Cisco WebEx Meetings Server Administration Guide Release 2.5 3
Deploying a System ManuallyGeneral Concepts for System Deployment
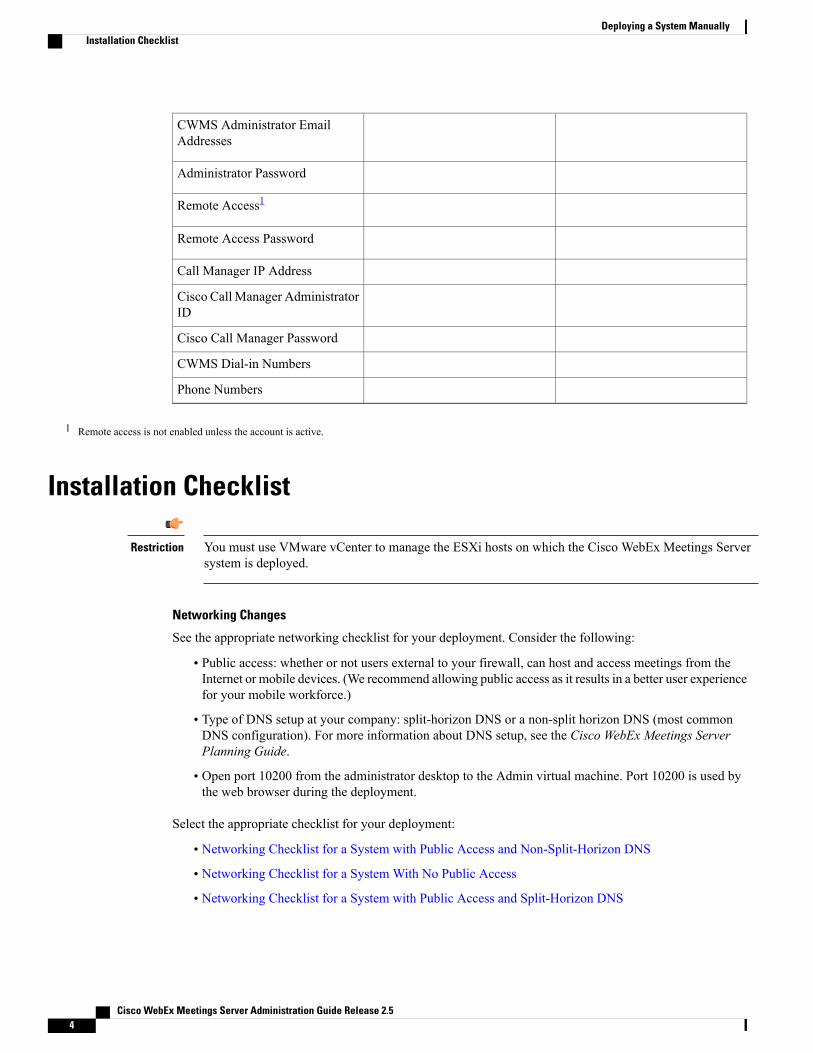
CWMS Administrator EmailAddresses
Administrator Password
Remote Access1
Remote Access Password
Call Manager IP Address
Cisco Call Manager AdministratorID
Cisco Call Manager Password
CWMS Dial-in Numbers
Phone Numbers
1 Remote access is not enabled unless the account is active.
Installation Checklist
You must use VMware vCenter to manage the ESXi hosts on which the Cisco WebEx Meetings Serversystem is deployed.
Restriction
Networking Changes
See the appropriate networking checklist for your deployment. Consider the following:
• Public access: whether or not users external to your firewall, can host and access meetings from theInternet or mobile devices. (We recommend allowing public access as it results in a better user experiencefor your mobile workforce.)
• Type of DNS setup at your company: split-horizon DNS or a non-split horizon DNS (most commonDNS configuration). For more information about DNS setup, see the Cisco WebEx Meetings ServerPlanning Guide.
• Open port 10200 from the administrator desktop to the Admin virtual machine. Port 10200 is used bythe web browser during the deployment.
Select the appropriate checklist for your deployment:
• Networking Checklist for a System with Public Access and Non-Split-Horizon DNS
• Networking Checklist for a System With No Public Access
• Networking Checklist for a System with Public Access and Split-Horizon DNS
Cisco WebEx Meetings Server Administration Guide Release 2.54
Deploying a System ManuallyInstallation Checklist

Required Information
The required information varies if you are doing an automatic deployment (supported for 50 concurrent users,250 concurrent users, and 800 concurrent users) systems or manual deployment (supported for all systemsizes). We recommend that you select an automatic deployment unless you are deploying a 2000-user systemthat always requires a manual deployment.
Select the appropriate checklist for your deployment type:
• Required Information For an Automatic Deployment
• Required Information For a Manual Deployment, on page 5
Required Information For a Manual DeploymentIn a manual deployment, you create all the virtual machines for your system using the OVA wizard from yourvSphere client. You then install your system using a manual deployment.
You must choose a manual deployment if you are deploying a 2000 user system.
Be sure to add the virtual machine FQDNs, IP addresses, WebEx and Administration site URLs, and VIPaddresses to your DNS servers before you start the system deployment. We will use this information tocheck network connectivity at the end of the deployment.
To avoid any DNS issues, you may want to test these URLs and IP addresses before you start the OVAdeployment. Otherwise, the system deployment will fail until you correct these errors.
Note
This is the information required for your system, in order.
Value For Your SystemDescriptionField Name
IP address for the WebEx site URL (site users accessto host and attend meetings)
Public VIP
• IP address for the Administration site URL (foradministrators to configure, monitor, andmanage the system)
• IP address for theWebEx site URL (for internalusers only, if you have a split-horizon DNS).
Private VIP
Secure HTTP URL (all lowercase characters) forusers to host and attend meetings.
WebEx Site URL
Secure HTTP URL (all lowercase characters) foradministrators to configure, monitor, and manage thesystem.
WebExAdministration URL
Depending on the system size you selected, the fullyqualified domain name (all lowercase characters) ofthe media and web virtual machines.
FQDN for theinternal virtualmachines
Cisco WebEx Meetings Server Administration Guide Release 2.5 5
Deploying a System ManuallyRequired Information For a Manual Deployment

Value For Your SystemDescriptionField Name
If you plan to add public access, then you need toenter the fully qualified domain name (all lowercasecharacters) of the Internet Reverse Proxy virtualmachine.
(Public access only)
FQDN of the InternetReverse Proxy
What To Do Next
With this information, start the system deployment by entering the deployment URL in a browser window.(The deployment URL is written in the console window for the Admin virtual machine.)
If the system is rebooted before the configuration is complete, a new passcode is generated and you mustuse the deployment URL with the new passcode.
Note
Deploying the OVA File From the VMware vSphere ClientThe OVA template creates two virtual NICs for each virtual machine. However, only the Administrationvirtual machines uses both virtual NICs. All other Cisco WebEx Meetings Server (CWMS) virtual machines,only one virtual NIC is used and the other one is disconnected.
This procedure is provided as a general guidance. The screens you see during the OVA deployment dependsupon your vCenter, storage, and networking configuration, and might be different from what is described inthis procedure. See your VMware vSphere documentation for complete information on the OVA wizard.
Before You Begin
Obtain the CiscoWebExMeetings Server OVA file for your system and place it in a location that is accessiblefrom VMware vSphere. Use the VMware vSphere client to deploy the Administration virtual machine foryour system.
You must use VMware vCenter to manage the ESXi hosts on which the CiscoWebExMeetings Server systemis deployed. Using the vSphere client, sign in to vCenter and deploy the OVA file for the Admin virtualmachine.
Step 1 Sign in to your VMware vSphere client.Be sure to sign in as a user that includes administrator privileges: to deploy, configure, power on or off, and delete virtualmachines.
Step 2 Select File > Deploy OVF Template...Step 3 Select Browse to navigate to the location of the OVA file. Select Next.
You can select theCiscoWebExMeetings Server link to go to a Web page with detailed information about this system.
Cisco WebEx Meetings Server Administration Guide Release 2.56
Deploying a System ManuallyDeploying the OVA File From the VMware vSphere Client
Step 4 Read the End User License Agreement and select Accept, then select Next.Step 5 Navigate to and select the location in the vCenter inventory where you want to place the Admin virtual machine.Step 6 Enter the name of the virtual machine for your system size and selectNext. For more information on selecting the correct
size for your company, see General Concepts for System Deployment.You must deploy the Admin virtual machine before deploying any other virtual machines. If you select automaticdeployment (recommended), we deploy the other virtual machines for you. If you choose manual deployment (requiredfor a 2000 concurrent users system), then after deploying the Admin virtual machine, you must deploy the other virtualmachines by using this same wizard.
Cisco recommends you include the type in the virtual machine name; for example, include "Admin" in your Adminvirtual machine name to easily identify it in your vCenter inventory.
All the internal virtual machines for your system must be in the same subnet as the Admin virtual machine. (Dependingon the system size you select, you might need one or more media and web internal virtual machines.)
Step 7 From the drop-down list, select the virtual machine for your system size and select Next.Be sure to deploy the Admin virtual machine before any other virtual machines in your system.
Step 8 Navigate through the vCenter inventory and select the ESXi host or cluster where you want to deploy the virtual machinesfor your system. Select Next.
Step 9 If the cluster contains a resource pool, select the resource pool where you want to deploy the OVA template and selectNext.Resource pools share CPU and memory resources working with VMware features such as DRS or vMotion. Resourcepools must be dedicated to a single ESXi Host. VMware resource pools are not recommended for use with CiscoWebExMeetings Server.
Step 10 Select the datastore for your virtual machine and the kind of provisioning for your virtual machine.You must select Thick Provisioning and create the maximum virtual disk space required for your system. With ThinProvisioning, VMware allocates the file system space on an as-needed basis that can result in poor performance. Lazyzero is sufficient and eager zero is acceptable, but eager zero will take more time to complete.
Step 11 Set up networkmapping. For each source network, select a destination network from the drop-down list in theDestinationNetworks column. Select Next.
Both the VM Network and the VIP Network must be mapped to the same value in the Destination Networkcolumn. You can ignore the warning message about multiple source networks mapped to the same host network.
Note
Step 12 Enter the following information for the virtual machine, then select Next:
• Hostname of the virtual machine (do not include the domain here)
• Domain for the virtual machine
• IPv4 address (Eth0) of the virtual machine
• Subnet mask of the virtual machine
• Gateway IP address
• Primary DNS server that contains entries for the hostname and IP address of this virtual machine
• Secondary DNS server that contains entries for the hostname and IP address of this virtual machine (A system withonly one DNS server configured is at risk, because it creates a single point-of-failure. We recommend that youconfigure a secondary DNS server to create network redundancy.)
• Language displayed during the install process, following the power on of this virtual machine
Cisco WebEx Meetings Server Administration Guide Release 2.5 7
Deploying a System ManuallyDeploying the OVA File From the VMware vSphere Client
To avoid DNS issues, you can test the URLs and IP addresses before you start the OVA deployment. Thedeployment will fail if there are errors.
Note
Step 13 Confirm the information that you have entered. If there are any mistakes, select Back and change the values.Step 14 If you are manually upgrading a system, select Finish, skip the balance of this procedure and continue with the next step
in Upgrading the System Manually. (Copying data from the original system to the upgrade system by using manualdeployment should be performed after the upgraded system is deployed, but not yet powered on.) Otherwise, checkPower on after deployment and select Finish.
Step 15 If you are deploying an Admin virtual machine, go to vCenter and open a console window for the virtual machine. Onceit powers on, we will check the networking information you entered during the OVA deployment.If we are able to confirm connectivity, a green checkmark appears.
If there is a problem, a red X appears. Fix the error and re-attempt the OVA deployment.
Step 16 Write down the case-sensitive URL displayed in the console window.An administrator uses this URL to continue the system deployment.
If the system is re-booted before the configuration is complete, a new passcode is generated and you must use the URLwith the new passcode.
What to Do Next
If you are performing a manual deployment, we recommend that you deploy the rest of the virtual machinesfor your system at this time. This avoids any issues such as time outs when powering on virtual machines.
If the deployment is successful, continue with system deployment in a browser window.
If the deployment failed, see Checking Your Networking Configuration After a Failed OVA Deployment.
Checking Your Networking Configuration After a Failed OVA DeploymentConfirm the networking entries for the virtual machine.
Do not use Edit Settings... for any of the virtual machines in your system, other than after a faileddeployment. Once the system is up and running, you must use the WebEx Administration site to makeany further edits to virtual machine settings. If you use your vSphere client, those changes will not beaccepted by the system.
Important
Cisco WebEx Meetings Server Administration Guide Release 2.58
Deploying a System ManuallyChecking Your Networking Configuration After a Failed OVA Deployment
For detailed steps, see your VMware vSphere documentation.Note
Step 1 In the vSphere client, select Power > Shut Down Guest on the virtual machine.Step 2 Find the virtual machine in the Inventory and right-click Edit settings....Step 3 Select the Options tab.Step 4 Select Properties and confirm that all the networking information has been entered correctly. If any changes are required,
redeploy the OVA with the correct settings.One possible networking issue is that the VLAN routing is not set up correctly for the ESXi host. Because the virtualmachine is on that VLAN, the virtual machine won't have network connectivity. From the network where the ESXi hostresides, you should be able to ping the default gateway IP address of the VLAN you will be using for the virtual machinesin your system.
Selecting Your Language for SetupDetermine your preferred language for setting up the system.
Do not close this browser window until the system deployment is complete. If you close the browser early,it might be necessary to restart the deployment.
CWMS System is the default name of the data center after an upgrade to version 2.5; it is not translatedfrom English in any of the other languages.
Note
Before You Begin
Be sure you have deployed the Admin virtual machine from VMware vCenter. See Deploying the OVA FileFrom the VMware vSphere Client
Step 1 Select the language from the drop-down menu.Step 2 Select Next.
Confirming the DeploymentTo confirm that you are deploying a new system or expanding an existing system, select Next.
Cisco WebEx Meetings Server Administration Guide Release 2.5 9
Deploying a System ManuallySelecting Your Language for Setup
Confirming the Size of Your SystemYou selected the size of your system when you deployed the Admin virtual machine by using the OVA file.
• Confirm that the system size you selected during the OVA deployment is correct.
◦If the system size you selected is correct, then select Next.
◦If the system size you selected is incorrect, then select I want to change System Size.
a) Using your VMware vSphere client, selectPower > Shut DownGuest for the Admin virtual machinewith the incorrect system size.
b) Right-click the virtual machine and select Delete from Disk.c) Redeploy the OVA file and select the Admin virtual machine for the correct system size.
Choosing What System to Install
Step 1 Determine the type of installation.
• If you are installing this system for the first time, then choose Install a primary system.
• If you have installed a primary system and are adding a redundant High Availability (HA) system, then chooseCreate a High Availability (HA) redundant system.
Do not attempt install a HA system before installing the primary system, as you cannot use the HA system unless theprimary system has first been installed.
Step 2 Select Next.
Choosing the Type of DeploymentYou can choose automatic or manual deployment of the system virtual machines. Your choice of automaticor manual deployment depends upon the following:
• If you have time constraints, an automatic deployment is faster than a manual deployment.
• If you prefer step-by-step guidance, this guidance is provided during an automatic deployment.
• If you are familiar with VMware vCenter and do not want to provide us your vCenter credentials, selectmanual deployment.
Cisco WebEx Meetings Server Administration Guide Release 2.510
Deploying a System ManuallyConfirming the Size of Your System

We recommend that you select Automatic unless you are deploying a 2000-user system that always requiresa manual deployment.
Step 1 Select automatic or manual deployment:
• Automatic: We deploy all the virtual machines required for your system.
•Manual: You manually deploy each virtual machine by using VMware vCenter. After answering a few questionsabout your system, you are provided with a list of the virtual machines required for your system.
Step 2 Select Next.
Adding Public AccessIf you add public access by using IRP, users outside the firewall can host or attend meetings from the Internetor mobile devices. IRP virtual machines can be added to a system at any time on a per-data center basis.Adding IRP to one data center in a Multi-data Center (MDC) environment gives users outside the firewallaccess to the entire system. To prevent external access, all IRP virtual machines must be removed from asystem.
For security reasons, we recommend that you locate the Internet Reverse Proxy on a subnet different fromthe subnet occupied by the Administration virtual machine. This ensures network level isolation between theInternet Reverse Proxy and your internal (Admin and media, if applicable) virtual machines.
In a Multi-data Center (MDC) environment, the data centers cannot be expanded, upgraded, or updated.Secondary data centers must be removed from the MDC, making it a Single-data Center (SDC) environment.TheMDC environment can be restored after the data centers are modified and it is verified that the data centersizes and version match.
Before You Begin
It is not necessary to connect your storage server to an Internet Reverse Proxy (IRP) server.
If there is a firewall between the Administration virtual machines and the IRP virtual machines, the temporaryIP address must be allowed through the firewall.
Step 1 Choose whether or not external users can host or attend meetings.
• If you want to add public access, confirm that Create an Internet Reverse Proxy virtual machine is selected.
• If you want only internal users (those behind the company firewall) to host or attend meetings, then deselectCreatean Internet Reverse Proxy virtual machine.
Step 2 Select Next.
Cisco WebEx Meetings Server Administration Guide Release 2.5 11
Deploying a System ManuallyAdding Public Access
What to Do Next
•With public access: Choosing vCenter Settings for Internet Reverse Proxy (IRP)
•Without public access: Entering the Private VIP Address
• For IPv6 client connections: Configuring IPv6 for Client Connections
Choosing vCenter Settings for Internet Reverse Proxy (IRP)
Before You Begin
Verify that the firewall ports required by VMware vCenter are open so that vCenter can deploy the InternetReverse Proxy (IRP) virtual machine. For more information on the required firewall ports, see the CiscoWebEx Meetings Server Planning Guide.
Step 1 From the drop-down list, choose the ESXi host for the IRP virtual machine.Step 2 Choose the datastore for the IRP.Step 3 Choose the virtual machine port group.Step 4 Select Next.
Entering Networking Information for the Internet Reverse Proxy (IRP)
Step 1 Enter the hostname and IP address of Internet Reverse Proxy (IRP) servers in your DNS to enable lookup from an externalnetwork.If you have DNS servers that enable lookup from internal networks, add the hostname and the IP address of the IRPservers into these DNS servers as well. This enables a secure connection between your internal virtual machines and theIRP servers.
Step 2 Enter the following:If you entered the hostname and IP address of the Internet Reverse Proxy virtual machine in your DNS servers, then theIPv4 Address field is automatically populated.
• Fully qualified domain name (FQDN)
• IPv4 gateway
• IPv4 subnet mask
• Primary DNS server IPv4 address
• (Optional) Secondary DNS server IPv4 address
Step 3 Select Next.
Cisco WebEx Meetings Server Administration Guide Release 2.512
Deploying a System ManuallyChoosing vCenter Settings for Internet Reverse Proxy (IRP)
Entering the Public VIP Address• This public VIP address must be visible from both the Internet and the internal network (split-horizonDNS only).
• This public VIP address must be on the same subnet as the Internet Reverse proxy.
• If you do not have a split-horizon DNS, then all users use the Public VIP address to host and attendmeetings.
• If you have a split-horizon DNS, and added public access, then external users use the Public VIP addressto host and attend meetings.
For more information on non-split horizon and split-horizon DNS, and public access, see the Cisco WebExMeetings Server Planning Guide.
If you are creating a High Availability (HA) system, you do not need to reenter this information, as wewill use the information you entered for the primary system.
Note
• Enter the public VIP IPv4 address and select Next.
Entering the Private VIP AddressAdministrators configure, monitor, and maintain the system from the Administration site URL that maps tothe private VIP address.
If you have a split-horizon DNS, then internal users also use the Private VIP address to host and attendmeetings.
If you are adding a High Availability (HA) system, you do not need to reenter this information; we will usethe information you entered for the primary system.
Before You Begin
The private virtual IP (VIP) address must be on the same subnet as your internal (Admin and Media, ifapplicable) virtual machines.
• Enter the IPv4 private VIP address and select Next.
Cisco WebEx Meetings Server Administration Guide Release 2.5 13
Deploying a System ManuallyEntering the Public VIP Address
WebEx Site and WebEx Administration URLsWebEx Site URL
Users access theWebEx site URL to schedule, host, or attend meetings. This URL resolves to either the privateVIP address or the public VIP address, depending on whether or not you are using a split-horizon DNS.
• Resolves to the public VIP address for all users, when you do not have split-horizon DNS.
• Resolves to the public VIP address for external users when you have split-horizon DNS.
• Resolves to the private VIP address for internal users when you have split-horizon DNS.
Ports 80 and 443 must be open for the WebEx site URL.Note
WebEx Administration URL
Administrators access the WebEx Administration URL to configure, manage, and monitor the system. ThisURL resolves to the private VIP address.
Ports 80 and 443 must be open for the WebEx Administration URL.Note
Names for the WebEx Site and WebEx Administration URLs
Youmay choose almost any names for these URLs, comprising all lowercase characters. However, you cannotuse the following as the hostname in the URLs:
• the same name as the hostnames for any of the virtual machines in the system
• authentication
• client
• companylogo
• dispatcher
• docs
• elm-admin
• elm-client-services
• emails
• maintenance
• manager
• orion
• oriondata
Cisco WebEx Meetings Server Administration Guide Release 2.514
Deploying a System ManuallyWebEx Site and WebEx Administration URLs

• oriontemp
• nbr
• npp
• probe
• reminder
• ROOT
• solr
• TomcatROOT
• upgradeserver
• url0107ld
• version
•WBXService
• webex
Entering the WebEx Common Site and Administration Site URLsThe Common Site URL allows users to schedule and host meetings, and access meeting recordings. TheAdministration Site URL provides management of the system. If you are adding a High Availability (HA)system, it is not necessary to reenter this information; the primary system URLs should match the HA systemURLs. (See General Concepts for System Deployment for descriptions of the URLs.)
Step 1 Enter the WebEx Common Site and WebEx Administration Site secure (https) URLs.The WebEx Common Site URL must be different from the WebEx Administration URL.
Do not reuse the hostnames of the virtual machines in the hostname portion of the WebEx URLs.
Step 2 Select Next.
Confirming that the Network is Configured CorrectlyThis screen provides links to online help for the networking changes required for your system. The onlinehelp provides details on DNS server changes as well as firewall settings.
You must make the DNS server and firewall changes that allow us to test network connectivity.
If you have not done so already, complete the networking configuration and select Next.
If you are testing an automatic deployment, we deploy the virtual machines required for your system whenyou select Next.
Cisco WebEx Meetings Server Administration Guide Release 2.5 15
Deploying a System ManuallyEntering the WebEx Common Site and Administration Site URLs
If you are testing a manual deployment, enter the hostnames for your virtual machines and deploy them (ifyou have not deployed them already).
When the deployment is complete, test them by powering them on and verifying that all the virtual machinespowered on successfully.
Deploying Virtual MachinesAfter providing information about the virtual machines in the system, we will attempt to connect to each ofthe virtual machines deployed for your system.
Do not leave this browser page until the system has connected to all the virtual machines or the connectionfailed with error messages indicating the problem.
Note
Step 1 Enter the fully qualified domain names (FQDNs) for any additional virtual machines required for your system. (Youentered the Admin virtual machine FQDN earlier, when you deployed it from the OVA file.)
Step 2 If you have not done so already, using VMware vCenter, deploy all the additional virtual machines required for thesystem.
Step 3 Power on all these virtual machines and verify that they powered on successfully. Then select Detect virtual machines.We establish connections to these virtual machines. This might take several minutes.
Step 4 Wait until a Connected status is displayed for each the virtual machine, then complete one of the following:
• If there are no errors, the status shows all green checks. If you are satisfied with the configuration so far, selectNext. Otherwise, you can change the FQDNs of the virtual machines by again selecting Detect virtual machines.
• If you see errors, fix the errors and select Next to continue.You can select Download log file to obtain the log file for this deployment, providing a record that canbe used to troubleshoot a failed deployment.
Note
• If there are other problems with one or more of the virtual machines, from the VMware vCenter power off thevirtual machines with errors and manually delete them. (If you do not delete them, you might see error messagesregarding these virtual machines.) After fixing the problems, redeploy the virtual machines from the OVA file andselect Detect virtual machines.
Checking the SystemThe system check verifies the configuration parameters of your system. This includes confirming that thevirtual machines have the required minimum configuration, and validating the WebEx site and WebExAdministration URLs.
The system check takes several minutes to complete. Do not leave this page until all the checks have beencompleted successfully, or the system check fails and shows error messages indicating the problem.
Cisco WebEx Meetings Server Administration Guide Release 2.516
Deploying a System ManuallyDeploying Virtual Machines
If you reload the page before the checks are complete, you are returned to the first page of this systemdeployment. When the checks are completed successfully, the first page of configuration utility appears.
The Administration site URL used during the deployment process is the Administration virtual machinehostname. During basic configuration, the hostname is replaced with the Administration site URL. As a result,the first time you sign in to the Administration site, the system might prompt you to accept the certificateexception.
• Complete one of the following:
◦If there are no errors and the status shows all green checks, select Next and continue withConfiguring an Email (SMTP) Server. In rare cases, you might seeNot tested. This does not meanthat there are any problems with your virtual machines. It simply states that system checks werenot completed; for example, the entry might display because there was a temporary loss of networkconnectivity. Once you complete the deployment, you can sign in to the Administration site andcheck these resources.
◦If there is a problem with network connectivity, verify that the WebEx Site URL, AdministrationURL, and IP addresses are entered correctly. Verify that these sites are in the same subnet, and theparameters have been correctly entered in the DNS servers.
◦If there are problems with your system meeting the minimum system capacity, you have twooptions:
◦Power down all the virtual machines from VMware vCenter and manually delete them. Thenretry the system deployment on a system with resources that meet or exceed the minimumrequirements.
◦Proceed with your current installation. If you do, you must acknowledge that you forgo theright to request technical support from Cisco. Confirm by checking the error message checkbox and select Next.
◦If there are any problems with one or more of your virtual machines, power off the virtual machineswith errors and manually delete them by using the VMware vCenter. Fix the issues and retry thesystem deployment.
• Select Continue to go to the basic configuration where you begin by setting up the mail server(Configuring an Email (SMTP) Server) and identifying an administrator (Creating AdministratorAccounts). If another administrator will complete the basic configuration, send this URL to thatadministrator.
Cisco WebEx Meetings Server Administration Guide Release 2.5 17
Deploying a System ManuallyChecking the System

Cisco WebEx Meetings Server Administration Guide Release 2.518
Deploying a System ManuallyChecking the System