Embed Size (px)
Citation preview

Deploying Avaya Aura® Session Managerusing VMware® in the VirtualizedEnvironment
Release 6.3Issue 6
November 2014

© 2014 Avaya Inc.
All Rights Reserved.
NoticeWhile reasonable efforts have been made to ensure that theinformation in this document is complete and accurate at the time ofprinting, Avaya assumes no liability for any errors. Avaya reservesthe right to make changes and corrections to the information in thisdocument without the obligation to notify any person or organizationof such changes.
Documentation disclaimer“Documentation” means information published by Avaya in varyingmediums which may include product information, operatinginstructions and performance specifications that Avaya may generallymake available to users of its products and Hosted Services.Documentation does not include marketing materials. Avaya shall notbe responsible for any modifications, additions, or deletions to theoriginal published version of documentation unless suchmodifications, additions, or deletions were performed by Avaya. EndUser agrees to indemnify and hold harmless Avaya, Avaya's agents,servants and employees against all claims, lawsuits, demands andjudgments arising out of, or in connection with, subsequentmodifications, additions or deletions to this documentation, to theextent made by End User.
Link disclaimerAvaya is not responsible for the contents or reliability of any linkedwebsites referenced within this site or documentation provided byAvaya. Avaya is not responsible for the accuracy of any information,statement or content provided on these sites and does notnecessarily endorse the products, services, or information describedor offered within them. Avaya does not guarantee that these links willwork all the time and has no control over the availability of the linkedpages.
WarrantyAvaya provides a limited warranty on Avaya hardware and software.Refer to your sales agreement to establish the terms of the limitedwarranty. In addition, Avaya’s standard warranty language, as well asinformation regarding support for this product while under warranty isavailable to Avaya customers and other parties through the AvayaSupport website: http://support.avaya.com or such successor site asdesignated by Avaya. Please note that if you acquired the product(s)from an authorized Avaya Channel Partner outside of the UnitedStates and Canada, the warranty is provided to you by said AvayaChannel Partner and not by Avaya.
LicensesTHE SOFTWARE LICENSE TERMS AVAILABLE ON THE AVAYAWEBSITE, HTTP://SUPPORT.AVAYA.COM/LICENSEINFO ORSUCH SUCCESSOR SITE AS DESIGNATED BY AVAYA, AREAPPLICABLE TO ANYONE WHO DOWNLOADS, USES AND/ORINSTALLS AVAYA SOFTWARE, PURCHASED FROM AVAYA INC.,ANY AVAYA AFFILIATE, OR AN AVAYA CHANNEL PARTNER (ASAPPLICABLE) UNDER A COMMERCIAL AGREEMENT WITHAVAYA OR AN AVAYA CHANNEL PARTNER. UNLESSOTHERWISE AGREED TO BY AVAYA IN WRITING, AVAYA DOESNOT EXTEND THIS LICENSE IF THE SOFTWARE WASOBTAINED FROM ANYONE OTHER THAN AVAYA, AN AVAYAAFFILIATE OR AN AVAYA CHANNEL PARTNER; AVAYARESERVES THE RIGHT TO TAKE LEGAL ACTION AGAINST YOUAND ANYONE ELSE USING OR SELLING THE SOFTWAREWITHOUT A LICENSE. BY INSTALLING, DOWNLOADING ORUSING THE SOFTWARE, OR AUTHORIZING OTHERS TO DO SO,YOU, ON BEHALF OF YOURSELF AND THE ENTITY FOR WHOMYOU ARE INSTALLING, DOWNLOADING OR USING THESOFTWARE (HEREINAFTER REFERRED TOINTERCHANGEABLY AS “YOU” AND “END USER”), AGREE TOTHESE TERMS AND CONDITIONS AND CREATE A BINDINGCONTRACT BETWEEN YOU AND AVAYA INC. OR THEAPPLICABLE AVAYA AFFILIATE (“AVAYA”).
Avaya grants you a license within the scope of the license typesdescribed below, with the exception of Heritage Nortel Software, forwhich the scope of the license is detailed below. Where the orderdocumentation does not expressly identify a license type, theapplicable license will be a Designated System License. The
applicable number of licenses and units of capacity for which thelicense is granted will be one (1), unless a different number oflicenses or units of capacity is specified in the documentation or othermaterials available to you. “Software” means Avaya’s computerprograms in object code, provided by Avaya or an Avaya ChannelPartner, whether as stand-alone products, pre-installed , or remotelyaccessed on hardware products, and any upgrades, updates, bugfixes, or modified versions thereto. “Designated Processor” means asingle stand-alone computing device. “Server” means a DesignatedProcessor that hosts a software application to be accessed bymultiple users. “Instance” means a single copy of the Softwareexecuting at a particular time: (i) on one physical machine; or (ii) onone deployed software virtual machine (“VM”) or similar deployment.
Concurrent User LicenseConcurrent User License (CU). End User may install and use theSoftware on multiple Designated Processors or one or more Servers,so long as only the licensed number of Units are accessing and usingthe Software at any given time. A “Unit” means the unit on whichAvaya, at its sole discretion, bases the pricing of its licenses and canbe, without limitation, an agent, port or user, an e-mail or voice mailaccount in the name of a person or corporate function (e.g.,webmaster or helpdesk), or a directory entry in the administrativedatabase utilized by the Software that permits one user to interfacewith the Software. Units may be linked to a specific, identified Serveror an Instance of the Software.
CopyrightExcept where expressly stated otherwise, no use should be made ofmaterials on this site, the Documentation, Software, Hosted Service,or hardware provided by Avaya. All content on this site, thedocumentation, Hosted Service, and the Product provided by Avayaincluding the selection, arrangement and design of the content isowned either by Avaya or its licensors and is protected by copyrightand other intellectual property laws including the sui generis rightsrelating to the protection of databases. You may not modify, copy,reproduce, republish, upload, post, transmit or distribute in any wayany content, in whole or in part, including any code and softwareunless expressly authorized by Avaya. Unauthorized reproduction,transmission, dissemination, storage, and or use without the expresswritten consent of Avaya can be a criminal, as well as a civil offenseunder the applicable law.
Third Party Components“Third Party Components” mean certain software programs orportions thereof included in the Software or Hosted Service maycontain software (including open source software) distributed underthird party agreements (“Third Party Components”), which containterms regarding the rights to use certain portions of the Software(“Third Party Terms”). As required, information regarding distributedLinux OS source code (for those Products that have distributed LinuxOS source code) and identifying the copyright holders of the ThirdParty Components and the Third Party Terms that apply is availablein the Documentation or on Avaya’s website at: http://support.avaya.com/Copyright or such successor site as designatedby Avaya. You agree to the Third Party Terms for any such ThirdParty Components.
VirtualizationEach product has its own ordering code and license types. Note thateach Instance of a product must be separately licensed and ordered.For example, if the end user customer or Avaya Channel Partnerwould like to install two Instances of the same type of products, thentwo products of that type must be ordered.
Preventing Toll Fraud“Toll Fraud” is the unauthorized use of your telecommunicationssystem by an unauthorized party (for example, a person who is not acorporate employee, agent, subcontractor, or is not working on yourcompany's behalf). Be aware that there can be a risk of Toll Fraudassociated with your system and that, if Toll Fraud occurs, it canresult in substantial additional charges for your telecommunicationsservices.
Avaya Toll Fraud interventionIf you suspect that you are being victimized by Toll Fraud and youneed technical assistance or support, call Technical Service CenterToll Fraud Intervention Hotline at +1-800-643-2353 for the United

States and Canada. For additional support telephone numbers, seethe Avaya Support website: http://support.avaya.com or suchsuccessor site as designated by Avaya. Suspected securityvulnerabilities with Avaya products should be reported to Avaya bysending mail to: [email protected].
TrademarksAvaya® and Avaya Aura® are registered trademarks of Avaya Inc. inthe United States of America and/or other jurisdictions.
All non-Avaya trademarks are the property of their respective owners.Linux® is the registered trademark of Linus Torvalds in the U.S. andother countries.
Downloading DocumentationFor the most current versions of Documentation, see the AvayaSupport website: http://support.avaya.com, or such successor site asdesignated by Avaya.
Contact Avaya SupportSee the Avaya Support website: http://support.avaya.com for Productor Hosted Service notices and articles, or to report a problem withyour Avaya Product or Hosted Service. For a list of support telephonenumbers and contact addresses, go to the Avaya Support website: http://support.avaya.com (or such successor site as designated byAvaya), scroll to the bottom of the page, and select Contact AvayaSupport.

Contents
Chapter 1: Introduction............................................................................................................ 7Purpose.................................................................................................................................. 7Intended audience................................................................................................................... 7Document changes since last issue.......................................................................................... 7Related resources................................................................................................................... 8
Documentation.................................................................................................................. 8Training............................................................................................................................ 9Viewing Avaya Mentor videos........................................................................................... 10
Support................................................................................................................................ 11Warranty............................................................................................................................... 11
Chapter 2: Architecture overview.......................................................................................... 12Avaya Aura® Virtualized Environment Overview....................................................................... 12Avaya Collaboration Pod for Enterprise Communications......................................................... 13VMware components............................................................................................................. 14VMware software requirements.............................................................................................. 14Server hardware and resources.............................................................................................. 15
Chapter 3: Planning and configuration................................................................................. 16Planning checklist.................................................................................................................. 16Capacity limits....................................................................................................................... 17
Alternative H.323 Endpoint administration considerations and impacts................................ 18Customer configuration data.................................................................................................. 19SAL Gateway........................................................................................................................ 20
Chapter 4: Deploying the Session Manager OVA................................................................ 21Deployment guidelines........................................................................................................... 21Deployment of cloned and copied OVAs................................................................................. 21Session Manager Deployment checklist.................................................................................. 22Verifying configuration for deployment..................................................................................... 23Methods for deploying the Session Manager OVA.................................................................... 23
Deploying using vSphere Client connected to vCenter........................................................ 23Deploying using vSphere Client connected directly to VMware host..................................... 24
Reconfiguring hardware resources for flexible footprint............................................................. 26Configuring the virtual machine automatic startup settings........................................................ 27Configuring Session Manager................................................................................................ 28
Chapter 5: Post-installation verification............................................................................... 30Post-installation checklist....................................................................................................... 30Using the hardware_info command......................................................................................... 30Verifying the Session Manager as a VMware instance.............................................................. 31Verifying the connections....................................................................................................... 31
Chapter 6: Upgrading Session Manager on VMware........................................................... 32
4 Deploying Session Manager using VMware® in the Virtualized Environment November 2014Comments? [email protected]

Upgrade checklist.................................................................................................................. 32Verifying the Enrollment Password status................................................................................ 34Upgrading the operating system............................................................................................. 34Upgrading Session Manager using a DVD............................................................................... 35Using Network transfer.......................................................................................................... 36Upgrading Session Manager VMware Tools............................................................................ 36Authentication files for Session Manager................................................................................. 37
Creating an authentication file for a Session Manager........................................................ 38Installing an authentication file.......................................................................................... 39
Chapter 7: Migrating Session Manager ............................................................................... 40Migration checklist................................................................................................................. 40Using the GUI to shut down or reboot the server...................................................................... 41Using the CLI to shut down or reboot the server....................................................................... 42
Chapter 8: Maintenance and administration procedures.................................................... 43Adding Session Manager as a SIP entity................................................................................. 43Accepting new service........................................................................................................... 43Denying new service.............................................................................................................. 44Creating a snapshot.............................................................................................................. 44Deleting a snapshot............................................................................................................... 45Restoring a snapshot............................................................................................................. 46Downloading software from PLDS.......................................................................................... 46Powering On Session Manager ............................................................................................. 47
Troubleshooting a Session Manager virtual machine that is unable to power on................... 48Running maintenance tests.................................................................................................... 48Session Manager Service Pack and patch updates.................................................................. 49Session Manager Backup and Restore................................................................................... 49
Accessing the Backup and Restore service....................................................................... 49Backup and Restore field descriptions............................................................................... 50
Verifying the Active Call Count............................................................................................... 51Verifying data replication........................................................................................................ 51
Troubleshooting Data Replication..................................................................................... 51Viewing Security Module status.............................................................................................. 52
Troubleshooting Security Module Sanity failure.................................................................. 52Viewing the Session Manager Entity Link Connection Status.................................................... 53Viewing the SIP Monitoring Status Summary page................................................................... 53
Appendix A: Best Practices for VMware performance and features................................. 54BIOS.................................................................................................................................... 54
Intel Virtualization Technology.......................................................................................... 54Dell PowerEdge Server ................................................................................................... 55HP ProLiant Servers........................................................................................................ 55
Timekeeping......................................................................................................................... 56VMware Tools....................................................................................................................... 57VMware networking best practices.......................................................................................... 57
Contents
November 2014 Deploying Session Manager using VMware® in the Virtualized Environment 5Comments? [email protected]

Separating Session Manager management and Security Module traffic............................... 61Storage................................................................................................................................ 62Thin vs. thick deployments..................................................................................................... 62Best Practices for VMware features........................................................................................ 63
VMware High Availability.................................................................................................. 63VMware vMotion............................................................................................................. 63VMware Snapshots......................................................................................................... 64
Appendix B: Product notifications........................................................................................ 66Viewing PCNs and PSNs....................................................................................................... 66Registering for product notifications........................................................................................ 67
Glossary................................................................................................................................... 68
Contents
6 Deploying Session Manager using VMware® in the Virtualized Environment November 2014Comments? [email protected]

Chapter 1: Introduction
PurposeThis document describes the procedures for deploying the Avaya Aura® Session Manager virtualapplication in the Avaya Aura® Virtualized Environment. This document includes installation,configuration, initial administration, troubleshooting, and basic maintenance procedures.
This document does not include optional or customized aspects of a configuration.
Intended audienceThe primary audience for this document is anyone who installs, configures, and upgrades SessionManager on VMware® in an Avaya Aura® Virtualized Environment.
The audience includes and is not limited to:
• Implementation Engineers
• Field Technicians
• Business Partners
• Solution Providers
• Customers
Document changes since last issueThe following changes were made to this document since the last issue:
• Added information regarding the alternative method for administering H.323 endpoints.
• Added authentication file information and procedures.
• Updated checklists.
November 2014 Deploying Session Manager using VMware® in the Virtualized Environment 7Comments? [email protected]

Related resources
DocumentationThe following documents are available at http://support.avaya.com.
For the latest information, see the Session Manager Release Notes.
Title Description AudienceOverview
Avaya Aura® Session ManagerOverview and Specification
Describes the key features of SessionManager.
IT management
System administratorsAvaya Aura® Virtualized EnvironmentSolution Description
Describes the Avaya VirtualizedEnvironment, design considerations,topology, and resources requirements.
Sales engineers
Implementationengineers
Support personnelAvaya Aura® Session ManagerSecurity Design
Describes the security considerations,features, and solutions for SessionManager.
Networkadministrators,services, and supportpersonnel
Avaya Aura® Session Manager 6.3.xRelease Notes
Contains enhancements, fixes, andworkarounds for the various SessionManager 6.3 releases.
System administrators
Services and supportpersonnel
ImplementationDeploying Avaya Aura® SessionManager
Describes how to install and configure aSession Manager instance.
Services and supportpersonnel
Deploying Avaya Aura® BranchSession Manager
Describes how to install and configureBranch Session Manager.
Services and supportpersonnel
Deploying Avaya Aura®
Communication Manager on SystemPlatform
Describes how to install the appropriateCommunication Manager template,including Branch Session Manager, on theserver.
Services and supportpersonnel
Deploying Avaya Aura® SessionManager using VMware® in theVirtualized Environment
Describes how to deploy the SessionManager virtual application in a VMwareenvironment.
Services and supportpersonnel
AdministrationAdministering Avaya Aura® SessionManager
Describes the procedures to administerSession Manager using System Manager.
System administrators
Administering Avaya Aura®
Communication Manager ServerOptions
Describes the procedures to administerCommunication Manager as a featureserver or an evolution server. Provides
System administrators
Introduction
8 Deploying Session Manager using VMware® in the Virtualized Environment November 2014Comments? [email protected]

Title Description Audienceinformation related to Session Manageradministration.
Avaya Aura® Session Manager CaseStudies
Provides common administration scenarios. System administrators
Installation and upgradesInstalling Service Packs for AvayaAura® Session Manager
Describes the procedures to install servicepacks on Session Manager.
Services and supportpersonnel
Installing Patches for Avaya Aura®
Session ManagerDescribes the procedures to install patcheson Session Manager.
Services and supportpersonnel
Installing the Avaya S8800 Server forAvaya Aura® CommunicationManager
Describes the installation procedures for theS8800 Server.
Services and supportpersonnel
Installing the Avaya S8510 ServerFamily and Its Components
Describes the installation procedures for theS8510 Server.
Services and supportpersonnel
Installing the Dell™ PowerEdge™
R610 ServerDescribes the installation procedures for theDell™ PowerEdge™ R610 server.
Services and supportpersonnel
Installing the Dell™ PowerEdge™
R620 ServerDescribes the installation procedures for theDell™ PowerEdge™ R620server.
Services and supportpersonnel
Installing the HP ProLiant DL360 G7Server
Describes the installation procedures for theHP ProLiant DL360 G7 server.
Services and supportpersonnel
Installing the HP ProLiant DL380pG8 Server
Describes the installation procedures for theHP ProLiant DL380p G8 server.
Services and supportpersonnel
Upgrading Avaya Aura® SessionManager
Describes the procedures to upgrade aSession Manager to the latest softwarerelease.
Services and supportpersonnel
MaintainingMaintaining and TroubleshootingAvaya Aura® Session Manager
Describes the procedures to troubleshootSession Manager, resolve alarms, andreplace hardware.
Services and supportpersonnel
TrainingThe following courses are available on https://www.avaya-learning.com. To search for the course, inthe Search field, enter the course code and click Go .
Course code Course title1A00236E Knowledge Access: Avaya Aura® Session and System Manager Fundamentals4U00040E Knowledge Access: Avaya Aura® Session Manager and System Manager
Implementation5U00050E Knowledge Access: Avaya Aura® Session Manager and System Manager Support
Related resources
November 2014 Deploying Session Manager using VMware® in the Virtualized Environment 9Comments? [email protected]

Course code Course title5U00095V System Manager Implementation, Administration, Maintenance and
Troubleshooting5U00096V Avaya Aura® Session Manager Implementation, Administration, Maintenance and
Troubleshooting5U00097I Avaya Aura® Session and System Manager Implementation, Administration,
Maintenance and Troubleshooting5U00103W Avaya Aura® Session Manager 6.2 Delta Overview5U00104W Avaya Aura® Session Manager 6.2 Delta Overview5U00105W Avaya Aura® Session Manager OverviewATU00171OEN Avaya Aura® Session Manager General OverviewATC00175OEN Avaya Aura® Session Manager Rack and StackATU00170OEN Avaya Aura® Session Manager Technical OverviewATC01840OEN Survivable Remote Avaya Aura® Session Manager Administration3U00100O Designing Avaya Aura 6.2 Part 13U00101O Designing Avaya Aura 6.2 Part 2
Viewing Avaya Mentor videosAvaya Mentor videos provide technical content on how to install, configure, and troubleshoot Avayaproducts.
About this taskVideos are available on the Avaya Support website, listed under the video document type, and onthe Avaya-run channel on YouTube.
Procedure• To find videos on the Avaya Support website, go to support.avaya.com and perform one of the
following actions:
- In Search, type Avaya Mentor Videos to see a list of the available videos.
- In Search, type the product name. On the Search Results page, select Video in theContent Type column on the left.
• To find the Avaya Mentor videos on YouTube, go to www.youtube.com/AvayaMentor andperform one of the following actions:
- Enter a key word or key words in the Search Channel to search for a specific product ortopic.
- Scroll down Playlists, and click the name of a topic to see the available list of videos postedon the website.
Introduction
10 Deploying Session Manager using VMware® in the Virtualized Environment November 2014Comments? [email protected]

Note:
Videos are not available for all products.
SupportGo to the Avaya Support website at http://support.avaya.com for the most up-to-datedocumentation, product notices, and knowledge articles. You can also search for release notes,downloads, and resolutions to issues. Use the online service request system to create a servicerequest. Chat with live agents to get answers to questions, or request an agent to connect you to asupport team if an issue requires additional expertise.
WarrantyAvaya provides a 90-day limited warranty on Session Manager. For more information about theterms of the limited warranty, see the sales agreement or other applicable documentation . Inaddition, see the standard warranty and details about Session Manager support during the warrantyperiod on the Avaya Support website at https://support.avaya.com under Help & Policies> Policies& Legal > Maintenance and Warranty Information. See also Help & Policies > Policies & Legal> License Terms.
Support
November 2014 Deploying Session Manager using VMware® in the Virtualized Environment 11Comments? [email protected]
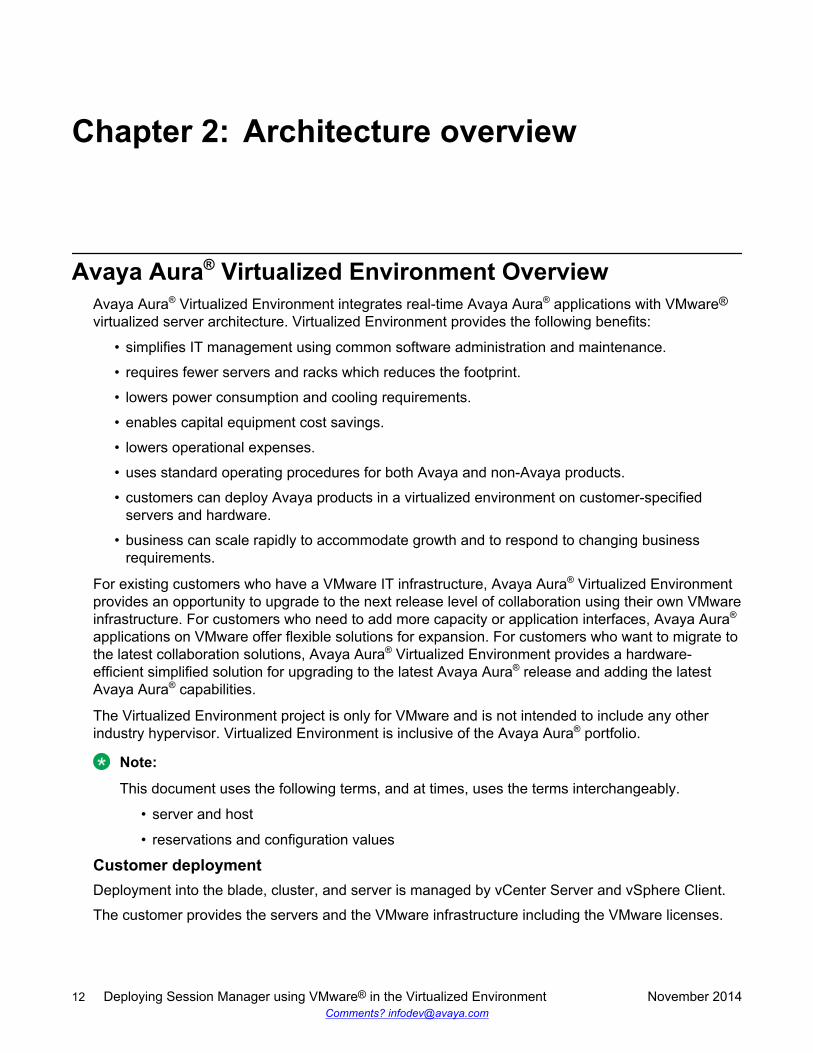
Chapter 2: Architecture overview
Avaya Aura® Virtualized Environment OverviewAvaya Aura® Virtualized Environment integrates real-time Avaya Aura® applications with VMware®
virtualized server architecture. Virtualized Environment provides the following benefits:
• simplifies IT management using common software administration and maintenance.
• requires fewer servers and racks which reduces the footprint.
• lowers power consumption and cooling requirements.
• enables capital equipment cost savings.
• lowers operational expenses.
• uses standard operating procedures for both Avaya and non-Avaya products.
• customers can deploy Avaya products in a virtualized environment on customer-specifiedservers and hardware.
• business can scale rapidly to accommodate growth and to respond to changing businessrequirements.
For existing customers who have a VMware IT infrastructure, Avaya Aura® Virtualized Environmentprovides an opportunity to upgrade to the next release level of collaboration using their own VMwareinfrastructure. For customers who need to add more capacity or application interfaces, Avaya Aura®
applications on VMware offer flexible solutions for expansion. For customers who want to migrate tothe latest collaboration solutions, Avaya Aura® Virtualized Environment provides a hardware-efficient simplified solution for upgrading to the latest Avaya Aura® release and adding the latestAvaya Aura® capabilities.
The Virtualized Environment project is only for VMware and is not intended to include any otherindustry hypervisor. Virtualized Environment is inclusive of the Avaya Aura® portfolio.
Note:
This document uses the following terms, and at times, uses the terms interchangeably.
• server and host
• reservations and configuration values
Customer deploymentDeployment into the blade, cluster, and server is managed by vCenter Server and vSphere Client.
The customer provides the servers and the VMware infrastructure including the VMware licenses.
12 Deploying Session Manager using VMware® in the Virtualized Environment November 2014Comments? [email protected]

Software deliveryThe software is delivered as one or more pre-packaged Open Virtualization Appliance (OVA) filesthat are posted on the Avaya Product Licensing and Download System (PLDS) and the Avayasupport site. Each OVA contains the following components:
• the application software and operating system.• pre-installed VMware tools.• preset configuration details for
- RAM and CPU reservations and storage requirements- Network Interface Card (NIC)
Patches and upgradesA minimum patch level can be required for each supported application. For more informationregarding the application patch requirements, see the compatibility matrix tool at http://support.avaya.com/CompatibilityMatrix/Index.aspx.
Important:Do not upgrade the VMware tools software that is packaged with each OVA unless instructed todo so by Avaya. The supplied version is the supported release and has been thoroughly tested.
Performance and capacitiesThe OVA template is built with configuration values which optimize performance and followrecommended Best Practices.
Caution:Modifying these values can have a direct impact on the performance, capacity, and stability ofthe virtual machine. It is the responsibility of the customer to understand the aforementionedimpacts when changing configuration values. Avaya Global Support Services (GSS) may not beable to assist in fully resolving a problem if the virtual hardware or resource allocation has beenchanged to unsupported values for a virtual application. Avaya GSS could require the customerto reset the values to the optimized values before starting to investigate the issue.
Avaya Collaboration Pod for Enterprise CommunicationsAvaya Collaboration Pod for Enterprise Communications is an alternative deployment option forAvaya Aura® Virtualized Environment applications.
Collaboration Pod is a full-stack turnkey solution that combines storage arrays from EMC,virtualization software from VMware, and networking, management, and real-time applications fromAvaya.
Collaboration Pod accelerates deployment of Avaya Aura® applications and simplifies IT operations.
DocumentationThe following table lists the Avaya Collaboration Pod for Enterprise Communications documents.These documents are available on the Avaya support website at http://support.avaya.com.
Avaya Collaboration Pod for Enterprise Communications
November 2014 Deploying Session Manager using VMware® in the Virtualized Environment 13Comments? [email protected]

Title DescriptionAvaya Collaboration Pod for EnterpriseCommunications – Technical Solutions Guide
Provides an overview of the solution, specifications,and components that Avaya Collaboration Pod forEnterprise Communications integrates.
Avaya Collaboration Pod for EnterpriseCommunications – Pod Orchestration Suite UserGuide
Provides an overview of the Avaya PodOrchestration Suite (POS). The POS contains theapplications which orchestrate, manage, and monitorthe Collaboration Pod. This guide explains how toaccess and use the applications in the POSmanagement suite.
Avaya Collaboration Pod for EnterpriseCommunications – Locating the latest productdocumentation
Identifies the Collaboration Pod customerdocumentation. Also includes the documentation forthe Avaya and non-Avaya products that are includedin the Collaboration Pod solution.
Avaya Collaboration Pod for EnterpriseCommunications – Release Notes
Describes fixed and known issues for CollaborationPod. This document does not describe issuesassociated with each component in the CollaborationPod. For information on the specific components,see the component Release Notes.
VMware componentsVMware software component DescriptionESXi Host The physical machine running the ESXi Hypervisor software.ESXi Hypervisor A platform that runs multiple operating systems on a host computer at
the same time.vSphere Client vSphere Client is an application that installs and manages virtual
machines. vSphere Client connects to a vCenter server or directly to anESXi host if a vCenter Server is not used. The application is installed ona personal computer or accessible through a web interface.
vCenter Server vCenter Server provides centralized control and visibility at every level ofthe virtual infrastructure. vCenter Server provides VMware features suchas High Availability and vMotion.
VMware software requirementsThe Avaya Aura® Virtualized Environment supports the following VMware software versions:
• VMware vSphere ESXi 5.0
• VMware vSphere ESXi 5.1
Architecture overview
14 Deploying Session Manager using VMware® in the Virtualized Environment November 2014Comments? [email protected]

• VMware vSphere ESXi 5.5
• VMware vCenter Server 5.0
• VMware vCenter Server 5.1
• VMware vCenter Server 5.5
To view compatibility with other solution releases, see VMware Product Interoperability Matrices at http://partnerweb.vmware.com/comp_guide2/sim/interop_matrix.php.
Note:
ESXi 4.1 is not supported.
Server hardware and resourcesVMware offers compatibility guides that list servers, system, I/O, storage, and backup compatibilitywith VMware infrastructure. For more information about VMware-certified compatibility guides andproduct interoperability matrices, see http://www.vmware.com/resources/guides.html.
Server hardware and resources
November 2014 Deploying Session Manager using VMware® in the Virtualized Environment 15Comments? [email protected]

Chapter 3: Planning and configuration
Planning checklistComplete the following actions before deploying the virtual appliance.
# Action Notes
1 Assess and verify the vSphereinfrastructure resource requirements withthe customer.
The key factors are:
• CPU Utilization
• Memory Usage
• Storage Requirements
• Network Utilization
• Supported capacity
Capacity limits on page 17.
2 If you are deploying the Session ManagerOVA using vCenter, enter the requiredinformation in the Customer ConfigurationData worksheet.
Customer configuration data onpage 19.
3 Verify the customer has all of the requiredhardware at the customer site.
4 Licenses:
1. Verify the customer has all of therequired licenses.
2. Keep a copy of the license files for theAvaya Aura® products so you canreplicate with the new Host ID afterthe OVA file installation.
3. Verify that the licenses areaccessible.
5 Verify you have the necessary resourcesfor the SAL Gateway.
SAL Gateway on page 20.
6 Plan staging and verification activities, andassign resources to those activities.
16 Deploying Session Manager using VMware® in the Virtualized Environment November 2014Comments? [email protected]

Capacity limitsSessionManagerDeviceFootprints
Up to 1KDevices
2.4KDevices
3.5KDevices
4.5KDevices
7KDevices
10KDevices
21.5KDevices
vCPUs 2 3 4 5 8 12 20MinimumvCPUResources
4,600 MHz(2 x 2300MHz)
6,900 MHz(3 x 2300MHz)
9,200 MHz(4 x 2300MHz)
11,500MHz (5 x2300 MHz)
18,400MHz (8 x2300 MHz)
27,600MHz (12 x2300 MHz)
46,000MHz (20 x2300 MHz)
Memory 4 GB 5 GB 6 GB 7 GB 10 GB 12 GB 20 GBStorageReservation
150 GB
OperatingSystem
RHEL 6.2 – reusing Session Manager kick start, 64-bit
Shared NICs Four virtual NICs @ 1000 Mbps, used for:
• Management (eth0)
• Services port (eth1)
• ASSET (eth2)
• NIC bonding (eth3)SIP Devices(Normal/Failure)
1K/1.2K 2.4K/3K 3.5K/4K 4.5K/5K 7K/8K 10K/12K 21.5K/ 25KNOTE: Assigning a SIP profile to an H.323 endpoint reduces the total SIP capacity by thatmany endpoints. See Alternative H.323 Endpoint administration considerations andimpacts on page 18.
CC Agents(Normal/Failure)
833/1K 2K/2.5K 2.9K/3333 3.75K/4166
5.8K/6666 8333/10K 18K/21K
PresenceUsers (Normal/Failure)
1K/1.2K 2.4K/3K 3.5K/4K 4.5K/5K 7K/8K 10K/12K 18K/21K
Sessions (Sec/Hour/Max)
10/36K/15K
24/86K/22.5K
35/126K/30K
45/162K/37.5K
70/256K/60K
100/ 360K/90K
150/ 540K/160K
DatabaseCapacities
Supported database capacities for users, routing data, and so on are described in theAvaya Aura® Session Manager Overview and Specification document. Note that thecapacities are based on large scale solutions of 100K users or more. Smaller footprintSession Managers are not intended for use in large scale solutions and the databasecapacities are scaled accordingly.
Session Manager capacities and the associated resources are determined with the assumption thathyperthreading is active. The vCPUs are based on the number of available logical processors of avirtual host. The minimum MHz resources do not necessarily reflect the actual available MHz of thehost, and a Session Manager deployment is not required to reserve the minimum MHz sincehyperthreading is active. A recommendation is to reserve at least half of the minimum MHzresources to guarantee that the Session Manager has the necessary resources to achieve the
Capacity limits
November 2014 Deploying Session Manager using VMware® in the Virtualized Environment 17Comments? [email protected]

stated capacities. Another recommendation is to reserve all the stated memory to guarantee theassociated capacities. Resource reservations are not necessary if the host resources are known(guaranteed) to never be oversubscribed. Oversubscribing resources of a virtual host can causeSession Manager call failures and/or prevent achieving the stated capacities.
Session Managers operate as redundant, homogeneous servers to provide high reliability if aSession Manager failure or a network component failure occurs. Each Session Manager has similarsystem resources and a balanced number of devices. The Session Managers must be similarlysized in both processing power and available memory.
Do not couple a smaller VMware Session Manager with a larger Session Manager. The smallerVMware-based offerings are a migration path for customers. Customer can increase the number ofSession Managers or the Session Manager footprint as the number of supported devices increase.
You can implement a system that consists of a mixture of Session Managers hosted on VMwareplatforms as well as Session Managers hosted on the existing non-VMware platforms. SessionManagers running under VMware and the non-VMware Session Managers can successfullyinteroperate with System Managers running on both System Platform and VMware.
Note:You must configure the VMware-based Session Managers to be similar to the non-VMware-based Session Managers across the enterprise. Similar configurations ensure the best use ofsystem resources and handling failover scenarios.
Caution:Be careful when configuring the system where a large non-VMware Session Manager canfailover to a Session Manager running in a VMware environment. You must ensure that thetarget Session Manager can handle the total capacities.
Alternative H.323 Endpoint administration considerations andimpacts
The current method for administering H.323 endpoints is to use either of the following:
• System Manager to create an H.323 endpoint without a SIP profile.
• The Communication Manager SAT.
You must configure Session Manager to route calls to the correct Communication Manager.
Alternative method for administering H.323 endpointsAn alternative method for administering H.323 endpoints is to use System Manager to create a SIPprofile for an H.323 endpoint. URE routing will automatically route calls to the correctCommunication Manager.
The alternative method:
• Simplifies Session Manager routing configuration.• Provides Dual Registration (H.323 and SIP endpoints on the same extension) with no further
System Manager configuration.
Planning and configuration
18 Deploying Session Manager using VMware® in the Virtualized Environment November 2014Comments? [email protected]

• Provides an easy migration to a SIP endpoint by changing the endpoint type and removing theH.323 station.
Use CaseA customer has H.323 endpoints with DID numbers scattered randomly among differentCommunication Manager servers. This arrangement makes it cumbersome to configure SessionManager routing to send calls for H.323 endpoints to correct Communication Manager.
The Customer uses the new technique to take advantage of URE routing in place of manuallyadministering Session Manager routing policies.
Impact on capacitiesImportant:
This method assigns a SIP profile to an H.323 endpoint. Using this method reduces the total SIPendpoint capacity by the number of H.323 endpoints assigned a SIP profile.
For example, if you configure 200 H.323 stations using the alternative method, you reduce themaximum number of SIP devices by 200.
Customer configuration dataThe following table identifies the required customer configuration information for the deployment andconfiguration process for Session Manager.
Required Data Value forSystem
Example Value
Session Manager server host name (short name) example-sm-1Session Manager IP address (Mgmt) - Eth 0 IP address(management interface for Session Manager on thecustomer network)
10.1.1.20
Netmask (Network Mask Eth0) 255.255.255.0Gateway IP address (for Eth0) 10.1.1.254Network Domain MyCompany.comPrimary DNS server IP address 10.1.0.2Secondary DNS (if applicable) 10.1.0.3Tertiary DNS (if applicable)Local time zoneNTP server time-server.example.comSecondary NTP server (if applicable)Tertiary NTP server (if applicable)Primary System Manager IP 10.1.1.100Primary System Manager FQDN smgr.example.com
Customer configuration data
November 2014 Deploying Session Manager using VMware® in the Virtualized Environment 19Comments? [email protected]

Required Data Value forSystem
Example Value
Secondary System Manager IPSecondary System Manager FQDNVirtual System Manager FQDNEnrollment Password: Set up in the Security section ofSystem Manager.
Note:
Verify the enrollment password is active.
Enroll01!
SAL GatewayA Secure Access Link (SAL) Gateway is required for remote access and alarming.
Through SAL, support personnel or tools can gain remote access to managed devices totroubleshoot and debug problems.
A SAL Gateway:
1. Receives alarms from Avaya products in the customer network.
2. Reformats the alarms.
3. Forwards the alarms to the Avaya support center or a customer-managed NetworkManagement System.
You can deploy the SAL Gateway OVA using vCenter through a vSphere client. You can alsodeploy the SAL Gateway OVA directly to the ESXi server through a vSphere client.
For more information about the SAL Gateway, see the Secure Access Link documentation on theAvaya Support website at http://support.avaya.com .
Planning and configuration
20 Deploying Session Manager using VMware® in the Virtualized Environment November 2014Comments? [email protected]

Chapter 4: Deploying the Session ManagerOVA
Deployment guidelinesThe high-level deployment steps are:
1. Deploy the OVA or OVAs.
2. Configure the application.
3. Verify the installation.
The deployment guidelines for the virtual appliances are:
• Deploy as many virtual appliances on the same host as possible.
• Deploy the virtual appliances on the same cluster if the cluster goes beyond the host boundary.
• Segment redundant elements on a different cluster, or ensure that the redundant elements arenot on the same host.
• Create a tiered or segmented cluster infrastructure that isolates critical applications, such asAvaya Aura® applications, from other virtual machines.
• Plan for rainy day scenarios or conditions. Do not configure resources only for traffic orperformance on an average day.
• Do not oversubscribe resources. Oversubscribing affects performance.
• Monitor the server, host, and virtual appliance performance.
Important:
The values for performance, occupancy, and usage can vary greatly. The blade servermight run at 5% occupancy, but a virtual machine might run at 50% occupancy. Note that avirtual machine behaves differently when the CPU usage is higher.
Deployment of cloned and copied OVAsTo redeploy a virtual machine, do not create a copy of the virtual machine or clone the virtualmachine. These processes have subtle technical details that require a thorough understanding of
November 2014 Deploying Session Manager using VMware® in the Virtualized Environment 21Comments? [email protected]

the effects of these approaches. To avoid any complexities and unexpected behavior, deploy a newOVA on the virtual machine. At this time, Avaya only supports the deployment of new OVAs.
Session Manager Deployment checklistThe Session Manager OVA is packaged as a virtual appliance that you can deploy using VMwarevSphere Client or VMware vCenter.
For Avaya Aura® Release 6.2 Feature Pack 4, you install the Session Manager OVA on ESXi 5.5,then install Avaya Aura® Release 6.2 Feature Pack 4.
Important:You cannot administer a core Session Manager OVA as a Branch Session Manager (remotesurvivable server). Deploy the Session Manager OVA as a core Session Manager OVA only.
Perform the following actions to deploy the Session Manager Open Virtual Application:
# Action Reference
1 Verify System Manager and SessionManager are configured.
Verifying configuration for deployment onpage 23.
2 Download the Session Manager OVA fromPLDS.
Downloading software from PLDS onpage 46.
3 Deploy the Session Manager OVA.
Do not power up the Virtual Machine atthis time.
Methods for deploying the SessionManager OVA on page 23.
4 Based on the user footprint requirement,reconfigure the hardware resources for theSession Manager virtual machine.
Reconfiguring hardware resources foruser footprint on page 26.
5 Configure the Session Manager virtualmachine to start automatically after apower failure.
Configuring the virtual machineautomatic startup settings on page 27.
6 Power on the Session Manager server. Powering On Session Manager onpage 47.
7 Configure Session Manager. Configuring Session Manager onpage 28.
8 Verify the installation. Post-installation checklist on page 30.
Deploying the Session Manager OVA
22 Deploying Session Manager using VMware® in the Virtualized Environment November 2014Comments? [email protected]

Verifying configuration for deploymentBoth System Manager and Session Manager require network connectivity during the SessionManager OVA installation.
Procedure1. Verify the System Manager is running the same or later Service Pack level as the Session
Manager you will be installing.
2. On System Manager, create the Session Manager instance using the Session ManagerAdministration page.
3. Add the Session Manager as a SIP entity using the Routing page.
4. Define an Enrollment Password.
5. Define FQDNs for both System Manager and Session Manager. You can either configure theFQDNs in the referenced DNS servers or add the FQDN of Session Manager to the hostsfile of the System Manager .
Methods for deploying the Session Manager OVADeploy the Session Manager OVA by using one of the following methods:
• Deploying using vSphere Client connected to vCenter on page 23.• Deploying using vSphere Client connected directly to VMware host on page 24.
Deploying using vSphere Client connected to vCenterWhen deploying using vCenter, the system prompts you during boot-up to enter the configurationinformation. Make sure you have a copy of the Customer Configuration Data worksheet availablebefore you begin this procedure.
Before you beginThe vCenter must have access to the VMware host on which the Session Manager will be deployed.
• Install the vSphere client.• Install the vCenter server.• Add the VMware host to the vCenter.
Note:If you use vSphere Client 5.5 to connect to vCenter Server 5.5, a warning displays asking you touse vSphere Web Client because of limitations with vSphere Client 5.5.
Procedure1. Start the vSphere client.
Verifying configuration for deployment
November 2014 Deploying Session Manager using VMware® in the Virtualized Environment 23Comments? [email protected]

2. Enter the IP address and the user credentials for the vCenter server. Ignore any securitywarnings that the system displays.
3. On the vSphere client, click File > Deploy OVF Template.
4. In the Deploy OVF Template dialog box, do one of the following:
• In the Deploy from a file or URL field, enter the path to the Session Manager .ova file.
• Click Browse and navigate to the Session Manager .ova file from the local computer,network share, CD-ROM, or DVD.
5. Verify the details of the OVF template, then click Next.
6. On the End User License Agreement page, click Accept.
7. Click Next.
8. (Optional) On the Name and Location page, in the Name field, change the name for thevirtual machine.
9. In the Inventory Location area, select the appropriate datacenter and click Next.
10. If the cluster exists, select the cluster and click Next.
11. Select the specific host within the cluster and click Next.
12. On the Storage page, select the required data store and click Next.
13. On the Disk Format page, click Thick Provision Lazy Zeroed.
The system displays the data store that you selected and the space available.
14. On the Network Mapping page, for each network that you specified in the OVA TemplateDetails page:
a. Click the Destination Network column.
b. Select a host network from the drop-down menu.
c. Click Next.
15. On the Properties page, enter the configuration data from the Customer Configuration Dataworksheet, then click Next.
16. Verify the deployment settings, then click Finish.
17. Check the Status in the Recent Tasks window and wait for the Deploy OVF template taskto display Completed.
Deploying using vSphere Client connected directly to VMwarehost
Procedure1. Start the vSphere Client.
Deploying the Session Manager OVA
24 Deploying Session Manager using VMware® in the Virtualized Environment November 2014Comments? [email protected]

2. Enter the IP address and the user credentials for the ESXi host. Ignore any securitywarnings that the system displays.
3. Click File > Deploy OVF Template.
4. In the Deploy OVF Template dialog box, do one of the following:
• In the Deploy from a file or URL field, enter the path to the Session Manager .ova file.
• Click Browse and navigate to the Session Manager .ova file from the local computer,network share, CD-ROM, or DVD.
5. Verify the details of the template, then click Next.
6. On the End User License Agreement page, click Accept.
7. Click Next.
8. On the Name and Location page, in the Name field, enter the name for the virtual machine,then click Next.
9. On the Storage page, select a destination storage for the virtual machine files, then clickNext.
Note:
The datastore can be local to the host or a mounted shared storage such as NFS orSAN. Select a datastore large enough to accommodate the virtual machine and all of itsvirtual disk files.
10. On the Disk Format page, select Thick Provision Lazy Zeroed, then click Next.
The system displays the data store that you selected and the available space.
11. On the Network Mapping page, for each network that you specified in the OVA TemplateDetails page:
a. Click the Destination Networks column.
b. Select a host network from the drop-down menu.
Administer host networks for source networks as follows:
Source Networks SM NICs Destination NetworksSessionManagerManagement
Eth0 VM Network2
Session Manager Services Eth1 VM Network2Session Manager SecurityModule
Eth2, Eth3 VMs Network
Note:
• Source Networks are defined in the OVA template. Source networks may containzero or more Network Interface Cards from the actual virtual machine. You mustmap networks defined by the OVA template to networks defined on the hostwhere the virtual machine has been deployed. This procedure assigns virtual
Methods for deploying the Session Manager OVA
November 2014 Deploying Session Manager using VMware® in the Virtualized Environment 25Comments? [email protected]

machine NICs to host networks. You can change these associations at a latertime.
• The Session Manager Services source network contains the Session Managerservices port. Map the Session Manager Services source network to the samedestination network as Session Manager Management.
• The Session Manager Security Module must be on its own network link. Eth2 andEth3 can be bonded. The Eth2 and Eth3 ports carry SIP TLS traffic. Dependingon the size of the system, the amount of data could be significant.
Important:
Do not mix the SIP TLS traffic with the administration traffic on the Eth0 port.
c. Click Next.
12. Verify the deployment settings, then click Finish.
13. Check the Status in the Recent Tasks window, and wait for the Deploy OVF template taskto display Completed.
Reconfiguring hardware resources for flexible footprintReconfigure the CPU and RAM resources for the Session Manager virtual machine.
For information related to the different capacity limits and requirements, see Capacity limits onpage 17.
Procedure1. Connect to the host or cluster using the VMware vSphere client.
2. Log in as an administrator
3. Right-click on the virtual machine name and select Edit Settings.
4. Click the Hardware tab.
5. Click Memory and change the Memory Size to the appropriate limit.
6. Click the Resources tab.
7. Select Memory and verify the Reservation is set correctly.
8. If you want to limit the Session Manager memory use, clear the unlimited check box andverify the Limit slide is set to the same value as the Reservation.
9. Click the Hardware tab.
10. Select CPUs and change the Number of sockets according to the limit requirement.
11. Click the Resources tab.
Deploying the Session Manager OVA
26 Deploying Session Manager using VMware® in the Virtualized Environment November 2014Comments? [email protected]

12. Select CPUs and verify the Reservation is set correctly. The Reservation value must be atleast half of the stated minimum MHz requirement because Session Manager capacitiesassume hyperthreading is active.
13. If you want to limit the Session Manager CPU use:
a. Clear the unlimited check box.
b. Verify the Limit slide is set to the full value of the stated minimum MHz requirement.
14. Click OK and wait until the virtual machine finishes the reconfiguration procedure.
Configuring the virtual machine automatic startup settingsWhen a vSphere ESXi host restarts after a power failure, the virtual machines that are deployed onthe host do not start automatically. You must configure the virtual machines to start automatically.
In high availability (HA) clusters, the VMware HA software ignores the startup selections.
Before you beginVerify with the system administrator that you have the proper level of permissions to configure theautomatic startup settings.
Procedure1. In the vSphere Client inventory, select the host where the virtual machine is located.
2. Click the Configuration tab.
3. In the Software section, click Virtual Machine Startup/Shutdown.
4. Click Properties in the upper-right corner of the screen.
5. In the System Settings section, select Allow virtual machines to start and stopautomatically with the system.
6. In the Manual Startup section, select the virtual machine.
7. Use the Move up button to move the virtual machine to the Automatic Startup section.
8. Click OK.
ExampleThe following is an example of the Virtual Machine Startup/Shutdown screen.
Configuring the virtual machine automatic startup settings
November 2014 Deploying Session Manager using VMware® in the Virtualized Environment 27Comments? [email protected]

Configuring Session ManagerIf you deployed the Session Manager OVA through vCenter, only perform Step 1 and skip the rest ofthe procedure.
Perform this entire procedure only if you deployed the Session Manager OVA using vSphere Clientconnected directly to the VMware host. The Session Manager is not yet configured. SMnetSetuprequires the information entered on the Customer Configuration Data worksheet. Make sure youhave the worksheet available before you begin this procedure.
Procedure1. Verify System Manager is configured and operational for the deployed Session Manager.
2. If you deployed the Session Manager OVA through vCenter, skip the rest of this procedure.
3. Right-click the Session Manager virtual machine and select Open Console.
4. Log in using the customer account.
Deploying the Session Manager OVA
28 Deploying Session Manager using VMware® in the Virtualized Environment November 2014Comments? [email protected]

5. Configure Session Manager:
a. Enter SMnetSetup.
b. At each prompt, enter the appropriate information from the Customer ConfigurationData worksheet.
c. Press Enter when the prompt appears.
d. When prompted, enter the Primary System Manager IP Address.
SMnetSetup automatically configures the configuration information related to theSystem Manager.
e. Verify your settings.
f. Enter the enrollment password.
The system starts the configuration process. The process takes approximately 15minutes to complete.
Configuring Session Manager
November 2014 Deploying Session Manager using VMware® in the Virtualized Environment 29Comments? [email protected]

Chapter 5: Post-installation verification
Post-installation checklistPerform the following steps to verify the Session Manager OVA installation.
# Action Link
1 Verify the Session Manager serverresources.
Using the hardware_info command onpage 30.
2 Verify the Session Manager VMwareadministration.
Verifying the Session Manager as a VMwareinstance on page 31.
3 Verify the connections of the deployedSession Manager.
Verifying the connections on page 31.
4 Upgrade Session Manager to the latestrelease.
Service Pack and patch updates onpage 49.
5 Run the maintenance tests on thedeployed Session Manager.
Running Session Manager maintenancetests on page 48.
6 Verify data replication. Verifying Data Replication on page 51.7 Upgrade the Session Manager VMware
tools.Upgrading VMware Tools on page 36.
Using the hardware_info commandThe hardware_info command displays detailed information about a server.
The output of the command is the same when run on VMware and non-VMware core SessionManager servers with the following exceptions:
• The System Information field displays as VMware Virtual Platform.
• The Raid Information field displays as N/A.
• The Disk Information field contains the linux path to the disk drive and the allocated size ofthe disk in GB.
Procedure1. Log in to the core Session Manager server.
30 Deploying Session Manager using VMware® in the Virtualized Environment November 2014Comments? [email protected]

2. Enter the command hardware_info.
3. Verify the hardware information.
Verifying the Session Manager as a VMware instanceProcedure
1. On the home page of the System Manager Web Console, under Elements, click SessionManager.
2. Click Session Manager Administration.
3. Under the Session Manager Instances section, select the appropriate Session Managerinstance from the Session Manager Instances list.
4. Click View.
5. In the General section, verify the VMware Virtual Machine check box is selected. If thecheck box is not selected:
a. Click Return.
b. Select the Session Manager instance from the Session Manager Instances list andclick Edit.
c. Select the VMware Virtual Machine check box.
d. Click Commit.
Verifying the connectionsVerify the connections of the deployed Session Manager.
Procedure1. On the home page of the System Manager Web Console, under Elements, click Session
Manager.
2. On the Dashboard page, verify the Service State of the Session Manager instance isAccept New Service. If the service state is not Accept New Service:
a. Select the Session Manager instance.
b. Click Service State > Accept New Service.
3. Verify the Security Module state is Up.
Verifying the Session Manager as a VMware instance
November 2014 Deploying Session Manager using VMware® in the Virtualized Environment 31Comments? [email protected]

Chapter 6: Upgrading Session Manager onVMware
Upgrade checklistWarning:All existing logs, other than the installation log, are lost as part of the upgrade process. To savethe logs, you must manually copy the logs to an external server. For information on managinglogs, see Administering Avaya Aura® Session Manager.
Upgrade ProcedureYou can upgrade Session Manager on VMware using vSphere or vCenter.
Note:Before upgrading Session Manager, ensure that you upgrade System Manager to the requiredrelease.
# Action Link/Notes
1 (Optional) Copy the logs to an external server. See Administering Avaya Aura®
Session Manager.
2 Verify System Manager is running the correctrelease.
3
Download the standard kickstart upgrade ISOimage. Either burn the ISO image to a DVD orplace the ISO image on a network shareconnected to vCenter or vSphere.
Downloading software from PLDS onpage 46.
4 Verify the Enrollment Password is notexpired.
Verifying Enrollment Passwordstatus on page 34.
5 Change the state of the Session Manager toDeny New Service.
Denying new service on page 44.
6 Verify the Active Call Count field is zero. Verifying Active Call Count onpage 51.
7 View the Entity Links and note any links thatare down.
Viewing Session Manager Entity LinkConnection Status on page 53.
32 Deploying Session Manager using VMware® in the Virtualized Environment November 2014Comments? [email protected]
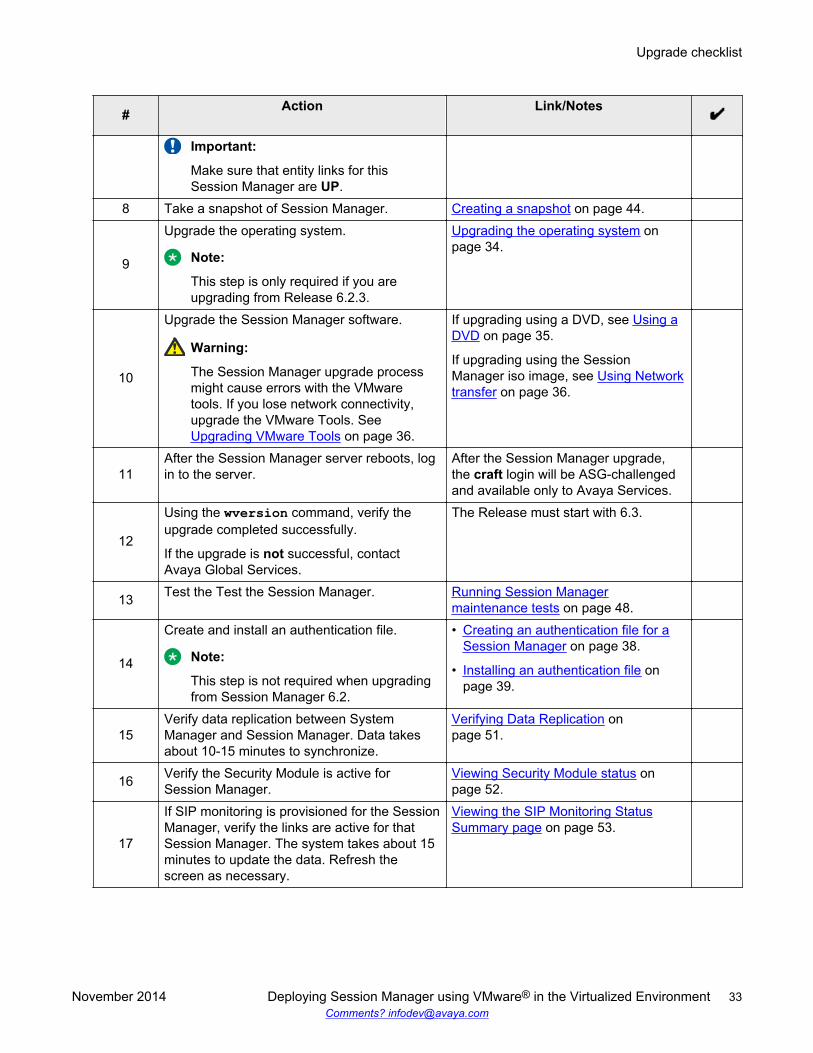
# Action Link/Notes
Important:
Make sure that entity links for thisSession Manager are UP.
8 Take a snapshot of Session Manager. Creating a snapshot on page 44.
9
Upgrade the operating system.
Note:
This step is only required if you areupgrading from Release 6.2.3.
Upgrading the operating system onpage 34.
10
Upgrade the Session Manager software.
Warning:
The Session Manager upgrade processmight cause errors with the VMwaretools. If you lose network connectivity,upgrade the VMware Tools. See Upgrading VMware Tools on page 36.
If upgrading using a DVD, see Using aDVD on page 35.
If upgrading using the SessionManager iso image, see Using Networktransfer on page 36.
11After the Session Manager server reboots, login to the server.
After the Session Manager upgrade,the craft login will be ASG-challengedand available only to Avaya Services.
12
Using the wversion command, verify theupgrade completed successfully.
If the upgrade is not successful, contactAvaya Global Services.
The Release must start with 6.3.
13 Test the Test the Session Manager. Running Session Managermaintenance tests on page 48.
14
Create and install an authentication file.
Note:
This step is not required when upgradingfrom Session Manager 6.2.
• Creating an authentication file for aSession Manager on page 38.
• Installing an authentication file onpage 39.
15Verify data replication between SystemManager and Session Manager. Data takesabout 10-15 minutes to synchronize.
Verifying Data Replication onpage 51.
16 Verify the Security Module is active forSession Manager.
Viewing Security Module status onpage 52.
17
If SIP monitoring is provisioned for the SessionManager, verify the links are active for thatSession Manager. The system takes about 15minutes to update the data. Refresh thescreen as necessary.
Viewing the SIP Monitoring StatusSummary page on page 53.
Upgrade checklist
November 2014 Deploying Session Manager using VMware® in the Virtualized Environment 33Comments? [email protected]

# Action Link/Notes
18 Change the state to Accept New Service forthe upgraded Session Manager server.
Accepting new service on page 43.
19 Make test calls to verify Session Manager isprocessing calls properly.
20 Delete the VMware snapshot. Deleting a snapshot on page 45 .
Verifying the Enrollment Password statusSession Manager requires an Enrollment Password during the initial installation and deploymentprocess. Enrolling a password establishes trust between System Manager and the SessionManager. The Enrollment Password is also known as the certificate enrollment password.
If the Enrollment Password has expired, or if you do not know the password, do one of the following:
• Ask the customer for a password.
• Make up a password.
Procedure1. On the home page of the System Manager web console, under Services, select Security >
Certificates > Enrollment Password.
2. If the value of the Time Remaining field is zero, you need to reset the password:
a. In the Password expires in field, select a value from the drop-down menu for the timewhen the password must expire.
b. Enter a password in the Password field.
c. Re-enter the password in the Confirm Password field.
d. Make a note of the password for future reference.
e. Click Commit.
The system updates the Time remaining field.
Upgrading the operating systemUpgrade the operating system of the Session Manager virtual machine.
Note:
Perform this procedure only if you are upgrading from Release 6.2.3.
Upgrading Session Manager on VMware
34 Deploying Session Manager using VMware® in the Virtualized Environment November 2014Comments? [email protected]

VMware provides several DVD sourcing options, including using:
• the media tray of the vSphere Client
• the media tray of the VMware host
• a virtual image of the DVD located in the datastore.
After the upgrade, the virtual machine will be running RHEL 6.2.
Procedure1. Open the virtual console to the Session Manager.
2. From vSphere or vCenter, click VM > Edit Settings.
3. On the Hardware tab, click CD/DVD drive 1 to see the DVD sourcing options.
4. Select the appropriate Device Type for the DVD source.
5. Select Connect at power on.
6. Click the Options tab and select Boot Options.
7. In the Power on Boot Delay field, enter the time as 10,000 ms.
8. Select Force BIOS Setup.
9. Click OK.
10. Verify that the DVD source is available at the location you specified earlier.
11. Reboot the virtual machine.
12. After the BIOS screen displays, set the boot order to boot from CD/DVD first.
13. From vSphere or vCenter, click VM > Edit Settings
14. On the Hardware screen, clear Connect at power on .
15. Click OK.
Upgrading Session Manager using a DVDProcedure
1. From vSphere or vCenter, click VM > Edit Settings.
2. On the Hardware tab, click CD/DVD drive 1 to see the DVD sourcing options.
3. Select the appropriate Device Type for the location of the Session Manager installer DVD.
4. Select the Connect at power on check box.
5. Log in using the customer account.
6. Verify the DVD is available at the location you specified earlier.
7. Enter the command $HOME/upgradeSM to start the upgrade script.
Upgrading Session Manager using a DVD
November 2014 Deploying Session Manager using VMware® in the Virtualized Environment 35Comments? [email protected]

8. If prompted, enter the Enrollment Password. The script takes about 20 minutes to complete.After the script installs the software, the virtual machine reboots.
Using Network transferTransfer the downloaded Session Manager ISO image to the Session Manager server and run theupgrade script.
Procedure1. Log in as craft or customer to a console on the Session Manager server, or use SSH for
remote login.
Note:
You can connect your laptop directly to the service port of the server.
2. Enter rm –f $HOME/asm*installer.iso3. Enter echo $HOME4. Transfer the ISO file to the directory represented by $HOME in the Session Manager server.
Note:
You can transfer the files over the network using WinSCP or another file transferapplication.
5. Enter cd $HOME6. Enter upgradeSM asm*installer.iso to mount the ISO image and run the upgrade
script.
7. If prompted, accept the EULA.
8. If prompted, enter the Enrollment password. The script takes about 20 minutes to complete.
Note:
The upgrade process does not prompt for the Enrollment Password when upgradingfrom Session Manager 6.3 to Session Manager 6.3.8 and later.
Upgrading Session Manager VMware ToolsInstalling Session Manager service packs might cause loss of network connectivity due to incorrectdrivers.
Upgrading Session Manager on VMware
36 Deploying Session Manager using VMware® in the Virtualized Environment November 2014Comments? [email protected]
The guest operating system checks the version of VMware Tools when you power on a virtualmachine. The status bar of the virtual machine displays a message regarding the availability of anew version.
Caution:
Do not upgrade the VMware tools software that is packaged with each OVA unless instructed todo so by Avaya. The supplied version is the supported release and has been thoroughly tested.
Procedure1. Right-click the target Session Manager virtual machine.
2. On the Guest menu, click Install/Upgrade VMware Tools.
3. Select Automatic Tools Upgrade in the pop-up window.
4. Click OK.
5. In the Recent Tasks window, check the status of the Initiated VMware Tools install orupgrade task. Wait until the status displays Completed.
6. Reboot the Session Manager virtual machine.
When the reboot completes, network connectivity is restored.
Authentication files for Session ManagerThe authentication file contains Access Security Gateway (ASG) keys and the server certificate forSession Manager. With the ASG keys, Avaya Services can securely gain access to the customersystem.
A default authentication file is installed with Session Manager. You must replace the default fileusing the Authentication File System (AFS) to create a unique authentication file. AFS is an onlineapplication available at RFA.
Each authentication file contains an authentication file ID (AFID) to identify the file. You use he AFIDto create a new authentication file for an upgrade or to replace the current authentication file on theserver.
Note:
Installation of the the unique authentication file is essential. Failure to install the uniqueauthentication file results in receiving an alarm that retransmits daily until you install theauthentication file.
Authentication files for Session Manager
November 2014 Deploying Session Manager using VMware® in the Virtualized Environment 37Comments? [email protected]

Creating an authentication file for a Session ManagerAFS is available only to Avaya service personnel and Avaya Partners. If you are a customer andneed an authentication file, contact Avaya or your authorized Avaya Partner.
To acquire an authentication file, use one of the following options:
• Download the authentication file directly from AFS.
• Receive the authentication file in an email.
After AFS creates the authentication file, AFS displays a confirmation message that contains thesystem type, release, and authentication file ID (AFID).
Procedure1. Enter http://rfa.avaya.com in your browser and log in.
2. Click Start the AFS Application, then click I agree.
3. In the Product field, select SM Session Manager.
4. In the Release field, select the software release number, then click Next.
5. If you are installing a new Session Manager instance (not upgrading), select New System,then click Next.
6. If you want to download the authentication file directly from AFS to your computer:
a. Click Download file to my PC.
b. Click Save in the File Download dialog box.
c. Select the location where you want to save the authentication file, then click Save.
d. Click Close in the Download complete dialog box to complete the download.
7. To receive the authentication file in an email message:
a. Enter the email address of the recipient in the Email Address field.
b. Click Download file via email.
AFS sends the email message that includes the authentication file as an attachmentand the AFID, system type, and release in the message text.
c. Save the authentication file to a location on the computer of the email recipient.
8. To view the header information in the authentication file:
a. Locate the saved file.
b. Open the file with WordPad.
The header includes the AFID, product name and release number, and the date and timethat AFS generated the authentication file.
Upgrading Session Manager on VMware
38 Deploying Session Manager using VMware® in the Virtualized Environment November 2014Comments? [email protected]

Installing an authentication fileProcedure
1. Log in using the customer login to the Session Manager server using an SSH tool such asPuTTy.
2. Enter the command echo $HOME.
3. Using WinSCP or some other file transfer program, transfer the authentication file to theSession Manager server into the directory represented by $HOME.
4. Load the authentication file manually using the loadpwd command. For example:
loadpwd -l <path to the auth file>.
5. Enter the displaypwd command to display information about the currently loadedauthentication file.
Authentication files for Session Manager
November 2014 Deploying Session Manager using VMware® in the Virtualized Environment 39Comments? [email protected]

Chapter 7: Migrating Session Manager
This chapter provides the procedures for migrating a bare-metal instance of a Session Manager to aVMware-based Session Manager. The Session Manager virtual machine reuses the IP addressesand hostname of the hardware Session Manager.
Warning:
Capacities for the hardware-based Session Manager differ from the VMware-based SessionManager. Before attempting a migration, verify the load capacity of the VMware SessionManager is compatible with the hardware-based Session Manager. For information about theVMware configuration requirements, see Capacity limits on page 17.
Migration checklist# Action Reference
1 Plan the migration activities using theplanning checklist.
Planning checklist on page 16
2 Verify System Manager is configuredproperly.
Verifying configuration for deployment onpage 23.
3 Download the Session Manager OVA fromPLDS.
Downloading software from PLDS onpage 46.
4 Deploy the Session Manager OVA.
Do not power up the virtual machine.
Methods for deploying the SessionManager OVA on page 23.
5 Based on the user footprint requirement,reconfigure the hardware resources for theSession Manager virtual machine.
Do not power up the virtual machine.
Reconfiguring hardware resources foruser footprint on page 26.
6 Verify the Enrollment Password. Verifying Enrollment Password status onpage 34.
7 Deny new service for the SessionManager
Denying new service on page 44.
8 Shut down the Session Manager. • Using the CLI to shut down or rebootthe server on page 42
40 Deploying Session Manager using VMware® in the Virtualized Environment November 2014Comments? [email protected]

# Action Reference
• Using the GUI to shut down or rebootthe server on page 41
9 Disconnect the Session Manager from thepower source and the network.
You do not want the old SessionManager to return to service andinterfere with the new Session Manager.
10 Configure the Session Manager virtualmachine to start automatically after apower failure.
Configuring the virtual machineautomatic startup settings on page 27.
11 Power on the Session Manager virtualmachine.
Powering On Session Manager onpage 47.
12 Configure the new Session Manager. Configuring Session Manager onpage 28.
13 Verify the Session Manager is configuredas a VMware instance.
Verifying the Session Manager as aVMware instance on page 31.
14 Upgrade the Session Manager to theappropriate version depending on theversion of the Session Manager at thetime of migration.
For example, the Session Manager OVAdeployment is 6.2.2, and you want to berunning Session Manager 6.3.8. Youneed to upgrade the Session Managervirtual machine to Session Manager6.3.8.
See Upgrading Session Manager onVMware on page 32.
15 Manage the serviceability agent.Redeploying Session Manager requires acleanup of the existing serviceability agentdata.
This procedure requires root access.Contact Avaya Global Services
16 Verify the migration. Continue with the Post-installationchecklist on page 30.
Using the GUI to shut down or reboot the serverProcedure
1. On System Manager Web Console, select Elements > Session Manager.
2. Select the Session Manager server that you want to shut down or reboot.
Note:
You can shut down or reboot only one Session Manager at a time.
3. Click Service State.
4. Select Deny New Service.
Using the GUI to shut down or reboot the server
November 2014 Deploying Session Manager using VMware® in the Virtualized Environment 41Comments? [email protected]

5. Wait for all active calls on the Session Manager to end before shutting down or rebooting theserver.
6. Click Shutdown System .
7. Select Shutdown or Reboot from the drop-down menu.
The system displays a confirmation screen. If the Session Manager is not in the Deny NewService state, the system displays an additional screen with the recommended action.
Using the CLI to shut down or reboot the serverAbout this taskIf you experience problems accessing System Manager, use the CLI to shut down or reboot thatparticular Session Manager using the following procedure:
Procedure1. Log in to the Session Manager using the cust login.
2. Enter one of the following commands:
• shutdownSM (to shut down the server)
• rebootSM (to reboot the server)
3. If Session Manager is shut down, the confirmation screen warns that onsite personnel mustrestart the system.
Migrating Session Manager
42 Deploying Session Manager using VMware® in the Virtualized Environment November 2014Comments? [email protected]

Chapter 8: Maintenance and administrationprocedures
Adding Session Manager as a SIP entityProcedure
1. On the System Manager web console home page, under Elements, select Routing > SIPEntities.
2. Click New.
3. In the Name field, enter the name of the Session Manager.
4. In the FQDN or IP Address field, enter the IP address of the Session Manager SecurityModule. This IP address is not the management IP address.
5. In the Type field, set the type to Session Manager.
6. In the Port section of the screen, click Add.
7. Add the port, protocol, and default domain entries for each port and protocol on which theSession Manager listens for SIP traffic. Add failover ports if the SIP entity is a failover groupmember. For more information about Failover Groups, see Administering Avaya Aura®
Session Manager.
8. Click Commit.
Accepting new serviceNote:
Even though the Security Module displays the status as Up, the security module might take 5 to10 minutes before the security module can begin routing calls.
Procedure1. On the home page of the System Manager Web Console, under Elements, click Session
Manager.
2. On the Session Manager Dashboard page, select the appropriate Session Manager in theSession Manager Instances table.
November 2014 Deploying Session Manager using VMware® in the Virtualized Environment 43Comments? [email protected]

3. Click Service State.
4. Select Accept New Service from the drop-down menu.
5. Click Confirm.
Denying new serviceWhen you change the state of the selected Session Manager to Deny New Service, the systemdenies any new call attempts and service requests. Existing calls remain in effect until the usersterminate the calls.
Procedure1. On the home page of the System Manager Web Console, under Elements, click Session
Manager.
2. On the Session Manager Dashboard page, select the appropriate Session Manager checkbox in the Session Manager Instances table.
3. Click Service State.
4. From the drop-down list box, select Deny New Service.
5. On the confirmation page, click Confirm.
Creating a snapshotCaution:
Do not perform any activity on the virtual application until the snapshot backup is complete.Snapshot operations can adversely affect service.
Before you beginVerify with the system administrator that the required privilege Virtual machine.State.Createsnapshot is available on the virtual machine.
Note:Differences exist between the vSphere Web Client versions. You might need to modify thefollowing steps accordingly.
Procedure1. Select a virtual machine.
• If you are using the vSphere Web Client:
a. Search for a virtual machine and select it from the search results list.
Maintenance and administration procedures
44 Deploying Session Manager using VMware® in the Virtualized Environment November 2014Comments? [email protected]

b. Stop the application that is running on the virtual machine or set to out-of-service.
c. Right-click the virtual machine and select Snapshot > Take Snapshot.
• If you are using the vSphere Client:
a. Stop the application that is running on the virtual machine or set to out-of-service.
b. Click Inventory > Virtual Machine > Snapshot > Take Snapshot.
2. In the Name field, enter a name for the snapshot.
3. In the Description field, enter a description for the snapshot.
4. Disable Snapshot the virtual machine’s memory.
5. Enable Quiesce guest file system (Needs VMware Tools installed).
6. Click OK.
The system displays Completed to indicate that the snapshot backup is complete.
Deleting a snapshotNote:
Differences exist between the vSphere Web Client versions. Modify the steps accordingly.
Before you beginVerify the required privilege Virtual machine.State.Remove snapshot is available on the virtualmachine.
Procedure1. Open the Snapshot Manger.
• If you are using the vSphere Web Client:
a. Search for a virtual machine and select it from the search results list.
b. Right-click the virtual machine and select Snapshot > Snapshot Manager.
• If you are using the vSphere Client:
a. Select Inventory > Virtual Machine > Snapshot > Snapshot Manager.
2. In the Snapshot Manager, click a snapshot to select it.
3. Select Delete from Disk to delete the single snapshot from the Snapshot Manager and thevirtual machine.
4. Click Yes in the confirmation dialog box.
5. If you are using the vSphere Web Client, click Close to close the Snapshot Manager.
Deleting a snapshot
November 2014 Deploying Session Manager using VMware® in the Virtualized Environment 45Comments? [email protected]

Restoring a snapshotUse this procedure to return the memory, settings, and state of the virtual machines to the statewhen you took the snapshot. The power and data states of the virtual machines return to the statewhen you took the parent snapshot.
Virtual machines running certain kinds of workloads can take several minutes to resumeresponsiveness after reverting from a snapshot.
Important:
Do not perform any activity on the virtual application until the snapshot restoration is complete.
Before you beginVerify with the system administrator that the required privilege Virtual machine.State.Revert tosnapshot is available on the virtual machine.
Note:Differences exist between the vSphere Web Client versions. You might need to modify the stepsaccordingly.
Procedure1. Click Inventory > Virtual Machine.
2. Right-click the virtual machine name on which you want to restore the snapshot, and clickSnapshot.
3. Open Snapshot Manager.
4. Select the snapshot version that you want to restore.
5. Click Go to.
6. In the Recent Tasks window, verify the Status of the Revert snapshot task.
Wait until the message Completed displays.
Downloading software from PLDSWhen you place an order for an Avaya PLDS-licensed software product, PLDS creates the licenseentitlements of the order and sends an email notification to you. The email includes a licenseactivation code (LAC) and instructions for accessing and logging into PLDS. Use the LAC to locateand download the purchased license entitlements.
In addition to PLDS, you can download the product software from http://support.avaya.com usingthe Downloads and Documents tab at the top of the page.
Note:
Maintenance and administration procedures
46 Deploying Session Manager using VMware® in the Virtualized Environment November 2014Comments? [email protected]

Only the latest service pack for each release is posted on the support site. Previous service packsare available only through PLDS.
Procedure1. Enter http://plds.avaya.com in your Web browser to access the Avaya PLDS website.
2. Enter your login ID and password.
3. On the PLDS home page, select Assets.
4. Select View Downloads.
5. Click on the search icon (magnifying glass) for Company Name.
6. In the %Name field, enter Avaya or the Partner company name.
7. Click Search Companies.
8. Locate the correct entry and click the Select link.
9. Enter the Download Pub ID.
10. Click Search Downloads.
11. Scroll down to the entry for the download file and click the Download link.
12. In the Download Manager box, click the appropriate download link.
Note:
The first link, Click to download your file now, uses the Download Manager todownload the file. The Download Manager provides features to manage the download(stop, resume, auto checksum). The click here link uses your standard browserdownload and does not provide the download integrity features.
13. (Internet Explorer only) If you receive an error message, click on the install ActiveXmessage at the top of the page and continue with the download.
14. Select a location where you want to save the file and click Save.
15. If you used the Download Manager, click Details to view the download progress.
Powering On Session ManagerProcedure
1. Start the vSphere Client.
2. Select the deployed Session Manager virtual machine from the list of virtual machines for thetarget host.
3. Do one of the following:
• On the Summary page, click Power On
• Right-click the virtual machine and click Power > Power On.
Powering On Session Manager
November 2014 Deploying Session Manager using VMware® in the Virtualized Environment 47Comments? [email protected]

4. Right-click the virtual machine, highlight the Power, and click Power On.
5. In the Recent Tasks window, check the Status of the Power On virtual machine task andwait until the Completed message displays.
6. Right-click the Session Manager virtual machine and select Open Console.
Wait for the Session Manager virtual machine to finish the initialization process.
7. If the Session Manager virtual machine does not power on, see Troubleshooting a SessionManager virtual machine that is unable to power on on page 48.
Troubleshooting a Session Manager virtual machine that isunable to power on
The system displays appropriate messages for CPU or memory resource limitations. The SessionManager might be deployed on a host that does not have the necessary resources allocated forpower up. A power up failure indicates the newly deployed OVA must be resized or resources arebeing oversubscribed. The recommendation is to not oversubscribe resources.
Default CPU and memory reservations are built into the Session Manager OVA. The reservationsmust be adjusted to match the desired configuration. To adjust the virtual machine resources, see Reconfiguring hardware resources for flexible footprint on page 26. If adjusting the reservationsdoes not correct the power up failure, it is likely that the available host resources are not adequatefor this Session Manager deployment. You must select a different, more available, host.
Running maintenance testsRun the maintenance tests on the current System Manager or any configured Session Manager.
Procedure1. On the System ManagerWeb Console, under Elements, select Session Manager > System
Tools > Maintenance Tests.
2. In the System Manager or a Session Manager to test field, select System Manager or aSession Manager instance from the drop-down menu.
3. To run all of the tests, select Execute All Tests.
4. To run only certain tests:
a. Select the test to run from the test list.
b. Click Execute Selected Tests.
5. Verify the tests pass.
Maintenance and administration procedures
48 Deploying Session Manager using VMware® in the Virtualized Environment November 2014Comments? [email protected]

Session Manager Service Pack and patch updatesFor the procedures to apply service pack and patch updates to Session Manager, see InstallingService Packs for Avaya Aura® Session Manager on the Avaya support website http://support.avaya.com.
Before you apply service pack or patch updates to Session Manager, take a snapshot of SessionManager. Delete the snapshot after you successfully apply the service pack or patch to increaseavailable space.
Note:
Applying service pack or patch updates to Session Manager might require you to update theversion of VMware tools. For more information about how to update the version of VMwaretools, see Upgrading VMware Tools on page 36.
Session Manager Backup and RestoreUse the native System Manager backup and restore function for the long-term backup and recoveryof the Session Manager virtual machine data when running on VMware.
For more information about Session Manager backup and restore, see Administering Avaya AuraSession Manager on the Avaya support website at http://support.avaya.com.
During the data restore operation on the virtual machine, verify that the maximum load capacitydoes not exceed the load as defined in Capacity limits on page 17.
Note:
This procedure only backs up administration data.
Accessing the Backup and Restore serviceProcedureOn System Manager Web Console, click Services > Backup and Restore.
Note:
The secondary System Manager that is in the standby mode does not display the Backup andRestore link on the web console.
ResultThe system displays the Backup and Restore page.
Session Manager Service Pack and patch updates
November 2014 Deploying Session Manager using VMware® in the Virtualized Environment 49Comments? [email protected]

Backup and Restore field descriptionsUse this page to view the details of backup files or the files you require to restore.
Name DescriptionOperation Specifies the type of operation. The values are:
• Backup
• RestoreFile Name • For the backup operation, specifies the name of
the backup file.
• For the restore operation, specifies the name of thefile you want to restore.
Path • For the backup operation, specifies the path of thebackup file.
• For the restore operation, specifies the path of thefile you want to restore.
Status Indicates the status of the backup or restoreoperation. The values are:
• SUCCESS
• FAILED
• PLANNED
• RUNNINGStatus Description Displays the error details of the backup or restore
operation that has failed.Operation Time Specifies the time of the backup or restore operation.Operation Type Defines whether the backup or restore operation is
local or remote.User Displays the user who performed the operation.
Button DescriptionBackup Opens the Backup page. Use this page to back up
data on a specified local or remote location.Restore Opens the Restore page. Use this page to restore
data to a specified local or remote location.
Maintenance and administration procedures
50 Deploying Session Manager using VMware® in the Virtualized Environment November 2014Comments? [email protected]

Verifying the Active Call CountThe Active Call Count value indicates the number of active calls on the Session Manager instance.Active calls are calls that were already active before the Session Manager was placed in the denialstate. Changing the state to Deny New Service does not drop calls that are currently processed.
To prevent any impact on calls that are active, the Active Call Count must be zero beforeproceeding with the Session Manager upgrade. If the administrator decides to continue the upgradeif the active call count is not zero, the active calls are dropped.
Procedure1. On the home page of the System Manager Web Console, under Elements, click Session
Manager.
2. Wait until Active Call Count is zero. Refresh the screen to update the count.
Verifying data replicationProcedure
1. On the System Manager web console home page, under Services, click Replication.
2. Select the Session Manager instance and click View Replica Nodes.
3. Confirm that the target Session Manager is Synchronized (green).
4. If the Session Manager is not Synchronized:
a. Select the Session Manager instance.b. Click Repair.
Troubleshooting Data ReplicationProcedure
1. On the home page of the System Manager Web console, under Services, click Replication.
2. If the status for the replica group is not Synchronized:
a. Select the check box in front of the affected replica group.b. Click View Replica Nodes.c. Verify that an entry for the upgraded Session Manager exists.d. Select the check box next to the upgraded Session Manager.e. Click View Details.f. Under the Synchronization Statistics section, wait until the Pending Batches number
is zero. Refresh the page as necessary.
Verifying the Active Call Count
November 2014 Deploying Session Manager using VMware® in the Virtualized Environment 51Comments? [email protected]

3. If the Pending Batches number does not change to zero, perform the following steps:
a. Click Done.
b. On the Replica Nodes page, click Repair.
c. Click OK in the dialog box.
4. Wait until the status of the Session Manager is Synchronized. Refresh the page asnecessary.
Viewing Security Module statusProcedure
1. On the System Manager Web Console, select Elements > Session Manager.
The Session Manager Dashboard page displays the details and Security Module status forall the administered Session Manager servers and Survivable Remote Session Managerservers (BSM).
2. If the Security Module state of a particular Session Manager is not displayed as Up, see Troubleshooting Security Module Sanity failure on page 52.
Troubleshooting Security Module Sanity failureProcedure
1. On the System Manager Web Console, select Elements > Session Manager > SystemStatus > Security Module Status.
2. Select Refresh to display the current status.
3. Verify that the Status for the indicated Session Manager is Up.
4. Verify that the IP address is correct.
5. If the status is selected as Down, reset the security module:
a. Select the appropriate Session Manager instance from the table.
b. Click Reset.
Warning:
Session Manager cannot process calls while the system resets the security module.
6. Select Refresh to display the current status.
Maintenance and administration procedures
52 Deploying Session Manager using VMware® in the Virtualized Environment November 2014Comments? [email protected]

Viewing the Session Manager Entity Link ConnectionStatus
An entity link consists of one or more physical connections between a Session Manager server anda SIP entity. If all the connections are up, then the Entity Link status is up. If one or moreconnections are down but at least one connection is up, the link status is partially down. If all theconnections are down, the Entity Link status is down.
On the Session Manager dashboard page, the number of down links and total links are shown in theEntity Monitoring column. The values have the format # of Down links / # of Total links.
Procedure1. On the home page of the System Manager Web Console, under Elements, click Session
Manager.
2. Red link values indicate that at least one entity link is down. Click the link to display theSession Manager Entity Link Connection Status page.
The Session Manager Entity Link Connection Status page displays the details for each link.If a link is down, the page displays a reason code.
3. To view the SIP Entity Link Monitoring Status Summary page, click Summary View.
Viewing the SIP Monitoring Status Summary pageAbout this taskThe SIP Entity Link Monitoring Status Summary page displays the status of the entity links for all theadministered Session Manager instances. An entity link consists of one or more physicalconnections between a Session Manager server and a SIP entity.
If all connections are up, then the entity link status is up. If one or more connections are down butthere is at least one connection up, the link status is partially down. If all of the connections aredown, the entity link status is down. If the connection denies any new service, the entity link statusis deny new service.
Procedure1. On System Manager Web Console, click Elements > Session Manager.
2. In the left navigation pane, click System Status > SIP Entity Monitoring
The SIP Entity Link Monitoring Status Summary page displays the SIP Entity Linkmonitoring status for all Session Manager instances.
Viewing the Session Manager Entity Link Connection Status
November 2014 Deploying Session Manager using VMware® in the Virtualized Environment 53Comments? [email protected]

Appendix A: Best Practices for VMwareperformance and features
BIOSFor optimal performance, turn off power saving server options. See the technical data provided bythe manufacturer for your particular server regarding power saving options.
For information about how to use BIOS settings to improve the environment for latency-sensitiveworkloads for an application, see the technical white paper at http://www.vmware.com/files/pdf/techpaper/VMW-Tuning-Latency-Sensitive-Workloads.pdf.
The following sections describe the recommended BIOS settings for:
• Intel Virtualization Technology
• Dell PowerEdge Servers
• HP ProLiant Servers
Intel Virtualization TechnologyIntel CPUs require EM64T and Virtualization Technology (VT) support in the chip and in the BIOS torun 64–bit virtual machines.
All Intel Xeon processors include:
• Intel Virtualization Technology
• Intel Extended Memory 64 Technology
• Execute Disable Bit
Ensure that VT is enabled in the host system BIOS. The feature is also known as VT, VanderpoolTechnology, Virtualization Technology, VMX, or Virtual Machine Extensions.
54 Deploying Session Manager using VMware® in the Virtualized Environment November 2014Comments? [email protected]

Note:
The VT setting is locked as either On or Off when the server starts. After enabling VT in thesystem BIOS, save your changes to the BIOS settings and exit. The BIOS changes take effectafter the host server reboots.
Other suggested BIOS settingsServers with Intel Nehalem class and newer Intel Xeon CPUs offer two more power managementoptions: C-states and Intel Turbo Boost.
• Disabling C-states lowers latencies to activate the CPUs from halt or idle states to a fully activestate.
• Intel Turbo Boost steps up the internal frequency of the processor if the workload requiresmore power. The default for this option is enabled. Do not change the default.
These settings depend on the OEM make and model of the server. The BIOS parameterterminology for current Dell and HP servers are described in the following sections. Other servermodels might use other terminology for the same BIOS controls.
Dell PowerEdge ServerWhen the Dell server starts, press F2 to display the system setup options.
• Set the Power Management Mode to Maximum Performance.
• Set the CPU Power and Performance Management Mode to Maximum Performance.
• In Processor Settings, set:
- Turbo Mode to enable.
- C States to disabled.
HP ProLiant ServersThe following are the recommended BIOS settings for the HP ProLiant servers:
• Set the Power Regulator Mode to Static High Mode.
• Disable Processor C-State Support.
• Disable Processor C1E Support.
• Disable QPI Power Management.
• Enable Intel Turbo Boost.
BIOS
November 2014 Deploying Session Manager using VMware® in the Virtualized Environment 55Comments? [email protected]

TimekeepingFor accurate timekeeping, use the Network Time Protocol (NTP) as a time source instead of theESXi hypervisor.
The NTP servers can be local or over the Internet. If the NTP servers are on the Internet, thecorporate firewall must open UDP port 123 so that the NTP service can communicate with theexternal NTP servers.
The VMware tools time synchronization method is disabled at application deployment time to avoiddueling clock masters. You must configure the NTP service first because the applications are notreceiving clock updates from the hypervisor. To verify that VMware Tools Timesync is disabled, runthe command /usr/bin/vmware-toolbox-cmd timesync status.
In certain situations, the ESXi hypervisor pushes an updated view of its clock into a virtual machine.These situations include starting the virtual machine and resuming a suspended virtual machine, Ifthis view differs more than 1000 seconds from the view that is received over the network, the NTPservice might shutdown. In this situation, the guest OS administrator must manually set the guestclock to be the same or as close as possible to the network time source clock. To keep the NTPservice active, the clock on the ESXi host must also use an accurate clock source, such as thesame network time source that is used by the guest operating system. The VMwarerecommendation is to add tinker panic 0 to the first line of the ntp.conf file so that the NTP canadjust to the network time even with large differences.
If you use the names of the time servers instead of the IP address, you must configure the DomainName Service in the guest OS before you administer the NTP service. Otherwise, the NTP servicecannot locate the time servers. If you administer the NTP service first, you must restart the NTPservice after administering the DNS service.
After you administer the NTP service in the application, run the ntpstat or /usr/sbin/ntpq -pcommand from a command window. The results from these commands:
• Verify if the NTP service is getting time from a network time source.• Indicate which network time source is in use.• Display how closely the guest OS matches the network time.• Display how often the guest OS checks the time.
The guest OS polls the time source every 65 to 1024 seconds. Larger time intervals indicate that theguest clock is tracking the network time source closely. If the time source is local, then the NTPservice is not using a network time source and a problem exists.
If the clock value is consistently wrong, look through the system log for entries regarding ntpd. TheNTP service writes the activities it performs to the log, including when the NTP service losessynchronization with a network time source.
For more information, see Timekeeping best practices for Linux guests at http://kb.vmware.com/kb/1006427. The article presents best practices for Linux timekeeping to achieve best timekeepingresults. The article includes:
• specifics on the particular kernel command line options to use for the Linux operating system ofinterest.
Best Practices for VMware performance and features
56 Deploying Session Manager using VMware® in the Virtualized Environment November 2014Comments? [email protected]

• recommended settings and usage for NTP time sync, configuration of VMware Tools timesynchronization, and Virtual Hardware Clock configuration.
VMware ToolsThe VMware Tools utility suite is built into the application OVA. The tools enhance the performanceof the guest operating system on the virtual machine and improve the management of the virtualmachine.
VMware tools provide:
• VMware Network acceleration
• Host to Guest time synchronization
• Disk sizing
For more information about VMware tools, see Overview of VMware Tools at http://kb.vmware.com/kb/340.
Important:
Do not upgrade the VMware tools software that is packaged with each OVA unless instructed todo so by Avaya. The supplied version is the supported release and has been thoroughly tested.
VMware networking best practicesYou can administer networking in a VMware environment for many different configurations. Theexamples in this section describe some of the VMware networking possibilities.
This section is not a substitute for the VMware documentation. Review the VMware networking bestpractices before deploying any applications on an ESXi host.
The following are the suggested best practices for configuring a network that supports deployedapplications on VMware Hosts:
• Separate the network services to achieve greater security and performance by creating avSphere standard or distributed switch with dedicated NICs for each service. If you cannot useseparate switches, use port groups with different VLAN IDs.
• Configure the vMotion connection on a separate network devoted to vMotion.
• For protection, deploy firewalls in the virtual machines that route between virtual networks thathave uplinks to physical networks and pure virtual networks without uplinks.
• Specify virtual machine NIC hardware type vmxnet3 for best performance.
• Connect all physical NICs that are connected to the same vSphere standard switch to thesame physical network.
VMware Tools
November 2014 Deploying Session Manager using VMware® in the Virtualized Environment 57Comments? [email protected]

• Connect all physical NICs that are connected to the same distributed switch to the samephysical network.
• Configure all VMkernal vNICs to be the same IP Maximum Transmission Unit (MTU).
Networking Avaya applications on VMware ESXi – Example 1
This configuration describes a simple version of networking Avaya applications within the sameESXi host. Highlights to note:
• Separation of networks: VMware Management, VMware vMotion, iSCSI (SAN traffic), andvirtual machine networks are segregated to separate physical NICs.
• Teamed network interfaces: vSwitch 3 in Example 1 displays use of a load-balanced NIC teamfor the Virtual Machines Network. Load balancing provides additional bandwidth for the VirtualMachines Network, while also providing network connectivity for the virtual machines in thecase of a single NIC failure.
Best Practices for VMware performance and features
58 Deploying Session Manager using VMware® in the Virtualized Environment November 2014Comments? [email protected]

• Communication Manager Duplex link: Communication Manager software duplication must beseparated from all other network traffic. Example 1 displays one method of separatingCommunication Manager Duplex with a port group combined with a VLAN. TheCommunication Manager software duplication link must meet specific network requirements.for more information, see Avaya PSN003556u at PSN003556u. The following are the minimumrequirements of the Communication Manager software duplex connectivity:
- The total capacity must be 1 Gbps or greater. Reserve 50 Mbps of bandwidth for duplicationdata.
- The round-trip delay must be 8 ms or less.- The round-trip packet loss must be 0.1% or less.- Both servers duplication ports must be on the same IP subnet.- You must disable duplication link encryption for busy-hour call rates that result in greater
than 40% CPU occupancy. You can view the CPU occupancy using the listmeasurements occupancy command and looking at the results under the Static + CPUoccupancy heading.
- The system must maintain CPU occupancy on the active server (Static + CPU) at less than65% to provide memory refresh from the active to standby server.
• Session Manager vNIC mapping: Session Manager OVA defines four separate virtual NICswithin the VM. However, Example 1 shows all interfaces networked through a single virtualmachine network, which is supported. If the Session Manager Management and SessionManager Asset networks are separated by subnets, you can create a VLAN for the appropriatenetwork.
• Virtual networking: The network connectivity between virtual machines that connect to thesame vSwitch is entirely virtual. In Example 2, the virtual machine network of vSwitch3 cancommunicate without entering the physical network. Virtual networks benefit from fastercommunication speeds and lower management overhead.
VMware networking best practices
November 2014 Deploying Session Manager using VMware® in the Virtualized Environment 59Comments? [email protected]

Networking Avaya applications on VMware ESXi – Example 2
This configuration shows a complex situation using multiple physical network interface cards. Thekey differences between Example 1 and Example 2 are:
• VMware Management Network redundancy: Example 2 includes a second VMkernel Port atvSwitch2 to handle VMware Management Network traffic. In the event of a failure of vmnic0,VMware Management Network operations can continue on this redundant managementnetwork.
• Removal of Teaming for Virtual Machines Network: Example 2 removes the teamed physicalNICs on vSwitch3. vSwitch3 was providing more bandwidth and tolerance of a single NICfailure instead of reallocating this NIC to other workloads.
• Communication Manager Duplex Link: vSwitch4 is dedicated to Communication ManagerSoftware Duplication. The physical NIC given to vSwitch4 is on a separate physical networkthat follows the requirements described in PSN003556u at PSN003556u.
Best Practices for VMware performance and features
60 Deploying Session Manager using VMware® in the Virtualized Environment November 2014Comments? [email protected]
• Session Manager Management Network: Example 2 shows the Session Manager Managementnetwork separated onto its own vSwitch. The vSwitch has a dedicated physical NIC thatphysically segregates the Session Manager Management network from other network traffic.
ReferencesTitle LinkProduct Support Notice PSN003556u https://downloads.avaya.com/css/P8/documents/
100154621Performance Best Practices for VMware vSphere™
5.0Performance Best Practices for VMware vSphere™
5.0Performance Best Practices for VMware vSphere™
5.5http://www.vmware.com/pdf/Perf_Best_Practices_vSphere5.5.pdf
VMware vSphere 5.0 Basics VMware vSphere Basics - ESXi 5.0VMware vSphere 5.5 Documentation https://www.vmware.com/support/pubs/vsphere-esxi-
vcenter-server-pubs.htmlVMware Documentation Sets https://www.vmware.com/support/pubs/
Separating Session Manager management and Security Moduletraffic
About this taskAs a best practice, Session Manager management and Security Module related traffic should beseparate. There are many ways in which to separate Session Manager including VLANs, VMwareport groups, and VMware virtual switches connected to different physical network interface cards.
Using a VLAN to separate management and Security Module related traffic must be done from acustomer’s switch, as VLAN configuration cannot be accomplished from a virtual machine orHypervisor level. The result is a Session Manager virtual machine with all of its NICs connected tothe same vSwitch.
If the defaults are selected during deployment, management and Security Module traffic are placedon the same vSwitch. As a best practice, separate Session Manager management and SecurityModule traffic using the following procedure.
Procedure1. Create a vSwitch for dedicated Session Manager Security Module traffic.
2. From the vSphere client inventory view, right-click the Session Manager virtual machine andselect Edit Settings.
3. The Hardware tab is selected by default. Select the proper Network adapter from thehardware list on the left-side.
4. On the right side, under the Network label list, select a separate vSwitch for this NIC.
5. Click OK to complete configuration.
VMware networking best practices
November 2014 Deploying Session Manager using VMware® in the Virtualized Environment 61Comments? [email protected]

StorageThere is no stipulation on the underlying storage vendor type and storage technology used. FibreChannel SAN arrays, iSCSI SAN arrays, and NAS arrays are different storage technologiessupported by VMware vSphere to meet different datacenter storage needs. The storage arrays areconnected to and shared between groups of servers through storage area networks. Thisarrangement allows aggregation of the storage resources and provides more flexibility inprovisioning these resources to virtual machines.
Thin vs. thick deploymentsWhen creating a virtual disk file, VMware ESXi uses a thick type of virtual disk by default. The thickdisk pre-allocates all of the space specified during the creation of the disk. For example, if youcreate a 10 megabyte disk, all 10 megabytes are pre-allocated for that virtual disk.
In contrast, a thin virtual disk does not pre-allocate all of the space. Blocks in the VMDK file are notallocated and backed by physical storage until they are written during the normal course ofoperation. A read to an unallocated block returns zeroes, but the block is not backed with physicalstorage until it is written. Consider the following when implementing thin provisioning in yourVMware environment:
• Thin provisioned disks can grow to the full size specified at the time of virtual disk creation, butdo not shrink. Once the blocks have been allocated, they cannot be un-allocated.
• By implementing thin provisioned disks, you are able to over-allocate storage. If storage isover-allocated, thin virtual disks can grow to fill an entire datastore if left unchecked.
• If a guest operating system needs to make use of a virtual disk, the guest operating systemmust first partition and format the disk to a file system it can recognize. Depending on the typeof format selected within the guest operating system, the format may cause the thinprovisioned disk to grow to full size. For example, if you present a thin provisioned disk to aMicrosoft Windows operating system and format the disk, unless you explicitly select the QuickFormat option, the Microsoft Windows format tool writes information to all of the sectors on thedisk, which in turn inflates the thin provisioned disk to full size.
Thin provisioned disks can over-allocate storage. If the storage is over-allocated, thin virtual diskscan grow to fill an entire datastore if left unchecked. You can use thin provisioned disks, but youmust use strict control and monitoring to maintain adequate performance and ensure that storage isnot completely consumed. If operational procedures are in place to mitigate the risk of performanceand storage depletion, then thin disks are a viable option.
Best Practices for VMware performance and features
62 Deploying Session Manager using VMware® in the Virtualized Environment November 2014Comments? [email protected]

Best Practices for VMware features
VMware High AvailabilityVMware High Availability (HA) provides automatic detection of hardware failures, server failures,and operating system failures. In the event of a physical server failure, VMware HA automaticallyrestarts the affected virtual machine on other production servers that have spare capacity. In theevent of an operating system failure, VMware HA restarts the affected virtual machine on the sameserver.
VMware HA ensures that capacity is available to restart all virtual machines that are affected by aservice failure. HA continuously monitors capacity utilization and reserves spare capacity to restartvirtual machines.
VMware HA helps users identify abnormal configuration settings detected within HA clusters. TheVMware vSphere client interface reports relevant operating status and potential error conditionsalong with suggested remediation steps.
For more information, see the VMware website at http://www.vmware.com/files/pdf/VMware-High-Availability-DS-EN.pdf.
Note:
• All virtual machines and their configuration files must be on shared storage, e.g. FibreChannel SAN, iSCSI SAN, or SAN iSCI NAS.
• The console network must have redundant network paths to have reliable failure detectionfor HA clusters. VMware HA monitors the heartbeat between hosts on the console networkfor failure detection.
• VMware HA uses virtual machine priority to decide order of restart.
• VMware HA only works across a LAN. VMware HA does not work across a WAN.
VMware vMotionVMware uses the vMotion technology to migrate a running virtual machine from one physical serverto another physical server without incurring downtime. The migration process, also known as a hotmigration, migrates running virtual machines with zero downtime, continuous service availability,and complete transaction integrity.
With vMotion, you can:
• Schedule migration to occur at predetermined times and without the presence of anadministrator.
• Perform hardware maintenance without scheduled downtime.
• Migrate virtual machines away from failing or under-performing servers.
Best Practices for VMware features
November 2014 Deploying Session Manager using VMware® in the Virtualized Environment 63Comments? [email protected]

Before using vMotion, you must:
• Ensure that each host that migrates virtual machines to or from the host uses a licensedvMotion application and the vMotion is enabled.
• Ensure that you have identical vSwitches. You must enable vMotion on these vSwitches.• Ensure the Port Groups are identical for vMotion.• Use a dedicated NIC to ensure the best performance.
VMware SnapshotsA snapshot preserves the state and data of a virtual machine at a specific point in time. You cancreate a snapshot before upgrading or installing a patch.
The best time to take a snapshot is when no applications in the virtual machine are communicatingwith other computers. The potential for problems is greatest if the virtual machine is communicatingwith another computer. For example, if you take a snapshot while the virtual machine isdownloading a file from a server on the network, the virtual machine continues downloading the fileand communicating its progress to the server. If you revert to the snapshot, communicationsbetween the virtual machine and the server are confused and the file transfer fails.
Caution:
Snapshot operations can adversely affect service. Before performing a snapshotoperation, you must stop the application that is running on the virtual machine or placethe application out-of-service. When the snapshot operation is complete, start or bringthe application back into service.
Snapshots can:
• Consume large amounts of data resources.• Increase CPU loads on the host.• Affect performance.• Affect service.
To prevent adverse behaviors, consider the following recommendations when using the Snapshotfeature:
• Do not rely on VMware snapshots as a robust backup and recovery method. Snapshots are notbackups. The snapshot file is only a change log of the original virtual disk.
• Do not run a virtual machine off of a snapshot. Do not use a single snapshot for more than 24to 72 hours.
• Take the snapshot, make the changes to the virtual machine, and delete or commit thesnapshot after you verify the virtual machine is working properly. These actions preventsnapshots from growing so large as to cause issues when deleting or committing thesnapshots to the original virtual machine disks.
• When taking a snapshot, do not save the memory of the virtual machine. The time that the hosttakes to write the memory to the disk is relative to the amount of memory that the virtual
Best Practices for VMware performance and features
64 Deploying Session Manager using VMware® in the Virtualized Environment November 2014Comments? [email protected]

machine is configured to use. Saving the memory can add several minutes to the time taken tocomplete the operation. If the snapshot is active, saving memory can make calls appear to beactive or in progress and can cause confusion to the user. To create a clean snapshot imagefrom which to boot, do the following when you create a snapshot:
- In the Take Virtual Machine Snapshot window, clear the Snapshot the virtual machine’smemory check box.
- Select the Quiesce guest file system (Needs VMware Tools installed) check box toensure that all write instructions to the disks are complete. You have a better chance ofcreating a clean snapshot image from which to boot.
• If you are going to use snapshots for a long time, you must consolidate the snapshot filesregularly to improve performance and reduce disk usage. Before merging the snapshot deltadisks back into the base disk of the virtual machine, you must first delete stored snapshots.
Note:
If a consolidation failure occurs, end-users can use the actual Consolidate option withoutopening a service request with VMware. If a commit or delete operation does not mergethe snapshot deltas into the base disk of the virtual machine, a warning is displayed in theUI.
Related resourcesTitle LinkBest practices for virtual machine snapshots in theVMware environment
Best Practices for virtual machine snapshots in theVMware environment
Understanding virtual machine snapshots in VMwareESXi and ESX
Understanding virtual machine snapshots in VMwareESXi and ESX
Working with snapshots Working with snapshotsConfiguring VMware vCenter Server to send alarmswhen virtual machines are running from snapshots
Send alarms when virtual machines are running fromsnapshots
Consolidating snapshots in vSphere 5.x Consolidating snapshots in vSphere 5.x
Best Practices for VMware features
November 2014 Deploying Session Manager using VMware® in the Virtualized Environment 65Comments? [email protected]

Appendix B: Product notifications
Avaya issues a product change notice (PCN) for a software update. A PCN accompanies a servicepack or patch that must be applied universally.
Avaya issues a product support notice (PSN) when there is a change in a product. A PSN providesinformation such as a workaround for a known problem and steps to recover software.
Both of these types of notices alert you to important issues that directly impact Avaya products.
Viewing PCNs and PSNsProcedure
1. Go to the Avaya Support website at http://support.avaya.com.
2. Enter your login credentials, if applicable.
3. On the top of the page, click DOCUMENTS.
4. In the Enter your Product Here field, enter the name of the product, then select the productfrom the drop-down menu.
5. In the Choose Release field, select the specific release from the drop-down menu.
6. In the list of filters, select the Product Correction Notices and/or Product Support Noticescheck box.
Note:
You can select multiple filters to search for different types of documents at one time.
7. Click Enter.
66 Deploying Session Manager using VMware® in the Virtualized Environment November 2014Comments? [email protected]

Registering for product notificationsNote:
This procedure applies only to registered Avaya customers and business partners with an SSOlogin.
Procedure1. Go to the Avaya Support website at http://support.avaya.com.
2. Log in using your SSO credentials.
3. Click on the MY PROFILE link.
4. Click the highlighted HI, <username> tab.
5. Select E Notifications from the menu.
6. In the Product Notifications section:
a. Click Add More Products.
b. Select the appropriate product.
7. In the Product box that appears on your screen:
a. Select the appropriate release or releases for which you want to receive notifications.
b. Select which types of notifications you want to receive. For example, Product SupportNotices and Product Correction Notices (PCN).
c. Click Submit.
8. If you want notifications for other products, select another product from the list and repeatthe above step.
9. Log out.
Registering for product notifications
November 2014 Deploying Session Manager using VMware® in the Virtualized Environment 67Comments? [email protected]

Glossary
AFS Authentication File System. AFS is an Avaya Web system that allows youto create Authentication Files for secure Avaya Global Services logins forsupported non-Communication Manager Systems.
Application A software solution development by Avaya that includes a guest operatingsystem.
Avaya Appliance A physical server sold by Avaya running a VMware hypervisor that hasseveral virtual machines, each with its virtualized applications. The serverscan be staged with the operating system and application software alreadyinstalled. Some of the servers are sold as just the server with DVD orsoftware downloads.
Blade A blade server is a stripped-down server computer with a modular designoptimized to minimize the use of physical space and energy. Althoughmany components are removed from blade servers to save space,minimize power consumption and other considerations, the blade still hasall of the functional components to be considered a computer.
ESXi A virtualization layer that runs directly on the server hardware. Also knownas a bare-metal hypervisor. Provides processor, memory, storage, andnetworking resources on multiple virtual machines.
Hypervisor A hypervisor is also known as a Virtual Machine Manager (VMM). Ahypervisor is a hardware virtualization technique which runs multipleoperating systems on the same shared physical server.
MAC Media Access Control address. A unique identifier assigned to networkinterfaces for communication on the physical network segment.
OVA Open Virtualization Appliance. An OVA contains the virtual machinedescription, disk images, and a manifest zipped into a single file. The OVAfollows the Distributed Management Task Force (DMTF) specification.
PLDS Product Licensing and Download System. The Avaya PLDS providesproduct licensing and electronic software download distribution.
Reservation A reservation specifies the guaranteed minimum required amounts of CPUor memory for a virtual machine.
68 Deploying Session Manager using VMware® in the Virtualized Environment November 2014Comments? [email protected]

RFA Remote Feature Activation. RFA is an Avaya Web system that you use tocreate Avaya License Files. These files are used to activate softwareincluding features, capacities, releases, and offer categories. RFA alsocreates Authentication Files for secure Avaya Global Services logins forCommunication Manager Systems.
SAN Storage Area Network. A SAN is a dedicated network that provides accessto consolidated data storage. SANs are primarily used to make storagedevices, such as disk arrays, accessible to servers so that the devicesappear as locally attached devices to the operating system.
Snapshot The state of a virtual appliance configuration at a particular point in time.Creating a snapshot can affect service. Some Avaya virtual applianceshave limitations and others have specific instructions for creatingsnapshots.
Storage vMotion A VMware feature that migrates virtual machine disk files from one datastorage location to another with limited impact to end users.
vCenter Server An administrative interface from VMware for the entire virtual infrastructureor data center, including VMs, ESXi hosts, deployment profiles, distributedvirtual networking, and hardware monitoring.
virtual appliance A virtual appliance is a single software application bundled with anoperating system.
VM Virtual Machine. Replica of a physical server from an operationalperspective. A VM is a software implementation of a machine (for example,a computer) that executes programs similar to a physical machine.
vMotion A VMware feature that migrates a running virtual machine from onephysical server to another with minimal downtime or impact to end users.vMotion cannot be used to move virtual machines from one data center toanother.
VMware HA VMware High Availability. A VMware feature for supporting virtualapplication failover by migrating the application from one ESXi host toanother. Since the entire host fails over, several applications or virtualmachines can be involved. The failover is a reboot recovery level which cantake several minutes.
vSphere Client The vSphere Client is a downloadable interface for administering vCenterServer and ESXi.
RFA
November 2014 Deploying Session Manager using VMware® in the Virtualized Environment 69Comments? [email protected]

Index
Aaccepting new service ......................................................... 43accessing the Backup and Restore service .........................49Active Call Count
verifying ........................................................................ 51adding SIP Entity
Session Manager ..........................................................43authentication file
installing ........................................................................39Authentication File
creating .........................................................................38automatic restart
virtual machine ............................................................. 27Avaya Learning ......................................................................9
BBackup and Restore page ................................................... 50backup and restore service; access .................................... 49best practices
performance and features ............................................ 54VMware networking ...................................................... 57
BIOS .................................................................................... 54BIOS for HP servers ............................................................ 55BIOS settings
for Dell servers ............................................................. 55
Ccapacity limits ...................................................................... 17change service state
deny new service ..........................................................44checklist
deployment procedures ................................................ 22migration procedures ....................................................40planning procedures ..................................................... 16post-installation procedures ..........................................30
clonesdeployment ................................................................... 21
Collaboration Pod ................................................................ 13components ......................................................................... 14
VMware ........................................................................ 14configuration data
customer .......................................................................19configuration verification ...................................................... 23configuring
Session Manager ..........................................................28virtual machine automatic restart ..................................27
connectionsverifying ........................................................................ 31
courses .................................................................................. 9creating a snapshot ............................................................. 44
creating Authentication File ................................................. 38customer configuration data ................................................ 19
Ddata replication .................................................................... 51
verifying ........................................................................ 51deleting a snapshot ..............................................................45deny new service ................................................................. 44deploying
using vSphere connected directly .................................24deploying copies .................................................................. 21deploying Session Manager OVA
using vCenter ............................................................... 23deployment
thick .............................................................................. 62thin ................................................................................62
deployment configuration verification .................................. 23deployment guidelines ......................................................... 21deployment procedures
checklist ........................................................................22documentation
related .............................................................................8document changes ................................................................ 7downloading software
using PLDS ...................................................................46
EEnrollment Password status ................................................ 34Entity Link Connection Status ..............................................53
Ffeatures best practices .........................................................54flexible footprint
reconfiguring hardware resources ................................ 26
Gguidelines
deployment ................................................................... 21
HH.323 endpoint considerations ............................................ 18hardware_info
verification check .......................................................... 30hardware resources
reconfiguring for flexible footprint ................................. 26
70 Deploying Session Manager using VMware® in the Virtualized Environment November 2014Comments? [email protected]

Iinstalling
authentication file ..........................................................39Intel Virtualization Technology .............................................54
Llegal notice ...............................................................................
Mmaintenance tests ................................................................48migrating Session Manager ................................................. 40migration procedures
checklist ........................................................................40multiple vSwitches ............................................................... 61
NNetwork transfer .................................................................. 36new service
changing state to accept ...............................................43notifications ..........................................................................66NTP time source .................................................................. 56
Ooverview ...............................................................................12
PPCNs
viewing ..........................................................................66PCN updates ....................................................................... 66performance best practices ................................................. 54planning procedures
checklist ........................................................................16PLDS
downloading software ...................................................46post-installation
checklist ........................................................................30product notification enrollment .............................................67product notifications
e-notifications ............................................................... 67PSNs
viewing ..........................................................................66PSN updates ........................................................................66
Rrelated documentation ........................................................... 8requirements
virtual machine resources .............................................17resource requirements .........................................................17resources
server ............................................................................15restoring a snapshot ............................................................ 46running
maintenance tests ........................................................ 48
SSAL Gateway .......................................................................20Security Module sanity failure
troubleshooting ............................................................. 52server hardware and resources ........................................... 15service packs and patches .................................................. 49Session Manager
backup .......................................................................... 49configuring .................................................................... 28does not power up ........................................................ 48power on the virtual machine ........................................47restore .......................................................................... 49
Session Manager OVAdeployment using vCenter ............................................23
Session Manager updates ................................................... 49shutdown or reboot the server
using the CLI ................................................................ 42SIP monitoring
viewing the SIP Monitoring Status Summary page ...... 53snapshot
creating .........................................................................44deleting ......................................................................... 45restoring ........................................................................46
snapshots ............................................................................ 64status
Enrollment Password ....................................................34storage .................................................................................62support .................................................................................11supported versions
VMware ........................................................................ 14
Tthick deployment ..................................................................62thin deployment ................................................................... 62timekeeping ......................................................................... 56training ................................................................................... 9troubleshooting .................................................................... 51
power on problem .........................................................48Security Module sanity failure Alarms .......................... 52
Uupgrade checklist .................................................................32upgrading
operating system .......................................................... 34VMware tools ................................................................36
upgrading Session Managerusing a DVD ................................................................. 35
using
Index
November 2014 Deploying Session Manager using VMware® in the Virtualized Environment 71Comments? [email protected]
using (continued)CLI to shut down or reboot the server .......................... 42
using, shutdown using GUIGUI to shut down or reboot the server ......................... 41reboot using GUI .......................................................... 41
Vverifying
Active Call Count .......................................................... 51connections .................................................................. 31data replication ............................................................. 51Session Manager VMware administration .................... 31
videos .................................................................................. 10viewing
Entity Link Connection Status .......................................53PCNs ............................................................................ 66PSNs ............................................................................ 66SIP Monitoring Status Summary page ......................... 53
viewing security module status ............................................ 52virtual machine
automatic restart configuration ..................................... 27vMotion ................................................................................ 63VMware High Availability ..................................................... 63VMware networking
best practices ............................................................... 57VMware software
supported ......................................................................14VMware tools
upgrading ......................................................................36VMware Tools ......................................................................57vSphere
deployment ................................................................... 24VT support ........................................................................... 54
Wwarranty ............................................................................... 11
Index
72 Deploying Session Manager using VMware® in the Virtualized Environment November 2014Comments? [email protected]