Embed Size (px)
Citation preview
Deploying F5 with Siebel Business Applications 8.0
DEPLOYMENT GUIDE Version 1.1
Table of Contents
Table of Contents
Deploying F5 with Siebel Business Applications 8.0 Prerequisites and configuration notes ..............................................................................1-1Product versions and revision history ..............................................................................1-2Configuration example .........................................................................................................1-2
Preparing the Siebel servers for load balancing .......................................................................1-4Installing the Siebel application on the servers ...............................................................1-4Generating and modifying the load balancing configuration file ..................................1-4Generate the F5 Configuration file ....................................................................................1-6Running the Perl script .........................................................................................................1-6
Configuring the BIG-IP system .................................................................................................. 1-10Connecting to the BIG-IP LTM ........................................................................................ 1-12Creating the TCP profile .................................................................................................. 1-12Choosing a load balancing scheme ................................................................................. 1-15Modifying the health monitor ........................................................................................... 1-15
Post Configuration Verification ................................................................................................ 1-18Installing the Siebel Web Server Extension .................................................................. 1-18Adding or removing a Siebel Server from the BIG-IP configuration ...................... 1-19
Appendix A: Sample lbconfig file and cleanup ....................................................................... 1-24Appendix B: Perl script for the BIG-IP configuration .......................................................... 1-29Appendix C: Troubleshooting the Perl script compilation ................................................ 1-37
Bad file name ........................................................................................................................ 1-37Perl script compiler is not installed ................................................................................ 1-37Invalid host name in lbconfig file ...................................................................................... 1-38Other errors not captured by the Perl script .............................................................. 1-39
Appendix D: Troubleshooting the BIG-IP configuration .................................................... 1-40The BIG-IP system is marking nodes DOWN ............................................................. 1-40Node is marked up, but continuous attempts to login results in a Server Busy error in the browser ..................................................................................................................... 1-41Login successful, but only after many refreshes .......................................................... 1-45Login successful, but it takes a long time to get the login screen ........................... 1-46Login successful, but unexpected Server Busy errors appear ................................... 1-46User Sessions distribution across servers is uneven .................................................. 1-46
Appendix E: Manual configuration of the BIG-IP system .................................................... 1-48Connecting to the BIG-IP system ................................................................................... 1-48Creating the HTTP health monitor ................................................................................ 1-48Creating the pools .............................................................................................................. 1-49Determining the server IDs ............................................................................................. 1-52Creating a rule ..................................................................................................................... 1-52Creating a TCP profile ....................................................................................................... 1-53Creating a virtual server ................................................................................................... 1-54Mapping the IP of the web server to the virtual server ............................................. 1-55Modifying the connect strings in eapps.cfg .................................................................... 1-56
Deploying F5 with the Siebel Server version 8.0 Web tier Prerequisites and configuration notes ..............................................................................2-1
Optimizing the BIG-IP LTM configuration for the Siebel web tier ......................................2-2Creating the HTTP health monitor ...................................................................................2-2Creating the pool ...................................................................................................................2-3Creating profiles .....................................................................................................................2-5Creating an iRule ....................................................................................................................2-9Creating a virtual server ................................................................................................... 2-10Optional: Configuring the BIG-IP LTM to offload SSL ............................................... 2-12
F5 Deployment Guide i
Table of Contents
Deploying the BIG-IP WebAccelerator with Siebel Business Applications 8.0 ............. 2-15Prerequisites and configuration notes ........................................................................... 2-15Configuration example ...................................................................................................... 2-15Configuring the WebAccelerator module .................................................................... 2-16Connecting to the BIG-IP LTM device ........................................................................... 2-16Creating an HTTP Class profile ...................................................................................... 2-16Modifying the Virtual Server to use the Class profile ................................................ 2-17Creating an Application ..................................................................................................... 2-19
ii

1
Deploying F5 with Siebel Business Applications version 8.0

Deploying F5 with Siebel Business Applications 8.0F5 Networks and Oracle|Siebel® have created a solution for the successful delivery of version 8.0 of Siebel Business Applications with F5's BIG-IP® Local Traffic Manager (LTM). The BIG-IP system manages traffic at both the web server content and application business logic levels.
This Siebel validated solution allows Siebel Business Applications version 8.0 customers to protect and enhance their investments in Siebel applications by providing a secure, fast, and available environment. This allows for increased user productivity and satisfaction, while significantly reducing the total cost of ownership (TCO).
For more information on Siebel version 8.0, see http://www.oracle.com/applications/siebel-release.html. For more information on the BIG-IP system, see http://www.f5.com/products/big-ip/.
The first chapter of this deployment guide details configuration procedures for the Siebel Application tier. Chapter 2, Deploying F5 with the Siebel Server version 8.0 Web tier, details optimizations for the Siebel Web tier.
Prerequisites and configuration notesThe following are prerequisites for this deployment:
◆ The BIG-IP LTM must be running version 9.1 or later. We strongly recommend version 10.2.1 or later.
◆ The Siebel Servers must be running version 7.7 or later. We recommend using version 8.0.
◆ See the Siebel note on Setting up Third-Party HTTP Load Balancers for general steps for setting up load balancers.
◆ This document assumes you have configured the F5 BIG-IP device on the network, assigned IP addresses, and have activated the license keys. Consult the BIG-IP documentation on how to initially configure the BIG-IP device. Keep the following in mind:
• In order to configure the F5 BIG-IP System for Siebel Application Servers, requires administration access into the F5 BIG-IP device.
• Plan what network topology and IP addresses should be used for Siebel Servers. This affects the network settings of F5 BIG-IP device.
• Plan access control and security aspects of the network. For example, determine if a firewall will be deployed in front of the Siebel Servers.
• We recommend using the BIG-IP in a redundant configuration to ensure high availability.
• Configure machines that host Siebel applications and configure the TCP/IP properties for these machines. Ensure there is TCP/IP connectivity between the BIG-IP LTM and servers.
1

Deploying F5 with Siebel Business Applications version 8.0
Product versions and revision historyProduct and versions tested for this deployment guide:
Configuration exampleThe BIG-IP system manages traffic at both the web server content and application business logic levels. This solution allows Siebel Business Applications version 8.0 customers to protect and enhance their investments in Siebel applications by delivering maximum availability, scalability, performance and security.
Figure 1.1, on page 1-3 shows an example configuration, with BIG-IP systems in front of both the web servers and Siebel servers.
Product Tested Version Tested
BIG-IP LTM 9.1, 9.4.x, 10.2.1
Siebel Business Applications 7.7. 8.0
Document Version Description
1.0 New guide
1.1 Added new script and support for version 10.0 and later
F5® Deployment Guide 2

Figure 1.1 BIG-IP LTM and Siebel logical configuration
To complete this configuration, you must complete the following procedures:
• Installing the Siebel application on the servers, on page 1-4
• Generating and modifying the load balancing configuration file, on page 1-4
• Generate the F5 Configuration file, on page 1-6
• Running the Perl script, on page 1-6
• Configuring the BIG-IP system, on page 1-10
• Choosing a load balancing scheme, on page 1-15
• Modifying the health monitor, on page 1-15
• Installing the Siebel Web Server Extension, on page 1-18
Firewalls
Internet
WebAccelerator
Optional and available as a module on the BIG-IP LTM
Siebel Web Tier
Web Servers
BIG-IP Local Traffic Manager
BIG-IP Local Traffic Manager
Database Servers
Siebel Application Servers
Siebel Application Tier
3
Deploying F5 with Siebel Business Applications version 8.0
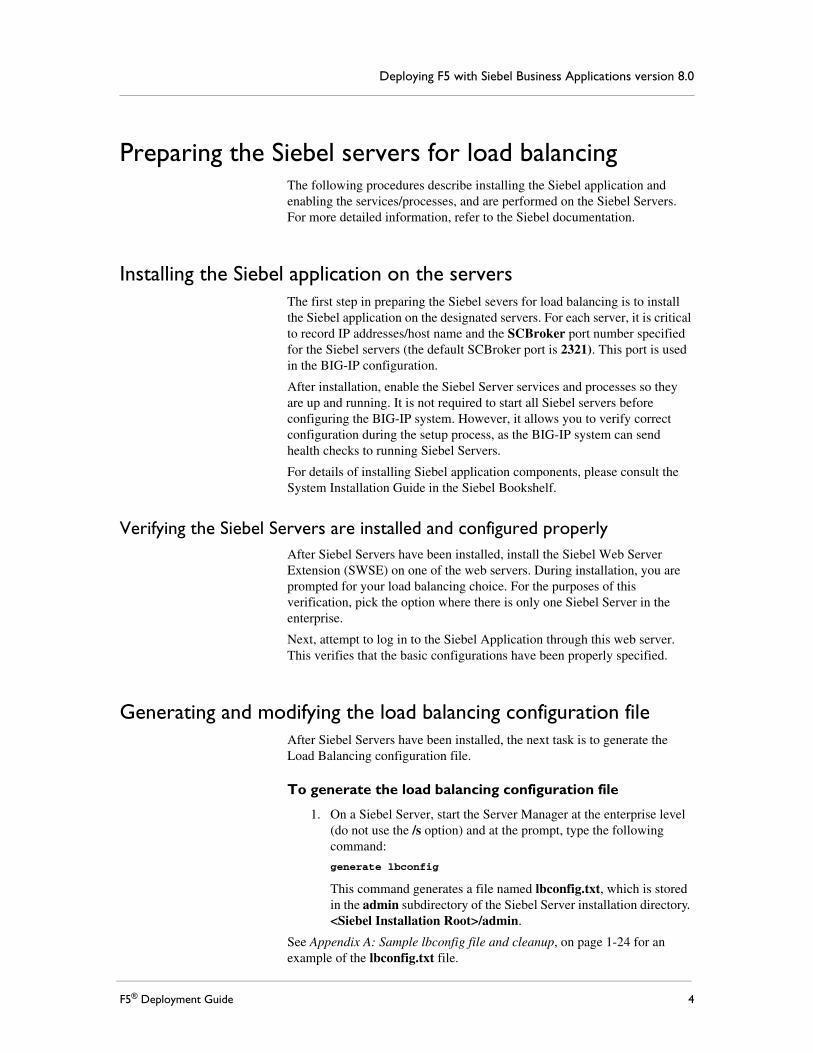
Preparing the Siebel servers for load balancingThe following procedures describe installing the Siebel application and enabling the services/processes, and are performed on the Siebel Servers. For more detailed information, refer to the Siebel documentation.
Installing the Siebel application on the serversThe first step in preparing the Siebel severs for load balancing is to install the Siebel application on the designated servers. For each server, it is critical to record IP addresses/host name and the SCBroker port number specified for the Siebel servers (the default SCBroker port is 2321). This port is used in the BIG-IP configuration.
After installation, enable the Siebel Server services and processes so they are up and running. It is not required to start all Siebel servers before configuring the BIG-IP system. However, it allows you to verify correct configuration during the setup process, as the BIG-IP system can send health checks to running Siebel Servers.
For details of installing Siebel application components, please consult the System Installation Guide in the Siebel Bookshelf.
Verifying the Siebel Servers are installed and configured properly After Siebel Servers have been installed, install the Siebel Web Server Extension (SWSE) on one of the web servers. During installation, you are prompted for your load balancing choice. For the purposes of this verification, pick the option where there is only one Siebel Server in the enterprise.
Next, attempt to log in to the Siebel Application through this web server. This verifies that the basic configurations have been properly specified.
Generating and modifying the load balancing configuration fileAfter Siebel Servers have been installed, the next task is to generate the Load Balancing configuration file.
To generate the load balancing configuration file
1. On a Siebel Server, start the Server Manager at the enterprise level (do not use the /s option) and at the prompt, type the following command:
generate lbconfig
This command generates a file named lbconfig.txt, which is stored in the admin subdirectory of the Siebel Server installation directory. <Siebel Installation Root>/admin.
See Appendix A: Sample lbconfig file and cleanup, on page 1-24 for an example of the lbconfig.txt file.
F5® Deployment Guide 4

Removing unused rules from the lbconfig.txt fileBefore using the lbconfig.txt file to configure the BIG-IP system, it should first be cleaned up to remove unused rules. To remove unused rules, you should first determine which Application Object Managers are used/enabled and where they are installed, and then remove the unnecessary rules using the following procedure.
To remove unnecessary rules from the load balancing configuration file
1. Remove Application Object Managers not available/enabled in the deployment. For example, if only Call Center and Sales Applications are used in a deployment, then remove all entries not used for Call Center and Sales Application. The steps are:
a) Determine Alias/Short Names for enabled Object Managers (OM). A complete list of OM names and their alias is listed in Appendix A of the Siebel System Administration Guide. For example, for Call Center Object Manager, it is sccobjmgr.
b) Identify and verify the URL entries in the lbconfig.txt file containing the alias of the enabled Object Managers.
c) Remove all other URL entries that do not contain the alias for enabled Object Managers. Because these URLs are intended for disabled or non-licensed components, they can be safely removed.
2. Next, determine if all enabled Application Object Managers are running on all Siebel Servers. If they are, then skip this step. The lbconfig.txt file is ready to use. If not, then create a table mapping of Siebel Servers against enabled Application Object Managers, such as the following table. Using this table, identify corresponding component and round-robin scheduling rules based on the alias, and remove server entries from these rules.
See Appendix A: Sample lbconfig file and cleanup, on page 1-24 for a complete step-by-step example of this process.
Application Object Manager Alias Enabled Application Servers
Sales (English) SSEObjMgr_enu SiebSrvr300pl2:2321;SiebSrvr300pl1:2321;
Marketing (English) SMEObjMgr_enu SiebSrvr300pl2:2321
Figure 1.2 Example table to map Siebel Servers to Enabled Application servers
5
Deploying F5 with Siebel Business Applications version 8.0
Generate the F5 Configuration fileAfter a clean lbconfig.txt file has been generated, the next step is to convert the lbconfig.txt file into F5 specific configuration commands. To assist this process, we provide a Perl script to convert lbconfig.txt contents into BIG-IP system commands.
There are two versions of the script, one for version 9.x and one for version 10.x. Use the one appropriate for your configuration.
◆ To download the Perl script for version 9.x, go to http://www.f5.com/solutions/resources/deployment-guides/files/siebel8-bigipv9.zip
◆ To download the Perl script for version 10.x, go to http://www.f5.com/solutions/resources/deployment-guides/files/siebel8-bigipv10.zip
Important
Before starting this procedure, ensure you have all files and configuration information ready. You need the lbconfig.txt file, the file containing the Perl script, and the virtual IP address and port number that will be used for load balanced Siebel Servers.
To extract the Perl script
1. Create a directory on your local PC that will be used to store working files for this configuration.For example, in UNIX: /f5configIn Windows: D:\f5config
2. Move the lbconfig.txt file into the directory created in Step 1.
3. Unzip the file containing the Perl script, and extract the siebbigipv9.pl file into the directory created in Step 1.In our example, we extract the file to D:\f5config.
Running the Perl scriptThe next step in this process is to run the Perl script, which generates a file called bigip.cfg. To complete this procedure, you must have Perl installed. If you do not have Perl installed, a free distribution of Perl for Microsoft® Windows® is available from http://www.activestate.com/Products/ActivePerl/.
You can execute the Perl script on a Windows or UNIX platform. We recommend executing the perl script in a command line interface because compilation errors are displayed on the screen.
To run the Perl script from a Windows platform
1. Open a command prompt by clicking the Start button, then selecting Run. In the Run dialog box, type cmd, and click OK.A new command line window opens.
F5® Deployment Guide 6
2. Change directories (using the cd command) to the directory you created in the preceding procedure. In our example, we change to the D:\f5config directory.
3. Type the name of the script, with the appropriate flag (see Table 1.3, on page 1-8 for flag descriptions). For version 9.x, our command looks like the following:
siebbigipv9.pl -r CRMEnt1Rule -v 192.10.10.100:2400
For version 10.x, our command looks like the following:
siebbigipv10.pl -r CRMEnt1Rule -v 192.10.10.100:2400
Where -r CRMEnt1Rule specifies the name of the rule. And -v 192.10.10.100:2400 specifies the virtual server and port for this deployment.
This executes the perl script and generates a file called bigip.cfg in the same directory. Compilation status and error messages are also returned to the screen.
To run the Perl script from a UNIX platform
1. Open a command line interface.
2. Change directories to the directory created in the preceding procedure.In our example, we change to the /f5config directory.
3. Type the name of the script, with the appropriate flag (see Figure 1.3 on page 1-8 for flag descriptions).For version 9.x, our command looks like the following:
siebbigipv9.pl -r CRMEnt1Rule -v 192.10.10.100:2400
For version 10.x, our command looks like the following:
siebbigipv10.pl -r CRMEnt1Rule -v 192.10.10.100:2400
4. Where -r CRMEnt1Rule specifies the name of the rule. And -v 192.10.10.100:2400 specifies the virtual server and port for this deployment.
If you would rather modify the Perl script itself, and not use the flags, see To modify the Perl script instead of using the flags.
This executes the perl script and generates a file called bigip.cfg in the same directory. Compilation status and error messages are also returned to the screen.
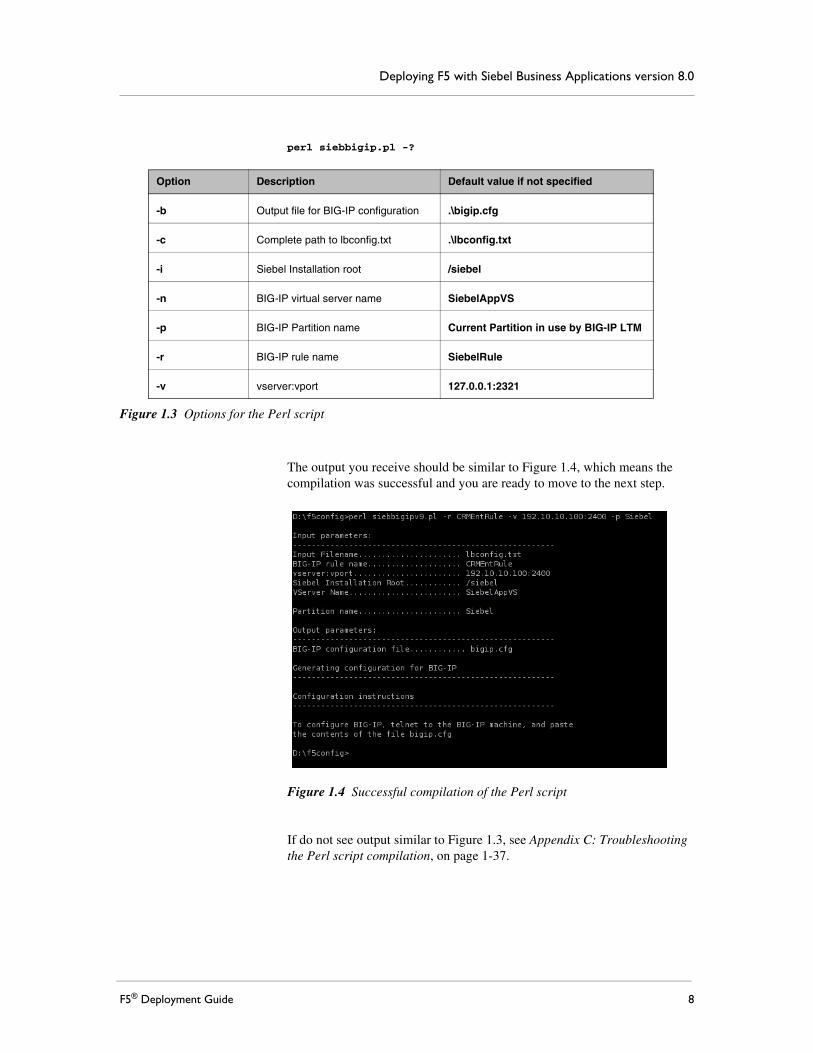
The options available with the Perl script are contained in the following table. They can also be listed by running the command on the following page.
7
Deploying F5 with Siebel Business Applications version 8.0
perl siebbigip.pl -?
The output you receive should be similar to Figure 1.4, which means the compilation was successful and you are ready to move to the next step.
Figure 1.4 Successful compilation of the Perl script
If do not see output similar to Figure 1.3, see Appendix C: Troubleshooting the Perl script compilation, on page 1-37.
Option Description Default value if not specified
-b Output file for BIG-IP configuration .\bigip.cfg
-c Complete path to lbconfig.txt .\lbconfig.txt
-i Siebel Installation root /siebel
-n BIG-IP virtual server name SiebelAppVS
-p BIG-IP Partition name Current Partition in use by BIG-IP LTM
-r BIG-IP rule name SiebelRule
-v vserver:vport 127.0.0.1:2321
Figure 1.3 Options for the Perl script
F5® Deployment Guide 8

To modify the Perl script instead of using the flags
Note: This procedure is optional, and is only used if you do not want to use the flags as specified in the preceding procedures. You can modify as many or as few of the following variables as you need.
1. To modify the virtual server address, open the siebbigip.pl file and modify it with the appropriate virtual IP address/host name and virtual port number. This is an optional step, as you can also specify them when compiling the Perl Script.
Search for the following string in the file:
$VSERVER="127.0.0.1:2321";
and modify the IP address and Port number to the ones designated for your deployment. For example, if VIP and Virtual Port for your deployment are 192.10.10.100 and port 2400, then modify the line above to:
$VSERVER="192.10.10.100:2400";
2. To modify the rule name, search for the string:
$RULE_NAME="SiebelRule";
And update “SiebelRule” to a meaningful name. A good name is using the Siebel enterprise name. For example, if Siebel enterprise name for this virtual server is CRMEnt1, then change the rule name to:
$RULE_NAME="CRMEnt1Rule";
3. To modify the virtual server name, search for the string:
$VSNAME="SiebelAppVS";
And update "SiebelAppVS" to a meaningful name.
4. To modify the Siebel Installation Root directory, search for the string:
$SIEBEL="/siebel";
And update "/siebel" to the correct directory.
5. Save the modified file, and then open a command line interface.
6. Change directories to the directory where you extracted the perl script.In our example, we change to the /f5config directory.
7. Type the name of the script, without any flags:
siebbigipv9.pl
9

Deploying F5 with Siebel Business Applications version 8.0
Configuring the BIG-IP systemNext task in this configuration is to copy the contents of the bigip.cfg you generated in the preceding procedure and load them into the BIG-IP device. This procedure requires that you have an SSH client.
If you do not have an SSH client, the BIG-IP configuration utility contains a link to http://www.openssh.org. The Open SSH web site provides links to free SSH clients for a number of operating systems. Either click the link from the Configuration utility or visit the site directly to download an SSH client.
In the following procedure, we assume you are using the Windows PuTTY SSH client.
To copy the contents of the bigip.cfg file to the BIG-IP device using the Windows PuTTY SSH client
1. Start the PuTTY SSH client.The PuTTY Configuration console opens.
2. In the Host Name box, type the administrative IP address of the BIG-IP system. In the Protocol section, click the SSH option button, and then click Open.
Figure 1.5 Windows PuTTY user interface
3. If a Security Alert displays, click Yes to trust the Host.
F5® Deployment Guide 10

4. Type the admin ID and Password for the BIG-IP LTM system.You are now connected to the BIG-IP device using SSH.
5. Leave the SSH client open, and locate the bigip.cfg file where you saved it, and open it using Notepad.
Figure 1.6 shows our example bigip.cfg file.
Note: Figure 1.6 shows the output in two columns for formatting purposes. The actual file is continuous.
bigpipe monitor monitor_siebel { ' defaults from http interval 30 timeout 91 send "GET /siebel/scbroker HTTP/1.0" ' }
bigpipe pool SCCObjMgr_enuConnPool { lb method rr \member 172.16.10.81:2321 \member 172.16.10.91:2321 \member 172.16.10.82:2321 \monitor all monitor_siebel \ }bigpipe pool eServiceObjMgr_enuConnPool { lb method rr \member 172.16.10.81:2321 \member 172.16.10.91:2321 \member 172.16.10.82:2321 \monitor all monitor_siebel \ }bigpipe pool SCCObjMgr_enuRRPool { lb method rr \member 172.16.10.81:2321 \member 172.16.10.91:2321 \member 172.16.10.82:2321 \monitor all monitor_siebel \ }bigpipe pool eServiceObjMgr_enuRRPool { lb method rr \member 172.16.10.81:2321 \member 172.16.10.91:2321 \member 172.16.10.82:2321 \monitor all monitor_siebel \ }bigpipe pool siebelapp2ServerPool { lb method rr \member 172.16.10.82:2321 \monitor all monitor_siebel \ }bigpipe pool siebeldbServerPool { lb method rr \member 172.16.10.91:2321 \monitor all monitor_siebel \ }bigpipe pool siebelapp1ServerPool { lb method rr \member 172.16.10.81:2321 \monitor all monitor_siebel \ }
bigpipe rule CRMEnt1Rule { 'when CLIENT_ACCEPTED { TCP::collect 1 }when CLIENT_DATA {if { [findstr [TCP::payload] "/siebel" 0 " "] == "/siebel/sccobjmgr_enu" } { # log local0. "Using pool SCCObjMgr_enuConnPool" pool SCCObjMgr_enuConnPool}elseif { [findstr [TCP::payload] "/siebel" 0 " "] == "/siebel/eserviceobjmgr_enu" } { # log local0. "Using pool eServiceObjMgr_enuConnPool" pool eServiceObjMgr_enuConnPool}elseif { [findstr [TCP::payload] "/siebel" 0 " "] == "/siebel/sccobjmgr_enu/rr" } { # log local0. "Using pool SCCObjMgr_enuRRPool" pool SCCObjMgr_enuRRPool}elseif { [findstr [TCP::payload] "/siebel" 0 " "] == "/siebel/eserviceobjmgr_enu/rr" } { # log local0. "Using pool eServiceObjMgr_enuRRPool" pool eServiceObjMgr_enuRRPool}elseif { [findstr [TCP::payload] "/siebel" 0 " "] contains "/!3." } { # log local0. "Using pool siebelapp2ServerPool" pool siebelapp2ServerPool}elseif { [findstr [TCP::payload] "/siebel" 0 " "] contains "/!1." } { # log local0. "Using pool siebeldbServerPool" pool siebeldbServerPool}elseif { [findstr [TCP::payload] "/siebel" 0 " "] contains "/!2." } { # log local0. "Using pool siebelapp1ServerPool" pool siebelapp1ServerPool}else { log local0. "Rejected request for [findstr [TCP::payload] "/siebel" 0 " "]" discard }} ' }
b virtual SiebelAppVS { destination 192.10.10.10:2400 ip protocol tcp rule CRMEnt1Rule }
Figure 1.6 Example bigip.cfg file shown in two columns
11
Deploying F5 with Siebel Business Applications version 8.0
6. Copy the entire contents of the bigip.cfg: from the Notepad edit menu, choose Select All, then Copy.This copies the contents of the file to the Windows clipboard.
7. Return to the PuTTY SSH client, and click the right mouse button anywhere on the window. This pastes the contents of the file into the command line, and executes each line as a command. These commands create the appropriate BIG-IP configuration.
8. In the PuTTY SSH client, at the prompt, type b save to save the BIG-IP configuration.
9. After you save the configuration, type exit to close the SSH session.
The next step in this deployment is to log on to the BIG-IP LTM system’s web-based Configuration utility for further BIG-IP configuration.
Connecting to the BIG-IP LTMUse the following procedure to access the BIG-IP web-based Configuration utility using a web browser.
To connect to the BIG-IP system using the Configuration utility
1. In a browser, type the following URL:https://<administrative IP address of the BIG-IP device>A Security Alert dialog box appears, click Yes.
2. Type your user name and password, and click OK. The Configuration Status screen opens.
Once you are logged onto the BIG-IP system, the Welcome screen of the new Configuration utility opens. From the Configuration utility, you can configure and monitor the BIG-IP system, as well as access online help, download SNMP MIBs and Plug-ins, and even search for specific objects.
Creating the TCP profileThe next step is to verify that TCP is enabled for the specified port, and to create a TCP profile that allows you to set an Idle Timeout. BIG-IP system version 9.0 and later uses profiles. A profile is a system-supplied configuration tool that enhances your capabilities for managing application-specific traffic. For more information on profiles, see the Configuration Guide for Local Traffic Management.
In this procedure, we create a custom TCP profile based on the default TCP profile, and then associate the profile with the virtual server.
To create a TCP profile and verify the TCP settings
1. On the Main tab, expand Local Traffic.
F5® Deployment Guide 12
2. Click Profiles.The Profiles screen opens.
3. On the menu bar, from the Protocol menu, select TCP.The TCP Profiles screen opens.
4. In the upper right corner of the screen, click the Create button.The New TCP Profile screen opens.
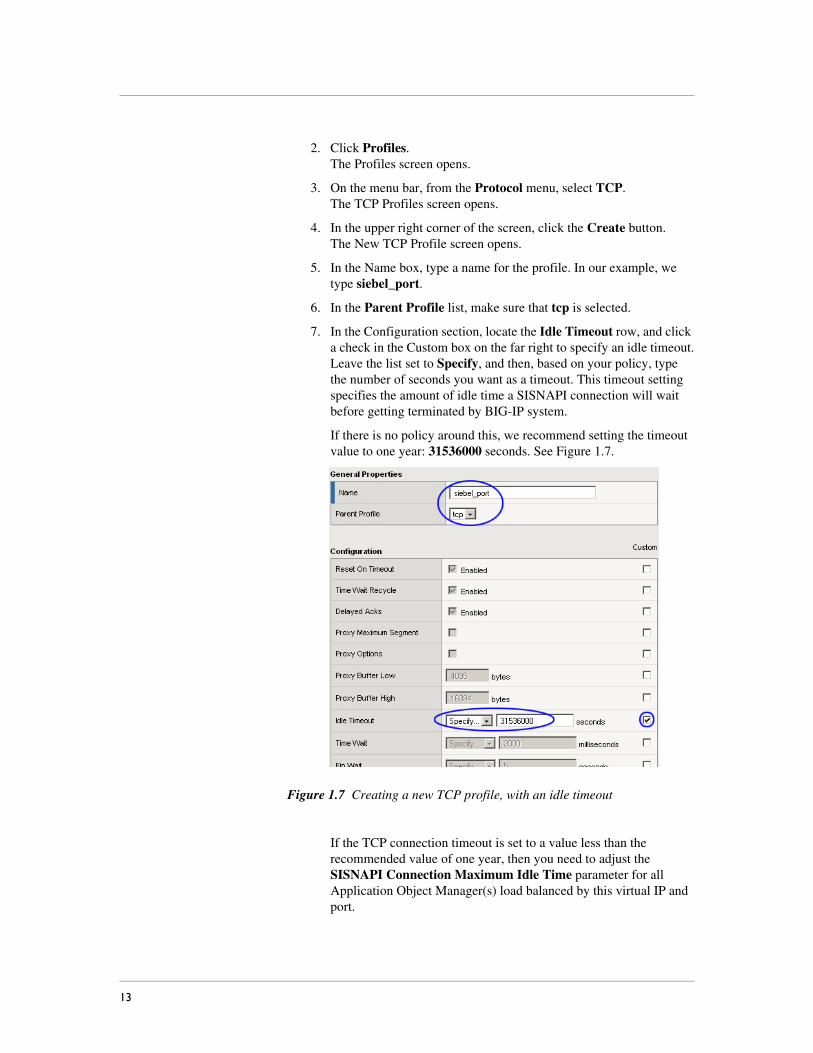
5. In the Name box, type a name for the profile. In our example, we type siebel_port.
6. In the Parent Profile list, make sure that tcp is selected.
7. In the Configuration section, locate the Idle Timeout row, and click a check in the Custom box on the far right to specify an idle timeout.Leave the list set to Specify, and then, based on your policy, type the number of seconds you want as a timeout. This timeout setting specifies the amount of idle time a SISNAPI connection will wait before getting terminated by BIG-IP system.
If there is no policy around this, we recommend setting the timeout value to one year: 31536000 seconds. See Figure 1.7.
Figure 1.7 Creating a new TCP profile, with an idle timeout
If the TCP connection timeout is set to a value less than the recommended value of one year, then you need to adjust the SISNAPI Connection Maximum Idle Time parameter for all Application Object Manager(s) load balanced by this virtual IP and port.
13

Deploying F5 with Siebel Business Applications version 8.0
The Connection Maximum Idle Time value should be set to a value slightly less than the TCP Idle Timeout value on the BIG-IP LTM system. For example, if BIG-IP TCP Idle Timeout is set to 3600, then Connection Maximum Idle Time should be set to 3500.
Important
Step 7 is critical to this configuration. If the Connection Maximum Idle Time is shorter than the BIG-IP idle timeout value, a user may experience occasional Server Busy errors after long periods of idle time. Please refer to Siebel System Administration Guide for details.
We recommend leaving the rest of the settings at their default level unless you have a specific need to change any of them.
8. Click the Finished button.The new profile appears in the TCP profiles list.
The next task is to associate this profile with the virtual server.
To modify the virtual server
1. On the Main tab, expand Local Traffic, and then click Virtual Servers.The Virtual Servers screen opens.
2. From the Virtual Server list, click the Siebel application virtual server. This virtual server was automatically created by the script. The default name for the virtual server is SiebelAppVS.
Note: It is possible that you changed the default name of the virtual server. Be sure to click the name of the virtual server generated by the script.
The Virtual Server properties screen opens.
3. In the Configuration section, select Advanced from the list.The Advanced properties of the virtual server appear.
4. In the Client Protocol Profile section, select the name of the profile you created in Step 5. In our example, we select siebel_port.
Figure 1.8 Selecting the TCP profile for the virtual server
5. Click the Update button.The virtual server now uses the new TCP profile.
F5® Deployment Guide 14

Choosing a load balancing schemeLoad balancing scheme for the BIG-IP system is defined at the pool level. You should not modify load balancing scheme for the Round Robin rules and Server rules, i.e. the Pools with the name <component alias>RRPool and <server name>ServerRule. These should be round robin.
You can modify the load balancing scheme for the <component alias>ConnPool. This pool is used for initial load balancing of user sessions. We recommend a load balancing method of Predictive, although different load balancing methods may yield optimal results for a particular network. For a complete description of the BIG-IP load balancing methods, see the BIG-IP Reference Guide.
Modifying the health monitorThe script automatically creates an HTTP health monitor to check the Siebel Server availability from the BIG-IP management interface. The monitor also minimizes unnecessary re-tries when servers are taken out of rotation for maintenance purposes or are unavailable for any reason.
This health monitor is automatically associated with each of the pools created by the script. The health monitor is named monitor_<Siebel Installation Root> by default, so in our example (default) the monitor is named monitor_siebel.
We strongly recommend using this health monitor. If for some reason you do not want the monitor checking a specific pool, or want to change any of the default values (seen in Figure 1.9), such as the Interval or Timeout, you need to modify the monitor as described in the following procedure.
Note
We recommend leaving the monitor at the default values and associations, unless you have a specific need to change it. Creating the HTTP health monitor, on page 48 in Appendix E contains the complete procedure for manually creating this health monitor.
15

Deploying F5 with Siebel Business Applications version 8.0
Figure 1.9 HTTP health monitor as generated by the script.
There are three options that make this monitor different than the default HTTP monitor: the Interval, Timeout and Send String values.
To modify any of the settings on the script-generated monitor
1. On the Main tab, expand Local Traffic, and then click Monitors.
2. From the Monitors list, click the name of your monitor. In our example, we click monitor_siebel.
3. Modify any of the settings, and then click the Update button.
If you want to change the Interval or Timeout values, we recommend at least a 1:3 +1 ratio between the interval and the timeout (in our monitor, we use a Interval of 30 and a Timeout of 91. If you change these values, ensure that you maintain this ratio.
To remove the monitor association from the pool
1. On the Main tab, expand Local Traffic, and then click Pools.
F5® Deployment Guide 16
2. From the Pool list, click the name of the pool to be disassociated from the monitor.The Pool Properties screen opens.
3. In the Health Monitor section, from the Active box, select monitor_siebel (or the name you changed it to), and click the Remove (>>) button.
4. Click the Update button. The health check no longer monitors the nodes in this pool.
Important: We strongly recommend leaving this health monitor associated with the pool. If you decide to remove it, consider adding a different type of monitor.
17
Deploying F5 with Siebel Business Applications version 8.0
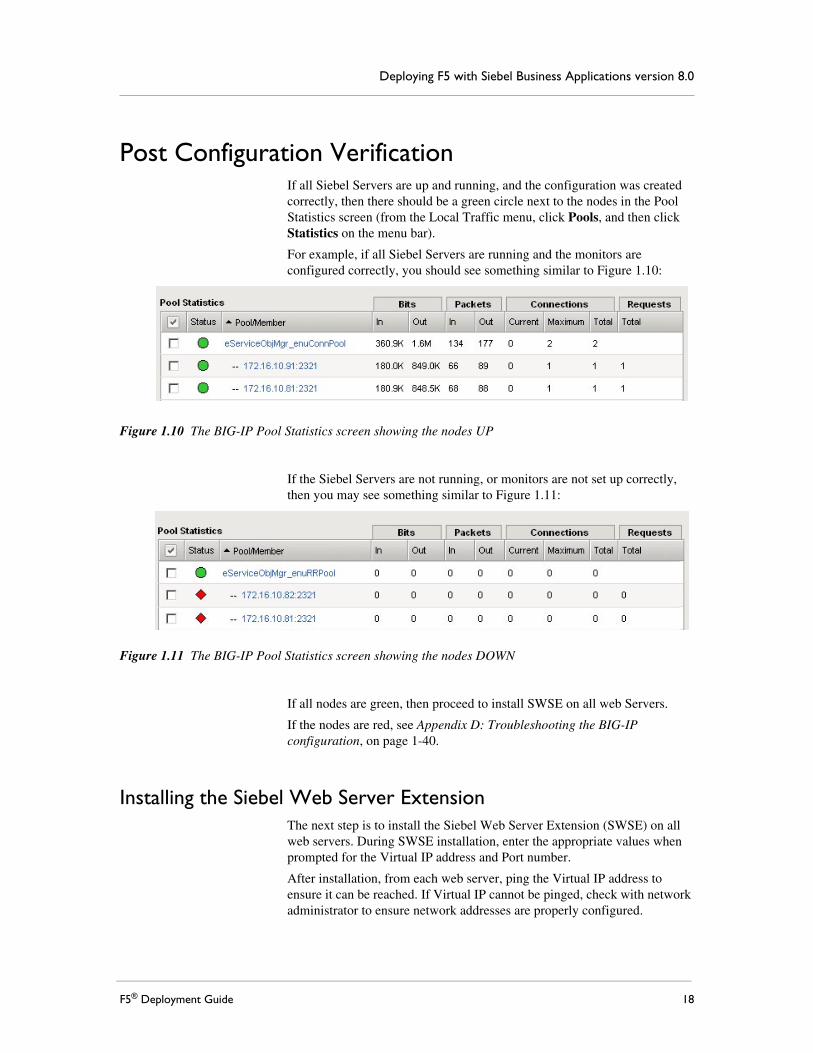
Post Configuration VerificationIf all Siebel Servers are up and running, and the configuration was created correctly, then there should be a green circle next to the nodes in the Pool Statistics screen (from the Local Traffic menu, click Pools, and then click Statistics on the menu bar).
For example, if all Siebel Servers are running and the monitors are configured correctly, you should see something similar to Figure 1.10:
Figure 1.10 The BIG-IP Pool Statistics screen showing the nodes UP
If the Siebel Servers are not running, or monitors are not set up correctly, then you may see something similar to Figure 1.11:
Figure 1.11 The BIG-IP Pool Statistics screen showing the nodes DOWN
If all nodes are green, then proceed to install SWSE on all web Servers.
If the nodes are red, see Appendix D: Troubleshooting the BIG-IP configuration, on page 1-40.
Installing the Siebel Web Server ExtensionThe next step is to install the Siebel Web Server Extension (SWSE) on all web servers. During SWSE installation, enter the appropriate values when prompted for the Virtual IP address and Port number.
After installation, from each web server, ping the Virtual IP address to ensure it can be reached. If Virtual IP cannot be pinged, check with network administrator to ensure network addresses are properly configured.
F5® Deployment Guide 18

If ping is successful, then open a browser and attempt to log into the Siebel Application. The initial login may take some time, and you may have to hit refresh a few times. If you get a Server Busy error on the screen right away, then proceed to Appendix D: Troubleshooting the BIG-IP configuration, on page 1-40. If you can get a login screen, then the configuration is successful.
Adding or removing a Siebel Server from the BIG-IP configurationIf you need to add or remove a Siebel Server from the configuration you have two options:
• If you are unfamiliar or uncomfortable with manually configuring the BIG-IP system, we recommend you repeat all the procedures in this Deployment Guide whenever a Siebel Server or application is added or removed from the Enterprise.
Before you perform the BIG-IP LTM configuration in the Configuring the BIG-IP system section, you will need to delete the current Virtual Server definition in BIG-IP. This may introduce a brief interruption of service, and some user sessions may be lost. Therefore, this is recommended during maintenance downtime.
• If you are familiar with manually configuring the BIG-IP system, continue with the following procedures. By configuring the BIG-IP system manually, you avoid the brief interruption of service when adding or removing a Siebel Server. This is not recommended for the first time user.
Adding a Siebel ServerTo add another Siebel Server to the configuration, you must first install the Siebel application software on the server, specify the SCBroker port, and start the server processes. Check the application log files to ensure it is running properly.
To add a Siebel Server to the deployment using the BIG-IP Configuration utility
1. Log on to the BIG-IP Configuration utility as described in To connect to the BIG-IP system using the Configuration utility, on page 1-12.
2. If you have more than one Siebel Enterprise, locate the virtual server used for this Siebel Enterprise.
To add a server, you need to first identify the server pools associated with the Application Object Managers running on the new Siebel Server. Each Application Manager has two server pools. You need to add the new Siebel Server to the appropriate Pools. For example, if the new server is running Sales Object Manager (alias SSEObgmgr_enu), then modify the following pools:
SSEObjMgr_enuConnPool and SSEObjMgr_enuRRPool.
19
Deploying F5 with Siebel Business Applications version 8.0
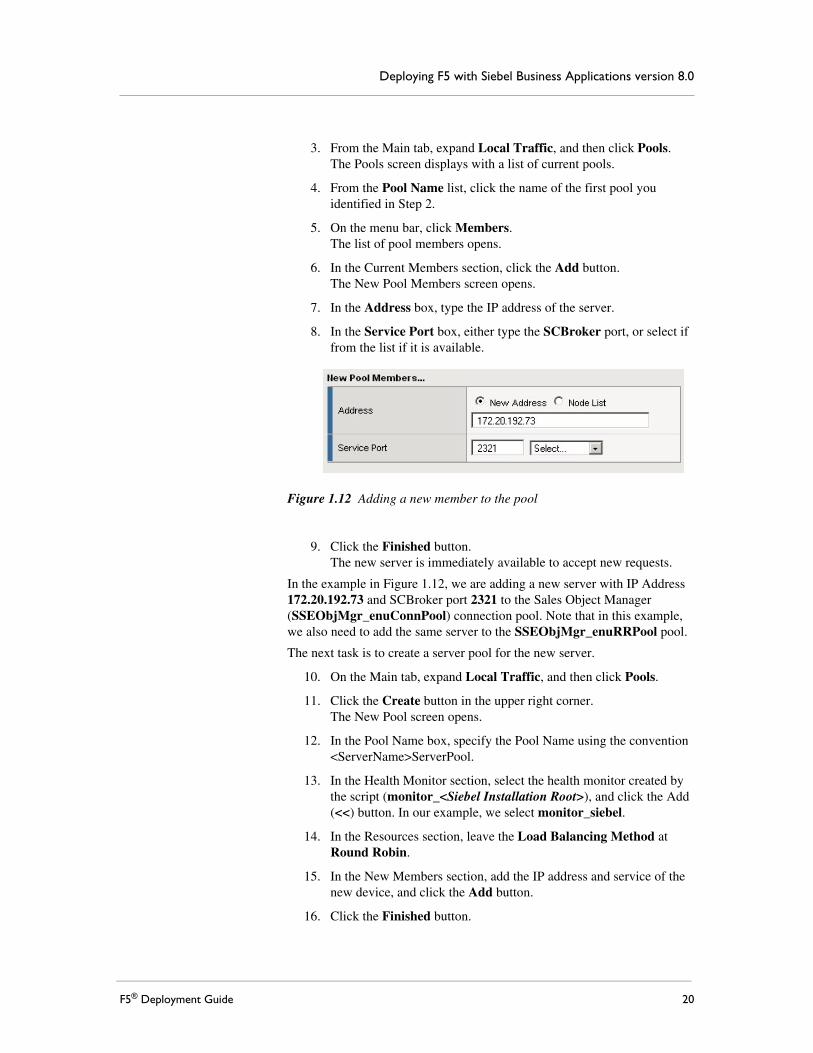
3. From the Main tab, expand Local Traffic, and then click Pools.The Pools screen displays with a list of current pools.
4. From the Pool Name list, click the name of the first pool you identified in Step 2.
5. On the menu bar, click Members.The list of pool members opens.
6. In the Current Members section, click the Add button.The New Pool Members screen opens.
7. In the Address box, type the IP address of the server.
8. In the Service Port box, either type the SCBroker port, or select if from the list if it is available.
Figure 1.12 Adding a new member to the pool
9. Click the Finished button.The new server is immediately available to accept new requests.
In the example in Figure 1.12, we are adding a new server with IP Address 172.20.192.73 and SCBroker port 2321 to the Sales Object Manager (SSEObjMgr_enuConnPool) connection pool. Note that in this example, we also need to add the same server to the SSEObjMgr_enuRRPool pool.
The next task is to create a server pool for the new server.
10. On the Main tab, expand Local Traffic, and then click Pools.
11. Click the Create button in the upper right corner.The New Pool screen opens.
12. In the Pool Name box, specify the Pool Name using the convention <ServerName>ServerPool.
13. In the Health Monitor section, select the health monitor created by the script (monitor_<Siebel Installation Root>), and click the Add (<<) button. In our example, we select monitor_siebel.
14. In the Resources section, leave the Load Balancing Method at Round Robin.
15. In the New Members section, add the IP address and service of the new device, and click the Add button.
16. Click the Finished button.
F5® Deployment Guide 20

After the new server Pool is added, the next step is to modify the rule for this enterprise. You need to first identify the Server ID for the new server. To do this, log into the Siebel Server Manager, and type:
srvrmgr> list server show SBLSRVR_NAME, SV_SRVRID
This returns something similar to Figure 1.13.
Where ServerName is the name of the newly installed server, and Server ID for this server is 3.
To modify the rule
1. From the navigation pane, click iRules.The Rules screen displays.
2. From the iRules list, click the name of the rule. In our example, we click CRMEnt1Rule.The Rule Properties screen displays.
3. At the bottom of the rule, just before the following line:
else {
log local0. "Rejected request for [findstr [TCP::payload] "/siebel" 0 " "]"
discard }
add the following syntax:
elseif { [findstr [TCP::payload] "/<Enterprise Name>" 0 " "] contains "/!<SV_SRVRID>." } {
pool <ServerNameServerPool>
}
For example:
elseif { [findstr [TCP::payload] "/siebel" 0 " "] contains "/!3." } {
pool siebelapp2ServerPool
}
You can also add a comment to the line above, to allow easy logging in the future. When you want to activate logging, you simply uncomment the line. If you want to add this log statement (which is added by default to entries in the script generated rule), add the following line on a separate line before the pool<ServerNameServerPool> line:
# log local0. "Using pool siebelapp2ServerPool"
4. Click the Update button.After modifying the rule, the new server is fully configured.
SBLSRVR_NAME SV_SRVRID
------------ ---------
SiebSrvr300p12 1
SiebSrvr300p11 2
ServerName 3
Figure 1.13 Server name and ID list
21

Deploying F5 with Siebel Business Applications version 8.0
Removing a Siebel ServerThe procedure to remove a Siebel Server are nearly identical to adding a Siebel Server, but in reverse. To remove a Siebel Server, remove the server entry from the Connection Pool and Round Robin Pool.
To remove a Siebel Server from the deployment using the BIG-IP Configuration utility
1. From the Main tab, expand Local Traffic, and then click Pools.
2. Click the name of the pool that contains the server you want to remove.The Pool Properties screen displays.
3. On the menu bar, click Members.
4. In the Current Members section, click a check in the box of the server you want to remove, and then click the Remove button.The server is removed from the pool.
Repeat these steps for any other pools containing the server.
The next task is to remove the Server pool that contains the server you want to remove.
5. On the Main tab, under Local Traffic, click Pools.The Pool list opens.
6. Click a check in the box next to the Server pool that contains the server you want to remove, and click the Delete button.
You also need to modify the rule to remove the reference to the Server pool.
To remove the Siebel Server from the deployment
1. From the Main tab, expand Local Traffic, and then click iRules.
2. From the iRule List, click the name of the Siebel iRule.In our example, we click CRMEnt1Rule.
3. In the Definition box, locate the line of code that contains the name of the server you want to remove. Highlight the entire line of code, from elseif to the closing bracket}, and click the Delete button on your keyboard. See Figure 1.14 for an example.
F5® Deployment Guide 22

Figure 1.14 Selecting the rule statement that contains the server to be removed
4. Click the Update button.
Adding an Application Object ManagerTo add a new Application Object Manager, you will need to add the corresponding Connection Pool and Round Robin Pool to the BIG-IP system. You will also need to add multiple entries in the rule. Therefore, we recommend you repeat all the procedures in this Deployment Guide to add the new Application Object.
If you must eliminate any downtime, and are comfortable with manually configuring the BIG-IP system, please refer to Appendix E: Manual configuration of the BIG-IP system, on page 1-48.
Remove an Application Object ManagerSimilar to adding an Object Manager, it is recommended to repeat all the procedures in this Deployment Guide. If you must manually remove an OM, please follow instructions in Appendix E: Manual configuration of the BIG-IP system, on page 1-48.
23
Deploying F5 with Siebel Business Applications version 8.0
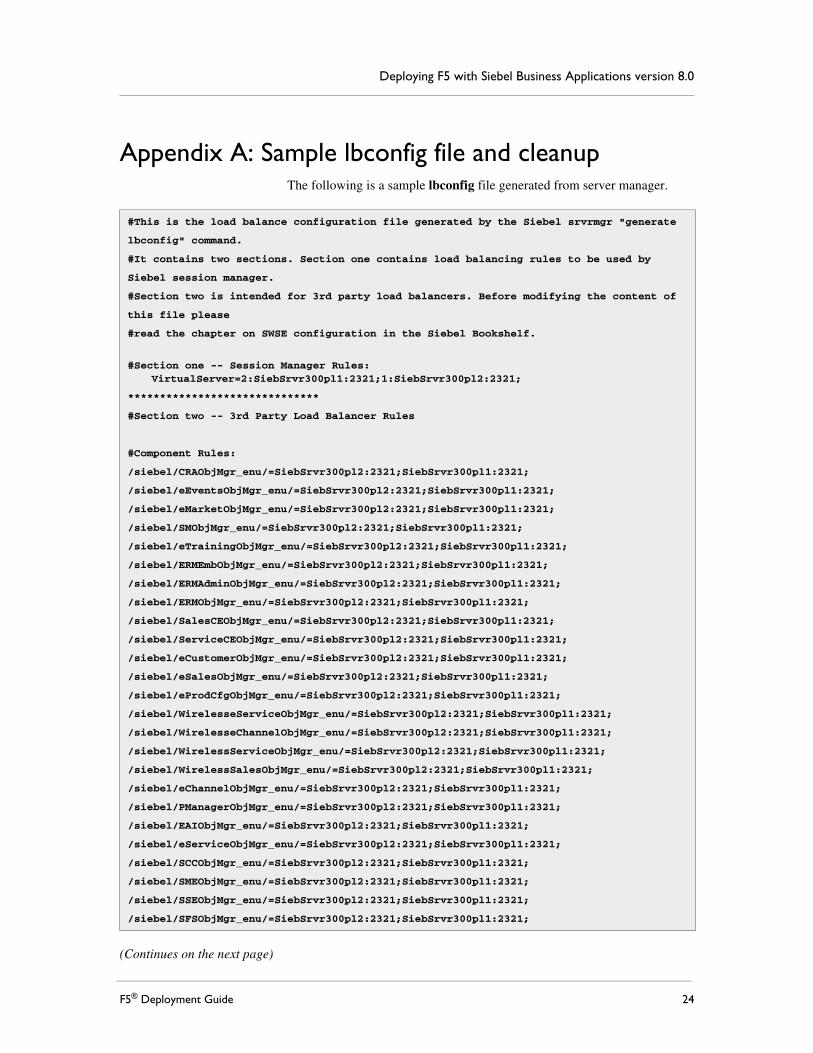
Appendix A: Sample lbconfig file and cleanupThe following is a sample lbconfig file generated from server manager.
(Continues on the next page)
#This is the load balance configuration file generated by the Siebel srvrmgr "generate
lbconfig" command.
#It contains two sections. Section one contains load balancing rules to be used by
Siebel session manager.
#Section two is intended for 3rd party load balancers. Before modifying the content of
this file please
#read the chapter on SWSE configuration in the Siebel Bookshelf.
#Section one -- Session Manager Rules: VirtualServer=2:SiebSrvr300pl1:2321;1:SiebSrvr300pl2:2321;
******************************
#Section two -- 3rd Party Load Balancer Rules
#Component Rules:
/siebel/CRAObjMgr_enu/=SiebSrvr300pl2:2321;SiebSrvr300pl1:2321;
/siebel/eEventsObjMgr_enu/=SiebSrvr300pl2:2321;SiebSrvr300pl1:2321;
/siebel/eMarketObjMgr_enu/=SiebSrvr300pl2:2321;SiebSrvr300pl1:2321;
/siebel/SMObjMgr_enu/=SiebSrvr300pl2:2321;SiebSrvr300pl1:2321;
/siebel/eTrainingObjMgr_enu/=SiebSrvr300pl2:2321;SiebSrvr300pl1:2321;
/siebel/ERMEmbObjMgr_enu/=SiebSrvr300pl2:2321;SiebSrvr300pl1:2321;
/siebel/ERMAdminObjMgr_enu/=SiebSrvr300pl2:2321;SiebSrvr300pl1:2321;
/siebel/ERMObjMgr_enu/=SiebSrvr300pl2:2321;SiebSrvr300pl1:2321;
/siebel/SalesCEObjMgr_enu/=SiebSrvr300pl2:2321;SiebSrvr300pl1:2321;
/siebel/ServiceCEObjMgr_enu/=SiebSrvr300pl2:2321;SiebSrvr300pl1:2321;
/siebel/eCustomerObjMgr_enu/=SiebSrvr300pl2:2321;SiebSrvr300pl1:2321;
/siebel/eSalesObjMgr_enu/=SiebSrvr300pl2:2321;SiebSrvr300pl1:2321;
/siebel/eProdCfgObjMgr_enu/=SiebSrvr300pl2:2321;SiebSrvr300pl1:2321;
/siebel/WirelesseServiceObjMgr_enu/=SiebSrvr300pl2:2321;SiebSrvr300pl1:2321;
/siebel/WirelesseChannelObjMgr_enu/=SiebSrvr300pl2:2321;SiebSrvr300pl1:2321;
/siebel/WirelessServiceObjMgr_enu/=SiebSrvr300pl2:2321;SiebSrvr300pl1:2321;
/siebel/WirelessSalesObjMgr_enu/=SiebSrvr300pl2:2321;SiebSrvr300pl1:2321;
/siebel/eChannelObjMgr_enu/=SiebSrvr300pl2:2321;SiebSrvr300pl1:2321;
/siebel/PManagerObjMgr_enu/=SiebSrvr300pl2:2321;SiebSrvr300pl1:2321;
/siebel/EAIObjMgr_enu/=SiebSrvr300pl2:2321;SiebSrvr300pl1:2321;
/siebel/eServiceObjMgr_enu/=SiebSrvr300pl2:2321;SiebSrvr300pl1:2321;
/siebel/SCCObjMgr_enu/=SiebSrvr300pl2:2321;SiebSrvr300pl1:2321;
/siebel/SMEObjMgr_enu/=SiebSrvr300pl2:2321;SiebSrvr300pl1:2321;
/siebel/SSEObjMgr_enu/=SiebSrvr300pl2:2321;SiebSrvr300pl1:2321;
/siebel/SFSObjMgr_enu/=SiebSrvr300pl2:2321;SiebSrvr300pl1:2321;
F5® Deployment Guide 24

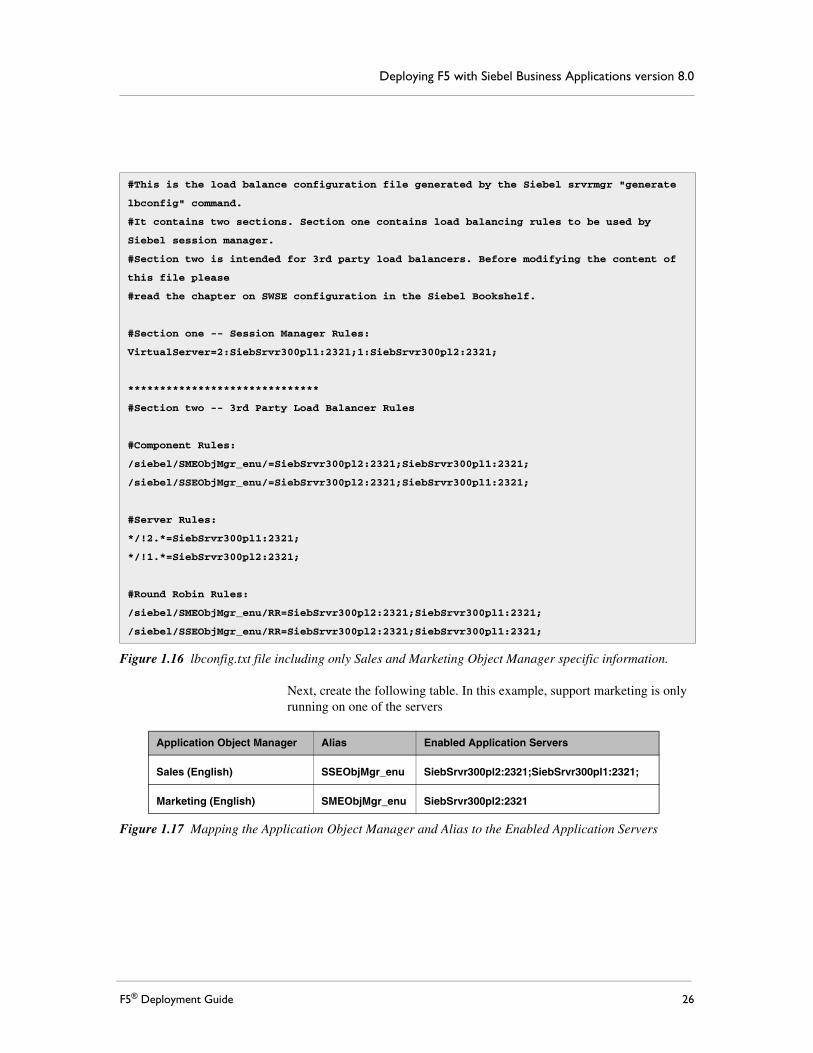
Note that the file contains references to both enabled and disabled object managers. If only Sales and Marketing Object Managers are used in the enterprise, then first identify alias for these 2 Object Managers (SSEObjMgr_enu and SMCObgMgr_enu). Then remove the unnecessary entries.
The result would look like Figure 1.16.
#Server Rules:
*/!2.*=SiebSrvr300pl1:2321;
*/!1.*=SiebSrvr300pl2:2321;
#Round Robin Rules:
/siebel/CRAObjMgr_enu/RR=SiebSrvr300pl2:2321;SiebSrvr300pl1:2321;
/siebel/eEventsObjMgr_enu/RR=SiebSrvr300pl2:2321;SiebSrvr300pl1:2321;
/siebel/eMarketObjMgr_enu/RR=SiebSrvr300pl2:2321;SiebSrvr300pl1:2321;
/siebel/SMObjMgr_enu/RR=SiebSrvr300pl2:2321;SiebSrvr300pl1:2321;
/siebel/eTrainingObjMgr_enu/RR=SiebSrvr300pl2:2321;SiebSrvr300pl1:2321;
/siebel/ERMEmbObjMgr_enu/RR=SiebSrvr300pl2:2321;SiebSrvr300pl1:2321;
/siebel/ERMAdminObjMgr_enu/RR=SiebSrvr300pl2:2321;SiebSrvr300pl1:2321;
/siebel/ERMObjMgr_enu/RR=SiebSrvr300pl2:2321;SiebSrvr300pl1:2321;
/siebel/SalesCEObjMgr_enu/RR=SiebSrvr300pl2:2321;SiebSrvr300pl1:2321;
/siebel/ServiceCEObjMgr_enu/RR=SiebSrvr300pl2:2321;SiebSrvr300pl1:2321;
/siebel/eCustomerObjMgr_enu/RR=SiebSrvr300pl2:2321;SiebSrvr300pl1:2321;
/siebel/eSalesObjMgr_enu/RR=SiebSrvr300pl2:2321;SiebSrvr300pl1:2321;
/siebel/eProdCfgObjMgr_enu/RR=SiebSrvr300pl2:2321;SiebSrvr300pl1:2321;
/siebel/WirelesseServiceObjMgr_enu/RR=SiebSrvr300pl2:2321;SiebSrvr300pl1:2321;
/siebel/WirelesseChannelObjMgr_enu/RR=SiebSrvr300pl2:2321;SiebSrvr300pl1:2321;
/siebel/WirelessServiceObjMgr_enu/RR=SiebSrvr300pl2:2321;SiebSrvr300pl1:2321;
/siebel/WirelessSalesObjMgr_enu/RR=SiebSrvr300pl2:2321;SiebSrvr300pl1:2321;
/siebel/eChannelObjMgr_enu/RR=SiebSrvr300pl2:2321;SiebSrvr300pl1:2321;
/siebel/PManagerObjMgr_enu/RR=SiebSrvr300pl2:2321;SiebSrvr300pl1:2321;
/siebel/EAIObjMgr_enu/RR=SiebSrvr300pl2:2321;SiebSrvr300pl1:2321;
/siebel/eServiceObjMgr_enu/RR=SiebSrvr300pl2:2321;SiebSrvr300pl1:2321;
/siebel/SCCObjMgr_enu/RR=SiebSrvr300pl2:2321;SiebSrvr300pl1:2321;
/siebel/SMEObjMgr_enu/RR=SiebSrvr300pl2:2321;SiebSrvr300pl1:2321;
/siebel/SSEObjMgr_enu/RR=SiebSrvr300pl2:2321;SiebSrvr300pl1:2321;
/siebel/SFSObjMgr_enu/RR=SiebSrvr300pl2:2321;SiebSrvr300pl1:2321;
Figure 1.15 Sample lbconfig.txt file (concluded)
25
Deploying F5 with Siebel Business Applications version 8.0
Next, create the following table. In this example, support marketing is only running on one of the servers
#This is the load balance configuration file generated by the Siebel srvrmgr "generate
lbconfig" command.
#It contains two sections. Section one contains load balancing rules to be used by
Siebel session manager.
#Section two is intended for 3rd party load balancers. Before modifying the content of
this file please
#read the chapter on SWSE configuration in the Siebel Bookshelf.
#Section one -- Session Manager Rules:
VirtualServer=2:SiebSrvr300pl1:2321;1:SiebSrvr300pl2:2321;
******************************
#Section two -- 3rd Party Load Balancer Rules
#Component Rules:
/siebel/SMEObjMgr_enu/=SiebSrvr300pl2:2321;SiebSrvr300pl1:2321;
/siebel/SSEObjMgr_enu/=SiebSrvr300pl2:2321;SiebSrvr300pl1:2321;
#Server Rules:
*/!2.*=SiebSrvr300pl1:2321;
*/!1.*=SiebSrvr300pl2:2321;
#Round Robin Rules:
/siebel/SMEObjMgr_enu/RR=SiebSrvr300pl2:2321;SiebSrvr300pl1:2321;
/siebel/SSEObjMgr_enu/RR=SiebSrvr300pl2:2321;SiebSrvr300pl1:2321;
Figure 1.16 lbconfig.txt file including only Sales and Marketing Object Manager specific information.
Application Object Manager Alias Enabled Application Servers
Sales (English) SSEObjMgr_enu SiebSrvr300pl2:2321;SiebSrvr300pl1:2321;
Marketing (English) SMEObjMgr_enu SiebSrvr300pl2:2321
Figure 1.17 Mapping the Application Object Manager and Alias to the Enabled Application Servers
F5® Deployment Guide 26

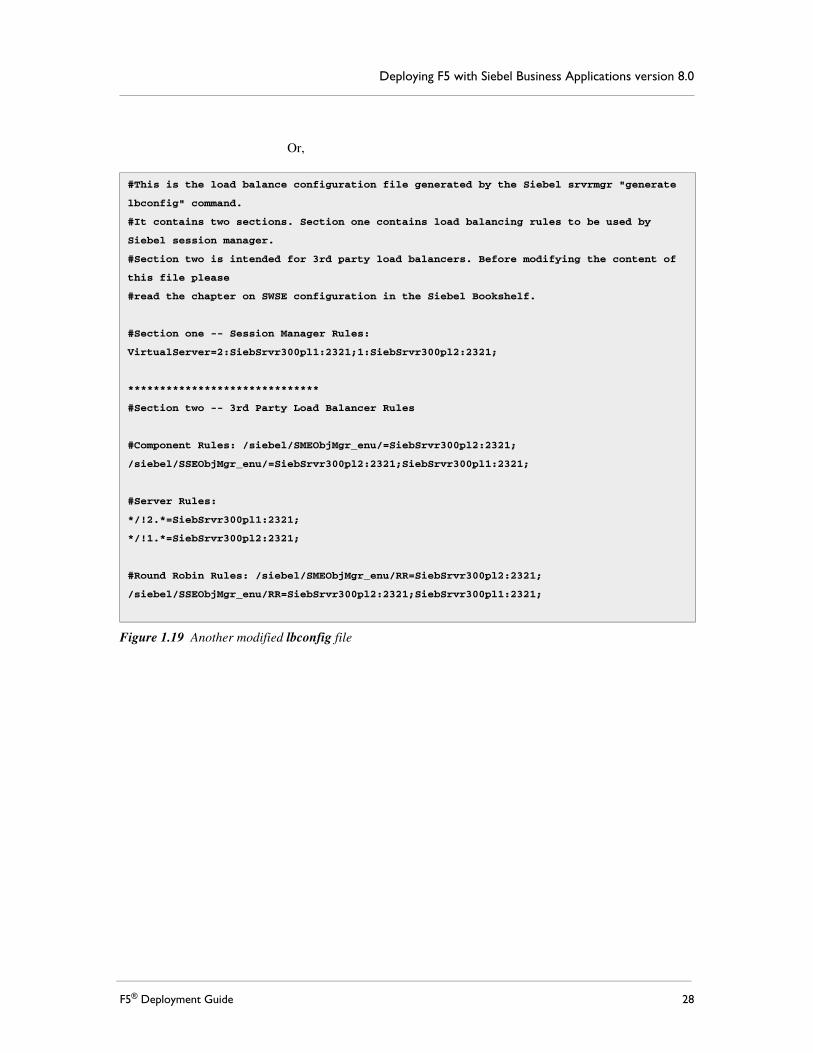
Then modify the lbconfig file to be one of the following:
#This is the load balance configuration file generated by the Siebel srvrmgr "generate
lbconfig" command.
#It contains two sections. Section one contains load balancing rules to be used by
Siebel session manager.
#Section two is intended for 3rd pa rty load balancers. Before modifying the content of
this file please
#read the chapter on SWSE configuration in the Siebel Bookshelf.
#Section one -- Session Manager Rules:
VirtualServer=2:SiebSrvr300pl1:2321;1:SiebSrvr300pl2:2321;
******************************
#Section two -- 3rd Party Load Balancer Rules
#Component Rules:
/siebel/SMEObjMgr_enu/=SiebSrvr300pl2:2321;SiebSrvr300pl1:2321;
/siebel/SSEObjMgr_enu/=SiebSrvr300pl2:2321;SiebSrvr300pl1:2321;
#Server Rules:
*/!2.*=SiebSrvr300pl1:2321;
*/!1.*=SiebSrvr300pl2:2321;
#Round Robin Rules: /siebel/SMEObjMgr_enu/RR=SiebSrvr300pl2:2321;SiebSrvr300pl1:2321;
/siebel/SSEObjMgr_enu/RR=SiebSrvr300pl2:2321;SiebSrvr300pl1:2321;
Figure 1.18 Modified lbconfig file
27
Deploying F5 with Siebel Business Applications version 8.0
Or,
#This is the load balance configuration file generated by the Siebel srvrmgr "generate
lbconfig" command.
#It contains two sections. Section one contains load balancing rules to be used by
Siebel session manager.
#Section two is intended for 3rd party load balancers. Before modifying the content of
this file please
#read the chapter on SWSE configuration in the Siebel Bookshelf.
#Section one -- Session Manager Rules:
VirtualServer=2:SiebSrvr300pl1:2321;1:SiebSrvr300pl2:2321;
******************************
#Section two -- 3rd Party Load Balancer Rules
#Component Rules: /siebel/SMEObjMgr_enu/=SiebSrvr300pl2:2321;
/siebel/SSEObjMgr_enu/=SiebSrvr300pl2:2321;SiebSrvr300pl1:2321;
#Server Rules:
*/!2.*=SiebSrvr300pl1:2321;
*/!1.*=SiebSrvr300pl2:2321;
#Round Robin Rules: /siebel/SMEObjMgr_enu/RR=SiebSrvr300pl2:2321;
/siebel/SSEObjMgr_enu/RR=SiebSrvr300pl2:2321;SiebSrvr300pl1:2321;
Figure 1.19 Another modified lbconfig file
F5® Deployment Guide 28

Appendix B: Perl script for the BIG-IP configuration#!/usr/bin/perl
# Eric Kozlowski
# Edits:
# 11/2004 -
# Added Monitor configuration
# Added Logging statements to Rule
#
# 13 Jun 2008 -
# Added check for trailing semicolon on host line and remove it
# Added partition support
#
# Generates a configuration file for BIG-IP based on
# lbconfig.txt. lbconfig.txt must first be generated by running
# the srvrmgr command "generate lbconfig".
#
# Run the program with the ? option to get the options
#
# For every <CompName> create pools: <CompName>ConnPool, <CompName>RRPool
$BIGIP_CFG_FILE_NAME="bigip.cfg";
$INPUT_FILE_NAME="lbconfig.txt";
$RULE_NAME="SiebelRule";
$VSERVER="172.16.11.21:2321";
$SIEBEL="/siebel";
$VSNAME="SiebelAppVS";
$PARTITION=(split /:/, `bigpipe shell write partition`)[1];
# remove leading and trailing spaces, newlines.
$PARTITION =~ s/(^\ )|(\ $)|(\n)//g;
$ORIG_PARTITION = $PARTITION;
if ($ARGV[0] =~ /\?/) {
&printOptions();
}
use Getopt::Long;
GetOptions("b=s"=>\$BIGIP_CFG_FILE_NAME,
"c=s"=>\$INPUT_FILE_NAME,
"r=s"=>\$RULE_NAME,
"v=s"=>\$VSERVER,
"i=s"=>\$SIEBEL,
"n=s"=>\$VSNAME,
"p=s"=>\$PARTITION,
"h"=>\$HELP_FLAG);
29

Deploying F5 with Siebel Business Applications version 8.0
&printOptions() if $HELP_FLAG;
sub printOptions()
{
print "\nOptions:\n";
print "\t-b [output file for BIG-IP config]\n";
print "\t-c [complete path to lbconfig.txt]\n";
print "\t-r [BIG-IP rule name]\n";
print "\t-v [vserver:vport]\n";
print "\t-i [Siebel Installation Root]\n";
print "\t-n [BIG-IP VServer Name]\n";
print "\t-p [Partition Name]\n";
exit();
}
print "\nInput parameters:\n";
print "--------------------------------------------------------\n";
print "Input Filename...................... $INPUT_FILE_NAME\n";
print "BIG-IP rule name.................... $RULE_NAME\n";
print "vserver:vport....................... $VSERVER\n";
print "Siebel Installation Root............ $SIEBEL\n";
print "VServer Name........................ $VSNAME\n\n";
print "Partition name...................... $PARTITION\n\n";
print "Output parameters:\n";
print "--------------------------------------------------------\n";
print "BIG-IP configuration file............ $BIGIP_CFG_FILE_NAME\n";
print "\nGenerating configuration for BIG-IP\n";
print "--------------------------------------------------------\n";
open(BIGIP_CFG_FILE,">$BIGIP_CFG_FILE_NAME") || die "Couldn't open $BIGIP_CFG_FILE_NAME";
open(INPUT_FILE,"$INPUT_FILE_NAME") || die "Couldn't open $INPUT_FILE_NAME";
# set write partition
print BIGIP_CFG_FILE "\nbigpipe shell write partition $PARTITION\n";
$rule_token_comp="#Component Rules:"; # rule type 1
$rule_token_srvr="#Server Rules:"; # rule type 2
$rule_token_rr="#Round Robin Rules:"; # rule type 3
$cRuleArrInd=0;
$sRuleArrInd=0;
$rrRuleArr=0;
$rule_type=-1;
while(chop($line = readline(*INPUT_FILE))) {
# based on the type of rule we are now on, process the data
if ($rule_type >= 0) {
F5® Deployment Guide 30

# the line is a rule of type rule_type, add it to the correct array
if ((index($line, "/") ==0 || index($line, "*") == 0 )
&& length($line) > 0) {
if ($rule_type == 1) {
$cRuleArr[$cRuleArrInd++]=$line;
}
elsif ($rule_type == 2) {
$sRuleArr[$sRuleArrInd++]=$line;
}
elsif ($rule_type == 3) {
$rrRuleArr[$rrRuleArrInd++]=$line;
}
}
else {
# the line is not a rule, determine if we need to switch rule_type
if (rindex($line, $rule_token_comp) > -1) {
$rule_type=1;
}
if (rindex($line, $rule_token_srvr) > -1) {
$rule_type=2;
}
if (rindex($line, $rule_token_rr) > -1) {
$rule_type=3;
}
}
}
# process until we find a line that starts with *****
if (rindex($line, "*****") > -1) {
$rule_type=0;
}
}
# This section is dedicated to generating the monitors that will
# configured for the pools
my @siebInstvals;
my @monNames;
for ($j=0; $j < $cRuleArrInd; $j++) {
# Split out the values for the Siebel Install Root
$appStr = substr($cRuleArr[$j], 0, index($cRuleArr[$j], "="));
@appArr=split(/\//, $appStr);
$siebInstbase=$appArr[1];
# print "$siebInstbase\n";
push @siebInstvals, $appArr[1];
}
31
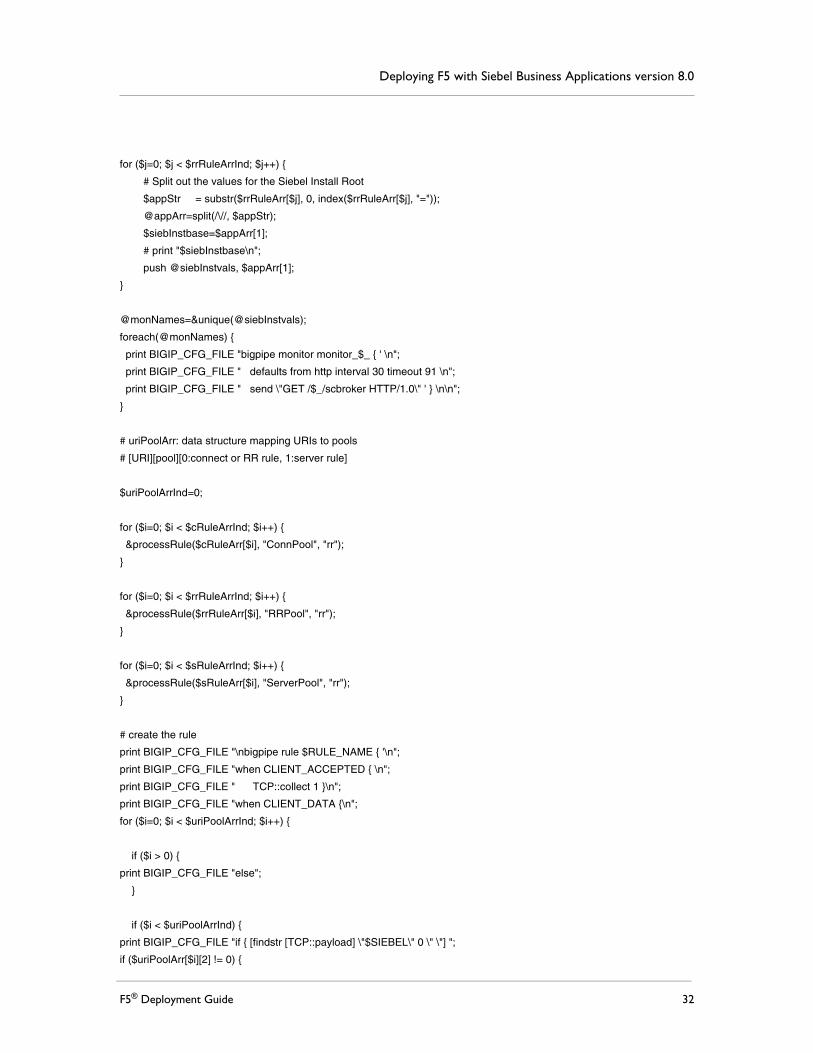
Deploying F5 with Siebel Business Applications version 8.0
for ($j=0; $j < $rrRuleArrInd; $j++) {
# Split out the values for the Siebel Install Root
$appStr = substr($rrRuleArr[$j], 0, index($rrRuleArr[$j], "="));
@appArr=split(/\//, $appStr);
$siebInstbase=$appArr[1];
# print "$siebInstbase\n";
push @siebInstvals, $appArr[1];
}
@monNames=&unique(@siebInstvals);
foreach(@monNames) {
print BIGIP_CFG_FILE "bigpipe monitor monitor_$_ { ' \n";
print BIGIP_CFG_FILE " defaults from http interval 30 timeout 91 \n";
print BIGIP_CFG_FILE " send \"GET /$_/scbroker HTTP/1.0\" ' } \n\n";
}
# uriPoolArr: data structure mapping URIs to pools
# [URI][pool][0:connect or RR rule, 1:server rule]
$uriPoolArrInd=0;
for ($i=0; $i < $cRuleArrInd; $i++) {
&processRule($cRuleArr[$i], "ConnPool", "rr");
}
for ($i=0; $i < $rrRuleArrInd; $i++) {
&processRule($rrRuleArr[$i], "RRPool", "rr");
}
for ($i=0; $i < $sRuleArrInd; $i++) {
&processRule($sRuleArr[$i], "ServerPool", "rr");
}
# create the rule
print BIGIP_CFG_FILE "\nbigpipe rule $RULE_NAME { '\n";
print BIGIP_CFG_FILE "when CLIENT_ACCEPTED { \n";
print BIGIP_CFG_FILE " TCP::collect 1 }\n";
print BIGIP_CFG_FILE "when CLIENT_DATA {\n";
for ($i=0; $i < $uriPoolArrInd; $i++) {
if ($i > 0) {
print BIGIP_CFG_FILE "else";
}
if ($i < $uriPoolArrInd) {
print BIGIP_CFG_FILE "if { [findstr [TCP::payload] \"$SIEBEL\" 0 \" \"] ";
if ($uriPoolArr[$i][2] != 0) {
F5® Deployment Guide 32
print BIGIP_CFG_FILE "==";
}
else {
print BIGIP_CFG_FILE "contains";
}
print BIGIP_CFG_FILE " \"$uriPoolArr[$i][0]\" } {\n";
print BIGIP_CFG_FILE " # log local0. \"Using pool $uriPoolArr[$i][1]\" \n";
print BIGIP_CFG_FILE " pool $uriPoolArr[$i][1] \n}\n";
}
}
print BIGIP_CFG_FILE "else { \n log local0. \"Rejected request for [findstr [TCP::payload] \"/siebel\" 0 \" \"]\"\n";
print BIGIP_CFG_FILE " discard }\n";
print BIGIP_CFG_FILE "} ' }\n";
# create virtual server
print BIGIP_CFG_FILE "\nbigpipe virtual $VSNAME { destination $VSERVER ip protocol tcp rule $RULE_NAME }\n";
# set back to original partition
print BIGIP_CFG_FILE "\nbigpipe shell write partition $ORIG_PARTITION\n";
print "\nConfiguration instructions\n";
print "--------------------------------------------------------\n";
print "\nTo configure BIG-IP, telnet to the BIG-IP machine, and paste\n";
print "the contents of the file $BIGIP_CFG_FILE_NAME\n\n";
exit();
# Routine to return the unique elements of an array
sub unique { return keys %{{ map { $_, 1 } @_ }} }
# create the pool declaration, add the URI and pool to the list
#
# arguments
# 0: input line <URI>=<server list>
# 1: pool name suffix, (ConnPool or RRPool)
# 2: LB method
#
sub processRule
{
local($line, $poolSuffix, $lbMethod) = ($_[0], $_[1], $_[2]);
# ruleType values
# 0: server
# 1: connect
# 2: round robin
33

Deploying F5 with Siebel Business Applications version 8.0
# determine the type of rule
if (index($line, "*") == 0) {
$ruleType=0;
}
elsif ($line =~ /\/RR/i) {
$ruleType=2;
}
else {
$ruleType=1;
}
# Get the component name. The pool will be named <CompName>ConnPool
$uriStr = substr($line, 0, index($line, "="));
$serverStr = substr($line, index($line, "=") + 1);
# As of 8.0, the server line may have a trailing ';' which throws things off.
# 20080613 -- [email protected]
if ((chop $serverStr) == ';') {
chop $serverStr;
}
# End of edit
@serverArr=split(/;/,$serverStr);
if ($ruleType != 0) {
@uriArr=split(/\//, $uriStr);
$compName=$uriArr[2];
# Set SiebelInstallationRoot value for monitor config
# Will only produce desired results if Installation Root
# is the same for all applications
$SiebelInstRoot=$uriArr[1];
}
else {
@serverDataArr=split(/:/,$serverArr[0]);
$compName=$serverDataArr[0];
}
# Add BIG-IP config
$poolName="$compName";
substr($poolName, length($poolName))="$poolSuffix";
print BIGIP_CFG_FILE "bigpipe pool $poolName";
print BIGIP_CFG_FILE " { lb method $lbMethod \\\n";
for ($j=0; $j < @serverArr; $j++) {
#print BIGIP_CFG_FILE "member $serverArr[$j] \\\n";
F5® Deployment Guide 34
@serverPortArr=split(/:/,$serverArr[$j]);
# $ipAddr=getIPForHost($serverPortArr[0]);
$ipAddr=getIPviaHosts($serverPortArr[0]);
print BIGIP_CFG_FILE "member $ipAddr:$serverPortArr[1] \\\n";
}
print BIGIP_CFG_FILE "monitor all monitor_$SiebelInstRoot \\\n";
print BIGIP_CFG_FILE "}\n";
$origUriStr=$uriStr;
# remove starting and trailing * if it is a server rule
$uriStr =~ tr /*/ /;
for ($uriStr) {
s/^\s+//;
s/\s+$//;
}
# If rule is a Connection Pool Rule, remove trailing "/"
if ($ruleType == 1) {
$slength = length($uriStr);
if (substr($uriStr, $slength-1, $slength) eq "/") {
substr($uriStr, -1) = ""; # Remove trailing "/" from uri
}
}
# add the URI to pool mapping to the array to create the
# BIG-IP rule later.
# change the URI to lower case (BIG-IP requirement)
$uriPoolArr[$uriPoolArrInd][0]=lc($uriStr);
$uriPoolArr[$uriPoolArrInd][1]=$poolName;
$uriPoolArr[$uriPoolArrInd][2]=$ruleType;
$uriPoolArrInd++;
}
# input: text hostname
# output: dotted decimal IP of the host
sub getIPForHost
{
local($host) = ($_[0]);
# redirect stderr to stdout so that we can parse for errors
$test=`nslookup $host 2>&1`;
if ($test =~ /find/) {
$ipAddress = $host;
print "Warning: Couldn't resolve hostname $host to IP address.\n";
35

Deploying F5 with Siebel Business Applications version 8.0
}
else {
@nsLookupArr = split(/:/, $test);
$ipAddress=$nsLookupArr[4];
for ($ipAddress) {
s/^\s+//;
s/\s+$//;
}
}
$ipAddress;
}
sub getIPviaHosts
{
local($host) = ($_[0]);
($host, $aliases, $addrtype, $length, @addrs) = gethostbyname( $host );
die "Lookup failed to find address for $host\n" unless @addrs;
foreach (@addrs) {
$ipAddress=join( '.', unpack( 'C4', $_ ) );
}
for ($ipAddress) {
s/^\s+//;
s/\s+$//;
}
$ipAddress;
}
F5® Deployment Guide 36
Appendix C: Troubleshooting the Perl script compilation
This section contains some of the error messages you may receive when compiling the Perl script.
Bad file nameIf you get an error message similar to the one shown in Figure 1.20, it means that either the Perl script does not exist, or the file name is misspelled. Check the file name and the location of the Perl script.
Figure 1.20 Bad file name error while compiling the Perl script
Perl script compiler is not installedIf the Perl script compiler is not installed correctly, or the Perl script file does not have the correct extension, you may see a Windows dialog box similar to Figure 1.21.
Figure 1.21 Windows dialog box
37
Deploying F5 with Siebel Business Applications version 8.0
Make sure the Perl script file has the correct extension: pl. If it does not, modify the file extension and try again. If it already has the correct extension, then Perl Script compiler may not be installed properly. Check the Perl script compiler installation.
Invalid host name in lbconfig fileYou may see an error similar to the one shown in Figure 1.22, if the lbconfig.txt file contains invalid host names. This error could be because of a typing error, or if the server does not exist or is simply not running or registered with the DNS.
Figure 1.22 Invalid host name in the lbconfig file
In the example in Figure 1.22, the error message is repeated three times because the host name is referenced three times in the lbconfig.txt file.
The first step is to ensure the specified host name is spelled correctly.
If an invalid IP address (bad format) is entered in the lbconfig.txt file, you will also see the same error message.
This is a NON-FATAL error. The bigip.cfg file is generated with the host name or IP address in question. The assumption is that you may be setting up the BIG-IP system while the target server is unavailable, or cannot be reached from your PC.
F5® Deployment Guide 38

Other errors not captured by the Perl scriptThere are certain entries that cannot be validated at the time of compilation, and therefore they are not captured. It is recommended to double check these entries before implementing them. They are:
◆ Invalid Virtual IP or Virtual PortBecause at the time of compilation, these are not yet configured, there is no way to verify these.
◆ URL, Object Manager, and Siebel Server mismatchAs long as lbconfig.txt file is generated and modified as specified above, this should not happen. If there is a mismatch, it may result in a number of communication failures. Please check the web server log file for any error messages.
39

Deploying F5 with Siebel Business Applications version 8.0
Appendix D: Troubleshooting the BIG-IP configuration
This section is continuously enhanced to reflect accumulated experiences from different sources. Please check Siebel SupportWeb or the F5 Solution Center for any updates to this document.
The BIG-IP system is marking nodes DOWNIf you see nodes marked DOWN in the BIG-IP Configuration utility (as shown in Figure 1.23), the BIG-IP system is unable to verify the Siebel Server(s) is up and running.
Figure 1.23 Nodes marked as DOWN by the BIG-IP system
This means that the target server and port combination is unable to reply to the BIG-IP HTTP health checks. The target server and port can only reply to this health check if Siebel Server or SCBroker is running and is listening on the specified TCP port. To troubleshoot, use the following steps.
To troubleshoot nodes marked DOWN
1. First, check for the interval and timeout setting of the monitor (on the Main tab, expand Local Traffic, click Monitors, and then click the monitor name). Keep in mind that the timeout value MUST BE 3 times greater than the interval value.
2. Next, check if BIG-IP device can ping the target server. To do this, from the BIG-IP Configuration utility, on the Main tab, expand System, and then click Console to open a terminal session, or use PuTTY to establish a telnet session on the BIG-IP box. Then ping the target server.
• If the ping does not work, check to see if target server is actually on the network, or if the network topology allows the BIG-IP device to reach Siebel Servers. For network topology and basic network setup issues, please check F5 documentation for details.
F5® Deployment Guide 40
• If this works, then the BIG-IP box can physically reach the target server.
a)Next, check to see if the target port is open. To do this, remove the HTTP health check to the server and then set up a TCP health check on the BIG-IP device to check for the target server and port.If it works, it means that the port is open, but the SCBroker is not up and running. If so, check in Siebel Application Administration screens to ensure SCBroker is running on that server. This may also indicate that the Siebel Server processes ended abnormally, the TCP may be left open. Therefore, you should restart the server machine to clean up the TCP port usage.
If this does not work, then there is no program listening on the specified port. First, check to ensure the correct port number is specified. If it is, then check to see if Siebel Server and SCBroker is actually running on that server.
Please remember to remove the TCP check and restore the HTTP check after this step. TCP check is not a recommended health monitor for ongoing operations.
3. Next, check to ensure the HTTP check string is configured correctly in the health monitor (in our example, monitor_siebel). The string must have the format:
Get /<Siebel Enterprise Name>/scbroker HTTP 1.0
Where Siebel Enterprise Name is the name of the Siebel Enterprise in which the target Siebel Server belongs to. If this appears to be correct, then bounce the Siebel Server to ensure SCBroker is running properly.
4. If this does not resolve the issue, you can remove the HTTP health check, and then proceed with configuration. At the end of configuration, check to see if you are able to get a login page. If not, go to the next troubleshooting step.
If you get the login page, then the health check string most likely contains an error. Running without the health check is not recommended, although it is unlikely to cause production downtime. Customer should try to resolve the issue with Siebel technical support.
Node is marked up, but continuous attempts to login results in a Server Busy error in the browser
If you see the node is marked up, but when you attempt to login you are getting Server Busy errors, use the following troubleshooting steps.
41
Deploying F5 with Siebel Business Applications version 8.0
To troubleshoot continual Server Busy errors
1. First, verify that web server and application servers are set up correctly. To do this, first update the eapps.cfg file on one of the web servers so it directly connects to the application server, and then check to see if a user session can be started.
For detail instructions on setting up Siebel Servers and web Servers, please reference the Siebel System Installation Guide in the Siebel Bookshelf.
2. Next, if you can get a login screen with one web server and Siebel Server, set up Siebel Load Balancing temporarily to see if all server configurations are correct.
You will need to copy the lbconfig.txt file generated above into the <SWSE Install Root>/Admin directory, and update the following eapps.cfg entry to true:
EnableVirtualHosts = True
Next, start a number of sessions to that there is at least one session on each Siebel Server. If this does not work, reference the troubleshooting section of the Siebel Load Balancing chapter in the Deployment Planning Guide for details.
If both direct connection and Siebel Load Balancing work correctly, then focus on troubleshooting the BIG-IP system configuration.
1. First, update eapps.cfg file to disable Siebel Load Balancing:
EnableVirtualHosts = False
2. Next, modify the Object Manager connect string so it points to the Virtual IP and Port. For the load balanced Object Manager, the connect string must have the format:
ConnectString = siebel.TCPIP.None.None://<VirtualIP>:<VirtualPort>/<Siebel Enterprise Name>/<Alias of the Object Manager>
The VirtualIP is the IP address of the Virtual Server specified in BIG-IP system. The Virtual Server should be linked to the scheduling Rule.
The VirtualPort is the Port Number, or “Service”, defined in the Virtual Server definition.
The Siebel Enterprise Name is the name of the Siebel Enterprise in which the load balanced Siebel Servers reside
The Alias of the Object Manager is the Alias of the Load Balanced Object Manager
3. If the connect string is configured correctly, then next check if the network connection request actually reached the BIG-IP device.
a) First, from each web Server, attempt to ping the Virtual IP address hosted by the BIG-IP device. You should be able to ping it. If not, then there are issues with the networking configuration. Double check the network topology to ensure the web Server can indeed reach the BIG-IP device.
F5® Deployment Guide 42

b) Next, open the BIG-IP web-based Configuration utility. From the Main tab, expand Local Traffic, click Virtual Servers, and then click Statistics on the menu bar. The virtual server statistics screen opens.
c) Click a check in the box for the Siebel virtual server, and click the Reset button, and ensure all statistics are reset to 0.
d) Start a web browser session and attempt to log into the Siebel Server.
e) At this time, continue to press the Refresh button on the BIG-IP statistics screen as many times as needed to see if there is any connection created against the Virtual IP and port.
f) If connection count goes up, it means the web server is able to reach the Virtual IP address, but the SISNAPI traffic is not getting routed correctly. If this is the case, move to the step that performs rule tracing (below).
g) If the connection count does not go up, it means the web server is not able to reach the BIG-IP system. If the web server can still ping the Virtual IP, then it is possible that port number specified in the connect strings do not match the virtual port number.
h) If the connection count does go up, but there is still no login page, then it is possible that networking topology (subnets, etc) is not set up correctly, so SISNAPI traffic is unable to complete its round trip. Please consult the F5 support documentation to ensure networking topology is set up correctly. Before doing so, however, please ensure you have tested against direct connection and Siebel Load Balancing to rule out any Siebel-specific configuration issues.
i) However, if the network topology has been checked out, then next we will need to check and see if the rules are created correctly.
4. Next, open the BIG-IP Configuration utility, and from the Main tab, expand Local Traffic and then click iRules. Click the Siebel rule (in our example, CRMEnt1Rule), and uncomment the logging statements in each if and ifelse statement, so that something is written to the log file when a URL match is hit. See Figure 1.24.
To uncomment the logging statements, simply remove the # at the beginning of the lines that start with # log.
Note
The Discard portion of the rule is not initially commented out. You should already be receiving discard logs from this part of the rule.
43
Deploying F5 with Siebel Business Applications version 8.0
Figure 1.24 Example of the Siebel rule (CRMEnt1Rule) with comment characters circled.
Next, start a web browser and attempt to log in. At this time, on the BIG-IP Configuration utility, on the Main tab, expand System, click Logs, and then click Local Traffic on the menu bar. It should display the log content specified in the rule above. Check to see if discard is logged when a connection attempt is made. If so, it means that request did reach the correct Virtual IP and Port number, but none of the rule condition matched. In this case, double check the HTTP rule conditions to ensure they are correct.
Note
The URLs specified in the Rule is case sensitive. All characters in the URL is lower case. If there is any upper case character, then covert it into lower case and try again.
Also, ensure the “If” condition in the rule is specified exactly as created by the siebbigip.pl script. In other words:
F5® Deployment Guide 44
• For all component and round robin rules (URLs containing the alias of the object manager component) the IF clause should use [findstr [TCP::payload] "/<Siebel Enterprise Name>" 0 " "] == condition. If not, URL matching will not work correctly. For example:
if { [findstr [TCP::payload] "/siebel" 0 " "] == /siebel/smeobjmgr_enu/" } {
# log local0. "Using pool SMEObjMgr_enuConnPool"
pool SMEObjMgr_enuConnPool
}
elseif { findstr [TCP::payload] "/siebel" 0 " "] == "/siebel/smeobjmgr_enu/rr"} {
# log local0. "Using pool SMEObjMgr_enuRRPool"
pool SMEObjMgr_enuRRPool
}
• For all server rules (URLs containing server ID), the If clause should use http_uri [findstr [TCP::payload] "/<Siebel Enterprise Name>" 0 " "] contains condition. For example:
elseif { [findstr [TCP::payload] "/siebel" 0 " "] contains "/!3."} {# log local0. "Using pool siebelapp3ServerPool"
pool siebelapp3ServerPool
}
Make any necessary changes, and try again. It may take a few trial and errors to uncover the cause of the problem.
5. If the correct rule is being invoked, but there is still no login screen, double check the Pool definitions to ensure Server IP addresses and ports are defined correctly.
6. After everything checked out OK, F5 documentation and troubleshooting steps have been exhausted, and both direct connection and native load balancing worked correctly, then contact Siebel Technical Support or F5 Technical Support for assistance. Whichever support organization is contacted first, it is likely that both Siebel and F5 will work together to resolve this issue.
Login successful, but only after many refreshesBy default, Siebel Web Server Extension will attempt five times or up to one minute to reach one Siebel Server. If several refreshes are necessary, it is possible that either health checks are not set up correctly, or at least five servers have reached max task.
To troubleshoot having to refresh several times before successful login
1. Check the SWSE and OM log files to see if there are maxtask reached error messages. If so, then you need to either increase the number of servers, server capacity, or maxtask setting.
45
Deploying F5 with Siebel Business Applications version 8.0
2. Next, if there is no such error, check to see if the health check is set up correctly. All servers should have the green circle next to their icons in the appropriate Pool-->Statistics screen. If there is no circle, then it means the health check is not set up correctly. If there are more than five servers down in the enterprise, then user may see the Server Busy error when attempting to log in.
3. Lastly, check to ensure the Round Robin rules (URL with RR at the end) are also created correctly. If Round Robin rules are not created, then all retries will fail. This means user only gets one shot in connecting, which may require many refreshes to overcome this.
Login successful, but it takes a long time to get the login screenIf the login screen is taking a long time to display, check to ensure HTTP health monitor is used, rather than the TCP monitor. Furthermore, check to ensure TCP connection timeout is set correctly. Review Modifying the health monitor, on page 1-15 for detailed information.
If the TCP timeout is not set correctly, it can result in SWSE attempting to use stale/timed out connections. This may cause some delays when SWSE tries to clean up these connections.
Login successful, but many unexpected Server Busy errors appear, which end the sessions
If you can successfully login, but are receiving unexpected Server Busy errors, check to ensure the Server Rules are created correctly. Also, ensure the right server ID is specified in the rule. For example:
elseif { [findstr [TCP::payload] "/siebel" 0 " "] contains "/!2." } {
pool bpt4500i008ServerPool
}
where 2 is the Siebel Server ID for bpt4500i008.
This Siebel Server ID is unique to each Siebel Server within one enterprise, and is assigned during initial installation. Please DO NOT assume that it is a sequential number. Always use the Server Manager command to obtain the server ID for a specific Siebel Server.
The command is: list server show SBLSRVR_NAME, SV_SRVRID
User Sessions distribution across servers is unevenIn most cases, this may be due to the natural dynamics of user sessions. Users on one server may log out at a faster rate than another server, which means that server will have less user sessions. In general, keep in mind that each user login will trigger the BIG-IP system to distribute the connection
F5® Deployment Guide 46

request. However, once logged in, user session is tied to a particular server, and the BIG-IP system will NOT perform load balancing for individual operations.
If round robin or weighted round robin scheme is used, then each new session request will be distributed evenly (or based on weights) to all active Siebel Servers. If other load balancing scheme is used, then results may be different. In general, we recommend that customer start with a simple round robin or weight round robin scheme initially, and observe the load dynamics. If necessary, then adjust and use more advanced load balancing scheme.
Lastly, a server taking on less load can simply mean that it has just been restarted, or it is having problem taking on user load. Check the server with unexpectedly low load for any errors or crashes.
47
Deploying F5 with Siebel Business Applications version 8.0
Appendix E: Manual configuration of the BIG-IP system
The procedures described below are required in the absence of the output provided by the automated configuration script. It is useful to be familiar with these manual steps as well, so that tuning the BIG-IP system and debugging configuration problems is easier.
Connecting to the BIG-IP systemUse the following procedure to connect to the BIG-IP system’s web-based Configuration utility.
To connect to the BIG-IP system from the Configuration utility.
1. In a browser, type the following URL:https://<administrative IP address of the BIG-IP device>A Security Alert dialog box appears, click Yes.
2. Type your user name and password, and click OK. The Configuration Status screen opens.
Creating the HTTP health monitorThe first step is to set up a health monitor for the Siebel Servers. This procedure is optional, but very strongly recommended. Setting up health monitor will minimize unnecessary re-tries when servers are taken out of rotation for maintenance purposes. It also allows you to monitor Siebel Server availability from the BIG-IP management interface.
The Extended Content Verification (ECV) health monitor on the BIG-IP system goes much further than a standard ICMP health check, by using send and recv statements in an attempt to retrieve explicit content from nodes.
To configure a health monitor from the BIG-IP Configuration utility
1. On the Main tab, expand Local Traffic, and then click Monitors.The Monitors screen opens.
2. Click the Create button.The New Monitor screen opens.
3. In the Name box, type a name for the Monitor.In our example, we type monitor_siebel.
4. From the Type list, select http.The HTTP Monitor configuration options appear.
F5® Deployment Guide 48

5. In the Configuration section, in the Interval and Timeout boxes, type an Interval and Timeout. We recommend at least a 1:3 +1 ratio between the interval and the timeout (for example, the default setting has an interval of 5 and an timeout of 16). In our example, we use a Interval of 30 and a Timeout of 91.
6. In the Send String box, type the following command (the GET / is present by default):
GET /<Siebel Enterprise Name>/scbroker HTTP/1.0
Where <Siebel Enterprise Name> is the name of your enterprise. In our example, the enterprise name is CRMEnt1. The New Monitor screen should look similar to Figure 1.25.
Figure 1.25 Creating the HTTP Monitor with a Send String
Important Note: When using the GET send string, you must end the string by including the HTTP protocol at the end of the statement. Use the following syntax: GET <fully qualified path name> HTTP/1.0 For example:GET /www/support/customer_info_form.html HTTP/1.0
7. Click the Finished button.The new monitor is added to the Monitor list.
Creating the poolsAfter you have logged into the BIG-IP Configuration utility, you create pools containing the machines that will be running the Siebel servers. There should be one pool for component connect rules, one pool for component
49

Deploying F5 with Siebel Business Applications version 8.0
round robin rules, and one pool for each physical machine running a Siebel server. For an enterprise with N number of servers, the total number of pools is 2 + N.
The first step is to create the component connect pool. This is the pool used for the initial connect from SWSE to the Siebel server.
To create the component connect pool from the Configuration utility
1. On the Main tab, expand Local Traffic, and then click Pools.The Pools screen opens.
2. Click the Create button.The New Pool screen opens.
3. In the Name box, name the pool something meaningful, such as sales_server_pool.
4. Select the health monitor you just created in the Creating the HTTP health monitor section, and click the Add (<<) button. In our example, we select monitor_siebel.
5. In the Resources section, choose the desired load balancing method from the Load Balancing Method list.
6. In the New Members section, repeat the following steps for each physical machine where siebsrvr will run.
a) Make sure that the New Address button is selected.
a) In the Address box, type the physical IP of the machine where siebsrvr will be running.
b) In the Service Port box, type 2321 (or whatever the SCBroker port will be on that machine).
c) Leave the other fields at their default settings, and click the Add button to add the machine to the pool.
7. Leave the other options as the default, and click the Finished button.
The next step is to create the component round robin pool.
To create the component round robin pool
1. On the Main tab, expand Local Traffic, and then click Pools.The Pools screen opens.
2. Click the Create button.The New Pool screen opens.
3. In the Name box, name the pool something like Sales_reconnect_pool.
F5® Deployment Guide 50

4. Select the health monitor you created in the Creating the HTTP health monitor section, and click the Add (<<) button. In our example, we select monitor_siebel.
5. In the Resources section, select Round Robin from the Load Balancing Method list.
6. In the New Members section, repeat the following steps for each physical machine where the Siebel Server (siebsrvr) will run.
a) Make sure that the New Address button is selected.
a) In the Address box, type the physical IP of the machine where siebsrvr will be running.
b) In the Service Port box, type 2321 (or whatever the SCBroker port will be on that machine).
c) Leave the other fields at their default settings, and click the Add button to add the machine to the pool.
7. Leave the other options as the default, and click the Finished button.
The next step is to create one pool for each server, with only one server in each pool. This is used for the reconnect rules so that SWSE can reconnect to the component in the session ID.
To create the single server pool from the Configuration utility
1. On the Main tab, expand Local Traffic, and then click Pools.The Pools screen opens.
2. Click the Create button.The New Pool screen opens.
3. In the Name box, name the pool something like <server>SalesPool, where <server> is the Siebel server name.
4. Select the health monitor you just created in the Creating the HTTP health monitor section, and click the Add (<<) button. In our example, we select monitor_siebel.
5. In the Resources section, select Round Robin from the Load Balancing Method list.
6. In the New Member section, add the IP address of the one <server>, with the appropriate Service Port, leave the other fields at their default settings, and click the Add button to add the machine to the pool.
7. Leave the other options as the default, and click the Finished button.
51

Deploying F5 with Siebel Business Applications version 8.0
Determining the server IDsThe next step is to determine the server IDs that will be used in the reconnect rules. Use srvrmgr to determine the server IDs of the servers for which scheduling rules will be registered. For example:
srvrmgr> list server show SBLSRVR_NAME, SV_SRVRID
which displays the following:
Creating a ruleThe next step is to create a rule that maps Siebel URLs to the appropriate BIG-IP system pools. The rule syntax in BIG-IP version 9.0 and later is considerably different than in previous versions. For more information on the new rule syntax (based on Tcl), see the BIG-IP documentation.
This rule will allow SWSE to connect to the appropriate component on the Siebel server. It contains component rules, round robin rules, and component reconnect rules.
The rules only need to be created to map URIs to object managers (such as SSEObjMgr_enu) and to SCBroker. Round robin rules (those ending with rr) only need to be created for object managers, and can be omitted for SCBroker.
Note
In our example in Figure 1.27, we include log statements that are commented out. These commented log statements are optional, but highly recommended to make troubleshooting the configuration easier.
SBLSRVR_NAME SV_SRVRID
------------ ---------
srvr1 3
srvr2 5
Figure 1.26 Server Name and ID
F5® Deployment Guide 52
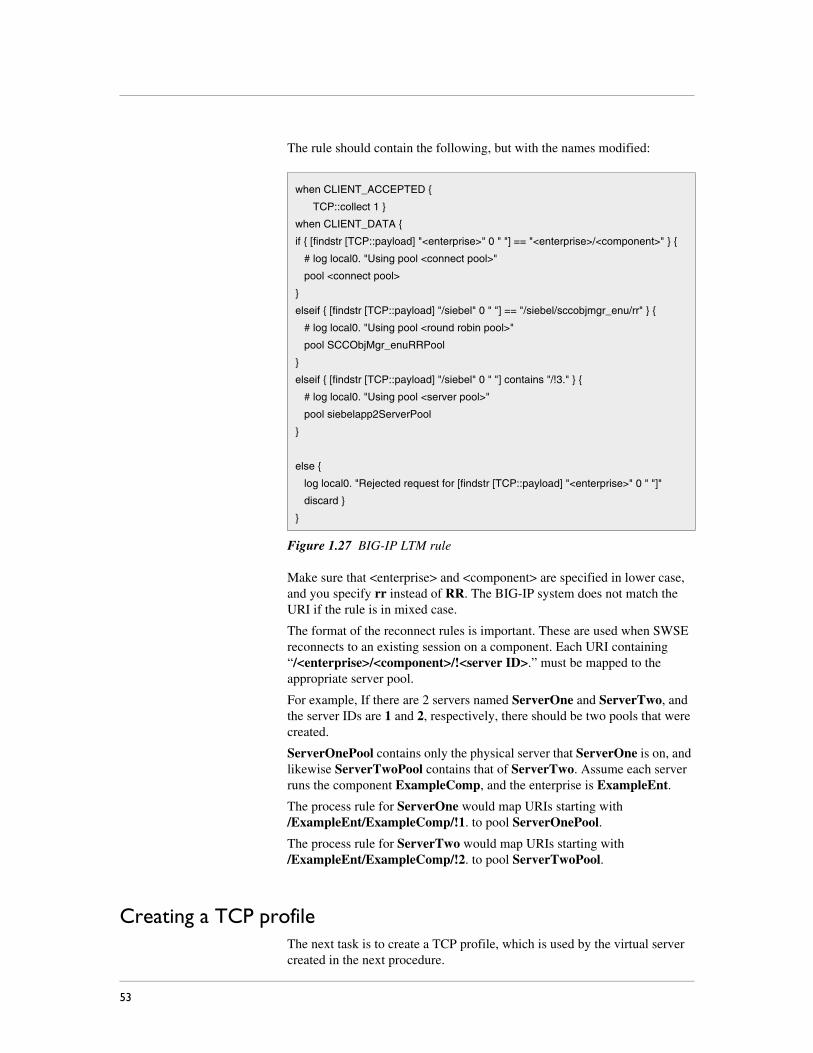
The rule should contain the following, but with the names modified:
Make sure that <enterprise> and <component> are specified in lower case, and you specify rr instead of RR. The BIG-IP system does not match the URI if the rule is in mixed case.
The format of the reconnect rules is important. These are used when SWSE reconnects to an existing session on a component. Each URI containing “/<enterprise>/<component>/!<server ID>.” must be mapped to the appropriate server pool.
For example, If there are 2 servers named ServerOne and ServerTwo, and the server IDs are 1 and 2, respectively, there should be two pools that were created.
ServerOnePool contains only the physical server that ServerOne is on, and likewise ServerTwoPool contains that of ServerTwo. Assume each server runs the component ExampleComp, and the enterprise is ExampleEnt.
The process rule for ServerOne would map URIs starting with /ExampleEnt/ExampleComp/!1. to pool ServerOnePool.
The process rule for ServerTwo would map URIs starting with /ExampleEnt/ExampleComp/!2. to pool ServerTwoPool.
Creating a TCP profileThe next task is to create a TCP profile, which is used by the virtual server created in the next procedure.
when CLIENT_ACCEPTED {
TCP::collect 1 }
when CLIENT_DATA {
if { [findstr [TCP::payload] "<enterprise>" 0 " "] == "<enterprise>/<component>" } {
# log local0. "Using pool <connect pool>"
pool <connect pool>
}
elseif { [findstr [TCP::payload] "/siebel" 0 " "] == "/siebel/sccobjmgr_enu/rr" } {
# log local0. "Using pool <round robin pool>"
pool SCCObjMgr_enuRRPool
}
elseif { [findstr [TCP::payload] "/siebel" 0 " "] contains "/!3." } {
# log local0. "Using pool <server pool>"
pool siebelapp2ServerPool
}
else {
log local0. "Rejected request for [findstr [TCP::payload] "<enterprise>" 0 " "]"
discard }
}
Figure 1.27 BIG-IP LTM rule
53

Deploying F5 with Siebel Business Applications version 8.0
To create a TCP profile and verify the TCP settings from the BIG-IP Configuration utility
1. On the Main tab, expand Local Traffic.
2. Click Profiles.The Profiles screen opens.
3. On the menu bar, from the Protocol menu, select TCP.The TCP Profiles screen opens.
4. Click the Create button.The New TCP Profile screen opens.
5. In the Name box, type a name for the profile. In our example, we type siebel_port.
6. In the Parent Profile list, make sure that tcp is selected.
7. In the Configuration section, locate the Idle Timeout row, and click a check in the Custom box on the far right to specify an idle timeout.Leave the list set to Specify, and then, based on your policy, type the number of seconds you want as a timeout. This timeout setting specifies the amount of idle time a SISNAPI connection will wait before getting terminated by BIG-IP system.
If there is no policy around this, we recommend setting the timeout value to one year: 31536000 seconds. See Figure 1.7.
If the TCP connection timeout is set to a value less than the recommended value of one year, then you need to adjust the SISNAPI Connection Maximum Idle Time parameter for all Application Object Manager(s) load balanced by this virtual IP and port.
The Connection Maximum Idle Time value should be set to a value slightly less than the TCP Idle Timeout value on the BIG-IP system. For example, if BIG-IP TCP Idle Timeout is set to 3600, then Connection Maximum Idle Time should be set to 3500.
Important
Step 7 is critical to this configuration. If the Connection Maximum Idle Time is shorter than the BIG-IP idle timeout value, a user may experience occasional Server Busy errors after long periods of idle time. Please refer to Siebel System Administration Guide for details.
8. Click the Finished button.The new profile appears in the TCP profiles list.
Creating a virtual server The next step is to create a virtual server that maps to the rule that was created in the preceding procedure.
F5® Deployment Guide 54
To create the virtual server from the Configuration utility
1. From the Main tab, expand Local Traffic, and then click Virtual Servers.The Virtual Servers screen opens.
2. Click the Create button.The New Virtual Server screen opens.
3. In the Name box, type a name for the virtual server.
4. In the Destination section, in the Address box, type the virtual IP that maps to the pool.
5. In the Service Port box, type the virtual port that will be used. You can chose any value not in use on the BIG-IP system, such as 2320.
6. In the Configuration section, select Advanced from the list.
7. In the Client and Server Protocol Profile sections, select the name of the profile you created in the preceding procedure from the lists. In our example, we select siebel_port from each list.Leave the other settings in this section at their default levels, unless you have specific reasons to change them.
8. In the Resources section, in the iRules area, select the iRule you created in the preceding procedure from the Available box, and click the Add (<<) button to enable the iRule.
9. Click the Finished button.
Mapping the IP of the web server to the virtual server
Important
This procedure is optional. Only use this procedure if your web servers are in the same network as your application servers.
The next step is to map the IP address of the web server to the BIG-IP virtual server IP address using a SNAT (secure network address translation).
To map the IP of the web server to the virtual server
1. From the Main tab, expand Local Traffic and then click SNATs.
2. In the Name box, type a name for the SNAT, for example siebel_snat.
3. In the Translation box, type the IP address for the virtual server.
4. In the Origin box, select Address List from the list.The Address list options appear.
5. In the Address box, type the client IP address(es), and click the Add button.
6. Click the Finished button.
55

Deploying F5 with Siebel Business Applications version 8.0
Modifying the connect strings in eapps.cfgThe next step is to modify the connect strings in eapps.cfg to use the virtual server. For example:
ConnectString = siebel://<virtual server>:<virtual Port>/<enterprise>/<component>
After modifying the connect strings, restart the web server and verify that you can connect to the system.
F5® Deployment Guide 56

57
2
Deploying F5 with Siebel Business Applications version 8.0 Web Tier
Deploying F5 with the Siebel Server version 8.0 Web tier
F5 Networks and Siebel® Systems have created a solution for the successful delivery of version 8.0 of Siebel Business Applications with F5's BIG-IP® system, including the BIG-IP Local Traffic Manager (LTM) and the BIG-IP WebAccelerator. The BIG-IP system manages traffic at both the web server and application server tiers.
This solution allows Siebel Business Applications version 8.0 customers to protect and enhance their investments in Siebel applications by providing a secure, fast, and available environment. This allows for increased user productivity and satisfaction, while significantly reducing the total cost of ownership (TCO).
Prerequisites and configuration notesThe following are prerequisites for this deployment:
◆ The BIG-IP system must be running version 9.1 or later. For certain advanced features, you must have licensed the appropriate module. We recommend using version 10.0 or later.Note that if you are using 10.0 or later, you may notice minor BIG-IP user interface differences between your version and the 9.x version shown in the screen captures.
◆ The Siebel Servers must be running version 7.7 or later.
◆ This document assumes you have configured the F5 BIG-IP device on the network, assigned IP addresses, and have activated the license keys. Consult the BIG-IP documentation on how to initially configure the BIG-IP device. When you are configuring the BIG-IP system, keep the following in mind:
• In order to configure the F5 BIG-IP System for Siebel Application Servers, the administrator must have administration access into the F5 BIG-IP device.
• Plan what network topology and IP addresses should be used for Siebel Servers. This affects the network settings of F5 BIG-IP device.
• Plan access control and security aspects of the network. For example, determine if a firewall will be deployed in front of the Siebel Servers.
• We recommend using the BIG-IP in a redundant configuration to ensure high availability.
• Configure machines that host Siebel applications and configure the TCP/IP properties for these machines. Ensure there is TCP/IP connectivity between the Load Balancer and servers.
2 - 1

Deploying F5 with Siebel Business Applications version 8.0 Web Tier
Optimizing the BIG-IP LTM configuration for the Siebel web tier
This chapter contains procedures for configuring the BIG-IP LTM system and the BIG-IP WebAccelerator to optimize your Siebel Web tier deployment. The following procedures can be configured independently, you can choose to configure one, many, or all of them.
In order to take advantage of these optimizations, the BIG-IP LTM must be running at least version 9.1. To use the WebAccelerator, you must have the WebAccelerator module licensed on the BIG-IP system. See your sales representative for more information about licensing WebAccelerator.
The following procedures apply to the Siebel web server configuration on the BIG-IP LTM system. These procedures assume that you do not already have these objects (such as a pool and virtual server) configured on the BIG-IP device. If you already have these objects configured, you can modify the appropriate object using the optimization settings in the following procedures.
Creating the HTTP health monitorThe first step is to set up a health monitor for the Siebel web servers. This procedure is optional, but very strongly recommended.
To configure a health monitor
1. On the Main tab, expand Local Traffic, and then click Monitors.The Monitors screen opens.
2. Click the Create button.The New Monitor screen opens.
3. In the Name box, type a name for the Monitor.In our example, we type siebel-web.
4. From the Type list, select http.The HTTP Monitor configuration options appear.
5. In the Configuration section, in the Interval and Timeout boxes, type an Interval and Timeout. We recommend at least a 1:3 +1 ratio between the interval and the timeout (for example, the default setting has an interval of 5 and an timeout of 16). In our example, we use a Interval of 30 and a Timeout of 91.
F5 Deployment Guide 2 - 2

6. Click the Finished button.The new monitor is added to the Monitor list.
Figure 2.1 Health monitor configuration settings
Creating the poolThe next step is to create a pool for the Siebel web servers.
Important
This procedure is only necessary if you do not already have a pool for the web servers.
To create the Siebel web server pool
1. On the Main tab, expand Local Traffic, and then click Pools.The Pool screen opens.
2. In the upper right portion of the screen, click the Create button. The New Pool screen opens.
3. From the Configuration list, select Advanced.The Advanced configuration options appear.
4. In the Name box, type a name for your pool. In our example, we use siebel-web.
2 - 3
Deploying F5 with Siebel Business Applications version 8.0 Web Tier
5. In the Health Monitors section, select the name of the monitor you created in the Creating the HTTP health monitor section, and click the Add (<<) button. In our example, we select siebel-web.
6. In the Slow Ramp Time box, type 300. In our example, we use the Least Connections load balancing method for this pool. We set the Ramp Time in order to ensure that if a pool member becomes available after maintenance or a new member is added, the Least Connections algorithm does not send all new connections to that member (a newly available member will always have the least number of connections). If you are not using the Least Connections, Observed, or Predictive load balancing method, skip this step.
7. From the Load Balancing Method list, choose your preferred load balancing method (different load balancing methods may yield optimal results for a particular network).In our example, we select Least Connections (member).
8. For this pool, we leave the Priority Group Activation Disabled.
9. In the New Members section, make sure the New Address option button is selected.
10. In the Address box, add the first Siebel Web server to the pool. In our example, we type 10.133.12.10
11. In the Service Port box, type 80.
12. Click the Add button to add the member to the list.
13. Repeat steps 10-12 for each server you want to add to the pool. In our example, we repeat these steps once for the remaining server, 10.133.12.11.
14. Leave the other options at the default settings, or configure as applicable for your network, and click the Finished button (see Figure 2.2).
F5 Deployment Guide 2 - 4

Figure 2.2 Configuring the BIG-IP pool for the Siebel web servers
Creating profilesBIG-IP version 9.0 and later use profiles. A profile is an object that contains user-configurable settings for controlling the behavior of a particular type of network traffic, such as HTTP connections. Using profiles enhances your control over managing network traffic, and makes traffic-management tasks easier and more efficient.
2 - 5

Deploying F5 with Siebel Business Applications version 8.0 Web Tier
Although it is possible to use the default profiles, we strongly recommend you create new profiles based on the default parent profiles, even if you do not change any of the settings initially. Creating new profiles allows you to easily modify the profile settings specific to this deployment, and ensures you do not accidentally overwrite the default profile..
These profiles use new optimized profiles available in BIG-IP LTM version 9.4 and later. If you are using a BIG-IP LTM version prior to 9.4, the Configuration Guide for BIG-IP Local Traffic Management for version 9.4 (available on AskF5) shows the differences between the base profiles and the optimized profile types. Use this guide to manually configure the optimization settings.
Creating an HTTP profile
The first new profile we create is an HTTP profile. The HTTP profile contains numerous configuration options for how the BIG-IP LTM system handles HTTP traffic. For deployments where WebAccelerator is used, and the majority of users accessing the Siebel servers are connecting across a WAN, F5 recommends using the http-acceleration parent profile (available in versions 9.4.2 and later). This profile uses specific settings to optimize traffic over the WAN. The BIG-IP LTM http-acceleration profile does not have compression enabled by default, because compression is handled by the WebAccelerator. If you are not using the WebAccelerator module, we recommend you use the http-wan-optimized-compression-caching parent profile.
If you are not using version 9.4.2, or have other considerations, you can choose the default HTTP parent profile, or one of the other optimized HTTP parent profiles.
Important
If you are using the BIG-IP LTM or the WebAccelerator to perform the compression duties, we strongly recommend you disable compression on the Siebel application to free up resources. See the following Siebel documents on how to disable compression:-http://download.oracle.com/docs/cd/B40099_02/books/SiebInstWIN/SiebInstCOM_InstSWSE17.html#wp1204534-http://download.oracle.com/docs/cd/B40099_02/books/SystAdm/SystAdm_SiebInstEapps.html#wp1016122Briefly, in the [defaults] section of the eapps.cfg file on each device, you need to change DoCompression to FALSE. This tells the Siebel Web Server Extension (SWSE) not to compress the content.
To create a new HTTP profile
1. On the Main tab, expand Local Traffic, and then click Profiles.The HTTP Profiles screen opens.
2. In the upper right portion of the screen, click the Create button. The New HTTP Profile screen opens.
F5 Deployment Guide 2 - 6
3. In the Name box, type a name for this profile. In our example, we type siebel-web-http.
4. From the Parent Profile list, select an appropriate http parent profile. If you are using the WebAccelerator, we recommend the http-acceleration parent profile. If you are not using the WebAccelerator, we recommend http-wan-optimized-compression-caching.
5. Modify any of the other settings as applicable for your network. In our example, we leave the settings at their default levels.
6. Click the Finished button.
Creating the TCP profiles
The next profiles we create are the TCP profiles. If most of the Siebel users are accessing the devices via a Local Area Network, we recommend using the tcp-lan-optimized (for server-side TCP connections) parent profile. If the majority of the users are accessing the system from remote or home offices, we recommend using an additional TCP profile, called tcp-wan-optimized (for client side TCP connections).
Creating the WAN optimized TCP profile
First we configure the WAN optimized profile. If most of the users are accessing the system over the LAN or other low latency links, you do not need to create this profile.
To create a new TCP WAN optimized profile
1. On the Main tab, expand Local Traffic, and then click Profiles.The HTTP Profiles screen opens.
2. On the Menu bar, from the Protocol menu, click tcp.
3. In the upper right portion of the screen, click the Create button. The New TCP Profile screen opens.
4. In the Name box, type a name for this profile. In our example, we type siebel-web-wan.
5. From the Parent Profile list, select tcp-wan-optimized.
6. Modify any of the settings as applicable for your network. In our example, we leave the settings at their default levels.
7. Click the Finished button.
Creating the LAN optimized TCP profile
Next we configure the LAN optimized profile. Remeber, if you are not using version 9.4 or do not want to use this optimized profile, you can choose the default TCP parent profile.
2 - 7

Deploying F5 with Siebel Business Applications version 8.0 Web Tier
To create a new TCP profile
1. On the Main tab, expand Local Traffic, and then click Profiles.The HTTP Profiles screen opens.
2. On the Menu bar, from the Protocol menu, click tcp.
3. In the upper right portion of the screen, click the Create button. The New TCP Profile screen opens.
4. In the Name box, type a name for this profile. In our example, we type siebel-web-lan.
5. From the Parent Profile list, select tcp-lan-optimized if you are using BIG-IP LTM version 9.4 or later; otherwise select tcp.
6. Modify any of the other settings as applicable for your network. In our example, we leave the settings at their default levels.
7. Click the Finished button.
Creating persistence profileThe next profile we create is a Persistence profile. We recommend using persistence for cookie persistenece for the Siebel Web tier. In our example, use cookie persistence (HTTP cookie insert).
To create a new cookie persistence profile
1. On the Main tab, expand Local Traffic, and then click Profiles.The HTTP Profiles screen opens.
2. On the Menu bar, click Persistence.The Persistence Profiles screen opens.
3. In the upper right portion of the screen, click the Create button. The New Persistence Profile screen opens.
4. In the Name box, type a name for this profile. In our example, we type siebel-web-cookie.
5. From the Persistence Type list, select Cookie.The configuration options for cookie persistence appear.
6. Modify any of the settings as applicable for your network. In our example, we leave the settings at their default levels.
7. Click the Finished button.
Creating a OneConnect profile
The final profile we create is a OneConnect profile. With OneConnect enabled, client requests can utilize existing, server-side connections, thus reducing the number of server-side connections that a server must open to service those requests. This can provide significant performance improvements for Siebel implementations. For more information on OneConnect, see the BIG-IP LTM documentation.
F5 Deployment Guide 2 - 8

In our example, we leave all the options at their default settings. You can configure these options as appropriate for your network.
To create a new OneConnect profile
1. On the Main tab, expand Local Traffic, and then click Profiles.The HTTP Profiles screen opens.
2. On the Menu bar, from the Other menu, click OneConnect.The Persistence Profiles screen opens.
3. In the upper right portion of the screen, click the Create button. The New HTTP Profile screen opens.
4. In the Name box, type a name for this profile. In our example, we type siebel-oneconnect.
5. From the Parent Profile list, ensure that oneconnect is selected.
6. Modify any of the other settings as applicable for your network. In our example, we leave the settings at their default levels.
7. Click the Finished button.
Creating an iRuleIn Siebel environments that are both utilizing the High Interactive Client and employing compression on the BIG-IP LTM, an additional iRule needs to be configured on the BIG-IP system. This iRule ensures that ActiveX client traffic is not handled the same way as the rest of the HTTP traffic.
Important
This procedure is only necessary if you are using the Siebel High Interactive Client and are using compression on the BIG-IP LTM system. If you are not using both these functions, you do not need to follow this procedure.
To create the iRule
1. On the Main tab, expand Local Traffic.
2. Click iRules. The iRules screen opens.
3. In the upper right portion of the screen, click the Create button. The New iRule screen opens.
4. In the Name box, type a name for this iRule.In our example, we use siebel_activex.
5. In the Definition box, copy and paste the following iRule:
when HTTP_REQUEST {
if { [HTTP::method] eq "POST" && not [HTTP::header exists "Accept"] } {
HTTP::disable
}
}
2 - 9

Deploying F5 with Siebel Business Applications version 8.0 Web Tier
6. Click the Finished button.
Figure 2.3 Creating the iRule
Creating a virtual server The final step is to create a virtual server for these servers. If you already have a virtual server for the Siebel web servers, you should modify that virtual server to use the profiles and iRule you created in the preceding procedures.
To create the virtual server
1. On the Main tab, expand Local Traffic, and then click Virtual Servers. The Virtual Servers screen opens.
2. In the upper right portion of the screen, click the Create button.
3. In the Name box, type a name for this virtual server. In our example, we type siebel-web.
4. In the Destination section, select the Host option button.
5. In the Address box, type the IP address of this virtual server. In our example, we use 10.133.100.185.
6. In the Service Port box, type 80.
F5 Deployment Guide 2 - 10

Figure 2.4 Creating the Siebel virtual server
7. From the Configuration list, select Advanced.The Advanced configuration options appear.
8. Leave the Type list at the default setting: Standard.
9. From the Protocol Profile (Client) list select the profile you created in Creating the WAN optimized TCP profile. If you did not create a WAN optimized profile, select the LAN optimized profile as in the following Step. In our example, we select siebel-web-wan.
10. From the Protocol Profile (Server) list, select the profile you created in Creating the LAN optimized TCP profile. In our example, we select siebel-web-lan.
11. From the OneConnect Profile list, select the profile you created in Creating a OneConnect profile. In our example, we select siebel-oneconnect.
12. From the HTTP Profile list, select the profile you created in Creating an HTTP profile. In our example, we select siebel-web-http.
Figure 2.5 Selecting the Siebel profiles for the virtual server
2 - 11
Deploying F5 with Siebel Business Applications version 8.0 Web Tier
13. In the Resources section, from the Default Pool list, select the pool you created in the Creating the pool section. In our example, we select siebel-web.
14. From the Default Persistence Profile list, select the persistence profile you created in the Creating persistence profile section. In our example, we select siebel-web-cookie.
Figure 2.6 Adding the Siebel resources to the virtual server
15. Click the Finished button.
The BIG-IP LTM HTTP configuration is complete. If you are using the BIG-IP LTM to offload SSL from the Siebel Web tier, see the following section. If you are using the WebAccelerator module, see Deploying the BIG-IP WebAccelerator with Siebel Business Applications 8.0, on page 2-15.
Optional: Configuring the BIG-IP LTM to offload SSLIf you are using the BIG-IP LTM system to offload SSL from the Siebel Web tier, there are additional configuration procedures you must perform on the BIG-IP LTM system and on the Siebel devices.
F5 Deployment Guide 2 - 12

Modifying the Siebel configuration
First, you must change the EnforceSSL setting on each Siebel Web Server Extension (SWSE) to TRUE. See http://download.oracle.com/docs/cd/B40099_02/books/Secur/Secur_DataEncrypt9.html#wp1386239 for information on how to change this setting.
Using SSL certificates and keys
Before you can enable the BIG-IP LTM system to act as an SSL proxy, you must install a SSL certificate on the virtual server that you wish to use for Siebel Web tier connections on the BIG-IP LTM device. For this Deployment Guide, we assume that you already have obtained an SSL certificate, but it is not yet installed on the BIG-IP LTM system. For information on generating certificates, or using the BIG-IP LTM to generate a request for a new certificate and key from a certificate authority, see the Managing SSL Traffic chapter in the Configuration Guide for Local Traffic Management.
Importing keys and certificates
Once you have obtained a certificate, you can import this certificate into the BIG-IP LTM system using the Configuration utility. By importing a certificate or archive into the Configuration utility, you ease the task of managing that certificate or archive. You can use the Import SSL Certificates and Keys screen only when the certificate you are importing is in Privacy Enhanced Mail (PEM) format.
To import a key or certificate
1. On the Main tab, expand Local Traffic.
2. Click SSL Certificates. The list of existing certificates displays.
3. In the upper right corner of the screen, click Import.
4. From the Import Type list, select the type of import (Certificate or Key).
5. In the Certificate (or Key) Name box, type a unique name for the certificate or key.
6. In the Certificate (or Key) Source box, choose to either upload the file or paste the text.
7. Click Import.
If you imported the certificate, repeat this procedure for the key.
Creating a Client SSL profile
The next step in this configuration is to create a Client SSL profile. This profile contains the SSL certificate and Key information for offloading the SSL traffic.
2 - 13
Deploying F5 with Siebel Business Applications version 8.0 Web Tier
To create a new Client SSL profile based on the default profile
1. On the Main tab, expand Local Traffic.
2. Click Profiles.The HTTP Profiles screen opens.
3. On the Menu bar, from the SSL menu, select Client.The Client SSL Profiles screen opens.
4. In the upper right portion of the screen, click the Create button.The New Client SSL Profile screen opens.
5. In the Name box, type a name for this profile. In our example, we type siebel-web-clientssl.
6. In the Configuration section, check the Certificate and Key Custom boxes.
7. From the Certificate list, select the name of the Certificate you imported in the Importing keys and certificates section.
8. From the Key list, select the key you imported in the Importing keys and certificates section.
9. Click the Finished button.
Modifying the Siebel virtual server
The next task is to modify the Siebel Web virtual server you created to use port 443 and the SSL profile you just created.
To modify the exisiting SharePoint virtual server
1. On the Main tab, expand Local Traffic, and then click Virtual Servers. The Virtual Servers screen opens.
2. From the Virtual Server list, click the Oracle Portal virtual server you created in Creating a virtual server, on page 2-10 section. In our example, we click siebel-web.
3. In the Service Port box, type 443 or select HTTPS from the list.
4. From the SSL Profile (Client) list, select the name of the profile you created in Creating a Client SSL profile, on page 2-13. In our example, we select siebel-web-clientssl
5. Click the Update button.
F5 Deployment Guide 2 - 14

Deploying the BIG-IP WebAccelerator with Siebel Business Applications 8.0
In this section, we configure the WebAccelerator module for the Siebel Web tier to increase performance for end users. The F5 WebAccelerator is an advanced web application delivery solution that provides a series of intelligent technologies designed to overcome problems with browsers, web application platforms and WAN latency issues which impact user performance.
For more information on the F5 WebAccelerator, see www.f5.com/products/big-ip/product-modules/webaccelerator.html.
Prerequisites and configuration notesThe following are prerequisites for this section:
◆ We assume that you have already configured the BIG-IP LTM system for directing traffic to the Siebel Web deployment as described in this Deployment Guide.
◆ You must have purchased and licensed the WebAccelerator module on the BIG-IP LTM system, version 9.4 or later.
◆ This document is written with the assumption that you are familiar with the BIG-IP LTM system, WebAccelerator and Siebel Business Applications. Consult the appropriate documentation for detailed information.
Configuration exampleUsing the configuration in this section, the BIG-IP LTM system with WebAccelerator module is optimally configured to accelerate traffic to Siebel Web servers. The BIG-IP LTM with WebAccelerator module both increases end user performance as well as offloads the servers from serving repetitive and duplicate content.
In this configuration, a remote client with WAN latency accesses a Siebel Web server via the WebAccelerator. The user’s request is accelerated on repeat visits by the WebAccelerator instructing the browser to use the dynamic or static object that is stored in its local cache. Additionally, dynamic and static objects are cached at the WebAccelerator so that they can be served quickly without requiring the server to re-serve the same objects.
2 - 15
Deploying F5 with Siebel Business Applications version 8.0 Web Tier
Configuring the WebAccelerator moduleConfiguring the WebAccelerator module requires creating an HTTP class profile and creating an Application. The WebAccelerator device has a large number of other features and options for fine tuning performance gains, see the WebAccelerator Administrator Guide for more information.
Connecting to the BIG-IP LTM deviceUse the following procedure to access the BIG-IP LTM system’s web-based Configuration utility using a web browser.
To connect to the BIG-IP LTM system using the Configuration utility
1. In a browser, type the following URL:https://<administrative IP address of the BIG-IP device>A Security Alert dialog box appears, click Yes.The authorization dialog box appears.
2. Type your user name and password, and click OK. The Welcome screen opens.
Creating an HTTP Class profileThe first procedure is to create an HTTP class profile. When incoming HTTP traffic matches the criteria you specify in the WebAccelerator class, the system diverts the traffic through this class. In the following example, we create a new HTTP class profile, based on the default profile.
To create a new HTTP class profile
1. On the Main tab, expand WebAccelerator, and then click Classes.The HTTP Class Profiles screen opens.
2. In the upper right portion of the screen, click the Create button. The New HTTP Class Profile screen opens.
3. In the Name box, type a name for this Class. In our example, we type siebel-class.
4. From the Parent Profile list, make sure httpclass is selected.
5. In the Configuration section, from the WebAccelerator row, make sure Enabled is selected.
6. In the Hosts row, from the list select Match Only. The Host List options appear.
a) In the Host box, type the host name that your end users use to access the Siebel devices. In our example, we type siebel-application.f5.com(see Figure 2.7).
F5 Deployment Guide 2 - 16

b) Leave the Entry Type at Pattern String.
c) Click the Add button.
d) Repeat these sub-steps for any other host names users might use to access the Siebel deployment.
7. The rest of the settings are optional, configure them as applicable for your deployment.
8. Click the Finished button. The new HTTP class is added to the list.
Figure 2.7 Creating a new HTTP Class profile
Modifying the Virtual Server to use the Class profileThe next step is to modify the virtual server for your Siebel deployment on the BIG-IP LTM system to use the HTTP Class profile you just created.
To modify the Virtual Server to use the Class profile
1. On the Main tab, expand Local Traffic, and then click Virtual Servers. The Virtual Servers screen opens.
2 - 17

Deploying F5 with Siebel Business Applications version 8.0 Web Tier
2. From the Virtual Server list, click the name of the virtual server you created in Creating a virtual server. In our example, we click siebel-web.The General Properties screen for the Virtual Server opens.
3. On the Menu bar, click Resources.The Resources screen for the Virtual Server opens.
4. In the HTTP Class Profiles section, click the Manage button.
5. From the Available list, select the name of the HTTP Class Profile you created in the preceding procedure, and click the Add (<<) button to move it to the Enabled box. In our example, we select siebel-class (see Figure 2.8).
6. Click the Finished button. The HTTP Class Profile is now associated with the Virtual Server.
Figure 2.8 Adding the HTTP Class to the Virtual Server
Important
If you are using the BIG-IP LTM version 9.4.2 or later, you must have created an HTTP profile on the BIG-IP LTM system that has RAM Cache enabled. In our example (Creating an HTTP profile, on page 2-6) we use a parent profile that includes RAM Cache. If you did not create an HTTP profile with RAM Cache enabled, you must create a new HTTP profile, based on a parent profile that uses RAM Cache (such as HTTP Acceleration), and modify the virtual server to use this new profile. This is only required for BIG-IP LTM version 9.4.2 and later.
To create the HTTP profile, use Creating an HTTP profile, on page 2-6, selecting the HTTP Acceleration parent profile. You must leave RAM Cache enabled; all other settings are optional. To modify the virtual server, follow Steps 1 and 2 from the preceding procedure to access the virtual server, and then from the HTTP Profile list, select the name of the new profile you just created and click Update.
F5 Deployment Guide 2 - 18
Creating an ApplicationThe next procedure is to create a WebAccelerator Application. The Application provides key information to the WebAccelerator so that it can handle requests to your application appropriately.
To create a new Application
1. On the Main tab, expand WebAccelerator, and then click Applications.The Application screen of the WebAccelerator UI opens in a new window.
2. Click the New Application button.
3. In the Application Name box, type a name for your application. In our example, we type Siebel Web.
4. In the Description box, you can optionally type a description for this application.
5. From the Local Policies list, select Oracle Siebel CRM. This is a pre-defined policy created specifically for Siebel devices (see Figure 2.9).
6. In the Requested Host box, type the host name that your end users use to access the Siebel deployment. This should be the same host name you used in Step 6a in the preceding procedure. In our example, we type siebel-application.f5.com/.If you have additional host names, click the Add Host button and enter the host name(s).
7. Click the Save button.
Figure 2.9 Configuring an Application on the WebAccelerator
2 - 19

Deploying F5 with Siebel Business Applications version 8.0 Web Tier
The rest of the configuration options on the WebAccelerator are optional, configure these as applicable for your network. With this base configuration, your end users will notice an marked improvement in performance after their first visit.
F5 Deployment Guide 2 - 20