Embed Size (px)
Citation preview
Deploying the Zimbra™ Collaboration Suite on Red Hat® Enterprise Linux® 5
Version 1.0 November 2008
www.redhat.com 2 www.zimbra.com
Deploying the Zimbra™ Collaboration Suite on Red Hat® Enterprise Linux® 5 1801 Varsity Drive Raleigh NC 27606-2072 USA Phone: +1 919 754 3700 Phone: 888 733 4281 Fax: +1 919 754 3701 PO Box 13588 Research Triangle Park NC 27709 USA "Red Hat," Red Hat Linux, the Red Hat "Shadowman" logo, and the products listed are trademarks or registered trademarks of Red Hat, Inc. in the United States and other countries. Linux is a registered trademark of Linus Torvalds. All other trademarks referenced herein are the property of their respective owners. © 2008 by Red Hat, Inc. This material may be distributed only subject to the terms and conditions set forth in the Open Publication License, V1.0 or later (the latest version is presently available at http://www.opencontent.org/openpub/). The information contained herein is subject to change without notice. Red Hat, Inc. and Zimbra, a Yahoo! company, shall not be liable for technical or editorial errors or omissions contained herein. Distribution of modified versions of this document is prohibited without the explicit permission of Red Hat Inc. and Zimbra, a Yahoo! Company. Distribution of this work or derivative of this work in any standard (paper) book form for commercial purposes is prohibited unless prior permission is obtained from Red Hat Inc. and Zimbra, a Yahoo! Company. The GPG fingerprint of the [email protected] key is: CA 20 86 86 2B D6 9D FC 65 F6 EC C4 21 91 80 CD DB 42 A6 0E
www.zimbra.com 3 www.redhat.com
Table of Contents
1. Zimbra Collaboration Suite (ZCS) Single Server Network Edition ..................................................... 5
1.1 Important Notice About Single Server Installations ....................................................................... 5 1.2 Installation Prerequisites ................................................................................................................. 6
1.2.1 System Requirements ............................................................................................................... 6 1.3 Modifying Operating System Configurations ................................................................................. 7
1.3.1 Installation Modifications for Red Hat® Enterprise Linux® .................................................. 7 1.4 Configure DNS ............................................................................................................................. 10 1.5 Overview of Installation Process .................................................................................................. 10 1.6 Downloading the Zimbra Software ............................................................................................... 11 1.7 Zimbra License Requirements for ZCS Network Edition ............................................................ 11 1.8 Basic Configuration ...................................................................................................................... 12 1.9 Installing Zimbra Software ........................................................................................................... 17
1.9.1 Verify Zimbra Server Operation ............................................................................................ 23 1.9.2 Installing Zimbra Proxy package ........................................................................................... 24
1.10 Provisioning Accounts ................................................................................................................ 25 1.10.1 Importing Content from User Mailboxes ............................................................................. 25 1.10.2 Administrator’s Account ...................................................................................................... 26
1.11 Uninstalling Zimbra Collaboration Suite .................................................................................... 26 1.12 Additional Information ............................................................................................................... 27 1.13 Support and Contact Information ................................................................................................ 27
2. Zimbra™ Collaboration Multi-Server Installation Network Edition ................................................. 28 2.1 Introduction ................................................................................................................................... 28
2.1.1 Audience ................................................................................................................................ 28 2.1.2 Zimbra Collaboration Suite License ...................................................................................... 28 2.1.3 For More Information ............................................................................................................ 29 2.1.4 Support and Contact Information ........................................................................................... 29
2.2 Preparing Your Server Environment............................................................................................. 30 2.2.1 System Requirements ............................................................................................................. 30 2.2.2 Installation Modifications for Red Hat Enterprise Linux ...................................................... 30 2.2.3 DNS Configuration Requirement........................................................................................... 34
2.3 Planning for the Installation .......................................................................................................... 35 2.3.1 Zimbra Packages .................................................................................................................... 35 2.3.2 Configuration Examples ........................................................................................................ 36 2.3.3 Downloading the Zimbra Software ........................................................................................ 37 2.3.4 Zimbra License ...................................................................................................................... 37 2.3.5 Menu-Driven Configuration .................................................................................................. 38
2.3.5.1 Common configuration options ..................................................................................... 38 2.3.5.2 Zimbra LDAP server configuration options .................................................................. 39 2.3.5.3 Zimbra Mailbox server configuration options ............................................................... 42 2.3.5.4 Zimbra MTA Server configuration options ................................................................... 45
2.3.6 Configuring IMAP and POP Proxy Server ............................................................................ 46 2.3.6.1 Zimbra Proxy Components ............................................................................................ 46

www.redhat.com 4 www.zimbra.com
2.3.7 Configuring ZCS HTTP Proxy (Beta 5.0.6) .......................................................................... 47 2.3.8 Configuring for Virtual Hosting ............................................................................................ 48
2.4 Multiple-Server Installation .......................................................................................................... 49 2.4.1 Starting the Installation Process ............................................................................................. 49 2.4.2 Installing Zimbra LDAP Master Server ................................................................................. 51 2.4.3 Installing Zimbra Mailbox Server .......................................................................................... 54 2.4.4 Installing Zimbra MTA on a Server ....................................................................................... 59 2.4.5 Installing the zimbra-proxy package ...................................................................................... 62 2.4.6 Installing the zimbra-SNMP package .................................................................................... 63 2.4.7 Final Set-Up ........................................................................................................................... 63 2.4.8 Verifying Server Configuration ............................................................................................. 64 2.4.9 Logging on to the Administration Console ............................................................................ 64 2.4.10 Post Installation Tasks ......................................................................................................... 65
2.4.10.1 Defining Classes of Service ......................................................................................... 65 2.4.10.2 Provisioning Accounts ................................................................................................. 65 2.4.10.3 Import the Content of Users’ Mailboxes ..................................................................... 66
2.4.11 Uninstalling Zimbra Collaboration Suite ............................................................................. 66 2.5 Configuring LDAP Replication .................................................................................................... 67
2.5.1 Installing Zimbra Master LDAP Server ................................................................................. 67 2.5.2 Enable Replication on the Master .......................................................................................... 67 2.5.3 Installing a Replica LDAP Server .......................................................................................... 67
2.5.3.1 Test the replica ............................................................................................................... 70 2.5.4 Configuring Zimbra Servers to use LDAP Replica ............................................................... 70 2.5.5 Uninstalling an LDAP replica server ..................................................................................... 71
2.5.5.1 Remove LDAP replica from all active servers .............................................................. 71 2.5.5.2 Disable LDAP on the Replica ........................................................................................ 71 2.5.5.3 Disable LDAP Replication on the Master server ........................................................... 71
Appendix A: System Requirments for Zimbra Collaboration Suite 5.0 ................................................. 73
www.zimbra.com 5 www.redhat.com
1. Zimbra Collaboration Suite (ZCS) Single Server Network Edition The Zimbra Collaboration Suite includes the Zimbra MTA, the Zimbra LDAP server, and the Zimbra mailbox server. In a single-server installation, all components are installed on one server and require no additional manual configuration.
This installation guide is a quick start guide that describes the basic steps needed to install and configure the Zimbra Collaboration Suite in a direct network connect environment. In this environment, the Zimbra server is assigned a domain for which it receives mail, and a direct network connection to the Internet. When the Zimbra Collaboration Suite is installed, you will be able to log on to the Zimbra administration console to manage the domain and provision accounts. The accounts you create will be able to send and receive external email.
This guide includes the following sections:
• Important Notice About Single Server Installations
• Installation Prerequisites
• Modifying Operating System Configurations
• Configure DNS
• Overview of Installation Process
• Downloading the Zimbra Software
• Zimbra License Requirements for ZCS Network Edition
• Basic Configuration
• Installing Zimbra Software
• Provisioning Accounts
• Support and Contact Information
1.1 Important Notice About Single Server Installations The Zimbra Collaboration Suite is designed to be the only application suite installed on the server. The Zimbra Collaboration Suite bundles and installs, as part of the installation process various other third party and open source software, including Apache Jetty, Postfix, OpenLDAP®, and MySQL®. The versions installed have been tested and configured to work with the Zimbra software. See the Administration Guide for a complete list of software.
Note: A Zimbra license is required in order to create accounts on the Network Edition Zimbra Collaboration Suite server. You cannot install ZCS without a license. See “Zimbra License Requirements for ZCS Network Edition (section 1.7).
Table 1 shows the default port settings when the Zimbra Collaboration Suite is installed.

www.redhat.com 6 www.zimbra.com
Table 1 Zimbra Port Mapping
Port
Remote Queue Manager 22
Postfix 25
HTTP 80
POP3 110
IMAP 143
LDAP 389
HTTPS 443
Mailboxd IMAP SSL 993
Mailboxd POP SSL 995
Mailboxd LMTP 7025
Important: You cannot have any other web server, database, LDAP, or MTA server running, when you install the Zimbra software. If you have installed any of the applications before you install Zimbra software, disable these applications. During the ZCS install, Zimbra makes global system changes that may break applications that are on your server.
1.2 Installation Prerequisites In order to successfully install and run the Zimbra Collaboration Suite, ensure your system meets the requirements described in this section. System administrators should be familiar with installing and managing email systems.
1.2.1 System Requirements For the ZCS system requirements see Other Dependencies in “System Requirements for Zimbra Collaboration Suite 5.0” (Appendix A).
Note: To find SSH client software, go to Download.com at http://www.download.com/ and search for SSH. The list displays software that can be purchased or downloaded for free. An example of a
www.zimbra.com 7 www.redhat.com
free SSH client software is PuTTY, a software implementation of SSH for Win32 and Unix platforms. To download a copy go to http:// putty.nl/ .
1.3 Modifying Operating System Configurations Configuration modifications for Red Hat Enterprise Linux are described throughout this guide.
Important: Zimbra recommends that Red Hat Enterprise Linux is updated with the latest patches that have been tested with ZCS. See the latest release notes to see the operating systems patch list that has been tested with ZCS.
1.3.1 Installation Modifications for Red Hat® Enterprise Linux® The Zimbra Collaboration Suite runs on the Red Hat Enterprise Linux, version 4 operating system or later. When you install the Red Hat software for the Zimbra Collaboration Suite accept the default setup answers, except for:
• Disk Partition Setup,
• Network Configuration,
• Gateway and Primary DNS addresses,
• Edit Interface, and
• Firewall Configuration.
Details of what should be modified in these categories are listed below. Refer to the Red Hat Enterprise Linux installation guide for detailed documentation about installing their software.
Important:
• Disk Partitioning Setup. Check Manually partition with DiskDruid. The disk partition should be set up as follows:
• The Mount Point/RAID Volume size for the Boot partition (/)should be 100 MB.
• The Swap partition should be set to twice the size of the RAM on your machine.

www.redhat.com 8 www.zimbra.com
• The Root partition (/) should be set with the remaining disk space size.
www.zimbra.com 9 www.redhat.com
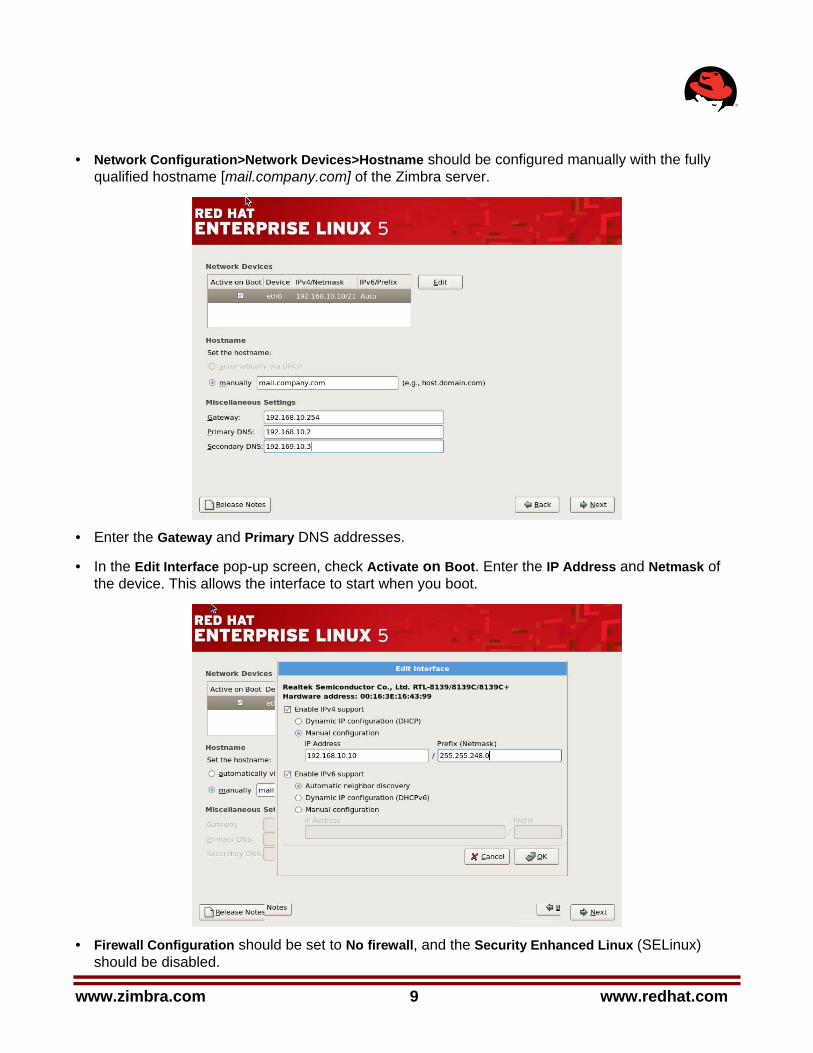
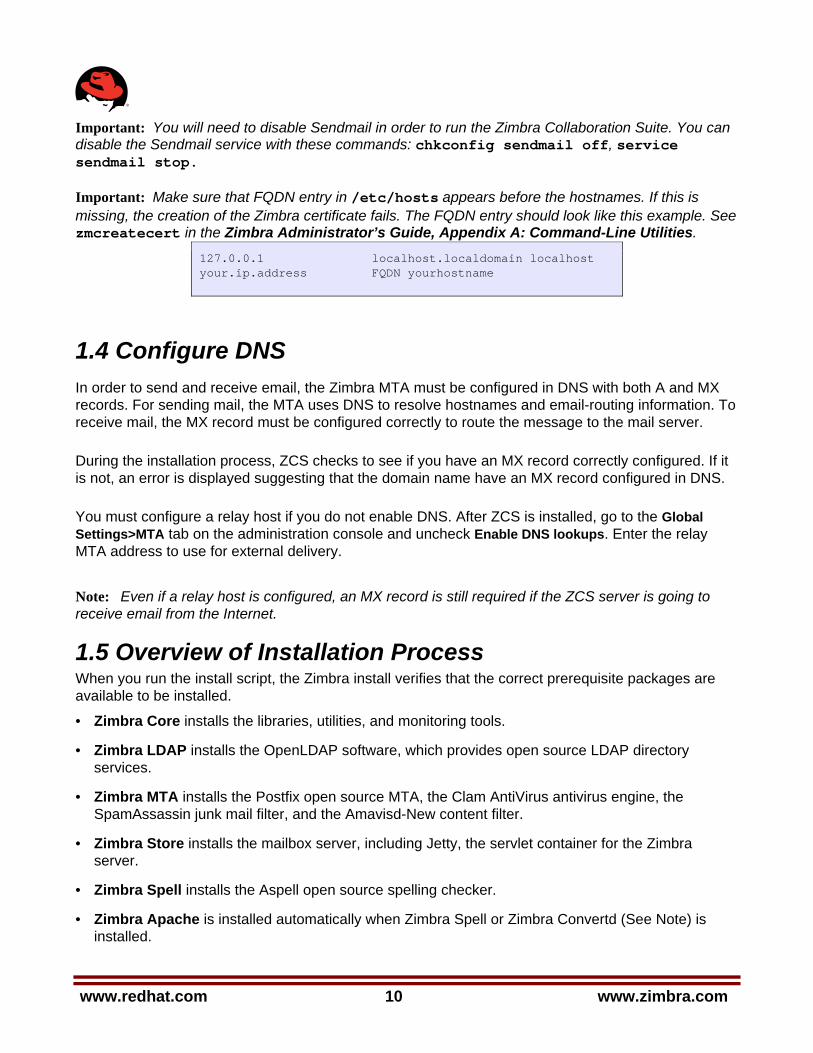
• Network Configuration>Network Devices>Hostname should be configured manually with the fully qualified hostname [mail.company.com] of the Zimbra server.
• Enter the Gateway and Primary DNS addresses.
• In the Edit Interface pop-up screen, check Activate on Boot. Enter the IP Address and Netmask of the device. This allows the interface to start when you boot.
• Firewall Configuration should be set to No firewall, and the Security Enhanced Linux (SELinux) should be disabled.
www.redhat.com 10 www.zimbra.com
Important: You will need to disable Sendmail in order to run the Zimbra Collaboration Suite. You can disable the Sendmail service with these commands: chkconfig sendmail off, service sendmail stop.
Important: Make sure that FQDN entry in /etc/hosts appears before the hostnames. If this is missing, the creation of the Zimbra certificate fails. The FQDN entry should look like this example. See zmcreatecert in the Zimbra Administrator’s Guide, Appendix A: Command-Line Utilities.
127.0.0.1 localhost.localdomain localhost your.ip.address FQDN yourhostname
1.4 Configure DNS In order to send and receive email, the Zimbra MTA must be configured in DNS with both A and MX records. For sending mail, the MTA uses DNS to resolve hostnames and email-routing information. To receive mail, the MX record must be configured correctly to route the message to the mail server.
During the installation process, ZCS checks to see if you have an MX record correctly configured. If it is not, an error is displayed suggesting that the domain name have an MX record configured in DNS.
You must configure a relay host if you do not enable DNS. After ZCS is installed, go to the Global Settings>MTA tab on the administration console and uncheck Enable DNS lookups. Enter the relay MTA address to use for external delivery.
Note: Even if a relay host is configured, an MX record is still required if the ZCS server is going to receive email from the Internet.
1.5 Overview of Installation Process When you run the install script, the Zimbra install verifies that the correct prerequisite packages are available to be installed.
• Zimbra Core installs the libraries, utilities, and monitoring tools.
• Zimbra LDAP installs the OpenLDAP software, which provides open source LDAP directory services.
• Zimbra MTA installs the Postfix open source MTA, the Clam AntiVirus antivirus engine, the SpamAssassin junk mail filter, and the Amavisd-New content filter.
• Zimbra Store installs the mailbox server, including Jetty, the servlet container for the Zimbra server.
• Zimbra Spell installs the Aspell open source spelling checker.
• Zimbra Apache is installed automatically when Zimbra Spell or Zimbra Convertd (See Note) is installed.
www.zimbra.com 11 www.redhat.com
Note: The zimbra-convertd package is a beta package for Network Edition customers that implements the ZCS 6.0 method of using convertd. For more information, contact Zimbra support.
• Zimbra SNMP installs the SNMP package for monitoring. This package is optional.
• Zimbra Logger installs tools for syslog aggregation, reporting, and message tracing. If you do not install Logger, you cannot use the message trace feature, the server statistics are not captures, and the server statistics section of the administration console does not display.
• Zimbra Proxy installs the proxy feature which can be configured for POP and IMAP proxy and for reverse proxy HTTP requests.
• Zimbra Archiving installs the Zimbra Archiving and Discovery feature. This is an optional feature for ZCS Network Edition that offers the ability to store and search all messages that were delivered to or sent by ZCS. When this package is installed on the mail server, the cross mailbox search function is enabled. Using the Archiving and Discovery feature can trigger additional mailbox license usage. To find out more about Zimbra Archiving and Discovery, contact Zimbra sales.
The Zimbra server configuration is menu driven. The installation menu shows you the default configuration values. The menu displays the logical host name and email domain name [mailhost.example.com] as configured on the computer. You can change any of the values. For single server installs, you must define the administrator’s password, which you use to log on to the administration console, and you specify the location of the Zimbra license xml file.
1.6 Downloading the Zimbra Software For the latest Zimbra software download, go to www.zimbra.com. Save the Zimbra Collaboration Suite archive file to the computer from which you will install the software.
1.7 Zimbra License Requirements for ZCS Network Edition A Zimbra license is required in order to create accounts in the Network Edition Zimbra Collaboration Suite servers.
A trial license and a regular license are available:
• Trial. You can obtain the trial license from the Zimbra license portal for free. The trial license allows you to create up to 50 users. It expires in 60 days.
• Regular. You must purchase the Zimbra Regular license. This license is valid for a specific Zimbra Collaboration Suite system and is encrypted with the number of Zimbra accounts (seats) you have purchased, the effective date, and expiration date of the regular license.
www.redhat.com 12 www.zimbra.com
Go to Zimbra’s Website to obtain a trial license from the Network Downloads area. Contact Zimbra sales to purchase a regular license, by emailing [email protected] or calling 1-650-212-7767, extension 100.
The regular license can only be installed on the ZCS system for which it is purchased. Only one Zimbra license is required for your Zimbra Collaboration Suite environment.
Current license information, including the number of accounts purchased, the number of accounts used, and the expiration date, can be viewed from Global Settings>License tab on the administration console.
1.8 Basic Configuration The default configuration installs the Zimbra-LDAP, the Zimbra-MTA with anti-virus and anti-spam protection, the Zimbra mailbox server, the SNMP monitoring tools (optional), Zimbra-spell (optional), the logger tool (optional), and the Zimbra proxy (optional) on one server.
The menu driven installation displays the components and their existing default values. You can modify the information during the installation process.
The table below describes the menu options
Table 2 Main Menu Options
Main Menu Description
1) Common Configuration - These are common settings for all servers
Hostname The host name configured in the operating system installation
LDAP master host The LDAP host name. On a single server installation, this name is the same as the hostname.
LDAP port The default port is 389
LDAP Admin password
This is the master LDAP password.
www.zimbra.com 13 www.redhat.com
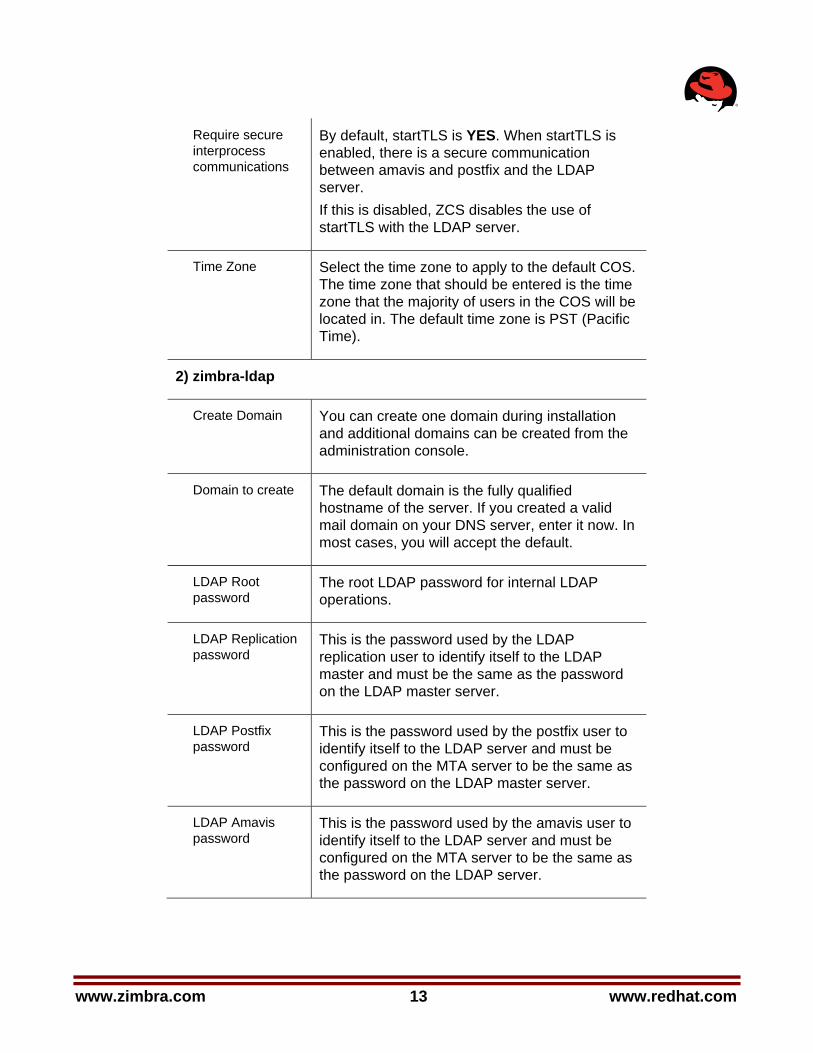
Require secure interprocess communications
By default, startTLS is YES. When startTLS is enabled, there is a secure communication between amavis and postfix and the LDAP server. If this is disabled, ZCS disables the use of startTLS with the LDAP server.
Time Zone Select the time zone to apply to the default COS. The time zone that should be entered is the time zone that the majority of users in the COS will be located in. The default time zone is PST (Pacific Time).
2) zimbra-ldap
Create Domain You can create one domain during installation and additional domains can be created from the administration console.
Domain to create The default domain is the fully qualified hostname of the server. If you created a valid mail domain on your DNS server, enter it now. In most cases, you will accept the default.
LDAP Root password
The root LDAP password for internal LDAP operations.
LDAP Replication password
This is the password used by the LDAP replication user to identify itself to the LDAP master and must be the same as the password on the LDAP master server.
LDAP Postfix password
This is the password used by the postfix user to identify itself to the LDAP server and must be configured on the MTA server to be the same as the password on the LDAP master server.
LDAP Amavis password
This is the password used by the amavis user to identify itself to the LDAP server and must be configured on the MTA server to be the same as the password on the LDAP server.
www.redhat.com 14 www.zimbra.com
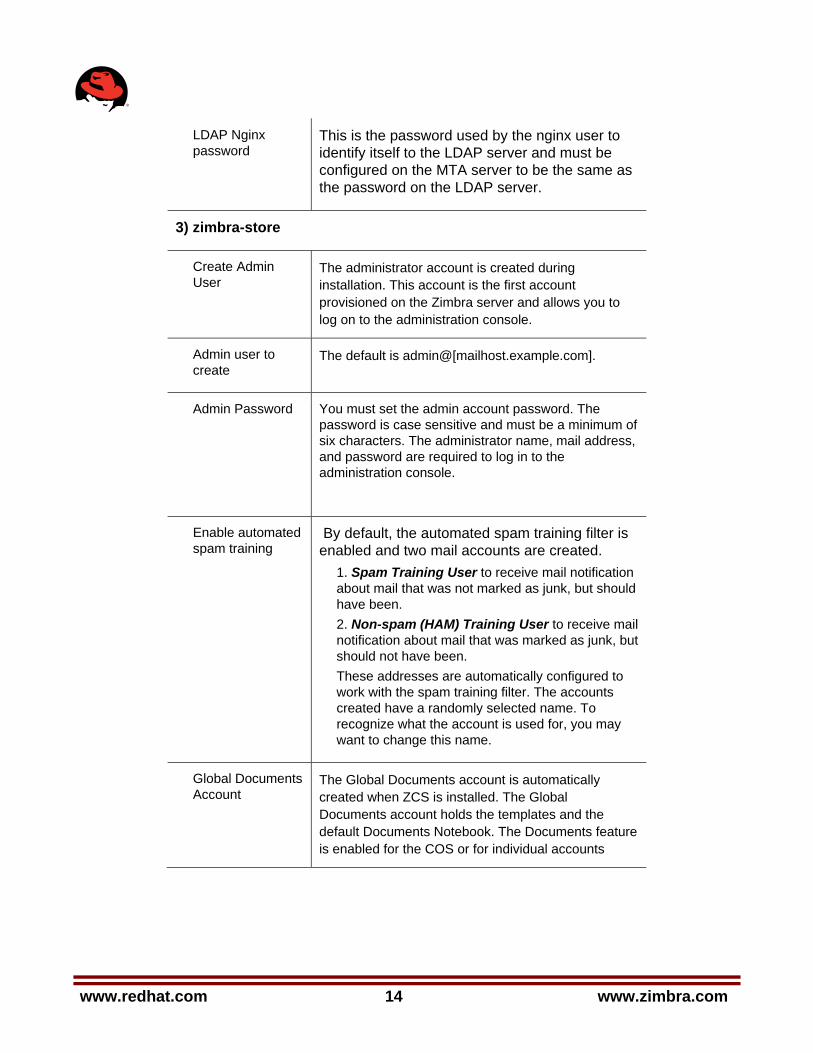
LDAP Nginx password
This is the password used by the nginx user to identify itself to the LDAP server and must be configured on the MTA server to be the same as the password on the LDAP server.
3) zimbra-store
Create Admin User
The administrator account is created during installation. This account is the first account provisioned on the Zimbra server and allows you to log on to the administration console.
Admin user to create
The default is admin@[mailhost.example.com].
Admin Password You must set the admin account password. The password is case sensitive and must be a minimum of six characters. The administrator name, mail address, and password are required to log in to the administration console.
Enable automated spam training
By default, the automated spam training filter is enabled and two mail accounts are created.
1. Spam Training User to receive mail notification about mail that was not marked as junk, but should have been. 2. Non-spam (HAM) Training User to receive mail notification about mail that was marked as junk, but should not have been. These addresses are automatically configured to work with the spam training filter. The accounts created have a randomly selected name. To recognize what the account is used for, you may want to change this name.
Global Documents Account
The Global Documents account is automatically created when ZCS is installed. The Global Documents account holds the templates and the default Documents Notebook. The Documents feature is enabled for the COS or for individual accounts
www.zimbra.com 15 www.redhat.com
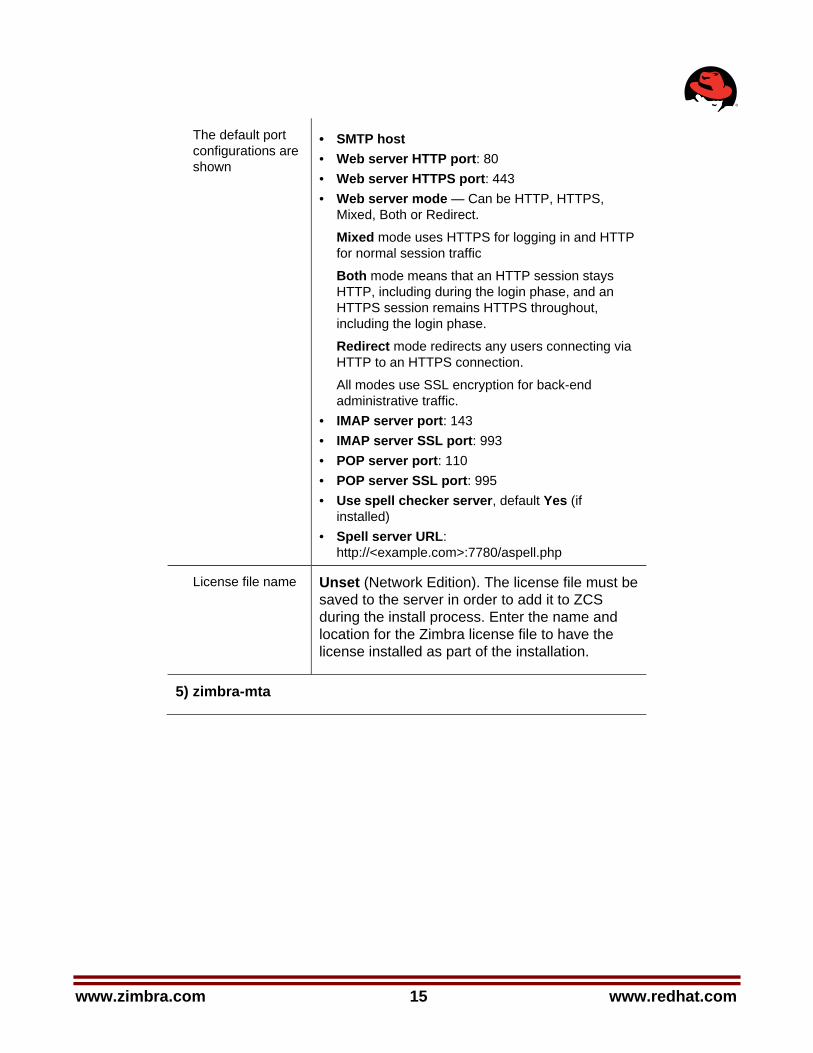
The default port configurations are shown
• SMTP host • Web server HTTP port: 80 • Web server HTTPS port: 443 • Web server mode — Can be HTTP, HTTPS,
Mixed, Both or Redirect.
Mixed mode uses HTTPS for logging in and HTTP for normal session traffic
Both mode means that an HTTP session stays HTTP, including during the login phase, and an HTTPS session remains HTTPS throughout, including the login phase.
Redirect mode redirects any users connecting via HTTP to an HTTPS connection.
All modes use SSL encryption for back-end administrative traffic.
• IMAP server port: 143 • IMAP server SSL port: 993 • POP server port: 110 • POP server SSL port: 995 • Use spell checker server, default Yes (if
installed) • Spell server URL:
http://<example.com>:7780/aspell.php
License file name Unset (Network Edition). The license file must be saved to the server in order to add it to ZCS during the install process. Enter the name and location for the Zimbra license file to have the license installed as part of the installation.
5) zimbra-mta

www.redhat.com 16 www.zimbra.com
• MTA Auth host — This is configured automatically if the MTA authentication server host is on the same server, but must be configured if the authentication server is not on the MTA.
• Enable Spamassassin — Default is enabled. • Enable ClamAV — Default is enabled. • Notification address for AV alerts — Sets the
notification address for AV alerts. You can either accept the default or create a new address. If you create a new address, remember to provision this address from the admin console.
Note: If the virus notification address does not exist and your host name is the same as the domain name on the Zimbra server, the virus notifications queue in the Zimbra MTA server cannot be delivered.
• Bind password for Postfix LDAP user. Automatically set.This is the password used by the postfix user to identify itself to the LDAP server and must be configured on the MTA server to be the same as the password on the LDAP master server.
• Bind password for Amavis LDAP user. Automatically set. This is the password used by the amavis user to identify itself to the LDAP server and must be configured on the MTA server to be the same as the password on the LDAP server.
5) zimbra-snmp (optional)
• Enable SNMP notifications — The default is Yes. • SNMP Trap hostname • Enable SMTP notification — The default is Yes. • SMTP Source email address • SMTP Destination email address
6) zimbra-logger When installed, it is automatically enabled. Logs from the hosts are sent to the mailbox server where zimbra-logger is installed and the information is used to generate the statistics graphs and for message tracing.
7) zimbra-spell (optional) When installed, it is automatically enabled.
www.zimbra.com 17 www.redhat.com
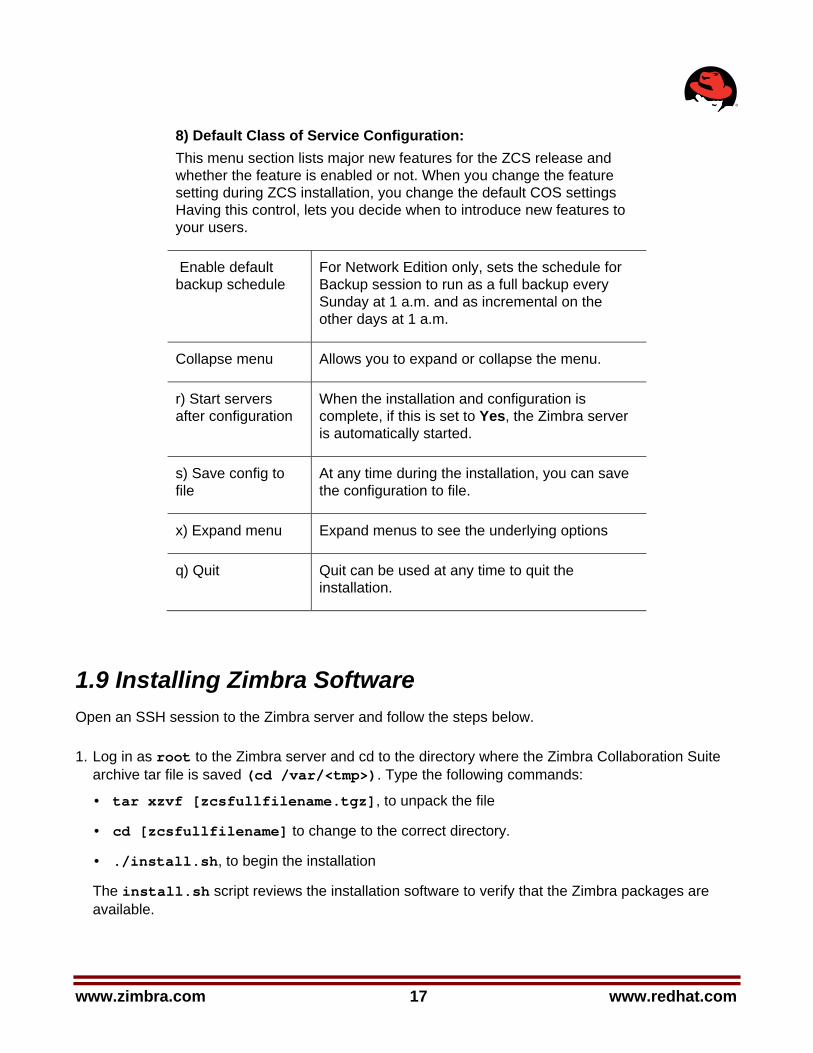
8) Default Class of Service Configuration: This menu section lists major new features for the ZCS release and whether the feature is enabled or not. When you change the feature setting during ZCS installation, you change the default COS settings Having this control, lets you decide when to introduce new features to your users.
Enable default backup schedule
For Network Edition only, sets the schedule for Backup session to run as a full backup every Sunday at 1 a.m. and as incremental on the other days at 1 a.m.
Collapse menu Allows you to expand or collapse the menu.
r) Start servers after configuration
When the installation and configuration is complete, if this is set to Yes, the Zimbra server is automatically started.
s) Save config to file
At any time during the installation, you can save the configuration to file.
x) Expand menu Expand menus to see the underlying options
q) Quit Quit can be used at any time to quit the installation.
1.9 Installing Zimbra Software Open an SSH session to the Zimbra server and follow the steps below.
1. Log in as root to the Zimbra server and cd to the directory where the Zimbra Collaboration Suite archive tar file is saved (cd /var/<tmp>). Type the following commands:
• tar xzvf [zcsfullfilename.tgz], to unpack the file
• cd [zcsfullfilename] to change to the correct directory.
• ./install.sh, to begin the installation
The install.sh script reviews the installation software to verify that the Zimbra packages are available.
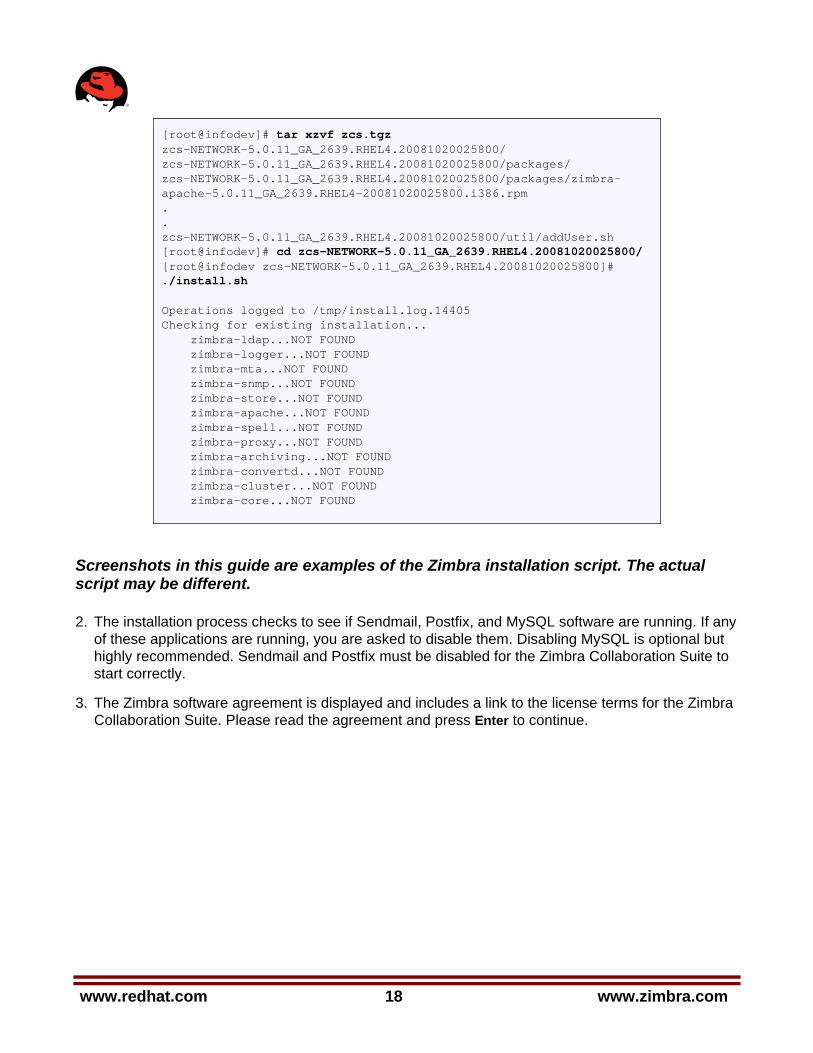
www.redhat.com 18 www.zimbra.com
[root@infodev]# tar xzvf zcs.tgz zcs-NETWORK-5.0.11_GA_2639.RHEL4.20081020025800/ zcs-NETWORK-5.0.11_GA_2639.RHEL4.20081020025800/packages/ zcs-NETWORK-5.0.11_GA_2639.RHEL4.20081020025800/packages/zimbra-apache-5.0.11_GA_2639.RHEL4-20081020025800.i386.rpm . . zcs-NETWORK-5.0.11_GA_2639.RHEL4.20081020025800/util/addUser.sh [root@infodev]# cd zcs-NETWORK-5.0.11_GA_2639.RHEL4.20081020025800/ [root@infodev zcs-NETWORK-5.0.11_GA_2639.RHEL4.20081020025800]# ./install.sh Operations logged to /tmp/install.log.14405 Checking for existing installation... zimbra-ldap...NOT FOUND zimbra-logger...NOT FOUND zimbra-mta...NOT FOUND zimbra-snmp...NOT FOUND zimbra-store...NOT FOUND zimbra-apache...NOT FOUND zimbra-spell...NOT FOUND zimbra-proxy...NOT FOUND zimbra-archiving...NOT FOUND zimbra-convertd...NOT FOUND zimbra-cluster...NOT FOUND zimbra-core...NOT FOUND
Screenshots in this guide are examples of the Zimbra installation script. The actual script may be different.
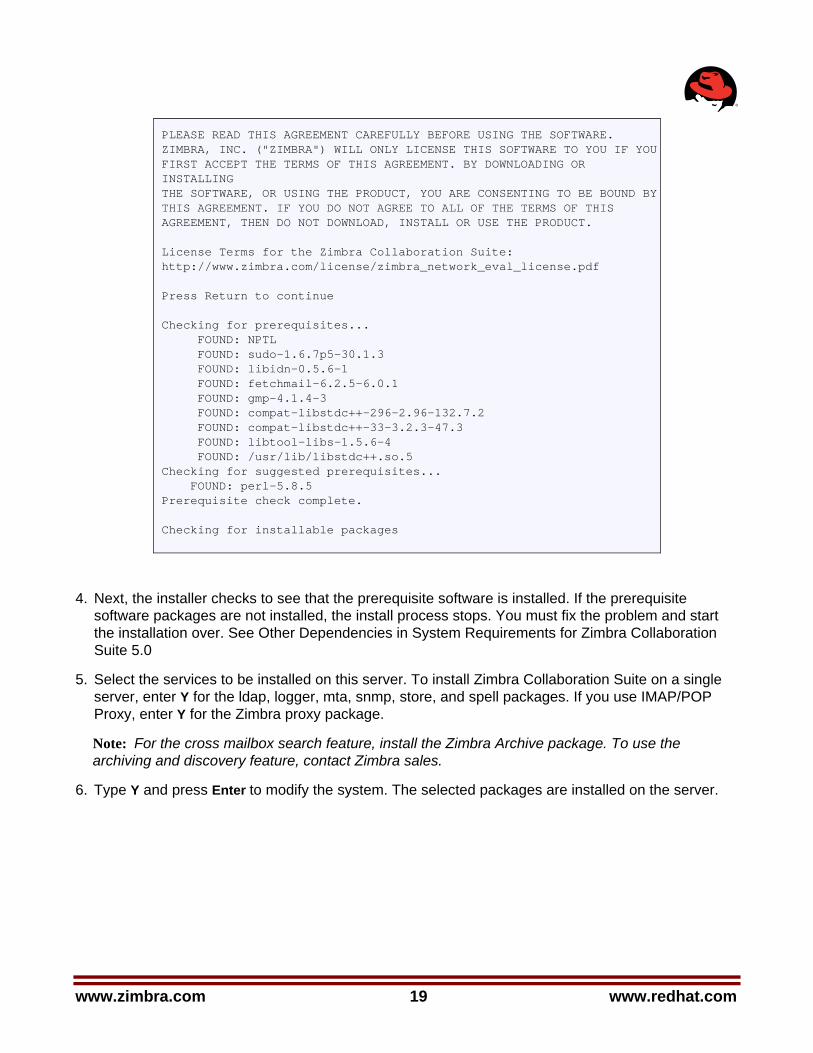
2. The installation process checks to see if Sendmail, Postfix, and MySQL software are running. If any of these applications are running, you are asked to disable them. Disabling MySQL is optional but highly recommended. Sendmail and Postfix must be disabled for the Zimbra Collaboration Suite to start correctly.
3. The Zimbra software agreement is displayed and includes a link to the license terms for the Zimbra Collaboration Suite. Please read the agreement and press Enter to continue.
www.zimbra.com 19 www.redhat.com
PLEASE READ THIS AGREEMENT CAREFULLY BEFORE USING THE SOFTWARE. ZIMBRA, INC. ("ZIMBRA") WILL ONLY LICENSE THIS SOFTWARE TO YOU IF YOUFIRST ACCEPT THE TERMS OF THIS AGREEMENT. BY DOWNLOADING OR INSTALLING THE SOFTWARE, OR USING THE PRODUCT, YOU ARE CONSENTING TO BE BOUND BYTHIS AGREEMENT. IF YOU DO NOT AGREE TO ALL OF THE TERMS OF THIS AGREEMENT, THEN DO NOT DOWNLOAD, INSTALL OR USE THE PRODUCT. License Terms for the Zimbra Collaboration Suite: http://www.zimbra.com/license/zimbra_network_eval_license.pdf Press Return to continue Checking for prerequisites... FOUND: NPTL FOUND: sudo-1.6.7p5-30.1.3 FOUND: libidn-0.5.6-1 FOUND: fetchmail-6.2.5-6.0.1 FOUND: gmp-4.1.4-3 FOUND: compat-libstdc++-296-2.96-132.7.2 FOUND: compat-libstdc++-33-3.2.3-47.3 FOUND: libtool-libs-1.5.6-4 FOUND: /usr/lib/libstdc++.so.5 Checking for suggested prerequisites... FOUND: perl-5.8.5 Prerequisite check complete. Checking for installable packages
4. Next, the installer checks to see that the prerequisite software is installed. If the prerequisite software packages are not installed, the install process stops. You must fix the problem and start the installation over. See Other Dependencies in System Requirements for Zimbra Collaboration Suite 5.0
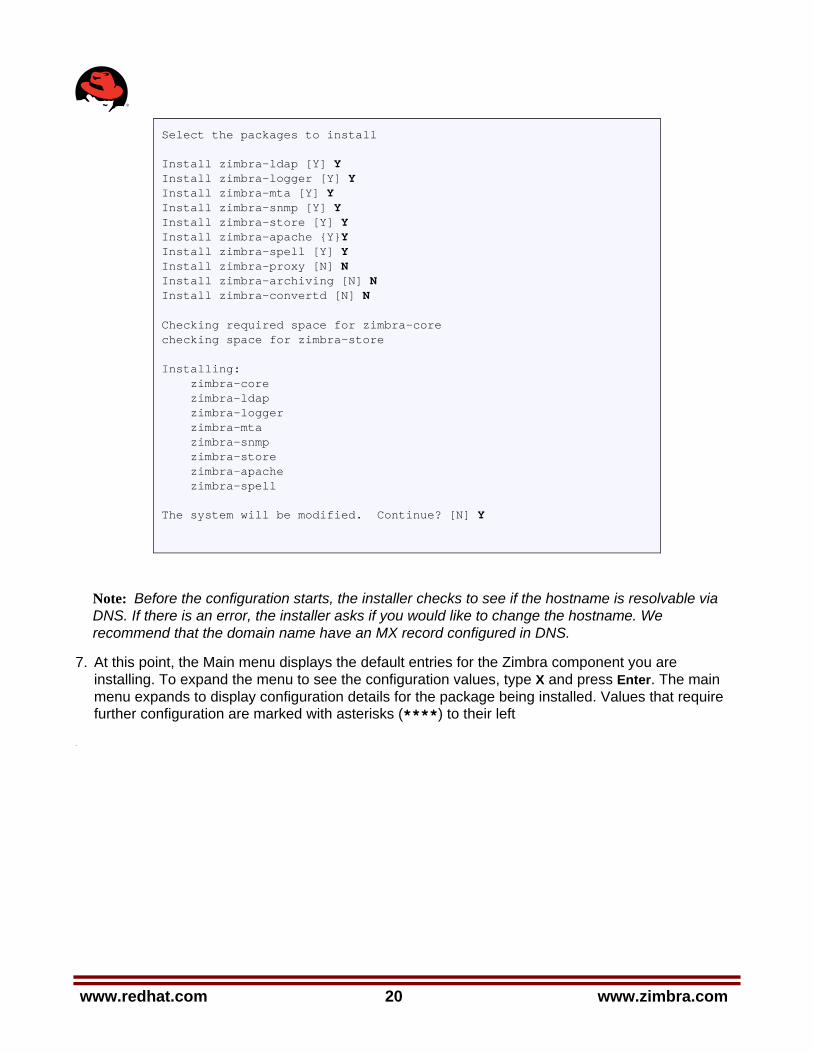
5. Select the services to be installed on this server. To install Zimbra Collaboration Suite on a single server, enter Y for the ldap, logger, mta, snmp, store, and spell packages. If you use IMAP/POP Proxy, enter Y for the Zimbra proxy package.
Note: For the cross mailbox search feature, install the Zimbra Archive package. To use the archiving and discovery feature, contact Zimbra sales.
6. Type Y and press Enter to modify the system. The selected packages are installed on the server.
www.redhat.com 20 www.zimbra.com
Select the packages to install Install zimbra-ldap [Y] Y Install zimbra-logger [Y] Y Install zimbra-mta [Y] Y Install zimbra-snmp [Y] Y Install zimbra-store [Y] Y Install zimbra-apache {Y}Y Install zimbra-spell [Y] Y Install zimbra-proxy [N] N Install zimbra-archiving [N] N Install zimbra-convertd [N] N Checking required space for zimbra-core checking space for zimbra-store Installing: zimbra-core zimbra-ldap zimbra-logger zimbra-mta zimbra-snmp zimbra-store zimbra-apache zimbra-spell The system will be modified. Continue? [N] Y
Note: Before the configuration starts, the installer checks to see if the hostname is resolvable via DNS. If there is an error, the installer asks if you would like to change the hostname. We recommend that the domain name have an MX record configured in DNS.
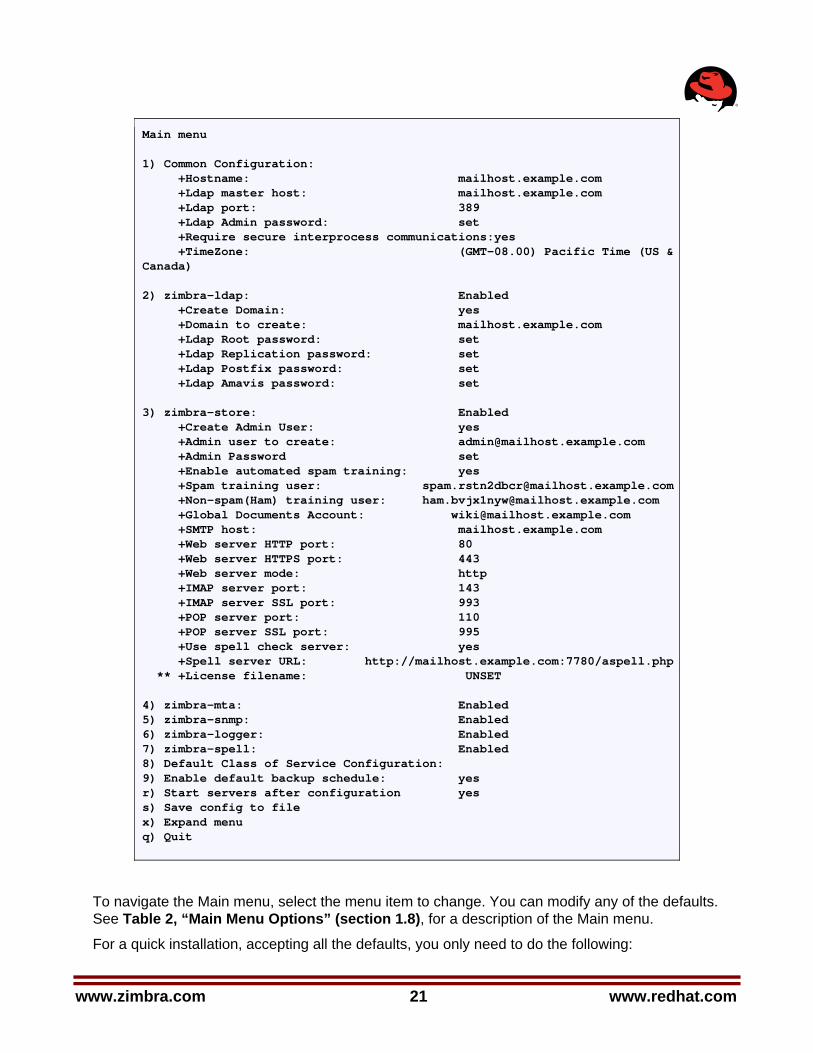
7. At this point, the Main menu displays the default entries for the Zimbra component you are installing. To expand the menu to see the configuration values, type X and press Enter. The main menu expands to display configuration details for the package being installed. Values that require further configuration are marked with asterisks (****) to their left
.
www.zimbra.com 21 www.redhat.com
Main menu 1) Common Configuration: +Hostname: mailhost.example.com +Ldap master host: mailhost.example.com +Ldap port: 389 +Ldap Admin password: set +Require secure interprocess communications:yes +TimeZone: (GMT-08.00) Pacific Time (US & Canada) 2) zimbra-ldap: Enabled +Create Domain: yes +Domain to create: mailhost.example.com +Ldap Root password: set +Ldap Replication password: set +Ldap Postfix password: set +Ldap Amavis password: set 3) zimbra-store: Enabled +Create Admin User: yes +Admin user to create: [email protected] +Admin Password set +Enable automated spam training: yes +Spam training user: [email protected] +Non-spam(Ham) training user: [email protected] +Global Documents Account: [email protected] +SMTP host: mailhost.example.com +Web server HTTP port: 80 +Web server HTTPS port: 443 +Web server mode: http +IMAP server port: 143 +IMAP server SSL port: 993 +POP server port: 110 +POP server SSL port: 995 +Use spell check server: yes +Spell server URL: http://mailhost.example.com:7780/aspell.php ** +License filename: UNSET 4) zimbra-mta: Enabled 5) zimbra-snmp: Enabled 6) zimbra-logger: Enabled 7) zimbra-spell: Enabled 8) Default Class of Service Configuration: 9) Enable default backup schedule: yes r) Start servers after configuration yes s) Save config to file x) Expand menu q) Quit
To navigate the Main menu, select the menu item to change. You can modify any of the defaults. See Table 2, “Main Menu Options” (section 1.8), for a description of the Main menu.
For a quick installation, accepting all the defaults, you only need to do the following:
www.redhat.com 22 www.zimbra.com
8. If your time zone is not Pacific time, enter 1 to select Main menu 1, Common Configuration and then enter 5 for TimeZone. Set the correct time zone.
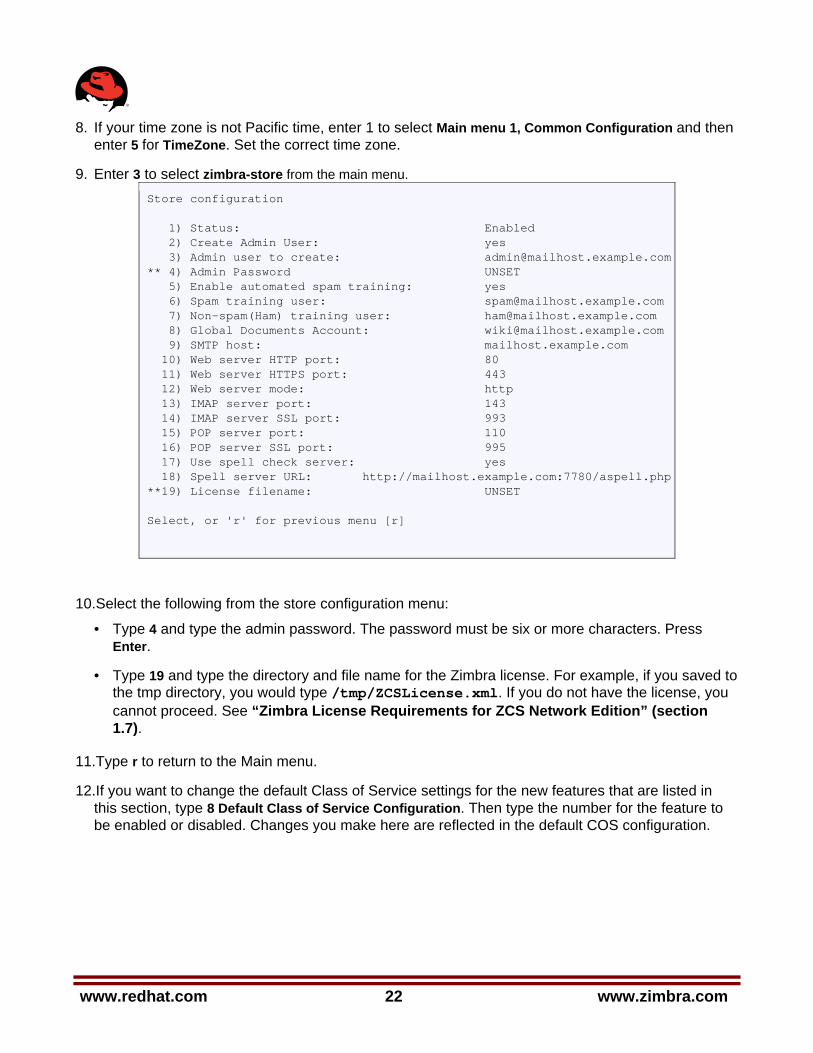
9. Enter 3 to select zimbra-store from the main menu.
Store configuration 1) Status: Enabled 2) Create Admin User: yes 3) Admin user to create: [email protected]** 4) Admin Password UNSET 5) Enable automated spam training: yes 6) Spam training user: [email protected] 7) Non-spam(Ham) training user: [email protected] 8) Global Documents Account: [email protected] 9) SMTP host: mailhost.example.com 10) Web server HTTP port: 80 11) Web server HTTPS port: 443 12) Web server mode: http 13) IMAP server port: 143 14) IMAP server SSL port: 993 15) POP server port: 110 16) POP server SSL port: 995 17) Use spell check server: yes 18) Spell server URL: http://mailhost.example.com:7780/aspell.php**19) License filename: UNSET Select, or 'r' for previous menu [r]
10.Select the following from the store configuration menu:
• Type 4 and type the admin password. The password must be six or more characters. Press Enter.
• Type 19 and type the directory and file name for the Zimbra license. For example, if you saved to the tmp directory, you would type /tmp/ZCSLicense.xml. If you do not have the license, you cannot proceed. See “Zimbra License Requirements for ZCS Network Edition” (section 1.7).
11.Type r to return to the Main menu.
12.If you want to change the default Class of Service settings for the new features that are listed in this section, type 8 Default Class of Service Configuration. Then type the number for the feature to be enabled or disabled. Changes you make here are reflected in the default COS configuration.
www.zimbra.com 23 www.redhat.com
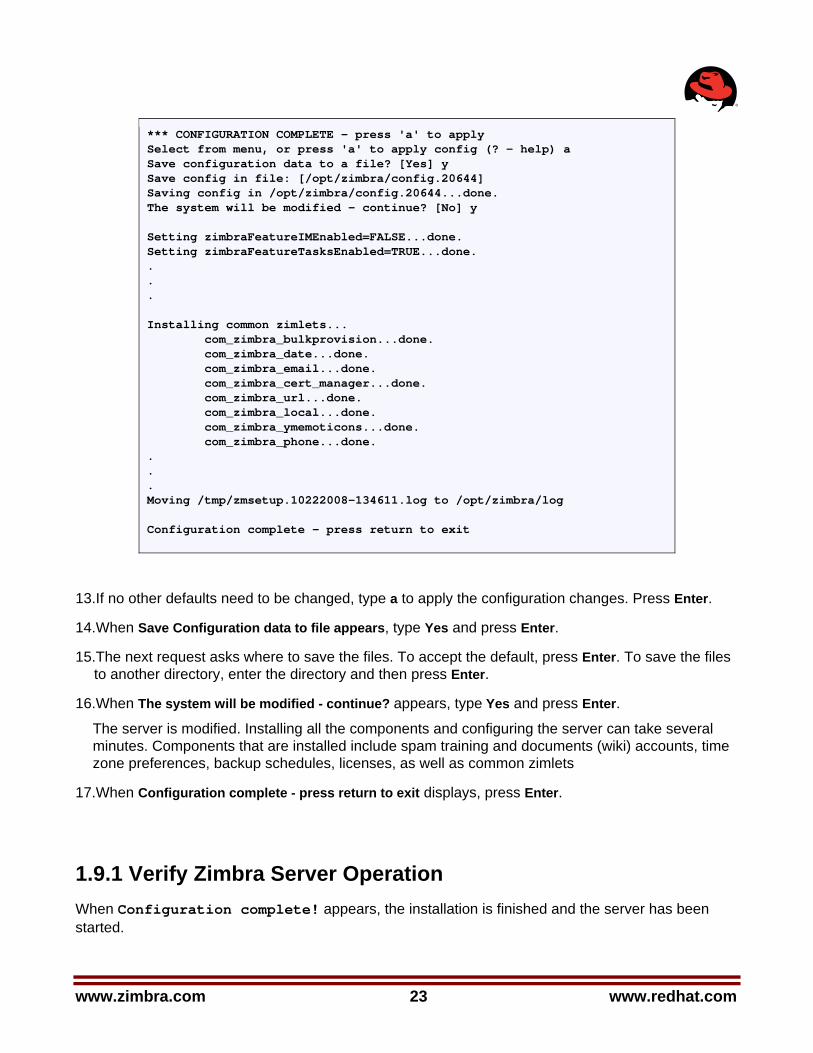
*** CONFIGURATION COMPLETE - press 'a' to apply Select from menu, or press 'a' to apply config (? - help) a Save configuration data to a file? [Yes] y Save config in file: [/opt/zimbra/config.20644] Saving config in /opt/zimbra/config.20644...done. The system will be modified - continue? [No] y Setting zimbraFeatureIMEnabled=FALSE...done. Setting zimbraFeatureTasksEnabled=TRUE...done. . . . Installing common zimlets... com_zimbra_bulkprovision...done. com_zimbra_date...done. com_zimbra_email...done. com_zimbra_cert_manager...done. com_zimbra_url...done. com_zimbra_local...done. com_zimbra_ymemoticons...done. com_zimbra_phone...done. . . . Moving /tmp/zmsetup.10222008-134611.log to /opt/zimbra/log Configuration complete - press return to exit
13.If no other defaults need to be changed, type a to apply the configuration changes. Press Enter.
14.When Save Configuration data to file appears, type Yes and press Enter.
15.The next request asks where to save the files. To accept the default, press Enter. To save the files to another directory, enter the directory and then press Enter.
16.When The system will be modified - continue? appears, type Yes and press Enter.
The server is modified. Installing all the components and configuring the server can take several minutes. Components that are installed include spam training and documents (wiki) accounts, time zone preferences, backup schedules, licenses, as well as common zimlets
17.When Configuration complete - press return to exit displays, press Enter.
1.9.1 Verify Zimbra Server Operation When Configuration complete! appears, the installation is finished and the server has been started.
www.redhat.com 24 www.zimbra.com
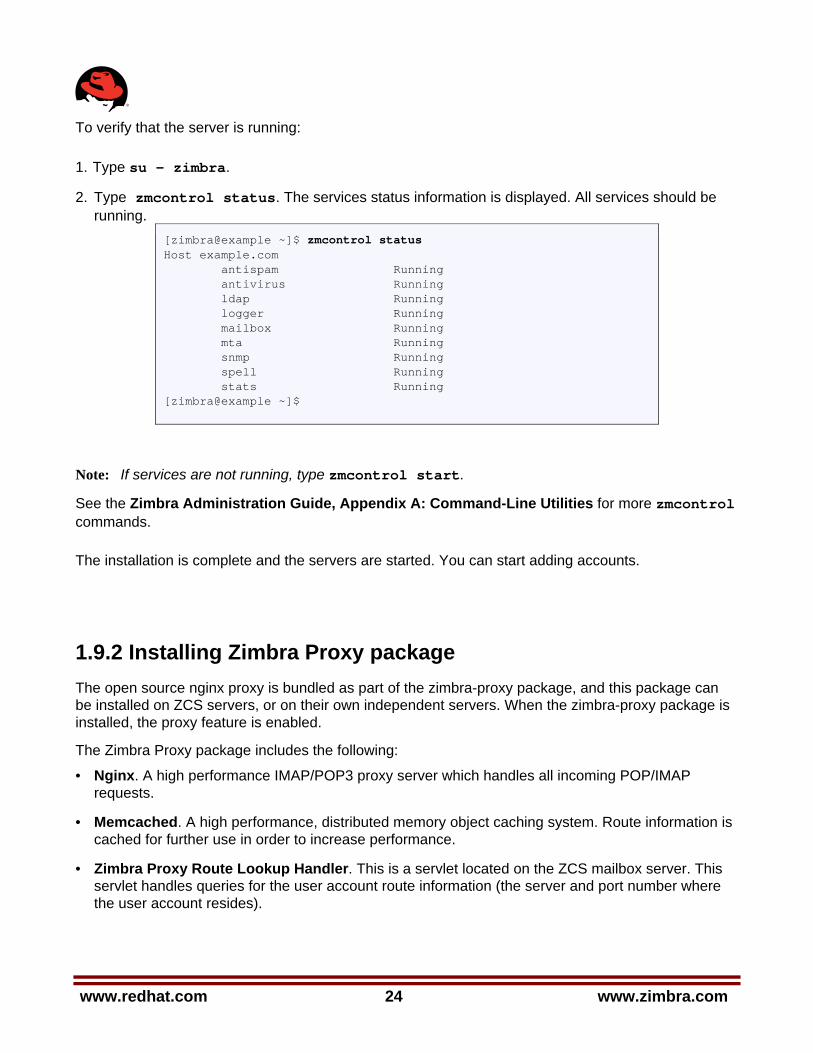
To verify that the server is running:
1. Type su - zimbra.
2. Type zmcontrol status. The services status information is displayed. All services should be running.
[zimbra@example ~]$ zmcontrol status Host example.com antispam Running antivirus Running ldap Running logger Running mailbox Running mta Running snmp Running spell Running stats Running [zimbra@example ~]$
Note: If services are not running, type zmcontrol start.
See the Zimbra Administration Guide, Appendix A: Command-Line Utilities for more zmcontrol commands.
The installation is complete and the servers are started. You can start adding accounts.
1.9.2 Installing Zimbra Proxy package The open source nginx proxy is bundled as part of the zimbra-proxy package, and this package can be installed on ZCS servers, or on their own independent servers. When the zimbra-proxy package is installed, the proxy feature is enabled.
The Zimbra Proxy package includes the following:
• Nginx. A high performance IMAP/POP3 proxy server which handles all incoming POP/IMAP requests.
• Memcached. A high performance, distributed memory object caching system. Route information is cached for further use in order to increase performance.
• Zimbra Proxy Route Lookup Handler. This is a servlet located on the ZCS mailbox server. This servlet handles queries for the user account route information (the server and port number where the user account resides).
www.zimbra.com 25 www.redhat.com
1.10 Provisioning Accounts Once the mailbox server is running, open your browser, enter the administration console URL and log on to the console to provision email accounts. The administration console URL is entered as:
https://[mailhost.example.com]:7071/zimbraAdmin
Note: To go to the administration console, you must type https, even if you configured the Web server mode as HTTP.
The first time you log on, a certificate authority (CA) alert may be displayed. Click Accept this certificate permanently to accept the certificate and be able connect to the Zimbra administration console. Then click OK.
Enter the admin user name and password configured during the installation process. Enter the name as [email protected].
To provision accounts:
1. From the administration console Navigation pane, click Accounts.
Note: Four accounts are listed: admin account, two spam training accounts, and a global Documents account. These accounts do not need any additional configuration.
2. Click New. The first page of the New Account Wizard opens.
3. Enter the account name to be used as the email address and the last name. This the only required information to create an account.
4. You can click Finish at this point, and the account is configured with the default COS and global features.
To configure aliases, forwarding addresses, and specific features for this account, proceed through the dialog before you click Finish.
When the accounts are provisioned, you can send and receive emails.
1.10.1 Importing Content from User Mailboxes Zimbra developed different applications to facilitate moving a user’s email messages, calendars, and contacts from their old email servers to their accounts on the Zimbra server. When the user’s files are imported, the folder hierarchy is maintained. Use one of the ZCS utilities to move user mail to ZCS to guarantee that all information is imported correctly.
The following applications can be accessed from the administration console Download page, and instruction guides are available from the Help Desk page or from the Zimbra Website, Documents page.
• ZCS Migration Wizard for Exchange. Format is an .exe file. You can migrate users from Microsoft® Exchange server email accounts to Zimbra server accounts.
www.redhat.com 26 www.zimbra.com
• ZCS Migration Wizard for Lotus® Domino®. Format is an .exe file. You can migrate users from Lotus Domino server email accounts to Zimbra server accounts.
• Zimbra Collaboration Suite Import Wizard for Outlook®. Format is an .exe file. Users download the Import Wizard to their computers and run the executable file to import their Outlook .pst files to the Zimbra server. Before users run this utility, Zimbra recommends that they run the Outlook Inbox Repair tool, scanpst.exe, on their .pst files, to clean up any errors in their file. For more information about this tool, go to http://support.microsoft.com/kb/287497 .
1.10.2 Administrator’s Account Initial administrative tasks when you log on for the first time may include setting up the admin mailbox to include features, aliases, and forwarding addresses needed for the administrator’s working environment.
Two aliases for the admin account are created during install:
• Postmaster. The postmaster address is displayed in emails that are automatically generated from Postfix when messages cannot be sent. If users reply to this address, the message is forwarded to the admin mailbox.
• Root. This address is where notification messages from the operating system are sent.
If you didn’t change the default during installation, the anti-virus notification is sent directly to the admin account.
1.11 Uninstalling Zimbra Collaboration Suite To uninstall servers, run the install script -u, delete the zcs directory, and remove the zcs.tgz file on the servers.
1. cd to the original install directory for the zcs files.
2. Type ./install.sh -u.
3. When Completely remove existing installation? is displayed, type Yes.
The Zimbra servers are stopped, the existing packages, the webapp directories, and the /opt/zimbra directory are removed.
4. Type rm -rf [zcsfullfilename] to delete the ZCS directory.
5. Delete the zcs.tgz file.
www.zimbra.com 27 www.redhat.com
1.12 Additional Information To learn more about the Zimbra Collaboration Suite, read the Administrator’s Guide and Help. The Zimbra guides and release notes in .pdf format can be found in the opt/zimbra/docs directory and is also available from the administration console Help button and from the Zimbra Website.
• Administrator’s Guide. This guide describes product architecture, server functionality, administration tasks, configuration options, and backup and restore procedures. The guide is available in pdf format from the administrator’s console, and in HTML format on the Zimbra Website.
• Administrator Help. The administrator Help provides detailed instructions about how to add and maintain your servers, domains, and user accounts from the admin console.
1.13 Support and Contact Information Visit www.zimbra.com to join the community and to be a part of building the best open source messaging solution. We appreciate your feedback and suggestions.
• Contact [email protected] to purchase the Zimbra Collaboration Suite.
• Network Edition customers can contact support at [email protected].
• Explore the Zimbra Forums for answers to installation or configuration problems.
• Join the Zimbra Community Forums, to participate and learn more about the Zimbra Collaboration Suite.
• Send an email to [email protected] to let us know what you like about the product and what you would like to see in the product. Or, if you prefer, post your ideas to the Zimbra Forums.
If you encounter problems with this software, visit www.zimbra.com and submit a bug report. Make sure you provide enough detail so that the bug can be easily duplicated.
www.redhat.com 28 www.zimbra.com
2. Zimbra™ Collaboration Multi-Server Installation Network Edition
2.1 Introduction Information in this guide is intended for persons responsible for installing the Zimbra Collaboration Suite. This guide will help you plan and perform all installation procedures necessary to deploy a fully functioning email system based on Zimbra’s messaging technology.
This guide covers the installation of Zimbra Collaboration Suite Network Edition 5.0.
2.1.1 Audience This installation guide assumes you have a thorough understanding of system administration concepts and tasks and are familiar with email communication standards, security concepts, directory services, and database management.
2.1.2 Zimbra Collaboration Suite License A Zimbra license is required in order to create accounts in the Network Edition Zimbra Collaboration Suite servers. You cannot install ZCS without a license.
The license types available are
• Trial. You can obtain the trial license from the Zimbra license portal for free. The trail license allows you to create up to 50 users. It expires in 60 days.
• Regular. You must purchase the Zimbra Regular license. This license is valid for a specific Zimbra Collaboration Suite system and is encrypted with the number of Zimbra accounts (seats) you have purchased, the effective date and expiration date of the regular license.
If do not have a license, go to Zimbra’s website to obtain a license from the Network Downloads area.
www.zimbra.com 29 www.redhat.com
2.1.3 For More Information Zimbra documentation, including a readme text file, the administration guide, and other Zimbra guides are copied to the servers during the installation. The major documentation types are listed below. You can access all the documents on the Zimbra website, www.zimbra.com and from the administration console, Help Desk page.
• Administrator’s Guide. This guide describes product architecture, server functionality, administration tasks, configuration options, and backup and restore procedures.
• Administrator Help. The administrator Help provides instructions about how to add and maintain your servers, domains, and user accounts from the admin console.
• Web Client Help. The Web Client Help provides instructions about how to use the Zimbra Web Client features.
• Migration Wizard Guides. These guide describes how to migrate users that are on Microsoft Exchange or Lotus Domino systems to the Zimbra Collaboration Suite.
• Clustering Guide. This guide describes how to setup clustering for a single server or multiple servers.
2.1.4 Support and Contact Information Visit www.zimbra.com to join the community and to be a part of building the best open source messaging solution. We appreciate your feedback and suggestions.
• Contact [email protected] to purchase Zimbra Collaboration Suite
• Network Edition customers can contact support at [email protected]
• Explore the Zimbra Forums for answers to installation or configuration problems
• Join the Zimbra Community Forum, to participate and learn more about the Zimbra Collaboration Suite.
• Send an email to [email protected] to let us know what you like about the product and what you would like to see in the product. If you prefer, post your ideas to the Zimbra Forum.
If you encounter problems with this software, visit Zimbra.com and submit a bug report. Make sure you provide enough detail so that the bug can be easily duplicated.
www.redhat.com 30 www.zimbra.com
2.2 Preparing Your Server Environment In order to successfully install and run Zimbra Collaboration Suite, ensure your system meets the requirements described in this section.
• System requirements
• Operating system modifications
• DNS configuration requirements
Important: Do not manually create the user ‘zimbra’ before running the ZCS installation. The installation automatically creates this user and sets up its environment.
2.2.1 System Requirements For the ZCS system requirements see System Requirements for Zimbra Collaboration Suite 5.0 (Appendix A).
Important: The operating system that you use should be at the current patch level before you install ZCS. See the latest release notes for a list of the operating systems patches that have been tested with ZCS.
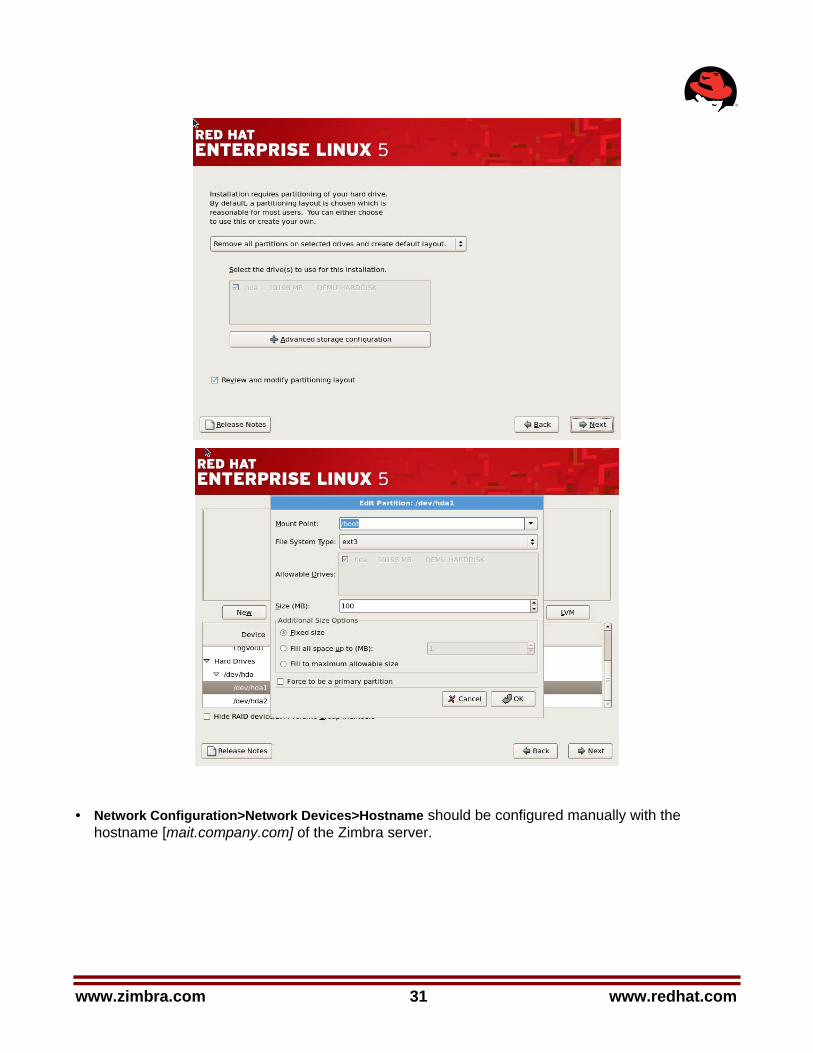
2.2.2 Installation Modifications for Red Hat Enterprise Linux The Zimbra Collaboration Suite runs on the Red Hat Enterprise Linux 4 or 5 operating system. When you install the Red Hat software for the Zimbra Collaboration Suite, accept the default setup answers to install the minimum configuration, except for the following steps that must be modified.
Refer to the Red Hat Enterprise Linux installation guide for detailed documentation about installing their software.
• Disk Partitioning Setup. Check Manually partition with DiskDruid. The disk partition should be set up as follows:
• The Mount Point/RAID Volume size for the /boot partition should be 100 MB.
• The Swap partition should be set to twice the size of the RAM on your machine.
• The Root partition (/) should be set with the remaining disk space size.
www.zimbra.com 31 www.redhat.com
• Network Configuration>Network Devices>Hostname should be configured manually with the hostname [mait.company.com] of the Zimbra server.
www.redhat.com 32 www.zimbra.com
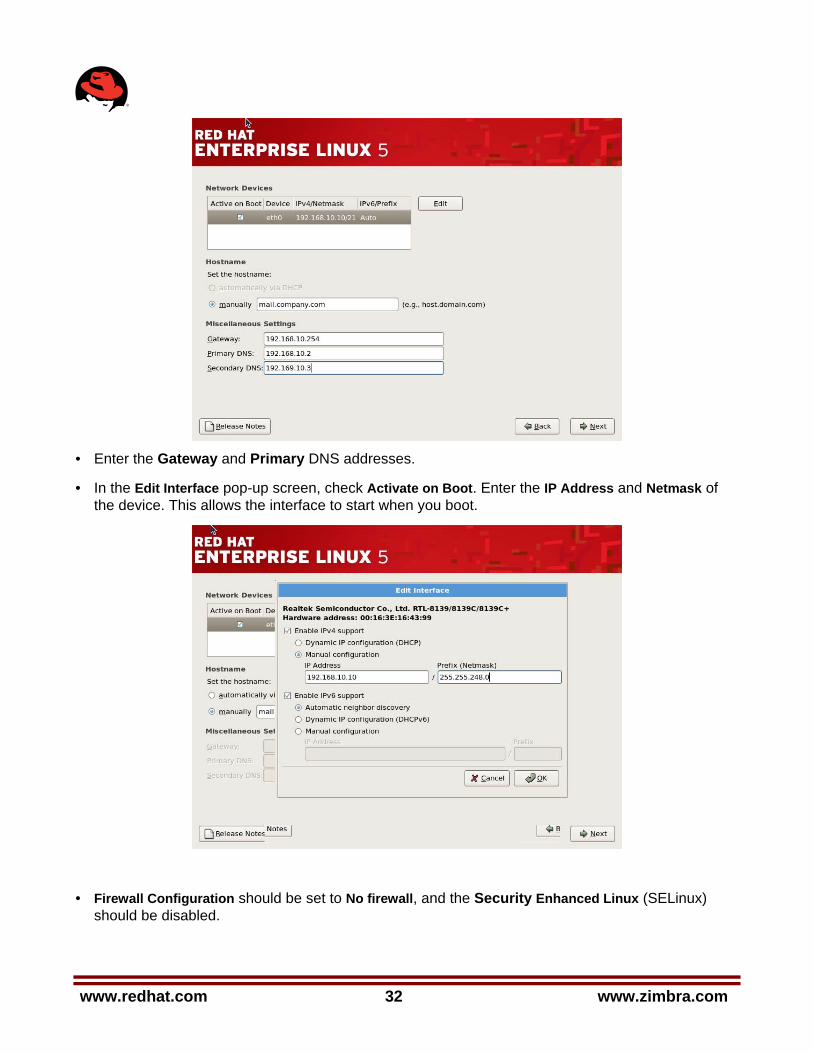
• Enter the Gateway and Primary DNS addresses.
• In the Edit Interface pop-up screen, check Activate on Boot. Enter the IP Address and Netmask of the device. This allows the interface to start when you boot.
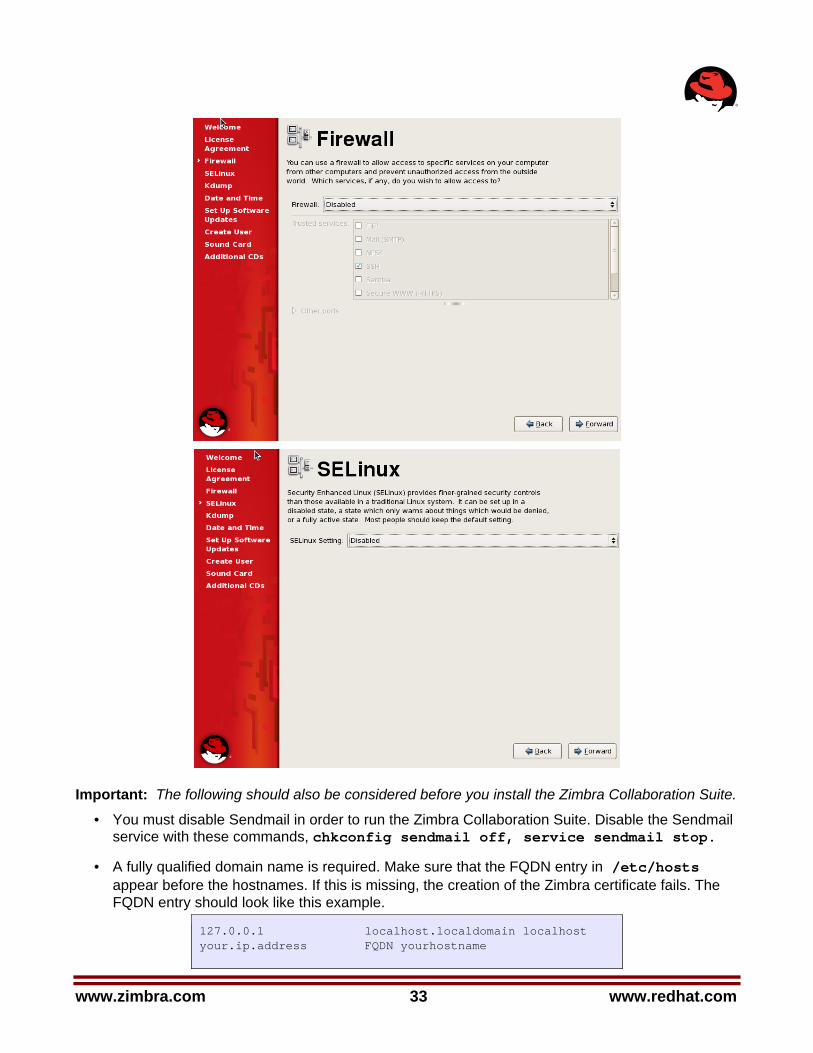
• Firewall Configuration should be set to No firewall, and the Security Enhanced Linux (SELinux) should be disabled.
www.zimbra.com 33 www.redhat.com
Important: The following should also be considered before you install the Zimbra Collaboration Suite.
• You must disable Sendmail in order to run the Zimbra Collaboration Suite. Disable the Sendmail service with these commands, chkconfig sendmail off, service sendmail stop.
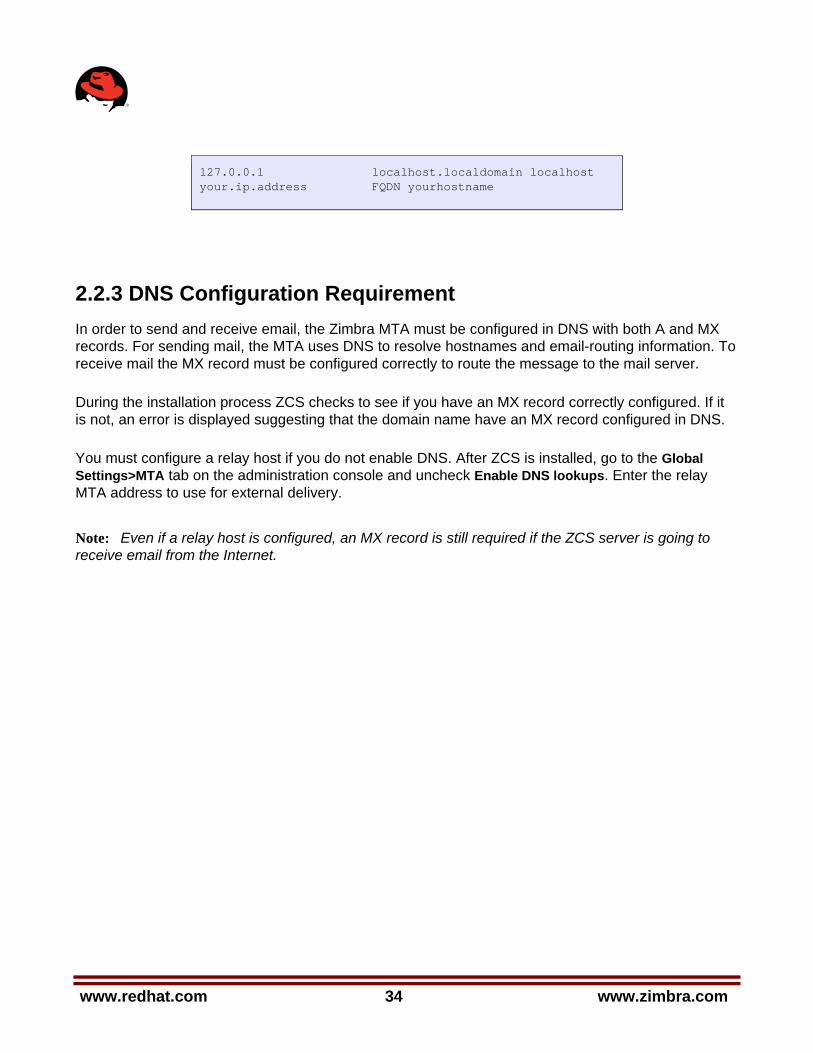
• A fully qualified domain name is required. Make sure that the FQDN entry in /etc/hosts appear before the hostnames. If this is missing, the creation of the Zimbra certificate fails. The FQDN entry should look like this example.
127.0.0.1 localhost.localdomain localhost your.ip.address FQDN yourhostname
www.redhat.com 34 www.zimbra.com
127.0.0.1 localhost.localdomain localhost your.ip.address FQDN yourhostname
2.2.3 DNS Configuration Requirement In order to send and receive email, the Zimbra MTA must be configured in DNS with both A and MX records. For sending mail, the MTA uses DNS to resolve hostnames and email-routing information. To receive mail the MX record must be configured correctly to route the message to the mail server.
During the installation process ZCS checks to see if you have an MX record correctly configured. If it is not, an error is displayed suggesting that the domain name have an MX record configured in DNS.
You must configure a relay host if you do not enable DNS. After ZCS is installed, go to the Global Settings>MTA tab on the administration console and uncheck Enable DNS lookups. Enter the relay MTA address to use for external delivery.
Note: Even if a relay host is configured, an MX record is still required if the ZCS server is going to receive email from the Internet.
www.zimbra.com 35 www.redhat.com
2.3 Planning for the Installation This chapter describes the components that are installed and reviews the configuration options that can be made when you install the Zimbra Collaboration Suite.
2.3.1 Zimbra Packages Zimbra architecture includes open-source integrations using industry standard protocols. The third-party software has been tested and configured to work with the Zimbra software.
The following describes the Zimbra packages that are installed.
• Zimbra Core. This package includes the libraries, utilities, monitoring tools, and basic configuration files. Zimbra Core is automatically installed on each server.
• Zimbra LDAP. User authentication is provided through OpenLDAP® software. Each account on the Zimbra server has a unique mailbox ID that is the primary point of reference to identify the account. The OpenLDAP schema has been customized for the Zimbra Collaboration Suite. The Zimbra LDAP server must be configured before the other servers. You can set up LDAP replication, configuring a master LDAP server and replica LDAP servers.
• Zimbra MTA. Postfix is the open source mail transfer agent (MTA) that receives email via SMTP and routes each message to the appropriate Zimbra mailbox server using Local Mail Transfer Protocol (LMTP). The Zimbra MTA also includes the anti-virus and anti-spam components.
• Zimbra Store. The Zimbra store includes the components for the mailbox server, including Jetty, which is the servlet container the Zimbra software runs within. The Zimbra mailbox server includes the following components:
• Data store. The data store is a MySQL® database.
• Message store. The message store is where all email messages and file attachments reside.
• Index store. Index and search technology is provided through Lucene. Index files are maintained for each mailbox.
• Zimbra SNMP. Installing the Zimbra SNMP package is optional. If you choose to install zimbra-SNMP for monitoring, this package should be installed on every Zimbra server.
• Zimbra Logger. Installing the Zimbra Logger package is optional. If you install the Logger package, it must be installed on the first mailbox server. The Zimbra logger installs tools for syslog aggregation, reporting, and message tracing. If you do not install Logger, you cannot use the message trace feature. In addition, the server statistics are not captured, and the server statistics section of the administration console will not display.
Note: The Logger package must be installed at the same time as the mailbox server.
• Zimbra Spell. Installing the Zimbra Spell package is optional. Aspell is the open source spell checker used on the Zimbra Web Client.
www.redhat.com 36 www.zimbra.com
• Zimbra Apache. This package is installed automatically when Zimbra Spell or Zimbra Convertd (See Note) is installed.
Note: The zimbra-convertd package is a beta package for Network Edition customers that implements the ZCS 6.0 method of using convertd. For more information, contact Zimbra support.
• Zimbra Proxy. Zimbra proxy can be configured as a POP and IMAP proxy server and for reverse proxy HTTP requests. This package can be installed on the mailbox server, MTA server or on its own independent server. When the zimbra-proxy package is installed, the proxy feature is enabled. Installing the Zimbra Proxy is optional.
• Zimbra Archiving. The Zimbra Archiving and Discovery feature is an optional feature for ZCS Network Edition. Archiving and Discovery offers the ability to store and search all messages that were delivered to or sent by ZCS. This package includes the cross mailbox search function which can be used for both live and archive mailbox searches. Note: Using Archiving and Discovery can trigger additional mailbox license usage. To find out more about Zimbra Archiving and Discovery, contact Zimbra sales.
The Zimbra server configuration is menu driven. The installation menu displays the default configuration values. The menu displays the logical host name and email domain name [example.com] as configured for the computer.
2.3.2 Configuration Examples Zimbra Collaboration Suite can be easily scaled for any size of email environment, from very small businesses with fewer than 25 email accounts to large businesses with thousands of email accounts. The following table shows examples of different configuration options.
Table 1 Zimbra Collaboration Suite Configuration Options
Small Medium Large Very Large
All ZCS components installed on one server See the Zimbra Installation Quick Start for installation instructions
• Zimbra LDAP and Zimbra message store on one server
• Zimbra MTA on a separate server.
• Possibly include additional Zimbra MTA servers
• Zimbra LDAP on one server
• Multiple Zimbra mailbox servers
• Multiple Zimbra MTA servers
• Zimbra Master LDAP server
• Replicas LDAP servers
• Multiple Zimbra mailbox servers
• Multiple Zimbra MTA servers
www.zimbra.com 37 www.redhat.com
2.3.3 Downloading the Zimbra Software For the latest Zimbra software download, go to www.zimbra.com. Save the Zimbra Collaboration Suite download file to the computer from which you will install the software.
When the Zimbra Collaboration Suite is installed, the following Zimbra applications are saved to the Zimbra server:
• Zimbra Collaboration Suite Connector for Outlook® .msi file. This is a MAPI service provider that is installed on users’ computers, and users can use Microsoft® Outlook® 2003 or 2007 to access the ZCS server and synchronize data to/from Outlook for offline use.
• Zimbra Connector for Apple iSync plug-in. When this is installed on users’ Macs, they can use Apple Address Book, iCal, and Microsoft Entourage® to access ZCS.
• Zimbra Collaboration Suite Migration Wizard for Exchange .exe file to migrate Microsoft® Exchange server email accounts to the Zimbra server.
• Zimbra Collaboration Suite Migration Wizard for Domino .exe file to migrate Lotus Domino server email accounts to the Zimbra server.
• Zimbra Collaboration Suite Import Wizard for Outlook .exe file to allow users to import their Outlook .pst files to the Zimbra server.
Supporting documentation can be found on the administration console Help Desk page or at www.zimbra.com.
2.3.4 Zimbra License A Zimbra license is required in order to create accounts. See “Zimbra Collaboration Suite License” (section 2.1.2) for a description of the license types.
The regular license can only be installed on the ZCS system for which it is purchased. Only one Zimbra license is required for your Zimbra Collaboration Suite environment. This license is installed on the Zimbra mail server.
When you renew or change the Zimbra license, you must update the Zimbra server with the new license information. Use the Update License Wizard from the administration console’s Global Settings to upload and install an updated license, or you can update the license using the zmlicense CLI command. See the Zimbra Administrator’s Guide, Appendix A: Command-Line Utilities.
Current license information, including the number of accounts purchased, the number of accounts used, and the expiration date, can be viewed from the Global Settings on the administration console.
www.redhat.com 38 www.zimbra.com
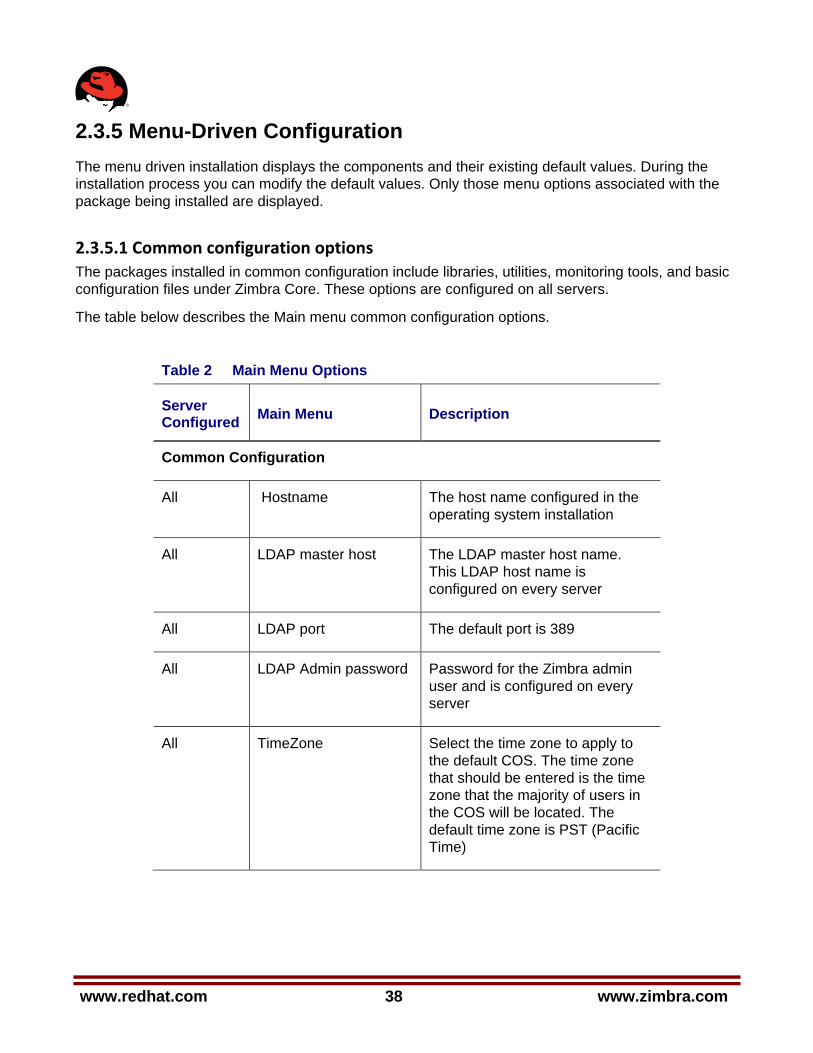
2.3.5 Menu-Driven Configuration The menu driven installation displays the components and their existing default values. During the installation process you can modify the default values. Only those menu options associated with the package being installed are displayed.
2.3.5.1 Common configuration options The packages installed in common configuration include libraries, utilities, monitoring tools, and basic configuration files under Zimbra Core. These options are configured on all servers.
The table below describes the Main menu common configuration options.
Table 2 Main Menu Options
Server Configured Main Menu Description
Common Configuration
All Hostname The host name configured in the operating system installation
All LDAP master host The LDAP master host name. This LDAP host name is configured on every server
All LDAP port The default port is 389
All LDAP Admin password Password for the Zimbra admin user and is configured on every server
All TimeZone Select the time zone to apply to the default COS. The time zone that should be entered is the time zone that the majority of users in the COS will be located. The default time zone is PST (Pacific Time)

www.zimbra.com 39 www.redhat.com
All Require secure interprocess communications
By default startTLS is YES. When startTLS is enabled there is a secure communication between amavis and postfix and the LDAP server If this is disabled, ZCS disables the use of startTLS with the LDAP server
All servers, if installed
zimbra-snmp Installing SNMP is optional, but if installed it must be on all servers.
You can modify the following options
• Enable SNMP notifications. The default is No. If you enter yes, you must enter the SNMP Trap hostname.
• SNMP Trap hostname • Enable SMTP notification — The
default is No. • SMTP Source email address —
If you enter yes for SMTP notification, you must enter the SMTP source email address and SMTP Destination email address — destination email address.
r) Start servers after configuration
When the installation and configuration is complete, if this is set to Yes, the Zimbra server is automatically started.
s) Save config to file At any time during the installation, you can save the configuration to a file.
q) Quit Quit can be used at any time to quit the installation.
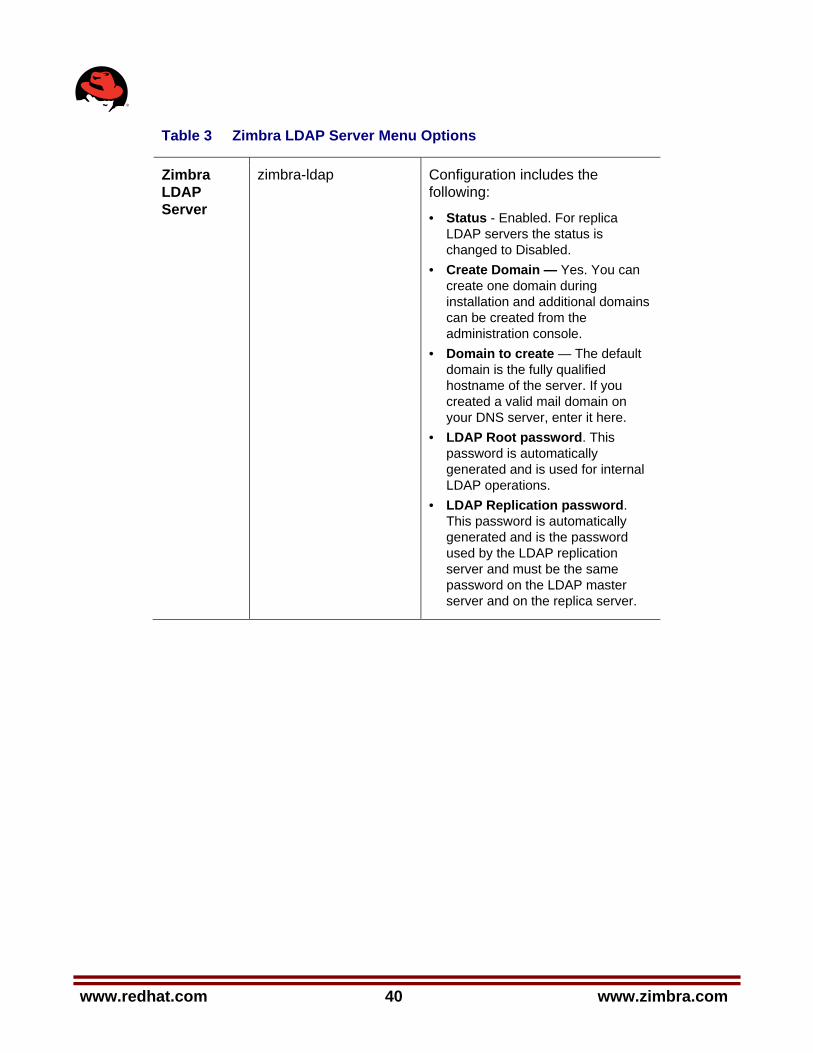
2.3.5.2 Zimbra LDAP server configuration options These options are configured on the Zimbra LDAP server. The table below describes the Main menu LDAP server configuration options
www.redhat.com 40 www.zimbra.com
Table 3 Zimbra LDAP Server Menu Options
Zimbra LDAP Server
zimbra-ldap Configuration includes the following:
• Status - Enabled. For replica LDAP servers the status is changed to Disabled.
• Create Domain — Yes. You can create one domain during installation and additional domains can be created from the administration console.
• Domain to create — The default domain is the fully qualified hostname of the server. If you created a valid mail domain on your DNS server, enter it here.
• LDAP Root password. This password is automatically generated and is used for internal LDAP operations.
• LDAP Replication password. This password is automatically generated and is the password used by the LDAP replication server and must be the same password on the LDAP master server and on the replica server.
www.zimbra.com 41 www.redhat.com
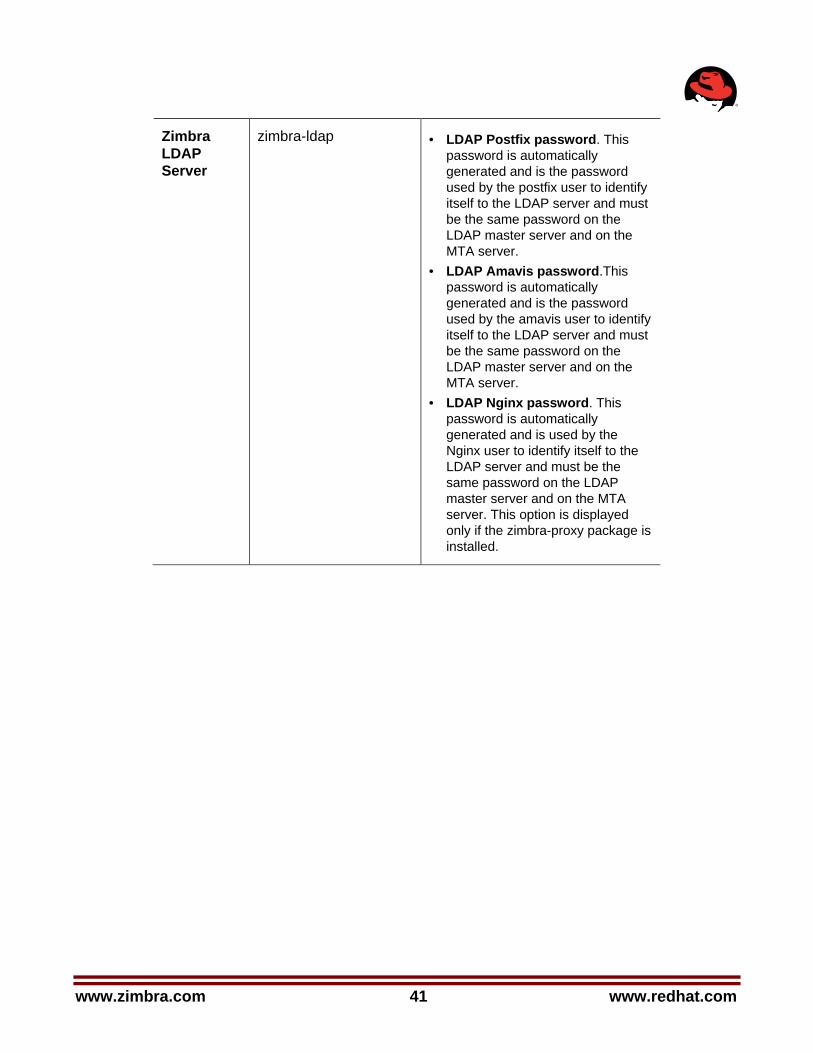
Zimbra LDAP Server
zimbra-ldap • LDAP Postfix password. This password is automatically generated and is the password used by the postfix user to identify itself to the LDAP server and must be the same password on the LDAP master server and on the MTA server.
• LDAP Amavis password.This password is automatically generated and is the password used by the amavis user to identify itself to the LDAP server and must be the same password on the LDAP master server and on the MTA server.
• LDAP Nginx password. This password is automatically generated and is used by the Nginx user to identify itself to the LDAP server and must be the same password on the LDAP master server and on the MTA server. This option is displayed only if the zimbra-proxy package is installed.
www.redhat.com 42 www.zimbra.com
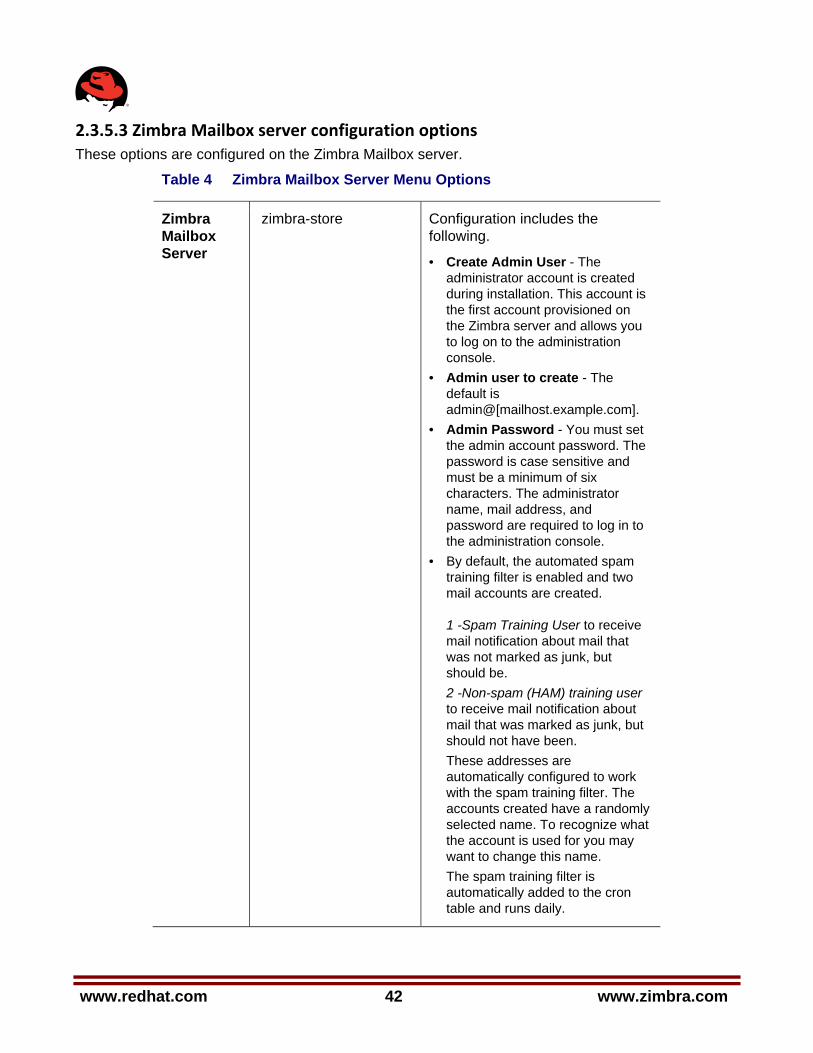
2.3.5.3 Zimbra Mailbox server configuration options These options are configured on the Zimbra Mailbox server.
Table 4 Zimbra Mailbox Server Menu Options
Zimbra Mailbox Server
zimbra-store Configuration includes the following.
• Create Admin User - The administrator account is created during installation. This account is the first account provisioned on the Zimbra server and allows you to log on to the administration console.
• Admin user to create - The default is admin@[mailhost.example.com].
• Admin Password - You must set the admin account password. The password is case sensitive and must be a minimum of six characters. The administrator name, mail address, and password are required to log in to the administration console.
• By default, the automated spam training filter is enabled and two mail accounts are created. 1 -Spam Training User to receive mail notification about mail that was not marked as junk, but should be. 2 -Non-spam (HAM) training user to receive mail notification about mail that was marked as junk, but should not have been. These addresses are automatically configured to work with the spam training filter. The accounts created have a randomly selected name. To recognize what the account is used for you may want to change this name. The spam training filter is automatically added to the cron table and runs daily.
www.zimbra.com 43 www.redhat.com
Zimbra Mailbox Server
zimbra-store (continued)
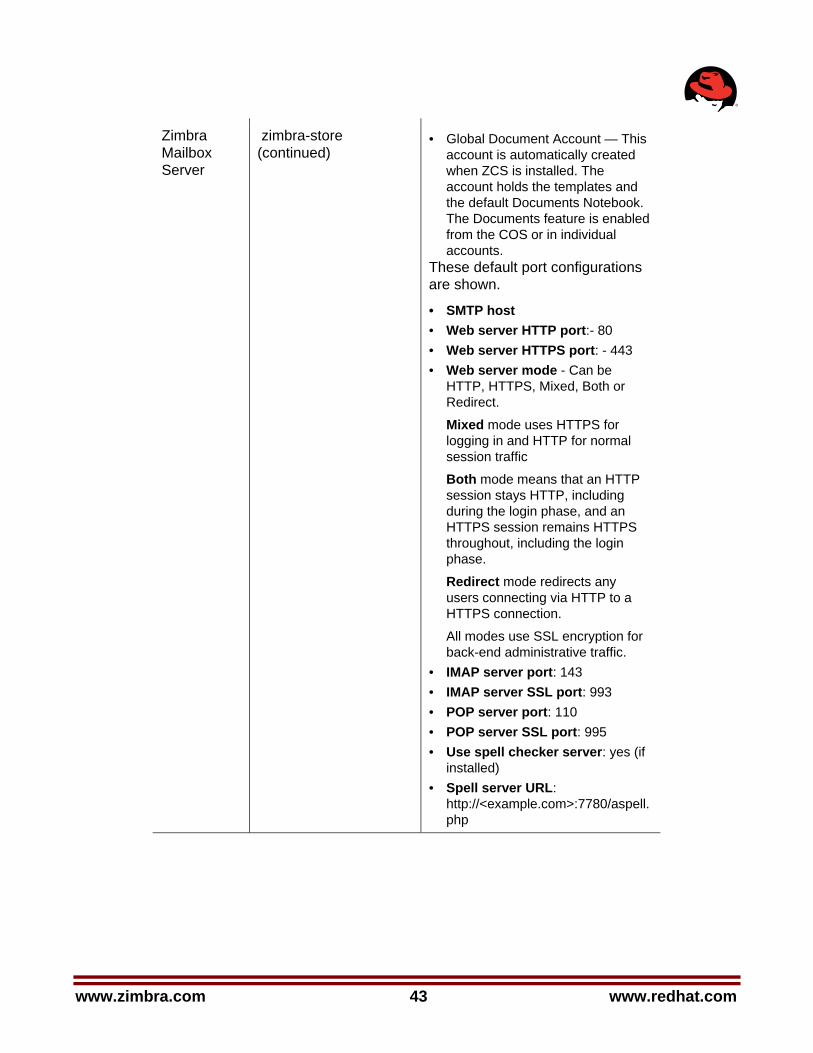
• Global Document Account — This account is automatically created when ZCS is installed. The account holds the templates and the default Documents Notebook. The Documents feature is enabled from the COS or in individual accounts.
These default port configurations are shown.
• SMTP host • Web server HTTP port:- 80 • Web server HTTPS port: - 443 • Web server mode - Can be
HTTP, HTTPS, Mixed, Both or Redirect.
Mixed mode uses HTTPS for logging in and HTTP for normal session traffic
Both mode means that an HTTP session stays HTTP, including during the login phase, and an HTTPS session remains HTTPS throughout, including the login phase.
Redirect mode redirects any users connecting via HTTP to a HTTPS connection.
All modes use SSL encryption for back-end administrative traffic.
• IMAP server port: 143 • IMAP server SSL port: 993 • POP server port: 110 • POP server SSL port: 995 • Use spell checker server: yes (if
installed) • Spell server URL:
http://<example.com>:7780/aspell.php
www.redhat.com 44 www.zimbra.com
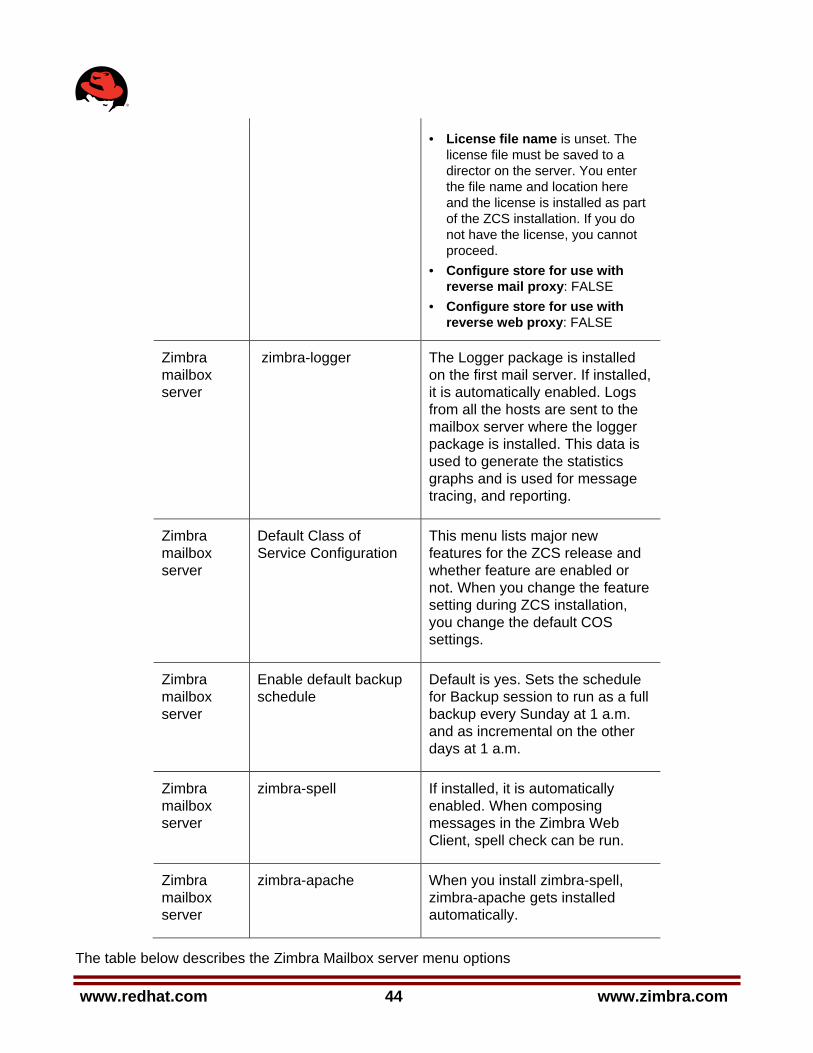
• License file name is unset. The license file must be saved to a director on the server. You enter the file name and location here and the license is installed as part of the ZCS installation. If you do not have the license, you cannot proceed.
• Configure store for use with reverse mail proxy: FALSE
• Configure store for use with reverse web proxy: FALSE
Zimbra mailbox server
zimbra-logger The Logger package is installed on the first mail server. If installed, it is automatically enabled. Logs from all the hosts are sent to the mailbox server where the logger package is installed. This data is used to generate the statistics graphs and is used for message tracing, and reporting.
Zimbra mailbox server
Default Class of Service Configuration
This menu lists major new features for the ZCS release and whether feature are enabled or not. When you change the feature setting during ZCS installation, you change the default COS settings.
Zimbra mailbox server
Enable default backup schedule
Default is yes. Sets the schedule for Backup session to run as a full backup every Sunday at 1 a.m. and as incremental on the other days at 1 a.m.
Zimbra mailbox server
zimbra-spell If installed, it is automatically enabled. When composing messages in the Zimbra Web Client, spell check can be run.
Zimbra mailbox server
zimbra-apache When you install zimbra-spell, zimbra-apache gets installed automatically.
The table below describes the Zimbra Mailbox server menu options
www.zimbra.com 45 www.redhat.com
2.3.5.4 Zimbra MTA Server configuration options Zimbra MTA server configuration involves installation of the Zimbra-MTA package. This also includes anti-virus and anti-spam components.
The table below describes the MTA server menu options
Table 5 Zimbra MTA Server Menu Options
Zimbra MTA Server
zimbra-mta The following options can be modified.
• MTA Auth host. This is configured automatically if the MTA authentication server host is on the same server, but must be configured if the authentication server is not on the MTA. The MTA Auth host must be one of the mailbox servers.
• Enable Spamassassin. Default is enabled.
• Enable ClamAV. Default is enabled.
• Notification address for AV alerts. Sets the notification address for AV alerts. You can either accept the default or create a new address. If you create a new address, remember to provision this address from the admin console.
Note: If the virus notification address does not exist and your host name is the same as the domain name on the Zimbra server, the virus notifications queue in the Zimbra MTA server and cannot be delivered.
• Bind password for postfix LDAP user. This password must be the same as the postfix password configured on the master LDAP server.
• Bind password for amavis LDAP user. This password must be the same as the amavis password configured on the master LDAP server.
www.redhat.com 46 www.zimbra.com
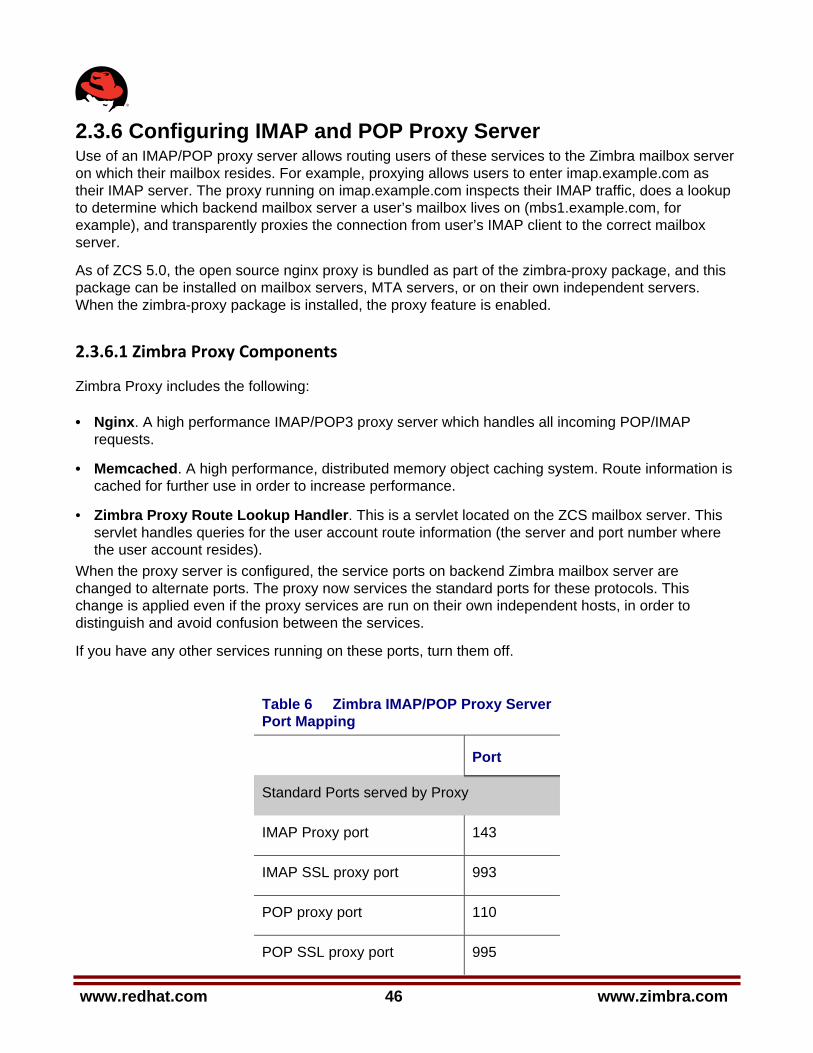
2.3.6 Configuring IMAP and POP Proxy Server Use of an IMAP/POP proxy server allows routing users of these services to the Zimbra mailbox server on which their mailbox resides. For example, proxying allows users to enter imap.example.com as their IMAP server. The proxy running on imap.example.com inspects their IMAP traffic, does a lookup to determine which backend mailbox server a user’s mailbox lives on (mbs1.example.com, for example), and transparently proxies the connection from user’s IMAP client to the correct mailbox server.
As of ZCS 5.0, the open source nginx proxy is bundled as part of the zimbra-proxy package, and this package can be installed on mailbox servers, MTA servers, or on their own independent servers. When the zimbra-proxy package is installed, the proxy feature is enabled.
2.3.6.1 Zimbra Proxy Components
Zimbra Proxy includes the following:
• Nginx. A high performance IMAP/POP3 proxy server which handles all incoming POP/IMAP requests.
• Memcached. A high performance, distributed memory object caching system. Route information is cached for further use in order to increase performance.
• Zimbra Proxy Route Lookup Handler. This is a servlet located on the ZCS mailbox server. This servlet handles queries for the user account route information (the server and port number where the user account resides).
When the proxy server is configured, the service ports on backend Zimbra mailbox server are changed to alternate ports. The proxy now services the standard ports for these protocols. This change is applied even if the proxy services are run on their own independent hosts, in order to distinguish and avoid confusion between the services.
If you have any other services running on these ports, turn them off.
Table 6 Zimbra IMAP/POP Proxy Server Port Mapping
Port
Standard Ports served by Proxy
IMAP Proxy port 143
IMAP SSL proxy port 993
POP proxy port 110
POP SSL proxy port 995
www.zimbra.com 47 www.redhat.com
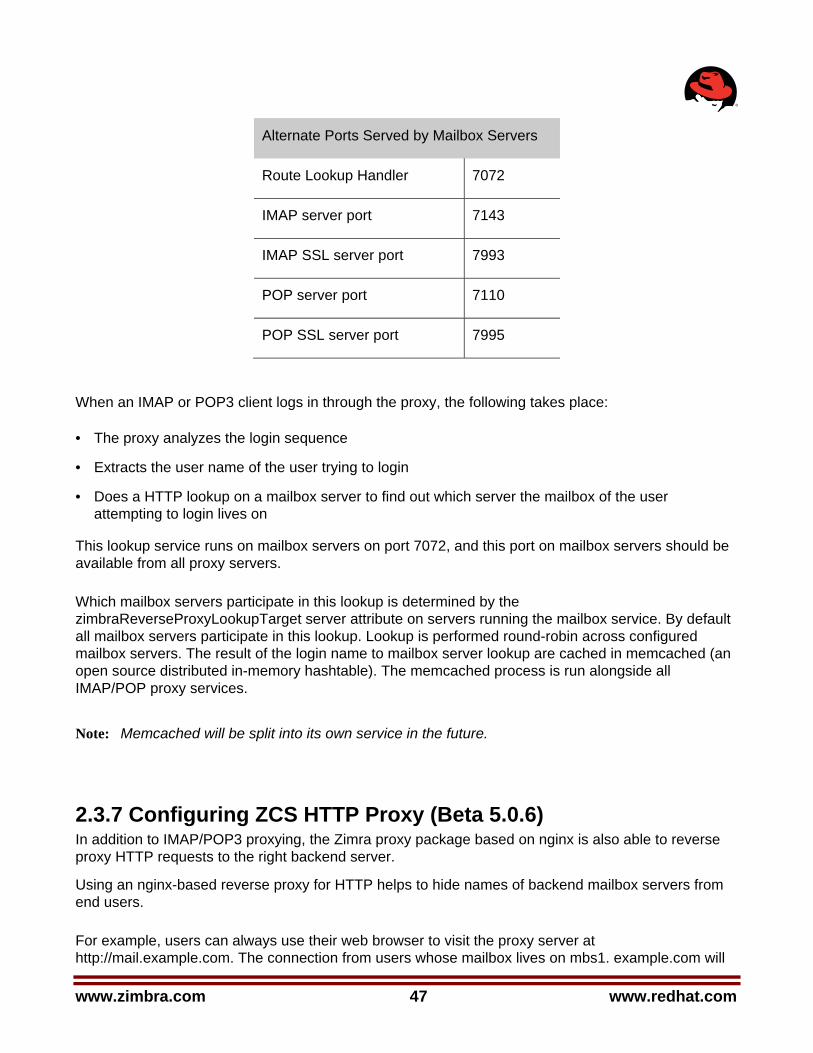
Alternate Ports Served by Mailbox Servers
Route Lookup Handler 7072
IMAP server port 7143
IMAP SSL server port 7993
POP server port 7110
POP SSL server port 7995
When an IMAP or POP3 client logs in through the proxy, the following takes place:
• The proxy analyzes the login sequence
• Extracts the user name of the user trying to login
• Does a HTTP lookup on a mailbox server to find out which server the mailbox of the user attempting to login lives on
This lookup service runs on mailbox servers on port 7072, and this port on mailbox servers should be available from all proxy servers.
Which mailbox servers participate in this lookup is determined by the zimbraReverseProxyLookupTarget server attribute on servers running the mailbox service. By default all mailbox servers participate in this lookup. Lookup is performed round-robin across configured mailbox servers. The result of the login name to mailbox server lookup are cached in memcached (an open source distributed in-memory hashtable). The memcached process is run alongside all IMAP/POP proxy services.
Note: Memcached will be split into its own service in the future.
2.3.7 Configuring ZCS HTTP Proxy (Beta 5.0.6) In addition to IMAP/POP3 proxying, the Zimra proxy package based on nginx is also able to reverse proxy HTTP requests to the right backend server.
Using an nginx-based reverse proxy for HTTP helps to hide names of backend mailbox servers from end users.
For example, users can always use their web browser to visit the proxy server at http://mail.example.com. The connection from users whose mailbox lives on mbs1. example.com will
www.redhat.com 48 www.zimbra.com
be proxied to mbs1.example.com by the proxy running on the mail.example.com server. In addition to the ZCS web interface, clients such as REST and CalDAV clients, Zimbra Connector for Outlook and Zimbra Mobile Sync devices are also supported by the proxy.
HTTP reverse proxy routes requests as follows:
• If the request has an auth token cookie (ZM_AUTH_TOKEN), the request is routed to the backend mailbox server of the authenticated user.
• If the requesting URL can be examined to determine the user name, then the request is routed to the backend mailbox server of the user in the URL. REST, Ca lDAV, and Zimbra Mobile Sync are supported through this mechanism.
• If the above methods do not work, the IP hash method is used to load balance the requests across the backend mailbox servers which are able to handle the request or do any necessary internal proxying.
For more information see the Zimbra Administration Guide, Zimbra Proxy chapter.
2.3.8 Configuring for Virtual Hosting You can configure multiple virtual hostnames to host more than one domain name on a server. When you create a virtual host, users can log in without have to specify the domain name as part of their user name.
Virtual hosts are configured from the administration console Domains>Virtual Hosts tab. The virtual host requires a valid DNS configuration with an A record.
When users log in, they enter the virtual host name in the browser. For example, https://mail.example.com. When the Zimbra logon screen displays, users enter only their user name and password. The authentication request searches for a domain with that virtual host name. When the virtual host is found, the authentication is completed against that domain.
www.zimbra.com 49 www.redhat.com
2.4 Multiple-Server Installation The multiple-server installation is straight-forward and easy to run. You run the same install script on each server, select the component(s) to install, and use the menu to configure the system.
After the installation is complete, two additional steps should be run as described in “Final Set-Up” (section 2.4.7).
• Fetch the ssh encryption keys
• Enable some logger functionality.
When the server installation is complete, the servers are started, and the status is displayed.
Important: Install the servers in the following order
1. LDAP server
2. Zimbra mailbox servers
3. Zimbra MTA servers
Note: You can install the Zimbra-proxy server with any of the above servers, or you can install it on its own server.
Important: Do not manually create the user ‘zimbra’ before running the ZCS installation. The installation automatically creates this user and sets up its environment.
Important: Before you start, verify that the system clocks are synced on all servers.
2.4.1 Starting the Installation Process For the latest Zimbra software download, go to www.zimbra.com. Save the Zimbra Collaboration Suite tar file to the computer from which you are installing the software.
Step 1 through step 4 below are performed for each server to be installed.
1. Log in as root to the Zimbra server and cd to the directory where the Zimbra Collaboration Suite archive file is saved (cd /var/<tmp>/var). Type the following commands.
• tar xzvf [zcs.tgz] to unpack the file
• cd [zcs filename] to change to the correct directory. The file name includes the release and build date.
• ./install.sh to begin the installation.
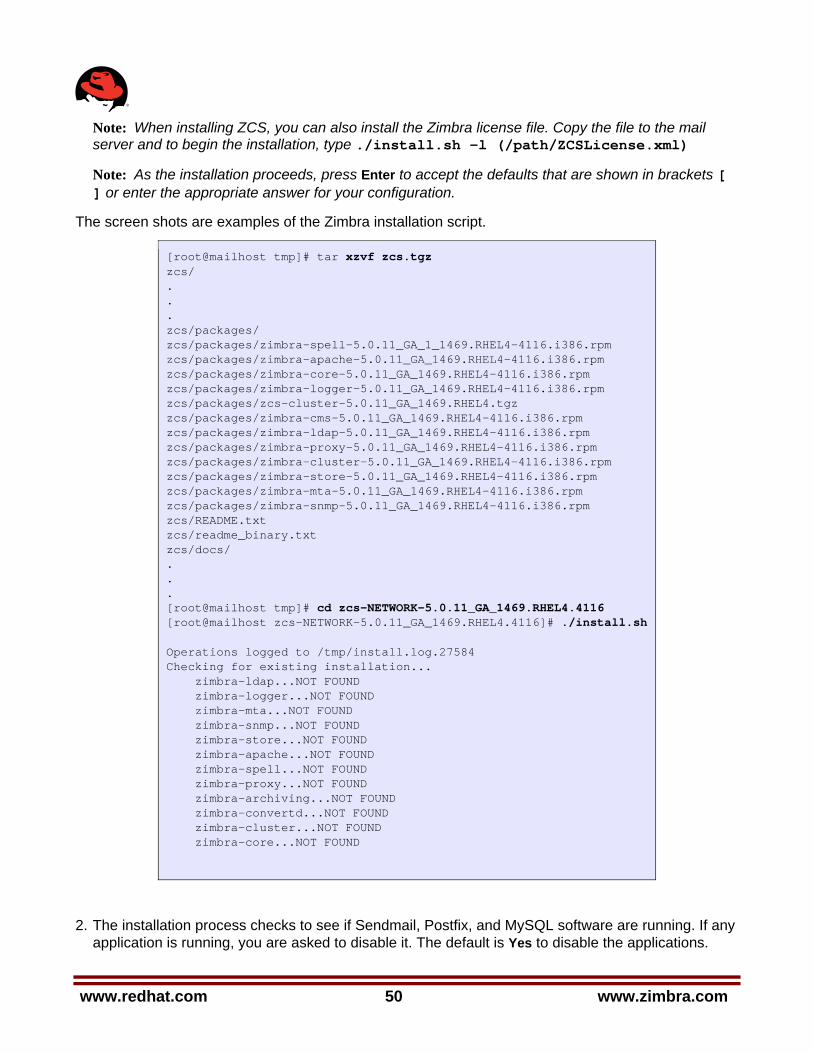
www.redhat.com 50 www.zimbra.com
Note: When installing ZCS, you can also install the Zimbra license file. Copy the file to the mail server and to begin the installation, type ./install.sh -l (/path/ZCSLicense.xml)
Note: As the installation proceeds, press Enter to accept the defaults that are shown in brackets [ ] or enter the appropriate answer for your configuration.
The screen shots are examples of the Zimbra installation script.
[root@mailhost tmp]# tar xzvf zcs.tgz zcs/ . . . zcs/packages/ zcs/packages/zimbra-spell-5.0.11_GA_1_1469.RHEL4-4116.i386.rpm zcs/packages/zimbra-apache-5.0.11_GA_1469.RHEL4-4116.i386.rpm zcs/packages/zimbra-core-5.0.11_GA_1469.RHEL4-4116.i386.rpm zcs/packages/zimbra-logger-5.0.11_GA_1469.RHEL4-4116.i386.rpm zcs/packages/zcs-cluster-5.0.11_GA_1469.RHEL4.tgz zcs/packages/zimbra-cms-5.0.11_GA_1469.RHEL4-4116.i386.rpm zcs/packages/zimbra-ldap-5.0.11_GA_1469.RHEL4-4116.i386.rpm zcs/packages/zimbra-proxy-5.0.11_GA_1469.RHEL4-4116.i386.rpm zcs/packages/zimbra-cluster-5.0.11_GA_1469.RHEL4-4116.i386.rpm zcs/packages/zimbra-store-5.0.11_GA_1469.RHEL4-4116.i386.rpm zcs/packages/zimbra-mta-5.0.11_GA_1469.RHEL4-4116.i386.rpm zcs/packages/zimbra-snmp-5.0.11_GA_1469.RHEL4-4116.i386.rpm zcs/README.txt zcs/readme_binary.txt zcs/docs/ . . . [root@mailhost tmp]# cd zcs-NETWORK-5.0.11_GA_1469.RHEL4.4116 [root@mailhost zcs-NETWORK-5.0.11_GA_1469.RHEL4.4116]# ./install.sh Operations logged to /tmp/install.log.27584 Checking for existing installation... zimbra-ldap...NOT FOUND zimbra-logger...NOT FOUND zimbra-mta...NOT FOUND zimbra-snmp...NOT FOUND zimbra-store...NOT FOUND zimbra-apache...NOT FOUND zimbra-spell...NOT FOUND zimbra-proxy...NOT FOUND zimbra-archiving...NOT FOUND zimbra-convertd...NOT FOUND zimbra-cluster...NOT FOUND zimbra-core...NOT FOUND
2. The installation process checks to see if Sendmail, Postfix, and MySQL software are running. If any application is running, you are asked to disable it. The default is Yes to disable the applications.
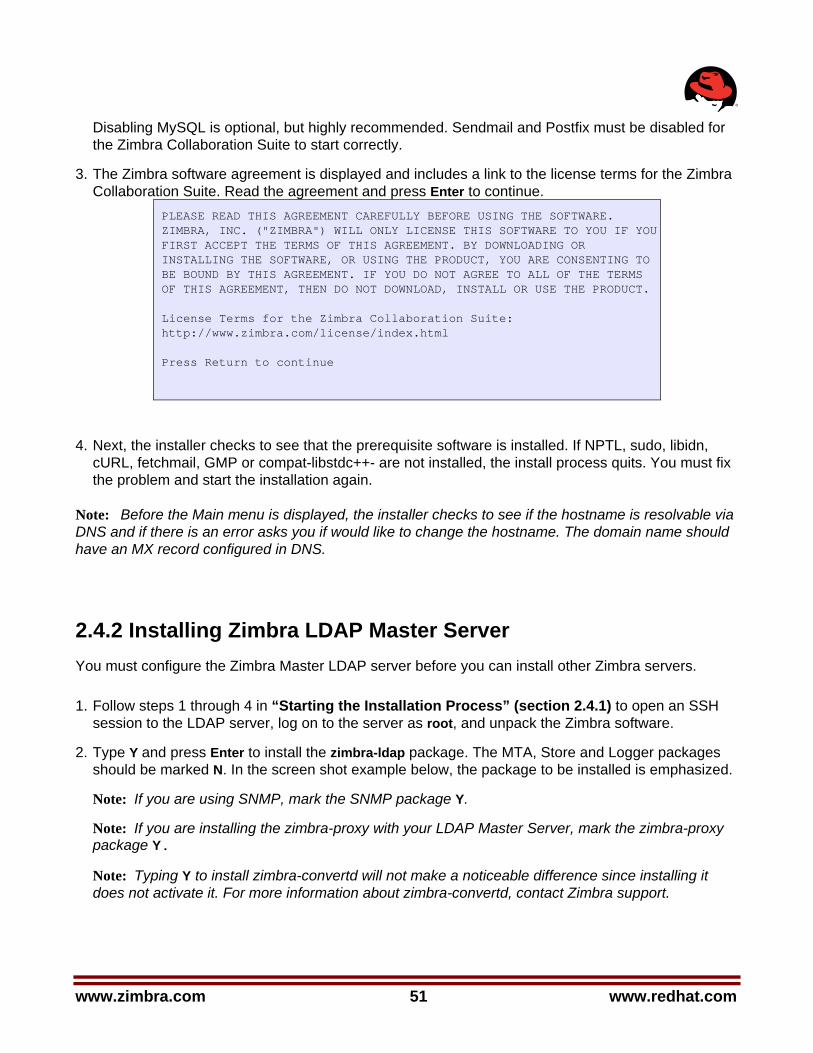
www.zimbra.com 51 www.redhat.com
Disabling MySQL is optional, but highly recommended. Sendmail and Postfix must be disabled for the Zimbra Collaboration Suite to start correctly.
3. The Zimbra software agreement is displayed and includes a link to the license terms for the Zimbra Collaboration Suite. Read the agreement and press Enter to continue.
PLEASE READ THIS AGREEMENT CAREFULLY BEFORE USING THE SOFTWARE. ZIMBRA, INC. ("ZIMBRA") WILL ONLY LICENSE THIS SOFTWARE TO YOU IF YOU FIRST ACCEPT THE TERMS OF THIS AGREEMENT. BY DOWNLOADING OR INSTALLING THE SOFTWARE, OR USING THE PRODUCT, YOU ARE CONSENTING TO BE BOUND BY THIS AGREEMENT. IF YOU DO NOT AGREE TO ALL OF THE TERMS OF THIS AGREEMENT, THEN DO NOT DOWNLOAD, INSTALL OR USE THE PRODUCT. License Terms for the Zimbra Collaboration Suite: http://www.zimbra.com/license/index.html Press Return to continue
4. Next, the installer checks to see that the prerequisite software is installed. If NPTL, sudo, libidn, cURL, fetchmail, GMP or compat-libstdc++- are not installed, the install process quits. You must fix the problem and start the installation again.
Note: Before the Main menu is displayed, the installer checks to see if the hostname is resolvable via DNS and if there is an error asks you if would like to change the hostname. The domain name should have an MX record configured in DNS.
2.4.2 Installing Zimbra LDAP Master Server You must configure the Zimbra Master LDAP server before you can install other Zimbra servers.
1. Follow steps 1 through 4 in “Starting the Installation Process” (section 2.4.1) to open an SSH session to the LDAP server, log on to the server as root, and unpack the Zimbra software.
2. Type Y and press Enter to install the zimbra-ldap package. The MTA, Store and Logger packages should be marked N. In the screen shot example below, the package to be installed is emphasized.
Note: If you are using SNMP, mark the SNMP package Y.
Note: If you are installing the zimbra-proxy with your LDAP Master Server, mark the zimbra-proxy package Y.
Note: Typing Y to install zimbra-convertd will not make a noticeable difference since installing it does not activate it. For more information about zimbra-convertd, contact Zimbra support.
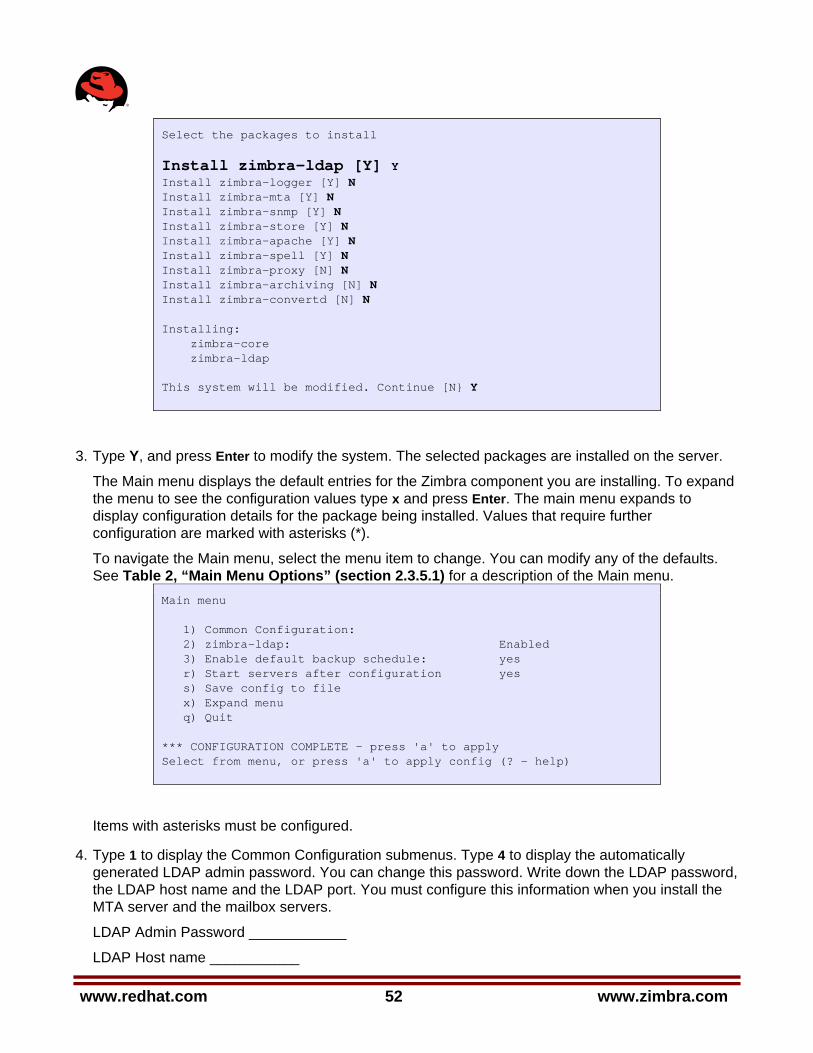
www.redhat.com 52 www.zimbra.com
Select the packages to install Install zimbra-ldap [Y] Y Install zimbra-logger [Y] N Install zimbra-mta [Y] N Install zimbra-snmp [Y] N Install zimbra-store [Y] N Install zimbra-apache [Y] N Install zimbra-spell [Y] N Install zimbra-proxy [N] N Install zimbra-archiving [N] N Install zimbra-convertd [N] N Installing: zimbra-core zimbra-ldap This system will be modified. Continue [N} Y
3. Type Y, and press Enter to modify the system. The selected packages are installed on the server.
The Main menu displays the default entries for the Zimbra component you are installing. To expand the menu to see the configuration values type x and press Enter. The main menu expands to display configuration details for the package being installed. Values that require further configuration are marked with asterisks (*).
To navigate the Main menu, select the menu item to change. You can modify any of the defaults. See Table 2, “Main Menu Options” (section 2.3.5.1) for a description of the Main menu.
Main menu 1) Common Configuration: 2) zimbra-ldap: Enabled 3) Enable default backup schedule: yes r) Start servers after configuration yes s) Save config to file x) Expand menu q) Quit *** CONFIGURATION COMPLETE - press 'a' to apply Select from menu, or press 'a' to apply config (? - help)
Items with asterisks must be configured.
4. Type 1 to display the Common Configuration submenus. Type 4 to display the automatically generated LDAP admin password. You can change this password. Write down the LDAP password, the LDAP host name and the LDAP port. You must configure this information when you install the MTA server and the mailbox servers.
LDAP Admin Password ____________
LDAP Host name ___________

www.zimbra.com 53 www.redhat.com
LDAP Port ___________
Common Configuration: 1)Hostname: zimbra.example.com 2)Ldap master host: zimbra.example.com 3)Ldap port: 389 4)Ldap Admin password: set 5)Require secure interprocess communications Yes 6)TimeZone: (GMT-08.00) Pacific Time (US & Canada)
5. Type 6 to set the correct time zone if your time zone is not Pacific time.
6. Type r to return to the Main menu.
7. Type 2 for zimbra-ldap to change the zimbra-ldap settings.
• Type 3, Domain to create, to change the default domain name to the email domain name.
• The passwords listed in LDAP configuration are automatically generated. You need these passwords when configuring the MTA and the LDAP replica servers. Write them down. If you want to change the passwords for LDAP root, LDAP replication, LDAP Postfix, LDAP Amavis, and LDAP Nginx, enter the corresponding number 4 through 8 and change the password.
LDAP Replication password ___________
LDAP Postfix password ___________
LDAP Amavis password ___________
LDAP Nginx password ___________
Ldap configuration 1) Status: Enabled 2) Create Domain: yes 3) Domain to create: mailhost.example.com 4) Ldap Root password: set 5) Ldap Replication password: set 6) Ldap Postfix password: set 7) Ldap Amavis password: set 8) Ldap Nginx password: set Select, or ‘r’ for previous menu [r] 3 Create Domain: [ldap.example.com] example.com
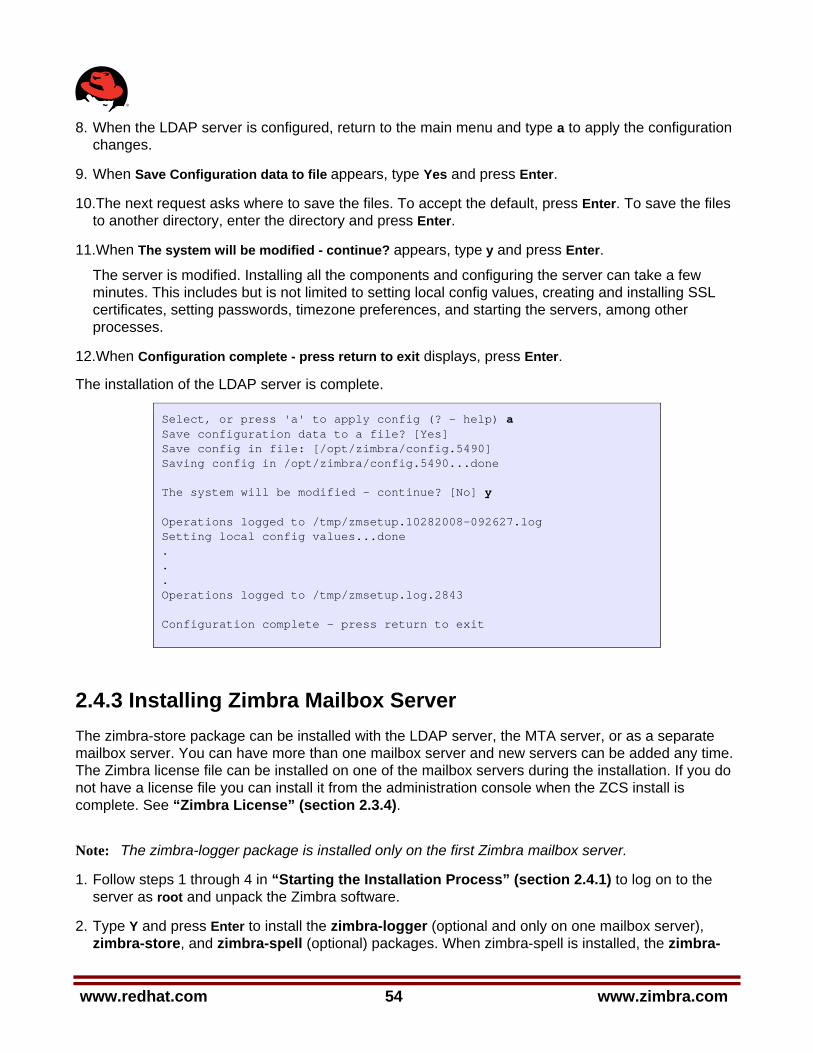
www.redhat.com 54 www.zimbra.com
8. When the LDAP server is configured, return to the main menu and type a to apply the configuration changes.
9. When Save Configuration data to file appears, type Yes and press Enter.
10.The next request asks where to save the files. To accept the default, press Enter. To save the files to another directory, enter the directory and press Enter.
11.When The system will be modified - continue? appears, type y and press Enter.
The server is modified. Installing all the components and configuring the server can take a few minutes. This includes but is not limited to setting local config values, creating and installing SSL certificates, setting passwords, timezone preferences, and starting the servers, among other processes.
12.When Configuration complete - press return to exit displays, press Enter.
The installation of the LDAP server is complete.
Select, or press 'a' to apply config (? - help) a Save configuration data to a file? [Yes] Save config in file: [/opt/zimbra/config.5490] Saving config in /opt/zimbra/config.5490...done The system will be modified - continue? [No] y Operations logged to /tmp/zmsetup.10282008-092627.log Setting local config values...done . . . Operations logged to /tmp/zmsetup.log.2843 Configuration complete - press return to exit
2.4.3 Installing Zimbra Mailbox Server The zimbra-store package can be installed with the LDAP server, the MTA server, or as a separate mailbox server. You can have more than one mailbox server and new servers can be added any time. The Zimbra license file can be installed on one of the mailbox servers during the installation. If you do not have a license file you can install it from the administration console when the ZCS install is complete. See “Zimbra License” (section 2.3.4).
Note: The zimbra-logger package is installed only on the first Zimbra mailbox server.
1. Follow steps 1 through 4 in “Starting the Installation Process” (section 2.4.1) to log on to the server as root and unpack the Zimbra software.
2. Type Y and press Enter to install the zimbra-logger (optional and only on one mailbox server), zimbra-store, and zimbra-spell (optional) packages. When zimbra-spell is installed, the zimbra-
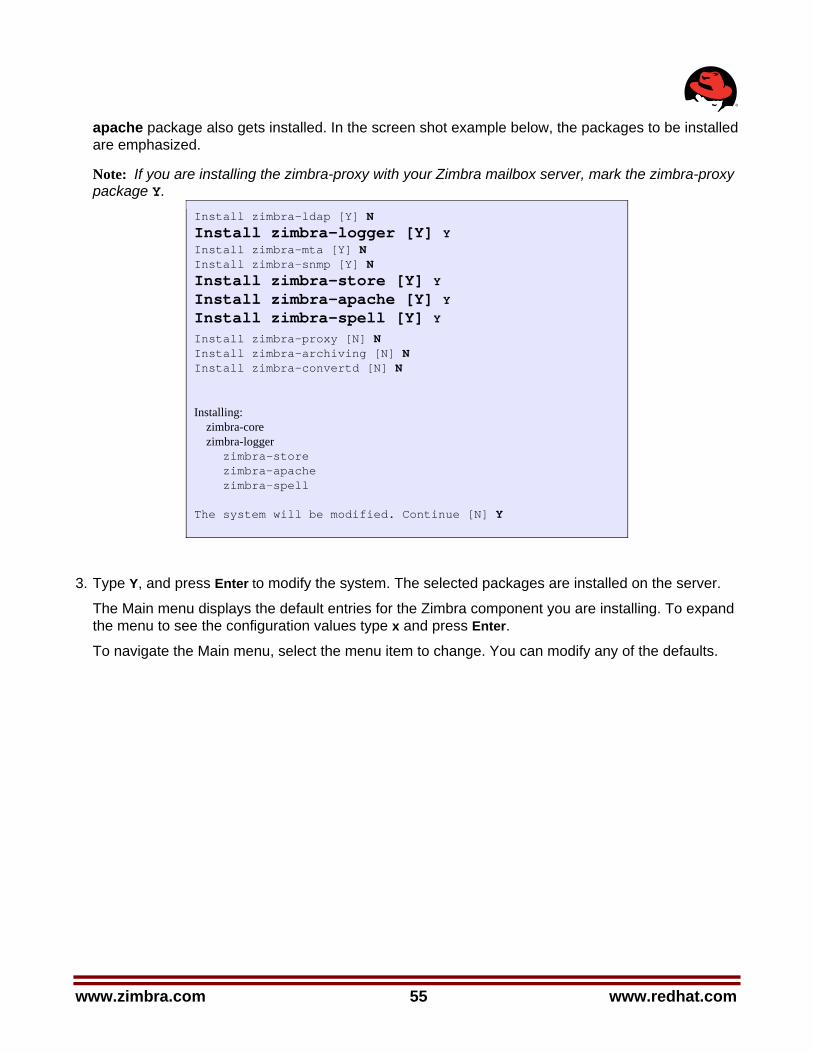
www.zimbra.com 55 www.redhat.com
apache package also gets installed. In the screen shot example below, the packages to be installed are emphasized.
Note: If you are installing the zimbra-proxy with your Zimbra mailbox server, mark the zimbra-proxy package Y.
Install zimbra-ldap [Y] N Install zimbra-logger [Y] Y Install zimbra-mta [Y] N Install zimbra-snmp [Y] N Install zimbra-store [Y] Y Install zimbra-apache [Y] Y Install zimbra-spell [Y] Y Install zimbra-proxy [N] N Install zimbra-archiving [N] N Install zimbra-convertd [N] N Installing: zimbra-core zimbra-logger zimbra-store zimbra-apache zimbra-spell The system will be modified. Continue [N] Y
3. Type Y, and press Enter to modify the system. The selected packages are installed on the server.
The Main menu displays the default entries for the Zimbra component you are installing. To expand the menu to see the configuration values type x and press Enter.
To navigate the Main menu, select the menu item to change. You can modify any of the defaults.
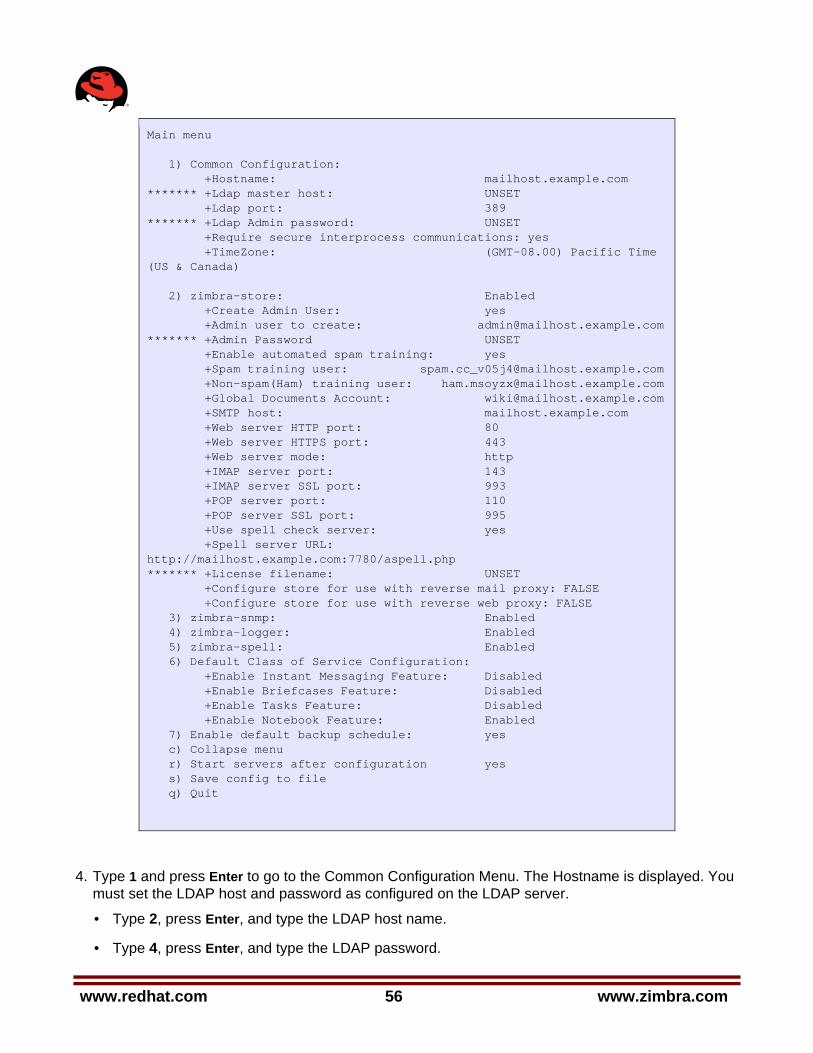
www.redhat.com 56 www.zimbra.com
Main menu 1) Common Configuration: +Hostname: mailhost.example.com ******* +Ldap master host: UNSET +Ldap port: 389 ******* +Ldap Admin password: UNSET +Require secure interprocess communications: yes +TimeZone: (GMT-08.00) Pacific Time (US & Canada) 2) zimbra-store: Enabled +Create Admin User: yes +Admin user to create: [email protected] ******* +Admin Password UNSET +Enable automated spam training: yes +Spam training user: [email protected] +Non-spam(Ham) training user: [email protected] +Global Documents Account: [email protected] +SMTP host: mailhost.example.com +Web server HTTP port: 80 +Web server HTTPS port: 443 +Web server mode: http +IMAP server port: 143 +IMAP server SSL port: 993 +POP server port: 110 +POP server SSL port: 995 +Use spell check server: yes +Spell server URL: http://mailhost.example.com:7780/aspell.php ******* +License filename: UNSET +Configure store for use with reverse mail proxy: FALSE +Configure store for use with reverse web proxy: FALSE 3) zimbra-snmp: Enabled 4) zimbra-logger: Enabled 5) zimbra-spell: Enabled 6) Default Class of Service Configuration: +Enable Instant Messaging Feature: Disabled +Enable Briefcases Feature: Disabled +Enable Tasks Feature: Disabled +Enable Notebook Feature: Enabled 7) Enable default backup schedule: yes c) Collapse menu r) Start servers after configuration yes s) Save config to file q) Quit
4. Type 1 and press Enter to go to the Common Configuration Menu. The Hostname is displayed. You must set the LDAP host and password as configured on the LDAP server.
• Type 2, press Enter, and type the LDAP host name.
• Type 4, press Enter, and type the LDAP password.

www.zimbra.com 57 www.redhat.com
The server immediately contacts the LDAP server. If it cannot contact the server, you cannot proceed.
Type r to return to the Main menu.
5. Type 3 to go to the zimbra-store menu.
• Type 4 and set the password for the administrator account. The password is case sensitive and must be a minimum of six characters. The admin account is provisioned on the Zimbra server and you log on to the administration console with this password.
• Type the corresponding number to set the SMTP host.
• Type the corresponding number if you want to change the default web server mode. The communication protocol options are HTTP, HTTPS, mixed, both or redirect.
Mixed mode uses HTTPS for logging in and HTTP for normal session traffic
Both mode means that an HTTP session stays HTTP, including during the login phase, and an HTTPS session remains HTTPS throughout, including the login phase.
Redirect mode redirects any users connecting via HTTP to a HTTPS connection.
All modes use SSL encryption for back-end administrative traffic.
• Mixed mode uses HTTPS for logging in and HTTP for normal session traffic. Redirect mode redirects users connecting via HTTP to a HTTPS connection. All modes use SSL encryption for back-end administrative traffic.
• If you are setting up IMAP/POP proxy servers, type the corresponding number to enable the servers. When you enable these, IMAP and POP server port numbers and proxy port numbers are automatically changed. See the “Planning for the Installation” (section 2.3), Configuring IMAP and POP Proxy Server.
• Type the corresponding number to install the Zimbra license file. Type the directory and file name for the Zimbra license. For example, if you saved the license file to the tmp directory, you would type /tmp/ZCSLicense.xml. You cannot proceed without a license.
• The two menu options for configuring store for use with reverse mail and web proxy appear under this menu only when installing zimbra-store without zimbra-proxy. The value can be set to TRUE or FALSE with FALSE being the default. Setting these values to TRUE causes different store-specific properties related to proxy to be set for mail and web proxy.
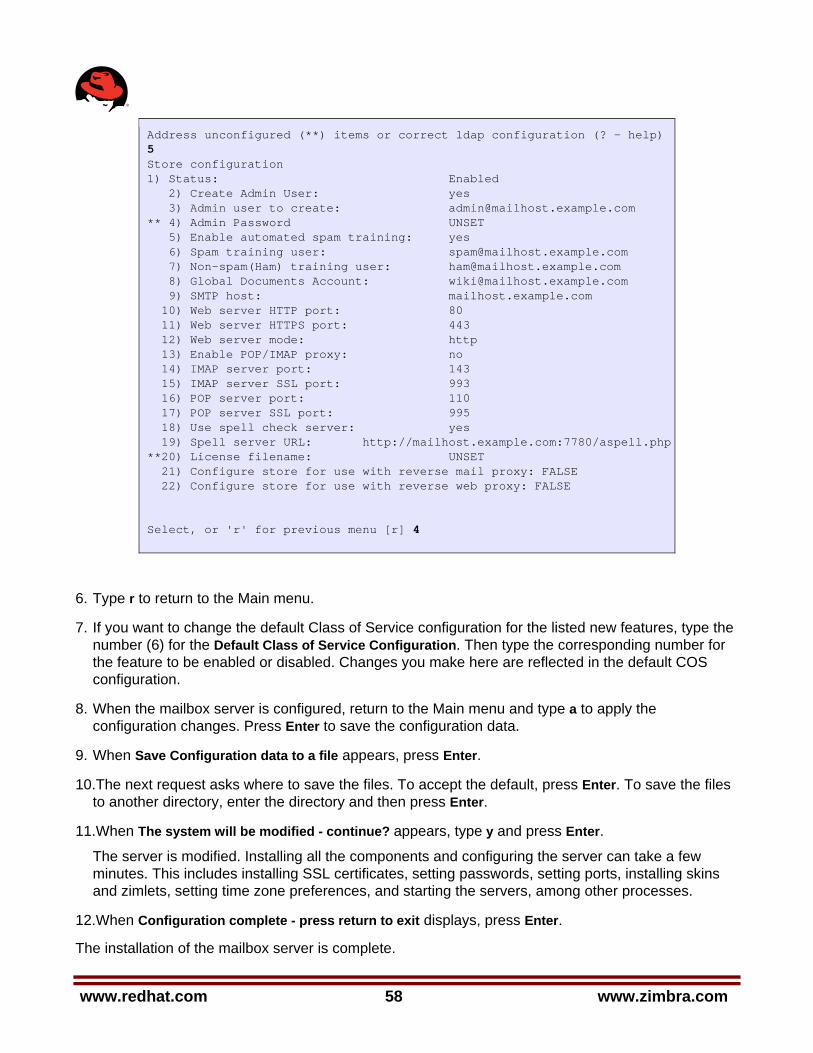
www.redhat.com 58 www.zimbra.com
Address unconfigured (**) items or correct ldap configuration (? - help) 5 Store configuration 1) Status: Enabled 2) Create Admin User: yes 3) Admin user to create: [email protected] ** 4) Admin Password UNSET 5) Enable automated spam training: yes 6) Spam training user: [email protected] 7) Non-spam(Ham) training user: [email protected] 8) Global Documents Account: [email protected] 9) SMTP host: mailhost.example.com 10) Web server HTTP port: 80 11) Web server HTTPS port: 443 12) Web server mode: http 13) Enable POP/IMAP proxy: no 14) IMAP server port: 143 15) IMAP server SSL port: 993 16) POP server port: 110 17) POP server SSL port: 995 18) Use spell check server: yes 19) Spell server URL: http://mailhost.example.com:7780/aspell.php**20) License filename: UNSET 21) Configure store for use with reverse mail proxy: FALSE 22) Configure store for use with reverse web proxy: FALSE Select, or 'r' for previous menu [r] 4
6. Type r to return to the Main menu.
7. If you want to change the default Class of Service configuration for the listed new features, type the number (6) for the Default Class of Service Configuration. Then type the corresponding number for the feature to be enabled or disabled. Changes you make here are reflected in the default COS configuration.
8. When the mailbox server is configured, return to the Main menu and type a to apply the configuration changes. Press Enter to save the configuration data.
9. When Save Configuration data to a file appears, press Enter.
10.The next request asks where to save the files. To accept the default, press Enter. To save the files to another directory, enter the directory and then press Enter.
11.When The system will be modified - continue? appears, type y and press Enter.
The server is modified. Installing all the components and configuring the server can take a few minutes. This includes installing SSL certificates, setting passwords, setting ports, installing skins and zimlets, setting time zone preferences, and starting the servers, among other processes.
12.When Configuration complete - press return to exit displays, press Enter.
The installation of the mailbox server is complete.
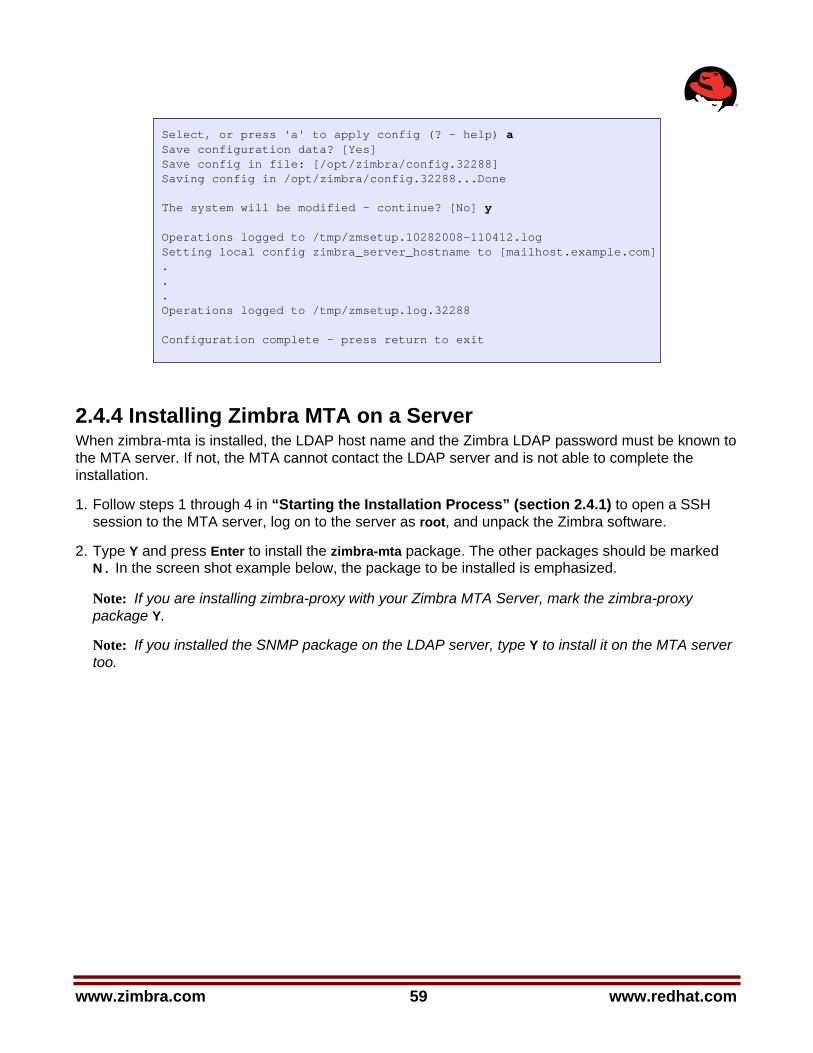
www.zimbra.com 59 www.redhat.com
Select, or press 'a' to apply config (? - help) a Save configuration data? [Yes] Save config in file: [/opt/zimbra/config.32288] Saving config in /opt/zimbra/config.32288...Done The system will be modified - continue? [No] y Operations logged to /tmp/zmsetup.10282008-110412.log Setting local config zimbra_server_hostname to [mailhost.example.com]. . . Operations logged to /tmp/zmsetup.log.32288 Configuration complete - press return to exit
2.4.4 Installing Zimbra MTA on a Server When zimbra-mta is installed, the LDAP host name and the Zimbra LDAP password must be known to the MTA server. If not, the MTA cannot contact the LDAP server and is not able to complete the installation.
1. Follow steps 1 through 4 in “Starting the Installation Process” (section 2.4.1) to open a SSH session to the MTA server, log on to the server as root, and unpack the Zimbra software.
2. Type Y and press Enter to install the zimbra-mta package. The other packages should be marked N. In the screen shot example below, the package to be installed is emphasized.
Note: If you are installing zimbra-proxy with your Zimbra MTA Server, mark the zimbra-proxy package Y.
Note: If you installed the SNMP package on the LDAP server, type Y to install it on the MTA server too.

www.redhat.com 60 www.zimbra.com
Select the packages to install Install zimbra-ldap [Y] N Install zimbra-logger [Y] N Install zimbra-mta [Y] Y Install zimbra-snmp [Y] N Install zimbra-store [Y] N Install zimbra-apache [Y] N Install zimbra-spell [Y] N Install zimbra-archiving [N] N Install zimbra-convertd [N] N Install zimbra-proxy [N] N Installing: zimbra-mta This system will be modified. Continue [N} Y Configuration section
3. Type Y, and press Enter to modify the system. The selected packages are installed on the server.
At this point the Main menu displays the default entries for the Zimbra component you are installing. To expand the menu to see all the configuration values type x and press Enter.
To navigate the Main menu, select the menu item to change. You can modify any of the defaults.
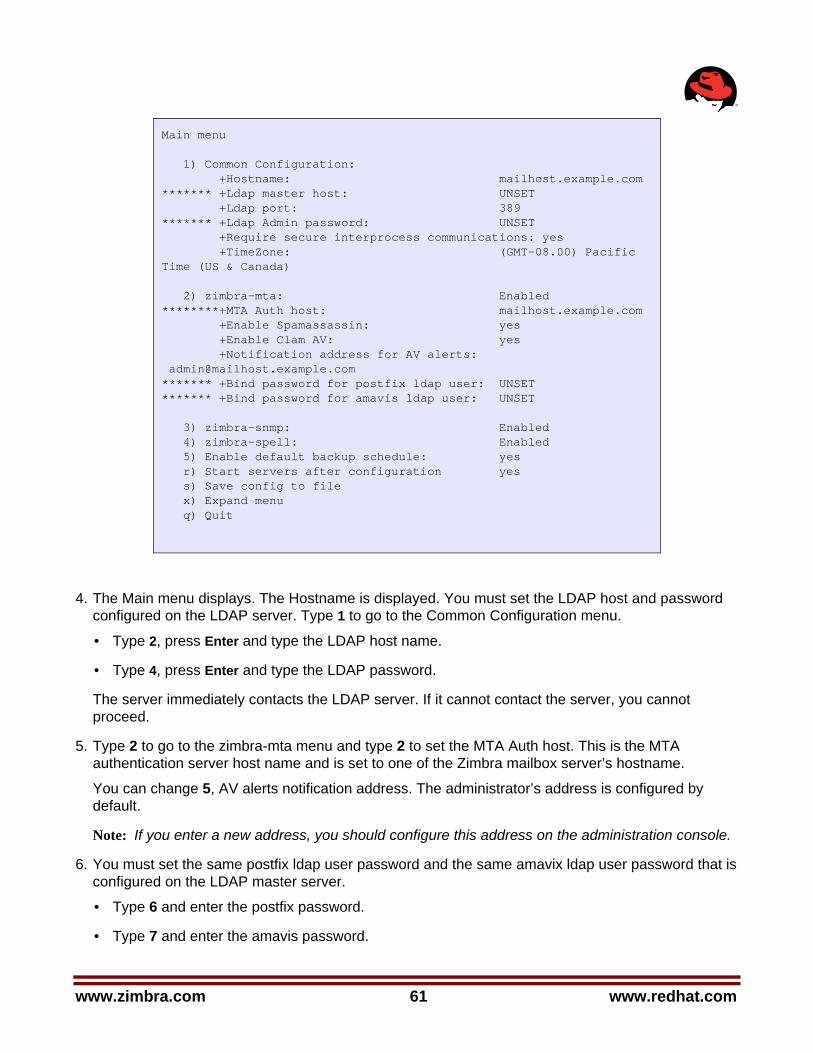
www.zimbra.com 61 www.redhat.com
Main menu 1) Common Configuration: +Hostname: mailhost.example.com ******* +Ldap master host: UNSET +Ldap port: 389 ******* +Ldap Admin password: UNSET +Require secure interprocess communications: yes +TimeZone: (GMT-08.00) Pacific Time (US & Canada) 2) zimbra-mta: Enabled ********+MTA Auth host: mailhost.example.com +Enable Spamassassin: yes +Enable Clam AV: yes +Notification address for AV alerts: [email protected] ******* +Bind password for postfix ldap user: UNSET ******* +Bind password for amavis ldap user: UNSET 3) zimbra-snmp: Enabled 4) zimbra-spell: Enabled 5) Enable default backup schedule: yes r) Start servers after configuration yes s) Save config to file x) Expand menu q) Quit
4. The Main menu displays. The Hostname is displayed. You must set the LDAP host and password configured on the LDAP server. Type 1 to go to the Common Configuration menu.
• Type 2, press Enter and type the LDAP host name.
• Type 4, press Enter and type the LDAP password.
The server immediately contacts the LDAP server. If it cannot contact the server, you cannot proceed.
5. Type 2 to go to the zimbra-mta menu and type 2 to set the MTA Auth host. This is the MTA authentication server host name and is set to one of the Zimbra mailbox server’s hostname.
You can change 5, AV alerts notification address. The administrator’s address is configured by default.
Note: If you enter a new address, you should configure this address on the administration console.
6. You must set the same postfix ldap user password and the same amavix ldap user password that is configured on the LDAP master server.
• Type 6 and enter the postfix password.
• Type 7 and enter the amavis password.
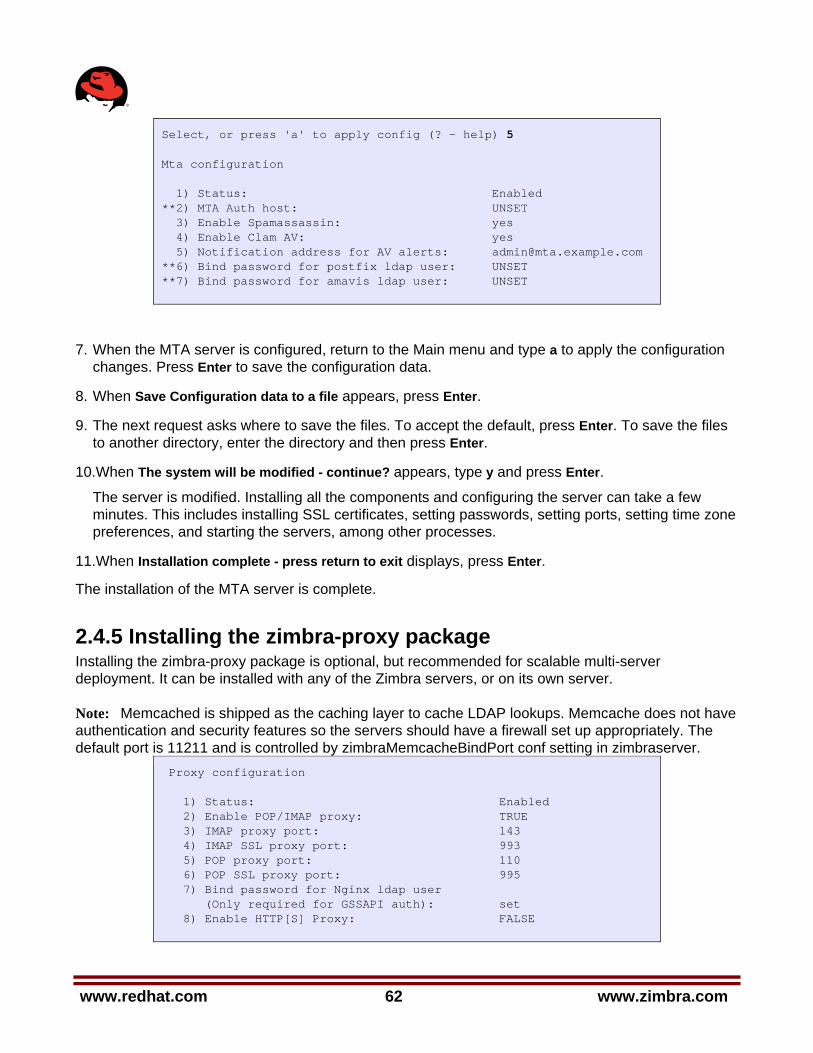
www.redhat.com 62 www.zimbra.com
Select, or press 'a' to apply config (? - help) 5 Mta configuration 1) Status: Enabled **2) MTA Auth host: UNSET 3) Enable Spamassassin: yes 4) Enable Clam AV: yes 5) Notification address for AV alerts: [email protected] **6) Bind password for postfix ldap user: UNSET **7) Bind password for amavis ldap user: UNSET
7. When the MTA server is configured, return to the Main menu and type a to apply the configuration changes. Press Enter to save the configuration data.
8. When Save Configuration data to a file appears, press Enter.
9. The next request asks where to save the files. To accept the default, press Enter. To save the files to another directory, enter the directory and then press Enter.
10.When The system will be modified - continue? appears, type y and press Enter.
The server is modified. Installing all the components and configuring the server can take a few minutes. This includes installing SSL certificates, setting passwords, setting ports, setting time zone preferences, and starting the servers, among other processes.
11.When Installation complete - press return to exit displays, press Enter.
The installation of the MTA server is complete.
2.4.5 Installing the zimbra-proxy package Installing the zimbra-proxy package is optional, but recommended for scalable multi-server deployment. It can be installed with any of the Zimbra servers, or on its own server.
Note: Memcached is shipped as the caching layer to cache LDAP lookups. Memcache does not have authentication and security features so the servers should have a firewall set up appropriately. The default port is 11211 and is controlled by zimbraMemcacheBindPort conf setting in zimbraserver.
Proxy configuration 1) Status: Enabled 2) Enable POP/IMAP proxy: TRUE 3) IMAP proxy port: 143 4) IMAP SSL proxy port: 993 5) POP proxy port: 110 6) POP SSL proxy port: 995 7) Bind password for Nginx ldap user (Only required for GSSAPI auth): set 8) Enable HTTP[S] Proxy: FALSE
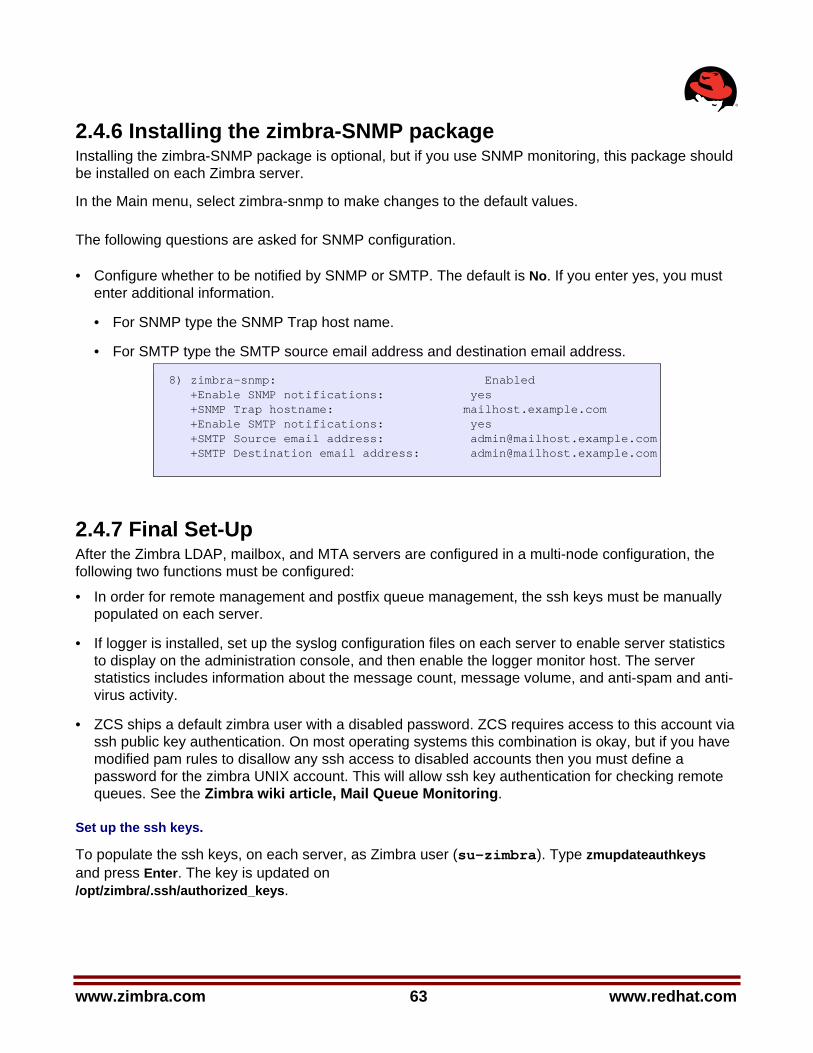
www.zimbra.com 63 www.redhat.com
2.4.6 Installing the zimbra-SNMP package Installing the zimbra-SNMP package is optional, but if you use SNMP monitoring, this package should be installed on each Zimbra server.
In the Main menu, select zimbra-snmp to make changes to the default values.
The following questions are asked for SNMP configuration.
• Configure whether to be notified by SNMP or SMTP. The default is No. If you enter yes, you must enter additional information.
• For SNMP type the SNMP Trap host name.
• For SMTP type the SMTP source email address and destination email address.
8) zimbra-snmp: Enabled +Enable SNMP notifications: yes +SNMP Trap hostname: mailhost.example.com +Enable SMTP notifications: yes +SMTP Source email address: [email protected] +SMTP Destination email address: [email protected]
2.4.7 Final Set-Up After the Zimbra LDAP, mailbox, and MTA servers are configured in a multi-node configuration, the following two functions must be configured:
• In order for remote management and postfix queue management, the ssh keys must be manually populated on each server.
• If logger is installed, set up the syslog configuration files on each server to enable server statistics to display on the administration console, and then enable the logger monitor host. The server statistics includes information about the message count, message volume, and anti-spam and anti-virus activity.
• ZCS ships a default zimbra user with a disabled password. ZCS requires access to this account via ssh public key authentication. On most operating systems this combination is okay, but if you have modified pam rules to disallow any ssh access to disabled accounts then you must define a password for the zimbra UNIX account. This will allow ssh key authentication for checking remote queues. See the Zimbra wiki article, Mail Queue Monitoring.
Set up the ssh keys.
To populate the ssh keys, on each server, as Zimbra user (su-zimbra). Type zmupdateauthkeys and press Enter. The key is updated on /opt/zimbra/.ssh/authorized_keys.

www.redhat.com 64 www.zimbra.com
Enabling Server Statistics Display.
In order for the server statistics to display on the administration console, the syslog configuration files must be modified.
1. On each server, as root, type /opt/zimbra/bin/zmsyslogsetup. This enables the server to display statistics.
2. On the logger monitor host, you must enable syslog to log statistics from remote machines.
a. Edit the /etc/sysconfig/syslog file, add -r to the SYSLOGD_OPTIONS setting, SYSLOGD_options=”-r -m 0”
b. Stop the syslog daemon. Type /etc/init.d/syslog stop.
c. Start the syslog daemon. Type /etc/init.d/syslog start.
2.4.8 Verifying Server Configuration When Configuration complete - press return to exit is displayed, the installation is finished and the server has been started. Before going to the next server, you should verify that the server is running.
Use the CLI command, zmcontrol status, to verify that each server is running.
1. For each server in the Zimbra Collaboration Suite environment, log on as a Zimbra administrator, from the root.
2. Type su - zimbra.
3. Type zmcontrol status. The services status information is displayed. All services should be running.
Note: If services are not started, you can type zmcontrol start. See the Zimbra Administrator’s Guide, Appendix A: Command-Line Utilities for more zmcontrol commands.
2.4.9 Logging on to the Administration Console To log on to the administration console, open your browser, type the administration console URL and log on to the console. The administration console URL is entered as https://[example.com]:7071/zimbraAdmin.
Note: The administration console address must be typed with “https”, even if you configured only “http”.
www.zimbra.com 65 www.redhat.com
The first time you log on, a certificate authority (CA) alert may be displayed. Click Accept this certificate permanently to accept the certificate and be able connect to the Zimbra administration console. Then click OK.
Enter the admin user name and password configured during the installation process. Enter the user name as admin@[example.com]
2.4.10 Post Installation Tasks Once the Zimbra Collaboration Suite is installed, if you installed the Zimbra license, you can log on to the administration console and configure additional domains, create Classes of Service, and provision accounts. See the Zimbra Administrator’s Guide.
2.4.10.1 Defining Classes of Service A default Class of Service (COS) is automatically created during the installation of Zimbra software. The COS controls mailbox quotas, message lifetime, password restrictions, attachment blocking and server pools. You can modify the default COS and create new COSs to assign to accounts according to your group management policies.
In an environment with multiple mailbox servers, COS is used to assign the new accounts to a mailbox server. The COS server pool tab lists the mailbox servers in your Zimbra environment. When you configure the COS, select which servers to add to the server pool. Within each pool of servers, a random algorithm assigns new mailboxes to any available server.
To create or modify a COS, from the administration console, click COS. If you have questions, refer to the Help.
2.4.10.2 Provisioning Accounts
From the administration console, you can quickly create accounts using the New Account Wizard that steps you through the account information to be completed.
To provision accounts:
1. From the admin console navigation pane, click Accounts.
2. Click New to open page 1 of the New Account Wizard.
3. Enter the account name to be used as the email address. The only required information is the account name and last name.
4. You can click Finish at this point, and the account will be configured with the default COS and global features.
www.redhat.com 66 www.zimbra.com
If you want to configure aliases, forwarding addresses, and specific features for this account, proceed through the dialog.
Accounts are now ready to send and receive mail.
Refer to the administration guide to learn more about provisioning accounts, including how to provision multiple accounts at once.
2.4.10.3 Import the Content of Users’ Mailboxes Zimbra’s migration and import tools can be used to move users’ email messages, calendars, and contacts from their old email servers to their accounts on the Zimbra server. When the user’s files are imported, the folder hierarchy is maintained. These tools can be accessed from the administration console Download page and instruction guides are available from the Administration Console Help Desk.
2.4.11 Uninstalling Zimbra Collaboration Suite To uninstall servers, you run the install script -u and then delete the zcs directory and remove the ZCS tgz file on the servers.
1. Change directories to the original install directory for the zcs files.
2. Type ./install.sh -u.
3. When Completely remove existing installation? is displayed, type Yes.
The Zimbra servers are stopped, the existing packages, the webapp directories, and the /opt/zimbra directory are removed.
4. Delete the zcs directory, type rm -rf [zcsfilename].
5. Delete the zcs.tgz file, type rm -rf zcs.tgz.
6. Additional files may need to be delete. See the Zimbra Wiki Installation section on http://wiki.zimbra.com/index.php?title=Main_Page

www.zimbra.com 67 www.redhat.com
2.5 Configuring LDAP Replication Setting up LDAP replication lets you distribute Zimbra server queries to specific replica LDAP servers. Only one master LDAP server can be set up. This server is authoritative for user information, server configuration, etc. Replica LDAP servers can be defined to improve performance and to reduce the load on the master server. All updates are made to the master server and these updates are copied to the replica servers.
The Zimbra install program is used to configure a master LDAP server and additional read-only replica LDAP servers. The master LDAP server is installed and configured first, following the normal ZCS installation options. The LDAP replica server installation is modified to point the replica server to the LDAP master host.
When the master LDAP server and the replica LDAP servers are correctly installed, the following is automatically configured:
• SSH keys are set up on each LDAP server
• Trusted authentication between the master LDAP and the LDAP replica servers is set up
• The content of the master LDAP directory is copied to the replica LDAP server. Replica LDAP servers are read-only.
• Zimbra servers are configured to query the replica LDAP server instead of the master LDAP server.
2.5.1 Installing Zimbra Master LDAP Server You must install the master LDAP server before you can install replica LDAP servers. Refer to “Installing Zimbra LDAP Master Server” (section 2.4.2) for master LDAP server installation instructions. When the master LDAP server is installed, continue with the section called, Enable Replication on the Mater.
2.5.2 Enable Replication on the Master On the master LDAP server, as a Zimbra user, type: /opt/zimbra/libexec/zmldapenablereplica and press Enter. This enables replication on the Master.
2.5.3 Installing a Replica LDAP Server The master LDAP server must be running when you install the replica server. You run the ZCS install program on the replica server to install the LDAP package.
Follow steps 1 through 4 in “Starting the Installation Process” (section 2.4.1) to open a SSH session to the LDAP server, log on to the server as root, and unpack the Zimbra software.
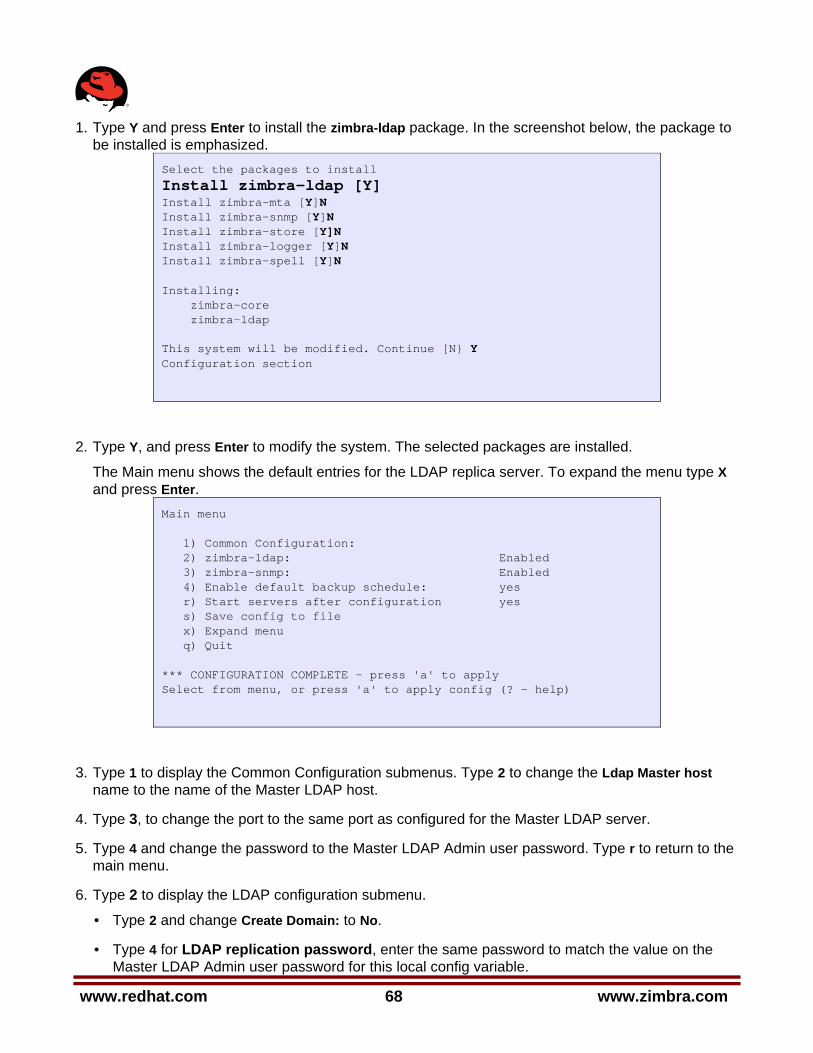
www.redhat.com 68 www.zimbra.com
1. Type Y and press Enter to install the zimbra-ldap package. In the screenshot below, the package to be installed is emphasized.
Select the packages to install Install zimbra-ldap [Y] Install zimbra-mta [Y]N Install zimbra-snmp [Y]N Install zimbra-store [Y]N Install zimbra-logger [Y]N Install zimbra-spell [Y]N Installing: zimbra-core zimbra-ldap This system will be modified. Continue [N} Y Configuration section
2. Type Y, and press Enter to modify the system. The selected packages are installed.
The Main menu shows the default entries for the LDAP replica server. To expand the menu type X and press Enter.
Main menu 1) Common Configuration: 2) zimbra-ldap: Enabled 3) zimbra-snmp: Enabled 4) Enable default backup schedule: yes r) Start servers after configuration yes s) Save config to file x) Expand menu q) Quit *** CONFIGURATION COMPLETE - press 'a' to apply Select from menu, or press 'a' to apply config (? - help)
3. Type 1 to display the Common Configuration submenus. Type 2 to change the Ldap Master host name to the name of the Master LDAP host.
4. Type 3, to change the port to the same port as configured for the Master LDAP server.
5. Type 4 and change the password to the Master LDAP Admin user password. Type r to return to the main menu.
6. Type 2 to display the LDAP configuration submenu.
• Type 2 and change Create Domain: to No.
• Type 4 for LDAP replication password, enter the same password to match the value on the Master LDAP Admin user password for this local config variable.
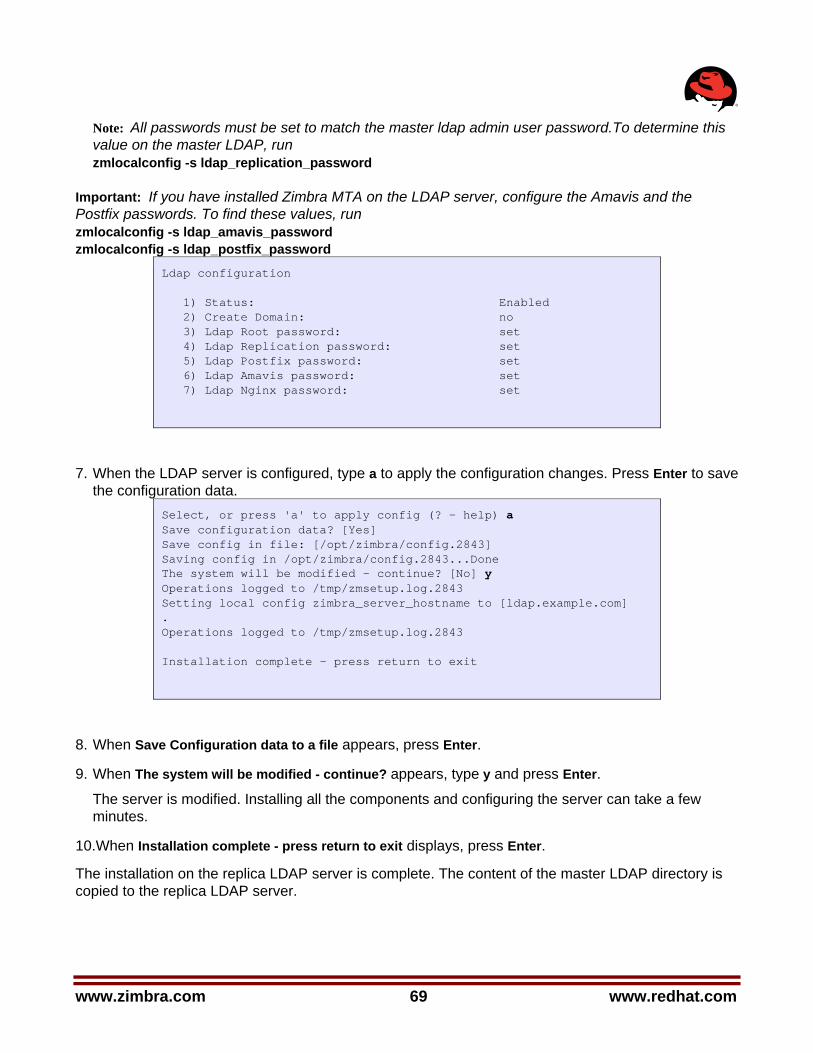
www.zimbra.com 69 www.redhat.com
Note: All passwords must be set to match the master ldap admin user password.To determine this value on the master LDAP, run zmlocalconfig -s ldap_replication_password
Important: If you have installed Zimbra MTA on the LDAP server, configure the Amavis and the Postfix passwords. To find these values, run zmlocalconfig -s ldap_amavis_password zmlocalconfig -s ldap_postfix_password
Ldap configuration 1) Status: Enabled 2) Create Domain: no 3) Ldap Root password: set 4) Ldap Replication password: set 5) Ldap Postfix password: set 6) Ldap Amavis password: set 7) Ldap Nginx password: set
7. When the LDAP server is configured, type a to apply the configuration changes. Press Enter to save the configuration data.
Select, or press 'a' to apply config (? - help) a Save configuration data? [Yes] Save config in file: [/opt/zimbra/config.2843] Saving config in /opt/zimbra/config.2843...Done The system will be modified - continue? [No] y Operations logged to /tmp/zmsetup.log.2843 Setting local config zimbra_server_hostname to [ldap.example.com] . Operations logged to /tmp/zmsetup.log.2843 Installation complete - press return to exit
8. When Save Configuration data to a file appears, press Enter.
9. When The system will be modified - continue? appears, type y and press Enter.
The server is modified. Installing all the components and configuring the server can take a few minutes.
10.When Installation complete - press return to exit displays, press Enter.
The installation on the replica LDAP server is complete. The content of the master LDAP directory is copied to the replica LDAP server.
www.redhat.com 70 www.zimbra.com
2.5.3.1 Test the replica
1. Create several user accounts, either from the admin console or on the master LDAP server. The CLI command to create these accounts is zmprov ca <[email protected]> <password>
If you do not have a mailbox server setup, you can create domains instead. Use this CLI command to create a domain zmprov cd <domain name>
2. To see if the accounts were correctly copied to the replica LDAP server, on the replica LDAP server, type zmprov gaa. Type zmprov gad to check all domains.
The accounts/domains created on the master LDAP server should display on the replica LDAP server.
In cases where the mailbox server is not setup, you can also use the following command for account creation.
zmprov ca <name@domain> <password> zimbraMailTransport <where_to_deliver>
Note: In cases where the LDAP host does not have Zimbra Store installed, type zmprov gaa may not display the accounts correctly. Instead, type zmprov -l gaa to see the accounts created on the master LDAP server.
2.5.4 Configuring Zimbra Servers to use LDAP Replica To use the replica LDAP server instead of the master LDAP server, you must update the ldap_url value on the Zimbra servers that will query the replica instead of the master. For each server that you want to change:
1. Stop the Zimbra services on the server. Type zmcontrol stop.
2. Update the ldap_url value. Enter the replica LDAP server URL zmlocalconfig -e ldap_url=”ldap://<replicahost> ldap://<masterhost>”
Enter more than one replica hostnames in the list typed as ”ldap://<replicahost1> ldap://<replicahost2> ldap://<masterhost>”. The hosts are tried in the order listed. The master URL must always be included and is listed last.
Additional Steps for MTA hosts. After updating the ldap_url, rerun /opt/zimbra/libexe/zmmtainit.
This rewrites the Postfix configuration with the updated ldap_url.
www.zimbra.com 71 www.redhat.com
2.5.5 Uninstalling an LDAP replica server If you do not want to use an LDAP replica server, follow these steps to disable it.
Note: Uninstalling an LDAP server is the same as disabling it on the master LDAP server.
2.5.5.1 Remove LDAP replica from all active servers
1. On each member server, including the replica, verify the ldap_url value. Type zmlocalconfig [ldap_url]
2. Remove the disabled LDAP replica server URL from zmlocalconfig. Do this by modifying the ldap_url to only include enabled ZCS LDAP servers. The master LDAP server should always be at the end of the ldap_url string value.
zmlocalconfig -e ldap_url="ldap://<replica-server-host> ldap://<master-server-host>"
2.5.5.2 Disable LDAP on the Replica To disable LDAP on the replica server,
1. Enter zmcontrol stop to stop the Zimbra services on the server.
The status of the LDAP service changes to off. The (+) changes to (-) in front of zimbraServiceEnabled.
zmprov -1 ms ‘zmhostname’ -zimbraServiceEnabled ldap
2. Enter zmcontrol start to start other current Zimbra services on the server,
Additional steps for MTA host. After updating the ldap_url with zmlocalconfig, rerun /opt/zimbra/libexec/zmmtainit. This rewrites the Postfix configuration with the updated ldap_url.
2.5.5.3 Disable LDAP Replication on the Master server Follow these steps to disable and remove record of LDAP replication entirely across all nodes.
Edit /opt/zimbra/conf/slapd.conf by adding the following comments. Make sure you use the same number of hash marks (#) shown.
www.redhat.com 72 www.zimbra.com
1. Change include /opt/zimbra/conf/master-accesslog.conf
to ###include /opt/zimbra/conf/master-accesslog.conf
2. Change overlay syncprov syncprov-checkpoint 20 10 syncprov-sessionlog 500 include /opt/zimbra/conf/master-accesslog-overlay.conf
to
#overlay syncprov #syncprov-checkpoint 20 10 #syncprov-sessionlog 500 ###include /opt/zimbra/conf/master-accesslog-overlay.conf
3. To restart the master LDAP server, type ldap stop; ldap start.
4. To remove the accesslog database that was created on the master for replication, as root, enter cd /opt/zimbra/openldap-data/ \rm -rf accesslog
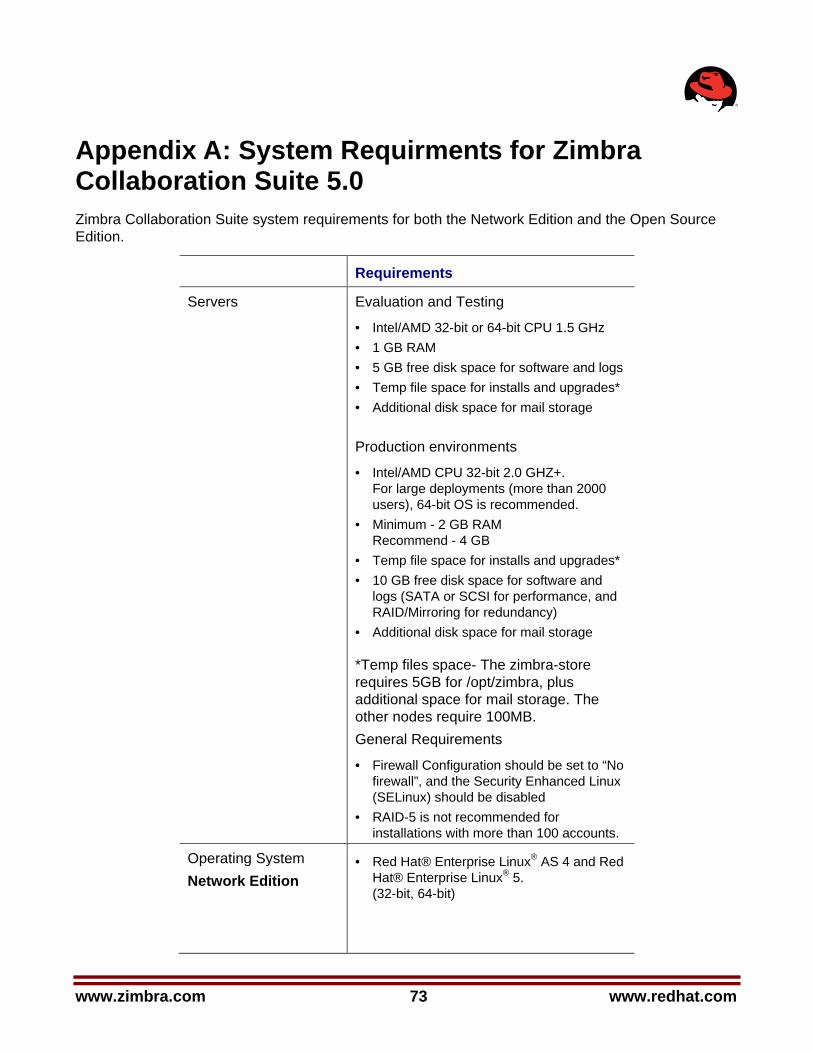
www.zimbra.com 73 www.redhat.com
Appendix A: System Requirments for Zimbra Collaboration Suite 5.0 Zimbra Collaboration Suite system requirements for both the Network Edition and the Open Source Edition.
Requirements
Servers Evaluation and Testing
• Intel/AMD 32-bit or 64-bit CPU 1.5 GHz • 1 GB RAM • 5 GB free disk space for software and logs • Temp file space for installs and upgrades* • Additional disk space for mail storage Production environments
• Intel/AMD CPU 32-bit 2.0 GHZ+. For large deployments (more than 2000 users), 64-bit OS is recommended.
• Minimum - 2 GB RAM Recommend - 4 GB
• Temp file space for installs and upgrades* • 10 GB free disk space for software and
logs (SATA or SCSI for performance, and RAID/Mirroring for redundancy)
• Additional disk space for mail storage
*Temp files space- The zimbra-store requires 5GB for /opt/zimbra, plus additional space for mail storage. The other nodes require 100MB. General Requirements
• Firewall Configuration should be set to “No firewall”, and the Security Enhanced Linux (SELinux) should be disabled
• RAID-5 is not recommended for installations with more than 100 accounts.
Operating System Network Edition
• Red Hat® Enterprise Linux® AS 4 and Red Hat® Enterprise Linux® 5. (32-bit, 64-bit)
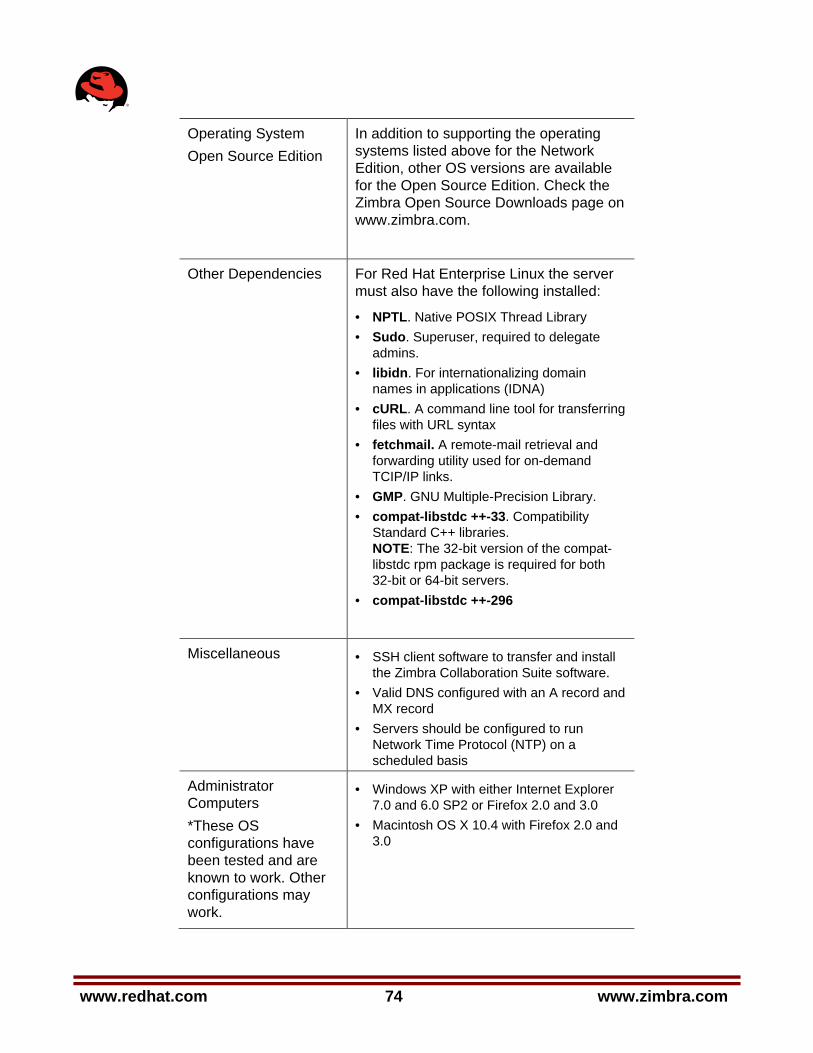
www.redhat.com 74 www.zimbra.com
Operating System Open Source Edition
In addition to supporting the operating systems listed above for the Network Edition, other OS versions are available for the Open Source Edition. Check the Zimbra Open Source Downloads page on www.zimbra.com.
Other Dependencies
For Red Hat Enterprise Linux the server must also have the following installed:
• NPTL. Native POSIX Thread Library • Sudo. Superuser, required to delegate
admins. • libidn. For internationalizing domain
names in applications (IDNA) • cURL. A command line tool for transferring
files with URL syntax • fetchmail. A remote-mail retrieval and
forwarding utility used for on-demand TCIP/IP links.
• GMP. GNU Multiple-Precision Library. • compat-libstdc ++-33. Compatibility
Standard C++ libraries. NOTE: The 32-bit version of the compat-libstdc rpm package is required for both 32-bit or 64-bit servers.
• compat-libstdc ++-296
Miscellaneous • SSH client software to transfer and install the Zimbra Collaboration Suite software.
• Valid DNS configured with an A record and MX record
• Servers should be configured to run Network Time Protocol (NTP) on a scheduled basis
Administrator Computers *These OS configurations have been tested and are known to work. Other configurations may work.
• Windows XP with either Internet Explorer 7.0 and 6.0 SP2 or Firefox 2.0 and 3.0
• Macintosh OS X 10.4 with Firefox 2.0 and 3.0
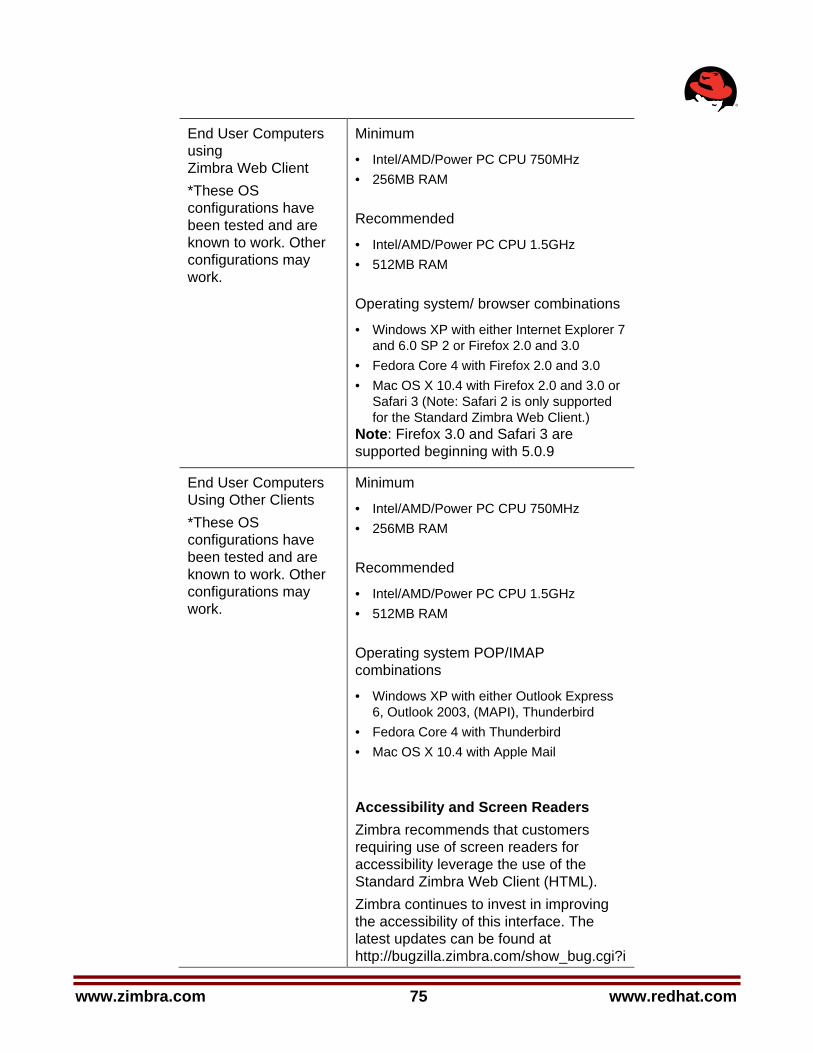
www.zimbra.com 75 www.redhat.com
End User Computers using Zimbra Web Client *These OS configurations have been tested and are known to work. Other configurations may work.
Minimum
• Intel/AMD/Power PC CPU 750MHz • 256MB RAM Recommended
• Intel/AMD/Power PC CPU 1.5GHz • 512MB RAM Operating system/ browser combinations
• Windows XP with either Internet Explorer 7 and 6.0 SP 2 or Firefox 2.0 and 3.0
• Fedora Core 4 with Firefox 2.0 and 3.0 • Mac OS X 10.4 with Firefox 2.0 and 3.0 or
Safari 3 (Note: Safari 2 is only supported for the Standard Zimbra Web Client.)
Note: Firefox 3.0 and Safari 3 are supported beginning with 5.0.9
End User Computers Using Other Clients *These OS configurations have been tested and are known to work. Other configurations may work.
Minimum
• Intel/AMD/Power PC CPU 750MHz • 256MB RAM Recommended
• Intel/AMD/Power PC CPU 1.5GHz • 512MB RAM Operating system POP/IMAP combinations
• Windows XP with either Outlook Express 6, Outlook 2003, (MAPI), Thunderbird
• Fedora Core 4 with Thunderbird • Mac OS X 10.4 with Apple Mail
Accessibility and Screen Readers Zimbra recommends that customers requiring use of screen readers for accessibility leverage the use of the Standard Zimbra Web Client (HTML). Zimbra continues to invest in improving the accessibility of this interface. The latest updates can be found at http://bugzilla.zimbra.com/show_bug.cgi?i
www.redhat.com 76 www.zimbra.com
d=28516
Monitor Display minimum resolution 1024 x 768
Internet Connection Speed
128 kbps or higher
Migration Wizard Requirements
Migration Wizard for Exchange - Accounts from Microsoft Exchange 2000, 2003, 2007 and 5.5 can be migrated to Zimbra Collaboration Suite. Migration Wizard for Lotus Dominos - Accounts from Lotus Domino 6.0 or later can be migrated to Zimbra Collaboration Suite.
Import Wizard Requirements
Contents of a .pst file from accounts using Microsoft® Outlook® 2003 and 2007 can be imported to accounts on the Zimbra server.
Zimbra Mobile for Network Edition only
Zimbra Mobile provides mobile data access to email, calendar, and contacts for users of selected mobile phones.
Zimbra Mobile supports native synchronization with the following devices.
• Treo™ 650 , Treo 700w
• Windows Mobile 5 devices
Zimbra Mobile supports synchronization with the following devices via “Mail for Exchange”.
• Symbian S60/S80 smart devices such as Nokia E Series
Note: Zimbra Connector for BES is in Beta for ZCS 5.0.