Embed Size (px)
Citation preview
P a g e | 1
Deployment of SAS Web Applications under IBM Web Sphere Application Server (Standalone)
Webtier
in love with
by sbxsub
Introduction For me there is no doubt why WebSphere Application Server (WAS) is one of the best known Web application server and a proven platform for the web-infrastructure of an organization using it At this point of time SAS is having more and more customers demanding to host SAS Web applications on WebSphere application server When we received the first request to use WebSphere for SAS Web-applications we had difficult times in gathering all the right information on-time All the information we could gather was kind of scattered saspedia for WebSphere SAS Web Administration guide instructionshtml wik_readmehtml deploymenthtml SAS Support site etc etc etc This document is a step in the direction to have all the WebSphere deployment related information at one place This document also includes complete steps to install WAS Server and raise it to a required and SAS supported level You can use these steps to make a trial installation and SAS deployment in SAS blade environments before pressing your hands into the mud at customer sites If you are one of those SAS Installation consultants whom everyone expects to magically figure out how to configure WAS to make SAS web-applications run smoothly this document is for you Wish you all the best For any corrections feedbacks or comments please send a mail to sbxsubsbxsascom
P a g e | 2
Contents Before we begin 2 WAS Base Server Installation Steps 3 Upgrading the WAS Server to 60219 13 Recommended settings to the server 28 Things to be done on SAS side to be able to deploy on WebSphere 34 Now we can start the deployment process of SAS WebApplications 36
WAS stands for WebSphere Application Server
Before we begin
Before we begin lets check on SAS Third Party Support site (httpsupportsascomresourcesthirdpartysupportv913sp4indexhtmlappsrv ) what version(s) of Web Sphere Application server are supported (recommended) by SAS So we can see following 3 versions of Web Sphere Application Servers are supported by SAS -WebSphere 511 -WebSphere V602 -WebSphere V61 This document describes the SAS Web Applications deployment mainly on WebSphere V602 (Most of the steps are quite the same for V61) Actually if we read carefully the exact version supported for WebSphere V602 is 60215 or 60219 Now what are these 60 and 2 and 15 (or 19)
A note about the IBM terminology on what WAS 60219 reflects
1 You will install WAS 60 and then 2 Apply the V60 refresh pack 2 to bring it to the 602 level and then 3 Apply V602 fix pack 15 to bring it to the 60219 level and then 4 Apply the WAS JDK Cumulative Fix to update the WAS JDKJRE to SR6 Documentation that helped me to understand most IBM terminologies and steps of installation is all available internally at SAS Please Note You might not be able to access the below mentioned links especially lsquosaspediarsquo SASpedia is now locked down to ldquoRampD Friends amp Familyrdquo Further precise information is available online at httpswwsascomwikiR26D_Friends_and_Family along with a complete listing of who to contact
For WebSphere V602 httpswwsascomsaspediaWebSphere_Version_60 For WebSphere V61 httpswwsascomsaspediaWebSphere_Version_61 For WebSphere 511 httpswwsascomsaspediaWebSphere_Version_51 Installn httprdwssnasascommtijdtWebSphere20DocumentsWAS6atSASdoc1 To install WebSphere you need binaries and that is available at SAS If you follow the above mentioned link you will find links under section Obtaining WebSphere 60 For Internal SAS Use
P a g e | 3
Please Note Webspshere is third-party software If you are downloading and using these third-party software binaries for NON RampD Use before starting it is very important to contact John Rothrsquos team Dept JDT (Java Development Technologies) or JDTwntsascom and discuss the license limitations on these internal versions of ird-party soft wares th
1Text descriptions below in the WAS Base Server Installation Steps are actually re-used from this document only I have added some more description and screenshots for each step
You can find the WAS 60 archive files that you need to extract and use to install WAS 60 with -Windows version is windowszip - AIX version is aixtar - Solaris version is solaristar These SASPEDIA pages not only contains links to binaries but it also points you to reference documents which are worth to refer to and can save a lot of time by avoiding problems that are likely to occur during the installation Now that you have the correct archive file for your platform lets install WAS 60
WAS Base Server Installation Steps
The majority of SAS users have been installing a single WAS Base server so this section runs through those steps If you know you will be installing a WAS ND environment make sure you read both this section and the ND Installation section (further down in this document)
1 As mentioned in the WAS6atSASdoc first item is to make sure that your machine meets both the hardware and software prerequisites before installing was 51 you can get this information from the link httpwww-01ibmcomsoftwarewebserversappservwasrequirements
2 As mentioned in the WAS6atSASdoc it is best to refer to the WAS 60 Infocenter to obtain a lot of information at httppublibboulderibmcominfocenterws60helpindexjsp) The specific installation section is at httppublibboulderibmcominfocenterws60helpindexjsptopic=comibmwebspherenddocinfoaeaetins_epinsthtml
3 We found that the general installation sections are too generic for UNIX installs (AIX and Solaris) They point you to check out platform specific details in the IBM Infocenter and we found this to be very important UNIX installs require much more specific setup and these items are documented in the URLs below You MUST check out this information especially before installing WAS on UNIX platforms otherwise you most likely will run into installation problems There are not as many requirements as there were in WAS V5 these sections also indicate how much space you will need on your system
4 Get WAS for your platform from sashqrootdeptjdtIBM_WAS60 It has been
downloaded from the IBM Partnerworld Software Access Catalog and renamed CURRENTLY only Windows AIX and Solaris are officially supported platforms but you will see a few other archives out there for some other platforms
-winwaszip -aixwastargz -solariswastargz
P a g e | 4
Please Note IBM Webspshere(WAS) is third-party software If you are downloading and using these third-party software binaries for NON RampD Use before starting it is very important to contact John Rothrsquos team Dept JDT (Java Development Technologies) or JDTwntsascom and discuss the license limitations on these internal versions of third-party softwares
5 Windows is a fairly straight forward install without too many prerequisite steps and
gotchas but thatrsquos not always the case for the UNIX platforms Remember to check out those resources outlined in step 3 above I have done both AIX and Solaris WAS installs and my system administrator had to update our machines before I could perform my WAS install
6 For UNIX you need to be root when you perform gzip untar and the WAS install 7 Unzip the windows archive files or untar the UNIX archives (using gzip -d followed by
tar ndashxvf) for the version you want to use into a temporary directory On UNIX it will look something like below
8 To install WAS you can run launchpadbat launchpadsh in the main directory (but
you must have a configured browser to do so) or you can run the lsquoinstallrsquo that resides in the ldquoWASrdquo directory that you unzipped or untarred into Below are the steps I followed bull Invoke launchpadbat on Windows or launchpadsh on UNIX For UNIX platforms if you do not have the current directory (ldquordquo) in your PATH then you will need to enter ldquolaunchpadshrdquo bull You will see ldquoIBM WebSphere Application Server Network Deploymentrdquo window (As mentioned you will see below window coming up automatically only if you have a configured browser to do so) This window shows you the different products that you can install For now we are only interested in WAS Note Launchpad will not work (especially on UNIX) if your browser is not configured correctly If this is the case you can configure the browser to run and invoke launchpad again Or you can invoke the WAS installation wizard directly (which does not require a browser) by going down to the ldquoWASrdquo sub-directory and executing ldquoinstallrdquo But in both the cases you must have your DISPLAY variable set in your unix client for eg SSH with and XServer(like Exceed or X Ming) running
P a g e | 5
bull Click on ldquoLaunch the installation wizard for WebSphere Application Serverrdquo bull Now you will see the initial Welcome to IBM WebSphere Application Server Network Deployment V6rdquo window Click Next
bull Select Accept License Agreement and click Next bull You will see the System Prerequisites Check window and the checking will executed with the prerequisite results displayed
P a g e | 6
bull If problems were found stop wizard correct the problems start wizard again The most common prerequisite values are back-level OS not enough space UNIX kernel settings but the results displayed are helpful as to the problem encountered
bull If no were problems found click Next bull If it finds another WAS it will tell you about it (unique ports can be set later) Click Next
bull Enter directory to install WAS to (or take the default ldquoCProgram FilesIBMWebSphereAppServerrdquo or for UNIX ldquousrIBMWebSphereAppServerrdquo) and click Next
bull You will see the ldquoFeatures Requestedrdquo window and all 3 features are checked Leave the Core product files checked but uncheck application server samples and Javadocs unless you really want them The samples add a lot of overhead and you most likely will not use the Javadocs Click Next
P a g e | 7
bull You will see the Installation Features Summary for you to review Click Next
bull The installation starts running be patient it will take awhile but you will see a progress bar Go grab a beverage now The last major component installed is ldquowebuirdquo you may think you are stuck at about 92 your not itrsquos just a large component
bull After the install is complete you will see the Installation Complete window with a checkbox to launch the profile creation wizard (leave this checked) Click Next
bull The Installation Wizard will end but now you will see the ldquoWelcome to Profile Creation Wizardrdquo window Click Next
P a g e | 8
bull The default is to create an Application Server profile leave this selected as most people are using and installing a single base application server If you decide you want to run in a WAS ND environment you will run the profile wizard at a later time and choose to create a Deployment Manager profile Our goal is first to get a single running application server Click Next
bull It will prompt you for the profile name the default is AppSrv01 Click Next
bull It will prompt you for the profile directory the default is your install directory followed by ldquoprofilesAppSrv01rdquo so for Windows it was ldquoCProgram FilesIBMWebSphereAppServerprofilesAppSrv01rdquo Click Next
P a g e | 9
bull You will see the node and host name window where the default host is your machine DNS name (D1234nasascom) and the node is machine plus ldquoNode01rdquo (D1234Node01) Click Next
bull You will see the Port Value Assignment window If you do not have another WAS installed on that machine you wonrsquot need to be concerned about any conflicts WAS normally sorts these ports out for you if it is aware of other profiles (in my case on AIX it did) If you are going to either run one or the other you can also use the same ports Click Next
bull For Windows you will see the ldquoWindows Service Definitionrdquo window This gives you the opportunity to start and stop WAS as a service If so you will need to enter a userid password and service startup type Click Next bull You will see the Profile Summary window with your selections click Next
P a g e | 10
bull Now the Profile Creation wizard creates the actual profile This will also take awhile so if are ready for another coffee feel free to go grab another cup
bull You will see the Profile Creation complete window with the Launch First Steps Console check box Leave this checked as we want to verify our WAS install and click Finish So now a standalone web application server is created under profile AppSrv01
bull The Profile Creation wizard window will go away and now you will see the First Steps window Click on ldquoInstallation Verificationrdquo
P a g e | 11
bull You will see the Installation Verification window with messages showing the progress of the test The test will start the server run some tests and then give you the result of the test All these messages are on this window but you will have to scroll down to see the ending messages the scrolling did not happen automatically for me In other words check the scroll bar on the right and when it shows more scroll otherwise you might be waiting for the end of test messages a long time The last message you should see is ldquoInstallation Verification is completerdquo
bull So now the application server is running Above screen also contains some useful commands and information if you want to start the application server from the command line tools (putty etc)
bull Back on the First Steps window click on admin console If your browser is configured correctly on that machine you will see the admin console display in your browser I say ldquoifrdquo because on my Windows box this worked fine but on my UNIX boxes it did not display nothing happens since the browser was not configured If you do not see the admin console go to a machine with a working browser and invoke the admin console (httpD1234nasascom9060ibmconsole)
P a g e | 12
bull This should bring up the WAS admin console which is just an application that is running on WAS No type of security is on so you can just click on login and explore the admin console If you go to Applications-gtEnterprise Applications you will see three applications are running
bull -DefaultApplication - default sample snoop servlet application bull -ivtApp - default initial verification test application bull -query - dynamic query PME features
If you see a whole bunch more applications it means you installed the WAS samples When you are finished exploring the admin console you can logout
bull Now go to the First Steps window click on Stop the server and once again you will see messages showing the progress of the server shutting down
bull Now exit the First Steps window bull Close the IBM WebSphere Application Server Network Deploymentrdquo window bull Your install is complete and the server is not running
9 Even if you choose to set up WAS ND (Network Deployment) you can add this WAS Base
server to your cell at a later time WAS ND is the deployment manager and will manage cells nodes and servers To install WAS ND you only have to add another
P a g e | 13
profile using the ldquoProfile Creation Wizardrdquo and then add your node(s) Then once you add a node you can then add other servers into this node More on this in a later section
Upgrading the WAS Server to 60219 The IBM web-site has been referred to update this section accordingly As of 020107 the most current WAS 6 level is 60223 BUT we plan on using 60219 You can determine the latest WAS level by looking at the recommended updates page at httpwww-1ibmcomsupportdocviewwssrs=180ampuid=swg27004980 This page will also list the latest WAS Java SDK cumulative fix for WAS 602 of which we are going to use the WAS JDK SR6 level The process below describes the manual service update process for WAS It takes awhile so please be patient
10 A note about some IBM terminology on what 60219 reflects It means you will have to first apply the V60 refresh pack 2 to bring you to the 602 level Then you will apply V602 fix pack 19 to bring you to the 60219 level Then you will apply the WAS JDK Cumulative Fix to update the WAS JDKJRE to the 142 SR6 level
11 See page httpwww-1ibmcomsupportdocviewwssrs=180ampuid=swg24009813 for 602
refresh pack details You will have to click on the tab for the platform you are interested in The readme for this refresh pack is at httpwww-1ibmcomsupportdocviewwssrs=180ampuid=swg27006336 We have this refresh pack locally at sashqrootdeptjdtIBM_WAS60refreshpack2
12 See page httpwww-01ibmcomsupportdocviewwssrs=180ampuid=swg24014975 for
60219 fix pack details You will have to click on the tab for the platform you are interested in The link to the readme for this fix pack and other details are on this page You can download the applicable 60219 fix pack for your platform or I have these fix packs locally at sashqrootdeptjdtIBM_WAS60fixpack19 Pick the correct one for your platform name is 602-WS-WAS-xxx-FP00000019 where xxx is the specific platform name
13 See page httpwww-1ibmcomsupportdocviewwssrs=180ampuid=swg24014326 for the WAS
602 Java SDK 142 SR6 cumulative fix details The link to the readme for this fix pack and other details are on this page You can download the applicable Java SDK 142 SR6 Cumulative Fix for your platform from this page or I have these fix packs locally at sashqrootdeptjdtIBM_WAS60WASJDKSR6 Pick the correct one for your platform name is 602-WS-WASJavaSDK-xxx-FP00000017 where xxx is the specific platform name
14 Verify that you will have enough space For a Refresh pack you will need
approximately 400 MB of free space in the system temporary directory (typically tmp) and another 400 MB in the file system that hosts the WebSphere Application Server image (typically usr or opt) on a UNIX-based platform or approximately 800 MB of free space on the disk drive where you are installing on a Windows platform
15 So go ahead and download both the refresh pack and fix pack for your platform they
are just archive files you will have to unzip or untar
16 On your machine where WAS is installed extract the file into your WAS_HOME This step is very important that you extract it into your WAS_HOME because unlike WAS 5 WAS 6 requires this updateinstaller directory structure be in WAS_HOME For example on Windows you would extract this into CProgram FilesIBMWebSphereAppServer( for UNIX ldquousrIBMWebSphereAppServerrdquo) which would create the directory structure CProgram FilesIBMWebSphereAppServerupdateinstaller If you already have
P a g e | 14
another updateinstaller directory there delete it rename it or move it some place else If you donrsquot extract to the correct location you will find out shortly when you execute the update command it will tell you So to untar the refresh pack file aixrp602tar present at tmpWASrefreshpack602 do following
cd usrIBMWebSphereAppServer change to WAS_HOME mv updateinstaller updateinstallerOLD rename existing updateinstaller tar -xvf tmpWASrefreshpack602aixrp602tar x Licensetxt 34565 bytes 68 media blocks x Noticestxt 47426 bytes 93 media blocks x updateinstaller x updateinstallerlib x updateinstallermaintenance x updateinstallermaintenance60-WS-WAS-AixPPC32-RP0000002pak 344081113 bytes 672034 media blocks x updateinstallerframework x updateinstallerdocsreadme_updateinstallertxt 103676 bytes 203 media blocks x updateinstallerupdate 363434 bytes 710 media blocks x updateinstallerversiontxt 175 bytes 1 media blocks teinstallerupdatejar 13500636 bytes 26369 media blocks x upda pwd usrIBMWebSphereAppServer cd updateinstaller ls -l total 27112 drwxr-xr-x 3 root system 4096 Jul 01 2005 docs drwxr-xr-x 3 root system 4096 Jul 01 2005 framework drwxr-xr-x 2 root system 256 Jul 01 2005 lib drwxr-xr-x 2 root system 256 Jul 01 2005 maintenance drwxr-xr-x 2 root system 256 Jul 01 2005 responsefiles -rwxr-xr-x 1 root system 363434 Jun 25 2005 update -rw-r--r-- 1 root system 13500636 Jun 25 2005 updatejar -rw-r--r-- 1 root system 175 Jun 25 2005 versiontxt cd maintenance ls -l total 672040 -rw-r--r-- 1 root system 344081113 Jul 01 2005 60-WS-WAS-AixPPC32- RP0000002pak So the above listed file 60-WS-WAS-AixPPC32-RP0000002pak confirms you have the right refresh pack file at right location to apply to raise WAS Base installation from 60 to 602 17 You can actually extract into the same ldquoupdateinstallerrdquo directory but it adds a few
more complications You will have to overwrite existing files because you will want the most current update tools As a matter of fact fix pack 60219 will NOT install with the update installer that came with refresh pack 2 You will now have multiple refreshfix pack files and will have to indicate which one during the update process You will also have to delete the existing updateinstallerjava directory because that gets created from your existing WAS level during the update process (for refesh packs)
18 Stop all application server processes the nodeagent process the deployment manager
process and all server processes that belong to serviceable features Features with server processes include the IBM HTTP Server Stop all WAS processes The product might not continue to run successfully or without error if you install a RefreshFix pack while a WebSphere Application Server-related Java process is running
19 It is recommended and very good practice to run the backupConfig command to back up
your WAS configuration files
P a g e | 15
20 Go to WAS_HOMEupdateinstaller directory and invoke the update installer graphical interface via the update executable
o You will see Welcome window click Next
o Enter WAS Home directory for UNIX ldquousrIBMWebSphereAppServerrdquo (CProgram FilesIBMWebSphereAppServer) click Next
P a g e | 16
o Choose Install Maintenance Package click Next
o It should then display the refresh pack directory and name to install click
Next FYI this is where if you have multiple refreshfix packs in this directory it will want to know which one
o For refresh packs you will see a window indicating it will copy your WAS JDK click Next This is because refresh packs may update the WAS JDKJRE If so they will copy the current WAS JRE to use into the updateinstaller directory because it is going to overwrite the WAS version A fix pack will not (normally) update the WAS JDKJRE so it can use the WAS version and not have to create a copy
P a g e | 17
o It copies the JDK and then asks you to relaunch the wizard make sure you click Relaunch otherwise the refresh pack will not get installed
o Once again it will display the refresh pack directory and name to install click Next
P a g e | 18
o You will see a window indicating you will be upgraded with RP6020 and to where click Next
o The upgrade will start it will take awhile just settle back Component webui is the last one and takes quite awhile itself its really not stuck You will see the process first backup all the WAS components and then update the components so be patient
o Then hopefully you will see the final window indicating Success The following product was successfully upgraded click Finish
P a g e | 19
21 So after applying refresh pack 2 go to WAS_HOMEbin and enter versionInfo command
and see info the important part being Name IBM WebSphere Application Server - ND Version 6020 ID ND
22 You will then follow a similar process as we just did but to apply fix pack 60219
In this case you should not see the JDKJRE get copied and when the process is done you should once again run versionInfo again and see the 60219 version o So first thing now is to get the fixpack file in the WAS_HOMEupdateinstaller directory
cd usrIBMWebSphereAppServer mv updateinstaller updateinstallerRP tar -xvf tmpWASfixpack19AIX-32bit602-WS-WAS-AixPPC32-FP00000019tar x Licensetxt 34565 bytes 68 media blocks x Noticestxt 47426 bytes 93 media blocks x updateinstaller x updateinstallerframeworkversionxml 562 bytes 2 media blocks x updateinstallermaintenance x updateinstallermaintenance602-WS-WAS-AixPPC32-FP00000019pak 260166234 bytes 508138 media blocks x updateinstallerlib x updateinstallerlibxdpluginsjar 17775 bytes 35 media blocks x updateinstallerlibupdipluginsjar 1567 bytes 4 media blocks x updateinstallerlibwbipluginsjar 3723 bytes 8 media blocks x updateinstallerdocsreadme_updateinstallertxt 103676 bytes 203 media blocks x updateinstallerdocsreadme_updateinstallerpdf 396992 bytes 776 media blocks teinstallerdocsreadme_updateinstallerhtml 94604 bytes 185 media blocks x upda
pwd usrIBMWebSphereAppServer cd updateinstaller
P a g e | 20 ls -l total 27016 drwxr-xr-x 3 root system 4096 Oct 06 2006 docs drwxr-xr-x 3 root system 4096 Oct 06 2006 framework drwxr-xr-x 2 root system 256 Oct 06 2006 lib drwxr-xr-x 2 root system 256 Apr 25 2007 maintenance drwxr-xr-x 2 root system 256 Oct 06 2006 responsefiles -rwxr-xr-x 1 root system 363512 Oct 06 2006 update -rw-r--r-- 1 root system 13451593 Oct 06 2006 updatejar -rw-r--r-- 1 root system 175 Oct 06 2006 versiontxt cd maintenance ls -l total 508152 -rw-r--r-- 1 root system 260166234 Apr 25 2007 602-WS-WAS-AixPPC32- FP00000019pak So the above listed file 602-WS-WAS-AixPPC32-FP00000019pak confirms you have the right Fix pack file at right location to apply to raise your WAS Base installation which is now 602 to 60219
o Stop all application server processes the nodeagent process the deployment manager process and all server processes that belong to serviceable features Features with server processes include the IBM HTTP Server Stop all WAS processes The product might not continue to run successfully or without error if you install a RefreshFix pack while a WebSphere Application Server-related Java process is running o Go to WAS_HOMEupdateinstaller directory and invoke the update installer graphical interface via the update executable You will see Welcome window click Next
o Enter WAS Home directory for UNIX ldquousrIBMWebSphereAppServerrdquo (CProgram FilesIBMWebSphereAppServer) click Next
P a g e | 21
o Choose Install Maintenance Package click Next
o It should then display the fix pack directory and name to install click Next FYI this is where if you have multiple refreshfix packs in this directory (not in this case) it will want to know which one
o You will see a window indicating you will be upgraded with FP60219 and to where click Next
o The upgrade will start it will take awhile just settle back
P a g e | 22
o Then you will see the final window indicating Success The following product was successfully upgraded click Finish
23 So after applying refresh pack 2 go to WAS_HOMEbin and enter versionInfo command and see info the important part being
Name IBM WebSphere Application Server - ND Version 60219 ID ND
24 You will then follow a similar process as we just did in the steps above for point 14
but to apply the WAS Java SDK cumulative fix In this case ONLY the WAS JDKJRE will get updated
P a g e | 23
Welcome Screen Click Next
Enter WAS_HOME
Select Install maintenance package Click Next
As there is only one package under WAS_HOMEupdateinstaller you get it by default
here Click Next
P a g e | 24
You will see a message about update to an installed JDK Click Next
Copying of JDK in progress
Click relaunch
Select Install maintenance package Click Next
P a g e | 25
Click Next
Click Next
Click Finish
25 You should be all set to start up WAS again at the new WAS 60219 version with the WAS Java SDK at the SR6 level To verify the Java version go to WAS_HOMEjavabin and enter the ldquoJava -versionrdquo command These versions are
1 AIX ca142ifx-20060421 2 Windows cn142ifx-20061121
P a g e | 26
3 Sun 142_12-b03
26 Now you can start your application server which is created with the AppSrv01 profile
and this profile AppSrv01 can be found under WAS_HOMEprofiles with a folder named AppSrv01 To start the server (created)associated with this profile
27 cd usrIBMWebSphereAppServerprofiles change to WAS_HOMEprofiles cd AppSrv01 change to profile directory cd bin change to bin under profile startServersh server1 command to start server ADMU0116I Tool information is being logged in file usrIBMWebSphereAppServerprofilesAppSrv01logsserver1startServ ADMU0128I Starting tool with the AppSrv01 profile ADMU3100I Reading configuration for server server1 ADMU3200I Server launched Waiting for initialization status ADMU3000I Server server1 open for e-business process id is 610528 To check if the server is runnig ps ndashef | grep IBM root 6105281 0 070112 pts0 115 usrIBMWebSphereAppServerjavabinjava -XbootclasspathpusrIBMWebSphereAppServerjavajrelibextibmorbjarusrIBMWebSphereAppServerjavajrelibextibmextjar -Dwasstatussocket=45740 -classpath usrIBMWebSphereAppServerprofilesAppSrv01propertiesusrIBMWebSphereAppServerpropertiesusrIBMWebSphereAppServerlibbootstrapjarusrIBMWebSphereAppServerlibj2eejarusrIBMWebSphereAppServerliblmproxyjarusrIBMWebSphereAppServerliburlprotocolsjar -Dwsextdirs=usrIBMWebSphereAppServerjavalibusrIBMWebSphereAppServerprofilesAppSrv01classesusrIBMWebSphereAppServerclassesusrIBMWebSphereAppServerlibusrIBMWebSphereAppServerinstalledChannelsusrIBMWebSphereAppServerlibextusrIBMWebSphereAppServerwebhelpusrIBMWebSphereAppServerdeploytoolitppluginscomibmetoolsejbdeployruntime -Dderbysystemhome=usrIBMWebSphereAppServerderby -Dcomibmitplocation=usrIBMWebSphereAppServerbin -DjavautilloggingconfigureByServer=true -Dibmwebspherepreloadclasses=true -Duserinstallroot=usrIBMWebSphereAppServerprofilesAppSrv01 -Dwasinstallroot=usrIBMWebSphereAppServer -Djavautilloggingmanager=comibmwsbootstrapWsLogManager -Ddb2jsystemhome=usrIBMWebSphereAppServercloudscape -Dserverroot=usrIBMWebSphereAppServerprofilesAppSrv01 -Xms640m -Xmx1840m -Xss256k -Xoss256k -Xpartialcompactgc -Xgcpolicyoptthruput -DsunrmidgcclientgcInterval=3600000 -DsunrmidgcservergcInterval=3600000 -Djavaawtheadless=true -Xk15000 -Xloratio02 -Xlp -DsunrmidgcackTimeout=1 -DcomibmwebspherethreadpoolclearThreadLocal=TRUE -Djavasecurityauthloginconfig=usrIBMWebSphereAppServerprofilesAppSrv01propertieswsjaasconf -Djavasecuritypolicy=usrIBMWebSphereAppServerprofilesAppSrv01propertiesserverpolicy comibmwsbootstrapWSLauncher comibmwsruntimeWsServer
srIBMWebSphereAppServerprofilesAppSrv01config blues07Node01Cell blues07Node01 server1 u
OR cd usrIBMWebSphereAppServerprofiles change to WAS_HOMEprofiles cd firststeps firststepssh before this command do set DISPLAY and start Xserver This command will display the following first steps window which you have already seen in one of steps above Click on Start the server link It will open another window where you can see the status of the starting server
P a g e | 27
You can close this window
Once the server is started successfully the link lsquoStart the Serverrsquo in the first steps window above will be changed to lsquoStop the Serverrsquo
Click Stop the server link whenever you want to stop the server This window can be closed
P a g e | 28 Recommended settings to the server 28 Setting JVM Arguments
bull Open the WebSphere Console for your profile using url as below httpMachineNameOnWhichServerIsRunningWC_adminhost_Portibmconsole Eg for me it is httpblues07unxsascom9060ibmconsole You should have noted the port Number for Administrative Console (WC_adminhost) from one of the screens that you get during profile creation If not you can find it in the following file
WAS_HOMEprofilesltltProfileNameYouGavegtgtconfigcellsltltCellNamegtgtnodesltltNodeNamegtgtserverindexxml For me usrIBMWebSphereAppServerprofilesAppSrv02configcellsblues07Node02Cellnodesblues07Node02
bull Just click on Login as by default the admin Console is not secured Once you are logged in Expand the lsquoServersrsquo on the left-hand side Click lsquoApplication Serversrsquo to see your server on the right hand side
bull Click on the lsquoserver1rsquo link and go to lsquoConfigurationrsquo tab
bull On the lsquoConfigurationrsquo tab Under lsquoServer Infrastructurersquo Click on lsquoProcess Definitionrsquo
bull On the next page under lsquoAdditional Propertiesrsquo Click on lsquoJava Virtual Machinersquo
P a g e | 29
bull On the next page we have Change Initial Heap Size=256 Maximum Heap Size=256 and Generic JVM Arguments=hellip Value to put for Generic JVM Arguments can be found in SASreg 913 Intelligence Platform Web Application Administration Guide Third Edition available at httpsupportsascomdocumentationconfigurationbiwaagpdf In this book Go to lsquoBest Practices for Configuring your Middle Tierrsquo and then go to lsquoTuning WebSphere 602 or 61rsquo on page 66 and under lsquoConfigure the JVM Argumentsrsquo you can find the value for lsquoGeneric JVM Argumentsrsquo for your platform
bull After putting the values as indicated Click on Apply
bull You get the same page refreshed and with a lsquosaversquo link on top Click save
P a g e | 30
bull Click Save
bull You will be back to the page where you made JVM changes Application servers gt server1 gt Process Definition gt Java Virtual Machine And you can see your changes this indicates your changes are successfully saved
29 Enforce Java 2 Security Go to Security ndash Global Security Check the check-box for lsquoEnforce Java 2 Securityrsquo Click Apply Click Save link on the next page and then lsquoSaversquo on the next screen
30 Setting Web Container Properties
bull Go to Servers ndash Application Servers ndash Server1 ndash Configuration tab ndash and under lsquoContainer Settingsrsquo expand lsquoWeb Container Settingsrsquo click lsquoWeb Containerrsquo
P a g e | 31
bull Underrsquo Additional Propertiesrsquo Click on lsquoCustom Propertiesrsquo
bull Click new button
bull In the Name field type prependSlashToResource and in the Value field type true and click Apply
bull You get the same page with lsquosaversquo link on top Click lsquosaversquo link
bull Click lsquoSaversquo button
P a g e | 32
bull You can see your Custom property prependSlashToResource is set to true
bull Follow the same steps as above to add one more custom property comibmwswebcontainerchannelwritetype with Value as sync as below
31 Setting Thread-Pool Properties
bull Go to Servers ndash Application Servers ndash Server1 ndash Configuration tab ndash and under lsquoAdditional Propertiesrsquo Click lsquoThread Poolsrsquo
bull Click on lsquoWeb Containerrsquo link
P a g e | 33
bull Change the minimum size value from 10 to 35 Change the maximum size value from 50 to 35 Click Apply
bull You will see the same page with save link Click Save link Then Click on save button on the next page
bull You can see your changes
32 Apply IBMs PK31745 fix (This could be optional as in my case things were working fine even though I did not follow this step)
bull Internally at SAS this fixpack is available at filesashqrootdeptjdtIBM_WAS60ibmfix Copy the jar file present at this location PK31745jar and put it under WAS_HOMEclasses
P a g e | 34
33 Apply the SAS Hotfix 14JPS01 also known as lsquoSAS fix from Tom Caulkinsrsquo to SAS Web
Applications May be you cannot perform this step now as it is SAS Specific and need to be followed later when you are ready to do (Re-)Configuration of SAS Midtier(webtier) Further down in this guide we remind you of this step again when we show the installation and configuration of SAS Midtier (webtier) components
34 If your WebSphere is running on AIX Operating system you might consider to follow some OS specific tuning that must be done (given sufficient RAM)
httpswwsascomsaspediaWebSphere_Version_60WAS_60215_and_SAS_913_SP4_Plus You can also find the same information in SASreg 913 Intelligence Platform Web Application Administration Guide Third Edition available at httpsupportsascomdocumentationconfigurationbiwaagpdf
In this book go to lsquoBest Practices for Configuring your Middle Tierrsquo and then go to lsquoTuning WebSphere 602 or 61rsquo and on page 69 you can find lsquoSet Tuning Values for the AIX Operating Systemrsquo
Things to be done on SAS side to be able to deploy on WebSphere
35 You need to create a custom plan file which has WebSphere Application Server (for Web download)
36 Moreover for all my new installations I follow a best-practice especially for SAS
Web(tier) Components -First only install (without configuration wizard) -Then apply all the Hot fixes (Do not forget to apply Hotfix 14JPS01) and -Then Run only the SAS Configuration Wizard
Reason to do so is that when SAS Configuration Wizard runs and creates ldquowarrdquo files for deployment it includes all the changes from Hotfixes
37 During configuration Wizard steps when you are asked for JDK location you must supply the JDK bundled with WebSphere which usually is (or can be found at) WAS_HOMEjava
Also you must specify this location in the configurationproperties file that you can edit during the Configuration itself
P a g e | 35
If your SAS WebTier is on a separate machine You may not get this screen
To view it clearly you may zoom it To view it clearly you may zoom it
But if I am configuring Xythos and I get the following screen I always specify the path for JDK 142_05142_15
38 Few other things that might you have to specify when configuring SAS WebTier in the
configurationproperties are WEBSRVHOST=was12 put the hostname of the machine where WebSphere runs WEBSRVPORT=9080 WC_defaulthost Can found from admin console at Servers gt Application Servers gt server1(yourAppSrvrName) Under lsquoCommunicationsrsquo expand lsquoPortsrsquo to see list of all the ports used by your server OR WAS_HOMEprofilesltltProfileNameYouGavegtgtconfigcellsltltCellNamegtgtnodesltltNodeNamegtgt
You can find all the ports in serverindexxml at
WEBSRVTYPE=websphere it will be set to this value if your plan file has WebSphere Note You might see TOMCAT_HOME=usrlocalTomcat41 Ignore it APP_SERVER_WEBSPHERE_NODE= blues07Node01 You can find these values from
APP_SERVER_WEBSPHERE_CELL= blues07Node01Cell websphere Console From the RunTime APP_SERVER_WEBSPHERE_SERVER=server1 rver of the seAPP_SERVER_WEBSPHERE_HOME=usrIBMWebSphereAppServer WAS_HOME WEBSPHERE_DEBUG_LOGIN=false
P a g e | 36
39 You save your configurationproperties file and complete the configuration wizard 40 After configuration wizard is completed successfully check in SAS_Configuration_dir
Lev1webwebapps if all the SAS Web Apps are created
41 In the instructionshtml file that gets created at the end of configuration wizard
contains some steps about SAS mid(web) tier deployments i Deploying your Web Applications (Modifying Policy Files) which states instructions
about modifying policy files Policy files control the permissions granted to the Web applications In WebSphere the policy file(s) we are interested in is lsquowaspolicyrsquo Mainly this policy file can be found at two places One under WAS_HOMEprofilesltltYourProfileNamegtgtproperties and there will be one lsquowaspolicyrsquo file with each web-application that is deployed under this profilersquos server for eg in my case when I will deploy Portal application Portal will have its own lsquowaspolicyrsquo file under usrIBMWebSphereAppServerprofilesAppSrv01installedAppsblues07Node01CellPortal_warearMETA-INF But the lsquowaspolicyrsquo file which is under WAS_HOMEprofilesltltYourProfileNamegtgtproperties is sort of global policy file All the changes (settings) made to this lsquowasploicyrsquo file will be applied to each application as it is deployed Two policy file fragments were created in SAS_Conf_DirLev1webDeployments -sasallpermissionswebspherepolicy allows the Web applications to run without security restrictions This file should be used during the initial install -saswebspherepolicy defines more restrictive security settings This file should be used in a production environment So far we have always appended the contents of sasallpermissionswebspherepolicy to the lsquowaspolicyrsquo file under WAS_HOMEprofilesltltYourProfileNamegtgtproperties before starting the deployment of any SAS Web-applications
ii Configure WebSphere Security and Authentication Information You can safely ignore these instructions as they are not enough for 60 and 61 Actually these changes along with some more are already covered under points 28 to 31 of this
document Note Unlike Tomcat for WebSphere one has to manually deploy the SAS Web
applications
Now we can start the deployment process of SAS WebApplications 42 First lets deploy SAS Web Infrastructure Kit applications
1 SASTheme_default 2 SASPreferences 3 SASDoc
P a g e | 37
4 Portal 5 SASStoredProcess
I follow application files into the servlet container from lsquowik_readmehtmlrsquo which you can find
step 10 Prepare the servlet container environment and Step 11 Deploy Web
in the installation of SAS Web-Tier components and is at SAS_Install_DirWebPortal201 Although the section for WebSphere in these steps mentions WebSphere51 these steps can be followed for WebSphere 60 and 61 as well but they are not enough
bull In Step 10 under section Installation Tips for IBM WebSphere 51 on Unix Systems there are two points a) and b) Changes mentioned in point a) are not sufficient for 60 and 61 If you have followed this document completely from the beginning you can ignore this point as these changes along with some more are already covered under point 28 to 31
Point b) is something that must be followed now which says Update WebSpheres JAAS configuration file to include the authentication information that is used by SAS Web Infrastructure Kit Web applications To do so concatenate the contents of the loginconfig file located in the SASServicesConfig folder of the setup (installation) directory to your servers JAAS configuration file located in the lsquoWAS_HOMEprofilesltltyourProfileNamegtgtpropertiesrsquo directory As a default the servers JAAS configuration file is called wsjaasconf
bull In Step 11 under section Installation Tips for IBM WebSphere 51 on Unix Systems you can safely ignore point a b and c if you have used SAS Configuration Wizard to configure your SAS Web Tier components (web applications) and you have war files created under SAS_Configuration_dirLev1webwebapps as mentioned in step 39 of this document above Now as mentioned in point d you can start deploying (install) the SAS Web- applications I have taken those steps here with screenshots Using the WebSphere Administrative Console deploy the Web applications created by SAS Configuration Wizard and kept in SAS_Configuration_dirLev1webwebapps as follows
i If needed start the WebSphere application server ii Point your browser to the WebSphere Administrative Console Web
application (for example httplocalhost9060ibmconsole) For Unix systems you have to start the browser on the unix machine where your war files are located
iii Log on to the WebSphere Administrative Console By default you do not need to enter an account and password
iv Use the lsquoPreparing for application installation wizardrsquo as described in Steps v through xiv below to deploy each of the following Web applications The Web applications should be deployed in the order that they are listed hereoorrddeerr
1 SASTheme_default 2 SASPreferences
P a g e | 38
3 SASDoc 4 Portal 5 SASStoredProcess
v After you have logged on use the tree on the left side of the console to navigate to the lsquoPreparing for application installation wizardrsquo (for example Applications -gt Install New Application)
vi On the first screen set the Local path (or Server path for a network deployment) by using the browse button to navigate to the usrwrdisasconfigLev1webwebapps directory and selecting the appropriate Web application
vii
Set the Context Root to the name of the Web application (the
filename without the war extension) and then select the Next button
viii On the next screen select the Generate Default Bindings check
box and then select the Next button
ix On the next screen select the Continue button The Java policies
that are used by the Web applications will be set in upcoming steps
P a g e | 39
x You should now be on Step 1 on the lsquoInstall a New Application
wizardrsquo Select the Next button to accept the defaults
xi On Step 2 of the wizard select the Next button to accept the
defaults At this step typically at customer sites under lsquoClusters and Serversrsquo (shown in red rectangle) you will see a list with more than one server (clusters) listed You (Web Administrator at Customer site) must know your server name (or cluster) to select from the list Then check the checkbox (shown in green circle) for the application and click the apply button (shown in blue rounded rectangle)
Typical example of the same step at customer site
P a g e | 40
xii On Step 3 of the wizard select the Next button to accept the defaults
xiii On Step 4 of the wizard select the Finish button to deploy the
Web application
xiv On the Installing screen select the Save to Master
Configuration link
P a g e | 41
On the Save screen select the Save button to save the changes to the master configuration
xv Repeat Steps v vi vii viii ix x xi xii xii and xiv for each SAS Web Infrastructure Kit web-application
Now as mentioned in point e after all of the SAS Web Infrastructure Kit web-applications have been deployed adjust the settings for the SASTheme_default SASPreferences and Portal Web applications as follows
i Use the tree on the left side of the console to navigate to the Enterprise Applications wizard (for example Applications -gt Enterprise Applications)
ii Select the SASTheme_default Web application link
iii Change the Starting Weight to a value that is less than the
Starting Weight of the other Web applications (for example 0) Then select the OK button You will see lsquosaversquo link appearing to save this change But you can choose not to click it now instead save everything once you are done with the changes for SASPreferences and Portal as well
P a g e | 42
iv Select the SASPreferences Web application link Change the
Starting Weight to a value that is greater than the Starting Weight of the SASTheme_default Web application (for example 10) Then select the OK button
v Select the Portal Web application link Change the Starting Weight
to a value that is greater than the Starting Weight of the SASTheme_default Web application (for example 10) Change the Classloader Mode to PARENT_LAST Change the WAR Classloader Policy to Application and then select the OK button
P a g e | 43
vi On the Enterprise Applications screen select the Save link in the Message(s) area On the Save screen select the Save button to save the changes to the master configuration This completes the deployment of SAS Web Infrastructure Kit web-applications
Now if have followed step i from point 40 in this document you can safely ignore the remaining steps (f to j) in the lsquowik_readmehtmlrsquo
43 If you have been asked to include SASBIDashboard in your deployment then follow steps below to deploy it
i Follow the steps v vi vii viii ix x xi xii xii and xiv from point no 41 in this document above to deploy the SASBIDashboardwar file
ii After the application is deployed select the application go to Configuration tab and insure that the starting weight value is greater than the SAS Portal that you set during step v under point 42 in this document
P a g e | 44
44 Now you might want to restart (stop and start) your WebSphere Application server and test the SAS Web-applications deployed so far or you can continue with the remaining steps and first complete the deployment of all the SAS Web Applications You might want to refer point no 48 about lsquoStarting and Stopping your WebSphere Application serverrsquo at the end of this document
45 Now letrsquos deploy SAS Web Report Studio i The document that I follow is lsquodeploymenthtmlrsquo located under SAS Web
Report Studio installation directory For me it is at lsquousrwrdisasSASWebReportStudio31rsquo In this document you can directly go to section lsquoDeploying SAS Web Report Studio for UNIX and WebSphere 51rsquo Although this section for WebSphere mentions WebSphere51 these steps can be followed for WebSphere 60 and 61 as well The instructions mentioned in subsection lsquoUpdating wsjaasconfrsquo about copying the contents of loginconfig can be skipped if you have followed point no 41 in this document Reason is the loginconfig file present in folder named lsquoliversquo under installation directory of SAS Web Report Studio is exactly the same as the loginconfig file present in folder named lsquoSASServicesConfigrsquo under installation directory of SAS Portal components (Web Infrastructure Kit) The deployment process steps mentioned there under lsquoDeploying SAS Web Report Studiorsquo are similar to the steps v vi vii viii ix x xi xii xii and xiv from point no 41 in this document Follow these steps to deploy SASWebReportStudiowar file
ii After the application is deployed return to the left side of the page and under the Applications heading click on Enterprise Applications Then on the right side of the page click on the SASWebReportStudio_war link In the Configuration tab set Classloader mode to PARENT_LAST and set WAR Classloader Policy to Module Then click on the OK button
P a g e | 45
On the Enterprise Applications screen select the Save link in the Message(s) area On the Save screen select the Save button to save the changes to the master configuration This completes the deployment of SAS Web Report Studio web-applications
46 Now letrsquos deploy SAS Web Report Viewer i The document that I follow is lsquodeploymenthtmlrsquo located under SAS Web
Report Viewer installation directory For me it is at lsquousrwrdisasSASWebReportViewer 31rsquo In this document you can directly go to section lsquoDeploying SAS Web Report Viewer for UNIX and WebSphere 51rsquo Although this section for WebSphere mentions WebSphere51 these steps can be followed for WebSphere 60 and 61 as well The instructions mentioned in subsection lsquoUpdating wsjaasconfrsquo about copying the contents of loginconfig can be skipped if you have followed point no 41 in this document Reason is the loginconfig file present in folder named lsquoliversquo under installation directory of SAS Web Report Viewer is exactly the same as the loginconfig file present in folder named lsquoSASServicesConfigrsquo under installation directory of SAS Portal components (Web Infrastructure Kit) The deployment process steps mentioned there under lsquoDeploying SAS Web Report Viewerrsquo are similar to the steps v vi vii viii ix x xi xii xii and xiv from point no 41 in this document Follow these steps to deploy SASWebReportViewerwar file
ii After the application is deployed return to the left side of the page and under the Applications heading click on Enterprise Applications Then on the right side of the page click on the SASWebReportViewer_war link In the Configuration tab set Classloader mode to PARENT_LAST and set WAR Classloader Policy to Module Then click on the OK button
P a g e | 46
On the Enterprise Applications screen select the Save link in the Message(s) area On the Save screen select the Save button to save the changes to the master configuration This completes the deployment of SAS Web Report Viewer web-applications
47 Now letrsquos deploy SAS Web OLAP Viewer
i The document that I follow is lsquoconfigpdfrsquo (configdoc) located under SAS Web OLAP Viewer installation directory For me it is at lsquousrwrdisas SASWebOlapViewerforJava31rsquo In this document you can directly go to section lsquoDeploymentrsquo on page 22 in Chapter8 SAS Web OLAP Viewer for UNIX and WebSphere 51 Although this chapter for WebSphere mentions WebSphere51 these steps can be followed for WebSphere 60 and 61 as well The instructions mentioned in subsection lsquoUpdating wsjaasconfrsquo about copying the contents of loginconfig can be skipped if you have followed point no 41 in this document Reason is the loginconfig file present in folder named lsquoSASServicesConfigrsquo under installation directory of SAS Web OLAP Viewer is exactly the same as the loginconfig file present in folder named lsquoSASServicesConfigrsquo under installation directory of SAS Portal components (Web Infrastructure Kit) The deployment process steps mentioned there under lsquoDeploying SAS Web OLAP Viewerrsquo are similar to the steps v vi vii viii ix x xi xii xii and xiv from point no 41 in this document Follow these steps to deploy SASWebOLAPViewerwar file
ii After the application is deployed return to the left side of the page and under the Applications heading click on Enterprise Applications Then on the right side of the page click on the SASWebOLAPViewer_war link In the Configuration tab set Classloader mode to PARENT_LAST and set WAR Classloader Policy to Application Then click on the OK button
On the Enterprise Applications screen select the Save link in the Message(s) area On the Save screen select the Save button to save the changes to the master configuration This completes the deployment of SAS Web Report Viewer web-applications
48 Now you can restart (stop and start) your WebSphere Application server and test the SAS Web-applications deployed You might want to refer point no 48 about lsquoStarting and Stopping your WebSphere Application serverrsquo at the end of this document
P a g e | 47
Portal Stored-Process Application
SASPreferences from Portal Stored-Process from Portal
BIDashboard from Portal Web Report Viewer from Portal
Web Report Studio WebOLAPViewer
49 Starting and Stopping your WebSphere Application server
i One way to start and stop server is to do it from the binary files of the profile to which your application server belongs to In this document our application server is lsquoserver1rsquo and it belongs to
le lsquoAppSrv01rsquo profiNote You need to log-in with the user who owns the WebSphere installation or user which has permission to execute startstop scripts and has porper access to required locations and files In my case lsquorootrsquo is the owner usrIBMWebSphereAppServerprofilesAppSrv01bingtstartServersh server1 ADMU0116I Tool information is being logged in file usrIBMWebSphereAppServerprofilesAppSrv01logsserver1startServerlog ADMU0128I Starting tool with the AppSrv01 profile ADMU3100I Reading configuration for server server1 ADMU3200I Server launched Waiting for initialization status ADMU3000I Server server1 open for e-business process id is 700562
usrIBMWebSphereAppServerprofilesAppSrv01bingt
P a g e | 48
usrIBMWebSphereAppServerprofilesAppSrv01bingtstopServersh server1 ADMU0116I Tool information is being logged in file usrIBMWebSphereAppServerprofilesAppSrv01logsserver1stopServerlog ADMU0128I Starting tool with the AppSrv01 profile ADMU3100I Reading configuration for server server1 ADMU3201I Server stop request issued Waiting for stop status ADMU4000I Server server1 stop completed
ii Another way to start and stop your server is from the firststeps window
cd usrIBMWebSphereAppServerprofiles change to WAS_HOMEprofiles cd firststeps firststepssh before this command do set DISPLAY and start Xserver
This command will display the following first steps window Click on Start the server link It will open another window where you can see the status of the starting server
You can close this window
Once the server is started successfully the link lsquoStart the Serverrsquo in the first steps window above will be changed to lsquoStop the Serverrsquo Click Stop the server link whenever you want to stop the server This window can be closed
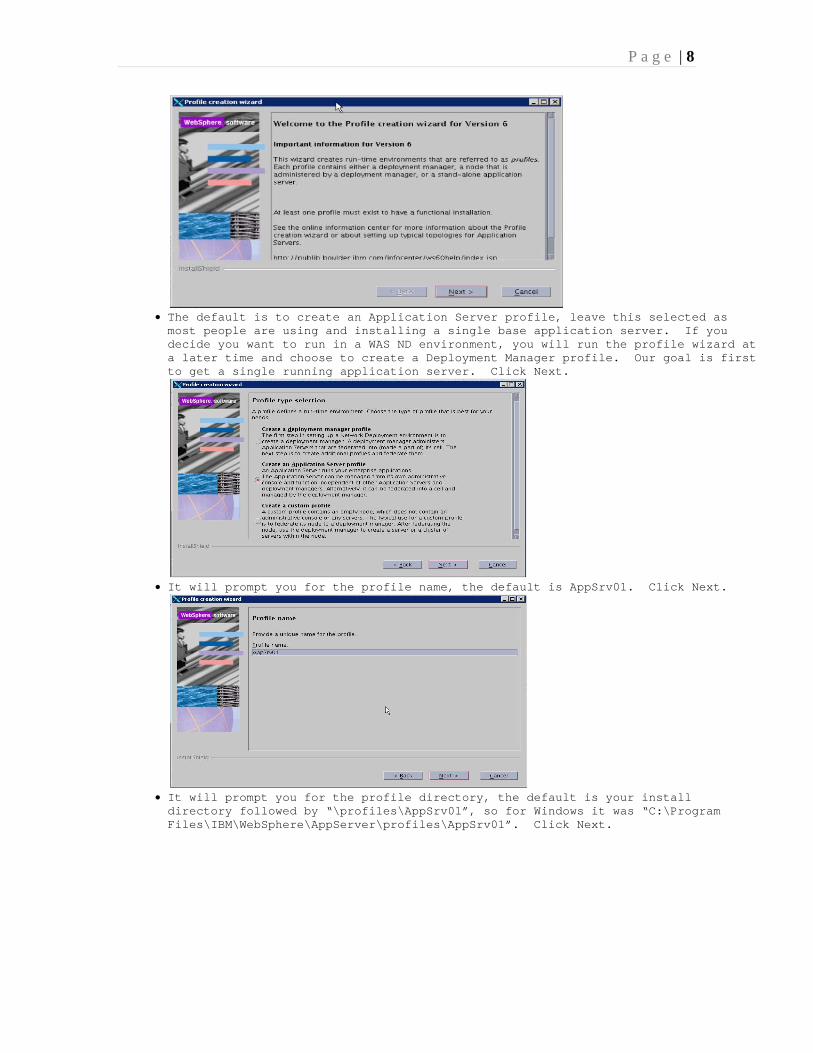
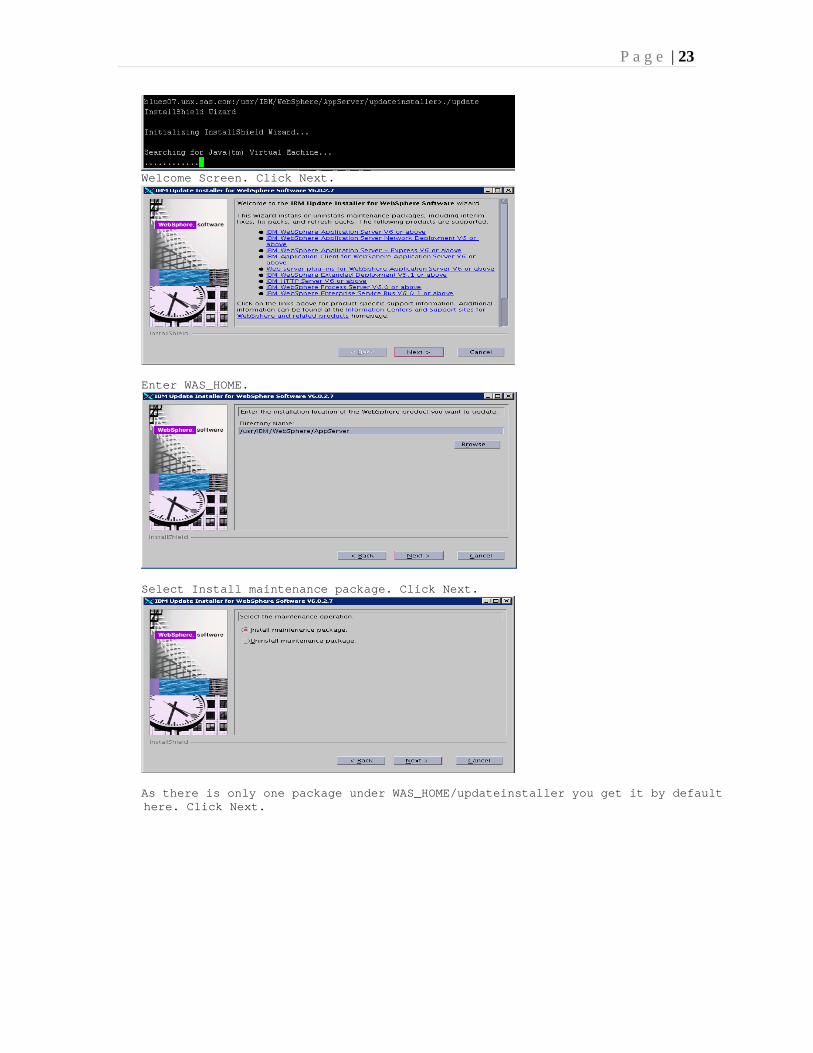
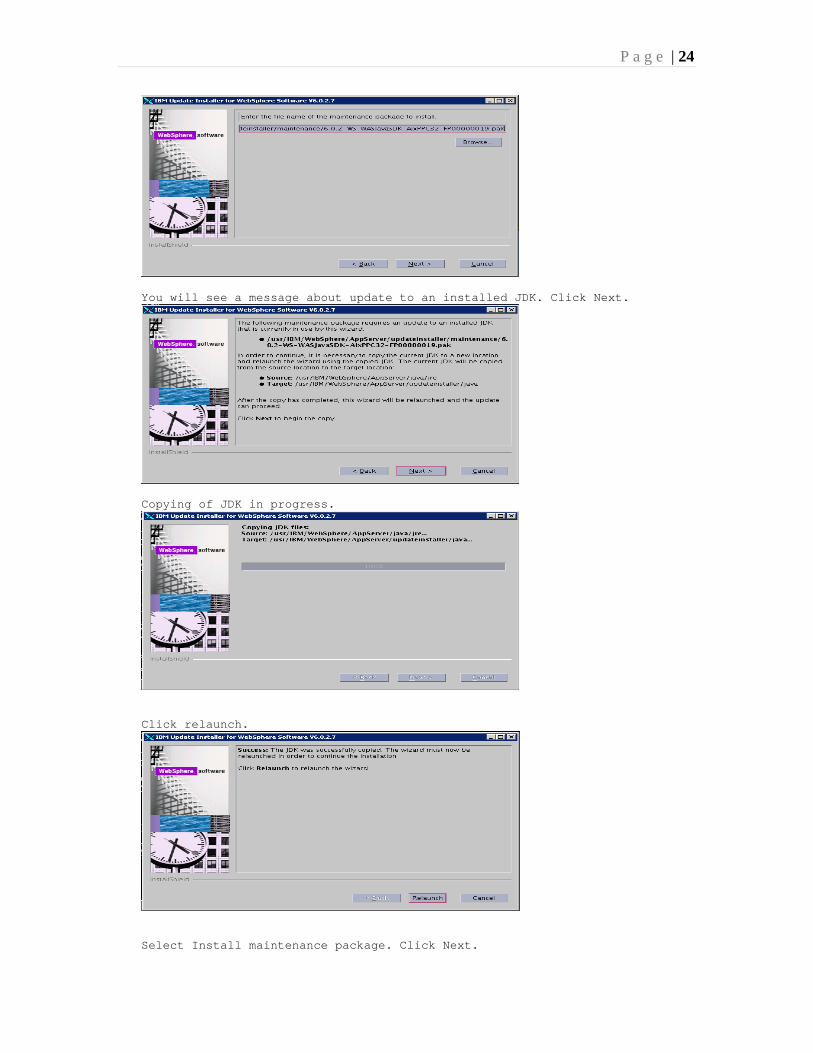
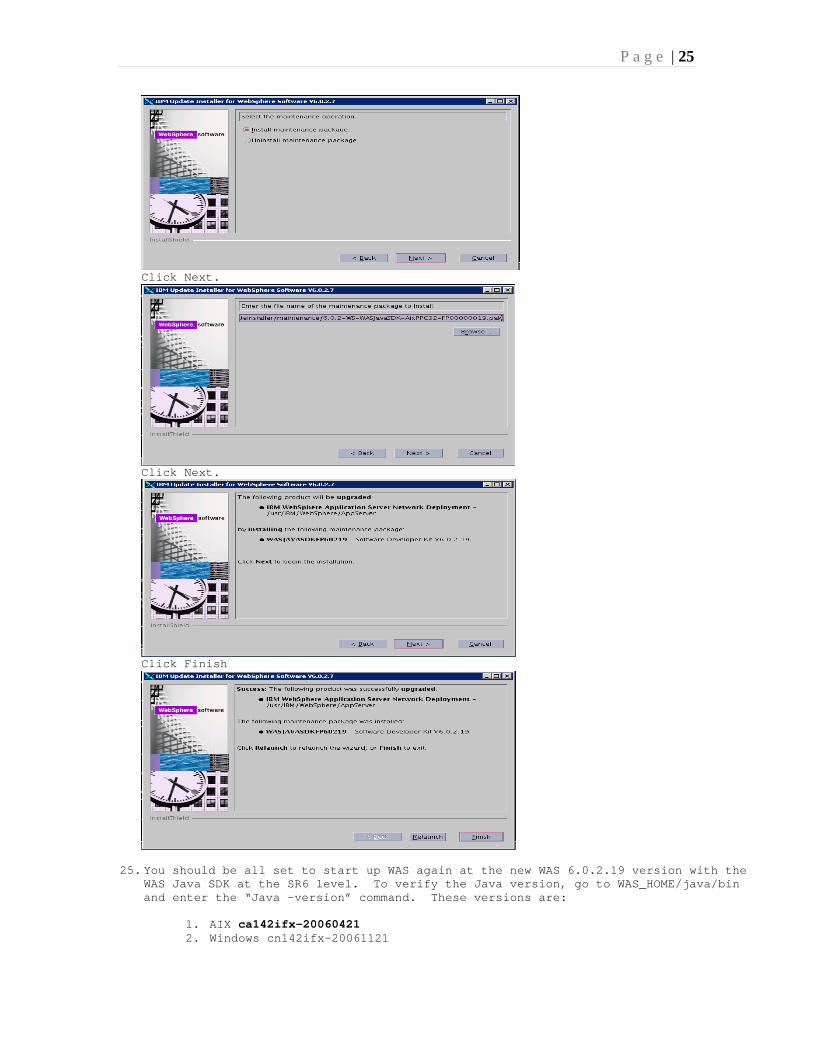
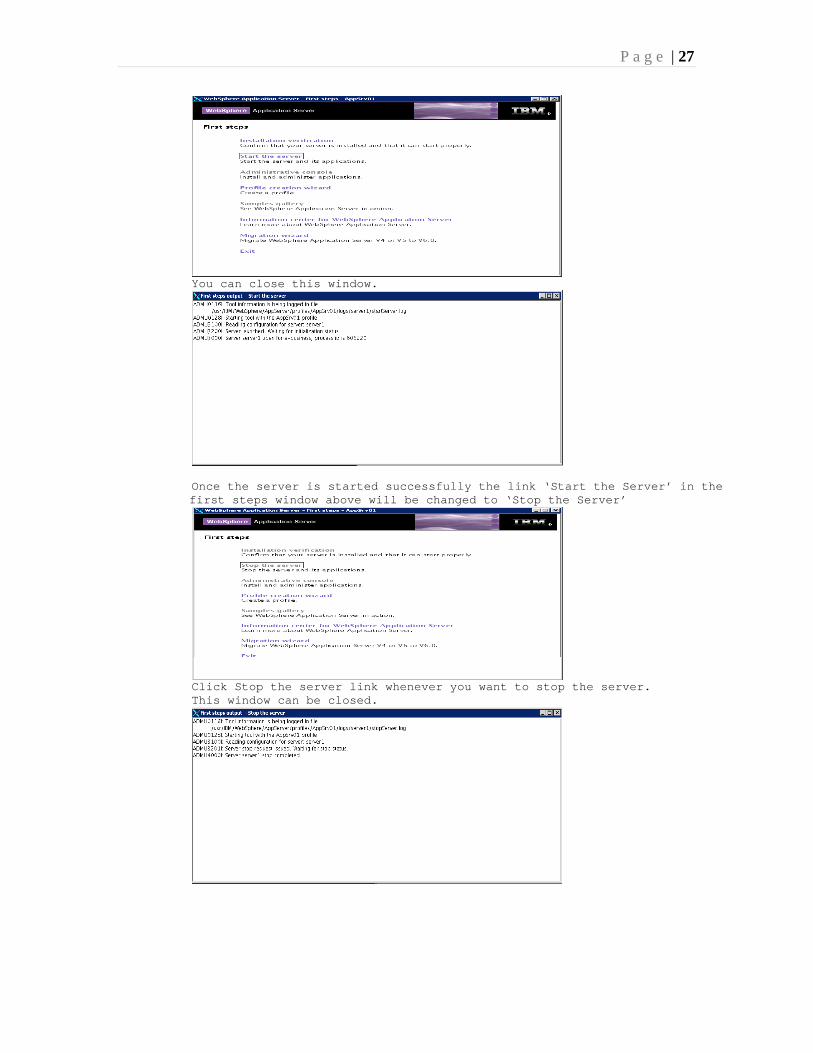
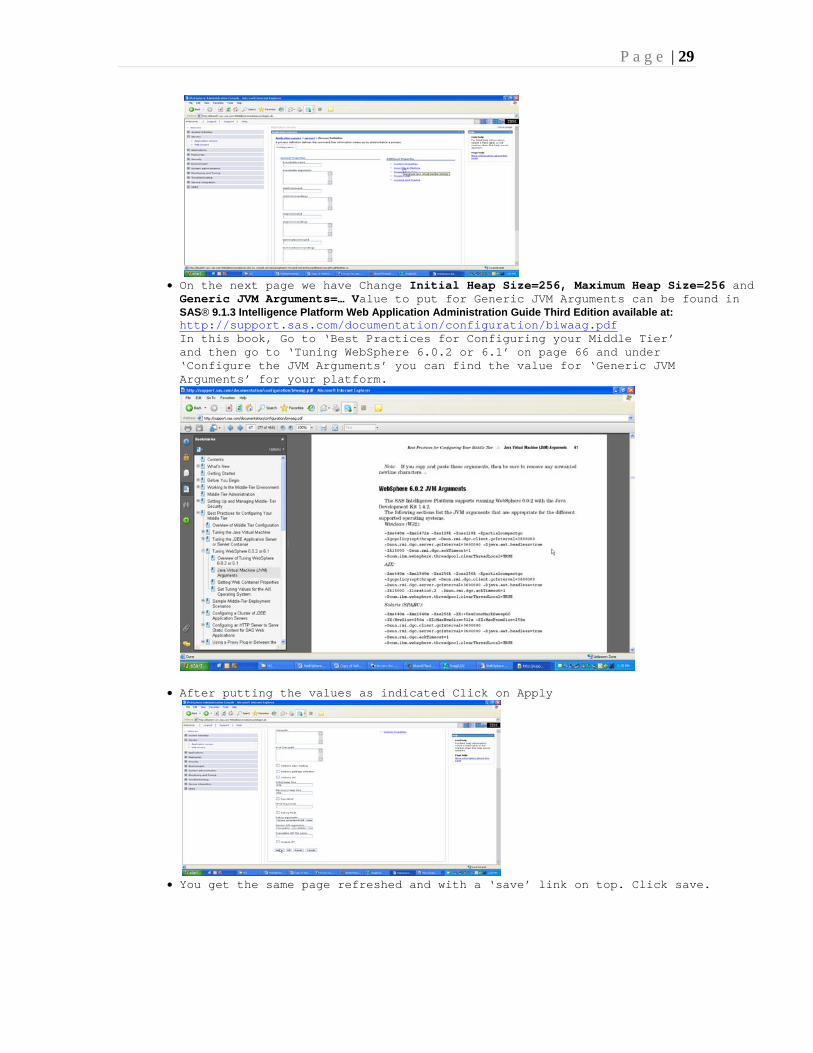
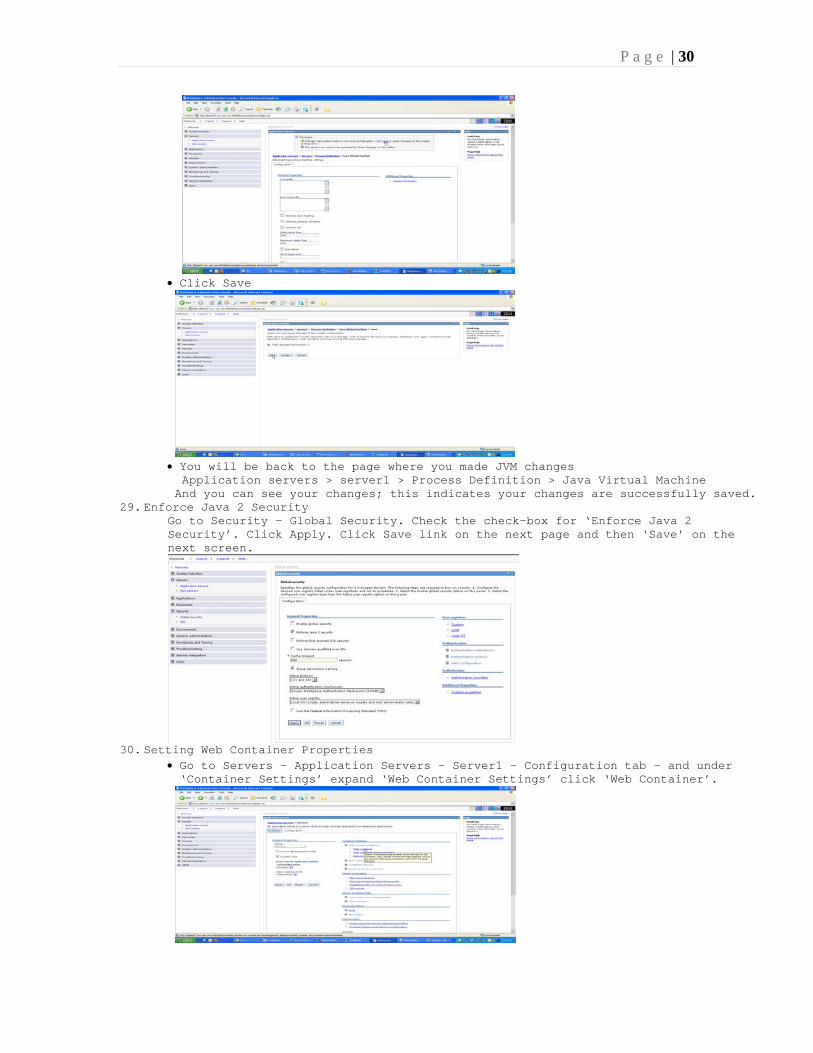
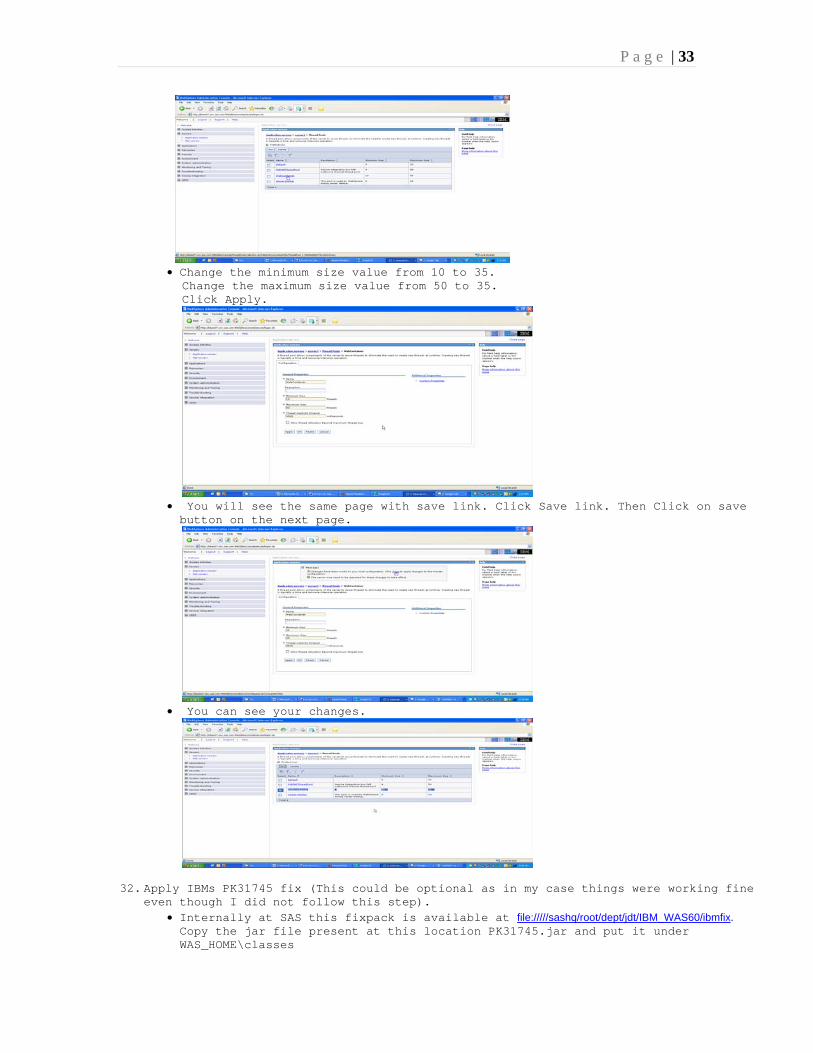
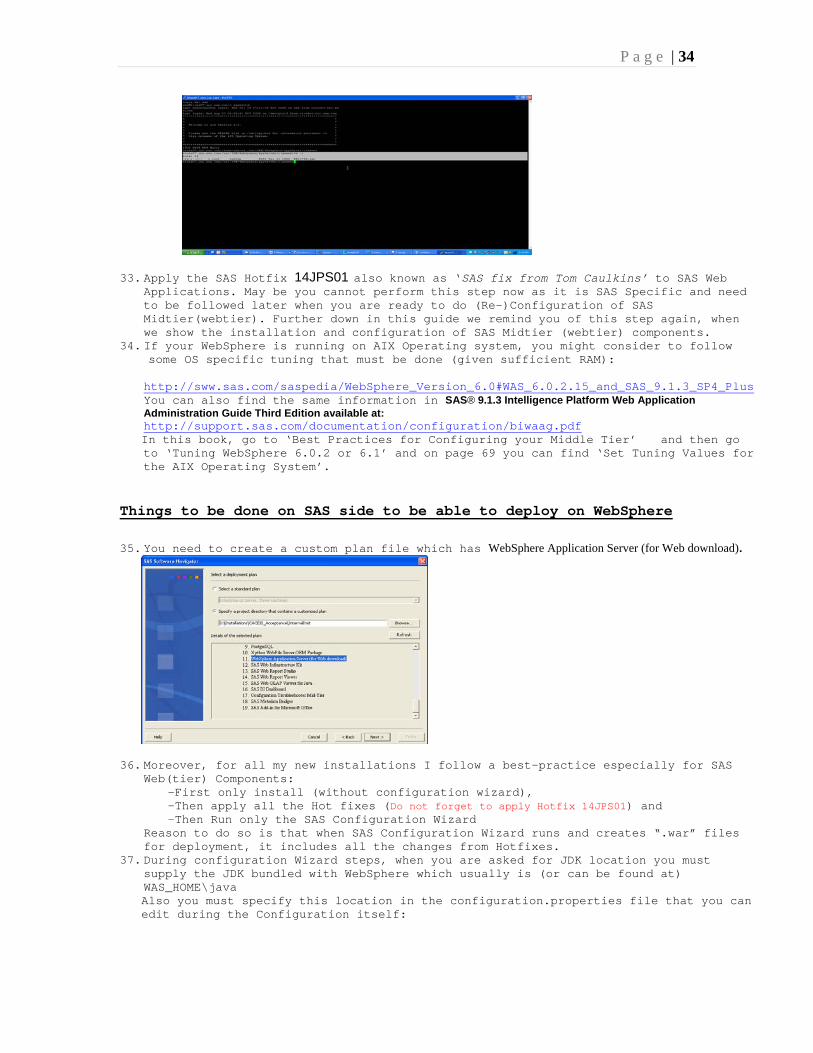
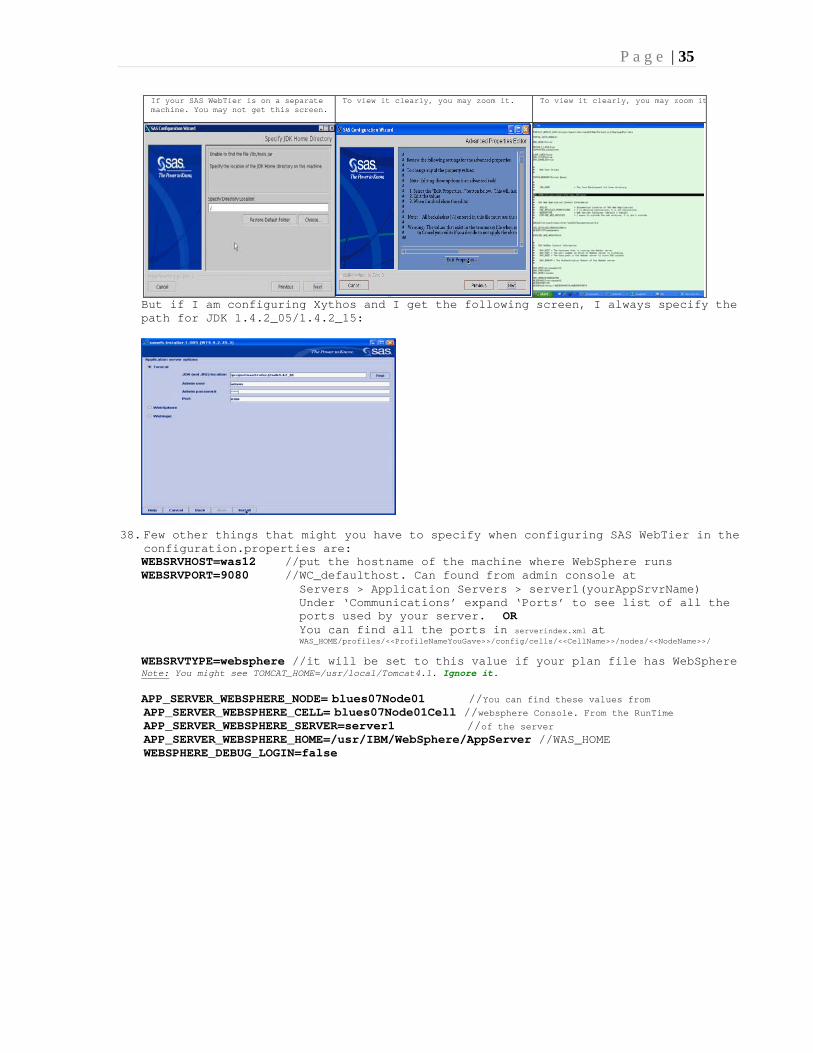
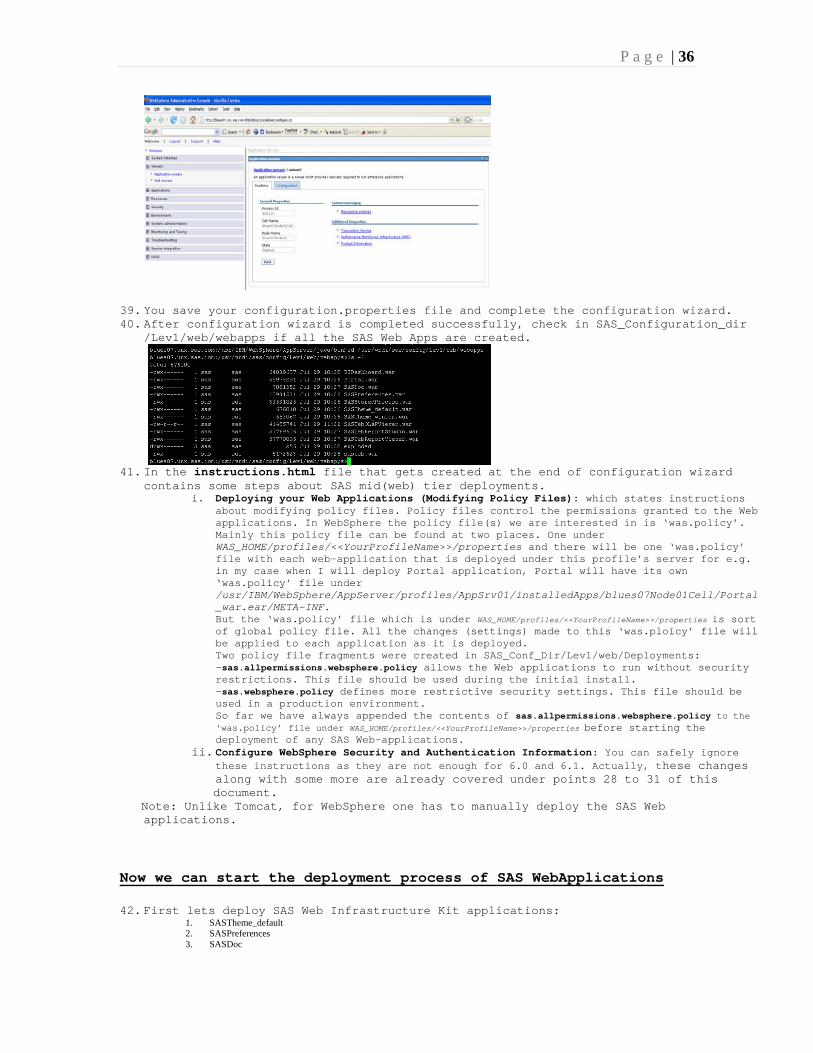