Embed Size (px)
Citation preview
1999-2000 BRAKES
Disc & Drum - Trucks & Vans
DESCRIPTION & OPERATION
Hydraulic brake system uses a tandem master cylinder with a vacuum power assist servo. All models (except Land Cruiser) are equipped with front disc brakes and rear drum brakes standard. Rear disc brakes are standard on Land Cruiser models.
A Load-Sensing Proportioning Valve (LSVP) is used to regulate brake pressure between front and rear brakes. Rear brakes on all models are self-adjusting.
Parking brake lever mechanically activates rear brakes. On models with rear drum brakes, a cable applies rear shoes. On models with rear disc brakes, parking brake is a drum brake internal to rear disc assembly.
BLEEDING BRAKE SYSTEM
BLEEDING PROCEDURES
1. If master cylinder is rebuilt or reservoir is empty, bleed master cylinder first. Bleed wheels in sequence. Start on wheel with longest hydraulic line, and work toward wheel with shortest hydraulic line.
2. Raise and support vehicle. Ensure brake fluid reservoir is at least half full during bleeding procedure. Connect one end of transparent vinyl tube to bleeder screw. Submerge other end of tube in a container half filled with clean brake fluid.
3. Have an assistant depress brake pedal several times and hold in depressed position. Loosen bleeder screw, and drain fluid into container. Tighten bleeder screw.
WARNING: For warnings and procedures regarding vehicles equipped with Anti-Lock Brake Systems (ABS), see appropriate ANTI-LOCK article.
NOTE: For disc brake coverage on Lexus LX470, see Land Cruiser information in this article. The 1999 Land Cruiser and Lexus LX470 information is the same. The 2000 Land Cruiser information for models equipped with traction control ABS is the same on 2000 LX470. Models with traction control ABS do not use a Load-Sensing Proportioning Valve (lspv) and By-Pass Valve (BPV).
CAUTION: DO NOT allow reservoir to run dry during brake bleeding procedure. Use only clean brake fluid. Ensure no dirt or other foreign matter contaminates brake fluid. DO NOT mix different types of brake fluid, as they may not be compatible. DO NOT spill brake fluid on vehicle, as it may damage paint. If brake fluid contacts paint, immediately wash with water.
NOTE: Ensure brake pedal remains depressed until bleeder screw is tightened.
1999 Toyota RAV4
1999-2000 BRAKES Disc & Drum - Trucks & Vans
1999 Toyota RAV4
1999-2000 BRAKES Disc & Drum - Trucks & Vans
Microsoft
Sunday, November 22, 2009 10:07:28 AM Page 1 © 2005 Mitchell Repair Information Company, LLC.
Microsoft
Sunday, November 22, 2009 10:07:32 AM Page 1 © 2005 Mitchell Repair Information Company, LLC.
4. Refill brake fluid reservoir as necessary. Repeat step 3 until air is no longer discharged. On RAV4, tighten front bleeder screw to 69 INCH lbs. (7.8 N.m), and tighten rear bleeder screw to 74 INCH lbs. (8.3 N.m). On Sienna, tighten bleeder screw to 74 INCH lbs. (8.3 N.m). Tighten bleeder screw to 97 INCH lbs. (11 N.m) on Land Cruiser, Tacoma, Tundra & 4Runner. Ensure fluid leakage is not present. Add fluid to reservoir. Repeat procedure for remaining wheels.
ADJUSTMENTS
BRAKE PEDAL HEIGHT
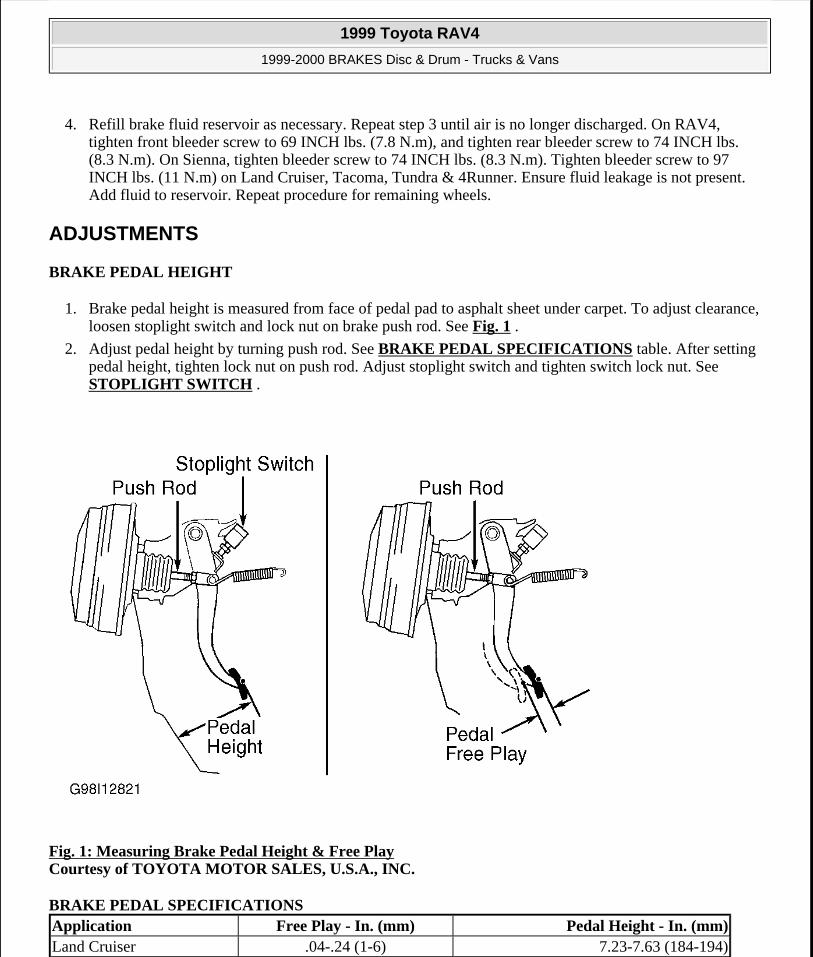
1. Brake pedal height is measured from face of pedal pad to asphalt sheet under carpet. To adjust clearance, loosen stoplight switch and lock nut on brake push rod. See Fig. 1 .
2. Adjust pedal height by turning push rod. See BRAKE PEDAL SPECIFICATIONS table. After setting pedal height, tighten lock nut on push rod. Adjust stoplight switch and tighten switch lock nut. See STOPLIGHT SWITCH .
Fig. 1: Measuring Brake Pedal Height & Free Play Courtesy of TOYOTA MOTOR SALES, U.S.A., INC.
BRAKE PEDAL SPECIFICATIONS Application Free Play - In. (mm) Pedal Height - In. (mm)Land Cruiser .04-.24 (1-6) 7.23-7.63 (184-194)
1999 Toyota RAV4
1999-2000 BRAKES Disc & Drum - Trucks & Vans
Microsoft
Sunday, November 22, 2009 10:07:28 AM Page 2 © 2005 Mitchell Repair Information Company, LLC.
BRAKE PEDAL FREE PLAY
1. Brake pedal free play is distance brake pedal travels before feeling resistance with engine stopped. To check pedal free play, depress brake pedal several times to exhaust vacuum from booster.
2. Depress pedal and measure travel until initial resistance is felt. See BRAKE PEDAL SPECIFICATIONS table. If free play is not within specification, adjust by turning push rod. See Fig. 1 .
BRAKE PEDAL RESERVE DISTANCE
1. Pedal reserve distance is measured from face of pedal pad to asphalt sheet under carpet with brakes applied. Measure reserve distance with engine running and weight of 110 lbs. (50 kg) applied against pedal.
2. If measured reserve distance is less than specification, inspect brake system. See BRAKE PEDAL MINIMUM RESERVE DISTANCE SPECIFICATIONS table.
BRAKE PEDAL MINIMUM RESERVE DISTANCE SPECIFICATIONS
LOAD-SENSING PROPORTIONING VALVE (LSPV) & BY-PASS VALVE (BPV)
PARKING BRAKE
Lever Stroke Adjustment
1. To check parking brake adjustment, pull on parking brake lever with weight of 66 lbs. (27 kg) on Sienna and 44 lbs. (20 kg) on all other models. Count number of notches (clicks) until parking brake is fully
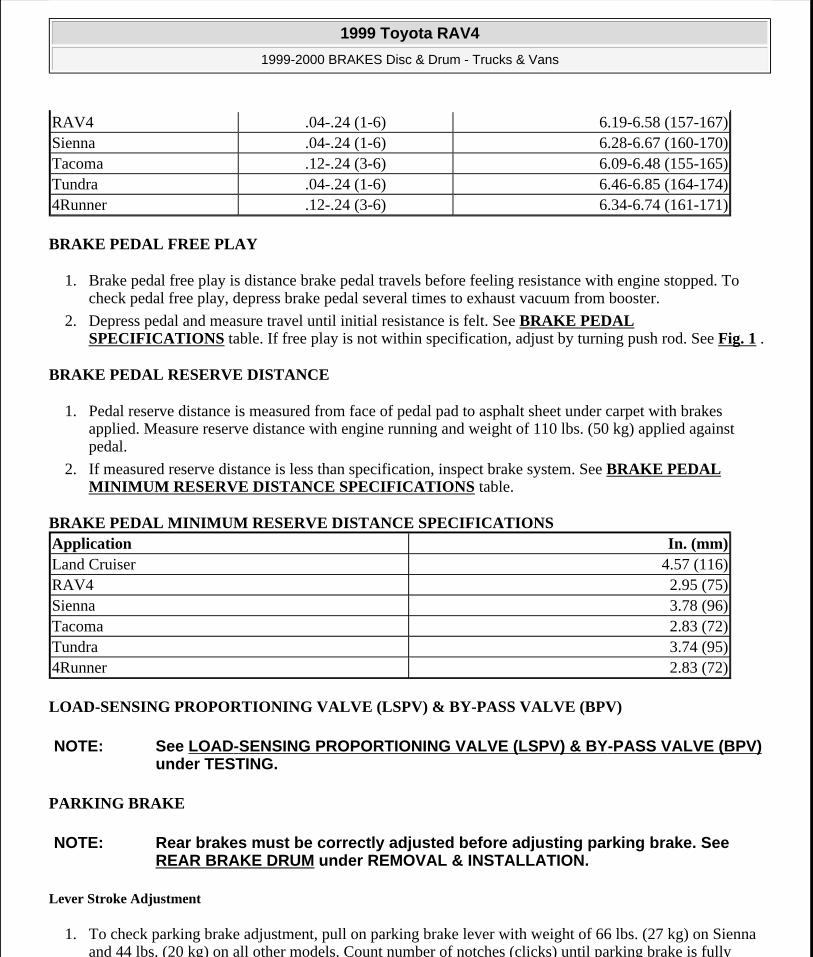
RAV4 .04-.24 (1-6) 6.19-6.58 (157-167)Sienna .04-.24 (1-6) 6.28-6.67 (160-170)Tacoma .12-.24 (3-6) 6.09-6.48 (155-165)Tundra .04-.24 (1-6) 6.46-6.85 (164-174)4Runner .12-.24 (3-6) 6.34-6.74 (161-171)
Application In. (mm)Land Cruiser 4.57 (116)RAV4 2.95 (75)Sienna 3.78 (96)Tacoma 2.83 (72)Tundra 3.74 (95)4Runner 2.83 (72)
NOTE: See LOAD-SENSING PROPORTIONING VALVE (LSPV) & BY-PASS VALVE (BPV)under TESTING.
NOTE: Rear brakes must be correctly adjusted before adjusting parking brake. See REAR BRAKE DRUM under REMOVAL & INSTALLATION.
1999 Toyota RAV4
1999-2000 BRAKES Disc & Drum - Trucks & Vans
Microsoft
Sunday, November 22, 2009 10:07:28 AM Page 3 © 2005 Mitchell Repair Information Company, LLC.
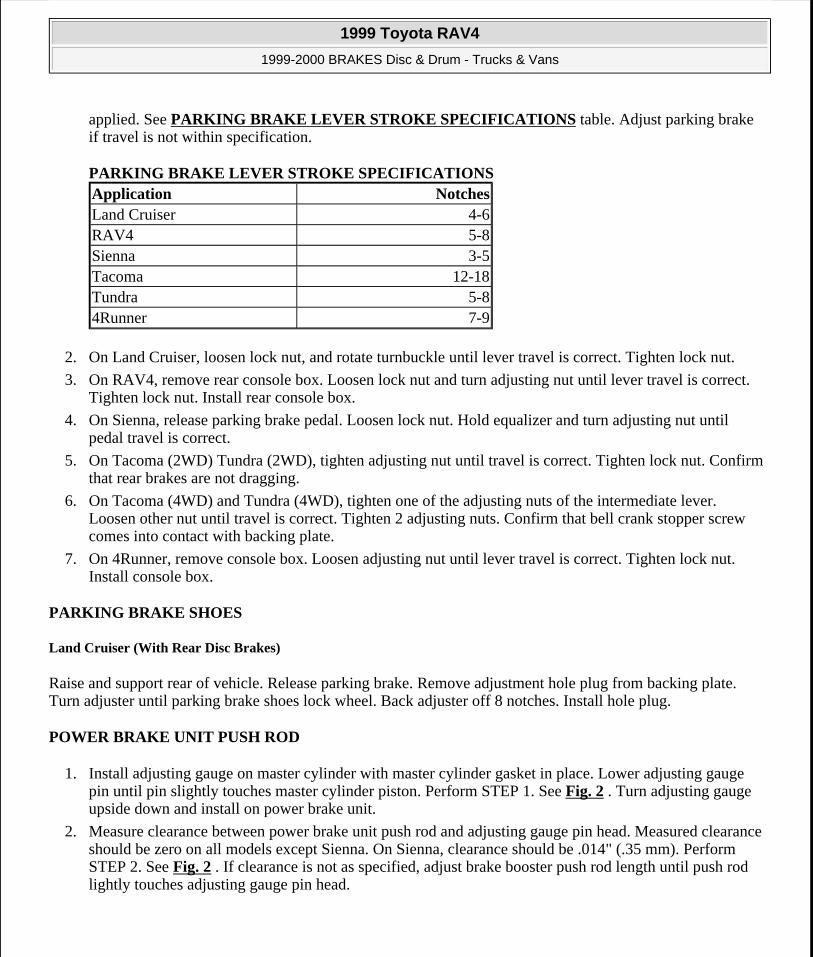
applied. See PARKING BRAKE LEVER STROKE SPECIFICATIONS table. Adjust parking brake if travel is not within specification.
PARKING BRAKE LEVER STROKE SPECIFICATIONS
2. On Land Cruiser, loosen lock nut, and rotate turnbuckle until lever travel is correct. Tighten lock nut.
3. On RAV4, remove rear console box. Loosen lock nut and turn adjusting nut until lever travel is correct. Tighten lock nut. Install rear console box.
4. On Sienna, release parking brake pedal. Loosen lock nut. Hold equalizer and turn adjusting nut until pedal travel is correct.
5. On Tacoma (2WD) Tundra (2WD), tighten adjusting nut until travel is correct. Tighten lock nut. Confirm that rear brakes are not dragging.
6. On Tacoma (4WD) and Tundra (4WD), tighten one of the adjusting nuts of the intermediate lever. Loosen other nut until travel is correct. Tighten 2 adjusting nuts. Confirm that bell crank stopper screw comes into contact with backing plate.
7. On 4Runner, remove console box. Loosen adjusting nut until lever travel is correct. Tighten lock nut. Install console box.
PARKING BRAKE SHOES
Land Cruiser (With Rear Disc Brakes)
Raise and support rear of vehicle. Release parking brake. Remove adjustment hole plug from backing plate. Turn adjuster until parking brake shoes lock wheel. Back adjuster off 8 notches. Install hole plug.
POWER BRAKE UNIT PUSH ROD
1. Install adjusting gauge on master cylinder with master cylinder gasket in place. Lower adjusting gauge pin until pin slightly touches master cylinder piston. Perform STEP 1. See Fig. 2 . Turn adjusting gauge upside down and install on power brake unit.
2. Measure clearance between power brake unit push rod and adjusting gauge pin head. Measured clearance should be zero on all models except Sienna. On Sienna, clearance should be .014" (.35 mm). Perform STEP 2. See Fig. 2 . If clearance is not as specified, adjust brake booster push rod length until push rod lightly touches adjusting gauge pin head.
Application NotchesLand Cruiser 4-6RAV4 5-8Sienna 3-5Tacoma 12-18Tundra 5-84Runner 7-9
1999 Toyota RAV4
1999-2000 BRAKES Disc & Drum - Trucks & Vans
Microsoft
Sunday, November 22, 2009 10:07:28 AM Page 4 © 2005 Mitchell Repair Information Company, LLC.
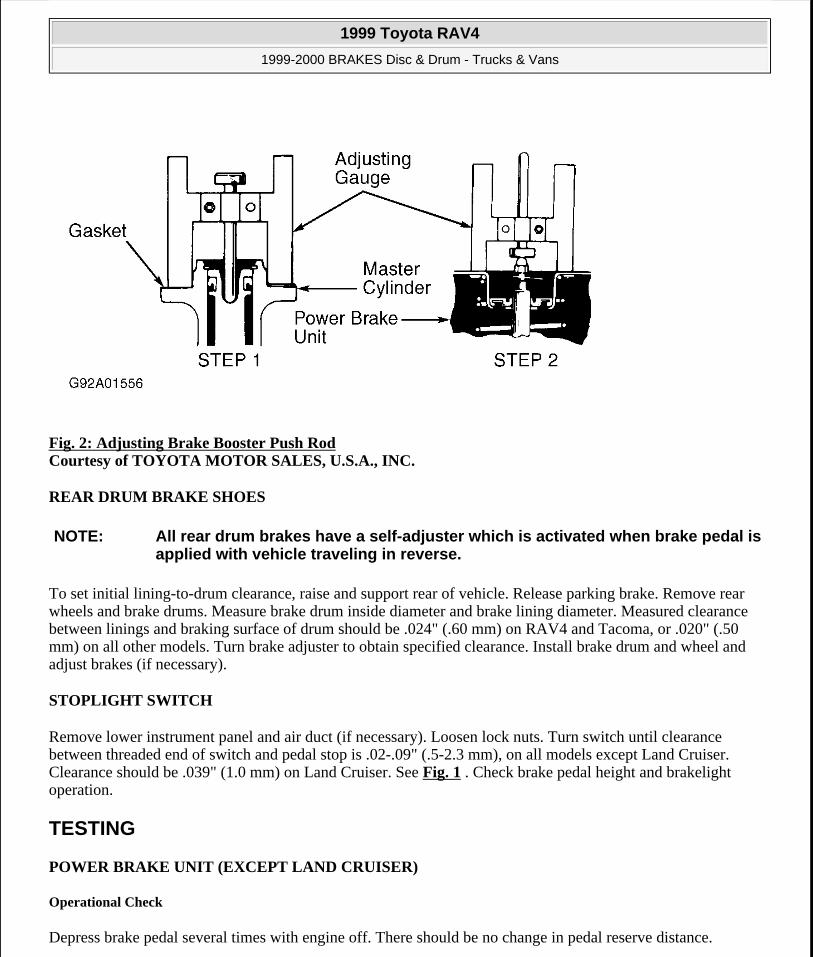
Fig. 2: Adjusting Brake Booster Push Rod Courtesy of TOYOTA MOTOR SALES, U.S.A., INC.
REAR DRUM BRAKE SHOES
To set initial lining-to-drum clearance, raise and support rear of vehicle. Release parking brake. Remove rear wheels and brake drums. Measure brake drum inside diameter and brake lining diameter. Measured clearance between linings and braking surface of drum should be .024" (.60 mm) on RAV4 and Tacoma, or .020" (.50 mm) on all other models. Turn brake adjuster to obtain specified clearance. Install brake drum and wheel and adjust brakes (if necessary).
STOPLIGHT SWITCH
Remove lower instrument panel and air duct (if necessary). Loosen lock nuts. Turn switch until clearance between threaded end of switch and pedal stop is .02-.09" (.5-2.3 mm), on all models except Land Cruiser. Clearance should be .039" (1.0 mm) on Land Cruiser. See Fig. 1 . Check brake pedal height and brakelight operation.
TESTING
POWER BRAKE UNIT (EXCEPT LAND CRUISER)
Operational Check
Depress brake pedal several times with engine off. There should be no change in pedal reserve distance.
NOTE: All rear drum brakes have a self-adjuster which is activated when brake pedal is applied with vehicle traveling in reverse.
1999 Toyota RAV4
1999-2000 BRAKES Disc & Drum - Trucks & Vans
Microsoft
Sunday, November 22, 2009 10:07:28 AM Page 5 © 2005 Mitchell Repair Information Company, LLC.
Depress brake pedal and start engine. If pedal goes down slightly, operation is normal.
Air Tightness Check
1. Start engine and run for 1-2 minutes, then turn engine off. Depress brake pedal several times slowly. If pedal goes down farthest on first time, but gradually rises after second or third time, power brake unit is airtight.
2. With engine stopped, depress brake pedal several times using normal pressure. Pedal should be low when first depressed. On consecutive applications, pedal height should gradually rise. If pedal height does not increase, check for air leaks.
LOAD-SENSING PROPORTIONING VALVE (LSPV) & BY-PASS VALVE (BPV)
Tacoma & Tundra
1. For testing purposes, rear axle is loaded to a specified weight. Set total rear axle weight to specified amount. See LSPV REAR AXLE TEST WEIGHT table.
2. Attach pressure gauge set to front caliper and rear wheel cylinder or caliper. Bleed air from system. See BLEEDING BRAKE SYSTEM . Depress brake pedal until front pressure is as specified. See LSPV PRESSURE SPECIFICATIONS table. Wait 2 seconds and record rear pressure reading.
LSPV REAR AXLE TEST WEIGHT
LSPV PRESSURE SPECIFICATIONS
NOTE: DO NOT depress brake pedal more than once or release pedal while setting pressure on front gauge.
Application Lbs. (kg)Tacoma
2WD 1543 (700)4WD 1874 (850)
TundraV6 Engine (5UZ-FE)
2205 (1000)
V8 Engine (2UZ-FE)
2315 (1050)
4Runner 2033 (922)
ApplicationFront Pressure - psi
(kg/cm2 )Rear Pressure - psi
(kg/cm2 )Tacoma
1999 Toyota RAV4
1999-2000 BRAKES Disc & Drum - Trucks & Vans
Microsoft
Sunday, November 22, 2009 10:07:28 AM Page 6 © 2005 Mitchell Repair Information Company, LLC.
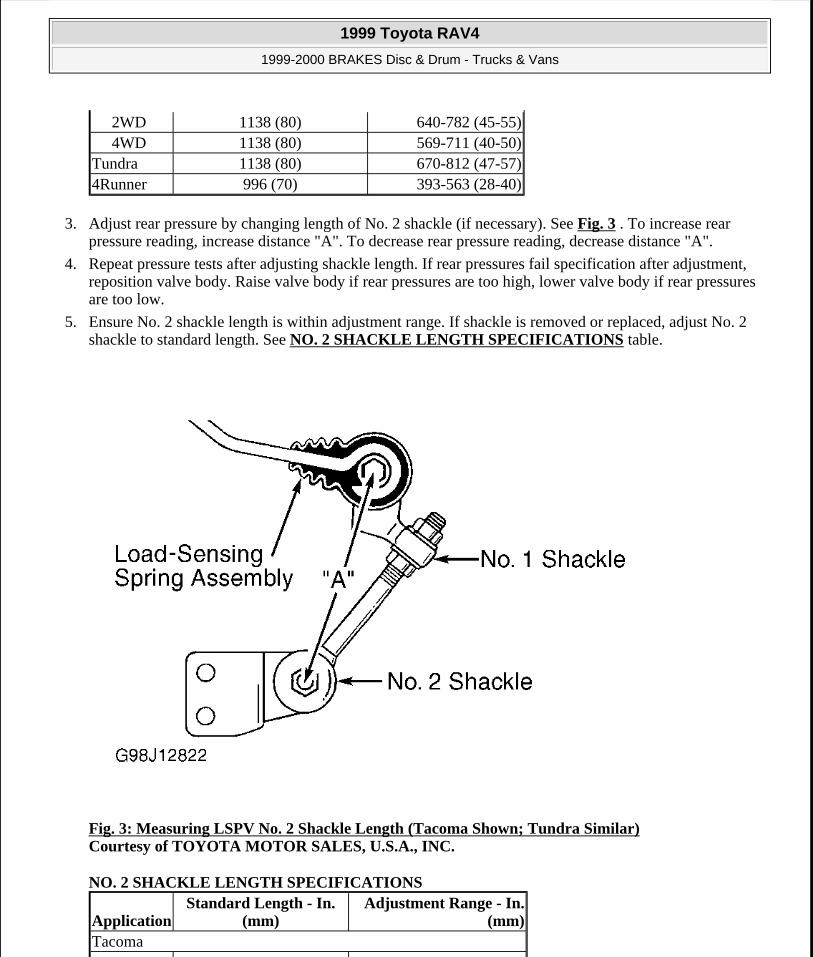
3. Adjust rear pressure by changing length of No. 2 shackle (if necessary). See Fig. 3 . To increase rear pressure reading, increase distance "A". To decrease rear pressure reading, decrease distance "A".
4. Repeat pressure tests after adjusting shackle length. If rear pressures fail specification after adjustment, reposition valve body. Raise valve body if rear pressures are too high, lower valve body if rear pressures are too low.
5. Ensure No. 2 shackle length is within adjustment range. If shackle is removed or replaced, adjust No. 2 shackle to standard length. See NO. 2 SHACKLE LENGTH SPECIFICATIONS table.
Fig. 3: Measuring LSPV No. 2 Shackle Length (Tacoma Shown; Tundra Similar) Courtesy of TOYOTA MOTOR SALES, U.S.A., INC.
NO. 2 SHACKLE LENGTH SPECIFICATIONS
2WD 1138 (80) 640-782 (45-55)4WD 1138 (80) 569-711 (40-50)
Tundra 1138 (80) 670-812 (47-57)4Runner 996 (70) 393-563 (28-40)
ApplicationStandard Length - In.
(mm)Adjustment Range - In.
(mm)Tacoma
1999 Toyota RAV4
1999-2000 BRAKES Disc & Drum - Trucks & Vans
Microsoft
Sunday, November 22, 2009 10:07:28 AM Page 7 © 2005 Mitchell Repair Information Company, LLC.
6. If pressures cannot be adjusted to specification, check valve housing. Position valve body in uppermost position. Apply brakes and record rear brake pressures. See VALVE BODY ADJUSTMENT PRESSURE SPECIFICATIONS (TACOMA & TUNDRA) table. If measured value does not meet specification, replace valve assembly.
VALVE BODY ADJUSTMENT PRESSURE SPECIFICATIONS (TACOMA & TUNDRA)
4Runner
1. For testing purposes, rear axle is loaded to a specified weight. Set total rear axle weight to specified amount. See LSPV REAR AXLE TEST WEIGHT table.
2. Attach pressure gauge set to front caliper and rear wheel cylinder. Bleed air from system. See BLEEDING BRAKE SYSTEM . Depress brake pedal until front pressure is as specified. See LSPV PRESSURE SPECIFICATIONS table. Wait 2 seconds and record rear pressure reading.
3. Adjust rear pressure by changing length "A" or "B". See Fig. 4 . To increase rear pressure reading, decrease distance "A" or "B". To decrease rear pressure reading, increase distance "A" or "B". If valve cannot be adjusted to specification, replace valve assembly.
2WD 3.07 (78) 2.83-3.31 (72-84)4WD 4.72 (120) 4.49-4.96 (114-126)
Tundra 4.72 (120) 4.41-5.04 (112-128)
ApplicationFront Pressure - psi
(kg/cm2 )Rear Pressure - psi
(kg/cm2 )Tacoma
2WD1st Reading 285 (20) 285 (20)2nd Reading 570 (40) 327-384 (23-27)3rd Reading 998 (70) 412-512 (29-36)
4WD1st Reading 213 (15) 213 (15)2nd Reading 570 (40) 256-313 (18-22)3rd Reading 998 (70) 320-420 (23-30)
Tundra1st Reading 213 (15) 213 (15)2nd Reading 569 (40) 263-377 (19-27)3rd Reading 1990 (140) 682-852 (48-60)
NOTE: DO NOT depress brake pedal more than once or release pedal while setting pressure on front gauge.
NOTE: To adjust pressure, turning adjusting nut one complete turn (360 degrees) will change pressure 14 psi (1.0 kg/cm2 ). If adjusting nut is moved up or
1999 Toyota RAV4
1999-2000 BRAKES Disc & Drum - Trucks & Vans
Microsoft
Sunday, November 22, 2009 10:07:28 AM Page 8 © 2005 Mitchell Repair Information Company, LLC.
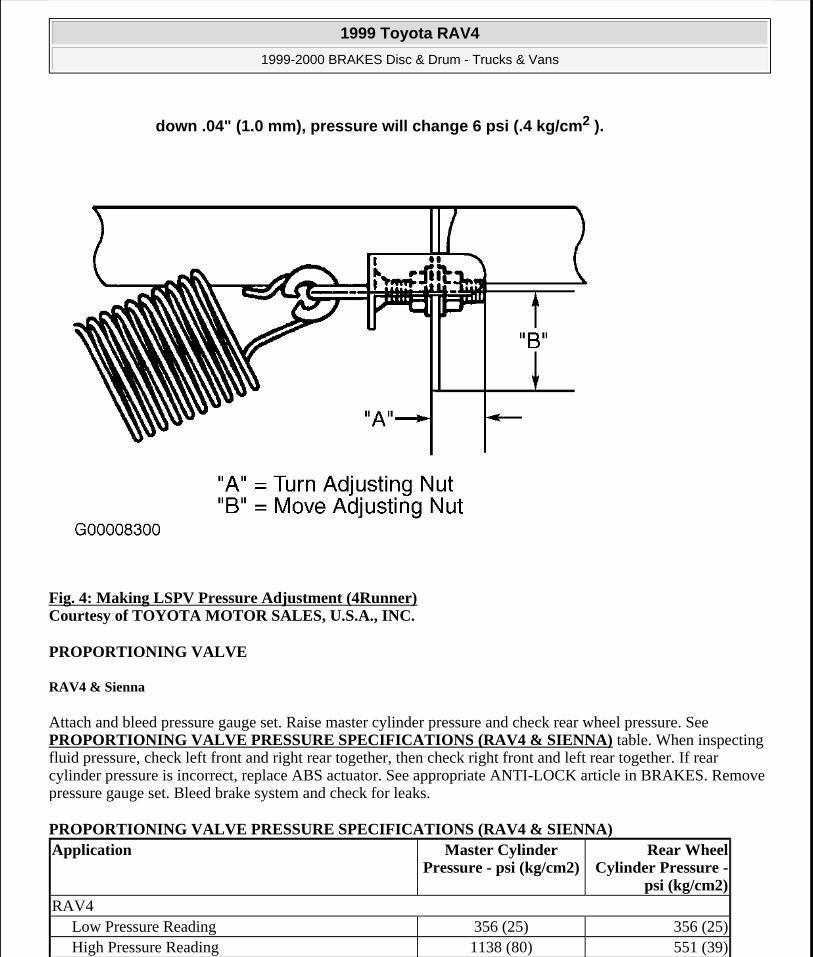
Fig. 4: Making LSPV Pressure Adjustment (4Runner) Courtesy of TOYOTA MOTOR SALES, U.S.A., INC.
PROPORTIONING VALVE
RAV4 & Sienna
Attach and bleed pressure gauge set. Raise master cylinder pressure and check rear wheel pressure. See PROPORTIONING VALVE PRESSURE SPECIFICATIONS (RAV4 & SIENNA) table. When inspecting fluid pressure, check left front and right rear together, then check right front and left rear together. If rear cylinder pressure is incorrect, replace ABS actuator. See appropriate ANTI-LOCK article in BRAKES. Remove pressure gauge set. Bleed brake system and check for leaks.
PROPORTIONING VALVE PRESSURE SPECIFICATIONS (RAV4 & SIENNA)
down .04" (1.0 mm), pressure will change 6 psi (.4 kg/cm2 ).
Application Master Cylinder Pressure - psi (kg/cm2)
Rear Wheel Cylinder Pressure -
psi (kg/cm2)RAV4
Low Pressure Reading 356 (25) 356 (25)High Pressure Reading 1138 (80) 551 (39)
1999 Toyota RAV4
1999-2000 BRAKES Disc & Drum - Trucks & Vans
Microsoft
Sunday, November 22, 2009 10:07:28 AM Page 9 © 2005 Mitchell Repair Information Company, LLC.
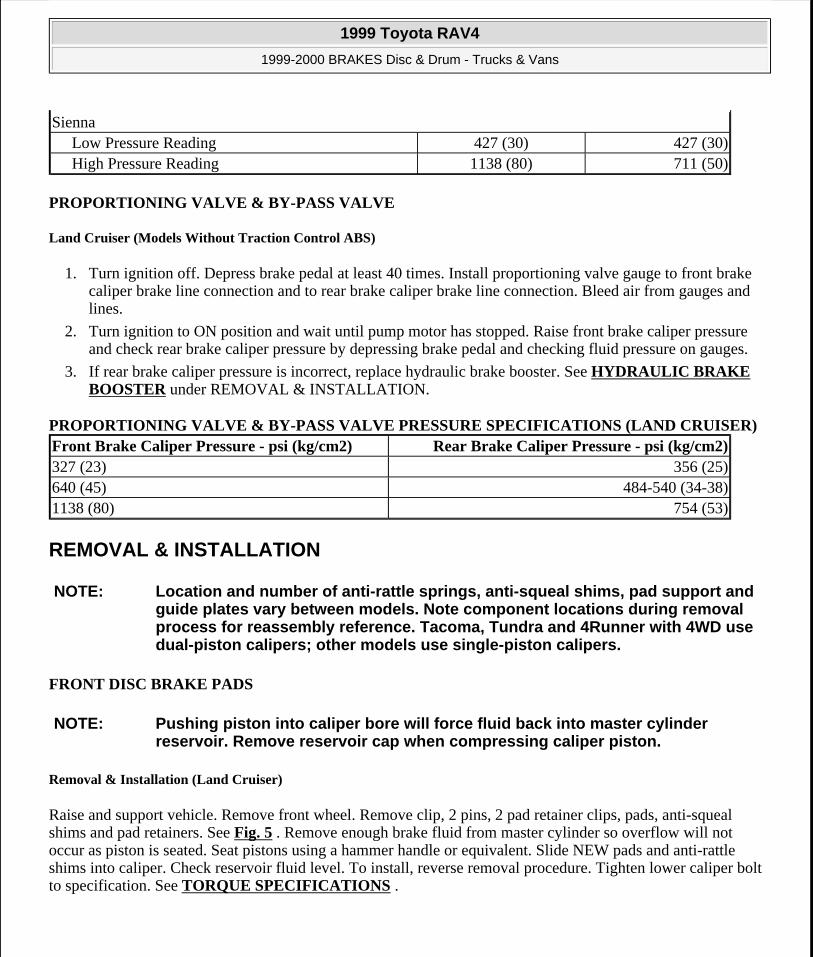
PROPORTIONING VALVE & BY-PASS VALVE
Land Cruiser (Models Without Traction Control ABS)
1. Turn ignition off. Depress brake pedal at least 40 times. Install proportioning valve gauge to front brake caliper brake line connection and to rear brake caliper brake line connection. Bleed air from gauges and lines.
2. Turn ignition to ON position and wait until pump motor has stopped. Raise front brake caliper pressure and check rear brake caliper pressure by depressing brake pedal and checking fluid pressure on gauges.
3. If rear brake caliper pressure is incorrect, replace hydraulic brake booster. See HYDRAULIC BRAKE BOOSTER under REMOVAL & INSTALLATION.
PROPORTIONING VALVE & BY-PASS VALVE PRESSURE SPECIFICATIONS (LAND CRUISER)
REMOVAL & INSTALLATION
FRONT DISC BRAKE PADS
Removal & Installation (Land Cruiser)
Raise and support vehicle. Remove front wheel. Remove clip, 2 pins, 2 pad retainer clips, pads, anti-squeal shims and pad retainers. See Fig. 5 . Remove enough brake fluid from master cylinder so overflow will not occur as piston is seated. Seat pistons using a hammer handle or equivalent. Slide NEW pads and anti-rattle shims into caliper. Check reservoir fluid level. To install, reverse removal procedure. Tighten lower caliper bolt to specification. See TORQUE SPECIFICATIONS .
SiennaLow Pressure Reading 427 (30) 427 (30)High Pressure Reading 1138 (80) 711 (50)
Front Brake Caliper Pressure - psi (kg/cm2) Rear Brake Caliper Pressure - psi (kg/cm2)327 (23) 356 (25)640 (45) 484-540 (34-38)1138 (80) 754 (53)
NOTE: Location and number of anti-rattle springs, anti-squeal shims, pad support and guide plates vary between models. Note component locations during removal process for reassembly reference. Tacoma, Tundra and 4Runner with 4WD use dual-piston calipers; other models use single-piston calipers.
NOTE: Pushing piston into caliper bore will force fluid back into master cylinder reservoir. Remove reservoir cap when compressing caliper piston.
1999 Toyota RAV4
1999-2000 BRAKES Disc & Drum - Trucks & Vans
Microsoft
Sunday, November 22, 2009 10:07:28 AM Page 10 © 2005 Mitchell Repair Information Company, LLC.

Fig. 5: Exploded View Of Front Brake Caliper Assembly (Land Cruiser) Courtesy of TOYOTA MOTOR SALES, U.S.A., INC.
Removal & Installation (RAV4 & Sienna)
1. Raise and support vehicle. Remove front wheel. Hold sliding pin on bottom and loosen installation bolt. Remove installation bolt and rotate caliper upward. Suspend caliper aside with wire.
1999 Toyota RAV4
1999-2000 BRAKES Disc & Drum - Trucks & Vans
Microsoft
Sunday, November 22, 2009 10:07:28 AM Page 11 © 2005 Mitchell Repair Information Company, LLC.
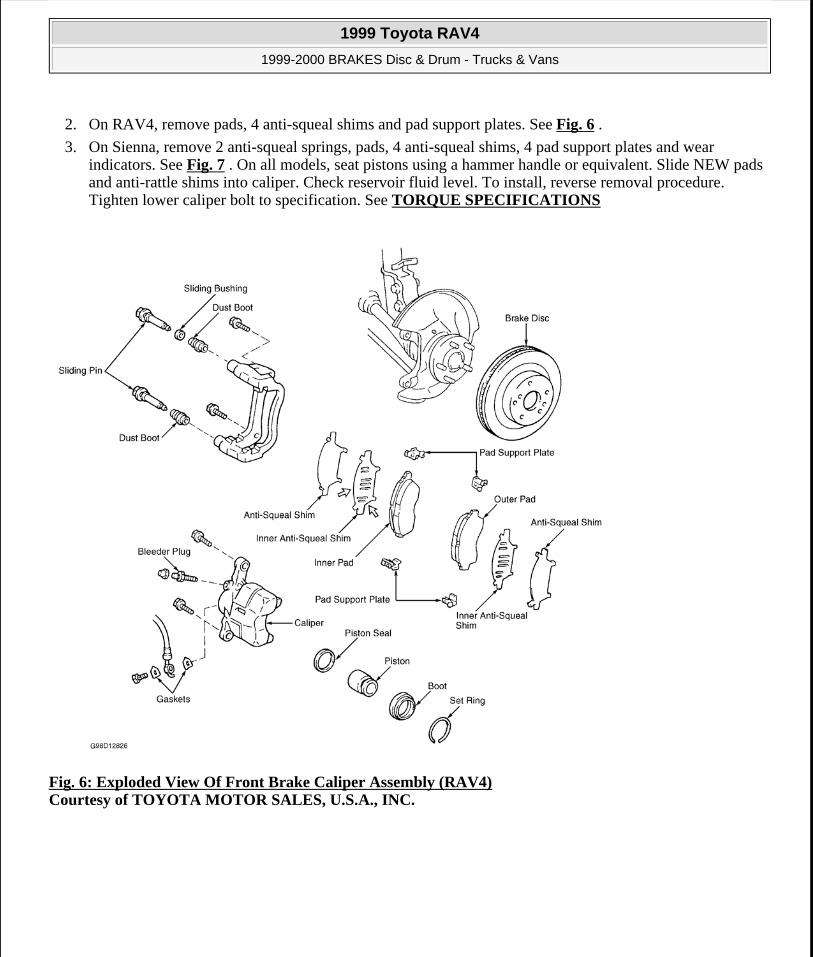
2. On RAV4, remove pads, 4 anti-squeal shims and pad support plates. See Fig. 6 .
3. On Sienna, remove 2 anti-squeal springs, pads, 4 anti-squeal shims, 4 pad support plates and wear indicators. See Fig. 7 . On all models, seat pistons using a hammer handle or equivalent. Slide NEW pads and anti-rattle shims into caliper. Check reservoir fluid level. To install, reverse removal procedure. Tighten lower caliper bolt to specification. See TORQUE SPECIFICATIONS
Fig. 6: Exploded View Of Front Brake Caliper Assembly (RAV4) Courtesy of TOYOTA MOTOR SALES, U.S.A., INC.
1999 Toyota RAV4
1999-2000 BRAKES Disc & Drum - Trucks & Vans
Microsoft
Sunday, November 22, 2009 10:07:28 AM Page 12 © 2005 Mitchell Repair Information Company, LLC.
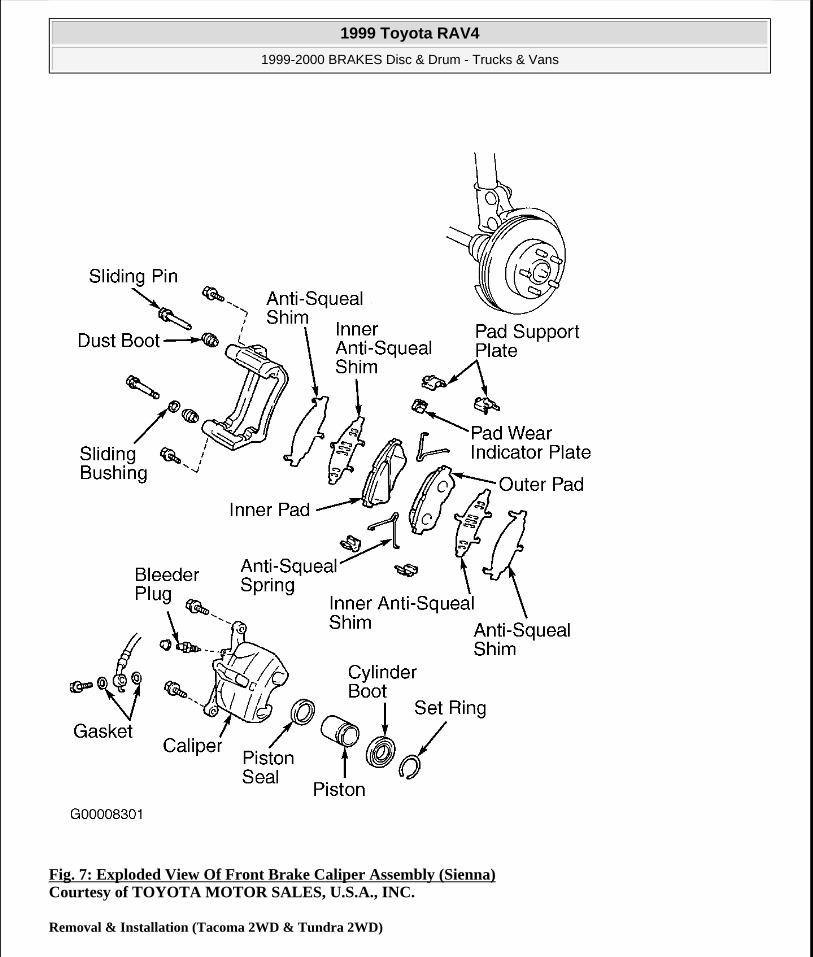
Fig. 7: Exploded View Of Front Brake Caliper Assembly (Sienna) Courtesy of TOYOTA MOTOR SALES, U.S.A., INC.
Removal & Installation (Tacoma 2WD & Tundra 2WD)
1999 Toyota RAV4
1999-2000 BRAKES Disc & Drum - Trucks & Vans
Microsoft
Sunday, November 22, 2009 10:07:28 AM Page 13 © 2005 Mitchell Repair Information Company, LLC.
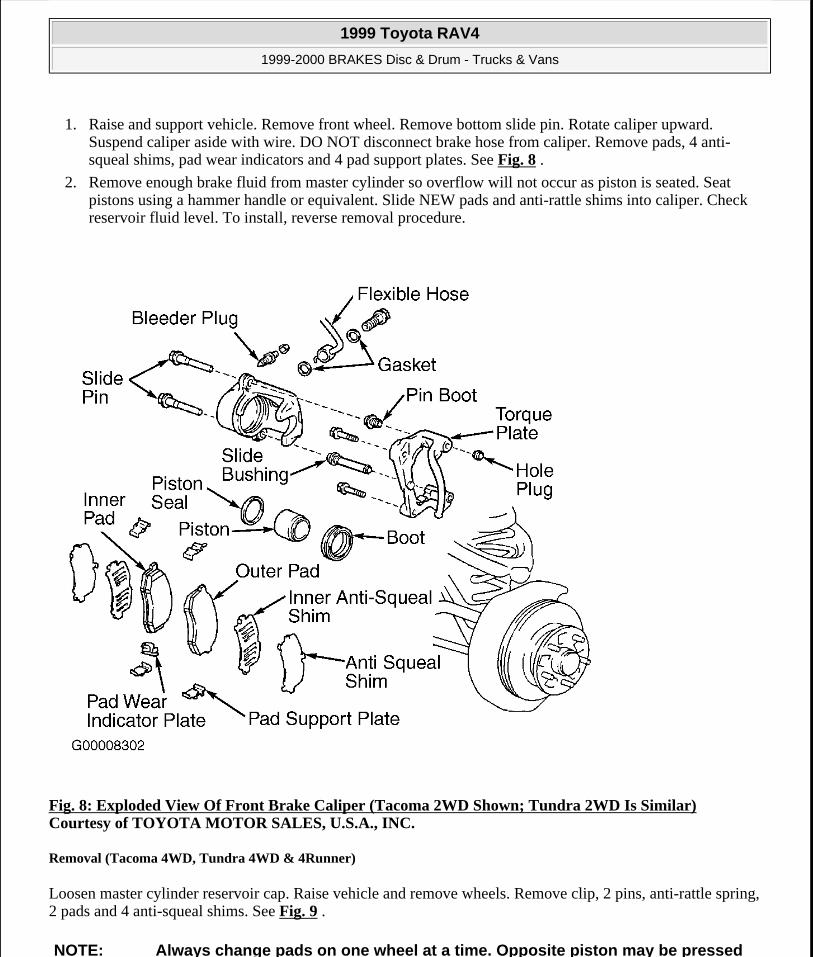
1. Raise and support vehicle. Remove front wheel. Remove bottom slide pin. Rotate caliper upward. Suspend caliper aside with wire. DO NOT disconnect brake hose from caliper. Remove pads, 4 anti-squeal shims, pad wear indicators and 4 pad support plates. See Fig. 8 .
2. Remove enough brake fluid from master cylinder so overflow will not occur as piston is seated. Seat pistons using a hammer handle or equivalent. Slide NEW pads and anti-rattle shims into caliper. Check reservoir fluid level. To install, reverse removal procedure.
Fig. 8: Exploded View Of Front Brake Caliper (Tacoma 2WD Shown; Tundra 2WD Is Similar) Courtesy of TOYOTA MOTOR SALES, U.S.A., INC.
Removal (Tacoma 4WD, Tundra 4WD & 4Runner)
Loosen master cylinder reservoir cap. Raise vehicle and remove wheels. Remove clip, 2 pins, anti-rattle spring, 2 pads and 4 anti-squeal shims. See Fig. 9 .
NOTE: Always change pads on one wheel at a time. Opposite piston may be pressed
1999 Toyota RAV4
1999-2000 BRAKES Disc & Drum - Trucks & Vans
Microsoft
Sunday, November 22, 2009 10:07:28 AM Page 14 © 2005 Mitchell Repair Information Company, LLC.
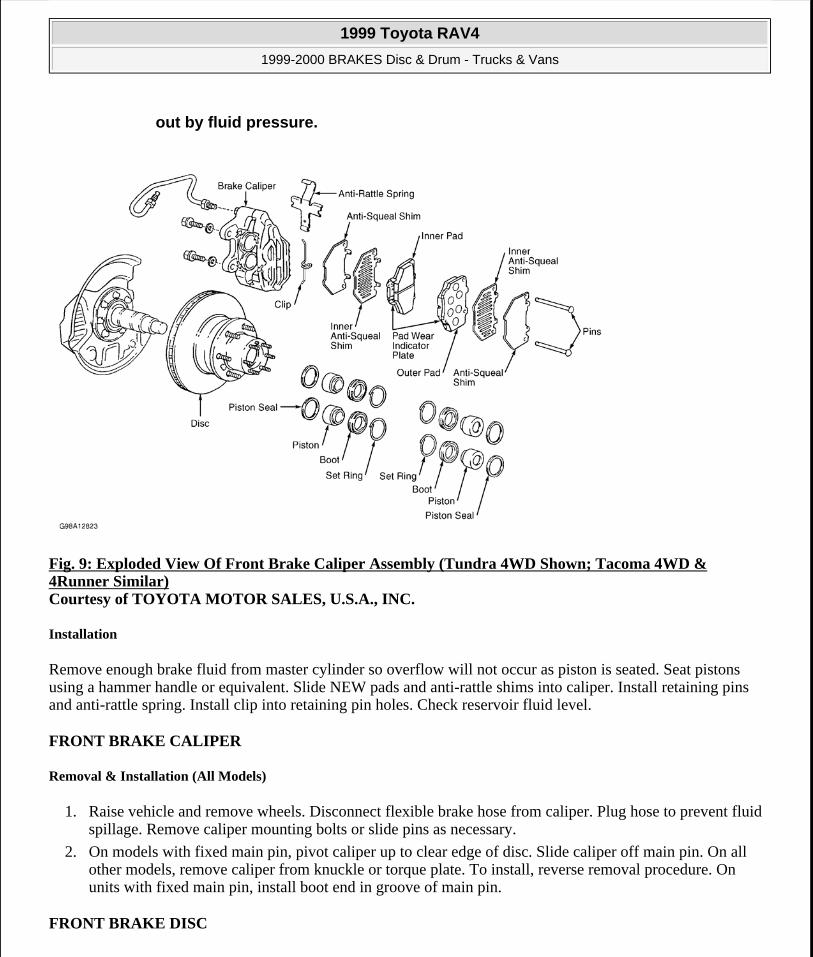
Fig. 9: Exploded View Of Front Brake Caliper Assembly (Tundra 4WD Shown; Tacoma 4WD & 4Runner Similar) Courtesy of TOYOTA MOTOR SALES, U.S.A., INC.
Installation
Remove enough brake fluid from master cylinder so overflow will not occur as piston is seated. Seat pistons using a hammer handle or equivalent. Slide NEW pads and anti-rattle shims into caliper. Install retaining pins and anti-rattle spring. Install clip into retaining pin holes. Check reservoir fluid level.
FRONT BRAKE CALIPER
Removal & Installation (All Models)
1. Raise vehicle and remove wheels. Disconnect flexible brake hose from caliper. Plug hose to prevent fluid spillage. Remove caliper mounting bolts or slide pins as necessary.
2. On models with fixed main pin, pivot caliper up to clear edge of disc. Slide caliper off main pin. On all other models, remove caliper from knuckle or torque plate. To install, reverse removal procedure. On units with fixed main pin, install boot end in groove of main pin.
FRONT BRAKE DISC
out by fluid pressure.
1999 Toyota RAV4
1999-2000 BRAKES Disc & Drum - Trucks & Vans
Microsoft
Sunday, November 22, 2009 10:07:28 AM Page 15 © 2005 Mitchell Repair Information Company, LLC.
Removal & Installation (Land Cruiser)
Raise vehicle and remove wheels. Remove bolt and disconnect brakeline from steering knuckle. Remove 2 bolts, washer and brake caliper. Support brake caliper securely. Remove grease cap from flange. Remove snap ring. Remove 6 nuts and washers. Remove 6 nuts and cone washers. Remove flange and gaskets. Remove lock nut, lock washer and adjusting nut. Remove disc with axle hub. To install, reverse removal procedure. Tighten bolts and nut to specifications. See TORQUE SPECIFICATIONS .
Removal & Installation (RAV4 & Tundra)
Raise and support vehicle. Remove front wheel. Remove 2 caliper retaining bolts and remove caliper. Support caliper securely out of way. Remove brake disc. To install, reverse removal procedure. Tighten bolts and nut to specifications. See TORQUE SPECIFICATIONS .
Removal & Installation (Sienna)
Raise and support vehicle. Remove front wheel. Remove cotter pin and hub lock cap. Remove hub nut. Remove 2 caliper retaining bolts and remove caliper. Support caliper securely out of way. Remove claw washer, outer bearing and axle hub with brake disc. To install, reverse removal procedure. Tighten bolts and nut to specifications. See TORQUE SPECIFICATIONS .
Removal & Installation (Tacoma 2WD)
Raise and support vehicle. Remove front wheel. Remove 2 caliper retaining bolts and remove caliper. Support caliper securely out of way. Remove cotter pin and hub lock cap. Remove hub nut. Remove claw washer, outer bearing and axle hub with brake disc. To install, reverse removal procedure. Tighten bolts and nut to specifications. See TORQUE SPECIFICATIONS .
Removal & Installation (Tacoma 4WD & 4Runner)
Raise and support vehicle. Remove front wheel. Remove and plug flexible brake hose from caliper. On Tacoma, remove snap ring. Remove 2 bolts and remove brake caliper and brake disc. Secure caliper out of way. To install, reverse removal procedure. Be sure to install brake hose lock securely into lock hole in caliper. Tighten bolts and nut to specifications. See TORQUE SPECIFICATIONS .
REAR DISC BRAKE PADS
Removal & Installation (Land Cruiser)
1. Raise and support vehicle. Remove wheels. Secure disc with lug nuts. Remove guide bolts from torque plate. Leave hose connected and suspend caliper from suspension. Remove pads, anti-squeal shims, wear indicators and pad support plates. See Fig. 10 .
2. Install NEW pad support plates on torque plate. Install NEW pad wear indicators, anti-squeal shims and pads. Position wear indicators on lower edge of pad. Anti-squeal shims go on outside of pads.
NOTE: Pushing piston into caliper bore will force fluid back into master cylinder reservoir. Remove small amount of fluid from reservoir with syringe.
1999 Toyota RAV4
1999-2000 BRAKES Disc & Drum - Trucks & Vans
Microsoft
Sunday, November 22, 2009 10:07:28 AM Page 16 © 2005 Mitchell Repair Information Company, LLC.
3. Push piston into bore with "C" clamp or wooden hammer handle. Slide caliper onto torque plate carefully to avoid damaging boot on edge of pad.
1999 Toyota RAV4
1999-2000 BRAKES Disc & Drum - Trucks & Vans
Microsoft
Sunday, November 22, 2009 10:07:28 AM Page 17 © 2005 Mitchell Repair Information Company, LLC.
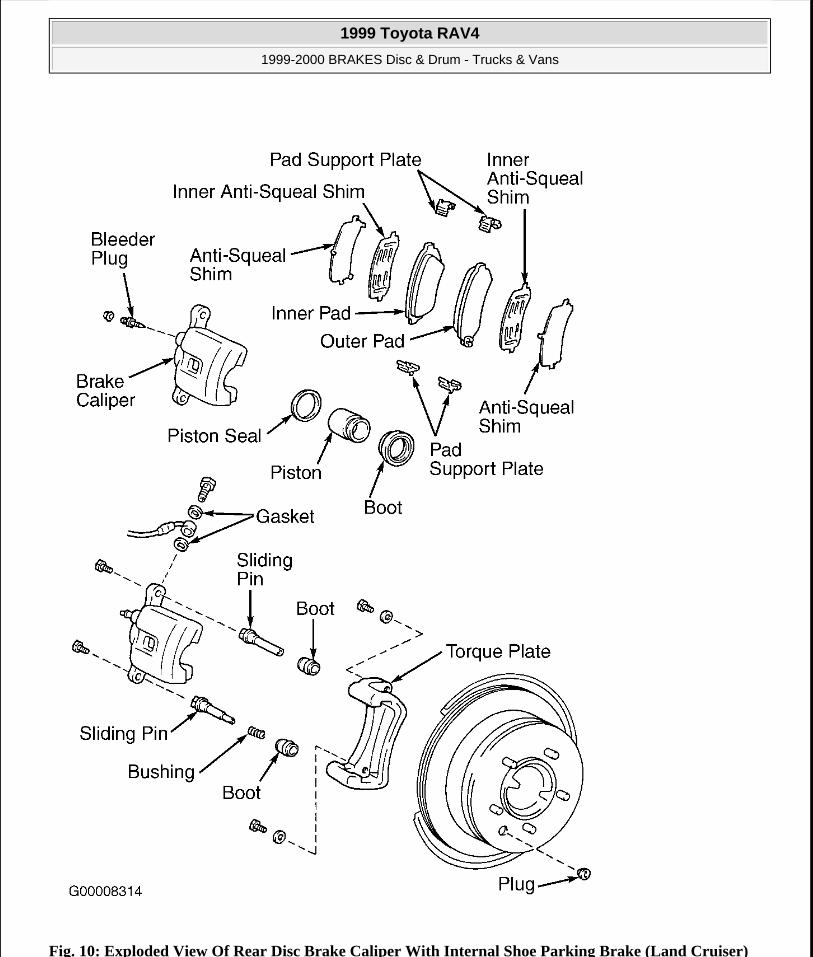
Fig. 10: Exploded View Of Rear Disc Brake Caliper With Internal Shoe Parking Brake (Land Cruiser)
1999 Toyota RAV4
1999-2000 BRAKES Disc & Drum - Trucks & Vans
Microsoft
Sunday, November 22, 2009 10:07:28 AM Page 18 © 2005 Mitchell Repair Information Company, LLC.
Courtesy of TOYOTA MOTOR SALES, U.S.A., INC.
REAR BRAKE CALIPER
Removal & Installation (Land Cruiser)
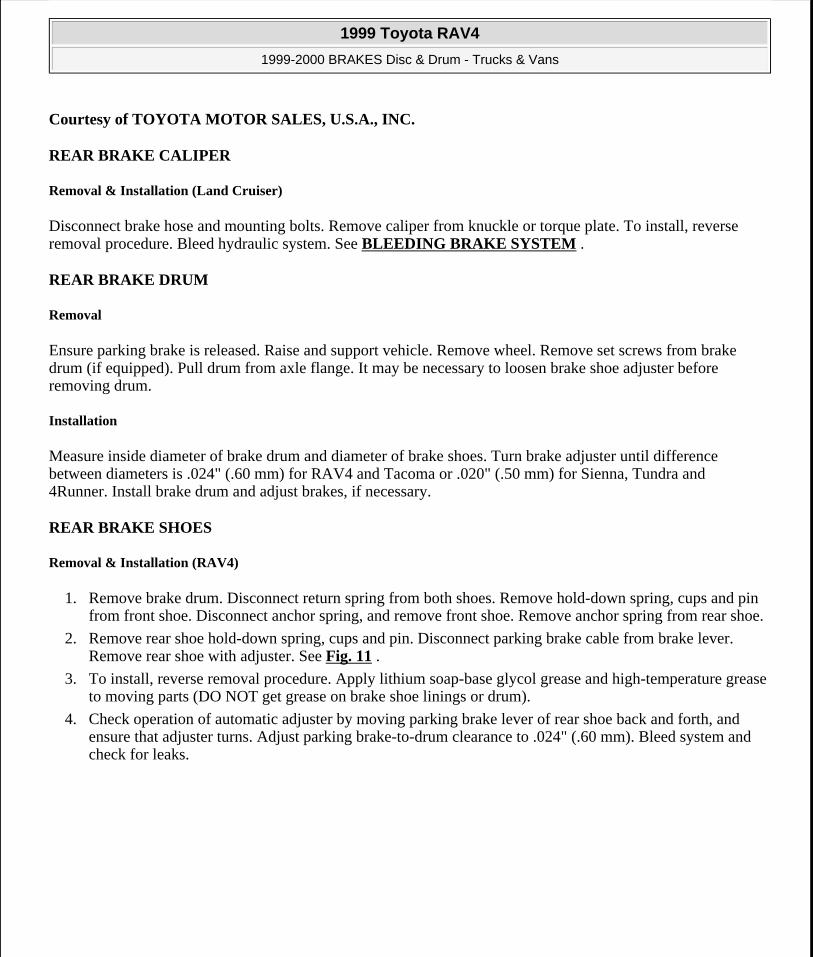
Disconnect brake hose and mounting bolts. Remove caliper from knuckle or torque plate. To install, reverse removal procedure. Bleed hydraulic system. See BLEEDING BRAKE SYSTEM .
REAR BRAKE DRUM
Removal
Ensure parking brake is released. Raise and support vehicle. Remove wheel. Remove set screws from brake drum (if equipped). Pull drum from axle flange. It may be necessary to loosen brake shoe adjuster before removing drum.
Installation
Measure inside diameter of brake drum and diameter of brake shoes. Turn brake adjuster until difference between diameters is .024" (.60 mm) for RAV4 and Tacoma or .020" (.50 mm) for Sienna, Tundra and 4Runner. Install brake drum and adjust brakes, if necessary.
REAR BRAKE SHOES
Removal & Installation (RAV4)
1. Remove brake drum. Disconnect return spring from both shoes. Remove hold-down spring, cups and pin from front shoe. Disconnect anchor spring, and remove front shoe. Remove anchor spring from rear shoe.
2. Remove rear shoe hold-down spring, cups and pin. Disconnect parking brake cable from brake lever. Remove rear shoe with adjuster. See Fig. 11 .
3. To install, reverse removal procedure. Apply lithium soap-base glycol grease and high-temperature grease to moving parts (DO NOT get grease on brake shoe linings or drum).
4. Check operation of automatic adjuster by moving parking brake lever of rear shoe back and forth, and ensure that adjuster turns. Adjust parking brake-to-drum clearance to .024" (.60 mm). Bleed system and check for leaks.
1999 Toyota RAV4
1999-2000 BRAKES Disc & Drum - Trucks & Vans
Microsoft
Sunday, November 22, 2009 10:07:28 AM Page 19 © 2005 Mitchell Repair Information Company, LLC.
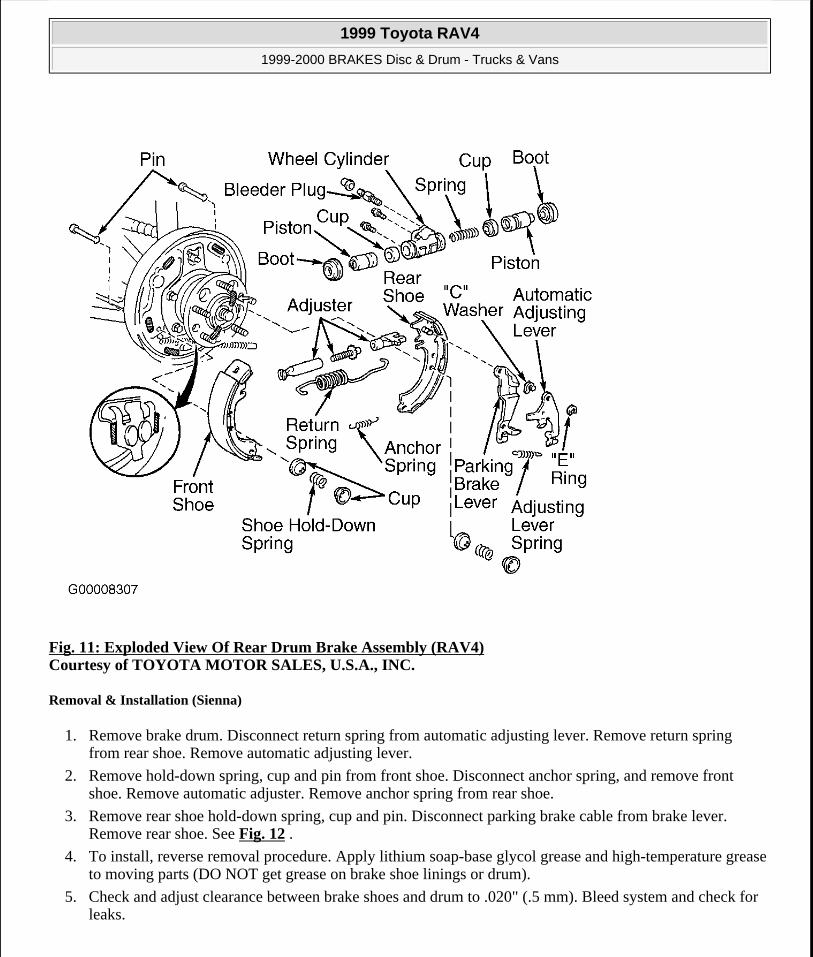
Fig. 11: Exploded View Of Rear Drum Brake Assembly (RAV4) Courtesy of TOYOTA MOTOR SALES, U.S.A., INC.
Removal & Installation (Sienna)
1. Remove brake drum. Disconnect return spring from automatic adjusting lever. Remove return spring from rear shoe. Remove automatic adjusting lever.
2. Remove hold-down spring, cup and pin from front shoe. Disconnect anchor spring, and remove front shoe. Remove automatic adjuster. Remove anchor spring from rear shoe.
3. Remove rear shoe hold-down spring, cup and pin. Disconnect parking brake cable from brake lever. Remove rear shoe. See Fig. 12 .
4. To install, reverse removal procedure. Apply lithium soap-base glycol grease and high-temperature grease to moving parts (DO NOT get grease on brake shoe linings or drum).
5. Check and adjust clearance between brake shoes and drum to .020" (.5 mm). Bleed system and check for leaks.
1999 Toyota RAV4
1999-2000 BRAKES Disc & Drum - Trucks & Vans
Microsoft
Sunday, November 22, 2009 10:07:28 AM Page 20 © 2005 Mitchell Repair Information Company, LLC.
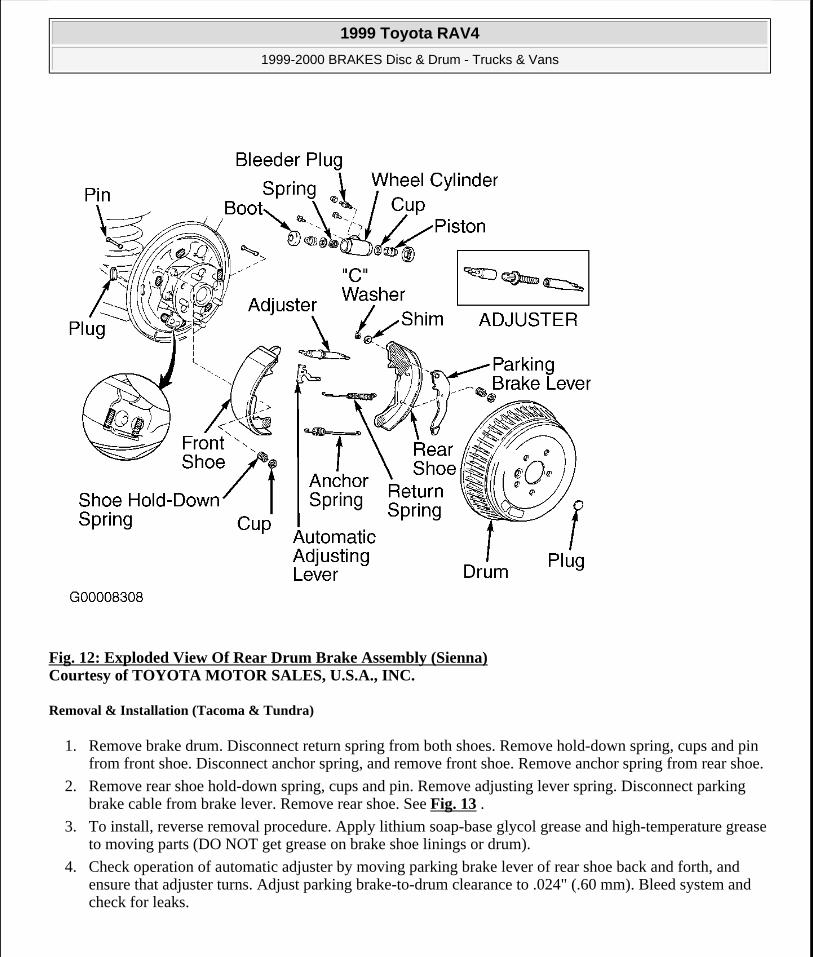
Fig. 12: Exploded View Of Rear Drum Brake Assembly (Sienna) Courtesy of TOYOTA MOTOR SALES, U.S.A., INC.
Removal & Installation (Tacoma & Tundra)
1. Remove brake drum. Disconnect return spring from both shoes. Remove hold-down spring, cups and pin from front shoe. Disconnect anchor spring, and remove front shoe. Remove anchor spring from rear shoe.
2. Remove rear shoe hold-down spring, cups and pin. Remove adjusting lever spring. Disconnect parking brake cable from brake lever. Remove rear shoe. See Fig. 13 .
3. To install, reverse removal procedure. Apply lithium soap-base glycol grease and high-temperature grease to moving parts (DO NOT get grease on brake shoe linings or drum).
4. Check operation of automatic adjuster by moving parking brake lever of rear shoe back and forth, and ensure that adjuster turns. Adjust parking brake-to-drum clearance to .024" (.60 mm). Bleed system and check for leaks.
1999 Toyota RAV4
1999-2000 BRAKES Disc & Drum - Trucks & Vans
Microsoft
Sunday, November 22, 2009 10:07:28 AM Page 21 © 2005 Mitchell Repair Information Company, LLC.
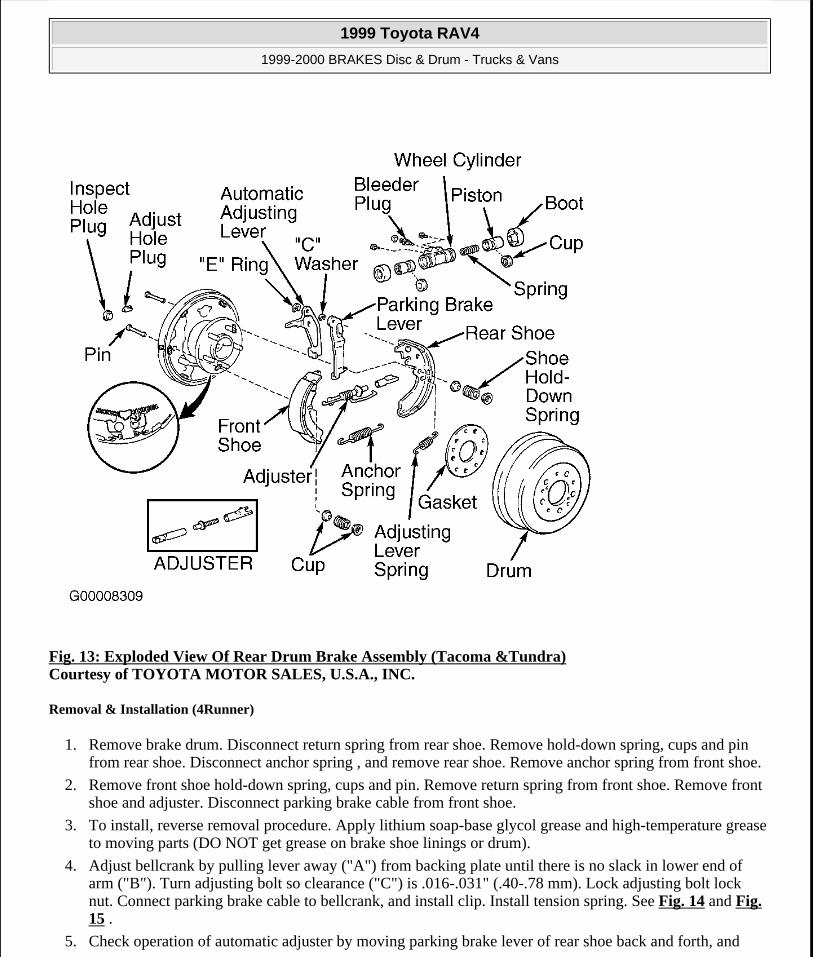
Fig. 13: Exploded View Of Rear Drum Brake Assembly (Tacoma &Tundra) Courtesy of TOYOTA MOTOR SALES, U.S.A., INC.
Removal & Installation (4Runner)
1. Remove brake drum. Disconnect return spring from rear shoe. Remove hold-down spring, cups and pin from rear shoe. Disconnect anchor spring , and remove rear shoe. Remove anchor spring from front shoe.
2. Remove front shoe hold-down spring, cups and pin. Remove return spring from front shoe. Remove front shoe and adjuster. Disconnect parking brake cable from front shoe.
3. To install, reverse removal procedure. Apply lithium soap-base glycol grease and high-temperature grease to moving parts (DO NOT get grease on brake shoe linings or drum).
4. Adjust bellcrank by pulling lever away ("A") from backing plate until there is no slack in lower end of arm ("B"). Turn adjusting bolt so clearance ("C") is .016-.031" (.40-.78 mm). Lock adjusting bolt lock nut. Connect parking brake cable to bellcrank, and install clip. Install tension spring. See Fig. 14 and Fig. 15 .
5. Check operation of automatic adjuster by moving parking brake lever of rear shoe back and forth, and
1999 Toyota RAV4
1999-2000 BRAKES Disc & Drum - Trucks & Vans
Microsoft
Sunday, November 22, 2009 10:07:28 AM Page 22 © 2005 Mitchell Repair Information Company, LLC.
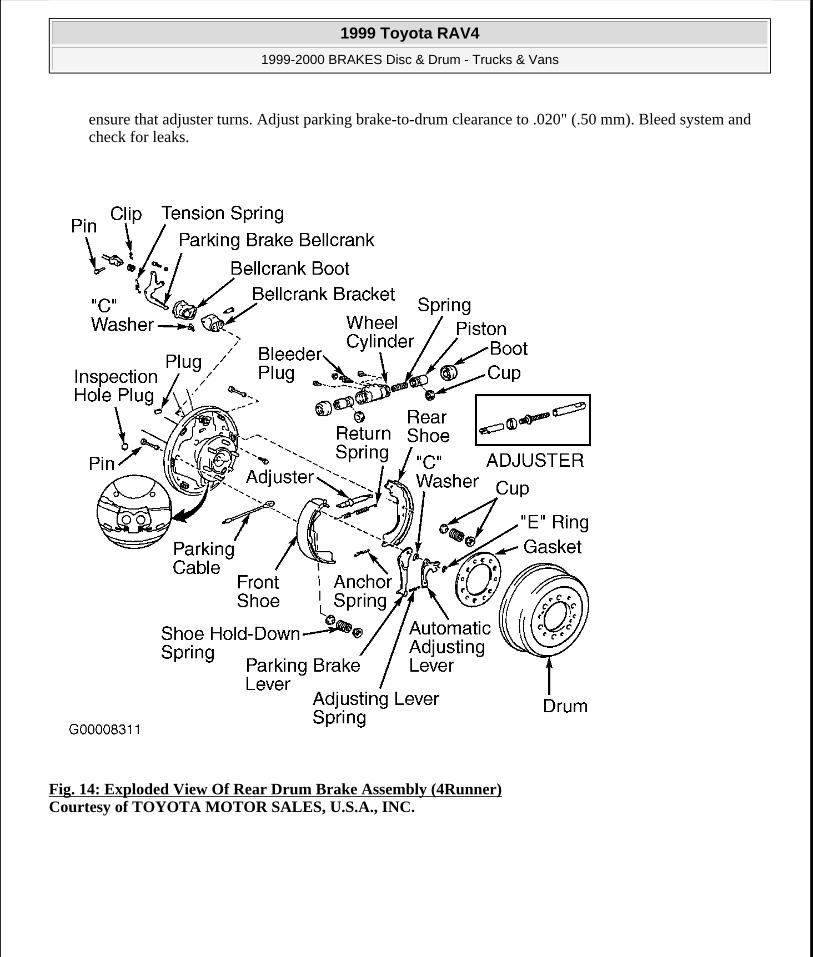
ensure that adjuster turns. Adjust parking brake-to-drum clearance to .020" (.50 mm). Bleed system and check for leaks.
Fig. 14: Exploded View Of Rear Drum Brake Assembly (4Runner) Courtesy of TOYOTA MOTOR SALES, U.S.A., INC.
1999 Toyota RAV4
1999-2000 BRAKES Disc & Drum - Trucks & Vans
Microsoft
Sunday, November 22, 2009 10:07:28 AM Page 23 © 2005 Mitchell Repair Information Company, LLC.
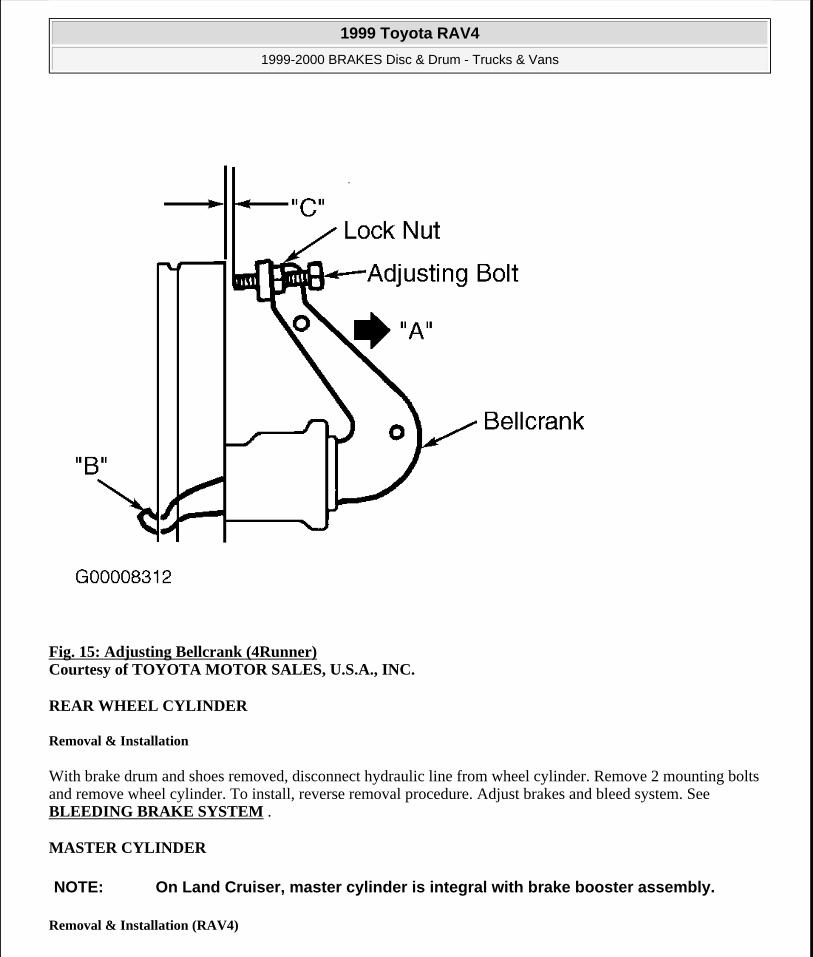
Fig. 15: Adjusting Bellcrank (4Runner) Courtesy of TOYOTA MOTOR SALES, U.S.A., INC.
REAR WHEEL CYLINDER
Removal & Installation
With brake drum and shoes removed, disconnect hydraulic line from wheel cylinder. Remove 2 mounting bolts and remove wheel cylinder. To install, reverse removal procedure. Adjust brakes and bleed system. See BLEEDING BRAKE SYSTEM .
MASTER CYLINDER
Removal & Installation (RAV4)
NOTE: On Land Cruiser, master cylinder is integral with brake booster assembly.
1999 Toyota RAV4
1999-2000 BRAKES Disc & Drum - Trucks & Vans
Microsoft
Sunday, November 22, 2009 10:07:28 AM Page 24 © 2005 Mitchell Repair Information Company, LLC.
1. Disconnect fluid level warning switch connector. Remove fluid from master cylinder with syringe. Remove 2 bolts, and move relay box aside. Remove air cleaner housing and hose.
2. Disconnect brake lines and 3-way line connector from master cylinder. If equipped with M/T, disconnect clutch reservoir hose. On all models, remove 2 bolts and master cylinder.
3. Prior to installation, adjust length of brake booster push rod if necessary. See POWER BRAKE UNIT PUSH ROD under ADJUSTMENTS.
4. Install master cylinder in reverse of removal procedure. Use NEW gasket. Fill and bleed system. Check for leaks and adjust pedal, if needed. Bleed clutch system, if equipped.
Removal & Installation (Sienna)
1. Remove air cleaner assembly. Disconnect fluid level warning switch connector. Remove fluid from master cylinder with syringe. Remove fluid reservoir tank and bracket (2 bolts).
2. Disconnect brake lines from master cylinder. Remove 2 bolts and master cylinder.
3. Prior to installation, adjust length of brake booster push rod if necessary. See POWER BRAKE UNIT PUSH ROD under ADJUSTMENTS.
4. Install master cylinder in reverse of removal procedure. Use NEW gasket. Fill and bleed system. Check for leaks and adjust pedal, if needed. Bleed clutch system, if equipped.
Removal & Installation (Tacoma, Tundra & 4Runner)
1. Unplug fluid level sensor lead. Drain brake fluid from reservoir. Disconnect and plug hydraulic lines. Remove master cylinder-to-power brake unit nuts. Remove master cylinder.
2. If master cylinder has been overhauled or replaced, check and adjust power brake unit push rod. See POWER BRAKE UNIT PUSH ROD under ADJUSTMENTS. To install, reverse removal procedure. Bleed brake system. See BLEEDING BRAKE SYSTEM .
POWER BRAKE UNIT
Removal & Installation (RAV4, Tacoma, Tundra & 4Runner)
1. Remove master cylinder. See MASTER CYLINDER . On RAV4, remove charcoal canister. On all models, disconnect vacuum hose. On Tundra, remove scuff plate LH, cowl side trim LH, lower finish panel and No. 2 heater to register duct. On all models, remove brake pedal return spring, clip and clevis pin. On Tundra, remove 4 nuts, clevis, brake booster and gasket. Remove 2 stopper rings, brake booster bracket and gasket from brake booster. Remove power brake unit.
2. Install power brake unit. On Tundra, install NEW gasket to power brake unit. Install bracket and stopper rings. Install clevis to operating rod. On all models, attach clevis pin, clip and return spring. Adjust push rod length. See POWER BRAKE UNIT PUSH ROD under ADJUSTMENTS.
3. Install master cylinder with NEW gasket. Connect vacuum hose. Fill master cylinder. Bleed system and check for leaks. Adjust brake pedal, if necessary.
Removal & Installation (Sienna)
1. Remove 2 cowl top vent louvers and outer front cowl top panel. See Fig. 16 . Remove master cylinder.
1999 Toyota RAV4
1999-2000 BRAKES Disc & Drum - Trucks & Vans
Microsoft
Sunday, November 22, 2009 10:07:28 AM Page 25 © 2005 Mitchell Repair Information Company, LLC.
See MASTER CYLINDER .
2. Remove ABS actuator assembly. Disconnect vacuum hose from power brake unit. Remove lower instrument panel finish panels to access brake pedal arm. Remove Cruise Control Engine Control Unit (ECU). Remove pedal return spring, clip and clevis pin.
3. Remove 4 nuts and clevis, and remove power brake unit.
4. Install power brake unit. Attach clevis pin, clip and return spring. Install Cruise Control Engine Control Unit (ECU). Adjust push rod length. See POWER BRAKE UNIT PUSH ROD under ADJUSTMENTS.
5. Install master cylinder with NEW gasket. Connect vacuum hose. Fill master cylinder. Bleed system and check for leads. Adjust brake pedal, if necessary. Install cowl panel and vent louvers.
1999 Toyota RAV4
1999-2000 BRAKES Disc & Drum - Trucks & Vans
Microsoft
Sunday, November 22, 2009 10:07:28 AM Page 26 © 2005 Mitchell Repair Information Company, LLC.

Fig. 16: Exploded View Of Power Brake Unit & Cowl Components (Sienna) Courtesy of TOYOTA MOTOR SALES, U.S.A., INC.
HYDRAULIC BRAKE BOOSTER (LAND CRUISER)
1999 Toyota RAV4
1999-2000 BRAKES Disc & Drum - Trucks & Vans
Microsoft
Sunday, November 22, 2009 10:07:28 AM Page 27 © 2005 Mitchell Repair Information Company, LLC.
Removal & Installation
1. Turn ignition switch off. Pump brake pedal at least 40 times (pedal stroke will become lighter and longer). Draw brake fluid from reservoir with a syringe.
2. Remove cowl side trim, lower panels and No. 2 heater duct for access. Remove ABS ECU. Remove charcoal canister. See Fig. 17 .
3. Disconnect connectors from brake booster. Disconnect brake lines from brake booster. Remove clip and clevis pin from inside passenger compartment. Remove 4 mounting nuts, and remove brake booster assembly.
4. To install, reverse removal procedure.
1999 Toyota RAV4
1999-2000 BRAKES Disc & Drum - Trucks & Vans
Microsoft
Sunday, November 22, 2009 10:07:28 AM Page 28 © 2005 Mitchell Repair Information Company, LLC.
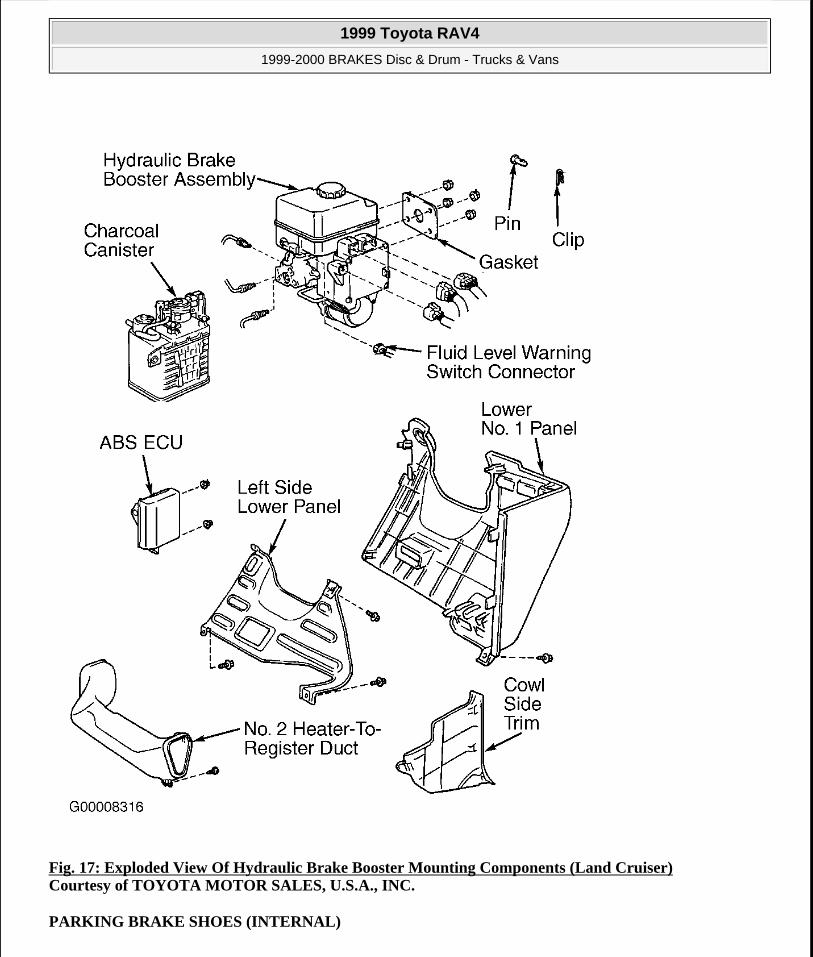
Fig. 17: Exploded View Of Hydraulic Brake Booster Mounting Components (Land Cruiser) Courtesy of TOYOTA MOTOR SALES, U.S.A., INC.
PARKING BRAKE SHOES (INTERNAL)
1999 Toyota RAV4
1999-2000 BRAKES Disc & Drum - Trucks & Vans
Microsoft
Sunday, November 22, 2009 10:07:28 AM Page 29 © 2005 Mitchell Repair Information Company, LLC.
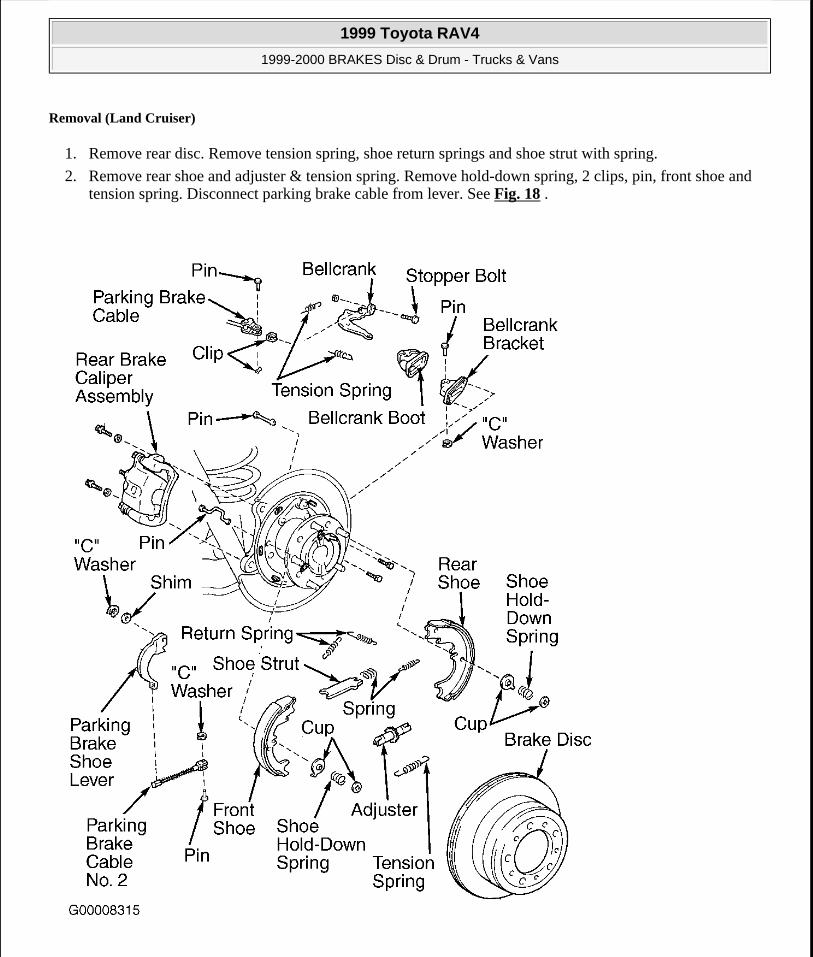
Removal (Land Cruiser)
1. Remove rear disc. Remove tension spring, shoe return springs and shoe strut with spring.
2. Remove rear shoe and adjuster & tension spring. Remove hold-down spring, 2 clips, pin, front shoe and tension spring. Disconnect parking brake cable from lever. See Fig. 18 .
1999 Toyota RAV4
1999-2000 BRAKES Disc & Drum - Trucks & Vans
Microsoft
Sunday, November 22, 2009 10:07:28 AM Page 30 © 2005 Mitchell Repair Information Company, LLC.
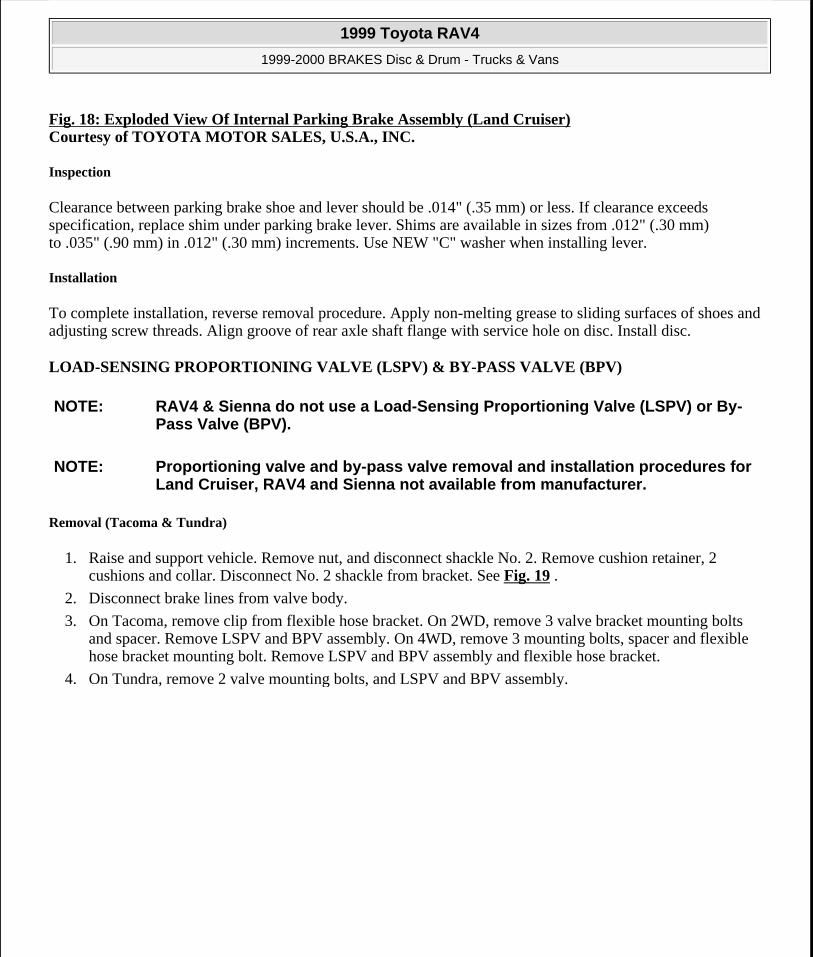
Fig. 18: Exploded View Of Internal Parking Brake Assembly (Land Cruiser) Courtesy of TOYOTA MOTOR SALES, U.S.A., INC.
Inspection
Clearance between parking brake shoe and lever should be .014" (.35 mm) or less. If clearance exceeds specification, replace shim under parking brake lever. Shims are available in sizes from .012" (.30 mm) to .035" (.90 mm) in .012" (.30 mm) increments. Use NEW "C" washer when installing lever.
Installation
To complete installation, reverse removal procedure. Apply non-melting grease to sliding surfaces of shoes and adjusting screw threads. Align groove of rear axle shaft flange with service hole on disc. Install disc.
LOAD-SENSING PROPORTIONING VALVE (LSPV) & BY-PASS VALVE (BPV)
Removal (Tacoma & Tundra)
1. Raise and support vehicle. Remove nut, and disconnect shackle No. 2. Remove cushion retainer, 2 cushions and collar. Disconnect No. 2 shackle from bracket. See Fig. 19 .
2. Disconnect brake lines from valve body.
3. On Tacoma, remove clip from flexible hose bracket. On 2WD, remove 3 valve bracket mounting bolts and spacer. Remove LSPV and BPV assembly. On 4WD, remove 3 mounting bolts, spacer and flexible hose bracket mounting bolt. Remove LSPV and BPV assembly and flexible hose bracket.
4. On Tundra, remove 2 valve mounting bolts, and LSPV and BPV assembly.
NOTE: RAV4 & Sienna do not use a Load-Sensing Proportioning Valve (LSPV) or By-Pass Valve (BPV).
NOTE: Proportioning valve and by-pass valve removal and installation procedures for Land Cruiser, RAV4 and Sienna not available from manufacturer.
1999 Toyota RAV4
1999-2000 BRAKES Disc & Drum - Trucks & Vans
Microsoft
Sunday, November 22, 2009 10:07:28 AM Page 31 © 2005 Mitchell Repair Information Company, LLC.
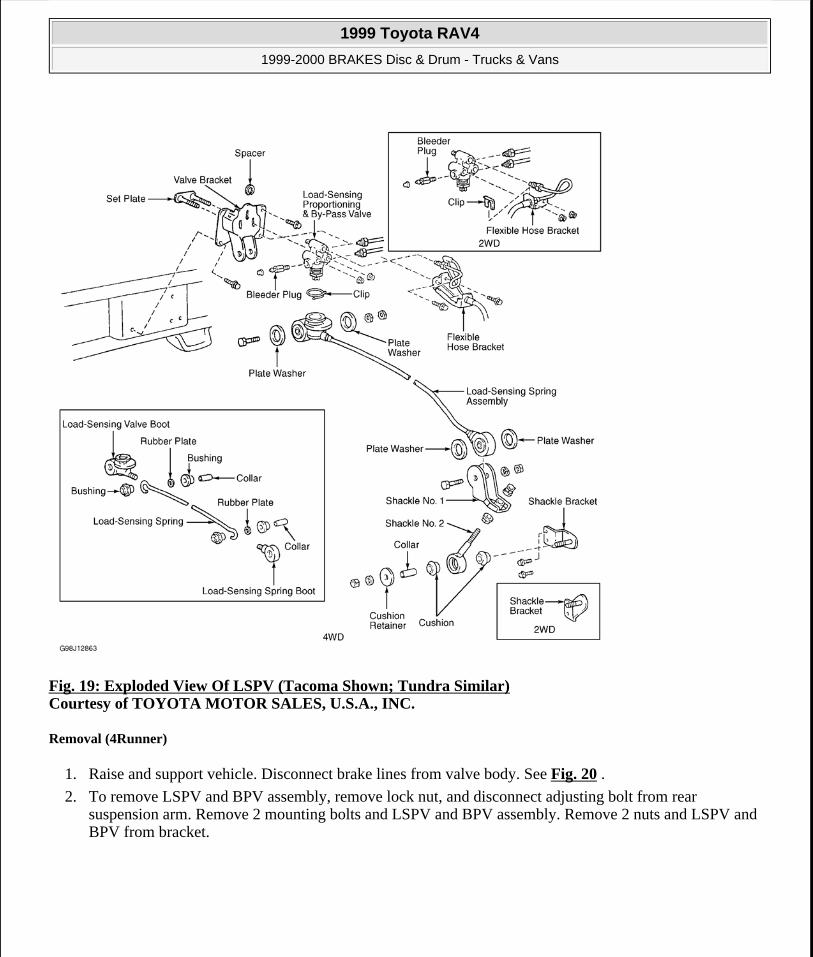
Fig. 19: Exploded View Of LSPV (Tacoma Shown; Tundra Similar) Courtesy of TOYOTA MOTOR SALES, U.S.A., INC.
Removal (4Runner)
1. Raise and support vehicle. Disconnect brake lines from valve body. See Fig. 20 .
2. To remove LSPV and BPV assembly, remove lock nut, and disconnect adjusting bolt from rear suspension arm. Remove 2 mounting bolts and LSPV and BPV assembly. Remove 2 nuts and LSPV and BPV from bracket.
1999 Toyota RAV4
1999-2000 BRAKES Disc & Drum - Trucks & Vans
Microsoft
Sunday, November 22, 2009 10:07:28 AM Page 32 © 2005 Mitchell Repair Information Company, LLC.
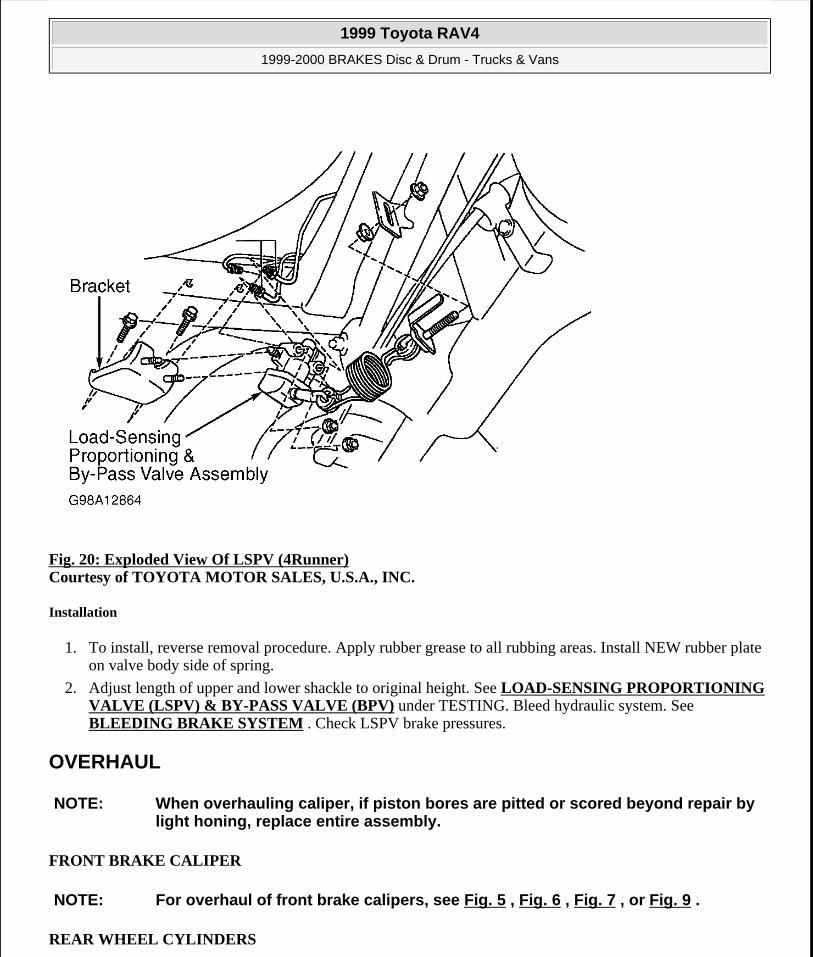
Fig. 20: Exploded View Of LSPV (4Runner) Courtesy of TOYOTA MOTOR SALES, U.S.A., INC.
Installation
1. To install, reverse removal procedure. Apply rubber grease to all rubbing areas. Install NEW rubber plate on valve body side of spring.
2. Adjust length of upper and lower shackle to original height. See LOAD-SENSING PROPORTIONING VALVE (LSPV) & BY-PASS VALVE (BPV) under TESTING. Bleed hydraulic system. See BLEEDING BRAKE SYSTEM . Check LSPV brake pressures.
OVERHAUL
FRONT BRAKE CALIPER
REAR WHEEL CYLINDERS
NOTE: When overhauling caliper, if piston bores are pitted or scored beyond repair by light honing, replace entire assembly.
NOTE: For overhaul of front brake calipers, see Fig. 5 , Fig. 6 , Fig. 7 , or Fig. 9 .
1999 Toyota RAV4
1999-2000 BRAKES Disc & Drum - Trucks & Vans
Microsoft
Sunday, November 22, 2009 10:07:28 AM Page 33 © 2005 Mitchell Repair Information Company, LLC.
MASTER CYLINDER
NOTE: For overhaul of rear wheel cylinders, see Fig. 11 , Fig. 12 , Fig. 13 or Fig. 14 .
NOTE: For overhaul of master cylinder assembly, see Fig. 21 , Fig. 22 or Fig. 23 .
1999 Toyota RAV4
1999-2000 BRAKES Disc & Drum - Trucks & Vans
Microsoft
Sunday, November 22, 2009 10:07:28 AM Page 34 © 2005 Mitchell Repair Information Company, LLC.
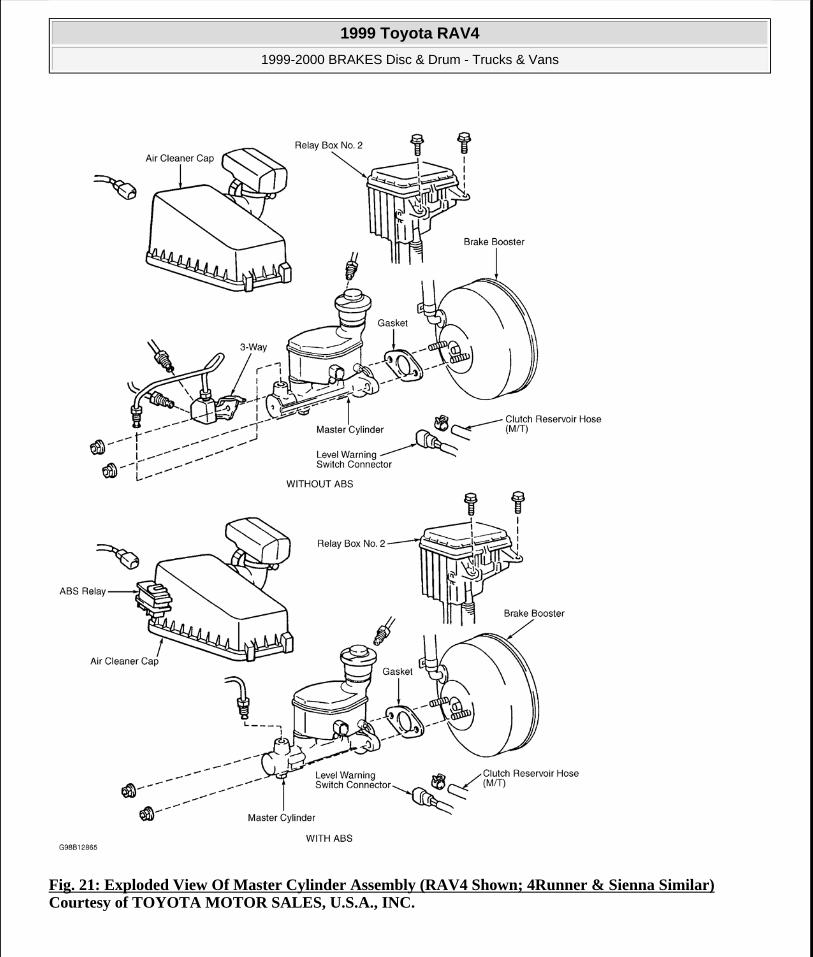
Fig. 21: Exploded View Of Master Cylinder Assembly (RAV4 Shown; 4Runner & Sienna Similar) Courtesy of TOYOTA MOTOR SALES, U.S.A., INC.
1999 Toyota RAV4
1999-2000 BRAKES Disc & Drum - Trucks & Vans
Microsoft
Sunday, November 22, 2009 10:07:28 AM Page 35 © 2005 Mitchell Repair Information Company, LLC.
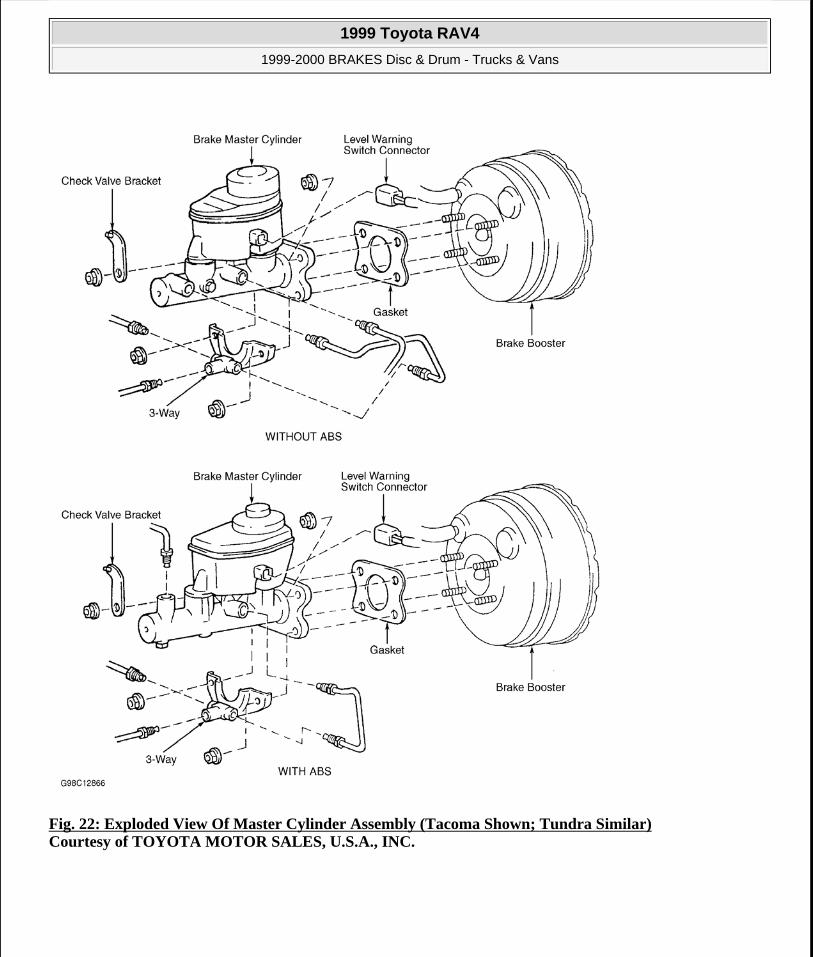
Fig. 22: Exploded View Of Master Cylinder Assembly (Tacoma Shown; Tundra Similar) Courtesy of TOYOTA MOTOR SALES, U.S.A., INC.
1999 Toyota RAV4
1999-2000 BRAKES Disc & Drum - Trucks & Vans
Microsoft
Sunday, November 22, 2009 10:07:28 AM Page 36 © 2005 Mitchell Repair Information Company, LLC.
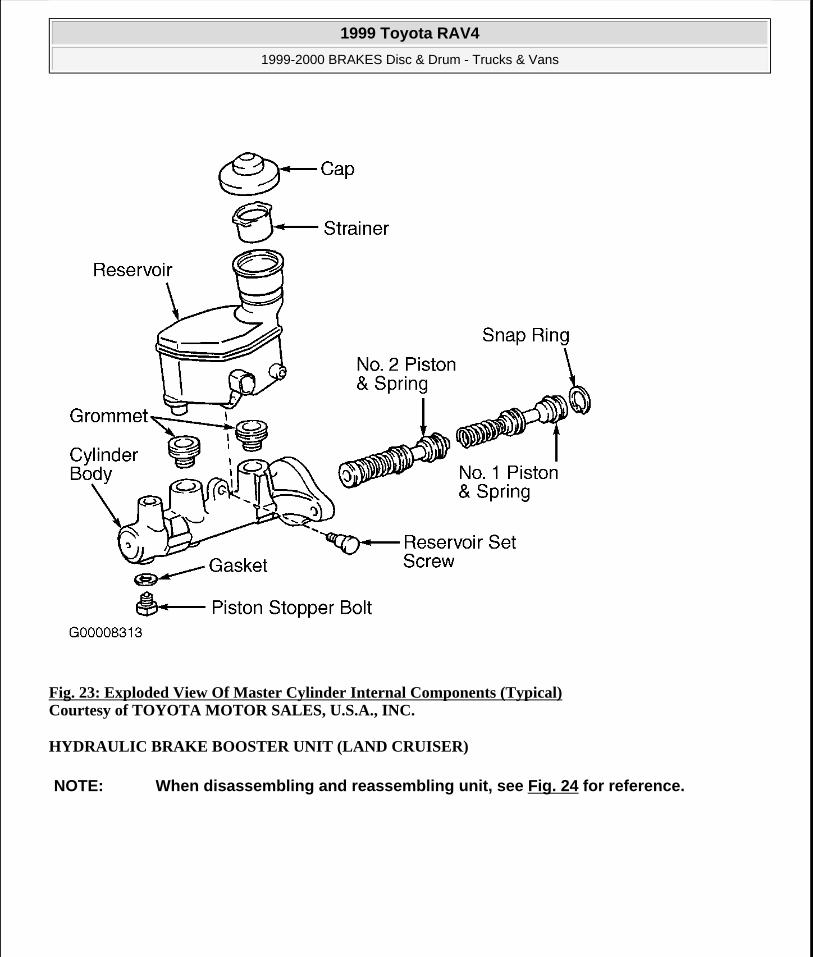
Fig. 23: Exploded View Of Master Cylinder Internal Components (Typical) Courtesy of TOYOTA MOTOR SALES, U.S.A., INC.
HYDRAULIC BRAKE BOOSTER UNIT (LAND CRUISER)
NOTE: When disassembling and reassembling unit, see Fig. 24 for reference.
1999 Toyota RAV4
1999-2000 BRAKES Disc & Drum - Trucks & Vans
Microsoft
Sunday, November 22, 2009 10:07:28 AM Page 37 © 2005 Mitchell Repair Information Company, LLC.
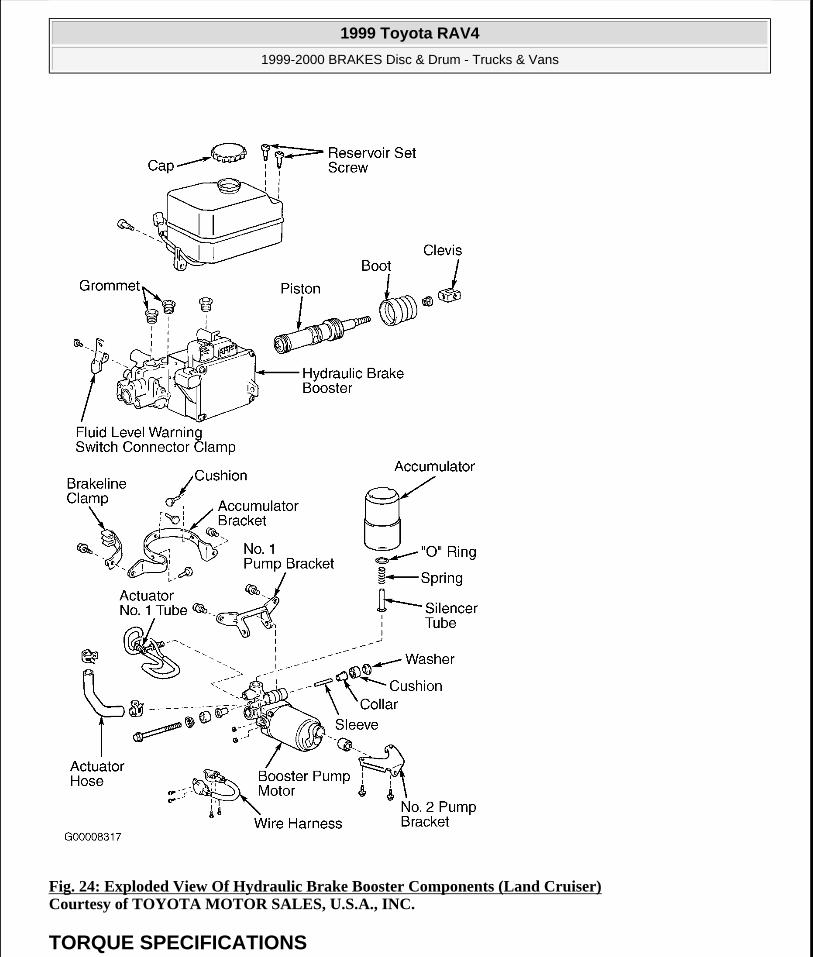
Fig. 24: Exploded View Of Hydraulic Brake Booster Components (Land Cruiser) Courtesy of TOYOTA MOTOR SALES, U.S.A., INC.
TORQUE SPECIFICATIONS
1999 Toyota RAV4
1999-2000 BRAKES Disc & Drum - Trucks & Vans
Microsoft
Sunday, November 22, 2009 10:07:28 AM Page 38 © 2005 Mitchell Repair Information Company, LLC.
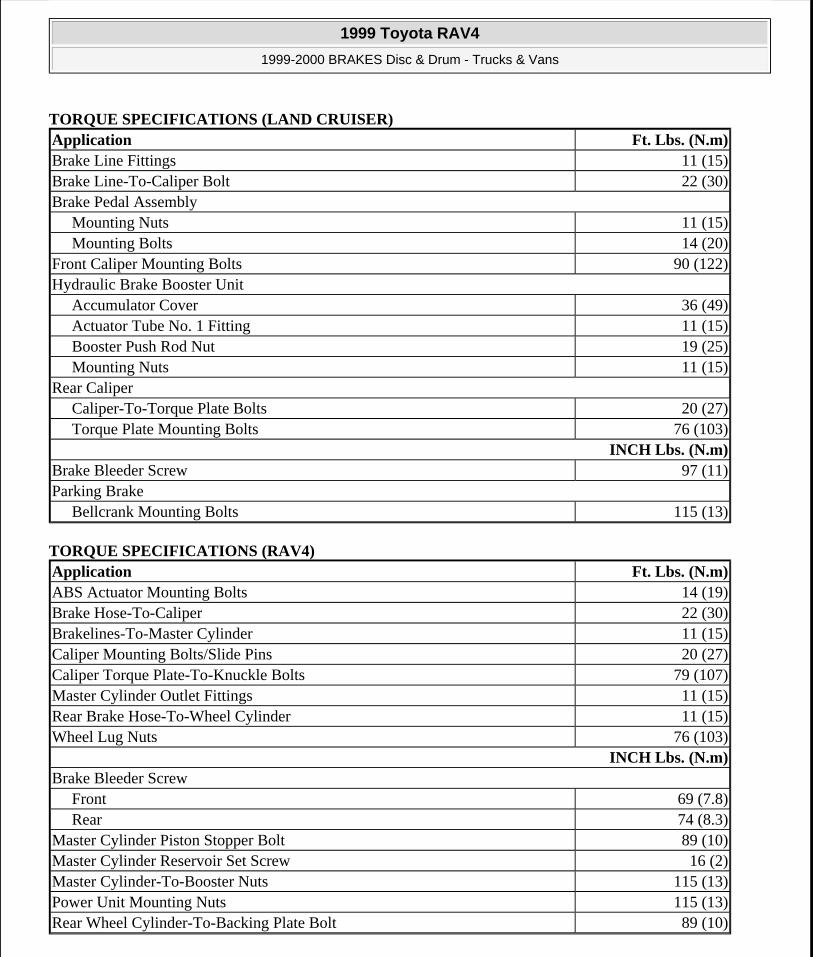
TORQUE SPECIFICATIONS (LAND CRUISER)
TORQUE SPECIFICATIONS (RAV4)
Application Ft. Lbs. (N.m)Brake Line Fittings 11 (15)Brake Line-To-Caliper Bolt 22 (30)Brake Pedal Assembly
Mounting Nuts 11 (15)Mounting Bolts 14 (20)
Front Caliper Mounting Bolts 90 (122)Hydraulic Brake Booster Unit
Accumulator Cover 36 (49)Actuator Tube No. 1 Fitting 11 (15)Booster Push Rod Nut 19 (25)Mounting Nuts 11 (15)
Rear CaliperCaliper-To-Torque Plate Bolts 20 (27)Torque Plate Mounting Bolts 76 (103)
INCH Lbs. (N.m)Brake Bleeder Screw 97 (11)Parking Brake
Bellcrank Mounting Bolts 115 (13)
Application Ft. Lbs. (N.m)ABS Actuator Mounting Bolts 14 (19)Brake Hose-To-Caliper 22 (30)Brakelines-To-Master Cylinder 11 (15)Caliper Mounting Bolts/Slide Pins 20 (27)Caliper Torque Plate-To-Knuckle Bolts 79 (107)Master Cylinder Outlet Fittings 11 (15)Rear Brake Hose-To-Wheel Cylinder 11 (15)Wheel Lug Nuts 76 (103)
INCH Lbs. (N.m)Brake Bleeder Screw
Front 69 (7.8)Rear 74 (8.3)
Master Cylinder Piston Stopper Bolt 89 (10)Master Cylinder Reservoir Set Screw 16 (2)Master Cylinder-To-Booster Nuts 115 (13)Power Unit Mounting Nuts 115 (13)Rear Wheel Cylinder-To-Backing Plate Bolt 89 (10)
1999 Toyota RAV4
1999-2000 BRAKES Disc & Drum - Trucks & Vans
Microsoft
Sunday, November 22, 2009 10:07:28 AM Page 39 © 2005 Mitchell Repair Information Company, LLC.

TORQUE SPECIFICATIONS (TACOMA)
TORQUE SPECIFICATIONS (TUNDRA)
Application Ft. Lbs. (N.m)Brake Hose-To-Caliper 11 (15)Brakelines-To-Master Cylinder 11 (15)Caliper Mounting Bolts/Slide Pins
2WD 65 (88)4WD 91 (123)
Caliper Mounting Torque Plate-To-Knuckle Bolts2WD 80 (108)4WD 90 (122)
Hub-To-Rotor Bolts (2WD) 47 (64)LSVP
Load Sensing Spring Assembly Nuts 13 (18)Shackle Bracket Bolts 22 (30)Shackle No. 1-To-No. 2 Nut 18 (24)
Rear Axle Retainer & Backing Plate Nuts 50 (68)Wheel Lug Nuts 76 (103)
INCH Lbs. (N.m)Brake Bleeder Screw 97 (11)LSPV-To-Bracket Nuts 115 (13)LSPV Bracket Mounting Bolts 257 (29)Master Cylinder Piston Stopper Bolt
With ABS 89 (10)Without ABS 71 (8)
Master Cylinder-To-Booster Nuts 115 (13)Power Brake Unit Mounting Nuts 115 (13)Wheel Cylinder Mounting Bolts 89 (10)
Application Ft. Lbs. (N.m)Brake Hose-To-Caliper 11 (15)Brakeline Fittings 11 (15)Caliper Mounting Bolts 90 (122)Load Sensing Spring Assembly At Shackle No. 1 13 (18)LSPV & BPV Bracket (1)
LSPV & BPV Bracket-To-Frame 21 (29)LSPV & BPV-To-Load Sensing Spring Assembly 13 (18)Rear Axle Retainer & Backing Plate Nuts 51 (69)Shackle No. 1-To-Shackle No. 2 (1)
Shackle No. 2-To-Shackle Bracket (1)
1999 Toyota RAV4
1999-2000 BRAKES Disc & Drum - Trucks & Vans
Microsoft
Sunday, November 22, 2009 10:07:28 AM Page 40 © 2005 Mitchell Repair Information Company, LLC.

TORQUE SPECIFICATIONS (4RUNNER)
TORQUE SPECIFICATIONS (SIENNA)
Wheel Lug Nuts 83 (113)INCH Lbs. (N.m)
Brake Bleeder Screw 97 (11)Master Cylinder Mounting Nuts 115 (13)Master Cylinder Piston Stopper Bolt 89 (10)Master Cylinder Reservoir 16 (1.8)Parking Brake Bellcrank Bracket 115 (13)Rear Wheel Cylinder Mounting Bolts 89 (10)(1) Tighten to 115 INCH lbs. (13 N.m).
Application Ft. Lbs. (N.m)Brake Line Fittings 11 (15)Caliper Mounting Bolts/Slide Pins 90 (122)LSPV Mounting Bolts 22 (30)Power Brake Unit Rod Nut 19 (25)Rear Axle Retainer & Backing Plate Nuts 48 (66)Wheel Lug Nuts 83 (112)
INCH Lbs. (N.m)Brake Bleeder Screws 97 (11)LSPV Adjusting Nuts 115 (13)Master Cylinder Mounting Nuts 115 (13)Master Cylinder Piston Stopper Bolt 89 (10)Power Brake Unit Mounting Nuts 124 (14)Rear Wheel Backing Plate Bolts 115 (13)Rear Wheel Cylinder Mounting Nuts 89 (10)
Application Ft. Lbs. (N.m)Brakeline Fittings 11 (15)Brake Pedal Bracket Bolts 14 (19)Brake Pedal Swivel Bolt/Nut 26 (35)Caliper Mounting Bolts 25 (34)Caliper-To-Knuckle Bolts 79 (107)Parking Brake Assembly Mounting Bolt/Nuts 45 (61)Power Brake Unit Push Rod Nut 19 (25)Rear Wheel Hub Nuts 59 (80)Wheel Cylinder Mounting Nuts 11 (150Wheel Lug Nuts 77 (104)
INCH Lbs. (N.m)
1999 Toyota RAV4
1999-2000 BRAKES Disc & Drum - Trucks & Vans
Microsoft
Sunday, November 22, 2009 10:07:29 AM Page 41 © 2005 Mitchell Repair Information Company, LLC.
DISC BRAKE SPECIFICATIONS
DISC BRAKE SPECIFICATIONS
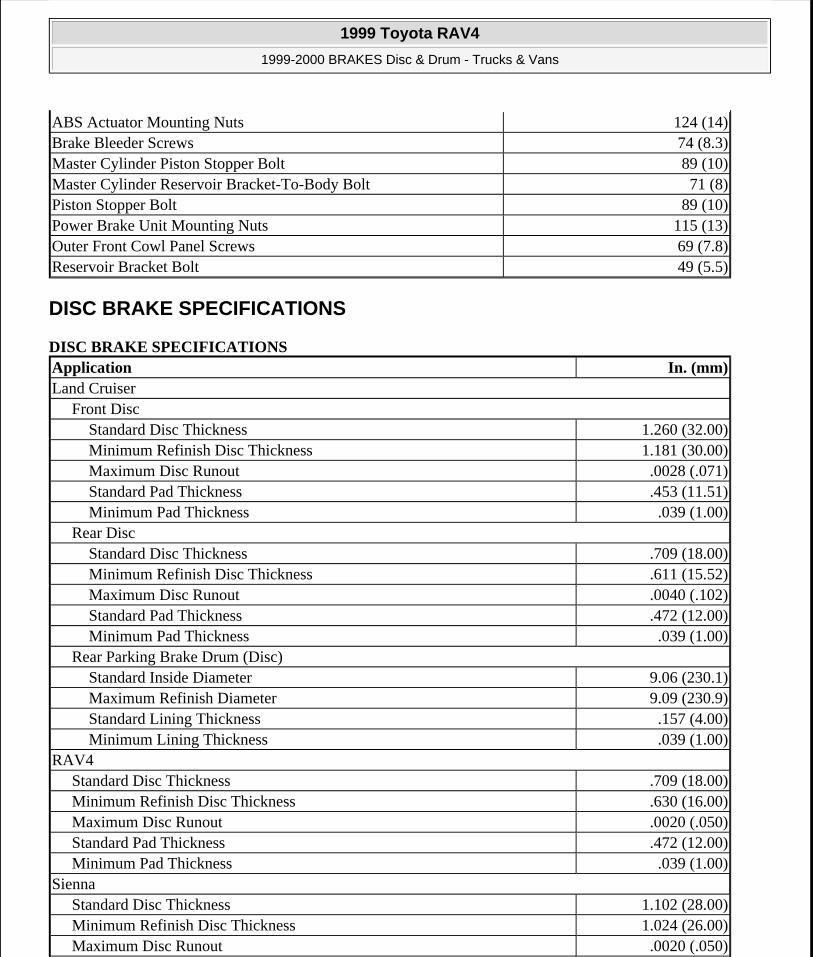
ABS Actuator Mounting Nuts 124 (14)Brake Bleeder Screws 74 (8.3)Master Cylinder Piston Stopper Bolt 89 (10)Master Cylinder Reservoir Bracket-To-Body Bolt 71 (8)Piston Stopper Bolt 89 (10)Power Brake Unit Mounting Nuts 115 (13)Outer Front Cowl Panel Screws 69 (7.8)Reservoir Bracket Bolt 49 (5.5)
Application In. (mm)Land Cruiser
Front DiscStandard Disc Thickness 1.260 (32.00)Minimum Refinish Disc Thickness 1.181 (30.00)Maximum Disc Runout .0028 (.071)Standard Pad Thickness .453 (11.51)Minimum Pad Thickness .039 (1.00)
Rear DiscStandard Disc Thickness .709 (18.00)Minimum Refinish Disc Thickness .611 (15.52)Maximum Disc Runout .0040 (.102)Standard Pad Thickness .472 (12.00)Minimum Pad Thickness .039 (1.00)
Rear Parking Brake Drum (Disc)Standard Inside Diameter 9.06 (230.1)Maximum Refinish Diameter 9.09 (230.9)Standard Lining Thickness .157 (4.00)Minimum Lining Thickness .039 (1.00)
RAV4Standard Disc Thickness .709 (18.00)Minimum Refinish Disc Thickness .630 (16.00)Maximum Disc Runout .0020 (.050)Standard Pad Thickness .472 (12.00)Minimum Pad Thickness .039 (1.00)
SiennaStandard Disc Thickness 1.102 (28.00)Minimum Refinish Disc Thickness 1.024 (26.00)Maximum Disc Runout .0020 (.050)
1999 Toyota RAV4
1999-2000 BRAKES Disc & Drum - Trucks & Vans
Microsoft
Sunday, November 22, 2009 10:07:29 AM Page 42 © 2005 Mitchell Repair Information Company, LLC.
DRUM BRAKE SPECIFICATIONS
DRUM BRAKE SPECIFICATIONS
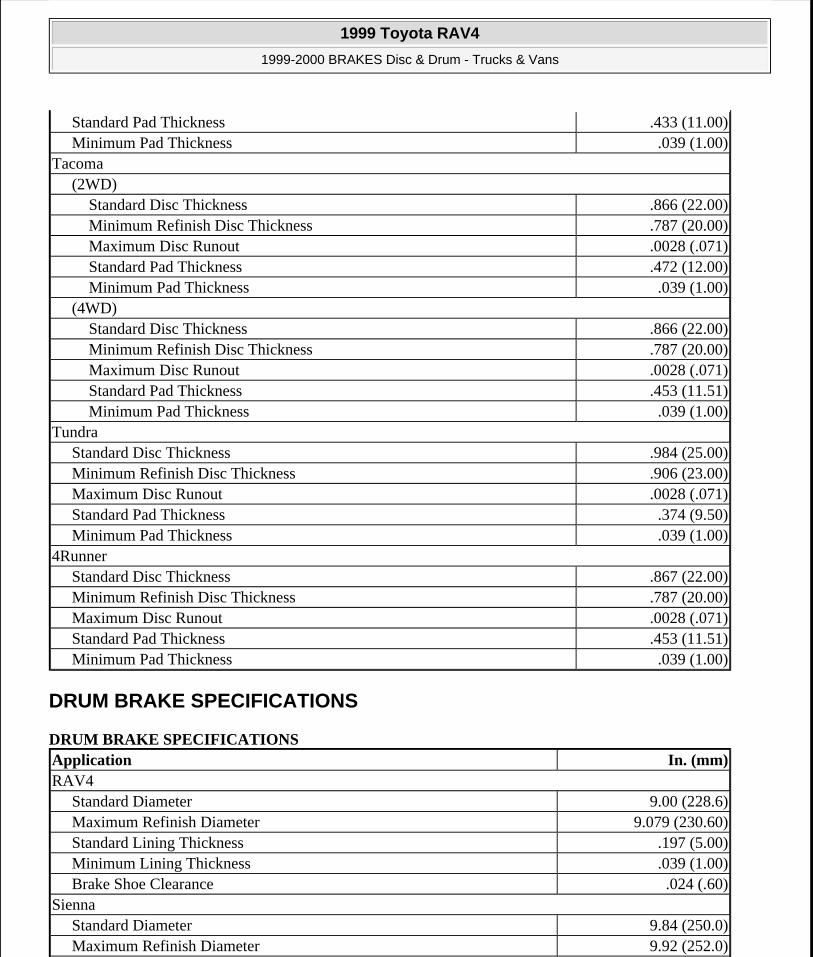
Standard Pad Thickness .433 (11.00)Minimum Pad Thickness .039 (1.00)
Tacoma(2WD)
Standard Disc Thickness .866 (22.00)Minimum Refinish Disc Thickness .787 (20.00)Maximum Disc Runout .0028 (.071)Standard Pad Thickness .472 (12.00)Minimum Pad Thickness .039 (1.00)
(4WD)Standard Disc Thickness .866 (22.00)Minimum Refinish Disc Thickness .787 (20.00)Maximum Disc Runout .0028 (.071)Standard Pad Thickness .453 (11.51)Minimum Pad Thickness .039 (1.00)
TundraStandard Disc Thickness .984 (25.00)Minimum Refinish Disc Thickness .906 (23.00)Maximum Disc Runout .0028 (.071)Standard Pad Thickness .374 (9.50)Minimum Pad Thickness .039 (1.00)
4RunnerStandard Disc Thickness .867 (22.00)Minimum Refinish Disc Thickness .787 (20.00)Maximum Disc Runout .0028 (.071)Standard Pad Thickness .453 (11.51)Minimum Pad Thickness .039 (1.00)
Application In. (mm)RAV4
Standard Diameter 9.00 (228.6)Maximum Refinish Diameter 9.079 (230.60)Standard Lining Thickness .197 (5.00)Minimum Lining Thickness .039 (1.00)Brake Shoe Clearance .024 (.60)
SiennaStandard Diameter 9.84 (250.0)Maximum Refinish Diameter 9.92 (252.0)
1999 Toyota RAV4
1999-2000 BRAKES Disc & Drum - Trucks & Vans
Microsoft
Sunday, November 22, 2009 10:07:29 AM Page 43 © 2005 Mitchell Repair Information Company, LLC.
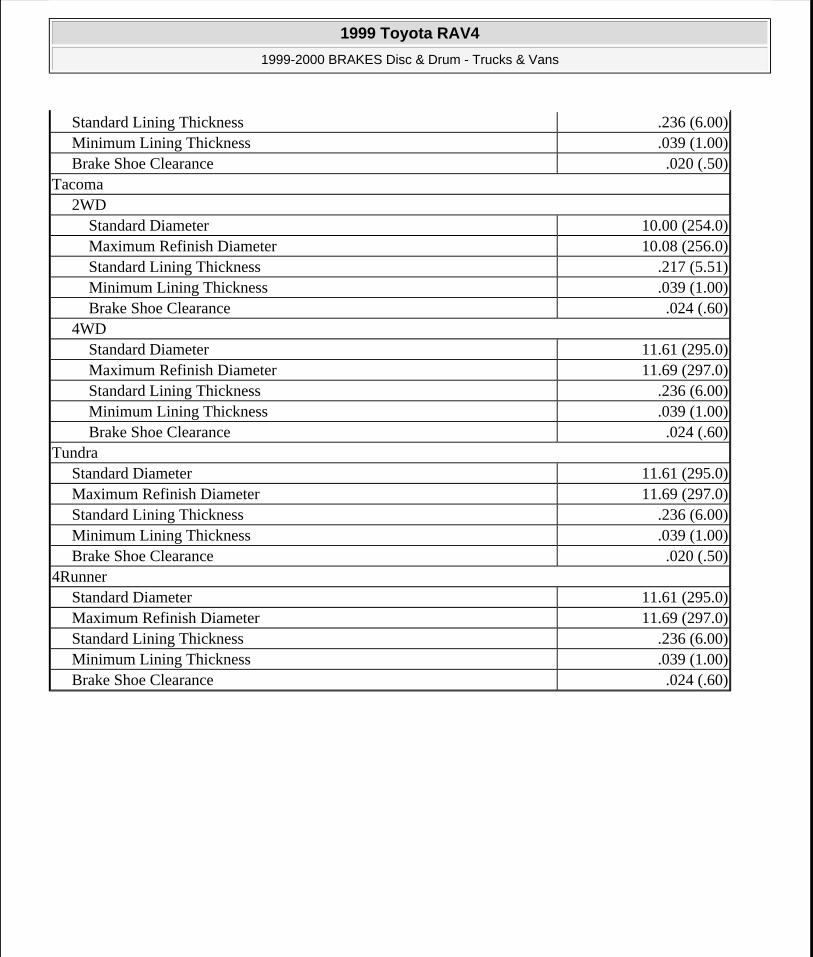
Standard Lining Thickness .236 (6.00)Minimum Lining Thickness .039 (1.00)Brake Shoe Clearance .020 (.50)
Tacoma2WD
Standard Diameter 10.00 (254.0)Maximum Refinish Diameter 10.08 (256.0)Standard Lining Thickness .217 (5.51)Minimum Lining Thickness .039 (1.00)Brake Shoe Clearance .024 (.60)
4WDStandard Diameter 11.61 (295.0)Maximum Refinish Diameter 11.69 (297.0)Standard Lining Thickness .236 (6.00)Minimum Lining Thickness .039 (1.00)Brake Shoe Clearance .024 (.60)
TundraStandard Diameter 11.61 (295.0)Maximum Refinish Diameter 11.69 (297.0)Standard Lining Thickness .236 (6.00)Minimum Lining Thickness .039 (1.00)Brake Shoe Clearance .020 (.50)
4RunnerStandard Diameter 11.61 (295.0)Maximum Refinish Diameter 11.69 (297.0)Standard Lining Thickness .236 (6.00)Minimum Lining Thickness .039 (1.00)Brake Shoe Clearance .024 (.60)
1999 Toyota RAV4
1999-2000 BRAKES Disc & Drum - Trucks & Vans
Microsoft
Sunday, November 22, 2009 10:07:29 AM Page 44 © 2005 Mitchell Repair Information Company, LLC.