Embed Size (px)
Citation preview
1
Supported By:
Created By:
Design
Plan
Implement
Learn
Close a Project

2
© Copyright 2017 PM4NGOsPMD Pro and the PMD Pro symbol are trademarks of PM4NGOs.
This work is licensed under the Creative Commons Attribution-Non-Commercial 4.0 International License. To view a copy of this license, visit http://creativecommons.org/licenses/by-nc/4.0/ .
Users are free to copy/redistribute and adapt/transform for non-commercial purposes.
3
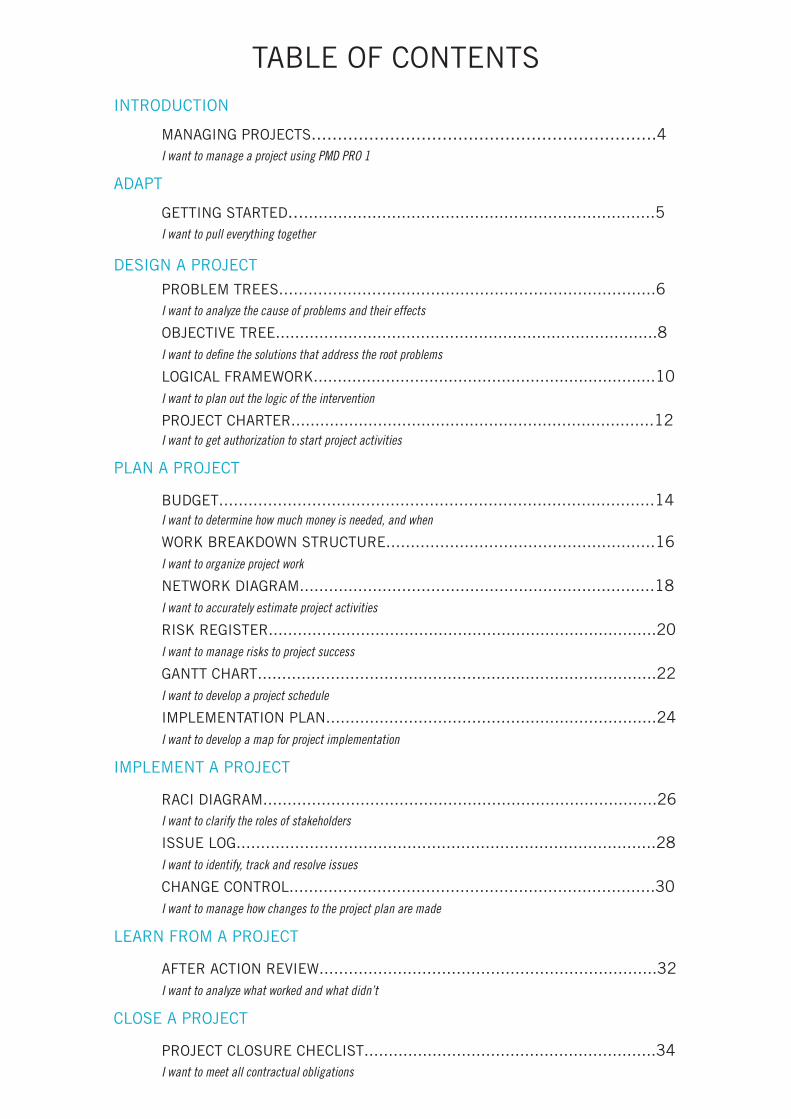
INTRODUCTION
MANAGING PROJECTS..................................................................4 I want to manage a project using PMD PRO 1
ADAPT
GETTING STARTED...........................................................................5 I want to pull everything together
DESIGN A PROJECT
PROBLEM TREES.............................................................................6 I want to analyze the cause of problems and their effects OBJECTIVE TREE...............................................................................8 I want to define the solutions that address the root problems LOGICAL FRAMEWORK.......................................................................10 I want to plan out the logic of the intervention PROJECT CHARTER...........................................................................12 I want to get authorization to start project activities
PLAN A PROJECT BUDGET.........................................................................................14 I want to determine how much money is needed, and when
WORK BREAKDOWN STRUCTURE.......................................................16 I want to organize project work
NETWORK DIAGRAM.........................................................................18 I want to accurately estimate project activities
RISK REGISTER................................................................................20 I want to manage risks to project success GANTT CHART..................................................................................22 I want to develop a project schedule IMPLEMENTATION PLAN....................................................................24 I want to develop a map for project implementation
IMPLEMENT A PROJECT
RACI DIAGRAM.................................................................................26 I want to clarify the roles of stakeholders
ISSUE LOG......................................................................................28 I want to identify, track and resolve issues
CHANGE CONTROL...........................................................................30 I want to manage how changes to the project plan are made
LEARN FROM A PROJECT
AFTER ACTION REVIEW.....................................................................32 I want to analyze what worked and what didn’t
CLOSE A PROJECT
PROJECT CLOSURE CHECLIST............................................................34 I want to meet all contractual obligations
TABLE OF CONTENTS

4
INTRODUCTIONManaging ProjectsDevelopment, environmental, and humanitarian organizations are helping to change the world every day working with beneficiary communities through agriculture, healthcare, micro finance, conservation, affordable housing, shelter, education, infrastructure, human rights, disaster preparedness, and response to emergencies. To achieve this, they all share one thing in common–managing projects!
A project is a product or service that needs to be completed within a fixed time frame. Projects can range hugely in size, from a small village level project to a large-scale emergency response. Despite differences in size and scope, well-run and successful projects all have one thing in common: a Project Manager who is responsible for the overall success of the project.
The Project Manager works with technical experts to write project proposals, and with partners and communities to develop project plans and implement activities. Project Managers recruit teams with the right skills, monitor progress, secure resources, and ask the right questions to ensure that projects are kept on track.
The PMD Pro approach is already used widely in our sector. Thousands of people are learning online and taking the low-cost exams in PMD Pro 1 and PMD Pro 2. The PMD Pro Starter serves both as an entry point for new project managers and as an overview for those with more experience. We have extracted the critical processes from the full Guide to Project Management to provide you with a tried and tested model and toolkit that will enable you to improve and deliver great work.
An Approach That Works!Whether you are starting out as a manager, or need a quick and easy refresher–PMD Pro will help you set up your project in the best possible way. Don’t wait until you need to set up a new project. Just dive in, learn and start experiencing the PMD Pro approach! It can add value no matter what stage of a project you are at!
Find out about the phases that you will need to work through during the life cycle of your project. You will learn how to move through each phase until your project is completed. We introduce six disciplines that will alert you to some of the constraints and tensions that will arise during your project. We outline five principles that should be at the center of your project management approach.
3 Project identification and design
3 Project set up
3 Project planning
3 Project implementation
3 Project monitoring, evaluation, and control
3 End of project transition
PhasesPMD Pro provides a balanced and phased project model that covers the entire life cycle of a project. You will learn how to work through each of the phases, making use of different tools in your toolkit, and also understand the benefits of repeating some of the phases as you plan and implement, in an iterative process that allows you adjust the scope of your program as necessary.
DisciplinesTo succeed as a Project Manager, it is important to develop the disciplines and systematic approaches needed to keep on top of activities. These include:
3 Scope Management
3 Time Management
3 Project Resource Management
3 Risk Management
3 Project Justification Management
3 Stakeholder Engagement
PrinciplesUnderpinning the project management model (phases and disciplines) are five important principles that contribute to a project’s success. Remember these and your project will be set up to succeed! Projects should be balanced and managed in a way that applies equal rigor to all phases of a project. They should be comprehensive with disciplines managed consistently and deliberately for the project life cycle.
Integration is essential and your role is to ensure that all aspects of project management are aligned and coordinated. It is also important to consult and invite a variety of stakeholders to participate in the different project phases as this helps to ensure transparency and strengthen buy-in at all levels.
As you develop your project management skills, you will also learn how and when to repeat and revisit project management processes, allowing you to confirm that your design, plans and intended results are still relevant. This process is called iteration.

5
ADAPT
Pulling it all togetherA good grounding in PMD Pro’s model–with clear phases, comprehensive disciplines, and overarching principles–will enable you to manage some of the tensions and constraints that will arise during your project. Experienced project managers often describe this as being aware of the Project Constraint Triangle– its three sides referring to 1) the scope or quality of work, 2) the cost and resources needed, and 3) time frame within which the project needs to be delivered.
There may be occasions when one side of the triangle is set and cannot change (e.g. the time frame for a project) but the other two sides (scope and budget) allow some flexibility and negotiation. As you develop as a project manager, you will understand the relationships and trade-offs that exist between each of the constraints. The more you start to think in this way, the easier it will be to set parameters early on in a project.
1: Get StartedSet aside a few hours to get to know the PMD Pro model. You will quickly see how everything fits together. Then it’s time to try out some of the approaches in your day-to-day work. You can do this at any phase of your project.
g If you are mid-way through implementing your work with a community, you may want to improve your Implementation Plan, or make use of tools such as the Risk Register, Issue Log or Change Control Diagram.
g Perhaps you are managing an emergency humanitarian project in a context that changes by the minute? Even in these situations, there may be something in the toolkit to help you take stock and systematize an approach.
g If you are at the very early stages of a project, you may want to structure your context analysis using the Objective Tree or Risk Register
g You may have oversight of a huge project, in several locations, with multiple deliverables, and are seeking a tried and tested approach to help break it down into more manageable areas.
g Your organization may already have an established approach to project management–one that feels comfortable and achieves results. But why not take a bit of time to consider a new model and toolkit that could complement or replace an existing tool or process? The emphasis here is on trying things out. Tools, techniques, and methodologies will not achieve anything if a project team cannot make them work in real life!
Testing your approach in an emergencyIn emergency situations things happen fast. Project managers must hit the ground running and move quickly into implementation. There will probably be a lack of accurate information at first and the environment will be one of rapid change. Applying project management principles in this context may seem like the wrong thing to do–but stick with it. Adapt and apply tools and strategies where you can. This will help to bring a sense of order–and a cool head and good thinking is what is required to achieve your overall response objectives!
Using the PMD Pro model, it’s likely that you will want to run some of the phases and tasks in parallel–which means that you might need to start some immediate response work while still at the planning stage. This is fine! Rather than planning four months ahead, your Issue Log and Project Implementation Plan are likely to change by the day, or week. If you are working in an area where there is tension or conflict, you will be capturing detail in your Risk Register much more frequently. As the situation becomes more stable, you will find that the blocks of time that you need to spend on these tasks becomes shorter.
Take time to consider what works bestNobody wants to be part of a bureaucratic and template-driven project! Simply applying tools and techniques without thinking about their wider context and use is more likely to confuse and demoralize, than add value to your project team. This is why it’s important to take time to consider the overall model, and to assess which tools and techniques are best adapted to your current situation. There will be times when a project management tool or technique could be applied but for any number of good reasons might NOT be the smartest choice. A Project Manager’s job is NOT about applying rigid rules, tools and processes. It is about being thoughtful and disciplined, and making sensible choices about applying tools and processes that will provide the clarity of direction that everyone needs.
In other words, take time to get to know the Model and toolkit and adapt it to suit your needs, in a way that works with the culture of your organization and your project team.
6
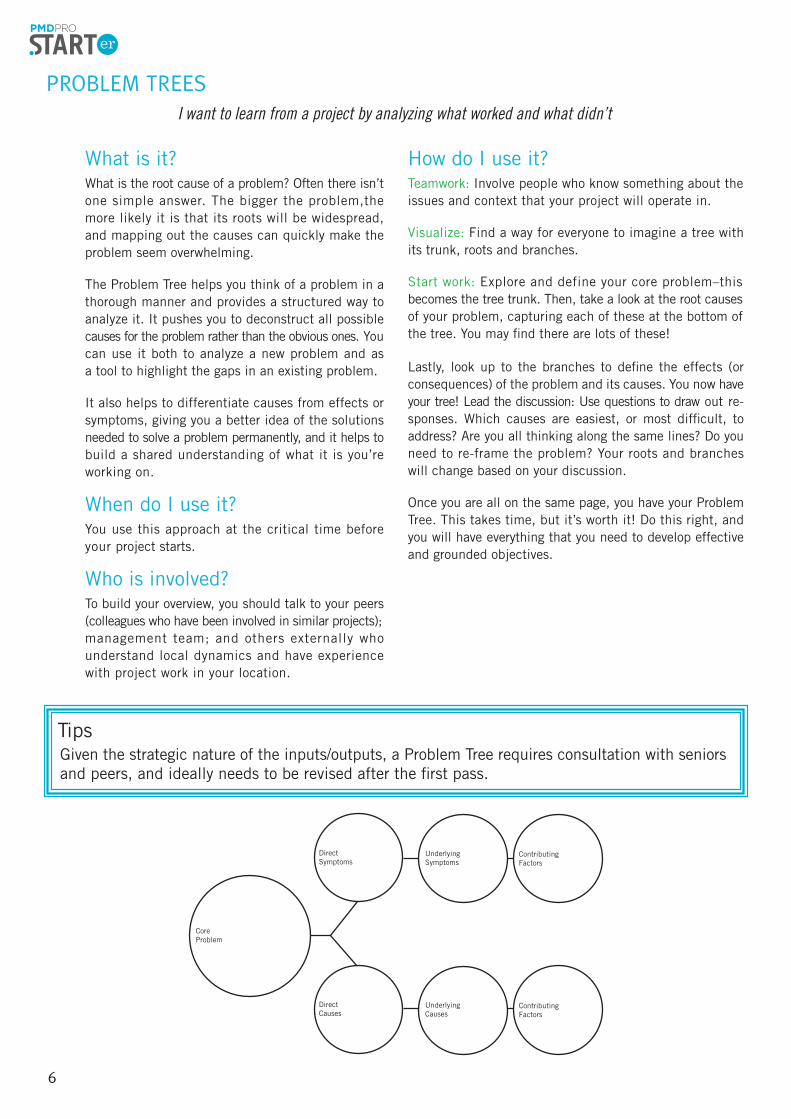
PROBLEM TREES
What is it? What is the root cause of a problem? Often there isn’t one simple answer. The bigger the problem,the more likely it is that its roots will be widespread, and mapping out the causes can quickly make the problem seem overwhelming.
The Problem Tree helps you think of a problem in a thorough manner and provides a structured way to analyze it. It pushes you to deconstruct all possible causes for the problem rather than the obvious ones. You can use it both to analyze a new problem and as a tool to highlight the gaps in an existing problem.
It also helps to differentiate causes from effects or symptoms, giving you a better idea of the solutions needed to solve a problem permanently, and it helps to build a shared understanding of what it is you’re working on.
When do I use it? You use this approach at the critical time before your project starts.
Who is involved? To build your overview, you should talk to your peers (colleagues who have been involved in similar projects); management team; and others externally who understand local dynamics and have experience with project work in your location.
How do I use it?Teamwork: Involve people who know something about the issues and context that your project will operate in.
Visualize: Find a way for everyone to imagine a tree with its trunk, roots and branches.
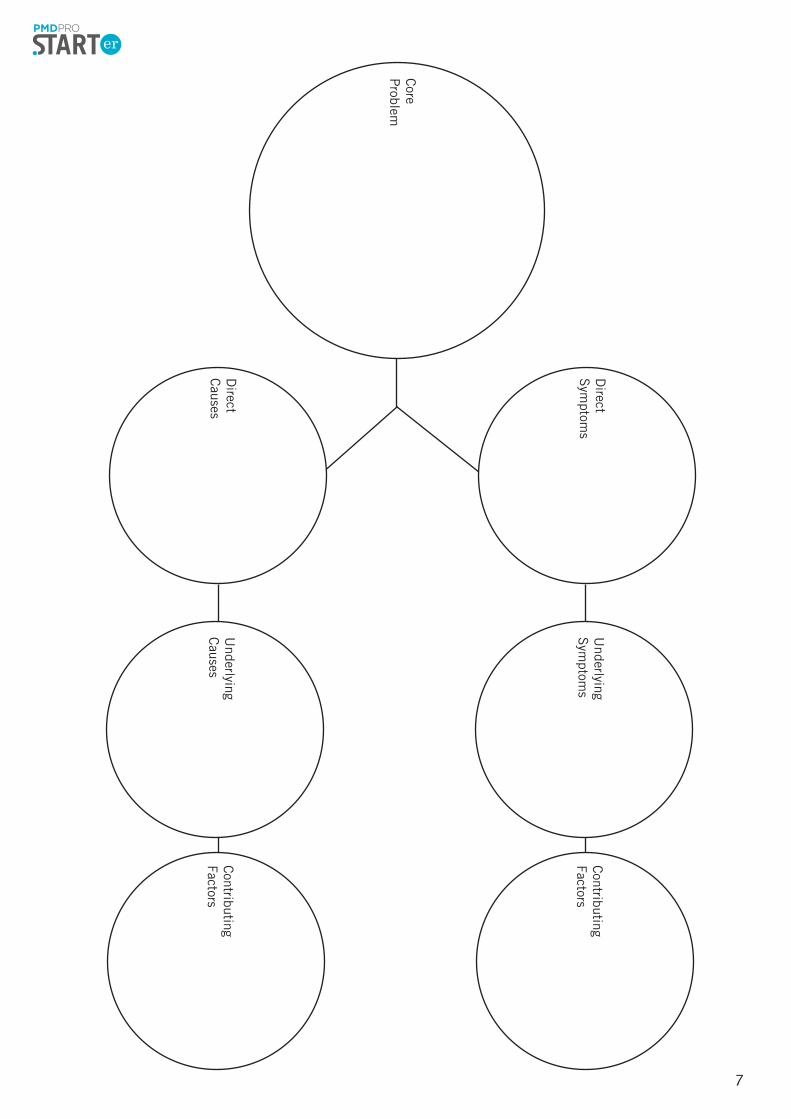
Start work: Explore and define your core problem–this becomes the tree trunk. Then, take a look at the root causes of your problem, capturing each of these at the bottom of the tree. You may find there are lots of these!
Lastly, look up to the branches to define the effects (or consequences) of the problem and its causes. You now have your tree! Lead the discussion: Use questions to draw out re-sponses. Which causes are easiest, or most difficult, to address? Are you all thinking along the same lines? Do you need to re-frame the problem? Your roots and branches will change based on your discussion.
Once you are all on the same page, you have your Problem Tree. This takes time, but it’s worth it! Do this right, and you will have everything that you need to develop effective and grounded objectives.
Tips Given the strategic nature of the inputs/outputs, a Problem Tree requires consultation with seniors and peers, and ideally needs to be revised after the first pass.
I want to learn from a project by analyzing what worked and what didn’t
7
Core
Problem
Direct
Sym
ptoms
Underlying
Sym
ptoms
Contributing
Factors
Direct
Causes
Underlying
Causes
Contributing
Factors
8
I want to design a project by identifying the solutions it will provide to problems
What is it? Think of ANOTHER tree with roots and branches! Like the Problem Tree, the Objective Tree is a great tool to help you consider different perspectives, and to define the different routes that you could take to solve your problem.
This tool helps you to define where and where not to intervene. It provides a structure for the conversation that you need to have with your team, the output of which becomes your project’s objective.
When do I use it? You use this approach at the critical time before your project starts and after you have completed your Problem Tree.
Who is involved? The most important people to involve are your team, those who have experience with, and are responsible for project delivery. You may also want to involve other helpful colleagues or your line manager. Or, you may prefer to work through this phase, and present it to your manager separately.
How do I use it?Teamwork: Involve people who know something about the issues and context that your project will operate in (likely to be the same people who worked through the Problem Tree).
Visualize: If you can, share the video with your team to show how the Objective Tree works in practice. If you can’t, find another way for everyone to imagine a tree with its trunk, roots, and branches.
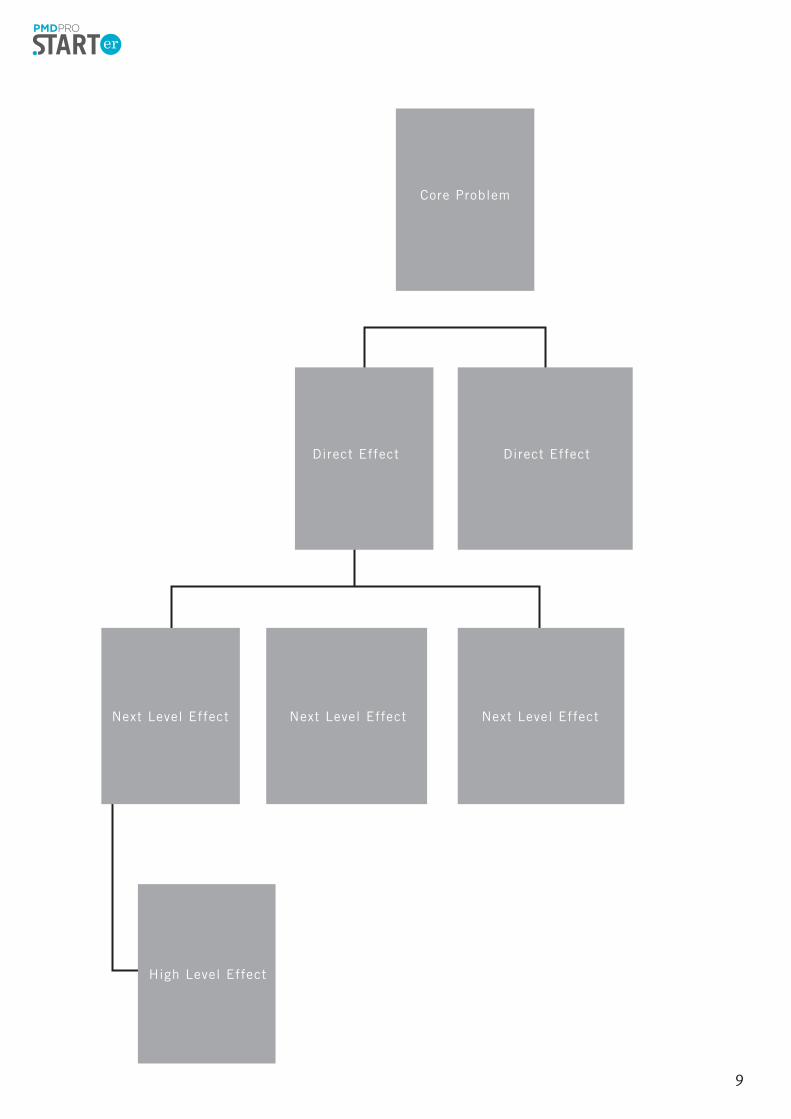
Start work: You need to turn your Problem Tree into an Objective Tree. Your tree trunk becomes your project objective, and the roots and branches are redefined to focus on solutions. As you work through the roots and branches of your Problem Tree, overlaying each of them with solutions, you develop the framework that you need to assess how and where your organization can best respond.
Lead the discussion: Use questions to draw out responses. Are you all thinking along the same lines? Do you need to re-frame areas for improvement?
Once you are all on the same page, you have your Objective Tree. Do this right, and you will have everything that you need to progress onto the next stage–establishing the logic of your project.
Tips Problem and Objective Trees work effectively for all types of organizations. Your solution could involve humanitarian intervention, a community development approach, or both!
OBJECTIVE TREE
Core Problem
Direct Effect Direct Effect
Next Level Effect Next Level Effect Next Level Effect
High Level Effect
9
Core Problem
Direct EffectDirect Effect
Next Level Effect Next Level Effect Next Level Effect
High Level Effect
10
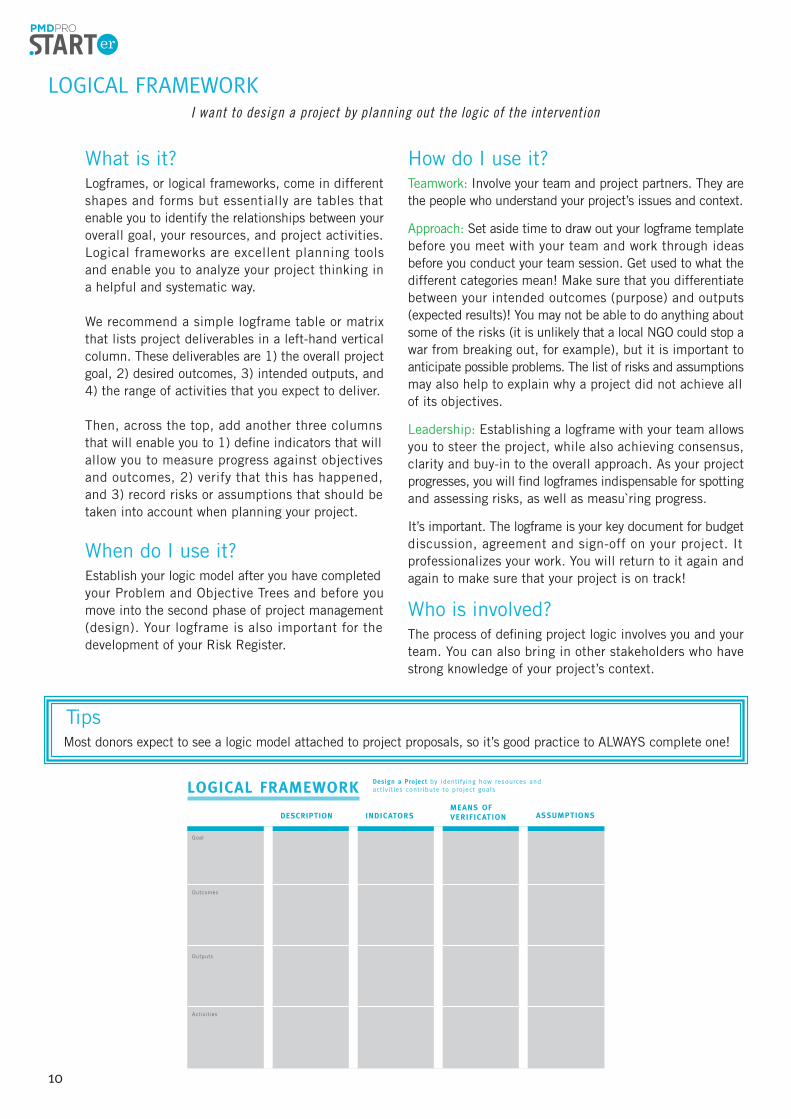
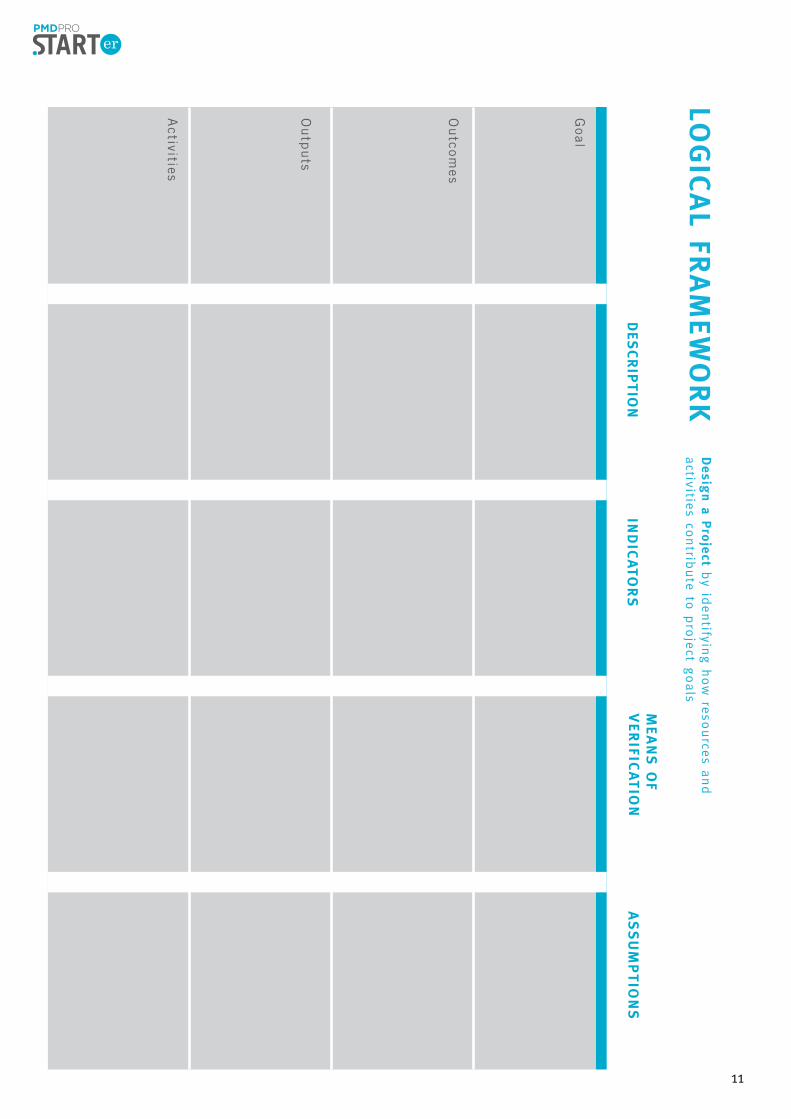
LOGICAL FRAMEWORK
What is it? Logframes, or logical frameworks, come in different shapes and forms but essentially are tables that enable you to identify the relationships between your overall goal, your resources, and project activities. Logical frameworks are excellent planning tools and enable you to analyze your project thinking in a helpful and systematic way.
We recommend a simple logframe table or matrix that lists project deliverables in a left-hand vertical column. These deliverables are 1) the overall project goal, 2) desired outcomes, 3) intended outputs, and 4) the range of activities that you expect to deliver.
Then, across the top, add another three columns that will enable you to 1) define indicators that will allow you to measure progress against objectives and outcomes, 2) verify that this has happened, and 3) record risks or assumptions that should be taken into account when planning your project.
When do I use it? Establish your logic model after you have completed your Problem and Objective Trees and before you move into the second phase of project management (design). Your logframe is also important for the development of your Risk Register.
How do I use it?Teamwork: Involve your team and project partners. They are the people who understand your project’s issues and context.
Approach: Set aside time to draw out your logframe template before you meet with your team and work through ideas before you conduct your team session. Get used to what the different categories mean! Make sure that you differentiate between your intended outcomes (purpose) and outputs (expected results)! You may not be able to do anything about some of the risks (it is unlikely that a local NGO could stop a war from breaking out, for example), but it is important to anticipate possible problems. The list of risks and assumptions may also help to explain why a project did not achieve all of its objectives.
Leadership: Establishing a logframe with your team allows you to steer the project, while also achieving consensus, clarity and buy-in to the overall approach. As your project progresses, you will find logframes indispensable for spotting and assessing risks, as well as measu`ring progress.
It’s important. The logframe is your key document for budget discussion, agreement and sign-off on your project. It professionalizes your work. You will return to it again and again to make sure that your project is on track!
Who is involved? The process of defining project logic involves you and your team. You can also bring in other stakeholders who have strong knowledge of your project’s context.
I want to design a project by planning out the logic of the intervention
Tips Most donors expect to see a logic model attached to project proposals, so it’s good practice to ALWAYS complete one!
LOGICAL FRAMEWORK
DESCRIPTION INDICATORSMEANS OF VERIF ICATION ASSUMPTIONS
Goal
Outcomes
Outputs
Activities
Design a Project by identifying how resources andactivities contribute to project goals
11
LOG
ICAL FR
AM
EWO
RK
DESCRIP
TIO
NIN
DIC
ATO
RS
MEA
NS
OF
VER
IFICATIO
NA
SS
UM
PTIO
NS
Goal
Ou
tcomes
Ou
tpu
ts
Activities
Desig
n a
Pro
ject b
y identifyin
g h
ow
reso
urce
s and
activitie
s contrib
ute
to p
roje
ct goals
12
PROJECT CHARTER
What is it? The Project Charter is a critical document that summarizes all of the important elements of your project. You then share it with key decision makers for sign-off, and once agreed, you have the ‘green light’ to proceed. You can now formally announce the start of your project!
When do I use it? Communication: Your Charter is a great document for sharing with others (inside and outside your organization), giving them a clear overview of your project goals and intentions, and context for how those goals will be achieved.
Who is involved? You and your sign-off decision-makers.
How do I use it?Your Charter should draw on evidence and decisions made during the Project Identification and Design Phases. This information is already detailed in the project logframe and high-level project plan. Using these documents, set aside time to work through and complete your Charter. You have all of the information that you need so it shouldn’t take long. It’s always worth sharing your draft with valued colleagues to ensure that you have everything covered!
Sign off: Include the key individuals who are responsible for authorizing your project – and who you are accountable to for achieving your deliverables. These are likely to be your line manager, donor(s), and partners.
Plan ahead: Achieving sign-off on your Charter is essential, so make sure that those responsible for authorizing your project are available. It’s better that they set aside time in advance, rather than getting a call from you to give it urgent attention!
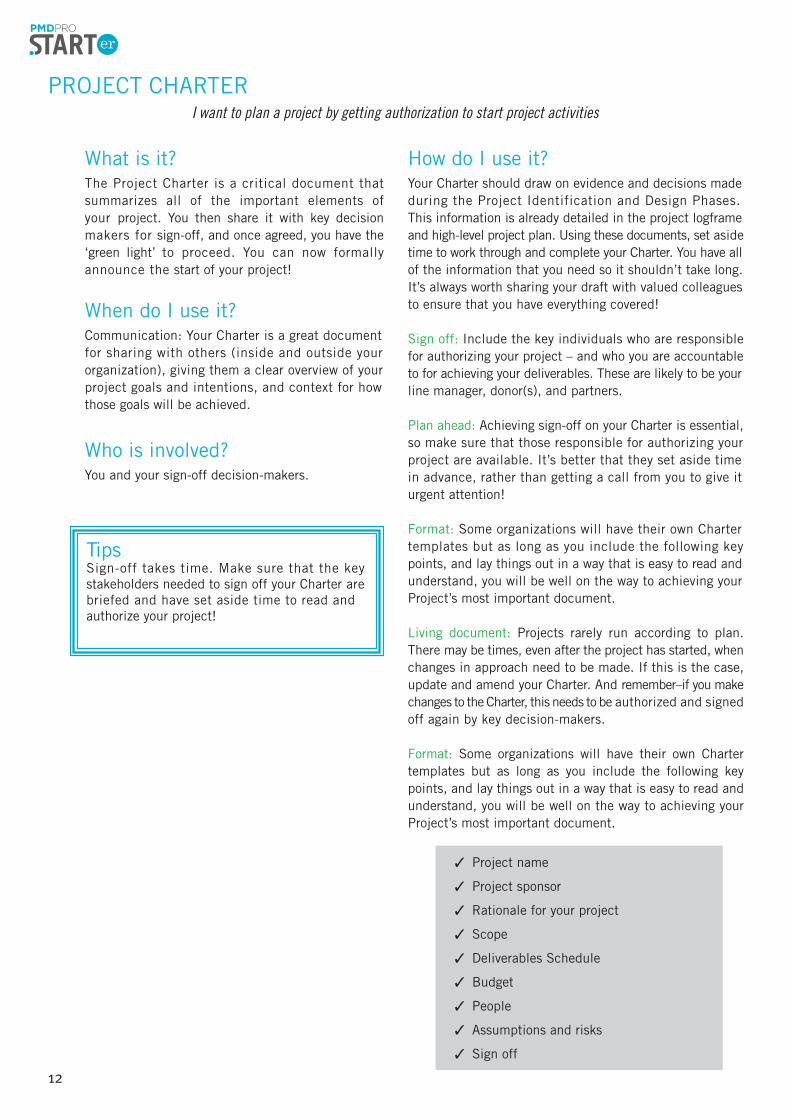
Format: Some organizations will have their own Charter templates but as long as you include the following key points, and lay things out in a way that is easy to read and understand, you will be well on the way to achieving your Project’s most important document.
Living document: Projects rarely run according to plan. There may be times, even after the project has started, when changes in approach need to be made. If this is the case, update and amend your Charter. And remember–if you make changes to the Charter, this needs to be authorized and signed off again by key decision-makers.
Format: Some organizations will have their own Charter templates but as long as you include the following key points, and lay things out in a way that is easy to read and understand, you will be well on the way to achieving your Project’s most important document.
3 Project name
3 Project sponsor
3 Rationale for your project
3 Scope
3 Deliverables Schedule
3 Budget
3 People
3 Assumptions and risks
3 Sign off
TipsSign-off takes time. Make sure that the key stakeholders needed to sign off your Charter are briefed and have set aside time to read and authorize your project!
I want to plan a project by getting authorization to start project activities
13
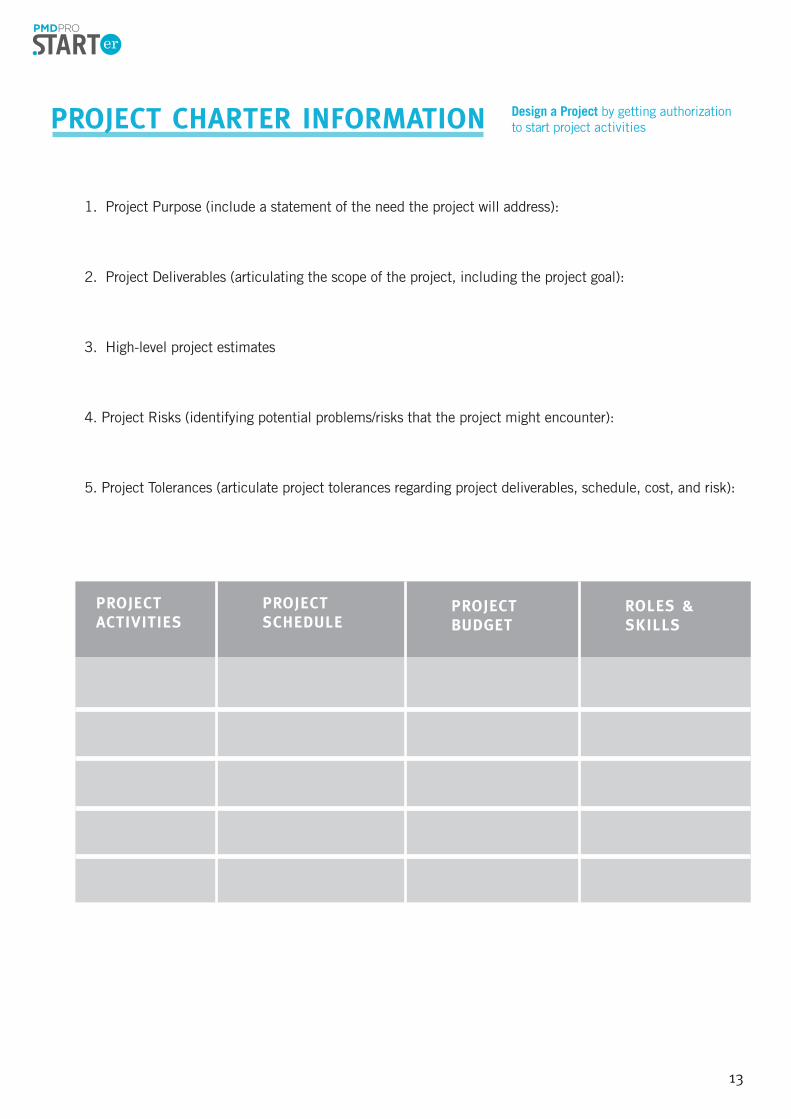
PROJECT CHARTER INFORMATION Design a Project by getting authorization to start project activities
1. Project Purpose (include a statement of the need the project will address):
2. Project Deliverables (articulating the scope of the project, including the project goal):
3. High-level project estimates
4. Project Risks (identifying potential problems/risks that the project might encounter):
5. Project Tolerances (articulate project tolerances regarding project deliverables, schedule, cost, and risk):
PROJECTACTIVITIES
PROJECTSCHEDULE
PROJECTBUDGET
ROLES & SKILLS
14
BUDGET
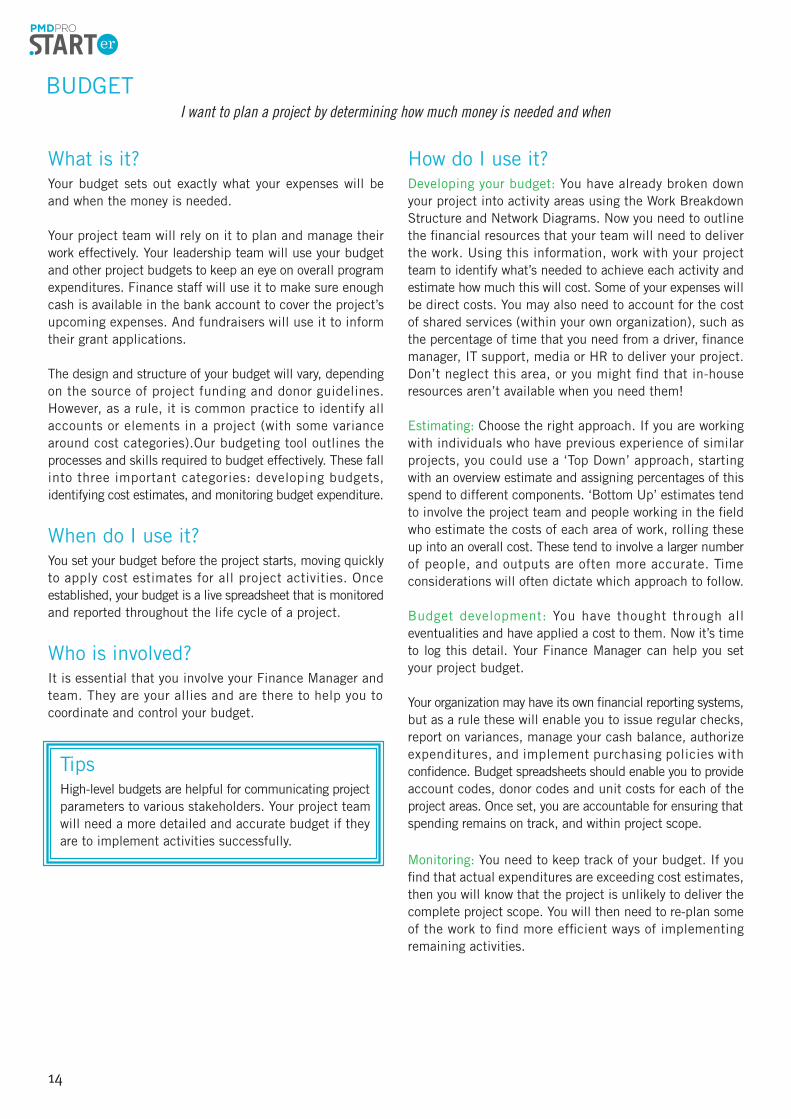
What is it? Your budget sets out exactly what your expenses will be and when the money is needed.
Your project team will rely on it to plan and manage their work effectively. Your leadership team will use your budget and other project budgets to keep an eye on overall program expenditures. Finance staff will use it to make sure enough cash is available in the bank account to cover the project’s upcoming expenses. And fundraisers will use it to inform their grant applications.
The design and structure of your budget will vary, depending on the source of project funding and donor guidelines. However, as a rule, it is common practice to identify all accounts or elements in a project (with some variance around cost categories).Our budgeting tool outlines the processes and skills required to budget effectively. These fall into three important categories: developing budgets, identifying cost estimates, and monitoring budget expenditure.
When do I use it? You set your budget before the project starts, moving quickly to apply cost estimates for all project activities. Once established, your budget is a live spreadsheet that is monitored and reported throughout the life cycle of a project.
Who is involved? It is essential that you involve your Finance Manager and team. They are your allies and are there to help you to coordinate and control your budget.
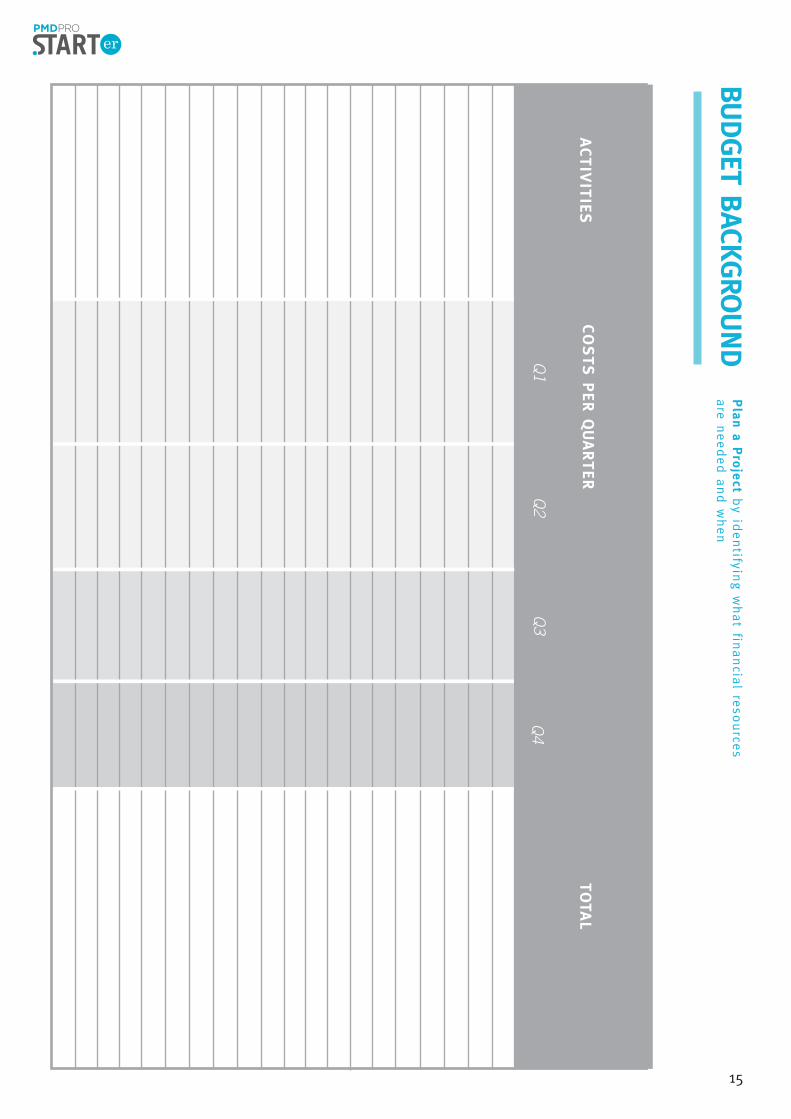
How do I use it?Developing your budget: You have already broken down your project into activity areas using the Work Breakdown Structure and Network Diagrams. Now you need to outline the financial resources that your team will need to deliver the work. Using this information, work with your project team to identify what’s needed to achieve each activity and estimate how much this will cost. Some of your expenses will be direct costs. You may also need to account for the cost of shared services (within your own organization), such as the percentage of time that you need from a driver, finance manager, IT support, media or HR to deliver your project. Don’t neglect this area, or you might find that in-house resources aren’t available when you need them!
Estimating: Choose the right approach. If you are working with individuals who have previous experience of similar projects, you could use a ‘Top Down’ approach, starting with an overview estimate and assigning percentages of this spend to different components. ‘Bottom Up’ estimates tend to involve the project team and people working in the field who estimate the costs of each area of work, rolling these up into an overall cost. These tend to involve a larger number of people, and outputs are often more accurate. Time considerations will often dictate which approach to follow.
Budget development: You have thought through all eventualities and have applied a cost to them. Now it’s time to log this detail. Your Finance Manager can help you set your project budget.
Your organization may have its own financial reporting systems, but as a rule these will enable you to issue regular checks, report on variances, manage your cash balance, authorize expenditures, and implement purchasing policies with confidence. Budget spreadsheets should enable you to provide account codes, donor codes and unit costs for each of the project areas. Once set, you are accountable for ensuring that spending remains on track, and within project scope.
Monitoring: You need to keep track of your budget. If you find that actual expenditures are exceeding cost estimates, then you will know that the project is unlikely to deliver the complete project scope. You will then need to re-plan some of the work to find more efficient ways of implementing remaining activities.
Tips High-level budgets are helpful for communicating project parameters to various stakeholders. Your project team will need a more detailed and accurate budget if they are to implement activities successfully.
I want to plan a project by determining how much money is needed and when
15
BUDGET B
ACKGRO
UND
Pla
n a
Pro
ject b
y identifyin
g w
hat fin
ancia
l reso
urce
s are
needed a
nd w
hen
ACTIV
ITIE
SCO
STS
PER Q
UARTER
TOTA
L
Q1
Q2
Q3
Q4
16
WORK BREAKDOWN STRUCTURE
What is it? You know what you want to achieve with your project. Now it’s time to get into the detail. The Work Breakdown Structure, or WBS, is a great tool for helping you to define the scope of your project–breaking the work into manageable chunks and enabling you to group these into different work streams.
Invest time will have the overview needed for other, more de-tailed, phases of project planning. Such as providing accu-rate time and cost estimates.
When do I use it? Your WBS should be completed at the start of the Project Planning phase.
Who is involved? Just like with the logframe, it’s important to consult widely to provide the level of comprehensiveness and detail needed for the WBS. Staff responsible for financial management and procurement activities should also be included to ensure that their activities are also mapped (thereby enhancing the quality of your WBS).
How do I use it?Teamwork: Your team should be familiar with your Problem and Objective Trees, and have a good understanding of your Logframe. This is your opportunity to work with them to draw on their expertise. This is important for your team as it sets the context and expectations from which they can go onto deliver great work!
Boundaries: Starting with your Logframe, and using sticky notes or a flip chart to record inputs, ask your team to brainstorm all aspects of the work that your project will need to cover if you are to meet your objectives. Ask questions. Does this reflect reality? Are we missing anything? Have we recorded all of the project deliverables?
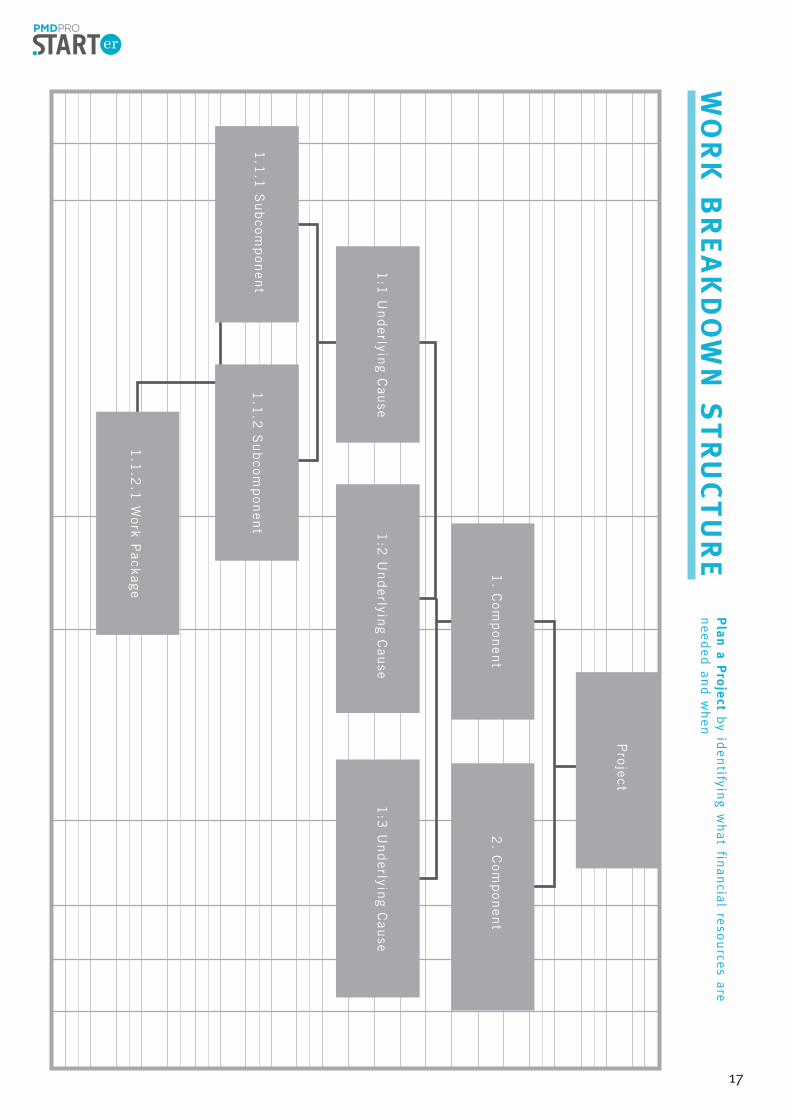
Then work with the team to group the inputs into common areas. Then turning each of them into work streams by rank-ing different elements in order of priority. You now have your WBS. Do this well, and you will clearly define project boundaries and be able to avoid ‘scope creep’–and project delays in the future!
Format: The format of a WBS usually assumes one of two styles: graphic or indented. The graphic version is an easy-to-read visual layout of the relative levels of project work and allows partners and staff to see the relationships between different elements. The indented version does the same but in text form. Either way, it is a means by which an increasing level of detail can be built into a project, providing a comprehensive overview of all activities.
Communicate: Once you have clearly specified the goods and services that need to be delivered, it’s important to ensure that all critical stakeholders (e.g. donors or service users) understand and agree with the project deliverables. You achieve this by sharing your WBS. If you have involved the right people earlier on, your WBS should come as no surprise.
TipsBeing able to accurately scope the ‘what’ and the ‘how’ elements of your project are critical to its success. The absence of such scope will result in unrealistic expectations and confusion among project stakeholders, and lead to inaccurate estimates, with a knock on impact on budget and timelines.
I want to plan a project by organizing project work into manageable components
17
WO
RK
BR
EA
KD
OW
N S
TR
UCTU
RE
Pla
n a
Pro
ject b
y identifyin
g w
hat fin
ancia
l reso
urce
s are
needed a
nd w
hen
Project
2. C
omp
onen
t1
. Com
pon
ent
1:1
Un
derlyin
g Cau
se
1.1
.1 S
ub
comp
onen
t
1.1
.2.1
Work P
ackage
1:2
Un
derlyin
g Cau
se1
:3 U
nd
erlying C
ause
1.1
.2 S
ub
comp
onen
t
18
NETWORK DIAGRAM
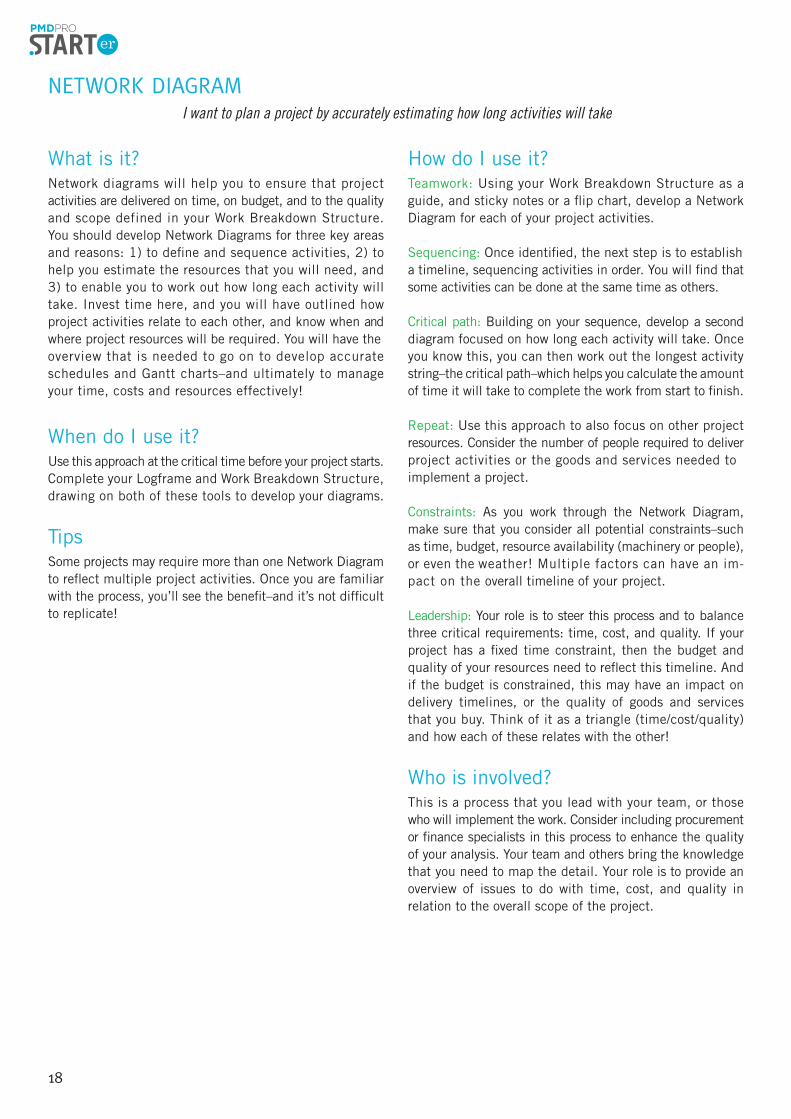
What is it? Network diagrams will help you to ensure that project activities are delivered on time, on budget, and to the quality and scope defined in your Work Breakdown Structure.You should develop Network Diagrams for three key areas and reasons: 1) to define and sequence activities, 2) to help you estimate the resources that you will need, and 3) to enable you to work out how long each activity will take. Invest time here, and you will have outlined how project activities relate to each other, and know when and where project resources will be required. You will have the overview that is needed to go on to develop accurate schedules and Gantt charts–and ultimately to manage your time, costs and resources effectively!
When do I use it? Use this approach at the critical time before your project starts. Complete your Logframe and Work Breakdown Structure, drawing on both of these tools to develop your diagrams.
TipsSome projects may require more than one Network Diagram to reflect multiple project activities. Once you are familiar with the process, you’ll see the benefit–and it’s not difficult to replicate!
How do I use it?Teamwork: Using your Work Breakdown Structure as a guide, and sticky notes or a flip chart, develop a Network Diagram for each of your project activities.
Sequencing: Once identified, the next step is to establish a timeline, sequencing activities in order. You will find that some activities can be done at the same time as others.
Critical path: Building on your sequence, develop a second diagram focused on how long each activity will take. Once you know this, you can then work out the longest activity string–the critical path–which helps you calculate the amount of time it will take to complete the work from start to finish.
Repeat: Use this approach to also focus on other project resources. Consider the number of people required to deliver project activities or the goods and services needed to implement a project.
Constraints: As you work through the Network Diagram, make sure that you consider all potential constraints–such as time, budget, resource availability (machinery or people), or even the weather! Multiple factors can have an im-pact on the overall timeline of your project.
Leadership: Your role is to steer this process and to balance three critical requirements: time, cost, and quality. If your project has a fixed time constraint, then the budget and quality of your resources need to reflect this timeline. And if the budget is constrained, this may have an impact on delivery timelines, or the quality of goods and services that you buy. Think of it as a triangle (time/cost/quality) and how each of these relates with the other!
Who is involved? This is a process that you lead with your team, or those who will implement the work. Consider including procurement or finance specialists in this process to enhance the quality of your analysis. Your team and others bring the knowledge that you need to map the detail. Your role is to provide an overview of issues to do with time, cost, and quality in relation to the overall scope of the project.
I want to plan a project by accurately estimating how long activities will take
19
NETW
OR
K D
IAG
RA
MPlan a Project by accurately estim
ating how long projects w
ill take
Start
En
d
20
RISK REGISTER
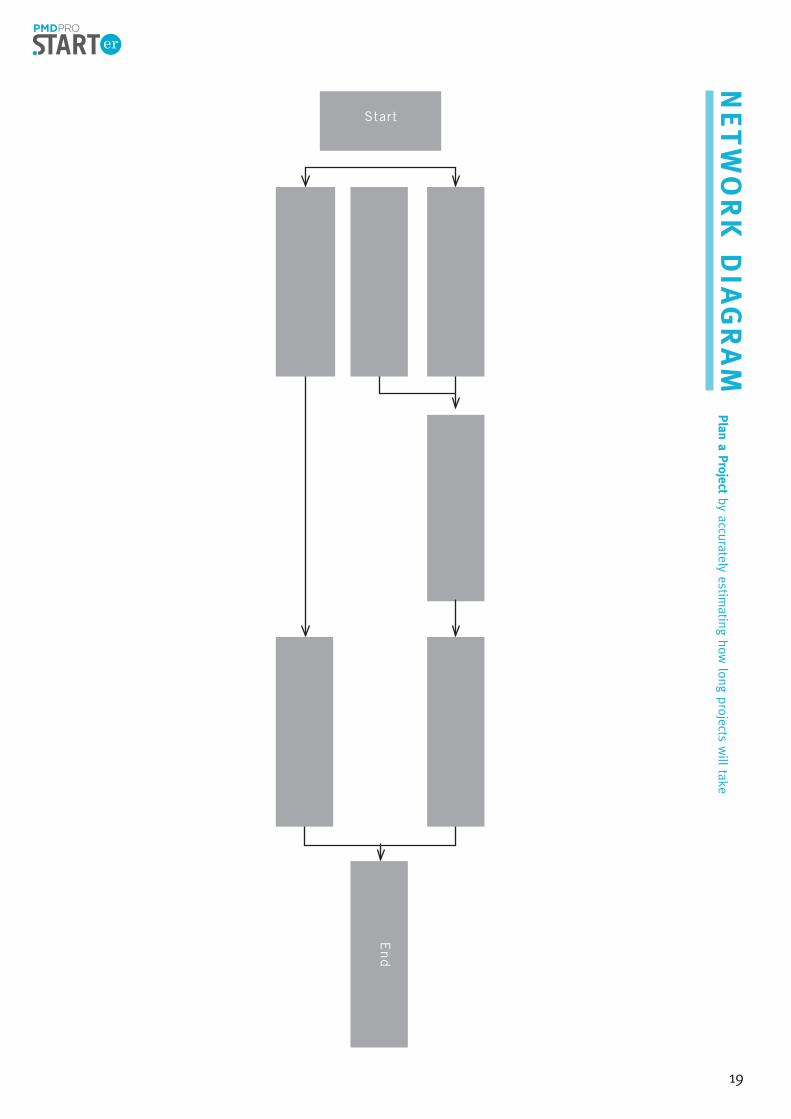
What is it? This tool is a living document that helps you manage risks that could jeopardize the delivery of your project. By understanding these risks, you can put processes in place to limit or avoid a major crisis.
It’s a process that involves identifying risk categories that could affect your work, ranking these in order and applying a ‘risk score’ to each. If the score is too high for one of your risks, then a ‘risk reduction strategy’ needs to be applied. Your output will be a table indicating the ‘risk categories’ in the left column, and outlining the risk itself, its status, score, and your response (who and when) in the top row headings. Allocating a person to manage each of the risks in a time-bound and accountable way is extremely important.
When do I use it? You will need to continually revisit and update your Risk Register. As your project evolves, some risks will be resolved or diminish in importance. Others may surface and should be added to the register. Working in this way enables you to stay one step ahead of risks, addressing them BEFORE they become serious issues.
Who is involved? Share risk status with your team and other project stakeholders or peers with knowledge of the context within which your project operates.
How do I use it?Teamwork: To complete your risk register, get your team together to brainstorm all of the risks that your project could face. You will have already gained some insight into these risks during your project identification and design phases. Every project is unique, so take time to identify these.
Risk to your project could involve political, legal, organizational, human, financial, technical or environmental considerations.
Management: The goal of risk management is not to eliminate risk altogether. It’s about being able respond if risk exceeds project tolerance levels. Risks with a high score will need to be managed and that risk reduced. You may decide to avoid a risk by not doing something or doing something differently.
You could transfer a risk by shifting it to another project area or another party. The most common example of this is transferring the risk of vehicle damage to an insurance provider. You could reduce or mitigate a risk so that it is acceptable. Or you may decide to accept some element of risk because you have assessed that it is reasonable.
TipsA risk MUST never go unrecognized, unmanaged or ignored–even in situations where some element of risk is acceptable.
I want to plan a project by managing risks to its success

21
RISK REG
ISTERPlan a Project by m
anaging risks to its success
RIS
KD
ESCRIP
TIO
N
OF IM
PACT
PRO
BAB
ILITY
IMPACT
RIS
K S
CO
RE
RIS
K R
ESPO
NSE
RIS
K O
WN
ER
22
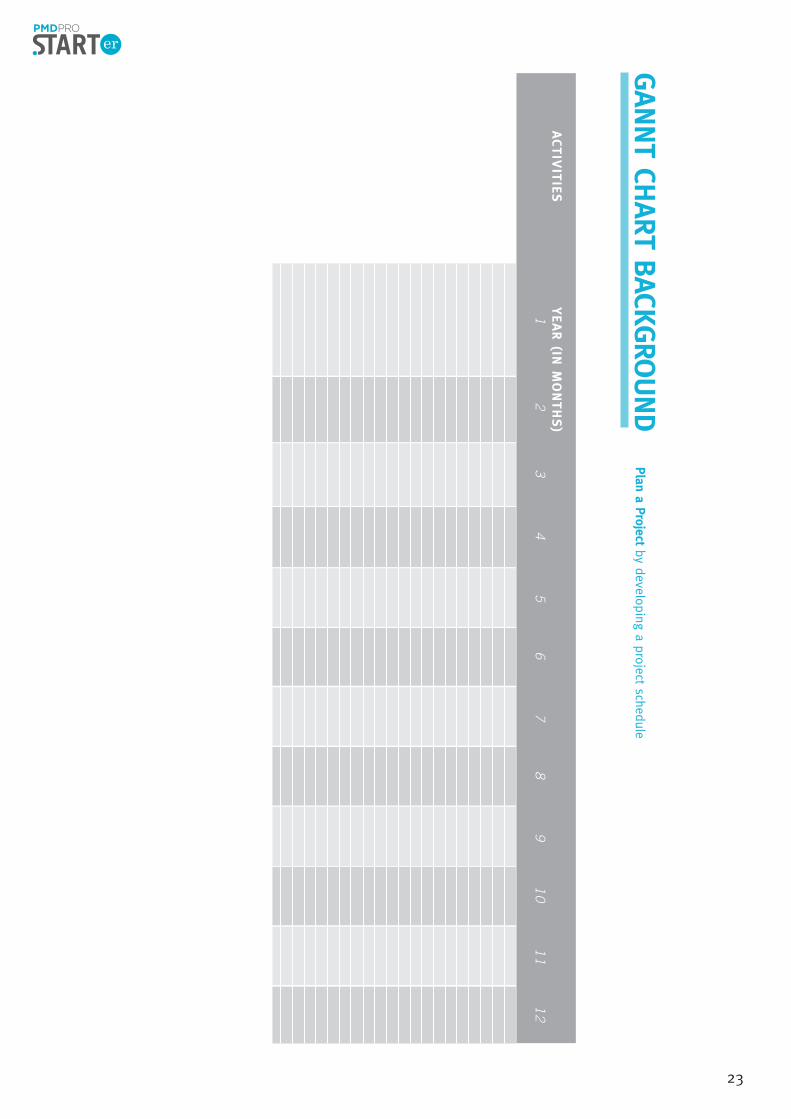
GANTT CHART
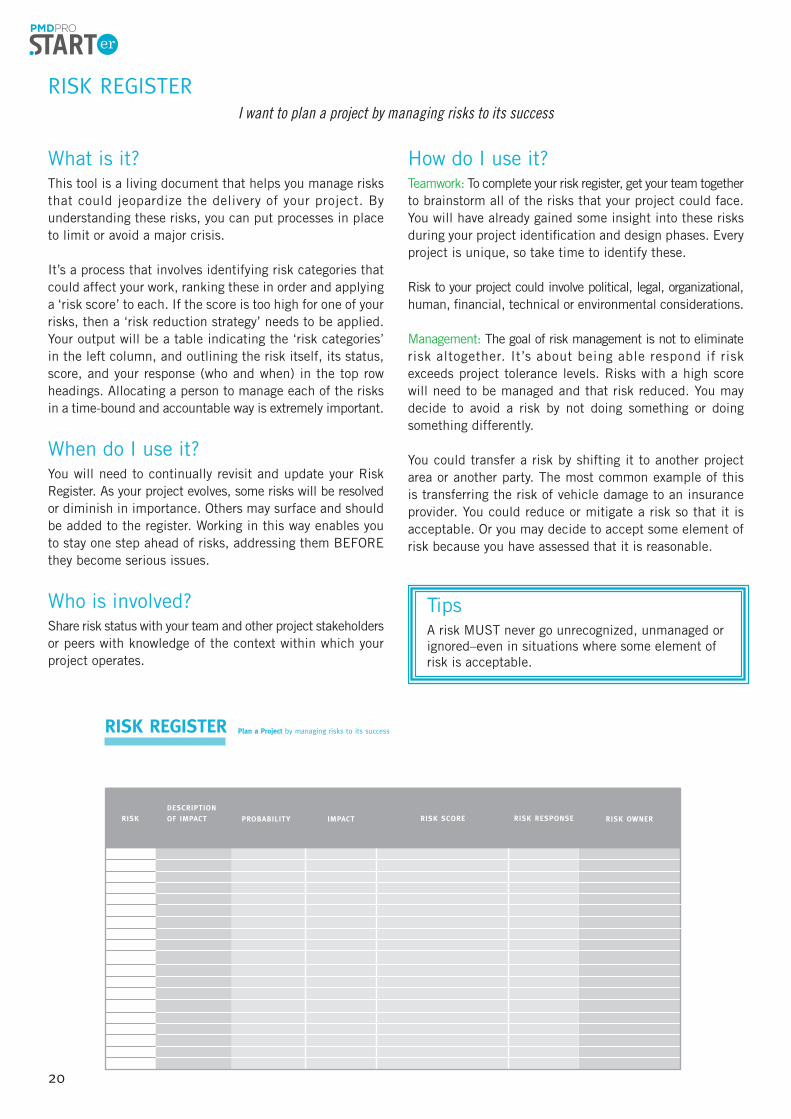
What is it? The Gantt Chart graphically represents your project timeline from start to end. It’s easy to prepare and a useful way to look at the relationships between different project elements.
Your Gantt Chart is the document that you use to make sure that project activities are on track! Once you have logged the timeline for each of your project deliverables, the software will allow you to roll each of these up into one timeline reflecting the whole project. The deliverable that takes the longest time to complete–or has the longest sequence of activities–is your critical path!
When do I use it? Complete your Gantt Chart with your team before you start to implement your project, revisiting it throughout to keep track of progress. Updating and sharing your Gantt chart is also a professional way to share project progress with donors or your leadership team.
Who is involved? The Gantt Chart is something that you develop, and that you share with your team, line managers, and other stakeholders involved in the project, as required.
How do I use it?Teamwork: Preparing your Gantt Chart is something that you should do with your project team. It’s worth completing a Gantt Chart for each of your project deliverables, breaking each of them down into their component activities.
Monitoring tool: It is important to revisit your Gantt Chart regularly. This will enable you to spot variations, amend deadlines, or re-scope the project if needed. If your delivery deadline and project scope are fixed, it may still be possible to keep a project on track by fast-tracking some elements, so as to bring the overall project back in line with its critical path. You may be able to add additional resources to accelerate progress, but there may also be cost implications in doing so.
Leadership: Your Gantt Chart is a living document, to be updated and shared with others to ensure that all are informed about progress. This gives your team, and those close to the project confidence that your project is being overseen and managed effectively.
The more detailed charts are great for operational planning, implementation and monitoring of activities–and are of great interest to the project team, partners and suppliers responsible for completing project work, packages and tasks. A high-level or summary Gantt Chart is a useful, high-quality and professional tool, suitable for formal meetings, such as board meetings or higher-level communications.
TipsThe format of the Gantt Chart makes it easy to spot and address issues that could have impact on the project’s critical path.
I want to plan a project by developing a project schedule
23
GAN
NT CH
ART BACKG
ROUND
Plan a Project by developing a project schedule
ACTIV
ITIE
SYEAR (IN
MO
NTH
S)
1
2
3
4
5
6
7
8
9
1
0
11
1
2
24
IMPLEMENTATION PLAN
What is it? You have already invested a lot of time in the Identification and Design phases, using tools to set up your project in the best possible way. Tempting as it is to move swiftly into implementation, develop your Project Implementation Plan. It’s one of the most important tools in your kit!
The implementation plan draws on insights from the other tools that you have developed, enabling you to work through a detailed overview of your project’s scope, cost and schedule. Your Implementation Plan differs significantly from outputs from the other tools that you have used. It will guide all of your project activities and provide the overview that you need to monitor the progress of your work.
When do I use it? A living document: Your Implementation Plan isn’t a static document. You will need to refer to it regularly, updating it as you move through different project phases. As you add more detail to the Plan, you will find that its value increases, providing the insight that you need to ensure that your schedule, costs and resources are in line with your project scope. This process is often referred to as ‘iterative’ or ‘rolling wave’ planning. It is particularly useful in situations where project information is difficult to collect or is changing rapidly (high risk or emergency contexts).
Who is involved?Format: The format of your Implementation Plan will vary according to the size, scope, complexity and level of risk incurred in your project.
1. Introduction In the introduction, make sure to summarize your project, define the problem(s) your project is addressing, state your goals and objectives, and define your intended audience.
2. Project Objectives In this section, discuss your projects objectives and activities in detail.
3. Implementation Schedule (Gantt Chart) Refer to your Gantt Chart to define your implementation schedule.
4. Discuss a Human Resource Plan Clearly state your projects personnel requirements. Describe persons roles and responsibilities.
5. Project Budget State how your project will be financed.
6. Project Communications Plan Discuss how you, your project phases will be monitored.
7. Appendix In the final section of your Implementation Plan, explain your projects logical framework.
How do I use it?Teamwork: Once your Project Charter has been signed off, it’s time to get your team together to complete your Implementation Plan. Working through the plan together is a great way of ensuring that everyone understands what happens next.
Format: The format of your Implementation Plan will vary according to the size, scope, complexity and level of risk incurred in your project.
TipsCaution: NGOs often use Project Proposals as implementation plans–especially when donors ask for highly detailed documents. Don’t take a shortcut here! Even the most expansive Project Proposals have weaknesses that limit their effectiveness for project implementation.
I want to plan a project by developing a comprehensive map for project implementation
25
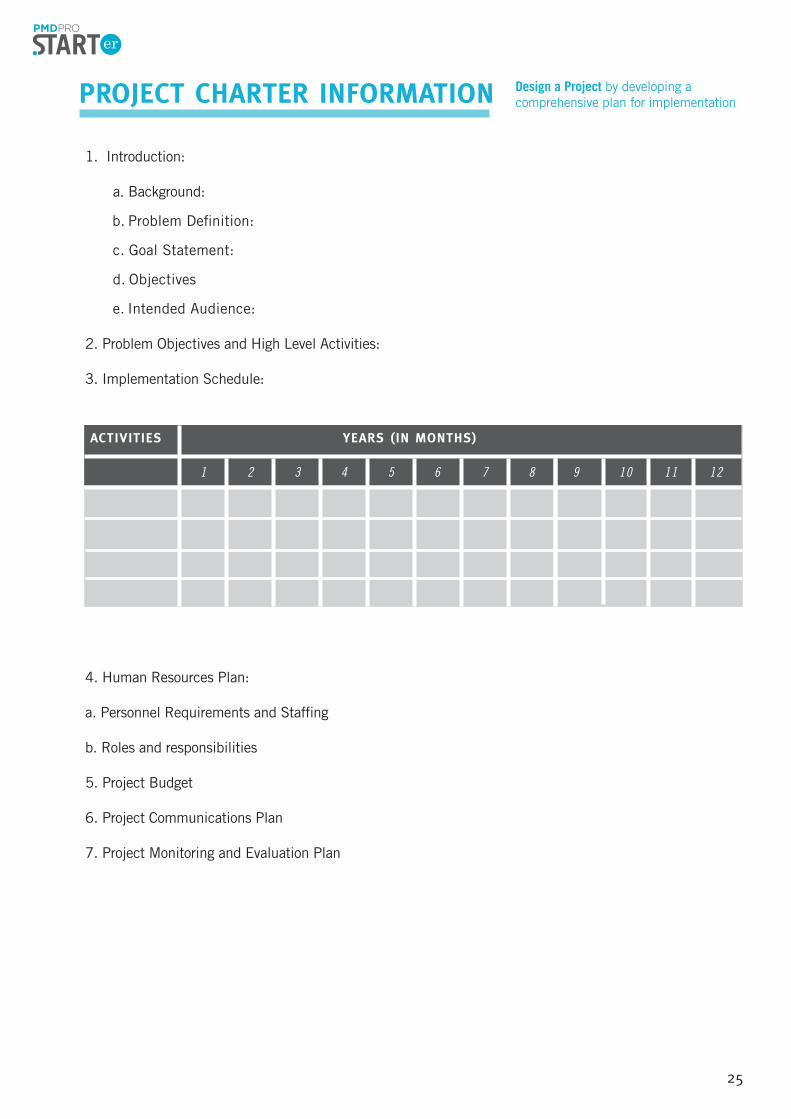
ACTIVITIES YEARS (IN MONTHS)
1 2 3 4 5 6 7 8 9 10 11 12
PROJECT CHARTER INFORMATION Design a Project by developing acomprehensive plan for implementation
1. Introduction:
a. Background:
b. Problem Definition:
c. Goal Statement:
d. Objectives
e. Intended Audience:
2. Problem Objectives and High Level Activities:
3. Implementation Schedule:
4. Human Resources Plan:
a. Personnel Requirements and Staffing
b. Roles and responsibilities
5. Project Budget
6. Project Communications Plan
7. Project Monitoring and Evaluation Plan
26
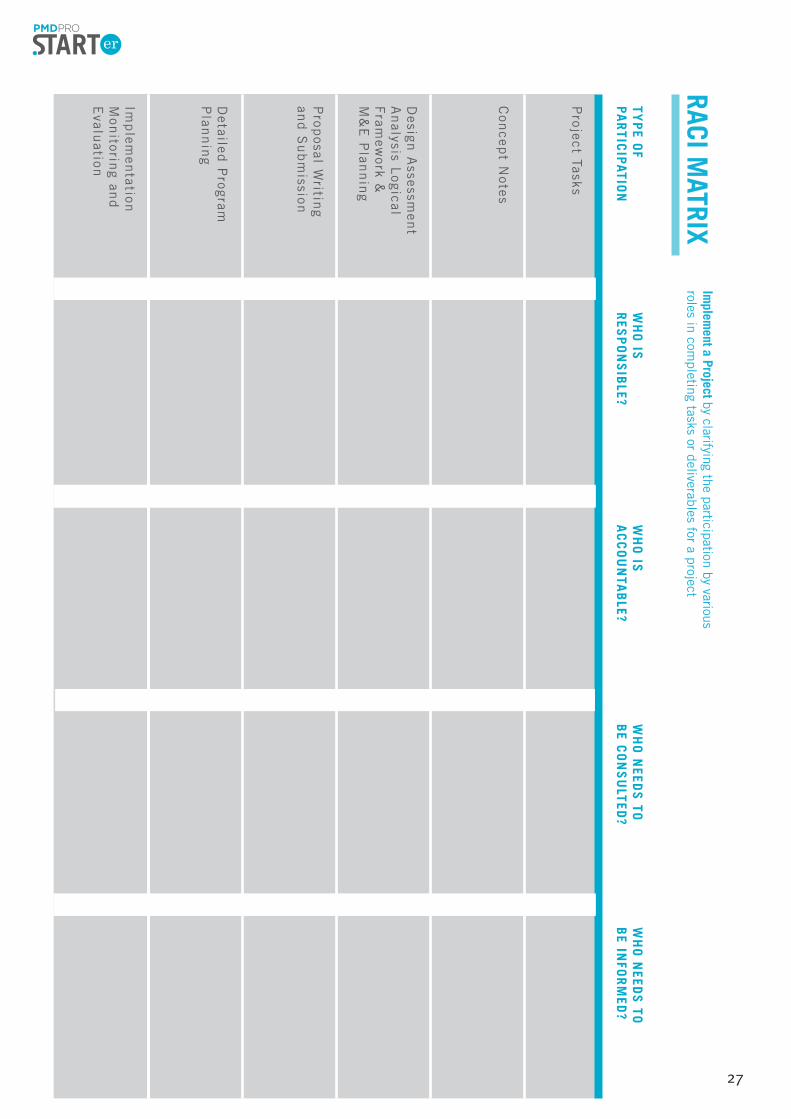
RACI DIAGRAM
What is it? Even the smallest projects depend on the input of many individuals. And as projects increase in complexity, so the web of relationships expands, potentially including community groups, government ministries, suppliers, local NGOs and other organizations.
A RACI diagram is a simple matrix that enables you to identify WHO needs to be involved at different stages and HOW they are involved. A left-hand column lists all of the activities that you need to complete as part of your project, and a top row outlines the four areas of responsibility that are critical for project delivery. RACI is a four-letter acronym describing the different level of roles–responsible, accountable, consulted, and informed.
When do I use it? The best time to work on your RACI diagram is after you have completed the project design and planning phases. You have developed some excellent tools already, and are primed for implementation. As you move into this third phase, the RACI diagram will help you to pull in the people resources that you need at different levels for your project.
Who is involved? You should complete the RACI diagram in consultation with your peers (to ensure that you have included everyone), and then inform others so that they are clear.
How do I use it?Teamwork: You already know from your Work Breakdown Structure and Network Diagram what activities need to be delivered to achieve your goals. Now, work with your team to list all of the tasks that need to be completed for each activity.
Next, ask your team to list all the stakeholders who need to be involved. For their latrine-building activity, UNITAS needs to deliver a variety of tasks from digging holes to building the shelter, and these tasks will involve a network of volunteers, engineers, local government, and community members.
The RACI diagram will help you to identify which individuals are critical for the delivery of your activity. Ask your team four key questions: Who is responsible for carrying out the task? Who is accountable for the correct completion of the task? Who needs to be consulted before moving forward with a task? And who needs to be informed during or at the end of the project?
Be precise. Make sure that you are nominating the right people for the right areas–involving too many could turn into a sign-off nightmare!
Leadership: You are accountable for the delivery of the project and can decide the level of responsibility that you want to give different members of staff, empowering them to step up and make decisions as appropriate. The bottom line is that everyone needs to be clear on what their role is, so that they can confidently get on with their job.
TipsYou consult to gain expertise, and have a duty to keep stakeholders informed of progress and project activities. It is important to record all those who have contributed on the RACI diagram–providing a complete picture of everyone involved in the project.
I want to implement a project by clarifying the roles of stakeholders
27
Implem
ent a Project by clarifying the participation by various roles in com
pleting tasks or deliverables for a projectRACI M
ATRIX
TYP
E OF
PAR
TICIPATIO
NW
HO
ISR
ESP
ON
SIB
LE?W
HO
ISA
CC
OU
NTA
BLE?
WH
O N
EEDS
TOB
E CO
NS
ULTED
?W
HO
NEED
S TO
BE IN
FOR
MED
?
Project Tasks
Con
cept N
otes
Design
Assessm
ent
An
alysis Logical
Fram
ework &
M&
E P
lann
ing
Prop
osal Writin
gan
d S
ub
mission
Detailed
Program
Plan
nin
g
Imp
lemen
tationM
onitorin
g and
Evalu
ation
28
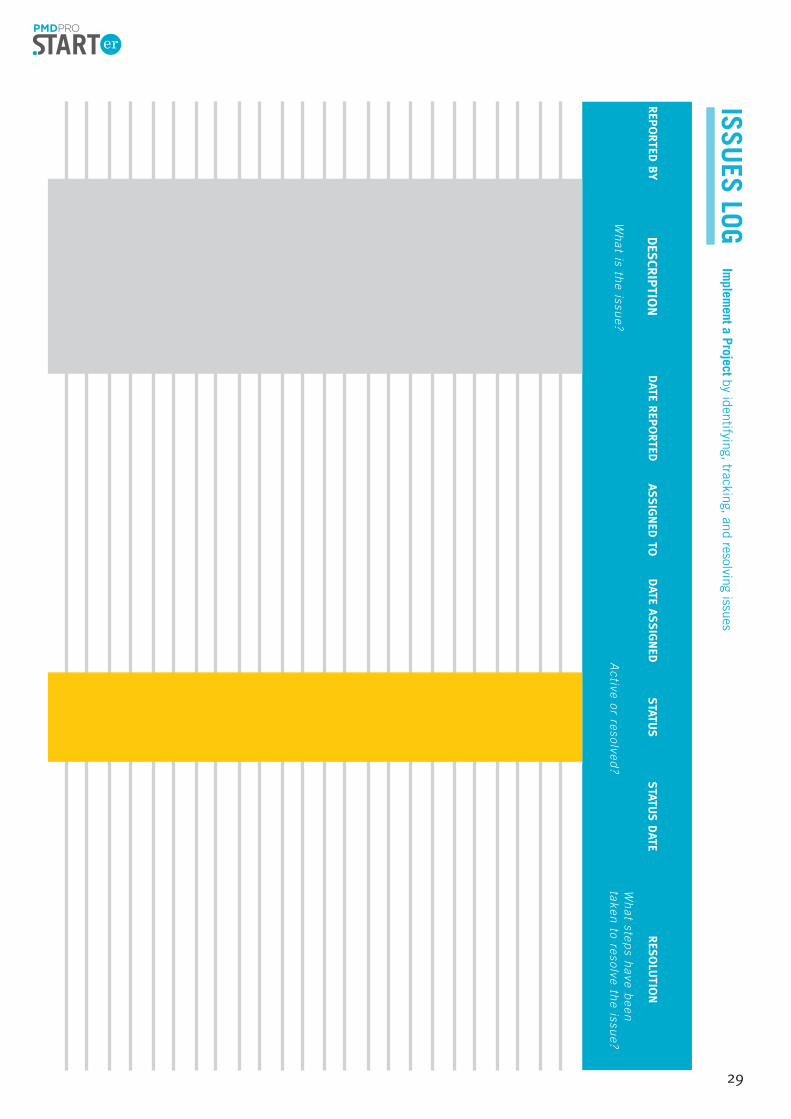
ISSUE LOG
What is it? Even the most thoughtful plans come up against issues that challenge projects during implementation. It is important to learn how to manage these, to track and monitor how issues are solved, and to adapt your plan so that it reflects the current status. Issue Logs vary from paper checklists to online databases, depending on the size of the project. They are easy to complete and at a minimum include 1) a reference number, 2) the name of the person reporting the issue, 3) a description of the issue, 4) the date it was reported, 5) the name of the person assigned to deal with it, and 6) a status and resolution column.
When do I use it? All project managers will encounter situations that could be problematic if they aren’t tackled in the right way. If issues are unresolved, this can lead to slipping timelines and budget overspends, a decline in project quality, and a reputational risk to your organization. You and your teams will log issues for the duration of a project, recording and tracking anything that comes up until the point of resolution. Issues should be dated and logged as they arise, and team meetings are a good place to monitor and ensure that progress is achieved.
Who is involved? You are accountable for establishing a team culture in which Issue Logs are seen as the means of mitigating risks to your project.
How do I use it?Teamwork: Using this tool enables your team to create an environment in which your team is accountable for carrying out actions to ensure that issues are resolved in a timely and effective manner.
This is best achieved by encouraging team members to resolve issues themselves, consulting you as required. There may be times when you need to escalate an issue to a higher level to achieve a solution. It’s important to remember that while issue management is a collaborative effort, you are ultimately accountable for ensuring that all of the issues that arise are dealt with appropriately.
As the person accountable, you will develop the skills to analyze and consider the consequences of the solutions that you employ, and will understand how to communicate and share this information with others.
TipsA quick glance at an Issue Log for a project will indicate problems encountered in the past so that they can be avoided in the future.
I want to implement a project by identifying, tracking and resolving issues
29
Implem
ent a Project by identifying, tracking, and resolving issuesISSU
ES LOG
REP
ORTED
BY
DES
CRIP
TION
DATE R
EPO
RTED
ASSIG
NED
TODATE A
SSIG
NED
STATU
SSTATU
S D
ATERES
OLU
TION
Wh
at is the issu
e?A
ctive or resolved?
Wh
at steps h
ave been
taken to resolve th
e issue?
30
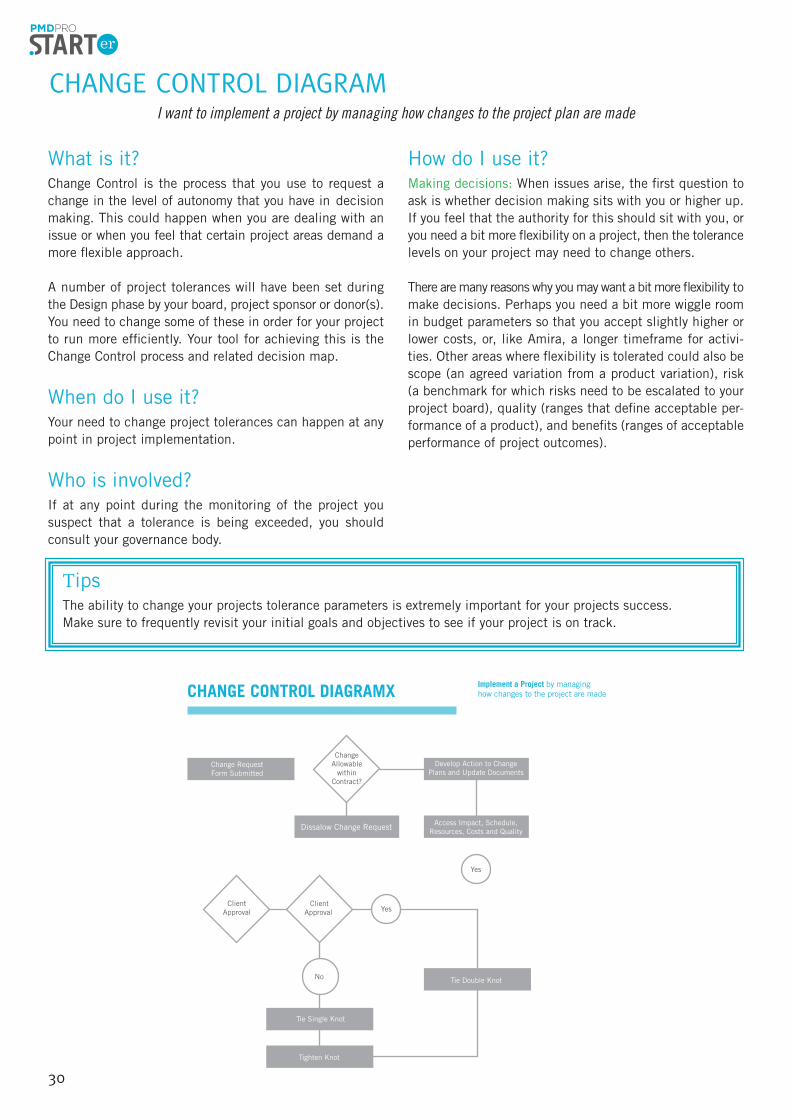
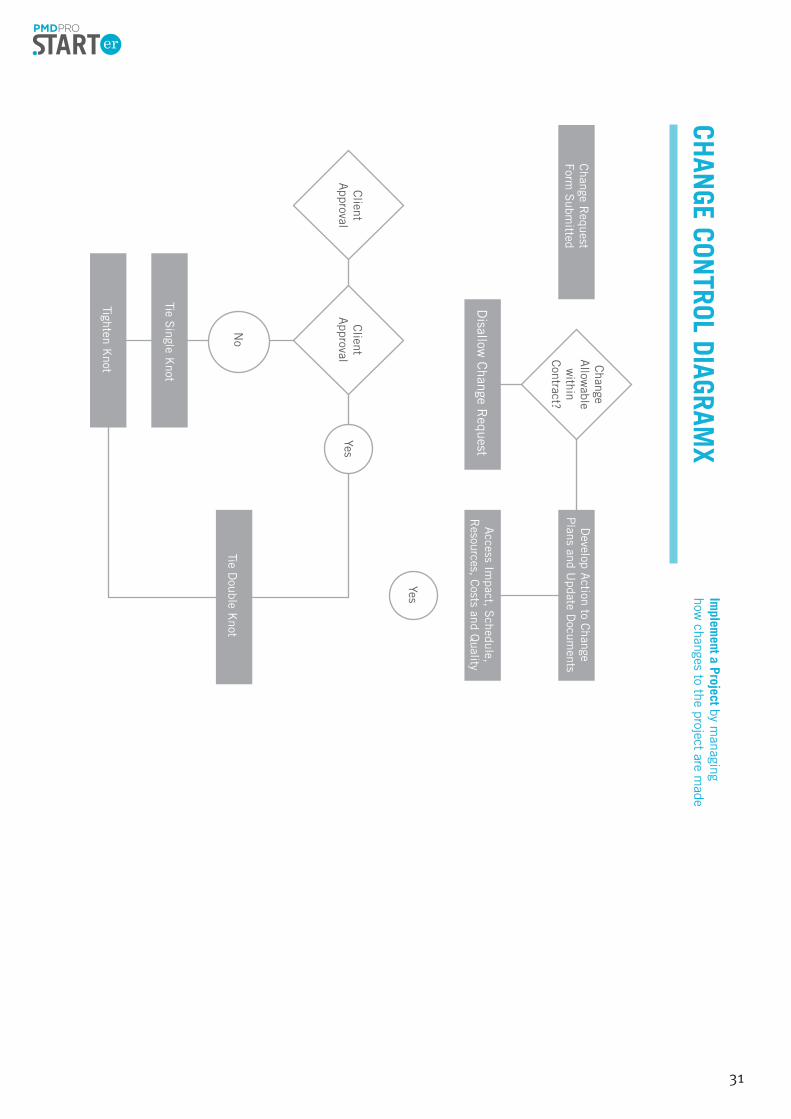
CHANGE CONTROL DIAGRAM
What is it? Change Control is the process that you use to request a change in the level of autonomy that you have in decision making. This could happen when you are dealing with an issue or when you feel that certain project areas demand a more flexible approach.
A number of project tolerances will have been set during the Design phase by your board, project sponsor or donor(s). You need to change some of these in order for your project to run more efficiently. Your tool for achieving this is the Change Control process and related decision map.
When do I use it? Your need to change project tolerances can happen at any point in project implementation.
Who is involved? If at any point during the monitoring of the project you suspect that a tolerance is being exceeded, you should consult your governance body.
How do I use it?Making decisions: When issues arise, the first question to ask is whether decision making sits with you or higher up. If you feel that the authority for this should sit with you, or you need a bit more flexibility on a project, then the tolerance levels on your project may need to change others.
There are many reasons why you may want a bit more flexibility to make decisions. Perhaps you need a bit more wiggle room in budget parameters so that you accept slightly higher or lower costs, or, like Amira, a longer timeframe for activi-ties. Other areas where flexibility is tolerated could also be scope (an agreed variation from a product variation), risk (a benchmark for which risks need to be escalated to your project board), quality (ranges that define acceptable per-formance of a product), and benefits (ranges of acceptable performance of project outcomes).
I want to implement a project by managing how changes to the project plan are made
TipsThe ability to change your projects tolerance parameters is extremely important for your projects success. Make sure to frequently revisit your initial goals and objectives to see if your project is on track.
31
Implem
ent a Project by managing
how changes to the project are m
adeCH
ANGE CON
TROL DIAGRAMX
Tighten Knot
Tie Single K
not
Tie Double K
not
Disallow
Change R
equestA
ccess Impact, S
chedule,R
esources, Costs and Q
uality
Change R
equest Form
Subm
ittedD
evelop Action to C
hange P
lans and Update D
ocuments
Change
Allow
ablew
ithin C
ontract?
Client
Approval
Client
Approval
No
Yes
Yes
32
AFTER ACTION REVIEW
What is it? The After Action Review is a simple way of identifying and recording the lessons that you have learned as a result of your project. This is important because it captures knowledge that can be used again by you or other project managers who will be implementing similar work in the future. Without a system to capture the end of project learning, your organization will reinvent the wheel each time a decision is made to pursue a similar project!
When do I use it? You have reached the end of your project and need to review learning moments in a timely way, before some of the lessons are forgotten. The After Action Review is an important document for your Project File, capturing the history of the project for others to use in the future. All NGOs and donors require projects to be evaluated, the impact of which is often published in Annual Reviews and other external documents. Donors often make future funding decisions based on the evaluation report of a previous project. They are also interested in ensuring that your learning is disseminated so that other organizations in the same sector can benefit from your experiences.
Who is involved? It is important to include a broad range of perspectives in your Review activity, so choose participants that you know will provide this. It’s also best to include both internal and external stakeholders.
How do I use it?Ideally you will have already tracked lessons learned as they occurred during the project Design, Planning and Implementation phases. The best tool for this is to keep a Lessons Learned log that you can now draw on to complete your After Action Review.
Teamwork: Ask your team and other internal and external project stakeholders to join you for this learning activity. Keep the discussion quick and open, and don’t let it fall into deep thinking or discussion. Make sure that participants have a copy of the Project Plan (Gantt Chart) for reference and compare this with reality as you work through each of these questions, capturing outputs on a flip chart:
3 What did we set out to do?
3 What did we achieve? (facts rather than opinions)
3 What went well? Why?
3 What could have gone better?
3 What prevented us from doing more?
3 What can we learn from this?
Concluding a project in this way gives you the opportunity to present your organization in a professional and positive way. The benefits are that external stakeholders appreciate their involvement and this opens the doors to future relationships or projects in the same area.
TipsMake sure that your Review is filed along with other project documents in a safe and easily accessible place, and distribute your learning to others in your internal and external network.
I want to learn from a project by analyzing what worked and what didn’t
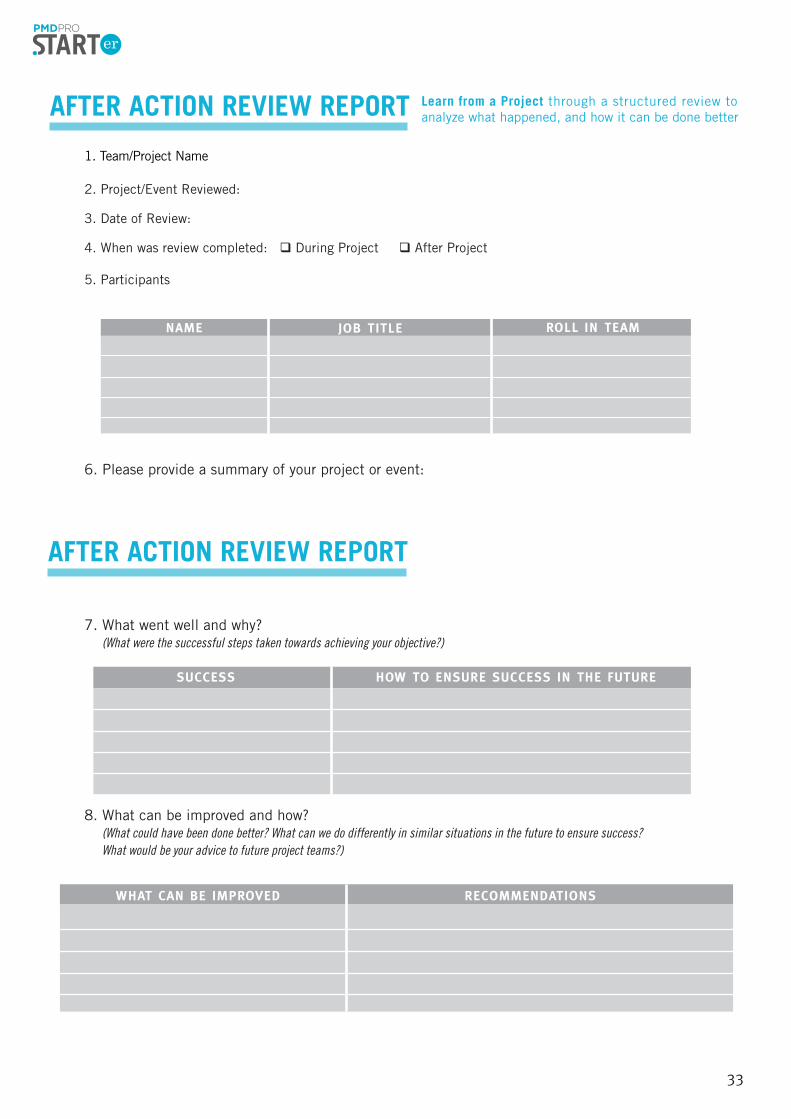
After action review report template:Learn from a project through a structured review to analyze what happened, and how it can be done better.
1. Team/Project Name
2. Project/Event Reviewed
3. Date of Review
4. When was the review completed?
5. List of participants
6. Summary of project or event
7. What went well and why?
8. What can be improved and how?
33
AFTER ACTION REVIEW REPORT Learn from a Project through a structured review to analyze what happened, and how it can be done better
1. Team/Project Name
2. Project/Event Reviewed:
3. Date of Review:
4. When was review completed: q During Project q After Project
5. Participants
6. Please provide a summary of your project or event:
7. What went well and why? (What were the successful steps taken towards achieving your objective?)
8. What can be improved and how? (What could have been done better? What can we do differently in similar situations in the future to ensure success? What would be your advice to future project teams?)
NAME JOB TITLE ROLL IN TEAM
AFTER ACTION REVIEW REPORT
SUCCESS HOW TO ENSURE SUCCESS IN THE FUTURE
WHAT CAN BE IMPROVED RECOMMENDATIONS
34
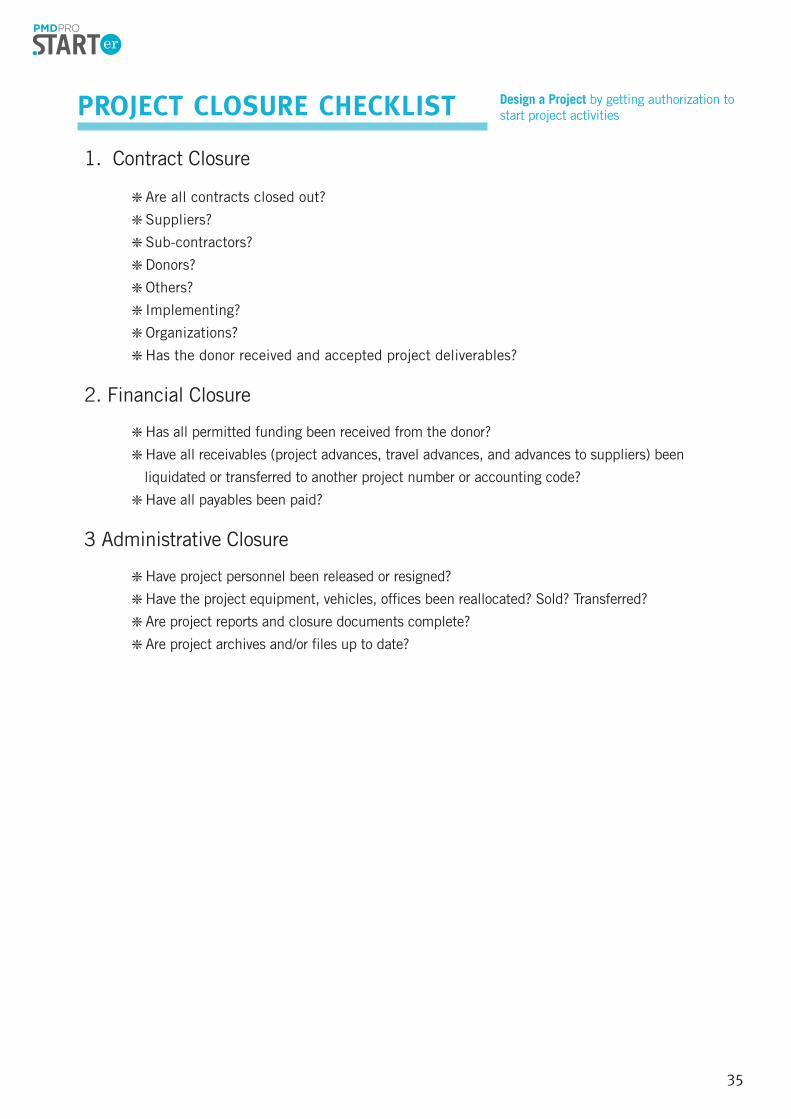
PROJECT CLOSURE CHECKLIST
What is it? Working through the Project Closure Checklist is a critical process that closes your project in a professional way and reduces the risk of suppliers, employees and donors disputing the accuracy and status of your accounts. Do this well, and when your project is audited in the future, it will have a clean bill of health! The Checklist covers three important areas: Contract Closure, Financial Closure, and Administrative Closure. You will need to work through each of these systematically, with whoever remains in your team.
When do I use it? You have reached the end of your project and completed meetings necessary to close out activities (see After Action Review). All internal and external stakehold-ers (donors, partners, community groups and your Project Board or Project Sponsor) have verified that the scope of the project has been achieved and that the deliverables are accepted. You then use the Project Closure Checklist as a tool to make sure that all of your paperwork, contracts, and administrative func-tions are concluded in professional way.
How do I use it?Teamwork: You will have identified team members who are vital for project closure. Using the Checklist, work through each area together, cross checking that everything has been completed.
Contract closure: Your team will have managed multiple contracts with suppliers of goods and services. Have all these contracts been closed and all sub-contractors paid? Other contracts include those with donors, partners and implementing organizations–have all of these been formally ended? Has your donor reviewed and accepted project deliverables?
Financial closure: You need to check whether all permitted funding has been received from your donor, and that all ‘receivables’ (project advances, travel advances, to suppliers) have been liquidated or transferred to another project number or accounting code. Have you paid all of your invoices?
Administrative Closure: Check that all project staff and those on contract have been released or reassigned to another project. Have your vehicles, office equipment and offices been reallocated, sold or transferred?
Finally, you need to check that you have completed all project reports and closure documents. Lastly, ensure that your project archives and/or files are up to date.
Who is involved? It is important to think ahead and select people who can best support you during the project closure phase. These are people with a good knowledge of the project, who can also work systematically through all of the requirements (e.g. from Logistics, Finance, Human Resources, Administration).
I want to close a project by ensuring that all obligations have been met
TipsAnticipating this process is important so that you can ensure that you have the right people in place at the end of the project to assist with this activity. These could be one or two critical staff with an overview of the important areas.
35
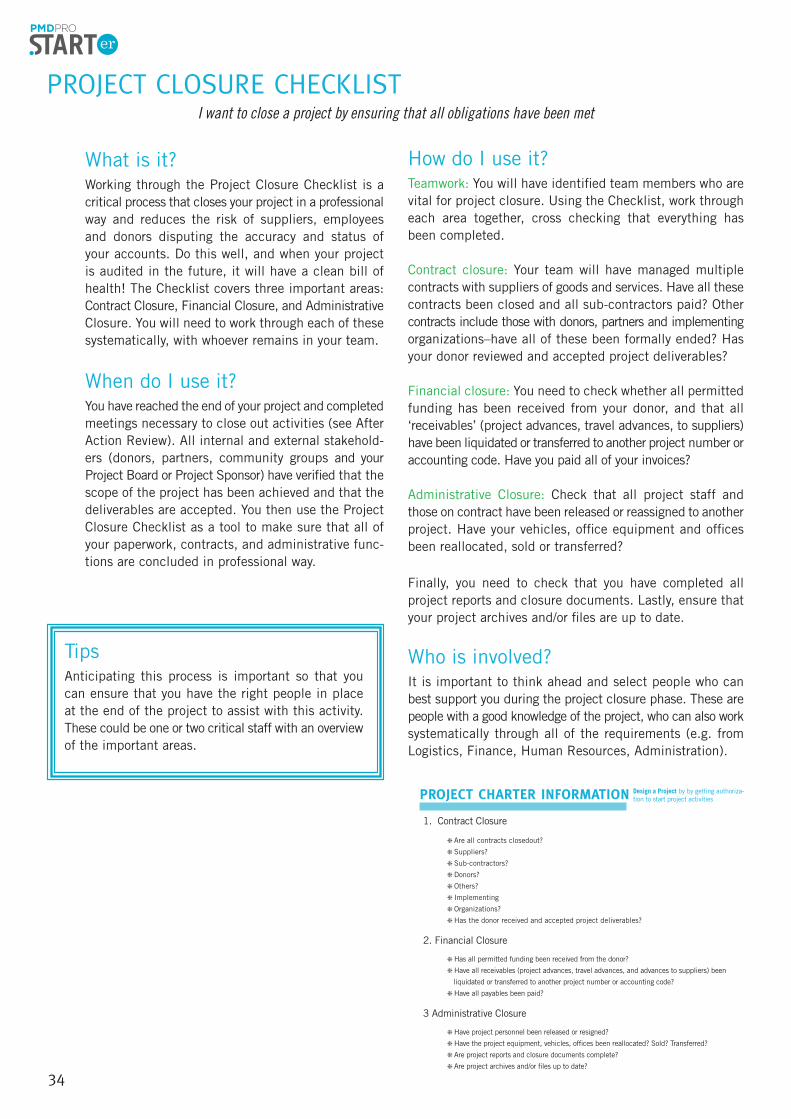
PROJECT CLOSURE CHECKLIST Design a Project by getting authorization to start project activities
1. Contract Closure
g Are all contracts closed out?
g Suppliers?
g Sub-contractors?
g Donors?
g Others?
g Implementing?
g Organizations?
g Has the donor received and accepted project deliverables?
2. Financial Closure
g Has all permitted funding been received from the donor?
g Have all receivables (project advances, travel advances, and advances to suppliers) been
liquidated or transferred to another project number or accounting code?
g Have all payables been paid?
3 Administrative Closure
g Have project personnel been released or resigned?
g Have the project equipment, vehicles, offices been reallocated? Sold? Transferred?
g Are project reports and closure documents complete?
g Are project archives and/or files up to date?