Embed Size (px)
Citation preview
DESKTOP VIRTUALIZATION WITH VMWARE VIEW 5.0 COMPARED TO VIEW 4.6
SEPTEMBER 2011
A PRINCIPLED TECHNOLOGIES TEST REPORT
Commissioned by VMware, Inc.
For workers using virtual desktops—in the local office, in remote offices,
at home, or elsewhere—the connection to the host server is what drives
productivity. Whether they are transferring files, participating in online
conferences, or using hosted applications, a desktop virtualization tool that
provides a good experience can reduce frustration, optimize productivity, and
boost their connectedness to the rest of the organization.
It is essential that your desktop virtualization software deliver a good
experience for your workers, even when bandwidth is limited. We tested virtual
desktop sessions using VMware View 4.6 and VMware View 5.0 and workloads
reflecting those of average workers to see how much bandwidth each
application used.
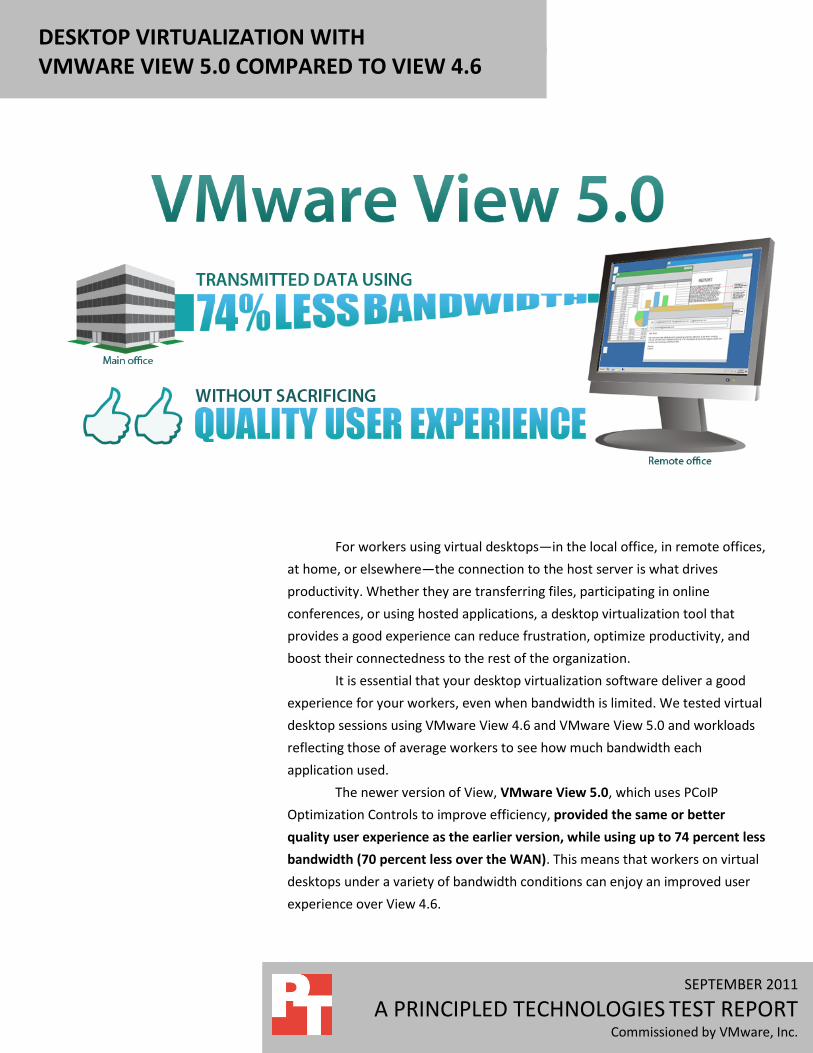
The newer version of View, VMware View 5.0, which uses PCoIP
Optimization Controls to improve efficiency, provided the same or better
quality user experience as the earlier version, while using up to 74 percent less
bandwidth (70 percent less over the WAN). This means that workers on virtual
desktops under a variety of bandwidth conditions can enjoy an improved user
experience over View 4.6.
1.
A Principled Technologies test report 2
Desktop virtualization with VMware View 5.0 compared to View 4.6
A GOOD USER EXPERIENCE DESPITE LIMITED BANDWIDTH Whether virtual desktop infrastructure (VDI) users connect to the host
server through a local area network (LAN) or a wide area network (WAN), their
ability to do their work well depends on having a virtual desktop that is quick
and responsive. Delivering this can be a challenge when bandwidth is limited;
users can find themselves subjected to excessive wait times and distractions
such as choppy or skipping video, poor response to screen scrolling, inconsistent
font size and color, blurring text, and a generally unresponsive system. By using
much less bandwidth to transmit data, VMware View 5.0 lets workers enjoy a
good experience with typical office workloads, even in a limited-bandwidth
situation.
To simulate the experience of such workers, we used three workloads
from the Login VSI 3.0 benchmarking tool: light, medium no Flash, and medium
(includes Flash). Login VSI 3.0 benchmarks virtual desktop solutions by
simulating Windows®-based Microsoft® Office user workloads. For more
information on Login VSI 3.0,
seehttp://www.loginconsultants.com/index.php?option=com_content&task=vie
w&id=496.
We measured the bandwidth necessary to run the Login VSI workloads
in virtual desktops connected two ways: over a LAN with 100Mb/s bandwidth
available and over a restricted-bandwidth WAN with 2Mb/s download/300 Kb/s
upload and 100m/s latency. We tested both single-session and five-session
scenarios. Note: Other test tools are available for comparing VDI performance,
including View Planner and RAWC. We opted to use Login VSI because it is not
vendor specific and is freely available for medium workloads.
As we show in the Optimizing bandwidth conservation on Windows 7
virtual desktop section in Appendix B, we invoked typical VDI optimizations in
our desktop image. We disabled services, disabled boot animation, and
removed some visual effects. We did not use PCoIP optimizations like
bandwidth modifications or bandwidth ceiling or floor to artificially improve
performance.
We conducted the entire gamut of permutations using both VMware
View 4.6 and VMware View 5.0, and found that the newer version used as much
as 74 percent less bandwidth than the older version.
In addition, we observed the tests in progress to watch for noticeable
user experience degradation. The user experience was comparable in all cases,
expect for the five-session scenario over the WAN with View 4.6, when frames
were clearly being dropped during the test runs.
A Principled Technologies test report 3
Desktop virtualization with VMware View 5.0 compared to View 4.6
For information for our test system, see Appendix A. For our test
methodology, see Appendix B. To see our Login VSI .INI files, see Appendix C.
OUR FINDINGS In the sections below, we present our findings for the three workloads.
One note: In all of the five-session WAN test scenarios, the VMware View 5.0
win percentages were skewed downward because View 4.6 dropped frames due
to WAN saturation. This artificially inflated the results for View 4.6 because the
benchmark’s bandwidth calculations for View 4.6 did not count these dropped
frames, which caused a degraded user experience noticeable during testing.
VMware View 5.0 delivered a better user experience in all five-session WAN test
scenarios.
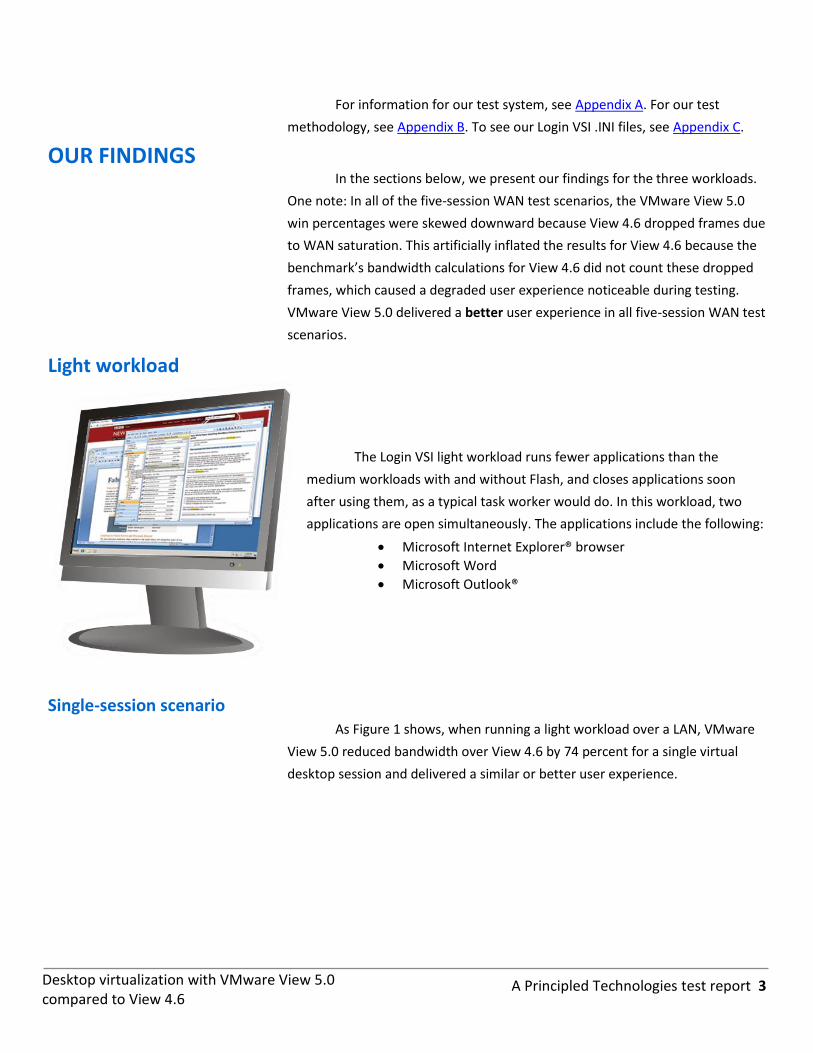
Light workload
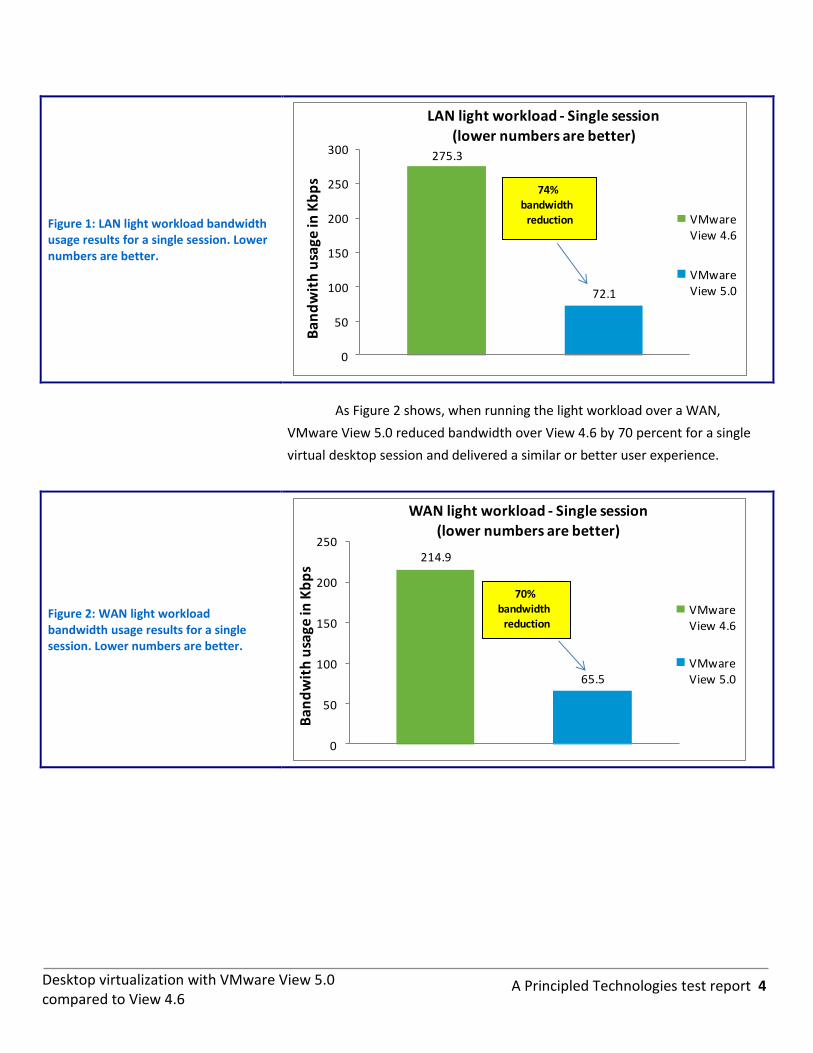
Single-session scenario As Figure 1 shows, when running a light workload over a LAN, VMware
View 5.0 reduced bandwidth over View 4.6 by 74 percent for a single virtual
desktop session and delivered a similar or better user experience.
The Login VSI light workload runs fewer applications than the
medium workloads with and without Flash, and closes applications soon
after using them, as a typical task worker would do. In this workload, two
applications are open simultaneously. The applications include the following:
Microsoft Internet Explorer® browser
Microsoft Word
Microsoft Outlook®
A Principled Technologies test report 4
Desktop virtualization with VMware View 5.0 compared to View 4.6
Figure 1: LAN light workload bandwidth usage results for a single session. Lower numbers are better.
275.3
72.1
0
50
100
150
200
250
300
Ba
nd
wit
h u
sag
e in
Kb
ps
LAN light workload - Single session
(lower numbers are better)
VMwareView 4.6
VMwareView 5.0
74% bandwidth
reduction
As Figure 2 shows, when running the light workload over a WAN,
VMware View 5.0 reduced bandwidth over View 4.6 by 70 percent for a single
virtual desktop session and delivered a similar or better user experience.
Figure 2: WAN light workload bandwidth usage results for a single session. Lower numbers are better.
214.9
65.5
0
50
100
150
200
250
Ban
dw
ith
usa
ge in
Kb
ps
WAN light workload - Single session
(lower numbers are better)
VMwareView 4.6
VMwareView 5.0
70% bandwidth
reduction
A Principled Technologies test report 5
Desktop virtualization with VMware View 5.0 compared to View 4.6
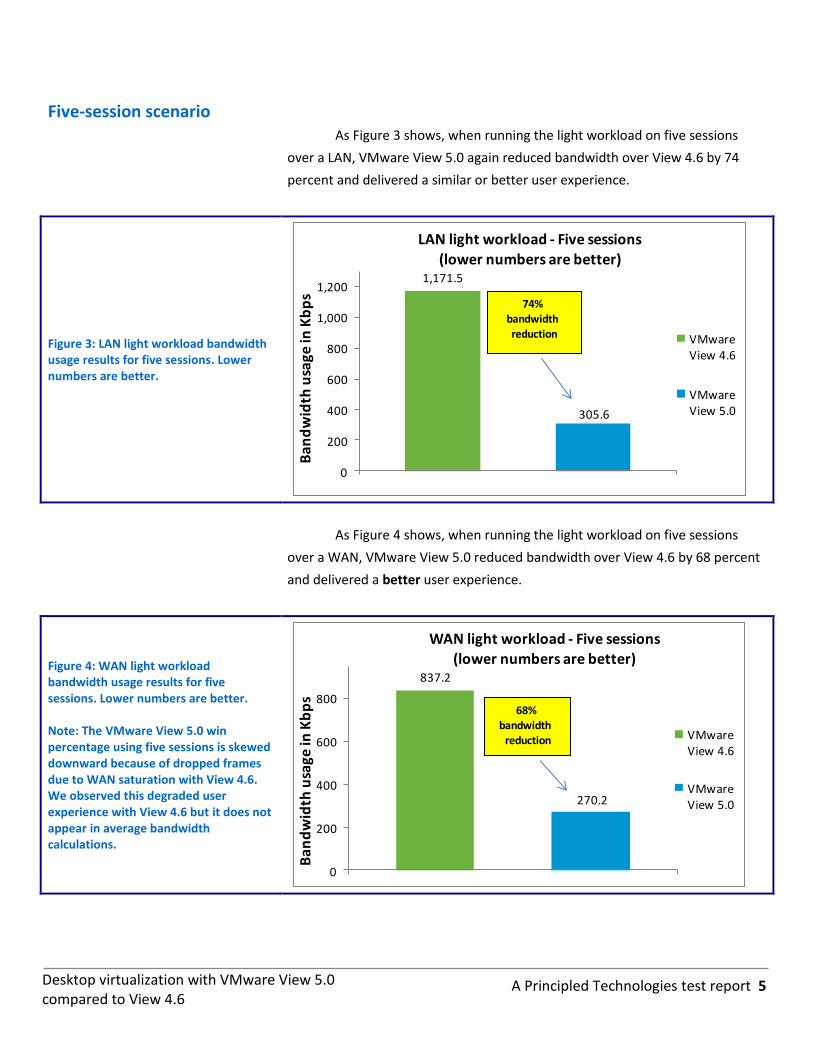
Five-session scenario As Figure 3 shows, when running the light workload on five sessions
over a LAN, VMware View 5.0 again reduced bandwidth over View 4.6 by 74
percent and delivered a similar or better user experience.
Figure 3: LAN light workload bandwidth usage results for five sessions. Lower numbers are better.
1,171.5
305.6
0
200
400
600
800
1,000
1,200
1
Ba
nd
wid
th u
sag
e in
Kb
ps
LAN light workload - Five sessions(lower numbers are better)
VMwareView 4.6
VMwareView 5.0
74%
bandwidth
reduction
As Figure 4 shows, when running the light workload on five sessions
over a WAN, VMware View 5.0 reduced bandwidth over View 4.6 by 68 percent
and delivered a better user experience.
Figure 4: WAN light workload bandwidth usage results for five sessions. Lower numbers are better. Note: The VMware View 5.0 win percentage using five sessions is skewed downward because of dropped frames due to WAN saturation with View 4.6. We observed this degraded user experience with View 4.6 but it does not appear in average bandwidth calculations.
837.2
270.2
0
200
400
600
800
1
Ba
nd
wid
th u
sag
e in
Kb
ps
WAN light workload - Five sessions
(lower numbers are better)
VMwareView 4.6
VMwareView 5.0
68%
bandwidthreduction
A Principled Technologies test report 6
Desktop virtualization with VMware View 5.0 compared to View 4.6
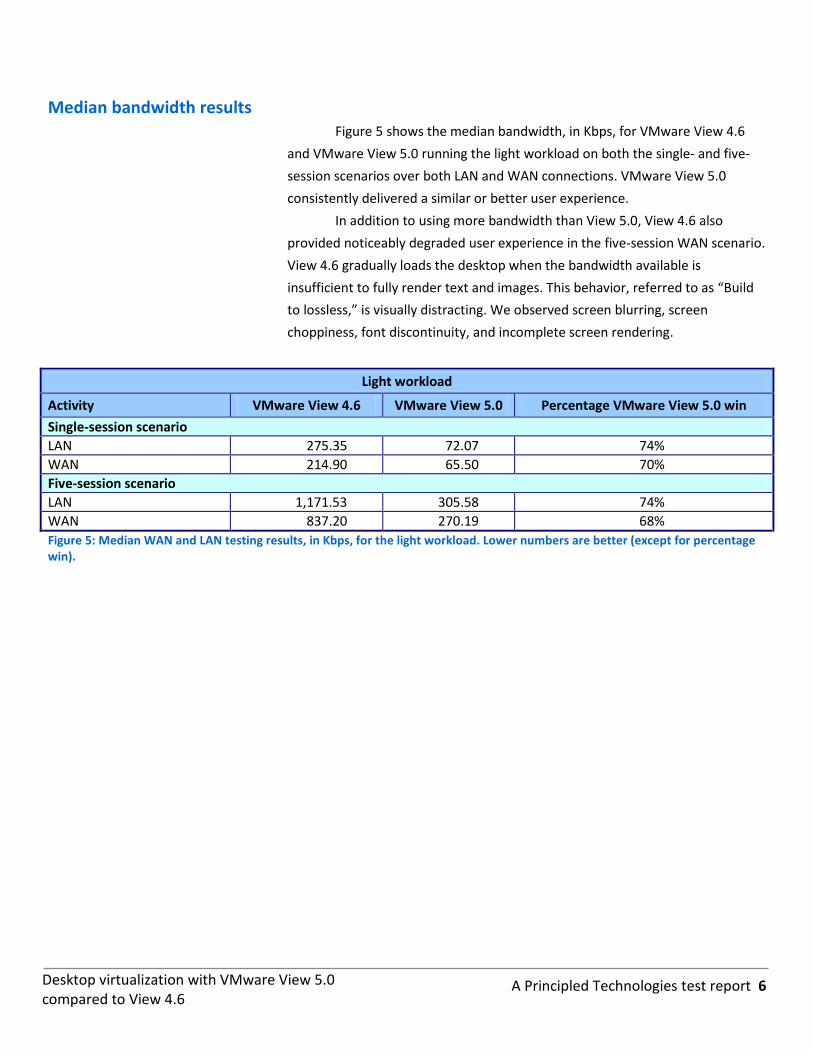
Median bandwidth results Figure 5 shows the median bandwidth, in Kbps, for VMware View 4.6
and VMware View 5.0 running the light workload on both the single- and five-
session scenarios over both LAN and WAN connections. VMware View 5.0
consistently delivered a similar or better user experience.
In addition to using more bandwidth than View 5.0, View 4.6 also
provided noticeably degraded user experience in the five-session WAN scenario.
View 4.6 gradually loads the desktop when the bandwidth available is
insufficient to fully render text and images. This behavior, referred to as “Build
to lossless,” is visually distracting. We observed screen blurring, screen
choppiness, font discontinuity, and incomplete screen rendering.
Light workload
Activity VMware View 4.6 VMware View 5.0 Percentage VMware View 5.0 win
Single-session scenario
LAN 275.35 72.07 74%
WAN 214.90 65.50 70%
Five-session scenario
LAN 1,171.53 305.58 74%
WAN 837.20 270.19 68%
Figure 5: Median WAN and LAN testing results, in Kbps, for the light workload. Lower numbers are better (except for percentage win).
A Principled Technologies test report 7
Desktop virtualization with VMware View 5.0 compared to View 4.6
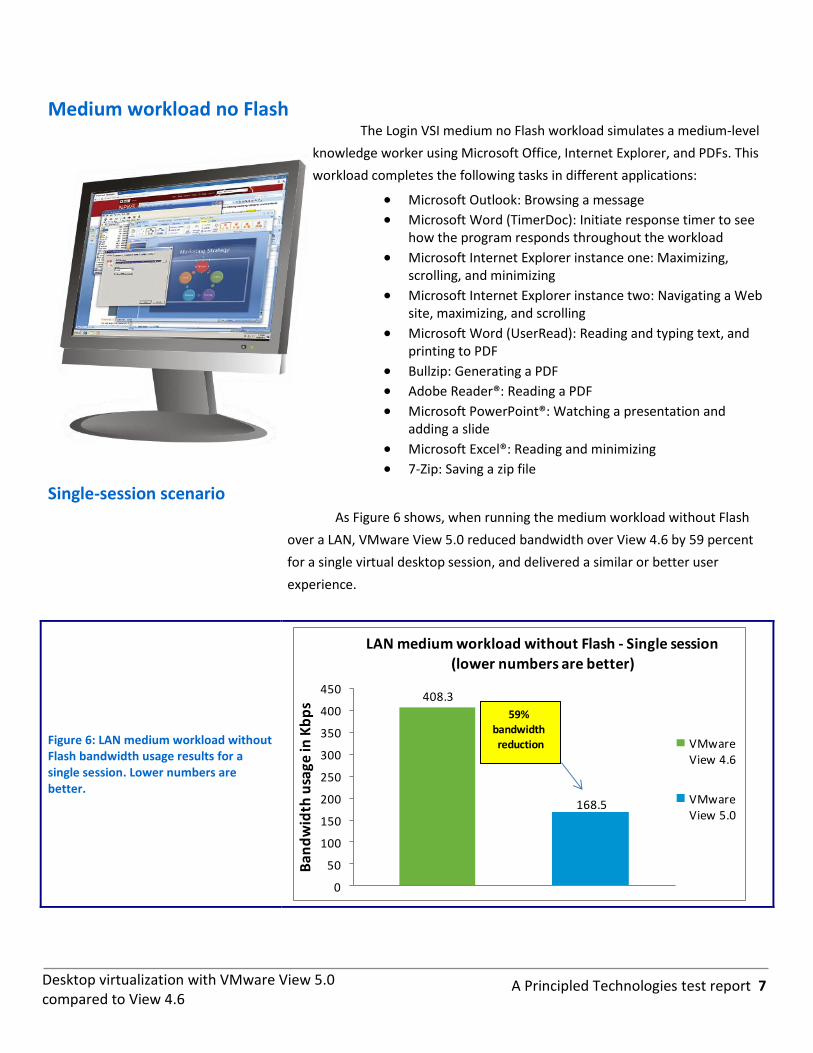
Medium workload no Flash
Single-session scenario As Figure 6 shows, when running the medium workload without Flash
over a LAN, VMware View 5.0 reduced bandwidth over View 4.6 by 59 percent
for a single virtual desktop session, and delivered a similar or better user
experience.
Figure 6: LAN medium workload without Flash bandwidth usage results for a single session. Lower numbers are better.
408.3
168.5
0
50
100
150
200
250
300
350
400
450
Ba
nd
wid
th u
sag
e in
Kb
ps
LAN medium workload without Flash - Single session
(lower numbers are better)
VMwareView 4.6
VMwareView 5.0
59%
bandwidth
reduction
The Login VSI medium no Flash workload simulates a medium-level
knowledge worker using Microsoft Office, Internet Explorer, and PDFs. This
workload completes the following tasks in different applications:
Microsoft Outlook: Browsing a message
Microsoft Word (TimerDoc): Initiate response timer to see how the program responds throughout the workload
Microsoft Internet Explorer instance one: Maximizing, scrolling, and minimizing
Microsoft Internet Explorer instance two: Navigating a Web site, maximizing, and scrolling
Microsoft Word (UserRead): Reading and typing text, and printing to PDF
Bullzip: Generating a PDF
Adobe Reader®: Reading a PDF
Microsoft PowerPoint®: Watching a presentation and adding a slide
Microsoft Excel®: Reading and minimizing
7-Zip: Saving a zip file
A Principled Technologies test report 8
Desktop virtualization with VMware View 5.0 compared to View 4.6
As Figure 7 shows, when running the medium workload without Flash
over a WAN, VMware View 5.0 reduced bandwidth over View 4.6 by 54 percent
for a single virtual desktop session, and delivered a similar or better user
experience.
Figure 7: WAN medium workload without Flash bandwidth usage results for a single session. Lower numbers are better.
278.4
129.4
0
50
100
150
200
250
300
Ba
nd
wid
th u
sag
e in
Kb
ps
WAN medium workload without Flash - Single
session (lower numbers are better)
VMwareView 4.6
VMwareView 5.0
54%
bandwidth
reduction
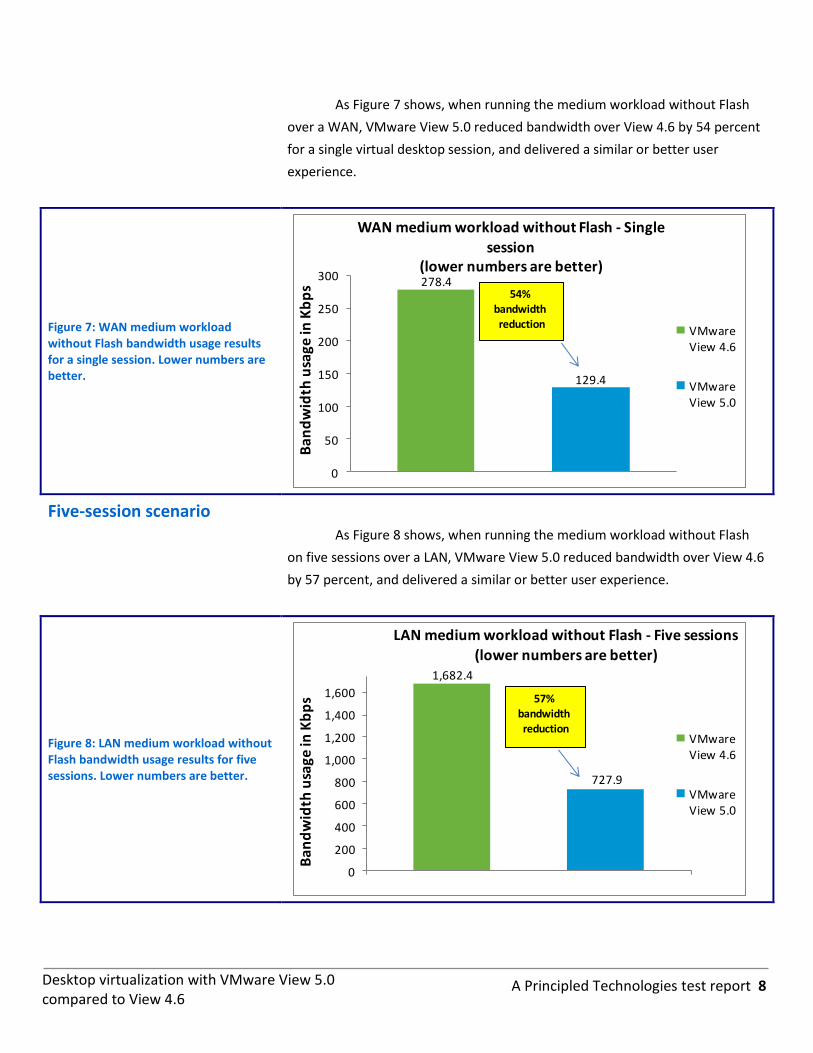
Five-session scenario As Figure 8 shows, when running the medium workload without Flash
on five sessions over a LAN, VMware View 5.0 reduced bandwidth over View 4.6
by 57 percent, and delivered a similar or better user experience.
Figure 8: LAN medium workload without Flash bandwidth usage results for five sessions. Lower numbers are better.
1,682.4
727.9
0
200
400
600
800
1,000
1,200
1,400
1,600
1
Ban
dw
idth
usa
ge in
Kb
ps
LAN medium workload without Flash - Five sessions
(lower numbers are better)
VMwareView 4.6
VMwareView 5.0
57% bandwidth
reduction
A Principled Technologies test report 9
Desktop virtualization with VMware View 5.0 compared to View 4.6
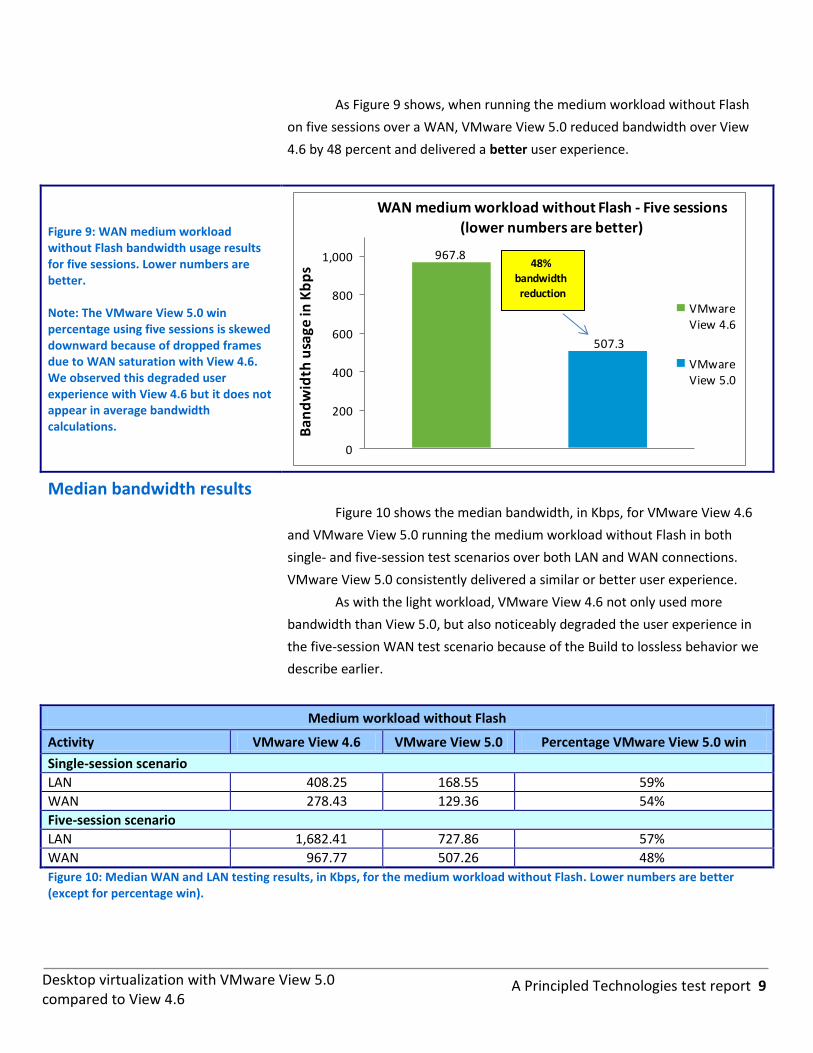
As Figure 9 shows, when running the medium workload without Flash
on five sessions over a WAN, VMware View 5.0 reduced bandwidth over View
4.6 by 48 percent and delivered a better user experience.
Figure 9: WAN medium workload without Flash bandwidth usage results for five sessions. Lower numbers are better. Note: The VMware View 5.0 win percentage using five sessions is skewed downward because of dropped frames due to WAN saturation with View 4.6. We observed this degraded user experience with View 4.6 but it does not appear in average bandwidth calculations.
967.8
507.3
0
200
400
600
800
1,000
Ba
nd
wid
th u
sag
e in
Kb
ps
WAN medium workload without Flash - Five sessions (lower numbers are better)
VMwareView 4.6
VMwareView 5.0
48%
bandwidth
reduction
Median bandwidth results Figure 10 shows the median bandwidth, in Kbps, for VMware View 4.6
and VMware View 5.0 running the medium workload without Flash in both
single- and five-session test scenarios over both LAN and WAN connections.
VMware View 5.0 consistently delivered a similar or better user experience.
As with the light workload, VMware View 4.6 not only used more
bandwidth than View 5.0, but also noticeably degraded the user experience in
the five-session WAN test scenario because of the Build to lossless behavior we
describe earlier.
Medium workload without Flash
Activity VMware View 4.6 VMware View 5.0 Percentage VMware View 5.0 win
Single-session scenario
LAN 408.25 168.55 59%
WAN 278.43 129.36 54%
Five-session scenario
LAN 1,682.41 727.86 57%
WAN 967.77 507.26 48%
Figure 10: Median WAN and LAN testing results, in Kbps, for the medium workload without Flash. Lower numbers are better (except for percentage win).
A Principled Technologies test report 10
Desktop virtualization with VMware View 5.0 compared to View 4.6
Medium workload with Flash
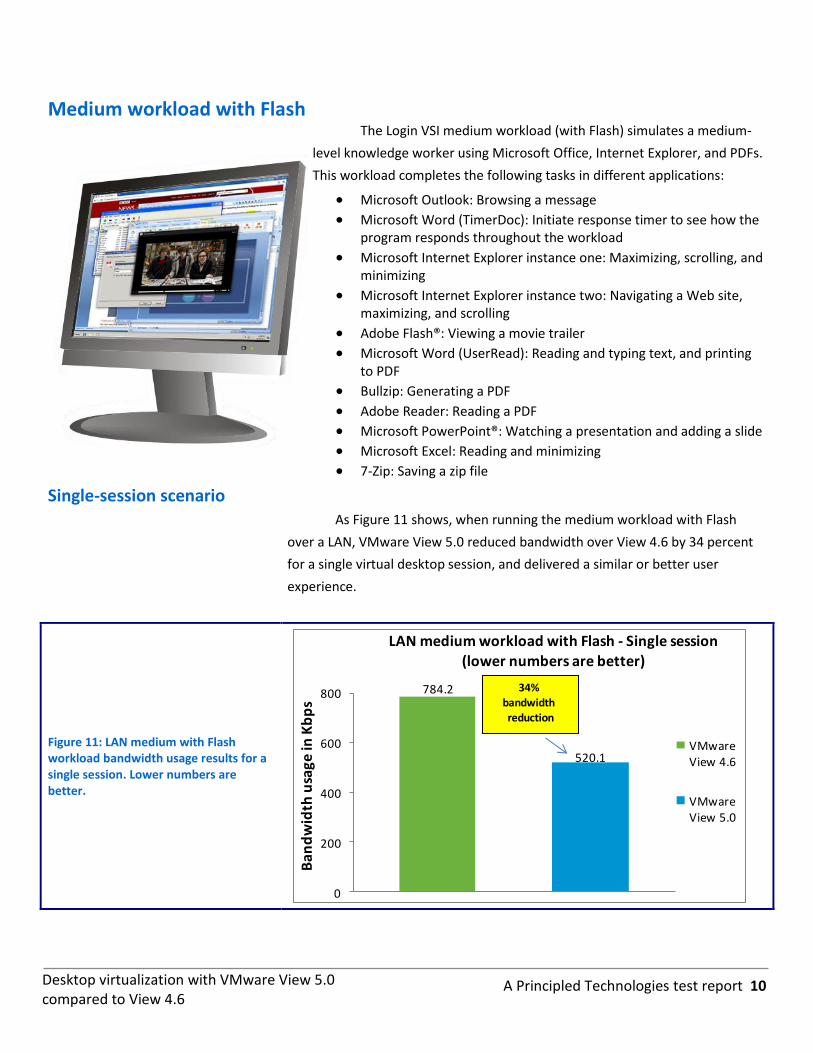
Single-session scenario As Figure 11 shows, when running the medium workload with Flash
over a LAN, VMware View 5.0 reduced bandwidth over View 4.6 by 34 percent
for a single virtual desktop session, and delivered a similar or better user
experience.
Figure 11: LAN medium with Flash workload bandwidth usage results for a single session. Lower numbers are better.
784.2
520.1
0
200
400
600
800
Ba
nd
wid
th u
sag
e in
Kb
ps
LAN medium workload with Flash - Single session
(lower numbers are better)
VMwareView 4.6
VMwareView 5.0
34%
bandwidth
reduction
The Login VSI medium workload (with Flash) simulates a medium-
level knowledge worker using Microsoft Office, Internet Explorer, and PDFs.
This workload completes the following tasks in different applications:
Microsoft Outlook: Browsing a message
Microsoft Word (TimerDoc): Initiate response timer to see how the program responds throughout the workload
Microsoft Internet Explorer instance one: Maximizing, scrolling, and minimizing
Microsoft Internet Explorer instance two: Navigating a Web site, maximizing, and scrolling
Adobe Flash®: Viewing a movie trailer
Microsoft Word (UserRead): Reading and typing text, and printing to PDF
Bullzip: Generating a PDF
Adobe Reader: Reading a PDF
Microsoft PowerPoint®: Watching a presentation and adding a slide
Microsoft Excel: Reading and minimizing
7-Zip: Saving a zip file
A Principled Technologies test report 11
Desktop virtualization with VMware View 5.0 compared to View 4.6
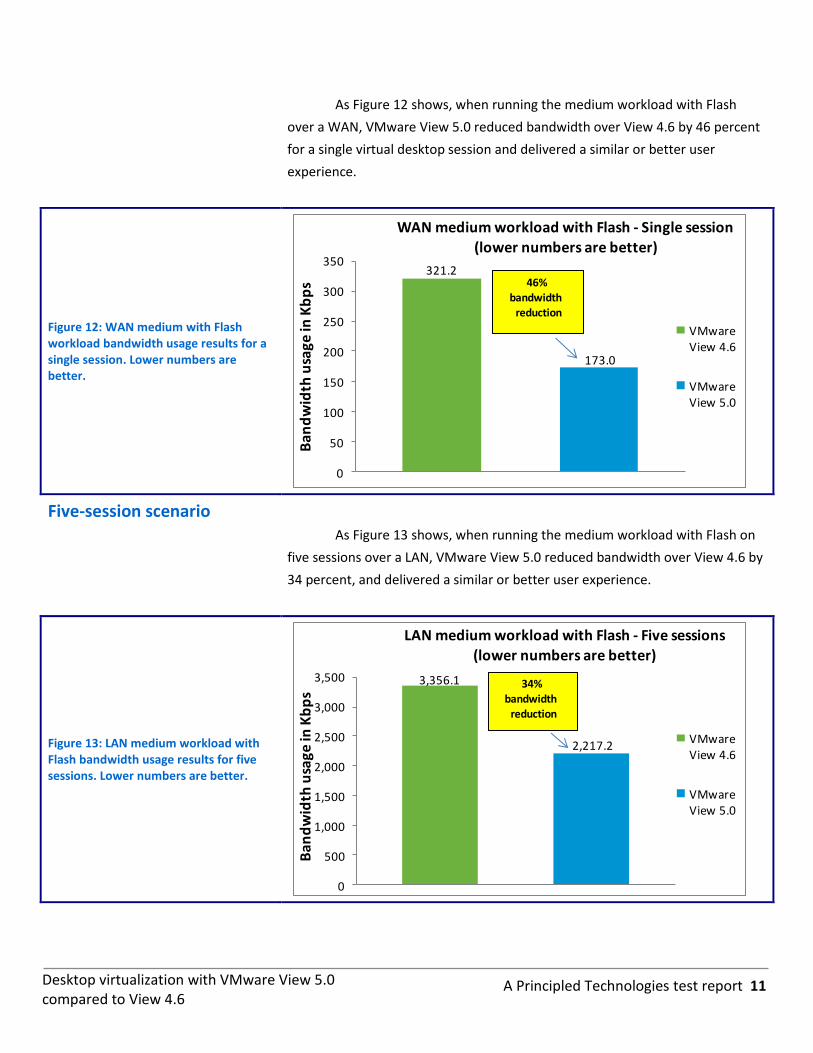
As Figure 12 shows, when running the medium workload with Flash
over a WAN, VMware View 5.0 reduced bandwidth over View 4.6 by 46 percent
for a single virtual desktop session and delivered a similar or better user
experience.
Figure 12: WAN medium with Flash workload bandwidth usage results for a single session. Lower numbers are better.
321.2
173.0
0
50
100
150
200
250
300
350
Ban
dw
idth
usa
ge in
Kb
ps
WAN medium workload with Flash - Single session
(lower numbers are better)
VMwareView 4.6
VMwareView 5.0
46%
bandwidth
reduction
Five-session scenario As Figure 13 shows, when running the medium workload with Flash on
five sessions over a LAN, VMware View 5.0 reduced bandwidth over View 4.6 by
34 percent, and delivered a similar or better user experience.
Figure 13: LAN medium workload with Flash bandwidth usage results for five sessions. Lower numbers are better.
3,356.1
2,217.2
0
500
1,000
1,500
2,000
2,500
3,000
3,500
Ban
dw
idth
usa
ge in
Kb
ps
LAN medium workload with Flash - Five sessions
(lower numbers are better)
VMwareView 4.6
VMwareView 5.0
34%
bandwidthreduction

A Principled Technologies test report 12
Desktop virtualization with VMware View 5.0 compared to View 4.6
As Figure 14 shows, when running the medium workload with Flash on
five sessions over a WAN, VMware View 5.0 reduced bandwidth over View 4.6
by 43 percent, and delivered a better user experience.
Figure 14: WAN medium workload with Flash bandwidth usage results for five sessions. Lower numbers are better. Note: The VMware View 5.0 win percentage using five sessions is skewed downward because of dropped frames due to WAN saturation with View 4.6. We observed this degraded user experience with View 4.6, but it does not appear in average bandwidth calculations.
1,008.8
577.0
0
200
400
600
800
1,000
1,200
Ba
nd
wid
th u
sage
in K
bp
s
WAN medium workload with Flash - Five sessions (lower numbers are better)
VMwareView 4.6
VMwareView 5.0
43%
bandwidthreduction
Median bandwidth results Figure 15 shows the median bandwidth, in Kbps, for VMware View 4.6
and VMware View 5.0 running the medium workload with Flash in both single-
and five-session test scenarios over both LAN and WAN connections. VMware
View 5.0 consistently delivered a similar or better user experience.
As with the light workload and medium workload without Flash,
VMware View 4.6 not only used more bandwidth than View 5.0, but also
noticeably degraded the user experience in the five-session WAN test scenario
because of the Build-to-lossless behavior we describe earlier.
Medium workload with Flash
Activity VMware View 4.6 VMware View 5.0 Percentage VMware View 5.0 win
Single-session scenario
LAN 784.19 520.14 34%
WAN 321.23 172.96 46%
Five-session scenario
LAN 3,356.06 2,217.20 34%
WAN 1,008.81 577.03 43%
Figure 15: Median WAN and LAN testing results, in Kbps, for the medium workload with Flash. Lower numbers are better (except for percentage win).
A Principled Technologies test report 13
Desktop virtualization with VMware View 5.0 compared to View 4.6
FINAL THOUGHTS For your virtual desktop infrastructure, where workers connect from the
local office or across a larger geographic area, you need the best possible
performance so that employees can have a good user experience and do their
work without delay.
In our tests, VMware View 5.0 showed marked improvements over
previous View 4.6 version. View 5.0 decreased bandwidth over View 4.6 by as
much as 74 percent on LAN tests and 70 percent on WAN tests while delivering
equal or better user experience, showing that VMware View 5.0 can provide you
and your workers with the session quality they need, especially in situations
where bandwidth comes at a premium.
WHAT WE TESTED
What’s new in VMware View 5.0 VMware View is desktop virtualization software designed to bring users
familiarity, flexibility, and great performance, while providing the IT department
with simplified management and increased security. Some of the new features
in VMware View 5.0 from View 4.6 include the following:
View Media Services for 3D Graphics. Allows View desktops to view
basic 3D applications (Microsoft® Office 2010, Microsoft Windows® Aero®), as
well as DirectX® and OpenGL® applications, without requiring client devices or
specialized graphic cards.
View Media Services for Integrated Unified Communications.
Optimizes desktop and unified communications by providing users with an
integrated voice-over IP (VOIP) and View desktop experience.
View Persona Management. Enables IT admins to deploy and manage
stateless floating desktops by dynamically associating a user persona to such
desktops. This also allows user personalization settings to remain between
sessions. Note that this feature is only available in premier editions of View.
PCoIP Extension Services. To improve user support issues such as
monitoring, trending, and troubleshooting, these features allow WMI-based
tools to collect over 20 session statistics.
PCoIP Optimization Controls. Helps IT administrators better configure
bandwidth settings (by user, use case, or network requirements), which can
reduce bandwidth by up to 75 percent and improve protocol efficiency.
PCoIP Continuity Services. Automatically reconnects interrupted
sessions, which helps provide a seamless user experience even under unreliable
network conditions.
A Principled Technologies test report 14
Desktop virtualization with VMware View 5.0 compared to View 4.6
View Client for Android. Allows those users with Android-based tablets
to access View virtual desktops.
Enhanced Security Settings. Customizes client certificate handling
through use of an established browser certificate model, which reinforces
corporate policy.
vSphere 5 support. Provides reliable and flexible IT support.
USB Redirect. Provides ability to connect USB devices to the virtualized
desktkop
Location-based printing from non-Windows devices. Allows VMware
View administrators to specify the printers that Windows and non-Windows
users print to based on the location of the device from which they are accessing
VMware View.
Client security certificate handling. Added more policies for security
including: Prompt user to accept and ignore certificate warnings, Disable
security certificate checking, and Mandatory certification checking.
About Dell EqualLogic storage We used the Dell™ EqualLogic™ PS4000XV to host all the virtual
desktops in our testing.
The Dell EqualLogic PS4000XV is a high-performance iSCSI SAN storage
array well suited for deploying business application and virtual server
environments in remote offices and in small-to-medium businesses (SMBs).
With its use of automation, the EqualLogic PS4000XV simplifies management
and is ready for quick deployment at an affordable price.
The EqualLogic comes with 15,000 RPM SAS disk drives to offer strong
random I/O per second (IOPS) for deployment in remote offices, and scales
easily should you need to expand your storage. For more information on the
Dell EqualLogic PS4000XV, visit http://www.dell.com/us/business/p/equallogic-
ps4000xv/pd.
A Principled Technologies test report 15
Desktop virtualization with VMware View 5.0 compared to View 4.6
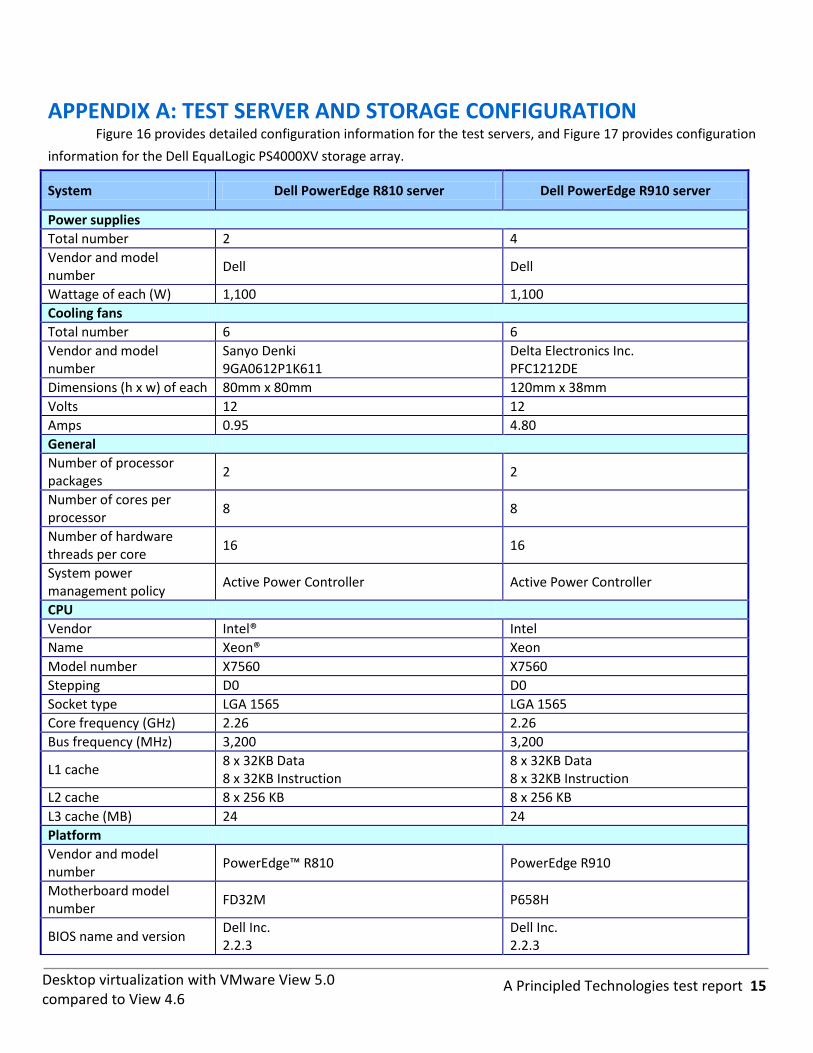
APPENDIX A: TEST SERVER AND STORAGE CONFIGURATION Figure 16 provides detailed configuration information for the test servers, and Figure 17 provides configuration
information for the Dell EqualLogic PS4000XV storage array.
System Dell PowerEdge R810 server Dell PowerEdge R910 server
Power supplies
Total number 2 4
Vendor and model number
Dell Dell
Wattage of each (W) 1,100 1,100
Cooling fans
Total number 6 6
Vendor and model number
Sanyo Denki 9GA0612P1K611
Delta Electronics Inc. PFC1212DE
Dimensions (h x w) of each 80mm x 80mm 120mm x 38mm
Volts 12 12
Amps 0.95 4.80
General
Number of processor packages
2 2
Number of cores per processor
8 8
Number of hardware threads per core
16 16
System power management policy
Active Power Controller Active Power Controller
CPU
Vendor Intel® Intel
Name Xeon® Xeon
Model number X7560 X7560
Stepping D0 D0
Socket type LGA 1565 LGA 1565
Core frequency (GHz) 2.26 2.26
Bus frequency (MHz) 3,200 3,200
L1 cache 8 x 32KB Data 8 x 32KB Instruction
8 x 32KB Data 8 x 32KB Instruction
L2 cache 8 x 256 KB 8 x 256 KB
L3 cache (MB) 24 24
Platform
Vendor and model number
PowerEdge™ R810 PowerEdge R910
Motherboard model number
FD32M P658H
BIOS name and version Dell Inc. 2.2.3
Dell Inc. 2.2.3
A Principled Technologies test report 16
Desktop virtualization with VMware View 5.0 compared to View 4.6
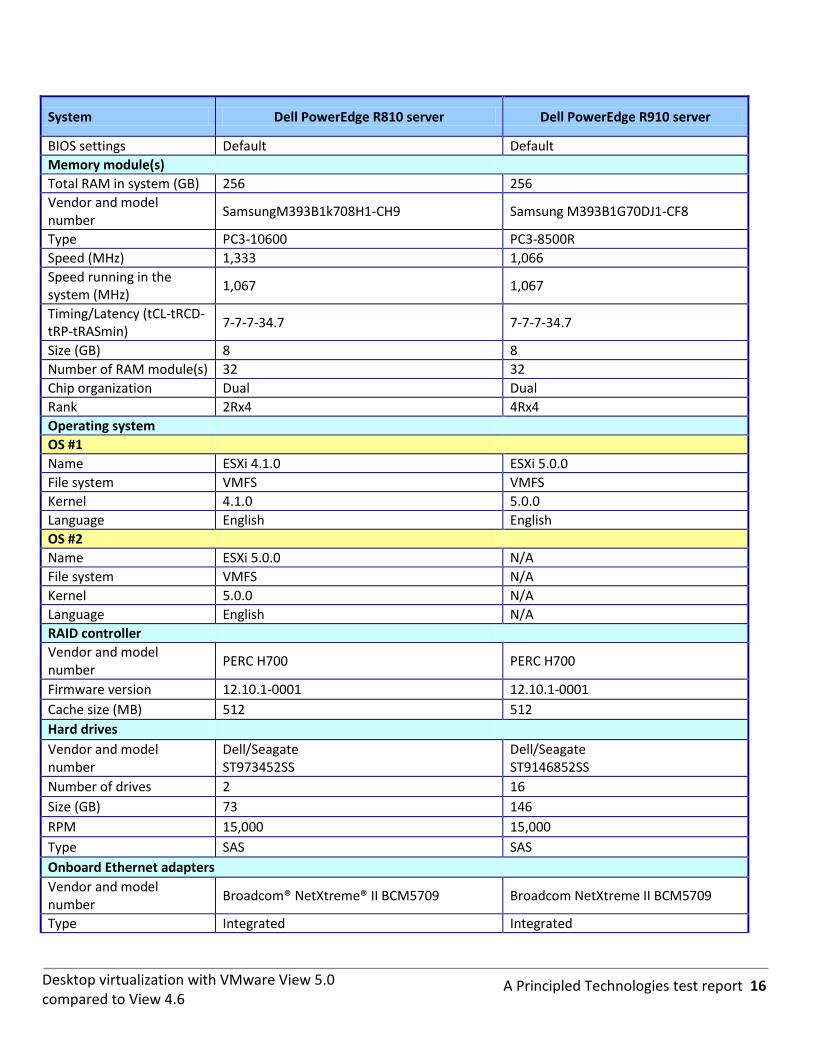
System Dell PowerEdge R810 server Dell PowerEdge R910 server
BIOS settings Default Default
Memory module(s)
Total RAM in system (GB) 256 256
Vendor and model number
SamsungM393B1k708H1-CH9 Samsung M393B1G70DJ1-CF8
Type PC3-10600 PC3-8500R
Speed (MHz) 1,333 1,066
Speed running in the system (MHz)
1,067 1,067
Timing/Latency (tCL-tRCD-tRP-tRASmin)
7-7-7-34.7 7-7-7-34.7
Size (GB) 8 8
Number of RAM module(s) 32 32
Chip organization Dual Dual
Rank 2Rx4 4Rx4
Operating system
OS #1
Name ESXi 4.1.0 ESXi 5.0.0
File system VMFS VMFS
Kernel 4.1.0 5.0.0
Language English English
OS #2
Name ESXi 5.0.0 N/A
File system VMFS N/A
Kernel 5.0.0 N/A
Language English N/A
RAID controller
Vendor and model number
PERC H700 PERC H700
Firmware version 12.10.1-0001 12.10.1-0001
Cache size (MB) 512 512
Hard drives
Vendor and model number
Dell/Seagate ST973452SS
Dell/Seagate ST9146852SS
Number of drives 2 16
Size (GB) 73 146
RPM 15,000 15,000
Type SAS SAS
Onboard Ethernet adapters
Vendor and model number
Broadcom® NetXtreme® II BCM5709 Broadcom NetXtreme II BCM5709
Type Integrated Integrated
A Principled Technologies test report 17
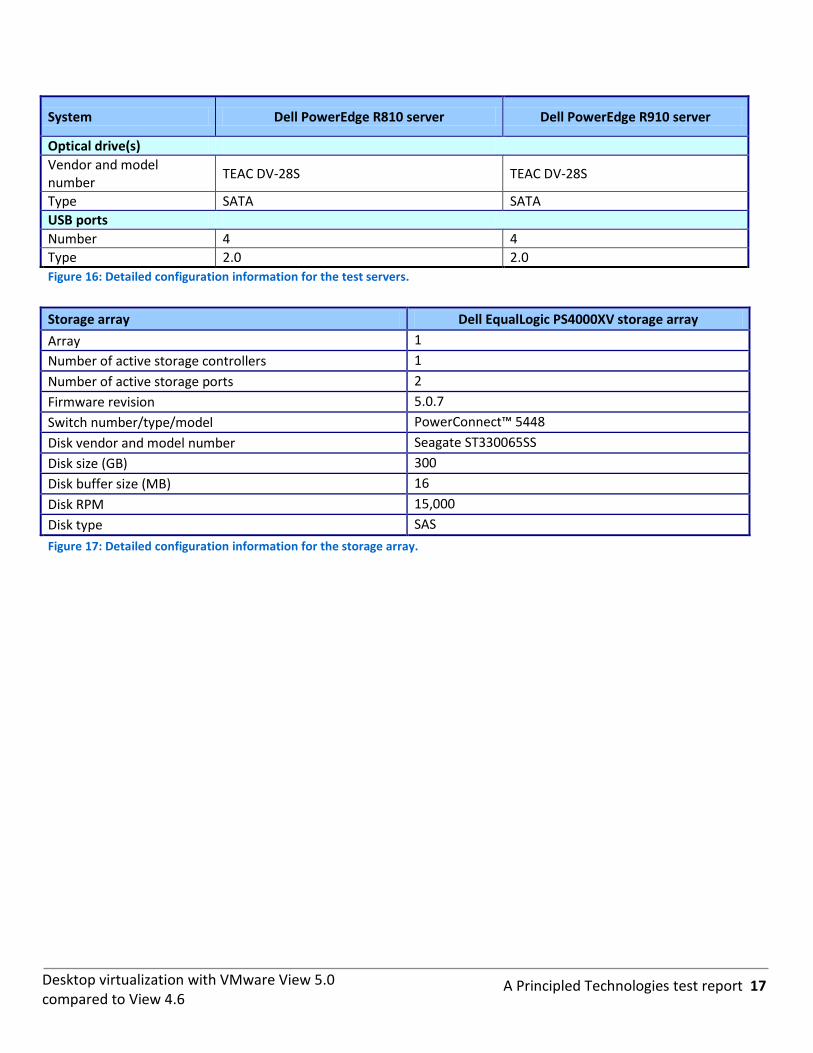
Desktop virtualization with VMware View 5.0 compared to View 4.6
System Dell PowerEdge R810 server Dell PowerEdge R910 server
Optical drive(s)
Vendor and model number
TEAC DV-28S TEAC DV-28S
Type SATA SATA
USB ports
Number 4 4
Type 2.0 2.0
Figure 16: Detailed configuration information for the test servers.
Storage array Dell EqualLogic PS4000XV storage array
Array 1
Number of active storage controllers 1
Number of active storage ports 2
Firmware revision 5.0.7
Switch number/type/model PowerConnect™ 5448
Disk vendor and model number Seagate ST330065SS
Disk size (GB) 300
Disk buffer size (MB) 16
Disk RPM 15,000
Disk type SAS
Figure 17: Detailed configuration information for the storage array.
A Principled Technologies test report 18
Desktop virtualization with VMware View 5.0 compared to View 4.6
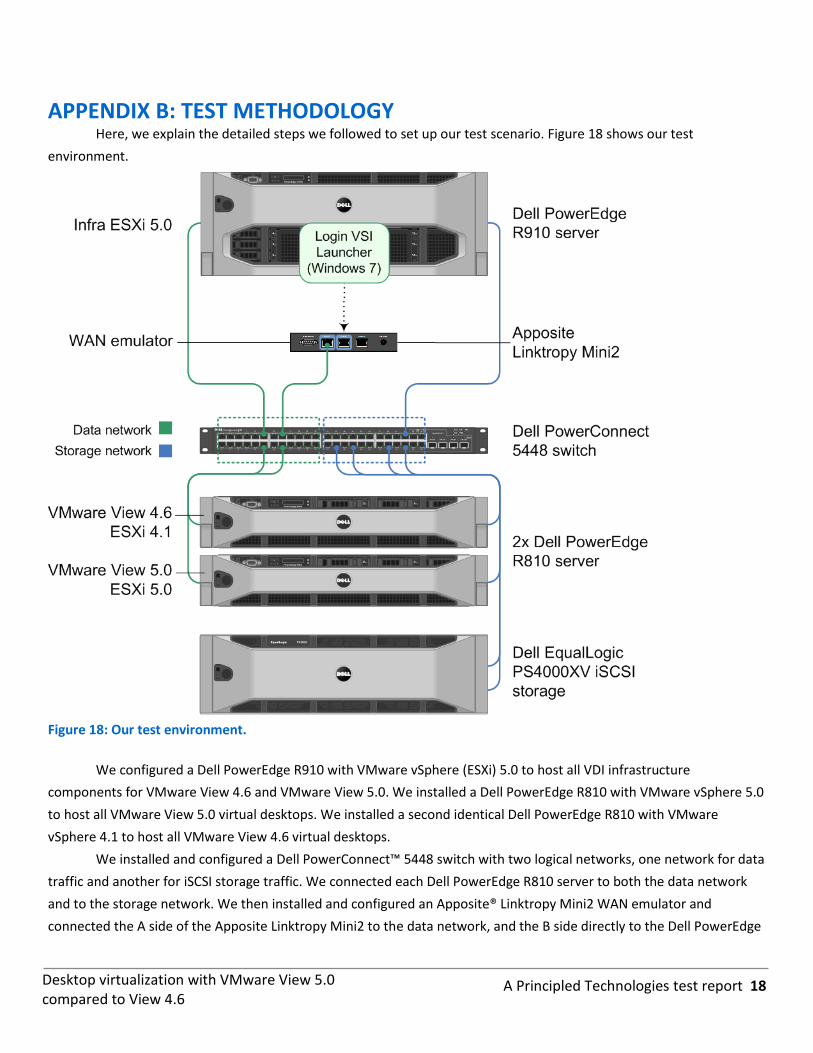
APPENDIX B: TEST METHODOLOGY Here, we explain the detailed steps we followed to set up our test scenario. Figure 18 shows our test
environment.
Figure 18: Our test environment.
We configured a Dell PowerEdge R910 with VMware vSphere (ESXi) 5.0 to host all VDI infrastructure
components for VMware View 4.6 and VMware View 5.0. We installed a Dell PowerEdge R810 with VMware vSphere 5.0
to host all VMware View 5.0 virtual desktops. We installed a second identical Dell PowerEdge R810 with VMware
vSphere 4.1 to host all VMware View 4.6 virtual desktops.
We installed and configured a Dell PowerConnect™ 5448 switch with two logical networks, one network for data
traffic and another for iSCSI storage traffic. We connected each Dell PowerEdge R810 server to both the data network
and to the storage network. We then installed and configured an Apposite® Linktropy Mini2 WAN emulator and
connected the A side of the Apposite Linktropy Mini2 to the data network, and the B side directly to the Dell PowerEdge
A Principled Technologies test report 19
Desktop virtualization with VMware View 5.0 compared to View 4.6
R910 (for the Login VSI launcher connection). Note: We configured the Linktropy Mini2 to emulate a over a restricted-
bandwidth WAN with 2 Mb/s download/300 Kb/s upload and 100 m/s latency.
We connected a Dell EqualLogic PS4000XV storage array to the storage network via two single gigabit links, and
configured the array to host the virtual desktops.
Setting up the storage Dell EqualLogic PS5000XV storage
We installed the Dell PowerEdge R910 server to use internal storage to host the ESXi operating system. We
configured the Dell PERC H700 array controller to use 16 146GB SAS disks in a RAID 10 configuration to host the ESXi
hypervisor and infrastructure virtual machines.
We installed both Dell PowerEdge R810 servers to use internal storage to host the ESXi operating systems. We
configured the integrated PERC 7i array for a RAID 1 configuration with two 73GB SAS drives. We hosted all virtual
desktops on a Dell EqualLogic PS4000XV Storage array.
We enabled jumbo frames on all iSCSI-dedicated server NICs, the Dell PowerConnect 5448 switch, and on each
NIC on the Dell EqualLogic PS4000XV storage.
The Dell EqualLogic PS4000XV contained 16 drives. We configured a single storage group with the Dell
EqualLogic PS4000XV as the only member. We configured the storage group to have a single storage pool in RAID 50
mode. On the storage pool, we created two 250GB LUNs: one for VMware View 4.6 virtual desktops, and one for
VMware View 5.0 virtual desktops.
Setting up the internal storage on the Dell PowerEdge R910 for host operating system installation
1. Enter the RAID controller BIOS by pressing Ctrl+R at the relevant prompt during boot. 2. Highlight Controller 0, and press F2. 3. Select Create New VD. 4. Select all 16 drives, select RAID level 10, tab to the OK button, and press Enter. Accept the warning regarding
initialization. 5. Select the new virtual drive, press F2, and select Initialization, Start Init. 6. Wait for the initialization operation to complete. 7. Repeat steps 2 through 6 for the remaining internal volume, selecting drives three and four. 8. Press Escape, and choose to Save and Exit to return to the boot sequence.
Setting up the internal storage on the two Dell PowerEdge R810s for host operating system installation
1. Enter the RAID controller BIOS by pressing Ctrl+R at the relevant prompt during boot. 2. Highlight Controller 0, and press F2. 3. Select Create New VD. 4. Select both drives, select RAID level 1, tab to the OK button, and press Enter. Accept the warning regarding
initialization. 5. Select the new virtual drive, press F2, and select Initialization, Start Init. 6. Wait for the initialization operation to complete. 7. Press Escape, and choose to Save and Exit to return to the boot sequence. 8. Repeat steps 1 through 7 for the second Dell PowerEdge R810.
Setting up the external storage
1. Using the command-line console, via serial cable, reset the first Dell EqualLogic PS4000XV by using the reset command.
A Principled Technologies test report 20
Desktop virtualization with VMware View 5.0 compared to View 4.6
2. Supply a group name, group IP address, and IP address for eth0. 3. After group creation, using a computer connected to the same subnet as the storage, use the Dell EqualLogic
Web interface to do the following: a. Assign IP addresses on the remaining NIC (eth1). Enable both NICs. b. Set a MTU size of 9,000 on each NIC on the array. c. Create a storage pool by right-clicking Storage pools, and choosing Create storage pool. d. Choose Yes when prompted to configure the member. e. Choose RAID 50 for the RAID Policy. f. Create a 250GB volume to host the data volumes for VMware View 5.0. g. For the volumes created in the previous step, limit access to iSCSI initiator name, and enter the initiator
name for the ESXi server named view5. h. Repeat steps e through g to create a second 250GB LUN for VMware View 4.6. Be sure to adjust the iSCSI
initiator name for the ESXi server named view46.
Setting up the infrastructure server (infra) and the virtual desktop hosts (view46 and view5)
BIOS settings
We used the latest BIOS updates on each of the two Dell PowerEdge R810s and the Dell PowerEdge R910. We
adjusted the default BIOS settings by enabling Virtualization Technology, disabling C-States, and setting the performance
profile to maximum performance.
Installing VMware vSphere 5.0 (ESXi) on the PowerEdge R910 (infra)
1. Insert the ESXi 5.0 disk, and select Boot from disk. 2. On the Welcome screen, press Enter. 3. On the End User License Agreement (EULA) screen, press F11. 4. On the Select a Disk to Install or Upgrade Screen, select the relevant volume to install ESXi on, and press Enter. 5. On the Please Select a Keyboard Layout screen, press Enter. 6. On the Enter a Root Password Screen, assign a root password, and confirm it by entering it again. Press Enter to
continue. 7. On the Confirm Install Screen, press F11 to install. 8. On the Installation complete screen, press Enter to reboot.
Configuring ESXi after installation
1. On the ESXi 5.0 screen, press F2, enter the root password, and press Enter. 2. On the System Customization screen, select Troubleshooting Options, and press Enter. 3. On the Troubleshooting Mode Options screen, select enable ESXi Shell, and press Enter. 4. Select Enable SSH, press Enter, and press Esc. 5. On the System Customization screen, select Configure Management Network. 6. On the Configure Management Network screen, select IP Configuration. 7. On the IP Configuration screen, select Set static IP; enter an IP address, subnet mask, and default gateway; and
press Enter. 8. On the Configure Management Network screen, press Esc. When asked if you want to apply the changes, press
Y. 9. Log into infra as root with the vSphere client. 10. Select the Configuration tab, and click Networking. 11. Click Add Networking… 12. Create a virtual machine network called data and select the appropriate adapter. 13. Create a virtual machine network called WAN and select the adapter connected directly to the Apposite
Linktropy Mini2.
A Principled Technologies test report 21
Desktop virtualization with VMware View 5.0 compared to View 4.6
14. Log off.
Installing VMware vSphere 5.0 (ESXi) on the PowerEdge R810 (view5)
1. Insert the ESXi 5.0 disk, and select Boot from disk. 2. On the Welcome screen, press Enter. 3. On the End User License Agreement (EULA) screen, press F11. 4. On the Select a Disk to Install or Upgrade Screen, select the relevant volume to install ESXi on, and press Enter. 5. On the Please Select a Keyboard Layout screen, press Enter. 6. On the Enter a Root Password Screen, assign a root password, and confirm it by entering it again. Press Enter to
continue. 7. On the Confirm Install Screen, press F11 to install. 8. On the Installation complete screen, press Enter to reboot.
Configuring ESXi after installation
1. On the ESXi 5.0 screen, press F2, enter the root password, and press Enter. 2. On the System Customization screen, select troubleshooting options, and press Enter. 3. On the Troubleshooting Mode Options screen, select enable ESXi Shell, and press Enter. 4. Select Enable SSH, press Enter, and press ESC. 5. On the System Customization screen, select Configure Management Network. 6. On the Configure Management Network screen, select IP Configuration. 7. On the IP Configuration screen, select Set static IP; enter an IP address, subnet mask, and default gateway; and
press Enter. 8. On the Configure Management Network screen, press Esc. When asked if you want to apply the changes, press
Y. 9. Log into view5 as root with the vSphere client. 10. Select the Configuration tab, and click Networking. 11. Click Add Networking… 12. Create a virtual machine network called data and select the appropriate adapter. 13. Create a vmkernel network called iSCSI and select the appropriate adapter. 14. Log off.
Installing VMware vSphere 4.1 (ESXi) on the PowerEdge R810 (view46)
1. Insert the ESXi 4.1 DVD, and restart the computer. 2. Boot the system from DVD. 3. On the VMware VMvisor Boot Menu, select ESXi Installer, and press Enter. 4. On the Welcome to VMware ESXi 4.1.0 Installation screen, click Enter. 5. On the EULA screen, press F11. 6. Select a disk on which to install ESXi, and press Enter. 7. To confirm install, press F11. 8. When the installation is complete, eject the DVD, and press Enter to reboot. 9. On the ESXi Screen, press F2 to Customize System. 10. On the Authentication Required Screen, log in as root with no password. 11. On the System Customization screen, select Configure Password. 12. On the Configure Password screen, enter your new password, confirm, and press Enter. 13. Select Configure Management Network, and press Enter. 14. Select IP Configuration, and press Enter. 15. On the IP Configuration screen, select Set static IP address and network configuration, and press the spacebar. 16. Enter the necessary network parameters, and press Enter. 17. Select DNS Configuration, and press Enter.
A Principled Technologies test report 22
Desktop virtualization with VMware View 5.0 compared to View 4.6
18. Select Use the following DNS server addresses and hostname. 19. Enter the IP address of the DNS server, and optionally, an alternate DNS server, and press Enter. 20. Press Esc when finished. On the Configure Management Network: Confirm pop-up, press Y to accept the
changes, and restart the management network. 21. On the main System Customization screen, select Troubleshooting Options, and press Enter. 22. Select Enable Remote Tech Support (SSH), and press Enter. 23. Press Esc twice to log out. 24. Log into view46 as root with the vSphere client. 25. Select the Configuration tab, and click Networking. 26. Click Add Networking…
27. Create a virtual machine network called data and select the appropriate adapter. 28. Create a vmkernel network called iSCSI and select the appropriate adapter. 29. Log off.
Setting up a VM to host Microsoft Windows Active Directory server (DC1) 1. From a Microsoft Windows server or workstation, connect to the infra server via the VMware vSphere client. 2. Log in as root to the infra server. 3. In the vSphere client, connect to the vCenter Server, and browse to the ESXi host. 4. Click the Virtual Machines tab. 5. Right-click, and choose New Virtual Machine. 6. Choose Custom, and click Next. 7. Assign the name DC1 to the virtual machine, and click Next. 8. Select datastore1, and click Next. 9. Choose Virtual Machine Version 8, and click Next. 10. Choose Windows, and choose Microsoft Windows Server 2008 R2 (64-bit), and click Next. 11. Choose two virtual processors, and click Next. 12. Choose 4GB RAM, and click Next. 13. Click 1 for the number of NICs, select E1000, connect to the data network, and click Next. 14. Leave the default virtual storage controller, and click Next. 15. Choose to create a new virtual disk, and click Next. 16. Make the OS virtual disk size 20 GB, choose thick-provisioned lazy zeroed, specify the OS datastore on the
external storage, and click Next. 17. Keep the default virtual device node (0:0), and click Next. 18. Click Finish. 19. Right-click the VM, and choose Edit Settings. 20. On the Hardware tab, click Add… 21. Click Hard Disk, and click Next. 22. Click Create a new virtual disk, and click Next. 23. Specify 10GB for the virtual disk size, choose thick-provisioned lazy zeroed, and specify datastore1. 24. Choose SCSI(1:2) for the device node, and click Next. 25. On the Hardware tab, click Add… 26. Click Finish, and click OK. 27. Click the Resources tab, and click Memory. 28. Connect the VM virtual CD-ROM to the Microsoft Windows Server 2008 R2 installation disk. 29. Start the VM.
Installing the Microsoft Windows Server 2008 R2 operating system on the VM
1. Choose the language, time and currency, and keyboard input. Click Next. 2. Click Install Now.
A Principled Technologies test report 23
Desktop virtualization with VMware View 5.0 compared to View 4.6
3. Choose Windows Server 2008 R2 Enterprise (Full Installation), and click Next. 4. Accept the license terms, and click Next. 5. Click Custom. 6. Click the Disk, and click Drive options (advanced). 7. Click NewApplyFormat, and click Next. 8. After the installation completes, click OK to set the Administrator password. 9. Enter the administrator password twice, and click OK. 10. Connect the machine to the Internet, and install all available Windows updates. Restart as necessary. 11. Enable remote desktop access. 12. Change the hostname to DC1 and reboot when prompted. 13. Run diskmgmt.msc.
14. Select the 10 GB secondary volume, format it NTFS, and assign it drive letter E 15. Set up networking for the data network:
a. Click StartControl Panel, right-click Network Connections, and choose Open. b. Right-click the VM traffic NIC, and choose Properties. c. Uncheck TCP/IP (v6). d. Select TCP/IP (v4), and choose Properties. e. Set the IP address, subnet, gateway, and DNS server.
Installing Active Directory and DNS services on DC1
1. Click StartRun, type dcpromo and click OK. 2. At the Active Directory Domain Services Installation Wizard welcome screen, check the Use advanced mode
installation option, and click Next. 3. In the Choose a Deployment Configuration dialog box, select Create a new domain in a new forest, and click
Next. 4. At the FQDN page, type VDI.com and click Next. 5. At the NetBIOS name prompt, leave the name VDI, and click Next. 6. At the Forest Functionality level, select Windows Server 2008 R2, and click Next. 7. At the additional Domain Controller Options, leave DNS server selected, and click Next.
8. At the System Folder Location screen, change to E:\ leave the default options, and click Next. 9. Assign a Directory Services Restore Mode Administrator account password, and click Next. 10. At the Summary screen, review your selections, and click Next. 11. Once Active Directory Domain Services finishes installing, click Finish, and restart the system. 12. Run dnsmgmt.msc. 13. Create a reverse lookup zone for DC1. 14. Create static entries for infra, view5, and view46.
Configuring the Windows time service on DC1
To ensure reliable time, we pointed our Active Directory server to a physical NTP server. 1. Open a command prompt. 2. Type the following:
32tm /config /syncfromflags:manual /manualpeerlist:"<ip address of a NTP
server>"
W32tm /config /reliable:yes
W32tm /config /update
W32tm /resync
Net stop w32time
Net start w32time
A Principled Technologies test report 24
Desktop virtualization with VMware View 5.0 compared to View 4.6
Configuring the PCOIP GPO to turn off
1. In the Active Directory users and computers MMC plugin, create an OU in Active Directory called No-build-to-lossless
2. Open the Group policy editor. 3. Create a new GPO called No-Build to lossless 4. Click Administrative templates, and click Add/remove templates… 5. Browse to the pcoip.adm on the View 5 install DVD, and click Open. 6. In the GPO, browse to Computer ConfigurationAdministrative TemplateClassic Administrative Template
(ADM)PCoIP Session Variables Not Overridable Administrative settings, and click Turn off Build-to-lossless feature. Right click, and click Edit.
7. Select the radio button for Enabled, and tick the box next to I accept to turn off the Build-to-lossless feature. 8. Click OK.
Setting up the Login VSI share and Active Directory users
For Login VSI to work correctly a CIFS share, Active directory OU, and Active directory users must be created. For
more information on Login VSI, see http://www.loginvsi.com/en/admin-guide/installation.html
1. Open Windows Explorer and create a file called share 2. Assign permissions of read/write to the VDI/everyone group. 3. From the login VSI 3oRelease 6 media, run the login VSI AD Setup. 4. Keep the defaults, and click Start.
Setting up VMs to host the vCenter servers (vCenter 5, and vCenter4) 1. From a Microsoft Windows server or workstation, connect to the infra server via the vSphere client. 2. Log into infra with the VMware vSphere client. 3. In the vSphere client, connect to the vCenter Server, and browse to the ESXi host. 4. Click the Virtual Machines tab. 5. Right-click, and choose New Virtual Machine. 6. Choose Custom, and click Next. 7. Assign the name vCenter5 to the virtual machine, and click Next. 8. Select the Datastore on the storage, and click Next. 9. Choose Virtual Machine Version 8, and click Next. 10. Choose Windows, choose Microsoft Windows Server 2008 R2 (64-bit), and click Next. 11. Choose two virtual processors, and click Next. 12. Choose 4GB RAM, and click Next. 13. Click 1 for the number of NICs, select E1000, connect to the data network, and click Next. 14. Leave the default virtual storage controller, and click Next. 15. Choose to create a new virtual disk, and click Next. 16. Make the OS virtual disk size 40 GB, choose thick-provisioned lazy zeroed, specify the OS datastore on the
external storage, and click Next. 17. Keep the default virtual device node (0:0), and click Next. 18. Connect the VM virtual CDROM to the Microsoft Windows 2008 R2 installation disk. 19. Click Finish. 20. Start the VM.
Installing the Microsoft Windows Server 2008 R2 operating system on the VM
1. Choose the language, time and currency, and keyboard input. Click Next. 2. Click Install Now. 3. Choose Windows Server 2008 R2 Enterprise (Full Installation), and click Next.

A Principled Technologies test report 25
Desktop virtualization with VMware View 5.0 compared to View 4.6
4. Accept the license terms, and click Next. 5. Click Custom. 6. Click the Disk, and click Drive options (advanced). 7. Click NewApplyFormat, and click Next. 8. After the installation completes, click OK to set the Administrator password. 9. Enter the administrator password twice, and click OK. 10. Connect the machine to the Internet, and install all available Windows updates. Restart as necessary. 11. Enable remote desktop access. 12. Change the hostname to vCenter5 and reboot when prompted. 13. Set up networking for the data network:
a. Click Start, Control Panel, right-click Network Connections, and choose Open. b. Right-click the VM traffic NIC, and choose Properties. c. Uncheck TCP/IP (v6). d. Select TCP/IP (v4), and choose Properties. e. Set the IP address, subnet, gateway, and DNS server.
14. Join the VDI domain. 15. Reboot the system. 16. Repeat steps 1 through 20 in the Setting up VMs to host the vCenter servers (vCenter 5, and vCenter4) section,
and steps 1 through 15 above to create a VM called vCenter4
Installing vCenter 5
1. Log onto the vCenter 5 as VDI\administrator 2. From the VMware vCenter5 install media, click Autorun. 3. Click Run to start the install wizard. 4. Click the install button on the VMware vSphere 5.0 wizard. 5. Select the install wizard language as English, and click OK. 6. At the install wizard welcome screen, click Next. 7. Agree to the license agreement, and click Next. 8. Enter user information and a license key, and click Next. 9. Select Install the SQL express instance, and click Next. 10. Select the system account for the vCenter Server service account, and click Next. 11. Keep the installation directory as C:\Program Files\VMware\Infrastructure\, and click Next. 12. Select Create a standalone VMware vCenter Server instance, and click Next. 13. Keep the vCenter default ports, and click Next. 14. Select 1024 MB for the JVM memory, and click Next. 15. Click Install to finish the vCenter server installation. 16. Restart the server when complete.
17. Using the vSphere client, log into vCenter5 as VDI\administrator 18. Right-click the root of vCenter5, and click New Data center. 19. Name the New datacenter View5-DC 20. Add the ESX server named view5 to the datacenter. 21. Log out.
Configuring iSCSI networking on ESXi (view5)
We followed the steps from VMware’s document, iSCSI SAN Configuration Guide version 4.1, as a guide for our
configuration of iSCSI on VMware vSphere 5.0. However, we performed most steps in the VMware vSphere 5.0 client UI
as opposed to the command line, as VMware has added the relevant features to the UI in vSphere 5.0.
1. Using the vSphere client from another machine, connect to the ESXi server.
A Principled Technologies test report 26
Desktop virtualization with VMware View 5.0 compared to View 4.6
2. Add the necessary vSwitches: a. Click the host, click the Configuration tab, and click Networking. b. Click Add Networking. c. Choose VMkernel, and click Next. d. Choose create a vSphere standard switch. e. Choose the first onboard NIC associated with iSCSI traffic. f. Assign the network label, and assign IP settings. g. Click Finish. h. Repeat steps b through g for the remaining NIC assigned to iSCSI traffic.
3. Add the iSCSI software storage adapter: a. Click the host, click the Configuration tab, and click Storage adapters. b. Click Add. c. Click Add software iSCSI adapter. d. Click OK.
4. Configure the iSCSI software storage adapter: a. Right-click the iSCSI adapter that was just added to the system, choose Properties, and ensure it is enabled. b. Inside the iSCSI adapter Properties window, click the Network Configuration tab. c. Under VMkernel port bindings, click Add, and add each VMkernel adapter to the VMkernel port bindings list.
5. Enable jumbo frames in ESXi: a. Click the host, click the Configuration tab, and click Networking. b. On the first vSwitch used for iSCSI, click Properties. c. Select the vSwitch. d. Click Edit. e. Modify the MTU to 9,000. f. Click OK. g. In the vSwitch Properties window, choose the VMkernel port. h. Click Edit. i. Modify the MTU to 9,000. j. Click OK. k. Click Yes if warned about datastore access. l. Click Close.
6. Access provisioned Dell EqualLogic storage: a. Using the Dell EqualLogic Web UI, ensure the VMware View 5-specific volume is online and the VMware
View 4.6-specific volume is offline. b. In the vSphere client, click the host, click the Configuration tab, and click Storage adapters. c. Right-click the iSCSI software storage adapter. d. Click Dynamic discovery. e. Click Add. f. Enter the Dell EqualLogic group IP address. g. Click Close. h. Click Yes when prompted to rescan the HBA.
Installing the Dell EqualLogic Multipathing Extension Module (MEM) version 1.1 Beta on the ESXi server 1. Using a file transfer utility, copy the MEM installation ZIP file to the ESXi server. 2. Use the following command to install the Dell EqualLogic MEM beta. Consult the installation and user guide for
more details on the VMware MEM integration. esxcli software vib install -d membundlename.zip --no-sig-check
A Principled Technologies test report 27
Desktop virtualization with VMware View 5.0 compared to View 4.6
3. Using the Dell EqualLogic Multipathing Extension Module Installation and User Guide, verify that the MEM is functional in vSphere.
Installing vCenter 4.1
1. Log into the VM named vCenter4 as VDI\administrator 2. From the VMware vCenter4 install media, click Autorun. 3. Click vCenter Server. 4. Select the install wizard language as English, and click OK. 5. At the install wizard welcome screen, click Next. 6. Agree to the license agreement, and click Next. 7. Enter user information and a license key, and click Next. 8. Select Install the SQL express instance, and click Next. 9. Select the system account for the vCenter Server service account, and click Next. 10. Keep the installation directory as C:\Program Files\VMware\Infrastructure\, and click Next. 11. Select Create a standalone VMware vCenter Server instance, and click Next. 12. Keep the vCenter default ports, and click Next. 13. Click install to finish the vCenter server installation. 14. Restart the server when complete. 15. Using the vSphere client, log into vCenter5 as VDI\administrator 16. Right-click the root of vCenter4, and click New Data center. 17. Name the New datacenter View4-DC 18. Add the ESX server named view46 to the datacenter.
Installing the vSphere client and vSphere CLI
Required materials:
One auxiliary system (guest, netbook, or server) with a recent Windows OS and with network connection to the VMware management network.
vSphere client 4.1 installer, available from http://vsphereclient.vmware.com/vsphereclient/3/4/5/0/4/3/VMware-viclient-all-4.1.0-345043.exe.
vSphere CLI 4.1 installer is available for Windows or 32-/64-bit Linux from http://downloads.vmware.com/d/details/vcli41/ZHcqYmRoaCpiZHRAag==
1. On the auxiliary system, run the vSphere installer VMware-viclient-all-4.1.0-345043.exe. 2. On the same host, run the vSphere CLI installer.
Configuring the iSCSI network for the Dell EqualLogic Multipath Extension Module
1. Create a new vSwitch for each NIC dedicated to iSCSI traffic. 2. In each vSwitch, create a new VMkernel, using each dedicated iSCSI NIC and assigning a valid IP address for the
storage network. 3. Under Storage adapters, create a new software iSCSI adapter, and bind all the iSCSI VMkernels to the adapter.
Installing the Dell ESX Multipath Extension Module
1. To install the EqualLogic ESX Multipath Extension Module, download the package from Dell (support contract required) at https://www.equallogic.com/support/download_file.aspx?id=946.
2. Unzip the package, and change the directory to EqualLogic-ESX-Multipathing-Module. 3. Determine whether the module is already installed with this command:
> setup.pl --query --server=view46.VDI.com --username=root \
--password=Password1
4. If needed, install it with this command: > setup.pl –-install --server= view46.VDI.com --username=root \

A Principled Technologies test report 28
Desktop virtualization with VMware View 5.0 compared to View 4.6
--password=Password1 5. Reboot the ESXi server. 6. Verify that the module is active:
> setup.pl --query --server= view46.VDI.com --username=root \ --password=Password1
Setting up a Windows 7 Enterprise x64 image for two VMware View virtual desktops and two Login VSI launchers
Using the vSphere client, we created four identical Windows 7 Enterprise x64 VMs using a base image (see
below): two of them on the server named infra, one on the view5 server, and one on the view46 server.
We configured the Windows 7 Enterprise x64 VMs on the infra server to be Login VSI launchers, one for VMware
View 5.0 testing, and another for View 4.6 testing. We configured the Windows 7 Enterprise x64 VM on the view5 server
to be the virtual desktop template for VMware View 5.0 testing. We configured the Windows 7 Enterprise x64 VM on
the view46 server to be the virtual desktop template for View 4.6.
For the Login VSI launcher VMs, after the base image, we installed the View 5 and View 4.6 clients on the
respective VMs, added them to the Login VSI OU in Active Directory, and then installed the Login VSI Launcher setup on
both.
For the virtual desktop images, we optimized the Microsoft Windows 7 OS for both, installed Microsoft Office
2007, installed the Login VSI target software, added them to the Login VSI OU, and installed the respective VMware View
5 and 4.6 agents. We then copied five View 4.6 virtual desktops, and copied five more virtual desktops. We customized
the virtual desktops using Microsoft Sysprep.
Installing the Windows 7 Enterprise (x64) base image
For all Login VSI launchers and for virtual desktops, we used the same base Windows 7 installation procedure.
1. Log into the appropriate vCenter. 2. In the vSphere client, connect to the vCenter Server, and browse to the ESXi host. 3. Click the Virtual Machines tab. 4. Right-click, and choose New Virtual Machine. 5. Choose Custom, and click Next. 6. Assign the name DC1 to the virtual machine, and click Next. 7. Select datastore1, and click Next. 8. Choose Virtual Machine Version 8, and click Next. 9. Choose Windows, choose Microsoft Windows 7 (64-bit), and click Next. 10. Choose two virtual processors, and click Next. 11. Choose 2GB RAM, and click Next. 12. Click 1 for the number of NICs, select E1000, and click Next. 13. Leave the default virtual storage controller, and click Next. 14. Choose to create a new virtual disk, and click Next. 15. Make the OS virtual disk size 20 GB, choose thick-provisioned lazy zeroed, specify the OS datastore on the
external storage, and click Next. 16. Keep the default virtual device node (0:0), and click Next. 17. Click Finish. 18. Click Finish, and click OK. 19. Click the Resources tab, and click Memory. 20. Connect the VM virtual CD-ROM to the Microsoft Windows 7 x64 installation disk.
A Principled Technologies test report 29
Desktop virtualization with VMware View 5.0 compared to View 4.6
21. Start the VM. 19. When the installation prompts you, press any key to begin setup. 20. Enter your language preferences, and click Next. 21. Click Install. 22. Accept the license terms, and click Next. 23. Select Custom, and select the drive that will contain the OS. 24. Click Install, and the setup begins. 25. Type user for the username and change the computer name, and click Next. 26. Enter no password, and click Next. 27. For system protection, select Use recommended settings, and click Next. 28. Enter your time zone, and click Next. 29. Select the Work Network setting, and click Next. 30. Use Windows Update to patch the Windows 7 installation. 31. Install VMware tools. For more information, see
http://kb.vmware.com/selfservice/microsites/search.do?language=en_US&cmd=displayKC&externalId=340 32. Reboot. 33. Repeat steps 1 through 35 to create a total of four VMs:two in the infra server, and one each on the view46 and
view5 servers.
Installing Windows 7 Enterprise, (x64) optimizing Windows 7
Adjusting page file
1. Log in as administrator 2. Right-click ComputerPropertiesChange settingsAdvancedPerformanceSettings. 3. In Performance settings, select the Advanced tab, and select Change for Virtual Memory. 4. Deselect automatically manage page file. 5. Select Custom size, type 2048 for both values, and select Set.
Disabling Windows Firewall
The domain GPO automatically disables the Windows Firewall.
Installing Office 2007 Professional
1. From the Office 2007 media, run Setup. 2. Enter the product key for Office 2007, and click Continue. 3. Accept the licensing agreement. 4. Select Custom install. 5. Al the root of the installation options, ensure that all Office components are set to Run from My Computer. 6. Click Install. 7. Download and run Office 2007 Service Pack 2. 8. Reboot the system.
Installing Login VSI target software on Windows 7 virtual desktop
1. Browse to \vsi-install\Target setup. 2. Run the setup.exe. 3. In the Target Setup wizard, specify the VSI share (\\dc1\share). 4. Click Start. 5. When prompted with security warnings, click OK. 6. Reboot the system.
Cleaning up the VM on Windows 7 virtual desktop
1. Click StartRunservices.msc.
A Principled Technologies test report 30
Desktop virtualization with VMware View 5.0 compared to View 4.6
2. In the Services menu, select Windows Search, and change it from Disabled to Automatic (delayed start). 3. Close the Services menu. 4. Click StartControl Panel View Devices and Printers. 5. In the Sevices and Printers window, delete the following:
XPS printers and document writers
Optimizing bandwidth conservation on Windows 7 virtual desktop
1. For each desktop image, we disabled the following services:
Background Intelligent Transfer Service
Desktop Windows Manager Session Manager
Function Discovery Resource Publication
Home Group Listener
Home Group Provider
Indexing Service
Offline Files
Security Center
SuperFetch
System Restore
Themes
Windows Defender
Windows Media Player Network Sharing Service
Windows Search 2. Disable the boot animation with the following command:
bcdedit /set bootux disabled
3. Open the System Properties, click the Advanced tab, and select Performance. 4. Under Visual Effects, select Custom, and remove the following:
a. Animate windows when minimizing b. Animations in the taskbar and start menu c. Show translucent selection rectangle d. Show windowed content while dragging e. Smooth edges and screen fonts f. Use drop shadows for icon labels on the desktop
Preparing for VMware View deployment on the Windows 7 VM
Install the VMware View agent on both the View 5 and View 4.6 virtual desktop images, and power each off.
Clone the View 5 image five times to have five virtual desktops on the ESX server named view5 and name the VMs
View5VDT1 through View5VDT5 In the same manner, copy the View 4.6 image to create five View 4.6 virtual
desktops on the view46 server. Name the View 4.6 VMs View46VDT1 through View46VDT5
Setting up VMs to host the VMware View connection servers (view5 and view46) 1. Log into infra with the VMware vSphere client. 2. In the vSphere client, connect to the vCenter Server, and browse to the ESXi host. 3. Click the Virtual Machines tab. 4. Right-click, and choose New Virtual Machine. 5. Choose Custom, and click Next. 6. Assign the name View5 to the virtual machine, and click Next. 7. Select the Datastore on the storage, and click Next.
A Principled Technologies test report 31
Desktop virtualization with VMware View 5.0 compared to View 4.6
8. Choose Virtual Machine Version 8, and click Next. 9. Choose Windows, choose Microsoft Windows Server 2008 R2 (64-bit), and click Next. 10. Choose two virtual processors, and click Next. 11. Choose 4GB RAM, and click Next. 12. Click 1 for the number of NICs, select E1000, connect to the data network, and click Next. 13. Leave the default virtual storage controller, and click Next. 14. Choose to create a new virtual disk, and click Next. 15. Make the OS virtual disk size 40 GB, choose thick-provisioned lazy zeroed, specify the OS datastore on the
external storage, and click Next. 16. Keep the default virtual device node (0:0), and click Next. 17. Connect the VM virtual CD-ROM to the Microsoft Windows Server 2008 R2 installation disk. 18. Click Finish. 19. Start the VM.
Installing the Microsoft Windows Server2008 R2 operating system on the VM
1. Choose the language, time and currency, and keyboard input. Click Next. 2. Click Install Now. 3. Choose Windows Server 2008 R2 Enterprise (Full Installation), and click Next. 4. Accept the license terms, and click Next. 5. Click Custom. 6. Click the Disk, and click Drive options (advanced). 7. Click NewApplyFormat, and click Next. 8. After the installation completes, click OK to set the Administrator password. 9. Enter the administrator password twice, and click OK. 10. Connect the machine to the Internet, and install all available Windows updates. Restart as necessary. 11. Enable remote desktop access. 12. Change the hostname to view5 and reboot when prompted. 13. Set up networking for the data network:
a. Click StartControl Panel, right-click Network Connections, and choose Open. b. Right-click the VM traffic NIC, and choose Properties. c. Uncheck TCP/IP (v6). d. Select TCP/IP (v4), and choose Properties. e. Set the IP address, subnet, gateway, and DNS server.
14. Join the VDI domain. 15. Reboot. 16. Repeat steps 1 through 19 in the Setting up VMs to host the VMware View connection servers (view5 and view
46) section, and steps 1 through 15 above to create a VM called View46
Installing the VMware View 5 server
1. Log into the server named view5. 2. Click Install Media for View Connection Server by running the VMware-viewconnectionserver-x86_x64-
443491.exe file. 3. To begin the install wizard, click Next. 4. Agree to the license agreement, and click Next. 5. Keep the destination directory as C:\Program Files\VMware View\Server\, and click Next. 6. Select View Standard Server, and click Next. 7. Allow View Server to configure the firewall, and click Next. 8. Click Next. 9. Click Finish.
A Principled Technologies test report 32
Desktop virtualization with VMware View 5.0 compared to View 4.6
10. Log onto the DC, and add the server account for view5 to the disable build-to-lossless OU.
11. Open a command window, and type gpupdate /force 12. Reboot the View 5 server. 13. Log out of DC1.
Configuring the View 5 server - creating a pool and adding entitlements for Login VSI users
1. Open the View Administrator. 2. Log in as VDI administrator 3. Click Pools, and in the right windows, click Add… 4. Select Manual Pool, and click Next. 5. Select Dedicated, disable Automatic assignment, and click Next. 6. Select the Desktop sources as vCenter virtual machines, and click Next. 7. Use the vcenter4(administrator) as the source, and click Next. 8. Type pool for the pool ID and display name, and click Next. 9. Leave the pool settings as defaults, and click Next. 10. Select the five virtual desktops in the add vCenter Virtual Machines box, and click Next. 11. Click Finish to create the pool. 12. Click the desktop icon, and in the right window, click the first desktop. 13. Click More CommandsAssign User… 14. Add the user login_VSI1, and click OK. 15. Add users login_VSI2 through 5 to the individual desktops in sequence. 16. Ensure all five desktops have a status of ready.
Installing the VMware View 4.6 server
1. Log into the server named view46. 2. Click Install Media for View Connection Server by running the VMware-viewconnectionserver-x86_64-4.6.0-
366101.exe. 3. To begin the install wizard, click Next. 4. Agree to the license agreement, and click Next. 5. Keep the destination directory as C:\Program Files\VMware View\Server\, and click Next. 6. Select View Standard Server, and click Next. 7. Allow View Server to configure the firewall, and click Next. 8. Click Next. 9. Click Finish.
Configuring the View 5 server - creating a pool
1. Open the View Administrator. 2. Log in as VDI administrator 3. Click Pools, and in the right window, click Add… 4. Select Manual Pool, and click Next. 5. Select Dedicated, disable Automatic assignment, and click Next. 6. Select the Desktop sources as vCenter virtual machines, and click Next. 7. Use the vcenter5(administrator) as the source, and click Next. 8. Type pool for the pool ID and display name, and click Next. 9. Leave the pool settings as defaults, and click Next.
A Principled Technologies test report 33
Desktop virtualization with VMware View 5.0 compared to View 4.6
10. Select the five virtual desktops in the add vCenter Virtual Machines box, and click Next. 11. Click Finish to create the pool. 12. Click the desktop icon, and in the right window, click the first desktop. 13. Click More CommandsAssign User… 14. Add the user login_VSI1, and click OK. 15. Add users login_VSI2 through 5 to the individual desktops in sequence. 16. Ensure all five desktops have a status of ready.
A Principled Technologies test report 34
Desktop virtualization with VMware View 5.0 compared to View 4.6
APPENDIX C: LOGIN VSI INI FILES USED FOR TESTING VMware View 5 launcher.ini
[Launcher] Servername= Username= Password= Domain= ConnectionType="Custom with CSV file" ConnectionNumber=User CCL=c:\program files\VMware\VMWare View\Client\bin\wswc.exe -serverURL http://VIEW5 -username %CSV_User% -password Password1 -domainname VDI -desktopname pool -Standalone -logInAsCurrentUser False -connectUSBOnStartup False CSV=\\DC1\Share\csv\view5-user.csv Launchmode=Sequential ParallelDelay=30 ParallelTimeframe=120 InitialStartNumber=1 NumberOfSessions=5 SequentialInterval=30 Fancy_number=1 Autologoff=1 LogoffTimeOut=120 CreateProfile=0 UseLocalLauncher=0
VMware View 4.6 launcher.ini
[Launcher] Servername= Username= Password= Domain= ConnectionType="Custom with CSV file" ConnectionNumber=User CCL=c:\program files\VMware\VMWare View\Client\bin\wswc.exe -serverURL http://view46 -username %CSV_User% -password Password1 -domainname VDI -desktopname pool -Standalone -logInAsCurrentUser False -connectUSBOnStartup False CSV=\\DC1\Share\csv\view5-user.csv Launchmode=Sequential ParallelDelay=30 ParallelTimeframe=120 InitialStartNumber=1 NumberOfSessions=5 SequentialInterval=30 Fancy_number=1 Autologoff=1 LogoffTimeOut=120
A Principled Technologies test report 35
Desktop virtualization with VMware View 5.0 compared to View 4.6
CreateProfile=0 UseLocalLauncher=0
User.csv
User login_vsi1 login_vsi2 login_vsi3 login_vsi4 login_vsi5
A Principled Technologies test report 36
Desktop virtualization with VMware View 5.0 compared to View 4.6
ABOUT PRINCIPLED TECHNOLOGIES
Principled Technologies, Inc. 1007 Slater Road, Suite 300 Durham, NC, 27703 www.principledtechnologies.com
We provide industry-leading technology assessment and fact-based marketing services. We bring to every assignment extensive experience with and expertise in all aspects of technology testing and analysis, from researching new technologies, to developing new methodologies, to testing with existing and new tools. When the assessment is complete, we know how to present the results to a broad range of target audiences. We provide our clients with the materials they need, from market-focused data to use in their own collateral to custom sales aids, such as test reports, performance assessments, and white papers. Every document reflects the results of our trusted independent analysis. We provide customized services that focus on our clients’ individual requirements. Whether the technology involves hardware, software, Web sites, or services, we offer the experience, expertise, and tools to help our clients assess how it will fare against its competition, its performance, its market readiness, and its quality and reliability. Our founders, Mark L. Van Name and Bill Catchings, have worked together in technology assessment for over 20 years. As journalists, they published over a thousand articles on a wide array of technology subjects. They created and led the Ziff-Davis Benchmark Operation, which developed such industry-standard benchmarks as Ziff Davis Media’s Winstone and WebBench. They founded and led eTesting Labs, and after the acquisition of that company by Lionbridge Technologies were the head and CTO of VeriTest.
Principled Technologies is a registered trademark of Principled Technologies, Inc. All other product names are the trademarks of their respective owners.
Disclaimer of Warranties; Limitation of Liability: PRINCIPLED TECHNOLOGIES, INC. HAS MADE REASONABLE EFFORTS TO ENSURE THE ACCURACY AND VALIDITY OF ITS TESTING, HOWEVER, PRINCIPLED TECHNOLOGIES, INC. SPECIFICALLY DISCLAIMS ANY WARRANTY, EXPRESSED OR IMPLIED, RELATING TO THE TEST RESULTS AND ANALYSIS, THEIR ACCURACY, COMPLETENESS OR QUALITY, INCLUDING ANY IMPLIED WARRANTY OF FITNESS FOR ANY PARTICULAR PURPOSE. ALL PERSONS OR ENTITIES RELYING ON THE RESULTS OF ANY TESTING DO SO AT THEIR OWN RISK, AND AGREE THAT PRINCIPLED TECHNOLOGIES, INC., ITS EMPLOYEES AND ITS SUBCONTRACTORS SHALL HAVE NO LIABILITY WHATSOEVER FROM ANY CLAIM OF LOSS OR DAMAGE ON ACCOUNT OF ANY ALLEGED ERROR OR DEFECT IN ANY TESTING PROCEDURE OR RESULT. IN NO EVENT SHALL PRINCIPLED TECHNOLOGIES, INC. BE LIABLE FOR INDIRECT, SPECIAL, INCIDENTAL, OR CONSEQUENTIAL DAMAGES IN CONNECTION WITH ITS TESTING, EVEN IF ADVISED OF THE POSSIBILITY OF SUCH DAMAGES. IN NO EVENT SHALL PRINCIPLED TECHNOLOGIES, INC.’S LIABILITY, INCLUDING FOR DIRECT DAMAGES, EXCEED THE AMOUNTS PAID IN CONNECTION WITH PRINCIPLED TECHNOLOGIES, INC.’S TESTING. CUSTOMER’S SOLE AND EXCLUSIVE REMEDIES ARE AS SET FORTH HEREIN.


![[Infographic] Real Customers, Real Results: A Research-Driven View of Service Virtualization](https://img.pdfslide.net/doc/110x75/55a52fac1a28ab4c348b4672/infographic-real-customers-real-results-a-research-driven-view-of-service-virtualization.jpg)