Embed Size (px)
Citation preview
1
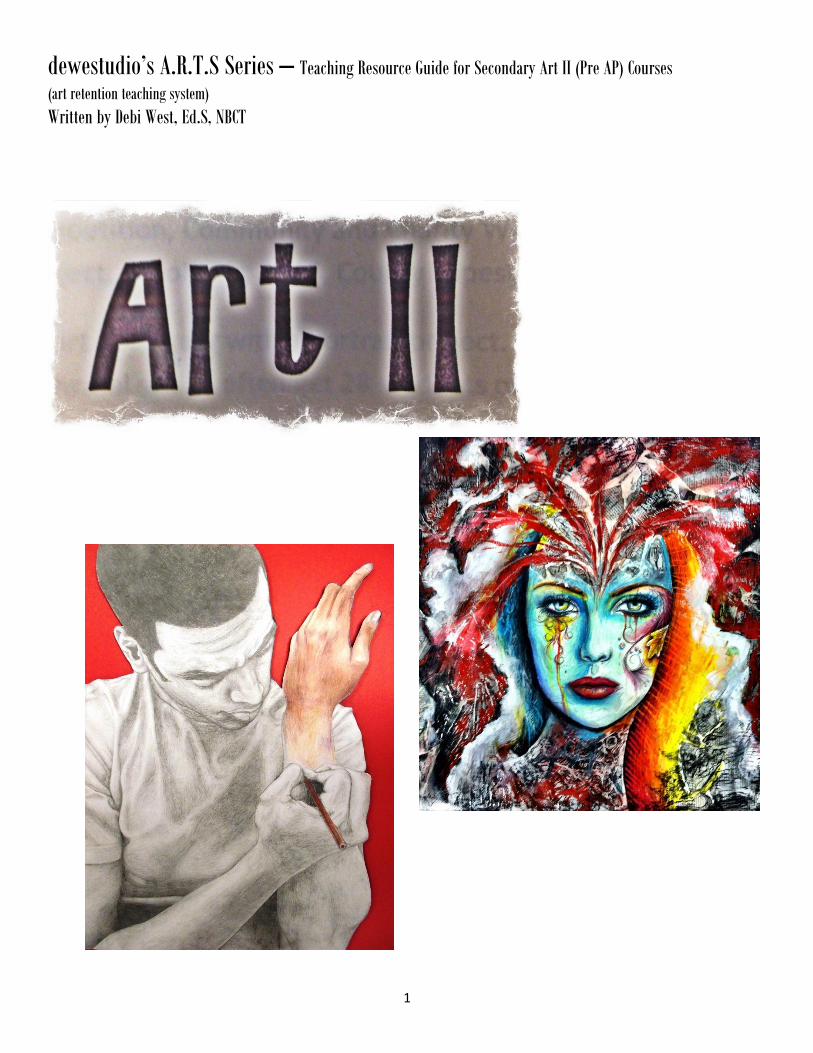
dewestudio’s A.R.T.S Series – Teaching Resource Guide for Secondary Art II (Pre AP) Courses
(art retention teaching system)
Written by Debi West, Ed.S, NBCT
2
dewestudio’s A.R.T.S Series – Teaching Resource Guide for Secondary Art II (Pre AP) Courses
(art retention teaching system)
Written by Debi West, Ed.S, NBCT
Secondary Art II Lessons at a Glance:
Portraits (photo / mirror); Upside Down Picasso - Color Study; Left Brain / Right Brain Creativity Lesson; Cloth
Drawings; Charcoal Studies; Theme and Variation; Memory Project; Bike Studies; Still Life Series; Art of
Anatomy; Figure Fridays (8 week lesson); Favorite Teacher Portraits; Large Scale Food Paintings; Watercolor
Still Life Work; PIN-spiration Portraits; Mini Art Exhibit; Visual Journal / Altered Book Work; Artist Trading
Cards; Competition, Community and Charity Work (Dream@50, PTA Reflections, Istanbul Center, Dream
Rocket Project, Scholastic, ASAS, County Tapestry Exhibit, Art Throwdown, Relay for Life Art Auction)
I start each year with a portrait project. This allows me to gage where my students are in terms of
technical skill. I often get 28 students per art II class, consisting of sophomores, juniors and seniors –
the portrait project is a two part lesson, one consisting of direct observation and the other utilizing a
photograph. This permits my students to immediately see the difference in drawing from life versus
drawing from a 2D image. It’s pretty powerful!
I have all of my lessons in “lesson plan format”, consisting of objectives, materials, procedures,
assessment/evaluation, and student samples (often including an image of the full class display).
I have also added copies of my project evaluation forms, my critiquing forms, study guides, and my
weekly visual journal/altered book assignments and rubric. My syllabus, fine art contract and
expectations sheets are included, as well. These are all found on the last few pages.
My hope is that this information will act as a springboard for you – take these ideas and put them into
your own creative curriculum – one that works for you and your students! Remember, our job is to be
the creative ART Guide, “guiding” our students to success! These lessons are geared to teach the
necessary steps to help your students succeed in the visual arts!
My full series of dewestudio’s A.R.T.S Series – Teaching Resource Guides consists of, “Intro Classes (2D)”, “Intro
Classes (3D)”, “Art II – Pre AP”, and “AP Studio” (coming soon: “NAHS - Art with Purpose”) Thank you for your purchase – I look forward to hearing (and seeing) your students successes so stay in touch! So Sincerely, Debi West, Ed.S, NBCT
North Gwinnett High School – Visual Art Department Chair / Fine Art Department Co-Chair [email protected] / art.northgwinnett.com
dewestudio©2014
3
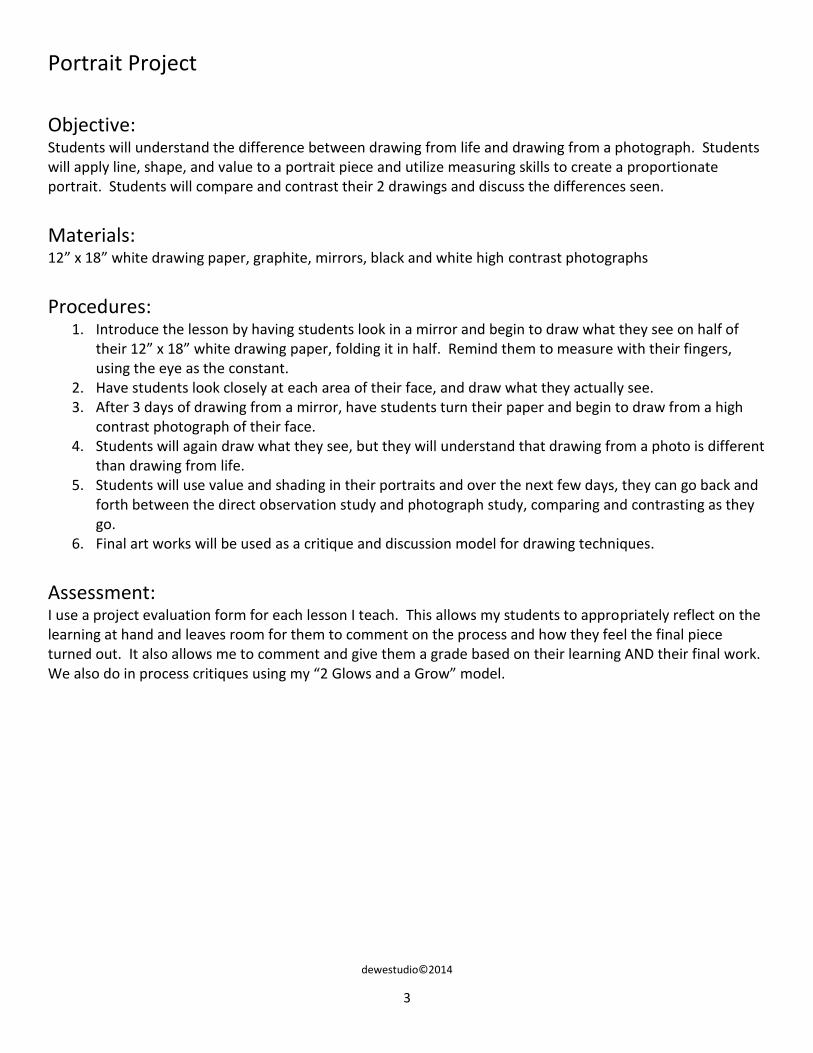
Portrait Project
Objective:
Students will understand the difference between drawing from life and drawing from a photograph. Students will apply line, shape, and value to a portrait piece and utilize measuring skills to create a proportionate portrait. Students will compare and contrast their 2 drawings and discuss the differences seen.
Materials:
12” x 18” white drawing paper, graphite, mirrors, black and white high contrast photographs
Procedures:
1. Introduce the lesson by having students look in a mirror and begin to draw what they see on half of their 12” x 18” white drawing paper, folding it in half. Remind them to measure with their fingers, using the eye as the constant.
2. Have students look closely at each area of their face, and draw what they actually see. 3. After 3 days of drawing from a mirror, have students turn their paper and begin to draw from a high
contrast photograph of their face. 4. Students will again draw what they see, but they will understand that drawing from a photo is different
than drawing from life. 5. Students will use value and shading in their portraits and over the next few days, they can go back and
forth between the direct observation study and photograph study, comparing and contrasting as they go.
6. Final art works will be used as a critique and discussion model for drawing techniques.
Assessment: I use a project evaluation form for each lesson I teach. This allows my students to appropriately reflect on the learning at hand and leaves room for them to comment on the process and how they feel the final piece turned out. It also allows me to comment and give them a grade based on their learning AND their final work. We also do in process critiques using my “2 Glows and a Grow” model.
dewestudio©2014
4
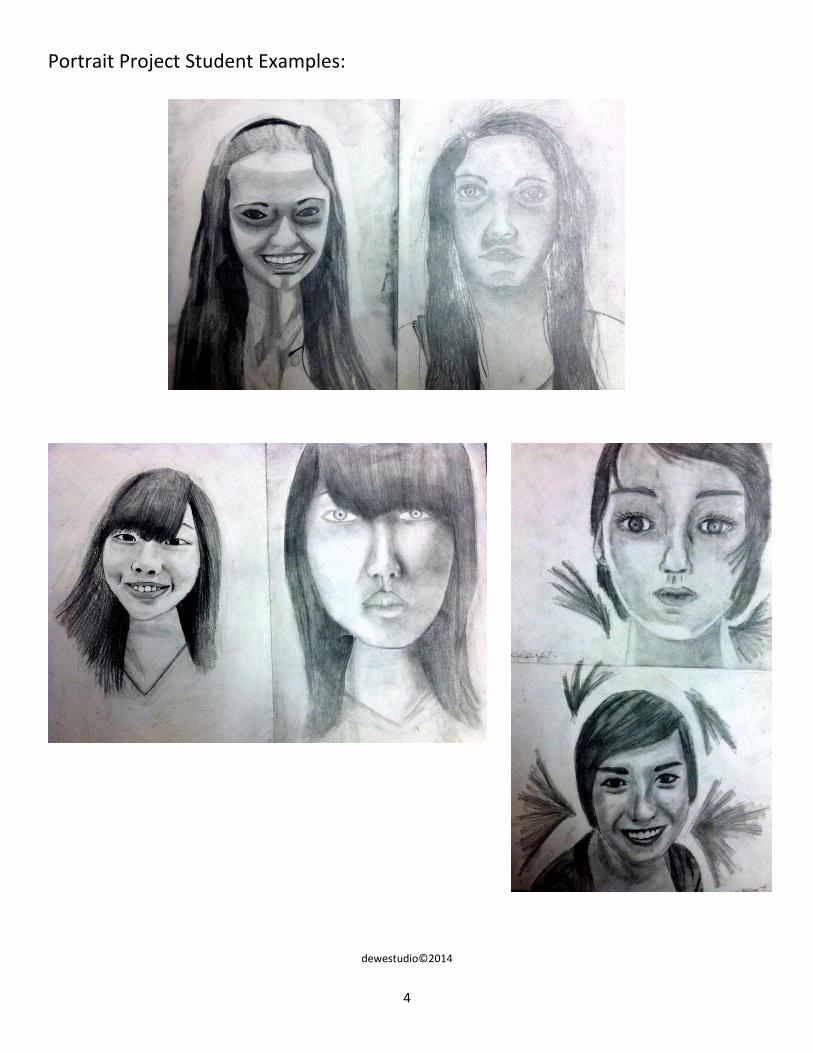
Portrait Project Student Examples:
dewestudio©2014
5
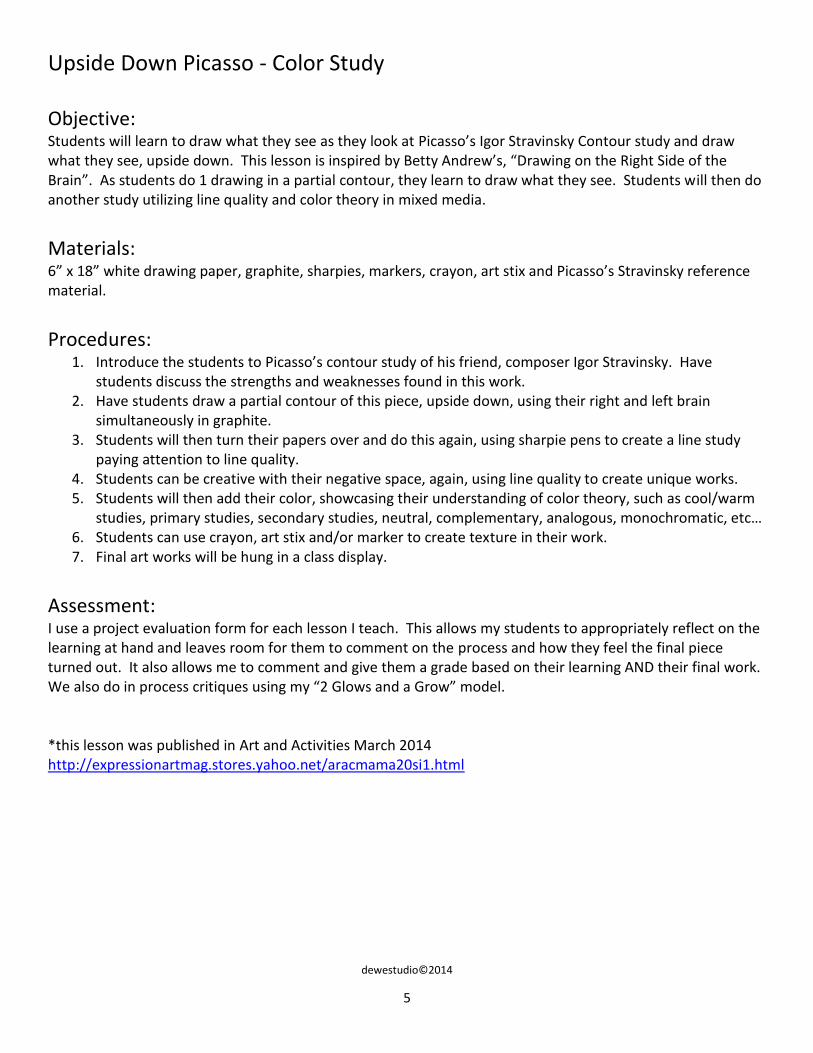
Upside Down Picasso - Color Study
Objective:
Students will learn to draw what they see as they look at Picasso’s Igor Stravinsky Contour study and draw what they see, upside down. This lesson is inspired by Betty Andrew’s, “Drawing on the Right Side of the Brain”. As students do 1 drawing in a partial contour, they learn to draw what they see. Students will then do another study utilizing line quality and color theory in mixed media.
Materials:
6” x 18” white drawing paper, graphite, sharpies, markers, crayon, art stix and Picasso’s Stravinsky reference material.
Procedures:
1. Introduce the students to Picasso’s contour study of his friend, composer Igor Stravinsky. Have students discuss the strengths and weaknesses found in this work.
2. Have students draw a partial contour of this piece, upside down, using their right and left brain simultaneously in graphite.
3. Students will then turn their papers over and do this again, using sharpie pens to create a line study paying attention to line quality.
4. Students can be creative with their negative space, again, using line quality to create unique works. 5. Students will then add their color, showcasing their understanding of color theory, such as cool/warm
studies, primary studies, secondary studies, neutral, complementary, analogous, monochromatic, etc… 6. Students can use crayon, art stix and/or marker to create texture in their work. 7. Final art works will be hung in a class display.
Assessment: I use a project evaluation form for each lesson I teach. This allows my students to appropriately reflect on the learning at hand and leaves room for them to comment on the process and how they feel the final piece turned out. It also allows me to comment and give them a grade based on their learning AND their final work. We also do in process critiques using my “2 Glows and a Grow” model. *this lesson was published in Art and Activities March 2014 http://expressionartmag.stores.yahoo.net/aracmama20si1.html
dewestudio©2014
6
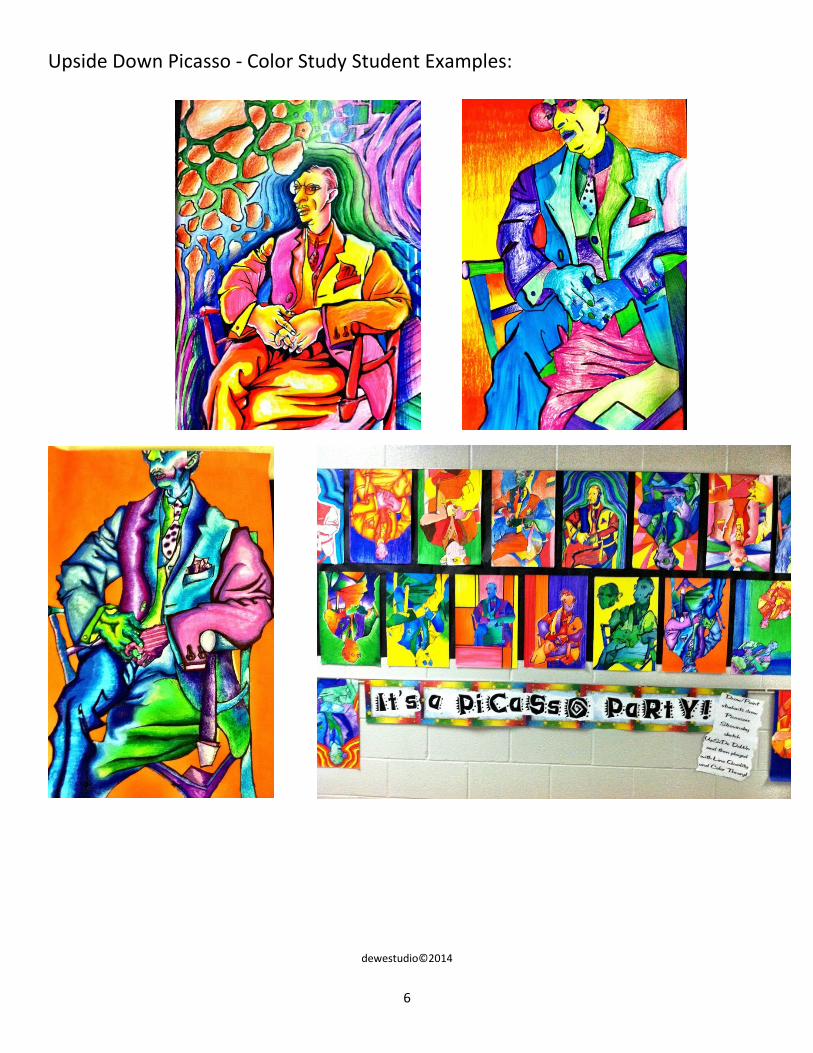
Upside Down Picasso - Color Study Student Examples:
dewestudio©2014
7
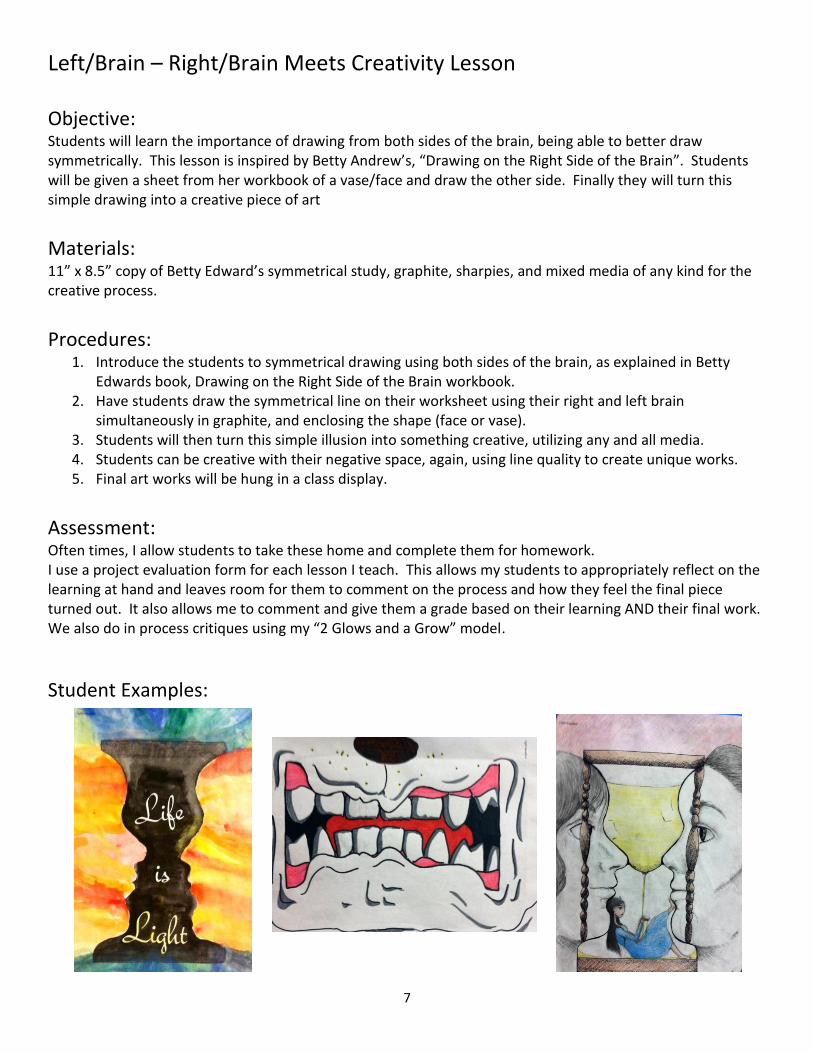
Left/Brain – Right/Brain Meets Creativity Lesson
Objective:
Students will learn the importance of drawing from both sides of the brain, being able to better draw symmetrically. This lesson is inspired by Betty Andrew’s, “Drawing on the Right Side of the Brain”. Students will be given a sheet from her workbook of a vase/face and draw the other side. Finally they will turn this simple drawing into a creative piece of art
Materials:
11” x 8.5” copy of Betty Edward’s symmetrical study, graphite, sharpies, and mixed media of any kind for the creative process.
Procedures:
1. Introduce the students to symmetrical drawing using both sides of the brain, as explained in Betty Edwards book, Drawing on the Right Side of the Brain workbook.
2. Have students draw the symmetrical line on their worksheet using their right and left brain simultaneously in graphite, and enclosing the shape (face or vase).
3. Students will then turn this simple illusion into something creative, utilizing any and all media. 4. Students can be creative with their negative space, again, using line quality to create unique works. 5. Final art works will be hung in a class display.
Assessment: Often times, I allow students to take these home and complete them for homework. I use a project evaluation form for each lesson I teach. This allows my students to appropriately reflect on the learning at hand and leaves room for them to comment on the process and how they feel the final piece turned out. It also allows me to comment and give them a grade based on their learning AND their final work. We also do in process critiques using my “2 Glows and a Grow” model.
Student Examples:
8
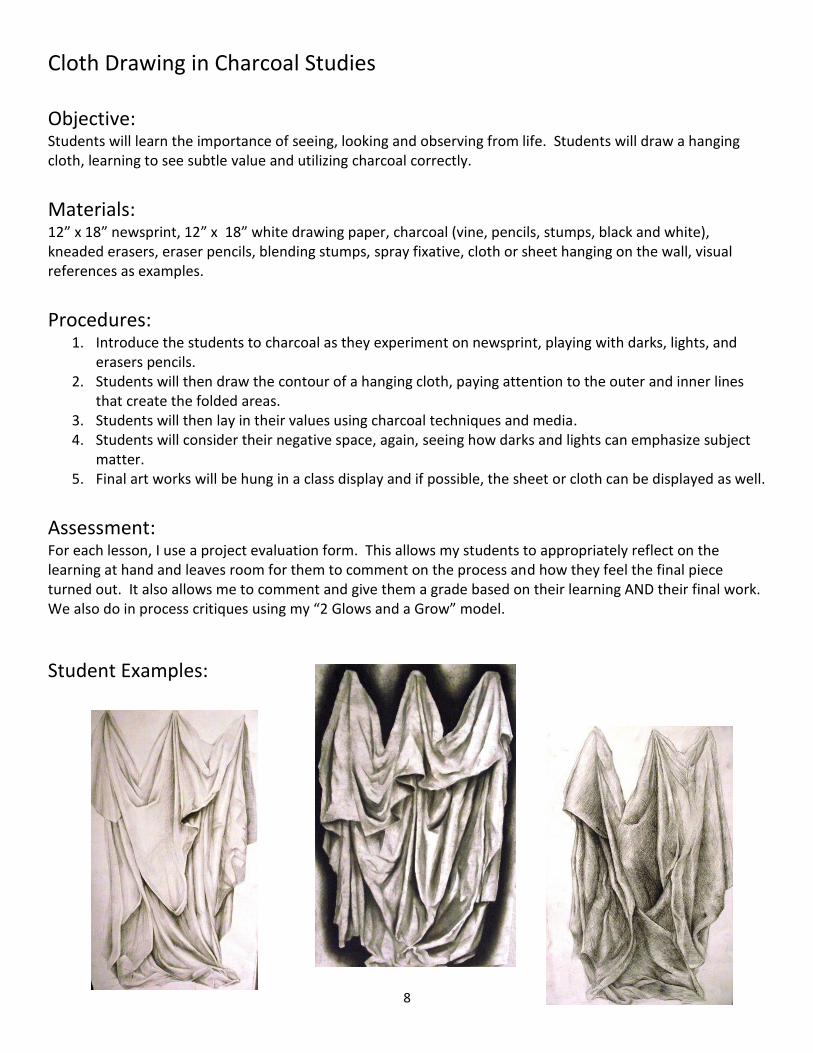
Cloth Drawing in Charcoal Studies
Objective:
Students will learn the importance of seeing, looking and observing from life. Students will draw a hanging cloth, learning to see subtle value and utilizing charcoal correctly.
Materials:
12” x 18” newsprint, 12” x 18” white drawing paper, charcoal (vine, pencils, stumps, black and white), kneaded erasers, eraser pencils, blending stumps, spray fixative, cloth or sheet hanging on the wall, visual references as examples.
Procedures:
1. Introduce the students to charcoal as they experiment on newsprint, playing with darks, lights, and erasers pencils.
2. Students will then draw the contour of a hanging cloth, paying attention to the outer and inner lines that create the folded areas.
3. Students will then lay in their values using charcoal techniques and media. 4. Students will consider their negative space, again, seeing how darks and lights can emphasize subject
matter. 5. Final art works will be hung in a class display and if possible, the sheet or cloth can be displayed as well.
Assessment: For each lesson, I use a project evaluation form. This allows my students to appropriately reflect on the learning at hand and leaves room for them to comment on the process and how they feel the final piece turned out. It also allows me to comment and give them a grade based on their learning AND their final work. We also do in process critiques using my “2 Glows and a Grow” model.
Student Examples:
9
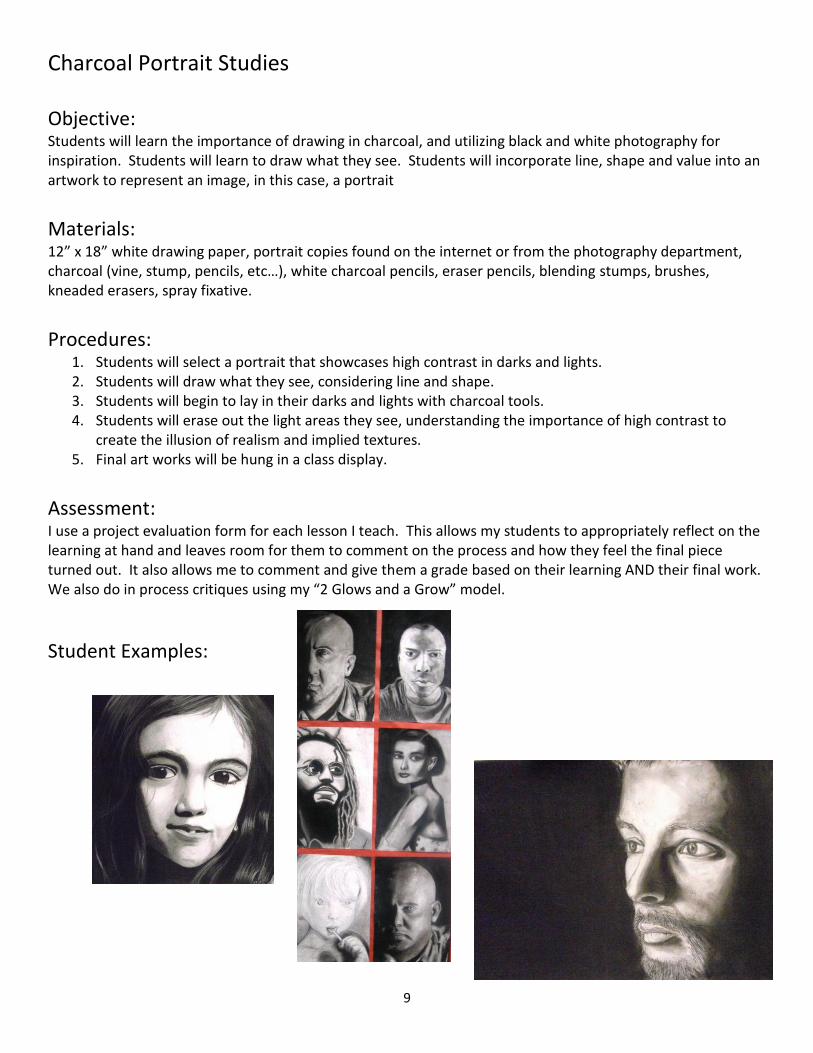
Charcoal Portrait Studies
Objective:
Students will learn the importance of drawing in charcoal, and utilizing black and white photography for inspiration. Students will learn to draw what they see. Students will incorporate line, shape and value into an artwork to represent an image, in this case, a portrait
Materials:
12” x 18” white drawing paper, portrait copies found on the internet or from the photography department, charcoal (vine, stump, pencils, etc…), white charcoal pencils, eraser pencils, blending stumps, brushes, kneaded erasers, spray fixative.
Procedures:
1. Students will select a portrait that showcases high contrast in darks and lights. 2. Students will draw what they see, considering line and shape. 3. Students will begin to lay in their darks and lights with charcoal tools. 4. Students will erase out the light areas they see, understanding the importance of high contrast to
create the illusion of realism and implied textures. 5. Final art works will be hung in a class display.
Assessment: I use a project evaluation form for each lesson I teach. This allows my students to appropriately reflect on the learning at hand and leaves room for them to comment on the process and how they feel the final piece turned out. It also allows me to comment and give them a grade based on their learning AND their final work. We also do in process critiques using my “2 Glows and a Grow” model.
Student Examples:
10
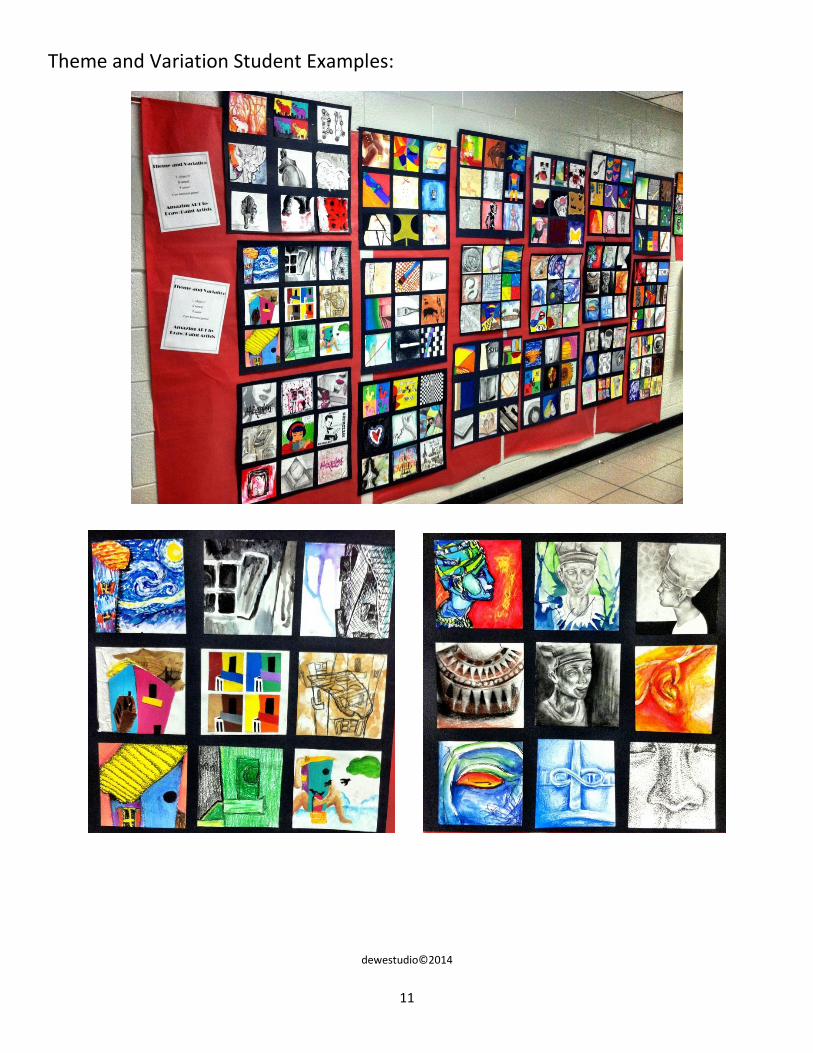
Theme and Variation Lesson
Objective:
Students will learn the importance of drawing from life, creatively. Students will find a subject matter and draw it from various views using various media, 9 times, to create a unique and interesting still life series in miniature.
Materials:
9 – 6” x 6” white drawing paper squares, object of student choice, mixed media, glue, poster board.
Procedures:
1. Students will select a subject matter that they will enjoy looking at for 2 weeks. 2. Students will draw what they see, considering line and shape and recreate the drawing by looking from
various views, ie, bird’s eye, bug, foreshortened, zoomed in, zoomed out, cropped, straight on, etc… 3. Students will sketch out each view and select the 9 that work the best. 4. Students will select 9 various media and illustrate their individual squares using these techniques, ie,
collage, paint, watercolor, graphite, charcoal, art stix, crayon, oil pastel, chalk pastel, pen and ink, etc… 5. Students will adhere each square onto their poster board, creatively, to tell a story about their subject
matter. 6. This is a strong lesson in that it merges the technical aspects needed in art, with the creative elements. 7. Final art works will be hung in a class display.
Assessment: I use a project evaluation form for each lesson I teach. This allows my students to appropriately reflect on the learning at hand and leaves room for them to comment on the process and how they feel the final piece turned out. It also allows me to comment and give them a grade based on their learning AND their final work. We also do in process critiques using my “2 Glows and a Grow” model.
dewestudio©2014
11
Theme and Variation Student Examples:
dewestudio©2014
12
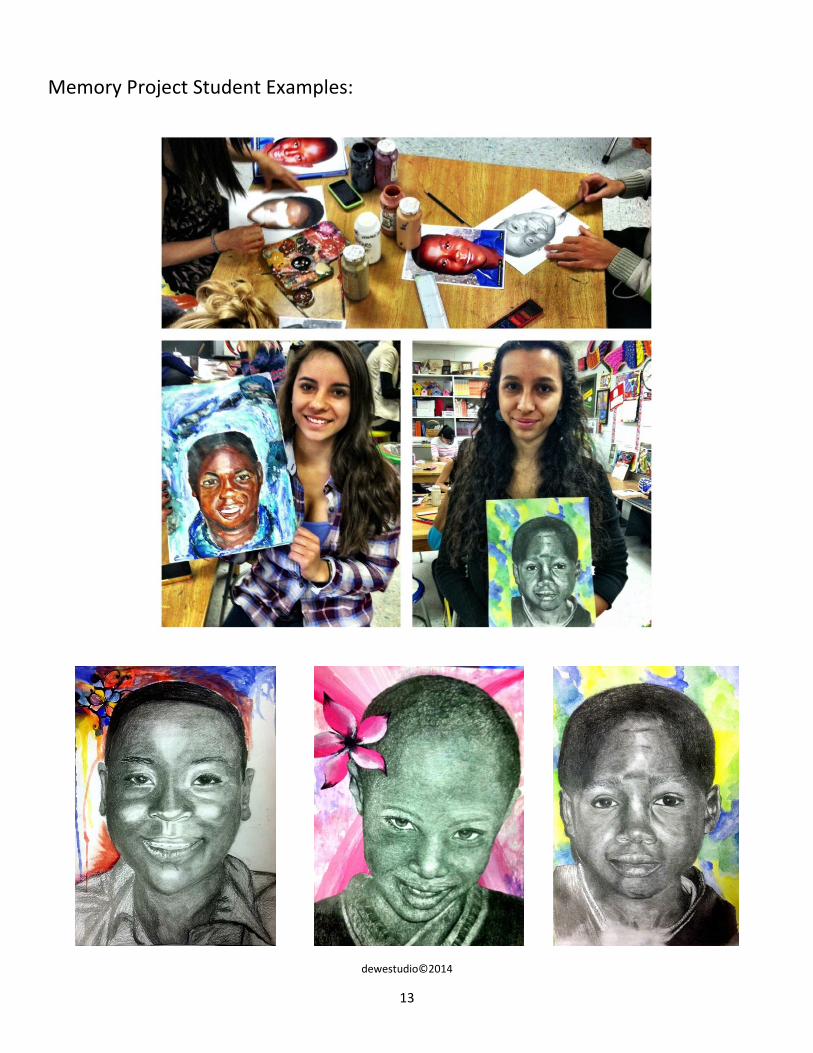
Memory Project
Objective:
Students will learn the importance of drawing and honoring the identity of another human being. Students will learn that while art documents our world, it also has the ability to change our world, for the better!
Materials:
www.thememoryproject.org, 9” x 12” white drawing paper, portraits of orphans pre-arranged through the Memory Project coordinator, Ben.; mixed media, information sheets provided by the company, plastic protector sheets provided by the company, $15 per student to participate.
Procedures:
1. The teacher will go to the above website and arrange to “adopt” a certain number of orphans from a third world country, such as Honduras, Ecuador, Rwanda, to name a few of the places we have “adopted” children from.
2. Ben will send images of the orphans to the class, as well as an electronic file for easy organizing. 3. Students will then select a child’s portrait that they will draw over the next few weeks. 4. Students will draw what they see, considering line and shape and add color or value appropriately, to
honor the identity and likeness of their “adopted” child. 5. Students will use any media they like, but oil pastels and charcoal are not recommended. 6. Students will consider the negative space creatively, to showcase a special environment for the
portrait. 7. Students will fill out the paper work, writing a special note to their orphan, adding their own artist
photo and seal the work into the plastic protector. 8. The teacher will send the completed portraits back to Ben so they can be delivered to the children. 9. It is highly recommended to take photos or make color copies of the art so that this beautiful lesson
can be shared with the school and community via a class display.
Assessment: I use a project evaluation form for each lesson I teach. This allows my students to appropriately reflect on the learning at hand and leaves room for them to comment on the process and how they feel the final piece turned out. It also allows me to comment and give them a grade based on their learning AND their final work. We also do in process critiques using my “2 Glows and a Grow” model.
13
Memory Project Student Examples:
dewestudio©2014
14
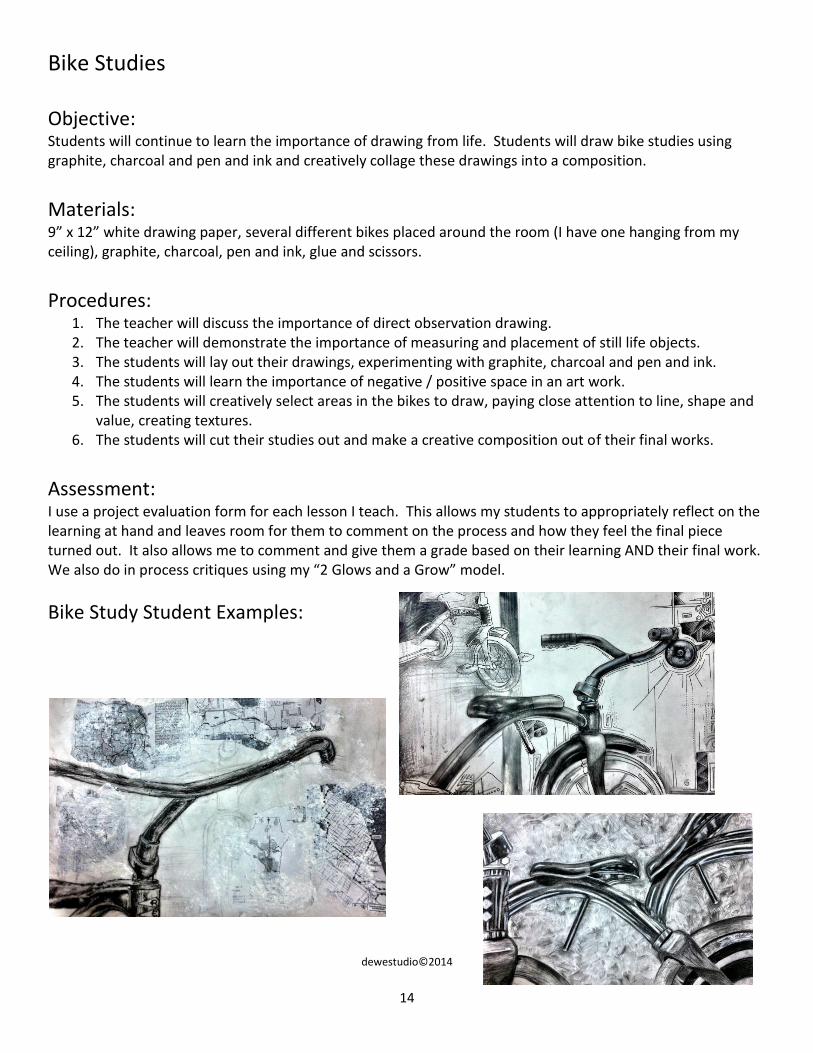
Bike Studies
Objective:
Students will continue to learn the importance of drawing from life. Students will draw bike studies using graphite, charcoal and pen and ink and creatively collage these drawings into a composition.
Materials:
9” x 12” white drawing paper, several different bikes placed around the room (I have one hanging from my ceiling), graphite, charcoal, pen and ink, glue and scissors.
Procedures:
1. The teacher will discuss the importance of direct observation drawing. 2. The teacher will demonstrate the importance of measuring and placement of still life objects. 3. The students will lay out their drawings, experimenting with graphite, charcoal and pen and ink. 4. The students will learn the importance of negative / positive space in an art work. 5. The students will creatively select areas in the bikes to draw, paying close attention to line, shape and
value, creating textures. 6. The students will cut their studies out and make a creative composition out of their final works.
Assessment: I use a project evaluation form for each lesson I teach. This allows my students to appropriately reflect on the learning at hand and leaves room for them to comment on the process and how they feel the final piece turned out. It also allows me to comment and give them a grade based on their learning AND their final work. We also do in process critiques using my “2 Glows and a Grow” model.
Bike Study Student Examples:
dewestudio©2014
15
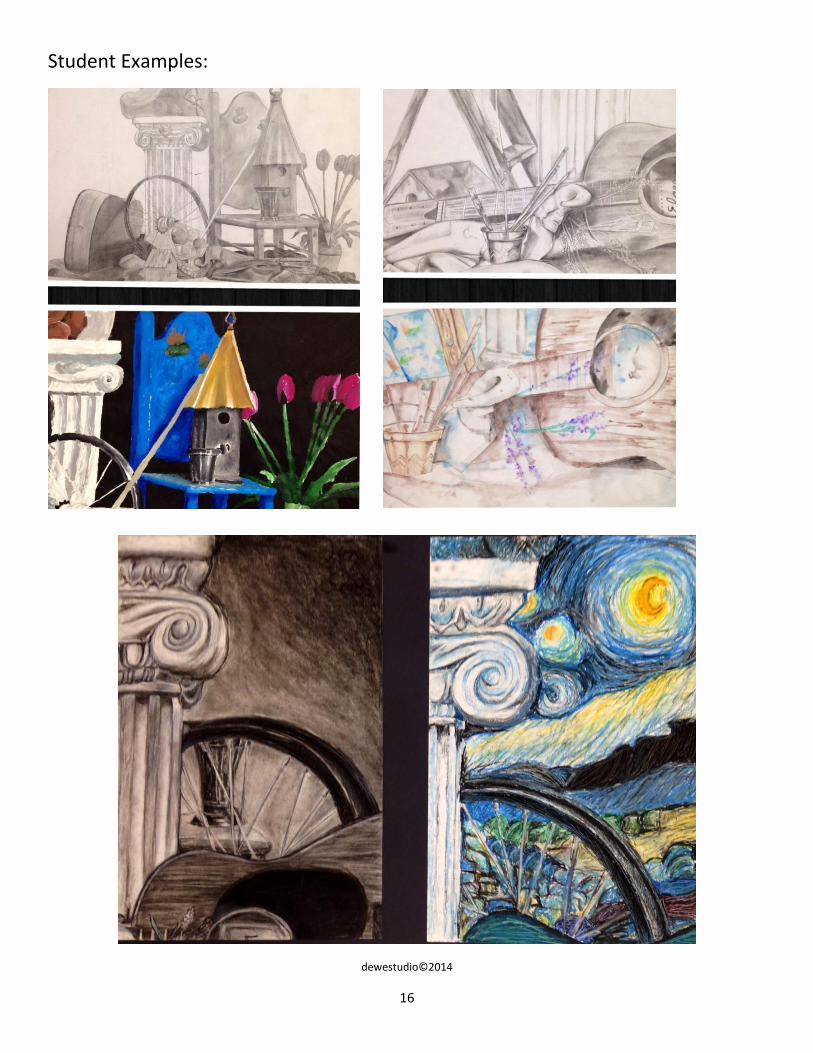
Still Life Studies – Traditional / Art Historical – Creative
Objective:
Students will learn the importance of drawing from life and from art historical inspirations. Students will conduct a compare / contrast of the 2 drawings as a final learning objective.
Materials:
9” x 12” white drawing paper, still life created by students using various heights, widths and textural elements, graphite, charcoal, mixed media
Procedures:
1. The teacher will discuss the importance of measuring when drawing from a direct observational still life.
2. Students will create their own class still life, utilizing materials used in previous lessons that contain various textural elements, such as metal, glass, cloth, plants, wood, etc…
3. Students will focus on at least 4 objects and draw an interesting composition drawing what they see. 4. Students will make their first drawing concentrating on realism using graphite or charcoal. 5. Students will then make their second drawing concentrating on a creative spin using an art historical
reference and mixed media. 6. Students will present both drawings together and add a written critique using a compare/contrast
essay. 7. This lesson could be a wonderful end of the semester summative assessment.
Assessment: I use a project evaluation form for each lesson I teach. This allows my students to appropriately reflect on the learning at hand and leaves room for them to comment on the process and how they feel the final piece turned out. It also allows me to comment and give them a grade based on their learning AND their final work. We also do in process critiques using my “2 Glows and a Grow” model.
dewestudio©2014
16
Student Examples:
dewestudio©2014
17
Art of Anatomy
Objective:
Students will learn the importance of drawing from direct observation by drawing from a class skeleton and / or plastic bones, borrowed from the science department, creating a measured anatomy work or multiple sketches. Students will utilize creative mixed media elements, designing an interesting final piece.
Materials:
9” x 12” white drawing paper, plastic bones as visual references, traditional drawing materials such as graphite, charcoal, markers, pen and ink, watercolor, oil pastel, etc… and non-traditional media such as cardboard, string, photo transfers, etc…
Procedures:
1. The teacher will present drawing strategies to the students and have them do a series of sketches from the class skeleton and / or borrowed plastic bones from the science department.
2. Students will use traditional drawing materials to do their sketch series creating interesting textures and utilizing positive and negative space.
3. Students will take their sketches and lay them out into a creative composition bringing in non-traditional art materials to create a new version of the anatomy studies.
4. Students will display their final pieces in a class display for the community to enjoy.
Assessment: I use a project evaluation form for each lesson I teach. This allows my students to appropriately reflect on the learning at hand and leaves room for them to comment on the process and how they feel the final piece turned out. It also allows me to comment and give them a grade based on their learning AND their final work. We also do in process critiques using my “2 Glows and a Grow” model.
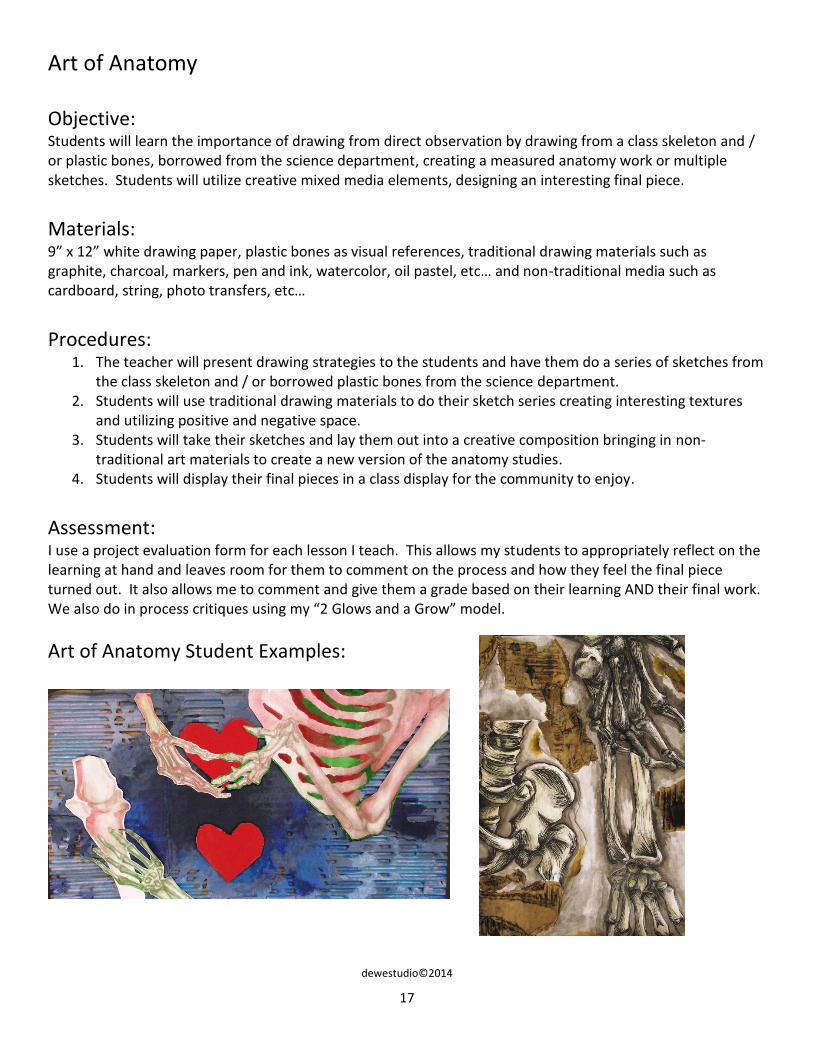
Art of Anatomy Student Examples:
dewestudio©2014
18
Figure Fridays (8 week consecutive Friday lesson)
Objective:
This is a wonderful extension from the Art of Anatomy lesson. It is also a wonderful collaboration as we work with the dance department. Students work on the same piece of large drawing paper each week utilizing a different media creating a unique spin on a traditional art lesson. As students conduct 10 minute figure studies of dancers, the results are always outstanding.
Materials:
18” x 26” white drawing paper, dancers, graphite, charcoal, pen and ink, oil pastel, marker, crayons, watercolor, acrylic, scissors, glue and mixed media.
Procedures:
1. Each Friday for 8 weeks several dancers will come into the art room to hold 2-3 minute poses for our art students to draw. As they work on their figure study techniques, they will utilize various media assigned to each week. The best results are to use these materials:
a. Week 1 – graphite b. Week 2 – pen and ink (sharpie) c. Week 3 – markers d. Week 4 – crayons e. Week 5 – Acrylic f. Week 6 – charcoal g. Week 7 – oil pastel h. Week 8 – watercolor
2. Students are encouraged to turn their paper each week and vary the sizes of their figure studies to create interesting, layered studies.
3. Students are encouraged to experiment with color theory. 4. On the 8th week students will take their pieces and deconstruct them, turning them into new works. 5. These newly created figure studies will be exhibited in a class display.
*this lesson was published in Arts and Activities magazine as April 2014
Assessment: I use a project evaluation form for each lesson I teach. This allows my students to appropriately reflect on the learning at hand and leaves room for them to comment on the process and how they feel the final piece turned out. It also allows me to comment and give them a grade based on their learning AND their final work. We also do in process critiques using my “2 Glows and a Grow” model.
dewestudio©2014

19
Student Samples:
20
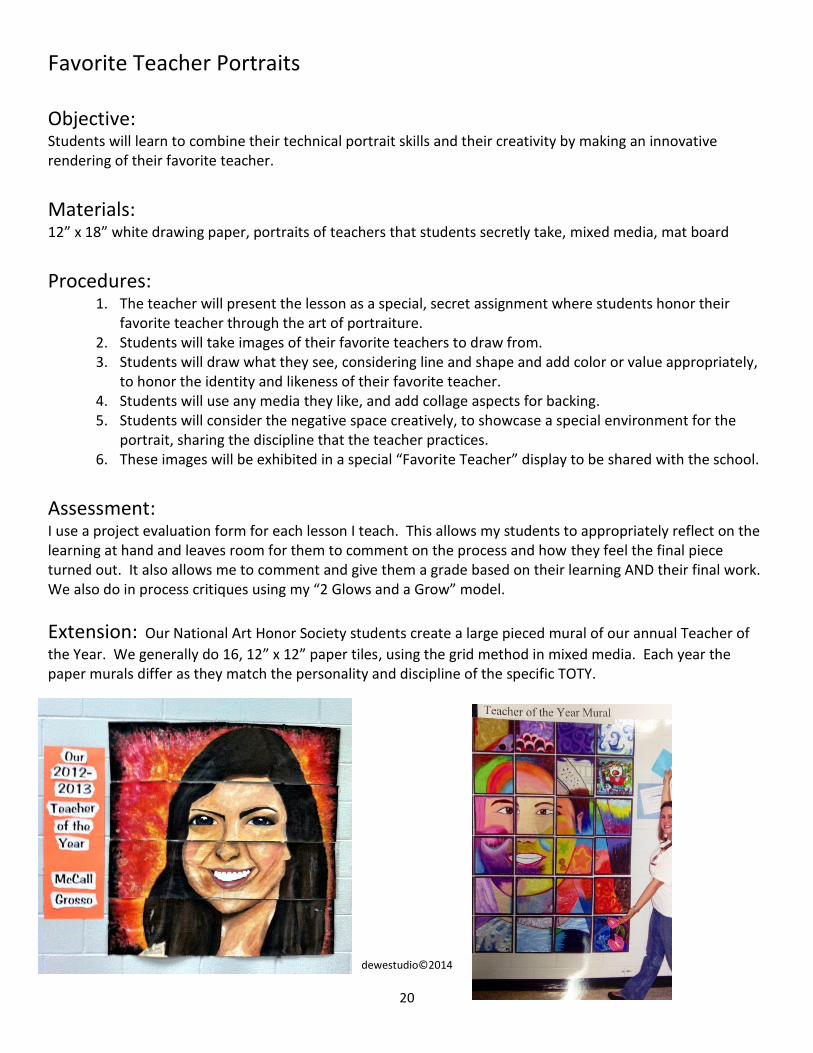
Favorite Teacher Portraits
Objective:
Students will learn to combine their technical portrait skills and their creativity by making an innovative rendering of their favorite teacher.
Materials:
12” x 18” white drawing paper, portraits of teachers that students secretly take, mixed media, mat board
Procedures:
1. The teacher will present the lesson as a special, secret assignment where students honor their favorite teacher through the art of portraiture.
2. Students will take images of their favorite teachers to draw from. 3. Students will draw what they see, considering line and shape and add color or value appropriately,
to honor the identity and likeness of their favorite teacher. 4. Students will use any media they like, and add collage aspects for backing. 5. Students will consider the negative space creatively, to showcase a special environment for the
portrait, sharing the discipline that the teacher practices. 6. These images will be exhibited in a special “Favorite Teacher” display to be shared with the school.
Assessment: I use a project evaluation form for each lesson I teach. This allows my students to appropriately reflect on the learning at hand and leaves room for them to comment on the process and how they feel the final piece turned out. It also allows me to comment and give them a grade based on their learning AND their final work. We also do in process critiques using my “2 Glows and a Grow” model.
Extension: Our National Art Honor Society students create a large pieced mural of our annual Teacher of
the Year. We generally do 16, 12” x 12” paper tiles, using the grid method in mixed media. Each year the paper murals differ as they match the personality and discipline of the specific TOTY.
dewestudio©2014
21
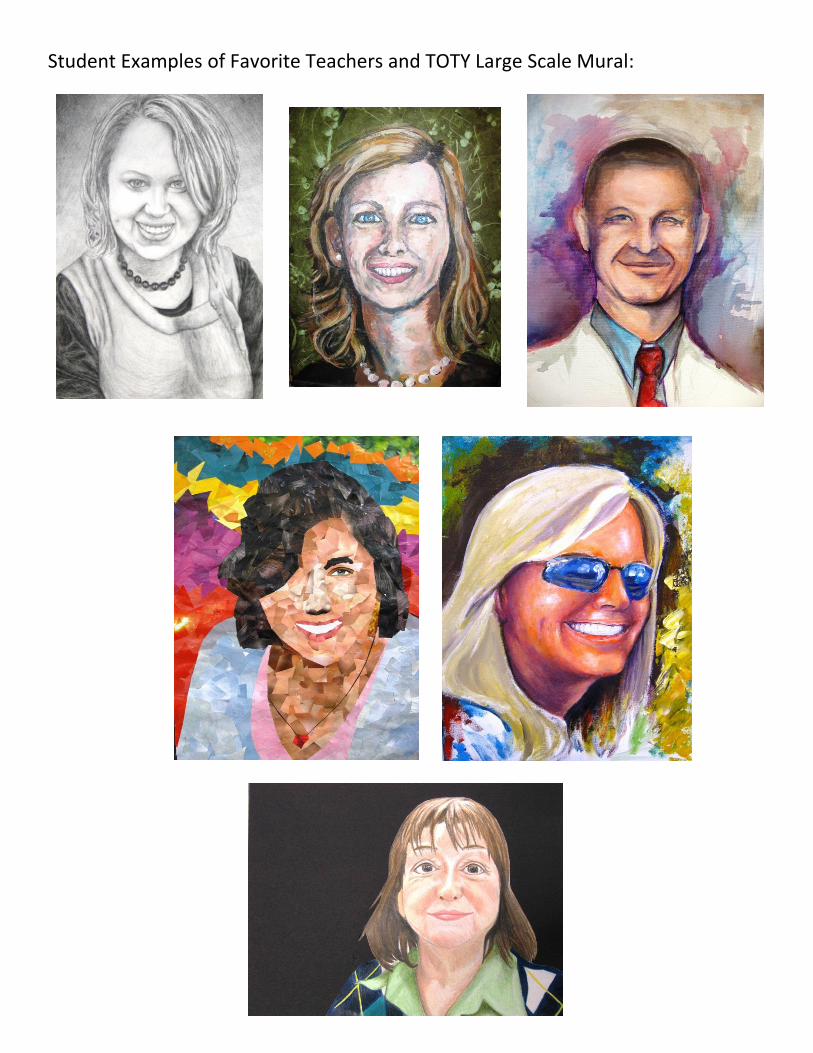
Student Examples of Favorite Teachers and TOTY Large Scale Mural:
22
Large Scale Food Paintings
Objective:
Students will learn the importance of drawing from life utilizing the elements they see in direct observational studies and then creatively utilize the principles of art to enlarge the objects before them. I have found that food works the best.
Materials:
Students favorite foods (when necessary, photos will work, but I prefer the actual food item), mixed media and surface elements that students select.
Procedures:
1. The teacher will discuss past drawing and painting lessons and introduce the students to this large scale food lesson.
2. The teacher will emphasize the importance of measuring, value, color theory, negative space and textural awareness.
3. Students will select any surface media and various media in which to work. 4. Students will be encouraged to creatively utilize new material and layer materials to see innovative
results. 5. Students will have 2 weeks to complete their works and install them into a student exhibit titled:
“Delicious Drawings”
Assessment: I use a project evaluation form for each lesson I teach. This allows my students to appropriately reflect on the learning at hand and leaves room for them to comment on the process and how they feel the final piece turned out. It also allows me to comment and give them a grade based on their learning AND their final work. We also do in process critiques using my “2 Glows and a Grow” model.
dewestudio©2014
23
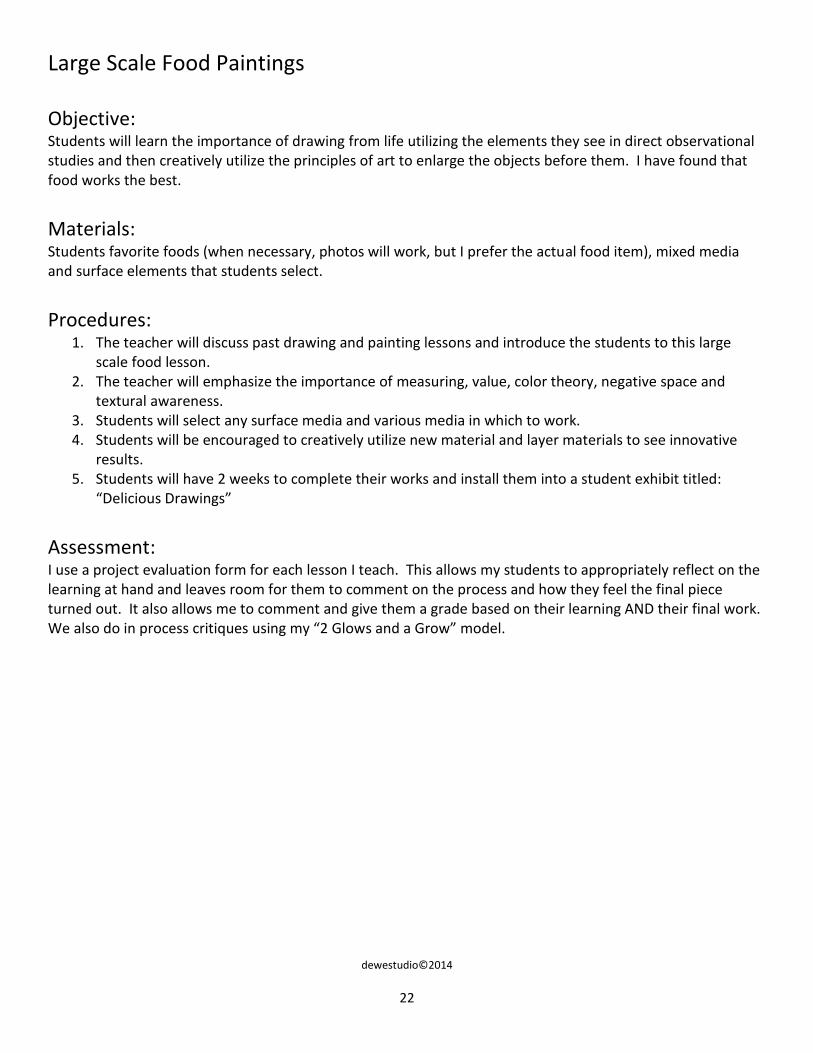
Student Examples:
Chalk on black poster board (28” x 22”) Oil Pastel on poster board (22” x 22”)
Acrylic with Oil Pastel on plywood (40” x 20”)
dewestudio©2014
24
Watercolor Still Life Work
Objective:
Students will learn how to utilize watercolor in direct observational studies, primarily through dyed water in glass vessel still life compositions.
Materials:
Still life set ups at each table with dyed water in glass vessels on cloth, watercolor palettes, brushes, water cups, mixed media for watercolor textures (alcohol, spray bottles, salt, etc…), newsprint, watercolor paper (6” x 6” squares and 12” x 18”), masking tape, examples of strong watercolor paintings utilizing light such as Tracy Taylor and Janet Fish
Procedures:
1. The teacher will set up table still life objects with the help of students at each table in the room. 2. Students will select several glass vessels in varying heights and widths and add dye to color the water,
creating interesting compositions. 3. Students will sketch out the still life work onto newsprint, to work on measuring and proportion skills. 4. Students will practice watercolor techniques using watercolor paper in 6” x 6” squares before
beginning their final works 5. When students feel ready, they will sketch out their final composition onto watercolor paper and begin
to paint their studies. 6. Students will pay attention to the light areas and block those using masking tape to create proper value
in their works. 7. Students will watercolor a strong background, which will help to emphasize the painted objects. 8. Final works will be exhibited in a group exhibit.
Assessment: I use a project evaluation form for each lesson I teach. This allows my students to appropriately reflect on the learning at hand and leaves room for them to comment on the process and how they feel the final piece turned out. It also allows me to comment and give them a grade based on their learning AND their final work. We also do in process critiques using my “2 Glows and a Grow” model.
dewestudio©2014
25
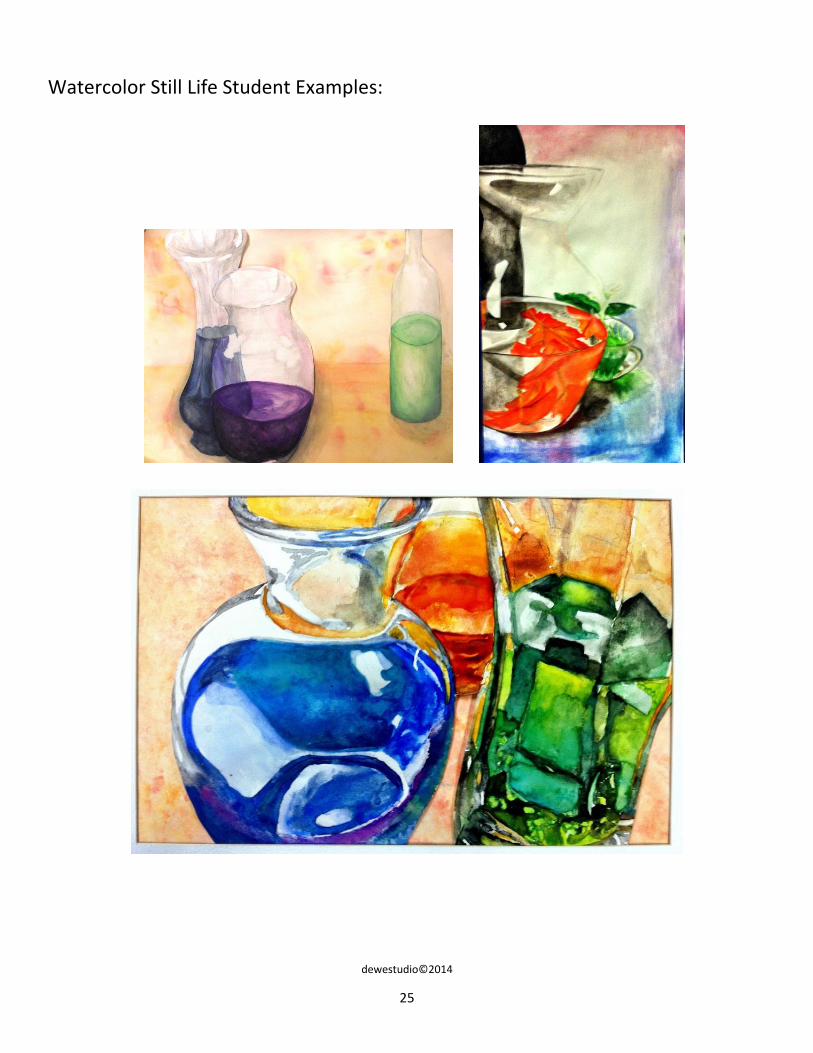
Watercolor Still Life Student Examples:
dewestudio©2014
26
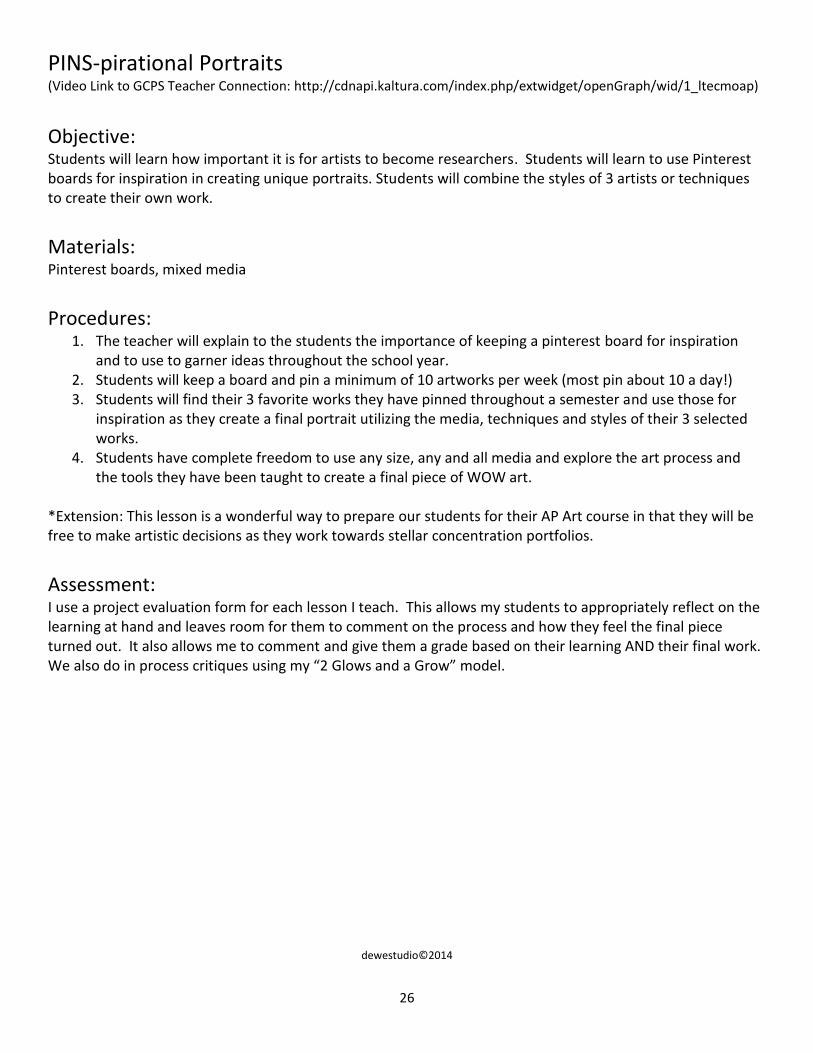
PINS-pirational Portraits (Video Link to GCPS Teacher Connection: http://cdnapi.kaltura.com/index.php/extwidget/openGraph/wid/1_ltecmoap)
Objective:
Students will learn how important it is for artists to become researchers. Students will learn to use Pinterest boards for inspiration in creating unique portraits. Students will combine the styles of 3 artists or techniques to create their own work.
Materials:
Pinterest boards, mixed media
Procedures:
1. The teacher will explain to the students the importance of keeping a pinterest board for inspiration and to use to garner ideas throughout the school year.
2. Students will keep a board and pin a minimum of 10 artworks per week (most pin about 10 a day!) 3. Students will find their 3 favorite works they have pinned throughout a semester and use those for
inspiration as they create a final portrait utilizing the media, techniques and styles of their 3 selected works.
4. Students have complete freedom to use any size, any and all media and explore the art process and the tools they have been taught to create a final piece of WOW art.
*Extension: This lesson is a wonderful way to prepare our students for their AP Art course in that they will be free to make artistic decisions as they work towards stellar concentration portfolios.
Assessment: I use a project evaluation form for each lesson I teach. This allows my students to appropriately reflect on the learning at hand and leaves room for them to comment on the process and how they feel the final piece turned out. It also allows me to comment and give them a grade based on their learning AND their final work. We also do in process critiques using my “2 Glows and a Grow” model.
dewestudio©2014

27
Student Examples:
dewestudio©2014
28
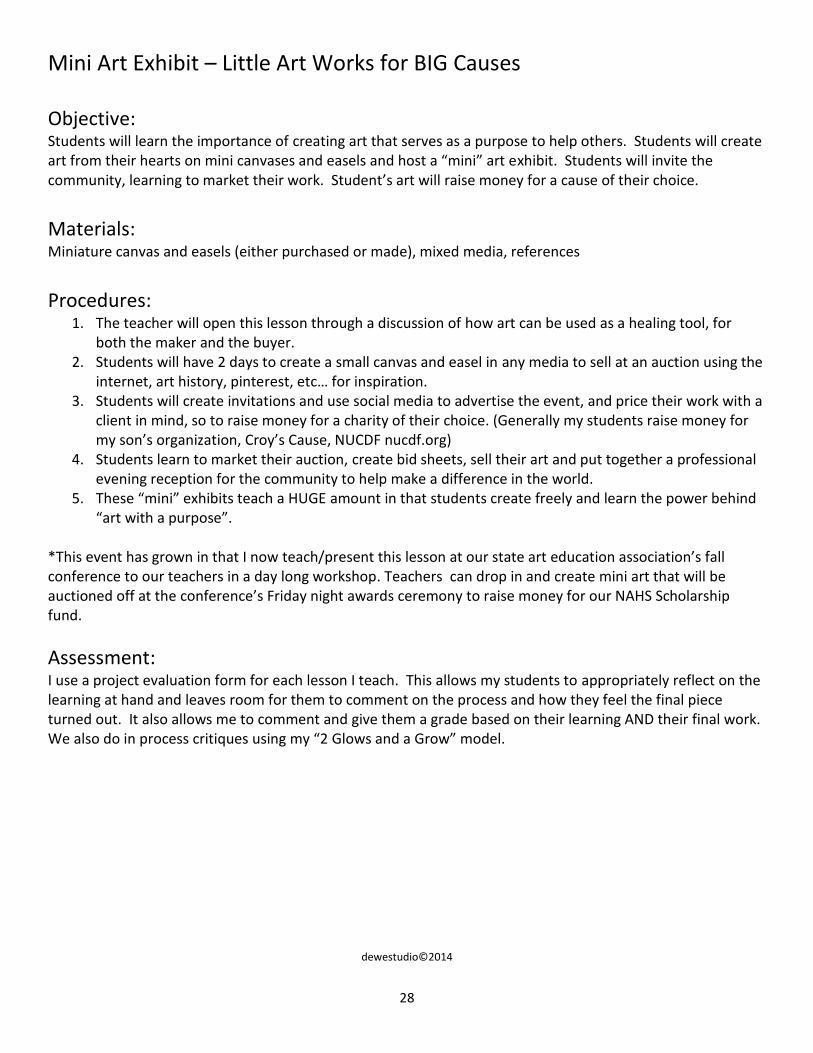
Mini Art Exhibit – Little Art Works for BIG Causes
Objective:
Students will learn the importance of creating art that serves as a purpose to help others. Students will create art from their hearts on mini canvases and easels and host a “mini” art exhibit. Students will invite the community, learning to market their work. Student’s art will raise money for a cause of their choice.
Materials:
Miniature canvas and easels (either purchased or made), mixed media, references
Procedures:
1. The teacher will open this lesson through a discussion of how art can be used as a healing tool, for both the maker and the buyer.
2. Students will have 2 days to create a small canvas and easel in any media to sell at an auction using the internet, art history, pinterest, etc… for inspiration.
3. Students will create invitations and use social media to advertise the event, and price their work with a client in mind, so to raise money for a charity of their choice. (Generally my students raise money for my son’s organization, Croy’s Cause, NUCDF nucdf.org)
4. Students learn to market their auction, create bid sheets, sell their art and put together a professional evening reception for the community to help make a difference in the world.
5. These “mini” exhibits teach a HUGE amount in that students create freely and learn the power behind “art with a purpose”.
*This event has grown in that I now teach/present this lesson at our state art education association’s fall conference to our teachers in a day long workshop. Teachers can drop in and create mini art that will be auctioned off at the conference’s Friday night awards ceremony to raise money for our NAHS Scholarship fund.
Assessment: I use a project evaluation form for each lesson I teach. This allows my students to appropriately reflect on the learning at hand and leaves room for them to comment on the process and how they feel the final piece turned out. It also allows me to comment and give them a grade based on their learning AND their final work. We also do in process critiques using my “2 Glows and a Grow” model.
dewestudio©2014
29
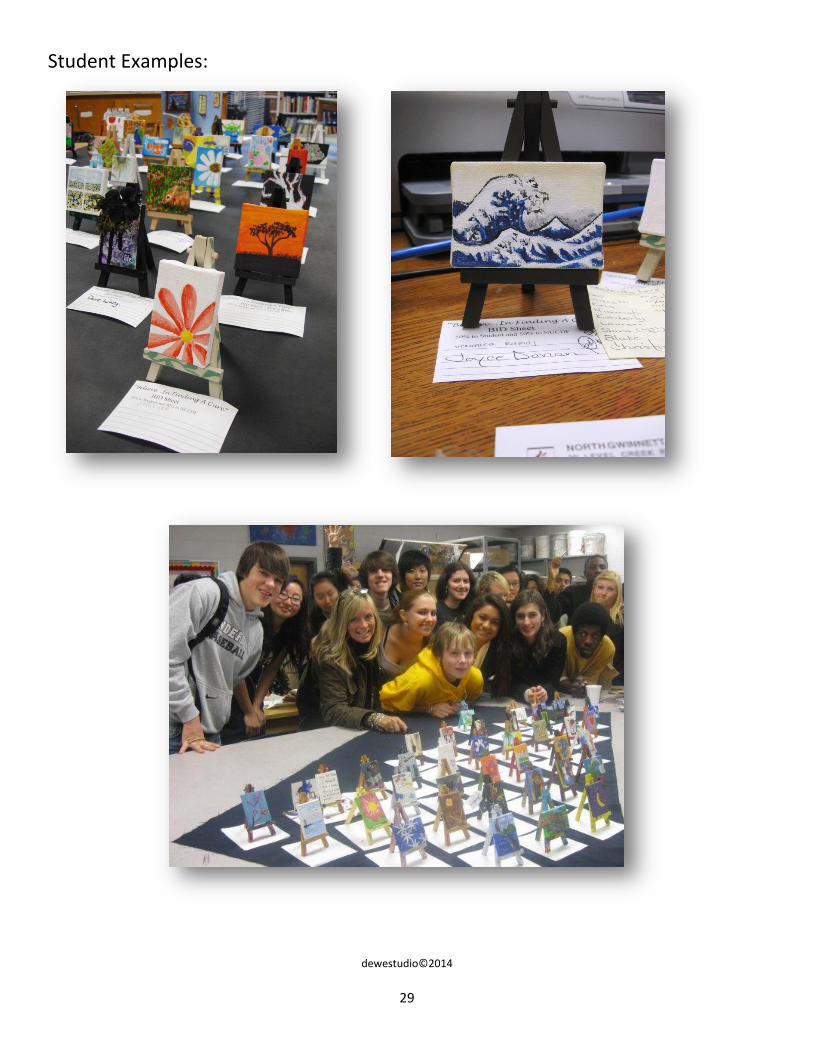
Student Examples:
dewestudio©2014
30
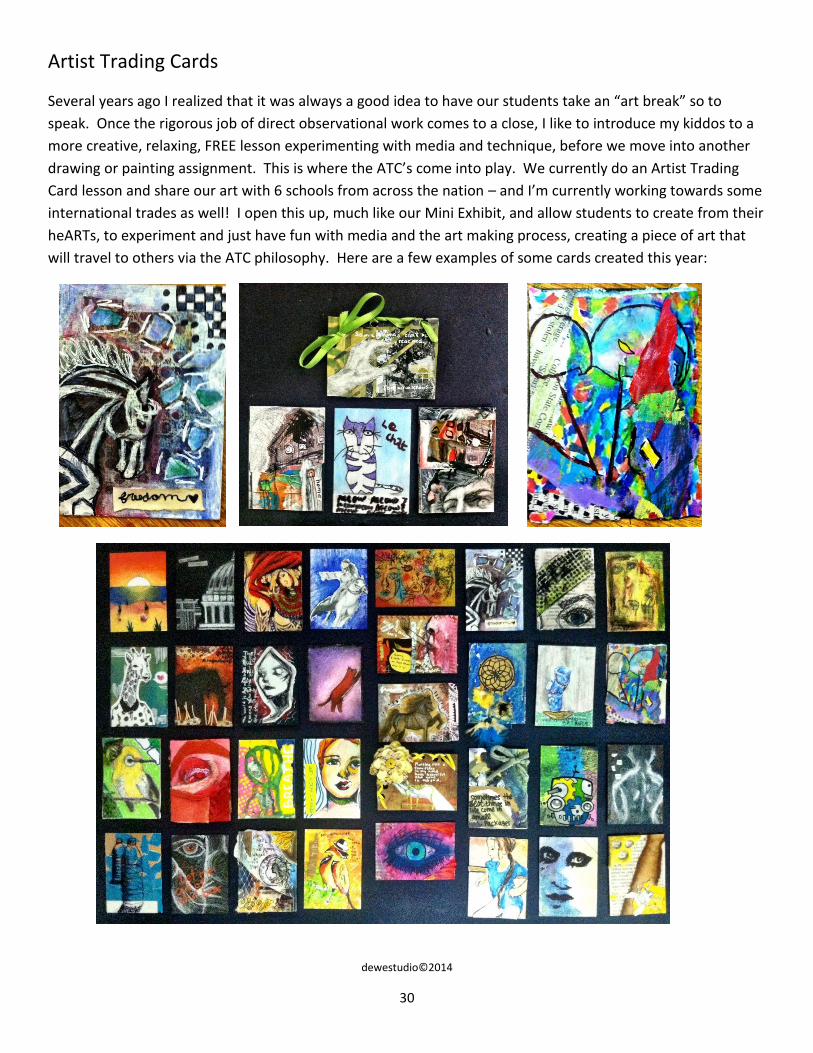
Artist Trading Cards
Several years ago I realized that it was always a good idea to have our students take an “art break” so to
speak. Once the rigorous job of direct observational work comes to a close, I like to introduce my kiddos to a
more creative, relaxing, FREE lesson experimenting with media and technique, before we move into another
drawing or painting assignment. This is where the ATC’s come into play. We currently do an Artist Trading
Card lesson and share our art with 6 schools from across the nation – and I’m currently working towards some
international trades as well! I open this up, much like our Mini Exhibit, and allow students to create from their
heARTs, to experiment and just have fun with media and the art making process, creating a piece of art that
will travel to others via the ATC philosophy. Here are a few examples of some cards created this year:
dewestudio©2014
31
Visual Journal / Sketchbook ASSIGNMENTS DP Fall 2012 WHY keep a Visual Journal / Sketchbook? PRACTICE makes PERFECT!! Most artists keep sketchbooks. In them, they experiment with ideas and collect drawings of things around them and things that they enjoy. Sketchbooks are like visual diaries for artists. Artists often use them for planning and developing their work.
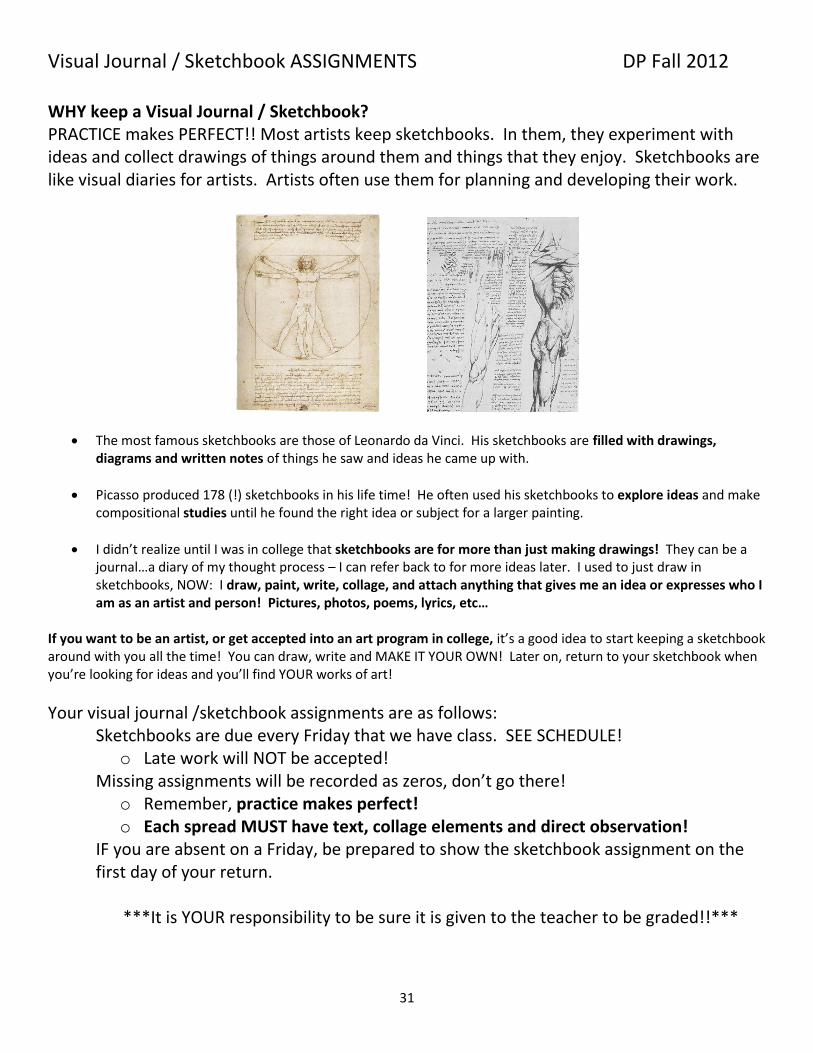
The most famous sketchbooks are those of Leonardo da Vinci. His sketchbooks are filled with drawings, diagrams and written notes of things he saw and ideas he came up with.
Picasso produced 178 (!) sketchbooks in his life time! He often used his sketchbooks to explore ideas and make compositional studies until he found the right idea or subject for a larger painting.
I didn’t realize until I was in college that sketchbooks are for more than just making drawings! They can be a journal…a diary of my thought process – I can refer back to for more ideas later. I used to just draw in sketchbooks, NOW: I draw, paint, write, collage, and attach anything that gives me an idea or expresses who I am as an artist and person! Pictures, photos, poems, lyrics, etc…
If you want to be an artist, or get accepted into an art program in college, it’s a good idea to start keeping a sketchbook around with you all the time! You can draw, write and MAKE IT YOUR OWN! Later on, return to your sketchbook when you’re looking for ideas and you’ll find YOUR works of art!
Your visual journal /sketchbook assignments are as follows: Sketchbooks are due every Friday that we have class. SEE SCHEDULE!
o Late work will NOT be accepted! Missing assignments will be recorded as zeros, don’t go there!
o Remember, practice makes perfect! o Each spread MUST have text, collage elements and direct observation!
IF you are absent on a Friday, be prepared to show the sketchbook assignment on the first day of your return.
***It is YOUR responsibility to be sure it is given to the teacher to be graded!!***
32
Visual Journal / Sketchbook Guidelines (HOW YOU WILL BE GRADED)
Assignments must be attached to your sketchbook to be graded. Loose assignments and assignments on notebook paper will NOT be accepted.
FILL THE PAGE! Each composition should touch the edges of your paper.
3D objects are allowed – even encouraged – think about a relief, collage, etc…
Unless otherwise noted, ALWAYS include a wide range of values (even in color work) and think about contrast!
ALWAYS think about BALANCE – and – where is the EMPHASIS – give it excitement!
Spend AT LEAST 30 minutes to 1 hour PER ASSIGNMENT ( have I mentioned that practice makes perfect) o Drawings from observation are preferred – meaning you should LOOK at the object(s) while you are
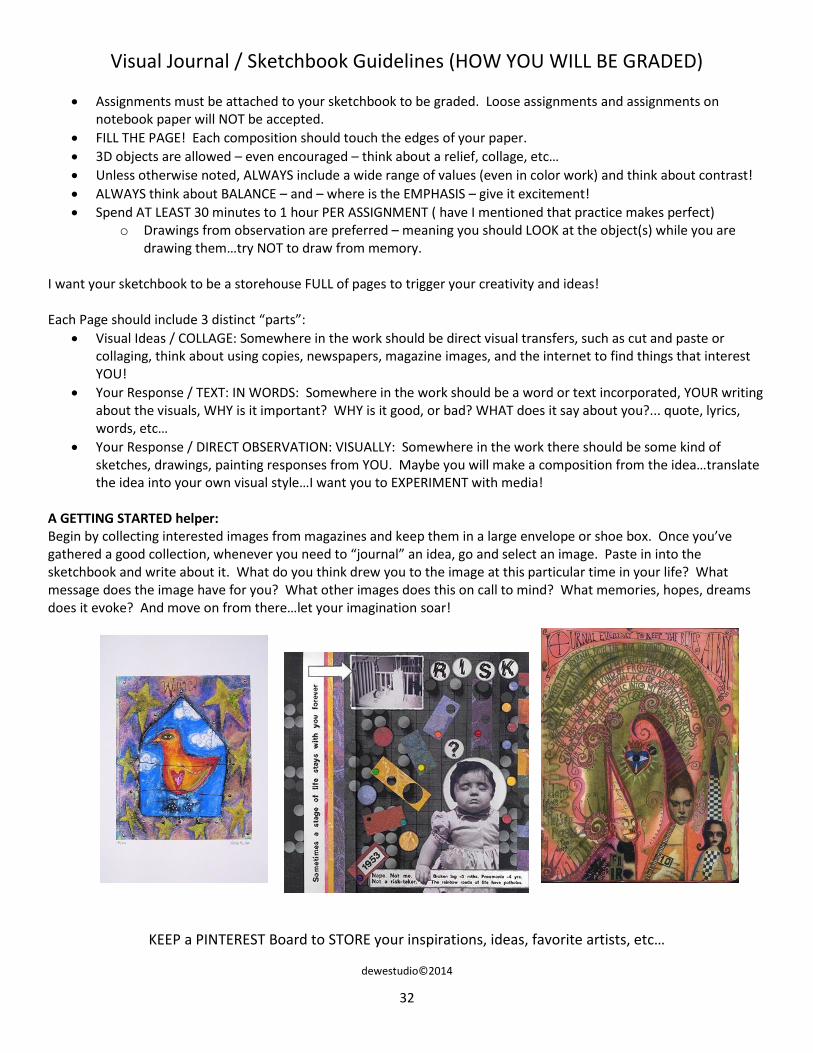
drawing them…try NOT to draw from memory. I want your sketchbook to be a storehouse FULL of pages to trigger your creativity and ideas! Each Page should include 3 distinct “parts”:
Visual Ideas / COLLAGE: Somewhere in the work should be direct visual transfers, such as cut and paste or collaging, think about using copies, newspapers, magazine images, and the internet to find things that interest YOU!
Your Response / TEXT: IN WORDS: Somewhere in the work should be a word or text incorporated, YOUR writing about the visuals, WHY is it important? WHY is it good, or bad? WHAT does it say about you?... quote, lyrics, words, etc…
Your Response / DIRECT OBSERVATION: VISUALLY: Somewhere in the work there should be some kind of sketches, drawings, painting responses from YOU. Maybe you will make a composition from the idea…translate the idea into your own visual style…I want you to EXPERIMENT with media!
A GETTING STARTED helper: Begin by collecting interested images from magazines and keep them in a large envelope or shoe box. Once you’ve gathered a good collection, whenever you need to “journal” an idea, go and select an image. Paste in into the sketchbook and write about it. What do you think drew you to the image at this particular time in your life? What message does the image have for you? What other images does this on call to mind? What memories, hopes, dreams does it evoke? And move on from there…let your imagination soar!
KEEP a PINTEREST Board to STORE your inspirations, ideas, favorite artists, etc…
dewestudio©2014
33
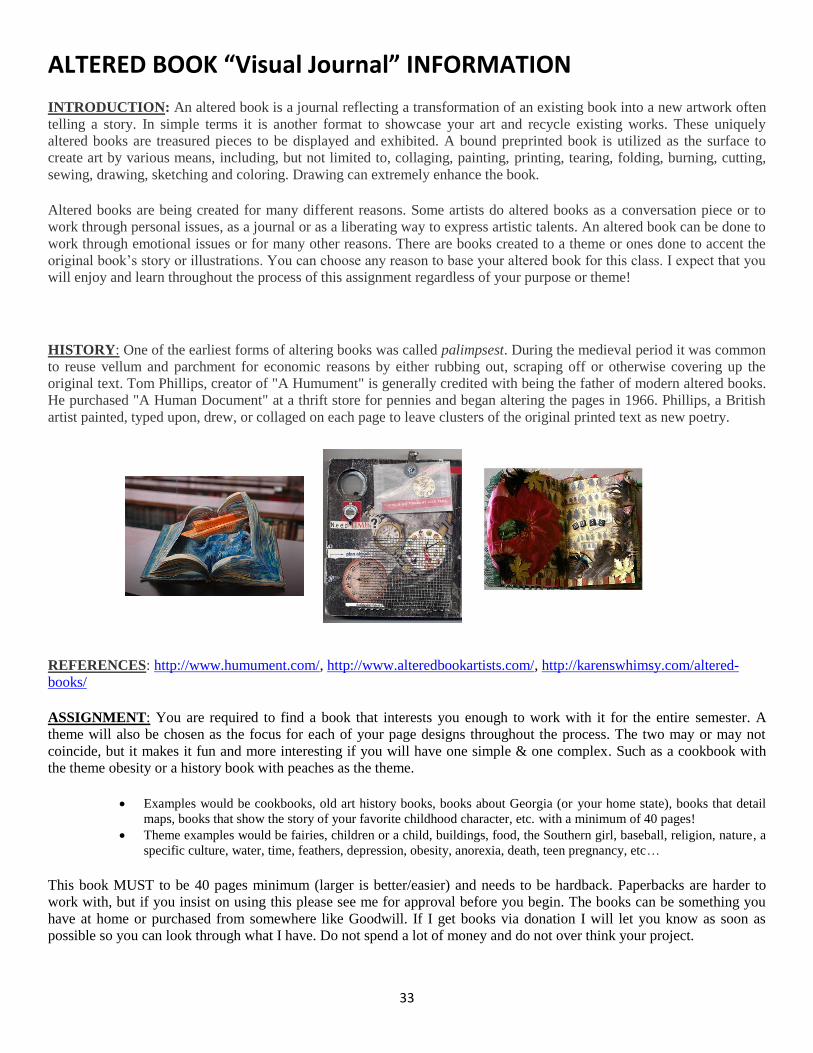
ALTERED BOOK “Visual Journal” INFORMATION
INTRODUCTION: An altered book is a journal reflecting a transformation of an existing book into a new artwork often
telling a story. In simple terms it is another format to showcase your art and recycle existing works. These uniquely
altered books are treasured pieces to be displayed and exhibited. A bound preprinted book is utilized as the surface to
create art by various means, including, but not limited to, collaging, painting, printing, tearing, folding, burning, cutting,
sewing, drawing, sketching and coloring. Drawing can extremely enhance the book.
Altered books are being created for many different reasons. Some artists do altered books as a conversation piece or to
work through personal issues, as a journal or as a liberating way to express artistic talents. An altered book can be done to
work through emotional issues or for many other reasons. There are books created to a theme or ones done to accent the
original book’s story or illustrations. You can choose any reason to base your altered book for this class. I expect that you
will enjoy and learn throughout the process of this assignment regardless of your purpose or theme!
HISTORY: One of the earliest forms of altering books was called palimpsest. During the medieval period it was common
to reuse vellum and parchment for economic reasons by either rubbing out, scraping off or otherwise covering up the
original text. Tom Phillips, creator of "A Humument" is generally credited with being the father of modern altered books.
He purchased "A Human Document" at a thrift store for pennies and began altering the pages in 1966. Phillips, a British
artist painted, typed upon, drew, or collaged on each page to leave clusters of the original printed text as new poetry.
REFERENCES: http://www.humument.com/, http://www.alteredbookartists.com/, http://karenswhimsy.com/altered-
books/
ASSIGNMENT: You are required to find a book that interests you enough to work with it for the entire semester. A
theme will also be chosen as the focus for each of your page designs throughout the process. The two may or may not
coincide, but it makes it fun and more interesting if you will have one simple & one complex. Such as a cookbook with
the theme obesity or a history book with peaches as the theme.
Examples would be cookbooks, old art history books, books about Georgia (or your home state), books that detail
maps, books that show the story of your favorite childhood character, etc. with a minimum of 40 pages!
Theme examples would be fairies, children or a child, buildings, food, the Southern girl, baseball, religion, nature, a
specific culture, water, time, feathers, depression, obesity, anorexia, death, teen pregnancy, etc…
This book MUST to be 40 pages minimum (larger is better/easier) and needs to be hardback. Paperbacks are harder to
work with, but if you insist on using this please see me for approval before you begin. The books can be something you
have at home or purchased from somewhere like Goodwill. If I get books via donation I will let you know as soon as
possible so you can look through what I have. Do not spend a lot of money and do not over think your project.
34
The list of assignments needs to be completed in order, but the book can reflect the designs from anywhere within the
book. In other words, just complete the next assignment somewhere within your book.
REQUIRED DESIGN INFORMATION: All ideas must keep within the theme chosen and I want to see many different
experiments. Failure is acceptable, just complete what you start.
1. A photo of some kind is encouraged to be used throughout the book. Photos include, but are not limited to photocopy,
magazine, newspaper, brochures, phototranfers, digital prints, postcards and negatives, etc…
2. Some other medium must also be used in conjunction with the photography. Charcoal, graphite, pen & ink, watercolor,
acrylic, oil paints, conte, oil pastel, crayon, markers, sharpies, gesso, paper collage, glues, stamps, embossing, glazing,
cutting, iron-ons, sewing’s, printing, typing are just a few things that you can easily do to complete your pages. Sizes can
vary, but images need to be clear and easy on the eyes.
3. Incorporated into the collage every page or spread must also have something written such as a word, phrase or poem that reflects your theme. Find the story within the preprinted page is often fun. Create a new story from what is already written. To make your work stand out keep in mind you want to see great compositions, a main focus, and always refer to the principles of design & elements of art. Repetition and movement are key to great designs! POSSIBLE SUPPLIES
Paints: watercolors, acrylics, tempera, Jacquard brand translucent colors, artists' inks.
Applicators: brushes, sponges, toothpicks, craft sticks, fingers.
Mark makings: Pilot V Ball or other roller ball pen, paint pens, squeeze paints, archival markers, photo tinting markers, colored pencils, oil pastels, crayons, charcoal, graphite.
Papers and fabrics: card stock, tags, bingo cards, vellum, ticket stubs, newsprint, magazine clippings, stamps, fabric scraps, colored threads, ribbons.
Scissors, hole punch, craft knife, cutting mat.
Adhesives: glue stick, white craft glue, mono-adhesive double-sided tape, gesso, acrylic medium, hot glue gun.
Embellishments: lace, hankies, charms, beads, alphabet beads, mini bottles, screen, grommets, tassels, wire, dried flowers, found objects, gum wrappers
CRAFTSMANSHIP: You will be layering and cutting and gluing in this book all year. Keep this book safe and clean. Take care of your baby! No torn edges unless it is design purposeful and each page/spread is to be well thought out. This is a work of art displayed at the end of the year. The works are known to win many awards. Make yours award winning!
GRADING RUBRIC:
√+’s = excellent, went over and above, successful √-’s = lacking, could have put more effort and thought into work √’s = did what you were asked, tried something new, good work, could use some verve with design 0 = no work, not completed, absent and showed no work when returned
5 √+’s = 100 1 √-’s = 85 1 0 = 80
4 √+’s = 97 2 √-’s = 80 2 0’s = 70
3 √+’s = 95 3 √-’s = 75 3 0’s = 60
2 √+’s = 93 4 √-’s = 70 4 0’s = 50
1 √+’s = 90 5 √-’s = 65 5 √’s = 88
35
ALTERED BOOK/ VISUAL JOURNAL ASSIGNMENTS – Spring 2013
Each Friday a new set of page designs will be due. Each design will cover 2 pages called a “spread”!
No late grades will be given! If a student is absent they must see me when they return in order to get credit, just as we
did with our sketchbooks! If a student does not show me their work the day they return they will not receive credit for
those page designs. A zero will seriously hurt your final altered book grade!
I give my students several weeks off throughout the semester but it is expected that they will work in their altered visual
journals weekly and incorporate DP lessons into their book – this is a wonderful practice tool for their drawing and
painting techniques! Remember – 50% of each spread should be direct observation – drawing is a must!
#1 Due: Friday, January 11th New Year’s Resolution(s)…Be Inspirational!
#2 Due: Friday, January 18th Anatomy Mixed Media
#3 Due: Friday, January 25th “Brighten My Day”…include a light source
#4 Due: Friday, February 8th Monochromatic Spread – think about your theme!
#5 Due: Thursday, February 14th Fill your page with LOVE…symbols, Valentines, BE CREATIVE!
These 5 entries will be for the 1st altered book project grade …1 missing assignment will hurt your grade!
#6 Due: Friday, February 22nd FREE Choice – WOW me with your theme!
#7 Due: Friday, March 1st Youth Art Month – art education advocacy – why?
#8 Due: Friday, March 15th Figure silhouettes / gesture drawings– full body or bodies
#9 Due: Friday, March 22nd Asymmetrical designs
#10 Due: Friday, April 5th April Fool’s! (and yes, you have to do a spread!)
These 5 entries will be for the 2nd altered book project grade …1 missing will hurt your grade!
#11 Due: Friday, April 19th Be Creative with Numbers
#12 Due: Friday, April 26th Find a poem within the pages…or write a poem
#13 Due: Friday, May 3rd Emphasis on an Art Element
#14 Due: Friday, May 10th Get creative with Stencils
#15 Due: Friday, May 17th Portraiture…work on portraits in a creative manner!
These 5 entries will be for the 3rd and Final altered book project grade …1 missing will hurt your grade!
Due: Friday, May 17th Present Your Altered Book and Performance Final for a Final Grade!
Can’t wait to see how GREAT these books turn out! Do your research and Be CREATIVE!
dewestudio©2014
36
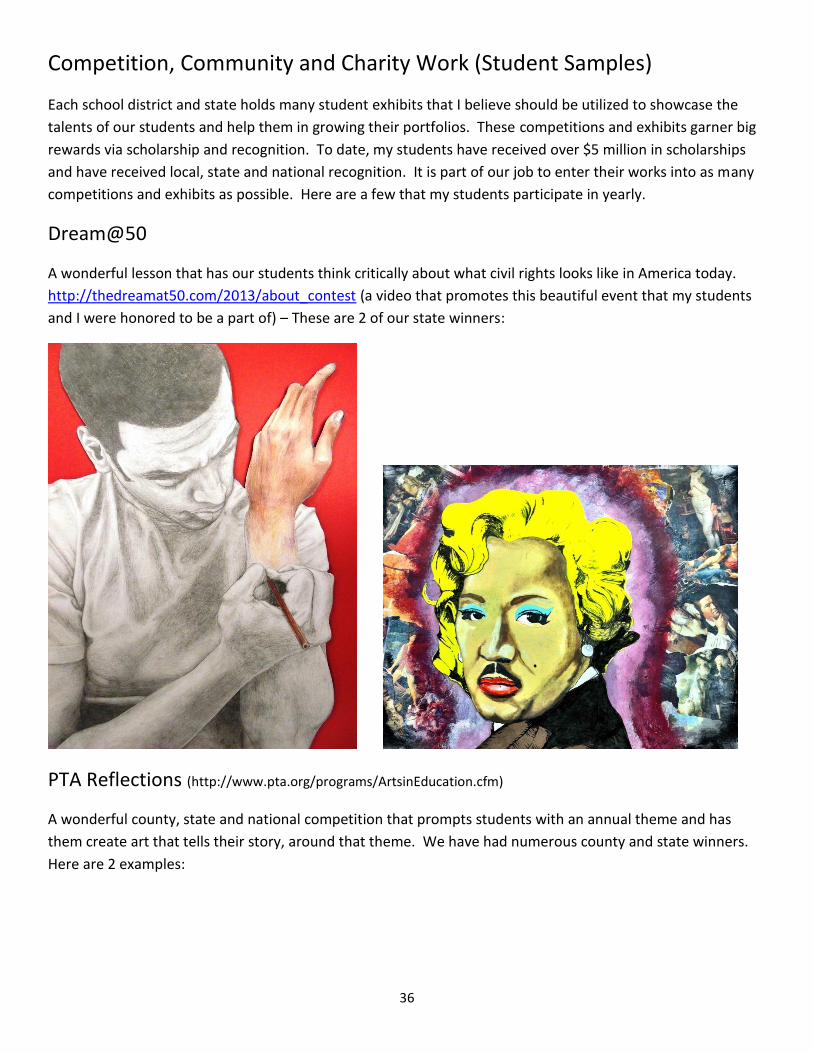
Competition, Community and Charity Work (Student Samples)
Each school district and state holds many student exhibits that I believe should be utilized to showcase the
talents of our students and help them in growing their portfolios. These competitions and exhibits garner big
rewards via scholarship and recognition. To date, my students have received over $5 million in scholarships
and have received local, state and national recognition. It is part of our job to enter their works into as many
competitions and exhibits as possible. Here are a few that my students participate in yearly.
Dream@50
A wonderful lesson that has our students think critically about what civil rights looks like in America today.
http://thedreamat50.com/2013/about_contest (a video that promotes this beautiful event that my students
and I were honored to be a part of) – These are 2 of our state winners:
PTA Reflections (http://www.pta.org/programs/ArtsinEducation.cfm)
A wonderful county, state and national competition that prompts students with an annual theme and has
them create art that tells their story, around that theme. We have had numerous county and state winners.
Here are 2 examples:
37
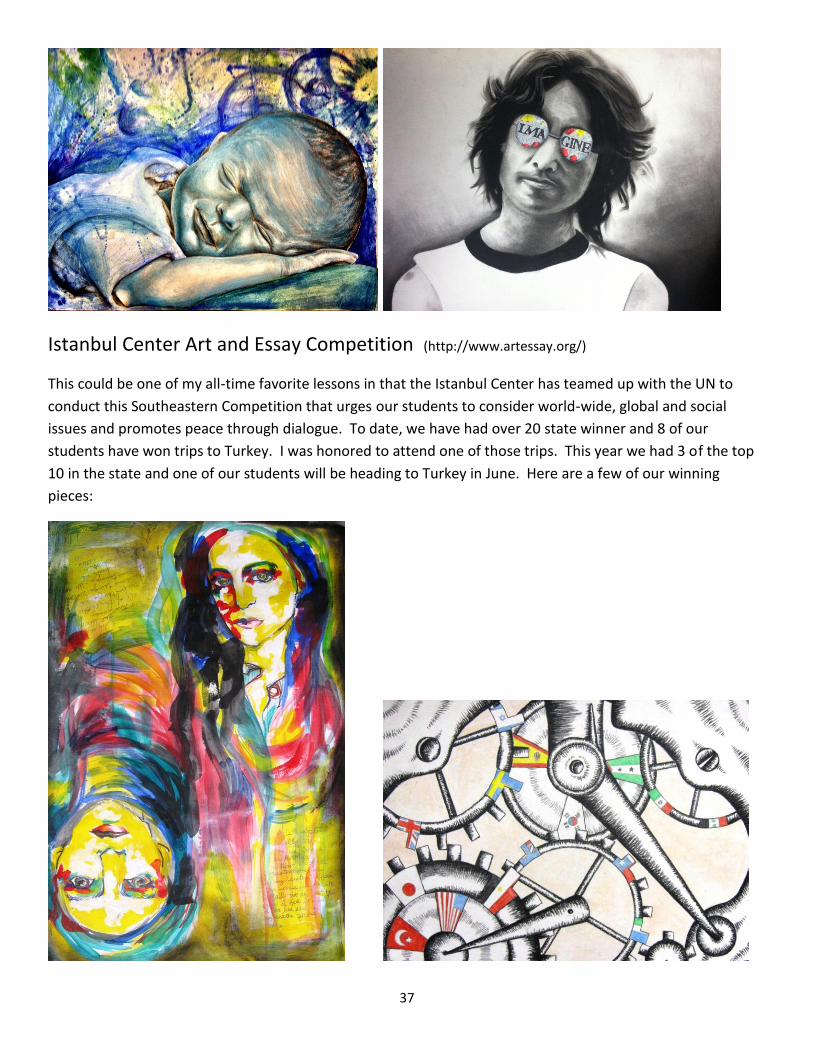
Istanbul Center Art and Essay Competition (http://www.artessay.org/)
This could be one of my all-time favorite lessons in that the Istanbul Center has teamed up with the UN to
conduct this Southeastern Competition that urges our students to consider world-wide, global and social
issues and promotes peace through dialogue. To date, we have had over 20 state winner and 8 of our
students have won trips to Turkey. I was honored to attend one of those trips. This year we had 3 of the top
10 in the state and one of our students will be heading to Turkey in June. Here are a few of our winning
pieces:
38
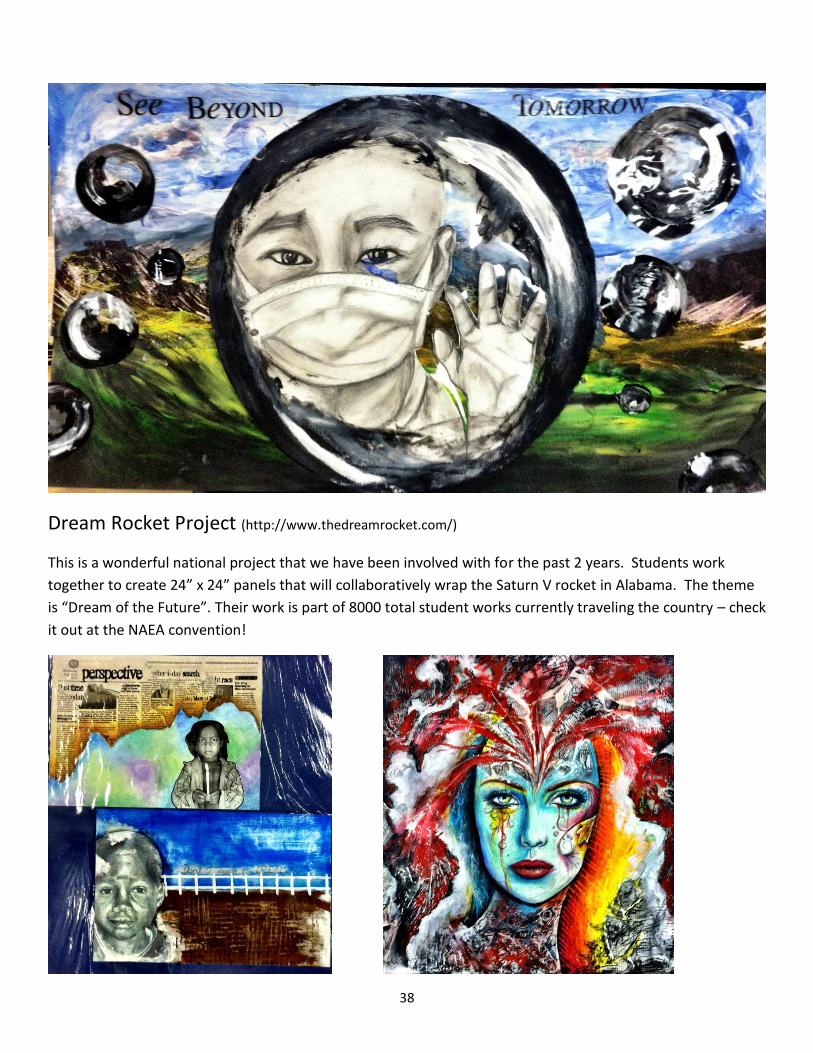
Dream Rocket Project (http://www.thedreamrocket.com/)
This is a wonderful national project that we have been involved with for the past 2 years. Students work
together to create 24” x 24” panels that will collaboratively wrap the Saturn V rocket in Alabama. The theme
is “Dream of the Future”. Their work is part of 8000 total student works currently traveling the country – check
it out at the NAEA convention!
39
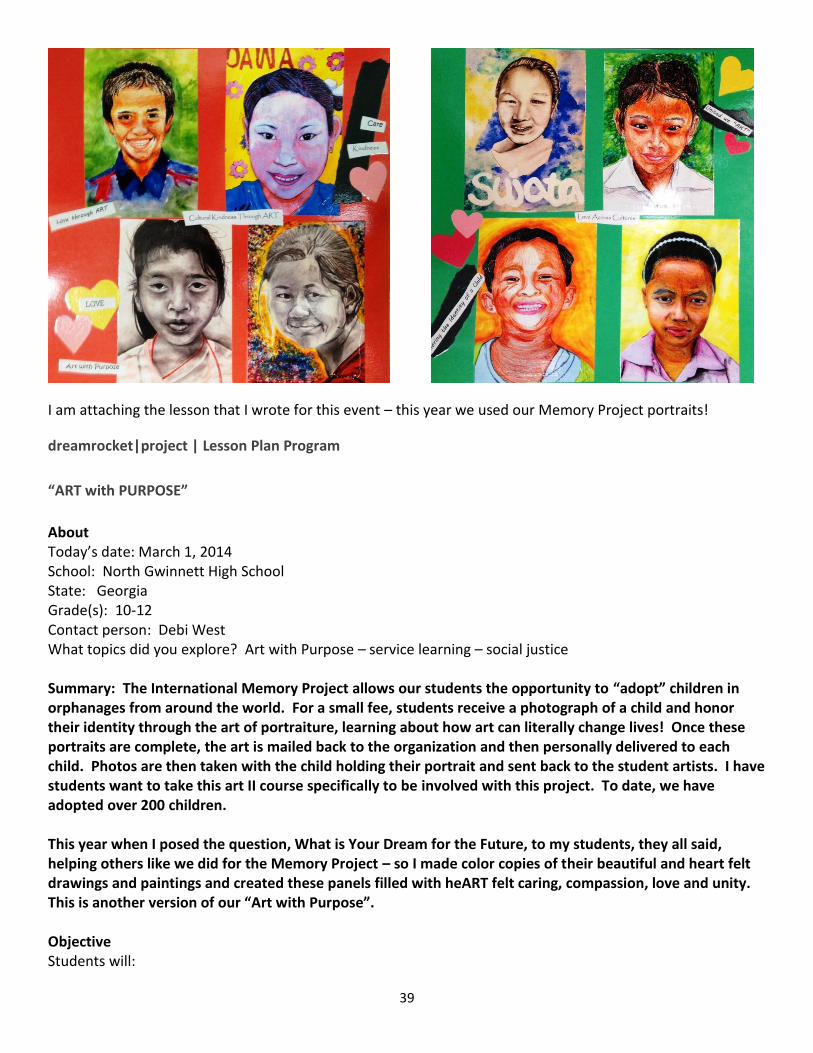
I am attaching the lesson that I wrote for this event – this year we used our Memory Project portraits!
dreamrocket|project | Lesson Plan Program
“ART with PURPOSE”
About Today’s date: March 1, 2014 School: North Gwinnett High School State: Georgia Grade(s): 10-12 Contact person: Debi West What topics did you explore? Art with Purpose – service learning – social justice Summary: The International Memory Project allows our students the opportunity to “adopt” children in orphanages from around the world. For a small fee, students receive a photograph of a child and honor their identity through the art of portraiture, learning about how art can literally change lives! Once these portraits are complete, the art is mailed back to the organization and then personally delivered to each child. Photos are then taken with the child holding their portrait and sent back to the student artists. I have students want to take this art II course specifically to be involved with this project. To date, we have adopted over 200 children. This year when I posed the question, What is Your Dream for the Future, to my students, they all said, helping others like we did for the Memory Project – so I made color copies of their beautiful and heart felt drawings and paintings and created these panels filled with heART felt caring, compassion, love and unity. This is another version of our “Art with Purpose”. Objective Students will:
40
1. Learn the art of portraiture 2. Honor the identity of an orphan through the art of portraiture 3. Put several copies of the art onto a panel with symbols and text that describe our “art with purpose” philosophy. Materials used 1. Mixed (graphite, charcoal, acrylic, pen and ink, oil pastel, art stix, watercolor 2. Images of the orphans who we painted 3. Collaged symbols and text Steps to setting up and preparing 1. Students have a strong foundation of the elements, principles and media to begin with 2. Students watch the video that introduces them to this lesson (www.memoryproject.org) 3. Students honor the identity of their “adopted” orphan using the art of portraiture. Directions Step 1: See attached Evaluation
1. How does this assignment fit into your States common core curriculum standards? It teaches the art of portraiture through the act of care
2. Did you and your students enjoy working on this assignment? Why or why not This is always one of my students’ most favorite projects due to the “art with purpose” objectives
3. Do you see any room for improvement? When students are creating from their hearts, there is no room for improvement! They have a strong foundation in the art methodologies that allows them to freely experiment with media to create a piece of art work that will make another child happy. This is a win/win lesson for everyone involved!
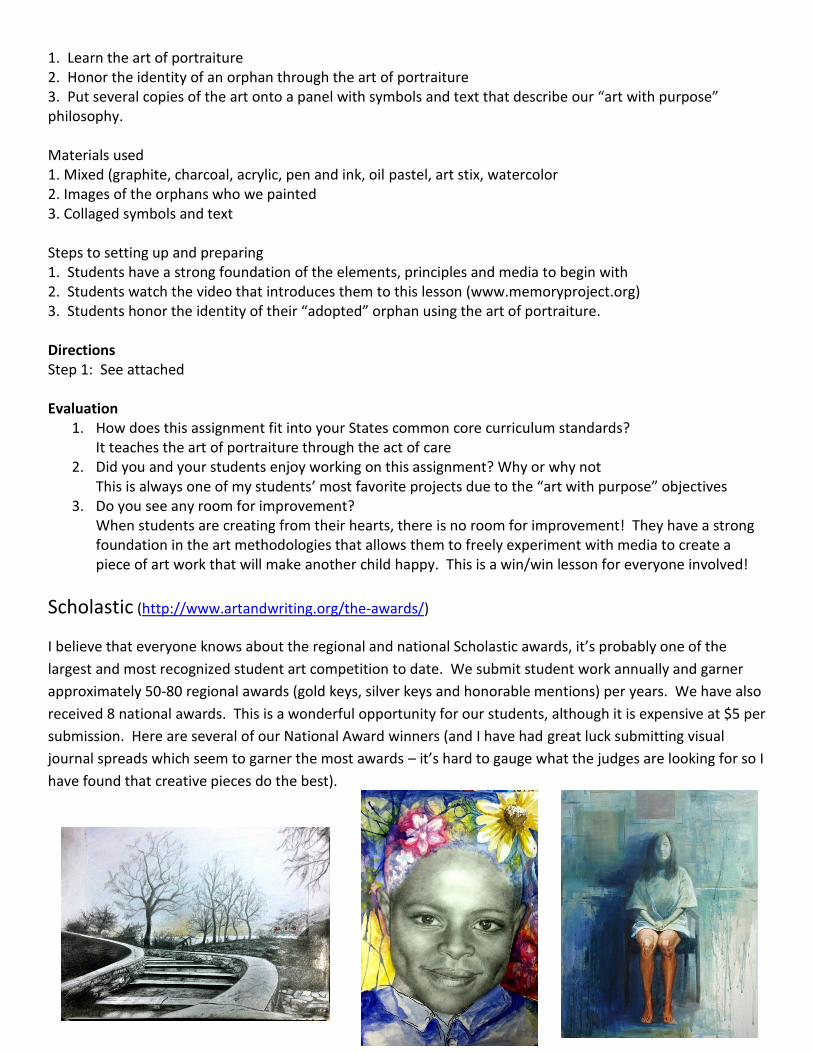
Scholastic (http://www.artandwriting.org/the-awards/)
I believe that everyone knows about the regional and national Scholastic awards, it’s probably one of the
largest and most recognized student art competition to date. We submit student work annually and garner
approximately 50-80 regional awards (gold keys, silver keys and honorable mentions) per years. We have also
received 8 national awards. This is a wonderful opportunity for our students, although it is expensive at $5 per
submission. Here are several of our National Award winners (and I have had great luck submitting visual
journal spreads which seem to garner the most awards – it’s hard to gauge what the judges are looking for so I
have found that creative pieces do the best).
41
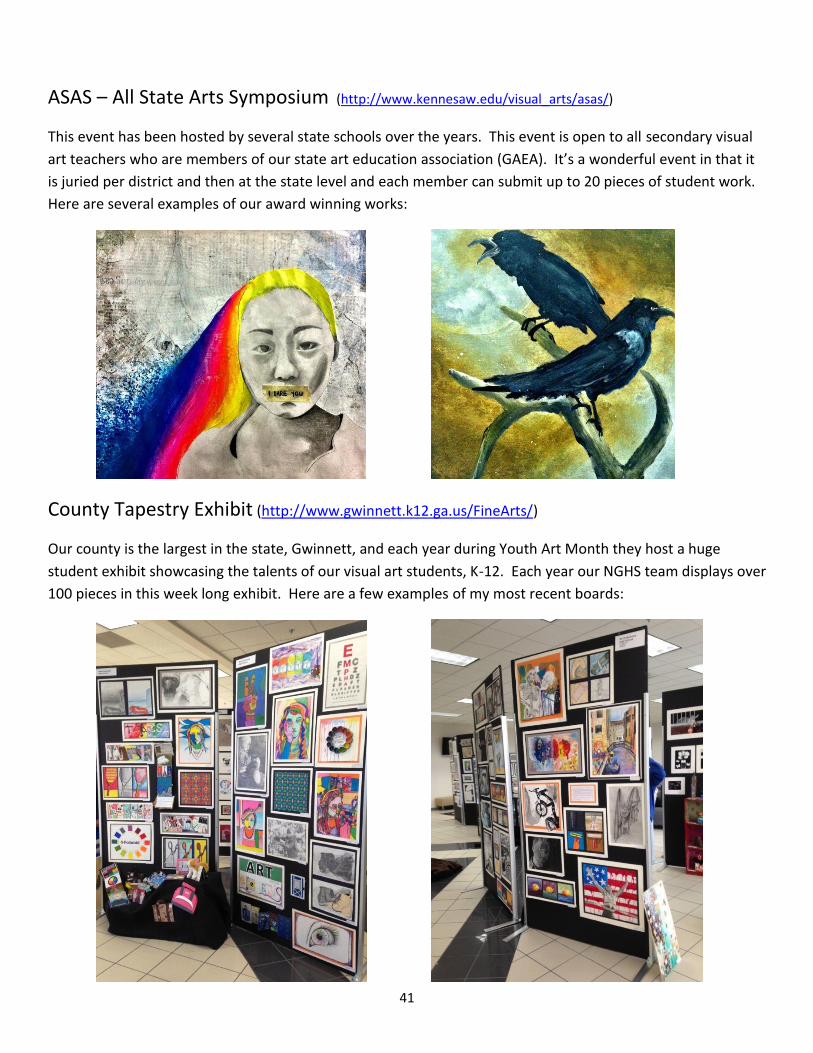
ASAS – All State Arts Symposium (http://www.kennesaw.edu/visual_arts/asas/)
This event has been hosted by several state schools over the years. This event is open to all secondary visual
art teachers who are members of our state art education association (GAEA). It’s a wonderful event in that it
is juried per district and then at the state level and each member can submit up to 20 pieces of student work.
Here are several examples of our award winning works:
County Tapestry Exhibit (http://www.gwinnett.k12.ga.us/FineArts/)
Our county is the largest in the state, Gwinnett, and each year during Youth Art Month they host a huge
student exhibit showcasing the talents of our visual art students, K-12. Each year our NGHS team displays over
100 pieces in this week long exhibit. Here are a few examples of my most recent boards:
42
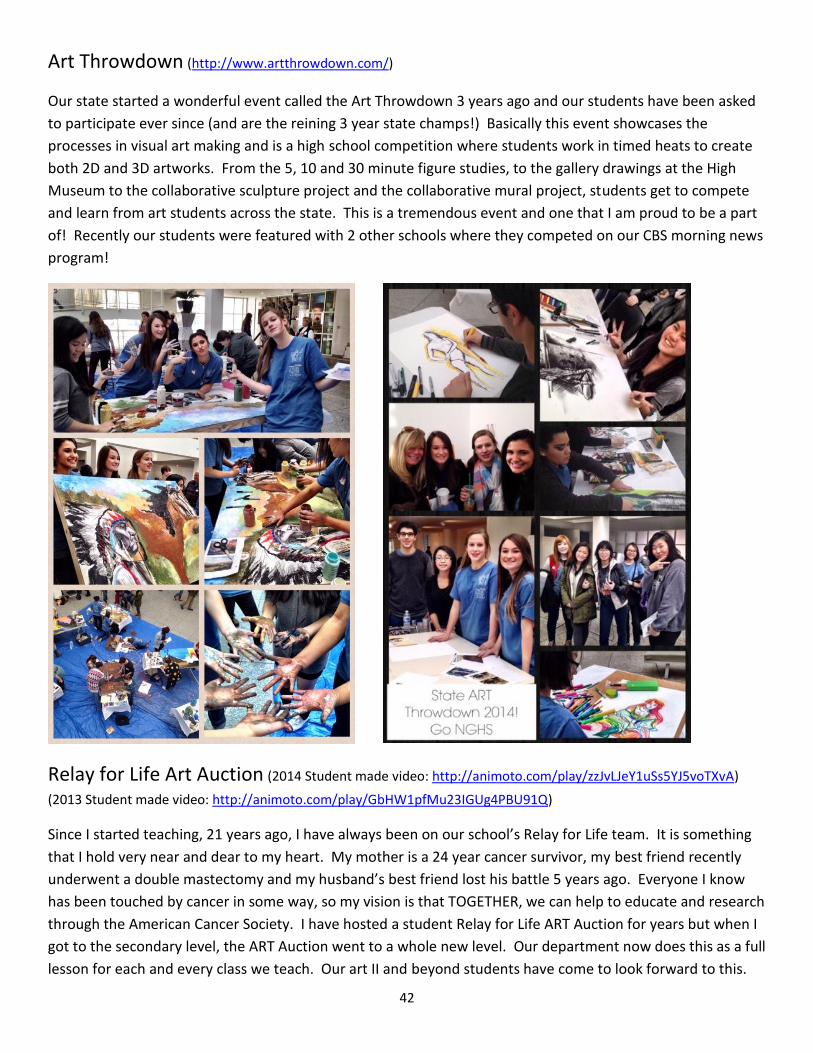
Art Throwdown (http://www.artthrowdown.com/)
Our state started a wonderful event called the Art Throwdown 3 years ago and our students have been asked
to participate ever since (and are the reining 3 year state champs!) Basically this event showcases the
processes in visual art making and is a high school competition where students work in timed heats to create
both 2D and 3D artworks. From the 5, 10 and 30 minute figure studies, to the gallery drawings at the High
Museum to the collaborative sculpture project and the collaborative mural project, students get to compete
and learn from art students across the state. This is a tremendous event and one that I am proud to be a part
of! Recently our students were featured with 2 other schools where they competed on our CBS morning news
program!
Relay for Life Art Auction (2014 Student made video: http://animoto.com/play/zzJvLJeY1uSs5YJ5voTXvA)
(2013 Student made video: http://animoto.com/play/GbHW1pfMu23IGUg4PBU91Q)
Since I started teaching, 21 years ago, I have always been on our school’s Relay for Life team. It is something
that I hold very near and dear to my heart. My mother is a 24 year cancer survivor, my best friend recently
underwent a double mastectomy and my husband’s best friend lost his battle 5 years ago. Everyone I know
has been touched by cancer in some way, so my vision is that TOGETHER, we can help to educate and research
through the American Cancer Society. I have hosted a student Relay for Life ART Auction for years but when I
got to the secondary level, the ART Auction went to a whole new level. Our department now does this as a full
lesson for each and every class we teach. Our art II and beyond students have come to look forward to this.
43
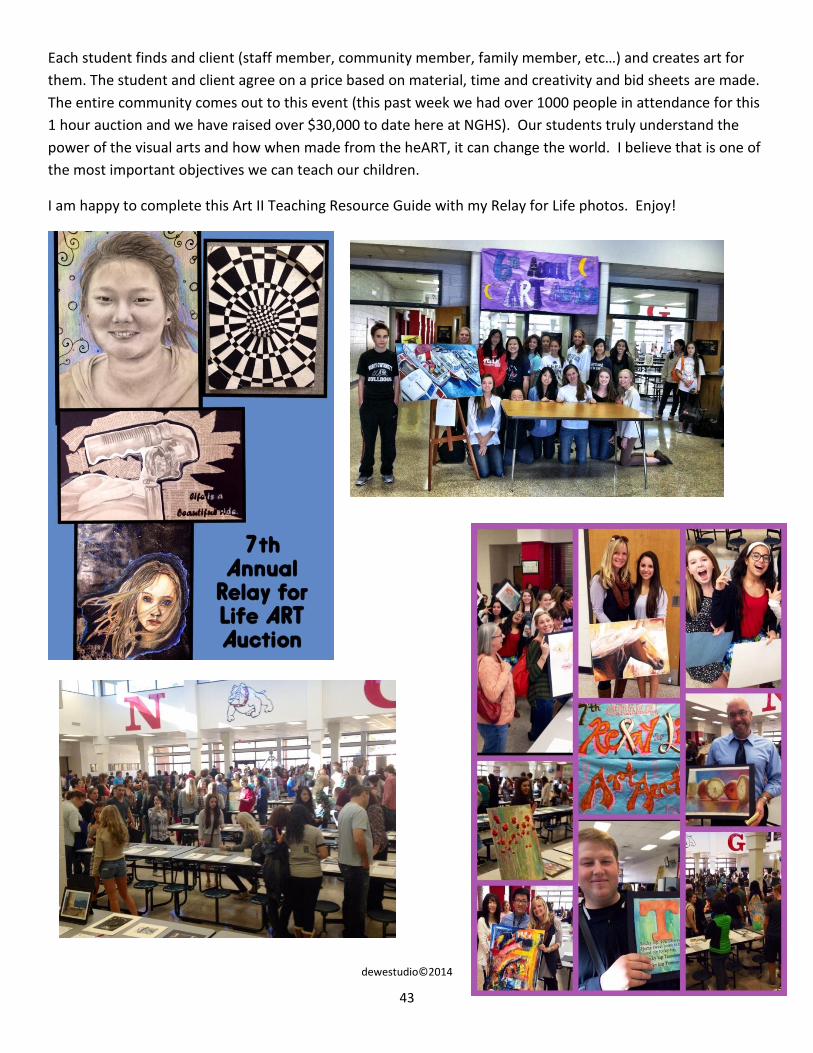
Each student finds and client (staff member, community member, family member, etc…) and creates art for
them. The student and client agree on a price based on material, time and creativity and bid sheets are made.
The entire community comes out to this event (this past week we had over 1000 people in attendance for this
1 hour auction and we have raised over $30,000 to date here at NGHS). Our students truly understand the
power of the visual arts and how when made from the heART, it can change the world. I believe that is one of
the most important objectives we can teach our children.
I am happy to complete this Art II Teaching Resource Guide with my Relay for Life photos. Enjoy!
dewestudio©2014
44
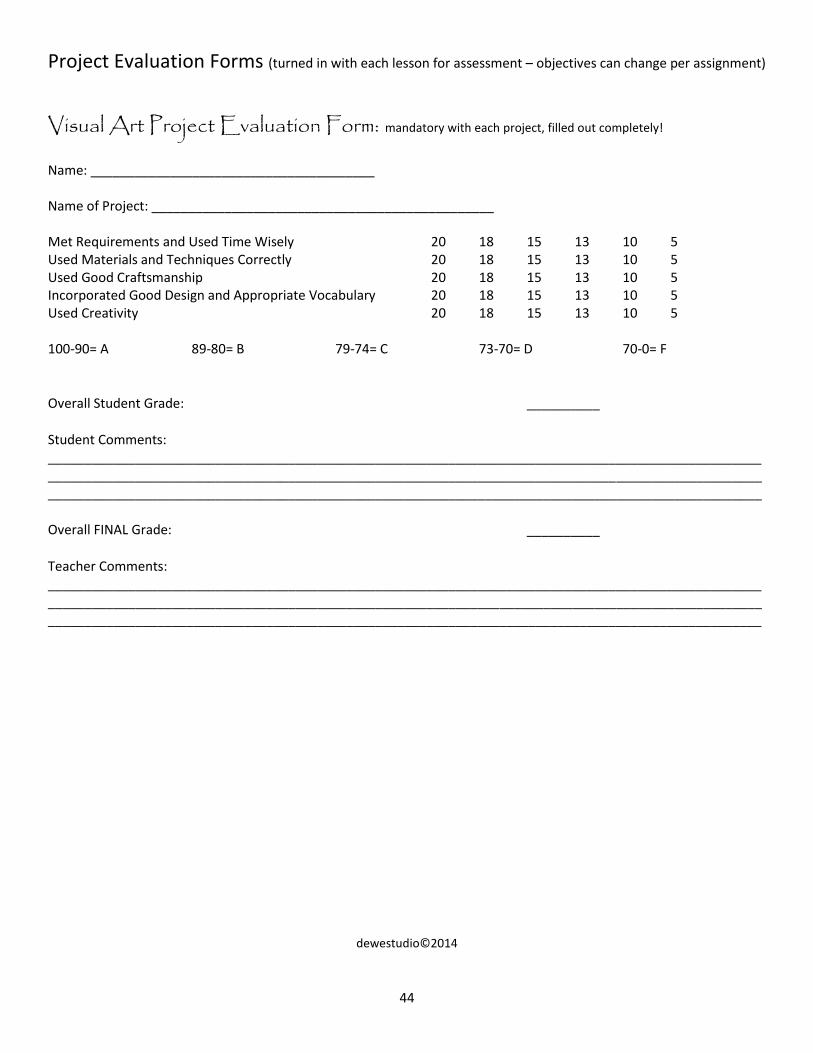
Project Evaluation Forms (turned in with each lesson for assessment – objectives can change per assignment)
Visual Art Project Evaluation Form: mandatory with each project, filled out completely!
Name: _______________________________________ Name of Project: _______________________________________________ Met Requirements and Used Time Wisely 20 18 15 13 10 5 Used Materials and Techniques Correctly 20 18 15 13 10 5 Used Good Craftsmanship 20 18 15 13 10 5 Incorporated Good Design and Appropriate Vocabulary 20 18 15 13 10 5 Used Creativity 20 18 15 13 10 5 100-90= A 89-80= B 79-74= C 73-70= D 70-0= F
Overall Student Grade: __________
Student Comments: ______________________________________________________________________________________________________________________________________________________________________________________________________________________________________________________________________________________________________
Overall FINAL Grade: __________
Teacher Comments: ______________________________________________________________________________________________________________________________________________________________________________________________________________________________________________________________________________________________________
dewestudio©2014
45
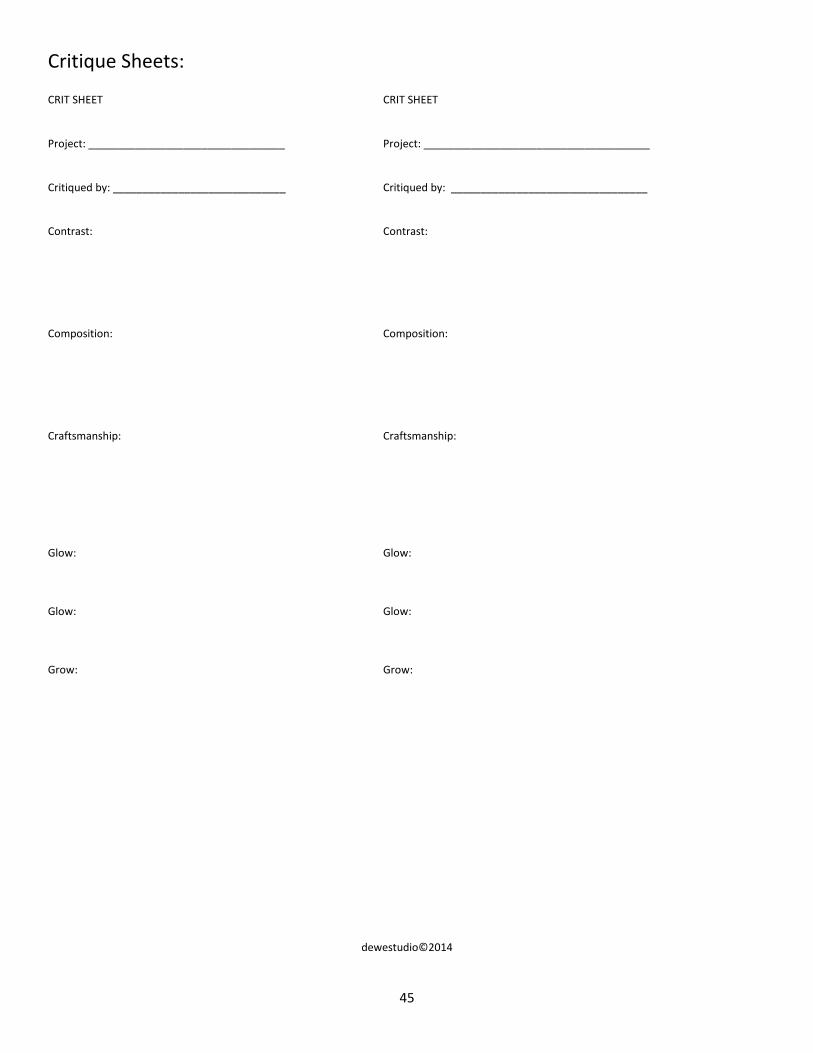
Critique Sheets:
CRIT SHEET CRIT SHEET Project: _________________________________ Project: ______________________________________ Critiqued by: _____________________________ Critiqued by: _________________________________ Contrast: Contrast: Composition: Composition: Craftsmanship: Craftsmanship: Glow: Glow: Glow: Glow: Grow: Grow:
dewestudio©2014

46
Study Guide:
Draw / Paint STUDY GUIDE
The ELEMENTS of art, or the essential BUILDING BLOCKS in art. An easy way to recall the ELEMENTS: TVSLCSF = Texture, Value, Shape, Line, Color, Space, Form
TEXTURE: is the element of art that refers to the quality of a surface, both tactile and visual
Different types of texture: real, tactile, implied VALUE: is the element of art that relates to the lightness or darkness of a color or tone
Crosshatching is the technique that involves the overlapping, at different angles, of parallel lines to create values in a drawing
Hatching involves parallel lines to create values in a drawing Chiaroscuro lighting is used by many artists, it is achieved when the lighted parts seem to
emerge from the surrounding dark areas. There is a strong contrast of dark and light values in such works
Shading is the graduated variations in value that give a feeling of volume, form and depth Stippling uses patterns of dots to create values and value gradation in a drawing or painting Pointillism is achieved by a technique is using dots as seen in Georges Seurat’s “Sunday on
La Grande Jatte” SHAPE : is the element of art that is an enclosed space having only two dimensions
Geometric shapes are derived from mechanical, human-made objects, such as circles, squares and triangles
Amorphic shapes are organic, non-man made shapes. LINE: is the element of art that is most important, it begins all art works
Linear Perspective is the technique of creating an illusion of depth on a flat surface by having all parallel lines recede into the distance and drawn to converge at one or more vanishing points on the horizon line called
The drawing above is an example of: two point perspective. What is the term for the place where lines appear to meet on the horizon?. vanishing point A contour line defines outer and inner edges of an object Gesture Drawing is a quick, energetic, fluid type of line that captures the movement of a
figure COLOR Information: [A
The primary colors are red, blue and yellow The secondary colors are orange, green, and violet A monochromatic color grouping consists of the original color, such as blue, plus any additions
of black or white? Local Colors are the colors of objects seen in natural light and free of reflected colors Which one of the following showcases the complementary color schemes? And WHY?
blue-orange, red-green, and yellow-purple primary blue cannot make secondary orange, primary red cannot make
secondary green and primary yellow cannot make secondary purple Warm colors seem to advance toward the viewer Cool colors seem to recede away from the viewer
47
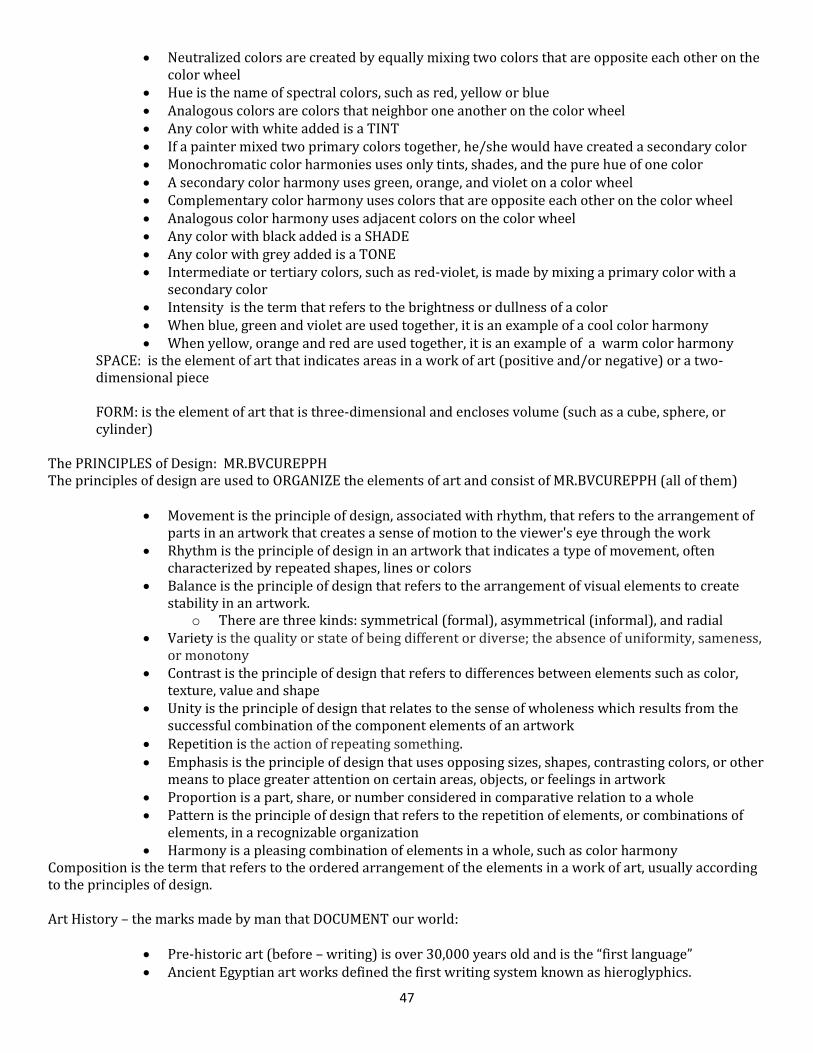
Neutralized colors are created by equally mixing two colors that are opposite each other on the color wheel
Hue is the name of spectral colors, such as red, yellow or blue Analogous colors are colors that neighbor one another on the color wheel Any color with white added is a TINT If a painter mixed two primary colors together, he/she would have created a secondary color Monochromatic color harmonies uses only tints, shades, and the pure hue of one color A secondary color harmony uses green, orange, and violet on a color wheel Complementary color harmony uses colors that are opposite each other on the color wheel Analogous color harmony uses adjacent colors on the color wheel: VA2D-6] Any color with black added is a SHADE Any color with grey added is a TONE [AKS: VA2D-6] Intermediate or tertiary colors, such as red-violet, is made by mixing a primary color with a
secondary color Intensity is the term that refers to the brightness or dullness of a color When blue, green and violet are used together, it is an example of a cool color harmony When yellow, orange and red are used together, it is an example of a warm color harmony
SPACE: is the element of art that indicates areas in a work of art (positive and/or negative) or a two-dimensional piece FORM: is the element of art that is three-dimensional and encloses volume (such as a cube, sphere, or cylinder)
The PRINCIPLES of Design: MR.BVCUREPPH The principles of design are used to ORGANIZE the elements of art and consist of MR.BVCUREPPH (all of them)
Movement is the principle of design, associated with rhythm, that refers to the arrangement of parts in an artwork that creates a sense of motion to the viewer's eye through the work
Rhythm is the principle of design in an artwork that indicates a type of movement, often characterized by repeated shapes, lines or colors
Balance is the principle of design that refers to the arrangement of visual elements to create stability in an artwork.
o There are three kinds: symmetrical (formal), asymmetrical (informal), and radial Variety is the quality or state of being different or diverse; the absence of uniformity, sameness,
or monotony Contrast is the principle of design that refers to differences between elements such as color,
texture, value and shape AKS: Unity is the principle of design that relates to the sense of wholeness which results from the
successful combination of the component elements of an artwork Repetition is the action of repeating something. Emphasis is the principle of design that uses opposing sizes, shapes, contrasting colors, or other
means to place greater attention on certain areas, objects, or feelings in artwork Proportion is a part, share, or number considered in comparative relation to a whole Pattern is the principle of design that refers to the repetition of elements, or combinations of
elements, in a recognizable organization Harmony is a pleasing combination of elements in a whole, such as color harmony
Composition is the term that refers to the ordered arrangement of the elements in a work of art, usually according to the principles of design. Art History – the marks made by man that DOCUMENT our world:
Pre-historic art (before – writing) is over 30,000 years old and is the “first language” Ancient Egyptian art works defined the first writing system known as hieroglyphics.
48
Greek and Roman Classical art was instrumental in creating architectural works that inspire today.
The Gothic and Middle Ages were about illustrations used document the times. Renaissance art was about a “new beginning”, a rebirth of sorts and the fresco painted churches
in Europe are still revered today. The romantic era showcased the use of light source in master art works. African art ranges over a 10,ooo year realm and the use of elements defines their traditions and
religious inspired works. Impressionism is about showcasing creativity as the camera could begin to capture realism. Post Impressionism comes after the Impressionistic movement and it about exploring paint. 20th Century Art Movement moved artists to a new realm of creative thinking and include many
styles. Surrealism is the style of art that is based on the unconscious, and depicts what is normally
experienced in dreams. Abstract Expressionism is often referred to as action painting and master artists include Willem
de Kooning and Jackson Pollack. Color Field painters use large canvases to paint non-objective works, the colors represent the
message in the art and master artists include Mark Rothko and Helen Frankenthaler, to name a few.
Pop art is about representing subject matter that is popular in culture and master artists from this era include Andy Warhol, Roy Lichtenstein and Wayne Thiebaud to name a few. Contemporary Pop artists include Keith Haring and Kenny Scharf.
Op art is about creating movement through the repetitive of lines, dots and values and master artists from this movement include Bridget Riley and Victor Vaserely
Joan Brown creates work that is recognized as funk art, combining collage and assemblage. George Basellitz was a German expressionist who used bright colors in his paintings Lee Kasner was an abstract painter married to the abstract expressionist Jackson Pollack. New Realism is painting that emphasizes photographic reality. Contemporary watercolor master artists include Janet Fish and Tracy Taylor Fauvism is a short lived art movement that expressed freedom while using vivid, violent,
contrasting colors and extreme brushstrokes. Minimalism is depicted as flat and opaque drawings and paintings, and often excludes
expressive content and has no true meaning. Jaune Quick-to-See Smith creates art that is focused on social comment, specifically addressing
the issues of Native American icons. Cubism is an art movement that depicts the subject matter as broken apart and reassembled in
an abstract form. This movement was created to showcase movement in an art work and the founders were Pablo Picasso and Georges Braque.
Jasper Johns art works often features targets, numbers, the American Flag, and maps of the United States in his art work
Claus Oldenburg created large scale pop art sculptures in both metal and soft sculptural media. Edvard Munch's, The Scream, was painted during the Expressionistic era. Non – objective art has no recognizable subject matter such as trees, flowers, or people, it is
only based on elements of art. Chuck Close uses a grid technique of drawing and painting to create enlarged photo realistic
portraits. Jim Dine was a master at utilizing the principles of design in his pop artworks. Fantasy art explored and visualized the human imagination and master artist include Marc
Chagall. Expressionism is a type of artwork portraying the strong personal feelings of the artist within
the art piece Representational art is the artistic style in which objects or figures are easily identified
49
Dada is the art movement that emerged as an artistic protest of traditional art forms through the creation of nonsense art.
Contemporary Art is the term that refers to the art of today.
Careers: museum director – manages and oversees the operational works within a museum museum curator – organized and installs gallery space and exhibitions of art works. art educator – Guiding students in their artisti creations via technical and creative aspects…the
best job in the world! art therapist - What type of artist may be trained to help the emotionally disabled as part of a
team headed by a psychiatrist. This person must be both an artist and a practitioner to fulfill the functions which lie within the range of this profession.
medical illustrator - requires an artist to have a detailed knowledge of human anatomy, as well as the ability to render perfectly accurate drawings
graphic artist - designs packages and advertisements interior designer – a person who specializes in designing architectural interiors and their
furnishings display designer - a field of the decorative arts that includes the temporary festive decoration of
streets, public squares, and industrial sites; window designs, etc… landscape architect - One whose profession is the decorative and functional alteration and
planting of grounds, especially at or around a building site. book illustrator - an artist who makes illustrations (for books or magazines or advertisements
etc… cinematographer - The art or technique of movie photography, including both the shooting and
development of the film. architect - a person who designs buildings and in many cases also supervises their construction. illustrator – this artist creates drawings or diagrams for printed materials photographer - The art or process of producing images of objects on photosensitive surfaces.
The art, practice, or occupation of taking and developing photographs Subject matter genres include:
non-objective – elements and principles are most significant narrative subject – tells a story through the subject matter still life – objects are purposefully placed on a table for direct observational drawing landscape – shows nature, the land, the ocean, etc… subject matter - drawing or painting that contains an arrangement of inanimate objects as its
subject matter genre - is the term for paintings or drawings that represent subjects or scenes from everyday
life Media:
Graphite Pencils create value in art o HB – middle tone o 2H – middle tone (light) o 4H – middle tone (lighter) o 4B – dark tone o 6B - darkest tone o 2B - dark light
Gesso is the plaster and glue mixture used to prime canvas. Pigment is the finely ground, colored powder that forms paint when mixed with a liquid Pastel is the dry medium that is often referred to as a painting medium Solvents are used to thin the paint to an easy brushing consistency Fixative is used to insure permanence and to prevent fading or smearing in an art piece
50
Impasto technique uses thick layers of paint, or spackle, that can be applied with a palette knife or a bristle brush
Charcoal is a type of drawing medium made by burning all the organic matter from twigs or sticks
Collage is the technique where materials, such as paper, or cloth, are glued to a background Hot press watercolor paper has a smooth surface. Cold press watercolor paper has a rough, toothy surface. Wax is the binder in Prismacolor pencils and art stix. Binder is a liquid that is ground with dry pigment and holds it in suspension while allowing it to
flow Brushes:
fan brush - type of brush would an artist use to blend oil or acrylic paint flat brush - short stiff bristles, good for driving paint into the weave of a canvas rigger brush - a long slender pointed sable brush used by artists round brush - a type of brush with round, full bristles forming a fine point at the tip.
Paints/Painting Techniques:
Tempera paint is the term for water based paint in which egg yolk is used as a vehicle Watercolor paint has gum arabic as a binder and water as a vehicle Acrylic paint is a medium that dries very quickly and adheres to most surfaces. The pigments
are mixed with a plastic emulsion binder to form this medium. When any wet media is diluted with water to make it lighter in value and more transparent it is
referred to as a wash. Under painting is the technique of blocking in main shapes with thin layers of paint to organize
the composition before adding color and details. A graded wash is the technique that refers to thin or transparent paint that gradually increases
or decreases in intensity Canvas is a painting surface made by woven fibers and is usually stretched on a wooden frame
Art Criticism is the process for analyzing an art work based on description, analysis, interpretation, and evaluation (aka – art crit) Drawing Terms and Techniques:
Hatching is a technique that uses parallel lines to create shading. Gesture drawing emphasizes direction and movement and generally portrays the human form The picture plane is the imaginary flat surface which the artist uses as a visual reference Stippling is the drawing or painting technique that is created by applying many tiny dots Foreshortening is the method of representing objects or parts of objects as if they are seen at an
angle and receding into space instead of being seen from a strictly frontal or profile view Abstracting can be achieved by compressing the space, fragmenting the composition, and
breaking things into geometric shapes Chiaroscuro is the technique used in drawing and painting that uses dramatic contrasts of light
and shadow to create a modeled form Foreground is the space in an art work that is closest to the viewer; Middle ground is in the middle of an art work Back ground is smaller and is the space in an art work that is furthest away from the viewer NOTES: ____________________________________________________________________________________________________________________________________________________________________________________________________________________________________________________________________________________________________________________________________________________________________________________________________________
Remember – You ALL KNOW THIS! You practice and apply this daily as you CREATE your own ART! dewestudio©2014
51
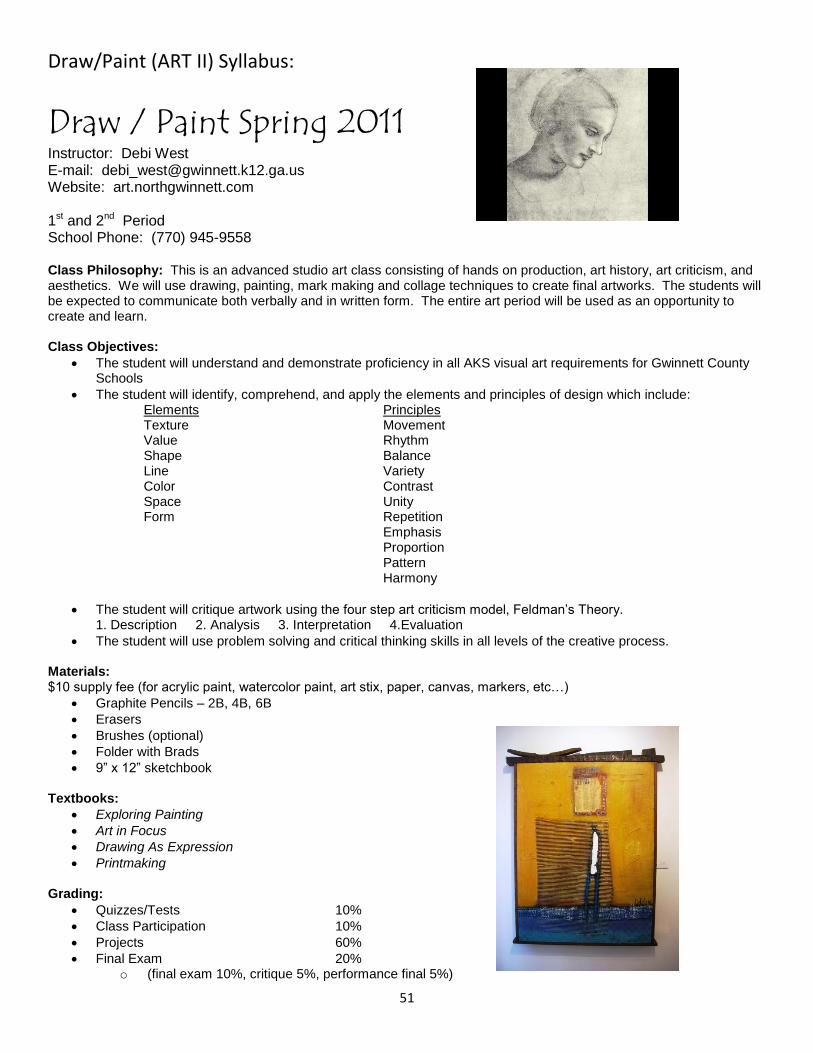
Draw/Paint (ART II) Syllabus:
Draw / Paint Spring 2011 Instructor: Debi West E-mail: [email protected] Website: art.northgwinnett.com 1st and 2nd Period School Phone: (770) 945-9558 Class Philosophy: This is an advanced studio art class consisting of hands on production, art history, art criticism, and aesthetics. We will use drawing, painting, mark making and collage techniques to create final artworks. The students will be expected to communicate both verbally and in written form. The entire art period will be used as an opportunity to create and learn. Class Objectives:
The student will understand and demonstrate proficiency in all AKS visual art requirements for Gwinnett County Schools
The student will identify, comprehend, and apply the elements and principles of design which include: Elements Principles Texture Movement Value Rhythm Shape Balance Line Variety Color Contrast Space Unity Form Repetition Emphasis Proportion Pattern Harmony
The student will critique artwork using the four step art criticism model, Feldman’s Theory. 1. Description 2. Analysis 3. Interpretation 4.Evaluation
The student will use problem solving and critical thinking skills in all levels of the creative process.
Materials: $10 supply fee (for acrylic paint, watercolor paint, art stix, paper, canvas, markers, etc…)
Graphite Pencils – 2B, 4B, 6B
Erasers
Brushes (optional)
Folder with Brads
9” x 12” sketchbook Textbooks:
Exploring Painting
Art in Focus
Drawing As Expression
Printmaking Grading:
Quizzes/Tests 10%
Class Participation 10%
Projects 60%
Final Exam 20% o (final exam 10%, critique 5%, performance final 5%)
52
SKETCH BOOKS/ALTERED BOOKS ARE DUE WEEKLY! Honor Code: Students are expected to follow the honor code established by North Gwinnett HS! NEED HELP? Every day is OPEN STUDIO Day…additional help is available after school for any student that requests it – however, arrangements MUST be scheduled in advance! Academic Knowledge & Skills: Drawing & Painting: Please refer to reference code “VADP” in the AKS booklet.
PLEASE pay careful attention to the MAJOR Deadlines for all projects! PROJECT EVALUATION All projects will be evaluated using the following criteria:
(1) – meets requirements and uses time wisely (2) – uses materials and techniques correctly and creatively (3) – uses good craftsmanship (4) – incorporates good design and creativity in the art work.
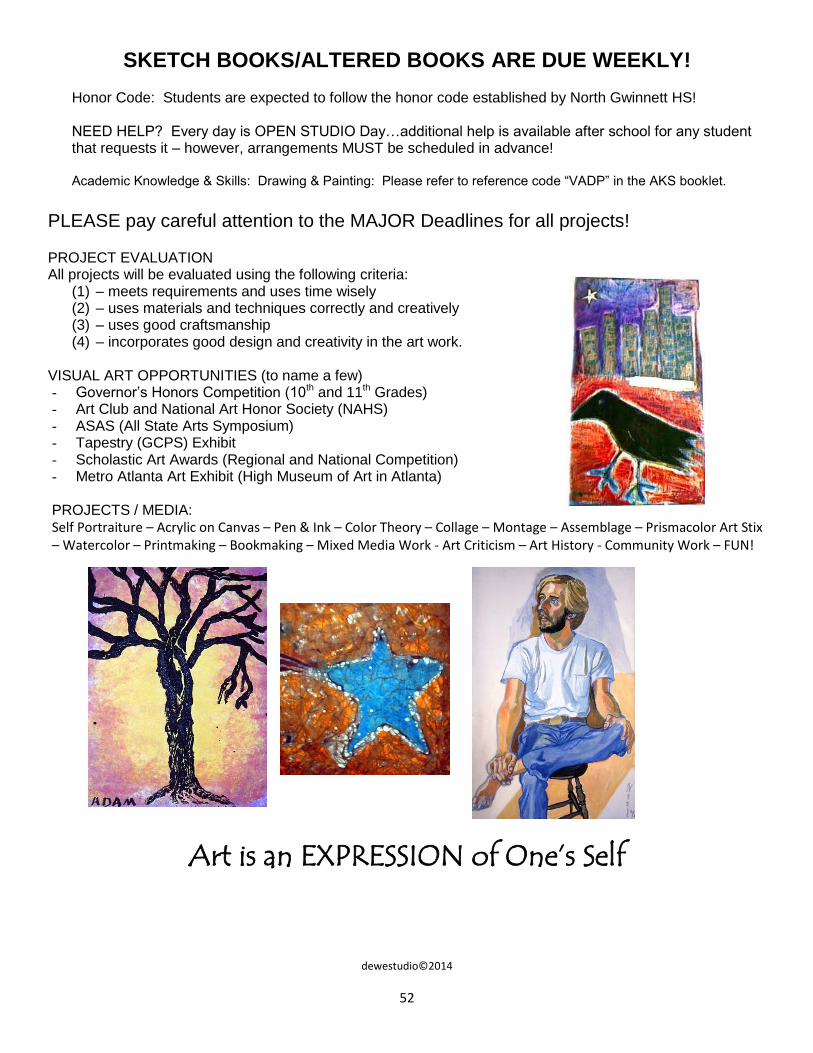
VISUAL ART OPPORTUNITIES (to name a few) - Governor’s Honors Competition (10th and 11th Grades) - Art Club and National Art Honor Society (NAHS) - ASAS (All State Arts Symposium) - Tapestry (GCPS) Exhibit - Scholastic Art Awards (Regional and National Competition) - Metro Atlanta Art Exhibit (High Museum of Art in Atlanta) PROJECTS / MEDIA: Self Portraiture – Acrylic on Canvas – Pen & Ink – Color Theory – Collage – Montage – Assemblage – Prismacolor Art Stix – Watercolor – Printmaking – Bookmaking – Mixed Media Work - Art Criticism – Art History - Community Work – FUN!
Art is an EXPRESSION of One’s Self
dewestudio©2014
53
Fine Arts Contract for the 2010-2011 School Year
As a student of North Gwinnett High School, I will uphold the following principles in all of my fine arts classes:
A. I will abide by the Student Code of Ethics, as listed in the Agenda Book. B. I will follow all art rules: A = Act Appropriately
R = Respect Everything (be responsible, respectful and reliable) T = Try…and you Can!
C. I understand the Consequences: 1. Redirect or meet with teacher 2. Detention for 15 minutes 3. Call Parent 4. Detention for 30 minutes -1 Hour 5. Referral *The teacher can skip consequences 1-4 and go straight to # 5 Referral if necessary.
D. I will be on time to my fine arts classes. E. I will clean up on time and after myself everyday. F. I understand that respect is an integral part of this class. G. I will use common sense with art tools, and be very cautious at all times. H. I will have a professional attitude and work ethic. I. I will be the sole creator of my artwork, unless otherwise asked.
Late work policy for Art Department The following deductions will be made for unexcused work that is handed in late:
10 points off - first week (5 days)
20 points off – second week (10 days)
Beyond two weeks, work will not be accepted (at teacher’s discretion) ----------------------------------------------------------------------------------------------------------------------------- ----------------------------------
Please return this sheet to Mrs. West by January 7th
, 2011
Please fill out the following information –
Student: By signing below, the student understands and agrees to all information and terms contained in the syllabus, fine arts contract, and late work policy. Student Name (please print)_______________________________________________
Student Signature_______________________________________________________
Parent:
Please fill out the following information for my confidential records. This information will be used for future communication. Also, please read the attached syllabus and fine arts contract and sign below. Parent Name (please print)________________________________________________ Parent Signature_________________________________________________________ Parent Phone Number____________________________________________________ Parent E-mail Address____________________________________________________
Let’s Have A GREAT Year of Art Making and Art Learning!
dewestudio©2014
54
Student Expectations:
A - Act Appropriately
R - Respect Everything (and Everyone)
T - Try! (and you can!)
dewestudio©2014