Embed Size (px)
Citation preview
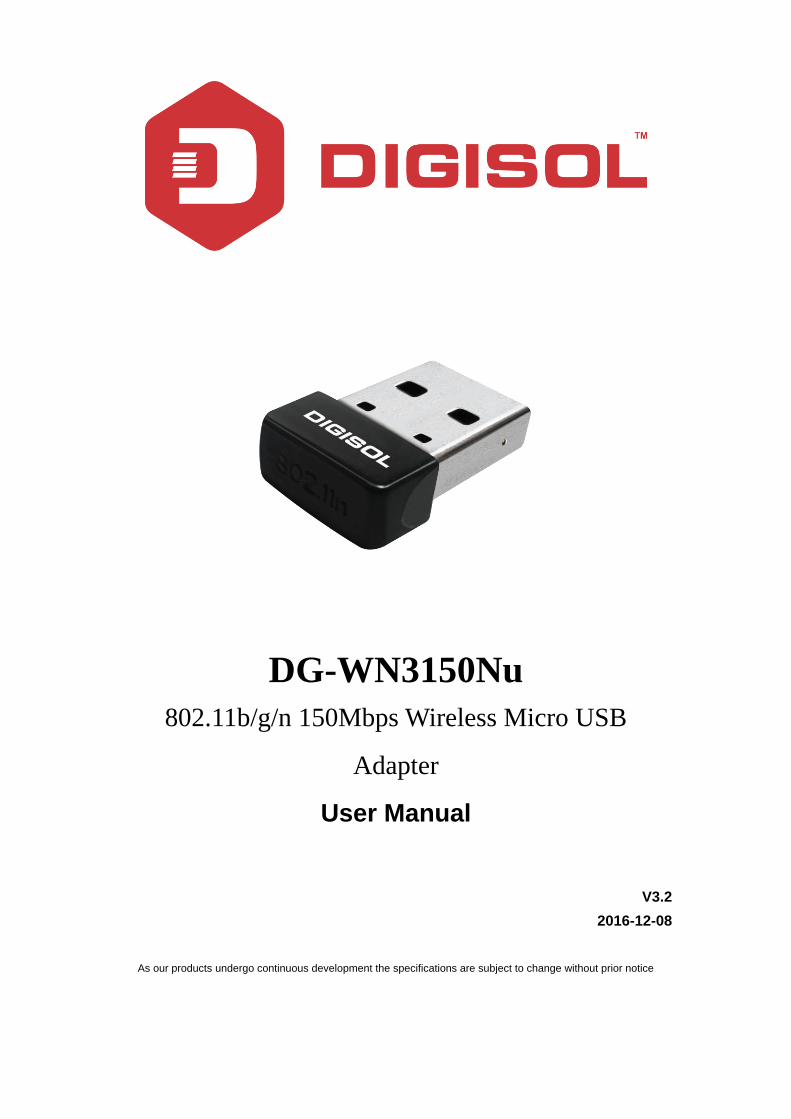
DG-WN3150Nu
802.11b/g/n 150Mbps Wireless Micro USB
Adapter
User Manual
V3.2
2016-12-08
As our products undergo continuous development the specifications are subject to change without prior notice
DG-WN3150Nu User Manual
2
COPYRIGHT
Copyright 2016 by DIGISOL SYSTEMS LTD. All rights reserved. No part of this
publication may be reproduced, transmitted, transcribed, stored in a retrieval system,
or translated into any language or computer language, in any form or by any means,
electronic, mechanical, magnetic, optical, chemical, manual or otherwise, without the
prior written permission of this company.
This company makes no representations or warranties, either expressed or implied,
with respect to the contents hereof and specifically disclaims any warranties,
merchantability or fitness for any particular purpose. Any software described in this
manual is sold or licensed "as is". Should the programs prove defective following
their purchase, the buyer (and not this company, its distributor, or its dealer) assumes
the entire cost of all necessary servicing, repair, and any incidental or consequential
damages resulting from any defect in the software. Further, this company reserves the
right to revise this publication and to make changes from time to time in the contents
thereof without obligation to notify any person of such revision or changes.
Trademarks:
DIGISOL™ is a trademark of DIGISOL SYSTEMS LTD. All other trademarks are
the property of the respective manufacturers.
Safety
This equipment is designed with the utmost care for the safety of those who install
and use it. However, special attention must be paid to the dangers of electric shock
and static electricity when working with electrical equipment. All guidelines of this
and of the computer manufacturer must therefore be allowed at all times to ensure the
safe use of the equipment.
DG-WN3150Nu User Manual
3
EU Countries Intended for Use
The ETSI version of this device is intended for home and office use in Austria,
Belgium, Denmark, Finland, France, Germany, Greece, Ireland, Italy, Luxembourg,
the Netherlands, Portugal, Spain, Sweden, and the United Kingdom.
The ETSI version of this device is also authorized for use in EFTA member states:
Iceland, Liechtenstein, Norway, and Switzerland.
EU Countries Not intended for use: None.
DG-WN3150Nu User Manual
4
Index
1. Product Information ..................................................................................... 6
1-1 Introduction and Safety Information ....................................................................... 6
1-2 Safety Information ........................................................................................................... 6
1-3 System Requirements ................................................................................................... 7
1-4 Package Contents ........................................................................................................... 7
1-5 Get familiar with your new wireless USB adapter .......................................... 8
2. Driver Installation and Configuration ........................................................ 9
2-1 Network Adapter Installation ...................................................................................... 9
2-2 Configuration Utility ..................................................................................................... 14
2-2-1 Utility Overview ................................................................................. 15
2-3 Connect to Wireless Access Point ....................................................................... 16
2-3-1 Using Mediatek Utility ....................................................................... 16
2-3-2 Using Windows Zero Configuration .................................................. 24
2-4 Connection Profile Management .......................................................................... 28
2-4-1 Add a new profile ............................................................................... 29
2-4-2 Remove an existing profile ................................................................ 30
2-4-3 Edit an existing profile ....................................................................... 31
2-4-4 Import/Export Profile ......................................................................... 32
2-4-5 Add WPS Profile ................................................................................ 34
2-4-5-1 Push Button ..................................................................................... 36
2-4-5-2 PIN Code ......................................................................................... 37
2-5 Network Statistics, Link Information and Status ........................................... 40
2-5-1 Link Status .......................................................................................... 40
2-5-2 Throughput ......................................................................................... 41
2-5-3 Statistics ............................................................................................. 42
2-6 Advanced .......................................................................................................................... 43
2-7 About ................................................................................................................................... 46
2-8 Help Section .................................................................................................................... 47
3. Soft-AP Function ......................................................................................... 48
3-1 Switch to AP Mode ....................................................................................................... 48
3-1-1 Configure SSID and Channel ............................................................. 49
3-1-2 Access Control List ............................................................................ 52
3-1-3 Connected Devices ............................................................................. 53
DG-WN3150Nu User Manual
5
3-1-4 About .................................................................................................. 54
4. Client + AP Mode ........................................................................................ 55
4-1 Switch to Client + AP Mode ..................................................................................... 55
4-2 AP Configuration ........................................................................................................... 57
4-3 MAC Table ........................................................................................................................ 58
5 Appendix ....................................................................................................... 59
5-1 Configuration for DG-WN3150Nu in “Client + AP” Mode: ....................... 59
5-2 Hardware Specifications ........................................................................................... 63
5-3 Troubleshooting ............................................................................................................. 64
5-4 Glossary............................................................................................................................. 66
DG-WN3150Nu User Manual
6
1. Product Information
1-1 Introduction and Safety Information
Thank you for purchasing DG-WN3150Nu IEEE 802.11b/g/n 150Mbps wireless N micro USB
adapter! This adapter has an ultra-nano size design which enables users to plug it into the USB
port of your computer. The ultra nano design makes the wireless adapter portable and easy to
carry even when the users are roaming. DG-WN3150Nu supports wireless standards
IEEE802.11b/g, this wireless adapter also supports IEEE802.11n through which users can get
data transfer speed up to 150Mbps.
Other features of this Wireless USB adapter include:
IEEE 802.11b/g/n compatible.
Wireless data transfer rate – up to 150Mbps.
Supports WMM wireless QoS feature.
Supports 64/128-bit WEP, WPA, WPA2 with IEEE 802.1x functions for high level of
security.
Supports the most popular operating system: Windows XP/7/8/10
Supports WPS (Wi-Fi Protected Setup) soft button for easy connection.
Supports soft AP function.
Supports USB 2.0 interface.
Portable and Ultra-Nano size design.
1-2 Safety Information
In order to keep the safety of users and your properties, please follow the safety instructions as
mentioned below:
1. This wireless micro USB adapter is designed for indoor use only. DO NOT expose this
wireless adapter to direct sun light, rain, or snow.
2. DO NOT put this USB adapter at or near a hot or humid place, like kitchen or bathroom. Also,
do not leave this wireless adapter in the car in summer.
DG-WN3150Nu User Manual
7
3. This USB adapter is small enough to put in a child‟s mouth, and it could cause serious injury
or could be fatal. If they throw the USB adapter, it will be damaged.
PLEASE KEEP THIS USB ADAPTER OUT OF REACH OF CHILDREN.
4. This USB adapter can get heated up when being used for long time (This is normal and is not
a malfunction). DO NOT put the USB adapter on a paper, cloth, or other flammable objects
after the USB adapter has been used for a long time.
5. There‟s no user-serviceable part inside the USB adapter. If you find that the USB adapter is
not working properly, please contact your dealer of purchase and ask for help. DO NOT
disassemble the USB adapter yourself, warranty will be void.
6. If the USB adapter falls into water, DO NOT USE IT AGAIN BEFORE YOU SEND IT TO
THE DEALER OF PURCHASE FOR INSPECTION.
7. If you smell something strange or even see some smoke coming out from the USB adapter,
switch the computer off immediately, and call the dealer of purchase for help.
1-3 System Requirements
An empty USB 2.0 port
Windows XP, Windows 7, Windows 8 & Windows 10 operating system
CD-ROM drive
At least 100MB of available disk space
1-4 Package Contents
Before you start using this wireless USB adapter, please check the following items in the
package.
DG-WN3150Nu 150Mbps Wireless Micro USB Adapter (1 No.)
Quick installation guide
Installation software CD (includes User Manual, QIG & Driver/Utility)
If any of the above items are missing, contact your supplier as soon as possible.

DG-WN3150Nu User Manual
8
1-5 Get familiar with your new wireless USB adapter
1. USB interface
2. Link/Activity LED (Under the case)
LED Name Light Status Description
Link/
Activity
Off Wireless Radio is switched OFF.
On Steady light 5 seconds means WPS connection is
established successfully.
Blinking i) Wireless network adapter is normally installed.
ii) Linked to a wireless access point.
iii) Transferring or receiving data.
Fast Blinking three times per second means WPS is
activated. The USB adapter will wait for 2 minutes to
establish WPS connection.
1
2
DG-WN3150Nu User Manual
9
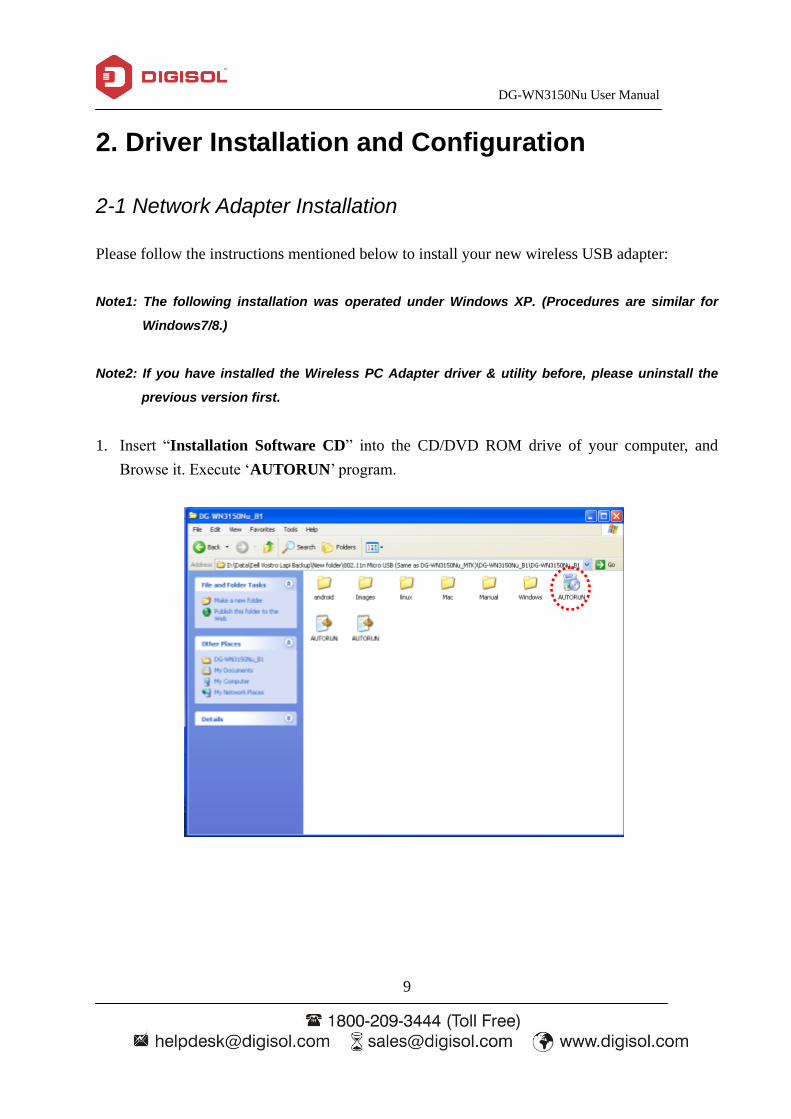
2. Driver Installation and Configuration
2-1 Network Adapter Installation
Please follow the instructions mentioned below to install your new wireless USB adapter:
Note1: The following installation was operated under Windows XP. (Procedures are similar for
Windows7/8.)
Note2: If you have installed the Wireless PC Adapter driver & utility before, please uninstall the
previous version first.
1. Insert “Installation Software CD” into the CD/DVD ROM drive of your computer, and
Browse it. Execute „AUTORUN‟ program.
DG-WN3150Nu User Manual
10
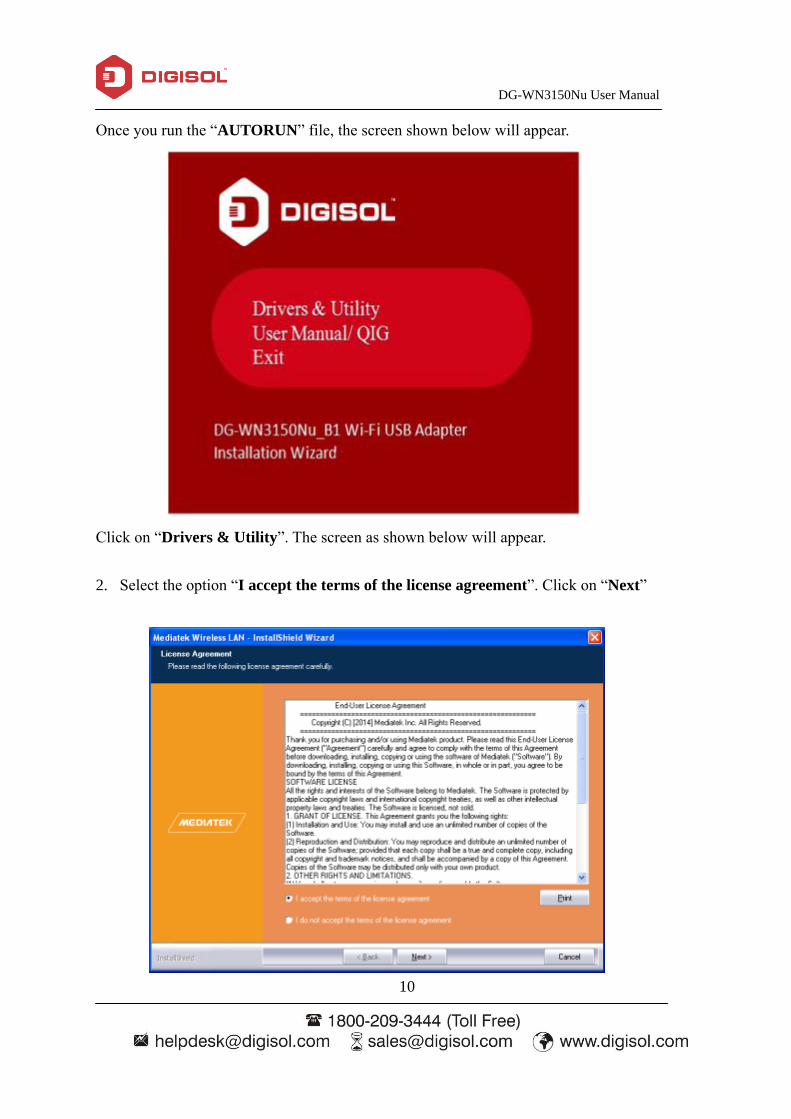
Once you run the “AUTORUN” file, the screen shown below will appear.
Click on “Drivers & Utility”. The screen as shown below will appear.
2. Select the option “I accept the terms of the license agreement”. Click on “Next”
DG-WN3150Nu User Manual
11
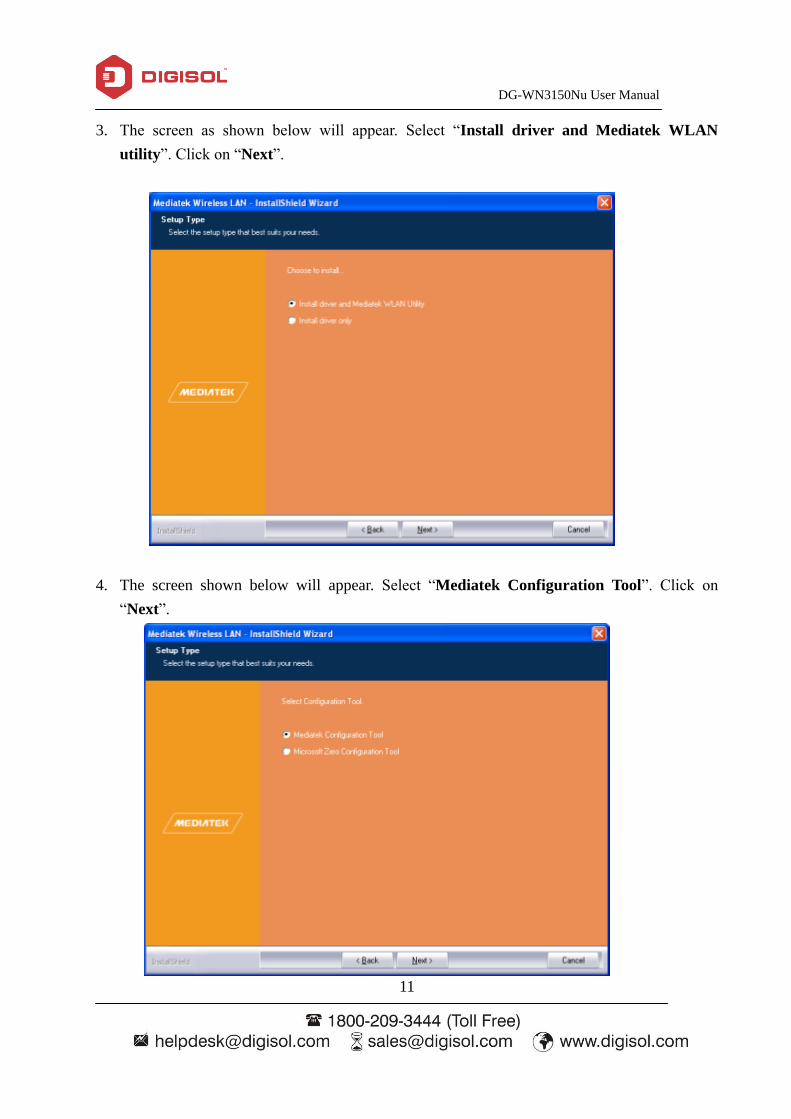
3. The screen as shown below will appear. Select “Install driver and Mediatek WLAN
utility”. Click on “Next”.
4. The screen shown below will appear. Select “Mediatek Configuration Tool”. Click on
“Next”.
DG-WN3150Nu User Manual
12
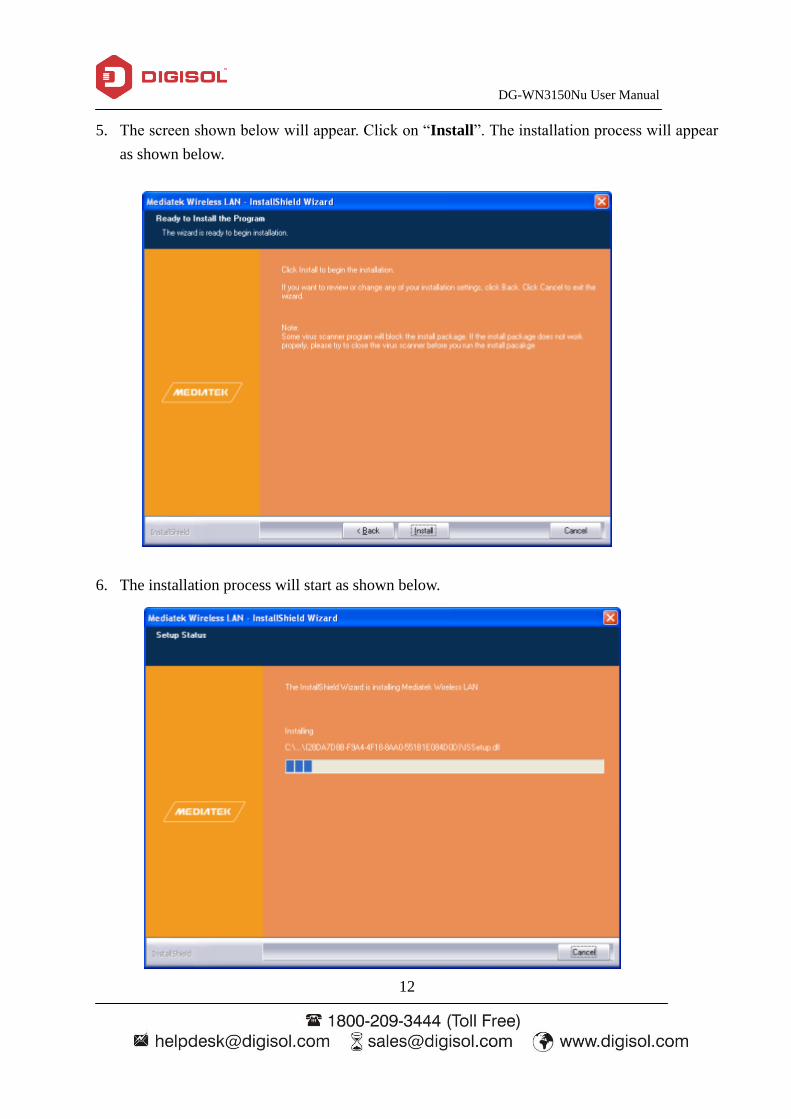
5. The screen shown below will appear. Click on “Install”. The installation process will appear
as shown below.
6. The installation process will start as shown below.
DG-WN3150Nu User Manual
13
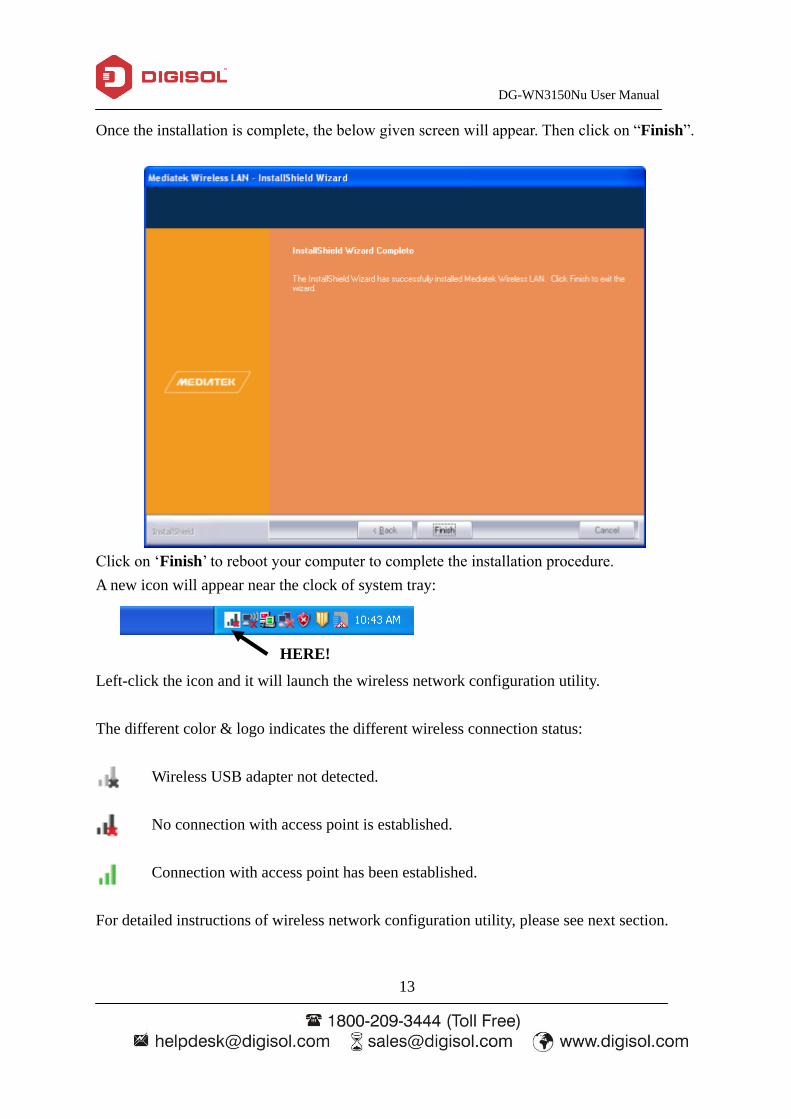
Once the installation is complete, the below given screen will appear. Then click on “Finish”.
Click on „Finish‟ to reboot your computer to complete the installation procedure.
A new icon will appear near the clock of system tray:
Left-click the icon and it will launch the wireless network configuration utility.
The different color & logo indicates the different wireless connection status:
Wireless USB adapter not detected.
No connection with access point is established.
Connection with access point has been established.
For detailed instructions of wireless network configuration utility, please see next section.
HERE!
DG-WN3150Nu User Manual
14
2-2 Configuration Utility
The Configuration Utility is a powerful application that helps you to configure the Wireless
Micro USB Adapter and monitors the link status and the statistics during the communication
process.
The Configuration Utility appears as an icon on the system tray and desktop of Windows. You
can open it by double-clicking on the icon.
Right click the icon in the system tray there are some items for you to operate the configuration
utility.
Launch Config Utility
Select “Launch Config Utility” to open the configuration utility.
Use Zero Configuration as Configuration Utility
Select this option to use Windows default configuration utility.
Switch to AP Mode
Select this option to configure this adapter as Soft AP.
Exit
Select “Exit” to exit the utility in the system tray.
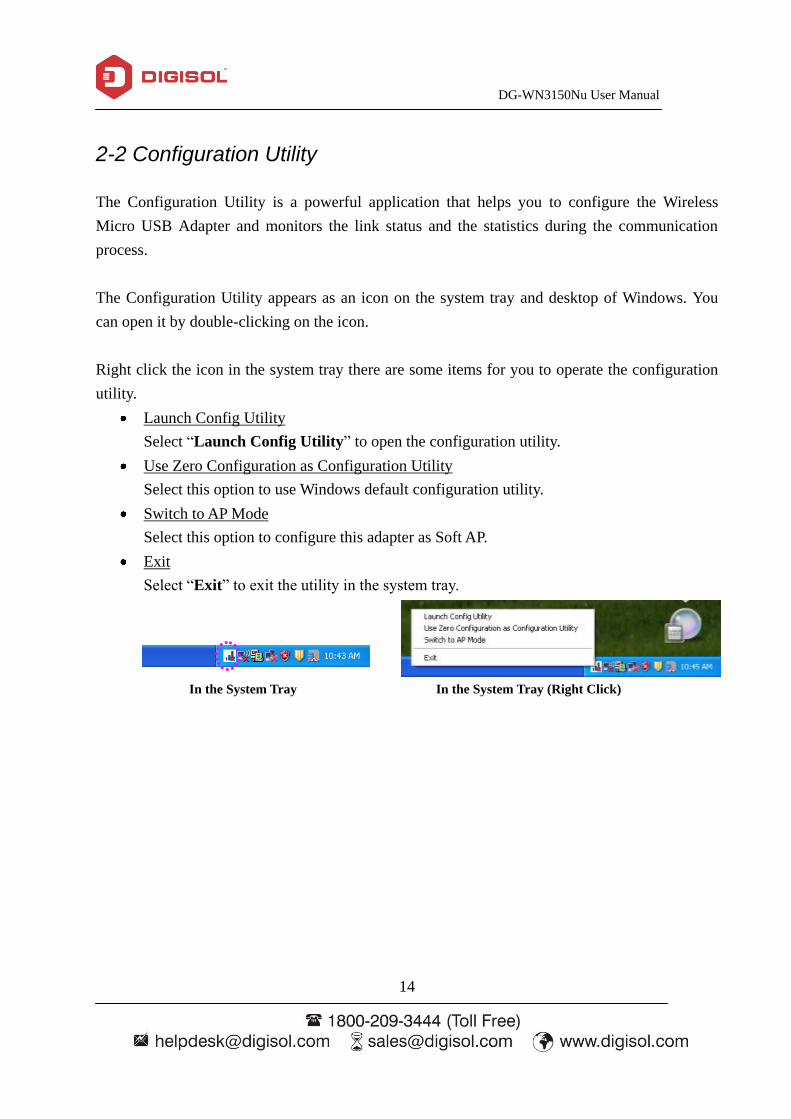
In the System Tray In the System Tray (Right Click)

DG-WN3150Nu User Manual
15
2-2-1 Utility Overview
There are several parts in the utility screen. Please refer to the following table for the description.
Parameter Description
Refresh – Refresh adapter list in the “A” block.
Add to Profile – Select the desired network & click this icon
to add the desired profile in the utility.
A
B
C
D
A

DG-WN3150Nu User Manual
16
This is a list for you to configure several available wireless
networks in your PC using the utility.
Shows the status of the SSID, Rate, Channel, IP address and
Mask.
Turn Off RF– This function is for you to turn off or turn on
the radio of the adapter. If the radio is turned off, the adapter
will not work.
Displays the connected AP information like: SSID,
Authentication, MAC address and Encryption.
Connect Button: To Connect to the desired profile.
2-3 Connect to Wireless Access Point
To use wireless network, you have to connect to a wireless access point first. You can either use
the Mediatek utility (comes with wireless adapter driver), or Windows Zero Config utility
(comes with Windows operating system) for configuration purpose.
2-3-1 Using Mediatek Utility
Please follow the instructions mentioned below to use Mediatek configuration utility to connect
to the wireless access point.
1. Left-click the Mediatek configuration utility icon located at lower-right corner of computer
desktop, and configuration menu will appear.
2. To connect to an available network, click the Available Networks button as shown below.
HERE
B
C
D
DG-WN3150Nu User Manual
17
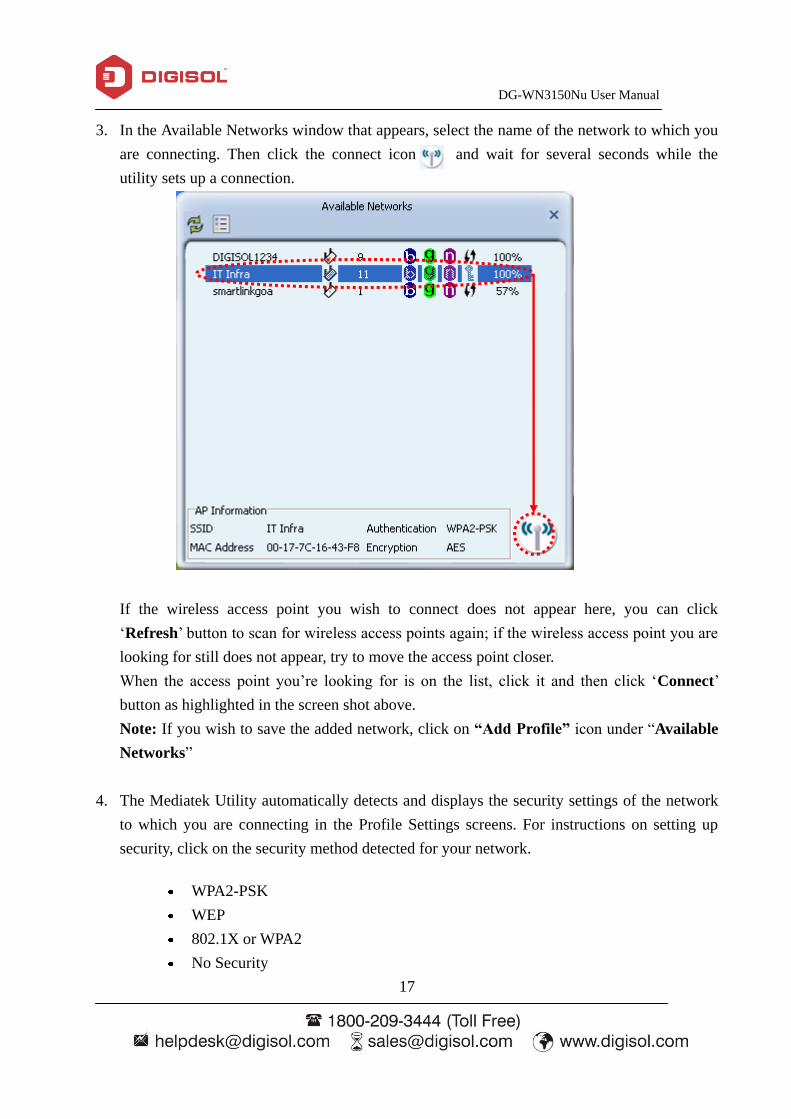
3. In the Available Networks window that appears, select the name of the network to which you
are connecting. Then click the connect icon and wait for several seconds while the
utility sets up a connection.
If the wireless access point you wish to connect does not appear here, you can click
„Refresh‟ button to scan for wireless access points again; if the wireless access point you are
looking for still does not appear, try to move the access point closer.
When the access point you‟re looking for is on the list, click it and then click „Connect‟
button as highlighted in the screen shot above.
Note: If you wish to save the added network, click on “Add Profile” icon under “Available
Networks”
4. The Mediatek Utility automatically detects and displays the security settings of the network
to which you are connecting in the Profile Settings screens. For instructions on setting up
security, click on the security method detected for your network.
WPA2-PSK
WEP
802.1X or WPA2
No Security
DG-WN3150Nu User Manual
18
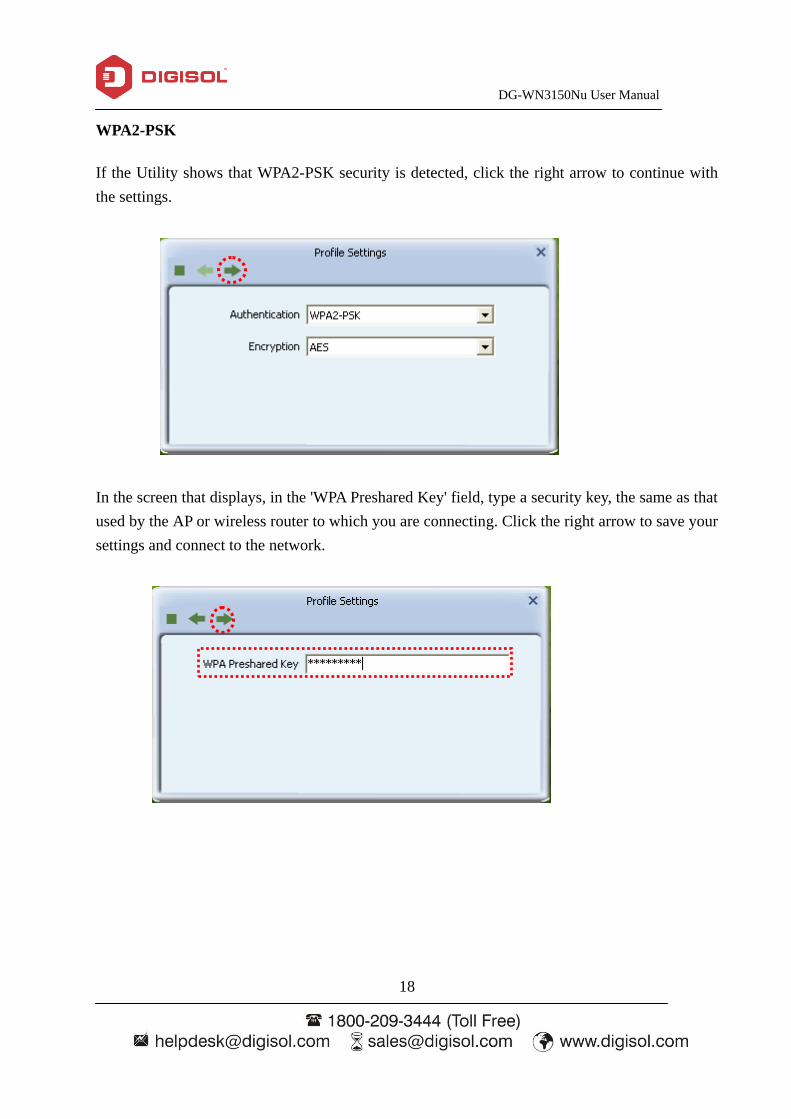
WPA2-PSK
If the Utility shows that WPA2-PSK security is detected, click the right arrow to continue with
the settings.
In the screen that displays, in the 'WPA Preshared Key' field, type a security key, the same as that
used by the AP or wireless router to which you are connecting. Click the right arrow to save your
settings and connect to the network.
DG-WN3150Nu User Manual
19
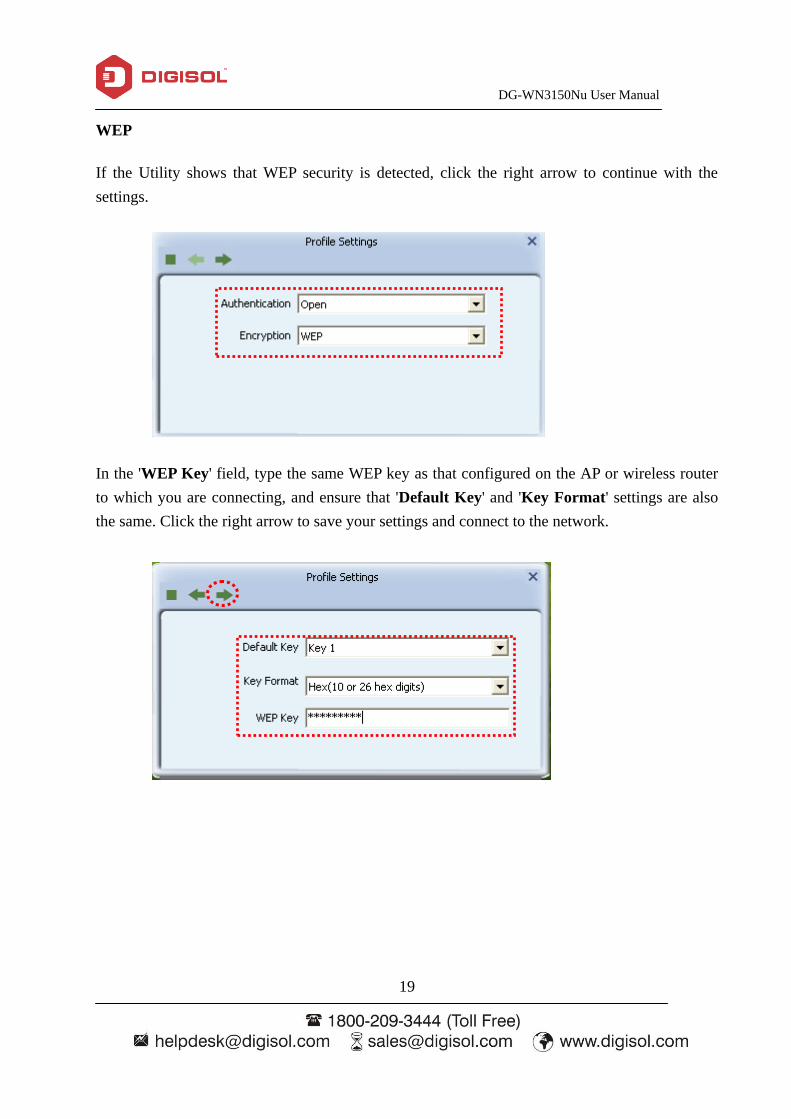
WEP
If the Utility shows that WEP security is detected, click the right arrow to continue with the
settings.
In the 'WEP Key' field, type the same WEP key as that configured on the AP or wireless router
to which you are connecting, and ensure that 'Default Key' and 'Key Format' settings are also
the same. Click the right arrow to save your settings and connect to the network.
DG-WN3150Nu User Manual
20
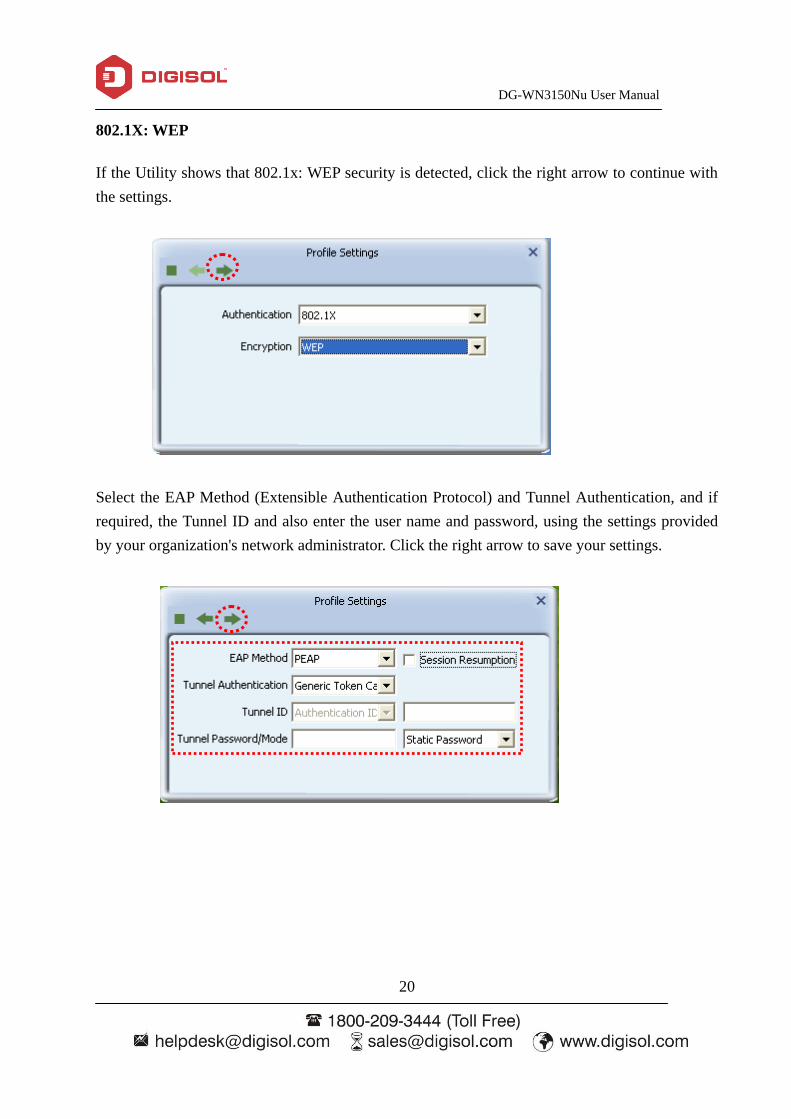
802.1X: WEP
If the Utility shows that 802.1x: WEP security is detected, click the right arrow to continue with
the settings.
Select the EAP Method (Extensible Authentication Protocol) and Tunnel Authentication, and if
required, the Tunnel ID and also enter the user name and password, using the settings provided
by your organization's network administrator. Click the right arrow to save your settings.
DG-WN3150Nu User Manual
21
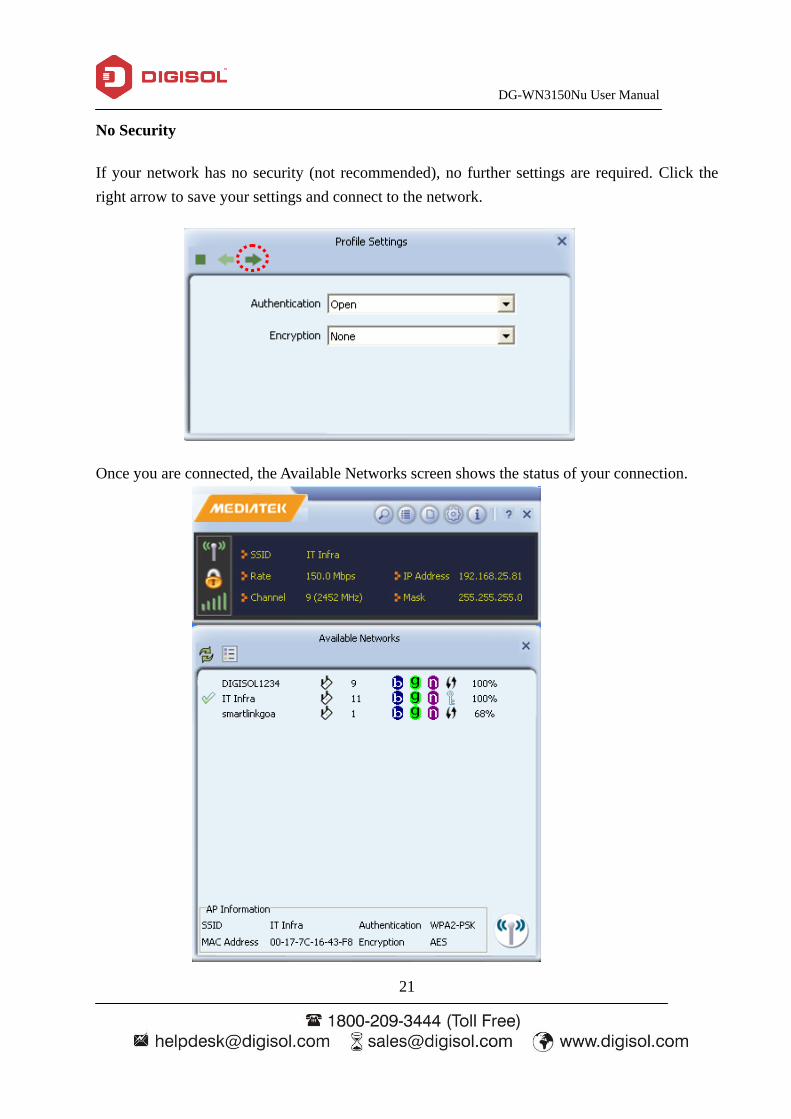
No Security
If your network has no security (not recommended), no further settings are required. Click the
right arrow to save your settings and connect to the network.
Once you are connected, the Available Networks screen shows the status of your connection.
DG-WN3150Nu User Manual
22
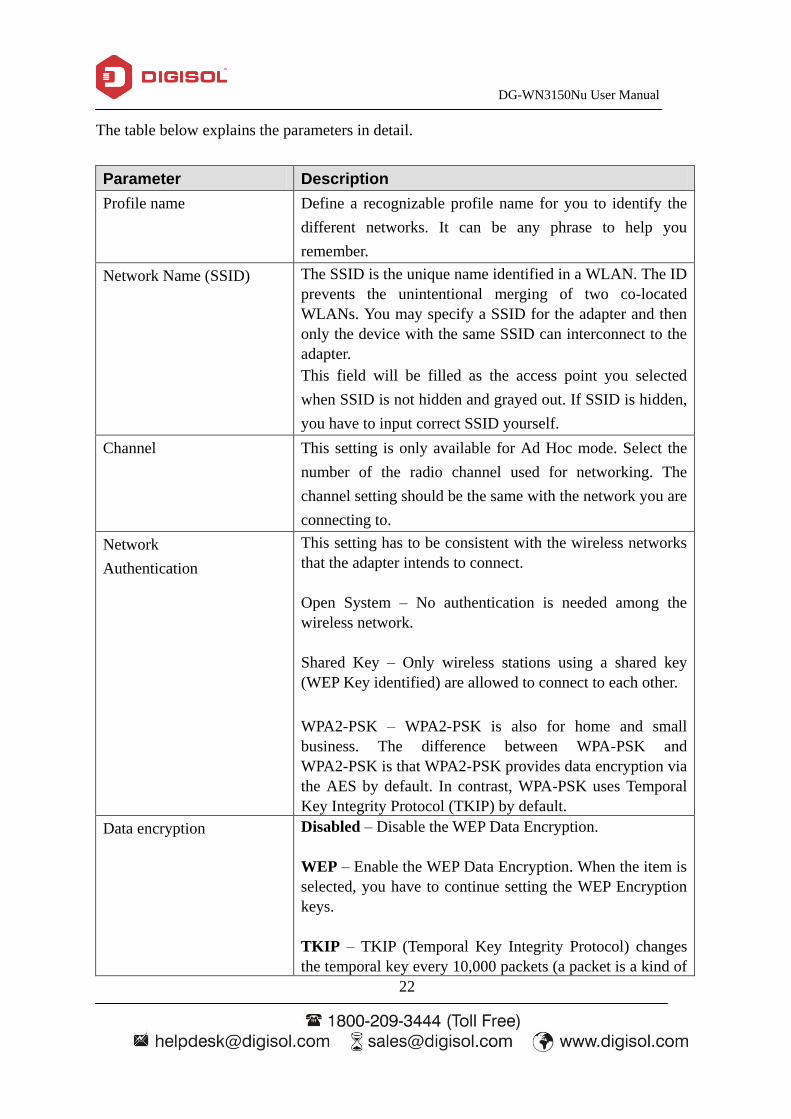
The table below explains the parameters in detail.
Parameter Description
Profile name Define a recognizable profile name for you to identify the
different networks. It can be any phrase to help you
remember.
Network Name (SSID) The SSID is the unique name identified in a WLAN. The ID
prevents the unintentional merging of two co-located
WLANs. You may specify a SSID for the adapter and then
only the device with the same SSID can interconnect to the
adapter.
This field will be filled as the access point you selected
when SSID is not hidden and grayed out. If SSID is hidden,
you have to input correct SSID yourself.
Channel This setting is only available for Ad Hoc mode. Select the
number of the radio channel used for networking. The
channel setting should be the same with the network you are
connecting to.
Network
Authentication
This setting has to be consistent with the wireless networks
that the adapter intends to connect.
Open System – No authentication is needed among the
wireless network.
Shared Key – Only wireless stations using a shared key
(WEP Key identified) are allowed to connect to each other.
WPA2-PSK – WPA2-PSK is also for home and small
business. The difference between WPA-PSK and
WPA2-PSK is that WPA2-PSK provides data encryption via
the AES by default. In contrast, WPA-PSK uses Temporal
Key Integrity Protocol (TKIP) by default.
Data encryption Disabled – Disable the WEP Data Encryption.
WEP – Enable the WEP Data Encryption. When the item is
selected, you have to continue setting the WEP Encryption
keys.
TKIP – TKIP (Temporal Key Integrity Protocol) changes
the temporal key every 10,000 packets (a packet is a kind of
DG-WN3150Nu User Manual
23
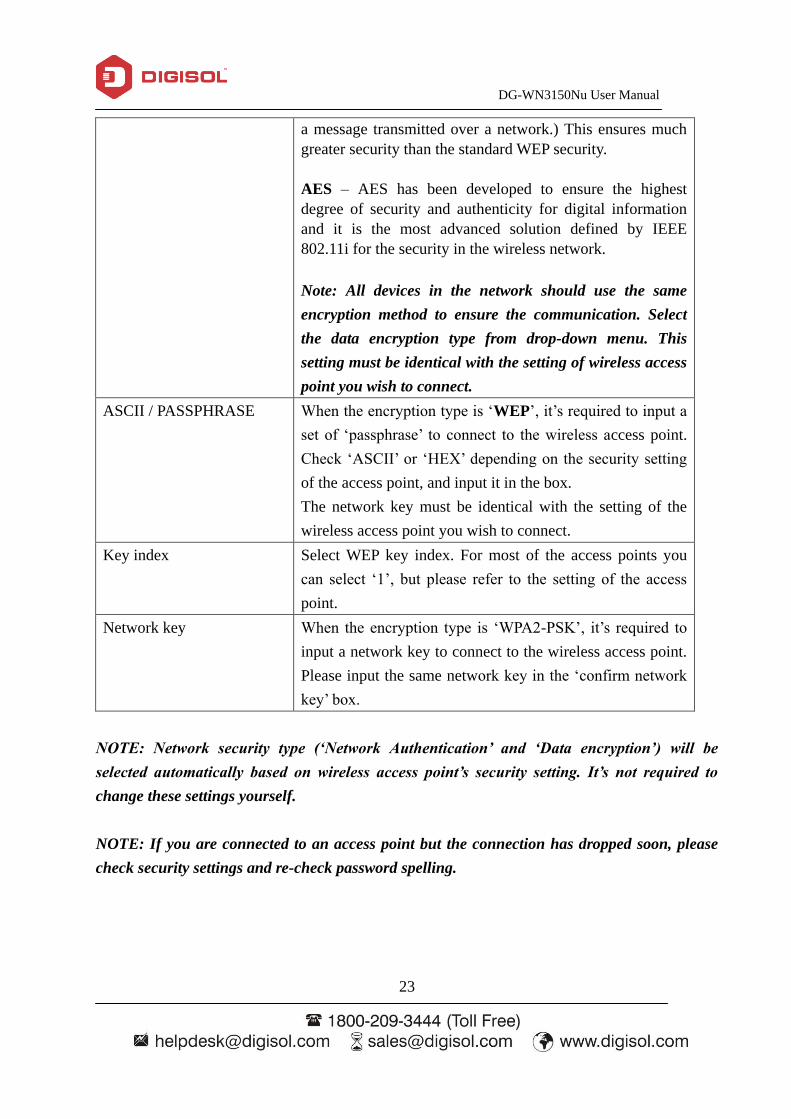
a message transmitted over a network.) This ensures much
greater security than the standard WEP security.
AES – AES has been developed to ensure the highest
degree of security and authenticity for digital information
and it is the most advanced solution defined by IEEE
802.11i for the security in the wireless network.
Note: All devices in the network should use the same
encryption method to ensure the communication. Select
the data encryption type from drop-down menu. This
setting must be identical with the setting of wireless access
point you wish to connect.
ASCII / PASSPHRASE When the encryption type is „WEP‟, it‟s required to input a
set of „passphrase‟ to connect to the wireless access point.
Check „ASCII‟ or „HEX‟ depending on the security setting
of the access point, and input it in the box.
The network key must be identical with the setting of the
wireless access point you wish to connect.
Key index Select WEP key index. For most of the access points you
can select „1‟, but please refer to the setting of the access
point.
Network key
When the encryption type is „WPA2-PSK‟, it‟s required to
input a network key to connect to the wireless access point.
Please input the same network key in the „confirm network
key‟ box.
NOTE: Network security type („Network Authentication‟ and „Data encryption‟) will be
selected automatically based on wireless access point‟s security setting. It‟s not required to
change these settings yourself.
NOTE: If you are connected to an access point but the connection has dropped soon, please
check security settings and re-check password spelling.
DG-WN3150Nu User Manual
24
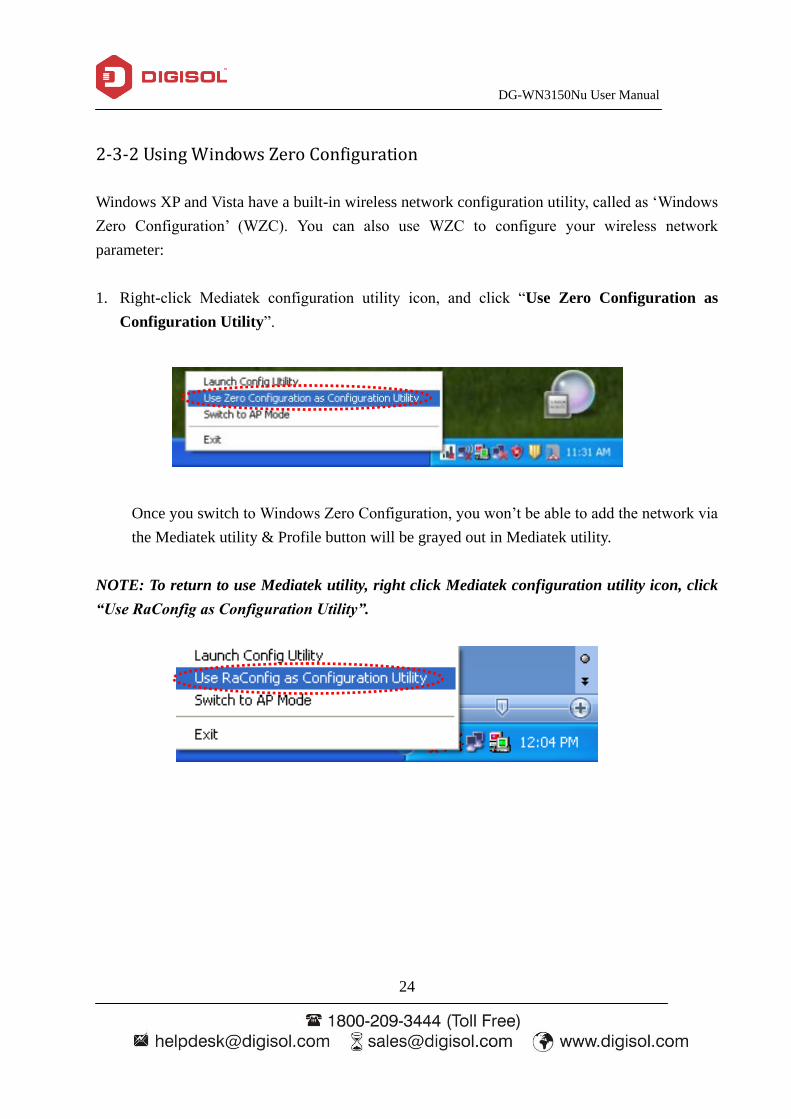
2-3-2 Using Windows Zero Configuration
Windows XP and Vista have a built-in wireless network configuration utility, called as „Windows
Zero Configuration‟ (WZC). You can also use WZC to configure your wireless network
parameter:
1. Right-click Mediatek configuration utility icon, and click “Use Zero Configuration as
Configuration Utility”.
Once you switch to Windows Zero Configuration, you won‟t be able to add the network via
the Mediatek utility & Profile button will be grayed out in Mediatek utility.
NOTE: To return to use Mediatek utility, right click Mediatek configuration utility icon, click
“Use RaConfig as Configuration Utility”.
DG-WN3150Nu User Manual
25
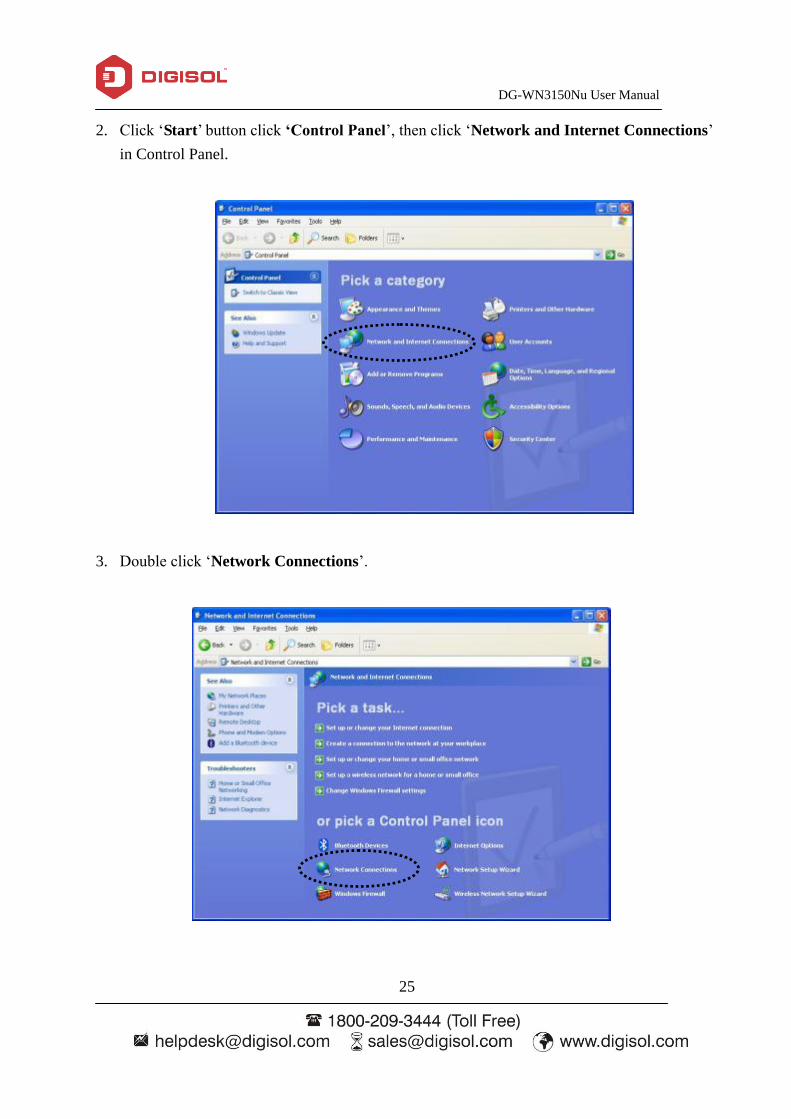
2. Click „Start‟ button click „Control Panel‟, then click „Network and Internet Connections‟
in Control Panel.
3. Double click „Network Connections‟.
DG-WN3150Nu User Manual
26
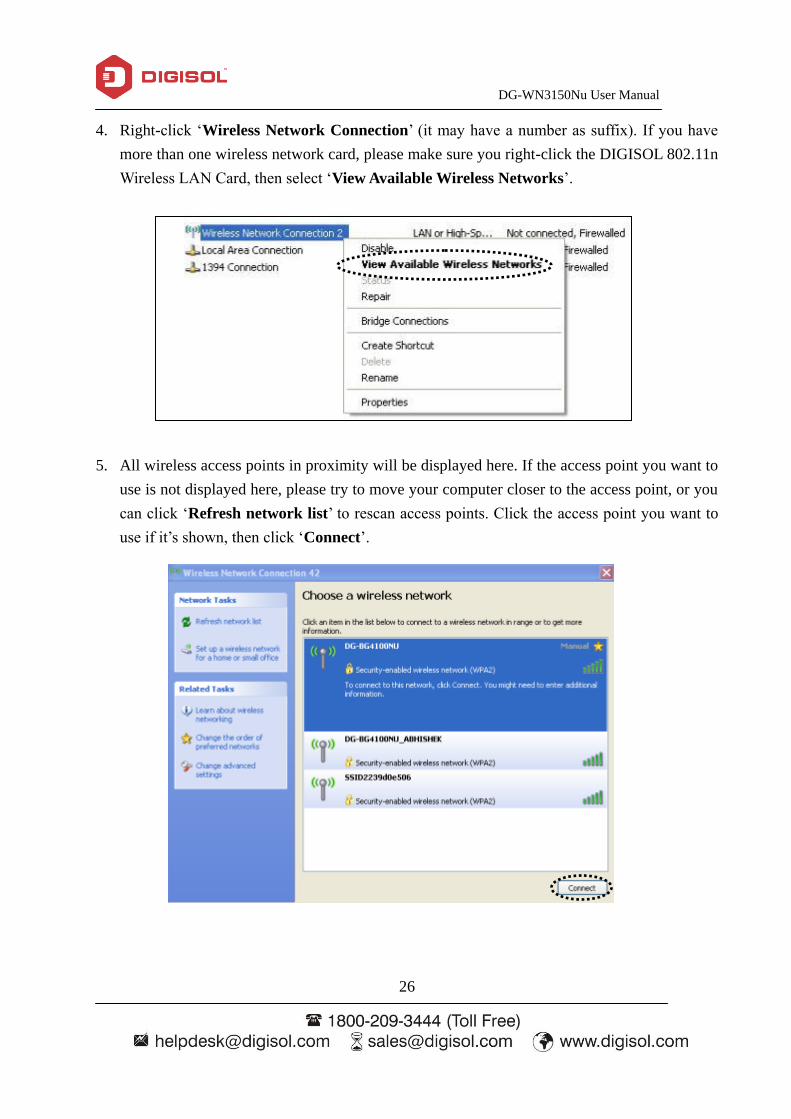
4. Right-click „Wireless Network Connection‟ (it may have a number as suffix). If you have
more than one wireless network card, please make sure you right-click the DIGISOL 802.11n
Wireless LAN Card, then select „View Available Wireless Networks‟.
5. All wireless access points in proximity will be displayed here. If the access point you want to
use is not displayed here, please try to move your computer closer to the access point, or you
can click „Refresh network list‟ to rescan access points. Click the access point you want to
use if it‟s shown, then click „Connect‟.
DG-WN3150Nu User Manual
27
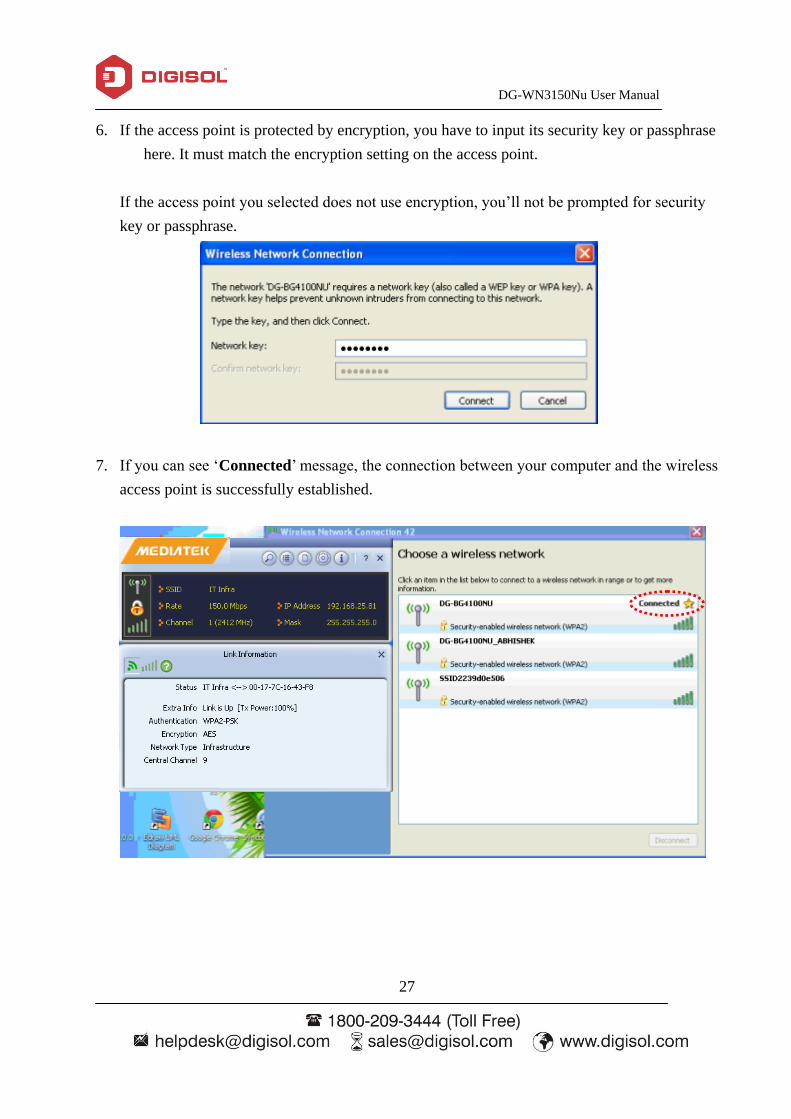
6. If the access point is protected by encryption, you have to input its security key or passphrase
here. It must match the encryption setting on the access point.
If the access point you selected does not use encryption, you‟ll not be prompted for security
key or passphrase.
7. If you can see „Connected‟ message, the connection between your computer and the wireless
access point is successfully established.
DG-WN3150Nu User Manual
28
2-4 Connection Profile Management
If you need to connect to different wireless access points at different time, for example, access
point of your home, office, cybercafé, or public wireless service, you can store the connection
parameters (SSID, encryption, passphrase, security etc.) as a profile for every access point, so
you don‟t have to input these parameters every time when you want to connect to a specific
wireless access point.
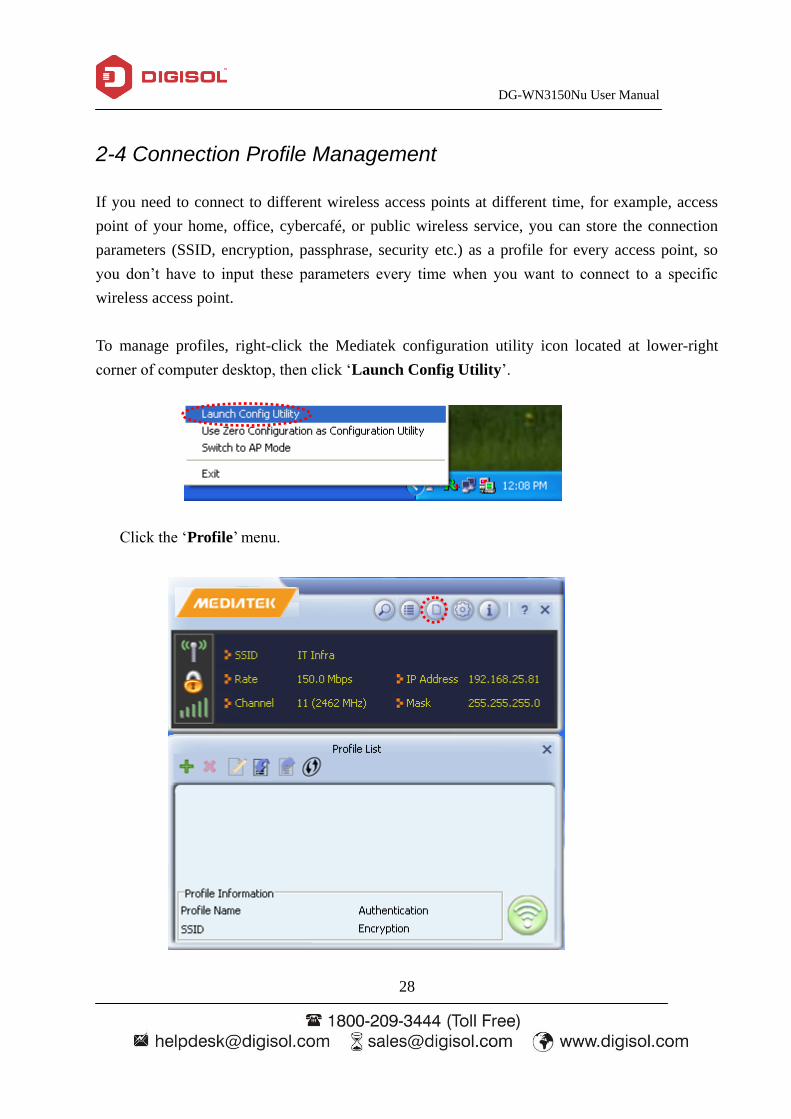
To manage profiles, right-click the Mediatek configuration utility icon located at lower-right
corner of computer desktop, then click „Launch Config Utility‟.
Click the „Profile‟ menu.
DG-WN3150Nu User Manual
29
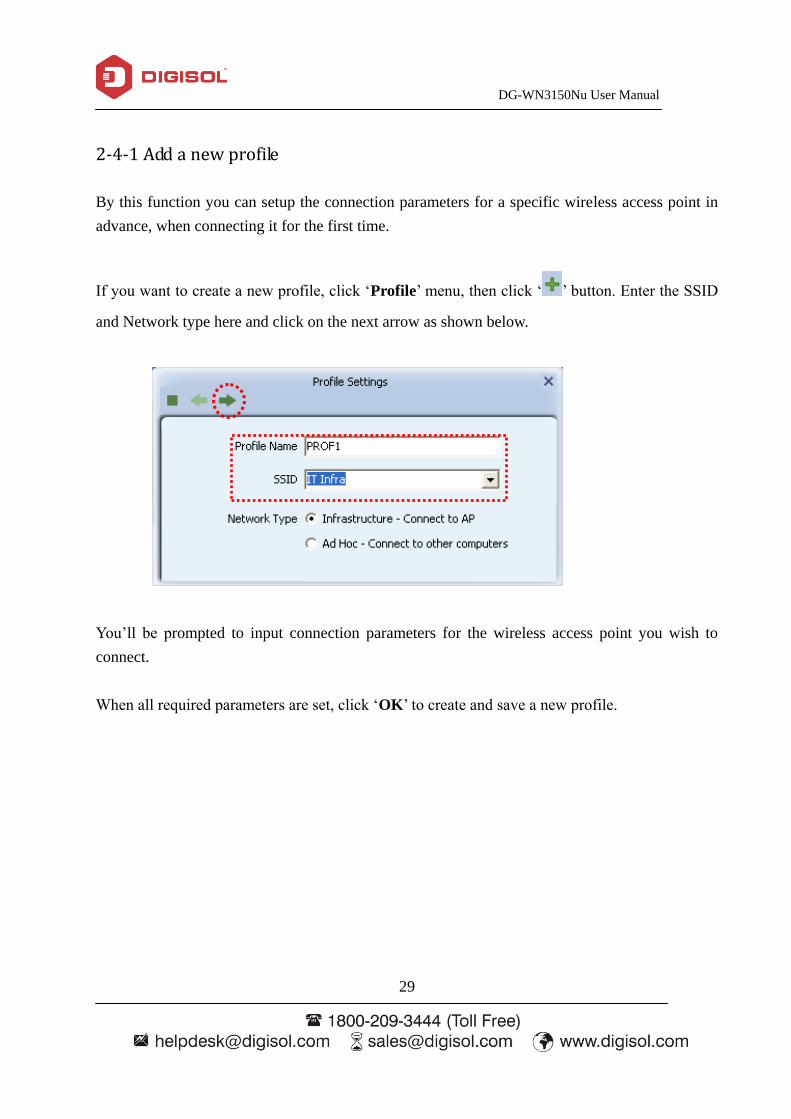
2-4-1 Add a new profile
By this function you can setup the connection parameters for a specific wireless access point in
advance, when connecting it for the first time.
If you want to create a new profile, click „Profile‟ menu, then click „ ‟ button. Enter the SSID
and Network type here and click on the next arrow as shown below.
You‟ll be prompted to input connection parameters for the wireless access point you wish to
connect.
When all required parameters are set, click „OK‟ to create and save a new profile.

DG-WN3150Nu User Manual
30
2-4-2 Remove an existing profile
When you no longer need an existing profile, you can remove it.
If you want to remove a profile, click on the profile, then select an existing profile which you
wish to remove, and then click „ ‟ button.
DG-WN3150Nu User Manual
31
2-4-3 Edit an existing profile
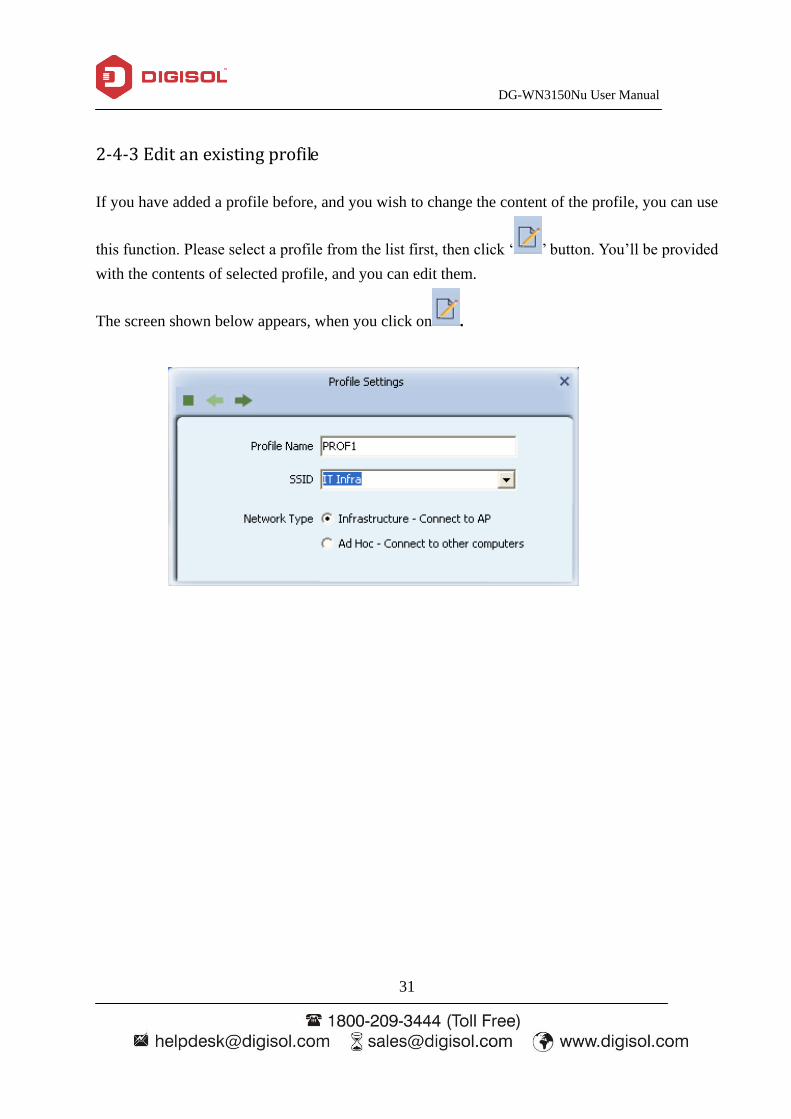
If you have added a profile before, and you wish to change the content of the profile, you can use
this function. Please select a profile from the list first, then click „ ‟ button. You‟ll be provided
with the contents of selected profile, and you can edit them.
The screen shown below appears, when you click on .
DG-WN3150Nu User Manual
32
2-4-4 Import/Export Profile
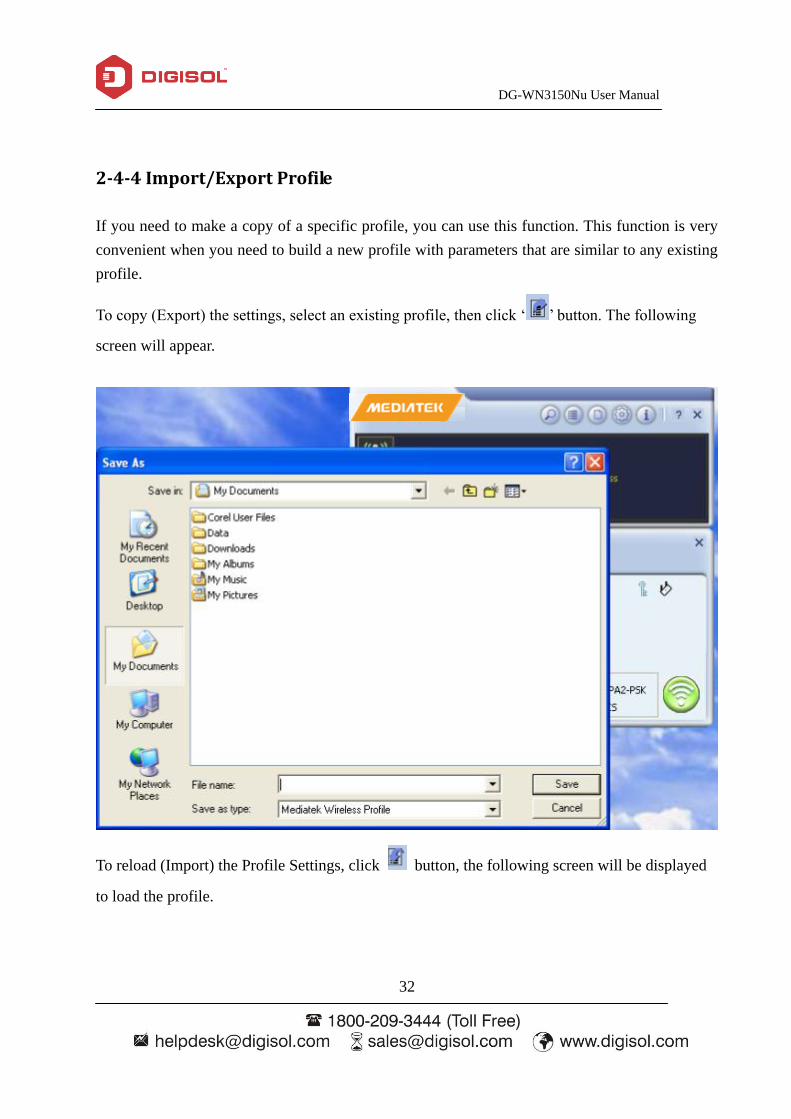
If you need to make a copy of a specific profile, you can use this function. This function is very
convenient when you need to build a new profile with parameters that are similar to any existing
profile.
To copy (Export) the settings, select an existing profile, then click „ ‟ button. The following
screen will appear.
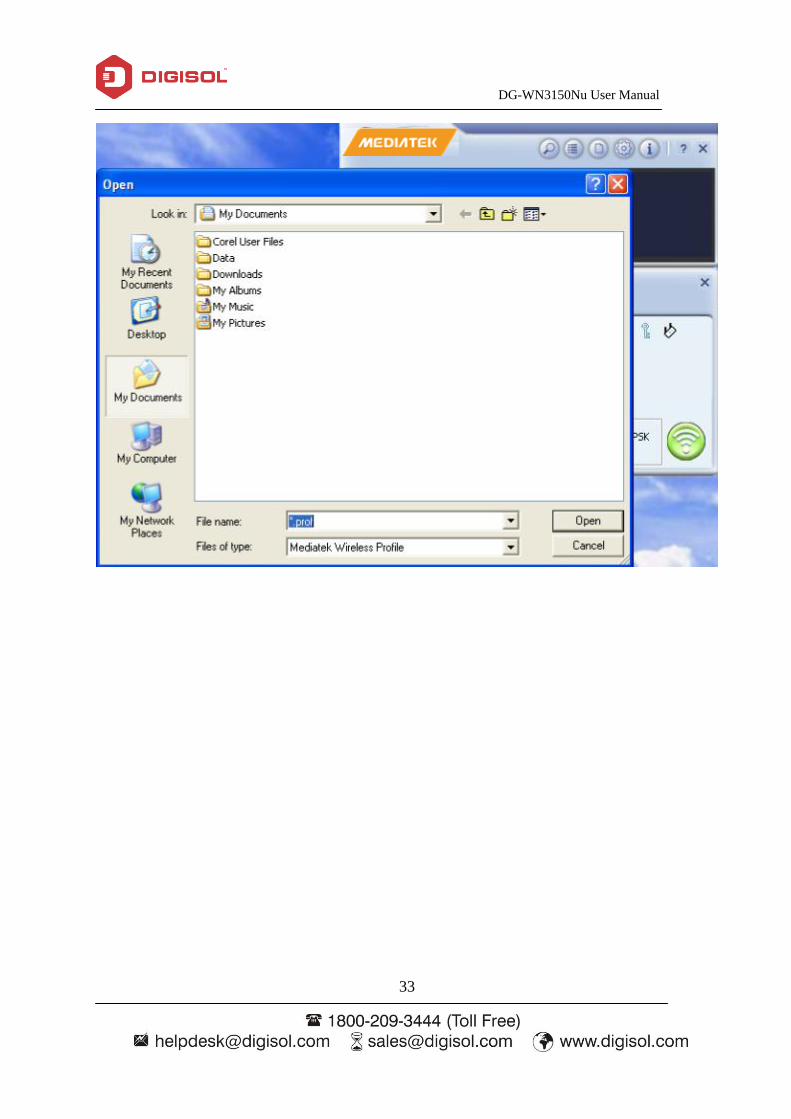
To reload (Import) the Profile Settings, click button, the following screen will be displayed
to load the profile.
DG-WN3150Nu User Manual
33
DG-WN3150Nu User Manual
34
2-4-5 Add WPS Profile
Wi-Fi Protected Setup (WPS) is the latest wireless network technology which makes wireless
network setup become very simple. If you have WPS-enabled wireless access point, and you
want to establish a secure connection to it, you don‟t have to configure the wireless access point
and setup data encryption by yourself. All you have to do is go to the WPS setup page of this
USB wireless adapter, click a button, and then press a specific button or enter a set of 8-digit
code on the wireless access point you wish to establish a secure connection - just three simple
steps.
For older wireless access points, it‟s possible to perform a firmware upgrade to become a
WPS-enabled access point. Since they may not have a hardware button to press for WPS setup,
you can use an alternative WPS setup method - input the pin code. Every WPS-compatible
wireless USB adapter supports pin code configuration method; you can just input the code to
wireless access point, then the wireless access point and wireless USB adapter will do the rest for
you.
This wireless USB adapter is compatible with WPS. To use this function, the wireless access
point you wish to connect to must support WPS function too. Now, please follow the instructions
mentioned below to establish secure connection between WPS-enabled wireless access point and
your wireless USB adapter.
This wireless network adapter supports 2 kinds of WPS: PIN code and Push-Button.
To do this, click „ ‟ button. The following screen will appear.

DG-WN3150Nu User Manual
35
You can use PIN code or Push-Button configuration, and WPS-compatible wireless access point
must use the same type of WPS.
DG-WN3150Nu User Manual
36
2-4-5-1 Push Button
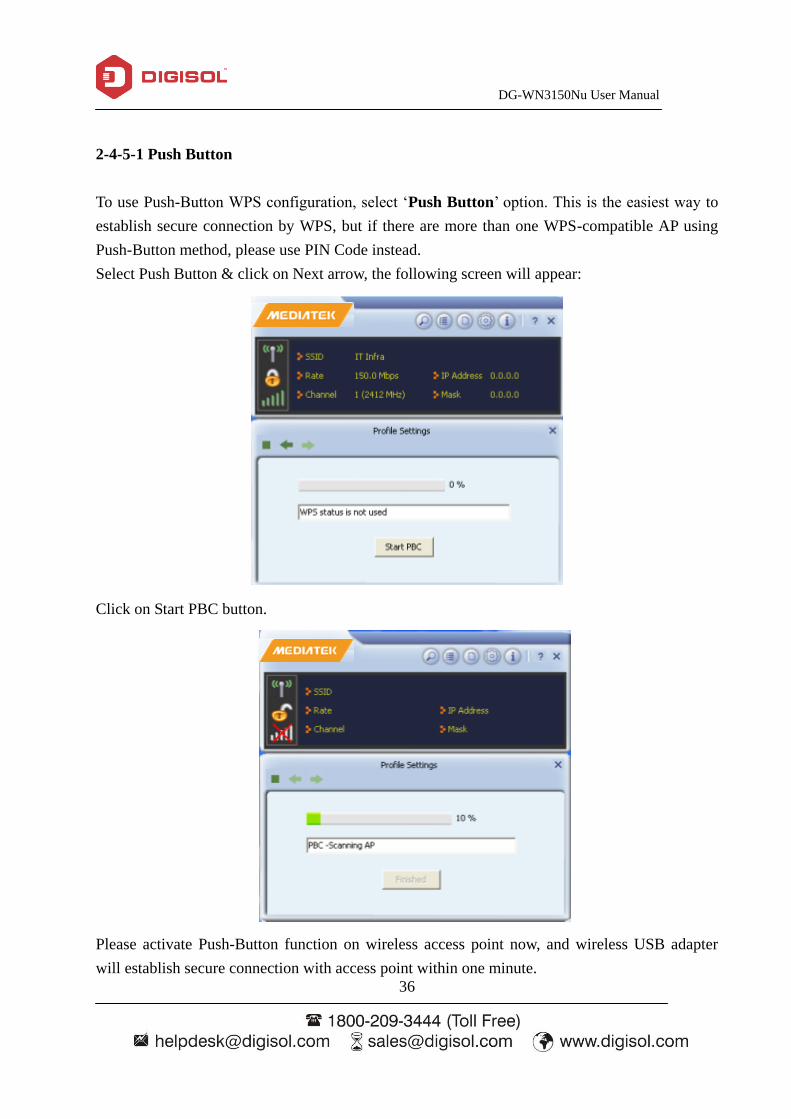
To use Push-Button WPS configuration, select „Push Button‟ option. This is the easiest way to
establish secure connection by WPS, but if there are more than one WPS-compatible AP using
Push-Button method, please use PIN Code instead.
Select Push Button & click on Next arrow, the following screen will appear:
Click on Start PBC button.
Please activate Push-Button function on wireless access point now, and wireless USB adapter
will establish secure connection with access point within one minute.
DG-WN3150Nu User Manual
37
2-4-5-2 PIN Code
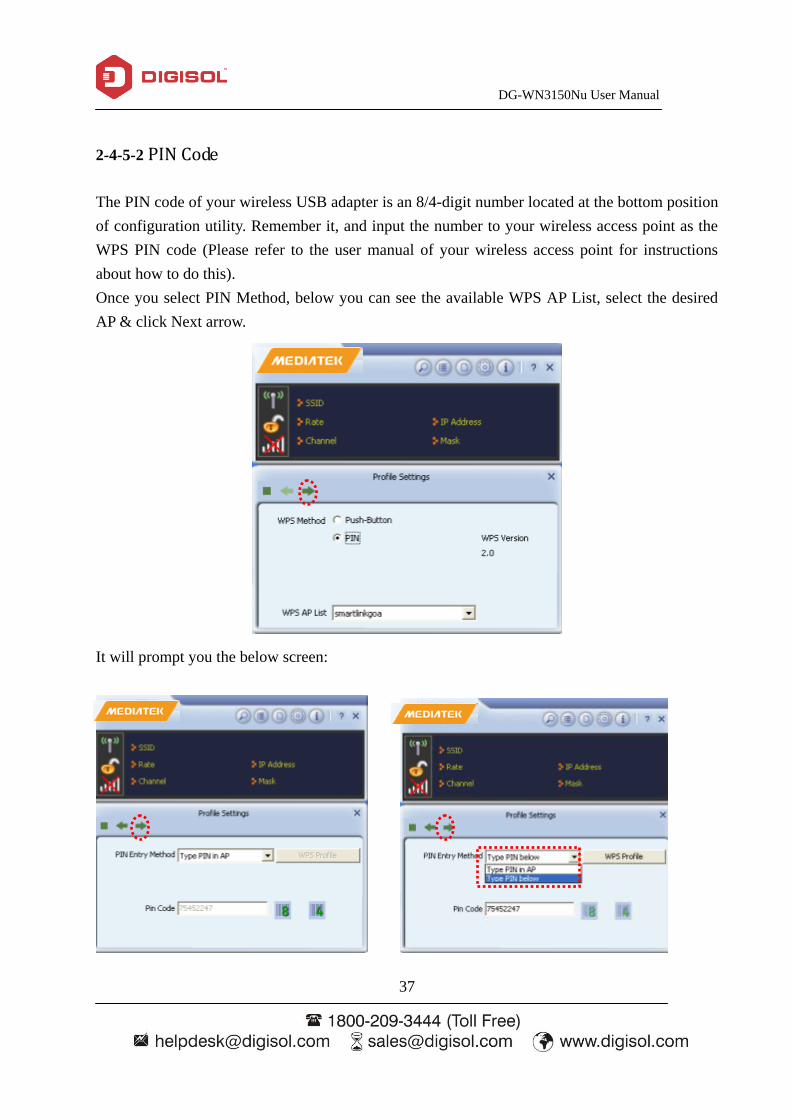
The PIN code of your wireless USB adapter is an 8/4-digit number located at the bottom position
of configuration utility. Remember it, and input the number to your wireless access point as the
WPS PIN code (Please refer to the user manual of your wireless access point for instructions
about how to do this).
Once you select PIN Method, below you can see the available WPS AP List, select the desired
AP & click Next arrow.
It will prompt you the below screen:
DG-WN3150Nu User Manual
38
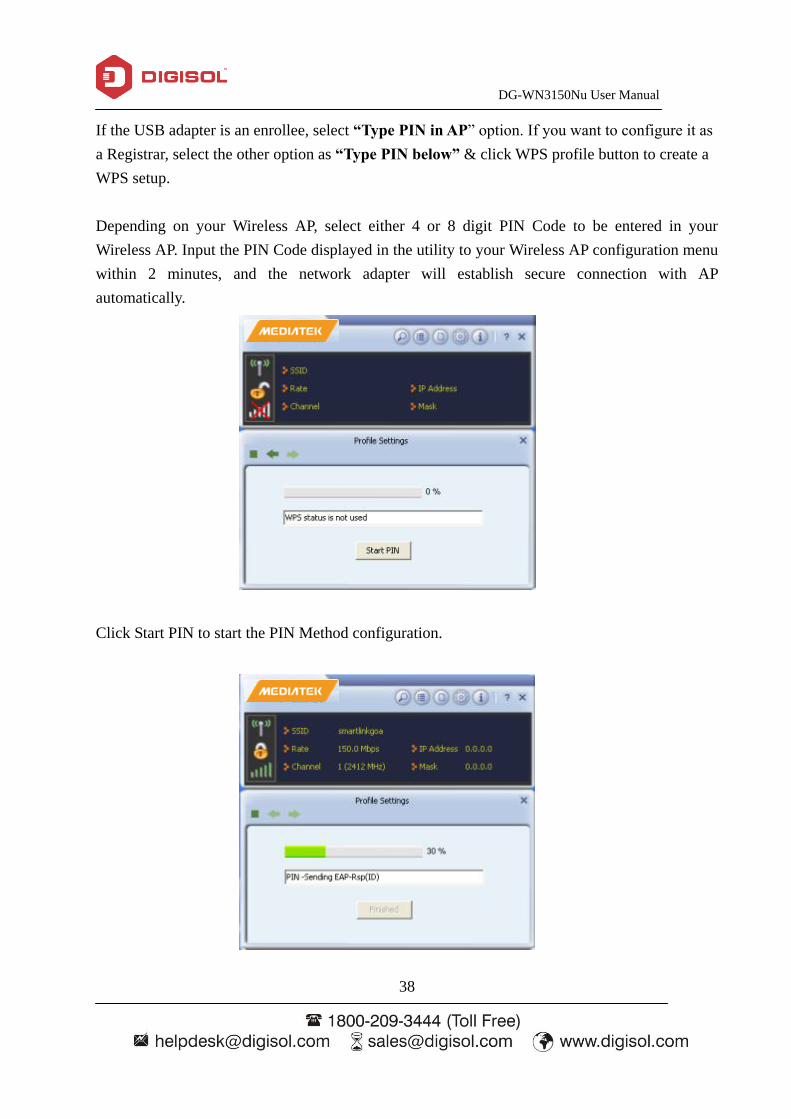
If the USB adapter is an enrollee, select “Type PIN in AP” option. If you want to configure it as
a Registrar, select the other option as “Type PIN below” & click WPS profile button to create a
WPS setup.
Depending on your Wireless AP, select either 4 or 8 digit PIN Code to be entered in your
Wireless AP. Input the PIN Code displayed in the utility to your Wireless AP configuration menu
within 2 minutes, and the network adapter will establish secure connection with AP
automatically.
Click Start PIN to start the PIN Method configuration.
DG-WN3150Nu User Manual
39
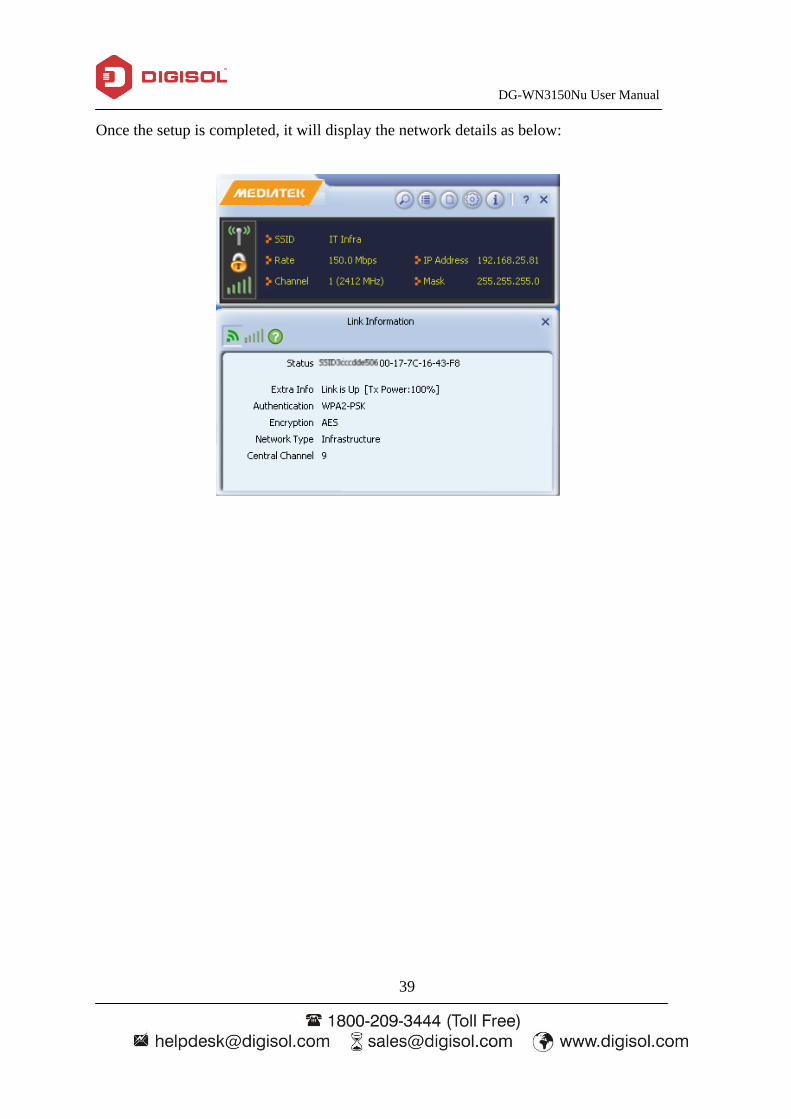
Once the setup is completed, it will display the network details as below:
DG-WN3150Nu User Manual
40
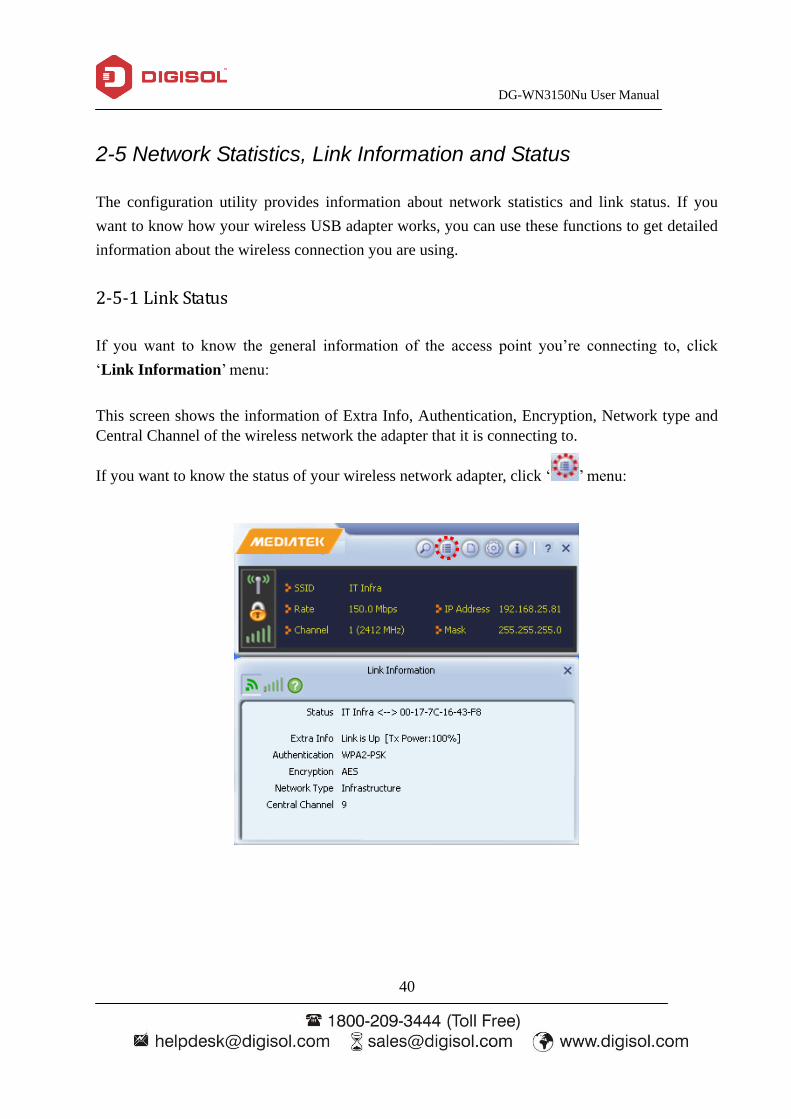
2-5 Network Statistics, Link Information and Status
The configuration utility provides information about network statistics and link status. If you
want to know how your wireless USB adapter works, you can use these functions to get detailed
information about the wireless connection you are using.
2-5-1 Link Status
If you want to know the general information of the access point you‟re connecting to, click
„Link Information‟ menu:
This screen shows the information of Extra Info, Authentication, Encryption, Network type and
Central Channel of the wireless network the adapter that it is connecting to.
If you want to know the status of your wireless network adapter, click „ ‟ menu:

DG-WN3150Nu User Manual
41
2-5-2 Throughput
Click on the icon „ „shown below. The link throughput information will appear as shown
below like: Link Quality and Signal Strength.
DG-WN3150Nu User Manual
42
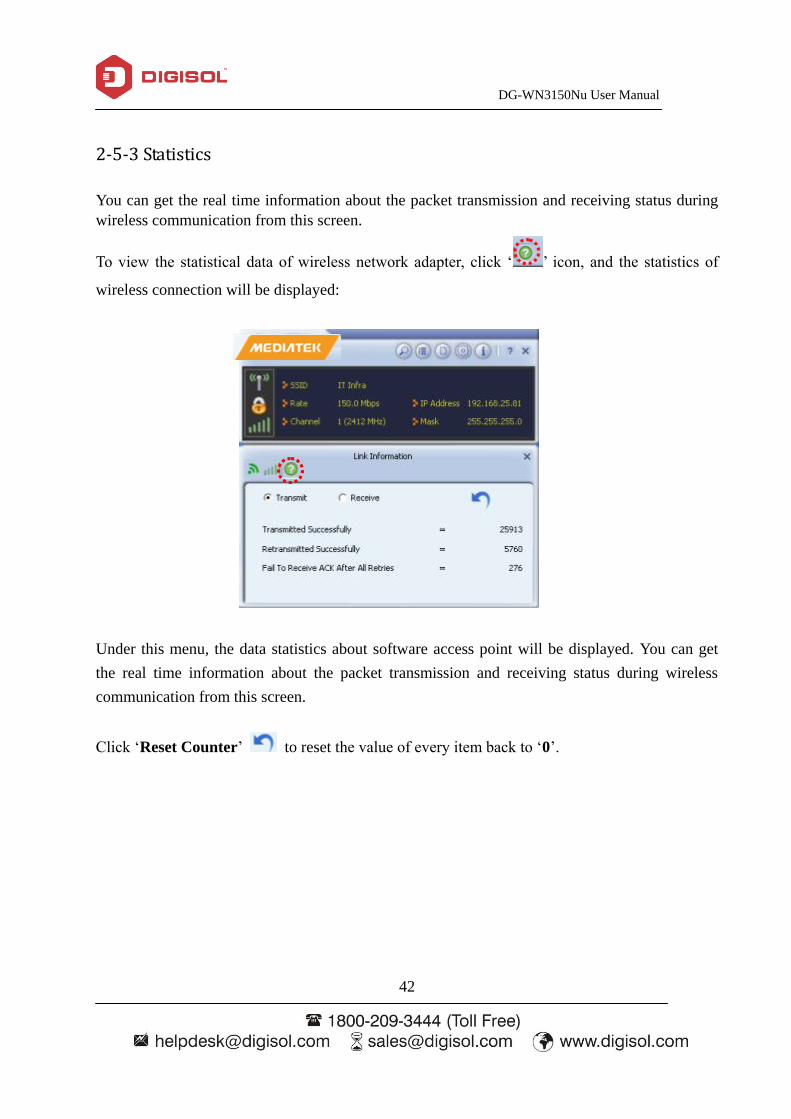
2-5-3 Statistics
You can get the real time information about the packet transmission and receiving status during
wireless communication from this screen.
To view the statistical data of wireless network adapter, click „ ‟ icon, and the statistics of
wireless connection will be displayed:
Under this menu, the data statistics about software access point will be displayed. You can get
the real time information about the packet transmission and receiving status during wireless
communication from this screen.
Click „Reset Counter‟ to reset the value of every item back to „0‟.
DG-WN3150Nu User Manual
43
2-6 Advanced
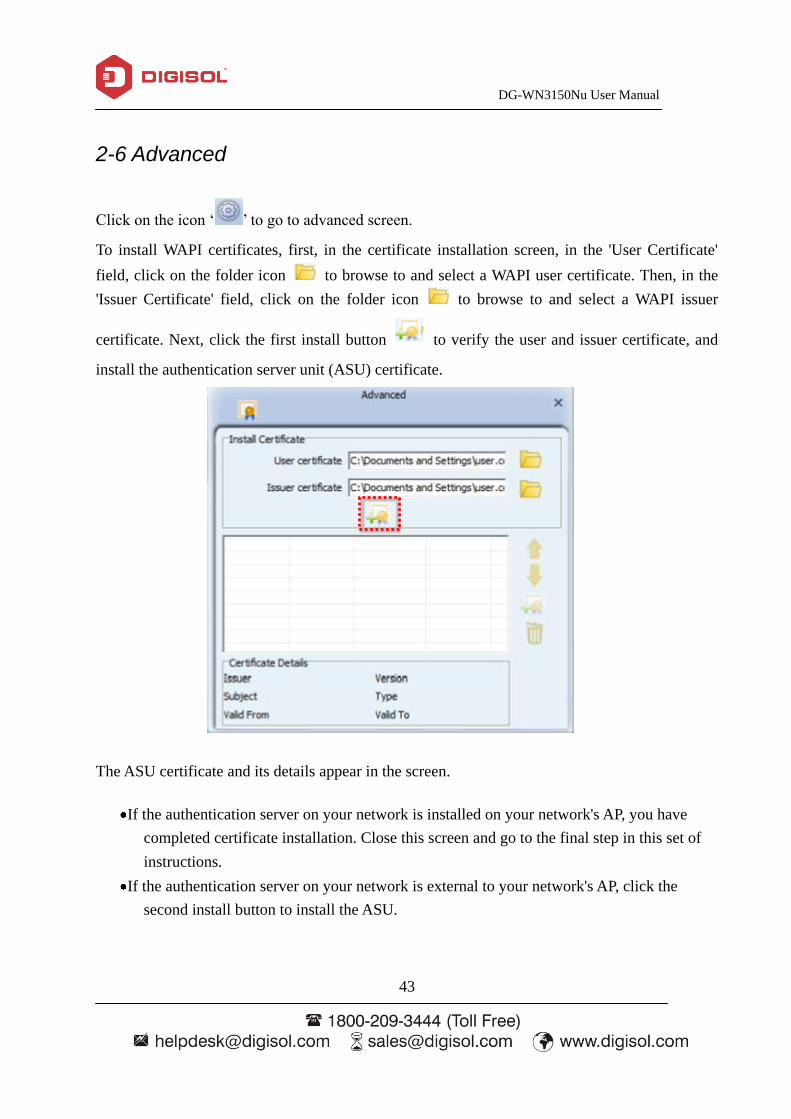
Click on the icon „ ‟ to go to advanced screen.
To install WAPI certificates, first, in the certificate installation screen, in the 'User Certificate'
field, click on the folder icon to browse to and select a WAPI user certificate. Then, in the
'Issuer Certificate' field, click on the folder icon to browse to and select a WAPI issuer
certificate. Next, click the first install button to verify the user and issuer certificate, and
install the authentication server unit (ASU) certificate.
The ASU certificate and its details appear in the screen.
If the authentication server on your network is installed on your network's AP, you have
completed certificate installation. Close this screen and go to the final step in this set of
instructions.
If the authentication server on your network is external to your network's AP, click the
second install button to install the ASU.

DG-WN3150Nu User Manual
44
Click the 'Browse' button to browse to and select an ASU, and click 'Install'. The ASU appears in
the list in this window. Click OK to close this screen.
DG-WN3150Nu User Manual
45
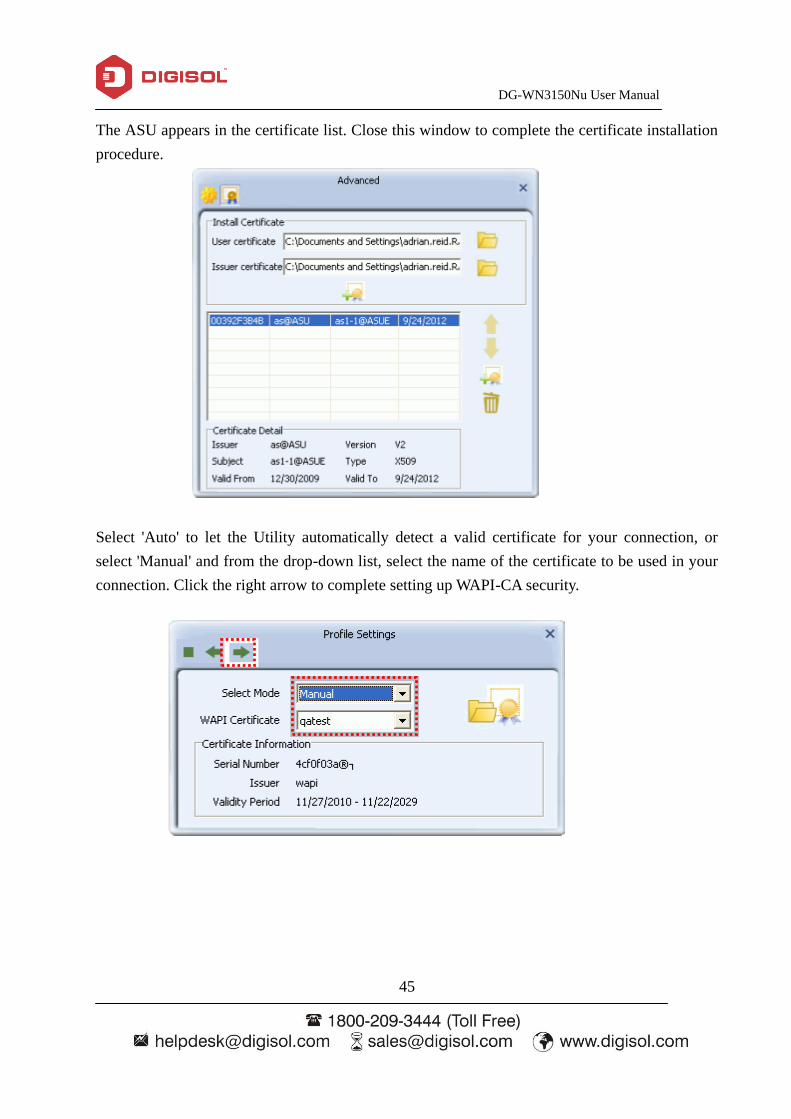
The ASU appears in the certificate list. Close this window to complete the certificate installation
procedure.
Select 'Auto' to let the Utility automatically detect a valid certificate for your connection, or
select 'Manual' and from the drop-down list, select the name of the certificate to be used in your
connection. Click the right arrow to complete setting up WAPI-CA security.
DG-WN3150Nu User Manual
46
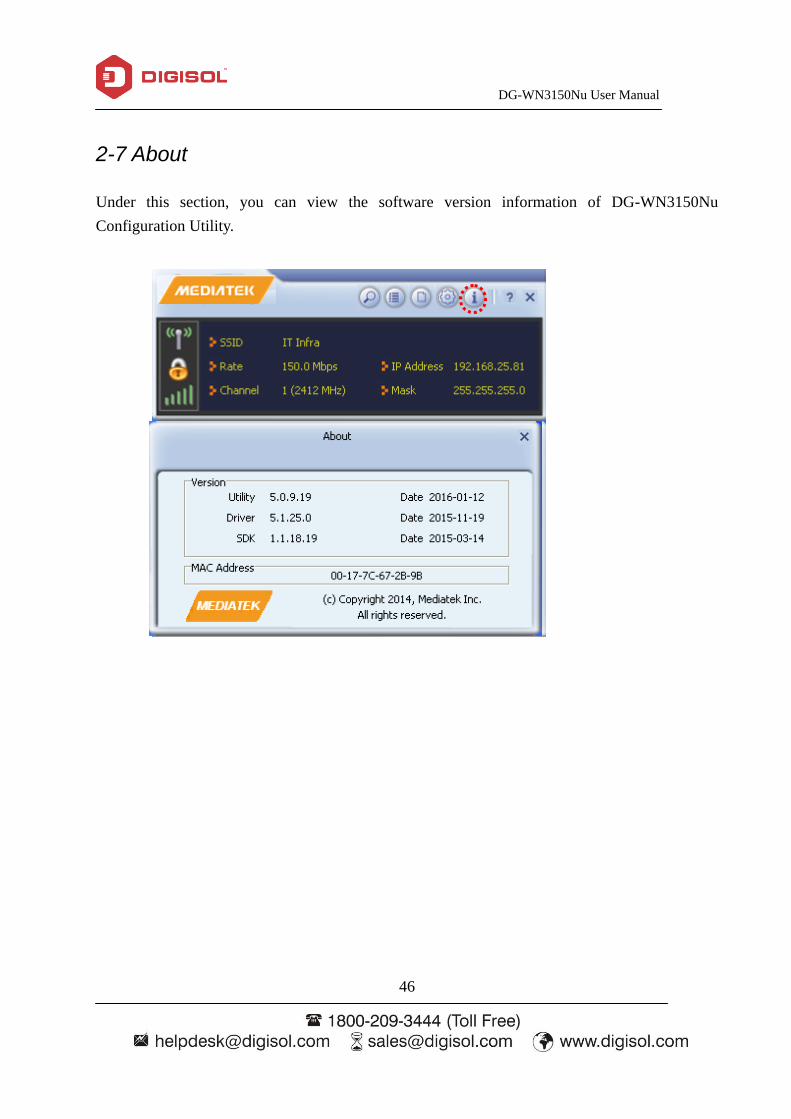
2-7 About
Under this section, you can view the software version information of DG-WN3150Nu
Configuration Utility.
DG-WN3150Nu User Manual
47
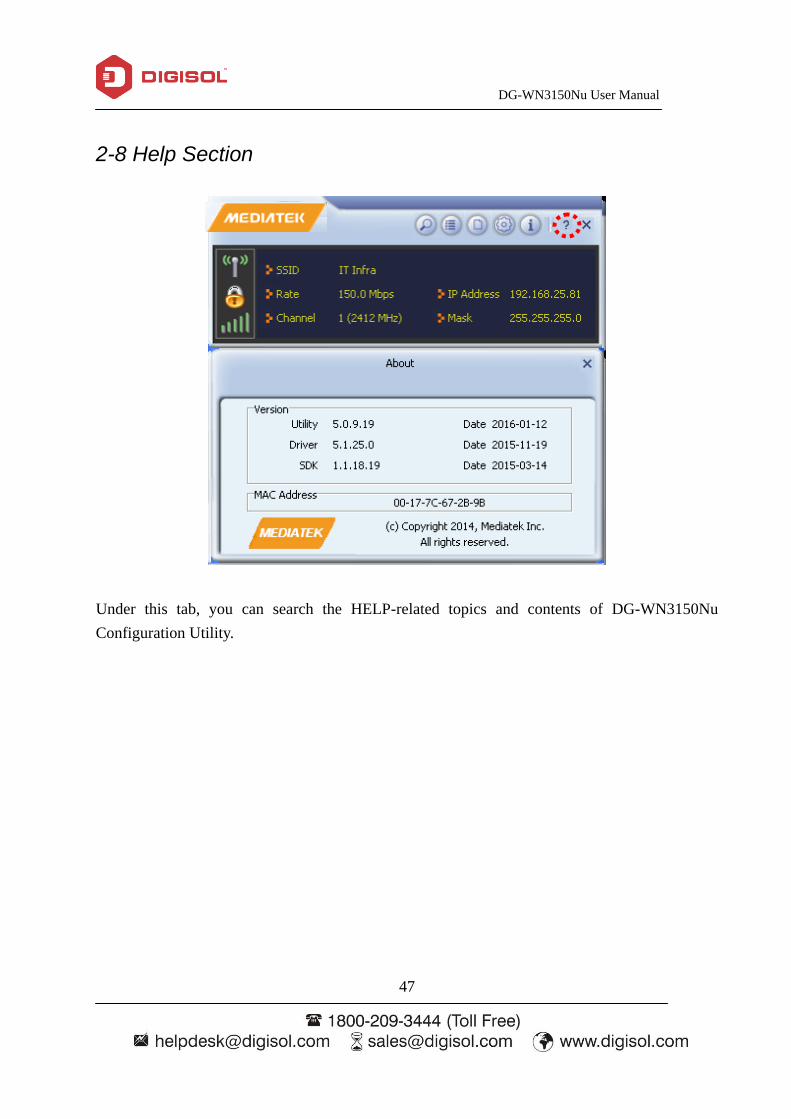
2-8 Help Section
Under this tab, you can search the HELP-related topics and contents of DG-WN3150Nu
Configuration Utility.
DG-WN3150Nu User Manual
48
3. Soft-AP Function
DIGISOL DG-WN3150Nu can act as a wireless service provider also. You can switch this
wireless adapter‟s operating mode to „AP‟ mode to simulate the function of a real wireless access
point by software, and all other computers and wireless devices can connect to your computer
wirelessly, even share the internet connection you have.
Please follow the instructions in the following chapters to use the AP function of your wireless
adapter.
3-1 Switch to AP Mode
The operating mode of the wireless adapter is „Station Mode‟ (becoming a client of other
wireless access points) by default.
Please follow the instructions mentioned below to switch to AP mode.
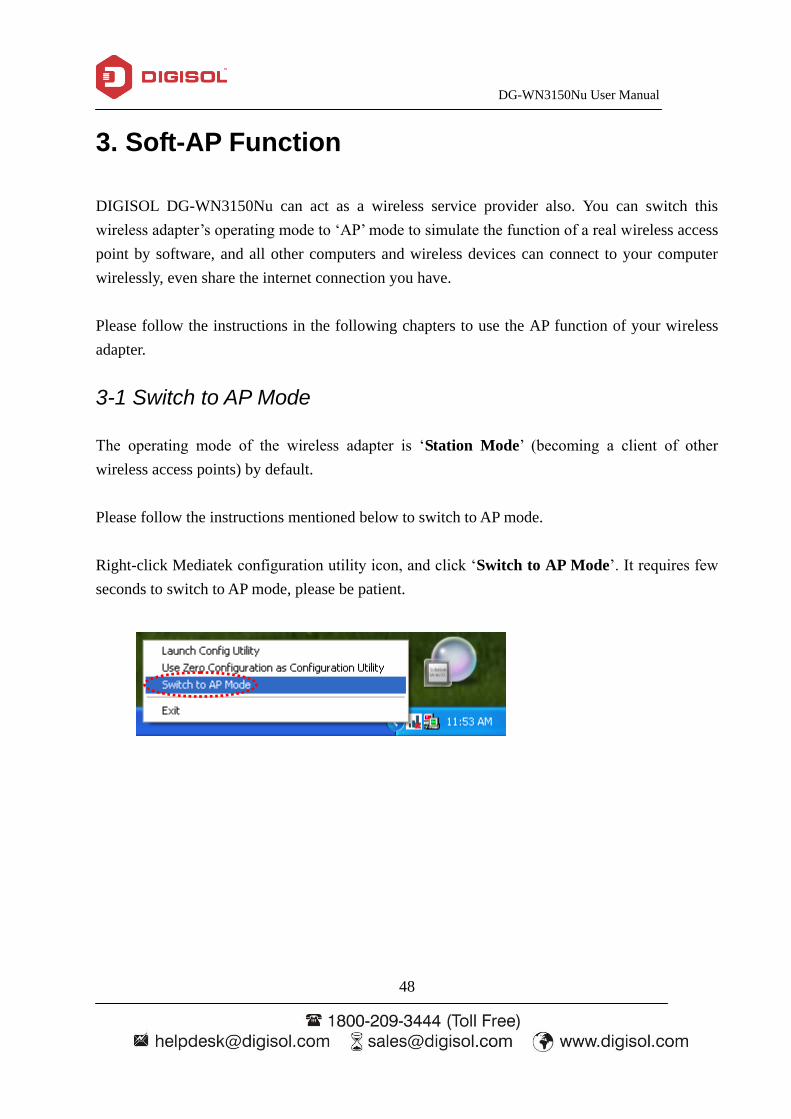
Right-click Mediatek configuration utility icon, and click „Switch to AP Mode‟. It requires few
seconds to switch to AP mode, please be patient.
DG-WN3150Nu User Manual
49
3-1-1 Configure SSID and Channel
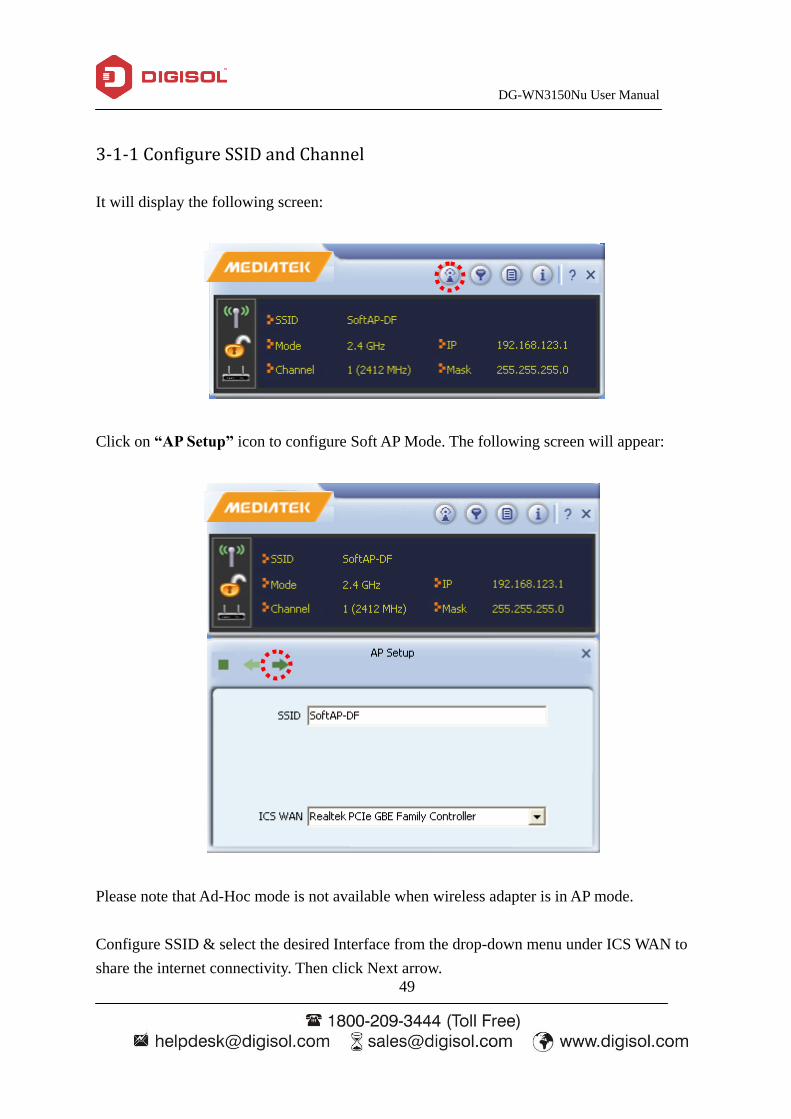
It will display the following screen:
Click on “AP Setup” icon to configure Soft AP Mode. The following screen will appear:
Please note that Ad-Hoc mode is not available when wireless adapter is in AP mode.
Configure SSID & select the desired Interface from the drop-down menu under ICS WAN to
share the internet connectivity. Then click Next arrow.

DG-WN3150Nu User Manual
50
Define the desired Channel number, authentication type if any & finish the AP configuration
setup.
The description of setup items about wireless security are listed below:
Parameter Description
Network
Authentication
This setting has to be consistent with the wireless networks that
the USB adapter intends to connect.
Open System – No authentication is needed among the wireless
network.
WPA-PSK – It is a special mode designed for home and small
business users who do not have access to network
authentication servers. In this mode, known as Pre-Shared Key,
the user manually enters the starting password in their access
point or gateway, as well as in each wireless station in the
network. WPA-PSK takes over automatically from that point,
keeping unauthorized users that don‟t have the matching
password from joining the network, while encrypting the data
traveling between authorized devices.
DG-WN3150Nu User Manual
51
WPA2-PSK – WPA2-PSK is also for home and small business.
The difference between WPA-PSK and WPA2-PSK is that
WPA2-PSK provides data encryption via the AES by default. In
contrast, WPA-PSK uses Temporal Key Integrity Protocol
(TKIP) by default.
WPA-PSK/ WPA2-PSK – WPA Mixed Mode.
Data encryption No Encryption – Disable the Data Encryption.
TKIP – TKIP (Temporal Key Integrity Protocol) changes the
temporal key every 10,000 packets (a packet is a kind of
message transmitted over a network.) This insures much greater
security than the standard WEP security.
AES – AES has been developed to ensure the highest degree of
security and authenticity for digital information and it is the
most advanced solution defined by IEEE 802.11i for the
security in the wireless network.
Note: All devices in the network should use the same
encryption method to ensure the communication. Select the
data encryption type from drop-down menu. This setting
must be identical with the setting of wireless access point
you wish to connect.
Network key
When the encryption type is „WPA-PSK‟ or „WPA2-PSK‟, it‟s
required to input a network key to connect to the wireless
access point.
Group Rekey Interval You can specify the time interval to re-issue the key to your
wireless clients here. You can click „10 seconds‟ or „Kpackets‟
to change the unit of time interval. (Every 10 seconds or a
thousand data packets times the value you specified in „Group
Rekey Interval‟ field).

DG-WN3150Nu User Manual
52
3-1-2 Access Control List
If you are not going to open your computer & wireless resources to the public, you can use MAC
address filtering function to enforce your access control policy, so only wireless clients with
MAC addresses you defined can be connected to your software Access point.
Here is the description of every setup item:
Parameter Description
Access Policy Select the policy type of your access rule.
Disable: Allow any wireless client with proper
authentication settings to connect to this Access Point.
Allow All: Only allow wireless clients with MAC
addresses listed here to connect to this Access Point.
Reject All: Reject wireless clients with MAC addresses

DG-WN3150Nu User Manual
53
listed here to connect to this Access Point.
MAC Address Input the MAC address of the wireless client you wish
to allow or reject here. No colon (:) or hyphen (-) is
required.
Add Add the MAC address you inputted in „MAC address‟
field to the list.
Delete Please select a MAC address from the list, then click
„Delete‟ button to remove it.
Remove All Delete all MAC addresses in the list.
When you finish with the settings and want to save changes, click „Apply‟ button.
3-1-3 Connected Devices
If you want to see the list of all wireless clients connected to this Soft Access Point, please select
„Connected Devices‟ tab from the utility.
DG-WN3150Nu User Manual
54
Here is the description of every field:
Parameter Description
MAC Address Displays the MAC address of the wireless client.
Client ID Displays the client ID.
Power Saving Mode Displays the capability of power-saving function of the wireless
client.
Tx Rate (Mbits) Displays the current data transfer rate of the wireless
connection.
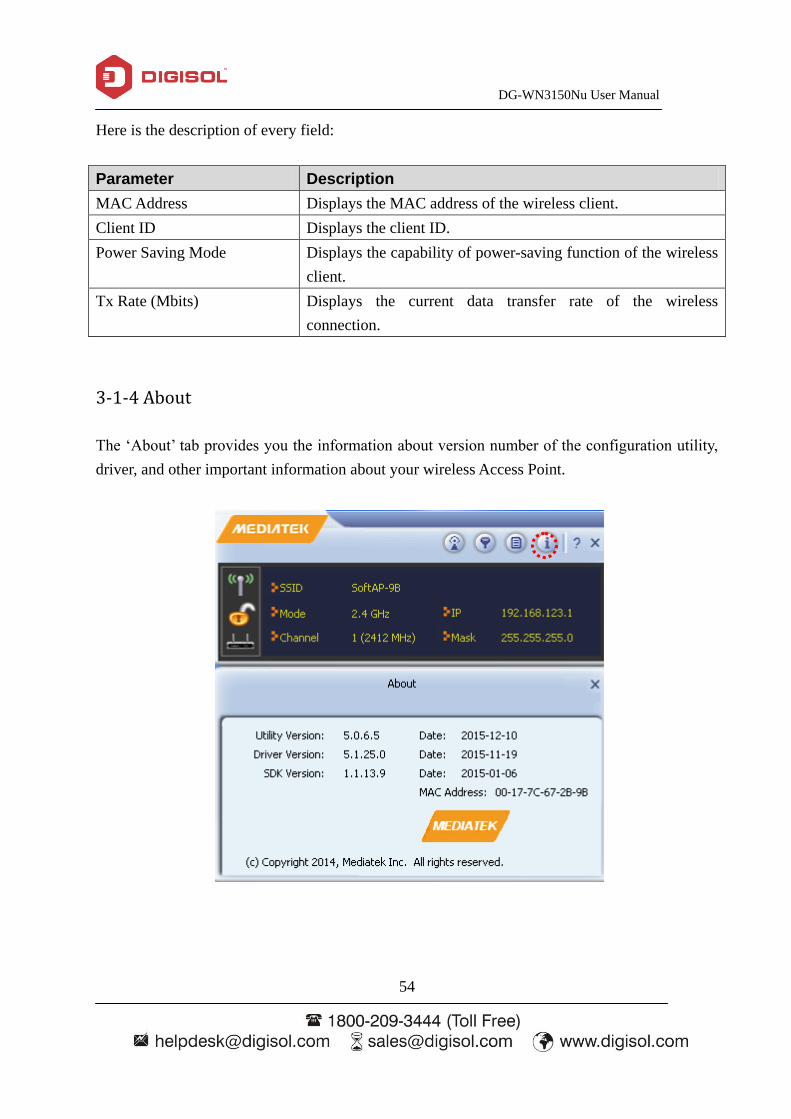
3-1-4 About
The „About‟ tab provides you the information about version number of the configuration utility,
driver, and other important information about your wireless Access Point.

DG-WN3150Nu User Manual
55
4. Client + AP Mode
DIGISOL DG-WN3150Nu can connect to a Wireless Service Provider and act as an AP at the
same time. This is possible in the feature “Client + AP Mode„‟. This feature can also be used to
extend the Wireless signal up to few meters.
NOTE: This feature is available for Operating systems like Windows 7/ Windows 8 only.
Please follow the instructions in the following chapters to use the „Client + AP Mode‟ function
of your wireless USB adapter.
4-1 Switch to Client + AP Mode
The operating mode of wireless adapter is „Station Mode‟ (becoming a client of other wireless
access points) by default.
Next, follow the below instructions to switch to Client + AP mode.
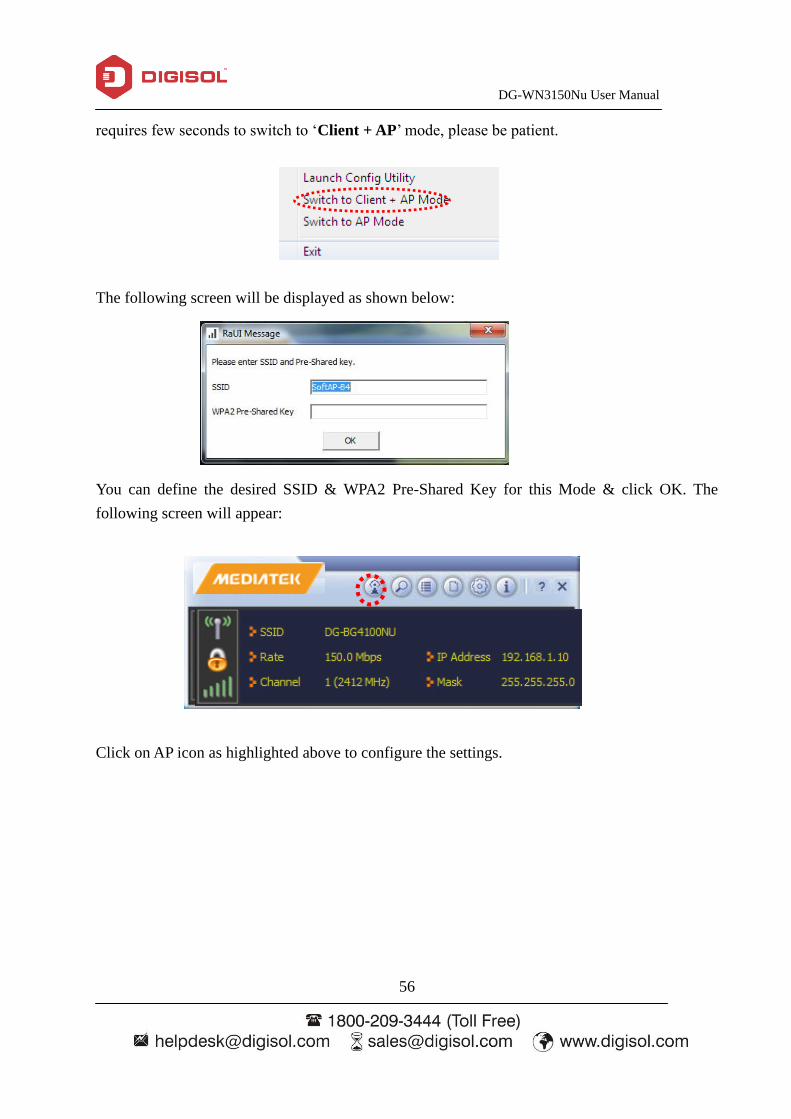
Right-click Mediatek configuration utility icon, and click „Switch to Client + AP Mode‟. It
DG-WN3150Nu User Manual
56
requires few seconds to switch to „Client + AP‟ mode, please be patient.
The following screen will be displayed as shown below:
You can define the desired SSID & WPA2 Pre-Shared Key for this Mode & click OK. The
following screen will appear:
Click on AP icon as highlighted above to configure the settings.
DG-WN3150Nu User Manual
57
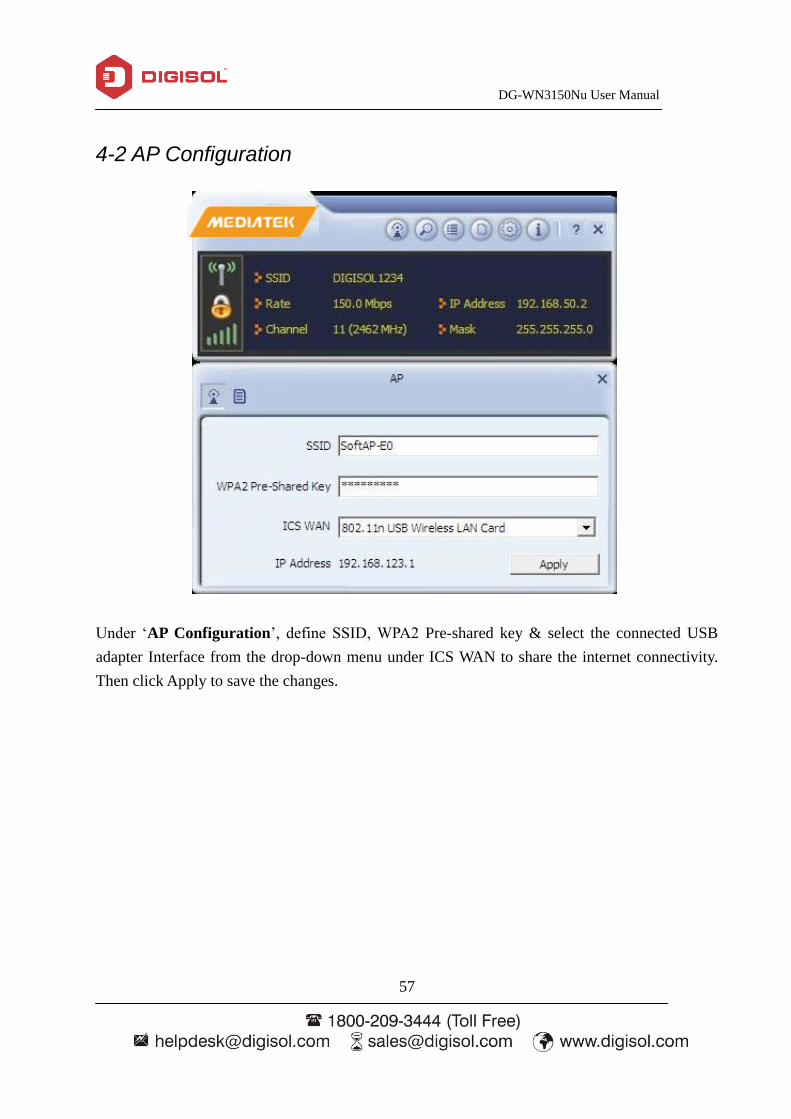
4-2 AP Configuration
Under „AP Configuration‟, define SSID, WPA2 Pre-shared key & select the connected USB
adapter Interface from the drop-down menu under ICS WAN to share the internet connectivity.
Then click Apply to save the changes.

DG-WN3150Nu User Manual
58
4-3 MAC Table
Under this tab, you can see the MAC addresses of wireless clients connected to the „Client + AP‟
Mode of this USB adapter.
Note: Please refer to Appendix Section 5-1 if you are connecting other DG-WN3150Nu adapter
as a wireless client to this “Client + AP” network.
DG-WN3150Nu User Manual
59
5 Appendix
5-1 Configuration for DG-WN3150Nu in “Client + AP” Mode:
To Connect other DG-WN3150Nu as a wireless client to this “Client + AP” network, follow the
steps as mentioned below:
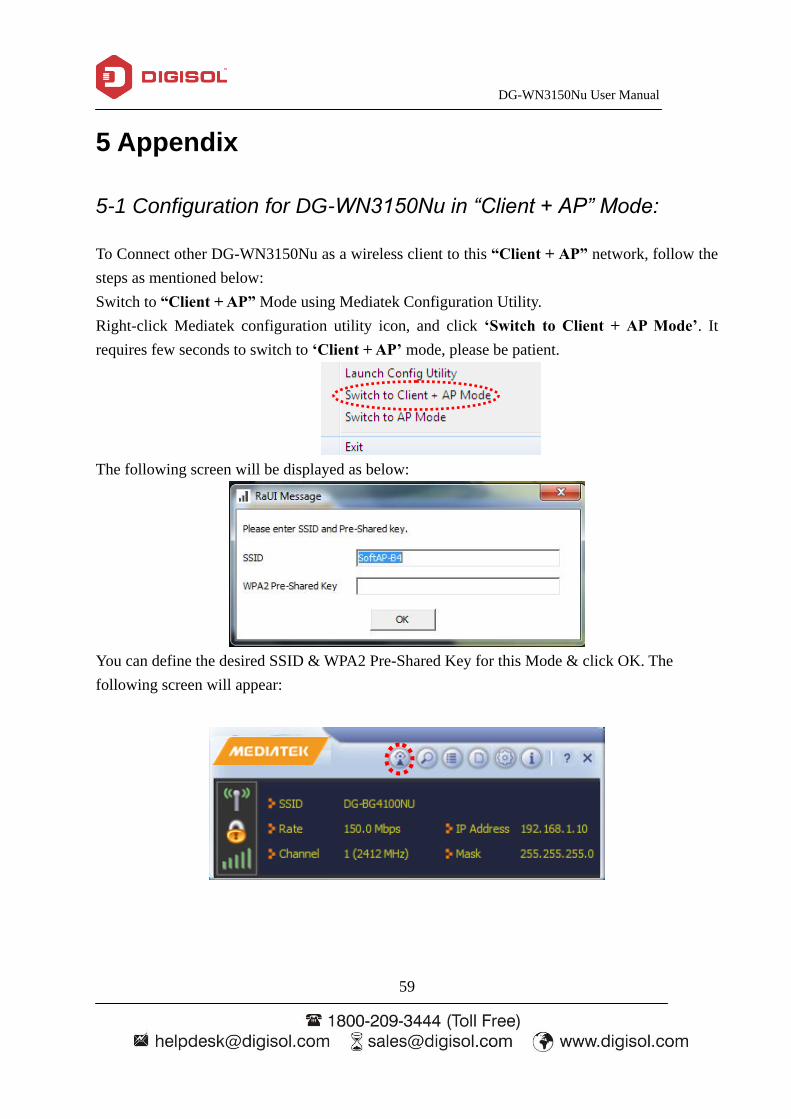
Switch to “Client + AP” Mode using Mediatek Configuration Utility.
Right-click Mediatek configuration utility icon, and click „Switch to Client + AP Mode‟. It
requires few seconds to switch to „Client + AP‟ mode, please be patient.
The following screen will be displayed as below:
You can define the desired SSID & WPA2 Pre-Shared Key for this Mode & click OK. The
following screen will appear:
DG-WN3150Nu User Manual
60
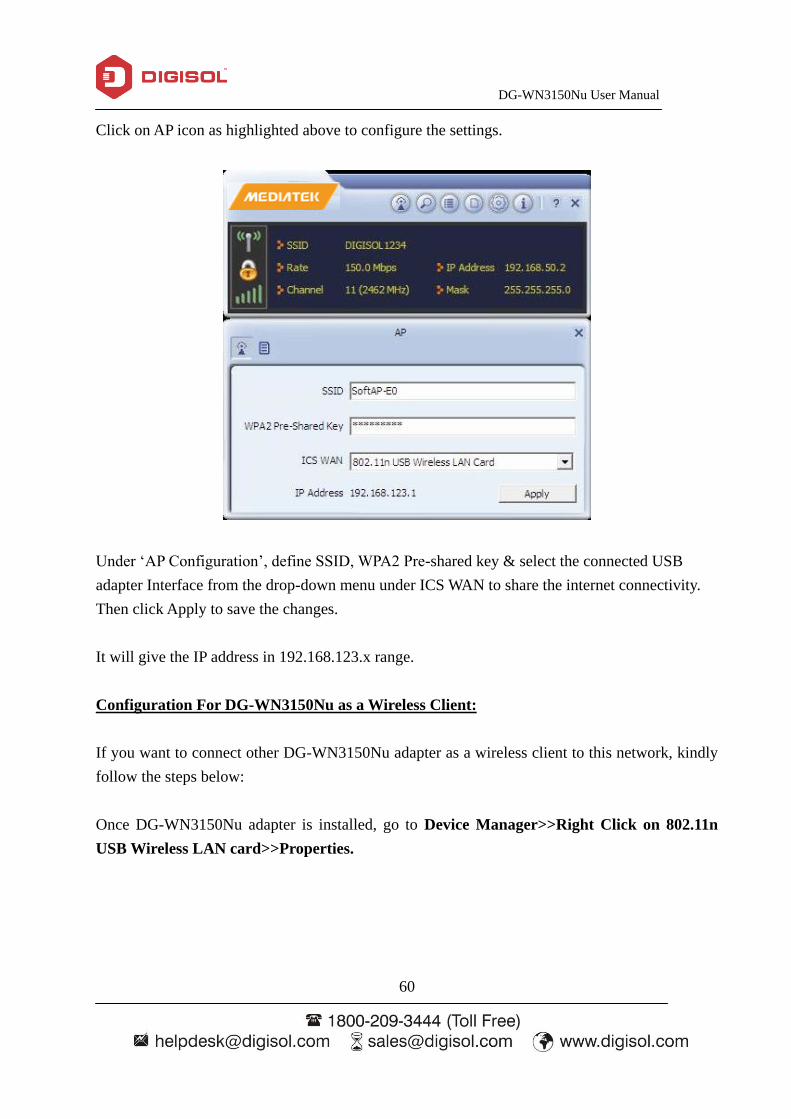
Click on AP icon as highlighted above to configure the settings.
Under „AP Configuration‟, define SSID, WPA2 Pre-shared key & select the connected USB
adapter Interface from the drop-down menu under ICS WAN to share the internet connectivity.
Then click Apply to save the changes.
It will give the IP address in 192.168.123.x range.
Configuration For DG-WN3150Nu as a Wireless Client:
If you want to connect other DG-WN3150Nu adapter as a wireless client to this network, kindly
follow the steps below:
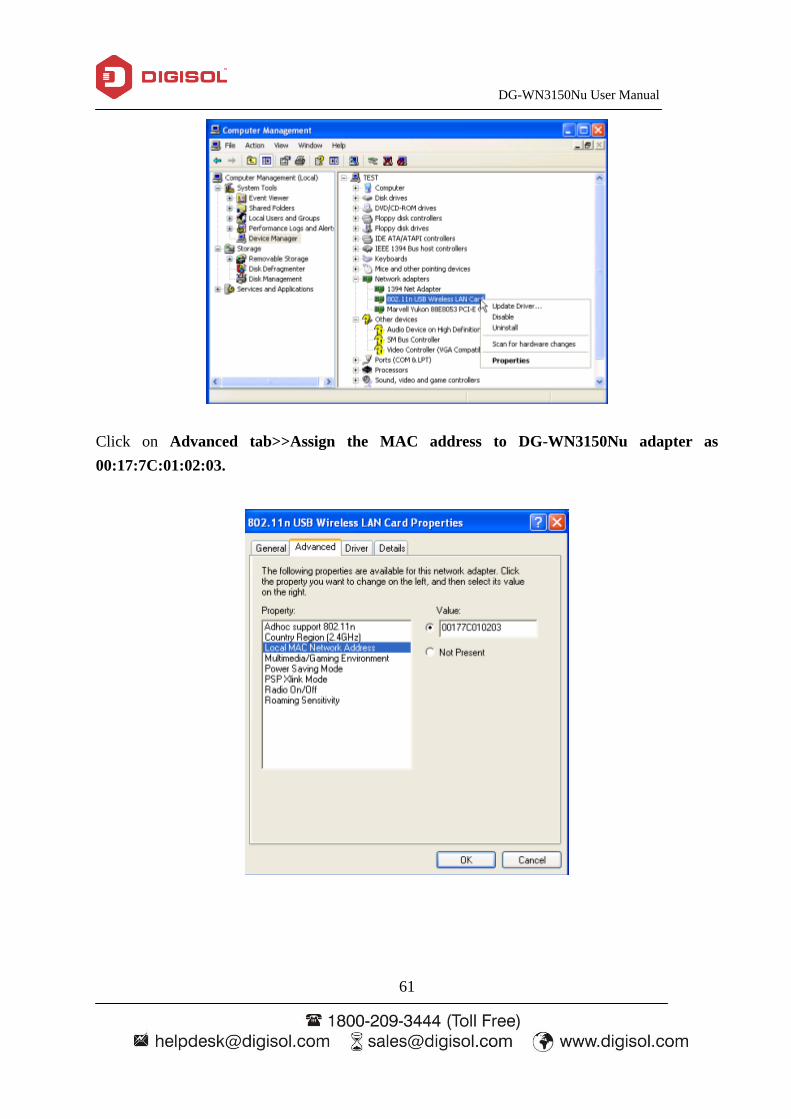
Once DG-WN3150Nu adapter is installed, go to Device Manager>>Right Click on 802.11n
USB Wireless LAN card>>Properties.
DG-WN3150Nu User Manual
61
Click on Advanced tab>>Assign the MAC address to DG-WN3150Nu adapter as
00:17:7C:01:02:03.
DG-WN3150Nu User Manual
62
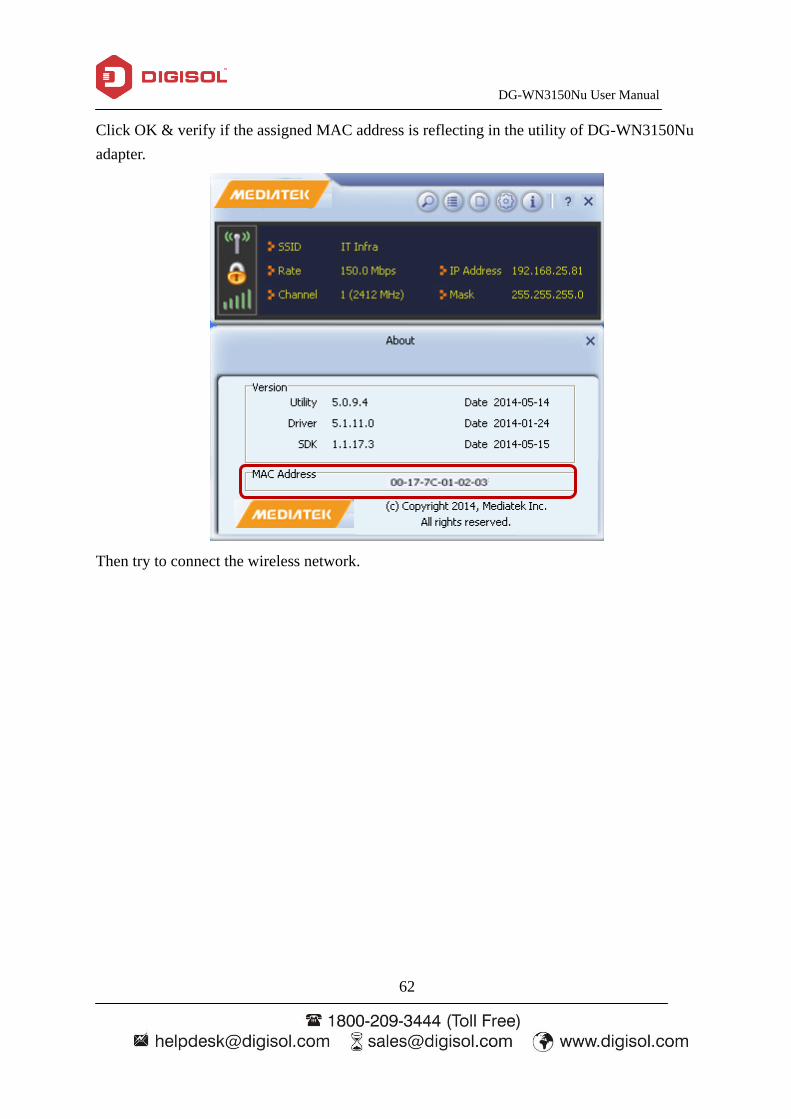
Click OK & verify if the assigned MAC address is reflecting in the utility of DG-WN3150Nu
adapter.
Then try to connect the wireless network.
DG-WN3150Nu User Manual
63
5-2 Hardware Specifications
Standards: IEEE 802.11b/g/n
Interface: USB 2.0
Frequency Band: 2.4000 ~ 2.4835GHz (Industrial Scientific Medical Band)
Data Rate: 11b: 1/2/5.5/11Mbps
11g: 6/9/12/24/36/48/54Mbps
11n: Support PHY rate up to 150Mbps.
Securities: WEP 64/128, WPA, WPA2, WPS and IEEE 802.1x
Antenna: Internal Antenna (1T1R)
Drivers: Windows XP/Windows 7/ Windows8/Windows10
LED: Link/Activity
Transmit Power: 11b: 18+/- 1dBm, 11g: 15+/- 1dBm, 11n: (HT20@MCS7),
14+/-1dBm(HT40@MCS15), 14+/-1dBm
Dimensions: Net Dimension: 23(L) x 13.8(W) x 6(H) mm
Gross Dimension:169(L) x 114(W) x 15(H) mm
Weight: Net weight: 2.5gms
Gross weight: 22.7gms
Temperature: Operating: (-10~50°C)
Storage: (-20~85°C)
Humidity: Operating: 10~90% (Non-Condensing)
Storage: 5%~90% (Non-Condensing)
DG-WN3150Nu User Manual
64
5-3 Troubleshooting
If you encounter any problem when you‟re using this wireless network adapter, don‟t panic.
Before you call your dealer of purchase for help, please check this troubleshooting table, the
solution of your problem could be very simple, and you can solve the problem yourself.
Scenario Solution
I can‟t find any wireless
access point / wireless device
in „Site Survey‟ function.
1. Click „Rescan‟ for few more times and see if you can
find any wireless access point or wireless device.
2. Please move closer to any known wireless access point.
3. „Ad-hoc‟ function must be enabled for the wireless
device you wish to establish a direct wireless link.
4. Please adjust the position of the network adapter (you
may have to move your computer if you‟re using a
notebook computer) and click „Rescan‟ button for few
more times. If you can find the wireless access point or
wireless device you want to connect by doing this, try to
move closer to the place where the wireless access point
or wireless device is located.
Nothing happens when I click
„Launch Config Utility‟.
1. Please make sure the wireless network adapter is inserted
into your computer‟s USB port.
2. Reboot the computer and try again.
3. Remove the adapter and insert it into another USB port.
4. Remove the driver and re-install.
5. Contact the dealer of purchase for help.
I cannot establish connection
with a certain wireless access
point.
1. Click „Add to Profile‟ for few more times.
2. If the SSID of the access point you wish to connect is
hidden (nothing displayed in „SSID‟ field in „Site Survey‟
function), you have to input correct SSID of the access
point you wish to connect. Please contact the owner of
access point to ask for correct SSID.
3. You have to input correct passphrase / security key to
connect an access point with encryption. Please contact
the owner of access point to ask for correct passphrase /

DG-WN3150Nu User Manual
65
security key.
4. The access point you wish to connect only allows
network cards with specific MAC addresses to establish
connection. Please go to „Status‟ menu and write down
the value of „MAC Address‟, then present this value to
the owner of access point so he / she can add the MAC
address of your network adapter to his / her access
point‟s list.
The network is slow / having
problem when transferring
large files.
1. Move closer to the place where the access point is
located.
2. There could be too many people using the same radio
channel. Ask the owner of the access point to change the
channel number.
Please try one or more solutions listed above.
DG-WN3150Nu User Manual
66
5-4 Glossary
IEEE 802.11n standard: 802.11n will work by utilizing multiple wireless antennas in tandem to
transmit and receive data. The associated term MIMO (Multiple Input, Multiple Output) refers to
the ability of 802.11n and similar technologies to coordinate multiple simultaneous radio signals.
MIMO increases both the range and throughput of a wireless network. An additional technique
employed by 802.11n involves increasing the channel bandwidth.
IEEE 802.11g standard: 802.11g is the new IEEE standard for high-speed wireless LAN
communications that provides up to 54 Mbps data rate in the 2.4 GHz band. 802.11g is quickly
becoming the next mainstream wireless LAN technology for home, office and public networks.
802.11g defines the use of the same OFDM modulation technique specified in IEEE 802.11a for
the 5 GHz frequency band and applies it in the same 2.4 GHz frequency band as IEEE 802.11b.
The 802.11g standard requires backward compatibility with 802.11b.
The standard specifically calls for:
A. A new physical layer for the 802.11 Medium Access Control (MAC) in the 2.4 GHz
frequency band, known as the extended rate PHY (ERP). The ERP adds OFDM as a
mandatory new coding scheme for 6, 12 and 24 Mbps (mandatory speeds), and 18, 36,
48 and 54 Mbps (optional speeds). The ERP includes the modulation schemes found in
802.11b including CCK for 11 and 5.5 Mbps and Barker code modulation for 2 and 1
Mbps.
B. A protection mechanism called RTS/CTS that governs how 802.11g devices and
802.11b devices interoperate.
IEEE 802.11b standard: The IEEE 802.11b Wireless LAN standard subcommittee, which
formulates the standard for the industry. The objective is to enable wireless LAN hardware from
different manufactures to communicate.
Ad-hoc: An Ad-hoc integrated wireless LAN is a group of computers, each has a Wireless LAN
card, connected as an independent wireless LAN. Ad hoc wireless LAN is applicable at a
departmental scale for a branch or SOHO operation.
Infrastructure: An integrated wireless and wired LAN is called an infrastructure configuration.
Infrastructure is applicable to enterprise scale for wireless access to central database, or wireless
application for mobile workers.
WEP: WEP is Wired Equivalent Privacy, a data privacy mechanism based on a 40 bit shared key
algorithm, as described in the IEEE 802 .11 standard.
TKIP: TKIP is a quick-fix method to quickly overcome the inherent weaknesses in WEP

DG-WN3150Nu User Manual
67
security, especially the reuse of encryption keys. TKIP is involved in the IEEE 802.11i WLAN
security standard, and the specification might be officially released by early 2003.
AES: AES (Advanced Encryption Standard), a chip-based security, has been developed to ensure
the highest degree of security and authenticity for digital information, wherever and however
communicated or stored, while making more efficient use of hardware and/or software than
previous encryption standards. It is also included in IEEE 802.11i standard. Compare with AES,
TKIP is a temporary protocol for replacing WEP security until manufacturers implement AES at
the hardware level.
DSSS and FHSS: Frequency-hopping spread-spectrum (FHSS) uses a narrowband carrier that
changes frequency in a pattern that is known to both transmitter and receiver. Properly
synchronized, the net effect is to maintain a single logical channel. To an unintended receiver,
FHSS appears to be short-duration impulse noise.
Direct-sequence spread-spectrum (DSSS) generates a redundant bit pattern for each bit to be
transmitted. This bit pattern is called a chip (or chipping code). The longer the chip is, the greater
the probability that the original data can be recovered. Even if one or more bits in the chip are
damaged during transmission, statistical techniques embedded in the radio can recover the
original data without-the need for retransmission. To an unintended receiver, DSSS appears as
low power wideband noise and is rejected (ignored) by most narrowband receivers.
Spread Spectrum: Spread Spectrum technology is a wideband radio frequency technique
developed by the military for use in reliable, secure, mission-critical communication systems. It
is designed to trade off bandwidth efficiency for reliability, integrity, and security. In other
words, more bandwidth is consumed than in the case of narrowband transmission, but the trade
off produces a signal that is, in effect, louder and thus easier to detect, provided that the receiver
knows the parameters of the spread-spectrum signal being broadcast. If a receiver is not tuned to
the right frequency, a spread –spectrum signal looks like background noise. There are two main
alternatives, Direct Sequence Spread Spectrum (DSSS) and Frequency Hopping Spread
Spectrum (FHSS).
WPS: WPS stands for Wi-Fi Protected Setup. It provides a simple way to establish unencrypted
or encrypted connections between wireless clients and access point automatically. User can press
a software or hardware button to activate WPS function, and WPS-compatible wireless clients
and access point will establish connection by themselves. There are two types of WPS: PBC
(Push-Button Configuration) and PIN code.
This product comes with limited lifetime warranty. For further details about warranty policy and
Product Registration, please visit support section of www.digisol.com