Embed Size (px)
Citation preview
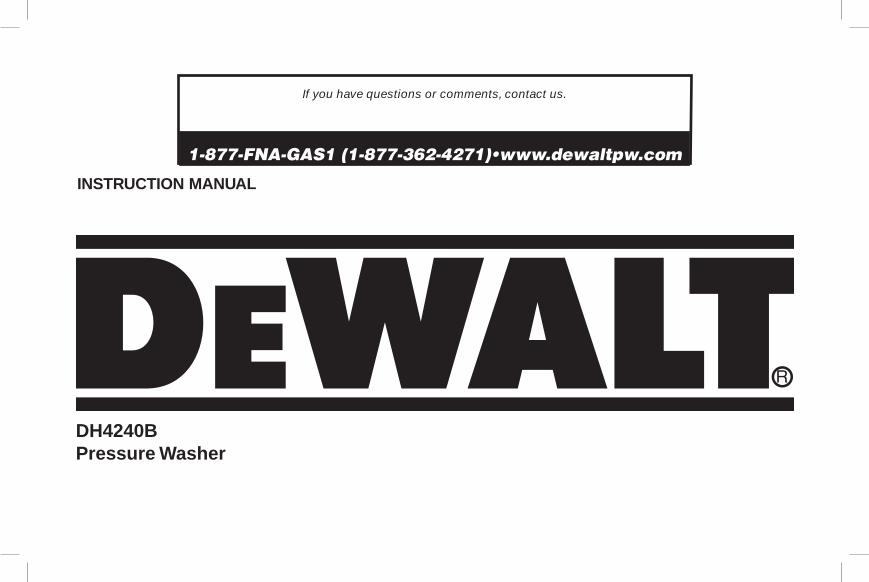
DH4240BPressure Washer
InstructIon ManuaL
If you have questions or comments, contact us.
1-877-FNA-GAS1 (1-877-362-4271)•www.dewaltpw.com

2
English
A. Panel assembly B. Nozzle Grommets C. Professional Spray gun D. Wheel E. Quick-connect
spray wand F. Frame G. Engine dipstick/oil plug H. Engine switch
I. Starter grip J. Engine K. Throttle control lever L. Choke control M. Fuel valve lever N. Gas cap O. Handle assembly P. High-pressure hose Q. High-pressure pump
DH4240B Pressure WasHer
EngineRefer to the engine instruction manual for location and operation of other engine controls.
Pump SpecificationsGeneraL PuMP tX1510aOil Capacity: 14 OuncesFor best results, pump oil designed specifically for pressure washers is recommended, as these contain a rust inhibitor and an anti-foaming agent. If this oil is not available, an SAE 30W non-detergent oil may be used.
H
FIG. 1
J
C
E
P
A BQ
N
D F
O
G
KL
M
IENGINE

3
English
Definitions: Safety Guidelines The definitions below describe the level of severity for each signal word. Please read the manual and pay atten-tion to these symbols.
DANGER: Indicates an imminently hazardous situation which, if not avoided, will result in death or serious injury.
WARNING: Indicates a potentially hazardous situation which, if not avoided, could result in death or seri-ous injury.
CAUTION: Indicates a potentially hazardous situation which, if not avoided, may result in minor or moder-ate injury.NOTICE: Indicates a practice not related to personal injury which, if not avoided, may result in property damage.
IF YOU HAVE ANY QUESTIONS OR COMMENTS ABOUT THIS CONTACT US AT: www.dewaltpw.com or 1-877-Fna-Gas1 (1-877-362-4271)
SpecificationsMoDeL WeIGHt HeIGHt WIDtH LenGtH PsI MaX* aVeraGe
oPeratInG PsI
GPM MaX* aVeraGe oPeratInG
GPM
enGIne
DH4240B 145 lbs 25.5" 28" 45" 4200 (29,958 kPa)
4100 (28,269 kPa)
4.0 (15.4 L/min)
3.9 (14.7L/min)
HONDA 389 cc OHV
* Maximum PSI and GPM ratings determined in accordance with the Pressure Washers Manufacturers Association (PWMA) standard PW101
Important Safety InstructionsDANGER: Carbon Monoxide. Using an engine indoors can kill
you in minutes. Engine exhaust contains high levels of carbon monoxide (CO), a poisonous gas you cannot see or smell. You may be breathing CO even if you do not smell engine exhaust.
WARNING: This product and its exhaust contain chemicals known to the State of California to cause cancer, and birth defects and other reproductive harm.• NEVER use an engine inside homes, garages, crawlspaces or
other partly enclosed areas. Deadly levels of carbon monoxide can build up in these areas. Using a fan or opening windows and doors does NOT supply enough fresh air.
• ONLY use outdoors and far away from open windows, doors and vents. These openings can pull in engine exhaust.
• Evenwhentheengineisusedcorrectly,COmayleakintoyourhome. ALWAYSuseabattery-poweredorbatterybackupCOalarm in your house. Read and follow all directions for CO alarm before using. Ifyoufeelsick,dizzyorweakatanytime,move to fresh air immediately. See a doctor. You could have carbon monoxide poisoning.

4
English
WARNING: Do not operate this unit until you read this instruction manual and the engine instruction manual for safety, operation and maintenance instructions.
WARNING: When using this product basic precautions should always be followed, including the following:1. Read all instructions before using the product.2. Toreducetheriskofinjury,closesupervisionisnecessarywhen
a product is used near children.3. Knowhow tostop theproductandbleedpressuresquickly.Be
thoroughly familiar with the controls.4. Stay alert–watch what you are doing.5. Do not operate the product when fatigued or under the influence
of alcohol or drugs.6. Keep operating area clear of all persons.7. Do not overreach or stand on unstable support. Keep good
footing and balance at all times.8. Follow the maintenance instructions specified in the manual.
DANGER: RISk Of INjECTION OR SEVERE INjURY. kEEP CLEAR Of NOzzLE. DO NOT DIRECT DISChARGE STREAM AT PERSONS. ThIS PRODUCT IS TO BE USED ONLY BY TRAINED OPERATORS.
WARNING: This product may not be equipped with a spark-arresting muffler. If the product is not equipped and will be used around flam ma ble ma teri als or on land covered with materials such as agricultural crops, forest, brush, grass or other similar items, then anapprovedsparkarrestermustbeinstalledandislegallyrequiredin the state of California. It is a violation of California statutes section 130050 and/or sections 4442 and 4443 of the CaliforniaPublicResourcesCode,unlesstheengineisequippedwithasparkarrester, as defined in section 4442, and maintained in ef fec tive working order. Spark arresters are also required on some U.S.
For est Service land and may also be legally required under other statutes and or di nanc es.
WARNING: This product and its exhaust contain chemicals known to the State of California to cause cancer, and birth defects or other reproductive harm. In addition, some cleaning products and dust contain chemicals known to the State of California to cause cancer, and birth defects or other reproduc-tive harm. Wash hands after handling.
Save theSe inStructionS
DANGER: RISk Of ExPLOSION OR fIRE
WHat can HaPPen HoW to PreVent It • Spilledgasolineandit’s
vapors can be come ignited from cigarette sparks, electrical arcing, exhaust gas es and hot engine components such as the muffler.
• Shutoffengineandallow it to cool before adding fuel to the tank.
• Usecareinfillingtanktoavoid spill ing fuel. Move pressure wash er away from fueling area before start ing en gine.
• Heatwillexpandfuelinthetank which could result in spillage and pos si ble fire explosion.
• Keepmaximumfuellevel 1/2" (12.7 mm) be low bottom of filler neck to allow for expansion.
• Operatingthepressurewasher in an ex plo sive en viron ment could re sult in a fire.
• Operateandfuelequipmentin well-ven ti lat ed areas free fromobstructions.Equipareas with fire extinguisher suit able for gas o line fires.

5
English
• Materialsplacedagainstornear the pressure washer can in ter fere with its proper ventilation fea tures caus ing overheating and possible ig ni tion of the materials.
• Neveroperatepressure wash er in an area containing dry brush or weeds.
• Mufflerexhaustheatcandamage paint ed sur fac es, melt any material sen si tive to heat (such as siding, plas tic, rub ber, vinyl or the pressure hose, itself), and dam age live plants.
• Alwayskeeppressurewasher a min i mum of 4' (1.2 m) away from sur fac es (such as houses, au to mo-biles or live plants) that could be damaged from muffler exhaust heat.
• Improperly stored fuel could lead to acciden tal ignition. Fuel im prop er ly secured could get into the hands of childrenorotherunqualifiedpersons.
• StorefuelinanOSHAapproved con tain er, in a se cure location away from work area.
• Useofacids,toxicor cor ro sive chemicals, poisons, in sec ti cides, or any kind of flam ma ble solvent with this product could re sult in se ri ous injury or death.
• Donotsprayflammable liquids.
DANGER: RISk TO BREAThING (ASPhYxIATION) WHat can HaPPen HoW to PreVent It
• Breathingexhaustfumes will cause se ri ous injury or death! En gine exhaust con tains carbon mon ox ide, an odorless and deadly gas.
• Operatepressurewasherina well-ventilated area. Avoid en closed areas such as ga rag es, base ments, etc.
• Neveroperateunitinornear a lo ca tion occupied by humans or animals.
• Somecleaningfluids con tain sub stanc es which could cause injury to skin, eyes or lungs.
• Useonlycleaningfluids spe cif i cal ly rec om mend ed for high-pressure washers. Fol low manufacturers recommendations. Do not use chlorine bleach or any other corrosive compound.

6
English
• Donotallowhosetocontactmuf fler.
• Neverattachorremovewand or hose fittings while sys tem is pres sur ized.
• Whenusingreplacementlances or guns with this pressure washer, DO NOT use a lance and/or lance/gun combination that is shorter in length than what was provided with this pressure washer as measured from the nozzle end of the lance to the gun trigger.
• Injuriescanresultifsystempressure is not reduced before attempting maintenance or disassembly.
• Torelievesystempressure, shut off engine, turn off water sup ply and pull gun trigger until water stops flowing.
• Use only accessories rated equaltoorhigherthanthe rating of the pressure washer.
DANGER: RISk Of fLUID INjECTION AND LACERATION
WHat can HaPPen HoW to PreVent It • Yourpressurewasher
operates at fluid pressures and velocities high enough to penetrate human and animal flesh, which could result in amputation or other serious injury. Leaks caused by loose fittings or worn or damaged hoses can result in injection injuries. DO NOT TREAT FLUID INJECTION AS A SIMPLE CUT! See a physician immediately!
• Inspectthehighpressurehose regularly. Replace the hose immediately if it is damaged, worn, has melted from contacting the engine, or shows any signs of cracks, bubbles, pinholes, or other leakage. Never grasp a high-pressure hose that is leaking or damaged.
• Nevertouch,grasporattempt to cover a pinhole or similar water leak on the high-pressure hose. The stream of water IS under high pressure and WILL penetrate skin.
• Neverplacehandsinfront of noz zle.
• Directsprayawayfromselfand others.
• Makesurehoseandfittingsare tight ened and in good condition. Never hold onto the hose or fittings during op er a tion.

7
English
DANGER: RISk Of INjURY fROM SPRAYWHat can HaPPen HoW to PreVent It
• Highvelocityfluidspraycan cause objects to break, propelling particles at high speed.
• AlwayswearANSIapprovedZ87.1 safety glasses. Wear protective clothing to protect against accidental spraying.
• Neverpointwandatorspray people or animals.
• Lightorunsecuredobjectscan become hazardous projectiles.
• Alwayssecuretriggerlock when wand is not in service to prevent accidental operation.
• Neverpermanentlysecuretrigger in pull-back (open) position.
DANGER: RISk Of UNSAfE OPERATIONWHat can HaPPen HoW to PreVent It
• Unsafeoperationofyourpressure wash er could lead to se ri ous in ju ry or death to you or others.
• Donotusechlorine bleach or any other corrosive compound.
• Becomefamiliarwiththeop er a tion and con trols of the pressure washer.
• Keepoperatingareaclear of all persons, pets and obstacles.
• Donotoperatetheproductwhen fatigued or under the influence of alcohol or drugs. Stay alert at all times.
• Neverdefeatthesafety fea tures of this prod uct.
• Donotoperatemachine with missing, broken or un au tho rized parts.
• Neverleavewand unattended while unit is running.

8
English
• Ifproperstartingprocedureis not followed, engine can kickback causing serious hand and arm injury.
• Ifenginedoesnotstartaftertwopulls,squeezetriggerof gun to relieve pump pressure. Pull starter cord slowly until resistance is felt. Then pull cord rapidly to avoid kickback and prevent hand or arm injury.
• Thespraygun/wandis a powerful clean ing tool that could look like a toy to a child.
• Keepchildrenawayfromthe pressure washer at all times.
• Reactiveforceofspray will cause gun/wand to kickback, and could cause the op er a tor to slip or fall or misdirect the spray. Im prop er control of gun/wand can re sult in in ju ries to self and others.
• Donotoverreachorstand on an unstable support.
• Donotusepressurewasherwhile standing on a ladder.
• Gripgun/wandfirmlywithboth hands. Expect the gun to kickback when triggered.
DANGER: RISk Of INjURY OR PROP ER TY DAMAGE WhEN TRANSPORTING OR STORING
WHat can HaPPen HoW to PreVent It • Fueloroilcanleakorspill
and could result in fire or breathing hazard. Se ri ous in ju ry or death can re sult. Fuel or oil leaks will dam age carpet, paint or oth er surfaces in ve hi cles or trailers.
• Oilcouldfillthecylinderand damage the engine if the unit is not stored or transported in an upright position.
• Ifpressurewasherisequippedwithafuelshutoff valve, turn the valve to the OFF position before transporting to avoid fuel leaks. If pres sure wash er isnotequippedwithafuelshut-off valve, drain the fuel from tank before trans port-ing. Only trans port fuel in an OSHA-approved container.
Al ways place pressure washer on a protective mat when transporting to protect against dam age to vehicle from leaks.
Always transport and store unit in an upright position.Re move pres sure washer from vehicle immediately upon arrival at your destination.

9
English
WARNING: RISk Of BURSTING
WHat can HaPPen HoW to PreVent It
• Over inflation of tires could result in serious injury and property damage.
• Useatirepressuregaugeto check the tires pressure before each use and while inflating tires; see the tire sidewall for the correct tire pressure.
note: Air tanks, compressors and similar equipmentusedtoinflatetires can fill small tires similar to these very rapidly. Adjust pressure regulator on air supply to no more than the rating of the tire pressure. Add air in small increments andfrequentlyusethetiregauge to prevent over inflation.
• Highvelocityfluidspraydirected at pneumatic tire sidewalls (such as found on automobiles, trailers and the like) could damage the sidewall resulting in serious injury.
• Onpressurewashersratedabove 1600 psi (11032 kPa) use the widest fan spray (40º nozzle) and keep the spray a minimum of 8" (20 cm) from the pneumatic tire sidewall. Do not aim spray directly at the joint between the tire and rim.
WARNING: RISk Of hOT SURfACESWHat can HaPPen HoW to PreVent It
• Contactwithhotsurfaces,such as engines exhaust com po nents, could result in se ri ous burn.
• Duringoperation,touch only the control surfaces of the pres sure washer. Keep children away from the pres sure washer at all times. They may not be able to recognize the haz ards of this product.

10
English
WARNING: RISk fROM MOVING PARTS
WHat can HaPPen HoW to PreVent It • Movingpartssuchasthe
pulley, flywheel, and belt can cause serious injury if they come into contact with you or your clothing.
• Neveroperatewithguardsor covers which are dam-aged or removed.
• Keepyourhair,clothing,and gloves away from mov-ing parts. Loose clothes, jewelry, or long hair can be caught in moving parts.
WARNING: RISk Of ChEMICAL BURNWHat can HaPPen HoW to PreVent It
• Useofacids,toxicorcorrosive chemicals, poisons, in sec ti cides, or any kind of flam ma ble solvent with this product could re sult in se ri ous injury or death.
• Donotsprayacids,gasoline, ker o sene, or any other flammable materials with this product. Use only household de ter gents, cleaners and degreasers recommended for use with pres sure washers.
• Wearprotectiveclothing to protect eyes and skin from con tact with sprayed materials.
WARNING: RISk Of ELEC TRI CAL ShOCkWHat can HaPPen HoW to PreVent It
• Spraydirectedatelectrical outlets or switch es, or ob jects con nect ed to an elec tri cal circuit, could re sult in a fatal electrical shock.
• Unpluganyelectrically op er at ed product before attempting to clean it. Direct spray away from electric out lets and switches.
WARNING: RISk Of INjURY fROM LIfTING
WHat can HaPPen HoW to PreVent It • Seriousinjurycanresult
from attempting to lift too heavy an object.
• Thepressurewasheristooheavy to be lifted by one person. Obtain assistance from others before lifting.
Save theSe inStructionS For Future uSe
inStaLLationPressure Washer Assembly (Fig. 1)Verify the fuel and oil tanks are empty prior to installing the handle. RefertotheHondaengineowner’smanualfordetails.Ifthefuelandoil tanks are not empty, raise the machine and provide adequatesupport before performing this installation.Always provide adequate support before performing theseoperations.

11
English
5. Attach high-pressure
E
P
hose (P) to spray gun. Make sure it is secure.
6. Connect wand (E) to spray gun. Make sure connection is secure.
7. Place the grommets (B) onto the panel assembly (A) and push into place.
BA
8.Remove the five coloredquickconnect nozzles from theplasticbag and insert them into correct grommet on the nozzle holder. Nozzles are color coded to match colored nozzles on panel assembly.
note: The high-pressure pump was filled with oil at the factory. Always check oil level before using (refer to Maintenance for more information).
WARNING: Riskofbursting.Useatirepressuregaugetocheckthetires pressure before each use and while inflating tires; see the tire side-wall for the correct tire pressure. note:Airtanks,compressorsandsimilarequipmentusedtoinflate
tires can fill small tires similar to these very rapidly. Adjust pressure regulator on air supply to no more than the rating of the tire pressure. Addair insmall incrementsandfrequentlyusethe tire gauge to prevent over inflation.
tools required (not included):1/2" (13 mm) open-end wrench1/2" (13 mm) socket or 1/2" (13 mm) wrench Hardware (Included with your machine): 1 Handle (F) 1 Leg Assembly (DD) 4 Bolts (EE) 8 Flat Washers (FF) 4 Nuts (GG) 1. Remember to secure/support the machine before removing or
loosening the bolts. Use the wrench and socket to remove the leg assembly bolts (EE, GG).
2. Position/slide the handle (O) into the frame (F) and on the out-side of each side of the foot bracket assembly (DD).
3. Align the holes in the Handle with the mounting holes in the frame and leg assemblies.
4. Fasten the handle (O) to the foot bracket (DD) and frame (F) with the hardware (EE, FF, GG) from step 1 as shown and tighten each nut until snug.
EEFF
O
DD
F
GG
FF
GG
FF EE
FF

12
English
9. The pressure washer is now ready for handling. Make sure to fol-lowtheOwner’sManualinstructionsbeforestartingthepressurewasher.
oPerationPressure AdjustmentsThe pressure setting is preset at the factory to achieve op ti mum pres sure and cleaning. To lower the pres sure, follow these instruc-tions. 1. Back away from the sur face to be cleaned. The further away you
are, the less the pressure will be on the surface to be cleaned. 2. Change to the 40˚ nozzle (white). This nozzle delivers a less
powerful stream of water and a wider spray pattern. Refer to spray Wand nozzles.
NOTICE: DO NOT attempt to increase pump pressure. A higherpressure setting than the factory set pressure may damage pump. 3. Reduce the speed of the gasoline engine (RPM). Slow the
engine down and the water pressure will go down with it.
Spray Wand Nozzles (Fig. 1)The nozzles for the spray wand are stored in the nozzle holder (B) on the panel assembly (A). Colors on the panel identify nozzle location and spray pattern. Refer to the following chart to choose the correct nozzle for the job to be performed.
nozzle color spray Pattern uses surfaces*
red
0˚ powerful pinpoint for very intense cleaning
metal or concrete;DO NOT use on wood
Yellow
15˚ intense cleaning of small areas
metal, concrete or wood
Green
25˚ intense cleaning of larger areas
metal, concrete or wood
White
40˚ covers wide areas of cleaning
metal, concrete, wood or vinyl
Black
low pressure applies cleaning solutions
metal, concrete, wood or vinyl
* NOTICE: The high-pressure spray from your pressure washer is capable of causing damage to surfaces such as wood, glass, automobilepaint,autostripingand trim,delicateobjectssuchas flowers and shrubs. Before spraying, check the item to be cleaned to assure yourself that it is strong enough to resist damage from the force of spray.
cHanGInG nozzLes on sPraY WanDDANGER: Riskoffluidinjection.Donotdirectdischargestream
toward persons, unprotected skin, eyes or any pets or animals. Seriousinjurywilloccur.

13
English
WARNING: Flyingobjectscouldcauseriskofseriousinjury.DONOT attempt to change nozzles while pressure washer is running. Turn engine off before changing nozzles. 1.Pullquickconnectcouplerbackandinsert
nozzle. 2.Release quickconnect coupler and
twist nozzle to make sure it is secure in coupler.
WARNING: Flying object could cause risk ofseriousinjury.Ensurenozzleiscompletelyinserted inquick-connectsocketandquick- connect snap ring is fully engaged (forward) before squeezing gun trigger.
Chemicals and Cleaning Solvents Applying chemicals or cleaning solvents is a low-pressure operation.note: Use only soaps and chemicals designed for pressure washer use. Do not use bleach.
to aPPLY cHeMIcaLs anD soLVents 1. Press chemical hose (S) onto barbed fitting
Slocated near high pressure hose connection of pump as shown.
2. Place the other end of chemical hose with filter on it into the container holding chemi-cal/cleaning solution.
note: For every 10 gallons (38 liters) of water pumped 1 gallon (3.8 liters) of chemi-cal/cleaning solution will be used.
3. Installlowpressure(black)nozzleintoquickconnectfittingofspraywand, refer to spray Wand nozzles. note: Chemicals and soaps will not siphon if the black soap nozzle is not installed on the spray wand.
4. After use of chemicals, place chemical hose into container of clean water and draw clean water through chemical injection system to rinse system thoroughly. If chemicals remain in the pump it could be damaged. Pumps damaged due to chemicals will not be covered under warranty.
StartingWARNING: Toreducetheriskofinjury,readthepressurewasher
instruction manual and the engine instruction manual before starting pressure washer.
DANGER: Riskof fluid injectionand laceration.Whenusingthehigh-pressure setting, DO NOT allow the high-pressure spray to come in contact with unprotected skin, eyes, or with any pets oranimals.Seriousinjurywilloccur.
• Your washer operates at fluid pressures and velocities highenough to penetrate human and animal flesh, which could result in amputation or other serious injury. Leaks caused by loose fit-tings or worn or damaged hoses can result in injection injuries. DO NOT TREAT FLUID INJECTION AS A SIMPLE CUT! See a physician immediately!
WARNING: Risk of fire, asphyxiation and burning. NEVER fill fuel tank when engine is running or hot. Do not smoke when filling fuel tank.
• NEvERfillfueltankcompletely.Filltankto1/2"(12.7mm)below bottomoffillernecktoprovidespaceforfuelexpansion.Wipeanyfuel spillage from engine and equipment before starting engine.
• NEvER run engine in doors or in en closed, poorly ven ti lat ed areas.Engineexhaust contains carbonmonoxide, anodorlessand deadly gas.
• DO NOT let hoses come in contact with very hot engine muffler during or immediately after use of your pressure washer. Damage to hoses from contact with hot engine surfaceswillNOTbecoveredbywarranty.

14
English
NOTICE: NEVER pull water supply hose to move pres sure washer. This could damage hose and/or pump inlet.
• DONOTusehotwater,usecoldwateronly.• NEvER turn water supply off while pressure washer engine is
running or damage to pump will result.• DONOTstopsprayingwaterformorethan
T
two minutes at a time. Pump operates in bypass mode when spray gun trigger is not pressed. When the temperature inside the pump rises too high the thermal relief valve (T) will open and release a gush of water in an effort to lower the temperature inside the pump. The thermal relief valve will then close. If pump is left in bypass mode for more than two minutes internal components of the pump can be damaged.
start-uP ProceDure 1. Inawellventilatedoutdoorarea,addfresh,highquality,unleaded
gasoline with a pump octane rating of 86 or higher. Do not overfill. Wipe up spilled fuel before starting the engine. Refer to engine instruction manual for correct procedure.
2. Check engine oil level. Refer to the engine instruction manual for correct procedure.
3. Connect the water hose to the water source. Turn the water source on to remove all air from the hose. When a steady stream of water is present, turn the water source off.
4. Verify the filter screen (U) is in water inlet of pump.
U
The cone side faces out.
5. Connect the cold water source (V) to pump inlet. note: Water source must provide a minimum of
5 gallons per minute at 20 psi (138 kPa).
WARNING: To reduce the possibility of contamination always pro-tectagainstbackflowwhenconnectedtoapotablewatersystem. 6. Connect high-pressure hose (P) to pump
V
Poutlet. 7. If applying a chemical or cleaning solution,
refer to chemicals and cleaning solvents. 8. Turn the water source on. NOTICE: Riskofproperty damage. Failure to do so could cause damage to the pump. 9. Remove all air from the pump and high pressure hose by depress-
ing trigger until a steady stream of water is present. 10. Turn the engine ON/OFF switch (H) to the ON position. 11. Place the fuel valve lever (M) in the ON postion. 12. If the engine is cold, move the choke (K) to the CLOSED position
as shown.
M
H
K
13. WARNING: Riskofunsafeoperation.Pullstartergripslowlyuntil resistance is felt. Then pull starter grip (I) rapidly to avoid kickbackandpreventhandorarminjury.
note: Do not allow the starter grip to snap back. Return it gently by hand.
WARNING: Risk of unsafe operation. If engine does not startafter two pulls, squeeze trigger of gun to relieve pump pressure. Pull starter cord slowly until resistance is felt. Then pull cord rapidly to avoidkickbackandpreventhandorarminjury.

15
English
note: If the oil level in the engine is low, the engine will not start. If the engine does not start, check the oil level and add oil as needed. 14. As the engine warms up, move the choke to
the OPEN position. 15. Depress trigger on gun to start water flow.
WARNING: Risk of unsafe operation. Standon a stable surface and grip gun/wand firmly with both hands. Expect the gun to kickback whentriggered. 16. Release trigger to stop water flow.
DANGER:Riskofinjuryfromspray.EngagetheXtriggerlock(X)whengunisnotinusetoprevent
accidental spraying. 17. Adjust spray for the task being performed
by changing quick connect nozzle. Refer tospray Wand nozzles.
Shutting Down 1. If chemicals were applied, place the chemical hose into a
container of clean water and draw clean water through chemical injection system to rinse system thoroughly.
NOTICE: Risk of property damage Failure to do so could cause damage to the pump. 2. Place the engine ON/OFF switch (H) to the OFF Position. 3. Place the fuel valve lever (M) in the OFF
postion.NOTICE: Riskofpropertydamage.NEvER turn water supply off while pressure washer engine is running or damage to pump will result.
4. Turn water source off. 5. Pull trigger on spray gun to relieve any water pressure in hose or
spray gun. 6. Refer to storage for proper storage procedures.
MaintenanceWARNING: Riskofburning. When performing maintenance, you
may be exposed to hot surfaces, water pressure or moving parts that cancauseseriousinjuryordeath.
WARNING: Risk of fire. Always disconnect, spark plug wire, letthe engine cool and release all water pressure before performing any maintenance or repair. The engine contains flammable fuel. Do notsmokeorworknearopenflameswhileperformingmaintenance.To ensure efficient operation and longer life of your pressure washer, a routine maintenance schedule should be prepared and followed. If the pressure washer is used in unusual conditions, such as high temperatures or dusty conditions, more frequent maintenancecheckswillberequired.
EngineConsult the engine instruction manual for the man u fac tur er's recom-mendations for any and all maintenance. note:Thepressurewasherframeisequippedwithanoildrainhole to help make changing the engine oil easier.
Pumpnote: The pump was filled with oil at the factory. Change pump oil after the first 50 hours of operation and every 300 hours thereafter.
to cHeck oILThe oil level should come to the dot in the middle of the sight glass (AA).

16
English
HoW to cHanGe BB
AA
CC
PuMP oIL 1. Loosen pump dipstick/oil
plug (BB). 2. Place a container under
the oil drain plug (CC). 3. Remove pump oil drain
plug. 4. After oil is drained, replace
oil drain plug. Tighten securely. 5. Remove pump dipstick/oil plug and fill with 30W non-detergent
oil. 6. Replace pump dipstick/oil plug and tighten securely.
Nozzle CleaningIf the nozzle becomes clogged with foreign materials, such as dirt, excessive pressure may develop. If the nozzle becomes partially clogged or restricted, the pump pressure will pulsate. Clean the nozzle immediately using the nozzle kit supplied and the following instructions: 1. Shut off the pressure washer and turn off the water supply. 2. Pull trigger on gun handle to relieve any water pressure. 3. Disconnect the spray wand from the gun. 4. Remove the high-pressure nozzle from the
Y
spray wand. Remove any obstructions with the nozzle cleaning tool (Y) provided and back flush with clean water.
5. Direct water supply into spray wand to back flush loosened particles for 30 seconds.
6. Reassemble the nozzle to the wand.
7. Reconnect spray wand to gun then turn on water supply. 8. Start pressure washer and place spray wand into high pressure
setting to test.
To Clean the Water Inlet FilterThis filter screen (U) should be checked periodically and cleaned if necessary. 1. Remove the filter screen (U) by grasping the
U
end and removing it from water inlet of pump.
2. Clean filter by flushing it with water on both sides.
3. Reinsert filter into water inlet of pump. Cone side faces out.
note: Do not operate pressure washer without filter properly installed.
To Remove Tires 1. Using a 1/8" hex head wrench loosen set
screw in hub collar. 2. Slide hub collar from axle and remove the
tire.
StoraGeEngineConsult the engine instruction manual for the man u fac tur er's recommendations for storage.
Pump The manufacturer recommends using a pump protector/winter-izer, such as DeWALT winterizer (DP80) when storing the unit for more than 30 days and/or when freezing temperatures are

17
English
expected. DeWALT winterizer (DP80) is availabe at the store where the pressure washer was purchased. If a pump protector/ winterizer is not available, RV antifreeze can be used as outlined in the following steps.note: Using a pump protector/ winterizer or RV antifreeze helps to provide proper lubrication to the internal seals of the pump regard-less of temperature or environment. 1. Obtain a funnel, 6 oz. (170 mL)
of RV antifreeze and 16–36" (40–91cm) of garden hose with a male hose connector attached to one end.
NOTICE: Riskofpropertydamage.Use only Rv antifreeze. Any otheran ti freeze is corrosive and can dam-age pump. 2. Disconnect spark plug wire. 3. Connect length of garden
hose to water inlet of pump. 4. Add RV antifreeze to hose as shown. 5. Pull engine starter rope slowly several times until an ti freeze
comes out of high-pressure hose con nec tion of pump. 6. Remove garden hose from water inlet of pump. 7. Reconnect spark plug wire.
Pressure Washer 1. Drain all water from high-pressure hose, coil it and store it in
cradle of the pressure washer handle. 2. With nozzle pointed down and the spray gun and wand in a
vertical position, squeeze trigger to drain all water from spraygun and wand. Store in gun holder.
3. Store chemical hose so it is protected from dam age.CAUTION:Riskofpersonalinjury.Avoidplacinghandsbetween
handle and frame when assembling to prevent pinching.NOTICE: Riskofpropertydamage.Alwaysstoreandtransportunitin an upright position.
acceSSorieSRecommended accessories for use with your tool are available for purchase from your local dealer or authorized service center. If you need assistance in locating any accessory for your tool, please con-tact the FNA Group at www.dewaltpw.com, 1825 Greenleaf Avenue, Elk Grove Village, Il 60007, or call (877) FNA-GAS1.
DANGER: Riskoffluidinjection.When using replacement lances or guns with this pressure washer, DO NOT use a lance and/or lance/gun combination that is shorter in length than what was pro-vided with this pressure washer as measured from the nozzle end of the lance to the gun trigger.
WARNING: The use of any other accessory not recommended for use with this tool could be hazardous. Use only accessories rated equal to or higher than the rating of the pressure washer.
Service inForMationPlease have the following information available for all service calls: Model Number ____________ Serial Number ___________ Date and Place of Purchase ____________________________
RepairsTo assure product SAFETY and RELIABILITY, repairs, maintenance and adjustment should be performed by a FNA factory service center,aFNAauthorizedservicecenterorotherqualifiedservicepersonnel. Always use identical replacement parts.

18
English
Limited WarrantyThis pressure washer is warranted for three years from date of pur-chase. We will repair, without charge, any defects due to faulty mate-rials or workmanship. This warranty does not cover parts that are damaged through misuse or abuse, or parts which must be replaced from time to time due to normal pressure washer operation. Normal wear parts include, but are not limited to, the engine air filter, spark plug, pump valve seals and O rings. This warranty does not apply to accessories or damage caused where repairs have been made or attempted by a repair center not authorized by FNA. This warranty gives you specific legal rights and you may have other rights which vary in certain states or provinces. For further details of warranty coverage and warranty repair information, visit www.dewaltpw.com and click on Service and Support or call 1-877-FNA-GAS1 (1-877-362-4271).LatIn aMerIca: This warranty does not apply to products sold in Latin America. For products sold in Latin America, see country spe-cific warranty information contained either in the packaging, call the local company or see website for warranty information.Free WarnInG LaBeL rePLaceMent: If your warning labels become illegible or are missing, call 1-877-FNA-GAS1 (1-877-362-4271) for a free replacement.

19
English
GlossaryBypass mode: Allows water to re-circulate within pump when the gun trigger is not pulled.chemical hose: Feeds cleaning agents into the pump to mix with the water. Refer to chemicals and cleaning solvents.chemical injection system: Mixes cleaners or cleaning solvents with water to improve cleaning effectiveness.choke control: Opens and closes carburetor choke valve.cu: Cleaning Units. GPM multiplied by psi. (GPM x PSI = CU)Fuel valve lever: Opens/closes connection between fuel tank and carburetor.GPM: Gallons Per Minute. The unit of measure for the flow rate of water.PsI:PoundsperSquareInch.Theunitofmeasureforwaterpressure.Alsousedforairpressure,hydraulicpressure,etc.kPa (kilopascal): Metricpressuremeasurement.1kilopascalequal1000pascals.Quick-connect spray wand: Allowstheusertoquicklychangeouthighpressurenozzles.RefertoSprayWandNozzles.thermal relief valve: When the temperature inside the pump rises too high the valve will open and release a gush of water in an effort to lower the temperature inside the pump. The valve will then close.Water supply: Allpressurewashersmusthaveasourceofwater.Theminimumrequirementsforawatersupplyare20psi(138kPa)and5 gallons per minute.

20
English
Troubleshooting GuideThis section provides a list of the more frequently encountered malfunctions, their causes and corrective actions. The operatorormaintenancepersonnelcanperformsomecorrectiveactions,andothersmayrequiretheassistanceofaqualifiedFNAtechni-cian or your dealer.
Problem codeEngine will not start ......................................................................................................1, 2, 3, 4, 5, 6, 7, 8, 36 (refer to the engine's instruction manual for further engine troubleshooting)No or low pressure (initial use) ......................................................................................9, 10, 11, 12, 13, 14, 15, 16Will not draw chemicals .................................................................................................16, 17, 18, 19, 20, 21No or low pressure (after period of normal use) ...........................................................22, 23, 24Water leaking at gun/spray wand connection ................................................................25, 26Water leaking at pump ...................................................................................................25, 26, 27, 28Oil leaking at pump ........................................................................................................29, 30, 31, 32, 33, 34, 35Pump Pulsates ...............................................................................................................12
Troubleshooting Codes
coDe PossIBLe cause PossIBLe soLutIon1 No fuel. Add fuel.2 Low oil. Addrequiredamountofoil.3 Pressure builds up after two pulls on the recoil starter or after initial
use.Squeezeguntriggertorelievepressure.
4 Choke lever in the NO CHOKE position. Move choke to the CHOKE po si tion.
5 Spark plug wire not attached. Attach spark plug wire.
6 Engine ON/OFF switch in OFF po si tion. Place engine ON/OFF switch in ON position.
7 Choke lever in the CHOKE position on a hot engine or an engine that has been exposed to thermal heat for a long period of time.
Move choke to the NO CHOKE po si tion.

21
English
coDe PossIBLe cause PossIBLe soLutIon8 Fuel valve closed. Move the fuel valve lever to the OPEN position.9 Spray wand not in high pressure. See spray Wand nozzles under Operation.10 Low water supply. Water supply must be at least 5 GPM @ 20 psi (138 kPa).11 Leak at high-pressure hose fitting. Repair leak. Apply sealant tape if necessary.12 Nozzle obstructed. See nozzle cleaning under Maintenance.13 Water filter screen clogged. Remove and clean filter.14 Air in hose. Turn off the engine, then the water source. Disconnect the
water source from the pump inlet and turn the water source on to remove all air from the hose. When there is a steady stream of water present, turn water source off. Recon nect watersourcetopumpinletandturnonwatersource.Squeezetrigger to re move re main ing air.
15 Choke lever in the CHOKE position. Move choke to the NO CHOKE po si tion.16 High-pressure hose is too long. Use high-pressure hose under 100 feet (30.48 m). Lengthen water
supply hose instead of high-pressure hose.17 Spray wand not in low pressure. See spray Wand nozzles under Operation.
18 Chemical filter clogged. Clean filter.19 Chemical screen not in cleaning solution. Make sure end of chemical hose is fully submerged into cleaning
solution.20 Chemical too thick. Dilute chemical. Chemical should be the same consistency as water.21 Worn seal or packing. Have parts cleaned or replaced by authorized service center.22 Chemical build up in chemical injector. Have replaced by an authorized service center.23 Worn or obstructed valves. Have replaced by authorized service center.24 Worn unloader piston. Have replaced by authorized service center.25 Worn or broken o-ring. Check and replace.26 Loose hose connection. Tighten.27 Piston packings worn. Have replaced by authorized service center.28 Pump head or tubes damaged from freezing. Have replaced by authorized service center.
(Troubleshooting Codes cont.)

22
English
coDe PossIBLe cause PossIBLe soLutIon29 Oil seals worn. Have replaced by authorized service center30 Loose drain plug. Tighten.
31 Worn drain plug o-ring Check and replace.32 Worn fill plug o-ring. Check and replace.
33 Pump overfilled. Check for correct amount.
34 Incorrect oil used. Drain and fill with correct amount and type of oil.35 Vent plug is clogged. Clean vent plug; blow air through it to remove any blockage. If prob-
lem per sists, replace plug.36 Air filter filled with oil. Clean air filter element. Refer to engine instruction manual for
correct procedure.
(Troubleshooting Codes cont.)