Embed Size (px)
Citation preview
DigiHeat by DigiFab Systems
User’s Manual Installation & Operation
Page 2 of 37
www.digifab.com
Index
I) Introduction & Safety
II) Requirements & Specifications
III) Pre-Installation & Installation Notes • Check List, Toos, Unpacking, & Setup
IV) Post-Installation & Operations • Basic Operations • Transfer & Heat Fixation Settings • Loading Diagram • Felt Tension & Position Control
V) Maintenance & Troubleshooting
VI) Final notes & Contact Information
Copyright © 2004-2007 by DigiFab Systems, Inc. All rights reserved. All other products are trademarks or registered trademarks of their respective owners. The information in this publication is provided for reference and is believed to be accurate and complete. DigiFab is not liable for errors in this publication or for incidental or consequential damage in connection with furnishing or use of the information in this publication, including but not limited to, any implied warranty of fitness or merchantability for any particular use. DigiFab reserves the right to make changes to this publication products described in it without notice. All specifications and information concerning products are subject to change without notice. Reference in this publication to information or to products is protected by copyright or patent are does not convey any license under the rights of DigiFab or others. DigiFab assumes no liability arising from infringements of patents or any other rights of third parties.
Page 3 of 37
www.digifab.com
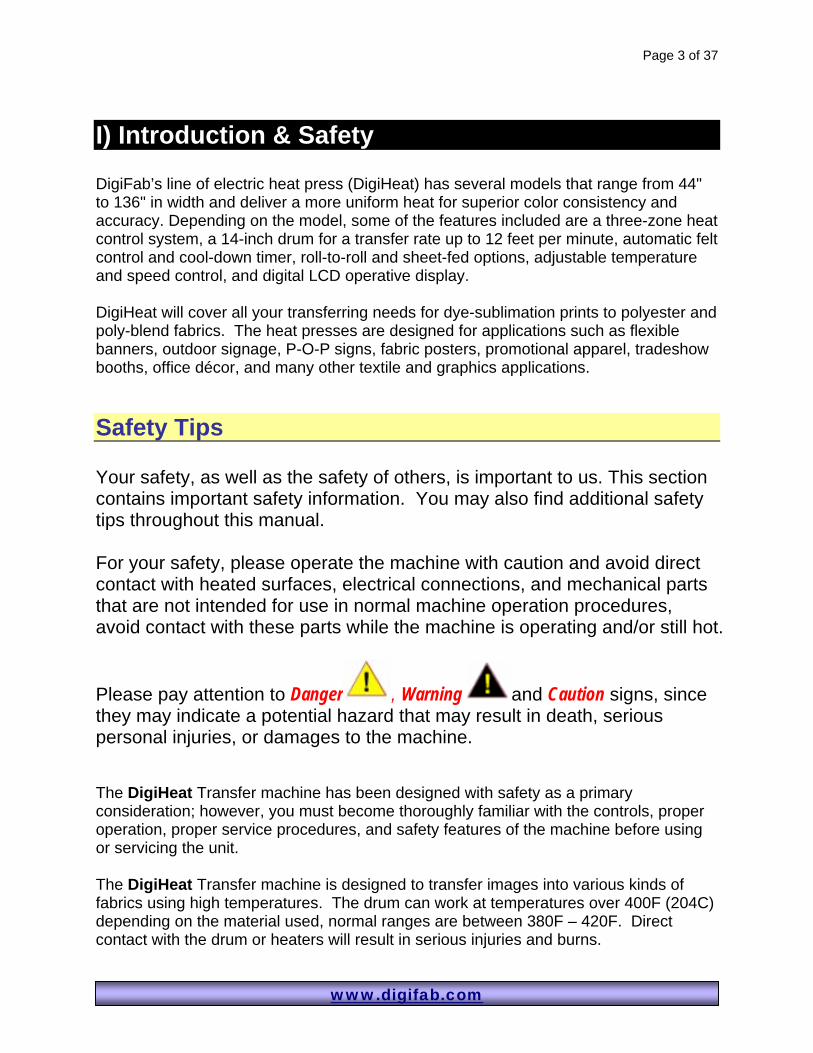
I) Introduction & Safety DigiFab’s line of electric heat press (DigiHeat) has several models that range from 44" to 136" in width and deliver a more uniform heat for superior color consistency and accuracy. Depending on the model, some of the features included are a three-zone heat control system, a 14-inch drum for a transfer rate up to 12 feet per minute, automatic felt control and cool-down timer, roll-to-roll and sheet-fed options, adjustable temperature and speed control, and digital LCD operative display. DigiHeat will cover all your transferring needs for dye-sublimation prints to polyester and poly-blend fabrics. The heat presses are designed for applications such as flexible banners, outdoor signage, P-O-P signs, fabric posters, promotional apparel, tradeshow booths, office décor, and many other textile and graphics applications. Safety Tips Your safety, as well as the safety of others, is important to us. This section contains important safety information. You may also find additional safety tips throughout this manual. For your safety, please operate the machine with caution and avoid direct contact with heated surfaces, electrical connections, and mechanical parts that are not intended for use in normal machine operation procedures, avoid contact with these parts while the machine is operating and/or still hot.
Please pay attention to Danger , Warning and Caution signs, since they may indicate a potential hazard that may result in death, serious personal injuries, or damages to the machine. The DigiHeat Transfer machine has been designed with safety as a primary consideration; however, you must become thoroughly familiar with the controls, proper operation, proper service procedures, and safety features of the machine before using or servicing the unit. The DigiHeat Transfer machine is designed to transfer images into various kinds of fabrics using high temperatures. The drum can work at temperatures over 400F (204C) depending on the material used, normal ranges are between 380F – 420F. Direct contact with the drum or heaters will result in serious injuries and burns.
Page 4 of 37
www.digifab.com
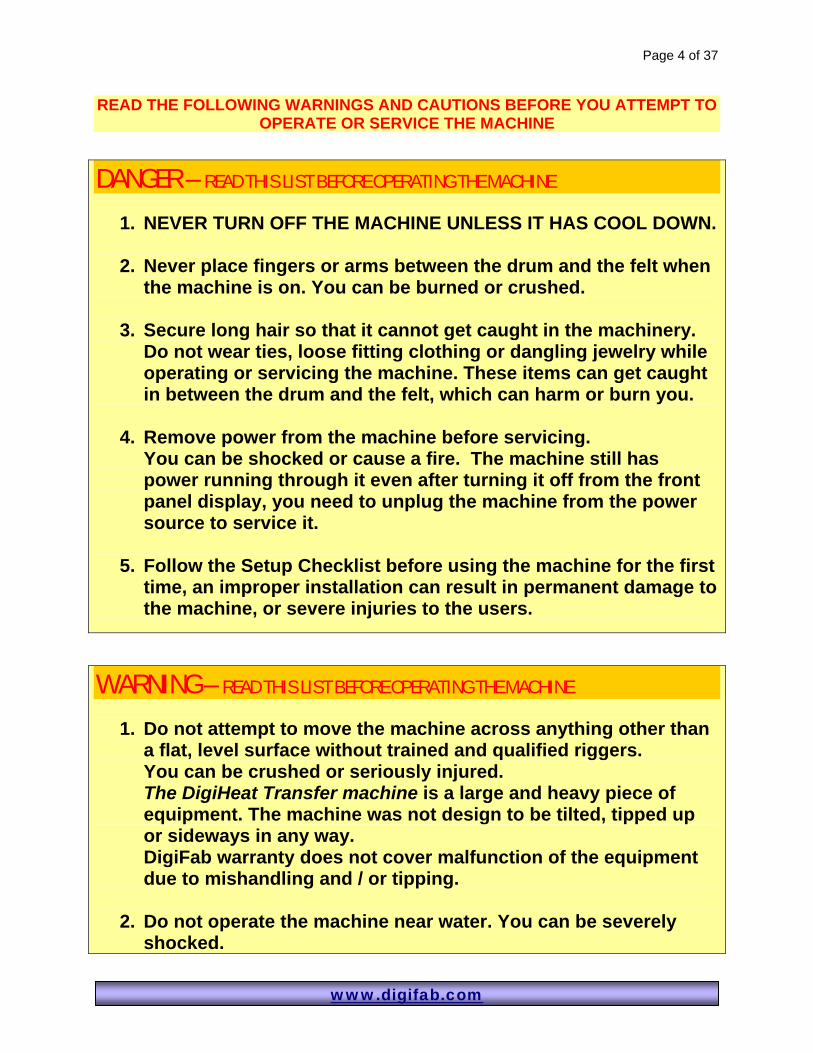
READ THE FOLLOWING WARNINGS AND CAUTIONS BEFORE YOU ATTEMPT TO OPERATE OR SERVICE THE MACHINE
DANGER – READ THIS LIST BEFORE OPERATING THE MACHINE 1. NEVER TURN OFF THE MACHINE UNLESS IT HAS COOL DOWN.
2. Never place fingers or arms between the drum and the felt when
the machine is on. You can be burned or crushed.
3. Secure long hair so that it cannot get caught in the machinery. Do not wear ties, loose fitting clothing or dangling jewelry while operating or servicing the machine. These items can get caught in between the drum and the felt, which can harm or burn you.
4. Remove power from the machine before servicing. You can be shocked or cause a fire. The machine still has power running through it even after turning it off from the front panel display, you need to unplug the machine from the power source to service it.
5. Follow the Setup Checklist before using the machine for the first time, an improper installation can result in permanent damage to the machine, or severe injuries to the users.
WARNING – READ THIS LIST BEFORE OPERATING THE MACHINE 1. Do not attempt to move the machine across anything other than
a flat, level surface without trained and qualified riggers. You can be crushed or seriously injured. The DigiHeat Transfer machine is a large and heavy piece of equipment. The machine was not design to be tilted, tipped up or sideways in any way. DigiFab warranty does not cover malfunction of the equipment due to mishandling and / or tipping.
2. Do not operate the machine near water. You can be severely shocked.
Page 5 of 37
www.digifab.com
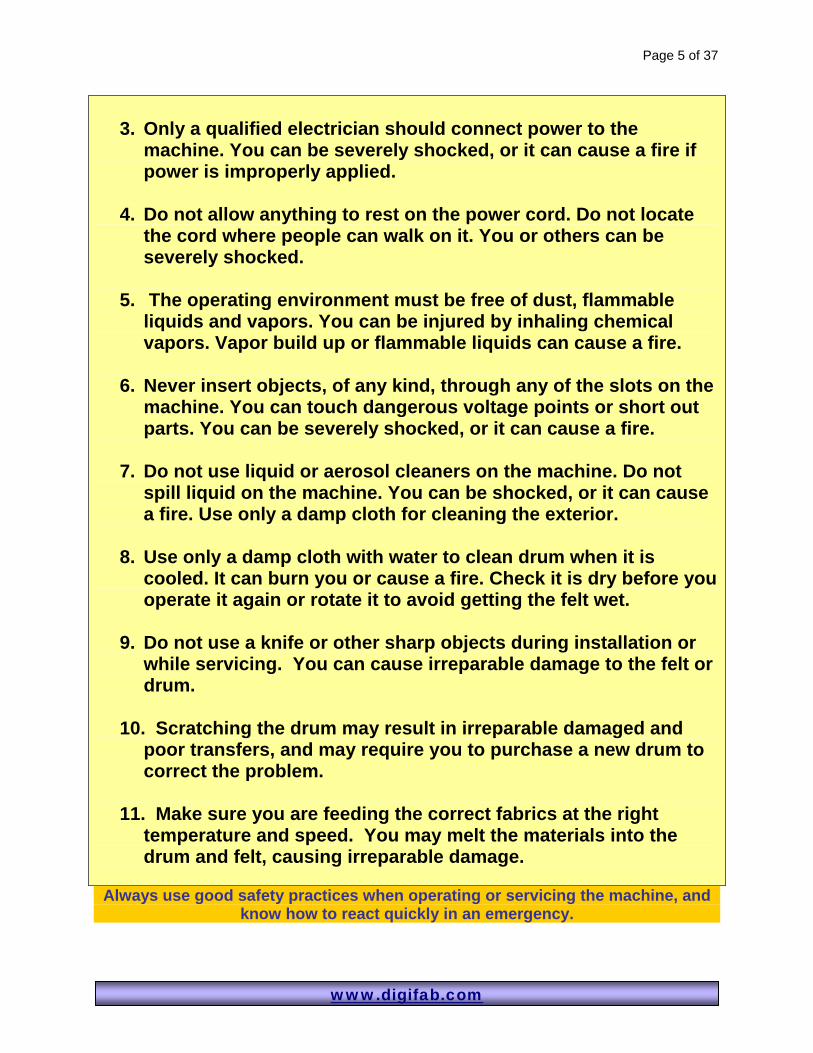
3. Only a qualified electrician should connect power to the
machine. You can be severely shocked, or it can cause a fire if power is improperly applied.
4. Do not allow anything to rest on the power cord. Do not locate the cord where people can walk on it. You or others can be severely shocked.
5. The operating environment must be free of dust, flammable liquids and vapors. You can be injured by inhaling chemical vapors. Vapor build up or flammable liquids can cause a fire.
6. Never insert objects, of any kind, through any of the slots on the machine. You can touch dangerous voltage points or short out parts. You can be severely shocked, or it can cause a fire.
7. Do not use liquid or aerosol cleaners on the machine. Do not spill liquid on the machine. You can be shocked, or it can cause a fire. Use only a damp cloth for cleaning the exterior.
8. Use only a damp cloth with water to clean drum when it is cooled. It can burn you or cause a fire. Check it is dry before you operate it again or rotate it to avoid getting the felt wet.
9. Do not use a knife or other sharp objects during installation or while servicing. You can cause irreparable damage to the felt or drum.
10. Scratching the drum may result in irreparable damaged and poor transfers, and may require you to purchase a new drum to correct the problem.
11. Make sure you are feeding the correct fabrics at the right temperature and speed. You may melt the materials into the drum and felt, causing irreparable damage.
Always use good safety practices when operating or servicing the machine, and
know how to react quickly in an emergency.
Page 6 of 37
www.digifab.com
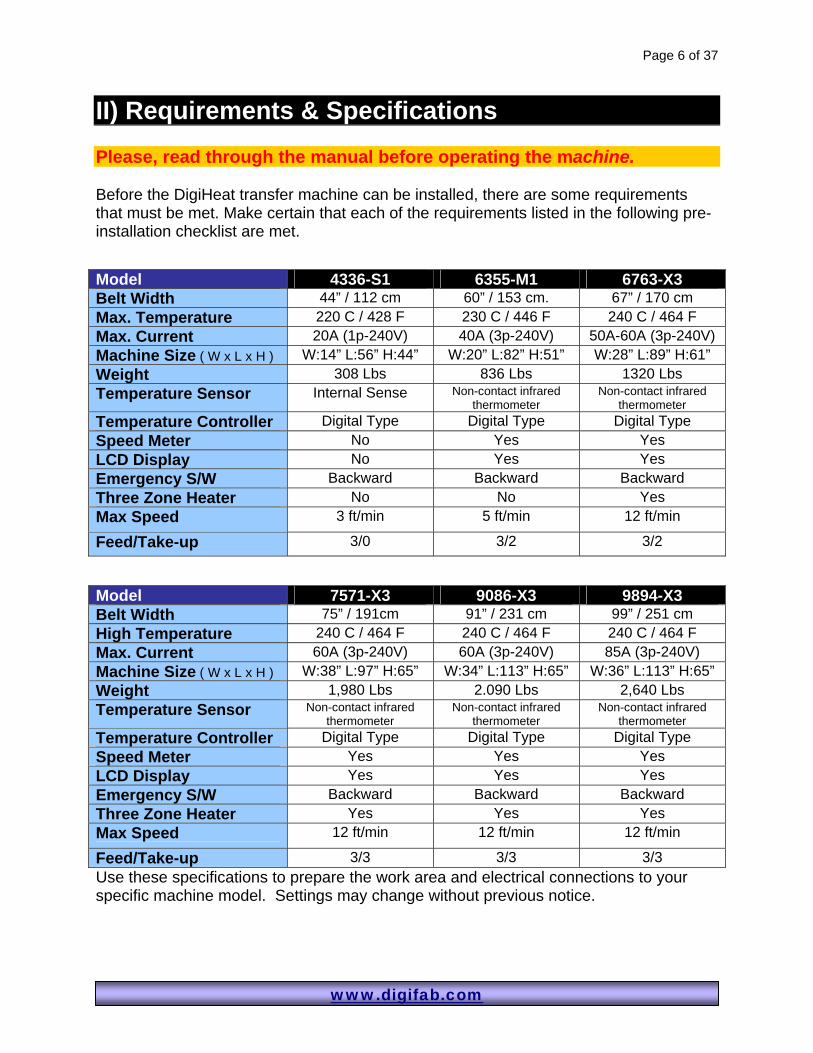
II) Requirements & Specifications Please, read through the manual before operating the machine. Before the DigiHeat transfer machine can be installed, there are some requirements that must be met. Make certain that each of the requirements listed in the following pre-installation checklist are met.
Model 4336-S1 6355-M1 6763-X3 Belt Width 44” / 112 cm 60” / 153 cm. 67” / 170 cm Max. Temperature 220 C / 428 F 230 C / 446 F 240 C / 464 F Max. Current 20A (1p-240V) 40A (3p-240V) 50A-60A (3p-240V) Machine Size ( W x L x H ) W:14” L:56” H:44” W:20” L:82” H:51” W:28” L:89” H:61” Weight 308 Lbs 836 Lbs 1320 Lbs Temperature Sensor Internal Sense Non-contact infrared
thermometer Non-contact infrared
thermometer Temperature Controller Digital Type Digital Type Digital Type Speed Meter No Yes Yes LCD Display No Yes Yes Emergency S/W Backward Backward Backward Three Zone Heater No No Yes Max Speed 3 ft/min 5 ft/min 12 ft/min
Feed/Take-up 3/0 3/2 3/2
Model 7571-X3 9086-X3 9894-X3 Belt Width 75” / 191cm 91” / 231 cm 99” / 251 cm High Temperature 240 C / 464 F 240 C / 464 F 240 C / 464 F Max. Current 60A (3p-240V) 60A (3p-240V) 85A (3p-240V) Machine Size ( W x L x H ) W:38” L:97” H:65” W:34” L:113” H:65” W:36” L:113” H:65” Weight 1,980 Lbs 2.090 Lbs 2,640 Lbs Temperature Sensor Non-contact infrared
thermometer Non-contact infrared
thermometer Non-contact infrared
thermometer Temperature Controller Digital Type Digital Type Digital Type Speed Meter Yes Yes Yes LCD Display Yes Yes Yes Emergency S/W Backward Backward Backward Three Zone Heater Yes Yes Yes Max Speed 12 ft/min 12 ft/min 12 ft/min
Feed/Take-up 3/3 3/3 3/3 Use these specifications to prepare the work area and electrical connections to your specific machine model. Settings may change without previous notice.

Page 7 of 37
www.digifab.com
III) Pre-Installation & Installation CAUTION: Failure to follow the pre-installation checklist can result in damage to the machine, electrical failure, or lower machine performance.
Pre Installation Check List • Are doorways and hallways wide enough for the machine to be moved to the
installation site?
• Is there ample room for the machine? A work area must be established that allows for operation in both the front and the rear of the machine and provides space for efficient material flow?
• Is the environment appropriate? The machine requires a clean, dust and vapor free environment to operate properly. It must not be located where there is air blowing directly on the machine. Provide environment that does not have major temperature and humidity fluctuations. The machine works at high temperatures, so be sure to check if your working space is large enough to avoid heating up excessively.
• Is the power supply sufficient and correct? Depending on machine models, they may support powers between 220 V – 240 V (some can be modified for 208V). Check the power connection in the back of your machine for the correct Voltage, Amp, and phase information.
• Has a certified electrician been contacted to both wire the machine and ensure that an adequate power supply is available with the appropriate capacity?
• Remember not to turn on power switches and NFB ( No Fuse Breakers ) on the machine until all conditions are tested.
Tools Most tools you may need during installation are already provided with the machine. But you may also find helpful to have the following tools at hand: a Volt-meter and an infrared thermometer gun. It will allow your electrician to check for the correct voltage inside the machine, and the thermometer will allow you to adjust for any temperature differences. We can provide you with thermometer information in case you need to buy one.
Page 8 of 37
www.digifab.com
WARNING 1. The operating environment must be free of dust, flammable liquids and
vapors. You can be injured by inhaling chemical vapors. Vapors build up or flammable liquids can cause a fire.
2. The machine is not designed for use in an industrial environment.
3. Do not locate the machine where air is blowing directly on the machine. The air flow can cool the drum unevenly and result in poor quality output.
4. Do not operate the machine if the power cord is damaged or frayed. You can be severely shocked, or it can cause a fire. Contact a qualified electrician to replace the cord immediately.
5. Do not allow anything to rest on the power cord. Do not locate the cord where people can walk on it. You or others can be severely shocked.
6. NEVER TURN OFF THE MACHINE UNLESS IT HAS COOL DOWN.
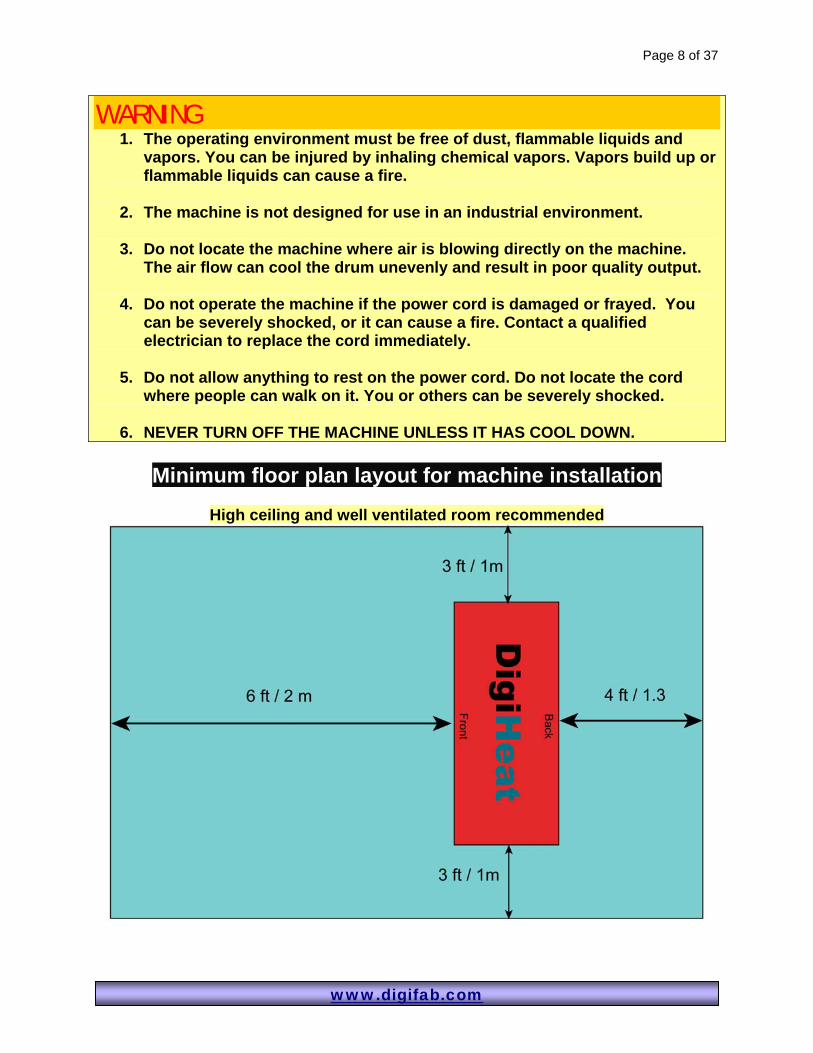
Minimum floor plan layout for machine installation
High ceiling and well ventilated room recommended
Page 9 of 37
www.digifab.com
Installation
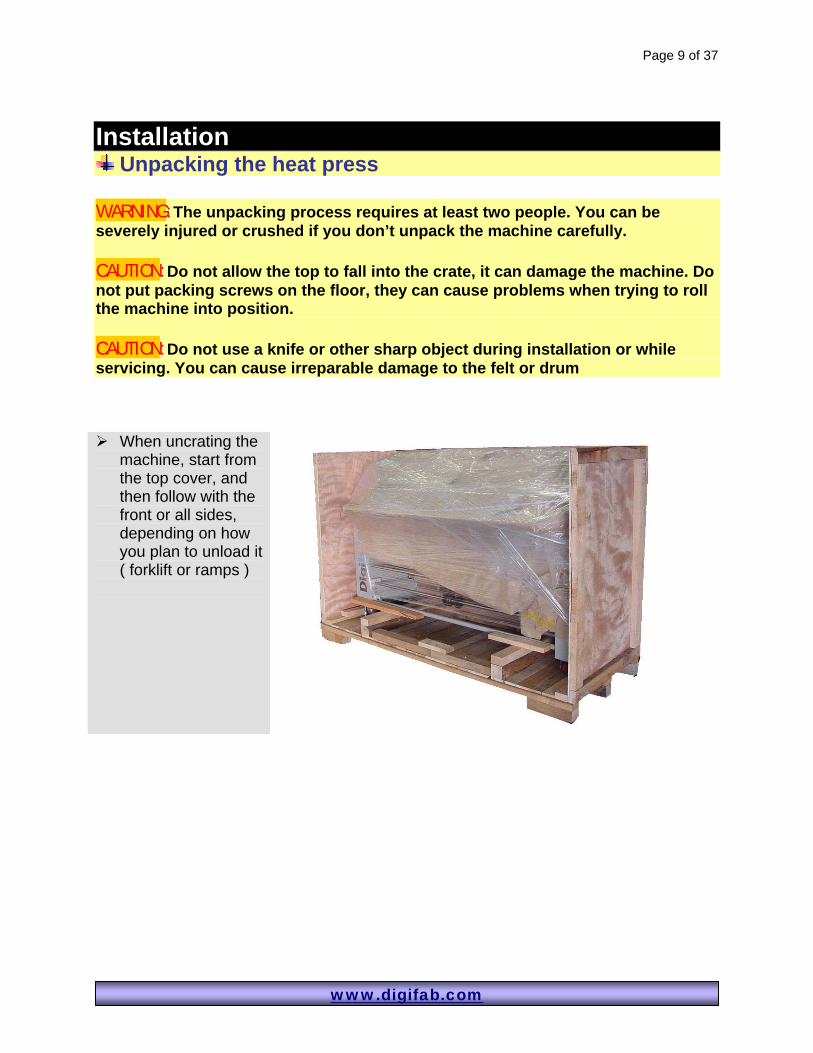
Unpacking the heat press WARNING: The unpacking process requires at least two people. You can be severely injured or crushed if you don’t unpack the machine carefully. CAUTION: Do not allow the top to fall into the crate, it can damage the machine. Do not put packing screws on the floor, they can cause problems when trying to roll the machine into position. CAUTION: Do not use a knife or other sharp object during installation or while servicing. You can cause irreparable damage to the felt or drum
When uncrating the machine, start from the top cover, and then follow with the front or all sides, depending on how you plan to unload it ( forklift or ramps )
Page 10 of 37
www.digifab.com
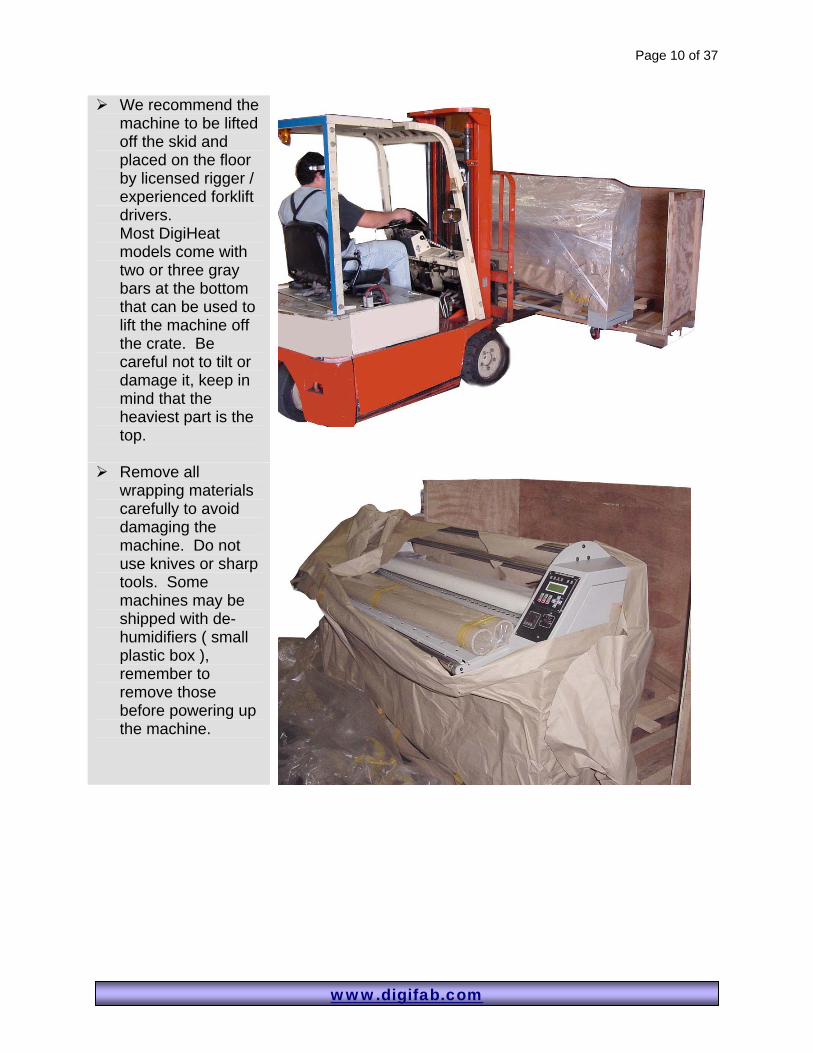
We recommend the machine to be lifted off the skid and placed on the floor by licensed rigger / experienced forklift drivers. Most DigiHeat models come with two or three gray bars at the bottom that can be used to lift the machine off the crate. Be careful not to tilt or damage it, keep in mind that the heaviest part is the top.
Remove all wrapping materials carefully to avoid damaging the machine. Do not use knives or sharp tools. Some machines may be shipped with de-humidifiers ( small plastic box ), remember to remove those before powering up the machine.
Page 11 of 37
www.digifab.com
Setup – After Unpacking
(1) Inspect the machine for any obvious shipping damage. (2) Inspect all the bolts and tighten any that were loosened during shipping. Call DigiFab for more details on bolt tightening. Do not touch the felt adjustment bolts and bars before talking to us first. (3) You can now raise the 4 legs of the machine using the metal plates provided, in order to level the machine properly. Leveling procedure explained shortly. (4) Power: Have a certified electrician wire the machine directly to a power source or get a male and female plug connection to connect the machine to the wall.
- Install an independent line for the machine, and confirm that is working at 220-240V 3 phase (7%), or the settings needed for your machine. Volts and Amps may vary depending on machine model and size - Install a 3 phase breaker NFB ( No Fuse Breaker ) of correct amperage on your electric panel. You may decide to use a male/female plug to connect your machine, or install a 3 phase disconnect switch with slow time-delay fuses. Amps may vary depending on machine model and size.
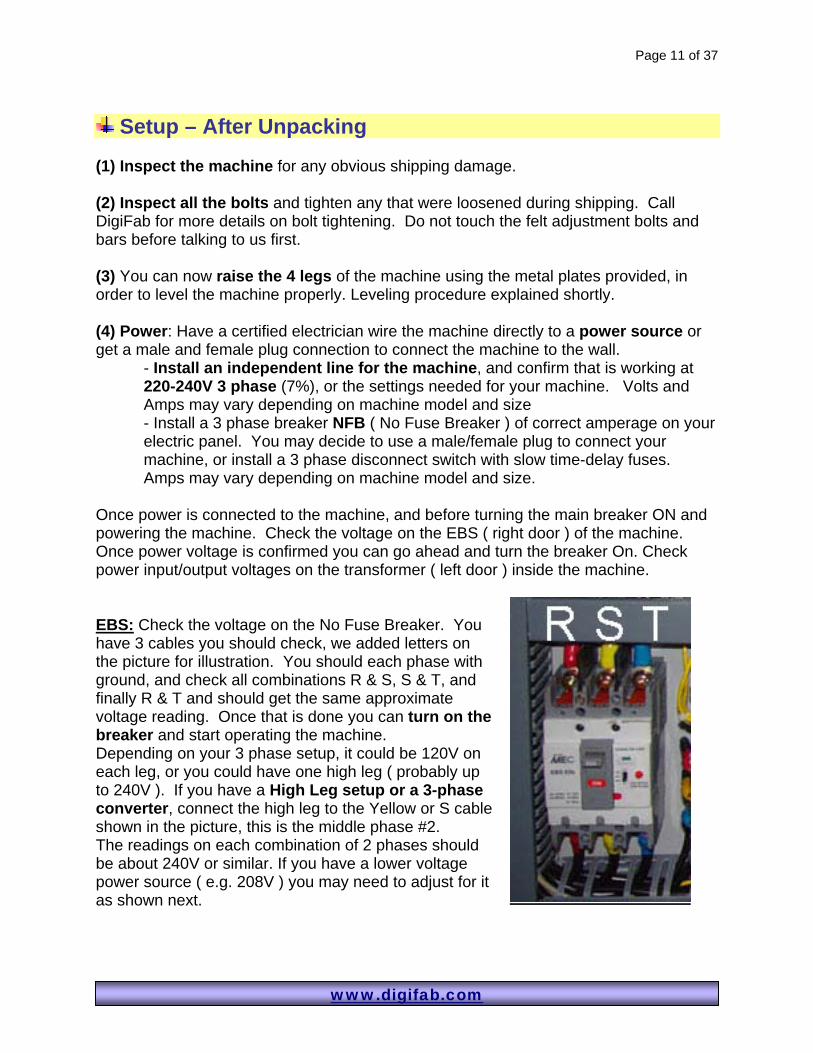
Once power is connected to the machine, and before turning the main breaker ON and powering the machine. Check the voltage on the EBS ( right door ) of the machine. Once power voltage is confirmed you can go ahead and turn the breaker On. Check power input/output voltages on the transformer ( left door ) inside the machine. EBS: Check the voltage on the No Fuse Breaker. You have 3 cables you should check, we added letters on the picture for illustration. You should each phase with ground, and check all combinations R & S, S & T, and finally R & T and should get the same approximate voltage reading. Once that is done you can turn on the breaker and start operating the machine. Depending on your 3 phase setup, it could be 120V on each leg, or you could have one high leg ( probably up to 240V ). If you have a High Leg setup or a 3-phase converter, connect the high leg to the Yellow or S cable shown in the picture, this is the middle phase #2. The readings on each combination of 2 phases should be about 240V or similar. If you have a lower voltage power source ( e.g. 208V ) you may need to adjust for it as shown next.
Page 12 of 37
www.digifab.com
Adjusting for 208V instead of 240V There are 2 main types of transformers that will come with your equipment depending on the model and type
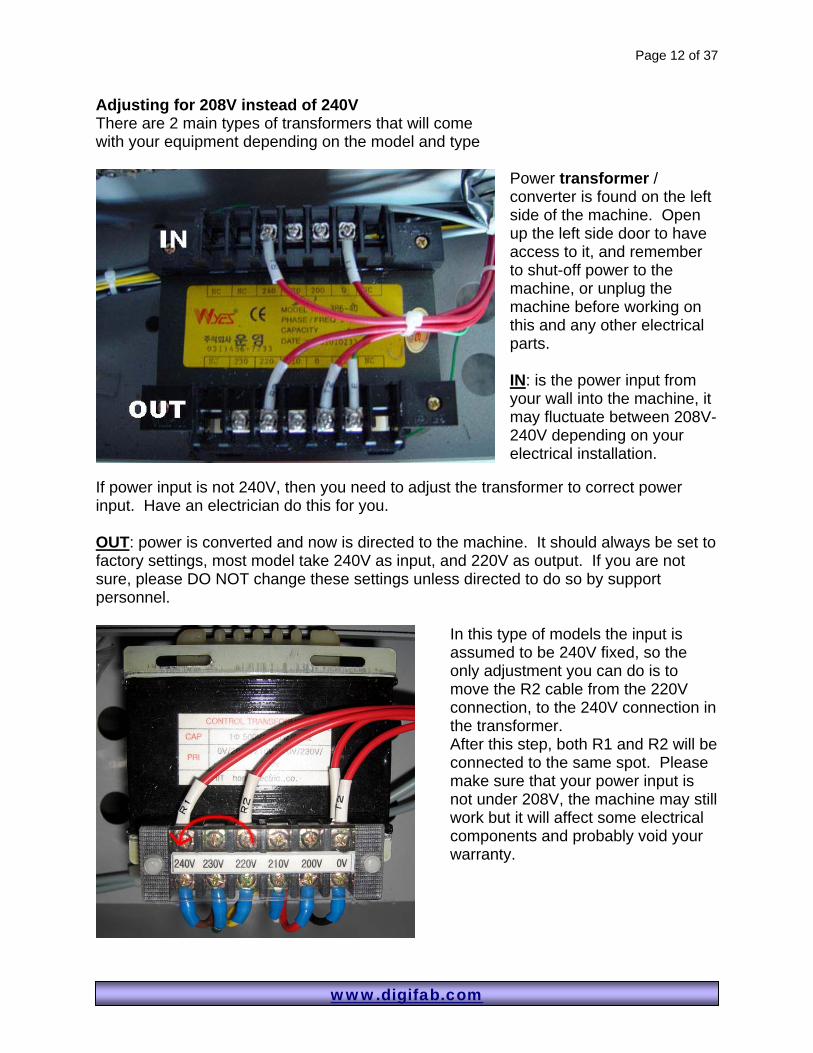
Power transformer / converter is found on the left side of the machine. Open up the left side door to have access to it, and remember to shut-off power to the machine, or unplug the machine before working on this and any other electrical parts. IN: is the power input from your wall into the machine, it may fluctuate between 208V-240V depending on your electrical installation.
If power input is not 240V, then you need to adjust the transformer to correct power input. Have an electrician do this for you. OUT: power is converted and now is directed to the machine. It should always be set to factory settings, most model take 240V as input, and 220V as output. If you are not sure, please DO NOT change these settings unless directed to do so by support personnel.
In this type of models the input is assumed to be 240V fixed, so the only adjustment you can do is to move the R2 cable from the 220V connection, to the 240V connection in the transformer. After this step, both R1 and R2 will be connected to the same spot. Please make sure that your power input is not under 208V, the machine may still work but it will affect some electrical components and probably void your warranty.
Page 13 of 37
www.digifab.com
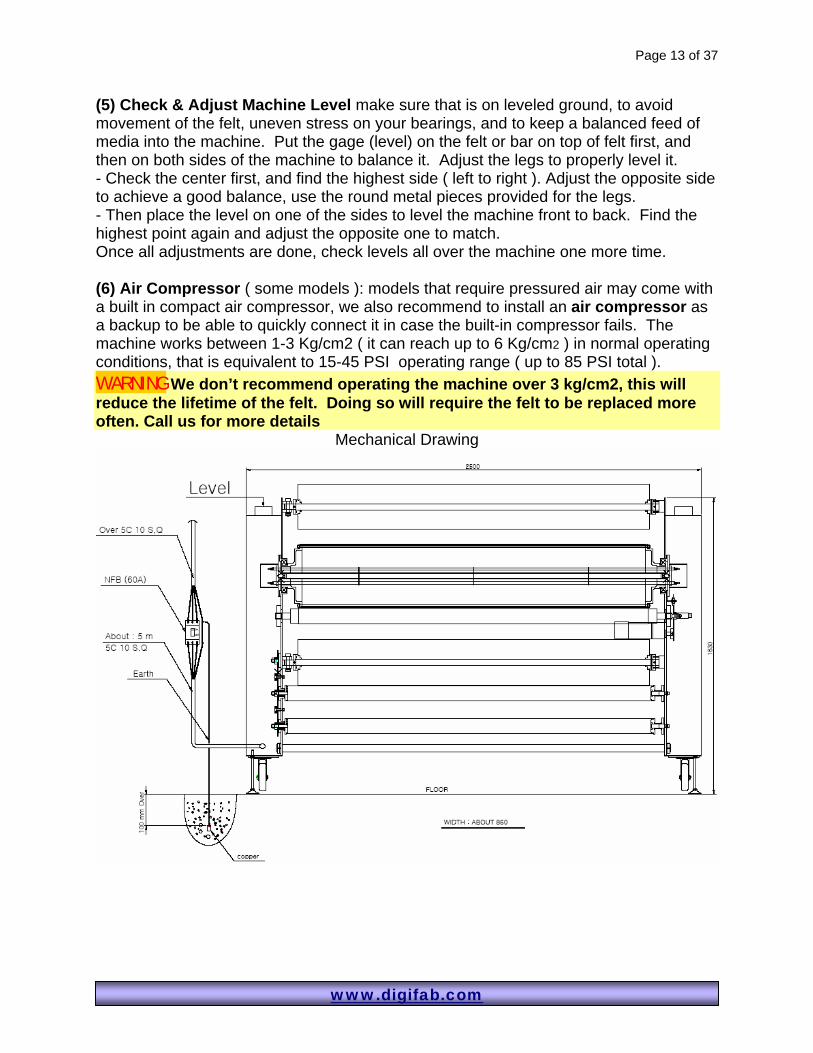
(5) Check & Adjust Machine Level make sure that is on leveled ground, to avoid movement of the felt, uneven stress on your bearings, and to keep a balanced feed of media into the machine. Put the gage (level) on the felt or bar on top of felt first, and then on both sides of the machine to balance it. Adjust the legs to properly level it. - Check the center first, and find the highest side ( left to right ). Adjust the opposite side to achieve a good balance, use the round metal pieces provided for the legs. - Then place the level on one of the sides to level the machine front to back. Find the highest point again and adjust the opposite one to match. Once all adjustments are done, check levels all over the machine one more time. (6) Air Compressor ( some models ): models that require pressured air may come with a built in compact air compressor, we also recommend to install an air compressor as a backup to be able to quickly connect it in case the built-in compressor fails. The machine works between 1-3 Kg/cm2 ( it can reach up to 6 Kg/cm2 ) in normal operating conditions, that is equivalent to 15-45 PSI operating range ( up to 85 PSI total ). WARNING We don’t recommend operating the machine over 3 kg/cm2, this will reduce the lifetime of the felt. Doing so will require the felt to be replaced more often. Call us for more details
Mechanical Drawing
Page 14 of 37
www.digifab.com
Startup – Starting the Machine The first time the machine is started, and every time it is serviced, you should use the following checklist to confirm that unit is operating properly and that all safety mechanisms are functioning.
Startup Checklist Start the machine and go through the following checklist.
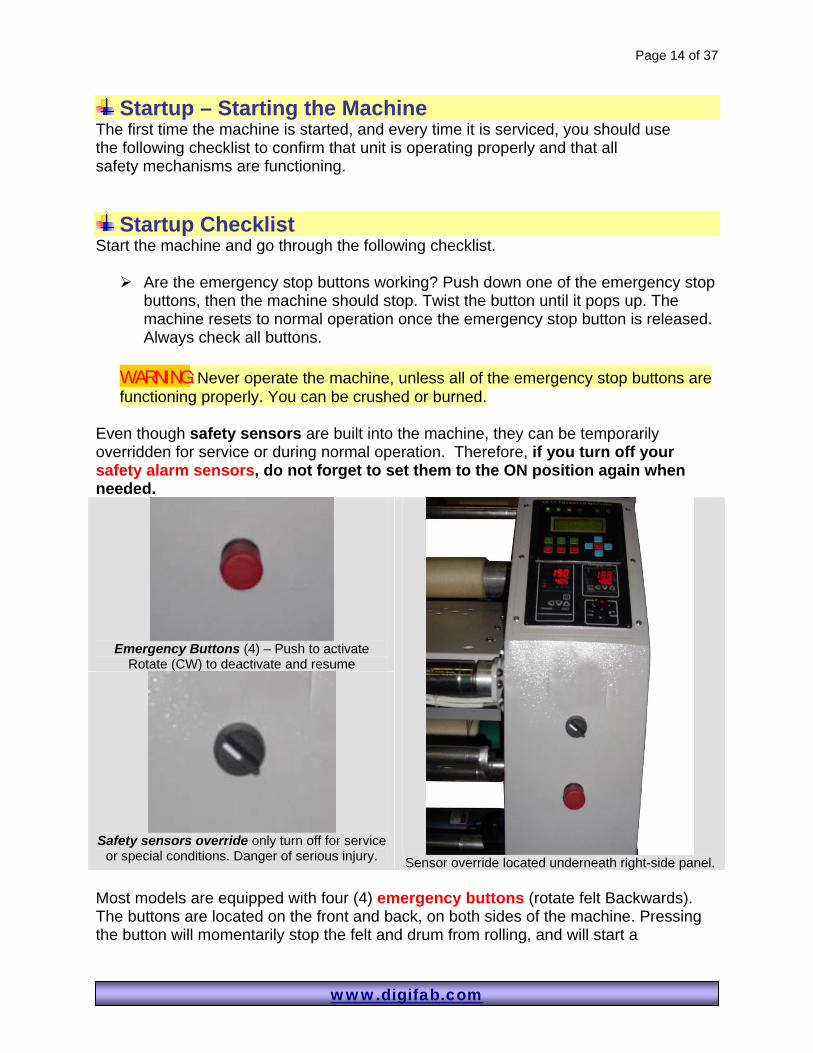
Are the emergency stop buttons working? Push down one of the emergency stop buttons, then the machine should stop. Twist the button until it pops up. The machine resets to normal operation once the emergency stop button is released. Always check all buttons.
WARNING: Never operate the machine, unless all of the emergency stop buttons are functioning properly. You can be crushed or burned.
Even though safety sensors are built into the machine, they can be temporarily overridden for service or during normal operation. Therefore, if you turn off your safety alarm sensors, do not forget to set them to the ON position again when needed.
Emergency Buttons (4) – Push to activate
Rotate (CW) to deactivate and resume
Safety sensors override only turn off for service
or special conditions. Danger of serious injury. Sensor override located underneath right-side panel.
Most models are equipped with four (4) emergency buttons (rotate felt Backwards). The buttons are located on the front and back, on both sides of the machine. Pressing the button will momentarily stop the felt and drum from rolling, and will start a
Page 15 of 37
www.digifab.com
backwards movement after a short pause. It will also cause the “Alarm” light to lit. To resume operation twist the emergency button until it pops up.
Despite the safety features built into the machine, extreme caution must be used when operating or servicing the unit
Remember to release all emergency buttons before taking an Alarm light or backwards rotating felt as an error.
Is the motor functioning? Test the motor at various speeds. Run the motor.
Is the heater working? Verify that heater controller heats the drum.
Now is time to double check all steps so far. The machine is in the correct environment, with the right power supply, and leveled. If so, we will continue with the next steps.
IV) Post-Installation & Operation
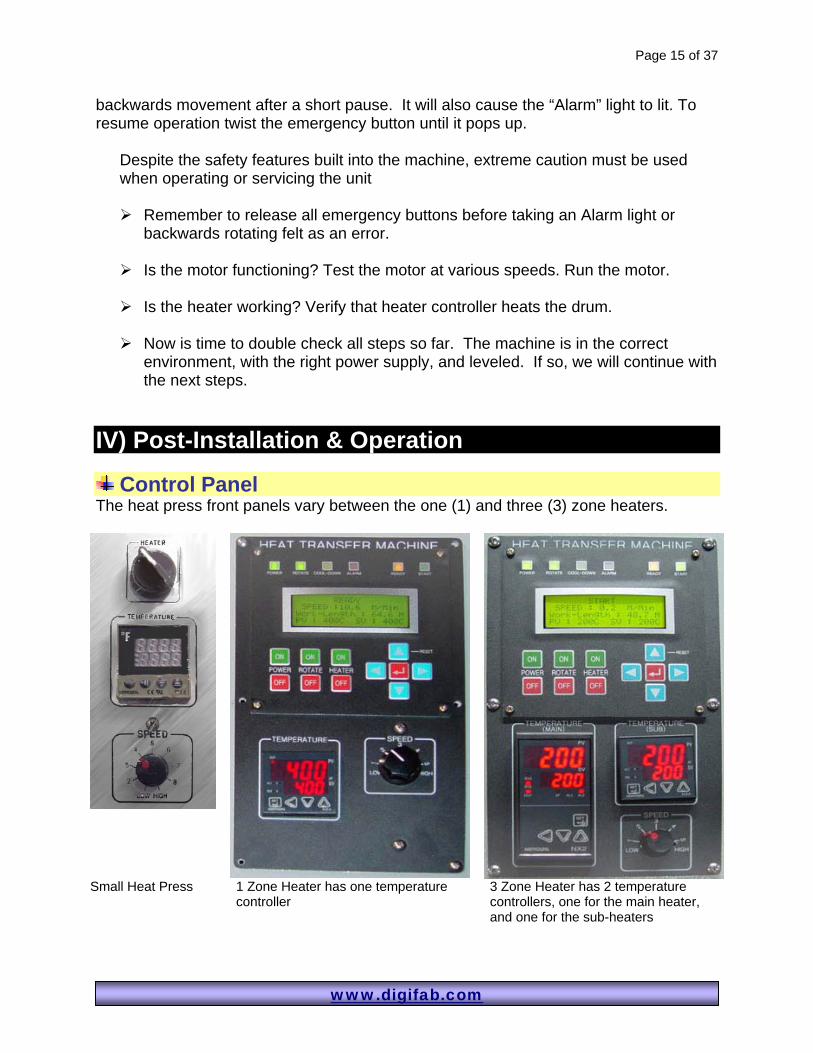
Control Panel The heat press front panels vary between the one (1) and three (3) zone heaters.
Small Heat Press 1 Zone Heater has one temperature controller
3 Zone Heater has 2 temperature controllers, one for the main heater, and one for the sub-heaters
Page 16 of 37
www.digifab.com
Control Name Description & Operation Power light Indicates the machine being On or Off Rotate light Indicates the felt rotating when On Cool-down light Indicates the machine set to cool down when On Alarm light Will lit when alarm photo sensors are activated or emergency button is pressed Ready light Indicates the machine is heating up Start light Indicates the machine has reached the set temperature and is ready to be used Power ON / OFF Click ON to turn On the machine, and OFF to turn it off.
Warning: Never turn off the machine if it hasn’t cool down under 200F / 183C Rotate ON / OFF Click ON to start rotating the felt and drum, OFF to stop
Warning: Never stop rotation if it hasn’t cool down under 200F / 183C Heater ON / OFF Click ON to turn heaters on and heat up the drum. Click OFF to stop the heater,
and start the cool down cycle Arrows Use the arrows to navigate through setup menu, where you can change the cool
down cycle, units, and other options. It is not recommended to make the cool down cycle a value under 60 minutes ( the default is 75 minutes )
Temperature Controller
Use this controller to set the desired temperature for the heater and sub-heaters (if applicable).
Speed Controller Use this knob to adjust the felt speed to desired value. Actual value is displayed on the Display
Display Displays current temperature, speed, and work length.
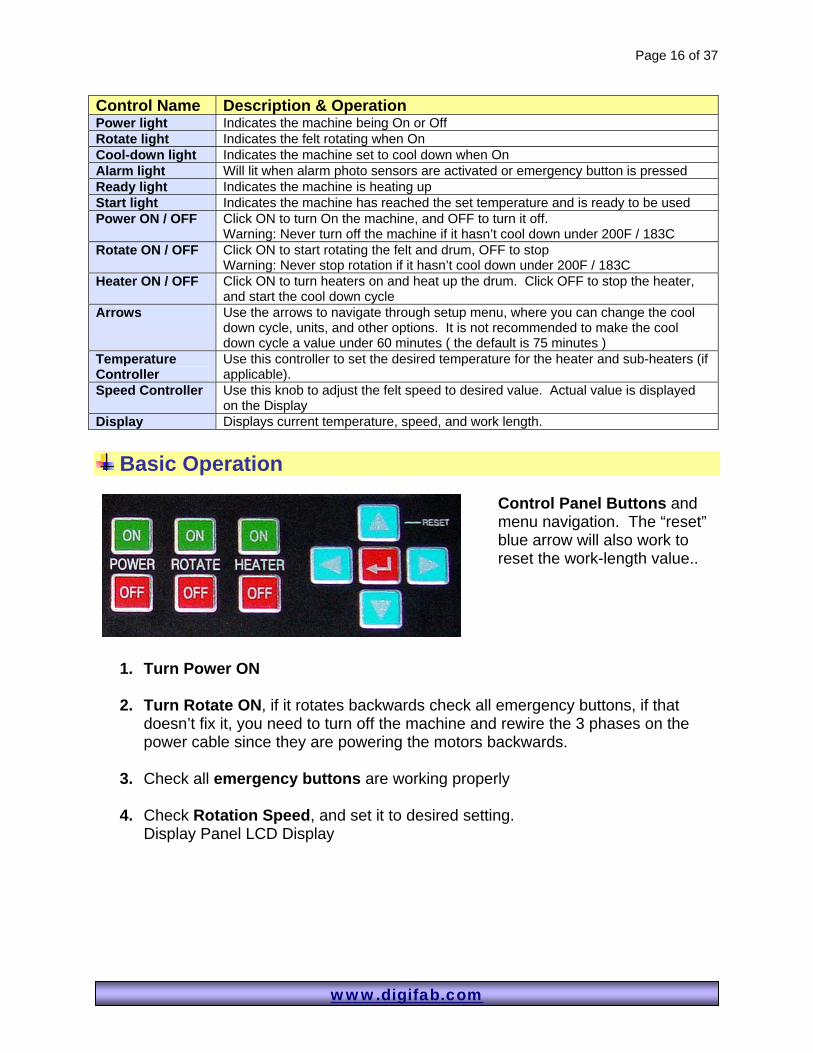
Basic Operation
Control Panel Buttons and menu navigation. The “reset” blue arrow will also work to reset the work-length value..
1. Turn Power ON
2. Turn Rotate ON, if it rotates backwards check all emergency buttons, if that doesn’t fix it, you need to turn off the machine and rewire the 3 phases on the power cable since they are powering the motors backwards.
3. Check all emergency buttons are working properly
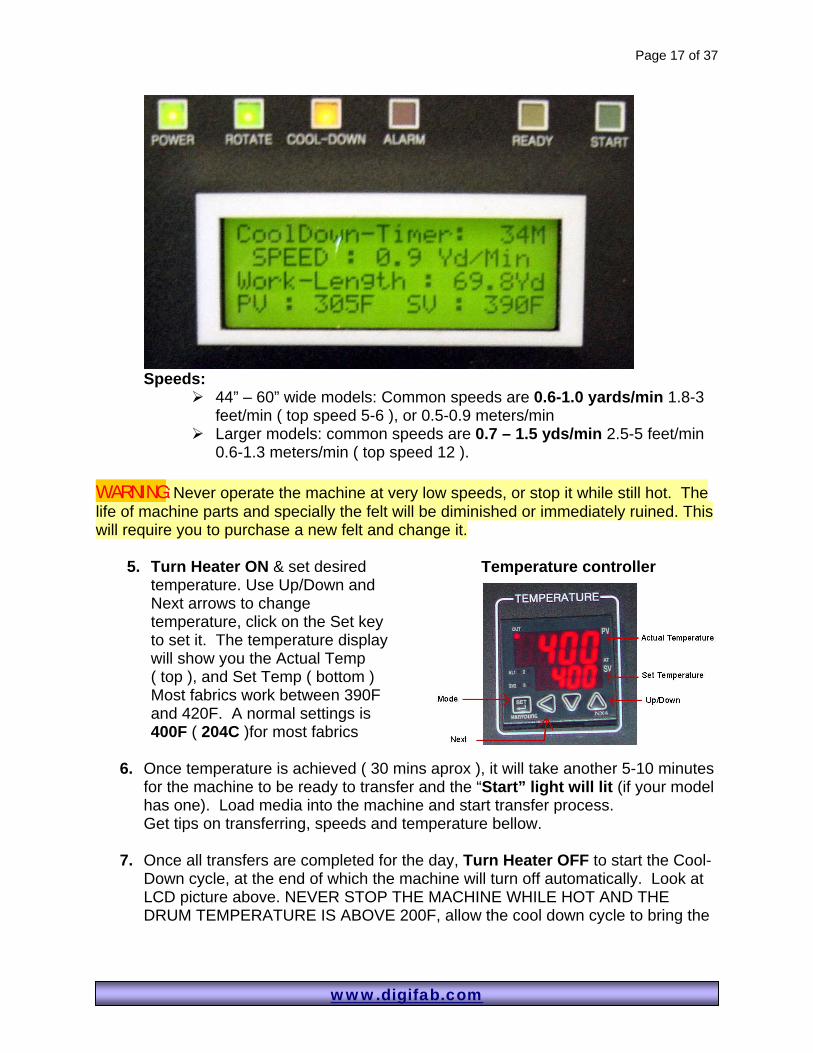
4. Check Rotation Speed, and set it to desired setting. Display Panel LCD Display
Page 17 of 37
www.digifab.com
Speeds:
44” – 60” wide models: Common speeds are 0.6-1.0 yards/min 1.8-3 feet/min ( top speed 5-6 ), or 0.5-0.9 meters/min
Larger models: common speeds are 0.7 – 1.5 yds/min 2.5-5 feet/min 0.6-1.3 meters/min ( top speed 12 ).
WARNING: Never operate the machine at very low speeds, or stop it while still hot. The life of machine parts and specially the felt will be diminished or immediately ruined. This will require you to purchase a new felt and change it.
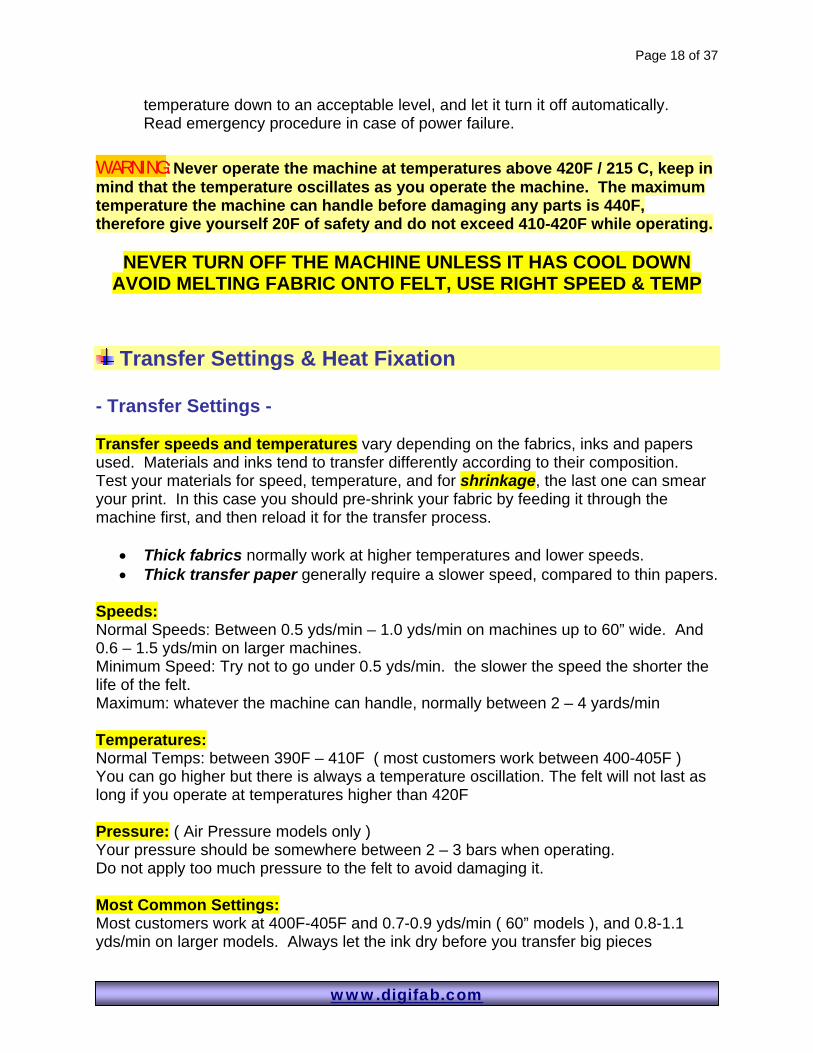
5. Turn Heater ON & set desired temperature. Use Up/Down and Next arrows to change temperature, click on the Set key to set it. The temperature display will show you the Actual Temp ( top ), and Set Temp ( bottom ) Most fabrics work between 390F and 420F. A normal settings is 400F ( 204C )for most fabrics
Temperature controller
6. Once temperature is achieved ( 30 mins aprox ), it will take another 5-10 minutes
for the machine to be ready to transfer and the “Start” light will lit (if your model has one). Load media into the machine and start transfer process. Get tips on transferring, speeds and temperature bellow.
7. Once all transfers are completed for the day, Turn Heater OFF to start the Cool-Down cycle, at the end of which the machine will turn off automatically. Look at LCD picture above. NEVER STOP THE MACHINE WHILE HOT AND THE DRUM TEMPERATURE IS ABOVE 200F, allow the cool down cycle to bring the
Page 18 of 37
www.digifab.com
temperature down to an acceptable level, and let it turn it off automatically. Read emergency procedure in case of power failure.
WARNING: Never operate the machine at temperatures above 420F / 215 C, keep in mind that the temperature oscillates as you operate the machine. The maximum temperature the machine can handle before damaging any parts is 440F, therefore give yourself 20F of safety and do not exceed 410-420F while operating.
NEVER TURN OFF THE MACHINE UNLESS IT HAS COOL DOWN
AVOID MELTING FABRIC ONTO FELT, USE RIGHT SPEED & TEMP
Transfer Settings & Heat Fixation - Transfer Settings - Transfer speeds and temperatures vary depending on the fabrics, inks and papers used. Materials and inks tend to transfer differently according to their composition. Test your materials for speed, temperature, and for shrinkage, the last one can smear your print. In this case you should pre-shrink your fabric by feeding it through the machine first, and then reload it for the transfer process.
• Thick fabrics normally work at higher temperatures and lower speeds. • Thick transfer paper generally require a slower speed, compared to thin papers.
Speeds: Normal Speeds: Between 0.5 yds/min – 1.0 yds/min on machines up to 60” wide. And 0.6 – 1.5 yds/min on larger machines. Minimum Speed: Try not to go under 0.5 yds/min. the slower the speed the shorter the life of the felt. Maximum: whatever the machine can handle, normally between 2 – 4 yards/min Temperatures: Normal Temps: between 390F – 410F ( most customers work between 400-405F ) You can go higher but there is always a temperature oscillation. The felt will not last as long if you operate at temperatures higher than 420F Pressure: ( Air Pressure models only ) Your pressure should be somewhere between 2 – 3 bars when operating. Do not apply too much pressure to the felt to avoid damaging it. Most Common Settings: Most customers work at 400F-405F and 0.7-0.9 yds/min ( 60” models ), and 0.8-1.1 yds/min on larger models. Always let the ink dry before you transfer big pieces
Page 19 of 37
www.digifab.com
Test your transfer speeds and temperatures use several print outs of the same pattern, and test at different combinations of speed and temperature settings. You could do test at different combinations of temperatures 395F – 400F – 405F and speeds 0.6 yds/min - 0.9 yds/min - 1.2 yds/min. Slow speeds at high temperatures will help the ink penetrate further into the fabric, giving you longer outdoor durability but duller colors. A faster or cooler transfer settings may give you brighter colors that stay more on the surface of the fabric ( shorter durability ) Once you reach the peak point in saturation for a specific fabric, any extra time in the press will give you more durability. So keep in mind the kind of transfer or application you need. Although you may be tempted to use the brightest output, keep the following in mind
• Look for smearing, ghosting, signs of rubbing of ink on edges • Although one of the settings may not be as bright, you are looking for a good
compromise in which the colors are decent, and you have no transfer issues • Once you found the best setting, you can use that as you initial setting. You may
find many fabrics work differently when transferring big pieces. You may need to slow down and increase the temperature by a few degrees
- Curing & Heat Fixation of Pigments & Disperse - The DigiHeat unit can be used to cure some fabrics printed with pigment or disperse inks. The ability to reach high temperatures and work under pressure ( between drum and felt ), will allow you to fixate or cure these fabrics faster than conventional steaming methods. Disperse:
- Polyester fabrics can be directly printed with Disperse / Sublimation inks if they are properly prepared. Since they already have the ink on them, the speed of the drum can be higher.
- General settings: would be the same temperature range as transferring ( 395F to 410F ). But speeds will be higher 5-9 feet / min. You should run test previous to production runs
Pigments: - Cotton fabrics and cotton blends can be printed with pigment inks, which
can also be cured dry heat and pressure. Keep in mind cottons may turn yellow at high temperatures, so you should test this before you do any production runs.
- General settings: temperatures are normally between 300F – 350F, and speeds tend to be higher too. Settings for cotton vary more than polyesters, due to differences in fabric, coatings, and inks. You need to run your own test for heat setting and wash-ability before production.
Page 20 of 37
www.digifab.com
NYLON WARNING: It has been the case in the past that users confuse Nylon-based fabrics, with their Polyester equivalent. Polyester takes more heat and can run at lower speeds, but Nylon will melt most of the time at 400F and/or low speeds. If you need to heat set nylon for any reason, follow this steps:
- Always use tissue paper - Never run it at high temperatures ( 360F max ) - Run it at high speed ( most users run it at max speed )
IF YOU MELT MATERIAL ON THE HEAT PRESS: you may be able to clean a small piece after opening the whole machine, partially removing the felt, and heating it for several hours as you clean the drum. Big pieces or yardage of melted material is almost impossible to clean. It will stick to the drum, remove its coating, and also glue itself to the felt. The only way to fix this is to change all the drum components and the felt.
Loading Fabric & Paper - Diagram & Tips
You can choose to load the fabric and printed paper in two ways. o Loading Method # 1: ( most commonly used )
Load Paper roll on top front roller with printed side outside and facing up as you lifted towards the feeding plate. ( This will insure the back of the paper touches the drum surface and printed side faces towards the felt )
Load Fabric on bottom front roller with its face or transfer side facing down. This will insure the print / face side of the fabric is facing down towards the printed side of the paper. The fabric will go between the printed paper and the felt and/or tissue paper if loaded.
o Loading Method # 2: exact opposite of Type 1 as shown on picture bellow Load Paper on bottom front roller with printed side facing down. Back
of paper will be against felt / tissue paper. Face will be facing down towards the drum and fabric.
Load Fabric on front top roller with face facing up. Back of fabric will be against the drum surface.
Type 1 is the most commonly used since the paper has direct contact with the drum, and this seems to insure a faster heat up of the ink into gas, and may decrease stiffness in some sensitive fabrics. Type 2 is used to avoid direct transfer of ink into the drum if the fabric or paper moves. It is more commonly used when transferring cut pieces. It also provides more traction since the smooth surface of the paper is not pressed against the smooth surface of the drum. Choose the one that works best for your application and gives you the best quality transfer.
The tissue paper is always loaded in roller located at the top of the machine. And it is used to protect the felt from ink and other chemicals. The build up of ink and chemicals on the felt will result on a shorter lifetime. If you do not care for the felt you may end up replacing it sooner than needed due to shrinkage or
Page 21 of 37
www.digifab.com
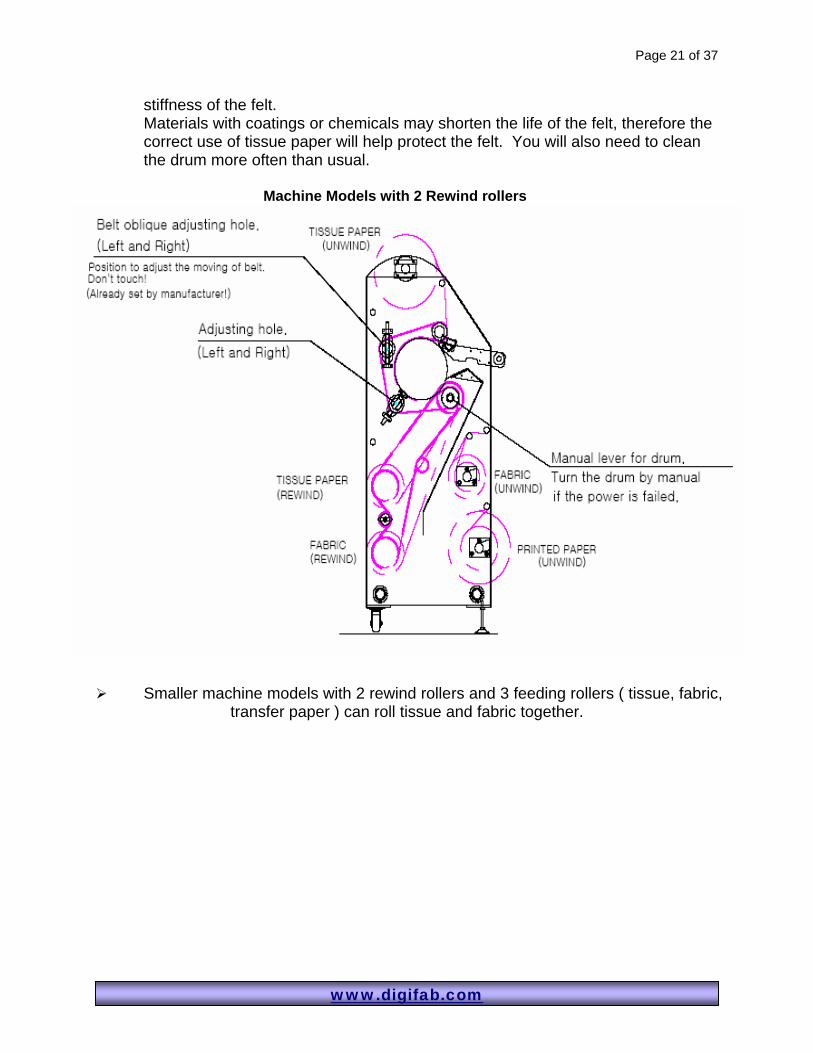
stiffness of the felt. Materials with coatings or chemicals may shorten the life of the felt, therefore the correct use of tissue paper will help protect the felt. You will also need to clean the drum more often than usual.
Machine Models with 2 Rewind rollers
Smaller machine models with 2 rewind rollers and 3 feeding rollers ( tissue, fabric, transfer paper ) can roll tissue and fabric together.
Page 22 of 37
www.digifab.com
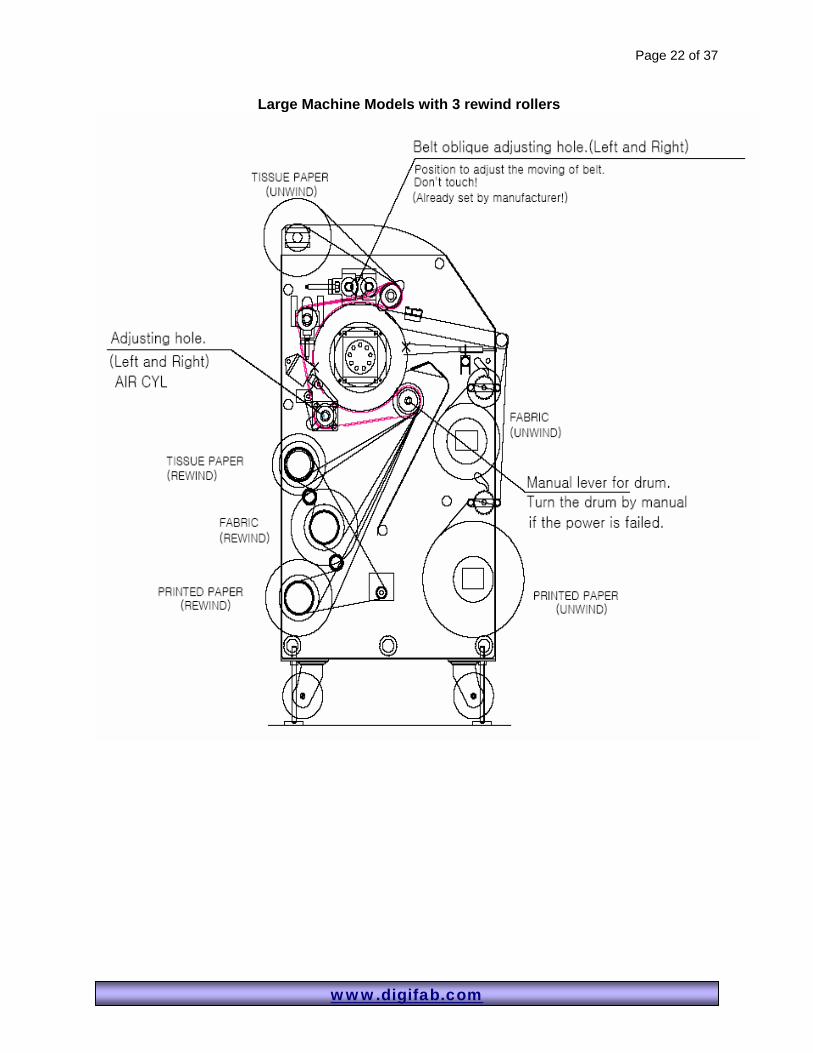
Large Machine Models with 3 rewind rollers
Page 23 of 37
www.digifab.com
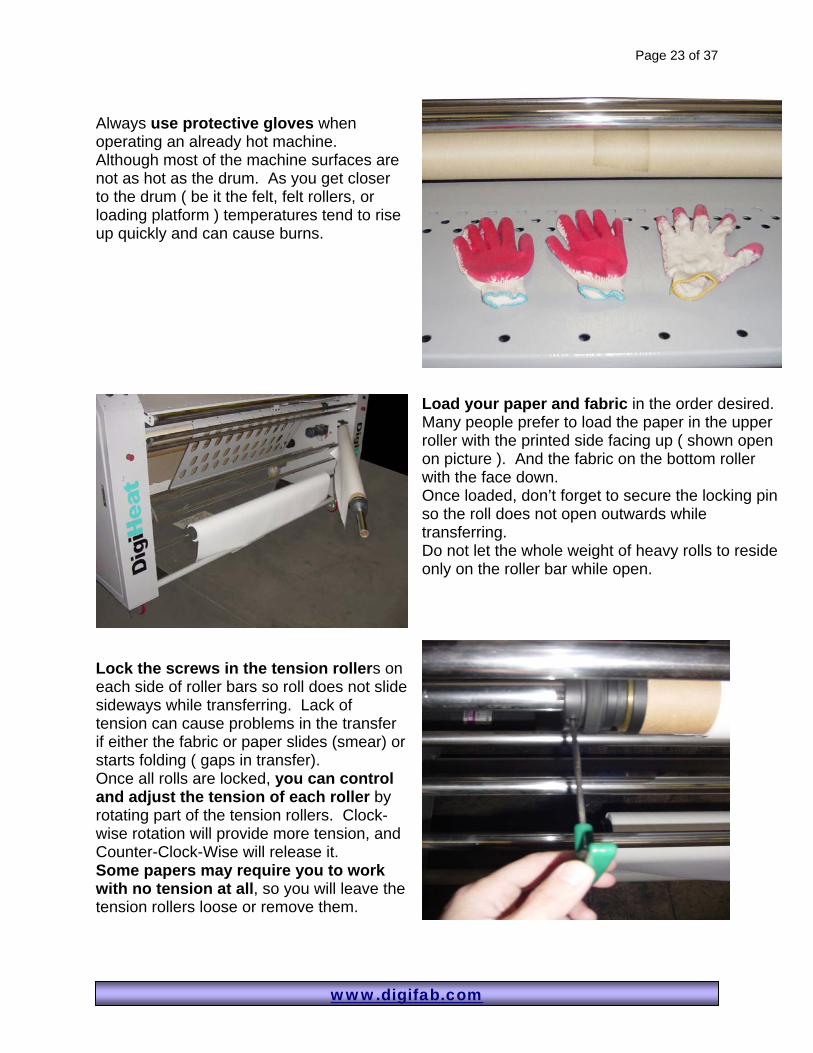
Always use protective gloves when operating an already hot machine. Although most of the machine surfaces are not as hot as the drum. As you get closer to the drum ( be it the felt, felt rollers, or loading platform ) temperatures tend to rise up quickly and can cause burns.
Load your paper and fabric in the order desired. Many people prefer to load the paper in the upper roller with the printed side facing up ( shown open on picture ). And the fabric on the bottom roller with the face down. Once loaded, don’t forget to secure the locking pin so the roll does not open outwards while transferring. Do not let the whole weight of heavy rolls to reside only on the roller bar while open.
Lock the screws in the tension rollers on each side of roller bars so roll does not slide sideways while transferring. Lack of tension can cause problems in the transfer if either the fabric or paper slides (smear) or starts folding ( gaps in transfer). Once all rolls are locked, you can control and adjust the tension of each roller by rotating part of the tension rollers. Clock-wise rotation will provide more tension, and Counter-Clock-Wise will release it. Some papers may require you to work with no tension at all, so you will leave the tension rollers loose or remove them.

Page 24 of 37
www.digifab.com
Some models have rotating bars to provide extra tension or evenness in the feeding of the media. Once you put the media through it, you can slightly rotate it to a certain position, and a locking arm will keep it from rolling back. You can load the media in an S shape form. Start taking the media from the roll bellow from the back, go in and down through the middle, and the back out and up through the front. Thus, the media still goes up and faces the same way, but now has the help of these rotating bars to achieve a more even feeding.
Felt Tension Control / Felt Position & Adjustment
AUTOMATIC: use knobs to adjust left and right side tension of felt (uses compressed air). Normal working conditions are of values between 2-3, higher values will work but will stretch your felt faster, therefore reducing its lifetime.
MANUAL: felt tension is adjusted on both sides of the machine ( open side doors ). Use provided wrench to adjust it ( bottom arrow on picture )
WARNING: Do not try to adjust any other bolts since you can loose the alignment of the belt. Only the shown controls are intended for felt tension adjustment. Felt tension will affect the output and the alignment of the felt to the drum. If after adjusting pressure you still experience problems with the felt, please contact DigiFab directly for support.
Page 25 of 37
www.digifab.com
WARNING: Do Not apply too much pressure too fast to the felt. This may cause the felt to overstretch, or may even brake the internal mesh of the felt. This kind of damage is unrecoverable, and will require changing the felt. As a General Rule:
- For small adjustments ( felt moved 1 or 2 inches either way ) start with 2 full turns of the adjustment screws only ( increase on one side and decrease on the other if necessary ).
- Unless the felt has moved all the way over to the side walls of the heat press ( which will damage the felt ), you should perform the adjustments at working temperature ( about 400 F ), since the shape of the machine changes when is cold and hot. It is normal for the felt to move during cool down and heat up cycles since metal expands and fibers stiffen with heat, which changes the tension on the felt, and thus the movement.
- The felt moves very slowly, it may take 20 minutes or more for you to see any changes in the position of the felt.
- In models with Air compressors: Never go 1 bar over whatever the current pressure is. A new heat press is normally set to use 2 bars of air pressure, so do not go over 3 in this case. If your machine had some use already, and has been working at a higher pressure, e.g., 3 bars, then do not go over 4 bars of pressure.
- In models with manual adjustment: never go over 1 point over the current
adjustment. One point is about a movement of ½ inch of the roller, although it seems small, this is a very big adjustment in pressure.
- Never go over 3 bars on new heat presses, this will brake your belt
- If you are not sure, call support for assistance In case of Manual adjustment type – DigiHeat 6763 If you have an Air and Manual adjustment type machine – i.e. DigiHeat 7571 : The 72” Heat press comes with air pressure adjustment knobs or gages to adjust the tension roller. In case the adjustment is minimal on the felt, you can first try to adjust the position or movement by increasing and/or decrease pressure using these knobs. Otherwise follow bellow outlined procedures. If the felt moves to the right, that means there is more pressure on the left, and less on the right. This is adjusted by either increasing the right side pressure, decreasing the left side pressure, or both. In the following steps, we will refer to Right Side as Panel Side, and Left Side as Far Side, and vice versa.
Page 26 of 37
www.digifab.com
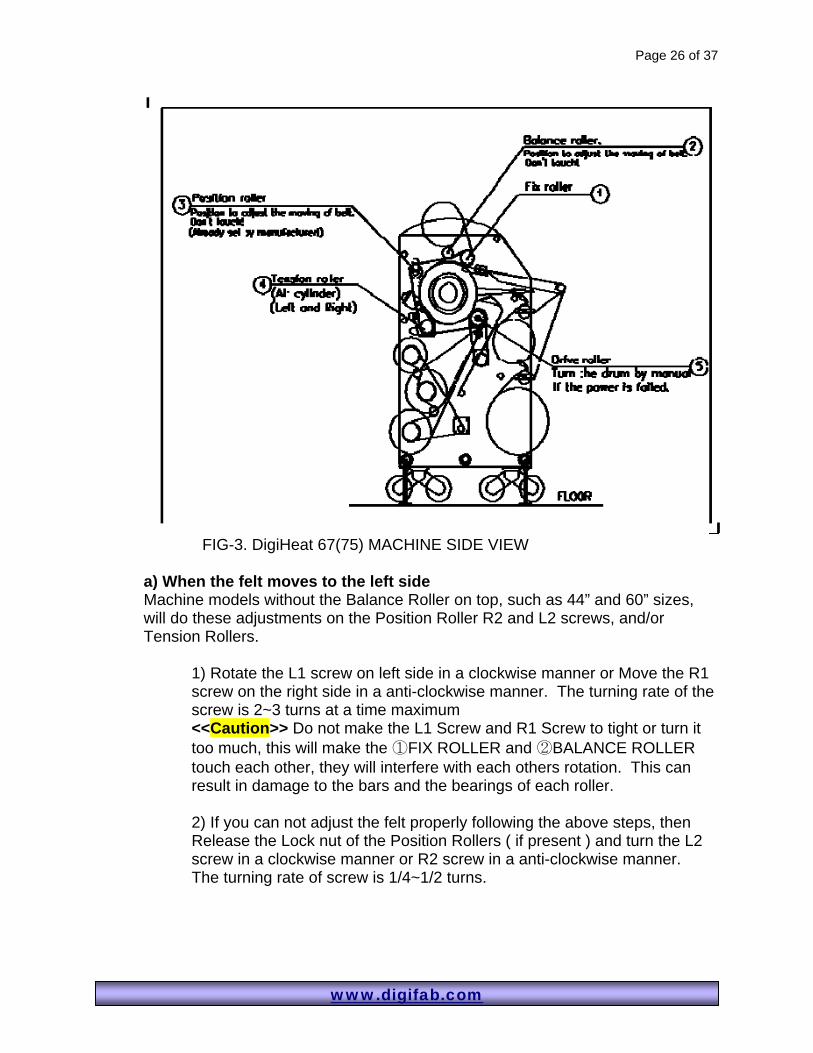
FIG-3. DigiHeat 67(75) MACHINE SIDE VIEW
a) When the felt moves to the left side Machine models without the Balance Roller on top, such as 44” and 60” sizes, will do these adjustments on the Position Roller R2 and L2 screws, and/or Tension Rollers.
1) Rotate the L1 screw on left side in a clockwise manner or Move the R1 screw on the right side in a anti-clockwise manner. The turning rate of the screw is 2~3 turns at a time maximum <<Caution>> Do not make the L1 Screw and R1 Screw to tight or turn it too much, this will make the ①FIX ROLLER and ②BALANCE ROLLER touch each other, they will interfere with each others rotation. This can result in damage to the bars and the bearings of each roller. 2) If you can not adjust the felt properly following the above steps, then Release the Lock nut of the Position Rollers ( if present ) and turn the L2 screw in a clockwise manner or R2 screw in a anti-clockwise manner. The turning rate of screw is 1/4~1/2 turns.
Page 27 of 37
www.digifab.com
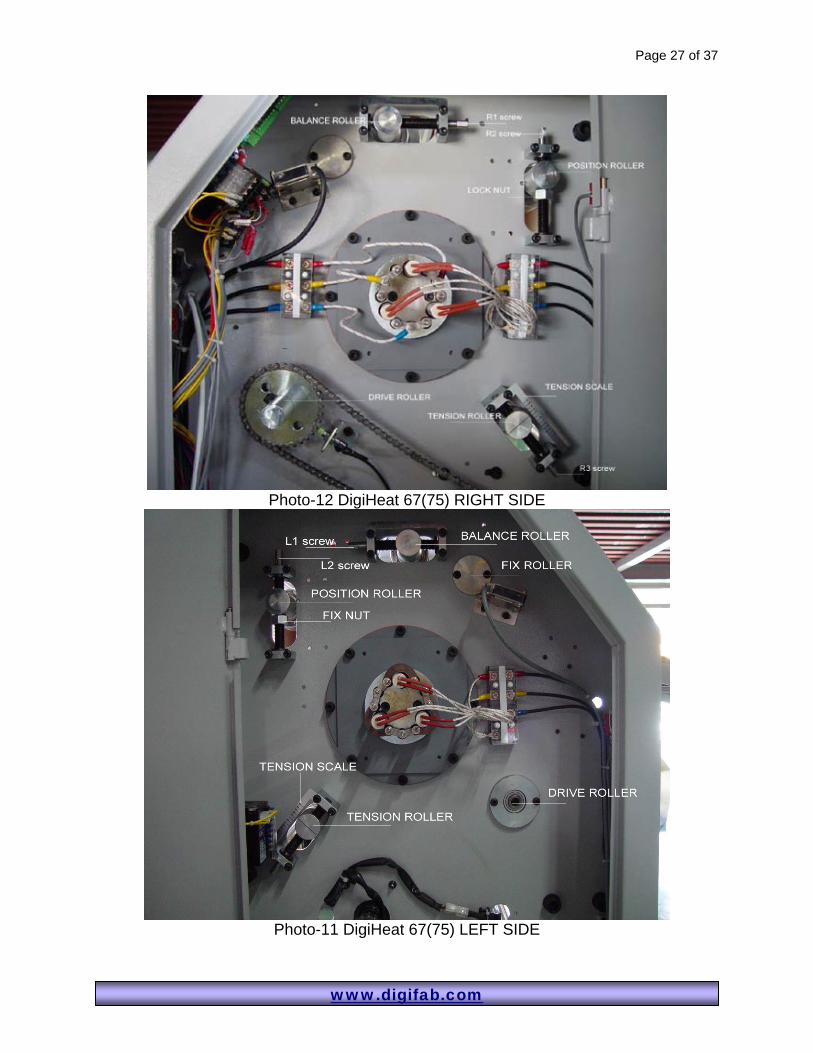
Photo-12 DigiHeat 67(75) RIGHT SIDE
Photo-11 DigiHeat 67(75) LEFT SIDE
Page 28 of 37
www.digifab.com
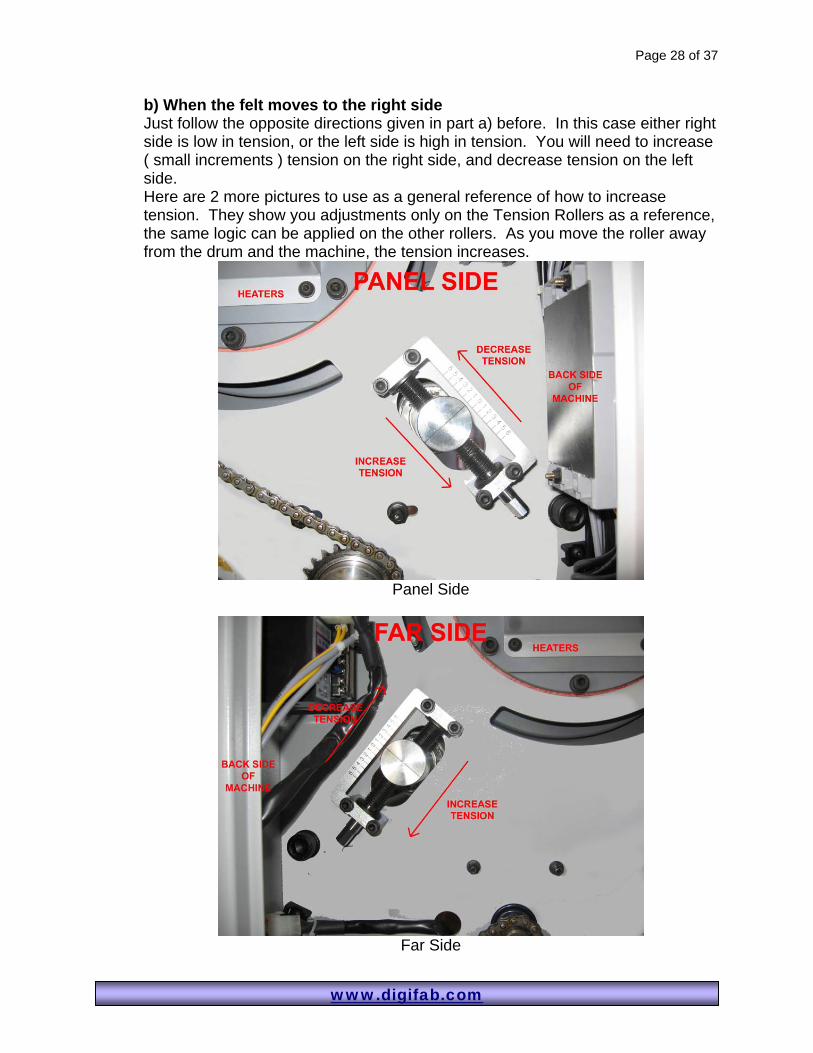
b) When the felt moves to the right side Just follow the opposite directions given in part a) before. In this case either right side is low in tension, or the left side is high in tension. You will need to increase ( small increments ) tension on the right side, and decrease tension on the left side. Here are 2 more pictures to use as a general reference of how to increase tension. They show you adjustments only on the Tension Rollers as a reference, the same logic can be applied on the other rollers. As you move the roller away from the drum and the machine, the tension increases.
Panel Side
Far Side
Page 29 of 37
www.digifab.com
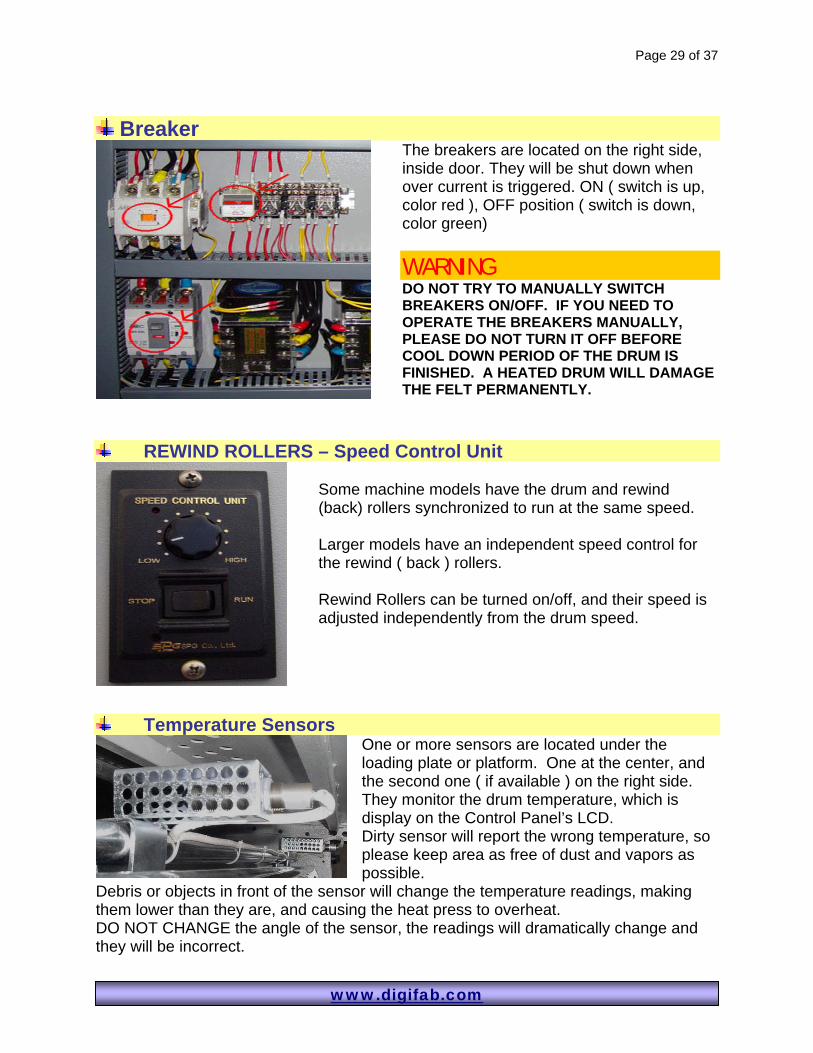
Breaker
The breakers are located on the right side, inside door. They will be shut down when over current is triggered. ON ( switch is up, color red ), OFF position ( switch is down, color green)
WARNING DO NOT TRY TO MANUALLY SWITCH BREAKERS ON/OFF. IF YOU NEED TO OPERATE THE BREAKERS MANUALLY, PLEASE DO NOT TURN IT OFF BEFORE COOL DOWN PERIOD OF THE DRUM IS FINISHED. A HEATED DRUM WILL DAMAGE THE FELT PERMANENTLY.
REWIND ROLLERS – Speed Control Unit
Some machine models have the drum and rewind (back) rollers synchronized to run at the same speed. Larger models have an independent speed control for the rewind ( back ) rollers. Rewind Rollers can be turned on/off, and their speed is adjusted independently from the drum speed.
Temperature Sensors One or more sensors are located under the loading plate or platform. One at the center, and the second one ( if available ) on the right side. They monitor the drum temperature, which is display on the Control Panel’s LCD. Dirty sensor will report the wrong temperature, so please keep area as free of dust and vapors as possible.
Debris or objects in front of the sensor will change the temperature readings, making them lower than they are, and causing the heat press to overheat. DO NOT CHANGE the angle of the sensor, the readings will dramatically change and they will be incorrect.

Page 30 of 37
www.digifab.com
V) Maintenance & Troubleshooting
MAINTENANCE Performing regular maintenance on the machine is critical to ensure proper operation and to the heat transfer machine and its components, and the frequency of the maintenance procedures will depend on usage
DAILY and/or Weekly : Inspect the drum & felt for dirt. Inspect the electrical cord for damage. Inspect the felt for damage. Inspect the area around machine for possible hazards (dust buildup, combustible
items in its surroundings, etc.)
MONTHLY: ( perform daily maintenance first ) Inspect & lubricate the chain with grease. Check main power wire connection, and power settings. Inspect bearings for signs of wear
SEASONAL WEATHER CHANGES
When weather changes by season, the drum may be overcompensating for ambient temperature. In those cases you will need to adjust the read value from the temperature sensors. To do so, you will need an infrared thermometer like the one shown at the beginning of the manual. Read the drum temperature and compare it to the displayed value on the LCD. Please contact DigiFab for further details on this procedure.
AT LEAST ONCE A YEAR: ( perform all other maintenance procedures first )
Check the felt condition, how much it has shrinked, did ink or chemicals built up and are darkening the felt? Is the felt getting to stiff for transfer work? If so, please contact DigiFab to make sure your felt is still in normal operating conditions. Depending on the kind of work and settings you have, your felt life will vary anywhere from 1 to 2 years. If the felt is cared for very well, it may even last up to 3 years with no problems.
Check the drum for problems. Any scratches on the drum will result in problems on your output.
Page 31 of 37
www.digifab.com
DRUM CLEANING Cool down the drum and machine, and clean it using several lint free 100% cotton terry clothes. It may be better to perform the cleaning in the morning before you heat up the press.
WARNING: Do not clean the drum while hot. Cut power off to the machine before cleaning and servicing it. WARNING: Exercise extreme caution while cleaning the machine. You can be caught in the turning drum and crushed or burned. WARNING: Scratching the drum with sharp objects may irreparably damage it by removing part of its special coating, and resulting in bad transfers. This will require you to purchase a new on and change it. CAUTION: Do not use compressed air to clean the machine. Compressed air forces dust/debris into machine, which can cause malfunction. CAUTION: Do not use any cleaning fluids, or abrasive solutions to clean the drum. Clean water is enough to remove build up of dust
Steps:
1. Machine should be cold ( room temperature ) 2. Turn off power, and disconnect from power source 3. Prepare a cup of water, pieces of terry cloth or smooth napkins ( to avoid any
scratching of the drum ). 4. Have the provided hand-ratchet with the big socket in it ( used for emergency
rotation of the felt & drum ) 5. Remove one section of the feeding front plate so you can have access to the
drum 6. Damp the fabric / napkin on water and wipe off dirt/dust from the drum 7. Take a dry piece of fabric, and dry up the drum before rotation 8. NO WATER OR LIQUIDS SHOULD TOUCH THE FELT 9. Use the hand-ratchet to rotate the drum a few inches so you can access the next
section to be cleaned. 10. Repeat Steps 6 through 9 until the whole drum has been cleaned 11. Re-install the section of the front plate that you removed in step 5. 12. Reconnect the power.
You will need to clean the scrapper tape located underneath the loading plate, which is in direct contact with the drum. This tape is there to stop fabric, paper, and big residues from entering the machine again. You may also need to replace this high temperature tape before it is burned or broken.
Page 32 of 37
www.digifab.com
FELT CLEANING
NEVER USE LIQUIDS OR WATER TO CLEAN THE FELT DO NOT BRUSH YOUR FELT
Raise drum temperature to about 410'F(210'C), which is a normal transfer temperature. Feed only white fabric (no paper or tissue paper), 100% polyester fabric, as you would when transferring. The fabric will help remove some of the debris and ink left over on the drum and felt. You can feed a couple of 1 yard pieces of white fabric. If there were any ink left over, they will partially transfer back to the fabric. Felts that are properly cared for may last a couple of years before they need to be replaced, felts that are not cared for may not last a year. Remember to always use protective tissue paper or avoid getting inks and chemicals into felt.
WARNING: High temperatures and pressures will shrink, burn, or damage your felt in many ways. Avoid temperatures over 420F, very low speeds, and high pressure on the felt. Try to protect your felt from ink and chemicals. All these tips will increase the lifetime of your felt.
Contact DigiFab for more tips on cleaning your felt
ELECTRICITY / POWER FAILURE ALERT
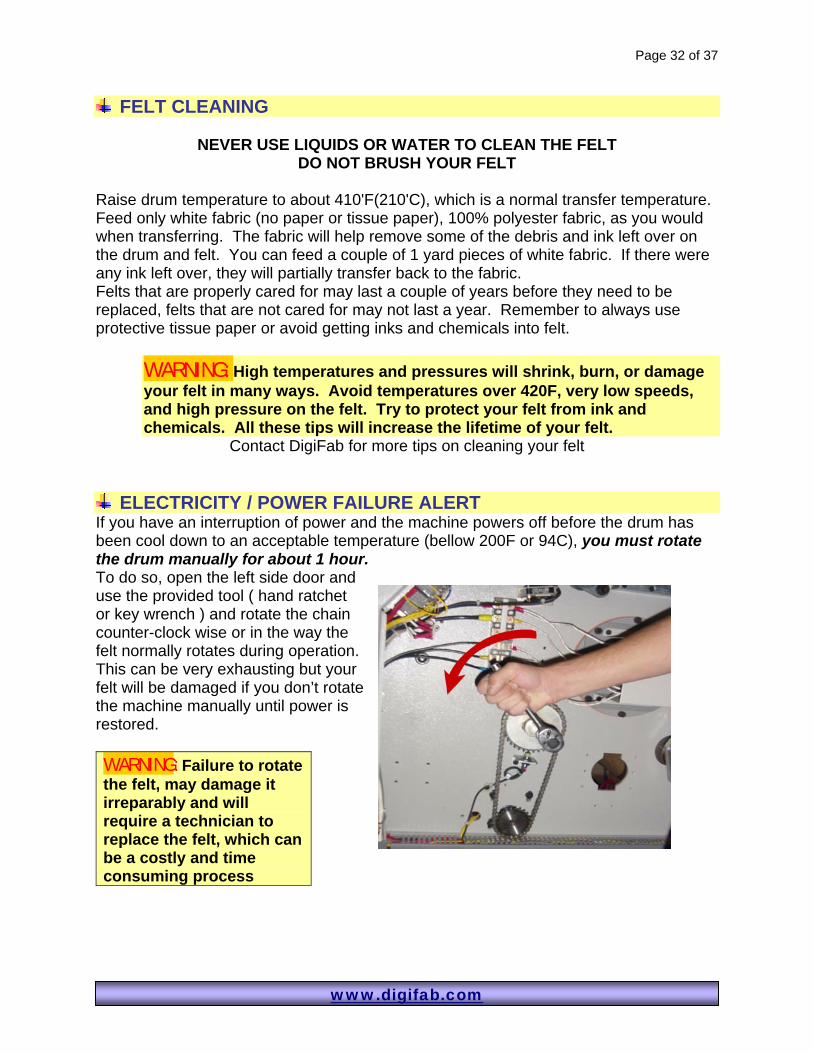
If you have an interruption of power and the machine powers off before the drum has been cool down to an acceptable temperature (bellow 200F or 94C), you must rotate the drum manually for about 1 hour. To do so, open the left side door and use the provided tool ( hand ratchet or key wrench ) and rotate the chain counter-clock wise or in the way the felt normally rotates during operation.This can be very exhausting but your felt will be damaged if you don’t rotate the machine manually until power is restored.
WARNING: Failure to rotate the felt, may damage it irreparably and will require a technician to replace the felt, which can be a costly and time consuming process
Page 33 of 37
www.digifab.com
LUBRICATION Open side doors on left and right sides, and rotate the drum at a moderate speed.
Make sure Heater is off and all parts are cool. If they are not, go through a cool down cycle first to avoid burns.
Lubricate rotating chains on both sides of the heat press if needed. Grease based lubrication is preferred. Get a high temperature resistance grease, the ones normally used on industrial machines will work.
If not grease lubricator is availably you can temporarely spray WD40 (spray
lubricator) on all the bearings that seem damaged, otherwise do not lubricate since WD40 acts as a degreaser. WARNING Do not lubricate the drum bearings when it is hot. You can be burned or can ignite a fire.
Troubleshooting
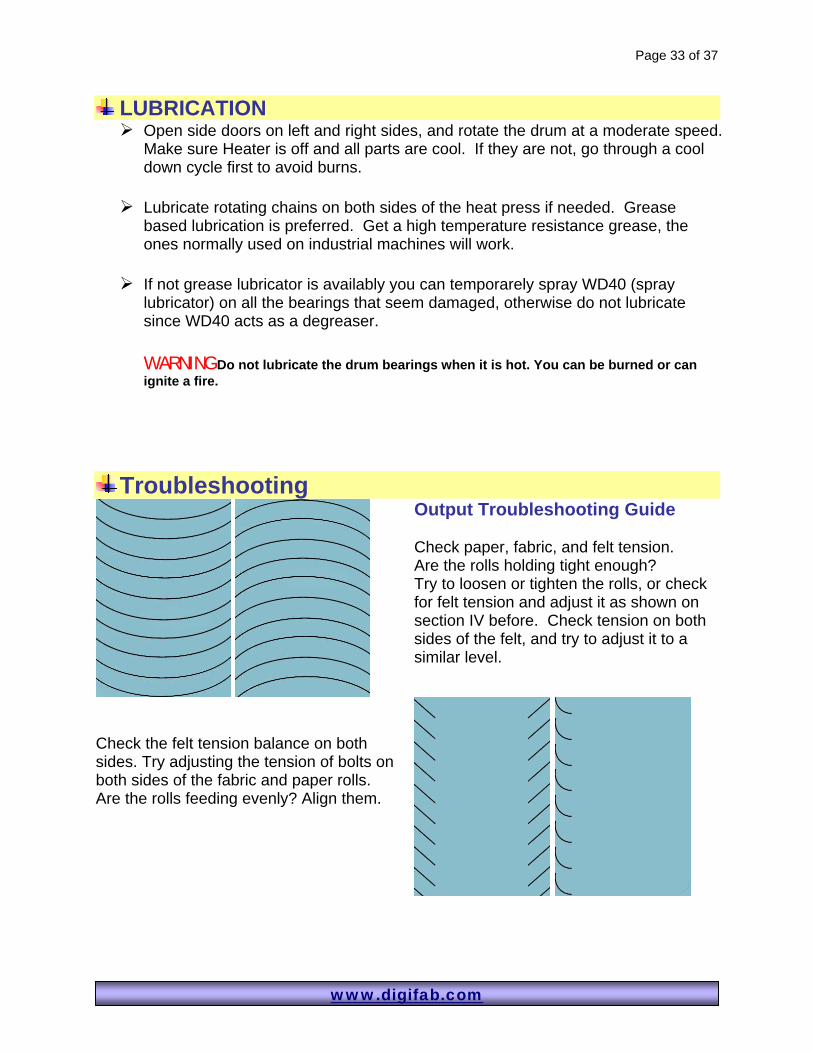
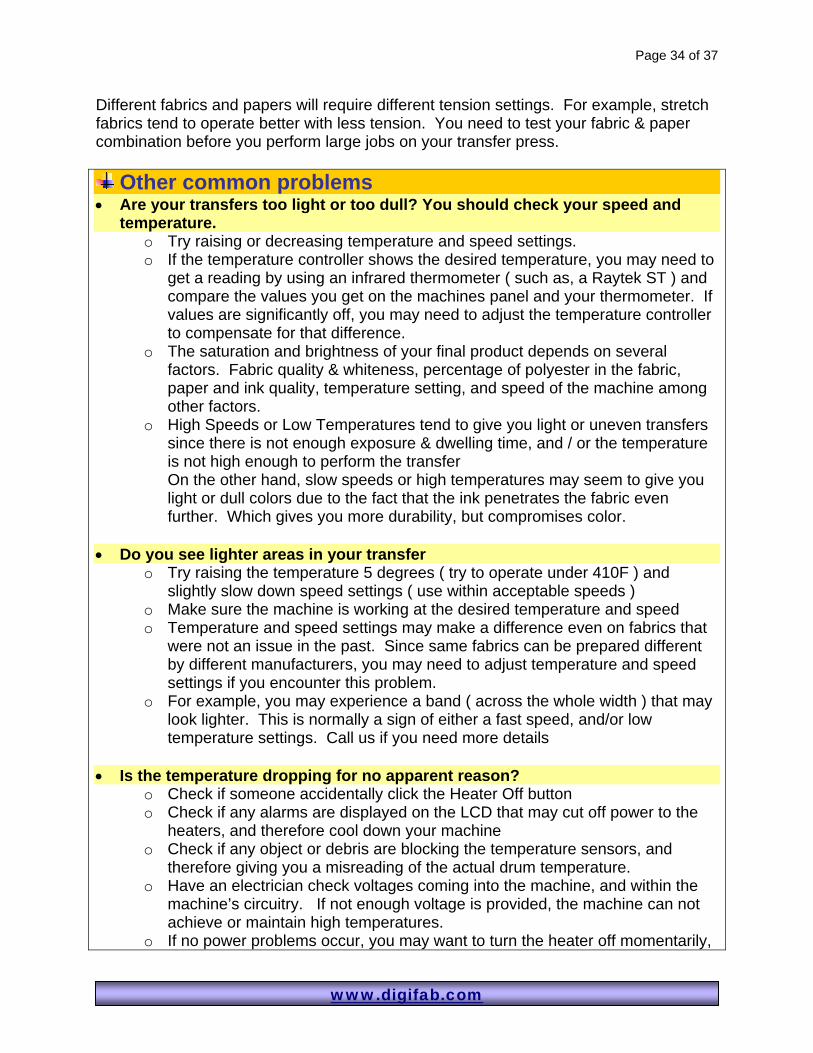
Output Troubleshooting Guide Check paper, fabric, and felt tension. Are the rolls holding tight enough? Try to loosen or tighten the rolls, or check for felt tension and adjust it as shown on section IV before. Check tension on both sides of the felt, and try to adjust it to a similar level.
Check the felt tension balance on both sides. Try adjusting the tension of bolts on both sides of the fabric and paper rolls. Are the rolls feeding evenly? Align them.
Page 34 of 37
www.digifab.com
Different fabrics and papers will require different tension settings. For example, stretch fabrics tend to operate better with less tension. You need to test your fabric & paper combination before you perform large jobs on your transfer press.
Other common problems • Are your transfers too light or too dull? You should check your speed and
temperature. o Try raising or decreasing temperature and speed settings. o If the temperature controller shows the desired temperature, you may need to
get a reading by using an infrared thermometer ( such as, a Raytek ST ) and compare the values you get on the machines panel and your thermometer. If values are significantly off, you may need to adjust the temperature controller to compensate for that difference.
o The saturation and brightness of your final product depends on several factors. Fabric quality & whiteness, percentage of polyester in the fabric, paper and ink quality, temperature setting, and speed of the machine among other factors.
o High Speeds or Low Temperatures tend to give you light or uneven transfers since there is not enough exposure & dwelling time, and / or the temperature is not high enough to perform the transfer On the other hand, slow speeds or high temperatures may seem to give you light or dull colors due to the fact that the ink penetrates the fabric even further. Which gives you more durability, but compromises color.
• Do you see lighter areas in your transfer
o Try raising the temperature 5 degrees ( try to operate under 410F ) and slightly slow down speed settings ( use within acceptable speeds )
o Make sure the machine is working at the desired temperature and speed o Temperature and speed settings may make a difference even on fabrics that
were not an issue in the past. Since same fabrics can be prepared different by different manufacturers, you may need to adjust temperature and speed settings if you encounter this problem.
o For example, you may experience a band ( across the whole width ) that may look lighter. This is normally a sign of either a fast speed, and/or low temperature settings. Call us if you need more details
• Is the temperature dropping for no apparent reason?
o Check if someone accidentally click the Heater Off button o Check if any alarms are displayed on the LCD that may cut off power to the
heaters, and therefore cool down your machine o Check if any object or debris are blocking the temperature sensors, and
therefore giving you a misreading of the actual drum temperature. o Have an electrician check voltages coming into the machine, and within the
machine’s circuitry. If not enough voltage is provided, the machine can not achieve or maintain high temperatures.
o If no power problems occur, you may want to turn the heater off momentarily,
Page 35 of 37
www.digifab.com
and turn it back on a couple of minutes later. Changing the temperature settings temporarily may also help reset this problem.
• Is the machine not warming up or not hot enough?
o Check voltage, relays and replace them if necessary o Check tightness of screws that connect cables to the heater bars. Make sure
machine is cool, this could case severe burns. If a shortage happened, then there is not enough voltage going to the heating bars, preventing the machine from achieving high temperatures.
o Check heating elements. • Is it taking a longer that usual time to heat up?
o Check voltage. Check relays and replace them if necessary o Check tightness of screws that connect cables to the heater bars. Make sure
machine is cool, this could case severe burns. If a shortage happened, then there is not enough voltage going to the heating bars, preventing the machine from achieving high temperatures.
o Check all cables are connected to the heaters. If you see any cables that are not properly connected or worn off, this will cause a drop of voltage or a complete cut off of power from one of the phases to your heaters which may result in very long heat up times. Instead of taking 30 minutes to 1 hour to heat up the machine, it may take you 2 to 3 hours.
• Is the machine not turning On? The felt not rotating? Heaters not turning On?
o If it is not rotating, the first thing to check is the speed setting. Change it up/down to see if it starts rotating.
o If machine is not powering up, the first thing to check is that power is being fed to the machine, you may need to check breakers, disconnect switches, and the internal main power switch of the machine to make sure they are on.
o If machine is not powering on or heating up, have an electrician or technician check power input, internal circuit and electrical connections to verify correct flow of power.
o Check circuit breakers, and relays. Replace the ones that are not working.
• Is felt rotating backwards? o Check the emergency buttons, they may have been accidentally pressed. o Wrong phase connections normally do NOT affect the rotation of the felt.
• How do I care for the felt? o To avoid quick shrinkage and damage to the felt, please operate the machine
under proper temperature conditions. Some normal transfer temperatures range from 370F up to 410F, try not to exceed 420F since you will be close to the 440F limit of most felts. The higher the temperature the shorter the life of the felt.
o The build up of ink and chemicals on the felt will result on a shorter lifetime. If
Page 36 of 37
www.digifab.com
you do not care for the felt you may end up replacing it sooner than needed due to shrinkage or stiffness of the felt. Materials with coatings or chemicals may shorten the life of the felt, therefore the correct use of tissue paper will help protect the felt. You will also need to clean the drum more often than usual.
o Very slow speeds will also speed up the shrinkage of the felt. o Some models equipped with air pressure may automatically turn the pressure
down for warm up and cool down periods, extending the life of your felt.
• Is the drum not rotating or the machine making a screeching noise? o This may be a sign of low tension on the felt, or bad bearings. Please check
your bearings to determine if they need to be replaced. Although you may be able to run the machine for a few days without permanently damaging the drum or bearing case, if you have bad bearings. We recommend you immediately replace them to avoid any further damage, and to avoid replacing other parts on the machine, such as, bearing cases, drum parts, etc.
VI) Final Notes & Contact Information
Contacting Technical Support For machine parts and technical service call (877) DigiFab, or (323) 581-4500. You can also visit us at www.digifab.com for more information. Please be ready to provide a serial number when calling, and any other information that may be required by our technical support personnel.
Warranty
Limited Warranty DigiFab warrants the equipment sold is free from defects in material and workmanship for a period of one year from the date of delivery to the customer. This warranty is the only warranty made by DigiFab and cannot be modified or amended. DigiFab sole and exclusive liability and the customer's sole and exclusive remedy under this warranty shall be, at DigiFab's examination of the product discloses to DigiFab's satisfaction that such defects actually exist and were not caused by misuse, neglect, attempt to repair, unauthorized alteration or modification, incorrect line voltage, contaminated air supply, or by fire, accident, flood, or other hazards. This warranty specifically does not cover damage to the felt caused by knives, razor blades, others sharp objects, failure caused by improper use of the machine. Warranty repair or replacement does not extend the warranty beyond the initial period from the date of delivery. DigiFab assumes no responsibility for damages caused by moving/handling of the
Page 37 of 37
www.digifab.com
equipment at customer’s location, and will not be liable for any equipment damage, property damage, personal injury, and/or consequential damages arising out of the use or inability to use the equipment. These damages may occur while being unloaded/loaded, loaded onto the elevator or stairs, craned, and/or handled and moved in any unconventional way for it to reach the customer’s specified location. The customer assumes all responsibilities and liability for transferring, moving, and handling the equipment from their loading area at ground level to their designated area.
WARNING: Unauthorized customer alterations will void this Warranty. THE WARRANTY MADE HEREIN IS IN LIEU OF ALL OTHER WARRANTIES, EXPRESS OR IMPLIED, INCLUDING ANY WARRANTY OR MERCHANTABILITY OR FITNESS FOR A PARTICULAR PURPOSE. DIGIFAB WILL NOT BE LIABLE FOR PROPERTY DAMAGE OR PERSONAL INJURY (UNLESS PRIMARILY CAUSED BY IT'S NEGLIGENCE), LOSS OF PROFIT OR OTHER INCIDENTAL OR CONSEQUENTIAL DAMAGES ARISING OUT OF THE USE OR INABILITY TO USE THE EQUIPMENT.
Exclusions to the Warranty This warranty specifically does not cover: 1. Damage to the felt caused by knives, razor blades, other sharp objects, neglecting to clean the drum and the felt, overheating the drum, built up of ink and chemicals over time. Burn or damage to the felt due to no rotation after a power outage. ( Read steps in the “Electrical Power Failure Alert” section of this manual ) 2. Damage to the felt, drum, and/or other parts caused by melting or fusing of materials and/or fabrics. Every fabric composition has a temperature and speed it can withhold; polyesters take the highest temperatures, other fabrics like Nylon can only run at low temperatures and high speed to avoid melting and damage. 3. Damage to the machine caused by lifting, tilting, and/or any attempt position the machine other than rolling on the install casters on even surfaces. 4. Damage to the machine caused by improper use, improper handling, and/or lack of maintenance. 5. Damage to the machine caused by improper power settings, unauthorized modifications, and/or negligence. 6. Different power setup other than the one recommended by the manufacturer may decrease the lifetime of electrical components of the machine. These components will not be warranted in case of early failure. 7. Some mechanical components exposed to high heat, pressure, rotation, and every day wear-and-tear may not be included in the warranty, unless they suffer early failure ( 180 days from the date of delivery ).