Embed Size (px)
Citation preview
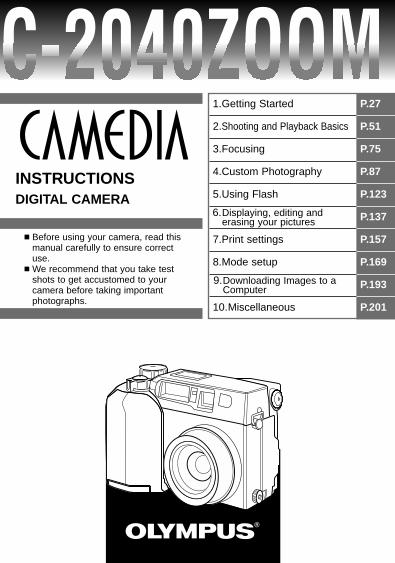
� Before using your camera, read thismanual carefully to ensure correctuse.
� We recommend that you take testshots to get accustomed to yourcamera before taking importantphotographs.
Serial number/Numéro de série /Número de serie
Digital camera
CD-ROM
VT2273-02
INSTRUCTIONSDIGITAL CAMERA
OLYMPUS OPTICAL CO., LTD.San-Ei Building, 22-2, Nishi Shinjuku 1-chome, Shinjuku-ku, Tokyo, Japan.
(Customer support) Tel. 0426-42-7499 Tokyohttp://www.olympus.co.jp
OLYMPUS AMERICA INC.Two Corporate Center Drive, Melville, NY 11747-3157, U.S.A. Tel. 631-844-5000
(Customer support) Tel. 1-888-553-4448http://www.olympus.com
OLYMPUS OPTICAL CO. (EUROPA) GMBH.(Premises/Goods delivery) Wendenstraße 14-18 D-20097 Hamburg, Germany. Tel. 040-237730
(Letters) Postfach 10 49 08, 20034 Hamburg, Germany.http://www.olympus-europa.com
6.Displaying, editing and erasing your pictures
9.Downloading Images to aComputer
Printed in Japan
1AG6P1P0899– –A
1.Getting Started
2.Shooting and Playback Basics
3.Focusing
4.Custom Photography
5.Using Flash
7.Print settings
8.Mode setup
10.Miscellaneous
P.27
P.51
P.75
P.87
P.123
P.137
P.157
P.169
P.193
P.201
2
Thank you for purchasing an Olympus digital camera. Before you start to useyour new camera, please read these instructions carefully to enjoy optimumperformance and a longer service life. Keep this manual in a safe place forfuture reference.
Legal and other notices•All contents of this publication are subject to change without notice.•Although the contents of this publication have been carefully checked to avoiderrors, some may still occur. If you have a question about any points, or findmistakes or omissions, please contact us.
•No part of this publication may be reproduced or reprinted except for person-al use without prior written permission from Olympus.
•Olympus makes no representations or warranties regarding any damages, orbenefit expected by using this unit lawfully, or any request from a third person,which are caused by the inappropriate use of this product.
•Olympus makes no representations or warranties regarding any damages orany benefit expected by using this unit lawfully which are caused by erasingpicture data.
•Olympus reserves all rights to this manual.
TrademarksWindows® is a registered trademark of Microsoft Corporation.Macintosh™ is a trademark of Apple Computer Inc.All other brand names and product names are trademarks of their respectiveowners.The standards for camera file systems referred to in this manual are the“Design Rule for Camera File System/DCF” standards stipulated by the JapanElectronics Industry Development Association (JEIDA).
3
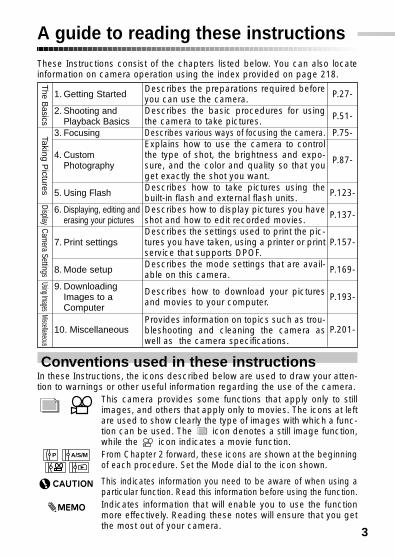
A guide to reading these instructionsThese Instructions consist of the chapters listed below. You can also locateinformation on camera operation using the index provided on page 218.
The B
asicsTaking P
icturesCam
era SettingsUsing Images
MiscellaneousDisplay
1. Getting Started
2. Shooting andPlayback Basics
3. Focusing
4. CustomPhotography
5. Using Flash
6. Displaying, editing anderasing your pictures
7. Print settings
8. Mode setup
9. DownloadingImages to aComputer
10. Miscellaneous
Describes the preparations required beforeyou can use the camera.Describes the basic procedures for usingthe camera to take pictures.Describes various ways of focusing the camera.Explains how to use the camera to controlthe type of shot, the brightness and expo-sure, and the color and quality so that youget exactly the shot you want.Describes how to take pictures using thebuilt-in flash and external flash units.Describes how to display pictures you haveshot and how to edit recorded movies.Describes the settings used to print the pic-tures you have taken, using a printer or printservice that supports DPOF.Describes the mode settings that are avail-able on this camera.
Describes how to download your picturesand movies to your computer.
Provides information on topics such as trou-bleshooting and cleaning the camera aswell as the camera specifications.
P.27-
P.51-
P.75-
P.87-
P.123-
P.137-
P.157-
P.169-
P.193-
P.201-
Conventions used in these instructionsIn these Instructions, the icons described below are used to draw your atten-tion to warnings or other useful information regarding the use of the camera.
This camera provides some functions that apply only to stillimages, and others that apply only to movies. The icons at leftare used to show clearly the type of images with which a func-tion can be used. The icon denotes a still image function,while the icon indicates a movie function.From Chapter 2 forward, these icons are shown at the beginningof each procedure. Set the Mode dial to the icon shown.
This indicates information you need to be aware of when using aparticular function. Read this information before using the function.Indicates information that will enable you to use the functionmore effectively. Reading these notes will ensure that you getthe most out of your camera.
P A/S/M
Important safety instructions
4
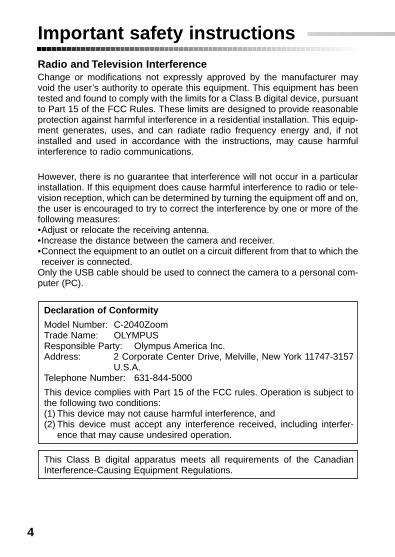
Radio and Television InterferenceChange or modifications not expressly approved by the manufacturer mayvoid the user’s authority to operate this equipment. This equipment has beentested and found to comply with the limits for a Class B digital device, pursuantto Part 15 of the FCC Rules. These limits are designed to provide reasonableprotection against harmful interference in a residential installation. This equip-ment generates, uses, and can radiate radio frequency energy and, if notinstalled and used in accordance with the instructions, may cause harmfulinterference to radio communications.
However, there is no guarantee that interference will not occur in a particularinstallation. If this equipment does cause harmful interference to radio or tele-vision reception, which can be determined by turning the equipment off and on,the user is encouraged to try to correct the interference by one or more of thefollowing measures:•Adjust or relocate the receiving antenna.•Increase the distance between the camera and receiver.•Connect the equipment to an outlet on a circuit different from that to which thereceiver is connected.
Only the USB cable should be used to connect the camera to a personal com-puter (PC).
Declaration of Conformity
Model Number: C-2040ZoomTrade Name: OLYMPUSResponsible Party: Olympus America Inc.Address: 2 Corporate Center Drive, Melville, New York 11747-3157
U.S.A.Telephone Number: 631-844-5000
This device complies with Part 15 of the FCC rules. Operation is subject tothe following two conditions:(1) This device may not cause harmful interference, and (2) This device must accept any interference received, including interfer-
ence that may cause undesired operation.
This Class B digital apparatus meets all requirements of the CanadianInterference-Causing Equipment Regulations.

5
Important safety instructions
CAUTION: TO REDUCE THE RISK OF ELECTRIC SHOCK, DO NOT REMOVE COVER (OR BACK). NO USER-SERVICEABLE
PARTS INSIDE. REFER SERVICING TO QUALIFIED OLYMPUS SERVICE PERSONNEL.
RISK OF ELECTRIC SHOCK DO NOT OPEN
CAUTION
The lightning flash with the arrowhead symbol, within an equilateral triangle, is intended to alert the user to the presence of uninsulated “dangerous voltage” within the product’s enclosure that may be of sufficient magnitude to constitute a risk of electric shock to persons.
The exclamation point within an equilateral triangle is intended to alert the user to the presence of important operating and maintenance (servicing) instructions in the literature accompanying the product.
WARNING:TO REDUCE THE RISK OF FIRE OR SHOCK HAZARD, DO NOT EXPOSE THIS EQUIPMENT TO RAIN, ANY LIQUID OR MOISTURE.

6
Important safety instructions
1 Read All Instructions — Before you use the product, read alloperating instructions.
2 Save These Instructions — Save all safety and operatinginstructions for future reference.
3 Heed Warnings — Read carefully and follow all warning labels onthe product and all warnings described in the instructions.
4 Follow Instructions — Follow all instructions provided with thisproduct.
5 Cleaning — Always unplug this product from the wall outlet beforecleaning. Use only a damp cloth for cleaning. Never use any type ofliquid or aerosol cleaner, or any type of organic solvent to clean thisproduct.
6 Attachments — For your safety, and to avoid damaging the product,use only accessories recommended by Olympus.
7 Water and Moisture — Never use this product around water (near abathtub, kitchen sink, laundry tub, wet basement, or swimming pool).
8 Location — To avoid damage to the product and to avoid personalinjury, never place this product on an unstable stand, tripod, bracket,table or cart. Mount only on a stable tripod, stand, or bracket. Followthe instructions which describe how to safely mount the product, anduse only the mounting devices recommended by the manufacturer.
9 Power Sources — Connect this product only to the power sourcedescribed on the product label. If you are not sure about the type ofpower supply in your home, consult your local power company.Refer to your operating instructions for information on using theproduct with batteries.
10 Grounding, Polarization — If this product can be used with anoptional AC adapter, the adapter may be equipped with a polarizedalternating current line plug, a plug with one blade wider than theother. This safety feature allows the plug to fit into the power outletonly one way. If you cannot insert the plug into the wall outlet, pull itout, reverse it, and then insert it again. If the plug still fails to fit,contact an electrician and have the receptacle replaced.
11 Protecting the Power Cord — The power supply cord should berouted so it will not be walked on. Never place a heavy object on thepower cord and never wrap the power cord around the leg of a tableor chair. Keep the areas around the power cord connection points,at the power outlet and at the product connection, free of allobstacles.
7
Important safety instructions
12 Lightning — If a lightning storm occurs while using the optional ACadapter, unplug the adapter power cord from the wall outletimmediately. To avoid damage from unexpected power surges,always unplug the AC adapter from the power outlet and disconnectit from the camera when the camera is not in use.
13 Overloading — Never overload wall outlets, extension cords, powerstrips, or other power connection points with too many plugs.
14 Foreign Objects, Spillage — To avoid personal injury from fire orelectrical shock from contact with internal high voltage points, neverinsert a metal object into the product. Avoid using the productwhere there is a danger of spillage.
15 Servicing — Refer all servicing to qualified personnel. Attempting toremove the covers or disassemble the product, could expose you todangerous high voltage points.
16 Damage Requiring Service — While using the optional AC adapter,if you notice any of the conditions described below, unplug the ACadapter from the wall outlet and refer servicing to qualified servicepersonnel:a) If liquid has been spilled, or any object has fallen into the
product.b) If the product has been exposed to water.c) If the product does not operate normally while following
operating instructions. Adjust only the controls described in theoperating instructions as improper adjustment of other controlscould damage the product, requiring extensive repair work by aqualified technician to restore the product to normal operation.
d) If the product has been dropped or damaged in any way.e) If the product exhibits a distinct change in performance, this
indicates a need for servicing.17 Replacement Parts — When replacement parts are required, make
sure that the service center uses only parts recommended by themanufacturer to ensure that the replacement parts have the samecharacteristics as the originals. Unauthorized substitution of partscould cause a fire, electrical shock, or create other hazards.
18 Safety Check — Upon completion of servicing or repairs, ask theservice technician to perform safety checks to determine that theproduct is in good working condition.
19 Heat — Never use or store this product near a heat source such asa radiator, heat register, stove, or any type of equipment orappliance which generates heat, including stereo amplifiers.
8
Important safety instructions
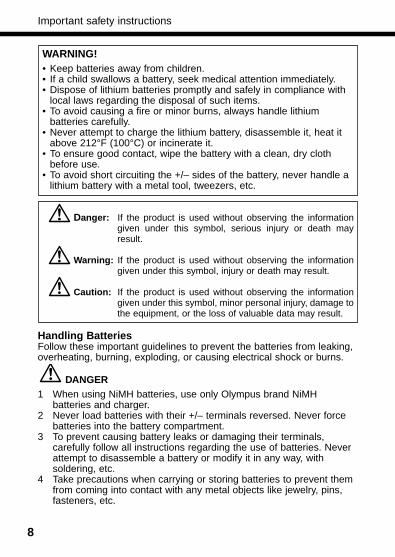
WARNING!• Keep batteries away from children.• If a child swallows a battery, seek medical attention immediately.• Dispose of lithium batteries promptly and safely in compliance with
local laws regarding the disposal of such items.• To avoid causing a fire or minor burns, always handle lithium
batteries carefully.• Never attempt to charge the lithium battery, disassemble it, heat it
above 212°F (100°C) or incinerate it.• To ensure good contact, wipe the battery with a clean, dry cloth
before use.• To avoid short circuiting the +/– sides of the battery, never handle a
lithium battery with a metal tool, tweezers, etc.
Handling BatteriesFollow these important guidelines to prevent the batteries from leaking,overheating, burning, exploding, or causing electrical shock or burns.
DANGER1 When using NiMH batteries, use only Olympus brand NiMH
batteries and charger.2 Never load batteries with their +/– terminals reversed. Never force
batteries into the battery compartment.3 To prevent causing battery leaks or damaging their terminals,
carefully follow all instructions regarding the use of batteries. Neverattempt to disassemble a battery or modify it in any way, withsoldering, etc.
4 Take precautions when carrying or storing batteries to prevent themfrom coming into contact with any metal objects like jewelry, pins,fasteners, etc.
Danger: If the product is used without observing the informationgiven under this symbol, serious injury or death mayresult.
Warning: If the product is used without observing the informationgiven under this symbol, injury or death may result.
Caution: If the product is used without observing the informationgiven under this symbol, minor personal injury, damage tothe equipment, or the loss of valuable data may result.
9
Important safety instructions
WARNING1 Keep batteries dry at all times. Never allow them to come into
contact with fresh water or salt water.2 To prevent batteries from leaking, overheating, or causing a fire or
explosion:• Use only batteries recommended for use with this product.• Never heat batteries, incinerate them, or attempt to disassemble
them.• Never mix batteries (old and new batteries, charged and
uncharged batteries, batteries of different manufacture or capacity,etc.).
• Never attempt to charge alkaline or lithium batteries.• Load batteries carefully as described in the operating instructions.
Never reverse their polarity when loading.• Do not use batteries if their body is not covered by the insulating
sheet or if the sheet is torn as it may cause fluid leak, fire, orinjury. Do not use these batteries even if they are sold in stores.
3 If NiMH batteries are not charged within the specified time, stopcharging them and do not use them.
4 Before loading, always inspect batteries carefully for leaks,discoloration, warping, or any other abnormality.
5 Always store batteries out of the reach of small children. If a childaccidentally swallows a battery, seek medical attention immediately.
6 If a battery leaks fluid onto your clothing or skin, remove the clothingand flush the affected area with clean, running cold waterimmediately. If the fluid burns your skin, seek medical attentionimmediately.
7 Never attempt to modify the battery compartment on the camera,never insert anything (other than the recommended battery) into thebattery compartment.
5 Never heat batteries or incinerate them.6 Never attempt to connect a battery directly to a power outlet, or to a
cigarette lighter in a vehicle.7 If battery fluid gets into your eyes, flush your eyes immediately with
clear, cold running water and seek medical attention immediately.
10
Important safety instructions
CAUTION1 Olympus NiMH batteries are intended for use only with Olympus
digital cameras. Never use these batteries with any other device.2 Never subject batteries to strong shocks or continuous vibration.3 Never mix batteries (old and new batteries, charged and uncharged
batteries, batteries of different manufacture or capacity, etc.).4 Always charge sets of batteries (2 or 4) together.5 Always charge NiMH batteries before using them for the first time, or
if they have not been used for a long period.6 While the camera is not in use, always remove the batteries to
prevent accidental leakage which could damage the batterycompartment.
7 If a battery leaks, becomes discolored or deformed, or in any otherway becomes abnormal during operation, stop using the cameraand consult your dealer or an authorized Olympus service center.Continued use may result in fire or electric shock.
8 Never store batteries where they will be exposed to direct sunlight,or subjected to high temperatures in a hot vehicle, near a heatsource, etc.
9 Batteries may become hot during prolonged use. To avoid minorburns, never remove them immediately after using the camera.
11
Important safety instructions
Handling the Camera
WARNING1 Use caution when taking flash pictures at close range. When you
fire the flash, you must be at least 3 ft. away from the faces of yoursubjects, especially when taking pictures of infants and smallchildren. Firing the flash too close to the subject's eyes could causea momentary loss of vision.
2 To avoid damaging your eyes, never aim the camera directly into thesun, or any other extremely bright light source.
3 To avoid causing a fire or explosion, never use the camera nearflammable or explosive gases.
4 Always use and store the camera out of the reach of young childrenand infants to prevent the following dangerous situations whichcould cause serious injury:• Becoming entangled in the camera strap, causing strangulation.• Accidentally swallowing a battery or small part.• Accidentally firing the flash into their own eyes or into the eyes of
another child.5 To avoid the hazards of fire or electrical shock, store the camera in a
cool, dry location where it will not be subjected to high humidity ordust.
6 To avoid minor burns, never cover the flash with your hand when itis fired. Never touch the flash unit after continuous use. The flashunit becomes very hot during continuous operation.
7 If the camera is accidentally dropped in water, or if liquid is spilledinto the camera, stop using the camera, allow the camera to dry,and then remove the batteries. Contact the nearest Olympusauthorized service center.
12
Important safety instructions
CAUTION1 During operation of the camera, if you notice any unusual odors,
noise, or smoke around the camera, immediately switch the cameraoff, disconnect the optional AC adapter (if it is connected), and allowthe camera to sit idle for a few minutes to allow it time to cool. Takethe camera outdoors, away from flammable objects, and carefullyremove the batteries to avoid burning your hands. Contact thenearest Olympus service center immediately.
2 Never attempt to disassemble the camera. The internal circuitscontain high voltage points which could cause serious burns orelectrical shock.
3 To avoid dangerous electrical shock, never hold or operate thecamera with wet hands.
4 To avoid damaging the camera or causing a fire, never expose thecamera to excessive heat.
CAUTIONCamera Care and Storage• Never store or use the camera for long periods in locations subject to
direct sunlight, high humidity, extreme variation in temperature, orstrong shocks and constant vibration. Protect the camera at all timesfrom dust and sand.
• Never store the camera near any type of appliance or equipmentwhich generates high temperatures, low temperatures, high or lowhumidity, or a strong magnetic field. Never use the camera in a factoryor laboratory where flammable gases are present.
• Never shake the camera or subject it to shock or strong vibration.• To avoid damaging its precision lens, never leave the camera pointing
directly into the sun.• Before storing the camera for a long period, remove the batteries.
Select a cool, dry location for storage to prevent condensation or moldfrom forming inside the camera. After storage, test the camera bypressing the shutter release button to make sure that it is operatingnormally.
• When the camera is mounted on a tripod, adjust the tripod head to re-position the camera; do not twist the camera.
• Never touch the flash after it has been fired. Avoid using the flash forextended periods. Allow it to cool occasionally between shots.
• To avoid injury from electrical shock, never attempt to disassemble ormodify the camera in any way.
13
Important safety instructions
CAUTIONSelecting Batteries for Your Camera• This camera can use four AA NiMH batteries, four AA Alkaline
batteries, four AA lithium batteries, four AA NiCd batteries, or two CR-V3 lithium battery packs. Use of Olympus brand batteries is stronglyrecommended.
• Alkaline battery performance is limited, especially at lowtemperatures. And it may runs out extremely shorter period thanCRV3 or NiMH. Using NiMH batteries is recommended.
• AA manganese batteries cannot be used with this camera.• Always follow the battery recommendations and loading instructions.
Incorrectly loading the batteries could cause the batteries to leak oroverheating.
• When using the camera on battery power at low temperatures, try tokeep the camera and extra batteries as warm as possible. Batterieswhich run down at low temperatures may be restored after they arewarmed at ambient temperature.
• Perspiration or oil from your hands on the battery contacts couldprevent them from operating. Before loading batteries, wipe theterminals with a dry, clean cloth.
• Before going on a long trip, especially before traveling abroad,purchase an ample supply of extra batteries. The recommendedbatteries may be difficult to obtain while traveling.
• Always recharge NiMH or NiCd batteries with a chargerrecommended for use with these batteries.
• Before using NiMH or NiCd batteries, always read the instructionsprovided with purchase of these batteries.
• To avoid personal injury or damage to the camera, always inspectbatteries before loading. If you notice leaking, damage to the batterycover or insulation, discoloration, warping or any other abnormality donot use the batteries.
• Recommended temperature ranges for NiMH batteries:Operation..................................... 32° ~ 104°FCharge......................................... 32° ~ 104°FStorage ........................................ –4° ~ 86°F
• Using, charging, or storing the batteries outside these ranges couldshorten battery life or affect battery performance. Always unload thebatteries from the camera before storing the camera and batteries fora long period.
14
Important safety instructions
NOTESLCD Display and Backlight● Do not point the viewfinder towards strong light like the sun, as this may
damage interior of the viewfinder.● The backlight built into the monitor and control panel has a limited service
life. When the monitor gets dark or flickers, consult your nearest Olympusdealer.
● In places subject to low temperatures, the backlight may take a long time toturn on or its color may change temporarily. When using the camera inextremely cold places, it is a good idea to occasionally place it in a warmplace. A backlight exhibiting poor performance due to low temperatures willrecover in normal temperatures.
● Do not push the monitor forcibly; otherwise the image may become vague,resulting in a Display mode failure or damage to the monitor.
● When a subject is viewed diagonally in the camera, the edges may appearzigzagged on the monitor. This is not a malfunction; It will be less noticeablein Display mode.
● A strip of light may appear on the top/bottom of the monitor, but this is not amalfunction.
● The LCD display is made with high-precision technology. However,black spots or bright spots of light may appear constantly on the LCDdisplay. Due to its characteristics or the angle at which you are viewingthe monitor, the spot may not be uniform in color and brightness. Thisis not a malfunction.
15
ContentsLegal and other notices............................................................................2Trademarks ...............................................................................................2
A guide to reading these instructions..............................................................3Conventions used in these instructions....................................................3
Important safety instructions............................................................................4Radio and Television Interference ............................................................4Handling batteries ....................................................................................8Handling the camera ..............................................................................11LCD Display and Backlight ....................................................................14
Contents .........................................................................................................15Main features..................................................................................................20Checking the package contents....................................................................21Names of parts...............................................................................................23
Camera ...................................................................................................23Viewfinder ...............................................................................................24Control Panel Display .............................................................................25Monitor Display .......................................................................................25
Getting Started .......................................................................27Attaching the strap and lens cap ..................................................................28Loading the batteries .....................................................................................29
Life of the lithium battery pack (Included) .............................................32Using a domestic AC wall outlet ............................................................33
Inserting and removing SmartMedia cards ...................................................35Inserting a card.......................................................................................36Removing a card ....................................................................................37
Setting the date and time...............................................................................38Using the Mode dial.......................................................................................41Using the menus ............................................................................................42Shooting menu options ..................................................................................46
Still picture shooting menu .....................................................................46Movie record menu.................................................................................47
Playback menu options..................................................................................48Still picture playback menu ....................................................................48Movie playback menu.............................................................................49
1
16
Shooting and Playback Basics .............................................51Switching on and off ......................................................................................52Checklist before shooting ..............................................................................54
Checking the remaining battery charge.................................................54Checking SmartMedia card status (Card check)...................................55Checking the available shots/time..........................................................56
Adjusting the viewfinder.................................................................................58Holding the camera .......................................................................................58Pressing the shutter button ............................................................................59Shooting .........................................................................................................60
Taking still pictures .................................................................................60Taking pictures using the monitor...........................................................63Shooting movies .....................................................................................65
Checking and erasing photographed images...............................................67Displaying pictures (Quick View)............................................................67Playing movies........................................................................................69Erasing pictures (One-frame erase) .......................................................71
Using the zoom..............................................................................................72Using the flash (Auto-Flash) ..........................................................................73
Focusing..................................................................................75Focusing on difficult subjects (Subjects not suited to autofocus).................76Working range................................................................................................77Focusing on off-center subjects (Focus lock) ...............................................78Focusing faster (Full-time AF) ........................................................................79Selecting a focusing area (AF MODE)...........................................................81Focusing manually (Manual focus) ................................................................82Focusing on close-up subjects (Macro mode)..............................................84Zooming in further (Digital Zoom mode) .......................................................85
3
2
Contents
17
Custom Photography.............................................................87[Type of Shot]Setting the "A/S/M" dial functions...................................................................88Controlling the depth of field (Aperture Priority mode)..................................89Capturing movement (Shutter Priority mode) ................................................90Selecting the aperture and shutter speed manually (Manual mode)............91
[Brightness and Exposure]Shooting at stepped exposures (Exposure compensation) ..........................92Continuous shooting at stepped exposures (Auto Bracketing) ....................93Measuring the subject brightness (Spot Metering mode).............................95
Using Spot Metering in Macro mode .....................................................97Taking pictures with pre-fixed exposure ........................................................98
Setting the [OK] button functions (Setting AE Lock)..............................98Taking pictures with the exposure locked (AE lock) ..............................99Measuring the average brightness (Multi-metering) ............................101
Locking the ISO value (ISO setting) ............................................................103
[Color and Quality]Selecting the color tone (Preset White Balance) .........................................105Setting the color tone (Quick Reference White Balance) ............................107Adjusting the color tone (White Balance Correction) ..................................109Setting the recording quality (Quality setting) .............................................111
[Other Types of Shots]Taking sequential shots (Sequence mode) .................................................113Using the self-timer and optional remote control.........................................115
Using the self-timer to take pictures.....................................................116Using the optional remote control to take pictures ..............................117
Using special effects (Function mode)........................................................118Panorama mode...........................................................................................120
Using Flash ...........................................................................123Selecting the flash firing pattern ..................................................................124
Firing the flash automatically (Auto-Flash) ...........................................125Reducing red-eye (Red-Eye Reduction mode) ....................................125Using flash for all shots (Forced Flash mode) .....................................126Preventing flash firing in dark conditions (Flash Off mode) .................126
Setting the flash brightness (Flash intensity control) ...................................127
5
4
Contents
18
Selecting the flash timing (Slow Synchro) ...................................................129Using external flash...............................................................................................131
Using the FL-40 external flash.......................................................................131Using only the FL-40 external flash...............................................................133Using a different external flash......................................................................134Supported different flash units ......................................................................136
Displaying, editing and erasing your pictures ..................137Displaying multiple images at one time (Index playback)....................................138
Selecting the number of images displayed concurrently (4, 9 or 16)...........139Enlarging images (Close-up playback).................................................................140Displaying images as a slide-show (Automatic playback) ...................................141Preventing unintentional erasing of images (Image protect) ................................142Viewing images on a TV ........................................................................................143Displaying image information................................................................................145
Displaying image information for pictures.....................................................146Displaying image information for movies ......................................................146
Editing recorded movies (FUNCTION)..................................................................147Creating an index ..........................................................................................147Editing movies ...............................................................................................150
Erasing all images (All-frame erase) .....................................................................152Initializing cards (Formatting) ................................................................................154
Print settings ........................................................................157Printing methods....................................................................................................158Printing all the images on a card (All print order) .................................................160Printing only selected images (Single print order)................................................162Printing some images enlarged (Trimmed print order) .........................................165Resetting print reserve ..........................................................................................167
Mode setup ...........................................................................169MODE SETUP - Using function settings for easy camera operation ....................170
List of mode settings .....................................................................................171Restoring the original settings when the camera is switched off (ALL RESET) ....173Selecting the settings when the camera is switched on (Custom settings)....175Setting the image clarity (Sharpness)..........................................................177Setting the image contrast (Contrast)..........................................................178Setting the resolution for TIFF mode (TIFF Settings) ...................................179Setting the resolution and quality for SQ mode (SQ1/SQ2 Settings) ...........180
8
7
6
Contents
19
Contents
Changing the camera's warning tone (Beep) .............................................182Displaying images during image recording (REC VIEW) ............................183Saving/erasing images right after shooting (CHECK) .................................184
When you select CHECK......................................................................184When you use Auto Bracket .................................................................187
Changing the way file names are assigned to recorded images (File Name setting)....189Folder names and file names ...............................................................189Assiging folder names and file names in each mode..........................189
Adjusting the Monitor brightness (Adjust monitor) ......................................191Changing the dis distance units (m/ft setting).............................................192
Downloading Images to a Computer..................................193Downloading images to your computer.......................................................194
Connecting the camera to a computer to download pictures .............194Downloading pictures directly from a card ..........................................195
Connecting to a computer using the communication cable .......................196Connecting via a USB cable ................................................................196
Overview of the CAMEDIA Master functions ...............................................199
Miscellaneous.......................................................................201Troubleshooting............................................................................................202
Camera operation problems.................................................................202Problems with images...........................................................................206
Camera maintenance and storage ..............................................................208After-use camera care ..........................................................................208Cleaning the camera ............................................................................208
Equipment that can be connected to this camera (System expansion chart) ...209Error codes...................................................................................................210Optional items ..............................................................................................212Compatibility of the picture data..................................................................212Specifications...............................................................................................213Glossary of terms.........................................................................................216Index ............................................................................................................218
10
9
20
Main features
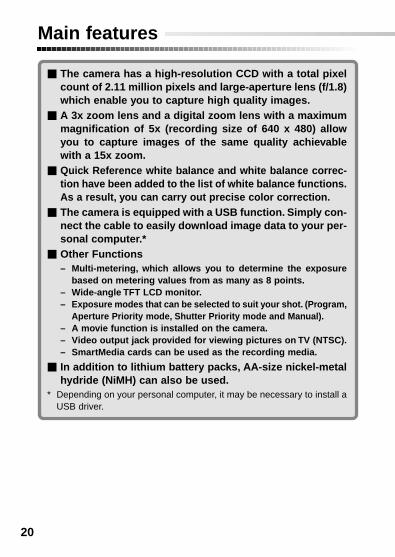
■ The camera has a high-resolution CCD with a total pixelcount of 2.11 million pixels and large-aperture lens (f/1.8)which enable you to capture high quality images.
■ A 3x zoom lens and a digital zoom lens with a maximummagnification of 5x (recording size of 640 x 480) allowyou to capture images of the same quality achievablewith a 15x zoom.
■ Quick Reference white balance and white balance correc-tion have been added to the list of white balance functions.As a result, you can carry out precise color correction.
■ The camera is equipped with a USB function. Simply con-nect the cable to easily download image data to your per-sonal computer.*
■ Other Functions– Multi-metering, which allows you to determine the exposure
based on metering values from as many as 8 points.– Wide-angle TFT LCD monitor.– Exposure modes that can be selected to suit your shot. (Program,
Aperture Priority mode, Shutter Priority mode and Manual).– A movie function is installed on the camera.– Video output jack provided for viewing pictures on TV (NTSC).– SmartMedia cards can be used as the recording media.
■ In addition to lithium battery packs, AA-size nickel-metalhydride (NiMH) can also be used.
* Depending on your personal computer, it may be necessary to install aUSB driver.
21
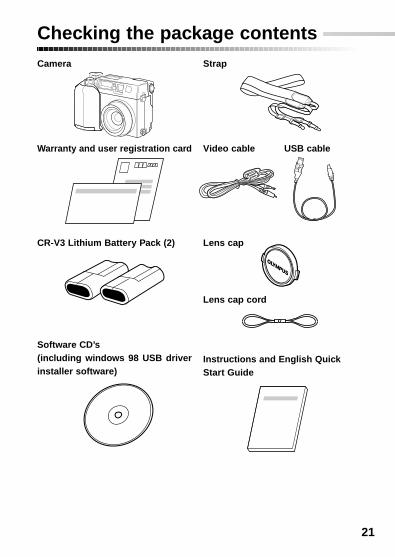
Checking the package contentsCamera Strap
Video cable USB cableWarranty and user registration card
Lens cap
Instructions and English QuickStart Guide
Lens cap cord
CR-V3 Lithium Battery Pack (2)
Software CD’s(including windows 98 USB driverinstaller software)
22
Checking the package contents
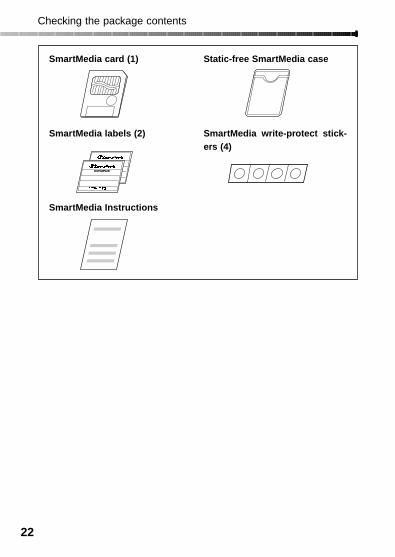
SmartMedia card (1) Static-free SmartMedia case
SmartMedia labels (2) SmartMedia write-protect stick-ers (4)
SmartMedia Instructions
23
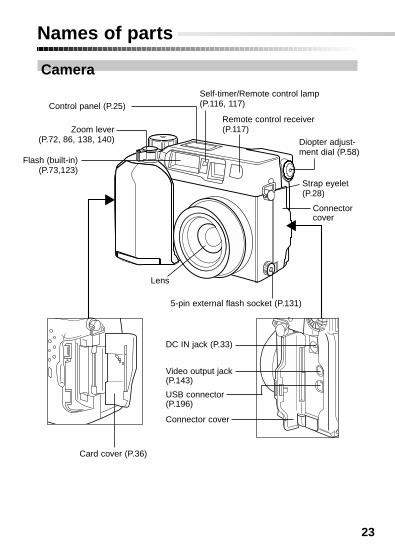
Names of parts
Camera
Zoom lever(P.72, 86, 138, 140)
Control panel (P.25)
Flash (built-in)(P.73,123)
Lens
Card cover (P.36)
Video output jack(P.143)
Connector cover
DC IN jack (P.33)
Diopter adjust-ment dial (P.58)
Self-timer/Remote control lamp(P.116, 117)
Remote control receiver(P.117)
5-pin external flash socket (P.131)
USB connector (P.196)
Connector cover
Strap eyelet (P.28)

24
Names of parts
Monitor (P. 25)
Viewfinder(P. 58, 60)
Tripod socketBattery compartment lock(P. 29)
Arrow pad(P. 43)
Viewfinder
Orange lamp (P. 60, 73)
Green lamp(P. 55, 59, 60)
AF target mark (P. 60, 74)
Mode dial (P. 41)
Shutter button (P. 59)
(Monitor button / P.63)
(Menu button /P. 42)
Card access lamp(P. 61)
Battery compartmentcover (P. 29)
Bottom view
(Flash mode button / P. 73,123)(Erase button / P. 71)
(Spot/Macro button / P. 84, 97)(Print button / P.158)
(OK button / P.44)(AE lock button / P.98)
(Protect button / P.142)
AEL
25
Names of parts
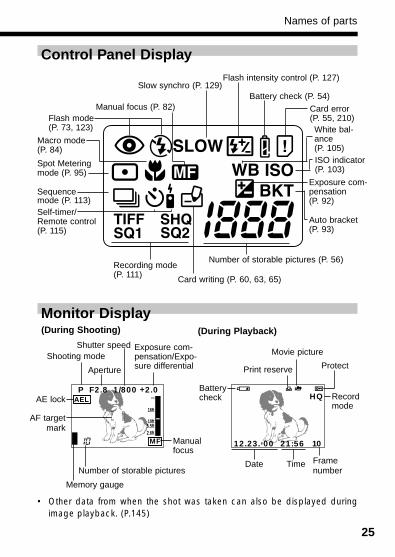
Control Panel Display
Monitor Display
1012.23.,00 21:56
HQ
Framenumber
Date
Protect
Battery check
Movie picture
Time
Print reserve
Recordmode
Spot Meteringmode (P. 95)
Flash intensity control (P. 127)
Sequence mode (P. 113)
Flash mode(P. 73, 123)
Exposure com-pensation (P. 92)
Card error(P. 55, 210)
Recording mode(P. 111)
Number of storable pictures (P. 56)
ISO indicator(P. 103)
Self-timer/Remote control(P. 115)
Macro mode(P. 84)
Slow synchro (P. 129)
Card writing (P. 60, 63, 65)
Battery check (P. 54)
Auto bracket(P. 93)
Manual focus (P. 82)
(During Playback)
Number of storable pictures
Memory gauge
Aperture
Shutter speed Exposure com-pensation/Expo-sure differential
(During Shooting)
MF
16ft
10ft5.5ft2.6ft
AELP F2.8 1/800 +2.0
White bal-ance (P. 105)
Shooting mode
AF targetmark
AE lock
• Other data from when the shot was taken can also be displayed duringimage playback. (P.145)
Manualfocus

26
1OLYMPUS DIGITAL CAMERA
Chapter
Getting Started
• This chapter describes the things you need toknow before you can use your camera. Theseinclude the procedures for loading the batteriesand SmartMedia card and for using the Modedial and menu screens.
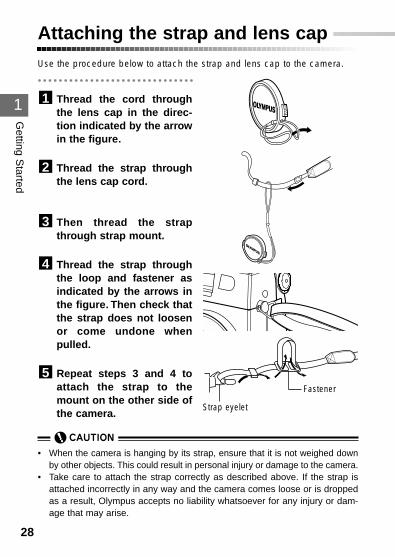
Attaching the strap and lens cap
1
Getting S
tarted
Use the procedure below to attach the strap and lens cap to the camera.
Thread the cord throughthe lens cap in the direc-tion indicated by the arrowin the figure.
Thread the strap throughthe lens cap cord.
Then thread the strapthrough strap mount.
Thread the strap throughthe loop and fastener asindicated by the arrows inthe figure. Then check thatthe strap does not loosenor come undone whenpulled.
Repeat steps 3 and 4 toattach the strap to themount on the other side ofthe camera.
5
4
3
2
1
28
• When the camera is hanging by its strap, ensure that it is not weighed downby other objects. This could result in personal injury or damage to the camera.
• Take care to attach the strap correctly as described above. If the strap isattached incorrectly in any way and the camera comes loose or is droppedas a result, Olympus accepts no liability whatsoever for any injury or dam-age that may arise.
Strap eyelet
Fastener
Loading the batteries
1
Getting S
tarted
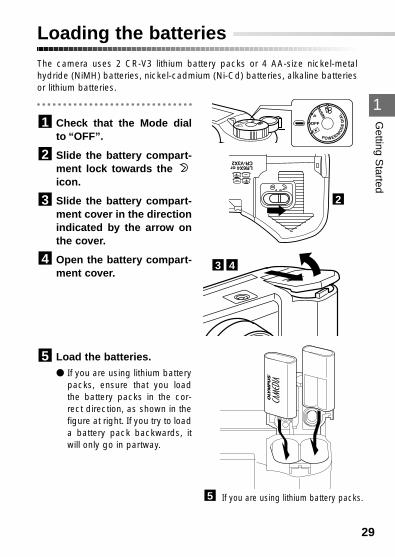
The camera uses 2 CR-V3 lithium battery packs or 4 AA-size nickel-metalhydride (NiMH) batteries, nickel-cadmium (Ni-Cd) batteries, alkaline batteriesor lithium batteries.
Check that the Mode dialto “OFF”.
Slide the battery compart-ment lock towards the icon.
Slide the battery compart-ment cover in the directionindicated by the arrow onthe cover.
Open the battery compart-ment cover.
Load the batteries.● If you are using lithium battery
packs, ensure that you loadthe battery packs in the cor-rect direction, as shown in thefigure at right. If you try to loada battery pack backwards, itwill only go in partway.
5
4
3
2
1
29
2
43
If you are using lithium battery packs.5
OFF
P A/S/M
P
A/S/M
OFF
POWER/MO
DE
DIA
L
1
Getting S
tarted
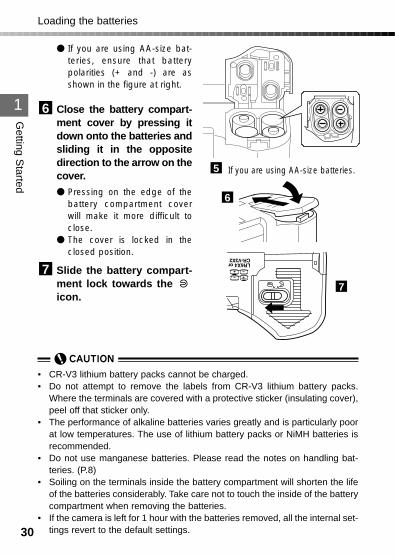
● If you are using AA-size bat-teries, ensure that batterypolarities (+ and -) are asshown in the figure at right.
Close the battery compart-ment cover by pressing itdown onto the batteries andsliding it in the oppositedirection to the arrow on thecover.● Pressing on the edge of the
battery compartment coverwill make it more difficult toclose.
● The cover is locked in theclosed position.
Slide the battery compart-ment lock towards the icon.
7
6
30
Loading the batteries
• CR-V3 lithium battery packs cannot be charged.• Do not attempt to remove the labels from CR-V3 lithium battery packs.
Where the terminals are covered with a protective sticker (insulating cover),peel off that sticker only.
• The performance of alkaline batteries varies greatly and is particularly poorat low temperatures. The use of lithium battery packs or NiMH batteries isrecommended.
• Do not use manganese batteries. Please read the notes on handling bat-teries. (P.8)
• Soiling on the terminals inside the battery compartment will shorten the lifeof the batteries considerably. Take care not to touch the inside of the batterycompartment when removing the batteries.
• If the camera is left for 1 hour with the batteries removed, all the internal set-tings revert to the default settings.
7
If you are using AA-size batteries.5
6
1
Getting S
tarted
31
Loading the batteries
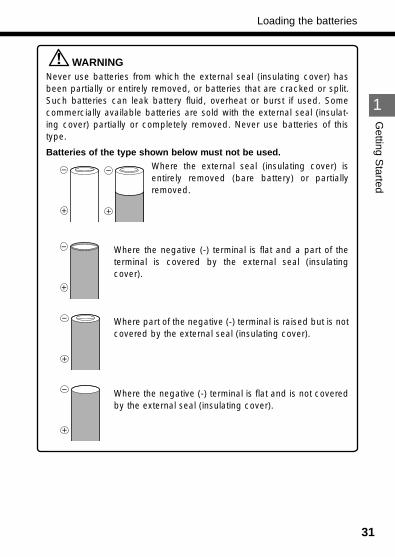
WARNINGNever use batteries from which the external seal (insulating cover) hasbeen partially or entirely removed, or batteries that are cracked or split.Such batteries can leak battery fluid, overheat or burst if used. Somecommercially available batteries are sold with the external seal (insulat-ing cover) partially or completely removed. Never use batteries of thistype.
Batteries of the type shown below must not be used.
Where the external seal (insulating cover) isentirely removed (bare battery) or partiallyremoved.
Where the negative (-) terminal is flat and a part of theterminal is covered by the external seal (insulatingcover).
Where part of the negative (-) terminal is raised but is notcovered by the external seal (insulating cover).
Where the negative (-) terminal is flat and is not coveredby the external seal (insulating cover).
1
Getting S
tarted
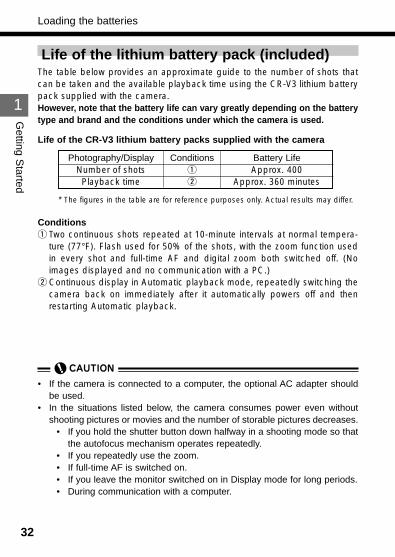
Life of the lithium battery pack (included)The table below provides an approximate guide to the number of shots thatcan be taken and the available playback time using the CR-V3 lithium batterypack supplied with the camera. However, note that the battery life can vary greatly depending on the batterytype and brand and the conditions under which the camera is used.
32
Loading the batteries
Photography/DisplayNumber of shots
Playback time
Conditionsq
w
Battery LifeApprox. 400
Approx. 360 minutes
* The figures in the table are for reference purposes only. Actual results may differ.
Conditionsq Two continuous shots repeated at 10-minute intervals at normal tempera-
ture (77°F). Flash used for 50% of the shots, with the zoom function usedin every shot and full-time AF and digital zoom both switched off. (Noimages displayed and no communication with a PC.)
w Continuous display in Automatic playback mode, repeatedly switching thecamera back on immediately after it automatically powers off and thenrestarting Automatic playback.
• If the camera is connected to a computer, the optional AC adapter shouldbe used.
• In the situations listed below, the camera consumes power even withoutshooting pictures or movies and the number of storable pictures decreases.
• If you hold the shutter button down halfway in a shooting mode so thatthe autofocus mechanism operates repeatedly.
• If you repeatedly use the zoom.• If full-time AF is switched on.• If you leave the monitor switched on in Display mode for long periods.• During communication with a computer.
Life of the CR-V3 lithium battery packs supplied with the camera
1
Getting S
tarted
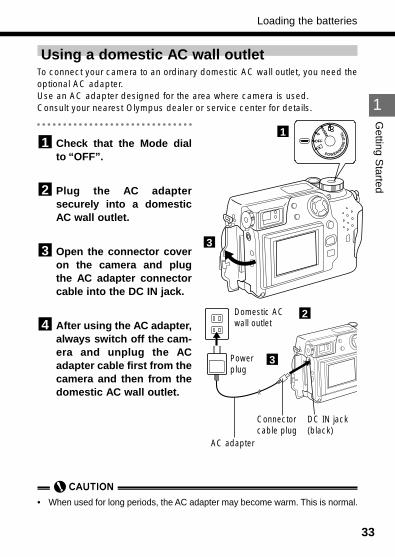
Using a domestic AC wall outletTo connect your camera to an ordinary domestic AC wall outlet, you need theoptional AC adapter.Use an AC adapter designed for the area where camera is used. Consult your nearest Olympus dealer or service center for details.
Check that the Mode dialto “OFF”.
Plug the AC adaptersecurely into a domesticAC wall outlet.
Open the connector coveron the camera and plugthe AC adapter connectorcable into the DC IN jack.
After using the AC adapter,always switch off the cam-era and unplug the ACadapter cable first from thecamera and then from thedomestic AC wall outlet.
4
3
2
1
33
Loading the batteries
P
A/S/M
OFF
POWER/MO
DE
DIA
L
Domestic ACwall outlet
Powerplug
2
3
AC adapter
DC IN jack(black)
Connectorcable plug
• When used for long periods, the AC adapter may become warm. This is normal.
1
3
1
Getting S
tarted
WARNINGIncorrect use may cause a fire, electric shock or burns.
• Be sure to use only the Olympus AC adapter. The use of other AC adapterscould damage the camera or power supply and cause other unforeseeableaccidents.
• Use an AC adapter designed for the area where camera is used. Consult your nearest Olympus dealer or service center for details.
• Ensure that the AC adapter is properly plugged into the power outlet beforeuse.
• Never connect or disconnect the AC adapter with wet hands.• If the AC adapter cable is hot, smells scorched or is emitting smoke, unplug
it immediately and contact your nearest Olympus service center.• Make sure that the camera is switched off before connecting or disconnect-
ing the AC adapter.• When unplugging the AC adapter from the AC wall outlet, always pull the
adapter itself, not the cable. Never unduly pull, bend, twist or bundle thecable.
• If the cable is damaged or cut or if there is a loose connection in the plug,contact your nearest Olympus service center immediately.
• Disconnect the AC adapter from the camera and the AC wall outlet when itis not in use.
34
Loading the batteries
Inserting and removing SmartMedia cards
1
Getting S
tarted
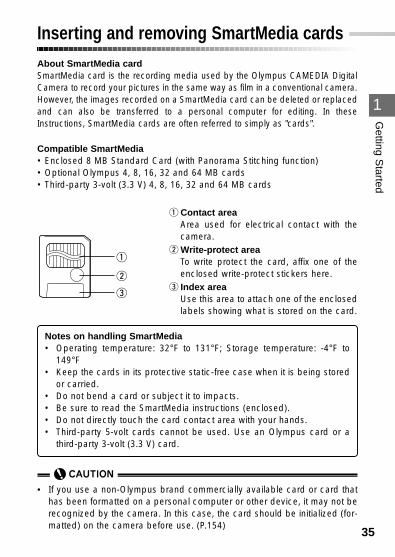
About SmartMedia cardSmartMedia card is the recording media used by the Olympus CAMEDIA DigitalCamera to record your pictures in the same way as film in a conventional camera.However, the images recorded on a SmartMedia card can be deleted or replacedand can also be transferred to a personal computer for editing. In theseInstructions, SmartMedia cards are often referred to simply as "cards".
Compatible SmartMedia• Enclosed 8 MB Standard Card (with Panorama Stitching function)• Optional Olympus 4, 8, 16, 32 and 64 MB cards• Third-party 3-volt (3.3 V) 4, 8, 16, 32 and 64 MB cards
35
q
q Contact areaArea used for electrical contact with thecamera.
w Write-protect areaTo write protect the card, affix one of theenclosed write-protect stickers here.
e Index areaUse this area to attach one of the enclosedlabels showing what is stored on the card.
Notes on handling SmartMedia• Operating temperature: 32°F to 131°F; Storage temperature: -4°F to
149°F• Keep the cards in its protective static-free case when it is being stored
or carried.• Do not bend a card or subject it to impacts.• Be sure to read the SmartMedia instructions (enclosed).• Do not directly touch the card contact area with your hands.• Third-party 5-volt cards cannot be used. Use an Olympus card or a
third-party 3-volt (3.3 V) card.
w
e
• If you use a non-Olympus brand commercially available card or card thathas been formatted on a personal computer or other device, it may not berecognized by the camera. In this case, the card should be initialized (for-matted) on the camera before use. (P.154)
1
Getting S
tarted
36
Inserting and removing SmartMedia cards
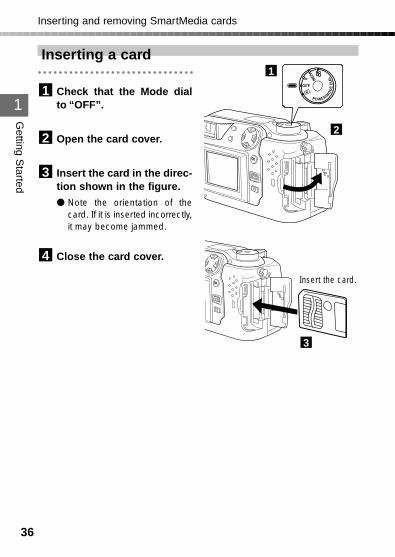
Inserting a card
Check that the Mode dialto “OFF”.
Open the card cover.
Insert the card in the direc-tion shown in the figure.● Note the orientation of the
card. If it is inserted incorrectly,it may become jammed.
Close the card cover.4
3
2
1P
A/S/MOFF
POWER/MO
DE
DIA
L
Insert the card.
2
3
1
1
37
Getting S
tartedInserting and removing SmartMedia cards
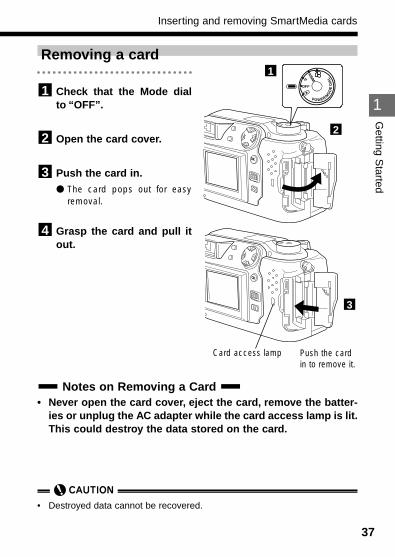
Removing a card
Check that the Mode dialto “OFF”.
Open the card cover.
Push the card in.● The card pops out for easy
removal.
Grasp the card and pull itout.
4
3
2
1P
A/S/MOFF
POWER/MO
DE
DIA
L
Push the cardin to remove it.
2
3
1
• Destroyed data cannot be recovered.
Notes on Removing a Card • Never open the card cover, eject the card, remove the batter-
ies or unplug the AC adapter while the card access lamp is lit.This could destroy the data stored on the card.
Card access lamp
1
Getting S
tarted
38
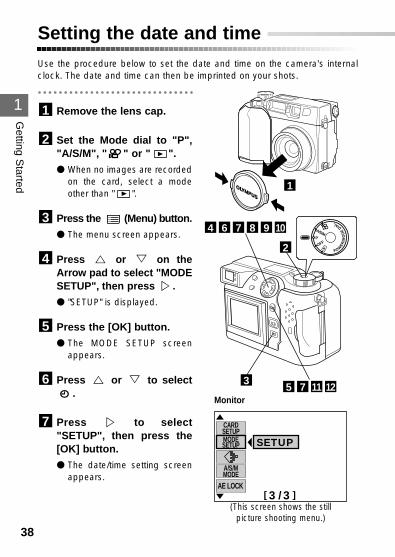
Setting the date and timeUse the procedure below to set the date and time on the camera's internalclock. The date and time can then be imprinted on your shots.
Remove the lens cap.
Set the Mode dial to "P","A/S/M", " " or " ".● When no images are recorded
on the card, select a modeother than " ".
Press the (Menu) button.● The menu screen appears.
Press or on theArrow pad to select "MODESETUP", then press .● "SETUP" is displayed.
Press the [OK] button.● The MODE SETUP screen
appears.
Press or to select.
Press to select"SETUP", then press the[OK] button.● The date/time setting screen
appears.
7
6
5
4
3
2
1
POW
ER/M
OD
E
DIAL
P
A/S/M
OFF
1098764
1211753
[3 /3 ]
A/S/MMODE
CARDSETUPMODESETUP SETUP
AE LOCK
Monitor
(This screen shows the still picture shooting menu.)
1
2
1
Getting S
tarted
39
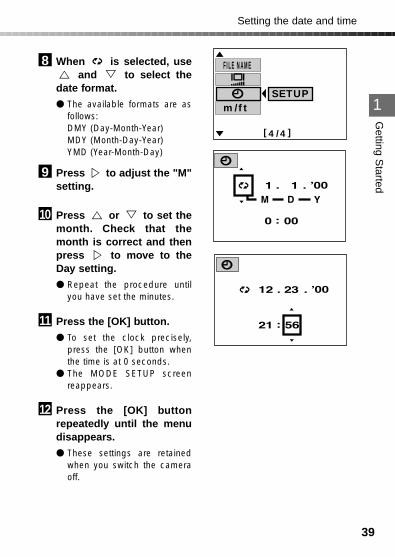
When is selected, useand to select the
date format.● The available formats are as
follows:DMY (Day-Month-Year)MDY (Month-Day-Year)YMD (Year-Month-Day)
Press to adjust the "M"setting.
Press or to set themonth. Check that themonth is correct and thenpress to move to theDay setting.● Repeat the procedure until
you have set the minutes.
Press the [OK] button.● To set the clock precisely,
press the [OK] button whenthe time is at 0 seconds.
● The MODE SETUP screenreappears.
Press the [OK] buttonrepeatedly until the menudisappears.● These settings are retained
when you switch the cameraoff.
12
11
10
9
8
Setting the date and time
[4 /4 ]
m/ft
FILE NAME
SETUP
1
Getting S
tarted
40
Setting the date and time
• The year 2000 is shown as '00.
• The adjusted date and time will revert to the default setting if the camera isleft without batteries for approximately 1 hour (based on Olympus test con-ditions). If this occurs, set the date and time again.
• We recommend that you check that the date and time are set correctlybefore taking important pictures.
• If the card contains no recorded images when the Mode dial is set to " ",the menu screen does not appear when you press the (Menu) button.
• If you switch the camera off, the camera retains date/time setting until thesetting is changed.
1
Getting S
tarted
41
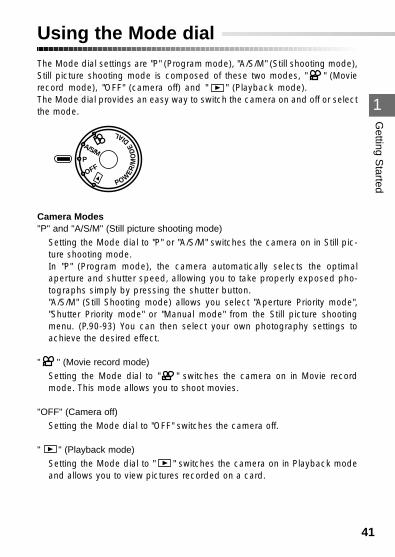
Using the Mode dialThe Mode dial settings are "P" (Program mode), "A/S/M" (Still shooting mode),Still picture shooting mode is composed of these two modes, " " (Movierecord mode), "OFF" (camera off) and " " (Playback mode).The Mode dial provides an easy way to switch the camera on and off or selectthe mode.
Camera Modes"P" and "A/S/M" (Still picture shooting mode)
Setting the Mode dial to "P" or "A/S/M" switches the camera on in Still pic-ture shooting mode.In "P" (Program mode), the camera automatically selects the optimalaperture and shutter speed, allowing you to take properly exposed pho-tographs simply by pressing the shutter button."A/S/M" (Still Shooting mode) allows you select "Aperture Priority mode","Shutter Priority mode" or "Manual mode" from the Still picture shootingmenu. (P.90-93) You can then select your own photography settings toachieve the desired effect.
" " (Movie record mode)
Setting the Mode dial to " " switches the camera on in Movie recordmode. This mode allows you to shoot movies.
"OFF" (Camera off)
Setting the Mode dial to "OFF" switches the camera off.
" " (Playback mode)
Setting the Mode dial to " " switches the camera on in Playback modeand allows you to view pictures recorded on a card.
POW
ER/M
OD
EDIAL
P
A/S/M
OFF
1
Getting S
tarted
42
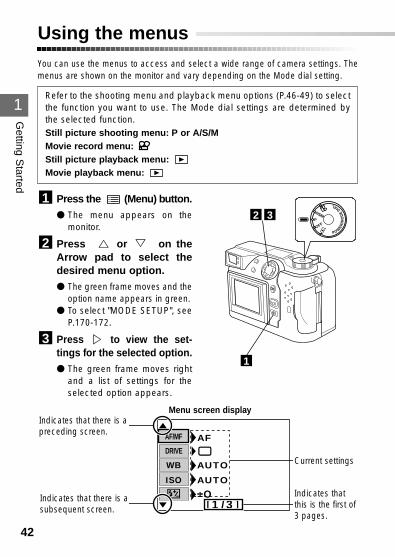
Using the menusYou can use the menus to access and select a wide range of camera settings. Themenus are shown on the monitor and vary depending on the Mode dial setting.
Refer to the shooting menu and playback menu options (P.46-49) to selectthe function you want to use. The Mode dial settings are determined bythe selected function.Still picture shooting menu: P or A/S/MMovie record menu:Still picture playback menu:Movie playback menu:
Press the (Menu) button.● The menu appears on the
monitor.
Press or on theArrow pad to select thedesired menu option.● The green frame moves and the
option name appears in green.● To select "MODE SETUP", see
P.170-172.
Press to view the set-tings for the selected option.● The green frame moves right
and a list of settings for theselected option appears.
3
2
1
[1 /3 ]
DRIVE
OISO
WB
AUTO
AUTO
AFAF/MF
Menu screen displayIndicates that there is apreceding screen.
Current settings
Indicates thatthis is the first of3 pages.
Indicates that there is asubsequent screen.
POW
ER/M
OD
E
DIAL
P
A/S/M
OFF
32
1
1
Getting S
tarted
43
Using the menus
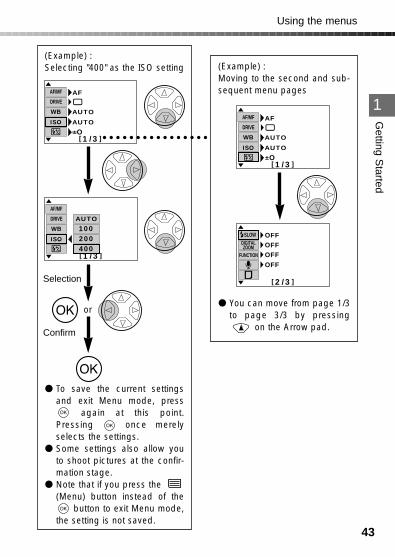
(Example) :Selecting "400" as the ISO setting
● To save the current settingsand exit Menu mode, press
again at this point.Pressing once merelyselects the settings.
● Some settings also allow youto shoot pictures at the confir-mation stage.
● Note that if you press the (Menu) button instead of the
button to exit Menu mode,the setting is not saved.
(Example) :Moving to the second and sub-sequent menu pages
● You can move from page 1/3to page 3/3 by pressing
on the Arrow pad.
[1 /3 ]
DRIVE
OISO
WB
AUTO
AUTO
AFAF/MF
[1 /3 ]
DRIVE
ISO
WB
AF/MF
AUTO
100200400
[1 /3 ]
DRIVE
OISO
WB
AUTO
AUTO
AFAF/MF
[2 /3 ]
OFFOFFOFFOFF
DIGITALZOOM
FUNCTION
SLOW
Selection
Confirm
or
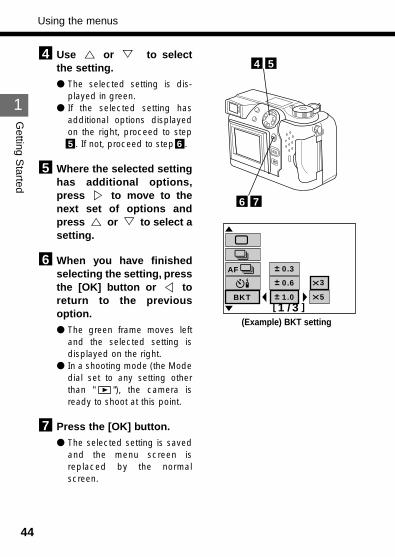
Use or to selectthe setting.● The selected setting is dis-
played in green.● If the selected setting has
additional options displayedon the right, proceed to step5.. If not, proceed to step 6 .
Where the selected settinghas additional options,press to move to thenext set of options andpress or to select asetting.
When you have finishedselecting the setting, pressthe [OK] button or toreturn to the previousoption.● The green frame moves left
and the selected setting isdisplayed on the right.
● In a shooting mode (the Modedial set to any setting otherthan " "), the camera isready to shoot at this point.
Press the [OK] button.● The selected setting is saved
and the menu screen isreplaced by the normalscreen.
7
6
5
4
1
Getting S
tarted
44
Using the menus
54
76
BKT[1 /3 ]
AF 0.3
0.6
1.0
3
5
(Example) BKT setting
1
Getting S
tarted
45
Tips
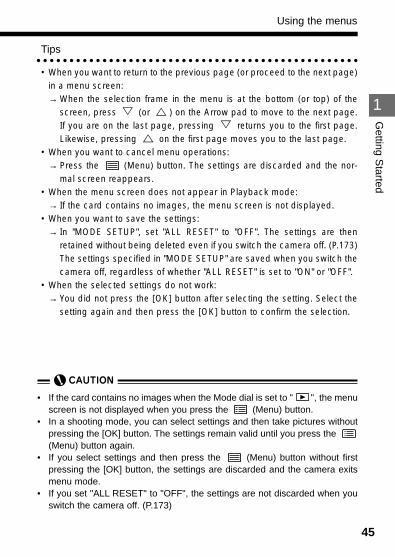
• When you want to return to the previous page (or proceed to the next page)in a menu screen:→ When the selection frame in the menu is at the bottom (or top) of the
screen, press (or ) on the Arrow pad to move to the next page.If you are on the last page, pressing returns you to the first page.Likewise, pressing on the first page moves you to the last page.
• When you want to cancel menu operations:→ Press the (Menu) button. The settings are discarded and the nor-
mal screen reappears.• When the menu screen does not appear in Playback mode:
→ If the card contains no images, the menu screen is not displayed.• When you want to save the settings:
→ In "MODE SETUP", set "ALL RESET" to "OFF". The settings are thenretained without being deleted even if you switch the camera off. (P.173)The settings specified in "MODE SETUP" are saved when you switch thecamera off, regardless of whether "ALL RESET" is set to "ON" or "OFF".
• When the selected settings do not work:→ You did not press the [OK] button after selecting the setting. Select the
setting again and then press the [OK] button to confirm the selection.
Using the menus
• If the card contains no images when the Mode dial is set to " ", the menuscreen is not displayed when you press the (Menu) button.
• In a shooting mode, you can select settings and then take pictures withoutpressing the [OK] button. The settings remain valid until you press the (Menu) button again.
• If you select settings and then press the (Menu) button without firstpressing the [OK] button, the settings are discarded and the camera exitsmenu mode.
• If you set "ALL RESET" to "OFF", the settings are not discarded when youswitch the camera off. (P.173)
1
Getting S
tarted
46
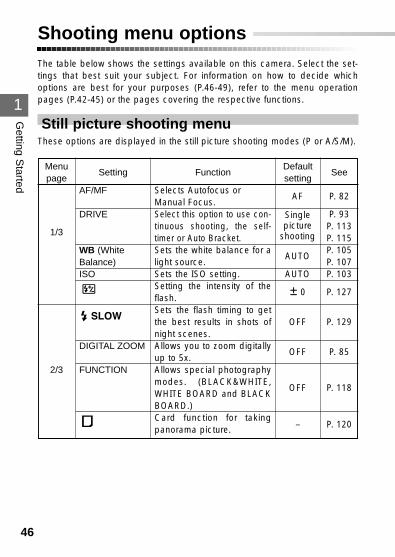
Shooting menu optionsThe table below shows the settings available on this camera. Select the set-tings that best suit your subject. For information on how to decide whichoptions are best for your purposes (P.46-49), refer to the menu operationpages (P.42-45) or the pages covering the respective functions.
Still picture shooting menuThese options are displayed in the still picture shooting modes (P or A/S/M).
Menupage
1/3
2/3
Setting
AF/MF
DRIVE
WB (WhiteBalance)ISO
DIGITAL ZOOM
FUNCTION
Function
Selects Autofocus orManual Focus.Select this option to use con-tinuous shooting, the self-timer or Auto Bracket.Sets the white balance for alight source.Sets the ISO setting.Setting the intensity of theflash.Sets the flash timing to getthe best results in shots ofnight scenes.Allows you to zoom digitallyup to 5x.Allows special photographymodes. (BLACK&WHITE,WHITE BOARD and BLACKBOARD.)Card function for takingpanorama picture.
Defaultsetting
AF
Singlepicture
shooting
AUTO
AUTO
± 0
OFF
OFF
OFF
–
See
P. 82
P. 93P. 113P. 115P. 105P. 107P. 103
P. 127
P. 129
P. 85
P. 118
P. 120
1
Getting S
tarted
47
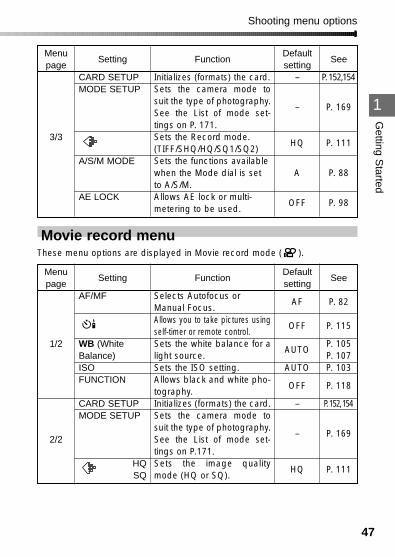
Shooting menu options
Menupage
3/3
Setting
CARD SETUPMODE SETUP
A/S/M MODE
AE LOCK
Function
Initializes (formats) the card.Sets the camera mode tosuit the type of photography.See the List of mode set-tings on P. 171.Sets the Record mode.(TIFF/SHQ/HQ/SQ1/SQ2)Sets the functions availablewhen the Mode dial is setto A/S/M.Allows AE lock or multi-metering to be used.
Defaultsetting
–
–
HQ
A
OFF
See
P. 152,154
P. 169
P. 111
P. 88
P. 98
Movie record menuThese menu options are displayed in Movie record mode ( ).
Menupage
1/2
2/2
Setting
AF/MF
WB (WhiteBalance)ISOFUNCTION
CARD SETUPMODE SETUP
HQSQ
Function
Selects Autofocus orManual Focus.Allows you to take pictures usingself-timer or remote control.Sets the white balance for alight source.Sets the ISO setting.Allows black and white pho-tography.Initializes (formats) the card.Sets the camera mode tosuit the type of photography.See the List of mode set-tings on P.171.Sets the image qualitymode (HQ or SQ).
Defaultsetting
AF
OFF
AUTO
AUTO
OFF
–
–
HQ
See
P. 82
P. 115
P. 105P. 107P. 103
P. 118
P. 152, 154
P. 169
P. 111
1
Getting S
tarted
48
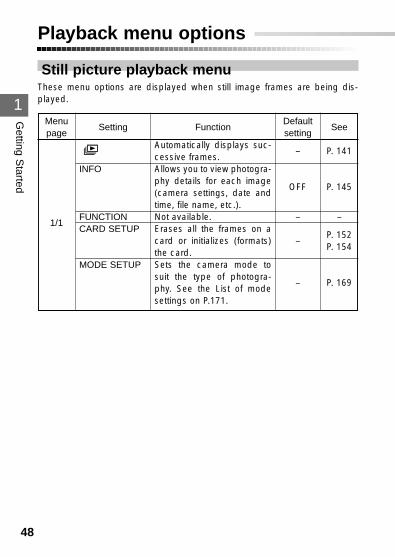
Playback menu options
Still picture playback menuThese menu options are displayed when still image frames are being dis-played.
Menupage
1/1
Setting
INFO
FUNCTIONCARD SETUP
MODE SETUP
Function
Automatically displays suc-cessive frames.Allows you to view photogra-phy details for each image(camera settings, date andtime, file name, etc.).Not available.Erases all the frames on acard or initializes (formats)the card.Sets the camera mode tosuit the type of photogra-phy. See the List of modesettings on P.171.
Defaultsetting
–
OFF
–
–
–
See
P. 141
P. 145
–
P. 152P. 154
P. 169
1
Getting S
tarted
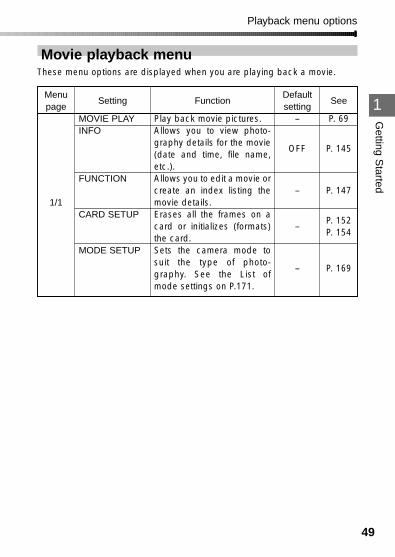
49
Movie playback menuThese menu options are displayed when you are playing back a movie.
Playback menu options
Menupage
1/1
Setting
MOVIE PLAYINFO
FUNCTION
CARD SETUP
MODE SETUP
Function
Play back movie pictures.Allows you to view photo-graphy details for the movie(date and time, file name,etc.).Allows you to edit a movie orcreate an index listing themovie details.Erases all the frames on acard or initializes (formats)the card.Sets the camera mode tosuit the type of photo-graphy. See the List ofmode settings on P.171.
Defaultsetting
–
OFF
–
–
–
See
P. 69
P. 145
P. 147
P. 152P. 154
P. 169

1
50
2OLYMPUS DIGITAL CAMERA
Chapter
Shooting and Playback Basics
• This chapter covers basic camera operation anddescribes how to use the camera for simplephotography, how to display your pictures andmovies, and how to erase images. Familiarizeyourself with your camera by reading throughthis chapter as you use the camera.
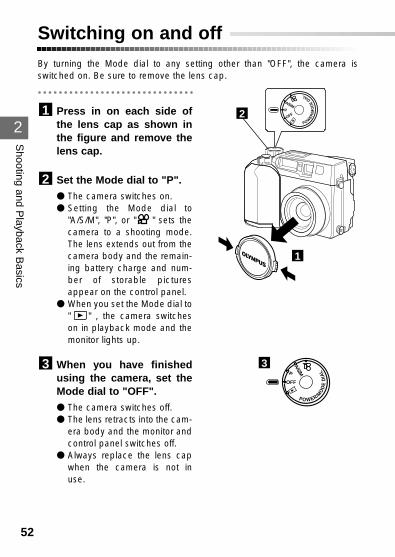
Switching on and off
2
Shooting and P
layback Basics
By turning the Mode dial to any setting other than "OFF", the camera isswitched on. Be sure to remove the lens cap.
Press in on each side ofthe lens cap as shown inthe figure and remove thelens cap.
Set the Mode dial to "P".● The camera switches on.● Setting the Mode dial to
"A/S/M", "P", or " " sets thecamera to a shooting mode.The lens extends out from thecamera body and the remain-ing battery charge and num-ber of storable picturesappear on the control panel.
● When you set the Mode dial to" " , the camera switcheson in playback mode and themonitor lights up.
When you have finishedusing the camera, set theMode dial to "OFF".● The camera switches off.● The lens retracts into the cam-
era body and the monitor andcontrol panel switches off.
● Always replace the lens capwhen the camera is not inuse.
3
2
1
52
POW
ER/M
OD
E
DIAL
P
A/S/M
OFF
P
A/S/M
OFF
POWER/MO
DE
DIA
L
2
1
3
53
Switching on and off
2
Shooting and P
layback Basics
• Always remove the lens cap before you switch the camera on.• Never open the card cover, eject the card, remove the batteries, or unplug
the AC adapter while the card access lamp is blinking. This could not onlyprevent the recording of your current picture, but could also destroy the datarecorded on the card.
• If you do not operate the camera for three minutes, the Power Save mech-anism automatically switches off the control panel (sleep mode). Press theshutter button or zoom lever to switch the control panel display back on.Though the camera automatically switches off after approximately fourhours in Standby mode, you should make a practice of switching the cam-era off as soon as possible when you are not taking pictures. (These timesmay be longer if you are using new batteries and depend on the type of bat-teries used.)
• Photographed images are saved even if you switch the camera off orreplace the batteries.
Checklist before shooting
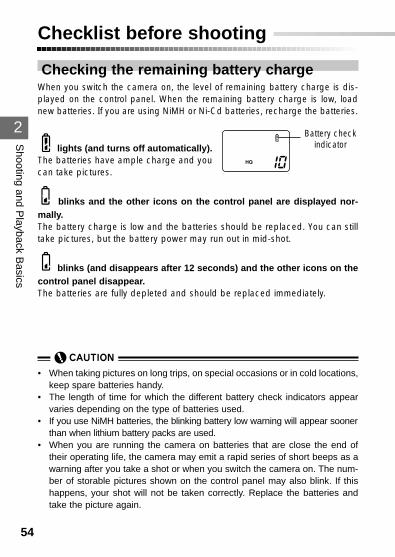
Checking the remaining battery chargeWhen you switch the camera on, the level of remaining battery charge is dis-played on the control panel. When the remaining battery charge is low, loadnew batteries. If you are using NiMH or Ni-Cd batteries, recharge the batteries.
lights (and turns off automatically).The batteries have ample charge and youcan take pictures.
blinks and the other icons on the control panel are displayed nor-mally.The battery charge is low and the batteries should be replaced. You can stilltake pictures, but the battery power may run out in mid-shot.
blinks (and disappears after 12 seconds) and the other icons on thecontrol panel disappear.The batteries are fully depleted and should be replaced immediately.
54
2
Shooting and P
layback Basics
• When taking pictures on long trips, on special occasions or in cold locations,keep spare batteries handy.
• The length of time for which the different battery check indicators appearvaries depending on the type of batteries used.
• If you use NiMH batteries, the blinking battery low warning will appear soonerthan when lithium battery packs are used.
• When you are running the camera on batteries that are close the end oftheir operating life, the camera may emit a rapid series of short beeps as awarning after you take a shot or when you switch the camera on. The num-ber of storable pictures shown on the control panel may also blink. If thishappens, your shot will not be taken correctly. Replace the batteries andtake the picture again.
Battery checkindicator
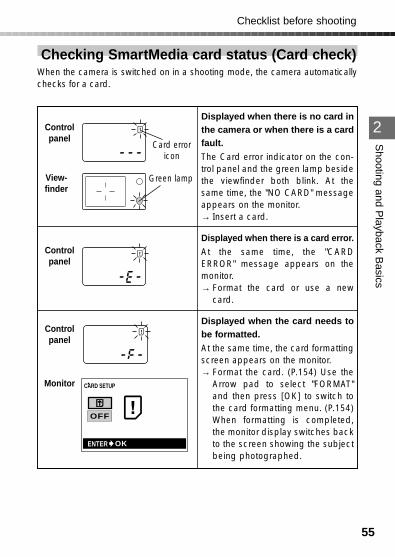
Checking SmartMedia card status (Card check)When the camera is switched on in a shooting mode, the camera automaticallychecks for a card.
55
Checklist before shooting
2
Shooting and P
layback Basics
Displayed when there is no card inthe camera or when there is a cardfault.
The Card error indicator on the con-trol panel and the green lamp besidethe viewfinder both blink. At thesame time, the "NO CARD" messageappears on the monitor.→ Insert a card.
Displayed when there is a card error.
At the same time, the "CARDERROR" message appears on themonitor.→ Format the card or use a new
card.
Displayed when the card needs tobe formatted.
At the same time, the card formattingscreen appears on the monitor.→ Format the card. (P.154) Use the
Arrow pad to select "FORMAT"and then press [OK] to switch tothe card formatting menu. (P.154)When formatting is completed,the monitor display switches backto the screen showing the subjectbeing photographed.
Controlpanel
Controlpanel
ENTER OK
OFF
CARD SETUP
Controlpanel
Monitor
View-finder
Card erroricon
Green lamp
Number of available still shots
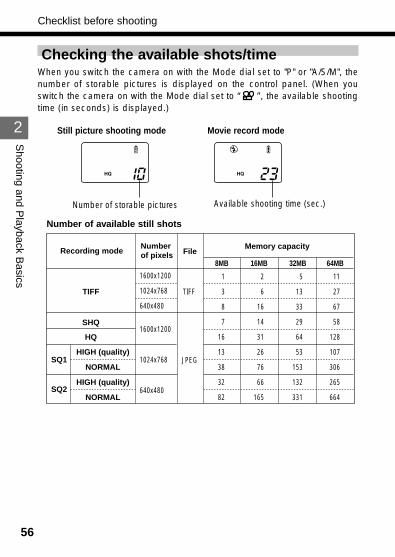
Checking the available shots/timeWhen you switch the camera on with the Mode dial set to "P" or "A/S/M", thenumber of storable pictures is displayed on the control panel. (When youswitch the camera on with the Mode dial set to “ ”, the available shootingtime (in seconds) is displayed.)
56
Checklist before shooting
2
Shooting and P
layback Basics
Still picture shooting mode
Number of storable pictures
Movie record mode
Available shooting time (sec.)
Recording mode
HIGH (quality)
NORMAL
HIGH (quality)
NORMAL
Number of pixels File
Memory capacity
8MB 16MB 32MB 64MB
1600x1200
1024x768
640x480
1600x1200
1024x768
640x480
1
3
8
7
16
13
38
32
82
2
6
16
14
31
26
76
66
165
5
13
33
29
64
53
153
132
331
11
27
67
58
128
107
306
265
664
TIFF
SHQ
HQ
SQ1
SQ2
TIFF
JPEG
57
2
Shooting and P
layback Basics
Checklist before shooting
When the nWhen the number of storabumber of storable pictures in Still le pictures in Still picture shooting mode reacpicture shooting mode reaches 0.hes 0.• When the number of storable pictures reaches 0, the camera emits a
warning beep, the green lamp beside the viewfinder blinks and the"CARD FULL" message appears on the monitor. The same thing occursthe next time you switch the camera on. (P.210)When this happens, load a new card or one that is not full. Alternatively,erase unwanted images on the card to create free space. (P.71, 152)
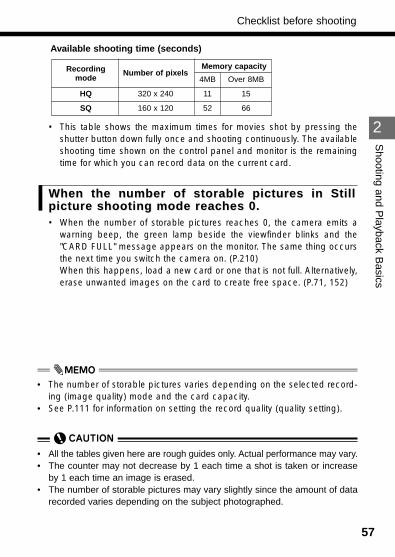
Available shooting time (seconds)
• This table shows the maximum times for movies shot by pressing theshutter button down fully once and shooting continuously. The availableshooting time shown on the control panel and monitor is the remainingtime for which you can record data on the current card.
Recording Number of pixelsMemory capacity
mode 4MB Over 8MB
HQ 320 x 240 11 15
SQ 160 x 120 52 66
• The number of storable pictures varies depending on the selected record-ing (image quality) mode and the card capacity.
• See P.111 for information on setting the record quality (quality setting).
• All the tables given here are rough guides only. Actual performance may vary.• The counter may not decrease by 1 each time a shot is taken or increase
by 1 each time an image is erased.• The number of storable pictures may vary slightly since the amount of data
recorded varies depending on the subject photographed.
2
Shooting and P
layback Basics
58
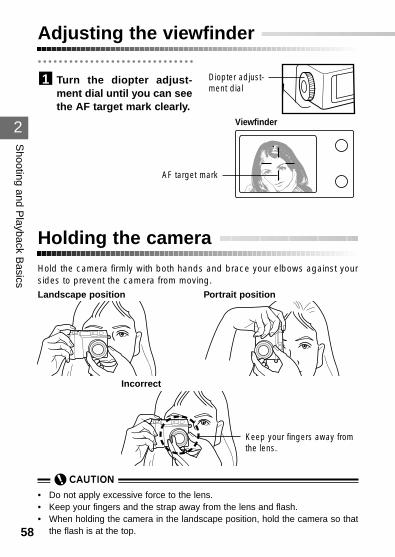
Holding the cameraHold the camera firmly with both hands and brace your elbows against yoursides to prevent the camera from moving.
Landscape position Portrait position
Incorrect
• Do not apply excessive force to the lens.• Keep your fingers and the strap away from the lens and flash.• When holding the camera in the landscape position, hold the camera so that
the flash is at the top.
Keep your fingers away fromthe lens.
Adjusting the viewfinder
Turn the diopter adjust-ment dial until you can seethe AF target mark clearly.
1 Diopter adjust-ment dial
Viewfinder
AF target mark
2
59
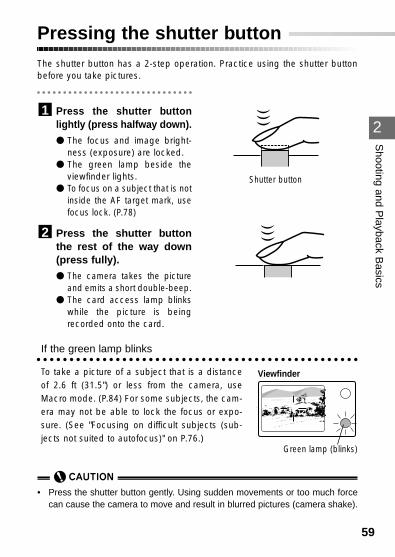
Pressing the shutter buttonS
hooting and Playback B
asics
The shutter button has a 2-step operation. Practice using the shutter buttonbefore you take pictures.
Press the shutter buttonlightly (press halfway down).● The focus and image bright-
ness (exposure) are locked.● The green lamp beside the
viewfinder lights.● To focus on a subject that is not
inside the AF target mark, usefocus lock. (P.78)
Press the shutter buttonthe rest of the way down(press fully).● The camera takes the picture
and emits a short double-beep.● The card access lamp blinks
while the picture is beingrecorded onto the card.
If the green lamp blinks
To take a picture of a subject that is a distanceof 2.6 ft (31.5") or less from the camera, useMacro mode. (P.84) For some subjects, the cam-era may not be able to lock the focus or expo-sure. (See "Focusing on difficult subjects (sub-jects not suited to autofocus)" on P.76.)
2
1
• Press the shutter button gently. Using sudden movements or too much forcecan cause the camera to move and result in blurred pictures (camera shake).
Shutter button
Viewfinder
Green lamp (blinks)
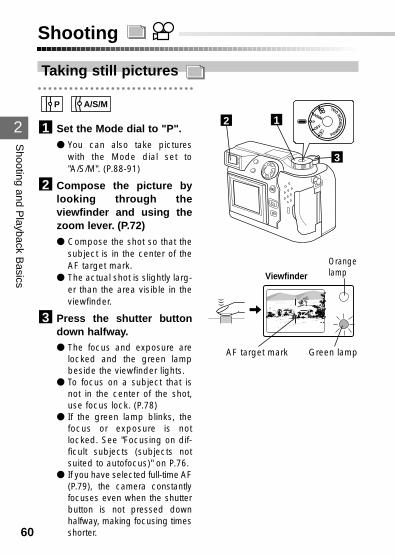
60
2
Shooting
Taking still pictures
Set the Mode dial to "P".● You can also take pictures
with the Mode dial set to"A/S/M". (P.88-91)
Compose the picture bylooking through theviewfinder and using thezoom lever. (P.72)● Compose the shot so that the
subject is in the center of theAF target mark.
● The actual shot is slightly larg-er than the area visible in theviewfinder.
Press the shutter buttondown halfway.● The focus and exposure are
locked and the green lampbeside the viewfinder lights.
● To focus on a subject that isnot in the center of the shot,use focus lock. (P.78)
● If the green lamp blinks, thefocus or exposure is notlocked. See "Focusing on dif-ficult subjects (subjects notsuited to autofocus)" on P.76.
● If you have selected full-time AF(P.79), the camera constantlyfocuses even when the shutterbutton is not pressed downhalfway, making focusing timesshorter.
3
2
1
A/S/MP
Shooting and P
layback Basics
POW
ER/M
OD
E
DIAL
P
A/S/M
OFF2
3
Viewfinder
Orangelamp
AF target mark Green lamp
1
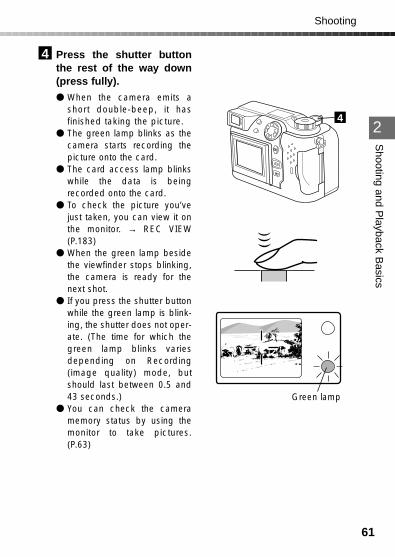
Press the shutter buttonthe rest of the way down(press fully).● When the camera emits a
short double-beep, it hasfinished taking the picture.
● The green lamp blinks as thecamera starts recording thepicture onto the card.
● The card access lamp blinkswhile the data is beingrecorded onto the card.
● To check the picture you’vejust taken, you can view it onthe monitor. → REC VIEW(P.183)
● When the green lamp besidethe viewfinder stops blinking,the camera is ready for thenext shot.
● If you press the shutter buttonwhile the green lamp is blink-ing, the shutter does not oper-ate. (The time for which thegreen lamp blinks variesdepending on Recording(image quality) mode, butshould last between 0.5 and43 seconds.)
● You can check the cameramemory status by using themonitor to take pictures.(P.63)
4
61
2
ShootingS
hooting and Playback B
asics
4
Green lamp
62
2
Shooting
Shooting and P
layback Basics
When the orange lamp lights
The flash fires automatically. (See "Using the flash (Auto-Flash)" on P.73.)
• Depending on the working distance, the picture that is actually taken andthe picture that you see in the optical viewfinder may be different.In that case, use the monitor to take the picture.
• Never open the card cover, eject the card, remove the batteries, or unplug theAC adapter while the card access lamp is blinking. This could not only preventthe recording of your current picture, but could also destroy the images record-ed on the card.
• If the orange lamp beside the viewfinder is blinking, this indicates that the flashis charging. Wait until the orange lamp goes out before pressing the shutterbutton.
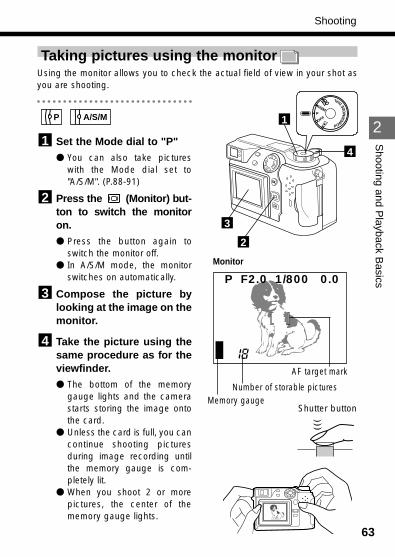
63
2
Taking pictures using the monitorUsing the monitor allows you to check the actual field of view in your shot asyou are shooting.
Set the Mode dial to "P"● You can also take pictures
with the Mode dial set to"A/S/M". (P.88-91)
Press the (Monitor) but-ton to switch the monitoron.● Press the button again to
switch the monitor off.● In A/S/M mode, the monitor
switches on automatically.
Compose the picture bylooking at the image on themonitor.
Take the picture using thesame procedure as for theviewfinder.● The bottom of the memory
gauge lights and the camerastarts storing the image ontothe card.
● Unless the card is full, you cancontinue shooting picturesduring image recording untilthe memory gauge is com-pletely lit.
● When you shoot 2 or morepictures, the center of thememory gauge lights.
4
3
2
1
A/S/MP
ShootingS
hooting and Playback B
asics
POW
ER/M
OD
E
DIAL
P
A/S/M
OFF
2
P F2.0 1/800 0.0
Memory gaugeShutter button
Monitor
Number of storable pictures
3
1
4
AF target mark
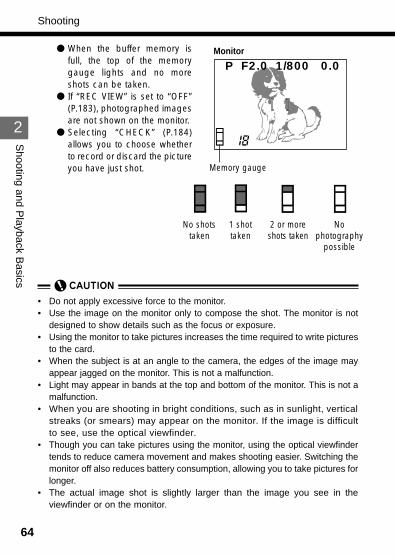
64
2
● When the buffer memory isfull, the top of the memorygauge lights and no moreshots can be taken.
● If “REC VIEW” is set to “OFF”(P.183), photographed imagesare not shown on the monitor.
● Selecting “CHECK” (P.184)allows you to choose whetherto record or discard the pictureyou have just shot.
Shooting
Shooting and P
layback Basics
P F2.0 1/800 0.0
1 shottaken
2 or moreshots taken
Nophotography
possible
Memory gauge
No shotstaken
Monitor
• Do not apply excessive force to the monitor.• Use the image on the monitor only to compose the shot. The monitor is not
designed to show details such as the focus or exposure.• Using the monitor to take pictures increases the time required to write pictures
to the card.• When the subject is at an angle to the camera, the edges of the image may
appear jagged on the monitor. This is not a malfunction.• Light may appear in bands at the top and bottom of the monitor. This is not a
malfunction.• When you are shooting in bright conditions, such as in sunlight, vertical
streaks (or smears) may appear on the monitor. If the image is difficultto see, use the optical viewfinder.
• Though you can take pictures using the monitor, using the optical viewfindertends to reduce camera movement and makes shooting easier. Switching themonitor off also reduces battery consumption, allowing you to take pictures forlonger.
• The actual image shot is slightly larger than the image you see in theviewfinder or on the monitor.
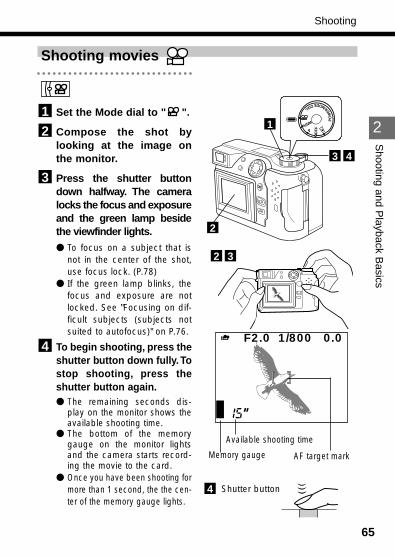
65
2
Shooting movies
Set the Mode dial to " ".
Compose the shot bylooking at the image onthe monitor.
Press the shutter buttondown halfway. The cameralocks the focus and exposureand the green lamp besidethe viewfinder lights.● To focus on a subject that is
not in the center of the shot,use focus lock. (P.78)
● If the green lamp blinks, thefocus and exposure are notlocked. See "Focusing on dif-ficult subjects (subjects notsuited to autofocus)" on P.76.
To begin shooting, press theshutter button down fully. Tostop shooting, press theshutter button again.● The remaining seconds dis-
play on the monitor shows theavailable shooting time.
● The bottom of the memorygauge on the monitor lightsand the camera starts record-ing the movie to the card.
● Once you have been shooting formore than 1 second, the the cen-ter of the memory gauge lights.
4
3
21
ShootingS
hooting and Playback B
asics
P
A/S/M
OF
F
PO
WER
/MODEDIAL
F2.0 1/800 0.0
Memory gauge
Available shooting time
Shutter button4
32
AF target mark
43
2
1
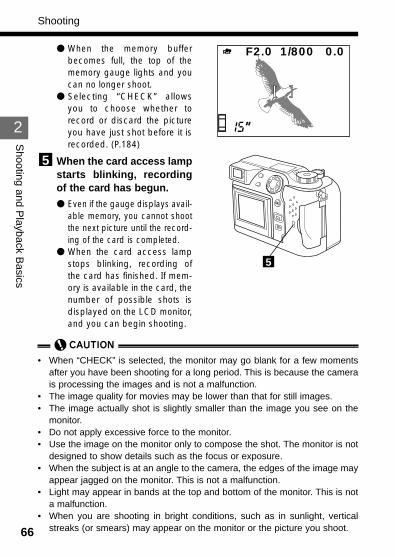
66
2
Shooting and P
layback Basics
● When the memory bufferbecomes full, the top of thememory gauge lights and youcan no longer shoot.
● Selecting “CHECK” allowsyou to choose whether torecord or discard the pictureyou have just shot before it isrecorded. (P.184)
When the card access lampstarts blinking, recordingof the card has begun.● Even if the gauge displays avail-
able memory, you cannot shootthe next picture until the record-ing of the card is completed.
● When the card access lampstops blinking, recording ofthe card has finished. If mem-ory is available in the card, thenumber of possible shots isdisplayed on the LCD monitor,and you can begin shooting.
5
Shooting
F2.0 1/800 0.0
• When “CHECK” is selected, the monitor may go blank for a few momentsafter you have been shooting for a long period. This is because the camerais processing the images and is not a malfunction.
• The image quality for movies may be lower than that for still images.• The image actually shot is slightly smaller than the image you see on the
monitor.• Do not apply excessive force to the monitor.• Use the image on the monitor only to compose the shot. The monitor is not
designed to show details such as the focus or exposure.• When the subject is at an angle to the camera, the edges of the image may
appear jagged on the monitor. This is not a malfunction.• Light may appear in bands at the top and bottom of the monitor. This is not
a malfunction.• When you are shooting in bright conditions, such as in sunlight, vertical
streaks (or smears) may appear on the monitor or the picture you shoot.
5

67
2
Checking and erasing photographed images
Displaying pictures (Quick View)When you want to view your shots right after you take them, you can displaythe images even in Still Shooting mode simply by pressing the (Monitor)button. You can also switch quickly back to the shooting mode if you want totake a picture while you are viewing your shots.
Press the (Monitor)button twice in quicksuccession.● The monitor switches on and
the most recent picture is dis-played.
● You can also view shots youhave taken by selecting " "on the Mode dial. (Single-frame playback)
You can use the Arrow padto view other picturesstored on the card.
: Displays the next picture.
: Displays the previous picture.
: Jumps back 10 pictures.
: Jumps forward 10 pictures.● See P.145 for information on
displaying the image informa-tion (date and time settings,file name, etc.).
● To play a movie, select animage with the " " icon.(P.69)
2
1
A/S/MP
Shooting and P
layback Basics
1
POW
ER/M
OD
E
DIAL
P
A/S/M
OFF2
645312.23.,00 21:56
HQ
Battery check Record mode
Date Time Framenumber
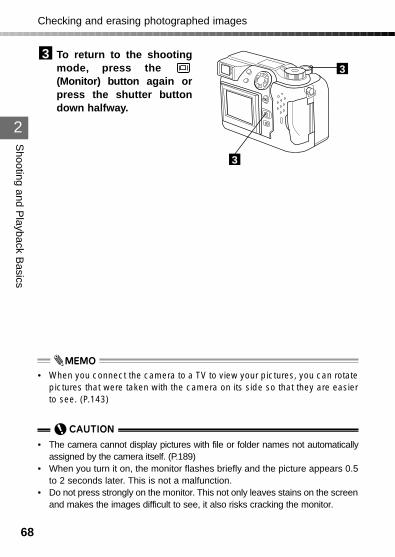
To return to the shootingmode, press the (Monitor) button again orpress the shutter buttondown halfway.
3
68
Checking and erasing photographed images
2
Shooting and P
layback Basics
• When you connect the camera to a TV to view your pictures, you can rotatepictures that were taken with the camera on its side so that they are easierto see. (P.143)
• The camera cannot display pictures with file or folder names not automaticallyassigned by the camera itself. (P.189)
• When you turn it on, the monitor flashes briefly and the picture appears 0.5to 2 seconds later. This is not a malfunction.
• Do not press strongly on the monitor. This not only leaves stains on the screenand makes the images difficult to see, it also risks cracking the monitor.
3
3
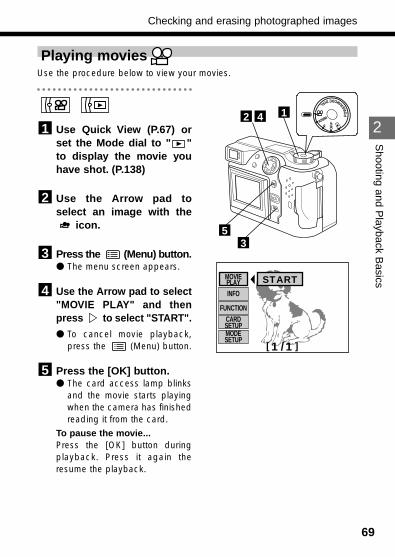
69
2
Shooting and P
layback Basics
Playing moviesUse the procedure below to view your movies.
Use Quick View (P.67) orset the Mode dial to " "to display the movie youhave shot. (P.138)
Use the Arrow pad toselect an image with the
icon.
Press the (Menu) button.● The menu screen appears.
Use the Arrow pad to select"MOVIE PLAY" and thenpress to select "START".● To cancel movie playback,
press the (Menu) button.
Press the [OK] button.● The card access lamp blinks
and the movie starts playingwhen the camera has finishedreading it from the card.
To pause the movie...Press the [OK] button duringplayback. Press it again theresume the playback.
5
4
3
2
1
Checking and erasing photographed images
P
A/S/M
OF
F
PO
WER
/MODEDIAL
3
42
MOVIEPLAY
CARDSETUP
START
[1 /1 ]MODESETUP
FUNCTION
INFO
1
5
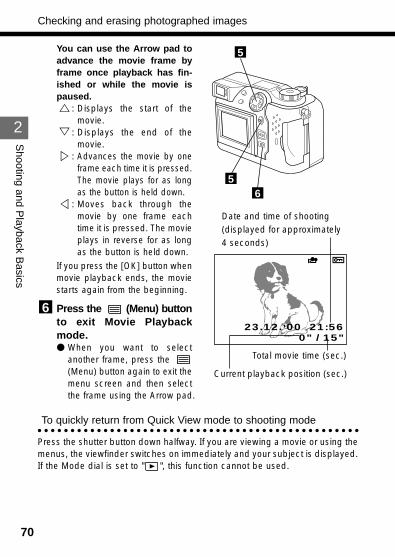
70
2
Shooting and P
layback Basics
You can use the Arrow pad toadvance the movie frame byframe once playback has fin-ished or while the movie ispaused.
: Displays the start of themovie.
: Displays the end of themovie.
: Advances the movie by oneframe each time it is pressed.The movie plays for as longas the button is held down.
: Moves back through themovie by one frame eachtime it is pressed. The movieplays in reverse for as longas the button is held down.
If you press the [OK] button whenmovie playback ends, the moviestarts again from the beginning.
Press the (Menu) buttonto exit Movie Playbackmode.● When you want to select
another frame, press the (Menu) button again to exit themenu screen and then selectthe frame using the Arrow pad.
To quickly return from Quick View mode to shooting mode
Press the shutter button down halfway. If you are viewing a movie or using themenus, the viewfinder switches on immediately and your subject is displayed.If the Mode dial is set to " ", this function cannot be used.
6
Checking and erasing photographed images
23.12.,00 21:560" / 15"
5
5
6
Date and time of shooting(displayed for approximately4 seconds)
Current playback position (sec.)
Total movie time (sec.)
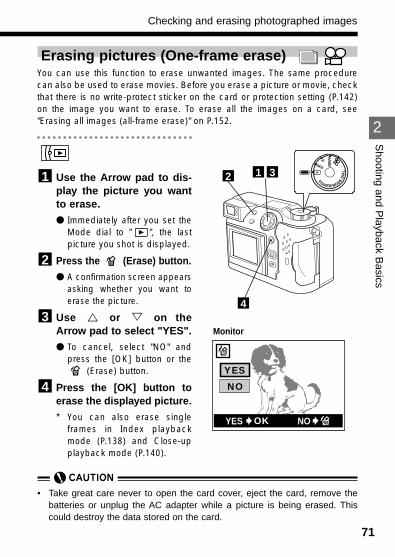
71
2
Shooting and P
layback Basics
Erasing pictures (One-frame erase) You can use this function to erase unwanted images. The same procedurecan also be used to erase movies. Before you erase a picture or movie, checkthat there is no write-protect sticker on the card or protection setting (P.142)on the image you want to erase. To erase all the images on a card, see"Erasing all images (all-frame erase)" on P.152.
Use the Arrow pad to dis-play the picture you wantto erase.● Immediately after you set the
Mode dial to " ", the lastpicture you shot is displayed.
Press the (Erase) button.● A confirmation screen appears
asking whether you want toerase the picture.
Use or on theArrow pad to select "YES".● To cancel, select "NO" and
press the [OK] button or the(Erase) button.
Press the [OK] button toerase the displayed picture.* You can also erase single
frames in Index playbackmode (P.138) and Close-upplayback mode (P.140).
4
3
2
1
Checking and erasing photographed images
• Take great care never to open the card cover, eject the card, remove thebatteries or unplug the AC adapter while a picture is being erased. Thiscould destroy the data stored on the card.
P
A/S
/M
OFF
POWER/MODED
IAL
4
312
YES
NO
YES OK NO
Monitor
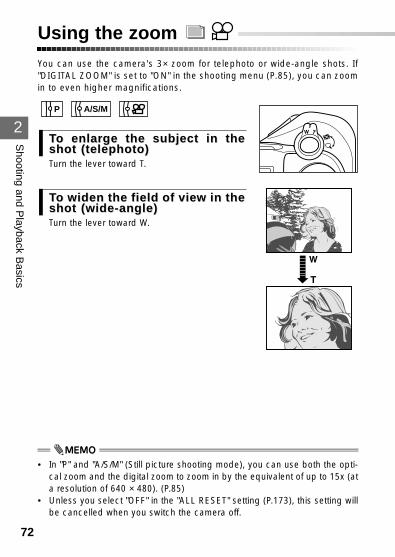
2
Shooting and P
layback Basics
72
You can use the camera's 3× zoom for telephoto or wide-angle shots. If"DIGITAL ZOOM" is set to "ON" in the shooting menu (P.85), you can zoomin to even higher magnifications.
TTo enlaro enlargge the subject in thee the subject in theshot (telephoto)shot (telephoto)Turn the lever toward T.
TTo widen the field of vieo widen the field of view in thew in theshot (wide-angle)shot (wide-angle)Turn the lever toward W.
A/S/MP
Using the zoom
• In "P" and "A/S/M" (Still picture shooting mode), you can use both the opti-cal zoom and the digital zoom to zoom in by the equivalent of up to 15x (ata resolution of 640 × 480). (P.85)
• Unless you select "OFF" in the "ALL RESET" setting (P.173), this setting willbe cancelled when you switch the camera off.
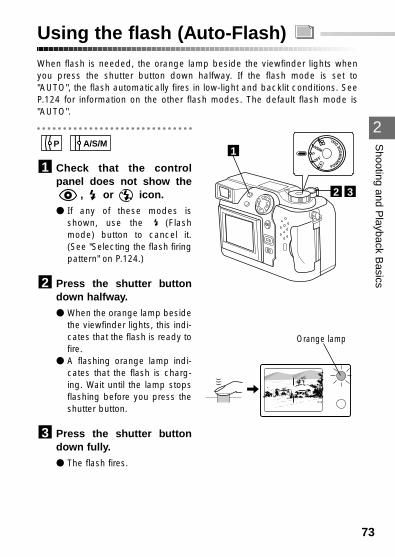
73
2
Shooting and P
layback Basics
Using the flash (Auto-Flash) When flash is needed, the orange lamp beside the viewfinder lights whenyou press the shutter button down halfway. If the flash mode is set to"AUTO", the flash automatically fires in low-light and backlit conditions. SeeP.124 for information on the other flash modes. The default flash mode is"AUTO".
Check that the controlpanel does not show the
, or icon.● If any of these modes is
shown, use the (Flashmode) button to cancel it.(See "Selecting the flash firingpattern" on P.124.)
Press the shutter buttondown halfway.● When the orange lamp beside
the viewfinder lights, this indi-cates that the flash is ready tofire.
● A flashing orange lamp indi-cates that the flash is charg-ing. Wait until the lamp stopsflashing before you press theshutter button.
Press the shutter buttondown fully.● The flash fires.
3
2
1
A/S/MP
POW
ER/M
OD
E
DIAL
P
A/S/M
OFF1
32
Orange lamp
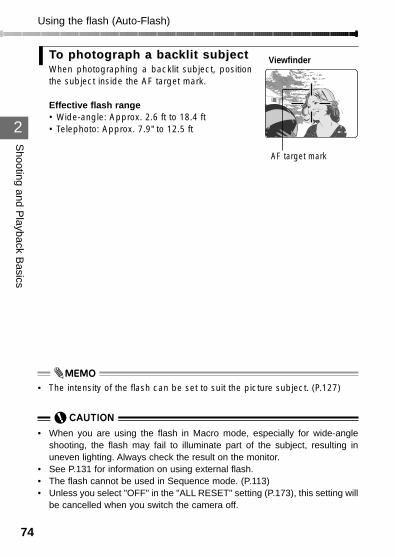
74
2
Shooting and P
layback Basics
TTo photograph a baco photograph a backlit subjectklit subjectWhen photographing a backlit subject, positionthe subject inside the AF target mark.
Effective flash range• Wide-angle: Approx. 2.6 ft to 18.4 ft• Telephoto: Approx. 7.9" to 12.5 ft
Using the flash (Auto-Flash)
Viewfinder
AF target mark
• The intensity of the flash can be set to suit the picture subject. (P.127)
• When you are using the flash in Macro mode, especially for wide-angleshooting, the flash may fail to illuminate part of the subject, resulting inuneven lighting. Always check the result on the monitor.
• See P.131 for information on using external flash.• The flash cannot be used in Sequence mode. (P.113)• Unless you select "OFF" in the "ALL RESET" setting (P.173), this setting will
be cancelled when you switch the camera off.

3OLYMPUS DIGITAL CAMERA
Chapter
Focusing
• This chapter describes how to use some of thecamera features, such as focusing and zoom-ing, that are essential to taking effective shots.
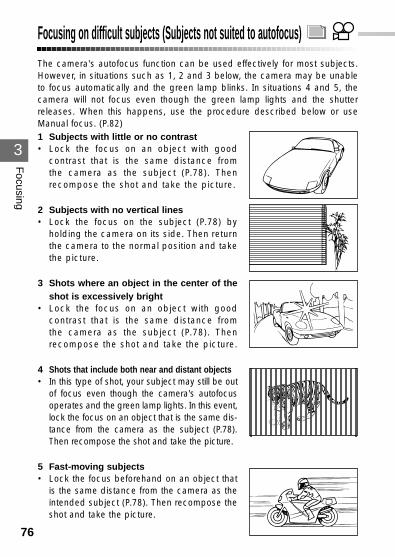
Focusing on difficult subjects (Subjects not suited to autofocus)
3
Focusing
The camera's autofocus function can be used effectively for most subjects.However, in situations such as 1, 2 and 3 below, the camera may be unableto focus automatically and the green lamp blinks. In situations 4 and 5, thecamera will not focus even though the green lamp lights and the shutterreleases. When this happens, use the procedure described below or useManual focus. (P.82)1 Subjects with little or no contrast• Lock the focus on an object with good
contrast that is the same distance fromthe camera as the subject (P.78). Thenrecompose the shot and take the picture.
2 Subjects with no vertical lines• Lock the focus on the subject (P.78) by
holding the camera on its side. Then returnthe camera to the normal position and takethe picture.
3 Shots where an object in the center of theshot is excessively bright
• Lock the focus on an object with goodcontrast that is the same distance fromthe camera as the subject (P.78). Thenrecompose the shot and take the picture.
4 Shots that include both near and distant objects• In this type of shot, your subject may still be out
of focus even though the camera's autofocusoperates and the green lamp lights. In this event,lock the focus on an object that is the same dis-tance from the camera as the subject (P.78).Then recompose the shot and take the picture.
5 Fast-moving subjects• Lock the focus beforehand on an object that
is the same distance from the camera as theintended subject (P.78). Then recompose theshot and take the picture.
76
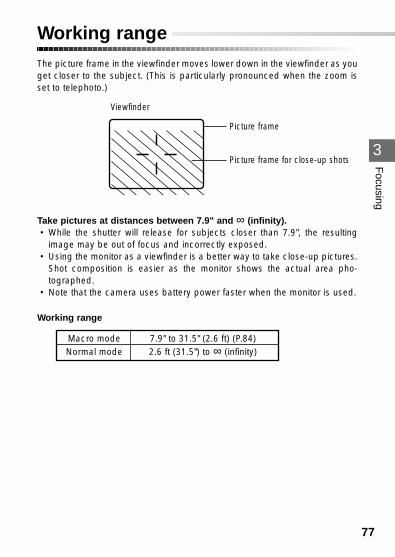
Working range
3
Focusing
The picture frame in the viewfinder moves lower down in the viewfinder as youget closer to the subject. (This is particularly pronounced when the zoom isset to telephoto.)
Take pictures at distances between 7.9" and ∞ (infinity).• While the shutter will release for subjects closer than 7.9", the resulting
image may be out of focus and incorrectly exposed.• Using the monitor as a viewfinder is a better way to take close-up pictures.
Shot composition is easier as the monitor shows the actual area pho-tographed.
• Note that the camera uses battery power faster when the monitor is used.
Working range
Macro mode 7.9" to 31.5" (2.6 ft) (P.84)Normal mode 2.6 ft (31.5") to ∞ (infinity)
77
Picture frame
Picture frame for close-up shots
Viewfinder
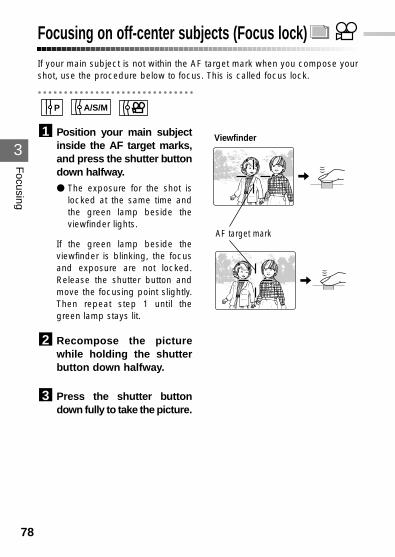
3
Focusing
78
Focusing on off-center subjects (Focus lock)If your main subject is not within the AF target mark when you compose yourshot, use the procedure below to focus. This is called focus lock.
Position your main subjectinside the AF target marks,and press the shutter buttondown halfway.● The exposure for the shot is
locked at the same time andthe green lamp beside theviewfinder lights.
If the green lamp beside theviewfinder is blinking, the focusand exposure are not locked.Release the shutter button andmove the focusing point slightly.Then repeat step 1 until thegreen lamp stays lit.
Recompose the picturewhile holding the shutterbutton down halfway.
Press the shutter buttondown fully to take the picture.
3
2
1
A/S/MP
AF target mark
Viewfinder
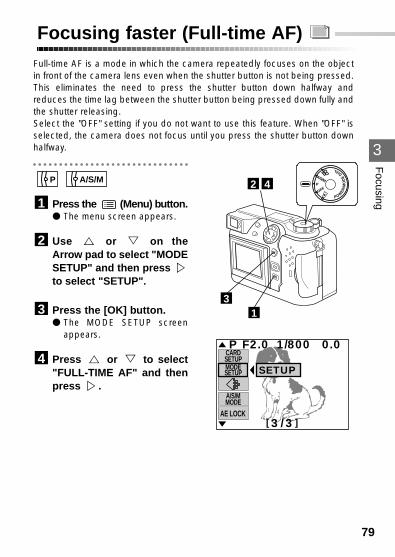
79
3
Focusing
Focusing faster (Full-time AF)Full-time AF is a mode in which the camera repeatedly focuses on the objectin front of the camera lens even when the shutter button is not being pressed.This eliminates the need to press the shutter button down halfway andreduces the time lag between the shutter button being pressed down fully andthe shutter releasing.Select the "OFF" setting if you do not want to use this feature. When "OFF" isselected, the camera does not focus until you press the shutter button downhalfway.
Press the (Menu) button.● The menu screen appears.
Use or on theArrow pad to select "MODESETUP" and then pressto select "SETUP".
Press the [OK] button.● The MODE SETUP screen
appears.
Press or to select"FULL-TIME AF" and thenpress .
4
3
2
1
A/S/MP
POW
ER/M
OD
E
DIAL
P
A/S/M
OFF
13
42
[3 /3 ]
F2.0 1/800 0.0 P
A/S/MMODE
CARDSETUPMODESETUP SETUP
AE LOCK
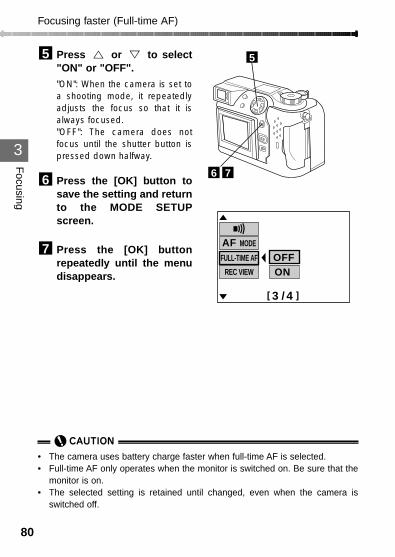
80
3
Focusing
Press or to select"ON" or "OFF"."ON": When the camera is set toa shooting mode, it repeatedlyadjusts the focus so that it isalways focused."OFF": The camera does notfocus until the shutter button ispressed down halfway.
Press the [OK] button tosave the setting and returnto the MODE SETUPscreen.
Press the [OK] buttonrepeatedly until the menudisappears.
7
6
5
Focusing faster (Full-time AF)
76
• The camera uses battery charge faster when full-time AF is selected.• Full-time AF only operates when the monitor is switched on. Be sure that the
monitor is on.• The selected setting is retained until changed, even when the camera is
switched off.
5
[3 /4 ]
OFFON
AF MODE
REC VIEW
FULL-TIME AF
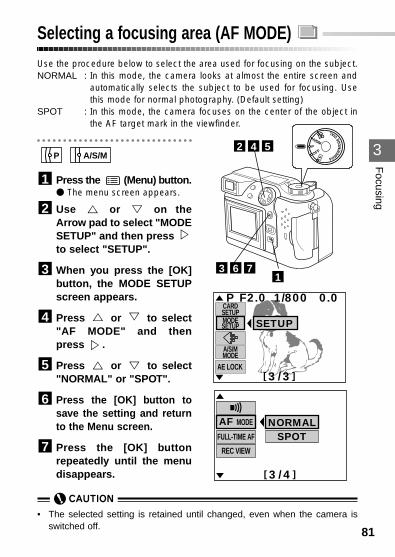
81
3
Focusing
Selecting a focusing area (AF MODE)Use the procedure below to select the area used for focusing on the subject.NORMAL : In this mode, the camera looks at almost the entire screen and
automatically selects the subject to be used for focusing. Usethis mode for normal photography. (Default setting)
SPOT : In this mode, the camera focuses on the center of the object inthe AF target mark in the viewfinder.
Press the (Menu) button.● The menu screen appears.
Use or on theArrow pad to select "MODESETUP" and then press to select "SETUP".
When you press the [OK]button, the MODE SETUPscreen appears.
Press or to select"AF MODE" and thenpress .
Press or to select"NORMAL" or "SPOT".
Press the [OK] button tosave the setting and returnto the Menu screen.
Press the [OK] buttonrepeatedly until the menudisappears.
7
6
5
4
3
2
1
A/S/MP POW
ER/M
OD
E
DIAL
P
A/S/M
OFF
763
542
1
[3 /3 ]
F2.0 1/800 0.0 P
A/S/MMODE
CARDSETUPMODESETUP SETUP
AE LOCK
[3 /4 ]
AF MODE
REC VIEW
FULL-TIME AF SPOTNORMAL
• The selected setting is retained until changed, even when the camera isswitched off.
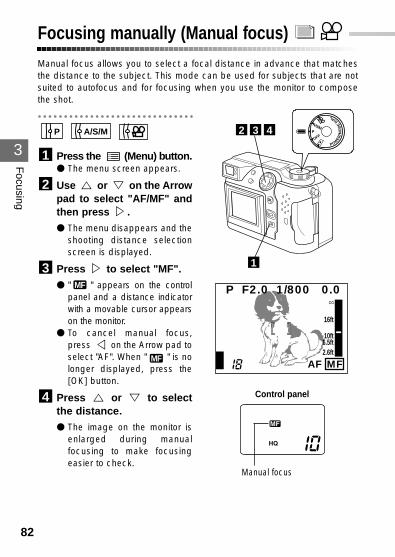
82
3
Focusing manually (Manual focus)Manual focus allows you to select a focal distance in advance that matchesthe distance to the subject. This mode can be used for subjects that are notsuited to autofocus and for focusing when you use the monitor to composethe shot.
Press the (Menu) button.● The menu screen appears.
Use or on the Arrowpad to select "AF/MF" andthen press .● The menu disappears and the
shooting distance selectionscreen is displayed.
Press to select "MF".● " " appears on the control
panel and a distance indicatorwith a movable cursor appearson the monitor.
● To cancel manual focus,press on the Arrow pad toselect "AF". When " " is nolonger displayed, press the[OK] button.
Press or to selectthe distance.● The image on the monitor is
enlarged during manualfocusing to make focusingeasier to check.
4
MF
MF
3
2
1
A/S/MP
Focusing
POW
ER/M
OD
E
DIAL
P
A/S/M
OFF432
1
P F2.0 1/800 0.0
AF MF
16ft
10ft6.5ft2.6ft
Control panel
Manual focus
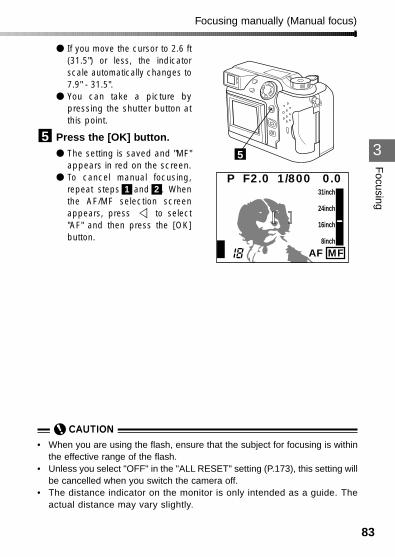
83
3
● If you move the cursor to 2.6 ft(31.5") or less, the indicatorscale automatically changes to7.9" - 31.5".
● You can take a picture bypressing the shutter button atthis point.
Press the [OK] button.● The setting is saved and "MF"
appears in red on the screen.● To cancel manual focusing,
repeat steps 1 and 2 . Whenthe AF/MF selection screenappears, press to select"AF" and then press the [OK]button.
5
Focusing manually (Manual focus)F
ocusing
• When you are using the flash, ensure that the subject for focusing is withinthe effective range of the flash.
• Unless you select "OFF" in the "ALL RESET" setting (P.173), this setting willbe cancelled when you switch the camera off.
• The distance indicator on the monitor is only intended as a guide. Theactual distance may vary slightly.
AF MF
31inch
24inch
16inch
8inch
P F2.0 1/800 0.0
5
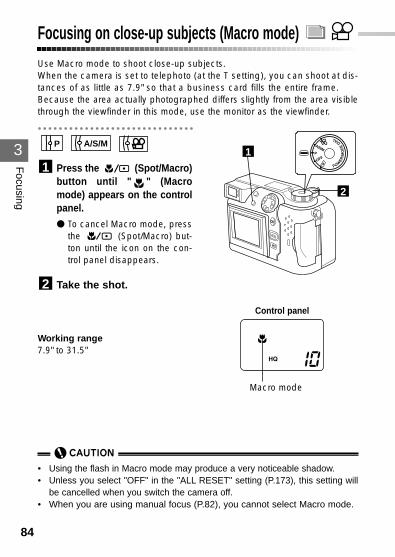
3
84
Focusing on close-up subjects (Macro mode)
Focusing
Use Macro mode to shoot close-up subjects.When the camera is set to telephoto (at the T setting), you can shoot at dis-tances of as little as 7.9" so that a business card fills the entire frame.Because the area actually photographed differs slightly from the area visiblethrough the viewfinder in this mode, use the monitor as the viewfinder.
Press the (Spot/Macro)button until " " (Macromode) appears on the controlpanel.● To cancel Macro mode, press
the (Spot/Macro) but-ton until the icon on the con-trol panel disappears.
Take the shot.
Working range7.9" to 31.5"
2
1
A/S/MP
POW
ER/M
OD
E
DIAL
P
A/S/M
OFF1
2
Control panel
Macro mode
• Using the flash in Macro mode may produce a very noticeable shadow.• Unless you select "OFF" in the "ALL RESET" setting (P.173), this setting will
be cancelled when you switch the camera off.• When you are using manual focus (P.82), you cannot select Macro mode.
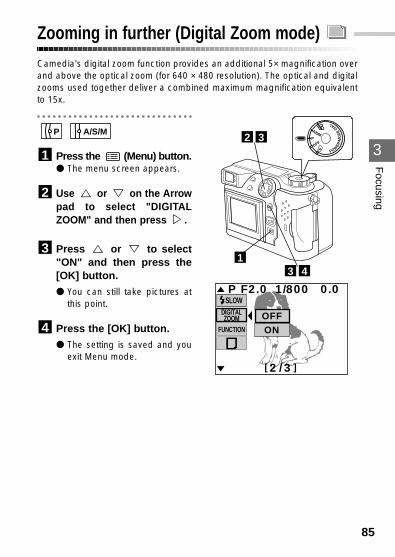
85
3
Zooming in further (Digital Zoom mode)Camedia's digital zoom function provides an additional 5× magnification overand above the optical zoom (for 640 × 480 resolution). The optical and digitalzooms used together deliver a combined maximum magnification equivalentto 15x.
Press the (Menu) button.● The menu screen appears.
Use or on the Arrowpad to select "DIGITALZOOM" and then press .
Press or to select"ON" and then press the[OK] button.● You can still take pictures at
this point.
Press the [OK] button.● The setting is saved and you
exit Menu mode.
4
3
2
1
A/S/MP
Focusing
POW
ER/M
OD
E
DIAL
P
A/S/M
OFF32
1
[2 /3 ]
F2.0 1/800 0.0 P
DIGITALZOOM
FUNCTION
SLOW
OFFON
43
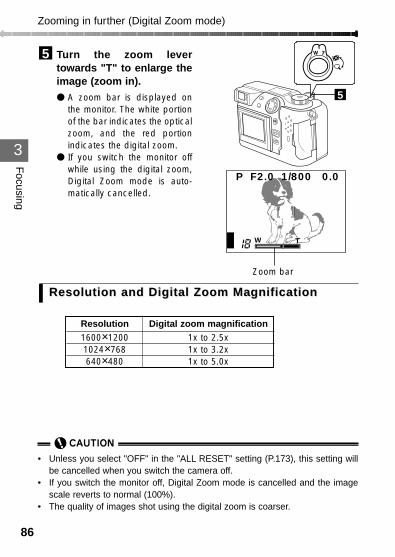
86
3
Turn the zoom levertowards "T" to enlarge theimage (zoom in).● A zoom bar is displayed on
the monitor. The white portionof the bar indicates the opticalzoom, and the red portionindicates the digital zoom.
● If you switch the monitor offwhile using the digital zoom,Digital Zoom mode is auto-matically cancelled.
Resolution and Digital Zoom MaResolution and Digital Zoom Magnificationgnification
5
Zooming in further (Digital Zoom mode)
Focusing
P F2.0 1/800 0.0
W T
5
Resolution1600×12001024×768640×480
Digital zoom magnification1x to 2.5x1x to 3.2x1x to 5.0x
• Unless you select "OFF" in the "ALL RESET" setting (P.173), this setting willbe cancelled when you switch the camera off.
• If you switch the monitor off, Digital Zoom mode is cancelled and the imagescale reverts to normal (100%).
• The quality of images shot using the digital zoom is coarser.
Zoom bar
4OLYMPUS DIGITAL CAMERA
Chapter
Custom Photography
• This chapter describes how to select camerasettings such as the field of view, brightness,exposure, color tones and quality so that youachieve the desired result. Read the instructionsfor each of the settings so that you can get theresults you want for all types of shots.
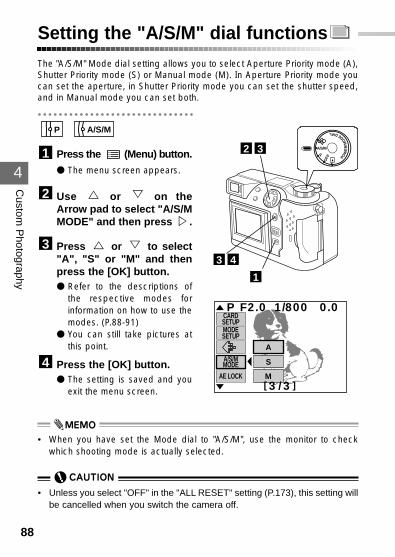
4
Custom
Photography
88
Setting the "A/S/M" dial functionsThe "A/S/M" Mode dial setting allows you to select Aperture Priority mode (A),Shutter Priority mode (S) or Manual mode (M). In Aperture Priority mode youcan set the aperture, in Shutter Priority mode you can set the shutter speed,and in Manual mode you can set both.
Press the (Menu) button.● The menu screen appears.
Use or on theArrow pad to select "A/S/MMODE" and then press .
Press or to select"A", "S" or "M" and thenpress the [OK] button.● Refer to the descriptions of
the respective modes forinformation on how to use themodes. (P.88-91)
● You can still take pictures atthis point.
Press the [OK] button.● The setting is saved and you
exit the menu screen.
4
3
2
1
A/S/MP
P
A/S/M
OFF PO
WE
R/M
O
DEDIAL
32
A
S
M[3 /3 ]
F2.0 1/800 0.0 P
A/S/MMODE
CARDSETUPMODESETUP
AE LOCK
1
43
• When you have set the Mode dial to "A/S/M", use the monitor to checkwhich shooting mode is actually selected.
• Unless you select "OFF" in the "ALL RESET" setting (P.173), this setting willbe cancelled when you switch the camera off.
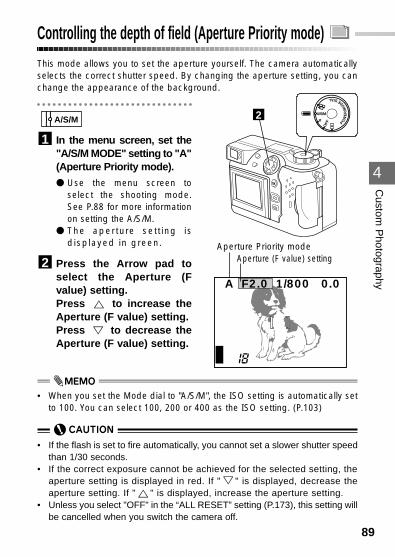
89
4
Custom
Photography
Controlling the depth of field (Aperture Priority mode)This mode allows you to set the aperture yourself. The camera automaticallyselects the correct shutter speed. By changing the aperture setting, you canchange the appearance of the background.
In the menu screen, set the"A/S/M MODE" setting to "A"(Aperture Priority mode).● Use the menu screen to
select the shooting mode.See P.88 for more informationon setting the A/S/M.
● The aper ture sett ing isdisplayed in green.
Press the Arrow pad toselect the Aperture (Fvalue) setting.Press to increase theAperture (F value) setting.Press to decrease theAperture (F value) setting.
2
1
A/S/M P
A/S/M
OFF PO
WE
R/M
O
DEDIAL
2
A F2.0 1/800 0.0
Aperture (F value) setting
• When you set the Mode dial to "A/S/M", the ISO setting is automatically setto 100. You can select 100, 200 or 400 as the ISO setting. (P.103)
• If the flash is set to fire automatically, you cannot set a slower shutter speedthan 1/30 seconds.
• If the correct exposure cannot be achieved for the selected setting, theaperture setting is displayed in red. If " " is displayed, decrease theaperture setting. If " " is displayed, increase the aperture setting.
• Unless you select "OFF" in the “ALL RESET” setting (P.173), this setting willbe cancelled when you switch the camera off.
Aperture Priority mode
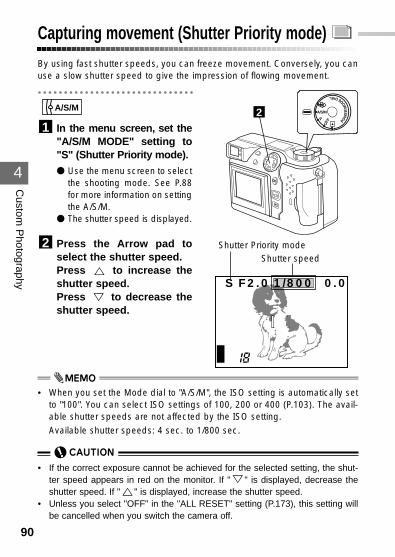
4
Custom
Photography
90
Capturing movement (Shutter Priority mode)By using fast shutter speeds, you can freeze movement. Conversely, you canuse a slow shutter speed to give the impression of flowing movement.
In the menu screen, set the"A/S/M MODE" setting to"S" (Shutter Priority mode).● Use the menu screen to select
the shooting mode. See P.88for more information on settingthe A/S/M.
● The shutter speed is displayed.
Press the Arrow pad toselect the shutter speed.Press to increase theshutter speed.Press to decrease theshutter speed.
2
1
A/S/MP
A/S/M
OFF PO
WE
R/M
O
DEDIAL
2
S F2.0 1/800 0.0
Shutter speed
• When you set the Mode dial to "A/S/M", the ISO setting is automatically setto "100". You can select ISO settings of 100, 200 or 400 (P.103). The avail-able shutter speeds are not affected by the ISO setting.Available shutter speeds: 4 sec. to 1/800 sec.
• If the correct exposure cannot be achieved for the selected setting, the shut-ter speed appears in red on the monitor. If " " is displayed, decrease theshutter speed. If " " is displayed, increase the shutter speed.
• Unless you select "OFF" in the "ALL RESET" setting (P.173), this setting willbe cancelled when you switch the camera off.
Shutter Priority mode
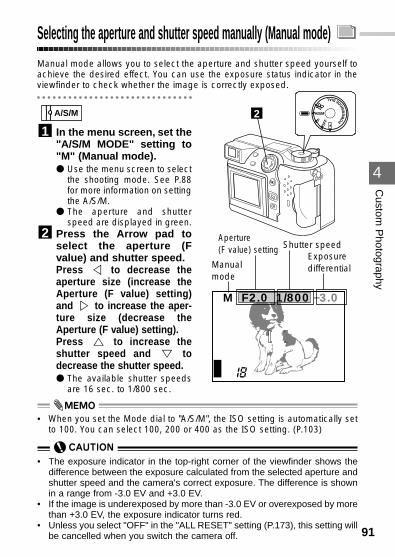
4
91
Custom
Photography
Selecting the aperture and shutter speed manually (Manual mode)Manual mode allows you to select the aperture and shutter speed yourself toachieve the desired effect. You can use the exposure status indicator in theviewfinder to check whether the image is correctly exposed.
In the menu screen, set the"A/S/M MODE" setting to"M" (Manual mode).● Use the menu screen to select
the shooting mode. See P.88for more information on settingthe A/S/M.
● The aperture and shutterspeed are displayed in green.
Press the Arrow pad toselect the aperture (Fvalue) and shutter speed.Press to decrease theaperture size (increase theAperture (F value) setting)and to increase the aper-ture size (decrease theAperture (F value) setting).Press to increase theshutter speed and todecrease the shutter speed.● The available shutter speeds
are 16 sec. to 1/800 sec.
2
1A/S/M
• When you set the Mode dial to "A/S/M", the ISO setting is automatically setto 100. You can select 100, 200 or 400 as the ISO setting. (P.103)
• The exposure indicator in the top-right corner of the viewfinder shows thedifference between the exposure calculated from the selected aperture andshutter speed and the camera's correct exposure. The difference is shownin a range from -3.0 EV and +3.0 EV.
• If the image is underexposed by more than -3.0 EV or overexposed by morethan +3.0 EV, the exposure indicator turns red.
• Unless you select "OFF" in the "ALL RESET" setting (P.173), this setting willbe cancelled when you switch the camera off.
P
A/S/M
OFF PO
WE
R/M
O
DEDIAL
2
M F2.0 1/800 –3.0
Aperture (F value) setting Shutter speed
ExposuredifferentialManual
mode
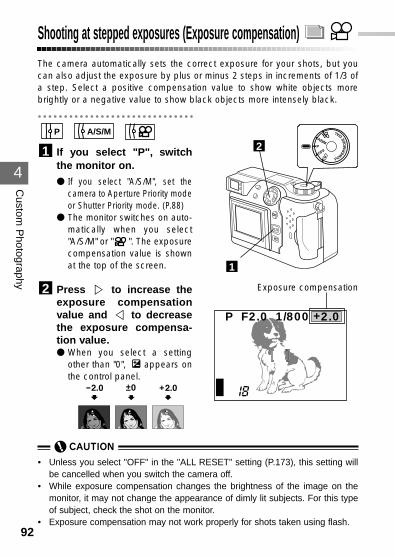
4
Custom
Photography
92
Shooting at stepped exposures (Exposure compensation)The camera automatically sets the correct exposure for your shots, but youcan also adjust the exposure by plus or minus 2 steps in increments of 1/3 ofa step. Select a positive compensation value to show white objects morebrightly or a negative value to show black objects more intensely black.
If you select "P", switchthe monitor on.● If you select "A/S/M", set the
camera to Aperture Priority modeor Shutter Priority mode. (P.88)
● The monitor switches on auto-matically when you select"A/S/M" or " ". The exposurecompensation value is shownat the top of the screen.
Press to increase theexposure compensationvalue and to decreasethe exposure compensa-tion value.● When you select a setting
other than "0", appears onthe control panel.
2
1
A/S/MP
• Unless you select "OFF" in the "ALL RESET" setting (P.173), this setting willbe cancelled when you switch the camera off.
• While exposure compensation changes the brightness of the image on themonitor, it may not change the appearance of dimly lit subjects. For this typeof subject, check the shot on the monitor.
• Exposure compensation may not work properly for shots taken using flash.
POW
ER/M
OD
E
DIAL
P
A/S/M
OFF2
P F2.0 1/800 +2.0
Exposure compensation
1
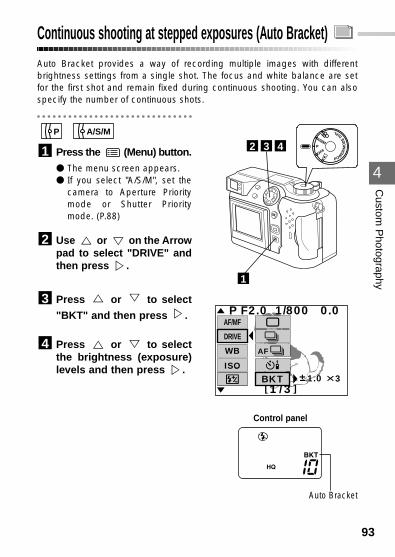
93
4
Custom
Photography
Continuous shooting at stepped exposures (Auto Bracket) Auto Bracket provides a way of recording multiple images with differentbrightness settings from a single shot. The focus and white balance are setfor the first shot and remain fixed during continuous shooting. You can alsospecify the number of continuous shots.
Press the (Menu) button.● The menu screen appears.● If you select "A/S/M", set the
camera to Aperture Prioritymode or Shutter Prioritymode. (P.88)
Use or on the Arrowpad to select "DRIVE" andthen press .
Press or to select
"BKT" and then press .
Press or to selectthe brightness (exposure)levels and then press .
4
3
2
1
A/S/MP
POW
ER/M
OD
E
DIAL
P
A/S/M
OFF432
[1 /3 ]
AF
1.0
F2.0 1/800 0.0 P
3
DRIVE
ISO
WB
AF/MF
BKT
Control panel
1
Auto Bracket

94
4
Custom
Photography
Continuous shooting at stepped exposures (Auto Bracket)
Press or to selectthe number of shots.
Press twice to confirmthe setting.
Press the [OK] buttonrepeatedly until the menudisappears. The setting issaved.● If you take the shot without
pressing the [OK] button, thesetting remains valid until youpress the the (Menu)button again.
Take the shot.● When you release the shutter
button during shooting, thecamera stops shooting even ifthe job is not completed.Shooting ends when thespecified number of frameshave been shot.
8
7
6
5
BKT[1 /3 ]
AF 0.3
F2.0 1/800 0.0 P
0.6
1.0
3
5
8
• The focus and white balance are determined for the first shot.• Auto bracket can be used in Program mode, Aperture Priority mode or Shutter
Priority mode.• Auto bracket cannot be used in the TIFF quality mode.• You can select only 3 as the number of shots in SHQ mode.• If there is insufficient buffer space available for the selected number of shots,
the camera cannot take the next shot.• Flash cannot be used.• Unless you select "OFF" in the "ALL RESET" setting (P.173), this setting will
be cancelled when you switch the camera off.
65
7
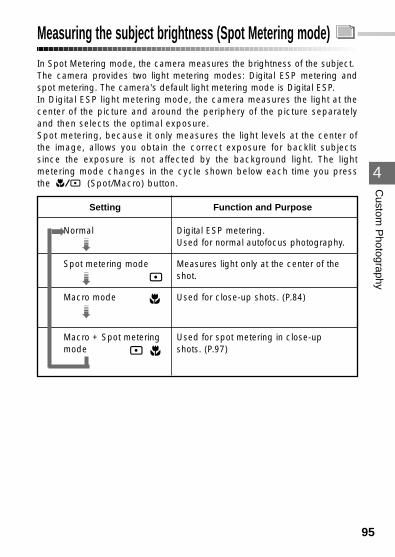
95
4
Measuring the subject brightness (Spot Metering mode)In Spot Metering mode, the camera measures the brightness of the subject.The camera provides two light metering modes: Digital ESP metering andspot metering. The camera's default light metering mode is Digital ESP.In Digital ESP light metering mode, the camera measures the light at thecenter of the picture and around the periphery of the picture separatelyand then selects the optimal exposure.Spot metering, because it only measures the light levels at the center ofthe image, allows you obtain the correct exposure for backlit subjectssince the exposure is not affected by the background light. The lightmetering mode changes in the cycle shown below each time you pressthe (Spot/Macro) button.
Setting Function and Purpose
Normal Digital ESP metering. Used for normal autofocus photography.
Spot metering mode Measures light only at the center of the shot.
Macro mode Used for close-up shots. (P.84)
Macro + Spot metering Used for spot metering in close-up mode shots. (P.97)
Custom
Photography
➠➠
➠
➡
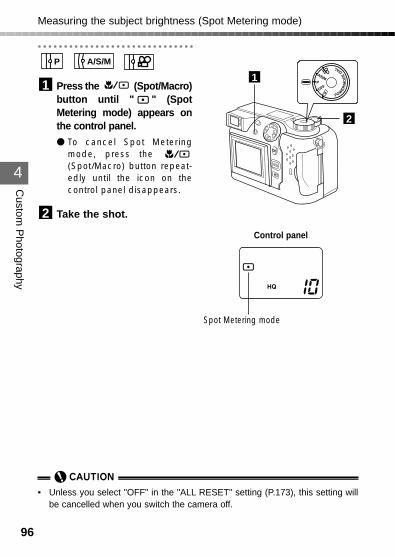
96
4
Measuring the subject brightness (Spot Metering mode)
Custom
Photography
Press the (Spot/Macro)button until " " (SpotMetering mode) appears onthe control panel.● To cancel Spot Metering
mode, press the (Spot/Macro) button repeat-edly until the icon on thecontrol panel disappears.
Take the shot.2
1
A/S/MP
POW
ER/M
OD
E
DIAL
P
A/S/M
OFF
2
Control panel
1
Spot Metering mode
• Unless you select "OFF" in the "ALL RESET" setting (P.173), this setting willbe cancelled when you switch the camera off.
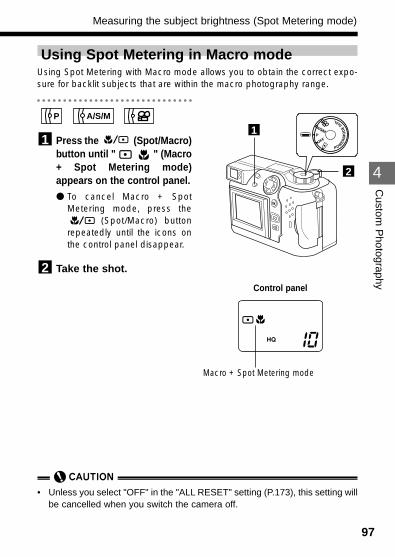
97
4
Measuring the subject brightness (Spot Metering mode)C
ustom P
hotography
Using Spot Metering in Macro modeUsing Spot Metering with Macro mode allows you to obtain the correct expo-sure for backlit subjects that are within the macro photography range.
Press the (Spot/Macro)button until " " (Macro+ Spot Metering mode)appears on the control panel.● To cancel Macro + Spot
Metering mode, press the(Spot/Macro) button
repeatedly until the icons onthe control panel disappear.
Take the shot.2
1
A/S/MP
POW
ER/M
OD
E
DIAL
P
A/S/M
OFF
2
Control panel
1
Macro + Spot Metering mode
• Unless you select "OFF" in the "ALL RESET" setting (P.173), this setting willbe cancelled when you switch the camera off.
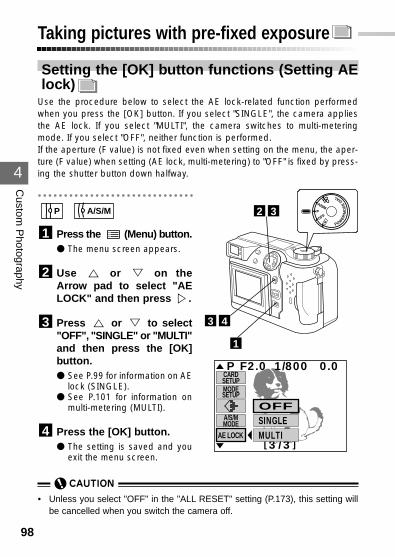
98
4
Custom
Photography
Taking pictures with pre-fixed exposure
Setting the [OK] button functions (Setting AElock)
Use the procedure below to select the AE lock-related function performedwhen you press the [OK] button. If you select "SINGLE", the camera appliesthe AE lock. If you select "MULTI", the camera switches to multi-meteringmode. If you select "OFF", neither function is performed.If the aperture (F value) is not fixed even when setting on the menu, the aper-ture (F value) when setting (AE lock, multi-metering) to "OFF" is fixed by press-ing the shutter button down halfway.
Press the (Menu) button.● The menu screen appears.
Use or on theArrow pad to select "AELOCK" and then press .
Press or to select"OFF", "SINGLE" or "MULTI"and then press the [OK]button.● See P.99 for information on AE
lock (SINGLE).● See P.101 for information on
multi-metering (MULTI).
Press the [OK] button.● The setting is saved and you
exit the menu screen.
4
3
2
1
A/S/MP
• Unless you select "OFF" in the "ALL RESET" setting (P.173), this setting willbe cancelled when you switch the camera off.
POW
ER/M
OD
E
DIAL
P
A/S/M
OFF32
1
43
[3 /3 ]
F2.0 1/800 0.0 P
A/S/MMODE
CARDSETUPMODESETUP
OFFSINGLEMULTIAE LOCK
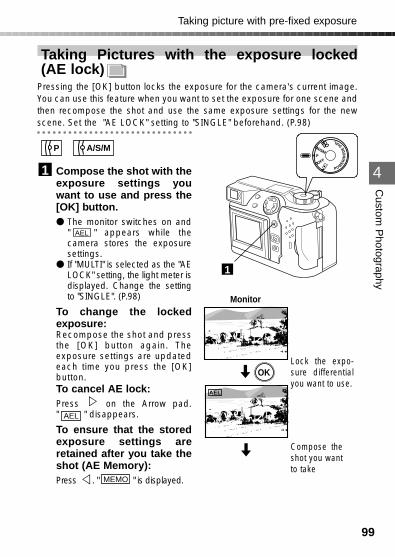
99
4
Taking picture with pre-fixed exposureC
ustom P
hotography
Taking Pictures with the exposure locked (AE lock)
Pressing the [OK] button locks the exposure for the camera's current image.You can use this feature when you want to set the exposure for one scene andthen recompose the shot and use the same exposure settings for the newscene. Set the "AE LOCK" setting to "SINGLE" beforehand. (P.98)
Compose the shot with theexposure settings youwant to use and press the[OK] button.● The monitor switches on and
" " appears while thecamera stores the exposuresettings.
● If "MULTI" is selected as the "AELOCK" setting, the light meter isdisplayed. Change the settingto "SINGLE". (P.98)
To change the lockedexposure:Recompose the shot and pressthe [OK] button again. Theexposure settings are updatedeach time you press the [OK]button.To cancel AE lock:Press on the Arrow pad." " disappears.
To ensure that the storedexposure settings areretained after you take theshot (AE Memory):Press . " " is displayed.MEMO
AEL
AEL
1
A/S/MP
POW
ER/M
OD
E
DIAL
P
A/S/M
OFF
OK
AEL
1
Lock the expo-sure differentialyou want to use.
Compose theshot you wantto take
Monitor
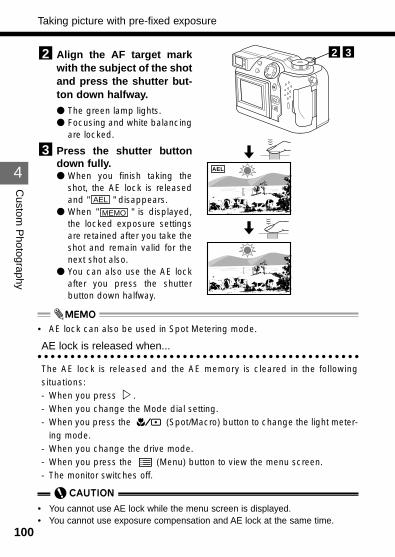
100
4
Taking picture with pre-fixed exposure
Custom
Photography
Align the AF target markwith the subject of the shotand press the shutter but-ton down halfway.● The green lamp lights.● Focusing and white balancing
are locked.
Press the shutter buttondown fully.● When you finish taking the
shot, the AE lock is releasedand " " disappears.
● When " " is displayed,the locked exposure settingsare retained after you take theshot and remain valid for thenext shot also.
● You can also use the AE lockafter you press the shutterbutton down halfway.
• AE lock can also be used in Spot Metering mode.
AE lock is released when...
The AE lock is released and the AE memory is cleared in the followingsituations:- When you press .- When you change the Mode dial setting.- When you press the (Spot/Macro) button to change the light meter-
ing mode.- When you change the drive mode.- When you press the (Menu) button to view the menu screen.- The monitor switches off.
MEMO
AEL
3
2 32
AEL
• You cannot use AE lock while the menu screen is displayed.• You cannot use exposure compensation and AE lock at the same time.

101
Taking picture with pre-fixed exposure
4
Custom
Photography
Measuring the average brightness (Multi-metering)
Multi-metering measures the subject brightness at up to 8 points and thendetermines the photography settings based on the average of those values.Change the "AE LOCK" setting to "MULTI" beforehand. (P.98)
Compose the shot with theexposure settings youwant to use and press the[OK] button.● The monitor switches on and a
light-metering bar appears indi-cating that the camera is inmulti-metering mode. (P.102)
● You can repeat this step totake up to 8 measurements.Any further measurements arenot accepted.
● The exposure is calculated asthe average of the measuredvalues.
To cancel multi-metering:Press on the Arrow pad. Allthe measurements are discarded.To ensure that the storedmulti-metering exposure set-tings are retained after youtake the shot (AE Memory):Press . " " is displayed.
Position the AF targetmark over the object onwhich you want to focusand press the shutter but-ton down halfway.● The green lamp lights.● Focusing and white balancing
are locked.
2MEMO
1
A/S/MP
POW
ER/M
OD
E
DIAL
P
A/S/M
OFF
1
OK
32
Lock the expo-sure differentialyou want to use.
Compose theshot you wantto take.
Monitor
Light-meteringbar (P.102)
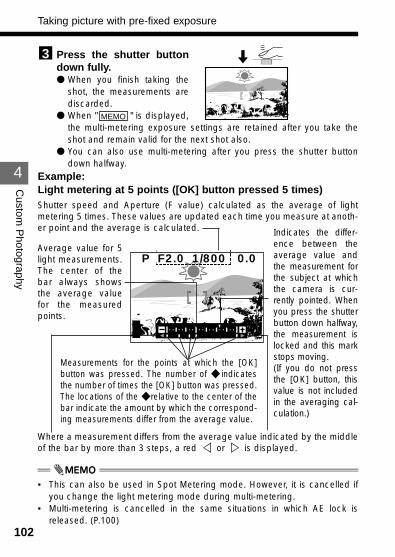
102
4
Taking picture with pre-fixed exposure
Custom
Photography
Press the shutter buttondown fully.● When you finish taking the
shot, the measurements arediscarded.
● When " " is displayed,the multi-metering exposure settings are retained after you take theshot and remain valid for the next shot also.
● You can also use multi-metering after you press the shutter buttondown halfway.
Example:Light metering at 5 points ([OK] button pressed 5 times)Shutter speed and Aperture (F value) calculated as the average of lightmetering 5 times. These values are updated each time you measure at anoth-er point and the average is calculated.
MEMO
3
P F2.0 1/800 0.0
Indicates the differ-ence between theaverage value andthe measurement forthe subject at whichthe camera is cur-rently pointed. Whenyou press the shutterbutton down halfway,the measurement islocked and this markstops moving.(If you do not pressthe [OK] button, thisvalue is not includedin the averaging cal-culation.)
Average value for 5light measurements.The center of thebar always showsthe average valuefor the measuredpoints.
Where a measurement differs from the average value indicated by the middleof the bar by more than 3 steps, a red or is displayed.
Measurements for the points at which the [OK]button was pressed. The number of ◆ indicatesthe number of times the [OK] button was pressed.The locations of the ◆ relative to the center of thebar indicate the amount by which the correspond-ing measurements differ from the average value.
• This can also be used in Spot Metering mode. However, it is cancelled ifyou change the light metering mode during multi-metering.
• Multi-metering is cancelled in the same situations in which AE lock isreleased. (P.100)
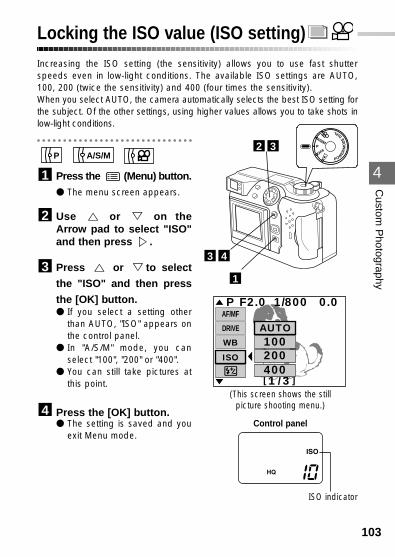
103
4
Custom
Photography
Locking the ISO value (ISO setting)Increasing the ISO setting (the sensitivity) allows you to use fast shutterspeeds even in low-light conditions. The available ISO settings are AUTO,100, 200 (twice the sensitivity) and 400 (four times the sensitivity).When you select AUTO, the camera automatically selects the best ISO setting forthe subject. Of the other settings, using higher values allows you to take shots inlow-light conditions.
Press the (Menu) button.● The menu screen appears.
Use or on theArrow pad to select "ISO"and then press .
Press or to select
the "ISO" and then press
the [OK] button.● If you select a setting other
than AUTO, "ISO" appears onthe control panel.
● In "A/S/M" mode, you canselect "100", "200" or "400".
● You can still take pictures atthis point.
Press the [OK] button.● The setting is saved and you
exit Menu mode.
4
3
2
1
A/S/MP POW
ER/M
OD
E
DIAL
P
A/S/M
OFF32
[1 /3 ]
F2.0 1/800 0.0 P
DRIVE
ISO
WB
AF/MF
200400
100AUTO
Control panel
1
ISO indicator
(This screen shows the still picture shooting menu.)
43
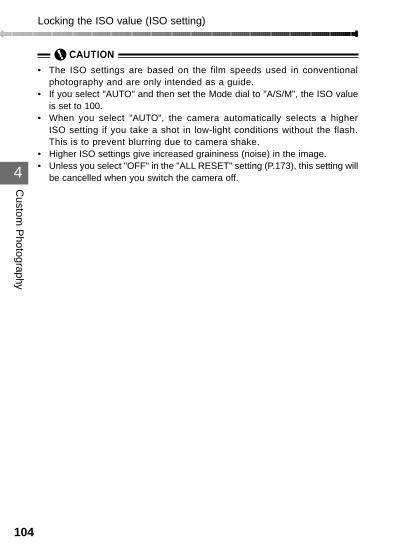
104
4
Custom
Photography
Locking the ISO value (ISO setting)
• The ISO settings are based on the film speeds used in conventionalphotography and are only intended as a guide.
• If you select "AUTO" and then set the Mode dial to "A/S/M", the ISO valueis set to 100.
• When you select "AUTO", the camera automatically selects a higherISO setting if you take a shot in low-light conditions without the flash.This is to prevent blurring due to camera shake.
• Higher ISO settings give increased graininess (noise) in the image.• Unless you select "OFF" in the "ALL RESET" setting (P.173), this setting will
be cancelled when you switch the camera off.
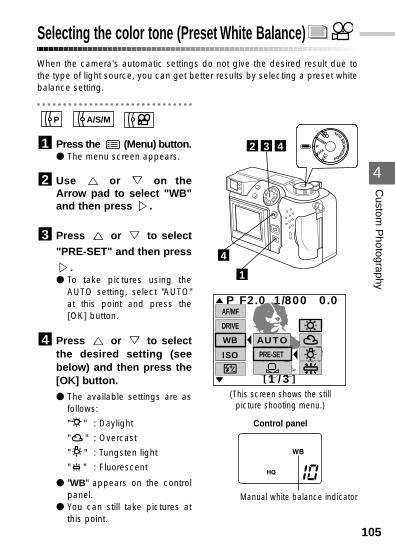
105
4
Custom
Photography
Selecting the color tone (Preset White Balance)When the camera's automatic settings do not give the desired result due tothe type of light source, you can get better results by selecting a preset whitebalance setting.
Press the (Menu) button.● The menu screen appears.
Use or on theArrow pad to select "WB"and then press .
Press or to select
"PRE-SET" and then press
.● To take pictures using the
AUTO setting, select "AUTO"at this point and press the[OK] button.
Press or to selectthe desired setting (seebelow) and then press the[OK] button.● The available settings are as
follows:
" " : Daylight
" " : Overcast
" " : Tungsten light
" " : Fluorescent
● "WB" appears on the controlpanel.
● You can still take pictures atthis point.
4
3
2
1
A/S/MP
POW
ER/M
OD
E
DIAL
P
A/S/M
OFF432
[1 /3 ]
F2.0 1/800 0.0 P
AUTO
DRIVE
ISO
WB
AF/MF
PRE-SET
Control panel
1
Manual white balance indicator
(This screen shows the still picture shooting menu.)
4
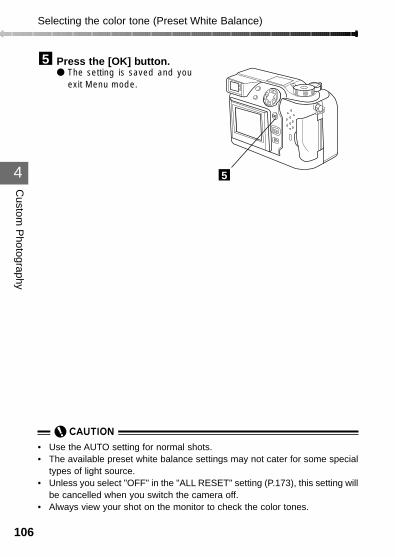
106
4
Custom
Photography
Selecting the color tone (Preset White Balance)
Press the [OK] button.● The setting is saved and you
exit Menu mode.
5
• Use the AUTO setting for normal shots.• The available preset white balance settings may not cater for some special
types of light source.• Unless you select "OFF" in the "ALL RESET" setting (P.173), this setting will
be cancelled when you switch the camera off.• Always view your shot on the monitor to check the color tones.
5
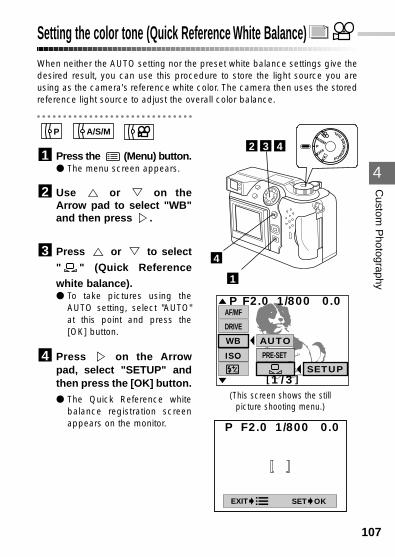
107
4
Custom
Photography
Setting the color tone (Quick Reference White Balance)When neither the AUTO setting nor the preset white balance settings give thedesired result, you can use this procedure to store the light source you areusing as the camera's reference white color. The camera then uses the storedreference light source to adjust the overall color balance.
Press the (Menu) button.● The menu screen appears.
Use or on theArrow pad to select "WB"and then press .
Press or to select
" " (Quick Reference
white balance).● To take pictures using the
AUTO setting, select "AUTO"at this point and press the[OK] button.
Press on the Arrowpad, select "SETUP" andthen press the [OK] button.● The Quick Reference white
balance registration screenappears on the monitor.
4
3
2
1
A/S/MP
POW
ER/M
OD
E
DIAL
P
A/S/M
OFF432
[1 /3 ]
F2.0 1/800 0.0 P
AUTO
SETUP
DRIVE
ISO
WB
AF/MF
PRE-SET
1
(This screen shows the still picture shooting menu.)
4
EXIT SET OK
P F2.0 1/800 0.0
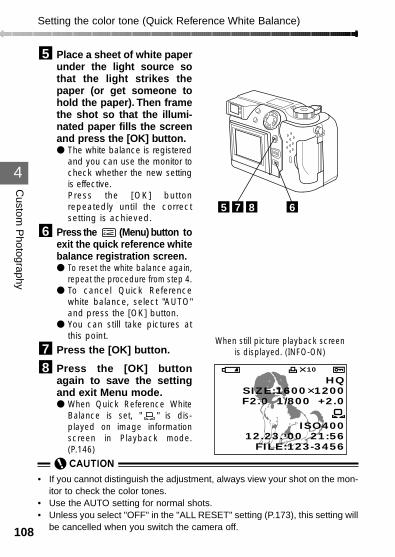
108
4
Custom
Photography
Setting the color tone (Quick Reference White Balance)
Place a sheet of white paperunder the light source sothat the light strikes thepaper (or get someone tohold the paper). Then framethe shot so that the illumi-nated paper fills the screenand press the [OK] button.● The white balance is registered
and you can use the monitor tocheck whether the new settingis effective.Press the [OK] buttonrepeatedly until the correctsetting is achieved.
Press the (Menu) button toexit the quick reference whitebalance registration screen.● To reset the white balance again,
repeat the procedure from step 4.● To cancel Quick Reference
white balance, select "AUTO"and press the [OK] button.
● You can still take pictures atthis point.
Press the [OK] button.
Press the [OK] buttonagain to save the settingand exit Menu mode.● When Quick Reference White
Balance is set, " " is dis-played on image informationscreen in Playback mode.(P.146)
87
6
5
• If you cannot distinguish the adjustment, always view your shot on the mon-itor to check the color tones.
• Use the AUTO setting for normal shots.• Unless you select "OFF" in the "ALL RESET" setting (P.173), this setting will
be cancelled when you switch the camera off.
875 6
HQSIZE:1600 1200F2.0 1/800 +2.0
ISO40012.23.,00 21:56
FILE:123-3456
10
When still picture playback screenis displayed. (INFO-ON)
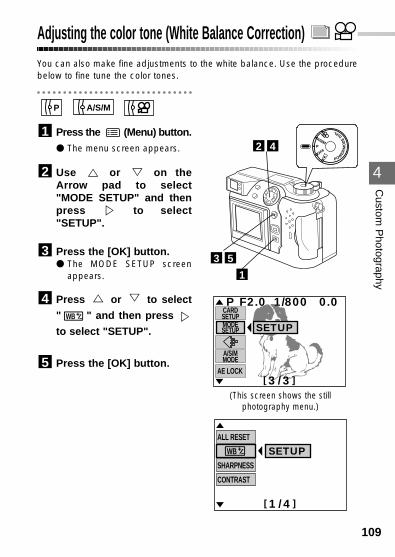
109
4
Custom
Photography
Adjusting the color tone (White Balance Correction) You can also make fine adjustments to the white balance. Use the procedurebelow to fine tune the color tones.
Press the (Menu) button.● The menu screen appears.
Use or on theArrow pad to select"MODE SETUP" and thenpress to select"SETUP".
Press the [OK] button.● The MODE SETUP screen
appears.
Press or to select
" " and then press
to select "SETUP".
Press the [OK] button.5
WB
4
3
2
1
A/S/MP
POW
ER/M
OD
E
DIAL
P
A/S/M
OFF42
[3 /3 ]
F2.0 1/800 0.0 P
A/S/MMODE
CARDSETUPMODESETUP SETUP
AE LOCK
1
(This screen shows the still photography menu.)
53
[1 /4 ]
ALL RESET
SHARPNESS
CONTRAST
SETUPWB
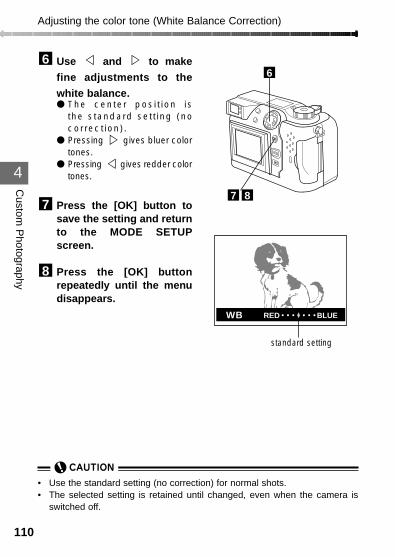
110
4
Custom
Photography
Adjusting the color tone (White Balance Correction)
Use and to make
fine adjustments to the
white balance.● The cen te r pos i t ion i s
the s tandard set t ing (nocorrect ion) .
● Pressing gives bluer colortones.
● Pressing gives redder colortones.
Press the [OK] button tosave the setting and returnto the MODE SETUPscreen.
Press the [OK] buttonrepeatedly until the menudisappears.
8
7
6
87
6
• Use the standard setting (no correction) for normal shots.• The selected setting is retained until changed, even when the camera is
switched off.
RED BLUEWB
standard setting
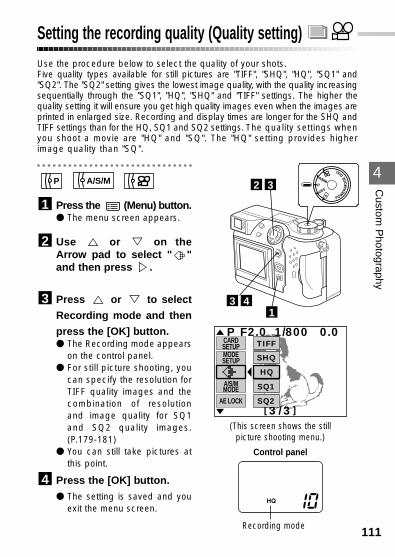
111
4
Custom
Photography
Setting the recording quality (Quality setting)Use the procedure below to select the quality of your shots.Five quality types available for still pictures are "TIFF", "SHQ", "HQ", "SQ1" and"SQ2". The "SQ2" setting gives the lowest image quality, with the quality increasingsequentially through the "SQ1", "HQ", "SHQ" and "TIFF" settings. The higher thequality setting it will ensure you get high quality images even when the images areprinted in enlarged size. Recording and display times are longer for the SHQ andTIFF settings than for the HQ, SQ1 and SQ2 settings. The quality settings whenyou shoot a movie are "HQ" and "SQ". The "HQ" setting provides higherimage quality than "SQ".
Press the (Menu) button.● The menu screen appears.
Use or on theArrow pad to select " "and then press .
Press or to select
Recording mode and then
press the [OK] button.● The Recording mode appears
on the control panel.● For still picture shooting, you
can specify the resolution forTIFF quality images and thecombination of resolutionand image quality for SQ1and SQ2 quality images.(P.179-181)
● You can still take pictures atthis point.
Press the [OK] button.● The setting is saved and you
exit the menu screen.
4
3
2
1
A/S/MP
POW
ER/M
OD
E
DIAL
P
A/S/M
OFF32
TIFF
SHQ
HQ
SQ1
[3 /3 ]
F2.0 1/800 0.0 P
A/S/MMODE
AE LOCK
CARDSETUPMODESETUP
SQ2
Control panel
Recording mode
(This screen shows the still picture shooting menu.)
431
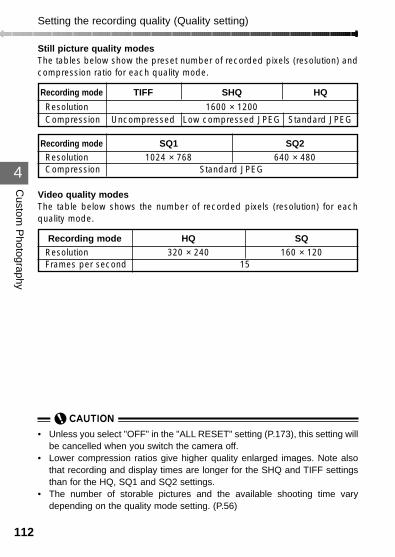
112
4
Custom
Photography
Setting the recording quality (Quality setting)
Still picture quality modesThe tables below show the preset number of recorded pixels (resolution) andcompression ratio for each quality mode.
Recording mode TIFF SHQ HQ
Resolution 1600 × 1200Compression Uncompressed Low compressed JPEG Standard JPEG
Recording mode SQ1 SQ2Resolution 1024 × 768 640 × 480Compression Standard JPEG
Video quality modesThe table below shows the number of recorded pixels (resolution) for eachquality mode.
Recording mode HQ SQ
Resolution 320 × 240 160 × 120Frames per second 15
• Unless you select "OFF" in the "ALL RESET" setting (P.173), this setting willbe cancelled when you switch the camera off.
• Lower compression ratios give higher quality enlarged images. Note alsothat recording and display times are longer for the SHQ and TIFF settingsthan for the HQ, SQ1 and SQ2 settings.
• The number of storable pictures and the available shooting time varydepending on the quality mode setting. (P.56)
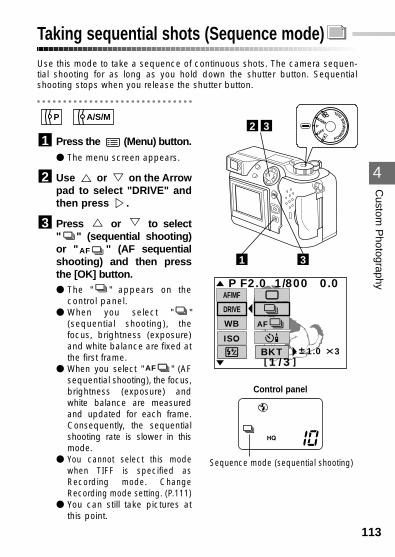
113
4
Custom
Photography
Taking sequential shots (Sequence mode)Use this mode to take a sequence of continuous shots. The camera sequen-tial shooting for as long as you hold down the shutter button. Sequentialshooting stops when you release the shutter button.
Press the (Menu) button.● The menu screen appears.
Use or on the Arrowpad to select "DRIVE" andthen press .
Press or to select" " (sequential shooting)or " " (AF sequentialshooting) and then pressthe [OK] button.● The " " appears on the
control panel.● When you select " "
(sequential shooting), thefocus, brightness (exposure)and white balance are fixed atthe first frame.
● When you select " " (AFsequential shooting), the focus,brightness (exposure) andwhite balance are measuredand updated for each frame.Consequently, the sequentialshooting rate is slower in thismode.
● You cannot select this modewhen TIFF is specified asRecording mode. ChangeRecording mode setting. (P.111)
● You can still take pictures atthis point.
AF
AF
3
2
1
A/S/MP
POW
ER/M
OD
E
DIAL
P
A/S/M
OFF32
[1 /3 ]
AF
1.0
F2.0 1/800 0.0 P
3
DRIVE
ISO
WB
AF/MF
BKT
Control panel
1 3
Sequence mode (sequential shooting)
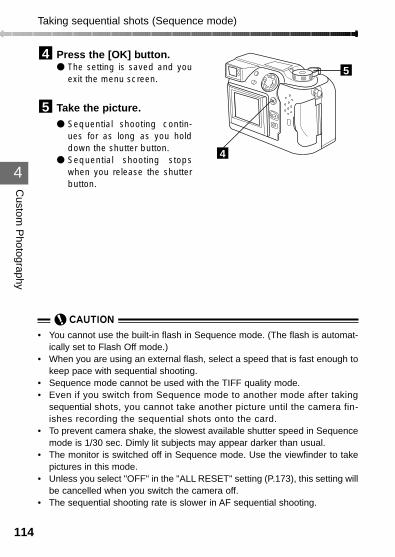
114
4
Custom
Photography
Taking sequential shots (Sequence mode)
• You cannot use the built-in flash in Sequence mode. (The flash is automat-ically set to Flash Off mode.)
• When you are using an external flash, select a speed that is fast enough tokeep pace with sequential shooting.
• Sequence mode cannot be used with the TIFF quality mode.• Even if you switch from Sequence mode to another mode after taking
sequential shots, you cannot take another picture until the camera fin-ishes recording the sequential shots onto the card.
• To prevent camera shake, the slowest available shutter speed in Sequencemode is 1/30 sec. Dimly lit subjects may appear darker than usual.
• The monitor is switched off in Sequence mode. Use the viewfinder to takepictures in this mode.
• Unless you select "OFF" in the "ALL RESET" setting (P.173), this setting willbe cancelled when you switch the camera off.
• The sequential shooting rate is slower in AF sequential shooting.
Press the [OK] button.● The setting is saved and you
exit the menu screen.
Take the picture.● Sequential shooting contin-
ues for as long as you holddown the shutter button.
● Sequential shooting stopswhen you release the shutterbutton.
5
4
4
5
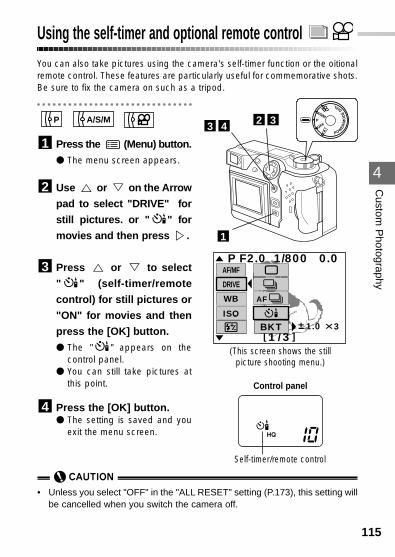
115
4
Custom
Photography
Using the self-timer and optional remote control You can also take pictures using the camera's self-timer function or the oitionalremote control. These features are particularly useful for commemorative shots.Be sure to fix the camera on such as a tripod.
Press the (Menu) button.● The menu screen appears.
Use or on the Arrow
pad to select "DRIVE" for
still pictures. or " " for
movies and then press .
Press or to select
" " (self-timer/remote
control) for still pictures or
"ON" for movies and then
press the [OK] button.● The " " appears on the
control panel.● You can still take pictures at
this point.
Press the [OK] button.● The setting is saved and you
exit the menu screen.
4
3
2
1
A/S/MPPOW
ER/M
OD
E
DIAL
P
A/S/M
OFF32
[1 /3 ]
AF
1.0
F2.0 1/800 0.0 P
3
DRIVE
ISO
WB
AF/MF
BKT
Control panel
1
Self-timer/remote control
(This screen shows the still picture shooting menu.)
43
• Unless you select "OFF" in the "ALL RESET" setting (P.173), this setting willbe cancelled when you switch the camera off.
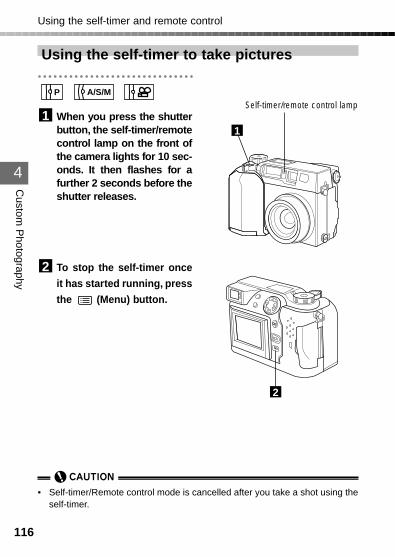
116
4
Custom
Photography
Using the self-timer and remote control
Using the self-timer to take pictures
When you press the shutterbutton, the self-timer/remotecontrol lamp on the front ofthe camera lights for 10 sec-onds. It then flashes for afurther 2 seconds before theshutter releases.
To stop the self-timer once
it has started running, press
the (Menu) button.
2
1
A/S/MP
Self-timer/remote control lamp
1
2
• Self-timer/Remote control mode is cancelled after you take a shot using theself-timer.
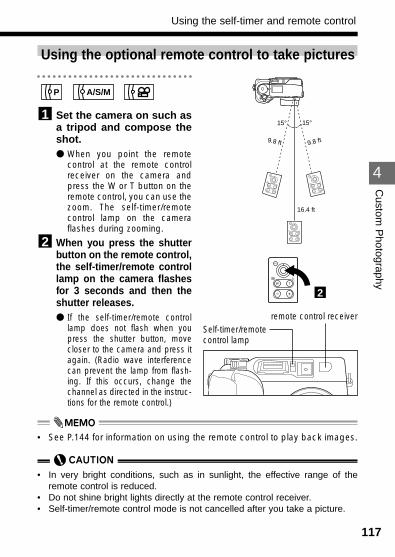
117
4
Custom
Photography
Using the self-timer and remote control
Using the optional remote control to take pictures
Set the camera on such asa tripod and compose theshot.● When you point the remote
control at the remote controlreceiver on the camera andpress the W or T button on theremote control, you can use thezoom. The self-timer/remotecontrol lamp on the cameraflashes during zooming.
When you press the shutterbutton on the remote control,the self-timer/remote controllamp on the camera flashesfor 3 seconds and then theshutter releases.● If the self-timer/remote control
lamp does not flash when youpress the shutter button, movecloser to the camera and press itagain. (Radio wave interferencecan prevent the lamp from flash-ing. If this occurs, change thechannel as directed in the instruc-tions for the remote control.)
2
1
A/S/MP
9.8 ft9.8 ft
16.4 ft
15° 15°
remote control receiver
• In very bright conditions, such as in sunlight, the effective range of theremote control is reduced.
• Do not shine bright lights directly at the remote control receiver.• Self-timer/remote control mode is not cancelled after you take a picture.
2
Self-timer/remotecontrol lamp
• See P.144 for information on using the remote control to play back images.
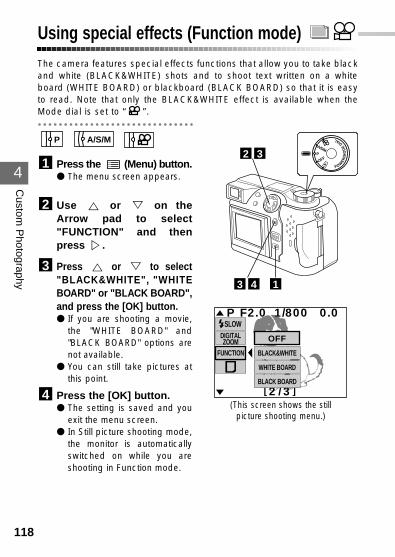
4
Custom
Photography
118
Using special effects (Function mode)The camera features special effects functions that allow you to take blackand white (BLACK&WHITE) shots and to shoot text written on a whiteboard (WHITE BOARD) or blackboard (BLACK BOARD) so that it is easyto read. Note that only the BLACK&WHITE effect is available when theMode dial is set to “ ”.
Press the (Menu) button.● The menu screen appears.
Use or on theArrow pad to select"FUNCTION" and thenpress .
Press or to select"BLACK&WHITE", "WHITEBOARD" or "BLACK BOARD",and press the [OK] button.● If you are shooting a movie,
the "WHITE BOARD" and"BLACK BOARD" options arenot available.
● You can still take pictures atthis point.
Press the [OK] button.● The setting is saved and you
exit the menu screen.● In Still picture shooting mode,
the monitor is automaticallyswitched on while you areshooting in Function mode.
4
3
2
1
A/S/MP
POW
ER/M
OD
E
DIAL
P
A/S/M
OFF32
[2 /3 ]
F2.0 1/800 0.0 P
BLACK&WHITE
OFFDIGITALZOOM
FUNCTION
SLOW
WHITE BOARD
BLACK BOARD
43 1
(This screen shows the still picture shooting menu.)
119
4
Custom
Photography
Using special effects (Function mode)
• When you select "WHITE BOARD" or "BLACK BOARD", the flash mode isset to “ ” (Flash Off). (P.126)
• If you select "WHITE BOARD" or "BLACK BOARD" and cannot read the textphotographed, try using exposure compensation. (P.92)
• Unless you select "OFF" in the "ALL RESET" setting (P.173), this setting willbe cancelled when you switch the camera off.
• When you set the Mode dial to " ", the "WHITE BOARD" and "BLACKBOARD" options are deactivated.
• You cannot set the white balance in this mode.
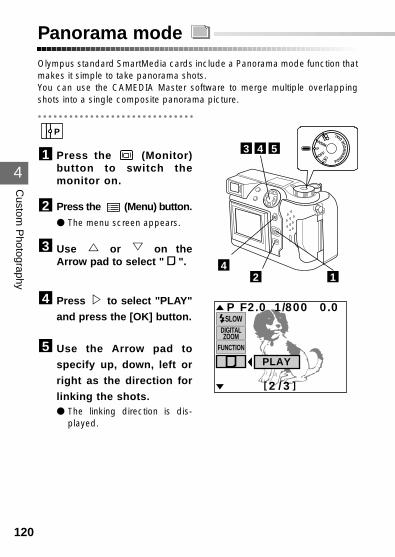
120
4
Custom
Photography
Panorama mode Olympus standard SmartMedia cards include a Panorama mode function thatmakes it simple to take panorama shots.You can use the CAMEDIA Master software to merge multiple overlappingshots into a single composite panorama picture.
Press the (Monitor)button to switch themonitor on.
Press the (Menu) button.● The menu screen appears.
Use or on theArrow pad to select " ".
Press to select "PLAY"
and press the [OK] button.
Use the Arrow pad to
specify up, down, left or
right as the direction for
linking the shots.● The linking direction is dis-
played.
5
4
3
2
1
P
POW
ER/M
OD
E
DIAL
P
A/S/M
OFF543
[2 /3 ]
F2.0 1/800 0.0 P
PLAY
DIGITALZOOM
FUNCTION
SLOW
2 14
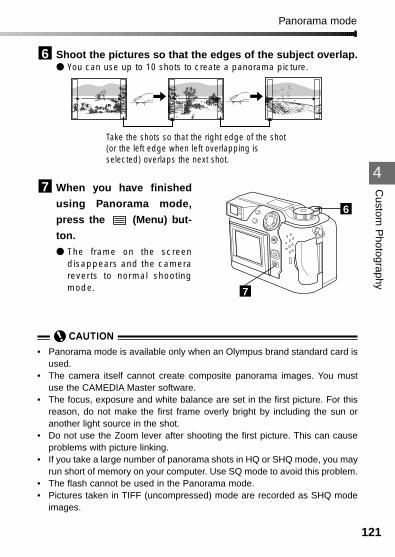
121
4
Custom
Photography
Panorama mode
• Panorama mode is available only when an Olympus brand standard card isused.
• The camera itself cannot create composite panorama images. You mustuse the CAMEDIA Master software.
• The focus, exposure and white balance are set in the first picture. For thisreason, do not make the first frame overly bright by including the sun oranother light source in the shot.
• Do not use the Zoom lever after shooting the first picture. This can causeproblems with picture linking.
• If you take a large number of panorama shots in HQ or SHQ mode, you mayrun short of memory on your computer. Use SQ mode to avoid this problem.
• The flash cannot be used in the Panorama mode.• Pictures taken in TIFF (uncompressed) mode are recorded as SHQ mode
images.
Shoot the pictures so that the edges of the subject overlap.● You can use up to 10 shots to create a panorama picture.
When you have finished
using Panorama mode,
press the (Menu) but-
ton.● The frame on the screen
disappears and the camerareverts to normal shootingmode.
7
6
7
6
Take the shots so that the right edge of the shot(or the left edge when left overlapping isselected) overlaps the next shot.

122
4
5OLYMPUS DIGITAL CAMERA
Chapter
Using Flash
• This chapter describes how to take picturesusing flash. These descriptions cover the use ofboth built-in flash and external flash units.
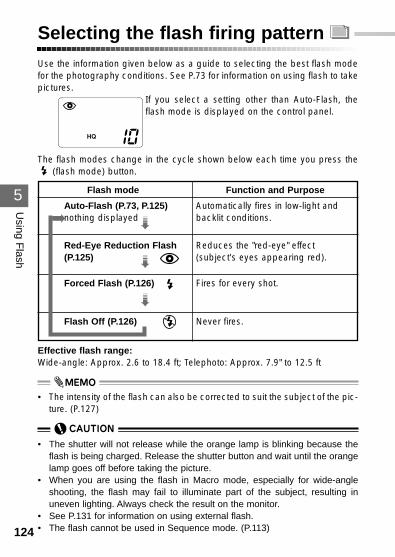
5
Using F
lash
124
Selecting the flash firing pattern
• The shutter will not release while the orange lamp is blinking because theflash is being charged. Release the shutter button and wait until the orangelamp goes off before taking the picture.
• When you are using the flash in Macro mode, especially for wide-angleshooting, the flash may fail to illuminate part of the subject, resulting inuneven lighting. Always check the result on the monitor.
• See P.131 for information on using external flash.• The flash cannot be used in Sequence mode. (P.113)
Use the information given below as a guide to selecting the best flash modefor the photography conditions. See P.73 for information on using flash to takepictures.
If you select a setting other than Auto-Flash, theflash mode is displayed on the control panel.
The flash modes change in the cycle shown below each time you press the(flash mode) button.
Flash mode Function and Purpose
Auto-Flash (P.73, P.125) Automatically fires in low-light and nothing displayed backlit conditions.
Red-Eye Reduction Flash Reduces the "red-eye" effect (P.125) (subject's eyes appearing red).
Forced Flash (P.126) Fires for every shot.
Flash Off (P.126) Never fires.
Effective flash range:Wide-angle: Approx. 2.6 to 18.4 ft; Telephoto: Approx. 7.9" to 12.5 ft
➠➠
➠
➡
• The intensity of the flash can also be corrected to suit the subject of the pic-ture. (P.127)
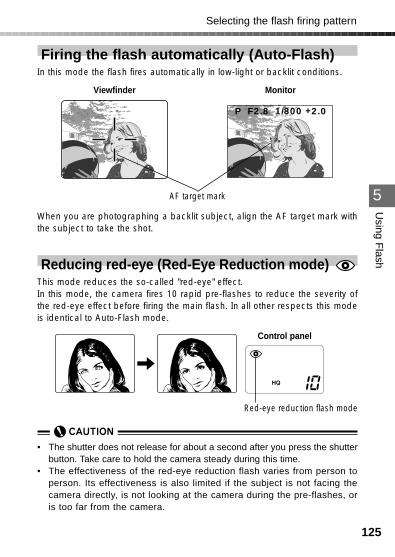
125
5
Using F
lash
Firing the flash automatically (Auto-Flash)In this mode the flash fires automatically in low-light or backlit conditions.
When you are photographing a backlit subject, align the AF target mark withthe subject to take the shot.
Reducing red-eye (Red-Eye Reduction mode)This mode reduces the so-called "red-eye" effect.In this mode, the camera fires 10 rapid pre-flashes to reduce the severity ofthe red-eye effect before firing the main flash. In all other respects this modeis identical to Auto-Flash mode.
Selecting the flash firing pattern
Viewfinder
AF target mark
• The shutter does not release for about a second after you press the shutterbutton. Take care to hold the camera steady during this time.
• The effectiveness of the red-eye reduction flash varies from person toperson. Its effectiveness is also limited if the subject is not facing thecamera directly, is not looking at the camera during the pre-flashes, oris too far from the camera.
Control panel
Red-eye reduction flash mode
P F2.8 1/800 +2.0
Monitor
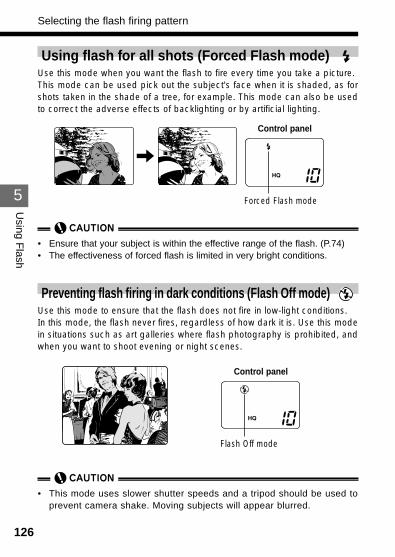
126
5
Using F
lash
Using flash for all shots (Forced Flash mode)Use this mode when you want the flash to fire every time you take a picture.This mode can be used pick out the subject's face when it is shaded, as forshots taken in the shade of a tree, for example. This mode can also be usedto correct the adverse effects of backlighting or by artificial lighting.
Selecting the flash firing pattern
• Ensure that your subject is within the effective range of the flash. (P.74)• The effectiveness of forced flash is limited in very bright conditions.
Control panel
Forced Flash mode
Preventing flash firing in dark conditions (Flash Off mode)Use this mode to ensure that the flash does not fire in low-light conditions.In this mode, the flash never fires, regardless of how dark it is. Use this modein situations such as art galleries where flash photography is prohibited, andwhen you want to shoot evening or night scenes.
Control panel
Flash Off mode
• This mode uses slower shutter speeds and a tripod should be used toprevent camera shake. Moving subjects will appear blurred.
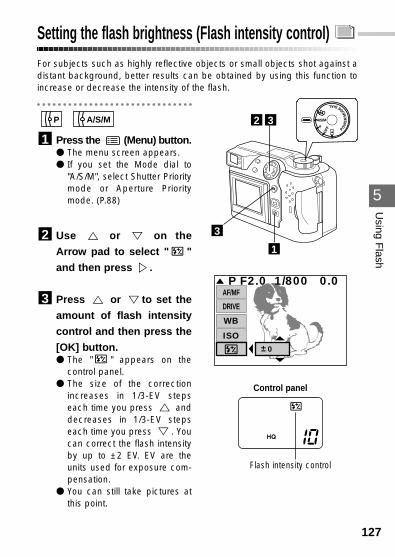
5
Using F
lash
127
Setting the flash brightness (Flash intensity control)For subjects such as highly reflective objects or small objects shot against adistant background, better results can be obtained by using this function toincrease or decrease the intensity of the flash.
Press the (Menu) button.● The menu screen appears.● If you set the Mode dial to
"A/S/M", select Shutter Prioritymode or Aperture Prioritymode. (P.88)
Use or on the
Arrow pad to select " "
and then press .
Press or to set the
amount of flash intensity
control and then press the
[OK] button.● The " " appears on the
control panel.● The size of the correction
increases in 1/3-EV stepseach time you press anddecreases in 1/3-EV stepseach time you press . Youcan correct the flash intensityby up to ±2 EV. EV are theunits used for exposure com-pensation.
● You can still take pictures atthis point.
3
2
1
A/S/MPP
A/S/M
OFF PO
WE
R/M
O
DEDIAL
32
F2.0 1/800 0.0 P
0
DRIVE
AF/MF
ISO
WB
1
Control panel
Flash intensity control
3
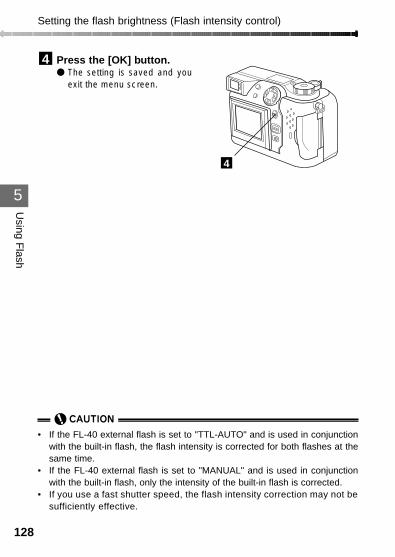
128
5
Using F
lash
Press the [OK] button.● The setting is saved and you
exit the menu screen.
4
Setting the flash brightness (Flash intensity control)
• If the FL-40 external flash is set to "TTL-AUTO" and is used in conjunctionwith the built-in flash, the flash intensity is corrected for both flashes at thesame time.
• If the FL-40 external flash is set to "MANUAL" and is used in conjunctionwith the built-in flash, only the intensity of the built-in flash is corrected.
• If you use a fast shutter speed, the flash intensity correction may not besufficiently effective.
4
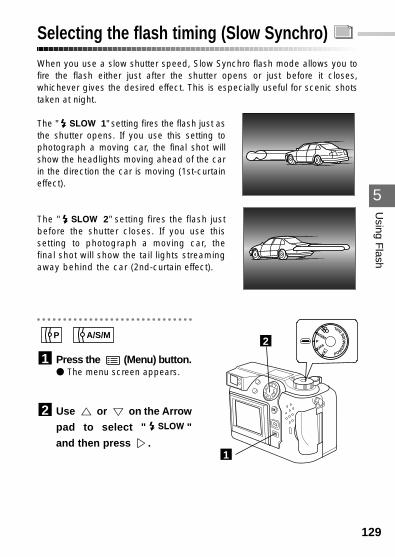
129
5
Using F
lash
Selecting the flash timing (Slow Synchro)When you use a slow shutter speed, Slow Synchro flash mode allows you tofire the flash either just after the shutter opens or just before it closes,whichever gives the desired effect. This is especially useful for scenic shotstaken at night.
The " 1" setting fires the flash just asthe shutter opens. If you use this setting tophotograph a moving car, the final shot willshow the headlights moving ahead of the carin the direction the car is moving (1st-curtaineffect).
The " 2" setting fires the flash justbefore the shutter closes. If you use thissetting to photograph a moving car, thefinal shot will show the tail lights streamingaway behind the car (2nd-curtain effect).
Press the (Menu) button.● The menu screen appears.
Use or on the Arrow
pad to select " "
and then press .
2
1
A/S/MP
POW
ER/M
OD
E
DIAL
P
A/S/M
OFF2
1

130
5
Using F
lash
Selecting the flash timing (Slow Synchro)
Press or to select" 1" or " 2"and then press the [OK]button.● " " appears on the
control panel.● When you select " 2",
the built-in flash fires a pre-flashbefore the main flash.
● You can still take pictures atthis point.
Press the [OK] button.● The setting is saved and you
exit the menu screen.
4
3
• Because this mode uses slow shutter speeds, a tripod should be used toprevent camera shake.
• This mode can be used for external flash units as well as the built-in flash.• Unless you select "OFF" in the "ALL RESET" setting (P.173), this setting will
be cancelled when you switch the camera off.
• When you use the FL-40 external flash, the external flash is controlled bythe same setting.
OFF
[2 /3 ]
F2.0 1/800 0.0 P
SLOW 1SLOW 2
SLOW
FUNCTION
DIGITALZOOM
Control panel
Slow Synchro mode
POW
ER/M
OD
E
DIAL
P
A/S/M
OFF3
43
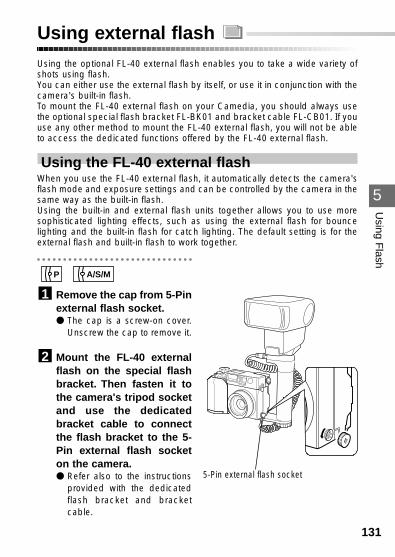
131
5
Using F
lash
Using external flash Using the optional FL-40 external flash enables you to take a wide variety ofshots using flash.You can either use the external flash by itself, or use it in conjunction with thecamera's built-in flash.To mount the FL-40 external flash on your Camedia, you should always usethe optional special flash bracket FL-BK01 and bracket cable FL-CB01. If youuse any other method to mount the FL-40 external flash, you will not be ableto access the dedicated functions offered by the FL-40 external flash.
Using the FL-40 external flashWhen you use the FL-40 external flash, it automatically detects the camera'sflash mode and exposure settings and can be controlled by the camera in thesame way as the built-in flash.Using the built-in and external flash units together allows you to use moresophisticated lighting effects, such as using the external flash for bouncelighting and the built-in flash for catch lighting. The default setting is for theexternal flash and built-in flash to work together.
Remove the cap from 5-Pinexternal flash socket.● The cap is a screw-on cover.
Unscrew the cap to remove it.
Mount the FL-40 externalflash on the special flashbracket. Then fasten it tothe camera's tripod socketand use the dedicatedbracket cable to connectthe flash bracket to the 5-Pin external flash socketon the camera.● Refer also to the instructions
provided with the dedicatedflash bracket and bracketcable.
2
1
A/S/MP
5-Pin external flash socket
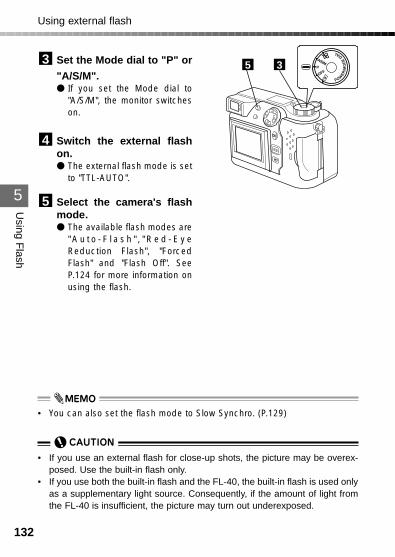
132
5
Using F
lash
Set the Mode dial to "P" or
"A/S/M".● If you set the Mode dial to
"A/S/M", the monitor switcheson.
Switch the external flashon.● The external flash mode is set
to "TTL-AUTO".
Select the camera's flashmode.● The available flash modes are
" A u t o - F l a s h " , " R e d - E y eReduction Flash", "ForcedFlash" and "Flash Off". SeeP.124 for more information onusing the flash.
5
4
3
Using external flash
POW
ER/M
OD
E
DIAL
P
A/S/M
OFF35
• If you use an external flash for close-up shots, the picture may be overex-posed. Use the built-in flash only.
• If you use both the built-in flash and the FL-40, the built-in flash is used onlyas a supplementary light source. Consequently, if the amount of light fromthe FL-40 is insufficient, the picture may turn out underexposed.
• You can also set the flash mode to Slow Synchro. (P.129)
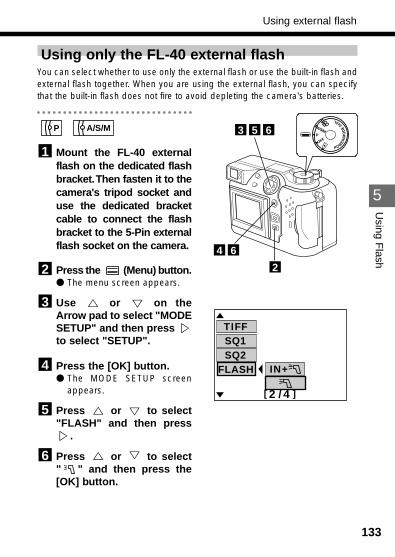
133
5
Using F
lash
Using only the FL-40 external flashYou can select whether to use only the external flash or use the built-in flash andexternal flash together. When you are using the external flash, you can specifythat the built-in flash does not fire to avoid depleting the camera's batteries.
Mount the FL-40 externalflash on the dedicated flashbracket.Then fasten it to thecamera's tripod socket anduse the dedicated bracketcable to connect the flashbracket to the 5-Pin externalflash socket on the camera.
Press the (Menu) button.● The menu screen appears.
Use or on theArrow pad to select "MODESETUP" and then press to select "SETUP".
Press the [OK] button.● The MODE SETUP screen
appears.
Press or to select"FLASH" and then press
.
Press or to select" " and then press the[OK] button.
6
5
4
3
2
1
A/S/MP
Using external flash
POW
ER/M
OD
E
DIAL
P
A/S/M
OFF
2
653
64
[2 /4 ]
IN+
TIFFSQ1SQ2
FLASH
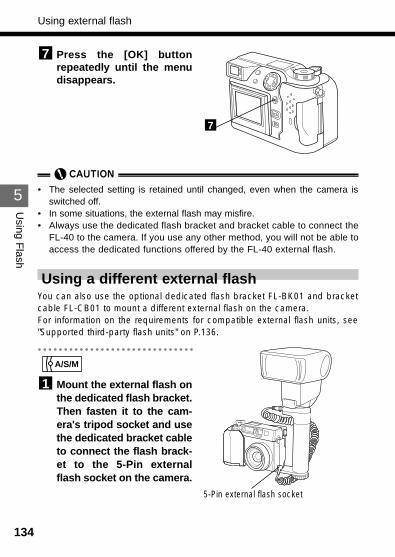
134
5
Using F
lash
Press the [OK] buttonrepeatedly until the menudisappears.
7
Using external flash
• The selected setting is retained until changed, even when the camera isswitched off.
• In some situations, the external flash may misfire.• Always use the dedicated flash bracket and bracket cable to connect the
FL-40 to the camera. If you use any other method, you will not be able toaccess the dedicated functions offered by the FL-40 external flash.
7
Using a different external flashYou can also use the optional dedicated flash bracket FL-BK01 and bracketcable FL-CB01 to mount a different external flash on the camera.For information on the requirements for compatible external flash units, see"Supported third-party flash units" on P.136.
Mount the external flash onthe dedicated flash bracket.Then fasten it to the cam-era's tripod socket and usethe dedicated bracket cableto connect the flash brack-et to the 5-Pin externalflash socket on the camera.
1
A/S/M
5-Pin external flash socket
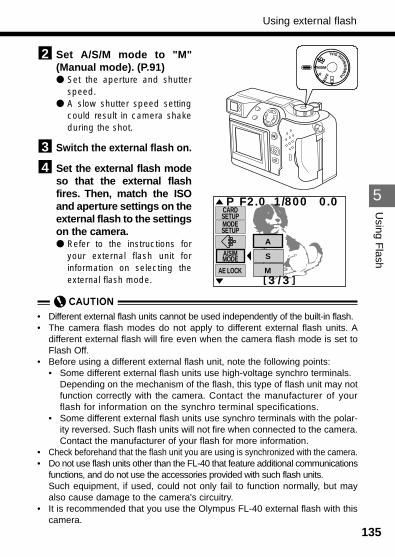
135
5
Using F
lashUsing external flash
Set A/S/M mode to "M"(Manual mode). (P.91)● Set the aperture and shutter
speed.● A slow shutter speed setting
could result in camera shakeduring the shot.
Switch the external flash on.
Set the external flash modeso that the external flashfires. Then, match the ISOand aperture settings on theexternal flash to the settingson the camera.● Refer to the instructions for
your external flash unit forinformation on selecting theexternal flash mode.
43
2P
A/S/M
OFF PO
WE
R/M
O
DEDIAL
A
S
M[3 /3 ]
F2.0 1/800 0.0 P
A/S/MMODE
CARDSETUPMODESETUP
AE LOCK
• Different external flash units cannot be used independently of the built-in flash.• The camera flash modes do not apply to different external flash units. A
different external flash will fire even when the camera flash mode is set toFlash Off.
• Before using a different external flash unit, note the following points:• Some different external flash units use high-voltage synchro terminals.
Depending on the mechanism of the flash, this type of flash unit may notfunction correctly with the camera. Contact the manufacturer of yourflash for information on the synchro terminal specifications.
• Some different external flash units use synchro terminals with the polar-ity reversed. Such flash units will not fire when connected to the camera.Contact the manufacturer of your flash for more information.
• Check beforehand that the flash unit you are using is synchronized with the camera.• Do not use flash units other than the FL-40 that feature additional communications
functions, and do not use the accessories provided with such flash units.Such equipment, if used, could not only fail to function normally, but mayalso cause damage to the camera's circuitry.
• It is recommended that you use the Olympus FL-40 external flash with thiscamera.
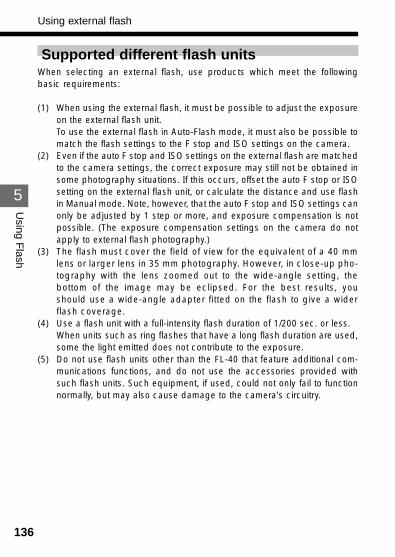
136
5
Using F
lash
Supported different flash unitsWhen selecting an external flash, use products which meet the followingbasic requirements:
(1) When using the external flash, it must be possible to adjust the exposureon the external flash unit.To use the external flash in Auto-Flash mode, it must also be possible tomatch the flash settings to the F stop and ISO settings on the camera.
(2) Even if the auto F stop and ISO settings on the external flash are matchedto the camera settings, the correct exposure may still not be obtained insome photography situations. If this occurs, offset the auto F stop or ISOsetting on the external flash unit, or calculate the distance and use flashin Manual mode. Note, however, that the auto F stop and ISO settings canonly be adjusted by 1 step or more, and exposure compensation is notpossible. (The exposure compensation settings on the camera do notapply to external flash photography.)
(3) The flash must cover the field of view for the equivalent of a 40 mmlens or larger lens in 35 mm photography. However, in close-up pho-tography with the lens zoomed out to the wide-angle setting, thebottom of the image may be eclipsed. For the best results, youshould use a wide-angle adapter fitted on the flash to give a widerflash coverage.
(4) Use a flash unit with a full-intensity flash duration of 1/200 sec. or less.When units such as ring flashes that have a long flash duration are used,some the light emitted does not contribute to the exposure.
(5) Do not use flash units other than the FL-40 that feature additional com-munications functions, and do not use the accessories provided withsuch flash units. Such equipment, if used, could not only fail to functionnormally, but may also cause damage to the camera's circuitry.
Using external flash
6OLYMPUS DIGITAL CAMERA
Chapter
Displaying, editing anderasing your pictures• This chapter describes how to display, edit and
erase pictures you have shot.
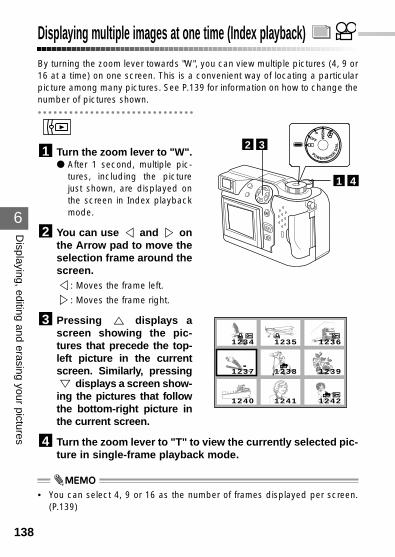
6
Displaying, editing and erasing your pictures
138
Displaying multiple images at one time (Index playback) By turning the zoom lever towards "W", you can view multiple pictures (4, 9 or16 at a time) on one screen. This is a convenient way of locating a particularpicture among many pictures. See P.139 for information on how to change thenumber of pictures shown.
Turn the zoom lever to "W".● After 1 second, multiple pic-
tures, including the picturejust shown, are displayed onthe screen in Index playbackmode.
You can use and onthe Arrow pad to move theselection frame around thescreen.
: Moves the frame left.
: Moves the frame right.
Pressing displays ascreen showing the pic-tures that precede the top-left picture in the currentscreen. Similarly, pressing
displays a screen show-ing the pictures that followthe bottom-right picture inthe current screen.
Turn the zoom lever to "T" to view the currently selected pic-ture in single-frame playback mode.
4
3
2
1
P
A/S
/M
OFF
POWER/MODED
IAL32
1234 1235 1236
1237 1238 1239
1240 1241 1242
• You can select 4, 9 or 16 as the number of frames displayed per screen.(P.139)
41

139
6
Displaying, editing and erasing your pictures
Displaying multiple images at one time (Index playback)
Selecting the number of images displayedconcurrently (4, 9 or 16)
By turning the zoom lever towards "W" in playback mode, you can view mul-tiple pictures on one screen. Use the procedure below to specify the numberof images (4, 9 or 16) to be displayed per screen.
Press the (Menu) button.● The menu screen appears.
Use or on theArrow pad to select"MODE SETUP". Thenpress to select"SETUP".
Press the [OK] button todisplay the MODE SETUPscreen.
Press or to select
" " and then press .
Use or to select"4", "9" or "16" and thenpress the [OK] button.
Press the [OK] buttonrepeatedly until the menudisappears.● The setting is saved.
6
5
4
3
2
1
P
A/S
/M
OFF
POWER/MODED
IAL542
[1 /1 ]
CARDSETUPMODESETUP SETUP
FUNCTION
INFO
653
• If there are no pictures recorded on the SmartMedia card, the menu screendoes not appear when you press the (Menu) button.
• The selected setting is retained until changed, even when the camera isswitched off.
ALL RESET
[1 /1 ]
916
4
1
(This screen shows the still picture playback menu.)
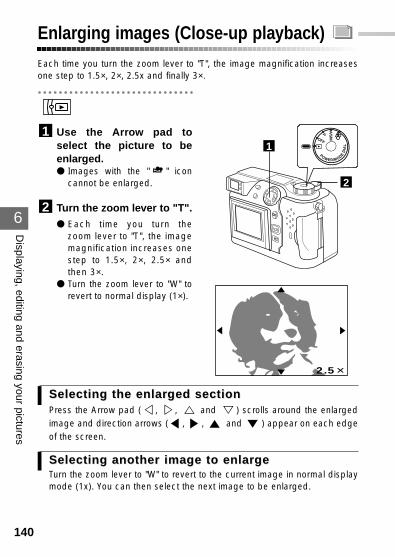
6
Displaying, editing and erasing your pictures
140
Enlarging images (Close-up playback)Each time you turn the zoom lever to "T", the image magnification increasesone step to 1.5×, 2×, 2.5x and finally 3×.
Use the Arrow pad toselect the picture to beenlarged.● Images with the " " icon
cannot be enlarged.
Turn the zoom lever to "T".● Each time you turn the
zoom lever to "T", the imagemagnification increases onestep to 1.5×, 2×, 2.5× andthen 3×.
● Turn the zoom lever to "W" torevert to normal display (1×).
2
1 P
A/S
/M
OFF
POWER/MODED
IAL1
2.5
2
Selecting the enlarSelecting the enlargged sectioned sectionPress the Arrow pad ( , , and ) scrolls around the enlargedimage and direction arrows ( , , and ) appear on each edgeof the screen.
Selecting another imaSelecting another imagge to enlare to enlarggeeTurn the zoom lever to "W" to revert to the current image in normal displaymode (1x). You can then select the next image to be enlarged.
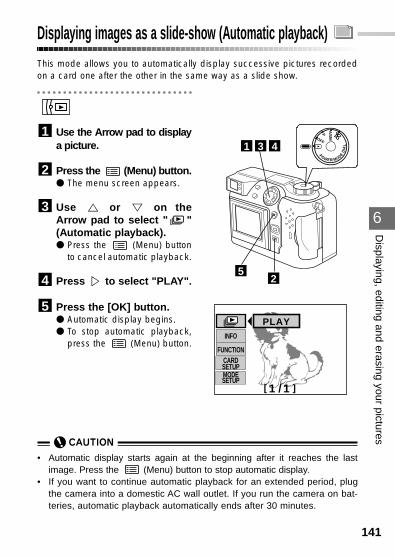
6
Displaying, editing and erasing your pictures
141
Displaying images as a slide-show (Automatic playback)
• Automatic display starts again at the beginning after it reaches the lastimage. Press the (Menu) button to stop automatic display.
• If you want to continue automatic playback for an extended period, plugthe camera into a domestic AC wall outlet. If you run the camera on bat-teries, automatic playback automatically ends after 30 minutes.
This mode allows you to automatically display successive pictures recordedon a card one after the other in the same way as a slide show.
Use the Arrow pad to displaya picture.
Press the (Menu) button.● The menu screen appears.
Use or on theArrow pad to select " "(Automatic playback).● Press the (Menu) button
to cancel automatic playback.
Press to select "PLAY".
Press the [OK] button.● Automatic display begins.● To stop automatic playback,
press the (Menu) button.
5
4
3
2
1 P
A/S
/M
OFF
POWER/MODED
IAL431
[1 /1 ] 1234
INFO
FUNCTION
PLAY
CARDSETUPMODESETUP
25
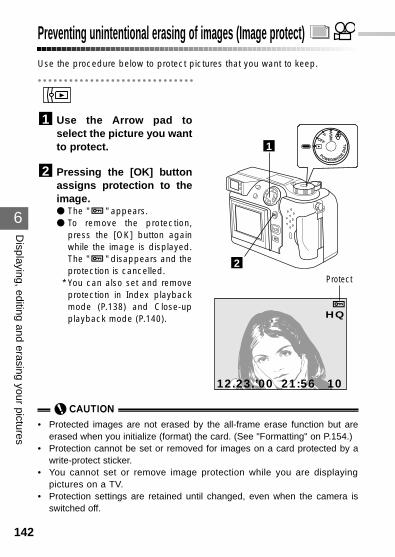
6
Displaying, editing and erasing your pictures
142
Preventing unintentional erasing of images (Image protect)
• Protected images are not erased by the all-frame erase function but areerased when you initialize (format) the card. (See "Formatting" on P.154.)
• Protection cannot be set or removed for images on a card protected by awrite-protect sticker.
• You cannot set or remove image protection while you are displayingpictures on a TV.
• Protection settings are retained until changed, even when the camera isswitched off.
Use the procedure below to protect pictures that you want to keep.
Use the Arrow pad toselect the picture you wantto protect.
Pressing the [OK] buttonassigns protection to theimage.● The " " appears.● To remove the protection,
press the [OK] button againwhile the image is displayed.The " " disappears and theprotection is cancelled.
* You can also set and removeprotection in Index playbackmode (P.138) and Close-upplayback mode (P.140).
2
1
P
A/S
/M
OFF
POWER/MODED
IAL1
12.23.’00 21:56 10
HQ10
2Protect
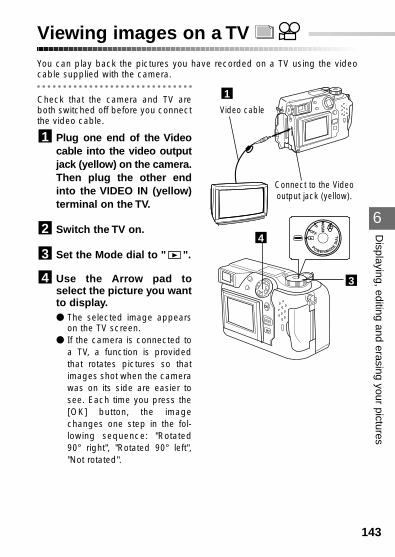
6
Displaying, editing and erasing your pictures
143
Viewing images on a TVYou can play back the pictures you have recorded on a TV using the videocable supplied with the camera.
Check that the camera and TV areboth switched off before you connectthe video cable.
Plug one end of the Videocable into the video outputjack (yellow) on the camera.Then plug the other endinto the VIDEO IN (yellow)terminal on the TV.
Switch the TV on.
Set the Mode dial to " ".
Use the Arrow pad toselect the picture you wantto display.● The selected image appears
on the TV screen.● If the camera is connected to
a TV, a function is providedthat rotates pictures so thatimages shot when the camerawas on its side are easier tosee. Each time you press the[OK] button, the imagechanges one step in the fol-lowing sequence: "Rotated90° right", "Rotated 90° left","Not rotated".
4
3
2
1
P
A/S
/M
OFF
POWER/MODED
IAL4
3
Video cable
1
Connect to the Videooutput jack (yellow).

144
6
Displaying, editing and erasing your pictures
● If you press the [OK] buttonwhen the camera is notconnected to a TV, theimage is protected. (P.142)
Viewing images on a TV
• The monitor is automatically switched off when you connect the camera toa TV.
• On some TVs, the picture may be displayed off-center.• On some TVs, a black frame may be displayed around the picture. This
frame may be very noticeable when the picture is printed on a video print-er. Check the completed prints.
• You should use the optional AC adapter as the camera power supply whenyou are viewing pictures on a TV.
1012.23.,00 21:56
SQ
1012.23.,00 21:56
SQOK OK
OK
1012.23.,00 21:56
SQ
Normal display of a picture shotwith the camera on its side.
[Using the optional remote control]To use the remote control, ensure that the remote control is pointed at theremote control receiver on the camera. Use the +/- button to select picturesand the W button to play back an index. You can also use the T button toswitch to Close-up playback mode and then use +/- button to move the selec-tion area rightward or leftward.
• Movie images cannot be rotated.
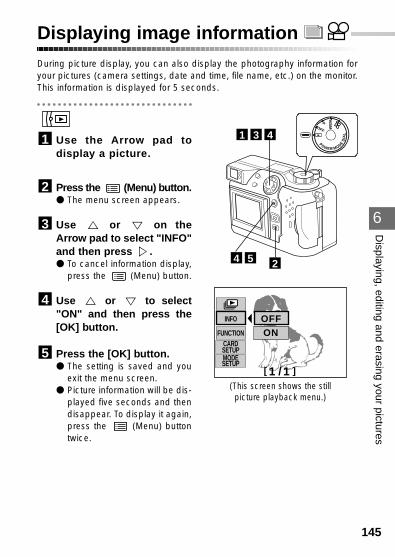
6
Displaying, editing and erasing your pictures
145
Displaying image informationDuring picture display, you can also display the photography information foryour pictures (camera settings, date and time, file name, etc.) on the monitor.This information is displayed for 5 seconds.
Use the Arrow pad todisplay a picture.
Press the (Menu) button.● The menu screen appears.
Use or on theArrow pad to select "INFO"and then press .● To cancel information display,
press the (Menu) button.
Use or to select"ON" and then press the[OK] button.
Press the [OK] button.● The setting is saved and you
exit the menu screen.● Picture information will be dis-
played five seconds and thendisappear. To display it again,press the (Menu) buttontwice.
5
4
3
2
1
P
A/S
/M
OFF
POWER/MODED
IAL431
[1 /1 ] 1234
INFO OFFONFUNCTION
CARDSETUPMODESETUP
(This screen shows the still picture playback menu.)
54 2
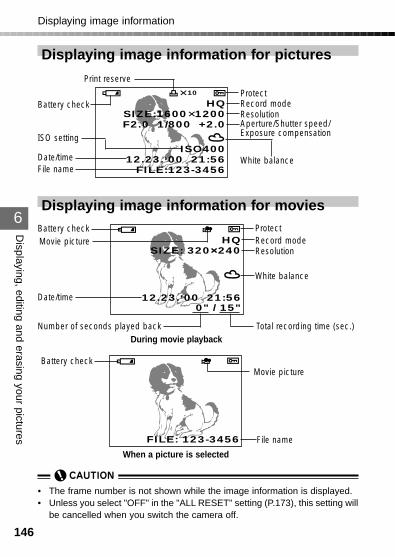
146
6
Displaying, editing and erasing your pictures
Displaying image information for pictures
Displaying image information
HQSIZE:1600 1200F2.0 1/800 +2.0
ISO40012.23.,00 21:56
FILE:123-3456
10
Battery check
• The frame number is not shown while the image information is displayed.• Unless you select "OFF" in the "ALL RESET" setting (P.173), this setting will
be cancelled when you switch the camera off.
Print reserve
ProtectRecord modeResolutionAperture/Shutter speed/Exposure compensation
White balanceFile nameDate/time
ISO setting
Displaying image information for movies
HQSIZE: 320 240
0" / 15"12.23.,00 21:56
Battery checkMovie picture
ProtectRecord modeResolution
White balance
During movie playback
Date/time
Total recording time (sec.)Number of seconds played back
FILE: 123-3456
Battery checkMovie picture
When a picture is selected
File name
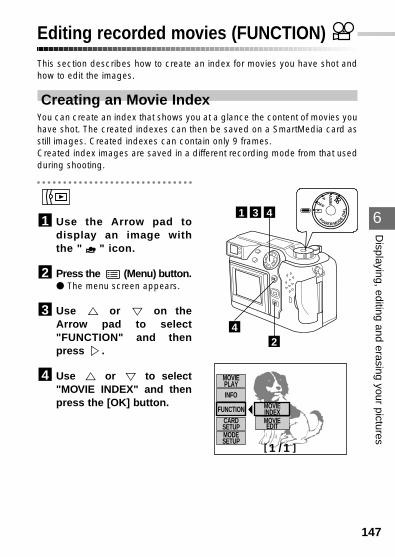
6
Displaying, editing and erasing your pictures
147
Editing recorded movies (FUNCTION)This section describes how to create an index for movies you have shot andhow to edit the images.
Creating an Movie IndexYou can create an index that shows you at a glance the content of movies youhave shot. The created indexes can then be saved on a SmartMedia card asstill images. Created indexes can contain only 9 frames.Created index images are saved in a different recording mode from that usedduring shooting.
Use the Arrow pad todisplay an image withthe " " icon.
Press the (Menu) button.● The menu screen appears.
Use or on theArrow pad to select"FUNCTION" and thenpress .
Use or to select"MOVIE INDEX" and thenpress the [OK] button.
4
3
2
1
P
A/S
/M
OFF
POWER/MODED
IAL431
[1 /1 ] 1234
MOVIEPLAY
CARDSETUPMODESETUP
FUNCTION
INFOMOVIEINDEXMOVIEEDIT
24
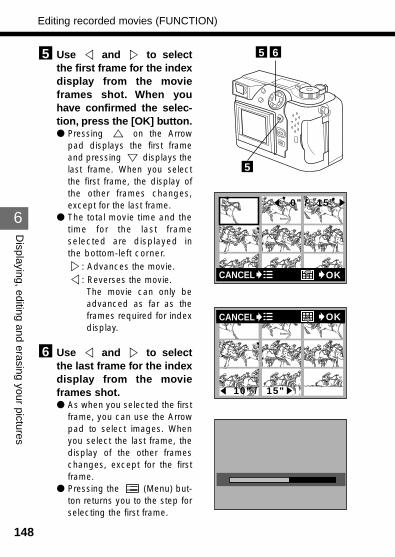
148
6
Displaying, editing and erasing your pictures
Use and to selectthe first frame for the indexdisplay from the movieframes shot. When youhave confirmed the selec-tion, press the [OK] button.● Pressing on the Arrow
pad displays the first frameand pressing displays thelast frame. When you selectthe first frame, the display ofthe other frames changes,except for the last frame.
● The total movie time and thetime for the last frameselected are displayed inthe bottom-left corner.
: Advances the movie.: Reverses the movie.The movie can only beadvanced as far as theframes required for indexdisplay.
Use and to selectthe last frame for the indexdisplay from the movieframes shot.● As when you selected the first
frame, you can use the Arrowpad to select images. Whenyou select the last frame, thedisplay of the other frameschanges, except for the firstframe.
● Pressing the (Menu) but-ton returns you to the step forselecting the first frame.
6
5
Editing recorded movies (FUNCTION)
CANCEL OK
0" / 15"
10" / 15"
CANCEL OK
65
5
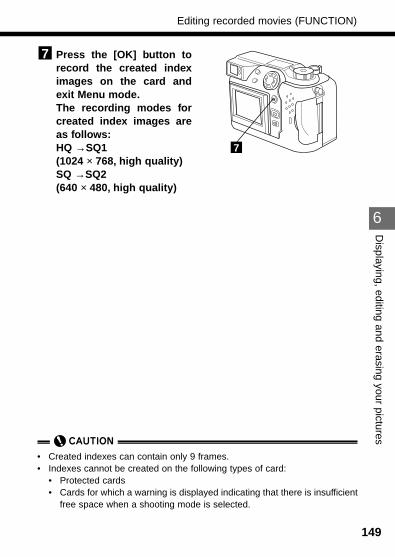
149
6
Displaying, editing and erasing your pictures
Press the [OK] button torecord the created indeximages on the card andexit Menu mode.The recording modes forcreated index images areas follows:HQ →SQ1 (1024 × 768, high quality)SQ →SQ2 (640 × 480, high quality)
7
Editing recorded movies (FUNCTION)
7
• Created indexes can contain only 9 frames.• Indexes cannot be created on the following types of card:
• Protected cards• Cards for which a warning is displayed indicating that there is insufficient
free space when a shooting mode is selected.
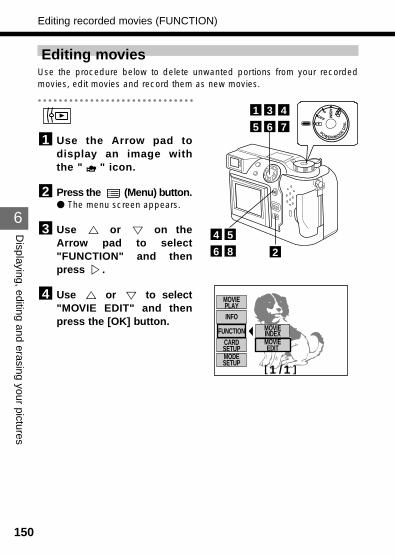
150
6
Displaying, editing and erasing your pictures
Editing recorded movies (FUNCTION)
Editing moviesUse the procedure below to delete unwanted portions from your recordedmovies, edit movies and record them as new movies.
Use the Arrow pad todisplay an image withthe " " icon.
Press the (Menu) button.● The menu screen appears.
Use or on theArrow pad to select"FUNCTION" and thenpress .
Use or to select"MOVIE EDIT" and thenpress the [OK] button.
4
3
2
1
P
A/S
/M
OFF
POWER/MODED
IAL
765431
[1 /1 ] 1234
MOVIEPLAY
CARDSETUPMODESETUP
FUNCTION
INFOMOVIEINDEXMOVIEEDIT
28654
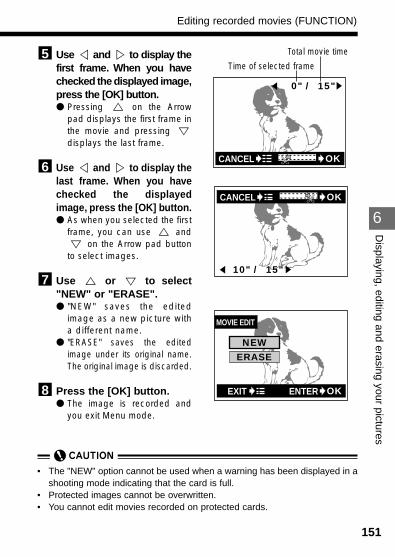
151
6
Displaying, editing and erasing your pictures
Editing recorded movies (FUNCTION)
Use and to display thefirst frame. When you havechecked the displayed image,press the [OK] button.● Pressing on the Arrow
pad displays the first frame inthe movie and pressing displays the last frame.
Use and to display thelast frame. When you havechecked the displayedimage, press the [OK] button.● As when you selected the first
frame, you can use andon the Arrow pad button
to select images.
Use or to select"NEW" or "ERASE".● "NEW" saves the edited
image as a new picture witha different name.
● "ERASE" saves the editedimage under its original name.The original image is discarded.
Press the [OK] button.● The image is recorded and
you exit Menu mode.
8
7
6
5
0" / 15"
CANCEL OK
10" / 15"
CANCEL OK
NEW
EXIT OKENTER
MOVIE EDIT
ERASE
• The "NEW" option cannot be used when a warning has been displayed in ashooting mode indicating that the card is full.
• Protected images cannot be overwritten.• You cannot edit movies recorded on protected cards.
Total movie time
Time of selected frame

6
Displaying, editing and erasing your pictures
152
Erasing all images (All-frame erase)You cannot use this function to erase protected images or images stored oncards protected by a write-protect sticker. To erase these images, remove theprotection or peel off the write-protect sticker. (Do not re-use write-protectstickers.)
Press the (Menu) button.● The menu screen appears.
Use or on the Arrowpad to select "CARDSETUP" and then press .
Press or to select" " and then press the[OK] button.● A confirmation screen appears.
3
2
1
P
A/S
/M
OFF
POWER/MODED
IAL32
[1 /1 ] 1234
CARDSETUPMODESETUP
FUNCTION
INFO
13
(This screen shows the still picture playback menu.)
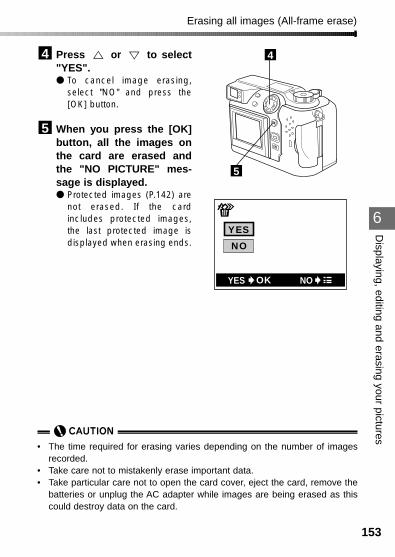
153
6
Displaying, editing and erasing your pictures
Erasing all images (All-frame erase)
Press or to select"YES".● To cancel image erasing,
select "NO" and press the[OK] button.
When you press the [OK]button, all the images onthe card are erased andthe "NO PICTURE" mes-sage is displayed.● Protected images (P.142) are
not erased. If the cardincludes protected images,the last protected image isdisplayed when erasing ends.
5
4
5
• The time required for erasing varies depending on the number of imagesrecorded.
• Take care not to mistakenly erase important data.• Take particular care not to open the card cover, eject the card, remove the
batteries or unplug the AC adapter while images are being erased as thiscould destroy data on the card.
4
YES OK NO
YES
NO
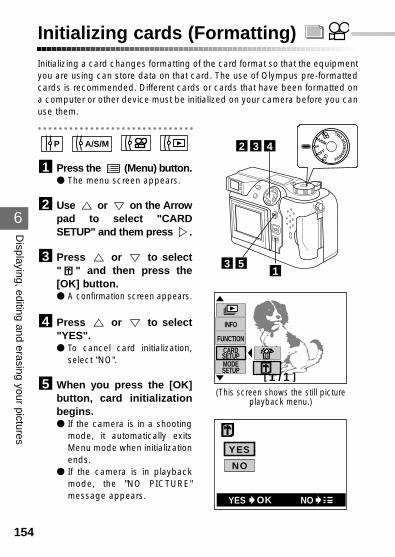
6
Displaying, editing and erasing your pictures
154
Initializing cards (Formatting) Initializing a card changes formatting of the card format so that the equipmentyou are using can store data on that card. The use of Olympus pre-formattedcards is recommended. Different cards or cards that have been formatted ona computer or other device must be initialized on your camera before you canuse them.
Press the (Menu) button.● The menu screen appears.
Use or on the Arrowpad to select "CARDSETUP" and them press .
Press or to select" " and then press the[OK] button.● A confirmation screen appears.
Press or to select"YES".● To cancel card initialization,
select "NO".
When you press the [OK]button, card initializationbegins.● If the camera is in a shooting
mode, it automatically exitsMenu mode when initializationends.
● If the camera is in playbackmode, the "NO PICTURE"message appears.
5
4
3
2
1
A/S/MP
POW
ER/M
OD
E
DIAL
P
A/S/M
OFF432
[1 /1 ] 1234
CARDSETUPMODESETUP
FUNCTION
INFO
153
(This screen shows the still picture playback menu.)
YES OK NO
YES
NO
155
6
Displaying, editing and erasing your pictures
Initializing cards (Formatting)
• You should check the images on the card carefully before initializing thecard.
• Initialization erases all the data on the card, including protected images.When you initialize a card you have already used, check that you do noterase any important data.
• If you use a non-Olympus brand commercially available card or card thathas been formatted on a personal computer or other device, it may not berecognized by the camera. In this case, the card should be initialized (for-matted) on the camera before use.
• You cannot initialize a card that is protected by a write-protect sticker.

156
7OLYMPUS DIGITAL CAMERA
Chapter
Print settings
• Follow the instructions in this chapter to print outrecorded images.
• The camera also allows you to specify printorders so that your pictures can be printed auto-matically by stores that provide DPOF (DigitalPrint Order Format) system print services.
7
Print settings
158
Printing methodsYou can print out pictures you have taken and stored on a card.There are three ways to obtain prints of the pictures you have taken andstored on a card:
1. Store the date, time and number of copies to be printed for the imagestored on the card (card print order).By inserting a card containing card print orders into a printer that supportsthe DPOF system, the specified pictures will automatically be printed.There is no need to specify the print settings on the printer.Similarly, you can take a card containing card print orders to any commercialprint service that offers the DPOF print system, and your pictures will be auto-matically printed with no need for further print instructions.
2. If you insert a card containing card print orders into the card slot of anOlympus CAMEDIA P-400/P-200/P-330N printer, you can print your pic-tures simply at the touch of a button.• For more information, refer to the user manual for your printer.
3. You can also transfer your pictures directly to a personal computer. You can do this by using the camera's USB functions, or by using aFlashPath or card adapter. Once you have downloaded your pictures to a computer, you can thenuse image printing software on the computer to print your pictures on aprinter connected to the computer.• For more information, refer to the user manuals for the respective software
programs.
DPOFDPOF (Digital Print Order Format) is a format used by digital cameras forrecording automatic printing information.The DPOF system allows you to record information specifying whichimages are to be printed and how many copies of each. This informationis recorded on the card used to store the pictures and allows the speci-fied pictures to be automatically printed by a printer or photo lab thatsupports the DPOF system.
159
7
Print settings
Printing methods
• You cannot use this camera to change DPOF order details specified usinganother device. Use the original device to modify the orders.
• If a card contains files with DPOF orders set on another device, using thiscamera to specify new orders may erase the previous orders.
• Even if the "PICTURE ERROR" message is displayed for a picture, itmay still be possible to specify print orders for the picture. In suchcases, the print reserve ( ) does not appear on the screen when theimage is displayed in single-frame playback mode. However, you cancheck the print orders in Index playback mode, since the icon is dis-played on the screen when multiple images are displayed in index-dis-play mode.
• You cannot connect the camera directly to printers that support directprinting, such as the Olympus P-300U digital printer, to print images.
• Some functions may not be available on all printers or at all photo labs.
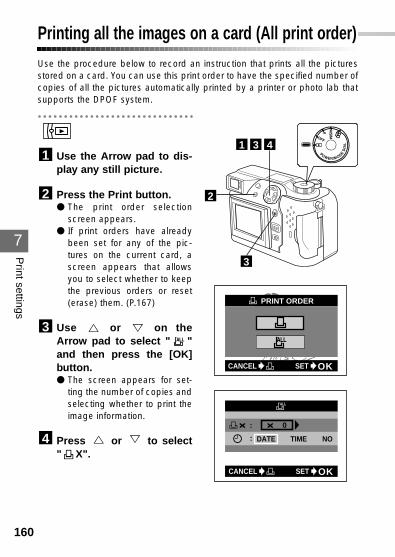
7
Print settings
160
Printing all the images on a card (All print order)Use the procedure below to record an instruction that prints all the picturesstored on a card. You can use this print order to have the specified number ofcopies of all the pictures automatically printed by a printer or photo lab thatsupports the DPOF system.
Use the Arrow pad to dis-play any still picture.
Press the Print button.● The print order selection
screen appears.● If print orders have already
been set for any of the pic-tures on the current card, ascreen appears that allowsyou to select whether to keepthe previous orders or reset(erase) them. (P.167)
Use or on theArrow pad to select " "and then press the [OK]button.● The screen appears for set-
ting the number of copies andselecting whether to print theimage information.
Press or to select" X".
4
3
2
1
P
A/S
/M
OFF
POWER/MODED
IAL431
CANCEL
PRINT ORDER
SET OK
2
3
: 0
: DATE TIME NO
CANCEL SET OK
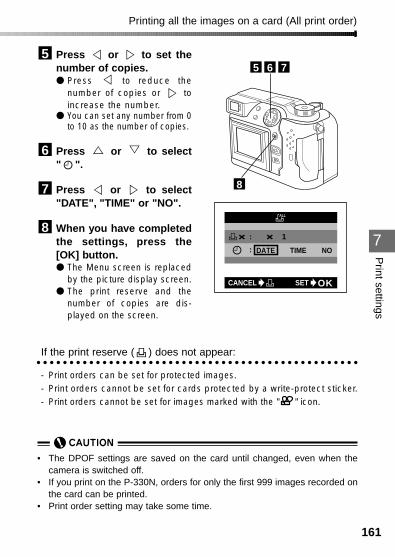
161
7
Print settings
Press or to set thenumber of copies.● Press to reduce the
number of copies or toincrease the number.
● You can set any number from 0to 10 as the number of copies.
Press or to select" ".
Press or to select"DATE", "TIME" or "NO".
When you have completedthe settings, press the[OK] button.● The Menu screen is replaced
by the picture display screen.● The print reserve and the
number of copies are dis-played on the screen.
If the print reserve ( ) does not appear:
- Print orders can be set for protected images.- Print orders cannot be set for cards protected by a write-protect sticker.- Print orders cannot be set for images marked with the " " icon.
8
7
6
5
Printing all the images on a card (All print order)
• The DPOF settings are saved on the card until changed, even when thecamera is switched off.
• If you print on the P-330N, orders for only the first 999 images recorded onthe card can be printed.
• Print order setting may take some time.
765
: 1
: DATE TIME NO
CANCEL SET OK
8
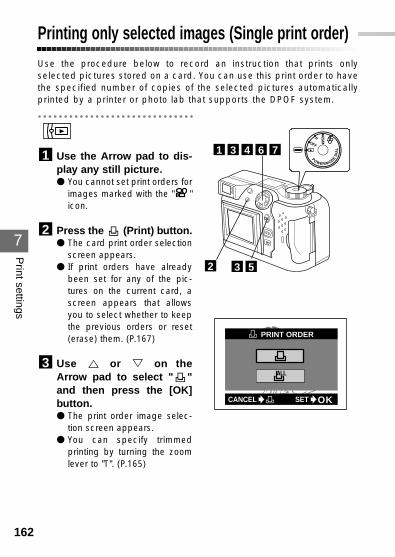
7
Print settings
162
Printing only selected images (Single print order)Use the procedure below to record an instruction that prints onlyselected pictures stored on a card. You can use this print order to havethe specified number of copies of the selected pictures automaticallyprinted by a printer or photo lab that supports the DPOF system.
Use the Arrow pad to dis-play any still picture.● You cannot set print orders for
images marked with the " "icon.
Press the (Print) button.● The card print order selection
screen appears.● If print orders have already
been set for any of the pic-tures on the current card, ascreen appears that allowsyou to select whether to keepthe previous orders or reset(erase) them. (P.167)
Use or on theArrow pad to select " "and then press the [OK]button.● The print order image selec-
tion screen appears.● You can specify trimmed
printing by turning the zoomlever to "T". (P.165)
3
2
1
P
A/S
/M
OFF
POWER/MODED
IAL76431
CANCEL
PRINT ORDER
SET OK
2 53
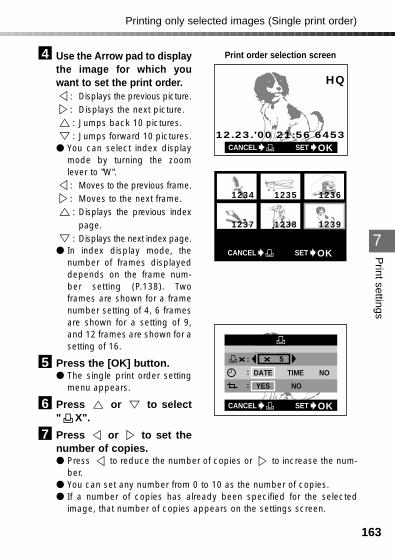
163
7
Print settings
Use the Arrow pad to displaythe image for which youwant to set the print order.
: Displays the previous picture.: Displays the next picture.: Jumps back 10 pictures.: Jumps forward 10 pictures.
● You can select index displaymode by turning the zoomlever to "W".: Moves to the previous frame.: Moves to the next frame.: Displays the previous index
page.: Displays the next index page.
● In index display mode, thenumber of frames displayeddepends on the frame num-ber setting (P.138). Twoframes are shown for a framenumber setting of 4, 6 framesare shown for a setting of 9,and 12 frames are shown for asetting of 16.
Press the [OK] button.● The single print order setting
menu appears.
Press or to select" X".
Press or to set thenumber of copies.● Press to reduce the number of copies or to increase the num-
ber.● You can set any number from 0 to 10 as the number of copies.● If a number of copies has already been specified for the selected
image, that number of copies appears on the settings screen.
7
6
5
4
Printing only selected images (Single print order)
1234 1235 1236
1237 1238 1239
CANCEL SET OK
HQ x10
CANCEL SET OK12.23.'00 21:56 6453
CANCEL SET OK
: 5
: DATE
: YES
TIME NO
NO
Print order selection screen

164
7
Print settings
Press or to select" ".
Press or to select"DATE" or "TIME" or "NO".
Press or to select" ".
Press or to select"YES" or "NO".● When trimming is not speci-
fied, you cannot select "YES".● See "Printing some images
enlarged (trimmed printorder)" (P.165) for informationon specifying trimming.
When you have completedthe settings, press the[OK] button.● The Menu screen is replaced
by the picture display screen.● The print reserve and the
number of copies aredisplayed on the screen.
● To set print orders for otherpictures, repeat steps 4 to 12.
Press the (Print) button.● You exit Print Order mode and
return to Display mode.
13
12
11
10
9
8
Printing only selected images (Single print order)
• The DPOF settings are saved on the card until changed, even when thecamera is switched off.
• If you print on the P-330N, orders for only the first 999 images recorded onthe card can be printed.
• Print order setting may take some time.
111098
CANCEL SET OK
: 5
: DATE
: YES
TIME NO
NO
13
12
CANCEL SET OK
: 5
: DATE
: YES
TIME NO
NO
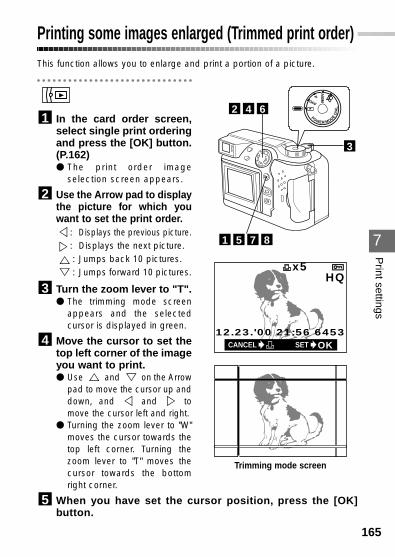
7
Print settings
165
Printing some images enlarged (Trimmed print order)This function allows you to enlarge and print a portion of a picture.
In the card order screen,select single print orderingand press the [OK] button.(P.162)● The print order image
selection screen appears.
Use the Arrow pad to displaythe picture for which youwant to set the print order.
: Displays the previous picture.: Displays the next picture.: Jumps back 10 pictures.: Jumps forward 10 pictures.
Turn the zoom lever to "T".● The trimming mode screen
appears and the selectedcursor is displayed in green.
Move the cursor to set thetop left corner of the imageyou want to print.● Use and on the Arrow
pad to move the cursor up anddown, and and tomove the cursor left and right.
● Turning the zoom lever to "W"moves the cursor towards thetop left corner. Turning thezoom lever to "T" moves thecursor towards the bottomright corner.
When you have set the cursor position, press the [OK]button.
5
4
3
2
1
P
A/S
/M
OFF
POWER/MODED
IAL642
HQ x5
CANCEL SET OK12.23.'00 21:56 6453
8751
Trimming mode screen
3
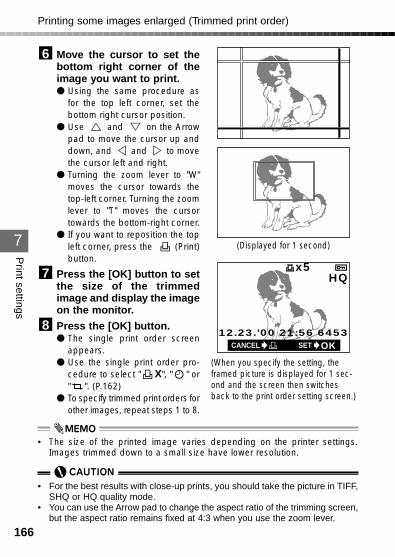
166
7
Print settings
Move the cursor to set thebottom right corner of theimage you want to print.● Using the same procedure as
for the top left corner, set thebottom right cursor position.
● Use and on the Arrowpad to move the cursor up anddown, and and to movethe cursor left and right.
● Turning the zoom lever to "W"moves the cursor towards thetop-left corner. Turning the zoomlever to "T" moves the cursortowards the bottom-right corner.
● If you want to reposition the topleft corner, press the (Print)button.
Press the [OK] button to setthe size of the trimmedimage and display the imageon the monitor.
Press the [OK] button.● The single print order screen
appears.● Use the single print order pro-
cedure to select " X", " " or" ". (P.162)
● To specify trimmed print orders forother images, repeat steps 1 to 8.
8
7
6
Printing some images enlarged (Trimmed print order)
(When you specify the setting, theframed picture is displayed for 1 sec-ond and the screen then switchesback to the print order setting screen.)
HQ x5
CANCEL SET OK12.23.'00 21:56 6453
• For the best results with close-up prints, you should take the picture in TIFF,SHQ or HQ quality mode.
• You can use the Arrow pad to change the aspect ratio of the trimming screen,but the aspect ratio remains fixed at 4:3 when you use the zoom lever.
• The size of the printed image varies depending on the printer settings.Images trimmed down to a small size have lower resolution.
(Displayed for 1 second)
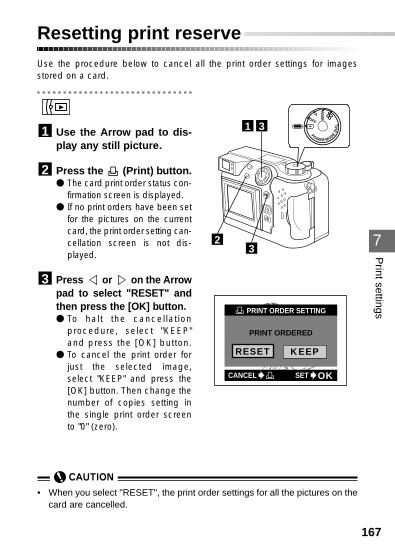
7
Print settings
167
Resetting print reserveUse the procedure below to cancel all the print order settings for imagesstored on a card.
Use the Arrow pad to dis-play any still picture.
Press the (Print) button.● The card print order status con-
firmation screen is displayed.● If no print orders have been set
for the pictures on the currentcard, the print order setting can-cellation screen is not dis-played.
Press or on the Arrowpad to select "RESET" andthen press the [OK] button.● To halt the cancellation
procedure, select "KEEP"and press the [OK] button.
● To cancel the print order forjust the selected image,select "KEEP" and press the[OK] button. Then change thenumber of copies setting inthe single print order screento "0" (zero).
3
2
1
P
A/S
/M
OFF
POWER/MODED
IAL31
PRINT ORDER SETTING
PRINT ORDERED
RESET KEEP
CANCEL SET OK
2
• When you select "RESET", the print order settings for all the pictures on thecard are cancelled.
3

168
8OLYMPUS DIGITAL CAMERA
Chapter
Mode setup
• The mode setup options are accessed from therespective menu screens. The options availablein the Still picture shooting menu, Movie recordmenu and Playback menu are different.
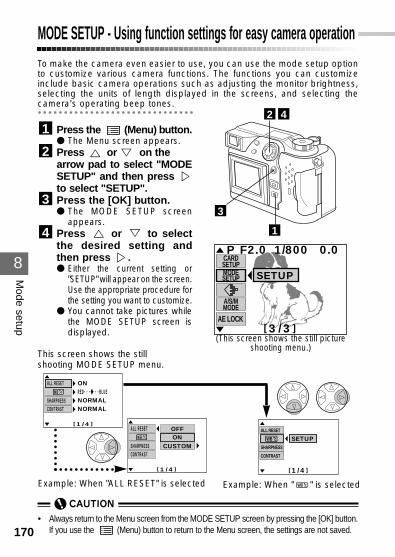
8
Mode setup
170
MODE SETUP - Using function settings for easy camera operationTo make the camera even easier to use, you can use the mode setup optionto customize various camera functions. The functions you can customizeinclude basic camera operations such as adjusting the monitor brightness,selecting the units of length displayed in the screens, and selecting thecamera's operating beep tones.
Press the (Menu) button.● The Menu screen appears.Press or on the arrow pad to select "MODESETUP" and then press to select "SETUP".Press the [OK] button.● The MODE SETUP screen
appears.Press or to selectthe desired setting andthen press .● Either the current setting or
"SETUP" will appear on the screen.Use the appropriate procedure forthe setting you want to customize.
● You cannot take pictures whilethe MODE SETUP screen isdisplayed.
4
3
2
1
(This screen shows the still pictureshooting menu.)
42
3
[3 /3 ]
F2.0 1/800 0.0 P
A/S/MMODE
CARDSETUPMODESETUP SETUP
AE LOCK
This screen shows the stillshooting MODE SETUP menu.
ALL RESET
SHARPNESSCONTRAST
[1 /4 ]
WB+-
OFFON
CUSTOM
[1 /4 ]
ALL RESET
SHARPNESS
CONTRAST
SETUPWB
Example: When "ALL RESET" is selected Example: When " " is selectedWB
1
ALL RESET
SHARPNESSCONTRAST
[1 /4 ]
ON
NORMALNORMAL
RED• • • ◆ • • •BLUEWB+-
• Always return to the Menu screen from the MODE SETUP screen by pressing the [OK] button.If you use the (Menu) button to return to the Menu screen, the settings are not saved.
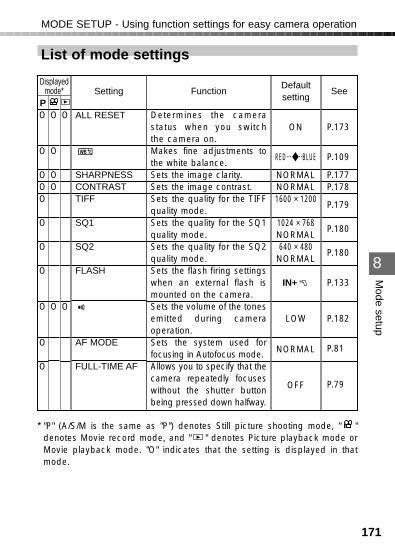
List of mode settings
171
8
Mode setup
* "P" (A/S/M is the same as "P") denotes Still picture shooting mode, " "denotes Movie record mode, and " " denotes Picture playback mode orMovie playback mode. "O" indicates that the setting is displayed in thatmode.
MODE SETUP - Using function settings for easy camera operation
PO
O
OOO
O
O
O
O
O
O
O
O
OO
O
O
O
Setting
ALL RESET
SHARPNESSCONTRASTTIFF
SQ1
SQ2
FLASH
AF MODE
FULL-TIME AF
WB
Function
Determines the camerastatus when you switchthe camera on.Makes fine adjustments tothe white balance.Sets the image clarity.Sets the image contrast.Sets the quality for the TIFFquality mode.Sets the quality for the SQ1quality mode.Sets the quality for the SQ2quality mode.Sets the flash firing settingswhen an external flash ismounted on the camera.Sets the volume of the tonesemitted during cameraoperation.Sets the system used forfocusing in Autofocus mode.Allows you to specify that thecamera repeatedly focuseswithout the shutter buttonbeing pressed down halfway.
Defaultsetting
ON
RED...◆ ...BLUE
NORMALNORMAL1600 × 1200
1024 × 768NORMAL640 × 480
NORMAL
IN+
LOW
NORMAL
OFF
See
P.173
P.109
P.177P.178
P.179
P.180
P.180
P.133
P.182
P.81
P.79
Displayedmode*
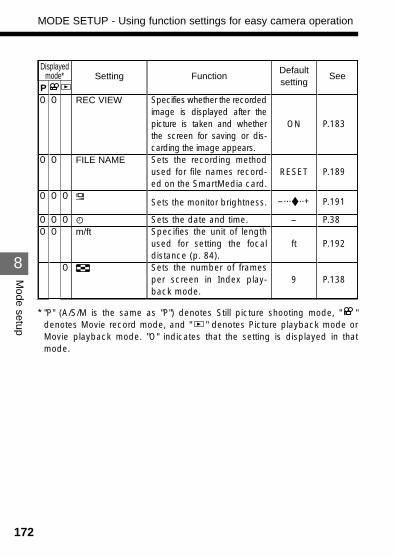
172
8
Mode setup
* "P" (A/S/M is the same as "P") denotes Still picture shooting mode, " "denotes Movie record mode, and " " denotes Picture playback mode orMovie playback mode. "O" indicates that the setting is displayed in thatmode.
MODE SETUP - Using function settings for easy camera operation
PO
O
O
OO
O
O
O
OO
O
O
O
Setting
REC VIEW
FILE NAME
m/ft
Function
Specifies whether the recordedimage is displayed after thepicture is taken and whetherthe screen for saving or dis-carding the image appears.Sets the recording methodused for file names record-ed on the SmartMedia card.
Sets the monitor brightness.
Sets the date and time.Specifies the unit of lengthused for setting the focaldistance (p. 84).Sets the number of framesper screen in Index play-back mode.
Defaultsetting
ON
RESET
-...◆ ...+
-
ft
9
See
P.183
P.189
P.191
P.38
P.192
P.138
Displayedmode*
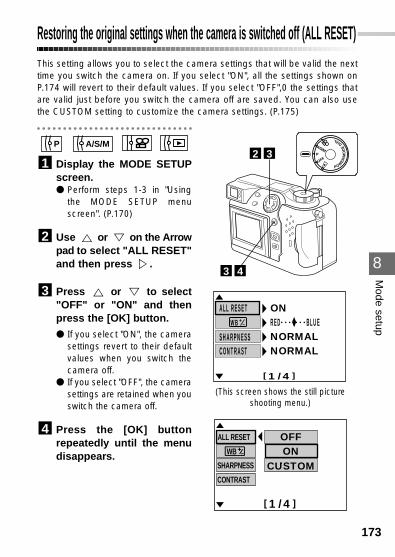
173
8
Mode setup
Restoring the original settings when the camera is switched off (ALL RESET)This setting allows you to select the camera settings that will be valid the nexttime you switch the camera on. If you select "ON", all the settings shown onP.174 will revert to their default values. If you select "OFF",0 the settings thatare valid just before you switch the camera off are saved. You can also usethe CUSTOM setting to customize the camera settings. (P.175)
Display the MODE SETUPscreen.● Perform steps 1-3 in "Using
the MODE SETUP menuscreen". (P.170)
Use or on the Arrowpad to select "ALL RESET"and then press .
Press or to select"OFF" or "ON" and thenpress the [OK] button.● If you select "ON", the camera
settings revert to their defaultvalues when you switch thecamera off.
● If you select "OFF", the camerasettings are retained when youswitch the camera off.
Press the [OK] buttonrepeatedly until the menudisappears.
4
3
2
1A/S/MP
POW
ER/M
OD
E
DIAL
P
A/S/M
OFF32
43
ALL RESET
SHARPNESSCONTRAST
[1 /4 ]
ON
NORMALNORMAL
RED• • • ◆ • • •BLUEWB+-
[1 /4 ]
ONOFF
CUSTOM
ALL RESET
SHARPNESS
CONTRAST
WB
(This screen shows the still pictureshooting menu.)
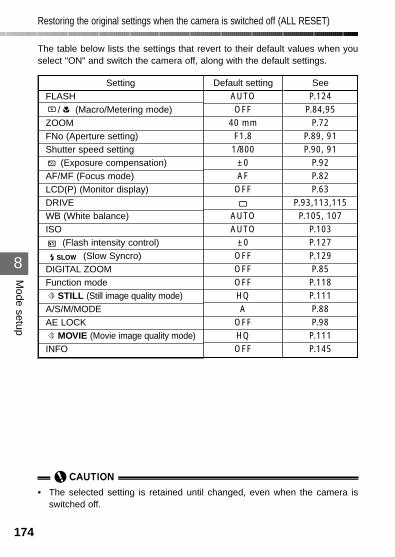
174
8
Mode setup
The table below lists the settings that revert to their default values when youselect "ON" and switch the camera off, along with the default settings.
Restoring the original settings when the camera is switched off (ALL RESET)
Default settingAUTOOFF
40 mmF1.8
1/800±0AF
OFF
AUTOAUTO
±0OFFOFFOFFHQA
OFFHQOFF
SeeP.124
P.84,95P.72
P.89, 91P.90, 91
P.92P.82P.63
P.93,113,115P.105, 107
P.103P.127P.129P.85P.118P.111P.88P.98P.111P.145
• The selected setting is retained until changed, even when the camera isswitched off.
SettingFLASH
/ (Macro/Metering mode)ZOOMFNo (Aperture setting)Shutter speed setting
(Exposure compensation)AF/MF (Focus mode)LCD(P) (Monitor display)DRIVEWB (White balance)ISO
(Flash intensity control)(Slow Syncro)
DIGITAL ZOOMFunction mode
STILL (Still image quality mode)A/S/M/MODEAE LOCK
MOVIE (Movie image quality mode)INFO
+ -
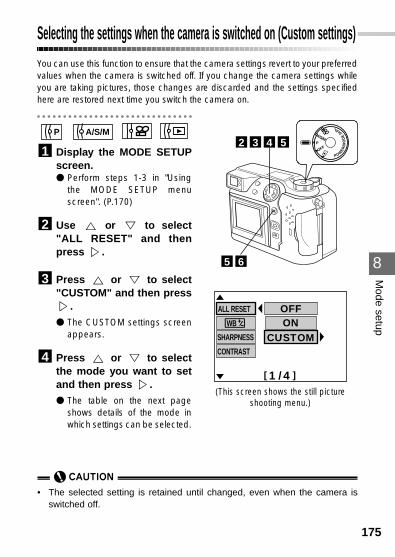
175
8
Mode setup
Selecting the settings when the camera is switched on (Custom settings)You can use this function to ensure that the camera settings revert to your preferredvalues when the camera is switched off. If you change the camera settings whileyou are taking pictures, those changes are discarded and the settings specifiedhere are restored next time you switch the camera on.
Display the MODE SETUPscreen.● Perform steps 1-3 in "Using
the MODE SETUP menuscreen". (P.170)
Use or to select"ALL RESET" and thenpress .
Press or to select"CUSTOM" and then press
.● The CUSTOM settings screen
appears.
Press or to selectthe mode you want to setand then press .● The table on the next page
shows details of the mode inwhich settings can be selected.
4
3
2
1A/S/MP
POW
ER/M
OD
E
DIAL
P
A/S/M
OFF5432
65
[1 /4 ]
OFFON
CUSTOM
ALL RESET
SHARPNESS
CONTRAST
WB
(This screen shows the still pictureshooting menu.)
• The selected setting is retained until changed, even when the camera isswitched off.
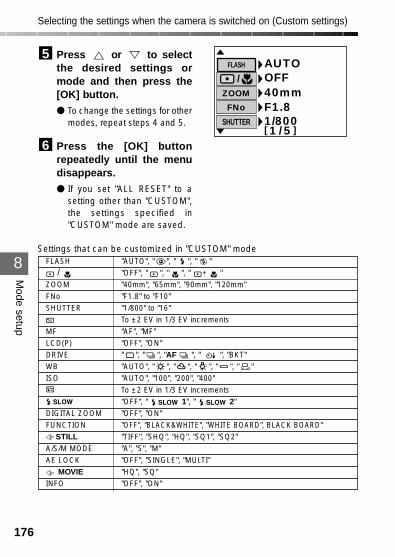
176
8
Mode setup
Press or to selectthe desired settings ormode and then press the[OK] button.● To change the settings for other
modes, repeat steps 4 and 5.
Press the [OK] buttonrepeatedly until the menudisappears.● If you set "ALL RESET" to a
setting other than "CUSTOM",the settings specified in"CUSTOM" mode are saved.
Settings that can be customized in "CUSTOM" mode
6
5
Selecting the settings when the camera is switched on (Custom settings)
FLASH "AUTO", " ", " ", " "/ "OFF", " ", " ", " + "
ZOOM "40mm", "65mm", "90mm", "120mm"FNo "F1.8" to "F10"SHUTTER "1/800" to "16"
To ±2 EV in 1/3 EV incrementsMF "AF", "MF"LCD(P) "OFF", "ON"DRIVE " ", " ", "AF ", " ", "BKT"WB "AUTO", " ", " ", " ", " ", " "ISO "AUTO", "100", "200", "400"
To ±2 EV in 1/3 EV increments"OFF", " 1", " 2"
DIGITAL ZOOM "OFF", "ON"FUNCTION "OFF", "BLACK&WHITE", "WHITE BOARD", BLACK BOARD"
STILL "TIFF", "SHQ", "HQ", "SQ1", "SQ2"A/S/M MODE "A", "S", "M"AE LOCK "OFF", "SINGLE", "MULTI"
MOVIE "HQ", "SQ"INFO "OFF", "ON"
[1 /5 ]
OFFAUTO
40mmF1.81/800
FLASH
ZOOM
FNo
SHUTTER
/
+ -
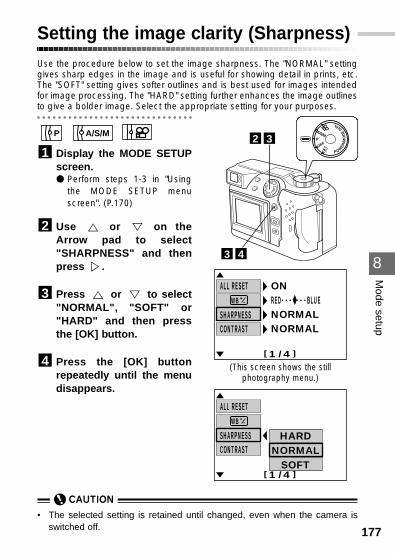
8
Mode setup
177
Setting the image clarity (Sharpness)Use the procedure below to set the image sharpness. The "NORMAL" settinggives sharp edges in the image and is useful for showing detail in prints, etc.The "SOFT" setting gives softer outlines and is best used for images intendedfor image processing. The "HARD" setting further enhances the image outlinesto give a bolder image. Select the appropriate setting for your purposes.
Display the MODE SETUPscreen.● Perform steps 1-3 in "Using
the MODE SETUP menuscreen". (P.170)
Use or on theArrow pad to select"SHARPNESS" and thenpress .
Press or to select"NORMAL", "SOFT" or"HARD" and then pressthe [OK] button.
Press the [OK] buttonrepeatedly until the menudisappears.
4
3
2
1A/S/MP
• The selected setting is retained until changed, even when the camera isswitched off.
POW
ER/M
OD
E
DIAL
P
A/S/M
OFF32
43
ALL RESET
SHARPNESSCONTRAST
[1 /4 ]
ON
NORMALNORMAL
RED• • • ◆ • • •BLUEWB+-
(This screen shows the still photography menu.)
ALL RESET
SHARPNESSCONTRAST
[1 /4 ]
NORMALNORMAL
WB+-
HARDNORMAL
SOFT

8
Mode setup
178
Setting the image contrast (Contrast)Use the procedure below to set the image contrast. Select "HIGH" for a highdegree of contrast between light and dark or "LOW" to lessen the contrast.
Display the MODE SETUPscreen.● Perform steps 1-3 in "Using
the MODE SETUP menuscreen". (P.170)
Use or on theArrow pad to select"CONTRAST" and thenpress .
Press or to select"NORMAL", "HIGH" or"LOW" and then press the[OK] button.
Press the [OK] buttonrepeatedly until the menudisappears.
4
3
2
1A/S/MP
• The selected setting is retained until changed, even when the camera isswitched off.
POW
ER/M
OD
E
DIAL
P
A/S/M
OFF32
43
ALL RESET
SHARPNESSCONTRAST
[1 /4 ]
ON
NORMALNORMAL
RED• • • ◆ • • •BLUEWB+-
(This screen shows the still pictureshooting menu.)
[1 /4 ]
ALL RESET
SHARPNESSCONTRAST
HIGHNORMAL
LOW
WB+-
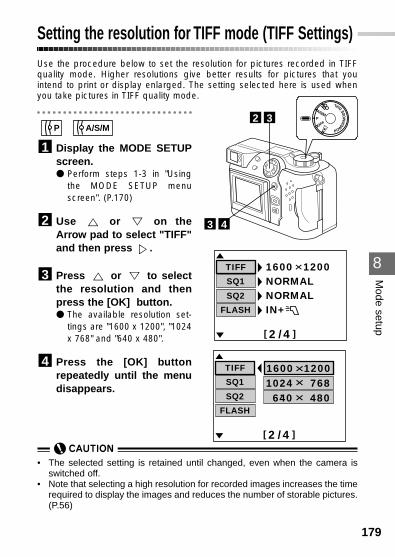
8
Mode setup
179
Setting the resolution for TIFF mode (TIFF Settings)Use the procedure below to set the resolution for pictures recorded in TIFFquality mode. Higher resolutions give better results for pictures that youintend to print or display enlarged. The setting selected here is used whenyou take pictures in TIFF quality mode.
Display the MODE SETUPscreen.● Perform steps 1-3 in "Using
the MODE SETUP menuscreen". (P.170)
Use or on theArrow pad to select "TIFF"and then press .
Press or to selectthe resolution and thenpress the [OK] button.● The available resolution set-
tings are "1600 x 1200", "1024x 768" and "640 x 480".
Press the [OK] buttonrepeatedly until the menudisappears.
4
3
2
1A/S/MP POW
ER/M
OD
E
DIAL
P
A/S/M
OFF32
43
[2 /4 ]
SQ1
SQ2
FLASH
TIFF 1600 1200
NORMALIN+
NORMAL
[2 /4 ]
SQ1
SQ2
FLASH
TIFF
1024 7681600 1200
640 480
• The selected setting is retained until changed, even when the camera isswitched off.
• Note that selecting a high resolution for recorded images increases the timerequired to display the images and reduces the number of storable pictures.(P.56)
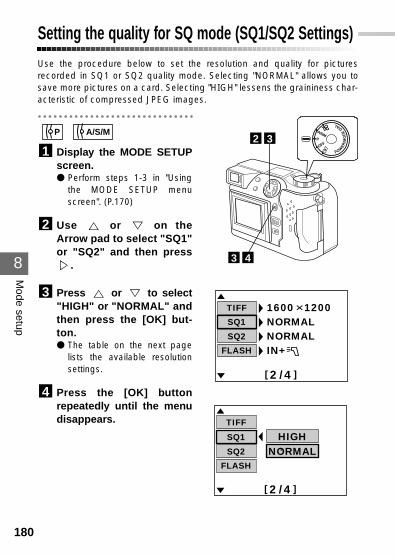
8
Mode setup
180
Setting the quality for SQ mode (SQ1/SQ2 Settings)Use the procedure below to set the resolution and quality for picturesrecorded in SQ1 or SQ2 quality mode. Selecting "NORMAL" allows you tosave more pictures on a card. Selecting "HIGH" lessens the graininess char-acteristic of compressed JPEG images.
Display the MODE SETUPscreen.● Perform steps 1-3 in "Using
the MODE SETUP menuscreen". (P.170)
Use or on theArrow pad to select "SQ1"or "SQ2" and then press
.
Press or to select"HIGH" or "NORMAL" andthen press the [OK] but-ton.● The table on the next page
lists the available resolutionsettings.
Press the [OK] buttonrepeatedly until the menudisappears.
4
3
2
1A/S/MP
POW
ER/M
OD
E
DIAL
P
A/S/M
OFF32
43
[2 /4 ]
SQ2
FLASH
TIFF 1600 1200
NORMALIN+
NORMALSQ1
HIGHNORMAL
[2 /4 ]
SQ2
FLASH
TIFF
SQ1
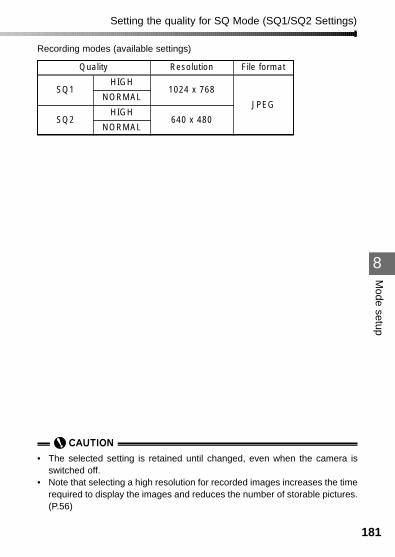
181
8
Mode setup
Recording modes (available settings)
Setting the quality for SQ Mode (SQ1/SQ2 Settings)
SQ1
SQ2
HIGH
NORMAL
HIGH
NORMAL
1024 x 768
640 x 480
JPEG
Quality Resolution File format
• The selected setting is retained until changed, even when the camera isswitched off.
• Note that selecting a high resolution for recorded images increases the timerequired to display the images and reduces the number of storable pictures.(P.56)
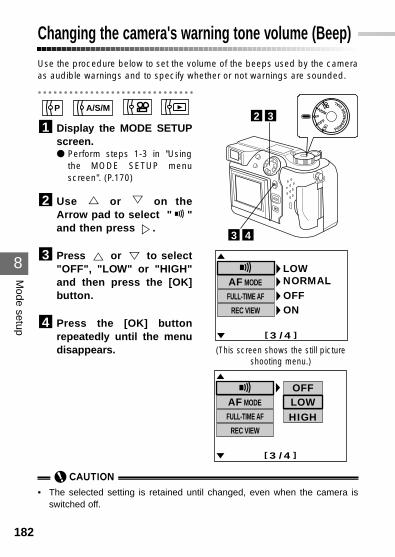
8
Mode setup
182
Changing the camera's warning tone volume (Beep)Use the procedure below to set the volume of the beeps used by the cameraas audible warnings and to specify whether or not warnings are sounded.
Display the MODE SETUPscreen.● Perform steps 1-3 in "Using
the MODE SETUP menuscreen". (P.170)
Use or on theArrow pad to select " "and then press .
Press or to select"OFF", "LOW" or "HIGH"and then press the [OK]button.
Press the [OK] buttonrepeatedly until the menudisappears.
4
3
2
1A/S/MP
POW
ER/M
OD
E
DIAL
P
A/S/M
OFF32
43
NORMAL
[3 /4 ]
OFFON
LOW
REC VIEW
FULL-TIME AF
AF MODE
OFFLOWHIGH
[3 /4 ]
REC VIEW
FULL-TIME AF
AF MODE
(This screen shows the still pictureshooting menu.)
• The selected setting is retained until changed, even when the camera isswitched off.
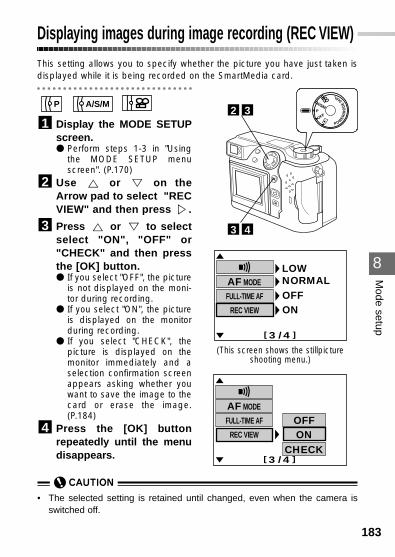
8
Mode setup
183
Displaying images during image recording (REC VIEW)This setting allows you to specify whether the picture you have just taken isdisplayed while it is being recorded on the SmartMedia card.
Display the MODE SETUPscreen.● Perform steps 1-3 in "Using
the MODE SETUP menuscreen". (P.170)
Use or on theArrow pad to select "RECVIEW" and then press .
Press or to selectselect "ON", "OFF" or"CHECK" and then pressthe [OK] button.● If you select "OFF", the picture
is not displayed on the moni-tor during recording.
● If you select "ON", the pictureis displayed on the monitorduring recording.
● If you select "CHECK", thepicture is displayed on themonitor immediately and aselection confirmation screenappears asking whether youwant to save the image to thecard or erase the image.(P.184)
Press the [OK] buttonrepeatedly until the menudisappears.
4
3
2
1A/S/MP
• The selected setting is retained until changed, even when the camera isswitched off.
POW
ER/M
OD
E
DIAL
P
A/S/M
OFF32
43
NORMAL
[3 /4 ]
OFFON
LOW
REC VIEW
FULL-TIME AF
AF MODE
(This screen shows the stillpicture shooting menu.)
OFFON
CHECK[3 /4 ]
REC VIEW
FULL-TIME AF
AF MODE
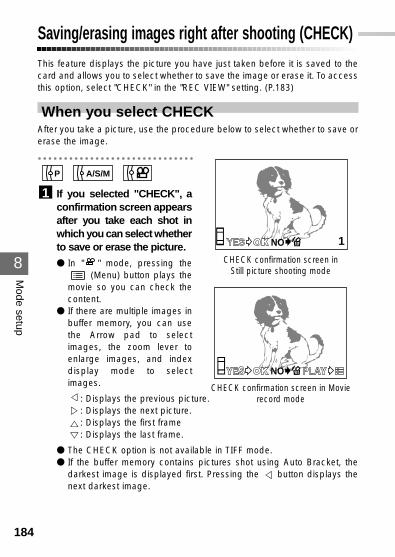
8
Mode setup
184
Saving/erasing images right after shooting (CHECK)This feature displays the picture you have just taken before it is saved to thecard and allows you to select whether to save the image or erase it. To accessthis option, select "CHECK" in the "REC VIEW" setting. (P.183)
When you select CHECKAfter you take a picture, use the procedure below to select whether to save orerase the image.
If you selected "CHECK", aconfirmation screen appearsafter you take each shot inwhich you can select whetherto save or erase the picture.● In " " mode, pressing the
(Menu) button plays themovie so you can check thecontent.
● If there are multiple images inbuffer memory, you can usethe Arrow pad to selectimages, the zoom lever toenlarge images, and indexdisplay mode to selectimages.
: Displays the previous picture.: Displays the next picture.: Displays the first frame: Displays the last frame.
● The CHECK option is not available in TIFF mode.● If the buffer memory contains pictures shot using Auto Bracket, the
darkest image is displayed first. Pressing the button displays thenext darkest image.
1A/S/MP
1NO
NO
CHECK confirmation screen inStill picture shooting mode
CHECK confirmation screen in Movierecord mode
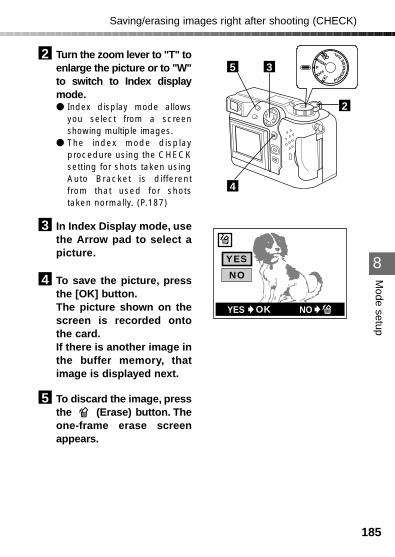
185
8
Mode setup
Turn the zoom lever to "T" toenlarge the picture or to "W"to switch to Index displaymode.● Index display mode allows
you select from a screenshowing multiple images.
● The index mode displayprocedure using the CHECKsetting for shots taken usingAuto Bracket is differentfrom that used for shotstaken normally. (P.187)
In Index Display mode, usethe Arrow pad to select apicture.
To save the picture, pressthe [OK] button.The picture shown on thescreen is recorded ontothe card.If there is another image inthe buffer memory, thatimage is displayed next.
To discard the image, pressthe (Erase) button. Theone-frame erase screenappears.
5
4
3
2
Saving/erasing images right after shooting (CHECK)
POW
ER/M
OD
E
DIAL
P
A/S/M
OFF3
4
2
YES
NO
YES OK NO
5
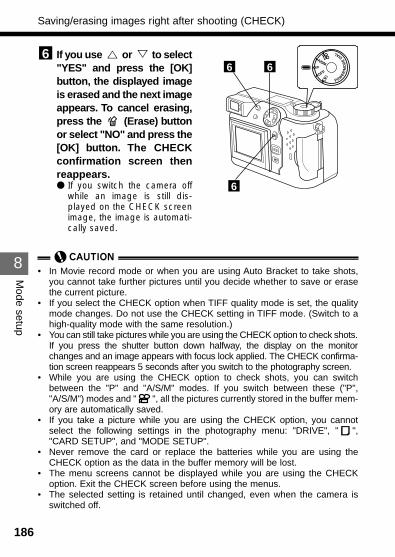
186
8
Mode setup
If you use or to select"YES" and press the [OK]button, the displayed imageis erased and the next imageappears. To cancel erasing,press the (Erase) buttonor select "NO" and press the[OK] button. The CHECKconfirmation screen thenreappears.● If you switch the camera off
while an image is still dis-played on the CHECK screenimage, the image is automati-cally saved.
6
Saving/erasing images right after shooting (CHECK)
POW
ER/M
OD
E
DIAL
P
A/S/M
OFF6 6
6
• In Movie record mode or when you are using Auto Bracket to take shots,you cannot take further pictures until you decide whether to save or erasethe current picture.
• If you select the CHECK option when TIFF quality mode is set, the qualitymode changes. Do not use the CHECK setting in TIFF mode. (Switch to ahigh-quality mode with the same resolution.)
• You can still take pictures while you are using the CHECK option to check shots.If you press the shutter button down halfway, the display on the monitorchanges and an image appears with focus lock applied. The CHECK confirma-tion screen reappears 5 seconds after you switch to the photography screen.
• While you are using the CHECK option to check shots, you can switchbetween the "P" and "A/S/M" modes. If you switch between these ("P","A/S/M") modes and " ", all the pictures currently stored in the buffer mem-ory are automatically saved.
• If you take a picture while you are using the CHECK option, you cannotselect the following settings in the photography menu: "DRIVE", " ","CARD SETUP", and "MODE SETUP".
• Never remove the card or replace the batteries while you are using theCHECK option as the data in the buffer memory will be lost.
• The menu screens cannot be displayed while you are using the CHECKoption. Exit the CHECK screen before using the menus.
• The selected setting is retained until changed, even when the camera isswitched off.
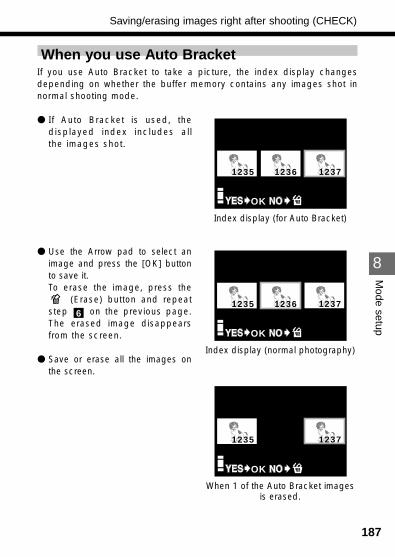
187
8
Mode setup
When you use Auto BracketIf you use Auto Bracket to take a picture, the index display changesdepending on whether the buffer memory contains any images shot innormal shooting mode.
● If Auto Bracket is used, thedisplayed index includes allthe images shot.
● Use the Arrow pad to select animage and press the [OK] buttonto save it.To erase the image, press the
(Erase) button and repeatstep on the previous page.The erased image disappearsfrom the screen.
● Save or erase all the images onthe screen.
6
Saving/erasing images right after shooting (CHECK)
1235 1236 1237
OK
Index display (for Auto Bracket)
1235 1236 1237
OK
Index display (normal photography)
1235 1237
OK
When 1 of the Auto Bracket imagesis erased.
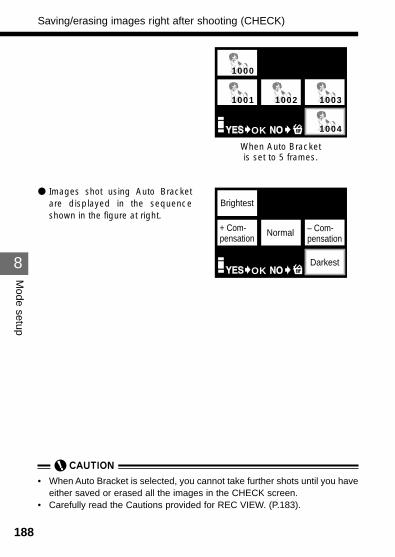
188
8
Mode setup
● Images shot using Auto Bracketare displayed in the sequenceshown in the figure at right.
Saving/erasing images right after shooting (CHECK)
1000
1001 1002 1003
1004OK
When Auto Bracketis set to 5 frames.
OK
Brightest
+ Com-pensation
– Com-pensation
Normal
Darkest
• When Auto Bracket is selected, you cannot take further shots until you haveeither saved or erased all the images in the CHECK screen.
• Carefully read the Cautions provided for REC VIEW. (P.183).

189
8
Mode setup
Changing the way file names are assigned to recorded images (File Name setting)You can use the procedure below to select the way image file names are recorded.If you select "AUTO", the files are managed so that file names are not duplicatedwhen you download pictures to your personal computer. Images are recordedusing automatically generated numbers as the file and folder names. Files arenumbered from 0001 to 9999, and folders are numbered from 100 to 999. You canselect either "RESET" or "AUTO" as the settings for both folders and files.
Folder names and file namesRecorded pictures are assigned folder names and file names according tothe following format:
* The notation used for "Month" in folder names is 1-9 for January toSeptember, and then A for October, B for November and C for December
Assigning folder names and file names in each mode● RESET
When you change the cards, the folder and file names are reset.(Example)
● AUTOWhen you change the cards, the camera continues to use the same foldername, and the file name continues on from the last number recorded on theprevious card.(Example)
This prevents the duplication of file numbers (file names) when you copy largenumbers of images individually to your computer from different cards. However,note that the numbering restarts at 0001 once you reach 9999.
\ D C I M \ * * * O L Y M P \ P m d d * * * * . j p g
Folder name
100 - 999 Month (1 - C)
File name
0001 - 9999Day (01 - 31)
Folder No.102Change cards
File No.0005
Folder No.100
File No.0001
Folder No.101Change cards
File No.0005
Folder No.101
File No.0006
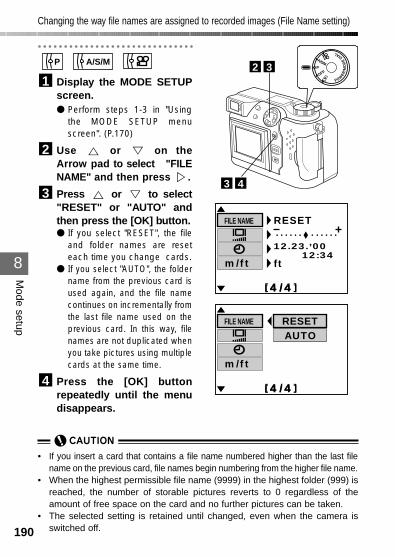
190
8
Mode setup
• If you insert a card that contains a file name numbered higher than the last filename on the previous card, file names begin numbering from the higher file name.
• When the highest permissible file name (9999) in the highest folder (999) isreached, the number of storable pictures reverts to 0 regardless of theamount of free space on the card and no further pictures can be taken.
• The selected setting is retained until changed, even when the camera isswitched off.
Display the MODE SETUPscreen.● Perform steps 1-3 in "Using
the MODE SETUP menuscreen". (P.170)
Use or on theArrow pad to select "FILENAME" and then press .
Press or to select"RESET" or "AUTO" andthen press the [OK] button.● If you select "RESET", the file
and folder names are reseteach time you change cards.
● If you select "AUTO", the foldername from the previous card isused again, and the file namecontinues on incrementally fromthe last file name used on theprevious card. In this way, filenames are not duplicated whenyou take pictures using multiplecards at the same time.
Press the [OK] buttonrepeatedly until the menudisappears.
4
3
2
1A/S/MP
Changing the way file names are assigned to recorded images (File Name setting)
POW
ER/M
OD
E
DIAL
P
A/S/M
OFF32
[4 /4 ]
ft
RESET
12.23.,0012:34
[4 /4 ]
m/ft
FILE NAME
43
[4 /4 ][4 /4 ]
m/ft
FILE NAME RESETAUTO
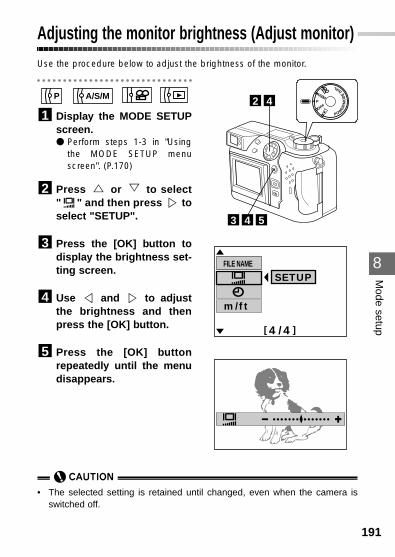
8
Mode setup
191
Adjusting the monitor brightness (Adjust monitor)Use the procedure below to adjust the brightness of the monitor.
Display the MODE SETUPscreen.● Perform steps 1-3 in "Using
the MODE SETUP menuscreen". (P.170)
Press or to select" " and then press toselect "SETUP".
Press the [OK] button todisplay the brightness set-ting screen.
Use and to adjustthe brightness and thenpress the [OK] button.
Press the [OK] buttonrepeatedly until the menudisappears.
5
4
3
2
1A/S/MP
POW
ER/M
OD
E
DIAL
P
A/S/M
OFF42
543
[4 /4 ]
SETUP
m/ft
FILE NAME
• The selected setting is retained until changed, even when the camera isswitched off.
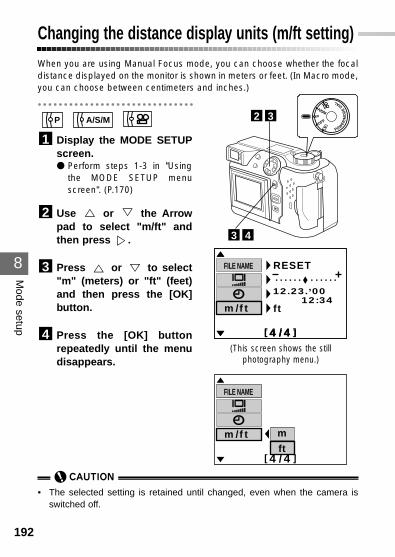
8
Mode setup
192
Changing the distance display units (m/ft setting)When you are using Manual Focus mode, you can choose whether the focaldistance displayed on the monitor is shown in meters or feet. (In Macro mode,you can choose between centimeters and inches.)
Display the MODE SETUPscreen.● Perform steps 1-3 in "Using
the MODE SETUP menuscreen". (P.170)
Use or the Arrowpad to select "m/ft" andthen press .
Press or to select"m" (meters) or "ft" (feet)and then press the [OK]button.
Press the [OK] buttonrepeatedly until the menudisappears.
4
3
2
1A/S/MP
POW
ER/M
OD
E
DIAL
P
A/S/M
OFF32
43
[4 /4 ]
ft
RESET
12.23.,0012:34
[4 /4 ]
m/ft
FILE NAME
[4 /4 ]
m/ft
FILE NAME
mft
(This screen shows the still photography menu.)
• The selected setting is retained until changed, even when the camera isswitched off.
9OLYMPUS DIGITAL CAMERA
Chapter
Downloading Images toa Computer• This chapter describes how to download your
pictures to your personal computer. Thischapter also introduces the downloading andimage processing functions offered by theCAMEDIA Master software.
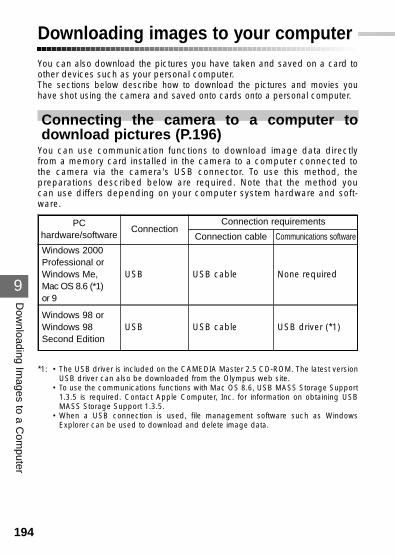
194
9
Dow
nloading Images to a C
omputer
Downloading images to your computerYou can also download the pictures you have taken and saved on a card toother devices such as your personal computer.The sections below describe how to download the pictures and movies youhave shot using the camera and saved onto cards onto a personal computer.
Connecting the camera to a computer todownload pictures (P.196)
You can use communication functions to download image data directlyfrom a memory card installed in the camera to a computer connected tothe camera via the camera's USB connector. To use this method, thepreparations described below are required. Note that the method youcan use differs depending on your computer system hardware and soft-ware.
*1: • The USB driver is included on the CAMEDIA Master 2.5 CD-ROM. The latest versionUSB driver can also be downloaded from the Olympus web site.
• To use the communications functions with Mac OS 8.6, USB MASS Storage Support1.3.5 is required. Contact Apple Computer, Inc. for information on obtaining USBMASS Storage Support 1.3.5.
• When a USB connection is used, file management software such as WindowsExplorer can be used to download and delete image data.
PChardware/software
Connection
USB USB cable None required
USB USB cable USB driver (*1)
Windows 2000Professional orWindows Me,Mac OS 8.6 (*1) or 9
Windows 98 orWindows 98Second Edition
Connection cable
Connection requirements
Communications software
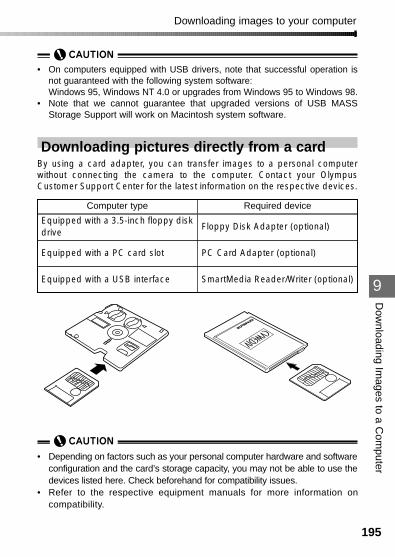
195
Downloading images to your computer
9
Dow
nloading Images to a C
omputer
• On computers equipped with USB drivers, note that successful operation isnot guaranteed with the following system software:Windows 95, Windows NT 4.0 or upgrades from Windows 95 to Windows 98.
• Note that we cannot guarantee that upgraded versions of USB MASSStorage Support will work on Macintosh system software.
Downloading pictures directly from a cardBy using a card adapter, you can transfer images to a personal computerwithout connecting the camera to the computer. Contact your OlympusCustomer Support Center for the latest information on the respective devices.
Computer type Required device
Equipped with a 3.5-inch floppy diskdrive
Floppy Disk Adapter (optional)
Equipped with a PC card slot PC Card Adapter (optional)
Equipped with a USB interface SmartMedia Reader/Writer (optional)
• Depending on factors such as your personal computer hardware and softwareconfiguration and the card’s storage capacity, you may not be able to use thedevices listed here. Check beforehand for compatibility issues.
• Refer to the respective equipment manuals for more information oncompatibility.
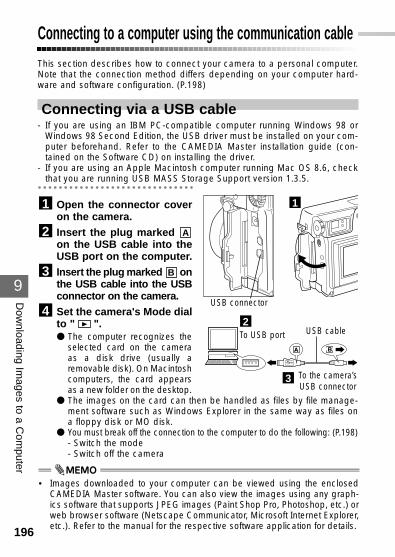
196
9
Dow
nloading Images to a C
omputer
Connecting to a computer using the communication cableThis section describes how to connect your camera to a personal computer.Note that the connection method differs depending on your computer hard-ware and software configuration. (P.198)
Connecting via a USB cable- If you are using an IBM PC-compatible computer running Windows 98 or
Windows 98 Second Edition, the USB driver must be installed on your com-puter beforehand. Refer to the CAMEDIA Master installation guide (con-tained on the Software CD) on installing the driver.
- If you are using an Apple Macintosh computer running Mac OS 8.6, checkthat you are running USB MASS Storage Support version 1.3.5.
Open the connector coveron the camera.Insert the plug marked on the USB cable into theUSB port on the computer.Insert the plug marked onthe USB cable into the USBconnector on the camera.Set the camera's Mode dialto " ".● The computer recognizes the
selected card on the cameraas a disk drive (usually aremovable disk). On Macintoshcomputers, the card appearsas a new folder on the desktop.
● The images on the card can then be handled as files by file manage-ment software such as Windows Explorer in the same way as files ona floppy disk or MO disk.
● You must break off the connection to the computer to do the following: (P.198)- Switch the mode- Switch off the camera
4
B3
A2
1
USB connector
To USB port
To the camera’sUSB connector
USB cable
1
2
3
• Images downloaded to your computer can be viewed using the enclosedCAMEDIA Master software. You can also view the images using any graph-ics software that supports JPEG images (Paint Shop Pro, Photoshop, etc.) orweb browser software (Netscape Communicator, Microsoft Internet Explorer,etc.). Refer to the manual for the respective software application for details.
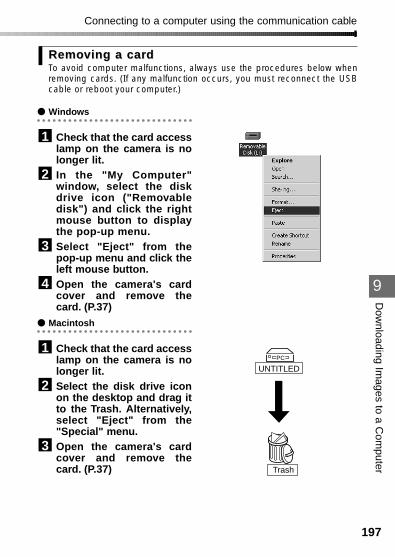
197
9
Dow
nloading Images to a C
omputer
RemoRemoving a carving a carddTo avoid computer malfunctions, always use the procedures below whenremoving cards. (If any malfunction occurs, you must reconnect the USBcable or reboot your computer.)
● Windows
Check that the card accesslamp on the camera is nolonger lit.In the "My Computer"window, select the diskdrive icon ("Removabledisk") and click the rightmouse button to displaythe pop-up menu.Select "Eject" from thepop-up menu and click theleft mouse button.Open the camera's cardcover and remove thecard. (P.37)
● Macintosh
Check that the card accesslamp on the camera is nolonger lit.Select the disk drive iconon the desktop and drag itto the Trash. Alternatively,select "Eject" from the"Special" menu.Open the camera's cardcover and remove thecard. (P.37)
3
2
1
4
3
2
1
Connecting to a computer using the communication cable
PC
UNTITLED
Trash
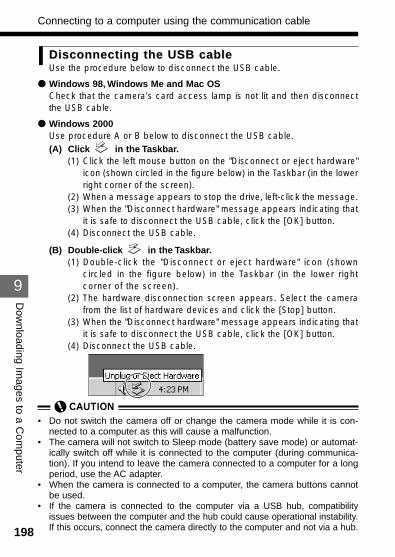
• Do not switch the camera off or change the camera mode while it is con-nected to a computer as this will cause a malfunction.
• The camera will not switch to Sleep mode (battery save mode) or automat-ically switch off while it is connected to the computer (during communica-tion). If you intend to leave the camera connected to a computer for a longperiod, use the AC adapter.
• When the camera is connected to a computer, the camera buttons cannotbe used.
• If the camera is connected to the computer via a USB hub, compatibilityissues between the computer and the hub could cause operational instability.If this occurs, connect the camera directly to the computer and not via a hub.198
9
Dow
nloading Images to a C
omputer
Connecting to a computer using the communication cable
Disconnecting the USB cabDisconnecting the USB cableleUse the procedure below to disconnect the USB cable.
● Windows 98, Windows Me and Mac OSCheck that the camera's card access lamp is not lit and then disconnectthe USB cable.
● Windows 2000Use procedure A or B below to disconnect the USB cable.(A) Click in the Taskbar.
(1) Click the left mouse button on the "Disconnect or eject hardware"icon (shown circled in the figure below) in the Taskbar (in the lowerright corner of the screen).
(2) When a message appears to stop the drive, left-click the message.(3) When the "Disconnect hardware" message appears indicating that
it is safe to disconnect the USB cable, click the [OK] button.(4) Disconnect the USB cable.
(B) Double-click in the Taskbar.(1) Double-click the "Disconnect or eject hardware" icon (shown
circled in the figure below) in the Taskbar (in the lower rightcorner of the screen).
(2) The hardware disconnection screen appears. Select the camerafrom the list of hardware devices and click the [Stop] button.
(3) When the "Disconnect hardware" message appears indicating thatit is safe to disconnect the USB cable, click the [OK] button.
(4) Disconnect the USB cable.
9
Dow
nloading Images to a C
omputer
199
Overview of the CAMEDIA Master functionsBy using CAMEDIA Master, you can install USB driver and downloadimages via USB connection on Windows 98/98SE (Second Edition).Also, simple some functions (image viewing, batch processing,image processing, and so on) are available. Refer to the CAMEDIAMaster online manual for more information on CAMEDIA Master.
● Image ViewerThis function displays image files stored on disk or downloaded from thecamera either individually or as indexes. The Image Viewer also uses ahierarchical folder display window that allows you to drag and drop yourimages between folders for easy file management. You can also use ImageViewer to play movies and to display your still pictures as a slide show(automatic display). Image Viewer even allows you to edit out frames fromany part of a movie.
● Batch processingCAMEDIA Master allows you to use the index window to perform batchoperations such as rotating, renaming or changing the format of groups ofimages at a time.
● Image processingWith CAMEDIA Master, you can rotate (left 90°, right 90°, 180°, inputtedangle), change the number of colors, resize, insert text and apply filters(brightness, contrast, color balance, sharpness, etc.).
● Camera-linked functions[Panorama Stitching]: Uses images shot in Panorama mode using a
standard Olympus SmartMedia card to createcomposite panorama images.
● PrintingIn addition to printing single images, CAMEDIA Master can also imprint thedate and time of shooting on your prints and print on sheets of dividedstickers.
Refer to the CAMEDIA Master online manual for more information onhow to use CAMEDIA Master.

200
10OLYMPUS DIGITAL CAMERA
Chapter
Miscellaneous
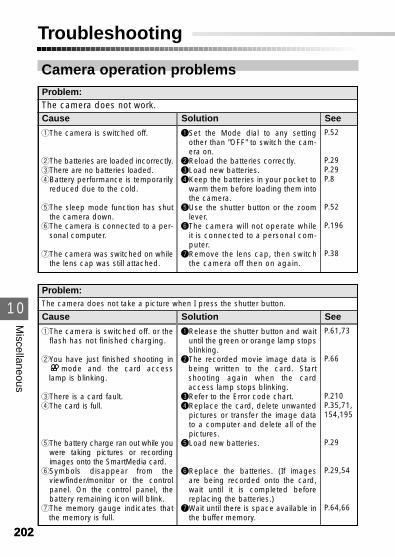
202
10
Miscellaneous
Troubleshooting
Camera operation problems
202
Problem:
Cause Solution SeeThe camera does not work.
qThe camera is switched off.
wThe batteries are loaded incorrectly.eThere are no batteries loaded.rBattery performance is temporarily
reduced due to the cold.
tThe sleep mode function has shutthe camera down.
yThe camera is connected to a per-sonal computer.
uThe camera was switched on whilethe lens cap was still attached.
qSet the Mode dial to any settingother than "OFF" to switch the cam-era on.
wReload the batteries correctly.eLoad new batteries.rKeep the batteries in your pocket to
warm them before loading them intothe camera.
tUse the shutter button or the zoomlever.
yThe camera will not operate whileit is connected to a personal com-puter.
uRemove the lens cap, then switchthe camera off then on again.
P.52
P.29P.29P.8
P.52
P.196
P.38
Problem:
Cause Solution SeeThe camera does not take a picture when I press the shutter button.
qThe camera is switched off. or theflash has not finished charging.
wYou have just finished shooting inmode and the card access
lamp is blinking.
eThere is a card fault.rThe card is full.
tThe battery charge ran out while youwere taking pictures or recordingimages onto the SmartMedia card.
ySymbols disappear from theviewfinder/monitor or the controlpanel. On the control panel, thebattery remaining icon will blink.
uThe memory gauge indicates thatthe memory is full.
qRelease the shutter button and waituntil the green or orange lamp stopsblinking.
wThe recorded movie image data isbeing written to the card. Startshooting again when the cardaccess lamp stops blinking.
eRefer to the Error code chart.rReplace the card, delete unwanted
pictures or transfer the image datato a computer and delete all of thepictures.
tLoad new batteries.
yReplace the batteries. (If imagesare being recorded onto the card,wait until it is completed beforereplacing the batteries.)
uWait until there is space available inthe buffer memory.
P.61,73
P.66
P.210P.35,71,154,195
P.29
P.29,54
P.64,66
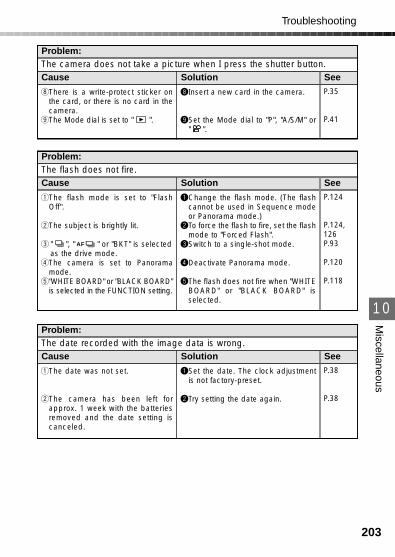
203
10
Miscellaneous
Troubleshooting
Problem:
Cause Solution SeeThe date recorded with the image data is wrong.
qThe date was not set.
wThe camera has been left forapprox. 1 week with the batteriesremoved and the date setting iscanceled.
qSet the date. The clock adjustmentis not factory-preset.
wTry setting the date again.
P.38
P.38
Problem:
Cause Solution SeeThe camera does not take a picture when I press the shutter button.
iThere is a write-protect sticker onthe card, or there is no card in thecamera.
oThe Mode dial is set to " ".
iInsert a new card in the camera.
oSet the Mode dial to "P", "A/S/M" or" ".
P.35
P.41
Problem:
Cause Solution SeeThe flash does not fire.
qThe flash mode is set to "FlashOff".
wThe subject is brightly lit.
e " ", " " or "BKT" is selectedas the drive mode.
rThe camera is set to Panoramamode.
t"WHITE BOARD" or "BLACK BOARD"is selected in the FUNCTION setting.
AF
qChange the flash mode. (The flashcannot be used in Sequence modeor Panorama mode.)
wTo force the flash to fire, set the flashmode to "Forced Flash".
eSwitch to a single-shot mode.
rDeactivate Panorama mode.
tThe flash does not fire when "WHITEBOARD" or "BLACK BOARD" isselected.
P.124
P.124,126P.93
P.120
P.118
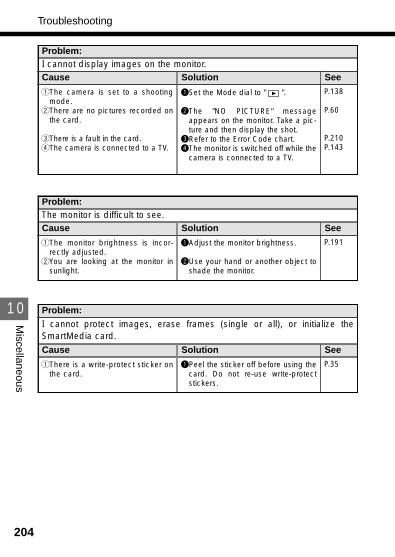
204
10
Miscellaneous
Troubleshooting
Problem:
Cause Solution SeeI cannot display images on the monitor.
qThe camera is set to a shootingmode.
wThere are no pictures recorded onthe card.
eThere is a fault in the card.rThe camera is connected to a TV.
qSet the Mode dial to " ".
wThe "NO PICTURE" messageappears on the monitor. Take a pic-ture and then display the shot.
eRefer to the Error Code chart.rThe monitor is switched off while the
camera is connected to a TV.
P.138
P.60
P.210P.143
Problem:
Cause Solution SeeThe monitor is difficult to see.
qThe monitor brightness is incor-rectly adjusted.
wYou are looking at the monitor insunlight.
qAdjust the monitor brightness.
wUse your hand or another object toshade the monitor.
P.191
Problem:
Cause Solution See
I cannot protect images, erase frames (single or all), or initialize theSmartMedia card.
qThere is a write-protect sticker onthe card.
qPeel the sticker off before using thecard. Do not re-use write-protectstickers.
P.35
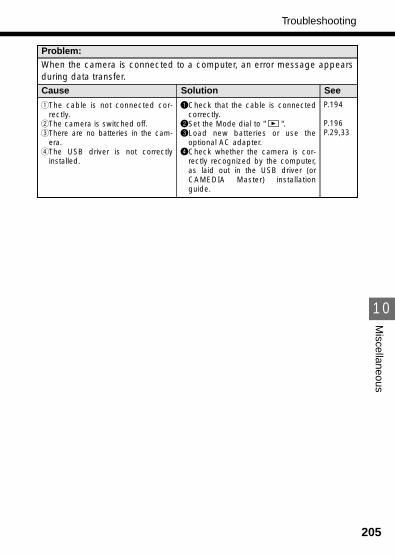
205
10
Miscellaneous
Troubleshooting
Problem:
Cause Solution See
When the camera is connected to a computer, an error message appearsduring data transfer.
qThe cable is not connected cor-rectly.
wThe camera is switched off.eThere are no batteries in the cam-
era.rThe USB driver is not correctly
installed.
qCheck that the cable is connectedcorrectly.
wSet the Mode dial to " ".eLoad new batteries or use the
optional AC adapter.rCheck whether the camera is cor-
rectly recognized by the computer,as laid out in the USB driver (orCAMEDIA Master) installationguide.
P.194
P.196P.29,33
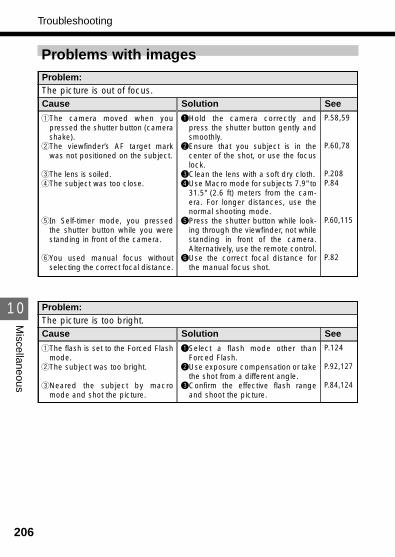
206
10
Miscellaneous
Troubleshooting
Problem:
Cause Solution SeeThe picture is too bright.
qThe flash is set to the Forced Flashmode.
wThe subject was too bright.
eNeared the subject by macromode and shot the picture.
qSelect a flash mode other thanForced Flash.
wUse exposure compensation or takethe shot from a different angle.
eConfirm the effective flash rangeand shoot the picture.
P.124
P.92,127
P.84,124
Problems with imagesProblem:
Cause Solution SeeThe picture is out of focus.
qThe camera moved when youpressed the shutter button (camerashake).
wThe viewfinder’s AF target markwas not positioned on the subject.
eThe lens is soiled.rThe subject was too close.
tIn Self-timer mode, you pressedthe shutter button while you werestanding in front of the camera.
yYou used manual focus withoutselecting the correct focal distance.
qHold the camera correctly andpress the shutter button gently andsmoothly.
wEnsure that you subject is in thecenter of the shot, or use the focuslock.
eClean the lens with a soft dry cloth.rUse Macro mode for subjects 7.9" to
31.5" (2.6 ft) meters from the cam-era. For longer distances, use thenormal shooting mode.
tPress the shutter button while look-ing through the viewfinder, not whilestanding in front of the camera.Alternatively, use the remote control.
yUse the correct focal distance forthe manual focus shot.
P.58,59
P.60,78
P.208P.84
P.60,115
P.82
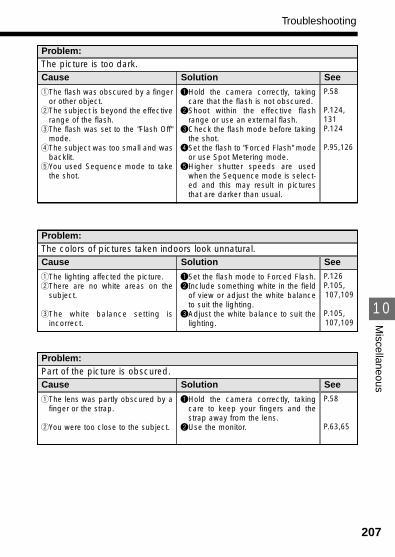
207
10
Miscellaneous
Troubleshooting
Problem:
Cause Solution SeeThe picture is too dark.
qThe flash was obscured by a fingeror other object.
wThe subject is beyond the effectiverange of the flash.
eThe flash was set to the "Flash Off"mode.
rThe subject was too small and wasbacklit.
tYou used Sequence mode to takethe shot.
qHold the camera correctly, takingcare that the flash is not obscured.
wShoot within the effective flashrange or use an external flash.
eCheck the flash mode before takingthe shot.
rSet the flash to "Forced Flash" modeor use Spot Metering mode.
tHigher shutter speeds are usedwhen the Sequence mode is select-ed and this may result in picturesthat are darker than usual.
P.58
P.124,131P.124
P.95,126
Problem:
Cause Solution SeeThe colors of pictures taken indoors look unnatural.
qThe lighting affected the picture.wThere are no white areas on the
subject.
eThe white balance setting isincorrect.
qSet the flash mode to Forced Flash.wInclude something white in the field
of view or adjust the white balanceto suit the lighting.
eAdjust the white balance to suit thelighting.
P.126P.105,107,109
P.105,107,109
Problem:
Cause Solution SeePart of the picture is obscured.
qThe lens was partly obscured by afinger or the strap.
wYou were too close to the subject.
qHold the camera correctly, takingcare to keep your fingers and thestrap away from the lens.
wUse the monitor.
P.58
P.63,65
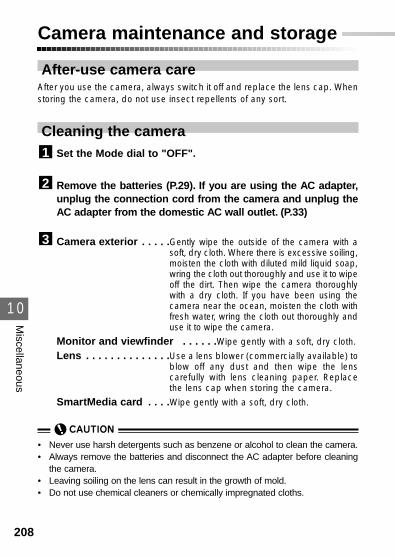
10
Miscellaneous
208
Camera maintenance and storage
After-use camera careAfter you use the camera, always switch it off and replace the lens cap. Whenstoring the camera, do not use insect repellents of any sort.
Cleaning the cameraSet the Mode dial to "OFF".
Remove the batteries (P.29). If you are using the AC adapter,unplug the connection cord from the camera and unplug theAC adapter from the domestic AC wall outlet. (P.33)
Camera exterior . . . . .Gently wipe the outside of the camera with asoft, dry cloth. Where there is excessive soiling,moisten the cloth with diluted mild liquid soap,wring the cloth out thoroughly and use it to wipeoff the dirt. Then wipe the camera thoroughlywith a dry cloth. If you have been using thecamera near the ocean, moisten the cloth withfresh water, wring the cloth out thoroughly anduse it to wipe the camera.
Monitor and viewfinder . . . . . .Wipe gently with a soft, dry cloth.
Lens . . . . . . . . . . . . . .Use a lens blower (commercially available) toblow off any dust and then wipe the lenscarefully with lens cleaning paper. Replacethe lens cap when storing the camera.
SmartMedia card . . . .Wipe gently with a soft, dry cloth.
• Never use harsh detergents such as benzene or alcohol to clean the camera.• Always remove the batteries and disconnect the AC adapter before cleaning
the camera.• Leaving soiling on the lens can result in the growth of mold.• Do not use chemical cleaners or chemically impregnated cloths.
3
2
1
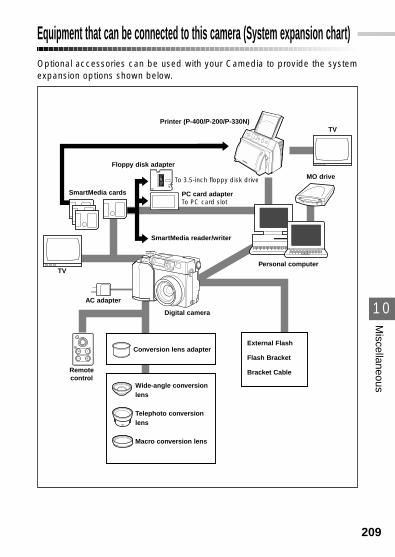
10
Miscellaneous
209
Equipment that can be connected to this camera (System expansion chart)Optional accessories can be used with your Camedia to provide the systemexpansion options shown below.
Printer (P-400/P-200/P-330N)TV
Floppy disk adapter
To 3.5-inch floppy disk drive
PC card adapter To PC card slot
SmartMedia cards
MO drive
SmartMedia reader/writer
AC adapter
Remotecontrol
TV
Digital camera
Conversion lens adapter
Wide-angle conversionlens
Telephoto conversionlens
Macro conversion lens
Personal computer
External Flash
Flash Bracket
Bracket Cable
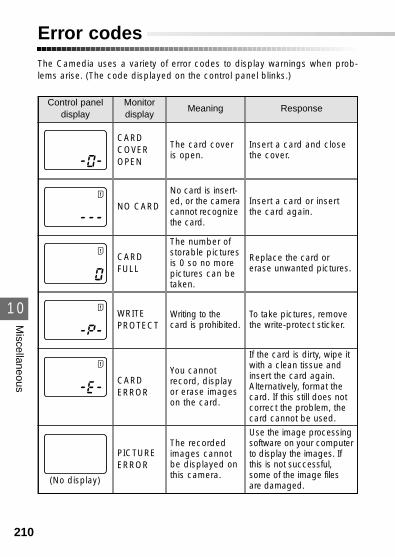
210
10
Miscellaneous
Error codesThe Camedia uses a variety of error codes to display warnings when prob-lems arise. (The code displayed on the control panel blinks.)
Control paneldisplay
Monitordisplay
Meaning Response
CARDCOVEROPEN
The card coveris open.
Insert a card and closethe cover.
NO CARD
No card is insert-ed, or the cameracannot recognizethe card.
Insert a card or insertthe card again.
CARDFULL
The number ofstorable picturesis 0 so no morepictures can betaken.
Replace the card orerase unwanted pictures.
WRITEPROTECT
Writing to thecard is prohibited.
To take pictures, removethe write-protect sticker.
CARDERROR
You cannotrecord, displayor erase imageson the card.
If the card is dirty, wipe itwith a clean tissue andinsert the card again.Alternatively, format thecard. If this still does notcorrect the problem, thecard cannot be used.
PICTUREERROR
The recordedimages cannotbe displayed onthis camera.
Use the image processingsoftware on your computerto display the images. Ifthis is not successful,some of the image filesare damaged.(No display)
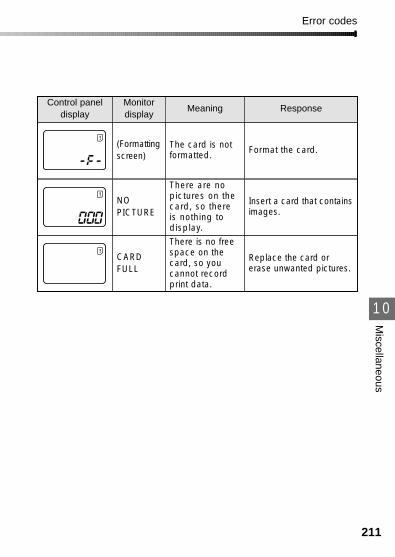
211
10
Miscellaneous
Error codes
Control paneldisplay
Monitordisplay
Meaning Response
(Formattingscreen)
The card is notformatted. Format the card.
NO PICTURE
There are nopictures on thecard, so thereis nothing todisplay.
Insert a card that containsimages.
CARDFULL
There is no freespace on thecard, so youcannot recordprint data.
Replace the card orerase unwanted pictures.
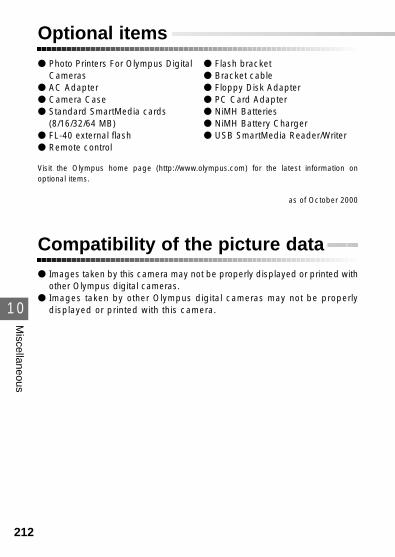
212
10
Miscellaneous
Optional items● Photo Printers For Olympus Digital
Cameras● AC Adapter● Camera Case● Standard SmartMedia cards
(8/16/32/64 MB)● FL-40 external flash● Remote control
● Flash bracket● Bracket cable● Floppy Disk Adapter● PC Card Adapter● NiMH Batteries● NiMH Battery Charger● USB SmartMedia Reader/Writer
Visit the Olympus home page (http://www.olympus.com) for the latest information onoptional items.
as of October 2000
Compatibility of the picture data● Images taken by this camera may not be properly displayed or printed with
other Olympus digital cameras.● Images taken by other Olympus digital cameras may not be properly
displayed or printed with this camera.
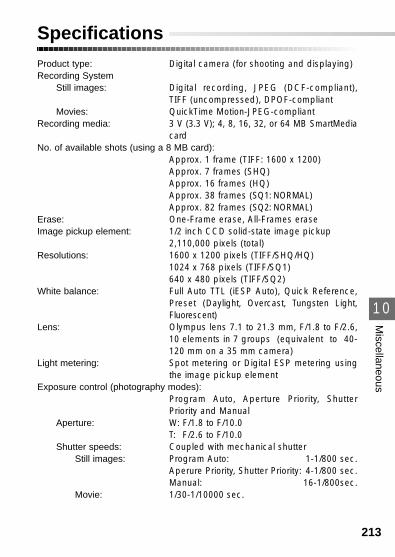
213
10
Miscellaneous
SpecificationsProduct type: Digital camera (for shooting and displaying)Recording System
Still images: Digital recording, JPEG (DCF-compliant),TIFF (uncompressed), DPOF-compliant
Movies: QuickTime Motion-JPEG-compliantRecording media: 3 V (3.3 V); 4, 8, 16, 32, or 64 MB SmartMedia
cardNo. of available shots (using a 8 MB card):
Approx. 1 frame (TIFF: 1600 x 1200)Approx. 7 frames (SHQ)Approx. 16 frames (HQ)Approx. 38 frames (SQ1: NORMAL)Approx. 82 frames (SQ2: NORMAL)
Erase: One-Frame erase, All-Frames eraseImage pickup element: 1/2 inch CCD solid-state image pickup
2,110,000 pixels (total)Resolutions: 1600 x 1200 pixels (TIFF/SHQ/HQ)
1024 x 768 pixels (TIFF/SQ1)640 x 480 pixels (TIFF/SQ2)
White balance: Full Auto TTL (iESP Auto), Quick Reference,Preset (Daylight, Overcast, Tungsten Light,Fluorescent)
Lens: Olympus lens 7.1 to 21.3 mm, F/1.8 to F/2.6,10 elements in 7 groups (equivalent to 40-120 mm on a 35 mm camera)
Light metering: Spot metering or Digital ESP metering usingthe image pickup element
Exposure control (photography modes):Program Auto, Aperture Priority, ShutterPriority and Manual
Aperture: W: F/1.8 to F/10.0T: F/2.6 to F/10.0
Shutter speeds: Coupled with mechanical shutterStill images: Program Auto: 1-1/800 sec.
Aperure Priority, Shutter Priority: 4-1/800 sec. Manual: 16-1/800sec.
Movie: 1/30-1/10000 sec.
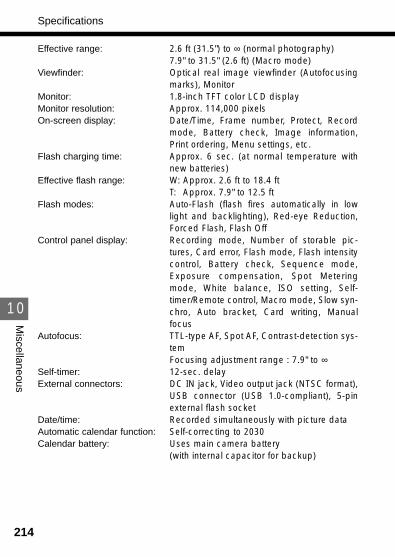
214
10
Miscellaneous
Effective range: 2.6 ft (31.5") to ∞ (normal photography)7.9" to 31.5" (2.6 ft) (Macro mode)
Viewfinder: Optical real image viewfinder (Autofocusingmarks), Monitor
Monitor: 1.8-inch TFT color LCD displayMonitor resolution: Approx. 114,000 pixelsOn-screen display: Date/Time, Frame number, Protect, Record
mode, Battery check, Image information,Print ordering, Menu settings, etc.
Flash charging time: Approx. 6 sec. (at normal temperature withnew batteries)
Effective flash range: W: Approx. 2.6 ft to 18.4 ftT: Approx. 7.9" to 12.5 ft
Flash modes: Auto-Flash (flash fires automatically in lowlight and backlighting), Red-eye Reduction,Forced Flash, Flash Off
Control panel display: Recording mode, Number of storable pic-tures, Card error, Flash mode, Flash intensitycontrol, Battery check, Sequence mode,Exposure compensation, Spot Meteringmode, White balance, ISO setting, Self-timer/Remote control, Macro mode, Slow syn-chro, Auto bracket, Card writing, Manualfocus
Autofocus: TTL-type AF, Spot AF, Contrast-detection sys-temFocusing adjustment range : 7.9" to ∞
Self-timer: 12-sec. delayExternal connectors: DC IN jack, Video output jack (NTSC format),
USB connector (USB 1.0-compliant), 5-pinexternal flash socket
Date/time: Recorded simultaneously with picture dataAutomatic calendar function: Self-correcting to 2030Calendar battery: Uses main camera battery
(with internal capacitor for backup)
Specifications
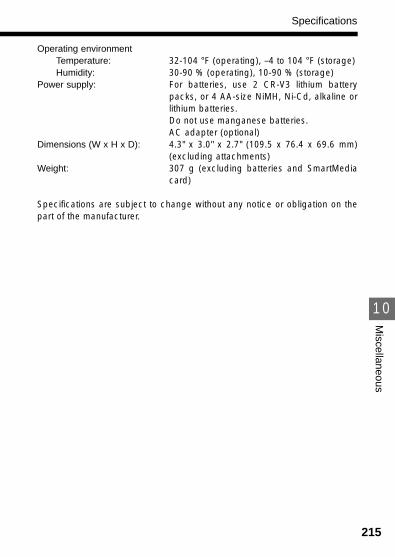
215
10
Miscellaneous
Operating environmentTemperature: 32-104 °F (operating), –4 to 104 °F (storage)Humidity: 30-90 % (operating), 10-90 % (storage)
Power supply: For batteries, use 2 CR-V3 lithium batterypacks, or 4 AA-size NiMH, Ni-Cd, alkaline orlithium batteries.Do not use manganese batteries.AC adapter (optional)
Dimensions (W x H x D): 4.3" x 3.0" x 2.7" (109.5 x 76.4 x 69.6 mm)(excluding attachments)
Weight: 307 g (excluding batteries and SmartMediacard)
Specifications are subject to change without any notice or obligation on thepart of the manufacturer.
Specifications
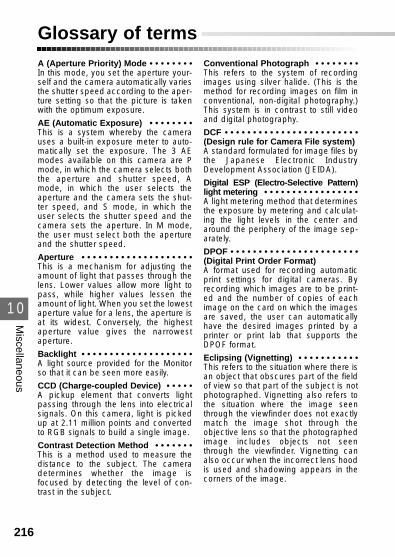
10
Miscellaneous
216
Glossary of termsA (Aperture Priority) Mode • • • • • • • •In this mode, you set the aperture your-self and the camera automatically variesthe shutter speed according to the aper-ture setting so that the picture is takenwith the optimum exposure.
AE (Automatic Exposure) • • • • • • • •This is a system whereby the camerauses a built-in exposure meter to auto-matically set the exposure. The 3 AEmodes available on this camera are Pmode, in which the camera selects boththe aperture and shutter speed, Amode, in which the user selects theaperture and the camera sets the shut-ter speed, and S mode, in which theuser selects the shutter speed and thecamera sets the aperture. In M mode,the user must select both the apertureand the shutter speed.
Aperture • • • • • • • • • • • • • • • • • • • •This is a mechanism for adjusting theamount of light that passes through thelens. Lower values allow more light topass, while higher values lessen theamount of light. When you set the lowestaperture value for a lens, the aperture isat its widest. Conversely, the highestaperture value gives the narrowestaperture.
Backlight • • • • • • • • • • • • • • • • • • • •A light source provided for the Monitorso that it can be seen more easily.
CCD (Charge-coupled Device) • • • • •A pickup element that converts lightpassing through the lens into electricalsignals. On this camera, light is pickedup at 2.11 million points and convertedto RGB signals to build a single image.
Contrast Detection Method • • • • • • •This is a method used to measure thedistance to the subject. The cameradetermines whether the image isfocused by detecting the level of con-trast in the subject.
Conventional Photograph • • • • • • • •This refers to the system of recordingimages using silver halide. (This is themethod for recording images on film inconventional, non-digital photography.)This system is in contrast to still videoand digital photography.
DCF • • • • • • • • • • • • • • • • • • • • • • • •(Design rule for Camera File system)A standard formulated for image files bythe Japanese Electronic IndustryDevelopment Association (JEIDA).
Digital ESP (Electro-Selective Pattern)light metering • • • • • • • • • • • • • • • • •A light metering method that determinesthe exposure by metering and calculat-ing the light levels in the center andaround the periphery of the image sep-arately.
DPOF • • • • • • • • • • • • • • • • • • • • • • •(Digital Print Order Format)A format used for recording automaticprint settings for digital cameras. Byrecording which images are to be print-ed and the number of copies of eachimage on the card on which the imagesare saved, the user can automaticallyhave the desired images printed by aprinter or print lab that supports theDPOF format.
Eclipsing (Vignetting) • • • • • • • • • • •This refers to the situation where there isan object that obscures part of the fieldof view so that part of the subject is notphotographed. Vignetting also refers tothe situation where the image seenthrough the viewfinder does not exactlymatch the image shot through theobjective lens so that the photographedimage includes objects not seenthrough the viewfinder. Vignetting canalso occur when the incorrect lens hoodis used and shadowing appears in thecorners of the image.
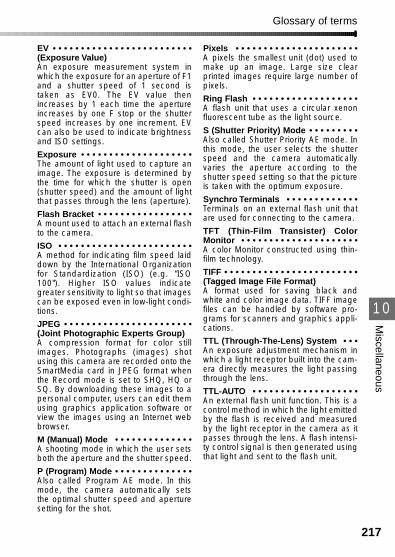
217
10
Miscellaneous
EV • • • • • • • • • • • • • • • • • • • • • • • • •(Exposure Value)An exposure measurement system inwhich the exposure for an aperture of F1and a shutter speed of 1 second istaken as EV0. The EV value thenincreases by 1 each time the apertureincreases by one F stop or the shutterspeed increases by one increment. EVcan also be used to indicate brightnessand ISO settings.
Exposure • • • • • • • • • • • • • • • • • • • •The amount of light used to capture animage. The exposure is determined bythe time for which the shutter is open(shutter speed) and the amount of lightthat passes through the lens (aperture).
Flash Bracket • • • • • • • • • • • • • • • • •A mount used to attach an external flashto the camera.
ISO • • • • • • • • • • • • • • • • • • • • • • • •A method for indicating film speed laiddown by the International Organizationfor Standardization (ISO) (e.g. "ISO100"). Higher ISO values indicategreater sensitivity to light so that imagescan be exposed even in low-light condi-tions.
JPEG • • • • • • • • • • • • • • • • • • • • • • •(Joint Photographic Experts Group)A compression format for color stillimages. Photographs (images) shotusing this camera are recorded onto theSmartMedia card in JPEG format whenthe Record mode is set to SHQ, HQ orSQ. By downloading these images to apersonal computer, users can edit themusing graphics application software orview the images using an Internet webbrowser.
M (Manual) Mode • • • • • • • • • • • • • •A shooting mode in which the user setsboth the aperture and the shutter speed.
P (Program) Mode • • • • • • • • • • • • • •Also called Program AE mode. In thismode, the camera automatically setsthe optimal shutter speed and aperturesetting for the shot.
Glossary of terms
Pixels • • • • • • • • • • • • • • • • • • • • • •A pixels the smallest unit (dot) used tomake up an image. Large size clearprinted images require large number ofpixels.
Ring Flash • • • • • • • • • • • • • • • • • • •A flash unit that uses a circular xenonfluorescent tube as the light source.
S (Shutter Priority) Mode • • • • • • • • •Also called Shutter Priority AE mode. Inthis mode, the user selects the shutterspeed and the camera automaticallyvaries the aperture according to theshutter speed setting so that the pictureis taken with the optimum exposure.
Synchro Terminals • • • • • • • • • • • • •Terminals on an external flash unit thatare used for connecting to the camera.
TFT (Thin-Film Transister) ColorMonitor • • • • • • • • • • • • • • • • • • • • •A color Monitor constructed using thin-film technology.
TIFF • • • • • • • • • • • • • • • • • • • • • • • •(Tagged Image File Format)A format used for saving black andwhite and color image data. TIFF imagefiles can be handled by software pro-grams for scanners and graphics appli-cations.
TTL (Through-The-Lens) System • • •An exposure adjustment mechanism inwhich a light receptor built into the cam-era directly measures the light passingthrough the lens.
TTL-AUTO • • • • • • • • • • • • • • • • • • •An external flash unit function. This is acontrol method in which the light emittedby the flash is received and measuredby the light receptor in the camera as itpasses through the lens. A flash intensi-ty control signal is then generated usingthat light and sent to the flash unit.
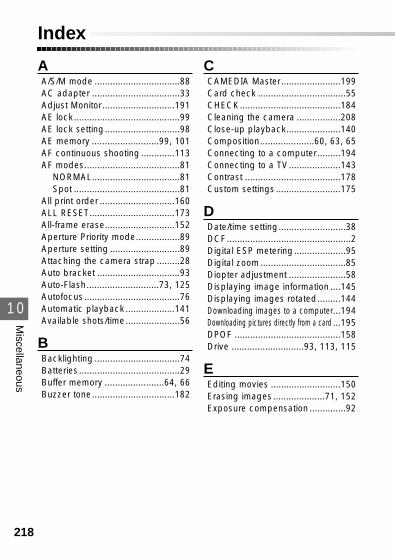
10
Miscellaneous
218
Index
AA/S/M mode .................................88AC adapter ..................................33Adjust Monitor............................191AE lock.........................................99AE lock setting.............................98AE memory ..........................99, 101AF continuous shooting .............113AF modes.....................................81
NORMAL..................................81Spot .........................................81
All print order .............................160ALL RESET.................................173All-frame erase...........................152Aperture Priority mode.................89Aperture setting ...........................89Attaching the camera strap .........28Auto bracket ................................93Auto-Flash............................73, 125Autofocus.....................................76Automatic playback ...................141Available shots/time.....................56
BBacklighting .................................74Batteries.......................................29Buffer memory .......................64, 66Buzzer tone................................182
CCAMEDIA Master.......................199Card check ..................................55CHECK.......................................184Cleaning the camera .................208Close-up playback.....................140Composition.....................60, 63, 65Connecting to a computer.........194Connecting to a TV ....................143Contrast .....................................178Custom settings .........................175
DDate/time setting..........................38DCF................................................2Digital ESP metering....................95Digital zoom.................................85Diopter adjustment ......................58Displaying image information ....145Displaying images rotated.........144Downloading images to a computer...194Downloading pictures directly from a card ...195DPOF .........................................158Drive ............................93, 113, 115
EEditing movies ...........................150Erasing images....................71, 152Exposure compensation ..............92
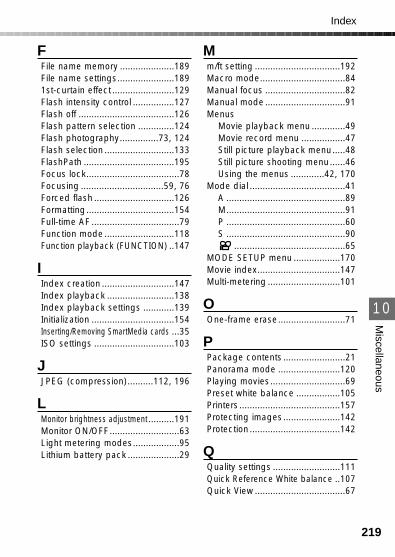
219
10
Miscellaneous
FFile name memory .....................189File name settings......................1891st-curtain effect ........................129Flash intensity control ................127Flash off .....................................126Flash pattern selection ..............124Flash photography...............73, 124Flash selection ...........................133FlashPath ...................................195Focus lock....................................78Focusing ................................59, 76Forced flash ...............................126Formatting..................................154Full-time AF ..................................79Function mode ...........................118Function playback (FUNCTION) ..147
IIndex creation ............................147Index playback ..........................138Index playback settings ............139Initialization ................................154Inserting/Removing SmartMedia cards ...35ISO settings ...............................103
JJPEG (compression)..........112, 196
LMonitor brightness adjustment ..........191Monitor ON/OFF...........................63Light metering modes..................95Lithium battery pack ....................29
Index
Mm/ft setting .................................192Macro mode.................................84Manual focus ...............................82Manual mode ...............................91Menus
Movie playback menu .............49Movie record menu .................47Still picture playback menu.....48Still picture shooting menu......46Using the menus .............42, 170
Mode dial .....................................41A ..............................................89M..............................................91P ..............................................60S ..............................................90
...........................................65MODE SETUP menu ..................170Movie index................................147Multi-metering ............................101
OOne-frame erase..........................71
PPackage contents ........................21Panorama mode ........................120Playing movies.............................69Preset white balance .................105Printers.......................................157Protecting images......................142Protection ...................................142
QQuality settings ..........................111Quick Reference White balance ..107Quick View ...................................67
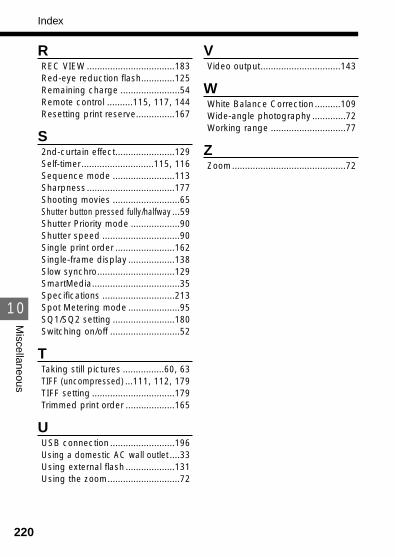
220
10
Miscellaneous
RREC VIEW ..................................183Red-eye reduction flash.............125Remaining charge .......................54Remote control ..........115, 117, 144Resetting print reserve...............167
S2nd-curtain effect.......................129Self-timer............................115, 116Sequence mode ........................113Sharpness..................................177Shooting movies ..........................65Shutter button pressed fully/halfway ...59Shutter Priority mode ...................90Shutter speed ..............................90Single print order .......................162Single-frame display ..................138Slow synchro..............................129SmartMedia..................................35Specifications ............................213Spot Metering mode ....................95SQ1/SQ2 setting ........................180Switching on/off ...........................52
TTaking still pictures ................60, 63TIFF (uncompressed) ...111, 112, 179TIFF setting ................................179Trimmed print order ...................165
UUSB connection .........................196Using a domestic AC wall outlet ....33Using external flash ...................131Using the zoom............................72
Index
VVideo output...............................143
WWhite Balance Correction ..........109Wide-angle photography .............72Working range .............................77
ZZoom............................................72

221
– MEMO –

222
– MEMO –

223

� Avant d’utiliser votre appareil photo,veuillez lire attentivement ce moded’emploi, de manière à obtenir lesmeilleurs résultats possibles.
� Avant d’effectuer des prises de vuesimportantes, nous vous conseillons parailleurs de faire quelques essais afinde vous familiariser avec le maniementde l’appareil photo.
Serial number/Numéro de série /Número de serie
Digital camera
CD-ROM
VT2274-02
MODE D’EMPLOIAPPAREIL PHOTO NUMÉRIQUE
OLYMPUS OPTICAL CO., LTD.San-Ei Building, 22-2, Nishi Shinjuku 1-chome, Shinjuku-ku, Tokyo, Japan.
(Customer support) Tel. 0426-42-7499 Tokyohttp://www.olympus.co.jp
OLYMPUS AMERICA INC.Two Corporate Center Drive, Melville, NY 11747-3157, U.S.A. Tel. 631-844-5000
(Customer support) Tel. 1-888-553-4448http://www.olympus.com
OLYMPUS OPTICAL CO. (EUROPA) GMBH.(Premises/Goods delivery) Wendenstraße 14-18 D-20097 Hamburg, Germany. Tel. 040-237730
(Letters) Postfach 10 49 08, 20034 Hamburg, Germany.http://www.olympus-europa.com
Printed in Japan
1AG6P1P0900--A
6.Affichage, édition et efface-ment des photos
9.Téléchargement des imagesvers un ordinateur
1.Préparatifs
2.Photographie et affichage de base
3.Mise au point
4.Photographie personnalisée
5.Utilisation du flash
7.Paramètres d'impression
8.Installation du mode
10.Divers
P.27
P.51
P.75
P.87
P.123
P.137
P.157
P.169
P.193
P.201