Embed Size (px)
Citation preview
Leaf River Outdoor ProductsVibrashine, Inc. P.O. Box 557, Taylorsville, MS 39168
(601) 785-9854 FAX (601) 785-9874 www.vibrashine.com
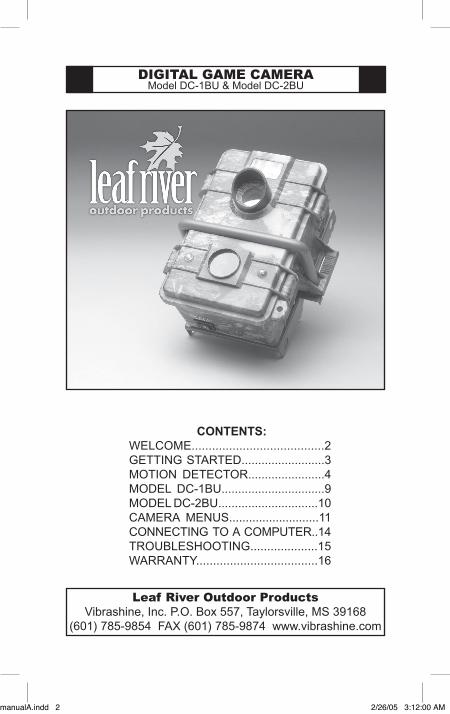
DIGITAL GAME CAMERAModel DC-1BU & Model DC-2BU
CONTENTS:WELCOME.......................................2GETTING STARTED.........................3MOTION DETECTOR.......................4MODEL DC-1BU...............................9MODEL DC-2BU..............................10CAMERA MENUS...........................11CONNECTING TO A COMPUTER..14TROUBLESHOOTING....................15WARRANTY....................................16
manualA.indd 2 2/26/05 3:12:00 AM
Thanks for purchasing the Digital Game Camera from Leaf River Outdoor Products. You’ve made a wise choice and we believe you’ll enjoy discovering how useful this camera is.
We’ve worked pretty hard to make the Game Camera easyto use while giving you plenty of options for makingdifferent kinds of photos and videos in various situations.We loaded the camera with default settings that work wellfor most people to begin with.
Before you can start making pictures though, there are afew of things you need to learn, so we made this user’s manual and accompanying video to help you out.
The first thing you’ll probably notice about the camera isthe Mossy Oak® Break-Up camouflage pattern. On the front you see at the top an oversized, extra bright flash. Just below that is the camera lens with its detachable lenshood. In the middle is the security bar. And below that isthe infra-red sensor and motion detector with a light sensorand an indicator light we’ll tell you about later.
The motion detector looks for warm, moving objects. When the sensor detects an animal moving, the camera takes a picture, storing it digitally in the camera’s memory or on a removable Compact Flash® card.
On the bottom of the housing unit is the main power switch.On the back is a sturdy steel mounting bracket for at-taching the camera to a post or tree. On one side are the hinges for the door and on the other side are the latches.
THANKS and WELCOME!What does this new camera do?
2
If the outside of the housing has moisture from rain or dew, be careful opening the unit to avoid getting water inside the camera.
TIP
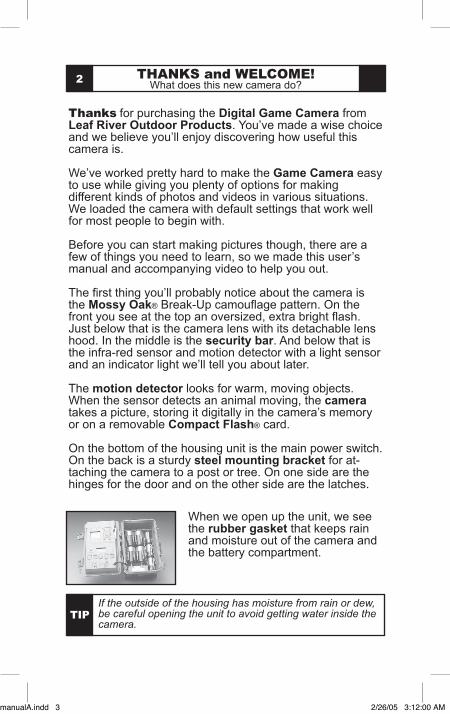
When we open up the unit, we see the rubber gasket that keeps rain and moisture out of the camera and the battery compartment.
manualA.indd 3 2/26/05 3:12:00 AM
BATTERIESThe Game Camera requires four D batteries and three C batteries. They all go in with the “Plus” side up. Once the batteries are loaded, you can begin taking your first pictures. Set the main power switch to ON and in about a minute the camera will begin sensing motion and taking pictures using the default settings.
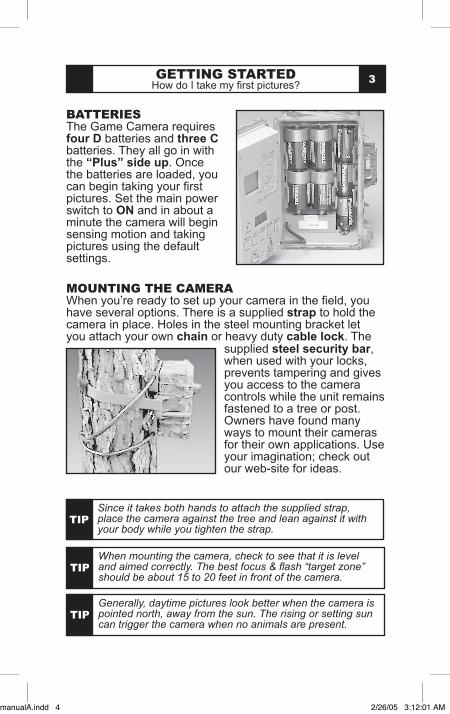
MOUNTING THE CAMERAWhen you’re ready to set up your camera in the field, youhave several options. There is a supplied strap to hold thecamera in place. Holes in the steel mounting bracket letyou attach your own chain or heavy duty cable lock. The
GETTING STARTEDHow do I take my first pictures?
3
supplied steel security bar, when used with your locks,prevents tampering and gives you access to the cameracontrols while the unit remains fastened to a tree or post. Owners have found many ways to mount their cameras for their own applications. Use your imagination; check out our web-site for ideas.
Generally, daytime pictures look better when the camera is pointed north, away from the sun. The rising or setting sun can trigger the camera when no animals are present.
TIP
When mounting the camera, check to see that it is level and aimed correctly. The best focus & flash “target zone” should be about 15 to 20 feet in front of the camera.
TIP
Since it takes both hands to attach the supplied strap, place the camera against the tree and lean against it with your body while you tighten the strap.
TIP
manualA.indd 4 2/26/05 3:12:01 AM
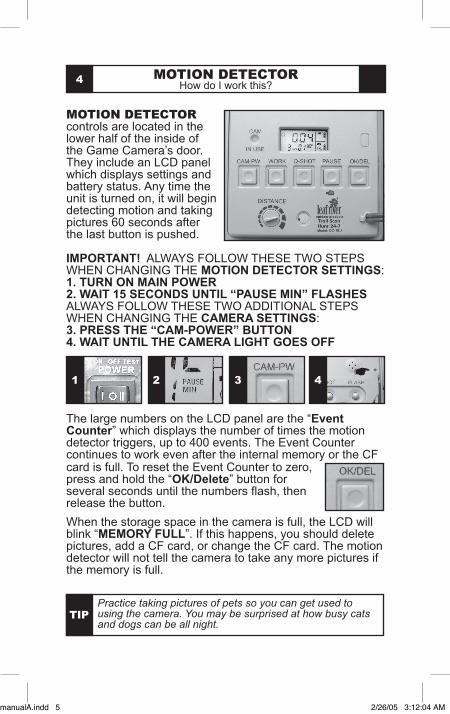
MOTION DETECTOR controls are located in the lower half of the inside of the Game Camera’s door. They include an LCD panel which displays settings and battery status. Any time the unit is turned on, it will begin detecting motion and taking pictures 60 seconds after the last button is pushed.
MOTION DETECTORHow do I work this?
4
The large numbers on the LCD panel are the “EventCounter” which displays the number of times the motiondetector triggers, up to 400 events. The Event Countercontinues to work even after the internal memory or the CF
Practice taking pictures of pets so you can get used to using the camera. You may be surprised at how busy cats and dogs can be all night.
TIP
IMPORTANT! ALWAYS FOLLOW THESE TWO STEPS WHEN CHANGING THE MOTION DETECTOR SETTINGS:1. TURN ON MAIN POWER2. WAIT 15 SECONDS UNTIL “PAUSE MIN” FLASHESALWAYS FOLLOW THESE TWO ADDITIONAL STEPS WHEN CHANGING THE CAMERA SETTINGS:3. PRESS THE “CAM-POWER” BUTTON4. WAIT UNTIL THE CAMERA LIGHT GOES OFF
�4321
card is full. To reset the Event Counter to zero, press and hold the “OK/Delete” button for several seconds until the numbers flash, then release the button.
When the storage space in the camera is full, the LCD will blink “MEMORY FULL”. If this happens, you should delete pictures, add a CF card, or change the CF card. The motion detector will not tell the camera to take any more pictures if the memory is full.
manualA.indd 5 2/26/05 3:12:04 AM
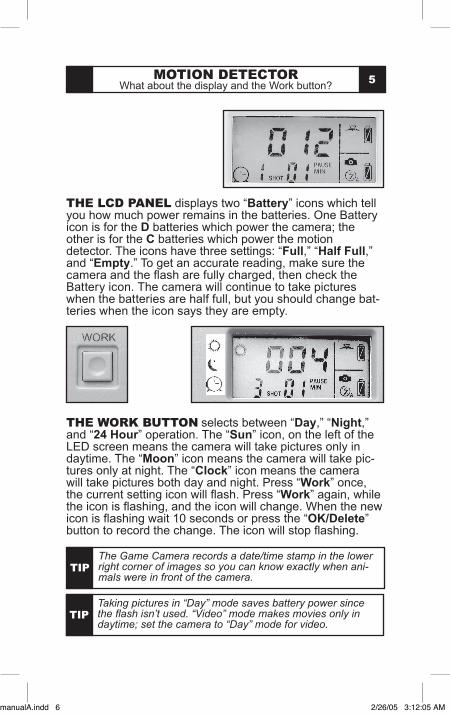
THE LCD PANEL displays two “Battery” icons which tell you how much power remains in the batteries. One Battery icon is for the D batteries which power the camera; theother is for the C batteries which power the motion detector. The icons have three settings: “Full,” “Half Full,”and “Empty.” To get an accurate reading, make sure thecamera and the flash are fully charged, then check theBattery icon. The camera will continue to take pictures when the batteries are half full, but you should change bat-teries when the icon says they are empty.
THE WORK BUTTON selects between “Day,” “Night,” and “24 Hour” operation. The “Sun” icon, on the left of the LED screen means the camera will take pictures only in daytime. The “Moon” icon means the camera will take pic-tures only at night. The “Clock” icon means the camerawill take pictures both day and night. Press “Work” once, the current setting icon will flash. Press “Work” again, while the icon is flashing, and the icon will change. When the new icon is flashing wait 10 seconds or press the “OK/Delete” button to record the change. The icon will stop flashing.
MOTION DETECTORWhat about the display and the Work button?
5
Taking pictures in “Day” mode saves battery power since the flash isn’t used. “Video” mode makes movies only in daytime; set the camera to “Day” mode for video.
TIP
The Game Camera records a date/time stamp in the lower right corner of images so you can know exactly when ani-mals were in front of the camera.
TIP
manualA.indd 6 2/26/05 3:12:05 AM
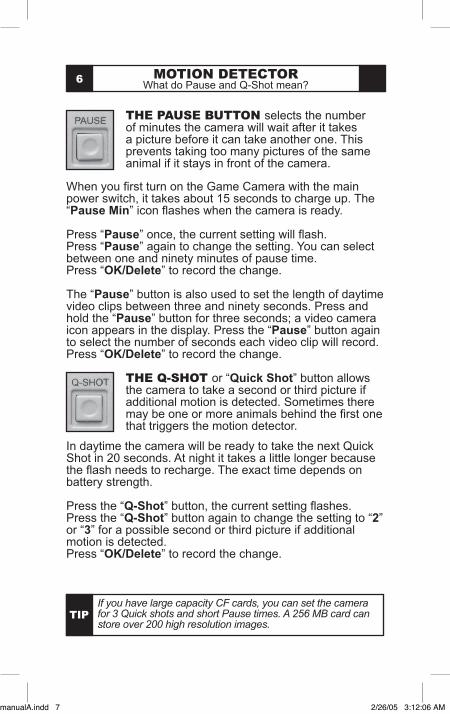
THE PAUSE BUTTON selects the number of minutes the camera will wait after it takes a picture before it can take another one. This prevents taking too many pictures of the same animal if it stays in front of the camera.
THE Q-SHOT or “Quick Shot” button allows the camera to take a second or third picture if additional motion is detected. Sometimes there may be one or more animals behind the first one that triggers the motion detector.
MOTION DETECTORWhat do Pause and Q-Shot mean?
6
When you first turn on the Game Camera with the main power switch, it takes about 15 seconds to charge up. The “Pause Min” icon flashes when the camera is ready.
Press “Pause” once, the current setting will flash.Press “Pause” again to change the setting. You can selectbetween one and ninety minutes of pause time. Press “OK/Delete” to record the change.
The “Pause” button is also used to set the length of daytimevideo clips between three and ninety seconds. Press and hold the “Pause” button for three seconds; a video camera icon appears in the display. Press the “Pause” button again to select the number of seconds each video clip will record. Press “OK/Delete” to record the change.
In daytime the camera will be ready to take the next QuickShot in 20 seconds. At night it takes a little longer because the flash needs to recharge. The exact time depends on battery strength.
Press the “Q-Shot” button, the current setting flashes.Press the “Q-Shot” button again to change the setting to “2”or “3” for a possible second or third picture if additionalmotion is detected.Press “OK/Delete” to record the change.
If you have large capacity CF cards, you can set the camera for 3 Quick shots and short Pause times. A 256 MB card can store over 200 high resolution images.
TIP
manualA.indd 7 2/26/05 3:12:06 AM
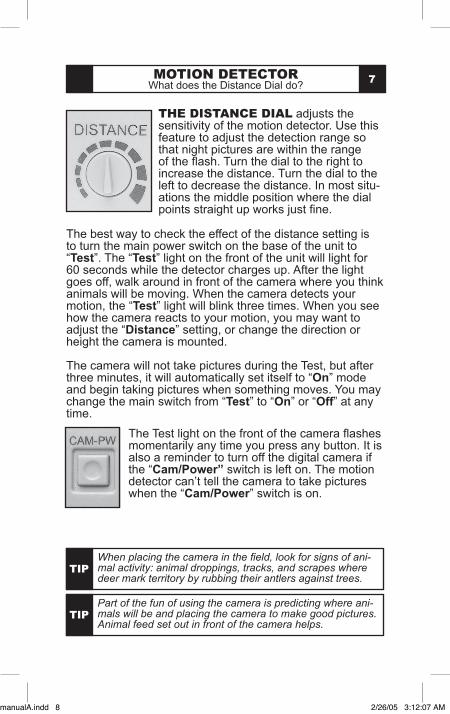
THE DISTANCE DIAL adjusts the sensitivity of the motion detector. Use this feature to adjust the detection range sothat night pictures are within the range of the flash. Turn the dial to the right to increase the distance. Turn the dial to the left to decrease the distance. In most situ-ations the middle position where the dial points straight up works just fine.
MOTION DETECTORWhat does the Distance Dial do?
7
The best way to check the effect of the distance setting isto turn the main power switch on the base of the unit to“Test”. The “Test” light on the front of the unit will light for60 seconds while the detector charges up. After the lightgoes off, walk around in front of the camera where you thinkanimals will be moving. When the camera detects yourmotion, the “Test” light will blink three times. When you seehow the camera reacts to your motion, you may want toadjust the “Distance” setting, or change the direction orheight the camera is mounted.
The camera will not take pictures during the Test, but after three minutes, it will automatically set itself to “On” mode and begin taking pictures when something moves. You may change the main switch from “Test” to “On” or “Off” at anytime.
The Test light on the front of the camera flashes momentarily any time you press any button. It is also a reminder to turn off the digital camera if the “Cam/Power” switch is left on. The motion detector can’t tell the camera to take pictures when the “Cam/Power” switch is on.
Part of the fun of using the camera is predicting where ani-mals will be and placing the camera to make good pictures. Animal feed set out in front of the camera helps.
TIP
When placing the camera in the field, look for signs of ani-mal activity: animal droppings, tracks, and scrapes where deer mark territory by rubbing their antlers against trees.
TIP
manualA.indd 8 2/26/05 3:12:07 AM
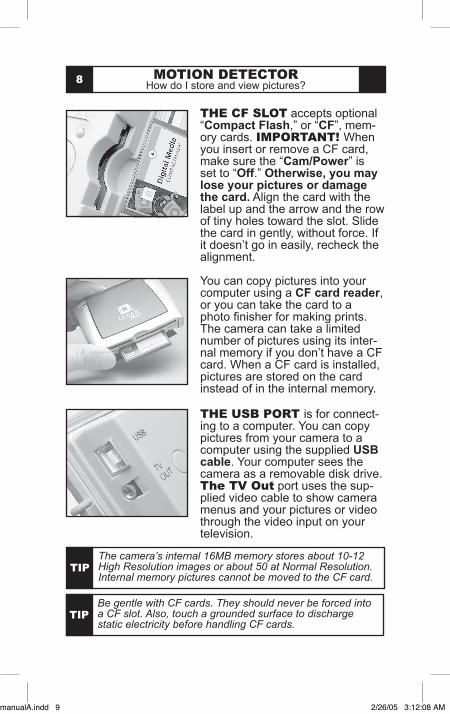
THE CF SLOT accepts optional “Compact Flash,” or “CF”, mem-ory cards. IMPORTANT! When you insert or remove a CF card, make sure the “Cam/Power” is set to “Off.” Otherwise, you may lose your pictures or damage the card. Align the card with the label up and the arrow and the row of tiny holes toward the slot. Slide the card in gently, without force. If it doesn’t go in easily, recheck the alignment.
You can copy pictures into your computer using a CF card reader, or you can take the card to a photo finisher for making prints. The camera can take a limited number of pictures using its inter-nal memory if you don’t have a CF card. When a CF card is installed, pictures are stored on the card instead of in the internal memory.
MOTION DETECTORHow do I store and view pictures?
8
THE USB PORT is for connect-ing to a computer. You can copy pictures from your camera to a computer using the supplied USB cable. Your computer sees the camera as a removable disk drive. The TV Out port uses the sup-plied video cable to show camera menus and your pictures or video through the video input on your television.
Be gentle with CF cards. They should never be forced into a CF slot. Also, touch a grounded surface to discharge static electricity before handling CF cards.
TIP
The camera’s internal 16MB memory stores about 10-12 High Resolution images or about 50 at Normal Resolution. Internal memory pictures cannot be moved to the CF card.
TIP
manualA.indd 9 2/26/05 3:12:08 AM
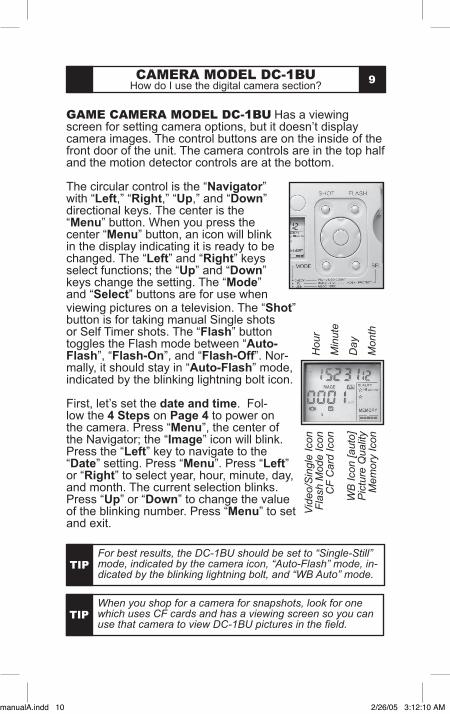
GAME CAMERA MODEL DC-1BU Has a viewing screen for setting camera options, but it doesn’t display camera images. The control buttons are on the inside of the front door of the unit. The camera controls are in the top half and the motion detector controls are at the bottom.
CAMERA MODEL DC-1BUHow do I use the digital camera section?
9
The circular control is the “Navigator” with “Left,” “Right,” “Up,” and “Down” directional keys. The center is the “Menu” button. When you press the center “Menu” button, an icon will blink in the display indicating it is ready to be changed. The “Left” and “Right” keys select functions; the “Up” and “Down” keys change the setting. The “Mode” and “Select” buttons are for use when viewing pictures on a television. The “Shot” button is for taking manual Single shots or Self Timer shots. The “Flash” button toggles the Flash mode between “Auto-Flash”, “Flash-On”, and “Flash-Off”. Nor-mally, it should stay in “Auto-Flash” mode, indicated by the blinking lightning bolt icon.
First, let’s set the date and time. Fol-low the 4 Steps on Page 4 to power on the camera. Press “Menu”, the center of the Navigator; the “Image” icon will blink. Press the “Left” key to navigate to the “Date” setting. Press “Menu”. Press “Left” or “Right” to select year, hour, minute, day, and month. The current selection blinks. Press “Up” or “Down” to change the value of the blinking number. Press “Menu” to set and exit.
When you shop for a camera for snapshots, look for one which uses CF cards and has a viewing screen so you can use that camera to view DC-1BU pictures in the field.
TIP
Hou
r
Min
ute
Day
Mon
th
Vid
eo/S
ingl
e Ic
onF
lash
Mod
e Ic
onC
F C
ard
Icon
WB
Icon
[aut
o]P
ictu
re Q
ualit
yM
emor
y Ic
on
For best results, the DC-1BU should be set to “Single-Still” mode, indicated by the camera icon, “Auto-Flash” mode, in-dicated by the blinking lightning bolt, and “WB Auto” mode.
TIP
manualA.indd 10 2/26/05 3:12:10 AM
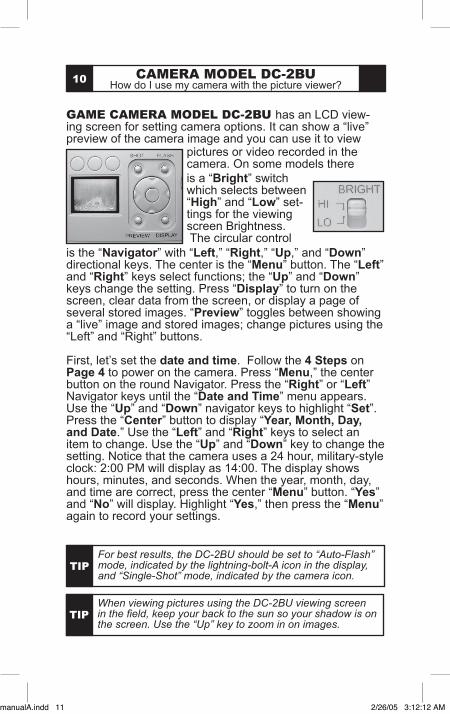
GAME CAMERA MODEL DC-2BU has an LCD view-ing screen for setting camera options. It can show a “live” preview of the camera image and you can use it to view
CAMERA MODEL DC-2BUHow do I use my camera with the picture viewer?
10
pictures or video recorded in the camera. On some models there is a “Bright” switch which selects between “High” and “Low” set-tings for the viewing screen Brightness. The circular control
is the “Navigator” with “Left,” “Right,” “Up,” and “Down” directional keys. The center is the “Menu” button. The “Left” and “Right” keys select functions; the “Up” and “Down” keys change the setting. Press “Display” to turn on the screen, clear data from the screen, or display a page of several stored images. “Preview” toggles between showing a “live” image and stored images; change pictures using the “Left” and “Right” buttons.
First, let’s set the date and time. Follow the 4 Steps on Page 4 to power on the camera. Press “Menu,” the center button on the round Navigator. Press the “Right” or “Left” Navigator keys until the “Date and Time” menu appears. Use the “Up” and “Down” navigator keys to highlight “Set”. Press the “Center” button to display “Year, Month, Day, and Date.” Use the “Left” and “Right” keys to select an item to change. Use the “Up” and “Down” key to change the setting. Notice that the camera uses a 24 hour, military-style clock: 2:00 PM will display as 14:00. The display shows hours, minutes, and seconds. When the year, month, day, and time are correct, press the center “Menu” button. “Yes” and “No” will display. Highlight “Yes,” then press the “Menu” again to record your settings.
When viewing pictures using the DC-2BU viewing screen in the field, keep your back to the sun so your shadow is on the screen. Use the “Up” key to zoom in on images.
TIP
For best results, the DC-2BU should be set to “Auto-Flash” mode, indicated by the lightning-bolt-A icon in the display, and “Single-Shot” mode, indicated by the camera icon.
TIP
manualA.indd 11 2/26/05 3:12:12 AM
MENUS give you access to a great many camera controls, probably more than most people need to bother with, but here are the details. You can change camera settings by us-ing the LCD on the DC-2BU or by connecting the “TV Out” from either camera model to a television.
In LIVE mode these are the menus:1. Capture Mode a. Exit b. SINGLE [default in capitals] c. Self Timer [press Shot for delayed shots] d. Video [for 320x240 resolution video]2. Color a. Exit b. AUTO c. Exposure Value [+ to lighten, - to darken] d. White Balance [DAYLIGHT, indoors] e. Sharpness [NORMAL, Sharpen, Soften]3. Resolution a. Exit b. High [4mp with interpolation] c. Medium [2.1mp] d. Standard [1.3mp] e. Low [0.3mp DC-1BU only]4.Quality a. Exit b. High [less compression, larger file size] c. NORMAL [more compression, smaller size]5. Auto Power OFF a. Exit b. Set [3.00]6. Date/Time a. Exit b. Set7. TV out a. Exit b. NTSC [North American TV standard] c. PAL [European TV standard]8. AE Type a. 50 Hz [some other countries] b. 60 Hz [North American]9. Language a. ENGLISH b. Chinese
In Picture Viewing mode these are the menus:1. Erase a. One Picture b. All Pictures c. Format d. Protect2. Auto Power Off a. Exit b. Set3. Date/Time a. Exit b. Set4. DPOF [used for DPOF printers] a. Exit b. Set5. TV Out a. Exit b. NTSC [North American standard] c. PAL [European standard] d. Screen6. Rotation [rotates pictures on television screen] a. 0 b. 90 c. 180 d. 2707. USB a. MSDC [for use with most computers] b. SIDC [for use with some computers]
CAMERA MENUSHow do I change the digital camera settings?
11
The default settings work best in most situations. The only things you’ll usually need to change are the Date/Time, Resolution, Quality, and Video/Single-Still modes.
TIP
manualA.indd 12 2/26/05 3:12:12 AM
CAMERA MENUSWhat about the DC-1BU Menus?
12
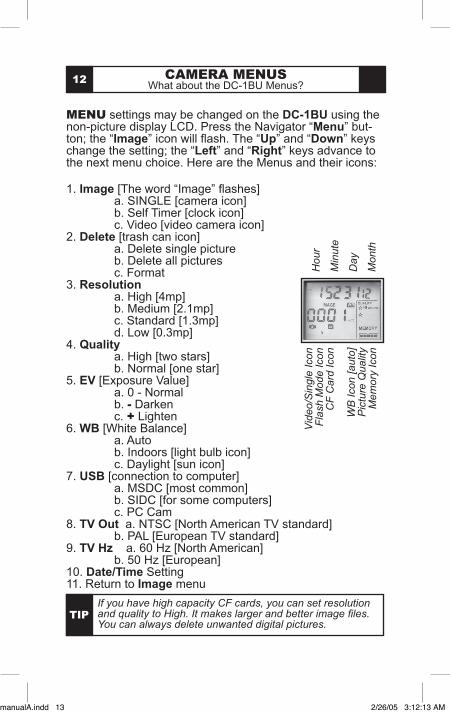
MENU settings may be changed on the DC-1BU using the non-picture display LCD. Press the Navigator “Menu” but-ton; the “Image” icon will flash. The “Up” and “Down” keys change the setting; the “Left” and “Right” keys advance to the next menu choice. Here are the Menus and their icons:
1. Image [The word “Image” flashes] a. SINGLE [camera icon] b. Self Timer [clock icon] c. Video [video camera icon]2. Delete [trash can icon] a. Delete single picture b. Delete all pictures c. Format3. Resolution a. High [4mp] b. Medium [2.1mp] c. Standard [1.3mp] d. Low [0.3mp]4. Quality a. High [two stars] b. Normal [one star]5. EV [Exposure Value] a. 0 - Normal b. - Darken c. + Lighten6. WB [White Balance] a. Auto b. Indoors [light bulb icon] c. Daylight [sun icon]7. USB [connection to computer] a. MSDC [most common] b. SIDC [for some computers] c. PC Cam8. TV Out a. NTSC [North American TV standard] b. PAL [European TV standard]9. TV Hz a. 60 Hz [North American] b. 50 Hz [European]10. Date/Time Setting11. Return to Image menu
If you have high capacity CF cards, you can set resolution and quality to High. It makes larger and better image files. You can always delete unwanted digital pictures.
TIP
Hou
r
Min
ute
Day
Mon
th
Vid
eo/S
ingl
e Ic
onF
lash
Mod
e Ic
onC
F C
ard
Icon
WB
Icon
[aut
o]P
ictu
re Q
ualit
yM
emor
y Ic
on
manualA.indd 13 2/26/05 3:12:13 AM
“Exposure Value” or “EV” adjusts the automatic exposure. If your pictures are consistently dark, change the setting inthe Plus direction. If they are consistently too bright, change the setting in the Minus direction.
“White Balance” or “WB” compensates for the color of different kinds of light such as fluorescent or indoor house lighting. The default Daylight or Auto setting works for both flash and day time outdoor shots.
“Still or Single Picture Mode” is the default setting. Still mode can be set to Day, Night, or both Day and Night.
“Video Mode” sets the camera to record day time movingvideo images at a resolution of 320 by 240 pixels. Theduration of video clips is set in the Motion Detector controlsusing the “Pause” button. Set the digital camera controls to “Video” using the camera menu. Turn off “Cam/Power”, set the “Work” mode to “Day.”
IMPORTANT! Remember, after changing between “Still Picture Mode” and “Video Mode,” set the main power switch to “Off”, wait a few seconds, then “On” again, to reboot and reset the unit to the new mode.
“Flash Mode” can be set to “Always On,” “Always Off,” or“Automatic.” “Automatic” mode uses the light sensor on the front of the camera to detect when the scene is too dark to take a good picture without flash. If night shots are black,the flash is probably set to “Always Off.” If day shots aretoo bright, the flash is probably set to “Always On.” The best mode for most applications is “Automatic.”
On the DC-1BU display a “Lightning-bolt” icon blinks in “Automatic” mode; it is steady in “Always On” mode; and it has a circle with a line through it in “Always Off” mode.
CAMERA MENUSWhat do those camera settings mean?
13
Before you take your camera into the field, set all the menu settings at home, make some test pictures, and look at them to see if the settings do what you want them to do.
TIP
It’s easier to take multiple CF cards back and forth to your computer than to bring your Game Camera out of the field and into your house.
TIP
manualA.indd 14 2/26/05 3:12:13 AM
To transfer pictures from your camera to your computer,you have a few choices. One way is to take the CF cardfrom the camera [with the power Off] and plug it directlyinto the CF slot on some computers. You can buy a small CF card reader that plugs into a USB port on your computer. You can also connect the Game Camera to your computer by the supplied USB cable. First make sure your computer is on and running. Follow the 4 Steps on Page 4 to power on the camera. On the DC-2BU only, use the “Preview” but-ton to display an image on the camera screen. Connect the USB cable from the camera to the computer. The computer recognizes the camera as a removable disk. You can see the images in a folder with a name like 100MEDIA. In some versions of Windows®, a pop-up menu will display options for viewing or copying pictures. One way to transfer files is to drag and drop the 100MEDIA folder from the camera or CF card to a folder on your computer, then rename the 100ME-DIA folder. You can view, edit or delete pictures with your own programs, or with the software supplied with your Game Camera. Some computers let you store pictures on CD-R.
INSTALLING PHOTO EXPRESS IMAGE EDITING SOFTWAREInsert the supplied installation CD. Click the “Photo Ex-press” button on the welcome screen. Select your language. Follow the instructions. Restart your computer. With your Game Camera power and Cam/Power on, and with the USB cable connected to your computer. Open “Photo Express”. Click “File” under the “Obtain” menu, then click “Browse for Folder”. Choose the removable disk which is assigned for the Game Camera [E through J]; then select DCIM\100MEDIA. Click “OK” to download pictures into “Photo Express.”
INSTALLING VIDEO STUDIO MOVIE EDITING SOFTWAREInsert installation CD. Click “Video Studio”. Select your lan-guage. Follow the instructions. Restart your computer.
CONNECTING TO A COMPUTERHow do I transfer my pictures?
14
Photo labs can make prints from the images on your CF card; first delete unwanted pictures. You can copy edited pictures back from your computer to the CF card for prints.
TIP
When transferring pictures from the CF card by copying the 100MEDIA folder, you can organize your folders by renam-ing them with the date and subject: 2005.2.10.deer
TIP
manualA.indd 15 2/26/05 3:12:14 AM
TROUBLESHOOTINGOops! What do I do now?
15
NO ANIMALS IN SOME OF MY PICTURES1. Check to see if the camera is pointing at the rising or setting sun which can trigger the sensor.2. At night, the Motion Detector may sense animals beyond the range of the flash. Reduce the Distance setting.3. Small animals may be triggering the unit. Reduce the Distance setting and/or raise the height of the camera above small animals.4. The Motion Detector may sense animals through foliage. Reduce the Distance setting.5. If the animal moves quickly, it may have moved out of the view of the camera before the picture was taken. a. Move the camera further back. b. Point the camera up or down a trail, not across it.6. Make sure the mounting post or tree is stable and doesn’t move.
CAM-IN-USE LIGHT ON; CAMERA NOT RESPONDING1. The camera may have timed out and shut down. Press the Cam/Power button to turn the camera off, then back on again.2. If you have just turned the Cam/Power button on, wait a few seconds until the small light near the CF slot goes off.3. Check the D cell batteries that supply the camera.
CAM/POWER BUTTON DOES NOT RESPONDIf you have just turned the main power switch on, wait a few seconds until the “Pause Min” icon flashes on the Motion Detector LCD.
RED LIGHT ON FRONT OF CAMERA STAYS ON1. Check to see if the main power switch is in Test mode.2. Check to see if the Cam/Power button is set to On mode.
DAYLIGHT PICTURES ARE TOO WHITE1. Make sure Flash is set to “Automatic”2. EV - Exposure Value may be set too high. Reduce.3. Camera may be pointed at the sun; point away from sun.
DAY PICTURES, BUT NO NIGHT PICTURES1. The Motion Detector may be set to “Day Only”, sun icon.2. Camera batteries may be too weak to charge the flash.
You can reboot and restore the factory default settings by turning the Main Power “Off”, then removing and reinstalling the batteries after 10 minutes. Stored pictures are not lost.
TIP
manualA.indd 16 2/26/05 3:12:14 AM
THANKS AGAINIs it over so soon?
16
LIMITED WARRANTY Your Leaf River Game Camera is covered by a Limited Warranty on parts and labor for a period of one year from the date of purchase. The warranty applies to defects in materials and workmanship. the warranty does not apply to units that have been damaged, abused, modified, serviced by unauthorized persons, or exposed to extreme tem-peratures below -20º C [-4º F] or above +60º C [+140º F]. Your sales receipt is your proof of purchase and should be presented if warranty service is needed. Please call (601) 785-9854 for warranty service.
REPAIR SERVICE Repair service for damage or other problems not covered by warranty will be provided at a reasonable charge. We have designed the electronics of the Leaf River Digital Game Camera to minimize repair cost and time.
YOUR COMMENTS AND PICTURES We welcome and appreciate your suggestions, comments, and pictures. Send us your pictures to our email address for possible use on our web-site or literature.
THANKS! We hope this manual and the supplied DVD help you get started using your camera. If you have any questions, more information can be found on our web-site where you’ll find tips and tricks for making better wildlife pictures. Again we thank you for your purchase and for watching the video. We know you will enjoy your new Digital Game Camera and we hope you’ll look for other quality items from:
Leaf River Outdoor ProductsVibrashine, Inc.P.O. Box 557, 113 Fellowship Road, Taylorsville, MS 39168Phone (601) 765-9854 Fax (601) 765-9874Web-site: www.vibrashine.com
Remove the batteries from the Game Camera before stor-ing it for long periods to prevent damage to the camera if the batteries should leak.
TIP
Use the supplied picture editing software to enhance the contrast of night pictures before you have prints made. You can crop pictures so animals are larger on the prints.
TIP
manualA.indd 17 2/26/05 3:12:15 AM


![Get 642-785 exam questions & 642-785 practice tests [Infographic]](https://img.pdfslide.net/doc/110x75/5a65c26d7f8b9ab3488b4f9b/get-642-785-exam-questions-642-785-practice-tests-infographic.jpg)