Embed Size (px)
Citation preview

* Roland’ , inilill <5
DIGITAL INTELLIGENT PIANO
KR-4700/2000 OWNER’S MANUAL

A fs A FISK OF ELECTRIC SHOCK NOT, [ RSX GE RET TRE Broo
ATTENTION aisave ve choc ELecTRIQue NE PAS QUVRIR
CAUTION: TO REDUCE THE RISK OF ELECTRIC SHOCK,
DO NOT REMOVE COVER (OR BACK).
NO USER-SERVICEABLE PARTS INSIDE.
REFER SERVICING TO QUALIFIED SERVICE PERSONNEL.
The lightning fiash with arrowhead symbol, within an equi- lateral trangle, is intended to alert the user to the presence of uninsuiated “dangerous voltage” within the product's enciosure that may be of sufficient magnitude to constitute a risk of electric shock to persons.
The exclamation point within an equilatera! triangle is intended to alert the user to the presence of important oper- ating and maintenance (servicing) instructions in the litera- ture accompanying the product.
INSTRUCTIONS PERTAINING TO A RISK OF FIRE, ELECTRIC SHOCK, OR INJURY TO PERSONS.
IMPORTANT SAFETY INSTRUCTIONS SAVE THESE INSTRUCTIONS
WARNING - When using electric products, basic precautions should always be followed, including the following:
Read all the instructions before using the product. . Do not use this product near water — for example, near a
bathtub, washbowl, kitchen sink, in a wet basement, or near a swimming pool, or the like.
3. This product should be used only with a cart or stand that is recommended by the manufacturer.
4. This product, either alone or in combination with an amplifier
and headphones or speakers, may be capable of producing
sound levels that could cause permanent hearing foss. Do not operate for a tong period of time at a high volume level or at a fevel that is uncomfortable. If you experience any hearing loss or ringing in the ears, you should consult an audiologist.
.. The product should be located so that its tocation or position does not interfere with its proper ventilation. The product should be located away from heat sources such as
radiators, heat registers, or other products that produce heat.
The product should be connected to a power supply only of the type described in the operating instructions or as marked on the product.
po
N 2 um
8. The power-supply cord of the product should be unplugged from the outlet when left unused for a long period of time.
9. Care should be taken so that objects do not fall and liquids are not spilied into the enclosure through openings.
10,The product should be serviced by qualified service person- nel when:
A. The power-supply cord or the plug has been damaged; or
B. Objects have fallen, or liquid has been spilled onto the product; or
C. The product has been exposed to rain; or D. The product does not appear to operate normally or
exhibits a marked change in performance; or &. The product has been dropped, or the enclosure dam-
aged. 11.Do not attempt to service the product beyond that described
in the user-maintenance instructions. Ali other servicing should be referred to qualified service personnel,
For the USA
This product may be equipped with a polarized line plug (one blade wider than the other) . This is a safety feature. If you are
unable to insert the plug into the outlet, contact an electrician to replace your obsolete outlet. Do not defeat the safety pur- pose of the plug.
For Polarized Line Piug
CAUTION:
ATENTION:
For Canada
TO PREVENT ELECTRIC SHOCK, MATCH WIDE BLADE OF PLUG TO WIDE SLOT, FULLY INSERT.
POUR EVITER LES CHOCS ELECTRIQUES, INTRODUIRE LA LAME LA PLUS LARGE DE LA FICHE DANS LA BORNE CORRESPONDANTE DE LA PRISE ET POUSSER JUSQU’ AU FOND.
BLUE BROWN
> NEUTRAL : LIVE
terminals in your plug, proceed as follows: As the colours of the wires in the mains lead of this apparatus may not correspond with the coloured markings identifying the
The wire which is coioured BLUE must be connected to the terminal which is marked with the letter N or coloured BLACK. The wire which is coloured BROWN must be connected ta the terminal which is marked with the letter L or coloured RED.
For the U.K.
IMPORTANT: THE WIRES IN THIS MAINS LEAD ARE COLOURED IN ACCORDANCE WITH THE FOLLOWING CODE.

Introduction Thank you for purchasing the Roland KR-4700/5000 Digital Intelligent Piano. The KR-4700/5000 is a
sophisticated keyboard instrument that allows you to create full ensemble performances with simple
operation. in order to take full advantage of its functionality and enjoy years of trouble-free use, please read this manual caretully.
Main features @ A wide variety of built-in sounds (Tones) A wide variety of musical instrument tones (such as piano, violin and trumpet) are built in. Normally,
you will be able to select from 16 tones. By switching to the Tone Expansion mode, however, you
will be able to select from 128 different tones. in addition, 8 drum sets and one SFX (sound effects) set are provided.
@ Sophisticated ensemble performances The KR-4700/5000 provides an Arranger function that allows you to create ensembles of various
musical genres (such as rock, bossanova or rhumba). All you have to do is select a Music Style and play the chords!
Normally, you will be able to select from 16 music styles. By switching to the Music Style Expansion
mode, however, you will be able to select from 128 different music styles. By using a Music Style
card (sold separately), you can add 8 more music styles.
@ Easy setup for performance The KR-4700/5000 provides a One Touch Program button and a Piano button By pressing the One Touch Program button, you can immediately begin using the Style performance
function, regardless of the panel settings. When you press the Piano button, the entire keyboard will function as a piano, again regardless of the panel settings.
® Built-in Composer with taperecorder-style operation The built-in Composer allows you to record your ensemble playing as with easily as with a tape
recorder. It can also play back SMF Music Data (sold separately).
@ User Program function for storing panel settings The User Program function lets you store 8 different panel setups. To recall a stored setup, simply
press a button.
@ High quality stereo sound
The KR-5000 features a 40W + 40W stereo amp and 6 speakers (2 in the piano; 4 in the stand), pro-
viding you with high quality sound. The KR-4700 has a 25W + 25W stereo amp and two internal speakers.
Copyright © 1983 ROLAND CORPORATION All rights reserved. No part of this publication may be reproduced in any form without the written permission of ROLAND CORPORATION.

MeN ene cmialsmaae alee] mum This manual consists of Six chapters.
Chapter 1. Try out the KR-4700/5000 This chapter explains basic operations of the KR-4700/5000, such as how to select sounds and use
the performance functions and the Arranger. If you are using the KR-4700/5000 for the first time,
please be sure to read this chapter.
Chapter 2. Enhancing your playing technique This chapter explains how to use the performance functions and the keyboard, and how to use the
User Program function to store panel settings. Read this chapter when you wish to take advantage of
these functions.
Chapter 3. Record and playback your playing This chapter explains how to use the built-in Composer to record and playback your playing. The
musical data you record is stored temporarily in memory, but will disappear when you turn the power
off. Be sure to save important data on a floppy disk.
Chapter 4. Editing performance data This chapter explains how to edit musical data, and also how to use various other performance func-
tions. Refer to this chapter as necessary.
Chapter 5. Various function settings This chapter explains various settings that can be made on the KR-4700/5000. Refer to this chapter as
necessary.
Chapter 6. Appendices This chapter contains various supplementary material, such as explanations of the message displays,
and lists of the internal Tones and Music Styles. Refer to this chapter as necessary.
General MIDI System The General MIDI System is a set of recommendations which seek to provide a way for going beyond
the limitations of proprietary designs, and standardize the MIDI capabilities provided by sound gener-
ating devices.
If you use a sound generating unit which carries the General MIDI logo, you will be able to faithfully
reproduce any song data which also carries the General MIDI logo.
G GS format The GS Format is Roland's universal set of specifications which were formulated in the interest of
standardizing the way in which sound generating devices will operate when MIDI is used for the per-
formance of music. If you use a sound generating unit which carries the GS logo, you will be able to
faithfully reproduce any commercially available song data which also carries the GS logo.
This product supports both General MIDI and GS.
Song data which carries either of these logos can be accurately reproduced.
SMF This device can playback Standard MID! Files (720 Kbyte format, 3.5 inch floppy disk) such as SMF
Music Data.

|@)(sme) mere) air= ali 2
AIMPOrANE MOLES F255. 250s Sa leases Se aose Capdade sina neg ctvsse cesses tadetebs to Sonesenceen andak seas daa has Mow sadbaes agua ee 7
Front-and tear patiels.cci iiss leiysahe std cup hnec boc ule Aisa de ate tate be nics taddeaca oss sea decateachutatants 9
Before you begin
Listen to the demo songs..
Chapter 1. Try out the KR-4700/5000
Auditioning the Sounds.
Selecting a Tone (Tone Seandard mude}
Selecting a Tone (Tone Expansion Mode) ........cccccsceseesesseesessenesecsssesescaresseseneasstseseeueesivsacanesessane 18
Using the performance functions
Using the stand pedals
Raising or lowering the pitch (Pitch Bend effect) occ eccceeessessceeseseseseersseearenresscseeessensecseeeseneaee 19
Changing the brightness of the sound (KR-5000 only) .
Try playing with a Style
Selecting aiMusic: Styles vsczeccccovedsevaadescdes ciccesstcivseG se cavtscadudbdtealdtSeses ce tyuientsticrtelveda desavastecotees tne
Selecting the basic*display::...i:fuccccA.gestgecs nasocsicesaveceueaest saebeddececchcesl clvevuvadgoescudabe opetvsddbasatecdbateesa 27
Chapter 2, Enhancing your playing techinque
Performance functions 2
Quick preparation for Style performance (One Touch Program button).. ay)
Quick preparation for Piano performance (Piano DUTTON) ......... eee ccsescsesescesseatsevaseescacsereesceeanee 29
Change the Tempo of a Style performance (Tempo buttons)
Simplified fingering for chords (the Chord Intelligence button)..
Hold notes played in the Lower area (the Lower Hold button)
Add harmony to the melody (the Melody Intelligence button)
Use the Leading Bass function (the Leading Bass button)...
Start/Stop Style performance
Using the metronome
Ways to use the keyboard (Keyboard Mode} ..
Split the keyboard (Split)
Play two tones together (Layer).......cccccsccssccsssssscssecscssesssesceesessescsssessssausuvsssavsvacsssssessessusrasenerevaree
Sounding the bass without using Style performance (Manual Bass)
Play drums from the keyboard (Manual Drums)
Register panel settings (User Program) ........ccsssessecssscesecseseseenesessesssesessesseescaescsseseccenenceeecaeeaveatareees
Chapter 3. Record and playback your playing
RECORd VOUT DIAVIAB ccs sessdesattevcasnctuiensiereceeldenoMa iD conse hsv eltl foster i due dalestectstieaeva 44
Playing back a recorded performance...
Save performance data to disk (Save) ....
Playback performance data from disk oo... eesseesssssseseseesesesesnesssncnsasssssessesessasenssseceesenescavevavevasesaee 50
Minus-one performance.
Record additional songs.

Chapter 4. Editing performance data
Before you: read this Chapter ccc. ox.cccscacccosseiesosseeas secevenececsressesstoscunattsn uate sues ndesoresssisensdansciaseeecsannysd 55
Load performance data from disk (Load) .
Three ways to record ..
Correct inaccurate note timing (Quantize} .
Erase performance data (Erase)
insert blank measures (Insert)
Copy performance data (Copy}
Delete specified measures of performance data (Delete}..
Modify the initial settings of the performance data .......cece cesses eserereeeseeeseesecesseeensnessiensaseseeaeaenes
Erasing all data from a disk (Format) .........:secsssssssscsscsssscsscsseseseessessstscsesessenssessessseausasesserecseasensgeee 68
Erasing specified performance data from disk (Delete File)
Convert performance data to Standard MIDI File (Save As SMF)
Chapter 5. Various function settings
Adjust the volume balance
Reverb effect settings
Chorus fect Seti BS cuccsesessedssscesavasveisievied ocassewdenssddcaclescsgusedegssgali au creda cqrtnsa geaas cass setihsees mecteseels 73
Transpose the: pitch :(TransPOse) ssc seis saves tatethschasclesssaessesdavecsedaoutesseet ches {hop dosage cede arate aL TNE
Shift the pitch by octaves (Octave Shi
Change the function of the pedals.
Pitch Bend Wheel settings
Adjust the keyboard response (Keyboard Sensitivity) ........ccscssssesssesssesesceeteeetecetecseeeeestenseenenensenes 79
Change the Split Point
Chord Hold on/off ..
Save User Programs on disk.
Adjust the volume of the metronOMme ........ccssssseseecetsecceeceessereseessscsssessesseaesecsesaueceseesecensaneteneeesa 85
Adjust the display contrast
Adjust the tuning
Restoring the factory settings
Chapter 6. Appendices
Troubleshooting...
Display messages.
TOME ES toc ases ce ecu ib eteca cies aph ce neo duets Saka cle Ye cube tbaaca dobb tanec ot habsrveisiegedseieasdshcdeitiaaaes cent eae lied
Music Style list
Drum set fist
Chord list
MIDI Implementation: Chatt .c.0..c.c..ccsisecccscesseesasassecnccnornensuqenseatesccsussenstaseastsntaecncesnecabesnsasancenacni oars
SPECIE CALIONS ress cae pce ces ost ancbudc saan cstecelnen ces Mesdeivas eva tndrac susdavacendtaeSevenbsddeesqaintiegtegetiReastelsaa
Assembling the stand (KR-4700) ..
Assembling the stand {KR-5000}
INGO: ccisiateuide setae secageese

ilaelerelacolaimareices
Power Supply
Placement
@ Before connecting this unit to other devices, turn off the power to all units; this will help prevent
damage or malfunction.
@ Do not use this unit on the same power circuit with any device that will generate line noise; an
electric motor or variable lighting system for example.
@ This device may interfere with radio and television reception. Do not use this device in the vicinity
of such receivers.
@ Make sure you always have the instrument placed so it is level and sure to remain stable.
Otherwise, if played while tilted, you risk causing damage to the keyboard as a result of the unnat- ural degree of force that might be applied to certain parts of it.
Maintenance
@ For everyday cleaning wipe the unit with a soft, dry cloth or one that has been slightly dampened
with water. To remove stubborn dirt, use a mild, non-abrasive detergent. Afterwards, be sure to wipe the unit thoroughly with a soft, dry cloth.
@ Never use benzene, thinners, alcohol or solvents of any kind, to avoid the possibility of discol-
oration and/or deformation.
Additional Precautions
@ Protect the unit from strong impact.
@ Never strike or apply strong pressure to the display.
@A smal! amount of heat will radiate from the unit during normal operation.
@ Before using the unit in a foreign country, consult with qualified service personnel.
@ Please be aware that the contents of memory may at times be Jost; when the unit is sent for repairs
or when by some chance a malfunction has occurred. Important data should be stored on a floppy
disk, or written down on paper (if possible).
During repairs, due care is taken to avoid the loss of data. However, in certain cases (such as when
circuitry related to memory itself is out of order), we regret that it may not be possible to restore the data.

Before Using Disks
Handling the drive @ Avoid using the unit in areas of high humidity (eg., condensation). High levels of humidity can
adversely affect the operation of the drive and/or damage floppy disks. When the unit has been
transported, allow it to warm to room temperature before operating.
@ To insert a disk, push it gently but firmly into the drive — it will click into place. To remove a disk,
press the EJECT button firmly. Do not use excessive force to remove a disk which is lodged in the
drive.
EJECT button
@ Never attempt to remove a floppy disk from the drive while the drive is operating (the indicator is
brightly lit); damage could result to both the disk and the drive.
@ Remove any disk from the drive before powering up or down,
Handling Floppy Disks @ Floppy disks contain a magnetic storage medium (much like magnetic recording tape). Please
observe the following when handling floppy disks: © Never touch the magnetic medium inside the disk.
2 Do not subject floppy disks to temperature extremes (eg., direct sunlight in an enclosed
vehicle). Recommended temperature range: 10 to 50°C.
2 Do not expose floppy disks to strong magnetic fields, such as those generated by Joud-
speakers.
@ Floppy disks contain a ‘write protect’ tab which can protect the disk from accidental erasure. It is
recommended that the tab be kept in the ‘PROTECT’ position and moved to the ‘WRITE’ position
only when you wish to write new data onto the disk.
ai ae |
Protect tab
Write (write enabie)
Protect (write disable)
@ All important data should be copied onto backup disk(s). This provides a complete duplicate of the
data should the original disk(s} be lost or damaged.
@ The identification label should be firmly fixed to the disk. Should the label come loose while the
disk is in the drive, it may be difficult to remove the disk.
@ Put the disk back into its case for storage.

imsealmelarenr-ve|melelai=s
1. Power switch This switch turns the power on/off.
When the power is turned on, the indicator above the head-
phone jack will light.
2. Demo button
Press this button to hear the demo songs. (#p.15)
3. Metronome button This button determines whether the metronome wil! sound during performance. (6p.35)
4. Chord Intelligence button Press this button when you wish to use the Chord Intelligence function (chords played by simplified fingering). (= p.30)
5. Lower Hold button Press this button when you wish to use the Lower Hold func- tion (notes played in the Lower area will continue to sound when you release the keys). (ep.32)
6. Part Balance buttons These buttons adjust the volume of each performance Part.’
(erp.71)
7. Music Style select buttons These buttons are used to select a Music Style. (n«p.22)
8. Display button This button switches among the three basic display pages.
(0'9.27)
9. User Program button Press this button when you wish to store panel settings as a
User Program, or to recall a previously stored User Program. (p.42)
10. Brilliance slider <KR-5000 only> This slider adjusts the brightness (tone quality) of the sound. (68 p.19)
11. Volume slider This slider adjusts the overall volume. (¢7p.15}
12. Leading Bass button Press this button when you wish to use the Leading Bass
function (the lowest note of the chord you play will be
played as the bass note). (#p.33)
13. Sync button Press this button when you wish to start a Style performance
the moment you play a note. (&p.34)
14. Arrangement buttons This button selects Arrangements within a Music Style. (e#p.24)
15. Fill in buttons Press this button to trigger a fill-in before switching to a dif- ferent arrangement. (#p.24, 35)
16. Intro/Ending button Press this button to start a Style performance with an Intro, or
to end a performance with an Ending. (#p.25, 35)

20
21 22 23 24 25
17. Display Various information is displayed in this area.
18. Beat indicator This indicator flashes to indicate the beat of the selected
Music Style (or performance data).
19. Tone select buttons These buttons select the tone played by each performance
Part; Upper, Lower, and Manual Bass. (®p.17, p.37, p.39)
20. Effect buttons Use these buttons to switch the Chorus and Reverb effects
on/off. Chorus adds spaciousness, and Reverb adds reverber-
ation. (Reverb: #*p.72, Chorus: &*p.73)
21. Start/Stop button Press this button to start/stop a Music Style. (&p.34)
22, Tempo buttons These buttons adjust the performance tempo. (*p.30)
23. Melody Intelligence button Press this button when you wish to use the Melody
Intelligence function (harmony will be added to the melody).
(9,33)
24. Piano button Press this button when you wish to use the entire keyboard as
a piano. (8.29)
25. One Touch Program button Press this button to set the KR-4700/5000 to a setting suitable
for the selected Music Style. (&p.29)
26. Keyboard Mode Use these buttons to specify how you wish to use the key-
board. (6p.36)
26 27 28 29
27. Manual Bass On/Off button This button determines whether or not the Manual Bass Part
will sound. (#p.38)
28. Lower On/Off button
This button determines whether or not the Lower Part will
sound.
29. Music Style Card slot A Music Style card (sold separately) can be inserted here.
(@p.23)

12 13 14 15 16 171819
1. Transpose button Press this button when you wish to use the Transpose func-
tion (shifting the keyboard range). (#p.74)
2. Octave Shift button Press this button to shift the pitch by octaves. (#*p.75)
3. Utility button Press this button to access various utility functions.
4, Exit button Press this button to cancel an operation.
5. Enter button Press this button to execute an operation.
6. Load button Press this button to load performance data from a disk into the KR-4700/5000. (ep.57)
7. Save button Press this button to save performance data from the KR-
4700/5000 on to a disk. (#*p.49)
8. Clear button Press this button to clear (erase) performance data from the KR-4700/5000's memory. (#*p.54)
9. Edit button Press this button to edit performance data.
10. All Song Play button Press this button to successively play all the songs on a disk.
(e#p.50)
11. Track buttons These buttons select the track on which to record.
12. Cursor button Press this button to select an item shown in the display.
13. Value buttons/Song Select buttons Use these buttons to modify the value of a setting, or to select a song from a disk for playback and load.
14. Reset button Press this button to return to the beginning of the song and
reset the initial values of the selected performance data.
15. Stop button This button stops playback/recording of performance-data.
16. Play button This button starts playback/recording of performance data.
17. Recording button Press this button to record performance data.
18. Backward button (Bwd) This button moves backward ("rewind") through performance data.
19. Forward button (Fwd) This button moves forward ("fast forward") through perfor- mance data.

1. Pedal connector Connect the pedals of the Keyboard stand to this jack.
2. MIDI connectors External MIDI devices can be connected here to exchange MIDI data with the KR-4700/5000
3. Expression pedal connector <KR-5000 only> When an expression pedal (sold! separately) is connected
here, you can control the volume with your foot.
4. Audio input jacks A tape recorder or CD player can be connected here and
played back through the KR-4700/5000's speakers together
with your own playing. This is especially convenient when
practicing a song.
5. Audio output jacks These jacks can be connected to a keyboard amp or an audio
system to hear the KR-4700/5000 through other speakers.
The input jacks of a tape recorder can also be connected
here to record your playing.
* if you wish to hear your playing only on the external
speaker system and not through the KR-4700/5000's
built-in speakers, insert a dummy plug into the head-
phone jack.
6. Speaker connector <KR-5000 only> Connect the speakers in the Keybuard stand to this connec-
tor.
7. AC inlet Connect the included power cable to this connector.
7
1
8. Phone jack A set of headphones (RH-20/80/1 20, sold separately) can be
connected here. When headphones are plugged in, the built-
in speakers of the KR-4700/5000 will not sound. This is use-
ful when you wish to practice without inconveniencing peo-
ple around you, or late at night.
* To adjust the headphone volume, use the Volume slider.
Remember that excessive volume levels can result in
permanent hearing loss.

Before you begin
Connect the power cable 1, Make sure that the Power switch (located on the left side of the panel) is in
the Off position (not pressed).
2. Connect the included power cable to the AC inlet (located on the bottom of the unit), and then connect the other end to an electrical outlet.
ae
Ty
* Use only the included power cable.
* If you will not be using the instrument for an extended period of time, disconnect the power cable from the electrical outlet.
Set up the music stand Raise the music stand, and bend down the two metal supports as shown below.
Open the cover For the KR-4700, use both hands to grasp the ridge at the lower edge of the cover; raise the cover vertically and slide it back. For the KR-5000, use both hands to grasp the cover handles, raise the cover vertically and slide it back.
¢

r
* Be careful not to pinch your fingers when opening or closing the cover. When closing the cover,
slide it slowly forward. When it stops, lift it a bit upward and then genily lower it. Small children
should be assisted by an adult.
* Do not close the cover with sheet music or other objects resting on the keyboard.
Attaching the Manual Drum template The Manual Drum template indicates which drum sound will be played by each key when playing
drums from the keyboard. You may attach it as desired.
The Manual Drum template is fastened to the inside of the packing carton with tape. Peel off the pro-
tective sheet on the back of the template, and affix it to the left side of the keyboard as shown below.

(iis(=\aliolial-xel-\anleielate ss The KR-4700/5000 has five demo songs in its memory. These demo songs cover a wide variety of
musical genres, and demonstrate the sounds and Music Styles the KR-4700/5000 can produce.
“Sia/Stos
1. Make sure that the power cable is connected, and that the Volume slider is at the minimum position.
2. Press the Power switch to turn the power on.
* When you first use the KR-4700/5000 or after it has been unused for a month or longer, the fol- lowing display will appear for a time and then the basic display will reappear. All settings in inter- nal memory will be restored to the factory settings. If you have modified any of the internal set- tings, these settings will be lost. For this reason it is a good idea to turn the power on regularly to
prevent the settings from being lost.
* This unit is equipped with a protection circuit. A brief interval (a few seconds) after power up is
required before the unit will operate normally.
3. Adjust the Volume slider to an appropriate volume.
4. Press the Demo button. The Start/Stop button and the Music Style buttons (1 —5) will blink, and you can now listen to the
demo songs.
5. Press the Start/Stop button. The five demo songs will be played in succession.
If you wish to hear only a specific demo song, press one of the Music Style buttons (1—5).
* Demo songs cannot be selected during playback.
6. To stop playback, press the Start/Stop button (or the Demo button).
7. After you have finished listening to the demo songs, press the Demo button
once again to return to normal playing mode.

List of demo songs 1. Strictly Salsa (Style: 54. Salsa) by John Maul Copyright 1993, Roland UK 2. Flying Home (Style: 83. Pop3) by Mark Van Der Sluis Copyright 1993, Roland New Zealand
3. 2 Left Feet (Style: A-4. Country) by Marvin Sanders Copyright 1993, Marvin Sanders 4. Latin Frenzy (Style 53. Latin) by Luigi Bruti & Roberto Lanciotti Copyright 1993, Roland Europe 5. Pink Sox (Style: 24. 8Beat4) by John Maul Copyright 1993, Roland UK
Profiles of the composers
John Maul John Maul is a musician, composer and arranger having graduated from the Royal Academy of Music
in London. John's work encompasses studio recordings and live performances, including work with
top cabaret artists in the U.K. His writing credits include commercilal music for radio and television,
as well as scoring jass and classical works. As a product specialist for Roland U.K., John’s talents are
well utilized in the preparation of support material for educational and instructional use.
Mark Van Der Sluis Mark did not go through formal musical training, but is a naturally gifted musician who by age 12
was already performing and composing as a professional keyboard player. He has appeared in many
recordings, television broadcasts and live performances, and in 1989 signed a contract with Roland
New Zealand as a product specialist. In 1992 he became a product specialist for Roland Japan, con-
ducting product clinics and demonstrations worldwide.
Marvin Sanders Marvin Sanders is a somewhat wacky Los Angeles composer whose work can be heard on projects
for Toyota, Acura, Max Factor, Alpine, Thomas Brothers, Theater for Young Audiences, and Michael
Jackson. He has also worked extensively with Roland, conducting clinics and writing music for
numerous product videos and demos including ROM-plays in the SC-155 and JV-880.
Luigi Bruti Luigi Bruti is the senior musical advisor in Roland Europe; he joined the company in 1979. He won the world championships of accordion in 1976 and worked for three years (1978—80) for an Italian record company in the creation of sound tracks, both as a composer and performer. He is a keyboard
and synthesizer player, and has his own recording studio where he creates sound tracks for radio and
TV spots and for movies. As the chief of Roland Europe's musical staff, he designed the musical sec-
tion of the E-series (from E-20 to E-70, which include several original patents), and has also created
many musical styles, demo songs and style cards related to the E-series.
Roberto Lanciotti Roberto Lanciotti is a musical advisor in Roland Europe; he joined the company in 1985. He is a key-
board and synthesizer player involved in various live performances. He works as a composer and per-
former in several recording studios in the creation of sound tracks for radio and TV spots and for
movies. As a member of Roland Europe's musical staff he has participated in the creation of the E-
series, music styles and style cards.

Chapter 1. Try out the KR-4700/5000 XUroliilelaliatemiave ase. ate cee
The KR-4700/5000 includes a wide variety of instrumental sounds such as piano, guitar, violin and trumpet. These sounds are called Tones. Normally, you can select from 16 Tones. By switching to the Tone Expansion mode, however, you can select trom 128 Tones.
When the power is turned on, the "Piano 1" Tone will be selected . Play the keyboard to hear the sound.
* Whenever the KR-4700/5000 is turned on, it will always be ready for Piano performance. If dur- ing operation you ever become confused, turn the power off and then on once again.
Selecting a Tone (Tone Standard mode) Normally you can select from 16 Tones.
The 16 Tones are organized by Group (A/B) and Number (1--8), and are selected by the Tone buttons. The Tones selected by each button are printed on the front panel.
1. Press the Group button to select the Group. Each time the button is pressed, you will alternate between Groups A and B.
* If you wish to select another Tone in the same group, there is no need to press the Group button.
2. Press a number button 1—8 to select the Number. The specified Tone will be selected. The name of the selected Tone will be shown in the display.
Example: When A-7 "E.Organ* is selected
17

Selecting a Tone (Tone Expansion mode) in Tone Expansion mode you can select from 128 different Tones.
The 128 Tones are organized by Group (A/B), Bank (1—8) and Number (1—8). For a list of the Tones,
refer to the “Tone list" (¢#p.94).
1. Press the Expansion button. The button indicator will light, indicating that the Tone Expansion mode is selected.
2. Press the Group button to select the Group.
* If you wish to select another Tone in the same group, there is no need to press the Group button.
3. Press a button 1—8 to select the Bank.
4. Again press a button 1—8 to select the Number. The specified Tone will be selected.
To return to Tone standard mode, press the Expansion button once again.
The button indicator will go off.

Using the stand pedals When the power is turned on, or when the Piano button is pressed (##p.29), the function of each pedal is set as follows:
Soft pedal Damper pedal
Sostenuto pedai
When the soft pedal is pressed, the sound will become softer (muted). When the sostenuto pedal is pressed, the notes that were sounding at that. moment will be sustained. Notes played afterward will not be affected. When the damper pedal is pressed, notes will be sustained.
* During Style performance, the function of the left and center pedals will be different. (««p.29)
Raising or lowering the pitch (Pitch Bend effect) The pitch bend wheel is located on the left side of the keyboard. If you move the wheel forward or backward while a note is sounding, the pitch will change smoothly (over a maximum of two half- steps). Moving the wheel away from you raises the pitch, and moving the wheel toward you lowers the pitch.
* When the power is turned on, this effect applies to the Upper Tone. * You can change the maximum range of pitch change. (**p.78)
Changing the brightness of the sound (KR-5000 only) Use the Brilliance lever to adjust the brightness of the sound. Moving the lever to the right will bright- en the sound, and moving it to the left will darken (soften) the sound.
14

20
Try playing with a Style
—
w
The KR-4700/5000 provides an Arranger function which allows you to easily create ensembles of var-
ious musical genres all by yourself. The Arranger function detects the type of chord being played, and
automatically produces an accompaniment suitable for the selected Style.
References in this manual to "Style Performance" refer to when you play the keyboard while using this
Arranger function.
About Music Styles .
There are many different types of music in the world, and each has certain characteristics.
For example, a bossanova tune has certain things about it that make us recognize it as a bossanova,
just as a rhumba has certain characteristics that mark it as a rhumba. Some of these elements are the
rhythm, the tempo, the type of instruments used, and the arrangement.
in the KR-4700/5000, "Music Style" refers to this type of data that has been analyzed for each genre of
music. Each Music Style contains accompaniment patterns for Original, Variation, intro, Ending and
Fill-in, In addition, there are two types of each of these patterns; Basic and Advanced. These accom-
paniment patterns are not simply played hack. Rather, the arrangement changes according to the
chords you play, for musically sophisticated development as the sang progresses.
For now, press Music Style button 1 to select the "A-1 Big Band" Music
Style (a large jazz orchestra). The display will indicate the selected Music Style name and tempo.
Ai Bigbands
Press the One Touch Program button to make the button indicator light.
You are now ready to begin Style performance.
Simultaneously play the notes of the following chord. When you play the chord, accompaniment will start automatically.
LAL ay
The accompaniment will continue even if you take your hands off the keyboard.

During a Style performance, the lower keyboard range (Ai3 and the keys to the left of it) are used for
accompaniment, and the upper keyboard range (the keys to the right) are used for melody. When you
play another chord in the lower area, the accompaniment will change accordingly.
4. To stop the accompaniment press the Start/Stop button.
* During a Style performance, you can use the /eft pedal to turn the Leading Bass function on/off (®«p.33), and the center pedal to contro! the Break function (e* p.76).
” if you wish to return to the condition before you began Style performance, stop the accompani- ment and then press the Piano button (to the left of the One Touch Program button). Now you can use the entire keyboard as a piano.
* You can change the key at which the upper and lower ranges are divided (the Split Point).
(© p.80)
Now let's follow the music written below, playing the chords with the jeft hand and adding a melody
with the right hand.
In this way, the KR-4700/5000 allows you to easily enjoy ensemble playing. If you have problems, practice the following:
1) Play only the left hand. Once you have played a chord, the accompaniment will continue until you press the next chord, so get ready to play the next chord before the time arrives.
2) Play notes in the chord simultaneously. {f you play notes one at a time, the chord will not be recognized correctly.
3) Listen closely to the rhythm as you play. The accompaniment changes at the moment the chord is played. Listen to the rhythm, and try to play the chords on the first beat of the measure.
* The four Beat indicators below the display are provided so that you can be aware of the beat. The red indicator indicates the first beat of the measure (the downbeat).
4) Practice the right hand melody. With the accompaniment stopped, you can practice the melody alone in the upper keyboard area.
When you are able to play the melody easily, you can add the left hand accompaniment.
al

Selecting a Music Style Here's how to select another Music Style. Normally you can select from 16 Music Styles. By switching to the Music Styles Expansion mode,
however, you can select from 64 Music Styles, A Music Style card (TN-SC2 series; sold separately)
can add 8 more Music Styles.
Note:
The Original accompaniment of Music Style "B-1 Pop" ("84 Pop4" in Music
Style Extension mode) does not contain percussion sounds.
@ Select a Music Style (Music Style Standard mode)
The 16 Music Styles are organized by Group (A/B) and Number (1-8), and are selected by the Music
Style buttons, The Music Styles selected by each button are printed on the front panel.
1. Press the Group button to select the Group. Each time the button is pressed, you will alternate between Groups A and B.
* If you wish to select another Music Style in the same group, there is no need to press the Group
button.
2. Press a number button 1—8 to select the Number. he specified Music Style will be selected. +
f you select a Music Style while the One Touch Program button is lit, a tempo and upper Tone etc.
most suitable for that Music Style will automatically be chosen. it is possible to select a different
Music Style even while playing, but be aware that in this case the tempo and upper Tone will also
change. (One Touch Program, **p.29)
@ Select a Music Style (Music Style Expansion mode)
The 64 Music Styles are organized by Bank (1-8) and Number (1-8). For a list of the Music Styles,
refer to "Music Style list" (##p.95).
1. Press the Expansion/Card button. The Expansion indicator above the button wil! light, indicating that the Music Style Expansion mode
is selected.
2. Press a button 1—8 to select the Bank.
22

3. Again press a button 1—8 to select the Number. The specified Music Style will be selected.
To return to Music Style Standard mode, press the Expansion button once again. The button indicator will go off.
@ Select a Music Style (Music Style card) A Music Style card (TN-SC2 series; sold separately) can add 8 more Music Styles.
* The following cards contain Music Styles which are identical to those built into the KR-
4700/5000. (The names are different but the contents are identical.) Please be aware of this when purchasing cards.
American Collection (TN-SC2-51}: 1—8
Country (TN-SC2-03): 1, 3, 5
Brazilian Style (TN-SC2-B1): 3
1. Insert the Music Style card into the card slot. Make sure that the card is positioned correctly, and push it all the way into the slot.
2. Press the Expansion/Card button to make the Card indicator light.
” If a card has not been inserted, the Card indicator will not light.
3. Press a button 1—8 to select a Music Style.

24
@ Select the arrangement of a Music Style The arrangement of a Music Style can be changed by pressing the Advanced button and the Variation
button. Select these as appropriate for the song you are playing. For example, you might use Original
for the quiet first half of a song, and select Variation for the more intense second hall.
‘ava Sie Meas
Advanced button: Basic (dark) : simple arrangement with fewer accompanying instruments
Advanced (lit). : mare complex arrangement with more accompanying instruments
Variation button: Original (dark) _: the basic accompaniment pattern Variation (lit) :an alternate accompaniment pattern
@ Add a fill-in
During a song, it is often nice to add variety by adding variation at breaks in the melody or places
where the mood of the song shifts. These are known as "fill-ins". A fill-in appropriate for the currently
selected Music Style will be added.
When you wish to add a fill-in, press the To Original button or the To Variation button.
use Sie
To Original: After the fill-in is played, the Arrangement of the Music Style will be set to Original. This means that if
Variation had been selected, the arrangement will change.
ToVanavon To Onginat Press
! v Fil In
Filkin Fill-in
To Variati After the fill-in is played, the Arrangement of the Music Style will be set to Variation. This means that
if Original had been selected, the arrangement will change.
JoVeraion To Ongral = Press ¥
Fin in centt, [origina IS

® Add an Intro/Ending You can start the accompaniment with an Intro {introduction}, or end it with an Ending. An intro or
ending appropriate to the currently selected Music Style will be added.
deacons
To start the accompaniment with an Intro: While the accompaniment is stopped, press the Intro/Ending button (the indicator will blink), Then
press the Start/Stop button or play the lower keyboard area to start the accompaniment.
To end the accompaniment with an Ending: While the accompaniment is playing, press the Intro/Ending button. The ending will be played from
the first beat of the next measure, and accompaniment will then stop automatically.
* The number of measures in the intro and ending depends on the Music Style. For details refer to
“Music Style list” (e# p.95).

2b
@ Try various functions during a Style performance In the preceding pages we have explained the basic functions of Styie performance. Now let's try
using these functions as we play the following song. Set the music style to "A-2 Rock," the arrangement to Advanced (the Advanced indicator will light),
and select Original (the Variation indicator is dark).
INTRO
ENDING ¥
= eee —
WF 1 "% 0 nv
If you have problems ... If the To Variation button is pressed with inaccurate timing, the fill-in may not be played correctly or a fill-in may be played at the wrong measure. Listen carefully to the rhythm, and be careful of the tin- ing when you press the button. For the ending also, be careful of the timing when you press the
Intro/Ending button.

=) Croiifatemistesorecienelselen At various times, different types of information appear in the KR-4700/5000 display. in most cases,
even if the display changes as a result of some operation, it will return to the contents that were dis- played before the operation. This is known as the "basic display.” You can select one of the following three as the basic display.
Press the Display button to select the basic display. The display will alternate each time you press the button.
“Asc Styie 7 Meare
* If performance data has not been read into the KR-4700/5000, pressing the Display button will
not select the Composer display.
Music style display: The upper line shows “Music Style name" / "measure number."
The lower line shows "tempo" / "name of the chord you played."
Composer display: The upper line shows “song name" / "measure number."
The lower line shows "tempo" / “name of the chord you played."
If you have selected performance data from a disk, the "measure number" area will show the "file number." In this case, a colon ":" will be displayed in front of the number.
Tone display: The Part name and the Tone name assigned to that Part will be displayed.
27

1%
MEMO
Si aroloj(-\a/saaalarearolnemuelelmeleliiaemiaemiaelels
Lixsldcolsnarelatersuie laveuicolars Quick preparation for Style performance (One Touch Program button)
When you wish to play a Style performance, it is usually necessary to press various buttons to make
the appropriate panel settings. However, by using the One Touch Program button, preparations for a Style performance can be made instantly.
When the Arranger is not in use (e.g., when the power has just been turned on), press the One Touch Program button.
The button indicator will light, and the following settings will be made in preparation for a Style per- formance.
* Sync button: Sync Start (the Start indicator is lit)
* Lower Hold button: Off (indicator is dark)
* Chord Intelligence button: On {indicator is lit) * Intro/Ending button: waiting for intro (indicator is blinking)
* Split Arranger button: Split Arranger (indicator is lit) * Chord Hold: On * A Tempo and Upper Tone suitable for the selected Music Style * Left pedal: turns the Leading 8ass function on/off * Center pedal: controls the Break function
If you select another Music Style while the One Touch Program indicator is lit, a tempo and upper Tone suitable for that Music Style will be selected. ‘
" Ifa Music Style from a Music Style Card is selected, pressing the One Touch Program button will not select the most appropriate Upper Tone.
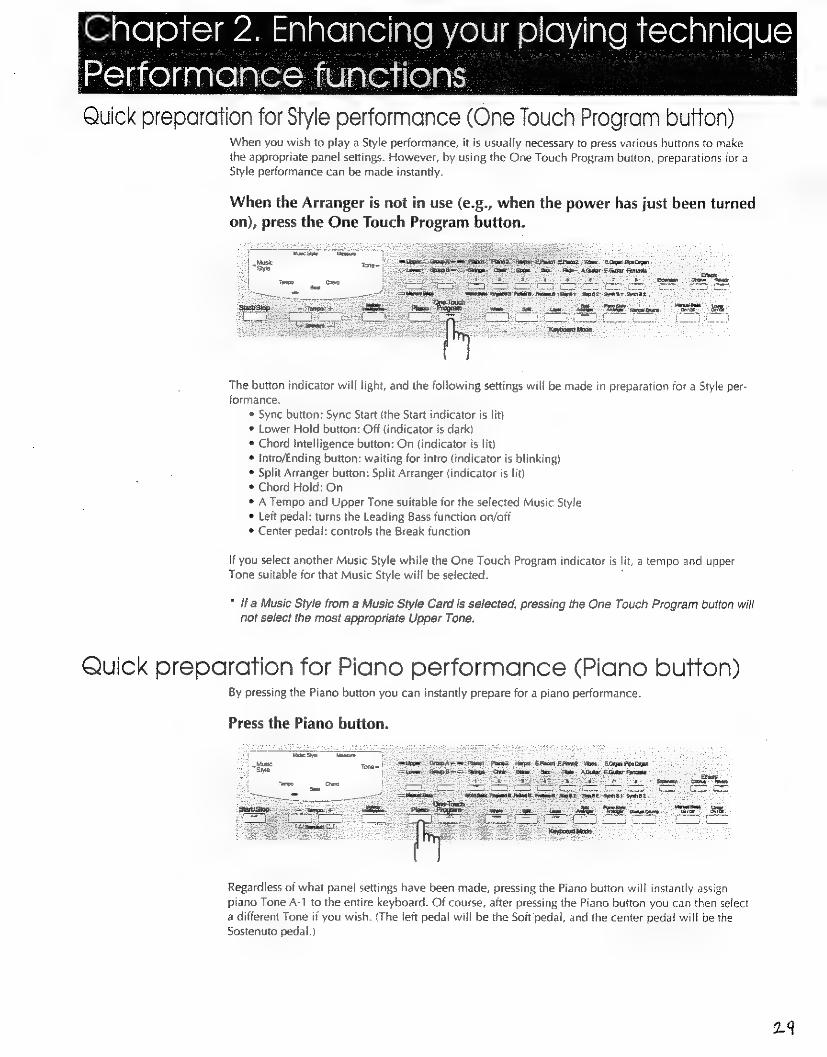
Quick preparation for Piano performance (Piano button) By pressing the Piano button you can instantly prepare for a piano performance.
Press the Piano button.
Wause Sie Measure anak Plan): Pano?! “Hart € Pant Pam? «vibes. €Onpan FipeDgan
Regardless of what panel settings have been made, pressing the Piano button will instantly assign
piano Tone A-1 to the entire keyboard. Of course, after pressing the Piano button you can then select
a different Tone if you wish. {The left pedal will be the Soit pedal, and the center peda! wil! be the Sostenuto pedal.)
24

Change the Tempo of a Style performance (Tempo buttons)
Use the Tempo buttons to make adjustments. The tempo will become faster when you press the "+" Tempo button, and slower when you press the
** Tempo button.
When you change the tempo, the display will show the tempo value (20—-250). The Beat indicator
also lets you check the tempo and the beat. The indicator will blink red for the first beat and green for
the second and later beats.
* By simultaneously pressing both the Tempo “+” and "-" buttons, you can reset the tempo to the
standard tempo for the selected Music Style.
Simplified fingering for chords (the Chord Intelligence button) When playing a Style performance, the left hand plays the chords. By using the Chord Intelligence
function, six main types of chord can be produced with simplified fingering.
* The Chord Intelligence function can be used when the keyboard mode is set to either Split
Arranger or Split.
Press the Chord Intelligence button to make the indicator light. Pressing the button once again will turn it off (dark).
The following illustrations show the types of chord that the Chord Intelligence function can produce
and the fingerings for each. The fingerings shown for each chord are with a root of C. For other roots,
see the “Chord list" (¢#p.99).
Major ([_|Maj): Play the root of the chord.
| | {
e e| (@ | Chord Intelligence: OFF Chord intelligence: ON
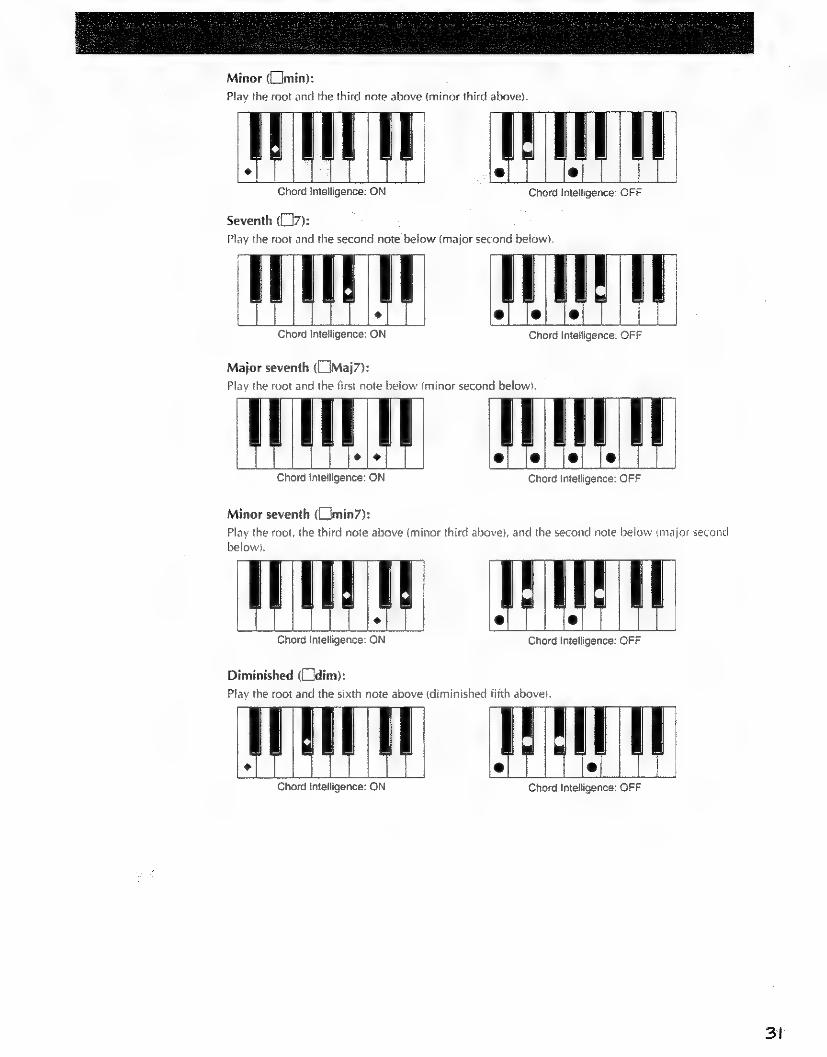
Minor ((_lmin):
Play the root and the third note above {minor third above).
I i
|
Seventh (L]7):
Play t
Chard Intelligence: ON
ble Chord Intelligence: OFF
he root and the second note below (major second below).
TT Chord Intelligence: ON
Major seventh (__|Maj7):
Play t
UH Chord Intelligence: OFF
he root and the first note below {minor second below).
| i
til lel |
Chord Intelligence: ON
Minor seventh (([min7): Play t
| TU eo je je le |
Chord Intelligence: OFF
he root, the third note above (minor third above), and the second note below imajor second
below).
od a.
Dimi
Play ¢
Chord Intelligence: ON
nished (dim):
Se adh cake
Chord intelligence: ON
Chord Intelligence: OFF
he root andl the sixth note above (diminished fifth above).
Chord Intelligence: OFF
31
Be
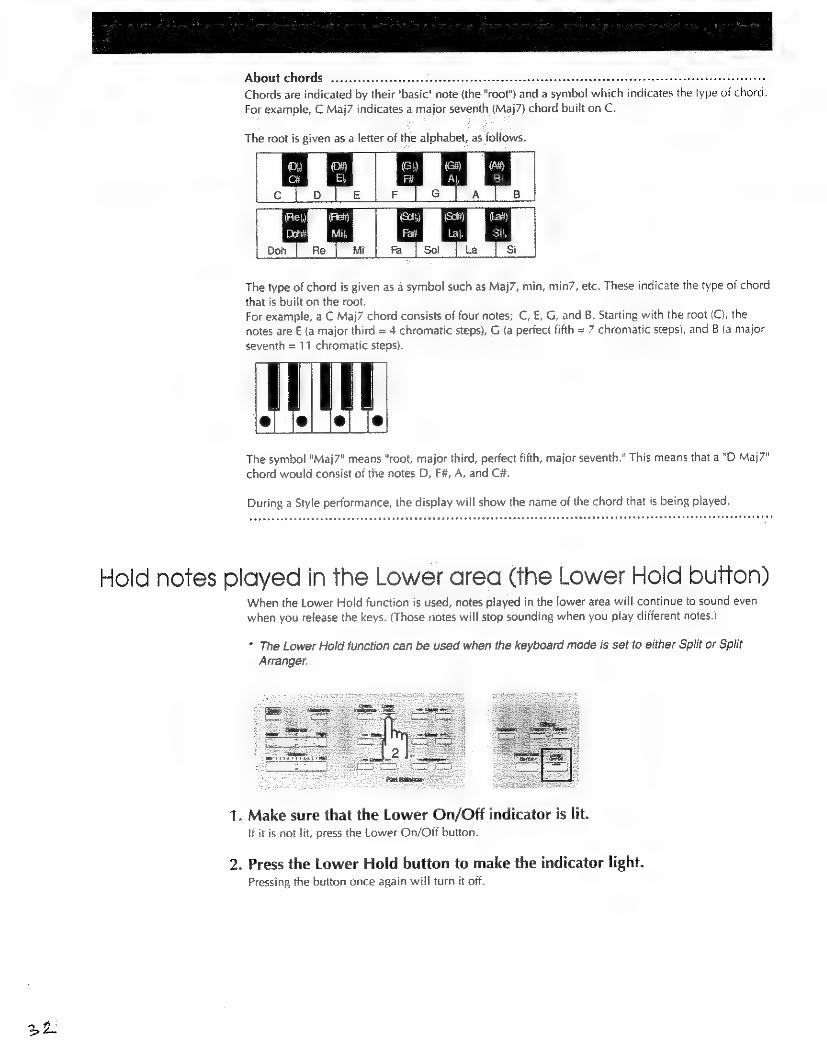
About CHOPS i circdece x cjecds exckaeodessongh ie psoas er ida gd een Le eC Ee
Chords are indicated by their ‘basic! note (the “root") and a symbol which indicates the type of chord.
For example, C Maj7 indicates a major seventh (Maj7) chord built on C.
The root is given as a letter of the alphabet, as follows.
aa EE
F G A B
(Ret) (ai)
Mil, Si
Fa Soi la
b
b
Doh Re Mi Si
The type of chord is given as a symbol such as Maj7, min, min7, etc. These indicate the type of chord
that is built on the root.
For example, a C Maj7 chord consists of four notes; C, E, G, and B. Starting with the root (C), the
notes are E {a major third = 4 chromatic steps), G (a perfect fifth = 7 chromatic steps), and B (a major
seventh = 11 chromatic steps).
TUM The symbol “Maj7" means "root, major third, perfect fifth, major seventh." This means that a "D Maj7"
chord would consist of the notes D, F#, A, and C#.
During a Style performance, the display will show the name of the chord that is being played.
Hold notes played in the Lower area (the Lower Hold button) When the Lower Hold function is used, notes played in the lower area will continue to sound even
when you release the keys. (Those notes will stop sounding when you play different notes.)
* The Lower Hold function can be used when the keyboard mode is set to either Split or Split
Arranger.
1. Make sure that the Lower On/Off indicator is lit. If it is not lit, press the Lower On/Off button.
2. Press the Lower Hold button to make the indicator light. Pressing the button once again will turn it off.

Add harmony to the melody (the Melody Intelligence button) Melody Intelligence is a function which adds harmony to the melody which you play with your right hand. The harmony will match the chord which you play with your left hand. The Melody Intelligence function can be used in any Keyboard Mode except Manual Drum mode.
To use the Melody intelligence function, press the Melody Intelligence but- ton to make the indicator light. Pressing the button once again will turn it off.
Use the Leading Bass function (the Leading Bass button) During Style performance, the root of the chord you play is normally sounded as the bass. But when the Leading Bass function is used, the lowest of the notes you actually press is sounded as the bass. This allows the bass to be a note other than the chord root, so that the bass note will change appropri- ately when inverted chords are used.
To use the Leading Bass function, press the Leading Bass button to make the indicator light. Pressing the button once again will turn it off.
Example:
——————— C Maj FMaj/C GMaj/B C Maj
Leading Bass: ON Leading Bass: OFF
= rel es = = =e rex rom 2 o
” Leading Bass can also be turned on/off by the left pedal. In this case, Leading Bass will be on only as long as the pedal is pressed.
" The Leading Bass function can also be used together with the Manual Bass function (s* p.38).
23>
34
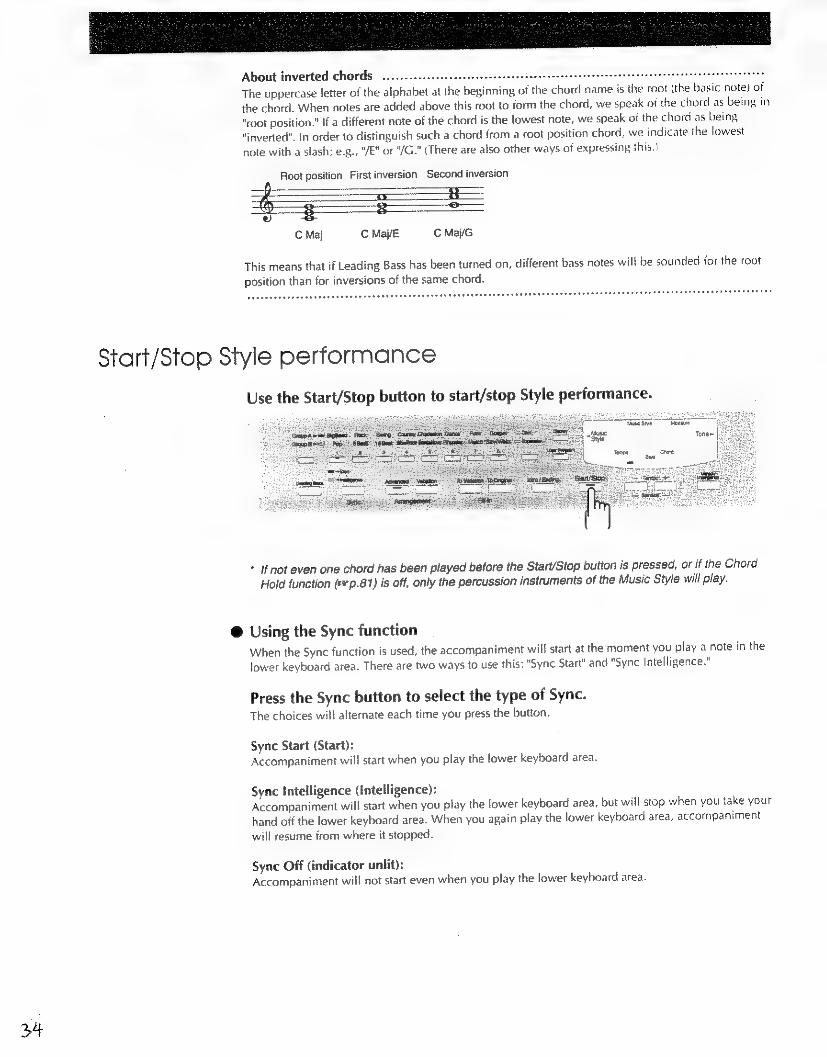
About inverted Chords ...........:cc2ccccsecceeeeee eee bee se eee e eee eee EEE EATER ESE
The uppercase etter of the alphabet at the beginning of the chord name is the root (the basic note) of
the chord. When notes are added above this root to form the chord, we speak of the chord as being in
“root position." If a different note of the chord is the lowest note, we speak of the chord as being
“inverted. in order to distinguish such a chord from a root position chord, we indicate the lowest
note with a slash; e.g., ‘/E" or /G.” (There are also other ways of expressing this.)
Roct position Firstinversion Second inversion
re 8 = = 3
C Maj C Maj/é C MafiG
This means that if Leading Bass has been turned on, different bass notes will be sounded for the root
position than for inversions of the same chord.
Start/Stop Style performance
Use the Start/Stop button to start/stop Style performance.
Tease Wane Se Fake Gomme fusic Tone
* If not even one chord has been played before the Start/Stop bution is pressed, or if the Chord
Hold function (e*p.81) is off, only the percussion instruments of the Music Style will play.
Using the Sync function When the Sync function is used, the accompaniment will start at the moment you play a note in the
lower keyboard area. There are two ways to use this: "Sync Start” and "Sync Intelligence."
Press the Sync button to select the type of Sync.
The choices wil! alternate each time you press the button.
Sync Start (Start):
Accompaniment will start when you play the lower keyboard area.
Sync Intelligence (Intelligence):
Accompaniment will start when you play the lower keyboard area, but will stop when you take your
hand off the lower keyboard area. When you again play the lower keyboard area, accompaniment
will resume from where it stopped.
Sync Off (indicator unlit): Accompaniment will not start even when you play the lower keyboard area.

@ Start accompaniment with an Intro
Press the Intro/Ending button. if you press the intro/Ending button when Sync Start is on, the button indicator will blink (waiting).
When you play the lower keyboard area, the intro will begin and accompaniment will start.
lf you press the intro/Ending button when Sync Start is off, the intro will begin immediately and
accompaniment will start.
* The number of measures in the intro depends on the Music Style. Refer to "Music Style list"
(e* p.95).
@ Start accompaniment with a Fill-in
Press the To Original or To Variation button. If you press the To Original or To Variation button when Sync Start is on, the Start/Stop button indica- tor will blink (waiting). When you play the lower keyboard area, the fill-in will begin and accompani-
ment will start. if you press the To Original or To Variation button when Syne Start is off, the fill-in will begin imme-
diately and accompaniment will start.
@ End accompaniment with an Ending
During Style performance press the Intro/Ending button. An ending will be played from the next measure, and accompaniment will stop.
* The number of measures in the ending depends on the Music Style. Refer to "Music Style list’
(&* p.95).
Using the metronome You can make the metronome sound while you play.
To use the metronome, press the Metronome button to make the indicator
light. The metronome will sound with the time signature of the currently selected Music Style. Press the button once again to turn it off (indicator dark).
To change the time signature, select a different Music Style (#*p.95 “Music Style list"), You can use the
Tempo buttons to adjust the metronome tempo.
* You can also adjust the volume of the metronome (t« p.85).

2b
Ways to use the keyboard (Keyboard Mode) Up to this point we have been using the entire keyboard to play one Tone, or using the Style Performance function to divide the keyboard between accompaniment and solo sections. But there
are still more ways to use the keyboard, such as layering two Tones together or playing percussion
instruments from the keyboard. The way in which the keyboard functions is determined by the Keyboard Mode.
Use the Keyboard Mode buttons to select the keyboard mode. When you press a button its indicator will light, indicating the selected keyboard mode.
Whole: The entire keyboard will play the upper Tone. Use this mode when you wish to play a single Tone
over the entire keyboard. When the Piano button is pressed, this keyboard mode will be selected.
Split: The keyboard will be divided into upper and lower areas around a specified key (the Split Point), and
a different Tone can be played in each area. Use this mode when you wish to play (for example)
piano with your right hand and bass with your left (7p.37).
Layer: The entire keyboard will play both the upper and lower Tones. For example you can combine various
Tones (e.g., piano and strings) to create new sounds (¢#p.37)}.
Layer mode can also be used together with the Split, Split Arranger, and Piano Style Arranger key-
board modes.
Split Arranger: This keyboard mode is for Style performance. The keyboard will be divided into upper and lower areas around a specified key (the Split Point), with the lower area used for accompaniment and the
upper area used for melody. When the One Touch Program button is pressed, this keyboard mode will be selected.
Piano Style Arranger: This keyboard mode is also for Style performance. Unlike Split Arranger mode, chords will be recog-
nized over the entire keyboard, and sounded using the upper Tone.
This mode allows you to add an automatic accompaniment to ordinary piano-style playing without
having to think about a split point.
Manual Drums: Each key will trigger a different percussion instrument or special effect (SFX) (#°p.40).
* If you wish to play the keyboard with the drum accompaniment of a Music Style, select one of the
keyboard modes which is not for Style performance. When you press the Start/Stop button, the
drums of the selected Music Style will start. Or, if the Sync function is turned on, you can play the
keyboard to start the drums instead of pressing the Start/Stop button. However, be aware that for
Music Style "B-1 Pop" (in Style Expansion mode this is "84 Pop4"), the Original accompaniment
has no drums.

Split the keyboard (Splih "Split? means to divide the keyboard at a certain key (the Split Point Ab3) so that the upper and lower
areas will play different Tones. For example, you could use this to play piano with your right hand
and bass with your left hand.
1. Press the Split button to make the indicator light. At the same time, the Lower On/Off button indicator will also light.
2. To select a Tone, first press the Upper/Lower/Manual Bass button to speci- fy whether you are selecting the upper or lower Tone. Then select a Tone. To select the upper Tone, make the Upper indicator light. To select the lower Tone, make the Lower indicator light.
* In Split mode, the right damper pedal will affect only the upper Tone. * If you press the Lower On/Off button to turn off the indicator, the lower Tone will no longer sound. * You can change the Split Point («= p.80).
Play two tones together (Layer) if you wish to play both the upper and the lower Tone together over the entire keyboard, set the key-
board mode to Layer. By combining Tones (such as piano and strings} you can create new sounds.
Press the Layer button to make the indicator light. At the same time, the Lower On/Off button indicator will also light.
ake Sty ‘Weasur ¥
Upper: Geouy A we Pinot : Pierci2> Hates! Pionat € Paro? “Vibeu” EOqm Ppergen
To select the upper and lower Tones, refer to the previous section "Split the keyboard (Split)."
* In Layer mode, the right damper pedal will affect both the upper Tone and the lower Tone. * Since the purpose of Layer mode is to combine the upper and lower Tones, it is not possible to
turn off the lower Tone by pressing the Lower On/Off button.
37

@ Use Layer with other keyboard modes
Layer mode can be used together with Split Arranger, Piano Style Arranger, and Split keyboard
modes.
Press the desired keyboard mode button simultaneously with the Layer
button. The indicators of both buttons will light.
Layer + Split Arranger: The lower keyboard area will be used for accompaniment, and two Tones (the upper Tone and lower
Tone) will be layered in the upper keyboard area.
I
Accompaniment (chord recognition) | Upper Tone + Lower Tone
Layer + Piano Style Arranger: The entire keyboard will recognize Style performance chords, and the entire keyboard will play the
two Tones layered.
| THN | rial | Lt Li
| Chord recognition, Upper Tone + Lower Tone |
Layer + Split + Manual Bass ON: After selecting the two combined keyboard modes, press the Manual Bass On/Off button to make the
indicator light. The lower area will sound the Manual Bass Tone, and the upper area will sound the
two layered Tones. {See the following paragraph for details.)
Sounding the bass without using Style performance (Manual Bass) The Manual Bass function allows you to sound the bass notes with a keyboard mode that does not
use Style performance (i.e., Whole, Split, Layer).
* When Manual Bass is on, you can also use the Leading Bass function (*« p.33).
Press the Manual Bass On/Off button to make the indicator light.
Muse _ | Si¥e
SwadiStop
The keyboard mode determines how the bass note will be souncied.

When Whole or Layer is selected: The manual bass Tone will sound the root of the chord you play.
When Split is selected: The upper area will sound the upper Tone, and the lower area will sound the lower Tone. When you
play a chord in the lower area, the manual bass Tone will sound the root of that chord.
UCT an |
| Lower Tone, Manuai Bass Tone sounds the chord root
Upper Tone
If Lower is turned off, the upper area will sound the upper Tone, and the lower area will sound the
manual bass Tone.
| Manual Bass Tone Upper Tone
When Split and Layer are selected: The upper area will sound the upper and lower Tones together, and the lower area will sound the
manual bass Tone.
| Manual Bass Tone Upper Tone + Lower Tone
@ Selecting the Manual Bass Tone Normally you can choose from 8 manual bass Tones. The manual bass Tones are organized by numbers 1—8, and are selected by the Tone buttons. The
Tone selected by each button is printed on the front panel.
Press the Upper/Lower/Manual Bass button to make the Manual Bass indi-
cator light. Then press a Tone button 1—8 to select the Tone.
asic ive case Muse tonen | SUPOw GAR Panot Pam? Hampss EManat EPem? Ves Eon ReaOyar She stlower Group Sega Choe Bras Sax Phe AGutar Guar Fantasia
* When the Expansion button indicator is lit (Tone Expansion mode), you can select the same Tone as selected for upper or lower. This means that you can select a Tone other than a bass
Tone as the Manual Bass Tone.
34

40
Play drums from the keyboard (Manual Drums) The Manual Drum keyboard mode allows you to play various percussion instruments and special
effects (SFX) from the keyboard. There are 8 drum sets and 1 SFX set. Select the set you wish.
Press the Manual Drums button to make the indicator light.
Each note of the keyboard will play a different percussive sound.
* For a list of the sounds played by each note, see “Drum set list" (e* p.97).
* If you affix the included Manual Drum template to the front of the keyboard you will be able to
see at a glance which key plays which sound (t*p.14).
* While playing Manual Drums, you can move the Pitch Bend wheel to change the pitch of the
sound by 1 octave.
@ Selecting a Manual Drum set
While a manual drum set name is displayed, use the Value buttons to select a different manual drum set. If the manual drum set name is not being displayed, press the Manual Drums button once again.
‘A baw je Cars

URSre Siri eke lati acialiare cn (esi- am rere|colaa) The User Program function allows you to register the settings you have made on the front panel. Eight separate User Programs can be registered. You can register various setups appropriate for different types of song, and later select one of these setups instantly.
The following settings are registered in each User Program.
Upper, Lower, and Manual Bass Tone
Drum set for Manual Drums Music Style Tempo
Variation on (variation) / off (original)
Advanced on (advanced) / off {basic} Keyboard Mode
Lower on/off
Manuai Bass on/off Leading Bass on/off
Intro on/off
Sync (Start/Intelligence/Off) Lower Hoid on/off Chord Hold on/off
Chord Intelligence on/off Melody Intelligence on/off
Volume balance and muting for each Part Reverb
Chorus
Octave Shift Transpose
Pedal function Pitch Bend
Split Point
” User Program settings can also be saved on disk (s* p.82).
a

@ Register a User Program
* When you register a User Program, the settings that were previously in that User Program mem-
ory will be lost.
face Sve Measure Tone
1. Make the panel settings that you wish to preserve.
2. Press the User Program button until the following display appears. The button indicator will light, and you can use the Music Style buttons 1—8 to specify which User
Program Memory will contain the current panel settings.
3. While holding down the User Program button, press the store destination
button. The current panel settings will be stored in the specified location.
@ Recalling a User Program
“Nmase 4 emt! Oo awe Sine Group A 22 Gigtand Rock’ Seng. . Country Chadesion Osnee :\: Funk: “Gospel
Seawock Basa
1. Press the User Program button. The button indicator will light, indicating that you may now select a User Program.
2. Press a button 1—8 to select a User Program. The indicator of the selected button will light, and the selected User Program will be recalled.
if you press the same number button once again, the settings before you selected the User Program
will be recalled.
GL
[GitcloiaMN-VeolroReoh ole cea oumoren ie
About the Composer oi -dovio5sc0csacedes cov varie therck x iacesed caecie it dope a peaed Feds Le pie doa ess The Composer {also known as a Sequencer) is a device which records your performance {including
any Tone charges or use of the instrument's controls). The Composer remembers ‘which note! was
played ‘when’, ‘how strongly,’ and ‘how long’. When the Composer is played back, it controls the
instrument (the sound-producing circuitry) instead of the musician, causing it to produce sound.
The Composer is unlike a tape recorder in that changing the tempo will not affect the pitch of the sound, and that the sound quality is never diminished by playback or re-recording.
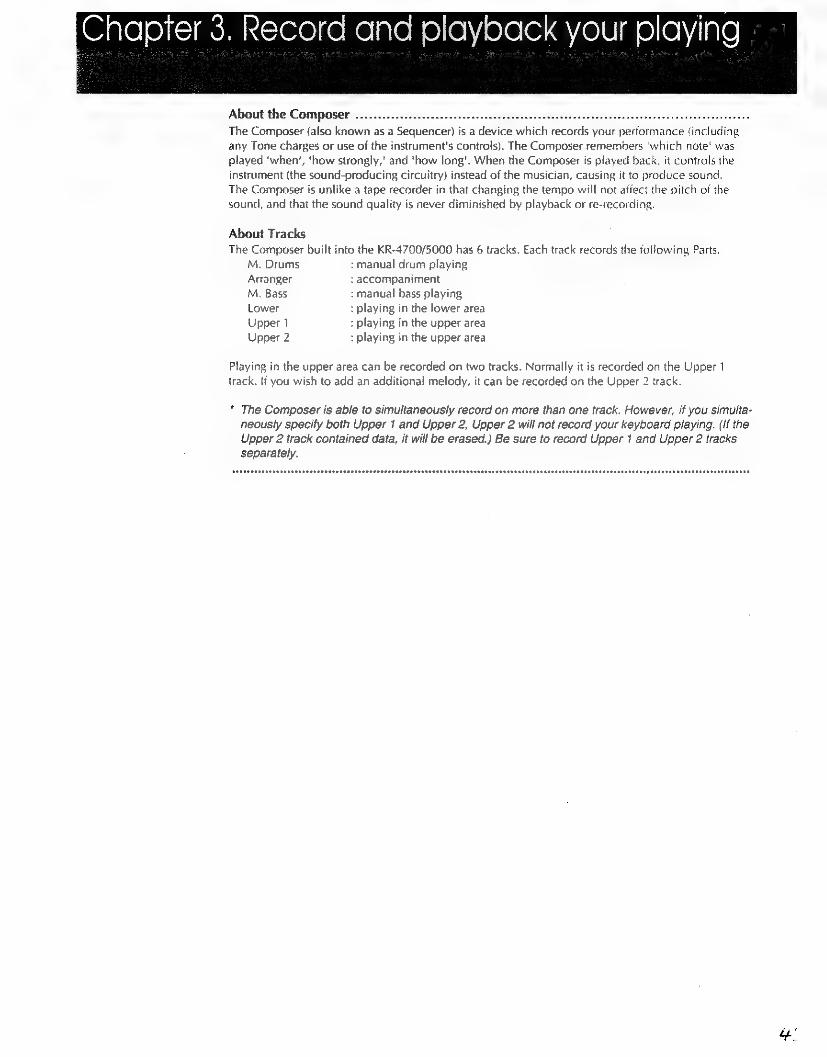
About Tracks The Composer built into the KR-4700/5000 has 6 tracks. Each track records the following Parts.
M. Drums > manual drum playing
Arranger : accompaniment
M. Bass : manual bass playing
Lower : playing in the lower area
Upper 1 : playing in the upper area
Upper 2 : playing in the upper area
Playing in the upper area can be recorded on two tracks. Normally it is recorded on the Upper 1
track. {f you wish to add an additional melody, it can be recorded on the Upper 2 track.
* The Composer is able to simultaneously record on more than one track. However, if you simulta- neously specify both Upper 1 and Upper 2, Upper 2 will not record your keyboard playing. (If the Upper 2 track contained data, it will be erased.) Be sure to record Upper 1 and Upper 2 tracks
separately.

44
foxo)ceayele|@ @)(@\/1a16) | Here's how to record your playing on the KR-4700/S000.
. Make the panel settings you wish to record.
* If you wish to record on the Upper 2 track, make panel settings while the KR-4700/5000 is wait-
ing to begin recording.
. Press the Rec button to prepare for recording. The following display will appear, the Rec indicator will light, and the Play indicator will blink.
If you are beginning a new recording, the recording track will be automatically selected according to
the panel settings (the Track button indicator will blink).
* if you wish to modify the tempo during Style performance or use the expression pedal to add vol-
ume changes to all performance parts, press the M.Drums button (Track button) to make the
indicator blink.
Start recording. if you are recording a Style’ performance, recording will begin when the accompaniment starts.
if not, press the Play button. After a two-measure metronome count-in, recording will begin.
When you finish recording, press the Stop button. Recording will end with the measure in which the button was pressed.
The Track button indicator will change to being steadily lit, indicating that the performance data was
recorded. A name of "KR-01" will be assigned to the performance data.
* if you press the Intro/Ending button (or the Starl/Stop button) while recording a Style perfor-
mance, the accompaniment will stop but recording will continue. When you wish to stop record-
ing, press the Stop button (or the Reset button).
* If you wish to return to the beginning of the first measure and stop recording, press the Reset
button instead of the Stop button.
If you make a mistake while recording and wish to record over from the beginning, you will need
to erase the already-recorded data. Press the Clear button and the following message will ask for
confirmation. Then press the Enter button.

@ If a message is displayed
Internal memory contains performance data which has not been saved to disk. If it is all right to erase
this data, press the Enter button. If you do not want to erase the data, press the Exit button to cancel the operation, and save the data to disk (f*p.47),
It is not possible to change to another Music Style that has a different time signature while recording.
@ Using the Sync Intelligence function Sometimes while recording a Style performance, the timing at which you play chords may be a hit
late, for example if the chords are difficult. The Sync Intelligence function (v9.34) is helpful when
such problems occur.
When using the Sync Intelligence function, releasing a chord in the lower area will pause both the accompaniment and recording. This means that even if you press the next chord a bit late, the delay will not be recorded.
* While recording is paused {i.e., when you are not playing the lower keyboard), do not play the
melody in the upper area or operate the panel switches. Operations performed while recording is
paused will be recorded at the time when recording is resumed, and may not be played back cor- rectly.
@ Start without a metronome count-in
From the record ready status, press the Cursor ® button. The following display will appear, so use the Value buttons to turn it Off. (Press the Cursor ~€ button to return to the previous display.)
as

4G
laying back a recorded p Here's how to playback the performance data you recorded.
1. Press the Reset button to return to the first measure.
2. Press the Play button to begin playback.
When playback ends it will stop automatically.
lf you wish to stop in the middle of the song, press the Stop button (or the Reset button).
* If you press the Play button while holding down the Stop button, a two-measure count-in will be
inserted before playback begins.
* When playing back performance data that uses a Music Style from a Music Style Card, insert the
appropriate card.
Playback from the middle of a song
Use the Bwd and Fwd buttons to move to the measure at which to begin
playback. To fast-forward, press the Fwd button. To rewind, press the Bwd button.
Each press of the button moves one measure. lf you continue to hold either button the measure nuni-
bers will change continuosly.
Silence (mute) a specific track
Press a Track button whose indicator is lit.
The button indicator will go off, and that track will not be played back.
Press the button once again and the indicator will light again.
Playback with different settings If you modify the tempo or select a different Tone or Music Style, playback will be done with the
modified settings.
Modified setting are temporary. When you press the Reset button the initial settings (except for
Tempo) will reappear. To restore the initial settings including Tempo, hold down the Reset button and
simultaneously press the Tempo + and — buttons.
* The number of measures in the Intro and Ending will differ according to the Music Style. This
means that if you select a Music Style with a different number of measures, the playback mea-
sure will shift.
It is not possible to change the Tone settings etc. for the Upper 2 track. *

OW (=9 Oz 18 Ke)daalolarexoue(elromrene|s aecielic)) Performance data you record is temporary, and will be lost when the power is turned off. If you wish
to save the performance data, you must save it to a 3.5 inch floppy disk (commercially available). This operation is known as Saving.
* There are two types of disk; 2DD and 2HD. A 2HD disk can store twice the data of a 2DD disk. * Before using disks, read the precautions on p.8.
@ Format a disk
Newly purchased disks or disks which have been used by a different device cannot be used by the KR-4700/5000 as they are. They must first be formatted.
* When you format a disk that has been used by a different device, all data that may have been on that disk will be lost. Be sure that the disk does not contain data you wish to keep.
1. Set the disk's protect tab to the write position, and insert it into the disk drive. Be sure that the disk is facing the correct way.
Protect tab
Write (write enable) ] | H
Protect (write disabie)
The following messages will appear.
For a new disk
2. Press the Enter button to execute formatting. Formatting will take about 1 minute. After formatting is complete, the basic display will reappear.
*-To quit without formatting, press the Exit button.
47

@ Change the name of the performance data
Performance data recorded by the KR-4700/5000 is automatically given a name of "KR-O1.
If the disk does not already contain other data with the same name, you may save the data with the
automatically assigned name. However, if is a better idea to assign a name to the data so that you will
be able to recognize it later.
* The KR-4700/5000 recognizes performance data by its name. This means that a single disk can-
not contain more than one song of the same name.
* itis not possible to directly change the name of a song on disk. You must first read the song into
internal memory and then change the name (*p.57).
* Each time you record additional songs, the name automatically assigned to the performance
data will be changed as "KR-02," "KR-03," etc.
1. Simultaneously press the Load button and the Save button. The Rename dis-
play will appear.
2. Use the Cursor buttons and the Value buttons to change the name.
Use the Cursor buttons to make the character you wish to change blink, and use the Value buttons to
specify the character. The following characters can be used:
01234567 89space! #%&'()*+,-./:;524_
ABCDEFGHIJKLMNOPQRSTUVWXYZ
abcdefghijkimnopgrstuvwxyz012...
* When assigning a name, the Track buttons can be used to directly enter the following characters.
1/Arranger button 720"
2/M. bass button 2 MAN 3/Lower button iM" 4/Upper 1 button : fa"
Upper 2 button :"m"
3. When you finish, press the Enter button.

@ Save to disk * KR-4700/5000 performance data cannot be saved on a disk which contains Standard MIDI files.
1. Make sure that a disk formatted by the KR-4700/5000 is in the disk drive.
2. Press the Save button to executing saving. When the save operation is completed, the basic display will reappear.
* If the amount of performance data is large, saving can take a bit of time. * Ifthe disk contains song data with an identical name, the following message will appear. If you
wish to overwrite the existing data, press the Enter button. If you wish to save the new data sep- arately (i.e, preserve the existing data), press the Exit button to cancel the save operation, change the name of the song data, and then save it.
44

Playback performance data from disk if you wish to use the KR-4700/5000 to playback performance data trom disk, you can directly speci-
fy the song on disk to be played. it is not necessary to first read the data into the KR-4700/5000.
The KR-4700/5000 is able to playback the following types of commercially available music data:
SMF Music Data, ism music data
* When playing back performance data from disk, the performance data already in internal memo-
ry must be erased. If you wish to preserve the performance data that is in internal memory, you
must save it to disk.
* Standard MIDI File is a widely-used format for exchanging performance data between various
devices. In addition to the formats mentioned above, the KR-4700/5000 is also able to playback
GM or GS-compatible Standard MIDI File data.
* If Standard MIDI File data has been selected, an asterisk “*" will be displayed following the file-
name.
@ Playback all songs
1. Insert the disk in the disk drive.
2. Press the All Song Play button to start playback. The button indicator will light, and playback will begin from the first song.
* If performance data exists in internal memory that has not been saved to disk, the following mes-
sage will appear. If it is all right to erase the data, press the Enter button, If you do not wish to
erase the data, press the Exit button to cancel the operation, and save the data to disk.
3. To stop playback, press the Stop button.
* If you use the Song Select buttons to select a song before pressing the All Song Play button,
playback will begin from that song.
* You can also stop playback by pressing the All Song Play button or the Reset button instead of
the Stop button.

@ Playback just one song
1. Insert the disk in the disk drive.
2. Use the Song Select buttons to select the song.
* If performance data exists in internal memory that has not been saved to disk, the following mes- Sage will appear. If it is all right to erase the data, press the Enter button and then select the song once again. If you do not wish to erase the data, press the Exit button to cancel the opera- tion, and save the data to disk.
3. Press the Play button to start playback. When the song ends playback will stop automatically.
* If you press the Play button while holding down the Stop button, playback will begin after a two- measure metronome count-in.
* If you move to a measure in the middle of the song before pressing the Play button, the following message may be displayed for a time, and playback will not start immediately. This is because the performance data is being checked to ensure that playback will begin correctly from the specified location.
< After playback ends > ........006 eienstacelvnendahea oaadidvabaesWieaads seeanaasaaaees fang ab asadeneiesanent When performance data other than that of the KR-4700/5000 itself is played back, the internal sound
source settings are modified by the performance data, and will be different than the settings before playback began. This means that depending on the performance data settings, the way in which the Tones sound can be affected. In such cases, press one of the black buttons shown below. This will
reset the KR-4700/5000 to its normal state, in addition to performing the usual function of the button.
° pais Frquese Pilea pase Sup up 68! got Senta: voce sce tame tee Seal tera | a ed ee ee
Keyboard Mods
Deere
Ss]

IWllale sxe) atom Ol-1 are) daglelalerc, The KR-4700/5000 allows you to enjoy 'minus-one' playing with your performance data. Minus-one
means that you can use the Mute function to mute a Part of the performance data and play that muted
Part yourself. The procedure will depend on the performance data you use, so read the explanation
for the appropriate type.
* The Mute settings are temporary. When you playback other performance data or press the Reset
button, the Mute function will be turned off again.
* When directly playing back performance data from disk, you must first start playback before you
will be able to turn Mute on/off.
@ Using KR-4700/5000 performance data
1. Select the performance data you wish to use for minus-one playing.
2. Press the Reset button, and then use the Track buttons to select the perfor-
mance Part you wish to play on the keyboard. Each time you press a Track button, the Mute setting will alternate between On (indicator dark) and
Off (indicator lit).
3. Select a keyboard mode that will allow you play the selected performance
Part (sp.36).
4. Playback the performance data, and play the muted Part yourself on the
keyboard.
@ Using Standard MIDI Files When using Standard MIDI Files, playback the performance data directly from disk without reading it
into internal memory. When you playback the performance data directly from disk, you can specify
any performance Part (MIDI channel).
1. Select the performance data you wish to use for minus-one playing.
2. Press the Reset button, and then use the Track buttons to select the perfor-
mance Part (MIDI channel) you wish to play on the keyboard.
52.
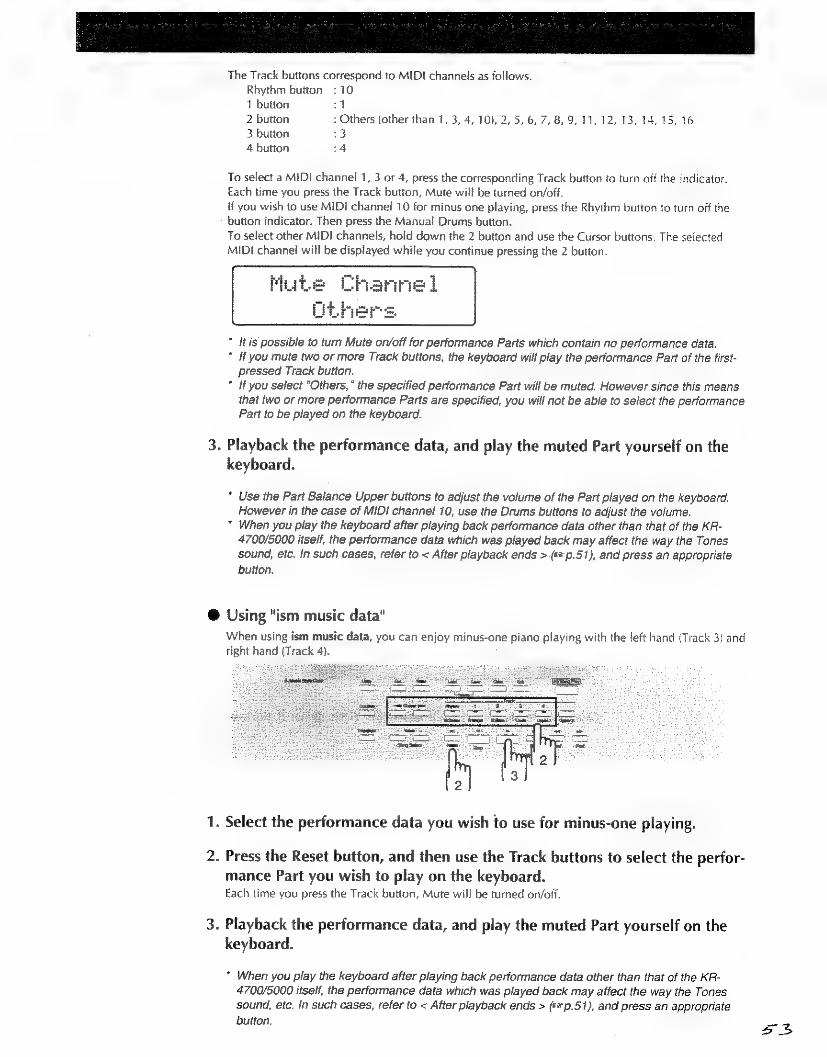
The Track buttons correspond to MIDI channels as follows.
Rhythm button : 10
1 button 17
2 button : Others (other than 1, 3, 4, 10), 2, 5, 6, 7, 8, 9, 11, 12, 13, 14, 15, 16
3 button 23 4 button :4
To select a MIDI channel 1, 3 or 4, press the corresponding Track button to turn off the indicator. Each time you press the Track button, Mute will be turned on/off. {f you wish to use MIDI channel 10 for minus one playing, press the Rhythm button to turn off the button indicator. Then press the Manual Drums button.
To select other MIDI channels, hoid down the 2 button and use the Cursor buttons. The selected MIDt channel will be displayed while you continue pressing the 2 button.
Muhe Chanrice 1
* {tis possible to turn Mute on/off for performance Parts which contain no performance data. * If you mute two or more Track buttons, the keyboard will play the performance Part of the first- pressed Track button.
” If you select “Others,” the specified performance Part will be muted. However since this means
that two or more performance Parts are specified, you will not be able to select the performance Part to be played on the keyboard.
3. Playback the performance data, and play the muted Part yourself on the keyboard.
* Use the Part Balance Upper buttons to adjust the volume of the Part played on the keyboard. However in the case of MIDI channel 10, use the Drums buttons to adjust the volume.
* When you play the keyboard after playing back performance data other than that of the KR- 4700/5000 itself, the performance data which was played back may affect the way the Tones sound, etc. In such cases, refer to < After playback ends > (*p.51), and press an appropriate
button.
@ Using "ism music data" When using ism music data, you can enjoy minus-one piano playing with the left hand (Track 3) and right hand (Track 4).
1. Select the performance data you wish to use for minus-one playing.
2. Press the Reset button, and then use the Track buttons to select the perfor- mance Part you wish to play on the keyboard. Each time you press the Track button, Mute wil! be turned on/off.
3. Playback the performance data, and play the muted Part yourself on the keyboard.
* When you play the keyboard after playing back performance data other than that of the KR-
4700/5000 itself, the performance data which was played back may affect the way the Tones sound, etc. In such cases, refer to < After playback ends > (*p.51), and press an appropriate
button. a3

ecord additional son | if you wish to record additional songs, perform the following operations as necessary.
@ [If performance data exists in internal memory
Use the following procedure to clear (erase) the data from internal memory.
Press the Clear button. If the performance data has already been saved to disk, the data will be erased, and the basic display
will reappear.
Vf the performance data has not yet been saved to disk, the following message will appear. If you are
sure you want to clear the data, press the Enter button,
* To cancel the operation, press the Exit button.
@ After playing back performance data from disk
If the disk is still inserted, use the Song Select buttons to select "New
Song," and then press the Rec button.
You may remove the disk from the disk drive if you wish.
54

Chapter 4. Editing performance data
Before you read this chapter Please familiarize yourself with the materiai below, which outlines the various types of operations
and ways to edit performance data which will be explained in this chapter.
@ Three ways to record The KR-4700/5000 provides three ways to record performance data. This chapter will be explaining
these methods with the assumption that you wish to re-record part of an already-recorded song. Use
the method most appropriate for your situation.
Replace Recording: This is the usual way of recording, as explained in the previous chapter. if performance data exists in
the sefected track, the new recording will repiace the old data.
Mix Recording: The newly recorded performance data will be added to the previously recorded data. Use this method
when you wish to add an additional performance part to an existing track,
Punch-in Recording: This method allows you to playback the previously recorded performance data, and when you arrive
at a desired place, press a pecial and begin re-recording. When you press the pedal once again, recording will stop and you will return to playback. This allows you to re-record only specific sec- tions.
@ Editing functions The KR-4700/5000 provides the following five editing functions. Use the function most appropriate
for your situation.
Quantize: This function adjusts the timing of inaccurately-played notes to a specified time value interval,
Erase: This function erases a specified section of performance data.
Insert:
This function inserts blank measures.
Copy: This function copies a specified section of performance data to another location in the same track. You might use this when a song contains repeated phrases.
Delete: This function deletes a specified section of performance data. When data is deleted, the performance
data following it will be moved forward to fill the gap.
* In addition to the above functions, you can also modify the initial settings (Tempo, Tone, etc.) that are used when the performance data is played back (s* p.67).
5S

SE
@ Other functions
Format: This function erases all data from a disk.
Delete File: This function deletes a specified file of performance data from disk.
Save As SMF: This function converts data recorded on the KR-4700/5000 to Standard MIDI File data. This allows
other devices sequencers, computers, etc.) to playback music recorded on the KR-4700/5000.
@ Procedure for editing performance data
When editing performance data, it sometimes happens that the results are not as you expect.
Especially when editing performance data that uses the Arranger function, the accompaniment may
slip out of time or even change. As a safeguard, it is a good idea to save the data to disk betore edit-
ing.
1. If you wish to edit performance data that is on disk, you must first read the
data into internal memory.
2. Use the appropriate editing functions to edit the performance data in
internal memory.
3. When you have finished editing, save the performance data to disk.
* For ism musie data (or Standard MIDI File data in Format 0), it is possible to use Replace
Recording to record the Upper part on track 1, but it is not possible to use other functions to
modify this data. This is the case even if the data was originally recorded on the KR-4700/5000
and then converted to Standard MID! File data.
it is not possible to load Standard MIDI File data in Format 1 into internal memory.

[Reforohor-\ncetanleiercneloiioniconakelc ahelele) Before you can edit performance data on a disk, the data must be first read into internal memory. This
operation is called Load.
1. Insert the disk into the disk drive.
2. Use the Song Select buttons to select the performance data you wish to modify.
* If the internal memory contains performance data which has not been saved to disk, the following
message will appear. If it is all right to erase the data, press the Enter button. If you do not wish
to erase the data, press the Exit button to cancel the operation and save the data to disk.
3. Press the Load button (or the Rec button) to execute Loading. When loading is complete, the basic display will appear.
” If the amount of performance data is large, loading can take a bit of time.
s7

SZ
Three ways to record The KR-4700/5000 provides three ways for you to re-record performance data; Replace, Mix, and
Punch-in.
@ Replace recording This is the usual way of recording. If performance data exists in the selected track, the new recording
will replace the old data.
* If you wish to record on the Upper 2 track, make panel settings while the KR-4700/5000 is wait-
ing to begin recording.
_ If you wish to begin re-recording from the middle of the song, use the
Bwd/Fwd buttons to move to the desired measure.
2. Press the Rec button to prepare for recording.
3. Make sure that the display shows "REPLACE." If not, use the Value buttons to get the correct display.
4. Press a Track button to select the track for recording. Performance data is recorded on tracks whose indicators are lit. Press the button of the track which
you wish to re-record, and its indicator will begin blinking.
The rest of the procedure is the same as explained in the previous chapter,
@ Mix recording The newly recorded performance data will be added to the previously recorded clata.
The recording procedure is the same as for Replace Recording except for step 3 in which you will use
the Value buttons to select "MIX."
@ Punch-in recording
This method allows you to playback the previously recorded performance data, and when you arrive
at a desired! place, press a pedal and begin re-recording. When you press the pedal once again,
recording will stop and you will return to playback. This allows you to re-record only specific sec-
tions.
Hf you wish to use punch-in recording, you must first change the function of the pedal.
Playback Recording Playback Recording Playback
Press the Press the Press the Press the
pedai pedal pedal pedal

10.
11.
12.
. Press the Utility button to get the Utility Menu. If the lower line does not read "Pedal Function,” use the Cursor buttons to select it.
. Use the Cursor buttons to select the pedal whose function you wish to change. (Left: left pedal, Center: center pedal)
. Use the Value buttons to select "PUNCH IN/OUT."
. This completes pedal settings. Press the Exit button twice to return to the basic display.
. While holding down the Reset button, simultaneously press both the Tempo + and - buttons. Then press the Rec button to prepare for record- ing.
. Use the Value buttons to select "PUNCH IN."
. Press a Track button to specify the track for recording. Performance data is recorded on tracks whose indicators are lit. Press the button of the track which
you wish to re-record, and its indicator will begin blinking.
. Press the Play button to begin playback. Playback will begin.
When you wish to begin re-recording, press the pedal. You will enter record mode, and your playing will be recorded.
When you wish to stop re-recording, press the pedal again. You will return to playback mode. if you wish to re-record another section, repeat steps 10 and 11.
To stop recording press the Stop button.
34

@0
(Qe) i(sormlaecerers
=
nN
ww
>
iiaaliare MGS ere lauiy4>>) Quantize is a function that adjusts the timing of recorded notes to the nearest specified time interval.
For example, if you intended to play quarter notes but the actual timing of the notes was slightly early
or later, you could quantize the data at quarter-note (1/4) resolution to correct the timing of each
note, as shown in the following diagram.
Resolution (timing for quantization) J
J iy
in
Notes as recorded
{i
Notes after quantizing a
Press the Edit button to get the Edit Menu display. If the lower line does not read "Quantize," use the Cursor buttons to select it.
Press the Enter button to get the Quantize display. The track button indicators of tracks which contain performance data will blink, indicating that they
are selected for quantizing.
If you wish to quantize only one track, press that Track button. Track button indicators of ail tracks (other than the one you pressed) will change to being steadily lit,
and only the track you specified will be selected for quantizing. If you wish to quantize other tracks,
press their track buttons. When you press a blinking track button, it will return to its original setting.
Specify the area and resolution for quantization. Use the Cursor buttons to select each item, and use the Value buttons to set the value.
Specify the area to be quantized (from: first measure, for: how many measures).
if you wish to quantize the entire track it is not necessary to change the setting.
if you wish to quantize only a specific area, specify the area. For example, if you wish to quantize
measures 4—12, specify “from:4 for:9." If you wish to quantize ail the way to the end, set “for:ALL.”

Specify the timing (resolution) to which the notes will be adjusted. This should be set to the shortest
(or less than the shortest) note value which occurs in the performance data being quantized.
i
v2 J haif-note 12 J y i eighth-note triplet
V4 J quarter-note 1/16 A sixteenth-note
aN a
| | | 7 T | 1/6 é @@ quarter-note triplet 124 @ ¢ @ ~ sixteenth-note triplet
18 o eighth-note 1/32 S thirty-second note
6. When you have finished making settings, use the Cursor buttons to get the following display.
7. Press the Enter button to execute the Quantize operation. When the quantize operation has been completed, the basic display will reappear.
* To quit without quantizing, press the Exit button twice.
él

62.
mice om Ol=1i
Ww
dante sexe l@lonén fe The Erase function erases the specified area of performance data, making it blank.
You may think of this as using a pencil eraser to erase notes on music paper.
Example: erasing measures 5—8
Note:
In the case of performance data which uses the Arranger function, accompaniment will continue
uninterrupted even through measures which have been erased. If you wish to interrupt the accom-
paniment, use the Mix Recording function («*p.58) to record a Break (**p.76) at the beginning of
the corresponding measure in the Arranger track. If you wish to have a blank section of two or
more measures, record a Break at the beginning of each measure.
Press the Edit button to get the Edit menu display.
. Use the Cursor buttons to select "Erase."
Press the Enter button to get the Erase display. The track button indicators of tracks which contain performance data will blink, indicating that they
are selected for erasing.
If you wish to erase only one track, press that Track button. Track button indicators of all tracks (other than the one you pressed) will change to being steadily lit,
and only the track you specified will be selected for erasing. If you wish to erase other tracks, press
their track buttons. When you press a blinking track button, it will return to its original setting.
. Specify the area and type of data to be erased. Use the Cursor buttons to select each item, and use the Value buttons to set the value,
Specify the area to be erased (from: first measure, for: how many measures}.
If you wish to erase the entire track it is not necessary to change the setting.
If you wish to erase only a specific area, specify the area. For example, if you wish to erase measures
4—12, specify "from:4 for:9." If you wish to erase all the way to the end, set “for:ALL."

Select the type of data which will be erased. Normaily you may leave the selection at “ALL. If you
wish to erase only a specific type of data, specify it here.
ALL : all performance data
EXC.NOTE — : data other than keyboard data (buttons, pitch bend wheel, and pedal operations)
DAMPER : damper peda! operations
P. BEND : pitch bend wheel operations
EXP. PEDAL _ : expression pedal operations (KR-5000 only)
* Even if you specify "EXP. PEDAL" as the data to be erased by this Erase function, the data will not be erased if the Expression Pedal Function setting (** p.76) has been set to "ALL" so that it
controls the volume of ail parts.
. When you have finished making settings, use the Cursor buttons to get the following display.
. Press the Enter button to execute the Erase operation. When the erase operation has been completed, the basic display will reappear.
* To quit without erasing, press the Exit button twice.
63

64
lTawoyam eelal-aaases: s (Insert) | The Insert function inserts blank measures at the specified location.
Example: insert three blank measures at measure 5.
Note:
In the case of performance data which uses the Arranger function, accompaniment will continue
uninterrupted even through blank measures which have been inserted. If you wish to interrupt the
accompaniment, use the Mix Recording function (p.58) to record a Break (#p.76) at the begin-
ning of the corresponding measure in the Arranger track. If you wish to insert a blank section of two
or more measures, record a Break at the beginning of each measure.
Press the Edit button to get the Edit menu display.
. Use the Cursor buttons to select "Insert."
Press the Enter button to get the Insert display. The track button indicators of tracks which contain performance data will blink, indicating that they
are selected for inserting.
Frame
. If you wish to insert blank measures into only one track, press that Track
button. Track button indicators of all tracks (other than the one you pressed) will change to being steadily lit,
and only the track you specified will be selected for inserting. If you wish to insert blank measures
into other tracks, press their track buttons. When you press a blinking track button, it will return to its
original setting.
Specify the location and the number of measures to be inserted. Use the Cursor buttons to select each item, and use the Value buttons to set the value.
For example, if you wish to insert 1 blank measure at measure 4, set “from:4 for:1."
When you have finished making settings, use the Cursor buttons to get the
following display.
Press the Enter button to execute the Insert operation. When the insert operation has been completed, the basic display will reappear.
* To quit without inserting, press the Exit button twice.

Copy performance data (Copy) The copy function Copies a specified section of performance data to another measure of the same track. This is useful when you wish to repeat a phrase.
Exampie: copy measures 5—-7 to measure 8
* ff performance data exists at the copy destination, it will be erased.
Press the Edit button to get the Edit menu display. -_
2. Use the Cursor buttons to select "Copy."
3. Press the Enter button to get the Copy display. The track button indicators of tracks which contain performance data will blink, indica are selected for copying.
that they
4. If you wish to copy only one track, press that Track button. Track button indicators of all tracks (other than the one you pressed) will change to bein and only the track you specified will be selected for copying. If you wish to « opy other tr. their track buttons. When you press a blinking track button, it will return to its original selling,
teactily fit,
S, Press
5. Specify the copy source and destination. Use the Cursor buttons to select each item, and use the Value buttons fo set the value
Specify the area to be copied (from: first measure, for: how many measures), and the copy destination measure (to). For example, if you wish to copy measures 4-—12 to the end of the track, specify “from:4 for:9" / "to:END." If you wish to copy all the way to the end, set “for:ALL.”
6. When you have finished making settings, use the Cursor buttons to get the following display.
Press the Enter button to execute the Copy operation. When the copy operation has been completed, the basic display will reappear.
al
* To quit without copying, press the Exit bution twice. ease ®
635

VeleTe specineda measures OT per
C(D{=\(=)15))
GE
_
-
wn
a
The Delete function deletes specified measures of performance data. Data following the deleted mea- sures will be moved forward.
Example: delete measures. 5—8
Press the Edit button to get the Edit menu.
Use the Cursor buttons to select "Delete."
[+
Press the Enter button to get the Delete display. The track button indicators of tracks which contain performance data will blink, indicating that they re selected for deletion. we
If you wish to delete blank measures into only one track, press that Track button. : Track button indicators of all tracks (other than the one you pressed) will change to being steadily lit,
and only the track you specified will be selected for deletion. if you wish to delete blank measures
from other tracks, press their track buttons. When you press a blinking track button, it will return ta its original setting
Specify the measures to be deleted. Use the Cursor buttons to select each item, and use the Value buttons to set the value.
Specify the area to be deleted (from: first measure, for: number of measures}.
if you wish to delete the entire track there is no need to change the settings.
lf you wish to delete only specified measures, specify the area. For example, if you wish to delete measures 4—12, specify "from:4 for:9." If you wish all the way to the end, set “for:ALL."
When you have finished making settings, use the Cursor buttons to get the following display.
Press the Enter button to execute the Delete operation. When the delete operation has been completed, the basic display will reappear.
* To quit without deleting, press the Exit button twice.

UNiCole in’miatea allie mscantiare Re) maton ersvare ianrelaexcue e) When performance data is first recorded, the settings at that time (such as tempo and Tones) are
recorded as initial settings. To get the initial playback settings, you can hold down the Reset button and simultaneously press both the Tempo + and - buttons before playback.
Here's how to modify the initial settings after fhey have been recorded.
1. While holding down the Reset button, simultaneously press both the Tempo + and - buttons to get the initial playback settings.
2. Use the panel buttons to make the desired settings.
* If you wish to modify Upper 2 settings (Tone, volume, etc.), press the Rec button and then press the Upper 2 button to make the button indicator blink. Now you can use the panel buttons to modify Upper 2 settings. When you finish making settings, press the Stop button.
Y While holding the Rec button, press the Reset button to get the following display.
4. If you wish to change the settings, press the Enter button. After the settings have been rewritten, the basic display will reappear.
* To quit without overwriting the setup, press the Exit button.
é7
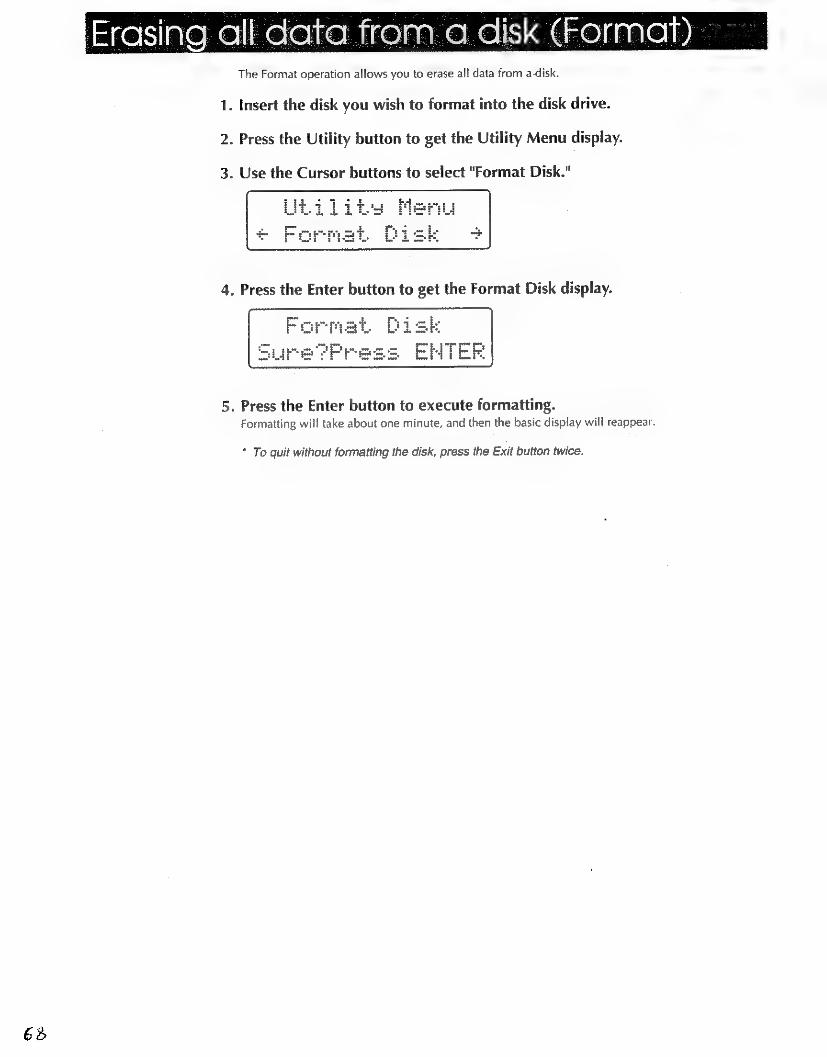
63
[conse nell ne(eiromicelgameme! <4 Gne)sagelD, The Format operation allows you to erase all data from a-disk.
1. Insert the disk you wish to format into the disk drive.
2. Press the Utility button to get the Utility Menu display.
3. Use the Cursor buttons to select "Format Disk."
5. Press the Enter button to execute formatting. Formatting wil! take about one minute, and then the basic display will reappear.
* To quit without formatting the disk, press the Exit button twice.

rasing specitied performance data trom. (Delete File)
This operation deletes a specified file of performance data from a disk.
1. Insert the disk containing the data you wish to delete into the disk drive.
2. Press the Utility button to get the Utility Menu display.
3. Use the Cursor buttons to select Song."
4. Press the Enter button to get the Song Menu display. if the lower line does not read “Delete File," use the Cursor buttons to select it
lete File display.
6. Use the Value buttons to select the performance data you wish to delete.
7. Press the Enter button to delete the performance data. After the performance data is deleted, the basic display will reappear.
* To quit without deleting, press the Exit button three times.

70
(Grola\ i= 1 ol= sie dane larex> oleic) to Sirelatelelie) MIDI File Gave As SMF)
“I
Performance data recorded by the KR-4700/5000 can be played back only by the KR-4700/5000. In
its original form it cannot be played back by other devices (sequencers and computers). If you wish to play back this data on other devices, you must convert it to Standard MiDi File data.
To convert data to Standard MiD! File data, you must first read it into the KR-4700/5000 internal memory, and then save it as Standard MIDI File data.
* It is not possible to save Standard MIDI File data on a disk that contains KR-4700/5000 pertor- mance data.
* Performance data can be piayed back on any other GS sound module device. However depend-
ing on the GS sound module device you use, there may be an insufficient number of notes avail- able, or the notes may be sounded differently.
If the performance data you wish to convert is on disk, load the data into internal memory (©p.57).
Insert the disk on which the Standard MIDI File data will be saved.
Press the Utility button to get the Utility Menu display.
Use the Cursor buttons to select "Song."
Press the Enter button to get the Song Menu display.
Use the Cursor buttons to select "Save as SMF."
Press the Enter button to execute conversion. Wher conversion is completed, the basic display will reappear
* {f the amount of performance data is large, converting can take a bit of time.
To quit without converting, press the Exit button three times.
* In order to distinguish the data saved on disk from the performance data before conversion, an
asterisk "*" will be added at the end of the name.
If the disk contains song data with an identical name, the following message will appear. If you
wish to overwrite the existing data, press the Enter button. If you wish to save the new data sep-
arately (i.e, preserve the existing data), press the Exit button to cancel the save operation,
change the name of the song data, and then save it.
‘

Oiareleir=\FomVoliele mivlseilelans-iiiaes
PAXe}[OCimia\>mve)|elaalouere|(elarers You can adjust the volume of each Part to achieve the ideal volume balance. Use the Part Balance buttons to adjust the volume of each Part.
* These settings will reset to their initial values when the power is turned off. If you wish to keep your seitings, register them as a User Program.
Adjust the volume (0—10) of each Part using its pair of buttons. The ® button increases the volume, and the «4 button decreases the volume. When you adjust
the volume, the volume of the Part being adjusted wil! be displayed both as a number and graphical- ly.
The Upper, Lower, and Accomp buttons respectively change the volumes of the Upper Tone, the Lower Tone, and the Accompaniment.
The Bass buttons adjust the Manual Bass Tone volume when the Manual Bass On/Off button is lil,
and adjust the accompaniment bass volume when it is dark.
The Drums buttons adjust the Manual Drums volume when the Keyboard Mode Manual Drums but- ton is lit, and adjust the accompaniment drums volume when it is dark.
Silence specified Parts (Mute)
If you wish to mute (silence) a specific Part, simultaneously press the <4 and » buttons for that Part. The clisplay will indicate "OFF." Press both-buttons again to un-mute the Part.
7/

T2.
ect settings Reverb is an effect which adds the reverberation that occurs when music is played in a concert hall or
other room. The effect wiil be applied to all Parts.
Reverb on/off
Each time you press the Reverb button the effect will be turned on or off.
* When the power is turned on, reverb will always be on.
Adjusting the reverb effect (Type and Depth) You can select from the following Types of reverb:
ROOM 1 : reverberation of a meeting room
ROOM 2 : reverberation of a club
ROOM 3 : reverberation of a large room HALL 1 : reverberation of a smail hail
HALL 2 : reverberation of a large hall
PLATE : bright metallic reverberation
DELAY : repeated echoes PAN DELAY : delays alternating between left and right speakers
The reverb depth can be adjusted independently (0—10) for each of the following Parts:
Upper, Lower, Accomp (entire accompaniment), A.Bass (accompaniment bass),
A.Drums (accompaniment drums), M.Bass (manual bass), M.Drums (manual drums).
* These settings will be reset to their initial values when the power is turned off. If you wish to keep
your settings, register them as a User Program.
Press the Utility button to get the Utility Menu display.
Use the Cursor buttons to select "Reverb."
Press the Enter button to get the Reverb display.
. Make settings for the reverb effect. Use the Cursor buttons to select the item, and use the Value buttons to set the value.
If the settings are not modified for a time, the basic display will reappear automatically.

Clomscillares Chorus is an effect which aclds spaciousness and depth to the sound.
@ Chorus on/off
The chorus effect applies to the Upper, Lower, and Manual Bass Parts. Chorus can be turned on/off individually for the Tone selected for each Part.
For example, chorus can be turned on for the E.Organ selected for the upper Part, and off for the
E.Organ selected for the lower Part. In this way, chorus settings can be independent even for the same Tone used by more than one Part.
” These settings are retained in memory even if the power is turned off.
1. Use the Upper/Lower/Manual Bass buttons to select a Part.
2. Use the Tone buttons to select the Tone to which you wish to apply the Chorus effect. If chorus is on for the selected Tone, the Chorus button will light.
3. Press the Chorus button to turn chorus on (lit) or off (dark).
@ Select the type of Chorus effect You can select from the following types of chorus effect. Tones for which chorus is turned on will all use the same type of chorus.
CHORUS 1 : slow and shallow chorus CHORUS 2. : slow and deep chorus
CHORUS 3. : rapid and shallow chorus CHORUS 4: rapid and deep chorus
* This setting will be reset to the initial value when the power is turned off. If you wish to keep your setting, register it as a User Program.
1. Press the Utility button to get the Utility Menu display.
2. Use the Cursor buttons to select "Chorus."
3. Press the Enter button to get the Chorus display.
4. Use the Value buttons to select the Chorus Type.
If the settings are not modified for a time, the basic display will reappear automatically.
73

Te
iirelacevereniaton oieandlcolaselece, The Transpose function allows you to change the pitch produced by the keyboard. For example, if a
song happened to be in a difficult key, you might use the Transpose function to play it with easier fin-
gering. Or conversely, you could change the pitch without changing the fingering. It is also possible
to transpose the playback of recorded performance data.
The Transpose function can be used in one of two ways: “Ail” or "Key." Use the type appropriate for
your situation.
All: The keyboard and playback will be transposed together.
Use this setting when you wish to transpose the playback to match your voice range.
Key: The keyboard will be transposed, but not the playback.
Use this setting when you wish to use an easier fingering to play along with a song that was recorded
ina difficult key, or when you wish to use an easier fingering to record a song in a difficult key. This
setting can also be used when you use the keyboard to play or record sheet music for a transposing
instrument in the correct pitch.
* When you record your keyboard playing with a setting of "Key," the transposed notes will be
recorded. However, with a setting of "All," the untransposed notes will be recorded.
* This setting will be reset to the initial value when the power is turned off. if you wish to keep your
setting, register it as a User Program.
Press the Transpose button to get the Transpose display.
Specify the Transpose settings. Use the Cursor buttons to select "All" or "Key," and use the Value buttons to specify the value (semi-
tone steps: -4 (Ab) — +7 (G)).
Ee
2 5 De
When a value other than "0 (C)" has been set, the Transpose button will light.
if the settings are not modified for a time, the basic display will reappear automatically.
* The Transpose setting which is displayed is the one which will be used.
To reset the value to its initial setting, simultaneously press the Value + and
- buttons while in the Transpose display.
* Instead of using the Value buttons, you can also hold the Transpose button and press the appro-
priate note of the keyboard to set the value.

Shift the pitch by octaves (Octave ohin The Octave Shift function changes the pitch in units of one octave. This function can be specified for
each Tone that can be selected for Upper, Lower, and Manual Bass. For example, you can set an
Octave Shift of "0" for the E.Organ Tone selected for the upper Part, and an Octave Shift of "+1" (one
octave up) for the E.Organ Tone selected for the lower Part. In this way, octave shift settings can be
independent even for the same Tone used by more than one Part.
* This setting is retained in memory even if the power is turned off.
1. For each Part, select the Tone you wish to Octave Shift.
2. Press the Oct Shift button to get the Octave Shift display.
3. Use the Cursor buttons to select the Part you wish to octave shift.
4. Use the Value buttons to specify the amount (+/- 2 octaves) of shift.
When a value other than "0" is selected for a Part played by the keyboard, the Oct Shift button will
light.
If the settings are not modified for a time, the basic display will reappear automatically.
75

76
(Gi alo lave(=mialsmi aeriolame)miaiouels.e(el5 You can change the function of the left and center pedals. Select the functions most useful for your
needs.
* These settings will reset to their initial values when the power is turned off. If you wish to keep
your settings, register them as a User Program.
* When you press the Piano button, the left pedal will be the Soft pedal and the center pedal will
be the Sostenuto pedal regardless of the settings made here. if you then select a keyboard mode
that allows Style performance, the pedal settings will return to the functions you specified here.
" It is not possible to set the left and center pedals to the same function.
SOFT (left pedal only): Soft pedal.
SOSTENUTO (center pedal only): Sostenuto pedal.
FILL IN TO VAR.:
The pedal will act as the Fill In “To Variation" button.
FILL IN TO ORIG.:
The pedal will act as the Fill in “To Original" button.
BREAK: When you press the pedal during Style performance, the accompaniment will pause for just one mea-
sure.
ADVANCED/BASIC: The pedal will act as the Arrangement "Advanced" button.
FADE IN/OUT: This allows you to start the accompaniment with a iade-in (the volume gradually becomes louder) or
end the accompaniment with a fade-out (the volume gradually becomes softer).
if you wish to start the accompaniment with a fade-in, first press the pedal to make the Start/Stop but-
ton indicator blink while Style performance is still stopped. Then use the normal procedure to start
Style performance. To fade out, press the pedal during Style performance. When the fade-out is complete, the Start/Stop
button indicator will blink. Accompaniment will not stop even after the fade-out. When you no
longer hear the sound, press the Start/Stop button. During a Style performance, fade-in and fade-out
will be repeated each time you press the pedal.
LEADING BASS: The Leading Bass function will be active only while you are pressing the pedal.
PUNCH IN/OUT: You can press the pedal to specify the area for punch-in recording (#*p.58).
DAMPER OF LOWER: The lower area will be sustained while the pedal is pressed.

For the KR-5000, an expression pedal (sold separately) can be connected to the Expression connector
so that you can control the volume with your foot. Normally, this will control the volume of ail Parts,
but you can also specify that it control only a specific Part.
ALL (all Parts}
UPPER (upper)
LOWER Ulower}
M.BASS (manual bass)
M.DRUMS (manual drums)
. Press the Utility button to get the Utility Menu display. if the lower line does not read “Pedal Function," use the Cursor buttons to select it.
. Use the Cursor buttons to select Pedal, and use the Value buttons to set the
pedal function.
If the settings are not modified for a time, the basic display will reappear automatically.
77

7%
Pitch Bend Wheel settin You can specify the maximum pitch change (range) produced by the pitch bend wheel.
When the power is turned on, the pitch bend wheel will affect only the upper Part, but you can also
specify that it affect the lower Part and the manual bass Part as well.
* These settings will be reset to the initial values when the power is turned off. If you wish to keep
your settings, register them as a User Program.
* jt is not possible to change the settings for the Manual Drum Part (range: 1 octave, on).
Press the Utility button to get the Utility Menu display.
Use the Cursor buttons to select "Pitch Bend."
Press the Enter button to get the Pitch Bend display.
Use the Cursor buttons to select the item, and use the Value buttons to
specify the value. There are two items to set: the range, and the Parts which will be affected by the pitch bend wheel.
Range can be set to a value 0--12 (semitone steps; maximum of 1 octave). Specify "ON" for the Parts
you want to be affected by the pitch bend wheel.
Fite Beri
are s
If the settings are not modified for a time, the basic display will reappear automatically.

ANe [US (Keyboard Sensitivity)
nN
e keyboard response
The keyboard sensitivity can be set to one of the following three levels:
Light: The dynamic range will narrower than usual, so that even a fight touch will produce fortissimo notes. This setting is suitable-for sustained sounds such as organ or strings.
Medium: This is the normal setting. The keyboard sensitivity will be closest to an acoustic piano.
Heavy: The dynamic range will be wider than usual, so that fortissimo will be produced only for strongly
played notes. Use this setting when you want your playing to have as much cynamic expressiveness as possible.
* This setting is retained in memory even if the power is turned off.
. Press the Utility button to get the Utility Menu display.
. Use the Cursor buttons to select "Keyboard Sens."
. Press the Enter button to get the Keyboard Sens. display.
. Use the Value buttons to specify the sensitivity.
if the setting is nat modified for a time, the basic display wil! reappear automatically.
74

Change the Split Point
ZO
The Split Point can be set independently for each of the Split and Split Arranger keyboard modes. There are two ways to set the Split Point.
*. These settings will be reset to their initial values when the power is turned off. If you wish to keep your settings, register them as a User Program.
In the Utility display
. Press the Utility button to get the Utility Menu display.
. Use the Cursor buttons to select "Split Point.”
. Press the Enter button to get the Split point display.
4. Use the Cursor buttons to select the keyboard mode, and use the Value buttons to set the Split Point.
li the setting is not modified for a time, the basic display will reappear automatically.
* If you simultaneously press the Value + and - buttons, the Split Point will be reset to 4-3.
Using the Keyboard Mode buttons
- Select either Split Arranger or Split keyboard mode.
. Hold down the button of the keyboard mode whose Split Point you wish to change (the Split Arranger button or the Split button), and press a note on the keyboard. The Split Point display of the specified keyboard mode will appear.
If the setting is not modified for a time, the basic display will reappear automatically.

Onmleleonea Chord Hold is a function used in Style performance.
When Chord Hold is on, chords you play in the lower area will be sustained and the accompaniment
continued even if you release the keys. If Chord Hold is off, the accompaniment will be paused when you take your hand off the lower area.
Normally this function will be left on, so that you can use your left hand to change panel settings dur- ing Style performance without interrupting the accompaniment. ,
* This setting will be reset to On when the power is turned off. In some cases, changing the key- board mode will also reset it to On. if you wish to leave it off, register it as a User Program.
. Make sure that the keyboard mode is either Split Arranger or Piano Style Arranger.
Press the Utility button to get the Utility Menu display.
. Use the Cursor buttons to select "Chord Hold."
. Press the Enter button to get the Chord Hold display.
Use the Value buttons to turn the setting on or off.
mead Rode
OH
If the setting is not modified for a time, the basic display will reappear automatically.
af

a2
ww
Save User Programs on disk Eight User Programs can be saved in the KR-4700/5000, and these eight programs can be saved to
disk as one set. If you wish to use User Programs that have been saved to disk, you must load them
into internal memory.
Saving User Programs (Save)
The disk on which the User Programs are to be saved must be formatted by the KR-4700/5000. You
may also use a disk that contains KR-4700/5000 performance data or Standard MID! File data.
. Insert the disk on which you wish to store the User Programs into the disk
drive.
. Press the Utility button to get the Utility Menu display.
Use the Cursor buttons to select "User Program."
Preogran +
. Press the Enter button to get the User Program Menu display.
If the lower line does not read "Save," use the Cursor buttons to select it.
te rong aim: Plea
+
. Assign a name for the User Programs. The procedure is the same as when assigning a name to performance data («*p.48).
. After you have assigned a name, press the Enter button to execute the Save
operation. When saving is complete, the basic display will reappear.
* To quit without saving, press the Exit button three times.

@ Loading User Programs (Load) When you wish to use User Programs that have been saved to disk, you must load them into internal
memory using the following procedure. Remember that this will overwrite the User Program data that is already in internal memory, if you
wish to keep this data, save it to disk first.
1. Insert the disk containing the User Programs you wish to load into the disk drive.
2. Press the Utility button to get the Utility Menu display.
3. Use the Cursor buttons to select "User Program."
4. Press the Enter button to get the User Program Menu display.
5. Use the Cursor buttons to select "Load."
7. Use the Value buttons to select the desired set of User Programs.
8. Press the Enter button to execute the Load operation. When loading is complete, the basic display will reappear.
* To quit without loading, press the Exit button three times.
23

Bt
@ Deleting User Programs from disk (Delete) This operation deletes a specified file of User Programs from disk.
1. Insert the disk containing the User Programs you wish to delete into the
disk drive.
2. Press the Utility button to get the Utility Menu.
3. Use the Cursor buttons to select "User Program."
4. Press the Enter button to get the User Program Menu display.
5. Use the Cursor buttons to select "Delete File."
7. Use the Value buttons to select the set of User Programs you wish to
delete.
8. Press the Enter button to execute the Delete operation.
When deletion is complete, the basic display will reappear.
* To quit without deleting, press the Exit button three times.

TAXe|(Osimial>mvce)|o|aa\sme) mi iaiomaa(s1iceaeaar=: The volume of the metronome can be adjusted as follows.
* This setting is retained in memory even if the power is turned oft.
1. Press the Utility button to get the Utility Menu display.
2. Use the Cursor buttons to select "Metronome Level."
4. Use the Value buttons to adjust the volume (0—10).
If the setting is not modified for a time, the basic display will reappear automatically.
gs

BG
Xo |i simuiatsmels ello mereaicenis The contrast of the LCD display screen can be adjusted as follows.
* This setting is retained in memory even if the power is turned off.
1. Press the Utility button to get the Utility Menu display.
2. Use the Cursor buttons to select "LCD Contrast."
3. Press the Enter button to get the LCD Contrast display.
4. Use the Value buttons to adjust the contrast (1—10).
If the setting is not modified for a time, the basic display will reappear automatically.

Uumiatsmnelaliare The tuning of the entire KR-4700/5000 can be adjusted as follows. Use this function to adjust the tun-
ing when you will be performing with other instruments.
* This setting is retained in memory even if the power is turned off.
1. Press the Utility button to get the Utility Menu display.
2. Use the Cursor buttons to select "Master Tune."
3. Press the Enter button to get the Master Tune display.
4, Use the Value buttons to adjust the tuning (415.3—466.2 Hz, 0.1 Hz
units).
If the setting is not modified for a time, the basic display will reappear automatically.
” If you simultaneously press the Value + and - buttons, the standard tuning (A4 = 440 Hz) will be
reset.
&7

BS
Restoring the factory settings The following procedure will reset all memory data of the KR-4700/5000 to the original factory set-
tings.
* Before you perform this operation, make sure that there is no disk in the disk drive.
While holding down the Edit button, simultaneously press the Load button
and the Save button; the factory setup will be loaded. The following display will appear for a time, and then the basic display will reappear.

[Siate/e)i~ gona e) el-lare eros iicelvlel(-calefejilare
@ Power does not come on when the Power switch is pressed. * The power cable is not connected correctly (tp.13).
@ No sound. * The Voiume slider is turned down.
* Headphones are connected. * Volume has been turned down or turned "OFF" (muted) with the Part Balance buttons (@p.71).
* For the KR-5000, make sure that the speaker cable of the stand (KRS-5000) is connected correctly.
(ewp.106)
@ Melody notes drop out. * The KR-4700/5000 can produce up to 28 notes simultaneously. During a Style performance or
when playing back performance data, this number may be exceeded. If this happens, notes will be dropped.
@ Pedals do not work. * The pedal cable is not connected correctly (**p.105, 106).
@ Cannot select the desired Tone or Music Style. ¢ The method of selecting Tones or Music Styles is ditferent depending on whether you are in
Standard mode or in Expansion mode. Make sure that you are in the appropriate mode to select the
Tone or Music Style you want. (Tones: (*p.17), Music Styles: (#p,22))
¢ User Program is turned On when a Music Style is not selected («'p.42).
@ Keys in the lower area do not produce sound. * The Part volume has been turned down or “OFF" (muted) with the Part Balance buttons (6 p.71).
* During Style performance, Sync is off (ep.34).
* When a split keyboard mode is selected, the Lower On/Off button and Manual Bass On/Off button indicators are dark (e#p.37,38).
* When layer and split keyboard modes are selected simultaneously, the Manual Bass On/Off button indicator is dark (F*p.38).
@ During Style performance, releasing the lower keyboard area makes the percussion instruments play alone. ¢ Chord Hold is turned off (#*p.81).
@ During Style performance, releasing the lower keyboard area makes the accompaniment stop. * Sync Intelligence is turned on (##"p.34).
@ When the lower keyboard area is released, notes continue sounding. * Lower Hold is turned on (##°p.32).
@ Two or more notes sound when just one key is pressed. * Melody Intelligence is turned on (F#p.33).
* Chord intelligence is turned on (#*p.30).
a4

qo
@ Sounds are played together. * The Keyboard Mode is set to Layer. («*p.37)
@ The Music Style sounds wrong. * Notes in the chord are not being played at the same time.
* Chord Intelligence may be off (when you assumed it was on) and you failed to play complete
chords. (ep.30)
@ Pitch is incorrect. * Transpose is being used (#*p.74).
* Tuning is incorrect (5p.87).
@ When a recorded Style performance is played back from the middle, the
accompaniment is silent for a time. * Each accompaniment phrase is played in blocks of several measures. If playback begins from the
middle of a block, the accompaniment will be silent until the beginning of the next block.
@ Drums do not sound during Style performance * The Original accompaniment in Music Style "B-1 Pop" ("84 Pop4" in Style Expansion mode) does
not contain any percussion sounds.
@ After playing back performance data, the sounds appear to be different. * When you play the keyboard after playing back performance data other than that of the KR-
4700/3000 itself, the performance data which was played back may affect the way the Tones sound, etc. Refer to < After playback ends > (e#p.51) for the appropriate action.

ID) elenman=suelel=s When a message appears in the display, refer to this list and take the appropriate action. Messages are
listed here in aiphabetical order.
Cause:
You selected a Music Style with a different time signature.
Action: It is not possible to change to a Music Style with a different time signature. Select a Music Style
with the same time signature.
Cause: You attempted to save KR-4700/5000 performance data on a disk containing Standard MID! File
data. Or, vice versa.
Action: Press the Exit button, and then insert a new disk or a disk containing the same type of pertor-
mance data.
Cause: This operation requires that the performance data in internal memory be erased. Is it ok to erase
the performance data from internal memory?
Action: If it is ok to erase the data, press the Enter button. If you do not wish to erase the data, press the
Exit button, and then save the data to disk.
Cause:
There are various restrictions on handling data other than KR-4700/5000 performance data, and
this display indicates that the attempted operation is not possible.
SMF Music Data (format 1) cannot be loaded into internal memory.
SMF Music Data (format 0) and ism music data can be loaded into internal memory. However, the performance data cannot be edited other than by Replace Recording the upper performance on track 1.
Action: Press the Exit button to cancel the operation.
Cause: There is no disk in the disk drive.
Action: Press the Exit button, and insert a disk into the disk drive.
Cause: The disk write protect tab is in the Protect position.
Protestiedd., Action: Move the disk write protect tab to the Write position.
Cause: The disk is full, and cannot store any more data.
Action: Press the Exit button. Then either use another disk, or delete unneeded data from the disk.
qI

q2z
Lad
“OR er
ber
G1
Cause: * This disk is a master clisk (a disk on which data cannot be over-written}. Data cannot be stored
on this disk. * The performance data you attempted to save contains data which prohibits illegal copying.
This performance data cannot be saved to disk.
Action: Press the Exit button to cancel the operation. if the disk was a master disk, exchange it for a dif-
ferent disk and save the data.
Cause: Disk data could not be successfully processed.
Action: Press the Exit button, and then re-insert the disk (or exchange the disk) and try the operation
once again.
Situation: When playing back performance data other than that of the KR-4700/5000 itself, you pressed a
non-functioning button.
Cause: This card cannot be used by the KR-4700/5000.
Action: Press the Exit button, and insert an appropriate Music Style card (TN-SC2 series).
Cause: This disk has been used by another device.
Action: Hf you wish to format the disk, press the Enter button.
If you wish to insert a different disk, press the Exit button to cancel the operation.
Situation: This message warns that the internal memory is nearly full, and that you will soon be unable to
continue recording.
Cause: Internal memory is full and recording or loading has been stopped.
Action: Press the Exit button.
Cause: Since the power was not turned on for approximately 1 month, the settings in internal memory
(User Programs, etc.) were lost.
Action: The factory settings will automatically be restored, and then the basic display will reappear.
Cause: Since internal memory does not contain performance data, the operation is not possible.
Action: Press the Exit button.

Cause:
The disk does not contain performance data.
Action:
Press the Exit button, insert a disk which contains performance data, and retry the operation.
Cause:
The disk does not contain User Program data.
Action:
Press the Exit button, insert a disk which contains User Program data, and retry the operation.
Cause:
Data with the same name exists on the disk.
Action:
If you wish to overwrite the old data {i.e., replace it with the new), press the Enter button. If you
wish to save it separately, press the Exit button, change the name (**p.48), and then save it.
Cause: You have not selected a track to re-record.
Action:
Press the Exit button, and then specify the track to re-record.
Cause:
This performance data cannot be converted into a Standard MIDI File.
Action: Press the Exit button to cancel the operation.
Cause: This is a new disk which has not been formatted.
Action: If you wish to format the disk press the Enter button. If you do not wish to format the disk press the Exit button, and then remove the disk.
42

* Some Tones are present in both the Tone Standard mode and Tone Expansion modes. These overlapping Tones are indi-
cated in parentheses ().
@ Tone Standard mode Group A Az] Piano 1
A-2 Piano 2
A-3 Harpsi
A-4 E.Piano 1
A-5 — E.Piano 2
A-6 Vibes A-7 — E.Organ
A-8 — Pipe Organ (A34)
Group 8
B-1 Strings (A71)
B-2. Choir
B-3 Brass
B-4 Sax (B12) B-5 Flute (B22) B-6 = A.Guitar
B-7 — E.Guitar (A43)
B-8 Fantasia (B41)
@ Tone Expansion mode Piano All Piano 1
Al2_ Piano 2
A13 Piano 3
Al4_— Honky-Tonk
A15_ E. Piano 1
Al6_— E. Piano 2
Al7 — Harpsichord
A18 Clav.
Bass A51_ Wood Bass A52_— Fingered Bs.
A53_ Picked Bs.
A54_— Fretless Bs.
A55 Slap Bass 1 A56_— Slap Bass 2
AS7 Synth Bass 1
A58 — Synth Bass 2
Reed B11. Soprano Sax
B12 Sax (B-4)
B13 Tenor Sax
Bi4 Baritone Sax
B15 Oboe B16 — English Horn
B17 Bassoon
B18 = Clarinet
Synth SFX BS ce Rain
B52. Soundtrack
B53 Crystal
854 Atmosphere
B55 Brightness B56 Goblin B57 — Echo Drops B58 = Star Theme
q4
Chromatic Pere Organ A21_— Celesta A319 Organ 1
A22. Glockenspie! A32 Organ 2
A23 Music Box A33 Organ 3 A24 Vibraphone A34 Pipe Organ (A-8)
A25 Marimba A35 Reed Organ
A26 Xylophane A36— Accordion Fr
A27_ Tubular-Bell A37.— Harmonica
A28 — Santur A38 — Bandneon
Strings / Orchestra Ensemble
A61 Violin A71__ Strings (B-1)
A62_ ‘Viola A72__ Slow Strings A63— Cello A73 Syn. Strings 1 A6é4 —Contrabass A74_— Syn, Strings 2
A65 Tremolo Str. A75— Choir Aahs
A66 _‘Pizzicato Str. A76_— Voice Oohs A67 Harp A77 — SynVox
A68 Timpani A78 Orchestra Hit
Pipe Synth Lead B21 Piccolo B31 Square Wave
B22 Flute (B-5) B32 Saw Wave B23. Recorder B33. Syn. Calliope
B24 Pan Flute B34 — Chiffer Lead
B25 Bottle Blow B35 Charang
B26 Shakuhachi B36 = Solo Vox B27. Whistle B37 5th Saw Wave
B28 Ocarina B38 Bass & Lead
Ethnic Percussive B61 Sitar B71 Tinkle Bell B62 Banjo B72 Agogo
B63 Shamisen B73 Stee! Drums B64 Koto B74. Woodblock B65 Kalimba B75 Taiko B66 Bag Pipe B76 Melo. Tom 1 B67 ‘Fiddle B77 Synth Drum
B68 Shanai B78 Reverse Cym.
Guitar
A41 A42 A43 A44 A45 A46 A47 A48
Brass
A81
AB2
A83 A84
A85 A86
A87
Nylon-str. Gt.
Steel-str. Gt. E.Guitar (B-7)
Clean Gt. Muted Gt.
Overdrive Gt.
Distortion Gt.
Gt. Harmonics
Trumpet
Trombone
Tuba Muted Trumpet
French Horn
Brass 1
Synth Brass 1
A88 = Synth Brass 2
Synth Pad
B41 Fantasia (B-8)
B42 Warm Pad
B43 Polysynth B44 Space Voice
B45 Bowed Glass
B46 = Metal Pad B47 — Halo Pad
B48 Sweep Pad
SFX
B81 Gt. Fret Noise
B82 Breath Noise
B83 Seashore
B84 Bird B85 Telephone 1 B86 Helicopter
B87 Applause
888 Gun Shot

Music Style list * Some Music Styles are present in both the Music Style Standard mode and Music Style Expansion modes. These overlap-
ping Music Styles are indicated in parentheses ().
@ Music Style Standard mode Group A Music Style
A-1 Big Band A-2 Rock
A-3. Swing
A-4— Country
A-5 — Charleston
A-6 Dance (15)
A-? Funk (16}
A-8 Gospel
Group B Music Style
B-1 Pop (84) B-2 8 Beat (21)
B-3 16 Beat (25) B-4 Slow Rock B-5 Bossa Nova
B-6 = Rhumba (56) B-7 = March
B-8 Slow Waltz
Beat
aA 4/4 4/4 4/4 4/4
4/4 4/4 6/4
Beat
4/4 4/4 4/4 4/4 4/4 4/4 4/4 3/4
Tempo
160
102
176
125
212
120
112
152
Tempo
54
64
82
60
140
120
120
75
intro (measures) Ending (measures)
bhp hOOHK BWR N YN
Intro (measures) Ending (measures)
BNO AH UN ban wh
Upper Tone (Split Arranger mode) A-1 Piano 1
A-1 Piano 1
A-6 — Vibes
A37 Harmonica
B18 Clarinet
B33 Syn. Calliope
A33 Organ 3
A33 Organ 3
Upper Tone (Split Arranger mode}
A-1 Piano 1
A-1 Piano 1
A-4 — E.Piano 1
A-1 Piano 1
B-5 Flute
A-6 Vibes A82 Trombone
A-1 Piano 1
* The Original accompaniment in B-1 "Pop (84)" does not contain any percussion sounds.
@ Music Style Expansion mode Group A Music Style
V1 Rock 12 Rock 2
13 Rap
14 House
15 Dance (A-6)
16 Funk (A-7} 17 Funk 2
18 Fusion
21 8 Beat 1 (B-2)
22 8 Beat 2
23 8 Beat 3
24 8 Beat 4
25 16 Beat (B-3) 26 16 Beat 2
27 16 Beat 3
28 16 Beat 4
Beat
4/4 4/4
4/4 4/4 4/4 4/4 4/4
4/4
4/4 4/4 4/4 4/4 4/4 4/4 4/4 4/4
Tempo
114
118
110
120
120
112
96 127
64
60
80
68
82
74
100
80
Intro (measures) Ending (measures)
4 5
wehbe eb Nw Ww ww
“fe bwn as WOW Pb ft
Upper Tone (Split Arranger mode}
A33 Organ 3 A46— Overdrive Gt.
Al3 Piano 3
B32 Saw Wave
B33 Syn. Calliope
A339 Organ 3
A87 Synth Brass 1
B-7 E.Guitar
A-1 Piano 1
B-6 = A. Guitar
B-7 — E.Guitar
A-5 — E.Piano 2
A-4 — E.Piano 1
B-6 = A.Guitar
Al2_ Piano 2
A33 Organ 3
qs

qb
Music Style
31 Boogie
32 Rock‘n'roll 33 Twist
34 R&B
35 Country Ballad
36 Slow Rock 2 37 Ballad 1
38 Ballad 2
41 Slow Swing 1
42 Slow Swing 2 43 Swing
44 Foxtrot
45 Big Band
46 Shuffle 47 Swing Waltz 48 Dixieland
31 Bossa Nova
52 Samba
53 Latin
54 Salsa
55 ChaCha 56 Rhumba (B-6)
57 Mambo
58 Tango
61 Country Waltz
62 Waltz 63 March 64 Polka 65 Baroque
66 Country
67 Beguine
68 Reggae
71 Pasodoble 72 Kars
73 Anadolu
74 Arab
75 Malfouf
76 Keroncong
77 Trot
78 Enka
81 Pop 1
82 Pop 2
83 Pop 3
84 Pop 4 (B-1)
85 Pop 5
86 Pop 6
87 Rock'n‘roll 2 88 jazz Waltz
Beat
4/4 4/4 4/4 4/4 4/4 4/4 afd
4/4
4/4 4/4 4/4 4/4 4/4 4/4 3/4 4/4
4/4 4/4
4/4 4/4 4/4
4/4 4/4 4/4
3/4 3/4 4/4 4/4 4/4 4/4 4/4 4/4
4/4 44+5/8 4/4 4/4 4/4 4/4 4/4 4/4
4/4 4/4 4/4 4/4 4/4 4/4 4/4 6/4
Tempo
162 171
164
120
80
64
120
120
60
08
132
80
150
160
62
132
132
120
108
120
120
1
120
72
80
120
80
54
64
120
160
160
Intro (measures) Ending (measures)
2 2
FELON EON Se eoN be oh BUWWNNDW WWNONWY
NPNWNHE EE Nw Ww bu
NVNNAN A
WOANWNHNEU
Naepo RONNN Ww =
UNuUAnnNnwny
NNNNN BU fb te
Upper Tone (Split Arranger mode} B-4 Ad6
A33
A33 B-7 A-4
A-1
A37
B-7
A-1
A-6
A-1
A81
Al4
A84
B18
B-6
B73
ABI
A-6
A81
A-6
B-3
A38
A33 A36
AB2 A38
A-3
B62
B-6
B73
ABI
B15
A32
B-4
B-3
B-5
826
B64
A-T
A-1
A-4
A-1
B33
A-t
A-7
B-7
* The Original accompaniment in 84 "Pop4 (B-1)" does not contain any percussion sounds.
Sax
Overdrive Gt.
Organ 3
Organ 3
E.Guitar
E.Piano 1
Piano 1
Harmonica
E.Guitar
Piano 1
Vibes Piano 1
Trumpet
Honky-Tonk
Muted Trumpet
Clarinet
A. Guitar
Steel Drums
Trumpet
Vibes Trumpet
Vibes
Brass
Bandneon
Organ 3 Accordion Fr
Trombone
Bandneon Harpsi
Banjo A.Guitar
Steel Drums
Trumpet
Oboe
Organ 2
Sax
Brass
Flute
Shakuhatchi
Koto
Piano 1
Piano 1
E.Piano 1
Piano 1
Syn. Calliope
Piano 1
€.Organ
E.Guitar

Drum Set list _ Note No, .STANDARDIJAZZ ROOM POWER ELECTRONIC TR-808 BRUSH ORCHESTRA
Hign Q Closed Hi-Hat [EXC1! 28 Stap Pedal Hi-Hal [EXC1}
Scratch Push Open Hi-Hat [EXC1} 28 Scratch Pull Ride Cymoai 34 | Sticks ' Square Click = Metronome Click el 22 Metronome Beil
35 Kick Drum 2 Concer 8D 2 dole Kick Drum 1 MONDO Kick Elec BD ‘808 Bass Drum Concent 8D 1 —Ea Side Stick 808 Rim Shot 38 Snare Drum t Gated So Eiec SO 808 Snare Drum Brush Tap Concert SD —(e Hand Clap Brush Sian —Castanets 40 Snare Orum 2 Gated SD Brush Swit Concert SD
Low Tom 2 RoomLowTom2 Room Low Tom 2 Etec Low Tom 2 808 Low Tom 2 Timpani F a1 Closed Hi-Hat {EXCt] 808 CHH [EXC1) Timpani F# | 43 Low Tom 1 Room Low Tom 1 Floom Law Tom ¢ Elec Low Tam 4 808 Low Tom 1 Timpani G
Pedal Hi-Hat [EXC1} 808 CHH {EXC1} Timpani G# \45 Mid Tom 2 Room Mid Tom 2 Room Mid Tom 2 Elec Mid Tom 2 808 Mia Tom 2 Timpani A (Zo Open Hi-Hat {EXC1} 808 OHH {EXC1} Timpani A# a7 Mid Tom 4 Room Mid Tom 4 Room Mid Tom 1 Elec Mid Tom 1 808 Mid Tom 1 Timpani B
alae | High Tom 2 Room Hi Tom 2 Fioom Hi Tom 2 Elec Hi Tom2 808 Hi Tom 2 Timpani ¢ ——En Crash Cymbal 1 808 Cymbat Timpani ct \50 High Tom 1 Room Hi Tom 1 Room Hi Tom 1 Elec Hi Tom 1 808 Hi Tom 4 Timpani d —im Ride Cymbal 1 Timpani d# 52 Chinese Cymbat Reverse Cymbal’ Timpani a [| Ride Beli Timpant f (53 : — Tambourine \55 Splash Cymbal -—(eoel Cowbell 808 Cowbell 57 Crash Cymbal 2 Concert Cymbal 2 —E Vibra Slap 59 Ride Cymbai 2 Concert Cymbat 1 eee
caleo High Bongo Low Bongo
62 } Mute High Conga 808 High Conga (;, Open High Conga 808 Mid Conga 64 Low Conga 808 Low Conga ———| High Timpale
a6 _| Low Timbale 67 | High Agogo — ml Low Agogo
69 Cabasa
i Maracas 808 Maracas 74 | Shon Hi Whistle (EXC2}
csi72 Long Low Whistle [EXC2]
-—ez Shon Guiro [EXC3]
74 | Long Guiro {EXC3} ioe 75_| Claves 808 Ciaves {76 High Wood Block
Low Wood Black 77 me 7e | Mute Cuica (EXC4] 79 Open Cuiea (EXC4] {iE Mute Triangie (EXCS} Bt Open Triangle {EXC5}
83 Jingle Belt celes Belltree -— {ice Castanets 86 Mule Surdo (EXC8} a8? Open Surdo [EXC6} 88 ae Coase Sau ee eee, Soe Appiause*
Blank: Same per ussion mstruments ay the Standart! Set = no sound FERC] 2 ill not sound simuftanecushy with other nercassion instruments of the same number
A. percussian instrument that uses we Gaices call other nercussien instruments use une voices
wt

43
(45
47
c3
Scratch Push
2 | Seratch Pull Sticks
(ea Square Click 1 Metronome Click
er Metronome Bell
Guitar sliding finger
Guitar cutting noise (down)
Guitar cutting noise (up) 48
i50 String siap of double bass Fi. Key Click
52
ha “=a
Laughing
Screaming
Punch
Heart Beat
Footsteps1
57 | Footsteps2
Applause’
59 H poet Creaking
oor alae Scratch
62 Windchime* Car-Engine
{64 | Car-Stop Car-Pass
° Car-Crash” 67 Siren
Train
69 Jetplane”
Helicopter
a Starship’
c5\72
76
79
|
Gun Shot
el 73_| Machine Gun Lasergun
fm 75_| Explosion” Dog
Horse-Gallop
" Birds" Rain*
{ea Thunder 81 Wind
— i Seashore
83 Stream”
Bubble” Ce\84
a percussion instrument that uses hyo voices fall other percussion instruments use one voices
9%

a
Si lecekisi : @ : Chord Intelligence On
C8 Maj
TNC ALT TN TEE C#Maj7—s—s—s—<isiésC Ma
TOE A WE EN cemin —i‘“‘“‘zi Mi ssi Emin
in7 C# min7 D min7 Ebmin7
ALUMI Le
C# dim
FOAM ALUIETEY UET TEAT

E Maj7
Fe dit

@ : Chord Intelligence On ® : Chord Intelligence Off
AbMaj A Maj BbMaj
CULL LULL 8 Maj :
AbMaj7 A Maj7 BbMaj7
—
Ab7 A? Bb7
UIA UILLILL LUI
TECTETT TEP EN WET o FA
Abmin Amin Bbmin B min
iH | | | s/ isi le I LI Jel | 3 Jel |
Abmin7 Amin? Bbhmin7 B min?
| | ° | eer ie i T ofel Te e e| je; je] Je t i tel | e| je e
Atdim Adim Bbaim 8 dim
i | EUICHT TC A Te Tn
10!
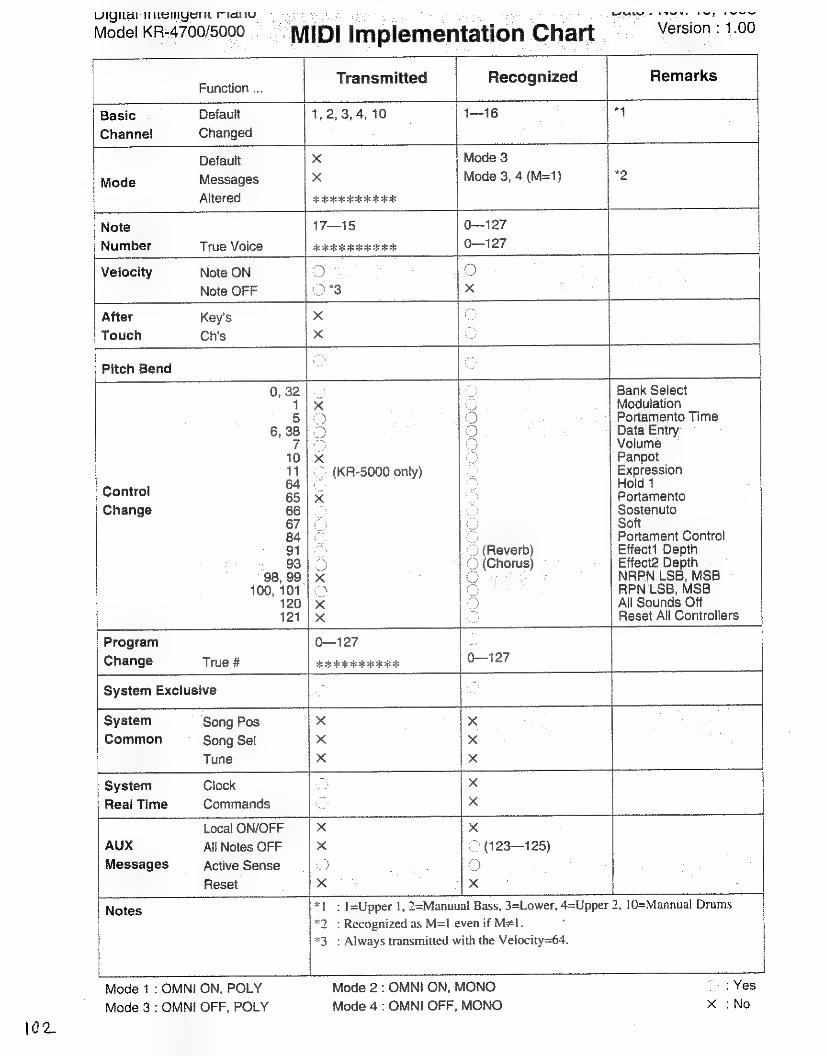
(02
VIGIL MENIYerh manu eA EN ry re
Model KR-4700/5000 MIDI Implementation Chart Version : 1.00
: Transmitted Recognized Remarks Function ...
Basic Default 1,2,3,4, 10 | 1-16 4 Channel Changed
Default x Mode 3
| Mode Messages x Mode 3, 4 (M=1) "2
Altered Se yess kook
Note 17—15 OQ—127
| Number True Voice | aco seo oe ale ok aca O—127 |
Velocity Note ON 2) ®)
Note OFF "3 x
After Key's x a
Touch Chis x
Pitch Bend
0, 32}. > 3 Bank Select 11x ue Modulation 512) ®) Portamento Time
6, 38 | 2) QO Data Entry. rane * Volume —
10 |x Panpot 11 | <> (KR-5000 only) ‘ Expression
Control 64 | 5 Hold 1 651 x Portamento
Change 66 Sostenuto 67 oO Soft 84 oO Portament Control 91). _ (Reverb) Effect Depth 93 | >> Chorus) Effect2 Depth
98,99 | x NRPN.LSB, MSB 100, 101 | > RPN LSB, MSB
120 |x All Sounds Off 121 1)x Reset All Controllers
Program 0—127 ‘
Change True # Aefeasak ok fescseok O—127
System Exclusive
System Song Pos x x Common Song Sei x x
Tune x 1x
System Clock |x
Real Time Commands x x |
Local ON/OFF | X x AUX All Notes OFF x <> (123—125)
Messages Active Sense ro) 2} Reset | x x
Notes *| :1=Upper 1, 2=Manuual Bass, 3=Lower, 4=Upper 2, 10=Mannual Drums
*2 .: Recognized as M=1 even if M#1.
*3 : Always transmitted with the Velocity=64.
Mode 1 : OMNI ON, POLY
Mode 3 : OMNI OFF, POLY
Mode 2 : OMNI ON, MONO
Mode 4 : OMNI OFF, MONO

Specifications | KR-4700/5000: Digital Intelligent Piano (Conforms to General MIDI System Level 1 and GS Format)
@ Keyboard
88 keys ; Velocity sensitive and Piano touch
@ Parts
Upper 1/2, Accompaniment 1/2/3, Accumpaniment Bass,
Accompaniment Drums, Manual Bass, Manual Drums
@ Maximum Polyphony
28 voices
@ Tones
Standard mode 16
Expansion mode :128
@ Music Styles
Standard mode —:16 Expansion mode :64
* Music Style Cards (sold separately; TN-SC2 series) can
provide additional Music Styies.
@ Manual Drum Sets
9 sets (including SFX set)
@ User Programs
8
@ Effects
Reverb, Chorus
@ Composer
Tracks S46
Songs 4
Note Storage : approx. 20,000 notes
Tempo : Quarter note= 20 to 250 beats per minute
Resolution : 120 clock/quarter note
Recording Method —: Realtime
@ Storage :3.5 inch Micro Floppy Disk
Disk Format : 720K bytes (2DD), 1.44M bytes (2HD}
Songs : max. 56 (720K bytes}, max. 99 (1.44M bytes)
Note Storage : approx. 80,000 notes {720K bytes),
approx. (1.44M bytes)
@ Disk Drive
3.5 inch Micro Floppy Disk Drive (2DD/2HD)
@ Display 16 characters, 2 lines (backlit LCD}
@ Connectors
Audio Input Jacks (L (MONO) / R)
Audio Output Jacks (L (MONO) / R)
Phone jack (stereo) MIDI connectors (IN, QUT}
Pedal connector
AC Inlet
Speaker connector (KR-5000)
Expression connector (KR-5000)
@ Pedals
3
Left Pedal and Center Pedal have assignable functions.
@ Speakers
KR-4700 (body) =: 20cm x 2
KR-5000 (body): 8cm x 2
{stand} : 20cm x 2, 8cm x 2
@ Rated Power Output KR-4700 :25W x2 KR-5000 : 40W x 2
@ Power Supply AC117V, AC230V or AC240V
@ Power Consumption
KR-4700 98W [ACI17Vi/76W (AC230V/
76W (AC240V)
KR-5000 » T20W (AC117V/92W (AC230V)/
92W IAC240V)
@ Finish
Simulated Brazilian Rosewood
io>

@ Dimensions
KR-4700 : 1434 {W) x 545 (D) x 206 (H} mm (including Music Rest)
56-1/2 (W) x 21-1/2 (D) x 8-1/8 {H) inches
Stand yT422 (W) x 455 (D) x 638 (H) mm 56 (W) x 18 (D) x 25-1/8 (H) inches
Total 21434 (W) x 545 (D} x 844 (H) mm
56-1/2 (W) x 21-1/2 (D) x 33-1/4 (H) inches
KR-5000 :1450 (W) x 545 {D} x 206 (H) mm (including Music Rest)
57-1/8 (W) x 21-1/2 (D) x 8-1/8 (H) inches
Stand 1415 (W) x 529 (D) x 638 (H) mm
55-3/4 (W) x 20-7/8 (D) x 25-1/8 (H) inches
Total 1450 (W) x 545 (D) x 844 (H) mm
57-1/8 (W) x 21-1/2 (D) x 33-1/4 (H) inches
@ Weight
KR-4700 -°53.9kg/ 118 Ibs 14 oz Stand : 17.4kg / 38 Ibs 6 oz Total :71.3kg / 157 lbs 4 0z
KR-5000 : 55.1kg /121 lbs 8 oz Stand : 39.4kg / 86 Ibs 14 oz
Total : 94.5kg / 208 Ibs 6 oz
@ Accessories
Owner's Manual Tone/Music Style List (Expansion mode)
Floppy Disk (MF-2HD) Manual Drum Template
Power Cord
@ Options
Music Style Card (TN-SC2 series)
" In the interest of product development, the specifications and/or appearance of this product are subject to change without
prior notice.
1o#

Lassiczanleliiare @ Check the parts
Before you begin assembly, check to see that you have ail the parts. Also make sure you have a philips (+) screwdriver.
4
2
3
4
rscrew ‘a’ (M4x10mm)x1
screw ‘b' (M4 x 13mm) x4 o screw ‘'c! (M4 x 25 mm) x 4
z screw 'd' (M4 x 60 mm) x + : knob bolt x 2 : cable holder x 1
: side board (left) :side hoard (right)
: pedal board
pear board OnG>
OuUbwh
@ Assembly procedure
* Tighten ail screws securely, and work on a stable and flat surface.
" During assembly, be careful not to pinch the pedal cable or power cable.
1, Assembling the stand (KRS-4700) (1) Use screws 'd' (M6 x 60 mm) to fasten the leit and right
side boards (with the metal fixtures facing inward) to the pedal board.
(2) As shown in the diagram, position the rear board with the woodgrain side facing forward.
(3) From the front, use screws 'b' (M4 x 15 mm) to fasten the rear board to the metal fixtures on the inside of the side
boards. From the back, use screws 'c' (M4 x 25 mm) to fasten it to the pedal board.
screws 'd’
7
screws ‘b
* Assembly will go smoothly if you first assemble the unit without tightening the screws all the way. Tighten all the screws when the stand is fully assembled.
the stand (KR-4700) 2. Place the piano on the stand
(4) Align the screws on the bottom of the piano (one each on
left and right sides) with the metal fixtures on the side
boards, and pull the piano toward you to hook the screws into the fixtures.
(5) Tighten the knob bolts to fasten the piano to the stand
(one each on the left and right).
” When lifting the piano, grasp the front and rear of the piano making sure not to pinch your fingers.
2 knab bolt BA
3. Connecting the cables
(6) Connect the pedal cable to the Pedal connector.
(7) Fasten the pedal cable with the cable holder, and use screw ‘a’ (M4 x 10 mm) to attach it to the rear board.
(8) Connect the power cable to its connector on the piano, and connect it to an electrical outlet.
(7) screw ‘a’
4. Adjuster knob
(9) Lower the adjuster (by rotating it to the right) located
under the pedal board so that it contacts the floor. If you
have placed the piano on a carpeted tloor, extend it a bit further.
When moving the unit
Disconnect the power cable and raise the Adjuster knob
located on the bottom of the stand. Then iift the unit taking care not to injure yourself.
jos

106
ssembling the s @ Check the parts Before you begin assembly, check to see that you have all the
parts. Also make sure you have a philips (+) screwdriver and
a coin.
OM
°
rscrew ‘al (M4 x 10mm) xi
screw 'b' (M4 x 15 mm) x 4 sscrew 'c’ (M4 x 25 mm) x 4
i screw 'd' (M6 x 70 mm) x 4 screw 'e' (M6 x 20 mm) x 6
: flat face screw x 2 : cable holder x }
: side board (left) : side board (right) : pedal board
: rear board speaker box MONMD>
NOU BW
@ Assembly procedure * Tighten ail screws securely, and work on a stable and flat
surface. * During assembly, be careful not to pinch the pedal cable
or power cable.
1. Assembling the stand (KR-5000)
(1) Use screws ‘d" (M6 x 70 mm) to fasten the left and right
side boards (with the metal fixtures facing inward) to the
pedal board.
Position the speaker box as shown in the diagram.
Use screws 'e' (M6 x 20 mm) to fasten the speaker box to
the left and right side boards (three from the inside of the
side boards, and two from the bottom).
Use screws 'b’ (M4 x 15 mm) to fasten the rear board to
the metal fixtures of the Speaker box. Then use screws ‘c'
(M4 x 25 mm) to fasten it to the pedal board.
oR
=
Say Screw ‘d!
and (KIk-5000) * Assembly will go smoothly if you first assemble the unit
without tightening the screws all the way. Tighten ail the
screws when the stand is fully assembled.
2. Place the piano on the stand
15) Align the screws on the bottom of the piano (one each on
left and right sides) with the metal fixtures on the side
boards, and pull the piano toward you to hook the screws
into the fixtures.
Tighten the flat face screws to fasten the piano to the
stand (one each on the left and right). Use a coin to tight-
en the flat face screws.
(6
* When lifting the piano, grasp the front and rear of the
piano making sure not to pinch your fingers.
flat face screws
3. Connecting the cables
(7) Connect the speaker box cable to the Speaker connector.
(8) Connect the pedal cable to the Pedal connector.
(9) Fasten the pedal cable with the cable holder, and use
screw ‘a’ (M4 x 10 mm) to attach it to the speaker box.
(10) Connect the power cable to its connector on the piano,
and connect it to an electrical outlet.
(8) my
2 ~N ae
screw ‘a’ ae
4. Adjuster knob
(71) Lower the adjuster (by rotating it to the right) located
under the pedal board so that it contacts the floor. If you
have placed the piano on a carpeted floor, extend it a bit
further.
When moving the unit
Disconnect the power cable and raise the Adjuster knob
located on the bottom of the stand. Then lift the unit taking
care not to injure yourself.

ACCOMP. eects cere reenernees
Advanced (Arrangement) .... 5
AIESORB PLAY se. sssegeniescvepace overs edie ecesstatdindenscvancvenveistensticane’
PAN BORG jisstesecseteaciil teense vteesaeaceds beech adiedare tetvele vce 20
B
Bank
Music Style a ..cciseeccee ova esa tices aateen de 22
TORO eet ie te ek As tet Ratt celal thes tek tases 18
Basic (ArranBeMent).........cseeeccsceccseecereneneseesesceecseseeensesees 24
Basic Display
Beat Indicator
Brilliance.
Card Slot.
Chord... a
GROVE GIG se. csisgis8, sobytedededociesqntsbascetsassisapadessapacsssdesendapiteed 81
Chorel intelligence... eee ecessecssetenesesnereseerseeceneeeeeeeeeensansnes 30
Chord Sse cisecuvinseehesatebecsszsavcce art artiedecscuuaeeentutiees 73
Count-in (Metronome)
D
DAMPSrisivsvesseuts Sysnscishossiessbieseteossteitenotsedensaattonesyissbetadeassbesee 19
Delete
Performance Data from Disk
Performance Data in Internal Memory
USOr Propranti reese. vissiusarefatiioiasssare hs satgidiecirariicanaiateiad
DOME SON Bs ass ieieercsh rd ieritan i akibaR eines edk Sock 15
DISK DFIVE SA sAt wees culucanccei Sian edit a sitess ant deads capstan ates 8,47
DIS Pla Vi. tesacseserteesoee dete yh cayacedoaace tateedieteybianbates Be rowieecre tices 17
E
Edit
COPY. ccsaveivacsis dius spots sebonthanhewaie un dienst db aenge reminders
Deletes wz asesechivs hens Asad beatin cavasee heed teat on
ELAS Osis geese Pelee sagale Itoh leuaibeagtecPepeoutestacsureseseanions
insert...
Quantize...
Effect
GHOPUS severe svesssaaceedetevionnevanecdsncsasteestanndincesouseversestsenen 73
REVERB i ctataiect trend fiat toca eadaatotiseers ee tire eae 72
Bintan cccecevedse cat cacti ue lod douesss bsg abeveedebetentensnaees 25,35
Eras Cr visit eihoveier den tiveness, Tsien acide \aueea 55,62
Expression: Reda biva fc cece gests ences esceae eRe sabe esses 77
F
File Number ...
Fill In
Floppy: Disks. 324 saxsseeh rns cows eee eae eee
Format (Dish)iscaosaciensiiterenawtieettes da ee teases
BW toes Rvepasitngs elgnids ety legas IA easdenezed
G
Group
Music. Style ccicccas tates ails Guicsct einen eat Rotel
TONE wxiewiteeguanati ih coe le ate trie 17
I
Initial Setti ns x: coc cosc cfc tec sects deeidedsadeasesiesdeyatedecse Nesstieodeateeed 67
UPSET eixcieci ck sods iasnaaiveat andi caimtrecnscsayoreuedsieieeetacetecetens 55,64
[TRO seac dete ees eetite Mabetieb edad Mice cela aba hactheecsece ory 25,35
Inverted Chard scsiscastessssssonssencaeerteaeneteravege band eiaeseateaanate 34
K
Keyboard Mode.
Layer...
Manual Drums
Leading Bas
Load
Pettormance: Datasissiitincasicitsisiseinearisessidetiinees 57
User Program: csccssatcestisdeteaeinnias cae ouiainavescuon’ 83
LOWOE cs cee cle csccilcaiies Mishtaaiepe nseitde tsb lisas leet ddoeateacasaneiagee 21,37
Lower Hold ....
Lower On/Oft.
Lower Tone ....
M
Mia mula Bass: csisciasseysdessctes iesscninas tek saicelegdcalous cootasvan(seantanee 38
Manual Bass On/O
Manual Bass Tone
Manual Drums...
Manua! Drums Set
Melody Intelligence 0... esesereseteeseneceeeeeeenenseeeee 33
MO@tlOnGING farce. ccc00 A Meelidest auth teai bMS: 35,45,85
Mix Recording .ac:atascazeiectin stan ainnalien a etd 55,58
Music-Style neat il el aa ee 20
Music Style Card
Music Style Expansion Mode

106
Mute
Part
Track
N NOW SONG cosccsscssssecsceseseesrecssesereseessnesessesserenserersenereetenseened 54
Number
Misc: Style..c. ccscsscsceessessssdecetsactessscdeceds satadeessedetnesecteenei 22
TOME cescacesessices divcysentcsedcasesvesene saapees donteoondans eeovesseeaveaserse 17
Oo Octave Shift... cesssececececossescsrsevesssedessrsviaasesoriaeoasdeconsnacerenees 75
One Touch Program
Original (Arrangement) .
P
Pedal
Break ...
Damper ..
Damper Of LOWED oo... cestccesesessseseessareceeetsnecenerneneeeens 76
Fade In/Out...
Punch In/Out
Piano Style Arranger
Pitch Bend Wheel..
Play
Performance Data from Disk
Performance Data in Internal Memory
Protect Tab ...
Punch In RECOrding ......ccsceseesesseeeesscesteeseeteeenneneeereneteeees
Q Quantize ..
R Rec
Recording vscacccececaeiccen cascades ceaetctsestadsanestavacoacensosevnncdonsngeoyy 44
Mix Recording
Punch In Recording
Replace Recording...
RENAME oe seeeeseessseersssssncserccsesecseseoessencsaneassacsnssensassnorsessees
Resolution
Reverb
S
Save
Performance Data ..........csssscecccessssrecneessneseneeeensnsneceerers 47
Standard MIDI File .....ccccesceeeceeesteeeseeeeereeserseeseeeen 56,70
User Program
Split Arranger.
Split Point
Standard MIDI File.
Standard Tempo .....c..ccccseseccssesseereeeteseesteneesesseenanaceeaseneses
Start
Recording
Styie Performance
Stop
Recording
Style Performance .,
Style Performance
Sync Intelligence ...
Lower Tone..
Manual Bass Toni
Upper Tone ...c.ceccccsesessereeeeeeneneneenenenessanavavereeraseateesenens
Tone Expansion Mode
Track ....
Transpose
User Program
Delete
Load ..
Recall
Vv

°$I—VAL
+ K-\OLMEEPIM
()
XK
“‘@P
OU!
PIBP
UBIS
G BU
OL
AL]
Uf
PUNO
] B42
LIUINJOD
SILI
UT
SIBQUINU
BUOL
.
lous und)
gg | ‘wAD asianay
Q/ reueys
9g BWBULJEIS
9g ped
deems gp |
peel
esseg ge
BULEDO QZ
JOULEID QL
asnejddy 79
wing uuds
££ appla
£9 sdoig
oyoa /G
ped oe
fp | ave mes
us /¢
BNSIUM LZ
uoosseg /|
saidoajiaH 9g |
1 WoL
‘oreyw 97
adig Beg 99
ug
9g ped O
N
OP XOA I
S
9E} lyeUMAEYS
OZ | WOH
YsIGUa 9]
{ suoydajel Gg
OWEL GZ
equirey $9
sseujybug Gg
| sseID
pemog Gy
Buereyg SE
molg aMog
GZ a0go
SI
pig pg
yoojqpoom, PZ
oy
pg |
eseydsouny pg]
eal0jaoeds pp]
peelleUD
pe any
ued pe
| xXeg euoweg
pl
aoysess €g
SUG
[PAIS CZ
uaslweys ¢9
: 1eshig
EG
uudshiod Ep | edoyjeg
uds EE
Jepi0d0y ET
XBS lous)
EC] asSION WeAIg ZY
oboby 2
ofueg 79
yorpunos
ZG
peg WweM
TY
BABM
MES ZTE ($-g) eng
~
(p-a) xeS ZL
aSION 11419
1Q leg epULL |Z JENS 19 urey 99] |G |
(e-g) eIseluey |p} even esenbs LE ojoodld 1Z] xeg oueidos ff]
dnois q Z sseig yUAS gg] WH eNSEUDIC gf jueduiy gg | zsseg uUAS gg | So1UOWWEH ID Ep uoeupueg gE INueS gz ‘ARID QL | sseig yds 7g xoauds / dey 79 | Lssequiuss sg} ID uoWosiG £p BoUOUUeH 7E teaseinan, £% puoysisdiey 71 Lsstig 99 SYOQ Bd10A 97 | ‘AS O1BDIZZId 99 zsseg deig 9G | 1 eAUDIEAQ OP | 44 UOIPIOIOV O¢ auoydoiAX 9 Z OUR “3 9 WO} Youel4 Gg suey NOUD GZ “AS Q}OWALL GO 1 sseg deig gg YD peny Gy} uebic pesy gE eQUUeI GZ | ourld "Fy Gf
yeduund)
panw
pe
| 2 sbunsg
‘uAs
pZ
SSEqeNUOD
p>
"sq
ssanlel4
pg
yD
ueao
pp
|(s-v)
uebio
edig
PE
auoydeicin
PZ,
yuo
-AYUOH
PL
Beant
¢g
| | sBuis
‘uAs
9Z
o1leD
€9
"sg
PaNdId
EG
| (2-8)
4e1ND'S
Ep
euebio
EE
XOg
SISNW
EZ
€ oueid
€f
suoquiol,
ZB}
sburg
Mos
ZZ
BOI,
9
|
‘sqpasbuy
ZG]
ID
“As198AIS
Ty
zuebic
ZE
|
leidsueypoy
Zz
Zouk
ZL
eduiniy
1g]
(1-g)
sGums
17
UNOIA
£9
sseg
poom
[G
|
19
uISs-UOIAN
LY
Luebio
[¢
BIS9109
1%
} ouRId
1
212,
sspig
a1quiesuy
ry
Sipuisnis
(@poyy
uOIsuDAx3)
Jst]
euO]
0005
/00Lb-
104

KR-4700/7000
Music Style
List (Expansion Mode)
11 Rock
21 & Beat
1 (B-2) | 31
Boogie 41
Slow Swing1
| 51
BossaNova | 61
Country Waltz
| 71
Pasodoble 81
Pop 1
12 Rock
2 22
8 Beat 2
32 Rock'n'roll
42 Siow
Swing2 | 52
Samba 62
Waitz 72
Kars 82
Pop 2
13 Rap
23 8 Beat
3 33
Twist 43.
Swing 53
Latin 63
March 73
Anadolu —«|
83 Pop3
14 House
24 8 B
eat 4
34 R&B
44 Foxtrot
54 Salsa
64 Polka
74 Arab
84 Pop 4 (B-1)
15 Dance
(A-6) | 25.
16 Beat (B-3)
| 35
Country Ballad
| 45
Big Band 55
ChaCha 65
Baroque 75
Malfouf 85
Pop5
16 Funk
(A-7) 26
16 Beat 2
36 Slow
Rock 2
| 46
Shuffle 56
Rhumba (B-6)
| 66
Country 76
Keroncong 86
Pop 6
17 Funk
2 27
16 Beat 3
37 Ballad
1 47
Swing Waltz
| 57
Mambo 67
Beguine 77
Trot 87
Rock'n'roll 2
ice Fusion
28 16 B
eat 4
38 Ballad
2 48
Dixieland 58
Tango 68
Reggae 78
Enka 88
Jazz Waltz
* Music Style numbers
in this column are
found in the Music
Style Standard mode.
* The Original
accompaniment
of Music Style
84 “Pop
4 (B-1)" does
not contain
percussion sounds.
0)
PUSHER
TOS
aD
7+ ABM
FYN-TF.
+84 [Pop 4 (B-1)]
DAU
LY IILITIS FS LIRA
A TUEHA.
f tolar 1d
00233089
'93-11-BE2-11S

eh elapalalecne) Slollersiareliaa
The following performance data disks (sold separately) allow you to record your minus-one playing.
Minus-one playing is when you use the Mute function to mute part of the performance data, and play
the muted part yourself on the keyboard.
ism Music Data
Interactive music pack (Music Sales Ltd.) The Complete Piano Player (Music Sales Ltd.)
More For Your Method Piano (Hal Leonard Publishing Co.) Music Interactive (Hal Leonard Publishing Co.)
* In the case of performance data other than that of the KR-4700/5000, you will be able to record the keyboard playing only on track 1 (MIDI channel 1).
* Before using disks, please read the precautions given in p.8 of the manual.
in these performance data disks, the performance parts are organized as follows. Here we will explain
the procedure for recording the right or left hand (or both hands) on track 1.
("Track R Track 4 drums/ accompaniment} . ‘ °
percussion (ch. 2, 5-9, [Piano left hand Jpiano right hand
(ch. 10) 11-16)
A an po and
1. Load the performance data you wish to use for minus-one playing. 1} Insert the disk into the disk drive.
2) Use the Song Select buttons to select a song. The name of the selected performance data will appear in the upper line of the display.
3) Press the Load button, and the performance data will be loaded.
When loading is complete, the basic display will reappear.
” if there is a large amount of performance data, loading will take some time.
2. Practice your minus-one playing. 1} First, press the Play button to listen to the performance until the end. 2) If you wish to play the right hand, press Track button 4 to turn off the button indicator. If you wish
to play the jeft hand, press Track button 3. !f you wish to play both hands, press Track buttons 3 and 4.
This will mute playback of the specified track. When you press the button once again, the indica-
tor will light and the track will return to unmuted status.
3) After pressing the Reset button, press the Play button to begin playback.
4) Practice playing the selected track.
3. When you are able to play the selected track, record your playing. 1) Press the Rec button to enter Record Ready mode (Track 1 indicator is blinking). 2) Press the Play button to begin recording, and play the keyboard.
After a two-measure metronome count, recording will begin.
3) When you finish recording, press the Stop button.
* if you wish to save your recording to disk, refer to “Save performance data to disk" (es p.47).
It is not possible to convert the data to Standard MIDI File and save to disk.


For Germany
Bescheinigung des Herstellers/Importeurs
Hiermit wird bescheinigt, da der/die/das Dem Zentralamt flr Zulassungen im Fernmeldewesen
Roland Intelligent Piano KR-4700/5000 wurde das Inverkehrbringen dieses Gerates angezeigt und
reusetnetsns tees eaten tetera marae orem ae (Gerat, Typ, Bezeichnung) Ig ig 9) i
Roland Corporation
4-16 Dojimahama 1-Chome Kita-ku Osaka 530 Japan @eeeeceoeseeeeeeeesseeseeseoeeee
(Name und Anschrift des Herstellers/Importeurs)
in Ubereinstimmung mit den Bestimmungen der BMPT- AmtsblVig 243/1991 funk-entstért ist. Der vorschriftsmaBige Betrieb mancher Gerate (z. B. Me@sender) kann ailerdings gewissen Einschraénkungen unterliegen. Beachten Sie deshalb die Hinweise in der Bedienungsanieitung.
For the USA
FEDERAL COMMUNICATIONS COMMISSION RADIO FREQUENCY INTERFERENCE STATEMENT
This equipment has been tested and found to comply with the limits for a Class B digital device, pursuant to Part 15 of the FCC Rules, These limits are designed to provide reasonable protection against harmful interference in a residential installation. This equipment generates, uses, and can radiate radio frequency energy and, if not installed and used in accordance with the instructions, may cause harmful interference to radio communications. However, there is no guarantee that interference will not occur in a particular installation. If this equipment does cause harmful interterence to radio or television reception, which can be determined by turning the equipment off and on, the user is encouraged to try to correct the interference by one or more of the following measures:
- Reorient or relocate the receiving antenna. ~- Increase the separation between the equipment and receiver. — Connect the equipment into an outlet on a circuit different from that to which the receiver is connected. — Consult the dealer or an experienced radio/TV technician for help.
Unauthorized changes or modification to this system can void the users authority to operate this equipment. This equipment requires shielded interface cables in order to meet FCC class B Limit.
For Canada
CLASS B NOTICE This digital apparatus does not exceed the Class B limits for radio noise emissions set out in the Radio Interference Regulations of the Canadian Department of Communications. :
CLASSE B AVIS Cet appareit numérique ne dépasse pas les limites de ia classe B au niveau des émissions de bruits radioélectriques fixés dans le Réglement des signaux parasites par le ministére canadien des Communications.

Roland
11019
11018
wn
Roland Corporation 00232978 ‘95-9-C2-23S(D)
000¢/00/+-44 ]