Embed Size (px)
Citation preview
Digital Music Player -B03

Index
English---------------------------------------------------------1-9Japanese-----------------------------------------------------10-20French-------------------------------------------------------21-29Italiano------------------------------------------------------30-39Spanish-----------------------------------------------------40-49German-----------------------------------------------------50-57

Getting Started
Quick Guide 1. Turn the switch button to “ON” to power on the device and then choose your language. 2. Each time you tap the button+/-/ / , it will bring you to its9 different functions, including Music, Video, Recording, FM Radio, Folder view, EBook, Pictures, Setting, and Tools. Tap the central
1

button to access to its function. 3. When it’s on music playing interface, tap the button to back toprevious level, and continually tapping to back to main interface. Buttons and Controls 1. Return to previous menu. 2. When on music/FM playing screen, tap to access to thesubmenu; Hold it to lock the player, and again to unlock it. 3. Enter key/ play/pause/ hold for 3 seconds to switch off/ on.4. Tap for previous track/hold to rewind. 5. Tap for next track/ hold to fast forward. 6. Decrease the volume. 7. Increase the volume. 8. Micro USB port.9. Switch to power it “ON”/“OFF”. Note: when it’s on main playing interface, tap the button +/- to choose different functions. Charging the Battery 1. Plug one end of the micro USB cable into the USB port of a
computer or into the mains plug, plug the other end into the device.
2. When the device is fully charged, disconnect the cable from your device by pulling it straight outward.
Power On/Off Turn the switch button to “ON”, the player will power up. When the switch button is turned to “ON”, it will be turned
on/off by pressing the center button for three seconds. You can set sleep time under “Setting” according to your
need, and then it will switch off as you set. When there is no operation on this player, it will switch off by
itself.Note: If you cannot power on the player, please check if you turn the switch on (the switch button is on right side of the player).
2
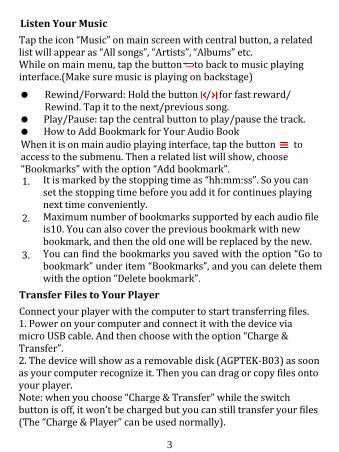
Listen Your Music Tap the icon “Music” on main screen with central button, a related list will appear as “All songs”, “Artists”, “Albums” etc.While on main menu, tap the button to back to music playing interface.(Make sure music is playing on backstage)
Rewind/Forward: Hold the button / for fast reward/Rewind. Tap it to the next/previous song.
Play/Pause: tap the central button to play/pause the track. How to Add Bookmark for Your Audio BookWhen it is on main audio playing interface, tap the button to access to the submenu. Then a related list will show, choose “Bookmarks” with the option “Add bookmark”. 1. It is marked by the stopping time as “hh:mm:ss”. So you can
set the stopping time before you add it for continues playingnext time conveniently.
2. Maximum number of bookmarks supported by each audio file is10. You can also cover the previous bookmark with newbookmark, and then the old one will be replaced by the new.
3. You can find the bookmarks you saved with the option “Go to bookmark” under item “Bookmarks”, and you can delete them with the option “Delete bookmark”.
Transfer Files to Your Player Connect your player with the computer to start transferring files. 1. Power on your computer and connect it with the device viamicro USB cable. And then choose with the option “Charge & Transfer”. 2. The device will show as a removable disk (AGPTEK-B03) as soon as your computer recognize it. Then you can drag or copy files onto your player. Note: when you choose “Charge & Transfer” while the switch button is off, it won’t be charged but you can still transfer your files (The “Charge & Player” can be used normally).
3

FM Radio Tap the icon “FM Radio” on main screen with central button, a related list will appear as “Presets”, “Manual tune” etc. Choose according to your need. Manual tune and Auto tuneYou can adjust the radio through “Manual tune” or “Auto tune”. When it’s on main radio playing interface, tap the left/right arrow button to rewind and forward search one by one, hold for searching automatically, then press the central button to stop on the channel you like. Recording and Presets-When it’s on main playing interface, tap the button with to access to the submenu, choose with the option “Start FM radio recording” to start recording, and you can find it in “Recordings library”. -when it’s on main playing interface, tap the button with to access to the submenu, choose with the option “Save to preset”. Note: Please plug the earphones into the player when you want to use the FM radio. Folder View Tap the icon “Folder View” on main interface, and then a related list will show as “Local folder” and “Card folder” with SD card (SD card is not included in the package) in. When there is no SD card, you will only see folders and files in local folder, choose according to your need. Settings Tap the icon “Settings” on main interface to access to its function, and then a related list will show, including “Sleep Timer”, “Display Settings”, and “Ear Protect” etc. Choose and adjust according to your need. For example: Date and timeChoose the format for your date and time, and then set it. Tap the
4

button with icon to adjust different items, tap the left and right arrow button to adjust its value. Recording Tap the icon “Recording” on main interface to access to its function, then a related list will appear showing the following: “Start voice recording”, “Recording library”, “Record format”, and “Record settings”. 1. Select option “Start voice recording“ and tap the center button on it, the player will indicate ‘please wait’ and the recording starts. 2. Push the center button to pause the recording.3. Push the back button and the player will show “Saverecording?” select “yes” to save it. Choose the item “Recording library” and you will find the recordings you saved. Tools Tap the icon “Tools” with central button on main interface to access to its function then a related list will appear showing the following: “Calendar”, “Stopwatch”, and “Alarm”. For example, you can tap the button to choose among the year/month/date, and tap the left/right button to choose its different value. AlarmChoose it and you can adjust its 5 different items, including “Alarm ON/OFF”, “Alarm time”, “Alarm cycle”, “Alarm music” and “Alarm volume”. Adjust according to your need. Pictures Tap the icon “Pictures” with central button on main interface, tap the button with icon to access to its submenu. Adjust according to your need. EBook Tap the icon “EBook” with central button on main interface, when it’s on text playing interface, tap the central button to switch
5

between the Manual play and Auto play, tap the button with icon to access to its submenu. Adjust according to your need. Note: max number of bookmarks supported by each file is 16. Please note: if you can’t read your txt document through E book, connect your player to the computer, and then choose the file for the item “save as”, select the code as “UTF-8” and save. Copy the txt file to E-Book folder and it will back to normal condition for your reading.
Video Tap the icon “Video” with central button on main interface, and then the video list will show, choose what you want and start playing. Tap the left/right arrow button to back to previous/next file,
hold them to rewind/forward. Tap +/- button to adjust the volume. Tap the central button to play / pause the track. Create the playlist by yourself Note: The product only supports 160*128 video, you may convert video files to this format by APP “amvtransform”. (Download it at http://images.agptek.us/Download/VideoTools.zip).
6

How to create your own playlist You can add your songs to the 3 preset playlists, and to create your own playlist, we recommend the free program called Media Go (http://mediago.sony.com/chs/download) Just create your playlists in Mediago and then right-click its name and select 'Synch to X :( Which is your mp3 player's disk) '. (You can download it at http://mediago.sony.com/chs/download) After sending your playlist and music to the player, you may find it in “Music”, and then select playlists.
How to make you music or audio books sort by number Play from “Music” on main interface, the order is sorted by
alphabet (or exactly called ASCII). Play from “Folder viewer” on main interface, the order is
sorted by the order you copy them. Before you copying theminto the player, arrange the files to a right sequence in computer (by name, like the picture below. Not by #).
7

If your music is not sort by the right number, use the app application“Renamer” to sort your music by number.Download it at http://renamer.en.softonic.com/, and then choose the item “Add folders” or “Add files” to add your music into list. For more details, please kindly check the link)
8
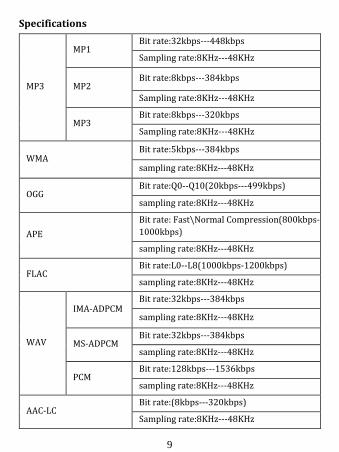
Specifications
MP3
MP1 Bit rate:32kbps---448kbps
Sampling rate:8KHz---48KHz
MP2 Bit rate:8kbps---384kbps
Sampling rate:8KHz---48KHz
MP3 Bit rate:8kbps---320kbps
Sampling rate:8KHz---48KHz
WMA Bit rate:5kbps---384kbps
sampling rate:8KHz---48KHz
OGG Bit rate:Q0--Q10(20kbps---499kbps)
sampling rate:8KHz---48KHz
APE Bit rate: Fast\Normal Compression(800kbps-1000kbps)
sampling rate:8KHz---48KHz
FLAC Bit rate:L0--L8(1000kbps-1200kbps)
sampling rate:8KHz---48KHz
WAV
IMA-ADPCM Bit rate:32kbps---384kbps
sampling rate:8KHz---48KHz
MS-ADPCM Bit rate:32kbps---384kbps
sampling rate:8KHz---48KHz
PCM Bit rate:128kbps---1536kbps
sampling rate:8KHz---48KHz
AAC-LC Bit rate:(8kbps---320kbps)
Sampling rate:8KHz---48KHz
9

AGPtEK B03 MP3 プレーヤー 取扱説明書
◎お買い上げ頂きまして、ありがとうございました。◎正しく安全にお使いいただくため、ご使用の前に必ず取扱説明書をよくお読みください。◎お読みになったあとはいつでも見られる所に大切に保管してください。ご注意:(初めは中国語なので、メーン界面に「setting/設定」-「Language/语言」-「日本語」の手順で設定してください。
10

各部名前1. : 前のメニューに戻ります 。2. : 再生中に ボタンを押し、再生モードを設定することができます。メイン界面で ボタンを長押しで本機をロックします。3. :1、OKにします2、音楽ファイルを再生/一時停止/停止を操作します。3、長押しで電源をオフ/オンにします。4. : ボリュームを下げます。5.: ボリュームを上げます。6. : 再生中に長押しで曲の早戻し、クリックで前の曲に戻ります。早戻しを停止したい場合は、 ボタンを押します。7. : 再生中に長押しで曲の早送り、クリックで次の曲に移ります。早送りを停止したい場合は、 ボタンを押します。8.ヘッドセットポート9. :マイクロUSB端子10. :電源スイッチ11. :マイク12. :マイクロSDカード端子: マイクロSDカードが64GBにサポートする
11

充電&ファイル転送
USBケーブルでパソコンと接続し、充電と転送できます。
1. MP3 プレーヤーとパソコンが接続前に、パソコンがオンに
なることをご確認をお願いします。
2. USB ケーブルで MP3 プレーヤーはパソコンと接続し、スク
リーンから【充電&転送】或いは【充電&再生】の提示が
出ます。(ご注意:ACアダプタを利用し充電する場合は、
【充電&転送】或いは【充電&再生】の提示は現れません。)
ん。旦)
3.
4. ファイルを転送と削除することができます。
ご注意:
MP3プレーヤーとパソコンが接続すると、バッテリーアイコン
は充電中状態になり点滅します。
転送中に、USBケーブルを引き出すことは禁止します。メモ
リ内容消失の可能性があります。予めご了承ください。 充電
前に電源オン/オフスイッチをオンの方向へずらすにしださ
い。 てく
一旦パソコンと接続するが成功になると、「AGPTEK B03」の
デイスクが出ます。
ご注意:オン/オフスイッチはMP3プレーヤーの右側で、MP3プレーヤーは再生できない場合、スイッチをオンにするかどうかことをご確認をお願いします。
12

基本操作
功能 操作
電源オン /
オフ
スイッチをオンにすると、MP3プレーヤーは起動
になります。
MP3プレーヤーは起動できない場合は、 ボタン
を長押ししてください。
MP3プレーヤーを操作しないと、自動的にオフに
なります。
メインメニ
ュー
ボタンを押するより、音楽、 FMラジオ、フォ
ルダビュー、設定、録音、アラームモード、画
像、電子ブックと動画があります。
音楽を中央ボタンで押すと、下記選択肢が出ま
す。すべての曲、アーティスト、アルバム、ジャ
ンル、再生リストを作ります、プレイリストとア
ルバムアートがあります。 或いは ボタンを押
し選択してください。中央ボタン押しで OKにし
ます。
再生中に 或いは ボタンを押し、前の
曲/次の曲にします。
再生中に 或いは ボタンを長押し、早
13
音楽

音楽
く戻り/早く送りにします。中央 ボタンを押
し早く戻し/早く送りの機能を停止します。
再生中に 中央ボタンを押し、音楽ファ
イルを再生/一時停止/停止を操作します。
メイン界面で ボタンを押しで再生中
に戻ります。
再生中に ボタンを長押しでメイン界面
に戻ります。
再生中に ボタンを押し、再生モードを設定する
ことができます。
ご注意:(語学勉強者には、AB モードと再生速度
の変更が設定できます。)
1、リピート設定→リピートモード→ABモードにし
ます。A が打つ場合、 ボタンをちょっと押し、始
まりにします。それから、Bが打つと、 ボタンを
ちょっと押し、終わりにします。では、ご設定す
るピースが聞かれます。五回再生する後、自動に
普通モードになります。または、中央ボタンを押
し、普通モードにします。)
2、サウンド設定→(シフト配信)再生速度の変
14

更にしてください。
FMラジオ
FM ラジオを中央ボタンで押すと、下記選択肢が
出ます。プリセット、手動チューニング、
自動チューニング、録音ライブラリです。 或い
は ボタンを押し選択してください。中央ボタン
押しで OKにします。
FM ラジオ再生中に、 ボタンを押し、ラジオ
録音を開始、プリセットに保存、ピリセットをク
リ、自動チューニング、周波数範囲、FM 録音があ
ります。中央ボタンで操作してください。
ご注意: FM受信周波数:日本の FM周波数に合
わせられます。
操作手順:「メインメニュー」→「FMラジオ」→
「手動チューニング」→FM ラジオ再生中に、Mボ
タンをします。サブメニューに入ります。 →周波
数範囲→日本周波段ように設定してください。
(ラジオアンテナとして、イヤホン/ヘッドホン
を接続してください。)
設定を中央ボタンで押すと、下記選択肢が
出ます。スリープタイマー、表示設定、Ear
15
設定
設定
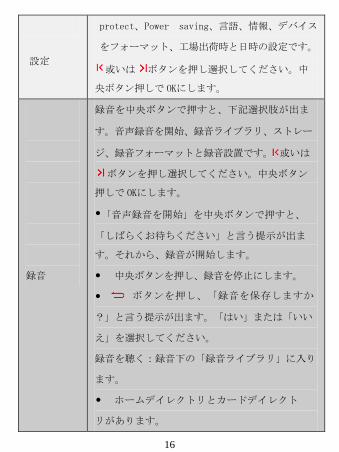
protect、Power saving、言語、情報、デバイス
をフォーマット、工場出荷時と日時の設定です。
或いは ボタンを押し選択してください。中
央ボタン押しで OKにします。
録音
録音を中央ボタンで押すと、下記選択肢が出ま
す。音声録音を開始、録音ライブラリ、ストレー
ジ、録音フォーマットと録音設置です。 或いは
ボタンを押し選択してください。中央ボタン
押しで OKにします。
「音声録音を開始」を中央ボタンで押すと、
「しばらくお待ちください」と言う提示が出ま
す。それから、録音が開始します。
中央ボタンを押し、録音を停止にします。
ボタンを押し、「録音を保存しますか
?」と言う提示が出ます。「はい」または「いい
え」を選択してください。
録音を聴く:録音下の「録音ライブラリ」に入り
ます。
ホームデイレクトリとカードデイレクト
リがあります。
16

お聞きしたい録音を選択してください。
アラムモー
ド
カレンダー
ストップ・ウォッチ:中央ボタンを押し、
タイマーを開始します。もう一度押し、一時停止
します。2番目・3番目へ使用したい場合は、
ボタンを押します。
アラーム:アラーム/時間を調整します/
周期/アラームメロデイー/ボリューム
画像
画像を中央ボタンで押すと、下記選択肢が出ま
す。ホームデイレクトリとカードデイレクトリ
があります。
ボタンを押し、次の画像に入ります。
ボタンを押し、前のメニューに戻りま
す。
画像界面中に、 ボタンを押し、画像を削
除することができます。
電子ブック
お読みたいブックを選択します。
或いは ボタンを押すで、お読みしたい
ボックにします。
ブックを読み中、 ボタンを押し、 play
17

setting、削除電子ブック、ブックマーク選択、
ブックマークを削除、ブックマックを追加、ペー
ジ選択など選択肢があります。
ボタンを押し、前のメニューに戻ります。
動画
動画を中央ボタンで押すと、下記選択肢が出ま
す。ホームデイレクトリとカードデイレクトリが
あります。
或いは ボタンを押し選択してくださ
い。中央ボタン押しで OKにします。
或いは ボタンを押し、お好きなビデオを選
択します。その後、 中央ボタンを押し、プレ ー
界面に入ります。
或いは ボタンを押し、音量調節ができ
ます。
或いは ボタンを長押し、ビデオを早く戻
り /早く送りにします。中央 ボタンを押すで停
止する必要がありません。
プレイリストの使い方 プレイリストを編集することは煩わしいと思われています。Media Goと呼ばれる無料のプログラムがある。それはAGPTek MP3プレーヤーにプレイリストを作るするために最も
18
電子ブック

簡単なプログラムです。Media Goでのプレイリストを作成し、曲名を右クリックし、AGPTek MP3プレーヤーの同期を行う。リンク:http://mediago.sony.com/chs/download 音楽やオーディオブックを名前でソートする方法
音楽から再生場合:再生順序はアルファベット(ASCIIでソートされる。プレイリストから再生場合:再生順序はプレイリスト中の順序と同じです。フォルダから再生場合:再生順序はコピーするときの順序と同じです。MP3プレーヤー中にファイルコピーする前に、01から10、次に11から22でのように再名前作ることがお勧めです。音楽の順序はアルファベット によってソートする。数字でソートするためにRenamerを使用してください。ステップ1: AdvancedRenamerをダウンロードして、リストに音楽を追加する。ステップ2: 音楽の名前の前に数字番号を追加するための新しい方法を作成する。トラック1、というように01から10、次に11から22で、画像が示すように:
19

ステップ3:Windowsの上部にあるボタンの開始バッチをクリックします。新しいWindowsで[開始]をクリックする。ステップ4:フォルダを入力してMP3プレーヤーとプレスプレイキーに音楽を入れてください。故障かな?と思ったら
起動でき
ない
パワーがあるかどうかチェックする
音が鳴ら
ない
1. 音量 UPボタン+を押して音量を上げる。
2. イヤフォンプラグをしっかり差し込む。
3. 音楽ファイル対応できるか確認してくだ
さい。
4. パソコンでファイルが破損していないか
確認してください。
ファイル
を転送で
きない
1. SDカードを変換し試してください。
2.本体とパソコンはちゃんと接続しないか確
認してください。
3. 内蔵メモリ容量がなくなります。
4、別の USBケーブルを変換し試してくださ い。
雑音
1. イヤフォンがきれいであるか否かを確認
してください。汚い、ノイズの原因となる可
能です。
2. 破損した音楽ファイルは、ノイズが発生
することが可能です。
◎若し商品についてどの様な問題と意見があれば、ご遠慮なく、[email protected]と連絡してください。お客様のご意見を待ちして望んでいます。
20
AGPTEK lecteur de musique numérique B03 Mode d'emploi
Instruction rapide1. Glissez le bouton latéral sur ON pour ouvrir le lecteur et puis choisir la langue.2. Chaque fois vous appuyez le bouton +/-/ / , il y a 9 fonctions différents, y compris musique, vidéo, enregistrement, FM radio, document, Ebook, photos, réglage et outils. Appuyez le bouton au milieu pour entrer ses fonctions.3. Quand sous l'interface de chansons, appuyez pour revenir au menu précédent, l'appuyez constamment pour revenir au menu principal.
21
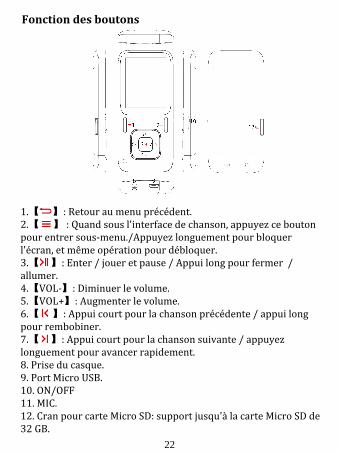
1.【 】: Retour au menu précédent. 2.【 】 : Quand sous l'interface de chanson, appuyez ce boutonpour entrer sous-menu./Appuyez longuement pour bloquer l'écran, et même opération pour débloquer.3.【 】: Enter / jouer et pause / Appui long pour fermer / allumer. 4.【VOL-】: Diminuer le volume.5.【VOL+】: Augmenter le volume.6.【 】: Appui court pour la chanson précédente / appui long pour rembobiner.7.【 】: Appui court pour la chanson suivante / appuyez longuement pour avancer rapidement.8. Prise du casque.9. Port Micro USB.10. ON/OFF11. MIC.12. Cran pour carte Micro SD: support jusqu'à la carte Micro SD de 32 GB.
22
Fonction des boutons

function action
Allumer/
Fermer
Glissez le bouton latéral sur ON pour ouvrir le lecteur. S'il n’allume pas, appyez 3 secondes le bouton au milieu. Quand il n'y a aucune opération, il s’éteint
automatiquement.
Menu
principal
Sous le menu principal, il y a 9 icônes :
Musique, Radio FM, Dossiers, Definir,
Enregistrements, Mode réveil, Photos, E-livres
et vidéo. Appuyez sur le bouton pour
choisir , et appuyez le bouton central pour
confirmer.
Écouter
Sélectionnez l'icône Musique et appuyez sur le
bouton central, une nouvelle liste apparaît
comme les suivantes: Toutes les chansons,
Artistes, Albums, Genres, Créer list, playlists,
pochette.
Appuyez sur le bouton central sur «Toutes
23

de la
musique
les chansons» et sélectionnez une chanson, il
commence à jouer.
Appuyez à droite ou à gauche, flèche
unique pour aller à la chanson suivante /
précédente.
Appuyez longuement à droite ou à
gauche pour retour / avance rapide.
Appuyez sur le bouton central pour
jouer/pauser.
Appuyez le bouton pour passer de
«Toutes les chansons» à «Artistes».(pas +/-)
regarder
la vidéo
Sélectionnez l'icône de vidéo dans le menu principal et appuyez sur le bouton central, une nouvelle liste apparaît : «dossier local» et «dossier de la carte». Appuyez / pour passer à la vidéo que vous voulez et appuyez sur le bouton central pour accéder à l'écran vidéo. Appuyez sur le bouton central pour lire / mettre en pause la vidéo. Poussez les boutons + ou - pour augmenter ou diminuer le volume.
24

Appuyez longuement / pour avancer ou reculer la vidéo
Enregistrement
vocal
Sélectionnez l'icône Enregistrements dans le menu principal et appuyez sur le bouton central, une nouvelle liste apparaîtra: démarrer l'enregistrement vocal, bibliothèque d'enregistrement, Enreg Format, Config d'enreg. Sélectionnez démarrer l'enregistrement vocal et appuyez sur le bouton central, le lecteur indiquera «Veuillez patienter...» et puis commencer. Appuyez sur le bouton central pour suspendre l'enregistrement. Bouton le joueur indiquent «sauvegarder l'enregistrement, oui ou non», sélectionnez Oui pour l'enregistrer.
Écoutez
les
enregistrements
Sélectionnez Enregistrements icône sur le menu principal, appuyez sur la touche pour passer à l'option <Enregistrement bibliothèque ». Appuyez sur le bouton central sur 'bibliothèque d'enregistrement », et le joueur indiquent deux dossiers de dossier local» et
25

«dossier de la carte». Sélectionnez l'enregistrement que vous voulez écouter.
Écoute de
la radio
FM
Sélectionnez l'icône Radio dans le menu principal et appuyez sur le bouton central, une nouvelle liste apparaît: Présets, réglage manuel, réglage autoet bibliothèque d'enreg. Quand jouer la radio, appuyez sur le bouton 【 】pour effacer présélection ou effacer toutes les présélections. Important: Branchez les écouteurs quand
vous voulez utiliser la radio FM. S'il vous plaît
Voir les
photos
Sélectionnez l'icône Photo dans le menu principal et appuyez sur le bouton central, le lecteur affiche deux dossiers de dossier local »et« dossier de la carte ». Appuyezz le pour passer à l'image que vous souhaitez afficher.
Appuyez 【 】pour revenir au menu principal. Quand le joueur est sous l'écran de
l'image, appuyez sur le bouton 【 】 et l'option d'affichage du lecteur 'effacer la
26

photo.
Paramètr
es
Sélectionnez l'icône Définir dans le menu principal et appuyez sur le bouton central, une nouvelle liste apparaît: Arrêt programmé,réglages de l'affichage, ear protect, power saving, langue, information, formater périphérique, réglage d'usine, date et heure.
Les livres
électroni
ques
Sélectionnez ebooks icône sur le menu principal et appuyez sur le bouton central, un nouveau menu apparaîtra, affichant tous les fichiers. Appuyez sur le bouton 【 】 et sélectionnez PLAY SET pour définir le jeu manuel ou lecture automatique. Appuyez / pour passer au fichier que vous souhaitez voir, et appuyez sur le bouton central pour afficher le fichier. Quand sous l'écran e-book, appuyez sur le bouton 【 】affiche une nouvelle liste: Jouer paramètre, supprimer eBook et ainsi de suite. Appuyez【 】pour revenir au menu principal.
27

Dossiers
Sélectionnez l'icône dossiers dans le menu principal et appuyez sur le bouton central, le joueur va montrer deux dossiers: dossier local et le dossier de la carte.
Comment utiliser playlistIl y a un programme gratuit appelle Media Go. Il est le programme plus facile à utiliser pour transférer des listes de lecture pour la B03 AGPTEK.Il suffit de créer votres listes de lecture dans le MG, puis cliquez sur son nom et sélectionnez 'Synch à X: (D'où est le disque de votre lecteur mp3). http://mediago.sony.com/chs/downloadComment faire de votre musique ou livres audio Trier en ordre Jouer sous l'interface de Musique, l'ordre est triée par alphabet (ou exactement appelé ASCII).Jouer sous l'interface de dossiers, l'ordre est triée en ordre et vous pouvez les copier. Avant de les copier dans le lecteur, organiser les fichiers à une séquence en plein ordinateur (par nom, comme l'image ci-dessous. Pas par #).
28

Si votre musique n'est pas trié en ordre, utiliser le APP “renamer” à trier en numéro. Télécharger renamer http://mediago.sony.com/chs/download, puis ajouter votre musique en liste. Pour plus de détails, merci de voir le lien dessus, s'il vous plaît.
29

Pronti? Via!
Guida rapida 1. Portare il tasto 9 in posizione ‘ON’ per accendere il dispositivo escegliere la lingua. 2. Premendo il tasto + oppure il tasto –oppure freccia singolaverso dx (tasto 5) oppure freccia singola verso sx (tasto 4) è possibile muoversi tra le 9 differenti funzioni del dispositivo che
30

includono Musica, Video, Registrazione, Radio FM, Cartelle, Ebooks, Immagini, Impostazioni e Strumenti. Premendo il tasto centrale (tasto 3) si può accedere alla singola funzione. 3. Quando si è all’interno di un menù, premere il tasto per tornare al livello precedente e, se si continua a premere, fino al menu principale. Tasti E Controlli 1. Premere per tornare al menu precedente/music Playing interface. 2. Quando si è in modalità ‘Riproduzione musica o Radio FM’, premere per accedere ai sottomenù, lungo premere per bloccare e sbloccare il mp3. 3. Selezionare / riprodurre / pausa / mantenere premuto 3 secper accendere/spegnere. 4. Premere per traccia precedente / Mantenere premuto per riascoltare. 5. Premere per traccia successiva / Mantenere premuto per avanzare velocemente. 6. Abbassare il volume. 7. Alzare il volume. 8. Porta micro USB. 9. Interruttore ACCESO/SPENTO. Nota: quando si è sul menù principale, premere il tasto + (tasto 7) oppure il tasto – (tasto 6) per scegliere le diverse opzioni disponibili Caricare La Batteria 1. Inserire una estremità del cavo nella porta USB del computer
o nella presa di corrente e l’altra nel dispositivo. 2. Quando il dispositivo è completamente carico, scollegare il
cavo dal dispositivo. Accendere/Spegnere Portare l’interruttore di accensione (tasto 9) in posizione
31

“ON”, il dispositvo si accenderà. Quando l’interruttore di accensione (tasto 9) è in posizione “ON”, il dispositivo può essere acceso/spento mantenendo premuto per 3 sec il pulsante centrale (tasto 3) Nel menù impostazioni, è possibile impostare un tempo di attesa oltre il quale il dispositivo si spegnerà automaticamente. Quando non vengono eseguite operazioni sul dispositivo perun certo tempo, esso si spegnerà automaticamente. Nota: se il dispositivo non si accende, verificare che l’interruttore di accensione (tasto 9) sia in posizione “ON” (l’interruttore di accensione si trova sul lato destro del dispositivo). Riprodurre La Propria Musica Selezionando l’icona “Musica” con il tasto centrale (tasto 3), apparirà una lista tipo “Tutte le canzoni”, “Artisti”, “Albums” ecc ecc. Scegliere in base alle proprie esigenze. Mantenere premuto il tasto / per riascoltare/avanzare
velocemente. Premere per traccia precedente/successive. Riproduzione/Pausa: premere il tasto centrale (tasto3). Come Aggiungere un Segnalibro al vostro Audiolibro. Quando si è sul menù principale di riproduzione audio, premere il tasto per accedere al sottomenù. A questo punto apparirà ‘Scegliere segnalibro’ con l’opzione ‘Aggiungi segnalibro’. 1. Il segnalibro è contraddistinto da un conto alla rovescia in
“hh:mm:ss”. In questo modo è possibile impostare il conto alla rovescia prima di aggiungere un segnalibro.
2. Il Massimo numero di segnalibri supportati da ciascun file audio è 10. E’ possibile anche sostituire il vecchio segnalibrocon uno nuovo.
3. E’ possibile trovare i segnalibri salvati con l’opzione ‘Vai al segnalibro’ ed è possibile cancellare i segnalibri esistenti con l’opzione ‘Cancella segnalibro’.
Importare I Files Sul Proprio Dispositivo Collegare il dispositivo al PC per iniziare ad importare i files sul
32

dispositivo. 1. Accendere il Pc e connettere il dispositivo tramite la porta microUSB (porta 8), quindi scegliere ‘Ricarica e Trasferisci’. 2. Una volta che il PC avrà riconosciuto il dispositivo, esso verrà mostrato come un disco removibile chiamato AGPTEK B03. A questo punto sarà possibile aggiungere/rimuovere i files sul/dal dispositivo. Nota: se si sceglie l’opzione “Ricarica e Trasferisci” con l’interruttore di acceso/spento in posizione spento, il dispositivo non si ricaricherà ma sarà comunque possibile trasferire i files (in alternativa si può usare l’opzione “Ricarica e Riproduci”) Radio FM Selezionando l’icona “Radio FM” del menù principale con il tasto centrale (tasto 3), apparirà una lista tipo: “Preimpostate sul dispositivo”, “Sintonizzazione manuale”, “Sintonizzazione automatica” ,“Libreria registrazioni”. Scegliere in base alle proprie esigenze. Sintonizzazione manuale ed automatica Si può scegliere se ricercare le frequenze radio in modo automatico oppure in modo manuale. Quando si è sul menù principale della radio, premere il tasto 5 (freccia singola verso dx) oppure il tasto 4 (freccia singola verso sx) per cercare la radio una per una oppure per arrestare la ricerca automatica, quindi premere il pulsante centrale (tasto 3) per ascoltare la radio scelta. Memorizzazione e Preimpostazione stazioni radio - Quando si è sul menu principale, premere il tasto 2 per accedere al sottomenù e scegliere l’opzione ‘Inizia la ricerca delle radio FM’. Le radio saranno salvate nella cartella ‘Libreria delle radio memorizzate’. - Quando si è sul menu principale, premere il tasto 2 per accedere al sottomenù e scegliere l’opzione ‘Salva le radio preimpostate’. Nota: Prima di utilizzare la radio, verificare di aver collegato le cuffie al dispositivo.
33

Cartella Selezionando l’icona “Cartella” del menù principale con il tasto centrale (tasto 3), apparirà una lista tipo “Cartella locale” e, se inserita, “ Cartella su scheda micro SD” (la scheda micro SD non è inclusa nel dispositivo). Se la scheda micro SD non è presente nel dispositivo, i files e le cartelle saranno contenuti solo nella “Cartella Locale”. A questo punto, scegliere in base alle proprie esigenze Impostazioni Selezionando l’icona “Impostazioni” del menù principale con il tasto centrale (tasto 3), apparirà una lista tipo: “Tempo di stand-by”, “Impostazioni display”, “Protezione orecchie” ecc ecc. Scegliere e regolare in base alle proprie esigenze. Per esempio: Data e oraScegliere il formato di data e ora e impostarlo. Premere il tasto 2 per regolare le varie voci, premere il tasto 5 (freccia singola verso dx) oppure il tasto 4 (freccia singola verso sx) per regolare il volume Registrazione Selezionando l’icona “Registrazione” del menù principale con il tasto centrale (tasto 3), apparirà una lista tipo: “Inizia registrazione vocale”, “Libreria delle registrazioni”, “Formato registrazioni” e “Impostazione registrazioni”. 1. Selezionando l’opzione ‘Inizia a registrare’ e premendo il tasto 3 (tasto centrale), il dispositivo segnalerà ‘Attendere, prego’ e la registrazione potrà cominciare. 2. Premere il tasto 3 (tasto centrale) per mettere in pausa la registrazione. 3. Premendo il tasto 2, il dispositivo chiederà ‘Salvare laregistrazione?’ Selezionare ‘si’ per salvare. Scegliendo l’icona “Libreria delle registrazioni” si potranno visualizzare le registrazioni salvate.
34
Strumenti Selezionando l’icona “Strumenti” del menù principale con il tasto centrale (tasto 3), apparirà una lista tipo: “Data”, “Cronometro” e “Sveglia”. Per esempio, premendo il tasto 2 si potrà scegliere giorno/mese/anno e premendo il tasto 5 (freccia singola verso dx) oppure il tasto 4 (freccia singola verso sx) regolare la data corrente. Sveglia Scegliendo questa icona, ne appariranno altre 5 diverse tra cui “Sveglia ON/OFF”, “Ora della sveglia”, “Ripetizione della sveglia”, “Musica per la sveglia” e “Volume della sveglia”. Regolare in base alle proprie esigenze. Foto Selezionando l’icona “Foto” del menù principale con il tasto centrale (tasto 3), apparirà un sottomenù. Regolare in base alle proprie esigenze. EBook Selezionare l’icona “EBook” del menù principale con il tasto centrale (tasto 3), quindi quando si è sul menù di lettura premere di nuovo il tasto centrale (tasto 3) per scegliere tra “Lettura manuale” e “ Lettura automatica” e accedere ai relativi sottomenù. Regolare in base alle proprie esigenze.. Nota: ogni file può supportare un numero massimo di 16 segnalibri. Nota bene: se il documento in formato .txt non risultasse leggibile con l’applicazione per EBook, procedere come segue: connettere il dispositivo al Pc, aprire il file .txt in questione, selezionare “salva come” e salvarlo come formato “UTF-8”. Copiare il file .txt di nuovo nella cartella degli EBook e a questo punto il problema dovrebbe essere risolto.
35

Video Selezionando l’icona “Video” del menù principale con il tasto centrale (tasto 3), apparirà l’elenco di tutti i files video presenti sul dispositivo. Scegliere cosa si vuole vedere e iniziare la visualizzazione. Premere il tasto 5 (freccia singola verso dx) oppure il tasto 4 (freccia singola verso sx) per file precedente/successivo, mantenere invece premuto per rivedere/avanzare velocemente. Premere il tasto + (tasto 7) oppure il tasto – (tasto 6) peralzare o abbassare il volume. Premere il tasto centrale (tasto 3) per riprodurre/mettere in pausa. Crearsi da soli la propria playlist Nota: il dispositivo supporta solo video 160*128. Per convertire i video in questo formato si consiglia di utilizzare “amvtransform” (scaricabile dal link http://images.agptek.us/Download/VideoTools.zip). Come creare la propria playlist
36

E’ possibile aggiungere le proprie canzoni ad una delle tre playlist già presenti sul dispositivo, mentre per creare playlist proprie raccomandiamo l’uso del programma ‘free’ Media Go (http://mediago.sony.com/chs/download) E’ sufficiente creare le tue playlist usando Media Go, quindi premere con il tasto destro del mouse sul nome della playlist e selezionare ‘Synch to X : (dove X è il disco del lettore mp3). Il programma si può scaricare dall’indirizzo http://mediago.sony.com/chs/download Dopo aver inviato la propria playlist e/o musica al dispositivo, la potrete trovare sotto l’icona “Musica” e una volta selezionata sarà immediatamente riproducibile.
Come ordinare con i numeri la musica e/o gli audiolibri Ascoltando la musica dalla cartella “Musica”, l’ordine dei files sarà dato dall’alfabeto (o più precisamente da un codice chiamato ASCII). Ascoltando la musica dalla cartella “Visualizzatore della cartella”, l’ordine dei files sarà dato invece dall’ordine con cui essi sono stati copiati al suo interno. Quindi prima di trasferirli nel
37

dispositivo, è meglio ordinarli sul Pc (per nome come da immagine seguente, al posto di #).
Se la vostra musica non è ordinata in base al numero giusto, consigliamo di utilizzare il programma “Renamer” scaricabile dall’indirizzo internet http://renamer.en.softonic.com/. Una volta scaricato il programma, scegliere l’icona “Aggiungere cartelle” oppure “Aggiungere files” per creare un corretto elenco della musica. Per maggiori dettagli, fare riferimento all’indirizzo di cui sopra
38
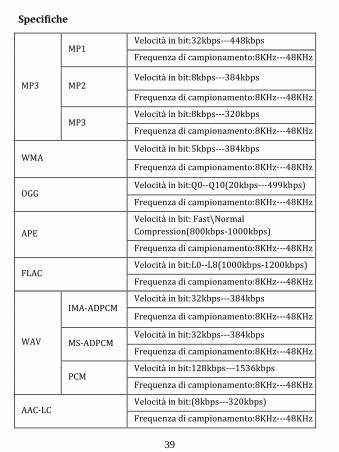
MP3
MP1 Velocità in bit:32kbps---448kbps
Frequenza di campionamento:8KHz---48KHz
MP2 Velocità in bit:8kbps---384kbps
Frequenza di campionamento:8KHz---48KHz
MP3 Velocità in bit:8kbps---320kbps
Frequenza di campionamento:8KHz---48KHz
WMA Velocità in bit:5kbps---384kbps
Frequenza di campionamento:8KHz---48KHz
OGG Velocità in bit:Q0--Q10(20kbps---499kbps)
Frequenza di campionamento:8KHz---48KHz
APE Velocità in bit: Fast\Normal Compression(800kbps-1000kbps)
Frequenza di campionamento:8KHz---48KHz
FLAC Velocità in bit:L0--L8(1000kbps-1200kbps)
Frequenza di campionamento:8KHz---48KHz
WAV
IMA-ADPCM Velocità in bit:32kbps---384kbps
Frequenza di campionamento:8KHz---48KHz
MS-ADPCM Velocità in bit:32kbps---384kbps
Frequenza di campionamento:8KHz---48KHz
PCM Velocità in bit:128kbps---1536kbps
Frequenza di campionamento:8KHz---48KHz
AAC-LC Velocità in bit:(8kbps---320kbps)
Frequenza di campionamento:8KHz---48KHz
Specifiche
39

AGPTEK Digital Música Reproductor B03 Guía
rápido de la inicio
40

Guía rápido 1. Gire el botón del interruptor en "ON" para encender el dispositivo y luego elija su idioma. 2. Cada vez que pulse el botón / / / , que le llevará a sus 9 funciones diferentes, incluyendo Música, Radio FM, Vista de carpetas, Establecer, Grabaciones, Modo de Alarma, Imágenes, E-libro, vídeo. Toque el botón central para acceder a su función. 3. Cuando está en la interfaz de reproducción de música, Toque el botón para volver Controles de un vistazo 1. Volver al menú anterior/ la interfaz de reproducción de música. 2. Acceder al menú de cada función;largo presa para bloquear y desbloquear el mp3 3. Introduzca la clave en el menú modo. en otras ocasiones esreproducir/pausa. Pulse protongadamenta para encender/apagar. 4. última canción/ Pulsar prolongadamente para retrocesorápido durante la reproducción de una interfaz. 5. Próxima canción/ Pulsar prolongadamente para avancerápido durante la reproducción de una interfaz. 6. Permite disminuir el nivel de volume. 7. Permite aumentar el nivel de volumen. 8. Micro USB puerto. 9. ENCENDIDO/ APAGADO: Interruptor principal. 10. Microfono: Para grabar sonido con su dispositivo 11. Ranura para tarjeta de memoria Micro SD: Tarjeta de memoria Micro SD ampliable hasta 64GB. Cargar la batería 1. Conecte el conector más pequeño del cable USB al puerto micro-USB del reproductor y el otro conector al puerto USB de su ordenador. se carga a una pantalla que dice "Cargar y transferir" o "Cargar y reproducir".
41

2. No desconecte el cable USB durante la transferenda de archivos. Puede causar mal fundonamiento del reproductor y de los archivos. 3. Cuando el interruptor está apagado, conectarlo a su ordenador y todavía se puede acceder al menú. Encender/Apagar Deslice el botón ON/OFF para encender/ apagar.. Pulse prolongadamente elbotón para encender/ apagar. Cuando no se realiza ninguna operación en este reproductor, se apagará por sí mismo, puedes ajustar el tiempo de dormir en "ajustes". Nota: Si no se puede encender el reproductor, compruebe si el interruptor de encendido está “ON". Escuchar musica Seleccione el icono Música y pulse el botón central, aparecerá una nueva lista que muestra lo siguiente: Todas las canciones, artistas, álbumes, géneros, Crear lista de reproducción, la carpeta local, carpeta de la tarjeta, listas de reproducción y carátulas de álbumes. Para introducir la lista de música, pulse el botón M antes de la reproducción y seleccione " Local folder" ( carpeta local) para selecionar el archivo Para ajustar el volumen, pulse【-】o 【+】para aumentar/ disminuir el volumen. Para saltar a la pista anterior o a la siguiente, pulse【 】o 【 】 para retroceso rápido o avance rápido en un mismo archivo de musica, pulse y mantenga pulsado【 】 o 【 】. Mientras escucha música, pulse el botón para establecer el modo repetición. Modo ecualizador reproducción. Cómo Agregar marcador para su libro de audio Mientras que en la pantalla de reproducción audio, pulse el iconopara acceder al submenú. En la lista que aparece, seleccione "Bookmarks" con la opción "Add bookmark".
42

1. Marcadores están marcadas por el tiempo de parada como "hh: mm: ss". pausa de reproducción- click el icono - Bookmarks- Add Bookmark- click el icono centro -elije una marcador lo que quieres "hh: mm: ss", si quieres seguir al punto ha marcado la última vez, click el icono - Bookmarks- Go to Bookmark-elije el marcador lo que quieres seguir. 2. El número máximo de marcadores soportados por cada archivo de audio es 10. Los marcadores adicionales anularán las establecidas anteriormente 3. Para encontrar los marcadores guardados, seleccione "ir a marcador". Seleccione "Eliminar marcador" para eliminarlo. Escuchar la Radio FM seleccionar el icono Radio en el menú principal y pulse el botón centro【 】, aparecerá una nueva lista que muestra lo siguiente: Presets, manual tune, auto tune y Bibliodega grabaciones. sintonización manual y sintonización automática Puedes ajustar el Radio por “sintonización manual” or “sintonización automática”. Cuando el reproductor está en la pantalla de la radio, pulse el boton【 】 o 【 】para rebobinar y hacia Adelante Grabación y ajustes preestablecidos - Cuandoel reproductor está en la pantalla de la radio, Pulse el botón sadra los opiniones: iniciargrabación radio FM ,Guardarpresintonia, Eliminar presintonia, sintonización automática, región desintonizador, grabación de FMImportante:Por favor, conecte los auriculares al reproductorcuando se quiere utilizar la radio FM. Ver carpetas seleccionar el icono “Vista de carpetas” en el menú principal , aparecerá una nueva lista que muestra lo siguiente: “Local folder” y “Card folder” (La tarjeta SD no está incluido en el paquete). Cuando no hay una tarjeta SD, sólo verá las carpetas y archivos en
43

la carpeta local, elegir de acuerdo a sus necesidades Ajuestes seleccionar el icono Establecer en el menú principal y pulseel botó n centro【 】, aparecerá una nueva lista que muestra lo siguiente: Temporizadordesconexión, Ajustes de pantalla, ear protect, power saving, Idioma, información,Formatear dispositivo, ajustes de fábrica, Fecha y hora Fecha y horaElija el formato de la fecha y la hora, y luego pulse el botón +/- configurarlo. pulse el botón para guartar el adjuste. Grabación seleccionar el icono Grabaciones en el menú principal, pulse【 】 para introducir el modo Grabación. 1. pulse el botón【 】Para iniciar la Grabación, Pulse el botón【 】de nuevo para hacer pausa. 2. mantenga pulsado el botón【 】para guardar el contenido dela grabación actual. 3. Pulse el botón para salir 4. Escuchar la voz grabada: seleccionar el icono Grabaciones en el menú principal, entra “Biblioteca Grabaciones” el reproductor indica dos carpetas ‘Local folder’ y ‘Card folder’, Seleccione la grabación que desea escuchar. Modo de Alarma seleccionar el icono Establecer en el menú principal y pulseel botón centro【 】, aparecerá una nueva lista que muestra lo siguiente: “Calendario”, “Cronometro”, y “Alarma”. Alarma Elegirlo y se puede ajustar sus 6 elementos diferentes, incluyendo “Alarma ON/OFF”, “Ajustar el tiempo”, “ciclo”, “Sonido de alarma” y “Alarma volumen”. Visualizar fotos Cuando el reproductor estáen la pantalla de imagen, pulse el botón
44

【 】y Sadrala opción de pantalla del reproductor 'borrar la imagen'. EBook seleccionar el iconoE-libroen el menú principal y pulse elbotón centro【 】, Aparecerá una nueva pantalla que muestra todos los archivos. 1. Presa el botón【 】buttony seleccionarPlay setpara ajustarManual playorAuto play 2. Cuando en la pantalla dele-libro, pulse el botón【 】mostraráuna nueva lista: ajuste de reproducción, eliminar de libros electrónicos, etc.. 3. si no puede leer el documento de texto a través del E-libro, conectar el reproductor al ordenador, y luego seleccione el archivo para el elemento "guardar como", seleccione el código como "UTF-8" y guardar. Copiar el archivo texto en la carpeta de E-Libro y será de nuevo a la condición normal para su lectura.
Ver Video seleccionar el icono de vídeo en el menú principal y pulse el botón central, aparecerá de nuevo la lista que muestra:'Carpeta local " y " carpeta Tarjeta'.
45

Utilice【 】o【 】para seleccionar un video y pulse【 】para reproducirel video seleccionado
Para hacer pausa en lareproducción, pulse【 】. para reanudar la reproducción, pulse【 】de nuevo.
Para ajustar el volumen, pulse【-】o 【+】para aumentar/disminuir el volumen.
Para saltar a la pista anterior o a la siguiente,pulse【 】o【 】Nota: El producto sólo admite 160 * 128 de vídeo, puede convertir archivos de vídeo a este formato por APP "amvtransform", Descargalo: http://images.agptek.us/Download/VideoTools.zip Cómo crear playlist Usted puede añadir sus canciones a los 3 listas de reproducción preajustes, también puede crear su propia lista de reproducción, se recomienda el programa gratuito Media Go: 1.Descargalo en el ordernador por este link:http://mediago.sony.com/chs/download). 2. Conecta el mp3 al PC, Abrir el programa Media go y crear su lista de reproducción en el Media Go, Seleccione la música en su reproductor y atraerlos a una lista de reproducción,luego haga clic derecho en su nombre y seleccione "Synch a X" :( Cuál es el disco de su reproductor de mp3), Después de enviar su lista de reproducción al mp3 reproductor, que se encuentra el playlist en "Música" del mp3, y luego seleccione las listas de reproducción
46

Cómo hacer que su música o libros se ordenen por nombre Reproduciendo desde la opción “música”, se ordena utilizando el alfabeto (o más exactamente, se la ordenación ASCII) Reproduciendo desde una lista de reproducción, las pistas se ordenan tal y como están en la lista de reproducción. Reproduciendo desde la opción “Carpeta” el orden utilizado es el orden en el cual usted copió los archivos. Antes de copiar los archivos en el reproductor, por favor, ordene los archivos en la secuencia correcta en su ordenador (Por nombre, como se indica en la fotografía, no por número de pista - # ).
47

si la lista de archivos es organizada según el nombre antes de copiarlos en el reproductor, debería de estar en el mismo orden.
Si su música no se ordena de forma correcta, utilize “advanced renamer” para organizarla de forma correcta. Descargue “Advanced Renamer” y entonces añada su música a la lista, Descargar Renamer en el sitio web (http://renamer.en.softonic.com/), y luego elegir la opción "Agregar carpetas" o "Agregar archivos" para añadir su música en la lista. (Para más detalles, por favor cheque bondadoso el enlace).
48

Specificacion
MP3
MP1 Bit rate:32kbps---448kbps
Sampling rate:8KHz---48KHz
MP2 Bit rate:8kbps---384kbps
Sampling rate:8KHz---48KHz
MP3 Bit rate:8kbps---320kbps
Sampling rate:8KHz---48KHz
WMA Bit rate:5kbps---384kbps
sampling rate:8KHz---48KHz
OGG Bit rate:Q0--Q10(20kbps---499kbps)
sampling rate:8KHz---48KHz
APE Bit rate: Fast\Normal Compression(800kbps-1000kbps)
sampling rate:8KHz---48KHz
FLAC Bit rate:L0--L8(1000kbps-1200kbps)
sampling rate:8KHz---48KHz
WAV
IMA-ADPCM Bit rate:32kbps---384kbps
sampling rate:8KHz---48KHz
MS-ADPCM Bit rate:32kbps---384kbps
sampling rate:8KHz---48KHz
PCM Bit rate:128kbps---1536kbps
sampling rate:8KHz---48KHz
AAC-LC Bit rate:(8kbps---320kbps)
Sampling rate:8KHz---48KHz
49

AGPTek langlebigerMP3 Player
Bitte kontaktieren Sie uns bei Fragen oder Anregungen via
[email protected]. Helfen Sie uns, diesen Musik-Player zum
besten Player der Welt zu machen.
50
Ein-/Ausschalten Stellen Sie den Schiewber unter dem Gerät auf "on"(7). Halten Sie die Play-Taste(3) für 3 Sekunden gedrückt, um das Gerät ein- bzw. auszuschalten.

Musik
Halten Sie die rechte Taste (>|) gedrückt zum Schnellvorlauf;
drücken Sie kurz, um zum nächsten Titel zu gelangen.
Halten Sie die linke Taste (|<) gedrückt zum Schnellrücklauf; kurz
drücken, um zum vorherigen Titel zu gelangen.
Zurück: Drücken Sie kurz die Zurück-Taste(1), um zum letzten
Menü zurückzukehren.
Drücken Sie lange Play-Taste(3) zum Ausschalten / auf
Lautstärkeregelung
Drücken Sie "+"oder "-" jeweils kurz zur Einstellung. Der
Lautstärkebalken schließt sich automatisch nach wenigen
Sekunden, wenn keine Eingabe mehr erfolgt oder Sie "|<"
oder">|"drücken, um zum vorherigen Bildschirm zurückzukehren.
Shuffle/Zufällige Wiedergabe
ZumStarten müssen Sie im Musik-Wiedergabemodus sein.
Drücken Sie die Taste " " und wählen Sie den
"Wiedergabemodus" mit der Play-Taste(3)aus. Ein Untermenü
erscheint, wählen Sie dort "Shuffle" und "EIN".
Durch Drücken von Zurück-Taste(1)gelangen Sie zurück zum
Hauptmenu.
Lock-Funktion/ Gerät sperren 51

Halten Sie die Taste(2) 3 Sekunden gedrückt, um das Gerät
zu sperren. Gleich drücken um zu entsperren.
Dateien übertragen
Schließen Sie den Player mittels USB-Kabel an den Computer an,
dann können Sie Dateien auf den Player übertragen
Laden
Verwenden Sie zum Laden das USB-Kabel.
Sie können das Gerät über den Computer oder ein Ladegerät per
USB-Kabel aufladen.
Video
Spielen / Pause: kurzes Drücken der Play-Taste.
Schneller Rücklauf / schneller Vorlauf: langes Drücken der Taste |<
/>|.
Zurück zum Menü: drücken Sie Zurück-Taste(1) für kurze Zeit, um
zum letzten Menü zurückzukehren.
HINWEIS: Das Gerät unterstützt nur 160 * 128 Videos. Siekönnen
Video-Dateien mittels der Tools im Gerät konvertieren.
Radio
Wählen Sie im Hauptmenu"Radio" durch Drücken der Play-Taste.
Wählen Sie im Untermenu durch Drücken der " "-Taste
voreingestelltes Radio/Rundfunk des Benutzers (Senderwahl) / 52

Manuelle Einstellung / Automatische Einstellung.
Aufzeichnung
Wählen Sie im Hauptmenü"Aufzeichnung"durch drücken der
Play-Taste aus.
Wählen Sie im Untermenu durchDrücken der " "
Spracheaufnahmestarten/ Aufnahmebibliothek / Aufnahme
Format / Aufnahme-Einstellungen.
Drücken Sie die Play-Taste, um die Eingabe zu wählen.
Drücken Sie nach der Sprachaufzeichnung VOL um die
Aufzeichnung zu beenden und wählen Sie durch Drücken der
Play-Taste, ob die Aufzeichnung gespeichert wird.
E book
Drücken Sie|</>|um die Seiten zu blättern; (1) um in ein anderes
Buch zu wechseln
Sie können das E-Book auf dem MP3-Player nicht lesen? Öffnen Sie
das txt-Dokument, klicken Sie auf "Speichern unter" und speichern
Sie es als "UTF-8". Kopieren Sie die txt-Datei in den Ordner E-Book
in den MP3 Player.
Die Playlist verwenden
Das Bearbeiten von Playlistenimmp3-Player kannlästig sein, egal
ob es sich um einen iPod oder andere Player handelt. 53
Es gibt ein einfaches, kostenloses Programm namens
Mediamonkey (MM), das Sie für die Übertragung von
Wiedergabelisten auf den AGPTek verwenden können. Erstellen
Sie einfach Ihre Wiedergabelisten in MM und klicken Sie dann
mitder rechten Maustaste auf den Dateinamen. Wählen Sie "Synch
zu X:" (Speicher Ihres mp3-Players).
http://www.mediamonkey.com/download/
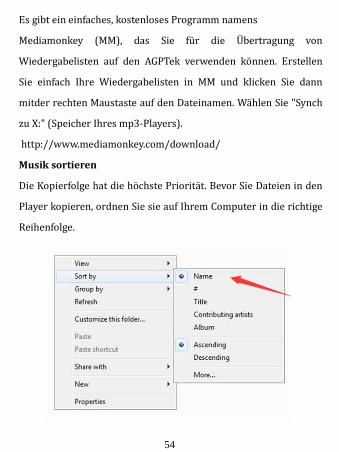
Musik sortieren
Die Kopierfolge hat die höchste Priorität. Bevor Sie Dateien in den
Player kopieren, ordnen Sie sie auf Ihrem Computer in die richtige
Reihenfolge.
54

(mit Namen, wie im Bild unten. Nicht durch #, es wird durch SCII
sortiert).
Wenn der Dateiauftrag nach Namen sortiert ist bevor Sie ihn in
den Player kopieren, bleibt die richtige Reihenfolge bestehen.
Wenn Ihre Musik nicht richtig sortiert ist, verwenden Sie den
"Advanced Renamer". Laden Sie den Advanced Renamer und fügen
Sie Ihrer Musik in der Liste die Nummern 01 für Track 1, 02 für
Track 2 usw. zu. (s. Bild)
55

Klicken Sie auf "Start batch" im oberen Bereich des Fensters. In
dem neuen Fenster klicken Sie auf Start. Laden Sie Ihre Musik in
Ihren MP3-Player und drücken Sie die Play-Taste, um den Ordner
zu öffnen und die Reihenfolge zu prüfen.
Unterstütze Formate
Sortierung Ihrer Musik auf der SD-Karte nach Interpreten,
Alben und Genres
1. Legen Sie die Micro SD-Karte in den Player
2. Wählen Sie "Ordner" und dann "Kartenordner" aus. Wählen
Sie ein Lied aus.Sie befinden sich nun im Lied-Bildschirm
3. Zurück auf dem Startbildschirmwählen Sie das
"Musik"-Zeichen. Sie können nun alle Titel auf Ihrer Micro
Musik-Format MP3/WAV/APE/WMA/FLAC etc
Video-Format AMV(converted video)
Bild JPG/JPEG/BMP
E-book Unterstützung TXT
FM Radio Unterstützung Radio
Songtexte Anserine Unterstützung LRC Songtexte
Aufzeichnung WAV
56

SD-Karte sehen und nach Künstler, Alben und Genres sortieren.
Während der Wiedergabe von Songs auf den Startbildschirm
zugreifen
1. Drücken Sie (1), um zum letzten Menü zu gelangen
2. Drücken Sie die linke Taste drei Mal um zurück zum
Home-Bildschirm zu gelangen.
Wiedergabe von der letzten Position
Halten Sie die Play-Taste für 3 Sekunden gedrückt, um das Gerät
auszuschalten.
Warum werden keine flac- oder andere Dateiformate
abgespielt?
Das Gerät spielt flac,die Musikdatei kann allerdings nur innerhalb
der folgenden Bereiche wiedergegeben werden:
57