Embed Size (px)
Citation preview
Digital TV HD Set-top Box
STB2-T2
NMS ETATM Stereo Advanced Digital TV Set-top Box
User Guide

CONTENTS
2
English
Safety Information ........................................................................................... 3
Introduction ..................................................................................................... 4
Set-top Box Front Panel ................................................................................. 4
Set-top Box Back Panel ................................................................................. 4
Remote Control .............................................................................................. 5
Setting up for Standard Definition Television Set ............................................ 6
Setting up for High Definition Television Set ................................................... 6
Menu ................................................................................................................ 7
Menu → Media Player .................................................................................... 7
Menu → Edit Channel .................................................................................... 8
Menu → Installation ........................................................................................ 8
Menu → System Setup .................................................................................. 9
Menu → System Setup ................................................................................ 10
Menu → Miscellaneous ................................................................................ 10
Menu → Edit Channel → TV/Radio Channel List ......................................... 11
Remote Control Function ............................................................................. 12
EPG ............................................................................................................. 12
Timer Setting ................................................................................................ 13
Time-shift ..................................................................................................... 13
Learning Your TV Remote Control Buttons ................................................ 14
Glossary......................................................................................................... 15
Troubleshooting ............................................................................................ 15
SAFETY INFORMATION
3
English
Safety Information
This Set-top Box (STB) is manufactured based on international safety standards. Please read the following safety precautions carefully. POWER SUPPLY 1. Use only 100V – 240V AC 50/60Hz.
2. Place the STB near an electrical socket and ensure that the power cord is
not likely to be walked on, pinched or damaged.
3. Ensure the electrical source is not overloaded as this can cause fire or
electrical shock
CABLES Use good quality and certified cables only.
LOCATION Place the STB indoors and away from any potential hazards, such as near
houseplants, open windows (where STB may be exposed to rain), direct
sunlight or near a heater.
CLEANING 1. Always disconnect the STB’s power cord from the wall socket before
cleaning it and use soft damp cloth only.
2. Avoid using solvents as it may cause fire or damage the STB.
VENTILATION 1. Do not block any ventilation holes on the STB and ensure that there is
sufficient space around the STB for proper ventilation.
2. Do not place the STB on carpets or materials that may prevent proper air-
flow within the STB.
3. Do not stack any other electronic equipment on the top of the STB.
LIQUID Ensure that the STB is placed in a dry place and away from any liquid. For
example, do not put containers with water such as a cup or vase on top of the
STB.
SMALL OBJECTS Keep coins or other small objects away from the STB as they can fall through
the ventilation holes and damage the STB.
ANTENNA Before disconnecting the antenna, switch off the STB first. Disconnecting the
antenna while the STB is switched on may damage the STB.
EARTHING Ensure the power cable is properly connected to the electrical earth (ground)
in accordance with all local codes and ordinances.
LIGHTNING 1. The STB must remain connected to the main electrical socket at all times.
2. Ensure that the safety instructions of other equipment connected to STB
such as a television set is adhered to.
3. Ensure lightning safety devices are in place for outdoor terrestrial
antennas, electrical sockets and all other devices near or connected to the
STB.
REPAIR Don’t attempt to repair, disassemble or alter the STB. Doing so may cause fire,
electric shocks or damage the STB. Ask your local distributor or service centre
should you need to repair your STB.
INTRODUCTION
4
English
Introduction
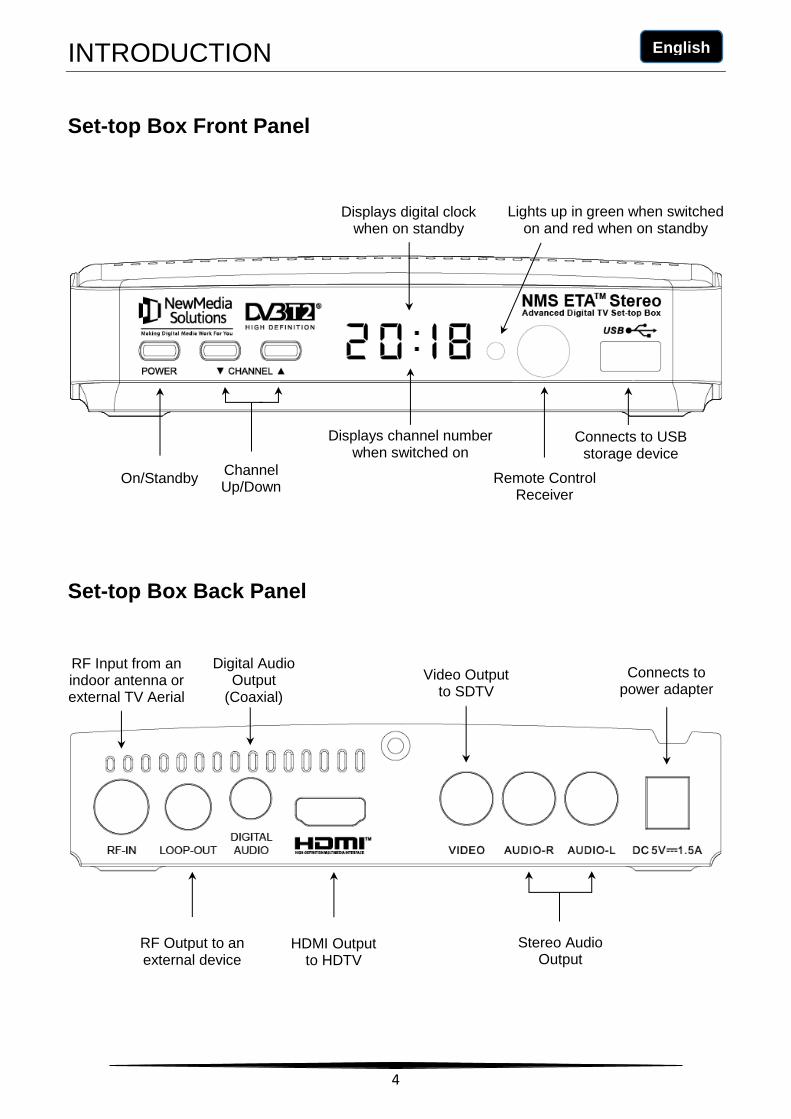
Set-top Box Front Panel
Set-top Box Back Panel
On/Standby
Displays digital clock when on standby
Channel Up/Down
Remote Control Receiver
Lights up in green when switched on and red when on standby
Connects to USB storage device
RF Input from an indoor antenna or external TV Aerial
RF Output to an external device
Digital Audio Output
(Coaxial)
HDMI Output to HDTV
Video Output to SDTV
Stereo Audio Output
Connects to power adapter
Displays channel number when switched on
INTRODUCTION
5
English
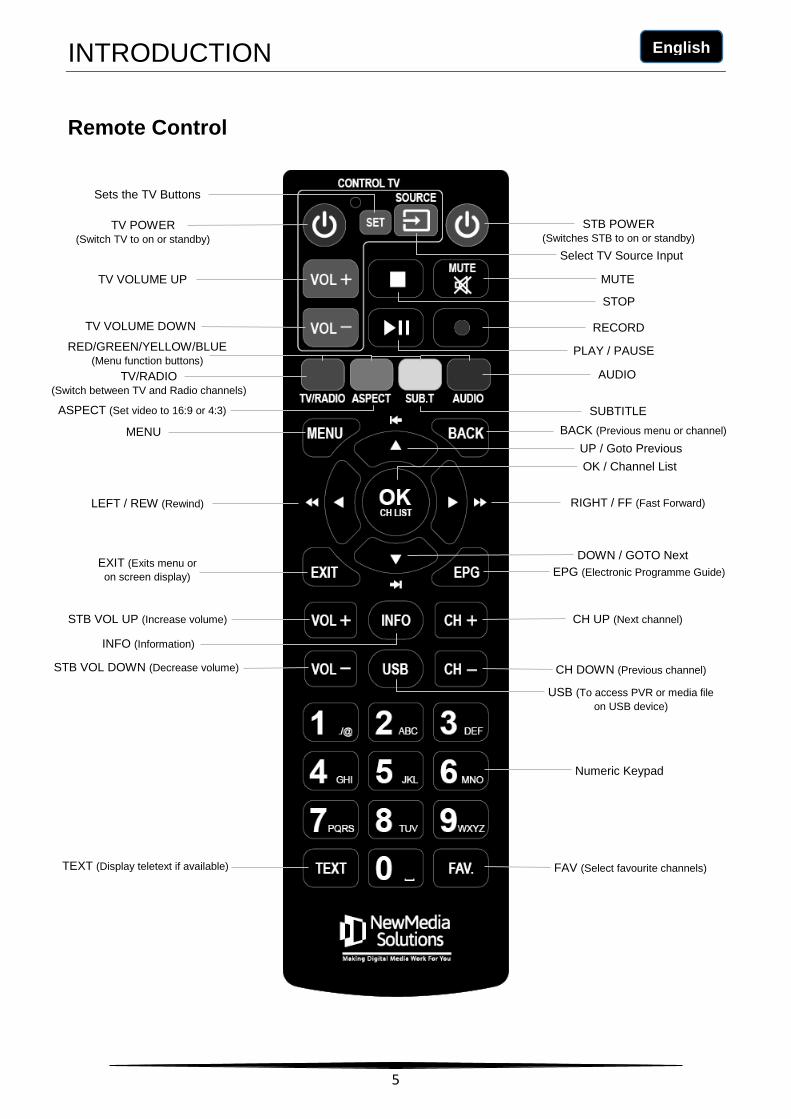
Remote Control
TV POWER (Switch TV to on or standby)
MUTE
RED/GREEN/YELLOW/BLUE (Menu function buttons)
TV/RADIO (Switch between TV and Radio channels)
ASPECT (Set video to 16:9 or 4:3)
AUDIO
PLAY / PAUSE
RECORD
SUBTITLE
STOP
MENU BACK (Previous menu or channel)
UP / Goto Previous
OK / Channel List
RIGHT / FF (Fast Forward)
DOWN / GOTO Next
LEFT / REW (Rewind)
EXIT (Exits menu or
on screen display)
INFO (Information)
STB VOL UP (Increase volume)
STB VOL DOWN (Decrease volume)
EPG (Electronic Programme Guide)
CH UP (Next channel)
CH DOWN (Previous channel)
USB (To access PVR or media file
on USB device)
Numeric Keypad
FAV (Select favourite channels) TEXT (Display teletext if available)
STB POWER (Switches STB to on or standby)
TV VOLUME UP
TV VOLUME DOWN
Select TV Source Input
Sets the TV Buttons
INTRODUCTION
6
English
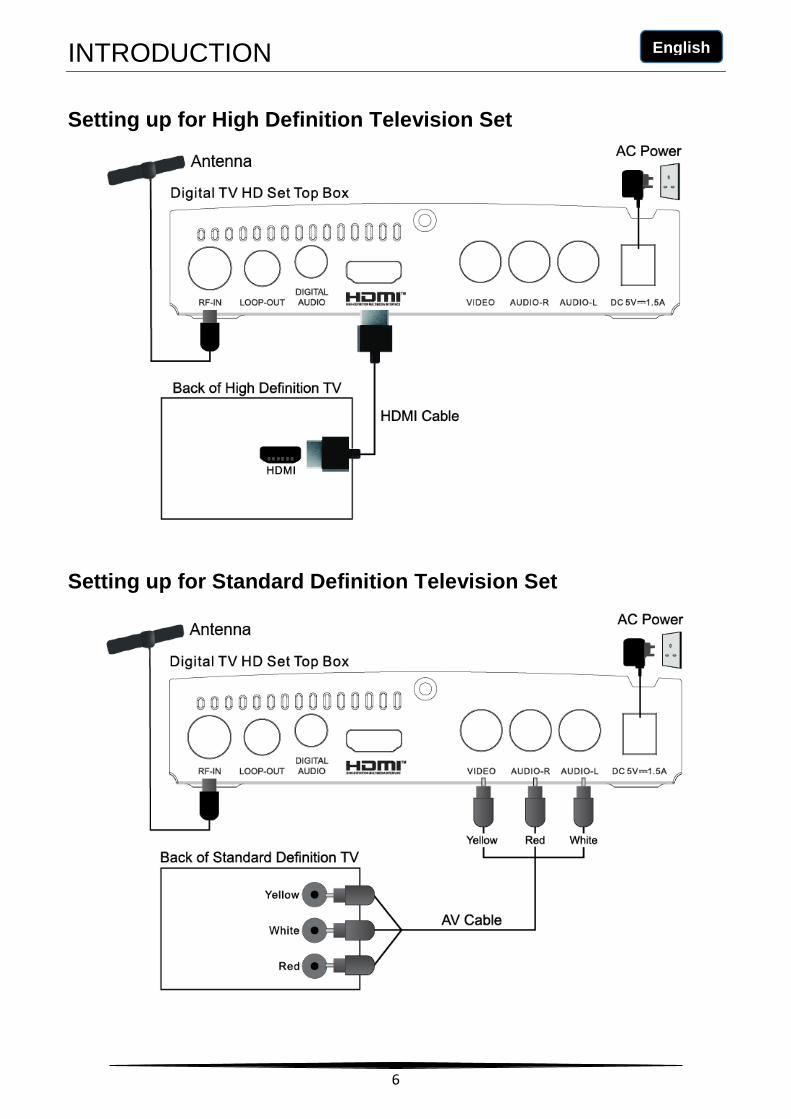
Setting up for High Definition Television Set
Setting up for Standard Definition Television Set
MENU
7
English
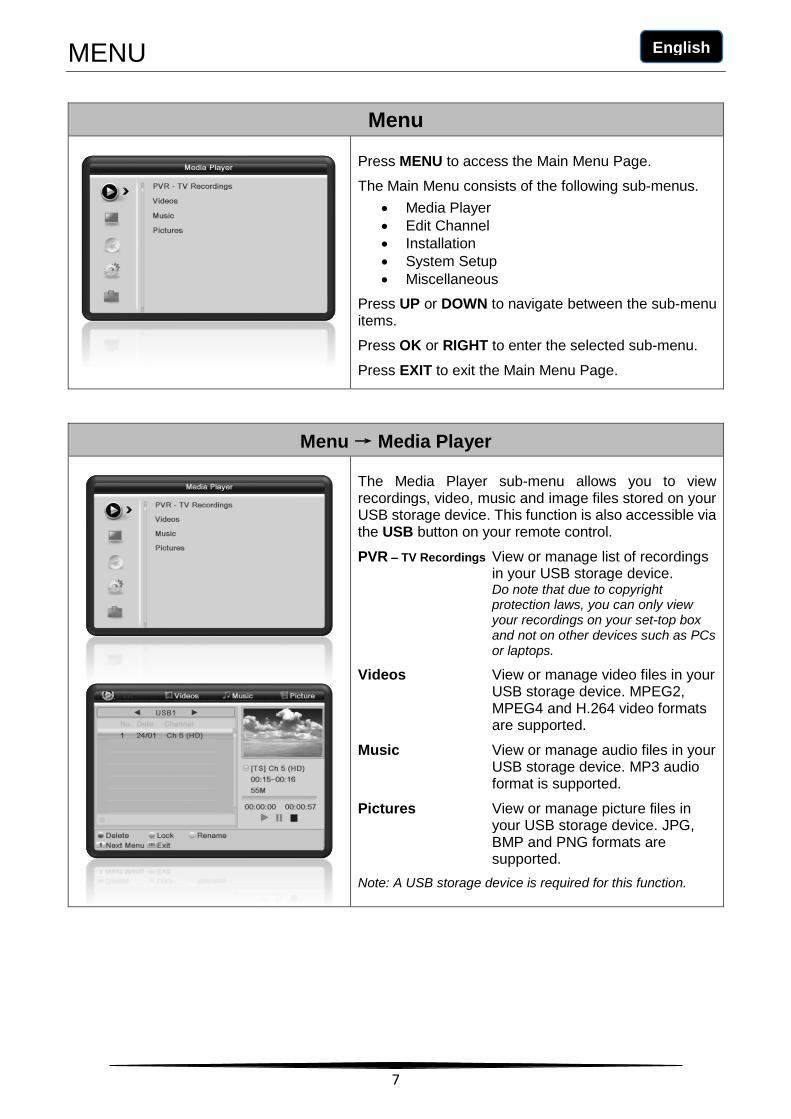
Menu
Press MENU to access the Main Menu Page.
The Main Menu consists of the following sub-menus.
• Media Player
• Edit Channel
• Installation
• System Setup
• Miscellaneous
Press UP or DOWN to navigate between the sub-menu items.
Press OK or RIGHT to enter the selected sub-menu.
Press EXIT to exit the Main Menu Page.
Menu → Media Player
The Media Player sub-menu allows you to view recordings, video, music and image files stored on your USB storage device. This function is also accessible via the USB button on your remote control.
PVR – TV Recordings View or manage list of recordings in your USB storage device. Do note that due to copyright protection laws, you can only view your recordings on your set-top box and not on other devices such as PCs or laptops.
Videos View or manage video files in your USB storage device. MPEG2, MPEG4 and H.264 video formats are supported.
Music View or manage audio files in your USB storage device. MP3 audio format is supported.
Pictures View or manage picture files in your USB storage device. JPG, BMP and PNG formats are supported.
Note: A USB storage device is required for this function.
MENU
8
English
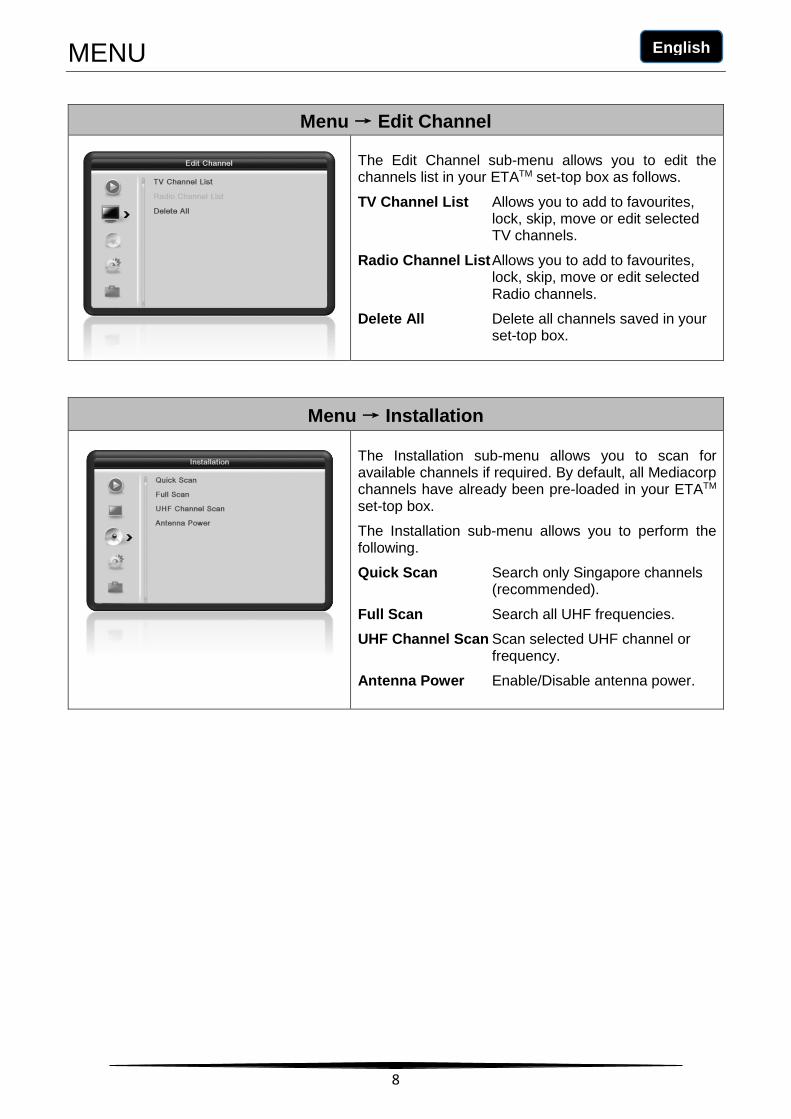
Menu → Edit Channel
The Edit Channel sub-menu allows you to edit the channels list in your ETATM set-top box as follows.
TV Channel List Allows you to add to favourites, lock, skip, move or edit selected TV channels.
Radio Channel List Allows you to add to favourites, lock, skip, move or edit selected Radio channels.
Delete All Delete all channels saved in your set-top box.
Menu → Installation
The Installation sub-menu allows you to scan for available channels if required. By default, all Mediacorp channels have already been pre-loaded in your ETATM set-top box.
The Installation sub-menu allows you to perform the following.
Quick Scan Search only Singapore channels (recommended).
Full Scan Search all UHF frequencies.
UHF Channel Scan Scan selected UHF channel or frequency.
Antenna Power Enable/Disable antenna power.
MENU
9
English
Menu → System Setup
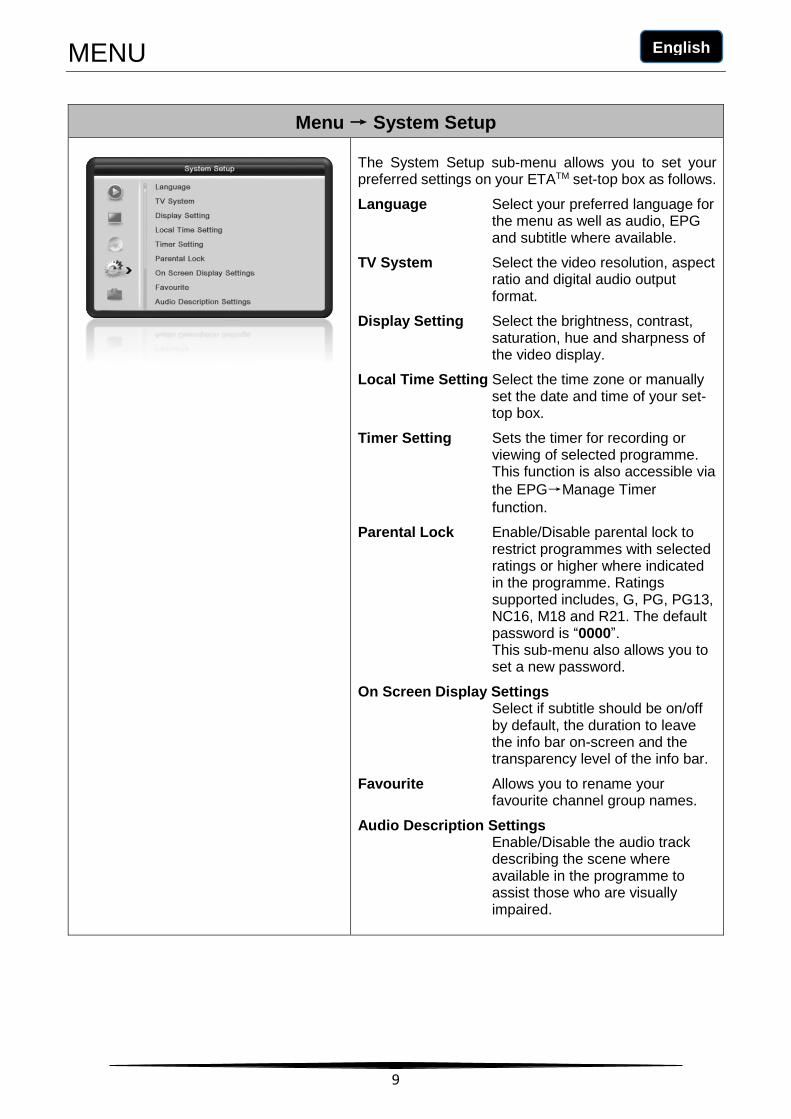
The System Setup sub-menu allows you to set your preferred settings on your ETATM set-top box as follows.
Language Select your preferred language for the menu as well as audio, EPG and subtitle where available.
TV System Select the video resolution, aspect ratio and digital audio output format.
Display Setting Select the brightness, contrast, saturation, hue and sharpness of the video display.
Local Time Setting Select the time zone or manually set the date and time of your set-top box.
Timer Setting Sets the timer for recording or viewing of selected programme. This function is also accessible via
the EPG→Manage Timer
function.
Parental Lock Enable/Disable parental lock to restrict programmes with selected ratings or higher where indicated in the programme. Ratings supported includes, G, PG, PG13, NC16, M18 and R21. The default password is “0000”. This sub-menu also allows you to set a new password.
On Screen Display Settings Select if subtitle should be on/off by default, the duration to leave the info bar on-screen and the transparency level of the info bar.
Favourite Allows you to rename your favourite channel group names.
Audio Description Settings Enable/Disable the audio track describing the scene where available in the programme to assist those who are visually impaired.
MENU
10
English
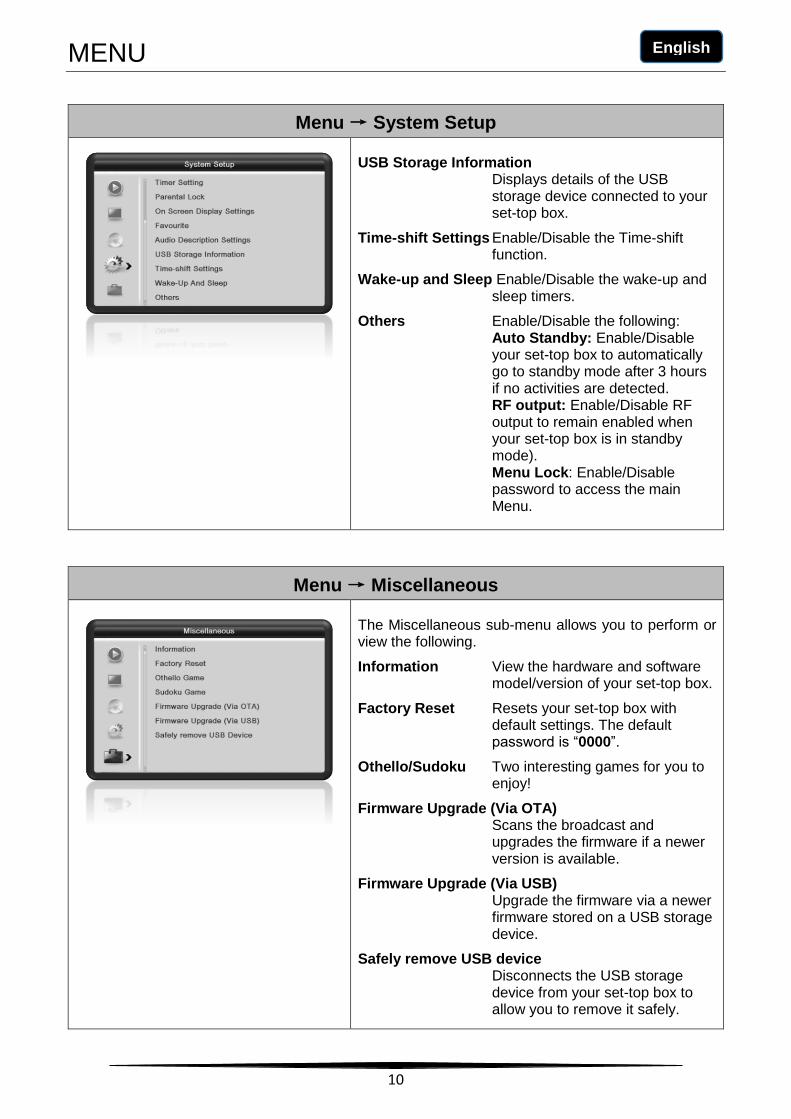
Menu → System Setup
USB Storage Information Displays details of the USB storage device connected to your set-top box.
Time-shift Settings Enable/Disable the Time-shift function.
Wake-up and Sleep Enable/Disable the wake-up and sleep timers.
Others Enable/Disable the following: Auto Standby: Enable/Disable your set-top box to automatically go to standby mode after 3 hours if no activities are detected. RF output: Enable/Disable RF output to remain enabled when your set-top box is in standby mode). Menu Lock: Enable/Disable password to access the main Menu.
Menu → Miscellaneous
The Miscellaneous sub-menu allows you to perform or view the following.
Information View the hardware and software model/version of your set-top box.
Factory Reset Resets your set-top box with default settings. The default password is “0000”.
Othello/Sudoku Two interesting games for you to enjoy!
Firmware Upgrade (Via OTA) Scans the broadcast and upgrades the firmware if a newer version is available.
Firmware Upgrade (Via USB) Upgrade the firmware via a newer firmware stored on a USB storage device.
Safely remove USB device Disconnects the USB storage device from your set-top box to allow you to remove it safely.
MENU
11
English
Menu → Edit Channel → TV/Radio Channel List
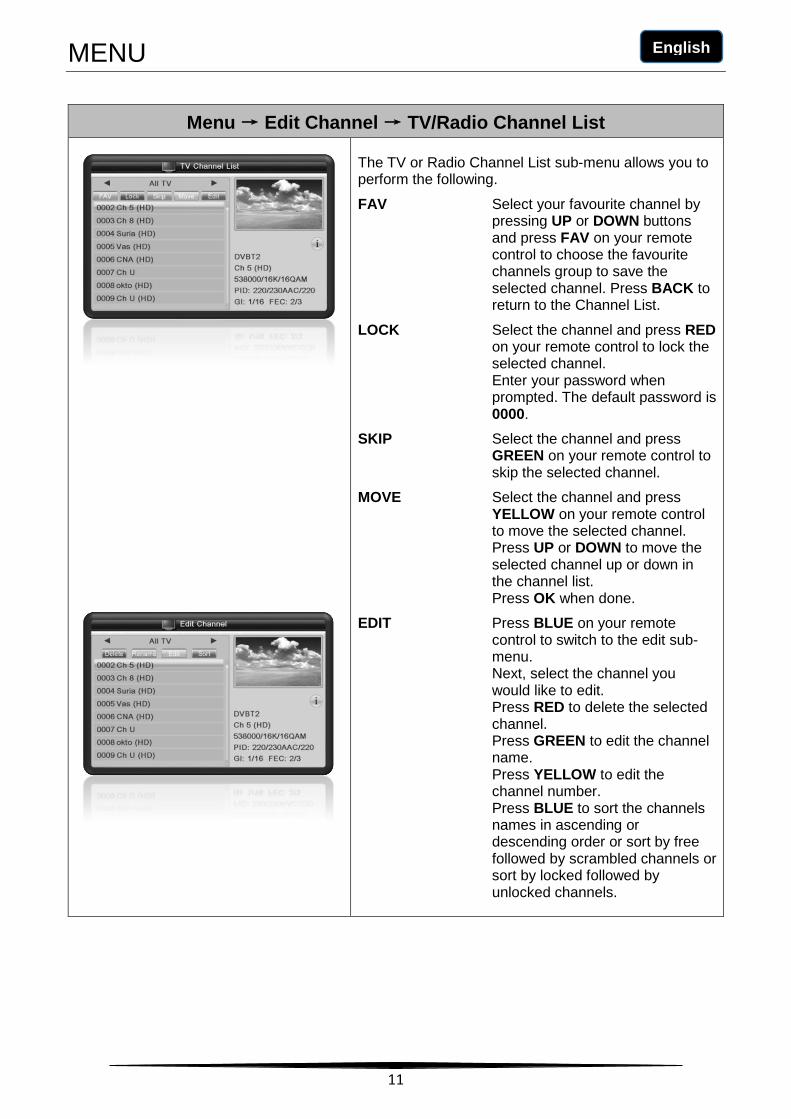
The TV or Radio Channel List sub-menu allows you to perform the following.
FAV Select your favourite channel by pressing UP or DOWN buttons and press FAV on your remote control to choose the favourite channels group to save the selected channel. Press BACK to return to the Channel List.
LOCK Select the channel and press RED on your remote control to lock the selected channel. Enter your password when prompted. The default password is 0000.
SKIP Select the channel and press GREEN on your remote control to skip the selected channel.
MOVE Select the channel and press YELLOW on your remote control to move the selected channel. Press UP or DOWN to move the selected channel up or down in the channel list. Press OK when done.
EDIT Press BLUE on your remote control to switch to the edit sub-menu. Next, select the channel you would like to edit. Press RED to delete the selected channel. Press GREEN to edit the channel name. Press YELLOW to edit the channel number. Press BLUE to sort the channels names in ascending or descending order or sort by free followed by scrambled channels or sort by locked followed by unlocked channels.
FUNCTION
12
English
Remote Control Function
EPG
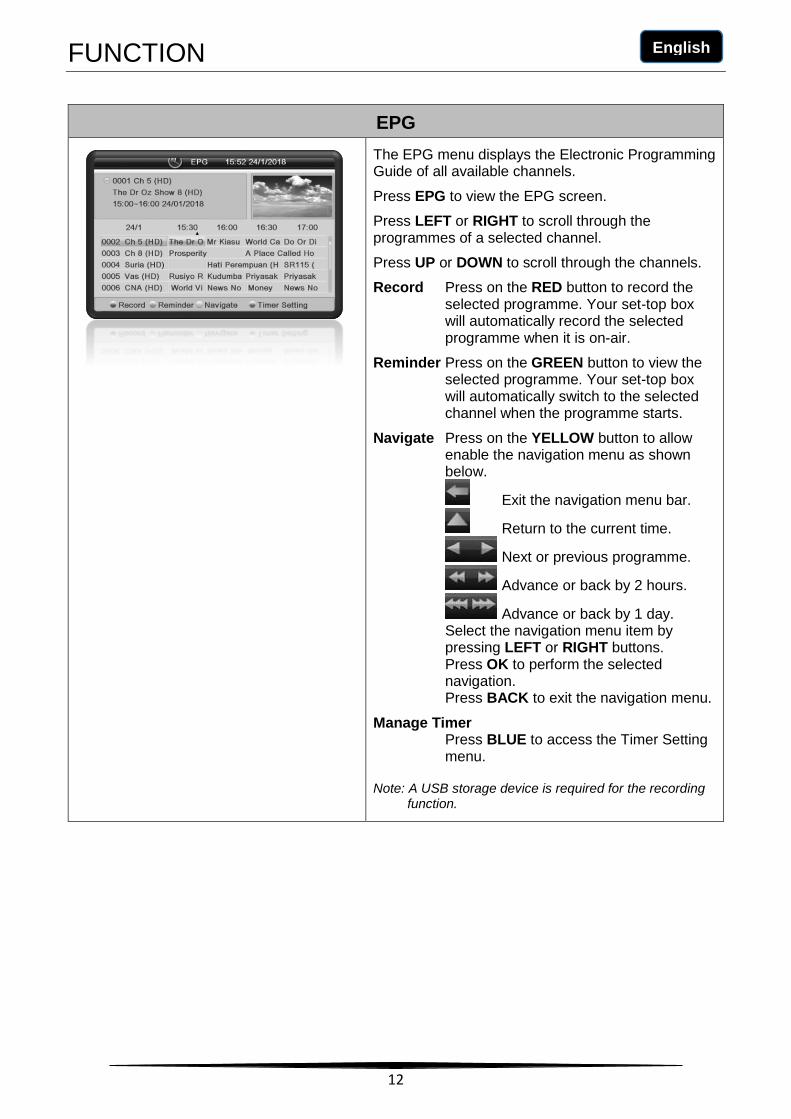
The EPG menu displays the Electronic Programming Guide of all available channels.
Press EPG to view the EPG screen.
Press LEFT or RIGHT to scroll through the programmes of a selected channel.
Press UP or DOWN to scroll through the channels.
Record Press on the RED button to record the selected programme. Your set-top box will automatically record the selected programme when it is on-air.
Reminder Press on the GREEN button to view the selected programme. Your set-top box will automatically switch to the selected channel when the programme starts.
Navigate Press on the YELLOW button to allow enable the navigation menu as shown below.
Exit the navigation menu bar.
Return to the current time.
Next or previous programme.
Advance or back by 2 hours.
Advance or back by 1 day. Select the navigation menu item by pressing LEFT or RIGHT buttons. Press OK to perform the selected navigation. Press BACK to exit the navigation menu.
Manage Timer Press BLUE to access the Timer Setting menu.
Note: A USB storage device is required for the recording function.
FUNCTION
13
English
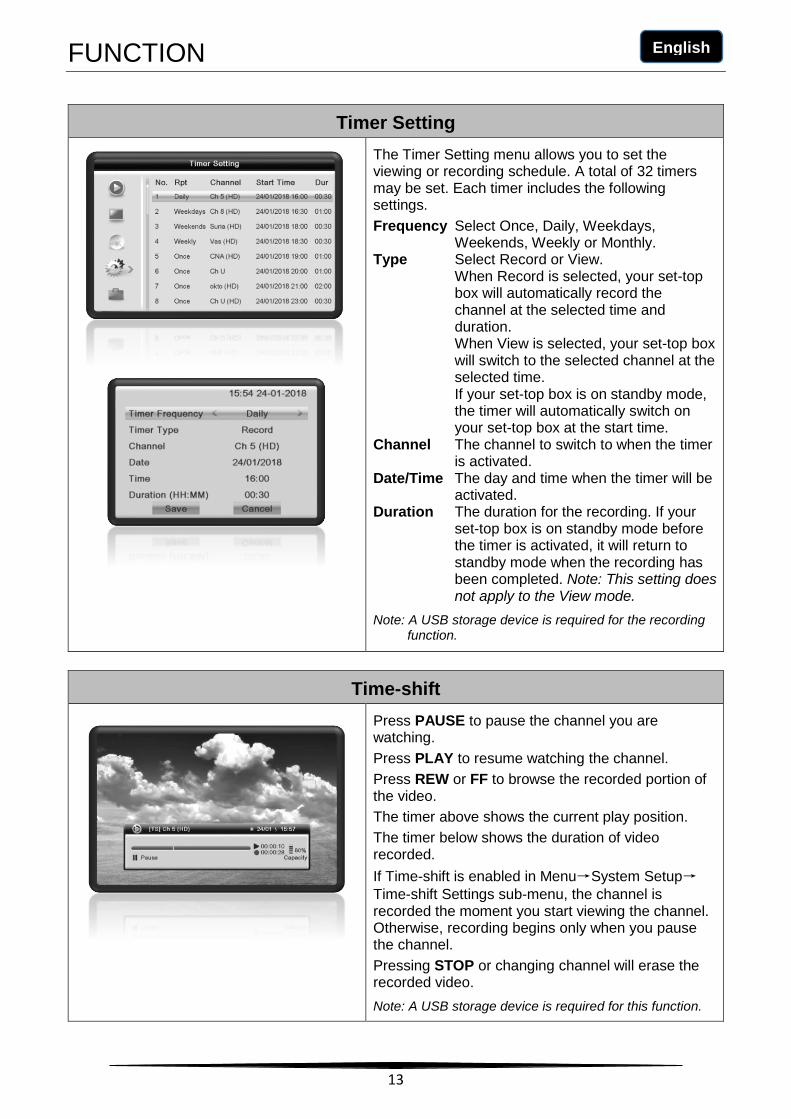
Timer Setting
The Timer Setting menu allows you to set the viewing or recording schedule. A total of 32 timers may be set. Each timer includes the following settings.
Frequency Select Once, Daily, Weekdays, Weekends, Weekly or Monthly.
Type Select Record or View. When Record is selected, your set-top box will automatically record the channel at the selected time and duration. When View is selected, your set-top box will switch to the selected channel at the selected time. If your set-top box is on standby mode, the timer will automatically switch on your set-top box at the start time.
Channel The channel to switch to when the timer is activated.
Date/Time The day and time when the timer will be activated.
Duration The duration for the recording. If your set-top box is on standby mode before the timer is activated, it will return to standby mode when the recording has been completed. Note: This setting does not apply to the View mode.
Note: A USB storage device is required for the recording function.
Time-shift
Press PAUSE to pause the channel you are watching.
Press PLAY to resume watching the channel.
Press REW or FF to browse the recorded portion of the video.
The timer above shows the current play position.
The timer below shows the duration of video recorded.
If Time-shift is enabled in Menu→System Setup→Time-shift Settings sub-menu, the channel is recorded the moment you start viewing the channel. Otherwise, recording begins only when you pause the channel.
Pressing STOP or changing channel will erase the recorded video.
Note: A USB storage device is required for this function.
FUNCTION
14
English
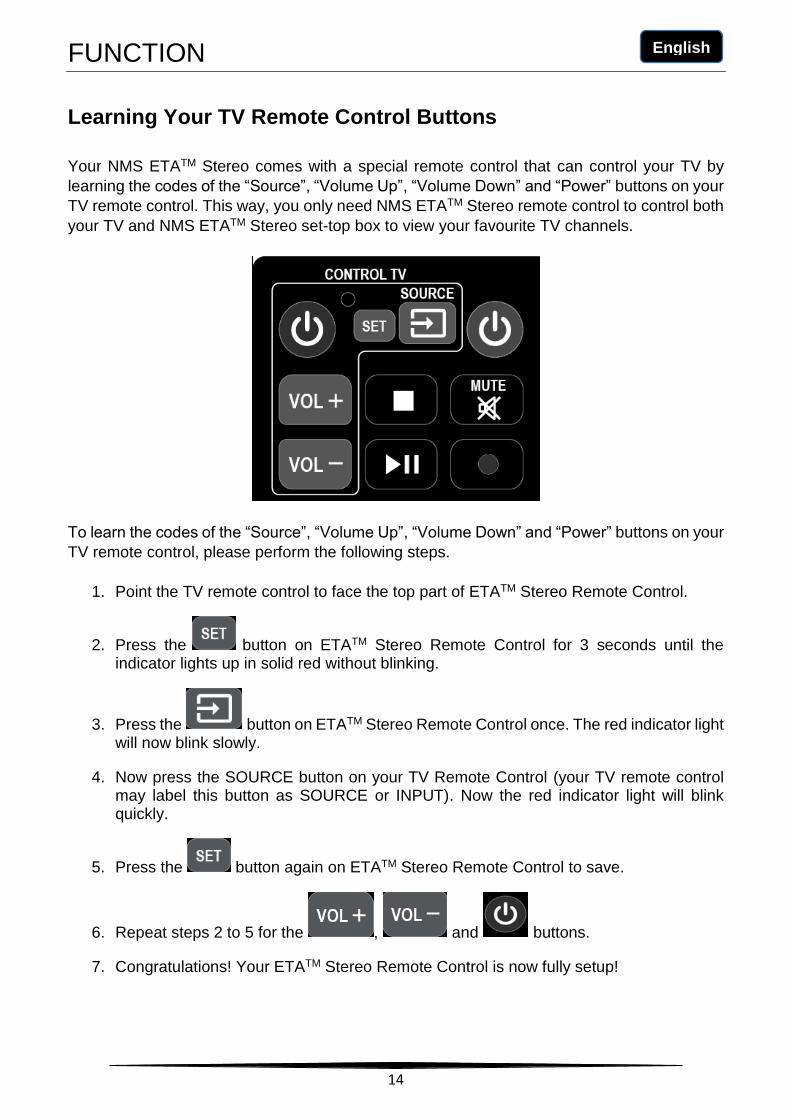
Learning Your TV Remote Control Buttons
Your NMS ETATM Stereo comes with a special remote control that can control your TV by
learning the codes of the “Source”, “Volume Up”, “Volume Down” and “Power” buttons on your
TV remote control. This way, you only need NMS ETATM Stereo remote control to control both
your TV and NMS ETATM Stereo set-top box to view your favourite TV channels.
To learn the codes of the “Source”, “Volume Up”, “Volume Down” and “Power” buttons on your
TV remote control, please perform the following steps.
1. Point the TV remote control to face the top part of ETATM Stereo Remote Control.
2. Press the button on ETATM Stereo Remote Control for 3 seconds until the indicator lights up in solid red without blinking.
3. Press the button on ETATM Stereo Remote Control once. The red indicator light will now blink slowly.
4. Now press the SOURCE button on your TV Remote Control (your TV remote control may label this button as SOURCE or INPUT). Now the red indicator light will blink quickly.
5. Press the button again on ETATM Stereo Remote Control to save.
6. Repeat steps 2 to 5 for the , and buttons.
7. Congratulations! Your ETATM Stereo Remote Control is now fully setup!
GLOSSARY
15
English
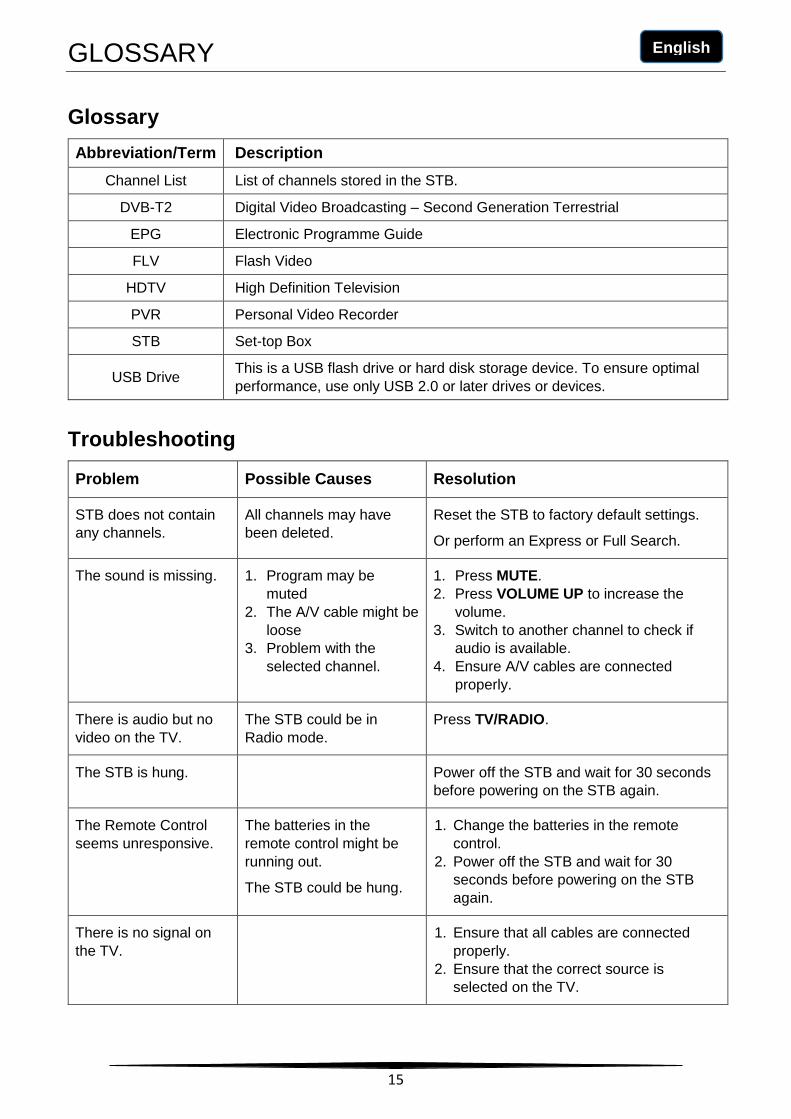
Glossary
Abbreviation/Term Description
Channel List List of channels stored in the STB.
DVB-T2 Digital Video Broadcasting – Second Generation Terrestrial
EPG Electronic Programme Guide
FLV Flash Video
HDTV High Definition Television
PVR Personal Video Recorder
STB Set-top Box
USB Drive This is a USB flash drive or hard disk storage device. To ensure optimal
performance, use only USB 2.0 or later drives or devices.
Troubleshooting
Problem Possible Causes Resolution
STB does not contain
any channels.
All channels may have
been deleted.
Reset the STB to factory default settings.
Or perform an Express or Full Search.
The sound is missing. 1. Program may be
muted
2. The A/V cable might be
loose
3. Problem with the
selected channel.
1. Press MUTE.
2. Press VOLUME UP to increase the
volume.
3. Switch to another channel to check if
audio is available.
4. Ensure A/V cables are connected
properly.
There is audio but no
video on the TV.
The STB could be in
Radio mode.
Press TV/RADIO.
The STB is hung. Power off the STB and wait for 30 seconds
before powering on the STB again.
The Remote Control
seems unresponsive.
The batteries in the
remote control might be
running out.
The STB could be hung.
1. Change the batteries in the remote
control.
2. Power off the STB and wait for 30
seconds before powering on the STB
again.
There is no signal on
the TV.
1. Ensure that all cables are connected
properly.
2. Ensure that the correct source is
selected on the TV.