Embed Size (px)
Citation preview

DVDR75Digital Video Disc Recorder
Owner's Manual
Important!Return your
WarrantyRegistration Cardwithin 10 days.See why inside.
®
NEED HELP? CALL US!PHILIPS REPRESENTATIVES ARE READY TO HELP YOU WITH ANY QUESTIONS ABOUT
YOUR NEW PRODUCT. WE CAN GUIDE YOU THROUGH CONNECTIONS, FIRST-TIME
SETUP, AND ANY OF THE FEATURES. WE WANT YOU TO START ENJOYING YOUR
NEW PRODUCT RIGHT AWAY.
CALL US BEFORE YOU CONSIDER
RETURNING THE PRODUCT.1-800-531-0039
OR VISIT US ON THE WEB AT WWW.PHILIPS.COM
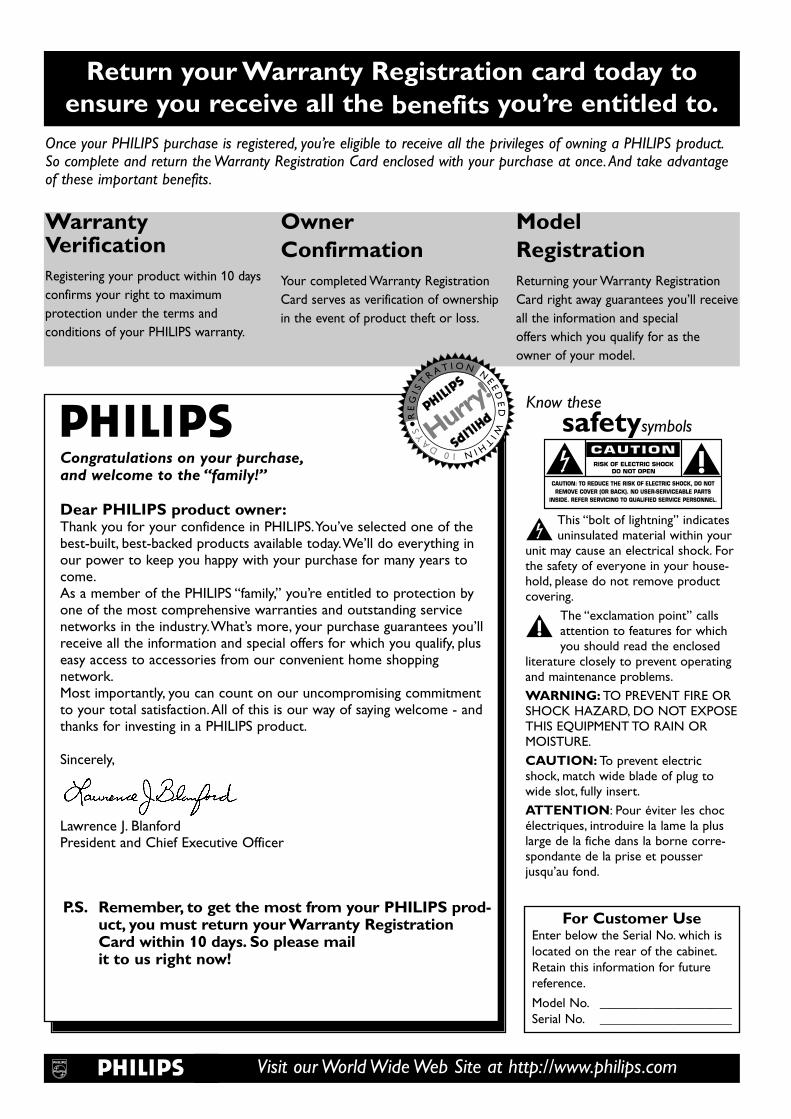
Once your PHILIPS purchase is registered, you’re eligible to receive all the privileges of owning a PHILIPS product.So complete and return the Warranty Registration Card enclosed with your purchase at once. And take advantageof these important benefits.
Return your Warranty Registration card today toensure you receive all the benefits you’re entitled to.
For Customer UseEnter below the Serial No. which islocated on the rear of the cabinet.Retain this information for future reference.
Model No. ____________________Serial No. ____________________
Congratulations on your purchase,and welcome to the “family!”
Dear PHILIPS product owner:Thank you for your confidence in PHILIPS.You’ve selected one of thebest-built, best-backed products available today.We’ll do everything inour power to keep you happy with your purchase for many years tocome.As a member of the PHILIPS “family,” you’re entitled to protection byone of the most comprehensive warranties and outstanding service networks in the industry.What’s more, your purchase guarantees you’llreceive all the information and special offers for which you qualify, pluseasy access to accessories from our convenient home shopping network.Most importantly, you can count on our uncompromising commitmentto your total satisfaction.All of this is our way of saying welcome - andthanks for investing in a PHILIPS product.
Sincerely,
Lawrence J. BlanfordPresident and Chief Executive Officer
P.S. Remember, to get the most from your PHILIPS prod-uct, you must return your Warranty RegistrationCard within 10 days. So please mailit to us right now!
Know thesesafetysymbols
This “bolt of lightning” indicatesuninsulated material within your
unit may cause an electrical shock. Forthe safety of everyone in your house-hold, please do not remove productcovering.
The “exclamation point” callsattention to features for whichyou should read the enclosed
literature closely to prevent operatingand maintenance problems.
WARNING: TO PREVENT FIRE ORSHOCK HAZARD, DO NOT EXPOSETHIS EQUIPMENT TO RAIN ORMOISTURE.
CAUTION: To prevent electricshock, match wide blade of plug towide slot, fully insert.
ATTENTION: Pour éviter les chocélectriques, introduire la lame la pluslarge de la fiche dans la borne corre-spondante de la prise et pousserjusqu’au fond.
CAUTIONRISK OF ELECTRIC SHOCK
DO NOT OPEN
CAUTION: TO REDUCE THE RISK OF ELECTRIC SHOCK, DO NOTREMOVE COVER (OR BACK). NO USER-SERVICEABLE PARTS
INSIDE. REFER SERVICING TO QUALIFIED SERVICE PERSONNEL.
WarrantyVerificationRegistering your product within 10 daysconfirms your right to maximumprotection under the terms and conditions of your PHILIPS warranty.
OwnerConfirmationYour completed Warranty RegistrationCard serves as verification of ownershipin the event of product theft or loss.
ModelRegistrationReturning your Warranty RegistrationCard right away guarantees you’ll receiveall the information and specialoffers which you qualify for as theowner of your model.
Visit our World Wide Web Site at http://www.philips.com
t
s
RE
GI S
T
R A T I O N N
E ED
ED
WIT
HIN10DA
YS Hurry
!
Contents 3
General InformationContents . . . . . . . . . . . . . . . . . . . . . . . . . . . . . . . . . . . . . . . . . . . . . . . . . . . . . . . . . . . . . . . . . . . . . . .3Safety Information . . . . . . . . . . . . . . . . . . . . . . . . . . . . . . . . . . . . . . . . . . . . . . . . . . . . . . . . . . . . . . .4-5Introduction . . . . . . . . . . . . . . . . . . . . . . . . . . . . . . . . . . . . . . . . . . . . . . . . . . . . . . . . . . . . . . . . . . . . .6
Getting StartedPlayable Discs . . . . . . . . . . . . . . . . . . . . . . . . . . . . . . . . . . . . . . . . . . . . . . . . . . . . . . . . . . . . . . . . . . . .7General Information . . . . . . . . . . . . . . . . . . . . . . . . . . . . . . . . . . . . . . . . . . . . . . . . . . . . . . . . . . . . . . .8Hookups . . . . . . . . . . . . . . . . . . . . . . . . . . . . . . . . . . . . . . . . . . . . . . . . . . . . . . . . . . . . . . . . . . . . .9-17Initial Setup . . . . . . . . . . . . . . . . . . . . . . . . . . . . . . . . . . . . . . . . . . . . . . . . . . . . . . . . . . . . . . . . . .18-19
Basic Play and RecordingQuick Disc Playback . . . . . . . . . . . . . . . . . . . . . . . . . . . . . . . . . . . . . . . . . . . . . . . . . . . . . . . . . . . . . .20Quick Recording . . . . . . . . . . . . . . . . . . . . . . . . . . . . . . . . . . . . . . . . . . . . . . . . . . . . . . . . . . . . . . . .21
ControlsRemote Control . . . . . . . . . . . . . . . . . . . . . . . . . . . . . . . . . . . . . . . . . . . . . . . . . . . . . . . . . . . . . .22-23Front Panel . . . . . . . . . . . . . . . . . . . . . . . . . . . . . . . . . . . . . . . . . . . . . . . . . . . . . . . . . . . . . . . . . . . . .24Rear Panel . . . . . . . . . . . . . . . . . . . . . . . . . . . . . . . . . . . . . . . . . . . . . . . . . . . . . . . . . . . . . . . . . . . . .25
Advanced InstallationTV Channel Programming . . . . . . . . . . . . . . . . . . . . . . . . . . . . . . . . . . . . . . . . . . . . . . . . . . . . . . . . .26VCR Plus+® Channels . . . . . . . . . . . . . . . . . . . . . . . . . . . . . . . . . . . . . . . . . . . . . . . . . . . . . . . . . . . .27Clock Setting . . . . . . . . . . . . . . . . . . . . . . . . . . . . . . . . . . . . . . . . . . . . . . . . . . . . . . . . . . . . . . . . .28-29
Menus and DisplaysMenu Bars . . . . . . . . . . . . . . . . . . . . . . . . . . . . . . . . . . . . . . . . . . . . . . . . . . . . . . . . . . . . . . . . . . . . .30On-screen Symbols, Status Box . . . . . . . . . . . . . . . . . . . . . . . . . . . . . . . . . . . . . . . . . . . . . . . . . . . . .31Index Picture Screen . . . . . . . . . . . . . . . . . . . . . . . . . . . . . . . . . . . . . . . . . . . . . . . . . . . . . . . . . . . . .32Information Boxes . . . . . . . . . . . . . . . . . . . . . . . . . . . . . . . . . . . . . . . . . . . . . . . . . . . . . . . . . . . . . . .33
Playback FeaturesTitle/Disc Menus, Chapter/Track Selection . . . . . . . . . . . . . . . . . . . . . . . . . . . . . . . . . . . . . . . . . . . . .34Audio Language, Subtitles . . . . . . . . . . . . . . . . . . . . . . . . . . . . . . . . . . . . . . . . . . . . . . . . . . . . . . . . . .35Zoom, Camera Angle . . . . . . . . . . . . . . . . . . . . . . . . . . . . . . . . . . . . . . . . . . . . . . . . . . . . . . . . . . . . .36Still Picture/Frame-by-Frame Play, Sound . . . . . . . . . . . . . . . . . . . . . . . . . . . . . . . . . . . . . . . . . . . . . . .37Slow Motion, Searching . . . . . . . . . . . . . . . . . . . . . . . . . . . . . . . . . . . . . . . . . . . . . . . . . . . . . . . . . . . .38Time Search, Scan . . . . . . . . . . . . . . . . . . . . . . . . . . . . . . . . . . . . . . . . . . . . . . . . . . . . . . . . . . . . . . . .39Repeat, Repeat A-B . . . . . . . . . . . . . . . . . . . . . . . . . . . . . . . . . . . . . . . . . . . . . . . . . . . . . . . . . . . . . . .40
Recording OptionsOne-Touch Recording . . . . . . . . . . . . . . . . . . . . . . . . . . . . . . . . . . . . . . . . . . . . . . . . . . . . . . . . . . . .41Timer Recording . . . . . . . . . . . . . . . . . . . . . . . . . . . . . . . . . . . . . . . . . . . . . . . . . . . . . . . . . . . . . . . .42VCR Plus+® Timer Recording . . . . . . . . . . . . . . . . . . . . . . . . . . . . . . . . . . . . . . . . . . . . . . . . . . . . . . .43Erasing Timer Recordings . . . . . . . . . . . . . . . . . . . . . . . . . . . . . . . . . . . . . . . . . . . . . . . . . . . . . . . . . .44Error Messages . . . . . . . . . . . . . . . . . . . . . . . . . . . . . . . . . . . . . . . . . . . . . . . . . . . . . . . . . . . . . . . . . .45Record One Channel/Watch Another . . . . . . . . . . . . . . . . . . . . . . . . . . . . . . . . . . . . . . . . . . . . . . . .46Title Settings Menu . . . . . . . . . . . . . . . . . . . . . . . . . . . . . . . . . . . . . . . . . . . . . . . . . . . . . . . . . . . . . . .47Append Recording, Chapter Markers . . . . . . . . . . . . . . . . . . . . . . . . . . . . . . . . . . . . . . . . . . . . . . . . .48Record Settings . . . . . . . . . . . . . . . . . . . . . . . . . . . . . . . . . . . . . . . . . . . . . . . . . . . . . . . . . . . . . . . . .49
EditingEditing: Disc Information Screen . . . . . . . . . . . . . . . . . . . . . . . . . . . . . . . . . . . . . . . . . . . . . . . . . . . . .50Editing . . . . . . . . . . . . . . . . . . . . . . . . . . . . . . . . . . . . . . . . . . . . . . . . . . . . . . . . . . . . . . . . . . . . . . . .51Finalize Disc . . . . . . . . . . . . . . . . . . . . . . . . . . . . . . . . . . . . . . . . . . . . . . . . . . . . . . . . . . . . . . . . . . . .52
Additional Features and Setup OptionsAuto Resume, Playback Control . . . . . . . . . . . . . . . . . . . . . . . . . . . . . . . . . . . . . . . . . . . . . . . . . . . . .53Access Control . . . . . . . . . . . . . . . . . . . . . . . . . . . . . . . . . . . . . . . . . . . . . . . . . . . . . . . . . . . . . . .54-58DVD Recorder Features Menu . . . . . . . . . . . . . . . . . . . . . . . . . . . . . . . . . . . . . . . . . . . . . . . . . . . . . .59Picture Settings . . . . . . . . . . . . . . . . . . . . . . . . . . . . . . . . . . . . . . . . . . . . . . . . . . . . . . . . . . . . . . . . . .60Digital Output . . . . . . . . . . . . . . . . . . . . . . . . . . . . . . . . . . . . . . . . . . . . . . . . . . . . . . . . . . . . . . . . . .61Analog Output . . . . . . . . . . . . . . . . . . . . . . . . . . . . . . . . . . . . . . . . . . . . . . . . . . . . . . . . . . . . . . . . . .62Language Settings . . . . . . . . . . . . . . . . . . . . . . . . . . . . . . . . . . . . . . . . . . . . . . . . . . . . . . . . . . . . . . . .63Night Mode, Remote Control Used . . . . . . . . . . . . . . . . . . . . . . . . . . . . . . . . . . . . . . . . . . . . . . . . . .64
Information You May NeedGlossary . . . . . . . . . . . . . . . . . . . . . . . . . . . . . . . . . . . . . . . . . . . . . . . . . . . . . . . . . . . . . . . . . . . . . . .65Helpful Hints . . . . . . . . . . . . . . . . . . . . . . . . . . . . . . . . . . . . . . . . . . . . . . . . . . . . . . . . . . . . . . . . .66-67Diagnostic Test . . . . . . . . . . . . . . . . . . . . . . . . . . . . . . . . . . . . . . . . . . . . . . . . . . . . . . . . . . . . . . . . . .68Specifications . . . . . . . . . . . . . . . . . . . . . . . . . . . . . . . . . . . . . . . . . . . . . . . . . . . . . . . . . . . . . . . . . . .69Limited Warranty . . . . . . . . . . . . . . . . . . . . . . . . . . . . . . . . . . . . . . . . . . . . . . . . . . . . . . . . . . . . . . . .70Information Index . . . . . . . . . . . . . . . . . . . . . . . . . . . . . . . . . . . . . . . . . . . . . . . . . . . . . . . . . . . . . . . .71

Safety PrecautionsWarning: To prevent fire or shock hazard, do not expose this equipment to rain or moisture.Federal Communications Commission (FCC) Warning: Any unauthorized changes or modifications to thisequipment void the user’s authority to operate it.
Laser SafetyThis unit employs a laser. Only a qualified service person should remove the cover or attempt to service this device,due to possible eye injury.CAUTION: Use of controls or adjustments or performance of procedures other than those specified herein mayresult in hazardous radiation exposure.The set complies with the FCC-Rules, Part 15 and with 21 CFR 1040.10.CAUTION:Visible and invisible laser radiation when open and interlock defeated. Do not stare into the beam.Thebeam is located inside, near the deck mechanism.
Special Information for Canadian UsersThis digital apparatus does not exceed the Class B limits for radio noise emissions from digital apparatus as set outin the Radio Interference Regulations of the Canadian Department of Communications.CET APPAREIL NUMÉRIQUE N'ÉMET PAS DE BRUITS RADIOÉLECTRIQUES DÉPASSANT LES LIMITES APPLICA-BLES DANS LA RÈGLEMENT SUR LE BROUILLAGE RADIOÉLECTRIQUES ÉDICTÉ PAR LE MINISTÈRE DESCOMMUNICATIONS DU CANADA.
Radio/TV InterferenceThis equipment has been tested and found to comply with the limits for a Class B digital device, pursuant to Part 15of the FCC Rules.These limits are designed to provide reasonable protection against harmful interference in a resi-dential installation.This equipment generates, uses, and can radiate radio frequency energy and, if not installed andused in accordance with the instructions, may cause harmful interference to radio communications. However, there isno guarantee that interference will not occur in a particular installation. If this equipment does cause harmful inter-ference to radio or television reception, which can be determined by turning the equipment off and on, try to cor-rect the interference by one or more of the following measures:
1) Reorient or relocate the receiving antenna.2) Increase the separation between the equipment and the receiver.3) Connect the equipment into an outlet on a circuit different from that to which the receiver is connected.4) Consult the dealer or an experienced radio/TV technician for help.
WARNING:This device complies with Part 15 of the FCC rules. Operation is subject to the following two conditions:
1) This device may not cause harmful interference.2) This device must accept any interference received, including interference that may cause undesired opera-tion.
IMPORTANT:This product was FCC verified under test conditions that included use of shielded cables and connectors betweensystem components. Use shielded cables to reduce the possibility of causing interference to radios, televisions, andother electronic devices. If you have any problems, contact your supplier.
Copyright ProtectionUnauthorized copying, broadcasting, public performance, and lending of Discs are prohibited.This product incorpo-rates copyright protection technology that is protected by method claims of certain U.S. patents and other intellectu-al property rights owned by Macrovision Corporation and other rights owners. Use of this copyright protectiontechnology must be authorized by Macrovision Corporation and is intended for home and other limited viewing usesonly unless otherwise authorized by Macrovision Corporation. Reverse engineering or disassembly is prohibited.
Note to Cable TV InstallerThis reminder is provided to call the Cable TV system installer’s attention to Section 820-40 of the NationalElectrical Code (NEC), which provides guidelines for proper grounding and, in particular, specifies that the cableground shall be connected to the grounding system of the building, as close to the point of cable entry as practical.
Declaration of ConformityModel Number: DVDR75Trade Name: PhilipsResponsible Party: Philips Consumer Electronics
P.O. Box 14810, Knoxville,TN 37914-1810(865) 521-4316
4 Safety Information

Safety Information (cont’d) 5IMPORTANT SAFETY INSTRUCTIONS
1. Read instructions. Read all the safety and operating instruc-tions before operating the product.
2. Retain instructions. Keep the safety and operating instruc-tions for future reference.
3. Heed warnings.Adhere to all warnings on the product and inthe operating instructions.
4. Follow instructions. Follow all operating and use instructions.5. Cleaning – Unplug this product from the wall outlet before
cleaning. Do not use liquid cleaners or aerosol cleaners. Usea damp cloth for cleaning.
6. Attachments – Do not use attachments not recommendedby the product manufacturer as they may cause hazards.
7. Water and Moisture – Do not use this product near water -for example, near a bathtub, washbowl, kitchen sink, or laun-dry tub, in a wet basement, near a swimming pool, etc.
8. Accessories – Do not place this product on an unstable cart,stand, tripod, bracket, or table.The product may fall, causingserious injury to a child or adult, and serious damage to theproduct. Use only with a cart, stand, tripod, bracket, or tablerecommended by the manufacturer or sold with the prod-uct.Any mounting of the product should follow the manufac-turer’s instructions and should use a mounting accessoryrecommended by the manufacturer.
9. Move a product and cart combination with care. Quickstops, excessive force, and uneven surfaces maycause the product and cart combination to over-turn.
10. Ventilation – Slots and openings in the cabinet provide venti-lation, ensure reliable operation of the product, and protectit from overheating. Do not block or cover these openings.The openings should never be blocked by placing the prod-uct on a bed, sofa, rug, or other similar surface. Do not placethis product in a built-in installation such as a bookcase orrack unless proper ventilation is provided or the manufactur-er’s instructions have been adhered to.
11. Power Sources – This product should be operated only fromthe type of power source indicated on the marking label. Ifyou are not sure of the type of power supply to your home,consult your product dealer or local power company. Forproducts intended to operate from battery power, or othersources, refer to the operating instructions.
12. Grounding or Polarization – This product may be equippedwith a polarized alternating-current line plug (a plug havingone blade wider than the other).This plug will fit into thepower outlet only one way.This is a safety feature. If you areunable to insert the plug fully into the outlet, try reversingthe plug. If the plug still fails to fit, contact your electrician toreplace your obsolete outlet. Do not defeat the safety pur-pose of the polarized plug.
13. Power-Cord Protection – Route power supply cords so theyare not likely to be walked on or pinched by items placedupon or against them, paying particular attention to cords atplugs, convenience receptacles, and the point where they exitfrom the product.
14. Outdoor Antenna Grounding – If an outside antenna orcable system is connected to the product, be sure the anten-na or cable system is grounded so as to provide some pro-tection against voltage surges and built-up static charges.Article 810 of the National Electrical Code,ANSI/NFPA 70,provides information with regard to proper grounding of themast and supporting structure, grounding of the lead-in wireto an antenna discharge unit, size of grounding conductors,location of antenna-discharge unit, connection to groundingelectrodes, and requirements for the grounding electrode.See figure at right.
15. Lightning – For added protection for this product during alightning storm, or when it is left unattended and unused forlong periods of time, unplug it from the wall outlet and dis-connect the antenna or cable system.This will prevent dam-age to the product due to lightning and power-line surges.
16. Power Lines – An outside antenna system should not belocated in the vicinity of overhead power lines or other elec-tric light or power circuits, or where it can fall into suchpower lines or circuits.When installing an outside antennasystem, take extreme care to keep it from touching suchpower lines or circuits; contact with them might be fatal.
17. Overloading – Do not overload wall outlets, extensioncords, or integral convenience receptacles.This can result ina risk of fire or electric shock.
18. Object and Liquid Entry – Never push objects of any kindinto this product through openings; they may touch danger-ous voltage points or short out parts, resulting in a fire orelectric shock. Never spill liquid of any kind on the product.
19. Servicing – Do not attempt to service this product yourself.Opening or removing covers may expose you to dangerousvoltage or other hazards. Refer all servicing to qualified ser-vice personnel.
20. Damage Requiring Service – Unplug this product from thewall outlet and refer servicing to qualified service personnelunder the following conditions:a) When the power supply cord or plug is damaged,b) If liquid has spilled or objects have fallen into the product,c) If the product has been exposed to rain or water,d) If the product does not operate normally by following theoperating instructions.Adjust only those controls covered bythe operating instructions.An improper adjustment of othercontrols may result in damage and will often require exten-sive work by a qualified technician to restore the product toits normal operation,e) If the product has been dropped or damaged in any way,f) When the product exhibits a distinct change in perfor-mance.This indicates a need for service.
21. Replacement Parts – When replacement parts are required,be sure the service technician uses replacement parts speci-fied by the manufacturer or having the same characteristicsas the original part. Unauthorized substitutions may result infire, electric shock, or other hazards.
22. Safety Check – Upon completion of any service or repairsto this product, ask the service technician to perform safetychecks to determine that the product is in proper operatingcondition.
23. Wall or Ceiling Mounting – Mount the product to a wall orceiling only as recommended by the manufacturer.
24. Heat - Situate this product away from heat sources, such asradiators, heat registers, stoves, or other products (includingamplifiers) that produce heat.
25. Battery usage CAUTION - To prevent battery leakage thatmay result in bodily injury, property damage, or damage tothe unit:• Install all batteries correctly, with + and - aligned as markedon the unit.• Do not mix batteries (old/new, carbon/alkaline, etc.).• Remove batteries when the unit is not used for a longtime.
ANTENNA LEAD IN WIRE
ANTENNA DISCHARGE UNIT (NEC SECTION 810-20)
GROUNDING CONDUCTORS (NEC SECTION 810-21)
GROUND CLAMPS
POWER SERVICE GROUNDING ELECTRODE SYSTEM (NEC ART 250, PART H)
GROUND CLAMP
ELECTRIC SERVICE EQUIPMENT
Example of Antenna Grounding per National Electrical Code

6 Introduction
Welcome!Your Philips DVD Recorder both records DVD+RWs/DVD+Rs and plays prerecorded DVDs.You canrecord TV programs, edit camcorder recordings, and quickly access your recordings in the IndexPicture Screen. Plus, the recordings you make on the Recorder will play on some DVD Players andDVD-ROM drives.You’ll soon appreciate the digital picture and sound quality of DVD, DVD+RW, andDVD+R, which will exceed the quality you have had with videotapes.Read this manual carefully to understand the latest features, then enjoy your new DVD Recorder.
Features● Digital Video (DV) connection● Fast Forward/Reverse Search● Index Picture Screen● NTSC/PAL compatibility● Paused/Slow/Step-by-Step/Zoomed Play
● Progressive Scan compatibility● Repeat and Repeat A-B playback● Time Search● VCR Plus+ Programming
Package Contents● DVD Recorder● Remote control with two AA batteries● AC power cord● One blank Philips DVD+RW● One RF coaxial cable (black with silver tip,
with single prong in center of tip)● One three-strand Component Video Cable
(with blue, green, and red markings)
● Two two-strand audio cables (with red andwhite markings)
● One composite video cable (with yellowmarkings)
● This owner’s manual and registration materials
Environmental InformationYour system has materials that can be recycled and reused if disassembled by a specialized company.Please observe the local regulations regarding the disposal of packaging materials, exhausted batteries,and old equipment.
Safety Information● Do not expose the Recorder to excessive moisture, rain, sand, or heat sources.● Place the DVD Recorder on a firm, flat surface.● Keep the Recorder away from domestic heating equipment and direct sunlight.● When placing the Recorder in a cabinet, allow about one inch of space all around the Recorder for
ventilation.
Cleaning Discs● When a Disc becomes dirty, clean it with a cleaning cloth.Wipe the Disc from the center to the
edge in a straight line. Do not wipe the Disc in a circular motion.
● Do not use solvents such as benzine, thinner, commercially available cleaners, or anti-static sprayintended for analog discs.
● Always keep the tray closed to avoid dust on the lens.● The lens may cloud over if you suddenly move the DVD Recorder from cold to warm surroundings.
Playing a Disc is not possible then. Leave the power on for about one hour with no Disc in theRecorder until normal playback is possible.
Manufactured under license from Dolby Laboratories.“Dolby,” “Pro Logic,” and the double-D symbol are trademarks of DolbyLaboratories. Confidential unpublished works. Copyright 1992-1999 Dolby Laboratories.All rights reserved.“DTS” and “DTS DIGITAL SURROUND” are registered trademarks of Digital Theater Systems, Inc.VCR Plus+ and PlusCode are registered trademarks of the Gemstar Development Corporation.The VCR Plus+ system is manu-factured under license from Gemstar Development Corporation.Copyright 2003 Philips Consumer Electronics.

This DVD Recorder will play various types of Discs. Some Disc types will only play on the Recorder;others will record in the Recorder; some will record and play.There are also a few types of Discs thatwill neither play nor record on this Recorder. Look for these logos on your Discs to determinewhether the Disc will or will not play or record on the Philips DVD Recorder.
Playable Discs 7
DVD Region Codes and Color SystemsDVDs must meet the requirements for Region Codes and Color Systems before you can use themwith the DVD Recorder. DVDs must be labelled for ALL regions or for Region 1 in order to play onthis DVD Recorder.You cannot play Discs that are labeled for other regions.These symbols mustappear on your DVDs, or you cannot play the DVD in this DVD Recorder.These symbols might alsoappear on the Disc’s case or packaging.The number inside the globe refers to a region of the world. Region 1 represents the United States,Canada, upper regions of North America, Bermuda, the U.S.Virgin Islands, and small regions nearAustralia.
Furthermore, recordings are made according to different color systems throughout the world.Themost common color systems are NTSC, which is used primarily in the United States and NorthAmerica, PAL, and SECAM.This DVD Recorder is compatible with NTSC and PAL. Make sure the Discs you play were recorded inNTSC or PAL.The color system of the DVD may appear on the DVD or its case.However, when playing a PAL Disc, the Recorder must be connected to a PAL-compatible TV usingeither the S-VIDEO (Y/C) or COMPONENT VIDEO (Y PB PR) jacks of the Recorder.The Recorder’sVIDEO (CVBS) jack does not send a clear PAL signal. If a PAL Disc is copy-protected, the picture maynot be correct if you are using the COMPONENT VIDEO (Y PB PR) jacks.
Discs for Playing OnlyDVD (Digital Video Disc)
DVD-R (DVD-Recordable)You cannot record on these Discsusing the Philips DVD Recorder.
DVD-RW (DVD-Rewritable)You cannot record on these Discsusing the Philips DVD Recorder.TheseDiscs play only if recorded in videomode and finalized.
Audio CD (Compact Disc Digital Audio)
Super Audio CD(plays only the CD layer, if present)
Video CD Similar to DVDs, these Discs hold lessmaterial. For example, a two-hourmovie will fit on one DVD, but maytake two VCDs.
Super Video CD
CD-R (CD-Recordable)
CD-RW (CD-Rewritable)
Discs for Recording and Playing
DVD+RW (Digital Video Disc +Rewritable): These Discs can berecorded on repeatedly. Recordingscan be erased, then you can recordagain on the same Disc.
Discs Unsuitable for Recordingor Playing
DVD-RAM
DVD+R (Digital Video Disc +Recordable): These Discs can berecorded only once.After you finalizea DVD+R, you cannot record on it oredit it any more.
DVD-Audio
SUPER AUDIO CD
Recordable
ReWritable

8 General Information
Battery Installation
1 Remove the battery compartment lid on the rear of theremote control by pressing in the tab, then lifting off the lid.
2 Place two AA batteries inside the battery compartmentwith their + and – ends aligned as indicated. Do not mix oldand new batteries or different types of batteries (standard, alkaline,etc.).
3 Replace the battery compartment lid. You will hear it clickinto place.
Using the Remote ControlUnless stated otherwise, the remote control can operate all the features ofthe DVD Recorder.Always point the remote control directly at the remotesensor on the front of the DVD Recorder, not the TV. See page 24.Make sure there are no barriers between the remote and the Recorder.The remote control also will operate some features of some Philips TVs.See pages 22-23.
DVD Disc Menus...Some explanations in this manual describe the DVD Disc Menus, whichvary among DVDs. Movie producers set these menus, and not all DVDshave menus. But, if the DVD has a menu, access it by pressing the DISCMENU button on the remote control. See page 34.
DVD Recorder Menus...Some instructions explain how to use the Recorder’s System Menu orMenu Bars to set up features of the Recorder or the Disc.You get to theSystem Menu by pressing SYSTEM MENU on the remote control. See page30. Even if a feature is set up in the Recorder’s menu, it will not be availableif the current Disc does not include that feature.
DVD Player UpgradesIf a DVD does not play properly, please contact Philips at 1-800-531-0039for assistance. Due to the inconsistency of Disc formats provided by vari-ous Disc manufacturers, your DVD Recorder may require a playabilityenhancement.As DVD technology has advanced, these enhancements havebecome both common and easy to complete.
Available Disc Features...Features in this manual may not be available on every Disc. If the feature isnot available, you cannot use the Recorder to make it available.An “X” willappear in the top left corner of the TV screen if you try to access a featurethat is not available on the current Disc.
+
_ +
_

Hookups 9
Determining the best possible connection...Your existing equipment, especially your TV, will determine your connection.Theseguidelines describe which options provide the best picture and sound quality.★★★★ Component Video provides the best picture quality. Progressive Scan
Component Video has the highest quality, but use it only if the TV hasProgressive Scan. See pages 12 and 60.
★★★ S-Video provides excellent picture quality. See page 13.★★ Composite Video (a yellow Video jack) provides good picture quality.
See page 14.★★ Your TV may have only an RF-style jack, usually labeled
Antenna In or 75 ohm. You can use an RF coaxial cable for a simpleconnection. See page 10.
★★★★ Digital audio connections provide the clearest sound. Connect theRecorder’s Coaxial DIGITAL AUDIO OUT jack to your Stereo for thebest sound quality. See page 16.
★★★ For the most common audio connection, connect the Recorder’swhite/red OUT AUDIO L/R (left/right) jacks to the Audio In jacks ofyour Stereo or TV. See pages 12-15.
Before you begin...● Refer to the manuals of your TV, Stereo, Cable Box, or other equipment as
necessary. Note the jacks and connectors on the other equipment. Determinehow to choose different Audio and Video In channels on your other equipmentso you can see and hear the DVD Recorder on the TV, Stereo, etc.
● Disconnect all equipment from the power outlets. Connect the equipment tothe power outlets only after you have finished hooking up everything. Nevermake or change connections with equipment connected to the power outlet.
Remember...● Set the TV to the correct Video In channel or channel 3.
This is channel 3 if you connect the Recorder directly to a TV only asshown on page 10.Otherwise,Video In channels may be called AUX or AUXILIARY IN,AUDIO/VIDEO or A/V IN, EXT1 or EXT2 or External In, etc.Thesechannels often are near TV channel zero (0). Or, your TV remote con-trol may have a button or switch that lets you choose the Video In channeldirectly. See your TV manual for details. Or, go to your lowest TV channel andchange channels down until you see the blue Philips DVD background pictureon the TV screen.
● Connect the Recorder directly to the TV. For example, do not connect theRecorder to a VCR, then connect the VCR to a TV. This may distort the pic-ture and sound. Your VCR may have the copy protection system, which coulddistort the DVD image.
● Set the Stereo to the correct channel or “source” mode.● Do not connect the Recorder’s AUDIO OUT jacks to the PHONO IN jack of
your Stereo.● You only need one audio connection and one video connection between the
Recorder and your TV (or TV and Stereo).You will not use all the jacks on theRecorder.
● You can use the DVD Recorder to preserve your memories by copy-ing a videotape to a DVD+R or DVD+RW. Special connections areneeded between the DVD Recorder and your camcorder or VCR,which will play the existing videotape into the DVD Recorder forrecording. See page 17 for details.
Once you determine the option that best fits with your existingequipment, find your choice on pages 10-16. Follow the steps for thehookup you chose.When you finish your connections and turn on the Recorder for thefirst time, complete the Initial Setup.This sets up TV channels, menulanguages, and other features. Go to page 18 to do the Initial Setup.
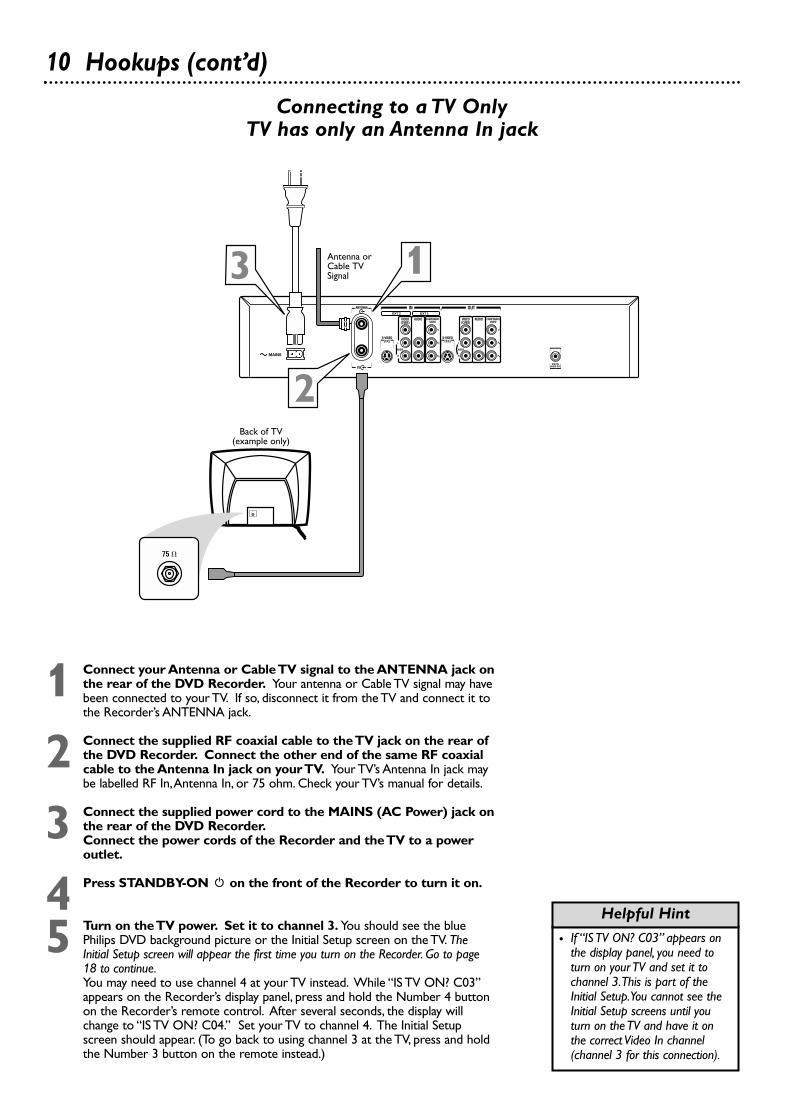
10 Hookups (cont’d)
Connecting to a TV OnlyTV has only an Antenna In jack
1 Connect your Antenna or Cable TV signal to the ANTENNA jack onthe rear of the DVD Recorder. Your antenna or Cable TV signal may havebeen connected to your TV. If so, disconnect it from the TV and connect it tothe Recorder’s ANTENNA jack.
2 Connect the supplied RF coaxial cable to the TV jack on the rear ofthe DVD Recorder. Connect the other end of the same RF coaxialcable to the Antenna In jack on your TV. Your TV’s Antenna In jack maybe labelled RF In,Antenna In, or 75 ohm. Check your TV’s manual for details.
3 Connect the supplied power cord to the MAINS (AC Power) jack onthe rear of the DVD Recorder.Connect the power cords of the Recorder and the TV to a poweroutlet.
4 Press STANDBY-ON yy on the front of the Recorder to turn it on.
5 Turn on the TV power. Set it to channel 3. You should see the bluePhilips DVD background picture or the Initial Setup screen on the TV. TheInitial Setup screen will appear the first time you turn on the Recorder. Go to page18 to continue.You may need to use channel 4 at your TV instead. While “IS TV ON? C03”appears on the Recorder’s display panel, press and hold the Number 4 buttonon the Recorder’s remote control. After several seconds, the display willchange to “IS TV ON? C04.” Set your TV to channel 4. The Initial Setupscreen should appear. (To go back to using channel 3 at the TV, press and holdthe Number 3 button on the remote instead.)
• If “IS TV ON? C03” appears onthe display panel, you need toturn on your TV and set it tochannel 3.This is part of theInitial Setup.You cannot see theInitial Setup screens until youturn on the TV and have it onthe correct Video In channel(channel 3 for this connection).
Helpful Hint
DIGITALAUDIO OUT
AUDIO
COMPONENTVIDEO
AUDIOVIDEO(CVBS)
OUT
S-VIDEO(Y/C)
L
R PR
PB
V
AUDIO
COMPONENTVIDEO
AUDIO
EXT 2 EXT 1
VIDEO(CVBS)
IN
S-VIDEO(Y/C)
L
R PR
PB
V
ANTENNA
TV
13 Antenna orCable TVSignal
2Back of TV
(example only)

Hookups (cont’d) 11
Connecting to a TV and a Cable Box or Satellite Receiver
1 Connect your Satellite or Cable TV signal to the ANTENNA IN jackon your Cable Box/Satellite Receiver.
2 If your Cable Box/Satellite Receiver has a single ANTENNA OUT orTO TV jack: Connect the supplied RF coaxial cable to the ANTEN-NA OUT/TO TV jack of the Cable Box/Satellite Receiver and to theANTENNA jack on the rear of the DVD Recorder.If your Cable Box/Satellite Receiver has AUDIO/VIDEO OUT jacks: Connect them tothe Recorder’s IN EXT 2 VIDEO (CVBS) and AUDIO L/R jacks.These jacks are redand white (AUDIO) and yellow (VIDEO). Use the supplied audio and video cables,which have red/white/yellow markings. Or, use the Recorder’s IN EXT 2 S-VIDEO (Y-C)jack (instead of CVBS) if your Cable Box/Satellite Receiver has an S-Video Out jack.
3 Connect another RF coaxial cable to the Recorder’s TV jack and tothe ANTENNA IN or RF IN jack on your TV. Your TV’s Antenna In jackmay be labelled RF In or 75 ohm. Check your TV manual for details. Or, use anAudio/Video connection between the Recorder and the TV. See pages 12-14.
4 Connect the supplied power cord to the MAINS (AC Power) jack onthe rear of the DVD Recorder.Connect the power cords of the Recorder, Cable Box/SatelliteReceiver, and TV to a power outlet.
5 Press STANDBY/ON yy on the front of the Recorder to turn it on.Set the Recorder to channel 3 or 4 (your Cable Box/SatelliteReceiver’s output channel) if you used an RF coaxial cable to connectthe Cable Box/Satellite Receiver to the DVD Recorder.Set the Recorder to EXT 2 if you used those jacks on the Recorderto connect to the Cable Box/Satellite Receiver.
6 Turn on the TV and the Cable Box/Satellite Receiver.Set the TV to channel 3 to receive the picture from the Recorder (ifyou used the RF coaxial cable as shown for step 3).You should see the blue Philips DVD background picture or the Initial Setupscreen on the TV. The Initial Setup screen will appear the first time you turn on theRecorder. Go to page 18 to continue.
DIGITALAUDIO OUT
AUDIO
COMPONENTVIDEO
AUDIOVIDEO(CVBS)
OUT
S-VIDEO(Y/C)
L
R PR
PB
V
AUDIO
COMPONENTVIDEO
AUDIO
EXT 2 EXT 1
VIDEO(CVBS)
IN
S-VIDEO(Y/C)
L
R PR
PB
V
ANTENNA
TV
OUT IN
Cable TVor Satellite Signal
3
12
4
Back of TV(example only)
Cable Box or Satellite Receiver
• To watch TV, put theRecorder in Monitor modeand on channel 3 or 4. (PressMONITOR on theRecorder’s remote.) ChangeTV channels at your CableBox or Satellite Receiver.
• If “IS TV ON? C03” appears onthe display panel, you need toturn on your TV and set it tochannel 3. This is part of theInitial Setup. You cannot see theInitial Setup screens until youturn on the TV and have it onthe correct Video In channel.
• You may need to use channel 4at your TV instead. While “IS TVON? C03” appears on theRecorder’s display panel, pressand hold the Number 4 buttonon the Recorder’s remote. Afterseveral seconds, the display willchange to “IS TV ON? C04.” Setyour TV to channel 4. The InitialSetup screen should appear.
Helpful Hints
12 Hookups (cont’d)
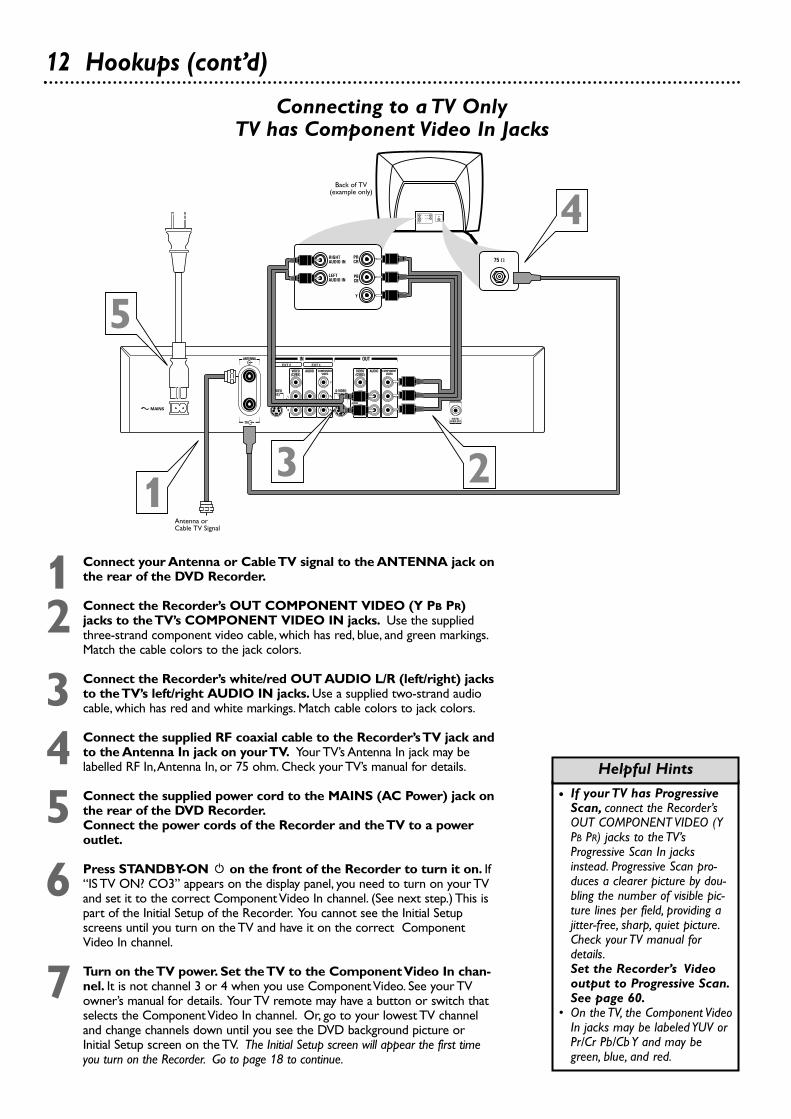
Connecting to a TV OnlyTV has Component Video In Jacks
DIGITALAUDIO OUT
AUDIO
COMPONENTVIDEO
AUDIOVIDEO(CVBS)
OUT
S-VIDEO(Y/C)
L
R PR
PB
Y
AUDIO
COMPONENTVIDEO
AUDIO
EXT 2 EXT 1
VIDEO(CVBS)
IN
S-VIDEO(Y/C)
L
R PR
PB
Y
ANTENNA
TV
23
5
4
Antenna orCable TV Signal
1
Back of TV(example only)
LEFTAUDIO IN
RIGHTAUDIO IN
Y
PRCR
PBCB
LEFT AUDIO IN
RIGHT AUDIO IN
Y
Pr/Cr
Pb/Cb
1 Connect your Antenna or Cable TV signal to the ANTENNA jack onthe rear of the DVD Recorder.
2 Connect the Recorder’s OUT COMPONENT VIDEO (Y PB PR)jacks to the TV’s COMPONENT VIDEO IN jacks. Use the suppliedthree-strand component video cable, which has red, blue, and green markings.Match the cable colors to the jack colors.
3 Connect the Recorder’s white/red OUT AUDIO L/R (left/right) jacksto the TV’s left/right AUDIO IN jacks. Use a supplied two-strand audiocable, which has red and white markings. Match cable colors to jack colors.
4 Connect the supplied RF coaxial cable to the Recorder’s TV jack andto the Antenna In jack on your TV. Your TV’s Antenna In jack may belabelled RF In,Antenna In, or 75 ohm. Check your TV’s manual for details.
5 Connect the supplied power cord to the MAINS (AC Power) jack onthe rear of the DVD Recorder.Connect the power cords of the Recorder and the TV to a poweroutlet.
6 Press STANDBY-ON yy on the front of the Recorder to turn it on. If“IS TV ON? CO3” appears on the display panel, you need to turn on your TVand set it to the correct Component Video In channel. (See next step.) This ispart of the Initial Setup of the Recorder. You cannot see the Initial Setupscreens until you turn on the TV and have it on the correct ComponentVideo In channel.
7 Turn on the TV power. Set the TV to the Component Video In chan-nel. It is not channel 3 or 4 when you use Component Video. See your TVowner’s manual for details. Your TV remote may have a button or switch thatselects the Component Video In channel. Or, go to your lowest TV channeland change channels down until you see the DVD background picture orInitial Setup screen on the TV. The Initial Setup screen will appear the first timeyou turn on the Recorder. Go to page 18 to continue.
• If your TV has ProgressiveScan, connect the Recorder’sOUT COMPONENT VIDEO (YPB PR) jacks to the TV’sProgressive Scan In jacksinstead. Progressive Scan pro-duces a clearer picture by dou-bling the number of visible pic-ture lines per field, providing ajitter-free, sharp, quiet picture.Check your TV manual fordetails.Set the Recorder’s Videooutput to Progressive Scan.See page 60.
• On the TV, the Component VideoIn jacks may be labeled YUV orPr/Cr Pb/Cb Y and may begreen, blue, and red.
Helpful Hints

1 Connect your Antenna or Cable TV signal to the ANTENNA jack onthe rear of the DVD Recorder.
2 Connect an S-Video cable (not supplied) to the Recorder’s OUT S-VIDEO (Y-C) jack and to the TV’s S-VIDEO In jack.
3 Connect a supplied two-strand audio cable to the Recorder’swhite/red OUT AUDIO L/R (left/right) jacks and to the left/rightAUDIO IN jacks on the TV. The supplied two-strand audio cable has redand white markings. Match the cable colors to the jack colors.
4 Connect the supplied RF coaxial cable to the TV jack on the rear ofthe DVD Recorder. Connect the other end of the same RF coaxialcable to the Antenna In jack on your TV. Your TV’s Antenna In jack maybe labelled RF In,Antenna In, or 75 ohm. Check your TV’s manual for details.
5 Connect the supplied power cord to the MAINS (AC Power) jack onthe rear of the DVD Recorder.Connect the power cords of the Recorder and the TV to a poweroutlet.
6 Press STANDBY-ON yy on the front of the Recorder to turn it on.If “IS TV ON? C03” appears on the display panel, you need to turn on your TVand set it to the S-Video In channel. (See next step.) This is part of the InitialSetup of the DVD Recorder.You cannot see the Initial Setup screens until youturn on the TV and have it on the correct S-Video In channel.
7 Turn on the TV power. Set the TV to the S-Video In channel. This isnot channel 3 or 4 when you are using S-Video. Your TV remote may have abutton or switch that selects the S-Video In channel. Or, go to your lowest TVchannel and change channels down until you see the DVD background pictureor Initial Setup screen on the TV screen. The Initial Setup screen will appear thefirst time you turn on the Recorder. Go to page 18 to continue.
Hookups (cont’d) 13
Connecting to a TV OnlyTV has an S-Video In Jack
DIGITALAUDIO OUT
AUDIO
COMPONENTVIDEO
AUDIOVIDEO(CVBS)
OUT
S-VIDEO(Y/C)
L
R PR
PB
V
AUDIO
COMPONENTVIDEO
AUDIO
EXT 2 EXT 1
VIDEO(CVBS)
IN
S-VIDEO(Y/C)
L
R PR
PB
V
ANTENNA
TV
Back of TV(example only)
2LEFT AUDIO IN
RIGHT AUDIO IN
LEFT AUDIO IN
RIGHT AUDIO IN
3
5AntennaorCable TVSignal
1
S-VIDEO IN
S-AUDIO IN
4
• On the TV, the S-Video In jackmay be labeled Y/C, S-Video, orS-VHS (super video).
Helpful Hint

14 Hookups (cont’d)
Connecting to a TV OnlyTV has a yellow CVBS Video In jack
DIGITALAUDIO OUT
AUDIO
COMPONENTVIDEO
AUDIOVIDEO(CVBS)
OUT
S-VIDEO(Y/C)
L
R PR
PB
Y
AUDIO
COMPONENTVIDEO
AUDIO
EXT 2 EXT 1
VIDEO(CVBS)
IN
S-VIDEO(Y/C)
L
R PR
PB
Y
ANTENNA
TV
Back of TV(example only)
2LEFT AUDIO IN
RIGHT AUDIO IN
LEFT AUDIO IN
RIGHT AUDIO IN
3
VIDEO IN
VIDEO IN
5AntennaorCable TVSignal
1
4
1 Connect your Antenna or Cable TV signal to the ANTENNA jack onthe rear of the DVD Recorder.
2 Connect the Recorder’s yellow OUT VIDEO (CVBS) jack to yourTV’s VIDEO IN jack. Use the supplied video cable that has yellow markings.
3 Connect a supplied two-strand audio cable to the Recorder’swhite/red OUT AUDIO L/R (left/right) jacks and to the left/rightAUDIO IN jacks on your TV. The supplied two-strand audio cable has redand white markings. Match the cable colors to the jack colors.
4 Connect the supplied RF coaxial cable to the TV jack on the rear ofthe Recorder. Connect the other end of the same RF coaxial cableto the Antenna In jack on your TV. Your TV’s Antenna In jack may belabelled RF In,Antenna In, or 75 ohm. Check your TV manual for details.
5 Connect the supplied power cord to the MAINS (AC Power) jack onthe rear of the DVD Recorder.Connect the power cords of the Recorder and the TV to a poweroutlet.
6 Press STANDBY-ON yy on the front of the Recorder to turn it on.If “IS TV ON? CO3” appears on the display panel, you need to turn on yourTV and set it to the correct Video In channel. (See next step.) This is part ofthe Initial Setup of the DVD Recorder.You cannot see the Initial Setup screensuntil you turn on the TV and have it on the correct Video In channel.
7 Turn on the TV power. Set the TV to the correct Audio/Video Inchannel. Such channels may be called AUX or AUXILIARY IN,AUDIO/VIDEO or A/V IN, EXT1 or EXT2 or External In, etc. This is notchannel 3 or 4. See your TV manual. Your TV remote may have a button orswitch that selects the Video In channel. Or, go to your lowest TV channel andchange channels down until you see the DVD background picture or InitialSetup screen. The Initial Setup screen will appear the first time you turn on theRecorder. Go to page 18 to continue.
• The TV’s Video In jack is usuallyyellow. It may be labeled video,CVBS, composite, or baseband.
Helpful Hint

Hookups (cont’d) 15
Connecting to a TV and a two-channel Stereo(Stereo has Dolby Pro Logic or right/left Audio In jacks)
Stereo(example only)
DIGITALAUDIO OUT
AUDIO
COMPONENTVIDEO
AUDIOVIDEO(CVBS)
OUT
S-VIDEO(Y/C)
L
R PR
PB
Y
AUDIO
COMPONENTVIDEO
AUDIO
EXT 2 EXT 1
VIDEO(CVBS)
IN
S-VIDEO(Y/C)
L
R PR
PB
Y
ANTENNA
TV
LEFT AUDIO IN
RIGHT AUDIO IN
3
Back of TV(example only)
VIDEO IN
54 Antenna
orCable TVSignal
1
2
VIDEO IN
1 Connect your Antenna or Cable TV signal to the ANTENNA jack onthe rear of the DVD Recorder.
2 Connect the Recorder’s yellow OUT VIDEO (CVBS) jack to yourTV’s VIDEO IN jack. Use the supplied video cable that has yellow markings.
3 Connect a supplied two-strand audio cable to the Recorder’swhite/red OUT AUDIO L/R (left/right) jacks and to the left/rightAUDIO IN jacks on the Stereo. The supplied two-strand audio cable hasred and white markings. Match the cable colors to the jack colors.
4 Connect the supplied RF coaxial cable to the TV jack on the rear ofthe Recorder. Connect the other end of the same RF coaxial cableto the Antenna In jack on your TV. Your TV’s Antenna In jack may belabelled RF In,Antenna In, or 75 ohm. Check your TV manual for details.
5 Connect the supplied power cord to the MAINS (AC Power) jack onthe rear of the DVD Recorder.Connect the power cords of the Recorder, Stereo, and TV to apower outlet.
6 Turn on the Stereo and set it to the correct Audio In channel orsound source. Refer to the Stereo owner’s manual.
7 Press STANDBY-ON yy on the front of the Recorder to turn it on.If “IS TV ON? CO3” appears on the display panel, you need to turn on yourTV and set it to the correct Video In channel. (See next step.) This is part ofthe Initial Setup of the DVD Recorder.You cannot see the Initial Setup screensuntil you turn on the TV and have it on the correct Video In channel.
8 Turn on the TV power. Set the TV to the correct Video In channel.Such channels may be called AUX or AUXILIARY IN,AUDIO/VIDEO orA/V IN, EXT1 or EXT2 or External In, etc. This is not channel 3 or 4. Seeyour TV manual. Your TV remote may have a button or switch that selects theVideo In channel. Or, go to your lowest TV channel and change channels downuntil you see the DVD background picture or Initial Setup screen.The Initial Setup screen will appear the first time you turn on the Recorder. Go topage 18 to continue.
• Set Analog output accordingly.See page 62.
• To use S-Video or ComponentVideo instead, see pages 12-13.You only need one video con-nection. Choose the correctVideo In channel at the TV.
Helpful Hints

16 Hookups (cont’d)
Connecting to a TV and a Digital Stereo(Stereo has Dolby DigitalTM, MPEG2, or Digital Theater System)
DIGITALAUDIO OUT
AUDIO
COMPONENTVIDEO
AUDIOVIDEO(CVBS)
OUT
S-VIDEO(Y/C)
L
R PR
PB
Y
AUDIO
COMPONENTVIDEO
AUDIO
EXT 2 EXT 1
VIDEO(CVBS)
IN
S-VIDEO(Y/C)
L
R PR
PB
Y
ANTENNA
TV
Back of TV (example only)
COAXIAL DIGITALAUDIO IN
2
Stereo (example only)
5AntennaorCable TVSignal
1
4VIDEO IN
3
VIDEO IN
1 Connect your Antenna or Cable TV signal to the ANTENNA jack onthe rear of the DVD Recorder.
2 Connect the Recorder’s Coaxial DIGITAL AUDIO OUT jack to yourStereo’s COAXIAL DIGITAL AUDIO IN jack. Use a coaxial digitalaudio cable (not supplied).You can use the supplied CVBS video cable (withyellow markings) instead if you are not using it for your video connection.
3 Connect the Recorder’s yellow OUT VIDEO (CVBS) jack to yourTV’s VIDEO IN jack. Use the supplied video cable that has yellow markings.
4 Connect the supplied RF coaxial cable to the TV jack on the rear ofthe Recorder. Connect the other end of the same RF coaxial cableto the Antenna In jack on your TV. Your TV’s Antenna In jack may belabelled RF In,Antenna In, or 75 ohm. Check your TV manual for details.
5 Connect the supplied power cord to the MAINS (AC Power) jack onthe rear of the DVD Recorder.Connect the power cords of the Recorder, Stereo, and TV to apower outlet.
6 Turn on the Stereo power and set your Stereo to the correct DigitalAudio In channel or sound source. Refer to the Stereo owner’s manual.
7 Press STANDBY-ON yy on the front of the Recorder to turn it on.If “IS TV ON? CO3” appears on the display panel, you need to turn on yourTV and set it to the correct Video In channel. (See next step.) This is part ofthe Initial Setup of the DVD Recorder.You cannot see the Initial Setup screensuntil you turn on the TV and have it on the correct Video In channel.
8 Turn on the TV power. Set the TV to the correct Video In channel.This is not channel 3 or 4. See your TV manual.Your TV remote may have abutton or switch that selects the Video In channel. Or, go to your lowest TVchannel and change channels down until you see the DVD background pictureor Initial Setup screen on the TV. The Initial Setup screen will appear the firsttime you turn on the Recorder. Go to page 18 to continue.
• Set Digital output accordingly. Seepage 61. If the Digital output set-ting does not match your Stereo’scapabilities, the Stereo may pro-duce a strong, distorted sound orno sound at all.
• Your Stereo must supportMPEG2, Dolby DigitalTM or DigitalTheater System (DTS). Check theStereo’s manual.
• To use S-Video or ComponentVideo instead, see pages 12-13.You only need one video con-nection. Choose the correctVideo In channel at the TV.
Helpful Hints

Hookups (cont’d) 17
Connecting to Other EquipmentDubbing Videotape to a DVD+R/DVD+RW
STANDBY-ON
OPEN/CLOSE
S-VIDEO VIDEO AUDIOL R
CAM 1
S-VIDEO VIDEO AUDIOLEFT RIGHT
DV
• Use the DV (Digital Video) INjack to connect the Recorder toa Personal Computer that has aDigital Video output.The PCmust have an IEEE 1394Firewire connector. Limited PCapplications may be supported.You also can use this jack toconnect the Recorder to DigitalVideo or Hi-8 camcorders. Ifyou use the DV IN jack, chooseCAM 2 at the Recorder inMonitor mode to see the mate-rial playing on other equipment.
• Most prerecorded videotapesand DVDs are copy protected. Ifyou try to copy them, theRecorder display may show“COPY PROTECT.”
• If the Recorder’s display shows“NO SIGNAL,” adjust the track-ing or play the tape on theVCR/Camcorder. See yourVCR/Camcorder manual.
• Do not connect a ProgressiveScan video source (such as aDVD Player) to the IN EXT 1COMPONENT VIDEO jacks.TheRecorder cannot receiveProgressive Scan video.
Helpful Hints
You can connect a Video Cassette Recorder(VCR), Camcorder, or DVD Player to theRecorder’s CAM or EXT IN jacks.A sample connection with a Camcorder isshown here, using the CAM 1 AUDIO/VIDEOIN jacks on the front of the Recorder. Thesejacks are the most easily accessible. Otherequipment will connect similarly, but this is acommon connection possibility.You will need this connection to copyvideotapes onto a DVD+R or DVD+RW.There are Component Video, S-Video, DigitalVideo, and Audio jacks on the front and rear ofthe Recorder. If your other equipment hasthese jacks, use them instead. Use the IN jackson the rear of the Recorder for permanentconnections.That will hide the cables from view.
1 Connect the DVD Recorder directly to your TV.Choose a connection from pages 10-16.
2 To access the AUDIO/VIDEO IN jacks on the front of theRecorder, flip down the door that covers the jacks.
3 Connect a video cable to the VIDEO OUT jack of yourCamcorder and to the yellow CAM 1 VIDEO IN jack on the frontof the DVD Recorder. Use an RCA-style video cable, which is usuallymarked with yellow. (One video cable is supplied with the Recorder.)
4 Connect audio cables to the AUDIO OUT jacks of yourCamcorder and to the red and white CAM 1 AUDIO IN jacks onthe front of the DVD Recorder. Most audio cables are color coded.Match the cable colors to the jack colors. (Two sets of audio cables aresupplied with the DVD Recorder.)
5 When all connections are complete, connect all the equipment topower. Turn on all the equipment. Press STANDBY-ON y on thefront of the DVD Recorder to turn it on.
6 Set your TV to the correct Video In channel. This will be channel 3or 4 or a specific Video In channel, depending on your connection betweenthe Recorder and the TV. Refer to the connection details on pages 9-16.Or, simply go to channel 5 on your TV, then change channels down untilyou see the DVD Recorder’s logo on the TV screen. The Initial Setup screenwill appear the first time you turn on the Recorder. Go to page 18 to continue.
7 To watch or record the material playing on the other equipment, pressMONITOR to put the Recorder in Monitor mode. Press CH+8 orCH-9 to select CAM1 at the Recorder. This is located after yourhighest TV channel and before your lowest TV channel. Choose CAM1 ifyou used the connection shown on this page (with the jacks on the front ofthe Recorder). If you use the IN EXT 1 or IN EXT 2 jacks on the rear ofthe Recorder instead, choose channel EXT 1 or EXT 2. Choose the chan-nel that matches the jacks to which you connected the other equipment.Start playing the material by pressing PLAY on the other equip-ment. Press Record I on the front of the DVD Recorder to startrecording. See page 21.

1 2 3
4 5 6
7 8
0
9
I I
MONITOR
TV / DVD T / C PLAY MODE REC. MODE
SELECT OK
DISC SYSTEM
MENU
CH
CH
TIMER
FSS
RETURN CLEAR
TV VOLUME
PLAY
STOP
AUDIO PAUSE
REC/OTR
STANDBY
18 Initial SetupInitial Setup screens will appear the very first time you turn on the Recorder.These on-screen messages and menus will help you set up Recorder featuresquickly, including TV channels and language options.During Initial Setup,“IS TV ON? CO3” will appear on theRecorder’s display panel.The Initial Setup information shows onyour TV.“IS TV ON? CO3” indicates you should turn on your television andset it to channel 3 or the correct Video In channel. Even thoughyour TV may be on, you must set it to the correct Video In channelto see the Initial Setup messages. See pages 9-14 to determine thecorrect Video In channel for your connection. Or, check your TVowner’s manual for details.
Follow the steps below to set up the Recorder. You cannot turn off theRecorder until you finish the Initial Setup.The only way to quit theInitial Setup is to disconnect the power cord. If you quit, the InitialSetup screens will appear again the next time you turn on theRecorder.The screens will not go away until you finish the InitialSetup. Also, you cannot open the Disc tray while “IS TV ON? CO3”appears. (“INSTALL RECORDER FIRST” will show on the display panel.)
If the setup screens do not appear, your Recorder has been set up previously.You can change setup items later. See the pages listed at each step below foreach feature.
1 Press STANDBYyy to turn on the Recorder.
2 The Menu Language screen will appear first. Press CH+8 or CH-9 to choose English, Espanol, or Francais, then press theOK button.The DVD Recorder’s menus will be in the language you selected.To change the Recorder’s Menu Language later, see page 63.
3 The Audio Language menu appears next. Press CH+8 or CH-9to choose the language you prefer, then press OK.The Recorder will play Discs in this language if it is on the Disc.TheDVD Disc menu will appear in the same language if available.Some Discs require you to choose the audio language or the DiscMenu language from the Disc menu.The Disc preferences ordefaults may override your selection in the Recorder’s AudioLanguage menu.To change the Audio Language later (as Playback Audio), see pages 35and 63.
Instructions continue on the next page.
~ Initial Setup
Menu LanguageEnglish K
L
EspañolFrançais
Press OK to continue
~ Initial Setup
Audio LanguageEnglish K
L
EspañolFrançaisPortuguêsItalianoPress OK to continue
1
2-3
• The Recorder’s features willscroll across the display panelwhen you first connect thepower cord.This is a demonstra-tion that cannot be cancelled. Itwill not appear anymore afteryou set up the Recorder.
Helpful Hint

Initial Setup (cont’d) 19
1 2 3
4 5 6
7 8
0
9
I I
MONITOR
TV / DVD T / C PLAY MODE REC. MODE
SELECT OK
DISC SYSTEM
MENU
CH
CH
TIMER
FSS
RETURN CLEAR
TV VOLUME
PLAY
STOP
AUDIO PAUSE
REC/OTR
STANDBY
Continued from previous page
4 The Subtitle Language menu appears next. Press CH+8 or CH-9to choose the language you prefer for subtitles, then pressOK.The Recorder will show subtitles in this language if they are avail-able. If the language is not available, either there will be no subtitlesor subtitles will be in the default language of the Disc.Some DVDs require you to choose a subtitle language from the Discmenu. Disc preferences or defaults may override your selection inthe Recorder’s Subtitle Language menu.To change the Subtitle Language later, see pages 35 and 63.
5 The TV Shape menu appears next. Press CH+8 or CH-9 tochoose the preferred TV Shape, then press OK.To change the TV Shape later or for details on TV Shapes, see page 60.
6 “If you have connected the antenna - press OK” appears next. Ifyou have connected an Antenna or Cable TV signal to theRecorder’s ANTENNA jack, press OK.If you have not connected the Antenna or Cable TV signal, take amoment now to do so.After the Antenna/Cable TV signal is con-nected, press OK. See pages 10-16.To reset TV channels later, or to add/delete new channel choices later, seepage 26.
7 “Searching for TV channels” will appear, along with a scaleshowing channels are being memorized.The number of channelsfound will show on the screen as the searching progresses.This willtake a few minutes, depending on the number of channels available inyour area.When the channel search finishes,“Auto ch. search complete” willappear, along with the total number of channels found.
8 Press SYSTEM MENU. The Recorder automatically turns off,then turns on again.You will see a blue Philips DVD backgroundscreen and some Information Boxes. (See page 33.)The Recorder is ready for use!
~ Initial Setup
Subtitle LanguageEnglish K
L
EspañolFrançaisPortuguêsItaliano
Press OK to continue
Installation Auto Ch. Programming
Auto ch. search complete
024 Channels found
To exit pressSYSTEM MENU
~ Initial Setup
TV Shape4:3 letterbox K
L
4:3 panscan16:9
Press OK to continue
84-6

20 Quick Disc Playback
1 Press STANDBYyy to turn on the DVD Recorder.Turn on your TV. Set it to the correct Video In channel. See pages 9-14. You should see the blue Philips DVD background picture on the TVscreen (if no Disc is in the Recorder).
2 Press OPEN/CLOSE A on the front of the Recorder to open the disctray.Load your Disc in the tray, with the label facing up and the shiny sidefacing down. If the Disc (DVD) is two-sided, make sure the label of the sideyou want to play is facing up.
3 Press OPEN/CLOSE A again to close the tray.
4 Play may start automatically. If not:• If you are playing a DVD, a Disc menu may appear. If the Title or Chapterselections are numbered, press a Number button to select an item. Or,press CH+8, CH-9, ;, or : to select an item, then press OK. Continueuntil you start playing the Disc. Or, follow the instructions in the DVD Discmenu.• If you are playing an Audio CD, press PLAY : to start playback.• If you are playing a DVD+RW/DVD+R, the Index Picture Screen willappear. See page 32. Press CH+8 or CH- 9 to select the Title you want toplay, then press OK. If the Disc is blank, the display will show “EMPTYDISC.”
5 To stop play at any time, press STOP C.If Auto resume is On, DVD play will resume at the same point the nexttime you play the DVD.To play the DVD from its beginning, restart playfrom the DVD’s Disc menu.If Auto resume is Off, Resume will appear in the top left corner whenyou play the DVD later.While Resume appears, press PLAY : toresume play from the point at which you last stopped it. Otherwise, playwill start at the beginning of the DVD. Resume will disappear afterabout 15 seconds.Auto resume is On when you purchase the Recorder. However, you canturn it On or Off. See page 53.
• If the Disc is Locked by AccessControl, you must enter the four-digit code or unlock the Disc. Seepages 54-58.
• DVDs have a region code.YourRecorder will not play Discs thathave a region code other than 1(one). See page seven.
• Auto resume does not affectAudio CDs. If you restart play ofan Audio CD, play starts at thebeginning of the Audio CD.
Helpful Hints
OPEN
STANDBY-ON
OPEN/CLOSE
1 2 3
4 5 6
7 8
0
9
I I
MONITOR
TV / DVD T / C PLAY MODE REC. MODE
SELECT OK
DISC SYSTEM
MENU
CH
CH
TIMER
FSS
RETURN CLEAR
TV VOLUME
PLAY
STOP
AUDIO PAUSE
REC/OTR
STANDBY
POWER ON/OFF
4
1
5
2-3

Quick Recording 21
The Recorder can record TV programming onto a DVD+RW or DVD+R. Beforeyou begin, set up TV channels. See pages 18-19 and 26. Use an unprotected, unfinal-ized, recordable DVD+RW/DVD+R. Recording options are on pages 41-52.
1 Press OPEN/CLOSE A on the front of the Recorder to open the disc tray.Or, press and hold STOP C on the remote control for about three secondsto open or close the Disc tray.
2 Insert a recordable DVD+RW/DVD+R, with the label facing up. PressOPEN/CLOSE A to close the disc tray.The Index Picture Screen willappear. See page 32. If the Disc is empty and has no recordings,“EMPTYDISC” will appear on the display panel.
3 Press CH-9 to select an empty Title box on a DVD+RW. To avoidoverwriting previous recordings on a DVD+RW, choose the last Empty Titlebox.On a DVD+R, the Recorder automatically starts recording at the end of theDisc, so you do not need to select an Empty Title box.You cannot overwriterecordings on a DVD+R.
4 Press MONITOR to see TV channels through the DVD Recorder.
5 Press CH+8, CH-9, or the Number buttons to select the channel youwish to record.To record material playing on equipment you connected to the Recorder,select EXT1, EXT2, CAM1, or CAM2. Choose the EXT (External) or CAM(Camera) channel that matches the jack to which you connected the otherequipment. See page 17.If you are using a Cable Box/Satellite Receiver, set the DVD Recorder to chan-nel 3 or 4 (or the EXT or CAM channel). Choose the output channel of yourCable Box/Satellite Receiver or the jacks to which you connected the CableBox/Satellite Receiver.Then, change TV channels at the Cable Box/SatelliteReceiver. See page 11.
6 Press REC/OTR I to record the selected channel. Recording will beginafter a few seconds. (The Disc has to prepare for recording.) A red light willencircle the Record I button on the front of the Recorder during recording.To pause recording, press PAUSE k once on the remote.The red light aroundthe Record I button will flash when recording is paused.
7 Press STOP C to stop recording.The red light around the Record I buttonwill flash.The Index Picture Screen will reappear after a few seconds. On abrief recording on a new DVD+RW, formatting the Disc will take a minute.If you plan to play a DVD+R on another DVD Player, finalize the Disc. Follow thesteps on page 52.You cannot record or edit a DVD+R after you finalize it.To edit your recordings, see page 51. However, editing changes may not be accessiblewhen you play the Disc on other DVD Players.
1 2 3
4 5 6
7 8
0
9
I I
MONITOR
TV / DVD T / C PLAY MODE REC. MODE
SELECT OK
DISC SYSTEM
MENU
CH
CH
TIMER
FSS
RETURN CLEAR
TV VOLUME
PLAY
STOP
AUDIO PAUSE
REC/OTR
STANDBY
OPEN
STANDBY-ON
OPEN/CLOSE
POWER ON/OFF
• You cannot record only Audio(sound) to a DVD+RW/DVD+R.You must record both audio andvideo (sound and picture).
• To erase a recording, see “Erasethis title” details on page 47.
• You cannot duplicate copyright-ed DVDs, videotapes, or TVbroadcasts using the Recorder.“COPY PROTECT” may appearon the display panel if youattempt this.
Helpful Hints
6
41-2
7
5
3,5

1 2 3
4 5 6
7 8
0
9
I I
MONITOR
TV / DVD T / C PLAY MODE REC. MODE
SELECT OK
DISC SYSTEM
MENU
CH
CH
TIMER
FSS
RETURN CLEAR
TV VOLUME
PLAY
STOP
AUDIO PAUSE
REC/OTR
STANDBY
22 Remote ControlMONITOR Button
Press to choose Disc mode orMonitor mode. In Disc mode, use the
Index Picture Screen or view Discplayback. In Monitor mode, watch TVchannels through the DVD Recorder
or make a recording. See page 21.
TV/DVD ButtonPress to switch between TV and DVD
positions.The selected position willappear briefly on the display panel. Use
TV position to watch one TV channelwhile recording another. See page 46.Use DVD position for other features.
DISC MENU ButtonPress during play to access a DVD’s
Disc menu. See page 34.Press to access the Index Picture
Screen of a DVD+RW/DVD+R.See page 32.
SELECT ButtonPress to select an AM or PM Start or
End time for a timer recording.See page 42.
RETURN ButtonPress to go to a previous menu on a
Video CD or some DVDs.
AUDIO YY ButtonPress to select a different audio language
during DVD play. Multiple languagesmust be available on the DVD.
See page 35.
STOP C ButtonPress to stop Disc play or recording.
Press and hold the STOP C button forthree seconds to open or close the
Recorder’s disc tray.
STANDBY yy ButtonPress to turn on or off the power ofthe DVD Recorder.
PLAY MODE ButtonPress during Disc play to choose aRepeat, Shuffle, or Scan mode.
SYSTEM MENU ButtonPress to access or remove the MenuBars of the DVD Recorder.See page 30.
OK ButtonPress to acknowledge or approve amenu selection.
CH-/9, CH+/8, ;, :ButtonsPress to select menu items.Press CH+8 and CH-9 to change TVchannels at the Recorder in Monitormode.
TV VOLUME +/- ButtonsPress to adjust the volume of somePhilips TVs. You do not have to holdthe DVD/TV button on the side of theremote for this feature.The TV VOLUME +/- buttons do notwork with all TVs.
REC/OTR I Button(Record/One-Touch Recording)Press to record the current TV channelin Monitor mode. See page 21. Or,press to record material playing onequipment connected to the Recorder(after choosing the correct EXT orCAM channel). See page 17.Press repeatedly to set up a One-Touch Recording. See page 41.

Remote Control (cont’d) 23
1 2 3
4 5 6
7 8
0
9
I I
MONITOR
TV / DVD T / C PLAY MODE REC. MODE
SELECT OK
DISC SYSTEM
MENU
CH
CH
TIMER
FSS
RETURN CLEAR
TV VOLUME
PLAY
STOP
AUDIO PAUSE
REC/OTR
STANDBY
T/C Button(Title/Chapter)
Press to select “T” (Title/Track) or “C”(Chapter) in the Menu Bar. Then press
CH+8 or CH-9 to select theTitle/Track/Chapter you want to play.
This button has no effect duringMonitor mode.
TIMER ButtonPress to access or remove the Timer
Recording menu. See pages 42-44.
FSS Button(Favorite Scene Selection)
Press to display or remove the FavoriteScene Selection menu during playback of
a DVD+R or DVD+RW. See page 51.
Previous j ButtonPress to return to the beginning of the
current Chapter/Track.Press repeatedly to return to previous
Chapters/Tracks. See page 34.Press and hold for two seconds to
search backward during play.See page 38.
REC MODE ButtonPress repeatedly to select a recordingspeed: M1, M2, M2x, M3, M4, or M6.This determines the quality of therecording and the amount/length oftime you can record on a Disc.See page 49.
Number ButtonsPress to select numbered items in amenu. See page 20. Press during play toselect a Chapter (within the current Title)or Track for play. See page 34.Press to select a TV channel while inMonitor mode.
CLEAR ButtonPress to delete the last entry of informa-tion into a menu. Press to clear a timerrecording. See page 44.
PLAY : ButtonPress to play a Disc.
Next G
Press to skip to the next Chapter orTrack during play. See page 34.Press and hold for two seconds tosearch forward during play.See page 38.
PAUSE k ButtonPress once to pause play. Press repeat-edly to advance a paused picture oneframe at a time (frame-by-frame play-back). See page 37.
DVD
/ TV
The following buttons willwork with some PhilipsTVs when you hold downthe DVD/TV button onthe side of the remote.Hold down the DVD/TVbutton at the same timeyou press these buttons.Otherwise, these buttonswill change channels orpower at the Recorder.
• CH+8 or CH-9Press to change TVchannels at the TV.
• Number buttonsPress to choose a TVchannel at the TV.
• STANDBY 22Press to turn on or offthe TV power.
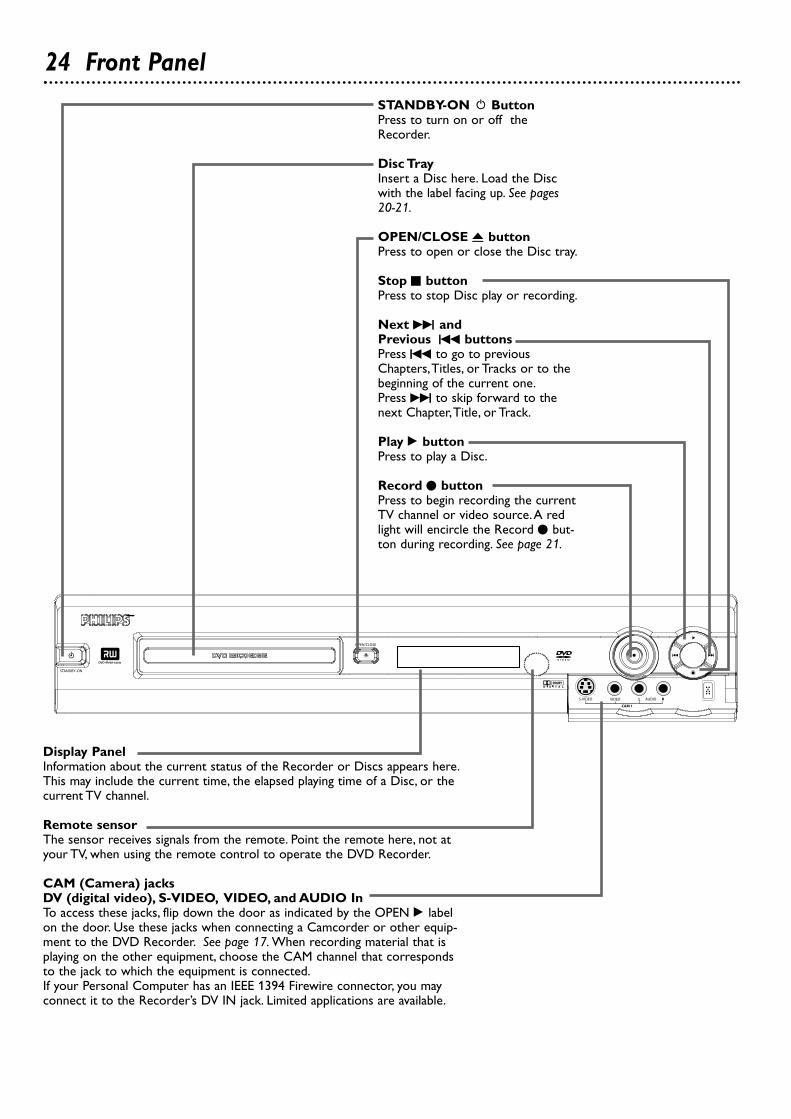
24 Front Panel
STANDBY-ON
OPEN/CLOSE
S-VIDEO VIDEO AUDIOL R
CAM 1
STANDBY-ON yy ButtonPress to turn on or off theRecorder.
Disc TrayInsert a Disc here. Load the Discwith the label facing up. See pages20-21.
OPEN/CLOSE A buttonPress to open or close the Disc tray.
Stop C buttonPress to stop Disc play or recording.
Next G andPrevious H buttonsPress H to go to previousChapters,Titles, or Tracks or to thebeginning of the current one.Press G to skip forward to thenext Chapter,Title, or Track.
Play : buttonPress to play a Disc.
Record I button Press to begin recording the currentTV channel or video source.A redlight will encircle the Record I but-ton during recording. See page 21.
Display PanelInformation about the current status of the Recorder or Discs appears here.This may include the current time, the elapsed playing time of a Disc, or thecurrent TV channel.
Remote sensorThe sensor receives signals from the remote. Point the remote here, not atyour TV, when using the remote control to operate the DVD Recorder.
CAM (Camera) jacksDV (digital video), S-VIDEO, VIDEO, and AUDIO InTo access these jacks, flip down the door as indicated by the OPEN : labelon the door. Use these jacks when connecting a Camcorder or other equip-ment to the DVD Recorder. See page 17. When recording material that isplaying on the other equipment, choose the CAM channel that correspondsto the jack to which the equipment is connected.If your Personal Computer has an IEEE 1394 Firewire connector, you mayconnect it to the Recorder’s DV IN jack. Limited applications are available.

Rear Panel 25
DIGITALAUDIO OUT
AUDIO
COMPONENTVIDEO
AUDIOVIDEO(CVBS)
OUT
S-VIDEO(Y/C)
L
R PR
PB
Y
AUDIO
COMPONENTVIDEO
AUDIO
EXT 2 EXT 1
VIDEO(CVBS)
IN
S-VIDEO(Y/C)
L
R PR
PB
Y
ANTENNA
TV
MAINS jackConnect the supplied AC power cord here. See pages 10-16.
TV jackConnect the supplied RF coaxial cable to the Recorder’s TV jack and tothe RF IN or ANTENNA IN jack (75 ohm) on your television.
ANTENNA jackConnect your antenna or Cable TV signal here. See pages 10-16.
IN EXT 2 jacksUse these jacks to receive picture and sound from other equipment.• VIDEO (CVBS): Use a video cable to connect this jack to the Video
Out jack of other equipment. See page 17.• AUDIO L/R (left/right): Connect audio cables here and to the AUDIO
OUT jacks of other equipment. See page 17.• S-VIDEO (Y-C): Use an S-video cable to connect this jack to the S-
Video Out jack of optional additional equipment. See page 17.
• Use the same EXT (external)number for each pair of audioand video connections. Forexample, if you use IN EXT 2S-VIDEO (Y/C), use the IN EXT2 AUDIO L/R jacks.
• Do not touch the inner pins ofthe jacks. Electrostatic dis-charge may damage the unitpermanently.
• You only need one audio andone video connection to a TV.You might not use all the jacks.
Helpful Hints
IN EXT 1 jacksUse these jacks to receive picture and sound from other equipment.• AUDIO L/R (left/right): Connect audio cables here and to the
AUDIO OUT jacks of other equipment. See page 17.• COMPONENT VIDEO (Y PB PR): Connect these jacks to the
Component Video Out jacks of optional video equipment (for exam-ple, a DVD Player). See page 17.
OUT jacksUse these jacks to connect the DVD Recorder directly to your TVand/or Stereo.VIDEO (CVBS): Connect the supplied video cable (yellow) here andto the TV’s Video In jack. See page 14.S-VIDEO (Y-C): Connect an S-Video cable here and to a TV’s S-Video In jack. See page 13.COMPONENT VIDEO (Y PB PR): Connect the supplied three-strand component videocable here and to the Component Video In jacks of a TV. See page 12.AUDIO L/R (Left/Right): Use the supplied audio cables (red andwhite) to connect these jacks to the Audio In jacks of a TV or Stereo.See pages 12-15.
Coaxial DIGITAL AUDIO OUT jackConnect a digital audio coaxial cable here and to the digital audiocoaxial In jack of a Stereo. See page 16.

26 TV Channel ProgrammingAlthough the DVD Recorder selects available TV channels during InitialSetup, you may want to repeat the process later if more channels becomeavailable in your area.This will erase and replace all previously stored chan-nels.To update the available channels, follow these steps.
1 Press SYSTEM MENU. Press ; to select in the top leftcorner of the menu bar at the top of the TV screen.
2 Press CH-9 repeatedly to select in the next menu, thenpress : to enter the Installation menu.
3 Auto Ch. Programming will be selected. Press OK. “Searching forTV channels” will appear, along with a scale showing channels thatare being memorized.The number of channels found will show onthe screen as the searching progresses.This will take a few minutes,depending on the number of channels available.
4 When the channel search finishes,“Auto ch. search com-plete” will appear, along with the total number of channels found.
Press SYSTEM MENU. The Installation menu will reappear.If you are satisfied with the channels found, press SYSTEMMENU repeatedly to remove the menu. You are finished.
To add or delete additional channels, press CH-9 to selectAdd/Delete Channels, then go to step 5.
5 Press :. A channel list will appear. Beside each channel number,you will see “Delete” or “Add.”
6 Press CH+8 or CH-9 to select the channel you want toadd or delete, then press ; or : to choose Add or Deletefor that channel. Press OK to store your choice. “Stored” willappear briefly in the lower left corner of the menu.Repeat step 6 as often as necessary to add or delete all the channelsyou want.
7 Press SYSTEM MENU repeatedly to remove all the menuswhen you are finished.
1 2 3
4 5 6
7 8
0
9
MONITOR
TV / DVD T / C PLAY MODE REC. MODE
SELECT OK
DISC SYSTEM
MENU
CH
CH
TIMER
FSS
RETURN CLEAR
TV VOLUME
PLAY
STANDBY
Installation
K Auto Ch. Programmingu B Add/Delete Channels B
L VCR Plus+ Ch.Time/DateCable/Antenna
To exit pressSYSTEM MENU
Installation
K
u B Auto Ch. Programming B
L Add/Delete ChannelsVCR Plus+ Ch.Time/DateCable/Antenna
To exit pressSYSTEM MENU
• Access added channels bypressing CH+8 or CH-9.Deleted channels will beskipped. Delete channels yourarely watch.You still can selectdeleted channels with theNumber buttons.
• If new channels become avail-able, or if you receive a chan-nel the Recorder did not set,add the channel.
• The Recorder detects whetheryou connected an Antenna orCable TV signal. If you are notreceiving the correct channels,reset your channels. Followsteps 1-2 above. Press CH-9to choose Cable/Antenna, thenpress OK. Press B or s tochoose Cable, Anten. (antenna),or Auto (for the Recorder todetect automatically). Press OK.“Stored” will appear briefly inthe lower left corner of themenu. Press SYSTEM MENU.Press OK again to reset thechannels.When the searchends, press SYSTEM MENUrepeatedly to clear the screen.
Helpful Hints
1,4,71-6

VCR Plus+ Channels 27If you intend to use the VCR Plus+ programming system, program the DVDRecorder with your local channel information.This will only take a few min-utes. Since the channel numbers of the stations you receive may not be thesame as the station numbers, and since channel numbers differ from area toarea, you must set up channels in order for the system to work efficiently.Before you begin, make sure you have 1) a cable TV channel list, if applicable(you can request one from your cable TV company), and 2) a chart that listsVCR Plus+ channel numbers, which you can find in your TV guide or the TVlistings of your local newspaper.
1 Press SYSTEM MENU. Press ; to select in the top leftcorner of the menu bar at the top of the TV screen.
2 Press CH-9 repeatedly to select at the end of the nextmenu screen, then press : to enter the Installation menu.
3 Press CH+8 or CH-9 to select VCR Plus+ Ch. (channel),then press :.
4 Press CH+8 or CH-9 to select a VCR Plus+ Ch. number,then press the Number buttons or ; or : to enter the cor-responding Channel number from your TV guide list. If youuse the Number buttons, enter the channel number as a three-digitnumber. For example, for channel 18, press 0,1,8.Refer to the list from your local newspaper or TV guide for the VCRPlus+ channels and corresponding TV channel numbers for yourarea.These are the numbers you will enter as the Channel numberas you complete the chart on the screen.
5 Press OK to store the Channel number. “Stored” will appearbriefly in the lower left corner of the menu. Repeat steps 4-5 asoften as necessary to complete the chart.
6 When you are finished, press SYSTEM MENU repeatedly toremove all the menus.
1 2 3
4 5 6
7 8
0
9
I I
MONITOR
TV / DVD T / C PLAY MODE REC. MODE
SELECT OK
DISC SYSTEM
MENU
CH
CH
TIMER
FSS
RETURN CLEAR
TV VOLUME
PLAY
STOP
AUDIO PAUSE
REC/OTR
STANDBY
Installation
Auto Ch. ProgrammingK Add/Delete Channelsu B VCR Plus+ Ch. B
L Time/DateCable/Antenna
To exit pressSYSTEM MENU
Installation VCR Plus+
VCR Plus+ ChannelK K...u 001 s 018 B
L 002 -- -- --003 -- -- --004 -- -- --005 -- -- --L... To store
Press OK
1,61-5
4
• Only memorized channels willappear if you use B and s toenter channel numbers at step4. Use the Number buttons toenter any channel number.
Helpful Hint
28 Clock Setting
Time/Date AutomaticThe Recorder can set the time and date automatically by referring to a PBSstation. If the Recorder chooses an incorrect PBS channel or sets thetime/date incorrectly, set the clock manually. See page 29.Before you begin, make sure TV channels are set. See page 26.
1 Press SYSTEM MENU. Press ; to select in the top leftcorner of the menu bar at the top of the TV screen.
2 Press CH-9 repeatedly to select at the end of the nextmenu, then press : to enter the Installation menu.
3 Press CH-9 repeatedly to select Time/Date, then press :.
4 Automatic will be selected. Press :.
5 With PBS Channel selected, press ; or : to choose the chan-nel number of your PBS station, then press OK. The menu willpause while storing the setting.If you do not know your PBS channel number, choose Auto.TheRecorder will choose a PBS station for you and set the time.If you want to set the clock manually, choose Off.The Recorder willnot update the time automatically according to a PBS station.
6 Press CH-9 to choose Daylight Saving. Press ; or : tochoose On, Off, or Auto, then press OK. The menu will pausewhile storing the setting. Choose Auto if you want the clock setaccording to the PBS station’s Daylight Savings Time schedule.
7 Press CH-9 to choose Time Zone. Press ; or : repeatedly tochoose your time zone, then press OK. The menu will pausewhile storing the setting.If you want the Recorder to use the time zone from which your PBSstation broadcasts, choose Auto. If your PBS station broadcasts from adifferent time zone than the one in which you live, be sure to selectyour time zone.
8 Press SYSTEM MENU repeatedly to remove the menus. PressSTANDBY yy to turn off the Recorder. In a few minutes, the timewill appear on the display panel on the front of the Recorder.If the Recorder cannot find the time, you may see an error messagewhen you turn on the Recorder. Check the PBS channel and try again.Or, set the clock manually. See page 29.
1 2 3
4 5 6
7 8
0
9
I I
MONITOR
TV / DVD T / C PLAY MODE REC. MODE
SELECT OK
DISC SYSTEM
MENU
CH
CH
TIMER
FSS
RETURN CLEAR
TV VOLUME
PLAY
STOP
AUDIO PAUSE
REC/OTR
STANDBY
Time/date Automatic
K PBS Channel 010u Daylight Saving s Off B
L Time Zone Auto.
To storePress OK
Time/date Automatic
PBS Channel 010K Daylight Saving Offu Time Zone s Auto. B
L
To storePress OK
Time/date AutomaticK
u PBS Channel s 010 B
L Daylight Saving OffTime Zone Auto.
To storePress OK
• The Recorder may set the clockwhen you complete InitialSetup. If the correct timeappears on the display, you donot need to set the clock.
• The factory default setting ofDaylight Saving is On.
• The Recorder can use the PBSchannel to set the clock only ifthe PBS channel is a memo-rized channel.To set up chan-nels, see page 26.
Helpful Hints
8
1,81-7

Clock Setting (cont’d) 29
Time/Date ManualIf the Recorder does not set the time and date correctly using theTime/Date Automatic feature, set the clock manually by following the stepsbelow. Manual clock setting overrides Automatic clock setting.
1 Press SYSTEM MENU. Press ; to select in the top leftcorner of the menu bar at the top of the TV screen.
2 Press CH-9 repeatedly to select at the end of the nextmenu, then press : to enter the Installation menu.
3 Press CH-9 repeatedly to select Time/Date, then press :.
4 Press CH-9 to choose Manual, then press :.
5 Time will be highlighted. Press ; or : to choose the correcttime in hours and minutes, then press OK. Or, press theNumber buttons to quickly enter the time in hours and minutes,then press OK.The menu will pause while storing the setting.
6 Press CH-9 to choose AM/PM, then press ; or : to chooseAM or PM. Press OK. The menu will pause while storing the set-ting.
7 Press CH-9 to choose Year, then press ; or : to choose thecurrent year. Press OK. The menu will pause while storing thesetting.
8 Press CH-9 to choose Month, then press ; or : to choosethe current month. Press OK. The menu will pause while storingthe setting.
9 Press CH-9 to choose Date, then press ; or : to choosethe current date. Press OK. The menu will pause while storingthe setting.
10Press CH-9 to choose Daylight Saving, then press ; or :to choose On or Off. Press OK. The menu will pause whilestoring the setting.
11Press SYSTEM MENU repeatedly to remove all menus.
1 2 3
4 5 6
7 8
0
9
I I
MONITOR
TV / DVD T / C PLAY MODE REC. MODE
SELECT OK
DISC SYSTEM
MENU
CH
CH
TIMER
FSS
RETURN CLEAR
TV VOLUME
PLAY
STOP
AUDIO PAUSE
REC/OTR
STANDBY
Time/date Manual K
u Time s 04:01 B
L AM/PM PMYear 2003Month 06Date 19Daylight Saving On
To exit pressSYSTEM MENU
• In order for the clock to remainset as you specified manually,you may need to set DaylightSaving to Off.
• If you set up channels again asdescribed on page 26, you mayneed to reset your clock.
• If you change any item manual-ly (Time,AM/PM,Year, Month,Date, Daylight Saving), PBSChannel will change to Offautomatically. See page 28.
Helpful Hints
1-101,11

30 Menu BarsYou can use the Menu Bars to operate some features.You cannot access theMenu Bars during recording.When a Menu Bar is on the screen, press the CH-9, CH+8, ;, and : buttonson the remote to select or change an item.
Menu Bar 1*Press SYSTEM MENU once to access Menu Bar 1.The followingitems are in Menu Bar 1. Depending on the available Disc features, you maynot be able to access each item at all times. Only available features can beselected.
User Preference Settings Set your preferences for audio and videoquality, depending on the equipment you connected to the DVDRecorder.Also set up Languages,Access Control, Record Settings,Remote Control settings, Installation features, and other DVD Recorderfeatures as detailed throughout this manual.
Title/Track Select to choose an available Title or Track for playback.Use the Number buttons or the CH-9/CH+8 buttons to select theTitle you want. Play will start automatically.
Chapter Select to choose an available Chapter for playback. Use theNumber buttons or the CH-9/CH+8 buttons to select the Chapteryou want. Play will start automatically.
Audio Language If the current DVD has multiple audio soundtracks,choose one here. For example, some DVDs let you play the movie inother languages or hear a director’s commentary during playback. Checkthe Disc case for details. See page 35.
Subtitle Language If the current Disc has subtitles, select a languagehere. See page 35.
Angle Select to choose a different camera angle, if available, duringDVD play. See page 36.
Zoom Select to enlarge the picture by 1.33, 2, or 4 times the normalsize during playback. See page 36.
Menu Bar 2*While in Menu Bar 1, press : repeatedly to move to Menu Bar 2.The following items may be available in Menu Bar 2.
Sound Mode Select to choose a sound mode: Stereo (st) or DolbySurround compatible (sur). See page 37.
Frame-by-frame playback Select for forward or reverse frame-by-frame playback. Press CH-9, then press ; or : to move the picturebackward or forward one frame at a time. See page 37.
Slow motion Select to slow the speed of DVD, DVD+R, or DVD+RWplayback. See page 38.
Fast motion Select to play a DVD, DVD+R, or DVD+RW forward orbackward at four, eight, or 32 times the normal play speed. Press CH-9,then press ; or : to choose a backward (-) or forward speed.
Time Search Select to enter a specific time within the current Title orTrack at which you want play to begin. See page 39.
W
Z
Y
d
H
E
a
X

Disc status icons
recording
stop
pause play
pause recording
fast forward (4 or 32 times the regular speed)
fast reverse (1/8, 1/4, or 1/2 the regular speed)
slow motion
Disc type icons
DVD+R
DVD+RW
DVD-Video
Super Video-CD
Video-CD
no Disc
Disc errorH1 / 4
Jx 4
Kx 4
0 ;p a u s e
;p a u s e
9s t o p
0r e c
Status BoxThe Status Box shows the current status of the Recorder and information about the current Disc,including Disc type, total playing time, and elapsed playing time. Set Status box to On if you want to seethe following icons briefly when you access a feature. See page 59.
On-screen Symbols, Status Box 31
Scan The first 10 seconds of eachChapter/Track will play.See page 39.
Repeat All The entire Disc will playrepeatedly. See page 40.
Repeat Title The current Title will playrepeatedly. See page 40.
Repeat Chapter The current Chapterwill play repeatedly. See page 40.
Repeat A Point A for Repeat A-B play-back has been entered. See page 40.
Repeat A-B A segment of the Disc willplay repeatedly. See page 40.
Angle Multiple angles are available.See page 36.
Locked The current Disc is Locked andcannot play. See pages 54-58.
Safe The current Disc is authorized forplayback. See pages 54-58.
“X” The feature you just attempted is notavailable on the current Disc or at thecurrent time.
Shuffle The Tracks or Chapters will playin random order. To start shuffled play,press PLAY MODE repeatedly until“shuffle” appears on the TV screen.
On-screen SymbolsThe following symbols will appear briefly on the TV screen when you activate some Disc features.
scan 2/2
locked
safe
shuffle
repeat
title
chapter
A -
A - B
DVD+R
DVD
SVCD
RW
VCD
no disc
error

Title descriptionIncludes program name (or channel/source andtime at which it was recorded), length ofrecording, the speed in which it was recorded,and the date of recording (if clock was set).
CueGo to the Disc Information Screen or to aTitle on a previous screen. Disc InformationScreen details are on page 50.
32 Index Picture ScreenThe Index Picture Screen shows your recordings on a DVD+RW or DVD+R. Itappears automatically when you insert a DVD+R or DVD+RW or when you stopplayback or recording.The Disc must contain recordings.An Index Picture represents each recording. Next to the Index Picture is the programname, length of recording, recording mode/speed, and date of recording. If the record-ing has no name, the recording source and time will appear instead (for example, therecorded TV channel and the time at which you started recording the channel).Empty disc areas (erased Titles or blank space at the end of the Disc) also appear inthe Index Picture Screen.“Empty title” and the amount of remaining recording timeappear beside the empty Index Picture box.The Index Picture Screen will dim after several minutes of no use.This prevents dam-age to your TV screen.To brighten the Index Picture Screen again, use the DVDRecorder or its remote control to access the regular features of the Index PictureScreen.
TitlesA maximum of three Index Pictures appears on the screen at once. Press CH+8 orCH-9 to move to other recordings.Press STOP C to move directly to the first recording on the Disc.
Disc BarThe Disc Bar appears at the right of the Index Picture Screen.This overviews allrecordings on the Disc, as well as any empty spaces.On the Disc Bar, the Disc Pointer indicates your current position on the Disc. Youcan press and hold the Next G button to scroll through the Disc Bar. Movingthrough the recordings by pressing CH+8 or CH-9 moves the Disc Pointer. On aDVD+RW, resume play or recording from this point by pressing OK for playback orREC/OTR I for recording. Later recordings will be overwritten. On a DVD+R,resume play from the Disc Pointer location by pressing OK. However, on a DVD+R,recording begins at the last empty title space when you press REC/OTR I.
Title Settings MenuWhen you select an Index Picture, press : to go to its Title Settings Menu.You canname, play, or erase the Title. See page 47.
Disc PointerShows the current Titlenumber and its positionwithin the Disc.
Disc BarTimer Information BoxDisplays the current time orthe time/date of the nextscheduled timer recording.See page 33.
Tuner Information BoxDisplays the current TVchannel or video source (ifadditional equipment is con-nected to the Recorder).See page 33.
X !Wed 07/02
L
C10 07:55AM00:01:24 . M1
Wed 08/27/2003
C06 11:30AMB 0100:00:22 . M1
Sun 06/15/2003
C10 12:01AM00:58:53 . M6
Sun 10/26/2003
K
2
¡012
Current Title
Index Picture An image representing arecording.An empty box rep-resents an area on the Discthat is empty and available forrecording. To personalize theIndex Picture, see page 51.

Information Boxes 33Warning boxAppears near the bottom of the screen when appropriate. Examples and details are on page 45.
Tuner Information boxAppears briefly on the left side of the TV screen in Monitor mode and identifies the current TV channelor Video source. For example, if EXT1 appears in the Tuner Information Box, you can view or recordthe material playing on the equipment connected to the IN EXT1 jacks on the rear of the Recorder.Make sure you have connected an Antenna or Cable TV signal to the ANTENNA jack on the Recorder.See pages 10-17. Press MONITOR to go into Monitor mode and view TV channels or play video fromother equipment.
Current TV channel No signal - Channel is not Copy-protected signalreceivable or no equipment
is connected to the designated jack.
Timer Information boxDisplays the start time or date of the next scheduled timer recording and appears in the Index PictureScreen.You cannot remove it from the Index Picture Screen.It appears briefly at the beginning of a timed One-Touch Recording. It does not appear during recordingor Disc playback.
Timer recording due later today Timer recording set for another day within the upcoming year
The time at which the current Current time; no timer recordingsOne-Touch Recording will end. are scheduled.
Disc locked
012
012
10:15 pm
4

1 2 3
4 5 6
7 8
0
9
I I
MONITOR
TV / DVD T / C PLAY MODE REC. MODE
SELECT OK
DISC SYSTEM
MENU
CH
CH
TIMER
FSS
RETURN CLEAR
TV VOLUME
PLAY
STOP
AUDIO PAUSE
REC/OTR
STANDBY
34 Title/Disc Menus, Chapter/Track Selection
Title/Disc menus
1 Press DISC MENU during Disc play.For a DVD, if the current Title has a menu, the Title menu willappear on the screen. Otherwise, the Disc menu will appear.Themenu will list features available on the current DVD and will vary forevery DVD.For a DVD+RW or DVD+R, the Index Picture Screen will appear.See page 32.
2 Press CH+8, CH-9, ;, and : to select items in the menuor Index Picture Screen, then press OK. Repeat this processuntil you set up all the features you want or until play begins.
1 2 3
4 5 6
7 8
0
9
MONITOR
TV / DVD T / C PLAY MODE REC. MODE
SELECT OK
DISC SYSTEM
MENU
CH
CH
TIMER
FSS
RETURN CLEAR
TV VOLUME
PLAY
STANDBY
Chapter/Track Selection
1 Press Next G during play to go to the next Track/Chapter.Press Previous j once to return to the beginning of thecurrent Track/Chapter. Press Previous j repeatedly to stepback to previous Tracks/Chapters.
2 Or, to go directly to any Track/Chapter during play, pressthe Number buttons to enter the Track/Chapter number.If you enter an invalid number, the current Track/Chapter may con-tinue to play. Or, an incorrect Track/Chapter may begin to play. Makesure the Track/Chapter number you enter is available on the Disc.Make sure the Chapter is available within the current Title.TheMenu Bar will disappear automatically in a few seconds.
12
1
2

1 2 3
4 5 6
7 8
0
9
I I
MONITOR
TV / DVD T / C PLAY MODE REC. MODE
SELECT OK
DISC SYSTEM
MENU
CH
CH
TIMER
FSS
RETURN CLEAR
TV VOLUME
PLAY
STOP
AUDIO PAUSE
REC/OTR
STANDBY
1 2 3
4 5 6
7 8
0
9
I I
MONITOR
TV / DVD T / C PLAY MODE REC. MODE
SELECT OK
DISC SYSTEM
MENU
CH
CH
TIMER
FSS
RETURN CLEAR
TV VOLUME
PLAY
STOP
AUDIO PAUSE
REC/OTR
STANDBY
Audio Language, Subtitles 35
Audio LanguageSome DVDs are recorded in different languages. For example, you may beable to watch the same movie in French, Spanish, etc.The movie may havespecial audio features, such as a director’s commentary or music sound-track. If these are available on the DVD, access the different languages orfeatured soundtracks by following these steps.
1 During DVD play, press the AUDIO YY button.Y Audio will be selected in the Menu Bar.
2 Within five seconds, press the AUDIO YY button repeatedlyto see the different languages available. Or, press CH+8 orCH-9 repeatedly to see the different languages.The language youselect will be audible in a few seconds; the Menu Bar will disappear.The languages or options may be abbreviated. For example, Frenchmay be “Fr.” See your Disc case for details on available audio fea-tures and explanations.
W X Y Z a
1 2 1en 1en K
L no off~
L F
RW play0:29:400:00:07
s B
W X Y Z a
1 2 1enK
L 1 no off~
L F
DVD play0:29:400:00:07
s B
SubtitlesSome DVDs include subtitles in different languages. Or, material yourecorded onto a DVD+RW or DVD+R might include subtitles.To choosesubtitles, follow these steps.
1 During play, press SYSTEM MENU so Menu Bar 1 appearsat the top of the TV screen.
2 Press : repeatedly to select ZZ Subtitle in the Menu Bar.
3 Press CH+8 or CH-9 to see the available subtitle languages.Subtitles will appear after a few seconds.You can choose subtitles only if they are available on the Disc.Thelanguages may be numbered or abbreviated, such as “En” for English.
4 Press SYSTEM MENU to remove the Menu Bar.
1,2
1,42-3

1 2 3
4 5 6
7 8
0
9
MONITOR
TV / DVD T / C PLAY MODE REC. MODE
SELECT OK
DISC SYSTEM
MENU
CH
CH
TIMER
FSS
RETURN CLEAR
TV VOLUME
PLAY
STANDBY
1 2 3
4 5 6
7 8
0
9
I I
MONITOR
TV / DVD T / C PLAY MODE REC. MODE
SELECT OK
DISC SYSTEM
MENU
CH
CH
TIMER
FSS
RETURN CLEAR
TV VOLUME
PLAY
STOP
AUDIO PAUSE
REC/OTR
STANDBY
36 Zoom, Camera Angle
ZoomZooming lets you enlarge the video image during play and pan through theenlarged image.
1 During play, press SYSTEM MENU so Menu Bar 1 appearsat the top of the TV screen.
2 Press : repeatedly to select a Zoom in the Menu Bar.
3 Press CH+8 or CH-9 to choose 1.33, 2, or 4. Play will pause.The still picture will appear at 1.33, 2, or 4 times the normal size.
4 To move the enlarged picture around on the TV screen(pan), press OK. Then, press CH+8, CH-9, ;, or : to movethe picture.
5 Press OK again to see the still, zoomed picture without theMenu Bar.
6 To return to regular play, press PLAY :.
7 Press SYSTEM MENU to remove the Menu Bar again.
Camera AngleSome DVDs include scenes recorded from different angles.To watch seg-ments from a different angle, follow these steps.
1 During play, press SYSTEM MENU so Menu Bar 1 appearsat the top of the TV screen.
2 Press : repeatedly to select Angle in the Menu Bar.
3 Press CH+8 or CH-9 to select a different angle. In a fewseconds, play changes to the selected angle.
If the Angle symbol appears in the top left corner of the TV screenduring play, multiple angles are available. Simply press CH+8 or CH-9 to switch among the different angles.
W X Y Z a
1 2 1en 1 no 1.33K
L~
L B
RW pause0:29:400:00:07
s B
Press OK to pan
2/2 op
1,72-5
6
12-3
W X Y Z a
1 2 1en 1 1/2K
L off~
L F
DVD play0:29:400:00:07
s B2/2

Still Picture/Frame-by-Frame Play, Sound 37Still Picture/Frame-by-frame PlaybackTo quickly pause play, press PAUSE k on the remote. To advance the stillpicture one frame at a time, press PAUSE k repeatedly.To resume play,press PLAY :.To freeze the picture using the Menu Bar, follow these steps.
1 Press SYSTEM MENU during play so Menu Bar 1 appears.
2 Press : repeatedly to select in Menu Bar 2.
3 Press CH-9 to freeze the picture. Press ; or : to move thepicture backward or forward one frame at a time.Do not leave a still picture on your TV more than five minutes.Thismay etch the image onto your screen permanently. Other still visualelements, such as TV station logos or video games, also will damageyour TV screen if left too long.
4 Press PLAY : to resume regular play.
5 Press SYSTEM MENU to remove the Menu Bar.
SoundChoose a sound setting based on the capabilities of the equipment towhich you connected the DVD Recorder. See pages 10-16 and 62.
1 During play, press SYSTEM MENU so Menu Bar 1 appearsat the top of the TV screen.
2 Press : repeatedly to select d in Menu Bar 2.
3 Press CH+8 or CH-9 to select st (stereo) or sur (DolbySurround).Select st (stereo) to hear stereo sound.This will work with equip-ment that has right and left audio jacks (usually red and white).Select sur (Dolby Surround) if your audio equipment is compatiblewith Dolby Surround. If it is, usually a Dolby Pro Logic logo willappear on the equipment.
4 Press SYSTEM MENU to remove the Menu Bar.
1 2 3
4 5 6
7 8
0
9
MONITOR
TV / DVD T / C PLAY MODE REC. MODE
SELECT OK
DISC SYSTEM
MENU
CH
CH
TIMER
STANDBY
• The Recorder also refers toSound settings as Analog output.The sound the Recorder sends toyour Stereo or TV is analog, ortwo-channel, left and right. Youare using analog sound if youused the red/white, left/right,Audio jacks. See page 62.Whether you adjust the soundhere or as described on page 62,the results will be the same.
Helpful Hint
d H E
L F
DVD play1 :2 3 :45 5
s Bst K
L
d H E
L B
DVD pause0:29:400:00:07
st
eo
1,42-3
1 2 3
4 5 6
7 8
0
9
MONITOR
TV / DVD T / C PLAY MODE REC. MODE
SELECT OK
DISC SYSTEM
MENU
CH
CH
TIMER
FSS
RETURN CLEAR
TV VOLUME
PLAY
STANDBY
2-31,5
4

1 2 3
4 5 6
7 8
0
9
I I
MONITOR
TV / DVD T / C PLAY MODE REC. MODE
SELECT OK
DISC SYSTEM
MENU
CH
CH
TIMER
FSS
RETURN CLEAR
TV VOLUME
PLAY
STOP
AUDIO PAUSE
REC/OTR
STANDBY
Forward and Reverse Searching
1 To search a Disc at four times the normal speed, press andhold Next i or Previous j during play. Repeat this tosearch at 32 times the normal speed.The sound will be mute.On an Audio CD, press and hold Next i or Previous j
during play to search the Disc at four times the normalspeed. Sound will be intermittent. Repeat this to search at eighttimes the normal speed. The sound will be mute.Each press of Next i or Previous j switches between theslower and faster search speed.
2 Press PLAY : to resume play or press STOP C to stopplayback.
1 2 3
4 5 6
7 8
0
9
I I
MONITOR
TV / DVD T / C PLAY MODE REC. MODE
SELECT OK
DISC SYSTEM
MENU
CH
CH
TIMER
FSS
RETURN CLEAR
TV VOLUME
PLAY
STOP
AUDIO PAUSE
REC/OTR
STANDBY
38 Slow Motion, Searching
Slow MotionTo use the Menu Bar for slow motion, follow these steps.
1 During Disc play, press SYSTEM MENU so Menu Bar 1appears at the top of the TV screen.
2 Press : repeatedly to select H (Slow motion) in Menu Bar2, then press CH-9. Play will pause.
3 Press ; or : to select the required speed: -1, -1/2, -1/4 or -1/8 (backward), or 1/8, 1/4, 1/2 or 1 (forward). The Disc willstart to play at the speed you selected, for example, one-half as fastas normal (1/2).Select 1 to play the Disc at normal speed again. Select 0 or pressPAUSE k on the remote control to pause the picture.
4 To return to normal play, press PLAY :.
5 Press SYSTEM MENU to remove the Menu Bar.
d H E
L F
DVD pause0:00:220:00:05
st
-1 -1/2 -1/4 -1/8 s 0 B 1/8 1/4 1/2 1 K
1,52-3
4
12

1 2 3
4 5 6
7 8
0
9
MONITOR
TV / DVD T / C PLAY MODE REC. MODE
SELECT OK
DISC SYSTEM
MENU
CH
CH
TIMER
FSS
RETURN CLEAR
TV VOLUME
PLAY
STANDBY
Time Search, Scan 39
Time SearchTime Search lets you choose a specific elapsed playing time at which youwant to begin playback.This feature may not be available on all Discs.
1 Press SYSTEM MENU during Disc play so Menu Bar 1appears at the top of the TV screen.
2 Press : repeatedly to select in Menu Bar 2.
3 Press CH-9. Play will pause.A time edit box will appear, showingthe elapsed playing time of the current Chapter or Disc.
4 Press the Number buttons to enter the time at which youwant play to begin. Enter the hour, minutes, and seconds from leftto right in the box.The time must be within the possible time of the current Chapter orDisc. If it is not, play will not begin after you press OK at step 5.Instead, a space in the time edit box will blink. Or, play may begin at thewrong time. Refer to the Status box to see the time available, thenenter a correct time.
5 Press OK. After a few seconds, play will resume at the point youselected.
6 Press SYSTEM MENU to remove the Menu Bar.
ScanScanning plays the first 10 seconds of each Chapter/Track on the Disc.
1 Press PLAY MODE repeatedly during play until “scan”appears on the TV screen. Starting with the currentChapter/Track, the first 10 seconds of each Chapter/Track will play.This will continue until the end of the Disc is reached or youresume regular playback.
2 To stop scanning and continue regular play, press PLAY :.
1 2 3
4 5 6
7 8
0
9
MONITOR
TV / DVD T / C PLAY MODE REC. MODE
SELECT OK
DISC SYSTEM
MENU
CH
CH
TIMER
FSS
RETURN CLEAR
TV VOLUME
PLAY
STANDBY
d H E
L F
DVD pause0:05:260:02:32
st
s 0:02:32 B
K
time edit box
Status box
41,62,3,5
2
1

40 Repeat, Repeat A-B
RepeatYou may play a Chapter,Track,Title or entire Disc repeatedly. All Discs donot allow all the repeat options.You cannot play a DVD+R or DVD+RWrepeatedly. Check your Disc for details.
1 During Disc play, press PLAY MODE repeatedly to choose aRepeat option. Depending on the type of Disc, you may choose toplay the Chapter,Track,Title, or Disc repeatedly.During DVD or Video CD play, the repeat symbols will appearbriefly on the TV screen. See page 31.
2 To cancel repeat play, repeatedly press PLAY MODE until allthe repeat symbols or messages disappear from the screen.
1 2 3
4 5 6
7 8
0
9
MONITOR
TV / DVD T / C PLAY MODE REC. MODE
SELECT OK
DISC SYSTEM
MENU
CH
CH
TIMER
FSS
RETURN CLEAR
TV VOLUME
PLAY
STANDBY
1 2 3
4 5 6
7 8
0
9
I I
MONITOR
TV / DVD T / C PLAY MODE REC. MODE
SELECT OK
DISC SYSTEM
MENU
CH
CH
TIMER
FSS
RETURN CLEAR
TV VOLUME
PLAY
STOP
AUDIO PAUSE
REC/OTR
STANDBY
Repeat A-BYou also may set the DVD Recorder to play only a specific portion of aTitle, Chapter, or Track repeatedly. Follow these steps.
1 Press PLAY : to start Disc play.
2 When the Disc reaches the point at which you want repeat-ed play to begin, press PLAY MODE until “repeat-A”appears on the TV screen.
3 When the Disc reaches the point at which you want to endthe segment, press OK. “Repeat A-B” will appear on the TVscreen briefly.The segment will begin playing repeatedly.
4 To cancel Repeat A-B play, press STOP C.Or, press PLAY : to resume normal play. The Disc may startplay where you last stopped it, or play may start at the beginning ofthe Disc.
1,4
1-2
2
4
3

One-Touch Recording 41
1 Insert a recordable DVD+RW or DVD+R into the Recorder.
2 In the Index Picture Screen of a DVD+RW, press CH+8 orCH-9 to select an Empty Title (or empty Index Picture box) onthe Disc that has enough time for the recording. Or, select the placeat which you want to start the new recording in order to overwriteother recordings. See page 48.You may skip this step if you use Safe Record. See step 5.Or, if you are using a DVD+R, you may skip this step. Recordings ona DVD+R are made at the end of the Disc automatically. Previousrecordings are not overwritten.
3 Press MONITOR to see TV channels through the DVD Recorder.Make sure you have programmed channels. See page 26.
4 Press CH+8, CH-9, or the Number buttons to select thechannel you wish to record.If you are using a Cable Box/Satellite Receiver, enter channel 3 or 4(the output channel of your Cable Box/Satellite Receiver) or the EXTchannel (that corresponds to the jacks to which you connected theCable Box/Satellite Receiver). Set the channel you want to record atthe Cable Box/Satellite Receiver. Leave it on for the recording.
5 Press REC/OTR I twice to start a 30-minute recording.Press REC/OTR I repeatedly to record longer timedrecordings. The length of recording available depends on the cur-rent recording mode/speed and the amount of time available on theDisc. Recording mode/speed details are on page 49. Recording willbegin about 30 seconds after you press REC/OTR I. (The Disctakes this time to prepare for recording.)Or, use Safe Record to have the DVD Recorder automatically findthe empty space at the end of a DVD+RW; this prevents overwritingother recordings.To do so, press and hold REC/OTR I for abouttwo seconds, or until SAFE REC appears on the Recorder’s displaypanel.Then, press REC/OTR I repeatedly to choose the time lengthyou want for your recording.If you press REC/OTR I only once, or press and hold REC/OTR I
one time and immediately start Safe Record, the Recorder willrecord the current channel or source until the end of the Disc isreached.The Recorder will turn off automatically.
6 Press |STOP C if you need to stop the recording before thedesignated end time. Otherwise, the Recorder will automaticallystop recording at the designated end time and turn itself off.
1 2 3
4 5 6
7 8
0
9
I I
MONITOR
TV / DVD T / C PLAY MODE REC. MODE
SELECT OK
DISC SYSTEM
MENU
CH
CH
TIMER
FSS
RETURN CLEAR
TV VOLUME
PLAY
STOP
AUDIO PAUSE
REC/OTR
STANDBY
• “Disc locked” will appear on theTV if a protected DVD+RW orDVD+R is in the Recorder.Recording is not possible.
• If the power fails during recording,the Index Picture Screen may notmatch the actual video content onthe Disc.The last recorded Titlemay be lost.A power failure orunit failure/system crash also maydestroy all the material recordedon a Disc.
• If no free space remains on theDisc, DISC FULL will appear.Recording is not possible.
• Press SYSTEM MENU duringrecording to access or remove theStatus box,Tuner Information box,and/or Timer Information box. Seepages 31 and 33.
• The recommended operating tem-perature range for the Recorder isfrom 32°F-122°F (Fahrenheit) forDVD+RW recording and 32°F-104°F for DVD+R recording.Exceeding these ranges maycause unstable recording results.
Helpful Hints
● If you plan to play a DVD+R on another DVD Player, finalize the Disc.Follow the steps on page 52.
● To edit your recordings, see page 51. However, editing changes may not beaccessible when you play the Disc on other DVD Players.
● To erase a recording, see “Erase this title” details on page 47.
5
2,4
6
3
4
42 Timer Recording
1 2 3
4 5 6
7 8
0
9
I I
MONITOR
TV / DVD T / C PLAY MODE REC. MODE
SELECT OK
DISC SYSTEM
MENU
CH
CH
TIMER
FSS
RETURN CLEAR
TV VOLUME
PLAY
STOP
AUDIO PAUSE
REC/OTR
STANDBY1 Press TIMER.
2 Press CH-9 to select Timer Programming, then press :.
3 Date will be selected. Press CH+8 or CH-9 to enter the month anddate you want the recording to start.Press SELECT repeatedly to choose: the date (timer recording willoccur once on the day you choose); Mo-Fr (timer recording will occur everyweekday at the same time); or a day of the week (for example, Mo forMonday; timer recording will occur every Monday at the same time). Whenthe date is correct, press :.
4 Ch. (channel) will be selected. Press CH+8 or CH-9 to enter the chan-nel you want to record, then press :.If you are using a Cable Box/Satellite Receiver, enter channel 3 or 4 (the out-put channel of your Cable Box/Satellite Receiver) or the EXT channel (thatcorresponds to the jacks to which you connected the Cable Box/SatelliteReceiver). Set the channel you want to record at the Cable Box/SatelliteReceiver. Leave it on for the recording.
5 Start will be selected. Press CH+8 or CH-9 to enter the time atwhich you want recording to begin - in hours and minutes.Press SELECT repeatedly to choose AM or PM.When the Start time is correct, press :.
6 End will be selected. Press CH+8 or CH-9 to enter the time at whichyou want recording to stop. Press SELECT repeatedly to chooseAM or PM.When the End time is correct, press :.
7 Rec Mode (Record Mode) will be selected. Press CH+8 or CH-9 tochoose a recording speed: M1, M2, M2x, M3, M4, or M6.See page 49.
8 Check your timer information. If something is incorrect, press ; or : tochoose the incorrect data. Use CH+8 or CH-9 to enter the correct data.
9 When the information is correct, press OK. Stored will appear at thebottom of the screen, then the Timer menu will reappear.“Switch off; timerrecording” will be highlighted in red at the bottom of the screen.This is areminder to turn off the DVD Recorder so the recording can occur.
10Press TIMER to remove the menu.
11Put a recordable DVD+RW or DVD+R in the Recorder. PressSTANDBY yy to turn off the Recorder. For the timer recording, theRecorder will turn itself on, record, then turn itself off when finished.A redlight will encircle the Record I button on the Recorder during recording.If you plan to play a DVD+R on another DVD Player, finalize the Disc. Follow thesteps on page 52.
• You can enter the Date, Channel,Start, and End information withthe Number buttons. Enter chan-nel numbers as a three-digitnumber. For example, for channel15, press 0,1,5.
• Press STANDBY y on theremote to turn off the Recorderand stop a timer recording that isin progress.
• You cannot select TimerProgramming if six recordings areset. Delete a recording, then set anew one. See page 44.
• Set a Timer recording and turnoff the Recorder five minutesbefore the recording will start.
• Set the timer recording oneminute ahead of the program’sstart time.This helps ensure theentire program is recorded.TheDisc needs about 30 seconds toprepare for recording.
• You cannot change channels dur-ing recording.
• To edit your recordings, see page51. Editing changes may not beaccessible when you play theDisc on other Players.
• TIMER will appear on the displaypanel if a Timer Recording is set.
Helpful Hints
Timer
K VCR Plus+ systemuB Timer Programming B
L Timer List
To exitPress TIMER
Timer Timer Programming
RecDate Ch. Start End Mode10/24 122 09:00AM 09:30AM M1
Mo-Fr/Weekly To storePress SELECT Press OK
Timer Timer Programming
RecDate Ch. Start End ModeMo-Fr 122 09:00AM 09:30AM M1
Mo-Fr/Weekly To storePress SELECT Press OK
Timer Timer Programming
RecDate Ch. Start End ModeTh 122 09:00AM 09:30AM M1
Mo-Fr/Weekly To storePress SELECT Press OK
Press SELECT once. Recording will happen onetime on the day you chose.
Press SELECT again.Recording will happen every day,Monday-Friday, starting on the day you chose.
Press SELECT again.Recording will happen on the sameday every week, starting the day you chose.
2-9
11
1,10

VCR Plus+® Timer Recording 43
A PlusCode® number is a number of up to eight digits, printed in most TVguides next to the start time of a TV program.You can program a timerrecording quickly by entering the code for your program.Before you begin, complete the VCR Plus+® channel setup. See page 27.
1 Press TIMER on the remote control.
2 Press CH+8 to select VCR Plus+ system, then press :.
3 Press the Number buttons to enter the PlusCode numberfrom your TV guide, then press OK. If you make a mistake,press CLEAR to erase the PlusCode number, then enter it again.Information about the timer will appear. If information is missing ornot available, you may be asked to enter more information. Followthe instructions on the screen.You may be asked to enter a channelnumber if you have not set up VCR Plus+ channels. See page 27.
4 If the timer recording information seems correct and com-plete, press OK. Stored will appear at the bottom of the screenbriefly.The Timer menu will reappear.
5 Press TIMER to remove the menu.
6 Put a recordable DVD+RW or DVD+R in the Recorder.Press STANDBY yy to turn off the Recorder at least fiveminutes before the timer recording is set to begin. TheRecorder must be off in order for the timer recording to occur.If you plan to play a DVD+R on another DVD Player, finalize the Disc.See page 52.To edit your recordings, see page 51. However, editing changes may not beaccessible when you play the Disc on other DVD Players.
1 2 3
4 5 6
7 8
0
9
I I
MONITOR
TV / DVD T / C PLAY MODE REC. MODE
SELECT OK
DISC SYSTEM
MENU
CH
CH
TIMER
FSS
RETURN CLEAR
TV VOLUME
PLAY
STOP
AUDIO PAUSE
REC/OTR
STANDBY
Timer
K
uB VCR Plus+ system B
L Timer ProgrammingTimer List
To exitPress TIMER
Timer VCR Plus+ system
PlusCode number
- - - - - - - -
Mo-Fr/Weekly To storePress SELECT Press OK
Timer VCR Plus+ system
RecDate Ch. Start End Mode10/24 122 09:00AM 09:30AM M1
AM/PM To storePress SELECT Press OK
6
2-41,5
3

44 Erasing Timer Recordings
1 Press TIMER.
2 Press CH-9 to choose Timer list, then press :.
3 Press CH+8 or CH-9 to highlight the timer recording youwant to erase.
4 Press CLEAR.The recording you selected will appear alone on thescreen beneath “Clear Timer.”
5 Press OK to erase the timer recording. “Timer Cleared” willappear at the bottom of the screen briefly, then the Timer List willreappear. (If you decide not to erase the timer recording, press theTIMER button.The Timer List will reappear.)
6 Press TIMER repeatedly to remove the menus.
1 2 3
4 5 6
7 8
0
9
I I
MONITOR
TV / DVD T / C PLAY MODE REC. MODE
SELECT OK
DISC SYSTEM
MENU
CH
CH
TIMER
FSS
RETURN CLEAR
TV VOLUME
PLAY
STOP
AUDIO PAUSE
REC/OTR
STANDBY
2,3,5
41,6
• Press STANDBY yy on theremote to turn off theRecorder and stop a timerrecording that is inprogress.
Helpful Hint
Error Messages 45These messages may appear while or after you set a timer recording.
CollisionThe timer recording overlaps with another timer recording.Timer record-ings that overlap or conflict with another will appear in a red highlight inthe Timer List.• To ignore the message, press TIMER repeatedly to remove all the
menus.The program with the earlier start time will record completely,then the remainder of the later program will record.
• Change one or both timer recordings. See page 42.• Delete one of the timer recordings. See page 44.
Please enter channel numberThe VCR Plus+programming system does not recognize the TV channel.• Use the Number buttons to enter the required VCR Plus+ channel
number, then press OK. See page 27.
PlusCode number wrongYou entered an incorrect PlusCode number.• Enter the correct information or press TIMER repeatedly to quit.
Weekend programming not possibleYou entered an incorrect date or chose a daily (Mo-Fr) recording.You canonly use daily programming for recordings that will occur Monday,Tuesday,Wednesday,Thursday, or Friday.
Clock not setYou cannot access the Timer menu if the clock is not set. See pages 28-29to set the clock.This message also may appear if you turn on the Recorder while the PBSchannel is downloading the time.Turn off the Recorder for a few minutesto let the download finish.
Data errorMake sure all information for the timer recording is correct and complete.
Insert recordable discThere is not a DVD+R or DVD+RW in the Recorder. Put a recordableDVD+R or DVD+RW in the disc tray before turning off the Recorder forthe timer recording.
Memory fullThere are six Timer recordings set.You cannot set more than six at a time.
Disc lockedA protected DVD+RW or DVD+R is in the Recorder. Recording is notpossible on the current Disc. You may be able to change Protection to“Unprotected.” See page 50.
• You cannot duplicate copyright-ed DVDs, videotapes, or TVbroadcasts using the DVDRecorder. “COPY PROTECT” willappear on the display if you tryto dub or record copyrightedmaterial onto a DVD+R orDVD+RW using the Recorder.
Helpful Hint

46 Record One Channel/Watch Another
1 Press REC/OTR I to record the current TV channel. A redlight will encircle the Record I button on the front of the Recorderto indicate recording is in progress. See page 21.
2 Press TV/DVD on the remote to put the Recorder in TVposition. TV will appear briefly on the Recorder’s display panel.
3 Use the TV remote control to select the channel you wantto watch at the TV. (If you have a Philips TV, you may be able tohold down the DVD/TV button on the side of the remote and usethe CH+8 and CH-9 buttons to change channels at the TV. Seepage 23.)
4 To return to the recording, use the TV remote control toreselect the TV channel at which you usually view the DVDRecorder. This may be a Video In channel or channel 3 or 4,depending on how you connected the DVD Recorder to the TV.The channel being recorded will appear on the TV screen.
5 Press TV/DVD on the Recorder’s remote control to returnthe Recorder to DVD position. DVD will appear briefly on theRecorder’s display panel.
6 To stop recording, press the STOP C button.
1 2 3
4 5 6
7 8
0
9
I I
MONITOR
TV / DVD T / C PLAY MODE REC. MODE
SELECT OK
DISC SYSTEM
MENU
CH
CH
TIMER
FSS
RETURN CLEAR
TV VOLUME
PLAY
STOP
AUDIO PAUSE
REC/OTR
STANDBY
1
6
2,5
Select the channel youwant to watch at the TV.3Reselect the Video Inchannel at the TV.4
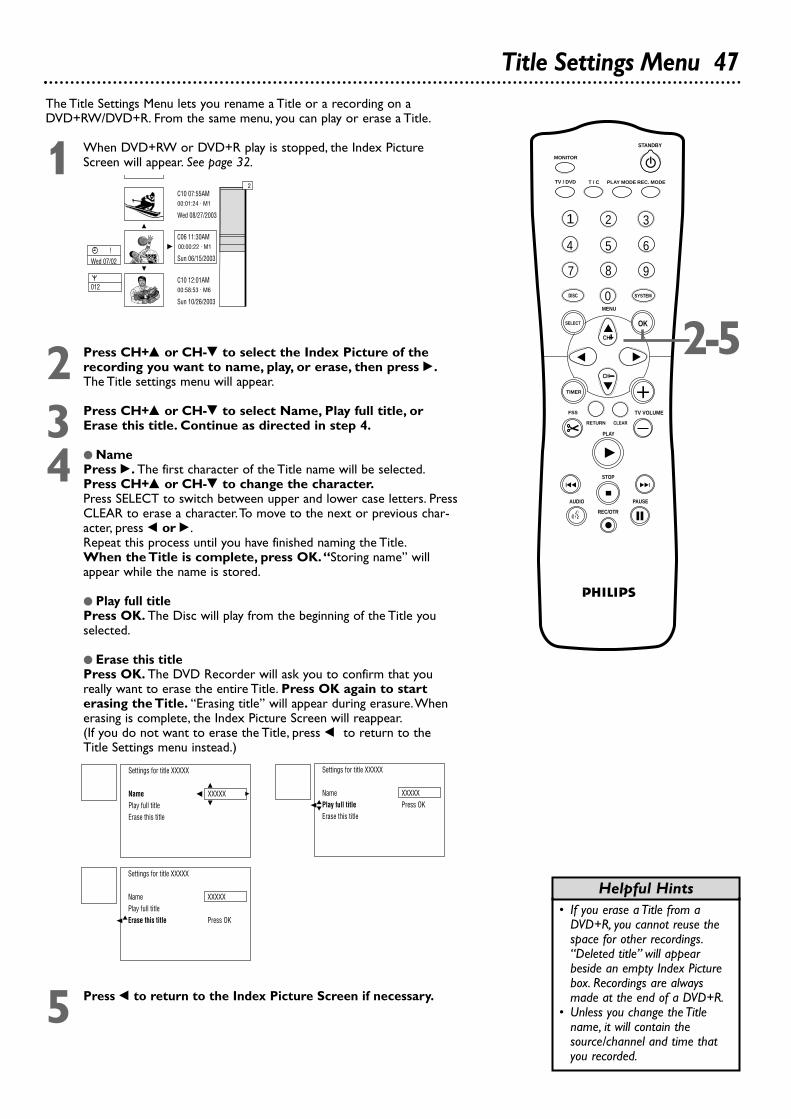
The Title Settings Menu lets you rename a Title or a recording on aDVD+RW/DVD+R. From the same menu, you can play or erase a Title.
1 When DVD+RW or DVD+R play is stopped, the Index PictureScreen will appear. See page 32.
2 Press CH+8 or CH-9 to select the Index Picture of therecording you want to name, play, or erase, then press :.The Title settings menu will appear.
3 Press CH+8 or CH-9 to select Name, Play full title, orErase this title. Continue as directed in step 4.
4 ● NamePress :. The first character of the Title name will be selected.Press CH+8 or CH-9 to change the character.Press SELECT to switch between upper and lower case letters. PressCLEAR to erase a character.To move to the next or previous char-acter, press ; or :.Repeat this process until you have finished naming the Title.When the Title is complete, press OK.“Storing name” willappear while the name is stored.
● Play full titlePress OK. The Disc will play from the beginning of the Title youselected.
● Erase this titlePress OK. The DVD Recorder will ask you to confirm that youreally want to erase the entire Title. Press OK again to starterasing the Title. “Erasing title” will appear during erasure.Whenerasing is complete, the Index Picture Screen will reappear.(If you do not want to erase the Title, press ; to return to theTitle Settings menu instead.)
5 Press ; to return to the Index Picture Screen if necessary.
1 2 3
4 5 6
7 8
0
9
I I
MONITOR
TV / DVD T / C PLAY MODE REC. MODE
SELECT OK
DISC SYSTEM
MENU
CH
CH
TIMER
FSS
RETURN CLEAR
TV VOLUME
PLAY
STOP
AUDIO PAUSE
REC/OTR
STANDBY
Title Settings Menu 47
X !Wed 07/02
L
C10 07:55AM00:01:24 . M1
Wed 08/27/2003
C06 11:30AMB 0100:00:22 . M1
Sun 06/15/2003
C10 12:01AM00:58:53 . M6
Sun 10/26/2003
K
2
¡012
Settings for title XXXXX
Name XXXXXPlay full title
sKErase this title Press OK
Settings for title XXXXX
Name s
K
L
XXXXX B
Play full titleErase this title
Settings for title XXXXX
Name XXXXXs
K
LPlay full title Press OKErase this title
• If you erase a Title from aDVD+R, you cannot reuse thespace for other recordings.“Deleted title” will appearbeside an empty Index Picturebox. Recordings are alwaysmade at the end of a DVD+R.
• Unless you change the Titlename, it will contain thesource/channel and time thatyou recorded.
Helpful Hints
2-5
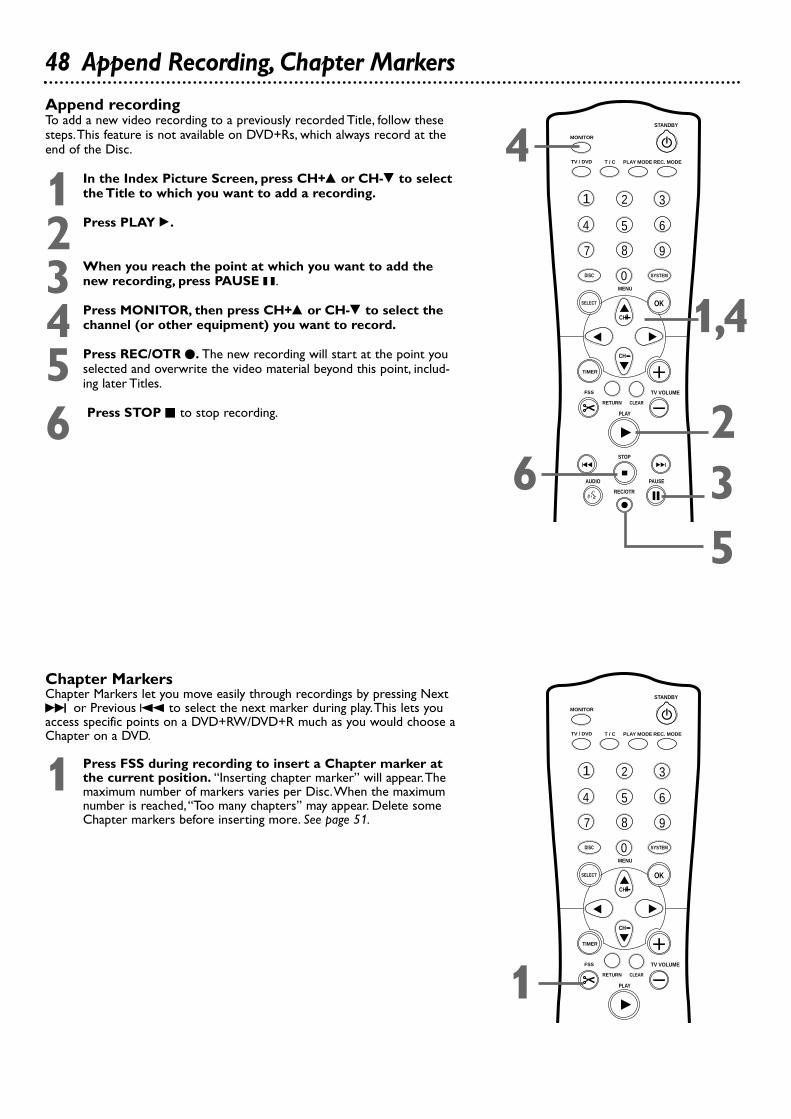
48 Append Recording, Chapter Markers
Append recordingTo add a new video recording to a previously recorded Title, follow thesesteps.This feature is not available on DVD+Rs, which always record at theend of the Disc.
1 In the Index Picture Screen, press CH+8 or CH-9 to selectthe Title to which you want to add a recording.
2 Press PLAY :.
3 When you reach the point at which you want to add thenew recording, press PAUSE k.
4 Press MONITOR, then press CH+8 or CH-9 to select thechannel (or other equipment) you want to record.
5 Press REC/OTR I. The new recording will start at the point youselected and overwrite the video material beyond this point, includ-ing later Titles.
6 Press STOP C to stop recording.
1 2 3
4 5 6
7 8
0
9
I I
MONITOR
TV / DVD T / C PLAY MODE REC. MODE
SELECT OK
DISC SYSTEM
MENU
CH
CH
TIMER
FSS
RETURN CLEAR
TV VOLUME
PLAY
STOP
AUDIO PAUSE
REC/OTR
STANDBY
5
4
236
1,4
Chapter MarkersChapter Markers let you move easily through recordings by pressing NextG or Previous j to select the next marker during play.This lets youaccess specific points on a DVD+RW/DVD+R much as you would choose aChapter on a DVD.
1 Press FSS during recording to insert a Chapter marker atthe current position. “Inserting chapter marker” will appear.Themaximum number of markers varies per Disc.When the maximumnumber is reached,“Too many chapters” may appear. Delete someChapter markers before inserting more. See page 51.
1 2 3
4 5 6
7 8
0
9
MONITOR
TV / DVD T / C PLAY MODE REC. MODE
SELECT OK
DISC SYSTEM
MENU
CH
CH
TIMER
FSS
RETURN CLEAR
TV VOLUME
PLAY
STANDBY
1
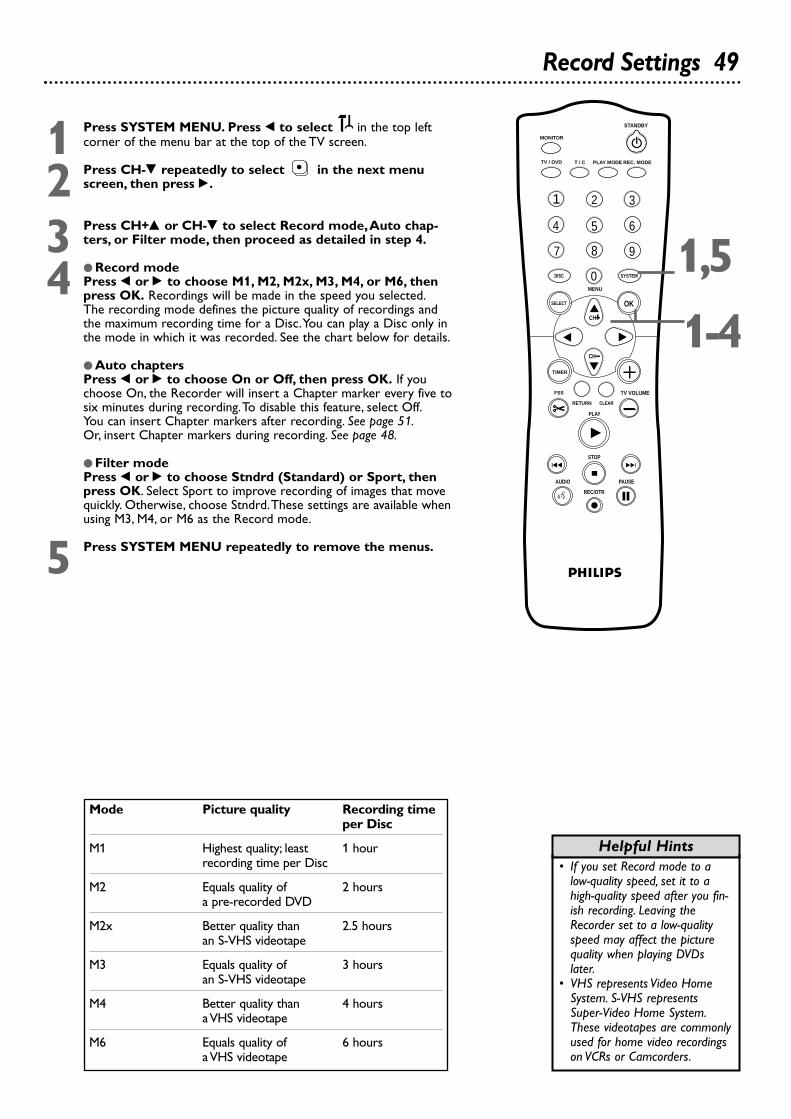
Record Settings 49
1 Press SYSTEM MENU. Press ; to select in the top leftcorner of the menu bar at the top of the TV screen.
2 Press CH-9 repeatedly to select in the next menuscreen, then press :.
3 Press CH+8 or CH-9 to select Record mode,Auto chap-ters, or Filter mode, then proceed as detailed in step 4.
4 ● Record modePress ; or : to choose M1, M2, M2x, M3, M4, or M6, thenpress OK. Recordings will be made in the speed you selected.The recording mode defines the picture quality of recordings andthe maximum recording time for a Disc.You can play a Disc only inthe mode in which it was recorded. See the chart below for details.
● Auto chaptersPress ; or : to choose On or Off, then press OK. If youchoose On, the Recorder will insert a Chapter marker every five tosix minutes during recording.To disable this feature, select Off.You can insert Chapter markers after recording. See page 51.Or, insert Chapter markers during recording. See page 48.
● Filter modePress ; or : to choose Stndrd (Standard) or Sport, thenpress OK. Select Sport to improve recording of images that movequickly. Otherwise, choose Stndrd.These settings are available whenusing M3, M4, or M6 as the Record mode.
5 Press SYSTEM MENU repeatedly to remove the menus.
1 2 3
4 5 6
7 8
0
9
I I
MONITOR
TV / DVD T / C PLAY MODE REC. MODE
SELECT OK
DISC SYSTEM
MENU
CH
CH
TIMER
FSS
RETURN CLEAR
TV VOLUME
PLAY
STOP
AUDIO PAUSE
REC/OTR
STANDBY
Mode Picture quality Recording time per Disc
M1 Highest quality; least 1 hourrecording time per Disc
M2 Equals quality of 2 hoursa pre-recorded DVD
M2x Better quality than 2.5 hoursan S-VHS videotape
M3 Equals quality of 3 hoursan S-VHS videotape
M4 Better quality than 4 hoursa VHS videotape
M6 Equals quality of 6 hoursa VHS videotape
• If you set Record mode to alow-quality speed, set it to ahigh-quality speed after you fin-ish recording. Leaving theRecorder set to a low-qualityspeed may affect the picturequality when playing DVDslater.
• VHS represents Video HomeSystem. S-VHS representsSuper-Video Home System.These videotapes are commonlyused for home video recordingson VCRs or Camcorders.
Helpful Hints
1,5
1-4

50 Editing: Disc Information ScreenYou can change Disc settings for a DVD+RW/DVD+R from the DiscInformation Screen.
1 When in the Index Picture Screen, press STOP C to selectthe first Title on the DVD+RW/DVD+R.
2 Press CH+8 to enter the Disc Information Screen.
3 In the Disc Information Screen, press : to enter theSettings menu.
4 Press CH+8 or CH-9 to select Disc name, Protection,Erase disc (DVD+RW only), Make edits compatible(DVD+RW only), or Finalize disc (DVD+R only). Proceed asfollows, depending on which feature you want to adjust.
● Disc name (DVD+RW and DVD+R)Press :. Press ; or : to choose the character position,then press CH+8 or CH-9 to enter a character. PressSELECT to alternate between capital and lower case characters.Press CLEAR to erase a character (the space will remain). Repeatthis process until you enter the complete name. To save thename, press OK. “Storing name” will appear briefly.
● Protection (DVD+RW and DVD+R)Press :. Press CH+8 or CH-9 to select Protected orUnprotected, then press OK. If you protect the Disc, you cannotmake any further changes to the Disc, including recording.“Disclocked” will appear on the TV screen briefly if you attempt record-ing. Choosing Protected also disables most editing features.To edit or record again, select Unprotected.Remember, protecting a DVD+R is not the same as finalizing it.Finalization cannot be undone.
● Erase disc (DVD+RW only)Press OK. “This will erase all titles Press OK to confirm” willappear. Press OK again to begin erasing. (If you decide not toerase the Disc, press ;.) “Erasing disc” appears until erasing is com-plete.When the Disc is erased, the Index Picture Screen will reap-pear, showing the free space on the Disc.
● Make edits compatible (DVD+RW only)Press OK. “This will take XX” and “Press OK to confirm” willappear to indicate how long the action will take.Press OK again. “Working ..” and a progress percentage bar willappear until the action is complete.The Index Picture Screen willreappear when the process is complete.
● Finalize Disc (DVD+R only, if not finalized already)Press OK. “Finalizing disc” will appear until finalization is complete.This may take a few minutes.Then, the Index Picture Screen willreappear. You cannot unfinalize a DVD+R, and you cannotrecord or edit the DVD+R after you finalize it.A DVD+R will play on other DVD Players only after the Disc isfinalized.
5 If necessary, press ; when you are finished and want to returnto the Disc Information Screen.
1 2 3
4 5 6
7 8
0
9
I I
MONITOR
TV / DVD T / C PLAY MODE REC. MODE
SELECT OK
DISC SYSTEM
MENU
CH
CH
TIMER
FSS
RETURN CLEAR
TV VOLUME
PLAY
STOP
AUDIO PAUSE
REC/OTR
STANDBY
• For information on the IndexPicture Screen, see page 32.
• Make edits compatible appearswhen the current DVD+RW isnot compatible with other DVDPlayers because you have addedChapter Markers or madeChapters invisible. See page 51.
• If a DVD+R was recorded on adifferent DVD Recorder, the set-tings may not be accessible.
• A disc name may contain amaximum of 64 characters.
Helpful Hints
Settings for XXXXXX
sL 01Disc name B sample
Protection Unprotected
Erase disc
Make edits compatible
DVD+RW example
1
2-5

Editing 51
1 2 3
4 5 6
7 8
0
9
I I
MONITOR
TV / DVD T / C PLAY MODE REC. MODE
SELECT OK
DISC SYSTEM
MENU
CH
CH
TIMER
FSS
RETURN CLEAR
TV VOLUME
PLAY
STOP
AUDIO PAUSE
REC/OTR
STANDBY
• The maximum number ofChapters per Title varies.Whenyou reach the maximum num-ber, “Too many chapters” mayappear on the screen. DeleteChapters before making more.
• You cannot undo a Title division.The Index Picture Screen willshow two Titles instead of one.
• Editing changes on DVD+Rs willbe accessible only when playingthe DVD+R on this DVDRecorder.You cannot edit aDVD+R after it is finalized.
• Insert chapter markers duringrecording by pressing FSS.See page 48.
Helpful Hints
Although all editing changes may not be accessible when you play the Disc onother DVD Players, these editing changes are available for the DVD Recorder.
1 During DVD+RW or DVD+R play, press FSS. The FavoriteScene Selection menu will appear as play continues.The current Titleand Chapter numbers will appear at the top of the screen.
2 Press CH+8 or CH-9 to select Insert chapter marker,Current chapter, Delete chapter marker, Delete all mark-ers, New index picture, or Divide title (DVD+RW only), thenproceed as described in step 3.
3 ● If you select Insert chapter marker, press OK. “Insertingchapter marker” will appear. This places a Chapter marker at thepoint you select. Then, during play, press Next G or Previousj to select the next Chapter.
● If you select Current chapter, press : (or SELECT) repeat-edly to select Visible or Hidden. Initially all Chapters are visible,but you can determine which chapters you want to view. For exam-ple, if you do not want to watch certain scenes (for example, com-mercials), insert Chapter markers at the beginning and end of thescene, then hide that segment by choosing Hidden.The picture mayfreeze briefly between scenes during playback, but you will not seethe hidden content.
● If you select Delete chapter marker, press OK. “Deletingmarker ...” will appear.This deletes the Chapter marker at the begin-ning of the current Chapter. (This option is not always available.)
● If you select Delete all markers, press OK. “This will deleteall markers in this title. Press OK to confirm” will appear. Press OKagain. (If you decide not to delete all markers, press ;.) (This option is not always available.)
● If you select New Index Picture, press PAUSE F tochoose a frame of picture during play. This frame will becomethe miniature picture that will appear in the Index Picture Screen forthe current Title.Press OK. “This will update the index picture Press OK to confirm”will appear. Press OK again. (If you decide not to select a newIndex Picture, press ;.) “Updating menu” will appear, then the IndexPicture Screen will reappear when the action is complete.
● If you select Divide title (DVD+RW only), press PAUSE F
during play to choose the point at which you want to startthe new Title. Press OK. “This will divide this title into two sepa-rate titles. Press OK to confirm” will appear. Press OK again. (Ifyou decide not to divide the Title, press ;.) “Dividing title” appearsin the menu until the action is complete; the Index Picture Screenwill reappear.
4 Press FSS to remove the Favorite Scene Selection menu.
Favorite Scene Selection
01Insert chapter markerK
L Current chapter B Hidden
Delete chapter marker
Delete all markers
New index picture
Divide title
Press FSS to exit
W X
1 2
L B
RW play0:01:240:00:22
1,4
2-3
3

52 Finalize Disc
1 2 3
4 5 6
7 8
0
9
I I
MONITOR
TV / DVD T / C PLAY MODE REC. MODE
SELECT OK
DISC SYSTEM
MENU
CH
CH
TIMER
FSS
RETURN CLEAR
TV VOLUME
PLAY
STOP
AUDIO PAUSE
REC/OTR
STANDBY
You can record and finalize DVD+Rs one time. After you fill a DVD+R orcomplete all the recordings you want on a single DVD+R, finalize it.Otherwise, the DVD+R will play only on this Recorder.To play the Disc onother DVD Players, you must finalize it first.Once you finalize a DVD+R, you cannot record on it anymore or makeediting changes.Therefore, make sure the Disc is as you want it before youfinalize it.
1 Press SYSTEM MENU. Press ; to select in the top leftcorner of the menu bar at the top of the TV screen.
2 Press CH-9 repeatedly to select in the second screen,then press :.
3 Press CH-9 repeatedly to select Finalize disc. Finalize discappears in the menu only when an unfinalized DVD+R is in theRecorder.
4 Press OK. “Finalizing” will appear in the menu.The process maytake a few minutes. When finalization is complete, the Indexpicture screen will reappear.You cannot unfinalize a DVD+R, and you cannot record oredit the DVD+R after you finalize it.A DVD+R will play on other DVD Players only after theDisc is finalized.
12-4
W X Y Z a
1 2 1en off no off~
Disc FeaturesAccess control Enter code ... Auto resume OnFinalize disc Press OK
L
s

Auto Resume, Playback Control 53
1 2 3
4 5 6
7 8
0
9
I I
MONITOR
TV / DVD T / C PLAY MODE REC. MODE
SELECT OK
DISC SYSTEM
MENU
CH
CH
TIMER
FSS
RETURN CLEAR
TV VOLUME
PLAY
STOP
AUDIO PAUSE
REC/OTR
STANDBY
Auto resume affects the last 20 prerecorded DVDs and Video CDs youplayed. When Auto resume is On, play resumes where you last stopped theDisc. If Auto resume is Off, play starts at the beginning of the Disc.
1 Press SYSTEM MENU. Press ; to select in the top leftcorner of the menu bar at the top of the TV screen.
2 Press CH-9 repeatedly to select in the second screen,then press :.
3 Press CH-9 to select Auto resume, then press :.
4 Press CH+8 or CH-9 to select On or Off, then press OK.
5 Press SYSTEM MENU to remove the menus.
W X Y Z a
1 2 1en off no off~
Disc FeaturesAccess Control Auto resume s On L
Off
1,52-4
Playback ControlSome Video CDs have interactive menus that customize play. If the VideoCD has Playback Control (PBC), follow these steps to turn it on or off.
1 Press SYSTEM MENU. Press ; to select in the top leftcorner of the Menu Bar at the top of the TV screen.
2 Press CH-9 repeatedly to select in the second screen,then press :.
3 Press CH-9 repeatedly to select PBC, then press :. Itappears in the menu only when a Video CD with Playback Control isin the Recorder.
4 Press CH+8 or CH-9 to select On or Off, then press OK.
5 Press SYSTEM MENU to remove the menus.
W X Y Z a
1 2 1en off no off~
Disc FeaturesAccess control Auto resumePBC On
Off
s L
1 2 3
4 5 6
7 8
0
9
MONITOR
TV / DVD T / C PLAY MODE REC. MODE
SELECT OK
DISC SYSTEM
MENU
CH
CH
TIMER
FSS
RETURN CLEAR
TV VOLUME
PLAY
STANDBY
1,52-4
• If resume appears when youstart play, press PLAY :.Thislets you resume play from thelast played point, even if Autoresume is Off. See page 20.
• The display panel will be blankduring play of a Video CD withPBC On.
Helpful Hints

54 Access ControlAccess Control limits viewing of Discs that exceed the limits you set.This fea-ture will not limit viewing if the Disc manufacturer did not code the Disc.Philips cannot guarantee the availability of Access Control with all Discs, andtherefore denies any liability associated with unintended watching of Discs.Make sure your Discs play according to your Access Control settings beforeyou allow children access to the DVD Recorder.
Change Code
1 Press SYSTEM MENU. Press ; to select in the top leftcorner of the menu bar at the top of the TV screen.
2 Press CH-9 repeatedly to select on the second screen,then press :. Access control will be selected.
3 Press : again, then press the Number buttons to enter yourold four-digit code. When doing this the first time, enter any fournumbers you prefer.You will have to enter the same code, exactly,twice.This will set your code for the first time.
4 Press CH-9 repeatedly to select Change code, then press :.
5 Press four Number buttons to enter the new four-digit code.Then, enter it again - exactly - to confirm it. The Access controlmenu will reappear.
6 Press SYSTEM MENU to remove the menu.
1 2 3
4 5 6
7 8
0
9
I I
MONITOR
TV / DVD T / C PLAY MODE REC. MODE
SELECT OK
DISC SYSTEM
MENU
CH
CH
TIMER
FSS
RETURN CLEAR
TV VOLUME
PLAY
STOP
AUDIO PAUSE
REC/OTR
STANDBY
W X Y Z a
1 2 1en off no off~
Access control [ ] [ ] [ ] [ ] Auto resume Enter codeFinalize disc
s
W X Y Z a
1 2 1en off no off~
Access control [ ] [ ] [ ] [ ] Auto resume Enter codeFinalize disc
s
• The code may not go into effectuntil you activate Child Lock.(You may have to keep confirm-ing the code.) See page 55 toactivate Child Lock.
• Finalize disc will appear in thismenu only when a non-finalizedDVD+R is in the Recorder. Seepage 52.
Helpful Hints
1-41,6
3,5
W X Y Z a
1 2 1en off no off
s Child lock [ ]Access control Parental level [ ]Auto resume Change country [ ]Finalize disc Change code K
B [ ]
~
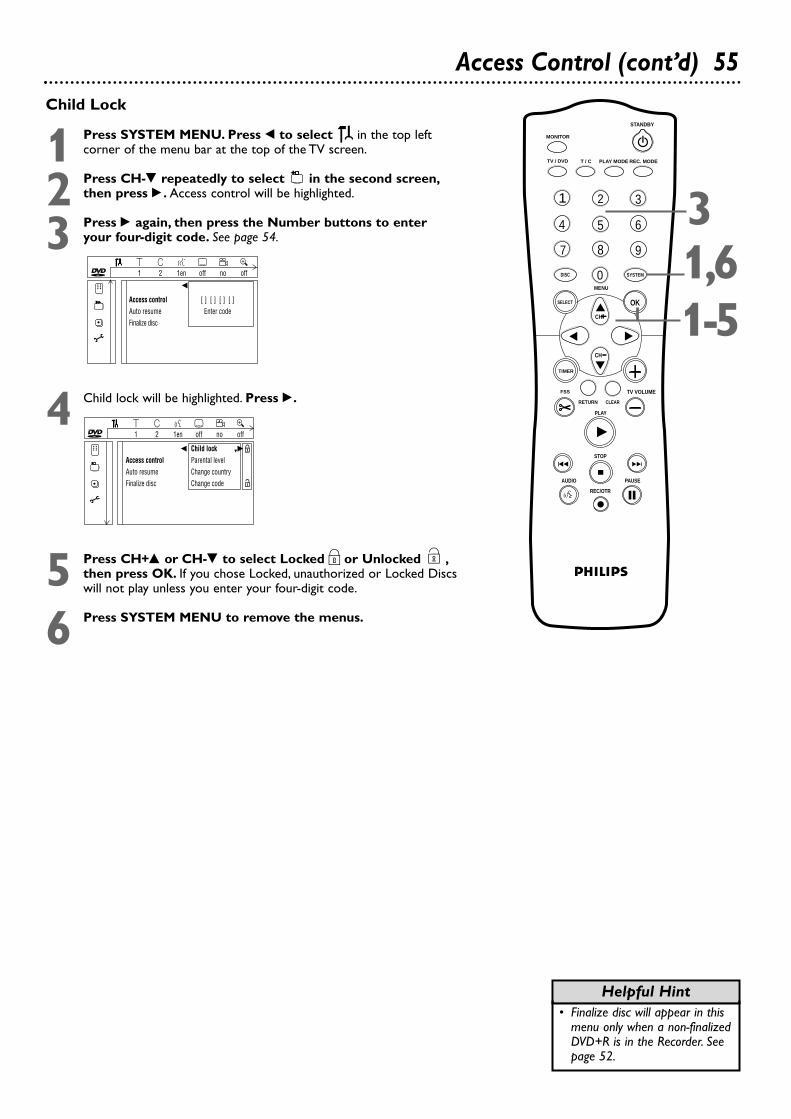
Access Control (cont’d) 55
Child Lock
1 Press SYSTEM MENU. Press ; to select in the top leftcorner of the menu bar at the top of the TV screen.
2 Press CH-9 repeatedly to select in the second screen,then press :. Access control will be highlighted.
3 Press : again, then press the Number buttons to enteryour four-digit code. See page 54.
4 Child lock will be highlighted. Press :.
5 Press CH+8 or CH-9 to select Locked Ç or Unlocked ,then press OK. If you chose Locked, unauthorized or Locked Discswill not play unless you enter your four-digit code.
6 Press SYSTEM MENU to remove the menus.
1 2 3
4 5 6
7 8
0
9
I I
MONITOR
TV / DVD T / C PLAY MODE REC. MODE
SELECT OK
DISC SYSTEM
MENU
CH
CH
TIMER
FSS
RETURN CLEAR
TV VOLUME
PLAY
STOP
AUDIO PAUSE
REC/OTR
STANDBY
W X Y Z a
1 2 1en off no off
s Child lock L B@
Access control Parental levelAuto resume Change countryFinalize disc Change code @
~
1,61-5
3W X Y Z a
1 2 1en off no off~
Access control [ ] [ ] [ ] [ ] Auto resume Enter codeFinalize disc
s
• Finalize disc will appear in thismenu only when a non-finalizedDVD+R is in the Recorder. Seepage 52.
Helpful Hint

56 Access Control (cont’d)
• The Access Control screen willappear when you try to play aLocked Disc. If you do not knowyour code, press STOP çC.Then,select Access Control asdescribed in steps 1-3 on page54. When you are asked toenter the code, press STOP C
four times. Press SYSTEMMENU, then press PLAY : tostart playback.This restores allthe Access Control settings totheir original factory settings.
• Two-sided DVDs may have a dif-ferent ID for each side.To unlockthe entire Disc, unlock each side.
• Multi-volume Disc sets may havea different ID for each volume.Unlock each volume.
Helpful Hints
1
Locking or Unlocking Specific DiscsNot all Discs are rated or coded by Parental levels.You may choose tospecifically lock or unlock a Disc by choosing Play once or Play always.Thisway, you can disable viewing regardless of the rating of a DVD. You willneed to know your 4-digit code in order to view the Disc.
1 Insert a Disc. The Access Control message will appear on the TVscreen. (Child Lock should be Locked. See page 55.)
2 Press CH+8 or CH-9 to select Play once or Play always.Then, press the Number buttons to enter your four-digitcode.If you select Play Once, the Disc will play one time. If you stop play-back, open the Disc tray, or turn off the Recorder’s power, theAccess Control screen will reappear when you try to play the Discagain.If you select Play Always, the Disc will play even if you turn off theDVD Recorder, open the disc tray, or set Child Lock to Ç (Locked).See page 55.
3 If you later decide to lock the Disc so it will not play always:When you insert the Disc, safe {{ appears on the TV screen. PressSTOP C while safe {{ is on the TV screen. Locked || willappear. If the Disc continues playing, press STOP C again to stopplayback.You may need to turn off the DVD Recorder or removethe Disc before the Disc is completely Locked.The next time youturn on the DVD Recorder or try to play the Disc, the AccessControl screen will appear.The Disc will not play unless you enterthe four-digit code.
Insert a Disc.
1 2 3
4 5 6
7 8
0
9
I I
MONITOR
TV / DVD T / C PLAY MODE REC. MODE
SELECT OK
DISC SYSTEM
MENU
CH
CH
TIMER
FSS
RETURN CLEAR
TV VOLUME
PLAY
STOP
AUDIO PAUSE
REC/OTR
STANDBY
locked Access Control|
p Play once [ ] [ ] [ ] [ ]
Play always [ ] [ ] [ ] [ ]
Choose 'Play always' to insert the disc in
the child-safe list
3
2

Access Control (cont’d) 57
Parental LevelDVDs may contain alternative scenes that conform to the Parental Level, ormovie rating, that you select.The Parental Level may apply to the complete Discor to certain scenes on the Disc.These scenes are rated from 1 to 8. Follow thesteps below to set the Parental Level at which you want Discs to play.
1 Press SYSTEM MENU. Press ; to select in the top leftcorner of the menu bar at the top of the TV screen.
2 Press CH-9 repeatedly to select in the second screen,then press :. Access control will be highlighted.
3 Press : again, then press the Number buttons to enteryour four-digit code.
4 Press CH-9 to select Parental level, then press :.
5 Press CH+8 or CH-9 or the Number buttons to select arating, then press OK.Select “0” (– –) to deactivate Parental level.The entire Disc will play.Choose a rating between 1-8, and scenes with the same rating orlower will play. Higher rated scenes will not play unless an alterna-tive scene is available on the Disc.The alternative must have thesame rating or a lower one. If no suitable alternative is found, playwill stop. Enter the four-digit code to play the Disc.
6 Press SYSTEM MENU to remove the menus.
W X Y Z a
1 2 1en off no off
Child lock 2Access control Parental levelAuto resume Change countryFinalize disc Change code s L
K
~
• The rating numbers compare tostandard U.S. movie ratings as fol-lows:7 - NC-176 - R4 - PG-133 - PG1 - G
• Finalize disc will appear in thismenu only when a non-finalizedDVD+R is in the Recorder. Seepage 52.
Helpful Hints
1 2 3
4 5 6
7 8
0
9
I I
MONITOR
TV / DVD T / C PLAY MODE REC. MODE
SELECT OK
DISC SYSTEM
MENU
CH
CH
TIMER
FSS
RETURN CLEAR
TV VOLUME
PLAY
STOP
AUDIO PAUSE
REC/OTR
STANDBY
W X Y Z a
1 2 1en off no off~
Access control [ ] [ ] [ ] [ ] Auto resume Enter codeFinalize disc
s
1,61-5
3,5

58 Access Control (cont'd)
Change CountryIf a Disc has Parental Level coding, the codings are applicable only for thecountry specified on the Disc.The Disc manufacturer sets these codings.For example, a Disc may be coded at Level 3 for the United States.So, for some Discs, you may need to choose the Country for which theDisc is coded in order for the Disc to play at the Parental Level you select.See page 57. Also refer to your Disc case for more information.
1 Press SYSTEM MENU. Press ; to select in the top leftcorner of the menu bar at the top of the TV screen.
2 Press CH-9 repeatedly to select in the second screen,then press :. Access control will be highlighted.
3 Press : again, then press the Number buttons to enteryour four-digit code. Child lock will be highlighted.
4 Press CH-9repeatedly to select Change country. Press :.
5 Press CH+8 or CH-9to select the country for which theDisc is coded, then press OK.
6 Press SYSTEM MENU to remove the menus.
1 2 3
4 5 6
7 8
0
9
I I
MONITOR
TV / DVD T / C PLAY MODE REC. MODE
SELECT OK
DISC SYSTEM
MENU
CH
CH
TIMER
FSS
RETURN CLEAR
TV VOLUME
PLAY
STOP
AUDIO PAUSE
REC/OTR
STANDBY
W X Y Z a
1 2 1en off no off
s American Samoa L
Access control BermudaAuto resume CanadaFinalize disc Puerto Rico
~
1,61-5
3

DVD Recorder Features Menu 59
1 Press SYSTEM MENU. Press ; to select in the top leftcorner of the Menu Bar at the top of the TV screen.
2 Press CH-9 repeatedly to select , then press :.
3 Press CH+8 or CH-9 to select Status box, Standby, orDisplay. Press : and follow step 4 according to your choice.
4 ● If you selected Status box, press CH+8 or CH-9 tochoose On or Off, then press OK. The status box briefly displaysthe Disc type and status of the Recorder. Select On if you want tosee the Status boxes. Choose Off if you do not want to see theStatus boxes. See page 31.
● If you selected Standby, press CH+8 or CH-9 to chooseLow power, Normal, or Demo mode, then press OK.Choose Low power if you do not want the clock to appear on thedisplay panel when the power is off. Choose Demo mode if youwant the Recorder’s features to scroll across the display panel whenthe power is off. Or, choose Off if you want the time to appear onthe display panel when the power is off.
● If you selected Display, press CH+8 or CH-9 to chooseBright, Dimmed, or Off, then press OK. This adjusts the bright-ness of the display panel text on the front of the Recorder. Choosethe brightness you prefer, or choose Off to see no information onthe display panel.
5 Press SYSTEM MENU repeatedly to remove the menus.
W X Y Z a
1 2 1en off no off
FeaturesStatus box s On L
G Standby OffDisplay r
~
W X Y Z a
1 2 1en off no off
FeaturesStatus box
G Standby s Low power L
Display Normal rDemo mode
~
W X Y Z a
1 2 1en off no off
FeaturesStatus box
G StandbyDisplay s Bright L r
DimmedOff
~
1 2 3
4 5 6
7 8
0
9
I I
MONITOR
TV / DVD T / C PLAY MODE REC. MODE
SELECT OK
DISC SYSTEM
MENU
CH
CH
TIMER
FSS
RETURN CLEAR
TV VOLUME
PLAY
STOP
AUDIO PAUSE
REC/OTR
STANDBY
1-41,5

• The picture format you selectmust be on the Disc. If not, thesettings for TV Shape will notaffect the picture.
• Some widescreen TVs may showonly part of the DVD Recorder’smenu.Adjust the screen modeon your TV. See your TV owner’smanual for details.
Helpful Hints
60 Picture Settings
Z Y dZ Y d
1 Press SYSTEM MENU. Press ; to select in the top leftcorner of the menu bar at the top of the TV screen.
2 Press CH-9 to select , then press :.
3 Press CH+8 or CH-9 to select TV Shape, Black level shift,Video shift, or Video output.Then, press : and follow step 4according to your choice.
4 ● If you selected TV Shape, press CH+8 or CH-9 to select4:3 letterbox, 4:3 panscan, or 16:9, then press OK.Select 4:3 letterbox if you want to see the widened picture withblack bars at the top and bottom of the screen.This looks like thepicture you see when watching movies in a theater.This setting ispossible only if the DVD is recorded in letterbox or widescreen for-mat.Select 4:3 panscan if you want the picture to be trimmed or format-ted to fit your TV screen.This setting is possible only if the DVD isrecorded in the regular format.Select 16:9 if you connected the DVD Recorder to a widescreen TV.
● If you selected Black level shift, press CH+8 or CH-9 toselect On or Off, then press OK. Set Black level shift to On toimprove the color contrast and brighten the picture of NTSC Discs.
● If you selected Video shift, press ; or : to center the pic-ture horizontally on your TV screen - or “shift” the video. Whenyou are satisfied with the position of the picture, press OK.
● If you selected Video output, press SELECT repeatedly tochoose Interlaced or Progressive Scan. Select Progressive Scanonly if you used the COMPONENT VIDEO (Y Pb Pr) jacks on theRecorder to connect it to a TV that has Progressive Scan. See page12. Otherwise, choose Interlaced.If you choose Progressive Scan, PRO will appear on the display panel.
5 Press SYSTEM MENU to remove the menus.
W X Y Z a
1 2 1en off no off
PictureTV Shape s 4:3 letterbox L
G Black level shift 4:3 panscanVideo shift 16:9rVideo output
~
Z Y dZ Y d
W X Y Z a
1 2 1en off no off
PictureTV Shape
G Black level shift s On L
Video shift OffrVideo output
~
W X Y Z a
1 2 1en off no off
PictureTV Shape
G Black level shiftVideo shift s BrVideo output OK to exit
~W X Y Z a
1 2 1en off no off
PictureTV Shape
G Black level shiftVideo shift rVideo output
~
s Interlaced Progressive Scan Press SELECT to toggle
1 2 3
4 5 6
7 8
0
9
I I
MONITOR
TV / DVD T / C PLAY MODE REC. MODE
SELECT OK
DISC SYSTEM
MENU
CH
CH
TIMER
FSS
RETURN CLEAR
TV VOLUME
PLAY
STOP
AUDIO PAUSE
REC/OTR
STANDBY
41,51-4
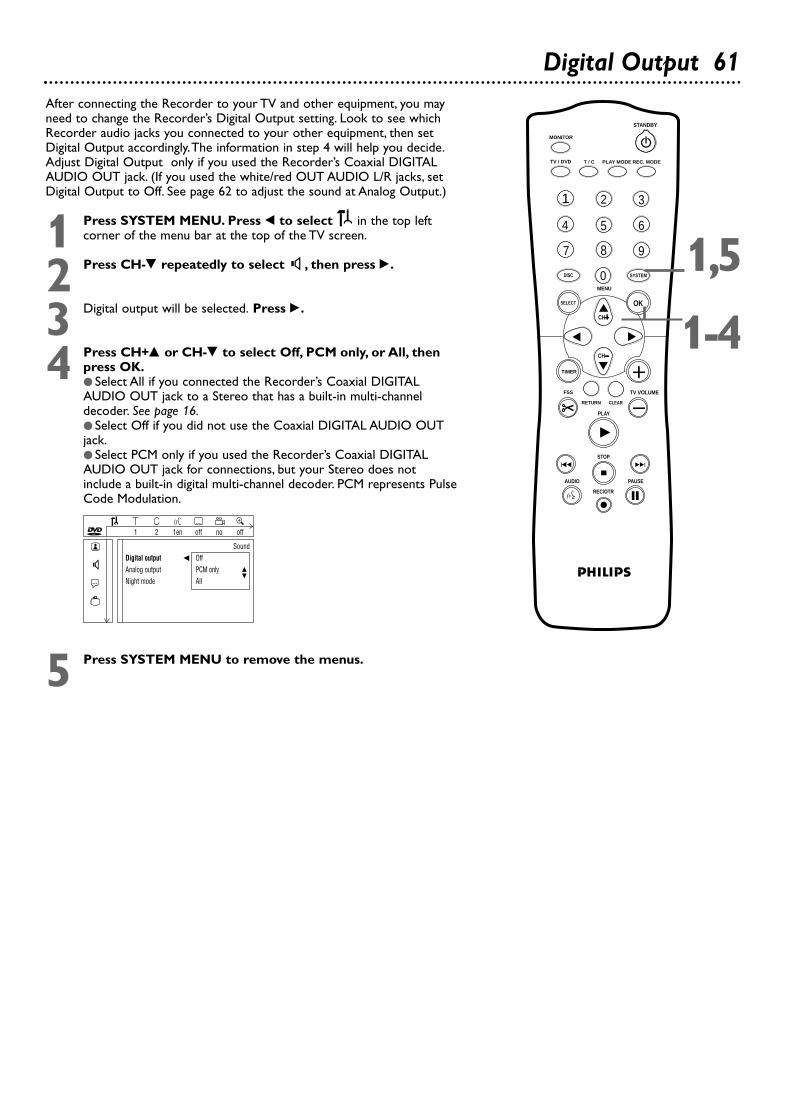
Digital Output 61After connecting the Recorder to your TV and other equipment, you mayneed to change the Recorder’s Digital Output setting. Look to see whichRecorder audio jacks you connected to your other equipment, then setDigital Output accordingly.The information in step 4 will help you decide.Adjust Digital Output only if you used the Recorder’s Coaxial DIGITALAUDIO OUT jack. (If you used the white/red OUT AUDIO L/R jacks, setDigital Output to Off. See page 62 to adjust the sound at Analog Output.)
1 Press SYSTEM MENU. Press ; to select in the top leftcorner of the menu bar at the top of the TV screen.
2 Press CH-9 repeatedly to select G, then press :.
3 Digital output will be selected. Press :.
4 Press CH+8 or CH-9 to select Off, PCM only, or All, thenpress OK.● Select All if you connected the Recorder’s Coaxial DIGITALAUDIO OUT jack to a Stereo that has a built-in multi-channeldecoder. See page 16.● Select Off if you did not use the Coaxial DIGITAL AUDIO OUTjack.● Select PCM only if you used the Recorder’s Coaxial DIGITALAUDIO OUT jack for connections, but your Stereo does notinclude a built-in digital multi-channel decoder. PCM represents PulseCode Modulation.
5 Press SYSTEM MENU to remove the menus.
1 2 3
4 5 6
7 8
0
9
I I
MONITOR
TV / DVD T / C PLAY MODE REC. MODE
SELECT OK
DISC SYSTEM
MENU
CH
CH
TIMER
FSS
RETURN CLEAR
TV VOLUME
PLAY
STOP
AUDIO PAUSE
REC/OTR
STANDBY
W X Y Z a
1 2 1en off no off
SoundDigital output s Off
G Analog output PCM only K
LNight mode Allr
~
1-4
1,5
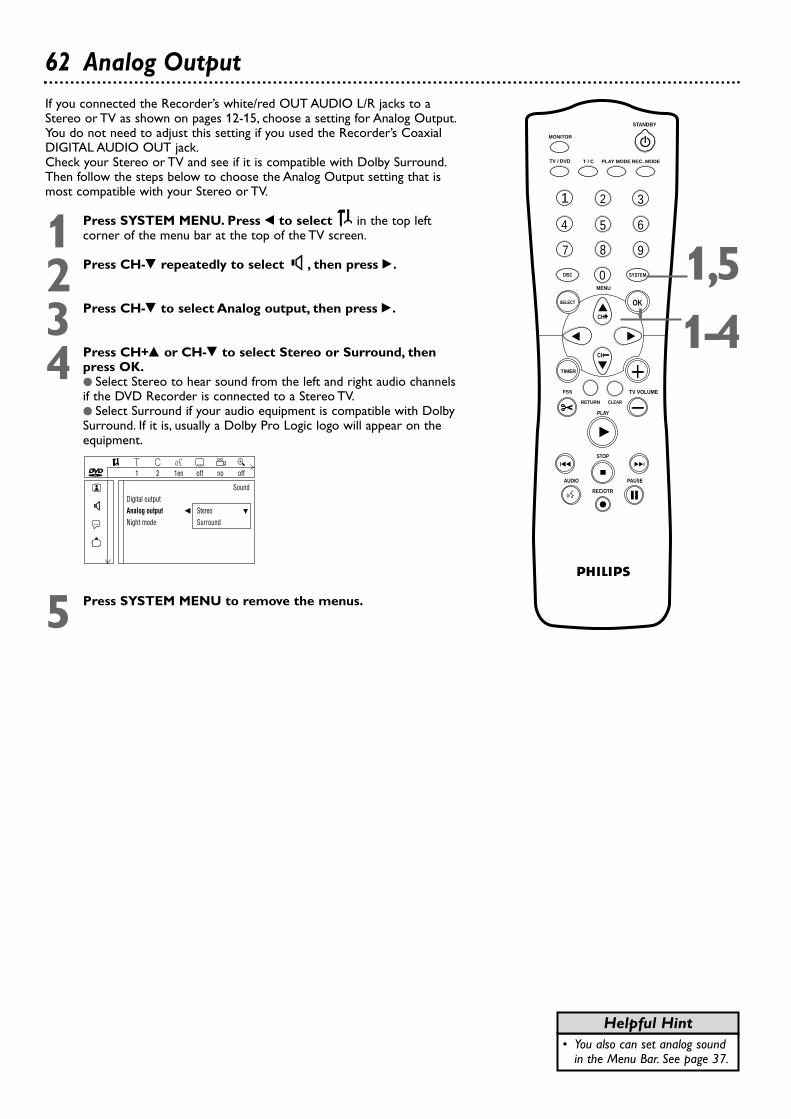
62 Analog Output
1 2 3
4 5 6
7 8
0
9
I I
MONITOR
TV / DVD T / C PLAY MODE REC. MODE
SELECT OK
DISC SYSTEM
MENU
CH
CH
TIMER
FSS
RETURN CLEAR
TV VOLUME
PLAY
STOP
AUDIO PAUSE
REC/OTR
STANDBY
• You also can set analog soundin the Menu Bar. See page 37.
Helpful Hint
If you connected the Recorder’s white/red OUT AUDIO L/R jacks to aStereo or TV as shown on pages 12-15, choose a setting for Analog Output.You do not need to adjust this setting if you used the Recorder’s CoaxialDIGITAL AUDIO OUT jack.Check your Stereo or TV and see if it is compatible with Dolby Surround.Then follow the steps below to choose the Analog Output setting that ismost compatible with your Stereo or TV.
1 Press SYSTEM MENU. Press ; to select in the top leftcorner of the menu bar at the top of the TV screen.
2 Press CH-9 repeatedly to select G, then press :.
3 Press CH-9 to select Analog output, then press :.
4 Press CH+8 or CH-9 to select Stereo or Surround, thenpress OK.● Select Stereo to hear sound from the left and right audio channelsif the DVD Recorder is connected to a Stereo TV.● Select Surround if your audio equipment is compatible with DolbySurround. If it is, usually a Dolby Pro Logic logo will appear on theequipment.
5 Press SYSTEM MENU to remove the menus.
W X Y Z a
1 2 1en off no off
SoundDigital output
G Analog output s Stereo L
Night mode Surroundr
~
1-41,5

Language Settings 63In the Language menu, select a different language for the Audio soundtrackor Subtitles of a DVD. Or, change the language of the DVD Recorder’sSystem Menu.You also can determine whether you receive TV channels inStereo or a Second Audio Program language by following these steps.
1 Press SYSTEM MENU. Press ; to select in the top leftcorner of the menu bar at the top of the TV screen.
2 Press CH-9 repeatedly to select r, then press :.
3 Press CH+8 or CH-9 to select Playback audio, Recordingaudio, Subtitle, or Menu, then press : and proceed asdetailed in step 4.
4 ● If you selected Playback audio, press CH+8 or CH-9 toselect the language in which you want to play the Disc, thenpress OK. The changes will be effective only if the language is avail-able on the Disc. Some DVDs allow you to change languages in theDisc Menu only.
● If you selected Recording audio, press CH+8 or CH-9 toselect Stereo or SAP, then press OK.Some TV programs broadcast in stereo or in a second audio program(SAP). Usually, second audio means the program has a second languageavailable. For example, the program might be available in English andSpanish, with Spanish being the SAP (second audio program) option.Your selection will only be active if the program is available in stereoor second audio. SAP will appear on the display panel when this fea-ture is active and available.When you play the recording, you can play only in the audio yourecorded. For example, if you recorded in SAP, you can play the record-ing only in SAP.
● If you selected Subtitle, press CH+8 or CH-9 to choosethe language in which you want the Subtitles, then pressOK. The subtitles will be in that language if available on the Disc.
● If you selected Menu, press CH+8 or CH-9 to chooseEnglish, Espanol (Spanish), or Français (French), then pressOK. This adjusts the language of the Recorder’s System Menu, which isavailable only in these three languages.
5 Press SYSTEM MENU to remove the menus.
W X Y Z a
1 2 1en off no off
LanguagePlayback audio s English L
G Recording audio EspañolSubtitle FrançaisrMenu
~W X Y Z a
1 2 1en off no off
LanguagePlayback audio
G Recording audio s Stereo L
Subtitle SAPrMenu
~
• If Recording audio is set to SAPand you record a TV programthat is available only in Stereo,the Recorder will record theprogram in Stereo.
Helpful Hint
W X Y Z a
1 2 1en off no off
LanguagePlayback audio
G Recording audioSubtitle s English LrMenu Español
Français
~
W X Y Z a
1 2 1en off no off
LanguagePlayback audio
G Recording audioSubtitlerMenu s English L
EspañolFrançais
~
1 2 3
4 5 6
7 8
0
9
I I
MONITOR
TV / DVD T / C PLAY MODE REC. MODE
SELECT OK
DISC SYSTEM
MENU
CH
CH
TIMER
FSS
RETURN CLEAR
TV VOLUME
PLAY
STOP
AUDIO PAUSE
REC/OTR
STANDBY
1-41,5

64 Night Mode, Remote Control Used
Remote Control Used
1 Press SYSTEM MENU. Press ; to select in the top leftcorner of the menu bar at the top of the TV screen.
2 Press CH-9 repeatedly to select in the next menu, thenpress :.
3 Remote control used will be highlighted. Press :.
4 Press CH+8 or CH-9 to select DVD Player or DVDRecorder, then press OK. The factory setting is DVD Recorder. Byselecting DVD Recorder, you choose to operate the Recorder with itssupplied remote control (as shown at right and throughout this book).If you have a Philips DVD Player and want to use its remote for theRecorder, select DVD Player.You might not access all the Recorder’sfeatures unless you use the Recorder’s remote.
5 Press SYSTEM MENU to remove the menus.
W X Y Z a
1 2 1en off no off~
Remote controlRemote control used s DVD Player L
DVD Recorder
Night ModeTurn on Night Mode to improve the sound during low volume playback.
1 Press SYSTEM MENU. Press ; to select in the top leftcorner of the menu bar at the top of the TV screen.
2 Press CH-9 repeatedly to select G, then press :.
3 Press CH-9 repeatedly to select Night mode, then press :.
4 Press CH+8 or CH-9 to select On or Off, then press OK.
5 Press SYSTEM MENU to remove the menus.
W X Y Z a
1 2 1en off no off
SoundDigital output
G Analog outputNight mode s On Lr
Off
~
1 2 3
4 5 6
7 8
0
9
MONITOR
TV / DVD T / C PLAY MODE REC. MODE
SELECT OK
DISC SYSTEM
MENU
CH
CH
TIMER
FSS
RETURN CLEAR
TV VOLUME
PLAY
STANDBY
1-41,5
1 2 3
4 5 6
7 8
0
9
MONITOR
TV / DVD T / C PLAY MODE REC. MODE
SELECT OK
DISC SYSTEM
MENU
CH
CH
TIMER
FSS
RETURN CLEAR
TV VOLUME
PLAY
STANDBY
1-41,5

AC-3: Audio Coding 3, also known as Dolby Digital; a multi-channel digital audio compression systemfrom Dolby Labs.
Analog: Sound that has not been turned into numbers.Analog sound varies, while digital sound has spe-cific numerical values.Analog sound is available when you use the red and white audio jacks on yourequipment.These jacks send audio through two channels, the left and right.
AUDIO Jacks: Red and white jacks that send audio to other equipment (TV, Stereo, etc.) (OUT) orreceive sound from other equipment (IN).
Coaxial DIGITAL AUDIO OUT jack: Sends digital audio to a Stereo, letting you adjust the volumeat the Stereo.The Stereo must have a Coaxial In jack.This connection provides the 5.1 channel surroundsound as heard in movie theaters.
Color system: There are various systems for transmitting television signals or a DVD picture, forexample PAL, SECAM, and NTSC. NTSC is the most common color system in the United States ofAmerica. The Recorder automatically selects the correct color system of DVDs.
COMPONENT VIDEO Jacks: The OUT jacks send high-quality video to a TV that has ComponentVideo In jacks.The IN jacks allow the Recorder to receive high-quality video from other equipment, suchas a DVD Player. The OUT jacks are also compatible with Progressive Scan (if your TV has ProgressiveScan).
Digital: Sound that has been converted into numerical values. Digital sound is available when you usethe Coaxial DIGITAL AUDIO OUT jack on the Recorder. Sound is distributed through multiple channels.
Digital Video or i.LINK: Also known as ‘FireWire ’and ‘IEEE 1394.’ A cable for transfer of high band-width digital signals as used by Digital Video camcorders or some Personal Computers.
Dolby Digital: A surround sound system that provides 5.1 channel sound as used in movie theaters.
DTS: Digital Theater Systems.This is a surround sound system, but it is different from Dolby Digital.Theformats were developed by different companies.
DVD+R: DVD+Recordable.These Discs can be recorded and finalized only once.
DVD+RW: DVD+ReWritable.These Discs can be recorded on repeatedly.
Index Picture Screen: A screen that gives an overview of a DVD+RW or DVD+R.An Index Picturerepresents each recording.
Letterbox: Widescreen format; a TV aspect ratio setting (4:3). Displays the video in full-width, withblack bars at the top and bottom of the TV screen.This format is similar to seeing a movie in a theater. Ifthe Disc does not include a letterbox format, selecting 4:3 letterbox may have no effect. (For example,some DVDs are two-sided, with one side playing in widescreen format and the other side playing in anormal format.)
MPEG: Motion Picture Experts Group.A collection of compression systems for digital audio and video.
OTR: One-Touch Recording. Start a timed recording by pushing just one button; select the switch-offtime in intervals of 30 minutes.
Pan & Scan: A TV aspect ratio setting (4:3). Displays the video with full-height picture, with one orboth sides of the picture trimmed to fit on your TV screen. Some movie companies refer to this as“reformatting the picture to fit your TV screen.”
PBC: Playback Control.A special feature on a Video CD or Super VCD that enables interactive use.
PBS: Public Broadcast System.The PBS channel transmits data for Automatic clock setting.
PCM: Pulse Code Modulation. A digital audio encoding system.
RGB: Red-Green-Blue.A top-quality video connection where red, green and blue components of avideo signal are carried through separate wires.This also is referred to as the component video connec-tion.
S-Video: Produces a clearer picture by sending separate signals for the luminance and the color.
VCD: Video Compact Disc. Similar to DVDs, but hold a smaller amount of recording.
VCR Plus+ System: Allows you to set a timer recording by entering a PlusCode number found in par-ticipating TV listings.
VIDEO Jacks: Yellow jacks that send picture to your TV (OUT) or receive video from other equip-ment (IN) (Camcorder,VCR, DVD Player, etc.).
Widescreen: A TV aspect ratio setting (16:9). Displays the video appropriately when you connect theDVD Recorder to a widescreen TV.
Glossary 65

66 Helpful Hints
If you are having problems with your product, check this list of problems and possible solutions before requesting service.Youmay be able to solve the problem yourself.
No power• Press STANDBY-ON y on the front of the DVD Recorder to turn on the DVD Recorder.• Connect the supplied power cord securely to the MAINS (AC power) jack on the rear of the DVD Recorder. Connect the
power cord firmly to an AC power outlet. Use only the supplied power cord.• Make sure the AC outlet has power by trying another appliance in the same outlet.
The buttons on the DVD Recorder do not work.• The Recorder may be in Dealer mode. Disconnect the power cord from the power outlet. Press and hold Stop C and
OPEN/CLOSE A on the front of the Recorder while you reconnect the power cord to power. When the time or --:--appears on the display panel (within 6-10 seconds), release the buttons.
No picture• Make sure the TV power is on.• Check the video cables. Make sure the cable(s) are fastened securely to the Recorder and the TV.• Set your TV to the correct Video In channel.These channels are usually near channel zero (0). Or, you may have a button on
the TV remote control that selects an Auxiliary or A/V IN channel. See your TV owner’s manual for details. Or, go to yourlowest TV channel and change channels down until you see the Recorder’s background picture on the TV screen.
• You only need one video connection between the DVD Recorder and the TV. See page 9.
The picture is distorted; the picture is black and white during playback.• TVs have a color system standard, usually NTSC in the United States. If the Disc’s color system is different than your TV’s
color system, the picture may be distorted or colorless.• The Recorder cannot record in color if the TV channel or source is not providing color. In some situations, programs that
are broadcast in black and white cannot be recorded.• Check the Disc for fingerprints. Clean the Disc with a soft cloth, wiping from the center to the edge in a straight line.• Sometimes a small amount of picture distortion may appear.This is not a malfunction.• If you set Record mode to a low-quality speed, change to a higher-quality speed after you finish recording. Leaving the
Recorder set to a low-quality speed may affect the picture quality when playing DVDs later. See page 49.
The sound is distorted during Disc playback through a Stereo.• Do not connect any cables from the DVD Recorder to the Stereo’s “PHONO IN” jack.• Do not connect the Recorder’s Coaxial DIGITAL AUDIO OUT jack to an analog jack (red or white) on the Stereo.
No sound • Check the audio connections. See pages 9-16. Remember, you only need one audio connection.
See page 9 to see what connection best suits your situation.• Make sure cables are connected firmly to all equipment.• Select another channel, sound source, or Auxiliary station at your Stereo or TV. See your Stereo’s manual or TV’s manual for
details. Or, just continue selecting the different sound sources or modes on the Stereo or TV until you hear sound from theDisc that is in the DVD Recorder. See pages 9-16.
• Set Analog output or Digital output correctly, based on what equipment you connected to the Recorder. See pages 61-62.• You cannot hear MP3 play if you are using the Coaxial DIGITAL AUDIO OUT jack for sound from the Recorder.• Change the Audio setting of the DVD in the DVD Disc Menu.
A Disc recorded on this DVD Recorder will not play on a DVD Player.• In some cases, you can adapt the Disc at the DVD Recorder, then try it again in the Player.This procedure does not solve
the playability problem with all brands of Players. Furthermore, it may make the Disc incompatible with Players with whichthe Disc was compatible before you modified the Disc.To modify a Disc, place the Disc in the DVD Recorder’s disc tray. Do not close the tray.Then, press and hold the Number 2button on the remote control until the tray closes.The Disc is now modified.Try it on the other Player.If the Disc still will not play on the Player, repeat this procedure, but press and hold the Number 3 button instead until theRecorder’s tray closes.To return the Disc to its original version, repeat this process using the Number 1 button.
• To adapt a Disc that was recorded on a different DVD Recorder, stop Disc play. Make sure the Disc Menu or INFO is noton the screen. Press Record I.The following message will appear:“Disc has different menu. If you record on this disc themenu will be replaced. Press OK to open tray or press REC to replace menu.” Press Record I.The “replacing menu” mes-sage will appear.When that is finished, the Disc Information Screen will appear. Some information may be missing, for exam-ple the recording mode.
• To play a DVD+R on another DVD Player, finalize the Disc first. See pages 50 or 52.• Editing changes may not be accessible when you play the Disc on other DVD Players. See page 50.
An Audio CD will not play on the DVD Recorder.• Some Audio CDs available on the market are copy protected.This DVD Recorder may not play such copy-protected discs.

Helpful Hints (cont'd) 67The DVD Recorder will not select some features, such as Angles, Subtitles, or multi-language Audio.• The feature may not be available on the Disc. If it is not, an “X” will appear on the TV screen. Check the Disc case to see if
the Disc has the feature. If the Disc does not have the feature, the Recorder cannot create the feature.This is not a mal-function of the Recorder.
Disc will not play.• Make sure the Disc label is facing up. If you are playing a two-sided Disc, make sure the label of the side you want to play is
facing up. See page 20.• Check the Access Control settings for the Disc. See pages 54-58.• Check the Region Code of the DVD.The DVD must be coded for All regions or Region 1 in order to play on this DVD
Recorder. See page 7.• See if the Disc is defective by trying another Disc. Make sure the Disc is not scratched or warped. Carefully clean the Disc.
See page 6.
The DVD Recorder does not respond to the remote control.• Aim the remote directly at the sensor on the front of the DVD Recorder (not toward your TV). See page 24.• Remove any obstacles between the DVD Recorder and the remote control.• Inspect or replace the batteries in the remote control. See page 8.• Make sure you selected DVD Recorder as the Remote control used. See page 64.• The D symbol will appear briefly on the display panel each time the Recorder receives a signal from the remote.
If D appears, the remote signal is reaching the Recorder correctly.
Recordings are not occurring as scheduled. New recordings cannot be made.• See if the Disc has the maximum number of titles. Delete some recordings (DVD+RW only). See page 47.• You can record only if the Disc is Unprotected.You cannot use a write-protected or finalized Disc. See page 50.• You cannot duplicate copyrighted DVDs, videotapes, or TV broadcasts using the Recorder.“COPY PROTECT” may appear
on the display panel if you try to dub or record copyrighted material onto a DVD+R or DVD+RW using the Recorder.• The signal from your Antenna/Cable TV system must be strong enough to provide good channel reception. If the signal is
weak, if there is no signal, or if a channel has gone off the air, a recording will not occur.• Check the Disc. If the Disc is bad (scratched, warped, etc.) or if the Recorder cannot read the Disc, you cannot record.
“NO DISC” may appear on the display.• A timer recording may not occur if the power fails during the time the recording was supposed to occur.• If you adjust the clock after you set a timer recording, reset the timer recording.
Another DVD Player shows the Index Picture Screen but does not react to PLAY :.• Press STOP C to exit the Index Picture Screen, then press PLAY :.
You need to access system information for service reasons.• Press SYSTEM MENU. may be selected. If it is not, press ; to select it. Press CH-9 repeatedly to
select , then press :. Press 9 until the system information appears.
The DVD Recorder does not work.• The DVD Recorder will not operate until you complete the Initial Setup. See pages 18-19.• Disconnect the power cord from the Recorder and the power outlet for a few minutes. Reconnect the power cord and try
to operate the Recorder again as usual.If the Recorder still will not operate, disconnect the power cord from the Recorder again.Then, while pressing and holdingthe STANDBY-ON y button on the front of the Recorder, reconnect the power cord.This resets the DVD Recorder tothe factory mode. Complete the Initial Setup again and reset any items you have adjusted during your use of the Recorder.
Messages or strange codes appear on the Recorder’s display.• Remove and reinsert the Disc.• Clean the Disc.• Disconnect the power cord from the power outlet, then reconnect the cord and try play as usual.• During Initial Setup,“IS TV ON? CO3” will appear on the Recorder’s display panel.This appears in addition to the Initial
Setup information that shows on your TV screen. (Initial Setup information is on pages 18-19.) “IS TV ON? CO3” indicatesyou should turn on your TV and set it to the correct Video In channel or channel 3. See pages 9-16 to determine the cor-rect Video In channel for your connection. Or, see your TV manual for details.
• There are error messages that apply to recording problems. See page 45.
All of the DVD Recorder’s system menu is not visible.• Certain TVs may not show the entire system menu on the TV screen. If the upper or top portion of the Recorder’s system
menu does not appear properly, this is a TV-related issue. It is not an improper functioning of the Recorder.

If you are still having trouble with the Recorder after checking Helpful Hints and other information inthis manual, you may perform a Diagnostic Test on the Recorder. Follow the steps below.
1 Disconnect the power cord from the Recorder’s MAINS (AC Power) jack on therear of the Recorder.
2 Press and hold the Play : button on the front of the Recorder while you reconnectthe power cord to the Recorder. “BUSY” will appear on the display panel, along with acounter number. Release Play :. The counter will reach zero (0) when the test is finished.
3 Momentarily,“FAIL” or “PASS” will appear on the display panel.If “FAIL” appears, your Recorder needs repair. Contact the Philips Customer Care Center forthe Authorized Service Center nearest you.If “PASS” appears, the Recorder apparently has no failure.The problem may be incorrect inter-pretation of the operating instructions, a wrong Disc in use, or incorrect connections. Contactthe Philips Customer Care Center for further assistance in solving the problem.
4 If there is no failure, disconnect the power cord again, then reconnect it to the Recorder and anAC power outlet.The DVD Recorder will be ready for regular use.
68 Diagnostic Test

Specifications 69DISC FORMATS SUPPORTED Disc type Playback RecordingDVD+RW • •DVD+R • •DVD-RW (Video format) • —DVD-R • —DVD-Video • —SVCD • —Video CD • —Audio CD • —CD-R • —CD-RW • —
DVD+REWRITABLE DISC FORMAT Medium Phase-Change ReWritableDiameter 12 cmCapacity (single side) 4.7 GbyteRecording time M1 1 hour
M2 2 hoursM2x 2.5 hoursM3 3 hoursM4 4 hoursM6 6 hours
TV STANDARD PAL/SECAM NTSC Scan Frequency 50Hz 60HzNumber of lines 625 525Playback • •Recording • •Internal tuner — •
VIDEO FORMAT Digital Compression MPEG2 for DVD
MPEG1 for VCD
VIDEO RESOLUTION 50Hz 60Hz DVD-Video/DVD+RW(HQ/SP)• Horiz.Resolution 720 pixels1 720 pixels1
• Vertical Resolution 576 lines 480 linesDVD+RW (LP/EP)• Horiz.Resolution 360 pixels2 360 pixels2
• Vertical Resolution 576 lines 480 linesVCD• Horiz.Resolution 352 pixels 352 pixels• Vertical Resolution 288 lines 240 lines
1 equivalent to 500 lines on your TV2 equivalent to 250 lines on your TV
VIDEO PERFORMANCEDA Converter 10-bitAD Converter 9-bitSignal handling ComponentsVideo Out 1 Vpp into 75 OhmS-Video Out Y: 1 Vpp into 75 Ohm
C: 0.300 Vpp into 75 OhmComponent Video/Progressive Scan Out Y: 1 Vpp into 75 Ohm
PB: 0.7 Vpp into 75 OhmPR: 0.7 Vpp into 75 Ohm
CABINETDimensions (w x h x d): 17 x 3 x 13 inchesNet weight: 8.8 lbs.
AUDIO FORMATCompressed digital Play Recording• Dolby Digital (AC-3) Multi-channel 2-channel
16 bit,fs 48 kHz
• DTS Multi-channel —• MPEG1 2-channel —• MPEG2 Multi-channel —
Uncompressed digital (SPDIF - Sony Philips Digital Interface)• PCM 2-channel —
16, 20, 24 bitfs 48, 96 kHz
AUDIO PERFORMANCEDA Converter 24 bitAD Converter 16 bitDVD fs 96 kHz 4 Hz -44 kHz
fs 48 kHz 4 Hz -22 kHzVideo CD fs 44.1 kHz 4 Hz -20 kHzAudio CD fs 44.1 kHz 4 Hz -20 kHzSignal-Noise (1kHz) 105 dBDynamic Range (1kHz) 100 dBCrosstalk (1kHz) 110 dBDistortion/Noise (1kHz) 90 dB
FRONT CONNECTIONSDV (Digital Video) In IEEE 1394 4-pinS-Video In Hosiden 4-pinVideo In Cinch (yellow)Audio Left/Right In Cinch (white/red)
REAR CONNECTIONSComponent Video In Cinch (green/blue/red)Component Video Out Cinch (green/blue/red)S-Video In Hosiden 4-pinS-Video Out Hosiden 4-pinVideo In Cinch (yellow)Video Out Cinch (yellow)Audio L/R In (2x) Cinch (white/red)Audio L/R Out (2x) Cinch (white/red)Digital Audio Out 1 coaxial
IEC958 for CDDA /LPCMIEC1937 for MPEG2,Dolby Digital
RF Antenna In Coaxial 75 ohmsRF TV Out Coaxial 75 ohmsPower Standard (IEC type)
POWER SUPPLYAC power polarized (IEC)Power supply 100 -120V AC
50/60 HzPower consumption Operation 29 W
Low-power standby 3 W

70 Limited Warranty
DVD RecorderOne year Free Labor / One year Parts Exchange
This product must be carried in for repair.
WHO IS COVERED?You must have proof of purchase to receive warranty service.A sales receipt or other document showing that you pur-chased the product is considered proof of purchase.
WHAT IS COVERED?Warranty coverage begins the day you buy your product. Forone year thereafter, all parts will be repaired or replaced, andlabor is free. After one year from the day of purchase, you payfor the replacement or repair of all parts, and for all laborcharges.All parts, including repaired and replaced parts, are coveredonly for the original warranty period.When the warranty onthe product expires, the warranty on all replaced andrepaired parts also expires.
WHAT IS EXCLUDED?Your warranty does not cover:• labor charges for installation or setup of the product,
adjustment of customer controls on the product, andinstallation or repair of antenna systems outside of theproduct.
• product repair and/or part replacement because of misuse,accident, unauthorized repair or other cause not withinthe control of Philips.
• reception problems caused by signal conditions or cable orantenna systems outside the unit.
• a product that requires modification or adaptation toenable it to operate in any country other than the countryfor which it was designed, manufactured, approved and/orauthorized, or repair of products damaged by these modifi-cations.
• incidental or consequential damages resulting from theproduct. (Some states do not allow the exclusion of inci-dental or consequential damages, so the above exclusionmay not apply to you.This includes, but is not limited to,prerecorded material, whether copyrighted or not copy-righted.)
• a product that is used for commercial or institutional pur-poses (including but not limited to rental purposes).
WHERE IS SERVICE AVAILABLE?Warranty service is available in all countries where the prod-uct is officially distributed by Philips. In countries wherePhilips does not distribute the product, the local Philips ser-vice organization will attempt to provide service (althoughthere may be a delay if the appropriate spare parts and tech-nical manual(s) are not readily available).
MAKE SURE YOU KEEP...Please keep your sales receipt or other document showingproof of purchase.Attach it to the owner’s manual and keepboth nearby.Also keep the original box and packing materialin case you need to return your product.
BEFORE REQUESTING SERVICE...Please check your owner’s manual before requesting service.Adjustments of the controls discussed there may save you aservice call.
TO GET WARRANTY SERVICE IN U.S.A.,PUERTO RICO, OR U.S. VIRGIN ISLANDS...Take the product to a Philips factory service center (seeenclosed list) or authorized service center for repair.Whenthe product has been repaired, you must pick up the unit atthe center. Centers may keep defective parts.(In U.S.A., Puerto Rico, and U.S.Virgin Islands, all implied war-ranties, including implied warranties of merchantability and fit-ness for a particular purpose, are limited in duration to theduration of this express warranty. Because some states do noallow limitations on how long an implied warranty may last,this limitation may not apply to you.)
TO GET WARRANTY SERVICE IN CANADA...Please contact Philips at:
1-800-661-6162 (French Speaking)1-800-531-0039 (English or Spanish Speaking)
(In Canada, this warranty is given in lieu of all other war-ranties. No other warranties are expressed or implied, includ-ing any implied warranties of merchantability or fitness for aparticular purpose. Philips is not liable under any circum-stances for any direct, indirect, special, incidental or conse-quential damages, howsoever incurred, even if notified of thepossibility of such damages.)
REMEMBER...Please record below the model and serial numbers found onthe product.Also, please fill out and mail your warranty regis-tration card promptly. It will be easier for us to notify you ifnecessary.MODEL # ________________________________SERIAL # ________________________________
EL6506E003 / 09-02
This warranty gives you specific legal rights.You may have other rights which vary from state/province to state/province.
Philips, P.O. Box 520890, Miami, FL 33152 (402) 536-4171

ac power cord . . . . . . .10-16,25access control . . . . . . . . . .54-58add/delete channels . . . . . . . .26analog output . . . . . . . . . . . . .62angle . . . . . . . . . . . . . .30, 31, 36antenna jack . . . . . . . . .10-16, 25append recording . . . . . . . . . .48arrow buttons . . . . . . . . . . . .22 audio button . . . . . . . . . . .22, 35audio in/out jacks . . .9,12-15, 25audio language . . . .18, 30, 35, 63auto chapters . . . . . . . . . . . . .49auto resume . . . . . . . . . . .20, 53automatic channel programming . . . . . . . . . . . . .26
batteries . . . . . . . . . . . . . . . . . .8black level shift . . . . . . . . . . . .60
cable box . . . . . . . . . . . . . . . .11cam1/cam2 jacks . . . . .17, 21, 24camcorder . . . . . . . . . . . . . . .17camera angle . . . . . . . . . . . . . .36change code . . . . . . . . . . . . . .54change country . . . . . . . . . . . .58channel buttons . . . . . . . . . . .22channel programming . . . . . . .26chapter . . . . . . . . . . . . . . . . . .30chapter markers . . . . . . . .48, 51chapter/track selection . . . . . .34 child lock . . . . . . . . . . . . . . . .55cleaning discs . . . . . . . . . . . . . .6clear button . . . . . . . . . . . . . .23clear timer . . . . . . . . . . . . . . .44clock setting . . . . . . . . . . .28-29coaxial (digital audio out)jack . . . . . . . . . . . . . . .16, 25, 61code (access control) . . . . . . .54color systems . . . . . . . . . . . . . .7component videoin/out jacks . . . . . . . . .12, 25, 60connections . . . . . . . . . . . . .9-17contents of package . . . . . . . . .6contents, table of . . . . . . . . . . .3controls, remote . . . . . . . .22-23copying videotapes . . . . . . . . .17current chapter . . . . . . . . . . .51
daylight saving . . . . . . . . . .28-29delete all markers . . . . . . . . . .51delete chapter marker . . . . . .51diagnostic test . . . . . . . . . . . . .68digital audio . . . . . . . . . .9, 16, 61digital output . . . . . . . . . . .16, 61dimmed . . . . . . . . . . . . . . . . .59disc bar . . . . . . . . . . . . . . . . . .32disc information screen . . . . .50disc lock . . . . . . . . . . . . . .55-57disc menu button . . . . . . .22, 34disc menus . . . . . . . . . . . . . . .34disc name . . . . . . . . . . . . . . . .50disc pointer . . . . . . . . . . . . . .32disc tray . . . . . . . . . . . . . . .20, 24display . . . . . . . . . . . . . . . . . . .59display panel . . . . . . . . . . .24, 59divide title . . . . . . . . . . . . . . . .51dolby surround . . . . . . . . .37, 62dts . . . . . . . . . . . . . . . . . . . . . .16dv (digital video) . . . . . . . .17, 24
dvd/tv button/switch . . . . . . . .23dvd recorder features menu . .59
editing . . . . . . . . . . . . . . . .50-51erase disc . . . . . . . . . . . . . . . .50erase this title . . . . . . . . . . . . .47erasing timer recordings . . . . .44error messages . . . . . . . . . . . .45
fast motion . . . . . . . . . . . . . . .30favorite scene selection . . . . .51filter mode . . . . . . . . . . . . . . .49finalize disc . . . . . . . . . . . .50, 52forward searching . . . . . . . . . .38frame-by-frame playback . .30, 37front panel . . . . . . . . . . . . . . .24fss button . . . . . . . . . . .23, 48, 51
glossary . . . . . . . . . . . . . . . . . .65
helpful hints . . . . . . . . . . . .66-67hidden chapter . . . . . . . . . . . .51home videotape duplication . .17hookups . . . . . . . . . . . . . . . .9-17
in ext 1/2 jacks . . . . . . . . . . . .25index picture screen . . . . . . . .32information boxes . . . . . . . . .33initial setup . . . . . . . . . . . .18-19insert chapter marker . . . . . . .51installation . . . . . . . . . . . . .26-29“IS TV ON? C03” . . . . . . . . . .18
language . . . . . . . . . . . .18-19, 63letterbox . . . . . . . . . . . . . .60, 65limited warranty . . . . . . . . . . .70lock/unlock . . . . . . . . . . . . . . .56
M1 - M6 . . . . . . . . . . . . . . . . .49make edits compatible . . . . . .50mains (AC power) jack . . . . . .25menu bars . . . . . . . . . . . . . . . .30menu language . . . . . . . . . .18, 63menus . . . . . . . . . . . . . . . . . . . .8monitor button . . . . . .21-22, 41
name . . . . . . . . . . . . . . . . . . . .47new index picture . . . . . . . . . .51next G button . . . . .23, 34, 38night mode . . . . . . . . . . . . . . .64ntsc . . . . . . . . . . . . . . . . . . . . . .7number buttons . . . . . . . . . . .23
ok button . . . . . . . . . . . . . . . .22on-screen symbols . . . . . . . . .31one-touch recording . . . . . . . .41open/close A button . . . . . . .24
pal . . . . . . . . . . . . . . . . . . . . . . .7panscan . . . . . . . . . . . . . . . . . .60parental level . . . . . . . . . . . . .57pause k button . . . . . . . .23, 37pbc . . . . . . . . . . . . . . . . . . . . .53pbs channel . . . . . . . . . . . . . . .28pc connections . . . . . . . . . . . .17pcm only . . . . . . . . . . . . . . . . .61picture settings . . . . . . . . . . . .60play always . . . . . . . . . . . . . . .56play : button . . . . . . . .20, 23-24
play full title . . . . . . . . . . . . . .47play mode button . . . . . . .22, 40play once . . . . . . . . . . . . . . . .56playable discs . . . . . . . . . . . . . .7playback audio . . . . . . . . . . . .63playback control . . . . . . . . . . .53playing a disc . . . . . . . . . . . . . .20pluscode . . . . . . . . . . . . . .43, 45power cord . . . . . . . . .10-16, 25preserving memories . . . . . . .17previous j
button . . . . . . . . . .23, 24, 34, 38progressive scan . . . . . . . .12, 60protection . . . . . . . . . . . . . . . .50
quick disc playback . . . . . . . . .20quick recording . . . . . . . . . . . .21
rear panel . . . . . . . . . . . . . . . .25rec/otr I button . . . . .21-22, 41rec mode button . . . . . . . .23, 49record I button . . . . . . . . . . .24record mode . . . . . . . . . . . . .49record one channel/watch another . . . . . . . . . . . .46record settings . . . . . . . . . . . .49recording audio . . . . . . . . . . .63region codes . . . . . . . . . . . . . . .7remote control . . . . . . . . .22-23remote control tv operation .23remote control used . . . . . . .64remote sensor . . . . . . . . . . . .24repeat . . . . . . . . . . . . . . . . . . .40repeat a-b . . . . . . . . . . . . .31, 40repeat playback . . . . . . . . . . . .40resume . . . . . . . . . . . . . . .20, 53return button . . . . . . . . . . . . .22reverse searching . . . . . . . . . .38
safe . . . . . . . . . . . . . . . . . .31, 56safe record . . . . . . . . . . . . . . .41safety precautions . . . . . . . . .4-6sap . . . . . . . . . . . . . . . . . . . . .63satellite receiver . . . . . . . . . . .11scan . . . . . . . . . . . . . . . . . .31, 39searching . . . . . . . . . . . . . . . . .38select button . . . . . . . . . . .22, 42slow motion . . . . . . . .30, 31, 38sound mode . . . . . . . .30, 37, 62specifications . . . . . . . . . . . . . .69st (stereo) . . . . . . . . . . . . . . . .37standby . . . . . . . . . . . . . . . . . .59standby yy button . . . . . . .20, 22standby-on yy button . . . . . . .24 status box . . . . . . . . . . . . .31, 59stereo . . . . . . . . . . . . . . . .62-63stereo connections . . . . . .15-16still picture . . . . . . . . . . . . . . .37stop C button . . . . . . .20-22, 24subtitles . . . . . . . . .19, 30, 35, 63 sur (surround) . . . . . . . . . .37,62svcd . . . . . . . . . . . . . . . . . . . . .7s-video in/out jacks . . .13, 17, 25system menu button . . . . . . . .22
T/C button . . . . . . . . . . . . . . .23table of contents . . . . . . . . . . .3time/date . . . . . . . . . . . . . .28-29time search . . . . . . . . . . . .30, 39
time zone . . . . . . . . . . . . . . . .28timer button . . . . . . . .23, 42-44timer information box . . . .32-33timer recording . . . . . . . . .42-43title/disc menus . . . . . . . . . . . .34title settings menu . . . . . . . . .47title/track . . . . . . . . . . . . . . . .30tracks . . . . . . . . . . . . . . . . . . .34tuner information box . . . .32-33tv/dvd button . . . . . . . . . .22, 46tv jack . . . . . . . . . . . . .10-16, 25tv shape . . . . . . . . . . . . . . .19, 60tv volume +/- buttons . . . . . . .22
user preference settings . . . . .30
vcr connections/recording . . .17VCR Plus+channels . . . . . . . . .27VCR Plus+ timer recording . .43video cd . . . . . . . . . . . . . . . . . .7video (cvbs) jacks . .14, 17, 24-25video in channel (tv) . . . . . . . . .9video output . . . . . . . . . . . . . .60video shift . . . . . . . . . . . . . . . .60visible chapter . . . . . . . . . . . . .51
warranty . . . . . . . . . . . . . . . . .70widescreen tv . . . . . . . . . . . . .60
“x” . . . . . . . . . . . . . . . . . . .8, 31
zoom . . . . . . . . . . . . . . . . .30, 36
Information Index 71

IB8451E0013139 246 1336 1
This owner’s manual is made of recyclable materials.Remember to recycle!

![PROFESSIONAL DISC RECORDER PDW-F1600 PDW-HD1500 · 2016-03-25 · PROFESSIONAL DISC RECORDER PDW-F1600 PDW-HD1500 OPERATION MANUAL [English] 1st Edition (Revised 3) 2 • Read these](https://img.pdfslide.net/doc/110x75/5e97cd206aab1347272eb525/professional-disc-recorder-pdw-f1600-pdw-hd1500-2016-03-25-professional-disc-recorder.jpg)