Embed Size (px)
Citation preview

1
ACCESSORIES Please check and identify the supplied accessories.
¡́ Remote controlX1
¡́ Audio CordX2
¡́ AV CordX1
¡́ (SIZE AAA/1.5V)X2
POWE R
Op en
/ Cl os e
DI SP L AY AU D IO
S UB T IT L E A N GLE MU T E
STOP PL
AY PAUS
E
1 2 3
4 5 6
7 8 9
0
ZOOMR ET U R NME N
U
TI T LE
SE T UP
V OL- V OL + P R EV N E XT
SL OWR S
LOWF FB F F /S T EP
MA R K S EA R C H P LA Y MOD E C L R /S H
I F T
GA ME A B 3D K A RA
OK E
DISC HANDLING gDisc storage ? Discs are made of plastic. Please protect them against deformation. Put them in a case and keep away
from sunlight, high temperature and humidity. Please do not put them outdoors in direct sunlight, or in a car where the temperature may rise.
? Please read the precautions marked on the disc notice. gDisc cleaning ? The image or sound quality may be reduced if a disc is dusty or carries fingerprints. ? Please do not use volatile chemicals like benzene or thinner, disc spray, or electrical charge eliminator. ? If a disc is very dirty, please wipe it with a wet soft cloth, then wipe it with a dry cloth. ? Please do not use a damaged disc (cracked or deformed disc). ? Please do not glue on the label side paper or a seal, or damage the side. Please do not use a disc with
extruding glue from under cellophane tape or rental label, or with parts of a label after incomplete peeling. If you use a disc like this, you may not be able to take it out later. And it may cause a breakdown.
gTo hold a disc by hand ? With two hands :
Hold it on the edge with fingers.
? With one hand : Hold it with the index in the center hole and other fingers at the edge.

2
ABOUT DISCS AND REGION CODE
PLAYABLE DISC TYPES AND MARKS SIZE/PLAYABLE SIDES PLAY TIME
DVD 12cm/Single 1 Layer Side 2 Layer 12cm/Double 1 Layer Side 2 Layer
Digital Sound/Digital Image(MPEG 2 Mode)
133min. 4.7 GB 242min. 8.5 GB 266min. 9.4 GB 484min. 17 GB
DVD
TM DVD
8cm/Single 1 Layer Side 2 Layer 8cm/Double 1 Layer Side 2 Layer
Digital Sound/Digital Image(MPEG 2 Mode)
41min. 75min. 82min. 150min.
VIDEO CD
12cm/Single Side
Digital Sound/Digital Image(MPEG 1 Mode)
74min. max.
VCD
VIDEO CD
8cm/Single Side
Digital Sound/Digital Image(MPEG 1 Mode)
20min. max.
CD 12cm/Single Side
Digital Sound 74min. max.
CD
CD
8cm/Single Side Digital Sound 20min. max.
ABOUT VIDEO CD The player corresponds to Video CD furnished with PBC (Version 2.0). PBC means Playback Control. The following 2 kinds of play can be performed :
DISC TYPE KINDS OF PLAY Video CD without PBC
(Version 1.1) The music and (animated) image playback can be done by operating in the same way as for a music CD.
Video CD with PBC (Version 2.0)
In addition to non-PBC Video CD plays, you can play interactive software or software having search function by using, menus shown on the screen (Menu play). Some functions described in this manual may not work.
REGION CODE Region code of DVDs you can play Region code indications such as are labelled on some DVDs to indicates which type of player can play the discs. This player can only playback discs with the same region code as the discs or discs with this labelled on the DVDs, you cannot play the discs on this player. If you try to play these DVDs , a invalid region pattern will appear on the TV screen. The region code for this player is indicated on the carton box.

3
OPERATION PANEL
FRONT PANEL
1
1514
1312 11
109
87
2 3 4 5 6
1. POWER/STANDBY button 2. POWER indicator 3. REMOTE sensor 4. DISPLAY window 5. OPEN/CLOSE button 6. DIRECTION buttons (UP , DOWN , LEFT , RIGHT ) 7. ENTER button
8. STOP button
9. PAUSE button 10. PLAY button 11. DISC TRAY 12. MIC. volume 2 knob 13. MIC. volume 1 knob 14. MIC. input jack 2 15. MIC. input jack 1

4
OPERATION PANEL REAR PANEL
1617
22192018
21 23
EURO SCART
16. CVBS/YUV output 17. S-VIDEO output 18. CENTER 19. SURROUND L & R 20. SUB-WOOFER 21. FRONT L & R
22. COAXIAL output 23. OPTICAL output 24. AC IN 25. GROUND 26. EUROSCART (optional) 27. POWER ON/OFF (optional)
5
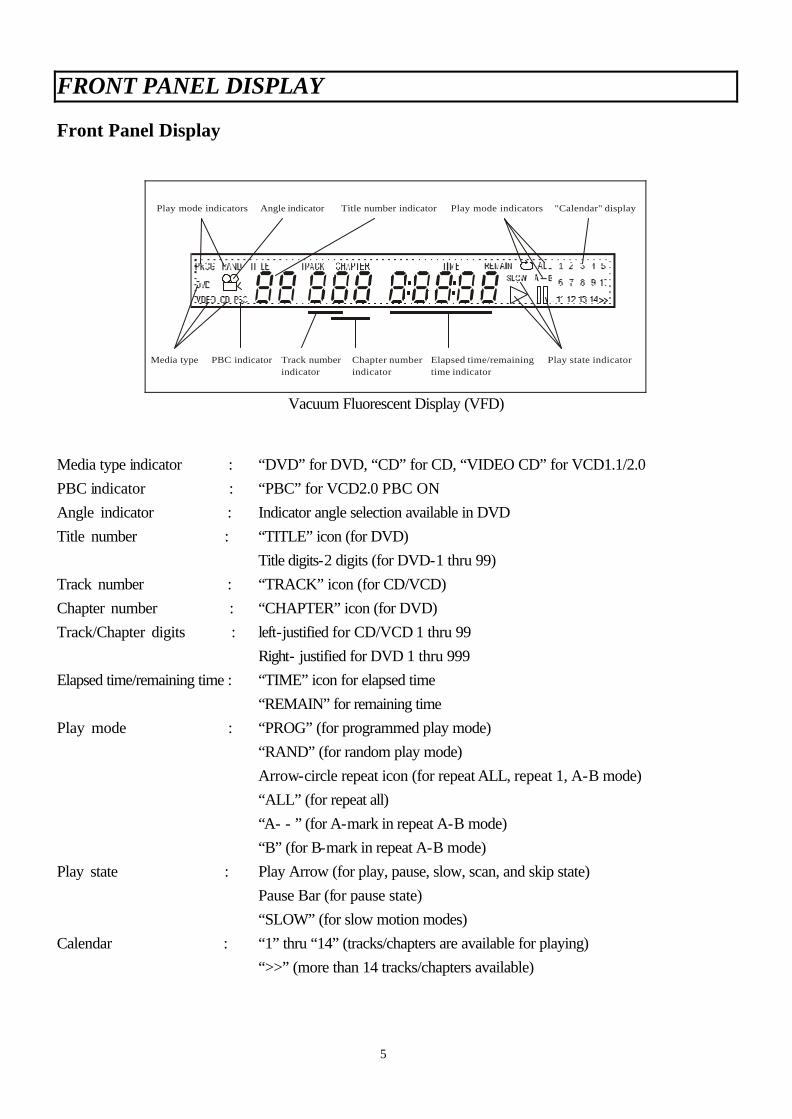
FRONT PANEL DISPLAY Front Panel Display
1
Play mode indicators
Media type PBC indicator Track numberindicator
Chapter numberindicator
Elapsed time/remainingtime indicator
Play state indicator
Angle indicator Title number indicator Play mode indicators "Calendar" display
Vacuum Fluorescent Display (VFD)
Media type indicator : PBC indicator : Angle indicator : Title number : Track number : Chapter number : Track/Chapter digits : Elapsed time/remaining time : Play mode : Play state : Calendar :
“DVD” for DVD, “CD” for CD, “VIDEO CD” for VCD1.1/2.0 “PBC” for VCD2.0 PBC ON Indicator angle selection available in DVD “TITLE” icon (for DVD) Title digits-2 digits (for DVD-1 thru 99) “TRACK” icon (for CD/VCD) “CHAPTER” icon (for DVD) left-justified for CD/VCD 1 thru 99 Right- justified for DVD 1 thru 999 “TIME” icon for elapsed time “REMAIN” for remaining time “PROG” (for programmed play mode) “RAND” (for random play mode) Arrow-circle repeat icon (for repeat ALL, repeat 1, A-B mode) “ALL” (for repeat all) “A- - ” (for A-mark in repeat A-B mode) “B” (for B-mark in repeat A-B mode) Play Arrow (for play, pause, slow, scan, and skip state) Pause Bar (for pause state) “SLOW” (for slow motion modes) “1” thru “14” (tracks/chapters are available for playing) “>>” (more than 14 tracks/chapters available)
6
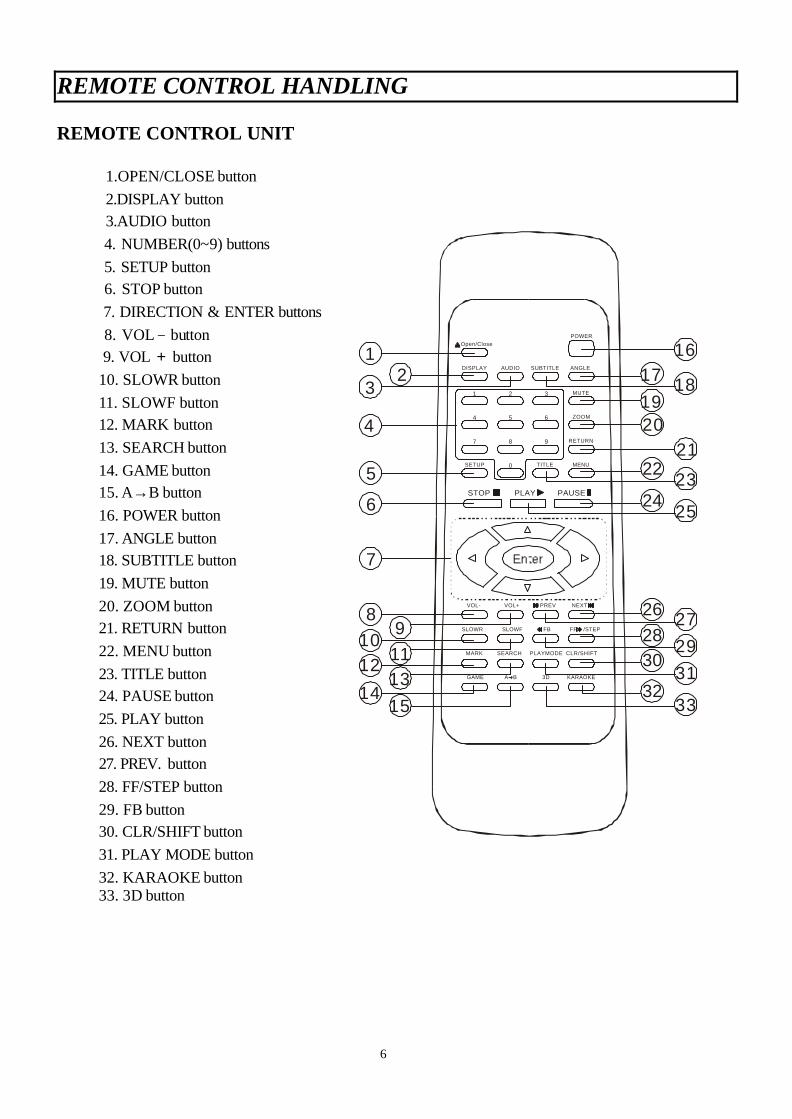
REMOTE CONTROL HANDLING REMOTE CONTROL UNIT
1.OPEN/CLOSE button 2.DISPLAY button 3.AUDIO button 4. NUMBER(0~9) buttons 5. SETUP button 6. STOP button 7. DIRECTION & ENTER buttons 8. VOL - button 9. VOL + button 10. SLOWR button 11. SLOWF button 12. MARK button 13. SEARCH button 14. GAME button 15. A→B button 16. POWER button 17. ANGLE button 18. SUBTITLE button 19. MUTE button 20. ZOOM button 21. RETURN button 22. MENU button 23. TITLE button 24. PAUSE button 25. PLAY button 26. NEXT button 27. PREV. button 28. FF/STEP button 29. FB button 30. CLR/SHIFT button 31. PLAY MODE button 32. KARAOKE button 33. 3D button
POWEROpen/Close
DISPLAY AUDIO SUBTITLE ANGLE
MUTE
STOP PLAY PAUSE
1 2 3
4 5 6
7 8 9
0
ZOOM
RETURN
MENUTITLESETUP
VOL- VOL+ PREV NEXT
SLOWR SLOWF FB FF /STEP
MARK SEARCH PLAYMODE CLR/SHIFT
GAME A B 3D KARAOKE
1 16
18
23
25
27
29
31
33
21
17
22
24
262830
32
1920
5
81012
14
6
7
4
2
91113
15
3

7
REMOTE CONTROL HANDLING HOW TO INSTALL BATTERIES 1.Remove the lid of battery compartment
Press the lid and push it in the direction of the arrow. 2.Insert batteries.
Insert the batteries supplied, respecting the polarity and . 3.Replace back the lid.
Push the lid in the arrow direction.
HOW TO HANDLE THE REMOTE CONTROL
60
CAUTION On use of remote control
? Please do not allow it to fall, or to receive a shock. ? To avoid a breakdown, please do not spray water on the device, or put it on a wet object. ? If you will not use the device for a long period, please take the batteries out. ? When the remote control operation becomes difficult, please change the batteries. ? When the signal receiving sensor is exposed to direct sunlight, it may operate with difficulty.
Please keep it away from direct light. ? Operate the remote control within the following area, in a straight line from the signal
detecting sensor of the player and an angle of 30°
8
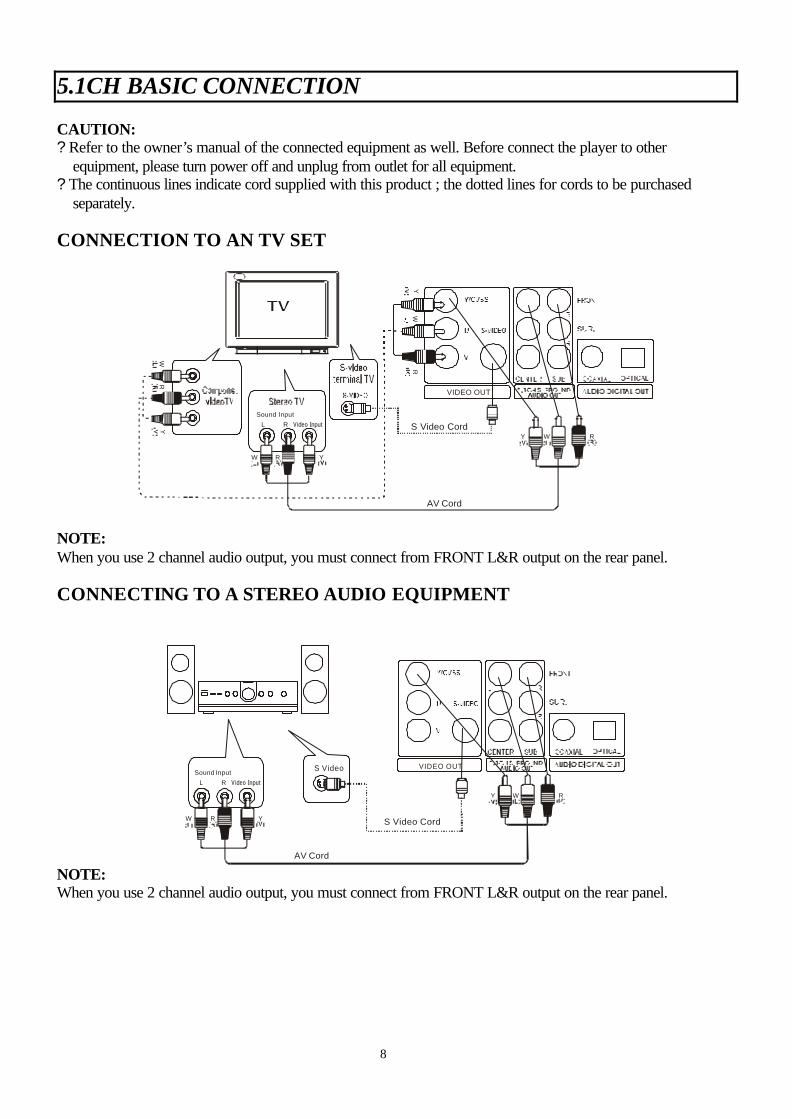
5.1CH BASIC CONNECTION CAUTION: ? Refer to the owner’s manual of the connected equipment as well. Before connect the player to other
equipment, please turn power off and unplug from outlet for all equipment. ? The continuous lines indicate cord supplied with this product ; the dotted lines for cords to be purchased
separately. CONNECTION TO AN TV SET
VIDEO OUT
Y RW
AV Cord
S Video CordSound Input
L R Video Input
W R Y
WR
Y
WR
Y
NOTE: When you use 2 channel audio output, you must connect from FRONT L&R output on the rear panel. CONNECTING TO A STEREO AUDIO EQUIPMENT
VIDEO OUT
Y RW
S Video
AV Cord
S Video Cord
Sound Input
L
W R Y
R Video Input
NOTE: When you use 2 channel audio output, you must connect from FRONT L&R output on the rear panel.
9
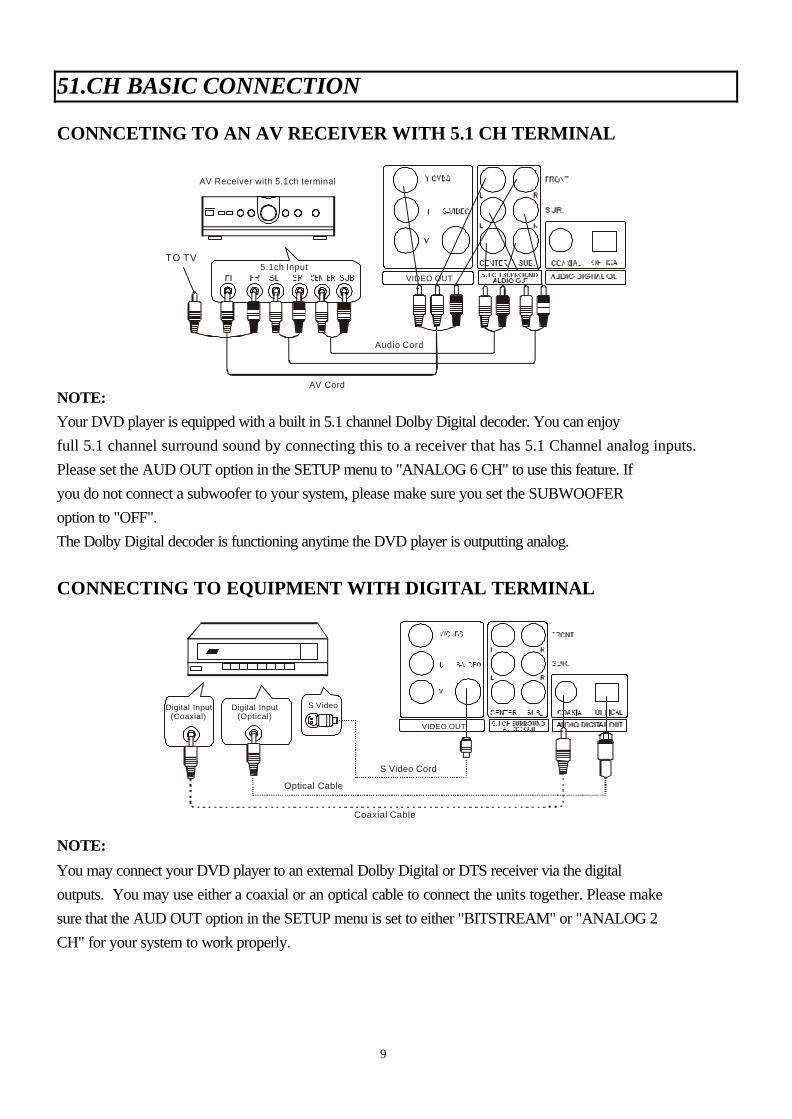
51.CH BASIC CONNECTION CONNCETING TO AN AV RECEIVER WITH 5.1 CH TERMINAL
Audio Cord
AV Cord
TO TV
AV Receiver with 5.1ch terminal
5.1ch InputVIDEO OUT
NOTE: Your DVD player is equipped with a built in 5.1 channel Dolby Digital decoder. You can enjoy full 5.1 channel surround sound by connecting this to a receiver that has 5.1 Channel analog inputs. Please set the AUD OUT option in the SETUP menu to "ANALOG 6 CH" to use this feature. If you do not connect a subwoofer to your system, please make sure you set the SUBWOOFER option to "OFF". The Dolby Digital decoder is functioning anytime the DVD player is outputting analog. CONNECTING TO EQUIPMENT WITH DIGITAL TERMINAL
S VideoDigital Input(Coaxial)
Digital Input(Optical)
S Video Cord
Optical Cable
Coaxial Cable
VIDEO OUT
NOTE:
You may connect your DVD player to an external Dolby Digital or DTS receiver via the digital outputs. You may use either a coaxial or an optical cable to connect the units together. Please make sure that the AUD OUT option in the SETUP menu is set to either "BITSTREAM" or "ANALOG 2 CH" for your system to work properly.

10
2CH BASIC CONNECTION CAUTION: ? Refer to the owner’s manual of the connected equipment as well. Before connect the player to other
equipment, please turn power off and unplug from outlet for all equipment. ? The continuous lines indicate cord supplied with this product ; the dotted lines for cords to be purchased
separately.
CONNECTION TO AN TV SET
Y RW
AV Cord
S Video Cord
VIDEO OUT
Sound InputL R Video Input
W R Y
WR
Y
CONNECTING TO A STEREO AUDIO EQUIPMENT
VIDEO OUT
Y RW
S Video
AV Cord
S Video Cord
Sound Input
L
W R Y
R Video Input
CONNECTING TO EQUIPMENT WITH DIGITAL TERMINAL
VIDEO OUTS VideoDigital Input
(Coaxial)Digital Input
(Optical)
S Video Cord
Optical Cable
Coaxial Cable NOTE: You may connect your DVD player to an external Dolby Digital or DTS receiver via the digital outputs. You may use either a coaxial or an optical cable to connect the units together. Please make sure that the AUD OUT option in the SETUP menu is set to either "BITSTREAM" or "ANALOG 2 CH" for your system to work properly.
11
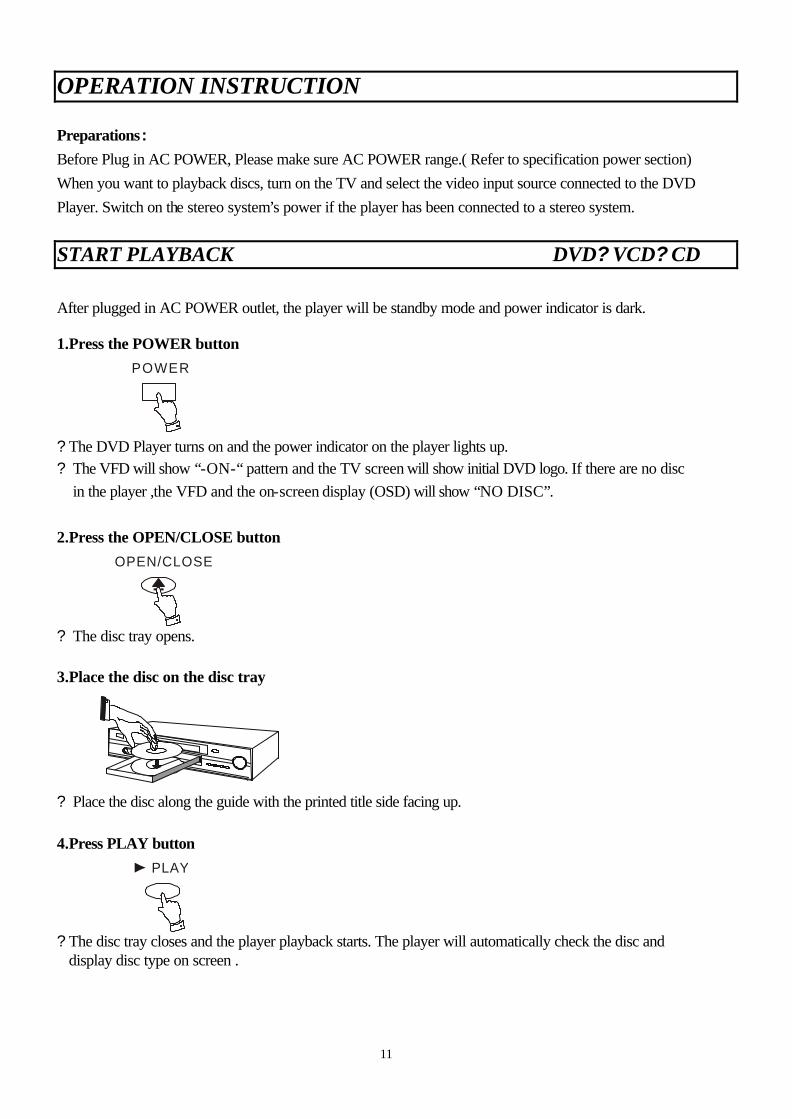
OPERATION INSTRUCTION Preparations: Before Plug in AC POWER, Please make sure AC POWER range.( Refer to specification power section) When you want to playback discs, turn on the TV and select the video input source connected to the DVD Player. Switch on the stereo system’s power if the player has been connected to a stereo system.
START PLAYBACK DVD? VCD? CD After plugged in AC POWER outlet, the player will be standby mode and power indicator is dark. 1.Press the POWER button
POWER
? The DVD Player turns on and the power indicator on the player lights up. ? The VFD will show “-ON-“ pattern and the TV screen will show initial DVD logo. If there are no disc
in the player ,the VFD and the on-screen display (OSD) will show “NO DISC”.
2.Press the OPEN/CLOSE button
OPEN/CLOSE
? The disc tray opens.
3.Place the disc on the disc tray
? Place the disc along the guide with the printed title side facing up.
4.Press PLAY button
PLAY
? The disc tray closes and the player playback starts. The player will automatically check the disc and
display disc type on screen .

12
TO TERMINATE DVD? VCD? CD 1.Press the STOP button
STOP
? The playback will stop.
2.Press the OPEN/CLOSE button
OPEN/CLOSE
? The disc tray will come out. 3.Remove the disc
? Remove the disc after the disc tray opens completely.
4.Press the POWER button
POWER
? The disc tray will close automatically, the player will turns off and enter to standby mode. NOTE: If the player is not in use for a long time, plugged out form AC POWER outlet.
STOP PLAYBACK DVD? VCD? CD
13
Press the STOP button
STOP
? The playback will stop, the screen will back to initial DVD logo. ? The OSD will show “RESUME STOP”. The player records the point where STOP was pressed. ? At this time press the PLAY button again, the player will resume from this point. The OSD will show
“RESUME PLAY”.
Press the STOP button again
STOP
? The OSD will show “STOP”. At this time press the PLAY button again ,the player will playback from head of disc.
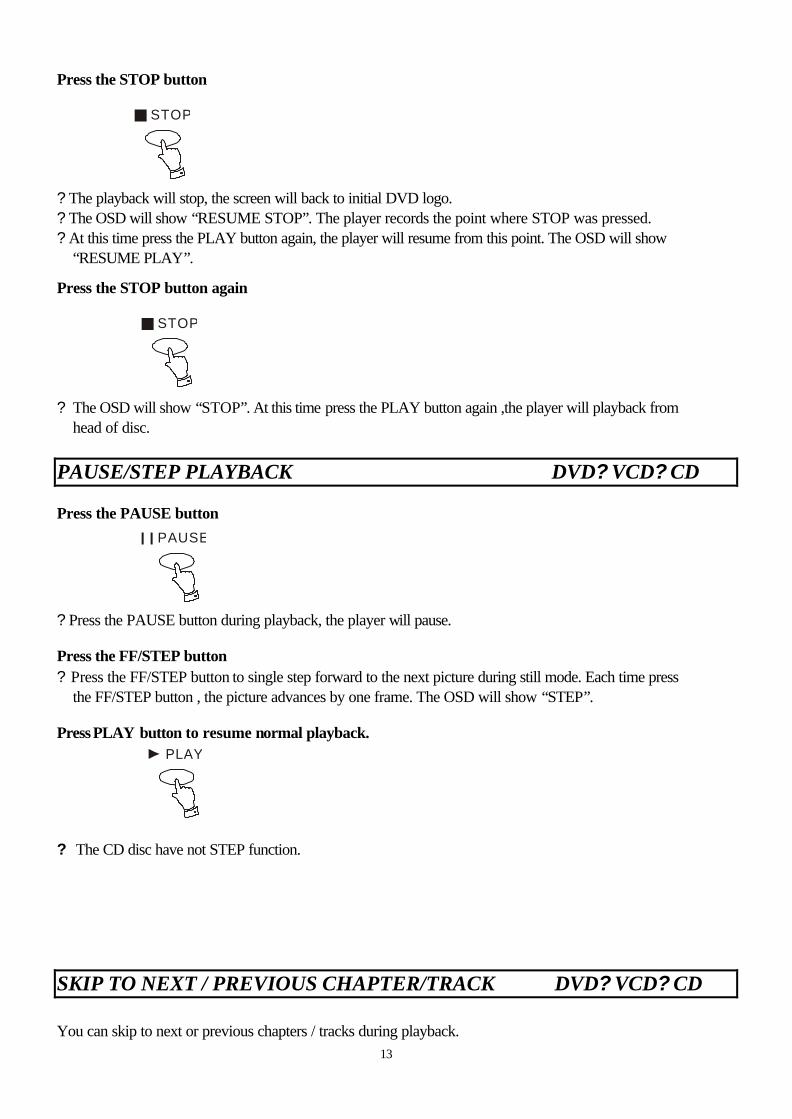
PAUSE/STEP PLAYBACK DVD? VCD? CD Press the PAUSE button
PAUSE
? Press the PAUSE button during playback, the player will pause. Press the FF/STEP button ? Press the FF/STEP button to single step forward to the next picture during still mode. Each time press
the FF/STEP button , the picture advances by one frame. The OSD will show “STEP”. Press PLAY button to resume normal playback.
PLAY
? The CD disc have not STEP function.
SKIP TO NEXT / PREVIOUS CHAPTER/TRACK DVD? VCD? CD You can skip to next or previous chapters / tracks during playback.

14
SKIP TO NEXT CHAPTER/TRACK Press the NEXT button ? Press the NEXT button , the player will skip to next chapters / tracks. ? If current chapter / track is the last chapter / track , press the NEXT button will be invalid and the OSD
will show invalid symbol ( ). SKIP TO PREVIOUS CHAPTER/TRACK Press the PREV. button ? Press the PREV. button , the player will skip to previous chapters / tracks. ? If current chapter / track is the first chapter / track , press the PREV. button will be invalid and the OSD
will show invalid symbol ( ). NOTE: About TITLE? CHAPTER? TRACK ? DVD video discs are divided into titles, and the titles are sub-divided into chapters. Video CDs and
Audio CDs are divided into tracks.
FAST FORWARD / BACKWARD PLAYBACK DVD? VCD? CD During playback, you can fast forward /backward to searching the point you want.
15
FAST FORDWARD PLAYBACK Press the FF/STEP button ? Press the FF/STEP button to fast forward through the disc. Each time you press the FF/STEP button ,
the playback speed changes ( X2, X4, X8, X20). Press the PLAY button to resume normal playback. FAST BACKWARD PLAYBACK Press the FB button ? Press the FB button to fast backward through the disc. Each time you press the FB button , the
playback speed changes (X2, X4, X8, X20). Press the PLAY button to resume normal playback. NOTE : If the disc is Audio CD(CD DA), the forward speed only have 3 types (X2, X4, X8).
SLOW PLAYBACK DVD? VCD You can play DVD disc and VIDEO CD disc in slow-motion during playback. SLOW FORWARD PLAYBACK Press the SLOWF button ? Each time the SLOWF button is pressed, the slow motion speed changes (1/7, 1/6, 1/5, 1/4, 1/3, 1/2). Press the PLAY button to resume normal playback. SLOW BACKWARD PLAYBACK Press the SLOWR button ? Each time the SLOWR button is pressed, the slow motion speed changes (1/7, 1/6, 1/5, 1/4, 1/3, 1/2). Press the PLAY button to resume normal playback.
MARK PLAYBACK DVD? VCD? CD You can set bookmarks for desired point during playback and have playback jump to the bookmarks .

16
Press the MARK button ? Press the MARK button during playback, the OSD will display bookmark menu as following:
MARKERS:
MARK 1: *: **: ** MARK 2: *: **: ** MARK 3: *: **: **
Select bookmarks and Set bookmarks ? Press the DIRECTION buttons ( ? ) to select which bookmark to set. ? The DVD player have three bookmarks for setting. ?Once the desired point during playback is reached, press the ENTER button to set the selected bookmark
to the current time . ? To clear a bookmark entry, select a bookmark with a time value and press the CLR/SHIFT button. Using bookmarks ? Press the MARK button and selecting bookmarks. ? Press the ENTER button, the player will jump to that spot on the disc. Clear bookmark menu ? Press the MARK button for clear bookmark menu, when the OSD display bookmark menu. NOTE : All the bookmarks are cleared when the power is turned off or the disc is removed.
SEARCH PLAYBACK DVD? VCD? CD You can directly jump to specify time, chapter, track, title for playback.
Press the SEARCH button ? Press the SEARCH button to enable the search menu.
17
? The OSD will display the search menu as following :
DVD
GOTO TM/CH/TL:
TIME: __:__:__ CHAPTER: [6] TITLE: [1]
VCD/CD (press the SEARCH button)
TRACK SEARCH
TIME: __:__:__ TRACK: [1]
VCD/CD (press the SEARCH button again)
DISC SEARCH
TIME: __:__:__ TRACK: [3]
Select the type of search ? Press the DIRECTION button ( ? ) to select the type of search, either a time search or chapter/
track/Title search. Enter time/chapter/title number ? To jump a spot in time on the disc, select TIME and enter the time in units of hh : mm : ss (hours,
minutes, seconds) then press the ENTER button. Example : wish from 1:15:45 (1 hour 15 minute 45 second)
Press ? 1 ? ? ? 1 ? ? ? 5 ? ? ? 4 ? ? ? 5 ? ? ENTER button Wish from 3:45 (3 minute 45 second) Press ? 3 ? ? ? 4 ? ? ? 5 ? ? ENTER button ? To jump to the beginning of a specific chapter/track, select CHAPTER/TRACK and enter the
chapter/track number with the number buttons then press the ENTER button. Example : wish from chapter 8
Press ? 8 ? ? ENTER button ?To jump to the beginning of a specific title (DVD only), select TITLE and enter the title number with the
number buttons then press the ENTER button. Example : wish from title 3
Press ? 3 ? ? ENTER button
Clear search menu Press the SEARCH button for clear search menu, when the OSD display search menu.
SPECIAL PLAY MODE DVD? VCD? CD You can playback with four special play mode (repeat, random, PBC, program).
Press the PLAY MODE button ? Press the PLAY MODE button to enable the Play Mode menu. ? The OSD will display the following :

18
**PLAY MODES**
REPEAT: [OFF]
RANDOM: [ON] <EXIT><OK> <PROGRAM>
Select special play mode ? Press the DIRECTION button ( ? ) to select which play mode to select. ² Repeat mode : DVD
OFF CHAPTER TITLE
? To enable/disable Repeat mode in DVD, select REPEAT and press the ENTER button repeatedly to toggle between OFF, CHAPTER or TITLE , then press the PLAY button.
? The settings are as follows : OFF = Repeat mode disable. CHAPTER = Repeat current chapter. When playback reaches the end of the current chapter,
playback jumps back to the beginning of the chapter.(The VFD will light icon) TITLE = Repeat current title. When playback reaches the end of the current title, playback
jumps back to the beginning of the title. (The VFD will light ALL icon) VCD / CD
OFF ONE ALL
? To enable/disable Repeat mode in VCD/ CD, select REPEAT and press the ENTER button repeatedly to toggle between OFF, ONE or ALL, then press the PLAY button.
? The settings are as follows : OFF = Repeat mode disable. ONE = Repeat current track. When playback reaches the end of the current track, playback
jumps back to the beginning of the track. (The VFD will light icon) ALL = Repeat entire disc. When playback reaches the end of the disc, playback resumes at the
beginning. (The VFD will light ALL icon)
SPECIAL PLAY MODE DVD? VCD? CD ² Random mode:
OFF ON
? To enable/disable Random mode, select RANDOM and press the ENTER button repeatedly to toggle
between OFF and ON, then press the PLAY button.

19
? The settings are as follows : OFF = Random mode disable. ON = Random mode enable. When playback reaches the end of the current chapter/track,
playback jumps to a random chapter/track. (The VFD will light RAND icon) ² PBC mode (playback control) ? If the disc allows PBC playback control (e.g. VCD 2.0 disc) , the PBC option is shown. If the disc does
not allow this mode of playback, this option is not display. To enable/disable PBC mode, select PBC and press the ENTER button repeatedly to toggle between OFF and ON.
? The settings are as follows : OFF = PBC mode disabled. ON = PBC mode enable. PBC-capable discs will play with menu control when the disc is
played for the first time after insertion into the player. (The VFD will light PBC icon) ² Program mode (playing in a favorite order) ? To enable Programmed Playback mode, select PROGRAM and press the ENTER button. This enables
the Program Menu. The OSD will display the following : DVD TITLE CHAPTER
VCD/CD
T C T C T C T C **** **** **** **** **** **** **** **** **** **** **** **** **** **** **** ****
<BACK><OK><CLEAR>
PROGRAM EDIT: [1-13] 1[**] 5[**] 9[**] 13[**] 2[**] 6[**] 10[**] 14[**] 3[**] 7[**] 11[**] 15[**] 4[**] 8[**] 12[**] 16[**]
<BACK><OK><CLEAR>
? Press the DIRECTION buttons( ? ) to select a position(DVD) or number(VCD/CD). ? Enter title and chapter number (DVD) or track number(VCD/CD) using the number buttons. ? If you make a mistake, press the CLR/SHIFT button to clear. ? Repeat this process until the desired number of entries are made. ? Press the PLAY button (or Select OK, then press the ENTER button) , the OSD will show? PROGRAM
PLAY? and playback will jump to the chapter/track given in #1.Once that chapter/track has finished playing, playback will jump to the chapter/track given in #2 and so on. (The VFD will light PROG icon)
? To disable Programmed Playback mode, Press PLAY MODE button to enable the Play Mode Menu, select PROGRAM <STOP> and press ENTER. This will stop playback and show the logo screen.
TIPS: you can press the CLR/SHIFT button then press the PLAY MODE button to show the PROGRAM MENU on screen.
SPECIAL PLAY MODE DVD? VCD? CD ²Repeat A→B mode You can playback in segment repeatedly. ? Press the A→B button at the beginning of the segment (point A) you want to play repeatedly. The OSD
will display “REPEAT A-”. ? Press the A→B button again at the end of the segment (point B). The OSD will display “REPEAT A-B

20
SET”. ? Press the A→B button a third time to disable repeat A→B mode and allow playback to continue in
normal fashion. The OSD will display “REPEAT A-B CANCELED”.
ZOOMING PLAYBACK DVD? VCD The player can zoom up the picture for viewing details during normal, slow or still playback. Press the ZOOM button
? If you further press the ZOOM button repeatedly, the magnification level increases. Three magnification levels are supported. (ZOOM 1,ZOOM 2, ZOOM 3)
? If you press the DIRECTION button ( ? ? ? )during zooming playback, the zoom point shifts. ? To resume normal playback, press the ZOOM button repeatedly until the OSD show “NO ZOOM”. NOTE : Zooming does not work on subtitles or menu screens included on DVDs.
PLAYBACK INFORMATION DVD? VCD? CD You can view information about a disc and its operational status during playback.
Press the DISPLAY button The screen will show first page of operational status.
DVD
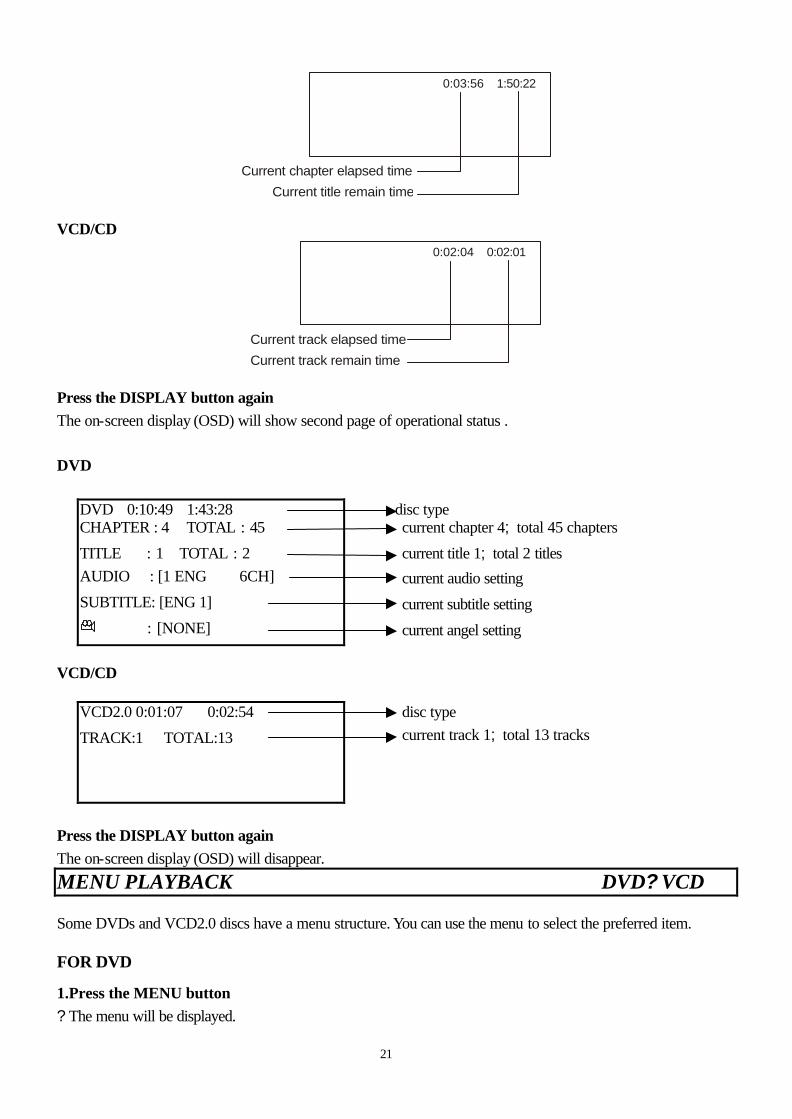
21
0:03:56 1:50:22
Current chapter elapsed time
Current title remain time VCD/CD
0:02:04 0:02:01
Current track elapsed time
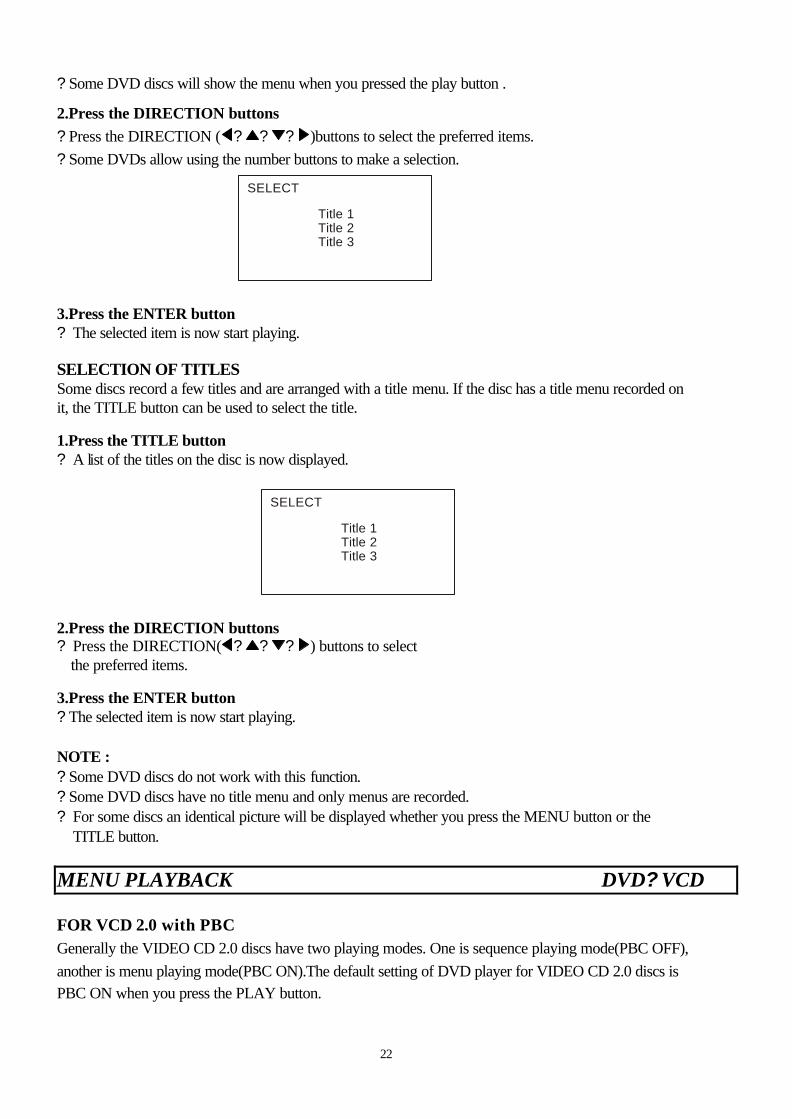
Current track remain time Press the DISPLAY button again The on-screen display (OSD) will show second page of operational status .
DVD
DVD 0:10:49 1:43:28 CHAPTER : 4 TOTAL : 45
TITLE : 1 TOTAL : 2
AUDIO : [1 ENG 6CH]
SUBTITLE: [ENG 1]
: [NONE]
disc type current chapter 4; total 45 chapters
current title 1; total 2 titles
current audio setting
current subtitle setting
current angel setting
VCD/CD
VCD2.0 0:01:07 0:02:54
TRACK:1 TOTAL:13
disc type
current track 1; total 13 tracks
Press the DISPLAY button again The on-screen display (OSD) will disappear.
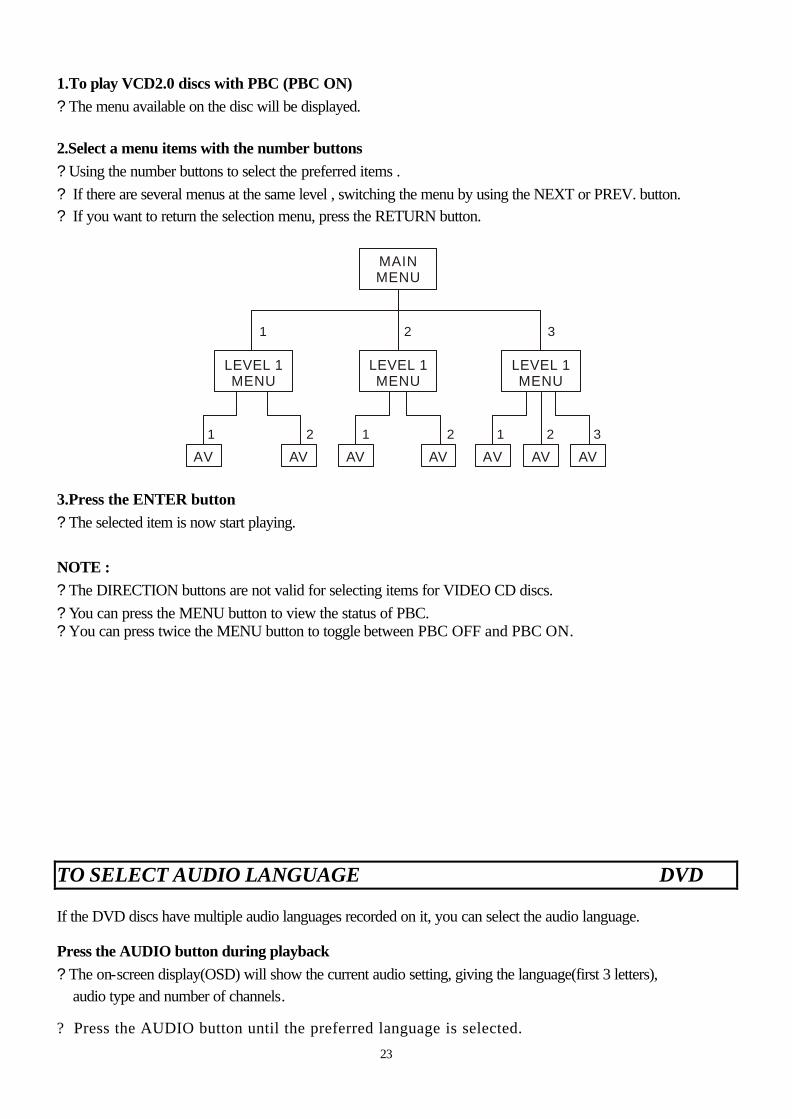
MENU PLAYBACK DVD? VCD Some DVDs and VCD2.0 discs have a menu structure. You can use the menu to select the preferred item. FOR DVD
1.Press the MENU button ? The menu will be displayed.
22
? Some DVD discs will show the menu when you pressed the play button .
2.Press the DIRECTION buttons ? Press the DIRECTION ( ? ? ? )buttons to select the preferred items. ? Some DVDs allow using the number buttons to make a selection.
Title 1Title 2Title 3
SELECT
3.Press the ENTER button ? The selected item is now start playing. SELECTION OF TITLES Some discs record a few titles and are arranged with a title menu. If the disc has a title menu recorded on it, the TITLE button can be used to select the title.
1.Press the TITLE button ? A list of the titles on the disc is now displayed.
Title 1Title 2Title 3
SELECT
2.Press the DIRECTION buttons ? Press the DIRECTION( ? ? ? ) buttons to select the preferred items.
3.Press the ENTER button ? The selected item is now start playing.
NOTE : ? Some DVD discs do not work with this function. ? Some DVD discs have no title menu and only menus are recorded. ? For some discs an identical picture will be displayed whether you press the MENU button or the
TITLE button.
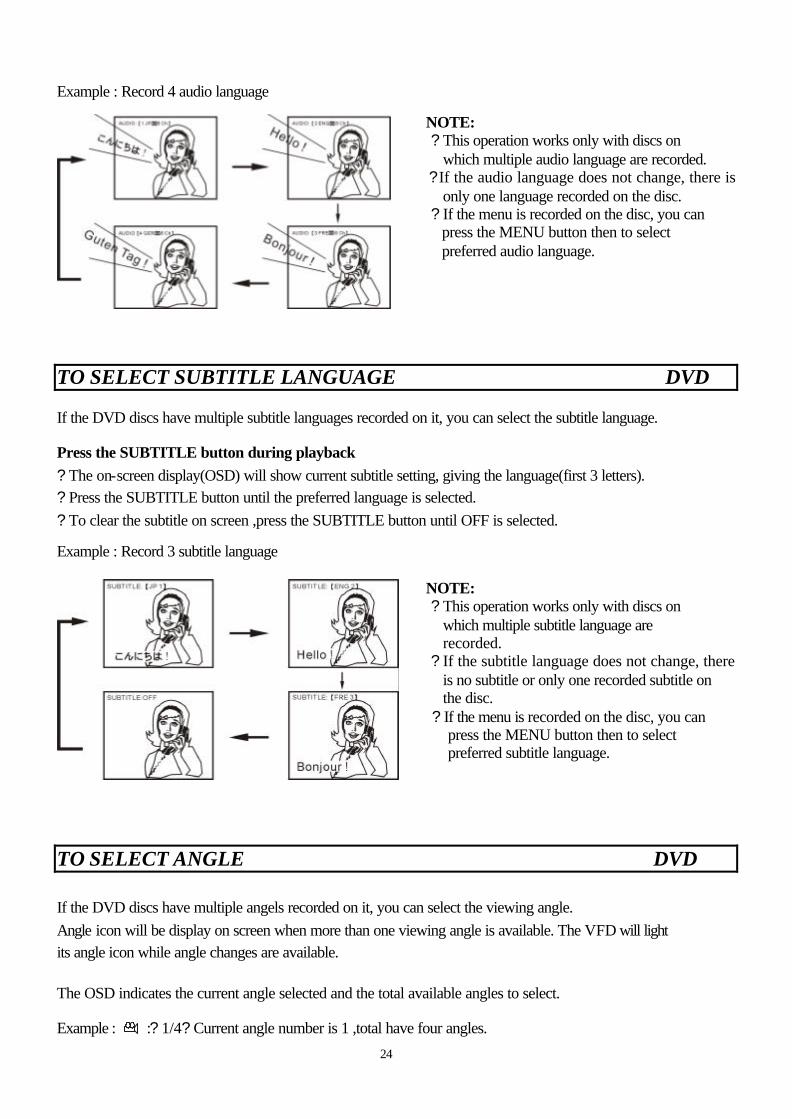
MENU PLAYBACK DVD? VCD FOR VCD 2.0 with PBC Generally the VIDEO CD 2.0 discs have two playing modes. One is sequence playing mode(PBC OFF), another is menu playing mode(PBC ON).The default setting of DVD player for VIDEO CD 2.0 discs is PBC ON when you press the PLAY button.
23
1.To play VCD2.0 discs with PBC (PBC ON) ? The menu available on the disc will be displayed. 2.Select a menu items with the number buttons ? Using the number buttons to select the preferred items . ? If there are several menus at the same level , switching the menu by using the NEXT or PREV. button. ? If you want to return the selection menu, press the RETURN button.
MAINMENU
LEVEL 1MENU
AV AV AV AVAV AV AV
LEVEL 1MENU
LEVEL 1MENU
1
1 1 12 2 2 3
2 3
3.Press the ENTER button ? The selected item is now start playing. NOTE : ? The DIRECTION buttons are not valid for selecting items for VIDEO CD discs. ? You can press the MENU button to view the status of PBC. ? You can press twice the MENU button to toggle between PBC OFF and PBC ON.
TO SELECT AUDIO LANGUAGE DVD If the DVD discs have multiple audio languages recorded on it, you can select the audio language.
Press the AUDIO button during playback ? The on-screen display(OSD) will show the current audio setting, giving the language(first 3 letters),
audio type and number of channels.
? Press the AUDIO button until the preferred language is selected.
24
Example : Record 4 audio language
NOTE: ? This operation works only with discs on
which multiple audio language are recorded. ?If the audio language does not change, there is
only one language recorded on the disc. ? If the menu is recorded on the disc, you can
press the MENU button then to select preferred audio language.
TO SELECT SUBTITLE LANGUAGE DVD If the DVD discs have multiple subtitle languages recorded on it, you can select the subtitle language.
Press the SUBTITLE button during playback ? The on-screen display(OSD) will show current subtitle setting, giving the language(first 3 letters). ? Press the SUBTITLE button until the preferred language is selected. ? To clear the subtitle on screen ,press the SUBTITLE button until OFF is selected.
Example : Record 3 subtitle language
NOTE: ? This operation works only with discs on
which multiple subtitle language are recorded.
? If the subtitle language does not change, there is no subtitle or only one recorded subtitle on the disc.
? If the menu is recorded on the disc, you can press the MENU button then to select preferred subtitle language.
TO SELECT ANGLE DVD If the DVD discs have multiple angels recorded on it, you can select the viewing angle. Angle icon will be display on screen when more than one viewing angle is available. The VFD will light its angle icon while angle changes are available. The OSD indicates the current angle selected and the total available angles to select.
Example : :? 1/4? Current angle number is 1 ,total have four angles.

25
Press the ANGLE button during playback ? The on-screen display (OSD) will show current angle selected and the total available angles to select. ? Press the ANGLE button until the preferred angle is selected.
Example : Record 4 angle NOTE: ? This function will only work on discs where different angles have been recorded. ? When you turn on the player or replace a disc, the player returns to the default angle. ? It will take a few seconds for the angle to change after the ANGLE button is pressed.
VOLUME CONTROL? MUTE? 3D SOUND DVD? VCD? CD u VOLUME CONTROL
Press the VOL+, VOL- buttons ? Press the VOL+,VOL- to adjust the volume of the player. (press the VOL+ button to increase volume;
press the button VOL- to decrease volume) ? The OSD will show volume level control icon which will indicate the output level.
: 1/4¡i ¡j
: 4/4¡i ¡j
: 2/4¡i ¡j
: 3/4¡i ¡j
26
u MUTE
Press the MUTE button ? Press the MUTE button , the DVD player will be mute and the OSD will show “ MUTE ”.
Press the MUTE button again ? Press the MUTE button again, the DVD player will disable mute and the OSD will clear MUTE. u 3D enhanced sound effect You can enjoy the 3D enhanced sound effect.
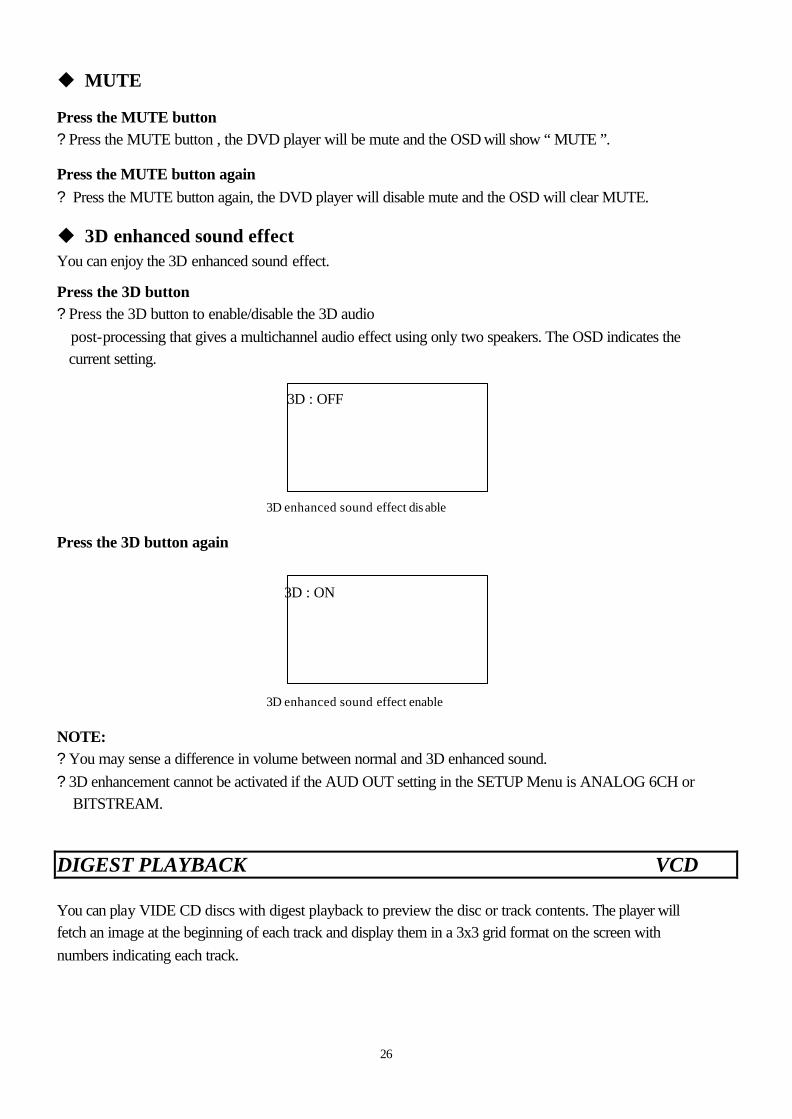
Press the 3D button ? Press the 3D button to enable/disable the 3D audio post-processing that gives a multichannel audio effect using only two speakers. The OSD indicates the
current setting. 3D : OFF 3D enhanced sound effect dis able Press the 3D button again
3D : ON
3D enhanced sound effect enable NOTE: ? You may sense a difference in volume between normal and 3D enhanced sound. ? 3D enhancement cannot be activated if the AUD OUT setting in the SETUP Menu is ANALOG 6CH or
BITSTREAM.
DIGEST PLAYBACK VCD You can play VIDE CD discs with digest playback to preview the disc or track contents. The player will fetch an image at the beginning of each track and display them in a 3x3 grid format on the screen with numbers indicating each track.

27
DISC preview 1.Press the TITLE button during stop ?Press the TITLE button during stop, the player will do disc preview and the OSD will show “ DIGEST ”.
?The disc are divided into 9 sections. Each picture (section) has its own number (1-9). If the disc has more than 9 tracks, press the NEXT button to display up 9 more tracks, press the NEXT/PREV. button as necessary to show all the tracks.
2.Press the DIRECTION buttons( ? ? ? ) or the NUMBER buttons (1~9) ? To select a track, press the DIRECTION buttons( ? ? ? ) to highlight the desired number or press
the number buttons (1-9). 3.Press the ENTER button ? The desired track will start playing. TRACK preview 1.Press the TITLE button during playing ? Press the TITLE button during playing, the player will do track preview and the OSD will show
DIGEST. ? The playing track are divided into 9 sections. Each picture (section) has its own number (1-9). 2.Press the DIRECTION buttons( ? ? ? ) or the number buttons (1~9) ? To select a section , press the DIRECTION buttons ( ? ? ? ) to highlight the desired number or
press the number button (1-9). 3.Press the ENTER button ? The desired section will start playing. NOTE : ? The DIGEST playback function just work in VIDEO CD discs.
USING KARAOKE The Player have two Microphone Input Jacks (MIC1, MIC2) and two Microphone volume control (VOL.1, VOL.2 ) for karaoke function. 1. Press the KARAOKE button ? The screen will show karaoke menu.
28
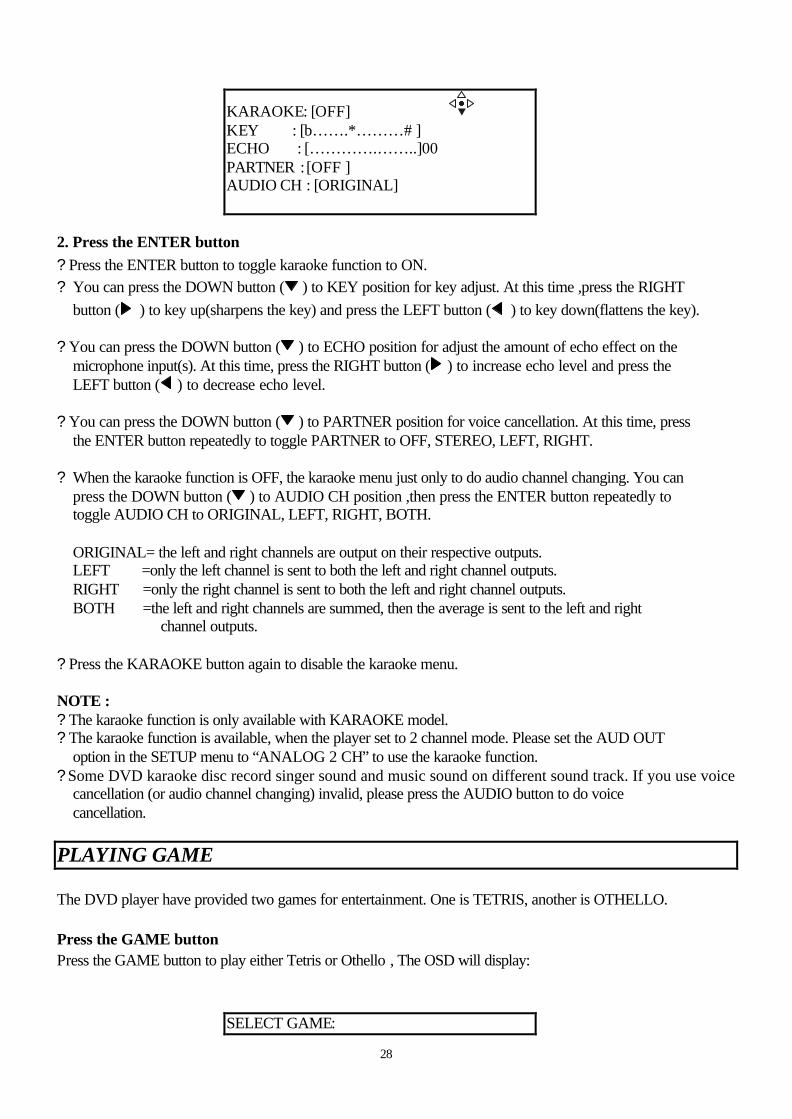
KARAOKE: [OFF] KEY : [b…….*………# ] ECHO : [………….……..]00 PARTNER : [OFF ] AUDIO CH : [ORIGINAL]
2. Press the ENTER button ? Press the ENTER button to toggle karaoke function to ON. ? You can press the DOWN button ( ) to KEY position for key adjust. At this time ,press the RIGHT
button ( ) to key up(sharpens the key) and press the LEFT button ( ) to key down(flattens the key).
? You can press the DOWN button ( ) to ECHO position for adjust the amount of echo effect on the microphone input(s). At this time, press the RIGHT button ( ) to increase echo level and press the LEFT button ( ) to decrease echo level.
? You can press the DOWN button ( ) to PARTNER position for voice cancellation. At this time, press the ENTER button repeatedly to toggle PARTNER to OFF, STEREO, LEFT, RIGHT.
? When the karaoke function is OFF, the karaoke menu just only to do audio channel changing. You can
press the DOWN button ( ) to AUDIO CH position ,then press the ENTER button repeatedly to toggle AUDIO CH to ORIGINAL, LEFT, RIGHT, BOTH.
ORIGINAL= the left and right channels are output on their respective outputs. LEFT =only the left channel is sent to both the left and right channel outputs. RIGHT =only the right channel is sent to both the left and right channel outputs. BOTH =the left and right channels are summed, then the average is sent to the left and right
channel outputs.
? Press the KARAOKE button again to disable the karaoke menu.
NOTE : ? The karaoke function is only available with KARAOKE model. ? The karaoke function is available, when the player set to 2 channel mode. Please set the AUD OUT
option in the SETUP menu to “ANALOG 2 CH” to use the karaoke function. ?Some DVD karaoke disc record singer sound and music sound on different sound track. If you use voice
cancellation (or audio channel changing) invalid, please press the AUDIO button to do voice cancellation.
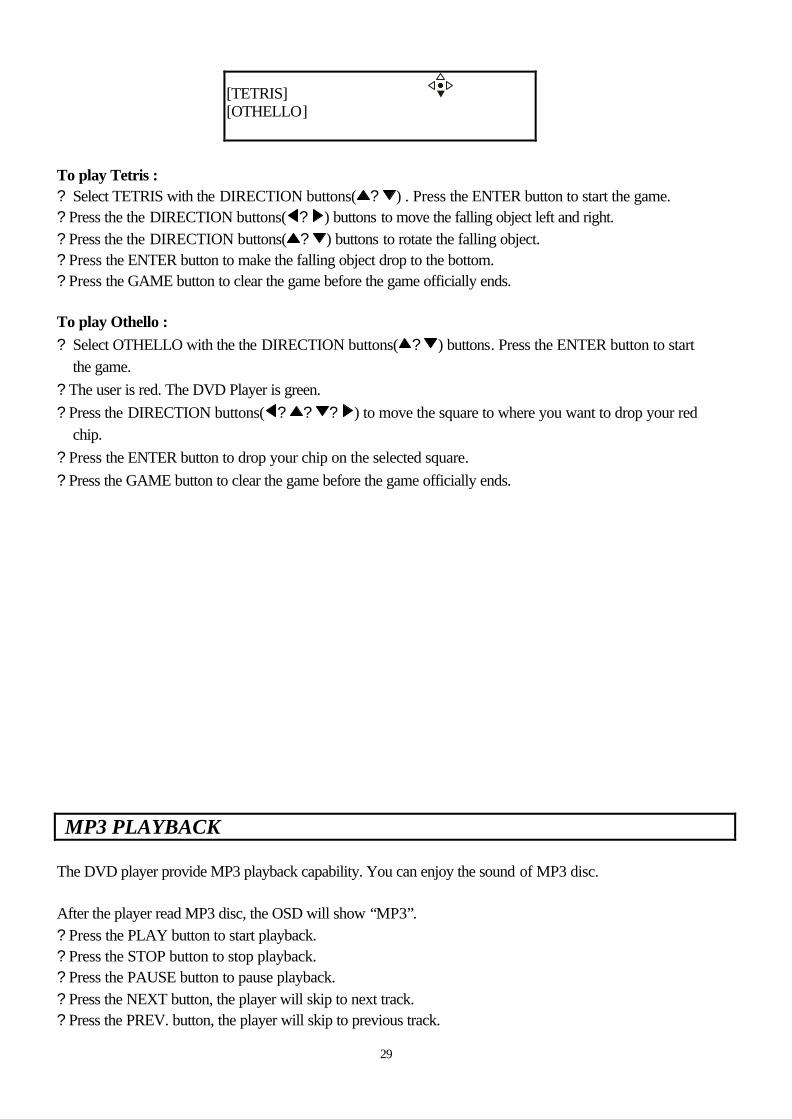
PLAYING GAME The DVD player have provided two games for entertainment. One is TETRIS, another is OTHELLO. Press the GAME button Press the GAME button to play either Tetris or Othello , The OSD will display:
SELECT GAME:
29
[TETRIS] [OTHELLO]
To play Tetris : ? Select TETRIS with the DIRECTION buttons( ? ) . Press the ENTER button to start the game. ? Press the the DIRECTION buttons( ? ) buttons to move the falling object left and right. ? Press the the DIRECTION buttons( ? ) buttons to rotate the falling object. ? Press the ENTER button to make the falling object drop to the bottom. ? Press the GAME button to clear the game before the game officially ends. To play Othello : ? Select OTHELLO with the the DIRECTION buttons( ? ) buttons. Press the ENTER button to start
the game. ? The user is red. The DVD Player is green. ? Press the DIRECTION buttons( ? ? ? ) to move the square to where you want to drop your red
chip. ? Press the ENTER button to drop your chip on the selected square. ? Press the GAME button to clear the game before the game officially ends.
MP3 PLAYBACK The DVD player provide MP3 playback capability. You can enjoy the sound of MP3 disc. After the player read MP3 disc, the OSD will show “MP3”. ? Press the PLAY button to start playback. ? Press the STOP button to stop playback. ? Press the PAUSE button to pause playback. ? Press the NEXT button, the player will skip to next track. ? Press the PREV. button, the player will skip to previous track.
30
? You can locate a specific track by directly selecting a track number. Example: to jump 125 track playback
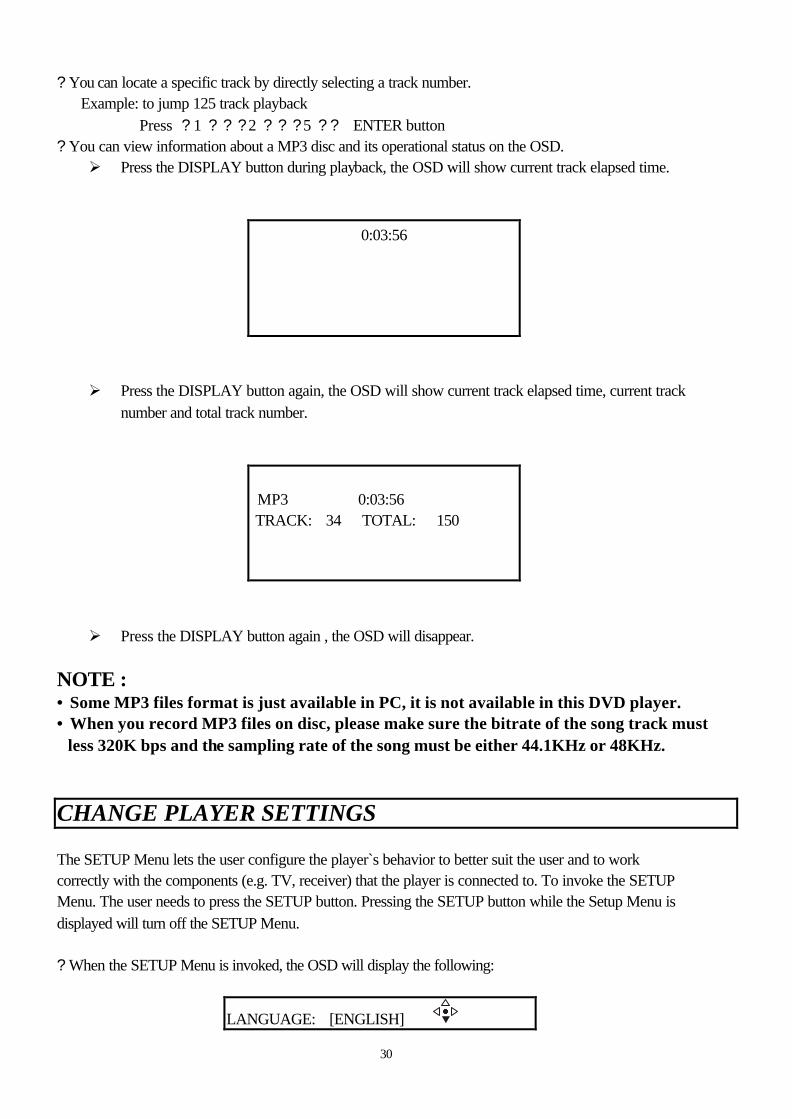
Press ? 1 ? ? ?2 ? ? ?5 ? ? ENTER button ? You can view information about a MP3 disc and its operational status on the OSD. Ø Press the DISPLAY button during playback, the OSD will show current track elapsed time.
0:03:56
Ø Press the DISPLAY button again, the OSD will show current track elapsed time, current track
number and total track number.
MP3 0:03:56 TRACK: 34 TOTAL: 150
Ø Press the DISPLAY button again , the OSD will disappear.
NOTE : • Some MP3 files format is just available in PC, it is not available in this DVD player. • When you record MP3 files on disc, please make sure the bitrate of the song track must
less 320K bps and the sampling rate of the song must be either 44.1KHz or 48KHz.
CHANGE PLAYER SETTINGS The SETUP Menu lets the user configure the player`s behavior to better suit the user and to work correctly with the components (e.g. TV, receiver) that the player is connected to. To invoke the SETUP Menu. The user needs to press the SETUP button. Pressing the SETUP button while the Setup Menu is displayed will turn off the SETUP Menu. ? When the SETUP Menu is invoked, the OSD will display the following:
LANGUAGE: [ENGLISH]
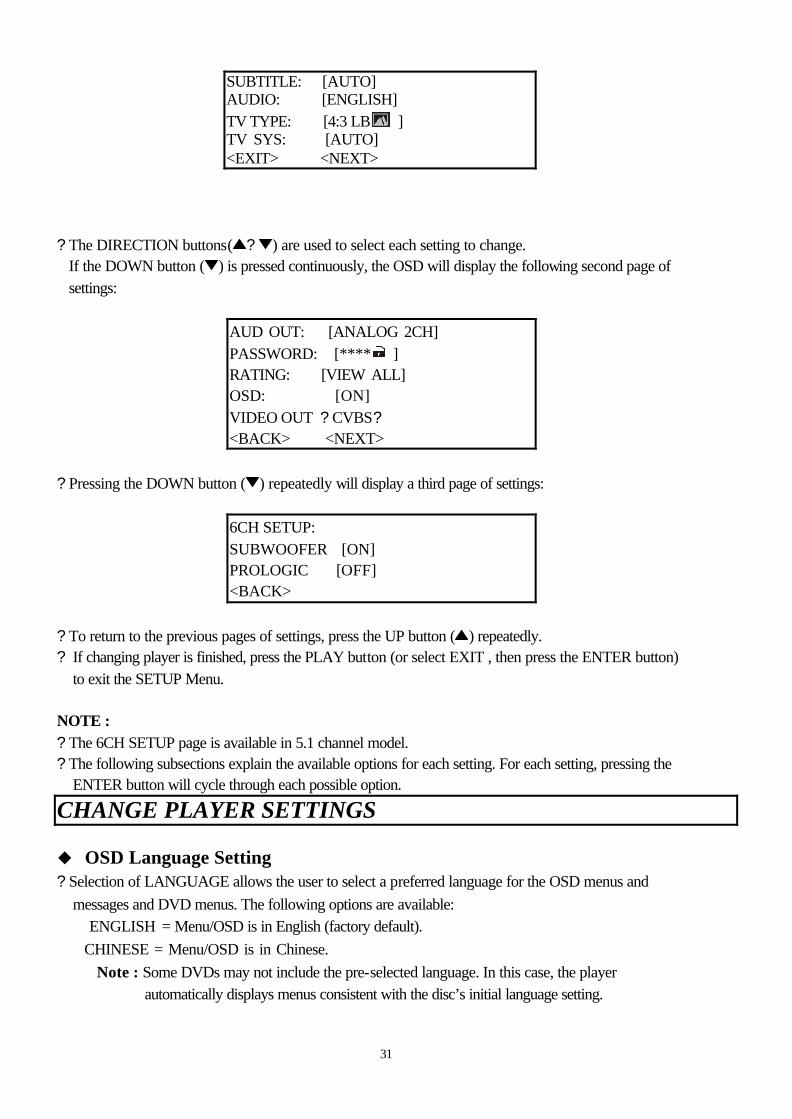
31
SUBTITLE: [AUTO] AUDIO: [ENGLISH] TV TYPE: [4:3 LB ] TV SYS: [AUTO] <EXIT> <NEXT>
? The DIRECTION buttons( ? ) are used to select each setting to change.
If the DOWN button ( ) is pressed continuously, the OSD will display the following second page of settings:
AUD OUT: [ANALOG 2CH] PASSWORD: [**** ] RATING: [VIEW ALL] OSD: [ON] VIDEO OUT ? CVBS? <BACK> <NEXT>
? Pressing the DOWN button ( ) repeatedly will display a third page of settings:
6CH SETUP: SUBWOOFER [ON] PROLOGIC [OFF] <BACK>
? To return to the previous pages of settings, press the UP button ( ) repeatedly. ? If changing player is finished, press the PLAY button (or select EXIT , then press the ENTER button)
to exit the SETUP Menu. NOTE : ? The 6CH SETUP page is available in 5.1 channel model. ? The following subsections explain the available options for each setting. For each setting, pressing the
ENTER button will cycle through each possible option.
CHANGE PLAYER SETTINGS u OSD Language Setting ? Selection of LANGUAGE allows the user to select a preferred language for the OSD menus and
messages and DVD menus. The following options are available: ENGLISH = Menu/OSD is in English (factory default). CHINESE = Menu/OSD is in Chinese.
Note : Some DVDs may not include the pre-selected language. In this case, the player automatically displays menus consistent with the disc’s initial language setting.

32
u Subtitle Setting ? Selection of SUBTITLE allows the user to select a preferred subtitle language (DVD only). The
following options are available: OFF = Preference is for disabled subtitles. AUTO = Subtitle preference is the primary language on the disc (factory default) ENGLISH = Subtitle Preference is English. CHINESE = Subtitle preference is Chinese.
Note : Some DVDs may be set to display subtitles in a different language than you selected. u TV Type Setting ? Selection of TV TYPE allows the user to select the aspect ratio of their TV (DVD only). The following
options are available: 4:3 LB = Aspect ratio of TV is 4:3 and letterboxing of widescreen material is preferred
(factory default). 4:3 PS = Aspect ratio of TV is 4:3 and pan &scan of widescreen material is preferred. 16:9 = Aspect ratio of TV is 16:9. Both widescreen and 4:3 content will fill the entire
screen. NOTE : Most widescreen DVDs will not allow pan & scan conversion. If 4:3 PS is selected on
these DVDs letterboxing will be used instead. If 16:9 is selected and a 4:3 TV is connected. 16:9 content will appear distorted during playback (objects look thin) .
CHANGE PLAYER SETTINGS u TV System Setting ? Selection of TV SYS allows the user to select the TV standard (DVD and VCD only). NTSC = TV is NTSC. PAL VIDEO CD content is played at NTSC resolution and frame rate. PAL =TV is PAL. NTSC content is played at PAL resolution and frame rate. AUTO = If the content is PAL, the output is PAL, If the content is NTSC, the output is NTSC.
(You need a multistandard TV in this case.) Note : Playing PAL DVDs with TV SYS set to NTSC is not allowed. The OSD will indicate:
PAL TO NTSC ERR PAL is the regular PAL (50Hz, 576 lines)
33
PALM is for same PAL TV with PALM system. Check your TV standard for correction setting u Audio Output Setting ? Selection of AUD OUT allows the user to adjust the output of the audio on the RCA jacks and Digital
Audio output(optical and coaxial connector) to work correctly with the audio equipment (e.g. receiver, speakers ) the player is connected to. The following options are available:
ANALOG 6CH = All 6 RCA jacks on the rear panel(5.1 CH SURROUND AUDIO OUT) are connected to a receiver with 6 RCA inputs (factory default) ANALOG 2CH = The L and R RCA jacks (FRONT L&R) are connected to a receiver with stereo
RCA inputs. STEREO PCM = The Digital Audio output is connected to a receiver that accepts PCM. BITSTREAM = The Digital Audio output t is connected to a receiver that accepts Dolby Digital
or DTS. NOTE: ? The ANALOG 6CH is available in 5.1 channel model. ? If ANALOG 6CH is selected, the SUBWOOFER settings take effect. ? If BITSTREAM is selected and the audio source is PCM (DVD), the output on the Digital Audio
output is PCM. ? When you play VCD disc for digital audio output, you must set to “STEREO PCM”
u Parental Control Rating Setting Selecting a password to lock and unlock the parental control rating ? Selection of PASSWORD allows the user to enter a password to lock and unlock the parental control
setting into the player. The following options are available: (unlocked) =The parental control is unlocked and may be changed in the RATING selection
(factory default). (locked) = The parental control is locked so no change may be made to the RATING selection. ? Locking the password: Enter four digits using the number buttons. Each number entered is overwritten
by “*” . Once all four have been entered, Press the ENTER button. The ‘locked’ icon? ?will appear and the password is saved in non-volatile memory.
? Unlocking the password: Enter the four digit password using the number buttons. Each number is overwritten by ‘*’. Once all four have been entered, press the ENTER button. If the password was entered correctly, the ‘unlocked’ icon? ? will appear and the password is erased from memory. If the wrong password was entered, no change will occur and the user may attempt to enter the password again.
NOTE: ? A password is always 4 digits. Do not forget your password. ? See the explanation on RATING to see how locking and unlocking the password has an effect on the
parental control.
CHANGE PLAYER SETTINGS Selecting the parental control rating ? Selection of RATING allows the user to set the parental control of the player. The following options are
available: VIEW ALL = Allow any title to play (factory default). NO ADULT = Only titles with a parental control setting of 4 or less are allowed to play (e.g.
PG–13, PG, G movies). KID’S ONLY = Only titles with a parental control setting of 1 are allowed to play (e.g. G movies).
NOTE:
34
? Parental Control functions only if the DVD title has it encoded in its program. Parental Control does not work for VCD or CD Audio.
? RATING can only be changed if the password is ‘unlocked’(? ?) .RATING cannot be changed if the password is ‘locked’(? ?) .
u OSD Display Setting ? Selection of OSD allows the user to enable/disable the pop-up OSD messages (e.g. PAUSE , PLAY).
The following options are available: ON=OSD “pop-up” messages are enabled (factory default). OFF=OSD “pop-up” messages are disabled.
? VIDEO OUT Setting ? Selection of Video out allows the user to set “CVBS” or “YUV” for user’s function of TV. CVBS = The video output is CVBS format. YUV = The video output is YUV format. (You need a component video TV in this case.)
RGB = The video output is RGB format. (You need using SCART connector for this format.) ? optional?
u 6 Channel Setting (Subwoofer)? just available in 5.1 channel model? ? Selection of SUBWOOFER allows the user to enable/disable the subwoofer output when AUD OUT is
set to ANALOG 6CH. The following options are available: ON= Subwoofer is on. Bass from center and surround channels is redirected to subwoofer. If the
content contains a discrete subwoofer channel, it is also sent to the subwoofer (factory default)
OFF= Subwoofer is off. Bass from center and surround channels is redirected to subwoofer. If the content contains a discrete subwoofer channel. It is discarded.
? Selection of PROLOGIC allows the user to enable/disable Pro Logic decoding on two-channel sources to create a multichannel output when AUD OUT is set to ANALOG 6CH. The following options are available:
OFF=Pro Logic decoding is off. Two-channel sources are output only on the left and right channels(factory default)
AUTO=Pro Logic decoding is automatically enabled for Dolby Digital content that indicates that it contains Pro Logic-encoded material. If the content does not contain this indication, no Pro Logic decoding is performed and only two-channel output on the left and right channels is provided.
ON=Pro Logic decoding is forced on for all two-channel content, regardless if the content is Pro Logic-encoded or not.
TROUBLE SHOOTING
Before requesting service for this player, check the table below for a possible cause of the problem you are experiencing. Some simple checks or adjustment on your part may eliminate the problem and restore proper operation.
Symptom Remedy No power ? Insert the power plug securely into the power outlet Play fail ? This player cannot play discs other than DVDs, VIDEO CDs,
Audio CDs. ? The disc may be dirty and may require cleaning. ? Ensure that the disc is placed with the label side up.
35
? Ensure that the disc is placed on the disc tray correctly inside the guide.
? Cancel the parental lock function or change the parental control rating.
No picture ? Ensure that the equipment is connected properly. ? Ensure that input setting for the TV is “VIDEO”
Connect the video cable into the video output jacks securely. Picture color is mono ? Check TV SYS in SETUP Menu.
? Check TV standard of playing disc. No sound ? Ensure that the equipment is connected properly.
? Select the correct input mode of the audio receiver. ? Connect the audio cable into the audio output jacks securely. ? Turn on the equipment connected with the audio cable. ? No sound is heard during still picture (pause)and step function
or slow motion play. ? Setting the SETUP Menu properly.
Picture has occasional distortion ? Disc is dirty and clean it. The remote control does not work properly
? Check the batteries are installed with the correct polarities. ? The batteries are exhausted, replace the batteries with new
ones. ? Point the remote control at the sensor and operate. ? Operate the remote control at a distance of not more than 7
meters from the sensor. Subtitle language cannot be changed ? The disc has no record of multiple subtitle language. Audio language cannot be changed ? The disc has no record of multiple audio language. Angel cannot be changed ? The disc has no record of multiple angel. The sound has not 6 channel output ? The disc has no record the 6 channel sound.
? Check the AUDIO OUT setting in SETUP Menu. The player cannot play ? Incorrect region code. CAUTION: Sometimes abnormal functioning of the player because of static electricity , or other external interference. To restore normal operation , either unplug the AC cord and then plug it in outlet again or press the POWER button again.
SPECIFICATION Model number DVD-2000/DVD-8050 TV system NTSC/PAL Playable disc DVD
VIDEO CD 1.0/1.1 VIDEO CD 2.0 (Playback control) CD-DA(Audio CD); MP3
Disc size 8 cm and 12 cm Digital Audio Output Optical output : optical connector
Coaxial output :RCA jack

36
Video Output Output level :1V-pp (75O) S-Video Output Y output level: 1V-pp (75O)
C output level: 0.3 V-pp (75O) S/N Ratio Better than 95dB Dynamic Range Better than 95dB Wow & Flutter Below measurable limit Total Harmonic Distortion Less than 0.005% (1KHz) Audio Output CD: 4Hz~20KHz(44.1 K sampling rate)
Output level : 2Vrms/10KO DVD : 4Hz~22KHz(44.1 K sampling rate) 4Hz~20KHz(96 K sampling rate) 5.1 Channel Analog Output---RCA jack X 6 2 Channel Analog Output---RCA jack X 2
Power Supply AC 100~240V 50/60Hz Power Consumption 21W Dimensions (W/H/D) 430x95x306 mm Weight 4KG net ? Design and specifications subject to change without notice for improvements.
This product incorporates copyright protection technology that is protected by method claims of certain
U.S. patents and other intellectual property rights owned by Macrovision Corporation and other rights
owners. Use of this copyright protection technology must be authorized by Macrovision Corporation,
and is intended for home and other limited viewing uses only unless otherwise authorized by
Macrovision Corporation. Reverse engineering or disassembly is prohibited.
Manufactured under license from Dolby Laboratories. "Dolby" and the double-D symbol are trademarks of Dolby Laboratories. Confidential unpublished works. 1992 - 1997. All rights reserved.


![WITHOUT YOU / Stranger Than The Night (Air Supply ) [CD-Single] CD - Maxi.pdf · 2020-03-18 · CD-Singles and Maxi-CD’s featuring songs published by Apple and mentioned as such](https://img.pdfslide.net/doc/110x75/5e95a087a4f7983ac520603d/without-you-stranger-than-the-night-air-supply-cd-single-cd-maxipdf.jpg)