Embed Size (px)
Citation preview
4-H Equine Series
Discovering Equine –Horsemanship 4 & 5 Reference Manual
Table of Contents
Introduction 1
Skill Builder 1: Ground work & Psychology
2
Skill Builder 2: Grooming 18
Skill Builder 3: Identification and Conformation
34
Skill Builder 4: Safety and Stable Management
47
Skill Builder 5:Health 64
Skill Builder 6: Riding 91
Glossary 117
- Revised 2017 -
Discovering Horses
The purpose of the Discovering Horses project is to help you develop skills in all areas of light horse management. The Reference Manual is meant to be used as a resource for Discovering Horses 1 and 2. By setting goals to become a responsible horse owner and a good rider, you will become strong in the areas of self-discipline, patience, responsibility, respect and pride in your accomplishments.
Horsemanship is an art of riding in a manner that makes it look easy. To do this, you and your horse must be a happy team and this takes time and patience. Even though some of these requirements may seem basic, this is the foundation that you will build upon for Mastering Horses. This resource manual is meant to be used with the Discovering Horses - Horsemanship 4 and Horsemanship 5.
The riding skills you develop in this project will prepare you for advancement. Whether you are interested in specialized riding disciplines or horse training, you will need to learn more about aids and equipment.
No matter what kind of goals you set for yourself in Discovering Horsemanship, the satisfaction you experience will come from the results of your own hard work. Take your time to do your best!
Get Online! I can’t wait to show you what I’ve found
on-line! Check out my great link ideas wherever you see me in the computer screen.
Meet Equus!
Equus is a smart, safe horse that will appear throughout your manual to give you useful facts and safety tips on working with your horse. Equus is the Latin word for horse. Equus is also the scientific name for the group of animals that includes horses, donkeys and zebras.
Do It
Dig It
Dream It
Learning is 3D!
To help you get the most out of your learning, the project
has the following parts:
Dream it! Plan for success Do it! Hands on learning
Dig it! What did you learn?
2
Skill Builder 1: Ground work and Psychology Lunging Muscling Balance & Symmetry Conformational Faults Nature of the Horse Body Language
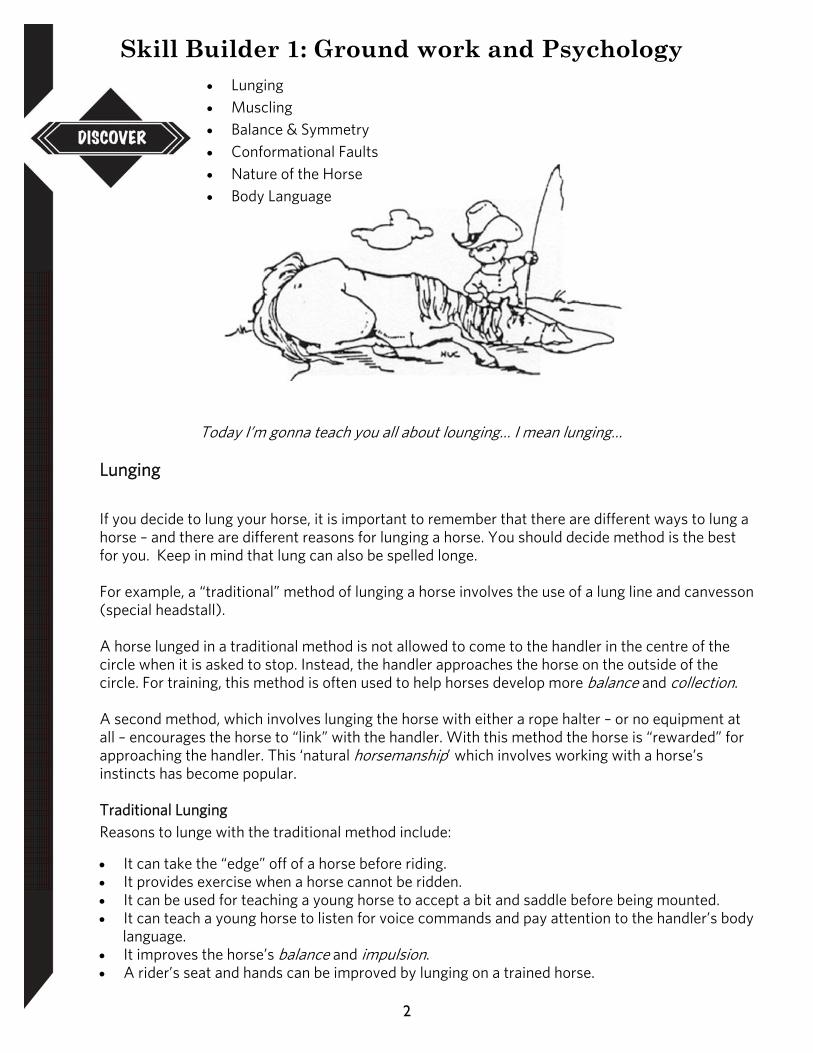
Today I’m gonna teach you all about lounging… I mean lunging…
Lunging
If you decide to lung your horse, it is important to remember that there are different ways to lung a horse – and there are different reasons for lunging a horse. You should decide method is the best for you. Keep in mind that lung can also be spelled longe. For example, a “traditional” method of lunging a horse involves the use of a lung line and canvesson (special headstall). A horse lunged in a traditional method is not allowed to come to the handler in the centre of the circle when it is asked to stop. Instead, the handler approaches the horse on the outside of the circle. For training, this method is often used to help horses develop more balance and collection. A second method, which involves lunging the horse with either a rope halter – or no equipment at all – encourages the horse to “link” with the handler. With this method the horse is “rewarded” for approaching the handler. This ‘natural horsemanship’ which involves working with a horse’s instincts has become popular. Traditional Lunging Reasons to lunge with the traditional method include:
It can take the “edge” off of a horse before riding. It provides exercise when a horse cannot be ridden. It can be used for teaching a young horse to accept a bit and saddle before being mounted. It can teach a young horse to listen for voice commands and pay attention to the handler’s body
language. It improves the horse’s balance and impulsion. A rider’s seat and hands can be improved by lunging on a trained horse.
3
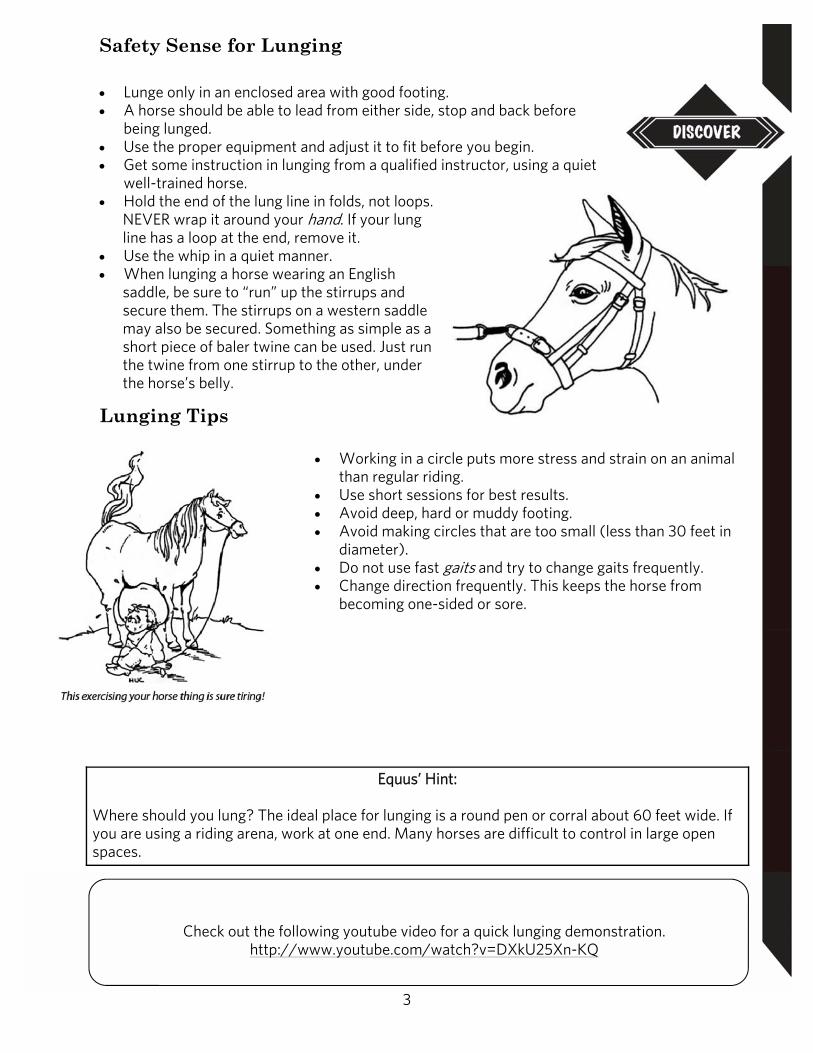
Safety Sense for Lunging Lunge only in an enclosed area with good footing. A horse should be able to lead from either side, stop and back before
being lunged. Use the proper equipment and adjust it to fit before you begin. Get some instruction in lunging from a qualified instructor, using a quiet
well-trained horse. Hold the end of the lung line in folds, not loops.
NEVER wrap it around your hand. If your lung line has a loop at the end, remove it.
Use the whip in a quiet manner. When lunging a horse wearing an English
saddle, be sure to “run” up the stirrups and secure them. The stirrups on a western saddle may also be secured. Something as simple as a short piece of baler twine can be used. Just run the twine from one stirrup to the other, under the horse’s belly.
Lunging Tips
Working in a circle puts more stress and strain on an animal than regular riding.
Use short sessions for best results. Avoid deep, hard or muddy footing. Avoid making circles that are too small (less than 30 feet in
diameter). Do not use fast gaits and try to change gaits frequently. Change direction frequently. This keeps the horse from
becoming one-sided or sore.
Equus’ Hint:
Where should you lung? The ideal place for lunging is a round pen or corral about 60 feet wide. If you are using a riding arena, work at one end. Many horses are difficult to control in large open spaces.
Check out the following youtube video for a quick lunging demonstration.
http://www.youtube.com/watch?v=DXkU25Xn-KQ

4
Getting Started - Lunging
To lung a horse to the left (counter-clockwise), hold the lung line in your left hand. To lung a horse to the right (clockwise), hold the lung line in your right hand. To teach your horse to move around you, hold the shank in one hand and the whip in the
other. Move back from the shoulder of the horse. You may need to point the whip at the horse’s hindquarters or tap the horse with the whip.
Tell the horse to “walk,” making sure that you stay opposite the flank of the horse or it may stop and face you.
Keep doing this until the horse moves around you on at least 15 feet of line without stopping. After the horse has gone around several times, let it stop, saying “whoa.”
To stop the horse, you may also step forward slightly (toward the front end of the horse). Do not let the horse come to you. It must wait for you to come to it on the outside of the
circle. (If the horse walks over the lung line it may become tangled in it.)
Praise the horse for obeying and change directions.
Do this every day until the horse easily walks around you.
To change directions, tuck the whip backwards under your arm and fold the lung line as you walk towards the horse. Now change the snap from one side of the halter to the other.
To teach the horse to trot, use the voice command “trot” and point the whip toward the horse’s hindquarters.
Do not attempt the “canter” or “lope” until the horse performs well at the trot.
Remember, horses understand the tone of your voice, not the words, so changing the tone of your voice when asking for a gait helps the horse understand.
5
Only EXPERIENCED horsepeople should lunge a TRAINED horse with side reins. Inexperienced horses and horsepeople using side reins can be dangerous for both horse and handler and result in harm and possible fatalities. You and your project group may wish to do some research on side reins—pros, cons, proper and improper use. If so here are some internet links to start your investigation.
http://www.compassionatehorsetraining.com/Sidereins.html http://www.horse-sense.org/archives/sidepros.php
http://www.youtube.com/watch?v=Yxw2JdXO6mQ&feature=mfu_in_order&list=UL
“Natural Horsemanship On Line Exercises” Here is one method that involves the use of a rope halter and lead line to encourage the horse to “link” with the handler.
Since this method involves a shorter line than traditional lunging, it is used as a very short training exercise. At the most, the horse is only asked to trot two to four small circles around the handler before being stopped.
To get the horse started, use the hand holding the line to “point” or lead off in the direction the horse is being asked to travel. At the same time, swing the excess portion of the lead line towards the horse’s forequarters. This encourages the horse to back off and move away from the handler.
The handler should stand in one place. The horse should do the moving.
Lunging a schooled horse: http://www.videojug.com/film/how-to-lunge-a-
schooled-horse This is an excellent video demonstrating the proper use of a cavesson and side reins, as well as correct
attire while lunging.
Want to learn more, then check out the following link! http://www.naturalhorsesupply.com/longeingprnt.shtml
6
When the horse begins trotting around the handler, the handler may pass the line from one hand to other behind his or her back. Since the horse is doing what is being asked of it, the handler refrains from any unnecessary movement. This way the horse becomes more responsive to the handler’s body position and cues To ask the horse to stop, the handler moves slightly ahead of the horse’s direction of movement. As soon as the horse gives its attention to the handler – the handler “backs off” and releases the pressure.
Eventually, the horse will realize that it will get a “rest” if it responds to this release of pressure and approaches the handler.
The handler praises and rewards the horse for coming to the centre of the circle.
Next, the handler asks the horse to do the same in the opposite direction. say here are a few links to videos and references regarding working with your horse on-line. These techniques will assist the handler later on when they ask the horse to link up or join up with them and eventually be able to work with your horse at liberty and free of any ropes/lines. Also keep in mind there are various natural horsemanship techniques out there and these are just a sampling of some videos on line to give you a glimpse of working with your horse on line.
These links are just an example of one Natural Horseperson’s techniques, so be sure if this is something you are interested in learning, be sure to do your homework to find what other clinicians and natural horsepeople can offer. There are many great Canadian clinicians of Natural Horsemanship including some in Manitoba that can offer lessons, clinics and demonstrations. As well broaden your research and see what other types of natural horsepeople you can find outside of North America.
Jonathan Field –A clip from The Liberty Series. DVD #1 - Jonathan's Pre-Liberty Plan - teaching your horse to follow you. http://www.youtube.com/watch?v=VYlBd3oiCHE&feature=related Jonathan Field – A clip from The Liberty Series , DVD #4 – The Round Pen - showing how to do a proper send on the lunge line http://www.youtube.com/watch?v=wLv3qTysKBo Jonathan Field – A clip from The Liberty Series, DVD #5 - Advancing Liberty DVD #5 - showing how to improve your horse’s draw on the lunge line. http://www.youtube.com/watch?v=s9zvBORY0kg&feature=mfu_in_order&list=UL Jonathan Field - Clips from his Liberty DVD series - http://www.youtube.com/watch?v=zV5B2MbYz1g&feature=related Jonathan Field - clips of him working with his Andalusian stallion at liberty http://www.youtube.com/watch?v=5aAeAVKNKMU&feature=mfu_in_order&list=UL
7
Important note about whips: With or without a lung line, a horse can also be worked in a larger circle to “link up” with the handler. If a whip is being used to encourage the horse to move forward, be aware of how it is being used. If the whip is used to encourage the horse to move up to a trot for example, do not keep flicking the whip once the horse has responded. Leave the whip down and do not point it at the horse. Leave the horse alone. It will realize that as long as it keeps trotting, it will be comfortable and not receive any additional pressure. If you keep moving the whip, the horse will not be as responsive to the cues either. Only give signals if you expect to receive a response.
Goals
To improve your relationship with your horse, try working on some of the following goals and activities. Most of these, which are becoming more popular with trainers and riders, involve working with your horse’s senses and instincts. Try to think like the horse and understand how the horse feels when you ask it to do something. In doing so, your horse will begin to see you as a “leader” and partner. He will respect you more and therefore be a more willing partner.
1. Establish your personal space. This is important for your safety.
Do not allow your horse to walk over you, lean on you or stand too close to you. The horse should always respect you and pay attention to you. Try to keep the horse’s eyes – or at least one eye – on you. For example, if you are leading your horse and it has its eyes focused on something off to its right, the horse may move its left shoulder towards you and step on your feet.
If the horse pulls away from you, as in the situation above, give the lead rope a short, quick tug to bring your horse’s nose back towards you. At the same time, step safely away from your horse as you both come to a stop. Now, is the horse giving you its full attention? Are its ears trained on you? Stand in one spot for awhile. If the horse turns its head to look back at something in the other direction again, give the lead rope a strong, quick tug again. Remember that timing is very important. As soon as the horse gives its nose around, release the pressure on the lead rope immediately to reward it. Let the horse know, “If you pay attention to me – you will be comfortable.”
Setting the boundaries of your personal space may be as simple as putting your hand up where your horse can see it. Do not just elbow your horse, lean back against it or pull on the rope steadily. Remember from Exploring Horses, the horse’s sense of touch can almost become “numb” to cues because the cues have been mixed or given ineffectively.
Teach your horse to back away from you with a simple wiggle of the lead rope. This may take some time, but it’s a good exercise to work on. In some cases you may have to move the horse by pushing the lead rope off the “left and back” followed by a tug off the “right and back” and so on.
Another suggestion for backing is to raise your hands up in front of the horse, keeping the horse’s head centered between your hands. See if you can make the horse back up by alternately pointing your hands past the horse’s head in sort of a “pistol” action. As your horse gets better at backing from this method, you may bring your hands down “in between” these steps to wiggle the lead rope.
8
Remember, when your horse backs up for you, reward it by allowing it to stand and relax. When you ask your horse to come to you – remember to reward it by stroking its head.
If you’re going to ask something of your horse, you should mean it. Don’t reward your horse if it just “sluggishly does” what you request. On the other hand, if your horse “tries,” don’t continue to ask for more.
2. Improve your success in the saddle by learning to communicate with your horse on the ground.
a. To make it easier to bridle your horse, teach it to drop its head by yielding to pressure on its poll. First, place your thumb and middle finger on your horse’s poll. Next, give the horse a gentle squeeze as you apply pressure downward. As soon as the horse’s head drops the slightest bit – release the pressure. Reward the horse by rubbing the poll area and the top of the neck. With practice, the horse will eventually keep its head down for as long as you want it there. To ask the horse to lift its head, tap it lightly on the cheek.
It takes practice to master these techniques and it is a matter of you learning how to perform them with the correct timing and feel to get the response you want from the horse. The horse usually picks up the techniques fairly quickly as they are based on the horse’s language. This is why when you see a Natural Horseperson perform them the horse responds fairly quickly. The Natural Horseperson has mastered all the techniques, knows exactly how to use them and the tools involved along with knowing the correct timing and pressure required to communicate effectively with the horse.
Your club may wish to look into organizing and getting a local NH clinician in to teach some groundwork techniques. This would help members get some hands on experience from a professional Natural Horseperson on how to effectively use their tools, learn more about the techniques as well as timing and pressure, which are “key” to Natural Horsemanship. Members might also be interested in taking some lessons on their own if this is something they wish to improve on or learn more about.
Equus says…
Your horse only learns when it makes a mistake and you have the opportunity to PROPERLY correct it.
http://www.youtube.com/watch?v=wFBDcACR7ZM – clip from Adiva Murphy Natural Horsemanship – DVD #1 – Safety and Leadership http://www.youtube.com/watch?v=TKlyx1vU7v8 – clip from Kate Farmer – Thinking Horse
9
b. To ask your horse to back up, use one of your hands to gently apply pressure on the horse’s nasal bone (face). If the horse doesn’t respond, give a slight squeeze with your thumb and middle finger. When the horse drops its nose and steps back, relieve the pressure immediately and stroke the horse. This exercise can also be done by applying pressure to the horse’s chest
c. To teach your horse to perform a turn on the haunches to the right, use the fingers on your right hand to apply pressure in the girth area. Raise your left hand to encourage your horse to turn its head in the direction it is travelling. Remember to reward your horse for the smallest try. If it even takes one step, remove the pressure and rub the horse. If you work with your horse one step at time, you can control the number of steps it takes. For example, see if you can turn your horse three steps to the right. If your horse takes more than you asked for, go back to the beginning and only ask for one step. Then reward the horse by allowing it to stand and relax. (This exercise can also be used for turning your horse to the left.)
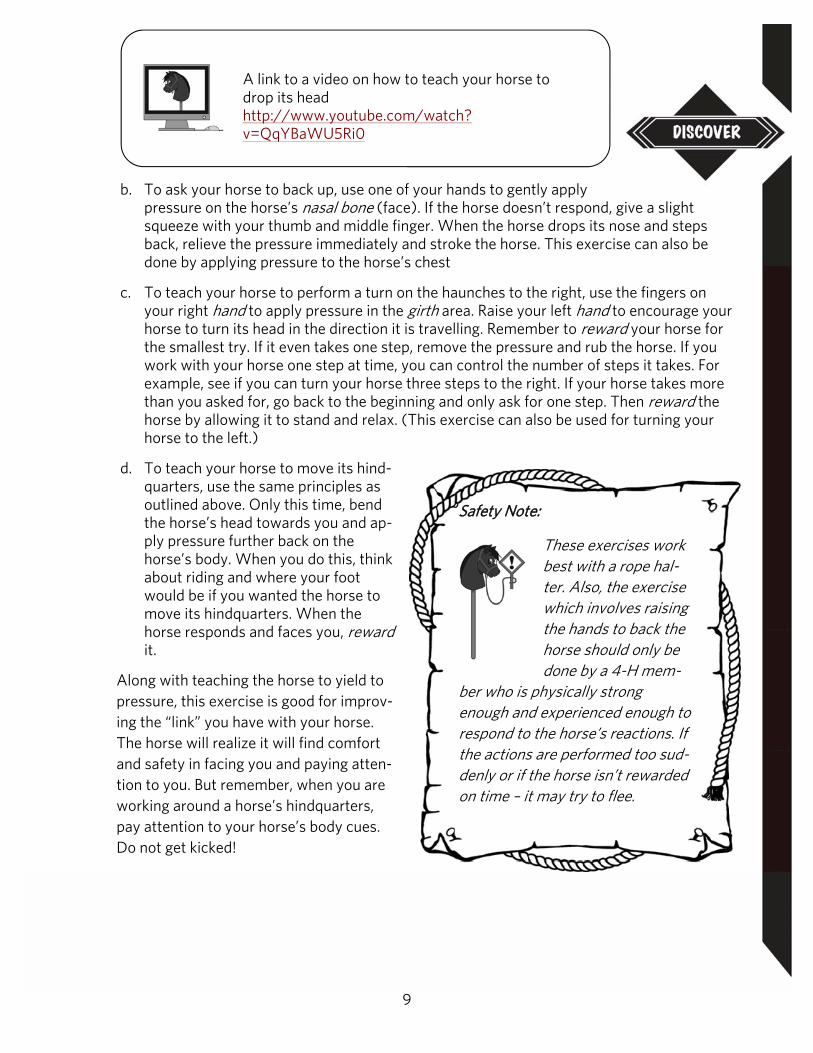
d. To teach your horse to move its hind-quarters, use the same principles as outlined above. Only this time, bend the horse’s head towards you and ap-ply pressure further back on the horse’s body. When you do this, think about riding and where your foot would be if you wanted the horse to move its hindquarters. When the horse responds and faces you, reward it.
Along with teaching the horse to yield to pressure, this exercise is good for improv-ing the “link” you have with your horse. The horse will realize it will find comfort and safety in facing you and paying atten-tion to you. But remember, when you are working around a horse’s hindquarters, pay attention to your horse’s body cues. Do not get kicked!
A link to a video on how to teach your horse to drop its head http://www.youtube.com/watch?v=QqYBaWU5Ri0
Safety Note:
These exercises work best with a rope hal-ter. Also, the exercise which involves raising the hands to back the horse should only be done by a 4-H mem-
ber who is physically strong enough and experienced enough to respond to the horse’s reactions. If the actions are performed too sud-denly or if the horse isn’t rewarded on time – it may try to flee.
10
Psychology
Nature of the Horse
To handle horses successfully, you need to understand the way they react to situations. However, you must also remember that every horse is different. Most behavior can be predicted because it is caused by the characteristics of the horse but each horse has its own way of reacting.
1. Shying and running away from something that frightens them is the horse’s natural
response. In earlier times, this was the horse’s main way of survival. Therefore when a horse shies and runs away, it is simply reacting the same way that its ancestors would have done.
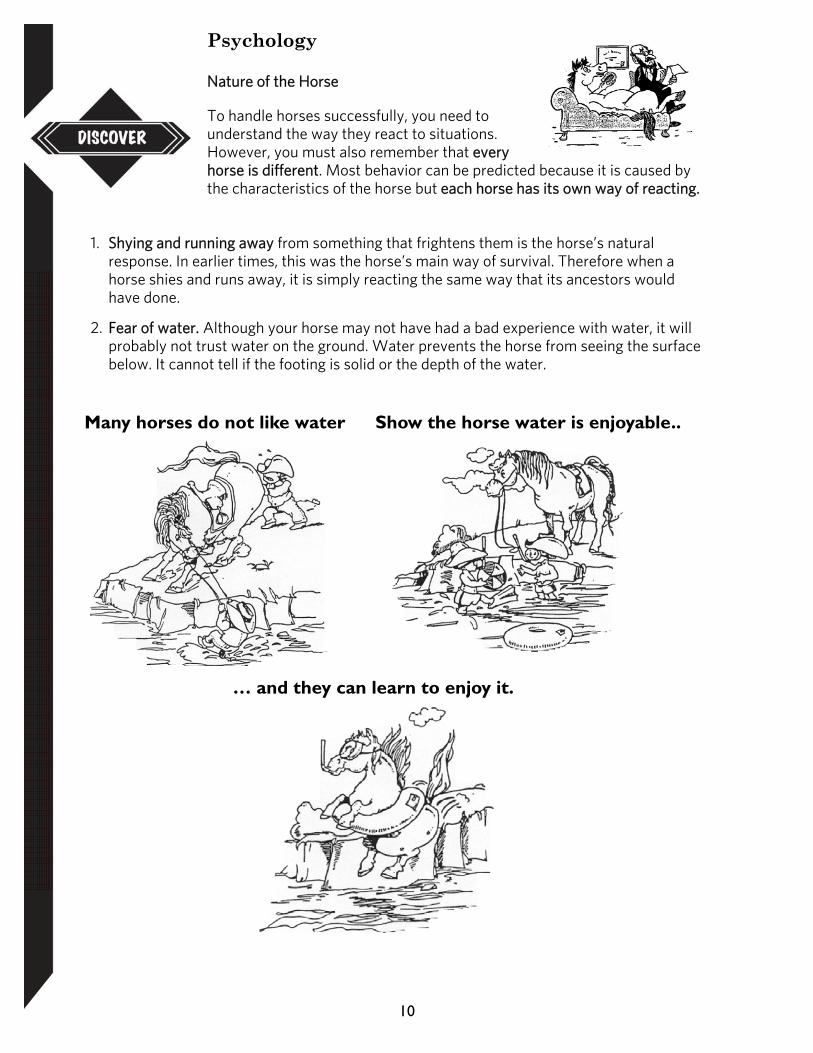
2. Fear of water. Although your horse may not have had a bad experience with water, it will probably not trust water on the ground. Water prevents the horse from seeing the surface below. It cannot tell if the footing is solid or the depth of the water.
Many horses do not like water Show the horse water is enjoyable..
… and they can learn to enjoy it.

11
3. Herd instinct. Horses are gregarious animals - that is, they like to be in a group. In the wild state, the horse felt safety in numbers. Horses feel most secure in the centre of the herd.
This instinct explains why a rider may have difficulty in getting his horse to leave a group of riders. The “herd instinct” causes horses within a group to do the same things. If one horse in the herd shies and runs, the others will no doubt follow.
4. Order of dominance. This is commonly known as the “pecking order”. In the wild state, obedience to leadership meant survival. In the herds of today, horses earn their position in the group depending on how aggressive they are. The amount of fighting depends upon the lead horse. The pecking order is tested every time a new horse is introduced to the group. Each horse in the group will fight with the newcomer until its position in the group is accepted. Older horses tend to be more aggressive than younger horses.
The more we understand the nature of horses (the way they think, how they act and react to different situations, what pleases them, what scares them) the easier it will be to ride and train them.
Horses are herd animals. In large herds, they will develop smaller sub-herds, each with its own leader and followers. Life in a herd is a very comfortable and safe place once the herd has established its pecking order. Each member is either more dominant or more submissive to other members of the herd. Leadership of the herd usually falls to an older stallion or older mare. Authority, once established, is rarely questioned.
Hearing
The hearing ability of horses has made them popular with hunters. The horse is able to hear game animals before they can be seen. Each of the horses ears are able to rotate to about 180 degrees and act as rotary antennas– rotating to the source of the sound that interests them. The hearing ability is not a problem. Sudden noises are more likely to upset a horse than a steady sound. However if the horse hears sudden or loud noises often enough, it will learn to get used to them.
Trainers use their voices when they are schooling horses. The horse responds to the tone and forcefulness of the voice. Horses will not always understand the words, but they do learn to recognize ones which are often repeated. This is why clucking and whistling work well as cues. The same command should always be used to get a certain response.
Smell
Smell is well developed in the horse. The horse uses smell as much as sight to identify another horse, a person or an object. Let the horse smell anything that is strange to it. Generally, smell does not cause a major reaction and the horse will move on once it is satisfied. If the horse dislikes a smell it may blow hard through the nostrils or snort. A horse will often snort just before it shies from an unacceptable smelling object.
12
Horses establish their territory and make statements with their feces and urine. When horses are first introduced to other horses and they blow into each other’s nostrils, they are sharing information about each other. When new horses are turned out to a new pasture, a great deal of sniffing goes on! When you meet a horse, let it smell you.
Taste
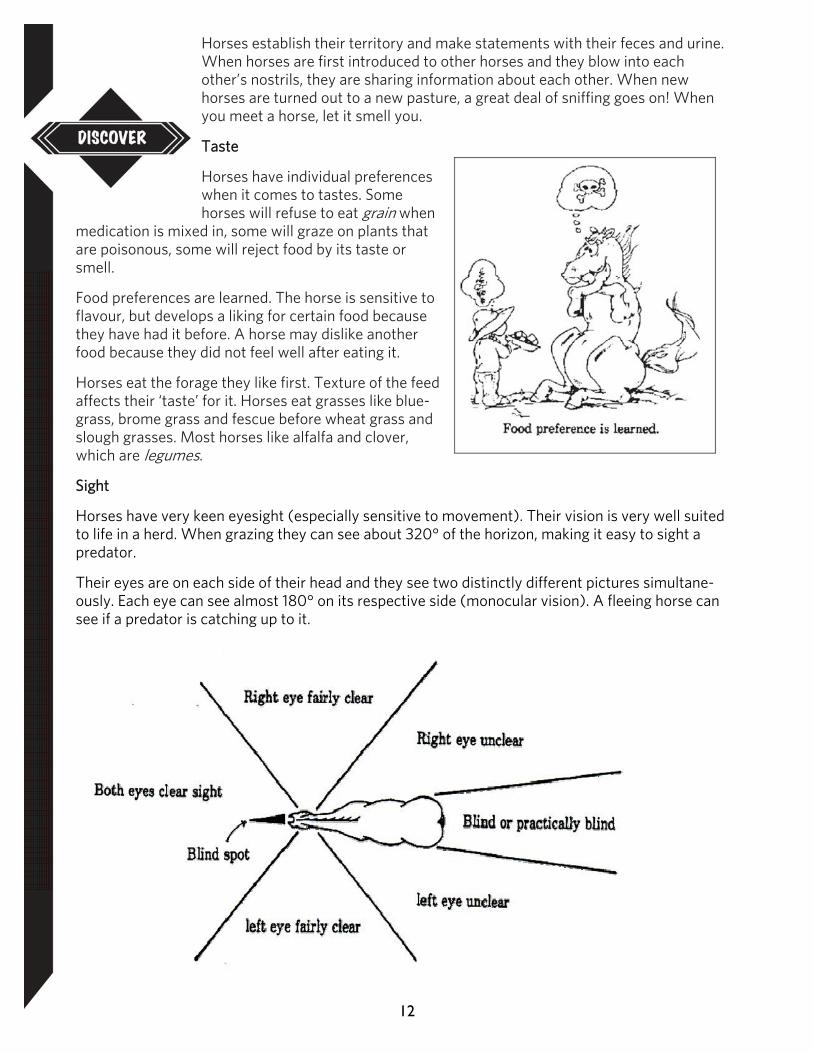
Horses have individual preferences when it comes to tastes. Some horses will refuse to eat grain when
medication is mixed in, some will graze on plants that are poisonous, some will reject food by its taste or smell.
Food preferences are learned. The horse is sensitive to flavour, but develops a liking for certain food because they have had it before. A horse may dislike another food because they did not feel well after eating it.
Horses eat the forage they like first. Texture of the feed affects their ‘taste’ for it. Horses eat grasses like blue-grass, brome grass and fescue before wheat grass and slough grasses. Most horses like alfalfa and clover, which are legumes.
Sight
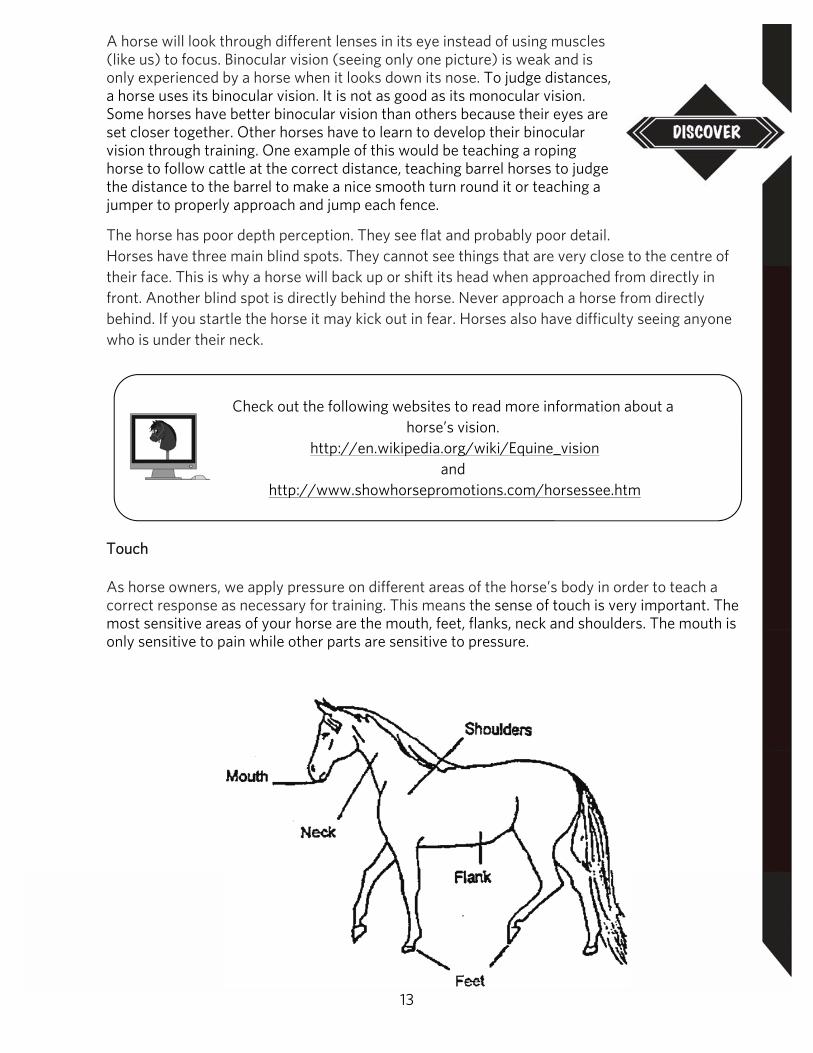
Horses have very keen eyesight (especially sensitive to movement). Their vision is very well suited to life in a herd. When grazing they can see about 320° of the horizon, making it easy to sight a predator.
Their eyes are on each side of their head and they see two distinctly different pictures simultane-ously. Each eye can see almost 180° on its respective side (monocular vision). A fleeing horse can see if a predator is catching up to it.
13
A horse will look through different lenses in its eye instead of using muscles (like us) to focus. Binocular vision (seeing only one picture) is weak and is only experienced by a horse when it looks down its nose. To judge distances, a horse uses its binocular vision. It is not as good as its monocular vision. Some horses have better binocular vision than others because their eyes are set closer together. Other horses have to learn to develop their binocular vision through training. One example of this would be teaching a roping horse to follow cattle at the correct distance, teaching barrel horses to judge the distance to the barrel to make a nice smooth turn round it or teaching a jumper to properly approach and jump each fence.
The horse has poor depth perception. They see flat and probably poor detail. Horses have three main blind spots. They cannot see things that are very close to the centre of their face. This is why a horse will back up or shift its head when approached from directly in front. Another blind spot is directly behind the horse. Never approach a horse from directly behind. If you startle the horse it may kick out in fear. Horses also have difficulty seeing anyone who is under their neck.
Touch
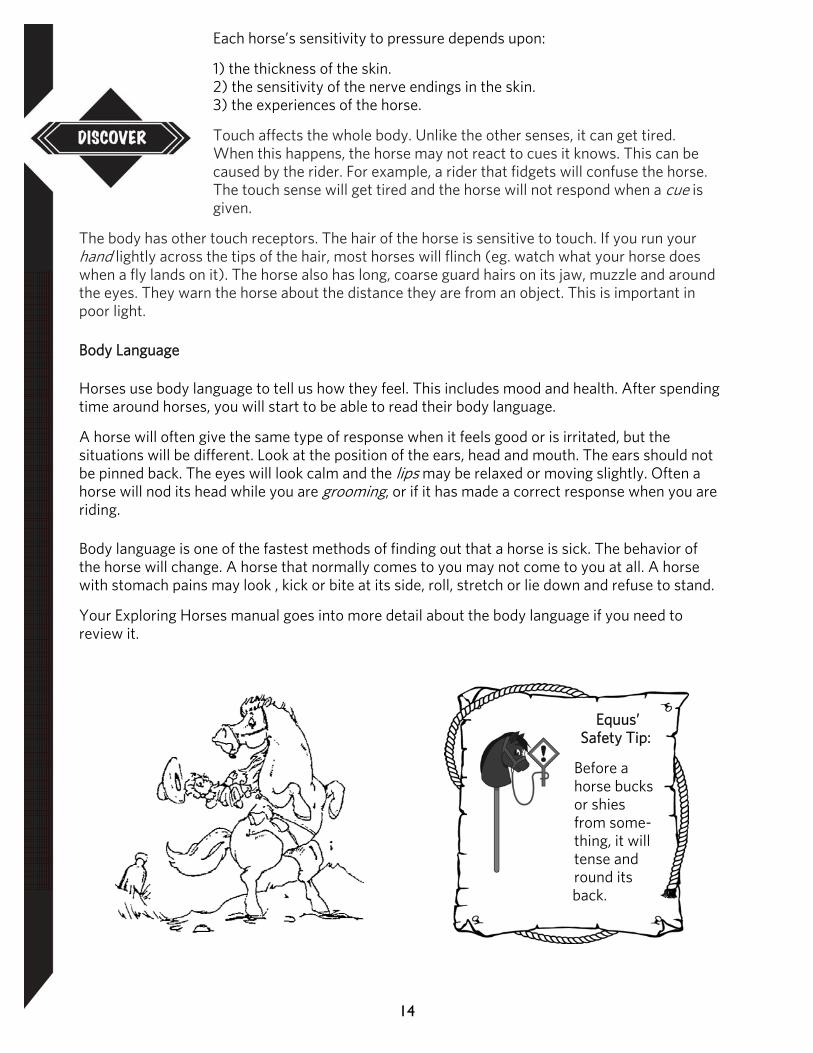
As horse owners, we apply pressure on different areas of the horse’s body in order to teach a correct response as necessary for training. This means the sense of touch is very important. The most sensitive areas of your horse are the mouth, feet, flanks, neck and shoulders. The mouth is only sensitive to pain while other parts are sensitive to pressure.
Check out the following websites to read more information about a horse’s vision.
http://en.wikipedia.org/wiki/Equine_vision and
http://www.showhorsepromotions.com/horsessee.htm
14
Each horse’s sensitivity to pressure depends upon:
1) the thickness of the skin. 2) the sensitivity of the nerve endings in the skin. 3) the experiences of the horse.
Touch affects the whole body. Unlike the other senses, it can get tired. When this happens, the horse may not react to cues it knows. This can be caused by the rider. For example, a rider that fidgets will confuse the horse. The touch sense will get tired and the horse will not respond when a cue is given.
The body has other touch receptors. The hair of the horse is sensitive to touch. If you run your hand lightly across the tips of the hair, most horses will flinch (eg. watch what your horse does when a fly lands on it). The horse also has long, coarse guard hairs on its jaw, muzzle and around the eyes. They warn the horse about the distance they are from an object. This is important in poor light. Body Language
Horses use body language to tell us how they feel. This includes mood and health. After spending time around horses, you will start to be able to read their body language.
A horse will often give the same type of response when it feels good or is irritated, but the situations will be different. Look at the position of the ears, head and mouth. The ears should not be pinned back. The eyes will look calm and the lips may be relaxed or moving slightly. Often a horse will nod its head while you are grooming, or if it has made a correct response when you are riding. Body language is one of the fastest methods of finding out that a horse is sick. The behavior of the horse will change. A horse that normally comes to you may not come to you at all. A horse with stomach pains may look , kick or bite at its side, roll, stretch or lie down and refuse to stand.
Your Exploring Horses manual goes into more detail about the body language if you need to review it.
Equus’ Safety Tip:
Before a horse bucks or shies from some-thing, it will tense and round its
back.
15
BE AWARE
Your horse reads your body language and your mood just as you read your horse’s body language. When you work with your horse be careful that your body language is not communicating a different message than you planned, without you realizing it. Be aware of the type of mood you are in when working with your horses as they will pick up on this very easily as well…happy, angry, sad.
It is just as important for us to understand and be aware of what our body language is communicating to our horses as it is for us to understand the horse’s body language.
Fear
Horses are naturally curious, yet quite suspicious. Everything is dangerous to them until proven otherwise. They have a natural instinct to flee from danger.
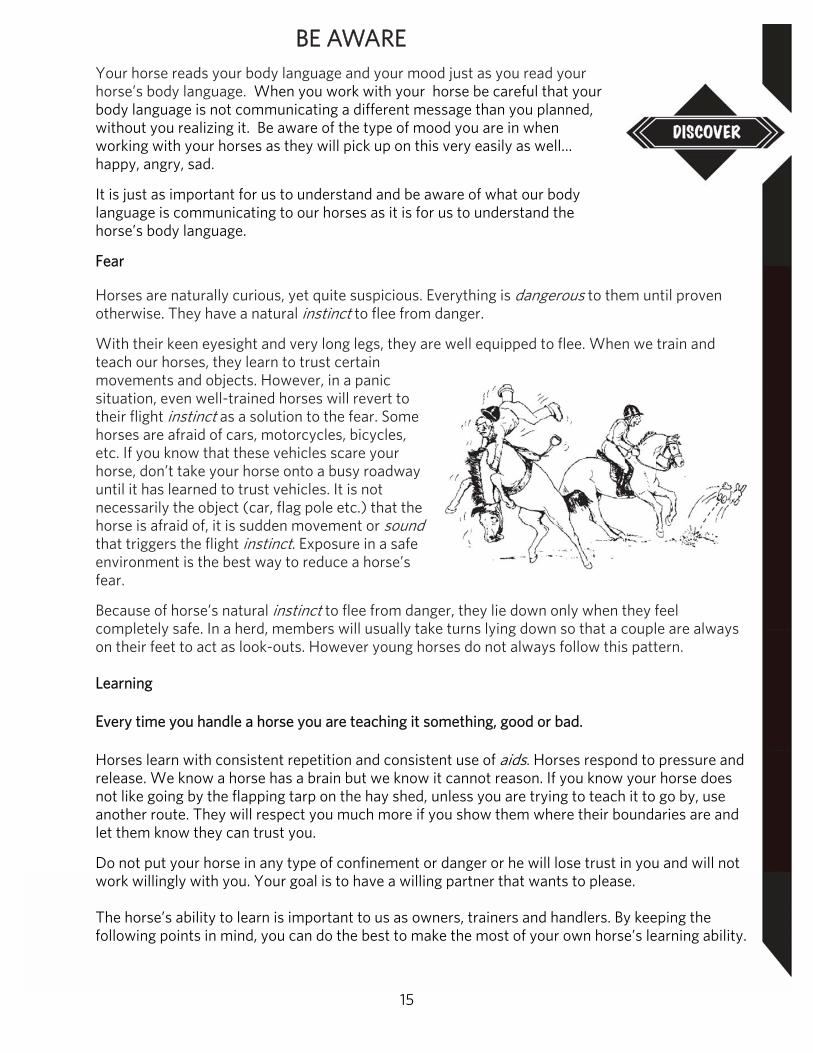
With their keen eyesight and very long legs, they are well equipped to flee. When we train and teach our horses, they learn to trust certain movements and objects. However, in a panic situation, even well-trained horses will revert to their flight instinct as a solution to the fear. Some horses are afraid of cars, motorcycles, bicycles, etc. If you know that these vehicles scare your horse, don’t take your horse onto a busy roadway until it has learned to trust vehicles. It is not necessarily the object (car, flag pole etc.) that the horse is afraid of, it is sudden movement or sound that triggers the flight instinct. Exposure in a safe environment is the best way to reduce a horse’s fear.
Because of horse’s natural instinct to flee from danger, they lie down only when they feel completely safe. In a herd, members will usually take turns lying down so that a couple are always on their feet to act as look-outs. However young horses do not always follow this pattern. Learning
Every time you handle a horse you are teaching it something, good or bad.
Horses learn with consistent repetition and consistent use of aids. Horses respond to pressure and release. We know a horse has a brain but we know it cannot reason. If you know your horse does not like going by the flapping tarp on the hay shed, unless you are trying to teach it to go by, use another route. They will respect you much more if you show them where their boundaries are and let them know they can trust you.
Do not put your horse in any type of confinement or danger or he will lose trust in you and will not work willingly with you. Your goal is to have a willing partner that wants to please. The horse’s ability to learn is important to us as owners, trainers and handlers. By keeping the following points in mind, you can do the best to make the most of your own horse’s learning ability.

16
Obedience to a leader is quite natural to a horse. Handlers that are able to have their horse regard him or her as leader of the herd are at an advantage.
The environment of the horse is important to learning. This includes the level of nutrition, health care and handling the horse has had.
Like most animals, horses are creatures of habit and find comfort in routine.
Learning will happen faster if every response of the horse is either rewarded or punished.
Discipline: If a horse is punished for an incorrect response, it must be punished every time it does it. The punishment must be given immediately or the horse will not know why it is being punished.
Reward: There are many ways to reward your horse. Providing “comfort” is the most effective. For example, after a horse has worked with speed for some time, stopping and resting is a reward. If the horse has been worked on the bit, riding with loose reins is a reward.
The length of time a horse is worked will depend on the age of the horse and the amount of physical work. For example, a young horse has a short attention span. The horse should only be worked until it gives a correct response to a new skill. If you quit on a positive note, your next session will likely get off to a good start.
Remember, to teach a horse a skill, it must be repeated. Although the horse learns slowly, it has a good memory.
Keep your horse interested. A bored horse, such as one that has been continuously worked in an arena day in and day out may become cranky and “sour.” By trying something new or going for a trail ride, you can keep your horse “fresh” and willing to learn. If riding is an enjoyable experience for both you and your horse – your achievements will become more rewarding.
Physical ability of the horse must be considered. Because of conformation, size and previous injuries, a horse may be unable to perform certain skills. Not every horse has the athletic ability to jump, rein or do games, even if they have the learning ability.
Here are some links to check for more information on why horse’s bite and tips to correct these habits.
http://www.kbrhorse.net/qt/bite.html
http://www.stephanieburns.com/articles/article16_horsebites.asp
http://www.infohorse.com/hilton.asp
http://www.horsetraining.org/horse-training-articles/2007/09/aggressive-at-feed-time-solutions-for.html
17
Obedience to a leader is quite natural to a horse. Handlers that are able to have their horse regard him or her as leader of the herd are at an advantage.
The environment of the horse is important to learning. This includes the
level of nutrition, health care and handling the horse has had. Like most animals, horses are creatures of habit and find comfort in
routine. Learning will happen faster if every response of the horse is either
rewarded or punished. Discipline: If a horse is punished for an incorrect response, it must be punished every time it
does it. The punishment must be given immediately or the horse will not know why it is being punished.
Reward: There are many ways to reward your horse. Providing “comfort” is the most effective.
For example, after a horse has worked with speed for some time, stopping and resting is a reward. If the horse has been worked on the bit, riding with loose reins is a reward.
The length of time a horse is worked will depend on the age of the horse and the amount of
physical work. For example, a young horse has a short attention span. The horse should only be worked until it gives a correct response to a new skill. If you quit on a positive note, your next session will likely get off to a good start.
Remember, to teach a horse a skill, it must be repeated. Although the horse learns slowly, it
has a good memory. Keep your horse interested. A bored horse, such as one that has been continuously worked
in an arena day in and day out may become cranky and “sour.” By trying something new or going for a trail ride, you can keep your horse “fresh” and willing to learn. If riding is an enjoyable experience for both you and your horse – your achievements will become more rewarding.
Physical ability of the horse must be considered. Because of conformation, size and previous
injuries, a horse may be unable to perform certain skills. Not every horse has the athletic ability to jump, rein or do games, even if they have the learning ability.
18
Skill Builder 2: Grooming
Braiding Hairstyles for Horses Hoof Anatomy Trimming Shoeing Common Foot Problems
Grooming
Just as individual people prefer individual hair styles, individual breeds of horses exhibit their own hair styles! As well, each riding discipline has certain requirements if you are planning to show. The following information will give you details on how to prepare your horse’s mane and some example of horse hairstyles. Regardless of the hair style, all horses need a clean, healthy, shiny coat to look their best.
P U L L I N G T H E M A N E
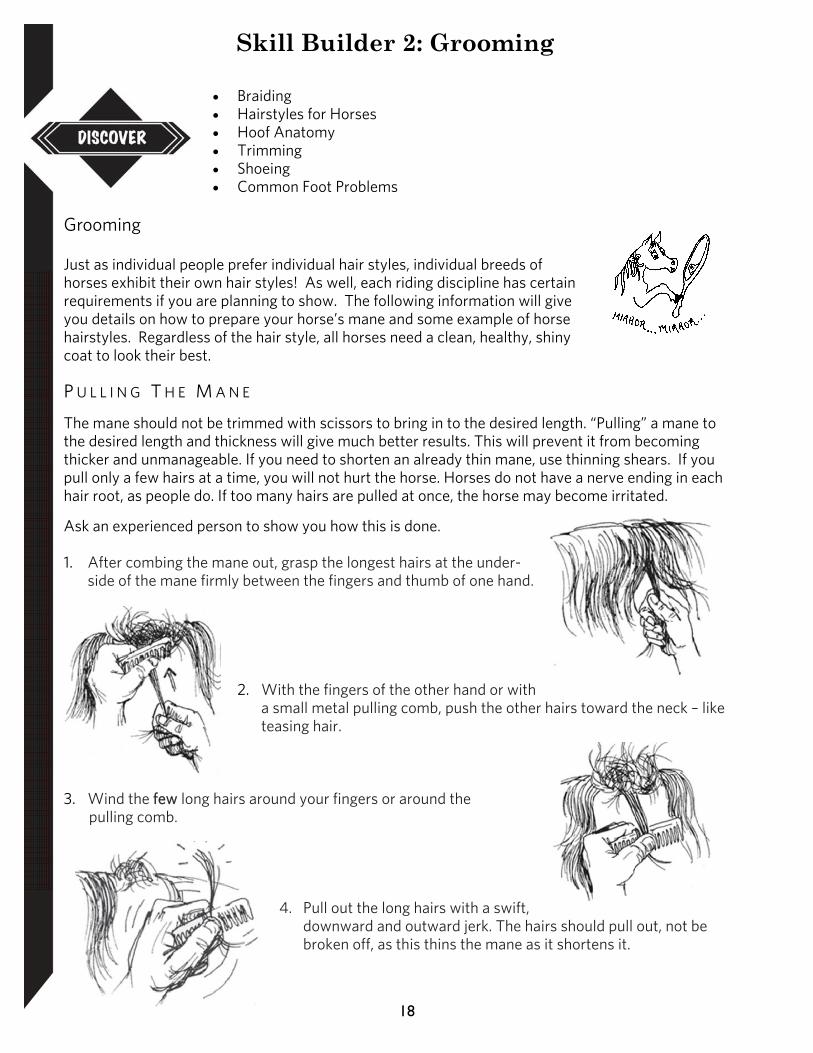
The mane should not be trimmed with scissors to bring in to the desired length. “Pulling” a mane to the desired length and thickness will give much better results. This will prevent it from becoming thicker and unmanageable. If you need to shorten an already thin mane, use thinning shears. If you pull only a few hairs at a time, you will not hurt the horse. Horses do not have a nerve ending in each hair root, as people do. If too many hairs are pulled at once, the horse may become irritated.
Ask an experienced person to show you how this is done. 1. After combing the mane out, grasp the longest hairs at the under-
side of the mane firmly between the fingers and thumb of one hand.
2. With the fingers of the other hand or with a small metal pulling comb, push the other hairs toward the neck – like teasing hair.
3. Wind the few long hairs around your fingers or around the pulling comb.
4. Pull out the long hairs with a swift,
downward and outward jerk. The hairs should pull out, not be broken off, as this thins the mane as it shortens it.
19
Banding Banding a horse's mane is a standard procedure for approved shows and for many open shows. It can make your horse's mane lie flat and close to the neck even on a windy day. When the mane lies close to the neck it gives the illusion of a slimmer neck. When you are just starting, it is always a good idea to practice banding your horse's mane early in the week prior to your show. This gives you an idea how long it will take and how well your horse will stand for you while you are banding. When you first start it will usually take several times to get the mane looking as good as you would like it to look, but hang in there, it comes with experience.
Check out the website below on how to prepare for showmanship.
http://www.ehow.com/videos-on_4652_prepare-horse-show_-showmanship-preparation.html
Check out the following website on how to pull a
horse’s mane! http://www.wikihow.com/Pull-a-Horse's-Mane
Check out the following website on how to braid the mane and tail
http://www.angelfire.com/tx3/equinekids/braiding.html
B R A I D I N G ( A L S O K N O W N A S P L A I T I N G )
If you plan to show your horse in English classes, it is important to know how to braid correctly. Braiding is also useful in training the mane to lie correctly. Wash your horse’s mane the day before you plan to braid, so the hair isn’t too slick. For best results the mane should be 4” – 5” (8-10 cm) in length. There are two ways of tying the braid – with elastics or yarn – both methods are acceptable.
20
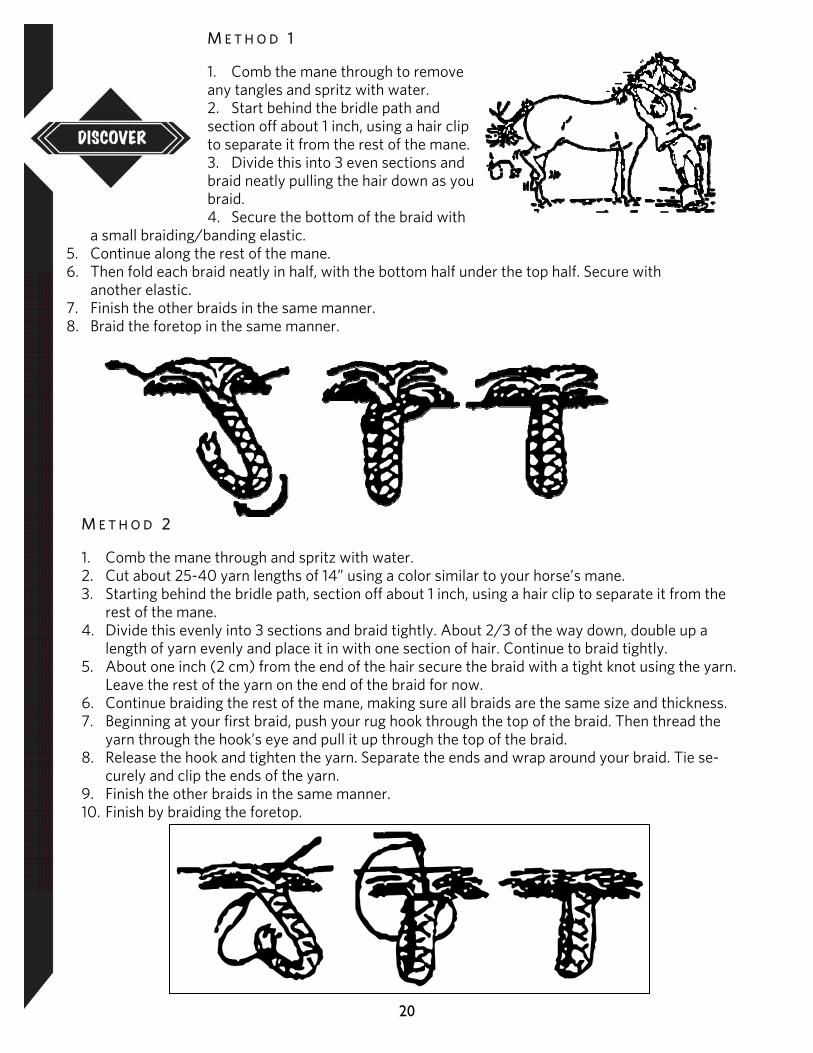
M E T H O D 1 1. Comb the mane through to remove any tangles and spritz with water. 2. Start behind the bridle path and section off about 1 inch, using a hair clip to separate it from the rest of the mane. 3. Divide this into 3 even sections and braid neatly pulling the hair down as you braid. 4. Secure the bottom of the braid with
a small braiding/banding elastic. 5. Continue along the rest of the mane. 6. Then fold each braid neatly in half, with the bottom half under the top half. Secure with
another elastic. 7. Finish the other braids in the same manner. 8. Braid the foretop in the same manner.
M E T H O D 2 1. Comb the mane through and spritz with water. 2. Cut about 25-40 yarn lengths of 14” using a color similar to your horse’s mane. 3. Starting behind the bridle path, section off about 1 inch, using a hair clip to separate it from the
rest of the mane. 4. Divide this evenly into 3 sections and braid tightly. About 2/3 of the way down, double up a
length of yarn evenly and place it in with one section of hair. Continue to braid tightly. 5. About one inch (2 cm) from the end of the hair secure the braid with a tight knot using the yarn.
Leave the rest of the yarn on the end of the braid for now. 6. Continue braiding the rest of the mane, making sure all braids are the same size and thickness. 7. Beginning at your first braid, push your rug hook through the top of the braid. Then thread the
yarn through the hook’s eye and pull it up through the top of the braid. 8. Release the hook and tighten the yarn. Separate the ends and wrap around your braid. Tie se-
curely and clip the ends of the yarn. 9. Finish the other braids in the same manner. 10. Finish by braiding the foretop.
21
Want to learn more on how to plait a horse’s mane? Check out this
video to learn how! https://www.equisearch.com/discoverhorses/video-how-plait-your-
horses-mane-html
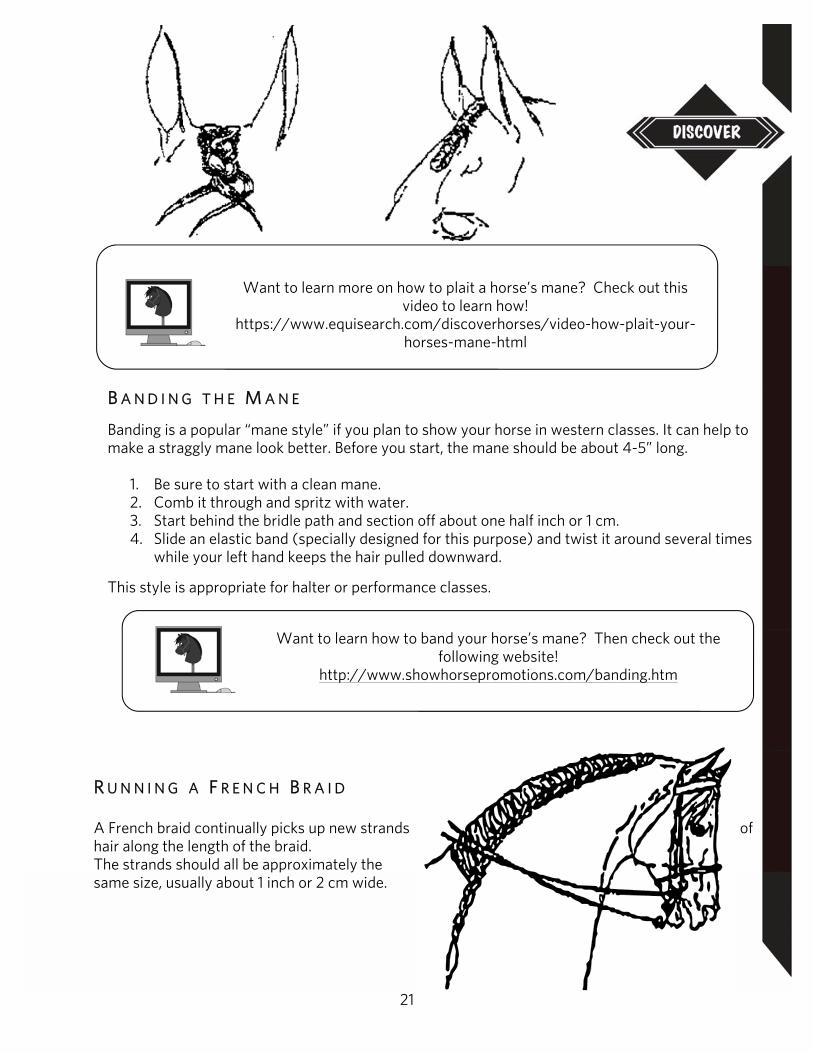
B A N D I N G T H E M A N E
Banding is a popular “mane style” if you plan to show your horse in western classes. It can help to make a straggly mane look better. Before you start, the mane should be about 4-5” long.
1. Be sure to start with a clean mane. 2. Comb it through and spritz with water. 3. Start behind the bridle path and section off about one half inch or 1 cm. 4. Slide an elastic band (specially designed for this purpose) and twist it around several times
while your left hand keeps the hair pulled downward.
This style is appropriate for halter or performance classes.
R U N N I N G A F R E N C H B R A I D A French braid continually picks up new strands of hair along the length of the braid. The strands should all be approximately the same size, usually about 1 inch or 2 cm wide.
Want to learn how to band your horse’s mane? Then check out the following website!
http://www.showhorsepromotions.com/banding.htm

22
1. Start at the edge of the bridle path by picking up 3 strands and making the first cross. 2. Work strands into the braid by adding to the original strand from behind the braid. 3. Continue to braid, adding a fresh strand each time the strand is brought into the centre
from the left or mane side. 4. When you reach the end of the mane finish by braiding the 3 strands to the end and fasten-
ing with yarn or an elastic band.
This braid is more easily done on long manes.
It is not appropriate for hunters and jumpers. It is most commonly used in showing Arabian horses.
Equus says…
Never try to remove elastics from the mane.
Snip carefully with small scissors.
23
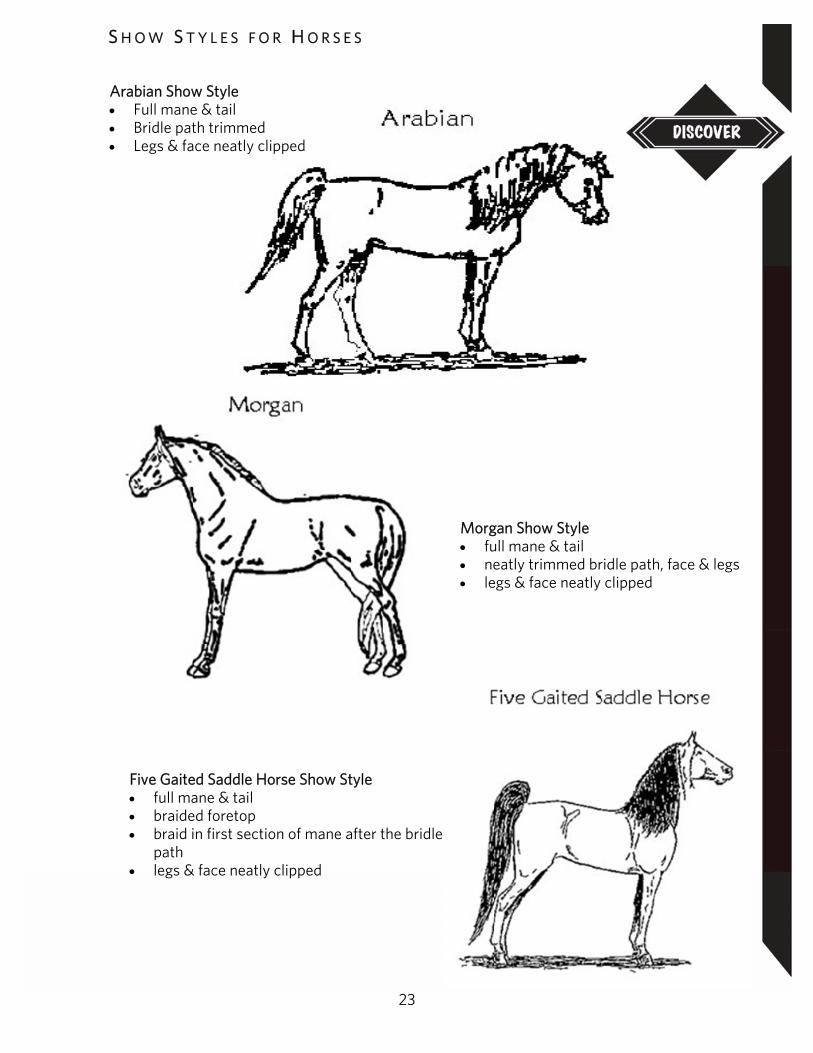
Arabian Show Style Full mane & tail Bridle path trimmed Legs & face neatly clipped
S H O W S T Y L E S F O R H O R S E S
Morgan Show Style full mane & tail neatly trimmed bridle path, face & legs legs & face neatly clipped
Five Gaited Saddle Horse Show Style full mane & tail braided foretop braid in first section of mane after the bridle
path legs & face neatly clipped
24
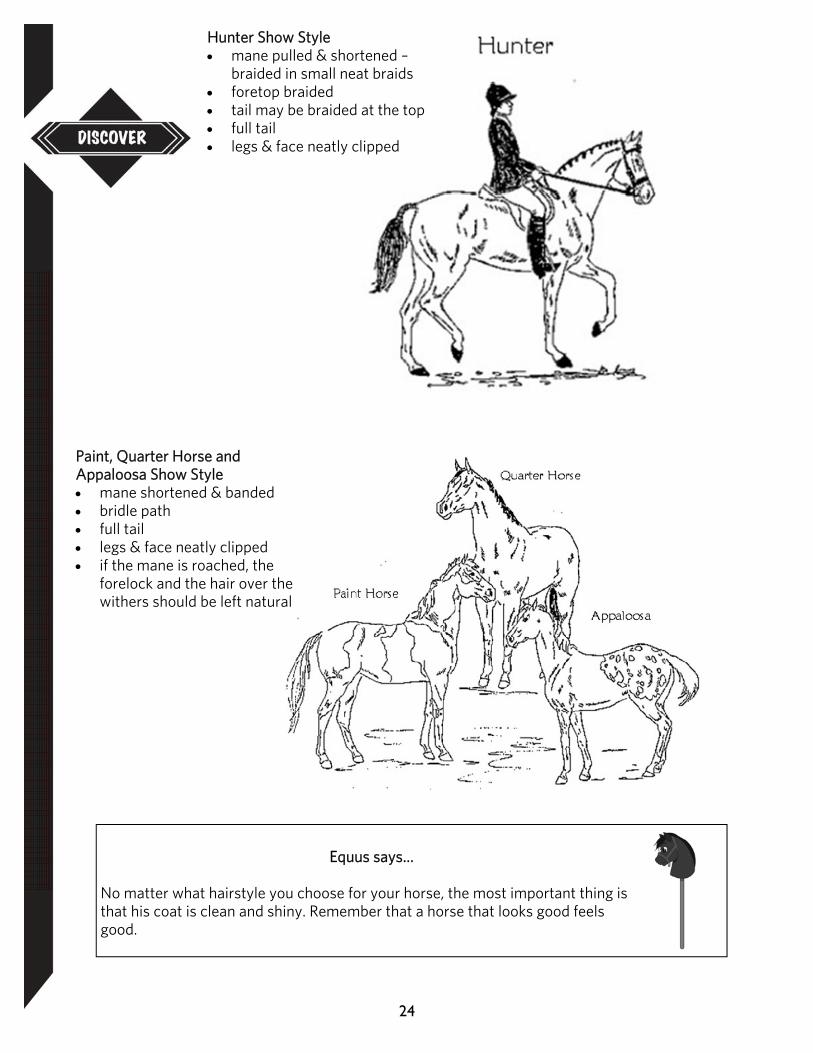
Hunter Show Style mane pulled & shortened –
braided in small neat braids foretop braided tail may be braided at the top full tail legs & face neatly clipped
Paint, Quarter Horse and Appaloosa Show Style mane shortened & banded bridle path full tail legs & face neatly clipped if the mane is roached, the
forelock and the hair over the withers should be left natural
Equus says…
No matter what hairstyle you choose for your horse, the most important thing is that his coat is clean and shiny. Remember that a horse that looks good feels good.
25
Hoof Care The value of the horse depends on its ability to work. Four sound feet are extremely important. Many foot troubles and the resulting need to shoe are largely manmade. The wild horse seems to have been almost free from serious foot trouble. Problems began after the horse was domesticated. The horse was brought from soft pasture to
hard roads; from self-regulated exercise to enforced work; from healthy pasture to indoor housing and from a light maintenance ration to the heavy diet necessary for work.
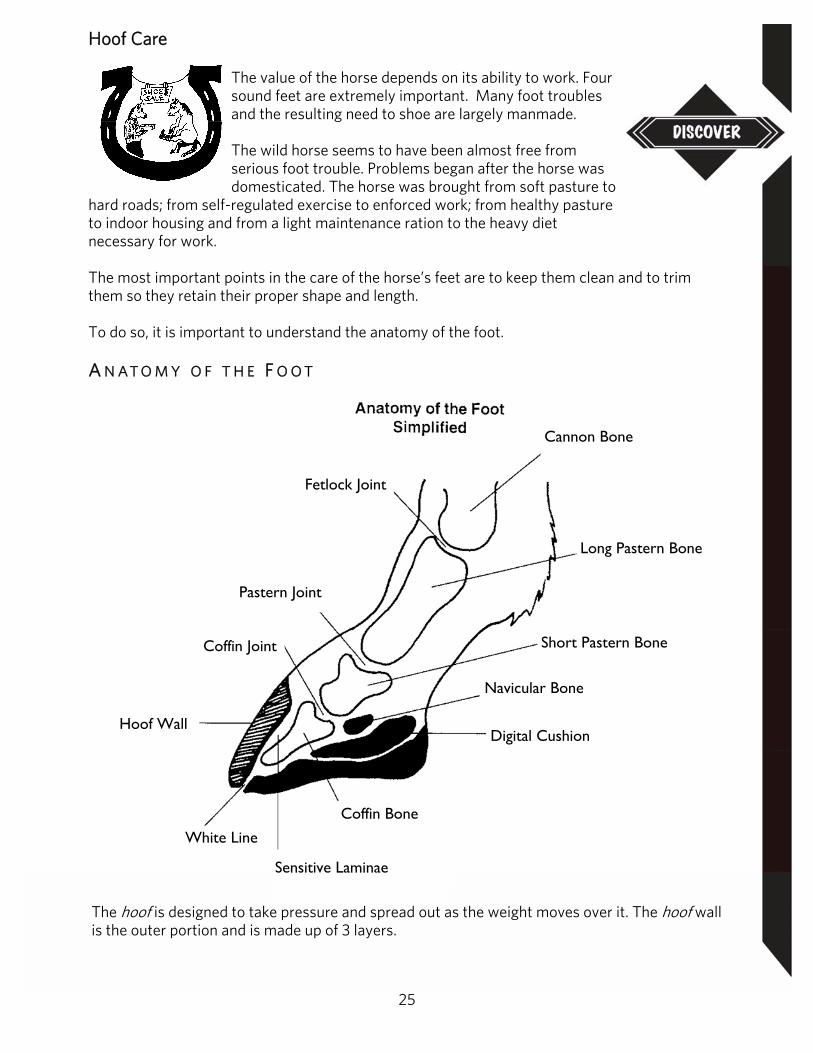
The most important points in the care of the horse’s feet are to keep them clean and to trim them so they retain their proper shape and length. To do so, it is important to understand the anatomy of the foot. A N AT O M Y O F T H E F O O T
Cannon Bone
Long Pastern Bone
Short Pastern Bone
Navicular Bone
Digital Cushion
Coffin Bone
Sensitive Laminae
White Line
Hoof Wall
Coffin Joint
Pastern Joint
Fetlock Joint
The hoof is designed to take pressure and spread out as the weight moves over it. The hoof wall is the outer portion and is made up of 3 layers.
26
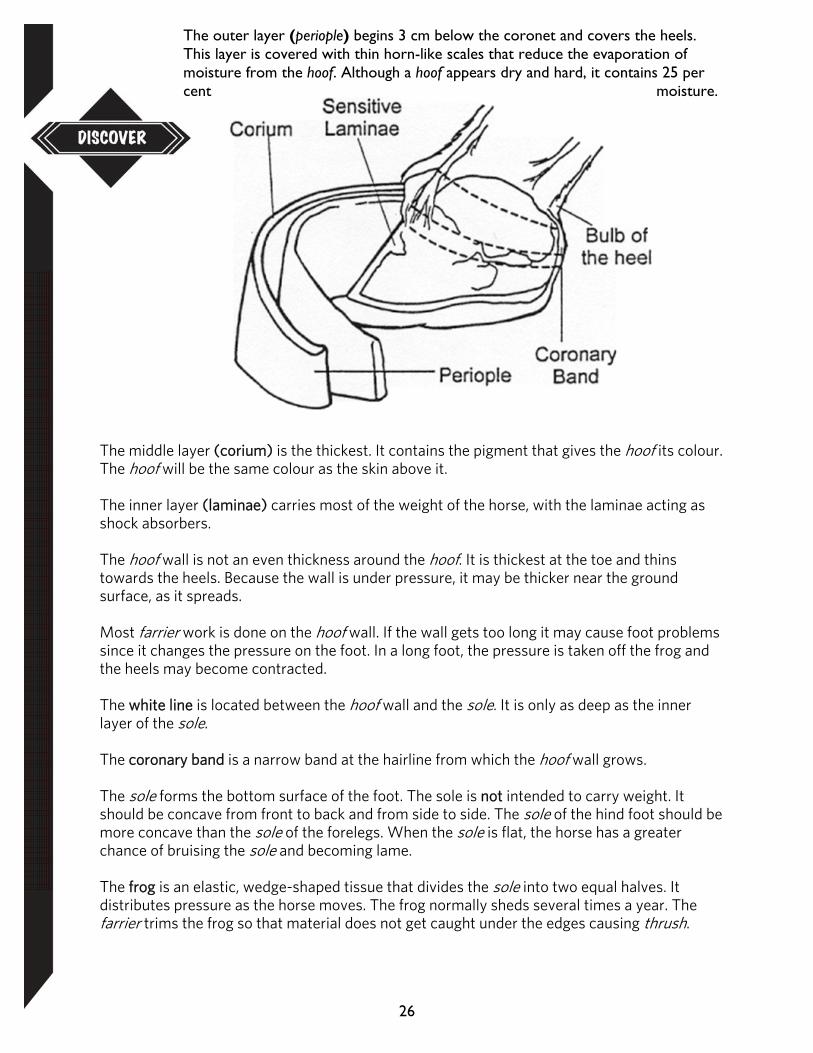
The outer layer (periople) begins 3 cm below the coronet and covers the heels. This layer is covered with thin horn-like scales that reduce the evaporation of moisture from the hoof. Although a hoof appears dry and hard, it contains 25 per cent moisture.
The middle layer (corium) is the thickest. It contains the pigment that gives the hoof its colour. The hoof will be the same colour as the skin above it. The inner layer (laminae) carries most of the weight of the horse, with the laminae acting as shock absorbers. The hoof wall is not an even thickness around the hoof. It is thickest at the toe and thins towards the heels. Because the wall is under pressure, it may be thicker near the ground surface, as it spreads. Most farrier work is done on the hoof wall. If the wall gets too long it may cause foot problems since it changes the pressure on the foot. In a long foot, the pressure is taken off the frog and the heels may become contracted. The white line is located between the hoof wall and the sole. It is only as deep as the inner layer of the sole. The coronary band is a narrow band at the hairline from which the hoof wall grows. The sole forms the bottom surface of the foot. The sole is not intended to carry weight. It should be concave from front to back and from side to side. The sole of the hind foot should be more concave than the sole of the forelegs. When the sole is flat, the horse has a greater chance of bruising the sole and becoming lame. The frog is an elastic, wedge-shaped tissue that divides the sole into two equal halves. It distributes pressure as the horse moves. The frog normally sheds several times a year. The farrier trims the frog so that material does not get caught under the edges causing thrush.
27
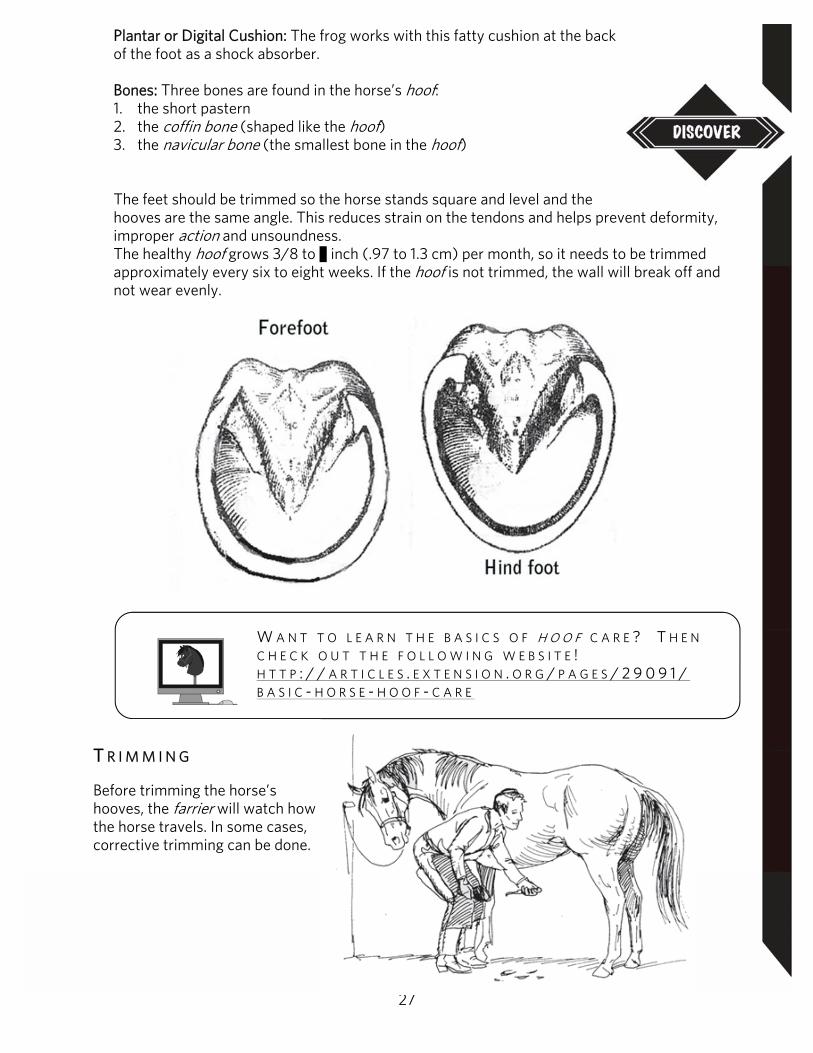
Plantar or Digital Cushion: The frog works with this fatty cushion at the back of the foot as a shock absorber. Bones: Three bones are found in the horse’s hoof: 1. the short pastern 2. the coffin bone (shaped like the hoof) 3. the navicular bone (the smallest bone in the hoof) The feet should be trimmed so the horse stands square and level and the hooves are the same angle. This reduces strain on the tendons and helps prevent deformity, improper action and unsoundness. The healthy hoof grows 3/8 to ½ inch (.97 to 1.3 cm) per month, so it needs to be trimmed approximately every six to eight weeks. If the hoof is not trimmed, the wall will break off and not wear evenly.
W A N T T O L E A R N T H E B A S I C S O F H O O F C A R E ? T H E N C H E C K O U T T H E F O L L O W I N G W E B S I T E ! H T T P : / / A R T I C L E S . E X T E N S I O N . O R G / P A G E S / 2 9 0 9 1 /B A S I C - H O R S E - H O O F - C A R E
T R I M M I N G Before trimming the horse’s hooves, the farrier will watch how the horse travels. In some cases, corrective trimming can be done.
28
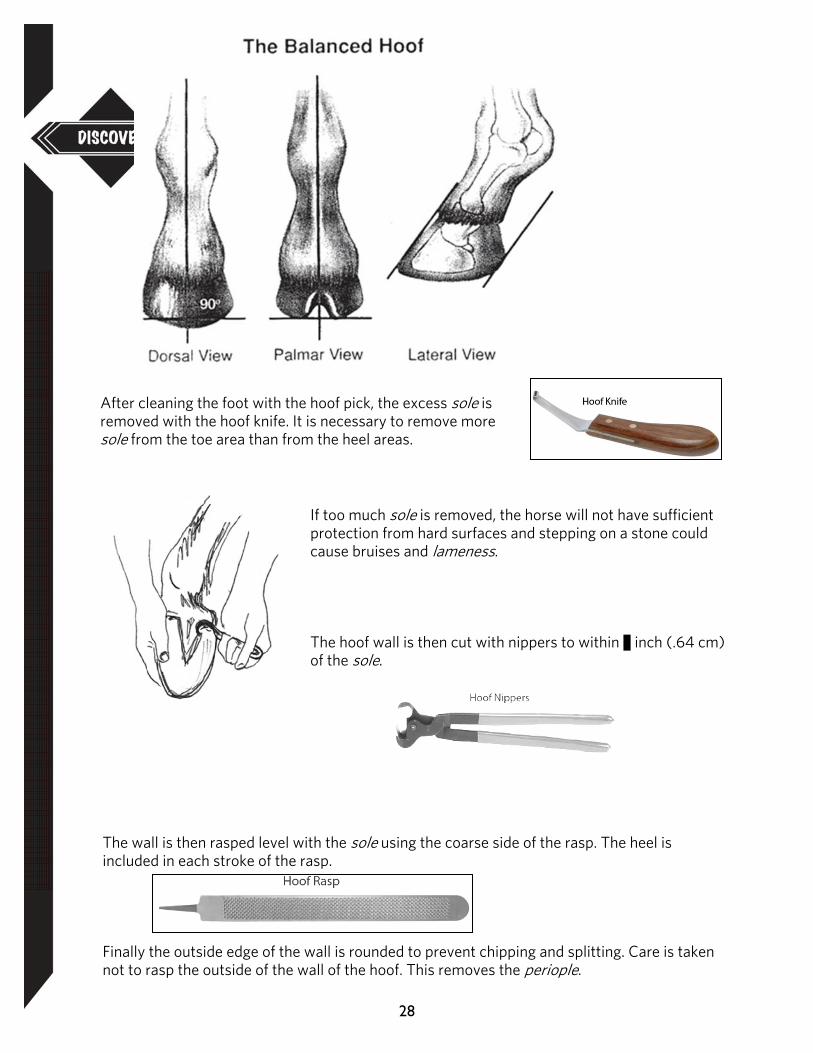
After cleaning the foot with the hoof pick, the excess sole is removed with the hoof knife. It is necessary to remove more sole from the toe area than from the heel areas.
If too much sole is removed, the horse will not have sufficient protection from hard surfaces and stepping on a stone could cause bruises and lameness. The hoof wall is then cut with nippers to within ¼ inch (.64 cm) of the sole.
The wall is then rasped level with the sole using the coarse side of the rasp. The heel is included in each stroke of the rasp. Finally the outside edge of the wall is rounded to prevent chipping and splitting. Care is taken not to rasp the outside of the wall of the hoof. This removes the periople.
29
C H E C K O U T T H E F O L L O W I N G H O R S E H O O F T R I M M I N G P R I N C I P L E S V I D E O
https://www.youtube.com/watch?v=x_8uYkDxcsY
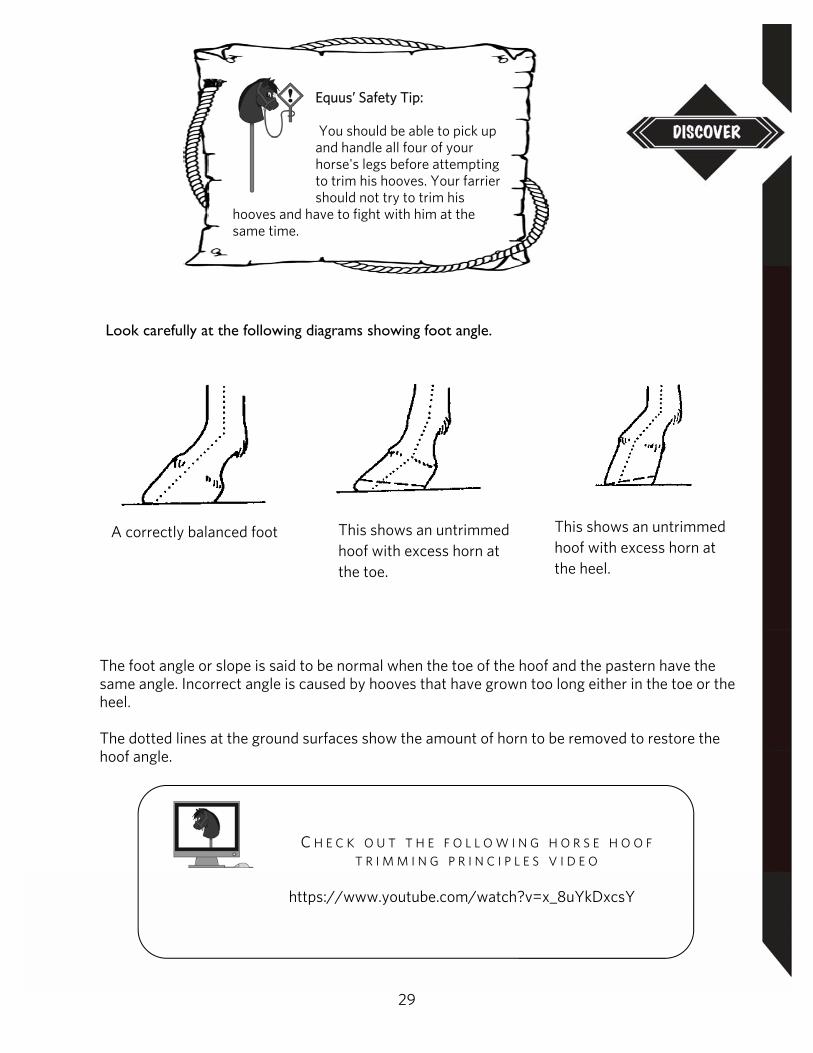
Equus’ Safety Tip: You should be able to pick up and handle all four of your horse's legs before attempting to trim his hooves. Your farrier should not try to trim his
hooves and have to fight with him at the same time.
Look carefully at the following diagrams showing foot angle.
The foot angle or slope is said to be normal when the toe of the hoof and the pastern have the same angle. Incorrect angle is caused by hooves that have grown too long either in the toe or the heel. The dotted lines at the ground surfaces show the amount of horn to be removed to restore the hoof angle.
A correctly balanced foot This shows an untrimmed hoof with excess horn at the toe.
This shows an untrimmed hoof with excess horn at the heel.

30
C O M M O N F A U LT S C O R R E C T E D B Y T R I M M I N G
Pigeon Toed - Can be helped or corrected by trimming the inner half of the foot more than the outer half. (front toes turned in, heels turned out – opposite of splayfoot)
Contracted Heels - Can be spread apart as the heels are lowered and the frog is allowed to carry more of the animal’s weight. (close at the heels)
Quarter Crack - Usually can be corrected if the hoof is kept moist and the toes shortened. (vertical crack on the side of the hoof)
Splayfoot - Can be helped or corrected by trimming the outer half of the foot (front toes turned out, heels turned in)
31
S H O E I N G Shoeing is not for every horse. If you are working them on a sandy loam, free of stones, or they are spending a lot of time in the pasture and their feet are in good shape, there is no reason for shoeing. The foot and leg are designed to minimize shock and concussion without shoes. A shoe does not make walking easier for a horse. Shoeing only increases the hazards. Nail holes from attaching the shoe weaken the hoof wall and may provide an entry for microorganisms.
On the other hand, if you are using your horse on the road a good part of the time, shoeing is necessary as part of preventative maintenance. Horses that are used on hard surfaces should be shod to prevent the wall from wearing down to the sensitive tissues beneath. Talk to your farrier about having your horse shod if you are unsure.
Reasons for Shoeing Protection: work on hard surfaces will wear the hoof faster than it can grow. Traction: shoes with corks can help prevent slipping, especially on slippery surfaces. Improving movement: changing the weight, shape, balance of the shoe can significantly alter
the horse's movement. Soundness: horses with issues such as cracks, bruised soles, laminitis or navicular can be
helped by special shoes.
Shoeing should always be done by a thoroughly experienced farrier. Shoes should be made to fit the foot, not the foot to fit the shoe. Reshoe or reset at four to six week intervals. Shoes left on too long cause the hooves to grow out of proportion or cause lameness. They will also become loose. Mark shoeing dates on your calendar.
Shoes left on too long can cause problems. Since the hoof wall grows perpendicular to the coronary band, the horse’s base of support actually grows out from under it if the shoes are left on too long. This puts more strain on the tendons. Here are some guidelines to help you know if your horse needs a reset:
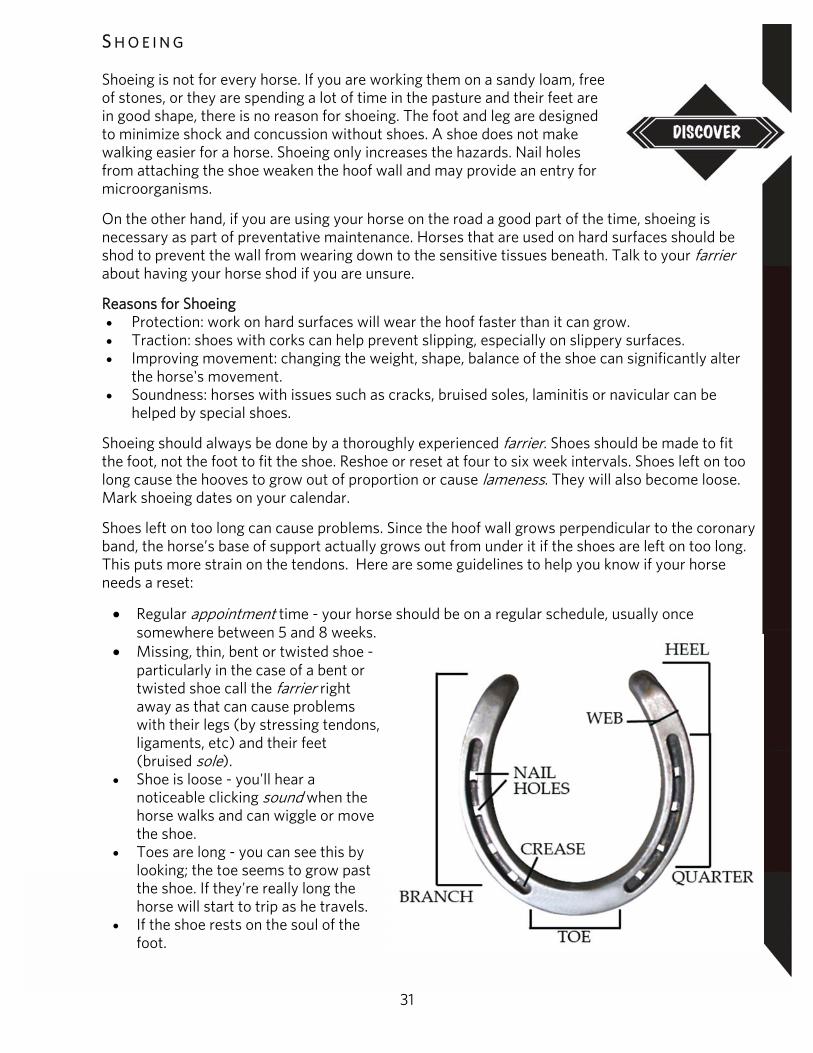
Regular appointment time - your horse should be on a regular schedule, usually once somewhere between 5 and 8 weeks.
Missing, thin, bent or twisted shoe - particularly in the case of a bent or twisted shoe call the farrier right away as that can cause problems with their legs (by stressing tendons, ligaments, etc) and their feet (bruised sole).
Shoe is loose - you'll hear a noticeable clicking sound when the horse walks and can wiggle or move the shoe.
Toes are long - you can see this by looking; the toe seems to grow past the shoe. If they're really long the horse will start to trip as he travels.
If the shoe rests on the soul of the foot.
32
Types of Horseshoes
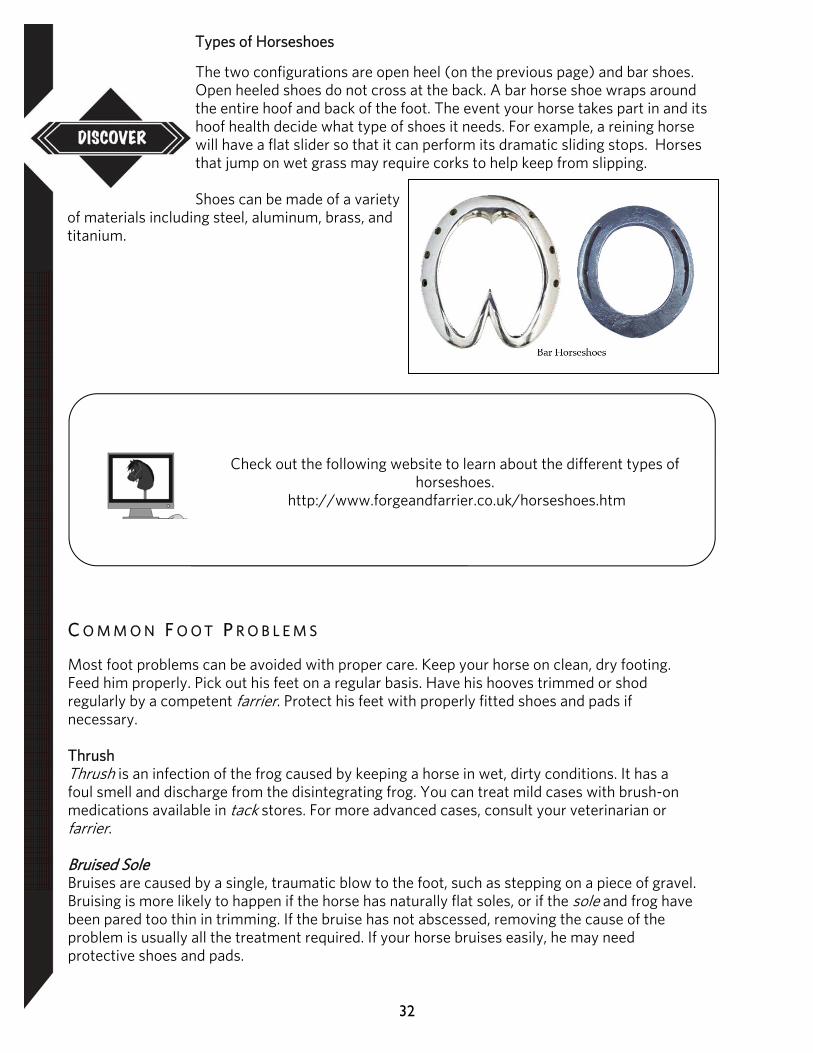
The two configurations are open heel (on the previous page) and bar shoes. Open heeled shoes do not cross at the back. A bar horse shoe wraps around the entire hoof and back of the foot. The event your horse takes part in and its hoof health decide what type of shoes it needs. For example, a reining horse will have a flat slider so that it can perform its dramatic sliding stops. Horses that jump on wet grass may require corks to help keep from slipping.
Shoes can be made of a variety
of materials including steel, aluminum, brass, and titanium.
Check out the following website to learn about the different types of
horseshoes. http://www.forgeandfarrier.co.uk/horseshoes.htm
C O M M O N F O O T P R O B L E M S Most foot problems can be avoided with proper care. Keep your horse on clean, dry footing. Feed him properly. Pick out his feet on a regular basis. Have his hooves trimmed or shod regularly by a competent farrier. Protect his feet with properly fitted shoes and pads if necessary. Thrush Thrush is an infection of the frog caused by keeping a horse in wet, dirty conditions. It has a foul smell and discharge from the disintegrating frog. You can treat mild cases with brush-on medications available in tack stores. For more advanced cases, consult your veterinarian or farrier. Bruised Sole Bruises are caused by a single, traumatic blow to the foot, such as stepping on a piece of gravel. Bruising is more likely to happen if the horse has naturally flat soles, or if the sole and frog have been pared too thin in trimming. If the bruise has not abscessed, removing the cause of the problem is usually all the treatment required. If your horse bruises easily, he may need protective shoes and pads.
33
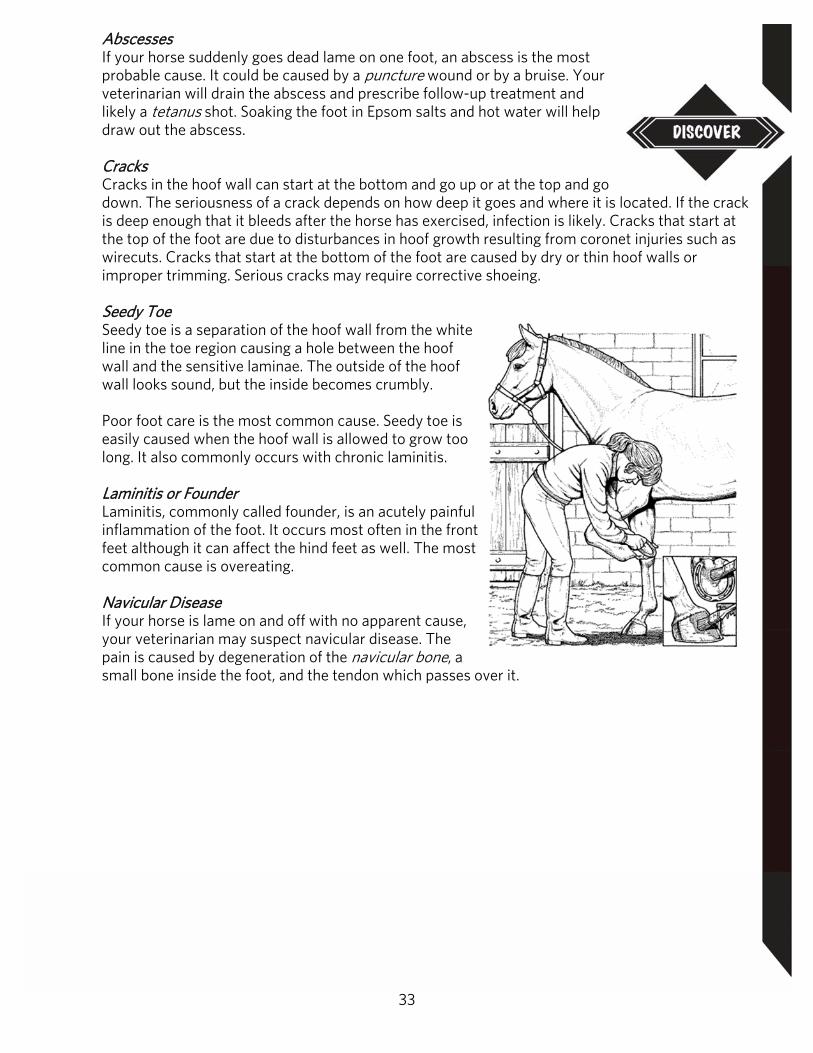
Abscesses If your horse suddenly goes dead lame on one foot, an abscess is the most probable cause. It could be caused by a puncture wound or by a bruise. Your veterinarian will drain the abscess and prescribe follow-up treatment and likely a tetanus shot. Soaking the foot in Epsom salts and hot water will help draw out the abscess. Cracks Cracks in the hoof wall can start at the bottom and go up or at the top and go down. The seriousness of a crack depends on how deep it goes and where it is located. If the crack is deep enough that it bleeds after the horse has exercised, infection is likely. Cracks that start at the top of the foot are due to disturbances in hoof growth resulting from coronet injuries such as wirecuts. Cracks that start at the bottom of the foot are caused by dry or thin hoof walls or improper trimming. Serious cracks may require corrective shoeing. Seedy Toe Seedy toe is a separation of the hoof wall from the white line in the toe region causing a hole between the hoof wall and the sensitive laminae. The outside of the hoof wall looks sound, but the inside becomes crumbly. Poor foot care is the most common cause. Seedy toe is easily caused when the hoof wall is allowed to grow too long. It also commonly occurs with chronic laminitis. Laminitis or Founder Laminitis, commonly called founder, is an acutely painful inflammation of the foot. It occurs most often in the front feet although it can affect the hind feet as well. The most common cause is overeating. Navicular Disease If your horse is lame on and off with no apparent cause, your veterinarian may suspect navicular disease. The pain is caused by degeneration of the navicular bone, a small bone inside the foot, and the tendon which passes over it.
34
Skill Builder 3: Identification and Conformation
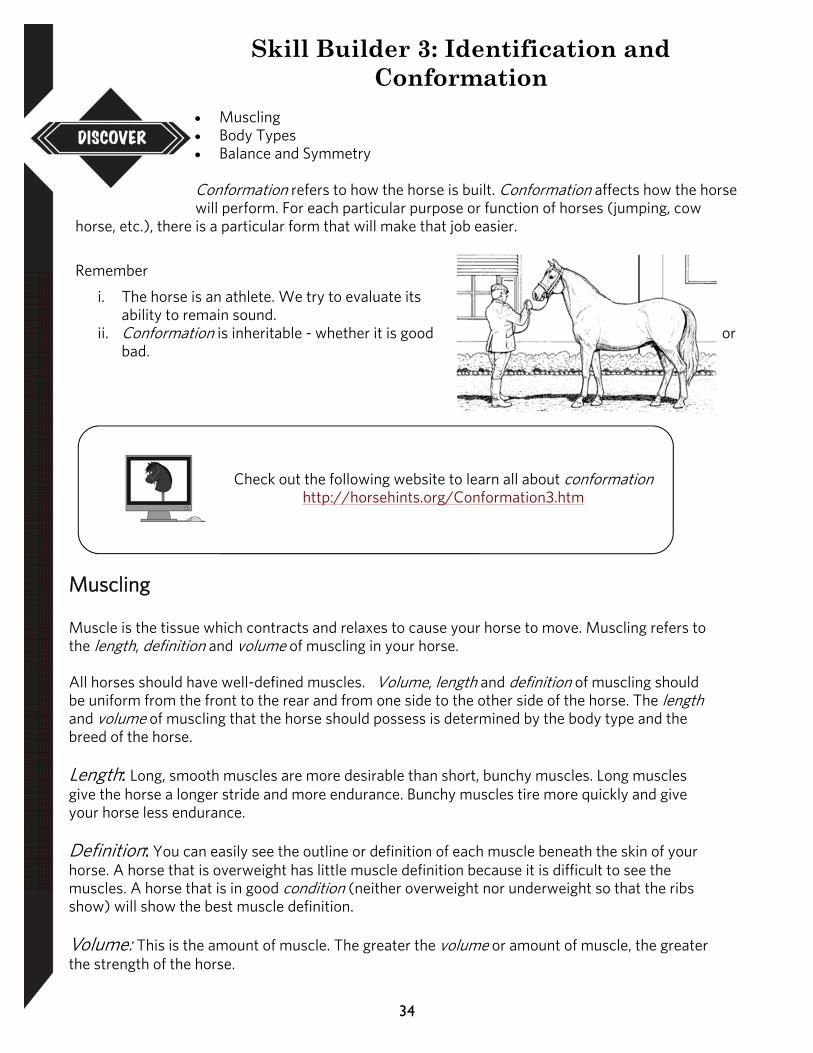
Muscling Body Types Balance and Symmetry Conformation refers to how the horse is built. Conformation affects how the horse will perform. For each particular purpose or function of horses (jumping, cow
horse, etc.), there is a particular form that will make that job easier.
Remember
i. The horse is an athlete. We try to evaluate its ability to remain sound.
ii. Conformation is inheritable - whether it is good or bad.
Check out the following website to learn all about conformation http://horsehints.org/Conformation3.htm
Muscling Muscle is the tissue which contracts and relaxes to cause your horse to move. Muscling refers to the length, definition and volume of muscling in your horse. All horses should have well-defined muscles. Volume, length and definition of muscling should be uniform from the front to the rear and from one side to the other side of the horse. The length and volume of muscling that the horse should possess is determined by the body type and the breed of the horse. Length: Long, smooth muscles are more desirable than short, bunchy muscles. Long muscles give the horse a longer stride and more endurance. Bunchy muscles tire more quickly and give your horse less endurance. Definition: You can easily see the outline or definition of each muscle beneath the skin of your horse. A horse that is overweight has little muscle definition because it is difficult to see the muscles. A horse that is in good condition (neither overweight nor underweight so that the ribs show) will show the best muscle definition. Volume: This is the amount of muscle. The greater the volume or amount of muscle, the greater the strength of the horse.
35
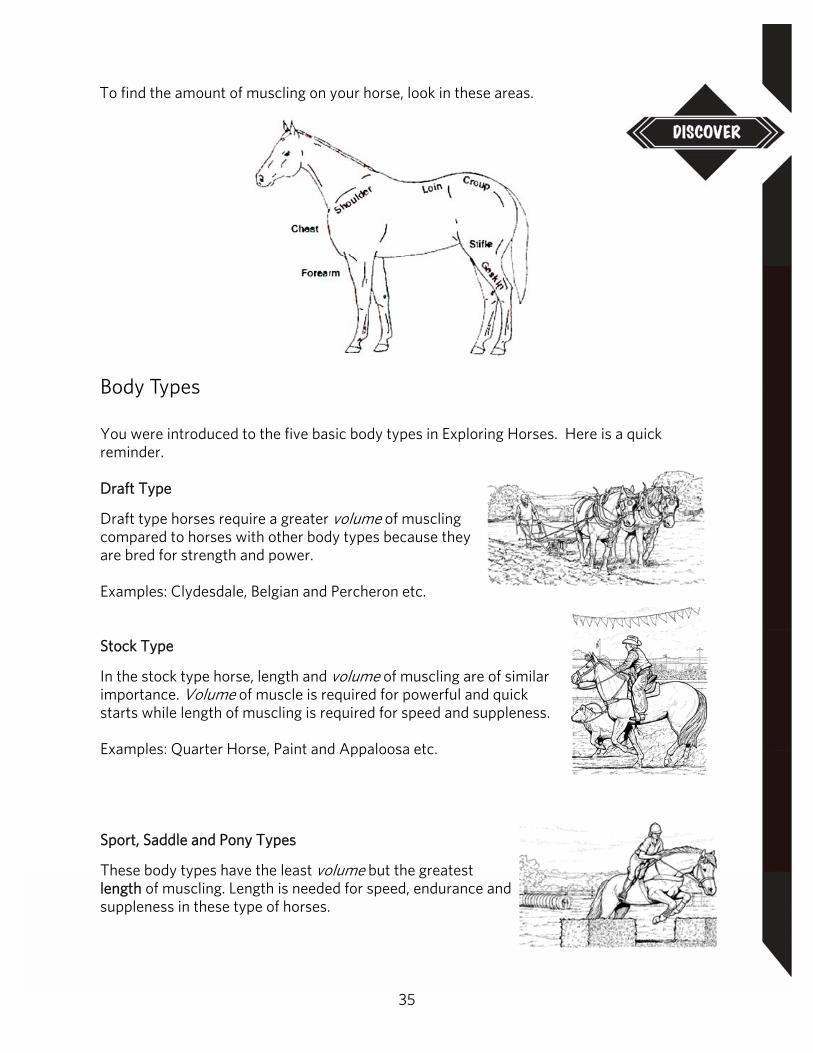
To find the amount of muscling on your horse, look in these areas.
Body Types You were introduced to the five basic body types in Exploring Horses. Here is a quick reminder. Draft Type
Draft type horses require a greater volume of muscling compared to horses with other body types because they are bred for strength and power. Examples: Clydesdale, Belgian and Percheron etc. Stock Type
In the stock type horse, length and volume of muscling are of similar importance. Volume of muscle is required for powerful and quick starts while length of muscling is required for speed and suppleness. Examples: Quarter Horse, Paint and Appaloosa etc. Sport, Saddle and Pony Types
These body types have the least volume but the greatest length of muscling. Length is needed for speed, endurance and suppleness in these type of horses.

36
Mares
Mares should look feminine. Compared to stallions and geldings, mares show more refinement about the head and neck. Compared to stallions, mares are not as heavily muscled and have less substance of bone. Geldings
Geldings should look more masculine than the mare, but much less masculine than the stallion. The volume of muscling and substance of bone in a gelding will be about the same or slightly more than in the mare.
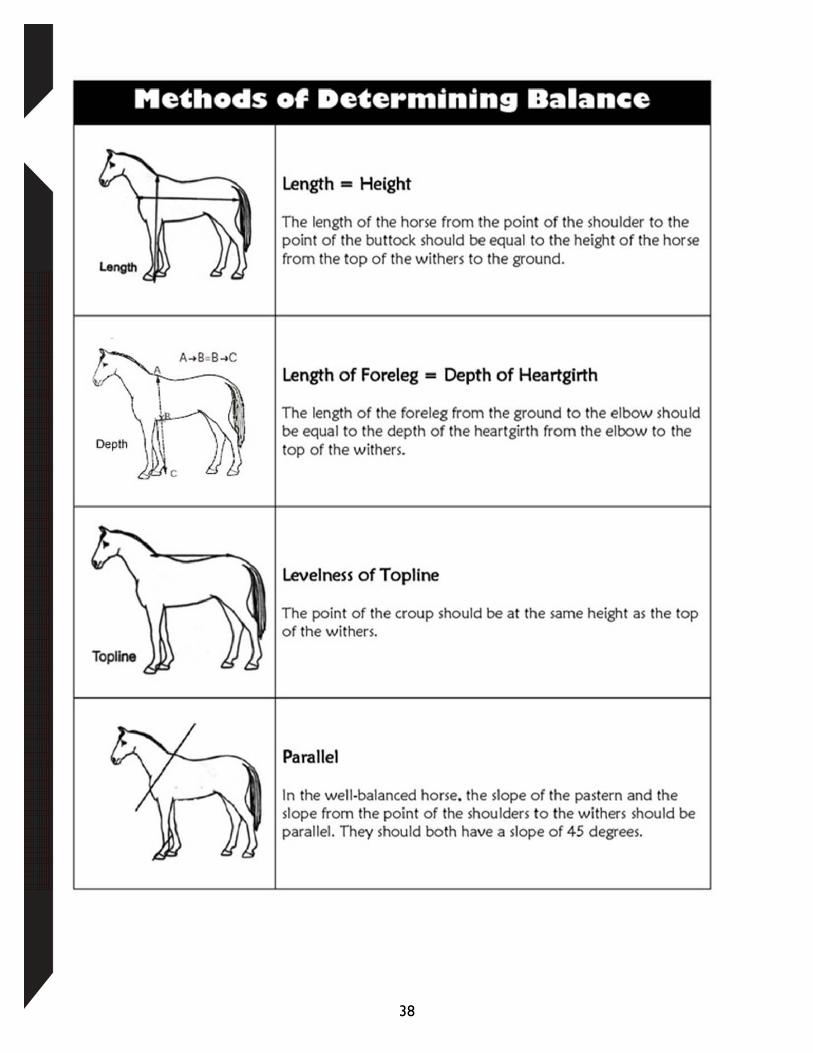
Balance and Symmetry Methods of Determining Balance
Symmetry
When viewing the horse from the front and rear, divide the horse in half down the spinal column and down the middle of each limb. Each half should be a “mirror image” of the other.
When the horse is divided through the centre of the back, the forequarter (not including the head and neck) should be equal in size to the hindquarter. Notice that the centre of gravity is different from the centre of the horse. Because of the weight of the head and neck, the centre of gravity is just behind the wither when the horse is standing. When the horse is divided through the middle of the back, approximately 60 per cent of the weight is carried on the front legs, because of the additional weight of the head and neck. Balance
All parts of the body are in correct proportion to each other resulting in a pleasing appearance.
Centre of the Horse
37
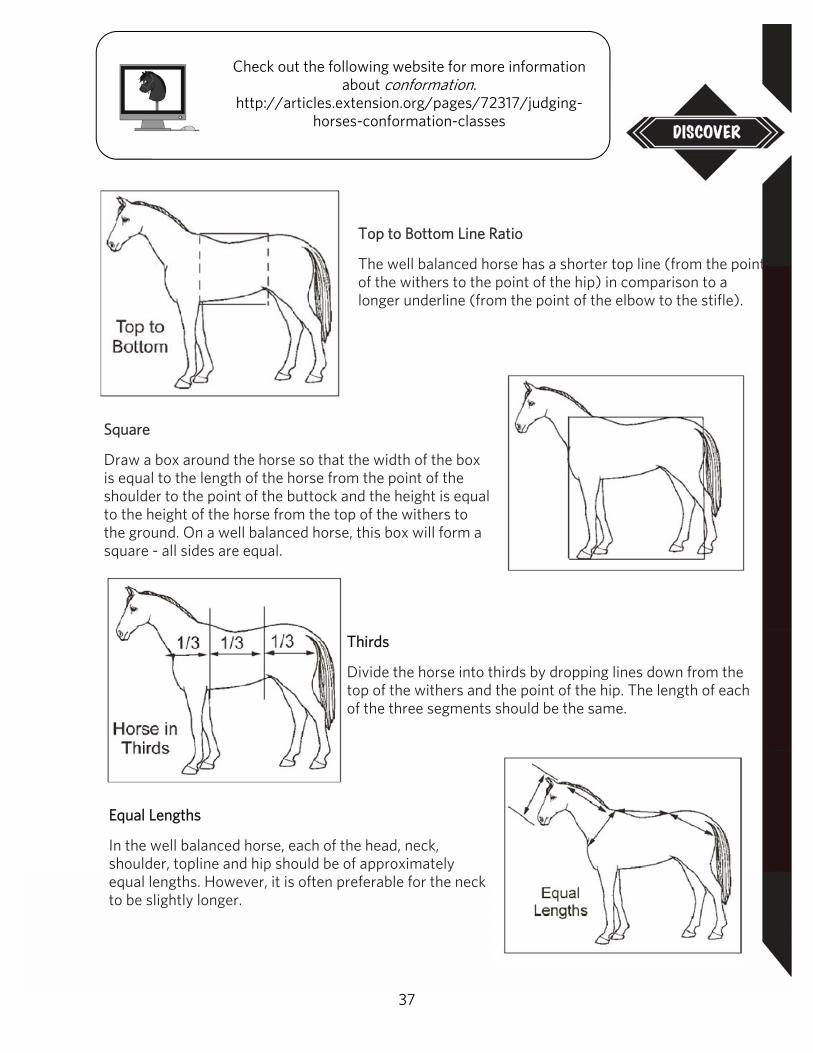
Top to Bottom Line Ratio
The well balanced horse has a shorter top line (from the point of the withers to the point of the hip) in comparison to a longer underline (from the point of the elbow to the stifle).
Check out the following website for more information about conformation.
http://articles.extension.org/pages/72317/judging-horses-conformation-classes
Square
Draw a box around the horse so that the width of the box is equal to the length of the horse from the point of the shoulder to the point of the buttock and the height is equal to the height of the horse from the top of the withers to the ground. On a well balanced horse, this box will form a square - all sides are equal.
Thirds
Divide the horse into thirds by dropping lines down from the top of the withers and the point of the hip. The length of each of the three segments should be the same.
Equal Lengths
In the well balanced horse, each of the head, neck, shoulder, topline and hip should be of approximately equal lengths. However, it is often preferable for the neck to be slightly longer.
38
39
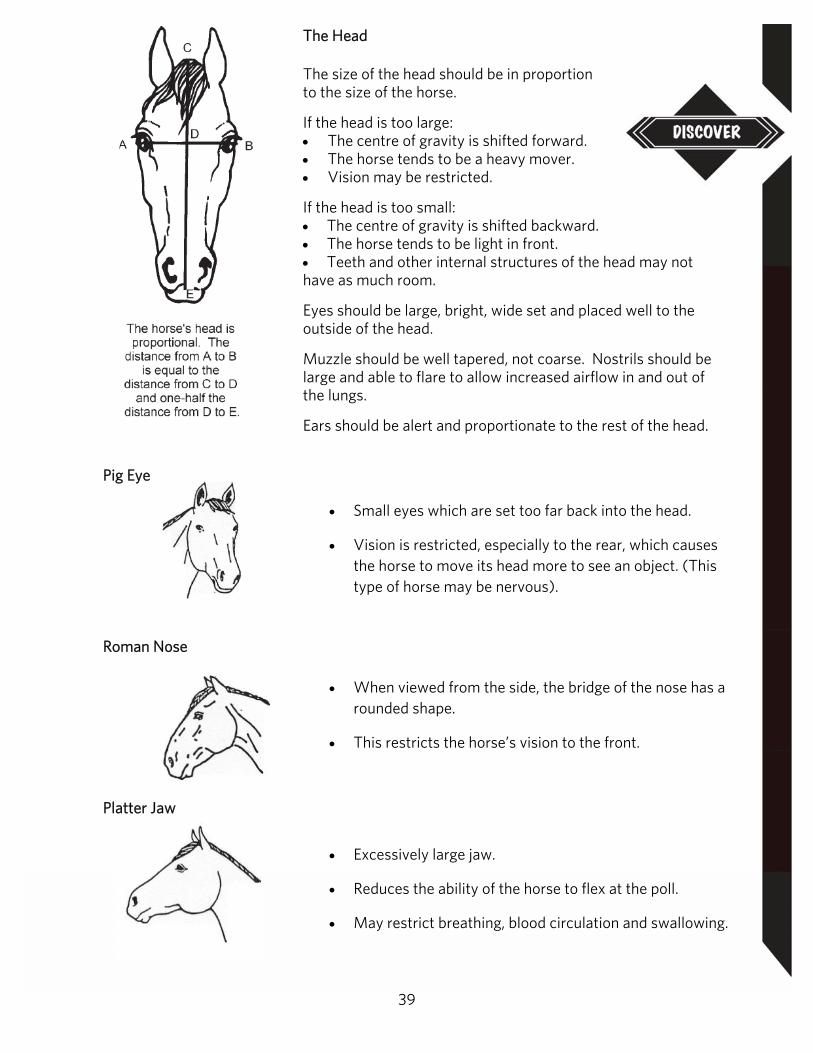
The Head
The size of the head should be in proportion to the size of the horse.
If the head is too large: The centre of gravity is shifted forward. The horse tends to be a heavy mover. Vision may be restricted.
If the head is too small: The centre of gravity is shifted backward. The horse tends to be light in front. Teeth and other internal structures of the head may not have as much room.
Eyes should be large, bright, wide set and placed well to the outside of the head.
Muzzle should be well tapered, not coarse. Nostrils should be large and able to flare to allow increased airflow in and out of the lungs.
Ears should be alert and proportionate to the rest of the head.
Pig Eye
Small eyes which are set too far back into the head.
Vision is restricted, especially to the rear, which causes the horse to move its head more to see an object. (This type of horse may be nervous).
Roman Nose
When viewed from the side, the bridge of the nose has a rounded shape.
This restricts the horse’s vision to the front.
Platter Jaw
Excessively large jaw.
Reduces the ability of the horse to flex at the poll.
May restrict breathing, blood circulation and swallowing.
40
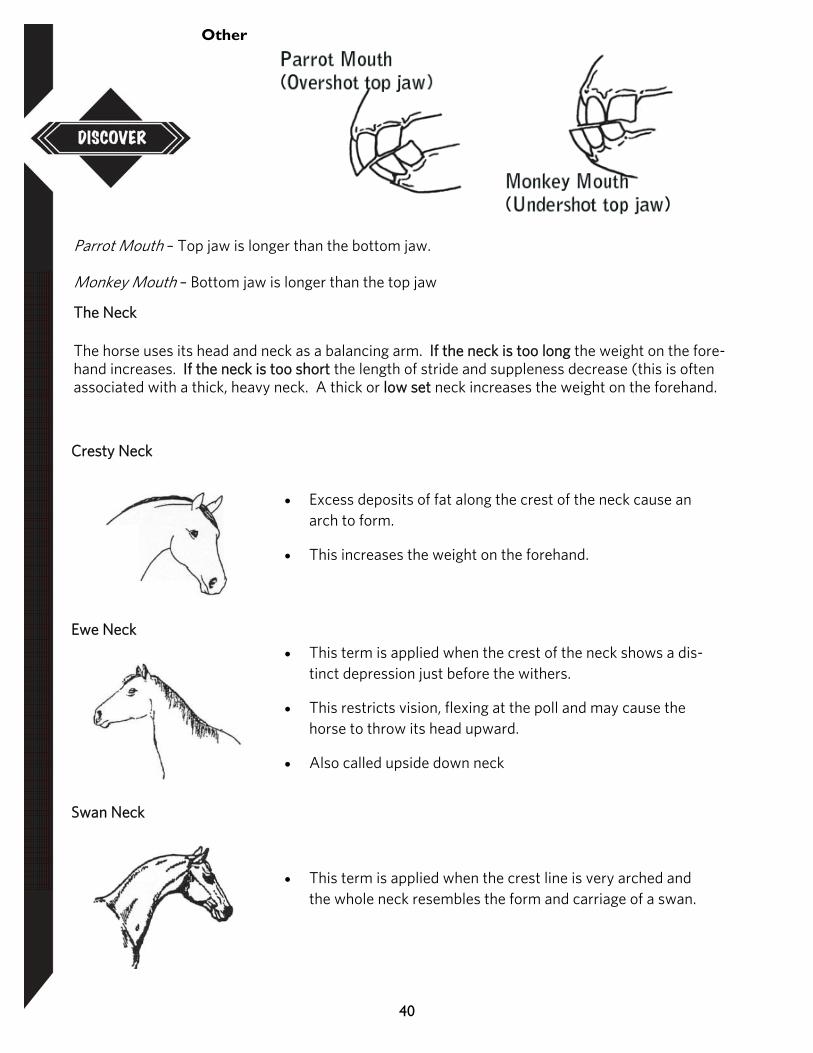
Other
Parrot Mouth – Top jaw is longer than the bottom jaw. Monkey Mouth – Bottom jaw is longer than the top jaw
The Neck
The horse uses its head and neck as a balancing arm. If the neck is too long the weight on the fore-hand increases. If the neck is too short the length of stride and suppleness decrease (this is often associated with a thick, heavy neck. A thick or low set neck increases the weight on the forehand.
Cresty Neck
Excess deposits of fat along the crest of the neck cause an arch to form.
This increases the weight on the forehand.
Ewe Neck
This term is applied when the crest of the neck shows a dis-tinct depression just before the withers.
This restricts vision, flexing at the poll and may cause the horse to throw its head upward.
Also called upside down neck
Swan Neck
This term is applied when the crest line is very arched and the whole neck resembles the form and carriage of a swan.
41
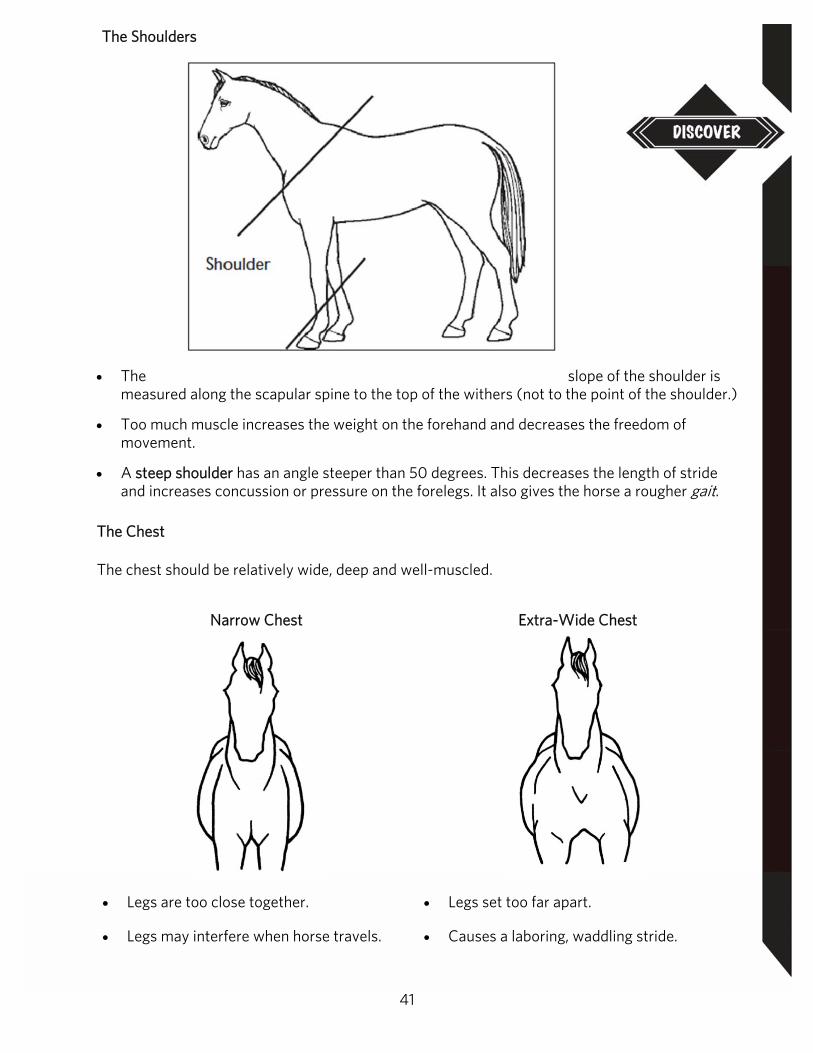
Narrow Chest Extra-Wide Chest
Legs are too close together.
Legs may interfere when horse travels.
Legs set too far apart.
Causes a laboring, waddling stride.
The Shoulders
The slope of the shoulder is measured along the scapular spine to the top of the withers (not to the point of the shoulder.)
Too much muscle increases the weight on the forehand and decreases the freedom of movement.
A steep shoulder has an angle steeper than 50 degrees. This decreases the length of stride and increases concussion or pressure on the forelegs. It also gives the horse a rougher gait.
The Chest
The chest should be relatively wide, deep and well-muscled.
42
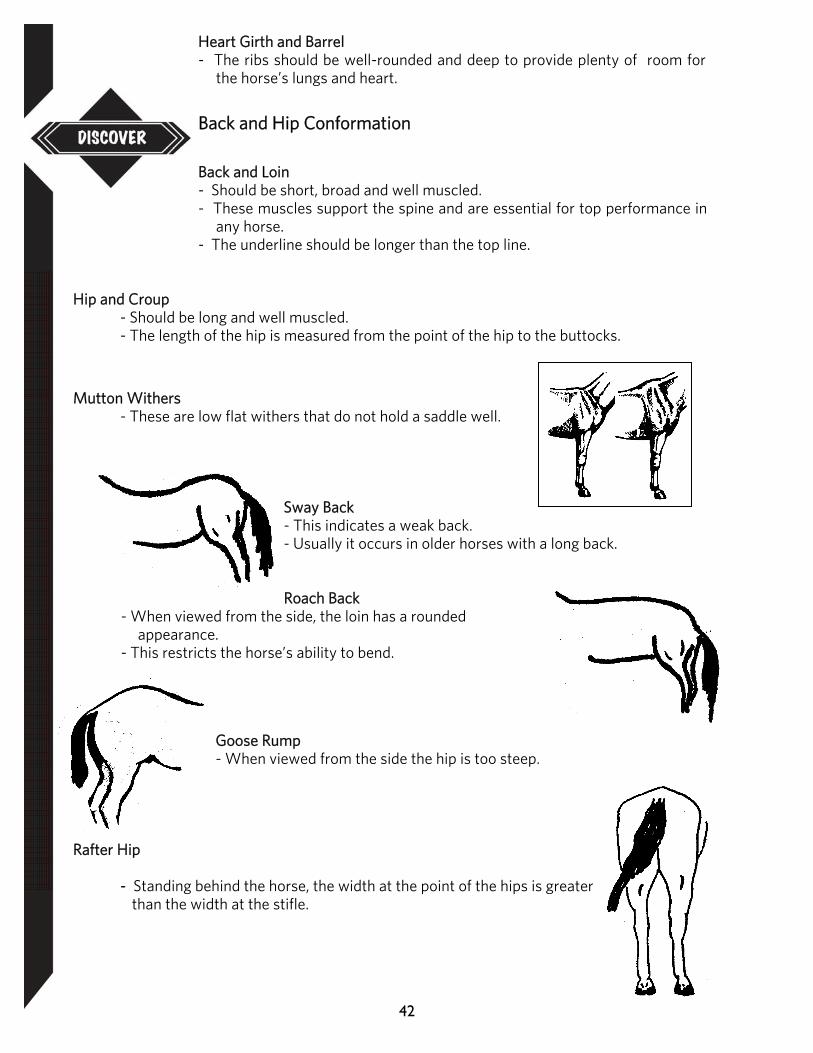
Heart Girth and Barrel - The ribs should be well-rounded and deep to provide plenty of room for
the horse’s lungs and heart. Back and Hip Conformation Back and Loin - Should be short, broad and well muscled. - These muscles support the spine and are essential for top performance in
any horse. - The underline should be longer than the top line.
Hip and Croup - Should be long and well muscled. - The length of the hip is measured from the point of the hip to the buttocks.
Mutton Withers
- These are low flat withers that do not hold a saddle well.
Sway Back - This indicates a weak back. - Usually it occurs in older horses with a long back.
Roach Back - When viewed from the side, the loin has a rounded
appearance. - This restricts the horse’s ability to bend.
Goose Rump - When viewed from the side the hip is too steep.
Rafter Hip
- Standing behind the horse, the width at the point of the hips is greater than the width at the stifle.
43
Hind Leg Conformation (from the rear)
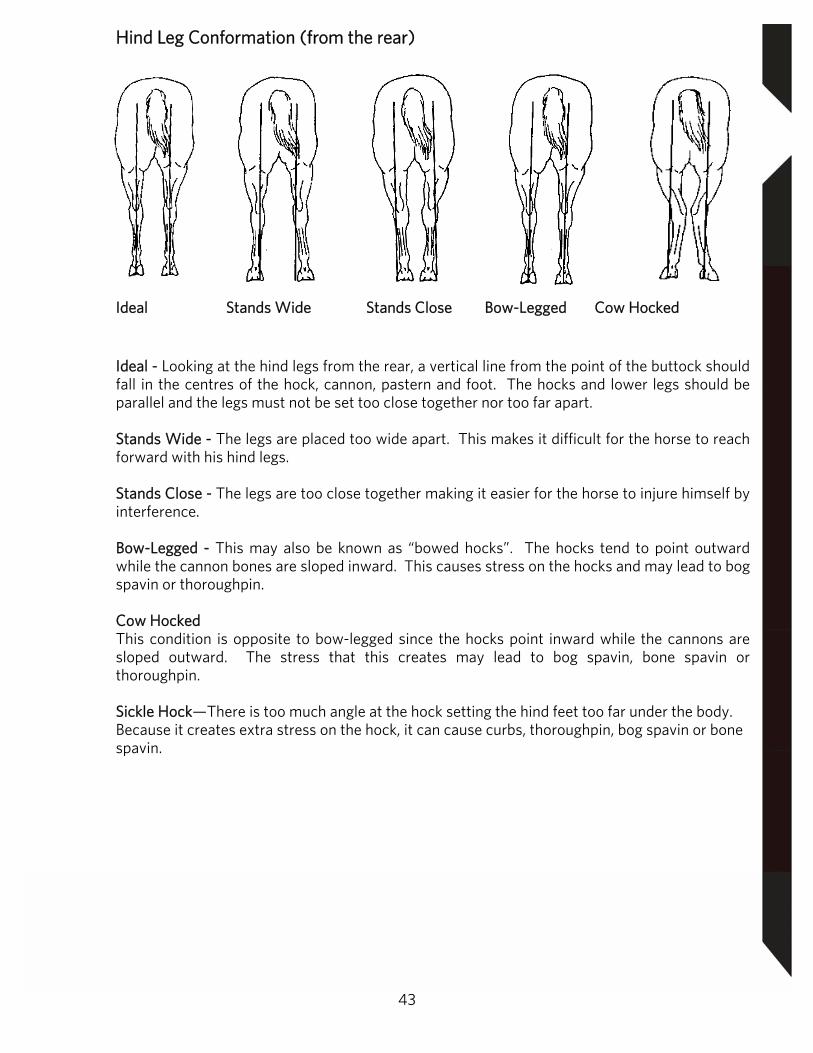
Ideal Stands Wide Stands Close Bow-Legged Cow Hocked Ideal - Looking at the hind legs from the rear, a vertical line from the point of the buttock should fall in the centres of the hock, cannon, pastern and foot. The hocks and lower legs should be parallel and the legs must not be set too close together nor too far apart. Stands Wide - The legs are placed too wide apart. This makes it difficult for the horse to reach forward with his hind legs. Stands Close - The legs are too close together making it easier for the horse to injure himself by interference. Bow-Legged - This may also be known as “bowed hocks”. The hocks tend to point outward while the cannon bones are sloped inward. This causes stress on the hocks and may lead to bog spavin or thoroughpin. Cow Hocked This condition is opposite to bow-legged since the hocks point inward while the cannons are sloped outward. The stress that this creates may lead to bog spavin, bone spavin or thoroughpin. Sickle Hock—There is too much angle at the hock setting the hind feet too far under the body. Because it creates extra stress on the hock, it can cause curbs, thoroughpin, bog spavin or bone spavin.
44
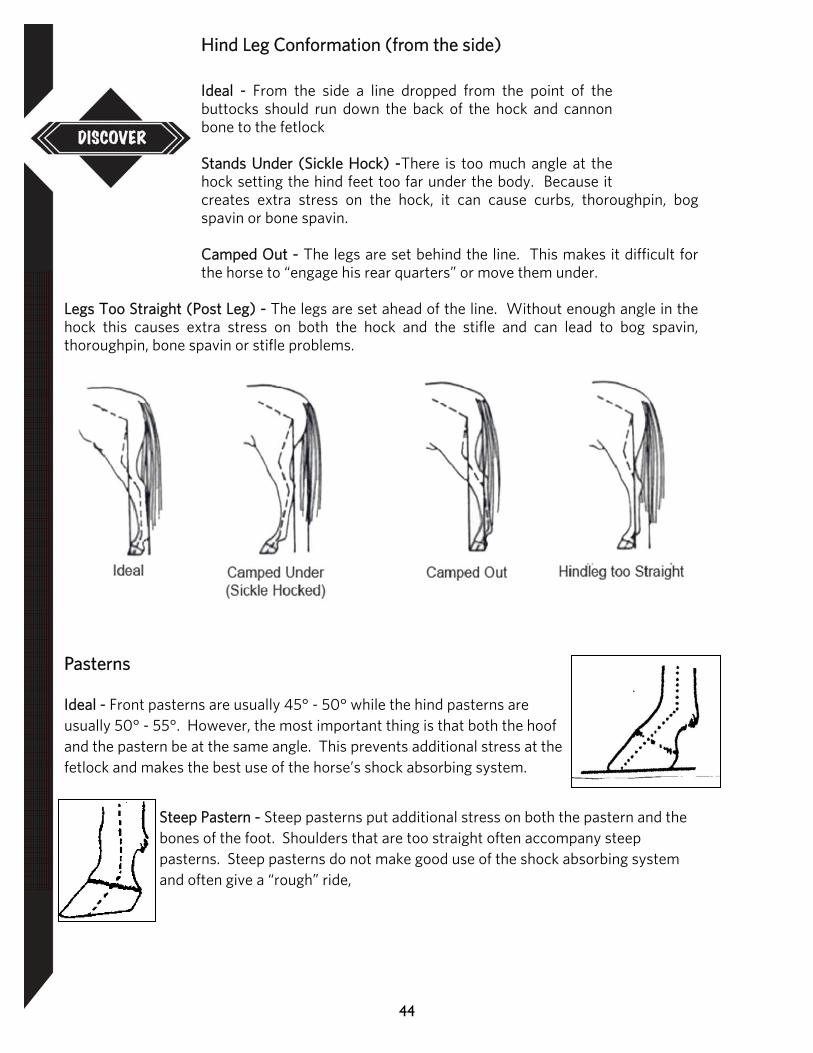
Hind Leg Conformation (from the side) Ideal - From the side a line dropped from the point of the buttocks should run down the back of the hock and cannon bone to the fetlock Stands Under (Sickle Hock) -There is too much angle at the hock setting the hind feet too far under the body. Because it creates extra stress on the hock, it can cause curbs, thoroughpin, bog spavin or bone spavin. Camped Out - The legs are set behind the line. This makes it difficult for the horse to “engage his rear quarters” or move them under.
Legs Too Straight (Post Leg) - The legs are set ahead of the line. Without enough angle in the hock this causes extra stress on both the hock and the stifle and can lead to bog spavin, thoroughpin, bone spavin or stifle problems.
Pasterns Ideal - Front pasterns are usually 45° - 50° while the hind pasterns are usually 50° - 55°. However, the most important thing is that both the hoof and the pastern be at the same angle. This prevents additional stress at the fetlock and makes the best use of the horse’s shock absorbing system.
Steep Pastern - Steep pasterns put additional stress on both the pastern and the bones of the foot. Shoulders that are too straight often accompany steep pasterns. Steep pasterns do not make good use of the shock absorbing system and often give a “rough” ride,
45
Excessively Long Pastern - These are weak since they are too long and sloping. This causes great stress on the fetlock and ligaments leading to problems.
Broken Angle - When the angle from the pastern and the hoof are not the same, great stress is created and can lead to severe problems both in the leg and in the hoof. Coon– Footed - Horses that are very long in the pastern with broken angulation are known as coon-footed.
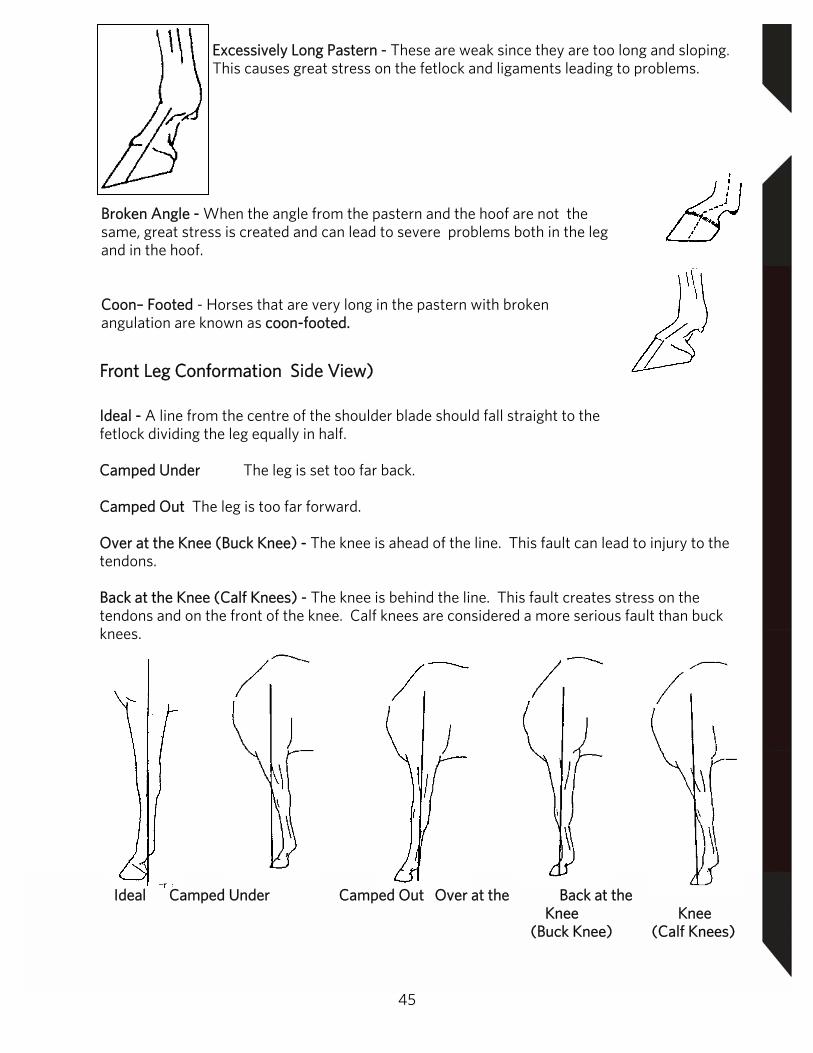
Front Leg Conformation Side View) Ideal - A line from the centre of the shoulder blade should fall straight to the fetlock dividing the leg equally in half. Camped Under The leg is set too far back. Camped Out The leg is too far forward. Over at the Knee (Buck Knee) - The knee is ahead of the line. This fault can lead to injury to the tendons.
Back at the Knee (Calf Knees) - The knee is behind the line. This fault creates stress on the tendons and on the front of the knee. Calf knees are considered a more serious fault than buck knees.
Ideal Camped Under Camped Out Over at the Back at the Knee Knee (Buck Knee) (Calf Knees)
46
Front Leg Conformation (Front View)
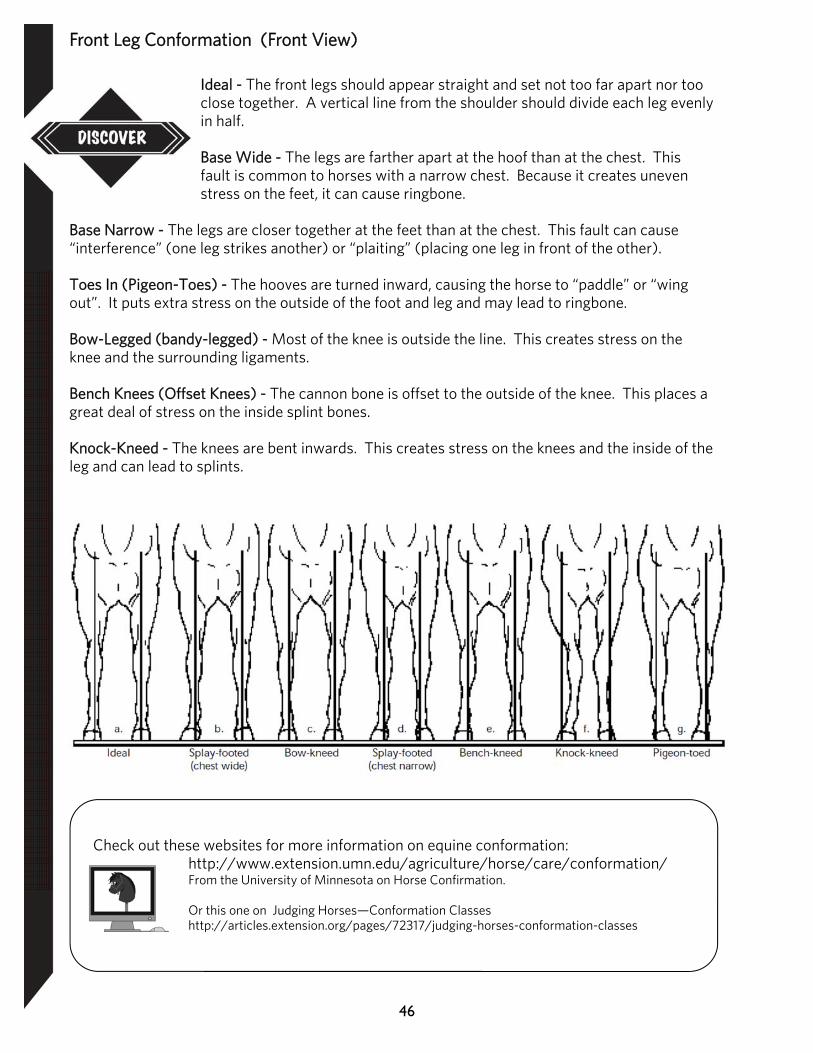
Ideal - The front legs should appear straight and set not too far apart nor too close together. A vertical line from the shoulder should divide each leg evenly in half. Base Wide - The legs are farther apart at the hoof than at the chest. This fault is common to horses with a narrow chest. Because it creates uneven stress on the feet, it can cause ringbone.
Base Narrow - The legs are closer together at the feet than at the chest. This fault can cause “interference” (one leg strikes another) or “plaiting” (placing one leg in front of the other). Toes In (Pigeon-Toes) - The hooves are turned inward, causing the horse to “paddle” or “wing out”. It puts extra stress on the outside of the foot and leg and may lead to ringbone. Bow-Legged (bandy-legged) - Most of the knee is outside the line. This creates stress on the knee and the surrounding ligaments. Bench Knees (Offset Knees) - The cannon bone is offset to the outside of the knee. This places a great deal of stress on the inside splint bones. Knock-Kneed - The knees are bent inwards. This creates stress on the knees and the inside of the leg and can lead to splints.
Check out these websites for more information on equine conformation:
http://www.extension.umn.edu/agriculture/horse/care/conformation/ From the University of Minnesota on Horse Confirmation. Or this one on Judging Horses—Conformation Classes http://articles.extension.org/pages/72317/judging-horses-conformation-classes
47
Skill Builder 4: Safety and Stable Management
Stable Management Tips Types of Housing & Shelter Booby Traps The Cast Horse Bandaging Trailering
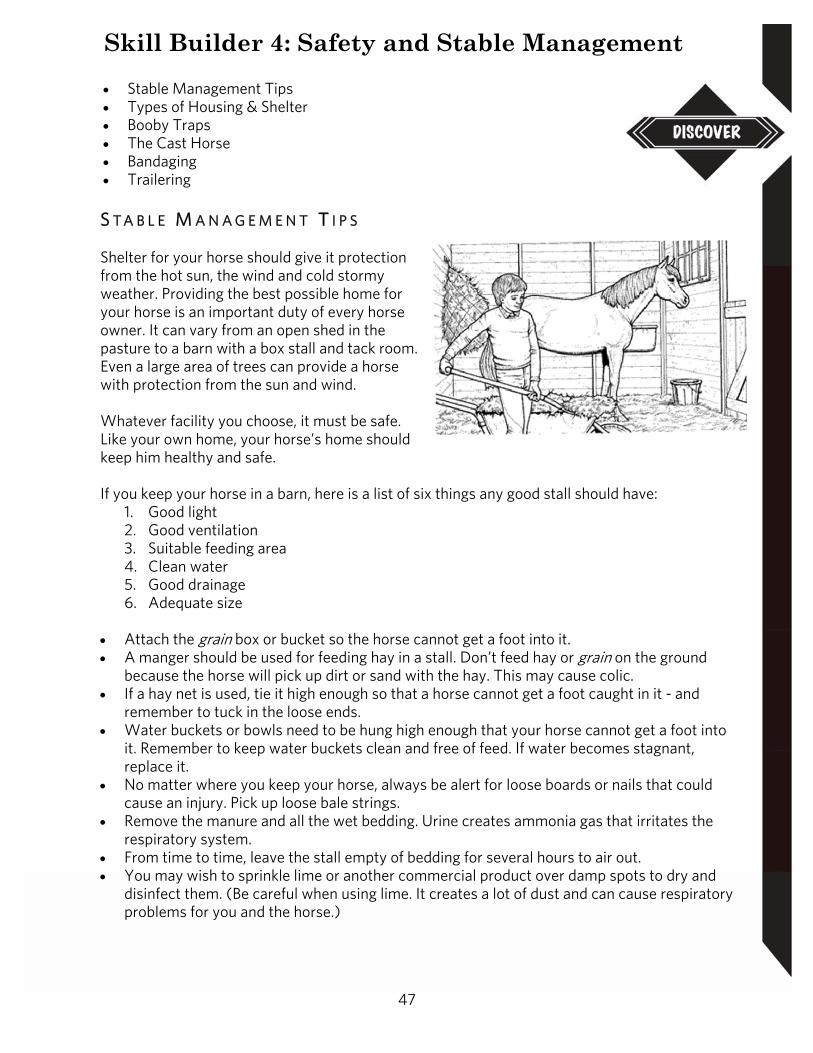
S T A B L E M A N A G E M E N T T I P S Shelter for your horse should give it protection from the hot sun, the wind and cold stormy weather. Providing the best possible home for your horse is an important duty of every horse owner. It can vary from an open shed in the pasture to a barn with a box stall and tack room. Even a large area of trees can provide a horse with protection from the sun and wind. Whatever facility you choose, it must be safe. Like your own home, your horse’s home should keep him healthy and safe. If you keep your horse in a barn, here is a list of six things any good stall should have:
1. Good light 2. Good ventilation 3. Suitable feeding area 4. Clean water 5. Good drainage 6. Adequate size
Attach the grain box or bucket so the horse cannot get a foot into it. A manger should be used for feeding hay in a stall. Don’t feed hay or grain on the ground
because the horse will pick up dirt or sand with the hay. This may cause colic. If a hay net is used, tie it high enough so that a horse cannot get a foot caught in it - and
remember to tuck in the loose ends. Water buckets or bowls need to be hung high enough that your horse cannot get a foot into
it. Remember to keep water buckets clean and free of feed. If water becomes stagnant, replace it.
No matter where you keep your horse, always be alert for loose boards or nails that could cause an injury. Pick up loose bale strings.
Remove the manure and all the wet bedding. Urine creates ammonia gas that irritates the respiratory system.
From time to time, leave the stall empty of bedding for several hours to air out. You may wish to sprinkle lime or another commercial product over damp spots to dry and
disinfect them. (Be careful when using lime. It creates a lot of dust and can cause respiratory problems for you and the horse.)
48
Equus’ Tip: Since one horse may produce as much as 50 pounds of manure a day as well as 9 pounds of urine and 8-15 pounds of soiled bedding, a good manure management program is essential for every horse
owner. Manure is a prime breeding ground for flies and parasites. Therefore, manure should not be spread on pastures which are being grazed by horses.
T Y P E S O F H O U S I N G A N D S H E LT E R
1. Tie Stalls The advantage of tie stalls in a barn is the provision of housing for a larger number of
animals. Tie stalls also require less work and less bedding than box stalls. The disadvantage of a tie stall is that a horse is not able to move about as freely as in a
box stall. A tie stall should be at least 11-12 feet (3.3-3.6 meters) long including the manger, water
supply and hay rack. There should also be enough room for you to work comfortably around the horse.
2. Box Stalls Give a horse freedom of movement and encourage it to lie down and rest. The size of a box stall should suit the size of the horse or pony. A safe stall is at least 12’
x 12’ (3.6 m x 3.6 m). The doors should be at least four feet wide since narrow doorways are dangerous. The
door should open outwards so you can enter the stall without interference from bedding. It would also be important if the horse should become cast near the door.
The door should be equipped with “non-projecting” type latches. There should be no nails or screws projecting that could injure the horse or tear blankets.
If possible, windows should be equipped with protective bars.
3. Sheds A shed should be placed at the highest point in the pasture for good drainage. The open end should face away from prevailing winds. In an ideal situation, a shed will be open to the south. This will allow the sunshine to
warm it up. The front of the shed should be kept free of all feed and water (for easy traffic flow). The roof should slope away from the opening.
4. Windbreaks Windbreaks such as trees or porosity fence can provide shade in the summer as well as
protection from cold winter winds. A Porosity (slab) fence should be at least eight feet high and allow 20 % porosity. This
means that 20 % of your fence is made up of open space while 80 % of your fence is solid. This will slow down the wind and help to trap snow.
49
5. Fencing Can be made of poles, boards or wires. The wire should be smooth since barbed wire
can cause serious injuries. Electric fences use smooth wire or tape. Check to make sure it works.
The Cast Horse
A horse is said to be cast when he has lain down or rolled and managed to position himself with his legs so close to the stall wall that he cannot get up or roll over. Horses are not made to lie down for long. Horses that are down for a long time, especially those lying on their back, may actually suffocate from the pressure of their digestive system pressing against their lungs.
Most horses panic when they find themselves cast in their stall. They will struggle violently, banging their legs against the wall (making quite a lot of racket) of the stall and sometimes banging their heads.
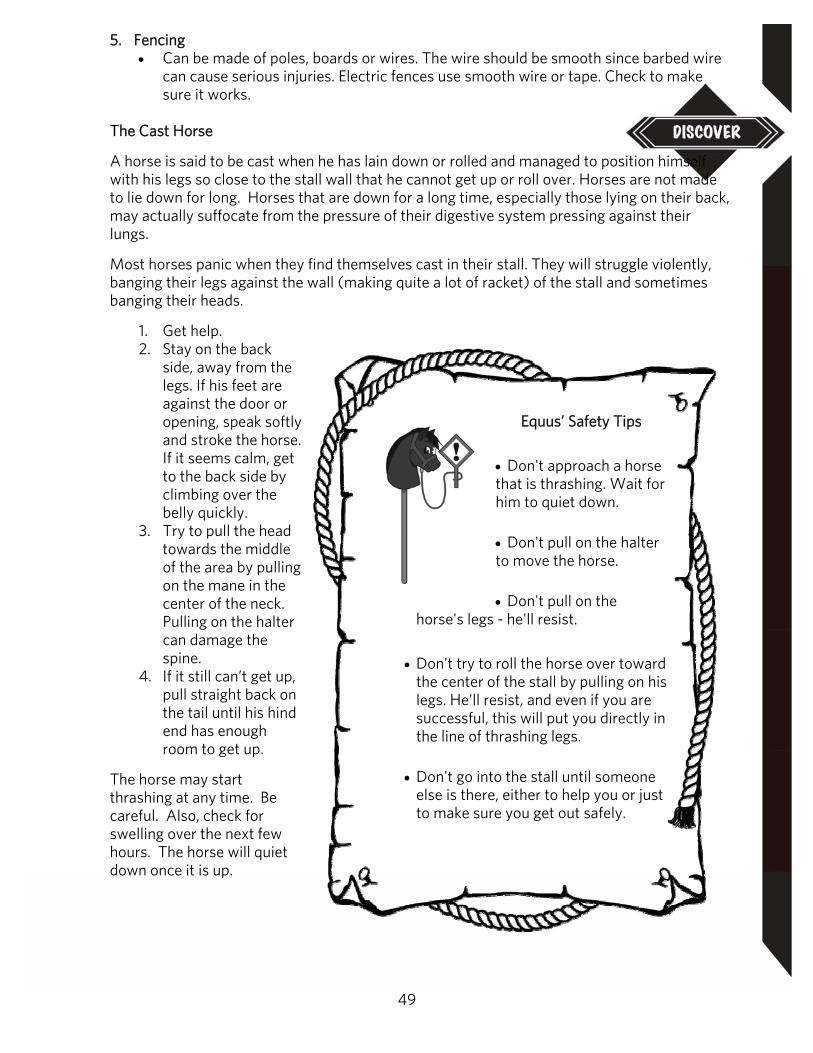
1. Get help. 2. Stay on the back
side, away from the legs. If his feet are against the door or opening, speak softly and stroke the horse. If it seems calm, get to the back side by climbing over the belly quickly.
3. Try to pull the head towards the middle of the area by pulling on the mane in the center of the neck. Pulling on the halter can damage the spine.
4. If it still can’t get up, pull straight back on the tail until his hind end has enough room to get up.
The horse may start thrashing at any time. Be careful. Also, check for swelling over the next few hours. The horse will quiet down once it is up.
Equus’ Safety Tips Don't approach a horse that is thrashing. Wait for him to quiet down. Don't pull on the halter to move the horse. Don't pull on the
horse's legs - he'll resist. Don't try to roll the horse over toward
the center of the stall by pulling on his legs. He'll resist, and even if you are successful, this will put you directly in the line of thrashing legs.
Don't go into the stall until someone
else is there, either to help you or just to make sure you get out safely.
50
Check out the following website for more information stable management.
https://www.equisearch.com/how-to/help-your-cast-horse-18634
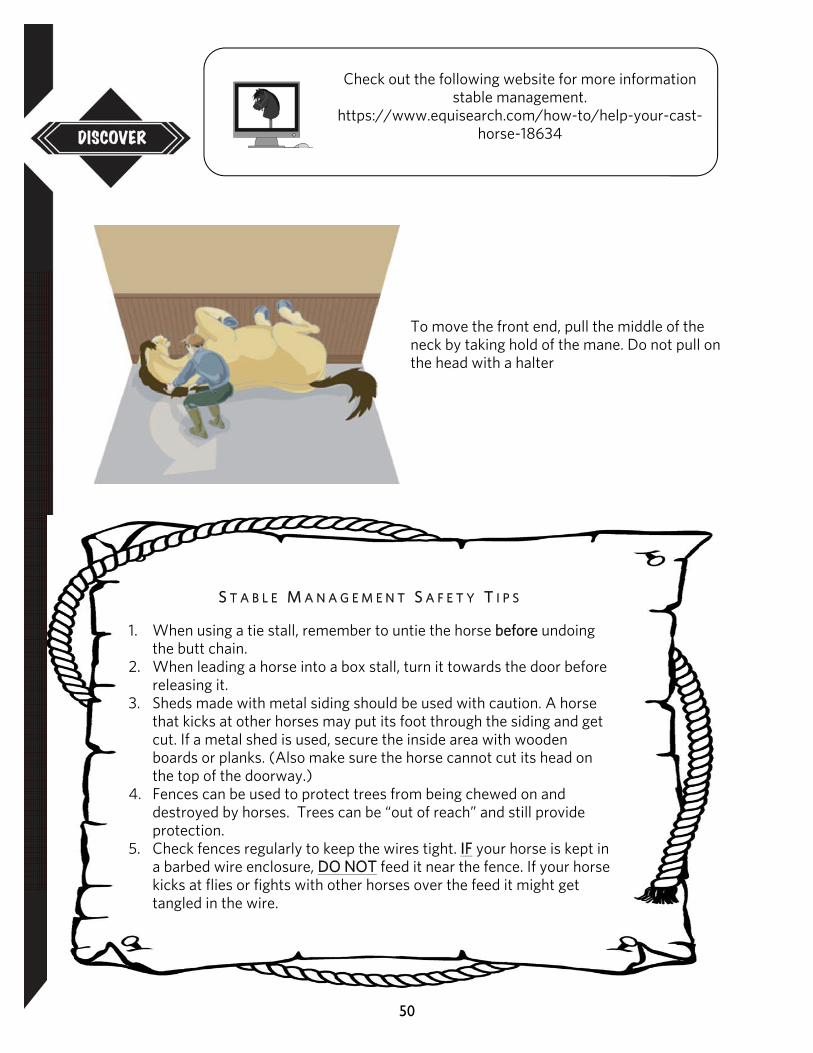
To move the front end, pull the middle of the neck by taking hold of the mane. Do not pull on the head with a halter
S T A B L E M A N A G E M E N T S A F E T Y T I P S
1. When using a tie stall, remember to untie the horse before undoing the butt chain.
2. When leading a horse into a box stall, turn it towards the door before releasing it.
3. Sheds made with metal siding should be used with caution. A horse that kicks at other horses may put its foot through the siding and get cut. If a metal shed is used, secure the inside area with wooden boards or planks. (Also make sure the horse cannot cut its head on the top of the doorway.)
4. Fences can be used to protect trees from being chewed on and destroyed by horses. Trees can be “out of reach” and still provide protection.
5. Check fences regularly to keep the wires tight. IF your horse is kept in a barbed wire enclosure, DO NOT feed it near the fence. If your horse kicks at flies or fights with other horses over the feed it might get tangled in the wire.
51
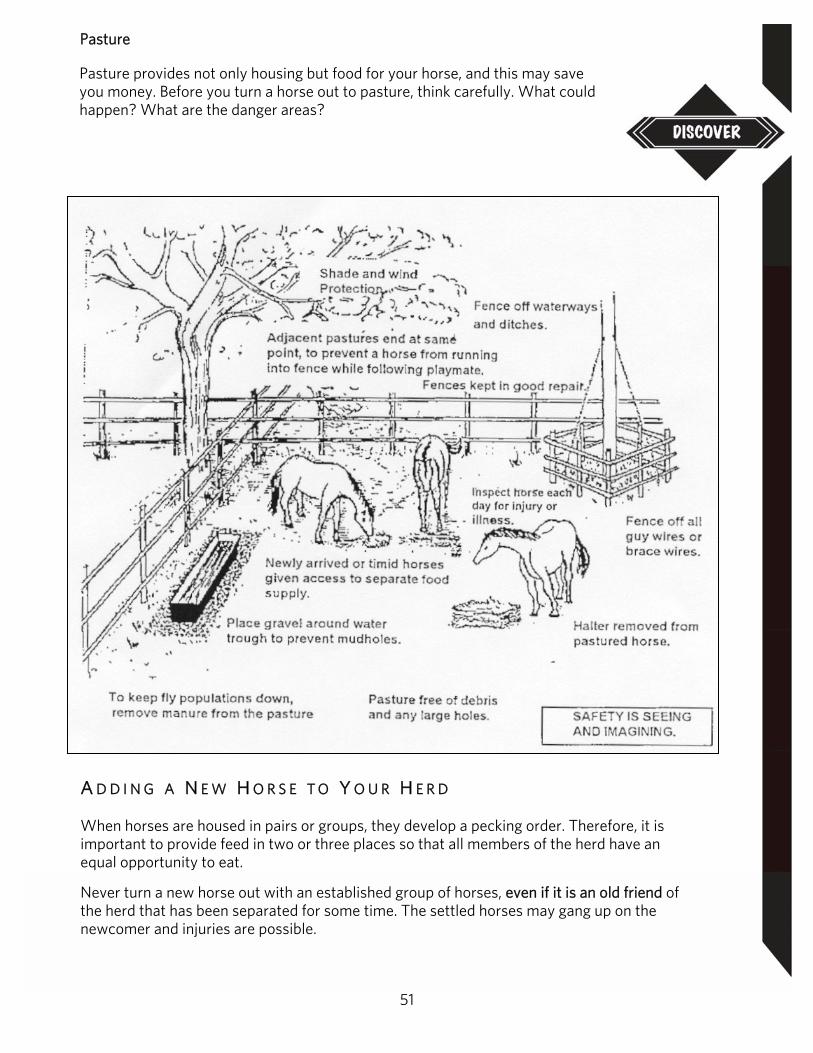
Pasture
Pasture provides not only housing but food for your horse, and this may save you money. Before you turn a horse out to pasture, think carefully. What could happen? What are the danger areas?
A D D I N G A N E W H O R S E T O Y O U R H E R D When horses are housed in pairs or groups, they develop a pecking order. Therefore, it is important to provide feed in two or three places so that all members of the herd have an equal opportunity to eat.
Never turn a new horse out with an established group of horses, even if it is an old friend of the herd that has been separated for some time. The settled horses may gang up on the newcomer and injuries are possible.
52
Put the new horse into a small paddock or corral in sight of the group. Gradually move the new horse closer to the pasture until it is next to the group of horses. Permit the new horse to sniff and nuzzle members of the herd with the fence barrier (not barbed wire!) between them. When all the preliminary kicks and squeals are done, put the horse into the group situation, with enough room that they can get away from each other if necessary. Stand by and watch the proceedings. B O O B Y T R A P S
A booby trap is anything a horse can get hurt with. They can be found in every stable, pasture, arena and farm yard. It is important to be aware of them and to try to prevent an accident before it happens.
Discuss the following list with your leader and other club members. Then think of your horse’s home. Are any of these booby traps “waiting” for your horse?
Booby Traps Problem How to Prevent
Broken Planks Tear, puncture with or without wood left in the horse
Put up new planks
Barbed Wire Deep cuts or skin cuts maintain fence use where horse
population is low use high tensile (smooth
wire) or electric fence as an alternative
Loose Wire punctures, deep cuts tighten wire
Hog Wire feet will go through and get caught
cuts and strains
use a size too small for a foot or very large (shoes still get caught)
place 30 cm off the ground
Gate – too long cuts, bruises hang gate properly or add a second post of plank so that the edge doesn’t stick out
gates should open against a fence so an animal can not be caught behind or run into it when it is open
Gate – metal Cuts cover sharp edges set high enough that if the
horse falls under it, it can get its legs free
Gate – open gate cuts, bruises gates should open against a fence so an animal can not be caught behind or run into it when it is open

53
Booby Traps Problem How to Prevent
Hinges, latches, bolts Cuts should not stick out from a wall or round the edges
Roof overhangs Cuts protect sharp edges
Machinery cuts, punctures, broken bones, sprains
do not leave where horses are kept
Batteries horses may lick them death
store away from the barn and horses
Used oil horse may lick them death
store away from the barn and horses
Grain bins, grain piles laminitis, colic, death possible
close bins securely fence grain piles or do not
allow horse into the field
Hay Feeders suffocation, strains, cuts, broken bones
place high up or on the ground with an open top and sides that can not cut the horse
Metal scraps, glass wire, nails
cuts, puncture pick up garbage around the yard or stable
Stall walls cuts, tears, broken bones, suffocation
remove or flatten nails cover holes level bottom of the stall so the horse
cannot get caught in a depression
Paint and wood preservatives
Poisoning Do not use where horses are kept
Black walnut wood shavings
death from a very small amount
only use wood shavings sold for bedding, not leftovers from a lumberyard or carpenter
Barn wiring/lights electrocution, cuts wiring should be enclosed or out of reach
cover lights or recess them into the ceiling
Stored equipment, wheel barrow, pitch fork, rakes, shovels
cuts, strains, broken bones punctures, cuts
put all equipment away when it isn’t being used
Metal feeders, water tubs
Cuts cover sharp edges keep in good repair
Tying horse spooks and pulls an object loose and runs into other objects
tying by reins hurts the mouth
tying too long, rope can wrap around the pasterns and break or burn leg
tie to a solid object that can not be pulled loose
use a strong halter and lead shank don’t tie too long or too short horse should have enough rope that it
can reach its feed (and lie down if it is in a tie stall)
tie so the horse can be freed easily
54
Mucous Membranes
The mucous membranes are the lining of a horse's eyelids, his gums and the inside of his nostrils. The color of the mucous membranes are another indicator of blood circulation. A healthy horse's gums are slightly more pale than a humans. Signs of Poor Horse Health
Call the Vet at signs of: A wound pulsing blood. Unusual swelling. Seizures. Unusual behavior such as depression, staggering, shivering. Diarrhea that is not a result of nervous excitement caused by things like trailering or
competition. Pulse that is over the normal values and is not a result of excitement or exertion. Straining to urinate, coffee or blood colored urine, or leaking urine. Change in appetite such as refusing to eat, or unable to eat or drink. A puncture wound that is oozing foul secretions or has become swollen. Constipation-straining to produce manure. Agitated rolling, kicking, biting at flanks and sweating that might indicate colic
(stomachache). Pale, bright red, grayish blue or bright yellow mucous membranes Persistent cough. Limping.
Check out the following website on vital health signs http://www.equusite.com/articles/health/healthVitalSigns.shtml
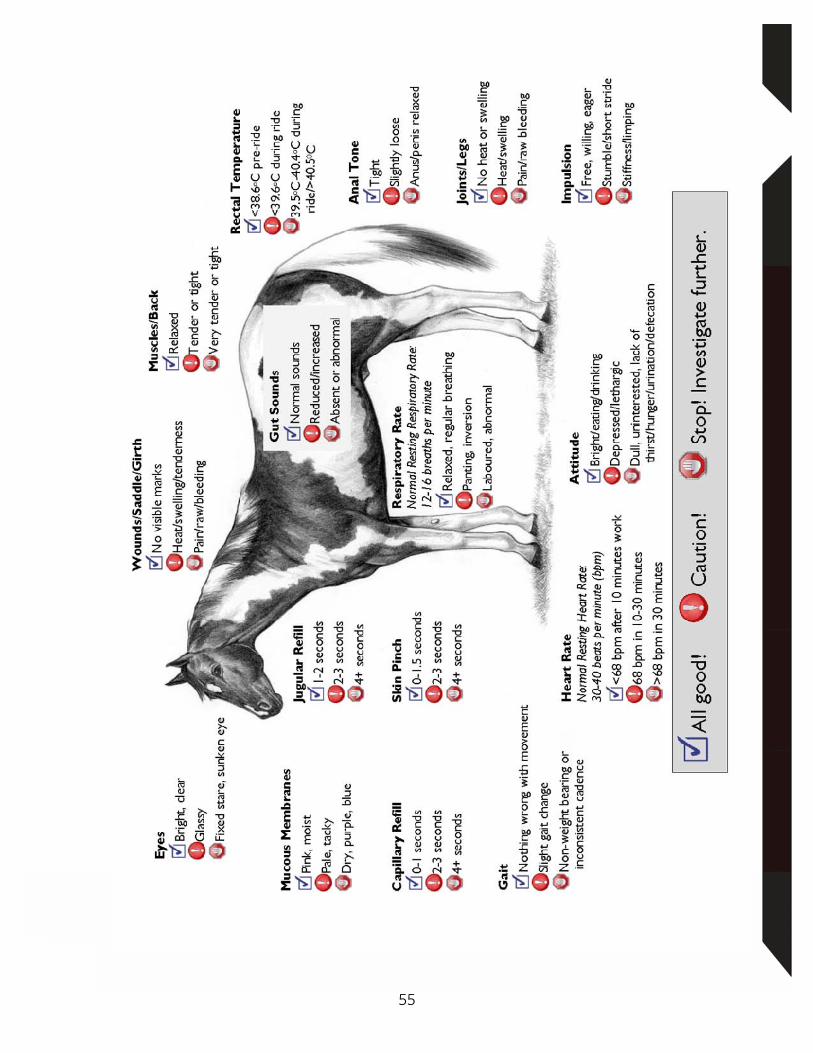
55
56
Equus says… A common injury to a horse is for it to catch its nose in the bucket handle and rip it. This can require 20-30 stitches and possibly
more damage can be done. Buckets often come with a rubber cover on the end of the handle which is quickly lost. Use duct or elec-trical tape to securely wrap the end of the handle and prevent a serious and painful injury.
Check out the following website for more information on bucket tips
https://www.equisearch.com/articles/6-horse-bucket-wise-tips
Other Commonly Used Equipment L E G B A N D A G E S Bandaging your horse’s legs is a good safety precaution when it is being trailered. Horses may require leg bandages after a hard work out, jumping session or long rides over difficult terrain, to help prevent the legs from filling up (stocking up) with fluid. As a first aid measure, if a horse has a cut, scrape or has pulled a tendon, bandages will help prevent or reduce swelling. They can also be used to provide extra warmth in a cold barn or used on a horse that is not feeling well.
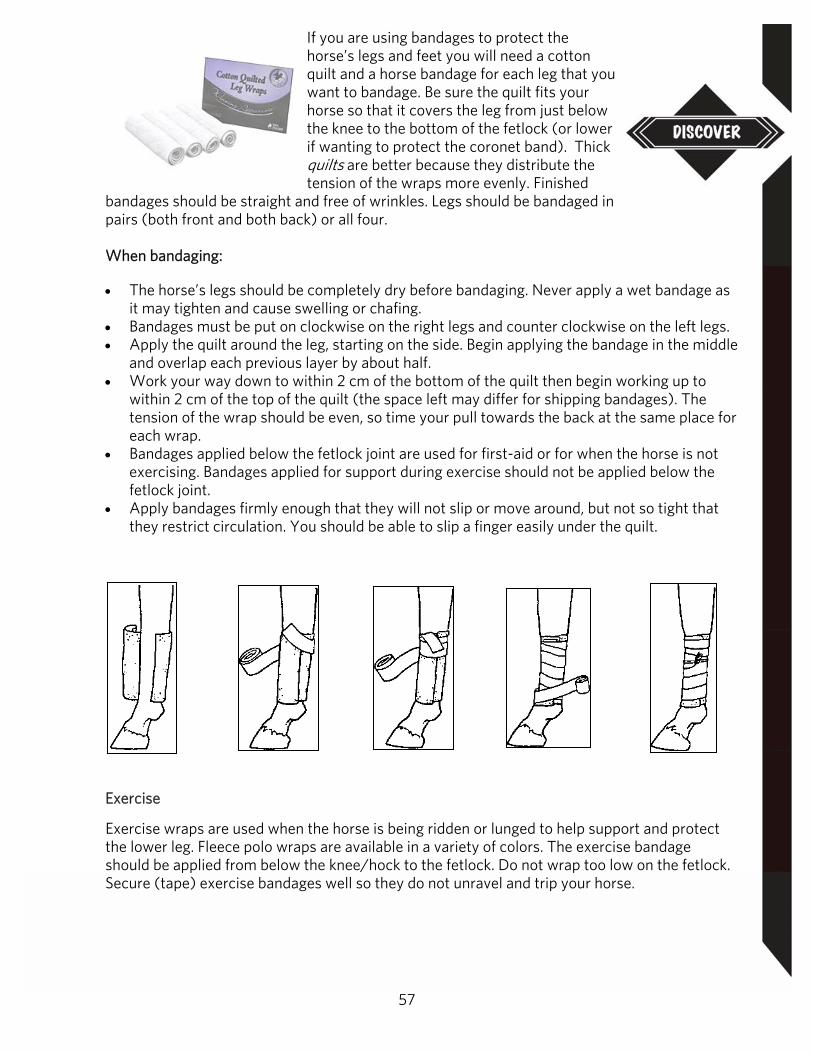
57
If you are using bandages to protect the horse’s legs and feet you will need a cotton quilt and a horse bandage for each leg that you want to bandage. Be sure the quilt fits your horse so that it covers the leg from just below the knee to the bottom of the fetlock (or lower if wanting to protect the coronet band). Thick quilts are better because they distribute the tension of the wraps more evenly. Finished
bandages should be straight and free of wrinkles. Legs should be bandaged in pairs (both front and both back) or all four. When bandaging:
The horse’s legs should be completely dry before bandaging. Never apply a wet bandage as it may tighten and cause swelling or chafing.
Bandages must be put on clockwise on the right legs and counter clockwise on the left legs. Apply the quilt around the leg, starting on the side. Begin applying the bandage in the middle
and overlap each previous layer by about half. Work your way down to within 2 cm of the bottom of the quilt then begin working up to
within 2 cm of the top of the quilt (the space left may differ for shipping bandages). The tension of the wrap should be even, so time your pull towards the back at the same place for each wrap.
Bandages applied below the fetlock joint are used for first-aid or for when the horse is not exercising. Bandages applied for support during exercise should not be applied below the fetlock joint.
Apply bandages firmly enough that they will not slip or move around, but not so tight that they restrict circulation. You should be able to slip a finger easily under the quilt.
Exercise
Exercise wraps are used when the horse is being ridden or lunged to help support and protect the lower leg. Fleece polo wraps are available in a variety of colors. The exercise bandage should be applied from below the knee/hock to the fetlock. Do not wrap too low on the fetlock. Secure (tape) exercise bandages well so they do not unravel and trip your horse.

58
Stable Bandage
Polo Wraps
Polo wraps are popular as a support bandage and for protection. They use only a wrap (no quilted pad) that should be applied: Firmly and evenly, just before exercise. By wrapping front to back, pulling tension from the cannon bone back and around the tendon. Working from outside to inside, guiding tendons to the inside of the leg. With even tension and overlaps. With no wrinkles.
So that they do not interfere with the movement of the fetlock joint. With velcro fasteners finished on the outside of the leg.
Polo wraps should be removed immediately after exercise.
Stable Bandages
A stable bandage is used when a horse is being kept in a stall overnight or for first aid. It often prevents “stocking up”. A long stable wrap should only be used with a quilted pad underneath.
Hauling Bandage
Hauling (shipping) Bandages consist of Leg Wraps and Bandages
This type of bandage is used for support and protection while the horse is being hauled in a trailer. A thick quilted pad that covers from below the knee/hock to below the coronet band on the front and hind legs is under the long wrap which is at least 12 feet in length.
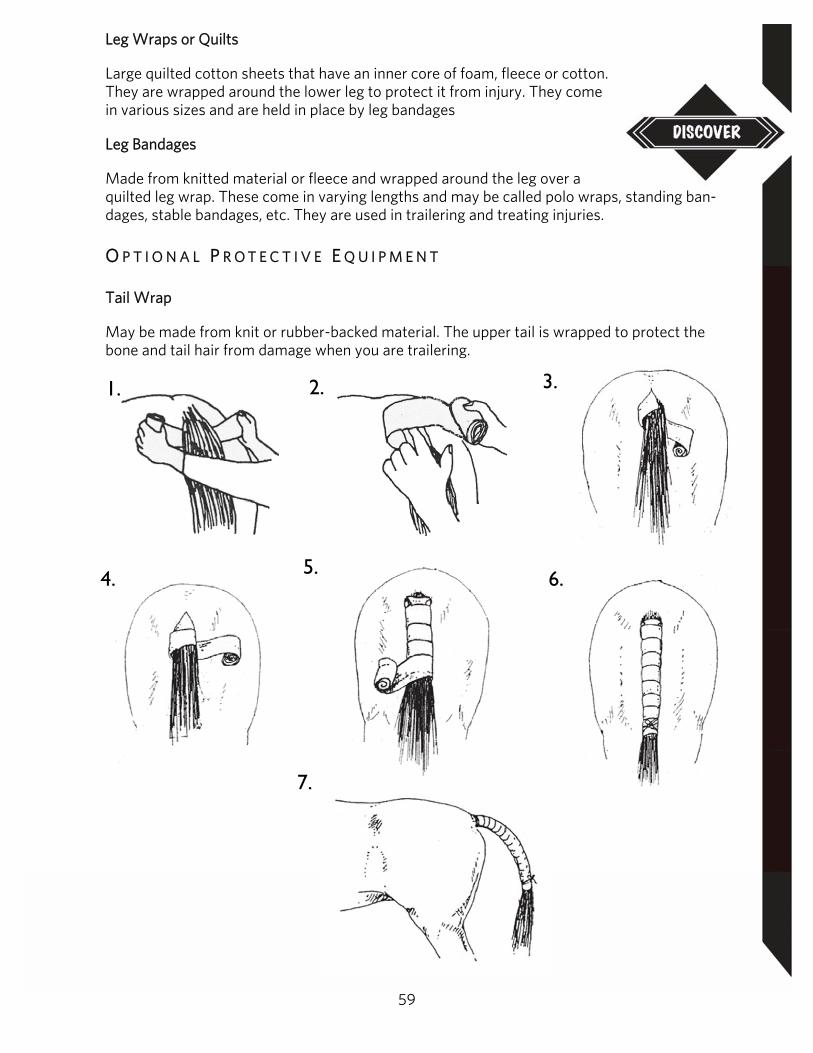
59
Leg Wraps or Quilts
Large quilted cotton sheets that have an inner core of foam, fleece or cotton. They are wrapped around the lower leg to protect it from injury. They come in various sizes and are held in place by leg bandages
Leg Bandages
Made from knitted material or fleece and wrapped around the leg over a quilted leg wrap. These come in varying lengths and may be called polo wraps, standing ban-dages, stable bandages, etc. They are used in trailering and treating injuries. O P T I O N A L P R O T E C T I V E E Q U I P M E N T Tail Wrap
May be made from knit or rubber-backed material. The upper tail is wrapped to protect the bone and tail hair from damage when you are trailering.
1. 2. 3.
4. 5. 6.
7.
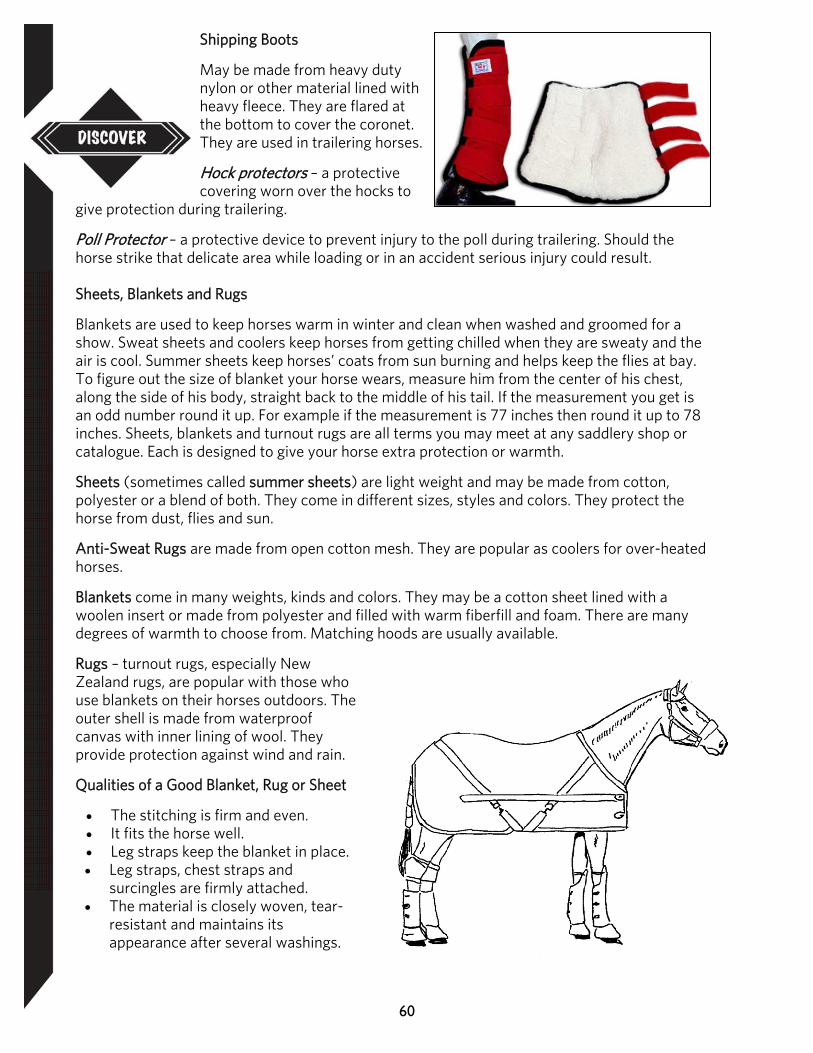
60
Shipping Boots
May be made from heavy duty nylon or other material lined with heavy fleece. They are flared at the bottom to cover the coronet. They are used in trailering horses.
Hock protectors – a protective covering worn over the hocks to
give protection during trailering.
Poll Protector – a protective device to prevent injury to the poll during trailering. Should the horse strike that delicate area while loading or in an accident serious injury could result. Sheets, Blankets and Rugs
Blankets are used to keep horses warm in winter and clean when washed and groomed for a show. Sweat sheets and coolers keep horses from getting chilled when they are sweaty and the air is cool. Summer sheets keep horses’ coats from sun burning and helps keep the flies at bay. To figure out the size of blanket your horse wears, measure him from the center of his chest, along the side of his body, straight back to the middle of his tail. If the measurement you get is an odd number round it up. For example if the measurement is 77 inches then round it up to 78 inches. Sheets, blankets and turnout rugs are all terms you may meet at any saddlery shop or catalogue. Each is designed to give your horse extra protection or warmth.
Sheets (sometimes called summer sheets) are light weight and may be made from cotton, polyester or a blend of both. They come in different sizes, styles and colors. They protect the horse from dust, flies and sun.
Anti-Sweat Rugs are made from open cotton mesh. They are popular as coolers for over-heated horses.
Blankets come in many weights, kinds and colors. They may be a cotton sheet lined with a woolen insert or made from polyester and filled with warm fiberfill and foam. There are many degrees of warmth to choose from. Matching hoods are usually available.
Rugs – turnout rugs, especially New Zealand rugs, are popular with those who use blankets on their horses outdoors. The outer shell is made from waterproof canvas with inner lining of wool. They provide protection against wind and rain.
Qualities of a Good Blanket, Rug or Sheet
The stitching is firm and even. It fits the horse well. Leg straps keep the blanket in place. Leg straps, chest straps and
surcingles are firmly attached. The material is closely woven, tear-
resistant and maintains its appearance after several washings.
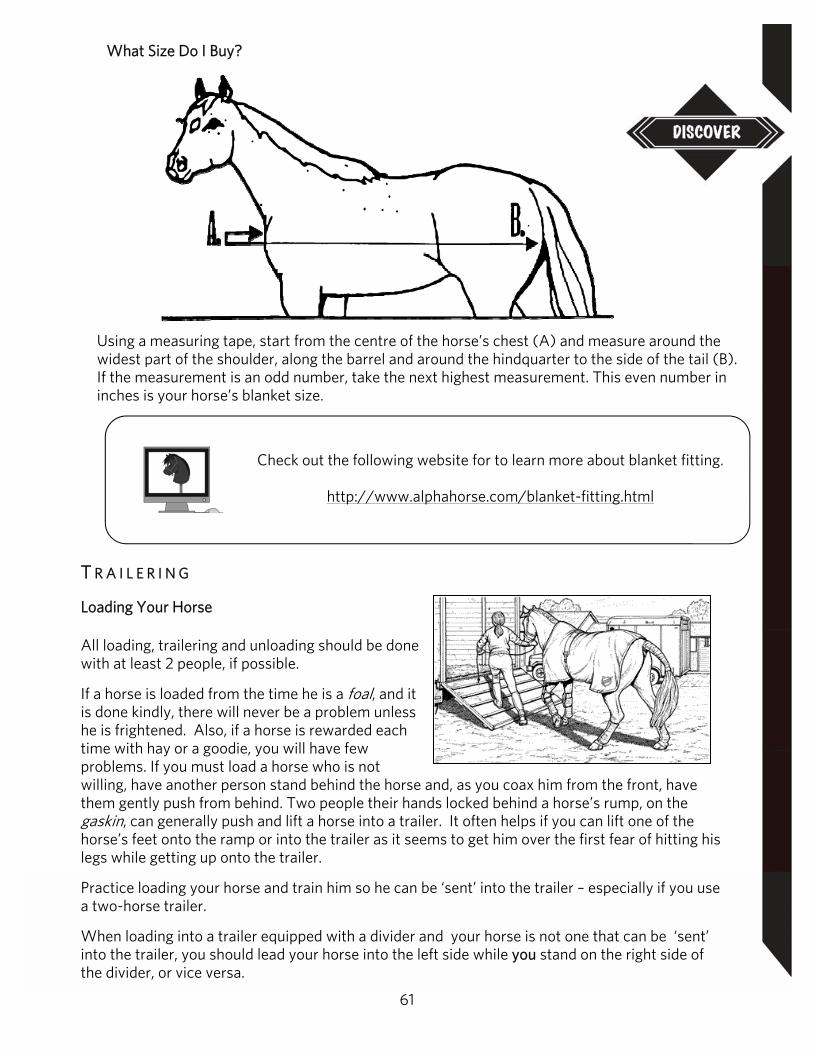
61
What Size Do I Buy?
Using a measuring tape, start from the centre of the horse’s chest (A) and measure around the widest part of the shoulder, along the barrel and around the hindquarter to the side of the tail (B). If the measurement is an odd number, take the next highest measurement. This even number in inches is your horse’s blanket size.
Check out the following website for to learn more about blanket fitting.
http://www.alphahorse.com/blanket-fitting.html
T R A I L E R I N G Loading Your Horse
All loading, trailering and unloading should be done with at least 2 people, if possible.
If a horse is loaded from the time he is a foal, and it is done kindly, there will never be a problem unless he is frightened. Also, if a horse is rewarded each time with hay or a goodie, you will have few problems. If you must load a horse who is not willing, have another person stand behind the horse and, as you coax him from the front, have them gently push from behind. Two people their hands locked behind a horse’s rump, on the gaskin, can generally push and lift a horse into a trailer. It often helps if you can lift one of the horse’s feet onto the ramp or into the trailer as it seems to get him over the first fear of hitting his legs while getting up onto the trailer.
Practice loading your horse and train him so he can be ‘sent’ into the trailer – especially if you use a two-horse trailer.
When loading into a trailer equipped with a divider and your horse is not one that can be ‘sent’ into the trailer, you should lead your horse into the left side while you stand on the right side of the divider, or vice versa.
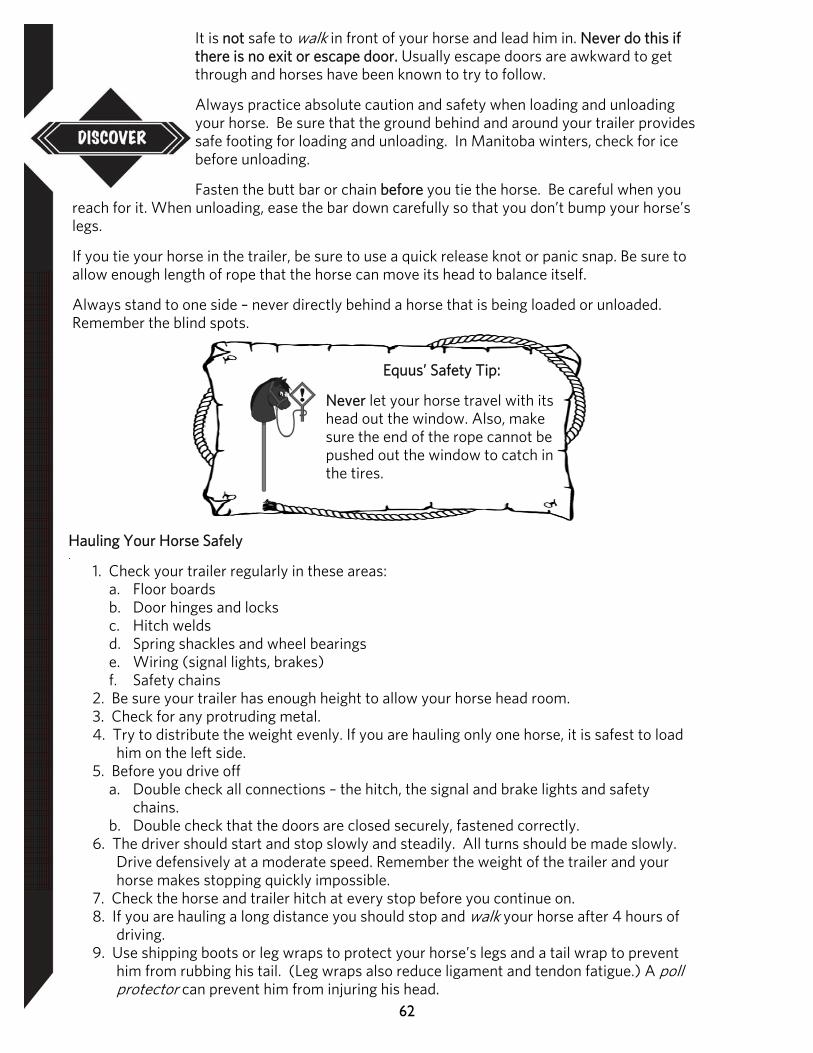
62
It is not safe to walk in front of your horse and lead him in. Never do this if there is no exit or escape door. Usually escape doors are awkward to get through and horses have been known to try to follow.
Always practice absolute caution and safety when loading and unloading your horse. Be sure that the ground behind and around your trailer provides safe footing for loading and unloading. In Manitoba winters, check for ice before unloading.
Fasten the butt bar or chain before you tie the horse. Be careful when you reach for it. When unloading, ease the bar down carefully so that you don’t bump your horse’s legs.
If you tie your horse in the trailer, be sure to use a quick release knot or panic snap. Be sure to allow enough length of rope that the horse can move its head to balance itself.
Always stand to one side – never directly behind a horse that is being loaded or unloaded. Remember the blind spots.
Equus’ Safety Tip:
Never let your horse travel with its head out the window. Also, make sure the end of the rope cannot be pushed out the window to catch in the tires.
Hauling Your Horse Safely .
1. Check your trailer regularly in these areas: a. Floor boards b. Door hinges and locks c. Hitch welds d. Spring shackles and wheel bearings e. Wiring (signal lights, brakes) f. Safety chains
2. Be sure your trailer has enough height to allow your horse head room. 3. Check for any protruding metal. 4. Try to distribute the weight evenly. If you are hauling only one horse, it is safest to load
him on the left side. 5. Before you drive off
a. Double check all connections – the hitch, the signal and brake lights and safety chains.
b. Double check that the doors are closed securely, fastened correctly. 6. The driver should start and stop slowly and steadily. All turns should be made slowly.
Drive defensively at a moderate speed. Remember the weight of the trailer and your horse makes stopping quickly impossible.
7. Check the horse and trailer hitch at every stop before you continue on. 8. If you are hauling a long distance you should stop and walk your horse after 4 hours of
driving. 9. Use shipping boots or leg wraps to protect your horse’s legs and a tail wrap to prevent
him from rubbing his tail. (Leg wraps also reduce ligament and tendon fatigue.) A poll protector can prevent him from injuring his head.
63
Links to videos or information on trailer loading.
http://www.youtube.com/watch?v=Sy0lZlx8hZA http://www.equisearch.com/uncategorized/4-step-horse-trailer-loading/
Unloading Your Horse
Be sure that the area where you will be unloading your horse offers safe non-slippery footing.
Always untie the horse before you open the door or unlatch the butt bar or chain. Stand to one side as your horse backs out. Fire Safety
Fire is always a danger, especially in wooden buildings. Fire prevention is always extremely important. As a horse owner, you should be very aware of fire prevention.
Should a fire ever occur at your stable, move all horses to a safe secure distance. Then close the doors to the barn to help contain the flames. Closing the doors will also prevent the horses or other animals from running back into the burning barn. Do this ONLY if it does not threaten your safety! Then phone the fire department immediately. Don’t try to fight the fire yourself. Wait for professional help to arrive!
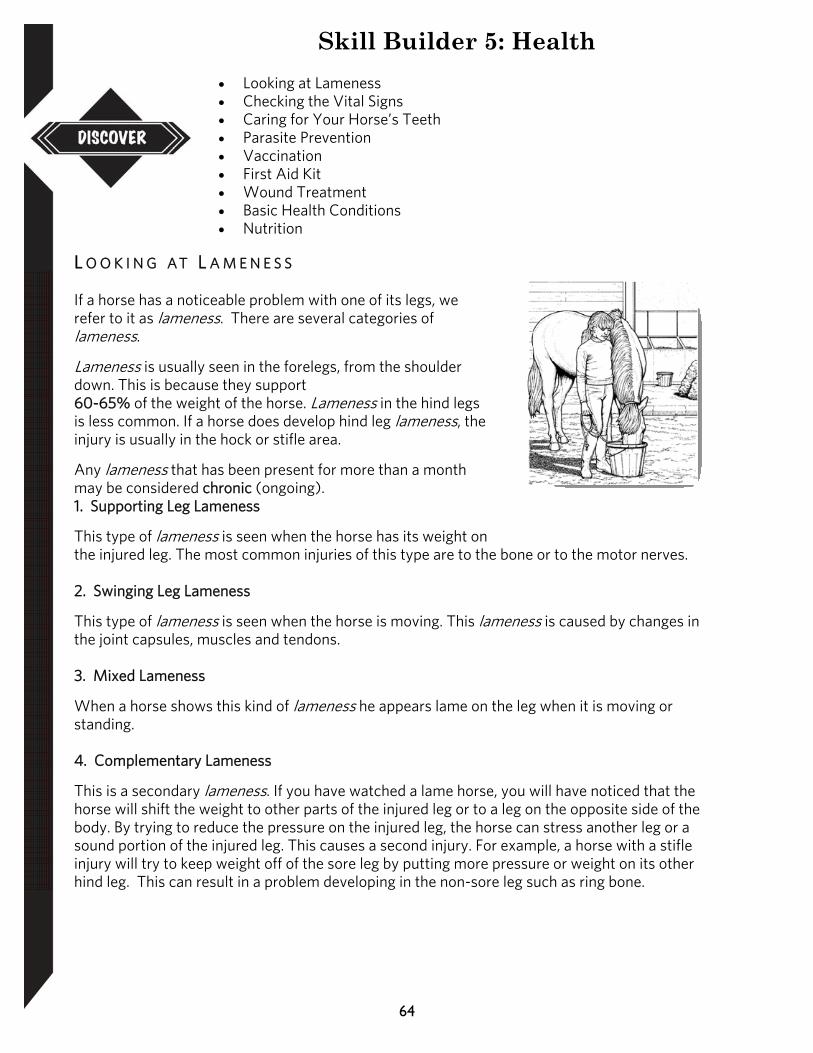
64
Skill Builder 5: Health
Looking at Lameness Checking the Vital Signs Caring for Your Horse’s Teeth Parasite Prevention Vaccination First Aid Kit Wound Treatment Basic Health Conditions Nutrition
L O O K I N G AT L A M E N E S S
If a horse has a noticeable problem with one of its legs, we refer to it as lameness. There are several categories of lameness.
Lameness is usually seen in the forelegs, from the shoulder down. This is because they support 60-65% of the weight of the horse. Lameness in the hind legs is less common. If a horse does develop hind leg lameness, the injury is usually in the hock or stifle area.
Any lameness that has been present for more than a month may be considered chronic (ongoing). 1. Supporting Leg Lameness
This type of lameness is seen when the horse has its weight on the injured leg. The most common injuries of this type are to the bone or to the motor nerves. 2. Swinging Leg Lameness
This type of lameness is seen when the horse is moving. This lameness is caused by changes in the joint capsules, muscles and tendons. 3. Mixed Lameness
When a horse shows this kind of lameness he appears lame on the leg when it is moving or standing. 4. Complementary Lameness
This is a secondary lameness. If you have watched a lame horse, you will have noticed that the horse will shift the weight to other parts of the injured leg or to a leg on the opposite side of the body. By trying to reduce the pressure on the injured leg, the horse can stress another leg or a sound portion of the injured leg. This causes a second injury. For example, a horse with a stifle injury will try to keep weight off of the sore leg by putting more pressure or weight on its other hind leg. This can result in a problem developing in the non-sore leg such as ring bone.
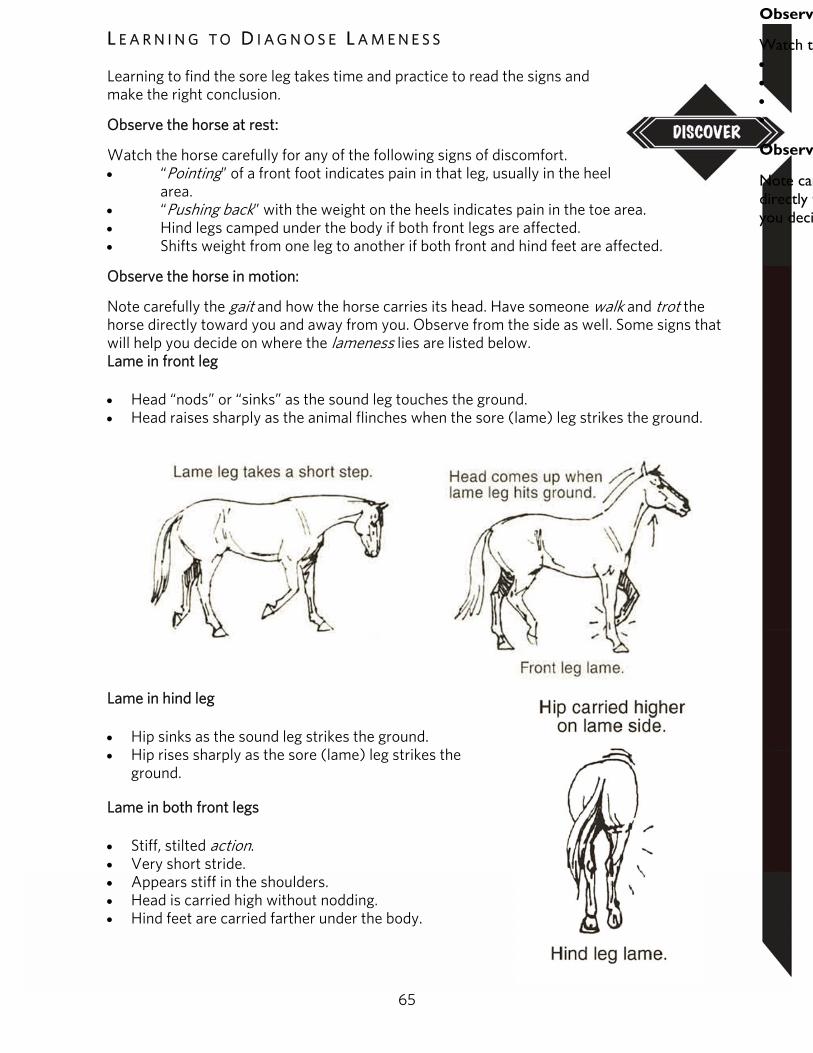
65
Observ
Watch th “ “ H S
Observ
Note cardirectly tyou deci
L E A R N I N G T O D I A G N O S E L A M E N E S S Learning to find the sore leg takes time and practice to read the signs and make the right conclusion.
Observe the horse at rest:
Watch the horse carefully for any of the following signs of discomfort. “Pointing” of a front foot indicates pain in that leg, usually in the heel
area. “Pushing back” with the weight on the heels indicates pain in the toe area. Hind legs camped under the body if both front legs are affected. Shifts weight from one leg to another if both front and hind feet are affected.
Observe the horse in motion:
Note carefully the gait and how the horse carries its head. Have someone walk and trot the horse directly toward you and away from you. Observe from the side as well. Some signs that will help you decide on where the lameness lies are listed below. Lame in front leg
Head “nods” or “sinks” as the sound leg touches the ground. Head raises sharply as the animal flinches when the sore (lame) leg strikes the ground.
Lame in hind leg
Hip sinks as the sound leg strikes the ground. Hip rises sharply as the sore (lame) leg strikes the
ground.
Lame in both front legs
Stiff, stilted action. Very short stride. Appears stiff in the shoulders. Head is carried high without nodding. Hind feet are carried farther under the body.
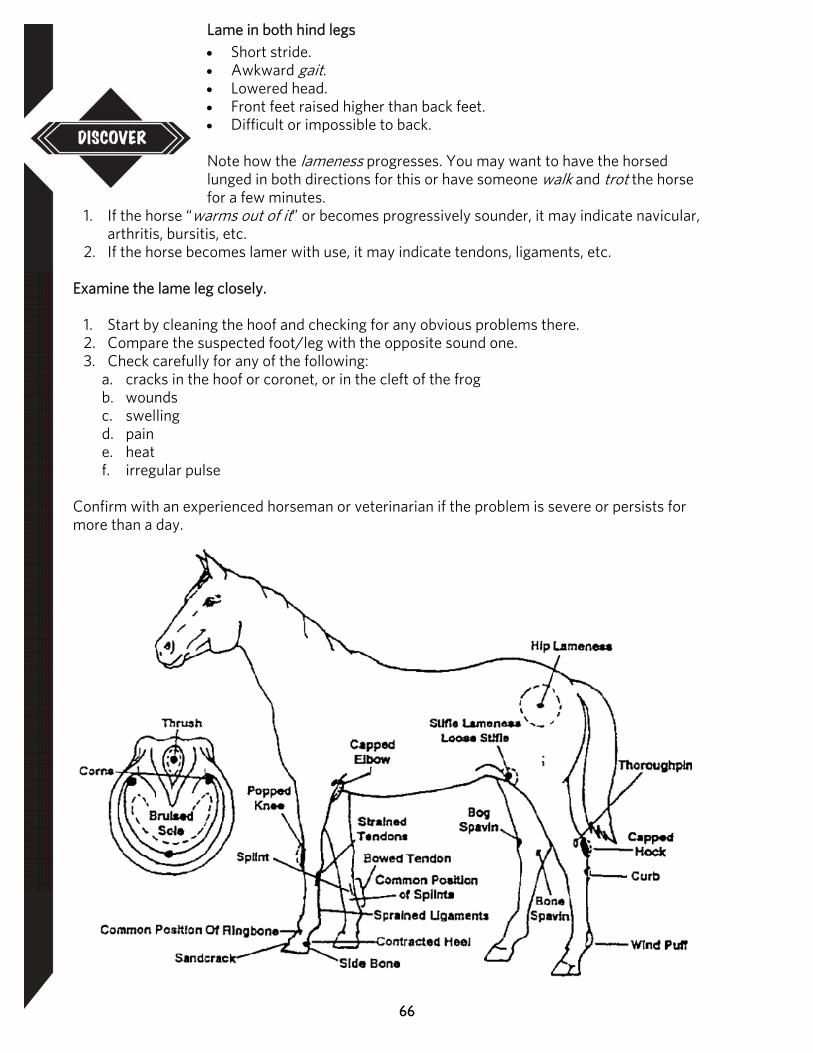
66
Lame in both hind legs Short stride. Awkward gait. Lowered head. Front feet raised higher than back feet. Difficult or impossible to back. Note how the lameness progresses. You may want to have the horsed lunged in both directions for this or have someone walk and trot the horse for a few minutes.
1. If the horse “warms out of it” or becomes progressively sounder, it may indicate navicular, arthritis, bursitis, etc.
2. If the horse becomes lamer with use, it may indicate tendons, ligaments, etc.
Examine the lame leg closely.
1. Start by cleaning the hoof and checking for any obvious problems there. 2. Compare the suspected foot/leg with the opposite sound one. 3. Check carefully for any of the following:
a. cracks in the hoof or coronet, or in the cleft of the frog b. wounds c. swelling d. pain e. heat f. irregular pulse
Confirm with an experienced horseman or veterinarian if the problem is severe or persists for more than a day.
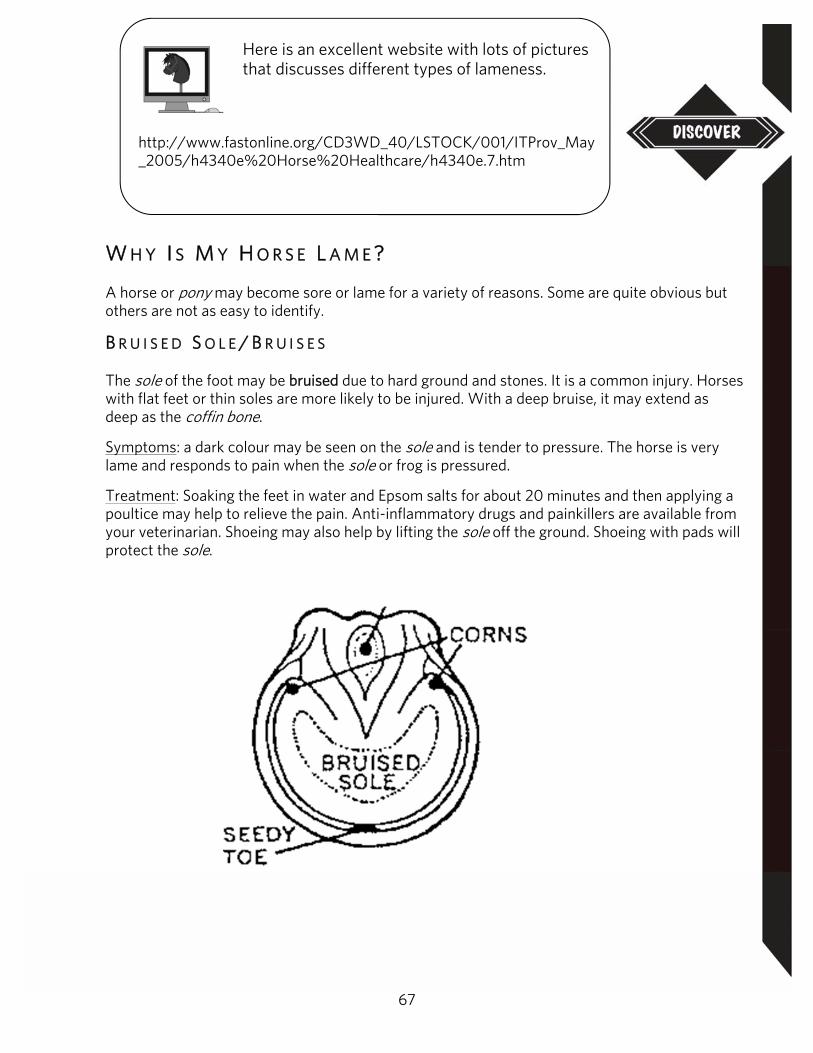
67
Here is an excellent website with lots of pictures that discusses different types of lameness.
http://www.fastonline.org/CD3WD_40/LSTOCK/001/ITProv_May_2005/h4340e%20Horse%20Healthcare/h4340e.7.htm
W H Y I S M Y H O R S E L A M E ? A horse or pony may become sore or lame for a variety of reasons. Some are quite obvious but others are not as easy to identify.
B R U I S E D S O L E / B R U I S E S The sole of the foot may be bruised due to hard ground and stones. It is a common injury. Horses with flat feet or thin soles are more likely to be injured. With a deep bruise, it may extend as deep as the coffin bone.
Symptoms: a dark colour may be seen on the sole and is tender to pressure. The horse is very lame and responds to pain when the sole or frog is pressured.
Treatment: Soaking the feet in water and Epsom salts for about 20 minutes and then applying a poultice may help to relieve the pain. Anti-inflammatory drugs and painkillers are available from your veterinarian. Shoeing may also help by lifting the sole off the ground. Shoeing with pads will protect the sole.
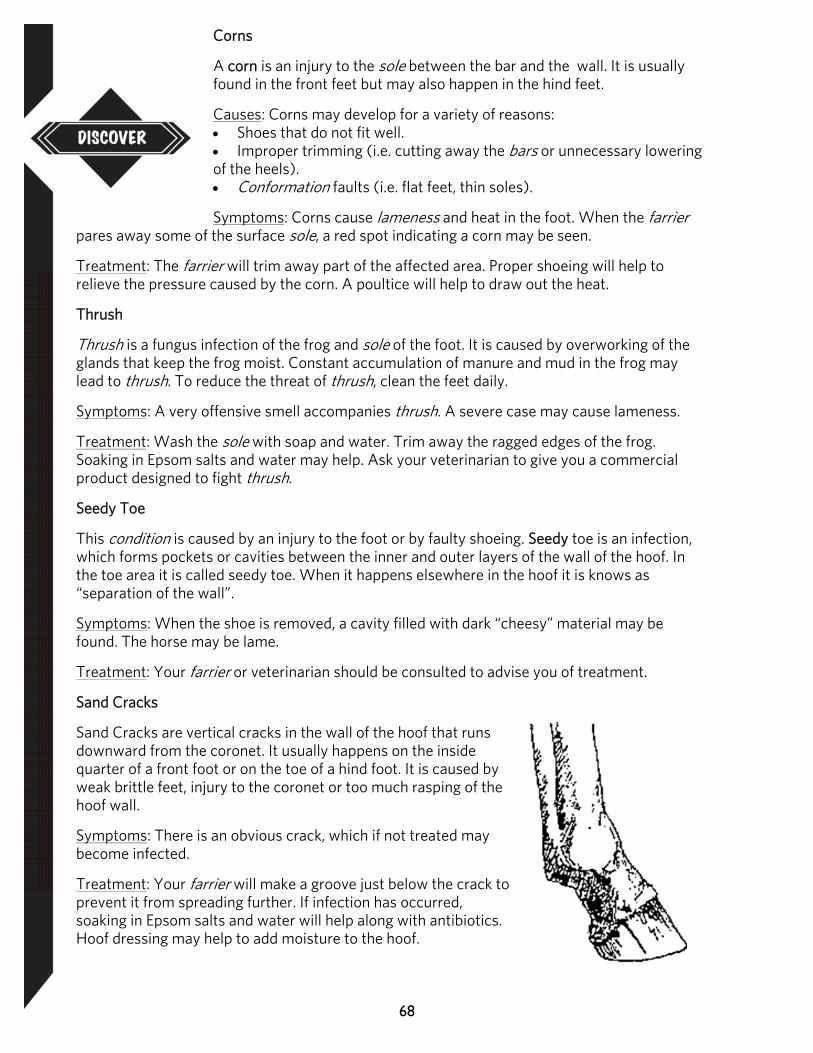
68
Corns
A corn is an injury to the sole between the bar and the wall. It is usually found in the front feet but may also happen in the hind feet.
Causes: Corns may develop for a variety of reasons: Shoes that do not fit well. Improper trimming (i.e. cutting away the bars or unnecessary lowering of the heels). Conformation faults (i.e. flat feet, thin soles).
Symptoms: Corns cause lameness and heat in the foot. When the farrier pares away some of the surface sole, a red spot indicating a corn may be seen.
Treatment: The farrier will trim away part of the affected area. Proper shoeing will help to relieve the pressure caused by the corn. A poultice will help to draw out the heat.
Thrush
Thrush is a fungus infection of the frog and sole of the foot. It is caused by overworking of the glands that keep the frog moist. Constant accumulation of manure and mud in the frog may lead to thrush. To reduce the threat of thrush, clean the feet daily.
Symptoms: A very offensive smell accompanies thrush. A severe case may cause lameness.
Treatment: Wash the sole with soap and water. Trim away the ragged edges of the frog. Soaking in Epsom salts and water may help. Ask your veterinarian to give you a commercial product designed to fight thrush.
Seedy Toe
This condition is caused by an injury to the foot or by faulty shoeing. Seedy toe is an infection, which forms pockets or cavities between the inner and outer layers of the wall of the hoof. In the toe area it is called seedy toe. When it happens elsewhere in the hoof it is knows as “separation of the wall”.
Symptoms: When the shoe is removed, a cavity filled with dark “cheesy” material may be found. The horse may be lame.
Treatment: Your farrier or veterinarian should be consulted to advise you of treatment.
Sand Cracks
Sand Cracks are vertical cracks in the wall of the hoof that runs downward from the coronet. It usually happens on the inside quarter of a front foot or on the toe of a hind foot. It is caused by weak brittle feet, injury to the coronet or too much rasping of the hoof wall.
Symptoms: There is an obvious crack, which if not treated may become infected.
Treatment: Your farrier will make a groove just below the crack to prevent it from spreading further. If infection has occurred, soaking in Epsom salts and water will help along with antibiotics. Hoof dressing may help to add moisture to the hoof.
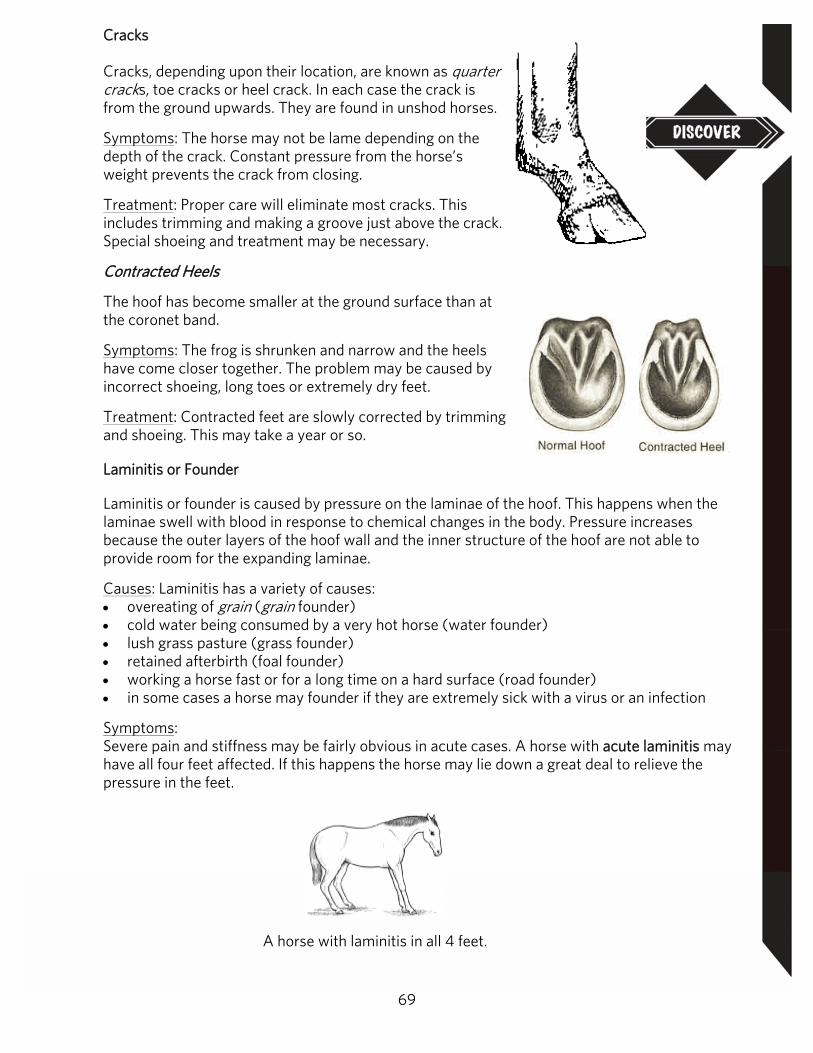
69
Cracks Cracks, depending upon their location, are known as quarter cracks, toe cracks or heel crack. In each case the crack is from the ground upwards. They are found in unshod horses.
Symptoms: The horse may not be lame depending on the depth of the crack. Constant pressure from the horse’s weight prevents the crack from closing.
Treatment: Proper care will eliminate most cracks. This includes trimming and making a groove just above the crack. Special shoeing and treatment may be necessary.
Contracted Heels
The hoof has become smaller at the ground surface than at the coronet band.
Symptoms: The frog is shrunken and narrow and the heels have come closer together. The problem may be caused by incorrect shoeing, long toes or extremely dry feet.
Treatment: Contracted feet are slowly corrected by trimming and shoeing. This may take a year or so.
Laminitis or Founder
Laminitis or founder is caused by pressure on the laminae of the hoof. This happens when the laminae swell with blood in response to chemical changes in the body. Pressure increases because the outer layers of the hoof wall and the inner structure of the hoof are not able to provide room for the expanding laminae.
Causes: Laminitis has a variety of causes: overeating of grain (grain founder) cold water being consumed by a very hot horse (water founder) lush grass pasture (grass founder) retained afterbirth (foal founder) working a horse fast or for a long time on a hard surface (road founder) in some cases a horse may founder if they are extremely sick with a virus or an infection
Symptoms: Severe pain and stiffness may be fairly obvious in acute cases. A horse with acute laminitis may have all four feet affected. If this happens the horse may lie down a great deal to relieve the pressure in the feet.
A horse with laminitis in all 4 feet.
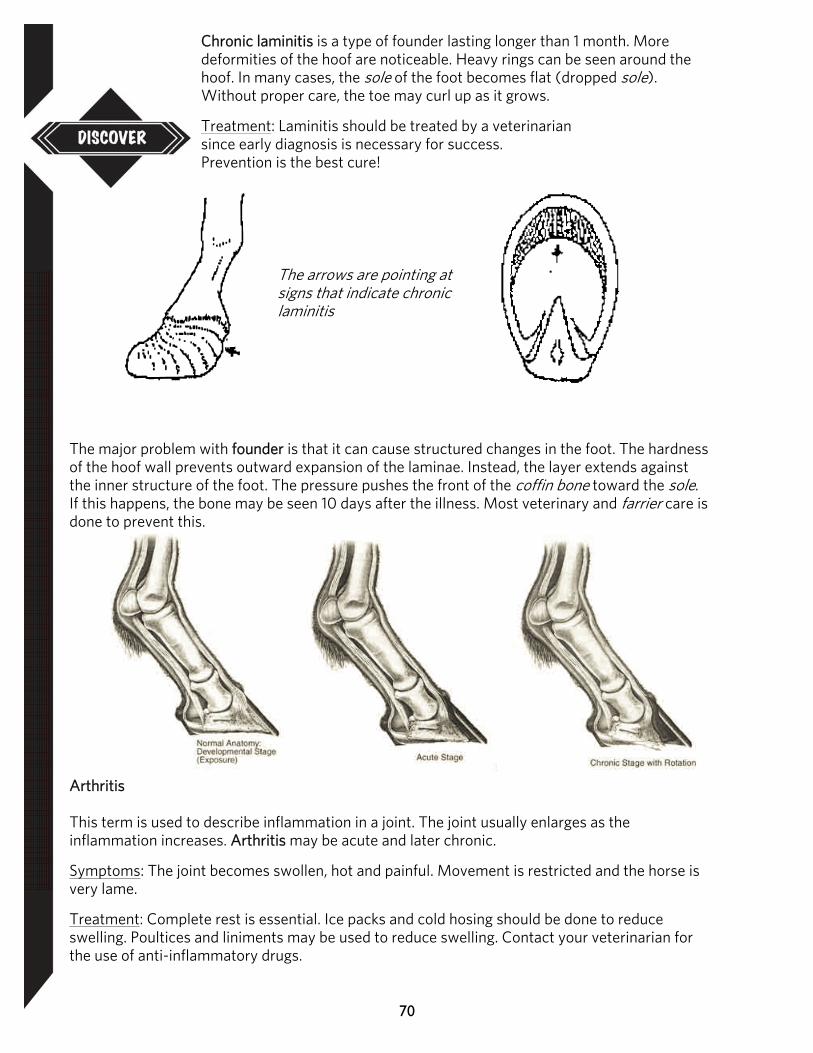
70
Chronic laminitis is a type of founder lasting longer than 1 month. More deformities of the hoof are noticeable. Heavy rings can be seen around the hoof. In many cases, the sole of the foot becomes flat (dropped sole). Without proper care, the toe may curl up as it grows.
Treatment: Laminitis should be treated by a veterinarian since early diagnosis is necessary for success. Prevention is the best cure!
The major problem with founder is that it can cause structured changes in the foot. The hardness of the hoof wall prevents outward expansion of the laminae. Instead, the layer extends against the inner structure of the foot. The pressure pushes the front of the coffin bone toward the sole. If this happens, the bone may be seen 10 days after the illness. Most veterinary and farrier care is done to prevent this.
Arthritis This term is used to describe inflammation in a joint. The joint usually enlarges as the inflammation increases. Arthritis may be acute and later chronic.
Symptoms: The joint becomes swollen, hot and painful. Movement is restricted and the horse is very lame.
Treatment: Complete rest is essential. Ice packs and cold hosing should be done to reduce swelling. Poultices and liniments may be used to reduce swelling. Contact your veterinarian for the use of anti-inflammatory drugs.
The arrows are pointing at signs that indicate chronic laminitis
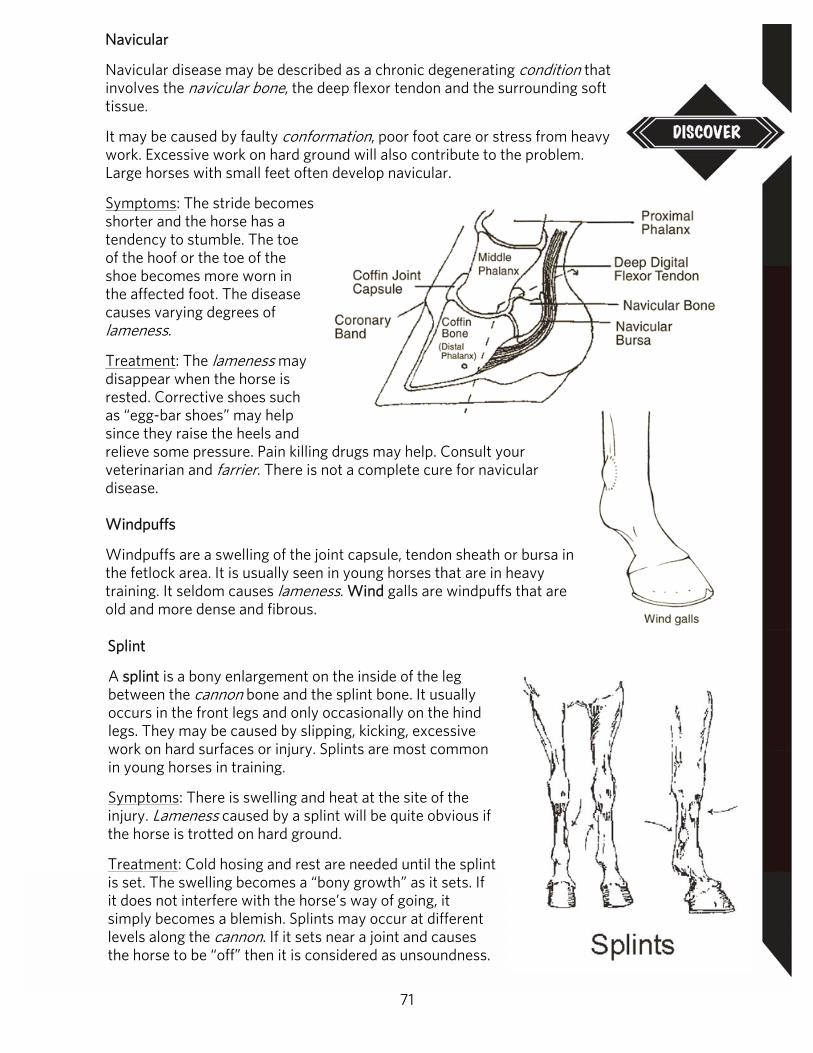
71
Navicular
Navicular disease may be described as a chronic degenerating condition that involves the navicular bone, the deep flexor tendon and the surrounding soft tissue.
It may be caused by faulty conformation, poor foot care or stress from heavy work. Excessive work on hard ground will also contribute to the problem. Large horses with small feet often develop navicular.
Symptoms: The stride becomes shorter and the horse has a tendency to stumble. The toe of the hoof or the toe of the shoe becomes more worn in the affected foot. The disease causes varying degrees of lameness.
Treatment: The lameness may disappear when the horse is rested. Corrective shoes such as “egg-bar shoes” may help since they raise the heels and relieve some pressure. Pain killing drugs may help. Consult your veterinarian and farrier. There is not a complete cure for navicular disease. Windpuffs
Windpuffs are a swelling of the joint capsule, tendon sheath or bursa in the fetlock area. It is usually seen in young horses that are in heavy training. It seldom causes lameness. Wind galls are windpuffs that are old and more dense and fibrous.
Splint
A splint is a bony enlargement on the inside of the leg between the cannon bone and the splint bone. It usually occurs in the front legs and only occasionally on the hind legs. They may be caused by slipping, kicking, excessive work on hard surfaces or injury. Splints are most common in young horses in training.
Symptoms: There is swelling and heat at the site of the injury. Lameness caused by a splint will be quite obvious if the horse is trotted on hard ground.
Treatment: Cold hosing and rest are needed until the splint is set. The swelling becomes a “bony growth” as it sets. If it does not interfere with the horse’s way of going, it simply becomes a blemish. Splints may occur at different levels along the cannon. If it sets near a joint and causes the horse to be “off” then it is considered as unsoundness.
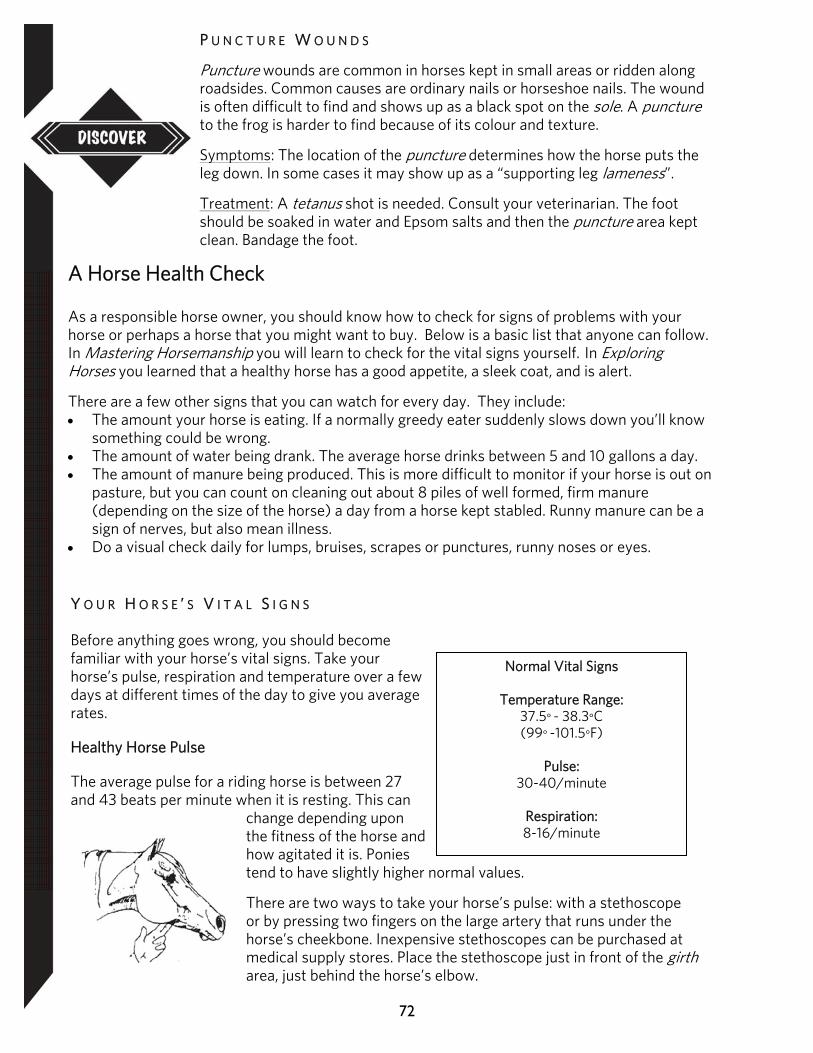
72
P U N C T U R E W O U N D S
Puncture wounds are common in horses kept in small areas or ridden along roadsides. Common causes are ordinary nails or horseshoe nails. The wound is often difficult to find and shows up as a black spot on the sole. A puncture to the frog is harder to find because of its colour and texture.
Symptoms: The location of the puncture determines how the horse puts the leg down. In some cases it may show up as a “supporting leg lameness”.
Treatment: A tetanus shot is needed. Consult your veterinarian. The foot should be soaked in water and Epsom salts and then the puncture area kept clean. Bandage the foot.
A Horse Health Check As a responsible horse owner, you should know how to check for signs of problems with your horse or perhaps a horse that you might want to buy. Below is a basic list that anyone can follow. In Mastering Horsemanship you will learn to check for the vital signs yourself. In Exploring Horses you learned that a healthy horse has a good appetite, a sleek coat, and is alert.
There are a few other signs that you can watch for every day. They include: The amount your horse is eating. If a normally greedy eater suddenly slows down you’ll know
something could be wrong. The amount of water being drank. The average horse drinks between 5 and 10 gallons a day. The amount of manure being produced. This is more difficult to monitor if your horse is out on
pasture, but you can count on cleaning out about 8 piles of well formed, firm manure (depending on the size of the horse) a day from a horse kept stabled. Runny manure can be a sign of nerves, but also mean illness.
Do a visual check daily for lumps, bruises, scrapes or punctures, runny noses or eyes.
Y O U R H O R S E ’ S V I T A L S I G N S Before anything goes wrong, you should become familiar with your horse’s vital signs. Take your horse’s pulse, respiration and temperature over a few days at different times of the day to give you average rates.
Healthy Horse Pulse
The average pulse for a riding horse is between 27 and 43 beats per minute when it is resting. This can
change depending upon the fitness of the horse and how agitated it is. Ponies tend to have slightly higher normal values.
There are two ways to take your horse’s pulse: with a stethoscope or by pressing two fingers on the large artery that runs under the horse’s cheekbone. Inexpensive stethoscopes can be purchased at medical supply stores. Place the stethoscope just in front of the girth area, just behind the horse’s elbow.
Normal Vital Signs
Temperature Range: 37.5° - 38.3°C (99° -101.5°F)
Pulse:
30-40/minute
Respiration: 8-16/minute
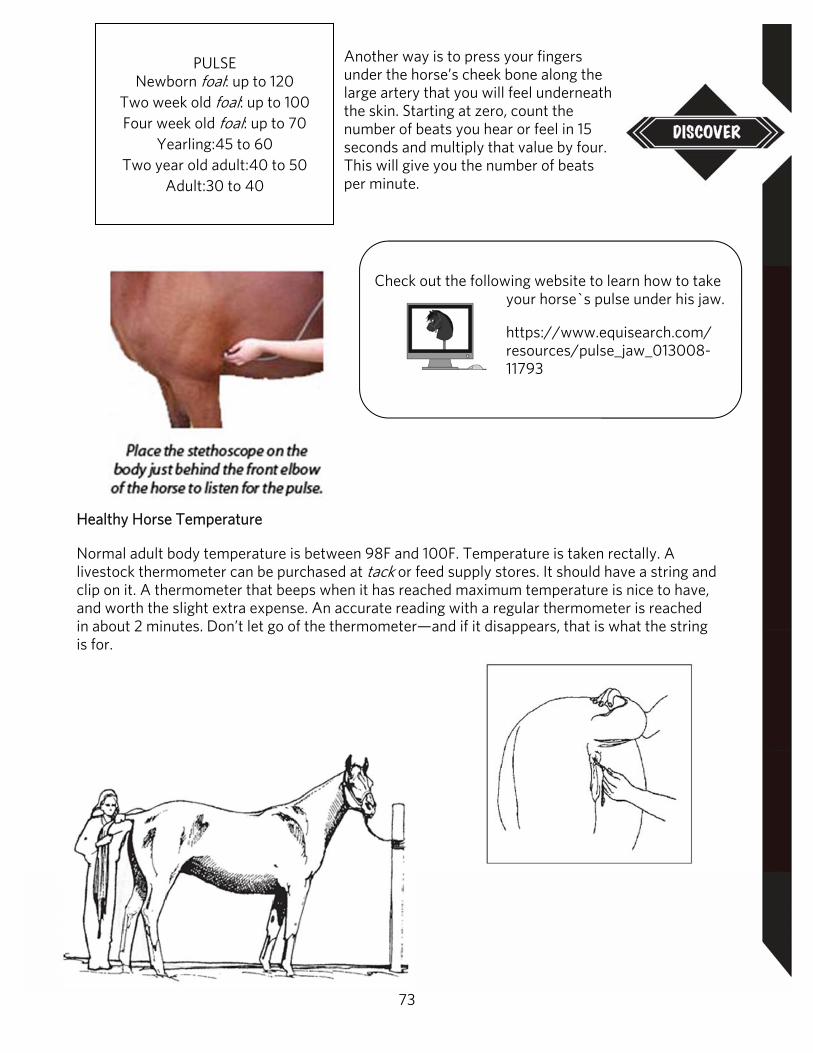
73
Another way is to press your fingers under the horse’s cheek bone along the large artery that you will feel underneath the skin. Starting at zero, count the number of beats you hear or feel in 15 seconds and multiply that value by four. This will give you the number of beats per minute.
PULSE Newborn foal: up to 120
Two week old foal: up to 100 Four week old foal: up to 70
Yearling:45 to 60 Two year old adult:40 to 50
Adult:30 to 40
Check out the following website to learn how to take
your horse`s pulse under his jaw.
https://www.equisearch.com/resources/pulse_jaw_013008-11793
Healthy Horse Temperature
Normal adult body temperature is between 98F and 100F. Temperature is taken rectally. A livestock thermometer can be purchased at tack or feed supply stores. It should have a string and clip on it. A thermometer that beeps when it has reached maximum temperature is nice to have, and worth the slight extra expense. An accurate reading with a regular thermometer is reached in about 2 minutes. Don’t let go of the thermometer—and if it disappears, that is what the string is for.
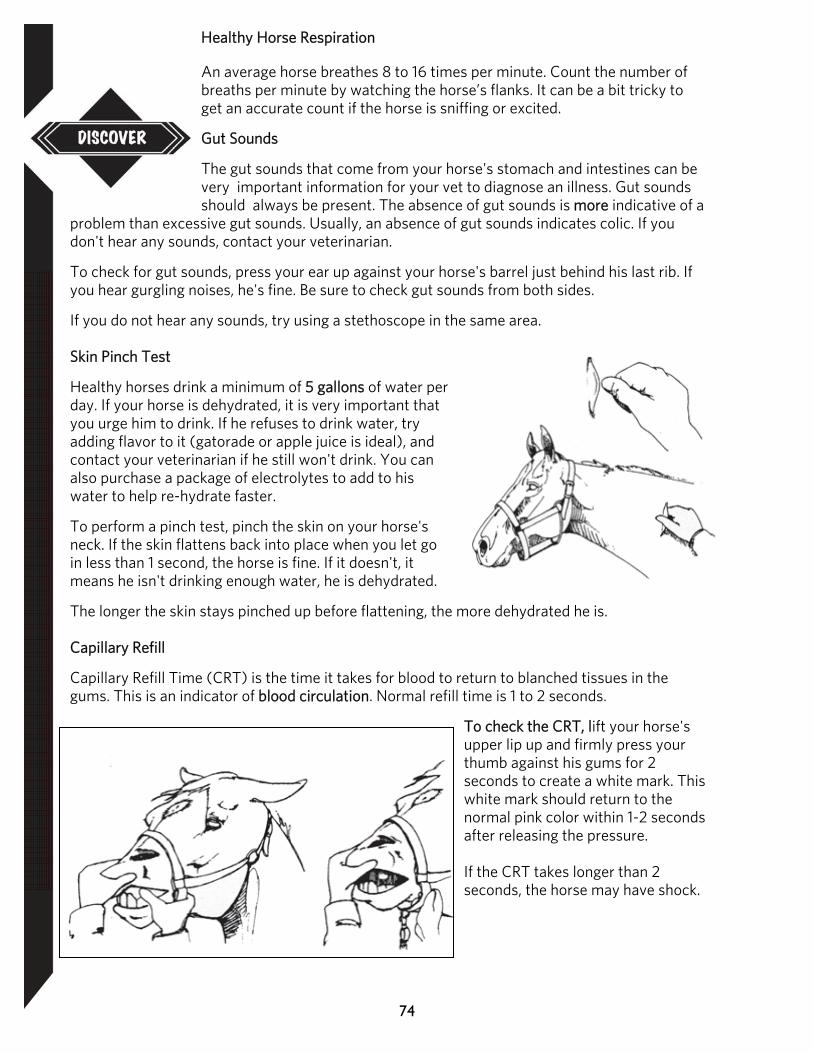
74
Healthy Horse Respiration
An average horse breathes 8 to 16 times per minute. Count the number of breaths per minute by watching the horse’s flanks. It can be a bit tricky to get an accurate count if the horse is sniffing or excited.
Gut Sounds
The gut sounds that come from your horse's stomach and intestines can be very important information for your vet to diagnose an illness. Gut sounds should always be present. The absence of gut sounds is more indicative of a
problem than excessive gut sounds. Usually, an absence of gut sounds indicates colic. If you don't hear any sounds, contact your veterinarian.
To check for gut sounds, press your ear up against your horse's barrel just behind his last rib. If you hear gurgling noises, he's fine. Be sure to check gut sounds from both sides.
If you do not hear any sounds, try using a stethoscope in the same area. Skin Pinch Test
Healthy horses drink a minimum of 5 gallons of water per day. If your horse is dehydrated, it is very important that you urge him to drink. If he refuses to drink water, try adding flavor to it (gatorade or apple juice is ideal), and contact your veterinarian if he still won't drink. You can also purchase a package of electrolytes to add to his water to help re-hydrate faster.
To perform a pinch test, pinch the skin on your horse's neck. If the skin flattens back into place when you let go in less than 1 second, the horse is fine. If it doesn't, it means he isn't drinking enough water, he is dehydrated.
The longer the skin stays pinched up before flattening, the more dehydrated he is. Capillary Refill
Capillary Refill Time (CRT) is the time it takes for blood to return to blanched tissues in the gums. This is an indicator of blood circulation. Normal refill time is 1 to 2 seconds.
To check the CRT, lift your horse's upper lip up and firmly press your thumb against his gums for 2 seconds to create a white mark. This white mark should return to the normal pink color within 1-2 seconds after releasing the pressure. If the CRT takes longer than 2 seconds, the horse may have shock.
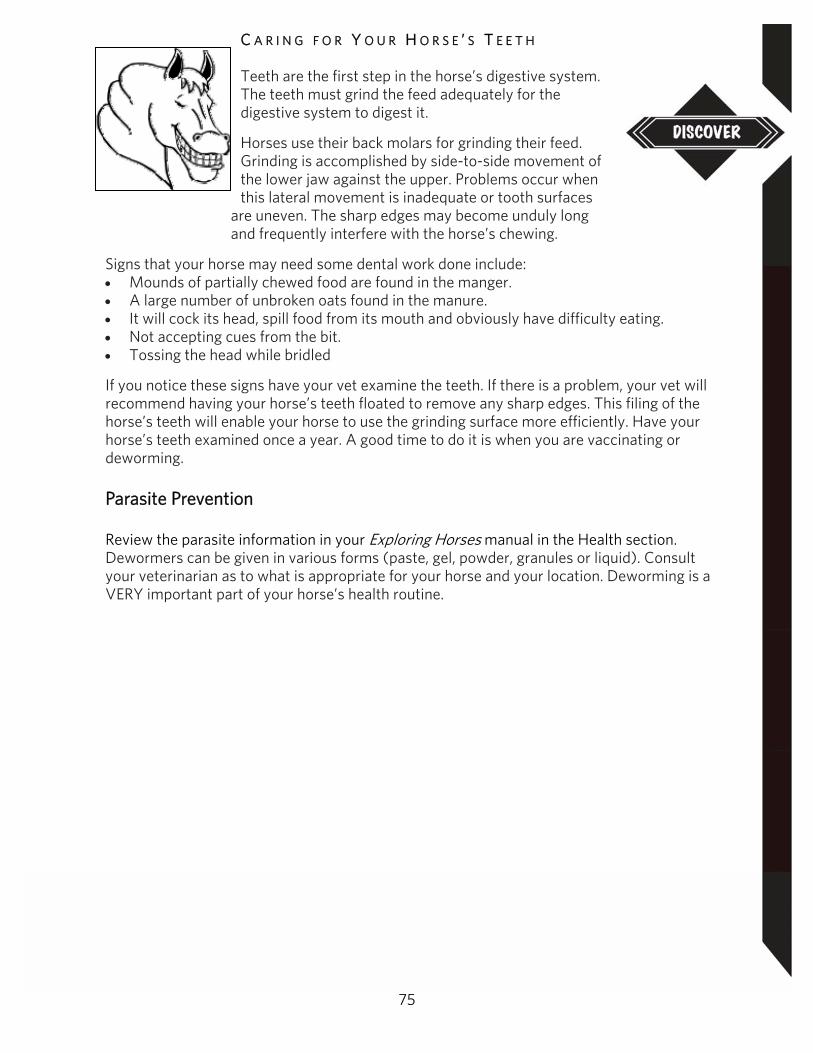
75
C A R I N G F O R Y O U R H O R S E ’ S T E E T H Teeth are the first step in the horse’s digestive system. The teeth must grind the feed adequately for the digestive system to digest it.
Horses use their back molars for grinding their feed. Grinding is accomplished by side-to-side movement of the lower jaw against the upper. Problems occur when this lateral movement is inadequate or tooth surfaces
are uneven. The sharp edges may become unduly long and frequently interfere with the horse’s chewing.
Signs that your horse may need some dental work done include: Mounds of partially chewed food are found in the manger. A large number of unbroken oats found in the manure. It will cock its head, spill food from its mouth and obviously have difficulty eating. Not accepting cues from the bit. Tossing the head while bridled
If you notice these signs have your vet examine the teeth. If there is a problem, your vet will recommend having your horse’s teeth floated to remove any sharp edges. This filing of the horse’s teeth will enable your horse to use the grinding surface more efficiently. Have your horse’s teeth examined once a year. A good time to do it is when you are vaccinating or deworming.
Parasite Prevention Review the parasite information in your Exploring Horses manual in the Health section. Dewormers can be given in various forms (paste, gel, powder, granules or liquid). Consult your veterinarian as to what is appropriate for your horse and your location. Deworming is a VERY important part of your horse’s health routine.
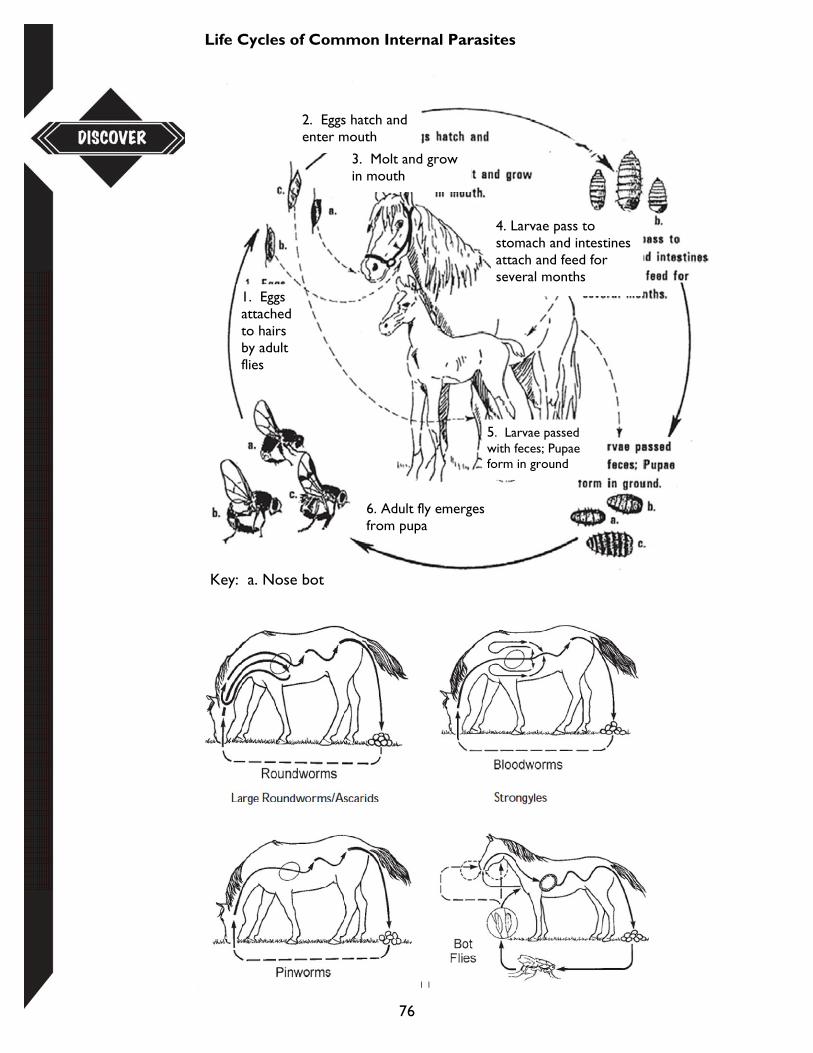
76
Key: a. Nose bot
1. Eggs attached to hairs by adult flies
6. Adult fly emerges from pupa
Life Cycles of Common Internal Parasites
2. Eggs hatch and enter mouth
3. Molt and grow in mouth
5. Larvae passed with feces; Pupae form in ground
4. Larvae pass to stomach and intestines attach and feed for several months
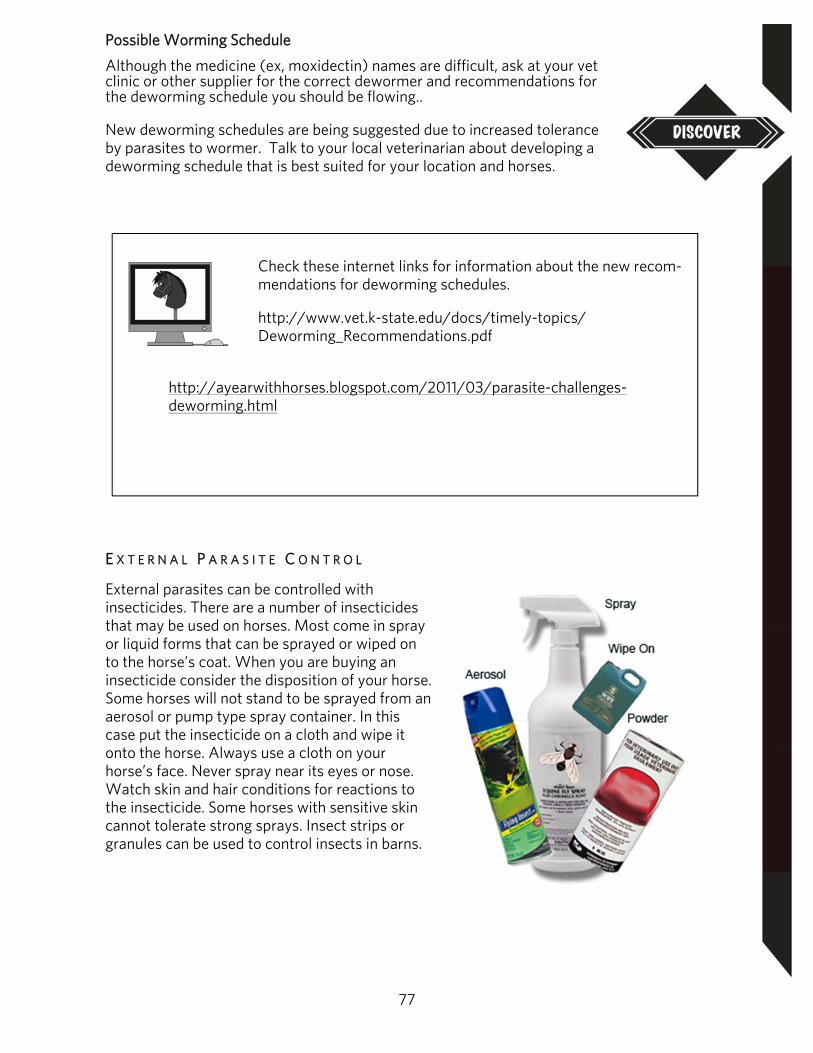
77
E X T E R N A L P A R A S I T E C O N T R O L
External parasites can be controlled with insecticides. There are a number of insecticides that may be used on horses. Most come in spray or liquid forms that can be sprayed or wiped on to the horse’s coat. When you are buying an insecticide consider the disposition of your horse. Some horses will not stand to be sprayed from an aerosol or pump type spray container. In this case put the insecticide on a cloth and wipe it onto the horse. Always use a cloth on your horse’s face. Never spray near its eyes or nose. Watch skin and hair conditions for reactions to the insecticide. Some horses with sensitive skin cannot tolerate strong sprays. Insect strips or granules can be used to control insects in barns.
Possible Worming Schedule Although the medicine (ex, moxidectin) names are difficult, ask at your vet clinic or other supplier for the correct dewormer and recommendations for the deworming schedule you should be flowing.. New deworming schedules are being suggested due to increased tolerance by parasites to wormer. Talk to your local veterinarian about developing a deworming schedule that is best suited for your location and horses.
Check these internet links for information about the new recom-mendations for deworming schedules. http://www.vet.k-state.edu/docs/timely-topics/Deworming_Recommendations.pdf
http://ayearwithhorses.blogspot.com/2011/03/parasite-challenges-deworming.html
78
V A C C I N A T I O N S Many horse illnesses are transmitted from horse to horse by shared feed bunks, buckets or watering troughs. Vaccinations for the common diseases are inexpensive and effective and should be administered on a yearly basis. Vaccines are made from inactive forms of the organism that causes the disease you are trying to prevent. After you vaccinate your horse, his immune system will make antibodies to fight that disease. There are many opinions on how often vaccinations should be given, how long they will remain effective and at what age they should begin. Remember a horse’s immune system
takes a minimum of 2 weeks to make the antibodies needed, so try to vaccinate at least 3 to 4 weeks before likely exposure to diseases. The best time for annual vaccinations is in early spring before the insect season starts. Check with your vet and put your horses on a regular schedule that will work best for you.
Common yearly vaccinations include:
1. Tetanus 2. Encephalomyelitis (sleeping sickness) Eastern and Western 3. Influenza (last for four (4) months) 4. Rhinopneumonitis 5. West Nile
Descriptions of the above conditions for which you can vaccinate are included below.
Equus wants you to remember this! 1. A horse’s immune system takes a minimum of 2 weeks to accumulate the antibodies needed. 2. Always vaccinate at least 3-4 weeks before likely exposure to a disease. 3. Best time for annual vaccinations is in the spring time before insect season starts.
G I V I N G I N J E C T I O N S Most vaccinations are given in the muscle (intramuscularly) and most often in the chest or neck. When giving injections in the neck, be careful not to hit the jugular vein or spine. The ideal location on the neck is in the triangle (as shown in the diagram). Make sure injection site is in a location that will drain if it becomes infected.
After the needle is inserted draw back slightly on the syringe to ensure that you are not in a blood vessel. If blood is seen within the neck of the needle, remove needle and try a new location.
When using any drug, always follow the directions on the label. Also keep a written record of any vaccines or drugs that are given to your horse.
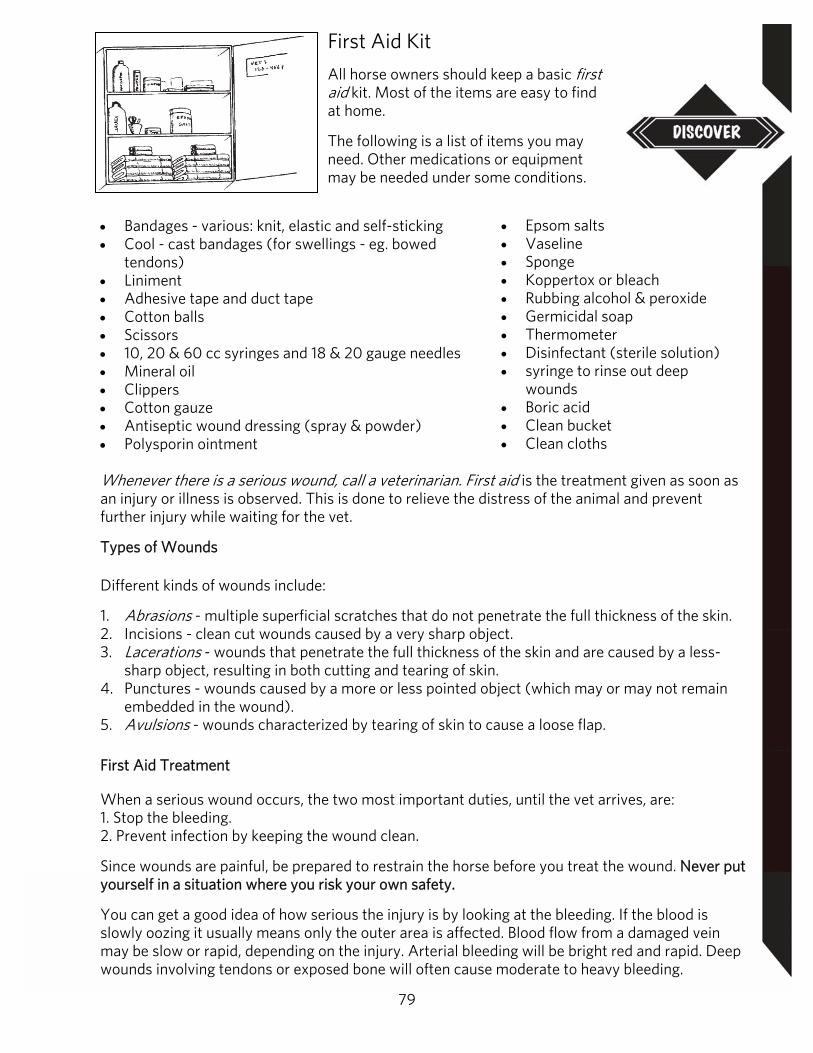
79
First Aid Kit
All horse owners should keep a basic first aid kit. Most of the items are easy to find at home.
The following is a list of items you may need. Other medications or equipment may be needed under some conditions.
Bandages - various: knit, elastic and self-sticking Cool - cast bandages (for swellings - eg. bowed
tendons) Liniment Adhesive tape and duct tape Cotton balls Scissors 10, 20 & 60 cc syringes and 18 & 20 gauge needles Mineral oil Clippers Cotton gauze Antiseptic wound dressing (spray & powder) Polysporin ointment
Whenever there is a serious wound, call a veterinarian. First aid is the treatment given as soon as an injury or illness is observed. This is done to relieve the distress of the animal and prevent further injury while waiting for the vet.
Types of Wounds
Different kinds of wounds include:
1. Abrasions - multiple superficial scratches that do not penetrate the full thickness of the skin. 2. Incisions - clean cut wounds caused by a very sharp object. 3. Lacerations - wounds that penetrate the full thickness of the skin and are caused by a less-
sharp object, resulting in both cutting and tearing of skin. 4. Punctures - wounds caused by a more or less pointed object (which may or may not remain
embedded in the wound). 5. Avulsions - wounds characterized by tearing of skin to cause a loose flap. First Aid Treatment
When a serious wound occurs, the two most important duties, until the vet arrives, are: 1. Stop the bleeding. 2. Prevent infection by keeping the wound clean.
Since wounds are painful, be prepared to restrain the horse before you treat the wound. Never put yourself in a situation where you risk your own safety.
You can get a good idea of how serious the injury is by looking at the bleeding. If the blood is slowly oozing it usually means only the outer area is affected. Blood flow from a damaged vein may be slow or rapid, depending on the injury. Arterial bleeding will be bright red and rapid. Deep wounds involving tendons or exposed bone will often cause moderate to heavy bleeding.
Epsom salts Vaseline Sponge Koppertox or bleach Rubbing alcohol & peroxide Germicidal soap Thermometer Disinfectant (sterile solution) syringe to rinse out deep
wounds Boric acid Clean bucket Clean cloths
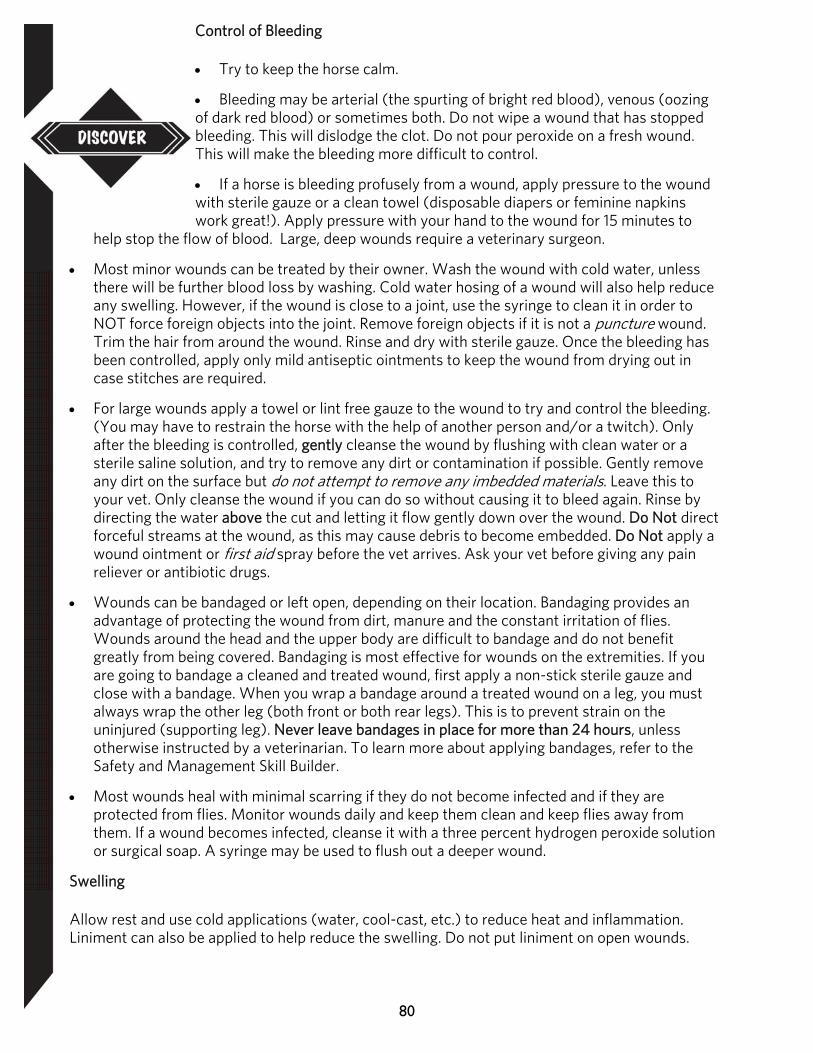
80
Control of Bleeding
Try to keep the horse calm.
Bleeding may be arterial (the spurting of bright red blood), venous (oozing of dark red blood) or sometimes both. Do not wipe a wound that has stopped bleeding. This will dislodge the clot. Do not pour peroxide on a fresh wound. This will make the bleeding more difficult to control.
If a horse is bleeding profusely from a wound, apply pressure to the wound with sterile gauze or a clean towel (disposable diapers or feminine napkins work great!). Apply pressure with your hand to the wound for 15 minutes to
help stop the flow of blood. Large, deep wounds require a veterinary surgeon.
Most minor wounds can be treated by their owner. Wash the wound with cold water, unless there will be further blood loss by washing. Cold water hosing of a wound will also help reduce any swelling. However, if the wound is close to a joint, use the syringe to clean it in order to NOT force foreign objects into the joint. Remove foreign objects if it is not a puncture wound. Trim the hair from around the wound. Rinse and dry with sterile gauze. Once the bleeding has been controlled, apply only mild antiseptic ointments to keep the wound from drying out in case stitches are required.
For large wounds apply a towel or lint free gauze to the wound to try and control the bleeding. (You may have to restrain the horse with the help of another person and/or a twitch). Only after the bleeding is controlled, gently cleanse the wound by flushing with clean water or a sterile saline solution, and try to remove any dirt or contamination if possible. Gently remove any dirt on the surface but do not attempt to remove any imbedded materials. Leave this to your vet. Only cleanse the wound if you can do so without causing it to bleed again. Rinse by directing the water above the cut and letting it flow gently down over the wound. Do Not direct forceful streams at the wound, as this may cause debris to become embedded. Do Not apply a wound ointment or first aid spray before the vet arrives. Ask your vet before giving any pain reliever or antibiotic drugs.
Wounds can be bandaged or left open, depending on their location. Bandaging provides an advantage of protecting the wound from dirt, manure and the constant irritation of flies. Wounds around the head and the upper body are difficult to bandage and do not benefit greatly from being covered. Bandaging is most effective for wounds on the extremities. If you are going to bandage a cleaned and treated wound, first apply a non-stick sterile gauze and close with a bandage. When you wrap a bandage around a treated wound on a leg, you must always wrap the other leg (both front or both rear legs). This is to prevent strain on the uninjured (supporting leg). Never leave bandages in place for more than 24 hours, unless otherwise instructed by a veterinarian. To learn more about applying bandages, refer to the Safety and Management Skill Builder.
Most wounds heal with minimal scarring if they do not become infected and if they are protected from flies. Monitor wounds daily and keep them clean and keep flies away from them. If a wound becomes infected, cleanse it with a three percent hydrogen peroxide solution or surgical soap. A syringe may be used to flush out a deeper wound.
Swelling
Allow rest and use cold applications (water, cool-cast, etc.) to reduce heat and inflammation. Liniment can also be applied to help reduce the swelling. Do not put liniment on open wounds.
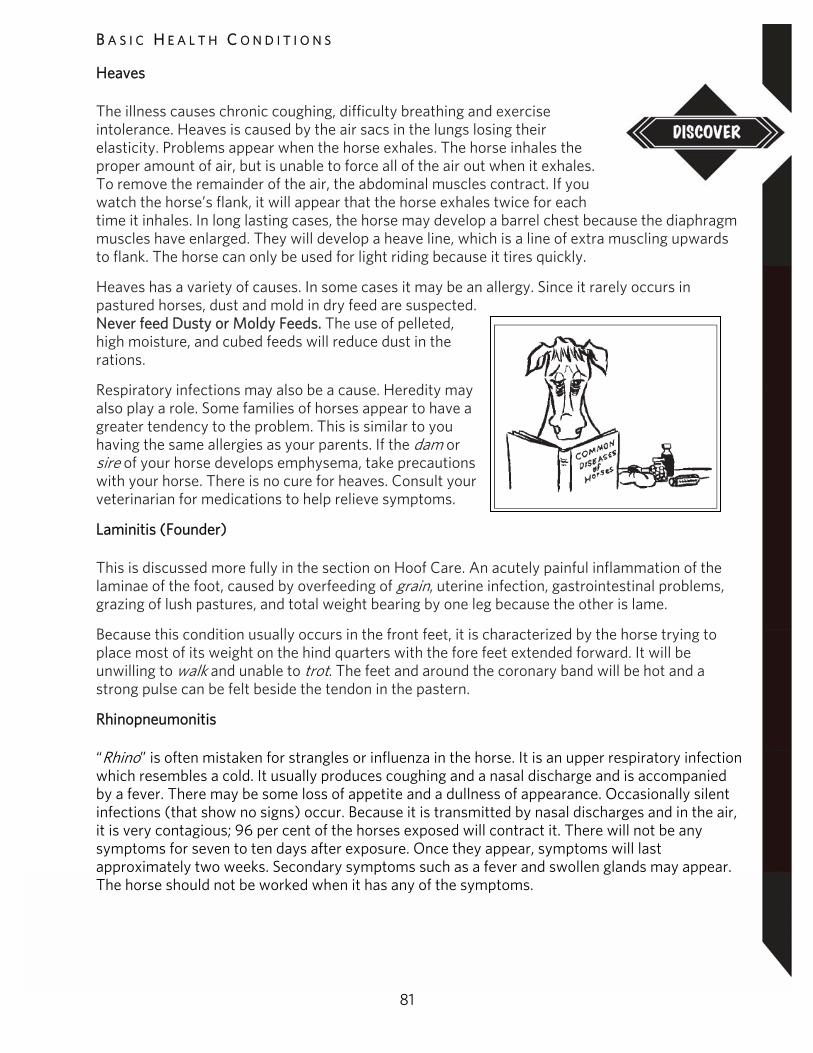
81
B A S I C H E A L T H C O N D I T I O N S Heaves
The illness causes chronic coughing, difficulty breathing and exercise intolerance. Heaves is caused by the air sacs in the lungs losing their elasticity. Problems appear when the horse exhales. The horse inhales the proper amount of air, but is unable to force all of the air out when it exhales. To remove the remainder of the air, the abdominal muscles contract. If you watch the horse’s flank, it will appear that the horse exhales twice for each time it inhales. In long lasting cases, the horse may develop a barrel chest because the diaphragm muscles have enlarged. They will develop a heave line, which is a line of extra muscling upwards to flank. The horse can only be used for light riding because it tires quickly.
Heaves has a variety of causes. In some cases it may be an allergy. Since it rarely occurs in pastured horses, dust and mold in dry feed are suspected. Never feed Dusty or Moldy Feeds. The use of pelleted, high moisture, and cubed feeds will reduce dust in the rations.
Respiratory infections may also be a cause. Heredity may also play a role. Some families of horses appear to have a greater tendency to the problem. This is similar to you having the same allergies as your parents. If the dam or sire of your horse develops emphysema, take precautions with your horse. There is no cure for heaves. Consult your veterinarian for medications to help relieve symptoms.
Laminitis (Founder)
This is discussed more fully in the section on Hoof Care. An acutely painful inflammation of the laminae of the foot, caused by overfeeding of grain, uterine infection, gastrointestinal problems, grazing of lush pastures, and total weight bearing by one leg because the other is lame.
Because this condition usually occurs in the front feet, it is characterized by the horse trying to place most of its weight on the hind quarters with the fore feet extended forward. It will be unwilling to walk and unable to trot. The feet and around the coronary band will be hot and a strong pulse can be felt beside the tendon in the pastern.
Rhinopneumonitis
“Rhino” is often mistaken for strangles or influenza in the horse. It is an upper respiratory infection which resembles a cold. It usually produces coughing and a nasal discharge and is accompanied by a fever. There may be some loss of appetite and a dullness of appearance. Occasionally silent infections (that show no signs) occur. Because it is transmitted by nasal discharges and in the air, it is very contagious; 96 per cent of the horses exposed will contract it. There will not be any symptoms for seven to ten days after exposure. Once they appear, symptoms will last approximately two weeks. Secondary symptoms such as a fever and swollen glands may appear. The horse should not be worked when it has any of the symptoms.
82
Sleeping Sickness
Sleeping sickness is a virus carried by biting insects that affects the central nervous system of the horse and man. The horse and man are the final host in the life cycle of the sleeping sickness virus. The virus starts in birds, rodents and reptiles and then is passed on to biting insects. The number of cases of sleeping sickness that occur each year is affected by the size of the bird and mosquito population.
There are different strains of sleeping sickness. We are mainly concerned with the Eastern and Western strains in Western Canada. People often
question the value of vaccinating for sleeping sickness. However, the mortality rate for Western Sleeping Sickness is 30 per cent and 80 per cent for Eastern Sleeping Sickness. Horses that do survive may have permanent brain damage, leaving them disabled. Multiple vaccines against both strains are available. They should be given several weeks before mosquitoes become a problem. Immunity is not immediate, so it is several weeks before it will be effective. Because immunity is short lasting in the first vaccination, a second vaccination (booster) is given three weeks after the first vaccination. After that, one vaccination per year is given.
A horse with sleeping sickness will show some of the following symptoms: persistent fever eyesight problems inability to swallow depression paralysis drooping lower lip loss of coordination (may cause circling) pneumonia - secondary infection due to the low resistance level of the horse to infection seizures and/or head pressing coma death
Strangles
This is a highly contagious bacterial infection. It is spread by coughing and through nasal discharge. Strangles is more of a problem in young horses. Strangles is very often improperly referred to as Distemper.
The Strangles infection can cause: A runny nose Lumps under the jaw High Fever (more than 40°) Coughing Depression Loss of Appetite
Penicillin is only effective if given during the first 24 hours. As the infection continues, antibiotics become less effective and may actually slow the recovery time by limiting the development of natural immunity. Consult your veterinarian for treatment. There is a vaccination available for strangles. Always administer according to label directions and never inject the nasal form.
83
Tetanus
Tetanus is also called “Lockjaw”. Horses can become infected through cuts and wounds. The bacteria that cause tetanus are found in the soil and on rusty metal. This is one reason that wounds can be serious problems.
The infection causes muscle spasms (mostly of the head and neck), contractions and shaking. The horse will often hold its head high with the ears very stiff and upright. The tail will be held straight out behind the horse. As the horse loses other muscle control, it will stiffen and have trouble moving. Symptoms usually appear in 7-14 days. The mortality rate for severe cases of tetanus is 80 per cent. If the horse does recover, it will take one to two months. Even after this length of time most horses are still nervous and sick.
A vaccine is available for tetanus. It is available as a toxoid, which is given once a year (one shot, plus a booster the first year) or as an antitoxin, which is given after surgery or a wound. Pregnant mares should have a tetanus toxoid vaccination one to three months before foaling to provide the foal with some immunity to tetanus at birth. The antitoxin may be given to three to four month old foals if the mare was not immunized. Tetanus can also be treated with penicillin.
West Nile Virus
West Nile Virus is relatively new to Canada. It is a virus carried by birds (mostly of the crow family - crows, ravens, magpies and blue or gray jays). Mosquitoes bite the infected birds, then pass the virus on. It does NOT spread from one horse to another. It affects the central nervous system (brain) because it causes a brain infection. Symptoms include lethargy, weakness, stupor, ataxia, hypersensitivity to sound, muscle tremors, blindness and seizures, ranging in severity from being extremely mild to severe and often fatal. Only about 25% of infected horses show fever. Intravenous fluid therapy and physical support (slings) to prevent injury are the current treatment protocol. Antibiotics are not effective. The death rate in horses has been reported as 25-40%. A vaccine for West Nile virus in horses has been conditionally approved in Canada. Initial vaccination is two injections three to six weeks apart then annually prior to mosquito season. You may wish to vaccinate your horse every 6-months if travelling to high risk areas, where mosquito populations survive year-round. Also, stress of travel and competition may compromise some animal’s immune systems. Check vaccine instructions prior to vaccinating.
Check out the following website to learn more information on West Nile for horse owners. http://www.gov.mb.ca/agriculture/animals/animal-
health/west-nile-virus.html
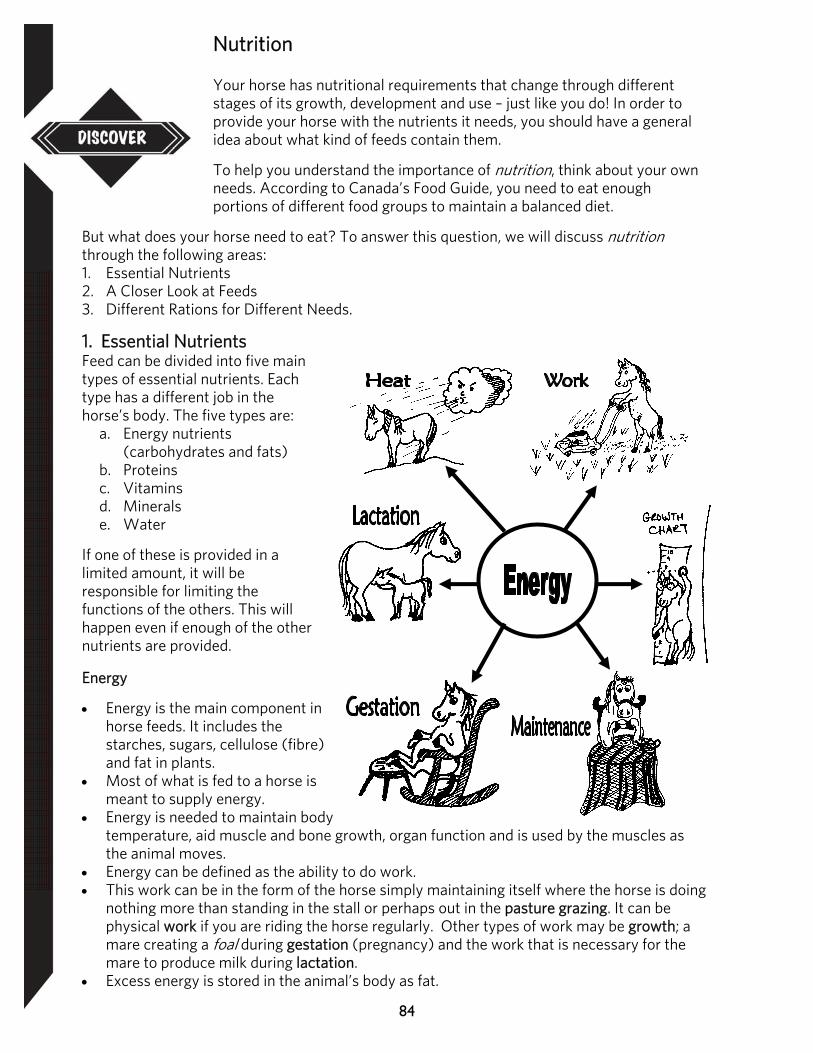
84
Nutrition
Your horse has nutritional requirements that change through different stages of its growth, development and use – just like you do! In order to provide your horse with the nutrients it needs, you should have a general idea about what kind of feeds contain them.
To help you understand the importance of nutrition, think about your own needs. According to Canada’s Food Guide, you need to eat enough portions of different food groups to maintain a balanced diet.
But what does your horse need to eat? To answer this question, we will discuss nutrition through the following areas: 1. Essential Nutrients 2. A Closer Look at Feeds 3. Different Rations for Different Needs.
1. Essential Nutrients Feed can be divided into five main types of essential nutrients. Each type has a different job in the horse’s body. The five types are:
a. Energy nutrients (carbohydrates and fats)
b. Proteins c. Vitamins d. Minerals e. Water
If one of these is provided in a limited amount, it will be responsible for limiting the functions of the others. This will happen even if enough of the other nutrients are provided.
Energy
Energy is the main component in horse feeds. It includes the starches, sugars, cellulose (fibre) and fat in plants.
Most of what is fed to a horse is meant to supply energy.
Energy is needed to maintain body temperature, aid muscle and bone growth, organ function and is used by the muscles as the animal moves.
Energy can be defined as the ability to do work. This work can be in the form of the horse simply maintaining itself where the horse is doing
nothing more than standing in the stall or perhaps out in the pasture grazing. It can be physical work if you are riding the horse regularly. Other types of work may be growth; a mare creating a foal during gestation (pregnancy) and the work that is necessary for the mare to produce milk during lactation.
Excess energy is stored in the animal’s body as fat.
85
Sources of Energy
Grains are a high source of energy. Since hays are much bulkier or more fibrous, they have a lower energy value. Pastures provide more energy in early season grazing than late season grazing.
Proteins
Proteins form body tissue and eventually become muscle, internal organs, bone, blood, skin, hair, hooves and many other parts of the body.
Not all horses need the same amount of protein. For example a newborn foal requires approximately 22 per cent protein while a mature horse may require about 10 per cent protein. Often, horses that do not get enough protein are less than one-year-old. Sources of Protein
Horse feeds contain 5 to 20 per cent protein. Pastures may provide adequate levels of protein, but that level drops off as the grass
matures later in the season. Legume hays such as alfalfa have more protein than grass hays. Hay baled at an early stage
also has more protein than hay baled at a more mature stage. Lower quality protein can be found in grains. This protein may not contain all of the
important amino acids a horse needs. Soybean meal is the most common source of supplemental protein in horse diets. Most commercial horse rations contain supplemental protein (e.g. 16% horse feed). Other
sources include milk powder, bran (16%), alfalfa meal or peas. Vitamins
Vitamins are essential to the normal body functions. A lack of vitamins may cause diseases.
The vitamins are usually divided into two classes: fat-soluble and water-soluble.
The fat-soluble include vitamins A, D, E and K. The water-soluble include the B-complex (group)
and vitamin C. Horses do not require a dietary source of vitamin
C. There is a potential for your horse to lack Vitamin
A and D. A shortage of fat soluble vitamins may cause
fertility problems in horses. Water soluble vitamins do not stay in the body for
a long time. They are removed from the body with waste fluids.
A horse will receive enough vitamins if it is fed the proper amount of feed.
Equus’ Safety Tip: Exercise caution when adding
supplements. With some vitamin supplements, such as Vitamin A, excessive use over extended periods may cause a condition similar to that of a vitamin deficiency.

86
Vitamins Required by Horses for the Maintenance of Good Health
Name Source Function
Vitamin A
Converted by the body from the carotene in forages (pasture or good quality hay). Also found in feed supplements; dehydrated alfalfa meal, horse rations (sweet feed).
Body Health: General skin condition, disease resistance, eyesight, respiration, digestion, production, growth & metabolism.
Vitamin B Complex Good quality forage, including bran. Metabolism
Vitamin D Sunlight, sun-cured hay and feed supplements.
Aids in the absorption of calcium and phosphorus (important for bones and teeth).
Vitamin E Good quality forage, including bran. The function is closely related to that of the mineral selenium. An animal with a condition affecting the muscles will be treated with selenium and
Vitamin K Synthesized in the body. No supplements are needed.
For blood clotting.
Sources of Vitamins
Vitamins A, D and E can be found in many range blocks. Minerals Minerals which often need to be supplied are calcium, phosphorus, salt (sodium and
chloride) and iodine. Hay can be tested to determine mineral content. A proper balance is important for bone development in young horses. An imbalance
increases the possibility of bone injuries in mature horses. Essential minerals include calcium, phosphorus, sodium, chlorine, iron, iodine, cobalt,
selenium, fluorine and the trace minerals potassium, magnesium, sulfur, manganese, copper, zinc and molybdenum.
Sources of Minerals Grains supply phosphorus. Roughages supply calcium. Iodine is rarely found in adequate amounts in forage. Mineral supplements can be provided to horses in loose or block forms. Some examples
include: trace salt, trace mineral blocks, molasses blocks and salt blocks. There are four kinds of salt blocks: white, blue, red and brown. Horses should at least have
access to the red blocks which contain sodium, chloride and iodine. Unlike cattle, horses don’t need the extra cobalt found in the blue blocks – but it won’t hurt them either.
Mineral supplements may be purchased from a feed mill and added to the grain. A complete ration that provides everything (except hay) can also be purchased.
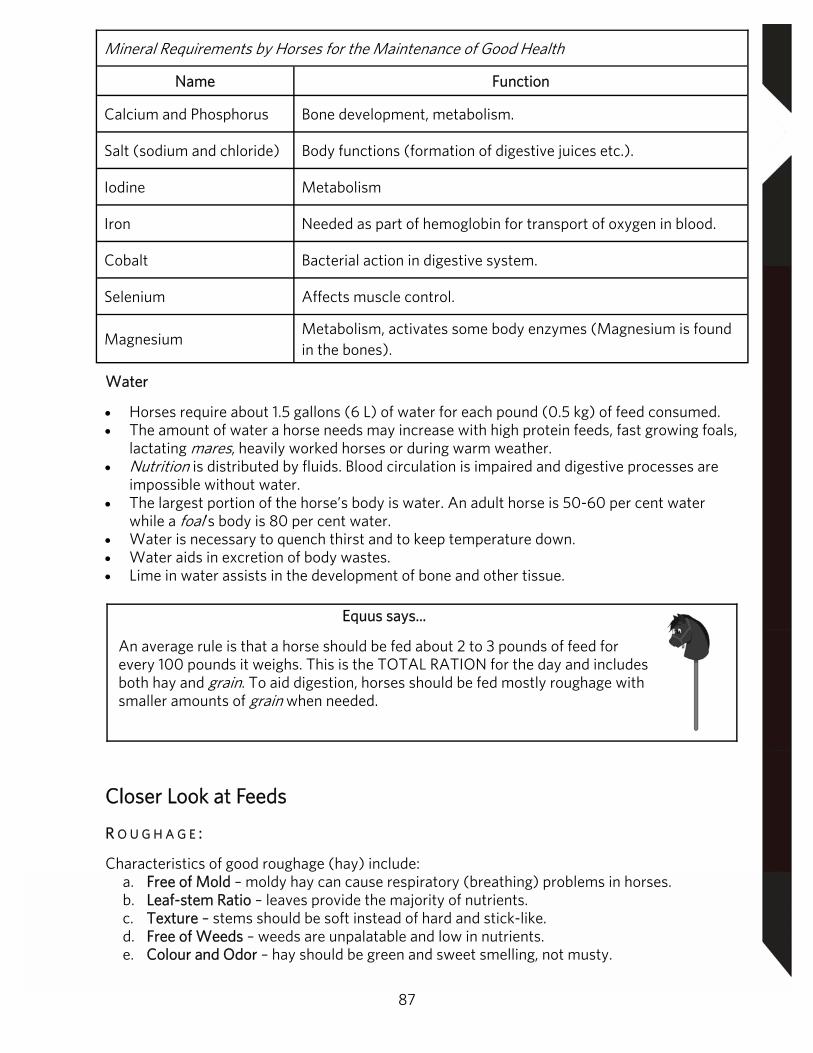
87
Mineral Requirements by Horses for the Maintenance of Good Health
Name Function
Calcium and Phosphorus Bone development, metabolism.
Salt (sodium and chloride) Body functions (formation of digestive juices etc.).
Iodine Metabolism
Iron Needed as part of hemoglobin for transport of oxygen in blood.
Cobalt Bacterial action in digestive system.
Selenium Affects muscle control.
Magnesium Metabolism, activates some body enzymes (Magnesium is found in the bones).
Water
Horses require about 1.5 gallons (6 L) of water for each pound (0.5 kg) of feed consumed. The amount of water a horse needs may increase with high protein feeds, fast growing foals,
lactating mares, heavily worked horses or during warm weather. Nutrition is distributed by fluids. Blood circulation is impaired and digestive processes are
impossible without water. The largest portion of the horse’s body is water. An adult horse is 50-60 per cent water
while a foal’s body is 80 per cent water. Water is necessary to quench thirst and to keep temperature down. Water aids in excretion of body wastes. Lime in water assists in the development of bone and other tissue.
Equus says...
An average rule is that a horse should be fed about 2 to 3 pounds of feed for every 100 pounds it weighs. This is the TOTAL RATION for the day and includes both hay and grain. To aid digestion, horses should be fed mostly roughage with smaller amounts of grain when needed.
Closer Look at Feeds
R O U G H A G E :
Characteristics of good roughage (hay) include: a. Free of Mold – moldy hay can cause respiratory (breathing) problems in horses. b. Leaf-stem Ratio – leaves provide the majority of nutrients. c. Texture – stems should be soft instead of hard and stick-like. d. Free of Weeds – weeds are unpalatable and low in nutrients. e. Colour and Odor – hay should be green and sweet smelling, not musty.
88
Alfalfa (a legume hay) generally has a higher nutritional value than other hays. Alfalfa can also be fed as pellets or cubes.
Brome Grass, if cut early and cured properly, is higher in nutrients than other grass hays generally available.
Green Oats can also be used as roughage. It should be cut at the soft oat stage to provide the highest nutritional value. It is fairly high in energy. (Note: Annual crops such as oats can build up nitrates, which are potentially deadly. For example, this may happen when an oat crop is “stressed” by frost. When the quality of feed is questionable, always have it tested.)
Equus says... When sweet clover becomes moldy it may cause “sweet clover poisoning.” When this happens, it interferes with the body’s ability to clot blood. An animal, which suffers from this condition, should be treated with Vitamin K.
E V A L U A T I N G H A Y You need to know if the hay you are feeding is of good quality. The following are some points to evaluate in your hay before feeding it to your horse.
Leafiness: Each stem should have visible leaf surface because leaves contain more nutrients than stems. Leaves are lost when the hay is baled too dry.
Color: Good hay is bright leafy green.
Odor: Hay should smell like a freshly cut lawn. Old hay loses its Vitamin A value.
Dust: Dusty hay should never be used for horses. It can cause heaves and other problems. If it is necessary to feed dusty hay, water it down just before feeding.
Texture: Fine stemmed hay that is soft is the best.
Foreign Material: It is undesirable to have hay that contains weeds, manure, rodent droppings, etc.
If at all possible, have your feeds, both grain and hay analyzed at a laboratory. The nutrient content of a feed grown during one year or in one field can vary tremendously from that grown during another year or in another field. Your local MAFRI GO office can supply you with equipment and instructions for taking feed samples and having them analyzed.
C O N C E N T R A T E S The following grains have been listed in order of their energy content from highest to lowest. Note: As the energy content goes down, the fibre content goes up. For example, oats have more fibre in their hulls than barley. Barley has more fibre than wheat and so on.
89
a) Corn
Corn has the most energy (calories) per pound of all the grains. It is easier to overfeed because one quart of corn provides as much digestible energy as two quarts of oats. Corn is lower in protein and minerals than other feed grains. It can be fed with a legume to make up for the protein deficiency.
b) Wheat
Wheat can make up about one-half of a grain mixture for horses but proper feeding practices should be followed.
c) Barley
Barley is higher in energy content than oats. When adding barley to the rather add a small amount each day, as it may cause digestive problems. Horses should be given plenty of time to adjust.
d) Oats
Oats are less concentrated than other grains due to the fact that they have more fibre in their hulls. This makes them the safest grain to feed. The best oats have plump, heavy ker-nels and weigh approximately 34 lbs. per bushel. This means they have plenty of starch and not too much fibre.
Equus Safety Tip:
Be cautious when feeding grains with a high energy content such as corn. There is greater chance of causing a horse to founder.
O T H E R F E E D S Sweet Feed: Sweet Feed is made up of mixed grains with molasses added. Molasses makes the feed less dusty and tastier. Be careful when storing and feeding sweet feed in hot humid condi-tions, as it can spoil. Sweet feed also attracts flies, so keep tubs clean.
Pelleted Feeds – Feed may be ground up and pressed into pellets. There are four types: Single ingredient such as alfalfa meal Mixed-grain pellets Feed supplements Complete feed pellets that contain both grain and hay

90
Supplying hay along with pellets provides necessary bulk and helps prevent wood chewing.
Bran: This is ground-up hulls of wheat. This feed is sometimes mixed with other feeds or fed as a bran mash (mixed with boiling water). Bran is used because it is palatable and adds bulk to a ration. Bran should not be fed in large quantities, as it contains large amounts of phosphorus and can upset the calcium-phosphorus balance, resulting in bone problems. D I F F E R E N T R A T I O N S F O R D I F F E R E N T N E E D S
Maintenance Ration – This ration is used to keep the horse just as it is – not gaining or losing weight. Ordinary health and fitness is to be maintained.
Conditioning Ration – This ration is for developing fitness. As a horse’s work increases, it needs more concentrates (grain) for extra energy.
Day Off Ration – When a horse has a day off it should receive less grain. This helps to prevent Azoturia or tying up syndrome (muscle damage). Feed approximately 3 pounds of extra hay for every pound of grain cut from the regular ration.
Laying Off – As a horse is worked less, its grain should be decreased and roughage increased until it reaches a maintenance level. Allow a horse to adjust to this change gradually.
Feeding the Sick Horse – A sick horse needs food that is nutritious and easy to digest. Since it is idle, it will need a more laxative diet. Bran mashes are ideal for this situation. To one-third of a bucket of bran add as much boiling water as the bran will absorb. Add ½ oz. of salt. Stir well. Cover to keep in steam and allow mash to steam until cool enough to feed. Correctly made, the mash should be crumble-dry, not stiff and not thin and watery. The mash is more appetizing if a handful of oats is added.
91
Skill Builder 6: Riding Spring Startup From the Ground Up Weight at Different Gaits Aids Bits & Biting Problems
Spring Startup
Many riders in Manitoba take a break from riding in the winter. That means that your horse has likely also had a break. Once you get spring fever for riding, there are some things you should take care of.
Check for condition. Make sure his feeding program is correct for the work he is about to begin.
Limit grazing. Spring grass contains lots of sugar that can trigger laminitis. Put your horse on grass gradually – less than 30 minutes per day, increasing by 5-10 minutes more each day.
Get grooming. This will help your horse shed his itchy winter hair and also help you find any injuries or skin conditions it may have. This includes looking after the feet and possible problems.
Deworm. Vaccinate. Your horse needs its annual vaccination. If you have a veterinarian come out to
do this, have him check the teeth, as well. Start out slowly. Ride gentle exercises at first, gradually increasing the length of your rides.
If your horse is still hairy, make sure you cool down properly. Take care of yourself. You might be out of shape, too. Use sunscreen, if necessary.
Remember that your horse might think that it is still in charge like it was all winter. Stay safe.
Check out following websites for tips for spring start up: https://www.equisearch.com/discoverhorses/body-condition-scoring-horse-30678
http://www.albertahorseindustry.ca/index.php?option=com_content&view=article&id=327:spring-grazing&catid=79:april-2010&Itemid=268
http://www.hcbc.ca/_customelements/uploadedResources/SpringPastureManagement.pdf
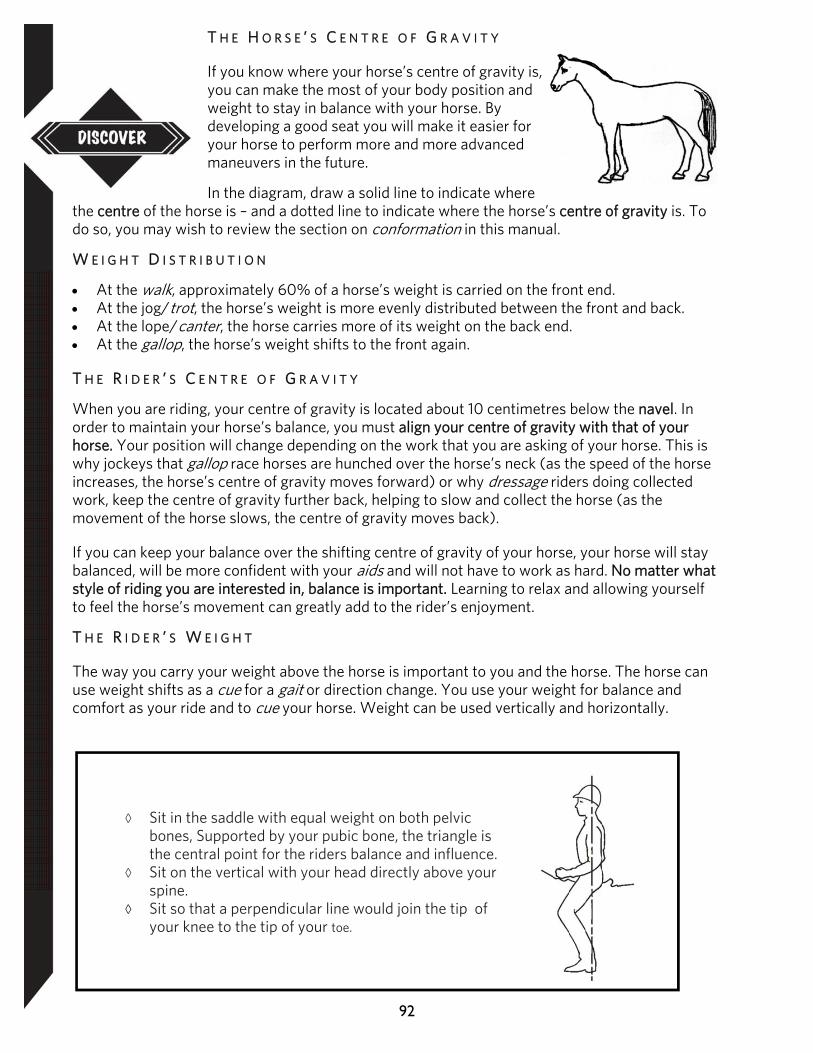
92
T H E H O R S E ’ S C E N T R E O F G R A V I T Y
If you know where your horse’s centre of gravity is, you can make the most of your body position and weight to stay in balance with your horse. By developing a good seat you will make it easier for your horse to perform more and more advanced maneuvers in the future.
In the diagram, draw a solid line to indicate where the centre of the horse is – and a dotted line to indicate where the horse’s centre of gravity is. To do so, you may wish to review the section on conformation in this manual.
W E I G H T D I S T R I B U T I O N
At the walk, approximately 60% of a horse’s weight is carried on the front end. At the jog/trot, the horse’s weight is more evenly distributed between the front and back. At the lope/canter, the horse carries more of its weight on the back end. At the gallop, the horse’s weight shifts to the front again.
T H E R I D E R ’ S C E N T R E O F G R A V I T Y
When you are riding, your centre of gravity is located about 10 centimetres below the navel. In order to maintain your horse’s balance, you must align your centre of gravity with that of your horse. Your position will change depending on the work that you are asking of your horse. This is why jockeys that gallop race horses are hunched over the horse’s neck (as the speed of the horse increases, the horse’s centre of gravity moves forward) or why dressage riders doing collected work, keep the centre of gravity further back, helping to slow and collect the horse (as the movement of the horse slows, the centre of gravity moves back).
If you can keep your balance over the shifting centre of gravity of your horse, your horse will stay balanced, will be more confident with your aids and will not have to work as hard. No matter what style of riding you are interested in, balance is important. Learning to relax and allowing yourself to feel the horse’s movement can greatly add to the rider’s enjoyment.
T H E R I D E R ’ S W E I G H T
The way you carry your weight above the horse is important to you and the horse. The horse can use weight shifts as a cue for a gait or direction change. You use your weight for balance and comfort as your ride and to cue your horse. Weight can be used vertically and horizontally.
Sit in the saddle with equal weight on both pelvic bones, Supported by your pubic bone, the triangle is the central point for the riders balance and influence.
Sit on the vertical with your head directly above your spine.
Sit so that a perpendicular line would join the tip of your knee to the tip of your toe.
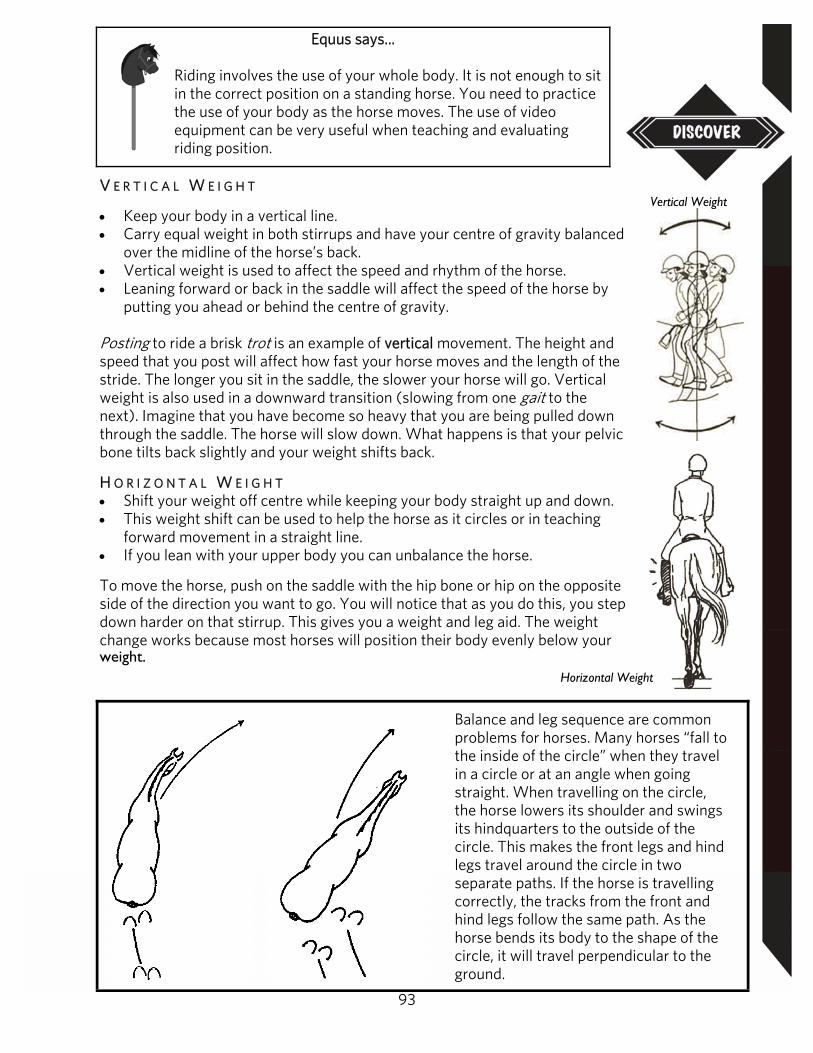
93
V E R T I C A L W E I G H T
Keep your body in a vertical line. Carry equal weight in both stirrups and have your centre of gravity balanced
over the midline of the horse’s back. Vertical weight is used to affect the speed and rhythm of the horse. Leaning forward or back in the saddle will affect the speed of the horse by
putting you ahead or behind the centre of gravity. Posting to ride a brisk trot is an example of vertical movement. The height and speed that you post will affect how fast your horse moves and the length of the stride. The longer you sit in the saddle, the slower your horse will go. Vertical weight is also used in a downward transition (slowing from one gait to the next). Imagine that you have become so heavy that you are being pulled down through the saddle. The horse will slow down. What happens is that your pelvic bone tilts back slightly and your weight shifts back.
H O R I Z O N T A L W E I G H T Shift your weight off centre while keeping your body straight up and down. This weight shift can be used to help the horse as it circles or in teaching
forward movement in a straight line. If you lean with your upper body you can unbalance the horse.
To move the horse, push on the saddle with the hip bone or hip on the opposite side of the direction you want to go. You will notice that as you do this, you step down harder on that stirrup. This gives you a weight and leg aid. The weight change works because most horses will position their body evenly below your weight.
Vertical Weight
Horizontal Weight
Balance and leg sequence are common problems for horses. Many horses “fall to the inside of the circle” when they travel in a circle or at an angle when going straight. When travelling on the circle, the horse lowers its shoulder and swings its hindquarters to the outside of the circle. This makes the front legs and hind legs travel around the circle in two separate paths. If the horse is travelling correctly, the tracks from the front and hind legs follow the same path. As the horse bends its body to the shape of the circle, it will travel perpendicular to the ground.
Equus says...
Riding involves the use of your whole body. It is not enough to sit in the correct position on a standing horse. You need to practice the use of your body as the horse moves. The use of video equipment can be very useful when teaching and evaluating riding position.
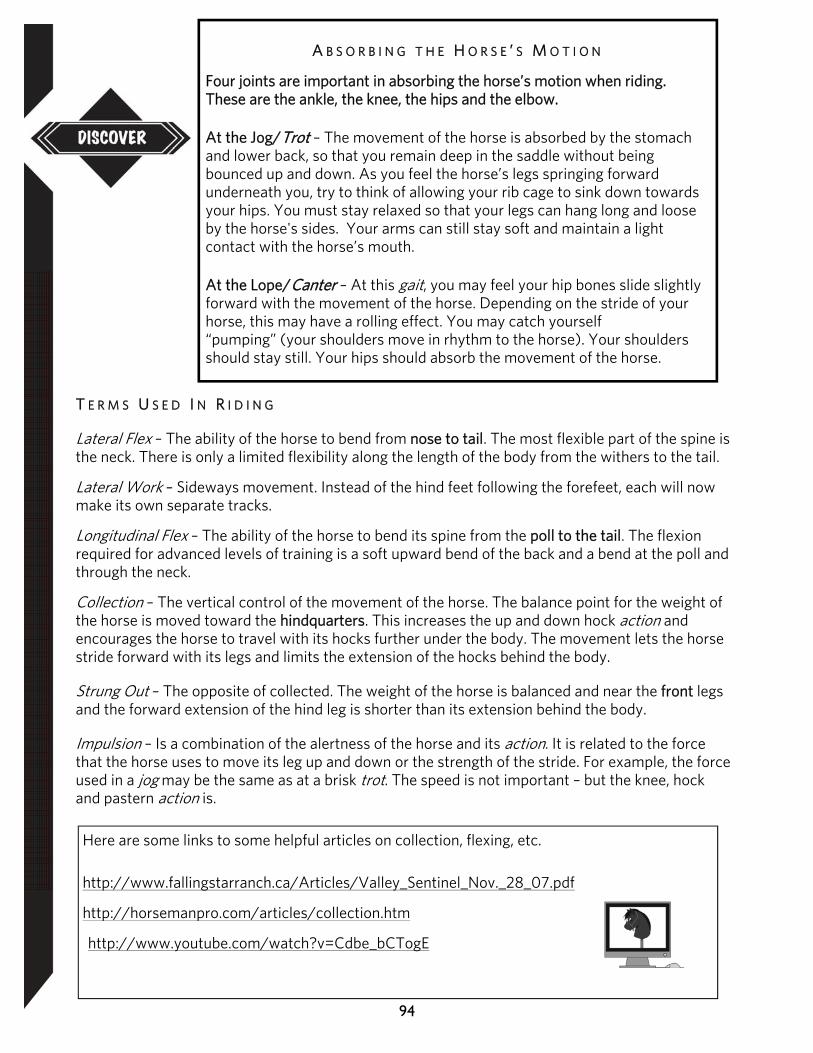
94
A B S O R B I N G T H E H O R S E ’ S M O T I O N
Four joints are important in absorbing the horse’s motion when riding. These are the ankle, the knee, the hips and the elbow.
At the Jog/Trot – The movement of the horse is absorbed by the stomach and lower back, so that you remain deep in the saddle without being bounced up and down. As you feel the horse’s legs springing forward underneath you, try to think of allowing your rib cage to sink down towards your hips. You must stay relaxed so that your legs can hang long and loose by the horse's sides. Your arms can still stay soft and maintain a light contact with the horse’s mouth.
At the Lope/Canter – At this gait, you may feel your hip bones slide slightly forward with the movement of the horse. Depending on the stride of your horse, this may have a rolling effect. You may catch yourself “pumping” (your shoulders move in rhythm to the horse). Your shoulders should stay still. Your hips should absorb the movement of the horse.
T E R M S U S E D I N R I D I N G
Lateral Flex – The ability of the horse to bend from nose to tail. The most flexible part of the spine is the neck. There is only a limited flexibility along the length of the body from the withers to the tail.
Lateral Work – Sideways movement. Instead of the hind feet following the forefeet, each will now make its own separate tracks.
Longitudinal Flex – The ability of the horse to bend its spine from the poll to the tail. The flexion required for advanced levels of training is a soft upward bend of the back and a bend at the poll and through the neck.
Collection – The vertical control of the movement of the horse. The balance point for the weight of the horse is moved toward the hindquarters. This increases the up and down hock action and encourages the horse to travel with its hocks further under the body. The movement lets the horse stride forward with its legs and limits the extension of the hocks behind the body.
Strung Out – The opposite of collected. The weight of the horse is balanced and near the front legs and the forward extension of the hind leg is shorter than its extension behind the body.
Impulsion – Is a combination of the alertness of the horse and its action. It is related to the force that the horse uses to move its leg up and down or the strength of the stride. For example, the force used in a jog may be the same as at a brisk trot. The speed is not important – but the knee, hock and pastern action is.
Here are some links to some helpful articles on collection, flexing, etc.
http://www.fallingstarranch.ca/Articles/Valley_Sentinel_Nov._28_07.pdf
http://horsemanpro.com/articles/collection.htm
http://www.youtube.com/watch?v=Cdbe_bCTogE
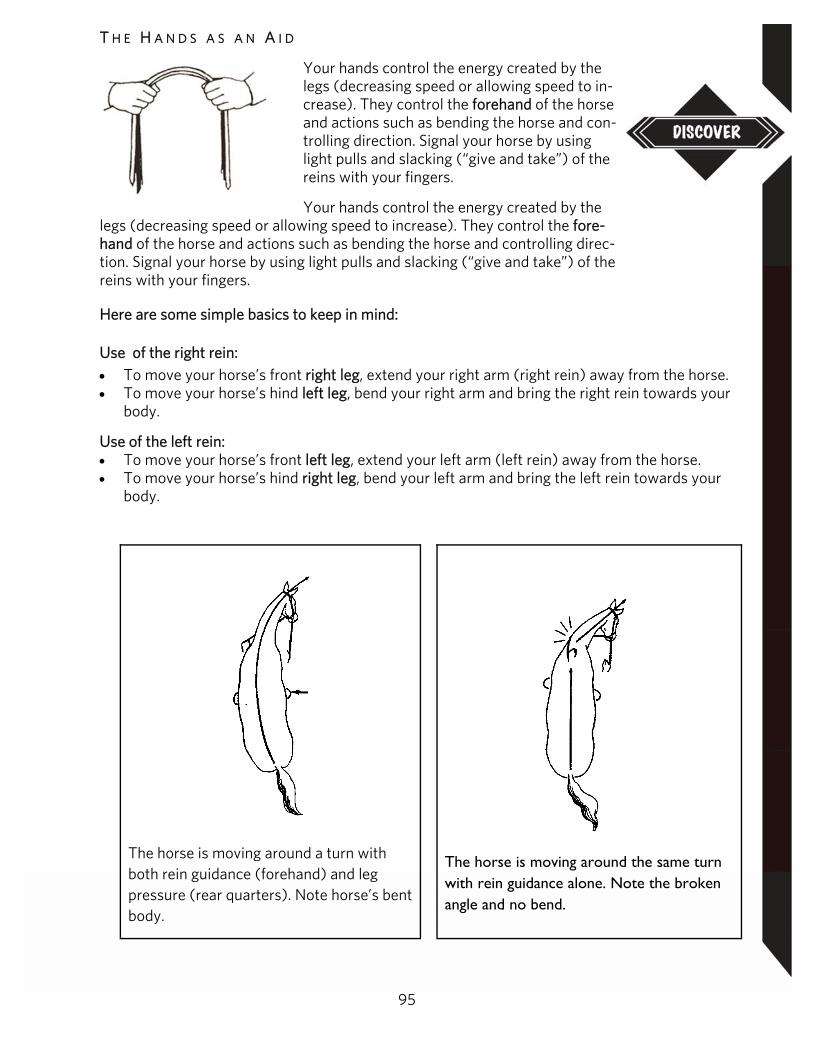
95
T H E H A N D S A S A N A I D
Your hands control the energy created by the legs (decreasing speed or allowing speed to in-crease). They control the forehand of the horse and actions such as bending the horse and con-trolling direction. Signal your horse by using light pulls and slacking (“give and take”) of the reins with your fingers.
Your hands control the energy created by the legs (decreasing speed or allowing speed to increase). They control the fore-hand of the horse and actions such as bending the horse and controlling direc-tion. Signal your horse by using light pulls and slacking (“give and take”) of the reins with your fingers.
Here are some simple basics to keep in mind:
Use of the right rein: To move your horse’s front right leg, extend your right arm (right rein) away from the horse. To move your horse’s hind left leg, bend your right arm and bring the right rein towards your
body.
Use of the left rein: To move your horse’s front left leg, extend your left arm (left rein) away from the horse. To move your horse’s hind right leg, bend your left arm and bring the left rein towards your
body.
The horse is moving around a turn with both rein guidance (forehand) and leg pressure (rear quarters). Note horse’s bent body.
The horse is moving around the same turn with rein guidance alone. Note the broken angle and no bend.
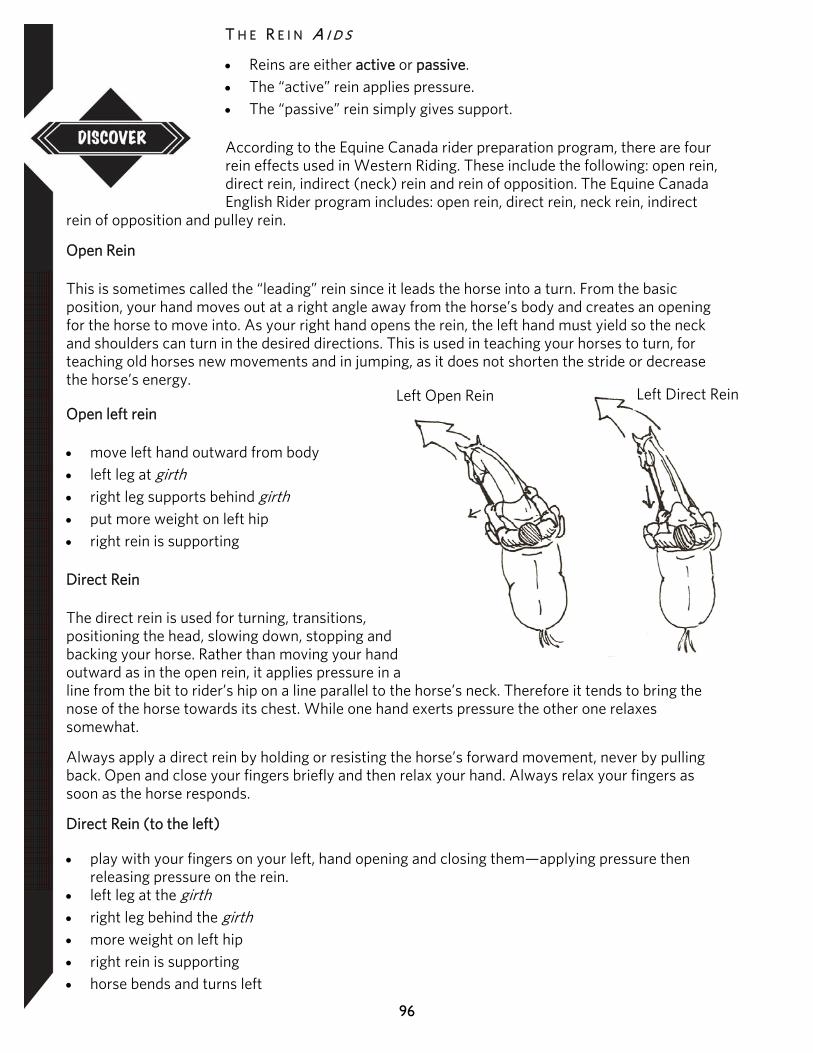
96
T H E R E I N A I D S
Reins are either active or passive. The “active” rein applies pressure. The “passive” rein simply gives support.
According to the Equine Canada rider preparation program, there are four rein effects used in Western Riding. These include the following: open rein, direct rein, indirect (neck) rein and rein of opposition. The Equine Canada English Rider program includes: open rein, direct rein, neck rein, indirect
rein of opposition and pulley rein.
Open Rein
This is sometimes called the “leading” rein since it leads the horse into a turn. From the basic position, your hand moves out at a right angle away from the horse’s body and creates an opening for the horse to move into. As your right hand opens the rein, the left hand must yield so the neck and shoulders can turn in the desired directions. This is used in teaching your horses to turn, for teaching old horses new movements and in jumping, as it does not shorten the stride or decrease the horse’s energy.
Open left rein
move left hand outward from body left leg at girth right leg supports behind girth put more weight on left hip right rein is supporting
Direct Rein
The direct rein is used for turning, transitions, positioning the head, slowing down, stopping and backing your horse. Rather than moving your hand outward as in the open rein, it applies pressure in a line from the bit to rider’s hip on a line parallel to the horse’s neck. Therefore it tends to bring the nose of the horse towards its chest. While one hand exerts pressure the other one relaxes somewhat.
Always apply a direct rein by holding or resisting the horse’s forward movement, never by pulling back. Open and close your fingers briefly and then relax your hand. Always relax your fingers as soon as the horse responds.
Direct Rein (to the left)
play with your fingers on your left, hand opening and closing them—applying pressure then releasing pressure on the rein.
left leg at the girth right leg behind the girth more weight on left hip right rein is supporting horse bends and turns left
Left Open Rein Left Direct Rein

97
Rein of Opposition
To control the horse’s shoulder position, this type of rein is used across the shoulder towards the rider’s opposite shoulder. For example, lift the right rein slightly towards your left shoulder. At the same time, apply a supporting rein with your left hand. Using your left hand in this manner will steady your horse and control the amount of flexion.
Open Rein
Direct Rein
Rein of Opposition
Left Rein of Opposition Right Neck Rein
Horse moves toward right
Left Turn
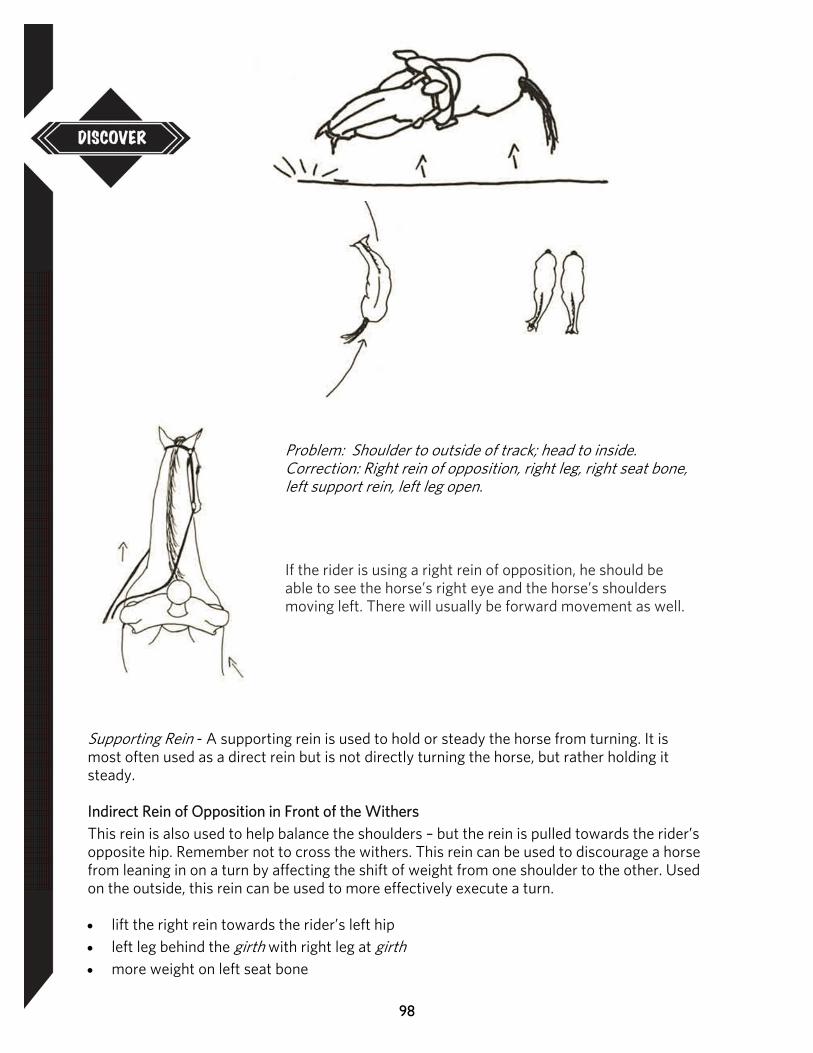
98
Problem: Shoulder to outside of track; head to inside. Correction: Right rein of opposition, right leg, right seat bone, left support rein, left leg open.
If the rider is using a right rein of opposition, he should be able to see the horse’s right eye and the horse’s shoulders moving left. There will usually be forward movement as well.
Supporting Rein - A supporting rein is used to hold or steady the horse from turning. It is most often used as a direct rein but is not directly turning the horse, but rather holding it steady. Indirect Rein of Opposition in Front of the Withers This rein is also used to help balance the shoulders – but the rein is pulled towards the rider’s opposite hip. Remember not to cross the withers. This rein can be used to discourage a horse from leaning in on a turn by affecting the shift of weight from one shoulder to the other. Used on the outside, this rein can be used to more effectively execute a turn.
lift the right rein towards the rider’s left hip left leg behind the girth with right leg at girth more weight on left seat bone
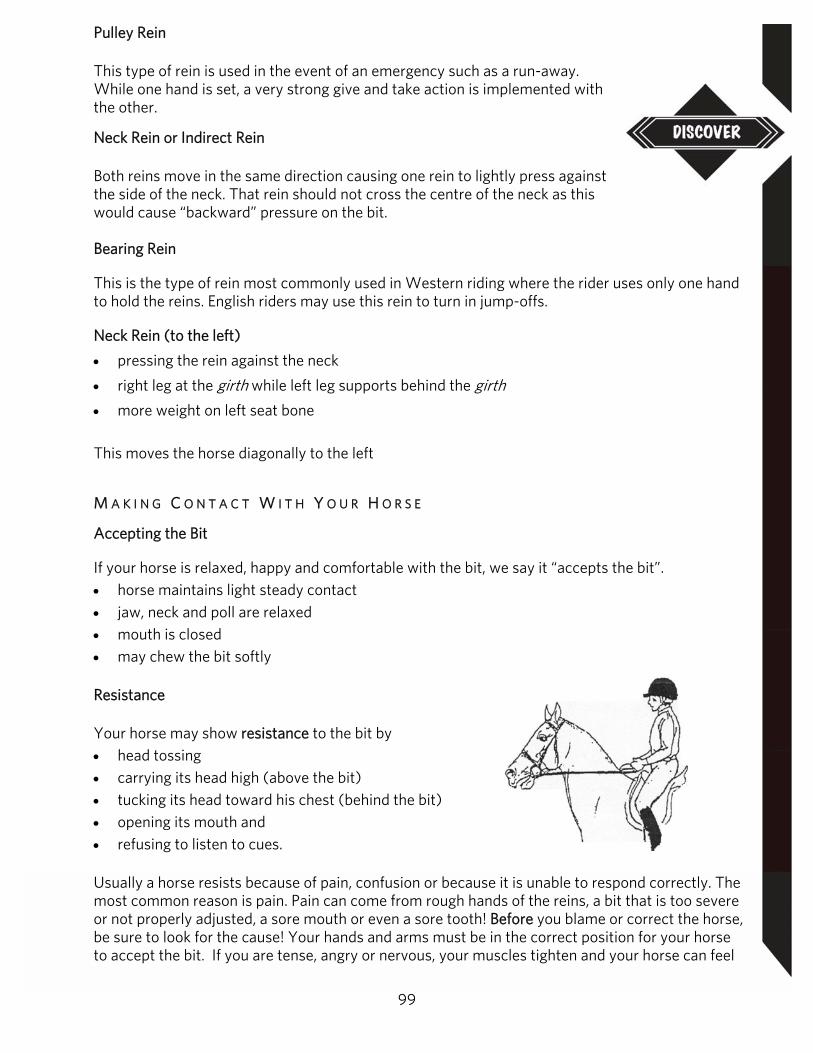
99
Pulley Rein
This type of rein is used in the event of an emergency such as a run-away. While one hand is set, a very strong give and take action is implemented with the other.
Neck Rein or Indirect Rein
Both reins move in the same direction causing one rein to lightly press against the side of the neck. That rein should not cross the centre of the neck as this would cause “backward” pressure on the bit. Bearing Rein
This is the type of rein most commonly used in Western riding where the rider uses only one hand to hold the reins. English riders may use this rein to turn in jump-offs.
Neck Rein (to the left)
pressing the rein against the neck
right leg at the girth while left leg supports behind the girth
more weight on left seat bone
This moves the horse diagonally to the left
M A K I N G C O N T A C T W I T H Y O U R H O R S E
Accepting the Bit
If your horse is relaxed, happy and comfortable with the bit, we say it “accepts the bit”. horse maintains light steady contact jaw, neck and poll are relaxed mouth is closed may chew the bit softly
Resistance
Your horse may show resistance to the bit by head tossing carrying its head high (above the bit) tucking its head toward his chest (behind the bit) opening its mouth and refusing to listen to cues.
Usually a horse resists because of pain, confusion or because it is unable to respond correctly. The most common reason is pain. Pain can come from rough hands of the reins, a bit that is too severe or not properly adjusted, a sore mouth or even a sore tooth! Before you blame or correct the horse, be sure to look for the cause! Your hands and arms must be in the correct position for your horse to accept the bit. If you are tense, angry or nervous, your muscles tighten and your horse can feel
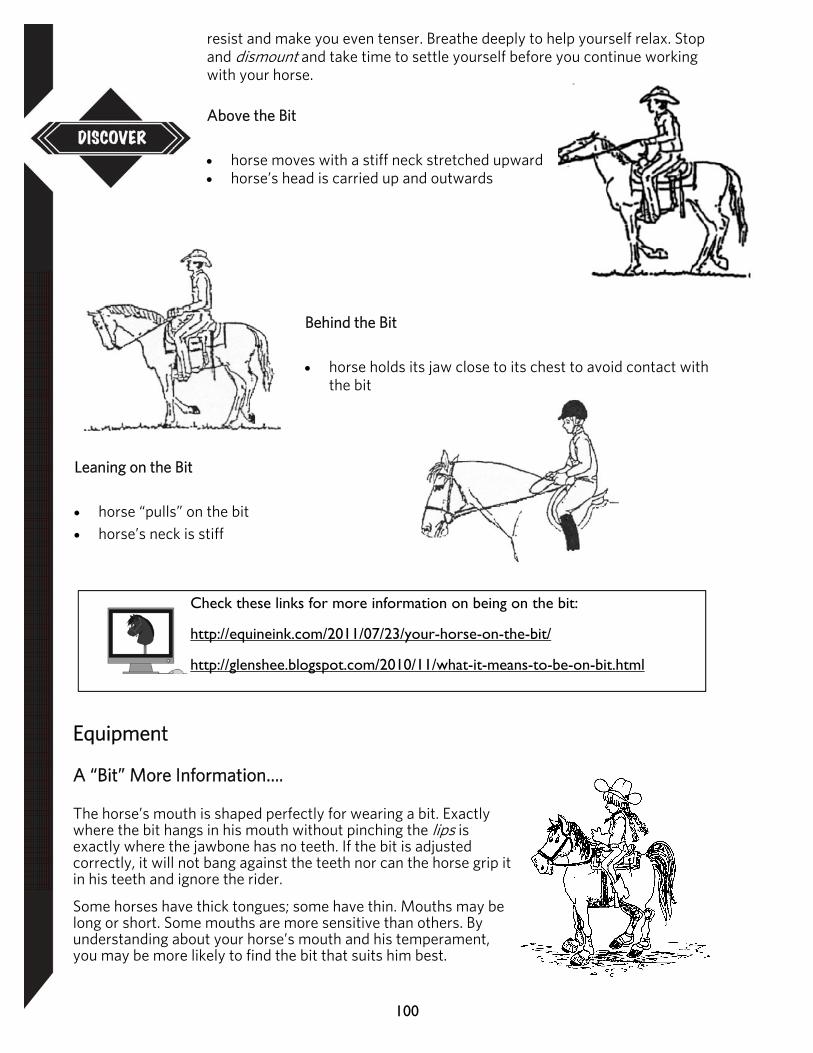
100
resist and make you even tenser. Breathe deeply to help yourself relax. Stop and dismount and take time to settle yourself before you continue working with your horse. Above the Bit horse moves with a stiff neck stretched upward horse’s head is carried up and outwards
Behind the Bit horse holds its jaw close to its chest to avoid contact with
the bit
Leaning on the Bit horse “pulls” on the bit horse’s neck is stiff
Equipment
A “Bit” More Information…. The horse’s mouth is shaped perfectly for wearing a bit. Exactly where the bit hangs in his mouth without pinching the lips is exactly where the jawbone has no teeth. If the bit is adjusted correctly, it will not bang against the teeth nor can the horse grip it in his teeth and ignore the rider.
Some horses have thick tongues; some have thin. Mouths may be long or short. Some mouths are more sensitive than others. By understanding about your horse’s mouth and his temperament, you may be more likely to find the bit that suits him best.
Check these links for more information on being on the bit:
http://equineink.com/2011/07/23/your-horse-on-the-bit/
http://glenshee.blogspot.com/2010/11/what-it-means-to-be-on-bit.html
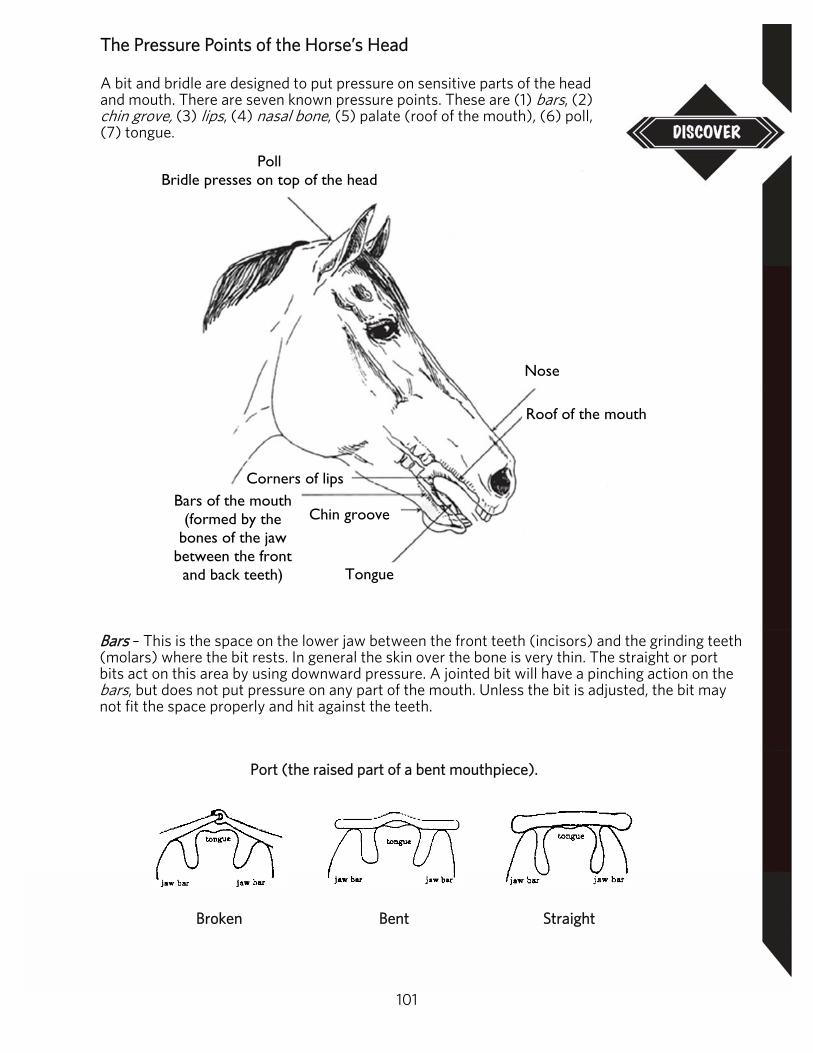
101
The Pressure Points of the Horse’s Head
A bit and bridle are designed to put pressure on sensitive parts of the head and mouth. There are seven known pressure points. These are (1) bars, (2) chin grove, (3) lips, (4) nasal bone, (5) palate (roof of the mouth), (6) poll, (7) tongue.
Bars – This is the space on the lower jaw between the front teeth (incisors) and the grinding teeth (molars) where the bit rests. In general the skin over the bone is very thin. The straight or port bits act on this area by using downward pressure. A jointed bit will have a pinching action on the bars, but does not put pressure on any part of the mouth. Unless the bit is adjusted, the bit may not fit the space properly and hit against the teeth.
Port (the raised part of a bent mouthpiece).
Broken Bent Straight
Poll Bridle presses on top of the head
Nose
Roof of the mouth
Tongue
Chin groove
Corners of lips Bars of the mouth
(formed by the bones of the jaw
between the front and back teeth)
102
Chin Grove – This is the jaw bone just behind the bulge of the chin. A curb chain or leather curb strap attached to a pelham or curb bit fits across the chin groove. Pulling the reins backward makes the bit rotate forward in the mouth of the horse and tighten the curb strap or chin. The purpose is to have the horse set its head against the pressure and brings its head into a nearly vertical position. Lips – The bit rests on the lips at the corners of the mouth. After early training the bit should fit so that one wrinkle shows on the lip. There is always some pressure on the lips. With most bits there is downward
pressure. Jointed bits will also give some pinching action. Too much pressure will bring the horse’s head into a nearly vertical position. Nasal Bone – The bone down the front of the face, just above the nostrils is known as the nasal bone. This includes the cartilage. The area is very sensitive. The pressure of a noseband or standing martingale may cause pain if the horse pushes against it. Palate – The palate is the name given to the roof of the mouth. Jointed, double-jointed and port bits all hit the palate of the mouth when rein pressure is used. If the bit is not used properly it can cause discomfort and pain. Poll – The Poll is the area at the top of the head behind the ears. The crown piece of the headstall causes discomfort in this area when pressure is applied to the bit. The horse is expected to move against the pressure. Tongue – All bits put some pressure on the tongue. In general, bits push the tongue downward into the mouth. A straight bit puts more downward pressure on the tongue than a jointed bit. A jointed bit gives the tongue more room. The tongue affects how the bit will sit on the bars. A thick tongue can lift the bit off the bars. A horse with a thick tongue will need a snaffle bit with a thicker joint or a higher port in a curb bit to keep pressure on the bars. Some of these horses are not comfortable with a jointed bit because it may pinch their tongue. A higher port in the curb bit takes pressure off the tongue but if it is used roughly it puts great pressure on the palate.
Equus says...
Equipment is just a tool that we use to communicate with the horse, but you first have to be able to use your hands correctly with any equipment.
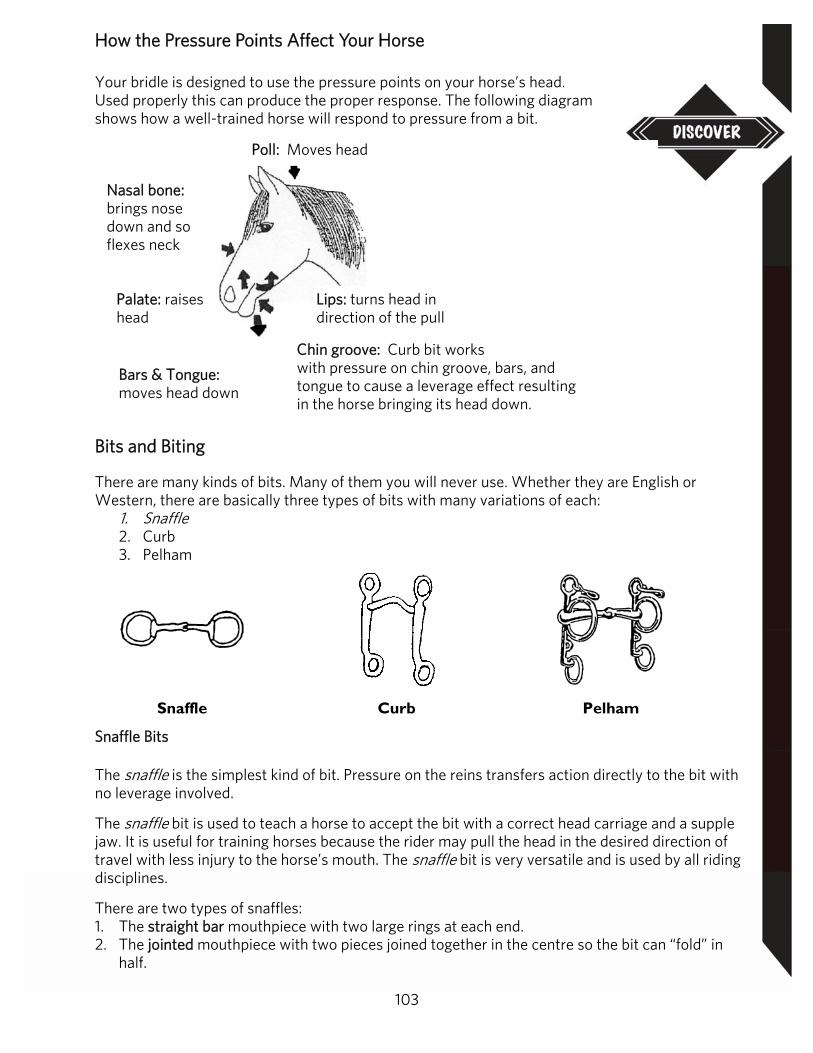
103
Snaffle Curb Pelham
How the Pressure Points Affect Your Horse Your bridle is designed to use the pressure points on your horse’s head. Used properly this can produce the proper response. The following diagram shows how a well-trained horse will respond to pressure from a bit.
Bits and Biting
There are many kinds of bits. Many of them you will never use. Whether they are English or Western, there are basically three types of bits with many variations of each:
1. Snaffle 2. Curb 3. Pelham
Snaffle Bits
The snaffle is the simplest kind of bit. Pressure on the reins transfers action directly to the bit with no leverage involved.
The snaffle bit is used to teach a horse to accept the bit with a correct head carriage and a supple jaw. It is useful for training horses because the rider may pull the head in the desired direction of travel with less injury to the horse’s mouth. The snaffle bit is very versatile and is used by all riding disciplines.
There are two types of snaffles: 1. The straight bar mouthpiece with two large rings at each end. 2. The jointed mouthpiece with two pieces joined together in the centre so the bit can “fold” in
half.
Poll: Moves head
Nasal bone: brings nose down and so flexes neck
Palate: raises head
Bars & Tongue: moves head down
Lips: turns head in direction of the pull
Chin groove: Curb bit works with pressure on chin groove, bars, and tongue to cause a leverage effect resulting in the horse bringing its head down.
104
Curb Bits
A curb bit, which has shanks, depends on leverage for more pressure. The goal of leverage bits is for the rider to be able to make the horse respond to lighter and lighter pressure from the hands.
All curb bits are meant to be used with a curb strap or curb chain. It is used for leverage on the bit and to stop the horse from stiffening its jaw against the bit. The length and angle of the shank determine the severity of the bit.
The curb bit puts pressure on the bars, tongue, lips, chin groove, poll and the palate (roof of the mouth). This is why you must never jerk your horse’s mouth.
Pelham Bit
A pelham bit is shaped like a curb bit but it has rings at the ends of the mouthpiece to which a snaffle rein may be attached. This bit attempts to combine the snaffle and the curb into one bit. Therefore, it also applies pressure to the bars, tongue, lips, palate, chin groove and the poll.
Bitting Problems Riders and horses seem to have a variety of problems with bits. One of the most common problems is “over bridling” where the rider uses too severe a bit on the horse. This can cause the horse to get “behind the bit”, to rear up or back up unexpectedly. With rough handling, the horse’s mouth may be permanently damaged. Over-bridling causes the horse to fear the bit.
What Is A Hard Mouth?
The bit sits on the sensitive bars of the mouth which can be damaged easily by a heavy hand or a severe bit. A horse feeling pain elsewhere in its body may also resist the bit, leading to a hard mouth. First the bars become numb. With continued mistreatment, all feeling is lost. Bony lumps or spurs may develop. When this happens the mouth is permanently damaged and the horse is described as “hard-mouthed”.
Equus says...
Use the softest bit in your horse’s mouth that you can. Do everything possible to keep your horse’s mouth soft and responsive, remembering that the best methods of communication with your horse are the simplest and least harsh. The horse will work better for you and be happier. A thick snaffle is the softest bit you can use. With a western bit, the higher the port and the longer the shank, the more severe it is. Never use a severe bit on a young horse as it will only frighten it and create problems.
Internet link regarding bits –
http://www.horses-and-horse-information.com/articles/1098advice.shtml
105
More Common Mistakes Using a long shank bit or a “Tom Thumb” as a snaffle. Not using a curb strap chain with a curb or pelham bit. Using non-snaffle bits with other training equipment such as side reins,
running martingales and draw-reins. This can ruin a mouth. Not adjusting the bit properly. It may then hit the teeth or cause sores at
the corners of the mouth. Having a bit that is too narrow for the horse’s mouth. The rubbing may
cause rawness and pain. Having a bit that is too wide or big for the horse’s mouth can also cause discomfort to the
horse. Not adjusting the curb chain/curb strap correctly. Always using a harsh bit when it is not necessary.
Equus says...
Remember: The bit doesn’t make the horse do anything. The rider does!!
Reins
There are a variety of reins used in riding depending on the discipline and show guidelines. Al-ways choose a size that feels comfortable in your hands giving you more control and contact with your horse’s mouth. In general the smaller the rider’s hands, the narrower the reins should be.
English Reins
All English reins buckle to the bit at each side and to each other in the middle.
Plain Reins - are flat leather straps which are comfortable to use, but can become slick from rain or sweat.
Laced Reins - are constructed of thin leather strips laced through and around the strap of the reins for a better grip.
Web Reins - come with either a horizontal loop of leather at intervals or rubber incorporated for grip. They are used in wet weather when leather reins would becomes slippery. They are made of cotton web with leather at the bit and buckle ends.
Rubber Reins - are covered with a pebble surface over the hand grip portion to provide a secure grip..
Natural Horsemanship Rope Reins - are made from various weights of rope and offer users a higher level of feel when riding.
Western Reins
Open or Split Reins - are the most commonly used rein for Western riding, designed with two separate straps which are attached to the bit at one end and left unattached at the other “rider” end.
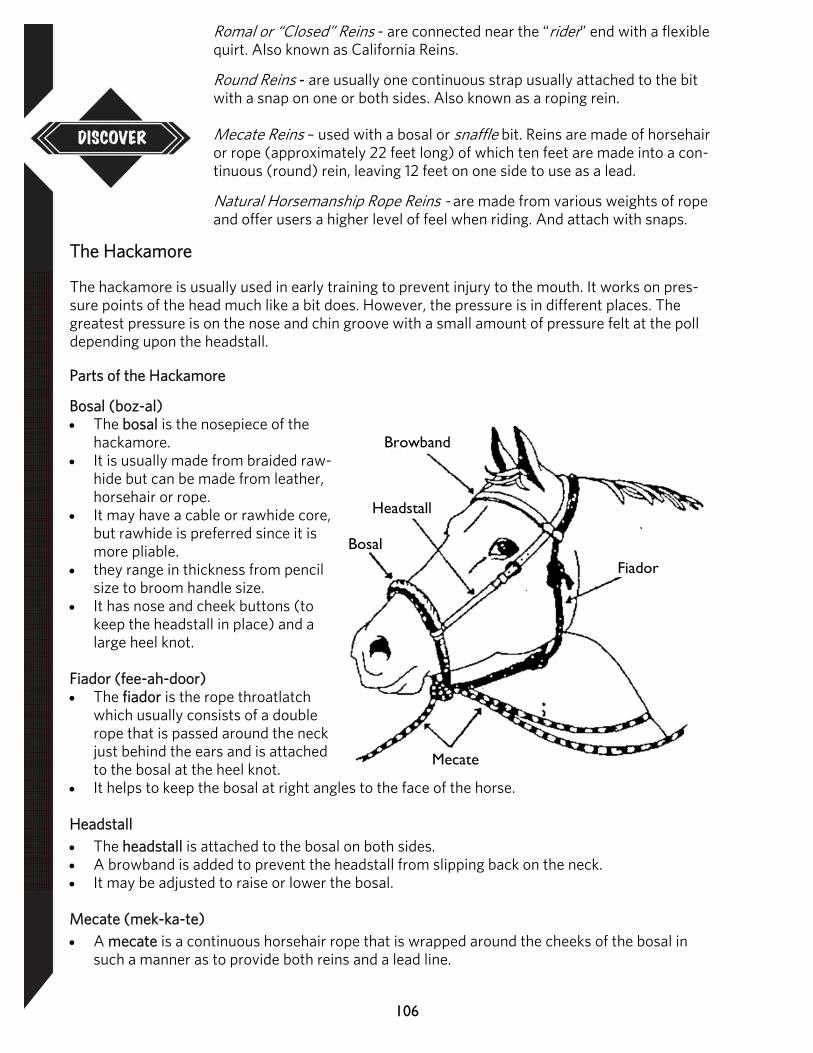
106
Romal or “Closed” Reins - are connected near the “rider” end with a flexible quirt. Also known as California Reins.
Round Reins - are usually one continuous strap usually attached to the bit with a snap on one or both sides. Also known as a roping rein. Mecate Reins – used with a bosal or snaffle bit. Reins are made of horsehair or rope (approximately 22 feet long) of which ten feet are made into a con-tinuous (round) rein, leaving 12 feet on one side to use as a lead.
Natural Horsemanship Rope Reins - are made from various weights of rope and offer users a higher level of feel when riding. And attach with snaps.
The Hackamore
The hackamore is usually used in early training to prevent injury to the mouth. It works on pres-sure points of the head much like a bit does. However, the pressure is in different places. The greatest pressure is on the nose and chin groove with a small amount of pressure felt at the poll depending upon the headstall.
Parts of the Hackamore
Bosal (boz-al) The bosal is the nosepiece of the
hackamore. It is usually made from braided raw-
hide but can be made from leather, horsehair or rope.
It may have a cable or rawhide core, but rawhide is preferred since it is more pliable.
they range in thickness from pencil size to broom handle size.
It has nose and cheek buttons (to keep the headstall in place) and a large heel knot.
Fiador (fee-ah-door) The fiador is the rope throatlatch
which usually consists of a double rope that is passed around the neck just behind the ears and is attached to the bosal at the heel knot.
It helps to keep the bosal at right angles to the face of the horse. Headstall The headstall is attached to the bosal on both sides. A browband is added to prevent the headstall from slipping back on the neck. It may be adjusted to raise or lower the bosal. Mecate (mek-ka-te) A mecate is a continuous horsehair rope that is wrapped around the cheeks of the bosal in
such a manner as to provide both reins and a lead line.
Browband
Headstall
Bosal
Mecate
Fiador
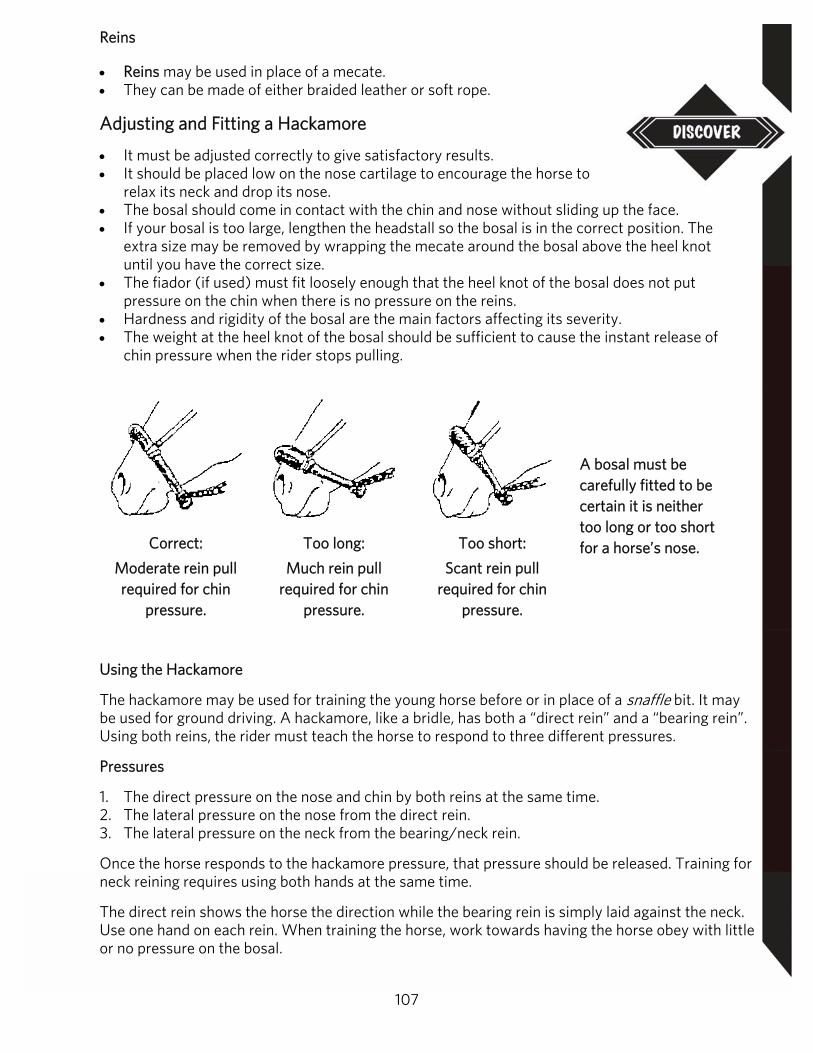
107
Reins
Reins may be used in place of a mecate. They can be made of either braided leather or soft rope.
Adjusting and Fitting a Hackamore
It must be adjusted correctly to give satisfactory results. It should be placed low on the nose cartilage to encourage the horse to
relax its neck and drop its nose. The bosal should come in contact with the chin and nose without sliding up the face. If your bosal is too large, lengthen the headstall so the bosal is in the correct position. The
extra size may be removed by wrapping the mecate around the bosal above the heel knot until you have the correct size.
The fiador (if used) must fit loosely enough that the heel knot of the bosal does not put pressure on the chin when there is no pressure on the reins.
Hardness and rigidity of the bosal are the main factors affecting its severity. The weight at the heel knot of the bosal should be sufficient to cause the instant release of
chin pressure when the rider stops pulling.
A bosal must be carefully fitted to be certain it is neither too long or too short for a horse’s nose. Correct:
Moderate rein pull required for chin
pressure.
Too long:
Much rein pull required for chin
pressure.
Too short:
Scant rein pull required for chin
pressure.
Using the Hackamore
The hackamore may be used for training the young horse before or in place of a snaffle bit. It may be used for ground driving. A hackamore, like a bridle, has both a “direct rein” and a “bearing rein”. Using both reins, the rider must teach the horse to respond to three different pressures.
Pressures
1. The direct pressure on the nose and chin by both reins at the same time. 2. The lateral pressure on the nose from the direct rein. 3. The lateral pressure on the neck from the bearing/neck rein.
Once the horse responds to the hackamore pressure, that pressure should be released. Training for neck reining requires using both hands at the same time.
The direct rein shows the horse the direction while the bearing rein is simply laid against the neck. Use one hand on each rein. When training the horse, work towards having the horse obey with little or no pressure on the bosal.
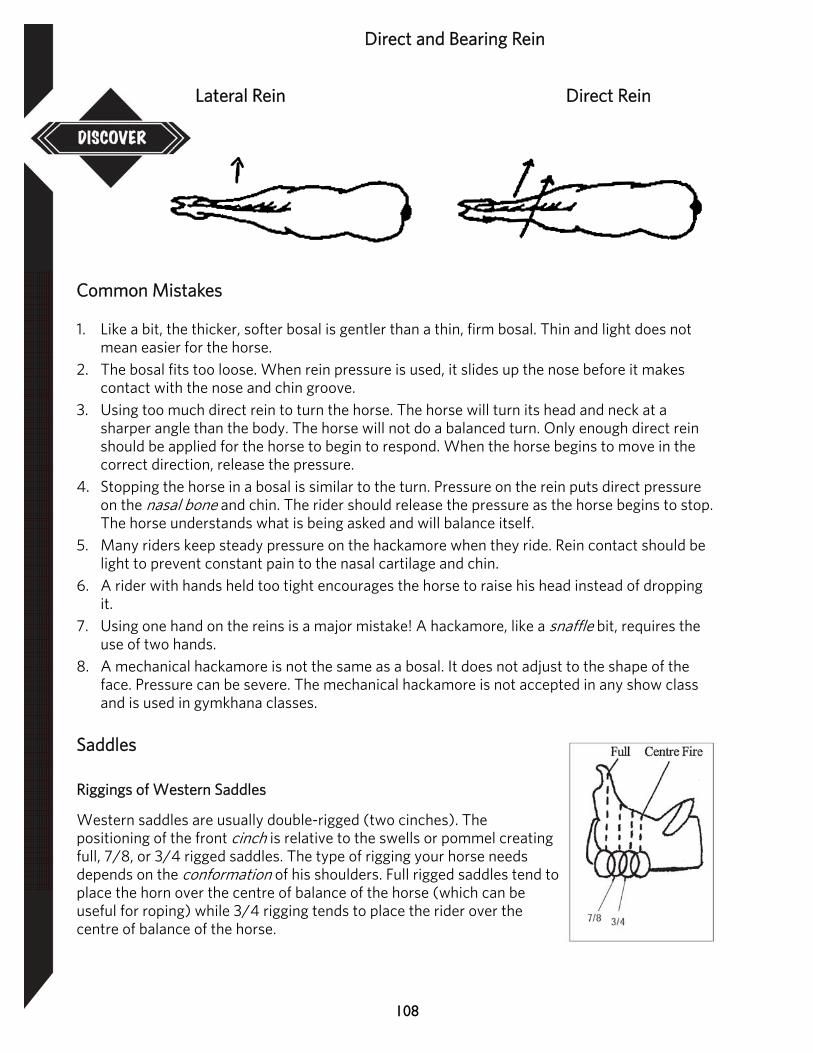
108
Direct and Bearing Rein
Lateral Rein Direct Rein
Common Mistakes 1. Like a bit, the thicker, softer bosal is gentler than a thin, firm bosal. Thin and light does not
mean easier for the horse. 2. The bosal fits too loose. When rein pressure is used, it slides up the nose before it makes
contact with the nose and chin groove. 3. Using too much direct rein to turn the horse. The horse will turn its head and neck at a
sharper angle than the body. The horse will not do a balanced turn. Only enough direct rein should be applied for the horse to begin to respond. When the horse begins to move in the correct direction, release the pressure.
4. Stopping the horse in a bosal is similar to the turn. Pressure on the rein puts direct pressure on the nasal bone and chin. The rider should release the pressure as the horse begins to stop. The horse understands what is being asked and will balance itself.
5. Many riders keep steady pressure on the hackamore when they ride. Rein contact should be light to prevent constant pain to the nasal cartilage and chin.
6. A rider with hands held too tight encourages the horse to raise his head instead of dropping it.
7. Using one hand on the reins is a major mistake! A hackamore, like a snaffle bit, requires the use of two hands.
8. A mechanical hackamore is not the same as a bosal. It does not adjust to the shape of the face. Pressure can be severe. The mechanical hackamore is not accepted in any show class and is used in gymkhana classes.
Saddles Riggings of Western Saddles
Western saddles are usually double-rigged (two cinches). The positioning of the front cinch is relative to the swells or pommel creating full, 7/8, or 3/4 rigged saddles. The type of rigging your horse needs depends on the conformation of his shoulders. Full rigged saddles tend to place the horn over the centre of balance of the horse (which can be useful for roping) while 3/4 rigging tends to place the rider over the centre of balance of the horse.
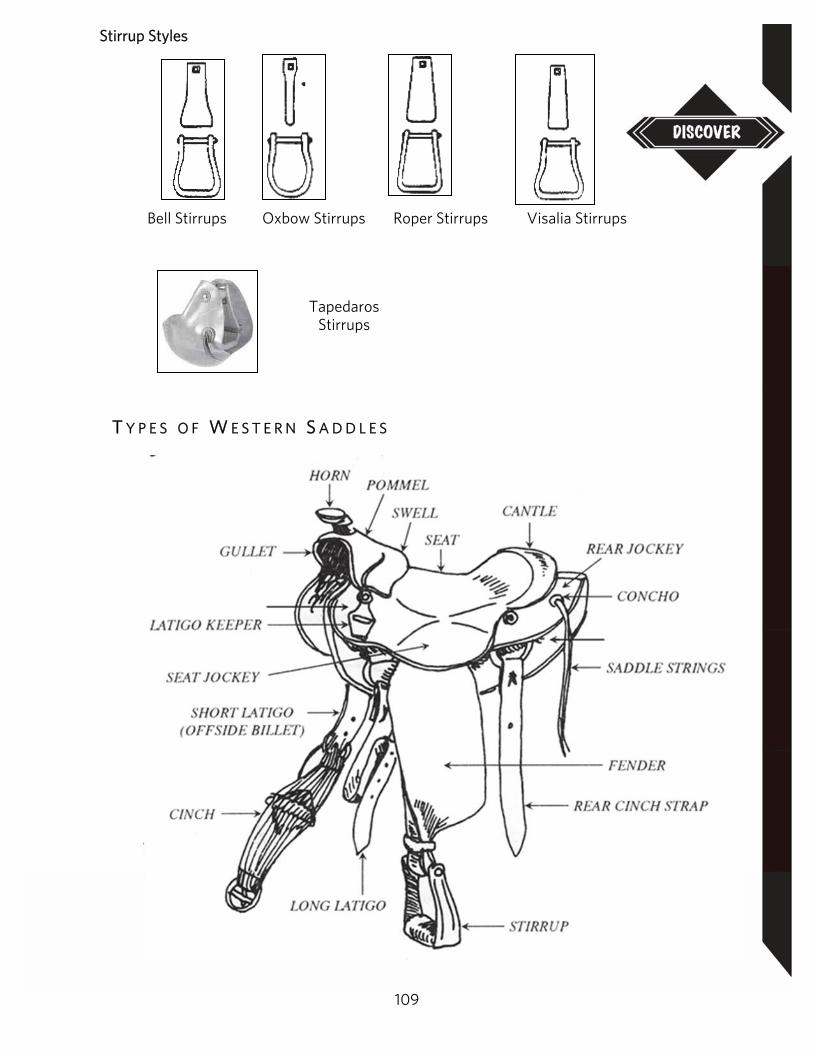
109
Stirrup Styles
Bell Stirrups Oxbow Stirrups Roper Stirrups Visalia Stirrups
T Y P E S O F W E S T E R N S A D D L E S
Tapedaros Stirrups
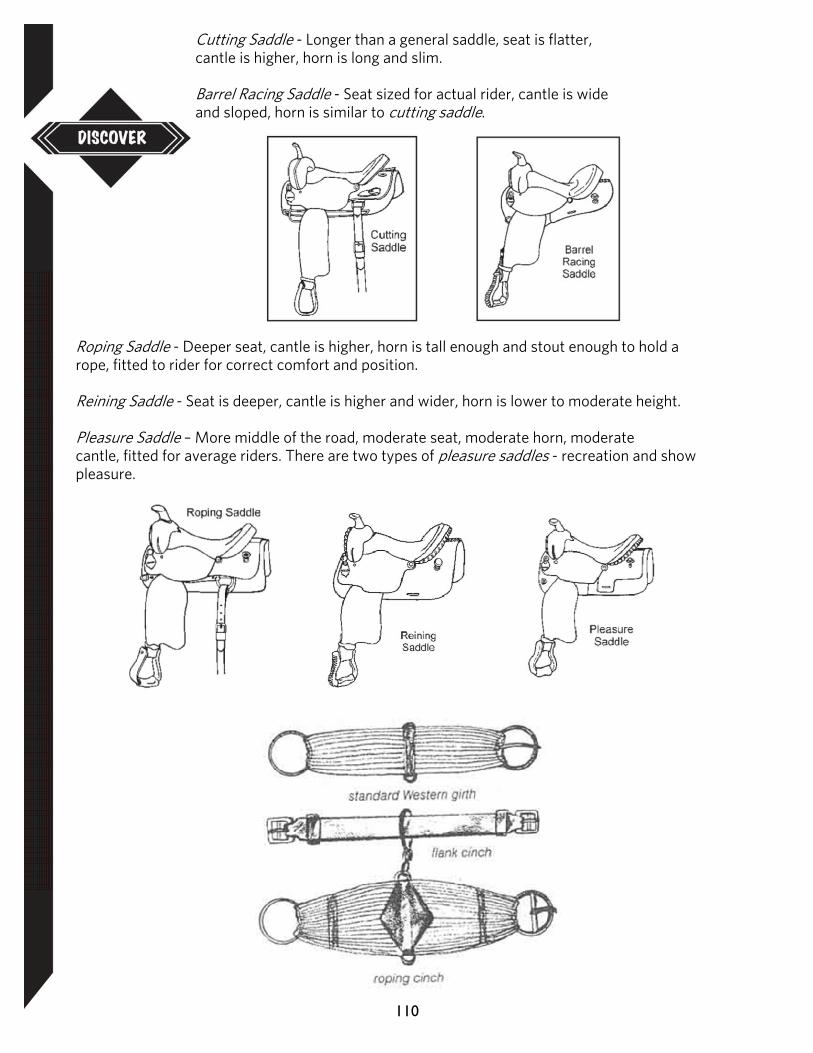
110
Cutting Saddle - Longer than a general saddle, seat is flatter, cantle is higher, horn is long and slim. Barrel Racing Saddle - Seat sized for actual rider, cantle is wide and sloped, horn is similar to cutting saddle.
Roping Saddle - Deeper seat, cantle is higher, horn is tall enough and stout enough to hold a rope, fitted to rider for correct comfort and position. Reining Saddle - Seat is deeper, cantle is higher and wider, horn is lower to moderate height. Pleasure Saddle – More middle of the road, moderate seat, moderate horn, moderate cantle, fitted for average riders. There are two types of pleasure saddles - recreation and show pleasure.
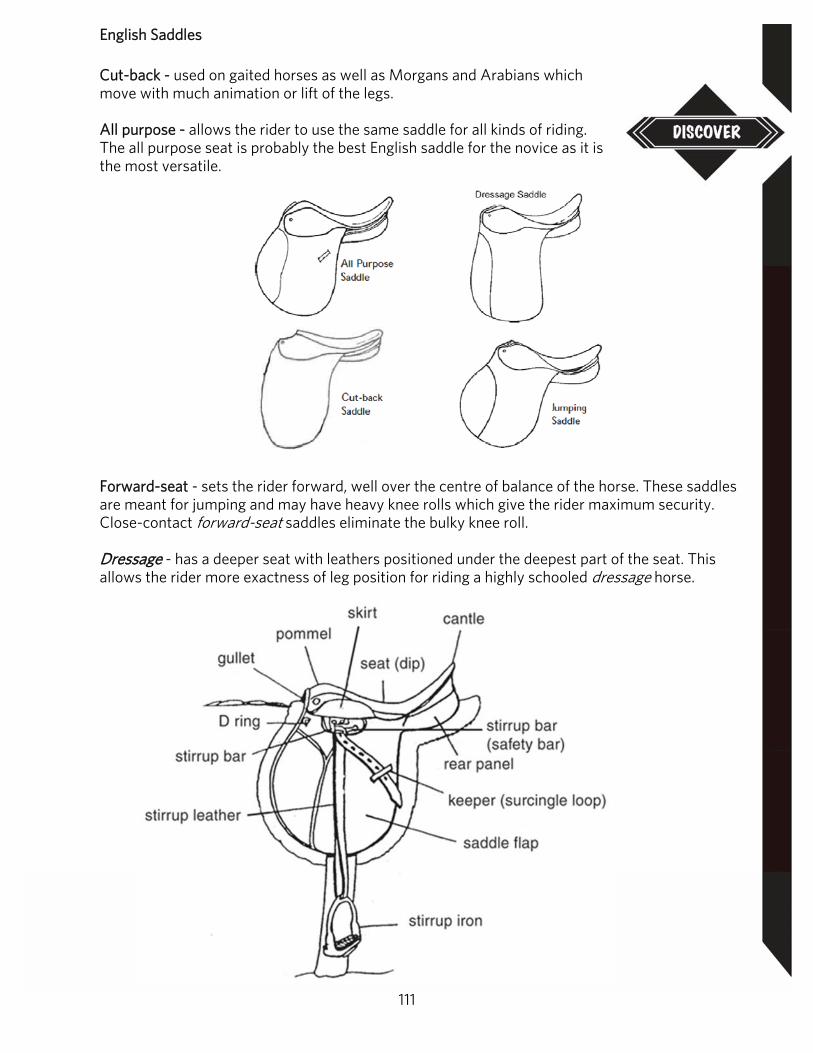
111
English Saddles Cut-back - used on gaited horses as well as Morgans and Arabians which move with much animation or lift of the legs. All purpose - allows the rider to use the same saddle for all kinds of riding. The all purpose seat is probably the best English saddle for the novice as it is the most versatile.
Forward-seat - sets the rider forward, well over the centre of balance of the horse. These saddles are meant for jumping and may have heavy knee rolls which give the rider maximum security. Close-contact forward-seat saddles eliminate the bulky knee roll. Dressage - has a deeper seat with leathers positioned under the deepest part of the seat. This allows the rider more exactness of leg position for riding a highly schooled dressage horse.
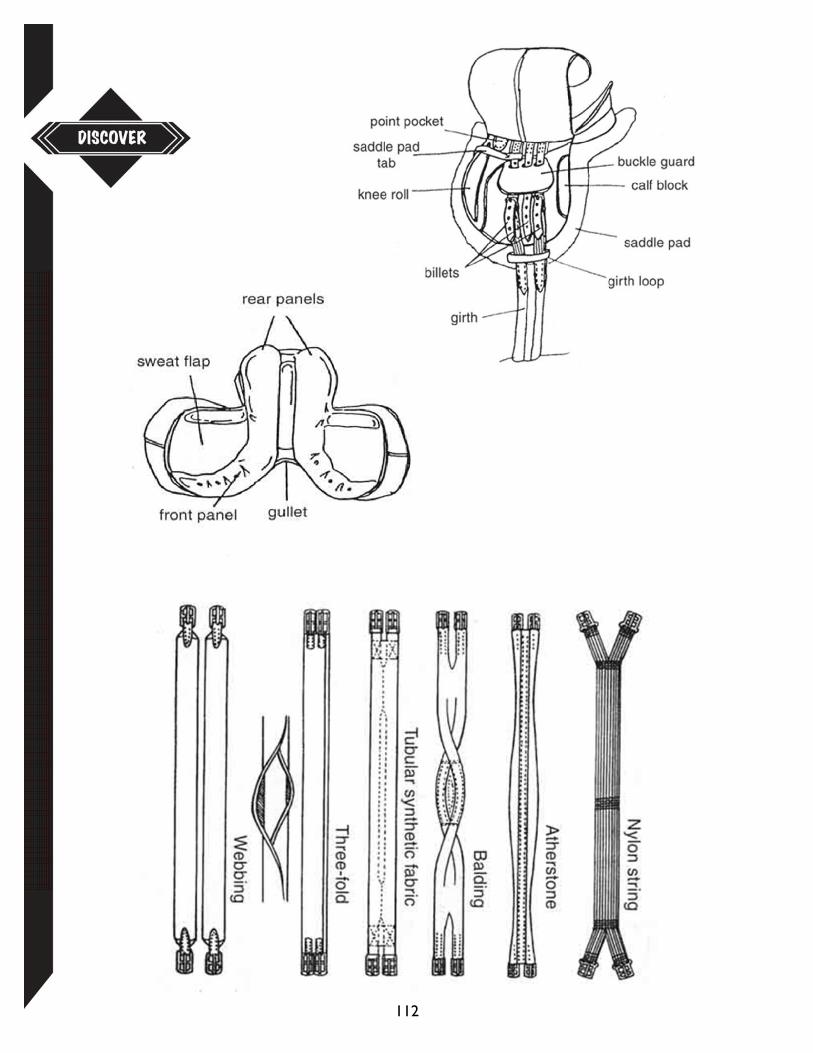
112
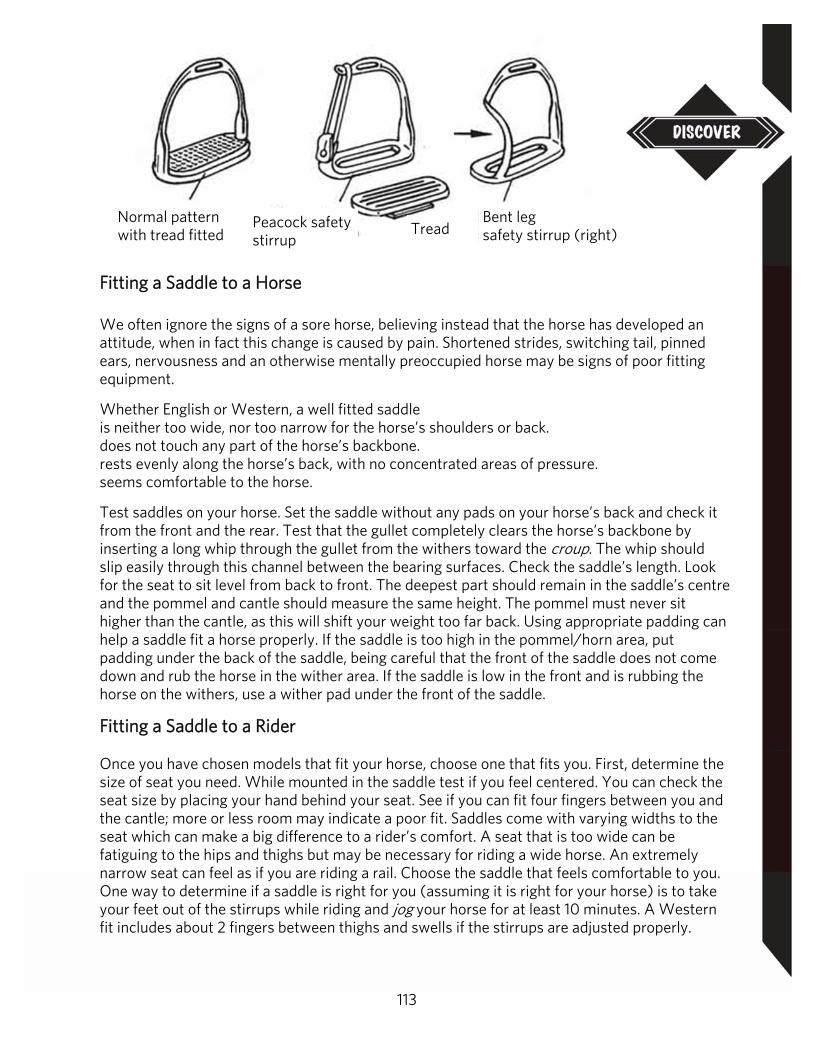
113
Fitting a Saddle to a Horse We often ignore the signs of a sore horse, believing instead that the horse has developed an attitude, when in fact this change is caused by pain. Shortened strides, switching tail, pinned ears, nervousness and an otherwise mentally preoccupied horse may be signs of poor fitting equipment.
Whether English or Western, a well fitted saddle is neither too wide, nor too narrow for the horse’s shoulders or back. does not touch any part of the horse’s backbone. rests evenly along the horse’s back, with no concentrated areas of pressure. seems comfortable to the horse.
Test saddles on your horse. Set the saddle without any pads on your horse’s back and check it from the front and the rear. Test that the gullet completely clears the horse’s backbone by inserting a long whip through the gullet from the withers toward the croup. The whip should slip easily through this channel between the bearing surfaces. Check the saddle’s length. Look for the seat to sit level from back to front. The deepest part should remain in the saddle’s centre and the pommel and cantle should measure the same height. The pommel must never sit higher than the cantle, as this will shift your weight too far back. Using appropriate padding can help a saddle fit a horse properly. If the saddle is too high in the pommel/horn area, put padding under the back of the saddle, being careful that the front of the saddle does not come down and rub the horse in the wither area. If the saddle is low in the front and is rubbing the horse on the withers, use a wither pad under the front of the saddle.
Fitting a Saddle to a Rider Once you have chosen models that fit your horse, choose one that fits you. First, determine the size of seat you need. While mounted in the saddle test if you feel centered. You can check the seat size by placing your hand behind your seat. See if you can fit four fingers between you and the cantle; more or less room may indicate a poor fit. Saddles come with varying widths to the seat which can make a big difference to a rider’s comfort. A seat that is too wide can be fatiguing to the hips and thighs but may be necessary for riding a wide horse. An extremely narrow seat can feel as if you are riding a rail. Choose the saddle that feels comfortable to you. One way to determine if a saddle is right for you (assuming it is right for your horse) is to take your feet out of the stirrups while riding and jog your horse for at least 10 minutes. A Western fit includes about 2 fingers between thighs and swells if the stirrups are adjusted properly.
Normal pattern with tread fitted
Peacock safety stirrup
Bent leg safety stirrup (right) Tread
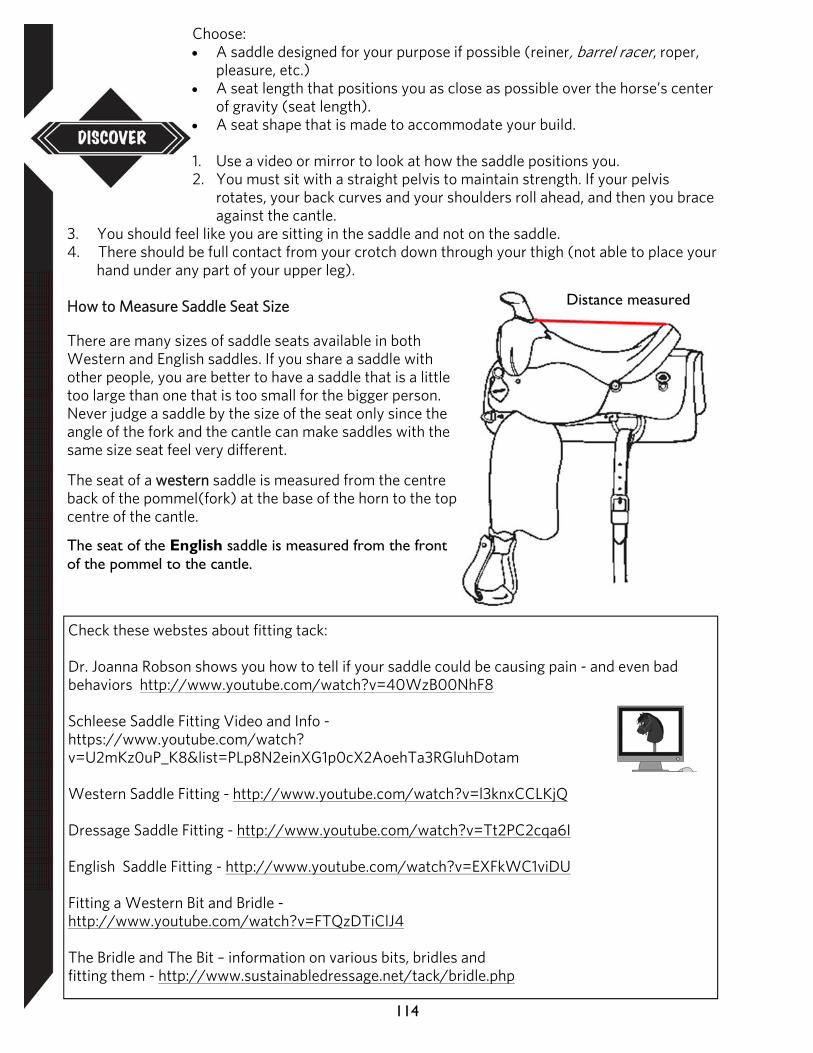
114
Choose: A saddle designed for your purpose if possible (reiner, barrel racer, roper,
pleasure, etc.) A seat length that positions you as close as possible over the horse’s center
of gravity (seat length). A seat shape that is made to accommodate your build. 1. Use a video or mirror to look at how the saddle positions you. 2. You must sit with a straight pelvis to maintain strength. If your pelvis rotates, your back curves and your shoulders roll ahead, and then you brace
against the cantle. 3. You should feel like you are sitting in the saddle and not on the saddle. 4. There should be full contact from your crotch down through your thigh (not able to place your
hand under any part of your upper leg).
How to Measure Saddle Seat Size
There are many sizes of saddle seats available in both Western and English saddles. If you share a saddle with other people, you are better to have a saddle that is a little too large than one that is too small for the bigger person. Never judge a saddle by the size of the seat only since the angle of the fork and the cantle can make saddles with the same size seat feel very different.
The seat of a western saddle is measured from the centre back of the pommel(fork) at the base of the horn to the top centre of the cantle.
The seat of the English saddle is measured from the front of the pommel to the cantle.
Distance measured
Check these webstes about fitting tack: Dr. Joanna Robson shows you how to tell if your saddle could be causing pain - and even bad behaviors http://www.youtube.com/watch?v=40WzB00NhF8 Schleese Saddle Fitting Video and Info - https://www.youtube.com/watch?v=U2mKz0uP_K8&list=PLp8N2einXG1p0cX2AoehTa3RGluhDotam Western Saddle Fitting - http://www.youtube.com/watch?v=l3knxCCLKjQ Dressage Saddle Fitting - http://www.youtube.com/watch?v=Tt2PC2cqa6I English Saddle Fitting - http://www.youtube.com/watch?v=EXFkWC1viDU Fitting a Western Bit and Bridle - http://www.youtube.com/watch?v=FTQzDTiClJ4 The Bridle and The Bit – information on various bits, bridles and fitting them - http://www.sustainabledressage.net/tack/bridle.php
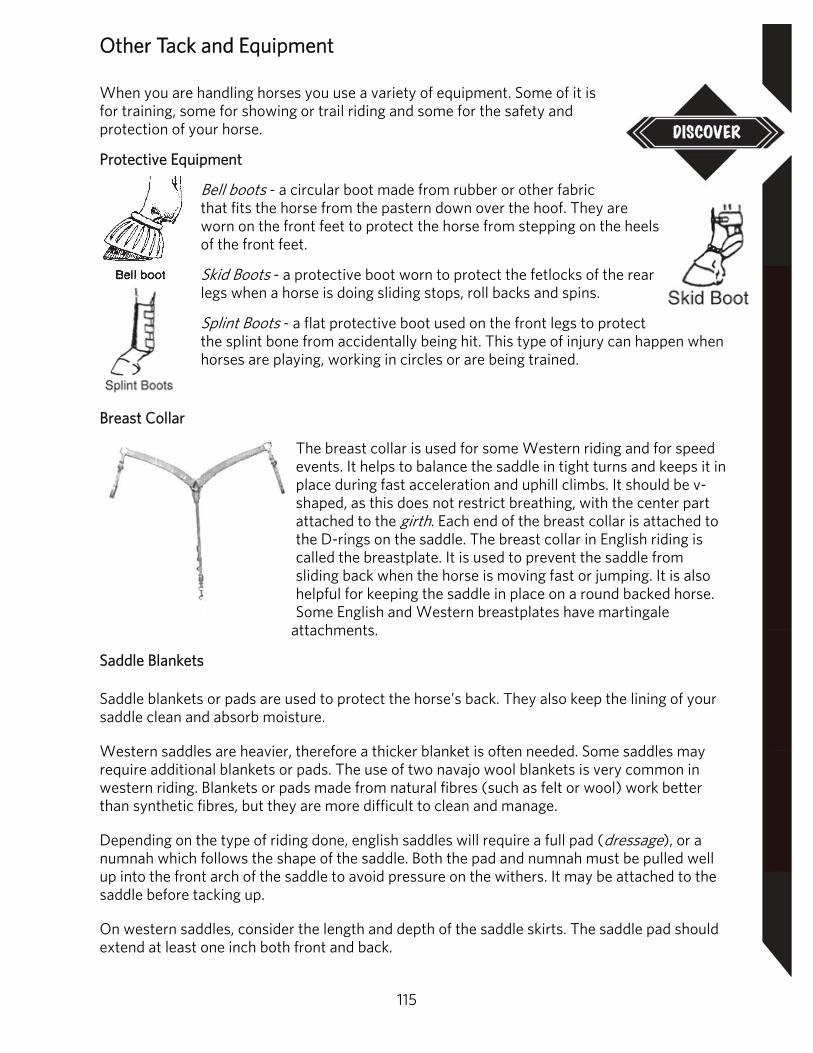
115
Other Tack and Equipment
When you are handling horses you use a variety of equipment. Some of it is for training, some for showing or trail riding and some for the safety and protection of your horse.
Protective Equipment
Bell boots - a circular boot made from rubber or other fabric that fits the horse from the pastern down over the hoof. They are worn on the front feet to protect the horse from stepping on the heels of the front feet.
Skid Boots - a protective boot worn to protect the fetlocks of the rear legs when a horse is doing sliding stops, roll backs and spins.
Splint Boots - a flat protective boot used on the front legs to protect the splint bone from accidentally being hit. This type of injury can happen when horses are playing, working in circles or are being trained.
Breast Collar
The breast collar is used for some Western riding and for speed events. It helps to balance the saddle in tight turns and keeps it in place during fast acceleration and uphill climbs. It should be v-shaped, as this does not restrict breathing, with the center part attached to the girth. Each end of the breast collar is attached to the D-rings on the saddle. The breast collar in English riding is called the breastplate. It is used to prevent the saddle from sliding back when the horse is moving fast or jumping. It is also helpful for keeping the saddle in place on a round backed horse. Some English and Western breastplates have martingale
attachments.
Saddle Blankets
Saddle blankets or pads are used to protect the horse’s back. They also keep the lining of your saddle clean and absorb moisture.
Western saddles are heavier, therefore a thicker blanket is often needed. Some saddles may require additional blankets or pads. The use of two navajo wool blankets is very common in western riding. Blankets or pads made from natural fibres (such as felt or wool) work better than synthetic fibres, but they are more difficult to clean and manage.
Depending on the type of riding done, english saddles will require a full pad (dressage), or a numnah which follows the shape of the saddle. Both the pad and numnah must be pulled well up into the front arch of the saddle to avoid pressure on the withers. It may be attached to the saddle before tacking up.
On western saddles, consider the length and depth of the saddle skirts. The saddle pad should extend at least one inch both front and back.

116
C A R E O F E Q U I P M E N T Storage All equipment should be stored where it will remain dry and out of the sunlight. Check equipment regularly for deteriorating threads, weak glue and any screws or bolts that are coming out. Cleaning Saddles Clean your saddle with a damp, not wet sponge to get all the dirt and salty
sweat off. If there are little black patches of greasy dirt called jockeys, scratch these off with a fingernail or a plastic pot scrubber but nothing more abrasive. Work glycerine saddle soap well into another damp sponge. If you get a lather you are using too much water. Work the saddle soap into all the leather, paying particular attention to the undersides of the flaps and other parts which touch the horse. Use lots of saddle soap and elbow grease. If the saddle has gotten wet or feels stiff, oil it using a product like Lexol or neatsfoot oil before using the saddle soap. Pay particular attention to the underside of the leather where water is more easily absorbed. On English saddles remove the stirrup leathers to clean and oil them. On Western saddles pull the stirrup leathers down a few inches so you can reach in and oil the bend where the leather grips the tree. Do not use saddle soap or oil on suede leather. English saddles should be examined often to see if the stuffing is going flat and making the saddle uncomfortable for the horse’s back. Cleaning Headstalls and Bits Clean the leather headstall or bridle the same way as the saddle. Ideally both saddle and bridle should be cleaned every time you ride. The bridle, breast collar/breastplate, martingale, leather girth and any other leather piece of tack which lies directly on the horse’s skin must be cleaned often because they pick up dirt, grease and salt which stiffens and cracks the leather. Saddles usually have a pad under them and do not get as dirty. Nylon bridles can be washed in the clothes washer with saddle pads and cinches. Rinse well! Cleaning Saddle Blankets or Pads Clean blankets are important to protect the back and prevent the spread of disease. When you wash blankets be sure to remove all of the soap because it can irritate the horse’s back during the next ride. Not all pads are washable, so brush or vacuum them to remove hair and debris or take them to the drycleaners.

117
Glossary
-A-
ABNORMAL - different from the standard ABRASIONS - scrapes (type of wound), multiple superficial scratches that
do not penetrate the full thickness of the skin.
ACTION - How a horse moves its feet and legs at a walk, trot, etc.
AIDS - Artificial: spurs, whips, martingales.
AIDS - Natural: the legs, hands, weight, and voice, as used in controlling a horse. APPOINTMENTS - The tack and clothing a rider uses.
AURICLE- The outer part of the ear.
AVULSIONS - wounds characterized by tearing of skin to cause a loose flap.
-B- BACK - To step a horse backwards.
BALD-FACED - Face marked by wide white stripe from forehead to nose.
BALANCE -The ability to change your center of gravity to suit the movement of the horse.
BARREL RACING SADDLE - Seat sized for actual rider, cantle is wide and sloped, horn is similar to cutting saddle.
BARS - This is the space on the lower jaw between the front teeth (incisors) and the grinding
teeth (molars) where the bit rests.
BIGHT OF THE REINS - The part of the reins passing between thumb and fingers and out the top
of the hand. BEET PULP - A dried by-product of processed sugar beets.
BELL BOOTS - A circular boot made of rubber or other fabric that fits the horse from the pastern
over the hoof.
BLACK POINTS - Mane, tail, and legs black or darker than rest of horse.
BRAN - The ground-up hulls (or the covering) of wheat.
BUCK KNEES (OVER AT THE KNEE) - the knee is forward of a line that bisects (divides in half)
the foreleg.
-C- CALF KNEES (BACK AT THE KNEE) - the knee is behind a line that bisects the foreleg.
CANNON - The lower leg bone below knee and below hock.
CANTER - A three beat pace, slower than a gallop.
CANTLE - fitted for average riders. There are two types of pleasure saddles - recreation and
show pleasure. The back of a saddle. CAVESSON – A special headstall made for use with a lung line. It has a padded noseband with
rings attached.
CHAPS—Seatless overalls made of leather, sometimes fur covered, for protection from cold.
118
CHESTNUTS - The horny growths on inside of a horse’s leg, also called night
eyes.
CHIN GROVE – This is the jaw bone just behind the bulge of the chin. CINCH - A wide cord girth used on western saddles.
COFFIN BONE - A little bone shaped like the hoof found at the front of the foot.
COLD-BLOODED - A horse with ancestry from the draft breeds.
COLD-HOSING - Running a cool stream of water over a wound or swelling.
COLLECTION – The vertical control of the movement of the horse.
CONDITION - How healthy, in shape, and sound your horse is.
CONFORMATION - Refers to the structure and form of a horse. CONTRACTED HEELS - Close at the heels.
CRACKED HEELS - a painful scabby skin condition found at the back of the pastern.
CROP - A riding whip with a short straight stock and a loop.
CROUP - Part of the back just in front of base of tail. CUE - A signal given by the rider to the horse.
CUTTING SADDLE - Longer than a general saddle, seat is flatter, cantle is higher, horn is long and
slim.
-D- DAM - The female parent of a horse.
DIAGONAL - The pair of legs that move forward at one time at a trot. Movement of a front leg and
opposite hind leg. Important when posting at a trot. DISCIPLINE: If a horse is punished for an incorrect response, it must be punished every time it does
it. The punishment must be given immediately or the horse will not know why it is being punished. DISMOUNT - To move from a saddled horse to the ground, or from the horse’s back to the ground.
DORSAL STRIPE - A dark line along the spine.
DRESSAGE - has a deeper seat with leathers positioned under the deepest part of the seat. This
allows the rider more exactness of leg position for riding a highly schooled dressage horse.
-E-
ENCYEPHALOMYELITIS - A serious disease, spread by mosquitoes, causing fever and death, also
known as “sleeping sickness”.
EQUINE - of or pertaining to the horse. EXHIBITOR – Name for person showing a horse.
-F-
FARRIER - A horse shoer.
FAR-SIDE - The right side of a horse (also known as the off-side). FILLY - Female horse less than four years of age.
FIRST AID - The first help given to an injured animal.
FIVE-GAITED - A saddle horse trained to perform in five gaits: the walk, trot, canter, slow gait and
rack.
119
FOAL - A young horse of either sex up to one year of age.
FOREHAND - The front quarters of a horse: the head, forelegs, shoulder, and chest.
FORWARD-SEAT - sets the rider forward, well over the centre of balance of the horse.
-G-
GAITS - The manner of going. The straight gaits are walk, trot, canter and gallop. Five-gaited
horses walk, trot, canter, rack and do one of the slow gaits, running walk, fox trot, or stepping pace. GALLOP - A three-beat gait resembling the canter but faster, 12 mi/hr (19 km/hr). The extended
gallop may be a four-beat and is about 16 mi/hr (25 km/hr).
GASKIN - The muscular part of the hind leg above the hock.
GIRTH - The measure of the circumference of a horse’s body back of the withers. A leather, canvas, or corded piece around body of horse to hold saddle on.
GRADE - An animal, one of whose parents is a registered purebred and the other of unknown
ancestry or containing some blood of the same breed as the purebred parent.
GRAIN - Seeds from crops (such as oats, corn & barley) that are used as energy sources in
concentrate feeds. GREGARIOUS - A word used to describe animals that like to be in a group, ie. horses.
GREEN HORSE - One with little training.
GROOM - To remove dust and dirt from the horse using brushes and a cloth. Groom also refers to
person who does this.
GOOD HANDS - The rider’s hands are in contact with the bit, but will still have some yield.
-H-
HAND - A measurement of the height of a horse. One hand equals 4 inches. For any
measurements less than a hand use a decimal, then the number of inches (1 to 3) and any fraction
of an inch written as a fraction. HEAD SHY - Applied to a horse that is sensitive about the head, jerks away when touched.
HEAD STALL - The leather bridle straps exclusive of bit and reins.
HERD BOUND - A horse who refuses to leave the group of horses.
HOCK PROTECTORS – a protective covering worn over the hocks to give protection during trailering.
HOOF - The foot as a whole in horses. The curved covering of horn over the foot.
HORSE LENGTH - Eight feet, distance between horses in a column.
HORSEMANSHIP - Art of riding the horse and understanding his needs.
-I-
INSTINCT - A natural reaction to any situation.
IMPULSION – Is a combination of the alertness of the horse and its action.
INCISED WOUND - A clean cut wound caused by a sharp object.
120
-J-
JOCKEY - The leather flaps on the side of a saddle.
JOG - Slow collected trot required for Western classes.
-L-
LACED REINS - are constructed of thin leather strips laced
through and around the strap of the reins for a better grip.
LACERATIONS - wounds that penetrates the full thickness of the skin and is caused by a less-sharp object, resulting in both cutting and tearing of skin.
LAMENESS - A defect detected when the animal favors the affected foot when standing. The load
on the ailing foot in action is eased and a characteristic
bobbing of the head occurs as the affected foot strikes the ground. LATERAL FLEX – The ability of the horse to bend from nose to tail.
LATERAL WORK – Sideways movement. Instead of the hind feet following the forefeet, each will now make its own separate tracks.
LEGUMES - A type of forage in pasture or hay that has stems, oblong leaves and flowers, ie. alfalfa, clover.
LENGTH - Long, smooth muscles are more desirable than short, bunchy muscles. Long muscles
give the horse a longer stride and more endurance. Bunchy muscles tire more quickly and give your
horse less endurance.
LIPS - The bit rests on the lips at the corners of the mouth. LOCKJAW - A common name for tetanus.
LONGITUDINAL FLEX - The ability of the horse to bend its spine from the poll to the tail.
LOPE - A three-beat gait.
-M-
MARE - A mature female horse, over four years of age.
MECATE REINS – used with a bosal or snaffle bit. MOUNTING - To get on the back of the horse with or without a saddle.
-N-
NASAL BONE – The bone down the front of the face, just above the nostrils is known as the nasal bone. This includes the cartilage.
NAVICULAR BONE - A small bone inside the foot.
NEAR SIDE - The left side of a horse.
NORMAL – standard
NUTRITION - Proper feeding program for a horse.
121
-O-
“OUT OF” - Means the same as “the dam of”. Female parent of a foal.
OFF-SIDE - The right side of a horse. OPEN OR SPLIT REINS - are the most commonly used rein for Western riding,
designed with two separate straps which are attached to the bit at one end and
left unattached at the other “rider” end.
OVER-REACH - A painful wound on the heel or back of the fetlock on the front
leg caused by the toe of the hind foot striking the front leg. OVERSHOT – Bottom jaw is longer than the top jaw
-P-
PARE - A two-beat gait in which the legs on the same side move at the same time, ie. left front and left hind; a natural gait of the Standardbred.
PARROT MOUTH – Top jaw is longer than the bottom jaw.
PERIOPLE - The shiny outer covering of the hoof wall.
PIGEON-TOED - Front toes are turned inwards while the heels are turned out.
PLAIN REINS - are flat leather straps which are comfortable to use, but can become slick from rain or sweat.
PLANTAR CUSHION - Fatty cushion at the back of the foot.
PLEASURE SADDLE – More middle of the road, moderate seat, moderate horn, moderate
POLL PROTECTOR – a protective device to prevent injury to the poll during trailering. Should the
horse strike that delicate area while loading or in an accident serious injury could result. PONY - Generally 14.2 hands or less in height.
POSTING - At a trot the rider moves forward and up in time to the outside front leg of the horse.
PUNCTURE - A deep narrow type of wound.
PUREBRED - A horse with known ancestry from a definite breed and having no mixed heritage from
other breeds.
-Q-
QUARTER CRACK - A vertical crack on the side of the hoof.
QUILTS - Large quilted cotton sheets wrapped around the horses leg and held in place by leg wraps;
used as protection when traveling or for injury.
-R-
RABIES - An infectious disease that destroys parts of the brain’s nerve cells.
REINING SADDLE - Seat is deeper, cantle is higher and wider, horn is lower to moderate height.
REWARD - Providing “comfort” is the most effective. ROMAL - A long flexible quirt or whip attached to closed reins.
ROMAL OR “CLOSED” REINS - are connected near the “rider” end with a flexible quirt. Also known
as California Reins.
122
ROUND REINS - are usually one continuous strap usually attached to the bit with
a snap on one or both sides. Also known as a roping rein.
RUBBER REINS - are covered with a pebble surface over the hand grip portion to provide a secure grip.
-S-
SIDE REINS - Are used on trained horses to develop more balance and collection.
They are attached from the snaffle bit to the rings on the surcingle or to the girth of the saddle.
SIRE - The male parent of a horse.
SKID BOOTS - Boots worn to protect the fetlocks of the rear legs.
SNAFFLE - A bit with a ring type of cheek piece and solid or jointed mouthpiece. SNIP - A white streak on the nose between the nostrils.
SOLE -Hard protective covering on the bottom of the hoof.
SOUND - The horse has no defects, illnesses or blemishes that will reduce their usefulness.
SPLAY FOOT - Front toes turned out; heels turned in.
SPLINT BOOTS - A flat boot worn on the front legs to protect the cannon bone. STRUNG OUT – The opposite of collected. The weight of the horse is balanced and near the front
legs and the forward extension of the hind leg is shorter than its extension behind the body.
SUPPORTING REIN - A supporting rein is used to hold or steady the horse from turning. SURCINGLE – A band with rings attached to it that is buckled around the horse’s girth.
-T-
TACK - Riding equipment or gear for the horse, such as saddles, bridles, etc. TETANUS - A serious disease caused by toxin-producing bacteria that invade an open wound; also
known as lockjaw.
THOROUGHBRED - A distinct breed of horse that is bred specifically for racing.
THREE-GAITED - A saddle horse trained to perform at the walk, trot and canter.
THRUSH - A fungus infection in the frog of the foot. Causes a strong smelling discharge. TREE - The wooden or metal frame of a saddle
TROT - A two-beat diagonal gait.
-V- VOLUME: This is the amount of muscle.
-W-
WALK - A slow, natural four-beat gait. WEB REINS - come with either a horizontal loop of leather at intervals or rubber incorporated for grip. They are used in wet weather when leather reins would becomes slippery. They are made of
cotton web with leather at the bit and buckle ends.
WINDPUFF - A puffy enlargement in the fetlock.

123
For more information about 4-H and the many 4-H opportunities available please visit
http://www.gov.mb.ca/agriculture/4-h/
If you have any questions, comments or suggestions for this or other 4-H projects contact:
Manitoba 4-H Projects Manitoba Agriculture 1129 Queens Avenue Brandon, MB R7A 1L9
Email: [email protected]
Phone: 204-726-6613
Fax: 204-726-6260
This manual is for educational use only and is not intended as professional advice.
4-H Achievement
4-H Achievement is… a 4-H club celebration when members have completed their projects. Achievements are planned by the club to give recognition to members and leaders for their accomplishments in their 4-H projects and club activities.
A 4-H Achievement can take many different formats: from choosing a theme, to member project displays, to members using their new skills for the event (entertainment, food, decorating, photographer, etc.), to members presenting their project to the whole group, the options are endless and open to the creativity of the members and leaders in each club! Clubs may also plan their Achievement to promote 4-H to the community or to recognize sponsors and others who have helped the club. Members and leaders - be sure to check your project books for the project completion requirements, so you will be ready for your club’s Achievement celebration!

124
What is 4-H?
4-H is an international youth organization involving more than 7 million members in 80 countries around the world. In Canada, 4-H began in 1913 in Roland, Manitoba as a community-based organization dedicated to growth and development of rural youth. Today’s 4-H program reaches both farm and non-farm youth across Canada. The motto of “Learn to Do by Doing” is embodied in the program, as 4-H focuses on skill development as well as personal development of life skills such as communications, leadership and citizenship.
4-H Motto
“Learn To Do by Doing” 4-H Pledge
I pledge, My HEAD to clearer thinking, My HEART to greater loyalty, My HANDS to larger service, My HEALTH to better living, For my club, my community, and my country.
All project materials are available in alternate format upon request.
Manitoba 4-H project material is developed by
Manitoba Agriculture