Embed Size (px)
Citation preview

1

3
TABLE OF CONTENTS
FACTORY CONTACT INFORMATION . . . . . . . . . . . . . . . . . . . . . . . . . . . . . .2WELCOME TO: Beer Pong Master . . . . . . . . . . . . . . . . . . . . . . . . . . . . . . . . .4HOW TO PLAY . . . . . . . . . . . . . . . . . . . . . . . . . . . . . . . . . . . . . . . . . . . . . . . .5SPECIFICATIONS . . . . . . . . . . . . . . . . . . . . . . . . . . . . . . . . . . . . . . . . . . . . . .6SAFETY PRECAUTIONS . . . . . . . . . . . . . . . . . . . . . . . . . . . . . . . . . . . . . . . .6QUICK SETUP GUIDE . . . . . . . . . . . . . . . . . . . . . . . . . . . . . . . . . . . . . . . . . .7DIP SWITCH SETTINGS . . . . . . . . . . . . . . . . . . . . . . . . . . . . . . . . . . . . . . . .8MAIN MENU FUNCTIONS . . . . . . . . . . . . . . . . . . . . . . . . . . . . . . . . . . . . . . .9 CLEAR CREDITS . . . . . . . . . . . . . . . . . . . . . . . . . . . . . . . . . . . . . . . . .9 GAME SETUP . . . . . . . . . . . . . . . . . . . . . . . . . . . . . . . . . . . . . . . . . . .10 DIAGNOSTICS MENU . . . . . . . . . . . . . . . . . . . . . . . . . . . . . . . . . . . . 11 LOCATION NAME & ADVERTISING . . . . . . . . . . . . . . . . . . . . . . . . . .12 MACHINE SETUP . . . . . . . . . . . . . . . . . . . . . . . . . . . . . . . . . . . . . . . .13 REPORTS . . . . . . . . . . . . . . . . . . . . . . . . . . . . . . . . . . . . . . . . . . . . . .14MAINBOARD PINOUT . . . . . . . . . . . . . . . . . . . . . . . . . . . . . . . . . . . . . . 15-17MINIGEN PINOUT . . . . . . . . . . . . . . . . . . . . . . . . . . . . . . . . . . . . . . . . . . . . .18WIRING DIAGRAMS . . . . . . . . . . . . . . . . . . . . . . . . . . . . . . . . . . . . . . . . 29-23TROUBLESHOOTING GUIDE . . . . . . . . . . . . . . . . . . . . . . . . . . . . . . . . 24-30POWER SUPPLY DIAGNOSTICS . . . . . . . . . . . . . . . . . . . . . . . . . . . . . . . .31BILL ACCEPTOR DIAGNOSTICS . . . . . . . . . . . . . . . . . . . . . . . . . . . . . . . . .32HOW TO: ACCESS MAINBOARD . . . . . . . . . . . . . . . . . . . . . . . . . . . . . . . .33HOW TO: REMOVE BALL SENSOR . . . . . . . . . . . . . . . . . . . . . . . . . . . . . .34HOW TO: REMOVE CUP ASSEMBLY . . . . . . . . . . . . . . . . . . . . . . . . . . . . .35HOW TO: ACCESS CAMERA/ LIGHT . . . . . . . . . . . . . . . . . . . . . . . . . . . . .35CREDIT CARD READER . . . . . . . . . . . . . . . . . . . . . . . . . . . . . . . . . . . . . . .36PARTS LISTS . . . . . . . . . . . . . . . . . . . . . . . . . . . . . . . . . . . . . . . . . . . . . 37-39CREDIT CARD READER REGISTRATION . . . . . . . . . . . . . . . . . . . . . . . . .40LEAGUE/TOURNAMENT MATERIALS . . . . . . . . . . . . . . . . . . . . . . . . . . . .41MAINTENANCE LOG . . . . . . . . . . . . . . . . . . . . . . . . . . . . . . . . . . . . . . . . . .42TECHNICAL SUPPORT . . . . . . . . . . . . . . . . . . . . . . . . . . . . . . . . . . . . . . . .43WARRANTY . . . . . . . . . . . . . . . . . . . . . . . . . . . . . . . . . . . . . . . . . . . . . . . . .44
To Purchase This Item, Visit BMI Gaming | www.bmigaming.com | (800) 746-2255 | +561.391.7200

4
WELCOME TO: Beer Pong Master
Congratulations on your Beer Pong MasterTM purchase!
Engourage friendly competition with the popular sport of Beer Pong! With automatic dispensing balls and brightly lit target cups, all you need to supply are the beverages!
This innovative bar game provides the opportunity to create contests and leagues, as well as offer prizes for high scores!
Please take a moment to read through this manual and be sure to contact our factory if you have any questions, or would like some more information.
Thank you for your purchase! Your business is important to us and we hope you enjoy this game as much as we do!
Your Friends at Bay Tek Games
GAME INSPECTION
Inspect the game for any damaged, loose, or missing parts. If damage is found, please contact your freight carrier first.
Then, contact Bay Tek Games’ Service Department at 920.822.3951 or e-mail them at [email protected] for further assistance.
To Purchase This Item, Visit BMI Gaming | www.bmigaming.com | (800) 746-2255 | +561.391.7200

5
HOW TO PLAY
Insert credits.
Stand behind the shot line and toss or bounce the balls into the cups, trying to hit each cup
and turn off the blue lights inside.
Challenge your friends for the high score!
To Purchase This Item, Visit BMI Gaming | www.bmigaming.com | (800) 746-2255 | +561.391.7200

6
GAME SPECIFICATIONS
SAFETY PRECAUTIONS
WEIGHTNET WEIGHT 475 LBS.
SHIP WEIGHT 525 LBS.
DIMENSIONSWIDTH 30”
DEPTH 71”
HEIGHT 77”
OPERATING TEMPERATUREFAHRENHEIT 80-100
CELSIUS 26.7-37.8
POWER REQUIREMENTSINPUT VOLTAGE
RANGE100 to 120
VAC / 220 to 240 VAC
INPUT FREQUENCY RANGE 50 HZ / 60 HZ
MAX START UP CURRENT
OPERATING CURRENT
1 AMPS @ 115 VAC 1.5 AMPS @ 115 VAC
0.5 AMPS @ 230 VAC .75 AMPS @ 230 VAC
DANGERDO NOT perform repairs or maintenance on this game with the power ON.
Unplug the unit from the wall outlet or shut off the power strip located inside the cabinet.
! !
NOTICEModifications to the mechanical, electrical and structural components of this game
may void its compliance certifications.
! !
WARNINGUse of flammable subtances can cause sever burns or serious injury.
Always use NON-FLAMMABLE solvents for cleaning. DO NOT use gasoline kerosene or thinners.
! !
CAUTIONLifting heavy objects can cause back, neck or other injuries. Be sure adequate lifting and moving
devices are available when unloading, unpacking and moving this game.
! !
ATTENTIONBe sure the electrical power matches the game requirements. See the serial number located on the back of the game cabinet. Always plug into a grounded circuit. If the supply cord is damaged, it must
be replaced by an approved cord or assembly provided by the manufacturer.
! !
IN CASE OF EMERGENCYUNPLUG THE POWER CORD.
The power cord must be accessible at all times in case of an emergency.
! !
To Purchase This Item, Visit BMI Gaming | www.bmigaming.com | (800) 746-2255 | +561.391.7200
7
QUICK SET UP GUIDE
Place the game near its final location.
Empty the bag of balls into the playfield.
No more than 20 balls should be in the machine at a time for best function
Beer Pong Master uses 38-40mm ping pong balls
Place the shot line at 34” from the front end of the cabinet.
Plug the power cord into a standard 110v outlet and switch the power strip inside the bounce pad com-partment to ON.
The camera may need calibration after shippping. Enter the main menu by pressing the menu button, then scroll to the diagnostics menu. Select Camera Calibrate; game will adjust automatically.
34”
To Purchase This Item, Visit BMI Gaming | www.bmigaming.com | (800) 746-2255 | +561.391.7200

8
DIP SWITCH SETTINGSThe dip switch bank is located on the minigen board
under the bouncing platform; open the front door, then slide the platform towards you.
*factory default settings are highlighted below
SWITCH DESCRIPTION OFF ON
1 Ticket Enable
2 Ball Dispense Speed
3 Not Used
4 Not Used
To Purchase This Item, Visit BMI Gaming | www.bmigaming.com | (800) 746-2255 | +561.391.7200
9
MAIN MENU
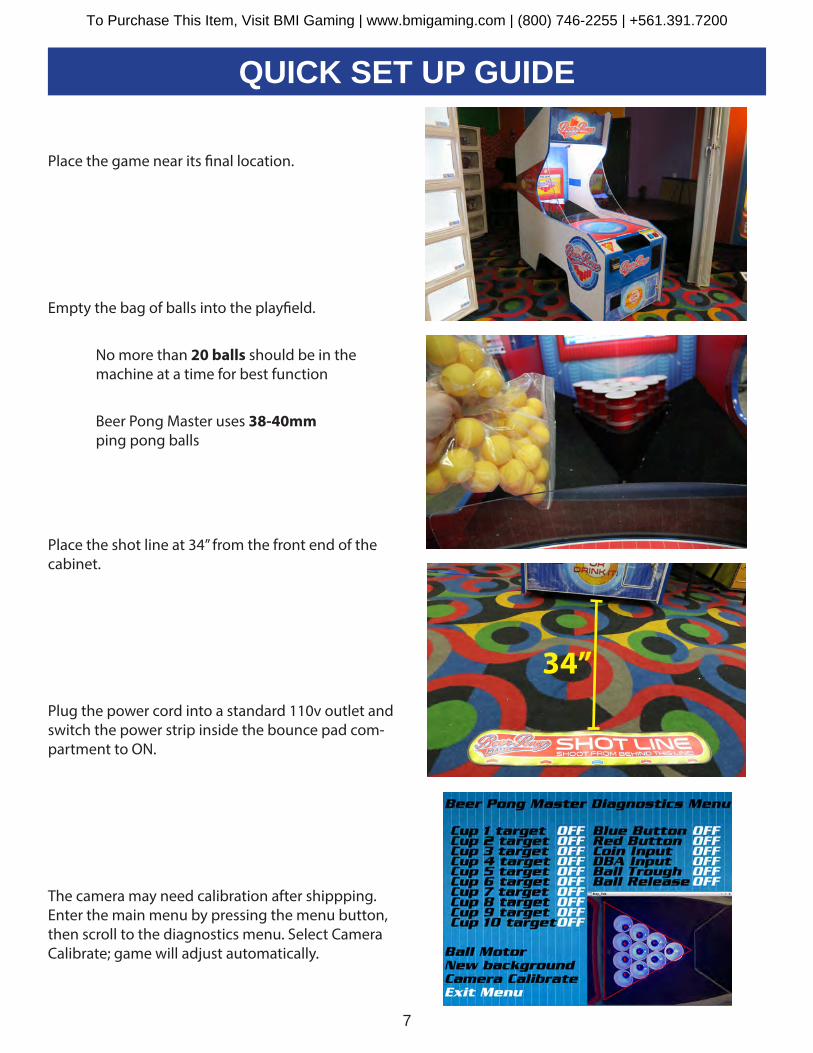
Press the MENU BUTTON inside the front door to enter the main menu.
Scroll through the options by pressing the MENU BUTTON and make your
selection with the MENU SELECT button.
CLEAR CREDITS
START TEST GAME AFTER EXIT
SOFTWARE UPDATE
CLEAR HIGH SCORES
Press MENU/SELECT when Clear Credits is highlighted to reset the available credits to 0.
Selecting this option will start a test game after exiting the menu.
Selecting this option will allow you to upadate software from a USB stick without deleting game settings and high scores. To activate, press SELECT twice, then wait for DONE to appear.
Selecting this option will start clear the high scores screen.
To Purchase This Item, Visit BMI Gaming | www.bmigaming.com | (800) 746-2255 | +561.391.7200

10
GAME SETUP
SETTINGS OPTIONS & FACTORY DEFAULTS
Credits per Play 0 1 2 3 4 5 6 7 8
DBA Additional Games Gives “bonus games” for inserting bills of $ denominations
Credit Card Enable on off
Credit Card Games per Swipe 0 (off) 1 2 3 4 5 6 7 8
Game Time (seconds) 30 60 90 120 150 180
Balls per Game unlimited
Extra last ball Delay never
To Purchase This Item, Visit BMI Gaming | www.bmigaming.com | (800) 746-2255 | +561.391.7200

11
DIAGNOSTICS MENU
7 8
4
9
5
2
10
6
3
1
To Purchase This Item, Visit BMI Gaming | www.bmigaming.com | (800) 746-2255 | +561.391.7200

12
LOCATION NAME & ADVERTISING
Insert a USB stick containing your advertise-ments and text file into the USB port next to the menu buttons under the bounce platform.
LOCATION NAME: Your location name can be entered manually with the on-screen keyboard and the player buttons, OR it can be uploaded from the USB stick (name.txt). Use Note Pad (on Windows computers) to type your location name, hit enter, then save.
ADVERTISEMENTS:The ideal size of an advertisement is 1280 x 960, in .png format. Ads must be named ad1, ad2, ad3 and ad4 to upload correctly. Ads can be created in Microsoft Paint, Adobe Photo-shop, or any other imaging software.
You can add up to 4 different advertisements to the machine, which display in rotation dur-ing attract mode. The ads can be changed out at any time.
One USB stick can be used to program mul-tiple machines to the same settings.
To Purchase This Item, Visit BMI Gaming | www.bmigaming.com | (800) 746-2255 | +561.391.7200

13
MACHINE SETUP
SETTINGS OPTIONS & FACTORY DEFAULTSGame Volume 0 1 2 3 4 5 6 7 8 9 10 11 12
Attract Volume 0 1 2 3 4 5 6 7 8 9 10 11 12
Attract Timing off 30 sec 1 min 5 min 10 min 15 min
Next Player Start Timeout off 30 sec 1 min 2 min 3 min 5 min
Timed Game Countdown Delay off 5 sec 10 sec 15 sec 20 sec 25 sec 30 sec
Cheat detect ends game off 1 cheat 2 cheats 3 cheats
Mechanical Coun-ters advance Per Credit Per Game
High Score Reset (5:00 a.m.) daily weekly monthly
H2H Settings off
To Purchase This Item, Visit BMI Gaming | www.bmigaming.com | (800) 746-2255 | +561.391.7200

14
REPORTS MENU
EARNINGS REPORT
GAME SCORING REPORT
These reports will help you to determine the earmings, payout and overall number of plays generated by your Beer Pong game.
To Purchase This Item, Visit BMI Gaming | www.bmigaming.com | (800) 746-2255 | +561.391.7200

15
MAINBOARD PINOUT DIAGRAM
To Purchase This Item, Visit BMI Gaming | www.bmigaming.com | (800) 746-2255 | +561.391.7200

16
MAINBOARD PINOUT GUIDE
Pin
Type
Pur
pose
Ref
Pin
#LO
WS
IDE
#1,
w d
iode
Mec
hani
cal C
ount
#1
Gam
eJ2
21
LOW
SID
E #
2, w
dio
deM
echa
nica
l Cou
nt #
2 Ti
cket
J22
2LO
WS
IDE
#3
J22
3LO
WS
IDE
#4
Trou
gh L
ight
s R
edJ2
24
LOW
SID
E #
5Tr
ough
Lig
hts
Gre
en
J22
5LO
WS
IDE
#6
Trou
gh L
ight
s B
lue
J22
6LO
WS
IDE
#7
Bou
nce
Are
a Li
ghts
J22
7Pi
n Ty
pePu
rpos
eR
efPi
n #
LOW
SID
E #
8J2
28
Gro
und
J24
1LO
WS
IDE
#9
Bal
l Un-
Jam
mer
Sol
enoi
dJ2
29
Gro
und
J24
2+1
2 V
olts
Mec
hani
cal C
ount
#1
Gam
e +1
2VJ2
211
+12
Vol
tsJ2
43
+12
Vol
tsM
echa
nica
l Cou
nt #
2 Ti
cket
+12
VJ2
212
+12
Vol
tsJ2
44
+12
Vol
tsJ2
213
PB
7B
all R
elea
se S
enso
rJ2
45
+12
Vol
tsJ2
214
LOW
SID
E #
12S
elec
t Red
Lig
htJ2
46
+12
Vol
tsJ2
215
PX
29B
all T
roug
h S
enso
rJ2
47
+12
Vol
tsJ2
216
HIG
HS
IDE
#10
Scr
oll B
lue
Ligh
tJ2
48
HIG
HS
IDE
#11
Bal
l Rel
ease
Dis
pens
er M
otor
J24
93.
3VJ2
410
PX
37Ti
cket
Not
ch #
1J5
1G
roun
dG
roun
d fo
r Tic
ket D
ispe
nser
J52
HIG
HS
IDE
#13
J25
1P
B18
Tick
et M
otor
#1
J53
HIG
HS
IDE
#14
J25
2+1
2 V
olts
Pow
er fo
r Tic
ket D
ispe
nser
J54
PX
10S
ervi
ce B
utto
n #1
J25
3P
X11
Ser
vice
But
ton
#2J2
54
PB
16Lo
w T
icke
t Sw
itch
J91
Gro
und
Gro
und
for S
ervi
ce B
utto
nsJ2
55
Gro
und
Gro
und
for L
ow T
icke
t Sw
itch
J92
Gro
und
J25
6P
B17
Bal
l Low
Sen
sor
J93
+12
Vol
tsJ9
4+1
2 V
olts
Coi
n D
oor P
owe r
J61
PA
05C
oin
Inpu
tJ6
2P
A06
DB
A In
put
J81
Gro
und
Coi
n G
roun
dJ6
3+1
2 V
olts
J82
Gro
und
J83
Gro
und
J84
= LE
D C
onst
ant C
urre
nt D
rive
= 12
Vol
ts=
Gro
und
Bay
Tek
BEE
R P
ON
G N
EWG
EN1
Har
dwar
e R
EV F
Pin
out W
ith A
UX
BO
AR
D -
Vers
ion
1.05
=Low
Sid
e D
river
=Hig
h S
ide
Driv
er=
TTL
Inpu
t/Out
put
To Purchase This Item, Visit BMI Gaming | www.bmigaming.com | (800) 746-2255 | +561.391.7200

17
MAINBOARD PINOUT GUIDE
PB
19J2
11
+12
Vol
tsJ2
91
PX
39J2
12
+12
Vol
tsJ2
92
PX
00J2
13
+12
Vol
tsJ2
93
PX
01J2
14
PA
21C
up 1
Sen
seJ2
94
PB
20J2
15
PA
23C
up 2
Sen
seJ2
95
PX
02J2
16
PA
22C
up 3
Sen
seJ2
96
PB
21J2
17
PA
25C
up 4
Sen
seJ2
97
PB
22J2
18
PA
24C
up 5
Sen
seJ2
98
PB
23J2
19
PA
27C
up 6
Sen
seJ2
99
PB
24J2
110
PA
26C
up 7
Sen
seJ2
910
Gro
und
J21
11P
C0
Cup
8 S
ense
J29
11G
roun
dJ2
112
PA
28C
up 9
Sen
seJ2
912
Gro
und
J21
13P
X20
Cup
10
Sen
seJ2
913
Gro
und
J21
14P
C1
Cup
1 L
ight
sJ2
914
+12
Vol
tsJ2
115
PX
21C
up 2
Lig
hts
J29
15+1
2 V
olts
J21
16P
B0
Cup
3 L
ight
sJ2
916
+12
Vol
tsJ2
117
PX
22C
up 4
Lig
hts
J29
17+1
2 V
olts
J21
18P
B1
Cup
5 L
ight
sJ2
918
PB
25S
elec
t Sw
itch
J21
19P
X24
Cup
6 L
ight
sJ2
919
PB
26G
ame
Sta
rt S
witc
hJ2
120
PX
23C
up 7
Lig
hts
J29
20P
X26
Cup
8 L
ight
sJ2
921
PX
25C
up 9
Lig
hts
J29
22P
X28
Cup
10
Ligh
tsJ2
923
Gro
und
J29
24G
roun
dJ2
925
Gro
und
J29
26
To Purchase This Item, Visit BMI Gaming | www.bmigaming.com | (800) 746-2255 | +561.391.7200

18
MINIGEN PINOUT (AANEWGEN1-PJ/RBN)
J16
J18
J22 J25
J8
J21 J24
J19
J29
J6
AACE2510 Bill Acceptor
AACE9109 Coin Door
+12 V
Signal
Com
AACE3303 12 Volt DC
Power In Cable
AACE3315Menu Buttons &
Counter
AACE3301Lights and Player
Start Buttons AACE3300 Motor and Ball Sensors
AACE3302 Cable to Speakers
A5CEAU010 Cable to Speakers
AACE3306 Ribbon Cable to
lights in cups
AANEWGEN1-PJ/RBN
To Purchase This Item, Visit BMI Gaming | www.bmigaming.com | (800) 746-2255 | +561.391.7200

192
To J6(COIN) on
To J9 on main board.
COM+ 12 V
AACE3303To Power IN(J18) from
power supply.
To J25 on main board.
GameCounter
AACE3317
AACE3315
Menu Scroll Button
AAPB2700
Menu Select Button
AAPB2700
AACE3315
Coin Switches (AASW9903)Wired Normal
Open
AACE3311
Coin Door Harness AACBL4A-DOOR
To Bill Acceptor A5AC9093
110 VAC Down-Stacker
To Bill Acceptor A5AC9093
110 VAC Down-Stacker
AACE3311
To Credit Card Reader A5CR1000
AACE3311
FromOutlet Strip
AACE3316
From AACE3301 Pushbutton/Motor
Wiring Section
AACE3316
AANEWGEN1-PJ AANEWGEN1-PJ/RBN
WIRING DIAGRAMSCOIN MECH, MENU BUTTON & COUNTERS
To Purchase This Item, Visit BMI Gaming | www.bmigaming.com | (800) 746-2255 | +561.391.7200

20
3
TO AACE3316 DBA Cable
Wiring Section
Game Select Switch Blue - A5PB3001
Game Start Switch Red - A5PB3000
Important:Do not short Light Wires to anything.
Switches wired Normally Open 12 Volts DC Power In between Red and Green wires
Normally 3.3 VDC between Green and White wires. (LED is OFF)
When Blocked - 0 VDC between Green and White wires. (LED is ON)
To J21 Connector on Main Board
To J24 Connector on Main Board
Ball Loader Motor AAMO3300
Motor is normally 3.8 Ohms 5 Volts DC when running
Ball Trough Sensor AACB2203
AACE3300
AACE3300
AACE3300 AACE3301
12 Volts DC Power In between Red and Black wires
Normally 0 VDC between Black and White wires. (LED is ON)
When Blocked - 3.3 VDC between Black and White wires. (LED is OFF)
Ball Release Sensor AACB3003
AANEWGEN1-PJ AANEWGEN1-PJ/RBN
WIRING DIAGRAMSPLAYER BUTTON, MOTOR & SENSORS
To Purchase This Item, Visit BMI Gaming | www.bmigaming.com | (800) 746-2255 | +561.391.7200

21
4
AANEWGEN1-PJ AANEWGEN1-PJ/RBN
AACM1300 Camera
A5CN1031 Adaptor to
plug cable into Motherboard.
AACE3314 Communication cable from J2 on Interface Board to Motherboard
AACB2204Interface Board
A5CEAU010 Audio Jack from Motherboard to
Main Board
A5CORD11
A5MO2200 Monitor
A5CORD23
AACE3309 Communication cable from J16 on main board to J1 on Interface Board.
Connector A5CN3001
A5CORD11
USB Dongle Software
Connection
A5CORD23
AAMB8
WIRING DIAGRAMSMOTHERBOARD COMMUNICATION
To Purchase This Item, Visit BMI Gaming | www.bmigaming.com | (800) 746-2255 | +561.391.7200

22
5
Playfield Layout for Cup Lights
Cup 10 Cup 9 Cup 8 Cup 7
Cup 4 Cup 5 Cup 6
Cup 3 Cup 2
Cup 1
AACB3004
+ -
LED Cup Light AACE3310-X
Each cup has one LED strip
for lighting
AANEWGEN1-PJ
Cup 1 LightsAACE3310-1
Cup 2 LightsAACE3310-2
Cup 3 LightsAACE3310-3
Cup 4 LightsAACE3310-4
Cup 6 LightsAACE3310-6
Cup 5 LightsAACE3310-5
Cup 10 LightsAACE3310-10
Cup 9 LightsAACE3310-9
Cup 8 LightsAACE3310-8
Cup 7 LightsAACE3310-7
Comm from Minigen AACE3306
SpeakerAACE8811
To J19 on main board.
AACE3302
A5CB3004
AANEWGEN1-PJ/RBN
WIRING DIAGRAMSCUP LIGHTS & SPEAKER
To Purchase This Item, Visit BMI Gaming | www.bmigaming.com | (800) 746-2255 | +561.391.7200

23
6
Bill Acceptor, Down-Stacker A5AC9093
AACE8868
AAMB8
To J18 Connectoron Main Board AANEWGEN1-PJ
4 3 1 2
Power Cable To MiniGen AACE3303 AC Power to
back of game. A5CORD5
Power Supply A5PS1008
Monitor A5MO2200
Line Filter A5FI9010
AC Power In cable AACE3304
Power In Cord From Wall A5CORD5
Outlet Strip A5OU1000
Bill Acceptor Power Cable AACE3316
AC Power to Power Supply
A5CORD5
AC Bulb A5LI0001
AC Power to Marquee
AACE3307
AANEWGEN1-PJ/RBN
WIRING DIAGRAMSA/C IN & POWER SUPPLY
To Purchase This Item, Visit BMI Gaming | www.bmigaming.com | (800) 746-2255 | +561.391.7200

24
TROUBLESHOOTING GUIDE
7
Troubleshooting Strategy Use common sense and a systematic method of troubleshooting to determine the exact problem, probable cause and remedy. Use the process of elimination to find the faulty component. Always check for the simple and obvious causes first such as unplugged, loose or broken wires and bad sensors, bent, pinched, stuck or jammed components.
Troubleshooting ChartProblem Probable Cause Remedy
No power to the game. No lights on at all.
Unplugged.Circuit breaker tripped.
Line Filter Faulty. Power strip faulty. Faulty cable/power supply.
Check wall outlet. Reset power strip breaker switch or building
circuit breaker. Replace Line Filter (Part # A5FI9010) Change plug position, replace if needed. See Power Supply diagnostic below.
AC Light and Bill Acceptor on.But everything else off.
(Power Supply not ON)
Insure unit is plugged into power strip. Make sure rocker switch is set ON. See power supply diagnostics to isolate bad component. A bad motor or 12 volt short would cause this. See Power Supply Diagnostic below.
Dollar Bill Acceptor not functioning.
Ensure Bill Acceptor is set to “Always Enable”
Important : Only 110 Volt AC DBA is to be installed.
Enter Diagnostic Menu to see if DBA input goes to ON quickly when bill is inserted.
Look for “Check Minigen Comm” error on screen.
Check for power to Bill Acceptor.Dirt or debris in acceptor slot.
Pinched, broken, or disconnected wiring.
Bill acceptor problem.
Refer to “Check Minigen Comm” error diagnostic section.
Acceptor should cycle stacker at game power up. If not, check cable connections. Refer to “How to Clean Bill Acceptor” Or clean with bill reader cleaning card.
(A5CC9000)Check wiring from bill acceptor to Mini Gen
Board. (AACE3316, AACE3311) Repair or replace wiring harness. Check J9 connector on Main Board Make sure wires are secure in connectors. Refer to troubleshooting section of dollar bill acceptor manual included with this game or the diagnostics label of the back of the unit.
Power supply unplugged.
Rocker Switch.
Power supply shutting down because of 12 V overload.
Faulty power supply.
No Sound
Volume set to zero in menu.
Disconnected, loose or broken wires.Faulty speaker.
Enter Machine Setup Menu and verify: Game Volume & Attract Volume is not zero Check connections and reseat J19 on main board. Cable # AACE3302 Replace speaker. AACE8811
To Purchase This Item, Visit BMI Gaming | www.bmigaming.com | (800) 746-2255 | +561.391.7200

25
TROUBLESHOOTING GUIDE
8
Problem Probable Cause Remedy
Scoring Incorrectly All scoring is registered with a camera in top of cabinet.
It is OK if camera is mounted on angle.
Enter Diagnostic Menu to see “live” view of camera
If no camera picture in Diagnostic Menu: Check: Camera (Part # AACM1300) Cable (Part # A5CORD23) USB connection at motherboard Replace motherboard. (Part # AAMB8/)
Cup Lights not working
All Cup light stay ON or stay OFF.
Individual cup lights not work-ing
Make sure balls are scoring. Playfield Aux Board faulty. (A5CB3004) Cable to Minigen faulty. (AACE3306) Faulty Minigen board. (AANEWGEN1-PJ/RBN)
Faulty LED light strip inside cup. (AACE3310-X) Playfield Aux Board faulty. (A5CB3004)
How to Calibrate Camera 1.) Enter Diagnostic Menu to see “live” view of camera. - Verify all cups are within triangle pattern shown on monitor. - Verify squares are aligned with the holes in bottom of cups. - All cup targets should read “OFF” when camera is aligned.
If problem here - scroll down and select “Camera Calibration”. This will reset the image.
If problem still exists: - Ensure camera is secure in game. - Ensure cup assembly is positioned correctly.
The camera is installed in it’s housing to ensure correct distance and alignment with the cup assembly. Check connections from camera to motherboard.
2.) Toss balls into each cup and verify that the corresponding “Cup target” flashes to ON in the diagnostic screen.
To Purchase This Item, Visit BMI Gaming | www.bmigaming.com | (800) 746-2255 | +561.391.7200

26
TROUBLESHOOTING GUIDE
9
Problem Probable Cause Remedy
Meter does not work. Credit meter will click as each coin is inserted.
Disconnected, loose or broken wires.
Faulty counter.
Check connections and reseat J25 on Minigen board. Cables # AACE3315and AACE3317
Replace counter. AACE3317
Check Minigen Comm Error
Game does not coin up but credit meter clicks.
If “Power” is not solid ON
Ensure AACE3309 cable is plugged into blue “IN” socket on main board. (J16)
Replace if needed.
Replace Serial Interface board. (AACB2204)
If “TX” & “RX” are not blinking very fast Communication to Motherboard faulty.
Check AACE3314 to motherboard.Check or replace adaptor (A5CN1031)
Main Board and wiring to coin switch OK.
Check green LED’s on Serial Interface board. Is “Power” solid ON?
Is “TX” & “RX” blinking very fast?
Game not coining up.
Note:If game is equipped with 2 Bill Accep-tors, they both share the signal line to Mini Gen Board to Connector J9
Enter Diagnostic Menu to see if Coin input goes to ON quickly when coin is inserted.
Look for “Check Minigen Comm” error on screen.
Ensure game makes sound when coin switch is triggered.
Game set to large amount of credits per game.
Refer to “Check Minigen Comm” error diagnostic section.
Check coin switches—both should be wired normally open. If one switch is “closed” the other will not work either. Check wiring to Mini Gen Board. (AACBL4A-DOOR, AACE3316, AACE3311) Check Game Setup Menu. Ensure Coins/Credits per Game is set. Default = 4.
To Purchase This Item, Visit BMI Gaming | www.bmigaming.com | (800) 746-2255 | +561.391.7200

27
TROUBLESHOOTING GUIDE
10
Error on screen If game detects a ball blocking the ball release sensor, it will power off motor to avoid dam-age to motor.
Remove jam from sensor. Refer to “Ball Release Sensor Blocked/Bad” section.
Ball jam
Too many balls in game. Game should have only 25 balls in it. If balls stack up and block sensor boards, it will not release balls.
Ball release sensor causing motor to pause.
If ball release sensor is blocked, it will stop motor until the blockage is cleared.
Ball Jam message will appear on screen:
Physical blockage in game. Inspect ball path and ensure no debris is blocking balls.
Problem Probable Cause Remedy
Not enough balls in game
Add balls (Part # A5BA4050) Any ping pong balls will work.
Game should have 25 balls in it.
Too many is bad - they may block a sensor
Balls not releasing - There are many factors that could contribute to the balls not releasing. Please browse through the following sections: - Not enough balls in game - Ball jam - Error on screen - Faulty Motor - Ball release sensor blocked/bad - Ball trough sensor blocked/bad
Faulty Motor
Check for blocked Ball Re-lease sensor.
Disconnected, loose or broken wires.
Faulty motor.
Enter Diagnostic Menu to test motor.
Faulty Minigen Board
Unplug Ball Release sensor to see if motor starts working again.
Check connections from motor to Minigen board. (Cable # AACE3300, AAMO3300)
Check for 3.8 Ohms across motor leads. Check for 5 Volts DC when running. Replace motor. (Part # AAMO3300)
Select “Turn on Motor” to force motor ON.
If 0 volts when motor should be running, Minigen board may be bad. (Part # AANEWGEN1-PJ/RBN)
To Purchase This Item, Visit BMI Gaming | www.bmigaming.com | (800) 746-2255 | +561.391.7200

28
TROUBLESHOOTING GUIDE
11
Problem Probable Cause Remedy
Balls not releasing - There are many factors that could contribute to the balls not releasing. Please browse through the following sections: - Not enough balls in game - Ball jam - Error on screen - Faulty Motor - Ball release sensor blocked/bad - Ball trough sensor blocked/bad
Ball release sensor blocked/bad
Too many balls in game blocking sensor, software will stop motor to prevent damage “Ball Jam—See Attendant” will show on screen
Check voltage with DCMulti-meter
Disconnected, loose or broken wires.
Enter Diagnostic Menu to see if game recognizes sensor.
Faulty sensor.
Game should have only 25 balls, if there are too many balls, they will back up and block sensor, turning off motor.
Check power: 12 Volts DC Power In between Red and Black wire Normally 0 VDC between Black and White wires. (LED is ON) When Blocked - 3.3 VDC between Black and White wires. (LED is OFF)
Check connections from sensor to Minigen board. Cable # (AACE3300)
Ball Release should go to ON when sensor is blocked.
Replace sensor. (Part # AACB3003)
Ball trough sensor blocked/bad
If ball trough sensor does not see balls played, game will not release more balls.
Check voltage with DCMulti-meter
Disconnected, loose or broken wires.
Enter Diagnostic Menu to see if game recognizes sensor.
Faulty sensor.
Ensure ball trough is clear and not blocked with debris.
Check power: 12 Volts DC Power In between Red and Green wire. Normally 3.3 VDC between Green and White wires. (LED is OFF) When Blocked - 0 VDC between Green and White wires. (LED is ON)
Check connections from sensor to Minigen board. Cable # (AACE3300)
Ball Trough should go to ON when sensor is blocked.
Replace sensor. (Part # AACB2203)
To Purchase This Item, Visit BMI Gaming | www.bmigaming.com | (800) 746-2255 | +561.391.7200

29
TROUBLESHOOTING GUIDE
12
Counting too many balls
Ball Trough Sensor is “seeing” too many balls pass through.
Test with finger to ensure LED goes ON. If LED is dim all the time, sensor is bad. Replace sensor. (Part # AACB2203)
Problem Probable Cause Remedy
Not counting balls
Any balls missing the cups will be counted be the Ball Trough SensorCheck voltage with DCMulti-meter
Disconnected, loose or broken wires.Enter Diagnostic Menu to see if game recognizes sensor. Faulty sensor.
Ensure ball trough is clear and not blocked with debris.Check power: 12 Volts DC Power In between Red and Green wire. Normally 3.3 VDC between Green and White wires. (LED is OFF) When Blocked - 0 VDC between Green and White wires. (LED is ON) Check connections from sensor to Minigen board. Cable # (AACE3300) Ball Trough should go to ON when sensor is blocked.Replace sensor. (Part # AACB2203)
Buttons do not work.
Button stuck, sticky or broken.
Disconnected, loose or broken wires.
Enter Diagnostic Menu to see if game recognizes button.
Faulty button.
Clean top of button, ensure it springs back when pushed down. Look for broken tab on bottom of switch.
Check connections from switch to Minigen board. (Cable # AACE3301)
Button should go to ON when button is pushed.
Replace button. A5PB3000 for Red. A5PB3001 for Blue.
Button lights do not work.
Light bulb itself burned out.
Disconnected, loose or broken wires.
Faulty button.
Check for 12 Volts DC across lights: Purple and Orange for Red Light Blue and Yellow for Blue Light
Check connections from switch to Minigen board. (Cable # AACE3301)
Replace button. A5PB3000 for Red. A5PB3001 for Blue.
To Purchase This Item, Visit BMI Gaming | www.bmigaming.com | (800) 746-2255 | +561.391.7200

30
TROUBLESHOOTING GUIDE
13
Monitor problems
Blurry Monitor Too bright, or dim.
Open back door of cabinet. Monitor will swing out on door. Menu buttons are located on bottom right edge of monitor,
partially hidden by clear plexi of monitor.
Press the far left button (Auto) to select Auto Adjustment. This may take a few seconds.
Verify that the screen looks good and image is centered.
Problem Probable Cause Remedy
Monitornotworking.
Powerdown, wait 10 seconds and power up again.
Monitor says “NO SIG-NAL” for 5 seconds after power-up.Then dark.
Monitor VGA cable unplugged.
Small 12 Volt power connector unplugged on motherboard.
Large power connector unplugged on motherboard
Faulty or loose RAM
Faulty power supply - Check for 12 Volts and green LED on motherboard.
Faulty motherboard - Replace faulty board. (AAMB8)
Monitor has nothing at all on power up.
Power cable unplugged from monitor.
Faulty monitor.
Ensure power is plugged into back of monitor, down to power strip.
Replace monitor. (A5MO2200)
Error on screen at power up.
Re-Bootgame to see if problem still exists.
Display stops at "No bootable device -- insert boot disk and press any key"
Display shows “Puppy Video Wizard” or “Xorg”
Display shows “Kernel panic – unable to mount root”
USB Flash Drive unplugged from board or faulty.
Re-seat and try power on to game again.
Game is not recognizing monitor. Ensure VGA cable is secure to I/O board. Replace monitor. (A5MO2200)
Faulty or loose RAM
To Purchase This Item, Visit BMI Gaming | www.bmigaming.com | (800) 746-2255 | +561.391.7200

31
POWER SUPPLY DIAGNOSTICS
14
1.) Verify AC power to game. Check power strip in front door.
The rocker switch should be illuminated.
3.) Check connection to power supply.
4.) Ensure Power Supply switch is set to 115V (or 230V) (Some model power supplies may not have this)
5.) Ensure Power switch is on.
6.) Ensure fan is turning. - If power supply fan is turning and there is no 12 Volt out, then replace power supply. (A5PS1008) - If power supply fan is not turning, then continue to “Verify Power to Motherboard”
Verify Power to Motherboard The motherboard will turn on power supply. If your game has no 12 volts, it may be the motherboard not turning on.
In addition - there may be a 12 volt short somewhere else in cabinet that is not allowing the power supply to turn on.
Minimize load on power supply and isolate short Unplug all outputs from power supply except for motherboard. This will have power supply, motherboard, and monitor left plugged in.
If power supply, motherboard, and monitor now turn on: Plug in one component at a time to power supply to locate short.
If power supply still does not power on, then continue to steps 1,2, and 3.
If power supply still does not power on, replace power supply. (A5PS1008), replace motherboard. (AAMB7)
AAMB7
3 - Motherboard “Jump Start”If green Led is ON, but game not on, you may start motherboard by quick-ly touching these 2 red pins at the same time.Motherboard may turn ON and boot normally.
2 - Check BOTH connections from power supply.
Large power supply Black and yellow wires connection. (12 Volts DC)
1 - Green LED on motherboard should be ON.
If this is not on, recheck power supply or replace motherboard. (AAMB8)
Note: The location of these con-nectors may vary depending on which version motherboard is in
To Purchase This Item, Visit BMI Gaming | www.bmigaming.com | (800) 746-2255 | +561.391.7200

32
BILL ACCEPTOR DIAGNOSTICS
15
Determine if Bill Acceptor has power: Turn game ON—The bill acceptor should make noise as stacker cycles and green lights on outside bezel should flash.
If NO power: Use meter to measure 110 AC voltage at cable going into Bill Acceptor from power strip.
If power is OK: Clean Bill Acceptor path to make sure there is nothing jamming unit. Check dipswitch settings on side of acceptor.
Make sure switch # 8 is OFF for Always Enable
ERROR CODES Count the number of flashes on front bezel of Bill Acceptor and follow chart for repair.
Note: There are many different models and brands of Bill Acceptors that are used on redemption games. Your Bill Acceptor may differ from the unit shown.
To Purchase This Item, Visit BMI Gaming | www.bmigaming.com | (800) 746-2255 | +561.391.7200

33
HOW TO: ACCESS MAINBOARD/ MOTOR
16
Unlock 2 top locks and flip open front panel.
Slide “Bounce Pad” out toward front of game.
To Remove Motor: Remove 4 screws from center of wood wheel.
Motor can now be unscrewed and removed from game.
Motherboard, Power Supply, Minigen board and Communication board are now accessible.
To Purchase This Item, Visit BMI Gaming | www.bmigaming.com | (800) 746-2255 | +561.391.7200

34
HOW TO: REMOVE BALL SENSOR
17
Unlock 2 top locks and flip open front panel.
Slide “Bounce Pad” out toward front of game.
Remove 2 screws from brackets on both sides of the cabinet and remove carpeted wood platform.
Remove screws from brackets holding vertical wood that sensor is mounted to.
Lift wood out of cabinet, unplug sensor, and remove sensor.
To Purchase This Item, Visit BMI Gaming | www.bmigaming.com | (800) 746-2255 | +561.391.7200

35
HOW TO: REMOVE CUP ASSEMBLY
HOW TO: ACCESS CAMERA/ AC LIGHT
18
Remove 2 screws holding cup platform in place.
Remove 3 screws holding wood support in place.
Slide plexi toward front of cabinet and remove from game.
To Purchase This Item, Visit BMI Gaming | www.bmigaming.com | (800) 746-2255 | +561.391.7200

36
CREDIT CARD READER
19
Beer Pong Masters is credit card reader ready. Baytek sells a credit card reader that will connect to a harness inside cabinet and will
communicate via cell phone signals. No need for an internet connection.
The E-Port Reader will involve drilling holes in the left side of your metal front to mount.
Instructions will come with E-Port Reader, here is a picture of it mounted on metal plate.
The E-Port Reader will plug into cable positioned in cabinet.
Enter “Game Setup” Menu to select number of games per credit card swipe.
Normally this is set to 4 games per swipe. ($4.00 per swipe at $1.00 per play)
Any questions on E-Port credit card readers - Please call E-Port technical support at (888) 561-4748
To Purchase This Item, Visit BMI Gaming | www.bmigaming.com | (800) 746-2255 | +561.391.7200

37
PARTS LIST
20
A5CORD23 Cord, USB 10 foot A5CORD5 AC Power Cord A5CU3000 Cup, Solo, Red 16 OZ A5DE3000 Decal, Marquee A5DE3001 Decal, Throw Line Floor A5DE3002 Decal, Bounce Pad A5DE3003 Decal, Side Cabinet A5DE3004 Decal, Front Cabinet A5DE3007 Decal, Seam Decal Right A5DE3008 Decal, Seam Decal Left A5DE3009 Decal, Back Wall around Monitor A5DE3010-1 Decal, Control Panel, Left Side A5DE3010-2 Decal, Control Panel, Right Side A5FI9010 Decal, Bottom Front, around cash box A5HU1200 Hub on Ball Loader Motor A5LI0001 AC Light Compact Fluorescent A5LK2000 Lock for Coin Box A5LK5001 Lock for Front and Back Door A5MO2200 Monitor, 22 Inch A5ME3000 Metal Support Marquee A5ME3001 Metal Motor Plate A5ME3002 Metal Left Window Rail A5ME3003 Metal Right Window Rail A5ME3004 Metal Downstacker BBA Plate A5OU1000 Outlet Strip AC A5PB3000 Pushbutton, Start, Red A5PB3001 Pushbutton, Select, Blue AAPB2700 Pushbutton, Menu buttons
A5PL9097 Plate, replaces the bill acceptor A5BA4050 Ball, Ping Pong Ball A5VF2002 Con Box, Black Plastic A5CE6601 Cable, USB, 6 foot A5CEAU010 Cable, Audio Stereo A5CN1031 Adapter for Motherboard A5CO4203 Cover for Speaker A5CORD14 Cord, USB 3 foot, Right angle connector A5CN3001 Connector VGA-VGA Adaptor
AACE3300 Cable, Count Sensor AACE3301 Cable, Main Door AACE3302 Cable, Volume AACE3303 Cable, Minigen Power In Cable AACE3304 Cable, Main Power Cable AACE3306 Cable, Ribbon from Minigen to AUX Board AACE3307 Cable, Fluorescent Light
AACE3309 Cable, Minigen to Interface Comm AACE3310-1 Cable, Playfield Cup #1 Light AACE3310-2 Cable, Playfield Cup #2 Light AACE3310-3 Cable, Playfield Cup #3 Light AACE3310-4 Cable, Playfield Cup #4 Light AACE3310-5 Cable, Playfield Cup #5 Light AACE3310-6 Cable, Playfield Cup #6 Light AACE3310-7 Cable, Playfield Cup #7 Light AACE3310-8 Cable, Playfield Cup #8 Light AACE3310-9 Cable, Playfield Cup #9 Light AACE3310-10 Cable, Playfield Cup #10 Light AACE3311 Cable, Dual DBA Cable AACE3314 Cable, Interface to Motherboard Comm AACE3315 Cable, Menu Buttons AACE3316 Cable, DBA Cable AACE8868 Cable, Fluorescent Light Socket AACBL4A-DOOR Cable, Coin Mech AACE3317 Credit Counter AAMO3300 Motor, Ball Loader A5AC9093 Dollar Bill Acceptor, Down Stacker, 110AC A5CB3004 AUX Board for Lights in Cups AACB2204 Interface Board AACB2203 Ball Trough Sensor AACB3003 Ball Release Sensor AACE8811 Speaker Assy. AAMB7 Motherboard AANEWGEN1-PJ/RBN Minigen Board
AACM3000 Camera for Beer Pong A5PS1008 Power Supply Ultra LS350W
PART # DESCRIPTION PART # DESCRIPTION
To Purchase This Item, Visit BMI Gaming | www.bmigaming.com | (800) 746-2255 | +561.391.7200

38
PARTS PICTURES
21
A5CN1031 A5CO4203 A5CORD14 A5CORD23 A5CN3001
A5CORD5 A5CU3000 A5FI9010 A5HU1200 A5OU1000
A5DE3000 A5DE3001 A5DE3002
A5DE3003 A5DE3004 A5DE3007 A5DE3008 A5DE3009
A5DE3010-1 A5DE3010-2
A5PL9097 A5BA4050 A5VF2002 A5CE6601 A5CEAU010
A5LK2000 A5LK5001 A5PB3000 A5PB3001
To Purchase This Item, Visit BMI Gaming | www.bmigaming.com | (800) 746-2255 | +561.391.7200

39
PARTS PICTURES
22
AACE3307 AACE3309 AACE3310-X AACE3311 AACE3314
AACE3301 AACE3302 AACE3303 AACE3304 AACE3306
AACE9109 AACE3317 AAMO3300 AACE8868 A5PS1008
AACBL4A-DOOR A5LI0001 AACE8811 AAPB2700 AACE3300
A5AC9093 AACB3003 AACB2204 AACB2203
AACB3003 AAMB7 AANEWGEN1-PJ/RBN AACM3000 AACB3004
To Purchase This Item, Visit BMI Gaming | www.bmigaming.com | (800) 746-2255 | +561.391.7200

40
CREDIT CARD READER REGISTRATION
To Purchase This Item, Visit BMI Gaming | www.bmigaming.com | (800) 746-2255 | +561.391.7200

41
LEAGUE & TOURNAMENT MATERIALS
2
1
4
3
5
6
7
Like us!
Scan Here!
facebook.com/playbeerpong masters
ELITE 8 BRACKET
BEER PONG MASTER TOURNAMENT
Master
2
1
4
3
9
10
13
14
15
11
12
6
5
8
7
Like us!
Scan Here!
facebook.com/playbeerpong masters
SWEET 16 BRACKET
BEER PONG MASTER TOURNAMENT
Master
Try these fun & unique ways to test your Beer Pong Master skills:
Opposite Hand- Toss or bounce the ball with your non-dominant hand
Money in the Bank- The ball must bank off the sides or backboard of the game before going in the cups
Bounce this Way- Every player must bounce the balls into the cups
Toss that Way- Every player must toss the balls into the cups
Long Distance- Stand an extra 2 feet behind the shot line
Plenty O’ Balls- Toss or bounce 3 to 5 balls at a time
Blindfold Me- Cover your eyes with a blindfold (or team-mate’s hands) while you play
Got Skill?- Take a ball in each hand and bounce one ball with one hand and while tossing the other ball with the other hand
Superman- Toss or bounce the balls into the cups while balancing on a bar stool on your stomach (like you’re flying)
Knee to the Ground- keep one knee on the ground as you bounce or toss the balls into the cups
Teammates for Life- Toss or bounce the balls into the cups with your arms wrapped around your team mate
Get Dizzy- Spin around 5-10 times before bouncing or tossing the balls into the cups
Team Up- Partner up and take turns bouncing or tossing the balls into the cups
Pitchin It- Toss the balls underhanded into the cups
Paddle Ponger- Use a Ping Pong paddle to tap the balls into the cups
Black Out- Block the playfield from view and see how many balls you can bounce in without seeing your targets
2
1
4
3
5
6
7
7
8
L1L5
L6L2
L3
L4
LOSERS BRACKET
TRUE CHAMPIONSHIP(Player from Loser Bracket must
WIN TWICE to be the Master)
ELITE 8 (Double Elimination)
BEER PONG MASTER TOURNAMENT
Master
Like us!
Scan Here!
facebook.com/playbeerpong masters
Like us!
Scan Here!
facebook.com/playbeerpong masters
SWEET 16 (DOUBLE ELIMINATION)
BEER PONG MASTER TOURNAMENT
Master
2
1
4
3
9
10
13
14
15
11
12
6
5
8
L1
L11L13
L15
16
17
L14
L12
L9
L10
L2
L3
L4
L5
L6
L7
L8
7
LOSERS BRACKET
TRUE CHAMPIONSHIP(Player from Loser Bracket must
WIN TWICE to be Champion)
THESE PROMOTIONAL ITEMS ARE AVAILABLE FOR DOWNLOAD AT
BAYTEKGAMES.COMSCAN THE CODE AT RIGHT TO GO THERE DIRECTLY
To Purchase This Item, Visit BMI Gaming | www.bmigaming.com | (800) 746-2255 | +561.391.7200

42
MAINTENANCE LOGIf repairs are necessary, it is good practice to keep a log of repairs done and parts ordered.
The chart below will assist you in tracking your game’s maintenance.
DATE MAINTENANCE PERFORMED PARTS ORDERED INITIALS
To Purchase This Item, Visit BMI Gaming | www.bmigaming.com | (800) 746-2255 | +561.391.7200

43
TECHNICAL SUPPORTExcellent customer service is very important to Bay Tek Games!
We know that keeping your games in great operating condition is important to your business. When you need us, we are here to help. You can call us for free technical assistance, and you can
count on us to have parts on-hand to support your game. We offer options that fit your needs.
Electronics / Circuit Boards - Repair OptionsRepair & Return – If you have Circuit Board issues with your Bay Tek game, you can send the board to us and we’ll repair it right away. Most items sent to us are repaired and returned to you within two days. This option is your best value as we offer this fast turn-around service at the most reasonable price.Advance Replacement – If you have Circuit Board issues with your Bay Tek game, but you don’t have time to send in your board in for repair, give us a call and ask for an Advance Replacement. We’ll send you a replacement board that same day (pending availability). When you get your new board, just repackage the defective board in the same box and send it back to us. We make it easy by including a UPS Return Shipping label for you to put on the box (not available for international ship-ments). This is your best option when you need to get your game up and running as quickly as pos-sible! Spare Parts – Take matters into your own hands and purchase new spare Circuit Boards for your Bay Tek games. Many of our games share the same main-board electronics. This means you can buy one set of spare electronics to support many of your Bay Tek games. Spare boards allow you to get your game up and running the quickest and provide you a valuable troubleshooting option. Call our technicians to get recommendations for what you should keep on hand for spare parts!
Technical Support:“You” are the best tool for troubleshooting! Your abilities to understand the game and your skills to repair the game are invaluable to us! If you need help, you know you can call us. It’s not easy to diag-nose a game remotely by phone, but our technicians do a great job. They’ll need your help to perform some troubleshooting steps and convey to them exactly what’s happening with your game.
Returns, Credits, & Fees: NOTICE! ALL ITEMS being sent to Bay Tek Games for repair or return, etc. require prior Return Authorization! Bay Tek Games will provide a Product Return Form with an authorizing Ticket Number for each item to be returned. Please be certain to include this document with all shipments!Late Fees and Non-Return Fees - Advance Replacement and Warranty Replacement items require the defective items to be returned by Bay Tek games promptly to avoid Late Fees. We expect items to be returned with 10 working days. Late fees are invoiced monthly. Late fees are non-refundable under any circumstance! Any item not returned within 90 days will be invoiced in full as a replacement part.Bench Fees - Bench fees will apply for each electronic item returned to Bay Tek Games (this includes unused Advance Replacement items). This charge covers our cost to inspect, evaluate and retest each item. Please note that returned items that do not pas our tests will be charged accordingly as replacement items or advance replacements. Restocking Fees - Unused items returned for credit will be credited minus a restocking fee. Items must be returned with in 30 days of purchase in order to qualify for any credit amount. No shipping charges will be credited.
To Purchase This Item, Visit BMI Gaming | www.bmigaming.com | (800) 746-2255 | +561.391.7200

44
WARRANTY
NON-WARRANTY
Bay Tek Games warrants to the original purchaser that all component parts will be free of defects in workmanship and materials for a period of 6 months from the date of purchase. An additional 3 month warranty extension can be obtained by filling out and submitting the Warranty Registration for each machine. Warranty Registration cards may be found as shipped with each machine or online at our website. These must be filled out and submitted to Bay Tek Games within 30 days of purchase to be valid.
For any game/machine we manufacture that is within its warranty period, with notification to our Parts & Service Department, Bay Tek Games will, without charge, repair or replace defective component parts. It is the owner’s responsibility to diagnose, remove and replace any faulty component part at their own expense & peril. As needed, at no charge, Bay Tek Games can provide reasonable tele-phone technical support during our normal business hours.
All claims of defective parts are subject to review upon our inspection of the faulty item. This warranty does not apply in the event of any misuse or abuse to the product, or as a result of any unauthorized repairs or alterations. The warranty does not apply if any serial number decal is altered, replaced or removed from its original position.
To process warranty replacement claims, customers may be charged for the replacement item at the time of shipment and later credited the same amount when the faulty item is returned and has passed our inspection. Bay Tek Games will provide the customer a pre-paid return shipping label which is sent along with the replacement item. The customer is responsible for properly packaging and ship-ping the faulty item back to Bay Tek Games.
Should you need your game serviced, determine the serial number from the decal placed on the front of this manual, or locate it on the back of the game. Then contact our Service Department at:
920.822.3951 or e-mail: [email protected]
Options and estimated charges will be provided to you for your approval. Please remember that any items being sent to Bay Tek Games must include prior return
authorization from our Parts & Service Department. This approval will include a Product Return Form which is required to be included with any incoming shipments. Repaired parts will be shipped back using the same method in which they were received.
Repairs are warranted for 30 days from the date of return shipment.
ATTENTION! !In order to maintain the safety & compliance certifications of this
game, ONLY approved parts may be used. For approved replacement parts, refer to the parts list in this manual.
To Purchase This Item, Visit BMI Gaming | www.bmigaming.com | (800) 746-2255 | +561.391.7200

45
CERTIFICATE OF COMPLIANCE
To Purchase This Item, Visit BMI Gaming | www.bmigaming.com | (800) 746-2255 | +561.391.7200