Embed Size (px)
Citation preview

Learn Chemistry
www.rsc.org/learn-chemistryRegistered Charity Number 207890
First Year Undergraduate Chemistry Laboratory Course Manual 2011-2012Core Chemistry 1A and 1B: Discovery Block 4Developed by Dr Jacquie Robson, RSC School Teacher Fellow 2010-2011 at Durham University
This resource was produced as part of the National HE STEM Programme
Core Chemistry 1A and 1B
First Year Chemistry Laboratory Course Manual 2011-2012
DISCOVERY
BLOCK 4
Name ………………………………………………………………………………. Core Chemistry 1A session: Day/Time: ………………………………… Group name: ….………..... Core Chemistry 1B session: Day/Time: ………………………………… Group name: …….…………
First Year Chemistry Laboratory Course 2011-2012: DISCOVERY Block 4 2
Contents
Page
Contents ...................................................................................................................................... 2
Safety in the first year laboratory (CG 021) ................................................................................... 3
Introduction ................................................................................................................................ 5
11A. Preparation of aspirin ........................................................................................................ 11
11B. The kinetics of an enzyme-catalysed reaction ..................................................................... 18
12A. Stereochemistry ................................................................................................................. 27
12B. Preparation of an iodide of tin ............................................................................................ 29
13A. Transition metal complexes of cobalt(II) ............................................................................. 33
13B. Isomers of cobalt(II) and cobalt(III) complexes .................................................................... 39
APPENDIX A: Assessment guide for laboratory reports ............................................................... 43
First Year Chemistry Laboratory Course 2011-2012: DISCOVERY Block 4 3
Safety in the first year laboratory (CG 021)
The Health and Safety at Work Act was introduced in 1974. Since then many regulations have been
made under the act, for example, The Control of Substances Hazardous to Health (COSHH). The
University has a statutory obligation to comply with these requirements and you, as a student, have
a duty to abide by the regulations. The following notes are to guide you in good laboratory practice
and to familiarise yourself with the safety aspects of your laboratory work.
Emergency Telephone Numbers
Internal telephones: FIRE, POLICE, AMBULANCE 9999
UNIVERSITY EMERGENCY NUMBER 43333
1. Staff with special responsibilities for safety:
Chairman of the Board of Studies: Professor J S O Evans
Chemistry Safety Officer: Dr J A G Williams
Undergraduate teaching laboratories: Dr E Wrede (Physical Chemistry)
Dr J A G Williams (Inorganic Chemistry)
Dr E Khosravi (Organic Chemistry)
2. No work is to be carried out unless a member of staff is present.
3. All persons in laboratories (whether or not they are actually doing practical work) must wear
safety spectacles and laboratory coats. Academic staff supervising undergraduates enforce
this rule. In all laboratories, hair should be secured so that it does not hang below the neck.
It is important to wear suitable clothing, and your footwear must incorporate flat heels, slip-
resistant soles and uppers fully enclosing the foot.
4. Foods, drinks, cigarettes, cosmetics and mobile phones must not be taken into or used in
areas where chemical substances are used or kept.
5. Bags and coats should be placed in the lockers provided outside the laboratory and not left
in corridors or on benches.
6. All accidents and dangerous occurrences must be reported immediately to a member of
staff or a demonstrator. The first aid box is located in the foyer area and a list of qualified
first aiders is on the front. The accident book is kept in room CG 058 and the member of
staff in charge of the laboratory must fill out a report for all incidents. An emergency shower
is located in the foyer area and there are four eyewash stations beside the sinks. There is a
chemical spillage treatment kit in CG195.
First Year Chemistry Laboratory Course 2011-2012: DISCOVERY Block 4 4
7. The fire action signs in the laboratory indicate the nearest fire alarm and the emergency
exit. There are two carbon dioxide fire extinguishers on either side of the central pedestal
and another in the instrument room. There is also a foam spray fire extinguisher on either
side of the central pedestal and one at each fire exit. A general fire practice is held twice
yearly to check the smooth operation of the procedure so you should ensure that you know
where to go in an emergency.
8. Pipetting by mouth is not allowed. Use a bulb or automatic pipette.
9. Do not inhale vapours or make skin contact with any substances. Use gloves where
necessary always remembering that they are semi-permeable.
10. Experiments must be conducted on clean working surfaces; any spillage should be cleaned
immediately. A high standard of tidiness should be maintained at all times. Contaminated
surfaces and equipment must be cleaned as soon as it is practicable after use. The
equipment should then be put away. Do not clutter bench-space with unused equipment
and bottles of chemicals.
11. Waste should be disposed of in the appropriate containers: solvents should be placed in
either the C, H, N, O-containing waste solvent bottles (Category C Waste), or halogen,
sulphur-containing waste solvent bottles (Category D Waste). Heavy metal waste should be
placed in the appropriate bottle. Broken glassware should be washed and placed in the
designated glass bin. Solid waste should be dried, placed in a polythene bag and placed in a
solid waste bin. A sharps bin is located in CG195. Consult a demonstrator if you are unsure
about the correct disposal procedure.
12. The COSHH assessment of any chemical you use or make will be given in the laboratory
script. There are further safety warnings at the appropriate parts of the text. Staff and
student demonstrators reinforce these. If you are in any doubt, consult a demonstrator.
13. No unauthorised experiments are to be carried out.
14. It is important to ensure that hands are washed and all protective clothing removed before
leaving the laboratory.
First Year Chemistry Laboratory Course 2011-2012: DISCOVERY Block 4 5
Introduction
Chemistry is an experimental science and, as well as attending lectures, both the University and the
Royal Society of Chemistry, who accredit your degree, require you to complete a designated
number of hours of laboratory work. During the first year, 18 weeks of practical work must be
completed. The first year practical course is split into four sections:
1. Induction (Week 1)
2. Skills (Weeks 2-7)
3. Discovery (Weeks 8-16)
4. Projects (Weeks 18-19).
During Blocks 3, 4 and 5, you will complete the Discovery section. This contains activities designed
to extend and build upon the key skills you have developed and practised in the Skills section. Some
experiments will lead on from some in the Skills section, some will be linked to lecture courses you
have studies and others will introduce new chemistry and ideas. Ideas developed in previous
sections is now assumed knowledge, so you may need to refresh your memory by reading back
through older laboratory manuals and your lab notebook as part of your pre-lab preparations.
1.1 The pre-lab exercises
As in the previous section, before every laboratory session one or more pre-lab exercises must be
completed. These may involve reading, watching video clips, answering questions, completing
assignments or using interactive software to rehearse techniques. Many of the files and resources
for these exercises will be accessed via DUO, the university Virtual Learning Environment, which
you should now be familiar with using regularly.
Pre-lab exercises will often contain summative aspects (i.e. the marks will count towards the overall
marks for the Laboratory Course), and they must be completed in the week before you attempt the
laboratory activity. All pre-lab work must be finished an hour before the relevant laboratory session
so that completion can be checked. For example, a student attending the Thursday laboratory
session, which begins at 9.00am, must have completed the pre-lab exercises by 8.00am that same
day. Anyone arriving at a laboratory session without having completed the pre-lab exercises will be
sent away to complete them before being allowed to begin work in the laboratory. Failure to
complete the pre-lab exercises on time will incur a marks penalty. Your time in the laboratory will
become very pressured if you are sent away to complete the pre-lab exercises. Good time
management is the key to success in most areas of university life, but particularly in your laboratory
work!
If there are any problems with access to DUO or LabSkills using personal computers, there are
open-access machines available for use in the library and at other points around the science site.
There may also be provision in college. Ask for help if problems arise when accessing the pre-lab
exercises. Failure to access the exercises will not be accepted as a reason for incomplete pre-lab

First Year Chemistry Laboratory Course 2011-2012: DISCOVERY Block 4 6
work unless the laboratory course leader (Dr J. M. Robson) is informed in advance of the deadline
so alternative arrangements can be made.
1.2 LabSkills
Many pre-lab exercises will again involve you using LabSkills. This is an electronic, interactive
laboratory textbook for you to use to gain confidence in assembling and using apparatus before you
begin work in the laboratory. Interactive exercises are designed to allow you to practice key
techniques and learn more about apparatus and safety as you progress through the course. During
the Discovery section of your laboratory course, the pre-lab exercises will be less prescriptive in
their use of LabSkills but you should continue to use it as part of your pre-lab preparations to
ensure you have refreshed your memory of the key techniques before your laboratory session.
LabSkills also contains useful glossaries and worked examples of calculations that you will find
useful. It will be accessible in the laboratory for additional assistance if you need it.
1.3 The laboratory sessions
One laboratory session per week will be assigned to Core Chemistry 1A, and a second session per
week for Core Chemistry 1B. Experiments that will count towards Core Chemistry 1A will contain a
suffix of ‘A’ in the title (e.g. Experiment 9A) and will be carried out by everybody. Experiment titles
containing a suffix of ‘B’ (e.g. Experiment 9B) will count towards Core Chemistry 1B and will be
carried out only by those studying Core Chemistry 1B.
In the second term (Michaelmas), University weeks begin on a Monday and end on a Thursday.
Those students only studying Core Chemistry 1A will be assigned one laboratory session per week
and will carry out all of the ‘A’ experiments. Those students also studying Core Chemistry 1B will be
assigned two sessions per week. The first session of the week is assigned to be the Core Chemistry
1A session, and the second session of the week is the Core Chemistry 1B session. For example, if
the two allocated laboratory sessions are on Monday morning and Thursday afternoon, the Core
Chemistry 1A session will be Monday morning, when an experiment with the suffix ‘A’ will be
performed, and the Core Chemistry 1B session will be Thursday afternoon, when the ‘B experiment
for that week will be completed.
Laboratory sessions will be allocated during one or two of the following times:
Monday 9.00am - 12.00pm
Monday 2.00pm - 5.00pm
Tuesday 2.00pm - 5.00pm
Wednesday 10.00am - 1.00pm
Thursday 9.00am - 12.00pm
Friday 9.00am - 12.00pm
Friday 2.00pm - 5.00pm
You may only attend the laboratory at your allocated time.
First Year Chemistry Laboratory Course 2011-2012: DISCOVERY Block 4 7
A risk assessment is either provided in this manual for the chemicals used in each experiment, or
you will be asked to construct one before attending the laboratory. Each demonstrator will be able
to advise on the hazards associated with each substance. Risk assessment advice must be followed
throughout each laboratory session. All experimental work must be completed in that laboratory
session and your lab notebook and work space signed off before you leave.
1.4 Set Allocation
Students in each laboratory session are allocated to one of three named sets of no more than 20
students. Sets are named after chemical elements and students are assigned to sets in no particular
order. Lists showing members of each set are available on DUO and details should be written onto
the front of the laboratory manual. During the second term (Epiphany), weeks begin on a Monday.
This will necessitate some set changes within groups to ensure that students complete their ‘A’
experiment in their first session and their ‘B’ experiment in the second session. New set lists will
become available before the start of the second term so students can check the experiment rota
and identify the experiments they need to prepare for.
Each set will tackle a different activity each week, in a three week cycle, until everyone has
completed each activity. The three experiments in the laboratory will then change and each set will
again work through each experiment according to the rota.
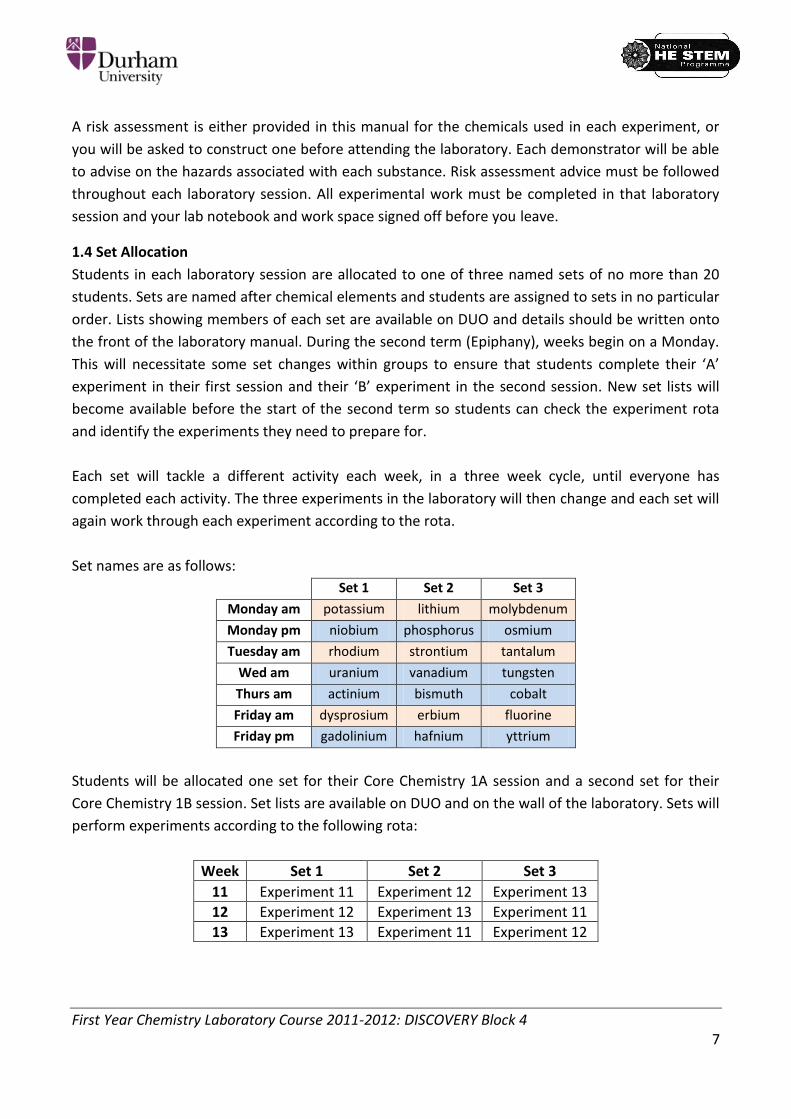
Set names are as follows:
Set 1 Set 2 Set 3
Monday am potassium lithium molybdenum
Monday pm niobium phosphorus osmium
Tuesday am rhodium strontium tantalum
Wed am uranium vanadium tungsten
Thurs am actinium bismuth cobalt
Friday am dysprosium erbium fluorine
Friday pm gadolinium hafnium yttrium
Students will be allocated one set for their Core Chemistry 1A session and a second set for their
Core Chemistry 1B session. Set lists are available on DUO and on the wall of the laboratory. Sets will
perform experiments according to the following rota:
Week Set 1 Set 2 Set 3
11 Experiment 11 Experiment 12 Experiment 13
12 Experiment 12 Experiment 13 Experiment 11
13 Experiment 13 Experiment 11 Experiment 12
First Year Chemistry Laboratory Course 2011-2012: DISCOVERY Block 4 8
For example, in week 12, everyone in Set 2 will carry out Experiment 13. Those studying only Core
Chemistry 1A will only complete Experiment 13A. Those students also studying Core Chemistry 1B
will complete Experiment 13B during their second session of the week. You should note your
allocated set on the front of your laboratory manual.
1.5 Assessment
Pre-lab exercises will contain assessed components. Some will be marked by a demonstrator in the
laboratory, others will be submitted for central marking. These exercises will differ between
experiments. Completion of these exercises is compulsory and there will be a marks penalty for
non-completion. The pre-laboratory exercise marks will make up 10% of the total marks for the
practical course.
During each laboratory session, work and progress will be assessed. Completion of the lab
notebook and performance in the practical tasks will be given marks. Occasionally there will be a
small amount of post-laboratory work that will need to be completed to finish each experiment.
Marks will be awarded during laboratory sessions throughout the year and will make up 10% of the
total marks for the practical course.
In the Discovery section, a number of additional assessed components will be introduced in
Experiments 10, 12 and 15 for Core Chemistry 1A and Experiments 10, 11 and 15 for Core
Chemistry 1B.
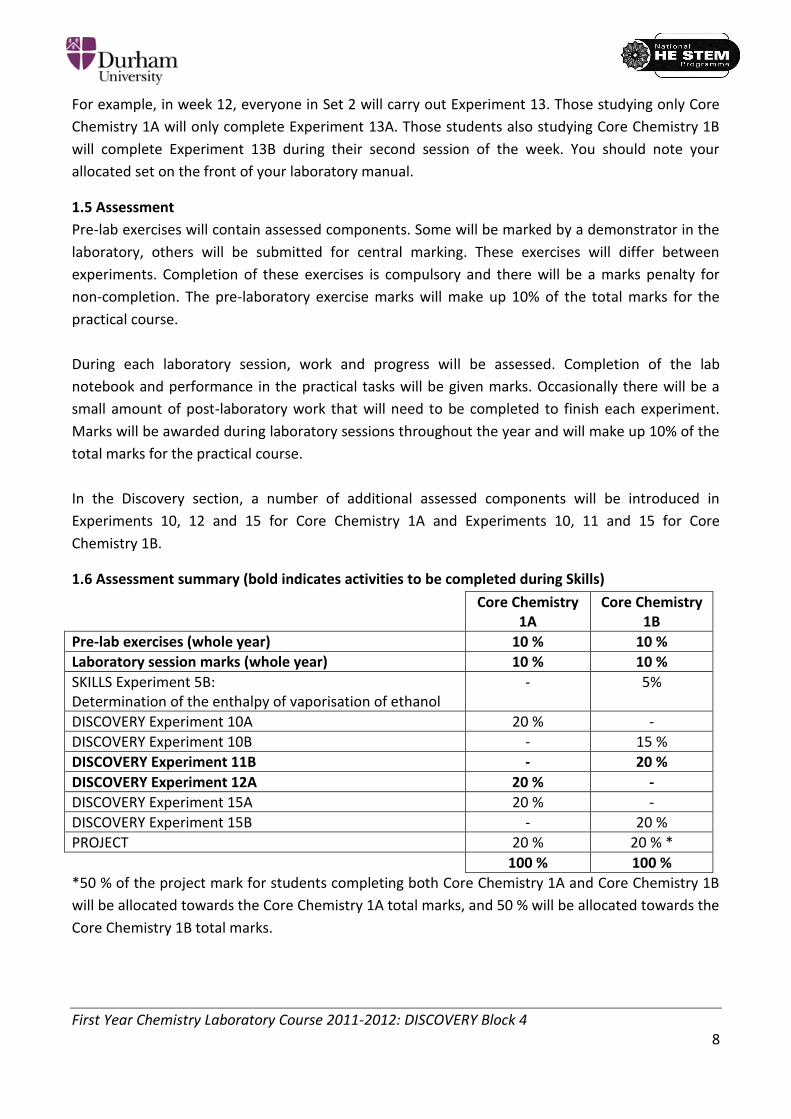
1.6 Assessment summary (bold indicates activities to be completed during Skills)
Core Chemistry 1A
Core Chemistry 1B
Pre-lab exercises (whole year) 10 % 10 %
Laboratory session marks (whole year) 10 % 10 %
SKILLS Experiment 5B: Determination of the enthalpy of vaporisation of ethanol
- 5%
DISCOVERY Experiment 10A 20 % -
DISCOVERY Experiment 10B - 15 %
DISCOVERY Experiment 11B - 20 %
DISCOVERY Experiment 12A 20 % -
DISCOVERY Experiment 15A 20 % -
DISCOVERY Experiment 15B - 20 %
PROJECT 20 % 20 % *
100 % 100 %
*50 % of the project mark for students completing both Core Chemistry 1A and Core Chemistry 1B
will be allocated towards the Core Chemistry 1A total marks, and 50 % will be allocated towards the
Core Chemistry 1B total marks.
First Year Chemistry Laboratory Course 2011-2012: DISCOVERY Block 4 9
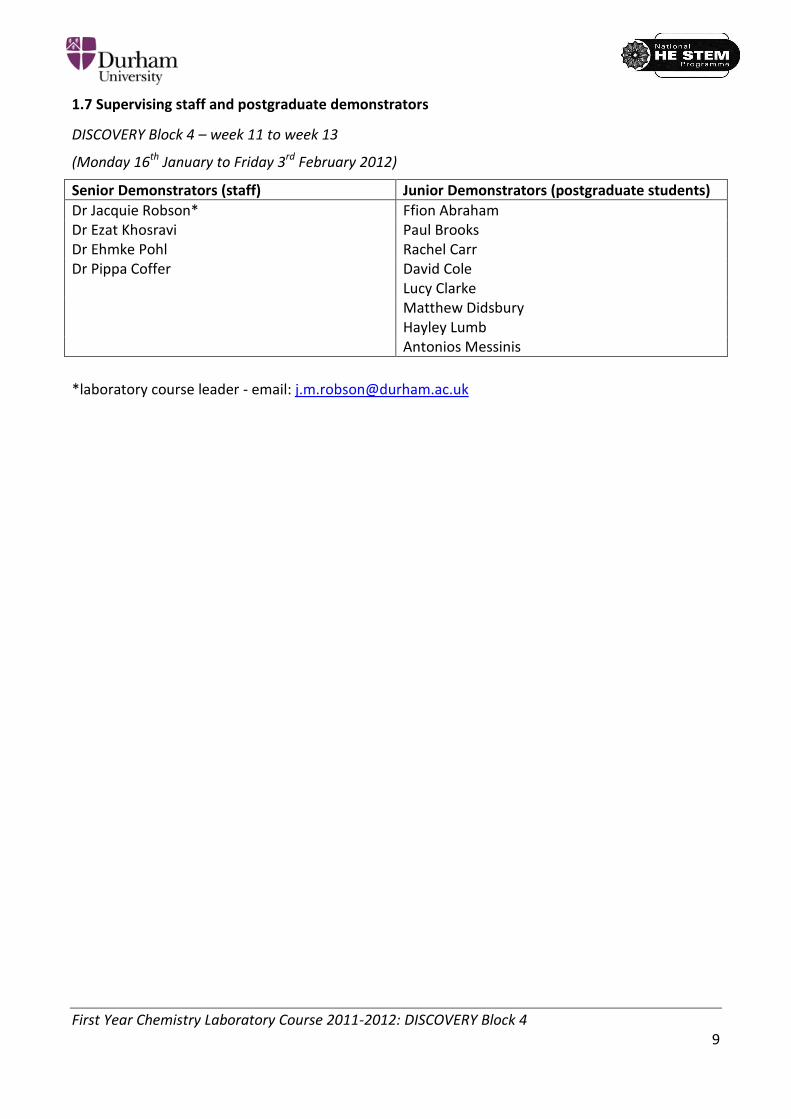
1.7 Supervising staff and postgraduate demonstrators
DISCOVERY Block 4 – week 11 to week 13
(Monday 16th January to Friday 3rd February 2012)
Senior Demonstrators (staff) Junior Demonstrators (postgraduate students)
Dr Jacquie Robson* Ffion Abraham Dr Ezat Khosravi Paul Brooks Dr Ehmke Pohl Rachel Carr Dr Pippa Coffer David Cole Lucy Clarke Matthew Didsbury Hayley Lumb Antonios Messinis
*laboratory course leader - email: [email protected]
First Year Chemistry Laboratory Course 2011-2012: DISCOVERY Block 4 10
DISCOVERY
BLOCK 4
EXPERIMENT 11A
PREPARATION OF ASPIRIN
First Year Chemistry Laboratory Course 2011-2012: DISCOVERY Block 4 11
DISCOVERY EXPERIMENT 11A
11A. Preparation of aspirin
Aspirin, also known as acetylsalicylic acid, is the most popular over-the-counter analgesic
worldwide. In addition to its well-known painkilling effects, it is also an anti-inflammatory agent
(reduces painful swelling), an anti-pyretic (reduces fever) and is thought to help prevent heart
attacks.
It is readily prepared from 2-hydroxybenzoic acid, also known as salicylic acid, by the following
reaction in which acetic anhydride in the presence of acetic acid is the acylating agent. An acylating
agent is a species that introduces the R(C=O)- group to a substance during a reaction.
11A.1 Aims
To prepare a sample of aspirin
To test recrystallize the product
To perform TLC (thin layer chromatography) to assess purity
11A.2 Pre-lab exercises
These exercises must be completed at least one hour before the timetabled start time of the
laboratory session. Students not completing the pre-laboratory task will be turned away from the
laboratory until the exercises are completed.
1. Read your laboratory instructions through carefully and highlight unfamiliar words or
apparatus. Use text books, the internet, LabSkills or the Interactive Lab Primer to look up
the meanings of these unfamiliar terms. If it is unfamiliar to you, be sure to read about TLC
(thin layer chromatography). Read back over related experiments you have previously
conducted, focusing particularly on how to set up and use reflux apparatus and how to
recrystallize a solid.
2. Prepare a risk assessment for the experiment in the same way as performed previously in
Experiment 10A. Use previous risk assessment tables that have been provided in laboratory
manuals as a template. The table should list all the chemicals encountered in the
experiment (including solvents, starting materials and products), the R and S (Risk and
Safety) numbers associated with that compound and the R and S phrases written out in full.
Use the MSDS (Material Safety Data Sheet) documents to identify the appropriate R and S
CO2H
OH
(CH3CO)2O
CO2H
OCOCH3
CH3CO2H+ +CH3CO2H
(catalyst)
First Year Chemistry Laboratory Course 2011-2012: DISCOVERY Block 4 12
numbers. Some have been provided on DUO. Others may need to be searched for on the
internet. Cross reference these R and S numbers with the lists of phrases provided in DUO
and copy them out in full into the table. Note that the R and S numbers are not normally
given in your laboratory manual, but they should be included in your own risk assessments.
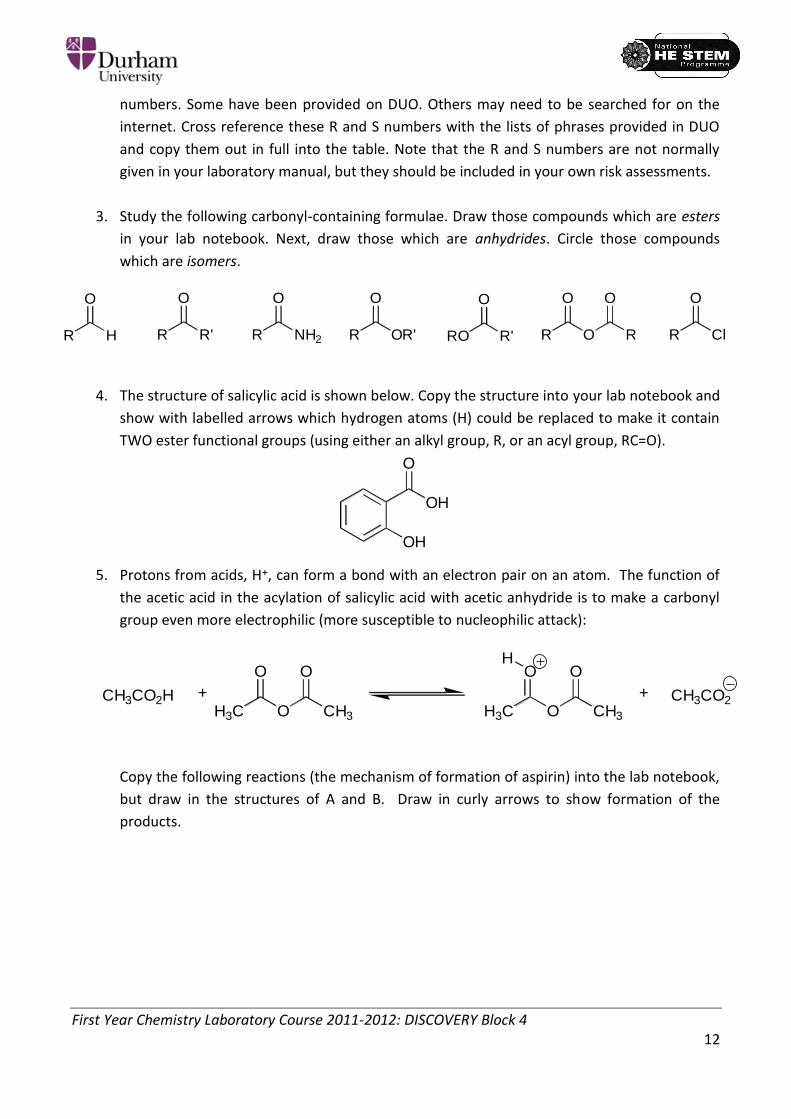
3. Study the following carbonyl-containing formulae. Draw those compounds which are esters
in your lab notebook. Next, draw those which are anhydrides. Circle those compounds
which are isomers.
4. The structure of salicylic acid is shown below. Copy the structure into your lab notebook and
show with labelled arrows which hydrogen atoms (H) could be replaced to make it contain
TWO ester functional groups (using either an alkyl group, R, or an acyl group, RC=O).
5. Protons from acids, H+, can form a bond with an electron pair on an atom. The function of
the acetic acid in the acylation of salicylic acid with acetic anhydride is to make a carbonyl
group even more electrophilic (more susceptible to nucleophilic attack):
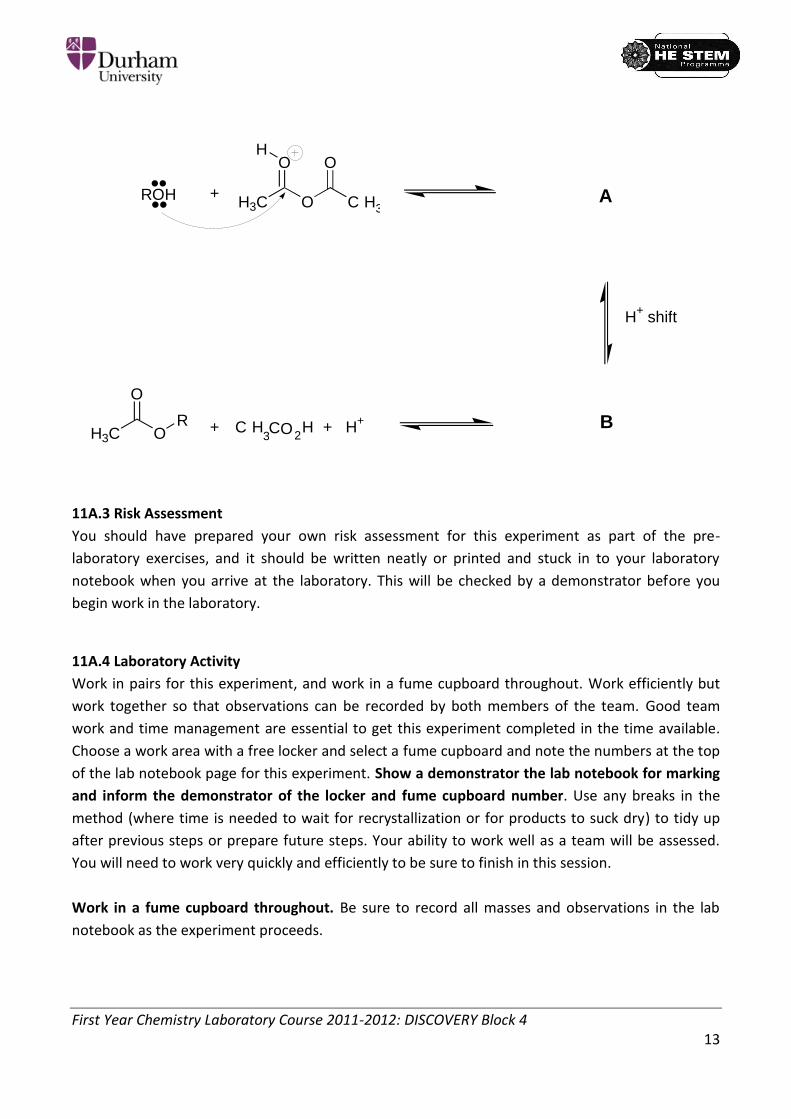
Copy the following reactions (the mechanism of formation of aspirin) into the lab notebook,
but draw in the structures of A and B. Draw in curly arrows to show formation of the
products.
R H
O
R R'
O
R NH2
O
R OR'
O
RO R'
O
R O
O O
R R Cl
O
O
OH
OH
CH3CO2HH3C O CH3
O O
H3C O CH3
O OH
CH3CO2+ +
First Year Chemistry Laboratory Course 2011-2012: DISCOVERY Block 4 13
11A.3 Risk Assessment
You should have prepared your own risk assessment for this experiment as part of the pre-
laboratory exercises, and it should be written neatly or printed and stuck in to your laboratory
notebook when you arrive at the laboratory. This will be checked by a demonstrator before you
begin work in the laboratory.
11A.4 Laboratory Activity
Work in pairs for this experiment, and work in a fume cupboard throughout. Work efficiently but
work together so that observations can be recorded by both members of the team. Good team
work and time management are essential to get this experiment completed in the time available.
Choose a work area with a free locker and select a fume cupboard and note the numbers at the top
of the lab notebook page for this experiment. Show a demonstrator the lab notebook for marking
and inform the demonstrator of the locker and fume cupboard number. Use any breaks in the
method (where time is needed to wait for recrystallization or for products to suck dry) to tidy up
after previous steps or prepare future steps. Your ability to work well as a team will be assessed.
You will need to work very quickly and efficiently to be sure to finish in this session.
Work in a fume cupboard throughout. Be sure to record all masses and observations in the lab
notebook as the experiment proceeds.
H
H
R O H H 3 C O C H 3
O O
+ A
H + s h i f t
B 3 C O
R
O
C H 3 C O 2 H H +
+ +
First Year Chemistry Laboratory Course 2011-2012: DISCOVERY Block 4 14
1. Transfer 5.00 g of salicylic acid to a dry 100 ml B19 flask carefully. Using the pre-calibrated
liquid dispensers in the fume cupboards, add 5 cm3 of glacial acetic acid and 5 cm3 of acetic
anhydride. Add a magnetic stirrer bar.
2. Boil the mixture under reflux for 30 minutes using a stirrer hotplate and heating block. Cool
the mixture with an external water bath. Once cooled, pour the reaction mixture into 100
cm3 of ice-cold water in a beaker to precipitate the product. Rinse the condenser and
reaction flask immediately with water to minimise acetic anhydride and acid vapours. If
no precipitate forms, scratch the side of the beaker with a glass rod to induce crystallisation.
Show the product to a demonstrator.
3. Filter the solid using a Buchner funnel and wash the solid thoroughly with cold water. Suck
dry and press down the filter cake with a stopper. Retain a small sample (microspatula tip-
full) of the dried crude solid for TLC analysis.
4. Recrystallise the remainder of the product in a 100 cm3 round-bottomed flask fitted with a
condenser using as solvent a 1:1 mixture of water and glacial acetic acid. The actual volume
of solvent required will need to be determined during the experiment, but it is unlikely to
exceed 15 cm3. Do not perform a hot filtration unless there is insoluble material remaining
in the hot solution. Transfer the solution from the 100 cm3 round-bottomed flask to a clean
beaker and allow the solution to cool down to room temperature for crystallisation to take
place. Filter the crystals on a Buchner filter, wash sparingly with water and suck dry. Record
the mass and calculate the percentage yield.
5. Perform thin-layer chromatography (TLC) on your product to assess its purity. To do this,
prepare solutions of the recrystallised product, the crude product (i.e. before
recrystallisation) and salicylic acid itself by dissolving a microspatula tip-full of each species
in dichloromethane, using about 0.5 to 1 cm3 of solvent. Do not remove any
dichloromethane from the fume cupboard.
6. To prepare the TLC tank, insert a filter paper around the inside of a 250 cm3 beaker (this
may require tearing off a small segment of the paper or fold it to make it fit). In a fume
cupboard, saturate the filter paper with the solvent to be used and add sufficient solvent to
the beaker to give a depth of 2 to 3 mm. In this experiment the solvent to be used is a
mixture of light petroleum ether and ethyl acetate (70:30 by volume). To apply the solution
to the TLC plate, use a fine capillary (not a melting point tube) with a flat end and place a
small spot of the solution (<2 mm diameter) in the middle of a line pencilled horizontally 8
mm from the bottom of the plate. Allow the solvent to dry, then place another spot on top
of the first one. Follow the same procedure for each solution, maintaining a distance of
around 5mm between spots, using a fresh section of capillary for each spot.
First Year Chemistry Laboratory Course 2011-2012: DISCOVERY Block 4 15
7. Place the plate under the UV lamp and view through the viewer. The spots should appear
dark on the pale green plate. If no spots are visible, continue adding spots over the top on
the same plate, this time spotting each compound more times (e.g. three each), then
visualise again with the UV lamp.
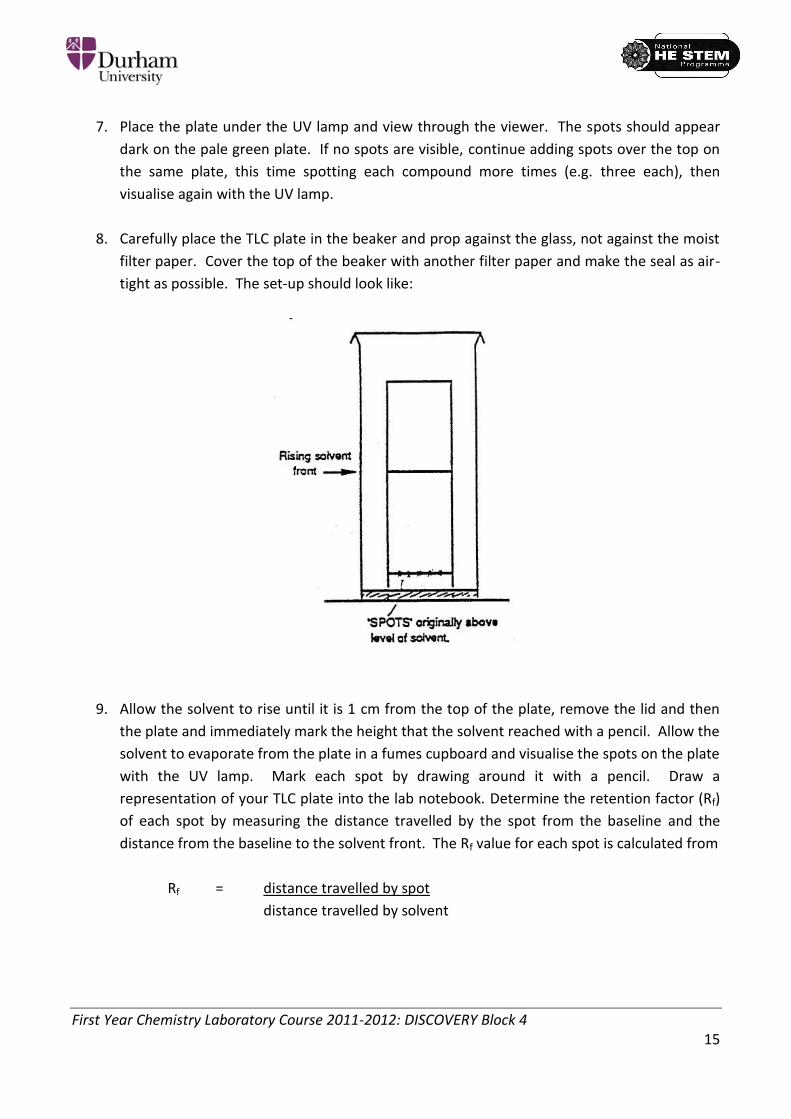
8. Carefully place the TLC plate in the beaker and prop against the glass, not against the moist
filter paper. Cover the top of the beaker with another filter paper and make the seal as air-
tight as possible. The set-up should look like:
9. Allow the solvent to rise until it is 1 cm from the top of the plate, remove the lid and then
the plate and immediately mark the height that the solvent reached with a pencil. Allow the
solvent to evaporate from the plate in a fumes cupboard and visualise the spots on the plate
with the UV lamp. Mark each spot by drawing around it with a pencil. Draw a
representation of your TLC plate into the lab notebook. Determine the retention factor (Rf)
of each spot by measuring the distance travelled by the spot from the baseline and the
distance from the baseline to the solvent front. The Rf value for each spot is calculated from
Rf = distance travelled by spot
distance travelled by solvent
First Year Chemistry Laboratory Course 2011-2012: DISCOVERY Block 4 16
Use the TLC results to draw a conclusion regarding the extent of conversion of salicyclic acid
into aspirin and the purity of aspirin following recrystallization. Note down the conclusion in
the lab notebook.
10. If there are more than 45 minutes remaining, attempt to determine the melting point of the
aspirin.
11. Wash up and tidy away all equipment. Have the lab notebook marked by a demonstrator
and show them the tidy workspace and fume cupboard before leaving the laboratory.
First Year Chemistry Laboratory Course 2011-2012: DISCOVERY Block 4 17
DISCOVERY BLOCK 4
EXPERIMENT 11B
THE KINETICS OF AN ENZYME-CATALYSED REACTION
First Year Chemistry Laboratory Course 2011-2012: DISCOVERY Block 4 18
DISCOVERY EXPERIMENT 11B
11B. The kinetics of an enzyme-catalysed reaction
Enzymes are biological catalysts. In this experiment, a chemical reaction catalysed by the enzyme -
chymotrypsin will be explored.
11B.1 Aims
To determine the rate constants for the -chymotrypsin-catalysed hydrolysis of an ester
using a spectrophotometer.
To analyse data using a non-linear regression analysis in Excel.
To work as a team and with the rest of the set to generate numerous data sets.
To produce a concise post-lab report.
11B.2 Pre-lab exercises
These exercises must be completed at least one hour before the timetabled start time of the
laboratory session. Students not completing the pre-laboratory task will be turned away from the
laboratory until the exercises are completed.
1. Read the instructions in the laboratory manual through carefully and highlight unfamiliar
words or apparatus. Use text books, the internet, LabSkills or the Interactive Lab Primer to
look up the meanings of these unfamiliar terms. Read through the information on
colorimetry in LabSkills and use the simulations to understand the basics behind the use of
spectrophotometry. Prepare the lab notebook for the experiment.
2. Study the document entitled “11B The kinetics of an enzyme-catalysed reaction –
background information”, available via the Core Chemistry 1B Laboratory Course folder on
DUO, and complete the following exercises in the lab notebook:
a) Explain why this is reaction described as an example of homogeneous catalysis.
b) Draw out the structure of the trimethylacetate ion and the 4-nitrophenoxide ion.
c) Explain why is it possible to analyse this reaction using a spectrophotometer.
d) Write down the Beer-Lambert law and the meaning of all terms in the lab notebook.
3. Prepare a risk assessment for the experiment in the same way as performed previously in
Experiment 10A. Use previous risk assessment tables that have been provided in laboratory
manuals as a template. The table should list all the chemicals encountered in the
experiment (including solvents, starting materials and products), the R and S (Risk and
Safety) numbers associated with that compound and the R and S phrases written out in full.
Use the MSDS (Material Safety Data Sheet) documents to identify the appropriate R and S
numbers. Some have been provided on DUO. Others may need to be searched for on the
internet. Cross reference these R and S numbers with the lists of phrases provided in DUO
First Year Chemistry Laboratory Course 2011-2012: DISCOVERY Block 4 19
and copy them out in full into the table. Note that the R and S numbers are not normally
given in your laboratory manual, but they should be included in your own risk assessments.
11B.3 Risk assessment
You should have prepared your own risk assessment for this experiment as part of the pre-
laboratory exercises, and it should be written neatly or printed and stuck in to your laboratory
notebook before you arrive at the laboratory. This will be checked by a demonstrator before you
may begin work in the laboratory.
11B.4 Laboratory Activity
Work in fours or threes. Assign a team leader. The team leader should work with their team to
ensure that the experiment is carried out efficiently, that all the preliminary parts of the
experiment (Parts 1 to 3) are carried out quickly and that at least one enzyme-catalysed reaction is
completed and analysed before the end of the session. Each team member will need to record all
the data from their team’s experiment, and each team will need to share final results from Part 4
with the other teams in the laboratory before leaving. This will allow multiple data sets to be
analysed in the post-lab exercise.
Each team should choose a computer with a spectrophotometer from benches 2 or 3 and a
workspace and locker on either of benches 1 or 4. Ensure that there is plenty of space to work.
Members of the team should be allocated tasks to ensure parts 1 to 3 are completed quickly, and
that part 4 is completed at least once during the session.
Part 1: Preparation of solutions
All solutions should be stored on the bench in sealed containers and clearly labelled.1
1. Solution #1: Take about 100 cm3 of 0.01 M TRIS buffer (tris(hydroxymethyl amino) methane
in water) which has a pH = 8.5. This solution will be used as the reaction medium and also
as a solvent blank.
2. Solution #2: Take 25 cm3 of a 3.4 10-3 M solution of the substrate, 4-nitrophenyl
trimethylacetate, in acetonitrile.
3. Solution #3: Collect accurately about 50 mg of the enzyme -chymotrypsin in 1.0 cm3 of the
pH 4.6 acetic acid-sodium acetate buffer. This solution will be used directly in the kinetic
run. Record the mass of the enzyme used.
1 All these solutions are water-based Category A waste, so may be disposed of by pouring down a fume cupboard sink
whilst running the cold water tap.
First Year Chemistry Laboratory Course 2011-2012: DISCOVERY Block 4 20
4. Solution #4: Take 5 cm3 of a 2.8 10-5 M 4-nitrophenol solution in the TRIS buffer. This is
the yellow coloured solution on the bench. This solution will be used to determine the
molar absorption coefficient of the product, P1. Note that since the pKa of 4-nitrophenol is
~7.0, the predominant species in the pH 8.5 TRIS buffer is the 4-nitrophenoxide ion.
Part 2: Determination of the molar absorption coefficient of 4-nitrophenoxide, the reaction product
1. On the computer attached to the spectrophotometer, open up the data acquisition software
programme named Experiment 11B (double-click on the Experiment 11B icon, and then
double-click on the Experiment 11B icon that appears).
2. Set the spectrophotometer wavelength to 400 nm, the position at which the absorbance of
the hydrolysis product, P1, is measured.
3. Record the temperature (try to ensure that it is 298 K).
4. Add TRIS buffer (solution #1) to a 1 cm spectrophotometer cell, place it in the
spectrophotometer cavity, and zero the instrument. Remove the sample cell, rinse it and fill
it with the 4-nitrophenol solution (solution #4). Replace the cell in the spectrophotometer,
and record the absorbance.2
5. Determine the molar absorption coefficient of the 4-nitrophenoxide ion using the Beer-
Lambert law and record the value in the lab notebook.
Part 3: Determination of the Spontaneous Hydrolysis Rate of the Substrate
This section allows determination of the rate constant of the uncatalysed (i.e. spontaneous)
hydrolysis of 4-nitrophenyl trimethylacetate.
1. Fill a clean sample cell with precisely 3 cm3 of TRIS buffer (solution #1).
2. Input the total running time as 1800 s and the data acquisition interval as 20 s in the
appropriate boxes in the computer programme.
3. Start the programme by pressing the white arrow on the tool bar.
4. Add 100 L of the 4-nitrophenyl trimethylacetate/acetonitrile solution (solution #2) to the
sample cell, stopper the cell, invert it a few times, and place it in the spectrophotometer
cavity. Immediately start collecting the absorbance data by pressing the green acquire
button on the computer programme.
5. At the end of the 30-minute data collection a box will automatically appear prompting you
to save your data. Save your data to an appropriate folder (use team leader initials and the
day and date in the folder name e.g. JMRThu16-1-12 so that the folder is easily identifiable)
on the server. Use an appropriate file name with a .txt extension and press Save. Do not
stop the programme before the data acquisition time of 30 minutes is complete as the data
2 Do not swap the 2 spectrophotometer cells with any other groups, as the cell pairs have been specifically matched.
First Year Chemistry Laboratory Course 2011-2012: DISCOVERY Block 4 21
will be lost. Do not try to save the data using File/Save as this will save a version of the
programme and not the experiment data, and again, the data will be lost.
Part 4a: Running the enzyme-catalysed reaction
The concentration of enzyme, [E]0, is constant for all experiments, only the concentration of
substrate is varied.
1. Empty the sample cell from Part 3 on completion of all readings, rinse well with water and
then with TRIS buffer (solution #1).
2. Add 30 L of the enzyme stock solution (solution #3) to the cell followed by precisely 3 cm3
of TRIS buffer (solution #1).
3. Place it in the spectrophotometer cavity and zero the instrument at 400 nm.
4. Add a volume (between 20 L and 80 L) of the substrate stock solution (solution #2) and
mix thoroughly. Team leaders need to liaise with other teams to decide the volumes of
solution #2 that each team will run. Each team should begin with a different volume.
5. Place the cell in the spectrophotometer and begin the data acquisition programme as
before, recording the absorbance readings at exactly the same time intervals as used above
for the spontaneous hydrolysis, i.e. every 20s for a total time of 30 minutes. Save the data
as before.
If there is a spectrophotometer and computer not in use by another team, set up an additional
enzyme-catalysed reaction run using a different volume of substrate stock solution (solution #2)
while waiting for the data collection.
Part 4b: Analysis of the data set
1. Open the Experiment 11B Data Analysis file. A bar may appear stating that Macros have
been disabled, click on Options … and Enable this content.
2. Make sure the cursor is in cell A1.
3. Insert your data into the worksheet by clicking on Data/Get External Data/From Text and
change to the directory where your data is stored. Select your required .txt file, and then
click on the Import button, use the Delimited/Tab/General choices that follow. The data
should now be loaded into columns A and B in an Excel worksheet with a curve fitting
button in it.
4. Multiply the absorbance values of the spontaneous substrate hydrolysis blank file by an
appropriate factor that reflects the different substrate concentrations used. For example, if
100 L were used in the blank and 80 L used for the kinetic run, multiply the absorbances
of the blank file by 0.8 before subtracting them from the kinetic data file. (This assumes
that the spontaneous hydrolysis constant, k0, is independent of concentration.)
First Year Chemistry Laboratory Course 2011-2012: DISCOVERY Block 4 22
5. Convert absorbance to concentration using the molar absorption coefficient of the product
(4-nitrophenoxide ion) determined in this experiment.
6. Each of the data files (including the spontaneous substrate hydrolysis blank) has the same
time interval between data points, and the same total acquisition time. Subtract the
spontaneous hydrolysis blank from each of the kinetic runs.
7. Copy the time and corrected concentration data into columns I and J, respectively, with the
first data points in cell 2. Then save the Excel file by pressing the file ‘save as’ button,
changing the directory to the same one used to save the raw data, and inputting an
appropriate file name.
8. Perform a non-linear regression analysis on the acquired P1 vs. t data sets according to the
equation )exp(1)(1 BtYXttP , by using the procedure outlined in Appendix 1.
9. At the end of the curve fitting procedure, values for X, Y, and B for each different initial
substrate concentration, [S]0, will be obtained. Tabulate the values of X, Y, and B as a
function of [S]0
If there are more than 45 minutes remaining before the end of the session, repeat Part 4a and 4b
for a different volume of substrate solution (solution #2). Note that a separate Excel file must be
used for analysing each different data set; it is not possible to use the macro on different data sets
in different Sheets in the same file.
Once as many data sets as time allows have been collected, dispose of all chemicals appropriately,
wash up all equipment and put it away and have your work areas signed off by a demonstrator.
Part 5: Sharing results
Values of X, Y and B are required for a number of different concentrations of substrate solution.
Collect the required data from other teams before leaving the laboratory.
Show a demonstrator your lab notebook for marking before leaving the laboratory.
11B.5 Post-lab exercise – production of a concise laboratory report
Once the practical work is completed, the results should be analysed and an individual concise
report produced. Guidelines for the production of the report are given below. It is recommended
that the report is written immediately after the laboratory session finishes. The report must be
completed and submitted via DUO within one week of the end of the laboratory session (i.e. the
time that the laboratory session finishes is your deadline one week later). You are reminded that
DUO time-stamps all submissions. Work submitted after your deadline will be awarded zero marks.
Reports should be produced independently and not as a team.
First Year Chemistry Laboratory Course 2011-2012: DISCOVERY Block 4 23
11B.6 Report guidance
Reports should be prepared using Microsoft Word and Excel, should be concise and should be
submitted electronically via DUO within one week of the end of the laboratory session. A paper
copy of your submission should be stuck into your lab notebook to follow the notes from the
experiment.
It is expected that you will refer to the background information document provided on DUO (and
studied during the pre-laboratory exercises) to assist with the production of the post-lab report for
this experiment. Other resources can be used to assist (e.g. text books, internet resources) but
these must be referenced in your work. Remember also to look back over previous relevant
sections of your laboratory manuals and your lab notebook from earlier in the laboratory course for
assistance.
Be sure to include: 1. Experiment title and reference, your name, laboratory team names, experiment date.
2. A concise summary of the experiment (what was done and why).
3. Tabulated data in an appropriate format, as recorded during the laboratory session. Include
values of [E]0 (the molarity of -chymotrypsin in pH 4.6 buffer in mol dm-3), the absorbance
of 2.8 10-5 M 4-nitrophenoxide ion in TRIS buffer at 400 nm, the molar absorption
coefficient of the 4-nitrophenoxide ion at 400 nm and the temperature of the solution in the
spectrophotometer. Give each table a Table caption. Microsoft Word can insert these
automatically.
4. A plot of Y1 as a function of 1/[S]0 (equation 15 in background document) to obtain
values of )[E]/( 023 kKk and )[E]/()( 0232 kkk from the slope and intercept.
Determine K / (k2 + k3) and 1 / (k2 + k3) from the slope and intercept of the double-reciprocal
plot of equation 16 in the background document. Calculate individual values of K, k2 and k3
from these values.
5. Any Excel-produced graphs should be titled, fully labelled, clear and well formatted. Give
each graph a Figure caption (e.g. ‘Figure 1: A graph to show…’). Microsoft Word can insert
these automatically. If you need help in producing graphs using Excel, see the University CIS
‘Introduction to Excel 2007: Simple Formulae and Charts’ document (Chapters 6, 7 and 8).
This can be found at http://www.dur.ac.uk/resources/its/local/er-guides/ER004.pdf. This
link is available via DUO.
6. A brief conclusion on your final results, giving reference to tables and figures (e.g. Figure 2
shows that… which implies that that…). What did you find out? What does this mean? Have
you made an assessment of any random or systematic errors in the experiment? Be sure to
report values of 232 kkk , k2 + k3, k3K / k2 and the individual values of K, k2 and k3
obtained from your graphs.
First Year Chemistry Laboratory Course 2011-2012: DISCOVERY Block 4 24
7. A brief narrative statement of the outcome of any linear regression error analysis (i.e. give
the gradient and/or intercept and their errors) and the source of errors. Do not include a
copy of the full regression analysis output from Excel.
8. Be sure to correctly state units, and quote numbers to an appropriate number of significant
figures. “Appropriate” is determined by the equipment and the regression analysis.
9. References used to assist in the production of the report.
Feedback on your submission will be provided at a later date via DUO. Remember that this
submission will count 20% towards your total practical mark for Core Chemistry 1B. Remember that
failure to submit the work by the deadline will result in a mark of zero being awarded unless the
appropriate procedures have been followed well in advance of the deadline (see p39 of the First
Year Handbook).
Useful information:
Molecular weight of -chymotrypsin = 24 800 g mol-1
Suggested Further Reading
1. R.A. Alberty and R.J. Silbey, Physical Chemistry, 2nd ed., pp. 730-736, Wiley (New York),
1977.
2. P.W. Atkins, Physical Chemistry, 6th ed., pp. 783-784, Oxford University Press (Oxford), 1994.
This list is not intended to be exhaustive; other text books and resources can and should be used, if
required.
First Year Chemistry Laboratory Course 2011-2012: DISCOVERY Block 4 25
Appendix 1: Non-linear curve fitting in Excel
Non-linear curve fitting is a common scientific procedure. The basis of the procedure is to minimise
the difference between the data and some model to describe the data, over the entire data range.
The following instructions assume that the first time data point is in cell I2, and the first corrected
concentration data point is in cell J2.
1. In cell P2, type X, in cell P3, type Y, in cell P4, type B.
2. Name cell Q2 ‘X’, cell Q3 ‘Y’, cell Q4 ‘B’. (To name a cell, firstly make the cell active by
clicking on it, then click on Formula, then Define name. Finally type the desired name in the
space provided. The default name will usually be the text entered into the cell to the
immediate left of the selected cell.)
3. Plot columns I and J on an XY scatter graph, with column I as the x-axis values.
4. Enter initial guesses for X, Y, and B into cells Q2, Q3 and Q4. Hints the final gradient
provides a good initial guess for X and a good approximate Y value is the absorption value
found from extrapolating the final slope back to the y-axis. Set B = 0.01 initially.
5. In cell K2, type =(X*I2)+(Y*(1-exp(-B*I2))), and copy to cells K3:K91. This column will now
contain the model data set that will depend on the values of X, Y and B.
6. Plot columns I and K on the same XY scatter graph as your experimental data, with column I
as the x-axis values. This will enable you to compare the experimental data with the model.
7. In cell P7, type rsq. Name cell Q7 ‘rsq’.
8. Vary the values of X, Y and B until the match between the model and the data is reasonable.
The closer the initial guess the faster the curve fitting will work. If the initial guess is too far
from the actual values the curve fitting will fail. Do not be afraid to experiment; curve fitting
will not affect your raw data, and you can always start again by restoring your saved data!
9. Once you are reasonably happy, press the ‘Curve Fit’ button. You will first be asked to select
the range of cells containing time data, the experimental absorbance and the theoretical
absorbance. This can either be done typing the appropriate range into the box (e.g., I2:K91)
or highlighting the full range with the mouse. The value in Q7 is a measure of progress. The
best fit corresponds to rsq = 1, as long as rsq is increasing the fitting procedure is working.
You can cancel at any time by pressing the ‘terminate’ button – this will save the most
recent values of X, Y and B, so you can restart the fitting from these values if you wish. Save
the Excel file when you obtain a good fit.
First Year Chemistry Laboratory Course 2011-2012: DISCOVERY Block 4 26
DISCOVERY
BLOCK 4
EXPERIMENT 12A
STEREOCHEMISTRY
First Year Chemistry Laboratory Course 2011-2012: DISCOVERY Block 4 27
DISCOVERY EXPERIMENT 12A
12A. Stereochemistry
This experiment is a ‘dry’ practical. Details will be provided on the day you complete the
experiment. Work will be completed on sheets provided in the laboratory, and collected in at the
end of the session and marked. This is a summative exercise, but no post-lab work is required. It is
essential that you bring your model kit to this laboratory session or you will place yourself at a
disadvantage with the exercises.
12A.1 Aims
To complete a written exercise using a model kit to develop understanding of basic
stereochemical principles.
To convey 3-D information in 2-D by use of accepted structural drawing conventions.
12A.2 Pre-lab exercises
These exercises must be completed at least one hour before the timetabled start time of the
laboratory session. Students not completing the pre-laboratory task will be turned away from the
laboratory until the exercises are completed.
1. Revise stereochemistry from Core Chemistry 1A organic chemistry lectures and your text
books (e.g. the relevant sections in Chapter 24 of Housecroft 4th Edition, or others). Read up
particularly on chirality, isomerism, the use of sawhorse projections, Newman projections,
assigning R and S configurations in chiral molecules, the meaning of ‘diastereomer’ and
‘topism’ and the meaning of ‘homotopic’, ‘enantiotopic’ and ‘diastereotopic’.
You are not required to prepare anything in the lab notebook for this experiment. You may, if you
wish, prepare some notes on the relevant topics in your lab notebook before the session, but this is
not compulsory. You may also bring relevant text books with you. Remember to bring your model
kit.
12A.3 Risk Assessment
This experiment has minimum risk, but the activity will be carried out in the laboratory and will
require the wearing of usual PPE.
12A.4 Laboratory Activity
Attend the laboratory as normal, bringing lab coats, safety specs, pencils, pens, rulers, erasers and
model kits. Each worksheet should be completed individually, but group discussion and discussion
with the demonstrator is permitted. Text books may be referred to, if desired or required.
The time available for this activity is 3 hours. Named worksheets must be completed and handed in
by the end of the session.

First Year Chemistry Laboratory Course 2011-2012: DISCOVERY Block 4 28
DISCOVERY
BLOCK 4
EXPERIMENT 12B
PREPARATION OF AN
IODIDE OF TIN
First Year Chemistry Laboratory Course 2011-2012: DISCOVERY Block 4 29
DISCOVERY EXPERIMENT 12B
12B. Preparation of an iodide of tin
In this experiment a sample of a tin iodide will be prepared and its molecular formula determined.
A known mass of iodine will be allowed to react with an excess of metallic tin. The amount of tin
that has reacted will be determined by weighing the metal before and after the reaction. Since the
quantitative aspect of the experiment is based on the assumption that all the iodine used reacts
with the tin, any loss of iodine, through spillage or as vapour, must be avoided.
For this experiment it is essential that the reaction flask and inner surface of the condenser are free
of moisture. Iodine sublimes readily and if you use a flask straight from the oven significant
quantities of iodine vapour will be formed, and the quantitative aspect of the experiment is lost.
12B.1 Aims
To prepare a tin iodide using anhydrous conditions.
To deduce the formula of the tin iodide.
12B.2 Pre-lab exercises
These exercises must be completed at least one hour before the timetabled start time of the
laboratory session. Students not completing the pre-laboratory task will be turned away from the
laboratory until the exercises are completed.
1. Read your laboratory instructions through carefully and highlight unfamiliar words or
apparatus. Use text books, the internet, LabSkills or the Interactive Lab Primer to look up
the meanings of these unfamiliar terms. Read back over any related experiments you have
previously conducted, focusing particularly on how to set up and use reflux apparatus and
how to calculate empirical formulas.
2. Prepare a risk assessment for the experiment in the same way as performed previously in
Experiment 10A. Use previous risk assessment tables that have been provided in laboratory
manuals as a template. The table should list all the chemicals encountered in the
experiment (including solvents, starting materials and products), the R and S (Risk and
Safety) numbers associated with that compound and the R and S phrases written out in full.
Use the MSDS (Material Safety Data Sheet) documents to identify the appropriate R and S
numbers. Some have been provided on DUO. Others may need to be searched for on the
internet. Cross reference these R and S numbers with the lists of phrases provided in DUO
and copy them out in full into the table. Note that the R and S numbers are not normally
given in your laboratory manual, but they should be included in your own risk assessments.
First Year Chemistry Laboratory Course 2011-2012: DISCOVERY Block 4 30
3. Using text books, the internet or other resources, read about and make some notes in the
lab notebook about known compounds of tin and iodine, including their colour and
properties, to aid identification of the compound to be prepared in the laboratory session.
12B.3 Risk Assessment
You should have prepared your own risk assessment for this experiment as part of the pre-
laboratory exercises, and it should be written neatly or printed and stuck in to your laboratory
notebook when you arrive at the laboratory. This will be checked by a demonstrator before you
begin work in the laboratory.
12B.4 Laboratory activity
Work in pairs for this experiment, and work in a fume cupboard throughout. Work efficiently but
work together so that observations can be recorded by both members of the team. Choose a work
area with a free locker and select a fume cupboard and note the numbers at the top of the lab
notebook page for this experiment. Show a demonstrator the lab notebook for marking and
inform the demonstrator of the locker and fume cupboard number. Your ability to work well as a
team will be assessed.
Work in a fume cupboard throughout. Be sure to record all masses and observations in the lab
notebook as the experiment proceeds.
1. Using a weighing bottle weigh out about 5 g of iodine (using an appropriate balance), and
transfer to a cold and dry 100 cm3 round-bottom flask. Ensure that the exact mass of iodine
is recorded.
2. In a fume cupboard measure out 50 cm3 of chloroform and add it to the flask; shake gently
to dissolve part of the iodine. Attach the condenser to the flask, and heat the contents of
the flask until a gentle reflux is obtained. A temperature of approximately 85oC should be
sufficient.
3. Meanwhile, clean the tin foil by wiping both sides with a piece of filter or tissue paper
dampened with acetone. Weigh out about 4 g of the tin foil, ensuring that the exact mass of
tin is recorded. Cut the foil into strips about 5 mm wide and roll these around a thin pen or
pencil into a narrow extended coil, to look like an extended spring. The diameter of these
springs should be small enough to allow them to travel unhindered all the way through the
condenser to be used for the experiment. Do not cut the tin into small pieces because at
the end of the reaction the residual tin must be removed and reweighed.
4. Once most of the iodine has dissolved, remove from the heat and allow the contents of the
flask to cool slightly so that reflux stops. Add the small coils of tin down through the
First Year Chemistry Laboratory Course 2011-2012: DISCOVERY Block 4 31
condenser. Alternatively, use a paper tissue to remove condensation from the outsides of
the neck of the flask and the lower part of the condenser, then remove the condenser and
quickly add the weighed tin foil to the flask, replacing the condenser quickly, to avoid loss of
iodine vapour. Water condensation from the apparatus should not be allowed to enter the
flask. This will have a profoundly detrimental effect on the reaction.
5. Reheat the flask until a steady reflux is obtained. Continue heating until all the iodine has
reacted. At this stage the drops of solvent at reflux should have become colourless, with
the colour of the solution being a clear orange.
6. At the end of the reaction carefully decant the hot reaction solution into a warm beaker so
that the residual tin remains in the flask. Allow the solution to cool slowly to room
temperature so that crystals develop and grow.
7. While you are waiting for your product to crystallise, wash the residual tin with 3-4 small
portions (approximately 5 cm3) of chloroform (with warming and in a fume cupboard) to
remove product from the tin. Continue the washing procedure until the tin is essentially
free of adhered product, then air dry the tin in a fumes cupboard. Note the appearance of
the metal, then reweigh using an appropriate balance.
8. If crystallisation does not occur, place the beaker on a stirrer hotplate at a moderate
temperature (in a fume cupboard), add a stirrer bar and slowly remove some of the solvent
by evaporation. Remove from the heat as soon as crystals start to appear at the surface of
the solution. Isolate the crystals by suction filtration. Do not let the product come into
contact with any moisture and do not wash with water, alcohols or acetone as it will
decompose.
9. Place all the chloroform wastes in the bottle labelled ‘D-waste’. Do not add other solvents
(or solvent mixtures) to this bottle. Once you have washed, dried and weighed the residual
tin it may be disposed of as normal solid wastes.
10. Determine the empirical formula of the tin iodide. Assuming that the molecular formula is
identical to the empirical formula, write a balanced equation for the formation of the tin
iodide. Calculate the % yield of your product. Place your product in an appropriately
labelled, sealed sample bag. Hand in your sample to the demonstrator and show them the
lab notebook for marking.
11. Ensure all equipment has been cleaned and tidied away, and that all work areas have been
left clean and tidy. Sign out with a demonstrator.
First Year Chemistry Laboratory Course 2011-2012: DISCOVERY Block 4 32
DISCOVERY
BLOCK 4
EXPERIMENT 13A
TRANSITION METAL
COMPLEXES OF COBALT(II)

First Year Chemistry Laboratory Course 2011-2012: DISCOVERY Block 4 33
DISCOVERY EXPERIMENT 13A
13A. Transition metal complexes of cobalt(II)
One of the features that make coordination compounds of, in particular, the d-block metals so
important is their so-called ‘complex’ behaviour, something first rationalised by Werner. He
studied many aspects of coordination chemistry, but his most notable contribution is to the
understanding of the types of isomerism possible in such metal complexes, something that will be
explored here.
In this experiment, linkage isomers will be prepared. Linkage isomerism is the type of structural
(constitutional) isomerism which can occur when ambidentate ligands form complexes.
Ambidentate ligands have two or more different sites that can be used for attachment to a metal
ion, but usually only one is used at any given time. This experiment is concerned with the NO2–
group, which bonds either through oxygen or nitrogen when it occupies one coordination position
at a transition metal centre. When it bonds through nitrogen it is termed a nitro ligand and when it
bonds through oxygen it is termed a nitrito ligand. Two such complexes, [Co(NH3)5NO2]Cl2 and
[Co(NH3)5ONO]Cl2, are prepared in this experiment.
The reaction sequence that will be used is as follows:
13A.1 Aims
To prepare and compare complexes of cobalt, including nitro- and nitrito isomers.
To develop understanding of some different ways ligands can bond to metal centres.
CoCl2.6H2ONH3 / NH4Cl
HCl / O2
H+ / heat
c. HCl / heat
H2O[Co(NH3)6]Cl2
H2O2[Co(NH3)5(H2O)]Cl3
NaNO2[Co(NH3)5(ONO)]Cl2
[Co(NH3)5(NO2)]Cl2
NaNO2
[Co(NH3)5Cl]Cl2
c. HCl
First Year Chemistry Laboratory Course 2011-2012: DISCOVERY Block 4 34
13A.2 Pre-lab exercises
These exercises must be completed before the experiment, and completed at least one hour before
the timetabled start time of the laboratory session. Students not completing the pre-laboratory
task will be turned away from the laboratory until the exercises are completed. Remember that
questions posed in the laboratory manual can also be answered before the laboratory session, and
calculations and equations prepared, to enable work in the laboratory to be more efficient.
1. Read the instructions in the laboratory manual through carefully and highlight unfamiliar
words or apparatus. Use text books, the internet, LabSkills or the Interactive Lab Primer to
look up the meanings of these unfamiliar terms.
2. Prepare a risk assessment for the experiment in the same way as performed previously in
Experiment 10A. Use previous risk assessment tables that have been provided in laboratory
manuals as a template. The table should list all the chemicals encountered in the
experiment (including solvents, starting materials and products), the R and S (Risk and
Safety) numbers associated with that compound and the R and S phrases written out in full.
Use the MSDS (Material Safety Data Sheet) documents to identify the appropriate R and S
numbers. Some have been provided on DUO. Others may need to be searched for on the
internet. Cross reference these R and S numbers with the lists of phrases provided in DUO
and copy them out in full into the table. Note that the R and S numbers are not normally
given in your laboratory manual, but they should be included in your own risk assessments.
3. Considering Part 1 of the experiment, answer the following questions in the lab notebook:
a. Write an equation to represent what happens when ammonia is dissolved in water.
b. Why is this important in the first stage of the synthesis in Part 1?
c. Copy and complete the following equations that describe the formation of
[Co(NH3)6]2+ (remembering to balance them):
CoCl2 + 2OH– (aq) + H2O ___________________________
[Co(OH2)6](OH)2 + 2OH-(aq) ___________________________
[Co(OH)4]2– + NH3 ___________________________
d. What are the oxidation states of cobalt in the following?
[Co(NH3)5(OH2)]3+ [Co(NH3)5Cl]2+ [Co(NH3)6]2+
e. Using half-equations, workout a balanced equation for the formation of
[Co(NH3)5(OH2)]3+ from [Co(NH3)6]2+ by reaction with H2O2.
f. Give a balanced equation for the synthesis of [Co(NH3)5Cl]2+ from [Co(NH3)5(OH2)]3+
ignoring the counter anions.
First Year Chemistry Laboratory Course 2011-2012: DISCOVERY Block 4 35
13A.3 Risk assessment
A risk assessment for this experiment should have been prepared as part of the pre-laboratory
exercises, and it should have been written neatly or printed and stuck in to the lab notebook before
arrival at the laboratory session. This will be checked by a demonstrator before work can begin in
the laboratory.
13A.4 Laboratory activity
Show a demonstrator the prepared lab notebook to confirm completion of the pre-lab exercises.
Work in pairs but keep individual records in lab notebooks as the experiment proceeds. Choose a
work area with a free locker and a fume cupboard to work in, and write the number of these at the
top of the lab notebook page for this experiment. Inform the demonstrator of the locker and fume
cupboard number.
Work in a fume cupboard for the duration of the experiment. Think carefully about use of stoppers
and bungs to prevent flammable vapours escaping into the laboratory during any transfer of liquids
during the experiment.
Part 1: Preparation of [Co(NH3)5Cl]Cl2
The product from Part 1 will be used to prepare the nitro and nitrito complexes. Inform a
demonstrator if the yield is less than 5.5 g. It is essential that the procedure is followed carefully if
good yields are to be obtained.
1. Work in pairs in a fume cupboard. Dissolve ammonium chloride (5.0 g) in concentrated 0.88
ammonia (30 cm3) in a 250 cm3 conical flask. Continually agitate this solution whilst adding
cobalt(II) chloride hexahydrate (CoCl2.6H2O) (10.0 g) in 2-3 g portions, making sure that each
portion reacts before the next portion is added. Initially a precipitate of [Co(NH3)6]Cl2 will
form with the evolution of heat.
2. To the warm slurry/solution add, with care, 30% hydrogen peroxide (8 cm3) in small portions
(with efficient stirring). This results in a vigorous exothermic reaction with effervescence. A
deep red solution of [Co(NH3)5(OH2)]3+ should form (sometimes this may look brown, which
is not a problem).
3. Cool in an ice bath, then slowly add concentrated hydrochloric acid (30 cm3). Heat the
reaction mixture gently with stirring until a purple product precipitates (typically after 20-30
minutes) from a blue-green supernatant liquid. Do not allow the solution to boil. When the
reaction is complete the supernatant liquid should be deep blue (to see this, let the mixture
settle for a few seconds).

First Year Chemistry Laboratory Course 2011-2012: DISCOVERY Block 4 36
4. Cool to ambient temperature, and filter to obtain the solid product. Wash with several
portions of ice cold water, then with a small quantity of acetone before drying in the air. The
product should be a dry powder. If it is still wet, re-wash the sample with acetone on
Buchner filter until free from water. Do not proceed with a wet solid. Record the mass of
product obtained. Show the product to a demonstrator.
Part 2: Preparation of [Co(NH3)5NO2]Cl2, the nitro-isomer
1. Working in a fumehood, dissolve [Co(NH3)5Cl]Cl2 (2.5 g) in a mixture of concentrated (0.88)
ammonia solution (6 cm3) and water (50 cm3) by heating at the boiling point. Rapidly filter
the hot solution through a Buchner funnel, cool the filtrate in an ice bath and acidify slightly
to about pH 6 (check with indicator paper using a glass rod and white tile) by the addition of
dilute hydrochloric acid.
2. Add sodium nitrite (3.0 g) to the cold solution, and heat the resultant mixture until the red
precipitate that initially forms completely redissolves. Continue heating until the solution is
dark yellow-brown in colour.
3. Cool the dark yellow-brown solution and then add concentrated hydrochloric acid (15 cm3).
Cool in ice for at least half an hour. Collect the brown-yellow crystals by filtration. Wash the
product with a small quantity of acetone, then dry in the air. Record the mass of the product
and determine the percentage yield (based on the amount of [Co(NH3)5Cl]Cl2 used). Give a
balanced equation for the formation of the product. Place the product in an appropriately
labelled sample bag and hand in to a demonstrator for marking. If completing Experiment
13B next session, notify the demonstrator so that the sample can be set aside for use next
session.
Part 3: Preparation of [Co(NH3)5ONO]Cl2, the nitrito-isomer
1. Dissolve [Co(NH3)5Cl]Cl2 (2.5 g) in a mixture of water (50 cm3) and conc. (0.88) ammonia (6
cm3) with heating as in Part 2. Filter the resultant solution, cool in ice then neutralise the
filtrate with dilute hydrochloric acid. This step is absolutely critical to the success of the
preparation. Use pH paper, a white tile and a glass rod to test the solution. A final pH of 6
can be tolerated.
2. Add sodium nitrite (2.5 g) and then 2.5 cm3 of a 1:1 mixture of water and concentrated
hydrochloric acid (prepare this solution in advance). Cool in ice for at least half an hour,
then filter the red precipitate that gradually forms.
First Year Chemistry Laboratory Course 2011-2012: DISCOVERY Block 4 37
3. Wash the product with ice-cold water and a small volume of acetone before drying in the
air. Record the mass of the product and determine the percentage yield (based on the
amount of [Co(NH3)5Cl]Cl2 used). Write the balanced equation for the reaction of NaNO2
with concentrated HCl and thus construct a balanced equation for the formation of
[Co(NH3)5ONO]2+ from [Co(NH3)5Cl]2+. Show the lab notebook to the demonstrator for
marking. Place the product in an appropriately labelled sample bag and hand in to a
demonstrator for marking. If completing Experiment 13B next session, notify the
demonstrator so that the sample can be set aside for use next session.
Ensure that the lab notebook has been checked, samples have been handed in and apparatus has
been washed up and put away. Tidy all work areas. Have the work areas checked by a
demonstrator before you leave the laboratory.
First Year Chemistry Laboratory Course 2011-2012: DISCOVERY Block 4 38
DISCOVERY
BLOCK 4 EXPERIMENT 13B
ISOMERS OF COBALT(II) AND
COBALT(III) COMPLEXES
First Year Chemistry Laboratory Course 2011-2012: DISCOVERY Block 4 39
DISCOVERY EXPERIMENT 13B
13B. Isomers of cobalt(II) and cobalt(III) complexes
In Experiment 13A, linkage isomers of a cobalt(II) complex were prepared using an ambidentate
ligand. In this experiment, these complexes will be investigated further, and a complex of cobalt(III)
and a bidentate ligand will be prepared. The isomerism in these complexes will be investigated.
Recall that there are two main types of isomerism: structural (consititutional) isomerism (e.g.
linkage isomerism and many others) and stereoisomerism (e.g. geometric isomerism and optical
isomerism). This experiment will investigate examples of both constitutional isomerism (in this
case, linkage isomerism) and stereoisomerism.
The complex to be prepared in this experiment contains various ligands that are capable of bonding
to the cobalt(III) ion, namely: ethylenediamine (1,2-diaminoethane, H2NCH2CH2NH2, often
abbreviated to en), water and chloride ions. By varying the number of these three ligands attached
to the 6-coordinate metal ion, various isomers are theoretically possible.
In this experiment the complex ion [Co(en)2Cl2]+ is prepared, which itself is capable of existing in
isomeric forms, but here we are concerned with geometrical isomerism arising from the
arrangement of the ligands about the metal ion. The cation has an octahedral co-ordination, so the
two ethylenediamine molecules and two chloride ions can be arranged in two ways.
The formulation of the complex, i.e. [Co(en)2Cl2]Cl, has been written so as to indicate the presence
of two types of chloride ions; one type is directly bonded to the metal, whereas the other is the
counter-ion of the complex cation and is not directly bound to the metal. When the complex is
dissolved in water the ions present in the solid lattice, [Co(en)2Cl2]+ and Cl-, become dispersed into
solution; thus only one third of the chloride in the material is released as chloride ions.
In the preparation described below, the chloride counter-ion interacts with the excess hydrochloric
acid used in the reaction to form the [HCl2]– ion. Other ions of this type are well known, particularly
[HF2]–.
13B.1 Aims
To consider isomerism in transition metal complexes
To prepare geometrical isomers of a cobalt(III) complex
To prepare the nitro-isomer of a cobalt(II) complex by conversion of the nitrito-isomer
First Year Chemistry Laboratory Course 2011-2012: DISCOVERY Block 4 40
13B.2 Pre-lab exercises
These exercises must be completed at least one hour before the timetabled start time of the
laboratory session. Students not completing the pre-laboratory task will be turned away from the
laboratory until the exercises are completed. If desired, additional questions posed in the
laboratory manual can be answered in the lab notebook before the session to ensure efficient use
of time during the session.
1. Read the instructions in the laboratory manual through carefully and highlight unfamiliar
words or apparatus. Use text books, the internet, LabSkills or the Interactive Lab Primer to
look up the meanings of these unfamiliar terms.
2. Prepare a risk assessment for the experiment in the same way as performed previously in
Experiment 10A. Use previous risk assessment tables that have been provided in laboratory
manuals as a template. The table should list all the chemicals encountered in the
experiment (including solvents, starting materials and products), the R and S (Risk and
Safety) numbers associated with that compound and the R and S phrases written out in full.
Use the MSDS (Material Safety Data Sheet) documents to identify the appropriate R and S
numbers. Some have been provided on DUO. Others may need to be searched for on the
internet. Cross reference these R and S numbers with the lists of phrases provided in DUO
and copy them out in full into the table. Note that the R and S numbers are not normally
given in your laboratory manual, but they should be included in your own risk assessments.
3. Ensure you possess a model kit and bring it with you to the laboratory session. Model kits
are available to purchase from chemistry stores.
13B.3 Risk assessment
A risk assessment for this experiment should have been prepared as part of the pre-laboratory
exercises, and it should have been written neatly or printed and stuck in to the lab notebook before
arrival at the laboratory session. This will be checked by a demonstrator before work can begin in
the laboratory.
13B.4 Laboratory activity
Show a demonstrator the prepared lab notebook to confirm completion of the pre-lab exercises.
Work in pairs but keep individual records in lab notebooks as the experiment proceeds. Choose a
work area with a free locker and a fume cupboard to work in, and write the number of these at the
top of the lab notebook page for this experiment. Inform the demonstrator of the locker and fume
cupboard number.
First Year Chemistry Laboratory Course 2011-2012: DISCOVERY Block 4 41
Model building work should be carried out on a clean bench away from any synthetic work. All
synthetic work should be carried out in a fume cupboard. Ensure that appropriate balances are
used, that all exact masses are recorded and that observations are recorded in the lab notebook
throughout the experiment.
Part 1: Conversion of a nitrito-isomer of cobalt, [Co(NH3)5ONO]Cl2, into the nitro-isomer [Co(NH3)5NO2]Cl2
Both isomers of this cobalt(II) complex were prepared during Experiment 13A. The nitrito-isomer
slowly reverts to the more stable nitro-isomer at room temperature in the solid state, but the
process can be accelerated by heating or by dissolution in acid solution. Retrieve the samples from
Experiment 13A and compare. Note that it is pointless undertaking the experimental work if the
product from Part 3 of Experiment 13A is yellow-brown. If it is, then the nitrito-isomer has already
isomerised to the nitro-form. If samples belonging to both partners are yellow-brown, consult a
demonstrator.
1. Dissolve about 0.5 g of the nitrito-complex prepared in Part 3 of Experiment 13A in hot
water (5 cm3) containing a few drops of dilute ammonia and cool the solution in an ice bath.
2. Carefully add concentrated hydrochloric acid (5 cm3). Cool the solution thoroughly in an ice
bath and isolate the yellow-brown crystals by filtration. Wash the product with a small
volume of acetone and dry in the air.
3. Record the mass of product and calculate the % yield based on the amount of starting
complex used.
4. Compare and contrast the two samples prepared in Experiment 13A with the product from
this section. Name another ligand that is ambidentate (hint: look back through the lab
notebook).
5. Place the sample in an appropriately labelled sample bag and hand in.
Part 2: Preparation of geometrical isomers cis- and trans-[Co(en)2Cl2]Cl
1. Add a 10% aqueous solution of ethylenediamine (1,2-diaminoethane) (15 cm3) with
stirring to a solution of CoCl2.6H2O (4.0 g) in water (12.5 cm3) contained in an
evaporating dish or small beaker.
2. Add approximately 3.5 cm3 of 30% hydrogen peroxide (the oxidant), adding quickly, but
cautiously, in approximately 1 cm3 portions.
First Year Chemistry Laboratory Course 2011-2012: DISCOVERY Block 4 42
3. Add a further 3.5 cm3 of hydrogen peroxide dropwise. When the oxidation is complete,
acidify the solution with concentrated hydrochloric acid (9 cm3) and evaporate the
solution slowly in a fume cupboard with continuous stirring at first, until a steady boiling
rate is achieved. Use a hot plate and heat slowly. A crust forms over the surface as the
volume is reduced (~ 20 cm3). Do not leave unattended otherwise a paste containing
concentrated hydrochloric acid will spatter.
4. The solution should then be cooled, and the bright-green square plates of the complex,
trans-[Co(en)2Cl2]Cl.HCl.2H2O collected by filtration, and washed with a small volume of
acetone and dried. The crystals should be green, not blue (which would indicate the
presence of Co(en)3Cl3). If a visible mixture of blue and green coloured complexes is
obtained, the blue complex may be removed by washing the solid with a small quantity
of acetone. Consult a demonstrator before attempting this. Record the mass of the
product and calculate the % yield based on the amount of CoCl2.6H2O used. Place the
sample in an appropriately labelled sample bag and hand in to the demonstrator.
5. The red solution contains the cis-isomer, but the latter is difficult to isolate without
contamination with the trans-isomer. Discard the red solution in the heavy metals waste
container located in the fumes cupboard.
6. Wash and put away all apparatus. Clean and tidy work spaces. Have a demonstrator
check the work spaces are clean and tidy.
Part 3: Isomerism in cobalt(III) complexes
1. Draw the three isomers of [Co(en)2Cl2]+ clearly into the lab notebook. Label each isomer
with a term that differentiates it from the others. Assume that the geometry of 1,2-
diaminoethane (en) restricts the positions of the nitrogen atoms to adjacent positions, i.e.
cis-positions, and that en remains bidentate. Make models of the complex ions with your
model kit, and take particular note of the features of the cis- isomer.
2. Draw all isomers of [Co(en)3]3+ (assuming en remains bidentate).
3. Suggest and outline an experiment that could be used to separate and isolate each of the
different forms of [Co(en)3]3+. (Hint: refer to a text book such as Shriver & Atkins or
Housecroft).
4. How many moles of AgCl would form upon addition of excess Ag+ ions to an aqueous
solution of [Co(en)2Cl2]Cl? (Hint: read back over the introductory text to the experiment).
5. Show the lab notebook to the demonstrator for marking and sign out.
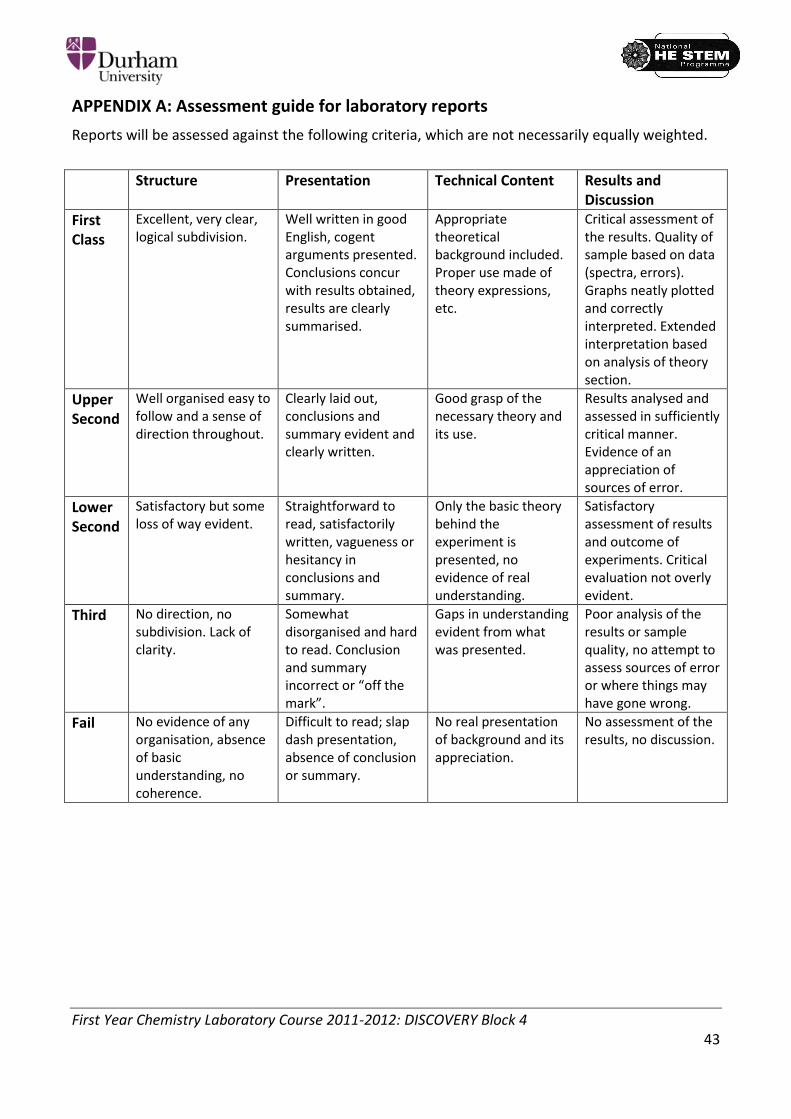
First Year Chemistry Laboratory Course 2011-2012: DISCOVERY Block 4 43
APPENDIX A: Assessment guide for laboratory reports
Reports will be assessed against the following criteria, which are not necessarily equally weighted.
Structure Presentation Technical Content Results and Discussion
First Class
Excellent, very clear, logical subdivision.
Well written in good English, cogent arguments presented. Conclusions concur with results obtained, results are clearly summarised.
Appropriate theoretical background included. Proper use made of theory expressions, etc.
Critical assessment of the results. Quality of sample based on data (spectra, errors). Graphs neatly plotted and correctly interpreted. Extended interpretation based on analysis of theory section.
Upper Second
Well organised easy to follow and a sense of direction throughout.
Clearly laid out, conclusions and summary evident and clearly written.
Good grasp of the necessary theory and its use.
Results analysed and assessed in sufficiently critical manner. Evidence of an appreciation of sources of error.
Lower Second
Satisfactory but some loss of way evident.
Straightforward to read, satisfactorily written, vagueness or hesitancy in conclusions and summary.
Only the basic theory behind the experiment is presented, no evidence of real understanding.
Satisfactory assessment of results and outcome of experiments. Critical evaluation not overly evident.
Third
No direction, no subdivision. Lack of clarity.
Somewhat disorganised and hard to read. Conclusion and summary incorrect or “off the mark”.
Gaps in understanding evident from what was presented.
Poor analysis of the results or sample quality, no attempt to assess sources of error or where things may have gone wrong.
Fail
No evidence of any organisation, absence of basic understanding, no coherence.
Difficult to read; slap dash presentation, absence of conclusion or summary.
No real presentation of background and its appreciation.
No assessment of the results, no discussion.