Embed Size (px)
Citation preview
DNS Cache Poisoning
Using Man-in-the-middle attack
Ryan Ellingson Herzing University 3/23/15
1
Table of Contents
I. Executive Summary ............................................................................................... 2
II. Project Planning .................................................................................................... 3
Network Diagram
Technical Planning
Linux Client Specifications
Windows Server Specifications
Windows Client Specifications
III. Implementation ..................................................................................................... 5
Installation of Kali Linux
Installation of Windows Server 2008
Installation of Windows 7
Cloning http://www.facebook.com
Editing Configuration Files
Using Ettercap
IV. DNS Cache Poisoning (with MITM) Plan Testing ............................................ 10
V. Preventing DNS Cache Poisoning (with MITM Attack) .................................................................................................................. 12
VI. Conclusion ............................................................................................................ 13
VII. Appendix ............................................................................................................... 14

Executive Summary
DNS Cache Poisoning is posing an imminent threat to open internet networks. It can be set up in only a
matter of minutes, and utilized in such a way that information such as accounts, emails, and passwords
can be compromised with minimal work. Creating some policies against this could just help save any
business that relies on the use of their internet network for a source of income, or for any business that
cares about the safety and integrity of their network as a whole.
*DNS Cache Poisoning is illegal. This paper is for educational purposes only. Do not try this on anyone’s
network.*

DNS CACHE POISONING - MARCH 2015
3
Project Planning
For this project, the planning is relatively simple. A simple understanding of DNS Cache Poisoning and Man-in-the-Middle attacks are necessary. DNS Cache Poisoning - computer hacking attack, whereby data is introduced into a DNS name server's cache database, causing the name server to return an incorrect IP address, diverting traffic to another computer. Man-in-the-Middle - a form of active eavesdropping in which the attacker makes independent connections with the victims and relays messages between them. This project is manageable on both a large-scale network, a small-scale network, or for testing purposes on virtual machines without any notable issues.
Network Diagram
Figure 1 Network Diagram

DNS CACHE POISONING - MARCH 2015
4
Technical Planning
The following specifications were used as part of the technical planning of the project entities. For this project, make a Kali Linux machine, Windows (7) client, 1 Windows Server (2008) client, and a router.
Linux Client Specifications
Operating System Kali Linux
Memory 1 GB
Hard Disk 15 GB
Network Cards 1 NIC
Figure 2 Linux Client Specifications
Windows Server Specifications
Operating System Windows Server 2008
Memory 2 GB
Hard Disk 60 GB
Network Cards 1 NIC
Figure 3 Server Specifications
Windows Client Specifications
Operating System Windows 7
Memory 2 GB
Hard Disk 20 GB
Network Cards 1 NIC
Figure 3 Windows Client Specifications
DNS CACHE POISONING - MARCH 2015
5
Implementation
Implementation (for the purpose of this project) was done on VMware Workstation 10.0.1. Depending on the network, the time that implementation will take may vary.
Installation of Kali Linux
When installing Kali Linux, follow all the prompts and use all the default options. Once fully installed, configure the IP Address, Network Mask, and Gateway. (Letting it get an IP via DHCP is alright too) Next, ping 8.8.8.8. If 8.8.8.8 cannot be reached, make sure to go back and check the configurations again.
Installation of Windows Server 2008
Install Windows Server 2008 like normal. Set a user and root password. Make sure to write them down so you will not forget them. Be sure to set up the DNS server role on the server. This will be the DNS Server that the Windows 7 Machine will use.
Installation of Windows 7
Install Windows 7 like normal. Set a user and password. Make sure to write them down so you will not forget it. Be sure to point the DNS towards the Windows Server 2008 Machine.
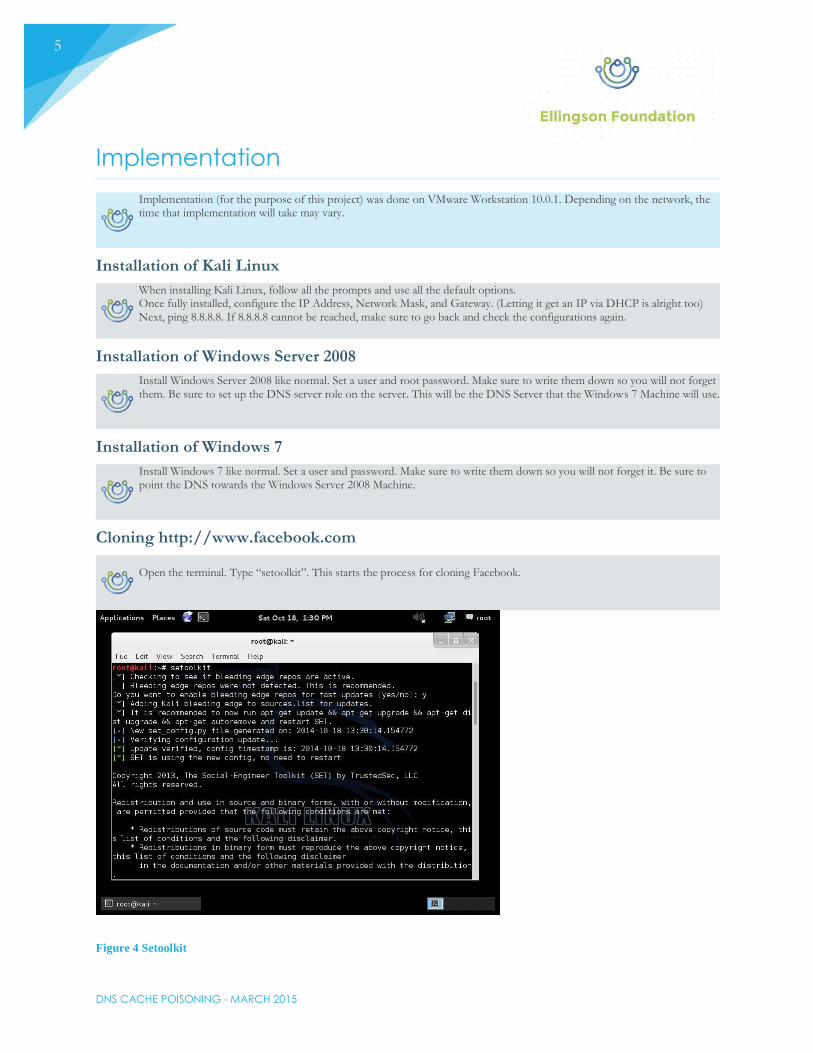
Cloning http://www.facebook.com
Open the terminal. Type “setoolkit”. This starts the process for cloning Facebook.
Figure 4 Setoolkit
DNS CACHE POISONING - MARCH 2015
6
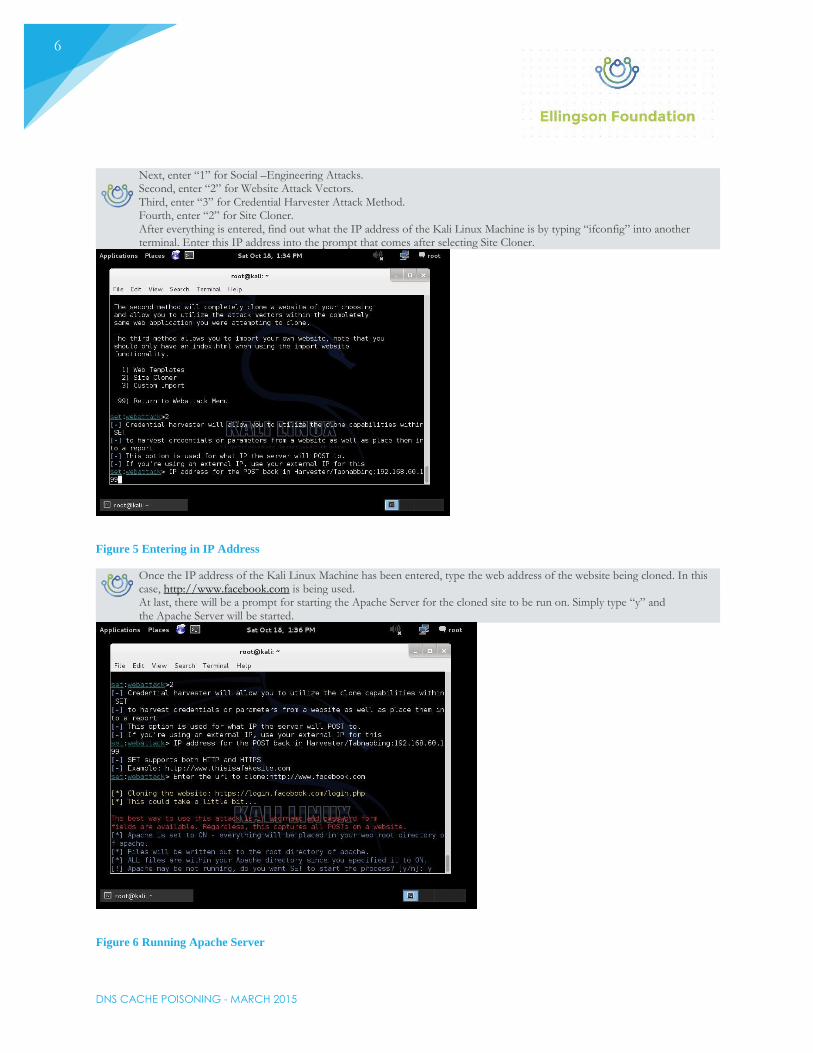
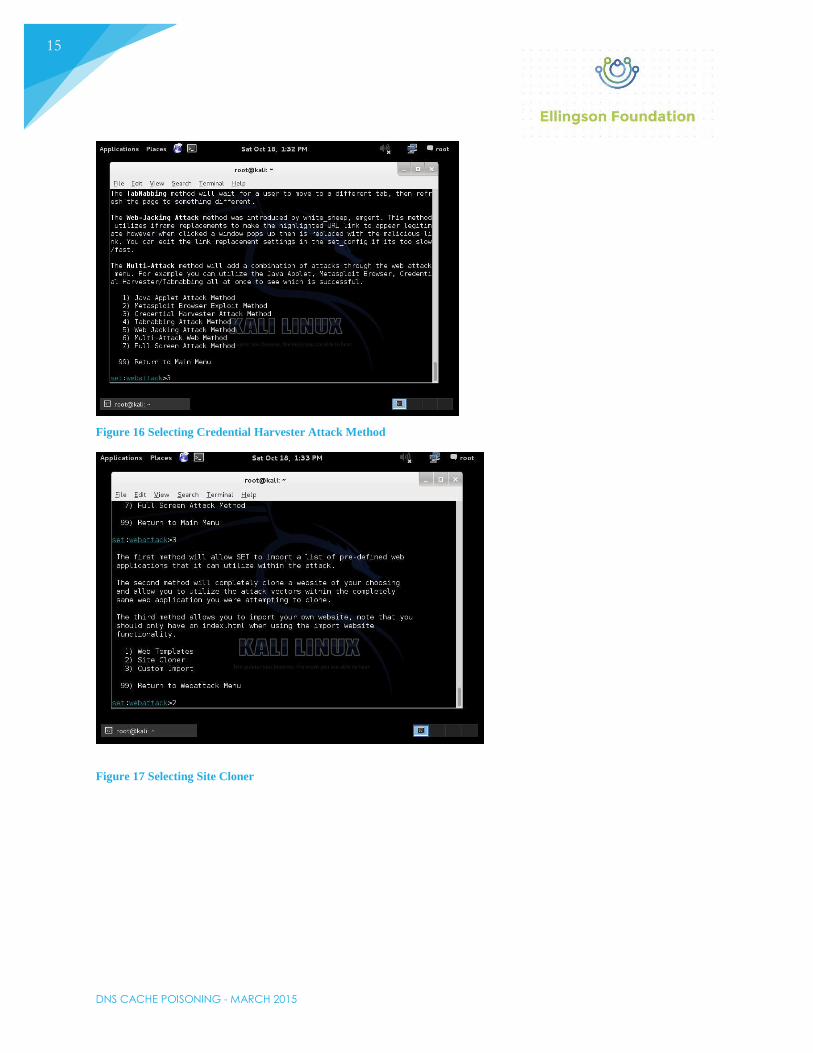
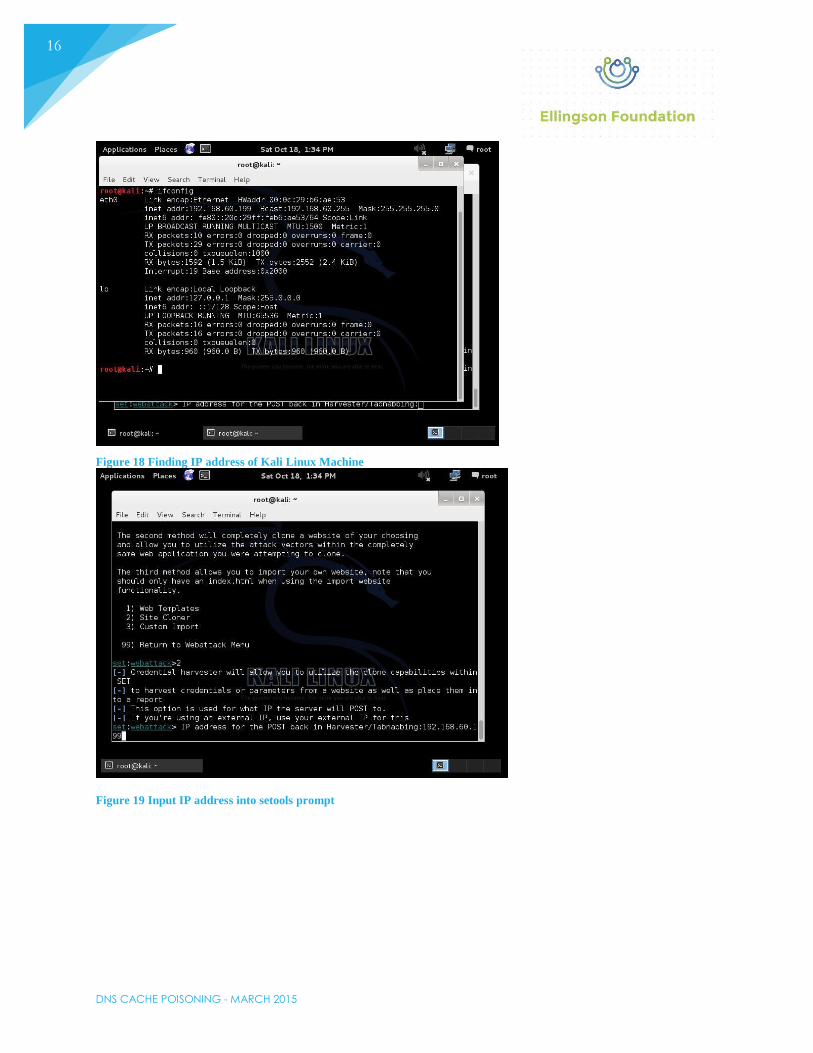
Next, enter “1” for Social –Engineering Attacks. Second, enter “2” for Website Attack Vectors. Third, enter “3” for Credential Harvester Attack Method. Fourth, enter “2” for Site Cloner. After everything is entered, find out what the IP address of the Kali Linux Machine is by typing “ifconfig” into another terminal. Enter this IP address into the prompt that comes after selecting Site Cloner.
Figure 5 Entering in IP Address
Once the IP address of the Kali Linux Machine has been entered, type the web address of the website being cloned. In this case, http://www.facebook.com is being used. At last, there will be a prompt for starting the Apache Server for the cloned site to be run on. Simply type “y” and the Apache Server will be started.
Figure 6 Running Apache Server
DNS CACHE POISONING - MARCH 2015
7
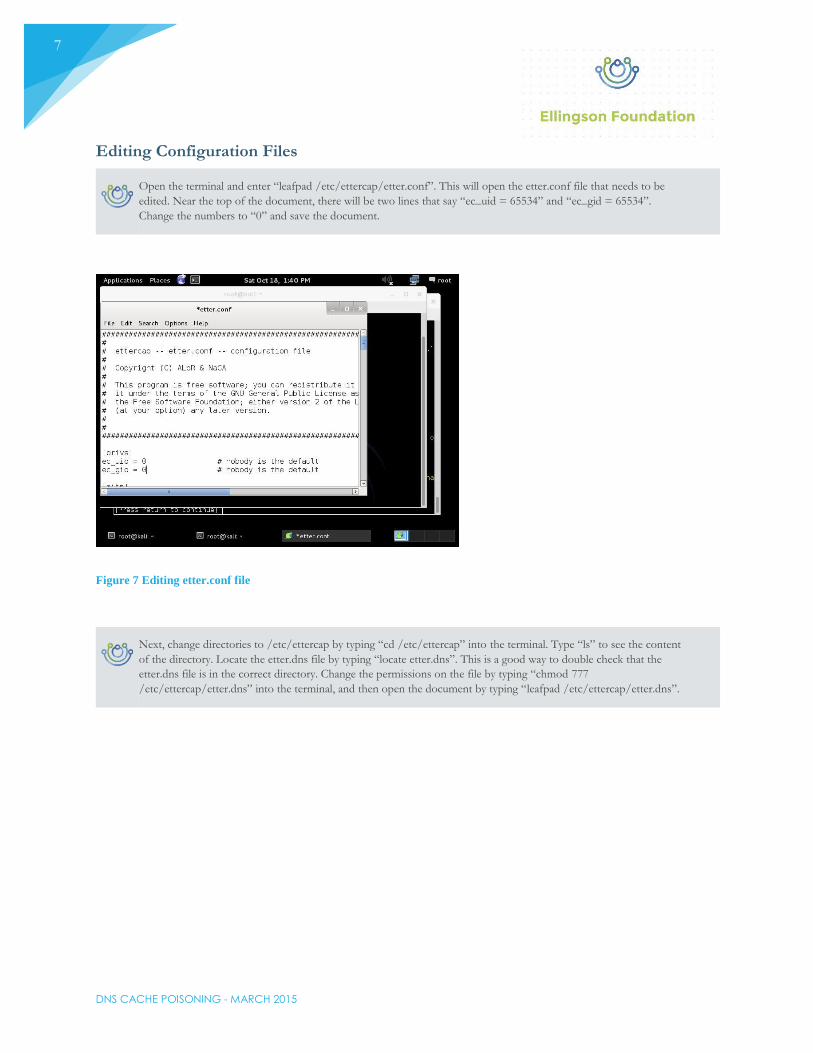
Editing Configuration Files
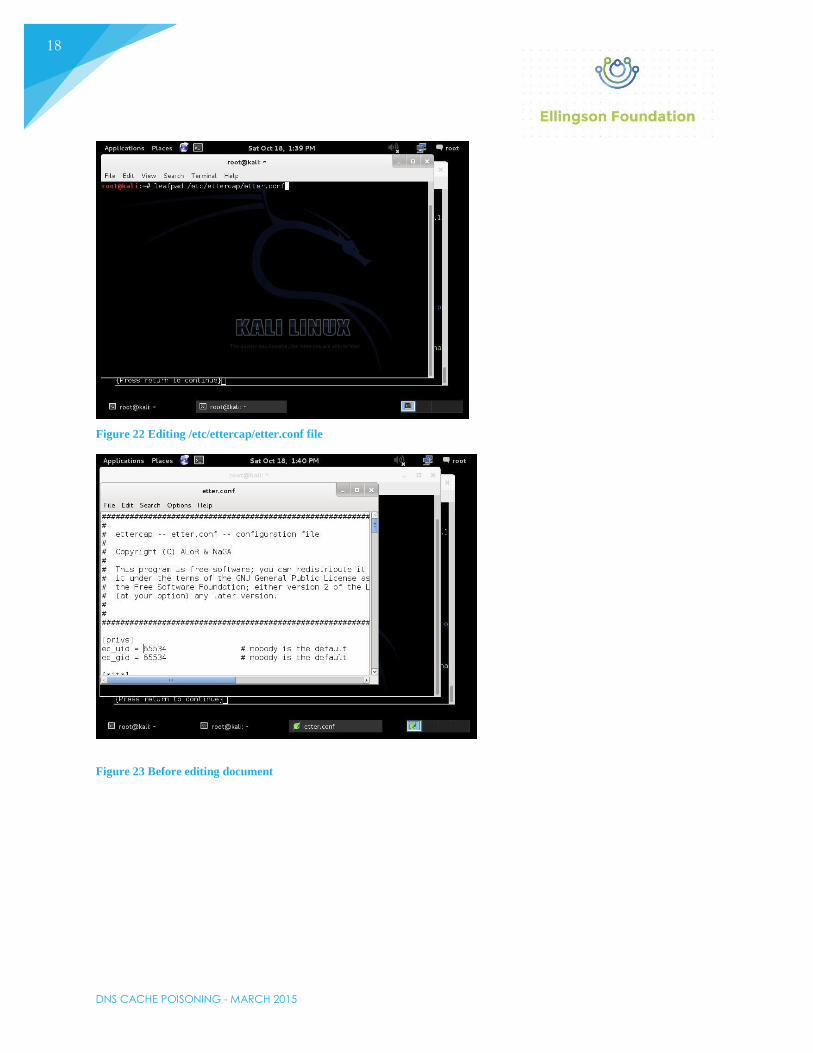
Open the terminal and enter “leafpad /etc/ettercap/etter.conf”. This will open the etter.conf file that needs to be
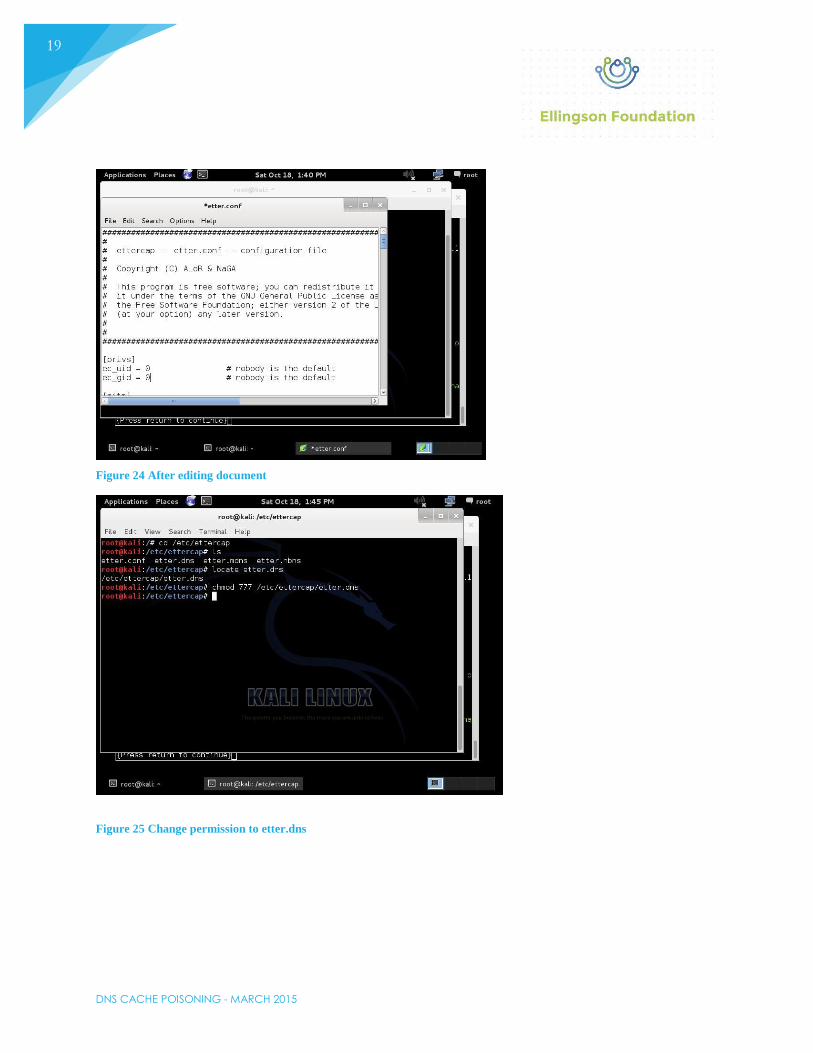
edited. Near the top of the document, there will be two lines that say “ec_uid = 65534” and “ec_gid = 65534”.
Change the numbers to “0” and save the document.
Figure 7 Editing etter.conf file
Next, change directories to /etc/ettercap by typing “cd /etc/ettercap” into the terminal. Type “ls” to see the content
of the directory. Locate the etter.dns file by typing “locate etter.dns”. This is a good way to double check that the
etter.dns file is in the correct directory. Change the permissions on the file by typing “chmod 777
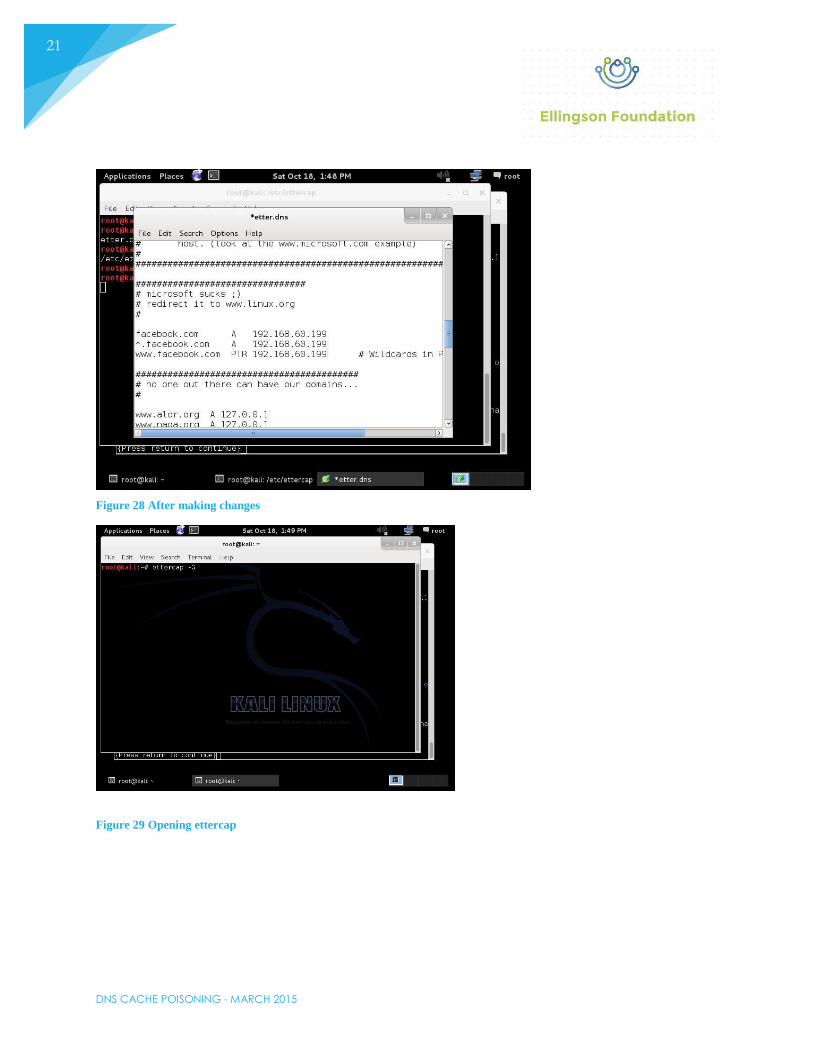
/etc/ettercap/etter.dns” into the terminal, and then open the document by typing “leafpad /etc/ettercap/etter.dns”.

DNS CACHE POISONING - MARCH 2015
8
Figure 8 Editing etter.dns file
Scroll down to where the document shows Microsoft.com along with some IP addresses (as shown in figure 6).
Replace the words “Microsoft” with “Facebook”. Replace the IP address to the right of the URL with the IP address
of the Kali Linux Machine. Save the document.
Using Ettercap
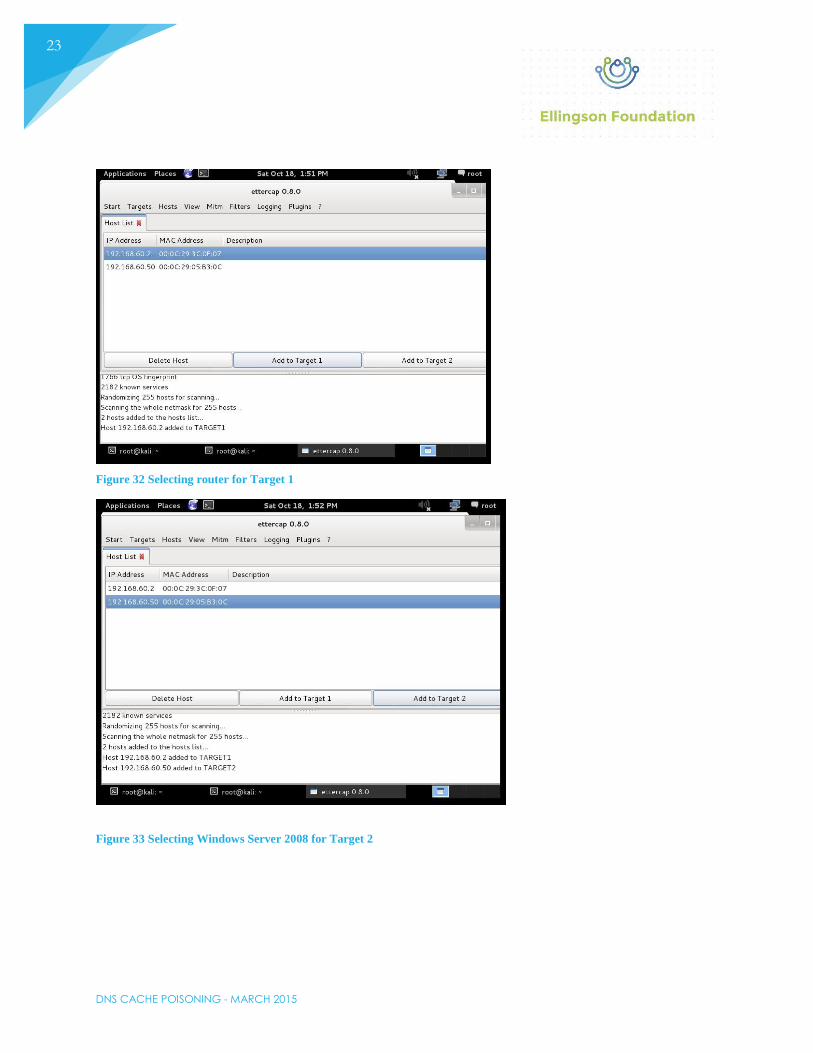
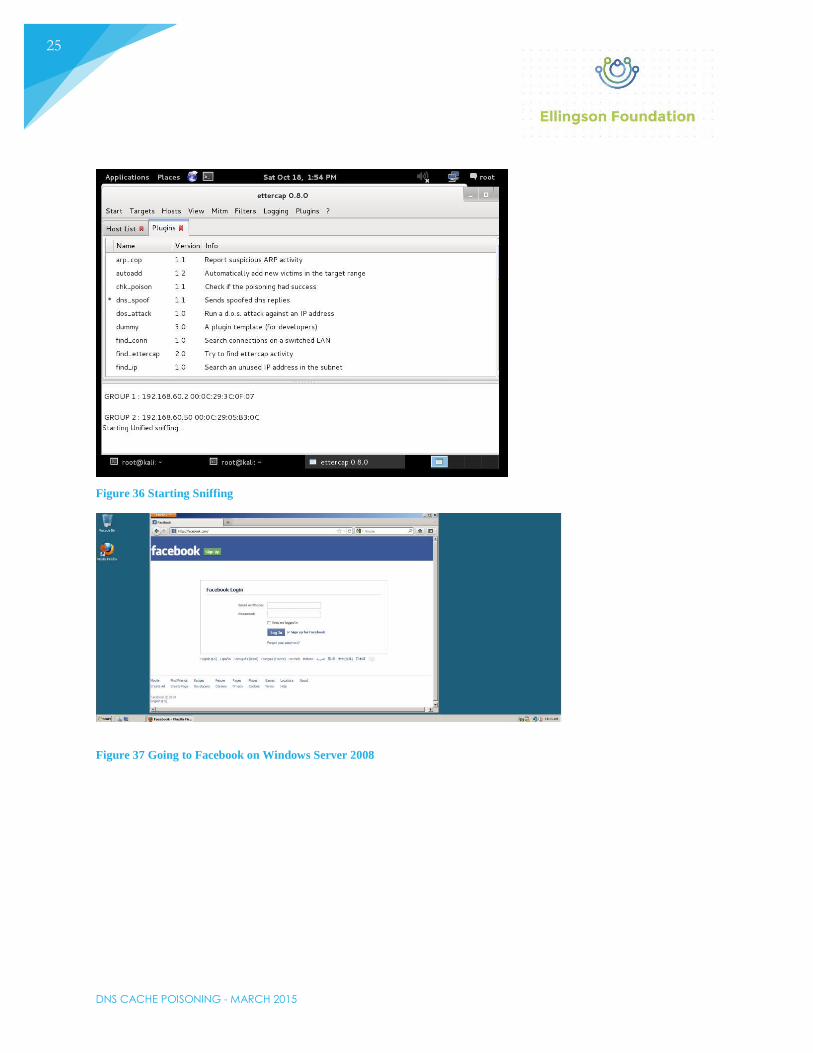
Open the program “Ettercap”. At the top of the program, click “Sniff” > “Unified sniffing…” > “OK”. Second, click “Hosts” > “Scan for hosts”. This will check the network for other machines available on the network. Third, click “Hosts” > “Host List” to see all the available targets. Add the router to Target 1 and the DNS server to Target 2. Fourth, click “Mitm” > “Arp poisoning…” and check the box for “Sniff remote connections. Press “OK”. Fifth, click “Plugins” > “Manage the plugins” and double click “dns_spoof”. Lastly, click “Start” > “Start sniffing”.

DNS CACHE POISONING - MARCH 2015
9
Figure 9 Start sniffing network

DNS CACHE POISONING - MARCH 2015
10
DNS Cache Poisoning (with MITM) Plan Testing
Windows Server 2008
On the Windows Server 2008 Machine, open the web browser and go to http://www.facebook.com. This should
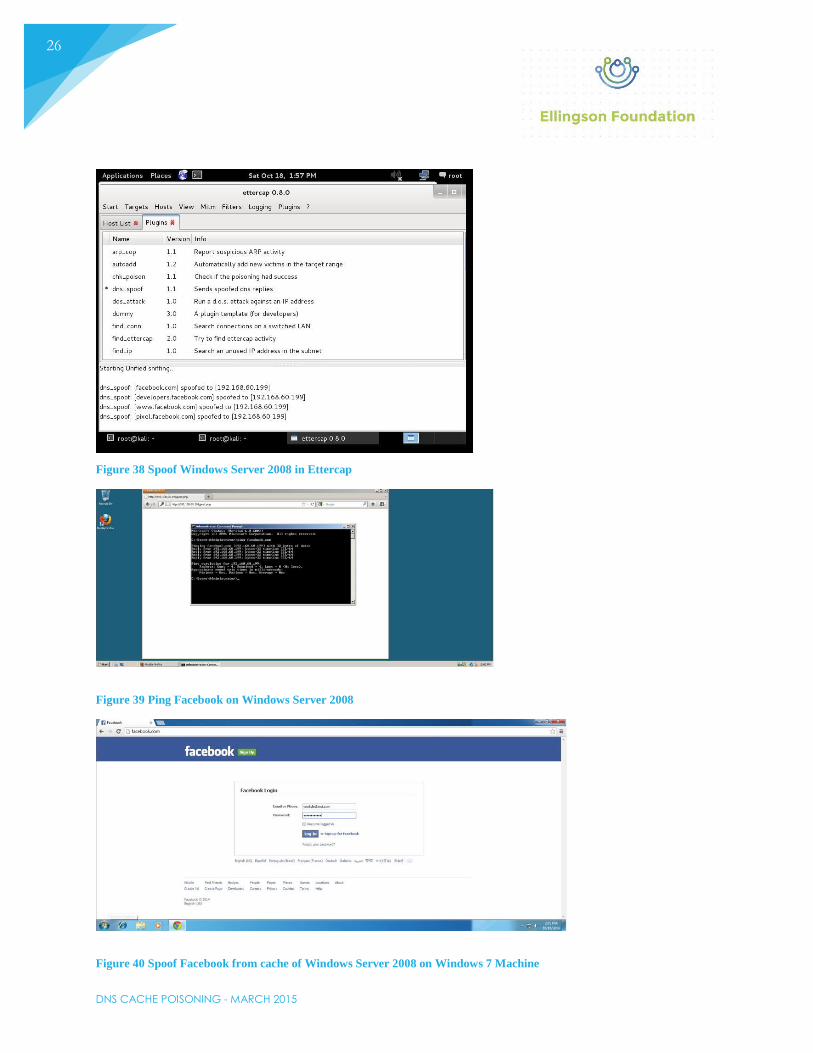
come up with the cloned website made in previous steps. To make sure that it is, open the command prompt and
type “ping facebook.com”. If the IP address matches the IP address of the Kali Linux machine, the attack was
successful.
Figure 10 Ping response from cloned website to Windows Server 2008 Machine
Also, to be sure that the Kali Linux Machine has picked up on this, go back to Ettercap and check to see if anything
was spoofed.
Figure 11 Ettercap spoof confirmation
Windows 7
Go to the Windows 7 Machine. Make sure the DNS is pointed towards the DNS server. Open up any browser and
go to http://www.facebook.com. If the cloned website/Kali Linux IP address was saved into the DNS Server’s
cache, this should take you to the very same cloned website that the Windows Server 2008 went to earlier. Again, to
find out if the attack was successful, open the command prompt and type “ping facebook.com”. If the IP address
matches that of the Kali Linux Machine, the attack was successful.
DNS CACHE POISONING - MARCH 2015
11
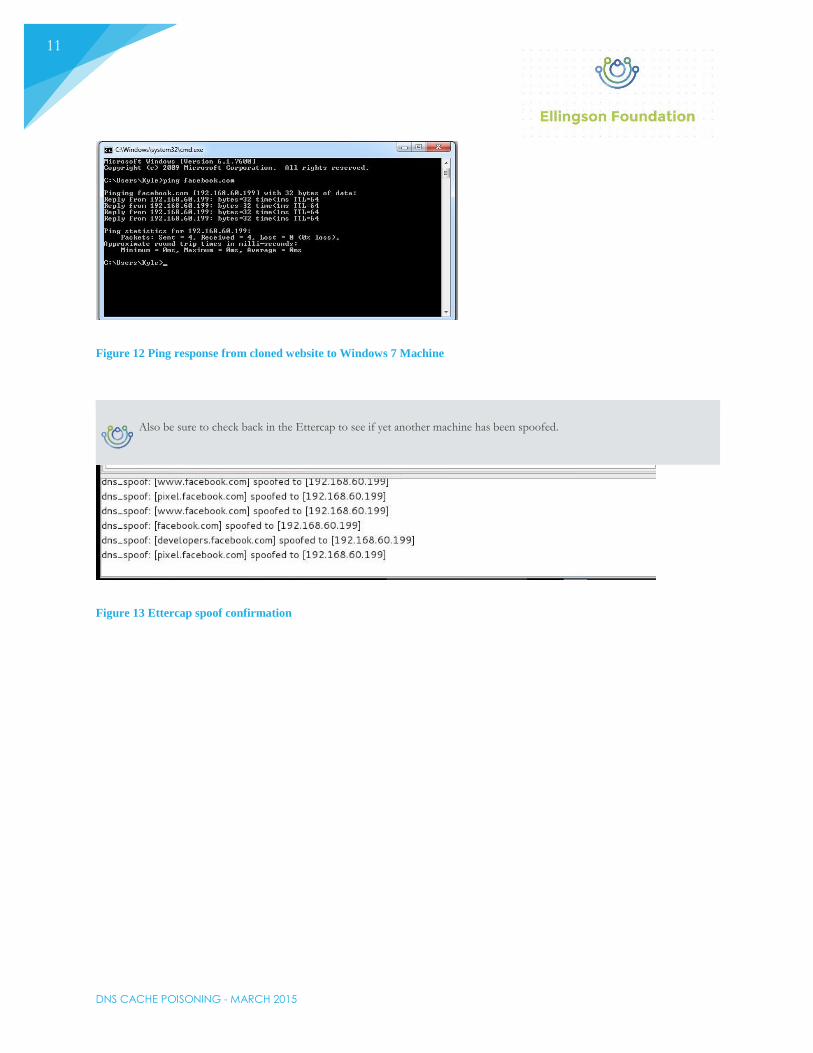
Figure 12 Ping response from cloned website to Windows 7 Machine
Also be sure to check back in the Ettercap to see if yet another machine has been spoofed.
Figure 13 Ettercap spoof confirmation

DNS CACHE POISONING - MARCH 2015
12
Preventing DNS Cache Poisoning (with MITM Attack)
Short-term solutions
1. Maximize the amount of randomness
a. Most implementations use randomized transaction numbers. There was a risk with it years ago, but has
been fixed since.
b. Most implementations do not randomize the port numbers. Most always use the same port number.
c. The patches that have been released in the last few months work by randomizing the source port for the
recursive server.
2. Disable open recursive name servers
a. The attack is not effective if the attacker cannot send question packets to the name server.
b. If a recursive name server must be run, limit access to only the computers that need it.
Long-term solutions
1. Introduce security to the DNS
a. The DNS is insecure. Upgrade the DNS for security.
b. DNSSEC is the current answer to this problem.
DNS CACHE POISONING - MARCH 2015
13
Conclusion
To conclude, DNS Cache Poisoning (with MITM Attack) is fairly simple and quick to set up. Protecting against it is
not nearly as simple, but it has to be something that has to be looked at if a network’s integrity is necessary in the
business (which it most likely is).
References
Wilson, C. (2014, October). Assistance Cann, J. (2014, October). Assistance https://www.youtube.com/watch?v=4k760wQ9rhI http://moinkhans.blogspot.com/2013/05/social-engineering-toolkit-kali-linux.html https://www.iana.org/about/presentations/davies-viareggio-entropyvuln-081002.pdf
DNS CACHE POISONING - MARCH 2015
14
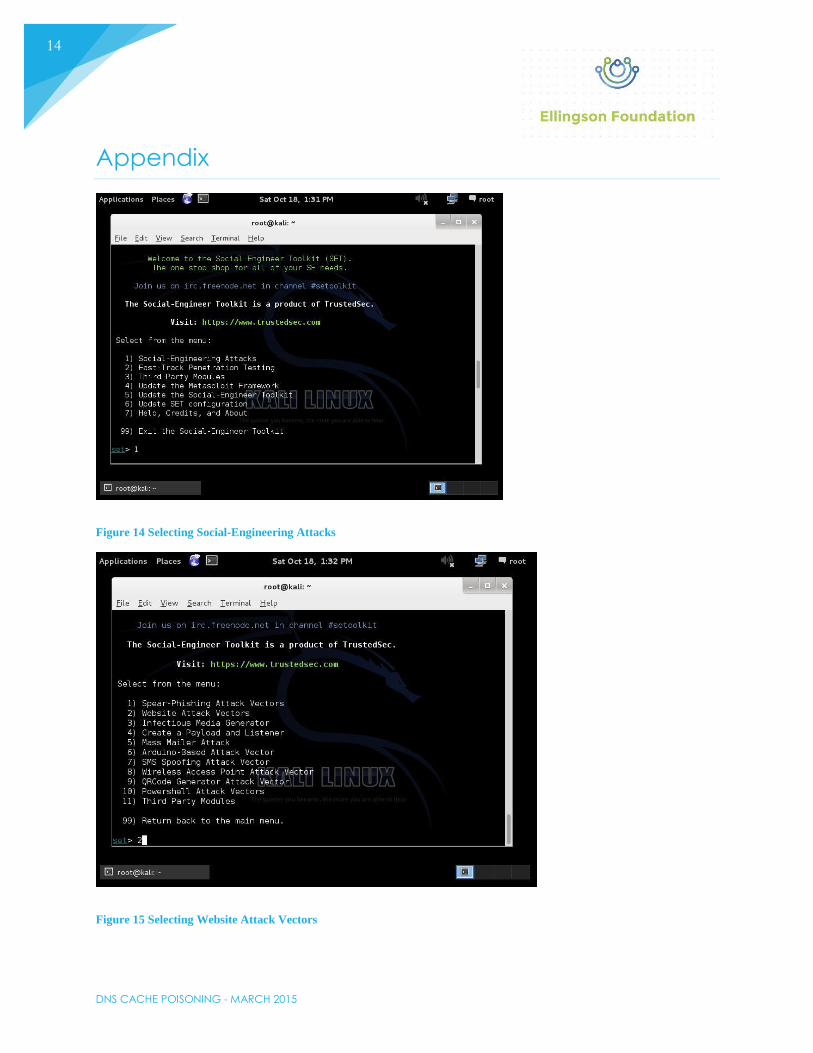
Appendix
Figure 14 Selecting Social-Engineering Attacks
Figure 15 Selecting Website Attack Vectors
DNS CACHE POISONING - MARCH 2015
15
Figure 16 Selecting Credential Harvester Attack Method
Figure 17 Selecting Site Cloner
DNS CACHE POISONING - MARCH 2015
16
Figure 18 Finding IP address of Kali Linux Machine
Figure 19 Input IP address into setools prompt

DNS CACHE POISONING - MARCH 2015
17
Figure 20 Input web address into setools prompt
Figure 21 Starting Apache Server
DNS CACHE POISONING - MARCH 2015
18
Figure 22 Editing /etc/ettercap/etter.conf file
Figure 23 Before editing document
DNS CACHE POISONING - MARCH 2015
19
Figure 24 After editing document
Figure 25 Change permission to etter.dns

DNS CACHE POISONING - MARCH 2015
20
Figure 26 Opening /.etter/ettercap/etter.dns
Figure 27 Before making changes
DNS CACHE POISONING - MARCH 2015
21
Figure 28 After making changes
Figure 29 Opening ettercap

DNS CACHE POISONING - MARCH 2015
22
Figure 30 Choosing the interface
Figure 31 Opeinging host list
DNS CACHE POISONING - MARCH 2015
23
Figure 32 Selecting router for Target 1
Figure 33 Selecting Windows Server 2008 for Target 2

DNS CACHE POISONING - MARCH 2015
24
Figure 34 Selecting dns spoof in Plugins
Figure 35 Selecting MITM Attack
DNS CACHE POISONING - MARCH 2015
25
Figure 36 Starting Sniffing
Figure 37 Going to Facebook on Windows Server 2008
DNS CACHE POISONING - MARCH 2015
26
Figure 38 Spoof Windows Server 2008 in Ettercap
Figure 39 Ping Facebook on Windows Server 2008
Figure 40 Spoof Facebook from cache of Windows Server 2008 on Windows 7 Machine
DNS CACHE POISONING - MARCH 2015
27
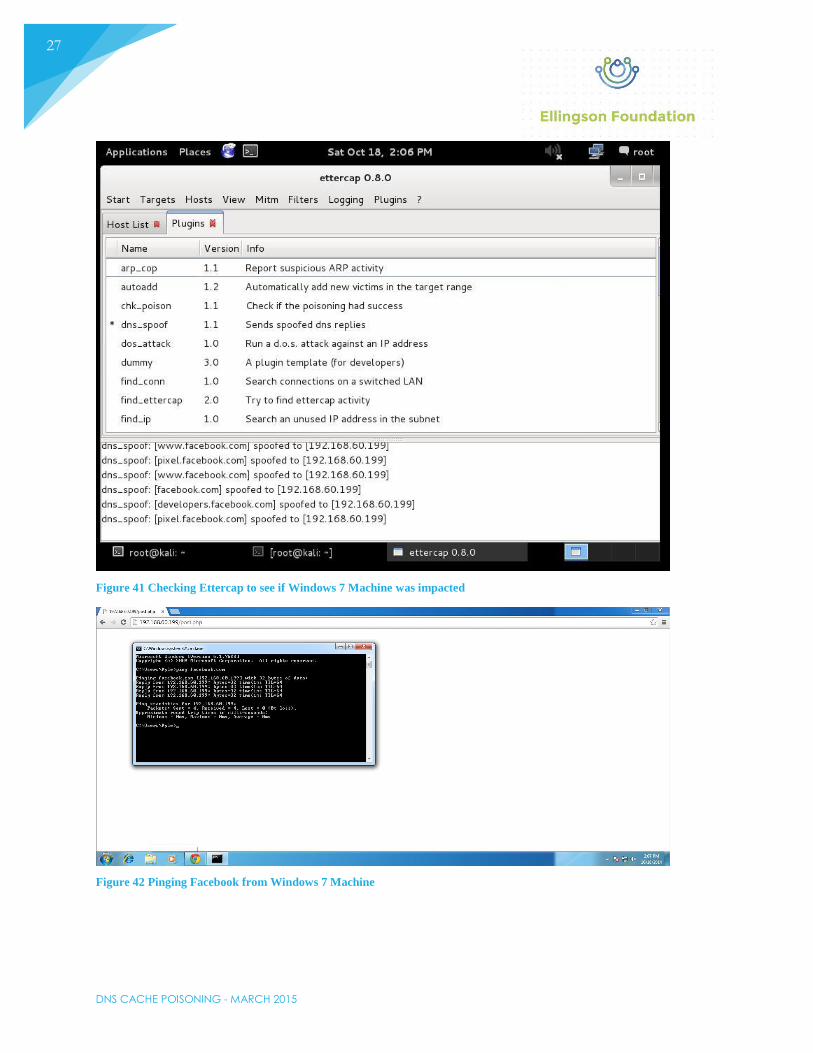
Figure 41 Checking Ettercap to see if Windows 7 Machine was impacted
Figure 42 Pinging Facebook from Windows 7 Machine