Embed Size (px)
Citation preview

DO-RE-MI AND
SWAPS
Perfectly Effortless Programs
Girl Scouts of Eastern MissouriEmerson Resource Center2300 Ball DriveSt. Louis, MO 63146314.592.2360

Two Girl Scout Traditions
MusicWhen Girl Scouts gather, you can be sure someone will break out in a song. It’s a tradition and part of who we are, Girl Scouts.
The activities in this Perfectly Effortless Program packet will help you to continue this tradition with your troop, whether you can sing or not.
Making music can mean singing songs, playing a game, making an instrument or grooving to the beat.
If singing is not your thing, here are some ways to bring this tradition to your troop:• Use this packet as a resource• Check at your neighborhood meeting for an experienced leader or an older girl who needs to work
with younger girls to earn an award• Choose a song from one of the Girl Scout song CD’s and play it for girls• Is there a girl in your troop who loves to sing and could teach songs to the girls?• Attend a song workshop• A survey of parents and troop committee members may provide information about musical talents
within or connected to the troop
SWAPSIn Girl Scouting, small gifts of friendship are often exchanged when girls and adults get together. We call these gifts of friendship:
Small size
What-cha-ma-call-it
Adorning a hat, vest or scarf
Passed between friends
OR Small size
What-cha-ma-call-it
Affectionately
Pinned somewhere
SWAPS can be exchanged at special events, when troops or individuals get together at neighborhood or district events, at Day Camp or Resident Camp or when older Girl Scouts go on a trip. Wherever Girl Scouts “Make New Friends” there is sure to be a SWAP passed between friends. For additional links to add to your collection, check www.scoutingweb.com.

Song Leading
A Skill That Can Be LearnedLove to sing but not sure how to start teaching others? Here are some great guidelines for the emerging song leader, no matter what age you are.
Choosing Songs• Know the group that you will work with. How old are they? How many girls are there? What are
their singing abilities? What are their song interests? How long is their attention span?• Begin with simple songs or songs that the girls know. Choose songs like short rounds, songs with
tra-la-la choruses or those that include repetition• Know what you are doing. Know the song words and the melody. Practice. Use note cards if you
need them. Make a list of the songs you will sing and know the order you will sing them in. • If you are choosing songs for an evening program, start out with the rowdy songs and end with
quiet songs to set the tone for bedtime
Leading Songs• Be enthusiastic• Singthesongforthegroup.Introducethesongbytellingwhereitisfrom.Singthefirstverseand
the chorus, so group members know how it sounds. Have those who know it sing with you.• Teach the song phrase-by-phrase. Sing a phrase and have the group sing back to you. Then join
phrases and sing the verse and chorus. If long, teach a few verses and then repeat. Repeat once or twice
• Sing the song all together. If singing a round, a song with parts or a descant, make sure each group knows its part well before putting the parts together. If you are singing a song with parts, have a leader who knows each part. Use simple hand motions to keep the tempo
• You give the starting note. Hum the melody or use a musical instrument. If you get it wrong, stop and start over. Avoid pitching too high or too low for girls
• Make sure that girls follow your hand motions. Let them know that hand motions are used to keep the group together in the right tempo and the motions will help them know where you are in the song
• Choose a variety of songs. Do songs that are fast and slow, songs that include hand motions, and songs that lend themselves to simple harmony, as well as funny songs. Avoid songs that might be offensive to religious or ethnic groups
2
Some Favorite Girl Scout Graces
Come Good Girl Scouts(Tune: Jesus Loves Me)Come good Girl Scouts Bow your headsThank the Lord for this good breadReverent Girl Scouts we will beThanks, Oh Lord, our thanks to thee
Time To Eat(Tune: Ain’t She Sweet)Time to eatGirl Scout snack time is a treatWe thank God for his generosityTime to eat
Addams Family Grace(Tune: Addams Family Theme)We thank you for this food, LordFor mom and dad and you, LordWe thank you for this food, LordThat gets us through the dayAmen (snap, snap) Amen (snap, snap)Amen, amen, amen (snap, snap)(Variations)Come join with us and prayWe’re thankful for this dayAnd we would like to sayWe’re thankful for this food(Same amen as above)
We thank you for this food, LordFor friends and family and you, LordWe thank you for this food, LordIt helps us through our day(Same amen as above)
Praise To Be God(Tune: Wendy)Praise be to God, the Father almightyPraise be to him who gives us our foodPraise be to God the maker of all thingsPraise be to God forever.
Alleluia(Tune: Michael Row the Boat)Thank you for the world so sweetAlleluiaThank you for the food we eat
AlleluiaThank you for the birds that singAlleluiaThank you God, for everythingAlleluia
Thank You(Tune: Ten Little Indians)Thank you, thank you heavenly FatherFor your blessings as we gatherGive us strength and understandingBless us all O Lord
Other Songs Sung to Familiar Tunes
A Pizza Hut(Tune: Ram Sam Sam)A Pizza Hut, a Pizza Hut,Kentucky Fired ChickenAnd a Pizza Hut (Repeat)
McDonald, McDonald,Kentucky Fired ChickenAnd a Pizza Hut (Repeat)
Daisies(Tune: Twinkle, Twinkle, Little Star)Daisy Girl Scouts lead the waySee us work and see us playWe can dance and we can singWe can do most anythingWe have fun with paint and clayDaisy Girl Scouts-here to stay
Daisy(Tune: Brownie Smile Song)“I’ve something in my pocket...That’s what the big girls sayI’ll have a pocket of my ownWhen I wear brown someday
My life is bright and easyI smile most of the dayI’m having lots of fun nowI sing and laugh and play
Girl Scout Cookie Song(Tune: Are You Sleeping?)Girl Scout CookiesGirl Scout Cookies
3

4
Yum, Yum, YumYum, Yum, YumEat’um by the dozenEat’um by the dozenThey’re all goneThey’re all gone Hiking SongI’m Walking In the Rain(Tune: Singing In the Rain)I’m walking in the rainJust walking in the rainWhat a glorious feelingI’m happy todayTHUMBS UPA tee ta taA tee ta taA-tee-tat-taKNEES TOGETHERA tee ta taA tee ta taA-tee-tat-taTOES TOGETHERA tee ta taA tee ta taA-tee-tat-taBUNS OUTA tee ta taA tee ta taA-tee-tat-taCHEST OUTA tee ta taA tee ta taA-tee-tat-taTONGUE OUTA tee ta taA tee ta taA-tee-tat-ta
I’ve Got Something In My Pocket(Tune: Brownie Smile Song)I’ve something in my pocketIt belongs behind a logMy leader says to put it backBut I want to keep this frog
It’s cool and green and slimyAnd it wiggles in my handI also have a wooly wormAnd a pocket full of sand
Jabba the Hut(Tune: Ram Sam Sam)Jabba the Hut, Jaba the Hut,Luke Skywalker and Jabba the Hut (Repeat)
Darth Vader, Darth Vader,Luke Skywalker and Jabba the Hut (Repeat)
Motions:Jabba the Hut (arms out to side- make like BIG)Luke Skywalker (fence with laser)Darth Vader (hand over face like mask)
Junior(Tune: Brownie Smile Song)“I’ve something in my pocket...”That’s what I used to sayI spent my time so aimlesslyAt home, at school, at play
Now every day is specialI’m searching, who am I?OnlyIcanfindthatoutPlease let me have a try!
Met A Polar Bear(Tune: I Met a Bear)The other dayI saw a bearA big white bear, I had to stareHe stared right back and seemed to grinHis long white fangs, hung to his chin
He moved toward me, upon four pawsAnd those four paws held six inch clawsI couldn’t move, my feet were frozeAs I saw steam, shoot from his nose
But I was safeBecause I knewThis polar bearWas at the zoo!
Poison Ivy(Tune: White Coral Bells)Three shiny leaves upon a slender stalkLots of poison ivy decks my campsite walkOh, don’t you wish that you could pick and touchBut you’d better not because you’d itch too much

5
Take Me Out to the Campsite(Tune: Take Me Out to the Ball Game)Take me out to the campsite, take me out with the troopWe’ll bring our bedrolls and knapsacks, tooWe’ll have fun and we know you will tooThen we’ll hike, hike, hike through the woodlandRain or shine, we won’t care, for it’s work, play, singing together the Girl Scout way
We belong to the Girl Scouts, always ready to serveWe can climb mountains and cook our own mealsIf you join us you’ll know how it feelsto be proudOf wearing the trefoil - working hard every dayIt is so-much-fun doing things the Girl Scout way!
Telephone(Tune: Jingle Bells)Dashing to the phone, in a one split-second raceOver the chairs we go, shouting all the way, “I got it!”Bells on telephone ring, making spirits riseWhat fun it is to get phone calls, in the middle of the night
Oh, the phone is ringingThe phone is ringing, the phone is ringing nowGet it quick before it stops or your parents will have a cow! Moo-oo!
Watermelon(Tune: Frere Jacques)Watermelon, watermelonHow it drips, how it dripsUp and down my arms, up and down my armsSpit out the pits, spit out the pitsSplat!
We Love the Girl Scouts(Tune: I Love the Mountains)We love the Girl Scouts, we love to go to campWe love the outings, we love to pitch a tentWelovethefiresidewhenallthelightsarelow Boom de adda, Boom de adda, boom de adda boom
We love the Girl Scouts, we love the meetings, tooWe love the handicrafts and all the things we doWe want to make it clear, we are all glad we’re here Boom de adda, Boom de adda, boom de adda boom

6
Copyrights and You
Most songs have a writer and a publisher who have the copyright to them. These songs aren’t published on Girl Scout websites because they do not belong to Girl Scouts of the USA. Most of the songs listed in the Girl Scout songbooks are either there because special arrangements were made with the publisher or because they are now in the “public domain.” That means they have been around so long that no one owns them any more - the author is usually no longer living and no publisher can claim ownership. Here’s a quick guide to what you can and cannot do:
You Can• Put together a collection of your favorite songs in a personal notebook• Singsongsforfunaroundacampfireorinmeetingswithoutspecialpermission• Getfinedheavilyifyouusesomeone’ssongillegally
You Cannot• Publish your own book of songs for others without securing permission or paying for the rights• Make a book or tape of songs to sell without asking permission and paying user fees for the use of
the song• Pass out song sheets with copyrighted music or words/or both without getting permission• Sing songs in a program and charge admission without permission or paying a fee for use of each
one
This applies to everyone: girls, volunteers, Council, camp staff and so on. For more information, about copyrights and licensing, including the use of other people’s music on the Internet, visit The American Society of Composers, Authors and Publishers at www.ascap.com.
Can’t Carry a Song in a Paper BagMusicismorethansinging.Trysomeoftheseactivitiesandyou’llfindmusicisrhytem.• Have girls make their own rhytem sticks. (see pg. 7) Then have them make up routines with a
buddy, to go with their favorite music• Turn girls loose with a jump rope. Listen and watch the rhytem explode. • Try Tinikling-Philippine folk dance using poles. (CD and poles available from the Emerson
Resource Center)
Music is SoundBefore there were pianos and guitars, people made sounds with their bodies. Think of the different parts of your body that can make a sound.Try this hand jive: as you say the following words, clap your hands rhythmically. Try alternating clapping your hands and clapping on your knees.
Hambone, hambone, where you been? (Repeat) Round the world and back again (Repeat) Hambone, hambone, that’s no name (Repeat) I still answer just the same (Repeat)

7
Music is Movement• Put on a CD and have girls move to the beat• Havegirlsmakeupafitnessroutinetotheirfavoritemusic• Learn a folk dance (square dance, line dance from another country, etc.)
Music is Instruments• Check out a handbell kit, include color-coded bells and song cards, available from the Emerson
Resource Center • Makeyourownbellswithglassjarsfilledwithdifferentlevelsofwater• Make your own troop-Going Green Junk Band. Information in this packet
Music is Universal• Check out JamTown - a multicultural instrument kit which includes bells, drums, goat toe nails and
gourds from the Emerson Resource Center• Listen to music from another country. What are the different instruments they use to make that
special sound? (Jamaican, Asian, etc.)
“Love 2 Sing” Pins• Materials: Coilless Safety Pin- 2¼”, number 2 bead, letter beads: “Sing” and “Heart,” foamie music
note• Directions: Open up the coiless pin. Slide on a “Heart” bead, a 2” bead, then the letters “Sing.”
Push them around the coil to the other side of the pin. Poke one or more music foamies on to complete
Lummi Sticks
Origin of Lummi sticks depends on whom you ask. Some people believe Lummi sticks are an Indian gamefromNorthAmericaplayedaroundthecampfirebyhighly-skilledwarriors.Thetribewouldchantasthecontestantsthrewthesticks.Thefirstwarriortomisshadtogiveaforfeitordemonstratea stunt to please the crowd.
Others believe the game came to us from the South Sea Islands. Here the natives used bamboo sticks to play the game. Safety factor: rhythm sticks should never be used to hit others and tappers should be at least an arm’s distance from each other.
Holding sticks• Hold sticks horizontally, beat out the rhythm with the chant in 3/4 time (1,2,3-1,2,3)• Practice repeating the words and rhythm until everyone is familiar with it• Each player should have a partner, sitting facing each other an arm’s distance apart in a cross
legged or comfortable position• Hold sticks loosely in a vertical position mid-center or slightly below• After learning the basics, allow girls to come up with their own creative routines to favorite music
Make Your Own Lummi SticksMaterials: sticks may be made from dowels or PVC pipe (3/4” – 5/8” inch thick), Length: nine to 12 inches, sandpaper (to smooth sticks)

8
Lummi Stick Carriers (Individual)1. Take one tube sock2. Decorate with fabric pens3. Insert one pair of Lummi Sticks and tie with shoe string or ribbon
BeatFour by four by four...4XBeat1:HitthefloorBeat 2: Hit own sticksBeat 3: Hit partner’s left stick
4X Same as above, except hit both of partner’s sticks on third beat4X Same…except toss stick to partner on third beat4X Same…except toss both sticks on third beat4XHitfloor,ownsticks,partner’sright,partner’sleft,partner’sright,partner’sleft
Chant:Mah-ko-waKo-we-tah-nahWa-ko-weTah-nah
Mah-ko-waKo-we-tah-nahWa-ko-weTah-nah
Going Green Junk Band
Stock up a large box with recyclable materials and let the fun and creativity begin.
String SectionPluck these instruments to make a sound.
Tissue Box LuteMaterials: tissue box, rubber bandsDirections:1. Stretch rubber bands around the box, short way.
Shoe Box GuitarMaterials: sturdy shoe box, four rubber bands in various widths, paper towel tube and tapeDirections:1. String rubber bands across the long end of the box. Thick rubber bands make low tones, thin ones
make higher tones.2. Make hole in one end of box and insert end of paper towel tube.3. Tape tube to box.

Tree Branch HarpMaterials: rubber bands, Y-shaped branchDirections:1. Find a fallen branch in a Y-shape.2. Put rubber bands across the top of the Y.
Rubber GuitarMaterials: three pencils or coloring pens, metal-baking pan, rubber bands of varying thicknessDirections:1. Stretch the rubber bands lengthwise across the pan.2. Put a pen underneath the rubber bands at each end of the pan.3. Press the third pen onto the bands, slide it back and forth while you pluck the bands. The pitch of
the notes changes. The notes get higher as you shorten the vibrating part of each band.
Thumb PianoMaterials: large bobby pins, pliers (to break the bobby pins), heavy-duty staple gun and 3/8” inch heavy duty staples, hammer, plywood (about 6 inches by 6 inches and at least ½-inch thick)Directions:1. Break three bobby pins by putting the bent part in the jaws of the pliers and crushing them.2. Staple a pin to the left side of your plywood. Use two staples positioned right at the sharp metal
edge of the pin to leave the rubber tipped end free for playing. If staples did not go all the way in, hammer down the staples to hold the pin tightly. The rubber-tipped side should be up in the air (to be able to vibrate). If it is not, then bend it up just a bit.
3. Start stapling the rest of the pins. As you work your way from left to right, staple the pins further and further toward the rubber tips so that the length of the vibrating pin gets shorter and shorter. Don’t staple the pins any farther than halfway down the length of the pin.
Toplay:pushdownontherubbertip,thenslideyourfingerbackoffthetip.Asthepinbouncesbackto its original position it will vibrate and make a sound. Try putting the plywood on different things tomakeitlouder.ThebestthingsarebigcardboardandStyrofoamboxesbuttryanythin,rigid,flatsurface to see what works best.
Wind SectionBlow into these instruments to make a sound.
Straw WhistleMaterials: plastic drinking straw, scissorsDirections:1. Pinchoneendofthestrawflat.2. Cut end of straw into a point to form the double reeds.3. Create different sounds by cutting straws into different lengths. Also, cut the points longer or
shorter.
To play the straw whistle: put the reed end (pointy end) into your mouth, just behind your lips and blow very hard. It may take several tries to make the straw whistle work.
9

10
Kazoo Materials: toilet paper or paper towel tube, rubber band, colored cellophane or wax paper cut into 4” circles, stickersDirections:1. Decorate the tube.2. Attach wax paper circle to one end of the tube with a rubber band.3. Sing or hum your favorite tune into the open end of the tube (this will tickle your upper lip).
ScreechersMaterials: balloons, balloon pumpDirections:1. Pump up the balloon. Pinch the neck to stop the air from escaping.2. Grip the neck of the balloon and stretch it. The balloon makes a sound as the air escapes. Percussion SectionBeat or shake these instruments to make a sound. BongosMaterials: two empty plastic bleach bottles in different sizes, scissors, duct tape, staples and a stapler, colorful plastic tape and stickers Directions:1. Cut off the tops of bleach bottles evenly.2. Cover the cut edge of bottles with duct tape.3. Staple the bottles together and cover the staples with duct tape.4. Decorate with colorful tape and stickers.5. Sitonthefloorwithbongosbetweenyourlegs.6. Play bongos along with singing or listening to a CD.
Tin Can DrumsMaterials: various sizes of tin cans, clean and dry with no sharp edges, rubber bands or duct tape, carpet square (optional), unsharpened pencilsDirections:1. Turn cans bottom side up and tape or rubber band together.2. Place open sides down on carpet square.3. Can drums make the best sound if they are put on something soft, like a rug or towel.
MaracasMaterials:filmcontainersorpillbottles,popcornkernels,riceorbeans,glue,knife,popsiclesticksstickers, contact paper (optional)Directions:1. Place small amount of popcorn, rice or beans in each container.2. Place a little glue on the inside of the lid and close tightly.3. Take a knife and make a small slit in the lid.4. Put the popsicle stick inside the slit.5. Decorate container.
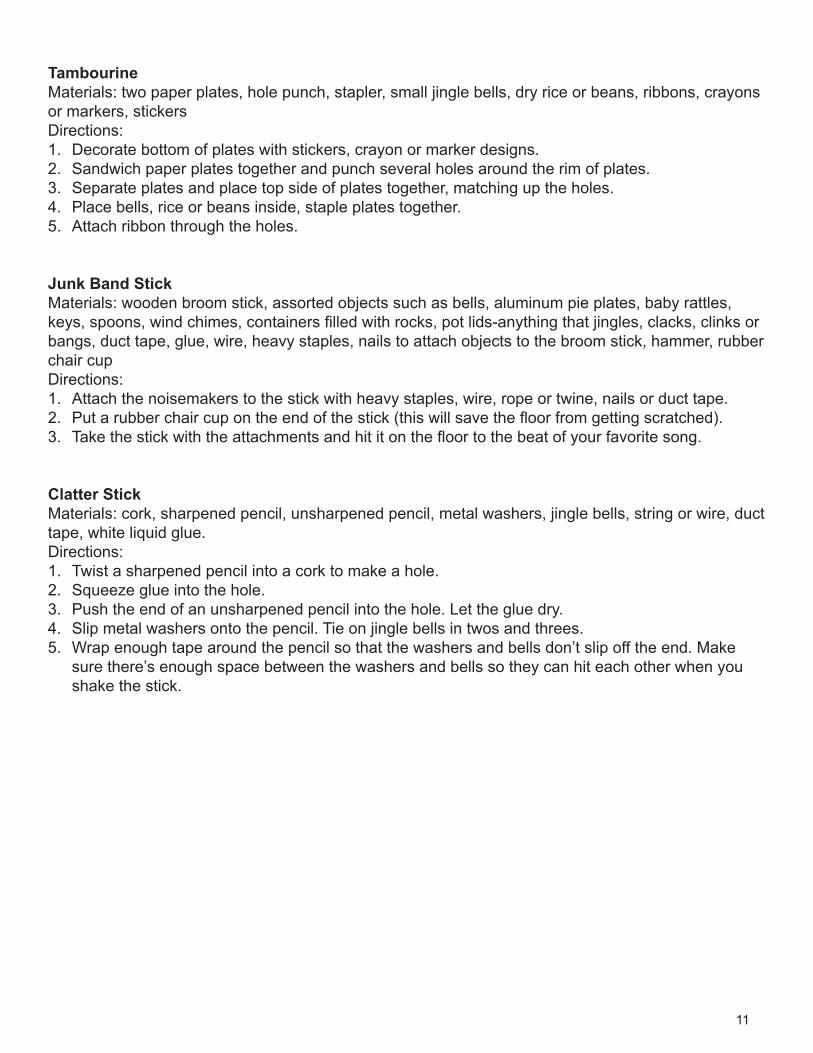
TambourineMaterials: two paper plates, hole punch, stapler, small jingle bells, dry rice or beans, ribbons, crayons or markers, stickersDirections:1. Decorate bottom of plates with stickers, crayon or marker designs.2. Sandwich paper plates together and punch several holes around the rim of plates.3. Separate plates and place top side of plates together, matching up the holes.4. Place bells, rice or beans inside, staple plates together.5. Attach ribbon through the holes.
Junk Band StickMaterials: wooden broom stick, assorted objects such as bells, aluminum pie plates, baby rattles, keys,spoons,windchimes,containersfilledwithrocks,potlids-anythingthatjingles,clacks,clinksorbangs, duct tape, glue, wire, heavy staples, nails to attach objects to the broom stick, hammer, rubber chair cupDirections:1. Attach the noisemakers to the stick with heavy staples, wire, rope or twine, nails or duct tape.2. Putarubberchaircupontheendofthestick(thiswillsavethefloorfromgettingscratched).3. Takethestickwiththeattachmentsandhititonthefloortothebeatofyourfavoritesong.
Clatter StickMaterials: cork, sharpened pencil, unsharpened pencil, metal washers, jingle bells, string or wire, duct tape, white liquid glue.Directions:1. Twist a sharpened pencil into a cork to make a hole.2. Squeeze glue into the hole.3. Push the end of an unsharpened pencil into the hole. Let the glue dry.4. Slip metal washers onto the pencil. Tie on jingle bells in twos and threes.5. Wrap enough tape around the pencil so that the washers and bells don’t slip off the end. Make
sure there’s enough space between the washers and bells so they can hit each other when you shake the stick.
11

12
SWAPS
When choosing a SWAP idea, remember to consider the girls’ skill level. A SWAP should be durable. Be sure to provide a small safety pin for each SWAP you give away.
SWAPS Should• Tell something about the giver’s country, community or local Girl Scout Council• Be small enough to be pinned to a hat, scarf or jacket
Girls Should• Think about the kind of SWAP they would like to receive from someone else• Try not to spend a lot of money. Consider making something from recycled materials• Try to have one SWAP for each event participant and staff member• Plan ahead so there’s time to make the SWAPS• Make SWAPS portable
What to Do with SWAPS• Make a display or scrapbook for troop visits• Keep SWAPS in a memory box or shadow box• Pin them to a quilt• Include SWAPS with thank-you letters to sponsors and those who helped them go to a Girl Scout
destination, other travel event or concert
SWAPS Etiquette• Always remember to say, “Thank You”• Be courteous. If a person gives you a SWAP you don’t really like, remember that it may have
come with the purest of intentions and the simplest of skills• Bring extra SWAPS if you are going to an event where swapping is part of the event. It is always a
Girl Scout “good turn” to give to those who have few or none• SWAPS should be handmade• Last, but not least, have fun swapping
For more SWAP ideas, check out www.scoutingweb.com or call the Emerson Resource Center at 314.592.2360.
SWAP Examples
1. Badge Sash Materials Green or brown felt or fun foam Star and circle sequins Construction paper: red, yellow, green, blue
Cut sash design from felt or fun foam, using a hole punch, punch circles of different colors from construction paper. Cut triangles for Brownie Badges. Glue on circles, sequins for Junior badges and stars to sash.
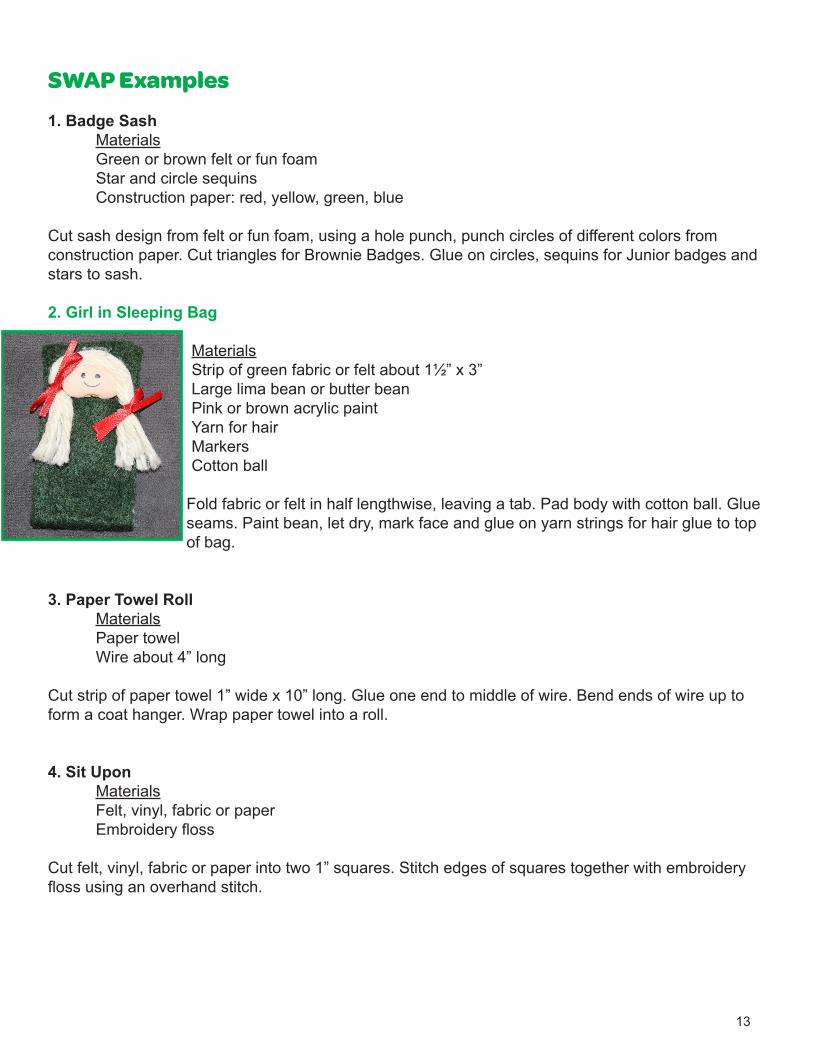
2. Girl in Sleeping Bag Materials Strip of green fabric or felt about 1½” x 3” Large lima bean or butter bean Pink or brown acrylic paint Yarn for hair Markers Cotton ball
Fold fabric or felt in half lengthwise, leaving a tab. Pad body with cotton ball. Glue seams. Paint bean, let dry, mark face and glue on yarn strings for hair glue to top of bag.
3. Paper Towel Roll Materials Paper towel Wire about 4” long
Cut strip of paper towel 1” wide x 10” long. Glue one end to middle of wire. Bend ends of wire up to form a coat hanger. Wrap paper towel into a roll.
4. Sit Upon Materials Felt, vinyl, fabric or paper Embroideryfloss
Cut felt, vinyl, fabric or paper into two 1” squares. Stitch edges of squares together with embroidery flossusinganoverhandstitch.
13

5. Beaver Bag Materials Nylon net Plastic plate, Solo© or Styrofoam Foil pie tin Stringorembroideryfloss
Cut nylon net 1½” x 1½”. Glue or sew three sides together. Cut small plate from plastic plate. Cut knife, forkandspoonfromfoilpietin.Lacetopofbagwithflossorstring,leavingenoughstringtotie.
6. Marshmallow or Hotdog on a stick Materials Toothpick or hairpin Styrofoam squares or clay Acrylic paint
Shape hot dog from clay. Place on stick while still wet. Let dry. Paint. Cut Styrofoam into small squares for marshmallows or shape clay into marshmallows, place on stick, let dry and paint.
7. Popsicle Materials Bright colored felt Flat sticks
Fold over felt and cut two popsicle shapes. Place sticks in between two felt pieces and glue.
8. Cupcake Materials 1” styrofoam ball Petitefourcups–smallmuffinbakingcups ¼” red pompom ball
Glue Styrofoam ball into baking cup (can be iced with acrylic paint or bathtub caulk). Glue pompom on for cherry.
9. Arrows in Quiver Materials Tan or brown felt Cocktail toothpicks Cut oval shape from felt approximately 1” Place two to three cocktail toothpicks at center of felt oval extending cellophane frills end past top end of oval. Fold felt over toothpicks and glue along edge.
14

10. Pretzel Materials Brown pipe cleaner White seed beads or white glitter
Bend pipe cleaner in the shape of a pretzel. Dot with glue and sprinkle with seed beads or glitter to represent salt.
11. Styrofoam Hat Materials 1 styrofoam cup, 6 or 7 oz. Smallflowers 1/8” ribbon Permanent markers
Ifdesired,decoratecupwithmarkersfirst.Placecupupsidedownonacookiesheet.Placeina350degreeovenforaboutfiveminutes.Removefromoven,letcool.Ifdecoratingwithribbonandflowers,glue on now. No two cups will shrink alike. Caution: will produce toxic fumes.
12. Fly Swatter Materials 1 hairpin 1 ½” square of plastic canvas
Weave hairpin through center of canvas square.
13. Worm or Snake on a stick Materials 1 brown or green pipe cleaner 6” long 1 twig – 2” long 2-4mm wiggle eyes
Wind pipe cleaner around twig, glue eyes to one end for head.
14. Bed Roll Materials 1 strip of felt 2” wide by 6” long 1 piece of string or yarn 12” long
Roll strip of felt lengthwise, tie with string and make a handle with string.
15

15. Canteen Materials 3/8” ribbon – 3” long 1” wooden button plug Grey or silver acrylic paint 1 7mm pony bead
Paint button plug. Glue end of ribbon on each side to form shoulder strap. Glue pony bead on top center.
16. Square Knot Materials 1 piece of cording
Tie a square knot with the cording.
17. Taco Materials Tan felt–2” circle Felt: brown, green, red and yellow cut in thin strips
Foldcircleinhalf,placestripsinthemiddleto“fill”tacoleavingendsstickingout.Gluefelttogether.
18. S’more Materials Fun foam: tan, brown and white Cut fun foam in 1” squares Tan felt represents graham crackers, brown represents the chocolate bar and white represents the marshmallow. Glue Fun Foam together in layers to form a s’more. Print on tan layer: “Make S’more Friends.”
19. Bead Head Person Materials Yarn: various colors Pipe cleaners: various colors, 1-6”, 1-3” ¾” wood bead 1” safety pin
Cut yarn into 4” pieces for hair. Bend one 6” pipe cleaner in half. Place four pieces of yarn in the bend. Thread pipe cleaner of yarn through wooden bead “feet”first.Pullpipecleanerthroughthewoodenbeaduntiltheyarnisstickingoutthetop.Takethe3”pipecleanerandbendinhalf.Windaroundfirstpipecleanerjust below wooden bead to form arms. Paint a face on the wooden bead. Bend ends
of pipe cleaners to make feet and hands.16
20. Caterpillar Materials 4 - ½” pompoms, various colors 1”plasticorsmallwoodenspringtypeclothespinorartificialgreenleaf 2 small wiggle eyes Glue 4 pompoms together. Glue to topside of clothespin or leaf. Glue eyes to front end of caterpillar.
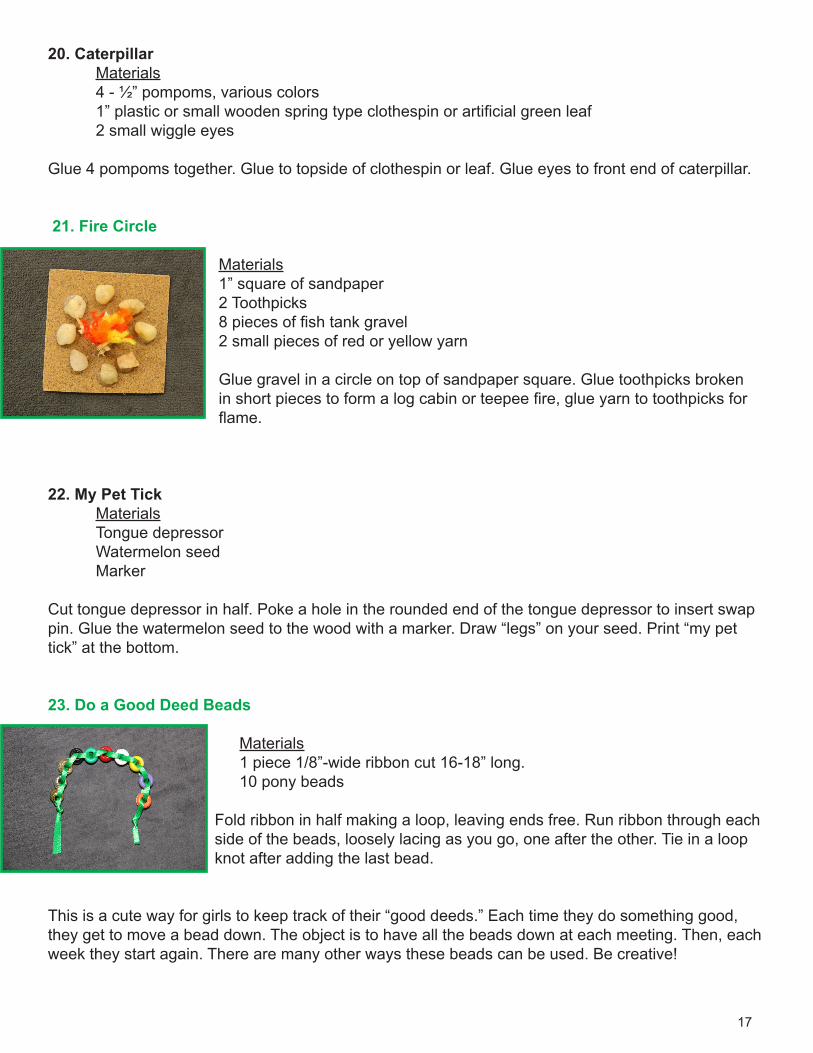
21. Fire Circle Materials1” square of sandpaper2 Toothpicks8piecesoffishtankgravel2 small pieces of red or yellow yarn Glue gravel in a circle on top of sandpaper square. Glue toothpicks broken inshortpiecestoformalogcabinorteepeefire,glueyarntotoothpicksforflame.
22. My Pet Tick Materials Tongue depressor Watermelon seed Marker
Cut tongue depressor in half. Poke a hole in the rounded end of the tongue depressor to insert swap pin. Glue the watermelon seed to the wood with a marker. Draw “legs” on your seed. Print “my pet tick” at the bottom.
23. Do a Good Deed Beads Materials 1 piece 1/8”-wide ribbon cut 16-18” long. 10 pony beads Fold ribbon in half making a loop, leaving ends free. Run ribbon through each side of the beads, loosely lacing as you go, one after the other. Tie in a loop knot after adding the last bead.
This is a cute way for girls to keep track of their “good deeds.” Each time they do something good, they get to move a bead down. The object is to have all the beads down at each meeting. Then, each week they start again. There are many other ways these beads can be used. Be creative!
17

18
24. Butterflies Materials Pre-cutfoambutterflies Markers, glitter glue pens, paint, etc.
Havegirlsdecoratebutterflies.
25. Flashlight Materials Golf tee, painted silver 1 white pony bead 1 small piece of fun foam
Glue pony bead to top of tee for light. Glue small piece of fun foam to side to represent switch.
26. Etch-A-Sketch Materials Fun foam – black, red, white Aluminum foil (heavy works best) Hole punch Blacksharpiemarker,finepoint
Cut template from a piece of cardboard for a rectangle 1 ½” x 2” with a rectangle near the top cut out 1” x 3/4” to resemble a frame. Use your
template to cut a back piece in black, solid rectangle. Trace and cut front in red – cut out center piece tomakeaframe.Cutapieceoffoiltofitbehindtheredfront.Gluelayerstogether.Holepunchtwowhite circles and glue to front for “knobs.” Use black sharpie to “etch” a picture or letters.
27. Magnifying Glass Materials Pipe cleaner, 6” Clear plastic sheet (transparency paper, sheet protector or clear contact paper, doubled) Bug sticker
Bend the pipe cleaner into a circle at one end. Glue clear plastic to back. Add a bug sticker.

19
28. Bird Nest Materials Acorn top 2-3 small beans or pompons Jute rope Glue jute loop to acorn top to hold pin, glue two to three small beans in bottom to represent eggs.
29. Snow Cone Materials Small Styrofoam ball, colored with powdered blush or powdered tempera paint White cardstock paper
Glue Styrofoam ball to cone made from white cardstock rolled into a cone shape.
30. Snow Globe Materials Small plastic container from vending machine toys Small piece of white Styrofoam Small object to put inside snow globe Artificialsnow
Glue a small piece of white Styrofoam in the lid of the container. Glue small object to center of Styrofoam.Allowgluetodry.Putsmallamountofartificialsnowinglobehalfofcontainer.Gluetoptobottom. Allow glue to dry before turning globe right side up.
31. Ear Muffs Materials Pipe cleaner – 3” length Pompoms
Curl cut ends of pipe cleaner in a “U” shape and glue the pompoms onto each end. Bend to make an archaswouldfitonyourhead.
32. God’s Eye Materials2 toothpicks with sharp ends cut offEmbroideryfloss(mayuseseveralcolorstocreatedesign)
Crosstoothpicksatcentertoformcross.Beginwrappingflossaroundcenterof two toothpicks until they are secure. Start going over and around and then tothenextstickandoverandarounduntilcomplete.Youcancutflossandtiein new color at any time. Hint: Tie floss colors together before wrapping so you don’t have to stop to tie knots in the middle of wrapping.

33. Bandana Materials Pinking shears to cut fabric Small piece of cotton fabric Pony bead
Cut triangle of fabric with pinking shears. Fold over at middle and feed two ends of one of the points through the pony bead.
34. Boxers Materials Fun foam Sharpies or gel pens Mini clothespin
Cut boxer shorts from fun foam. Decorate with sharpies or gel pens. Attach a mini clothespin to the top.
35. Caterpillar on Leaf Materials Green felt 2 wiggly eyes Lime green pipe cleaner Cut leaf shape from green felt
Wrappipecleaneraroundpencilandslideofftoformacoil.Cuttofitonleaf.Gluewigglyeyestooneend of pipe cleaner.
36. Tray of Cookies Materials Cardboard cut to rectangle shape 1” x 2” Foil cut to rectangle shape 1” x 2” Fun foam – tan Fine tip sharpie marker
Glue foil to cardboard. Using hole punch, punch six circles from fun foam. Glue evenly to cookie sheet to represent cookies. Dot cookies with black dots to represent chocolate chips.
20

37. Igloo CoolerMaterials2 bottle caps from 2-liter soda bottles–same sizeSmall piece of wire, pipe cleaner or plastic lacingOrange electrical tapeMini pony bead-white
Tape together two bottle caps to make a cooler. Tape piece of wire from one side to the other to form handle. Glue mini pony bead to front to represent spigot. Write IGLOO on tape.
38. Blackboard Materials Black posterboard Cardboard White marker or paint pen
Cut black posterboard approximately 1½” x 2”. Cut thin strips of cardboard to glue around edges to make frame. Use white marker or paint pen to make letters on board.
39. Newspaper Materials Strips of newspaper Thin string
Cut strips of newspapers 1” wide by 8” long. Start at one end and roll newspaper tightly. Tie string around middle.
40. Maps Materials Old map
Cut up old map into 1 ½” x 1 ½” squares. Add a pin.
41. Rock and Roll Record Materials Black fun foam Yellow hole reinforcer Hole punch Cut a circle from the black fun foam. Stick hole reinforcer in center. Punch hole from center.
21

42. Clothespin Reindeer MaterialsRound miniature clothespinWiggle eyesRed pompomBrown feltBrown paintGlue
Paint clothespin brown. Turn upside down so that the slit is the antlers and the round part is the nose. Glue on wiggle eyes. To make Rudolph, glue a tiny red pompom on the nose. Cut out ears from the felt and glue them on above the eyes.
43. Easter Basket Materials Lid to a 2-liter soft drink bottle Spray paint in a pastel color Colored grass Small eggs made from dough or clay Colored pipe cleaner for handle
Spray paint the soda bottle lid. Punch holes in each side to connect pipe cleaner handle. Glue colored grass and small eggs inside. Glue safety pin on the bottom of the basket or insert safety pin through the handle.
44. Green Angel Necklace
MaterialsSquare paper clipsGreen satin ribbonSilver or gold metallic pony bead
Use “square” type paper clips, turn upside down. Take a length of green satin ribbon where edges of clip intersect at the top, wrap ribbon around clip and tie in a square knot. Slide the ends of the ribbon up through the center of a silver metallic bead. Tie ribbon in an overhand knot on top of bead. Tie ends of ribbon together to make a necklace or attach a pin for a SWAP.
22

45. Pizza Slice Materials Tan fun foam Assorted colors of felt or fun foam scraps Tiny pompoms Brown marker Glue
Cut a triangle from the fun foam about 2” from point to “crust.” Color back edge with brown marker for crust. Decorate with scraps of felt and pompoms for toppings.
46. Cotton Candy Materials Pink cotton ball Piece of white paper 1” by 1” square Glue
Roll paper from one end to the other and glue down to form a tube. Glue one end of the tube into one end of the pink cotton ball.
47. Tropical Fish Materials 1 small glass decorator gem 1 small balloon (water balloon size) Sharpie marker
Insert the glass gem into the small balloon no further than just inside the opening. Tie the balloon in a knotjustbehindtheglassbeadtoformthetailfin.Usingthesharpie,addeyestoeithersideofyourfish.
48. Make New Friends Swap Materials 2puzzlepieces(figureshaped) Silver paint Gold paint Glue
Paint one puzzle piece gold and the other silver. Glue “hands and legs” together. You can add names, troop numbers etc.
23

49. Life Vest Materials Orange fun foam 1/4” white ribbon Black sharpie marker
Cut life vest pattern from fun foam. Fold down the sides of the vest and glue in place. Wrap ribbon around jacket and glue in place. When dry, draw buckle with sharpie.
50. Just Add a Pin! Materials Small miniature straw hats Baskets Plastic bugs Fsh Charms Party favors Fun foam shapes Flowers
Just add a pin to any miniature item and use as a SWAP.
24
SWAPS Notes

Patterns
Oval Pattern for Quiver
Box Shorts PatternEtch A Sketch Pattern
Sash PatternSno Cone or Ice Cream Cone Pattern
25

Popsicle Pattern Life Vest Pattern
26
Popsicle Pattern Life Vest Pattern