Embed Size (px)
Citation preview

ID 191.733
AUTHORTITLE
INSTITUTION
SPONS AGENCYPUB DATECONTRACTNOTE
EDRS PRICEDESCRIPTORS
1BSTRACT'
DOCOMIT! HEMS
FL 010 901
Hitler, AnneHearsay, a Listening Workbook: Series B Video*Lectures.-English for Special Purposes Series:Autobodriepair.HOftolulu City and County Office of Human Resources,Hawaii.; Honolulu Community Coll., 'Hawaii.Department of Labor, Washington, D.C.77DL-15-6053-37124p.: For related documents, see FL 010 897-905
MF01/PC05 Plus Postage.Adult Education: Auto Mechanical. Cloze procedute;*English (Second Language): *English for \SpecialPurposes: Instructional Materials; *LanguageInstruction: *Listening Comprehension: SecondLanguage Learning; *Vocational Education:Workbooks
This is the second of two parallel workbooks designedto accompany videotaped lectures cn automotive'repair fornon-English-speaking adult students. Each of the 11 units is devotedto one aspect of auto mectanics (e.g., power toolsw.welding.ptif4).; After listening to the lectures, the student is expectedto1omplete exercises of the, following types: multiple-choice, Cloze,fill-ih-the-blanks, pick-a-picture, and label-the-picture. (JB)
4 6
A1010******************************************Ii*************************** Reproductions supplied by EDRS are the best that.ban be made , ** from the oricUal document. *

0
ENGLISH FOR SPECIAL PURPOSES SERIES
AUTOBODY REPAIR
HEARSAYA LISTENING WORKBOOKSkRIES B VIDEO LECTURES
ANNE MILLER
Edited .by
Alfred G. Hod
US DIARTMENT OISHBALTH.EDUCATION A WELPARINATIONAL INSTITUTE OF
EDUCA/ION
THIS DOCUMENT HAS BEEN REPRO-DUCED ElACKLY AS RECEIVED FROM.THE PERSON OR ORGANIZATION ORIGIN-ATING I T POINTS OF VIEW OR OPINIONSSTATED DO NOT NECESSARILY REPRESENT OFFICIAL NATIONAL INSTITUTf OFEDUCATION POSITION OR POLICY
*Video LectureS by
Herbert Nishii ,Illustrations by
Michael Nonaka
Produced at Honolulu C9rnmunity College'1977 4

'''s
A q ..
Mb rights reserved. Any part of this book gay be reproducedin any lorm or by any lectronib or mechanical means by anyclassrbom teacher for use in a classroom. No writtenpermiesion from the author or publisher is nebessary. Thistext may not be commercially sold or published. Arrangementsfor obtainipg multiple copies of this text can be made with*the Hobolult Community CollegmIdstructional Resource Center.
.., .
Produced at Honolulu Community College, 1977.
/hie text was deyeloped under Comprehensive Zmployment andTraining Act CRTA) contract %ober 15-6053 -37.betweem theU.S. Departme of Labor and the Office of Human Resources,C4ty and Counfy of Honolulu, under subcontract to konoluluCommunity Col lege.
)
ii
3

ACRNOWLEDGMENTS
The videotapes on autobody repair, upon which the listeningtaxta are based, were a product of the combined efforts of manyindividuals'here_at Honolulu Community College.
The initial members of the staff-- Al "Hoel, Kathy Hubbard;Bill Peet, Marybeth Clark and I-- created the idea of havingvideo-based listening materials.
Herbert Nishii, an autobody student, and part-time autobodyrepairman, planned the content of the video lectures and.thenskillfully delivered the lectures and demonaikated the.autohodyrepair techniques before the camera. He was also my ptimaryource of information about autobody work.
Steven Dowpey, also a student, set,up the video equipmentand did the camera work for lectures VI through XII, He thenedited'all of the lectures into Series A,and Series 13 tapes, alaborious task completed with equal amounts of-precision, skillandpatience. -
Stanley Oganeku, the director of the Autobody Repair Programhere, gave us permission to us& the autobody shop and equipment'for some of olq videotaping sessions; he and other instructors'/Woo provided ds with technical information whenever Herbert '
NIshii was not available to answer our questions.
,Katsumi Ige, the media technician for the InstructionalResource Center, arranged for our use of the PRC videotapingequipment, studio, editing room,. and monitOrs. Hill Wiley,the'director of the Instructional Resource Center, also assisted '
us in the production of our materials.
11imie Ono, the director of the Learning Assistance Centbr,made LAC rooms avdllable for our students and teachers to viewthe tapes and conduct.classes.
The students with whoM we used the materials gave usmuch valuable feedback as to the relative difficulty of thedifferent lectures and the exercises written for the lectures.
Ofelia Bersabal, Yong-Ok Park, and Tanh Van Phan, thebilingual teachers, regularly helped the students and me inthe video listening classroom, and also provided me with goodadvice and suggestions as to the editing of.the lecteres'intodifferent series.
Nike Nonake, artist, drew the excellent plctures of theautobody tools and equipment.which are included in theworkbook xercises.-
iii

Sheila Nun, Fay Ishikawa, Jessiefema Figuerres, mdDiane Yoshidan our typists at various time. during the year,gave us dedicated service and the benefit of their fast_accurate typing skills for week upon week of non-stop typing.
Al Hoel, the coordinator of our program, encouraged me msthe videotapinci, material, writing, transcribing, and videoediting progressed. His meticulous skills in designing a folat.for the materials, editing the xercises, and ptoofinglthefinal typed copiea of all Cho materials have been crucial to the
quality of the finished product. His stcnse of humor, also, helpedthe entirebstaff to cope with tho project and the simultaneouswriting tnd teaching we-handled through much ot the year.
v
A4/4.
Honolutu, HaLaiiAugust J977

;ABLE OF CONTENTS
1cknow1edgments
411,
iii
To The Student.171
UNIT I )\ INTRODUCTION TO AUTOBODIci REPAIR 1.
UNIT II/ HAND TOOLS
UNIT III POWER TOOLS 32
UNIT IV USE OF HAMME AND DOLLY )1 46
UNIT Vv
UNtT VI
UNIT VII
r .
UNIT VIII
UNIT IX
*
UNIT XI
UNIT X/I FINAL PREPF9ATI N AND SPOT PAINTING 111
il'ICKING AND ILING
USE OF THE D SC GRINDER
5i
61
PLASTIC Ft'LL e, 70
WELDING 78.
.THE SPRAY GUNI 89
INTRODUCTION ID PAINTING 95
PREPARATION FO PAINTING 103

TO THE STUOENT
These txts are designed to be used with video-tapedlectures. There are two purposes for these listening materialsand lectures. The primary purpose is to help you ddvelopyour.ability to understand American English as it is spokenby a native A second purpose.is to provide you with ,
information o utobodY repair.
Before watching ach pelt of a video lecture for the firsttine, look in the workbook for the Preview and the QuestionsTo Think About for that part of the-Li-JR-lie and read them.HaVing this information will help you understand ihe lecture.The Preview and QUestions To Think About are translated inyourA-iiiiiration manual. You should also look in the translationmanual fo'r the vocshuldry used in that part of the lecture, andfamiliarize yourself with the words and leanings.
A. you watch each part of the lecture for the first tine,try to get the general ideas as the lecturer explains them.Please do not read your translaition vocabulary or any of yourother texts as you listen, sinee if you keep your eyes on abook 1;ou will miss-the important visual aspects of the lectureand demonstrations.
After witching the video lecture part, go-to.theExercises in your workbook and read them oVer. The translftionmanual contains' the translations.of the directions for each ofthe Exercises. Try to answer the questions you know, but avoidspending too much time on them: the teacher will soon playthe sane video lecture part over again, and you will havd timelater to complete the xercises:
The second time you watchothe lecture,.you can also glanceat the Exercise questions and/or the translation vocabulary inorder.to listen for the answers to specific questions or tolisten fOr 'particular vocabulary words. In your translationtext, the list of vocabulary words are written in the order inwhich they are said in the lecture parts.
Iv
After listening to the mideo lecture a second time, finishanswering the xercise questions.
When you do the Multiple Choice xercises, do not select theword choices simply according to the wofds you,hear on ihe tape.You will do better if you carefully read ahd think about all thechoicbs and then elect th ones which make sense, based on all
the information which Herbert Nishii gave in the lecture.
For the Cloze xercises, however, you will fill the blankswith the cact words you hear Hrbert Nishii use in the entence":as you listen closely to the tape several times.,
v4

The Fill in the Blanks ftems are similar to the Clozexercises. You can listen closely to the tape to write,
word-tor-word, the phrase or words you hear.Herbert Nishii usein the same sentences. Thh main difference between the Clozeand the Fill in.the Blanks exercises is that the Cloze riiaties
(tzto'listen for single words, but the Fill in the Blanksrcises require you to use any number of words necessary to
.complete the sentence.
If there is a Pick the Pictures exercise, your teacher willsad the leads (questions or statements) for which you are to
;. hoose the corresponding picture(s).
.
For Label the Pictures'exercites, however, you can sin61ywrite the name of fhe pictured ,item in the space provided underthe 'picture. The rest of the types of exercises in yourworkbook are fairly simple and need no clarification.
When all of the students finish doing the exercises, ttieteacher will go over the exercises with the class, asking youfor your answers and letting you'know whi,ch answers are correct.If necessar I', the teacher will explain why an answer is correct .
or incorrect, and/or play the same lecture part over again, soyou can listep for a particular exercise,answer. To not"----.hesitate to ask any questions you might h ve. If you continueto have trouble understanding any particul r section of alecture, your teacher can give_you a tran cript of the tape toteed while you listen again to the lecture.
To:get maximum benefit from your listening,c asses, youould: '1) mage*sure understand the content of the'lecture
at the time you are 1 ng to it in classt 2) periodicallyreview the names of th Is and the repair procedures covetedin arlier lectures; 3) memorize the new vocabulary found ineach lecture; 4) frequently review and .use all of the vocabularyo that you do not forget it.
You might find, at first, that the lectures and exercisesare difficult. Please do not get discouraged! Gradually,'withpractice!, you Iill begin to understand more of Herbert Nishii'speech. You will also learn how to do the exercise* more
e isily.and rapidly. Do not expect to be able to get all of theWM/sr& correct at first. The development of listening andreading skills takes time and a lot of practice, and that is apurpose for which these texts were designed.
3
tr 111
r A.M.
Honolulu, HawaiiAugust, 1977

UNt I
VIDEOLECTURE (SERIES q)
INTRODUCTION TO AUTOBODY REPAIR
PREVA145
(Par la-lea, 2**)
librbert Nishii tells about the kinds,st_work autobodyrepairmen do.. Aid what those jobs consist of.
Questions lo Think About:N.
I. What irrthe kinds of work autobody repairmen do?
2. What is the work of a "metal man"?
3. What is the work of a painter?
(Parts 3**, 4**).
This part of the.lecture deals with pay scales atd ratings,and with the expectations that youe employer will probablyhave about the work yod'do in the shop.
questions To Think!Aboet:
1. What is tr.1 lonest hourly wage earned by autobody repairmenno
at is the ibp hourly wage?
3. What kind of work will your employer expect from you?
4. Is autobody repair an easy job?
0
1
\ft
.

Preview continued
.(Parts 5**-7**)
This part of the lecture describes safety precautionsand the safety egypment you will need as an autobody repairman.
Questione*To Think About:-
1. What safety.equipMent do you Need to we'ar at all:tipos?
2. What safety equipment do y4:14 need,for particular jobs?
3. What is the telephone number for emergency. calls?
(Parts 8**, 9**)
In this part'of the lecture, Herbert Nishii describes theautobody Sepair working conditions, and what'clothing isappropriate for the job.
questions To-Think About:
1. Will you get dirty on autobody repair jobs?
2. What kinds of dirt will get on your hands and your clothes?
3: What kind of shirt and pants should SFou wear?
.011,
1 o AGek,
2
PERCOIN
(Part 1)
Multiple.ehoice (TrA)
/ v'y
01. Autobody repair and painting is
a. fun. c. basically lecturing.b. fixing car bodies. y d. easy.
2. In autobody repair you have
a. one job.b. two jobs.
3. The metal man'does ,t.he
a. repairing of daMaged parts of the cal-,b. lecturing of a program.c. replacing of damaged parts of the car.d. repainting.gf damaged autos.
c. three jobs.d. four fobs.
4. The painter does the
a. replacing of damaged parts of the gar.b. repainting of the repaired area....c. repairing of the car.d. repainting of the complete car.
(Part 2)
eloze (TrG)
What you do in the metal work baaically.you pull
4ents, you fix . ,know, -tiwf undercaxriage of the
4 body. You p align doors, that means you fit
doors hoo s. You also, later on, will probably_tackle1
1 collision work, or thecars You see t get_ - _ _
into accidInts. Those type of things. _ for painting;_
you learn to basically mix p to form different
color., you sand cars, tape c _ up, and you try to make the
car 1 new again.- -3

4.
jPart
Shobt Mower (TrC)
1: Do autobody repairmen worA:'for apmabody at ono time or
anothoil ,
2. HoW much W001daVtobody meh be paid At this time?
3. What doea your pay depend upon?''
4. ,What pay do you start out at?t,
-What'pay-could you work your way up to?
4 :
(Part 43
True-False (Tr8)
1. Your boss wants you to porform well.
21 Your boss wants you to work fast.
Your boss wants to make money.
4. You'r boss wants to work
5. Your'boss wants to work tiard.
6. Your bo nts to sWeat.a little bit.
ave to sweat a little Wit..
8. You have to do easy jobs.
9. Your boss is'fulfillipg.
10. Autobody repair jobs cAh be fUlfillin§.
(1/art 5)
Fill.in thoillanks (tr6)
L. Auto is a * job and a
2. You hive to have safety precautions to keep
You need to wear
job,
rl

. .
V..
.
in the Blaeks (continued),
4. The names of the masks are\
e 5. The is use0 when you work, with plastic filler.re'
O. _The tos two filters and it'is used when you
and
painfT-'
t
'Lhbelthe Ilicturett
- 410
1.
(Part 6)
wrill in the Blanks. (TrD)
41.
2.
LI You need eye protection, suCh as the andthe
2. The are used when you use the powergrinder, drill, or blow gun.
3., The are used when you are welding.
,r
3
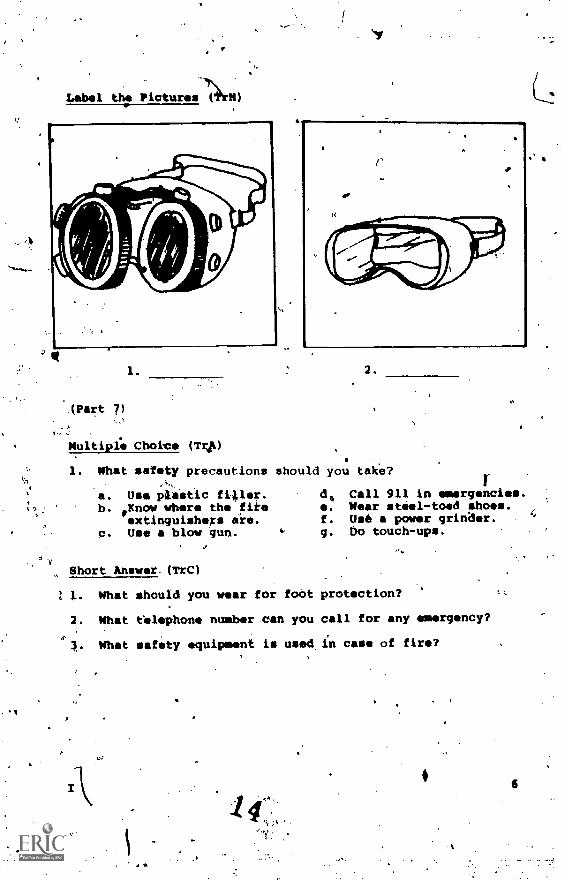
Label the Pictures"1( li)
(Part 71
Multiple Choice (TcA)
2.
1. What safety precautions should you take?
1. a. Use plastic filer. d, Call 911 in emergencies.b. Know where the fite e. Wear steel-toed shoes.
#sactinguishets are. f. Us6 a power grinder.C. Use a blow gun. g. Do touch-ups.
Short Answer. (TrC)
1 1. What should you wear for foot
2. What telephone number can you
1. What safety equipment is usedA
protection?
call for any emergency?
in case of fire?
46

Pick the Pictures (PrI)
a.
a.
1.
b.;
0
2.
(Part 8)
Multiple Choice (rrA)
l. What kind.of job is autobody?
a. hazardous c. not dustyb. fulfilling d. dirty
2. What thingek make the job dirty?
a. oil c. groaseb. dust, d. paint
3. In autobody work, you also get
a.b.
cuts.bruises.
C. old.d., ears.
4. You know you've worked well when
a. you're dirty.b. you're hazardous.
(t.
c. you have kn anergency.d. you're'boat up.
7

.(Part 9)
VultiPte Choice (TrA)
1. What kind of shirt should you wear at an autobedy shop?
t . .
A. a.clan shirt d. a comfortablé shiktb. a cOol shirt 6, a light shirt..c.. a new shirt !. a T-shirt
8 .
2. ,What kind of pants-should yoyfwear at an autobedy shop?
/ va. com ,
tantsrtable pants F. , pants you can tbrow
b. old. '
;.y
)t
away laterd. cleanpants
3. An'autobody repairmaR's p7hts are going/to
'a. get staled. .' (3. get dusty.b. get alautiful. d. hav holes in the knees.
8

UNIT II
VIDEO LECTURE, (SERIES 9)
. HAND TOOLS '
%
ft,WVIt4
Q
(Parts 1**,..2**)
Herbert Nishii introduces fhe sot of hammers you would find toin a toolbox, and alsg the all-purpose dolly. He describes thefinishing hammer and explains What it is used for.
Questions To Think About:
I. What are the names of the hammers?
2. What is the name of the heavy metal object used with thehammers?
3. How would you describe the appearanCe of the finishing hammer?
4.. Wh;lt is the finishing hammer used for?
(Parts 3**, 4**)
Herbert Nishii holds a picking hammer and describes itiappearance and use. He then points out some features of theshrinking Oammer, and explains what it is used for.
Question& To Think About:
1. What gloss the picking hammer look like? What is it used for?
2. What does the shrinking hammer look like? What is it usedfor?
,9

Previe%0 continved # 0
I' ,
(Parts .5, 6**) .
Herbert.Nishii holdS,and describes the 2-pound ball=peenhammer and comptes it 4ith'the other h9mmers. He alscexplainsthp.use of the 11-pben hhmmer, and telli when you,would use ,
relation,0 usicg the other hammers for autobody repair./He therCshows AA all-purpose dolly and.explains its uses.
\
Questions To Think About:,
1. How does Fhe ball-peen hammer compere in size and weight tothe othedP hammers?
4
. When would.yliu, use the ball-peen hammer in agtobody repair?
3. What are two uses of the all-purpose dolly?
.(Parts 7**, 0")
Herbert Nishii hows and desCribes `two types of pliers,drive ratchets, sockets, and extensions of different sizes, andtiells what these are used for.
questions To Think About:
1. What are the uss of the two types of pliers?
2. What are the two sizes of the drive ratchets?
3. What is the purpose of the extensions?
)4. What is.the purpose of the drive ratchets and sockets?
(Part /)
Herbert Nishii show* screwdriyers of tiro types and manywdifferent sizes. Heidescribes the uses apd the different shapesof the two_types pf screwdrkvers. ,

Preview continued4e
questions To Think About:
1. -what are the two types of screwdrivers ca/led?
2. Hoow are the screwdrivers shaped?
3'. What a're theY used Tore?
.(Parts 10", 11**)
Herbert Nishii shows a roloc disc, oxp)oins what equipmentyou need in osder to use it. and also tells what it is used'fdr.He then shows a wire-end brush and tells where and why it is used.
Questions To Think About:
yhat equipment do you need in order to use the roloc disc?.2. What is.the roloc disc used for?
3. What equipment do you need in order to use the. wire-end40y,ush?.4. Where and why is the wiry-end brush used?
(Parts 12** 14**)
Herbert Nishii introdutes a set of files used in autobodyshops. He describes the appearance and uses of each file as heholds it.
Questions To Thihk About:
1. What does the speed file look like, and what kind of surfeceis it used on?
2. What!'doete the Vixen'file look like, and what kind of surfaceis it used on?
3. What does the Hondo file look like, and what kind of surface'is it used on?
II
9
r,

Preview continge'd
.2qestions To Think About: (continued)
4. How do you hold the speed file and thevixem file? .
5.. How,do you holad the Bendo file?
(eerts 15,-16011)
Herbert pitshii holds I reverse hammer, names its differentparts; and,explains.what it is used for end how you use it.
He then shown and explains the uses of the tin-snips, the blow
gun, ind the measuring tape. 1 .
Questions,To Th4nk-About:
1. What are thd-four parts of the reverse hammer?
2. What is the reverse hammer used for, and when would you need
to use it?
3. What do the tin-snips resemble? What are they used for?
4. What is the blow gun used for?
5. What is the tape measure used for?
(Part 171")
Herbert Nishii introduces the finaltools in a toolbox:
putty knives, plasbic Applicators, dnd a sanding block. He
explains the purposes of the putty knives,and plastic applicators,
and describes the appearance and use of the sanding block.
Questions To Think About:
1. What Are putty knives and plastic applicators used for?
2. What is another name for "plastic applicators"?
3. What would you use a s$nding block for?
12

(Part. 1)
Fill in the Blanks (ITrDY b. .-
. ! Ii.
' I. In autobody remir and painting you're going to becarrying around.a set of
. .
,
.6*
..-,N . %,,2. These tools.are palred your
3. Herbert Nishii- will tell you about.a set of \ .
4. He will also tell you Alieut Something else, the
(Part.2)
Fill in the Blanks (TrD)
I. The firstlimmer is a hammer. .
2. The finishing hammer has a back.
3. The finishing hammer has a,
4. The other part of the'hammer is a
face.
5. The finishing hammer/1 used foe and..
6. ln simpler words, this hammer is used fordamaged metal.
(Part 3)
Multiple Choice (TrA)
1. The back of the picking hammer is
a: slightly rounded. c. crowned.b. long. d. pointed.
2. The face. of the picking hammer is
a. slightly rounded. c. crowned.'b. d. painted. .
It
913
^

Multiple Choiceccontinued)
3. The picking hammer is Wiwi for (
a. picking up.iiles. c.i crowned spots.b: picking up friends. d. picking up low spots,
4. If you have a very small, tiny dent,-.won
g. prck it up, c. pick.it on.411 b. pick iC off. d. make it crowned.'
5.rYour picking will leave a
a. face. c. file.b. low spot. d. slight hill.
lg. You will the slight hill.
41, '.a. file on. c. file out.b. file off. d. file up.
(Part 4)
True-Falsq17
, 1. The shrinking hammer face tkas ridges on it.
2. The shrinking hammer makes slight bulges in yourmetal.
3. The shrinkting hammer ridges push down on certainparts of the metal and pull it in.
4. The shrinking hammer ridges pull the metal down.
5. The purpose of your shrinking hammer is to bringup slight bulges in metzl.
(Part 5)
Multiple Choice (TrA)
1. The 2-pound ball-peen hammer is
a. a dolly. c. the biggest hammer.b. a heavy hatmer. d. easily recognizable.
0 214
So.

Multiple.Choice (continued)
2. The 2-pdend ball-peen hammer is used for
a. shrinking metal. c. picking.up dents.b. roughing out large dents. d. bumping and dinging.
A
3. After you use 'the 2-poupd ball-peen hammer, you can
a. bump and ding, c. use the other hammers.b. damage the met.al. d. use a bigger hammer.
Pick the Pictures (TrI)
a. b.
V
15

Pick the Pictures (TrI)
1
1.
2.
(Part 6)
d.
3.4.
Multiple Choice (TrA)
A. Another name for all-purpose dolly is
1a. pulling dolly.b. shrinking dolly.
2. The All-purpose dolly is
a
c: high crown dolly. .
d. picking dolly.
used with the fkammers fin
a. smoothening out metal.b. shrinking the metal.
3. The all-purpose dolly is
,a. filing metal.b. roughing out metal.
c. picking up small dents.d. bulging up the metal.
also used for
4. "Roughing out" meanA
a. hitting out major dents.b. finishing.
24
c. pulling in metal.d. making ridges in metal.
c. bumping and dinging.d. rounding out.
16
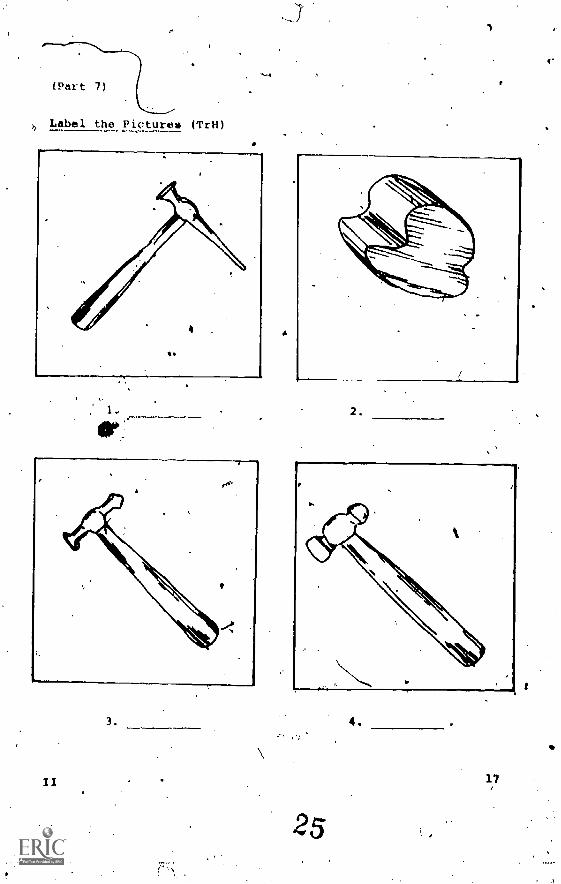
Label the Pictures (TrH)
fp'
3.
II
A
2.
5
4.
17

A1
Label pe Pictures (continued)1 -
S.
Fill in the Blanks (TrD)
A
1. 'The water-pump pliers and the regular pliers are used forthings and th4ngs.
2. You can even use pliers to things.,
26%

Label tile Pictures' (TrH)
1.
(Part 8
elk
a.
Multiple Choice (TrA)
1. Tla two sixes of Herbert Hishii's drive ratchets are
a. half-inch. c. three-eighths inch.b. quarter-inch. d. one-inch.
2. The extensions are used when you want
a. to make the ratchet Smaller.b. to have a longer reach at things.c. tteuse a smaller ratchet.
tO remove- sockets.
3. Ttie uses of the drive ratcbets and :sockets are
a.- removing nuts and bolts.b. putting on nuts and bolts.
,c. taking off nuts and bolts.d: smooithining'nuts andlbolts.
et
f.
19
,

ft.
.4
Nultipls Choice (continued)
4. The ratchets and sockets are Iliad. in different sizes
a. for Uifferent suited hemmers.b. for different sized jobs.c. for different lased pliers.d. for different silted nuts and bolta .
albel the Pictures (TrH)
1: 2..
20

4
Label the Pictures (continued)
3.
(Part 9)
Multiple Choice (TrA)
1. 'Regular screwdrivers have tips which are
a. flat. c. pointed.b. square. Id. wedge-shaped,
2. Phillips screwdrivers have tips which are
a. flat.b.. square.
3. Screwdrivers art used for
c.d.
pointed.wedge-shaped.,
a. removing screws. C. putting on screws.b. taking off screws. d. filing.
4. The standard screwdrivers can remove
a. standard hammers. c. phillips screws.b. standard screws. d. any screws.
II
29
21

,t
.4
Multig:le Choice (continued)
S. Th phillips screwdriver can remove
a. standard hammers.b. tandard screws.
Pigk the Picturps (TrI)\0
a.,
'al
1.2.
4
1
if
c. phillips screws.d. any screws.
b.
d.
3.
4.
22

A')
(Part 10)
Multiple Choice (TrA)
1. A roloc disc is used with
A
a. a standard type of screwdriver.b. a special typ of screw.c. a regular hand'drill.d. 4 specially designed,type of sandpapir.
2. To use the roloc disc, you put At into the
a.b.
drive ratchet.drill chuck.
3. A roloc disc is used to
c. sandpaper.dr. ratchet extension.
a. grind iq tight corners. c. sand off paint.b. grind in small spices. d. clean out rust.
(Part 11)'
Fill in the Blanks (TrD)
1. The disc grinder, roiloc disc, and.used to remove rust)
2. You use the wire-end brush where the disc grinders and theroloc disc
3. You need a lo use the wire-ond,brush.
4. Another way to say "remove rust", is " rust.'
.1?
II

A.
Label, the Pictures (TrH)
1.
(Part 12)
2.
Multiple Choice (TrA)
in the hand tools?
c. 'threed. four
1. How mamy files are ther
a. oneb. two
.2. The speed filM
a. lomg. c. wide.
b. flat. d. nerrow.
3. The speed file is
a. hard to use. c. not easy to handle.
4.
b. easy to handle;,
You need to put
d. comfortable to hold.
bn the speed file.
a. sheets of paint e. sheets of sandpaper
b. water d. "sheets of metal
A
II
,
o.

Multiple Choic (continued)
5. The speed file ls used tiff
a. cut the plastic filler%b. cut the high spots off the metal.c. sand the plastic filler.d. reveal high and low mpots in plastic filler.e. reveal high and low spots in metal.f. make plastic filler smooth.
(Part 13)
Multiple Choice (TrA)
1. The Vixen file ie made out of
a. plastic filler, c. cloth.b. metal. d. plastic.
2. The Vixen file is
a. wide.b. flat.
c. narrow.d. sharp.
3. \The Vixen file is used like
a. the speed fiie. t. the screwdriver.b. the roloc disc. d. the ratchets.
4. The Vixen 'file is used on
a. wood. c. paint.b. plastic filler. d. metal.
5. The Vixen file is used to
a. sh4pe plastic filler.
b. qmoothen metal.
J "e
c. cut down high spotson metal.
d. reveal low spots.on metal.
3325

(Part 14)
Multiple Choice (TrA)
1. The Rondo fife looks
a.. like a choose grater.b. very wide.c. like a Vixn file.d. like a mantling block.
2. You can buy or
4. squareb. slightly round
3. 'Th. Bondd file is used for
a. shaping plastic filler.b. cutting plastic filler.c. cutting metal.d. smoothening metal.
c. circulard. flat
Rondo files.
4. You shape the plastic filler when it
a. is not that hard. c. looks like metal.b. is not that soft. d. is very sort.
Pick the Pictures (TrI)
a.
'V
XI
b.
26

Pick the Pictures (continued)6
(Part 15)
Short Answer (TrC)
1.
2.
3.
1. Nams the four parts of the reverse hammer.
Number in Order (TrE)
To pull out a dent with a reverse hammer, you
screw the end into the hole in the dent.
slide the weight along the shrift.
drill a hole into a dent.
pull the dent out.
Multiple Choice (TrA)
1. 'You use a reverse hammer when
a. the dent is big.b. .you cannot reach behind the dent.c. your dolly pushes the dent out.d. you can't hammer the dent grom the inside.
27
-46

(Part 16)
NUltiple Choic (4iA)
1. The tin-snips.look like
a. vry large scissors.b. Bondo files.
The tin-snips are
a. plastic scissorsb. large scissors.
3. The tin-snips are used for
cutting hair.b. cutting metal.
4. The blow gun is connected to a
a. disc grinder.b. line.
The blow gun is used to
a. clean things off.b. blow air.
,6. The tape measure is used to
a. measure air.b. measure paint.
II
36
c. blow guns.d. gardening shears.
0. specially made cissors.d. safety scissors,
c. pulling dents.d. hammering.
c.d.
compressor.ratchet.
c. cut metal.d. dry things.
c. measure distance.d. measure time.
ie

Label the Pictures (TrR)
3.
2.
V. 3 7
1.
29

(Plirt 1))
Multiple Choice (TrA)
I. Putty knives and plastic applicators are used for
a. mixing plastic filler. c. pulling dents.
b. sanding plastic filler. d. applying plastic fillor.
2. Another name for plastic applicator is
a. putty'knife.b. sanding block.
3. The sanding block is
a. heavy.b. flexible.
c. squee-gee.d. plastic filler.
\4c. flat.d, easily used.
4. A sanding block is usedfor
a. sanding plastic filler. c. making smooth hands.
b. making ,smooth surfaces. d. making presentablesurfaces.
Pick the Pictures (TrI)
a.
II \
38
30

Pick the Pictures (continued)
II
. .
1.
2.
3.
31.
39

4 1
(Part 1")
UNIT III
VIDEO LECTURE (SERIES 0)
POWER TOOLS
In him introduction to power tools, Herbert Nishii expliins f
what the powor sources are, and why power tools are potentially
dangercum to use.411-
Questions To Think About':
1. What are the power sources of power tool.?
2. What is a danger of power tools which are run by electricity?
3. When you use power tools, what is one thing.you can do to
reduce the danger?.,ffao
(Parts 2" - 4") 4
Herbert Nishii shows two types.of disc grinders. H.
explains the respective power sources, parts, sixes and weights,
and functions of both types of grinder.. H. also tells what
the grinders are used for An autobody shops.
Questions To ThiAk About:
1. What is the power source of the larger disc grinder?
2. Where is the on-and-off switch on the larger grinder?
3. How much does the larger disc grinder weigh?
4. How fast does a disc rotate?
S. What is the power source of the smaller disc grinder?
6. Where is tha on-and-off mwitth on the smaller disc grinder?
4032
.

Preview continued
(Parts 5** - 7**)
Herbert Nishii shows two types of orbital sanders. °Heexplains how you hold each one,,what the purpose's or usee of theorbital sanderi are, and what sandpaper you need to use withboth orbital sanders.
Question* To Think ibout:
1r1 What are the tiro types of orbital.sanders?
P2. 'What is one use for the orbital sanders?
A
3. What is another name for "orbital sander"?
4. What is needed in order to'use these toola?
5. How do you turn on the rectangular orbital sander?
6. What is another use for the orbital sanders?
(Part 8**)
In this,part of the lecture, Herbert Nishii describes thestraight-line sander. skte tells how to hold it, mentions a toolit resembles,,and tells what the power source is. H. also tellsthe size( weight, and purpose of the straight-line *ander.
guestione To Think, About:
1. How do you hold the straight-lihe sander?
42. What is the power source of this tool?'
3. What is the purpose of this tool?1
4,1
111
' 33

4
Preview continued
:Mart ")
Hrbert Nishii shows two types of polishers (or eir buffers).He compares the size of the larger buffer with the disc grinder,
and he also compares their rotation speeds. He tells what thepont:hi:1g heads are made dt, and what the uses of the buffers are.Hethen.shows,two types of air wrenches, and tells-what theirpurpose'is.
questions To Think About:
I. Which air buffer resembles the disc grinder?
2. How fast do theyair buffers spin?
3. HOW fast does the disc grinder spin?
4. What is the purpose of the polishers?
5. What are the two shapes of the air wrenches?
6. Whatis the main use of the air wrenches?
(Part 1.0)
Herbert Nishii xplains the zip gun (panel cutter) and theattashments for it which you can use for various purposes. Heshows a drawing on the blackboard of what the attachment for 1
cutting metal would look like.
questions To Think About:
1. What is the basic use of the zip gun?
2. With other attachments, what Other things can you do with
the sip gun?
34
4
,4741-74j4,r-:
(Part 1)
Multiple Choice (TrA)
1. Power tools ar run on
a. sunlight. c. lectricity. ro
b. air. d. water.
2. You have to be careful with your power tools becauee
a. they are convenient. c. they ar hasardobs.b. they are all gribders. d. they are water-powered.
Electrical currents couldw 40
a.\-tabbse any of the tools, c. run on your air lines,b. give you a shock. d. be in workini order.
4. Air tools
a. are carefut. c. run on air lines from a shopb. ire poweeful. compressor. .
'd. are good tO brathe.
5. Air tools are dangerous because
a. air produces a'lot of power. c. IF is dangerous.b. air runs on electricity. d. an gives a shock.
6. When you use power tools,
a. wear gloves. c. do not abuse them.b. run away. Q. be careful.
(Part 2)
rm, in the,Blanks (TrD)
1. The.first tools Herbert Nishil will talk'about.will bethe various %)'
2. On the larger disc grinders there are two
3. The pOwer source of 410 larger disc grinder IN
III 35
43
o

rill in theillanks (cOntinued)
4. The larger disc grinder has an on-and-off 'Breach on a
5. The smaller disc grinder has a type on-and-offswitch.
6. The larger disc grinaer has a handle that u canto either side of the tool.
(Part 3)
Short Answer (Tre)
1. How long is the larger disc grinder?
2. How limuch does the larger disc grinder weigh?
3. Why do you need to uss the larger disc grinder properly?
4. The sanding disc rotates at what speed?
5. If the moving disc touches you, what will happen?
(Part 4).
0
True-False (TrB)
1. Tho small, compact grinder has a pistol grik
2. The small grinder has a trigger.
3. The small grinder runs on electricity.
4. The small grinder weighs about 2 to 3 pounds.
5. The small grinder is about 7 feet long.
till in the Blanks (Tr)))
1. The disc grinders are used for removingxemoving nd smootheningin your metal.
. 2. the disc grinders are also used to locatein your metal.
III
44
I.
36

Fill in the Blanks (continued)
3. Also, the disc grinder is used to smoothen a metal calledis sometimes used for filling up
Pick the Pictures (TrI)
b
6
(Part 5)
Multiple ehcice (TrA)
1. The two types of orbital sanders are the
a.b.
round type.roctangular'itype.
2. Orbital sanders are used for
c.d.
A!).
squire type.triangular type.
a. feather-edging.b. painting metal surface.42. asking circles.d. tapering the paint to make a smooth surface frcm tho old
paint to the bare mitalq.
A 45
./
-t..

MUltiple Choice (continued)
3. The feather-edged surface
a. is smooth. c. has a big step.b. is tapered paint. d. is tapered metal.
(Part 6)
Short Answer (TrC)
1. What is another name for the orbital sander?
2. How-big is the...rectangular orbital sander?
3. Whim do you use with the orbital sander? t
4. Whre*is the on-and-off switch on the rectangular orbitalsander?
S. How do you turn the rectangular orbital sander on?
6. How do you hold the round orbital sander?
(Part 7)
Fill in the Blanks (TrD)
1. Another purpose of the orbital sander is to use it with
2. After you cut the plasticrfiller with Bondo files, youuse the orbital sander to stake a job, a
very surface. T-
3. You don't want any oryour plastic filler.
4. So, besides feather- dging, they're used forand lastic filler.
(Part 8)
Fill in the. Blanks (TrD)
1. This tool is used for
Ill
.400
in
30

Fill in the Blianks (continued)
2. This tool is caljed the
3. You uss ,
4. One hand grips thethe
hands to ho,ld
ahd the other hand holds
5. The stratght-lino sander resembles the
6. .The strOght-line sander is powered bythe speed file is a hand tool which is powered by
7. The straight-line sander is aboutwide and. inches long.
, but
inches
8. The straight-line sander weighs about pounds.
9. Again, the purpose of the straight-line sander is
-Label the rictures (TrH)
III
...1,
'2.
47 '39

(Part 9)
Multiple Choice (TvA)
1. The polishers are also called
a. portions.b. air buffers.
2. The' larger polisher resembles
a. the smaller one.b. a disc grinder.
3. The polishers spin at about
4.
5.
(3. electric grinder,.d. compounders.
c.d.
an orbital sander.a straight-line sander.
a. 4,000 - 5,500 r.p.m. - C. 25,000 - 30,000 r.p.m.b. 2,500 - 3,000 r.p.m. d. 3,000 - 4,500 r.p.m.
The polishers spin
a. slower thanb. faster than
The polisher heads are made of
a.
b.
Cloth.polish.
6. The polishers are used for
a. compounding cars.b. shining shoes.
UI48
c.d.
the eiectric grinders.
at the same speed asat double the speed of
c. wool.d. sandpaper.
c. painting cars.d. polishing cars after
painting them.
40

Label the Pictures (TrH)
(
1.
a.
XII
2.
;
- ; .;1-
Multiple Choice .(TrA)
1. Air wrenches come in
a. 'ratchet shapes. c. hand-form shapes.b. pistol shapes. d. square shapes.
2. You use air wrenches to
a. remove nuts and bolts faster.b. remov air tools.C. .remove the air.d. remove the shapes.
(Part 10)
Multiple Choice (TrA)
1. This tool is mainly used for
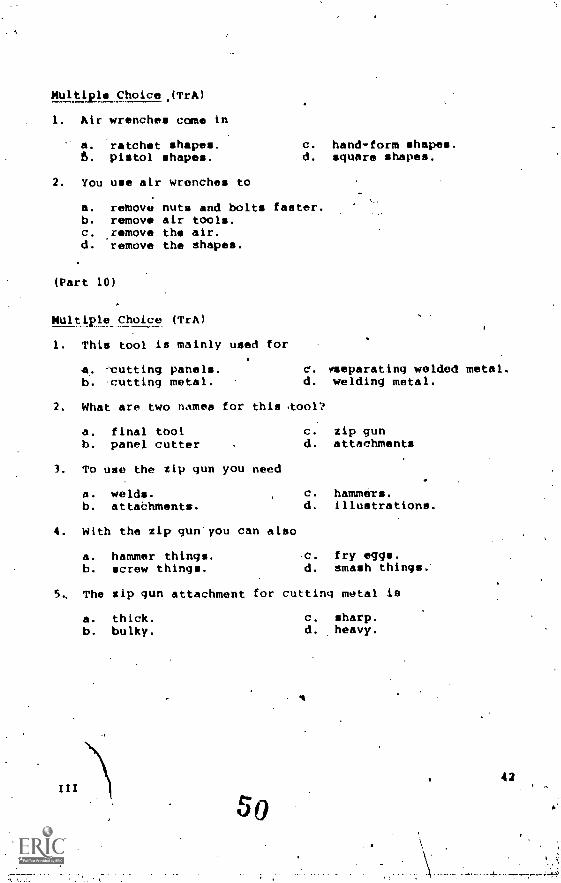
a. -cutting panels. C. rseparating welded metal.b. cutting metal. d. welding metal.
2. What are two names for this tool?
a. final tOolb. panel cutter
3. To use the zip gun you need
c. zip gund. attachments
a. welds. c. hammers.b. attabhments. d. illustrations.
4. With the zip gun you can also
a. hammer things. C. fry eggs.b. screw things. d. smash things.
5, The zip gun attachment for cutting metal is
a. thick.b. bulky.
c. sharp.d. heavy.
42

Label the pictures (141,10
1.
3.
III
4.
43

Lapel the Pictures (continued)
s.
III
7. ....
52
6.
e.
44
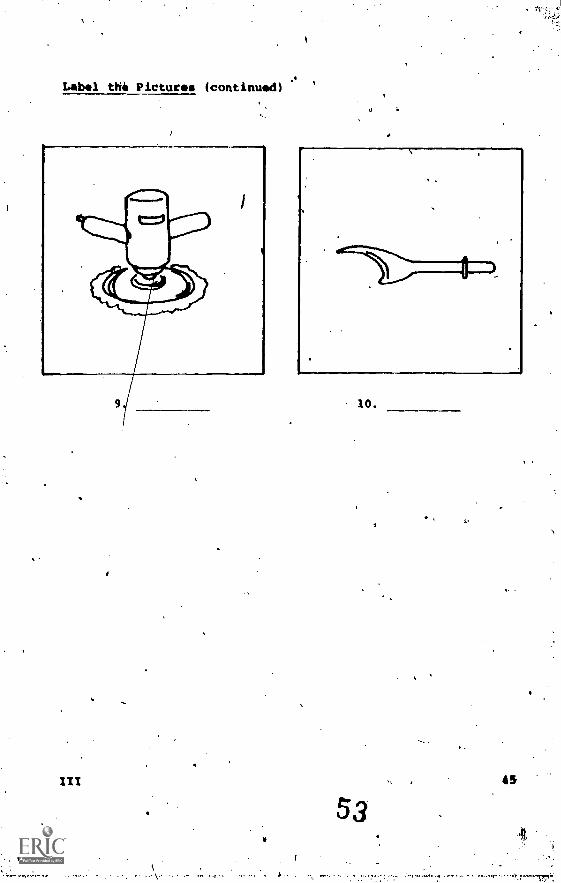
Labia the Picturs (continued) '
4
10.
5345

UNIT rvg "
VIDEO LECTURE (SERIES B)
,USE OF HAMNER AND DOLLY
tftgvt_N
(Parts 1**--)**)
Herbert Nishii, introduces the lecture, explains the ProperWay to hold the finishing hammer, and he also shows %OW tOcontrol the motion of the hammer when doing body and-fender work.
guestions To Think About:
1. What tools witl 'you use in, metal bumping and dinging?
2. -Haw do you hold a hammer when you pound nails?
3. How,should you hold your hammer for body and fendek Work?
(Parts 4*"-6**)
In thiS part of the lecture, Aprbert Nishfi explains howto hold the dolly and demOnstrates the hamMer-on-dolly technique..
queitions To Thirl_About:
1. How do you.hold the dolly?
2. Ipor hammr-on-dólly iechnigue, where do you place the dolly?' 1
3. .why. does the metal bulge sometimes.when you hatialer-on-dolly?
4. How can you prevent the metal Irom bulging?
54

Prot:Pm continuedC. N.
(Part 7sa)
In this part-, Herbert Nishii demonstrate* the hammer-off-dolly technique in metal bumping and dinging.
Questions To Think About:
1. For hammer-off-dolly, where do you place the dolly?
2. When you hammer-off-dolly, do you'bounce the dolly?
3. What is the purpose of-the hammer-off-dolly technique?
(Part 8")
This part shows some illustrations of the position* of thehammer and dolly for the hammer-on-dolly and hammer-off-dolly,techniques.
Questions To Think Abouti
Haw dp'you position Vie tools for hammer-on-dolly technique?
2. How do you position the tools for hammer-off-dolly techniqde2
IV
Alb
<CN
-47

thiFtensip4
(Part '1)..
Multiple Choioe (TrA)
4iiilbI. Por metal bumping and dinging you use
a. one c. threeb. two four
1. The toolsowhich you use for metal bumping and dinging arethe
a. file.b. screwdriver.
c. hammer.d: dolly.
3. Metal bumping and dinging is also Oalred
a.b.
autobody operation:bumping operation;
c.d.
hammer-on-dolly operation.pulling operation.
4. In this lecture, Herbert Nishii will show how to
a... use the haoither properly. c. lecture about metal.b. like autobody work. d. use the dolly properly.
Pick the Pictures (TrI)
Iv .
5 e
481.)
11

I .,
Pick,the Pictures (continued)
C.
(Part 2)
Close (TrG)
First, the hammer. You notice I'm the basic
finishing hammer / showed y that we have in the toolbox.
_, when you folks hammer at h _ _ (you*know).
pounding nails, like that, you usually (you know) g
the hammer tight and you pound at your tool --. your_
? You .do that, yclim just Orab t hammer real_
bard, pound on the n and you get the work d
right? Well, in body and fender w _, you don't just
grip,the hammer r _ hard and pound. You have to_
your hammer:
(Part 3)
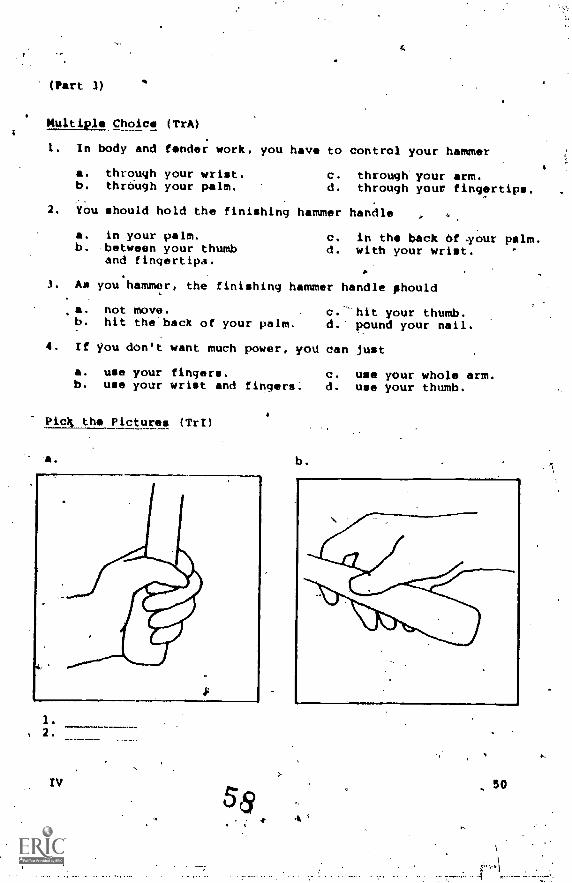
Multiele Choice (TrA)
to control your hammer
c. through your arm.d. through your fingertips.
1. In body and fonder work, you have
a. through your wrist.b. thrOugh your palm.
2. You should hold the finishing hammer handle ,
a. in your palm. c. in the back Of -your palm.b. between your thumb
and fingertips.d. with your wrist.
3. Am you'hammer, the finishing hammer handle phould
.a. not move. c. 'hit your thumb.b. hit the back of your palm. d." pound your nail.
4. If you don't want much power, yoU can just
I. use your fingers, c. use your whole arm .b. use your wrist and fingers d. use your thumb.
a
Pick the Pictures (TrI)
a. b.
1., 2.
A
50

(Part 4)
True-false (TrO)
I. "Dolly block" is another'name for the high crown dolly.
2. when you haAsSer metal, you.should use only the highcrown of Cke dolly.
3. When you hammer metal, you should use any part the7 do1V.4. Iiihen you hemmer the3flat side of.the fender, you
should us the round part of Ehe dolly.
S. When you hammer on a corner area, you should use thepart of the dolly which is shaped like a corner.
6. You should use the part Of the dolly that conformsto the shape of the fender or body.
7. You should'hold the dolly with two hands.
8. You should not change your hand position.
(Part 5)
Multiple Choics (TrA)
1. The two basic operations with a dolly are
a. hammer-in-dolly. c. hammer-by-dolly.b. hammer-on-dolky. d. hammer-off-dolly.
2. Wben you hammer-on-dolly, you
a. put the dolly under the low spot of the metal.b. put the dolly behind the raised area of the metal.c. put the dolly and hammer under the metal.d. hammer the metal onto the dolly.
3. *len you hammer-on-dolly, you should
a. sometimes feel the contour of the body.b. not listen to the sound of the hammer%c. check to sea how well the metal is shaping up.d. check the dots.

APert Al
Multiple Choice (TrA)4
1. As you,hammor-on-dolly, the metal will bulge if you
a. bounce the dolly. c. feel comfortable.b. don't bounce the dolly. d. hold the dolly in place.
2. When you hammer-on-dolly0 you should
a. let the dolly spring back with the blow of the hammer.b. not bounce the dolly.c. stretch the metal.d. bounce your dolly.
4
(Part 7)
Oultiple_Choice (TrA)_-
1. In this part of the lectur . Herbert Nishii will talk about
I\
a. hammer-by-dolly.b. hammer-on-dolly.
2. A high spot of the metal ii
c. hammgr -off -dolly.d. hammers and dollies.
a. an area of raised metal.. c. plastic filler.b. a ridge in the metal. d. a low area in the metal.
3. The purpose of hammer-off...dolly is to
a. find a low spot.b. .hammer a high spot down.
4. For hammer-off-dolly, you
c. push'a low spot up.d. make a slight ridge.
a. place the dolly behind the low spot.the dolly up.
c. se a springing action with the dolly.d. hammer on the high spot.e. hammer with the dolly.
5. When you are finished hammering-ciff-dolly,
a. the high spot is lower.b. the high spoeis bIgger.c. the low spot is higher.
d. the,low spot ie lowerthe whole metal area
, is higher. ' 4
52.
'
Multiple Choice (continued)
6. Xhe sound of the hammer-off-dolly issound of the hammer-on-dolly.
a. higher than 0. the same asb. lower than
1
7. After you finish hammer-off-dolly or hammer-on-dofty,you can
a. plastic fill.b. grindthe metal.
(Part 8)
rill in the Blanks (TrD)
1. For hammer-on-dolly,spot
2. For hammer-off-dollyspot
c. dnt the metal.d. pull the dents.
you.place the dolly behind the
you place the dolly behind the
the
3. For hammer-off-dolly and hammer-onrdolly, you hammer directlyonto the spot,
4. For hammer-off-dolly, you
IV
6'
the do'lly.
53

Pick th. Pictures (TrI)
.
1.2.
40-
62
^
54

UNIT V
VIDEO LECTURE (SERIES 15)
PICKING AND FILING
PREVIRIN
(Part 15*)
In this part of the lecture, Herbert Nishii introducesthe picking and filing operation. H. also tells which toolsare used for this technique, and tells when and why pickingand filing is done.
Questions To Think About:
I. What are the parts of the pick hammer?
2. What are the,parts of the Vixen file?
3. Is-picking and filing often done in abtobody shops?
(Parts 2 5, 3.55)
In this part of the lecture, Herbert Nishii shows how tohold and use the picking hemmer to pick up dent.
Questions To Think About:
1 at_la_thi;.corredt way to hold the pick hammer?
2. How do you find the Corrlict spat for picking?
SS
,

Preview continued
(Parts 4**, 5**)
In this part of the lecture, Herbert Nishii explains the
use of the Vixen file for filing the area which was picked up.Thip process permits you,to make a emooth metal surface without
.using plastic filler. ,
Questions To Think About:
I. What is the correct way to hold the Vixen file?
2. What &Jos the blade of the Vixen file look like?
1. Why don't you need plastic filler?
V
64
1.

OPIFACIii8(
(Part 1)
hort Answer (Tre)
1. What is this technique called?
2. What kind of job does this ieehnique create?
3. What tools will you use?
4. What part of the hammer will you Use?
5. What part of the Vixen file do you bold?:
6. What part of the file does the cutting?
7. What care would need this technique?
8. Is this technique4often used in autobody shops?
(Part 2)
Multiple Choice (TrA)'
1. When you holci the pick hammer, your index finger
a. points tp the hammer head.. c. shakes.b.. points to your thump. d. cradles the handle.
2. When you hold the pick hammer,-your, other fingers and yourthumb
a. cradle the handle.b. point to the fender.
3. When you hammer, you
c. hit the sheet metal.d. move.
a. .'move your toes. c. MOVe your arm.b. move your fingers. d. move your wrist.
4. When you use your pick hammer, you make believe
a. it is a shrinking hammer.''b. it is a friend.o. it is an extension of your hand.d.' it is your thumb.
V
65
57'

Pibk the Pictures (TrI)
a:
(Part 3)
b.
v
True-Falso (TrB)
1. You use pick hammer-to make pimples in the metal.
II
s.

,.
True-Fells. (continued)
2. You us a pick hammer to make an X.
3. Another name for "pimple*" is "slight hUlaTM.
Number in Order (TrE)
To pick up an area, you
pick up.
tap the pick hammer underneath the area.
feel the area you want tb,pick.
feel the vibrations directly.under your fingers.
(Part 4)
Fill in.the Blanks (TrD)
.1. The Vixen file is used to the pimples in thesheet metal.
2. You uno the Vixen file by or
3. 'The Vixen file blade has and--
4. The ridges on the blade.all in one direction.
5. The direction that the ridges curve is the dir;Ction youshould or the filo.
6. The direction that the ridges curve is the dieection thatthe file
1,
(part.5)
Multiale-Choice (TrA)
I. When you file in one direction and then in Anotherdirection, you are
a. back-filing. c. front-filing.b. opposite-filing. d. cross-filing.
V
6 7
*

Multiple Choice (continued)
2.. Picking and'firing is called a "quality job" beciuse
a. you pick up all the low spots.b. you create smooth finiuh with the metal itself.C. you us* no plastic filler.d. you do a.nice job..4
# .
Short Answer (TIT)
1. To finish the picking and filing job, what will Herbert Niphit
have to do?
2... How Will Herbert Nishii know when all the lbw spots have beenpicked up.
3. Why does picking and filing demand a lot of patience?
V
4.
to.
60.

UNIT VI
Immo LEcTuRz (SERIES 15)
USE Or THE DISC GRINDER
EiEg4
ePart 1**)
In this part of the lecture, Herbert Nishii gives anintroduction to the lecture. He then describes the disc grinder;411s what it is used for, and names the parts of the grinder.
Questions To Think-About:
1. Is an elefippric disc grinder a dangerous machine?
2. What are the uses of the disO grinder?
3. What.are the different parts of the disc grinder?
(Parts 2**-:5**)
In this part of the lecture, Herberl Nishii tells aboltt. and shows the various abrasive discs used with the disc gfinder.He then tells what kinds of jobs the differenf discs are usedfor.
Herbert Nishii-then dethmistrates how to put a disc On thedisc grinder backing pad.
. Then the two methods of grinding are explained. Themethod for smoothening the metal to produce a quality )obis explained in detail first.
Then the other method for using the disc grinder isexplained. This method is used to create a rough surface onthe metal for plattic filler to adhere to.
questions To Think About:
1., What are the three types of discs Usd in autobody shops?
2. What it the number of the grit for each type of disc?1-
- 3. How do you put a disc on the grinder?0
61

Preview continued
Questions To Think About: (continued)
u4. How many dilcs do you need when your purpose is to smoo0en
the metal and not use plastic filler?
5. How many discs do you need when your purpose_te, oughenthe surface in order to use plastic filler eft it?
(Parts 6**-10**) '
In thip part of the lecture, Herbert Nishii tells youfirst about safety measures necessary when using the discgrinder. He mentions how .to protect yourmelf from thedangerous cutting edge, .the electrical current and cord, andhow to piotect yo-tir face and eyes from pieces of metal and paintthrown from the grinding surface.
He also demonstrates both grnding techniques-- the onefor smoothening the metal for a quality' job, and then the onefor roughening the metal (in order to apply plastic filler onit later). He also tells you how to avoid warping the panelsas Pou grind.
Questions To Think About:
.1. How fast does the disc of the disc.grinder rotate?1,
2. How can you reduce the posaibility of getting shocked?
3. What is the purpose of.the safety shield?
4. When you grind the metal for a quality smoothening job,how much of the disc do you use?
5. When you grind the metal to roughen it, how much of the. diRc do you use?
6. Why should you feel the metal occasionally as you grind?
Y1 62
7

13pc figgi
(Part 1)
Multiple Choice (TrA)
1. The disc grinder is
a. large.b. heavy.c. narrow.
d. bulky.e. dangerous.f. handy.
2. Herbert Nishii'S disc grinder is run by
A. air. c. water.b. electricity. d. gasolin.
3. A disc grinder is used to
n. remove bolts.b. remove rust.c. take off paint.
d. locate low spots.0. smoothen WIWI.
Short Answer (TrC)
1. Name seven parts of the disc grinder.
(Part 2)
MultiulL _Choice (TrA)
l. What are three typos of abrasive discs?
a. fine c. mediumb. smooth d. coarse
2. The 16-grit disc is used for creating a
a. rough surface.- c. smooth surface.b. fine surface. d. nice job.
The I6-grit dit.tc is used
-a, to remove paint. c. on anyone.b. before using plastic filler. i. on -bumpers.
VI-
a
63
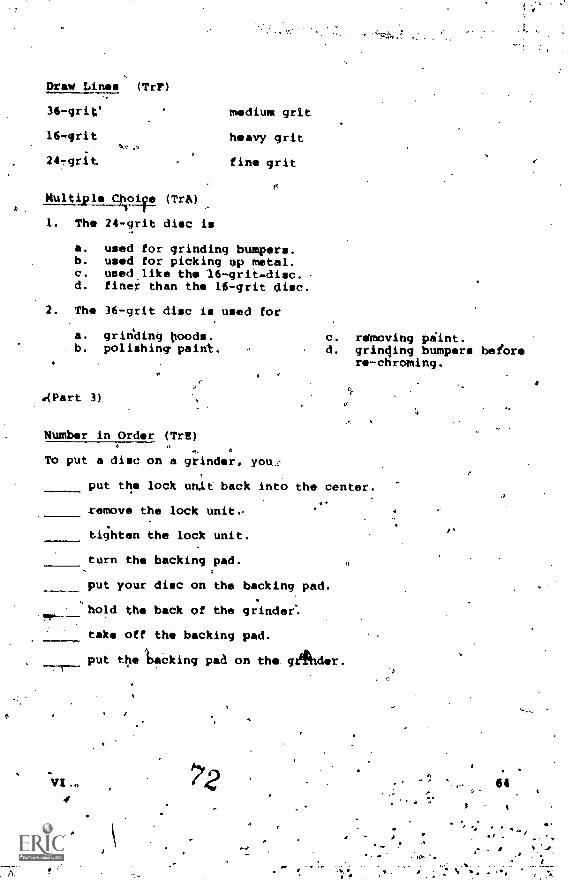
Draw Lines (TrP)
36-grin'
16-gritNo.c,
24-grit
medium grit
heavy grit
fine grit
Multiple Choife (TrA)
1. The 24-grit disc is
a. used for grinding bumpers.b. used for picking up metal.c. used.like the 16-grit.disc.d. finer than the 16-grit disc.
2. The 36-grit disc is used for
a. grin"ding Ooods.b. polishing paint.
e(Part 3)
Number in Order (TrE)
To put a disc on a grinder, you.:
c. r4Moving piint.d. grincling bumpers before
re-chroming.
put the lock unit back into the center.
remove the lock unit,
tighten the lock unit.
turn the backingopad.
put your disc on the backing pad.
"hold the back of the grinder:
take off the backing pad.
VI .
,
put the is.acking pad on the glichdor.
A
3.
-,
64

(Part 4)
Close (TrC)
Basically alive you have two t Of grinding, where_
you're gonna s with a rough to a f or you just
tay with t rough. When you sand from rough urfac and_
you go t a smboth r, say that you're g use your
16 grit, and y . onna sand some metal, grind m_ . _ _ _
down, (Lonna use your 16 and then you're gonna go
your 2.4, then you go w your 36. That way it's_ _ _
oF metal, no plastic filler whatsoever, n fill. You're
just using the m itself and creating a quality j _
. *len you do it that way, what you have to do try to use as
much of the grinding disc as p . So that. _ .
'when it's on t surface, it's almost flat, this
g disc is almost flat except f macrbe about
5 to 25 d -- elevated in the back or the side'.
Choico (TrA)
The two types of grinding are
a. sanding from a rough surface to a fine surface.b. starting again. .
c. "Sanding from a fine to.a medium surface.d. staying with a naugh surface. .
2. When you sand a rough surface to a smoother surface,
VI
a. you stay with the rough sandpaper.b. you use the ft grit, then 24-grit, then 3,6-grit sandpiwer.c. you will doe p antic filler. qd. you won't use plastic filler.
- 65
A

Multiple Choice (continued)
3. When you sand a rough surface to a smoother surface.
a. you are creating a quality job by using the metalitself.
b. you don't use a fine sandpaper.0. you elevate the disc 75 degrees on the back or side.d. you use most of the grinding disc.
(Part 5)
True-False (Tr8)
1. When you create a surface for plastic filler, youwant a rough surface.
2. You use a 36-grit disc to create a rough surface.
3. When you create a surface for plastic filler, try bouse the whole disc.
4. When you giind with the 16-grit disc, grind with theedge Of the disc.
5. Wheh you grind with the edge of the disc, it isexpenlave.
6. When you grind with the edge of your disc, it iseconomical for the shop.
7. You need a smooth surface for your plastic filler toadhere to your fender or panel.
8. When you grind to make a rough surfate, you shouldworry about gouges in your metal.
9. You will fill up gouges with plastic filler.%10. After you grind with the edge of your disc, you can
t off the edge and use the disc again.
'6)1
rt 6)
. Fill,in the (TrD)
1. Herbert Nishii will talk about,
2. The disc grinder is a very machine.
VI 66

tho Blanks (continued)
3. The disc at a very high spend.
4. when the disc is moving, it goes fromto about r.p.m.
r.p.m.
5. If you-put your hand on the edge of the moving disc, you willget ---_^. - ^ -
6. Don:t put on tho side of the disc unless youare going to grind it.
(Part 7)
Multiple Choice (TrA)
8 1. You should check the cord for
a. breaks.b. shocks.
2. Some cords come with
a. one prong.%b. two proros.
3. Two-prongs plugs
'a. are all right.b. are dangerous.-
c. tears.d. discs.
,c. three prongs.d. four prongs.
c. are shocked.d. run on gasoline.
4. If the plug has three prongs, you should
a. always plug in all of the prongs.b. not use it.c. always have the third prong grounded.d. cut the third prong off.
5. If you.don't plug in the third prong, you might
a. get wired; c. get shocked..b. get tired. d. die.
VI
75-
67

(Part 8)
Multiple Choice (TrA)'
1. To protect,your eyes yon should
a. wear olieralls. - a weaP4W6ratches.b. wear a safety shield. d. look dirtyt..
2. You use the safety shield to
a. cover your-face. c. see the' wr1d.b. look good. d. be safe.
3. If you don't use a safety shield, you can
a. see colors. c. get paint in your eyes.b. ruin your yes. d. go blind.
. (Part 9)
Multiple Choice (TrA)
1. Before you plug the grinder inr make sure
a. everything is attached.b. your disc.is on.c. you don't'have to change anything.d. you put on your face shield.
0 e. you're ready to go.4
2. As you rind for a quality job, you need to
a. watc the plug.b. watc your face shield.c: overl p your strokes on the metal surface.d. creat an even lurface.
3. For the q ity grinding Tothod, you
deel4 a. use onl the edge of the disc. 4b. Use only one coarse disc.'C. use as much of tho disc as possible.d. use three discs, changing them from coarse to fine.
VI ,
3
'
fa .

(Part 10)
Multiple Choice (TrA)
1. To prepare the surface for plastic filler,
a. the angle of the disc is tilted.b. keep the disc as flat as you can.c, never touch the metal.d. us the least amount of ara on the disc,
2. After you hav grindod, your metal should not be-a. tilted. c. warped.b. hoe. d. cool.
3. If the metal gets hot nough to burn,your %anta., you should fry an gg.b. you should not touch it.c. chances are great thatcthe panel will warp.d. water will warp it.
4. To keep your metal from getting too hot, you should
a. fl the metal Ofttn.b. keep the grinder tilted.c. use water.d. keep the grinder moving.
VI

UNIT VII .
VIDEO LECTURE (SERIES B)
PLASTIC FILLING
(Parts-1**-4**1
This part of the lecture is an introduction to plastic
filling. First, Herbert Nishii explains that-the use of plastic
filler has revolutionized the autobody industry. He then shows
the tools and supplies used in filling dents.
Queitioni; To Think About3
1. Why has the use-of_plastic filler changed the autobody
industry so much?
2. What was used to fill dents before plastic filler was
created?
3. What supplies wikl.you need to use in filfing dents?
'
4. What tools will you need?
de
(Parts 5"-8")
In this part of the lecture, Herbert Nishil. shows the types
of surfaces ready for application of plastic filler. He then
shows how to prepare the plastic filler and cream hardener for
use. He then shows how to mix the plaetic filler with the
cream hardener and how to apply it to the metal surfaces.
Westions To Think About:
1. Do you need to remove all of the paint from the Metal to
prepare the Surface for plastic filler? 'Why or why not?
2. Why does Herbert Nishii massage the cream hardener tdbe? '
3. Why I. it necessary to keep the plastic filler Can covered?
70

Preview continued
Questions To Think About : (continued)
4. When you mix thm cream hardener and the plastic filler. together, how long should you keep mixing?
5. How do you clean your tools?
(Parts 1", 10")
In this part of the lecture, Herbert Nishii demonstrateshow to cut, shape, and sand the plastic filler.
Questions To Think About:
1. Should'you take any safety predautions when cutting andsanding plastic filler?
2. When should you begin to cut the plastic filler?
3. What part of the Hondo file do you uss when cutting andshaping the platitic filler?
4. When you use the feather-edger to sand the plastic filler,what different grits of sandpaper could you use?
VII
4
71

1-43.4 NCR:.
/(Part 1)
True-False (TrB)
1. Plastic filling has revolutionized the autobodyindustry.
2. With plastic filling, body work can be finished veryquickly.
3. With plastic filling, production in an_autobody shopis cut in.half.
4. Before, they used to rough out dents and fill them withsheet metal.
S. Nowadays,'they have taken away plastic filling.0
6. Now, you can use Hondo, and car repaii is simple andfast.
(Part.2)
Multiple Choice (TrA)
1. The brand name of the plastic filler which Herbert Nishiiis timing is
a. Cuz. c. Catalyst. *,
b. Napa. d. Filler.
2. Napa is the woe
a. of a plastic._ c. of a store.b. of a Sondo fiio. d. of a cdmiany.
,
3. "Hardening agent" also means
a, filler. c. catalyst.b. hard surface. d. haniener.
4. Other tools you can use for this operation are
a. plastic squee-gees. c. Rondo files.b. putty knives. d. hardwar stores.
Vii.
\
7 2
MUltiple Choice (continued)
5. Another name for Rondo file ii
a. surface file.b. sand file.
6. Rondo files are used
a.
b.
C.d.
o., razor blade.d. sur-form file.
to
shape the plastic filler before it hardens.ihine the plastic filler before it hardens.sand the plastic tiller.cut the plastic filler. befote it hardens.
(Part 3)'
Fill in the Blanks (frD)
'1. ,You will also need a
2. A mixing pan can be made out of any
3. An ideal surface wotild be
4. The next-best surface would be
5. You can your Bondo omanywhich is flat.
surface.
scrap sheet metal
6. You can even use if you like.
7. Howevet, cardboard is not so ideal because it tends to soikup the in the plastic filler.
(Part 4)
Multiple Choice (TrA)
1. For smoothening the Bonfo use the
a. feather-edger.b. orbital sander.
2. The trigger on the Xeather-edger is
a. underneath. cf. c. on top.b. on the side. d. Oh the end.
c. Sanding block.d. dinging hammer.
vii 73

Multiple Choice (continued)
3. To hold the feather-edger, you%
a. grip the handles. grab the sandpaper.b. grip the sides. d. palm it.
4. Ancither tool you might use is
a. an air wrench. C. your arm.b. a,sanding block. d. your car body.
5. The lower the number of your sandpaper
a. the finer it is. b. the rougher it is.\
6. Tha 40-grit sandpaper is a
a. fine sandpaper. c. coarse sandpaper.b. medium sandpaper.
7. The 150-grit sandpaper is
a: fine sandpaper. c. coarse sandpaper.b. medium sandpaper.
8. The f'inest sandpaper on the market is
a. 36-grit. c. 100-grit.b. 40-grit. d. 600-grit.
(Part 5)
Multiple Choice (TrA)
1. What are the two surfaces'for plastic filling which HerbertNishii shows in the lecture?
a. bare metal surface c. 36-grit surfaceb. wet surface d. rough surface
2. Which surface is ricommended on.your plastic filler can?
.a. bare metal b. rough
3. Which surface is recommended in the industry?
a. bare metal b. rough
VII 74 ,
S.

Kult?leCho.ice' (continued)',
4.
r.
)
' Why should you maka a rough surface .whigh you need to%work fast? ,
v
. The tough gtinding takes lees time.:The rough. grinding lcoks betrat.
c. The plastic 'filler,Hbonds to the rouglj .surfaco,bettor;d; The plastic' filler .wiLl peel nicely IIh.fl it iS rough..
1. Why ie A bare metal surface not' good wheh yOu need to workfast?
a. The bare metal is not shiny enough.b. You can sand the filler, right away.. '
c. The plastic filler tends to peel from the bare metal surfaci.d. The bare metal has a rough surface.
(f4rt.6)
Short Answer. (TIT)
1: How can you save or lconserve plastic ?
2: :Why houldn't you'wastil plajstic filler?
3. Why should You mix.,yout astic filler?,
(
)
. ,
. AN4. Why does the plastic filler at' the top of the can tend to'be .
o (softer?1"...110 ' J
.
. -
,
- ; ... .
5., What to
cll
I do yob Toe; to mix the plaktic finer?
(Part 1)
rill in the. Ekletnkt ('TrD)
I. "Anothey thing you'will Ausing in .
2.. The cream ha.rdeiler is a1 Ai
3. When" you .mix, the catalys 4with- yodr piestiC 'filer, t gets ..4 ' f
.
) 4%.
t .., . .
,1,
k.. After you mix the plaetic ,filler with'the creamAardener, .
do not put-ie back into,the _... P....
, .. . .5. To mix the creem hardener, iou - the tub.: I"
'.
' A r . al 45 i. only ' will' tel ypii bow Much Boddo and,bardetler .. .:X'
to usir..,
1: '
ekir
t, . i
-t
(4. f(
.
le.. e w
751,
..

.1
Fill in the Blanks (cc;intinued)
7. You should alWays try to cover your filleraso-that thedon't i'vaporate.
8. You should get your cream hardener and read the
9. The cream hardener is a pcolor,:'and theplastic.filler is -4-rii-JOlor.
. i - I'
(Pert 4).
.a
iiltiple Choice (TrA)I
1. iihen AIN 4you.mix t reap hardener and ttle plast'ic filtler
together, rou should use a-
1a. swicling motion.b. kneading moti"on.
'
2. ;Jou st;ovld mix theNcrpam hardenet
a. "II the sereaks,come out.b. it looks like'blead.
*.
c. putty-knife:d. .equee-gee.
and plastic fillet Until
c. it hai etre-eke of redand light grey in it.it has ad even colorall the way through.
If there is a deeper dent, 4;bu shoulld.
',
'a. p4t a little bit more fillet in it.. f 4
b. apply the frisler evenly. . ..
c. applt the ffller roughly'.d... knead it.
. .. '0 . ...
$.
4. ',If'you dbp.'t miA thesaredm harden6i and plastti2cenough, ,you Will
, --.
A. Aave vtry hard spoti in your Iillir.6: get dirty tools.
-
c: hal:re Nigger Ailits.',
d. have soft spots in-your filler.
5 ater you apply tne pleitlic filler; remember ,to4
a. have soft spots ih your filler:
b. wash your'hands.c. clean your tools.d? 'look for,very very haird spote.
ytx. a.
n . .
76
a *

.
(Pert 9) ,
-Pt in' the Blanks (Tree)
' 1, Aftym you apply your plasti&lfiller, give it time toorAsardon.
11
2: When you sand and'cut the plastic filler, you create a lotof.
3. Pine patti'Cles. Of go into the air.
4. This plasttc,filler dust is
5. To protect'your lungs, you need a(7
. to your health.
... ar .
(Part 10)' 4
\ ,. 1
Multiple ChOice (TrA)'.
1. You,should cut the Bondo when it is,. ' . .
a. hArd. . c. Still a little,soft.
f-lingrem dir
"b. hardening a little bi d.. in your mask.
. .2. Keen ynn ire er fo
a. dkoss file.b.. double your work.C. (jet tbe proper contour.d. drop your file.
3. .With a (Gilt -round nOnd0 file,
a. the whole file.b: , the middle off thm fi
e. work from inside-out.f. work from the outside
edge in.g. work comfortably.h. work slowly.
you'shoucd use :
a. the outside edge.le. d. tre fend of the file.
4. When you use the:feather-edger to sand plastic-1141*r, youuse
. .
40-grit sandpaper for fast sanding.1107grif sandpaper. for fist sanding.40grit sandpaper for smooth sanding:.1107grit sandpaper for smooth sanding.
you.aro working fast for production, what-to wand the plastic filler?
a. a 36-grit Ofb. a 60-grit orc. 'a 36-grit orch a 60-grit or
5. In a shop, whentool do you uie
a. Vixen filebl Bondo file
' VII
c. sanding blockd. feather-edger
,
4
4..
77

IME119, .
(parts 1** -.1**)
Herbertand comparingin shops. HeHe then namessetup. Finaltools, and ma
UNIT VIII
VIDEO LECTURE (SERIES B)
WELDING
ANishii gives an introduction to welding by naming ,
thi two types of welding setups which can be foundalso xplains the uses of the oxyacetylene-torches.end xplains the parts of the oxyacetyiene torch
ly, he shows and explains the other equipment..
terials needed tor'oxyacetylene welding or brazing.,
Questions To Th.enk Abaft:
f. What are.the tiro types'of welding setups?
..*
2. What is the oxyacetylene torch used for.in an autobody shqp?
3. What'are the parts of the oxyacetylene tdrch setup?
. Ihat are the tools and supplies needed for oxyacetylene
11
welding? ,.
Parts S** 1 lb**)
041erbert Nishii tells about safety measures for welding. Hethen shows.how to turn bn the tanks and regulators and adjustthe flame on the torch. -Hieexplains the proper way,to prepare.the Surface for welding, and then explains and'shows the proceduresfor steel rod welding. He alio shows how to quench theyelded.rea, hamier the weld down, and:use,the wire bEush tO keep- the ;!surface clean.- He makes a good even weld (bead),,arsdthen makelA bad, uneven bead so you can compare the way they look.
Questions To Think Abouts
1. What are Ewe safety measures for weldi,
1. What is thevorrect sequence for turning n and adjustingthe tanks end regulators and torch valves
.711
. .
0.
.0

.
--"
Preview continued
(14eStions To Think Ablout: (continued).
How ca'n you prepare the surface for wellAng?.
4. Why do you quench the metal?
Why,do you use the wire brush?
What. ill -tilt; bad weld n(bload) calli;d?
(Parts nal* - 1.741+)
I)
Herbert Nishii demOnstiates the welding movements of thetorch.tip and rod, with the torch flizie off to show the movesmnti. more cleanly... Hi then explains and demonstrates the brazingtechniques. ,He shows the equipmentf tools, and supplies'he will need. He demonstrates the metal heating procedure forbrazing; and how to coat the rod With flux and apply.the bras* 1onto the metal. He makes two brazes ao tht the appearancesof a good one and an uneven one can be compared: He alsoexplains the method of putting a patch,onto metal by tackwelding and stitch welding to make,a continuous braze. Finally,Herbert Nishii shows the carebt sequence to turn off,all valves,tanks, and regulators,
6. 14
Quest ions 'Te Think About 1,
f: What equipment, tools, and supplies art needed Or brazing?,
' 2. How should yftheat the the metal sdrfaces for brising?
3. How should you coat theAirazing- rod with flux?
-_4. What does a good brase bead look like/
What dies a bad braze bead look like?
6. "What is a stcbch weld? What is a tack imld?. t
1, 7. Why should yoU apply. patches with tacks and then stitches,
rather than fusit continuing to weld sli the way around the. f
1. I8. What is the corrsobisequenCeifor turning off the valves,tanks, and regulators/

:oftc,
.1111.--411-1-k-triri-
(Part 1).0.
Trye-False (TrB)
'Welding is bonding metal together.
2.t. There e4re two kinds_of weldinglietups.
3. In thir lecture Herbert Nirhij will demonstrate tarc welding electrical,torch setup.
4. Most shops do not have arc\welders., OA
5. Most shops specialiie in frame reriair.P
1
6. Oxyabetilene torches Are used foc making Patqhisand for welding tears and breaks in fenders.
7. Oxyatetylene-torches are cheaPer tt(an arc weldirs.
8. Dayacetylepé torches Are nottes dangerous adAarewelders. A
,(\par t 2) ---
\
Fi92. in the,,Blanks (TrD)
1. \Tim large, green'container hes , in it.
A . :...
,..
2. -lhe smaller cll./Cher hasA
init. :
1 .
.t 3. A!ror
acetylene,tank is painted,,-- -
.. ,,.,,;. v,,
. 0.,' n- ,.4. is a rkaMhable-gas.
5. , . usa'ncin-flammabl1s4faslo
o
"Nis
s .
6. The regu or and main valve are used to the ,
gas. - - ,. s
0
show rmuch gas you'have in your. tanks.
Wsmaller numbers 'show Ito* mUch,pressure'lnes.
r,
so
o
h

.
(Part 3)
rill in the Blanks (TrID)
_ 1. On,your torch, the acetylene line is colored
2. "'The oxygen lkne on your torch is colored
3. The ) torch tip cones Off very easily and canbe put\on very easily.
4. You should point your torch tip in the direction thatthe point.
5. If you have the torch tip in the proper direction, youhave easier to your valves.
. It your hand or wrist accidentally moves valve on the .
',torch, you might your_ mixture of oxygeneandaCetylene.
(Part 4)
Short Aricswer (Tre)
.1. Name 7ix other things
. ,What are the names of
I. WhSch,rOd is used for
4. Which rod is used for
5. Which rod sie used for
(Part 5) ir
Close etrG)
you will use when you are welding.
the t)hreq0Apes of rods?
weldin two similar metals together?04.
puttiir
welding
patches ontofust?
ears in your fenaers?
Okay. To introduce you a'little bit more into your
_w _ _ , before I startilictual welding, would be your.. ' .
.
... In the safety, you don't hav.40th r
i\\
very
:- \--
..
much. Just have to retne'4er to wear yipr g\
.
protnt your eyes from any $ flying from the welded
VIII
I.
01
114

I.
. clim (continued)
area. Also it:s to p _ your eyes from gettfng blind,_ _ _ _W
from getting b . Because these lenses are treated, they're
dark, dark lenses. They're d than your regular sun
glasses. They protect your eye a lot b Another
'thing is, when you work with your torch, of using
a lighter, a regular cigarette ligNter, try to use your
. Your striker produces only the spark to 1_ _ _ _ _ _
the torch. It doesn't produce a g and a spark, which
your lighter does. So try to use only ybur $
(Part 6) A
_Short Answer (TrC)
1. `Where should you stand when turning the tanks.on?
2. What might happen if the regulato4- joint breaks or is faulty?
3. Wby shouldn't you breathe the acetylene gas?
4. What shoUldllou do if you have any leaks In youlircetylenetank, regu or, hose, akr torch?
.5'. -If somebody lights a cigerotte when there is an acetyleneleak in your torch setup, what might happen?
6.' Is oxygen flammable when-iit is contentratedV
(Part 7)
Short Anegier (TrC)
0 1. Whtch tank should you turn on first?
0 2. How much do you turn it? Why?
3. What should you do' if your bpss tells you to turn it'onlya quarter-turn?
90
02
Short Answer (continued)
4. What tank do you turn on next?
5.. How muchdo.you turirit?
6. What can you check to see how muCh gas is left in the tank?
7. How do you adjust the amounts of gas pressure in the lines2---
8. .What should the readings on the regulator gauges be?
,(Part 8)
-frill in the Blanks (TrD)
1. Right after yoU light your torch, the acetylene will createa flame with a lot of
2. When'you turn up the acetylene, the flame willk
and there will be a lot less smoke. There will also be acolor close the torch tip.
-3. when you open the oxygen, an Ideal flame will have a.in the middle.
4.. If you have too much oxygen, there will be a,sound.
5. If you have too little oxygen, you will have a long,flame with two separate
O. when you turn off your torch, you turn off yourfirst.
(Part 9)
Short Answer AyrC)
I. Holp0.60101bu prepare the metal surface for weldinsp?
2. Wliat is the purpose of steel:welding rods?'
3. What is the purpose' of your hammer in this procedure?
4. What is the purpose of the wirs..4rualit_,.
5. What is the purpose of the water and rag?
3"

Short Answer (continued)
I. If you put too much heat onto your panel, what might happen?
(Part 1O)
Multiple Choice (TrA)
.in steel rod welding you heat up ttle, panel to make a
a. panel shape. c. molten puddle.b. panel viewing. d. neutral flame.'
2.. After heating your panel, you put the steel rod into thepuddle tomake,your
a. heat. c. flame.b. torch. d. bead.
3. Tho ideal flame'for your torch 48 hlso called a
a. bead. j c. rod.b. neutral flame. d. liquid state.
4. You shoula hold your torch at an angle of
a. forty-five degrees.. b. fifty-five degrees:
5. 4As you weld,
c. fourteen degrees.d. ninety degrees.
might get on your clothes.
a. fillet c. paintb. sparks -d. dirt
6. To get an even head you need
a. a friend. c. rcids.b. money. d. practice.
7. An undven bead is also.called'
a. an ugly bead.b. chickens.
(Part 11)
-
c. chicken-shit.d. steel ,rod welding.
Fill-Iii the Slanki (Trb)
1. The.two types of beads that Herbert Nishii ihows you arecalled a weld And a weld,
92114

A
rill in the Blanks (continued)
4hon you weld, you put tho torch in the hand you feel mostwith.
3. When you wld, you should let the in theflame touch the mete). itself.
4. You should move the torch tip in small
S. A. the molten puddle forms, you keep the torch moving
6. It take4 a lot of praClico in order to got
*(Part 12)
Short Answer (TrC)
I. .Why are there two types of brazing rods?
2. What is the white coating on one of the krazing.rods?
3. .How do you coat the brazing rod which does not have the whitecoating?
4. Which kind of brazing rAz do most shops havi? Why?
(Pkrt 13)
Shcirt Answer (TrC)
1. Do you create a molten puddle when you ar brazi.ng?
.2,. When you heat the metal, what colórshould it be?
3. What is the welding or braking torCh flame called?
4. To coat the brazing rod with flux, what two things do you needto do?
S., As you are brazing,,how often do you need to flux-coat yourrod?
fe. What is the purpose of the flOx?
0
85

(Part 14)
rill in the Blanks (TrO)
1. You don't want a big head when you are brazing because
2. You shotild try to keep your bead very and
3. Your hammer is used to your braZe.
4. Your wire brush is used to
5. A good bead is and
lumber in Order (TrE)
o braze the metal, you
dip the rod into the can of flux.
use your hammer.
heat the metal to.a cherry red.
use the wire brush.
heat the end of the brazing tod.
apply the rod and t9rch to the heated.metal.
guench t.he area.
(Part 15)1,
Short Answer (TrC)
1. When you weld and braze, do you make the bead continuous?
2. Why do you need to'tack and stitch before making a continuousweld?
3. Will you always be using the hammer and wire.brush asoften as Herbert Nishii is doing'in the lecture?
VIII 86

(Part 16)
Fill in the Blank. (TrD)
1. After you tack weld, you should
2. If Ulf metal becomes too hot, you should turn the flame uptowards your
3. You should try not to yourself.
4. After you stitch weld, you have brass.
5. You can learn more about welding throughthrough
, or at
'6. You can also learn about welding if youup On it.
Label the Pictures iTrH)
411,
Iliellietv40110itigno
VIII
1.
7-11---411-7-4111-7-111--4,
j

Label tqf Pict re (continuea'-.1rt
3. ,
(Part 11)
Number in Oriter 1TrE)
.To turn'off.the .volves, tanks, and regulators, you
turn off the oxygen valve on your tordh.
open the acetylene valve on your torch, let-the acetyleneescape from the line,-and close the valve.
t
turn off the acetykerte tank.:
turn off the oxygen tank.
open the acetylene tank regulator.
open the oxygen valve on your torch, let the oxyien, opcapi,from the line, and close the valve.
4f %
.1
open the oxygep eank regulator.., .. 4.1.-. .
turn off the.acetylene valve orl your torch.im---
".`
t

(Parts I**, 2")
e
UNIT IX
VIDEO LECTURE -(SERIES $)
THE SPRAY GUN
In this introdUction, Herbert NishiiAexplains the importaere'Of the spray gun tn eutobody repair work. He then tells theuses of the three typos of spray guns found in autobody shops,and also mentions the names of three manufacturers of goodquality spray guns.
Questions To Think About:
1. Why is the spray gun (and the paint job it produces) soimportant in autobody repair eilwer
2: What arp the ttiree types of sprax guns?
3. What are the names of three manufacturers of godd paipt guds?
' 4. Which is thin, newest model paint gu0
(Parte 3, 4**).
-
Next, Herbert Nishii names and describes the fpnctions ofmany parts.of the spraygun. " I
Questions To Think About:
r. What are the names of the spray gun parts?
2. How
7ny adjustment knobs are there?
3. No 0 do you find out how much air pressure is going into thegun?
,
, N...
4. What will keep the paint from dripping out of the Sharpemodel gun if you are painting upside down r sideways withit?
..
N.,
%
59

#
Preview ctintinued
(Parta 5"*, 6"*)
Herbert Nishii describee the adjustments for the spragun in.more detail.
Questiptis To Think About:
1. HOW do'you change the size (Wid01) of your fan.pattern)?
2. How do you adjust the
(spray
amount of air going into the gun?
3,; How do you adjust Ae amoun% Of paint coming out of yourgun?
4. How do you make a horizontal fan (spray pattern) becomevertical one?
A .
WEI
90

114 7,4 1:14;
A
(Part 1)
MUltiple Choicelik)
1. The spray oun is one of te most important tools in yourshop because
a. it does important body work.b. it crates the paint job that customers see.c. you will paint the body-fender shop with it.d. it is very glossy and smooth.
'A primer gun is
a. filled with primer.b. spotless.
31 A lacquer gun is
a. used for tobch-ups.b. a junlegun.
4. An enamel gun is
a. used for complete paint jobs.b. fille0 with lacquer.
(Part
c. filled with lacquer.d. dirty.
c. used for priming.d. shiny and clean.
Multiple Choice (TrA)
1. If you have a paint gun, you should
a. keep it'shiny.b. keep it clean.
C.d.
2. Sinks, DeVillbus, and SharpeA.
a. body atibps.b. paint Ilan models..
3. The newer snodel paint gun is
Ix
c. clean and shiny.d. dirty.
Are.
keep it ailed With dirt.keep Moisture out of the inside%
are
"c. old-timers.d. manufacturers or good
paint guns.
a. Sinks. 'e c. DeVillbus.b. !tondo.
Cd. Sharpe.
7-
,
91

4'
-
am/
Multiple Chojse (6ontinued)
1
4. Why should you 6uy a 'h ig name" paint gun?
a. "Big name" manufacturers have a good supply of paint. win parts.
b. 'You can send your gun to those manufacturers forservicing.
y. The.y aro good quality guns.d. They aro cHoaper guns.
(Part 3)
Short finswer (TrC)
I. Which part of the spkay gun holds the paint?
Whictk pare is.wliore iou hold "it?
3. Which part do you pull to make the paint conle out?
4. &Which part do you haVe to remove sometimes to overhaulyour gun?
(Part 4)
Short Answer (Trc).,
1. Which part controls how much paiIit is coming out of yourgun?
;
2. Which part controls how much air is cioing into your gun?'
Which part tolls the pressue of Ao air going into th gun?
4. Which part is helpful for paipting upside down or sideways?
q.
411.
IX92

Label the Pictures (TrH)
. IX 93

(Part 5)
Multi.ple Choice (TrA)
1. If you want to make the sprqy wider as it comes From yourgun, you adjust
a. the air horns.b. the 'fluid.
,
c. the fac.d. the no-drip.
2. If you want more paint coming out of the,gun, you '
a: opvn the fluid adjustment.b. turn up the fluid adjustment.c. close the fan.d. turn down the fan.
3. If yot.i41.4nt to spray a large surface, you
a. open the fluid yalve. c. turn down the air.pressure.b. close the flvid valve. d. turn up the air prdssures
4. If yoU want to spray a smaller area, you
a. op4n the fluid valve. c. turn down the air pressure.b. close the fluid va1ve. d. turn up the air pressure.
(Part 6)
Multiple Choice (TrA)
1. If your air horns are v&tical, your fan will be
a, horizontal. . c. up and down.b. verticA. d. sideways.
2: If you want to spray with a side-to-side arm movement, you'put the air horns
a. horizontal.b. vertical.
3. Another word for fan is
c. 'up &nil down.d. 'sideways.
a. valve. c. fluid.b. spray pattern. .d. %air horns.
4. Youithould pafnt Sb hat4RAF-itrokes .
a. overlap halfway. . c.r go opposited
b. cover your hand. d. looesizaple.
'IX .16,294

4\
UNIT X
VIDEO laCTURE OBRIBB B)
INTRODUCTION TO PAINTING
"MI(Parts 1**-3**)
Herbert Nishii desOribels the two types of paint jobs donein autobody shops. H. then lists meths blackboard, in orderof preference from best choice to worst, the types of paintused for the two Xinds of paint jobs. H then explains thereasons for the preferences by explaining the characteristicsof the different types of paint and the production need's of theautobody repair shops.
Questions Topink About:
1. Wbat are the two types of paint jobs?
.2. What are the three tYpes of paints?
.3. Which paint is preferred for which tl1pe of job?.
4. Which paint dries fastest?
S. Which paint has a very high gloss and needs no buffing orcompoundirig?
c.
(Parts 4**,8")
Herbert Nishii explains the rkitial stops for preparing acar for a complete paint job. This part of tho lecture explainsthe preparations done before the car is taken into the paintbooth.
pestions To Think AboUt;
Wbat are two kinds of cleaning agents used to take the wax,dirt,.and polish-off a car before it is painted?' >
2. What grit sandpaper should you use when sanding thloar?
3. What materials can yolase for mitaking'the oar?
4. .Why is a final blow down so important?
95
1 03

Pi*eview continued
a.(Parts 9**-13*")
Herbere Nihii explains the p?eparatibn of the spray Ipooth,the painting equipment, and the final preparations of the carwhich are done in the spray booth. He also explains the propertechniques for painting the whole -car.
Queations To Think About: 116.
I. How do you prepare thy paint booth?
2. After you put the car into the spray booth, what can youuse to remove any remaining dust on the car?
3. What must you do to prepare the painting equipment?
4. What is a good technique-for painting the car?
5. Does it matter which part of the car you begin paintingfirst?
6. What is the purpose .o.f the spray booth fan?
X
1 0496

rmlun6(Part 1)
Fill in the Blanks (TrD)
1. The two types of paint jobs are and
2. Much-up paintiftelTis painting, or a paint jot)that is confined-to a small .
3. X0 r complete job is painting the car.
n touch-up painting the order of paint preferences isfirst , second , and third
S. In complitejpaint jobs, th e. order of.paint prefernces isfirst , second , and third
6. The reason why you hame these preferences is theand involved.
(Part 2)
Multkple Choice (TrA)
1. Since autobody shops do a lot of touéh upt, they want thecars to
*a. go in and out of the shop yery quickly.b. sit there for quite a while.
2. .For'touch-up painting, the preference is acrylic lacquer' because
a. it 16 prettier. c. it dries faster.b. it is cheaper. d. the boss likes it.
3. For complete paint jobs, drying time is not o importantbecause .
a. the car usually sits in the shop for a long timeanyway.,
b. the car is in and out.
X
,
97

'1. 1
(Part 3)
Multiple Choice (TrA)
1. In complete paint jobs, the preference is acrylic enamel..because
a. it is less work. a. you don't have to buff it.b. it has a high gloss: d. you don't have to compOund it.
.,2. If you use enamel for youT touch-ups,
'a. you need to do it .fast.b. you have to spray.a very large area.c. it takes jonger to paint.
p-, d. the drying time is longer..;
3. ',If'you use lacquer paint for complete paint jobs, it is aitotmore work because you 1140.re to
p. spray so many coats.b. sand the lacquer coats.
c. buff the lacquer..d. weld the lacquer.
4. What type of cars might get a completelacquer job?
a. a custom car. C. a policeman's car.b. a car-show car. d. your own car.
(Part 4)
fatjo
Number in 'Corder (TrE)
Before you put the car in the paint booth for a complete paint,job, you have to
p'repare the body work for painting.I.
do the body work.
prepar the whol ear for painting.
Short Answe (Tre)
1. What ix a th?
2. What is the foundafion of everything?
3. What job will Herbert Mishii talk about in another lesson?
x
VVP I
9$
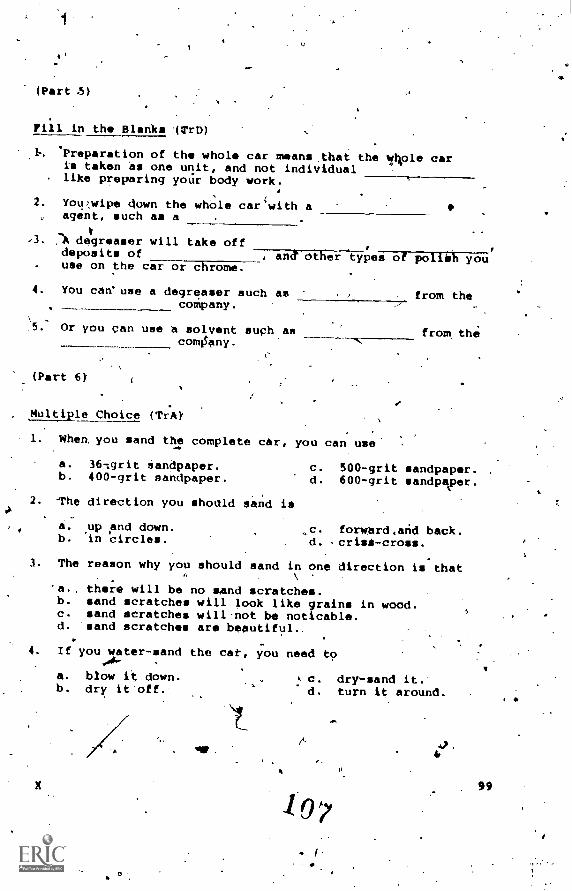
(Part 5)
Fill in the Blanks (WrD)
'Preparation of the whole car means that the wilole caris taken As one unit, and not individuallike preparing yotir body work.
2. Yotr_wipe down the whole car ( with a 0, agent, such as a
V
degreaser will take offdeposits of and other types of poliil you
- use on the car or chrome.
4. You can'use a degreaser such as from thecompany.
5.- Or you can use /t solvent such ascomi3any.
(Part 6).
Multiple Choice (TI:A)
.1. When you sand the complete car, you can use'
from the
a. 36-;grit sandpaper. c. 500-grit sandpaper.b. 400-grit sandpaper. d. 600-grit sandpeper
2. -rhe direction you shoOld sand is
a. ,up pnd down.b. in circles.
c. forward,afid back.d. -crisi-oross.
3. The reason why you should sand in one direction is that
'a., there will be no sAnd scratches.b. sand scratches will look like grain, in wood.c. sand scratches willnot be noticable.d. sand scratches are beautiful.
4. /f you water-sand the cat, you need to
a. b/ow it down. k C. dry-sand it.b. dry it'off. d. turn it around.
*4,
10 A7
II
99

r (Part 7)
MuLtjhoice (TrA)
1. For masking you can uae
a.b.
2.. The
a.b.
production,paper.newspaper,
tape hnd paper is used to
windowi.bumpers.
C.
d.
cover
3. Some shops use newspaper instead1 because newapaper is 4
a.b.
a lot cheaper.better quality papar.
When masking, youtcciver up
tape.plastic filler.
a. hoods.d. large chrome areas.
of production papgr
C.d.
roue expensive.free if you collectit from friends.
a. whatevel--"garts.of the car you don't want painted.\\b. the whole car.c. only the' chrome.d. only the windows.
5. After you mask the car,
a.b.C.d.
(Part 8)
checking out thechecking out thegetting the dirtchecking outthe
-
yod inspect the whole Car by
body work.taping.dut of the seams;paint booth.
"Shgrt Answer-.,(Mr6
.401 1. skti'y do you ap alfinal.:.t4ow-rdown?.7* 4
2. .Wha'E'will the paint job'iook-like if.you don't blow theaown before Painting it?
car
'What parts of the car do you need to rehlianber tO blow dcwft?
rof

:
(Part 9.) -..
illultiPle Choice (TrA)
' -1. TO pOseare your spray booth, pit' wet down. .
a. Ole outside of the spray booth.b. your whole spray boxoth area.c. the inside of the-aar.
.d. the inside of the spray bboth.
2... You wei down the spray bOoth td .
46 clean it with soap. c. wash the car.p. einimizethe duet. ! d. keep the car dust-free.
.041alt3. When you bring the car into the spray booth,
4.a. try not to damage it.- have someNdy guide you in.b. try to damege-it. d. ding Alp t gar:
4. When ITA1 have the car in the spray booth,
a. blow down the car. c. blow down the booth.b. cover the tires. d. cover the molding and windshield.
f
(Part 10)
.Multiple Choice (TrA)
1. You tack the car
a- with i Varnish-sOaked rig. ,
b. to pick up any left-overcdust.c. by Wart/ a transformer on it.d. inside the various seams, tires, and in the engine.
2. The purpose of the transformer i, to.
a; mix your paint.b. compress the air.c. clean the-line from the compreslor to the gut.d. catch rubbish coming from the compressor.
3. You bleed your transformer'to
a. clan the line connected to your spray gun.b. make it die.c. clean the transformerd. lei the water and oil drip out.
F.
1.01

(Part 11)
Fill in the Blanka (TrO).
1. If you :le lacquer paint, you thtn*it out witO
2. If you use enamel paint, you thinPit out with-3. When you mix the paint, how"much solvent you use dependsupon
, and4
4. Different people mix their paints in different ways:- somePeople reduce it some people reduce it
(Par."72)
'Fill in the Bj.anks (TrD\
.1. you cap find out how much- air pressure to use by.
2. Some paints will tell you to have pounds airpressure at the gun, some -.
even pOunas air prespute.
3. For spraying technique, some people spray panel by. some people will spray 4'
panels, and sOme people will spray be wholeof the car..
Your painting technique depends u how you learn, howyou want to go, t e'type. of
you4re tieing ana how it's drying.
(Part 13)-
Short,Answer (Tre)
1.' What will determine where you htart painting yoUr car?
2., Why should yoU begin spraying on the end of the car which isfurthest from the fan?
3. If you begin spraying on the other end of the car whit willhappen?
I
1024

(Parts l**, 2**)
UNIT XI
VIDX0 LOCTURS (8111I11 1)
PRIPARATION TOR -PAINTING
6
Norbert Nishki intoducei tha topic Itpxe *ring fot'paint,"add explains why preparation for painting iY important and time-consuming. H. pays that he will explain two ways of doing thepreparations. Ne thoh shows the supplies and oquipment necessaryfor preparations.
Questions To Think About:ki
Why,arl the peeparations for painting so'important?4
1
2. What are the two ways to prepare, for painting?
3. What is.the !lain diffgarence between the two ways?.-
4. Whit tools will be needad?1
5. What supplies 'will bo neodad?
(Parts 3** -7**)
Nerbort Nishii first shows how to feather-edge tit. outsideedge. lie<then explains two ways of priming and demonstrate'sthe way to apply primar for a quality job. Ne also Xplainsand demonstrates the application of glazing putty.
Questions To Think About: , ,Ne,
1. When you are feather-edging, what.can you do to prevent themetal from becoming,too hot and warping?
2: When priming for production, how many coats of primer do youapply?
3. When iriming for 4 quality job, how *Many matp.of paint doyou apply?
103
411

a. a
Previdw continved
. guestions To Think About: (continued)
'§t4. Dairen coats of primer, how lohg do you. hveito Lait?
5. Mter Pout- last applica't.ion'of primer, how long should you! wait before applying the.putty?
14.
--4.4mos
-x 6) Hbw many coke of glazing Putty should you apply?
(Parts,8"-13")
: : f
Herbert Nishii explaini t
f'
o'methods of sanding the dridd'
I
glazing putty and demonstrate part of the sanding procedure.'He then applies primer on the puttied surface, applying manycoaks to fill up the scratches for a quality job. He thenspot putties.the remaining scratches, sands the spot puttied
,areas, and again applies primet to the area.
4Questions To Thirk bout:
1. When sanding glazi1q putty, what kinds of sandpaper do youuse 1) for product on jobs (autobody shop, jobs) 2) for aquality job?
2. When sanding glazing putty, what sanding technique doesHerbert Nishii use?
3. How do you check the glazing putty for smoothness?
How many coats of primer does Herbert Nishii use to fill upthe scratches for a quality joP?
If you.put,the spot putty on too soon,, while the primer isstill wet, what will happen?
.When sanding the spot putty (before putting on the nail twowet*coats'of primer) what kinds of sandpaper can you use?
XI, p
444%
104
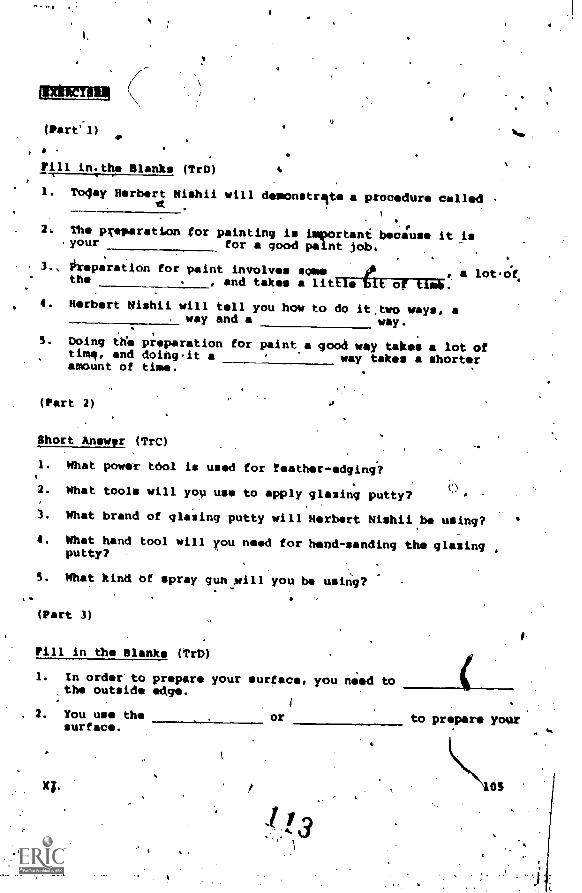
(Part'-1)
Fill in.ths Blanks (TrD)
1. To4ay Herbert Nishii will domonstrite procedure called .
w.
,2. The preparation for painting is important because it is
your for a good paint job.
3., Preparation for paint involves SONO a lot*the . , and takes a little Lilt of timo.
4. Herbert Nishii will tell you how to do it two ways, away and a way.
S. Doing thi preparation for paint a good way takes a lot oftims, and doing,it a way taks a shorteramount of time.
/I
(Part 2)
port Answer (TrC) -
I. What power tool is used for feather-edging?
2. What tools will you use to apply glazing putty?
3. What brand of glaZing putty will Herbert Nishii.b44 using?
4. What hand tool will you need for band-sanding the glazingputty?
S. What kind of spray gun.mill you bib using?
(Part 3)
Fill in the Blanks (TrD)
1. In order to prepare your surface, you need tothe outside edge.
. 2. You use the orsurface.
Xi.
. 40,
to prepare your
7

0' Fill in the Blanks Icontinued)
s 3. *Herbert Iiishif is using aon the feather-edger.
-grit sandpaper
1 4. You should try to 'the surface to make sure .
I
that.the metal isnTi getting hot.A ) .
r 5. .You should also bold the tool as . .as
possible to get a more even surface.
(Part 4)
Mulb.i.ple Choice (TrA)1
1. Your next step in preparing the surface is to
a. warp your metal. c. prime.b. plastic fill. d. feel the surface.
2. In your production way of priming, you
a. lay the primdr on thick and wet.b. only paint one transparent coat of primer.c. paint two coats of wet primer.d. paint aro transparent coats and a third wet coat.
3. In your good Way of priming; you
a. lay the primer.on thick and wet.b. only paint one transparent coat of primer.c. paint two coats of wet primer.d. paint two transparent coats and a third wet coat.
(Part 5) S.
Multiple Choice (TrA)
1. When you prepare the primer giin, you adjuit
a. your fan.b. your fluid.
2. When priming, You should watch
(a. the glazing putty.ly. the overlap of the strokes.c. how wet or dry the.prtmer ia going on.d. the feather-edger:
:I
c. your air pressure.d. !your respirator.
XI II 4411.
106

lhatiple Choice (conti141) 4
3. After applying the.third, wet pat, you need to wait for it to
a. get wet.b. flash.
p: set !d. become transparen.
4. If you paint coats of primer with letting them flash,
a. the solvents won't have a chance tp evaporate.4P- b. you woul4 have a very soft bottom.
c. you would have a hard coat.d. you would have a hard top.
(Part 6)
Multiple Choice (TrA)
I. If ybu put the putty on when the primer is wet,
a. the primer'will probably come off.b. it will look Qice.C. it will becomikdry.d. the primer will run.
2. You can find oo., hen the primer Os dry by
a. putting the putty on.. b. looking it it.c. 'feeling with your hand over the area.d. _listening to it.
3..If the primer is still wet, you can feel
a. that it is not that cold.b. that it I very warm.c. a cool breese'coming through the priNer.d. the putty.
4. When the air over the primer is not that,cold
a. you need to wait. .
b. you can appli your putty.c. you need to apply more primer.d. the solvents are still evaporating.
:
XI
4
107

(Part 7)
Short Answer (TrC)
1. What is the purpoile of glazing putty?
.2. Do you use putty to fill up big dents?
It. What will happen to the putty if you use too much?
Fill in the,Blahks (PrD) .
4. You first application of putty should be
2. After the firlit coat of putty, let it
3. After'the second cbat o/f putty, you let itfor a while.
(Part 8)
Fill in the.81anks (TrD)
I. When you sand your glazing putty, you start off with a-grit sandpaper.
. .
2. The sandpaper could be dry (fre-cut), or you could sand itwith, for wet sandfng.
If you are doing a production job,yoU start4out with a'sandpaper, and finish it off with a verysandpaper.
4. If you are doing a quality job at home, you might use ,
a sandpaper all the way through.
(Part 9)
Multiple Choice (TrA)
1. Whet) you sand, yoU
a. start at the outside edge.b. start in the center.c. crosi-sand.on the outside edge.d. cross-sand in thg center.. use circular movement With the sanding blocR on the edge.f. 'uSe a circular movement in the center.
XI,. 41.tp
Kulilple Choice (gpntinued)
2. Herbert Nishii will notqfhow the fine sandfng because-
a. the procedure is tho same.b. he rants to show a Ntay 'ado a lot bettr job.c. yod should not do it.
1 d. you,tave t smooth surface now.. ,
APart.10)
-
, rill in the Blanks (TrD)
1. While you are eanding you should the'area.
2. You should be careful not to create orspots.
3. You should check to make sure that the putty has filled up.the
(Part 11)
Fill in the'Blanks (TrD)
1. Usually, in production, you would go over it again with asandpaper and then shoot .the primer.
2. Herbert Nishii will 01) it a different way, and fill dp thescratches with
7
3. H puts coats of primer on to fill up thescratches.
4. You have to let the primer
S. While waiting for the primer to dry, you shouldon another job, or do something else on the car.
4(Par-t.131
Fill in the Blanks (TrD)
1. When you spot putty, you try to find orthat have been left behind.
XI JO!
Fill )in the Blanks (cOntinued)
21 Make sure you do the steps.
3: If Your 15 ss tells you a way to do.it, do itway.
(Part 13)
Fill in the Blanks (Trro)
1. When you sand the spot'putty, you can use a-grit sandpaper and then a -grit
sandpaper.
2. You clear the-area that you will prime byit with the primer gun.
3. You us.e
XI
puttied surface.coats of primer to cover the spot
0
sq
110

UNIT XII
VIDEO LECTURX (SERIES B)
FINAL PREPAIATION AND SitOT PAINTING
FEEM
(Parts A"-3**)
Ln this section of the lecture, Herbert Nishii describesthe final procedures for preparation for spot painting: com-pounding the outer edge, sanding the primered surface, blowingthe surface off with the air gun.
Questions To Think About:
, 1. What is the purpose of compounding the outside..edge?.
2. What machine do you use to compOund the edge?
3. What kind of sanding technique should you use?
.4. Why do you need to blow the surface off?
(Parts 4**-8")
Herbert Nishii shows the equipment and supplies neededs
for painting. He shows how to check the spray gun to see that' it is in working order. Hi then explains the different propor-tions for mixing the lacquer paint with lacquer thinner for thefirst. and later coats of paint. He demonstrates the mixing procedureand the painting technique for the cover (first) coats of paint. .Ha then Shoys how to paint later coati of reduced paint. Andlast, he xtilains two different ways of getting a glossy surfaceto finisli the job.
Questions yo Think About:
1. What.Aupplies will you need for painting?
2. What safety precaution should you take when painting?
3. In what proportions should you mix youi paint and thinnerfor the cover coats of paint?
4. What proportions should you have for laier coats of paint?,s

treview continued
QUsstions_yo hink_About:. (continued)
5. !low much airqWessure will you need?
/6 'Mould you paint transparene.coats?
7. What might.happen if you do not pause or wait between applyingthe different coats of paint? *
8. What are two possible methods of getting a gloss on the
paint surface when it dries?
XII
4
112
.11

(Part
lhort Answer (TrC)41,
1. When you compound the arma surrounding the primer, what'twopthings do ydu peed t9 use?
.2. How far outside the primer should you compound?
3. What does the Compound do to the paint surface?
4. Why do you need to compound the surrounding area?
5. What tool does the buffer resemble?
4.6. How As-the larger buffer diffe;ent frOm a disc grinder?
7. What should'you try not to do when using the buffer?
(Part 2)
Multiple Choice (TrA)
1. You put the compound on
a. the area you'll be painting.b. the buffer.c. your A.m.d. the area about two feet away from the edge of the primer.
2. When Herbert Nishii was using the buffer, he
'a. caught the ball.b. caught the buffer on the edge of the metal.c. made some scratches.d. had a little bit of a problem with the buffer.
3. The buffing compound 4
a. I-akesJaway the roughness on the primeeedge.b. takes away the'primer edge.c. smoothens the inside of the primer.d. sands the outside area of the paint.
XII
(
113

4
Multiple Choice,(continupd)
4. To slpothen the inside of the primer; you ne5dit.
. ite the buffer. C. "the sanding block.
.p. the coTpbund. . d: .the feather-edger. .
(Part 3),
N.
Short Answer (Tre) ., .
/, .
I. When you have finished Sand-ing.the primer, should you .
make the sand-scratches move in one direction?
' co.
2. which dirpction should.you mike the sand-scratches go?
3. Why should ydu be carefUl nort to sand off too much primer?..
4. After you finish sandIng,lhow do you c1ean off the surface?
,(Part 4)
Fill in the Blanks (TrO)
I. When you mix,your paiwt you should try to
the colors as closely as possible.
2. You need a , a can of , a
stick, a can of , and for
sarety yop should'wear a
3. On your spray gun you should check the, and
(Part 5)
Fill An the Blanks (TrC)
1. Lacquer 'paint dries tlirough
inside your paint.
of the thinners
2. -When you mix (reduce) the paint with thinner, for the
first coats of paint, it should be part of
paint to parts thinner.
XII

Fill in the Blanks{ (continued)
3. You could go a little thicker or thinner, but usually thereduction is , to or maybe
to
4. Primer reduction is strictly to
(Part 6)
Fill in the Blanks (TrD)
1. When you do lacquer jobs, you'll be down. your paint a lot.
k2. When yin* reduce the paint mixture for the final coats
of paint it will be part orpart thinner than before.
p 3. The paint mixture for the final coats of paint wouldther ore be parts of.thinner to
. part of paint.
(Part 7)
Fill in the Blanks (TrD)
1. When you first start to paint, you use atype of paint.
2. You use a air pressure so that the paintdoesn't go into the air as overspray.
3. You apply the paint wet, not
4. You yse a percent overlap.
- 5. You let it for a while between coats, since,youtmn't want it to
6. Tco much paint will cause it to collect in one area,and because the panel is sloping downwards the paint will
7. At the Isnd of each stroke, try towrist.
your
I. This first application of paint is celled your
XII
23
115

t
(Part e)
Tr!ue-False (TrB)
1. For the later coats of paint, you needsto reduce the'paint two parts.
0
. You should chck to oo if the cotors match whenmixing paint.
3, If the color isn't matchihg right, you might haveto add a different shade of color to yourippaint,
4. When you start blending in, you shOuld start from theidside and work your way out.
;
5. You hould agaln crack Ypur wrist and optily the paintwet when blepding in the paint.
6. At this time you hould be applying transparent boatsof paint,
7. Aftr painting, some shops will com0ound the area andbuff it to gt a shine.
. After paintjng, Isom, shops will sand it with 4600-grit sasdpOor and then shoot a thinner coat ofpaint.
4. H.rber Ni.hii boo left out a lot of steps on how totough-p.paint.
10. Herbert Nishii has given you a complete rundown of.the
20painting procedures and steps.
11. YOu Should listen to what your boss tells-you about.painting.
,
12. YOu should OVID Herbert Nishii"a helpful hints toyour.boss.
124