Embed Size (px)
Citation preview

Start
Oracle® Documaker
Documaker Administration Guideversion 12.0
Part number: E17552-01
October 2011

Copyright © 2009, 2011, Oracle and/or its affiliates. All rights reserved.The Programs (which include both the software and documentation) contain proprietary information; they are provided under a license agreement containing restrictions on use and disclosure and are also protected by copyright, patent, and other intellectual and industrial property laws. Reverse engineering, disassembly, or decompilation of the Programs, except to the extent required to obtain interoperability with other independently created software or as specified by law, is prohibited.The information contained in this document is subject to change without notice. If you find any problems in the documentation, please report them to us in writing. This document is not warranted to be error-free. Except as may be expressly permitted in your license agreement for these Programs, no part of these Programs may be reproduced or transmitted in any form or by any means, electronic or mechanical, for any purpose.If the Programs are delivered to the United States Government or anyone licensing or using the Programs on behalf of the United States Government, the following notice is applicable:
U.S. GOVERNMENT RIGHTSPrograms, software, databases, and related documentation and technical data delivered to U.S. Government customers are "commercial computer software" or "commercial technical data" pursuant to the applicable Federal Acquisition Regulation and agency-specific supplemental regulations. As such, use, duplication, disclosure, modification, and adaptation of the Programs, including documentation and technical data, shall be subject to the licensing restrictions set forth in the applicable Oracle license agreement, and, to the extent applicable, the additional rights set forth in FAR 52.227-19, Commercial Computer Software--Restricted Rights (June 1987). Oracle USA, Inc., 500 Oracle Parkway, Redwood City, CA 94065.The Programs are not intended for use in any nuclear, aviation, mass transit, medical, or other inherently dangerous applications. It shall be the licensee's responsibility to take all appropriate fail-safe, backup, redundancy and other measures to ensure the safe use of such applications if the Programs are used for such purposes, and we disclaim liability for any damages caused by such use of the Programs.The Programs may provide links to Web sites and access to content, products, and services from third parties. Oracle is not responsible for the availability of, or any content provided on, third-party Web sites. You bear all risks associated with the use of such content. If you choose to purchase any products or services from a third party, the relationship is directly between you and the third party. Oracle is not responsible for: (a) the quality of third-party products or services; or (b) fulfilling any of the terms of the agreement with the third party, including delivery of products or services and warranty obligations related to purchased products or services. Oracle is not responsible for any loss or damage of any sort that you may incur from dealing with any third party.Oracle, JD Edwards, and PeopleSoft are registered trademarks of Oracle Corporation and/or its affiliates. Other names may be trademarks of their respective owners.
Notice

THIRD PARTY SOFTWARE NOTICESThis product includes software developed by Apache Software Foundation (http://www.apache.org/).
THIS SOFTWARE IS PROVIDED "AS IS" AND ANY EXPRESS OR IMPLIED WARRANTIES, INCLUDING, BUT NOT LIMITED TO, THE IMPLIED WARRANTIES OF MERCHANTABILITY AND FITNESS FOR A PARTICULAR PURPOSE ARE DISCLAIMED. IN NO EVENT SHALL THE AUTHOR OR CONTRIBUTORS BE LIABLE FOR ANY DIRECT, INDIRECT, INCIDENTAL, SPECIAL, EXEMPLARY, OR CONSEQUENTIAL DAMAGES (INCLUDING, BUT NOT LIMITED TO, PROCUREMENT OF SUBSTITUTE GOODS OR SERVICES; LOSS OF USE, DATA, OR PROFITS; OR BUSINESS INTERRUPTION) HOWEVER CAUSED AND ON ANY THEORY OF LIABILITY, WHETHER IN CONTRACT, STRICT LIABILITY, OR TORT (INCLUDING NEGLIGENCE OR OTHERWISE) ARISING IN ANY WAY OUT OF THE USE OF THIS SOFTWARE, EVEN IF ADVISED OF THE POSSIBILITY OF SUCH DAMAGE.Copyright © 2000-2009 The Apache Software Foundation. All rights reserved.
This product includes software distributed via the Berkeley Software Distribution (BSD) and licensed for binary distribution under the Generic BSD license.
THIS SOFTWARE IS PROVIDED BY THE COPYRIGHT HOLDERS AND CONTRIBUTORS ``AS IS'' AND ANY EXPRESS OR IMPLIED WARRANTIES, INCLUDING, BUT NOT LIMITED TO, THE IMPLIED WARRANTIES OF MERCHANTABILITY AND FITNESS FOR A PARTICULAR PURPOSE ARE DISCLAIMED. IN NO EVENT SHALL THE COPYRIGHT OWNER OR CONTRIBUTORS BE LIABLE FOR ANY DIRECT, INDIRECT, INCIDENTAL, SPECIAL, EXEMPLARY, OR CONSEQUENTIAL DAMAGES (INCLUDING, BUT NOT LIMITED TO, PROCUREMENT OF SUBSTITUTE GOODS OR SERVICES; LOSS OF USE, DATA, OR PROFITS; OR BUSINESS INTERRUPTION) HOWEVER CAUSED AND ON ANY THEORY OF LIABILITY, WHETHER IN CONTRACT, STRICT LIABILITY, OR TORT (INCLUDING NEGLIGENCE OR OTHERWISE) ARISING IN ANY WAY OUT OF THE USE OF THIS SOFTWARE, EVEN IF ADVISED OF THE POSSIBILITY OF SUCH DAMAGE.Copyright © 2009, Berkeley Software Distribution (BSD)
This product includes software developed by the JDOM Project (http://www.jdom.org/).
THIS SOFTWARE IS PROVIDED ``AS IS'' AND ANY EXPRESSED OR IMPLIED WARRANTIES, INCLUDING, BUT NOT LIMITED TO, THE IMPLIED WARRANTIES OF MERCHANTABILITY AND FITNESS FOR A PARTICULAR PURPOSE ARE DISCLAIMED. IN NO EVENT SHALL THE JDOM AUTHORS OR THE PROJECT CONTRIBUTORS BE LIABLE FOR ANY DIRECT, INDIRECT, INCIDENTAL, SPECIAL, EXEMPLARY, OR CONSEQUENTIAL DAMAGES (INCLUDING, BUT NOT LIMITED TO, PROCUREMENT OF SUBSTITUTE GOODS OR SERVICES; LOSS OF USE, DATA, OR PROFITS; OR BUSINESS INTERRUPTION) HOWEVER CAUSED AND ON ANY THEORY OF LIABILITY, WHETHER IN CONTRACT, STRICT LIABILITY, OR TORT (INCLUDING NEGLIGENCE OR OTHERWISE) ARISING IN ANY WAY OUT OF THE USE OF THIS SOFTWARE, EVEN IF ADVISED OF THE POSSIBILITY OF SUCH DAMAGE.Copyright (C) 2000-2004 Jason Hunter & Brett McLaughlin. All rights reserved.
This product includes software developed by the Massachusetts Institute of Technology (MIT).
THE SOFTWARE IS PROVIDED "AS IS", WITHOUT WARRANTY OF ANY KIND, EXPRESS OR IMPLIED, INCLUDING BUT NOT LIMITED TO THE WARRANTIES OF MERCHANTABILITY, FITNESS FOR A PARTICULAR PURPOSE AND NONINFRINGEMENT. IN NO EVENT SHALL THE AUTHORS OR COPYRIGHT HOLDERS BE LIABLE FOR ANY CLAIM, DAMAGES OR OTHER LIABILITY, WHETHER IN AN ACTION OF CONTRACT, TORT OR OTHERWISE, ARISING FROM, OUT OF OR IN CONNECTION WITH THE SOFTWARE OR THE USE OR OTHER DEALINGS IN THE SOFTWARE.Copyright © 2009 MIT
This product includes software developed by Jean-loup Gailly and Mark Adler. This software is provided 'as-is', without any express or implied warranty. In no event will the authors be held liable for any damages arising from the use of this software.Copyright (c) 1995-2005 Jean-loup Gailly and Mark Adler

This software is based in part on the work of the Independent JPEG Group (http://www.ijg.org/).
This product includes software developed by the Dojo Foundation (http://dojotoolkit.org).
THIS SOFTWARE IS PROVIDED BY THE COPYRIGHT HOLDERS AND CONTRIBUTORS "AS IS" AND ANY EXPRESS OR IMPLIED WARRANTIES, INCLUDING, BUT NOT LIMITED TO, THE IMPLIED WARRANTIES OF MERCHANTABILITY AND FITNESS FOR A PARTICULAR PURPOSE ARE DISCLAIMED. IN NO EVENT SHALL THE COPYRIGHT OWNER OR CONTRIBUTORS BE LIABLE FOR ANY DIRECT, INDIRECT, INCIDENTAL, SPECIAL, EXEMPLARY, OR CONSEQUENTIAL DAMAGES (INCLUDING, BUT NOT LIMITED TO, PROCUREMENT OF SUBSTITUTE GOODS OR SERVICES; LOSS OF USE, DATA, OR PROFITS; OR BUSINESS INTERRUPTION) HOWEVER CAUSED AND ON ANY THEORY OF LIABILITY, WHETHER IN CONTRACT, STRICT LIABILITY, OR TORT (INCLUDING NEGLIGENCE OR OTHERWISE) ARISING IN ANY WAY OUT OF THE USE OF THIS SOFTWARE, EVEN IF ADVISED OF THE POSSIBILITY OF SUCH DAMAGE.Copyright (c) 2005-2009, The Dojo Foundation. All rights reserved.
This product includes software developed by W3C.Copyright © 2009 World Wide Web Consortium, (Massachusetts Institute of Technology, Institut National de Recherche en Informatique et en Automatique, Keio University). All Rights Reserved. (http://www.w3.org/Consortium/Legal/)
This product includes software developed by Mathew R. Miller (http://www.bluecreststudios.com).Copyright (c) 1999-2002 ComputerSmarts. All rights reserved.
This product includes software developed by Shaun Wilde and distributed via Code Project Open License (http://www.codeproject.com).THIS WORK IS PROVIDED "AS IS", "WHERE IS" AND "AS AVAILABLE", WITHOUT ANY EXPRESS OR IMPLIED WARRANTIES OR CONDITIONS OR GUARANTEES. YOU, THE USER, ASSUME ALL RISK IN ITS USE, INCLUDING COPYRIGHT INFRINGEMENT, PATENT INFRINGEMENT, SUITABILITY, ETC. AUTHOR EXPRESSLY DISCLAIMS ALL EXPRESS, IMPLIED OR STATUTORY WARRANTIES OR CONDITIONS, INCLUDING WITHOUT LIMITATION, WARRANTIES OR CONDITIONS OF MERCHANTABILITY, MERCHANTABLE QUALITY OR FITNESS FOR A PARTICULAR PURPOSE, OR ANY WARRANTY OF TITLE OR NON-INFRINGEMENT, OR THAT THE WORK (OR ANY PORTION THEREOF) IS CORRECT, USEFUL, BUG-FREE OR FREE OF VIRUSES. YOU MUST PASS THIS DISCLAIMER ON WHENEVER YOU DISTRIBUTE THE WORK OR DERIVATIVE WORKS.
This product includes software developed by Chris Maunder and distributed via Code Project Open License (http://www.codeproject.com).THIS WORK IS PROVIDED "AS IS", "WHERE IS" AND "AS AVAILABLE", WITHOUT ANY EXPRESS OR IMPLIED WARRANTIES OR CONDITIONS OR GUARANTEES. YOU, THE USER, ASSUME ALL RISK IN ITS USE, INCLUDING COPYRIGHT INFRINGEMENT, PATENT INFRINGEMENT, SUITABILITY, ETC. AUTHOR EXPRESSLY DISCLAIMS ALL EXPRESS, IMPLIED OR STATUTORY WARRANTIES OR CONDITIONS, INCLUDING WITHOUT LIMITATION, WARRANTIES OR CONDITIONS OF MERCHANTABILITY, MERCHANTABLE QUALITY OR FITNESS FOR A PARTICULAR PURPOSE, OR ANY WARRANTY OF TITLE OR NON-INFRINGEMENT, OR THAT THE WORK (OR ANY PORTION THEREOF) IS CORRECT, USEFUL, BUG-FREE OR FREE OF VIRUSES. YOU MUST PASS THIS DISCLAIMER ON WHENEVER YOU DISTRIBUTE THE WORK OR DERIVATIVE WORKS.

This product includes software developed by PJ Arends and distributed via Code Project Open License (http://www.codeproject.com).THIS WORK IS PROVIDED "AS IS", "WHERE IS" AND "AS AVAILABLE", WITHOUT ANY EXPRESS OR IMPLIED WARRANTIES OR CONDITIONS OR GUARANTEES. YOU, THE USER, ASSUME ALL RISK IN ITS USE, INCLUDING COPYRIGHT INFRINGEMENT, PATENT INFRINGEMENT, SUITABILITY, ETC. AUTHOR EXPRESSLY DISCLAIMS ALL EXPRESS, IMPLIED OR STATUTORY WARRANTIES OR CONDITIONS, INCLUDING WITHOUT LIMITATION, WARRANTIES OR CONDITIONS OF MERCHANTABILITY, MERCHANTABLE QUALITY OR FITNESS FOR A PARTICULAR PURPOSE, OR ANY WARRANTY OF TITLE OR NON-INFRINGEMENT, OR THAT THE WORK (OR ANY PORTION THEREOF) IS CORRECT, USEFUL, BUG-FREE OR FREE OF VIRUSES. YOU MUST PASS THIS DISCLAIMER ON WHENEVER YOU DISTRIBUTE THE WORK OR DERIVATIVE WORKS.
This product includes software developed by Erwin Tratar. This source code and all accompanying material is copyright (c) 1998-1999 Erwin Tratar. All rights reserved.THIS SOFTWARE IS PROVIDED "AS IS" WITHOUT EXPRESS OR IMPLIED WARRANTY. USE IT AT YOUR OWN RISK! THE AUTHOR ACCEPTS NO LIABILITY FOR ANY DAMAGE/LOSS OF BUSINESS THAT THIS PRODUCT MAY CAUSE.
This product includes software developed by Sam Leffler of Silicon Graphics.
THE SOFTWARE IS PROVIDED "AS-IS" AND WITHOUT WARRANTY OF ANY KIND, EXPRESS, IMPLIED OR OTHERWISE, INCLUDING WITHOUT LIMITATION, ANY WARRANTY OF MERCHANTABILITY OR FITNESS FOR A PARTICULAR PURPOSE.
IN NO EVENT SHALL SAM LEFFLER OR SILICON GRAPHICS BE LIABLE FOR ANY SPECIAL, INCIDENTAL, INDIRECT OR CONSEQUENTIAL DAMAGES OF ANY KIND, OR ANY DAMAGES WHATSOEVER RESULTING FROM LOSS OF USE, DATA OR PROFITS, WHETHER OR NOT ADVISED OF THE POSSIBILITY OF DAMAGE, AND ON ANY THEORY OF LIABILITY, ARISING OUT OF OR IN CONNECTION WITH THE USE OR PERFORMANCE OF THIS SOFTWARECopyright (c) 1988-1997 Sam LefflerCopyright (c) 1991-1997 Silicon Graphics, Inc.
This product includes software developed by Guy Eric Schalnat, Andreas Dilger, Glenn Randers-Pehrson (current maintainer), and others. (http://www.libpng.org)The PNG Reference Library is supplied "AS IS". The Contributing Authors and Group 42, Inc. disclaim all warranties, expressed or implied, including, without limitation, the warranties of merchantability and of fitness for any purpose. The Contributing Authors and Group 42, Inc. assume no liability for direct, indirect, incidental, special, exemplary, or consequential damages, which may result from the use of the PNG Reference Library, even if advised of the possibility of such damage.
This product includes software components distributed by the Cryptix Foundation.
THIS SOFTWARE IS PROVIDED BY THE CRYPTIX FOUNDATION LIMITED AND CONTRIBUTORS ``AS IS'' AND ANY EXPRESS OR IMPLIED WARRANTIES, INCLUDING, BUT NOT LIMITED TO, THE IMPLIED WARRANTIES OF MERCHANTABILITY AND FITNESS FOR A PARTICULAR PURPOSE ARE DISCLAIMED. IN NO EVENT SHALL THE CRYPTIX FOUNDATION LIMITED OR CONTRIBUTORS BE LIABLE FOR ANY DIRECT, INDIRECT, INCIDENTAL, SPECIAL, EXEMPLARY, OR CONSEQUENTIAL DAMAGES (INCLUDING, BUT NOT LIMITED TO, PROCUREMENT OF SUBSTITUTE GOODS OR SERVICES; LOSS OF USE, DATA, OR PROFITS; OR BUSINESS INTERRUPTION) HOWEVER CAUSED AND ON ANY THEORY OF LIABILITY, WHETHER IN CONTRACT, STRICT LIABILITY, OR TORT (INCLUDING NEGLIGENCE OR OTHERWISE) ARISING IN ANY WAY OUT OF THE USE OF THIS SOFTWARE, EVEN IF ADVISED OF THE POSSIBILITY OF SUCH DAMAGECopyright © 1995-2005 The Cryptix Foundation Limited. All rights reserved.

This product includes software components distributed by Sun Microsystems.
This software is provided "AS IS," without a warranty of any kind. ALLEXPRESS OR IMPLIED CONDITIONS, REPRESENTATIONS AND WARRANTIES, INCLUDING ANYIMPLIED WARRANTY OF MERCHANTABILITY, FITNESS FOR A PARTICULAR PURPOSE OR NON-INFRINGEMENT, ARE HEREBY EXCLUDED. SUN AND ITS LICENSORS SHALL NOT BELIABLE FOR ANY DAMAGES SUFFERED BY LICENSEE AS A RESULT OF USING, MODIFYING OR DISTRIBUTING THE SOFTWARE OR ITS DERIVATIVES. IN NO EVENT WILL SUN OR ITS LICENSORS BE LIABLE FOR ANY LOST REVENUE, PROFIT OR DATA, OR FOR DIRECT, INDIRECT, SPECIAL, CONSEQUENTIAL, INCIDENTAL OR PUNITIVE DAMAGES, HOWEVER CAUSED AND REGARDLESS OF THE THEORY OF LIABILITY, ARISING OUT OF THE USE OF OR INABILITY TO USE SOFTWARE, EVEN IF SUN HAS BEEN ADVISED OF THE POSSIBILITY OF SUCH DAMAGES.Copyright (c) 1998 Sun Microsystems, Inc. All Rights Reserved.
This product includes software components distributed by Dennis M. Sosnoski.
THIS SOFTWARE IS PROVIDED BY THE COPYRIGHT HOLDERS AND CONTRIBUTORS "AS IS'" AND ANY EXPRESS OR IMPLIED WARRANTIES, INCLUDING, BUT NOT LIMITED TO, THE IMPLIED WARRANTIES OF MERCHANTABILITY AND FITNESS FOR A PARTICULAR PURPOSE ARE DISCLAIMED. IN NO EVENT SHALL THE COPYRIGHT OWNER OR CONTRIBUTORS BE LIABLE FOR ANY DIRECT, INDIRECT, INCIDENTAL, SPECIAL, EXEMPLARY, OR CONSEQUENTIAL DAMAGES (INCLUDING, BUT NOT LIMITED TO, PROCUREMENT OF SUBSTITUTE GOODS OR SERVICES; LOSS OF USE, DATA, OR PROFITS; OR BUSINESS INTERRUPTION) HOWEVER CAUSED AND ON ANY THEORY OF LIABILITY, WHETHER IN CONTRACT, STRICT LIABILITY, OR TORT (INCLUDING NEGLIGENCE OR OTHERWISE) ARISING IN ANY WAY OUT OF THE USE OF THIS SOFTWARE, EVEN IF ADVISED OF THE POSSIBILITY OF SUCH DAMAGE.
Copyright © 2003-2007 Dennis M. Sosnoski. All Rights Reserved
It also includes materials licensed under Apache 1.1 and the following XPP3 license
THIS SOFTWARE IS PROVIDED "AS IS'" AND ANY EXPRESSED OR IMPLIED WARRANTIES, INCLUDING, BUT NOT LIMITED TO, THE IMPLIED WARRANTIES OF MERCHANTABILITY AND FITNESS FOR A PARTICULAR PURPOSE ARE DISCLAIMED. IN NO EVENT SHALL THE COPYRIGHT OWNER OR CONTRIBUTORS BE LIABLE FOR ANY DIRECT, INDIRECT, INCIDENTAL, SPECIAL, EXEMPLARY, OR CONSEQUENTIAL DAMAGES (INCLUDING, BUT NOT LIMITED TO, PROCUREMENT OF SUBSTITUTE GOODS OR SERVICES; LOSS OF USE, DATA, OR PROFITS; OR BUSINESS INTERRUPTION) HOWEVER CAUSED AND ON ANY THEORY OF LIABILITY, WHETHER IN CONTRACT, STRICT LIABILITY, OR TORT (INCLUDING NEGLIGENCE OR OTHERWISE) ARISING IN ANY WAY OUT OF THE USE OF THIS SOFTWARE, EVEN IF ADVISED OF THE POSSIBILITY OF SUCH DAMAGE.Copyright © 2002 Extreme! Lab, Indiana University. All Rights Reserved
This product includes software components distributed by CodeProject. This software contains material that is © 1994-2005 The Ultimate Toolbox, all rights reserved.
This product includes software components distributed by Geir Landro.Copyright © 2001-2003 Geir Landro ([email protected]) JavaScript Tree - www.destroydrop.com/hjavascripts/tree/version 0.96

This product includes software components distributed by the Hypersonic SQL Group.
THIS SOFTWARE IS PROVIDED BY THE COPYRIGHT HOLDERS AND CONTRIBUTORS "AS IS'" AND ANY EXPRESS OR IMPLIED WARRANTIES, INCLUDING, BUT NOT LIMITED TO, THE IMPLIED WARRANTIES OF MERCHANTABILITY AND FITNESS FOR A PARTICULAR PURPOSE ARE DISCLAIMED. IN NO EVENT SHALL THE COPYRIGHT OWNER OR CONTRIBUTORS BE LIABLE FOR ANY DIRECT, INDIRECT, INCIDENTAL, SPECIAL, EXEMPLARY, OR CONSEQUENTIAL DAMAGES (INCLUDING, BUT NOT LIMITED TO, PROCUREMENT OF SUBSTITUTE GOODS OR SERVICES; LOSS OF USE, DATA, OR PROFITS; OR BUSINESS INTERRUPTION) HOWEVER CAUSED AND ON ANY THEORY OF LIABILITY, WHETHER IN CONTRACT, STRICT LIABILITY, OR TORT (INCLUDING NEGLIGENCE OR OTHERWISE) ARISING IN ANY WAY OUT OF THE USE OF THIS SOFTWARE, EVEN IF ADVISED OF THE POSSIBILITY OF SUCH DAMAGECopyright © 1995-2000 by the Hypersonic SQL Group. All Rights Reserved
This product includes software components distributed by the International Business Machines Corporation and others.
THE SOFTWARE IS PROVIDED "AS IS", WITHOUT WARRANTY OF ANY KIND, EXPRESS OR IMPLIED, INCLUDING BUT NOT LIMITED TO THE WARRANTIES OF MERCHANTABILITY, FITNESS FOR A PARTICULAR PURPOSE AND NONINFRINGEMENT. IN NO EVENT SHALL THE AUTHORS OR COPYRIGHT HOLDERS BE LIABLE FOR ANY CLAIM, DAMAGES OR OTHER LIABILITY, WHETHER IN AN ACTION OF CONTRACT, TORT OR OTHERWISE, ARISING FROM, OUT OF OR IN CONNECTION WITH THE SOFTWARE OR THE USE OR OTHER DEALINGS IN THE SOFTWARE.Copyright (c) 1995-2009 International Business Machines Corporation and others. All rights reserved.
This product includes software components distributed by the University of Coimbra.
University of Coimbra distributes this software in the hope that it will be useful but DISCLAIMS ALL WARRANTIES WITH REGARD TO IT, including all implied warranties of MERCHANTABILITY or FITNESS FOR A PARTICULAR PURPOSE. In no event shall University of Coimbra be liable for any special, indirect or consequential damages (or any damages whatsoever) resulting from loss of use, data or profits, whether in an action of contract, negligence or other tortious action, arising out of or in connection with the use or performance of this software.Copyright (c) 2000 University of Coimbra, Portugal. All Rights Reserved.
This product includes software components distributed by Steve Souza.
THIS SOFTWARE IS PROVIDED BY THE AUTHOR AND CONTRIBUTORS "AS IS'" AND ANY EXPRESS OR IMPLIED WARRANTIES, INCLUDING, BUT NOT LIMITED TO, THE IMPLIED WARRANTIES OF MERCHANTABILITY AND FITNESS FOR A PARTICULAR PURPOSE ARE DISCLAIMED. IN NO EVENT SHALL THE COPYRIGHT OWNER OR CONTRIBUTORS BE LIABLE FOR ANY DIRECT, INDIRECT, INCIDENTAL, SPECIAL, EXEMPLARY, OR CONSEQUENTIAL DAMAGES (INCLUDING, BUT NOT LIMITED TO, PROCUREMENT OF SUBSTITUTE GOODS OR SERVICES; LOSS OF USE, DATA, OR PROFITS; OR BUSINESS INTERRUPTION) HOWEVER CAUSED AND ON ANY THEORY OF LIABILITY, WHETHER IN CONTRACT, STRICT LIABILITY, OR TORT (INCLUDING NEGLIGENCE OR OTHERWISE) ARISING IN ANY WAY OUT OF THE USE OF THIS SOFTWARE, EVEN IF ADVISED OF THE POSSIBILITY OF SUCH DAMAGE.Copyright © 2002, Steve Souza ([email protected]). All Rights Reserved.
This product includes software developed by the OpenSymphony Group (http://www.opensymphony.com/.)"Copyright © 2001-2004 The OpenSymphony Group. All Rights Reserved.

PANTONE (R) Colors displayed in the software application or in the user documentation may not match PANTONE-identified standards. Consult current PANTONE Color Publications for accurate color. PANTONE(R) and other Pantone LLC trademarks are the property of Pantone LLC. (C) Pantone LLC, 2011.Pantone LLC is the copyright owner of color data and/or software which are licensed to Oracle to distribute for use only in combination with Oracle Documaker. PANTONE Color Data and/or Software shall not be copied onto another disk or into memory unless part of the execution of Oracle Documaker.

ix
Contents
Chapter 1, Introduction
2 System Overview
3 Rules Publishing Solution Overview
4 Document Automation Evolution
7 Document Automation Goals
8 System Benefits
Chapter 2, Understanding the System
11 Processing Overview
14 Processing Options
15 Using Banner Processing
22 Using Multiple step Processing
22 Creating Transaction Records
23 File Summary
24 Processing Transactions
25 Output Files for GenPrint
25 Output Files for GenWIP
25 Output Files for GenArc
26 File Summary
28 Creating Print Spool Files
29 File Summary
30 Sending Incomplete Transactions to WIP
31 File Summary
32 Archiving Transactions
33 File Summary
33 Rules Used in Multiple Step Processing
34 Restarting the GenData Program
36 Generating Batch Status Emails
38 Tracking Batch Page Statistics
x
38 Recipient Page Statistics
39 Batch Totals Summary File
40 Sample Log File
41 Default DFD Files
44 Controlling GenTrn Processing
46 Using Single Step Processing
46 Creating and Processing Transaction Records
47 System Settings and Resources
48 Creating Print Files
49 File Summary
50 Using the MultiFilePrint Callback Function
51 Mapping Fields with XPath
52 Running Archive in Single Step Processing
52 Running WIP in Single Step Processing
53 Rules Used in Single Step Processing
56 Single Step Processing Example
58 Using IDS to Run Documaker
59 Writing Unique Data into Recipient Batch Records
66 Using Class Recipients
68 Running Documaker Using XML Job Tickets
69 Handling 2-up Printing
70 Changing the INI File
72 Changing the Recipient Batch DFD File
73 Rules Used for 2-up Printing
75 Placing the 2-up Rules in the JDT File
76 2-up Processing Example
77 Running the GenData Program
80 Printing in Booklet Format
81 Booklet Printing Examples
85 Splitting Recipient Batch Print Streams
87 DeviceName
87 SetDeviceName
87 BreakBatch
88 UniqueString
88 Using DAL to Manipulate File Names

xi
89 FileDrive
89 FilePath
89 FileName
90 FileExt
90 FullFileName
91 Assigning Printer Types Per Logical Batch Printer
93 Controlling WIP Field Assignments
96 Generating Email Notifications from GenWIP
99 Using Multi-mail Processing
99 Changing the RCPDFDFL.DAT and TRNDFDFL.DAT Files
100 Setting Up the FSISYS.INI File for Multi-mail Processing
102 Using Addressee Records
102 Using Addressee Records in Batch Files
103 Using Address Records for Printing
104 Adding and Removing Pages
104 Using Custom Code
104 Using DAL Scripts
106 Using IDS
107 Adding Indexes and Tables of Contents
108 Using Run-Time Options
108 GenData Command Line Options
108 GenPrint Command Line Options
109 GenTrn Command Line Options
109 Debugging Options
111 Grouping Print Batches
112 Controlling Console Logging
112 Logging INI File Names and Options
113 Listing the Rules Executed
114 Analyzing DAL Performance
117 Handling Large Files on Windows, UNIX, and Linux
118 Handling Large Extract and NAFILE Files on z/OS
119 Controlling What is in the MultiFilePrint Log
121 Using INI Built-In Functions
125 Accessing WIP Fields
129 Defining Built-in Functions via Studio

xii
130 Outputting WIP Field Data Onto the XML Tree
131 Using Form Inclusion Information
133 Selecting the Display Language
133 Documaker Studio
133 Transall
134 Documaker Server
134 Documaker Add-In
135 Using XML Files
135 Handling Overflow
136 Triggering Forms and Sections
137 Using XPath
137 XPath Syntax
137 Axes
138 Symbols
138 Functions
139 Expressions
140 Using the XPath Testing Utility
140 Examples
Chapter 3, Implementing Your System
150 Using a Methodology
153 Gathering Information
153 Understanding Your Niche
153 Understanding Your Organization
154 Roles and Responsibilities
Chapter 4, Setting Recipients and Copy Counts
156 Concepts
157 Key Files
157 Transaction Trigger Table
157 Trigger Levels
157 Form Set Definition Table

xiii
158 Trigger Table Record Format
160 Specifying the Transaction Trigger Table
161 How Transaction Triggering Works
162 Section Level Triggers
165 Form Level Triggers
167 Master and Subordinate Sections
167 Marking Subordinate Sections
168 Marking Master Forms
169 Examples
170 Specifying Copy Counts and Sections
172 Using Transaction Codes
173 Setting Up Search Mask and Sections
175 Using the RECIPIF Rule
177 Using Automatic Overflow
179 Using Forced Overflow
180 Setting Search Masks and Recipients
181 Using the Set Recipient Table and Extract Files
182 Formatting Search Masks
185 Sorting Forms by Recipient
187 Summary
Chapter 5, Setting Up Error Messages and Log Files
190 Overview
190 Types of Error Codes
191 Configuring the Message System
191 Enabling and Disabling Messages
192 Logging INI Files and Options Used
192 Clearing Messages
192 Defining the Output Message Files
193 Initializing the Output Message Files
194 Turning Off Date Stamps
194 Controlling the Translation Process
195 DBLib Trace Messages
196 Overriding Error Behavior

xiv
197 Creating Messages
197 Using the RPErrorProc and RPLogProc Functions
198 Using Message Tokens
200 Setting Up Message Text
203 Using the Message Token File
Chapter 6, Archiving and Retrieving Information
208 Terminology
210 System Scenarios
212 Archive and Retrieval Features
213 Processing Overview
213 Files GenArc Uses
213 How the GenArc Program Works
216 Running GenArc
217 Command Line Options
219 Using the Restart Option
221 Using GenArc with Documanage
228 Using the Oracle ODBC Driver
230 Creating the Database and Tables
233 Resolving Errors
234 Viewing Archives in Documanage
235 Using Multiple Simultaneous ODBC Connections
237 Using WIP and the Archive Index File
238 Formatting Archive Fields
240 Retrieving Archived Forms
240 Files the Archive Module Uses
240 Using the Archive Module
241 Retrieval Options
243 Working with Documanage
244 Using Documanage Data Type Support
245 Setting Up Automatic Category Overrides
246 Mapping Documaker Archive Fields to Documanage Properties
248 Using Next/Retrieve Cursor

xv
249 Enhanced Documanage Document Extended Properties Support
Chapter 7, Setting Up Archive/Retrieval Configurations
258 DB2 Server on OS/390 —Windows Client
258 Configuring the Server
259 Setting Up the Windows 2000 Server (Middle Tier)
261 Installing and Configuring Microsoft’s SNA Server
262 Configuring SNA Server 4.0 SP3
264 Setting Up DB2 on a Windows 2000 Server
265 Installing and Configuring DB2 on a Windows 2000 Server
265 Setting Up Universal Database on Windows 2000
267 Updating TCP/IP-related Values on a Windows 2000 Server
267 Common DB2 Errors
267 Setting Up Clients
268 Setting Up the INI Options for the DB2 Driver
270 DB2 Server on Windows — Windows Client
270 Setting up a DB2 Database on the Server
271 Setting Up a Client for DB2 VERSION 6.1
273 Archiving to a Remote DB2 Database Using the Native DB2 Driver
275 DB2 Server and Client on Windows
275 Setting Up a DB2 Database
276 Archiving to a Local DB2 Database Using the Native DB2 Driver
279 SQL Server on Windows — ODBC Client on Windows
279 Setting Up a Client
281 IDS on Windows —DB2 Archive on z/OS
281 Setting Up the DB2 Archive on z/OS
282 Creating a z/OS Database
282 Updating TCP/IP Values on a Windows 2000 Server
Chapter 8, Optimizing Your System
286 Optimizing Performance on z/OS

xvi
287 Compile Options
287 Language Environment (LE) or c/370 Runtime Options
288 File Types and Characteristics
288 Extract Files
288 DEFLIB
289 SETRCPTB
289 FAPLIB
289 TRNFILE
289 NEWTRN
289 NAFILE
289 POLFILE
289 Recipient Batch Files
290 Pre-compiled Xerox Metacode Files (PMETLIB)
290 Print Files
290 Setting Your FSISYS INI Options
290 Caching Options
291 Logging Options
292 Debug Options
292 Other Options
293 Defining the Extract File as a VSAM KSDS
295 Moving DDT Files into a VSAM KSDS
297 Moving JDTs into a VSAM KSDS
299 Moving PMETs into a VSAM KSDS
301 Moving SETRCPTB to a VSAM KSDS
303 Creating NAFILEs and POLFILEs as VSAM KSDSs
304 Optimizing Performance on UNIX/Linux
304 Setting FSISYS INI Options
305 Logging Options
306 Debug Options
306 Run Options
307 Other Options
308 Optimizing Performance On Windows
308 Setting FSISYS INI Options
308 Caching Options
309 Logging Options
310 Debug Options
310 Run Options
xvii
310 Other Options
311 Uploading and Downloading Resources on z/OS
312 Transferring Files
313 Handling International Characters
314 Xerox Image, Font, and Form Files
314 Xerox Pre-compiled Metacode (PMET) Files
315 Moving Resource Files Between UNIX/Linux and Windows
315 Uploading a Library from PC to UNIX
315 Downloading Print Streams from UNIX to PC
Chapter 9, Uploading and Downloading Resource Files
318 Uploading and Downloading Resources on z/OS
319 Transferring Files
320 Handling International Characters
321 Xerox Image, Font, and Form Files
321 Xerox Pre-compiled Metacode (PMET) Files
322 Moving Resource Files Between UNIX/Linux and Windows
322 Uploading a Library from PC to UNIX
322 Downloading Print Streams from UNIX to PC
Appendix A, System Files
324 Overview
326 Types of Files
329 Resource Files
333 DFD File Format
336 Files Created by the GenTrn Program
337 Files Created by the GenData Program
339 Files Created by the GenPrint Program
340 Files Created by the GenWIP Program
341 Files Used by the GenArc Program

xviii
Glossary
343 00000001.DAT File
343 00000001.POL File
344 AFP
344 ARCHIVE.CAR File
344 ARCHIVE.DBF File
344 ARCHIVE.DFD File
344 .BCH Files
344 Batch Files
344 .CAR Files
344 DAL
345 .DAT Files
345 .DBF Files
345 DDT Files
345 .DFD Files
345 Distributed Resource Library
345 Duplex
345 ERRFILE.DAT
346 Error Batch
346 Error Files
346 Extract Files
346 .FAP Files
346 FDB.DBF File
346 fetype
346 Fixed Data
347 Font Manager
347 Form
347 Form Set
347 FSISYS.INI File
347 FSIUSER.INI File
348 .FXR Files
348 GenArc Program
348 GenData Program
348 GenPrint Program
348 GenTrn Program
348 GenWIP Program

xix
349 Graphics Manager
349 .INI Files
349 .JDT Files
349 Library Manager
349 Log Files
349 .LOG Files
349 MANUAL.BCH File
350 Master Resource Library
350 Metacode
350 .MDX Files
350 NAFILE.DAT File
350 NEWTRN.DAT File
350 Objects
350 Overflow
351 Page
351 PCL
351 POLFILE.DAT File
351 PostScript
351 Section
351 Simplex
351 System Releases
352 System Patches
352 Transaction List
352 .TRN Files
352 TRNDFDFL.DFD File
352 UNIQUE.DBF File
352 Variable Data
352 WIP.DBF File
352 WIP.MDX
353 xBase
355 Index

xx

1
Chapter 1
Introduction
Welcome to the Documaker rules-based publishing solution. This product consists of a complete set of tools which provide solutions for all your form and document processing needs. The system includes these major components:
• Documaker Studio
• Documaker Server
• Docupresentment
This manual serves as a reference to Documaker Server. This chapter discusses the following topics:
• System Overview on page 2
• Rules Publishing Solution Overview on page 3
• Document Automation Evolution on page 4
• System Benefits on page 8
Chapter 1Introduction
2
SYSTEMOVERVIEW
Documaker Server is part of the Oracle Documaker rules publishing solution, which also includes Documaker Studio, Docupresentment, and reusable resource libraries.
Documaker Server uses resources you create using Documaker Studio to process information and forms. This processing includes merging external data onto forms, processing data according to rules you set up, creating print-ready files, archiving data and forms, and, if applicable, sending incomplete forms to Documaker for completion by a user.
Forms can be completed using Documaker when user input is required or, if all of your information can be extracted from external data sources, you can set up Documaker Server to process forms without requiring user input.
Documaker Server can create print-ready files for a variety of printer languages including, AFP, PostScript, PCL, and Xerox Metacode printers. In addition, using Docupresentment, the system can produce output in Adobe Acrobat PDF format.
The following topic discusses the entire rules publishing solution, its purpose, its underlying concepts and how it all works together to provide you with an enterprise-level solution to meet your document creation, processing, and storage needs.

Rules Publishing Solution Overview
3
RULESPUBLISHINGSOLUTIONOVERVIEW
Document automation is the basic concept underlying the system. An understanding of document automation helps you understand the purpose of the rules publishing solution.
Document automation replaces paper documents with electronic media. Generally, document automation is an integrated process within enterprise information systems.
The greatest challenge that document intensive industries face is the efficient processing of forms and documents. Moving toward the era of electronic information means finding workable solutions for the paper-to-electronic media replacement process. New business directions include developing ways to automate document handling processes, which extend beyond simply creating electronic output or print.
Document automation is rapidly becoming an integral part of today's business environment. The rules publishing solution creates a total business solution which lets you automate both paper document processing and electronic document management.
Let's examine document automation outside the rules publishing solution to build a knowledge base applicable to unique platforms. Then we can apply the basic concepts to the rules publishing solution.

Chapter 1Introduction
4
DOCUMENTAUTOMATION
EVOLUTION
Through the years, document automation has moved in concert with technological evolution. The technological evolution has progressed from initial ideas and applications about forms processing, to the integrated management of electronic documents. The distinction between merely automating paper production and permanently integrating electronic processing and management is critical to understanding the technological evolution. This table shows the progression of document automation in the current environment.
Stage 1 - paperautomation
Paper automation, enabled by the advent of computers and laser printers, is the first stage of the document automation evolution. Most people think of the processing and assembly of business correspondence and forms by computers as document automation. While the computer does perform some information processing, this stage of document automation evolution is still very paper intensive. It does not extend to associated automated document workflow and procedures.
Stage Type of Automation Components
1 Paper Automation Business correspondence
Forms processing
Document assembly
2 Workflow Automation Electronic mail
Electronic data interchange
Electronic funds transferIntegrated facsimile
3 Paperless Information Automation
Cooperative processing
Enterprise indexingIntegrated section processing
Multimedia

Document Automation Evolution
5
Stage 2 - workflowautomation
Workflow automation, enabled by the proliferation of personal computers, communication standards, Local Area Networks (LANs), Wide Area Networks (WANs), and integrated FAX machines, is the second stage in the document automation evolution. Workflow automation goes beyond information processing to the transfer of digitized information across telecommunication lines. It eliminates many manual procedures, often clerical in nature, from the workflow process.

Chapter 1Introduction
6
Stage 3 - paperlessinformation automation
Paperless information automation combines multiple technologies across multiple organizations, enterprises, and government entities. Information elements from various sources are shared and are readily available in flexible electronic formats. Paperless information automation enables you to reuse the information contained in the documents. Electronic documents are much easier to track, maintain, update, route, file, and retrieve.
Cooperative Processing
Enterprise Indexing
Image Processing Multimedia
Paperless Information Automation
Document Automation Evolution
7
DOCUMENT AUTOMATION GOALS
Document automation combines many elements of the evolutionary stages previously discussed to accomplish these primary objectives:
• Eliminate paper
Paper consumes enormous resources. Document automation decreases the costs associated with paper documents, and decreases the requirements for both long term and short term storage, retrieval, and document distribution.
• Automate manual procedures
Automating manual procedures associated with document automation increases efficiency, increases accuracy, and reduces costs. Repetitive and unnecessary procedures are identified and eliminated.
• Automate system interfaces
Interfaces which allow exchange of data between automated systems eliminate the need to manually enter data. Automated system interfaces also eliminate the need to supplement automated processes with manual functions. Automated system interfaces reduce errors, increase efficiency, and simplify the workflow.
As you can see, document automation encompasses many different technologies which merge in a variety of ways. In the current business environment, there are many single technologies and partial solutions which mimic document automation at first glance. Keep in mind, a single solution using one technology is not document automation. Document automation involves multiple technologies which help you manage forms and documents, workflow, procedures, and other electronic media, based on the needs and requirements of each individual organization or enterprise.

Chapter 1Introduction
8
SYSTEMBENEFITS
The system's cohesive design results in many benefits to the user. The system provides a seamless interface to your existing systems by integrating document automation technology with your current systems, and by offering you a customized computer system with reusable resources. You can select modules to meet your specifications.
The system also provides you with the following advantages in your document automation processing:
• Functional - The system's configuration meets a wide variety of document processing needs. The system's expandable architecture utilizes technological innovations to meet changing processing needs.
• Portable - The system's architecture allows core processing modules to operate on multiple hardware platforms and in multiple operating environments. This design gives the user control of the system configuration in order to meet individual needs.
• Modular - The system's configuration lets you select modules to customize your system. The modular design eases maintenance by segregating functions in independent modules. A change in one module does not necessitate multiple changes throughout the system. This modular design also improves performance by eliminating unnecessary processing.
• Reusable - The biggest advantage in using the system is the reusability of resources. Libraries are composed of customizable resource units such as sections (sections) and rules, which can be reused. Reusing resources increases efficiency and promotes consistency throughout your system and product.
• Easy to use - System components have a graphical user interface common to all components. The system's seamless system interface provides transparent print and data merge capabilities.

9
Chapter 2
Understanding the System
In Chapter 1, you were introduced to the system as a whole. This chapter provides an overview of Documaker Server.
As you review this chapter you will learn about the programs that make up Documaker Server. Following the overview, you will learn about the files used and created by the system programs in both the multiple and single step processes.
This chapter contains the following topics:
• Processing Overview on page 11
• Processing Options on page 14
• Using Banner Processing on page 15
• Using Multiple step Processing on page 22
• Restarting the GenData Program on page 34
• Tracking Batch Page Statistics on page 38
• Generating Batch Status Emails on page 36
• Controlling GenTrn Processing on page 44
• Using Single Step Processing on page 46
• Using IDS to Run Documaker on page 58
• Writing Unique Data into Recipient Batch Records on page 59
• Using Class Recipients on page 66
• Running Documaker Using XML Job Tickets on page 68
• Handling 2-up Printing on page 69
Chapter 2Understanding the System
10
• Printing in Booklet Format on page 80
• Splitting Recipient Batch Print Streams on page 85
• Assigning Printer Types Per Logical Batch Printer on page 91
• Controlling WIP Field Assignments on page 93
• Generating Email Notifications from GenWIP on page 96
• Using Multi-mail Processing on page 99
• Adding and Removing Pages on page 104
• Adding Indexes and Tables of Contents on page 107
• Using Run-Time Options on page 108
• Controlling What is in the MultiFilePrint Log on page 119
• Using INI Built-In Functions on page 121
• Outputting WIP Field Data Onto the XML Tree on page 130
• Using Form Inclusion Information on page 131
• Selecting the Display Language on page 133
• Using XML Files on page 135
• Using XPath on page 137

Processing Overview
11
PROCESSINGOVERVIEW
Documaker Server is designed to gather source data, process that data by applying rules you define, merge the data onto pre-designed forms, and print the result. In addition, Documaker Server can automatically check for incomplete data and send that data to Documaker for completion. Documaker Server can also automatically archive completed transactions which you can later view as needed.
The following illustration shows a high level view of Documaker Server:
NOTE:This illustration and the other illustrations in this chapter show a typical, workstation-based system flow. Your system may be set up differently. Furthermore, the system can be customized in many ways and can run on a variety of platforms. For instance, if your source data is properly formatted, you can bypass the GenTrn program. Or, you may choose to run the GenTrn, GenData, and GenPrint programs on a host machine and then download the information and use a system utility (FIXOFFS) to prepare it for use by the GenWIP and GenArc programs running on a workstation. You could also run the GenArc program on the host and only run the GenWIP program on a workstation.
This illustration shows the main programs which make up Documaker Server and an overall view of the processing cycle.
• GenTrn. The GenTrn program reads source data and uses system settings to create transaction records. The source data is stored in extract files. Depending on the operating system you use, this program has various names such as GENTNW32.EXE for 32-bit Windows environments.
• GenData. The GenData program takes the transaction records created by the GenTrn program and uses system settings and resources to apply processing rules to those transactions.

Chapter 2Understanding the System
12
The GenData program creates output files the GenPrint program can use. It also creates files with incomplete transactions which the GenWIP program can use. The GenWIP program creates from these files, output you can display and complete using the WIP module of Documaker Workstation.
The output from the GenData program is also used by the GenArc program to archive data. Depending on the operating system you use, this program has various names such as GENDAW32.EXE for 32-bit Windows environments.
NOTE:The illustration on the preceding page and this overview discuss the standard or multiple step processing flow of the system. By using specific rules you can have the GenData program execute both the functions of GenTrn and GenPrint. This is called single step processing and can improve performance. To learn more, see Using Single Step Processing on page 46.
• GenPrint. The GenPrint program takes information produced by the GenData program and creates printer spool files for use with PCL, AFP, Metacode, and PostScript compatible printers. In addition, the GenPrint program can also produce a Portable Document File or PDF (Acrobat) output. Depending on the operating system, this program has various names such as GENPTW32.EXE for 32-bit Windows environments.
NOTE:You can also use the GenPrint rule to add all of the functionality of running the GenPrint program. Anything you can do with the GenPrint program can be done using this rule. See the Rules Reference for more information.
• GenWIP. The GenWIP program receives information about incomplete transactions from the GenData program and processes that information so you can use the WIP module of Documaker to display the form and fill in the missing information. Once completed, you can print, archive, print and archive, delete, or change the status of form sets using Documaker. Depending on the operating system, this program has various names such as GENWPW32.EXE for 32-bit Windows environments.
NOTE:When using Documaker Server, a transaction may be placed in WIP for completion by a data entry operator. In these cases, you would first complete the transaction before it is archived.
• GenArc. The GenArc program archives data so you can store the information efficiently and retrieve it quickly. This program receives information from the GenData program. Depending on the operating system, this program has various names such as GENACW32.EXE for 32-bit Windows environments.
The previous illustration showed a high level view of Documaker Server which shows you the main programs in the system and its processing cycle. These programs create and use several types of files as they process information. The following illustration shows this processing flow in greater detail, though not every possible system file is included.

Processing Overview
13
Understanding how the information flows from one program to another and which files are used and created is key to understanding Documaker Server. Here you can see all of the files the system uses and creates during its processing cycle.
You can find information about all these files and programs in the Glossary. You can also find examples of certain files in Appendix B, System Files on page 425. Let’s first look at the GenTrn program and the files it uses and creates.
NOTE:You can run the GenData and GenPrint programs on z/OS using resources retrieved from Documanage (on a Windows server) via Library manager. For information on setting up the library in Documanage and setting the INI options on z/OS to access this library, refer to the Documaker Studio User Guide. See Using Documanage in Chapter 9, Managing Resources.
Chapter 2Understanding the System
14
PROCESSINGOPTIONS
You can run Documaker Server as a multiple or single step process. Variations of these processes provide additional options such as AFP 2-up printing and multi-mail sorting.
This chapter begins with a general overview of the system. From this point forward, we will review specific processing options. The following topic discusses running the system using the multiple step process. This topic is followed by a discussion of running the system using the single step processes. The remainder of the chapter provides brief explanations of 2-up and multi-mail printing.
NOTE:To gain a complete understanding of the different features of the multiple and single step processes, it is important to read through both sections. Certain information that is common to both processes is only described in the multiple step section.
To help determine which option is best suited for a particular need, a brief description of the run-time options and related processes are provided in the table below:
Process Description
2-Up Printing Two-up printing is a two-step process which passes input through GenData three (3) times with a different JDT file each pass. This process is similar to the single step process in that GenData performs the work, but the three passes through GenData actually represent two steps of the multiple step process: processing the transactions and printing the transactions. Two-up printing is AFP printer-specific. For more information, see Handling 2-up Printing on page 69.
Banner The system lets you process banners at several points in the processing cycle. Doing this involves using a simplified AFGJOB.JDT file. For more information, see Using Banner Processing on page 15.
Multi-mail GenData groups transactions with the same multi-mail code into selected print batches to be sorted and delivered to the same location. For more information, see Using Multi-mail Processing on page 99.
Multiple step The system programs, GenTrn, GenData and GenPrint, each perform a set of steps to read data, create output files and print. GenWIP and GenArc are optional programs to complete incomplete transactions and archive data for retrieval. For more information, see Using Multiple step Processing on page 22.
Restarting the system
You can set up the GenData program to restart itself at a particular transaction if it encounters a failure. For more information, see Restarting the GenData Program on page 34.
Single step To enhance system performance, the steps of the GenTrn, GenData and GenPrint programs are performed in one step by GenData. The GenWIP and GenArc programs function the same as in the multiple step process. For more information, see Using Single Step Processing on page 46.

Using Banner Processing
15
USING BANNERPROCESSING
The system includes support for banner processing. Banner processing is supported at these points in the processing cycle:
• Beginning of a batch
Before a transaction is processed
After a transaction is processed
• End of a batch
Banner processing is optional at each point. Banner processing can optionally include FAP forms processing and DAL script processing.
You specify the FAP forms for banner processing in this manner:
;key1;key2;form name;
The forms must appear in the FOR file in DefLib. The associated sections (images) for those forms and must reside in FormLib.
You can set up banner forms and scripts at a global level so they can be used by all print batches. Individual recipient print batches can specify local forms or scripts to override the global forms and scripts.
Keep in mind these limitations:
• Only the standard printer drivers, such as AFP, Metacode, PCL, and Postscript, support batch banner processing. Avoid batch banner processing if you are using another print driver.
• Banner pages are printed at the group level. As a result, this bypasses the custom callback function named in the CallbackFunc option of the Print control group since it is a form set-level callback.
NOTE:Version 10.1 added batch-level banner processing to multiple step mode. Version 10.2 added batch-level banner processing to single step processing — printing via GenData using the PrintFormset rule.
The method of banner processing discussed here only affects the GenPrint program. Documaker Workstation has a separate banner handling method, and does not support this method of banner processing.
Enabling bannerprocessing
For performance reasons banner processing is, by default, disabled. You must enable it using one or both of these INI options:
< Printer >
EnableTransBanner = True
EnableBatchBanner = True
Omitting either option disables the associated level of batch banner processing. Once enabled, banner processing is in effect for the entire GenPrint run. You can, however, disable banner processing for individual batches by specifying forms and scripts with blank names.
Specifying bannerforms and scripts
You can globally specify forms and scripts for all batches, or locally for specific batches. Use these INI options to specify global batch forms and scripts:

Chapter 2Understanding the System
16
< Printer >
BatchBannerBeginForm = form name
BatchBannerBeginScript = script name
BatchBannerEndForm = form name
BatchBannerEndScript = script name
TransBannerBeginForm = form name
TransBannerBeginScript = script name
TransBannerEndForm = form name
TransBannerEndScript = script name
Specify form names as follows:
;KEY1;KEY2;Form name;
The sections (FAP files) for the forms are specified in the form lines in the FOR file. You must include these FAP files in FormLib.
Store the banner forms in a separate and unique banner form group, defined by a combination of Key1 and Key2. You can use the AddForm DAL function in a DAL script to insert additional forms for banner processing. Place these additional forms and sections in the same group as the initial banner form. Each form is printed separately and after all banner forms are printed, the entire banner group is removed from the document set. For these reasons, it is critical that you isolate the banner forms from the rest of the transaction document set by specifying a Key1/Key2 combination that does not otherwise occur within the document.
The FAP files assigned to the form must have the recipient BANNER with a copy count of at least one. When banner forms are printed, only sections assigned to the recipient BANNER with a non-zero copy count are printed.
Specify the DAL script names without a path or extension. For best results, store the DAL scripts in your DAL libraries because they are easier to maintain. The system automatically loads DAL libraries if you include these INI options:
< DALLibraries >
LIB = library1
LIB = library2
The DAL script libraries or files must reside in DefLib.
You can specify forms and scripts at the recipient batch level to override the global specification. Here is an example of how you do this:
< Print_Batches >
BATCH1 = BATCH1.BCH
BATCH2 = BATCH2.BCH
< Batch1 >
BatchBannerBeginForm = form name
BatchBannerBeginScript = script name
BatchBannerEndForm = form name
BatchBannerEndScript = script name
TransBannerBeginForm = form name
TransBannerBeginScript = script name
TransBannerEndForm = form name
TransBannerEndScript = script name
You can specify some, none, or all of the forms and scripts for local override of the default global forms and scripts.

Using Banner Processing
17
An individual batch can completely or partially disable banner processing if the forms, script names, or both are blank, as shown here:
< Batch1 >
BatchBannerBeginForm =
BatchBannerBeginScript =
BatchBannerEndForm =
BatchBannerEndScript =
TransBannerBeginForm =
TransBannerBeginScript =
TransBannerEndForm =
TransBannerEndScript =
Banner formprocessing and
multifile print
Use the RetainTransBeginForm option to make pre-transaction transaction banner form processing compatible with multifile printing. Banner forms print separately from the rest of the document. When using multifile printing with print drivers such as PDF or RTF, banner forms do not appear in the output file. This options lets the banner form appear in the same print file.
Banner pages are, by design, not considered part of the form set. A pre-transaction banner page is designed to print separately, using data from the form set, but as if it were not physically part of the form set. For that reason, when printing to a single-file-per-transaction format such as PDF, RTF, XML, or HTML, and using the MultiFile print callback method to produce separate files, the banner output is not included in the output file.
It is possible to use pre-transaction banner forms as a way of producing a mailer sheet for a form set. This works for true printed output, but if you are producing a PDF file, for example, the banner (mailer page) does not appear within the PDF.
If, however, you use the RetainTransBeginForm option to retain the pre-transaction banner form, the banner process proceeds as before, but the printing of the banner is initially suppressed. The banner page is retained and remains inside the form set, as the first form in the form set. When the form set is processed by the PDF driver to produce the PDF file, the pre-transaction banner form (or mailer sheet) is then included in the resulting PDF file.
Keep in mind however that the document is only temporarily modified during the print step. The banner form is not included with the actual, intelligent form set when it is archived. For instance, if the intelligent document format is used for archiving, the mailer sheet does not appear as part of the form set, and will not print if retrieved from archive. If, however, you archive the PDF output, then the mailer sheet will appear in the PDF file.
You can place the RetainTransBeginForm option in the Printer control group as a global setting or you can place it at the recipient batch level. A setting at the recipient batch level overrides a setting in the Printer control group.
Here is an example of how you could set a global or default setting in the Printer control group and override that setting for a particular recipient batch:
< Printer >
RetainTransBeginForm = Yes
... (other applicable options omitted - see the following note)
< Print_Batches >

Chapter 2Understanding the System
18
Batch1 = BATCH1.BCH
Batch2 = BATCH2.BCH
< Batch1 >
RetainTransBeginForm = No
... (other applicable options omitted - see the following note)
NOTE:There are additional INI settings required for single- and multiple step processing. For more information about single step processing, see the discussion of the PrintFormset rule in the Rules Reference.
For more information about multiple step processing, see the discussion of the MultiFilePrint callback function in the Using the PDF Print Driver.
Processing logic Banner processing functions are part of the base system and are primarily located in GenLib. The GenPrint program, however, first routes the processing to CusLib. This lets you use the exit points in CusLib to create additional customized processing before, after, or in place of, the calls to GenLib routines.
The processing sequence for banner processing (at any level) is as follows:
1 If a banner form is specified, it is created in the form set and the FAP files are loaded.
2 If a banner DAL script is specified, it is executed.
3 For any banner form specified in step 1 or created during step 2, the following steps take place:
Any variable fields in the banner form that are still empty are updated, first from matching GVM (global variable member) variables, such as fields in the recipient batch record, then from matching DAL variables.
The form is printed.
4 If there were banner forms to process, after updating the fields and printing the forms, the entire banner form group is removed from the form set.
Option Description
RetainTransBeginForm Enter Yes if you want the system to include the transaction banner form in the form set. The default it No.
If you are using the PDF, RTF, XML, or HTML print driver, this means the banner pages will be included in each transaction’s print file.

Using Banner Processing
19
NOTE:You can suppress the printing of the banner page by using the SuppressBanner DAL function. This is useful when you need to combine several transactions within the same transaction banner pages.
If there are registered comment record functions, each banner form in the form group receives its own set of comment records. If the additional forms should not receive their own comment records, add the sections for those forms to the original form—do not add them as separate forms.
DAL functions You can also use these DAL functions with banner processing. See the DAL Reference for more information.
• RecipName. Returns the name, such as INSURED, AGENT, COMPANY, and so on, of the recipient batch record of the transaction currently being printed.
• RecipBatch. Returns the name, such as BATCH1, BATCH2, ERROR, MANUAL, and so on, of the recipient batch file being processed.
• SuppressBanner. Suppresses the current banner from printing. You can use this function when you want to combine several transactions inside one set of banner pages, based on a flag that the DAL script checks.
Banner processingexample
Assume you have these FAP files in your forms library (FormLib).
• btchbannr
• btctrail
• trnbannr
• trntrail
Here is an excerpt from the FSISYS.INI file:
< Printer >
PrtType = PCL
EnableTransBanner = TRUE
EnableBatchBanner = TRUE
BatchBannerBeginScript = PreBatch
TransBannerBeginScript = PreTrans
BatchBannerEndScript = PstBatch
TransBannerEndScript = PstTrans
BatchBannerBeginForm = ;BANNER;BATCH;BATCH BANNER;
BatchBannerEndForm = ;BANNER;BATCH;BATCH TRAILER;
TransBannerBeginForm = ;BANNER;TRANSACTION;TRANS HEADER;
TransBannerEndForm = ;BANNER;TRANSACTION;TRANS TRAILER;
< DALLibraries >
LIB = Banner
Here is an excerpt from the FORM.DAT file:
;BANNER;BATCH;Batch Banner;Batch Banner (Job\ Ticker);N;;btcbannr|D<BANNER(1)>;
;BANNER;BATCH;Batch Trailer;Batch Trailer (End\ Ticket);N;;btctrail|<BANNER(1)>;

Chapter 2Understanding the System
20
;BANNER;TRANSACTION;Trans Trailer;Transaction Trailer (End\ Ticket);N;;trntrail|D<BANNER(1)>;
;BANNER;TRANSACTION;Trans Header;Transaction Banner\ Page;N;;trnbannr|D<BANNER(1)>;
Here is an example of the BANNER.DAL file in DefLib:
BeginSub PreBatch
#batch += 1
#trans = 0
rb = RecipBatch()
rn = RecipName()
EndSub
BeginSub PreTrans
#trans += 1
rb = RecipBatch()
rn = RecipName()
EndSub
These additions to the FORM.DAT and FSISYS.INI files plus file additions to the FormLib and DefLib sub-directory would cause the following pages to be added to each batch:

Using Banner Processing
21
Batch Banner Page
Transaction Banner Page
Company: Sampco
LOB: LB1
Policy: 1234567Recip name: Insured
Recip batch: Batch1
Batch no.: 1Trans no.: 1
Pages associated with the transaction
Transaction Trailer
Repeat of the previous pages—from Transaction Banner page through the Transaction Trailer page
Batch Trailer
(ending job ticket)

Chapter 2Understanding the System
22
USINGMULTIPLE STEP
PROCESSING
This topic describes the standard, multiple step approach to processing. In a multiple step processing scenario, the system takes these steps:
• Create the transaction records
• Process the transactions
• Create print spool files
• Send incomplete transactions to work-in-progress (WIP)
• Archive transactions
NOTE:Be sure to carefully read this topic even if you are using single step processing.
CREATING TRANSACTION RECORDS
This illustration shows the files used and created by the GenTrn program as it creates transaction records:
The GenTrn program takes the source data, which is stored in extract files, and creates a list of the transactions, which is stored in the TRNFILE, or transaction file. This transaction list is then used by the GenData program as it processes the transactions.
The GenTrn program uses settings in the FSISYS.INI and TRNDFDFL.DFD files to determine how to process the transactions. These files provide the GenTrn program with information about the format and structure of the extract file, such as how to determine where each new record starts.

Using Multiple step Processing
23
The GenTrn program also produces a log file of its activities, a message file, and an error file which you can use to resolve any errors that occur.
File SummaryThis table summarizes the files used to supply information (input) and the files created by (output) the GenTrn program:
NOTE:You can use the Data control group in the FSISYS.INI file to specify the names and extensions for all other input and all of the output files.
File Name or Type
Default Extension
File Format Description
Input Extract files .DAT text Contains the data you want to process.
FSISYS .INI text Initialization file which includes system settings.
TRNDFDFL .DFD text Defines the attributes of the variable fields in the TRNFILE.DAT file.
Output
TRNFILE .DAT text Serves as an index to the individual transactions. Used by the GenData program as it processes the source data in the extract file.
Log file .DAT text Serves as a processing log for the GenTrn program. The system records the information by transaction.
Error file .DAT text Notes any errors and warnings encountered by the GenTrn program as it created the TRNFILE.DAT file. The system records the information by transaction.
Message file .DAT text Contains errors and warnings.

Chapter 2Understanding the System
24
PROCESSING TRANSACTIONS
The following illustration shows the files used and created by the GenData program as it processes transactions:
The GenData program uses the transaction list (TRNFILE) created by the GenTrn program as it processes the source data stored in the extract files. The FSISYS.INI file provides system setting information, such as whether or not it should stop processing if it encounters errors, how to identify key fields in extract files, whether or not it should check the output data size against the defined field length, and so on.
The files listed under System resources provide additional information such as:
• How to read the transaction file (TRNDFDFL.DFD)
• The forms, graphics, and other resources to use when creating the form sets (RESLIB)
• What forms to use (FORM.DAT)
• Who to send the forms to (SETRCPTB.DAT)
• What processing rules to apply to the data
• What processing rules to apply to this job (JDT files)
• How the batch files are defined (RCBDFDFL.DFD)

Using Multiple step Processing
25
NOTE:You can learn more about these files in Appendix B, System Files on page 425.
Output Files for GenPrintThe output files created by the GenData program include three types of files used by the GenPrint program: Batch files, NAFILEs, and POLFILEs. Batch files list the transactions which should be included in each batch print job. NAFILEs store section and variable field information. POLFILEs define the form set the GenPrint program should use for each transaction it processes.
Output Files for GenWIPThe GenWIP program also uses the NAFILE and POLFILE to store section and variable field information and to define the form sets. In addition, the GenData program creates manual batch files specifically for the GenWIP program.
The GenData program creates manual batch files if it is unable to complete the processing of a form set. Typically, this occurs if the form set is missing information. The GenWIP program uses this file to create separate transactions which can then be completed manually using the Entry module of Documaker Workstation. The data for the separate transactions are stored in files with the extension DAT, such as 00000001.DAT, 00000002.DAT, and so on.
Output Files for GenArcThe GenArc program also uses the NAFILE and POLFILE to store section and variable field information and to define the form sets. In addition, the GenArc program uses the NEWTRN files to tell it where to find data in the NAFILEs and which forms to use in the POLFILEs.

Chapter 2Understanding the System
26
File SummaryThis table summarizes the files used to supply information (input) and the files created by (output) the GenData program:
NOTE:You can use the Data control group in the FSISYS.INI file to specify the names and extensions for all other input and all of the output files.
File name or Type
Default Extension
File Format Description
Input Extract files text Contains the data you want to process.
FSISYS INI text Initialization file which includes system settings.
TRNFILE DAT text Used as an index to the individual transactions stored in the extract file.
TRNDFDFL DFD text Tells GenData how to read the TRNFILE.
FORM DAT text Defines the forms in a form set.
SETRCPTB DAT text Defines the recipients of a form set.
DDT files DDT text Contains the rules GenData applies to the data.
JDT files JDT text Contains the rules GenData follows when processing the job.
RCBDFDFL DFD text Defines the attributes of the variable fields in a batch file.
Resources (various) (various) Includes graphics (.LOG), font cross reference files (.FXR), sections (.FAP), and so on.
Output Batch files BCH text Indicates which transactions should be included in a given batch job. Used by the GenPrint program.
NAFILE DAT text Contains section and variable field information. Used by the GenPrint, GenWIP, and GenArc programs.
POLFILE DAT text Defines the forms to use for each batch. Used by the GenPrint, GenWIP, and GenArc programs.

Using Multiple step Processing
27
NEWTRN DAT text Tells the GenArc program where to find data in the NAFILE and which forms to use in the POLFILE.
Manual batch files
BCH text Created if the form is incomplete. Used by GenWIP to allow an operator to complete the form in the Entry module of Documaker.
Error batch files
.BCH text Created if the system spots an error, such as if the system spots an error and the form is marked as host required. In contrast to manual batch files, you cannot correct these errors using the GenWIP program. Instead, you must correct the error in the extract file, change the flag to operator required, or change the FAP file and then process the transaction again.
ARCHIVE DFD text Tells the GenArc program how to store archived data.
Log file DAT text Serves as a processing log. Created by the GenTrn program, the GenData program adds information to this file.
Error file DAT text Notes any errors encountered by the GenData program. Created by the GenTrn program, the GenData program adds information to this file (as do the GenPrint, GenWIP, and GenArc programs).
Message file .DAT text Contains errors and warnings.
File name or Type
Default Extension
File Format Description

Chapter 2Understanding the System
28
CREATING PRINT SPOOL FILES
The following illustration shows the files used and created by the GenPrint program as it creates print-ready files:
The GenPrint program receives batch files from the GenData program which tell it what transactions to print, NAFILEs which tell it what data to print, and POLFILEs which tell it which forms to print.
With this information, the GenPrint program creates print-ready files for AFP, Xerox Metacode, PCL, or PostScript compatible printers. The GenPrint program serves as the print engine for the system.
NOTE:In addition, the GenPrint program can also create PDF (Acrobat) if you have purchased the PDF Print Driver. For more information about this product, contact your sales representative.

Using Multiple step Processing
29
File SummaryThis table summarizes the files used to supply information (input) and the files created by (output) the GenPrint program:
NOTE:You can use the Data control group in the FSISYS.INI file to specify the names and extensions for all other input and all of the output files.
File name or Type
Default Extension
File Format Description
Input Batch files BCH text Indicates which transactions should be printed in a given batch. Used as trigger files by the GenPrint program.
NAFILE DAT text Contains section and variable field information.
POLFILE DAT text Defines the forms to use for each batch.
RCBDFDFL DFD text Defines the attributes of the variable fields in a batch file.
Output Print-ready files
AFP, PCL, XER, PST, PDF
AFP, PCL, MetaCode, PostScript, or PDF
Printer spool files which can be printed on the printer of your choice.

Chapter 2Understanding the System
30
SENDING INCOMPLETE TRANSACTIONS TO WIPThe following illustration shows the files used and created by the GenWIP program as it processes incomplete transactions:
The GenWIP program receives information from the GenData program about incomplete transactions the GenData program found during its processing cycle. With this information, the GenWIP program creates files the WIP module of Documaker can read. Through the WIP module, data entry operators can complete the transactions by entering the missing information.
The manual batch file tells the GenWIP program which transactions are incomplete and should be included in work-in-progress (WIP).
Using the information in the manual batch files, the GenWIP program extracts the information it needs from the NAFILE and POLFILE. With this information, it then creates individual NA and POL files for each incomplete transaction. The GenWIP also creates a WIP.DBF (database) file which contains information about the incomplete transactions. The WIP.MDX file serves as an index to this file. Both the WIP.DBF and WIP.MDX files are used by the WIP module of Documaker Workstation.

Using Multiple step Processing
31
File SummaryThis table summarizes the files used to supply information (input) and the files created by (output) the GenWIP program:
NOTE:You can use the Data control group in the FSISYS.INI file to specify the names and extensions for all other input and all of the output files.
File Name or Type
Default Extension
File Format Description
Input NAFILE DAT text Contains section and variable field information.
POLFILE DAT text Defines the forms to use for each batch.
RCBDFDFL DFD text Defines the attributes of the variable fields in the batch files.
Manual batch
BCH text Indicates which transactions should be included.
Output WIP DBF Contains information about the incomplete transactions extracted from the NAFILE and POLFILE.
WIP MDX Serves as an index to the WIP.DBF file.
NA Files DAT text Contains the data (section and variable field information) for a specific transaction. These files are named numerically and each file has a corresponding POL file.
POL Files POL text Defines the forms to use for a specific transaction. These files are named numerically and each file has a corresponding NA file.

Chapter 2Understanding the System
32
ARCHIVING TRANSACTIONS
The following illustration shows the files used and created by the GenArc program as it archives completed transactions:
The GenArc program receives information from the GenData program, using many of the same files used by the GenWIP and GenPrint programs, such as the NAFILE and POLFILE. These two files identify the data to archive. The NEWTRN file tells the GenArc program where to find data in the NAFILE, which is created by the GenArc program.
In addition, the GenArc program also uses the ARCHIVE.DFD file which tells it how to store the data.
With this information, the GenArc program creates DBF and CAR files. The DBF files serve as an index to the CAR files, where the archived information is actually stored. You can have multiple CAR files.

Using Multiple step Processing
33
File SummaryThis table summarizes the files used to supply information (input) and the files created by (output) the GenArc program:
NOTE:You can use the Data control group in the FSISYS.INI file to specify the names and extensions for all other input and all of the output files.
RULES USED IN MULTIPLE STEP PROCESSING
Several rules are used to execute the programs of the multiple step process. For a complete listing and description of these and other rules, see the Rules Reference.
File Name or Type
Default Extension
File Format Description
Input NAFILE DAT text Contains section and variable field information.
POLFILE DAT text Defines the forms to use for each batch.
NEWTRN DAT text Tells the GenArc program where to find data in the NAFILE and which forms to use in the POLFILE.
APPIDX DFD text Tells the GenArc program how to store the data.
Output DBF files DBF text Serves as an index to the archived data in the CAR files.
ARCHIVE CAR CAR Contains the archived forms.

Chapter 2Understanding the System
34
RESTARTINGTHE GENDATA
PROGRAM
You can set up the GenData program to restart itself at a particular transaction if it encounters a failure. To accomplish this, the system uses a restart file. You use INI options to set up the restart file.
NOTE:This feature does not apply if you are using single step processing.
The restart file stores checkpoint information at specified intervals. If an error is encountered, the program resets itself and then checks each transaction until it isolates the transaction causing the error.
The restart file is removed at the end of a successful run. If the file exists at the start of a GenData run, the system assumes a restart is necessary and will open and read the file. The checkpoint information lets the system set internal pointers and output files in such a way that it can begin at that transaction.
These rules are used to handle restarting the GenData program:
• RULCheckTransaction
• RestartJob
RULCheckTransactionrule
The RULCheckTransaction rule is always the first base form set rule. It saves the EXTRFILE offset, TRNFILE offset, NEWTRN offset, NAFILE offset, POLFILE offset, and batch file offsets into a restart (RSTFILE) file.
These offsets are updated in the post process after a specific number of transactions. You specify the number of transactions using the CheckCount option. You define the Restart file and the and check count in the Restart control group:
< Restart >
RstFile =
CheckCount =
Here is an example:
;RULCheckTransaction;2;Always the first form set rule;
Option Description
RstFile Enter the name of the restart file. If you omit this option, the system uses RSTFILE.RST (DD:RSTFILE for MVS) as the file name.
The system uses the DataPath option in the Data control group to determine where to create the restart file. The default location is the current working directory.
CheckCount Enter a number to specify the number of transactions to process before updating the offsets. For instance, if you specify two hundred (200), the system processes two hundred transactions, updates the offsets, processes two hundred more transactions, and so on. The default is 100.
You can also use the /cnt command line option with the GenData program to override the CheckCount option. Here is an example:
gendaw32 /cnt=10

Restarting the GenData Program
35
RestartJob rule The RestartJob is always the first base rule. This rule opens the restart file (RSTFILE) and resets the EXTRFILE, TRNFILE, NEWTRN, NAFILE, POLFILE, and batch files at the broken transaction if the restart file exists. If the restart file does not exist, the RestartJob rule is skipped.
NOTE:For more information on these rules, see the Rules Reference. You can also set up the GenArc program to restart itself. For more information, see Using the Restart Option on page 219.
Here is an example:
;RestartJob;1;Always the first base rule;
INI options To use the restart feature, you should also set the following INI options:
< GenDataStopOn >
BaseErrors = Yes
TransactionErrors = Yes
ImageErrors = Yes
FieldErrors = Yes

Chapter 2Understanding the System
36
GENERATINGBATCH STATUS
EMAILS
You can set up the GenData program to check recipient batches and notify the print operator via email as to when to expect output print files.
You use INI options to have the JobInit1 rule notify batch recipients about batch file information. On Windows, Microsoft mail and the SMTP mail type is supported. On UNIX, only the SMTP mail type is supported.
With the INI settings shown below, the GenData program can...
• Notify a user that a batch is not empty. For example, the GenData program can send email notification if there are transactions in the error or manual batches or both.
• Notify a user that a batch is empty. For example, it can send an email to the print operator telling the operator not to expect a print file for processing.
• The notifications above can be skipped on per batch basis. For example, you can have the GenData program skip batches that do not produce print files or produce files that do not need to be printed.
• For each notification email you can specify a send to address, reply to address, message body, optional attachment, and message subject.
• To each email you can optionally attach a recipient batch file.
• The notification email message can include variable data which comes from GVM (global variable member) variables.
To use this feature, make sure you have your INI files set up as shown here. The new control groups and options appear in bold and are documented in the following table.
< Print_Batches >
Batch1 = batch1.bch
Batch2 = batch2.bch
Batch2 = batch3.bch
Manual = manual.bch
Error = error.bch
< Batch1 >
Printer = Printer1
Notify = BchRecip1
...
< BatchNotify:BchRecip1 >
Empty = Yes
MailType = MSM
AttachBatchFile = Yes
SendTo = John Formaker
Subject = Batch 1 is empty
BodyTemplate = email.txt
...
< Mail >
MailType = MSM
; MailType = SMTP
< MailType:MSM >
Module = MSMW32
MailFunc = MSMMail
ReplyTo = [email protected]
UserID = test
SuppressDlg = Yes

Generating Batch Status Emails
37
HiddenMsgSupport = Yes
Name = MS Exchange Settings
Recipient = [email protected]
Option Description
Batch1 control group
Notify Enter the name of INI control group where the notification options are specified. In the example above, the control group name would be BatchNotify:BchRecip1.
BatchNotify:BchRecip1 control group
Empty Enter Yes if you want the system to notify you if this batch is empty or missing.
Enter No if you want the system to notify you if the batch is not empty.
MailType Enter MSM to specify the mail type as Microsoft mail. Enter SMTP to specify the mail type as SMTP. SMTP is the only option for UNIX.
AttachBatchFile Enter Yes to attach the batch file if it exists and is not empty.
Enter No if you do not want the system to attach it.
SendTo Enter the name of the recipient or his or her email address.
Subject Enter the text you want the system to place in the email subject line. For instance, you could enter Batch 1 is empty.
BodyTemplate Here you can specify a template file, such as email.txt, to use when creating an email message. It has format:
data for item one <% //test1,%s %> and trailing data

Chapter 2Understanding the System
38
TRACKINGBATCH PAGESTATISTICS
The system lets you track job statistics that show you...
• Total pages
• Pages not including copy counts
• Printed sheets
• Sheets by tray (1 through 9)
You can compile these statistics by batch, recipient within each batch, and job totals. You can also have the system write the totals to a recipient detail file, a batch summary file, and the log file. Totals are written to the log file by default.
You can add recipient totals to the recipient batch records by adding the appropriate global variables (GVMs) to the recipient batch file's Data Format Definition (DFD) file. If you create the optional batch summary file, the batch page statistics will be available to the GenPrint program via the batch total GVMs.
RECIPIENT PAGE STATISTICS
These statistics are captured for each recipient batch record written to the batch file:
Statistic GVM Description
Recipient RCB_NAME The current recipient name
Total Pages RCB_TOTAL The total recipient pages including non-print (display only) pages
Total Pages - No Copy
RCB_TOTAL_NC
The total recipient pages not including copy counts. Non-print (display-only) pages are included.
Total Sheets RCB_SHEETS The total printed sheets for the transaction (omits display-only pages)
Total Tray 1 RCB_TRAY1 The total printed sheets for Tray 1
Total Tray 2 RCB_TRAY2 The total printed sheets for Tray 2
Total Tray 3 RCB_TRAY3 The total printed sheets for Tray 3
Total Tray 4 RCB_TRAY4 The total printed sheets for Tray 4
Total Tray 5 RCB_TRAY5 The total printed sheets for Tray 5
Total Tray 6 RCB_TRAY6 The total printed sheets for Tray 6
Total Tray 7 RCB_TRAY7 The total printed sheets for Tray 7
Total Tray 8 RCB_TRAY8 The total printed sheets for Tray 8
Total Tray 9 RCB_TRAY9 The total printed sheets for Tray 9

Tracking Batch Page Statistics
39
BATCH TOTALS SUMMARY FILE
The system can write a summary record for each recipient within each batch and a total summary record to the optional Batch Totals Summary file. To have the system create this file, include the RCBStatsTot option in the Data control group and specify a file name.
You can modify the summary total file layout using a custom DFD. Specify the name of the custom DFD in the RCBStatsTotDFD option in the Data control group. If you omit the RCBStatsTotDFD option, the default DFD file is used (see Default DFD Files on page 41).
If there are more that one recipient for a given batch file, a Total record is written. The BATCH_RCB_NAME value is set to *** Total *** for the total file record. If a total record exists, the total record is loaded by the GenPrint program.
Accessing totals inGenPrint
If you set the RCBStats option in the RunMode control group to Yes and RCBStatsTot option in the Data control group has a value, the GenPrint program loads the total values for each batch. These values will then be available as GVM variables.
INI Options You use the following INI options to record statistics:
< RunMode >
RCBStats =
RCBTotals =
< Data >
RCBStatDtlDFD =
RCBStatsTotDFD =
RCBStatsDtl =
RCBStatsTot =
Option Description
RCBStats Enter No if you do not want to execute statistics processing.The default is Yes, unless the system is running under IDS. If IDS is running Documaker Server, the default is No.
RCBTotals Enter No if you do not want the system to write recipient totals to the log file. The default is Yes.
Option Description
RCBStatDtlDFD Enter a name for the RCB Statistics Detail File DFD. The system defaults to an internal DFD entry.
RCBStatsTotDFD Enter a name for the RCB Statistics Total File DFD. The system defaults to an internal DFD entry.
RCBStatsDtl Enter the name and path you want assigned to the detail log file. The system will create this file if you include a value for this option.
RCBStatsTot Enter the name and path you want assigned to the total log file. The system will create this file if you include a value for this option.

Chapter 2Understanding the System
40
SAMPLE LOG FILE
Here is an example of a log file:
----------------------------
Batch Page Statistics
----------------------------
Batch(BATCH1):
- Total for Recipient(AGENT) in Batch(BATCH1):
Pages : 9
Pages(nc): 9
Sheets : 6
Tray1 : 2
Tray2 : 2
Tray3 : 0
Tray4 : 2
Tray5 : 0
Tray6 : 0
Tray7 : 0
Tray8 : 0
Tray9 : 0
- Total for Recipient(COMPANY) in Batch(BATCH1):
Pages : 21
Pages(nc): 21
Sheets : 16
Tray1 : 3
Tray2 : 2
Tray3 : 9
Tray4 : 2
Tray5 : 0
Tray6 : 0
Tray7 : 0
Tray8 : 0
Tray9 : 0
- Total for Recipient(INSURED) in Batch(BATCH1):
Pages : 44
Pages(nc): 44
Sheets : 28
Tray1 : 6
Tray2 : 11
Tray3 : 9
Tray4 : 2
Tray5 : 0
Tray6 : 0
Tray7 : 0
Tray8 : 0
Tray9 : 0
- Total for Batch(BATCH1):
Pages : 74
Pages(nc): 74
Sheets : 50
Tray1 : 11
Tray2 : 15
Tray3 : 18
Tray4 : 6
Tray5 : 0

Tracking Batch Page Statistics
41
Tray6 : 0
Tray7 : 0
Tray8 : 0
Tray9 : 0
Job Page Statistics:
Pages : 74
Pages(nc): 74
Sheets : 50
Tray1 : 11
Tray2 : 15
Tray3 : 18
Tray4 : 6
Tray5 : 0
Tray6 : 0
Tray7 : 0
Tray8 : 0
Tray9 : 0
DEFAULT DFD FILES
Here are examples of the DFD files:
RCBStatsDtlDFD < FIELDS >
FIELDNAME = RCB_BATCH
FIELDNAME = RCB_NAME
FIELDNAME = RCB_TRANS
FIELDNAME = RCB_TOTAL
FIELDNAME = RCB_TOTAL_NC
FIELDNAME = RCB_SHEETS
FIELDNAME = RCB_TRAY1
FIELDNAME = RCB_TRAY2
FIELDNAME = RCB_TRAY3
FIELDNAME = RCB_TRAY4
FIELDNAME = RCB_TRAY5
FIELDNAME = RCB_TRAY6
FIELDNAME = RCB_TRAY7
FIELDNAME = RCB_TRAY8
FIELDNAME = RCB_TRAY9
< FIELD:RCB_BATCH >
INT_TYPE = CHAR_ARRAY
INT_LENGTH = 21
EXT_TYPE = CHAR_ARRAY_NO_NULL_TERM
EXT_LENGTH = 20
KEY = Y
REQUIRED = Y
< FIELD: RCB_NAME>
INT_TYPE = CHAR_ARRAY
INT_LENGTH = 21
EXT_TYPE = CHAR_ARRAY_NO_NULL_TERM
EXT_LENGTH = 20
KEY = Y
REQUIRED = Y
< FIELD:RCB_TRANS >
INT_TYPE = CHAR_ARRAY

Chapter 2Understanding the System
42
INT_LENGTH = 31
EXT_TYPE = CHAR_ARRAY_NO_NULL_TERM
EXT_LENGTH = 30
KEY = N
REQUIRED = N
< FIELD:RCB_TOTAL >
INT_TYPE = CHAR_ARRAY
INT_LENGTH = 11
EXT_TYPE = CHAR_ARRAY_NO_NULL_TERM
EXT_LENGTH = 10
KEY = N
REQUIRED = N
< FIELD:RCB_TOTAL_NC >
INT_TYPE = CHAR_ARRAY
INT_LENGTH = 11
EXT_TYPE = CHAR_ARRAY_NO_NULL_TERM
EXT_LENGTH = 10
KEY = N
REQUIRED = N
< FIELD:RCB_TRAY1 >
INT_TYPE = CHAR_ARRAY
INT_LENGTH = 11
EXT_TYPE = CHAR_ARRAY_NO_NULL_TERM
EXT_LENGTH = 10
KEY = N
REQUIRED = N
< FIELD:RCB_TRAY2 >
INT_TYPE = CHAR_ARRAY
INT_LENGTH = 11
EXT_TYPE = CHAR_ARRAY_NO_NULL_TERM
EXT_LENGTH = 10
KEY = N
REQUIRED = N
< FIELD:RCB_TRAY3 >
INT_TYPE = CHAR_ARRAY
INT_LENGTH = 11
EXT_TYPE = CHAR_ARRAY_NO_NULL_TERM
EXT_LENGTH = 10
KEY = N
REQUIRED = N
< FIELD:RCB_TRAY4 >
INT_TYPE = CHAR_ARRAY
INT_LENGTH = 11
EXT_TYPE = CHAR_ARRAY_NO_NULL_TERM
EXT_LENGTH = 10
KEY = N
REQUIRED = N
< FIELD:RCB_TRAY5 >
INT_TYPE = CHAR_ARRAY
INT_LENGTH = 11
EXT_TYPE = CHAR_ARRAY_NO_NULL_TERM
EXT_LENGTH = 10
KEY = N
REQUIRED = N
< FIELD:RCB_TRAY6 >

Tracking Batch Page Statistics
43
INT_TYPE = CHAR_ARRAY
INT_LENGTH = 11
EXT_TYPE = CHAR_ARRAY_NO_NULL_TERM
EXT_LENGTH = 10
KEY = N
REQUIRED = N
< FIELD:RCB_TRAY7 >
INT_TYPE = CHAR_ARRAY
INT_LENGTH = 11
EXT_TYPE = CHAR_ARRAY_NO_NULL_TERM
EXT_LENGTH = 10
KEY = N
REQUIRED = N
< FIELD:RCB_TRAY8 >
INT_TYPE = CHAR_ARRAY
INT_LENGTH = 11
EXT_TYPE = CHAR_ARRAY_NO_NULL_TERM
EXT_LENGTH = 10
KEY = N
REQUIRED = N
< FIELD:RCB_TRAY9 >
INT_TYPE = CHAR_ARRAY
INT_LENGTH = 11
EXT_TYPE = CHAR_ARRAY_NO_NULL_TERM
EXT_LENGTH = 10
KEY = N
REQUIRED = N
RCBStatsTotDFD < FIELDS >
FIELDNAME = BATCH_NAME
FIELDNAME = BATCH_RCB_NAME
FIELDNAME = BATCH_TOTAL
FIELDNAME = BATCH_TOTAL_NC
FIELDNAME = BATCH_SHEETS
FIELDNAME = BATCH_TRAY1
FIELDNAME = BATCH_TRAY2
FIELDNAME = BATCH_TRAY3
FIELDNAME = BATCH_TRAY4
FIELDNAME = BATCH_TRAY5
FIELDNAME = BATCH_TRAY6
FIELDNAME = BATCH_TRAY7
FIELDNAME = BATCH_TRAY8
FIELDNAME = BATCH_TRAY9

Chapter 2Understanding the System
44
CONTROLLINGGENTRN
PROCESSING
Include the following control group and option in the FSISYS.INI file when you want the GenTrn program to continue processing transactions when errors occur. By default, the GenTrn program halts when it encounters an error.
NOTE:This control group and option is typically used if you are using XML extract files and you do not want the GenTrn program to stop every time it encounters an error. For any type of extract file, using this option detects missing Key1 and Key2 information.
Here is an example of the control group and option:
< GenTranStopOn >
TransactionErrors = Parameter1;Parameter2;Parameter3;
Separate the parameters with semicolons (;).
The system records all errors and warnings it encounters during a processing run in the ERRORFILE.DAT file. In addition, it writes the extract file records of the transaction in error to the file you specify in Parameter2. This lets you inspect those transactions and determine the best way to proceed.
Here are some examples. This option:
TransactionErrors = No;..\Extracts\ErrorTransaction.dat;No;
Is the same as:
TransactionErrors = No;..\Extracts\ErrorTransaction.dat;;
Both let the GenTrn program continue processing subsequent transactions when errors occur. These options tell the GenTrn program to write the error transaction to a file named ERRORTRANSACTION.DAT, stored in the \Extracts directory.
TransactionErrors = No; ErrorTransaction.dat;Yes;
Parameter Description
Parameter1 Enter No to turn the GenTranStopOn option off. The default is Yes.
Parameter2 Enter the name of the transaction file. To write out the error transaction, enter the name of the file where you want the extract file records written.If you omit the path, the system uses the DataPath option in the Data control group in the FSISYS.INI file to determine where to locate this file.
Parameter3 The system only looks at this parameter if you entered a file name for Parameter2.Enter Yes to tell the system to append the error transactions accumulated during this processing run to the file created in a prior run.
Enter No to tell the system to overwrite any existing file. If Parameter2 exists and you omit this parameter, the system defaults to No.
If you enter Yes, you must remove the file when necessary. Keep in mind that over a series of processing runs, this file will expand in size.

Controlling GenTrn Processing
45
This option lets the GenTrn program continue processing subsequent transactions when errors occur. Since the path of the error transaction file was omitted, the system uses the DataPath option in the Data control group in the FSISYS.INI file to find the file so it can append any error transactions to the existing error transaction file.
TransactionErrors = No;;;
This option lets the GenTrn program continue processing subsequent transactions when errors occur. It does not, however, write out error transactions.
When using this option, you may encounter these errors:
• Problem in loading the XML file. Syntax error.
GenTrn
Transaction Error Report - System timestamp: Mon Dec 16 13:42:27 2002
DM12041: Error: FAP library error: Transaction:<1111111111>, area:<DXMLoadXMLRecs>
code1:<48>, code2:<0>
msg:<XML Parse Error: The 15 chars before error=< <Key1>Comp1<>, the 8 chars starting at error=</Key1c>
>>.
DM12041: Error : FAP library error: Transaction:<1111111111>, area:<DXMLoadXMLRecs>
code1:<48>, code2:<0>
msg:<mismatched tag at line 3 column 16>.
DM10293: Error: Error in <BuildTranRecs>: Unable to <DXMLoadXMLRecs()>.
Skip Transaction# <2>.
Warning: the specific info you see may not be the info for the error transaction. It may be the info on the last complete transaction.
==> Warning count: 0
==> Error count: 3
• No problem in loading the file, however, Key1 is omitted in the transaction.
GenTrn
Transaction Error Report - System timestamp: Fri Dec 13 13:52:13 2002
DM1002: Error: Required INI definition omitted.
Cannot locate INI group <Key1Table> with value = defined.
DM15062: Error in BuildTrnRecs(): Unable to GENGetDocSetNames(pRPS).
Skip Transaction# <3>.
==> Warning count: 0
==> Error count: 2

Chapter 2Understanding the System
46
USING SINGLESTEP
PROCESSING
The single step process improves the performance of your system by combining the functions of GenTrn, GenData and GenPrint into one step performed by GenData. This process is used when no intermediate steps are necessary.
The GenWIP and GenArc options are performed the same as in the multiple step process. See Sending Incomplete Transactions to WIP on page 30 and Archiving Transactions on page 32 for more information on the functions of the GenWIP and GenArc programs.
NOTE:When running in single step mode, you can only produce a single print stream. For instance, the most common method of print batching is to batch by recipient, in single step processing, however, you cannot produce separate print streams for each recipient batch.
CREATING AND PROCESSING TRANSACTION RECORDS
In the multiple step process, the GenTrn program creates transaction records that are sent to the GenData program for processing. In the single step process, the GenData program performs both of these actions in one step.

Using Single Step Processing
47
As shown in the illustration above, the GenData program processes transaction records, originated from the source data, and creates various output files for print, WIP or GenArc. By combining the functions of GenTrn and GenPrint into GenData, you reduce the number of times the system needs to open and close files, thus enhancing the overall performance of your system.
System Settings and ResourcesThe FSISYS.INI and the FSIUSER.INI file provide system setting information, such as whether or not it should stop processing if it encounters errors, how to identify key fields in extract files, whether or not it should check the output data size against the defined field length, and so on.
The files listed under system resources provide additional information such as:
• How to read the transaction file (TRNDFDFL.DFD)
• The forms, graphics, and other resources to use when creating the form sets (RESLIB)
• What forms to use (FORM.DAT)
• Who to send the forms to (SETRCPTB.DAT)
• What processing rules to apply to the data
• What processing rules to apply to this job (JDT files)
• How the batch files are defined (RCBDFDFL.DFD)
NOTE:You can learn more about these files in Appendix B, System Files on page 425.
The advantage of single step processing is the improvement to performance The disadvantage is that it is much more difficult to correct errors because the system does not create batch files at the end of each step. These batch files tell you what occurred and help you spot and correct errors.

Chapter 2Understanding the System
48
CREATING PRINT FILES
With the placement of specific rules, you can make the GenData program perform the functions of the GenTrn and GenPrint programs. In other words, when GenData is processing transactions files, it is also producing the print-ready files necessary to print on AFP, Metacode, PCL, or Postscript printers.
As in the multiple step process, the GenData program creates these types of files:
• Batch files - list the transactions which should be included in each batch print job
• NAFILEs - store section and variable field information
• POLFILEs - define the form set the GenPrint program should use for each transaction it processes
NOTE:When using single step processing, you should clear all messages before each processing run. For information on how to do this, see Clearing Messages on page 192.

Using Single Step Processing
49
File SummaryThis table summarizes the files used to supply information (input) and the files created by (output) the GenData program:
NOTE:You can use the Data control group in the FSISYS.INI file to specify the names and extensions for all other input files and all of the output files.
File name or Type
Default Extension
File Format Description
Input Extract files text Contains the data you want to process.
FSISYS INI text Initialization file which includes system settings.
TRNDFDFL DFD text Tells GenData how to read and write the TRNFILE.
FORM DAT text Defines the forms in a form set.
SETRCPTB DAT text Defines the recipients of a form set.
DDT files DDT text Contains the rules GenData applies to the data.
JDT files JDT text Contains the rules GenData follows when processing the job.
RCBDFDFL DFD text Defines the attributes of the variable fields in a batch file.
Resources (various) (various) Includes graphics (LOG), font cross reference files (FXR), sections (FAP), and so on.
Output Batch files BCH text Indicates which transactions should be included in a given batch job.
NAFILE DAT text Contains section and variable field information. Used by the, GenWIP, and GenArc programs.
POLFILE DAT text Defines the forms to use for each batch. Used by the GenWIP and GenArc programs.
NEWTRN DAT text Tells the GenArc program where to find data in the NAFILE and which forms to use in the POLFILE.

Chapter 2Understanding the System
50
USING THE MULTIFILEPRINT CALLBACK FUNCTION
The system includes a MultiFilePrint callback function designed for running the GenData program in single step mode. The log file is either a semicolon delimited text file—the same as the file created by MultiFilePrint—or an XML file.
The layout of the XML file is as follows:
-
-
.\data\BATCH1.BCH
SAMPCO
LB1
1234567
T1
INSUREDS COPY
DATA\0rDcP7WxytE82ECp5jexhWXVqkjV840Vw_F-GykT_VMfd.PDF
-
.\data\BATCH2.BCH
SAMPCO
LB1
1234567
T1
Manual batch files
BCH text Created if the form is incomplete. Used by GenWIP to allow an operator to complete the form in the Entry module.
Error batch files
.BCH text Created if the system spots an error, such as if the system spots an error and the form is marked as host required. In contrast to manual batch files, you cannot correct these errors using the GenWIP program. Instead, you must correct the error in the extract file, change the flag to operator required, or change the FAP file and then process the transaction again.
ARCHIVE DFD text Tells the GenArc program how to store archived data.
Log file DAT text Serves as a processing log. Created by the GenData program in the single step process.
Error file DAT text Notes any errors encountered by the GenData program. Created by the GenData program in the single step process.
Message file .DAT text Intermediate file which contains log and error messages. These messages are then translated and written to either the LOGFILE.DAT or ERRFILE.DAT files.
File name or Type
Default Extension
File Format Description
Using Single Step Processing
51
COMPANY COPY
DATA\0v3l7pBdVqHceoRL5hf2xqjJ7WAMxiRVO9U70iFiXIcne.PDF
You can use the INI options in the DocSetNames control group to determine which XML elements are created. The values are the same as those written to a recipient batch or transaction file.
The MultiFilePrint callback function should only be used with the PDF, RTF, HTML, and XML print drivers. See also Controlling What is in the MultiFilePrint Log on page 119.
NOTE:If you are using the PDF Print Driver, you must set the SpoolBatches INI option to No.
MAPPING FIELDS WITH XPATH
The GenTrn program and the NoGenTrnTransactionProc rule let you use the TRN_Fields control group to map all of your fields with XPath. To let the system know you are using the XML file, set the XMLTrnFields option in the TRN_File control group to Yes and also set the XMLExtract option in the RunMode control group to Yes.
Here is an example:
< RunMode >
XMLExtract = Yes
< TRN_File >
XMLTrnFields= Yes
< TRN_Fields >
Company = !/Forms/Key1
LOB = !/Forms/Key2
PolicyNum = !/Forms/PolicyNum
RunDate = !/Forms/RunDate;DM-4;D4
NOTE:Use this format for the Trn_Fields control group options:
(Field in the Transaction DFD File) = XPath;Field Format
Be sure to include the leading exclamation mark (!). This tells the system to use an XML path search but is not part of the actual search routine. Do not specify whether a field is a key. The system does not support multiple (search) keys with the XML implementation.
If you are selectively excluding transactions in your exclude file, instead of an offset and search mask, replace it with the XPath. Here is an example:
!/Forms[PolicyType="OLD"]

Chapter 2Understanding the System
52
RUNNING ARCHIVE IN SINGLE STEP PROCESSING
Using rules developed for archiving via Docupresentment, you can run the GenArc program as part of single step processing.
Use the InitArchive rule to check the INI options in the Trigger2Archive control group, initialize the database, open the APPIDX.DFD and CAR files, and perform other steps to initialize archive.
The Archive rule then unloads the current form set and converts field data for archive using the INI options in the Trigger2Archive control group.
Here is an example:
< Base Rules >
;InitArchive;1;;
< Base Form Set Rules >
;Archive;2;;
NOTE:For more information on these rules, see the Rules Reference.
RUNNING WIP IN SINGLE STEP PROCESSING
You can use the InitConvertWIP and ConvertWIP rules to run the GenWIP program in single step mode.
Use the InitConvertWIP rule to perform the initialization necessary for the ConvertWIP rule.
Use the ConvertWIP rule to see if the current transaction is assigned to the MANUAL.BCH file. If it is, the rule adds the record to WIP and unloads the contents of the POLFILE.DAT and NAFILE.DAT files to new files with unique names.
You can then view these WIP records using Documaker Workstation or the WIP Edit plug-in, which is part of the Docupresentment suite of products.
Here is an example:
< Base Rules >
;InitConvertWIP;1;;
< Base Form Set Rules >
;ConvertWIP;2;;
NOTE:For more information on these rules, see the Rules Reference.

Using Single Step Processing
53
RULES USED IN SINGLE STEP PROCESSING
Specific rules are used to combine the execution and functionality of the GenTrn, GenData, and GenPrint programs into a single step. To begin familiarizing yourself with these rules, an alphabetical listing and brief description follows. You can find more information in the Rules Reference.
Archive Use this rule after the InitArchive rule to unload the current form set and convert field data for archive using the INI options in the Trigger2Archive control group.
BatchingByRecipINI Use this rule to send transactions to a batch you specify based on data in the extract file. To use this rule, you must include the BatchingByRecip control group in your FSISYS.INI file with options similar to those shown below:
< BatchingByRecip >
Batch_Recip_Def = default;"ERROR"
Batch_Recip_Def = 4,1234567;"BATCH1";INSURED
Batch_Recip_Def = true;"BATCH2";INSURED
Batch_Recip_Def = True;"BATCH3";COMPANY | true;”BATCH2”;AGENT
You must also add the TWOUP control group and CounterTbl option to the FSISYS.INI file.
BatchByPageCount Use this rule to send a transaction to a specific batch based on the number of pages produced by processing the transaction. The batch used is determined by the PageRange option in the Batch control group.
In the example below; transactions that produce 1 to 7 pages are send to Batch1. Transactions that produce 8 to 25 pages are send to Batch2. In addition, you must add the TWOUP control group and CounterTbl option to the FSISYS.INI file.
< Batches >
Batch1 = .\data\Batch1
Batch2 = .\data\Batch2
Batch3 = .\data\Batch3
Error = .\data\Error
Manual = .\data\Manual
< Batch1 >
Printer = Batch1_PTR
...
PageRange = 1,7
< Batch2 >
Printer = Batch2_PTR
... .....
PageRange = 8,25
< TWOUP >
CounterTbl = .\data\counter.tbl
BuildMasterFormList Use this rule to load the FORM.DAT file into an internal linked list within the GenData program. You must include this rule in the AFGJOB.JDT file because the RunSetRcpTbl rule is dependent on the list this rule creates.

Chapter 2Understanding the System
54
ConvertWIP Use this rule to see if the current transaction is assigned to the MANUAL.BCH file. If it is, the rule adds the record to WIP and unloads the contents of the POLFILE.DAT and NAFILE.DAT files to new files with unique names. You can then view these WIP records using Documaker Workstation or the WIP Edit plug-in.
InitArchive Use this rule to check the INI options in the Trigger2Archive control group, initialize the database, open the APPIDX.DFD and CAR files, and perform other steps to initialize archive.
InitConvertWIP Use this rule to perform the initialization necessary for the ConvertWIP rule.
InitPrint Use this rule to load printer and recipient batch information. This rule sets up PRTLIB data, initializes print options, and loads a table which contains page totals for recipient batch files.
InitSetRecipCache Use this rule to set the amount of cache the system uses to store recipient information in memory. With this rule you can tell the system the amount of memory to set aside and use for storing information in the Key1 and Key2 fields, often used to store the company, line of business, and transaction codes. You can use this rule to improve processing performance for complex forms. This rule has no affect on the processing speed for static forms.
NOTE:If you omit this rule, the system does not set aside memory for the Key1 and Key2 fields.
NoGenTrnTransactionProc
Use this rule when you use the GenData program by itself to execute the GenTrn and GenData steps. In the single step processing environment, this rule processes the extract file and creates the information normally created in both the GenTrn and GenData steps. When combined with the InitPrint and PrintFormset rules, it creates the output files normally created during the GenPrint step.
NOTE:Do not use this rule if you are running the GenTrn, GenData, and GenPrint programs as separate processes (multiple step processing).
PageBatchStage1InitTerm
Use this rule to create and populate a list of records which contain page ranges and total page counts for each recipient batch file.
This rule is typically used for handling 2-up printing for AFP and compatible printers.
This rule creates a list (populated in another rule) to contain the recipient batch records for a multi-mail transaction set. The rule then writes out the recipient records for the final multi-mail transaction set and writes out the total page counts for each recipient batch. You must add the TWOUP control group and CounterTbl option to the FSISYS.INI file, as shown here:
< TwoUp >
CounterTbl = .\data\counter.tbl
PaginateAndPropogate Use this rule to paginate the form set and merge in or propagate field data.

Using Single Step Processing
55
PrintFormset Use this rule when you run the GenData program by itself to execute GenTrn and GenPrint processes. In the single step processing environment, this rule, when combined with the InitPrint rule, prints form sets.
NOTE:Do not use this rule if you are running the GenTrn, GenData, and GenPrint programs as separate processes (multiple step processing).
ProcessQueue Use this rule to process the queue you specify. This rule loops through the list of functions for the queue you specify and then frees the queue when finished.
StandardFieldProc This rule is a field level rule which you must include in the AFGJOB.JDT file. This rule is used when you are using the performance mode JDT and should be the first field level rule. This rule tells the system to process each field on all of the sections triggered by the SETRCPTB.DAT file. If you use the StandardFieldProc rule in your JDT, you must also include the WriteNAFile rule.
StandardImageProc This rule is a section level rule which you must include in the AFGJOB.JDT file. This rule is used when you are using the performance mode JDT and should be the first section level rule. This rule tells the system to process each section triggered by the SETRCPTB.DAT file.
WriteNAFile Use this rule to append the NAFILE.DAT file data records for the current form set into an existing NAFILE.DAT file. When you use the NoGenTrnTransactionProc rule, which replaces the RULStandardProc rule, you must include the WriteNAFile rule to cause data (records) to be written to the NAFILE during the GenData processing step. In addition, you must also include the WriteOutput rule to cause data (records) to be written to the POLFILE.DAT and NEWTRN.DAT files during the GenData processing step.
WriteOutput Use this rule to append the POLFILE.DAT file data records for the current form set into an existing POLFILE.DAT file.
You also use this rule when you are using the GenData program by itself to execute the GenTrn, GenData, and GenPrint processing steps.
If you use this rule, do not use the UpdatePOLFile rule.
WriteRCBWithPageCount
Use this rule to write page counts for each recipient. This rule is typically used for handling 2-up printing on AFP and compatible printers. To use this rule, you must update the RCBDFDFL.DFD file with the following items:
< Fields >
FieldName = CurPage
FieldName = TotPage
FieldName = AccumPage
FieldName = MMFIELD
< FIELD:CurPage >
INT_Type = LONG
EXT_Type = CHAR_ARRAY_NO_NULL_TERM
EXT_Length = 10
Key = No
Required = No

Chapter 2Understanding the System
56
< FIELD:TotPage >
INT_Type = LONG
EXT_Type = CHAR_ARRAY_NO_NULL_TERM
EXT_Length = 10
Key = No
Required = No
< FIELD:AccumPage >
INT_Type = LONG
EXT_Type = CHAR_ARRAY_NO_NULL_TERM
EXT_Length = 10
Key = No
Required = No
< FIELD:MMFIELD >
INT_Type = CHAR_ARRAY
INT_Length = 7
EXT_Type = CHAR_ARRAY_NO_NULL_TERM
EXT_Length = 6
Key = No
Required = No
SINGLE STEP PROCESSING EXAMPLE
As stated earlier, the single step process is performed by combining the execution and functionality of the GenTrn, GenData, and GenPrint programs. This is done by placing certain rules into a specialized JDT. The earlier illustration shows the input and output files used by GenData to process transactions and print output files in one step. The following file describes the JDT used to process the job and an example of the rules used to combine the GenTrn, GenData, and GenPrint functions.
To make this happen, the NoGenTrnTransactionProc rule, along with other rules, are placed in the JDT file as seen in the following sample file. You can find a sample file in the DMS1 sample library.
Base rules The following base rules are designed for the performance mode.
;RULStandardJobProc;1;Always the first job level rule;
;SetErrHdr;1;***:------------------------------------------------;
;SetErrHdr;1;***: BillPrint Data Generation (Base);
;SetErrHdr;1;***:;
;SetErrHdr;1;***: Transaction: ***ACCOUNTNUM***;
;SetErrHdr;1;***: Company Name: ***Company***;
;SetErrHdr;1;***: Line of Business: ***LOB***;
;SetErrHdr;1;***: Run Date: ***RunDate***;
;SetErrHdr;1;***:--------------------------------------------------;JobInit1;;;
;CreateGlbVar;1;TXTLst,PVOID;
;CreateGlbVar;1;TblLstH,PVOID;
;InitOvFlw;1;;
;SetOvFlwSym;1;SUBGROUPOVF,SUBGROUP,5;
;BuildMasterFormList;;4;
;PageBatchStage1InitTerm;;;
;InitSetrecipCache;;;
The following rule is required to execute GenData and GenPrint as a single step.
;InitPrint;;;

Using Single Step Processing
57
Base form set rules The following base form set rules cause GenTrn and GenData to be combined into a single step.
;NoGenTrnTransactionProc;;;
;ResetOvFlw;2;;
;BuildFormList;;;
;LoadRcpTbl;;;
;RunSetRcpTbl;;;
The following rules are required to execute GenData and GenPrint as a single step.
;PrintFormset;;;
;WriteOutput;;;
;WriteNaFile;;;
;WriteRCBWithPageCount;;;
;ProcessQueue;;PostPaginationQueue;
;PaginateAndPropogate;;;
;BatchingByRecipINI;;;
Base image rules The following base image rules apply to every section in this base.
;StandardImageProc;3;Always the 1st image level rule;
Base field rules The following base field rules apply to every field in this base.
;StandardFieldProc;4;Always the 1st field level rule;

Chapter 2Understanding the System
58
USING IDS TORUN
DOCUMAKER
You can set up the Internet Document Server (IDS) to run Documaker as a subordinate process. Web clients communicate with IDS using queues. IDS communicates with Documaker via XML files called job tickets and job logs.
This diagram illustrates the process:
IDS can start or stop Documaker Server as needed, without user interaction. One IDS session controls one Documaker process. You can, however, implement multiple IDS sessions and have multiple Documaker Server processes as well.
Keep in mind these limitations:
• You can only run Documaker in single step mode.
• You must run Documaker on Windows 2000 or higher.
• Different resource setups for Documaker are supported, but Documaker processing restarts if resources are changed, eliminating the performance benefits. This should not be a problem because it is unlikely multiple Documaker Server setups will be used with a single IDS implementation. You can, however, experience problems testing a system with multiple setups.
• During processing, some INI options can be changed by the client. Since some Documaker rules use static variables and store INI values in memory, it is possible that a client will be unable to change an INI option if those Documaker rules are used. To handle these situations, you must restart Documaker.
For more information, see the Internet Document Server Guide and the SDK Reference.
Web Client IDS
DocumakerServer
(GenData)
VB\COM\ Java Client
XML Job Ticket
XML Job Log

Writing Unique Data into Recipient Batch Records
59
WRITINGUNIQUE DATA
INTO RECIPIENTBATCH
RECORDS
The GenData program lets you add unique data to each recipient batch record before it is written to the recipient batch files. The recipient batch record data and format is defined by the GVM variable definitions in the RCBDFDFL.DAT file.
You can use this capability if you need to add...
• Address information or other field level information to the batch record, which is typically unique for each recipient.
• Recipient information that is not handled by normal field mapping from the transaction DFD to the recipient batch DFD.
• Cumulative or calculated information not available until the document is nearly completed.
NOTE:Before this feature was implemented in version 10.2, the recipient batch records were identical except for the recipient code field which contains a unique identifier assigned to a given recipient. If additional recipient data was required, you had to write a custom rule.
Use the options in the RecipMap2GVM control group to set up this capability. Data that can be added to the recipient batch record can be:
• Contents of a variable field on the specified section or form/section
• Constant value
• Data from an existing INI built-in functions, such as ~DALRun
• Data from a custom written INI function
Here is an example of the RecipMap2GVM control group:
< RecipMap2GVM >
Form =
Image =
Req =
Opt =
Option Description
Form (Optional) Enter the name of the form.
Image Enter the name of the section (image). You can also enter a section name root.
A section name root is the first part of a name. For instance, MAILER is the root name for sections with names such as MAILER A, MAILER_B, or MAILERS.

Chapter 2Understanding the System
60
Optional formattinginformation
You can add optional formatting information as a parameter of the Opt INI option. This formatting information is comprised of four items separated by commas.
Here are some formatting examples:
d,”1/4”, d, “4/4”
This converts an input date, mmddyyyy, into month name dd, yyyy, such as February 17, 2012.
n, nCAD, nUSD, “$zzz,zz9.99”
This converts an input numeric value in Canadian French format into a value in United States format.
Keep in mind...
• For the Req option, if the data is missing an error occurs and the transaction is send to the error batch.
• For the Opt option, if the data is missing the system stores an empty string in the GVM variable.
• A RCB GVM variable cannot be restored to its original or default value after it has been changed using this method.
• Any RCB GVM variable not assigned using this method retains the value originally set during the transaction processing.
Req * A semicolon delimited string that contains one of the following:
- GVM variable name; variable field name; optional formatting information - GVM variable name; blank character (space); constant value
- GVM variable name; INI built-in function
Opt * A semicolon delimited string that contains one of the following:
- GVM variable name; variable field name; optional formatting information - GVM variable name; blank character (space); constant value
- GVM variable name; INI built-in function
* = Repeat for each GVM variable you are setting up.
Option Description
Item Description
Input fetypes D or d = date
N or n = number
Input format mask
Date - see the FmtDate rule in the Rules Reference.
Number – see the FmtNum rule in the Rules Reference.
Output fetypes D or d = dateN or n = number
Output format mask
Date - see the FmtDate rule in the Rules Reference.
Number – see the FmtNum rule in the Rules Reference.

Writing Unique Data into Recipient Batch Records
61
• Some RCB GVM variables should never be changed using this mapping technique. These include:
TRN_Offset
NA_Offset
POL_Offset
• If the section defined in the Image option in the RecipMap2GVM control group does not name a section, the feature is disabled for all transactions.
• If the section defined in the Image option is missing from the form set being processed, the GVM data is not changed. Depending on where the GVM data is mapped, this could mean data from the prior transaction will still be in the GVM variables.
• If there are multiple sections with the same name in the form set, the form specified in the Form option is used to identify the section to use. If the Form option is omitted, the first section found in the current form set is used.
• The system assumes the specified section contains all of the unique data except for a constant value or data gathered from an INI built-in function.
• If more than one recipient is assigned to the section, all recipient batch records receive the same added data.
Example This example creates a mailer cover page for each insured, agent, and/or company recipient per transaction. The cover page is created using banner page processing which occurs during GenPrint processing. Examples of the three different mailer cover pages are as follows.

Chapter 2Understanding the System
62
Jill Smith11111 Oak CircleSuite 999Smryna, FL 12345
Suzy SmithMorris Farmer99934 Oak CircleSuite 999Smartburg, WI 99999
Insureds
Jill Smith
Martin Short Agent963 Atlantic BoulevardSuite 1250Miami, FL 30202
Suzy Smith
David Miller Agent999 Green Dolphin StreetSuite 1200Miami, FL 30202
Suzy Smith
Company
Jill Smith
Sampco, Inc.316 N.E. 3rd AvenuePompano Beach, FL 33333
Agents

Writing Unique Data into Recipient Batch Records
63
This example assumes that the:
• Agent and company recipient batch files are sorted (agent number and company name, respectively) before the GenPrint program runs. This sorting allows for the creation of only one mailer cover page per unique agent and company.
• Unique information is contained on the form/section, Dec Page/Q1MDC1.
• The FSIUSER.INI file includes these control groups and options:
< RecipMap2GVM >
Form = Dec Page
Image = Q1MDC1
Opt = Name1;Insured Name;
Opt = Name2;Insured Name2;
Opt = Address1;Address Line1;
Opt = Address2;Address Line2;
Opt = CityCounty;prtvalue;
Opt = AgentName;Agent Name;
Opt = AgentID; Agent ID;
Opt = OfficeAddress;Office Address;
Opt = TownandState;Town And State;
< Printer >
PrtType = PCL
EnableTransBanner = True
EnableBatchBanner = False
TransBannerBeginScript= PreTrans
TransBannerEndScript = PstTrans
TransBannerBeginForm = ;BANNER;TRANSACTION;TRANS HEADER;
TransBannerEndForm = ;BANNER;TRANSACTION;TRANS TRAILER;
< DALLibraries >
LIB = Banner
BANNER.DAL The DefLib directory contains this DAL script:
* This script obtains the required unique data from the recipient
* batch record and stores it on the mailer form.
BeginSub PreTrans
blank_gvm = Pad(" ",41," ")
SetGVM("NameA" ,blank_gvm,,"C",41)
SetGVM("NameB" ,blank_gvm,,"C",41)
SetGVM("AddressA" ,blank_gvm,,"C",41)
SetGVM("AddressB" ,blank_gvm,,"C",41)
SetGVM("CityCounty1" ,blank_gvm,,"C",41)
If Trim(RecipName()) = "INSURED" Then
SetGVM("NameA" ,GVM("Name1") ,,"C",41)
SetGVM("NameB" ,GVM("Name2") ,,"C",41)
SetGVM("AddressA" ,GVM("Address1") ,,"C",41)
SetGVM("AddressB" ,GVM("Address2") ,,"C",41)
SetGVM("CityCounty1" ,GVM("CityCounty"),,"C",41)
GoTo exit:
End
last_agent_id = last_agent_id
If Trim(RecipName()) = "AGENT" Then

Chapter 2Understanding the System
64
If last_agent_id != Trim(GVM("AgentID")) Then
last_agent_id = Trim(GVM("AgentID"))
SetGVM("NameA" ,GVM("AgentName") ,,"C",41)
SetGVM("NameB" ,GVM("OfficeAddress") ,,"C",41)
SetGVM("AddressA" ,GVM("TownandState") ,,"C",41)
GoTo exit:
Else
SuppressBanner()
GoTo exit :
End
End
last_company_name = last_company_name
If Trim(RecipName()) = "COMPANY" Then
If Trim(GVM("Company")) != last_company_name Then
last_company_name = Trim(GVM("Company"))
If Trim(GVM("Company")) = "SAMPCO" Then;
SetGVM("NameA" ,"Sampco, Inc." ,,"C",41)
SetGVM("NameB" ,"316 N.E. 3rd Avenue" ,,"C",41)
SetGVM("AddressA" ,"Pompano Beach, FL 33333" ,,"C",41)
GoTo exit:
ElseIf Trim(GVM("Company")) = "FSI"
SetGVM("NameA" ,"FSI Inc." ,,"C",41)
SetGVM("NameB" ,"222 Newbury St." ,,"C",41)
SetGVM("AddressA" ,"Northwest City, FL 99999" ,,"C",41)
GoTo exit:
End
Else
SuppressBanner()
GoTo exit:
End
End
exit:
EndSub
BeginSub PstTrans
EndSub
The RCBDFDFL.DAT file contains the following GVM variable definitions which are defined in the RecipMap2GVM control group:
• Name1
• Name2
• Address1
• Address2
• CityCounty
• AgentName
• AgentID
• OfficeAddress
• TownAndState
Writing Unique Data into Recipient Batch Records
65
Here are two recipient batch records from this example:
SAMPCOLB12234567SCOM1FLT1 B2199802232234567890 0 22560 ******001 3724 452Jill Smith Morris 11111 Oak Circle Suite 999 Smyrna, FL 12345 Martin Short Agent 963 Main Street, Suite 1250 Miami, FL 30202
FSI CPP4234567FSIM1WIT1 B3199802234234567890 0 30360 ******001 4667 565Suzy Smith Morris 99934 Oak Circle Suite 999 SmartBurg, WI 99999 David Miller Agent 999 Main Street, Suite 1200 Miami, FL 30202

Chapter 2Understanding the System
66
USING CLASSRECIPIENTS
A class recipient identifies a recipient that represents one or more persons or entities. For instance, in an insurance implementation, you might have a policy that has a several recipients declared as an Additional Interest. Instead of declaring each as a separate recipient with separate triggering logic, it is more convenient to declare a single recipient name that represents all those of the same type or class. All members of this class receive virtually identical copies of the document.
In this scenario, you do not have to do anything special to declare a class recipient in your form definitions. Merely determine the appropriate title for this class of recipients and define that name as you would a normal recipient that represents a single entity.
If you want all members of the class to receive identical copies of the document, use the trigger for the recipient to assign a copy count to each form or section — where the count equals the number of members in the class.
There are some limitations to using form copy counts to provide recipient copies. For instance, this does not let you print unique information about each member of the class recipient, as would be necessary on a mailer page, for instance.
NOTE:It is possible to handle this using trigger overflow processing to physically trigger multiple copies of each form — one for each member, but a disadvantage of this approach is that each item (form or section) triggered is physically duplicated in the form set and therefore each requires data processing. This means that if there are a large number of these duplicate recipients, the throughput performance of transactions could be affected.
To handle this situation, the RecipMap2GVM feature can write additional batch records for each member of a class recipient. The RecipMap2GVM feature lets you write unique recipient information to each batch record.
With this method, only a minimal amount of additional processing occurs in the form set mapping. Yet, because a separate batch record is written for each member, the system prints a separate copy of the document for each member and you can use the unique information saved in each batch record to provide a unique banner page, such as a mailer, for each member in the print output.
To use the RecipMap2GVM feature, follow these steps:
1 Add a section to your form set definition and assign this section the name of your class recipient. Normally, you would also flag this section as hidden, since you would not want it to display or print. This purpose of this section is to hold the unique information for each member of the class recipient.
2 Define a trigger for the section that uses overflow to generate as many copies of the section as there are members in the data. The idea is to trigger an instance of the section for each member recipient. Be sure to also declare and create the appropriate overflow variable in the AFGJOB.JDT file you will use during data mapping.
3 Create the section and add fields that map the data to be written to the batch record for each member. Be sure to use the appropriate overflow variable for this section in your rule mapping definitions. Also remember to assign the appropriate section level rule to increment the overflow symbol after processing each section.

Using Class Recipients
67
4 Set up your RecipMap2GVM INI control group and modify your RCBDFDFL.DFD (Recipient Table DFD) file to include your unique data fields for the recipient batch records. Specify the new section as the section required in the RecipMap2GVM control group and set up each of the fields to map into your RCBDFDFL.DFD file layout.
NOTE:See Writing Unique Data into Recipient Batch Records on page 59 for more information on the RecipMap2GVM control group.
When you run the GenData program, your new section will trigger once for each member recipient. During normal processing, the fields on each section will map (using overflow variables) the unique data for each member. Because you have multiple copies of the section triggered, the RecipMap2GVM feature creates a separate batch record for each instance of the section. Therefore, you receive a separate record representing each individual member of your class recipient.
When the GenPrint program runs, having a separate record for each class recipient in the batch causes that transaction to print once for each member. And by using banner page processing, you can take the unique information written into each batch record and map that information to a mailer page, making the final output unique to each member of the class.

Chapter 2Understanding the System
68
RUNNINGDOCUMAKERUSING XMLJOB TICKETS
You can run Documaker from another application using an XML job ticket. You receive results in an XML job log file.
The layout of these files is the same as those used by IDS for running Documaker. See Using IDS to Run Documaker on page 58 for more information.
The name of the job ticket is passed to the GenData program on the command line as
/jticket= parameter
The default name is JOBTICKET.XML.
To set this up replace the StandardJobProc rule with the TicketJobProc rule. Keep in mind you must run Documaker in single step mode, since only the GenData program is executed. See Using Single Step Processing on page 46 for more information.
You can specify the name of the resulting job log file using this command line parameter:
/jlog=
The default is JOBLOG.XML.

Handling 2-up Printing
69
HANDLING 2-UPPRINTING
Two-up printing lets you print two transactions on the same page of single and multiple page forms. 2-up printing is a two-step process which passes input through GenData three (3) times, using a different JDT file each time.
This process is similar to the single step process in that GenData performs the work, but the three passes through GenData actually represent two steps of the multiple step process: processing the transactions and printing the transactions.
For more information and to see example JDT files, see Single Step Processing Example on page 56.
NOTE:2-up printing is only available for AFP printers.
There are several scenarios in which 2-up printing applies:
• 2-up printing with single page forms
• 2-up printing with multiple page forms
The following illustrations describe these scenarios.
2-up printing withsingle page forms
This illustration shows how 2-up printing works when you use single page forms, such as some types of bills and statements.
In this scenario, the system merges the data for the first transaction onto the form and then prints the form.
Batch file
Transaction 1
Transaction 2
Transaction 3
Transaction 4
Transaction 5
Transaction 6
BIll100.00100.00100.00100.00100.00
Services renderedServices renderedServices renderedServices renderedServices rendered
BIllBIll
BIll
BIllBIll
BIllBIll
100.00100.00100.00100.00100.00
Services renderedServices renderedServices renderedServices renderedServices rendered
100.00100.00100.00100.00100.00
Services renderedServices renderedServices renderedServices renderedServices rendered
100.00100.00100.00100.00100.00
Services renderedServices renderedServices renderedServices renderedServices rendered
100.00100.00100.00100.00100.00
Services renderedServices renderedServices renderedServices renderedServices rendered
100.00100.00100.00100.00100.00
Services renderedServices renderedServices renderedServices renderedServices rendered
100.00100.00100.00100.00100.00
Services renderedServices renderedServices renderedServices renderedServices rendered
100.00100.00100.00100.00100.00
Services renderedServices renderedServices renderedServices renderedServices rendered

Chapter 2Understanding the System
70
2-up printing withmultiple page forms
This illustration shows how 2-up printing works when you use multiple page forms.
Changing the INI FileYou must make the following changes in your FSISYS.INI file.
NOTE:Changes to the error and manual recipient batch control groups are not necessary.
• You must include a Printer option in the recipient batch control groups for each print file created. These printers must also be defined in the FSISYS.INI file.
• The recipient batch groups must have a FinalPrinter option. This option specifies the printer to use for the final, merged file. This printer must also be defined in the FSISYS.INI file.
page 2
Transaction 1
Transaction 1
Transaction 1
Transaction 2
Transaction 2
Transaction 2
BIllBIll
page 2
page 3 page 3
page 2
BIll BIll
page 2
page 1
page 2
page3
page 1
page 2
Batch file
page 3 page 3
page 3
Transaction 3
Transaction 3
Transaction 3
Transaction 4
Transaction 4
Transaction 4
page 1
page 2
page3
page 1
page 2
page 3
100.00100.00100.00100.00100.00
Services renderedServices renderedServices renderedServices renderedServices rendered
100.00100.00100.00100.00100.00
Services renderedServices renderedServices renderedServices renderedServices rendered
100.00100.00100.00100.00100.00
Services renderedServices renderedServices renderedServices renderedServices rendered
100.00100.00100.00100.00100.00
Services renderedServices renderedServices renderedServices renderedServices rendered
100.00100.00100.00100.00100.00
Services renderedServices renderedServices renderedServices renderedServices rendered
100.00100.00100.00100.00100.00
Services renderedServices renderedServices renderedServices renderedServices rendered
100.00100.00100.00100.00100.00
Services renderedServices renderedServices renderedServices renderedServices rendered
100.00100.00100.00100.00100.00
Services renderedServices renderedServices renderedServices renderedServices rendered
100.00100.00100.00100.00100.00
Services renderedServices renderedServices renderedServices renderedServices rendered
100.00100.00100.00100.00100.00
Services renderedServices renderedServices renderedServices renderedServices rendered
100.00100.00100.00100.00100.00
Services renderedServices renderedServices renderedServices renderedServices rendered
100.00100.00100.00100.00100.00
Services renderedServices renderedServices renderedServices renderedServices rendered

Handling 2-up Printing
71
• The recipient batch groups must have a PageRange option for page count batching. You specify this option as shown below:
PageRange = [min],[max]
If you do not specify min, the system uses zero (0). If you omit max, the system uses (unsigned )-1 (all bits on). The min and max values are inclusive.
• You can also include in the recipient batch control groups a TwoUpStart option, which can have any of these values (case is irrelevant):
L
Left
R
Right
This option specifies whether the merge process should associate the first Printer option with the left or the right side of the page. The system only checks this option when there are multiple Printer options present in the control group. If you omit this option, the file specified in the first Printer option is used for the left side of the page.
Here is an example of a recipient batch control group:
< Batch1 >
Printer = Printer1
Printer = Printer2
FinalPrinter = Printer3
PageRange = ,1
TwoUpStart = R
This splits single page transactions evenly between the files specified in the Printer1 and Printer2 control groups. The files specified in the Printer1 and Printer2 control groups will then be merged into the file specified in the Printer3 control group. The file specified in the Printer1 control group is used for the right page.
Creating the TWOUPcontrol group
You must create the TwoUp control group. This control group must contain the CounterTbl option, which specifies the file name for the table that contains recipient batch page counts.
The TwoUp control group can optionally contain the CounterDFD option, which specifies the name of a DFD file. See the Rules Reference for information about this DFD.
The TwoUp control group can optionally contain the LMargin, LShift, and RShift options. Records on the left page will be shifted to the right by LShift - LMargin, and records on the right page will be shifted to the right by RShift - RMargin. Amounts are in FAP units (2400 per inch). If you omit these options, the system uses these defaults:
LMargin = 600
LShift = 1200
RShift = 16800
< TwoUp >
CounterTbl = data\counter.tbl
CounterDFD = deflib\counter.dfd

Chapter 2Understanding the System
72
LMargin = 300
LShift = 600
RShift = 15000
The first two options define the location of the files shown above.
The LMargin=300 option sets the left margin to 1/4 inch. The LShift=600 option shifts the left page 1/2 inch from the left edge of the paper (1/4 inch beyond the left margin). The RShift=15000 option shifts the right page 6 1/2 inches the left edge of the paper (6 inches from the left margin).
Creating theAdded_Fonts control
group
You can optionally create the Added_Fonts control group. The options in this group specify additional fonts to add to the AFP output file for text label records which may be added during the merge process. Each option takes the form:
FontName = <font name>
Here is an example:
< Added_Fonts >
FontName = X0FATIN0
FontName = X0FAUNN8
This tells the system to include the fonts X0FATIN0 and X0FAUNN8 in the final output file, regardless of whether they are present in the input files.
Changing the Recipient Batch DFD FileThe recipient batch DFD file (RCBDFDFL.DAT) must have the following fields with the given types. You can modify the field lengths—just make sure you set the EXT_LENGTH option large enough to represent all of the pages in a multi-mail transaction set. Also make sure you set the INT_LENGTH option larger by one than the EXT_LENGTH option.
Note that the field name is case sensitive. Also, for each of these fields, be sure to add a FIELDNAME= line to the <FIELDS> line in the DFD file.
< FIELD:CurPage >
INT_Type = CHAR_ARRAY
INT_Length = 5
EXT_Type = CHAR_ARRAY_NO_NULL_TERM
EXT_Length = 4
Key = N
Required = N
< FIELD:TotPage >
INT_Type = CHAR_ARRAY
INT_Length = 5
EXT_Type = CHAR_ARRAY_NO_NULL_TERM
EXT_Length = 4
Key = N
Required = N
< FIELD:AccumPage >
INT_Type = LONG
EXT_Type = CHAR_ARRAY_NO_NULL_TERM
EXT_Length = 10
Key = N
Required = N

Handling 2-up Printing
73
RULES USED FOR 2-UP PRINTING
The following descriptions will help familiarize you with the rules that are required to perform the 2-up printing process. All of the rules listed in the topic, Rules Used in Single Step Processing on page 53 are required for 2-up printing, plus these additional rules:
NOTE:You can find more information in the Rules Reference.
AddLine Use this rule to add a line record, such as for OMR marks, to the AFP record list built by the MergeAFP rule.
AddTextLabel Use this rule to add a text label record to the AFP record list built by the MergeAFP rule.
ForceNoImages Use this rule to return the msgNO_MORE_IMAGES message. This prevents errors if you have no section level rules.
GetRCBRec Use this rule to set the current recipient batch file. This rule initializes the current recipient batch file, if necessary.
This rule also sets the first printer for current batch to be the current printer and retrieves the next record from the current recipient batch file.
InitMerge Use this rule to create a list of printers, batches, and buffers for the comment (RCB) records. This rule also creates a list to hold AFP records and AFP fonts. After the system finishes running the rule, it deletes everything the rule created.
NOTE:The recipient batch files are not used at this stage. The batch list must be created beforehand so the system will know which print files belong together. The skipping batch message is an artifact of the batch file loading process.
InitPageBatchedJob Use this rule to open NA and POL files. This rule installs the section level callback function for inserting recipient batch records into the AFP print stream as AFP comment records.
When finished, this rule restores the original callback function and closes the NA and POL files.
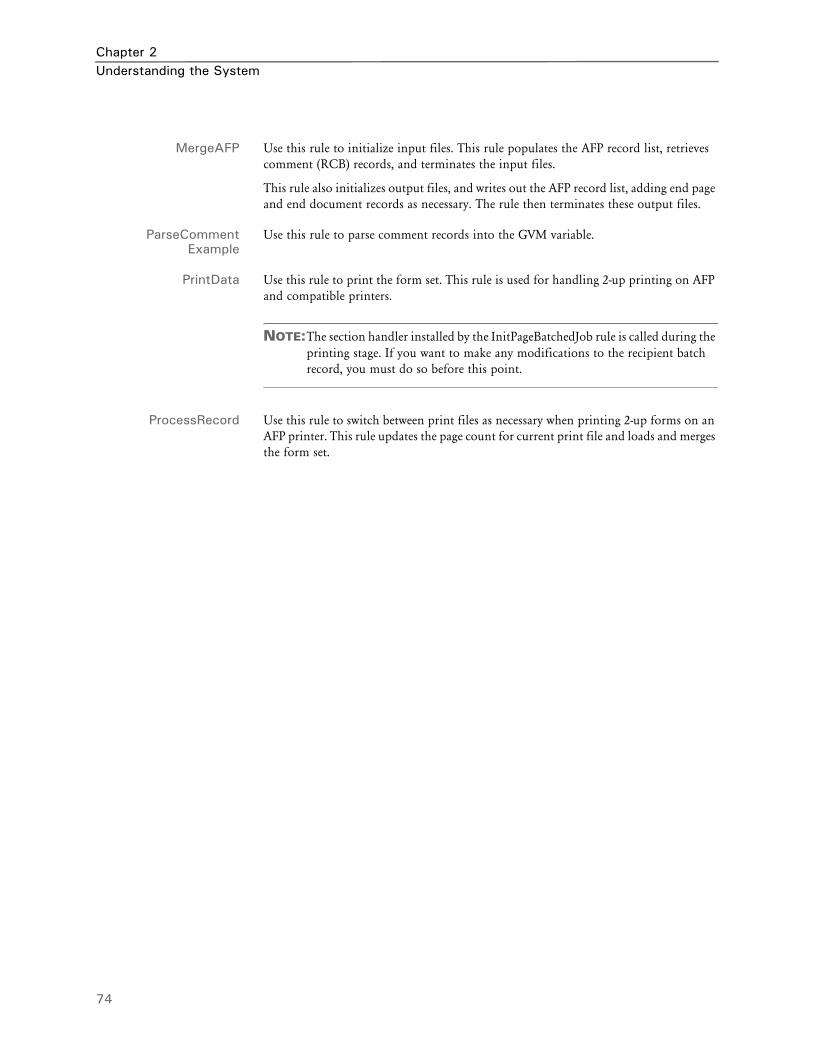
Chapter 2Understanding the System
74
MergeAFP Use this rule to initialize input files. This rule populates the AFP record list, retrieves comment (RCB) records, and terminates the input files.
This rule also initializes output files, and writes out the AFP record list, adding end page and end document records as necessary. The rule then terminates these output files.
ParseCommentExample
Use this rule to parse comment records into the GVM variable.
PrintData Use this rule to print the form set. This rule is used for handling 2-up printing on AFP and compatible printers.
NOTE:The section handler installed by the InitPageBatchedJob rule is called during the printing stage. If you want to make any modifications to the recipient batch record, you must do so before this point.
ProcessRecord Use this rule to switch between print files as necessary when printing 2-up forms on an AFP printer. This rule updates the page count for current print file and loads and merges the form set.

Handling 2-up Printing
75
Placing the 2-up Rules in the JDT FileWhen you use the rules listed at the beginning of this topic to handle 2-up printing, you must place them in the correct places and order in the AFGJOB.JDT file. Use the following table as a guide to where to place these rules. You can insert other rules before, between, or after the 2-up rules—just keep the 2-up rules in the order indicated below with respect to one another.
Stage 1
Job level Insert the PageBatchStage1InitTerm rule after the RULStandardJobProc and JobInit1 rules
Form set level
List the form set level rules in this order:WriteOutput
CreateRecordList
BatchByPageCountPaginateAndPropogate
Place these rules after the RULStandardTransactionProc rule and make sure any rule which changes page count appears before these rules.
Stage 2
Job level Include these rules in this order:
InitPrintInitPageBatchedJob
SetErrHdr
Do not include the RULStandardJobProc or JobInit1 rules in this stage.
Form set level
Include these rules in this order:
GetRCBRec
ProcessRecordPrintData
Do not include the RULStandardTransactionProc rule in this stage.
Section (image) level
There are no regulations on the order in which you can place rules in this stage. Remember, however, that if there are no section level rules, you must include the ForceNoImages rule to avoid errors.
Stage 3
Job level Place the InitMerge rule anywhere after the RULStandardJobProc rule.
Form set level
Make sure the MergeAFP rule is the first rule called. Place rules which add records or determine whether a page pair should be printed after the MergeAFP rule.
Section level
There are no stipulations on the order in which you must place rules in this stage. Remember, however, that if there are no section level rules, you must include the ForceNoImages rule to avoid errors.

Chapter 2Understanding the System
76
2-UP PROCESSING EXAMPLE
As stated earlier, 2-up printing is a two-step process which calls GenData three times with different JDT files. These file excerpts show how to set up your batch and INI files:
2upbycnt.bat You can set up this batch file as follows:
@Echo Off
SetLocal
Echo Y|Del Data\*.* >NUL
GenDaW32.Exe -INI=2upstep1.ini
If Not ErrorLevel 5 GoTo Step1NoError
Echo "2Up Printing Failed in Step 1."
GoTo Exit
:Step1NoError
GenDaW32.Exe -INI=2upstep2.ini
If Not ErrorLevel 5 GoTo Step2NoError
Echo "2Up Printing Failed in Step 2."
GoTo Exit
:Step2NoError
GenDaW32.Exe -INI=2upstep3.ini
If Not ErrorLevel 5 GoTo Step3NoError
Echo "2Up Printing Failed in Step 3."
:Step3NoError
EndLocal
:Exit
2upstep1.ini You can set up this INI file as follows:
< Data >
AfgJobFile = .\Def\AfgJob1.jdt
< Environment >
FSISYSINI = .\fsisys.ini
2upstep2.ini You can set up this INI file as follows:
< Data >
AfgJobFile = .\Def\AfgJob2.jdt
< Environment >
FSISYSINI = .\fsisys.ini
2upstep3.ini You can set up this INI file as follows:
< Data >
AfgJobFile = .\Def\AfgJob3.jdt
< Environment >
FSISYSINI = .\fsisys.ini

Handling 2-up Printing
77
RUNNING THE GENDATA PROGRAM
The following pages provide illustrations and an example files for each time the GenData program is run.
Step 1 - Using theAFGJOB1.JDT file
The first execution of GenData uses the AFGJOB1.JDT file with the base and form set rules shown in this example to create output files shown in the illustration.
<Base Rules>
;RULStandardJobProc;1;;
;SetErrHdr;1;***:------------------------------------------------;
;SetErrHdr;1;***: BillPrint Data Generation (Base);
;SetErrHdr;1;***:;
;SetErrHdr;1;***: Transaction: ***ACCOUNTNUM***;
;SetErrHdr;1;***: Company Name: ***Company***;
;SetErrHdr;1;***: Line of Business: ***LOB***;
;SetErrHdr;1;***: Run Date: ***RunDate***;
;SetErrHdr;1;***:--------------------------------------------------;
;JobInit1;;;
;CreateGlbVar;1;TXTLst,PVOID;
;CreateGlbVar;1;TblLstH,PVOID;
;InitOvFlw;1;;
;SetOvFlwSym;1;SUBGROUPOVF,SUBGROUP,5;
;BuildMasterFormList;;4;
;PageBatchStage1InitTerm;;;
;InitSetrecipCache;;;
<Base Form Set Rules>
;NoGenTrnTransactionProc;;;

Chapter 2Understanding the System
78
;ResetOvFlw;2;;
;BuildFormList;;;
;LoadRcpTbl;;;
;RunSetRcpTbl;;;
;WriteNaFile;;;
;WriteRCBWithPageCount;;;
;ProcessQueue;;PostPaginationQueue;
;WriteOutput;;;
;CreateRecordList;;
;BatchByPageCount;;
;PaginateAndPropogate;;;
<Base Image Rules>
;StandardImageProc;3;Always the 1st image level rule;
<Base Field Rules>
;StandardFieldProc;4;Always the 1st field level rule;
Step 2 - Using theAFGJOB2.JDT file
The second execution of GenData uses the AFGJOB2.JDT file. This JDT file uses the base and form set rules shown in this example to process the intermediate print files.
<Base Rules>
;InitPrint;;;
;InitPageBatchedJob;;;
;SetErrHdr;1;***:--------------------------------------------------;SetErrHdr;1;***: BillPrint Data Generation (Base) ;
;SetErrHdr;1;***: Company Name: ***Company***;
;SetErrHdr;1;***: SubCompany:***SubCompany***;
;SetErrHdr;1;***: Account #: ***AC-KY-BA***;
;SetErrHdr;1;***:--------------------------------------------------

Handling 2-up Printing
79
<Base Form Set Rules>
;GetRCBRec;;;
;ProcessRecord;;;
;PrintData;;;
<Base Image Rules>
;ForceNoImages;;;
Step 3 - Using theAFGJOB3.JDT file
The third execution of GenData uses the AFGJOB3.JDT file. This JDT file uses base and form set rules shown in this example to merge data intermediate print-ready files into a print-ready file for an AFP printer.
<Base Rules>
;RULStandardJobProc;;;
;SetErrHdr;1;***:------------------------------------------------;
;SetErrHdr;1;***: BillPrint Data Generation (Base);
;SetErrHdr;1;***: Company Name: ***Company***;
;SetErrHdr;1;***: SubCompany: ***SubCompany***;
;SetErrHdr;1;***: Account #: ***AC-KY-BA***;
;SetErrHdr;1;***:------------------------------------------------;
;InitMerge;;;
<Base Form Set Rules>
;MergeAFP;;;
<Base Image Rules>
;ForceNoImages;;;

Chapter 2Understanding the System
80
PRINTING INBOOKLETFORMAT
You can use Documaker Server to print booklets. A booklet is a 2-up duplex print format that can be stapled in the middle and folded to form a small book. Although the system does not impose a size limit, there is a practical limit on the number of pages that can be affixed in this manner. The system lets you customize the paper size, cover sheets, a custom blank page, and different size and tray selections for the cover sheet and booklet pages.
NOTE:In Documaker Server version 11.5, the ability to output in booklet format is provided in the GenPrint program and the GenData PrintFormset rule.
Include these INI options to set up your system for booklet printing:
< Print >
Booklet =
< Booklets >
Booklet =
< Booklet:NameOfBooklet >
BookletPapersize =
BookletTray =
RightGutter =
BlankPage =
CoverSheet =
CoverFrontOut =
CoverFrontIn =
CoverBackOut =
CoverBackIn =
CoverTray =
Option Description
Print control group
Booklet Enter the name of the booklet.
Booklets control group
Booklet Enter the name of the booklet. Your entry must match the name in the Booklet field in the Print control group and must remain consistent throughout the INI file.
Booklet:NameOfBooklet control group
BookletPapersize Enter the paper size. The default is 11 x 17.
BookletTray Enter the tray code. The default is one (1).
RightGutter Specify the right shift past mid-point, in FAP units (2400 per inch). This right shift accommodates booklet thickness as pages are added.
As pages are added, then stapled, the margins of inner pages may be covered by the fold in the booklet. this option tells the system to shift the sections on the pages in small increments so all sections appear to have the same margins.
You can leave this option blank for short booklets.

Printing in Booklet Format
81
NOTE:The system reformats the page, but it does not reformat or re-flow any of the sections on the page. You must create sections in the appropriate dimensions to fit on the booklet pages.
Keep in mind...
• You can only have one front and back cover page per print batch. So you can have multiple booklets in a batch but they will share the same front and back cover.
• The FAP files you specify for the front cover, front inside cover, back cover, and back inside cover can have no data mapping. These files simply display and print.
• To include a mailing address for the booklet, insert a transaction banner/mailer page.
Booklet Printing ExamplesHere is an example of the INI options for printing a booklet named Renewal_Package.
< Booklet:Renewal_Package >
BlankPage = BlankPageBookletPaperSize = US LetterBookletTray = 1CoverBackIn = qb_inCoverBackOut = qb_cvrCoverFrontIn = qf_inCoverFrontOut = qf_cvrCoverSheet = NoCoverTray = 1RightGutter =
< Booklets >Booklet = Renewal_Package
< Print >
Booklet = Renewal_Package
BlankPage Enter the name of the FAP file you want to use as a blank page.
The system inserts blank pages as needed. This option just lets you specify a FAP file you want to be used in place of a blank page. For instance, you could specify a FAP file that simply said:
This page deliberately left blank.
CoverSheet Enter Yes if you want to include a cover sheet. The default is No.
CoverFrontOut Enter the name of the FAP file you want to use as the outside front cover.
CoverFrontIn Enter the name of the FAP file you want to use as the inside front cover.
CoverBackOut Enter the name of the FAP file you want to use as the outside back cover.
CoverBackIn Enter the name of the FAP file you want to use as the inset back cover.
CoverTray Enter the tray ID for the cover sheet. The default is one (1).
Option Description

Chapter 2Understanding the System
82
Here is an example of a 16-page Renewal_Package booklet, with cover:

Printing in Booklet Format
83
BackFront
Page16
Page1
Page15
Page2
BackFront
BackCover
FrontCover
InsideBack
InsideFront
(blank)
Here is the front/back layout for the booklet cover.
Here is the front/back layout for the interior booklet pages.
BackFront
Page14
Page3
Page13
Page4
(blank)
BackFront
Page12
Page5
Page11
Page6
BackFront
Page10
Page7
Page9
Page8

Chapter 2Understanding the System
84
Here is an example of how to set up multiple booklet templates. This example shows two booklet templates. All booklets going to Printer1 use the Renewal_Package template (rfcov, rfcovin, and so on). All booklets going to Printer2 use the NewPolicy template (nfcov, nfcovin, and so on).
< Booklets >
Booklet = Renewal_Package
Booklet = NewPolicy
< Printer1 >
Booklet = Renewal_Package
Port = data\renew01.pdf
< Printer2 >
Booklet = NewPolicy
< Booklet:Renewal_Package >
BookletPaperSize = US Letter
BookletTray = 2
RightGutter =
BlankPage =
CoverSheet = Yes
CoverFrontOut = rfcov
CoverFrontIn = rfcovin
CoverBackOut = rbcov
CoverBackIn = rbcovin
CoverTray = 2
< Booklet:NewPolicy >
BookletPaperSize = US Letter
BookletTray = 1
RightGutter =
BlankPage =
CoverSheet = Yes
CoverFrontOut = nfcov
CoverFrontIn = nfcovin
CoverBackOut = nbcov
CoverBackIn = nbcovin
CoverTray = 1

Splitting Recipient Batch Print Streams
85
SPLITTINGRECIPIENT
BATCH PRINTSTREAMS
The GenPrint program and the PrintFormset rule (when running in single step mode) are designed to produce one print stream output file for each recipient batch. This print stream output file includes all of the transactions in the recipient batch.
Sometimes, however, you may want to split the print stream output into multiple print stream output files. For instance, you can use this feature to split your batches into files that reflect the amount of paper you can load into your printer at one time.
You can use DAL scripts to set up criteria for splitting the output file to reflect almost any scenario. For example, it can be based on a certain number of transactions, a maximum number of sheets of paper, or on changes in variables in the recipient batch.
NOTE:Some types of print streams require one file per transaction, such as RTF, PDF, and HTML. The typical way of handling this is via the multi-file print callback method, but this feature provides an alternate method which gives you greater control over the naming of the output file.
To do this you use the PrintFormset rule and these DAL functions:
• DeviceName
• SetDeviceName
• BreakBatch
• UniqueString
This rule and these DAL functions let you:
• Split recipient batches into multiple print stream files
• Assign names to those print stream files
For example, here are some things you can do:
Splitting batches bysheet count
You can use these functions to split a batch based on the sheet count during the GenPrint process. Once a batch reaches a certain number of sheets, you can tell the system to:
• Finish processing the current transaction
• End the current print file. (If you are using a post-transaction or post batch banner page, it will print before the file is closed.)
• Repeat this process when the next print file reaches the specified number of sheets
You can use virtually any logic to decide when to break the batch. For instance, to break based on sheet count, use the TotalSheets function to get the number of sheets to maintain a counter across the transactions.
NOTE:Be sure to reset the sheet count variable in the pre-batch banner DAL script.

Chapter 2Understanding the System
86
Here is an example of DAL script logic that might appear in a post-transaction banner DAL script:
IF TotalSheets() > 16000
#COUNTER += 1
CurFile = DeviceName()
Drive = FileDrive(CurFile)
Path = FilePath(CurFile)
Ext = FileExt(CurFile)
RecipBatch = RecipBatch()
NewFile = FullFileName(Drive,Path,RecipBatch & #COUNTER,Ext)
SetDeviceName(NewFile)
BreakBatch()
END
NOTE:See Using DAL to Manipulate File Names on page 88 for information on using DAL functions to manipulate file names.
Creating PDF output You can also modify the above script to unconditionally break the batch after each transaction. Assuming you used the SetDeviceName function to assign a proper file name, each recipient printed would receive a separate output file.
This is particularly useful for output types such as PDF, which require a separate file for each transaction.
NOTE:You can also use the multi-file print callback method in GenPrint to get separate files. Similarly, the single step processing mode currently uses this INI option:
< PrintFormset >
MultiFilePrint = Yes
to tell the system to generate separate files for each transaction. Single step mode automatically generates a unique file name and offers no way to override that name. By using the BreakBatch and SetDeviceName functions, however, you can control the names assigned to the files in single step mode. To emulate the action of the current code, use the UniqueString function.
DAL functions Here is a summary of the DAL functions you would use. Keep in mind...
• These print drivers are supported: PCL5, PCL6, PST, MET, AFP, PDF, HTML, and RTF.
• These print drivers are not supported: EPT, MDR, and GDI.
• All platforms are supported, but note that while UniqueString is supported on z/OS, z/OS does not support long file names.
• Both multiple step and single step processing are supported.

Splitting Recipient Batch Print Streams
87
The only DAL function actually involved in splitting the print stream is BreakBatch. The others make it easier to implement this functionality. For example, since you need to name the new print stream, you use the SetDeviceName procedure. To find the name of the current device, you use the DeviceName function. If you need to create unique file names, you can use the UniqueString function.
NOTE:While you can call all of these DAL functions in the Rules Processor or Entry, the BreakBatch and SetDeviceName functions are not applicable in Entry since it does not use the batch printing engine. The other functions, DeviceName and UniqueString, are applicable to both Entry and the Rules Processor.
DeviceNameUse this function to return the current output device file name, such as the name of the current print stream output file.
Syntax DeviceName()
SetDeviceNameUse this procedure to set a new output device file name which will be used the next time the output device is opened, assuming nothing overrides the name prior to that.
Syntax SetDeviceName(Device)
BreakBatchUse this procedure to tell the Rules Processor to break the output print stream file for the current recipient batch after processing the current recipient, including post transaction banner processing.
Syntax BreakBatch()
The procedure is typically called in the transaction banner DAL script. You must use the SetDeviceName function to specify a new device name. Otherwise, the new file has the same name as the old file and overwrites its contents.
After the GenPrint program finishes processing the current transaction, it closes the current output device file. This includes executing any post-batch banner processes. It then continues processing the recipient batch.
If you have assigned a new output device file name using the SetDeviceName function, the system will create and start writing to a new print stream file with that name. The best place to call the BreakBatch function is in the post-transaction banner DAL script.
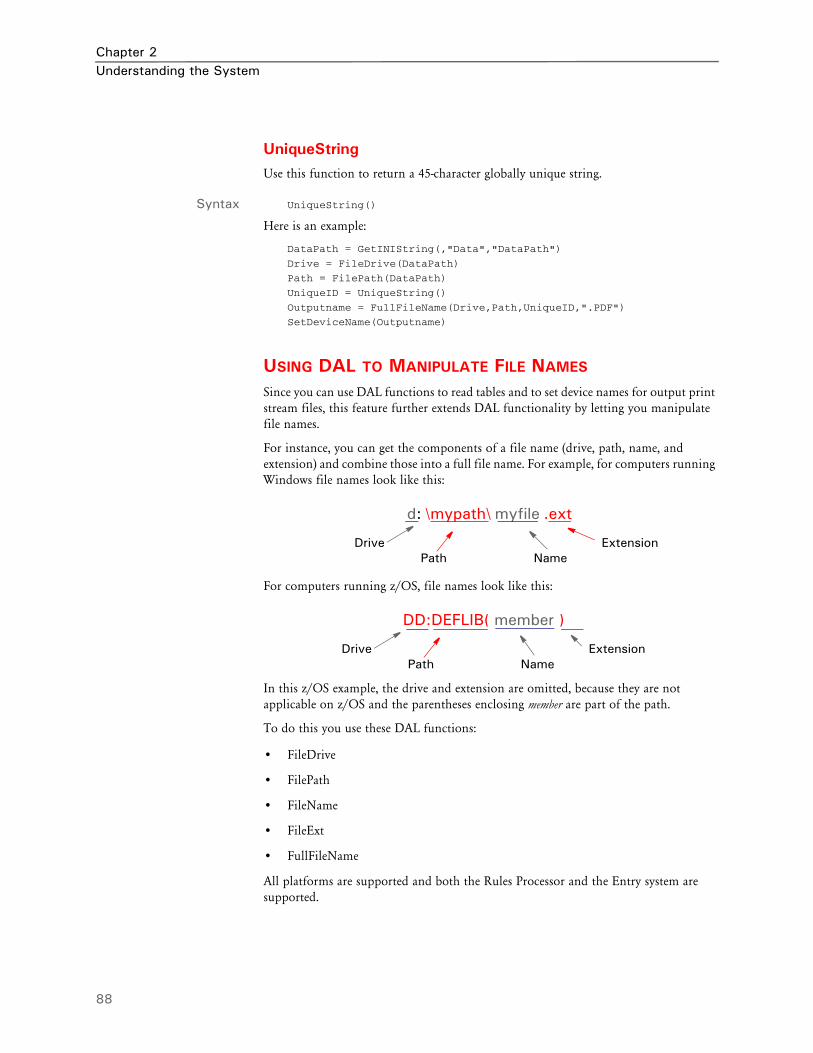
Chapter 2Understanding the System
88
UniqueStringUse this function to return a 45-character globally unique string.
Syntax UniqueString()
Here is an example:
DataPath = GetINIString(,"Data","DataPath")
Drive = FileDrive(DataPath)
Path = FilePath(DataPath)
UniqueID = UniqueString()
Outputname = FullFileName(Drive,Path,UniqueID,".PDF")
SetDeviceName(Outputname)
USING DAL TO MANIPULATE FILE NAMES
Since you can use DAL functions to read tables and to set device names for output print stream files, this feature further extends DAL functionality by letting you manipulate file names.
For instance, you can get the components of a file name (drive, path, name, and extension) and combine those into a full file name. For example, for computers running Windows file names look like this:
For computers running z/OS, file names look like this:
In this z/OS example, the drive and extension are omitted, because they are not applicable on z/OS and the parentheses enclosing member are part of the path.
To do this you use these DAL functions:
• FileDrive
• FilePath
• FileName
• FileExt
• FullFileName
All platforms are supported and both the Rules Processor and the Entry system are supported.
d: \mypath\ myfile .ext
DrivePath Name
Extension
DD:DEFLIB( member )
DrivePath Name
Extension

Splitting Recipient Batch Print Streams
89
Each platform will use platform specific logic to extract or assemble the components. For example, UNIX uses forward slashes and z/OS uses DD names or partitioned dataset names for the path and member names for name.
Here are descriptions of these functions:
FileDriveUse this function to get the drive component of a file name.
Syntax FileDrive(“FullFileName”)
This function accepts a string containing a fully qualified file name, returns a string that contains the drive component of that file name.
Here is an example:
MYDRIVE = FileDrive("d:\mypath\myfile.ext")
In this example, MYDRIVE would contain:
“d:”
FilePathUse this function to get the path component of a file name.
Syntax FilePath(“FullFileName”)
This function accepts a string containing a fully qualified file name, returns a string that contains the path component of that file name.
Here is an example:
MYPATH = FilePath("d:\mypath\myfile.ext")
In this example, MYPATH would contain:
“\mypath\”
FileNameUse this function to get the name component of a file name.
Syntax FileName(“FullFileName”)
This function accepts a string containing a fully qualified file name, returns a string that contains the name component of that file name.
Here is an example:
MYNAME = FileName("d:\mypath\myfile.ext")
In this example, MYNAME would contain:
“myfile”

Chapter 2Understanding the System
90
FileExtUse this function to get the extension component of a file name.
Syntax FileExt(“FullFileName”)
This function accepts a string containing a fully qualified file name, returns a string that contains the extension component of that file name.
Here is an example:
MYEXT = FileExt("d:\mypath\myfile.ext")
In this example MYEXT would contain:
“.ext”
FullFileNameUse this function to make the full file name.
Syntax FullFileName(“Drive”,”Path”,”Name”,”Ext”)
This function accepts a string containing the drive, path, name, and extension components of a fully qualified file name, assembles them, and returns a string that contains the full file name.
Here is an example:
MYFILENAME = FullFileName("d:","\mypath\","myfile",".ext")
In this example, MYFILENAME would contain:
“d:\mypath\myfile.ext”
NOTE:If, in this example, \mypath had no trailing slash, the FullFileName function would have added it for you.
Here is a z/OS example:
FullFileName(,”DD:DEFLIB()”,”MEMBER”)
In this example, the result would be:
DD:DEFLIB(MEMBER)

Assigning Printer Types Per Logical Batch Printer
91
ASSIGNINGPRINTER TYPES
PER LOGICALBATCH PRINTER
Recipient batches often need to be sent to different types of printers. For example, you could have a situation where you want to generate PDF files with one batch, email another batch, and send the rest of the batches to a Metacode printer.
In addition, logical printers may also need different callback functions. For example, one batch might print Metacode and need OMR marks created in a callback function while another batch may need to be split by transaction using the MultiFilePrint callback function.
NOTE:Before version 11.1, the print system only supported one type of printer and only one type of callback per run. You made this assignment using the PrtType option in the Printer control group.
You can optionally define for each logical printer a printer type and a callback function. For instance, now the PrtType option in the Printer control group defines the default type of printer while the CallbackFunc option defines the default callback function you want to use.
Here is an example:
< Printer >
PrtType = XER ; Default
< Printers >
Printer = Printer1
Printer = Printer2
< Insured >
Printer = Printer1
< Agent >
Printer = Printer2
< Printer1 >
Port = Output1.XER
< Printer2 >
Port = Output2.PDF
CallbackFunc = RULMultiFilePrint
PrtType = PDF
When you define a callback function, such as shown below, you are defining the default callback function for all defined logical printers:
< Print >
CallbackFunc = Mycallback
If, however, you do not want a specific logical printer to have a callback function, you can disable the callback for that logical printer by leaving blank the CallbackFunc option for that logical printer, as shown here:
< MyPrinter >
CallbackFunc =
To disable the default callback, define an empty callback name. Otherwise, the system uses the default callback function.

Chapter 2Understanding the System
92
You can also set these INI options using Documaker Studio’s Manage, System, Settings option. Here is an example:
Keep in mind this applies to...
• A batch of transactions. Each transaction within that batch will print to a single type of printer.
• Both single and multiple step processing of transaction batches.
Single step processing has limitations as compared to multiple step processing and this feature does not remove those limitations. Single step processing optimizes the processing of transactions that do not require recipient batching. Single step processing is, therefore, intended for use with a single input batch of transactions for a single recipient or a single transaction with one or more recipients, such as in real-time processing.
While you can specify multiple printers and associate a different printer per recipient batch, single step processing can still only process a single recipient batch at a time. Therefore, it is not possible to do the same type of multi-batch processing in single step as is done in multiple step processing. A given set of transactions can specify a single recipient and you can map that recipient to a different type of printer.
Real-time transaction processing of single transactions may also benefit from this by using the multi-file callback method to split output files, along with necessary logic to create unique file names for each output file. When used in this manner, single step processing of a single, real-time transaction can call a different driver for each recipient in the transaction.

Controlling WIP Field Assignments
93
CONTROLLINGWIP FIELD
ASSIGNMENTS
You can use options in the Trigger2WIP control group to set almost all of the WIP record fields for each transaction.
NOTE:Do not try to set the ModifyTime, InUse, or the FormSetID fields of the WIP record. The ModifyTime field is assigned by the system when a WIP record is added or updated. If you need to save a date and time for the transaction, store that information in the CreateTime field, using the hextime X format for the destination as shown in one of the examples.
The InUse field is used internally to prevent multiple people from editing the same transaction. Let the system manage this column.
The FormSetID is assigned by the system when a new WIP transaction is created. Let the system handle this.
The Trigger2WIP control group defines which recipient batch (RCB) transaction fields from the manual batch (those kicked to WIP) are mapped to the corresponding WIP transaction record fields.
The options under the Trigger2WIP control group define the mappings as shown here:
RCBField represents one of the fields defined by the batch transaction record definition (RCBDFDFL.DFD). WIPField represents a field defined in the WIP database.
NOTE:There may be an external WIP.DFD file that identifies the fields in a WIP record. An external DFD file is not required if you are using the default WIP database layout.
Note, although the normal mapping technique is to name a RCB field on the left side, the left side can name any defined GVM (global variable member). Typically, the only GVMs that exist during GenWIP processing are those defined in the RCB DFD file, but custom applications or single step WIP systems may have additional GVMs.
The changes in this release support this INI definition and also let you convert data or define a constant value you want to map to a WIP field. For a data conversion, define your INI options as shown here:
< Trigger2WIP >
RCBField = WIPField; input format ; output format;
The conversion information must appear on the right side of the INI option, after the WIPField name definition. Separate it from the named variable with a semicolon. Here is an example:
RunDate = CREATETIME;DD4;X
The contents of this field...
...is copied into this field< Trigger2WIP >
RCBField 1 = WIPField 1
RCBField 2 = WIPField 2
...

Chapter 2Understanding the System
94
The first semicolon denotes the input format of the data. The second separates the desired output format. In this example, the input format of DD4 means the source data is a date field in the format D4, which is YYYYMMDD.
The output format X indicates you want to convert the date value to the internal HEXTIME format used in the WIP CreateTime field.
NOTE:For more information selecting from the pre-defined date formats or defining your own, see the Rules Reference.
Although conversions are often used to change date formats, you can also use them to do additional formatting. The system supports a simple C style sprintf (%s) and constant text formatting, like %s, %10.10s, %-38.38s, and so on. The system does not support any of the other C style formats flags that assume non-text data or asterisk (variable width) designations.
Here is an example:
EFFVALUE = APPData; ;(%s%%)
Suppose in this example, that EFFVALUE contains the text 10, the resulting value mapped into the APPData field will read (10%).
NOTE:You must use two percent signs (%%) to represent a single percent sign in the output. The system only supports a string %s type format. It does not support numeric data formats of any type.
Normally, the left side of the INI option names a field from the RCB file definition. You can also enter NULL as a keyword to mean there is no corresponding RCB data field to associate with the WIP field. This lets you assign the constant data to the WIP field, as shown here:
NULL = DESC; ;ABC123 HERE WE GO
This example shows how to assign the constant text ABC123 HERE WE GO into the DESC field of the WIP record. NULL indicates there is no source variable to associate with this destination field.
You can also use INI built-in functions to provide a constant value to map to the field. For example:
NULL = CURRUSER; ;~GETENV USERNAME
INI built-in functions are preceded with a tilde (~). This example executes the GETENV built-in INI function, which gets the environment variable USERNAME. If you assume the variable contained the text TOM, the WIP variable CURRUSER would be assigned TOM after execution of the built-in function.
These options show the defaults used if the Trigger2WIP control group does not override the variables:
< AFG2WIP >
StatusCode = WIP
RecordType = NEW
UserID = DOCUCORP

Controlling WIP Field Assignments
95
The StatusCode option defines which INI option in the Status_CD control group to use as the default WIP StatusCD field. Suppose you have the following Status_CD control group defined.
< Status_CD
WIP =W
Assign =A
Quote =Q
BatchPrint =W
Archive =AR
Printed =P
This means a W would be assigned to the WIP StatusCD field (usually meaning a normal WIP transaction).
The RecordType option defines which INI option to locate in the Record_Type control group as the default setting for WIP RecType. Suppose you have these options defined:
< Record_Type >
New =00
Assign =01
Partial =02
New is the normal default for the AFG2WIP control group and would therefore map 00 into the WIP RecType field.
The UserID option defines which user should be assigned the WIP transactions in the CURRUSER field. Unless this option is changed or the CURRUSER field assigned from the Trigger2WIP control group, the system defaults this value to DOCUCORP. DOCUCORP is one of the default users created in a default user database.
You would normally want to add an option to the AFG2WIP control group to name a valid user in your company, otherwise, users will have to log in as DOCUCORP and reassign the WIP to valid users later.

Chapter 2Understanding the System
96
GENERATINGEMAIL
NOTIFICATIONSFROM GENWIP
You can enable the GenWIP program to send email. The GenWIP program will generate an email message by processing a message body template against variable data in the manual batch. It then sends the message when the document is added to WIP.
NOTE:See also the Printers Reference.
Email-specific data can be in the recipient batch read by the GenWIP program or in the INI file. The system checks the recipient batch first. If the field is not present or blank, the system then checks the INI option.
Below is a list of the fields the GenWIP program looks at to get email information. If you want to include other fields, you can use the INI built-in function to accomplish this.
Email is enabled in the GenWIP program when there is both a send-to email address and a subject or message body. The message body is expected to be in a separate file. Email attachment files are also supported and are processed as template files the same as the message body. You use these INI options to enable email processing:
< GenWIPEmail >
EnableEmailNotification=
MailMessageBody =
MailID =
MailSubject =
MailAttachment =
These field names to go into the RCBDFDFILE:
FIELDNAME = MAILID
FIELDNAME = MAILATTACHMENT_IN
FIELDNAME = MAILATTACHMENT_OUT
FIELDNAME = MAILSUBJECT
FIELDNAME = MAILIDFROMADDRESS
FIELDNAME = MAILMESSAGEBODY
Group: < FIELD:MAILID > entries:
INT_Type = CHAR_ARRAY
INT_Length = 51
EXT_Type = CHAR_ARRAY_NO_NULL_TERM
EXT_Length = 50
Option Description
EnableEmailNotification Enter Yes.
MailMessageBody Enter the path and file name for the email template.
MailID The email address to send. This is optional if the MAILID is omitted, you can send using this address.
MailSubject If the MAILSUBJECT is missing or blank, the system will use the text you enter here as the Subject.
MailAttachment The name of the file to attach.

Generating Email Notifications from GenWIP
97
Key = No
Required = Yes
Group: < FIELD:MAILATTACHMENT_IN > entries:
INT_Type = CHAR_ARRAY
INT_Length = 129
EXT_Type = CHAR_ARRAY_NO_NULL_TERM
EXT_Length = 128
Key = No
Required = Yes
Group: < FIELD:MAILATTACHMENT_OUT > entries:
INT_Type = CHAR_ARRAY
INT_Length = 129
EXT_Type = CHAR_ARRAY_NO_NULL_TERM
EXT_Length = 128
Key = No
Required = Yes
Group: < FIELD:MAILMESSAGEBODY > entries:
INT_Type = CHAR_ARRAY
INT_Length = 129
EXT_Type = CHAR_ARRAY_NO_NULL_TERM
EXT_Length = 128
Key = No
Required = Yes
Group: < FIELD:MAILSUBJECT > entries:
INT_Type = CHAR_ARRAY
INT_Length = 129
EXT_Type = CHAR_ARRAY_NO_NULL_TERM
EXT_Length = 128
Key = No
Required = Yes
Errors Here are the error messages that can appear:
Error Description
11226 Error in GENCreateEmail(): Unable to get <&Name&> does it exist in rcb dfd file?\n
11227 Error in GENCreateEmail(): Unable to process template check file <&filename&> for valid markup syntax\n
11228 Error in GENCreateEmail(): Unable to open file <&Name&>\n
11229 Error in GENCreateEmail(): Unable to QueryAPI <&apiname&> check for valid path to DLL <&dllname&>\n
11230 Error in GENCreateEmail(): Unable to Logon to email server\n

Chapter 2Understanding the System
98
11231 Error in GENCreateEmail(): Unable to set <&data&> check INI file for valid <&inigroup&> <&inioption&>\n
11232 Error in GENCreateEmail(): Unable to get <&data&> check INI file for <&inigroup&> <&inioption&>\n
11233 Error in GENCreateEmail(): failed to send e-mail <&userid&> <&emailaddress&>\n
Error Description

Using Multi-mail Processing
99
USING MULTI-MAIL
PROCESSING
Multi-mail processing groups the transactions with the same multi-mail code into selected print batches based on the number of pages defined in the PageRange INI option. Multi-mail can only be handled as a 2-up process. In the INI example below, all transactions with the same multi-mail will be stored in a batch category:
batch1-less than five pages
batch2-five to nine pages
batch3-10 or more pages
The MM_FIELD option in the TRN_Field control group identifies position, length, type of data and where the multi-mail code is located in the transaction record.
NOTE:The parameter has been named MM_FIELD in the above explanation, however it can be given any name.
The BatchByPageCount rule in the AFGJOB.JDT file identifies the name in the TRN_Field control group, as shown here:
BatchByPageCount;;MMFIELD=MM_FIELD;
Changing the RCPDFDFL.DAT and TRNDFDFL.DAT Files You must make the following changes to the RCPDFDFL.DAT and TRNDFDFL.DAT files for multi-mail processing:
< Fields >
::::::
FIELD:MMField
< FIELD:MMFIeld >
INT_Type = CHAR_ARRAY
INT_Length = 7
EXT_Type = CHAR_ARRAY_NO_NULL_TERM
EXT_Length = 6
Key = N
Required = N

Chapter 2Understanding the System
100
Setting Up the FSISYS.INI File for Multi-mail ProcessingHere is an example of how the relevant control groups and options in your FSISYS.INI file should look:
< Print_Batches >
P_Batch1 = .\data\Batch1
P_Batch2 = .\data\Batch2
P_Batch3 = .\data\Batch3
Error = .\data\Error
Manual = .\data\Manual
< P_Batch1 >
Printer = Batch1_PTR_1
Printer = Batch1_PTR_2
FinalPrinter = Batch1_PTR_F
PageRange = ,4 (controls which batch is used)
TwoUpStart = L
< P_Batch2 >
Printer = Batch2_PTR_1
Printer = Batch2_PTR_2
FinalPrinter = Batch2_PTR_F
PageRange = 5,9 (controls which batch is used)
TwoUpStart = L
< P_Batch3 >
Printer = Batch3_PTR_1
Printer = Batch3_PTR_2
FinalPrinter = Batch3_PTR_F
PageRange = 10,99 (controls which batch is used)
TwoUpStart = L
< TRN_FIELDS >
...
MM_Field = 326,6,N (defines where the multi-mail code
is found in each transaction)
The order of the page output on the final print file will produce 2-up printing depending on how many intermediate printer files are specified. The output will look as follows:
< P_Batch2 >
Printer = Batch2_PTR_1 intermediate printer file
Printer = Batch2_PTR_2 intermediate printer file
FinalPrinter = Batch2_PTR_F intermediate printer file
PageRange = 5,9
TwoUpStart = L
transaction #1 mmcode 111 page 1transaction n mmcode 555 page 1
transaction #1 mmcode 111 page 2transaction n mmcode 555 page 2
transaction #1 mmcode 111 page ntransaction n mmcode 555 page 3
transaction #2 mmcode 126 page 1transaction n mmcode 555 page 4
transaction #2 mmcode 126 page 2transaction n mmcode 555 page 5
transaction #2 mmcode 126 page ntransaction n mmcode 555 page n
transaction #3 mmcode 222 page 1transaction x mmcode 865 page 1
transaction #3 mmcode 222 page 1transaction x mmcode 865 page 2
transaction #3 mmcode 222 page ntransaction x mmcode 865 page n
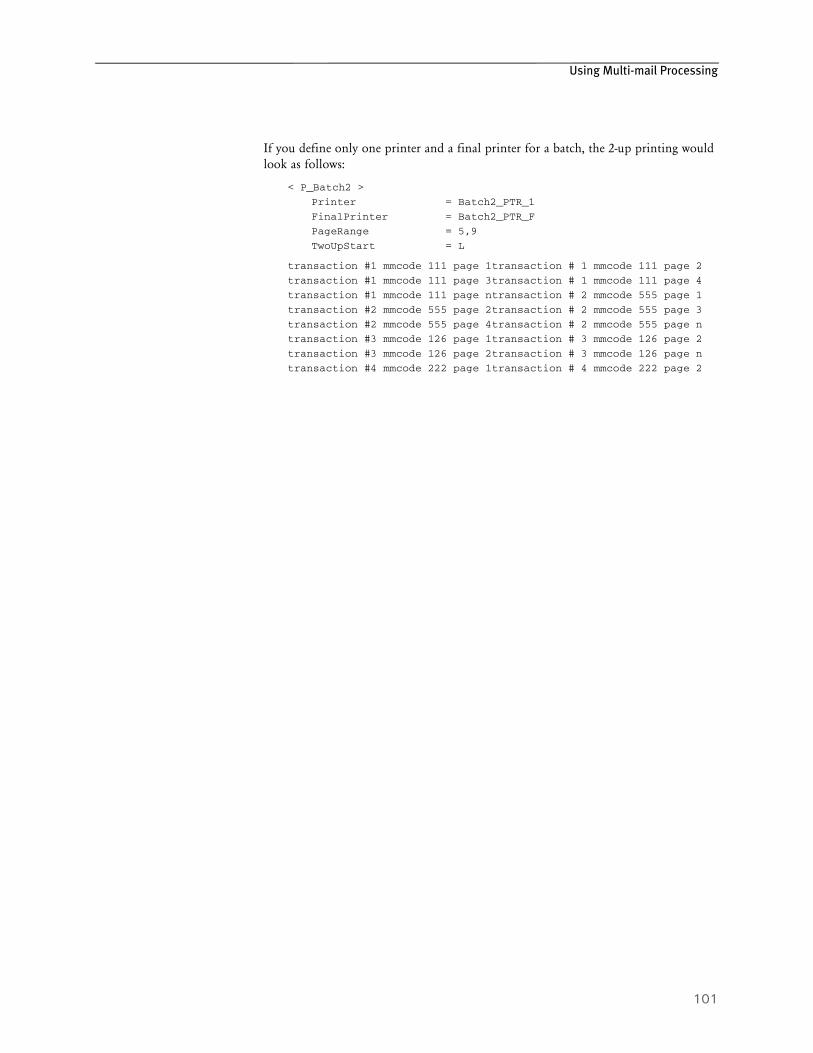
Using Multi-mail Processing
101
If you define only one printer and a final printer for a batch, the 2-up printing would look as follows:
< P_Batch2 >
Printer = Batch2_PTR_1
FinalPrinter = Batch2_PTR_F
PageRange = 5,9
TwoUpStart = L
transaction #1 mmcode 111 page 1transaction # 1 mmcode 111 page 2
transaction #1 mmcode 111 page 3transaction # 1 mmcode 111 page 4
transaction #1 mmcode 111 page ntransaction # 2 mmcode 555 page 1
transaction #2 mmcode 555 page 2transaction # 2 mmcode 555 page 3
transaction #2 mmcode 555 page 4transaction # 2 mmcode 555 page n
transaction #3 mmcode 126 page 1transaction # 3 mmcode 126 page 2
transaction #3 mmcode 126 page 2transaction # 3 mmcode 126 page n
transaction #4 mmcode 222 page 1transaction # 4 mmcode 222 page 2

Chapter 2Understanding the System
102
USINGADDRESSEE
RECORDS
Addressee records support class recipients and individual addressee-based processing. Each addressee is written to batch files as a separate record for subsequent printing or processing. This lets you uniquely distribute documents for a given recipient type to a specific address, such as a mailing address, email address, or fax number.
USING ADDRESSEE RECORDS IN BATCH FILES
Correspondence applications often need to send copies of a recipient document set to multiple addressees. You may want to have each addressee produce a separate batch record when multiple addressees are included for a given recipient. Such records can be further processed or ultimately printed.
NOTE:To activate the use of Addressee records in the extract dictionary, see the Documaker Studio User Guide.
Once enabled, Documaker Server (GenPrint and single step processing) can then assign the addressee index and a new batch record for each addressee recipient (CC recipient). The system uses your entries in the ADR_Index control group in the recipient DFD file (RCBDFDFL.DFD). Set up these INI options as shown here:
< Fields >
FieldName = ADR_Index
< Field:ADR_Index >
INT_Type = Long
EXT_Type = CHAR_ARRAY_NO_NULL_TERM
EXT_Length = 10
The ADR_Index contains the sequence index of the CC addressee specified for that batch record. In addition, you can include other information from the addressee mapped data in the recipient batch record. To do this, prefix the name of the addressee variable names with ADR_, such as ADR_NAME.
This takes the Name member from the addressee mapped information and includes it in the associated batch record member. This ADR_Index record is then present in the batch record definition file.
Option Description
Fields List control group
FieldName Enter ADR_Index.
Field:ADR_Index control group
INT_Type Specify the internal type as Long.
EXT_Type Specify the external type as CHAR_ARRAY_NO_NULL_TERM
EXT_Length Specify the length as 10.

Using Addressee Records
103
Using Address Records for PrintingCorrespondence applications often need to send copies of a recipient document set to multiple addressees. When writing addressee information into batch records, the system makes sure only specified addressees print for a given recipient.
Once you enable addressee records, Documaker Server (GenPrint and single step processing) can then assign the addressee index and a batch record for each addressee recipient (CC recipient). The system uses your entries in the ADR_Index control group in the recipient DFD file (RCBDFDFL.DFD). Set up these INI options as shown here:
< Fields >
FieldName = ADR_Index
< Field:ADR_Index >
INT_Type = Long
EXT_Type = CHAR_ARRAY_NO_NULL_TERM
EXT_Length = 10
These entries make sure the ADR_Index record is present in the batch record definition file. When the batch record for a recipient is read by the GenPrint program, and the ADR_Index member has a value other than zero (0), only that recipient addressee/CC prints. If the value is zero (0), all found addressee records print.
Option Description
Fields List control group
FieldName Enter ADR_Index.
Field:ADR_Index control group
INT_Type Specify the internal type as Long.
EXT_Type Specify the external type as CHAR_ARRAY_NO_NULL_TERM
EXT_Length Specify the length as 10.

Chapter 2Understanding the System
104
ADDING ANDREMOVING
PAGES
You can add and remove blank pages or a FAP file to a form set. Typically, you would add these pages so each printed page has a front and back.
This lets you change a simplex or mixed plex form set into a fully duplexed form set. For instance, you can use this feature to create PDF files for mixed plex form sets that print in a similar fashion to printers that support mixed plex.
You can access this functionality several ways:
• Using custom code
• Using DAL scripts
• Using Docupresentment rules (version 1.6 and higher)
NOTE:Typically, you use this feature to add blank pages just before the print step. These additional pages are not actually part of the saved document.
If, however, if you added the blank pages before the batch steps that save document information to the NA/POL files, the blank pages would become a permanent part of the document layout.
USING CUSTOM CODE
Adding pages Use this API to call custom code to add blank pages:
DWORD _VMMAPI FAPAddBlankPages(
VMMHANDLE objectH, /* form set or form handle */
char FAR * sectionname) /* if NULL, "Blank Page" */
If the section name is NULL, a blank page is created when a dummy page is needed. If the section name is not NULL, the section name is loaded when a dummy page is needed. Omit the path and file extension when you enter sectionname.
Removing pages Use this API to call custom code to remove blank pages:
DWORD _VMMAPI FAPDelBlankPages(VMMHANDLE objectH)
/* formset or form handle */
USING DAL SCRIPTS
Adding pages Use this DAL function to add blank pages:
AddBlankPages()
or
AddBlankPages('FAPFile')
For example, you can use this function with the banner processing feature. First, specify a DAL script that runs at the start of each transaction. The DAL script calls the AddBlankPages function. This tells the system to convert each transaction to a fully duplexed form set with blank pages added as needed.
Here is an example of the INI settings you would need:

Adding and Removing Pages
105
< Printer >
EnableTransBanner = True
TransBannerBeginScript = PreBatch
< DALLibraries >
Lib = BANNER
Here is an example of the BANNER.DAL script:
BeginSub PreBatch
AddBlankPages()
EndSub
Removing pages Use this DAL function to remove a page from a form set:
DelBlankPages()
For example, you can use this function with the banner processing feature. First, specify a DAL script that runs at the start of each transaction. The DAL script calls the DelBlankPages function. This tells the system to remove blank pages from each transaction.
< Printer >
EnableTransBanner = True
TransBannerBeginScript = PreBatch
< DALLibraries >
Lib = BANNER
Here is an example of the BANNER.DAL script:
BeginSub PreBatch
DelBlankPages()
EndSub

Chapter 2Understanding the System
106
USING IDSFor more information on the rules listed below see Using the Documaker Bridge.
Adding pages Use this IDS rule to add blank pages:
function = dpros2->DPRAddBlankPages
This IDS rule assumes the form set being used has been loaded by the Documaker Bridge into the DSI variable, DPRFORMSET. If you are using this rule with a different bridge, you may need to specify a different DSI variable that contains the form set.
To specify a FAP file to use for the dummy pages, add the name of that FAP file after the form set variable name when you specify the IDS rule. Here is an example:
function = dpros2->DPRAddBlankPages,DPRFORMSET,FAPFile
Removing pages Use this IDS rule to remove blank pages:
function = dpros2->DPRDelBlankPages
This IDS rule assumes that the form set has been loaded by the Documaker Bridge into the DSI variable, DPRFORMSET. If you are using this rule with a different bridge, you may need to specify a different DSI variable.
To specify the FAP file being used for dummy pages, add the FAP file name after the form set variable name when you specify the IDS rule. Omit the path and extension. Here is an example:
function = dpros2->DPRAddBlankPages,MTCFORMSET

Adding Indexes and Tables of Contents
107
ADDINGINDEXES AND
TABLES OFCONTENTS
Using Documaker Studio, you can insert tables of contents, lists of figures or indexes to your form sets. This makes it easier for users to navigate through the various forms.
To use this feature, all sections must be loaded before the print operation executes. Otherwise, the system will not have all the content available and will not be able to create a complete table of contents, list of figures, or index. Since some print drivers do not force the loading of all sections until necessary, this means you may have to include an additional INI option.
For Documaker Server (GenPrint), you would include this option:
< RunMode >
DownloadFAP = Yes
Chapter 2Understanding the System
108
USING RUN-TIME OPTIONS
The system offers several ways you can customize the way it runs. The following topics discuss these options.
GENDATA COMMAND LINE OPTIONS
The GenData program accepts several command line options. Command line options are prefixed with either a backslash (/) or a dash (-). Here is an example:
c:fap\mstrres\dms1\gendaw32 /ini=my.ini
The command line options are explained below:
GENPRINT COMMAND LINE OPTIONS
The GenPrint program accepts several command line options. Command line options begin with either a backslash (/) or a dash (-). Here is an example:
c:fap\mstrres\dms1\genptw32 /ini=my.ini
The command line options are explained below:
Option Description
CNT Overrides the number of transactions specified in the CheckCount option in the Restart control group. This count specifies the frequency of updating offsets for GenData restart processing.
INI Tells the program to use the specified FSIUSER.INI file instead of the one in the current directory.
JDT Tells the program to use the specified AFGJOB.JDT file instead of the one defined in the FSIUSER.INI or FSISYS.INI files.
L Writes the names of the INI files and options the program uses in the log file.
? Displays the command line options for the program.
Option Description
INI Tells the program to use the specified FSIUSER.INI file instead of the one in the current directory.
L Writes the names of the INI files and options the program uses in the log file.
? Displays the command line options for the program.

Using Run-Time Options
109
GENTRN COMMAND LINE OPTIONS
The GenTrn program accepts several command line options. Command line options are prefixed with either a backslash (/) or a dash (-). Here is an example:
c:fap\mstrres\dms1\genTnw32 /ini=my.ini
The command line options are explained below:
DEBUGGING OPTIONS
You can use the following options in the Debug_Switches control group to turn on or off debugging options.
< Debug_Switches >
Debug_If_Rule = Yes
Enable_Debug_Options = Yes
Show_Debug_Options = Yes
LoadListFromTable = Yes
Option Description
B Tells the program to build only the transaction file.
F Tells the program to build only the filter extract file.
FB Tells the program to build only the filter extract and transaction files.
INI Tells the program to use the specified FSIUSER.INI file instead of the one in the current directory.
L Writes the names of the INI files and options the program uses in the log file.
? Displays the command line options for the program.
Option Description
Debug_If_Rule Set to Yes if you want to turn on the debug options for the IF and DAL rules. The system places the debug data in the LOGFILE.DAT file. Setting this option to Yes slows performance.
Enable_Debug_Options Set this option to Yes to turn on all debug options.
Show_Debug_Options Set this option to Yes to make the GEN_DEBUG_DebugSwitchSet function log the state (on or off) of all debug options.
LoadListFromTable Set this option to Yes to make the Gen_TabUtil_LoadListFromTable function log the contents of any ASCII table it loads.

Chapter 2Understanding the System
110
Noting font IDs of zero You can use the CheckZeroFontID option to tell the system to display a warning or error message if the field being processed contains a font ID equal to zero (0).
Typically, this means no font was assigned during the mapping. Since the merging of FAP and DDT files in version 11.0, the field definition should be complete at the time of processing. So if you encounter a field with no font ID assigned, it probably means some unusual situation has occurred — like the field was defined via an import method but not actually defined on the FAP file where it resides.
Here is an example of the CheckZeroFontID option:
< RunMode>
CheckZeroFontID =
Suppressing elapsedruntime messages
You can suppress the elapsed runtime message by setting the ElapsedTimeStamp option to No. This turns off the elapsed runtime message for the error, log, and trace files. Here is an example:
< Control >
ElapsedTimeStamp = No
NOTE:You can use the existing ErrorFileDateStamp and LogFileDateStamp options to turn off the time stamp in the error and log files. The new ElapsedTimeStamp option controls the elapsed runtime message.
Option Description
CheckZeroFontID Enter Yes (or Error) to have the system to issue an error message if it encounters a font ID set to zero (0). If you enter Yes (or Error) and the system encounters a font ID of zero, you get a message similar to this:
DM30046: Error: Field < FLDNAME > on Image < IMGNAME > has Font ID = 0. The field may have been included incorrectly or the FAP has not been updated to include the field's definition.
Enter Warn if you want the system to issue a warning message if it encounters a font ID set to zero. If you enter Warn and the system encounters a font ID of zero, you will get a message similar to this:
DM30046: Warning: Field < FLDNAME > on Image < IMGNAME > has Font ID = 0. The field may have been included incorrectly or the FAP has not been updated to include the field's definition.
In either message, FLDNAME and IMGNAME are reflect the appropriate field name and section (image) name.The default is No, which means nothing is checked and no message is issued.
Option Description
ElapsedTimeStamp Enter No to suppress the elapsed runtime message for the error, log, and trace files. The default is Yes.

Using Run-Time Options
111
GROUPING PRINT BATCHES
If you want to group all of your print batches (BCH files) in one file, follow these steps:
1 Add two options to the FSISYS.INI file. In the RunMode control group, set the AliasPrintBatches option to Yes. In the Data control group, add the BatchTable option. Set this option as shown below:
BatchTable = <tablename>
If you omit the path, the system uses your entry in the DataPath option of the Data control group.
2 Add a key to the RCBDFDFL.DFD file. In the Fields control group, add the following option:
FieldName = BatchName
Add the option exactly as shown here. Do not substitute the desired batch name, here or in any of the following steps.
3 Add a corresponding FIELD:BatchName control group. Note that the lengths you specify in this group must be sufficient to hold the batch name (the option side of the equations in the Print_Batches control group). In the Keys control group, add the following option:
Key = BatchName
and add a corresponding KEY:BatchName control group, with these options:
FieldList = BatchName
Expression = BatchName
If you are using ASCII for the print batch, after you run the GenData program you must sort the batch file using the BatchName field as the key. If you are using xBase or DB2, you should be able to run the GenPrint program without this step.
NOTE:If you are using ASCII for the print batches, be sure to place the BatchName field directly before the NA_Offset field in the RCBDFDFL.DFD file. And when sorting, use the BatchName and NA_Offset fields together as the key.
This will help make sure the print output is identical to that produced with multiple batches. If you are using xBase or DB2, you do not need these additional instructions.

Chapter 2Understanding the System
112
CONTROLLING CONSOLE LOGGING
When processing a large number of transactions, you can see how far along you are without affecting performance by using the LogToConsole option. This option lets you control how often the console is updated with progress information.
Using the LogToConsole option, you specify the number of transactions that should be processed before that information is logged on the console. For instance, if your processing run consisted of 10,000 transactions, you could set the option to log progress on the console after every 1000 transactions are processed. Here is an example:
< Control >
LogToConsole = 1000
LOGGING INI FILE NAMES AND OPTIONS
You can log INI file names and options in the TRACE file during GenTrn, GenData, GenPrint, GenArc, and Documaker Studio processing.
To turn on the logging of INI file names and options, include these INI options:
< Debug_Switches >
Enable_Debug_Options = Yes
INILib = Yes
For the GenTrn, GenData, GenPrint, and GenArc programs, you can include the /L command line parameter to log these file names and options in the TRACE file.
NOTE:Logging the INI file names and options in the TRACE file replaces the writing of the INI file names and options to the LOGFILE as was done prior to version 11.1, patch 02.
Option Description
LogToConsole Enter the number of transactions you want the system to process before it logs its progress on the console. For instance, enter 1000 to have the system tell you each time it processes 1000 transactions.
If you leave this option blank or enter Yes, the system logs the processing of each transaction on the console. If you enter a number, such as 1000, the system will send a log message to the console each time it processes that number of transactions.
Keep in mind that logging information to the console affects performance. The more often the system logs information to the console, the greater the affect.
Consider how many transactions you will process in the run and use that number to determine appropriate progress benchmarks.
If you enter No, the system will not notify you of its progress.

Using Run-Time Options
113
LISTING THE RULES EXECUTED
Use the following INI options to tell the system to create a list of the Documaker Server rules executed and the amount of time (in milliseconds) spent for each execution:.
< Debug_Switches >
Enable_Debug_Options = Yes
BaseRuleTime = Yes
FormSetRuleTime = Yes
ImageRuleTime = Yes
ImageFuncTime = Yes
FieldFuncTime = Yes
The rule timings are written to a standard debug trace file. Individual records are tab-delimited with the following fields:
Turn off the time stamp associated with the rule timing options listed above, set the PrintTimeStamp option to No.
< Debug_Switches >
PrintTimeStamp = No
Option Description
Enable_Debug_Options Enter Yes to turn on the logging service.
BaseRuleTime Enter Yes to report base or job-level (level 1) rules.
FormSetRuleTime Enter Yes to report form set-level (level 2) rules.
ImageRuleTime Enter Yes to report image-level (level 3) rules.
ImageFuncTime Enter Yes to report image functions.
FieldFuncTime Enter Yes to report field functions.
Field Description
Standard Log Trace info
This field tells you the log entries data, time, and process ID. You can omit this information using the PrintTimeStamp option (see below).
Rule Type This field provides information like: Base Rule Forward, Base Rule Reverse, and so on.
Time Spent Label The comment label for the Time Spent field:
Time Spent (sec)
Time Spent The time, in milliseconds, spent executing the rule.
Rule Name The name of the rule. Image functions use this format:
"Image Name"."Rule Name"
Field functions use this format:
"Image Name"."Field Name"."Rulename"

Chapter 2Understanding the System
114
ANALYZING DAL PERFORMANCE
In addition to DAL profile information which includes the time spent per function (DAL subroutine), the system places information into the TRACE file about the total time spent in each function and number of times each function is called.
An example of this information is shown below. This example is from a GenData run which processed 600 transactions. The total processing time was 23 seconds. Only the beginning of the log is shown because of space considerations.
The log is sorted by the cumulative time spent in each script with longest running scripts at the top. The log information appears in the trace file and is written out when the program terminates.
You will find this information appears in the log:
Some scripts look like they are listed twice, but are not. For instance, in the example below PostTrans_Prod() and PostTrans_Prod actually are the script that had a call to PostTrans_Prod (all it had was “PostTrans_Prod()”) and the actual PostTrans_Prod DAL subroutine.
When you analyze the log, keep these things in mind:
• The scripts you need to review are usually the scripts at the top of the log.
• Review any scripts that are executed more times than number of transactions in the run. You can probably modify your implementation so the script is run no more than once per transaction or once per job.
• Review the scripts that run the longest and see if they can be optimized. For example, move assignment of variables outside the loop. Consider parts that can be executed only when needed.
• Typically, scripts that take longer to run or receive a higher number of calls are good candidates for review of either the script itself or the implementation.
• Clock resolution is set at one millisecond. If a script executes in less than one millisecond, the time spent equals zero (0). Scripts that show a high number of calls, even if the time is shown as zero (0), or a relatively small number are good candidates for optimization.
Item Description
Executed XXX The number of times script was executed.
Cumulative run time X.XXX
The time in seconds dot milliseconds spent in this script and all scripts/code that was executed from this script.
Compiled or Non-compiled
Whether or not the script was compiled.
Name The name of the script or the actual script if it was not in an external file.

Using Run-Time Options
115
NOTE:The extra logging does affect total time spent executing the program being analyzed and should not be turned on in a production environment or left on when not needed.
Executed 600 times Cumulative run time 2.840 Non-compiled Script PostTrans_Prod()
Executed 600 times Cumulative run time 2.824 Compiled Script PostTrans_Prod
Executed 600 times Cumulative run time 2.451 Non-compiled Script PREFILL_VARS()
Executed 600 times Cumulative run time 2.420 Compiled Script PREFILL_VARS
Executed 600 times Cumulative run time 1.954 Compiled Script DEFLIB\BarCode.DAL
Executed 534 times Cumulative run time 0.792 Compiled Script DEFLIB\Delete_Images.DAL
Executed 1150 times Cumulative run time 0.784 Non-compiled Script CALL("SERVPHONENUM")
Executed 1150 times Cumulative run time 0.737 Compiled Script DEFLIB\SERVPHONENUM.DAL
Executed 600 times Cumulative run time 0.372 Non-compiled Script COPYCOUNT()
Executed 1813 times Cumulative run time 0.359 Non-compiled Script call("INSUREDNAME1")
Executed 1813 times Cumulative run time 0.312 Compiled Script DEFLIB\INSUREDNAME1.DAL
Executed 600 times Cumulative run time 0.295 Compiled Script COPYCOUNT
Executed 1180 times Cumulative run time 0.234 Non-compiled Script call("INSUREDNAME2")
Executed 1200 times Cumulative run time 0.205 Non-compiled Script call("BROKERNAMELIT")
Executed 1180 times Cumulative run time 0.203 Compiled Script DEFLIB\INSUREDNAME2.DAL
Executed 567 times Cumulative run time 0.186 Non-compiled Script Return ((?("POL.NUM.LIT")) & " " & (?("INS.POL.NUM")) & (?("INS.POL.YREFF")))
Executed 1200 times Cumulative run time 0.186 Non-compiled Script Call("DMGMERGESETID")
Executed 1137 times Cumulative run time 0.173 Non-compiled Script call("POLEFFDATE")
Executed 534 times Cumulative run time 0.159 Non-compiled Script MSGB03A()
Executed 534 times Cumulative run time 0.158 Non-compiled Script MSGD12A1()
Executed 600 times Cumulative run time 0.158 Non-compiled Script CALL("SERVADDR1DAL")
Executed 534 times Cumulative run time 0.142 Non-compiled Script MSGS04A()
Executed 534 times Cumulative run time 0.141 Non-compiled Script MSGB07B()
Executed 1137 times Cumulative run time 0.139 Non-compiled Script call("POLEXPDATE")
Executed 534 times Cumulative run time 0.126 Non-compiled Script MSGS09B()
Executed 1149 times Cumulative run time 0.126 Non-compiled Script call("DUEDATE")
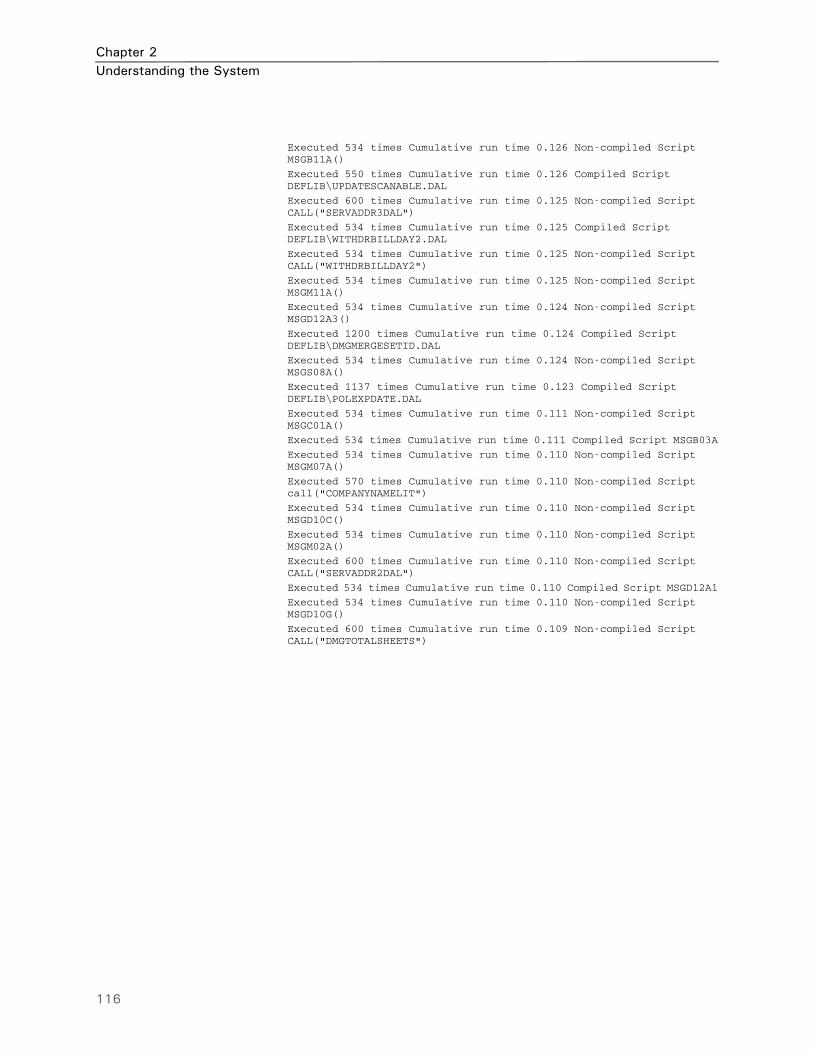
Chapter 2Understanding the System
116
Executed 534 times Cumulative run time 0.126 Non-compiled Script MSGB11A()
Executed 550 times Cumulative run time 0.126 Compiled Script DEFLIB\UPDATESCANABLE.DAL
Executed 600 times Cumulative run time 0.125 Non-compiled Script CALL("SERVADDR3DAL")
Executed 534 times Cumulative run time 0.125 Compiled Script DEFLIB\WITHDRBILLDAY2.DAL
Executed 534 times Cumulative run time 0.125 Non-compiled Script CALL("WITHDRBILLDAY2")
Executed 534 times Cumulative run time 0.125 Non-compiled Script MSGM11A()
Executed 534 times Cumulative run time 0.124 Non-compiled Script MSGD12A3()
Executed 1200 times Cumulative run time 0.124 Compiled Script DEFLIB\DMGMERGESETID.DAL
Executed 534 times Cumulative run time 0.124 Non-compiled Script MSGS08A()
Executed 1137 times Cumulative run time 0.123 Compiled Script DEFLIB\POLEXPDATE.DAL
Executed 534 times Cumulative run time 0.111 Non-compiled Script MSGC01A()
Executed 534 times Cumulative run time 0.111 Compiled Script MSGB03A
Executed 534 times Cumulative run time 0.110 Non-compiled Script MSGM07A()
Executed 570 times Cumulative run time 0.110 Non-compiled Script call("COMPANYNAMELIT")
Executed 534 times Cumulative run time 0.110 Non-compiled Script MSGD10C()
Executed 534 times Cumulative run time 0.110 Non-compiled Script MSGM02A()
Executed 600 times Cumulative run time 0.110 Non-compiled Script CALL("SERVADDR2DAL")
Executed 534 times Cumulative run time 0.110 Compiled Script MSGD12A1
Executed 534 times Cumulative run time 0.110 Non-compiled Script MSGD10G()
Executed 600 times Cumulative run time 0.109 Non-compiled Script CALL("DMGTOTALSHEETS")

Using Run-Time Options
117
Handling Large Extract and NAFILE FilesPrior to version 11.5, during processing the system stored records which contained offsets back into the originating transaction record. This offset was stored as a 32-bit integer (a 32-bit LONG, where a LONG integer can have a value of less than 2 gigabytes). Because the value of these offset references to the input was limited to less than 2 gigabytes (GB), the maximum size of the input data that could be stored and processed was also limited to less than 2 GB. The system would warn you with one of these messages if it was approaching the limit:
NOTE:Prior to version 11.5, you would divide the input into multiple files to work around this limitation.
This limitation was removed in version 11.5, which lets you process input files that exceed 2 GB. The solution differs, depending on the platform you run on. The following topics describe the solution for the various platforms.
Handling Large Files on Windows, UNIX, and LinuxOn the Windows, UNIX, and Linux platforms, the system uses a 64-bit integer value to allow for larger offset values to be written to the TRNFILE, NEWTRN, and Recipient Batch output files. To process input files larger than 2 GB, you must update the TRNDFDFL.DFD and RCBDFDFL.DFD files to reflect these larger file offsets.
NOTE:The TRNDFDFL.DFD and RCBDFDFL.DFD files are usually stored in the DEFLIB directory.
Change the following fields in the TRNDFDFL.DFD and RCBDFDFL.DFD files from a data type of LONG to a data type of LONG_LONG and expand the length from 10 to 19 characters.
Here is an example of the changes you would make:
< Field:X_Offset >
INT_Type = LONG_LONG
EXT_Type = CHAR_ARRAY_NO_NULL_TERM
EXT_Length = 19
Key = No
Required = No
< Field:NA_Offset >
INT_Type = LONG_LONG
EXT_Type = CHAR_ARRAY_NO_NULL_TERM
Program Message
GenTrn DM15065: Error in BuildTrnRecs(): Offset for extract file is approaching 2GB limit.
GenData DM30049: Error in <RULLoadXtrRecs>(): Offset for extract file is approaching 2GB limit.

Chapter 2Understanding the System
118
EXT_Length = 19
Key = No
Required = No
< Field:POL_Offset >
INT_Type = LONG_LONG
EXT_Type = CHAR_ARRAY_NO_NULL_TERM
EXT_Length = 19
Key = No
Required = No
Using theAutoIncreaseOffset
Lengths option
The AutoIncreaseOffsetLengths INI option lets you prevent the automatic increasing of the X_Offset, NA_Offset, and POL_Offset field lengths from 10 bytes to 19 bytes.
< Control >
AutoIncreaseOffsetLengths =
Handling Large Extract and NAFILE Files on z/OSOn z/OS, files larger than 2 gigabytes in size are processed as Virtual Storage Access Method (VSAM) Key Sequenced Data Set (KSDS) files. See the following topics in the Documaker Installation Guide for information on setting up the extract file and the NAFILE/POLFILE pair as VSAM KSDS files:
• Defining the Extract file as a VSAM KSDS
• Creating NAFILEs and POLFILEs as VSAM KSDSs
NOTE:The capability to define the extract file as a VSAM KSDS was added in version 11.5. The capability to create the NAFILE and POLFILE as VSAM KSDS files was added in version 9.7.
Option Description
AutoIncreaseOffsetLengths Before the release of version 11.5, the maximum size of the extract, NAFILE, and POLFILE files was 2.2 gigabytes. Offsets into these files took 10 digits to represent, for example 2,200,000,000. Version 11.5 added support for files larger than 2.2 gigabytes and to accommodate the larger files, the X_Offset, NA_Offset, and POL_Offset fields were automatically increased from the value (usually 10) in the DFD file to 19.To begin reading and writing of files over 2.2 gigabytes, you did not have to change your DFD files, but, the automatic increasing of the length of these fields causes the record length of the TRNFILE, NEWTRN, and recipient batch files, which contain these fields, to be increased.
If you do not want the record length for these files to be changed, set this option to No. The default is Yes.

Controlling What is in the MultiFilePrint Log
119
CONTROLLINGWHAT IS IN THEMULTIFILEPRINT
LOG
Use the MultiFileLogRecord option to control the content of the log file produced during multi-file printing. For certain print drivers (PDF, RTF, XML, or HTML), you must generate a separate print file for every transaction in a batch.
During this process, the system creates a log file to keep track of the print files it creates. The MultiFileLogRecord option lets you control the contents of the log file produced.
For multiple step processing using the multi-file callback function, you must change the FSISYS.INI file as shown below:
< Print >
CallbackFunc = MultiFilePrint
MultiFileLog = {log file name and path}
MultiFileLogRecord = ~DALRUN MyScript.DAL
The system first looks for MultiFileLog option in the logical printer control group first, such as Printer1, Printer2, Printer3, and so on. If not found, it then looks for this option in the Print control group.
To control the information written to the MultiFileLog file, specify the name of the DAL script, such as MyScript.DAL, in the MultiFileLogRecord option. The system will then execute this script whenever a new output file needs to be created. If a string is returned, the string is used instead of building the log record as a set of semicolon delimited fields. If an empty string is returned, the current log record format is produced.
NOTE:A linefeed is appended to the string before it is written to the log file.
The DAL script could be as simple as one that returns the string from the DAL function, DeviceName. Here is an example:
RETURN( DeviceName() )
NOTE:For more information about multiple step processing, see Using Multiple step Processing on page 22 and the discussion of the MultiFilePrint callback function in Using the PDF Print Driver.
For this processing mode You set the
Multiple step processing (GenTrn, GenData, and GenPrint)
CallbackFunc option in the Print control group to MultiFilePrint
Single step processing(GenData)
MultiFilePrint option in the PrintFormset control group to Yes

Chapter 2Understanding the System
120
In single step processing (GenData), use the MultiFilePrint option in the PrintFormset control group, as shown here:
< PrintFormset >
MultiFilePrint = Yes
LogFileType =
LogFile = {log file name and path}
MultiFileLogRecord = ~DALRUN MyScript.DAL
... (other applicable options omitted - see the following note)
The PrintFormset rule checks for the MultiFileLogRecord option and if a string is returned, it uses the string instead of building the log record as a set of semicolon delimited fields. If an empty string is returned, the current log record format is produced.
If you set the LogFileType option to XML, the system generates a log file using XML and ignores the MultiFileLogRecord option.
NOTE:There are additional INI settings required for single- and multiple step processing. For more information about single step processing, see the discussion of the PrintFormset rule in the Rules Reference.

Using INI Built-In Functions
121
USING INIBUILT-IN
FUNCTIONS
You can use these INI built-in functions when running the system:
There are also several functions you can use to retrieve information from WIP records. See Accessing WIP Fields on page 125 for more information.
And, see Defining Built-in Functions via Studio on page 129 for information on how you can use Documaker Studio to define built-in functions.
Built-in function Form more information, see
~GetEnv ~GetEnv on page 122
~GVM ~GVM on page 122
~Platform ~Platform on page 123
~OS ~OS on page 123
~DALRUN ~DALRUN ~DALVAR on page 123
~DALVAR ~DALRUN ~DALVAR on page 123
~Encrypted ~Encrypted on page 124
~ProcessID ~ProcessID on page 124
~WIPField ~WIPField on page 125

Chapter 2Understanding the System
122
~GetEnv Here are examples which show how you can use the GetEnv function.
< MasterResource >
DefLib = ~Getenv MYDRIVE \mstrres\deflib\
This INI function recognizes a value that begins with a tilde (~). It then parses out the next word and looks to see if a built-in function has been registered with that name, such as getenv in the above example.
Once found, the function is called. It then parses the first word to get the environment variable, such as MYDRIVE. Leave a space before and after the environment variable.
Finally, the function puts together the result of the environment data with the remainder of the data line, as in \mstrres\deflib\.
So, if MYDRIVE=G:\APPS you would see G:\APPS\mstrres\deflib\.
NOTE:Before executing an application whose INI contains the GetEnv function, you must initialize the operating system environment variables. For Windows 32-bit, you enter on a command line:
Set EnvironmentVariable = Value
Here are some examples:
Set MyDrive=G:\APPS
Set UserID=MVF
Be sure to leave a space before and after the environment variable.
For this example, assume the environment contains USERID=(INITIALS) and the INI contains:
< SignOn >
UserID = ~GetEnv USERID
The logon process picks up your user ID from an environment variable.
This method results in a very generic built-in function that does not assume what the data represents. However, if you were using it to build file names, the environment variables would have to be consistent in terms of whether they contained the final backslash or not. In this example, MYDRIVE=G:\APPS\ produces an invalid path because a double backslash would occur.
~GVM Use the ~GVM (global variable member) function to tell the system to use a global variable to get the value. Here is an example:
< NYAAMVA>
Ins_Key = ~GVM MyGVMName
NOTE:You can only use the ~GVM function in batch processing. This function is not available to Documaker Workstation.

Using INI Built-In Functions
123
~Platform Use the ~Platform function to create multi-platform INI files. The possible return values are: PC, and MVS. This lets you set up INI control groups and options that work on either a PC or MVS platform. When the system executes this function, it replaces ~Platform with either PC or MVS, depending on the platform. Here is an example:
< Print_Batches >
P_Batch1 = < Config:~Platform > P_Batch1
P_Batch2 = < Config:~Platform > P_Batch2
P_Batch3 = < Config:~Platform > P_Batch3
Error = < Config:~Platform > Error
Manual = < Config:~Platform > Manual
< CONFIG:PC >
P_Batch1 = .\data\Batch1
P_Batch2 = .\data\Batch2
P_Batch3 = .\data\Batch3
Error = .\data\Error
Manual = .\data\Manual
< CONFIG:MVS >
P_Batch1 = DD:Batch1
P_Batch2 = DD:Batch2
P_Batch3 = DD:Batch3
Error = DD:Error
Manual = DD:Manual
NOTE:You can also use the File option in the INIFiles control group to load multiple INI files. Place this control group and option in your FSIUSER.INI file. Here is an example:
< INIFiles >
File = PC.INI
File = MVS.INI
You can assign any name as long as you include the INI extension. You can have as many File options as needed. You can customize these files based on the platform you are using.
~OS Use the ~OS function to determine the current operating system environment. The possible return values are: WIN32, HPUX, AIX, MVS, Sun, and OS1100.
Here is an example of the functions usage in the INI file. Be sure to include the space after ~OS.
< DBHandler:DB2 >
BindFile = <DB2:~OS > bindfile =
< DB2:WIN32 >
BindFile = w32bin\DB2LIB.BND
This setup allows for the different bindfiles being specified for different operating systems — compare with the ~Platform function which returns PC for Win32.
~DALRUN~DALVAR
Use the DALRUN and DALVAR built-in functions to execute DAL scripts or get DAL variable information you can use to complete INI options. For instance, you can use this to map unique recipient information into batch records.
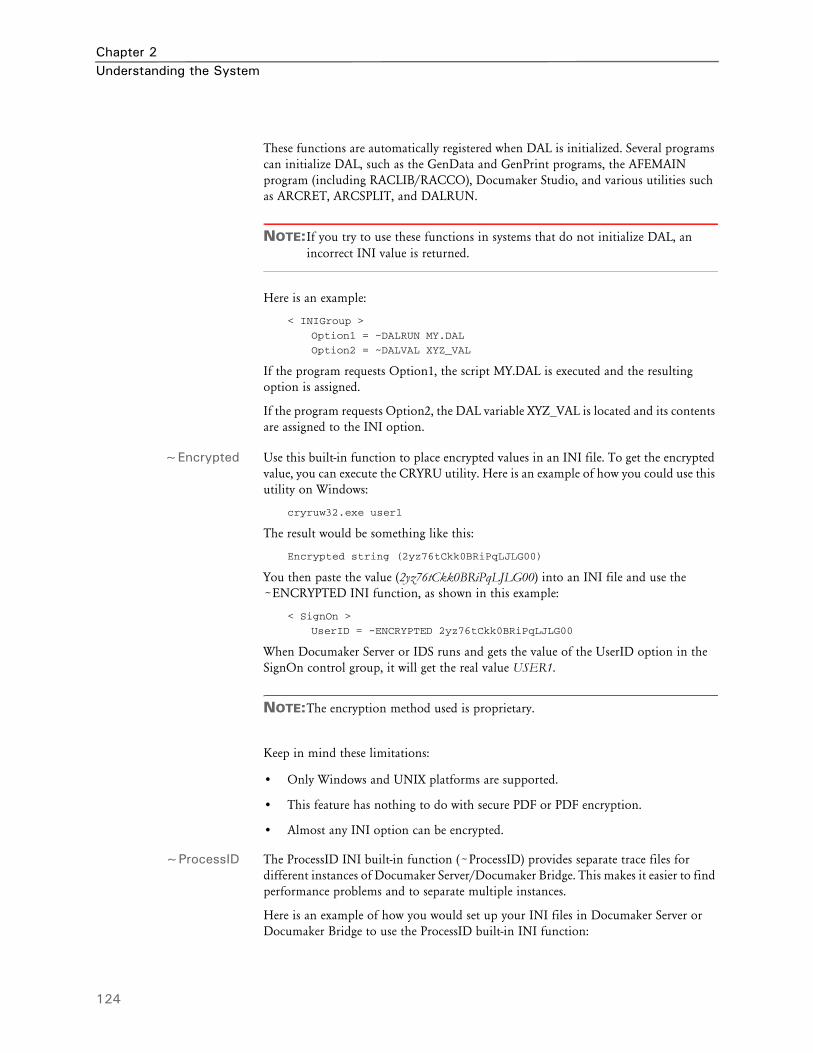
Chapter 2Understanding the System
124
These functions are automatically registered when DAL is initialized. Several programs can initialize DAL, such as the GenData and GenPrint programs, the AFEMAIN program (including RACLIB/RACCO), Documaker Studio, and various utilities such as ARCRET, ARCSPLIT, and DALRUN.
NOTE:If you try to use these functions in systems that do not initialize DAL, an incorrect INI value is returned.
Here is an example:
< INIGroup >
Option1 = ~DALRUN MY.DAL
Option2 = ~DALVAL XYZ_VAL
If the program requests Option1, the script MY.DAL is executed and the resulting option is assigned.
If the program requests Option2, the DAL variable XYZ_VAL is located and its contents are assigned to the INI option.
~Encrypted Use this built-in function to place encrypted values in an INI file. To get the encrypted value, you can execute the CRYRU utility. Here is an example of how you could use this utility on Windows:
cryruw32.exe user1
The result would be something like this:
Encrypted string (2yz76tCkk0BRiPqLJLG00)
You then paste the value (2yz76tCkk0BRiPqLJLG00) into an INI file and use the ~ENCRYPTED INI function, as shown in this example:
< SignOn >
UserID = ~ENCRYPTED 2yz76tCkk0BRiPqLJLG00
When Documaker Server or IDS runs and gets the value of the UserID option in the SignOn control group, it will get the real value USER1.
NOTE:The encryption method used is proprietary.
Keep in mind these limitations:
• Only Windows and UNIX platforms are supported.
• This feature has nothing to do with secure PDF or PDF encryption.
• Almost any INI option can be encrypted.
~ProcessID The ProcessID INI built-in function (~ProcessID) provides separate trace files for different instances of Documaker Server/Documaker Bridge. This makes it easier to find performance problems and to separate multiple instances.
Here is an example of how you would set up your INI files in Documaker Server or Documaker Bridge to use the ProcessID built-in INI function:

Using INI Built-In Functions
125
< Data >
TraceFile = dprtrc~PROCESSID .log
Here is an example of an output trace file:
1. Tue May 25 21:27:26.489 2006 pid=00003896 SQInstallHandler: Info from SQLGetInfo, DBName=<>, DBMS=<Oracle>, DBMS Version=<09.02.0010>
2. Tue May 25 21:27:26.489 2006 pid=00003896 SQInstallHandler: Info from SQLGetInfo, DriverName=<SQORA32.DLL>, DriverVer=<09.02.0000>, DriverODBCVer=<03.51>
3. Tue May 25 21:27:26.677 2006 pid=00003896 SQHandler (LOCATEREC): ENTER
4. Tue May 25 21:27:26.677 2006 pid=00003896 SQBindParamData: calling _SQLBindParameter, len = <10>, <JOB_ID> = <DEF_JOB_ID>
5. Tue May 25 21:27:26.677 2006 pid=00003896 select STATUS,JOB_ID,COMM_RECS,LASTREC from SJSRPX1_ORA_RESTART where JOB_ID = ?
6. Tue May 25 21:27:26.693 2006 pid=00003896 SQHandler (LOCATEREC): SQLocate returned a row.
~WIPField Use this built-in INI function to tell the system to substitute a value in the INI file with a value from the WIP record. This works with either Documaker Workstation (AFEMAIN) or the WIP Edit plug-in.
For example, if you want the UserDict value to equal the value for ORIGUSER in the current WIP record, you would set up the following option:
< Spell >
UserDict = ~WIPFIELD ORIGUSER
ACCESSING WIP FIELDS
You can access most standard WIP fields using the following built-in INI functions. For instance, if you want to create an export file and a PDF file and have the names for these files be identical except for the extension, you could use these function to create a unique name for a file that does not depend on the current time, but rather on a time that does not change, such as the create or modify time.
Function Returns the
~Key1 WIP Key1 field
~Key2 WIP Key2 field
~KeyID WIP KeyID field
~ORIGUSER Original WIP User ID field (the ID used to create the WIP)
~CREATETIME WIP Create Time field. You can format this option.
~MODIFYTIME WIP Modify Time field. You can format this option.
~ORIGFSID Original WIP form set ID.
Keep in mind when routing messages, the original form set ID is not necessarily the same as the current form set ID.
~TRANCODE WIP Transaction Code field.
Chapter 2Understanding the System
126
NOTE:You can access all of the WIP fields via DAL using the WIPFld function. And, since DAL can be accessed via the ~DALRUN function (see page 123), you have another method you can use to get those fields.
The system retrieves the Modify Time and Create Time from the WIP record. You can use the ~DATE function to get the current date value. You can also include a parameter to tell the system to format the date.
Keep in mind that if you are trying to use the value as part of a file name, you should only include characters that are valid in file names.
Here is an example of how to specify a date format:
~MODIFYTIME ;%m-%d-%Y;
Semicolons (:) begin and end the string that defines the date format. If you omit a semicolon, you get the hexadecimal value of the date for ~MODIFYTIME and ~CREATETIME. For the ~DATE function, you get the format specified by the DateFormat option in the Formats control group. This option defaults to:
%m/%d/%y
If you include the semicolon, but omit the format information after the semicolon, for ~MODIFYTIME and ~CREATETIME you get the format specified by the DateFormat option in the Formats control group. This option defaults to:
%m/%d/%y.
Formatting arguments Format arguments consists of one or more codes. Begin each code with a percent sign (%). Characters that do not begin with a percent sign are copied unchanged to the output buffer.
Any character following a percent sign that is not recognized as a format code is copied to the destination—so you can enter %% to include a percent sign in the resulting output string.
You can choose from these format codes:
~DESC WIP Description field.
~DATE The current date value.
~USERID Currently logged in user ID.
~FIELD A field value from the form set.
Function Returns the
Code Description
%d Day of month as decimal number (01 - 31)
%H Hour in 24-hour format (00 - 23)
%I Hour in 12-hour format (01 - 12)

Using INI Built-In Functions
127
Here are some examples:
Here are some additional format attributes for certain codes:
%m Month as decimal number (01 - 12)
%M Minute as decimal number (00 - 59)
%p Current locale's AM/PM indicator for 12-hour clock
%S Second as decimal number (00 - 59)
%y Year without century, as decimal number (00 - 99)
%Y Year with century, as decimal number
%A Weekday name, such as Tuesday
%b Abbreviated month name, such as Mar
%B Full month name, such as March
%j Day of year as decimal number (001 - 366)
%w Weekday as decimal number (0-6, with Sunday as 0)
%@xxx Specify language locale (where xxx is a 3-letter code that identifies one of the supported languages. For example. A format of %@CAD%A might produce mardi, the French word for Tuesday.
This format Will result in
%m-%d-%Y 01-01-2009
The year is %Y. The year is 2009.
Born %m/%d/%y at %I:%M %p Born 01/01/09 at 11:57 PM
Code Description
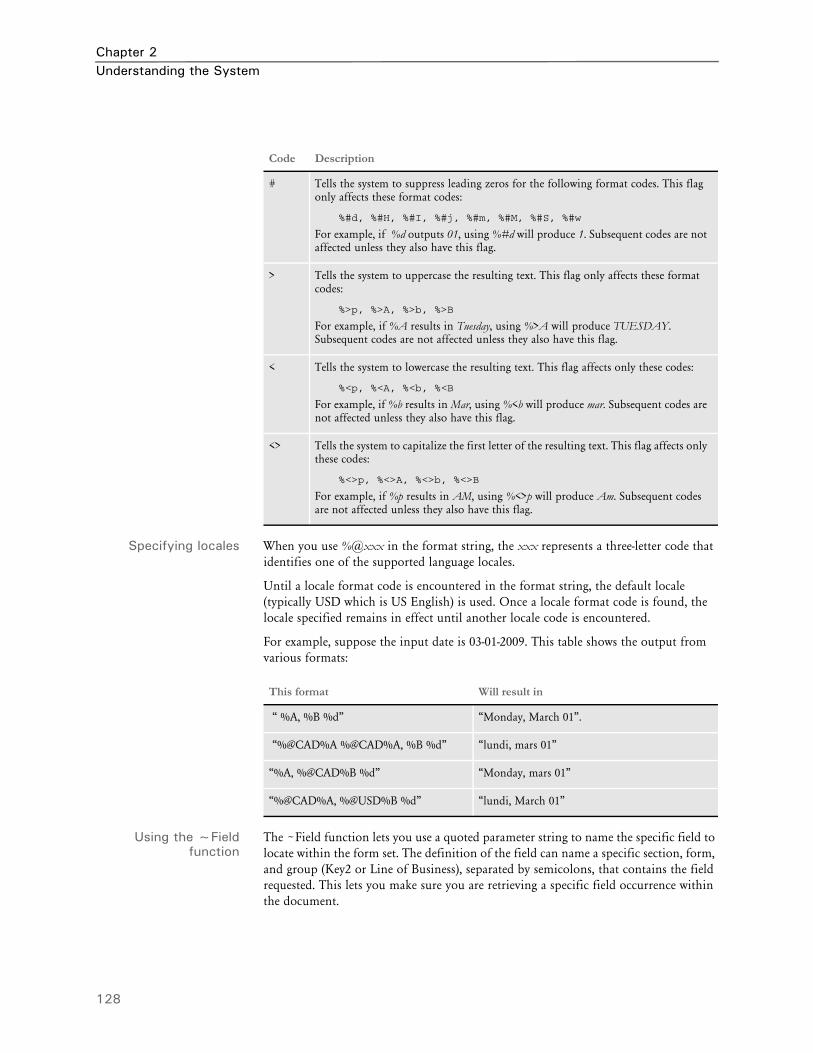
Chapter 2Understanding the System
128
Specifying locales When you use %@xxx in the format string, the xxx represents a three-letter code that identifies one of the supported language locales.
Until a locale format code is encountered in the format string, the default locale (typically USD which is US English) is used. Once a locale format code is found, the locale specified remains in effect until another locale code is encountered.
For example, suppose the input date is 03-01-2009. This table shows the output from various formats:
Using the ~Fieldfunction
The ~Field function lets you use a quoted parameter string to name the specific field to locate within the form set. The definition of the field can name a specific section, form, and group (Key2 or Line of Business), separated by semicolons, that contains the field requested. This lets you make sure you are retrieving a specific field occurrence within the document.
Code Description
# Tells the system to suppress leading zeros for the following format codes. This flag only affects these format codes:
%#d, %#H, %#I, %#j, %#m, %#M, %#S, %#w
For example, if %d outputs 01, using %#d will produce 1. Subsequent codes are not affected unless they also have this flag.
> Tells the system to uppercase the resulting text. This flag only affects these format codes:
%>p, %>A, %>b, %>B
For example, if %A results in Tuesday, using %>A will produce TUESDAY. Subsequent codes are not affected unless they also have this flag.
< Tells the system to lowercase the resulting text. This flag affects only these codes:
%<p, %<A, %<b, %<B
For example, if %b results in Mar, using %<b will produce mar. Subsequent codes are not affected unless they also have this flag.
<> Tells the system to capitalize the first letter of the resulting text. This flag affects only these codes:
%<>p, %<>A, %<>b, %<>B
For example, if %p results in AM, using %<>p will produce Am. Subsequent codes are not affected unless they also have this flag.
This format Will result in
“ %A, %B %d” “Monday, March 01”.
“%@CAD%A %@CAD%A, %B %d” “lundi, mars 01”
“%A, %@CAD%B %d” “Monday, mars 01”
“%@CAD%A, %@USD%B %d” “lundi, March 01”

Using INI Built-In Functions
129
Because object names, like fields, sections, forms, and groups, can sometimes contain spaces or other special characters, you should enclose the entire definition in quotation marks (“). You cannot quote individual elements of the search.
Here are some examples:
This is a valid definition for the ~Field function:
option = ~FIELD "Field;Section;Form;Group"
This is not a valid definition for the ~Field function:
option = ~FIELD "Field";"Section";"Form";"Group"
DEFINING BUILT-IN FUNCTIONS VIA STUDIO
In addition to using INI files to define built-in INI functions, you can implement the following built-in functions via Documaker Studio:
For example, to use Studio to tell the system to print the current date in the footer section of a page, you would first create a field in the footer section at the location where you want it to appear. Then name this field as shown here:
No other rules or script calculations are required. During print processing, each time the section that contains this field prints, the system will assign a date value.
Field Description
~HEXTIME A generated eight-character hexidecimal time value.
~DATE The current date.
~DALRUN (script) Tells the system to execute the named DAL script which is expected to return a value.
Enter ~DATE in the Name field

Chapter 2Understanding the System
130
OUTPUTTINGWIP FIELD
DATA ONTOTHE XML TREE
Documaker can export these WIP-related transaction fields onto the XML tree:
The XML print driver (print type XMP) includes WIP field data in the output when it is generated from GenData's PrintFormset rule or the GenPrint program. You use the Trigger2WIP control group to map the field information. This WIP field information is included in the resulting XML tree under the DOCSET tag.
NOTE:The transaction batch record is defined by the DFD which is defined via the RCBDFDFL setting. The mapped WIP fields must be defined in the WIP DFD file or the internal WIP definition if an external DFD is not used.
Here is an example of the Trigger2WIP control group set up for field mapping:
< Trigger2WIP >
Company = Key1
LOB = Key2
PolicyNum = KeyID
TransactionType= TranCode
The output XML tree should have this format:
<?xml version="1.0" encoding="UTF-8"?>
<DOCUMENT TYPE="RPWIP" VERSION="11.2">
<DOCSET NAME="">
<LIBRARY NAME="" CONFIG="Batch Processing">Batch Processing</LIBRARY>
<ARCEFFECTIVEDATE>20061115</ ARCEFFECTIVEDATE>
<KEY1 NAME="COMPANY">SAMPCO</KEY1>
<KEY2 NAME="LOB">LB1</KEY2>
<KEYID NAME="PolicyNum">1234567</KEYID>
<TRANCODE NAME="TRANSACTIONTYPE">T1</TRANCODE>
<STATUSCODE NAME="STATUSCODE"/>
<DESC NAME="DESC"/>
. . .
</DOCSET>
</DOCUMENT>
Key1 Key2 KeyID
TranCode StatusCode Desc
GuidKey TrnName LocID
SubLocID Jurisdictn QueueID

Using Form Inclusion Information
131
USING FORMINCLUSION
INFORMATION
Documaker writes form inclusion information into output files. This means triggers are retained in the resulting transaction set for groups, forms, and sections. This can help you determine which events led to the resulting document set.
In NAFILE output, additional records hold the trigger information. An example of the layout is shown here:
\TRIG=;TriggerName; ObjectTypeNumber; Name; SecondName; ThirdName; TransactionCodes; Recipients; SearchMask; RequiredFlags; CopyCount; ConditionalMask; FunctionName; RuleData; ItemsTriggered; TriggerDescription;
The trigger's name is included at the start of the line. For instance, you will see Manual if it is a non-DAL trigger (the legacy SetRecip trigger rule).
The system distinguishes between the group, form, and section trigger records by including a name in the record, as this table shows:
In the XML output (exported or printed) the trigger information is output in the same way it is stored in regular resources except the < TRIGCOUNT > node indicates the number of items included by the trigger.
Here is an example of a group trigger entry in the NA file using DAL triggers:
\TRIG=;ALWAYS;3;FSI;GL;;;;;1;1;;DALTRIGGER;ALWAYS;1;This is my trigger description;
\TRIG=;ALWAYS;3;FSI;GL;Extra;;;;1;1;;DALTRIGGER;ALWAYS;1;;
Here is an example of the form entry:
\TRIG=;Manual;4;FCG 0001 04 93;;;T1;INSURED,COMPANY;11,HEADERREC,98,~0;0;1;;;;1;;
Here is an example of the section entry:
\TRIG=;ALWAYS;6;q1snam;;;;AGENT(1),COMPANY(1),INSURED(1);;1;1;;DALTRIGGER;ALWAYS;1;;
Here is an example of a form entry in the NA file for a SetRecip (manual) trigger:
\TRIG=;Manual;4;MEDICAL HISTORY USING MEDBODY1;;;;;;0;0;10,TREATMENT;;;1;;
Here is an example of a section entry for a SetRecip trigger:
\TRIG=;Manual;6;MEDBODY1;;;;AGENT,HOMEOFFICE,INSURED;10,TREATMENT;1;1;;;;35;;
Record type Placement in NA Format
Group Top of file, after any addressee records
\TRIG=;TriggerName;3;GroupName1;GroupName2;GroupName3;
Form Before the first section of the form
\TRIG=;TriggerName;4;FormName; ; ;
Section After the section \NA header line
\TRIG=;TriggerName;6;SectionName; ; ;

Chapter 2Understanding the System
132
NOTE:To produce form inclusion records, you must have an MRL created in Studio. You must also include the RunTriggers rule in your AFGJOB.JDT file.

Selecting the Display Language
133
SELECTING THEDISPLAY
LANGUAGE
Documaker Studio, Documaker Document Factory, and other Documaker products provide user interfaces and online help that you can translate into your preferred language. This includes producing error messages based on your default language setting and supplying log file messages that are translatable.
This topic outlines how to select the language you want to use in a product once the translation of the language and help files has been completed.
Documaker StudioIn Documaker Studio, use the Settings Manager to change the Configuration Options. In the Language field, select the language to be used in the Documaker Studio interface and the content of the online help:
Keep in mind that messages often contain dynamic content such as file names that will not be translated with the product.
Certain Microsoft Windows managed items will continue to display according to your Windows setup and will not be altered based upon the language you choose for our application display. For instance, file browsing in Windows will remain under Windows control even if offered from a Documaker application configured to another language. And simple message dialogs that might offer buttons of OK, Cancel, Yes and No will also display according to the Windows configuration and not in your Documaker product language setting.
TransallThe Transall Editor checks the default language for the current user according to Windows and then look for this resource DLL:
TranResDllXX.dll
where XX is the Oracle language abbreviation
The Transall Engine looks for the Oracle NLS_LANG environment variable to determine the name of the Oracle message file to use. The Transall message file name uses this naming convention:
transall##.msb
where ## is the language abbreviation.

Chapter 2Understanding the System
134
Documaker ServerDocumaker Server looks for the Oracle NLS_LANG environment variable to determine the name of the Oracle message file to use. The Documaker Server message file name uses the following naming convention: “xlt##.msb” where ## is the language abbreviation.
Documaker ServerError Handling
If the Documaker message file (xltus.msb) cannot be found by the Documaker Server, you will see messages like this:
Warning: Unable to locate message file in directory C:\PATH\Lang
Unable to find message number 15068
Documaker Add-InYou can select the desired language by starting Word and selecting a list of enabled editing languages and a primary editing language. The primary editing language is the default Add-In text language and is the controlling language for Add-In forms, menus, boxes, ribbons, on-line help, and any other visual items within the Add-In.
The Add-In will pick up the preferred language based on the language setting in Word, assuming the resource for that language is available.
Please note that certain system dialogs (like Open File, Save File) are localized based on regional settings of the Windows system itself and thus may show a different language than the one you specify.
Documaker Add-InError Handling
The Documaker Add-In defaults to English if the specific language resource DLL is not found.
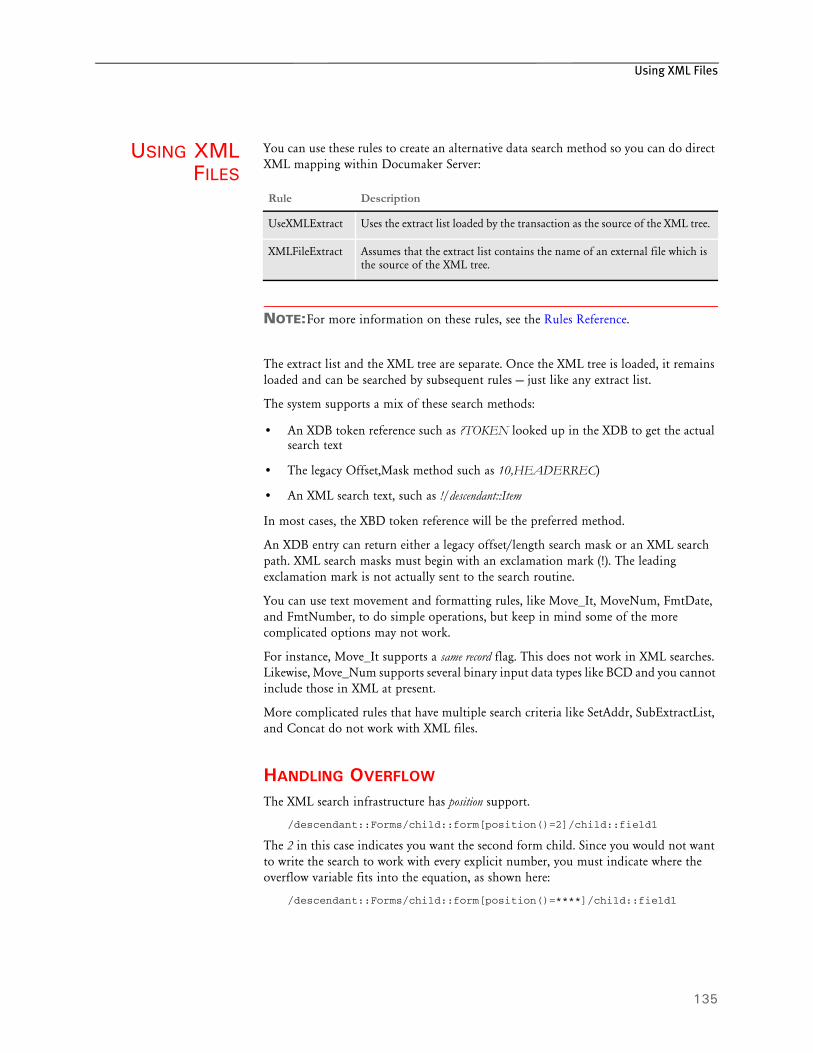
Using XML Files
135
USING XMLFILES
You can use these rules to create an alternative data search method so you can do direct XML mapping within Documaker Server:
NOTE:For more information on these rules, see the Rules Reference.
The extract list and the XML tree are separate. Once the XML tree is loaded, it remains loaded and can be searched by subsequent rules — just like any extract list.
The system supports a mix of these search methods:
• An XDB token reference such as ?TOKEN looked up in the XDB to get the actual search text
• The legacy Offset,Mask method such as 10,HEADERREC)
• An XML search text, such as !/descendant::Item
In most cases, the XBD token reference will be the preferred method.
An XDB entry can return either a legacy offset/length search mask or an XML search path. XML search masks must begin with an exclamation mark (!). The leading exclamation mark is not actually sent to the search routine.
You can use text movement and formatting rules, like Move_It, MoveNum, FmtDate, and FmtNumber, to do simple operations, but keep in mind some of the more complicated options may not work.
For instance, Move_It supports a same record flag. This does not work in XML searches. Likewise, Move_Num supports several binary input data types like BCD and you cannot include those in XML at present.
More complicated rules that have multiple search criteria like SetAddr, SubExtractList, and Concat do not work with XML files.
HANDLING OVERFLOW
The XML search infrastructure has position support.
/descendant::Forms/child::form[position()=2]/child::field1
The 2 in this case indicates you want the second form child. Since you would not want to write the search to work with every explicit number, you must indicate where the overflow variable fits into the equation, as shown here:
/descendant::Forms/child::form[position()=****]/child::field1
Rule Description
UseXMLExtract Uses the extract list loaded by the transaction as the source of the XML tree.
XMLFileExtract Assumes that the extract list contains the name of an external file which is the source of the XML tree.

Chapter 2Understanding the System
136
The system first scans the search to see if a replacement is needed for the overflow value. In this case, it would insert the 2 (taken from the overflow variable value) and then do the actual XML search.
You can also handle overflow within overflow by specifying an overflow variable name in the search. For instance, suppose you have multiple cars and each car can have multiple drivers.
<car>
<driver>Tom<driver/>
<driver>Tim<driver/>
<car/>
<car>
<driver>Sally<driver/>
<car/>
If you had two overflow variables, one working for car and one for driver, you could create a search like this:
/descendant::car[**carvar**]/child::driver[**drivevar**]
Where the system gets two overflow variables and insert them into the search text.
TRIGGERING FORMS AND SECTIONS
You can do simple triggering based upon the existence of a node. For example, this
/child::car
would trigger a form if car is a child of the root node. Referring back to the earlier example, you could make it trigger two of the same forms because there are two cars.
The system supports value matching. So you can do the following:
/child::car[child::driver="Tom"]
Or, you can use the RecipIf rule to trigger a section with custom rule parameters, as shown in this example:
A={!/child::car/child::driver 1,7}::if (A='Tom')::return("^1^")::end::;
If there is such a value in that element in the XML file, the section would trigger. For this to work, define the offset of the variable attribute as 1 and the length of the data you want to compare.
You can also use XML search strings such as these:
This string Finds
!descendant::PolicyNumber The PolicyNumber value
!descendant::Forms/child::Form All forms

Using XPath
137
USING XPATH XML path locator (XPath) complies with the standard syntax specifications (W3C standards) found in the XML Path Language, but differs in some regards because it was developed to support Documaker applications. Because this version of XPath has some limitations, you should check the syntax using the XPATHW32 utility.
XPATH SYNTAX
Here are examples of the valid axes, function calls, signs, and operators to help you understand and use the XPath syntax.
AxesYou have these axes:
When used, an axis is always followed by a context node name separated by two colons (::). For example, the syntax descendant::para locates all para descendants of the current context node.
Name Used to locate the
ancestor Ancestors of the current context node
ancestor-or-self Ancestors of the current context node and itself
parent Parents of the current context node
descendant Descendants of the current context node
descendant-or-self Descendants of the current context node and itself
attribute Attributes of the current context node
child Children of the current context node
following-sibling Following siblings of the current context node
following Context nodes that follow the current node
preceding-sibling Preceding siblings of the current context node
preceding Context nodes that precede the current node
self Self context node

Chapter 2Understanding the System
138
SymbolsYou can use these calculation operators:
Where !=, <, >, + can be used as calculation operators in function position(), such as, [position()=2], [position()!=2], [3+i], [position()<5], and so on. The equals sign (=) is also used for evaluations such as @Name=’Auto’.
You can use these symbols in a valid XPath:
Where the pair of brackets ( [ ] ) enclose a condition for evaluation, the at symbol (@) is an abbreviation of the attribute, the asterisk (*) is used for a wild card search, and others are used in a valid XPath, as shown below.
FunctionsYou can use these functions:
= != < > + -
/ // * :: [ ] @
Function Returns
concat(string, string, string… The concatenation of the strings.
contains(string, string) The data of the string. Here are some examples:contains("tattoo","t")
contains("tattoo","tatt")
ends-with(string, string) The data of the string. Here are some examples:ends-with("tattoo","tattoo")
ends-with("tattoo","atto")
last() The last element in the selection.
name() The name of the selected elements. Here is an example:name(/FirstLevel/SecondLevel)
node() The node names.
position() The position of selected elements.
text() The text of selected elements.
These functions comply with W3C XPath 2.0 specifications.

Using XPath
139
ExpressionsYou can use abbreviated syntax with XPath. Here are the valid expressions:
starts-with(string, string) The data of the string. Here are some examples:starts-with("tattoo","tat")
starts-with("tattoo","tatt")
string(object) The string from the context node. Here is an example:String("tattoo")
xml() The output buffer containing all descendents of the specified element.
Abbreviated syntax Full syntax
* child::*
para child::para
chapter/para child::chapter/child::para
para[1] child::para[position()=1]
/chapter/para[last()] /child::chapter/child::para[position()=last()]
text() child::text()
node() child::node()
para[@type] child::para[attribute::type]
para[@type="warning"] child::para[attribute::type="warning"]
para[@type="warning"][2+i] child::para[attribute::type="warning"][position()#2+i]
chapter[title] child::chapter[child::title]
chapter[title=’Introduction’] child::chapter[child::title="Introduction"]
doc//para child::doc/descendant-or-self::node()/child::para
@* attribute::*
@type attribute::type
[@name=’warning’] [attribute::name=’warning’]
//para /descendant-or-self::node()/child::para
. self::node()
Function Returns
These functions comply with W3C XPath 2.0 specifications.
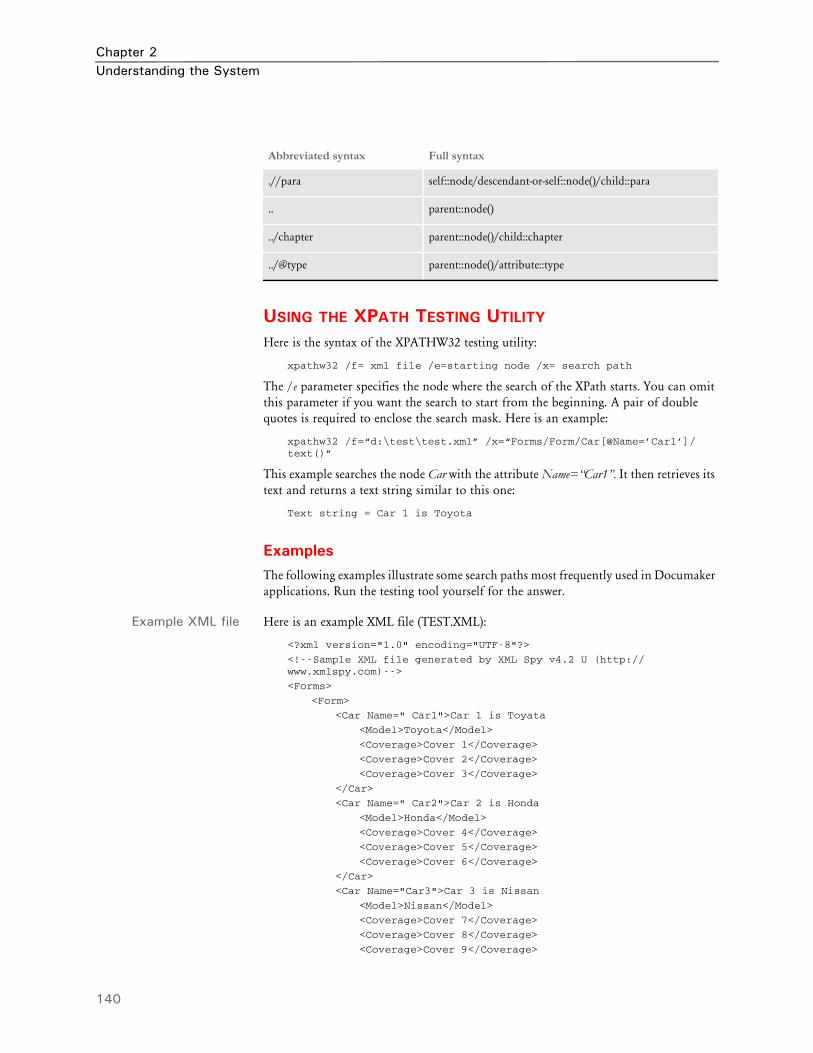
Chapter 2Understanding the System
140
USING THE XPATH TESTING UTILITY
Here is the syntax of the XPATHW32 testing utility:
xpathw32 /f= xml file /e=starting node /x= search path
The /e parameter specifies the node where the search of the XPath starts. You can omit this parameter if you want the search to start from the beginning. A pair of double quotes is required to enclose the search mask. Here is an example:
xpathw32 /f=“d:\test\test.xml” /x=“Forms/Form/Car[@Name=’Car1’]/text()”
This example searches the node Car with the attribute Name=“Car1”. It then retrieves its text and returns a text string similar to this one:
Text string = Car 1 is Toyota
ExamplesThe following examples illustrate some search paths most frequently used in Documaker applications. Run the testing tool yourself for the answer.
Example XML file Here is an example XML file (TEST.XML):
<?xml version="1.0" encoding="UTF-8"?>
<!--Sample XML file generated by XML Spy v4.2 U (http://www.xmlspy.com)-->
<Forms>
<Form>
<Car Name=" Car1">Car 1 is Toyata
<Model>Toyota</Model>
<Coverage>Cover 1</Coverage>
<Coverage>Cover 2</Coverage>
<Coverage>Cover 3</Coverage>
</Car>
<Car Name=" Car2">Car 2 is Honda
<Model>Honda</Model>
<Coverage>Cover 4</Coverage>
<Coverage>Cover 5</Coverage>
<Coverage>Cover 6</Coverage>
</Car>
<Car Name="Car3">Car 3 is Nissan
<Model>Nissan</Model>
<Coverage>Cover 7</Coverage>
<Coverage>Cover 8</Coverage>
<Coverage>Cover 9</Coverage>
.//para self::node/descendant-or-self::node()/child::para
.. parent::node()
../chapter parent::node()/child::chapter
../@type parent::node()/attribute::type
Abbreviated syntax Full syntax

Using XPath
141
</Car>
</Form>
</Forms>

Chapter 2Understanding the System
142
Example 1 These examples search for a list of nodes with or without conditions. Keep in mind a condition is always placed within brackets, as shown here: [condition].
Example 2 These examples search for the path for a single element:
Example 3 These examples search for a list of attributes:
This Returns
Forms/Form/Car A list of the Car nodes
Forms/Form/Car[@*][position()<3]
The first two nodes in the Car node list
Forms/Form/Car[@Name][position()>1]
A list of the Car nodes above the first element
Forms/Form/Car[text()][position()!=2]
A list of the Car nodes, excluding the second one
Forms/Form/Car[Model] A list of Car nodes that have a child named Model
Forms/Form/Car/node() A list of children nodes under the Car nodes
Forms/Form/Car/Coverage[1] A list of first child Coverage under the Car nodes
Forms/Form/Car[@Name=’Car1’]/Coverage
A list of nodes Coverage under Car1
This Produces
Forms/Form/Car[@*][1] The first node of the Car list with any attributes
Forms/Form/Car[@Name][last()] The last node of the Car list with the attribute Name
Forms/Form/Car[@Name=’Car1’] The Car node with attribute name Car1
Forms/Form/Car[Model=’Toyota’]
The Car node with a child Model that has a text string of Toyota.
Forms/Form/Car[Mode=’Nissan’]/Coverage[3]
The third child node of Coverage under the parent node Car that has a child named Model with a text string of Nissan
This Produces
Forms/Form/Car[Model=’Nissan’]/@*
A list of attributes of the Car node that have a Child node named Model with a value of Nissan
Forms/Form/Car/@Name A list of the attribute Name that has a parent node of Car
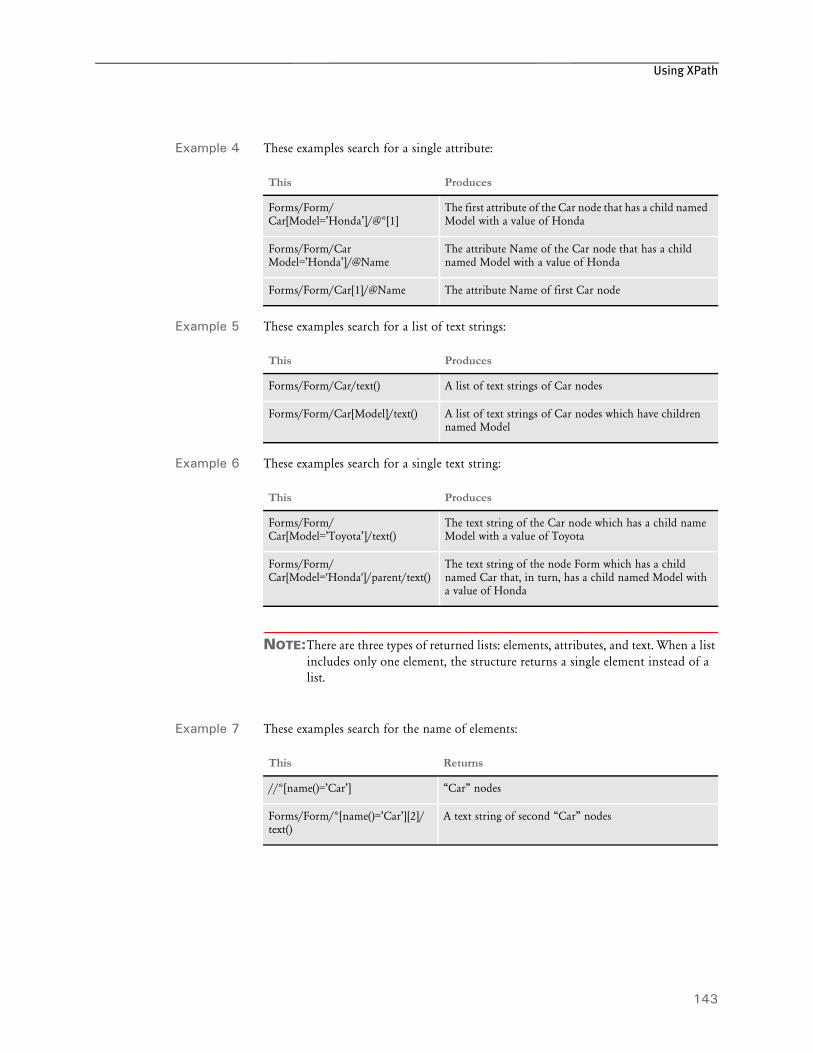
Using XPath
143
Example 4 These examples search for a single attribute:
Example 5 These examples search for a list of text strings:
Example 6 These examples search for a single text string:
NOTE:There are three types of returned lists: elements, attributes, and text. When a list includes only one element, the structure returns a single element instead of a list.
Example 7 These examples search for the name of elements:
This Produces
Forms/Form/Car[Model=’Honda’]/@*[1]
The first attribute of the Car node that has a child named Model with a value of Honda
Forms/Form/Car Model=’Honda’]/@Name
The attribute Name of the Car node that has a child named Model with a value of Honda
Forms/Form/Car[1]/@Name The attribute Name of first Car node
This Produces
Forms/Form/Car/text() A list of text strings of Car nodes
Forms/Form/Car[Model]/text() A list of text strings of Car nodes which have children named Model
This Produces
Forms/Form/Car[Model=’Toyota’]/text()
The text string of the Car node which has a child name Model with a value of Toyota
Forms/Form/Car[Model='Honda']/parent/text()
The text string of the node Form which has a child named Car that, in turn, has a child named Model with a value of Honda
This Returns
//*[name()=’Car’] “Car” nodes
Forms/Form/*[name()=’Car’][2]/text()
A text string of second “Car” nodes

Chapter 2Understanding the System
144
Example 8 These examples concatenate text strings:
Example 9 These examples search for strings:
Example 10 This example returns a buffer that contains all descendants of the specified element:
Note that the XPath must point to a single element, such as Car[2] in the example.
Example 11 Here are some additional examples, based on this XML tree:
<FirstLevel>
<SecondLevel>
<Third NAME="JDOE" />
<Third>EFG123</Third>
<Third>ABC456</Third>
</SecondLevel>
</FirstLevel>
This Returns
concat('Car1', 'and', 'Car2')" A string “Car1 and Car2”
concat(//Car[@Name='Car1'], 'and',//Car[@Name='Car3'], 'are imported cars.'))
A string “Toyata and Nissan are imported cars.”
This Returns
string(‘ 12345’) The string “ 12345”
string(//Car[2]/*[1]) The string of the first child of the second Car node
This Produces
xpathw32 /f=cars.xml /x="//Car[2]/xml() <Car Name=" Car2">Car 2 is Honda<Model>Honda</Model>
<Coverage>Cover 4</Coverage>
<Coverage>Cover 5</Coverage>
<Coverage>Cover 6</Coverage></Car>
This Results in
xpathw32 /f=test.xml /x="/FirstLevel/SecondLevel/Third[starts-with(.,'ABC')]"
Element name = Third
Text string = ABC456
xpathw32 /f=test.xml /x="/FirstLevel/SecondLevel/Third[starts-with(@NAME,'JY')]"
Element name = Third
Attribute: NAME = JDOE
xpathw32 /f=test.xml /x="/FirstLevel/SecondLevel/Third[starts-with(text(),'EFG')]"
Element name = ThirdText string = EFG123
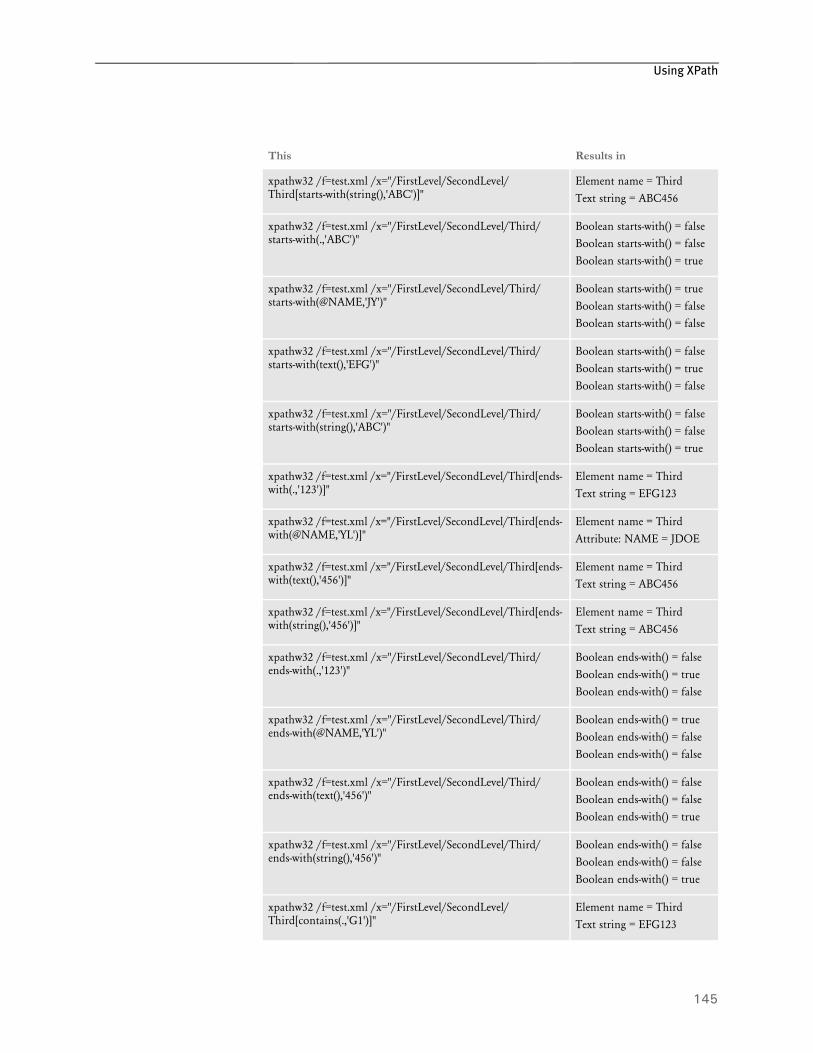
Using XPath
145
xpathw32 /f=test.xml /x="/FirstLevel/SecondLevel/Third[starts-with(string(),'ABC')]"
Element name = Third
Text string = ABC456
xpathw32 /f=test.xml /x="/FirstLevel/SecondLevel/Third/starts-with(.,'ABC')"
Boolean starts-with() = falseBoolean starts-with() = false
Boolean starts-with() = true
xpathw32 /f=test.xml /x="/FirstLevel/SecondLevel/Third/starts-with(@NAME,'JY')"
Boolean starts-with() = true
Boolean starts-with() = falseBoolean starts-with() = false
xpathw32 /f=test.xml /x="/FirstLevel/SecondLevel/Third/starts-with(text(),'EFG')"
Boolean starts-with() = false
Boolean starts-with() = true
Boolean starts-with() = false
xpathw32 /f=test.xml /x="/FirstLevel/SecondLevel/Third/starts-with(string(),'ABC')"
Boolean starts-with() = falseBoolean starts-with() = false
Boolean starts-with() = true
xpathw32 /f=test.xml /x="/FirstLevel/SecondLevel/Third[ends-with(.,'123')]"
Element name = Third
Text string = EFG123
xpathw32 /f=test.xml /x="/FirstLevel/SecondLevel/Third[ends-with(@NAME,'YL')]"
Element name = Third
Attribute: NAME = JDOE
xpathw32 /f=test.xml /x="/FirstLevel/SecondLevel/Third[ends-with(text(),'456')]"
Element name = ThirdText string = ABC456
xpathw32 /f=test.xml /x="/FirstLevel/SecondLevel/Third[ends-with(string(),'456')]"
Element name = Third
Text string = ABC456
xpathw32 /f=test.xml /x="/FirstLevel/SecondLevel/Third/ends-with(.,'123')"
Boolean ends-with() = false
Boolean ends-with() = trueBoolean ends-with() = false
xpathw32 /f=test.xml /x="/FirstLevel/SecondLevel/Third/ends-with(@NAME,'YL')"
Boolean ends-with() = true
Boolean ends-with() = false
Boolean ends-with() = false
xpathw32 /f=test.xml /x="/FirstLevel/SecondLevel/Third/ends-with(text(),'456')"
Boolean ends-with() = falseBoolean ends-with() = false
Boolean ends-with() = true
xpathw32 /f=test.xml /x="/FirstLevel/SecondLevel/Third/ends-with(string(),'456')"
Boolean ends-with() = false
Boolean ends-with() = falseBoolean ends-with() = true
xpathw32 /f=test.xml /x="/FirstLevel/SecondLevel/Third[contains(.,'G1')]"
Element name = Third
Text string = EFG123
This Results in

Chapter 2Understanding the System
146
xpathw32 /f=test.xml /x="/FirstLevel/SecondLevel/Third[starts-with(string(),'ABC')]"
Element name = Third
Text string = ABC456
xpathw32 /f=test.xml /x="/FirstLevel/SecondLevel/Third/starts-with(.,'ABC')"
Boolean starts-with() = falseBoolean starts-with() = false
Boolean starts-with() = true
xpathw32 /f=test.xml /x="/FirstLevel/SecondLevel/Third/starts-with(@NAME,'JY')"
Boolean starts-with() = true
Boolean starts-with() = falseBoolean starts-with() = false
xpathw32 /f=test.xml /x="/FirstLevel/SecondLevel/Third/starts-with(text(),'EFG')"
Boolean starts-with() = false
Boolean starts-with() = true
Boolean starts-with() = false
xpathw32 /f=test.xml /x="/FirstLevel/SecondLevel/Third/starts-with(string(),'ABC')"
Boolean starts-with() = falseBoolean starts-with() = false
Boolean starts-with() = true
xpathw32 /f=test.xml /x="/FirstLevel/SecondLevel/Third[ends-with(.,'123')]"
Element name = Third
Text string = EFG123
xpathw32 /f=test.xml /x="/FirstLevel/SecondLevel/Third[ends-with(@NAME,'YL')]"
Element name = Third
Attribute: NAME = JDOE
xpathw32 /f=test.xml /x="/FirstLevel/SecondLevel/Third[ends-with(text(),'456')]"
Element name = ThirdText string = ABC456
xpathw32 /f=test.xml /x="/FirstLevel/SecondLevel/Third[ends-with(string(),'456')]"
Element name = Third
Text string = ABC456
xpathw32 /f=test.xml /x="/FirstLevel/SecondLevel/Third/ends-with(.,'123')"
Boolean ends-with() = false
Boolean ends-with() = trueBoolean ends-with() = false
xpathw32 /f=test.xml /x="/FirstLevel/SecondLevel/Third/ends-with(@NAME,'YL')"
Boolean ends-with() = true
Boolean ends-with() = false
Boolean ends-with() = false
xpathw32 /f=test.xml /x="/FirstLevel/SecondLevel/Third/ends-with(text(),'456')"
Boolean ends-with() = falseBoolean ends-with() = false
Boolean ends-with() = true
xpathw32 /f=test.xml /x="/FirstLevel/SecondLevel/Third/ends-with(string(),'456')"
Boolean ends-with() = false
Boolean ends-with() = falseBoolean ends-with() = true
xpathw32 /f=test.xml /x="/FirstLevel/SecondLevel/Third[contains(.,'G1')]"
Element name = Third
Text string = EFG123
This Results in

Using XPath
147
xpathw32 /f=test.xml /x="/FirstLevel/SecondLevel/Third[starts-with(string(),'ABC')]"
Element name = Third
Text string = ABC456
xpathw32 /f=test.xml /x="/FirstLevel/SecondLevel/Third/starts-with(.,'ABC')"
Boolean starts-with() = falseBoolean starts-with() = false
Boolean starts-with() = true
xpathw32 /f=test.xml /x="/FirstLevel/SecondLevel/Third/starts-with(@NAME,'JY')"
Boolean starts-with() = true
Boolean starts-with() = falseBoolean starts-with() = false
xpathw32 /f=test.xml /x="/FirstLevel/SecondLevel/Third/starts-with(text(),'EFG')"
Boolean starts-with() = false
Boolean starts-with() = true
Boolean starts-with() = false
xpathw32 /f=test.xml /x="/FirstLevel/SecondLevel/Third/starts-with(string(),'ABC')"
Boolean starts-with() = falseBoolean starts-with() = false
Boolean starts-with() = true
xpathw32 /f=test.xml /x="/FirstLevel/SecondLevel/Third[ends-with(.,'123')]"
Element name = Third
Text string = EFG123
xpathw32 /f=test.xml /x="/FirstLevel/SecondLevel/Third[ends-with(@NAME,'YL')]"
Element name = Third
Attribute: NAME = JDOE
xpathw32 /f=test.xml /x="/FirstLevel/SecondLevel/Third[ends-with(text(),'456')]"
Element name = ThirdText string = ABC456
xpathw32 /f=test.xml /x="/FirstLevel/SecondLevel/Third[ends-with(string(),'456')]"
Element name = Third
Text string = ABC456
xpathw32 /f=test.xml /x="/FirstLevel/SecondLevel/Third/ends-with(.,'123')"
Boolean ends-with() = false
Boolean ends-with() = trueBoolean ends-with() = false
xpathw32 /f=test.xml /x="/FirstLevel/SecondLevel/Third/ends-with(@NAME,'YL')"
Boolean ends-with() = true
Boolean ends-with() = false
Boolean ends-with() = false
xpathw32 /f=test.xml /x="/FirstLevel/SecondLevel/Third/ends-with(text(),'456')"
Boolean ends-with() = falseBoolean ends-with() = false
Boolean ends-with() = true
xpathw32 /f=test.xml /x="/FirstLevel/SecondLevel/Third/ends-with(string(),'456')"
Boolean ends-with() = false
Boolean ends-with() = falseBoolean ends-with() = true
xpathw32 /f=test.xml /x="/FirstLevel/SecondLevel/Third[contains(.,'G1')]"
Element name = Third
Text string = EFG123
This Results in

Chapter 2Understanding the System
148
xpathw32 /f=test.xml /x="/FirstLevel/SecondLevel/Third[contains(@NAME,'Y')]"
Element name = Third
Attribute: NAME = JDOE
xpathw32 /f=test.xml /x="/FirstLevel/SecondLevel/Third[contains(text(),'C4')]"
Element name = ThirdText string = ABC456
xpathw32 /f=test.xml /x="/FirstLevel/SecondLevel/Third[contains(string(),'G1')]"
Element name = Third
Text string = EFG123
xpathw32 /f=test.xml /x="/FirstLevel/SecondLevel/Third/contains(.,'G1')"
Boolean contains() = false
Boolean contains() = trueBoolean contains() = false
xpathw32 /f=test.xml /x="/FirstLevel/SecondLevel/Third/contains(@NAME,'Y')"
Boolean contains() = false
Boolean contains() = false
xpathw32 /f=test.xml /x="/FirstLevel/SecondLevel/Third/contains(text(),'C4')"
Boolean contains() = false
Boolean contains() = falseBoolean contains() = true
xpathw32 /f=test.xml /x="/FirstLevel/SecondLevel/Third/contains(string(),'J1')"
Boolean contains() = false
Boolean contains() = false
Boolean contains() = false
This Results in

149
Chapter 3
Implementing Your System
This chapter provides an overview of how a system is implemented. Although implementations may be handled by Professional Services and each implementation differs, you can make your implementation run more smoothly by understanding the procedures and methodologies outlined here.
In general terms, a system implementation is a set of structured procedures and processes our Business Analysts follow to design, develop, and set up a customized system for a particular client.
This chapter discusses...
• Using a Methodology on page 150
• Gathering Information on page 153
• Roles and Responsibilities on page 154

Chapter 3Implementing Your System
150
USING AMETHODOLOGY
When each system implementation is so unique and so configurable, why use a methodology?
Because, a methodology allows for consistent handling of each specific implementation. Consistency promotes efficiency. The smoother and more efficient a system implementation is, the more satisfied you will be. Furthermore, it will be easier to maintain and, if necessary, easier to modify the implemented system should your needs change.
The system Implementation methodology is followed for each implementation project. The methodology is designed to allow for project flexibility to accommodate the various system customizations.
The System Implementation Methodology is comprised of these phases:
Phase 1 - Define Requirements
Phase 2 - Create Detail Forms Requirements
Phase 3 - Build the Master Resource Library
Phase 4 - Install and Configure the System
Phase 5 - Test the System
Phase 6 - Go Live
The methodology phases are cyclical. After completing Phase 6, Phase 1 begins again, to continually evaluate the system and to incorporate product maintenance.

Using a Methodology
151
Because each system implementation is different, the time frame for completing each phase varies. Here is a summary of the phases and the related tasks:
Phase 1 - Define therequirements
Defining the requirements is the planning and definition phase of an implementation. In this phase, your processing needs are defined. Your input is very important in accurately identifying your needs.
The primary output of this phase is the Requirements Definition Documentation. This document includes the project scope and schedule, information regarding the technical and functional areas targeted for document automation, and the steps outlining how the implementation will proceed.
Phase 2 - Create thedetail forms
requirements
Creating the detail forms requirements involves specifying all forms to be converted from paper to electronic forms, and determining how to automate the transferal of data to the forms. Determining how to automate data transfer includes defining how the data will be mapped, defining the data transfers from the source file to the forms, and the form data format. This process requires mapping data in hierarchical succession: form set, form, section, fields, field attributes, and field sequencing and navigation logic.
Documaker Studio is often used during this phase. You can learn more about this tool in the Documaker Studio User Guide.
Phase 3 - Build theMaster Resource
Library
Building the Master Resource Library involves organizing and setting up the resources to be used by your system. Here a complete library of reusable resources is set up. Your users will select from these resources to complete their work activities.
1
Define Requirements
2Create Detail
Forms Requirements
6
Go Live
3
Build Master Resource Library
5
Test the System
4
Install and Configure System

Chapter 3Implementing Your System
152
A resource library is divided into these libraries: Section Library, Variable Data Dictionary Library, and Rules Library. Each of these libraries contains files that store different resource components. Depending on your system configuration and location, you may have separate Distributed Resource Libraries, as a subset of the Master Resource Library.
In addition to setting up the resources, this phase involves configuring forms sets, the rules used for processing forms, and the system initialization files that determine how your system operates. During this phase the base system is customized to meet your needs. Customization can range from changing system functions to changing the system interface.
Phase 4 - Install andconfigure the system
During this phase, the various system modules are installed. After installing the components, you test various aspects and functions of the system, such as printing and archiving, using test scenarios and sample data. Adjustments are made if required to the configuration files. If available, you should use real data for these initial tests.
Phase 5 - Test thesystem
In Phase 5, system testing begins. Detailed test matrices are created, which are used to test the entire system using real data. A test matrix is a listing of the functions, conditions, and exceptions of the system you want to test. It’s important to have plenty of real data you can use for testing purposes during this phase.
Phase 6 - Go live In Phase 6, the system is now ready for full production. The support personnel assigned to the project will assist you with start up procedures and training.

Gathering Information
153
GATHERINGINFORMATION
At the beginning of any implementation, it is important to gather as much relevant information as possible. This information helps ensure requirements are correctly defined, future goals are taken into consideration, and the solution meets your needs exactly.
UNDERSTANDING YOUR NICHE
Understanding your current and future industry positioning is integral in successfully implementing a customized system. The system must suit your needs now, and expand as your company grows. Knowing where you expect to take the company in the future is important for defining a system.
The implemented system must be set up so it can grow as your company grows. The system must also serve the your current needs. To define your current and future needs, you will be asked questions about the your company’s goals, industry trends, and company projections, such as:
• Do you expect a significant growth in revenue over the next five years? What is your vision for the future?
• Do you expect to experience a reduction or increase in number of employees?
• Do you envision growth into other related or non-related industries?
• How far has the company grown (or downsized) in the past few years? Can you detect industry trends based on past revenues, and financial status?
One of the greatest benefits of a system is its flexibility. Determining where you are and where you expect to be in the future helps to make sure your system solves your business problems today and tomorrow.
UNDERSTANDING YOUR ORGANIZATION
Understanding your organization is also important in fulfilling your needs. It helps to understand the chain of command, and the responsibilities associated with each role in your organization. To gather information about your organization, you will be asked questions such as:
• Have you had previous experience with document automation? How would you describe that experience positive?
• How many data entry operators do you have, and who and where are they?
• What percentage of total time do employees at each level spend on the system?
• Is there a specific organizational hierarchy or chain of command within the company?
• What is your corporate culture? Is there a discreet division of labor at all levels, or is there cross-training and information sharing?
You may also have documentation about your company, future company directions, system flows and workflows, and other information which is important in mapping an implementation strategy. This background information is important in defining the best solution for your company.

Chapter 3Implementing Your System
154
ROLES ANDRESPONSIBILITIES
There are many people involved in a system implementation project. A system implementation project team is comprised of both Documaker Professional Services personnel and personnel from your company. The team's goal is to provide a seamless integrated solution for the your document automation needs.
You are an integral member of the system implementation team. With your knowledge of your business needs, you can often be the navigator or guide during the implementation process.
Documaker Professional Services personnel include:
BUSINESS ANALYST. Throughout the project the Business Analyst is responsible for coordinating the project, creating the phase deliverables, and keeping apprised of the status of all processes and subprocesses within the project.
PROJECT MANAGER. The project manager is involved in initial project analysis and planning, and sizing of the system component development process. The project manager is also responsible for creating the project schedule.
SYSTEM DEVELOPERS. The developers are primarily responsible for coding the system components. Additionally, the programmers may provide analysis, and planning input during the initial phases. Professional Services personnel are involved in customization projects.
155
Chapter 4
Setting Recipients and Copy Counts
This chapter describes how you can specify recipients for the individual forms that comprise your form sets and how you can specify the number of copies each recipient will receive.
In this chapter you will find information about:
• Concepts on page 156
• Key Files on page 157
• Trigger Table Record Format on page 158
• Specifying the Transaction Trigger Table on page 160
• How Transaction Triggering Works on page 161
• Form Level Triggers on page 165
• Master and Subordinate Sections on page 167
• Examples on page 169
• Summary on page 187

Chapter 4Setting Recipients and Copy Counts
156
CONCEPTS In a manual form system, a data entry operator selects the forms that make up a document set. Some forms may be mandatory and are always included. Others are optional and must be specified by the operator.
The operator chooses forms by examining the data at hand and considering certain conditions pertaining to that data. For instance, if the operator is creating insurance policies, he or she would have to know:
• What company is this for?
• What line of business?
• What type of transaction is this?
• Does the agent need a copy?
• How many copies?
• What about the home office copy?
And so on. The answer to each question affects the makeup of the document set you will assemble.
Documaker Server automates the tasks and selection decisions that an operator makes. The set of forms to be printed, and the recipients of those forms, are selected by executing a series of business rules that test the supplied data to see if certain conditions are met.
As matching conditions are found in the data for a transaction, a form set can be constructed, form by form, with all the proper recipients designated. This is the first step in the assembly of a document set. Later, once the set of forms has been determined, other business rules for each form and variable field can be executed to begin to construct the output data, field by field, within each form.
NOTE:Documaker Studio includes a Form manager which you can use to select recipients and specify how many copies those recipients should receive. This chapter explains how the underlying files and settings work. You can change these settings using Studio. You can find more information in the Documaker Studio User Guide.

Key Files
157
KEY FILES Here is a discussion of the key files which the system uses to determine who gets what form and how many copies it should print. You’ll also find information about important concepts, such as form and section (image) level triggers.
TRANSACTION TRIGGER TABLE
The transaction trigger table (also known as the SETRECIP table, or SETRCPTB.DAT file) is a text file used by Documaker Server to define the conditions under which certain forms are included in form sets, and which recipients are to receive the forms. Each record in the transaction trigger table defines a triggering condition for a form or section and is referred to as a trigger record, or, more simply, a trigger.
Trigger LevelsThere are two levels of trigger records: form level triggers which trigger forms, and section level triggers which trigger sections within a form. section level triggers are optional, since some forms automatically include all necessary sections. Also, form level triggers can be optional, since a form can also be triggered by a section level trigger.
NOTE:sections are defined by FAP files and are maintained using Documaker Studio. A section may be an entire page, or a page segment. Forms can be made up of many pages, each containing one or more sections.
FORM SET DEFINITION TABLE
The transaction trigger table works with the form set definition table (also known as the FORM.DAT file) to define the required form set. Together they define many complex inter-relationships and rules, and a number of powerful options by which forms and sections can be triggered, and recipients defined.
In this chapter we will discuss the...
• Purpose of the transaction trigger table.
• Record layout of the transaction trigger table.
• Runtime setup options for the transaction trigger table.
• Rules under which the transaction trigger table program logic operates.
In addition, this chapter discusses several scenarios to illustrate many of the options and variations used to trigger forms and sections.

Chapter 4Setting Recipients and Copy Counts
158
TRIGGER TABLERECORDFORMAT
The transaction trigger table is a semi-colon delimited text file. Each record in the table defines a form level or section level trigger condition. Each record contains the following fields:
;GroupName1 (Company)
;GroupName2 (Line of Business)
;Form name
;Image name
;Transaction codes
;Recipient list
;Search mask 1 (Counter)
;Overflow field 1 (Occurrence flag)
;Overflow field 2 (Records per overflow image)
;Overflow field 3 (Records per first image)
;Recipient Copy count
;Search mask 2 (True/False)
;Custom rule;
NOTE:Semicolons are required as field separators, or placeholders. When values are omitted from optional fields, one or more consecutive semicolons may appear.
The table describes each field.
Field Description
GroupName1 Matches the GroupName1 field in the form set definition table. In an insurance industry application, this would typically contain the Company code. <Key1Table> in the FSISYS.INI file.
GroupName2 Matches the GroupName2 field in the form set definition table. In an insurance industry application, this would typically contain the “line of business” code. <Key2Table> in the FSISYS.INI file.
Form name The name of the form, as specified in the form set definition table. Note: Form names are descriptive, and do not correlate to any physical file name.
Image name The name of a section (image) within a form, as specified in the form set definition table. This name also correlates to a physical section file (.FAP file).
Note: A section level trigger record requires an entry in this key field; a form level trigger record must omit any value in this field.

Trigger Table Record Format
159
Transaction codes By including one or more transaction codes in this field, a form is triggered only if the extract file record includes that transaction code.If no transaction code value is mapped from the extract data for a transaction, the system considers all triggers eligible, regardless of whether they specify a transaction code list.Conversely, if a transaction code value is mapped from the data, the system only considers those triggers that have the same value to be eligible for evaluation.
Recipient list Lets you optionally specify certain recipients.
Search mask 1 (Counter)
Defines the criteria to determine when a form belongs in a form set (or a section within a form). The criteria lets Documaker Server get specific data from the extract file. One form (or section) is added for every occurrence of the Search Mask per Transaction when the overflow flag is set.
Occurrence (overflow) Flag
Indicates the need to calculate overflow conditions. Enter zero (0) for no overflow or 1 for overflow.
Also used for Master and Subordinate form and section level flags. You can enter:
M=master (used on form level triggers)
S=subordinate (used on section level triggers)
F=tells the system to override any previous copy count settings and use the copy count settings in this trigger file (used on form level triggers). In essence, this flag tells the system that if this form is already triggered, don't trigger it again—just modify the previously triggered copy.
Records per overflow image
(Used by overflow) Specifies the number of records matching the Counter Search Mask that will fit on the specified overflow form.
Records per first image
(Used by overflow) Specifies the number of records matching the Counter Search Mask that will fit on a specific form before overflowing to a new form.
Recipient copy count
Specifies the number of copies a recipient receives.
Search Mask 2 (True/False)
Similar to Search Mask 1, but only one form will be triggered, regardless of how many occurrences of the condition exists.
Custom Rule Available field for use with custom rules or search masks. Most common custom rule is RECIPIF.
Field Description

Chapter 4Setting Recipients and Copy Counts
160
SPECIFYING THETRANSACTION
TRIGGER TABLE
You specify the file name of the transaction trigger table (also known as the SETRECIP table) in the FSISYS.INI file. For example:
< Data >
SetRcpTb = SETRCPTB.DAT
< MasterResource >
FormsetTrigger = SETRCPTB.DAT
The form set definition table is also specified in the FSISYS.INI file, in the following control group:
< MasterResource >
FormDef = FORM.DAT
There are two form set level rules that relate to the transaction trigger table in the AFGJOB.JDT file:
<Base Form Set Rules>
;LoadRcpTbl;2;;
;RunSetRcpTbl;2;;
The LoadRcpTbl rule loads the entries from the SETRCPTB.DAT file for the current GroupName1, GroupName2, and Transaction code. The RunSetRcpTbl rule runs all entries in the transaction trigger table that pertain to the current GroupName1, GroupName2, and Transaction code to generate the form set for the current transaction.
For more information on these and other rules, see the Rules Reference.
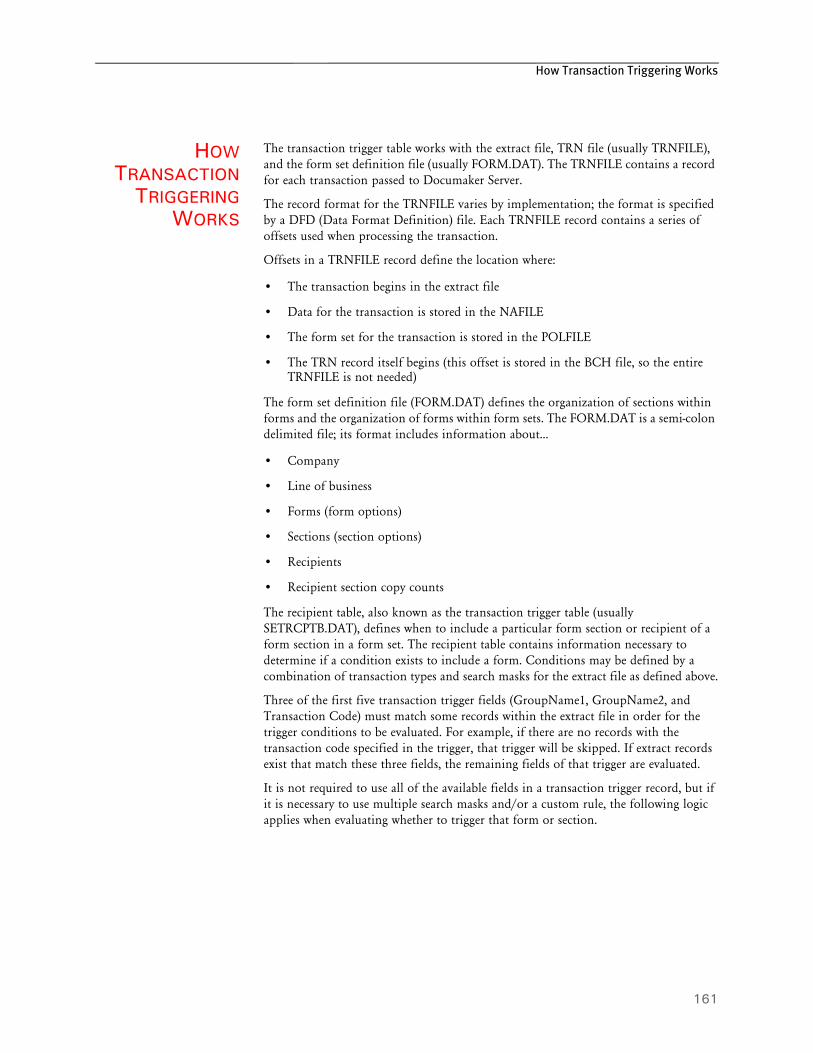
How Transaction Triggering Works
161
HOWTRANSACTION
TRIGGERINGWORKS
The transaction trigger table works with the extract file, TRN file (usually TRNFILE), and the form set definition file (usually FORM.DAT). The TRNFILE contains a record for each transaction passed to Documaker Server.
The record format for the TRNFILE varies by implementation; the format is specified by a DFD (Data Format Definition) file. Each TRNFILE record contains a series of offsets used when processing the transaction.
Offsets in a TRNFILE record define the location where:
• The transaction begins in the extract file
• Data for the transaction is stored in the NAFILE
• The form set for the transaction is stored in the POLFILE
• The TRN record itself begins (this offset is stored in the BCH file, so the entire TRNFILE is not needed)
The form set definition file (FORM.DAT) defines the organization of sections within forms and the organization of forms within form sets. The FORM.DAT is a semi-colon delimited file; its format includes information about…
• Company
• Line of business
• Forms (form options)
• Sections (section options)
• Recipients
• Recipient section copy counts
The recipient table, also known as the transaction trigger table (usually SETRCPTB.DAT), defines when to include a particular form section or recipient of a form section in a form set. The recipient table contains information necessary to determine if a condition exists to include a form. Conditions may be defined by a combination of transaction types and search masks for the extract file as defined above.
Three of the first five transaction trigger fields (GroupName1, GroupName2, and Transaction Code) must match some records within the extract file in order for the trigger conditions to be evaluated. For example, if there are no records with the transaction code specified in the trigger, that trigger will be skipped. If extract records exist that match these three fields, the remaining fields of that trigger are evaluated.
It is not required to use all of the available fields in a transaction trigger record, but if it is necessary to use multiple search masks and/or a custom rule, the following logic applies when evaluating whether to trigger that form or section.
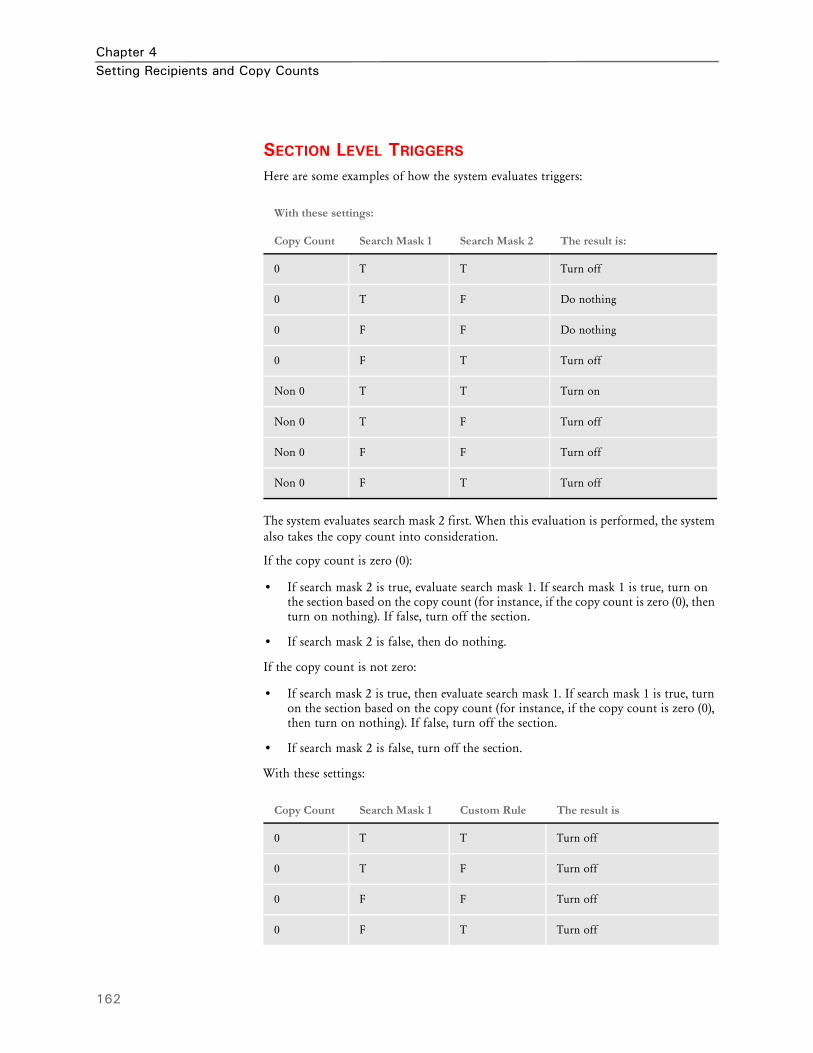
Chapter 4Setting Recipients and Copy Counts
162
SECTION LEVEL TRIGGERS
Here are some examples of how the system evaluates triggers:
The system evaluates search mask 2 first. When this evaluation is performed, the system also takes the copy count into consideration.
If the copy count is zero (0):
• If search mask 2 is true, evaluate search mask 1. If search mask 1 is true, turn on the section based on the copy count (for instance, if the copy count is zero (0), then turn on nothing). If false, turn off the section.
• If search mask 2 is false, then do nothing.
If the copy count is not zero:
• If search mask 2 is true, then evaluate search mask 1. If search mask 1 is true, turn on the section based on the copy count (for instance, if the copy count is zero (0), then turn on nothing). If false, turn off the section.
• If search mask 2 is false, turn off the section.
With these settings:
With these settings:
Copy Count Search Mask 1 Search Mask 2 The result is:
0 T T Turn off
0 T F Do nothing
0 F F Do nothing
0 F T Turn off
Non 0 T T Turn on
Non 0 T F Turn off
Non 0 F F Turn off
Non 0 F T Turn off
Copy Count Search Mask 1 Custom Rule The result is
0 T T Turn off
0 T F Turn off
0 F F Turn off
0 F T Turn off
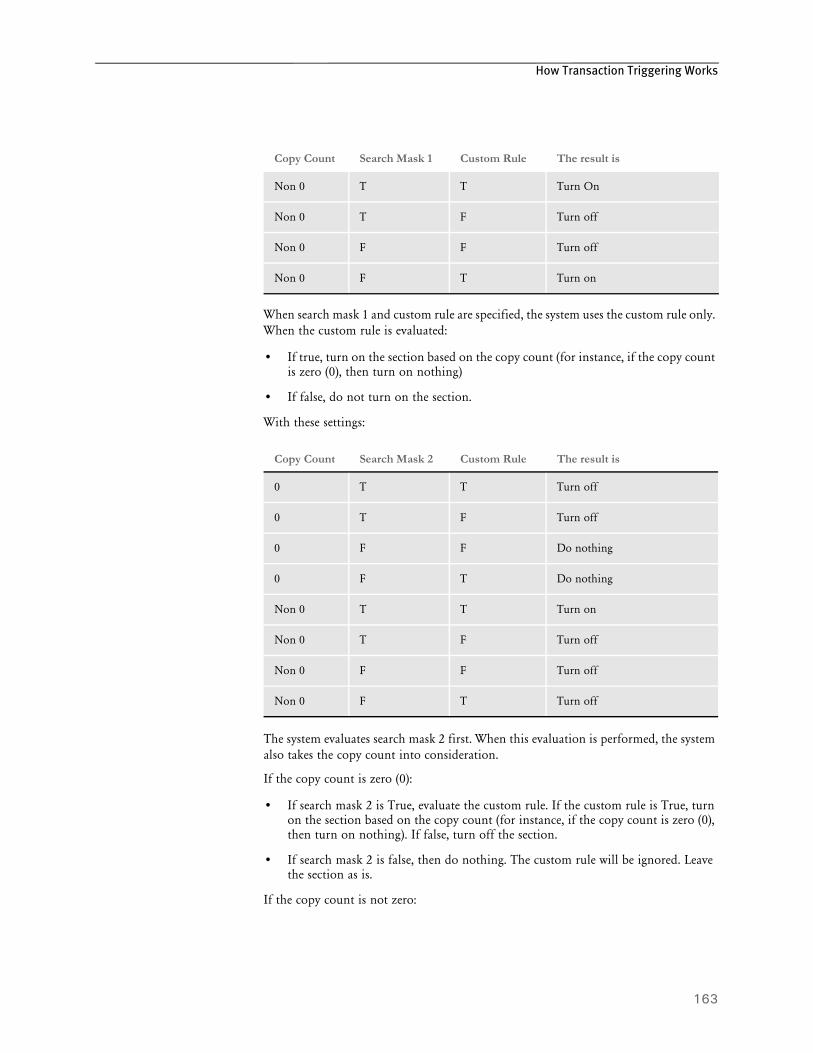
How Transaction Triggering Works
163
When search mask 1 and custom rule are specified, the system uses the custom rule only. When the custom rule is evaluated:
• If true, turn on the section based on the copy count (for instance, if the copy count is zero (0), then turn on nothing)
• If false, do not turn on the section.
With these settings:
The system evaluates search mask 2 first. When this evaluation is performed, the system also takes the copy count into consideration.
If the copy count is zero (0):
• If search mask 2 is True, evaluate the custom rule. If the custom rule is True, turn on the section based on the copy count (for instance, if the copy count is zero (0), then turn on nothing). If false, turn off the section.
• If search mask 2 is false, then do nothing. The custom rule will be ignored. Leave the section as is.
If the copy count is not zero:
Non 0 T T Turn On
Non 0 T F Turn off
Non 0 F F Turn off
Non 0 F T Turn on
Copy Count Search Mask 2 Custom Rule The result is
0 T T Turn off
0 T F Turn off
0 F F Do nothing
0 F T Do nothing
Non 0 T T Turn on
Non 0 T F Turn off
Non 0 F F Turn off
Non 0 F T Turn off
Copy Count Search Mask 1 Custom Rule The result is

Chapter 4Setting Recipients and Copy Counts
164
• If search mask 2 is true, then evaluate the custom rule. If the custom rule is true, turn on the section based on the copy count (for instance, if the copy count is zero (0), then turn on nothing). If false, turn off the section.
• If search mask 2 is false, turn off the section.

Form Level Triggers
165
FORM LEVELTRIGGERS
Here are some examples. With these settings:
At the form level, search mask 2 is evaluated first. It is unlike the section level in that the copy count is not considered.
If search mask 2 is true, search mask 1 is evaluated:
• If true, trigger the form based on the copy count (for instance, if the copy count is zero (0), then turn on nothing)
• If false, do not trigger the form.
With these settings:
When search mask 1 and custom rule are specified, the system uses the custom rule only. When the custom rule is evaluated:
Copy Count Search Mask 1 Search Mask 2 The result is:
0 T T Turn off
0 T F Turn off
0 F F Turn off
0 F T Turn off
Non 0 T T Turn on
Non 0 T F Turn off
Non 0 F F Turn off
Non 0 F T Turn off
Copy Count Search Mask 1 Custom Rule The result is:
0 T T Turn off
0 T F Turn off
0 F F Turn off
0 F T Turn off
Non 0 T T Turn on
Non 0 T F Turn off
Non 0 F F Turn off
Non 0 F T Turn on

Chapter 4Setting Recipients and Copy Counts
166
• If true, trigger the form based on the copy count (for instance, if the copy count is zero (0), then turn on nothing)
• If false, do not trigger the form.
With these settings:
At the form level, search mask 2 is evaluated first. It is unlike the section level in that the copy count is not considered. If search mask 2 is true, the custom rule is evaluated:
• If true, trigger the form based on the copy count (for instance, if the copy count is zero (0), then turn on nothing)
• If false, do not trigger the form.
If search mask 2 is false, do not trigger the form.
When a transaction trigger table entry is evaluated to be true or false, the effect varies depending on the type of trigger. The following table explains the effects of form and section level triggers:
Copy Count Search Mask 1 Custom Rule The result is:
0 T T Turn off
0 T F Turn off
0 F F Turn off
0 F T Turn off
Non 0 T T Turn on
Non 0 T F Turn off
Non 0 F F Turn off
Non 0 F T Turn off
Logic Form Level Trigger Section Level Trigger
True Turns on all sections in the form for selected recipients with the copy count specified in the copy count field in the transaction trigger table entry.
Turns on sections in the form for non-selected recipients only if those sections have a copy count of at least 1 in the form set definition table.
Turns on the specified section for the selected recipients with the copy count specified in the copy count field in the transaction trigger table entry.Turns on other sections in the form with the same recipients with a copy count of at least 1 in the form set definition table.
False Does not turn on any images for any recipients.
Turns off the specified image by setting the copy count to zero (0) for the selected recipients or does nothing.

Master and Subordinate Sections
167
MASTER ANDSUBORDINATE
SECTIONS
The set recipient table contains both form and section (image) level triggers to handle cases of conditional sections on forms. There are two flag options you can use in the set recipient table (SETRECIP) for transaction triggering. These two flags, S and M, are used to regulate the evaluation of section level triggers and are placed in the Occurrence (overflow) flag field of form or section level triggers.
NOTE:When you are using master and subordinate triggering, keep in mind you cannot evaluate multiple form level triggers. The system limits you to a single form level trigger for a given group of sections. You can repeat the same sections for another form level trigger.
MARKING SUBORDINATE SECTIONS
The S flag, called the subordinate flag, identifies the section as subordinate to the parent or master form. The subordinate flag is enabled when you place an uppercase S in the Occurrence flag field (which is the 8th semi-colon delimited field of each table entry), and may be separated from the overflow flag (0 or 1) by a comma. As long as there is an uppercase S character in the flags field, the section will be treated as a subordinate. The S flag makes the section level trigger dependent on the successful triggering of its parent form by the form level trigger for that form. If the parent form was not triggered on its own account, such as if it was added because of an underlying non-subordinate section being triggered, then all subordinate sections triggers are still ignored.
The intended use of this flag is to eliminate redundant conditional logic at both the section and form level, as well as to maintain a hierarchy of form and section with respect to the inclusion of these entities into a form set. A subordinate section cannot cause the inclusion of the parent form because if the form was not triggered then the subordinate section triggers are never processed. The use of subordinate sections lends itself largely to situations where you want to trigger a form based on some condition, and then conditionally add sections to that form.
If the form was not triggered then all underlying section triggers can be ignored, which eliminates unnecessary processing. The subordinate flag also eliminates processing the same conditional logic over and over again since the logic is only performed once at the form level.
Subordinate sections are subordinate to the master (or parent) form level trigger being true or false, and not actually to the form being triggered. Therefore, it is probably not a good idea to mix subordinate and non-subordinate sections under the same parent form. If the form was triggered by a non-subordinate section, and not by its own conditional, then all subordinate sections for that parent form will still be ignored, despite the fact the form was triggered.

Chapter 4Setting Recipients and Copy Counts
168
MARKING MASTER FORMS
The master form flag, uppercase M, works in a similar manner but on the form level. The M flag is used only with form level triggers and is ignored if used with a section level trigger. The M flag is used to signify a master form level trigger, causing all of the section level triggers beneath the master form level trigger to be treated as if they were subordinate section level triggers.
When you use the M flag with a form level trigger, it does not matter whether the underlying section level triggers have the S flag—they will all be treated as if they did. If effect, if the logic in a master form level trigger fails, the form does not trigger and all of the form’s section level triggers are ignored. The next section illustrates transaction triggering logic through specific examples.

Examples
169
EXAMPLES The transaction trigger table works with the form set definition table. The transaction trigger table is usually named SETRCPTB.DAT and the form set definition table is usually named FORM.DAT.
The FORM.DAT file defines which sections make up a form. There are many possible combinations of sections that can constitute a form. A form can be comprised of a single section or multiple sections. The FORM.DAT file also specifies which recipients get which sections. It is possible to have a single form that is composed of four sections, three of which are constant for all recipients, and one section that varies depending on recipient.
Recipient and copy count information contained in the FORM.DAT is also included in the SETRCPTB.DAT transaction trigger table, so it is important to understand how these two tables work together. Designing the two tables independently can often cause undesired results because one table is overriding the other in a manner that the user did not anticipate. But if the two tables are designed to work together, many complex forms with conditional sections and copy counts can be implemented.
In this topic, numerous examples of form set definition files and transaction trigger tables are shown to illustrate some basic relationships between the form set definition table file and the transaction trigger table file.
In each example, the FORM.DAT and SETRCPTB.DAT tables are shown along with the resulting POL file generated by the GenData program. The POL file shows the final form sets created by the GenData program and is used as an input file by the GenPrint program (along with the NA file) to generate printed output.
You will find examples which discuss:
• Specifying Copy Counts and Sections on page 170
• Using Transaction Codes on page 172
• Setting Up Search Mask and Sections on page 173
• Using the RECIPIF Rule on page 175
• Using Automatic Overflow on page 177
• Using Forced Overflow on page 179
• Setting Search Masks and Recipients on page 180
• Using the Set Recipient Table and Extract Files on page 181
• Formatting Search Masks on page 182
• Sorting Forms by Recipient on page 185

Chapter 4Setting Recipients and Copy Counts
170
SPECIFYING COPY COUNTS AND SECTIONS
One of the fields that is shared by both the transaction trigger table and the form set definition table is the copy count. The copy count specifies the number of copies of a section to be printed for a given recipient.
In the FORM.DAT file, there can be multiple copy counts—one for each recipient for each section that makes up a form. However, in the SETRCPTB.DAT file, there is only one copy count field for each entry. A single SETRCPTB.DAT entry can reference multiple recipients however, so that one copy count field can be applied to more than one recipient.
NOTE:You can also use GVM or DAL variables to set the copy count for a recipient. For more information see the Documaker Studio User Guide.
The copy count is a typical interaction between the FORM.DAT and the SETRCPTB.DAT. In this example, note from the FORM.DAT that the form DECPAGE is made up of the sections PRUNAME, COMDEC1, COMDEC2, and COMDEC3. The other form in the FORM.DAT is VARFLD, which is made up of one section VARFIELD.
All the sections that make up DECPAGE and VARFLD have individual copy counts associated with each recipient. Note that the sections COMDEC2 and VARFIELD have their copy counts set to zero (0) for each recipient. This means that the default copy counts for these sections is zero (0), and if these forms are included in a form set, these sections will not print for any of the listed recipients unless their copy counts are changed by the SETRCPTB.DAT table.
Now looking at the SETRCPTB.DAT file, the first entry causes the form DECPAGE to be loaded, provided the search mask criteria is true (which it is in this case). This first entry is known as a form level trigger because the section name field has been left blank. While the first SETRCPTB.DAT entry references only INSURED and AGENT in the recipient list field, the form is also triggered for COMPANY as well because COMPANY is listed in the FORM.DAT with a copy count of 1 for all sections that make up DEC PAGE except COMDEC2. COMDEC2 is included in DEC PAGE for recipients INSURED and AGENT because they are in the form level SETRCPTB.DAT entry recipients list field.
The second SETRCPTB.DAT line is a section level entry, referencing the section COMDEC2 in the form DECPAGE. The purpose of this section level entry is to set the copy count of the section COMDEC2 (which defaults to zero (0) in the FORM.DAT) so that it will be included in or excluded from the DEC PAGE if the conditions in its SETRCPTB.DAT entry are true (more on this in Example 3).
In this example, COMDEC2 has already been included for INSURED and AGENT by the previous form level entry. If the conditions of this section level entry are true, the section COMDEC2 will be included for recipient AGENT with a copy count of 1 (which in this case is redundant since the previous form level entry already did this). However, since the section level entry conditions are false, the copy count of COMDEC2 for AGENT is set to zero (0). Looking at the POL file, COMDEC 2 only printed for INSURED, because the copy count for AGENT was set to zero (0).

Examples
171
The final three SETRCPTB.DAT entries are all form level entries for VARFLD. Note that in the FORM.DAT, VARFLD, which is composed of one section, VARFIELD has two recipients, INSURED and COMPANY, both of which have copy counts of zero (0). The three SETRCPTB.DAT entries for VARFLD each reference a different recipient in the recipient list field and assign them copy counts. COMPANY gets 1 copy, INSURED gets 2 copies, and AGENT gets 3 copies. However, looking at the POL file, VARFLD printed once for COMPANY and twice for INSURED, but it did not print at all for AGENT. This is because, even though AGENT was included in the SETRCPTB.DAT entry, AGENT was never an original recipient for VARFLD in the FORM.DAT.
FORM.DAT file ;SAMPCO;LB1;DEC PAGE;;R;;PRUNAME|D<INSURED(1),COMPANY(1),AGENT(1)>/COMDEC1|DS<INSURED(1),COMPANY(1),AGENT(1)>/COMDEC2|DS<INSURED(0),COMPANY(0),AGENT(0)>/COMDEC3|DS<INSURED(1),COMPANY(1),AGENT(1)>;
;SAMPCO;LB1;VARFLD;NEW FORM;RD;;VARFIELD|D<INSURED(0),COMPANY(0)>;
SETRCPTB.DAT file ;SAMPCO;LB1;DEC PAGE;;T1;INSURED,AGENT;11,HEADERREC,96,~O;0;0;0;1;;;;
;SAMPCO;LB1;DEC PAGE;COMDEC2;T1;AGENT;11,HEADERREC,11,SPCIALREC,25,Special;0;0;0;1;;;;
;SAMPCO;LB1;VARFLD;;T1;COMPANY;11,HEADERREC,96,~O;0;0;0;1;;;;
;SAMPCO;LB1;VARFLD;;T1;INSURED;11,HEADERREC,96,~O;0;0;0;2;;;;
;SAMPCO;LB1;VARFLD;;T1;AGENT;11,HEADERREC,96,~O;0;0;0;3;;;;
POL file ;SAMPCO;LB1;DECPAGE;;R;;PRUNAME|D<INSURED,COMPANY,AGENT>/COMDEC1|DS<INSURED,COMPANY,AGENT>/COMDEC2|DS<INSURED,>/COMDEC3|DS<INSURED,COMPANY,AGENT>;
;SAMPCO;LB1;VARFLD;NEW FORM;RD;;VARFIELD|DN<COMPANY>;
;SAMPCO;LB1;VARFLD;NEW FORM;RD;;VARFIELD|DN<INSURED(2),>;
\ENDDOCSET\ 1234567
;SAMPCO;LB1;DECPAGE;;R;;PRUNAME|D<INSURED,COMPANY,AGENT>/COMDEC1|DS<INSURED,COMPANY,AGENT>/COMDEC2|DS<INSURED,>/COMDEC3|DS<INSURED,COMPANY,AGENT>;
;SAMPCO;LB1;VARFLD;NEW FORM;RD;;VARFIELD|DN<COMPANY>;
;SAMPCO;LB1;VARFLD;NEW FORM;RD;;VARFIELD|DN<INSURED(2),>;
\ENDDOCSET\ 3234567
;SAMPCO;LB1;DECPAGE;;R;;PRUNAME|D<INSURED,COMPANY,AGENT>/COMDEC1|DS<INSURED,COMPANY,AGENT>/COMDEC2|DS<INSURED,>/COMDEC3|DS<INSURED,COMPANY,AGENT>;
;SAMPCO;LB1;VARFLD;NEW FORM;RD;;VARFIELD|DN<COMPANY>;
;SAMPCO;LB1;VARFLD;NEW FORM;RD;;VARFIELD|DN<INSURED(2),>;
\ENDDOCSET\ 5234567

Chapter 4Setting Recipients and Copy Counts
172
USING TRANSACTION CODES
In this example, the same environment as in the first example, Specifying Copy Counts and Sections, is used. In this case, however, the second entry in the SETRCPTB.DAT has been slightly modified. The transaction code field has been changed from T1 to T2 to illustrate that not having the proper transaction code will cause that entry to be skipped.
In this example, the SETRCPTB.DAT section level entry that references COMDEC2 is not being evaluated because the transaction code field does not match the data contained in the extract file. The result of skipping this entry is, unlike the previous example, where COMDEC2 did not print for AGENT, in this example COMDEC2 prints for both AGENT and INSURED.
FORM.DAT file ;SAMPCO;LB1;DEC PAGE;;R;;PRUNAME|D<INSURED(1),COMPANY(1),AGENT(1)>/COMDEC1|DS<INSURED(1),COMPANY(1),AGENT(1)>/COMDEC2|DS<INSURED(0),COMPANY(0),AGENT(0)>/COMDEC3|DS<INSURED(1),COMPANY(1),AGENT(1)>;
;SAMPCO;LB1;VARFLD;NEW FORM;RD;;VARFIELD|D<INSURED(0),COMPANY(0)>;
SETRCPTB.DAT file ;SAMPCO;LB1;DEC PAGE;;T1;INSURED,AGENT;11,HEADERREC,96,~O;0;0;0;1;;;;
;SAMPCO;LB1;DEC PAGE;COMDEC2;T2;AGENT;11,HEADERREC,11,SPCIALREC,25,Special;0;0;0;1;;;;
;SAMPCO;LB1;VARFLD;;T1;COMPANY;11,HEADERREC,96,~O;0;0;0;1;;;;
;SAMPCO;LB1;VARFLD;;T1;INSURED;11,HEADERREC,96,~O;0;0;0;2;;;;
;SAMPCO;LB1;VARFLD;;T1;AGENT;11,HEADERREC,96,~O;0;0;0;3;;;;
POL file ;SAMPCO;LB1;DEC PAGE;;R;;PRUNAME|D<INSURED,COMPANY,AGENT>/COMDEC1|DS<INSURED,COMPANY,AGENT>/COMDEC2|DS<INSURED,AGENT>/COMDEC3|DS<INSURED,COMPANY,AGENT>;
;SAMPCO;LB1;VARFLD;NEW FORM;RD;;VARFIELD|DN<COMPANY>;
;SAMPCO;LB1;VARFLD;NEW FORM;RD;;VARFIELD|DN<INSURED(2),>;
\ENDDOCSET\ 1234567
;SAMPCO;LB1;DEC PAGE;;R;;PRUNAME|D<INSURED,COMPANY,AGENT>/COMDEC1|DS<INSURED,COMPANY,AGENT>/COMDEC2|DS<INSURED,AGENT>/COMDEC3|DS<INSURED,COMPANY,AGENT>;
;SAMPCO;LB1;VARFLD;NEW FORM;RD;;VARFIELD|DN<COMPANY>;
;SAMPCO;LB1;VARFLD;NEW FORM;RD;;VARFIELD|DN<INSURED(2),>;
\ENDDOCSET\ 3234567
;SAMPCO;LB1;DEC PAGE;;R;;PRUNAME|D<INSURED,COMPANY,AGENT>/COMDEC1|DS<INSURED,COMPANY,AGENT>/COMDEC2|DS<INSURED,AGENT>/COMDEC3|DS<INSURED,COMPANY,AGENT>;
;SAMPCO;LB1;VARFLD;NEW FORM;RD;;VARFIELD|DN<COMPANY>;
;SAMPCO;LB1;VARFLD;NEW FORM;RD;;VARFIELD|DN<INSURED(2),>;
\ENDDOCSET\ 5234567

Examples
173
SETTING UP SEARCH MASK AND SECTIONS
There are two search mask fields in the SETRCPTB.DAT table structure. The first search mask is known as the counter search mask because it works with the overflow counters that immediately follow it in the transaction trigger table format, provided that the overflow flag is set.
The second search mask is known as the true/false search mask. Both search masks can be used to set conditions to evaluate whether a set recipient entry should be executed. In this example, the second SETRCBTP.DAT entry that references COMDEC2 has a multiple condition counter search mask.
NOTE:If you want the system to stop searching after it finds the first match, use the true\false search mask instead of the counter search mask. If you place the search mask in the counter search mask field, the system finds the first match and then looks for multiple occurrences.
The first entry in the SETRCPTB.DAT table causes the form DEC PAGE to be triggered for recipients INSURED and AGENT. All sections that make up DEC PAGE and have INSURED and/or AGENT as recipients (from the FORM.DAT file) are triggered with a copy count of 1 for each recipient. The second SETRCPTB.DAT entry is a section level entry that references COMDEC2.
The search mask in this entry will obviously fail because the first condition looks for HEADERREC at offset 11 and the second condition also looks at offset 11, but for SPCIALREC. Both conditions cannot be true at the same time, so the search mask fails. The result of this section level search mask failing is to set the copy count for the recipients in the recipient list field, in this case AGENT, to zero (0).
Were the search mask true, AGENT would have been set to a copy count of 1 (which would be no change, since AGENT already had a copy count of 1 for COMDEC2).
Looking at the POL file, COMDEC2 was printed only for INSURED because the copy count of COMDEC2 for AGENT was set to zero (0) when the section level entry in the SETRCPTB.DAT file failed.
FORM.DAT file ;SAMPCO;LB1;DEC PAGE;;R;;PRUNAME|D<INSURED(1),COMPANY(1),AGENT(1)>/COMDEC1|DS<INSURED(1),COMPANY(1),AGENT(1)>/COMDEC2|DS<INSURED(0),COMPANY(0),AGENT(0)>/COMDEC3|DS<INSURED(1),COMPANY(1),AGENT(1)>;
;SAMPCO;LB1;VARFLD;NEW FORM;RD;;VARFIELD|D<INSURED(0),COMPANY(0)>;
SETRCPTB.DAT file ;SAMPCO;LB1;DEC PAGE;;T1;INSURED,AGENT;11,HEADERREC,96,~O;0;0;0;1;;;;
;SAMPCO;LB1;DEC PAGE;COMDEC2;T1;AGENT;11,HEADERREC,11,SPCIALREC,25,Special;0;0;0;1;;;;
;SAMPCO;LB1;VARFLD;;T1;COMPANY;11,HEADERREC,96,~O;0;0;0;1;;;;
;SAMPCO;LB1;VARFLD;;T1;INSURED;11,HEADERREC,96,~O;0;0;0;2;;;;

Chapter 4Setting Recipients and Copy Counts
174
;SAMPCO;LB1;VARFLD;;T1;AGENT;11,HEADERREC,96,~O;0;0;0;3;;;;
POL File ;SAMPCO;LB1;DECPAGE;;R;;PRUNAME|D<INSURED,COMPANY,AGENT>/COMDEC1|DS<INSURED,COMPANY,AGENT>/COMDEC2|DS<INSURED,>/COMDEC3|DS<INSURED,COMPANY,AGENT>;
;SAMPCO;LB1;VARFLD;NEW FORM;RD;;VARFIELD|DN<COMPANY>;
;SAMPCO;LB1;VARFLD;NEW FORM;RD;;VARFIELD|DN<INSURED(2),>;
\ENDDOCSET\ 1234567
;SAMPCO;LB1;DECPAGE;;R;;PRUNAME|D<INSURED,COMPANY,AGENT>/COMDEC1|DS<INSURED,COMPANY,AGENT>/COMDEC2|DS<INSURED,>/COMDEC3|DS<INSURED,COMPANY,AGENT>;
;SAMPCO;LB1;VARFLD;NEW FORM;RD;;VARFIELD|DN<COMPANY>;
;SAMPCO;LB1;VARFLD;NEW FORM;RD;;VARFIELD|DN<INSURED(2),>;
\ENDDOCSET\ 3234567
;SAMPCO;LB1;DECPAGE;;R;;PRUNAME|D<INSURED,COMPANY,AGENT>/COMDEC1|DS<INSURED,COMPANY,AGENT>/COMDEC2|DS<INSURED,>/COMDEC3|DS<INSURED,COMPANY,AGENT>;
;SAMPCO;LB1;VARFLD;NEW FORM;RD;;VARFIELD|DN<COMPANY>;
;SAMPCO;LB1;VARFLD;NEW FORM;RD;;VARFIELD|DN<INSURED(2),>;
\ENDDOCSET\ 5234567

Examples
175
USING THE RECIPIF RULE
The RECIPIF rule is the primary rule used in the custom rule field. There are other rules which have been written for specific implementations that have been used in this field, but the RECIPIF rule is a part of base. The RECIPIF rule allows for customized search mask evaluations.
In this example, the RECIPIF rule is being used to evaluate two different conditions:
• does ‘1995’ exist beginning at offset 51 in records with HEADERREC beginning at offset 11
• does ‘T1’ exist at offset 45 in records with FRMLSTREC beginning at offset 11
Looking at the entry in the SETRCPTB.DAT, notice that there are no search masks - only the RECIPIF rule is being used. Following the Search Mask 2 field, the rule name appears, and the rule itself appears in the following field. Each element of the rule is separated by double colons (::).
The first RECIPIF statements assign variables to the search criteria. In this case, A is assigned to the information appearing in the four characters beginning at offset 51 in records with HEADERREC beginning at offset 11. And B is assigned to the information appearing in the two characters beginning at offset 45 in records with FRMLSTREC beginning at offset 11.
The next RECIPIF statement sets up the evaluation logic for the rule. What should A equal? What should B equal? Should both conditions be true, or just one? In this case, A should be ‘1995’ and B should be ‘T1’, and both need to be those values for the rule to be evaluated as true. An OR condition could have been used, which would have been true if either A or B matched their desired values.
The next RECIPIF statements set the return values. In this case, if A=‘1995’ and B=‘T1’, then a ‘1’ is returned (note that the boolean ‘1’ is enclosed both in quotes and carats, such as “^1^”). If those conditions are not met, then return a Boolean zero (0). These return values can be reversed to return a zero (0) when the RECIPIF criteria is true and a one (1) when false, should the need arise in a particular implementation. The last RECIPIF entry is the END statement. Here is an example of the RECIPIF rule syntax:
;recipif;var1={offset,value offset,length}::var2={offset,value offset,length} ::if((var1=‘var1value’) boolean (var2=‘var2value’))::return(“^#^”)::else::return(“^#^”)::end::;
NOTE:There is a space between offset,value and offset,length.
FORM.DAT file ;SAMPCO;LB1;DEC PAGE;;R;;PRUNAME|D<INSURED(0),COMPANY(0),AGENT(0)>/COMDEC1|DS<INSURED(0),COMPANY(0),AGENT(0)>/COMDEC2|DS<INSURED(0),COMPANY(0),AGENT(0)>/COMDEC3|DS<INSURED(0),COMPANY(0),AGENT(0)>;
SETRCPTB.DAT file ;SAMPCO;LB1;DEC PAGE;;;INSURED,AGENT;;0;0;0;1;;recipif;A={11,HEADERREC 51,4}::B={11,FRMLSTREC 45,2}::if((A='1995') AND (B='T1'))::return("^1^")::else::return("^0^")::end::;

Chapter 4Setting Recipients and Copy Counts
176
POL file ;SAMPCO;LB1;DEC PAGE;;R;;PRUNAME|D<INSURED,AGENT>/COMDEC1|DS<INSURED,AGENT>/COMDEC2|DS<INSURED,AGENT>/COMDEC3|DS<INSURED,AGENT>;
\ENDDOCSET\ 1234567
;SAMPCO;LB1;DEC PAGE;;R;;PRUNAME|D<INSURED,AGENT>/COMDEC1|DS<INSURED,AGENT>/COMDEC2|DS<INSURED,AGENT>/COMDEC3|DS<INSURED,AGENT>;
\ENDDOCSET\ 2234567

Examples
177
USING AUTOMATIC OVERFLOW
In some cases, there is information on a form that will repeat an unknown number of times. For example, an auto insurance policy may contain a form that lists the vehicles owned by the insured. The number of vehicles will vary from one insured to another, so there is no way to know in advance how many lines will be needed on a form to list the vehicles. Overflow exists to handle these situations.
There are two types of overflow in the transaction trigger table, forced and automatic. In this example, automatic overflow is used. In automatic overflow, the system automatically determines how many entries exist and inserts them in the form.
Looking at the SETRCPTB.DAT, there is only one section level entry, referencing the section cgdcbd. Looking at the FORM.DAT, section cgdcbd has a default copy count of zero (0), while all the other sections have a default copy count of one (1) for all recipients. So, triggering the section cgdcbd will trigger the remaining sections that make up the form CGDEC.
The SETRCPTB.DAT entry has a simple counter search mask and has the overflow field (occurrence flag) set. The next two overflow-related fields are set to zero (0), so we know that this is an automatic overflow situation.
When this SETRCPTB.DAT entry is executed, it will keep track of the number of records that exist in the extract file that meet this criteria and automatically insert that number of cgdcbd sections into the form CGDEC. Looking at the POL file in this example, many cdgcbd sections were inserted into the form to reflect the number of entries in the extract file that met the specified transaction trigger search criteria.
FORM.DAT file ;FSI;GL;CGDEC;General Liability Declarations;RD;;cgdctp|FDSOX<INSURED(1),COMPANY(1)>/cgdcbd|RDS<INSURED(0),COMPANY(0)>/cgdcbt|RDS<INSURED(1),COMPANY(1)>/cgdcft|RDSOY<INSURED(1),COMPANY(1)>;
SETRCPTB.DAT file ;FSI;GL;CGDEC;cgdcbd;T1;INSURED,COMPANY;11,CLSSCDREC;1;0;0;1;;;;
POL file ;FSI;GL;CGDEC;General Liability Declarations;RD;;cgdctp|FDSOX<INSURED,COMPANY>/cgdcbd|RDS<INSURED,COMPANY>/cgdcbd|RDS<INSURED,COMPANY>/cgdcbd|RDS<INSURED,COMPANY>/cgdcbd|RDS<INSURED,COMPANY>/cgdcbd|RDS<INSURED,COMPANY>/cgdcbd|RDS<INSURED,COMPANY>/cgdcbd|\
RDS<INSURED,COMPANY>/cgdcbd|RDS<INSURED,COMPANY>/cgdcbd|RDS<INSURED,COMPANY>/cgdcbd|RDS<INSURED,COMPANY>/cgdcbd|RDS<INSURED,COMPANY>/cgdcbd|RDS<INSURED,COMPANY>/cgdcbd|RDS<INSURED,COMPANY>/cgdcbd|RDS<INSURED,COMPANY>/cgdcbd|RDS<INSURED,COMPANY>/cgdcbd|RD\
S<INSURED,COMPANY>/cgdcbd|RDS<INSURED,COMPANY>/cgdcbd|RDS<INSURED,COMPANY>/cgdcbd|RDS<INSURED,COMPANY>/cgdcbd|RDS<INSURED,COMPANY>/cgdcbd|RDS<INSURED,COMPANY>/cgdcbd|RDS<INSURED,COMPANY>/cgdcbd|RDS<INSURED,COMPANY>/cgdcbd|RDS<INSURED,COMPANY>/cgdcbd|RDS<\
INSURED,COMPANY>/cgdcbd|RDS<INSURED,COMPANY>/cgdcbd|RDS<INSURED,COMPANY>/cgdcbd|RDS<INSURED,COMPANY>/cgdcbd|RDS<INSURED,COMPANY>/cgdcbd|RDS<INSURED,COMPANY>/cgdcft|RDSOY<INSURED,COMPANY>/cgdctp|RDSOX<INSURED,COMPANY>/cgdcbd|RDS<INSURED,COMPANY>/cgdcbd|RD\

Chapter 4Setting Recipients and Copy Counts
178
S<INSURED,COMPANY>/cgdcbd|RDS<INSURED,COMPANY>/cgdcbd|RDS<INSURED,COMPANY>/cgdcbd|RDS<INSURED,COMPANY>/cgdcbd|RDS<INSURED,COMPANY>/cgdcbd|RDS<INSURED,COMPANY>/cgdcbd|RDS<INSURED,COMPANY>/cgdcbd|RDS<INSURED,COMPANY>/cgdcbd|RDS<INSURED,COMPANY>/cgdcbd|RDS<\
INSURED,COMPANY>/cgdcbd|RDS<INSURED,COMPANY>/cgdcbt|RDS<INSURED,COMPANY>/cgdcft|RDSOY<INSURED,COMPANY>;
\ENDDOCSET\ 5234567

Examples
179
USING FORCED OVERFLOW
In this example, forced overflow is used. Forced overflow differs from automatic overflow in that there are a set number of overflow entries that can be placed on a given form.
For example, if a form is designed to list all the vehicles owned by an insured, the form designer might have a section that has room to list up to two vehicles. For insureds with two or less vehicles, only that one section is needed. However, for insureds with more than two vehicles, the designer has a separate add-on section to list the remaining vehicles. Forced overflow is used in situations such as this.
In this example, there are two sections in the FORM.DAT that make up the form FCP DEC. The first section, FCPDEC, is the main section, and the second section, FCPDEC2, is the overflow section. Both sections have copy counts of zero (0), allowing the SETRCPTB.DAT entries to control the copy counts.
The first SETRCPTB.DAT entry triggers the form for all recipients (in this case INSURED), leaving the copy counts set to zero (0). The next entry sets FCPDEC’s copy count to 1 if the search mask is true. The final SETRCPTB.DAT entry is the forced overflow entry. The same search criteria is used, but the overflow (occurrence) flag is set.
The next two overflow fields specify how many entries are to be split among the two sections. The records per overflow section (6 in this example), specifies how many records will fit on the FCPDEC2 overflow section. The next field, records per first section, specifies how many records will fit on the primary section FCPDEC (2 in this example). So, FCPDEC2 will only be triggered if the search mask criteria is true and there are more than 2 occurrences of this record type.
Looking at the POL file, FCPDEC2 was triggered twice, so there must have been at least 9 overflow records. The first two went on the first section FCPDEC, the next six on the first FCPDEC2 section, and the remaining on the second FCPDEC2 section.
FORM.DAT file ;FSI;CPP;FCP DEC;FCPDEC OVERFLOW;RO;;FCPDEC|D<INSURED(0)>/FCPDEC2|D<INSURED(0)>;
SETRCPTB.DAT file ;FSI;CPP;FCP DEC;;T1;INSURED;11,PREMLCREC;0;0;0;0;;;;
;FSI;CPP;FCP DEC;FCPDEC;T1;INSURED;11,PREMLCREC;0;0;0;1;;;;
;FSI;CPP;FCP DEC;FCPDEC2;T1;INSURED;11,PREMLCREC;1;6;2;1;;;;
POL file ;FSI;CPP;FCP DEC;FCPDEC OVERFLOW;RO;;FCPDEC|D<INSURED>/FCPDEC2|D<INSURED>/FCPDEC2|D<INSURED>;
\ENDDOCSET\ 4234557

Chapter 4Setting Recipients and Copy Counts
180
SETTING SEARCH MASKS AND RECIPIENTS
In this example, two transaction trigger table concepts are illustrated. First, notice that there are two search masks in the SETRCPTB.DAT entries. Both the counter and true/false search masks are being used. Also, in the recipient selection from the SETRCPTB.DAT is used.
The FORM.DAT consists of a single form, OP654, made up of a single section, addr. section addr is defined for three recipients, INSURED, COMPANY, and AGENT, all with default copy counts of zero (0). In the SETRCPTB.DAT, there are two form level entries. In the first entry, we are looking for ‘1995’ at offset 51 in records with HEADERREC at offset 11 and 0 at position 20 in records with FRMLSTREC at offset 11.
If both of these conditions are true, OP654 is triggered for INSURED with a copy count of 1. In the second entry, the same conditions apply for AGENT, with the exception of looking for ‘1996’ in the counter search mask (rather than ‘1995’).
Notice in the POL file that form OP654 was triggered for INSURED only, indicating that the second SETRCPTB.DAT entry failed. The second entry failed because ‘1996’ did not appear at offset 51 in records with HEADERREC at offset 11. This example illustrates that the two search masks work with a logical AND condition, since the true/false search mask is true in both entries.
This example also illustrates letting the SETRCPTB.DAT control the copy counts for a form. When the section OP654 was triggered for INSURED in the first entry, it was triggered for all recipients. Since the default copy count for all recipients is zero (0), and only INSURED was set to a copy count of 1 in the SETRCPTB.DAT entry, OP654 was only printed for INSURED.
FORM.DAT file ;SAMPCO;LB2;OP654;First Letter;RD;;addr|DS<INSURED(0),COMPANY(0),AGENT(0)>;
SETRCPTB.DAT file ;SAMPCO;LB2;OP654;;T1;INSURED;11,HEADERREC,51,1995;0;0;0;1;11;FRMLSTREC,20,0;
;SAMPCO;LB2;OP654;;T1;AGENT;11,HEADERREC,51,1996;0;0;0;1;11,FRMLSTREC,20,0;
POL file ;SAMPCO;LB2;OP654;First Letter;RD;;addr|DS<INSURED,>;
\ENDDOCSET\ 6SAMPCO
;SAMPCO;LB2;OP654;First Letter;RD;;addr|DS<INSURED,>;
\ENDDOCSET\ 8SAMPCO

Examples
181
USING THE SET RECIPIENT TABLE AND EXTRACT FILES
Here are some hints on how to best use the set recipient table (SETRCPTB.DAT) and extract files:
• Fewer triggers equals better performance. Each trigger is like a condition statement for the system to evaluate. The more conditions the system has to evaluate, the slower the processing cycle.
• Use the master (M) and subordinate (S) flags to avoid repetition.
The set recipient table contains both form and section level triggers to handle cases of conditional sections on forms. A section level trigger can be used to trigger a form. This is beneficial in situations where a conditional section can trigger header and footer sections. If, however, you use it improperly, you will add redundant conditional logic at both section and form level—which slows performance.
There are two flags (S and M) which you can use to control the evaluation of section level triggers and to maintain a hierarchy of form and section with respect to the inclusion of these entities into a form set. The S flag, called the subordinate flag, identifies the section as subordinate to the parent or master form level trigger. If the form is not triggered, all underlying section triggers can be ignored, which eliminates unnecessary processing. The subordinate flag also eliminates processing the same conditional logic over and over again since the logic is only performed once at the form level.
The master form flag (M) works in a similar manner but at the form level. When you use the M flag with a form level trigger, it does not matter whether the underlying section level triggers have an S flag—all will be treated as if they did. If the logic in a master form level trigger fails, the form does not trigger and all of the form’s section level triggers are ignored.
• Limit your use of the RecipIf rule.
The RecipIf rule is just like the IF rule except it is used in the SETRCPTB.DAT file. The more conditions the system has to evaluate, the slower the processing cycle. Avoiding the RecipIf rule often depends on the structure of the extract file.
The ideal situation is to trigger a form or section based on one search criteria. If you want to trigger a form or section based on more than one search criteria, you may need to use the RecipIf rule. The more conditions you have, the more complicated the RecipIf rule will be. If the system has to look for a value in a given range of data instead of at an exact location, you have to add a long and complicated recipif. There is a price to pay for flexibility and it’s paid in performance.
• Structure the data in your extract file to be read in the order that it will be processed. This improves performance since the system will find the next piece of data to process faster.

Chapter 4Setting Recipients and Copy Counts
182
FORMATTING SEARCH MASKS
Here are some tips to keep in mind when formatting a search mask.
Spaces • You cannot have a space in any part of the search mask after the comma following an offset unless you intend to search for that space in the extract file. For example,
"10,DATA"
is not the same as
"10, DATA"
In the second mask, the space is considered part of the search string.
• You cannot have spaces following DATA that you do not want to include in the search. For example,
"10,DATA,20,DATA"
is not the same as
"10,DATA ,20,DATA"
In the latter, the space following the first word DATA is considered part of the search text.
• You can have space following the numerical offset value. For example, “10 ,DATA” is interpreted the same as “10,DATA”.
Commas You cannot search for data which contains a comma. For instance, you cannot have a search mask of
"10,A,B"
where you expect to find
"A,B"
in your extract row.
You can, however, write the search mask to exclude every other possible character that might occur between A at offset 10 and B at offset 12. For instance, you could create this search mask:
"10,A,12,B,11,~+,11,~="
assuming that the only other possible combinations are A+B and A=B.

Examples
183
Tildes The tilde (~) represents a logical NOT of the search operation. The tilde must immediately follow the comma—but remember that any space after the comma is considered part of the search text.
For example, a search mask of
"10,~DATA"
is only true if “DATA” does not occur starting at offset 10.
To search for text that beings with a tilde, include two tildes in a sequence. For example, “10,~~DATA” tells the system to search for “~DATA” beginning at offset 10.
If, however, the tilde is not the first character in the search text, you do not duplicate the character. For instance, “10,DATA~” is all you have to enter to find “DATA~” starting at offset 10.
If a space is what you want to compare, add a comma after the space in the search mask. For example, a search mask of
"10,~ ,"
is true if a space does not occur starting at offset 10.
Parentheses There is no way to search for text that begins with an open parenthesis. For instance, if you use a search mask like
"10,(,20,DATA"
assuming that the open paren character would be at offset 10, you will not get the results you want.
Using the OR condition The OR condition is defined as OFFSET,(DATA,DATA,DATA). You must include a comma between the offset value and the open parenthesis. In addition, you cannot include spaces between the comma and open parenthesis or the calculation will be mishandled.
You can have any number of search text items inside the parenthesis as long as they are separated by commas. Having only one search text inside the parenthesis is no different than not using the OR condition. For example, “10,DATA” is the same as “10,(DATA)” and “10,DATA,20,(MORE)” is the same as “10,DATA,20,MORE”.
Using the NOTcondition
You cannot use the tilde (NOT conditions) with OR condition data in any fashion. It cannot be used outside the parentheses, as shown here
OFFSET,~(MORE,DATA)
nor can you include it inside the parentheses, as shown here
OFFSET,(~MORE,DATA)
The NOT condition is not supported with the OR search criteria.

Chapter 4Setting Recipients and Copy Counts
184
Using AND and ORconditions
You can include a mix of AND and OR conditions, but the result is an AND operation. In other words, each individual search mask operation must evaluate to TRUE before the result is assumed TRUE. Here is an example:
10,DATA,20,(MORE,DATA),
This statement will only be TRUE when “DATA” occurs starting at offset 10 and “MORE” or “DATA” occur at offset 20.
Here are some additional examples:
10,(MORE),10,(DATA)
will never be TRUE since the text at offset 10 cannot be both “MORE” and “DATA”.
10,(MORE,DATA),10(SOME,DATA)
will only be TRUE when “DATA” occurs at offset 10. If the word “SOME” or “MORE” occurs at offset 10, the other part of the condition would return FALSE and the result of the entire statement would be FALSE. So, you can rewrite this statement simply as “10,DATA”.
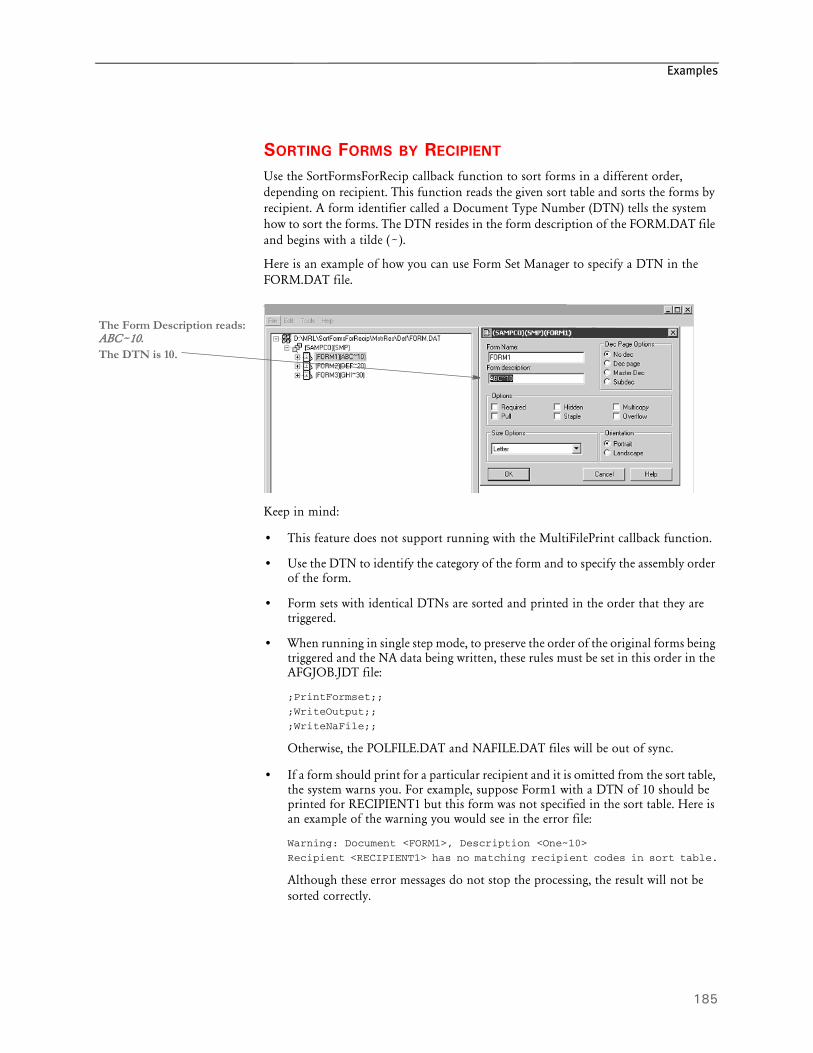
Examples
185
SORTING FORMS BY RECIPIENT
Use the SortFormsForRecip callback function to sort forms in a different order, depending on recipient. This function reads the given sort table and sorts the forms by recipient. A form identifier called a Document Type Number (DTN) tells the system how to sort the forms. The DTN resides in the form description of the FORM.DAT file and begins with a tilde (~).
Here is an example of how you can use Form Set Manager to specify a DTN in the FORM.DAT file.
Keep in mind:
• This feature does not support running with the MultiFilePrint callback function.
• Use the DTN to identify the category of the form and to specify the assembly order of the form.
• Form sets with identical DTNs are sorted and printed in the order that they are triggered.
• When running in single step mode, to preserve the order of the original forms being triggered and the NA data being written, these rules must be set in this order in the AFGJOB.JDT file:
;PrintFormset;;
;WriteOutput;;
;WriteNaFile;;
Otherwise, the POLFILE.DAT and NAFILE.DAT files will be out of sync.
• If a form should print for a particular recipient and it is omitted from the sort table, the system warns you. For example, suppose Form1 with a DTN of 10 should be printed for RECIPIENT1 but this form was not specified in the sort table. Here is an example of the warning you would see in the error file:
Warning: Document <FORM1>, Description <One~10>
Recipient <RECIPIENT1> has no matching recipient codes in sort table.
Although these error messages do not stop the processing, the result will not be sorted correctly.
The Form Description reads: ABC~10.The DTN is 10.
Chapter 4Setting Recipients and Copy Counts
186
INI files Here is how you set up your INI file:
< Print >
CallBackFunc= SortFormsForRecip
< Sort_Forms >
TableName = ..\MstrRes\Table\sort.tbl
This tells the system to use a sort table called SORT.TBL.
Keep in mind, when using the SortFormsForRecip rule on UNIX platforms, you have to enter the extract path with forward slashes, as shown here:
< Sort_Forms>
TableName = /mstrres/table/sort.tbl
Sort tables Here is an example of a sort table called SORT.TBL:
;*;10,20,30;
;CUSTOMER;10,30,20;
;AGENT,OFFICE;20,30,10;
The first line in the sort table defines the default sort order for all recipients not defined in the sort table. The second and third lines are sort records. You set up a sort record for each different sort order.
To set up a sort record, begin with a semicolon (;), followed by the recipient names separated with commas (,). End the list of recipients with a semicolon (;). Here is an example:
;Recipient1,Recipient2,Recipient3;
Next, and on the same line, list the DTNs associated with the form sets. Separate the DTNs with commas (,) and end the list with a semicolon (;). Here is an example of a sort record:
;Recipient1,Recipient2,Recipient3;10,20,30;
Based on the form sets and the SORT.TBL file shown above, here is an excerpt from the resulting POLFILE.DAT file:
;SAMPCO;SMP;FORM1;One~10;R;;ImageA|D<CUSTOMER,AGENT,OFFICE>;
;SAMPCO;SMP;FORM1.1;Two~10;R;;IMAGEA2|D<CUSTOMER,AGENT,OFFICE>;
;SAMPCO;SMP;FORM2;Three~20;R;;IMAGEB|DS<CUSTOMER,AGENT,OFFICE>;
;SAMPCO;SMP;FORM3;Four~30;R;;IMAGEC|D<CUSTOMER,AGENT,OFFICE>;
\ENDDOCSET\ 1234567890
The print file for CUSTOMER will be in this order:
;SAMPCO;SMP;FORM1;One~10;R;;ImageA
;SAMPCO;SMP;FORM1.1;Two~10;R;;IMAGEA2
;SAMPCO;SMP;FORM3;Four~30;R;;IMAGEC
;SAMPCO;SMP;FORM2;Three~20;R;;IMAGEB
The print file for AGENT and OFFICE will be in this order:
;SAMPCO;SMP;FORM2;Three~20;R;;IMAGEB
;SAMPCO;SMP;FORM3;Four~30;R;;IMAGEC
;SAMPCO;SMP;FORM1;One~10;R;;ImageA
;SAMPCO;SMP;FORM1.1;Two~10;R;;IMAGEA2

Summary
187
SUMMARY This chapter explains the major principles illustrated in the previous examples and reviews the triggering logic used by the transaction trigger table. Keep in mind that the transaction trigger table cannot be viewed in isolation; it works with the form set definition table, and both must be examined to predict triggering behavior. The form set definition table defines the default recipients and copy counts for form sections. The transaction trigger table may override some or all of the form set definition table settings.
In the case of the copy count, the form set definition table defines a default copy count for each recipient of each form section. A transaction trigger table entry defines a copy count for one or more recipients. This transaction trigger table copy count may be the same or different from that already defined in the form set definition table. When evaluated, a transaction trigger table entry’s copy count will override the one already defined for those recipients in the form set definition table for that form section.
A similar relationship exists between the form set definition table and the transaction trigger table for recipients. The form set definition table defines the default recipients for a form section. The transaction trigger table can be used to change the copy count for those recipients. And if a transaction trigger table entry sets the copy count to zero (0) for a particular recipient, it has the effect of removing that form section for that recipient. Keep in mind that a recipient may not be included in a transaction trigger entry unless that recipient has already been included for that form section in the form set definition table.
For a transaction trigger table entry to be evaluated, three of the first five transaction trigger fields (GroupName 1, GroupName 2, and Transaction Code) must match some records within the extract file. For example, if there are no records with the transaction code specified in the trigger, that trigger will be skipped. If extract records exist that match these three fields, the remaining fields of that trigger are evaluated. A blank transaction code field is treated as a wildcard, accepting any transaction code for the trigger.
Of the two transaction trigger table search masks, the true/false mask is evaluated first. Once an extract file record has been found that meets the true/false search mask criteria, the counter search mask is evaluated next, if one is present. The counter and true/false search masks work the same way when the overflow flag is not set. But when the overflow flag is set, the counter search mask criteria search does not stop at the first matching extract file record - the system will continue to search for all matching extract file records.
When the system evaluates the counter or true/false mask, the system searches through all the records in the extract file for the specified transaction. If any of the transactions match the search criteria, the condition is considered true. If there are multiple records with the same search criteria, the system will evaluate all of them. If any of these records match the search criteria, the trigger condition is considered true.
For example, if Search Mask 2 is specified as 11,SPECIAL,20,5 and there are two records containing SPECIAL at offset 11, the first one an A at offset 20 and the second one with a 5 at offset 20, the system will evaluate both records and finding the second meets the search criteria, the trigger condition is considered true. The system will stop searching once a True condition is found, except in overflow situations. For overflow situations, the system will not stop searching. Rather, it will keep searching and counting the number of True conditions. The system will then trigger the number of sections or forms based on that count.

Chapter 4Setting Recipients and Copy Counts
188
When the custom rule RECIPIF is evaluated, the search is different than that used for Search Masks 1 and 2 in that when the system only evaluates the first found record which matches the search criteria. For example, if the custom rule is specified as follows:
;Recipif;A={11,SPECIAL 51,4}::if(A=’1995’)::return(“^1^”)::else::return(“^0^”)::end::
There are two records in the extract file containing SPECIAL at offset 11. The first one has 1994 at offset 51, and the other has 1995 at offset 51. When the system stops searching once it finds the first record which matches the search criteria. In this case, it evaluates the record contains 1994 and determines that the trigger condition is false.
When the overflow flag is set, the next two transaction trigger table entry fields, records per overflow section and records per first section, are examined. If both of these fields are set to zero (0), the system will automatically handle the overflow. If these fields are used, they specify how many entries are to be split among the two sections. The records per overflow section specifies how many records will fit on the overflow section. The next field, records per first section, specifies how many records will fit on the primary section.
At a minimum, a transaction trigger table entry must contain a GroupName1 value, a GroupName2 value, a Form Name value, and a Copy Count value. A section level trigger must also contain a section Name value. At a minimum, the three overflow fields must be set to zero (0). A blank Transaction Code field acts as a wildcard, accepting any transaction code. A blank Recipient List field will default to the recipients named in the form set definition table. And the two Search Mask fields and the Custom Rule field may be used as needed to produce the desired triggering results.

189
Chapter 5
Setting Up Error Messages and Log Files
This chapter discusses the how the system creates error and log messages and describes how you can customize these messages to meet your company’s needs.
In this chapter, you will find information about...
• Overview on page 190
• Configuring the Message System on page 191
• Creating Messages on page 197
• Using the Message Token File on page 203

Chapter 5Setting Up Error Messages and Log Files
190
OVERVIEW The message system is enabled by default. Without making any modifications, it is fully functional. Each executed system program (GenTrn, GenData, GenPrint, and so on) appends output messages to the appropriate log or error file.
When an error or log message occurs, the system writes the information to a token file named MSGFILE.DAT. A second step converts or translates the output into log and error files, which are typically named LOGFILE.DAT and ERRFILE.DAT.
By default, this translation step occurs before each program’s termination so the system is compatible with earlier versions. You can, however, delay this step and execute it manually using the TRANSLAT utility (see the Utilities Reference for more information). This lets you translate the message and error information after all system programs have completed their processing cycle for a given batch run.
NOTE:Typically, you will want to use system defaults as you implement your system. This lets you spot errors after each processing step. Once your system is implemented and is running without error, you may want to delay the translation process to improve performance. See Controlling the Translation Process on page 194 for more information.
Delaying the translation process can sometimes improve throughput performance—especially in batch implementations that typically run without errors.
This translation process, delayed or not, gives you flexibility in the type of options you can use; increases the amount of information that can be generated; and lets you control message formatting and language.
TYPES OF ERROR CODES
The system returns the following types of messages:
NOTE:Version 11.5, added the Critical Error. Previously, the system only emitted Warnings and Errors.
The difference between an Error and a Critical Error is that a critical error always causes the program to stop processing, even if you set the GenDataStopOn, GenTranStopOn, or GenArcStopOn control group options to No.
Type Code Description
Warning **04** Warning message
Error **08** Error message
Critical Error **12** Critical error message

Configuring the Message System
191
CONFIGURINGTHE MESSAGE
SYSTEM
As with most system features, you can configure the messaging system. Typically you use INI options in the FSISYS.INI file (or whatever your INI file is named) to configure the message system.
For example, you can turn off or on the log and error files, assign different output file names or directories, and so on. As mentioned earlier, you can also configure the message translation process to occur during normal system processing or as a final, separate step.
The system automatically prefixes an error code before each error message. Each code begins with the two-character identifier. Here is an example:
DM10825: Warning in TextMergeParagraph(): Rule used in image that does not have any text areas. Image name is <q1snam>. Processing will continue
ENABLING AND DISABLING MESSAGES
Messages output from system programs fall into two categories—log and error messages. Unless specifically turned off via INI options, the message system produces both error and log files.
Error messages contain information about the problems encountered during the execution of the program. The generation of error information cannot be disabled. It is possible to not translate the results into an actual error file, instead the informational tokens output by the programs are written to a message token file named MSGFILE.DAT.
Log messages are a different matter. This type of message is informational, but not generally tied to the success or failure of the job. In general, these messages are transactional in nature—meaning that they provide information about each transaction as it proceeds through the processing cycle.
You can suppress the log information output by the programs. The LogTransactions option enables or disables the generation of log messages:
< Control >
LogTransactions = Yes
The LogTransactions options defaults to Yes. To disable the logging of messages, set it to No. By disabling this option, you suppress the informational tokens written to the intermediate file and prevent the translation of the log file.
When you set the LogTransactions option to No, system programs do not output the informational tokens, so you cannot generate the log file even if you use the TRANSLAT utility.
NOTE:For more information on the TRANSLAT utility, see the Utilities Reference.

Chapter 5Setting Up Error Messages and Log Files
192
Logging INI Files and Options UsedBy default, the GenTrn, GenData, GenPrint, and GenArc programs log the INI files being used. This tells you which files were used and if they were opened successfully. For more information, see Logging INI File Names and Options on page 112.
CLEARING MESSAGES
If you are using single step processing, you can use the following INI option to delete all MSGFILE.DAT, ERRFILE.DAT, and LOGFILE.DAT files before the system begins the single step process.
< GenData >
ClearMsgFile = Yes
The default is No.
DEFINING THE OUTPUT MESSAGE FILES
Several files are used by the message system. You identify the output files and their locations with these INI options:
< Data >
ERRFile = errfile.dat
LOGFile = logfile.dat
MSGFile = msgfile.dat
TranslationFile = translat.ini
NOTE:The TRANSLAT.INI file was designed to let you to translate output messages. Beginning with version 11.5, this file is being migrated to work through the Oracle national language support (NLS) interface. As a part of this migration, the TRANSLAT.INI file is now replaced with an Oracle message file (.MSG) which is compiled into a binary file (.MSB) and stored in the \Lang subdirectory of your executables directory. The English US translation is in the XLTUS.MSB file. As demand warrants, output messages will be translated into additional languages and compiled into additional .MSB files.
Message binary (.MSB) files are used on the Windows and UNIX platforms but the TRANSLAT.INI file is still used on mainframe platforms, such as on z/OS.
The expected format of NLS messages differs slightly from the format of messages within the TRANSLAT.INI file. To complete the interface, the TRANSLAT.MMP file is used to internally map the message parameters.
The values for the LOGFile and ERRFile options are probably already set correctly if you are upgrading your system from an earlier version.
The values you specify for each option identify the file name for that option. You can also specify a directory path for each file. If you omit the path and include only the file name, the setting for the DataPath option is used as the default location for these files.

Configuring the Message System
193
Initializing the Output Message FilesIn a standard implementation, the GenTrn program is the first program run in the batch process. As the first program, it re-initializes the data files by first deleting the existing data files.
If your implementation does not use the GenTrn program, you ether have to set up the implementation to manually delete these files or you must include an additional INI option.
The ErrorFileOpenMode option lets you tell system programs to delete old message files before beginning its processing cycle. Here is an example of this option:
< Control >
ErrorFileOpenMode = Create
If you set this option to Create, the system deletes existing files and creates new ones for the processing run. If you leave this option blank or enter any other value, the system appends information onto existing files.
Option Description
ERRFile Identifies the file which contains the error messages.
LOGFile Identifies the file which contains the log messages.
MSGFile Identifies the message token file the system programs produce.
TranslationFile Contains the message text. Normally defaults to TRANSLAT.INI. Use this option to specify the file name and location.
Unlike the other files, the TRANSLAT.INI file is static—it does not change during the batch process and is not considered a data file. This file’s location does not default to DataPath option as do the other files.
In the MVS environment, the DefLib option identifies the TRANSLAT.INI file’s default location if you do not specify a path in the TranslationFile option.

Chapter 5Setting Up Error Messages and Log Files
194
Turning Off Date StampsYou can turn off date stamps in batch processing error and log files using these INI options:
< Control >
ErrorFileDateStamp = No
LogFileDateStamp = No
Entering No to turn off these options can be of use when regression testing.
Use this option to disable date stamps in the batch trace file:
< Debug_Switches >
PrintTimeStamp = No
Controlling the Translation ProcessBy default, the GenTrn program deletes the old message file at the beginning of its execution and starts a new file with output information. All other programs, such as GenData, GenWIP, and so on, append information to the end of the message file created by the GenTrn program.
The default translation options are set so the log and error files are created after each system program executes. You can, however, set the ImmediateTranslate option to No to delay the translation process until all system programs finish processing—at the end of the batch process.
Here is an example:
< Control >
ImmediateTranslate = No
Once processing stops, you can then use the TRANSLAT utility to translate the messages. By delaying the translation process and only executing it once per batch cycle, you can reduce job throughput times.
NOTE:If you set the ImmediateTranslate option to No, the system will not create the ERRFILE.DAT file.
Option Description
ErrorFileDateStamp Enter No to disable date stamps in error files. The default is Yes.
LogFileDateStamp Enter No to disable the date stamp in log files. The default is Yes.
Option Description
PrintTimeStamp Enter No to disable date stamps in the batch trace file. The default is Yes.

Configuring the Message System
195
DBLib Trace MessagesDBLib-related trace (or log) messages are written to the trace file. The name of this file defaults to trace but you can set it to another file name using the TraceFile option:
< Data >
TraceFile = xxxxx
We recommend you use the default name of trace.
NOTE:Before version 11.0, DBLib-related logging messages were written to the file indicated by this option:
< Data >
DBLogFile = (file name)
The default was DBLOGFLE.DAT.
Keep in mind, all types of tracing, including DBLib tracing, slow performance. You should only activate DBLib tracing during development and testing or if requested by Documaker support personnel.
In the Rules Processor, the trace file for DBLIB log messages is the default logging file. You can activate DBLib tracing by specifying these INI options in the FSISYS.INI file:
< Debug_Switches >
Enable_Debug_Options = Yes
DBLib = Yes
In IDS, the default logging file is the DPRTRC.LOG file DBLIB log messages. You can enter the INI options in the DAP.INI file or the MRL-specific INI file.

Chapter 5Setting Up Error Messages and Log Files
196
Overriding Error BehaviorUse the ErrorCodeOverride control group to tell the system how you want it to handle specific errors. Your entries override how the system would normally process errors.
Here is how to set up the ErrorCodeOverride control group options:
< ErrorCodeOverride >
(ErrorNumber) = Warning
(ErrorNumber) = Critical
(ErrorNumber) = Error
For example, the DM10836 code tells you the system cannot locate a specific chart object. Normally when this occurs, the system generates a warning and continues processing. If, however, you make the following entry, the system treats DM10836 as a critical error and stops processing the transaction.
< ErrorCodeOverride >
10836 = Critical
Option Description
ErrorNumber For each error code you enter, select from these options to tell the system how you want it to handle the situation:•Warning•Error•Critical (stops all processing)

Creating Messages
197
CREATINGMESSAGES
System messages fall into these categories:
• Log messages
• Error messages
Log messages record information about the processing run. These messages are informative rather than diagnostic. Types of information that fall into this category include transaction IDs that are processed; the start, ending and elapsed time of the run; transaction counts and statistics; and the program description that is producing the information.
Error messages are also informative, but usually help diagnose problems encountered during the processing run. These messages include such things as invalid data recognition; improper options; input/output errors; and resource validation.
The way these messages are produced is exactly the same. In general, the only real distinction between these two message classes is the destination file to which each is written.
USING THE RPERRORPROC AND RPLOGPROC FUNCTIONS
Use these two functions when you specify information to be output to the log or error files. You can use these functions to install the custom error and log procedures called from within these functions. The system lets the calling function provide the details of a message without having to specify the exact formatted text.
Here is an example:
RPErrorProc(pRPS, (WORD)EMIT_WARNING, (DWORD)10012,
"OutBuff", pRPS->OutBuff,
"Image", IMAGENAME(pRPS->CurrentFapImageH),
LASTERRORTOKEN);
RPLogProc(pRPS, (WORD)EMIT_MESSAGE, (DWORD)10775,
LASTERRORTOKEN);
Each parameter is discussed below:
RP Struct The first parameter represents the pointer to the RP Struct active during the run.
Message Types The second parameter identifies the type of message being reported. There are these classes of messages:
Class Description
EMIT_MESSAGE Indicates the resulting information is simply a message.
EMIT_WARNING Indicates the information is a warning to the user.
EMIT_ERROR Indicates an error has been encountered by the program.
EMIT_CRITICAL Indicates a critical error has been encountered that will stop all processing.

Chapter 5Setting Up Error Messages and Log Files
198
The message system recognizes the type of message if you use one of the above defines. Use the EMIT_??? keywords for this parameter and do not rely upon the underlying numeric value. This lets you later change these values or add new values and recompile without invalidating the meaning of a particular message.
Message Number Use this parameter to specify the message number to associate with the output data.
Message numbers are associated with the TRANSLAT.INI file. This file contains all the static text for each message. The static text is later merged with the variable information to produce the messages written into the log or error files. This table shows the message number ranges:
Assigning numbers tocustom messages
The range 50000 and higher is for customization messages, which are generally added when you customize your system. Although you can use previously defined messages, it is better to assign an unused number within the custom range for each message you add.
This makes sure the intended meaning of an existing message is not changed in case someone modifies the text of the assumed custom message in the external file. In addition, if you develop a numbering system for the custom range, you can provide additional debugging information through the message number.
You can add custom messages into the TRANSLAT.INI file, as in previous releases (version 11.5 and prior releases). The system searches for messages in the Oracle message file first and if not found, the system searches for messages in the TRANSLAT.INI file.
USING MESSAGE TOKENS
The remaining parameters passed to the RPErrorProc or RPLogProc functions are variables which represent token-data pairs used to define the content of the message.
In this example, there are two pairs of token-data.
RPErrorProc(pRPS, (WORD)EMIT_WARNING, (DWORD)10012,
"OutBuff", pRPS->OutBuff,
"Image", IMAGENAME(pRPS->CurrentFapImageH),
LASTERRORTOKEN);
Range Description
0 to 49999 Reserved range for Documaker base system messages.
50000 and higher Can be used for custom messages. The maximum message number in an Oracle message (.MSG) file is 65535.

Creating Messages
199
There are several points to remember about tokens which will become apparent as you examine the TRANSLAT.INI file—the file that contains the rest of the message text.
• The message text from the TRANSLAT.INI file does not have to use all, or for that matter any, of the tokens output from a particular function. This means you can output more information (in token-data format) than would normally be required in the message. This information, however, might prove useful to a programmer during closer examination of the message file.
• Token names live forever. This means that a token logged earlier in the session can be referenced by messages that occur later. For instance, if an early message outputs a token (with a value) named ID, any message text translated after that point may refer to ID and receive that same value.
• Token names are reusable. You should reuse token names whenever it makes sense. For instance, each time a function is required to emit the section (image) name, use the same token name. This conserves space in the token list (because a new entry does not have to be created) and if subsequent messages rely upon the last known value of a given token, it is more likely to be correct.
• Tokens are not case sensitive. A token named Image can be referred to as IMAGE, Image, image, ImageE, and so on.
Also note, that the example refers to one-word tokens. Although, this is the most efficient use of space, tokens can be longer and include spaces. The only character you cannot use in a token is the ampersand (&)—ampersands are used in defining the static message text. For instance, you can define a token such as One A Day, but you cannot define a token such as Will Not&Work.
Token Description
OutBuff Represents a token name. The data for that token is defined in pRPS->OutBuff.
Image A second token name, with appropriate data text following. Token and data must be character text. Therefore, if the data to be represented is anything other than text, it must be converted before you call the message function.
LASTERRORTOKEN Not really a single token, but rather is a macro that contains several token-data pairs. These pairs identify the source module name and the line number of the statement being compiled. The last component of LASTERRORTOKEN is a NULL pointer used by the internal message formatter to recognize the end of the Token-Data pairs.
LASTERRORTOKEN must be the last variable passed to both the RPErrorProc and RPLogProc functions.

Chapter 5Setting Up Error Messages and Log Files
200
NOTE:Legacy systems expected the fourth parameter to be a string representing a format. This format string might be the complete message or contain flags indicating where subsequent variables will be substituted—such as %d, %s, %X, and so on.
The RPErrorProc or RPLogProc functions distinguish how these remaining parameters are handled (legacy or new) by first determining if the Message Type and Message Number parameters are values expected by the new functionality.
The new use of the functions does not require a format string. Instead, the variables represent token-data pairs until the LASTERRORTOKEN is encountered.
SETTING UP MESSAGE TEXT
Message output from system programs is typically destination bound to the error or log files. All static message text is isolated into an external file for easy maintenance. The static portion of all messages is contained in the XLTUS.MSG file on Windows and UNIX or the TRANSLAT.INI file.on z/OS.
NOTE:The INI designation is one of convenience, since the TRANSLAT.INI file is not intended to be used like a conventional INI file. INI references intended for other program functionality do not work when placed in this file. Likewise, you cannot add static message text intended for the log or error files into the FSISYS.INI or FSIUSER.INI files.
All messages must have a unique message number. You must make sure the proper message number is referenced in the code.

Creating Messages
201
Message examples Here are some examples from the XLTUS.MSG file:
10529, 42, "%1: %2 in RunDate(): Unable to GENFmtDate(<%3>,,)."
10536, 42, "%1: %2 in LookUp(): Missing Key offset in LookUp."
20261, 42, "\nProcessing Batch:<%1> File:<%2> Port:<%3>\n"
Here are the corresponding examples from the TRANSLAT.INI file:
10529 = &E&: &MTYPE& in RunDate(): Unable to GENFmtDate(<&RunDate&>,,).
10536 = &E&: &MTYPE& in LookUp(): Missing Key offset in LookUp.
20261 = \nProcessing Batch:<&Name&> File:<&File&> Port:<&Print&>
There are several points to note in these messages.
• Each line specifies a unique message number and associates the static text portion of the message with that number.
• In the XLTUS.MSG file, %1, %2, %3, and so on, are token placeholders for value replacement. In the TRANSLAT.INI file, the words bounded on each end with an ampersand (&) are token placeholders for value replacement.
This is where the token-data pairs passed to the RPErrorProc and RPLogProc functions are matched and substituted into the static text. For example, assume the following statement is in the code of one of the system programs.
RPErrorProc(pRPS, (WORD)EMIT_ERROR, (DWORD)10529,
"RunDate", “April 1, 1999”,
LASTERRORTOKEN);
This would cause message number 10529, shown above, to print this text in the log file.
Error in rundate(): Unable to GENFmtDate(<April 1, 1999>,,).
• Since token names are identified between ampersand characters, two ampersand characters together (&&) signals that the output text is to contain a single ampersand character.
Undefined tokens Notice there are three substitution variables in the 10529 message but only one substitution pair is passed to the RPErrorProc function.
The TRANSLAT.MMP file contains three substitution variables (%1, %2, %3) for message 10529.
10529:E,MTYPE,RunDate,
E and MTYPE in the TRANSLAT.MMP file (or &E& and &MTYPE& in the TRANSLAT.INI file on z/OS) are substitution variables that are automatically handled by the RPErrorProc function.
A warning message is generated when EMIT_MESSAGE is passed as the second parameter to RPErrorProc and the MTYPE substitution variable is replaced with the string, Warning.
An error message is generated when EMIT_ERROR is passed as the second parameter to RPErrorProc and the MTYPE substitution variable is replaced with the string, Error.
An error message is also generated when EMIT_CRITICAL is passed as the second parameter to RPErrorProc and the MTYPE substitution variable is replaced with the string, Critical Error.

Chapter 5Setting Up Error Messages and Log Files
202
Messages can have any number of token replacements. If, however, a token is undefined when the messages are translated, the token name is left in the text. So, if you view the log or error file and find a message which includes a word bounded by ampersands, it means one of these things:
• The token is misspelled in the message file.
• The token is misspelled in the code that called the RPLogProc or RPErrorProc function.
• The token and data was not included in the parameters to the message functions.
• This is not a token and was intended to print in this manner. Either it is data associated with a token or two ampersands were included at each end of the word in the static message text.
The first place to begin diagnosing this type of result is by examining the text included for the message in the XLTUS.MSG or TRANSLAT.INI file.
Adding a new line In message number 20261, you can see the use of another format convention. The \n in the text is translated as a new line character. This causes the following text to print on the next line. The layout of the XLTUS.MSG or TRANSLAT.INI file requires that all of the text for each message must fit onto a single line. Using \n in text expands your formatting possibilities.
Determining where themessage originated
Examine message number 20246. This message does not contain any tokens. Therefore there is no variable text that is required to print within this message.
The fact that the message does not contain any tokens does not mean that no tokens were output from the system program when the RPErrorProc function was called. In fact, there are at least two tokens associated with this message.
LASTERRORTOKEN is the last required parameter to calls to the RPErrorProc and RPLogProc functions. This macro defines the FSIFileName and FSILineNumber tokens. If you include the FSIFileName token in the message text, the name of the module that contained the code calling the RPErrorProc or RPLogProc function is substituted into the message. Likewise, FSILineNumber is substituted with the source line number of the statement calling the RPLogProc or RPErrorProc function.
This information can be quite useful if you are trying to determine what code is issuing a particular message. All you have to do is edit the message and include &FSILFileName& and &FSILineNumber& into the message text defined in the XLTUS.MSG or TRANSLAT.INI file.

Using the Message Token File
203
USING THEMESSAGE
TOKEN FILE
While a system program is running and emitting information, the token-data pairs are written to the message file (MSGFILE.DAT). Typically, you do not have to examine the message file. The translation process that produces the error file and log file will do that for you and will make the final text more readable.
On occasion, however, examining the file reveals more information than is provided by the translation process. For instance, if you see a particular message in the error file and want to know where in the code this message originated, you can do one of two things.
You could edit the XLTUS.MSG or TRANSLAT.INI file to add the FSILineNumber and FSIFileName tokens to the message. Then, by rerunning the translation process, you would get the additional message information. (See Determining where the message originated on page 202 for more information)
Or, if you know what you are looking for, you could peek into the message file and locate the information more readily. Here is an excerpt from a message token file.
T DestField/PREM PAY INCEPTION
T Image/qmdc2
T FSIFileName/..\C\rulbsfl.c
T FSILineNumber/364
E 10010
T FSIFileName/..\C\rcbbatpr.c
T FSILineNumber/418
E 13027
T FSIFileName/..\C\rulbsfs.c
T FSILineNumber/185
L 10775
T ID/3234567
T GrpName1/SAMPCO
T GrpName2/LB1
T GrpName3/
T Buff/T1
T FSIFileName/..\C\gentrans.c
T FSILineNumber/1187
L 11190
The first character on the line is a letter code which designates the meaning of the line. Valid codes are shown here:
The token-data pairs for a given message will occur in the file on lines before the E or L lines. Knowing this, you can see that the excerpt from the message file shown above contains the information for four different messages.
Code Description
E Followed by a message number bound for the error file. (error or warning)
L Followed by a message number bound for the log file. (informational)
T Followed by a token-data pair, separated by a forward slash (/).

Chapter 5Setting Up Error Messages and Log Files
204
The first message number occurs at the line that contains E 10010. This is a message bound for the error file. Four tokens are defined before translation:
• DestField
• Image
• FSIFileName
• FSILineNumber
This means that if the message text for 10010 contains any of these tokens the appropriate data will be substituted. Remember, however, if the message refers to a token that has not been defined prior to this point, the token will be left in the output text to indicate a problem might have occurred.
The next message number occurs at the line that contains E 13027. This too is a message bound for the error file. Notice that two tokens occur between the location of the first and second message—FSIFileName and FSILineNumber. These use the same token names used before, however, now their data values are different.
Also note that although only two additional token (changes) occurred before message 13027, four tokens are defined. If you could look into the program memory at this moment, you would see that the token list has these values:
All tokens remain active after they have been translated. Tokens that are reused are updated with new values, but no tokens are removed until the translation process is complete.
Therefore, it is permissible (but at this point not likely) that a message can use tokens output by a prior message. This is why it is important to reuse token names when it makes sense, such as when all references to a section’s (image) name should use the same token.
Continuing with the examination of the message file excerpt, the next message is identified via the line that reads, L 10775. This is a message bound for the log file, not the error file. It too redefines the FSIFileName and FSILineNumber tokens, as do all messages that use LASTERRORTOKEN.
Token Value
DestField PREM PAY INCEPTION
Image qmdc2
FSIFileName ..\C\rcbbatpr.c
FSILineNumber 418

Using the Message Token File
205
The last message in this example is defined by the line, L 11190. Five new tokens were introduced before this message. Peeking into program memory again, the token list now looks something like this:
Note that the most recent values for FSIFileName and FSILineNumber are reflected. Also note that the tokens previously defined still exist. Finally, note that one of the tokens appears to have no data (GrpName3) and is therefore blank. This is permissible.
Token Value
Buff T1
DestField PREM PAY INCEPTION
GrpName1 SAMPCO
GrpName2 LB1
GrpName3
ID 3234567
Image qmdc2
FSIFileName ..\C\gentrans.c
FSILineNumber 1187

Chapter 5Setting Up Error Messages and Log Files
206

207
Chapter 6
Archiving and Retrieving Information
The GenArc program lets you store completed form sets for later retrieval. The GenArc program can be run as an independent program or from within the Documaker system using the archive and retrieval options.
When you run the archive module, the information the system uses to compose the form sets is compressed and stored in an archive file along with certain indexing information.
Once the form set information has been archived, those form sets can be regenerated by retrieving the form set information from the archive file. The archive index file is used to aid in the retrieval of particular form set information through the use of keys. These keys can be set to meaningful search criteria such as policy or account numbers, claim or invoice numbers, company names, customer names, and so on.
This chapter includes information on the following topics:
• Terminology on page 208
• System Scenarios on page 210
• Archive and Retrieval Features on page 212
• Processing Overview on page 213
• Running GenArc on page 216
• Using WIP and the Archive Index File on page 237
• Retrieving Archived Forms on page 240
• Working with Documanage on page 243

Chapter 6Archiving and Retrieving Information
208
TERMINOLOGY The GenData program creates the NEWTRN file (which contains one record for every transaction to be processed), the NAFILE (which contains section and variable field information and possibly some in-line data), the POLFILE (which contains form and section inclusion information) and the recipient batch files, such as BATCH1, BATCH2, and so on (which look similar to the NEWTRN file).
The GenArc process accepts as input the NEWTRN, NAFILE and POLFILE files and archives this data. Here are some terms you need to be familiar with:
Files and tables The term file refers to a non-database data structure, such as a flat file, while the term table refers to data structures within some database management system, such as DB2, SQL Server, and so on. However, the terms file and table might be used interchangeably in this chapter.
Commit The term commit is a database term which means to make table changes permanent. As data is written to tables, the data is not really made permanent until a commit is performed. Before performing a commit, if you determine that you really don’t want to make the changes to the table, you can perform a rollback which will undo any table changes you have made since the last commit point. The GenArc program performs periodic commits based on an INI value you set.
Rollback The term rollback is a database term which means to undo any table changes that have been made since the last commit point. As table rows are inserted, deleted and updated, these changes do not become permanent until a commit is performed.
GenArc The program name for the process which performs batch archive. The program names vary slightly, depending on the operating system you are running. For example, the GenArc program on Windows is called GENACW32.EXE.
AFEMAIN The program name for the Processing System. The AFEMAIN program contains a graphical user interface. It lets you enter key information and retrieve a list of archived form sets you can display. The program name may vary slightly, depending on the operating system platform you are using. For example, on Windows it is called AFEMNW32.EXE.
CARFILE Compressed Archive File. The CARFILE may also be referred to as the ARCHIVE file. The GenArc program compresses the NAFILE/POLFILE data for each transaction and writes archives this data to the CARFILE. The GenArc program writes one or more records to the CARFILE for each transaction it archives.
APPIDX Application Index. The GenArc program archives indexing information to the APPIDX file. The GenArc program writes one record to the APPIDX file for each transaction it archives.
TEMPIDX Temporary Application Index. The TEMPIDX file is used as a temporary storage for records to be added to the Application Index file. The TEMPIDX file is used only when the GenArc program is archiving to a DBASE IV database. TEMPIDX is not used by the GenArc program when archiving to DB2, SQL Server, Oracle, or other databases.

Terminology
209
CATALOG Refers to the CATALOG file. As the GenArc program archives data to the CARFILE and the APPIDX, it connects the CARFILE and APPIDX files with a key (by default called ARCKEY). Part of this key is a field called the CATALOGID. The GenArc program generates a unique CATALOGID (timestamp) each time it runs and writes this CATALOGID to the CATALOG file. The GenArc program writes one record to the CATALOG file for each GenArc run.
RESTART The Restart table. The Restart table describes whether a GenArc run was successful or if the run failed. The GenArc program writes one record to the Restart table for each distinct GenArc run. GenArc runs are made distinct by passing the GenArc program a parameter called JOBID.
DFD Data Format Definition. A DFD file is used to describe the fields a file’s records are composed of. DFD files have a particular format and are frequently used to map the layout of system-related data files. The archive-related files defined above all have default DFD files that describe their layout.
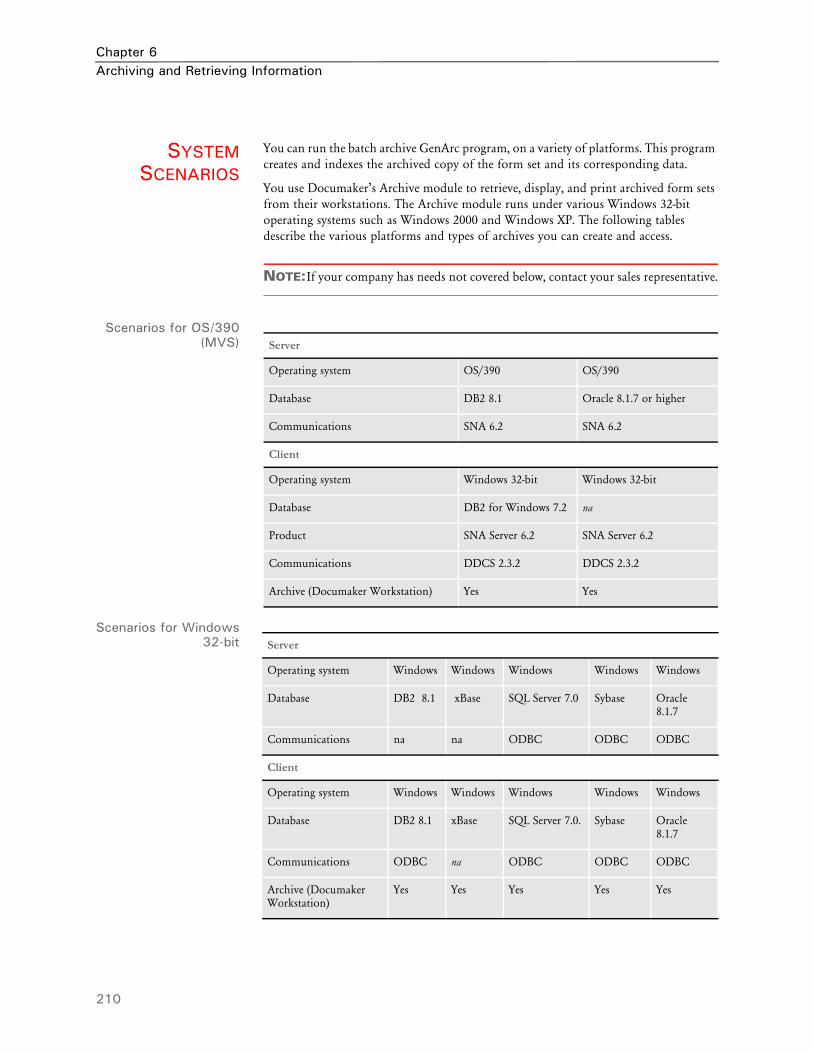
Chapter 6Archiving and Retrieving Information
210
SYSTEMSCENARIOS
You can run the batch archive GenArc program, on a variety of platforms. This program creates and indexes the archived copy of the form set and its corresponding data.
You use Documaker’s Archive module to retrieve, display, and print archived form sets from their workstations. The Archive module runs under various Windows 32-bit operating systems such as Windows 2000 and Windows XP. The following tables describe the various platforms and types of archives you can create and access.
NOTE:If your company has needs not covered below, contact your sales representative.
Scenarios for OS/390(MVS)
Scenarios for Windows32-bit
Server
Operating system OS/390 OS/390
Database DB2 8.1 Oracle 8.1.7 or higher
Communications SNA 6.2 SNA 6.2
Client
Operating system Windows 32-bit Windows 32-bit
Database DB2 for Windows 7.2 na
Product SNA Server 6.2 SNA Server 6.2
Communications DDCS 2.3.2 DDCS 2.3.2
Archive (Documaker Workstation) Yes Yes
Server
Operating system Windows Windows Windows Windows Windows
Database DB2 8.1 xBase SQL Server 7.0 Sybase Oracle 8.1.7
Communications na na ODBC ODBC ODBC
Client
Operating system Windows Windows Windows Windows Windows
Database DB2 8.1 xBase SQL Server 7.0. Sybase Oracle 8.1.7
Communications ODBC na ODBC ODBC ODBC
Archive (Documaker Workstation)
Yes Yes Yes Yes Yes

System Scenarios
211
Scenarios for UNIX
The DB2 database uses DB2LIB on if you are running the UNIX version of the GenArc program. If you are archiving to UNIX from the Windows version of the GenArc program, the system uses ODBC as the database communications layer.
You can also retrieve to Windows using DB2LIB or ODBC from tables created from the UNIX version of the GenArc program.
For Oracle databases, the UNIX processes use ORALIB as the communications client to the Oracle database server so the UNIX version of the GenArc program uses ORALIB. The Oracle database server can reside on UNIX/Linux or on Windows and you can set up ORALIB to communicate with the Oracle database server.
After the tables are populated by the UNIX version of the GenArc program, Windows applications such as AFEMAIN can retrieve archived form sets using ODBC as the Oracle database client communication layer.
Server
Operating system AIX version 5 or higher Linux (x86) Kernel version 2.4.21
Solaris 9 or higher
Database DB2 8.1 or higher
Oracle 8.1.7 or higherxBase
DB2 8.1 or higher
xBase
DB2 8.1 or higher
Oracle 8.1.7 or higherxBase
Communications na na no
Client
Operating system Windows Windows Windows
Database DB2 8.1 DB2 8.1
Oracle
Communications ODBC see below ODBC
Archive (Documaker Workstation)
Yes see below Yes

Chapter 6Archiving and Retrieving Information
212
ARCHIVE ANDRETRIEVALFEATURES
Regardless of the platform being used, the system has many features, including:
• Multiple media support
The archive and index files can be automatically or manually divided into separate files which may be stored on multiple storage devices. This allows for the segregation of archive data chronologically to improve search and retrieval performance. Also, as archive files grow in size, they are not limited by the physical space available on a single drive. This feature also lets you easily copy older archive files to long-term media for storage without inhibiting the retrieval capabilities.
• Stability and redundancy
The archive files are designed to be reliable. Indexing information is stored redundantly in separate files so that the index can be regenerated independently in the event of index corruption. There are a variety of archive utilities you can use to repair archive files damaged by user error or hardware failure.
• Flexible indexing
The archive index can be configured to use certain field keys within the data, allowing for retrieval based on the specified keys. This lets you design your archive system to store information for later retrieval using the most relevant data fields.
• Network-ready
The system lets you use both local and network drives for storing of archive files. The archive files are independent, so archive files can be split up over combinations of local and network drives. The system keeps track of where specific files are stored, so users do not need to know the physical or logical file storage locations.
• Unattended operation
If configured to do so, the archive module can be executed as part of the batch process. This allows data to be archived automatically.
• Restarting the archival process
Should the archive process get interrupted, you can easily restart the GenArc program and have it automatically begin where it was interrupted. You can also use command line options to process a specified range of transactions or a specific job if you are running the GenArc program on multiple computers simultaneously.

Processing Overview
213
PROCESSINGOVERVIEW
The GenArc program can archive form set data to files and/or Database Management Systems (DBMS). By default (if the INI file is not configured otherwise), the GenArc program archives form set data to a DBASE IV DBMS (actually a combination – APPIDX is DBASE IV file and CARFILE is a flat file). Below is a list containing some of the DBMS systems the GenArc program can archive to.
NOTE:For information on the various INI option settings, see the appropriate installation manual for your operating system and the technical documentation.
DBASE IV The APPIDX, TEMPIDX and CATALOG files are created as DBASE IV files. This results in the GenArc program creating DBF and MDX database files for the APPIDX, TEMPIDX and CATALOG and a CAR file (non-DBASE IV) for the CARFILE. The restart option is not available for DBASE IV archive.
DB2 The APPIDX, ARCHIVE, CATALOG and RESTART files are all created as DB2 tables. GenArc communication to DB2 can be done through either the DB2’s native API or DB2’s ODBC interface. The restart option is available for DB2 archive.
SQL server The APPIDX, ARCHIVE, CATALOG and RESTART files are all created as SQL Server tables. SQL Server is an ODBC-compliant DBMS. The restart option is available for SQL Server archive.
Oracle The APPIDX, ARCHIVE, CATALOG, and RESTART files are all created as Oracle tables. Oracle is an ODBC-compliant DBMS. The restart option is available for Oracle archive.
FILES GENARC USES
Input files • NEWTRN file
• NAFILE file
• POLFILE file
Output files • Compressed Archive (CAR) file
• Application Index file
• Catalog file
• Restart file
HOW THE GENARC PROGRAM WORKS
Below is a brief description of how GenArc processing is performed. Most of the restart information has been omitted but is covered in Using the Restart Option on page 219.
1 Store the command line parameters, load INI files, and check and update the Restart table.

Chapter 6Archiving and Retrieving Information
214
the GenArc program parses and stores any command line parameters passed to it. INI files are read and loaded. The Status column of the Restart table is checked (if archiving to a DBMS, not DBASE IV) to determine if the previous GenArc run by this JOBID (DEFAULT_JOB_ID by default) was successful or whether it failed. If the last GenArc run was successful the Status column of the Restart row is initialized to Failed.
2 Get a CATALOGID and then check and update the CATALOG table.
the GenArc program gets a timestamp from the system and constructs a 10-character CATALOGID. The CATALOG table is checked to make sure this CATALOGID is not already in the table. If the CATALOGID is already in the table, the GenArc program gets additional timestamps, until it finds one that is not already in the table. Once it has a unique CATALOGID, the GenArc program constructs a row containing this CATALOGID (CATALOGID column) and writes this row to the CATALOG table so future runs of the GenArc program will not be able to use this CATALOGID.
3 Read the NEWTRN file, get form set data from the NAFILE and POLFILE, then combine and compress the information.
The NEWTRN file is opened and the first record (transaction) is read. The NEWTRN record contains offset values into the NAFILE and POLFILE for the transaction. The GenArc program uses these offset values to retrieve the NAFILE data and POLFILE data for the transaction and it then combines and compresses this data.
4 Construct the ARCKEY, construct and archive the rows to the ARCHIVE table.
An eight-character sequential number (which will be incremented for each transaction) is appended with the 10-character CATALOGID to form an 18-character ARCKEY. This ARCKEY will be unique for each transaction. A record (or row) is constructed to be written to the ARCHIVE table. This row (whose columns are described by the CARFILE DFD file) contains the ARCKEY and the combined and compressed NAFILE/POLFILE data (CARDATA column). If the CARDATA is too large to fit on a single row, additional rows are constructed—each row will have the same ARCKEY but will have an incremented Sequence Number (SEQ_NUM column). The constructed rows are archived to the ARCHIVE table.
5 Construct and archive the rows to the APPIDX table.
The index information for the transaction is gathered and a row is constructed to be written to the APPIDX table. This row (whose columns are described by the APPIDX DFD file) contains the ARCKEY used to construct the row for the ARCHIVE table above, as well as other information, such as Company, Line of Business, PolicyNumber, and so on (columns identified in the INI group Trigger2Archive). Once this APPIDX row is constructed it is archived to the APPIDX table. Only one record is written to the APPIDX table for each transaction.
6 Repeat the process, update the Restart table, issue messages, and terminate processing.

Processing Overview
215
Steps 3 through 5 are repeated until all the NEWTRN records have been read. Once all the NEWTRN records have been read and the archiving is complete for all transactions, the Status column of the Restart table row, which was set to failed in step 1, is updated to reflect that the GenArc run was successful. The GenArc program issues console messages indicating how may transactions were read, archived, in error, and rolled back. The GenArc program then terminates processing.

Chapter 6Archiving and Retrieving Information
216
RUNNINGGENARC
The name of the GenArc program and how you run it varies somewhat depending on the operating system you are using. The concepts are the same, though, for all operating systems. For our example let’s assume you are running the GenArc program on Windows 2000. To run the GenArc program on Windows 2000, you enter a command like this:
C:FAP\MSTRRES\DMS1\genacw32
Notice the command includes the program name (GENACW32) and it’s full path—from the DMS1 master resources directory. This command starts the GENACW32 program (GENACW32.EXE) and attempts to locate a FSIUSER.INI file in the c:\fap\mstrres\dms1 directory.
The GenArc program messages will look something like the sample below if you have the LogToConsole option set as shown here:
< Control >
LogToConsole = Yes
Here are the sample messages:
--- GenArc ---
==> Processing: TransactionId-GroupName1-GroupName2-GroupName3-TransactionType
==> Processing: 1234567-SAMPCO-LB1--T1
==> Processing: 2234567-SAMPCO-LB1--T1
==> Processing: 5SAMPCO-SAMPCO-LB2--T1
==> Processing: 6SAMPCO-SAMPCO-LB2--T1
==> Processing: 7SAMPCO-SAMPCO-LB2--T1
==> Processing: 8SAMPCO-SAMPCO-LB2--T1
==> Processing: 9SAMPCO-SAMPCO-LB2--T1
==> Processing: 4234567-FSI-CPP--T1
==> Processing: 5234567-FSI-GL--T1
==> Transactions Read : 9
==> Transactions Archived : 9
==> Transactions In Error : 0
==> Transactions Rolled Back: 0
==> Warning count: 0
==> Error count: 0
Elapsed Time: 2 seconds
--- GenArc Completed ---
Logging archivedtransactions
If you want the GenArc program to produce a log of the archived transactions, include the following INI option in the ArcRet control group:
< ArcRet >
ExportIndex = <file name>.
Be sure to include the full path and file name of the log file. If you omit the ExportIndex option, the system does not create the log file.
Archiving to a database The system lets you archive information to a database, such as DB2, as an alternative to archiving to flat files (CAR files). You use the ArchiveMem option in the FSISYS.INI file to enable database archiving, as shown here:
< Archival >
ArchiveMem = Yes

Running GenArc
217
NOTE:When running on z/OS, the GenArc program sets the ArchiveMem option to Yes if it was not in the FSISYS file and produces a warning. This prevents an error (running with non-VSAM NA and POL files) or an abend (running with VSAM NA and POL files) which will occur if the ArchiveMem option is set to No.
Sorting records in adatabase
Use the DefaultTag option to specify the default tag in ODBC and DB2. This tag is then used by the ORDER BY clause in the SQL database to sort records.
< DBTable:MYTABLE >
DefaultTag =
For the DefaultTag option, enter the name of the key from the DFD file.
Keep in mind this only works with ODBC and DB2. It does not work with xBase files.
Preparing SQL Add the AlwaysSQLPrepare option to make sure the ODBC driver always performs the _SQLPrepare() function. Here is an example:
< DBHandler:ODBC >
AlwaysSQLPrepare = Yes
Omitting this option can the S1010 0 [Oracle][ODBC]Function sequence error.
COMMAND LINE OPTIONS
The GenArc program accepts several command line options. Command line options are prefixed with either a backslash (/) or a dash (-). Here is an example of starting the GenArc program with command line options:
C:FAP\MSTRRES\DMS1\genacw32 /ini=my.ini /jobid=tuesday1
The command line options are explained below:
INI Use the INI command line option to tell the GenArc program to open and read a FSIUSER.INI file other than the one in the current directory.
JOBID (Abbreviation: J)
Use the JOBID command line option to associate a Job Identifier with this particular run of the GenArc program. By default the GenArc program associates a run with the identifier, DEF_JOB_ID. This identifier (either the default identifier or the identifier specified with the JOBID option) is used when the Restart row in the Restart table is searched for and/or updated. Using JOBID allows for concurrent runs of the GenArc program.
DPASSWD (Abbreviation: DP)
Use the DPASSWD command line option to indicate the password to be used when connecting to a DB2 database management system (DBMS). Use this option along with the DUSERID option. You can also specify the DPASSWD option in the INI file as shown below:
< DBHandler:DB2 >
Chapter 6Archiving and Retrieving Information
218
Passwd = xxxxxxxx
DUSERID (Abbreviation: DU)
Use the DUSERID command line option to indicate the User ID to use when connecting to a DB2 database management system. Use this option along with the DPASSWD option. You can also specify the DUSERID option in the INI file as shown below:
< DBHandler:DB2 >
UserID = xxxxxxxx
OPASSWD (Abbreviation: OP)
Use the OPASSWD command line option to indicate the password to be used when connecting to an ODBC-compliant database management system. Use this option along with the OUSERID option. You can also specify the OPASSWD option in the INI file as shown below:
< DBHandler:ODBC >
Passwd = xxxxxxxx
OUSERID (Abbreviation: OU)
Use the OUSERID command line option to indicate the password to be used when connecting to an ODBC-compliant database management system. Use this option along with the OPASSWD option. You can also specify the OPASSWD option in the INI file as shown below:
< DBHandler:ODBC >
UserID = xxxxxxxx
RESTART (Abbreviation: R)
Use the RESTART command line option to tell the GenArc program to start processing with the n’th record in the NEWTRN file. The GenArc program will skip n-1 NEWTRN records and begin with the n’th record. When you use the RESTART command line option you are explicitly restarting the GenArc program.
SQLID (Abbreviation: SQL)
Use the SQLID command line option to tell the GenArc program to perform a SET CURRENTSQLID=SQLID at initialization time. You can also specify the SQLID option in the INI file as shown below:
< DBHandler:DB2 >
CurrentSQLID = xxxxxxxx
STOPREC (Abbreviation: S)
Use the STOPREC command line option to tell the GenArc program to stop processing on the n’th NEWTRN record.

Running GenArc
219
Using the Restart OptionThe Restart option is only available if you are archiving both APPIDX and ARCHIVE data into a database management system. The Restart option is not available if you are using DBASE IV, which is the default archive method.
If the GenArc program detects an error during its processing, it can skip the transaction in error and continue processing with the next transaction in the NEWTRN.DAT file. The INI option listed below tells the GenArc program whether it should terminate processing when it encounters errors:
< GenArcStopOn >
DBErrors = No
The default value for the DBErrors option is Yes, which means the GenArc program stops processing when it receives an error. If you set the DBErrors option to No, the GenArc program tries to skip the transaction in error and then continues with the next transaction in the NEWTRN.DAT file.
Below is a brief description of how the GenArc program performs restart processing. The description below does not include all of the information provided in How the GenArc Program Works on page 213 but all of that information applies to restart processing as well.
1 Check the command line for parameters, load INI files, and then check and update the Restart table.
The GenArc program parses and stores any command line parameters passed to it. INI files are read and loaded. If the JOBID parameter was passed, the GenArc program will attempt to locate a row in the Restart table whose JOB_ID column equals the JOBID value. If the GenArc program cannot locate a row whose JOB_ID column matches the JOBID value passed in, the GenArc program issues an error message and terminates.
If the RESTART parameter was passed, this is an explicit restart, meaning we are supposed to restart on the n’th record of the NEWTRN.DAT file (skipping the first n-1 records).
If the RESTART parameter was not passed, either the prior run of the GenArc program was successful (and there is no need to try to restart) or the prior run was unsuccessful but the operator made some change since encountering the error that should allow the GenArc program to continue where it left off (implicit restart).
2 Determine the restart point and check the Restart table.
If this is an explicit restart, the GenArc program simply skips the first n-1 records of the NEWTRN file and reads the n’th record. It begins the archiving process with that record.
If this is either a no restart or an implicit restart, the GenArc program first locates the appropriate row of the Restart table (based on the JOBID described in Step 1). The GenArc program then checks the Status column of the Restart table to determine if the previous GenArc run by this JOBID was successful or whether it failed. If the last GenArc run was successful the Status column of the Restart row is initialized to Failed.

Chapter 6Archiving and Retrieving Information
220
If the last GenArc run failed, the COMM_RECS column is checked to see how may transactions were committed during the prior GenArc run. The GenArc program also retrieves the value of the LASTREC column – this column contains the actual NEWTRN record for the last successful transaction. If the value of COMM_RECS is, for example, X, the GenArc program then skips to the x’th record in the NEWTRN.DAT file and compares the NEWTRN record with the value of the LASTREC column – if the values do not match, the GenArc program issues an error message indicating there is a consistency problem and terminates processing. If the values of the x’th NEWTRN record and the LASTREC column do match, the GenArc program positions itself to the x+1’th NEWTRN record and will begin the archiving process with that record.
3 Archive form sets and then perform regular commits.
Before beginning the actual archive processing of the NEWTRN records, the GenArc program checks the INI file to determine how often to perform commits to the DBMS tables. The GenArc program checks the INI option listed below:
< ArcRet >
CommitEvery = 10
The default value for the CommitEvery option is 10. This value tells the GenArc program to perform a commit every 10 transactions.
Once the GenArc program is positioned to the appropriate NEWTRN record where it is to begin processing, it processes each NEWTRN record. Processing means the NAFILE and POLFILE data are combined and compressed and archived to the ARCHIVE table, an index record is constructed and is archived to the APPIDX table.
Also, the Restart table is updated: the COMM_RECS column receives the NEWTRN record number—the record number of the most recently archived NEWTRN transaction—and the LASTREC column receives a full copy of the actual NEWTRN record itself. If at any time GenArc processing fails, a rollback is performed which will restore all the GenArc tables to the last point of consistency, which is the last commit point.
4 Finish processing the NEWTRN.DAT file and then update the Restart table.
The archiving and committing process described in step 3 is performed until all of the NEWTRN records have been processed. When the final NEWTRN record is processed, the Status column of the Restart table is updated from F (failed) to S (successful) and a final commit is performed to make the last few table changes permanent.
The GenArc program issues messages indicating how many transactions were read from the NEWTRN.DAT file, how may transactions were skipped (if this was a restart), how many transactions were successfully archived, how may transactions were in error and how many transactions were rolled back. The sum of the number of transactions skipped, archived, in error and rolled back should equal the number of transactions read.

Running GenArc
221
USING GENARC WITH DOCUMANAGE
You can use Documanage to archive files created from the GenArc program. This is done using the PO Handler. Set up the Documanage Administrator in this order:
• Map to database
• Business tables
• Cabinets
• Document types
• Authorities
The user-defined table contains a record for each folder in the cabinet. The OT_Docs table includes one record for each document in the folder.
What happens when a transaction is archived:
1 The PO Handler searches the cabinet for a folder that matches the transaction data. The FolderBy option in the Cabinet control group defines the fields used to identify the correct folder.
2 If the folder exists, the data needed to create the document is checked into the folder. A folder is created if a matching folder was not found. Creating the folder adds a record to the table that defines the cabinet. Adding the document adds a record to the OT_Docs table. The document is named by the fields defined in the NameDocBy INI option. The document appears by this name in Documanage.
When you display a transaction using the Entry system:
1 Folders are searched based on the fields defined in the FolderBy option. If a folder exists, the documents in the folder that match the type are searched. If no documents match, the folder is ignored. The document type is defined in the FileType option in the Cabinet control group. The system then creates a row in the Formset Selection window for each document where the folder has matching properties and document types.
2 When you select a document, the body of the document (CARDATA) is extracted into a temporary file. The data is then retrieved into the ARCHIVE record and the form set is displayed.
Cabinet
Folder A
Folder B
Document A
Document B
Defined in a user-defined table
Defined in the OT_Docs table

Chapter 6Archiving and Retrieving Information
222
Here are examples of the INI options you use. These options set all archive tables to use the PO Handler:
< DBTable:APPIDX >
DBHandler = PO
< DBTable:ARCHIVE >
DBHandler = PO
These options set up the PO Handler:
< DBHandler:PO >
UserID = EZPOWER
Password = EZPOWER
Cabinet = ARCCAB
Domain = FSI
The Cabinet option contains all of the fields in all tables. You would use the Domain option if you are executing Documaker Workstation or the GenArc program in a different domain than the server machine.
Here are the options for the cabinet:
< PO:ARCCAB >
FileType = dap
FolderBy = KEY1,KEY2,KEYID
NameDocBy = KEY1,KEYID,TRANCODE
Use this control group to map the DFD fields to the OT_Docs fields. For instance, this example assumes that the AddedOn option is in the OT_Docs table:
< POField2Document >
AddedOn = CreateTime
Use this control group to map the OT_Docs fields to the DFD fields:
< PODocument2Field >
CreateTime = AddedOn
This control group is required for the GenArc program. The Restart table is not supported by Documanage:
< Archival >
ArchiveMem = Yes
UseRestartTable = No
Option Description
FileType Use this option to define the file types that can be placed in the folder.
FolderBy Use this option to define the fields you want the system to use to sort the document into the various folders. For instance, if you enter Key1,Key2,KeyID, the system places documents which have the same data in these fields in the same folder.
NameDocBy Use this option to tell the system which field contains the document name. If you omit this field, the systems uses ARCKEY.

Running GenArc
223
These field names are reserved in the Documanage/PO Handler environment:
Other fields are associated with the folder unless you specify otherwise in the PODocument2Field or POField2Document control group.
Here are samples of the FSIUSER.INI, APPIDX.DFD, and CARFILE.DFD files:
NOTE:Make sure you use upper- and lowercase correctly in DFD and INI files.
Forcing folder updates You can now use the ForceFolderUpdate option to force folder updates when the folder already exists. This lets Documanage Folder Update Authorities, when set to No, prevent duplicate archive entries from being sent to the Documanage archive repository.
Here is an example of the ForceFolderUpdate option:
< PO:Prod >
FileType = PROD
FolderBy = DOC_TYPE_CODE,DOC_NUM,DOC_REV_NUM
NameDocBy = DOC_TYPE_CODE,DOC_NUM,DOC_REV_NUM
ForceFolderUpdate = Yes
The default is No.
FSIUSER.INI sample < Archival >
ArchiveMem = Yes
UseRestartTable = No
< ArcRet >
AppIdx = ARC\APPIDX
AppIdxDFD = DefLib\AppIdx.Dfd
ArcPath = [CONFIG:Batch Processing] ARCPath =
Arrangement = Stack
CARFile = ARCHIVE
CARFileDFD = .\DEFLIB\ODBC\carfile.dfd
CARPath = [CONFIG:Batch Processing] CARPath =
Catalog = ARC\CATALOG
ExactMatch = No
Key1 = Company
Key2 = Lob
KeyID = Policynum
Field Description
CARData This field must be present in the CARFILE DFD file. Never folder on this field. Should never be in the DB table under Documanage only in the DFD. Must be defined in the CARFILE.DFD as a BLOB. Always associated with the document.
ARCKey This field is the archive key. It must be in both the APPIDX.DFD and CARFILE.DFD files. Required in the table under Documanage.
DESC (Optional) The document description. By default, this field is associated with document.
RunDate (Optional) The document’s run date. By default, this field is associated with document.

Chapter 6Archiving and Retrieving Information
224
LBLimit = 500
TempIdx = ARC\Temp
< Config:Batch Processing >
ARCPath = ARC\
BaseDef =
CARPath = arc\
CompLib = COMPLIB\
DALFile =
DefLib = DEFLIB\
FntFile = REL95SM.fnt
FontLib = ..\fmres\deflib\
Form7x =
FormDef = FORM.DAT
FormFile =
FormLib = FORMS\
FormsetTrigger = SETRCPTB.DAT
HelpLib = help\
LogoFile =
TableLib = table\
WIPPath = wip\
XrfFile = REL95SM
< Configurations >
Config = Batch Processing
< Control >
XrfExt = .FXR
< DBHandler:PO >
Cabinet = DMS1
Domain = FSI
PassWord = astros3
UserID = erm
< DBTable:APPIDX >
DBHandler = PO
< DBTable:ARCHIVE >
DBHandler = PO
< DefaultTextArea >
Chars = 10
Font = 16010
Lines = 2
< DefaultVarField >
Font = 12010
Length = 1
Type = x
< Environment >
FSISYSINI = .\FSISYS.INI
FSITemp = TEMP
< MasterResource >
BaseDef = [CONFIG:Batch Processing] BaseDef =
CompLib = [CONFIG:Batch Processing] CompLib =
DalFile = <CONFIG:Batch Processing> DalFile =
DDTFile = [CONFIG:Batch Processing] DDTFile =
DDTLib = [CONFIG:Batch Processing] DDTLib =
DefLib = [CONFIG:Batch Processing] DefLib =
DictionaryFile = [CONFIG:Batch Processing] DictionaryFile =
FieldBaseFile = [CONFIG:Batch Processing] FieldBaseFile =
FntFile = [CONFIG:Batch Processing] FntFile =
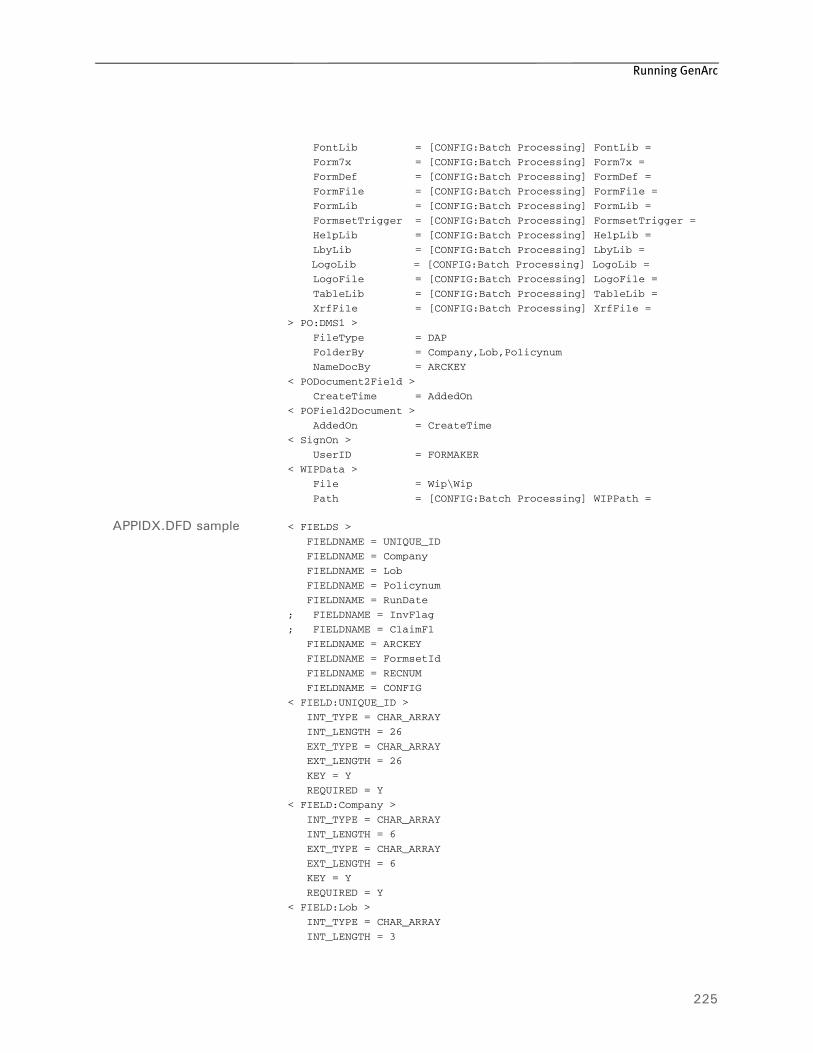
Running GenArc
225
FontLib = [CONFIG:Batch Processing] FontLib =
Form7x = [CONFIG:Batch Processing] Form7x =
FormDef = [CONFIG:Batch Processing] FormDef =
FormFile = [CONFIG:Batch Processing] FormFile =
FormLib = [CONFIG:Batch Processing] FormLib =
FormsetTrigger = [CONFIG:Batch Processing] FormsetTrigger =
HelpLib = [CONFIG:Batch Processing] HelpLib =
LbyLib = [CONFIG:Batch Processing] LbyLib =
LogoLib = [CONFIG:Batch Processing] LogoLib =
LogoFile = [CONFIG:Batch Processing] LogoFile =
TableLib = [CONFIG:Batch Processing] TableLib =
XrfFile = [CONFIG:Batch Processing] XrfFile =
> PO:DMS1 >
FileType = DAP
FolderBy = Company,Lob,Policynum
NameDocBy = ARCKEY
< PODocument2Field >
CreateTime = AddedOn
< POField2Document >
AddedOn = CreateTime
< SignOn >
UserID = FORMAKER
< WIPData >
File = Wip\Wip
Path = [CONFIG:Batch Processing] WIPPath =
APPIDX.DFD sample < FIELDS >
FIELDNAME = UNIQUE_ID
FIELDNAME = Company
FIELDNAME = Lob
FIELDNAME = Policynum
FIELDNAME = RunDate
; FIELDNAME = InvFlag
; FIELDNAME = ClaimFl
FIELDNAME = ARCKEY
FIELDNAME = FormsetId
FIELDNAME = RECNUM
FIELDNAME = CONFIG
< FIELD:UNIQUE_ID >
INT_TYPE = CHAR_ARRAY
INT_LENGTH = 26
EXT_TYPE = CHAR_ARRAY
EXT_LENGTH = 26
KEY = Y
REQUIRED = Y
< FIELD:Company >
INT_TYPE = CHAR_ARRAY
INT_LENGTH = 6
EXT_TYPE = CHAR_ARRAY
EXT_LENGTH = 6
KEY = Y
REQUIRED = Y
< FIELD:Lob >
INT_TYPE = CHAR_ARRAY
INT_LENGTH = 3

Chapter 6Archiving and Retrieving Information
226
EXT_TYPE = CHAR_ARRAY
EXT_LENGTH = 3
KEY = Y
REQUIRED = Y
< FIELD:Policynum >
INT_TYPE = CHAR_ARRAY
INT_LENGTH = 7
EXT_TYPE = CHAR_ARRAY
EXT_LENGTH = 7
KEY = Y
REQUIRED = Y
< FIELD:RunDate >
EXT_TYPE = CHAR_ARRAY
EXT_LENGTH = 8
EXT_PRECISION = 0
INT_TYPE = CHAR_ARRAY
INT_LENGTH = 8
INT_PRECISION = 0
KEY = N
REQUIRED = Y
< FIELD:InvFlag >
EXT_TYPE = CHAR_ARRAY
EXT_LENGTH = 1
EXT_PRECISION = 0
INT_TYPE = CHAR_ARRAY
INT_LENGTH = 1
INT_PRECISION = 0
KEY = N
REQUIRED = Y
< FIELD:ClaimFl >
EXT_TYPE = CHAR_ARRAY
EXT_LENGTH = 1
EXT_PRECISION = 0
INT_TYPE = CHAR_ARRAY
INT_LENGTH = 1
INT_PRECISION = 0
KEY = N
REQUIRED = Y
< FIELD:ARCKEY >
EXT_TYPE = CHAR_ARRAY
EXT_LENGTH = 18
EXT_PRECISION = 0
INT_TYPE = CHAR_ARRAY
INT_LENGTH = 18
INT_PRECISION = 0
KEY = Y
REQUIRED = Y
< FIELD:FormsetId >
EXT_TYPE = NOT_PRESENT
EXT_LENGTH = 0
EXT_PRECISION = 0
INT_TYPE = CHAR_ARRAY
INT_LENGTH = 8
INT_PRECISION = 0
KEY = N

Running GenArc
227
REQUIRED = Y
< FIELD:RECNUM >
EXT_TYPE = NOT_PRESENT
EXT_LENGTH = 0
EXT_PRECISION = 0
INT_TYPE = LONG
INT_LENGTH = 4
INT_PRECISION = 0
KEY = N
REQUIRED = Y
< FIELD:CONFIG >
EXT_TYPE = CHAR_ARRAY
EXT_LENGTH = 10
EXT_PRECISION = 0
INT_TYPE = CHAR_ARRAY
INT_LENGTH = 10
INT_PRECISION = 0
KEY = Y
REQUIRED = Y
< KEYS >
KEYNAME = UNIQUE_ID
KEYNAME = Company
KEYNAME = Lob
KEYNAME = Policynum
< KEY:Company >
EXPRESSION = Company
FIELDLIST = Company
< KEY:Lob >
EXPRESSION = Lob
FIELDLIST = Lob
< KEY:PolicyNum >
EXPRESSION = Policynum
FIELDLIST = Policynum
< KEY:UNIQUE_ID >
EXPRESSION = UNIQUE_ID
FIELDLIST = UNIQUE_ID
CARFILE.DFD sample < FIELDS >
FIELDNAME = ARCKEY
FIELDNAME = SEQ_NUM
FIELDNAME = CONT_FLAG
FIELDNAME = TOTAL_SIZE
FIELDNAME = CARDATA
< FIELD:ARCKEY >
INT_TYPE = CHAR_ARRAY
INT_LENGTH = 18
EXT_TYPE = CHAR_ARRAY
EXT_LENGTH = 18
KEY = N
REQUIRED = N
< FIELD:SEQ_NUM >
INT_TYPE = CHAR_ARRAY
INT_LENGTH = 5
EXT_TYPE = CHAR_ARRAY
EXT_LENGTH = 5

Chapter 6Archiving and Retrieving Information
228
KEY = N
REQUIRED = N
< FIELD:CONT_FLAG >
INT_TYPE = CHAR_ARRAY
INT_LENGTH = 1
EXT_TYPE = CHAR_ARRAY
EXT_LENGTH = 1
KEY = N
REQUIRED = N
< FIELD:Total_Size >
INT_Type = LONG
INT_Length = 4
EXT_Type = LONG
EXT_Length = 4
Key = N
Required = N
< FIELD:CARData >
INT_Type = BLOB
INT_Length = 8
EXT_Type = BLOB
EXT_Length = 8
Key = N
Required = N
< Keys >
KeyName = ARCKEY
KeyName = SEQ_NUM
KeyName = CAR_KEY
< KEY:ARCKey >
Expression = ARCKEY+SEQ_NUM
FieldList = ARCKEY,SEQ_NUM
< KEY:SEQ_NUM >
Expression = SEQ_NUM
FieldList = SEQ_NUM
< KEY:CAR_Key >
Expression = ARCKEY
FieldList = ARCKEY
Using the Oracle ODBC DriverThe Oracle ODBC driver is supported on all Windows platforms. The DFD and INI files shown on previous pages require special consideration when using the Oracle driver. Here are samples of CARFILE.DFD and FSIUSER.INI files.
CARFILE DFD To use a library using the Oracle ODBC driver, you must use an Oracle Insurance-supplied CARFILE DFD file that differs from the standard (internal) DFD definition. The supplied CARFILE.DFD file is located in the sample DMS1 resources in the directory:
..\DEFLIB\ODBC_ORA\CARFILE.DFD
The contents of the CARFILE.DFD are listed below:
; CARFILE.DFD - this DFD is to be used when referencing a library or ; archive with the Oracle ODBC driver.
< FIELDS >
FIELDNAME = ARCKEY

Running GenArc
229
FIELDNAME = SEQ_NUM
FIELDNAME = CONT_FLAG
FIELDNAME = TOTAL_SIZE
FIELDNAME = CARDATA
< FIELD:ARCKEY >
INT_TYPE = CHAR_ARRAY
INT_LENGTH = 18
EXT_TYPE = CHAR_ARRAY
EXT_LENGTH = 18
KEY = N
REQUIRED = N
< FIELD:SEQ_NUM >
INT_TYPE = CHAR_ARRAY
INT_LENGTH = 5
EXT_TYPE = CHAR_ARRAY
EXT_LENGTH = 5
KEY = N
REQUIRED = N
< FIELD:CONT_FLAG >
INT_TYPE = CHAR_ARRAY
INT_LENGTH = 1
EXT_TYPE = CHAR_ARRAY
EXT_LENGTH = 1
KEY = N
REQUIRED = N
< FIELD:TOTAL_SIZE >
INT_TYPE = LONG
INT_LENGTH = 4
EXT_TYPE = DOUBLE
EXT_LENGTH = 4
KEY = N
REQUIRED = N
< FIELD:CARDATA >
INT_TYPE = BLOB
INT_LENGTH = 252
EXT_TYPE = BLOB
EXT_LENGTH = 252
KEY = N
REQUIRED = N
< KEYS >
KEYNAME = ARCKEY
KEYNAME = SEQ_NUM
KEYNAME = CAR_KEY
< KEY:ARCKEY >
EXPRESSION = ARCKEY+SEQ_NUM
FIELDLIST = ARCKEY,SEQ_NUM
< KEY:SEQ_NUM >
EXPRESSION = SEQ_NUM
FIELDLIST = SEQ_NUM
< KEY:CAR_KEY >
EXPRESSION = ARCKEY
FIELDLIST = ARCKEY
To use the supplied CARFILE.DFD file, do the following:

Chapter 6Archiving and Retrieving Information
230
1 Copy the CARFILE.DFD file into the directory where you store other DFD files, such as the \DefLib directory.
2 Make the system use the CARFILE.DFD file by adding this entry into the INI file:
< ArcRet >
CARFileDFD = ..\DEFLIB\CARFILE.DFD
Creating the Database and TablesUse these INI options to tell Library Manager to create a library using the Oracle ODBC driver and to load resources from that library:
< MasterResource >
DALFile = LBYI
DDTFile = LBYI
FormFile = LBYI
LOGOFile = LBYI
< LibraryManager >
LBYLOGFile = LBYLOG
< Library:LBYI >
DBTable = LBYD
< DBTable:LBYI >
DBHandler = ODBC
< DBTable:LBYD >
DBHandler = ODBC
UniqueTag = ARCKEY+SEQ_NUM
< DBTable:LBYLOG >
DBHandler = ODBC
< DBTable:CATALOG >
DBHandler = ODBC
UniqueTag = CATALOGID
< DBHandler:ODBC >
Server = LBYSQL
Qualifier = LBYSQL
CreateTable = Yes
CreateIndex = No
UserID = userid
Passwd = password
Debug = No
< ODBC_FileConvert >
LBYI = DAP102_LBYI
LBYD = DAP102_LBYD
LBYLOG = DAP102_LBYLOG
A description of the above INI options follows:

Running GenArc
231
Option Description
MasterResource control group
DALFile Enter the name of the library from which you want the system to retrieve DAL scripts and DAL script libraries.
DDTFile Enter the name of the library from which you want the system to retrieve DDT files.If you define this option, the system expects to find all DDT files there, including the MASTER.DDT file. You can use the following option to exclude the MASTER.DDT file from being located in the library:
< RunMode >
MasterDDTNotInLibrary = Yes
The only advantage to having an external MASTER.DDT file is if your setup creates the MASTER.DDT file on the fly, before a transaction is run. If that is the case, it is easier to manipulate if it is outside of the library.
FormFile Enter the name of the library from which you want the system to retrieve FAP files.
LOGOFile Enter the name of the library from which you want the system to retrieve graphics (LOG) files.
LibraryManager control group
LBYLOGFile Enter the name of the library log file. The library log contains information about resources that are added to, deleted from, or updated in the library. The LBYLOGFile does not have to use the same type of DB handler as the library index and data portions.
Library:LBYI control group
DBTable Enter the name of the data component of the library. In this example, the names LBYI and LBYD are used to emphasize that one table, LBYI, represents the library index and one table, LBYD represents the library data. You can use up to eight characters to give these tables any name you like. See the ODBC_FileConvert control group if you need to map these eight-character names to longer table names.
DBTable:LBYI control group
DBHandler Tells the system to access the LBYI table using the data base handler named ODBC. Because of this INI value, the system expects to find an INI control group named DBHandler:ODBC. Microsoft's SQL Server is an ODBC-compliant database.
DBTable:LBYD control group
DBHandler Tells the system to access the LBYD table using the data base handler named ODBC. Because of this INI value, the system expects to find an INI control group named DBHandler:ODBC.

Chapter 6Archiving and Retrieving Information
232
UniqueTag In this example, ARCKEY+SEQ_NUM specifies that the columns ARCKEY and SEQ_NUM can be combined to represent a unique tag for the table. This unique tag is only used for internal purposes. If you do not specify a unique tag for this table, and a column with the name UNIQUE_ID does not exist within the table, you receive warning messages indicating that there is no unique tag defined.
DBTable:LBYLOG control group
DBHandler Tells the system to access the LBYLOG table using the data base handler named ODBC. Because of this INI value, the system expects to find an INI control group named DBHandler:ODBC.
DBTable:CATALOG control group
DBHandler Tells the system to access the CATALOG table using the data base handler named ODBC. The CATALOG table is used to temporarily store CATALOGID values used to construct an ARCKEY.
UniqueTag This specifies that the column CATALOGID represents a unique tag for this table. This unique tag is only used for internal purposes. If you do not specify a unique tag for this table, and a column with the name UNIQUE_ID does not exist within the table, you receive warning messages indicating that there is no unique tag defined.
DBHandler:ODBC control group
Server Specifies the name of the ODBC data source for this database handler, such as LBYSQL. You must also define an ODBC data source with this name.
Qualifier Specifies the name of the database for this database handler, such as LBYDBASE. If you omit this option, the database set up as the default database for the LBYSQL ODBC data source is used.
CreateTable Specifies the system should create any tables Library Manager needs, that do not already exist, at run time.
CreateIndex Specifies the system should create any database indexes it needs, that do not already exist. Always set this option to No.
UserID Enter the user ID to use when connecting to the data base management system.
Passwd Enter the password to use when connecting to the data base management system.
Debug Enter Yes to turn on tracing for the Documaker ODBC DB handler. Enter No or omit this option except in troubleshooting situations.
ODBC_FileConvert control group
This INI control group lets you map table names of eight characters or less to table names longer than eight characters. The table names you specify must follow the table naming conventions for the data base management system.
Option Description

Running GenArc
233
Resolving ErrorsIf the GenArc program produces an error similar to the following example, it indicates the INT_Length or EXT_Length (or both) options in the CARData control group have not been set in the CARFILE.DFD file:
Error:
====
GenArc
Transaction Error Report - System timestamp: Fri Sep 07 02:07:33 2001
-->Transaction: 1234567
Error in RPFAPErrorNotify(): FAP library error: area:<..\C\dxmerror.c
Jun 16 2001 12:44:04
400.101.002
DXMSetLastError>, code:<2>, code:<2>, msg<Invalid object handle was passed>.
An example of the correct INI settings is shown in the FSIUSER.INI sample on page 223.
LBYI Specifies the name of the table referenced in several INI locations as LBYI on the data base management system.
LBYD Specifies the name of the table referenced in several INI locations as LBYD on the data base management system.
LBYLOG Specifies the name of the table referenced in several INI locations as LBYLOG on the data base management system.
Option Description

Chapter 6Archiving and Retrieving Information
234
VIEWING ARCHIVES IN DOCUMANAGE
You can use the ARCVIEW utility to view Documaker archive files checked into the Documanage archive system. This utility only runs under 32-bit Windows.
To use this utility, follow these steps:
1 Register the Documanage file extension (DPA) in Windows so the operating system will automatically use the ARCVIEW utility to view these files.
2 Set the FSIPATH environment variable to point to the directory where the INI file for the AFEMAIN program is stored. Here is an example:
FSIPath = d:\dms1
NOTE:The AFEMAIN program is the executable file for Documaker Workstation.
3 Place a menu file, similar to the MEN.RES file used by Documaker Workstation, be in the directory specified by the FSIPath option. The name of the menu file should be ARCVIEW.RES.
NOTE:You can edit this file to remove functionality you do not want to include.
4 Edit the FILETYPES.INI file on the computer where the Documanage server runs. Add the DPA file extension to the list of file types to view with the ARCVIEW.EXE program. This causes the Documanage client to use the viewer registered in Windows instead of the default Documanage viewer.
You can now click on Documaker archive files in Windows Explorer to display them.

Running GenArc
235
USING MULTIPLE SIMULTANEOUS ODBC CONNECTIONS
The system supports multiple simultaneous ODBC connections via different ODBC drivers. This will, for instance, let you connect at the same time to multiple:
• Databases on an SQL server
• Databases on an SQL server and Excel spreadsheet databases
• Access databases and Excel spreadsheet databases
• Access databases
• Excel spreadsheet databases
• Databases for which you have an ODBC-compliant driver
The system does not support multiple different DB2 databases using native DB2 drivers. Support is limited to ODBC-compliant data bases.
NOTE:Keep in mind the ODBC_FileConvert and ODBC_FieldConvert control groups are global and affect all of the handlers.
For example, to access a database on a SQL Server and in a Microsoft Excel spreadsheet simultaneously, you first set up the ODBC Data Sources Administrator panel as illustrated and these INI options:
< DBHandler:DBSQL >
Class = ODBC
Server = SQL Server
< DBHandler:DBEXCEL >
Class = ODBC
Server = MS Excel
The database handler name is limited to 22 characters.

Chapter 6Archiving and Retrieving Information
236
For the table you want to open using the appropriate handler add this INI option:
< DBTable:MYTABLE >
DBHandler = DBSQL
Debug INI option can be specified under each of the DBHandler:XXX control group.
If you use the name of the ODBC handler in the appropriate DAL function, you can omit the DBTable:XXX control group. For more information on DAL functions and setting up database handlers for Excel databases, see the DAL Reference.

Using WIP and the Archive Index File
237
USING WIP ANDTHE ARCHIVE
INDEX FILE
Since the Archive module supports custom application archive index files, you must create an application archive index record from a WIP record. The following example shows a standard application archive index file.
The Archive option in the AFEProcedures control group defines the DLL and the function name to call when converting a WIP record into an archive record. The standard DLL is AFEW32 and the standard function is called AFEWip2ArchiveRecord. Here is an example of the standard DLL and function:
< AFEProcedures >
Archive = AFEW32-> AFEWip2ArchiveRecord
The AFEWip2ArchiveRecord function uses options in the AFEWip2ArchiveRecord control group. Options in the AFEWip2ArchiveRecord control group are:
Archive Field Name = WIP Field Name
Where ARCHIVE FIELD NAME is the actual field name from archive DFD file and WIP FIELD NAME is the field name from WIP file. This means that data from WIP record field WIP FIELD NAME would be copied into archive record field ARCHIVE FIELD NAME.
For a base application archive index file, this control group and options are as follows:
< AFEWIP2ArchiveRecord >
KEY1 = KEY1
KEY2 = KEY2
KEYID = KEYID
RECTYPE = RECTYPE
CREATETIME = CREATETIME
ORIGUSER = ORIGUSER
CURRUSER = CURRUSER
MODIFYTIME = MODIFYTIME
FORMSETI = FORMSETID
TRANCODE = TRANCODE
STATUSCODE = STATUSCODE
FROMUSER = FROMUSER
FROMTIME = FROMTIME
TOUSER = TOUSER
TOTIME = TOTIME
DESC = DESC
INUSE = INUSE
ARCKEY = ARCKEY
APPDATA = APPDATA
RECNUM = RECNUM
RUNDATE = RUNDATE
INVFLAG = INVFLAG
CLAIMFL = CLAIMFL

Chapter 6Archiving and Retrieving Information
238
FORMATTINGARCHIVE FIELDS
The system lets you format data values that will be mapped to the archive index record from the Trigger2Archive control group. Normally, this group is defined like this:
< Trigger2Archive >
Key1 = Company
Key2 = LOB
KeyID = TransID
RunDate = RunDate
NOTE:These same options in the ArcRet control group are used for searching the key fields in the archive index file.
Where the value on the left of the equals sign designates an archive index field (defined in APPIDX.DFD) and the value on the right represents a GVM variable normally associated with the NEWTRN record (defined by the TRNDFDFL.DFD). These options are used by the GenArc program to add the Key1, Key2, and KeyID information to the archive index file.
You can have the system format these archive fields in several ways:
• Preserving the case of values in the key fields
• Formatting dates
• Storing a constant value
Converting the case ofkey fields
By default, the system converts the case of information in the Key1, Key2, and KeyID fields to uppercase when it archives a record. It does this to reduce the amount of time it takes to find a record during a search. You can, however, use the CaseSensitiveKeys option to preserve the case of the Key1, Key2, and KeyID values as entered. For example, this option
< Archival >
CaseSensitiveKeys = Yes
Tells the system to preserve the case of the Key1, Key2, and KeyID fields as entered. If you enter No or omit the CaseSensitiveKeys option, the system convert the values for these options to uppercase before it archives the record.
Reformatting dates You can do optional date reformatting and assign a constant data value not associated with a GVM. Here is an example of date reformatting:
RUNDATE = TRANDATE;D1-4;D4
You still are associating the archive index field with a GVM variable normally loaded from the NEWTRN record. Separated by a semicolon, you can define the date format of the input variable and specify a different format for the final value after the second semicolon.
In this example, the RUNDATE field is to be set from the TRANDATE field from the NEWTRN record. Note the first D that follows the semicolon indicates you want a date conversion. This example converts the data from format 1-4 (MM-DD-YYYY) to format D4 (YYYYMMDD) before storing it in the RUNDATE field of the archive index.

Formatting Archive Fields
239
NOTE:Always use YYYYMMDD to store your run date in the archive.
Storing a constantvalue
Here is an example of how you store a constant value instead of associating the field with a GVM variable from the NEWTRN record.
USERID = NULL; ;TOM
Keep in mind that NULL is a keyword and is not interpreted as the name of a GVM variable associated with any record. When using NULL, the system skips to the final destination format section (the second semicolon) and places whatever value is defined there in the resulting archive index field. In this case, that value is TOM.
Since this method assumes there will be a constant text value defined after the second semicolon, you can also use INI built-in functions to provide this value. For instance, consider this example.
USERID = NULL; ; ~GETENV USERNAME
This is similar to the previous example except it uses the GetEnv (Get Environment Variable) INI function to get the value associated with USERNAME from the environment to supply the field value.

Chapter 6Archiving and Retrieving Information
240
RETRIEVINGARCHIVED
FORMS
Once the form set information has been archived, you can re-create those form sets by retrieving the form set information from the archive file, as long as you have access to the resource library which contains the forms. You do this using the Archive module of Documaker.
NOTE:The Archive module of Documaker can also archive form sets. For more information, see the Documaker Workstation User Guide. The following information is provided here so you can have a basic understanding of the retrieval process.
FILES THE ARCHIVE MODULE USES
The Archive module (the AFEMAIN program) uses the archive index file to aid in the retrieval of form set information through the use of keys. You can define these keys to provide meaningful search criteria such as account or policy numbers, company names, or customer names.
Input files • Compressed Archive (CAR) file
• Application Index file
• Catalog file
• Restart file
• Resource file such as FAPLIB, DEFLIB, and so on
Output files None.
USING THE ARCHIVE MODULE
To retrieve a document from archive using the Archive module, you select the Retrieve, Formset option. The Retrieve Document window appears.
You can configure the Retrieve Document window using these FSISYS.INI settings:

Retrieving Archived Forms
241
< Group1 >
Title1 = Company
Title2 = Line of Business
Title3 = Policy #
Title4 = Run Date
Title5 = Invoice Only
Title6 = Claim Only
Title7 = Policy # Date St Tr Description
NOTE:Title5 and Title6 are not used in the base Documaker Workstation system, but are available if you choose to customize your installation. If you remove these options from the FSISYS.INI file, the system does not display those fields.
Retrieval OptionsIf you click the Options button on the Retrieve Document window, the Retrieval Options window appears, as shown below.
This window is shown with default text. If you want to change these default values, add values to DlgTitles and ArcRet control groups as follows:
Beside this DlgTitles option Enter the title for the…
RetOptionsDlgTitle window (Retrieve options in this example)
RetrOptionsPrintOnly Print only field
RetrOptionsOnlyEntry Display only field
RetrOptionsStackOnly Stack only mode field

Chapter 6Archiving and Retrieving Information
242
The options in the ArcRet control group define only the default settings for fields users can change actual values by checking or unchecking the fields on the window.
For this ArcRet option Enter…
Arrangement StackOnly. If StackOnly mode is on, the system shows one form at a time and the Stack, Tile, and Cascade options are available. In this mode DisplayPrintOnly is set to Yes DisplayOnlyEntry is set to No and cannot be changed.
DisplayPrintOnly Yes. This setting displays only the forms in the form set defined as Print Only, along with variable data forms included in the form set. These forms do not contain manually-entered data.
DisplayOnlyEntry No. This setting displays only forms containing variable data. The system will omit reference forms.

Working with Documanage
243
WORKING WITHDOCUMANAGE
If you use Documanage as part of your archiving solution, you may want to use Documanage data types when mapping archive index data. You may also want to categorize the documents you archive.
These topics discuss how to do these tasks.
• Using Documanage Data Type Support on page 244
• Setting Up Automatic Category Overrides on page 245
• Mapping Documaker Archive Fields to Documanage Properties on page 246
• Using Next/Retrieve Cursor on page 248
• Enhanced Documanage Document Extended Properties Support on page 249

Chapter 6Archiving and Retrieving Information
244
USING DOCUMANAGE DATA TYPE SUPPORT
Pulling Documaker archive documents (DPA files) into Documanage lets you use Documanage-supported data types when mapping the Documaker archive index data into the Documanage folder and document properties tables.
This lets you search, query, and present the data through Documanage clients such as Documanage Workstation and Documanage Bridge-based clients. For example, you can store Documaker date/time data as Documanange date/time data types and enable the use of date ranges and calendar functionality in web page design and for sorting and searching Documaker archive documents. Data mining and reporting can also benefit from better data representation and storage.
The DMIA DBHandler (DMILIB module: [DBHandler:DMIA]) used with the GenArc program and other Documaker Server archive processes lets you use additional Documanage Data Types in Documanage Folder fields instead of only supporting the varchar or char data types.
Keep in mind...
• The date/time data types must be in either a Documaker D4 string format:
YYYYMMDDHHMMSS
The hours, minutes, and seconds (HHMMSS) are optional. For example, the D4 format can be sent in as:
20070131 (Jan. 31, 2007)
2007013113 (Jan. 31, 2007 1PM)
200701311330 (Jan. 31, 2007 1:30PM)
20070131133055 (Jan. 31, 2007 1:30:55 PM)
Or in a Documanage client-supported string format:
YYYY-MM-DD HH:MM:SS.msec
The hours, minutes, seconds and milliseconds (HH:MM:SS.msec) are optional. For example, the Documanage format can be sent in as:
2007-01-31
2007-01-31 13
2007-01-31 13:30
2007-01-31 13:30:55
2007-01-31 13:30:55.800
• Documaker’s Archive Application Index Data Format Definition file (APPIDX.DFD) fields must remain as CHAR_ARRAY for the INT_TYPE and EXT_TYPE with the appropriate INT_LENGTH and EXT_LENGTH values for representing the data in string format.

Working with Documanage
245
SETTING UP AUTOMATIC CATEGORY OVERRIDES
You can categorize DPA documents from Documaker Server Archive into Documanage. This makes it easier to do searches and queries when retrieving via Documanage Bridge. It also provides more flexibility in using Extended Document Properties (XDPs), which allows for different XDPs in the different document categories so transactions can store different relative data in the XDPs.
You can use input data to set the Documanage document's Category property during archival via the Documaker Server Archive interface (DMIA). The default value for this property comes from the FileType INI option during archival, but you can also dynamically override the default with input data using this INI option:
< POField2Document >
ObjectClass = AppIdx_Field
During retrieval, the Category Document property can be loaded into the Documaker AppIdx_Field using this INI option:
< PODocument2Field >
AppIdx_Field = ObjectClass
Extended Document Properties (XDPs) are based on the Category value set during ingestion. Mappings to XDPs only occur if the XDP for the Document Category exists by name. Otherwise, they are ignored and no error is generated. This allows different data to be populated into the XDPs based on the category used.
Here is an example of how you would override the default document category of DPA with the APPIDX.DFD field value of the field FormSet:
< DMIA:RPEX2ARC >
; FileType is the default Category/ObjectClass value
FileType = DAP
< PODocument2Field >
; Category/ObjectClass is overridden by the value in the AppIdx
; field FormSet
FormSet = ObjectClass
< POField2Document >
; Category/ObjectClass is overridden by the value in the AppIdx
; field FormSet
ObjectClass = FormSet
Keep in mind the APPIDX.DFD field used to override the document Category in the INI options POField2Document and PODocument2Field can not be used to also set other folder or document properties. For instance, in the example another entry for FormSet can not be used to map FormSet to another folder or document or XDP field.

Chapter 6Archiving and Retrieving Information
246
MAPPING DOCUMAKER ARCHIVE FIELDS TO DOCUMANAGE PROPERTIES
When mapping Documaker archive field names to Documanage Folder and Extended Document Properties, you can use DB Field Name values. This lets you modify the Folder Property Name and Extended Document Property Name values in Documanage Server to effect changes to applications that use these values for input field/control labels without requiring reconfiguring your Documaker to Documanage interface setup.
You can map Documaker archive index data to either the Documanage Folder Property Name field and the Documanage Extended Document Property Name field (default behavior as previously provided) or to the Documanage DB Field Name, which is the database column name, based on the MapByDBName option.
< DMIA:cabinetname >
MapByDBName =
You can also use these new control groups for even more control over mapping:
• DMIA_FieldConvert_cabinetname
• DMIA_FieldConvert
NOTE:The DMIA_FieldConvert_cabinetname control group overrides any entries in the DMIA_FieldConvert control group.
Also, all filter and order by syntax generated and submitted to the Documanage Server and used in SQL statements now uses qualified column names instead of the Documanage Folder Property and Extended Document Property names to avoid requiring the DB column name to be the same as the Property Name.
Here are some examples:
Example 1 The Documaker archive index (AppIdx) fields QTY and PreTaxAmt are mapped to Documanage Field or Extended Document Property name Quantity and Pretax Amount. All other Documaker archive index fields map to the same named Field and Extended Document Property names with a test for the name with spaces as they exist and then for spaces replaced with underscores (case-insensitive):
< DMIA:RPEX2ARC >
MayByDBName = No
< DMIA_FieldConvert >
QTY = Quantity
PreTaxAmt = Pretax Amount
Option Description
MapByDBName Enter Yes to map to Documanage DB Field Names values for both Folder Properties and Extended Document Properties. The default is No, which instead maps them to the Folder Property Names and Extended Document Property Names (Display Names).

Working with Documanage
247
Example 2 The Documaker archive index fields QTY and PreTaxAmount are mapped to Documanage DB Field Name Quantity and PreTax_Amount. All other Documaker archive index fields map to the same named DB Field Name (case-insensitive):
< DMIA:RPEX2ARC >
MayByDBName = Yes
< DMIA_FieldConvert >
QTY = Quantity
PreTaxAmt = Pretax Amount

Chapter 6Archiving and Retrieving Information
248
USING NEXT/RETRIEVE CURSOR
Documanage supports a next/retrieve cursor for use by the ARCRET utility when accessing data from Documanage.
The ARCRET utility lets you retrieve records from archive and produce files. You can then send these files to plug-in functions to print or migrate the archive records or to test the archive retrieval results.
NOTE:The ARCRET utility’s /REV parameter is only applicable to an archive stored in xBase.
This eliminates the need to use the /BQ option for a Documanage archive. The previous (before version 11.3) interface to Documanage did not support retrieving documents while sequentially reading the index. The /BQ option told the system to queue batches of records into memory before attempting to retrieve each associated documents. This could be memory intensive and affected performance. With version 11.3 and higher, the system can retrieve the associated document while reading the index rows.

Working with Documanage
249
ENHANCED DOCUMANAGE DOCUMENT EXTENDED PROPERTIES SUPPORT
You can populate Documanage Extended Document Properties (XDPs) using Documaker Server archive indexed data. There are no limits to the number, sizes, and data types you can use at the document level. This lets you use XDPs when you are directly archiving to Documanage.
NOTE:Before version 11.1, only Documanage Basic Document Properties could only be used for user data and the number, size and type of data available was limited.
To use this feature, you must...
• Create the extended document properties in Documanage in the proper document categories
• Set up the GenArc program to map to them.
• Add the names you use for the XDP fields into GenArc's application index file (APPIDX.DFD).
• Set up Documaker Server to capture extract data to populate into the XDP fields.
The fields are propagated during GenTrn processing from the XML extract file to the TRNFILE. During GenData processing, the fields are populated from the TRNFILE to the NEWTRN file. Then, during GenArc processing, the fields are populated from the NEWTRN file to the APPIDX structure and into the Documanage XDP fields.
The field names added to the APPIDX.DFD file must have the exact same names as those set up in Documanage's Category Extended Properties. Here are some examples:
• PolicyDate
• PolicyType
• FormSet
• Number
• FinalDate
• Amount
• PreTaxAmt
• QTY
• Percentage
• Ratio
• Overage
• Specifier

Chapter 6Archiving and Retrieving Information
250
For the appropriate fields to end up in the structure mapped by GenArc's APPIDX.DFD file, those fields must be propagated from the NEWTRN.DAT file. This file is created during GenData processing and is mapped using the TRNDFDFL.DFD file.
For the appropriate fields to exist in the NEWTRN file, those fields must be propagated from the TRNFILE. This file is created during GenTrn processing and is mapped by the TRNDFDFL.DFD file.
The TRNFILE is populated with data which is usually retrieved from the extract file. This data is mapped using the INI options in the Trn_Fields control group or by using the Ext2GVM rule in the AFGJOB.JDT file.
NOTE:Documanage Extended Document Properties is not supported by Docusave so the Stacked DPA feature will not propagate the XML header data in the DPA files into Documanage's XDP fields.
To handle the propagation of these fields, you must include additional information in these files:
• FSISYS.INI file or the AFGJOB.JDT file or both
• TRNDFDFL.DFD file
• APPIDX.DFD file
• Extract file
Here are some examples of the additional information required in these files:
FSISYS.INI file Here is an excerpt from the FSISYS.INI file:
< Trn_Fields >
SYM = 1,3,N
POL = 4,7,N
EffectiveDate = 25,6,N;DB;D4
Module = 38,2,N
State = 43,2,N
Trn_Type = 45,2,N
Company = 35,3,N
LOB = 40,3,N
SentToManualBatch = 47,2,N
Branch = 49,2,N
RunDate = 51,14,N
DueDate = 100,8,N
Cust_Num = 87,10,N
PKG_Offset = 97,10,N
TRN_Offset = 107,10,N
X_Offset = 117,10,N
NA_Offset = 127,10,N
POL_Offset = 137,10,N
TokenLen = 118,316,N
; PolicyDate = 51,14,N
PolicyType = 45,2,N
FormSet = 38,2,N
< Trigger2Archive >

Working with Documanage
251
Key1 = COMPANY
Key2 = LOB
KeyID = POL
Customer = customer
RunDate = RUNDATE
DueDate = DueDate
TokenLen = TOKENLEN
PolicyDate = PolicyDate
PolicyType = PolicyType
FormSet = FormSet
Number = Number
FinalDate = FinalDate
Amount = Amount
PreTaxAmt = PreTaxAmt
Qty = QTY
Percentage = Percentage
Ratio = Ratio
Overage = Overage
Specifier = Specifier
< Trn_File >
MaxExtRecLen = 750
BinaryExt = N
TRNDFDFL.DFD file Here is an excerpt from the TRNDFDFL.DFD file:
< FIELDS >
FIELDNAME = sym
FIELDNAME = pol
FIELDNAME = EffectiveDate
FIELDNAME = module
FIELDNAME = state
FIELDNAME = trn_type
FIELDNAME = company
FIELDNAME = lob
FIELDNAME = SentToManualBatch
FIELDNAME = branch
FIELDNAME = RunDate
FIELDNAME = DueDate
FIELDNAME = cust_num
FIELDNAME = customer
FIELDNAME = PKG_Offset
FIELDNAME = TRN_Offset
FIELDNAME = X_Offset
FIELDNAME = NA_Offset
FIELDNAME = POL_Offset
FIELDNAME = TOKENLEN
FIELDNAME = PolicyDate
FIELDNAME = PolicyType
FIELDNAME = FormSet
FIELDNAME = Number
FIELDNAME = FinalDate
FIELDNAME = Amount
FIELDNAME = PreTaxAmt
FIELDNAME = QTY
FIELDNAME = Percentage
FIELDNAME = Ratio

Chapter 6Archiving and Retrieving Information
252
FIELDNAME = Overage
FIELDNAME = Specifier
< FIELD:PolicyDate >
INT_TYPE = CHAR_ARRAY
INT_LENGTH = 24
EXT_TYPE = CHAR_ARRAY_NO_NULL_TERM
EXT_LENGTH = 23
KEY = N
REQUIRED = Y
< FIELD:PolicyType >
INT_TYPE = CHAR_ARRAY
INT_LENGTH = 31
EXT_TYPE = CHAR_ARRAY_NO_NULL_TERM
EXT_LENGTH = 30
KEY = N
REQUIRED = Y
< FIELD:FormSet >
INT_TYPE = CHAR_ARRAY
INT_LENGTH = 41
EXT_TYPE = CHAR_ARRAY_NO_NULL_TERM
EXT_LENGTH = 40
KEY = N
REQUIRED = Y
< FIELD:Number >
INT_TYPE = CHAR_ARRAY
INT_LENGTH = 11
EXT_TYPE = CHAR_ARRAY_NO_NULL_TERM
EXT_LENGTH = 10
KEY = N
REQUIRED = N
< FIELD:FinalDate >
INT_TYPE = CHAR_ARRAY
INT_LENGTH = 24
EXT_TYPE = CHAR_ARRAY_NO_NULL_TERM
EXT_LENGTH = 23
KEY = N
REQUIRED = N
< FIELD:Amount >
INT_TYPE = CHAR_ARRAY
INT_LENGTH = 16
EXT_TYPE = CHAR_ARRAY_NO_NULL_TERM
EXT_LENGTH = 15
KEY = N
REQUIRED = N
< FIELD:PreTaxAmt >
INT_TYPE = CHAR_ARRAY
INT_LENGTH = 16
EXT_TYPE = CHAR_ARRAY_NO_NULL_TERM

Working with Documanage
253
EXT_LENGTH = 15
KEY = N
REQUIRED = N
< FIELD:QTY >
INT_TYPE = CHAR_ARRAY
INT_LENGTH = 6
EXT_TYPE = CHAR_ARRAY_NO_NULL_TERM
EXT_LENGTH = 5
KEY = N
REQUIRED = N
< FIELD:Percentage >
INT_TYPE = CHAR_ARRAY
INT_LENGTH = 10
EXT_TYPE = CHAR_ARRAY_NO_NULL_TERM
EXT_LENGTH = 9
KEY = N
REQUIRED = N
< FIELD:Ratio >
INT_TYPE = CHAR_ARRAY
INT_LENGTH = 9
EXT_TYPE = CHAR_ARRAY_NO_NULL_TERM
EXT_LENGTH = 8
KEY = N
REQUIRED = N
< FIELD:Overage >
INT_TYPE = CHAR_ARRAY
INT_LENGTH = 11
EXT_TYPE = CHAR_ARRAY_NO_NULL_TERM
EXT_LENGTH = 10
KEY = N
REQUIRED = N
< FIELD:Specifier >
INT_TYPE = CHAR_ARRAY
INT_LENGTH = 2
EXT_TYPE = CHAR_ARRAY_NO_NULL_TERM
EXT_LENGTH = 1
KEY = N
APPIDX.DFD file Here is an excerpt from the APPIDX.DFD file:
[FIELDS]
FIELDNAME=KEY1
FIELDNAME=KEY2
FIELDNAME=KEYID
FIELDNAME=customer
FIELDNAME=RUNDATE
FIELDNAME=DueDate
FIELDNAME=INVFLAG
FIELDNAME=CLAIMFL
FIELDNAME=ARCKEY
FIELDNAME=FORMSETID
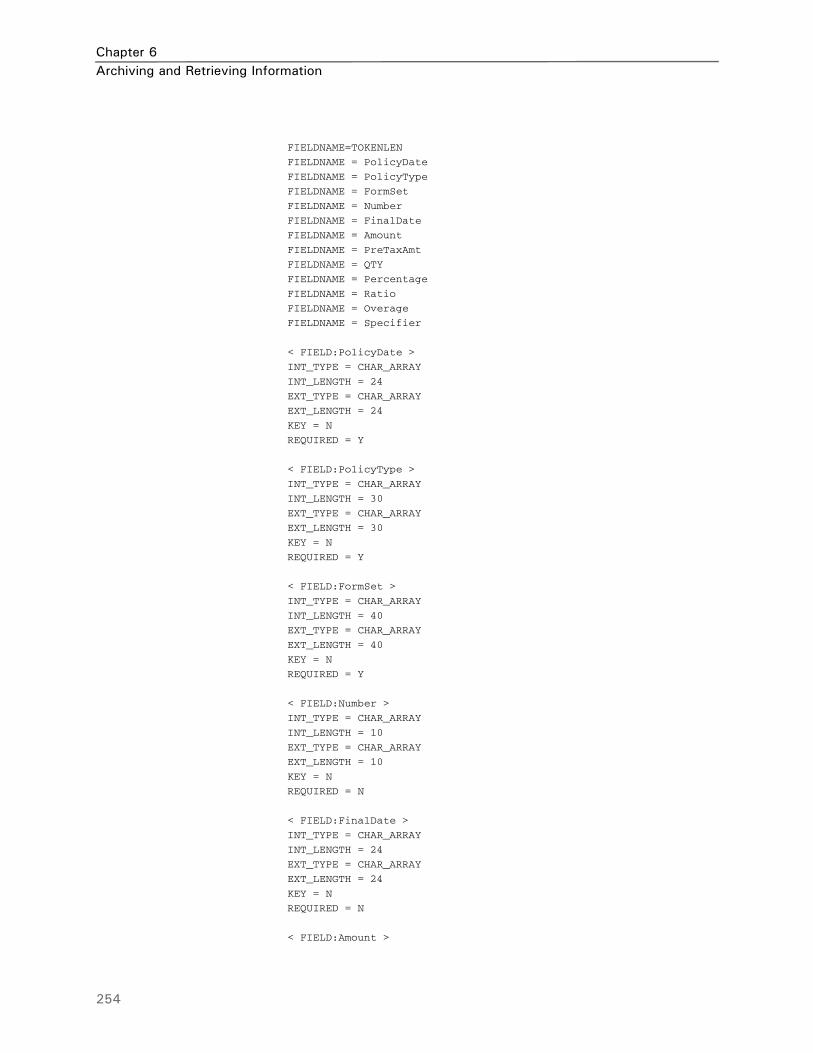
Chapter 6Archiving and Retrieving Information
254
FIELDNAME=TOKENLEN
FIELDNAME = PolicyDate
FIELDNAME = PolicyType
FIELDNAME = FormSet
FIELDNAME = Number
FIELDNAME = FinalDate
FIELDNAME = Amount
FIELDNAME = PreTaxAmt
FIELDNAME = QTY
FIELDNAME = Percentage
FIELDNAME = Ratio
FIELDNAME = Overage
FIELDNAME = Specifier
< FIELD:PolicyDate >
INT_TYPE = CHAR_ARRAY
INT_LENGTH = 24
EXT_TYPE = CHAR_ARRAY
EXT_LENGTH = 24
KEY = N
REQUIRED = Y
< FIELD:PolicyType >
INT_TYPE = CHAR_ARRAY
INT_LENGTH = 30
EXT_TYPE = CHAR_ARRAY
EXT_LENGTH = 30
KEY = N
REQUIRED = Y
< FIELD:FormSet >
INT_TYPE = CHAR_ARRAY
INT_LENGTH = 40
EXT_TYPE = CHAR_ARRAY
EXT_LENGTH = 40
KEY = N
REQUIRED = Y
< FIELD:Number >
INT_TYPE = CHAR_ARRAY
INT_LENGTH = 10
EXT_TYPE = CHAR_ARRAY
EXT_LENGTH = 10
KEY = N
REQUIRED = N
< FIELD:FinalDate >
INT_TYPE = CHAR_ARRAY
INT_LENGTH = 24
EXT_TYPE = CHAR_ARRAY
EXT_LENGTH = 24
KEY = N
REQUIRED = N
< FIELD:Amount >

Working with Documanage
255
INT_TYPE = CHAR_ARRAY
INT_LENGTH = 15
EXT_TYPE = CHAR_ARRAY
EXT_LENGTH = 15
KEY = N
REQUIRED = N
< FIELD:PreTaxAmt >
INT_TYPE = CHAR_ARRAY
INT_LENGTH = 15
EXT_TYPE = CHAR_ARRAY
EXT_LENGTH = 15
KEY = N
REQUIRED = N
< FIELD:QTY >
INT_TYPE = CHAR_ARRAY
INT_LENGTH = 5
EXT_TYPE = CHAR_ARRAY
EXT_LENGTH = 5
KEY = N
REQUIRED = N
< FIELD:Percentage >
INT_TYPE = CHAR_ARRAY
INT_LENGTH = 9
EXT_TYPE = CHAR_ARRAY
EXT_LENGTH = 9
KEY = N
REQUIRED = N
< FIELD:Ratio >
INT_TYPE = CHAR_ARRAY
INT_LENGTH = 8
EXT_TYPE = CHAR_ARRAY
EXT_LENGTH = 8
KEY = N
REQUIRED = N
< FIELD:Overage >
INT_TYPE = CHAR_ARRAY
INT_LENGTH = 10
EXT_TYPE = CHAR_ARRAY
EXT_LENGTH = 10
KEY = N
REQUIRED = N
< FIELD:Specifier >
INT_TYPE = CHAR_ARRAY
INT_LENGTH = 1
EXT_TYPE = CHAR_ARRAY
EXT_LENGTH = 1
KEY = N
REQUIRED = N

Chapter 6Archiving and Retrieving Information
256
NOTE:DATE type data must be passed in a format that is accepted by Documanage Server or in a Documaker Server D4 format (YYYYMMDD).
AFGJOB.JDT file Here is an excerpt from the AFGJOB.JDT file:
;Ext2Gvm;2;11,TOTAL1REC 147,4,Number;
;Ext2Gvm;2;11,TOTAL1REC 25,24,PolicyDate;
;Ext2Gvm;2;11,TOTAL1REC 49,23,FinalDate;
;Ext2Gvm;2;11,TOTAL1REC 143,15,Amount;
;Ext2Gvm;2;11,TOTAL1REC 158,10,PreTaxAmt;
;Ext2Gvm;2;11,TOTAL1REC 168,4,QTY;
;Ext2Gvm;2;11,TOTAL1REC 172,3,Percentage;
;Ext2Gvm;2;11,TOTAL1REC 175,8,Ratio;
;Ext2Gvm;2;11,TOTAL1REC 183,6,Overage;
;Ext2Gvm;2;11,TOTAL1REC 189,1,Specifier;
Extract file Here is an excerpt from a single record in a flat extract file:
SCOREMOVEDHEADERREC00000030194 SCOM1FP GAT1I1B119950123 804-345-8789 041594 REMOVEDOOO 20000223 MAMTEST TOKEN LENGTH TEST TOKEN LENGTH TEST TOKEN LENGTH TEST TOKEN LENGTH TEST TOKEN LENGTH ARCCAB DAP SubTypeTest1 TitleTest1 TEST DESCRIPTION 1 19950124 Complete UserFlag1Test1 UserFlag2Test1 Keyword1Test1 Keyword2Test1 X
SCOREMOVEDTOTAL1RECP00002005-01-01 12:00:00.001 2006-01-01 12:00:00.999 Comprehensive FullLine 1000000.00 1228.98 2 1001.1 98.76 B X

257
Chapter 7
Setting Up Archive/Retrieval Configurations
This chapter outlines several commonly-used archive/retrieval scenarios. Click on a scenario to quickly go to that discussion:
• DB2 Server on OS/390 —Windows Client on page 258
• DB2 Server on Windows — Windows Client on page 270
• DB2 Server and Client on Windows on page 275
• SQL Server on Windows — ODBC Client on Windows on page 279
• IDS on Windows —DB2 Archive on z/OS on page 281
• Creating a z/OS Database on page 282
NOTE:Windows refers to 32-bit Windows operating systems, such as Windows 2000 or Windows XP.
We recommend that you only use uppercase for table and column names when storing information in a database. For instance, avoid CustomerName, Customername, or customername and instead use CUSTOMERNAME.
Database management systems (DBMS) vary in how they handle case issues so it is best to standardize on uppercase. With version 11.2, all column names must be in uppercase.

Chapter 7Setting Up Archive/Retrieval Configurations
258
DB2 SERVERON OS/390 —
WINDOWSCLIENT
For this scenario, assume you are running DB2 version 6.1 on OS/390 version 2. For the DB2 client, assume you are running Windows 2000 or Windows XP.
The DB2 Distributed Data Facility is an optional part of the DB2 product on OS/390. The Distributed Data Facility must be configured and running for the DB2 client (on 32-bit Windows) to communicate with the DB2 Server (on OS/390).
CONFIGURING THE SERVER
Getting the DB2location name and
LUNAME
You can use the PRTLOGMP DB2 utility to print a report that lists the communication record of the DB2 Bootstrap Dataset. In the communication record you can find the DB2 location and LU name for that DB2 subsystem. The location and LU name are needed when configuring the SNA Server and DB2 on the 2000 Server.
Here is an example of the JCL used to run PRTLOGMP is shown follows, along with the communication record portion of the output from the PRTLOGMP utility.
//* COPY JOBCARD HERE …
//*
//S1 EXEC PGM=DSNJU004
//SYSUT1 DD DSN=TDB1.BSDS01,DISP=SHR
//SYSPRINT DD SYSOUT=*
**** DISTRIBUTED DATA FACILITY ****
COMMUNICATION RECORD
15:35:33 OCTOBER 12, 1999
LOCATION=USFSIMVSTDB1 LUNAME=DB2TDB1 PASSWORD=(NULL)
DSNJ200I DSNJU004 PRINT LOG UTILITY PROCESSING COMPLETED
DB2 Client
DB2 Client
DB2 Client
Windows 2000 Server
OS/390Host
DB2 version 6.1 on OS/390 version 2

DB2 Server on OS/390 —Windows Client
259
SUCCESSFULLY
Defining the SNAserver’s APPC LU in
VTAM
The following Switched Major Node (SNA) is contained in SYS1.VTAMLST(SW0E40C):
* * * * * * * * * * * * * * * * * * * * * * * * * * * * * * * * * * *
*
* VTAM SWITCHED MAJOR NODE
* FOR MICROSOFT SNA SERVER COMMUNICATIONS
*
* * * * * * * * * * * * * * * * * * * * * * * * * * * * * * * * * * *
*
SW0E40C VBUILD TYPE=SWNET,MAXGRP=3,MAXNO=30
*
CP00010 PU ADDR=40,CPNAME=CL00010, X
DISCNT=NO,MAXDATA=16384,USSTAB=USSFSIS, X
MAXPATH=1,MAXOUT=7,PASSLIM=7, X
VPACING=7,PACING=7,SSCPFM=USSSCS
*
CL00010 LU LOCADDR=0.
Defining the DB2Application Major Node
in VTAM
The following Application Major Node is contained in SYS1.VTAMLST(DB2TDB1A):
* * * * * * * * * * * * * * * * * * * * * * * * * * * * * * * * * * *
*
* VTAM APPLICATION NODE FOR DB2
*
* * * * * * * * * * * * * * * * * * * * * * * * * * * * * * * * * * *
DB2TDB1A VBUILD TYPE=APPL
DB2TDB1 APPL APPC=YES, X
ATNLOSS=ALL, X
AUTH=(ACQ), X
AUTOSES=1, X
DMINWNL=25,X
DMINWNR=25, X
DSESLIM=50, X
MODETAB=, X
SECACPT=ALREADYV, X
SRBEXIT=YES, X
SYNCLVL=SYNCPT, X
VERIFY=NONE, X
VPACING=2
Setting Up the Windows 2000 Server (Middle Tier)
Installing andconfiguring Microsoft’s
SNA Server
To set up the middle tier, first install Microsoft SNA Server version 4,with Service Pack 3 applied, onto a server running Windows 2000 Server. Then Install SNA Server into its own domain called USR04SNA.
Here are the steps for installing the SNA Server:
1 Insert the install CD into CD drive. Select Start, Run and enter this command:
e:\sna40\i386\setup.exe
Go through the normal set up process. Enter this server domain information:

Chapter 7Setting Up Archive/Retrieval Configurations
260
Click Ok when finished.
2 Choose Primary Configuration Server. Then choose Named Pipe, TCP/IP, IPX/SPX.
3 Choose IPX/SPX Directory Service. Then choose Bindery (Netware 3.x, 4.x, 5.x or 6.x) and SNA Server Subdomain (USR04SNA).
4 Next, use the Microsoft SNA Server Manager to make the following definitions. To start this tool select Start, Programs, Microsoft SNA Server (Common), Manager. Then right click the SNA Server you created in the first three steps. Choose Insert, Link Services. From the Insert Link Services window select your adapter and protocol (DLC 802.2 Link Service).
5 Select and right click the SNA Server you configured (USRSRV04). Select Properties.
The control point configured here is for incoming connections only and is not used for this outgoing connection to OS/390. You should, however, configure it. Use the Network Name (P390) and Control Point name (CL00010). Accept the defaults on the Server Configuration tab.
NOTE:The network name matches the value of the NETID parameter in the VTAM startup parameters in SYS1. VTAMLST(ATCSTR00). The control point name (CL00010) here matches the value of the CPNAME parameter of the VTAM Switched Major Node on OS/390, in SYS1.VTAMLST(SW0E40C).
6 Select and right click on Connections under the SNA Server you configured. Move to APPC and select Local LU. The Local LU Alias can be whatever you want but in this scenario it’s the same as the LU Name (CL00010).
Enter the network name (P390). Enter an LU Name that matches the control point name used above (CL00010). Click the Advanced tab. Check Member Of Outgoing Local APPC LU Pool. Make sure that the LU 6.2 Type is set to Independent then click Ok.
7 Select and right click on Connections under the SNA Server you configured. Move to APPC and select Remote LU. Use the Connection List to select your connection (ETH2MVS). The LU Alias can be whatever you want but in this scenario it’s the same as the LU Name (DB2TDB1) — remember this is the remote LU Name.
In this field Enter
Domain your domain name
Account your account user name
Password (leave blank)
Confirm Password (leave blank)

DB2 Server on OS/390 —Windows Client
261
Enter the network name (P390) and LU Name (DB2TDB1) and uninterpreted name (DB2TDB1). Click the Option tab. Accept the defaults. The PLU for DB2 | OS/390 is independent to support parallel sessions. Click Ok.
NOTE:Remote LU Name here should match the APPL name of the DB2 application major node in SYS1.VTAMLST(DB2TDB1A). Note that the member name (DB2TDB1A) cannot be the same as the APPL name (DB2TDB1) within it.
8 Move to Configured Users, right click, select Insert, and click on User. Highlight Everyone and click Add. Go back to the SNA Manager window where you should now see Everyone under Configured Users. Right click on Everyone, choose Properties and then click the APPC Defaults tab.
Click the list for Local APPC LU and choose (CL00010). Click the list for the Remote APPC LU and choose (DB2TDB1).
9 Move down to APPC Modes, right click, select Insert, APPC, and click on Mode Definition. Enter the mode name (IBMRDB). Click the Limits tab. Enter the Parallel Session Limit (10), Minimum Contention Winner Limit (3), Partner Minimum Contention Winner Limit (3), and Automatic Activation Limit (2). Accept the defaults on the Characteristics tab and click Ok.
10 Move to CPIC Symbolic Names, right click, select Insert, APPC. Click on CPIC Symbolic Name. This name can be anything you want but it must later match something in DB2 on Windows 2000. This name is case sensitive.
For this scenario, use DB2CPIC (in all caps). Choose Conversation Security (Same), Mode Name (IBMRDB). Click the Partner Information tab. In the Partner TP Name area click SNA Service TP (in hex) and enter 07F6C4C2. In the Partner LU Name area click Alias and enter Partner LU alias (DB2TDB1). Click Ok.
The CPIC Symbolic Name (DB2CPIC) must match the destination name when you define the node entry in DB2 on the Windows 2000 Server (see the following section).
Installing and Configuring Microsoft’s SNA ServerFor this scenario, you should install Microsoft SNA Server version 4, with Service Pack 3 applied, onto a Server running Windows 2000 Server. Install SNA Server into its own domain and call the domain USR04SNA.
Follow these steps to install SNA Server 4.0 SP3:
1 Insert the install CD into CD-ROM drive. Go to Start, Run and enter:
e:\sna40\i386\setup.exe
Then click Ok. Go through the normal set up process.
2 Choose Primary Configuration Server. Then choose Named Pipe, TCP/IP, IPX/SPX.
3 Choose IPX/SPX Directory Service. Then choose Bindery (Netware 3.x, 4.x, 5.x or 6.x).

Chapter 7Setting Up Archive/Retrieval Configurations
262
4 Choose SNA Server Subdomain (USR04SNA).
5 Next, set up this server domain information:
Click Ok.
Configuring SNA Server 4.0 SP3The following definitions are made using the Microsoft SNA Server Manager tool. To start this tool select Start, Programs, Microsoft SNA Server, Manager.
1 Right click the server you created. Choose Insert, Link Services. From the Insert Link Services window select your adapter and protocol (DLC 802.2 Link Service). Click Add. The properties window for that protocol appears. Click Ok.
2 Expand the server. Right click on SNA Service and choose Properties. The control point configured here is for incoming connections only and is not used for this outgoing connection to OS/390.
You should, however, configure it. Enter the network name (P390) and control point name (DL00010). The comment field is optional. Click Ok.
NOTE:The network name matches the value of the NETID parameter in the VTAM startup parameters in SYS1.VTAMLST(ATCSTR00). The control point name (DL00010) matches the value of the CPNAME parameter of the VTAM Switched Major Node on OS/390, in SYS1.VTAMLST(SW0E40D).
3 Highlight SNA Service and on the right hand side of the screen click the Connections tab. Right click the Connections tab. Choose Insert, APPC, Local LU. The Local LU Alias can be set to is whatever you want but for this scenario set it to the LU Name (DL00010). Enter the LU Alias (DL00010). If you tab to the next field the network name and LU name automatically appear in those fields. If this information does not appear, enter P390 as the network name and DL00010 as the LU Name. The comment is optional. Click the Advanced tab. Check Member of Default Outgoing Local APPC LU Pool. Make sure Independent is selected for the section LU 6.2 type. Click Ok.
4 Right click the Connections tab and choose Insert, Connection, 802.2.
Field Enter
Domain your domain name
Account your account user name
Password (leave blank)
Confirm Password (leave blank)

DB2 Server on OS/390 —Windows Client
263
5 On the General tab, enter a name for your connection, such as ETH2MVS. Choose SNADLC1 (or whatever the option may be) for the link service. The Comment is optional. In the Remote End section, choose Host System. In the Allowed Directions section, choose Outgoing Calls. In the Activation section choose On Server Startup.
6 On the Address tab, enter your remote network address, such as 10005A6EA879. Set the Remote SAP Address to 0x04.
7 On the System Identification tab, make sure the following information is filled in. In the Local Node Name section, the network name should be P390, the control point name should be DL00010, and the local node ID should be 05D FFFFF. In the XID Type section, Format 3 should be selected.
In the Remote Node Name section, the network name should be P390 and the control point name should be USS3270. Make no changes on the 802.2 DLC tab. Click Ok.
NOTE:The Remote LU Name should match the APPL name of the DB2 application major node in SYS1.VTAMLST(DB2TDB1A). Note that the member name (DB2TDB1A) cannot be the same as the APPL name (DB2TDB1) within it.
8 Right click on APPC Modes. Choose Insert, APPC, Mode Definition. On the General tab, enter a mode name, such as IBMRDB. The Comment field is optional. On the Limits tab, enter 10 for the parallel session Limit. Enter 3 for the minimum contention winner limit. Enter 3 for the partner minimum contention winner limit. Enter 2 for the automatic activation limit. Leave the Characteristics, Partners, and Compression tabs as is. Click Ok.
9 Highlight SNA Service. Right click the Connections tab on the right side of your screen. Choose Insert, APPC, Remote LU. On the General tab, choose ETH2MVS. The LU alias can be whatever you want but in this scenario it’s DB2TDB1. Make sure the following information is in these fields:
On the Options tab, choose IBMRDB for the implicit incoming mode. Leave everything else as is. Click Ok.
10 Move to Configured Users, right click, select Insert, and click on User. Highlight Everyone and click Add. Everyone appears in the Add Names box. Click Ok. Go to the SNA Manager Window where you should now see Everyone under Configured Users. Right click on Everyone, choose Properties, and then click the APPC Defaults tab. Choose DL0010 as the local APPC LU. Then choose DB2TDB1 as the remote APPC LU. Click Ok.
Field Entry
Network Name P390
LU Name same as your alias DB2TDB1
Uninterpreted Name same as your alias DB2TDB1
Comment optional

Chapter 7Setting Up Archive/Retrieval Configurations
264
11 Move to CPIC Symbolic Names, right click, select Insert, select APPC, and click CPIC Symbolic Name. This name must match something in DB2 on the Windows 2000 server and is case sensitive. For this scenario, enter DB2CPIC.
12 Choose Same as the Conversation Security and IBMRDB as the mode name. The Comment field is optional. Click the Partner Information tab. In the Partner TP Name area, click SNA Service TP (in hex) and enter 07F6C4C2. In the Partner LU Name area, click Alias and enter Partner LU alias (DB2TDB1). Click Ok.
NOTE:The CPIC symbolic name (DB2CPIC) must match the destination name when you define the node entry in DB2 on the Windows 2000 Server. This is discussed further in the following topic.
Setting Up DB2 on a Windows 2000 ServerOn the Windows 2000 Server, this scenario assumes DB2 version 8.1 for Windows is installed with version 2.3.2 of the Distributed Database Connection Services.
Installing DB2 on aWindows 2000 Server
Follow these steps:
1 Insert the installation CD and go to Start, Run. Then enter the following command, substituting the appropriate drive letter for the CD drive:
e:\setup /I=LANGUAGE
Where LANGUAGE represents the two-character country code for your language (for example, EN for English).
Click Ok.
2 The installation routine asks if you would like to view the read me file. If not, click Next.
3 Check IBM Database 2, select the Server option, and check Distribution Database Connection Services (DDCS). Then select the Multi-User gateway option. Click Next.
4 Choose Try and Buy Only for both options then click Next.
5 Choose Full installation and click Next. Accept the default destination directory and drive letter and click Install. The installation routine asks if you want to reboot:
Yes, reboot
OR
No, wait to reboot
Choose one of these options and click Finish.
All of the following definition descriptions were performed using DB2’s Database Director. To start this tool choose Start, Programs, DB2 For Windows, Database Director.
Configure the DB2instance
Click the plus sign (+) to the left of the Database Managers icon to expand it. Then right click on the DB2 icon and choose Configure. On the Protocols tab, enter db2inst1 in the Service Name field. Click Ok.

DB2 Server on OS/390 —Windows Client
265
Defining an OS/390node
Click the plus sign (+) to the left of the DB2 icon to expand it, then click the plus sign to the left of the Directories icon to expand it. Double-click the Node Directory icon, then choose Directory Entry, Catalog.
Enter a Node Name (OS/390), an optional comment, choose the protocol type (APPC) and the destination name (DB2CPIC), and then choose the security type (Program). Click Ok.
Defining a systemdatabase entry
Click the plus sign (+) to the left of the DB2 icon to expand it, then click the plus sign to the left of the Directories icon to expand it. Double-click the System Database Directory icon, then choose Directory Entry, Catalog.
On the General tab, choose Type for the Remote radio button. Click the Remote tab and enter the database name (ARCDB) and alias (ARCDB). Choose Node from the list (OS/390). Do not click the box labeled DDCS or Back level Database. Click Ok.
Updating TCP/IP valueson the Windows 2000
server
The next step is to update TCP/IP-related values on the Windows 2000 server. For information on how to do this, see Updating TCP/IP values on the Windows 2000 server on page 265.
Defining a databaseconnection services
entry
Click the plus sign (+) to the left of the DB2 icon to expand it, then click the plus sign to the left of the Directories icon to expand it. Double-click the Database Connection Services Directory icon, then choose Directory Entry, Catalog.
Choose Database (ARCDB). For Target Database, enter the location name for the DB2 subsystem on OS/390.
Installing and Configuring DB2 on a Windows 2000 ServerThis scenario assumes DB2 for Windows was installed and DB2 Server was at version 8.1.
All of the following definition descriptions were performed using DB2’s Control Center tool. To start this tool choose Start, Programs, DB2 for Windows, Administration Tools, Control Center.
Defining an OS/390system
Right click on Systems and choose Add. On the Add System window, click the drop down arrow for the operating system. Choose MVS/ESA, and enter P390 for the system name. Click Apply. A confirmation message appears. Click Close.
Defining a DB2instance
Expand the Host System (P390) you created in the previous topic. Right click on Instances and choose Add. Enter names such as DB2TDB1 as a remote instance and DB2 as a destination name. Choose APPC as the protocol. In the Security Section of this window, choose Same and click Apply. A confirmation message appears. Click Close.
Defining an OS/390database
Expand out the newly created Instance from the previous section (DB2TDB1). Right click on Databases and choose Add. Enter a database name and alias, such as ARCDB, and click Apply. A confirmation message appears. Click Close.
Setting Up Universal Database on Windows 2000
Installing UniversalDatabase
This involves installing Universal Database (UDB) version 6.1 EE:

Chapter 7Setting Up Archive/Retrieval Configurations
266
1 On the Welcome window, click Next. Then select the DB2 Enterprise Edition option and click Next. Then click Custom.
2 Select the components you need. Make sure the Destination folder is correct and click Next. The Configure DB2 Services window appears.
3 Make sure there is a DB2 instance (DB2) and an Administration Server (DB2DAS00) then click Next.
4 Check the user name and password for the Administration Server.
username = dbadmin
password = (password)
Click Next.
5 On the Start Configuring Files window, click Next. Then decide if you want to restart your computer and click Finish.
Configuring UniversalDatabase
Follow these steps to configure UDB version 6.1 EE:
1 Choose Start, Programs, DB2 for Windows, Client Configuration Assistant.
2 Click Add Database if you have just installed. Click Add to add databases if you have already created databases. The Add Database Smart Guide appears.
3 On the Source tab (step 1), choose the Manually Configure a Connection to a DB2 Database option and click Next.
4 On the Protocol tab (step 2), choose TCP/IP as the protocol. Select OS/390 as the target operating system. Click Next.
5 On the TCP/IP tab (step 3), set the following fields:
Click Next.
6 On the Database tab (step 4), set the following fields:
Click Next.
In this field Enter
Host Name os390
Port Number 446
Service Name (leave blank)
In this field Enter
Location Name USDCIOS39DSN1
Database Alias ARCDB
Comment (Optional)

DB2 Server on OS/390 —Windows Client
267
7 On the ODBC tab (step 5), check the Register this Database for ODBC option. Then select the appropriate data source. Click Done.
Updating TCP/IP-related Values on a Windows 2000 ServerFollow these steps to update TCP/IP values on a Windows 2000 Server.
1 Enter these lines into the services file (c:\winnt\system32\drivers\etc\services):
db2inst1 3702/tcp # db2 port
db2insti 3703/tcp # db2 port interrupt
2 Go to Programs, Start, Settings, Control Panel, System and choose the Environment tab. Enter a system variable called DB2COMM and set its value to APPC, TCP/IP.
This indicates the communication protocols DB2 will use — APPC talks to the OS/390 Host and TCP/IP talks to the Windows clients.
3 Add a system variable called DB2CODEPAGE and set its value to 850.
4 Reboot your system to apply these changes.
COMMON DB2 ERRORS
Here is a list of some common DB2 errors:
SETTING UP CLIENTS
This scenario assumes DB2 for Windows version 8.1 is installed and the Distributed Database Connection Services is at version 2.3.2.
Error Description
SQL30073 “119C”
Parameter value “” is notSupported
This is a problem with CCSID or code page. Select Start, Control Panel, System, and click the Environments tab. Enter a system variable called DB2CODEPAGE and set the value to 850.
You must reboot for the change to take affect.
SQL30081N A communication error has been detected
This problem is related to the SNA Connectivity parameters.
Protocol specific error 9 First look at the CPIC symbolic destination name and make sure everything is correct. Also check the Partner LU and Local LU definitions. If you change any of these parameters only a stop and restart of SNA Server is required.
Protocol specific error 1 The first thing to look at is the Link. Make sure it has started and you have a valid connection to the host.
Protocol specific error 2 Look at your LU definitions for both the Local LU and Partner LU. Make sure they are correctly defined.

Chapter 7Setting Up Archive/Retrieval Configurations
268
All of the following definition descriptions were performed using DB2’s Database Director. To start this tool choose Start, Programs, DB2 For Windows, Database Director.
Defining a DB2/2000node
Click the plus sign (+) to the left of the DB2 icon to expand it, then click the plus sign to the left of the Directories icon to expand it. Double-click the Nodes Directory icon, then choose Directory Entry, Catalog.
Enter a node name (NT04), an optional comment, and choose the protocol type (TCP/IP). For the host name, enter your server name and for the service name enter DB2INST1. Click Ok.
Defining a systemdatabase entry
Click the plus sign (+) to the left of the DB2 icon to expand it, then click the plus sign to the left of the Directories icon to expand it. Double-click the System Database Directory icon, then choose Directory Entry, Catalog.
On the General tab, choose Remote for Type. Click the Remote tab and enter the database name (ARCDB) and alias (ARCDB). Choose Node from the list (NT04).
Do not click the boxes labeled DDCS or Back Level Database. Click Ok.
Updating TCP/IP-related values on a
Windows client
Follow these steps so the system can update TCP/IP related values on a Windows client:
1 So the system can find the host name (see Configuring SNA Server 4.0 SP3 on page 262), make this entry in the hosts file (c:\windows\system32\drivers\etc\hosts):
10.8.10.211 USRSRV04
The left indicates the IP address of the server and right indicates the host name.
2 Enter these lines in the services file (c:\windows\system32\drivers\etc\services):
db2inst1 3702/tcp # db2 port
db2insti 3703/tcp # db2 port interrupt
3 Go to Programs, Settings, Control Panel, System, and click the Environment tab. Enter a system variable called DB2COMM and set its value to TCP/IP. This indicates the communication protocols DB2 will use (TCP/IP) to talk to the Windows Server. Also add a system variable called DB2CODEPAGE and set its value to 850. Reboot your system to apply these changes.
Setting Up the INI Options for the DB2 DriverHere are the INI options for the DB2 driver:
< Archival >
ArchiveMem = Yes
< ArcRet >
AppIdxDfd = Deflib\AppIdx.dfd
AppIdx = APPIDX
CARFile = ARCHIVE
CARPath =
Catalog = CATALOG
RestartTable = RESTART
< DBHandler:DB2 >
BindFile = c:\rel10\fap400\w32bin\db2lib.bnd
Database = ARCDB

DB2 Server on OS/390 —Windows Client
269
CreateTable = Yes
CreateIndex = No
UserID = (OS/390 user ID)
PassWd = (OS/390 password)
< DBTable:APPIDX >
DBHandler = DB2
< DBTable:ARCHIVE >
DBHandler = DB2
< DBTable:CATALOG >
DBHandler = DB2
< DBTable:RESTART >
DBHandler = DB2
< DB2_FileConvert >
APPIDX = DAP102_APP_R1
Archive = DAP102_ARC_R1
Catalog = DAP102_CAT_R1
Restart = DAP102_RES_R1
< Trigger2Archive >
Company = Company
LOB = Lob
PolicyNum = PolicyNum
RunDate = RunDate
These table names are examples of the names you can use.

Chapter 7Setting Up Archive/Retrieval Configurations
270
DB2 SERVERON WINDOWS— WINDOWS
CLIENT
For this scenario, assume you have a DB2 (version 6.1) Universal Database set up on a Windows 2000 server.
SETTING UP A DB2 DATABASE ON THE SERVER
Follow these steps to set up a DB2 Database on the server.
1 Go to Start, Programs, DB2 for Windows, Administration Tools, Control Center. The Control Center window appears. Expand Systems and you should see a server name such as ARCDB6.
If so, go to step 3. If the server name is not listed, go to step 2.
2 Right click on Systems and choose Add. The Add System window appears. This is where you set up the system information DB2 uses to find the location of the database you are going to archive to.
Go to the Protocol field and select Named Pipe. The Protocol Parameters area changes, now displaying a Computer Name field. Click Refresh to retrieve information about the local system. The server name appears under the System Name field. If you click on that name the system places it in the System Name field. Fill in other pertinent information. The Comment field is optional. Click Apply when finished.
A confirmation message appears. Click Close. This should take you back to the Control Center window. The server name should now be listed under Systems. Go to step 3.
Windows Client
Windows Client
Windows Client
DB2 Universal Database (version 6.1)
Windows 2000Server
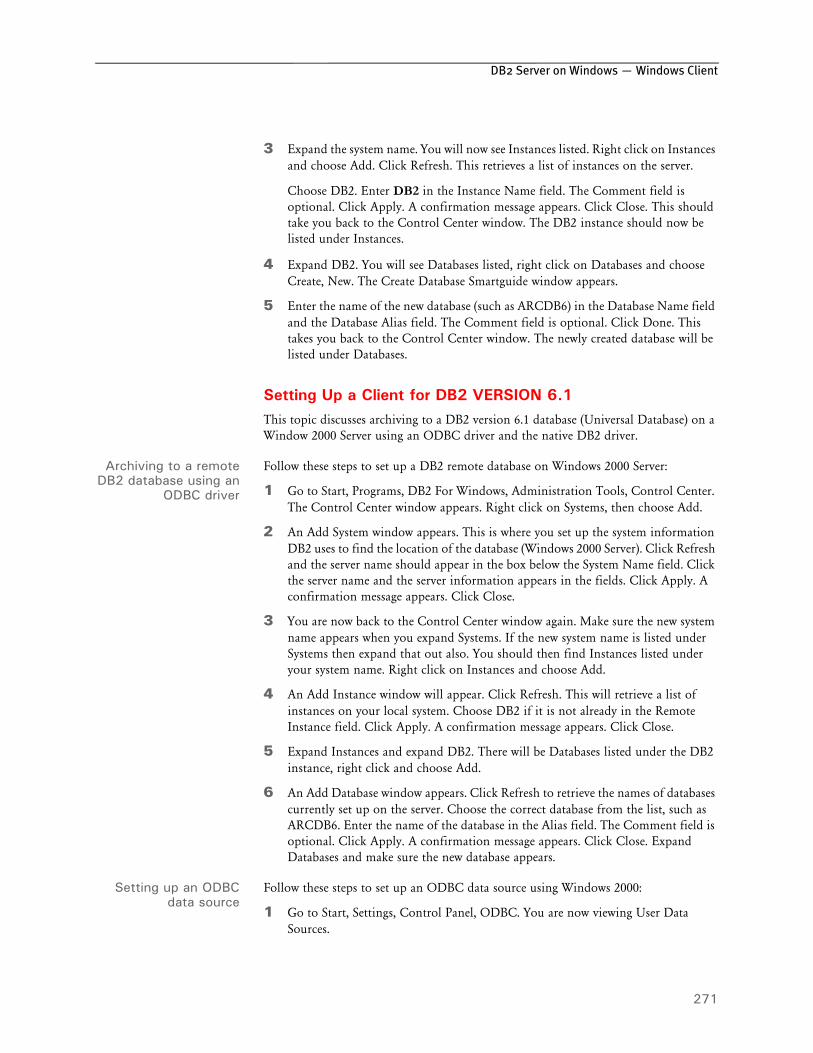
DB2 Server on Windows — Windows Client
271
3 Expand the system name. You will now see Instances listed. Right click on Instances and choose Add. Click Refresh. This retrieves a list of instances on the server.
Choose DB2. Enter DB2 in the Instance Name field. The Comment field is optional. Click Apply. A confirmation message appears. Click Close. This should take you back to the Control Center window. The DB2 instance should now be listed under Instances.
4 Expand DB2. You will see Databases listed, right click on Databases and choose Create, New. The Create Database Smartguide window appears.
5 Enter the name of the new database (such as ARCDB6) in the Database Name field and the Database Alias field. The Comment field is optional. Click Done. This takes you back to the Control Center window. The newly created database will be listed under Databases.
Setting Up a Client for DB2 VERSION 6.1This topic discusses archiving to a DB2 version 6.1 database (Universal Database) on a Window 2000 Server using an ODBC driver and the native DB2 driver.
Archiving to a remoteDB2 database using an
ODBC driver
Follow these steps to set up a DB2 remote database on Windows 2000 Server:
1 Go to Start, Programs, DB2 For Windows, Administration Tools, Control Center. The Control Center window appears. Right click on Systems, then choose Add.
2 An Add System window appears. This is where you set up the system information DB2 uses to find the location of the database (Windows 2000 Server). Click Refresh and the server name should appear in the box below the System Name field. Click the server name and the server information appears in the fields. Click Apply. A confirmation message appears. Click Close.
3 You are now back to the Control Center window again. Make sure the new system name appears when you expand Systems. If the new system name is listed under Systems then expand that out also. You should then find Instances listed under your system name. Right click on Instances and choose Add.
4 An Add Instance window will appear. Click Refresh. This will retrieve a list of instances on your local system. Choose DB2 if it is not already in the Remote Instance field. Click Apply. A confirmation message appears. Click Close.
5 Expand Instances and expand DB2. There will be Databases listed under the DB2 instance, right click and choose Add.
6 An Add Database window appears. Click Refresh to retrieve the names of databases currently set up on the server. Choose the correct database from the list, such as ARCDB6. Enter the name of the database in the Alias field. The Comment field is optional. Click Apply. A confirmation message appears. Click Close. Expand Databases and make sure the new database appears.
Setting up an ODBCdata source
Follow these steps to set up an ODBC data source using Windows 2000:
1 Go to Start, Settings, Control Panel, ODBC. You are now viewing User Data Sources.

Chapter 7Setting Up Archive/Retrieval Configurations
272
2 Click Add to add an IBM DB2 ODBC driver. The Create New Data Source window appears.
3 Choose IBM DB2 ODBC Driver. Click Finish. The ODBC IBM DB2 Driver – Add window appears.
4 Click the down arrow in the Data Source Name field, choose the correct database name, such as ARCDB6. The Description field is optional, but it should be there if you specified it when you created the database. Click Ok. The User Data Sources tab of the ODBC Data Source Administrator window appears. Make sure your new data source is there, along with its corresponding driver, then click Ok.
Setting up INI optionsfor the ODBC driver
Follow these steps to set up the INI options specific to the ODBC driver:
1 Set up the DBHandler:ODBC control group as shown below.
< DBHandler:ODBC >
CreateTable = Yes
CreateIndex = No
Debug = No
Server = (such as ARCDB6–the newly-created data source name.)
BLOBSupportForDB2ODBC =
UserID = (Windows user ID)
Passwd = (Windows password)
Use the BLOBSupportForDB2ODBC option to tell the Archive/Retrieval programs the version of DB2 being accessed can support BLOB (Binary Large Object) data types. This INI option, along with specifying BLOB as the data type for the CARData field in the CARFILE.DFD file, tells the Archive/Retrieval programs to process the field as a BLOB. If you omit this option or set it to No, the Archive/Retrieval programs translate any CARFILE.DFD data type request of BLOB to LONG VARCHAR.
2 The DBTable:XXX control groups determine what tables are used by looking at the ArcRet control group. The ArcRet control group should look like the one shown here:
< ArcRet >
AppIdxDfd = Deflib\AppIdx.dfd
AppIdx = APPIDX
CARFile = ARCHIVE
CARPath =
Catalog = CATALOG
RestartTable = RESTART
ExactMatch = No
Key1 = Company
Key2 = Lob
KeyID = PolicyNum
3 For all the tables listed above, add these control groups:
< DBTable:APPIDX >
DBHandler = ODBC
< DBTable:ARCHIVE >
DBHandler = ODBC
< DBTable:CATALOG >
DBHandler = ODBC

DB2 Server on Windows — Windows Client
273
< DBTable:RESTART >
DBHandler = ODBC
4 The ODBC_FileConvert control group contains the table names of each table to be created. Here is an example, your table names may differ:
< ODBC_FileConvert >
APPIDX = FSIV100_APPIDX
Archive = FSIV100_ARCHIVE
Catalog = FSIV100_CATALOG
Restart = FSIV100_RESTART
5 Set the Archival control group as shown here:
< Archival >
ArchiveMem = Yes
Archiving to a Remote DB2 Database Using the Native DB2 DriverFollow these steps to archive to a remote DB2 database using DB2’s native driver. These steps assume you are using Windows 2000.
Setting up a DB2database
First set up a DB2 database:
1 Go to Start, Programs, DB2 For Windows, Administration Tools, Control Center. Once the Control Center appears, right click on Systems, then choose Add. An Add System window appears.
2 On the Add System window you set up system information DB2 uses to find the location of the database (Windows 2000 Server). Click Refresh and the server name should appear below the System Name field. Click the server name and the server information appears in the fields. Click Apply. A confirmation message appears. Click Close. You return to the Control Center window.
3 Make sure the new system name appears when you expand Systems. If the new system name is listed under Systems, expand that out also. You should find Instances listed under your system name. Right click on Instances and choose Add. An Add Instance window will appear.
4 Click Refresh to retrieve a list of instances on your local system. Choose DB2 if it is not already in the Remote Instance field. Click Apply. A confirmation message appears. Click Close.
5 Expand Instances and expand DB2.There will be Databases listed under the DB2 instance, right click and choose Add. An Add Database window appears.
6 Click Refresh to retrieve the names of databases are currently set up on the server. Choose the correct database from the list, such as ARCDB6. Enter the name of the database in the Alias field. The Comment field is optional. Click Apply. A confirmation message appears. Click Close. Expand Databases to make sure the new database appears.
Setting up the INIoptions for the DB2
driver
Follow these steps to add the INI setting the native DB2 driver will use:
1 Set up the DBHandler:DB2 control group as shown below.

Chapter 7Setting Up Archive/Retrieval Configurations
274
< DBHandler:DB2 >
BindFile = c:\rel10\fap400\w32bin\db2lib.bnd
CreateTable = Yes
CreateIndex = No
Database = (such as ARCDB6, a remote database name)
UserID = (Windows 2000 user ID)
Passwd = (Windows 2000 password)
2 The DBTable:XXX control groups determine what tables are used by looking at the ArcRet control group, which should look like the following.
< ArcRet >
AppIdxDfd = Deflib\AppIdx.dfd
AppIdx = APPIDX
CARFile = ARCHIVE
CARPath =
Catalog = CATALOG
RestartTable = RESTART
3 For all the tables listed above, add the following control groups:
< DBTable:RESTART >
DBHandler = DB2
< DBTable:CATALOG >
DBHandler = DB2
< DBTable:APPIDX >
DBHandler = DB2
< DBTable:ARCHIVE >
DBHandler = DB2
4 Make sure the DB2_FileConvert control group contains the table names of each table to be created. Here is an example, your table names may differ:
< DB2_FileConvert >
APPIDX = DAP102_APP_R1
Archive = DAP102_ARC_R1
Catalog = DAP102_CAT_R1
Restart = DAP102_RES_R1
5 Set the Archival control group as shown here:
< Archival >
ArchiveMem = Yes

DB2 Server and Client on Windows
275
DB2 SERVERAND CLIENT ON
WINDOWS
This topic discusses archiving to a local DB2 version 6.1 database using an ODBC driver and the native DB2 driver.
SETTING UP A DB2 DATABASE
This scenario shows how to archive to a DB2 database using an ODBC driver on Windows 2000.
1 Go to Start, Programs, DB2 For Windows, Administration Tools, Control Center. Once the Control Center appears, right click on Systems, then choose Add. An Add System window appears.
2 On the Add System window you set up system information DB2 uses to find the location of the database (local Windows 2000). Go to the Protocol field and click the down arrow, select Named Pipe. The Protocol Parameters area changes, displaying the Computer Name field. Type in the computer’s network name here and click Retrieve.
The program retrieves information about the local system. Once that information is retrieved you will see names in the System Name and Remote Instance fields. Click Apply. A confirmation message appears. Click Close. You return to the Control Center window.
3 Make sure the new system name appears when you expand Systems. If the new system name is listed under Systems, expand that also. You should then find Instances listed under your system name. Right click Instances and choose Add.
4 An Add Instance window will appear. Click Refresh. You will see a list of instances on your local system. Choose DB2 and click Apply. A confirmation message appears. Click Close.
5 Expand Instances and expand DB2. You will see Databases listed, right click and choose Add. The Add Database window appears.
6 Enter the name of the new database, such as ARCDBL, in the Database Name field and the Alias field. The Comment Field is optional. Click Apply. A confirmation message appears. Click Close. Expand Databases and make sure that the new database appears.
Setting up an ODBCdata source
This scenario uses Windows 2000.
1 Choose Start, Settings, Control Panel, ODBC. You are now viewing User Data Sources. Click Add to add an IBM DB2 DBC driver. The Create New Data Source window appears
2 Choose IBM DB2 ODBC Driver. Click Finish. The ODBC IBM DB2 Driver - Add window appears.
3 Click the down arrow in the Data Source Name field and choose the correct database name. The Description field is optional, but should appear if you specified it when you created the database. Click Ok. The User Data Sources tab of the ODBC Data Source Administrator window appears. Make sure that your newly created data source is there and its corresponding driver is correct then click Ok.

Chapter 7Setting Up Archive/Retrieval Configurations
276
Setting up INI optionsfor ODBC
Follow these steps to set up the INI options specific to ODBC:
1 Set up the DBHandler:ODBC control group as shown below.
< DBHandler:ODBC >
CreateTable = Yes
CreateIndex = No
Debug = No
Server = (such as ARCDBL – The data source name)
BLOBSupportForDB2ODBC =
UserID = (Windows user ID)
Passwd = (Windows password)
Use the BLOBSupportForDB2ODBC option to tell the Archive/Retrieval programs the version of DB2 being accessed can support BLOB (Binary Large Object) data types. This INI option, along with specifying BLOB as the data type for the CARData field in the CARFILE.DFD file, tells the Archive/Retrieval programs to process the field as a BLOB. If you omit this option or set it to No, the Archive/Retrieval programs translate any CARFILE.DFD data type request of BLOB to LONG VARCHAR.
2 Use the DBTable:XXX control groups to determine what tables are used by looking at the ArcRet control group. Here is an example:
< ArcRet >
AppIdxDfd = Deflib\AppIdx.dfd
AppIdx = APPIDX
CARFile = ARCHIVE
CarPath =
Catalog = CATALOG
RestartTable = RESTART
3 For all the tables listed above, add these control groups:
< DBTable:APPIDX >
DBHandler = ODBC
< DBTable:ARCHIVE >
DBHandler = ODBC
< DBTable:CATALOG >
DBHandler = ODBC
< DBTable:RESTART >
DBHandler = ODBC
4 Use the ODBC_FileConvert control group to list the table names of each table to be created. Here is an example, your table names may differ:
< ODBC_FileConvert >
APPIDX = FSIV100_APPIDX
Archive = FSIV100_ARCHIVE
Catalog = FSIV100_CATALOG
Restart = FSIV100_RESTART
5 Set the Archival control group as shown here.
< Archival >
ArchiveMem = Yes
Archiving to a Local DB2 Database Using the Native DB2

DB2 Server and Client on Windows
277
Driver
Setting up the DB2database
This scenario uses Windows 2000.
1 Select Start, Programs, DB2 For Windows, Administration Tools, Control Center. Once the Control Center window appears, right click on Systems, then choose Add. The Add System window appears.
2 On the Add System window you set up system information DB2 uses to find the location of the database (local Windows 2000). Go to the Protocol field and click the down arrow, select Named Pipe. The Protocol Parameters area then displays a Computer Name field. Enter the computer’s network name and click Retrieve.
The program retrieves information about the local system. Once that information appears, you see names in the System Name and Remote Instance fields. Click Apply. A confirmation message appears. Click Close. The Control Center window appears.
3 Make sure the new system name appears when you expand Systems. If the new system name is listed under Systems, expand that also. You should then find Instances listed under your system name. Right click Instances and choose Add. The Add Instance window appears.
4 Click Refresh to retrieve a list of instances on your local system. Choose DB2 and click Apply. A confirmation message appears. Click Close.
5 Expand Instances and expand DB2. You will see Databases listed, right click and choose Create, New. The Create Database Smartguide window appears.
6 Enter the name of the new database (ARCDBL) in the New Database Name field and the Database Alias field. The Comment Field is optional. Click Done.
This should take you back to the Control Center window. Expand Databases if it is not already. Your new database should be listed.
Setting up the INIoptions for the DB2
driver
Be sure to set up the following INI options for the native DB2 driver.
1 Set up the DBHandler:ODBC control group as shown below.
< DBHandler:DB2 >
BindFile = d:\rel10\fap400\w32bin\db2lib.bnd
CreateTable = Yes
CreateIndex = No
Debug = No
Database = (such as ARCDBL – Local database name)
UserID = (Windows user ID)
Passwd = (Windows password)
2 Use the DBTable:XXX control groups to determine what tables are used by looking at the ArcRet control group, which should look like the following.
< ArcRet >
AppIdxDFD = Deflib\AppIdx.dfd
AppIdx = APPIDX
CARFile = ARCHIVE
CARPath =
Catalog = CATALOG
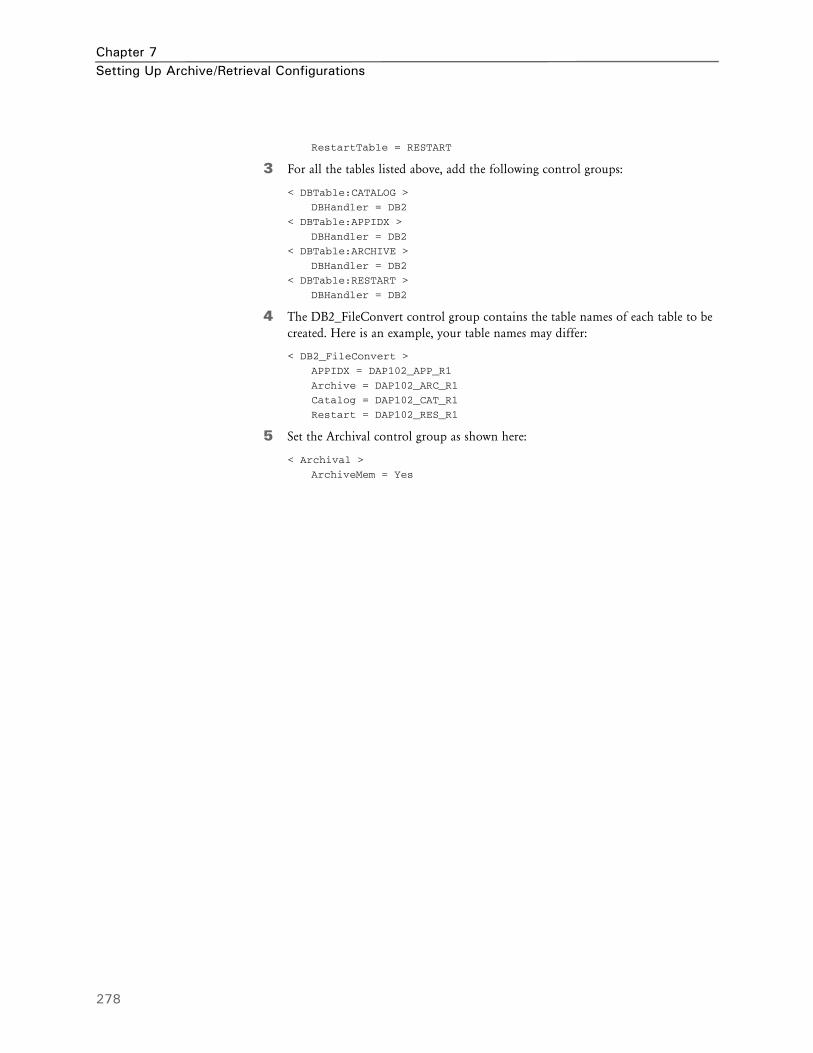
Chapter 7Setting Up Archive/Retrieval Configurations
278
RestartTable = RESTART
3 For all the tables listed above, add the following control groups:
< DBTable:CATALOG >
DBHandler = DB2
< DBTable:APPIDX >
DBHandler = DB2
< DBTable:ARCHIVE >
DBHandler = DB2
< DBTable:RESTART >
DBHandler = DB2
4 The DB2_FileConvert control group contains the table names of each table to be created. Here is an example, your table names may differ:
< DB2_FileConvert >
APPIDX = DAP102_APP_R1
Archive = DAP102_ARC_R1
Catalog = DAP102_CAT_R1
Restart = DAP102_RES_R1
5 Set the Archival control group as shown here:
< Archival >
ArchiveMem = Yes

SQL Server on Windows — ODBC Client on Windows
279
SQL SERVERON WINDOWS
— ODBCCLIENT ONWINDOWS
This scenario sets up a database in SQL Server using Microsoft SQL Server version 7.0.
1 Go to Start, Programs, Microsoft SQL Server 7.0 SQL Enterprise Manager. The Server Manager window appears, SQL 7.0 should already be expanded and there will be server names that appear below, choose the correct server and expand it.
2 Highlight the Databases folder, right click and choose New Database. Type in the database name, such as ARCDB7, and select a data device. There is a size specified to the right of this field and the device should have a size greater than zero. Click the Create Now button.
3 If no login has been defined, highlight the Logins folder under the server and right click. Choose New Login. Type in a login name and a password. Click the Permit field next to the database you would like the login to default to. Then click Add. Confirm your password and click Ok.
SETTING UP A CLIENT
Follow these instructions to set up a Windows client and an ODBC data source using Windows 2000.
1 Select Start, Settings, Control Panel, ODBC. The User Data Sources window appears. Click Add to add a new SQL Server data source. The Create New Data Source window appears.
2 Choose SQL Server. Click Finish. The ODBC SQL Server Setup window appears. Enter the following information:
3 Click Options and enter the database name, such as ARCDB7, you will be archiving to in the Database Name field. Click Ok. The Data Sources window appears.
4 Make sure the new data source name appears with the correct driver specified. If all is correct, click Ok.
Setting up the INIoptions for ODBC
1 Set up the DBHandler:ODBC control group as shown below.
< DBHandler:ODBC >
CreateTable = Yes
CreateIndex = No
Debug = No
Server = (such as ARCDB7 - This is the data source name)
UserID = (SQL Server user ID)
Passwd = (SQL Server password)
The user ID and password must be set up in SQL Server. For more information see SQL Server on Windows — ODBC Client on Windows on page 279.
In this field Enter
Data Source Name This is your database name.)
Description (Optional)
Server (This will drop down and the server should be listed.)

Chapter 7Setting Up Archive/Retrieval Configurations
280
2 In the DBTable:XXX control groups, determine what tables are used by looking at the ArcRet control group, which should look like the one shown here:
< ArcRet >
AppIdxDfd = Deflib\AppIdx.dfd
AppIdx = APPIDX
CARFile = ARCHIVE
CARPath =
Catalog = CATALOG
RestartTable = RESTART
For all the tables listed above, add the following control groups:
< DBTable:APPIDX >
DBHandler = ODBC
< DBTable:ARCHIVE >
DBHandler = ODBC
< DBTable:CATALOG >
DBHandler = ODBC
< DBTable:RESTART >
DBHandler = ODBC
3 Add these INI options for DFD files for these tables:
< ArcRet >
CARFileDFD = carfile.dfd
RestartDFD = restart.dfd
DFD files can specify the full file name, otherwise they are located in the directory specified in the DefLib option:
< MasterResource >
DefLib = subdirectory
4 The ODBC_FileConvert control group contains the table names of each table to be created. Here is an example, your table names may differ:
< ODBC_FileConvert >
APPIDX = FSIV100_APPIDX
Archive = FSIV100_ARCHIVE
Catalog = FSIV100_CATALOG
Restart = FSIV100_RESTART
These table names are examples of the names you can use.
5 Set the Archival control group as shown here:
< Archival >
ArchiveMem = Yes

IDS on Windows —DB2 Archive on z/OS
281
IDS ONWINDOWS —
DB2 ARCHIVEON Z/OS
This scenario features Docupresentment’s Internet Document Server (IDS) running on a Windows 32-bit computer and communicating with a DB2 archive residing on a z/OS machine.
To illustrate this scenario, you should download the setup executable to install Docupresentment 10.2 (IDS version 1.8). You can do this from the Oracle support site:
http://metalink.oracle.com
Follow these steps:
1 From the Support site, register, log in, and then click on product installations.
2 Select the current version for Windows 32-bit operating systems.
Refer to these documents for installation and configuration information:
Internet Document Server Guide
Docupresentment Installation Guide
SDK Reference
SETTING UP THE DB2 ARCHIVE ON Z/OSRefer to this document and the Documaker Installation Guide for information on configuring a DB2 archive on z/OS:

Chapter 7Setting Up Archive/Retrieval Configurations
282
CREATING A Z/OS DATABASE
To create a database, you must be an administrator on the machine you are creating the database on. Follow these instructions:
1 Click Add Database once you enter into the Client Configuration Assistant. On Tab 1 (Source), choose the Manually Configure a Connection to a DB2 Database option. Click Next.
2 On Tab 2 (Protocol), choose TCP/IP as the protocol and z/OS as the target operating system. Click Next.
3 On Tab 3 (TCP/IP), enter os390 in the Hostname field. The Port number defaults to 446. Enter db2ins 1 in the Service Name field. Click Next.
4 On Tab 4 (Target Database), enter the database name, such as USDCIOS39DSN1, in the Location Name field. Click Next.
5 On Tab 5 (Alias), enter ARCDB (or your database name on the mainframe) in the DBAlias field. The DBAlias field gets the first part of the location name from the previous tab. The Description field is optional. Click Next.
6 On Tab 6 (ODBC), check the Register this Database for ODBC field. Then select the data source. Click Done.
7 The system asks if you want to test your connection, click the Test Connection button. Then enter your user ID and password and click Ok. A window should appear with a message similar to this one:
The Connection test was successful.
Database product= DB2 OS/390 7.0
SQL authorization ID= akb
Database alias = ARCDB
To close this window and proceed, click OK.
Click Add to add another database or click Close to exit the Client Configuration Assistant.
Updating TCP/IP Values on a Windows 2000 ServerFollow these steps to update TCP/IP-related values on a Windows 2000 server:
1 So that the host name you entered can be found, add this entry in the host file
(c:\winnt \system32 \drivers \etc \hosts):
10.8.10.210 WIN2000A_1
The value on the left is the IP address of the Windows 2000 Server. The value on the right is the host name for that Windows 2000 Server.
2 Add these lines in the services file (c:\winnt\system32\drivers\etc\services):
db2inst1 446/tcp #db2 port
db2insti 447/tcp #db2 port interrupt
3 Go to Start, Settings, Control Panel, System, and choose the Environment tab. Enter a system variable called DB2COMM and set its value to:
APPC,TCP/IP

Creating a z/OS Database
283
This specifies the communication protocols DB2 will use —APPC to talk to the z/OS host and TCP/IP to talk to Windows 2000 clients.
Also add a system variable called DB2CODEPAGE and set its value to:
850
4 Reboot Windows 2000 for the system variable to take effect.

Chapter 7Setting Up Archive/Retrieval Configurations
284

285
Chapter 8
Optimizing Your System
This chapter outlines several steps you can take to optimize how your Documaker system performs. The following topics discuss optimization for each platform:
• Optimizing Performance on z/OS on page 286
• Optimizing Performance on UNIX/Linux on page 304
• Optimizing Performance On Windows on page 308
• Uploading and Downloading Resources on z/OS on page 311
• Moving Resource Files Between UNIX/Linux and Windows on page 315
Chapter 8Optimizing Your System
286
OPTIMIZINGPERFORMANCE
ON Z/OS
This topic will help you configure your system for optimum performance. To gather the following recommendations, we first created benchmarks on a test system. Then, by changing different parameters of that system, we measured performance gains or losses. Here are some of the terms we used during this exercise:
CPU TIME. The amount of time that a program, such as GenTrn, GenData, or GenPrint, uses the CPU. In a multi-tasking operating system like z/OS, there are many tasks competing for use of the CPU.
EXCPS. Execute Channel Programs. We have used these counts as basic measurements of I/O activity.
WALL CLOCK TIME. The elapsed time, as measured from the time a program begins to the time that the program ends. This wall clock time can vary significantly from one run to another.
BATCH WINDOW. Most installations have specific times of the day or night when large batch processes, like this system, are scheduled to run. The time frame in which these processes run is sometimes referred to as the batch window. A batch window is measured in wall clock time, such as from 10:00 pm to 5:00 am. Your system installation should run fast enough to complete its processing within the batch window.
Most, but not all, of the following recommendations are the result of many tests and subsequent improvements designed for a hypothetical user. The characteristics of Documaker Server implemented for this hypothetical user are as follows:
• Extract file with large record length (approximately 25,000 bytes/record).
• Form sets composed with large number of individual images.
• Large number of different recipients (approximately 300).
• Moderate number of transactions (approximately 4,000)

Optimizing Performance on z/OS
287
COMPILE OPTIONS
If your license included source code, use the following information when compiling your system for best results.
OPTIMIZE Use the highest level of C optimization by passing the following option to the compiler:
NOVALIDATEHANDLE Specify NOVALIDATEHANDLE by passing the following option to the compiler:
DEF(NOVALIDATEHANDLE)
INLINE The INLINE option can produce performance gains but there are other activities required for it to work.
LANGUAGE ENVIRONMENT (LE) OR C/370 RUNTIME OPTIONS
Use the following runtime options:
REPORT You can use the REPORT option to gather information on various values reached when you run a particular program, such as GenData or GenPrint. There is overhead involved in running with this option.
Do not use the REPORT option in production runs. Use the REPORT option during testing to report runtime values, then use these values to assess the need to run with additional runtime options such as HEAP.
HEAP Based on the values received from running with the REPORT option, you may choose to specify the HEAP run-time option, modifying the initial and incremental heap allocations as the values from REPORT would recommend. You would then want to remove the REPORT option.
If time permits, set HEAP values based on the values received from running with the REPORT option.
Use If you are using
OPT(1) C/C++ For MVS/ESA, 1 is the highest level
OPT(2) either of the other C/370 compilers

Chapter 8Optimizing Your System
288
FILE TYPES AND CHARACTERISTICS
Block sizes Best results have been achieved by specifying large block sizes. In general, try to use half-track block size—that is, if you are creating files on a 3380-type device (which has a track size of 47,476 bytes), specify a block size around 23,500. A half-track block size for a 3390-type device (which has a track size of 56,664 bytes) would be around 28,000.
Specify half-track block sizes for all files.
Record formats FB stands for the fixed block record format and FBS stands for the Fixed Block Standard record format. The record format is specified on the JCL DD statement when a particular file is defined. The C function, fseek, appears to be able to seek more quickly to a location in a file if that file is defined with a record format of FBS instead of FB.
The standard keyword guarantees that all the blocks of a file will be of the stated block size length and that there will be no short blocks.
If you are choosing between record formats of FB and FBS for any of these files, choose FBS: EXTRACT, TRNFILE.DAT, NEWTRN.DAT, NAFILE.DAT, and POLFILE.DAT.
As for the size of record blocks, the larger the record length, the fewer records per block. For FBS, this results in additional EXCPs and slower performance.
Number of files As mentioned earlier, the total run-time, or wall clock time of a job is increased as more files are created, opened, and closed. An additional 10 or 20 files may have no significant affect on the wall time but if your system has to create, open and close hundreds of files, the wall time will lengthen significantly.
Design your system with a minimal number of recipient batch and print files. For instance, try to keep the number of recipient files to less than 20 or so. See also the AliasPrintBatches option on page 292.
Extract FilesThe standard extract file is usually defined with a record format of fixed block standard (FBS) with a half-track block size.
Defining the extract file asa VSAM ESDS
You may choose to define the extract file to be a VSAM Entry Sequenced Data Set (ESDS). See Defining the Extract File as a VSAM KSDS on page 293 for more information.
DEFLIBThe standard DEFLIB is created as a Partitioned Data Set (PDS), or as a Partitioned Data Set Extended (PDS/E). The best performance results have been achieved with DEFLIB defined with a Variable Blocked (VB) record format.
Placing DDT files into aVSAM KSDS
DEFLIB contains DDT files, DFD files, SETRCPTB, FORMDAT, various tables, and so on. You can move the DDT files into a VSAM KSDS by running the program PDS2VSAM. See Moving DDT Files into a VSAM KSDS on page 295 for more information.
Optimizing Performance on z/OS
289
SETRCPTB
Moving the SETRCPTBmember into a VSAM
KSDS
You can move the set recipient table member, SETRCPTB, into a VSAM KSDS by running the RCP2VSAM utility. See Moving SETRCPTB to a VSAM KSDS on page 301 for more information.
FAPLIB Define the FAPLIB file as variable blocked (VB) with a half-track block size.
TRNFILEDefine the transaction trigger file (TRNFILE) file as fixed block standard (FBS) with a half-track block size.
NEWTRNDefine the updated transaction trigger file (NEWTRN) file as fixed block standard (FBS) with a half-track block size.
NAFILEDefine the NAFILE file as fixed block standard (FBS) with a half-track block size or use VSAM to create and read from the NAFILE as outlined below.
Creating a NAFILE as aVSAM file
The NAFILE can be created in the GenData step as a VSAM key sequenced data set (KSDS), then read in the GenPrint step. Actually, NAFILE and POLFILE function as a pair so that they must both be either VSAM or non-VSAM. See Creating NAFILEs and POLFILEs as VSAM KSDSs on page 303 for the steps required to create the NAFILE/POLFILE files as VSAM files.
POLFILEDefine the POLFILE file as fixed block standard (FBS) with a half-track block size or use VSAM to create and read from the POLFILE as outlined in the section below.
Creating a POLFILE as aVSAM file
The POLFILE can be created in the GenData step as a VSAM key sequenced data set (KSDS), then read in the GenPrint step. See Creating NAFILEs and POLFILEs as VSAM KSDSs on page 303 for the steps required to create the NAFILE.DAT and POLFILE.DAT files as VSAM files.
Recipient Batch FilesAs mentioned earlier, the fewer recipient batch files you have the better the performance. Define the recipient batch files as fixed block standard (FBS) with a half-track block size. A rule of thumb is to try to keep the number of recipient batch files under 20. If it is necessary to design the system as having many recipient batch files you may consolidate these logical groupings into a single physical recipient batch file. See AliasPrintBatches option on page 292 for more information.
Chapter 8Optimizing Your System
290
Pre-compiled Xerox Metacode Files (PMETLIB)The standard PMETLIB is created as a PDS or PDS/E. If you are using a PDS or PDS/E, define PMETLIB with a record format of VB and with a half-track block size.
Placing PMETs into aVSAM KSDS
You can move the PMETs into a VSAM KSDS by running the program PDS2VSAM. See Moving PMETs into a VSAM KSDS on page 299 for the steps to accomplish this task.
Print FilesDefine the print files as Variable Blocked Machine (VBM) control codes, with a record length near 255 for Xerox or 8205 for AFP, and a half-track block size.
SETTING YOUR FSISYS INI OPTIONS
Caching OptionsThe following options attempt to minimize the repeated opening and closing of frequently used files (actually, PDS members in MVS) by retaining, or caching, file handles and file data. In many cases the defaults are sufficient but for specific cases, where many different Images are used, these caching values may be increased to improve performance.
Caching FAP files In some cases, FAP files (image definitions) are loaded from the FORMLIB or FAPLIB PDS during GenData processing. The cache feature keeps frequently used FAP members available for re-use. Here is an example of how you set up the cache feature:
< Control >
CacheFAPFiles = 100
The default is 100. Accept the default value unless you are loading FAP files in GenData using the CompileInStream FSISYS INI option (set to Yes) and you are using more than 100 FAP files and/or logo files.
DDT files Data definition table (DDT) members are loaded from the DDTLIB or DEFLIB PDS during GenData processing. The cache feature keeps frequently used DDT members available for re-use. Here is an example of how you set up the cache feature:
< Control >
RuleFilePool = 100
The default is 100. Accept the default value unless you are using more than 100 DDT files.
NOTE:With the release of Documaker Studio, DDT files are no longer used. Support for Image Editor ended in version 11.5.

Optimizing Performance on z/OS
291
Using/Caching XeroxPMET files
MET files contain pre-compiled Xerox Metacode information produced by the FAP2MET utility. The GenPrint program loads MET members from the PMETLIB PDS. The cache option keeps frequently used MET members available for re-use. Here is an example of how you set up the cache feature:
< PrtType:XER >
CacheFiles = 100
CompileInstream= No
The default is 100. Accept the default unless you are using pre-compiled FAP files you are using more than 100 FAP files and/or logo files.
Using AFP Overlays For best performance, you should run the FAP2OVL utility, compiling FAP files into AFP overlays. Tell the system to use the overlays by specifying:
< PrtType:AFP >
SendOverlays = Yes
LOGGING OPTIONS
LogTransactions option The GenTrn, GenData, and GenPrint programs optionally place transaction information into a LOG file. In most situations, this information is not needed. The LogTransactions option is specified in:
< Control >
LogTransactions = No
The default is Yes.
For optimum performance, specify No.
LogToConsole option The GenTrn, GenData, and GenPrint programs optionally place transaction information in the SYSPRINT DD statement you specified in the job’s JCL. In most situations, this information is not needed. The LogToConsole option is specified in:
< Control >
LogToConsole = No
The default is Yes.
For optimum performance, specify No.

Chapter 8Optimizing Your System
292
DEBUG OPTIONS
If_Rule control group < If_Rule >
Debug_if = No
The default is Yes.
For optimum performance, specify No.
RunMode control group For these run options:
< RunMode >
DownloadFAP = No
LoadCordFAP = No
CompiledFAP = Yes
The defaults are...
DownloadFAP = No
LoadCordFAP = No
CompiledFAP = Yes
Set the DownloadFAP option to No, the LoadCordFAP option to No, and the CompileFAP option to Yes for the best performance.
OTHER OPTIONS
MaxRecsPerTransactionoption
< ExtractFile >
MaxRecsPerTransaction = nn
The default is zero (0) and there is no maximum. Be careful using this option. You might want to use this option if you know that each record in the extract file corresponds to a transaction.
AliasPrintBatches option < ExtractFile >
AliasPrintBatches = Yes
The default is No. Use the default.

Optimizing Performance on z/OS
293
DEFINING THE EXTRACT FILE AS A VSAM KSDSThe extract file is generally defined as a Fixed Blocked Standard (FBS) file, with the record length depending on the particular implementation. When the extract file is defined as an FBS file, Documaker is unable to process it if it is greater than 2GB in size. If your extract file is larger than 2GB, follow these steps to copy the extract file to a VSAM KSDS and set up Documaker to process this file.
Once the extract file has been copied to a VSAM KSDS, Documaker can process it, even if it exceeds 2GB.
1 Execute the job in member SEQ2KSDX in the JCLLIB dataset. Modify the member as appropriate for your site. The SEQ2KSDX job first uses the IBM program IDCAMS to delete and re-define the VSAM KSDS extract file and then it uses Documaker’s SEQ2KSDS utility to copy the (non-VSAM) extract file to the VSAM KSDS extract file. This job should receive a condition code of 00 in each step.
2 Since the name of the VSAM KSDS extract file probably differs from the name of the non-VSAM extract file, change the DAP procedure in PROCLIB (or the GENTRNX and GENDATAX JCLLIB members if you are using those jobs) to reference the new name of the extract file. There should be a reference to the extract file in both the GenTran and GenData steps of the DAP procedure.
3 Modify the FSISYS INI file as follows:
< VSAM >
VSAMEXT = Yes
Here is an example of the SEQ2KSDX member of JCLLIB:
//* COPY JOBCARD HERE ...
//*
//*****************************************************************
//* JOB PERFORMS 2 STEPS :
//*
//* 1. DELETES / RE-DEFINES OUTFILE KSDS.
//* 2. RUNS SEQ2KSDS PROGRAM TO COPY SEQUENTIAL FILE TO
//* VSAM KSDS. CHANGE FILE NAMES APPROPRIATELY.
//*
//*******************************************************************
//*
//IDCAMS EXEC PGM=IDCAMS
//SYSPRINT DD SYSOUT=*
//SYSUDUMP DD SYSOUT=*
//SYSIN DD *
DELETE &HLQ..&RES..EXTRACT.KSDS CLUSTER
DEFINE CLUSTER(NAME(&HLQ..&RES..EXTRACT.KSDS) +
CYL(5 1) +
KEY(4 0) +
REUSE ) +
DATA(NAME(&HLQ..&RES..EXTRACT.KSDS.DATA) +
RECORDSIZE(2048 2048) ) +
INDEX(NAME(&HLQ..&RES..EXTRACT.KSDS.INDEX))

Chapter 8Optimizing Your System
294
IF LASTCC = 00 THEN SET MAXCC = 00
//*
//SEQ2KSDS EXEC PGM=SEQ2KSDS
//STEPLIB DD DISP=SHR,DSN=&HLQ..LINKLIB
// DD DISP=SHR,DSN=CEE.SCEERUN
//SYSOUT DD SYSOUT=*
//SYSPRINT DD SYSOUT=*
//INFILE DD DSN=&HLQ..&RES..EXTRACT,DISP=SHR
//OUTFILE DD DSN=&HLQ..&RES..EXTRACT.KSDS,DISP=SHR
Internal format of theVSAM KSDS file
The SEQ2KSDS utility writes both an index portion and a data portion to the VSAM KSDS file. The index portion consists of four bytes (and is related to the Key value specified in the IDCAMS job above). The index for the first record is zero (0) and is incremented by a value of one for each record in the VSAM KSDS extract file. This index value is the offset that is written to the TRNFILE and NEWTRN files. Because this offset grows very slowly, it is unlikely to approach the limit of 2GB.
Here is a screen shot from an ISPF browser session, with HEX turned on, which shows the values of the index (0000, 0001, 0002) for the first three records of an extract file. This extract file was generated by running the IDCAMS REPRO utility to copy the VSAM KSDS to a non-VSAM file for viewing purposes.
Menu Utilities Compilers Help
___________________________________________________
WASD JCRTR FSI.V115.DMS1.EXTRACT.KSDS.VB
Command ===>
********************************* Top of Data *****
--------------------------------------------------
....SCO1234567HEADERREC00000030198 SCOM1FP GAT1I
0000ECDFFFFFFFCCCCCDDCCFFFFFFFFFFF4444ECDDFCD4CCEFC
000023612345678514599530000003019800002364167071319
--------------------------------------------------
....SCO1234567FRMLSTREC0000010110 SCO FP T1
0000ECDFFFFFFFCDDDEEDCCFFFFFFFFFF44444ECD44CD444EF4
000123612345676943239530000010110000002360067000310
--------------------------------------------------
....SCO1234567PRODNMREC00000David Miller 000
0000ECDFFFFFFFDDDCDDDCCFFFFFC8A884D8998944444444FFF
000223612345677964549530000041594049335900000000000
--------------------------------------------------

Optimizing Performance on z/OS
295
MOVING DDT FILES INTO A VSAM KSDSDDT files normally reside as members in the DDTLIB or DEFLIB PDS. The DEFLIB PDS also contains other types of members, such as SETRCPTB, FORMDAT, FXR, FSISYS and various tables. These other types of members should not be copied to the VSAM KSDS, but it probably will not hurt anything if they are copied — so step 1 is optional.
Follow the steps below to move the DDT files in DEFLIB to a VSAM KSDS.
1 You can use the ALLOCDDT job in JCLLIB to define a “DDTLIB PDS” (to contain only DDT files) and to copy the DDT files for the sample resource from DEFLIB into this new PDS. Once you have all the DDT files in a separate (non-VSAM) PDS, proceed to step 2.
If you are moving your own resources (not the sample resources), copy your DDT files into this DDTLIB.
2 Execute the PDS2VSDX job that resides in the JCLLIB PDS. The job consists of these steps:
The IDCAMS step deletes/re-defines the VSAM KSDS that the DDT files will be copied into.
The PDS2VSAM step reads the DDTLIB PDS created in step 1 and copies the DDT files to the VSAM KSDS defined in the IDCAMS step.
The PDS2VSDX job is shown below:
//* COPY JOBCARD HERE
//* * * * * * * * * * * * * * * * * * * * * * * * * * * * * * * * *
//* JOB PERFORMS 2 STEPS :
//*
//* 1. DELETES / RE-DEFINES DDTVSAM KSDS.
//* 2. RUNS PDS2VSAM PROGRAM TO COPY DDT MEMBERS INTO
//* DDTVSAM
//*
//* PRIOR TO RUNNING THIS JOB YOU SHOULD HAVE RUN
//* THE JOB IN THE "ALLOCDDT" MEMBER OF JCLLIB TO
//* ALLOCATE A NON-VSAM DDTLIB AND COPY THE DDT'S
//* FROM DEFLIB INTO IT.
//*
//* NOTE: THE &HLQ AND &RES WITHIN INSTREAM JCL WILL NOT
//* WORK. PLEASE REPLACE THE &HLQ AND &RES WITH
//* THEIR RESPECTIVE VALUES.
//*
//* * * * * * * * * * * * * * * * * * * * * * * * * * * * * * * * *
//*
//IDCAMS EXEC PGM=IDCAMS
//SYSPRINT DD SYSOUT=*
//SYSUDUMP DD SYSOUT=*
//SYSIN DD *
DELETE &HLQ..&RES..DDTVSAM CLUSTER
DEFINE CLUSTER -
( NAME(&HLQ..&RES..DDTVSAM) -

Chapter 8Optimizing Your System
296
CYL(25 5) -
REUSE -
SHAREOPTIONS(2 3) ) -
DATA -
( NAME(&HLQ..&RES..DDTVSAM.DATA) -
RECORDSIZE(2048 2048) -
CONTROLINTERVALSIZE(4096) -
FREESPACE(0 10) -
KEYS(16 0) ) -
INDEX -
( NAME(&HLQ..&RES..DDTVSAM.INDEX))
IF LASTCC = 00 THEN SET MAXCC = 00
//*
//PDS2VSAM EXEC PGM=PDS2VSAM
//STEPLIB DD DISP=SHR,DSN=&HLQ..LINKLIB
// DD DISP=SHR,DSN=SYS1.SCEERUN
//SYSOUT DD SYSOUT=*
//SYSPRINT DD SYSOUT=*
//PDSIN DD DSN=&HLQ..&RES..DDTLIB,DISP=SHR
//VSAMOUT DD DSN=&HLQ..&RES..DDTVSAM,DISP=SHR
3 Add this option to the FSISYS INI file:
< VSAM >
DDTVSAM = DD:DDTVSAM
The DD name you use to associate with the VSAM DDT file is up to you. This INI option tells the system to open and read the DDT file using VSAM.
4 Modify the JCL for the GenData step so the DDTVSAM DD statement is in that step and references the VSAM KSDS created for the DDT files in step 2. If you are using the DAP procedure in PROCLIB, add the appropriate DD statement to that procedure.
If, you are executing each step as a separate job, add the DD statement to the GenDataX job.

Optimizing Performance on z/OS
297
MOVING JDTS INTO A VSAM KSDSThe Job Definition Table (JDT) normally resides as member AFGJOB in the DEFLIB PDS. You can move this member (and other JDT members if you have several) into its own VSAM KSDS, similar to the VSAM KSDS used for DDT files.
Follow these steps to move the JDT files in DEFLIB to a VSAM KSDS.
1 You can use the ALLOCJDT job in JCLLIB to define a JDTLIB PDS (to contain only JDT files) and to copy the JDT files for the sample resource from DEFLIB into this new PDS. Once you have all the JDTs in a separate (non-VSAM) PDS proceed to step 2.
If you are moving your own resources (not the sample resources), copy your JDT files into this JDTLIB.
2 Execute the PDS2VSJX job that resides in the JCLLIB PDS. The job consists of these steps:
The IDCAMS step deletes/re-defines the VSAM KSDS that the JDT files will be copied into.
The PDS2VSAM step reads the JDTLIB PDS created in step 1 and copies the JDTs to the VSAM KSDS defined in the IDCAMS step.
The PDS2VSJX job is shown below:
//* COPY JOBCARD HERE
//* * * * * * * * * * * * * * * * * * * * * * * * * * * * * * * * *
//* JOB PERFORMS 2 STEPS :
//*
//* 1. DELETES / RE-DEFINES JDTVSAM KSDS.
//* 2. RUNS PDS2VSAM PROGRAM TO COPY JDT MEMBERS INTO
//* JDTVSAM
//*
//* PRIOR TO RUNNING THIS JOB YOU SHOULD HAVE RUN THE
//* JOB IN MEMBER "ALLOCJDT" OF JCLLIB TO ALLOCATE A
//* NON-VSAM JDTLIB AND COPY THE JDT MEMBER(S) INTO IT.
//*
//* NOTE: THE &HLQ AND &RES WITHIN INSTREAM JCL WILL NOT
//* WORK. PLEASE REPLACE THE &HLQ AND &RES WITH
//* THEIR RESPECTIVE VALUES.
//*
//* * * * * * * * * * * * * * * * * * * * * * * * * * * * * * * * *
//*
//IDCAMS EXEC PGM=IDCAMS
//SYSPRINT DD SYSOUT=*
//SYSUDUMP DD SYSOUT=*
//SYSIN DD *
DELETE &HLQ..&RES..JDTVSAM CLUSTER
DEFINE CLUSTER -
( NAME(&HLQ..&RES..JDTVSAM) -
CYL(25 5) -
REUSE -
SHAREOPTIONS(2 3) ) -
Chapter 8Optimizing Your System
298
DATA -
( NAME(&HLQ..&RES..JDTVSAM.DATA) -
RECORDSIZE(2048 2048) -
CONTROLINTERVALSIZE(4096) -
FREESPACE(0 10) -
KEYS(16 0) ) -
INDEX -
( NAME(&HLQ..&RES..JDTVSAM.INDEX))
IF LASTCC = 00 THEN SET MAXCC = 00
//*
//PDS2VSAM EXEC PGM=PDS2VSAM
//STEPLIB DD DISP=SHR,DSN=&HLQ..LINKLIB
// DD DISP=SHR,DSN=SYS1.SCEERUN
//SYSOUT DD SYSOUT=*
//SYSPRINT DD SYSOUT=*
//PDSIN DD DSN=&HLQ..&RES..JDTLIB,DISP=SHR
//VSAMOUT DD DSN=&HLQ..&RES..JDTVSAM,DISP=SHR
3 Add this option to the FSISYS INI file:
< VSAM >
JDTVSAM = DD:JDTVSAM
The DD name you associate with the VSAM JDT file is up to you. This INI option tells the system to open and read the JDT file using VSAM.
4 Modify the JCL for the GenData step so that the JDTVSAM DD statement is in that step and references the VSAM KSDS that was created for the JDT files in step 2. If you are using the DAP procedure in PROCLIB add the appropriate DD statement to that procedure. If, on the other hand, you are executing each step as a separate job, add the DD statement to the GenDataX job.

Optimizing Performance on z/OS
299
MOVING PMETS INTO A VSAM KSDSPre-compiled Metacode files normally reside as members in the PMETLIB PDS. Follow the steps below to move the PMETs in PMETLIB to a VSAM KSDS.
1 Execute the following PDS2VSPX job, changing any necessary values to fit your environment. This job resides in the JCLLIB PDS and consists of these steps:
The IDCAMS step deletes/re-defines the VSAM KSDS the PMETs will be copied into.
The PDS2VSAM step reads the PMETLIB PDS and copies the PMET members to the VSAM KSDS defined in the previous step.
//* COPY JOBCARD HERE
//* * * * * * * * * * * * * * * * * * * * * * * * * * * * * * * * *
//* JOB PERFORMS 2 STEPS :
//*
//* 1. DELETES / RE-DEFINES PMETVSAM KSDS.
//* 2. RUNS PDS2VSAM PROGRAM TO COPY PMET MEMBERS INTO
//* PMETVSAM
//* 3. THE DEFAULT INPUT / OUTPUT DD NAMES ARE "PDSIN" AND
//* "VSAMOUT", RESPECTIVELY. IF YOU WISH TO OVERRIDE
//* THESE NAMES PASS THE EXECUTE PARAMETER :
//* PARM='/ /I=DD:INPUTDD /O=DD:OUTPUTDD'
//*
//* NOTE: THE &HLQ AND &RES WITHIN INSTREAM JCL WILL NOT
//* WORK. PLEASE REPLACE THE &HLQ AND &RES WITH
//* THEIR RESPECTIVE VALUES.
//*
//* * * * * * * * * * * * * * * * * * * * * * * * * * * * * * * * *
//*
//IDCAMS EXEC PGM=IDCAMS
//SYSPRINT DD SYSOUT=*
//SYSUDUMP DD SYSOUT=*
//SYSIN DD *
DELETE &HLQ..&RES..PMETVSAM CLUSTER
DEFINE CLUSTER -
( NAME(&HLQ..&RES..PMETVSAM) -
CYL(25 25) -
REUSE -
SHAREOPTIONS(2 3) ) -
DATA -
( NAME(&HLQ..&RES..PMETVSAM.DATA) -
RECORDSIZE(2048 2048) -
CONTROLINTERVALSIZE(4096) -
FREESPACE(0 10) -
KEYS(16 0) ) -
INDEX -
( NAME(&HLQ..&RES..PMETVSAM.INDEX) )
IF LASTCC = 00 THEN SET MAXCC = 00
//*

Chapter 8Optimizing Your System
300
//*
//PDS2VSAM EXEC PGM=PDS2VSAM
//STEPLIB DD DISP=SHR,DSN=&HLQ..LINKLIB
// DD DISP=SHR,DSN=SYS1.SCEERUN
//SYSOUT DD SYSOUT=*
//SYSPRINT DD SYSOUT=*
//PDSIN DD DSN=&HLQ..&RES..PMETLIB,DISP=SHR
//VSAMOUT DD DSN=&HLQ..&RES..PMETVSAM,DISP=SHR
2 Add this option to the FSISYS INI file:
< VSAM >
METVSAM = DD:PMETVSAM
The DD name you associate with the VSAM PMET file is up to you. This INI option tells the system to open and read the PMET file using VSAM.
3 Modify the JCL for the GenPrint step so the PMETVSAM DD statement is in that step and it references the VSAM KSDS created for the PMETs in step 1. If you are using the DAP procedure in PROCLIB, add the appropriate DD statement to that procedure. If you are executing each step as a separate job, add the DD statement to the GenPrtX job.

Optimizing Performance on z/OS
301
MOVING SETRCPTB TO A VSAM KSDSFollow the steps below to move the SETRCPTB member from DEFLIB to a VSAM KSDS.
NOTE:Before you run this, please make sure that there are no blank lines at the end of your extract file. Blank lines can cause the following error:
DM1002: Error: Required INI definition omitted.
Cannot locate INI group <Key1Table> with value = defined.
The error appears when you run Documaker Server.
1 Execute the following RCP2VSMX job, changing any necessary values to fit your installation. This job resides in the JCLLIB PDS and consists of these steps:
The IDCAMS step deletes/re-defines the VSAM KSDS that the SETRCPTB will be copied into.
The RCP2VSAM step reads the DEFLIB PDS and copies the SETRCPTB member to the VSAM KSDS defined in the previous step.
//* COPY JOBCARD HERE
//* * * * * * * * * * * * * * * * * * * * * * * * * * * * * * * * *
//* JOB PERFORMS 2 STEPS :
//*
//* 1. DELETES / RE-DEFINES SETRCPVS KSDS.
//* 2. RUNS RCP2VSAM PROGRAM TO COPY SETRCPTB TO
//* SETRCPVS KSDS.
//*
//* DEFAULT INPUT / OUTPUT DD NAMES ARE SETRCPTB AND
//* SETRCPVS, RESPECTIVELY. YOU CAN OVERRIDE BY
//* PASSING THE PARM : PARM='/ /I=DD:DDIN /O=DD:DDOUT'
//*
//* NOTE: THE &HLQ AND &RES WITHIN INSTREAM JCL WILL NOT
//* WORK. PLEASE REPLACE THE &HLQ AND &RES WITH
//* THEIR RESPECTIVE VALUES.
//*
//* * * * * * * * * * * * * * * * * * * * * * * * * * * * * * * * *
//*
//DEFINE EXEC PGM=IDCAMS
//SYSPRINT DD SYSOUT=*
//SYSUDUMP DD SYSOUT=*
//SYSIN DD *
DELETE &HLQ..&RES..SETRCPVS CLUSTER
DEFINE CLUSTER -
( NAME(&HLQ..&RES..SETRCPVS) -
RECORDSIZE(500 1000) -
KEYS(152 0) -
REUSE -
SHAREOPTIONS(2 3) ) -
DATA -
( NAME(&HLQ..&RES..SETRCPVS.DATA) -

Chapter 8Optimizing Your System
302
CONTROLINTERVALSIZE(4096) -
RECORDS(1000 1000) -
FREESPACE(0 5) ) -
INDEX -
( NAME(&HLQ..&RES..SETRCPVS.INDEX) -
RECORDS(100 50) )
IF LASTCC = 00 THEN SET MAXCC = 00
//*
//RCP2VSAM EXEC PGM=RCP2VSAM
//STEPLIB DD DISP=SHR,DSN=&HLQ..LINKLIB
// DD DISP=SHR,DSN=SYS1.SCEERUN
//SETRCPTB DD DISP=SHR,DSN=&HLQ..&RES..DEFLIB(SETRCPTB)
//SETRCPVS DD DISP=SHR,DSN=&HLQ..&RES..SETRCPVS
//SYSPRINT DD SYSOUT=*
2 Add this option to the FSISYS INI file:
< VSAM >
VSAMRCPTB = DD:SETRCPVS
The DD name you associate with the VSAM SETRCPTB file is up to you. This INI option tells the system to open and read the SETRCPTB file using VSAM.
3 Modify the JCL for the GenData step so the SETRCPVS DD statement is in that step and it references the VSAM KSDS created for the SETRCPTB in step 1. If you are using the DAP procedure in PROCLIB, add the appropriate DD statement to that procedure. If you are executing each step as a separate job, add the DD statement to the GenDataX job.

Optimizing Performance on z/OS
303
CREATING NAFILES AND POLFILES AS VSAM KSDSS
Normally, the NAFILE and POLFILE, which are created and written to during the GenData step, are defined as sequential files with a record format of FBS. You can, however, create them as VSAM KSDSs. The member, NAPOLVS, in JCLLIB provides the JCL for the additional IDCAMS job step you will need. This JCL is also listed below:
//NAPOLVS EXEC PGM=IDCAMS
//SYSPRINT DD SYSOUT=*
//SYSIN DD *
DELETE &HLQ..&RES..GENDATA.NAFILE.KSDS PURGE
DELETE &HLQ..&RES..GENDATA.POLFILE.KSDS PURGE
DEFINE CLUSTER(NAME(&HLQ..&RES..GENDATA.NAFILE.KSDS) +
CYL(5 1) +
KEY(4 0) +
REUSE ) +
DATA(NAME(&HLQ..&RES..GENDATA.NAFILE.KSDS.DATA) +
RECORDSIZE(2048 2048) ) +
INDEX(NAME(&HLQ..&RES..GENDATA.NAFILE.KSDS.INDEX))
DEFINE CLUSTER(NAME(&HLQ..&RES..GENDATA.POLFILE.KSDS) +
CYL(5 1) +
KEY(4 0) +
REUSE ) +
DATA(NAME(&HLQ..&RES..GENDATA.POLFILE.KSDS.DATA) +
RECORDSIZE(2048 2048) ) +
INDEX(NAME(&HLQ..&RES..GENDATA.POLFILE.KSDS.INDEX))
To use VSAM for the NAFILE and POLFILE follow these steps:
1 Insert the NAPOLVS JCL step listed above into the GenData step prior to the GenData execution step, changing any file names or other values to conform to your environment.
2 Make sure the NAFILE and POLFILE file names in the GenData and GenPrint steps (GenDataX and GenPrtX if you are executing each step as a separate job) reflect the name of the VSAM files created in the IDCAMS step.
3 Add this option to the FSISYS INI file:
< VSAM >
VSAMNA = DD:NAFILE
The DD name you associate with the VSAM NAFILE file is up to you. This INI option tells the system to open and read both the NAFILE and the POLFILE using VSAM.

Chapter 8Optimizing Your System
304
OPTIMIZINGPERFORMANCE
ON UNIX/LINUX
This topic will help you configure your system for optimum performance. To gather the following recommendations, we first created benchmarks on a test system. Then, by changing different parameters of that system, we measured performance gains or losses. in our benchmark testing. Here are some of the terms we used during this exercise:
CPU Time The amount of time that a program, such as GenTrn, GenData, or GenPrint, uses the CPU.
EXCPs Execute Channel Programs. We have used these counts as basic measurements of I/O activity.
Wall Clock Time The elapsed time, as measured from the time a program begins to the time that the program ends. This wall clock time can vary significantly from one run to another.
Batch Window Most installations have specific times of the day or night when large batch processes, like this system, are scheduled to run, such as through cron. The time frame in which these processes run is sometimes referred to as the batch window.
A batch window is measured in wall clock time, such as from 10:00 pm to 5:00 am. Your system installation should run fast enough to complete its processing within the batch window.
Most, but not all, of the following recommendations are the result of many tests and subsequent improvements designed for a hypothetical user. The characteristics of Documaker Server implemented for this hypothetical user are as follows:
• Extract file with large record length (approximately 25,000 bytes/record).
• Form sets composed with large number of individual images.
• Large number of different recipients (approximately 300).
• Moderate number of transactions (approximately 4,000)
SETTING FSISYS INI OPTIONS
The following options attempt to minimize the repeated opening and closing of frequently used files by retaining, or caching, file handles and file data. In many cases the defaults are sufficient but for specific cases, where many different images are used, these caching values may be increased to improve performance.
Caching FAP files In some cases, FAP files (images) are loaded as the GenData program runs. The cache feature keeps frequently used FAP files available for re-use. The CacheFAPFiles option is specified in:
< Control >
CacheFAPFiles = 100
The default is 100.
Accept the default value unless you are loading FAP files in GenData using the CompileInstream option, you are using more than 100 FAP files or graphics, or both.

Optimizing Performance on UNIX/Linux
305
DDT files Data definition table (DDT) files are loaded during as the GenData program runs. The cache feature keeps frequently used DDT file available for re-use. The RuleFilePool option is specified in:
< Control >
RuleFilePool = 100
The default is 100.
Accept the default value unless you are using more than 100 DDT files.
NOTE:With the release of Documaker Studio, DDT files are no longer used. Support for Image Editor ended in version 11.5.
Caching Xerox PMET files MET files contain pre-compiled Xerox Metacode information produced by the FAP2MET utility. The GenPrint program loads MET files as necessary. The cache option keeps frequently used MET files available for re-use. The CacheFiles option is specified in:
< PrtType:XER >
CacheFiles = 100
CompileInstream= No
The default is 100.
Accept the default value unless you are using pre-compiled FAP files, more than 100 FAP files or logos, or both.
Using AFP Overlays For best performance, you should run the FAP2OVL utility program to compile FAP files into AFP overlays. Tell the system to use the overlays by specifying:
< PrtType:AFP >
SendOverlays =Yes
Use the PSF librarian to add printer resources to the printer.
LOGGING OPTIONS
LogTransactions option The GenTrn, GenData, and GenPrint programs optionally place transaction information into a LOG file. In most situations, this information is not needed. The LogTransactions option is specified in:
< Control >
LogTransactions = No
The default is Yes. For optimum performance, specify No.
LogToConsole option The GenTrn, GenData, and GenPrint programs optionally store transaction information. In most situations, this information is not needed. The LogToConsole option is specified in:
< Control >
LogToConsole = No
The default is Yes. For optimum performance, specify No.

Chapter 8Optimizing Your System
306
DEBUG OPTIONS
In the If_Rule control group, the Debug_If option helps you solve problems when using the IF rule:
< If_Rule >
Debug_If = No
The default is Yes. For optimum performance, specify No.
RUN OPTIONS
In the RunMode control group, you have these run time options:
< RunMode >
Download FAP = No
LoadCordFAP = No
CompiledFAP = No
The defaults are shown above.
For optimal performance, set the DownloadFAP option to No, the LoadCordFAP option to No, and the CompileFAP option to Yes.
You can learn more about these options in the Documaker Administration Guide.

Optimizing Performance on UNIX/Linux
307
OTHER OPTIONS
MaxRecsPerTransactionoption
< ExtractFile >
MaxRecsPerTransaction = nn
The default is zero (0) and there is no maximum. Be careful using this option. You might want to use this option if you are sure each record in the extract file corresponds to a transaction.
AliasPrintBatches option < ExtractFile >
AliasPrintBatches = Yes
The default is No. Use the default.

Chapter 8Optimizing Your System
308
OPTIMIZINGPERFORMANCEON WINDOWS
This topic will help you configure your system for optimum performance. To gather the following recommendations, we first created benchmarks on a test system. Then, by changing different parameters of that system, we measured performance gains or losses. in our benchmark testing. Here are some of the terms we used during this exercise:
CPU TIME. The amount of time that a program, such as GenTrn, GenData, or GenPrint, uses the CPU.
EXCPS. Execute Channel Programs. We have used these counts as basic measurements of I/O activity.
WALL CLOCK TIME. The elapsed time, as measured from the time a program begins to the time that the program ends. This wall clock time can vary significantly from one run to another.
BATCH WINDOW. Most installations have specific times of the day or night when large batch processes, like this system, are scheduled to run. The time frame in which these processes run is sometimes referred to as the batch window. A batch window is measured in wall clock time, such as from 10:00 pm to 5:00 am. Your system installation should run fast enough to complete its processing within the batch window.
Most, but not all, of the following recommendations are the result of many tests and subsequent improvements designed for a hypothetical user. The characteristics of Documaker Server implemented for this hypothetical user are as follows:
• Extract file with large record length (approximately 25,000 bytes/record).
• Form sets composed with large number of individual images.
• Large number of different recipients (approximately 300).
• Moderate number of transactions (approximately 4,000)
SETTING FSISYS INI OPTIONS
Caching OptionsThe following options attempt to minimize the repeated opening and closing of frequently used files by retaining, or caching, file handles and file data. In many cases the defaults are sufficient but for specific cases, where many different images are used, these caching values may be increased to improve performance.
Caching FAP files In some cases, FAP files (images) are loaded as the GenData program runs. The cache feature keeps frequently used FAP files available for re-use. The CacheFAPFiles option is specified in:
< Control >
CacheFAPFiles = 100
The default is 100.
Accept the default value unless you are loading FAP files in GenData using the CompileInstream option (set to Yes), you are using more than 100 FAP files or logos, or both.

Optimizing Performance On Windows
309
DDT files Data definition table (DDT) files are loaded during as the GenData program runs. The cache feature keeps frequently used DDT file available for re-use. The RuleFilePool option is specified in:
< Control >
RuleFilePool = 100
The default is 100. Accept the default value unless you are using more than 100 DDT files.
NOTE:With the release of Documaker Studio, DDT files are no longer used. Support for Image Editor ended in version 11.5.
Using/Caching XeroxPMET files
MET files contain pre-compiled Xerox Metacode information produced by the FAP2MET utility. The GenPrint program loads MET files as necessary. The CacheFiles option keeps frequently used MET files available for re-use. The CacheFiles option is specified in:
< PrtType:XER >
CacheFiles = 100
CompileInstream= No
The default for the CacheFiles option is 100. Accept the default value unless you are using pre-compiled FAP files and more than 100 FAP files or logos or both.
Using AFP Overlays For best performance, you should run the FAP2OVL utility program, compiling FAP files into AFP overlays. Tell the system to use the overlays by specifying:
< PrtType:AFP >
SendOverlays = Yes
Use the PSF librarian to add printer resources to the printer.
LOGGING OPTIONS
LogTransactions option The GenTrn, GenData, and GenPrint programs optionally place transaction information into a LOG file. In most situations, this information is not needed. The LogTransactions option is specified in:
< Control >
LogTransactions = No
The default is Yes. For optimum performance, specify No.
LogToConsole option The GenTrn, GenData, and GenPrint programs optionally store transaction information. In most situations, this information is not needed. The LogToConsole option is specified in:
< Control >
LogToConsole = No
The default is Yes. For optimum performance, specify No.

Chapter 8Optimizing Your System
310
DEBUG OPTIONS
If_Rule control group < If_Rule >
Debug_if = No
The default is Yes. For optimum performance, specify No.
RUN OPTIONS
RunMode control group You have these runtime options:
< RunMode >
Download FAP = No
LoadCordFAP = No
CompiledFAP = Yes
The defaults are...
DownloadFAP = No
LoadCordFAP = No
CompiledFAP = No
Set the DownloadFAP option to No, the LoadCordFAP option to No, and the CompileFAP option to Yes for the best performance.
OTHER OPTIONS
MaxRecsPerTransactionoption
< ExtractFile >
MaxRecsPerTransaction = nn
The default is zero (0) and there is no maximum. Be careful using this option. You might want to use this option if you know that each record in the extract file corresponds to a transaction.
AliasPrintBatches option < ExtractFile >
AliasPrintBatches = Yes
The default is No. Use the default.

Uploading and Downloading Resources on z/OS
311
UPLOADINGAND
DOWNLOADINGRESOURCES ON
Z/OS
The standard location for the DMS1 resources on the PC is in:
\fap\mstrres\DMS1
These resources exist on the PC as text files and are sometimes referred to as ASCII files (COMPLIB is an exception and will be explained shortly). The resources are generally uploaded into files as follows:
Text files on a PC are represented using the ASCII character set. Text files on a z/OS system are represented using the EBCDIC character set. As these text files are uploaded from the PC to a z/OS system, each text character must be translated from ASCII to EBCDIC. The program that provides the communications between your PC and the z/OS system (3270 Emulator) generally includes a file transfer feature. Included in the file transfer feature is an option to translate files from ASCII to EBCDIC as the files are uploaded.
COMPLIB stands for Compiled Resources Library. FAP files can be parsed, or compiled, before you run the system, and placed into the COMPLIB. The utilities you can use to compile FAP files are: FAP2CFA and FDT2CFA.
This compilation improves performance since the text-oriented FAP files do not have to be parsed again during the print assembly process.
NOTE:You must, however, run the utility using the same version and on the same platform on which you will run the system—you cannot compile the FAP files on the PC and upload the resulting CFA files onto a z/OS system. You must run the FAP2CFA or FDT2CFA utilities on your z/OS system.
PC directory z/OS file name z/OS file type
DEFLIB\*.* &HLQ..&RES..DEFLIB(*) PDS
DDTLIB\*.* &HLQ..&RES..DDTLIB(*) PDS
FORMS\*.* &HLQ..&RES..FAPLIB(*) PDS
EXTRACT\*.* &HLQ..&RES..EXTRACT Sequential file

Chapter 8Optimizing Your System
312
TRANSFERRING FILES
Your 3270 emulation program may include features which let you transfer files from the PC to the z/OS system (upload) and from the z/OS system to the PC (download). Part of this capability will probably be an option to transfer a binary file or a text file. Generally, when a 3270 emulator uploads a binary file, it does not translate characters as the file is uploaded—it uploads the file as is. What’s more, any carriage return and line feed (CRLF) characters are also uploaded as is.
Conversely, when a 3270 emulation program uploads a file designated as text, it translates each character as it uploads it and removes any CRLF characters from the file. Characters between the CRLFs are assumed to be the records and are placed into the file on z/OS. You will almost always upload your resources to the z/OS as text files (see the following topic, Handling International Characters on page 313, for an exception).
Your 3270 emulation program may also let you upload a file from the PC to z/OS using the DOS Command Line interface. The upload program is usually called SEND and the download program is called RECEIVE.
For example, to upload the PC file “myfap fap” in the c:\dms1\forms directory to the z/OS PDS “DOC.FAPLIB” you could enter the following command in a DOS window:
SEND c:\dms1\forms\myfap.fap 'doc.faplib(myfap)' ASCII CRLF
This SEND command includes the exact file name and full path name of the PC file, followed by a space and the name of the host file ('doc.faplib(myfap)'). In this case, the host file is a PDS (Partioned Data Set) so you must indicate what member to place the file into.
The ASCII parameter tells the system to translate the PC file from ASCII to EBCDIC as it is uploaded. The CRLF parameter tells the system to remove the carriage return and line feed characters as it is uploaded.
Using the ASCII and CRLF parameters tells the SEND command to treat the file as a text file. If you omitted the ASCII and CRLF parameters, the SEND command would treat the file as a binary file. There are some situations where you might want to use just the ASCII parameter or just the CRLF parameter, but these situations are rare (see Handling International Characters on page 313, for an example) and you will generally use either both of them or neither of them.

Uploading and Downloading Resources on z/OS
313
HANDLING INTERNATIONAL CHARACTERS
Docucorp uses the Windows ANSI code page (1004) for files residing on the PC and the EBCDIC code page 37 for files residing on a z/OS system. There are, however, characters in code page 1004 which are not in code page 37—mainly desktop publishing characters from code point 128 to 159.
To support these characters, the system uses undefined code points in code page 37 (code points below 64). For maximum portability, avoid using characters which are not defined in code page 37.
If you have resource files, such as extract or FAP files, on the PC which contain international characters you will need to translate those characters into the correct code point when you upload them from the PC to a z/OS system.
Depending on your 3270 emulation program, you might be able to tell it to translate the file during the upload. If your 3270 emulation program does not let you specify the code page to translate from and to during the upload, or if your resource files on the PC use some of the undefined code points in code page 37, use the CPCNV utility.
The CPCNV utility converts text files from one code page to another. You can run the CPCNV utility either on the PC or on a z/OS system. Below are examples of how you would convert a FAP file named french1.fap, on a PC or on a z/OS system:
Running CPCNV on a PC Follow these steps to run the CPCNV utility on a personal computer:
1 Run the CPCNV program on the FAP files as follows:
cpcnv /i=french1 /s=1004 /d=37
2 Upload the FAP files as follows:
SEND french1.fap 'doc.faplib(french1)' CRLF
Note that this is one of the cases in which you use the CRLF parameter but do not use the ASCII parameter. You do not use the ASCII parameter because you have already translated the text characters in french1.fap from ANSI code page 1004 (ASCII) to EBCDIC code page 37. You still use CRLF however, because you want the upload process to remove the carriage return and line feed characters from the file as it is uploaded.
Running CPCNV onz/OS
Follow these steps to run the CPCNV utility on z/OS:
1 Upload the FAP file as follows:
SEND french1.fap 'doc.faplib.unconv(french1)' CRLF
Again, note that you do not use ASCII, but you do use CRLF. In this case, you do not want the 3270 Emulator program to translate from ASCII to EBCDIC because you are going to let the CPCNV utility on a z/OS system perform the translation. Also, note that the file name on the z/OS system of 'doc.faplib.unconv' denotes that the resources in this PDS are not converted.
2 Run the CPCNV utility on the FAP file using, as an example, the JCL provided in member CPCNVX of JCLLIB. Just as on the PC, the source code page will be 1004 and the destination code page will be 37.
Chapter 8Optimizing Your System
314
XEROX IMAGE, FONT, AND FORM FILES
You can use the XERDNLD utility to send a resource to the Xerox printer and save it on the printer’s disk drive. Some of the Xerox resources you might want to save to the printer are Xerox images (IMG), fonts (FNT) and forms (FRM). Each of these resources must first be created on the PC and then uploaded to the z/OS system without ASCII or CRLF.
To get a Xerox resource from the PC up to the z/OS system and then to a Xerox printer, follow these steps:
1 Define a PDS on the z/OS system to upload into. Define the PDS with the DCB characteristics as shown in the XERLOGOS job in JCLLIB, such as RECFM=VBM, LRECL=512, BLKSIZE=23000.
2 Upload the Xerox resource from the PC to the z/OS system without ASCII or CRLF.
3 Run the XERDNLD utility against this resource. There is a sample job in JCLLIB called XERDNLDX which runs XERDNLD. Note the output PDS is again defined with the characteristics RECFM=VBM, LRECL=512, and BLKSIZE=23000.
4 Run the GENERXER job in JCLLIB. Change the SYSUT1 DD statement so it points to the output from the XERDNLD utility, as discussed in step 3.
Change the SYSUT2 DD statement's SYSOUT class to the correct class for the Xerox printer. The GENERXER job will copy the resource into this SYSOUT class and the resource will be saved onto the Xerox printer's disk drive. Before you send the resource to the printer, start the Xerox printer in the same manner you currently start it (or intend to start) to print Documaker Server output.
XEROX PRE-COMPILED METACODE (PMET) FILES
Currently, you cannot upload Xerox pre-compiled Metacode (PMET) files generated on the PC onto a z/OS system. You must run the FAP2MET utility on a z/OS system and convert the FAP files into PMETs on your z/OS system.

Moving Resource Files Between UNIX/Linux and Windows
315
MOVINGRESOURCE
FILES BETWEENUNIX/LINUX
AND WINDOWS
You can use FTP to transfer files from Windows to UNIX and from UNIX to Windows. The important thing to remember is to use the correct mode (binary or ASCII) for the files.
Other options to transfer files between these platforms are available such as using mapped network drive resources such as NFS and SaMBa. This method lets you map a directory on UNIX directly to a Windows workstation. When using this method, the transfer mode is always binary by default.
Uploading a Library from PC to UNIXText files such as INI, DFD, and FAP should be uploaded in ASCII mode if using FTP. Compiled files should be loaded in binary mode. For example, FRM files for Xerox must be uploaded in binary mode after they are compiled using the FAP2FRM utility on a PC.
Overlays for PCL and PostScript can be compiled by the OVLCOMP utility on a PC and then uploaded to UNIX in binary mode or they can be produced directly on UNIX/Linux with the OVLCOMP executable.
NOTE:MET and CFA files are platform dependent, therefore they must be compiled on UNIX. Be sure to also use the same version of the system to compile and use these files.
Downloading Print Streams from UNIX to PCAll types of print streams (PCL, PST, AFP, and Xerox) from the GenPrint program should be downloaded to PC in binary mode if you are going to print from a Windows workstation.
PCL print stream files, once transferred to a Windows workstation, can be printed to a local or network printer using this command:
copy /b pclbat1 lpt1
PST print stream files, after successful transfer to a Windows workstation, can be printed to a local or network printer using the following command if the DownloadFonts option in the PrtType:PST control group is set to No:
copy /b rel121sm.pst+ pstbat1 lpt1
You can send an AFP print stream to an AFP printer through PSF/2 from an OS/2 workstation.
Xerox print stream can be sent to Xerox printer through a connected workstation running BARR software.

Chapter 8Optimizing Your System
316

317
Chapter 9
Uploading and Downloading Resource Files
This chapter outlines how to move resource files from one platform to another. This discussion includes these topics:
• Uploading and Downloading Resources on z/OS on page 318
• Moving Resource Files Between UNIX/Linux and Windows on page 322

Chapter 9Uploading and Downloading Resource Files
318
UPLOADINGAND
DOWNLOADINGRESOURCES ON
Z/OS
The standard location for the DMS1 resources on the PC is in:
\fap\mstrres\DMS1
These resources exist on the PC as text files and are sometimes referred to as ASCII files (COMPLIB is an exception and will be explained shortly). The resources are generally uploaded into files as follows:
Text files on a PC are represented using the ASCII character set. Text files on a z/OS system are represented using the EBCDIC character set. As these text files are uploaded from the PC to a z/OS system, each text character must be translated from ASCII to EBCDIC. The program that provides the communications between your PC and the z/OS system (3270 Emulator) generally includes a file transfer feature. Included in the file transfer feature is an option to translate files from ASCII to EBCDIC as the files are uploaded.
COMPLIB stands for Compiled Resources Library. FAP files can be parsed, or compiled, before you run the system, and placed into the COMPLIB. The utilities you can use to compile FAP files are: FAP2CFA and FDT2CFA.
This compilation improves performance since the text-oriented FAP files do not have to be parsed again during the print assembly process.
NOTE:You must, however, run the utility using the same version and on the same platform on which you will run the system—you cannot compile the FAP files on the PC and upload the resulting CFA files onto a z/OS system. You must run the FAP2CFA or FDT2CFA utilities on your z/OS system.
PC directory z/OS file name z/OS file type
DEFLIB\*.* &HLQ..&RES..DEFLIB(*) PDS
DDTLIB\*.* &HLQ..&RES..DDTLIB(*) PDS
FORMS\*.* &HLQ..&RES..FAPLIB(*) PDS
EXTRACT\*.* &HLQ..&RES..EXTRACT Sequential file
Uploading and Downloading Resources on z/OS
319
TRANSFERRING FILES
Your 3270 emulation program may include features which let you transfer files from the PC to the z/OS system (upload) and from the z/OS system to the PC (download). Part of this capability will probably be an option to transfer a binary file or a text file. Generally, when a 3270 emulator uploads a binary file, it does not translate characters as the file is uploaded—it uploads the file as is. What’s more, any carriage return and line feed (CRLF) characters are also uploaded as is.
Conversely, when a 3270 emulation program uploads a file designated as text, it translates each character as it uploads it and removes any CRLF characters from the file. Characters between the CRLFs are assumed to be the records and are placed into the file on z/OS. You will almost always upload your resources to the z/OS as text files (see the following topic, Handling International Characters on page 320, for an exception).
Your 3270 emulation program may also let you upload a file from the PC to z/OS using the DOS Command Line interface. The upload program is usually called SEND and the download program is called RECEIVE.
For example, to upload the PC file “myfap fap” in the c:\dms1\forms directory to the z/OS PDS “DOC.FAPLIB” you could enter the following command in a DOS window:
SEND c:\dms1\forms\myfap.fap 'doc.faplib(myfap)' ASCII CRLF
This SEND command includes the exact file name and full path name of the PC file, followed by a space and the name of the host file ('doc.faplib(myfap)'). In this case, the host file is a PDS (Partitioned Data Set) so you must indicate what member to place the file into.
The ASCII parameter tells the system to translate the PC file from ASCII to EBCDIC as it is uploaded. The CRLF parameter tells the system to remove the carriage return and line feed characters as it is uploaded.
Using the ASCII and CRLF parameters tells the SEND command to treat the file as a text file. If you omitted the ASCII and CRLF parameters, the SEND command would treat the file as a binary file. There are some situations where you might want to use just the ASCII parameter or just the CRLF parameter, but these situations are rare (see Handling International Characters on page 320, for an example) and you will generally use either both of them or neither of them.

Chapter 9Uploading and Downloading Resource Files
320
HANDLING INTERNATIONAL CHARACTERS
Docucorp uses the Windows ANSI code page (1004) for files residing on the PC and the EBCDIC code page 37 for files residing on a z/OS system. There are, however, characters in code page 1004 which are not in code page 37—mainly desktop publishing characters from code point 128 to 159.
To support these characters, the system uses undefined code points in code page 37 (code points below 64). For maximum portability, avoid using characters which are not defined in code page 37.
If you have resource files, such as extract or FAP files, on the PC which contain international characters you will need to translate those characters into the correct code point when you upload them from the PC to a z/OS system.
Depending on your 3270 emulation program, you might be able to tell it to translate the file during the upload. If your 3270 emulation program does not let you specify the code page to translate from and to during the upload, or if your resource files on the PC use some of the undefined code points in code page 37, use the CPCNV utility.
The CPCNV utility converts text files from one code page to another. You can run the CPCNV utility either on the PC or on a z/OS system. Below are examples of how you would convert a FAP file named french1.fap, on a PC or on a z/OS system:
Running CPCNV on a PC Follow these steps to run the CPCNV utility on a personal computer:
1 Run the CPCNV program on the FAP files as follows:
cpcnv /i=french1 /s=1004 /d=37
2 Upload the FAP files as follows:
SEND french1.fap 'doc.faplib(french1)' CRLF
Note that this is one of the cases in which you use the CRLF parameter but do not use the ASCII parameter. You do not use the ASCII parameter because you have already translated the text characters in french1.fap from ANSI code page 1004 (ASCII) to EBCDIC code page 37. You still use CRLF however, because you want the upload process to remove the carriage return and line feed characters from the file as it is uploaded.
Running CPCNV onz/OS
Follow these steps to run the CPCNV utility on z/OS:
1 Upload the FAP file as follows:
SEND french1.fap 'doc.faplib.unconv(french1)' CRLF
Again, note that you do not use ASCII, but you do use CRLF. In this case, you do not want the 3270 Emulator program to translate from ASCII to EBCDIC because you are going to let the CPCNV utility on a z/OS system perform the translation. Also, note that the file name on the z/OS system of 'doc.faplib.unconv' denotes that the resources in this PDS are not converted.
2 Run the CPCNV utility on the FAP file using, as an example, the JCL provided in member CPCNVX of JCLLIB. Just as on the PC, the source code page will be 1004 and the destination code page will be 37.

Uploading and Downloading Resources on z/OS
321
XEROX IMAGE, FONT, AND FORM FILES
You can use the XERDNLD utility to send a resource to the Xerox printer and save it on the printer’s disk drive. Some of the Xerox resources you might want to save to the printer are Xerox images (IMG), fonts (FNT) and forms (FRM). Each of these resources must first be created on the PC and then uploaded to the z/OS system without ASCII or CRLF.
To get a Xerox resource from the PC up to the z/OS system and then to a Xerox printer, follow these steps:
1 Define a PDS on the z/OS system to upload into. Define the PDS with the DCB characteristics as shown in the XERLOGOS job in JCLLIB, such as RECFM=VBM, LRECL=512, BLKSIZE=23000.
2 Upload the Xerox resource from the PC to the z/OS system without ASCII or CRLF.
3 Run the XERDNLD utility against this resource. There is a sample job in JCLLIB called XERDNLDX which runs XERDNLD. Note the output PDS is again defined with the characteristics RECFM=VBM, LRECL=512, and BLKSIZE=23000.
4 Run the GENERXER job in JCLLIB. Change the SYSUT1 DD statement so it points to the output from the XERDNLD utility, as discussed in step 3.
Change the SYSUT2 DD statement's SYSOUT class to the correct class for the Xerox printer. The GENERXER job will copy the resource into this SYSOUT class and the resource will be saved onto the Xerox printer's disk drive. Before you send the resource to the printer, start the Xerox printer in the same manner you currently start it (or intend to start) to print Documaker Server output.
XEROX PRE-COMPILED METACODE (PMET) FILES
Currently, you cannot upload Xerox pre-compiled Metacode (PMET) files generated on the PC onto a z/OS system. You must run the FAP2MET utility on a z/OS system and convert the FAP files into PMET files on your z/OS system.

Chapter 9Uploading and Downloading Resource Files
322
MOVINGRESOURCE
FILES BETWEENUNIX/LINUX
AND WINDOWS
You can use FTP to transfer files from Windows to UNIX and from UNIX to Windows. The important thing to remember is to use the correct mode (binary or ASCII) for the files.
Other options to transfer files between these platforms are available such as using mapped network drive resources such as NFS and SaMBa. This method lets you map a directory on UNIX directly to a Windows workstation. When using this method, the transfer mode is always binary by default.
Uploading a Library from PC to UNIXText files such as INI, DFD, and FAP files should be uploaded in ASCII mode if using FTP. Compiled files should be loaded in binary mode. For example, FRM files for Xerox must be uploaded in binary mode after they are compiled using the FAP2FRM utility on a PC.
Overlays for PCL and PostScript can be compiled by the OVLCOMP utility on a PC and then uploaded to UNIX in binary mode or they can be produced directly on UNIX/Linux with the OVLCOMP executable.
NOTE:MET and CFA files are platform dependent, therefore they must be compiled on UNIX. Be sure to also use the same version of the system to compile and use these files.
Downloading Print Streams from UNIX to PCAll types of print streams (PCL, PST, AFP, and Xerox) from the GenPrint program should be downloaded to PC in binary mode if you are going to print from a Windows workstation.
PCL print stream files, once transferred to a Windows workstation, can be printed to a local or network printer using this command:
copy /b pclbat1 lbt1
PST print stream files, after successful transfer to a Windows workstation, can be printed to a local or network printer using the following command if the DownloadFonts option in the PrtType:PST control group is set to No:
copy /b rel121sm.pst+ pstbat1 lpt1
You can send an AFP print stream to an AFP printer through PSF/2 from an OS/2 workstation.
Xerox print stream can be sent to Xerox printer through a connected workstation running BARR software.

323
Appendix A
System Files
This appendix includes samples of the various files used by and created by the system. For each file you will find a definition, including information on the tools you can use to modify the files, and a sample of the files.
The sample files are based on the base system. If you or Oracle Insurance’s staff have customized your system, your files may differ.
For information on file formats, consult the technical documentation, which is located on your distribution CD and on Oracle Insurance’s web site.
This appendix discusses these topics:
• Overview on page 324
• Types of Files on page 326
• Resource Files on page 329
• Files Created by the GenTrn Program on page 336
• Files Created by the GenData Program on page 337
• Files Created by the GenPrint Program on page 339
• Files Created by the GenWIP Program on page 340
• Files Used by the GenArc Program on page 341

Appendix ASystem Files
324
OVERVIEW The files discussed in this appendix are arranged in the following order:
Types of files:
• BCH files
• DAT files
• DBF files
• DFD files
• Error files
• Initialization (INI) files
• JDT files
• Log files
• LOG files
• MDX files
• Transaction files
Resource files
• FSISYS.INI
• FSIUSER.INI
• DFD files
• JDT files
• Extract files
Files created by the GenTrn program as it gathers information:
• TRNFILE.DAT
• LOGFILE.DAT
• ERRFILE.DAT
• MSGFILE.DAT
Files created by the GenData program to make print-ready files:
• NAFILE.DAT
• POLFILE.DAT
• NEWTRN.DAT
• Batch files (*.bch)
• MANUAL.BCH
• Updated log and error files
• Spool files

Overview
325
• MSGFILE.DAT
Files used by the GenWIP program for processing incomplete transactions
• WIP DBF
• WIP.MDX
• 00000001.DAT
• 00000001.POL
Files used by and created by the GenArc program for archiving information:
• APPIDX.DBF
• ARCHIVE.CAR
• APPIDX.MDX
• APPIDX.DFD

Appendix ASystem Files
326
TYPES OF FILES There are several types of files used in the system. These file types are defined below.
BCH files The GenData program creates files with the extension BCH, called batch files, which list the transactions to be included in each batch, as specified in your FSISYS.INI file settings. Batch files are used as trigger files by the GenPrint and GenWIP programs. Batch files indicate which transactions should be printed in a given batch job. The GenPrint program uses batch files to print completed forms. The GenData program also creates manual batch files which record incomplete transactions. These manual batch files are used by the GenWIP program.
CAR files The GenArc program creates compressed archive (CAR) files in which it stores NAFILEs, POLFILEs, and archived forms and data. An example of a generated CAR file is ARCHIVE.CAR. You can have multiple CAR files. The GenArc program also creates the APPIDX.DBF file which serves as an index to the archived information stored in the CAR file.
DAT files Data table (DAT) files define various information the system uses as it processes information.
The NAFILE.DAT file contains the variable data generated by the GenData program. This file, along with the POLFILE.DAT file, tell the GenPrint program what to print. This file also tells the GenWIP and GenArc programs what to place into WIP and what to archive.
The GenWIP program also creates DAT files for each incomplete transaction it must process. These files are numbered sequentially and for each file there is a corresponding POL file which contains information about the forms to use.
DBF files Database files (DBF) are used in several places in the system. For each DBF file, there is a corresponding MDX file which serves as its index. Examples of DBF files are FDB.DBF, which is created by the Field Database Editor; ARCHIVE.DBF, which is created by the GenArc program; and WIP.DBF, which is created by the GenWIP program.
NOTE:The UNIQUE.DBF file contains the last number for WIP file that was created. Whenever a WIP file is created, a number is generated to uniquely identify it to make sure no WIP file is overwritten.
DDT files Before version 11.0, the data definition table (DDT) file told the GenData program, what rules it should use as it processes the data.
NOTE:With the release of Documaker Studio, DDT files are no longer used. Support for Image Editor ended in version 11.5.

Types of Files
327
DFD files Data format definition (DFD) files define to the system the database file formats of the files generated by the system. Many common system files are stored in database format. For example, the transaction file, the new transaction, application index, and recipient batch files are all stored in database format. These database files can be in a variety of formats, including Xbase, DB/2, ODBC, and standard sequential files, such as flat text files. The record structure defined in the DFDs remains independent, regardless of the type of database being used—although there are occasionally exceptions for some database specific records.
The GenData program uses TRNDFDFL.DFD to read the TRNFILE which contains the actual transactions GenTrn creates.
Error files The GenTrn program produces an error file to note any transactions it could not process correctly. The other programs, such as GenData, GenPrint, GenWIP, and GenArc, update this file as they perform their processing activities. This file will help you discover and correct any processing errors you may encounter. Errors may be caused by incorrect or missing data. The system records the error information by transaction. You can view this file using a text editor.
The GenData program creates error batch files if it spots an error. In contrast to manual batch files, you cannot correct these errors using the GenWIP program. Instead, you must, for instance, correct the error in the extract file, change the flag to operator required so the transaction will be added to the manual batch file, or change the FAP file and then process the transaction again.
Extract files Extract files are typically text files which contain the data the system processes. Extract files are created by another program, typically a database program, in a format the system can read. The text file format provides a standard interface into the system. For example, your data may be stored in a DB/2 or VSAM database from which you extract the data you want the system to process.
You can customize the system to read almost any type of file layout. The GenTrn program first reads the extract file and, using that extract data and TRNDFDFL.DFD file, creates transaction files (TRN files) the GenData program can use as it applies the processing rules and creates batch files, the NAFILE.DAT, and the POLFILE.DAT file.
NOTE:For use on an z/OS platform, the extract file must be converted to EBCDIC format if the file contains international characters. See the Fonts Reference for more information on international characters.
You can use the OpSystem option to specify the origination platform of an extract file:
< RunMode >
OpSystem =
If you enter OS400, the system loads an EBCDIC conversion table which handles binary number conversions for source extract files originating from an IBM AS/400 system.
FAP files The information which defines each section (image) is stored in a FAP file. FAP files are text files with the extension FAP. You can edit FAP files using a text editor, but they are most commonly created and edited using Documaker Studio. The FAP file defines the section while the FOR file defines the sections which comprise a form and form set.

Appendix ASystem Files
328
Initialization files Initialization (INI) files are used by the system to set system parameters and to enable or disable system features. Some examples of system INI files are: FSISYS.INI and FSIUSER.INI. For example, the FSISYS.INI file contains information the GenTrn program uses to determine when a new record starts and other information about the extract files the GenTrn program processes. The FSIUSER.INI file contains information specific to each user, such as the location of files and so on.
JDT files The job definition table (JDT) file is a text file which tells the system which rules to use as it processes a specific job. Rules defined in the JDT file are run before the system runs rules assigned to specific fields. An example of a JDT file is the AFGJOB.JDT file.
Log files When you run GenTrn, the program creates log files which record, by transaction, each transaction the program processes. These files have a DAT extension. You can review these log files using any text editor.
LOG files Graphics, such as scanned signatures or logos, are stored as LOG files in the system. You use Documaker Studio to view, manage, and manipulate LOG files.
MDX files The various system programs create MDX files which serve as indexes to the database files (.DBF files). For example, the GenWIP program creates the WIP.DBF file and the corresponding WIP.MDX file to record the incomplete transactions which were not printed.
The Field Database editor creates the FDB.MDX file to serve as an index to the FDB.DBF file which contains common variable field definitions.
Transaction files The GenTrn program creates transaction or TRN files which contains a record for each transaction. The record format for the TRN file can vary to meet your needs. This format is defined in the TRNDFDFL.DFD file. The GenData program uses the TRNDFDFL.DFD file to read the information in the TRN file as it processes the information.
Each record in a TRN file contains a series of offsets or pointers. These offsets define the location of the transaction data. For instance, the offsets in a TRN file tell the GenData program where the transaction begins in the extract file, where the data for the transaction is stored in the NAFILE.DAT file, and where the form set for the transaction is stored in the POLFILE.DAT file.

Resource Files
329
RESOURCEFILES
Resource files are used by the various programs which comprise Documaker Server. These files provide information these programs use to know how to read extract files, how to create print-ready files, which rules to apply, which recipients receive copies of which forms, and so on.
The resource files include:
• FSISYS.INI
• FSIUSER.INI
• FAPCOMP.INI
• DFD files
• JDT files
• Extract files
FSISYS.INI file The FSISYS.INI file is one of the initialization (INI) files used by the system to set parameters and to enable or disable features. For example, the FSISYS.INI file contains information the GenTrn program uses to determine when a new record starts and other information about the extract files the GenTrn program processes. You can see examples of this file in the DMS1 sample resources.
FSIUSER.INI file The FSIUSER.INI file is one of the initialization (INI) files used by the system to set system parameters. For example, the FSIUSER.INI file contains information specific to each user, such as the location of files and so on. If there are common settings in the FSISYS.INI and FSIUSER.INI files, the system looks at both, but uses the settings in the FSIUSER.INI file. You can see examples of this file in the DMS1 sample resources.
DFD files There are several database files, meaning that these files are written and read via calls to Oracle Insurance’s DBLIB database software library. These database files can be in several formats, including Xbase (dBase), DB/2, and flat text. Not all database files require a corresponding DFD file because their record structure is coded in the software modules that access them. For instance, here is a list of Oracle Insurance’s database files:
• transaction files
• new transaction files
• recipient batch files
• manual batch files
• application index files
• WIP files
• help files
• table files
Only these files require an external DFD file:
• transaction files
• new transaction files

Appendix ASystem Files
330
• recipient batch files
• manual batch files
• application index files
The WIP file may optionally have an external DFD. If there is no external WIP DFD file, the internal record structure as coded in the program is used. The help and table files do not support the use of external DFD files.
Of the database files that require external DFD files, only three actual DFD files are needed:
• a transaction file DFD (TRNDFDFL.DFD)
• a recipient batch file DFD (RCBDFDFL.DFD)
• an application index file DFD (APPIDX.DFD)
The transaction file DFD is used by both the transaction file and the new transaction file. The recipient batch file DFD is used by both the recipient batch files and the manual batch files. The application index file DFD is used by the application index file. You can see examples of all these files in the DMS1 sample resources.
TRNDFDFL.DFD file The TRNDFDFL.DFD file tells the GenData program how to read the TRN file. If necessary, you can edit this text file in a text editor. The TRNDFDFL, is used by the GenTrn, GenData, GenArc, and GenWIP programs.
The GenTrn program writes out the transaction file using the TRNDFDFL. The GenData program reads the transaction file and writes out the new transaction file using the TRNDFDFL file. And the GenArc and GenWIP programs read the new transaction file using the TRNDFDFL file.
You can define the name of the TRNDFDFL file in the Data control group of the FSISYS.INI file, as shown below:
< Data >
TrnDfdFile = trndfdfl.dfd
RCBDFDFL.DFD file The RCBDFDFL.DFD file, or recipient batch file DFD, is used by the GenData, GenPrint, and GenWIP programs. If necessary, you can edit this text file in a text editor.
The GenData program writes the recipient and manual batch files using the RCBDFDFL.DFD file. The GenPrint program reads the recipient batch files using the RCBDFDFL.DFD file. The GenWIP program reads the manual batch files using the RCBDFDFL.DFD file.
You can set the name of the RCBDFDFL.DFD file in the Data control group of the FSISYS.INI file, as shown below:
< Data >
RcbDfdFile = rcbdfdfl.dfd
APPIDX.DFD The APPIDX.DFD file, or application index file, is used by the GenArc program and the Archive module of Documaker Workstation. The GenArc program writes out the application index file using the APPIDX.DFD. While Documaker Workstation’s Entry module reads the application index file using APPIDX.DFD. If necessary, you can edit this text file in a text editor.
Resource Files
331
You can set the name of the APPIDX.DFD file in the ArcRet control group in the FSIUSER.INI file, as shown below:
< ArcRet >
AppIdxDfd = appidx.dfd
However, the APPIDX.DFD name does not have to be set as shown above, provided the system is running in a Windows environment. If the APPIDX.DFD name is not specified as shown, the system automatically appends a DFD extension to the APPIDX name specified in the same group, as shown below:
< ArcRet >
AppIdx = AppIdx
This will not work in an environment that does not support file name extensions, such as z/OS.
.DDT files The Data Definition Table (DDT) were used to map data from a source record to fields in a form before the release of Documaker Studio. DDT files told the GenData program what rules it should use as it processes the data.
NOTE:With the release of Documaker Studio, DDT files are no longer used. Support for Image Editor, which created DDT files, ended in version 11.5.
.JDT files The job definition table (JDT) file is a text file which tells the system which rules to use as it processes a specific job. Rules defined in the JDT file are run before the system runs rules assigned to specific fields.
An example of a JDT file is the AFGJOB.JDT file, which you can see in the DMS1 sample resources. You can also see examples of JDT files, including the performance JDT file used with single step processing in the topic, Single Step Processing Example on page 56.
Extract files Extract files are typically text files which contain the data the system processes. Extract files are created by another program, typically a database program, in a format the system can read. The text file format provides a standard interface into the system. For example, your data may be stored in a DB/2 or VSAM database from which you extract the data you want to process in the system in text format.
You can customize the system to read almost any type of file layout. The GenTrn program first reads the extract file and, using that extract data and TRNDFDFL.DFD file, creates transaction files (TRN files) the GenData program can use as it applies the processing rules and creates batch files, the NAFILE.DAT, and the POLFILE.DAT file.
NOTE:For use on a z/OS platform, the extract file must be converted to EBCDIC format if the file contains international characters. See the Fonts Reference for more information on international characters.

Appendix ASystem Files
332
Extract data can be in the form of a flat file, a VSAM file, or it can come directly from a database. The important thing is that the data is organized and presented in a manner that makes it efficient to process. While the system is very flexible, there are things you can do to minimize the need for customizations and to maximize the speed at which the system identifies and processes the data.
Here are some general guidelines to follow when you design an extract file:
• The basic entity of the data is the transaction. Data for transactions is stored in multiple rows.
• To speed the identification of a transaction entity, make the first record for each transaction a general information row.
• Each record should have a standard key structure. Here is an example of a minimum key structure:
Sequence numbers are not required. In some cases they are nice to have to keep track of which occurrence has been passed. It is, however, not a requirement that you sequence repeating records.
• To make testing easier, use a flat ASCII or EBCDIC extract file. By eliminating packed data fields, you can more easily view the contents of an extract file using standard text editors.
• Speed processing by keeping the extract file as small as possible—minimize the occurrence of repeated information in subsequent records.
• When possible, structure the data in the extract file so the system can read it in the order it should be processed. The less the system has to search for data, the faster it will process the data.
• Keep all related information in one record if possible, to minimize complexity of rules. For example, the layout should look something like this:
• When information occurs multiple times (occurs clauses) in records, structure the extract file to contain one record for each occurrence. For example, when multiple forms are present on a policy or multiple meters are present on a bill, structure the information into individual records per entity (form, meter, and so on). This increases the likelihood that you can use base system overflow and mapping features to process the data.
Include this key Which is
Transaction Identifier unique to each transaction
Record Type Identifier for each record type
Record Counter a sequence number
Record Name Layout
GENERALINFO account number, type transaction
ADDRESSINFO client name, address, phone

Resource Files
333
NOTE:For overflow, the system first determines the maximum number of lines it can print on a page. When this number is exceeded, the system automatically inserts overflow pages as necessary. If overflow is dependent upon custom conditions to determine line counts, you will need custom code.
• Design records that will recur or overflow to have specific identifiers to sequence the records and to have key identifiers for overflow requirements within one record. This helps to minimize processing time and rule complexity. This is not a requirement, but may ease custom rule complexity with a point of reference.
• It is a good idea to have a header record which contains all global identifiers for a transaction, such as COMPANY, LINE OF BUSINESS, and TRANSACTION. You can then use this header record as the trigger to each transaction and as the basis for building the correct form set.
• When you build a header record, place all of the key fields for WIP, Archive, and the batch sorting fields in this record. This makes it easier for the system to perform searches and simplifies the building of the DFD records used to define the key architecture.
• Where possible, place all conditional data triggers for a form in one record. This may eliminate the need for the RECIPIF rule in the SETRCPTB.DAT file when triggering records. By reducing usage of this rule, you can improve system performance.
NOTE:You can find additional performance considerations for MVS systems in the Installation Guide.
• To maximize performance, provide sub totals and totals for groups of information in the extract data. This eliminates the need for system calculations via DAL scripts or custom rules and speeds performance.
• Provide any data in the extract file that would require the use of the TblLkUp, LookUp, SetState rules. This also improves performance and simplifies your master resource libraries.
• For Year 2000 compliance, make sure all date fields in the extract file are in 4-digit year format, preferably in YYYYMMDD format. (For the Archive application index file, APPIDX.DFD, the rundate field retrieved from the extract file must be in this format).
DFD File FormatThe DFD file contains two control groups. The Fields control group lists all the fields in the record structures and the order those fields appear in the storage media. The fields are automatically stored internally in the same order they appear externally. The second group describes each field. This description includes an external and internal definition of the field where applicable.
Fields Group The Fields control group appears as follows:

Appendix ASystem Files
334
< Fields >
FIELDNAME =
FIELDNAME =
FIELDNAME =
...where FIELDNAME lists the name of the field. This is the name used by applications to reference data in a DFD record. The order of the FIELDNAME options dictates the order these fields are in, where applicable, on the storage media and how are they are stored in memory.
FIELDNAME has a maximum length of 26 characters, except when using xBase. Using xBase, the maximum length is 10 characters.
Field Description Group The Field Description control group has the following format:
< xxxxxx >
EXT_TYPE=
EXT_LENGTH=
EXT_PRECISION=
INT_TYPE=
INT_LENGTH=
INT_PRECISION=
KEY=
REQUIRED=
...where xxxxxx is name of field as listed in the Fields control group.
EXT_TYPE Data format of field on storage media Possible formats are:
NOT_PRESENT not present in this record
SIGNED_CHAR a signed char
CHAR char
CHAR_ARRAY NULL terminated string
CHAR_ARRAY_NO_NULL_TERM character array not NULL terminated
SHORT 16-bit signed integer
UNSIGNED_SHORT 16-bit unsigned integer
LONG 32-bit signed integer
UNSIGNED_LONG 32-bit unsigned integer
FLOAT float single precision
DOUBLE double precision
LONG_DOUBLE long double precision
DATESTAMP a FSI date/time field

Resource Files
335
The external record definition must match the actual records written to or read from the database. The internal record definition is provided for easier programming use.
The options can appear in any order. The system records any errors encountered while loading a field in the log file.
TIMESTAMP a FSI time stamp
VARCHAR variable length character array
Item Description
EXT_LENGTH: Length of field on storage media. Valid for data types CHAR_ARRAY and CHAR_ARRAY_NO_NULL_TERM only. Ignored for all other data types.
EXT_PRECISION: Number of digits after decimal point. Valid for data types FLOAT, DOUBLE, and LONG_DOUBLE only. It is ignored for all other data types.
INT_TYPE: Same as EXT_TYPE.
INT_LENGTH: Same as EXT_LENGTH except one additional byte is added to length to store null termination byte.
INT_PRECISION: Same as EXT_PRECISION.
KEY: Indicates if this field is a key field. Y indicates it is a key field. All other values, or if field is not present, indicates field is not a key field. This field is only used for DB/2 and indicates that the field is required.
REQUIRED: Indicates if this field is required in order for a record to be stored on or retrieved from a storage media. Y indicates it is required. All other values, or if field is not present, indicates field is not required. If KEY=Y, the field is required regardless of the value of this option.

Appendix ASystem Files
336
FILES CREATEDBY THE GENTRN
PROGRAM
The GenTrn program reads data in an extract file and creates transaction records which in turn are processed by the GenData program. The main file created by the GenTrn program is the TRN file which, along with the TRNDFDFL.DFD file, tells the GenData program which transactions to process.
The GenTrn program creates these files as it reads in the extract file and uses the resource files:
• Transaction files
• Error files
• Log files
Transaction files The GenTrn program creates transaction or TRN files which contains a record for each transaction. The record format for the TRN file can vary to meet your needs. This format is defined in the TRNDFDFL.DFD file. The GenData program uses the TRNDFDFL.DFD file to read the information in the TRN file as it processes the information.
Each record in a TRN file contains a series of offsets or pointers. These offsets define the location of the transaction data. For instance, the offsets in a TRN file tell the GenData program where the transaction begins in the extract file, where the data for the transaction is stored in the NAFILE.DAT file, and where the form set for the transaction is stored in the POLFILE.DAT file.
Error files The GenTrn program produces this file to note any transactions it could not process correctly. This file will help you discover and correct any processing errors you may encounter. The most common errors are caused by incorrect or missing data. The information is recorded by transaction. You can view this file using a text editor. You can see examples of this file in the DMS1 sample resources.
Log files When you run GenTrn, the program creates log files which record by transaction each transaction the program processes. You can review these log files using any text editor. You can see examples of this file in the sample resources.

Files Created by the GenData Program
337
FILES CREATEDBY THE
GENDATAPROGRAM
The GenData program takes information created by the GenTrn program and applies processing rules to those transactions and data. The GenData program creates batch files, the NAFILE.DAT, and the POLFILE.DAT file for the GenPrint program. It also creates a manual batch file (MANUAL.BCH) for the GenWIP program. The output from the GenData program is also used by the GenArc program to archive forms and data.
The GenData program creates the following files:
• NAFILE.DAT
• POLFILE.DAT
• NEWTRN.DAT
• Batch files (*.bch)
• MANUAL.BCH
• Updated error and log files
NAFILE.DAT file The GenData program creates an NAFILE.DAT file, commonly referred to as the NA file, in which it stores section and variable field information. The GenPrint program uses this file, along with the POLFILE.DAT file, which is also produced by the GenData program to print the forms.
If the data is incomplete and GenData cannot complete the form, it creates a manual batch file. The GenWIP program then creates separate DAT and POL files for each incomplete transaction. These files provide the entry system with the information it needs to open the form so a data entry operator can add the missing data. This is a semi-colon-delimited text file. You can see examples of this file in the DMS1 sample resources.
POLFILE.DAT file The POLFILE.DAT file, commonly referred to as the POL file, defines the form set used for a specific transaction. The GenData program creates this file which is used by the GenPrint, GenWIP, and GenArc programs. For instance, if the data is complete, GenData creates an NA file and a POL file. These files are used by GenPrint, along with the batch files, to produce the print-ready file.
If the data is incomplete and GenData cannot prepare the form for printing, it creates a manual batch file. The GenWIP program then creates separate files for each transaction to provide the entry system with the information it needs to open the form so a data entry operator can add the missing data. This is a semi-colon-delimited text file. You can see examples of this file in the DMS1 sample resources.
NOTE:You can use the MaxPolLineLength option to control the output line length when writing out POL file records. The default is 255. You can set it to shorter lengths when testing to more easily view the file in a text editor.
< Control >
MaxPolLineLength = 80
Choose a length between 40 to 4000 bytes.

Appendix ASystem Files
338
NEWTRN.DAT file The GenData program creates the NEWTRN.DAT file. This file tells the GenArc program where to find data in the NAFILE.DAT file and which forms to use in the POLFILE.DAT file. You can see examples of this file in the DMS1 sample resources.
Batch files The GenData program creates files with the extension BCH, called batch files, list the transactions to be included in each batch, as specified in your FSISYS.INI file settings. Batch files are used as trigger files by the GenPrint and GenWIP programs. Batch files indicate which transactions should be printed in a given batch job. The GenPrint program uses batch files to print completed forms. The GenData program also creates manual batch files which record incomplete transactions. These manual batch files are used by the GenWIP program.
MANUAL.BCH file The GenData program creates this file if it is unable to complete the processing of a form set. Typically, this occurs because the forms are missing information. This file is then used by the GenWIP program so a data entry operator can manually complete the form and resubmit it for processing.
Error batch The GenData program creates error batch files if it spots an error. In contrast to manual batch files, you cannot correct these errors using the GenWIP program. Instead, you must, for instance, correct the error in the extract file, change the flag to operator required, or change the FAP file and then process the transaction again.
Updated log, error, andmessage files
As the GenData program processes information, it updates the log, error, and message files. You can review these files in a text editor to review when transactions were processed or to resolve errors.

Files Created by the GenPrint Program
339
FILES CREATEDBY THE
GENPRINTPROGRAM
The GenPrint program takes information produced by the GenData program and creates a printer spool file for use with PCL, AFP, Metacode, and PostScript printers. Specifically, the GenData program produces batch files, an NAFILE.DAT, and a POLFILE.DAT file which the GenPrint program uses to create printed forms
The GenPrint program creates the following files:
• Spool files
• Updated log and error files
Spool files The spool files are print-ready files the GenPrint program creates from information received from the GenData program and from resource files.
Updated log and errorfiles
As the GenPrint program processes information, it updates the log and error files. You can review these files in a text editor to review when transactions were processed or to resolve errors.

Appendix ASystem Files
340
FILES CREATEDBY THE GENWIP
PROGRAM
The GenWIP program receives information about incomplete transactions from the GenData program. This information is stored in manual batch (MANUAL.BCH) files. The GenWIP program then creates separate files for each incomplete transaction. The data for these incomplete transactions is stored in a file with the extension DAT, such as 00000001.DAT. The corresponding form set information is stored in a file with the extension POL, such as 00000001.POL.
The GenWIP program also creates the WIP.DBF file, a database file which contains records of all the incomplete transactions extracted from the NAFILE.DAT file produced by the GenData program. The WIP.MDX file, also created by the GenWIP program serves as an index to the WIP.DBF file.
This gives the entry program the information it needs to display the form so you can fill in the missing information and complete the form in Documaker Workstation. Once completed, you can resubmit the form for processing by the GenData program.
The GenWIP program uses these files as it prepares incomplete transactions for further processing with the entry system.
• WIP DBF
• WIP.MDX
• 00000001.DAT files
• 00000001.POL files
• UNIQUE.DBF
WIP.DBF file The WIP.DBF file contains information about the incomplete transactions which the GenWIP program extracted from the NAFILE.DAT and POLFILE.DAT file created by the GenData program. The WIP.MDX file serves as an index to this file.
WIP.MDX file This file serves as an index to the WIP.DBF file.
00000001.DAT file Using the MANUAL.BCH file produced by the GenData program. The GenWIP program creates from the NAFILE.DAT file, a separate data file for each incomplete transaction. These files are numbered and have the extension DAT. In essence, they are like the NAFILE.DAT except there is only one transaction per file.
00000001.POL file Using the MANUAL.BCH file produced by the GenData program, the GenWIP program creates from the POLFILE.DAT file, a separate POL file for each incomplete transaction. These files are numbered to correspond with their matching data file and contain information about the form set on which the system should place the data. In essence, they are like the POLFILE.DAT except there is only one form set per file.
UNIQUE.DBF file The UNIQUE.DBF file contains the last number for WIP file that was created. Whenever a WIP file is created, a number is generated to uniquely identify it to make sure no WIP file is overwritten. You should not modify, rename, or delete this file. The highest number it will generate for WIP files is FFFFFFFF, which is 4,294,967,295. After this number, the counter resets to 00000001.
The GenWIP program uses this information to create separate data and form information files for the incomplete transaction information it receives from the GenData program.
Files Used by the GenArc Program
341
FILES USED BYTHE GENARC
PROGRAM
The GenArc program archives forms and data so you can store the information efficiently and retrieve it quickly. This program receives information stored in the APPIDX.DFD. Using this information, the GenArc program creates CAR files to store the information and forms and a DBF files which serves as an index to the data in the CAR files. The GenArc program can create multiple CAR files, as needed.
The GenArc program uses and creates these files as if archives information:
• APPIDX.DBF
• APPIDX.DFD
• ARCHIVE.CAR
• APPIDX.MDX
APPIDX.DBF file The APPIDX.DBF file is created by the GenArc program and contains records about the archive information stored in the ARCHIVE.CAR file.
APPIDX.DFD file The GenData program creates this file to tell the GenArc program how to store data and forms to be archived. The actual information is stored in ARCHIVE.CAR files.
ARCHIVE.CAR file The GenArc program creates CAR files in which it stores archived forms and data. An example of a generated CAR file is ARCHIVE.CAR. You can have multiple CAR files.
APPIDX.MDX file This file serves as an index to the APPIDX.DBF file.
APPIDX.DFD file The APPIDX.DFD file, or application index file, is used by the GenArc program and the Entry module. The GenArc program writes out the application index file using the APPIDX.DFD. While the entry module reads the application index file using the APPIDX.DFD file.
You can set the name of the APPIDX.DFD file in the ArcRet control group in the FSIUSER.INI file, as shown below:
< ArcRet >
AppIdxDfd = AppIdx.Dfd
However, the APPIDX.DFD name does not have to be set as shown above, provided the system is running in a Windows environment. If the APPIDX.DFD name is not specified as shown, the system automatically appends a DFD extension to the APPIDX name specified in the same group, as shown below:
< ArcRet >
AppIdx = AppIdx
This will not work in an environment that does not support file name extensions, such as z/OS systems.

Appendix ASystem Files
342

343
Glossary
All components of the system use specific terminology. We suggest you familiarize yourself with these terms before you begin using the system. The following terms include definitions of system tools and files as well as commonly-used terms.
NOTE:The Data control group in the FSISYS.INI file lets you specify many of the file names you want to use. For instance, by modifying the settings in this group, you can change the name of the error file (ERRFILE.DAT) to any file name you want. In this manual, we refer to the default names for these files.
00000001.DAT File Using the MANUAL.BCH file produced by the GenData program, the GenWIP program creates from the NAFILE.DAT file, a separate data file for each incomplete transaction. These files are numbered and have the extension DAT. In essence, they are like the NAFILE.DAT except there is only one transaction per file.
See also 0000001.POL and the GenWIP Program on page 348.
00000001.POL File Using the MANUAL.BCH file produced by the GenData program, the GenWIP program creates from the POLFILE.DAT file, a separate POL file for each incomplete transaction. These files are numbered to correspond with their matching data file and contain information about the form set on which the system should place the data. In essence, they are like the POLFILE.DAT except there is only one form set per file.
See also 0000001.DAT and the GenWIP Program on page 348.
Glossary
344
AFP Advanced Function Printing (AFP), developed by IBM, is a print server language that generates data streams of objects. The data streams merge with print controls and system commands to generate Intelligent Printer Data Stream (IPDS). Your system then sends the IPDS to the AFP printer for printing. The GenPrint program can create spool files for AFP printers.
ARCHIVE.CAR File See .CAR Files on page 344.
ARCHIVE.DBF File The ARCHIVE.DBF file is created by the GenArc program and contains records about the archive information stored in the ARCHIVE.CAR file.
ARCHIVE.DFD File The GenData program creates this file to tell the GenArc program how to store data and forms to be archived. The actual information is stored in ARCHIVE.CAR files.
.BCH Files The GenData program creates files with the extension BCH, called batch files, which list the transactions to be included in each batch. Batches are specified in your FSISYS.INI file settings. Batch files are used as trigger files by the GenPrint and GenWIP programs. Batch files indicate which transactions should be printed in a given batch job. The GenPrint program uses batch files to print completed forms. The GenData program also creates manual batch files which record incomplete transactions. These manual batch files are used by the GenWIP program. Error batch files contain transactions which cannot be processed by the system. Batch files are comma-delimited TEXT files.
See also MANUAL.BCH File on page 349.
Batch Files See .BCH Files on page 344.
.CAR Files The GenArc program creates CAR files in which it stores archived forms and data. An example of a generated CAR file is ARCHIVE.CAR. You can have multiple CAR files. The GenArc program also creates DBF files which serve as an index to the archived information stored in the CAR file.
DAL Document Automation Language (DAL) is the language you use when you tell the system how to calculate variable fields. This calculation is also called a script. When you select calculation options for a variable field, you can choose one of the following:
DAL CALC. Recalculates the value of all fields each time a user tabs to a new field in the section.
DAL SCRIPT. Recalculates the value of the fields to which you assign the script only when a user tabs out of that field
NOTE:You can find detailed information about DAL in the DAL Reference.
345
.DAT Files Data table (DAT) files define various information the system uses as it processes information. All DAT are text files which have the extension DAT. Some DAT files are comma-delimited text files.
The NAFILE.DAT file contains the variable data generated by the GenData program. This file, along with the POLFILE.DAT file, tell the GenPrint program what to print. This file also tells the GenWIP and GenArc programs what to place into WIP and what to archive. These files can only be edited with a text editor.
The GenWIP program also creates DAT files for each incomplete transaction it must process. These files are numbered sequentially and for each file there is a corresponding POL file which contains information about the forms to use.
.DBF Files Database files (DBF) are used in several places in the system. For each DBF file, there is a corresponding MDX file which serves as its index. Examples of DBF files are FDB.DBF, ARCHIVE.DBF, which is created by the GenArc program; and WIP.DBF, which is created by the GenWIP program.
DDT Files In legacy implementations, the data definition table (DDT) file told the GenData program what rules it should use as it processes the data.
.DFD Files Data field definition (DFD) files define to the system the file formats of the files generated by the system.
An example of a DFD file is the TRNDFDFL file which the GenTrn program creates. The GenData program uses this file to read the TRNFILE which contains the actual transactions GenTrn creates.
Distributed ResourceLibrary
A Distributed Resource Library provides a decentralized repository into which you can place compiled items you select from your master resource library. A distributed resource library provides a unique and customized library of reusable resources for specific users at various locations in your organization. A distributed resource library contains a section (image) library, a variable data dictionary library, a rules library, and a system library.
See also Master Resource Library on page 350.
Duplex A form printed on both the front and back sides of a sheet of paper is printed in duplex mode.
See also Simplex on page 351.
ERRFILE.DAT The GenTrn program creates this file to note any transactions it could not process correctly. The other programs, such as GenData, GenPrint, GenWIP, and GenArc, update this file as they perform their processing activities. This file will help you discover and correct any processing errors you may encounter. Common errors are caused by incorrect or missing data. The system records error information by transaction. You can view this file using a text editor.
Glossary
346
Error Batch The GenData program creates error batch files if it spots an error. In contrast to manual batch files, you cannot correct these errors using the GenWIP program. Instead, you must, for instance, correct the error in the extract file, change the flag to operator required, or change the FAP file and then process the transaction again.
Error Files See ERRFILE.DAT on page 345.
Extract Files Extract files are typically text files which contain the data the system processes. Extract files are created by another program, typically a database program, in a format the system can read. The text file format provides a standard interface into the system. For example, your data may be stored in a DB/2 or VSAM database from which you extract the data you want to process in the system in text format.
You can customize the system to read almost any type of file layout. The GenTrn program first reads the extract file and, using that extract data and TRNDFDFL.DFD file, creates transaction files (TRN files) the GenData program can use as it applies the processing rules and creates batch files, the NAFILE.DAT, and the POLFILE.DAT file.
NOTE:For use on an z/OS platform, the extract file must be converted to EBCDIC format if the file contains international characters.
The system includes a base extract file, called EXTRFILE.DAT, which serves as an example of the type of file the base system can read. You can use this file to experiment with the base system and determine how you want to set up your system.
.FAP Files The information which defines each section is stored in a FAP file. FAP files are text files with the extension FAP. You can edit FAP files using a text editor, but they are most commonly created and edited using Documaker Studio or the Documaker Add-In for Word.
FDB.DBF File The FDB.DBF file is a database file which contains a record for each unique variable field you create in Documaker Studio. You can add records (variable fields) using Studio. The FDB.MDX file serves as an index to this file.
fetype An fetype defines the field format type. You can have an input and an output fetype. For example, an input fetype with the FmtNum rule tells the system where the decimal goes in the number. The output fetype tells the system how to format the output amount. An fetype can consist of either one or four characters. For more information, see the Rules Reference.
Fixed Data Fixed data is the same on every copy of the form. This includes items such as logos, headers and titles. This information remains constant regardless of the data entry.

347
Font Manager Documaker Studio’s Font manager is used to organize fonts and font sets. A font is a collection of letters, symbols, and numbers that share a particular design. A font set is a collection of fonts you choose to group together for your section and printing needs. The font set information is stored in the font cross reference file (FXR file) which is created by Font manager. Font manager lets you make sure your documents print the same way on different printers.
A well organized font set makes section creation quick and efficient. Forms composers need a variety of fonts for text and field creation. Studio does not change the actual printer fonts. This tool is used for defining the appropriate characteristics (bold, size, and so on) about the font so the fonts used to create a particular form set are consistent and easily accessible to the forms composers.
Form A form is a single document containing one or more pages or sections. Most forms contain multiple pages that are usually printed on both sides of a single sheet (duplex). Some forms are printed only on one side (simplex). Typical forms include insurance policies, tax returns, and mortgage documents.
A form includes two types of data: fixed and variable.
• Fixed data is the same on every copy of the form. This includes items such as logos, headers and titles. This information remains constant regardless of the data entry.
• Variable data may differ from form to form. This includes items such as individuals' names, addresses, and policy numbers. This information relates to the specific data processed on each form.
Form Set A form set is a group of logically related forms required to process a single transaction. A form set may contain one or many forms. You can group forms any way you want as you create form sets.
FSISYS.INI File The FSISYS.INI file is a one of the initialization (INI) files used by the system to set system parameters and to enable or disable system features. For example, the FSISYS.INI file contains information the GenTrn program uses to determine when a new record starts and other information about the extract files the GenTrn program processes.
NOTE:The Data control group in the FSISYS.INI file lets you specify many of the file names you want to use in Documaker Server. For instance, by modifying the settings in this group, you can change the name of the error file (ERRFILE.DAT) to any file name you want. In this manual, we refer to the default names for these files.
FSIUSER.INI File The FSIUSER.INI file is one of the initialization (INI) files used by the system to set system parameters. For example, the FSIUSER.INI file contains information specific to each user, such as the location of files and so on.
Glossary
348
.FXR Files Font cross-reference (FXR) files are used by the system so you can make sure your documents print the same way, regardless of which printer you choose. These files contain information about the various fonts you use and their equivalents on various printers.
The system includes several font cross-reference files. You can edit and create font cross-reference files using Studio’s Font manager.
GenArc Program The GenArc program archives forms and data so you can store the information efficiently and retrieve it quickly. This program receives information stored in the APPIDX.DFD file from the GenData program. Using this information, the GenArc program creates CAR files to store the information and forms and DBF files which serve as an index to the data in the CAR files. The GenArc program can create multiple CAR files, as needed.
Depending on the operating system you use, this program has various names such as genacw32.exe for 32-bit Windows environments.
GenData Program The GenData program takes information created by the GenTrn program and applies processing rules to those transactions and data. The GenData program creates batch files, the NAFILE.DAT, and the POLFILE.DAT file for the GenPrint program. It also creates a manual batch file for the GenWIP program. The output from the GenData program is also used by the GenArc program to archive forms and data.
Depending on the operating system you use, this program has various names such as gendaw32.exe for 32-bit Windows environments.
GenPrint Program The GenPrint program takes information produced by the GenData program and creates a printer spool file for use with PCL, AFP, Metacode, and PostScript printers. Specifically, the GenData program produces batch files, an NAFILE.DAT, and a POLFILE.DAT file which the GenPrint program uses to create printed forms.
Depending on the operating system you use, this program has various names such as genptw32.exe for 32-bit Windows environments.
GenTrn Program The GenTrn program reads data in an extract file and creates transaction records which in turn are processed by the GenData program. The main file created by the GenTrn program is the TRN file which, along with the TRNDFDFL.DFD file, tells the GenData program which transactions to process.
Depending on the operating system you use, this program has various names such as gentnw32.exe for 32-bit Windows environments.
GenWIP Program The GenWIP program receives information about incomplete transactions from the GenData program. This information is stored in manual batch files. The GenWIP program then creates separate files for each incomplete transaction. The data for these incomplete transactions is stored in a file with the extension DAT, such as 00000001.DAT. The corresponding form set information is stored in a file with the extension POL, such as 00000001.POL.
349
The GenWIP program also creates the WIP.DBF file, a database file which contains records of all the incomplete transactions extracted from the NAFILE.DAT file produced by the GenData program. The WIP.MDX file, also created by the GenWIP program, serves as an index to the WIP.DBF file.
This gives the Entry module the information it needs to display the form so you can fill in the missing information and complete the form. Once completed, you can resubmit the form for processing by the GenData program.
Depending on the operating system you use, this program has various names such as genwpw32.exe for 32-bit Windows environments.
Graphics Manager Once you create a graphic object such as a logo or a scanned signature, you can edit it using Documaker Studio’s Graphics manager. This tool lets you resize, reverse, rotate, crop, and otherwise manipulate a section to fit your needs. The system stores these graphic files as LOG files.
.INI Files Initialization (INI) files are used by the system to set system parameters and to enable or disable system features. Some examples of system INI files are: FSISYS.INI and FSIUSER.INI. For example, the FSISYS.INI file contains information the GenTrn program uses to determine when a new record starts and other information about the extract files the GenTrn program processes. The FSIUSER.INI file contains information specific to each user, such as the location of files and so on.
.JDT Files Job Definition Table (JDT) files tell the system which rules to use as it processes a specific job. Rules defined in the JDT file are run before the system runs rules assigned to specific fields. An example of a JDT file is the AFGJOB.JDT file.
Library Manager Documaker Studio’s Library manager lets you manage documents and logos while maintaining the versions, revisions, and integrity of the sections you are developing. You may want to set up a library for a specific client or form set. You can store all sections and logos in a resource library. The storage consists of a listing of the section or logo, as well as a snap shot of the section.
When you set up a library, you must define the locations of the library and storage files. Entries made during library setup are automatically saved back to the FSIUSER.INI file when you exit the setup window.
Log Files When you run GenTrn, the program creates log files which record by transaction each transaction the program processes. You can review these log files using any editor.
.LOG Files Logos and other graphics, such as scanned signatures, are stored as LOG files in the system. You use Documaker Studio to view, manage, and manipulate LOG files.
MANUAL.BCH File The GenData program creates this file if it is unable to complete the processing of a form set. Typically, this occurs because the forms are missing information. This file is then used by the GenWIP program so a data entry operator can manually complete the form and resubmit it for processing.

Glossary
350
See also Batch Files on page 344 and the GenWIP Program on page 348.
Master ResourceLibrary
Master resource libraries provide a central repository into which you can place all reusable resources such as sections, fonts, graphic files, data definitions, processing rules, and processing procedures. A master resource library contains a section library, a variable data dictionary library, a rules library, and a system library.
See also Distributed Resource Library on page 345.
Metacode A printer definition language developed by Xerox. Metacode is the native language of Xerox’s Centralized Printing Systems. The GenPrint program can create spool files for Metacode printers.
.MDX Files The various system programs create MDX files which serve as indexes to the database files (.DBF files). For example, the GenWIP program creates the WIP.DBF file and the corresponding WIP.MDX file to record the incomplete transactions which were not printed.
The Field Database Editor creates the FDB.MDX file to serve as an index to the FDB.DBF file which contains common variable field definitions.
NAFILE.DAT File The GenData program creates an NAFILE.DAT file, commonly referred to as the NA file, in which it stores section and variable field information. The GenPrint program uses this file, along with the POLFILE.DAT file, which is also produced by the GenData program to print the forms.
If the data is incomplete and GenData cannot complete the form, it creates a manual batch file. The GenWIP program then creates separate DAT and POL files for each incomplete transaction. These files provide the entry system with the information it needs to open the form so a data entry operator can add the missing data. This is a comma-delimited text file.
NEWTRN.DAT File The GenData program creates the NEWTRN.DAT file. This file tells the GenArc and GenWIP programs where to find data in the NAFILE.DAT file and which forms to use in the POLFILE.DAT file. This is a comma-delimited text file.
Objects Objects are the individual items which comprise your section. Examples of objects are boxes, bar codes, lines, graphics, and text. All objects have unique attributes within the section. Attributes include items such as position, size, font type, and color. Documaker Studio lets you easily create the various objects which comprise a section.
Overflow Overflow refers to a situation where there is not enough room on the form for all of the data you need to enter. In this situation, you want to have the system automatically place the additional data onto another form or another copy of the same form. The system includes features which let you do this.

351
For instance, suppose you have a form which records automobiles and the drivers of the automobiles. The form has room to record four different automobiles and drivers. In most cases this will suffice but, in some situations, you need to include information about additional automobiles and drivers. Using the overflow features, you can handle this situation automatically.
Page Pages are the printed result of a section or a group of sections. You can have one section per page, several sections per page, or even a section that spans several pages. You determine the size of a page based on the size of your printed output. With Documaker Studio, you can design forms for any size page your printer can print.
PCL PCL (Printer Control Language) is a printer definition language developed by the Hewlett-Packard company. The GenPrint program can create spool files for PCL printers.
POLFILE.DAT File The POLFILE.DAT file, commonly referred to as the POL file, defines the form set used for a specific transaction. The GenData program creates this file which is used by the GenPrint, GenWIP, and GenArc programs. For instance, if the data is complete, GenData creates an NA file and a POL file. These files are used by GenPrint, along with the batch files, to produce the print-ready file.
If the data is incomplete and GenData cannot prepare the form for printing, it creates a manual batch file. The GenWIP program then creates separate files for each transaction to provide the entry system with the information it needs to open the form so a data entry operator can add the missing data. This is a semicolon-delimited text file.
PostScript PostScript is a printer definition language developed by Adobe Systems which you can use on various printers. The GenPrint program can create spool files for PostScript printers.
Section A section (formerly called an image) is a group of text or graphics or both that make up a form or a section of a form. You create sections using Documaker Studio. Each section is stored in a separate file, so you can reuse sections in several forms and form sets. Multiple sections can comprise a single form. For instance, a three-page form with text and graphics, printed on both sides of each page, could contain a total of six sections. Some examples of sections include an insurance policy declaration page, the return portion of a bill, and page one of a 1040 Federal tax return form.
You may choose to create a single page containing multiple sections, especially if you develop a page with graphics.
Simplex A form printed on only one side of a sheet of paper is printed in simplex mode.
See also Duplex on page 345.
System Releases To continually improve and support the product, software enhancements and corrections are organized into regularly scheduled system releases. Releases are noted with a major and minor version number, such as 11.5 or 12.0.

Glossary
352
System Patches In certain situations, and on a case by case basis, a correction to the current system release can be made available as a system patch. Corrections to the prior release are handled on a case by case basis, and are made available only as system patches.
Transaction List The GenTrn program creates the transaction list which is used by the GenData program as an index to the data in the extract file. The transaction list is stored in the TRN File.
.TRN Files The GenTrn program creates transaction or TRN files which contain a record for each transaction. The record format for the TRN file can vary to meet your needs. This format is defined in the TRNDFDFL.DFD file. The GenData program uses the TRNDFDFL.DFD file to read the information in the TRN file as it processes the information.
Each record in a TRN file contains a series of offsets or pointers. These offsets define the location of the transaction data. For instance, the offsets in a TRN file tell the GenData program where the transaction begins in the extract file, where the data for the transaction is stored in the NAFILE.DAT file, and where the form set for the transaction is stored in the POLFILE.DAT file.
TRNDFDFL.DFD File The TRNDFDFL.DFD file tells the GenData program how to read the TRN file. If necessary, you can edit this text file in a text editor.
UNIQUE.DBF File The UNIQUE.DBF file contains the last number for the WIP file that was created. Whenever a WIP file is created, a number is generated to uniquely identify it to make sure no WIP file is overwritten. You should not modify, rename, or delete this file. The highest number it will generate for WIP files is FFFFFFFF, which is 4,294,967,295. After this number, the counter resets to 00000001.
The GenWIP and GenArc programs use this information to create separate data and form information files for the incomplete transactions received from the GenData program and for the individual forms stored in archive.
See also 00000001.DAT File on page 343 and 00000001.POL File on page 343.
Variable Data Variable data may differ from form to form. This includes items such as individuals' names, addresses, and policy numbers. This information relates to the specific data processed on each form.
WIP.DBF File The WIP.DBF file contains information about the incomplete transactions which the GenWIP and GenArc programs extracted from the NAFILE.DAT and POLFILE.DAT file created by the GenData program. The WIP.MDX file serves as an index to this file.
See also the GenWIP Program on page 348.
WIP.MDX This file serves as an index to the WIP.DBF file.

353
xBase A generic term for industry-standard dBase IV file format.

Glossary
354
355
Index
Symbols
& (ampersand) 199
.BCH files 326
.CAR files 326
.DAT files 326
.DBF files 326
.DDT files 326, 331
.DFD files 327
.FAP files 327
.INI files 328
.JDT files 328, 331
.LOG files 328
.MDX files 328
~Encrypted 124
~GetEnv function 122
~OS function 123
~Platform function 123
~WIPField built-in function 125
Numerics
00000001.DAT file 340
00000001.POL file 340
2-up printingoverview 69rule order 75
3270 emulator program 312, 319

Index
356
A
Access databases 235
AddBlankPages function 104
Added_Fonts control group 72
AddedOn option 222
AddForm functionbanner forms 16
addingtables of contents and indexes 107
AddLine rule 73
AddTextLabel rule 73
Adobe Acrobat 2
AFEMAIN programdefined 208viewing archives 234
AfeProcedures control group 237
AFEW32 237
AFEWIP2ArchiveRecord 237
AfeWIP2ArchiveRecord control group 237
AFG2WIP control group 95
AFGJOB member 297
AFGJOB.JDT file 328, 331and 2-up printing 75
AFPcomment records 73record list and the AddTextLabel rule 73
AIXarchive/retrieval scenarios 211
AliasPrintBatches option 111, 292, 307, 310
ALLOCDDT job 295
ALLOCJDT job 297
AlwaysSQLPrepare option 217
ancestor 137
ANSI code page 313, 320
APPIDX filedefined 208
APPIDX.DBF file 341
APPIDX.DFD file 330, 341
APPIDX.MDX file 341
application index file 330
archivefeatures 210field names 246retrieval 240transaction log 216
archive index fileand WIP 237
Archive rule 52, 53
ARCHIVE.CAR file 341
ArchiveMem option 216, 222
archivingtransactions 32
ArcRet control group 216, 241
ARCRET utility 248
ARCVIEW utility 234
ASCII files 311, 318
AutoIncreaseOffsetLengths option 118
B
banner form processingmulti-file print 17
banner formsgroups 16
banner processingcustom callback function 15overview 15
BARR software 315, 322
BaseErrors option 35
BaseRuleTime option 113
Batch control group 53
batch files 338and single step processing 47grouping 111page statistics 38
Batch window 286, 304, 308
BatchBannerBeginForm option 16
BatchBannerBeginScript option 16
BatchBannerEndForm option 16
BatchBannerEndScript option 16
357
BatchByPageCount rule 53
BatchingByRecip control group 53
BatchingByRecipINI rule 53
BatchTable option 111
BlankPage option 81
block sizes 288
Booklet option 80
booklet printing 80
BookletPapersize option 80
BookletTray option 80
BreakBatch function 87
BuildMasterFormList rule 53
built-in functions 121
C
Cabinet option 222
CacheFAPFiles option 304, 308
CacheFiles option 305, 309
caching optionsfor DDT files 290, 305, 309for FAP files 290summary 308
callback functionsInitPageBatchedJob rule 73
CallbackFunc option 91
CARData control group 233
CARFILEdefined 208
CARFILE.DFD file 229
carriage returns 312, 319
CaseSensitiveKeys option 238
CATALOG filedefined 209
CheckCount option 34
CheckZeroFontID option 110
child 137
Class option 235
class recipient 66
ClearMsgFile option 192
code page 1004 313, 320
code page 37 313, 320
column names 257
COMM_RECS columnrestarting GenArc 220
commasin search masks 182
comment records 19
commitdefined 208
CommitEvery option 220
compile options 287
COMPLIB 311, 318
conceptssetting recipients and copy counts 156
configuringthe message system 191the system 150
consolelogging information 112
controlling the message translation process 194
ConvertWIP rule 52, 54
copy countsDAL and GVM variables 170example 170setting 155, 156
Counter field 159
counter search mask 173
CounterDFD option 71
CounterTbl option 53, 54, 71
CoverBackIn option 81
CoverBackOut option 81
CoverFrontIn option 81
CoverFrontOut option 81
CoverSheet option 81
CoverTray option 81
CPCNV utility 313, 320
CPU time 286, 304, 308
CreateIndex option 232
CreateTable option 232
CreateTime field 94

Index
358
CreateTime option 222
creatingprint spool files (multiple step processing) 28transaction records (multiple step processing) 22transaction records (single step processing) 46
creating messages 197
Creating NAFILE and POLFILEs as VSAM KSDSs 303
Critical Error message 190
CRYRU utility 124
custom callback function in banner processing 15
Custom Rule field 159
D
DALanalyzing performance 114
DAL functionsmanipulating file names 88
DAL scriptsand extract files 333banner processing 16splitting print streams 85
DALFile option 231
DALLibraries control group 16, 105
DALRUN built-in function 123
DALVAR built-in function 123
Data control groupprint batches 111
data definition tabledefined 326file format 331
data format definition files 327
data table files 326
databasearchiving to 216
database files 326, 329
DataPath option 111and message files 192and the TRANSLAT.INI file 193
date stampsturning off 194
DB Field Name values 246
DB2databases 235
dBase 353
DBErrors option 219
DBHandler option 231, 232, 236
DBLib tracing 195
DBLogFile option 195
DBTable option 231
DDT filescaching 290, 305, 309
DDTFile option 231
DDTVSAM DD statement 296
DDTVSAM option 296
Debug option 232, 236
debug options 292, 306, 310
Debug_If_Rule option 109
Debug_Switches control group 109
DefaultTag option 217
definingoutput message files 192
defining the extract file as a VSAM ESDS 293
DEFLIB 288
DefLib optionand the TRANSLAT.INI file 193
DEFLIB PDS 295, 297, 301
DelBlankPages function 105
descendant 137
DestField token 204
DeviceName function 87
DFD filedefined 209
DFD files 329and 2-up printing 72format 333
DlgTitles control group 241
DocSetNames control group 51
Documaker Add-Inselecting a language 134

359
Documaker Serverresource files 329running via IDS 58selecting a language 134system benefits 8system overview 2understanding the system 9
Documaker Studioselecting a language 133
Documanagecategorizing documents 245data types 244Extended Document Properties 249mapping Documaker archive fields 246Next/Retrieve cursor 248using resources in GenData and GenPrint 13using with GenArc 221viewing archives 234
Document Type Number 185
Docupresentment 2
Docusaveretrieving form sets 240
DOS command line interface 312, 319
DownloadFAP option 107, 292, 306, 310
DownloadFonts option 315, 322
downloadingprint streams 315, 322
downloading resources 311, 318
DPA filesviewing 234
DPASSWD command line option 217
DPRAddBlankPages rule 106
DPRDelBlankPages rule 106
duplexadding and removing pages 104
DUSERID command line option 218
E
EBCDIC 327code page 313, 320uploading files 311, 318
ElapsedTimeStamp option 110
emailGenWIP 96
EMIT_CRITICAL type 197
EMIT_ERROR type 197
EMIT_MESSAGE type 197
EMIT_WARNING type 197
Enable_Debug_Options option 109, 112, 195
EnableEmailNotification option 96
EnableTransBanner option 105
encrypted values 124
ERRFile option 192
ERRFILE.DAT file 190and the ImmediateTranslate option 194
error batch 338
error codes 191
error files 327, 336turning off the date stamp 194
Error message 190
error messagesconfiguring 191creating 197defining the output file 192delaying the translation process 194determining where a message originates 203disabling 191formatting 202initializing output files 193message tokens 198overview 190setting up static text 200
ErrorCodeOverride control group 196
ErrorFileDateStamp option 110
ErrorFileOpenMode option 193

Index
360
errorscorrecting 47using GenArc with Documanage 233
examplescopy counts and sections 170of form set definition files and transaction trigger
tables 169RECIPIF rule 175search mask and sections 173setting search masks and recipients 180transaction code 172
Excel spreadsheet databases 235
EXCPs 286, 304, 308
ExportIndex option 216
Expression option 111
EXT_Length option 72, 233
Extended Document Properties (XDPs) 245
extract files 288defined 327guidelines for 331layout of 332NoGenTrnTransactionProc rule 54XML files 135
F
FAP filesadding and removing 104caching 290caching options 304, 308compiled 311, 318using pre-compiled 291, 305, 309
FAP2CFA utility 311, 318
FAP2MET utility 291, 305, 309, 314, 321
FAPAddBlankPages 104
FAPDelBlankPages 104
FAPLIB 289
FB 288
FBS 288, 303
FDT2CFA utility 311, 318
FIELDBatchName control group 111
Field Description control group 334
FieldErrors option 35
FieldFuncTime option 113
FieldList option 111
fieldsmapping with XPath 51
Fields control group 333grouping print batches 111
file namesDAL functions 88
File optionINIFiles control group 123
file summaryGenArc program 33GenData program (multiple step processing) 26GenData program (single step processing) 49GenPrint program (multiple step processing) 29GenTrn program (multiple step processing) 23GenWIP program (multiple step processing) 31
FileDrive function 88
FileExt function 88
FileName function 88
FilePath function 88
361
files.CAR files 326.DAT files 326.DBF files 326.DDT files 326, 331.DFD files 327.FAP files 327.JDT files 328.LOG files 328.MDX files 32800000001.DAT file 34000000001.POL file 340APPIDX.DBF file 341APPIDX.DFD file 330, 341APPIDX.MDX file 341ARCHIVE.CAR file 341batch files 338BCH files 326created by the GenData program 337created by the GenTrn program 336created by the GenWIP program 340DFD file format 333DFD files 329error batch files 338error files 327, 336extract files 327, 331FORM.DAT file 157formats of 323FSISYS.INI file 329FSIUSER.INI file 329initialization files 328JDT files 331log files 328, 336MANUAL.BCH file 338NAFILE.DAT file 337NEWTRAN.DAT file 338POLFILE.DAT file 337RCBDFDFL.DFD file 330recipient and copy count files 157resource files 329system files 323transaction files 328, 336transferring 311, 318
TRNDFDFL.DFD file 330types and characteristics 288types of 326UNIQUE.DBF file 340updated log and error files 338, 339used by the GenArc program 341WIP.DBF file 340WIP.MDX file 340
FileType option 222
FinalPrinter optionand 2-up printing 70
FolderBy option 221
foldersupdating 223
fontsIDs equal to zero 110
FOR filebanner processing 15
ForceFolderUpdate option 223
ForceNoImages rule 73
form level triggers 157, 165
Form manager 156
Form name field 158
Form option 59
form set definition table 157examples 169summary 187
form setsadding and removing pages 104PrintFormset rule 55
FORM.DAT file 157banner processing 19examples 169single step processing 53
formatDFD files 333trigger table record 158
FormFile option 231

Index
362
formsinclusion information 131marking master forms 168requirements 150triggering in XML files 136
FormSetID field 93
FormSetRuleTime option 113
fseek 288
FSIFileName taken 202
FSIFileName token 204
FSILineNumber token 202, 204
FSIPATH environment variable 234
FSISYSDDTVSAM option 296, 298METVSAM option 300options 304, 308performance options 290VSAMNA option 303VSAMRCPTB option 302
FSISYS.INI file 329and 2-up printing 70banner processing 19, 20grouping print batches 111single step processing 47
FSIUSER.INI file 329INIFiles control group 123single step processing 47
FullFileName function 88
functionsbuilt-in INI functions 121
G
GEN_DEBUG_DebugSwitchSet function 109
Gen_TabUtil_LoadListFromTable function 109
GenArc program.CAR files 326and Documanage 249APPIDX.DBF file 341APPIDX.DFD file 341APPIDX.MDX file 341ARCHIVE.CAR file 341archiving transactions 32command line options 217description 12file summary 33files used 341output files 25running 216single step processing 52system scenarios 210using with Documanage 221
GenData program.BCH files 326.DDT files 326batch files 338command line options 108description 11error batch files 327, 338file summary (multiple step processing) 26file summary (single step processing) 49files created 337MANUAL.BCH file 338NAFILE.DAT file 326, 337NEWTRAN.DAT file 338processing transactions (multiple step processing) 24restarting 34TRNDFDFL.DFD file 330updated log and error files 338, 339
GenDataStopOn control group 35
GenDataX job 296, 298
GenPrint programaccessing batch totals 39banner processing 15command line options 108creating print spool files (multiple step processing)

363
28description 12file summary (multiple step processing) 29output files from GenData (multiple step processing)
25
GenTranStopOn control group 44
GenTrncontrolling processing 44
GenTrn programand single step processing 46command line options 109creating transaction records for multiple step
processing 22description 11error files 327, 336file summary (multiple step processing) 23files created 336initializing message files 193log files 328, 336transaction files 328, 336TRNDFDFL file 330
GenWIP program.DAT files 32600000001.DAT file 34000000001.POL file 340description 12field assignments 93file summary (multiple step processing) 31files created 340generating emails 96output files from GenData (multiple step processing)
25sending incomplete transactions to WIP 30UNIQUE.DBF file 340WIP.DBF file 340WIP.MDX file 340
GETENV INI function 94
GetEnv INI function 239
GetRCBRec rule 73
going live 150
GroupName1 field 158
GroupName2 field 158
H
handling international characters 313, 320
header recordsand extract files 333
HEAP option 287
HP-UXarchive/retrieval scenarios 211
I
IDCAMS job 303
IDSrunning Documaker Server 58trace file 195
IF_Rule control group 292, 306, 310
image level triggers 157, 162
Image Name field 158
Image option 59
ImageErrors option 35
ImageFuncTime option 113
ImageRuleTime option 113
ImmediateTranslate option 194and ERRFILE.DAT 194
implementation methodologies 150
implementing your system 149
indexesadding 107
INI built-in functions 121
INI command line option 217
INI fileschanges for 2-up printing 70using multiple 123
INIFiles control group 123
INIGroup control group 124
INILib option 112
InitArchive rule 52, 54
InitConvertWIP rule 52, 54
initialization files 328

Index
364
InitMerge rule 73
InitPageBatchedJob rule 73
InitPrint rule 54and the NoGenTranTransactionProc rule 54
InitSetrecipCache rule 54
INLINE option 287
installingthe system 150
INT_LENGTH option 72
INT_Length option 233
international characters 313, 320
InUse field 93
J
JCLLIB PDS 295, 299, 301
JDTVSAM DD statement 298
JDTVSAM option 298
job definition table 328, 331
JOBID command line option 217
JOBID parameterrestarting GenArc 219
K
KEYBatchName control group 111
key fieldsand extract files 333
Key1CaseSensitiveKeys option 238
KeyIDCaseSensitiveKeys option 238
L
languagesselecting 133
LASTERRORTOKEN token 199, 202
LASTREC columnrestarting GenArc 220
LBYD option 233
LBYI option 233
LBYLOG option 233
LBYLOGFile option 231
line feeds 312, 319
lists of figuresadding 107
LoadListFromTable option 109
log filesconfiguring 191creating log messages 197defined 328defining the output file 192delaying the translation process 194determining where a message originates 203disabling 191formatting 202GenTrn program 336initializing output files 193message tokens 198of archived transactions 216overview 190setting up static text 200turning off the date stamp 194
LOGFile option 192
LOGFILE.DAT file 190
LogFileDateStamp option 110
logging messages 195
logging options 291, 305, 309
logical printers 91
LOGOFile option 231
LogToConsole option 112, 216, 291, 305, 309
LogTransactions option 191, 291, 305, 309

365
LookUp ruleand extract files 333
M
MailAttachment option 96
MailID option 96
MailMessageBody option 96
MailSubject option 96
MANUAL.BCH file 338
MapByDBName option 246
markingmaster forms 168subordinate sections 167
Master and Subordinate Sections 167
master flagand performance 181
master formsmarking 168
master resource librariesimplementation 150
MasterDDTNotInLibrary option 231
MaxPolLineLength option 337
MaxRecsPerTransaction option 292, 307, 310
MergeAFP rule 74
message token fileusing 203
message token filesdefining the output file 192overview 191
messagesassigning message numbers 198clearing 192configuring 191creating 197defining output message files 192determining where the originated 202formatting 202initializing output message files 193types 197using tokens 198
Metacodemoving PMETs 299
methodologies for implementation 150
METVSAM option 300
ModifyTime field 93
movingDDT files into a VSAM KSDS 295JDT files into a VSAM KSDS 297PMET files into a VSAM KSDS 299SETRCPTB files to a VSAM KSDS 301
MSGFile option 192
MSGFILE.DAT file 190, 203
msgNO_MORE_IMAGES message 73
multi-file print callback method 85
MultiFileLogRecord option 119
MultiFilePrint callback function 50, 185
MultiFilePrint optioncontrolling the log 119
multi-mail transactionand the EXT_LENGTH option 72
multi-mail transactionsPageBatchStage1InitTerm rule 54
multi-page formsand 2-up printing 70
MVSarchive/retrieval scenarios 210programs 311, 318
MVS file format 327
N
NAFILE 289, 303
NAFILE.DAT file 326, 337and the WriteNAFile rule 55
NameDocBy INI option 221
NameDocBy option 222
NAPOLVS member 303
NEWTRAN.DAT filedefined 338

Index
366
NEWTRN.DAT fileand the WriteNAFile rule 55optimizing performance 289Restart option 218
next/retrieve cursor 248
NLS messages 192
NoGenTrnTransactionProc rule 54and the WriteNAFile rule 55mapping fields 51
NOT conditionsin search masks 183
NOVALIDATEHANDLE option 287
O
Occurrence flag 159
occurs clauses 332
ODBCarchive/retrieval scenarios 210multiple connections 235
ODBC_FieldConvert control group 235
ODBC_FileConvert control group 235
OMR marksand the AddLine rule 73
OPASSWD command line option 218
OpSystem option 327
Opt option 59, 60
Optimize option 287
optimizing performance 286, 304, 308
OR conditionsin search masks 183
Oraclearchive/retrieval scenarios 210, 211ODBC driver 228
ORDER BY clause 217
OT_Docs table 221, 222
OUSERID command line option 218
OutBuff token 199
output filesfor the GenArc program (Docusave) 25for the GenPrint program (multiple step processing)
25for the GenWIP program (multiple step processing)
25
overflowand class recipients 66defined 333XML files 135
Overflow flag 159
P
PageBatchStage1InitTerm rule 54
PageRange option 53and 2-up printing 71
pagesadding and removing 104total 38
parent 137
parenthesesin search masks 183
Passwd option 232
PDF format 2
PDS2VSDX job 295
PDS2VSJX job 297
PDS2VSPX job 299
performanceINI options 304, 308optimizing 286, 304, 308reducing job throughput 194
platformsmultiple INI files 123
PMETLIB PDS 291, 299
PO Handler 221
PODocument2Field control group 223
POField2Document control group 223
POLFILE 289, 303
POLFILE.DAT file 337and the WriteNAFile rule 55

367
pre-compiled Metacode files 290, 299, 314, 321
print batchesbanner processing 15grouping 111
print files 290
print spool filescreating (multiple step processing) 28
print streamsdownloading 315, 322splitting recipient batch 85
Print_Batches control group 111banner forms 16
printer driversbanner processing 15
Printer optionand 2-up printing 70, 71
PrintFormset rule 55, 130and the NoGenTranTransactionProc rule 54splitting recipient batch print streams 85
printing2-up 69PrintFormset rule 55
PrintTimeStamp option 113, 194
ProcessID built-in INI function 124
processingtransactions (multiple step processing) 24transactions (single step processing) 46
processing overview 11
ProcessQueue rule 55
PRTLIB data 54
PrtType option 91
PSF/2 315, 322
Q
Qualifier option 232
queuesProcessQueue rule 55
R
RCBDFDFL.DAT fileand 2-up printing 72
RCBDFDFL.DFD file 330and the WriteRCBWithPageCount rule 55grouping print batches 111
RCBStatDtlDFD option 39
RCBStats option 39
RCBStatsDtl option 39
RCBStatsTot option 39
RCBStatsTotDFD option 39
RCBTotals option 39
RCP2VSAM utility 289
RCP2VSMX job 301
Receive command 312, 319
RecipBatch function 19
recipient batch (RCB) transaction fields 93
recipient batch DFD fileand 2-up printing 72
recipient batch file 91, 330
recipient batch files 289
recipient batch recordsPageBatchStage1InitTerm rule 54unique data 59
Recipient copy count field 159
Recipient list field 159
recipientsclass recipients 66key files 157mapping information 123selecting 156setting 155
RECIPIF ruleand extract files 333and performance 181example 175
RecipMap2GVM control group 59
RecipMap2GVM INI control group 67
RecipName function 19
record formats 288

Index
368
Records per first image field 159
Records per overflow image field 159
RecordType option 95
Report option 287
Req option 59, 60
requirements definition 150
resource files 329
resourcesfor single step processing 47
Restart control group 34
restart file 34
Restart option 218, 219
Restart tabledefined 209
RestartJob rule 35
RetainTransBeginForm option 17, 18
Retrievaloptions 241
Retrieval Options window 241
Retrieve Document window 240
RightGutter option 80
rollbackdefined 208restarting GenArc 220
RP Struct 197
RPErrorProc function 197
RPLogProc function 197
RstFile option 34
RULCheckTransaction rule 34
RuleFilePool option 305, 309
rulesfor 2-up printing 73for single step processing 53listing those executed 113order for 2-up printing 75used in multiple step processing 33
Rules Processortrace file 195
Rules Publishing Solutionsystem overview 3
RULStandardProc ruleand the WriteNAFile rule 55
RunMode control group 292, 306, 310checking font IDs 110DownloadFAP option 107grouping print batches 111mapping fields with XPath 51
RunSetRcpTbl ruleand the BuildMasterFormList rule 53
runtime options 287
S
Search Mask 1 field 159
Search Mask 2 field 159
search masksand recipients 180example 173formatting 182RECIPIF rule 175
section level triggers 157, 162
sectionsmarking subordinate sections 167master and subordinate 167tokens 199, 204triggering in XML files 135, 136
self 137
Send command 312, 319
sequence numbersand extract files 332
Server option 232, 235
set recipient tableand performance 181
SetDeviceName function 87
SETRCPTBmember 289, 301
SETRCPTB.DAT fileand the StandardFieldProc rule 55and the StandardImageProc rule 55examples 169

369
SETRECIP tabledefined 157specifying 160
SetState ruleand extract files 333
settingFSISYS options 290FSISYS.INI options 304, 308
setting uperror messages and log files 189message text 200recipients and copy counts 155transaction trigger tables 160
Show_Debug_Options option 109
sibling 137
simplexadding and removing pages 104
single step processingclearing messages 192example 56overview 46WriteOutput rule 55
single-page formsand 2-up printing 69
skipping batch message 73
SortFormsForRecip callback function 185
sorting records 217
SQL Serverarchive/retrieval scenarios 210
SQLID command line option 218
StandardFieldProc rule 55and the WriteNAFile rule 55
StandardImageProc rule 55
StandardJobProc rule 68
statistics processing 39
Status columnrestarting GenArc 219, 220
StatusCode option 95
STOPREC command line option 218
subordinate flagsand performance 181
subordinate sectionsmarking 167overview 167
SuppressBanner function 19
Sybasearchive/retrieval scenarios 210
SYSPRINTDD statement 291
systemresources on a PC 311, 318
system files 323
system implementation methodology 150
system overview 11
system scenariosGenArc 210
system settingsmultiple step processing 47
T
table names 257
tablesdefined 208
TblLkUp ruleand extract files 333
TEMPIDX filedefined 208
testingthe system 150
text files 311, 318
TicketJobProc rule 68
tildesin search masks 183
token-data pairs 198, 201, 203
trace filesProcessID built-in INI function 124
TraceFile option 195
transaction codesexample 172
Transaction codes field 159

Index
370
transaction files 328, 336
transaction recordscreating for multiple step processing 22creating for single step processing 46
transaction trigger tabledefined 157examples 169how it works 161specifying 160summary 187
TransactionErrors option 35GenTrn processing 44
transactionsarchiving 32log of archived 216logging 112processing (multiple step processing) 24
Transallselecting a language 133
TransBannerBeginForm option 16
TransBannerBeginScript option 16, 105
TransBannerEndForm option 16
TransBannerEndScript option 16
transferring files 312, 319
TRANSLAT utility 190, 194
TRANSLAT.INI file 203defining the output message file 193determining where messages originate 202formatting messages 202message numbers 198message tokens 199setting up message text 200
translating messages 194
TranslationFile option 192
TRIGCOUNT node 131
trigger levelsdefined 157
trigger recordslevels 157
Trigger Table Record Format 158
Trigger2Archive control group 52, 54, 238
Trigger2WIP control group 93, 130
triggering logic 187
triggersand performance 181form inclusion information 131form level 165section level 162
TRN files 328, 336
Trn_Fields control group 51
TRNDFDFL.DFD file 330
true/false search mask 173
TWOUP control group 53, 54
TwoUp control group 71
TwoUpStart option 71
U
unique dataadding 59
UNIQUE.DBF file 340
UniqueString function 88
UniqueTag option 232
UNIXarchive/retrieval scenarios 211
updated log and error files 338, 339
UpdatePOLFile ruleand the WriteOutput rule 55
uploading and downloading resources 311, 318
uppercase 257
UseRestartTable option 222
UserID option 95, 124, 232
UseXMLExtract rule 135
V
VSAMNA option 303
VSAMRCPTB option 302

371
W
wall clock time 286, 304, 308
Warning message 190
Windowsarchive/retrieval scenarios 210
WIPand the archive index file 237transaction fields 130
WIP Edit plug-inWIPField built-in function 125
WIP RecType field 95
WIP StatusCD field 95
WIP.DBF file 340
WIP.DFD files 93
WIP.MDX file 340
WriteNAFile ruleand the StandardFieldProc rule 55described 55
WriteOutput rule 55
X
Xbase 353archive/retrieval scenarios 210DFD files 327, 329maximum length 334
XDPs 249
XERDNLD utility 314, 321
Xeroximage, font, and form files 314, 321pre-compiled Metacode files 314, 321
XLTUS.MSG file 200, 202, 203
XML 51job tickets 68path locator 137
XML filesas extract files 135
XML print driver 130
XMLExtract option 51
XMLFileExtract rule 135
XMLTrnFields option 51
XPath 137mapping fields 51
XPATHW32 utility 137, 140
Y
Year 2000 complianceand extract files 333

Index
372