Embed Size (px)
Citation preview
Document generation tutorial
Table of contents
1 Installation procedure .................................................................................................................. 1
2 Default generation from a Papyrus model ............................................................................... 1
3 Creation of a document generator ............................................................................................. 1
4 Configure the generation : <config> tag .................................................................................... 2
4.1 Define generation output ................................................................................................................... 2
4.2 Define global parameters for the template ...................................................................................... 2
4.3 Pre-defined parameters ...................................................................................................................... 3
4.4 Use of variables inside parameters ................................................................................................... 3
4.5 Variables stored in another file ......................................................................................................... 4
4.6 Context with CDO models ................................................................................................................ 4
5 Define script execution context : <context> tag ........................................................................ 5
5.1 Dealing with specific models ............................................................................................................ 5
5.1.1 Using multiple meta-models ......................................................................................................................... 5
5.1.2 Meta-models where elements have no ‘name’ feature ............................................................................... 5
6 Define script parts : <gendoc> tag : ............................................................................................ 6
6.1 Script language .................................................................................................................................... 6
6.2 Text generation ................................................................................................................................... 7
6.2.1 Applying styles to the generation output .................................................................................................... 7
6.2.2 Using bullets and numbering ........................................................................................................................ 7
6.3 Images generation ............................................................................................................................... 8
6.3.1 Customize image size ..................................................................................................................................... 8
6.3.2 Displaying diagrams ..................................................................................................................................... 10
6.3.3 Displaying static images ............................................................................................................................... 11
6.4 Table generation ............................................................................................................................... 11
6.5 Bookmarks and hyperlinks generation .......................................................................................... 12
6.6 Rich text generation .......................................................................................................................... 14
6.7 Enclose the external document ....................................................................................................... 15
6.8 Formatting ......................................................................................................................................... 15
6.8.1 Removing extra lines .................................................................................................................................... 15
6.8.2 Removing lines with empty content ........................................................................................................... 16
6.8.3 Removing line breaks ................................................................................................................................... 17
6.9 Listing elements ................................................................................................................................ 17
7 Reusing gendoc scripts inside the same document : <fragment> tag ................................. 18
8 Command Line Interface ........................................................................................................... 19
9 Gendoc bundles .......................................................................................................................... 19
9.1 Commons ........................................................................................................................................... 19
9.1.1 Advanced services from bundle “commons” ............................................................................................ 20
9.2 Gmf ..................................................................................................................................................... 21

9.2.1 Advanced services concerning gmf diagrams ........................................................................................... 21
9.3 Papyrus .............................................................................................................................................. 22
9.4 Capella ................................................................................................................................................ 22
APPENDIX: Overview of all Gendoc tags and attributes ............................................................ 23
1 Gendoc 0.6.0 tutorial
1 Installation procedure
Get last Gendoc update site from Gendoc downloads page.
Adding a software update site: see Eclipse.org online help
2 Default generation from a Papyrus model
A default simple template is available for any model
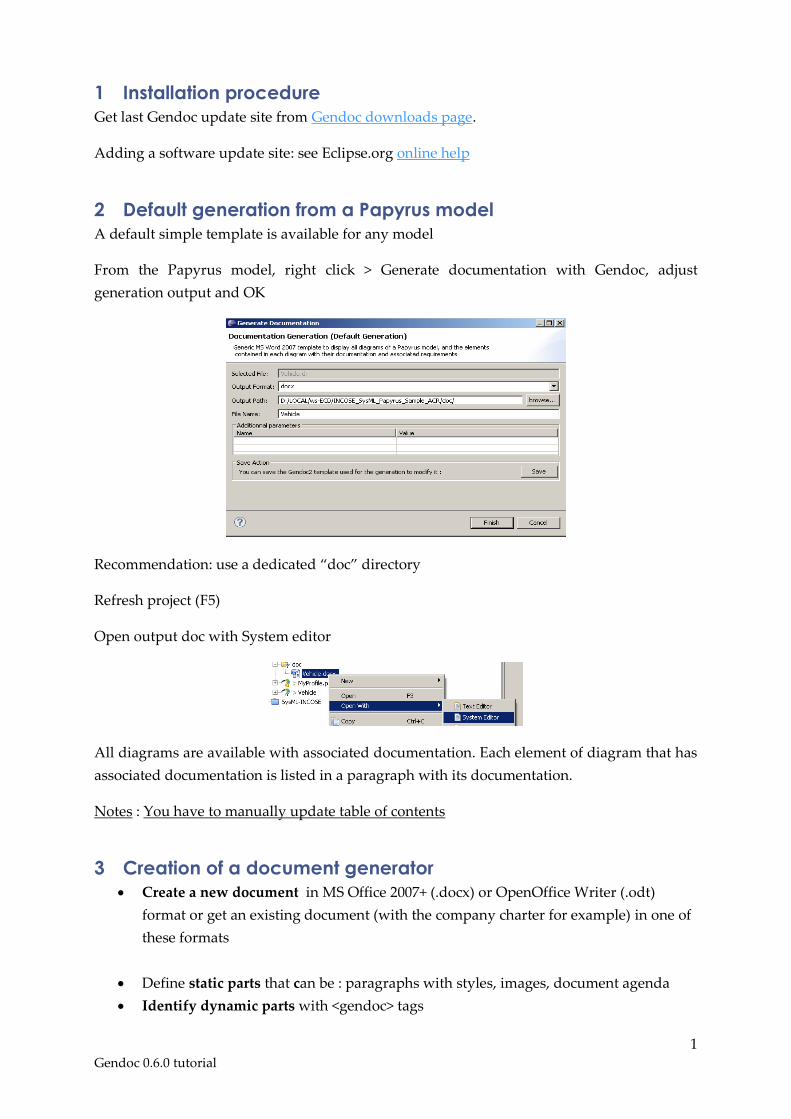
From the Papyrus model, right click > Generate documentation with Gendoc, adjust
generation output and OK
Recommendation: use a dedicated “doc” directory
Refresh project (F5)
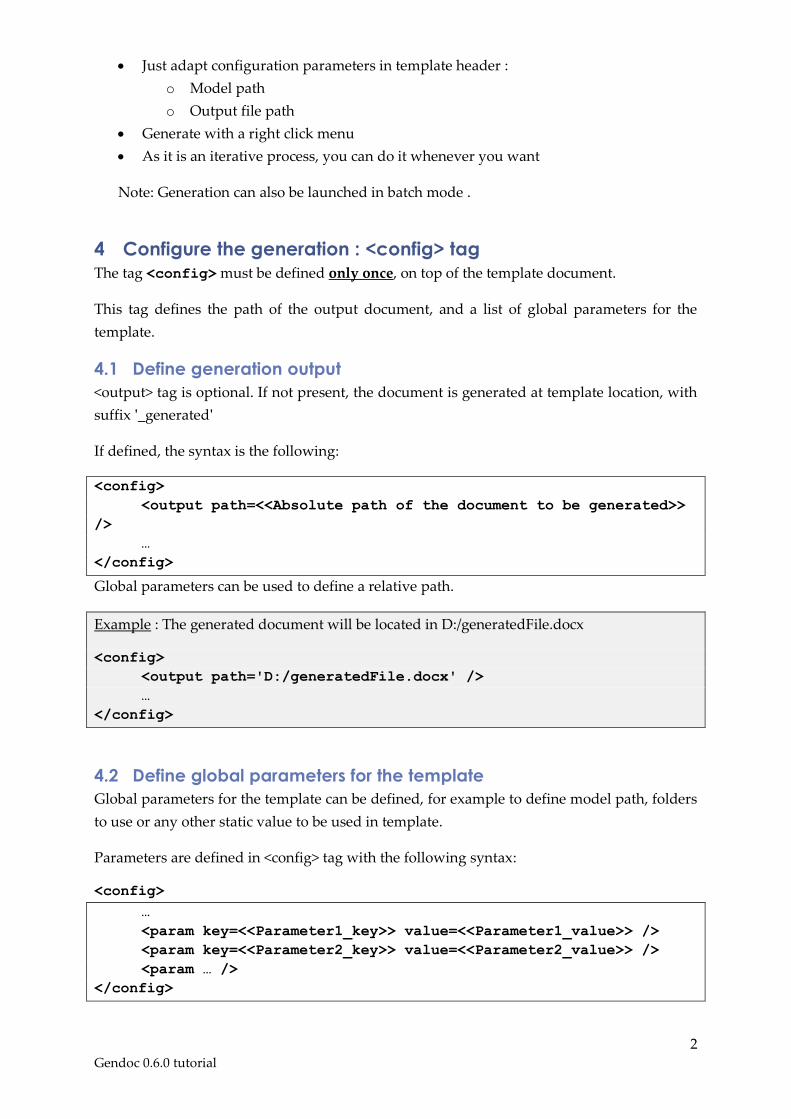
Open output doc with System editor
All diagrams are available with associated documentation. Each element of diagram that has
associated documentation is listed in a paragraph with its documentation.
Notes : You have to manually update table of contents
3 Creation of a document generator
Create a new document in MS Office 2007+ (.docx) or OpenOffice Writer (.odt)
format or get an existing document (with the company charter for example) in one of
these formats
Define static parts that can be : paragraphs with styles, images, document agenda
Identify dynamic parts with <gendoc> tags
2 Gendoc 0.6.0 tutorial
Just adapt configuration parameters in template header :
o Model path
o Output file path
Generate with a right click menu
As it is an iterative process, you can do it whenever you want
Note: Generation can also be launched in batch mode .
4 Configure the generation : <config> tag The tag <config> must be defined only once, on top of the template document.
This tag defines the path of the output document, and a list of global parameters for the
template.
4.1 Define generation output
<output> tag is optional. If not present, the document is generated at template location, with
suffix '_generated'
If defined, the syntax is the following:
<config>
<output path=<<Absolute path of the document to be generated>>
/>
…
</config>
Global parameters can be used to define a relative path.
Example : The generated document will be located in D:/generatedFile.docx
<config>
<output path='D:/generatedFile.docx' />
…
</config>
4.2 Define global parameters for the template
Global parameters for the template can be defined, for example to define model path, folders
to use or any other static value to be used in template.
Parameters are defined in <config> tag with the following syntax:
<config>
…
<param key=<<Parameter1_key>> value=<<Parameter1_value>> />
<param key=<<Parameter2_key>> value=<<Parameter2_value>> />
<param … />
</config>
3 Gendoc 0.6.0 tutorial
How to access parameters?
• ${paramKey} inside <context> or other <param> ,
• gGet(paramKey) inside a <gendoc> tag
Example : creation of global parameters for model folder, model path, and path of a specific
package inside model and example of usage in <context> tag.
<config>
<param key='model_path' value='D:/Models/Model_v1/My_model.uml'/>
<param key='UC_package_path' value='/MyUMLModel/UseCases'/>
</config>
<context model='${model_path}' element='${UC_package_path}'/>
4.3 Pre-defined parameters
Some <param> are pre-defined in Gendoc and can be used directly in the template
• ${input} is the name of the input template document
Example: <param key='generation_folder' value='D:/Generated'/>
<output path='${generation_folder}/${input}-generated.docx' />
If the input document is named template1.docx, the result file is named template1-
generated.docx.
The following variables are also ready to be used by default:
• ${date} is the date of the generation. The format of the date is 'yyyy-MM-dd-HHmmss'
• ${input_directory} location directory of the template
Example:
<output path='${input_directory}/${input}-generated-${date}.docx' />
Result file example: template-generated-2014-08-02-093707.docx
4.4 Use of variables inside parameters
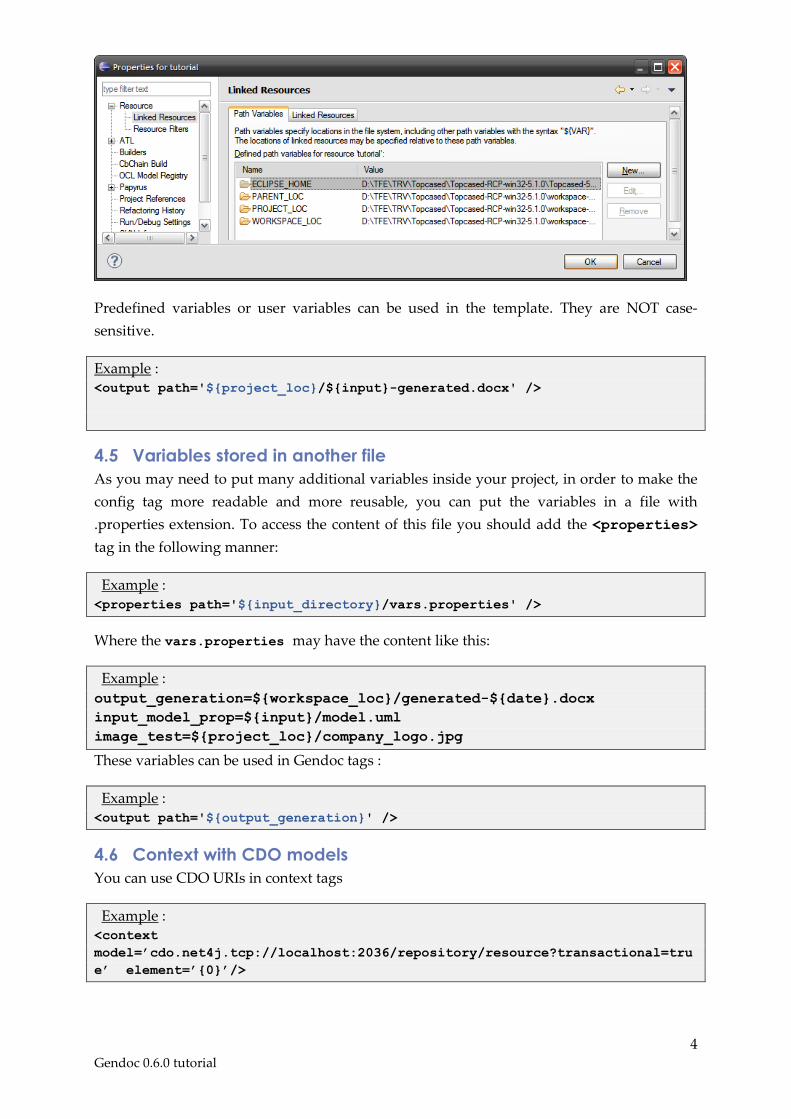
It is also possible to use variables defined in project of the document.
From the project on Project Explorer view, right click > Properties > Resource > Linked
Resources > Path Variables
4 Gendoc 0.6.0 tutorial
Predefined variables or user variables can be used in the template. They are NOT case-
sensitive.
Example : <output path='${project_loc}/${input}-generated.docx' />
4.5 Variables stored in another file
As you may need to put many additional variables inside your project, in order to make the
config tag more readable and more reusable, you can put the variables in a file with
.properties extension. To access the content of this file you should add the <properties>
tag in the following manner:
Example :
<properties path='${input_directory}/vars.properties' />
Where the vars.properties may have the content like this:
Example :
output_generation=${workspace_loc}/generated-${date}.docx
input_model_prop=${input}/model.uml
image_test=${project_loc}/company_logo.jpg
These variables can be used in Gendoc tags :
Example :
<output path='${output_generation}' />
4.6 Context with CDO models
You can use CDO URIs in context tags
Example : <context
model=’cdo.net4j.tcp://localhost:2036/repository/resource?transactional=tru
e’ element=’{0}’/>
5 Gendoc 0.6.0 tutorial
5 Define script execution context : <context> tag Before a <gendoc> tag, a <context> must have been defined to determine the model and
the element to use as starting context.
<context> tag can contain the following attributes :
- model : Model absolute path (global parameters can be used)
- element : Path to the model element to use as script context (path from model root)
- importedBundles : List of external bundles names (separated by ‘;’ character)
- searchMetamodels : false(default)/true.
Set to “true” when your model uses element from external meta-models, for example
with SysML, when both UML and SysML meta-models are used.
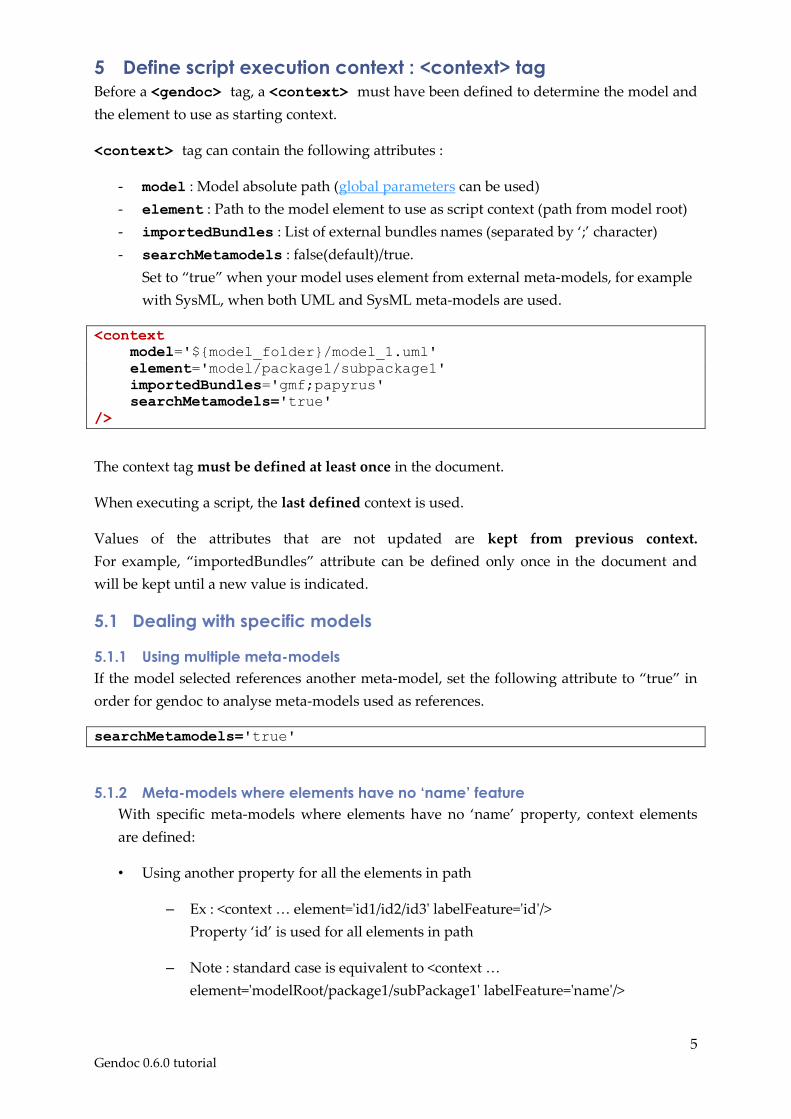
<context
model='${model_folder}/model_1.uml'
element='model/package1/subpackage1'
importedBundles='gmf;papyrus'
searchMetamodels='true'
/>
The context tag must be defined at least once in the document.
When executing a script, the last defined context is used.
Values of the attributes that are not updated are kept from previous context.
For example, “importedBundles” attribute can be defined only once in the document and
will be kept until a new value is indicated.
5.1 Dealing with specific models
5.1.1 Using multiple meta-models
If the model selected references another meta-model, set the following attribute to “true” in
order for gendoc to analyse meta-models used as references.
searchMetamodels='true'
5.1.2 Meta-models where elements have no ‘name’ feature
With specific meta-models where elements have no ‘name’ property, context elements
are defined:
• Using another property for all the elements in path
– Ex : <context … element='id1/id2/id3' labelFeature='id'/>
Property ‘id’ is used for all elements in path
– Note : standard case is equivalent to <context …
element='modelRoot/package1/subPackage1' labelFeature='name'/>
6 Gendoc 0.6.0 tutorial
• Using another property only for some elements in path
– Ex : <context … element='modelRoot/id=“id2”/subPackage1'/>
Property ‘id’ is used only for the package part of the element path
Property ‘name’ is used for others
• Using indexes of the position inside model tree (starting at 0 and not 1)
– Ex: <context … element='modelRoot/{1}/subPackage1'/>
If package2 is at the second place inside the model.
6 Define script parts : <gendoc> tag :
Each dynamic part corresponds to a <gendoc> tag.
A <context> tag must be present before, in order to set the execution context.
<gendoc> tag can contain:
• Acceleo script (see details on this language on http://eclipse.org/acceleo/)
• Static text
• Styles (colors / bullets / …)
• Tables
• Images and diagrams
• Rich text content
6.1 Script language
The content of a gendoc tag corresponds to a script written in Acceleo language.
Example: display names of all packages
Acceleo syntax to display names of all packages
[for (p:Package | Package.allInstances())]
[p.name/]
[/for]
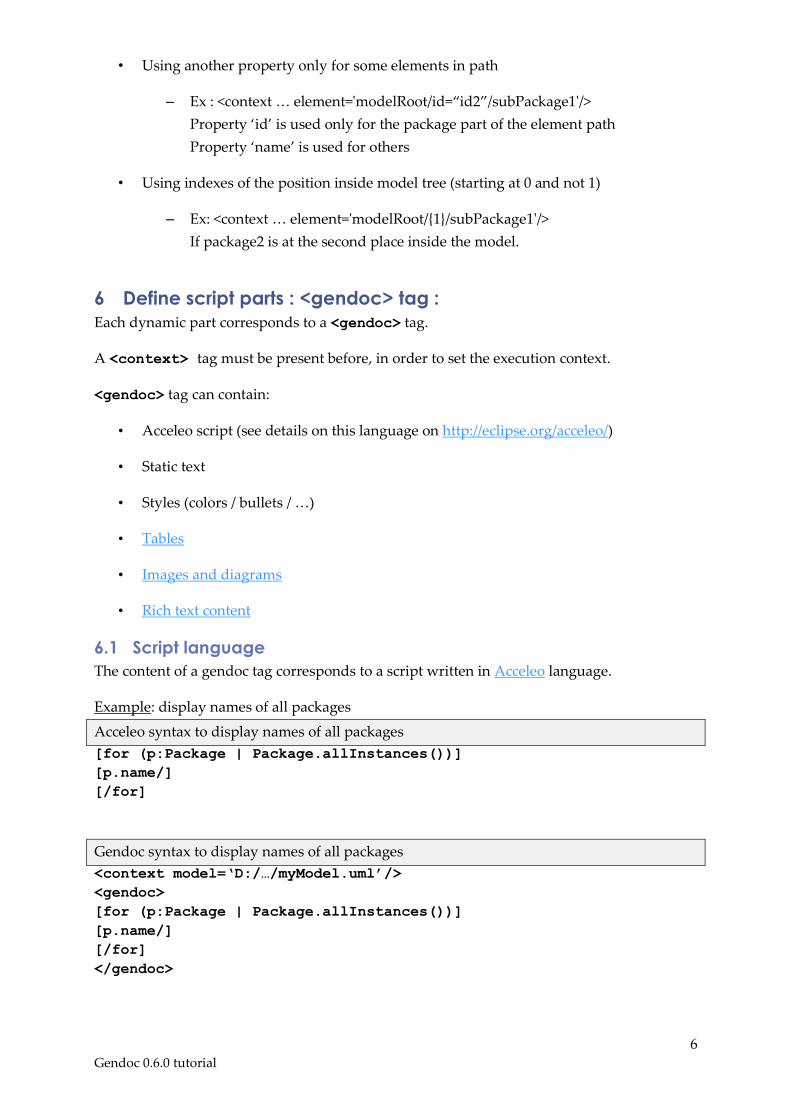
Gendoc syntax to display names of all packages
<context model=‘D:/…/myModel.uml’/>
<gendoc>
[for (p:Package | Package.allInstances())]
[p.name/]
[/for]
</gendoc>
7 Gendoc 0.6.0 tutorial
6.2 Text generation
Writing scripts inside a Text editor has a lot of inconveniences but the great advantage is to
benefit from all text edition functionalities, mainly styles and formatting, from the Text
editor.
6.2.1 Applying styles to the generation output
The style applied to the script inside template document is kept in the generation output
(color, font, size, alignment,…).
Template content Generation output <context model=‘…’/>
<gendoc>
[for (p:Package|self.ownedElement-
>filter(Package))]
[p.name/] [/for]
</gendoc>
Actors
Use case view
Logical view
Deployment view
6.2.2 Using bullets and numbering
With the same example as in the previous paragraph, other style information such as bullets
or numbering can be used for generation.
Template content Generation output <context model=‘…’/>
<gendoc>
[for (p:Package|self.ownedElement-
>filter(Package))]
[p.name/] [/for]
</gendoc>
Actors
Use case view
Logical view
Deployment view
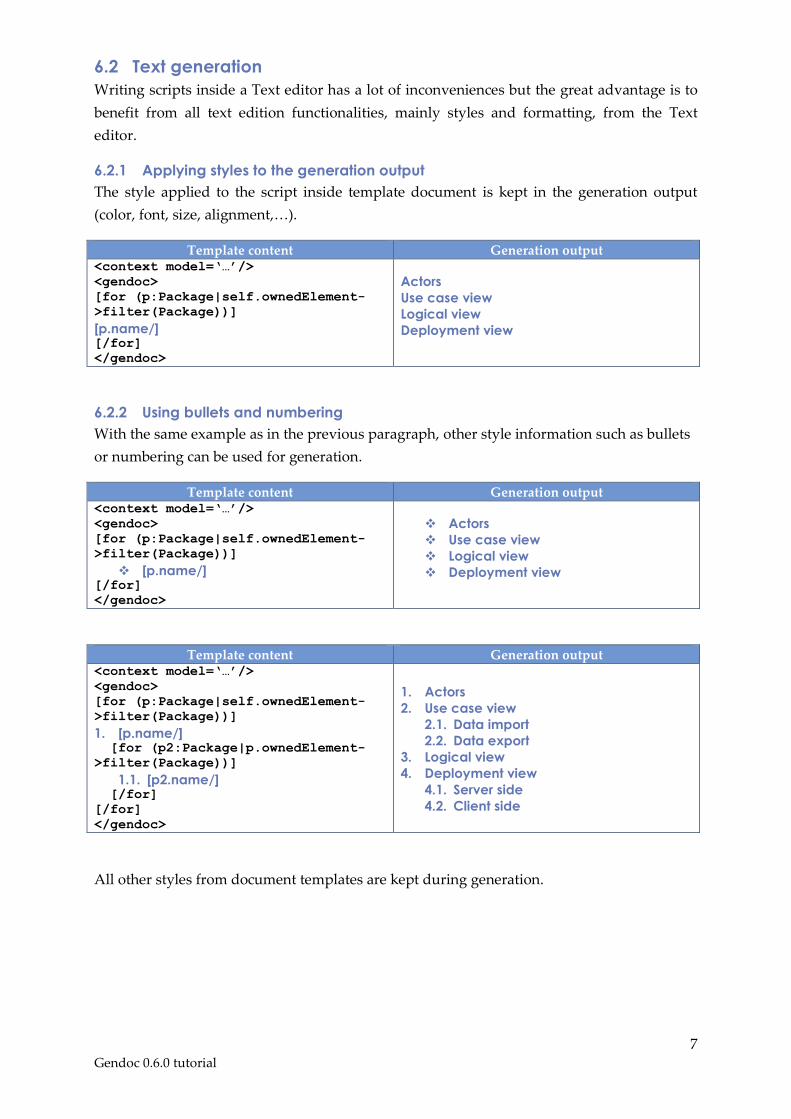
Template content Generation output <context model=‘…’/>
<gendoc>
[for (p:Package|self.ownedElement-
>filter(Package))]
1. [p.name/] [for (p2:Package|p.ownedElement-
>filter(Package))]
1.1. [p2.name/] [/for]
[/for]
</gendoc>
1. Actors
2. Use case view
2.1. Data import
2.2. Data export
3. Logical view
4. Deployment view
4.1. Server side
4.2. Client side
All other styles from document templates are kept during generation.
8 Gendoc 0.6.0 tutorial
6.3 Images generation
<image> tag must be defined under a <gendoc> tag.
It shall define one of the following attributes:
object for diagram generation, filled with an ID of the diagram. See Diagram
generation section.
filePath for static image generation, filled with the image absolute path. See static
image generation section.
An empty drawing area inside start and end of tag:
<image … >
</image>
6.3.1 Customize image size
<image> tag provides the following attributes to handle image size customization : keepW,
keepH, maxW, maxH. They are used in association with the dimensions of the drawing
area inside <image> tag:
keepW : output image width will be the same as drawing area width
keepH : output image height will be the same as drawing area height
maxW : output image width will not oversize drawing area width
maxH : output image height will not oversize drawing area height
Possible values for these attributes: false(default), true.
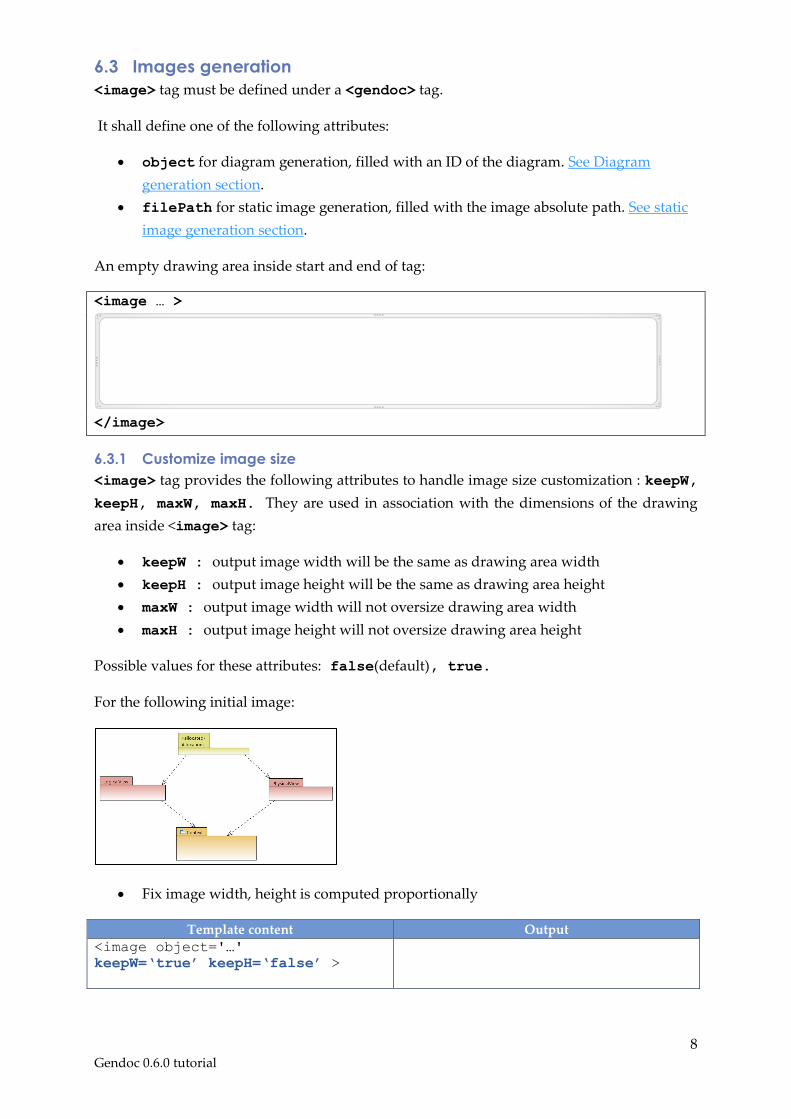
For the following initial image:
Fix image width, height is computed proportionally
Template content Output
<image object='…'
keepW=‘true’ keepH=‘false’ >
9 Gendoc 0.6.0 tutorial
</image>
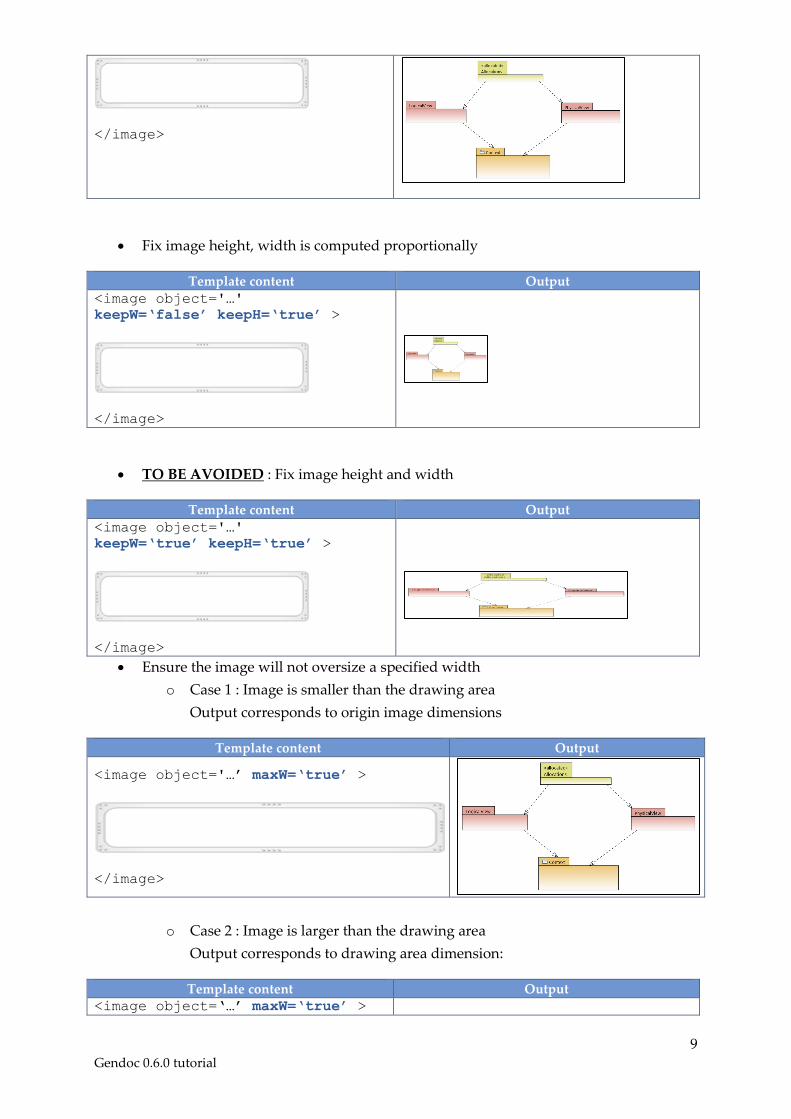
Fix image height, width is computed proportionally
Template content Output
<image object='…'
keepW=‘false’ keepH=‘true’ >
</image>
TO BE AVOIDED : Fix image height and width
Template content Output
<image object='…'
keepW=‘true’ keepH=‘true’ >
</image>
Ensure the image will not oversize a specified width
o Case 1 : Image is smaller than the drawing area
Output corresponds to origin image dimensions
Template content Output
<image object='…’ maxW=‘true’ >
</image>
o Case 2 : Image is larger than the drawing area
Output corresponds to drawing area dimension:
Template content Output <image object=‘…’ maxW=‘true’ >
10 Gendoc 0.6.0 tutorial
</image>
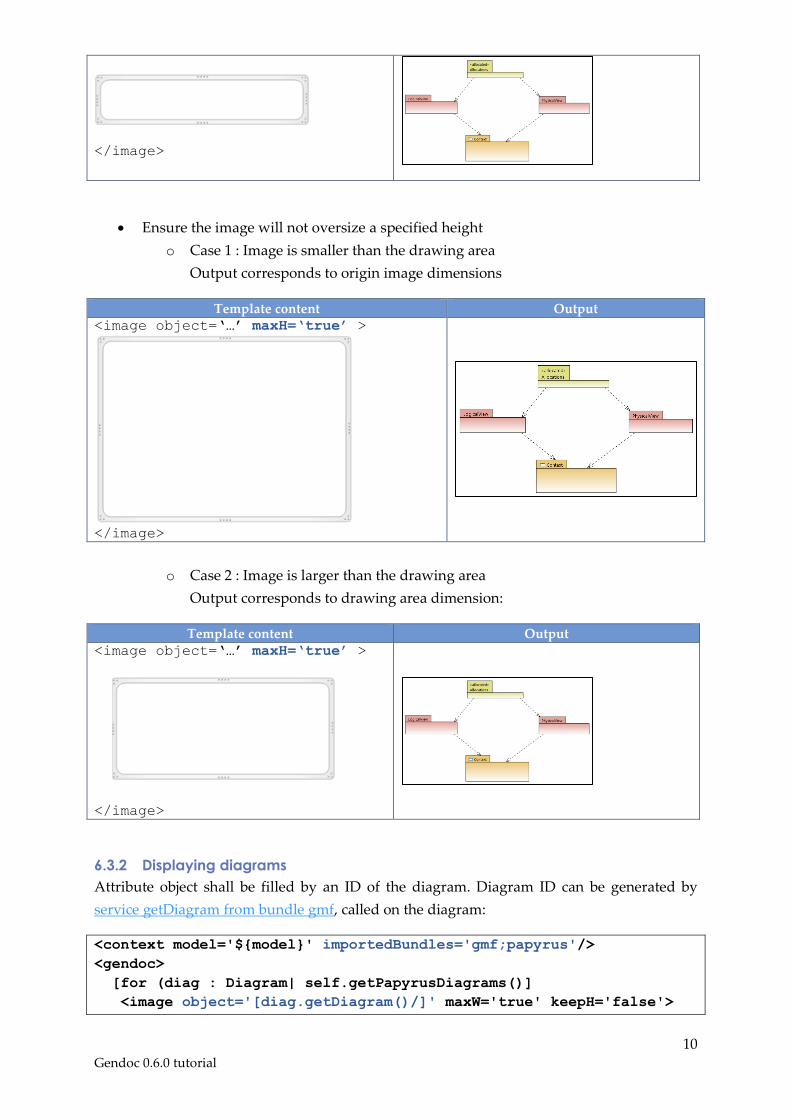
Ensure the image will not oversize a specified height
o Case 1 : Image is smaller than the drawing area
Output corresponds to origin image dimensions
Template content Output <image object=‘…’ maxH=‘true’ >
</image>
o Case 2 : Image is larger than the drawing area
Output corresponds to drawing area dimension:
Template content Output <image object=‘…’ maxH=‘true’ >
</image>
6.3.2 Displaying diagrams
Attribute object shall be filled by an ID of the diagram. Diagram ID can be generated by
service getDiagram from bundle gmf, called on the diagram:
<context model='${model}' importedBundles='gmf;papyrus'/>
<gendoc>
[for (diag : Diagram| self.getPapyrusDiagrams()]
<image object='[diag.getDiagram()/]' maxW='true' keepH='false'>
11 Gendoc 0.6.0 tutorial
</image>
[/for]
</gendoc>
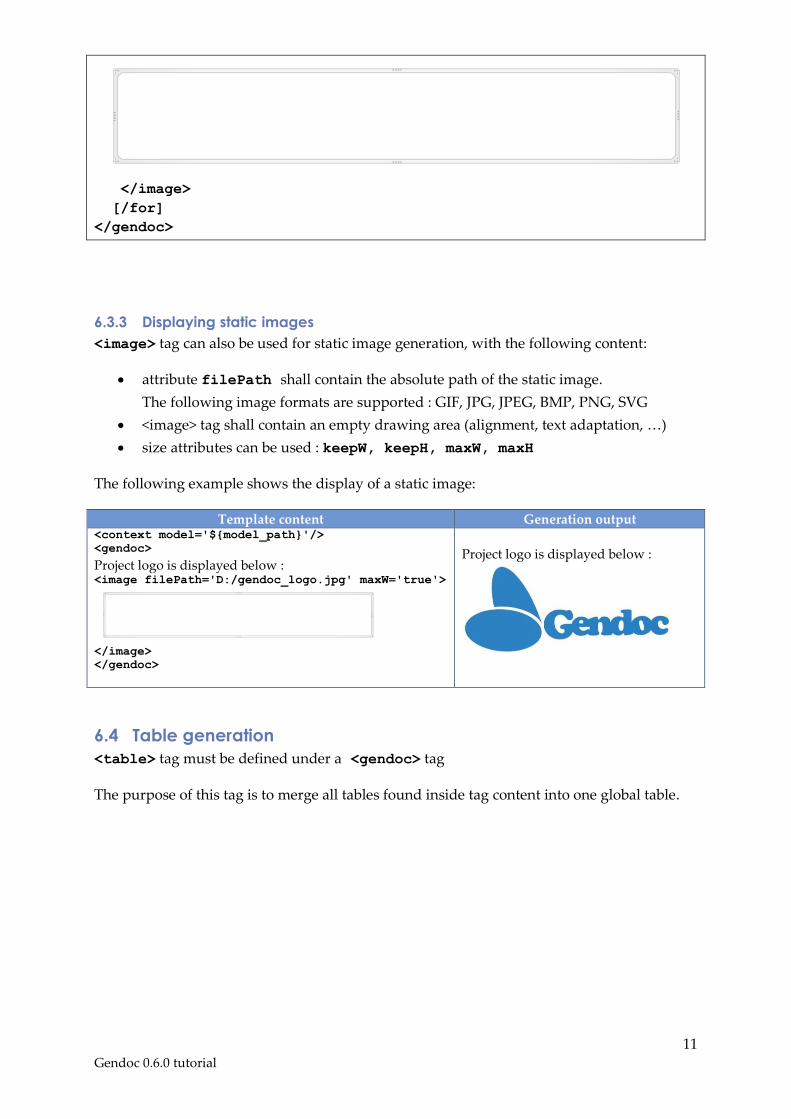
6.3.3 Displaying static images
<image> tag can also be used for static image generation, with the following content:
attribute filePath shall contain the absolute path of the static image.
The following image formats are supported : GIF, JPG, JPEG, BMP, PNG, SVG
<image> tag shall contain an empty drawing area (alignment, text adaptation, …)
size attributes can be used : keepW, keepH, maxW, maxH
The following example shows the display of a static image:
Template content Generation output <context model='${model_path}'/>
<gendoc>
Project logo is displayed below : <image filePath='D:/gendoc_logo.jpg' maxW='true'>
</image> </gendoc>
Project logo is displayed below :
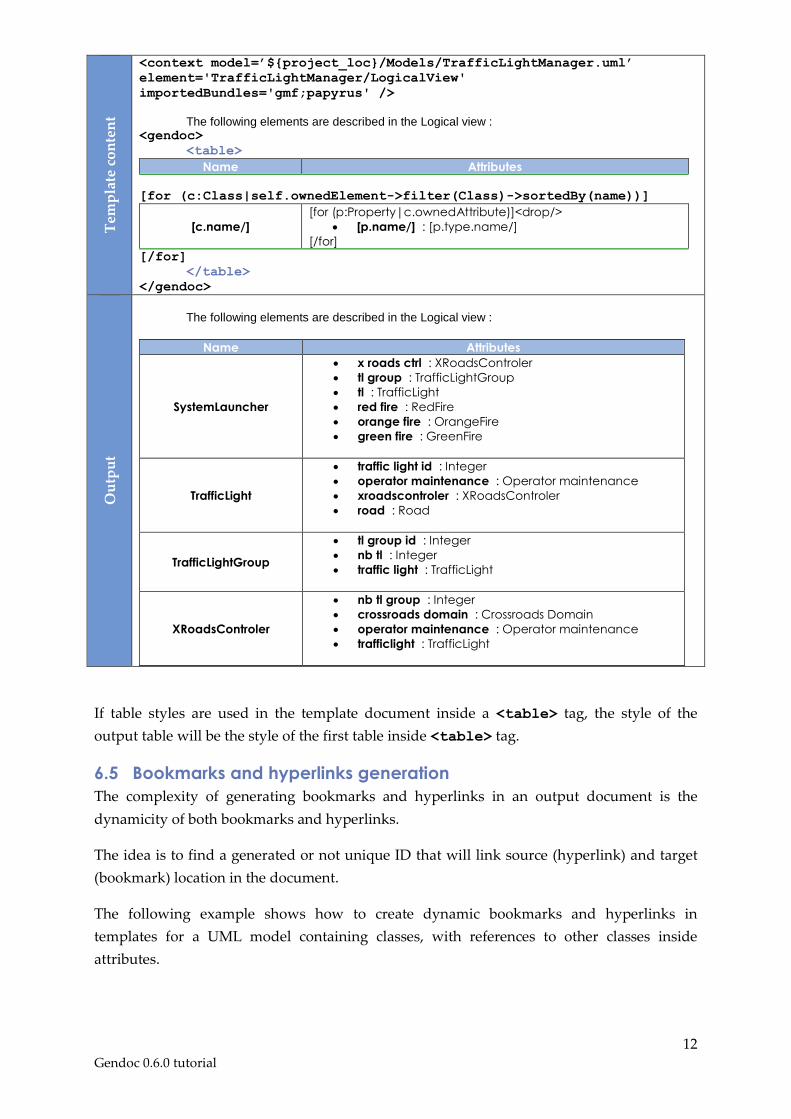
6.4 Table generation
<table> tag must be defined under a <gendoc> tag
The purpose of this tag is to merge all tables found inside tag content into one global table.
12 Gendoc 0.6.0 tutorial
Tem
pla
te c
on
ten
t
<context model=’${project_loc}/Models/TrafficLightManager.uml’
element='TrafficLightManager/LogicalView'
importedBundles='gmf;papyrus' />
The following elements are described in the Logical view :
<gendoc>
<table>
Name Attributes
[for (c:Class|self.ownedElement->filter(Class)->sortedBy(name))]
[c.name/]
[for (p:Property|c.ownedAttribute)]<drop/>
[p.name/] : [p.type.name/]
[/for]
[/for]
</table>
</gendoc>
Ou
tpu
t
The following elements are described in the Logical view :
Name Attributes
SystemLauncher
x roads ctrl : XRoadsControler
tl group : TrafficLightGroup
tl : TrafficLight
red fire : RedFire
orange fire : OrangeFire
green fire : GreenFire
TrafficLight
traffic light id : Integer
operator maintenance : Operator maintenance
xroadscontroler : XRoadsControler
road : Road
TrafficLightGroup
tl group id : Integer
nb tl : Integer
traffic light : TrafficLight
XRoadsControler
nb tl group : Integer
crossroads domain : Crossroads Domain
operator maintenance : Operator maintenance
trafficlight : TrafficLight
If table styles are used in the template document inside a <table> tag, the style of the
output table will be the style of the first table inside <table> tag.
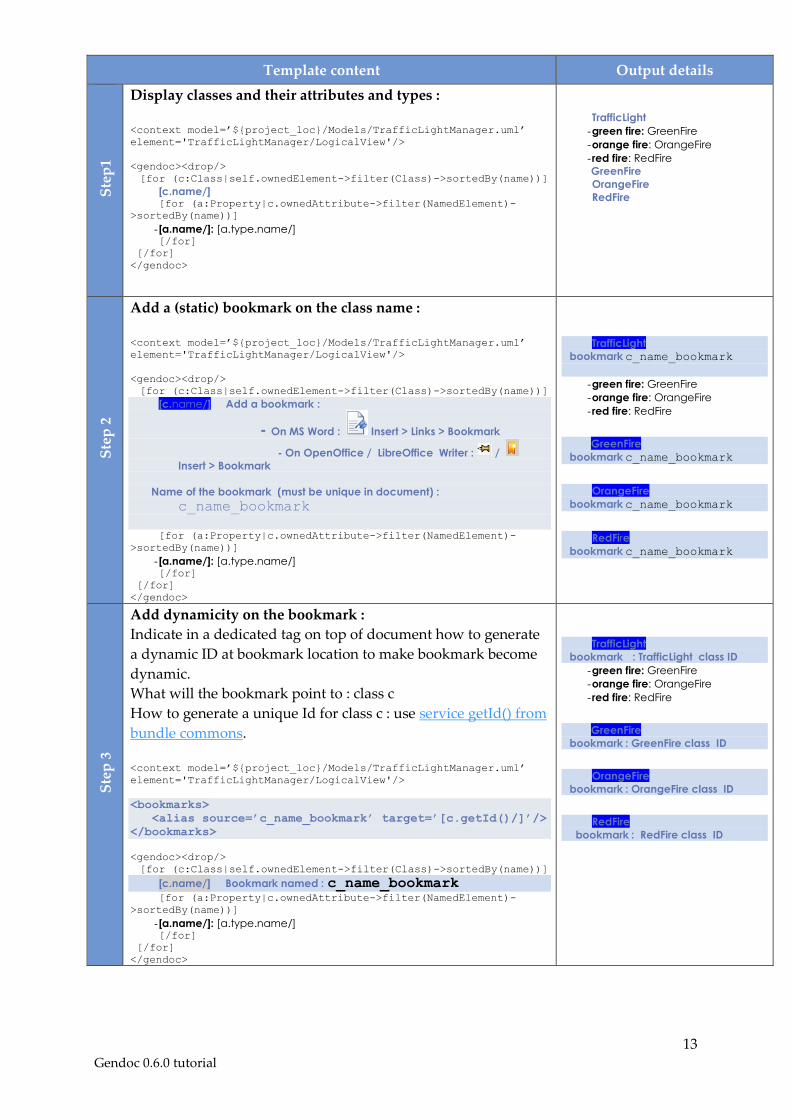
6.5 Bookmarks and hyperlinks generation
The complexity of generating bookmarks and hyperlinks in an output document is the
dynamicity of both bookmarks and hyperlinks.
The idea is to find a generated or not unique ID that will link source (hyperlink) and target
(bookmark) location in the document.
The following example shows how to create dynamic bookmarks and hyperlinks in
templates for a UML model containing classes, with references to other classes inside
attributes.
13 Gendoc 0.6.0 tutorial
Template content Output details
Ste
p1
Display classes and their attributes and types :
<context model=’${project_loc}/Models/TrafficLightManager.uml’
element='TrafficLightManager/LogicalView'/>
<gendoc><drop/>
[for (c:Class|self.ownedElement->filter(Class)->sortedBy(name))]
[c.name/] [for (a:Property|c.ownedAttribute->filter(NamedElement)-
>sortedBy(name))]
- [a.name/]: [a.type.name/] [/for]
[/for]
</gendoc>
TrafficLight
- green fire: GreenFire
- orange fire: OrangeFire
- red fire: RedFire
GreenFire
OrangeFire
RedFire
Ste
p 2
Add a (static) bookmark on the class name :
<context model=’${project_loc}/Models/TrafficLightManager.uml’
element='TrafficLightManager/LogicalView'/>
<gendoc><drop/>
[for (c:Class|self.ownedElement->filter(Class)->sortedBy(name))]
[c.name/] Add a bookmark :
- On MS Word : Insert > Links > Bookmark
- On OpenOffice / LibreOffice Writer : /
Insert > Bookmark
Name of the bookmark (must be unique in document) :
c_name_bookmark
[for (a:Property|c.ownedAttribute->filter(NamedElement)-
>sortedBy(name))]
- [a.name/]: [a.type.name/] [/for]
[/for]
</gendoc>
TrafficLight
bookmark c_name_bookmark
- green fire: GreenFire
- orange fire: OrangeFire
- red fire: RedFire
GreenFire
bookmark c_name_bookmark
OrangeFire
bookmark c_name_bookmark
RedFire
bookmark c_name_bookmark
Ste
p 3
Add dynamicity on the bookmark :
Indicate in a dedicated tag on top of document how to generate
a dynamic ID at bookmark location to make bookmark become
dynamic.
What will the bookmark point to : class c
How to generate a unique Id for class c : use service getId() from
bundle commons.
<context model=’${project_loc}/Models/TrafficLightManager.uml’
element='TrafficLightManager/LogicalView'/>
<bookmarks>
<alias source=’c_name_bookmark’ target=’[c.getId()/]’/>
</bookmarks>
<gendoc><drop/>
[for (c:Class|self.ownedElement->filter(Class)->sortedBy(name))]
[c.name/] Bookmark named : c_name_bookmark [for (a:Property|c.ownedAttribute->filter(NamedElement)-
>sortedBy(name))]
- [a.name/]: [a.type.name/] [/for]
[/for]
</gendoc>
TrafficLight
bookmark : TrafficLight class ID
- green fire: GreenFire
- orange fire: OrangeFire
- red fire: RedFire
GreenFire
bookmark : GreenFire class ID
OrangeFire
bookmark : OrangeFire class ID
RedFire
bookmark : RedFire class ID
14 Gendoc 0.6.0 tutorial
Ste
p 4
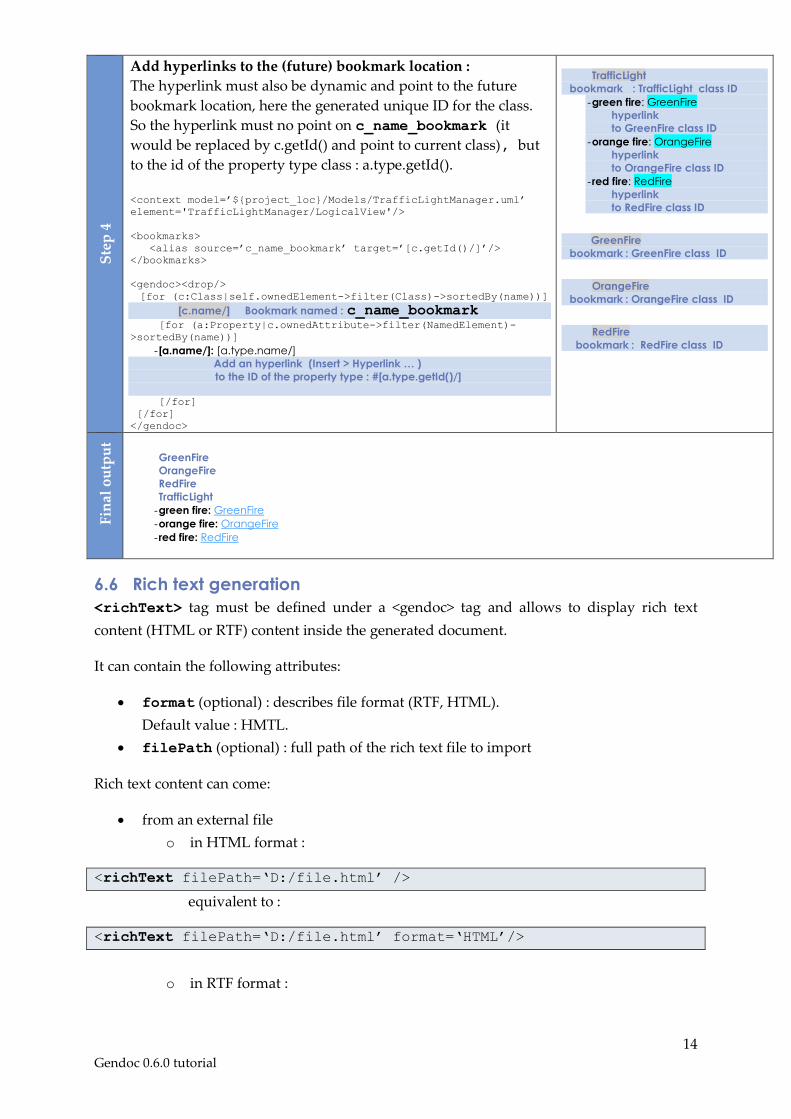
Add hyperlinks to the (future) bookmark location :
The hyperlink must also be dynamic and point to the future
bookmark location, here the generated unique ID for the class.
So the hyperlink must no point on c_name_bookmark (it
would be replaced by c.getId() and point to current class), but
to the id of the property type class : a.type.getId().
<context model=’${project_loc}/Models/TrafficLightManager.uml’
element='TrafficLightManager/LogicalView'/>
<bookmarks>
<alias source=’c_name_bookmark’ target=’[c.getId()/]’/>
</bookmarks>
<gendoc><drop/>
[for (c:Class|self.ownedElement->filter(Class)->sortedBy(name))]
[c.name/] Bookmark named : c_name_bookmark [for (a:Property|c.ownedAttribute->filter(NamedElement)-
>sortedBy(name))]
- [a.name/]: [a.type.name/]
Add an hyperlink (Insert > Hyperlink … )
to the ID of the property type : #[a.type.getId()/]
[/for]
[/for]
</gendoc>
TrafficLight
bookmark : TrafficLight class ID
- green fire: GreenFire
hyperlink
to GreenFire class ID
- orange fire: OrangeFire
hyperlink
to OrangeFire class ID
- red fire: RedFire
hyperlink
to RedFire class ID
GreenFire
bookmark : GreenFire class ID
OrangeFire
bookmark : OrangeFire class ID
RedFire
bookmark : RedFire class ID
Fin
al o
utp
ut
GreenFire
OrangeFire
RedFire
TrafficLight
- green fire: GreenFire
- orange fire: OrangeFire
- red fire: RedFire
6.6 Rich text generation
<richText> tag must be defined under a <gendoc> tag and allows to display rich text
content (HTML or RTF) content inside the generated document.
It can contain the following attributes:
format (optional) : describes file format (RTF, HTML).
Default value : HMTL.
filePath (optional) : full path of the rich text file to import
Rich text content can come:
from an external file
o in HTML format :
<richText filePath=‘D:/file.html’ />
equivalent to :
<richText filePath=‘D:/file.html’ format=‘HTML’/>
o in RTF format :
15 Gendoc 0.6.0 tutorial
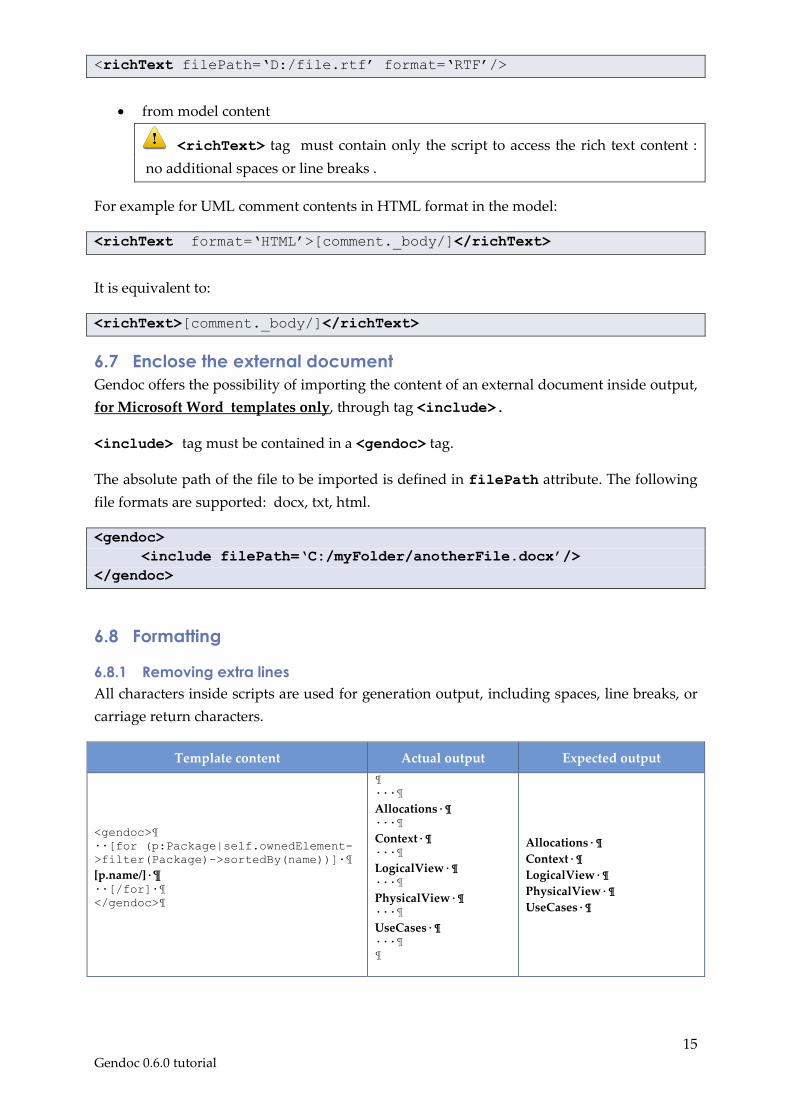
<richText filePath=‘D:/file.rtf’ format=‘RTF’/>
from model content
<richText> tag must contain only the script to access the rich text content :
no additional spaces or line breaks .
For example for UML comment contents in HTML format in the model:
<richText format=‘HTML’>[comment._body/]</richText>
It is equivalent to:
<richText>[comment._body/]</richText>
6.7 Enclose the external document
Gendoc offers the possibility of importing the content of an external document inside output,
for Microsoft Word templates only, through tag <include>.
<include> tag must be contained in a <gendoc> tag.
The absolute path of the file to be imported is defined in filePath attribute. The following
file formats are supported: docx, txt, html.
<gendoc>
<include filePath=‘C:/myFolder/anotherFile.docx’/>
</gendoc>
6.8 Formatting
6.8.1 Removing extra lines
All characters inside scripts are used for generation output, including spaces, line breaks, or
carriage return characters.
Template content Actual output Expected output
<gendoc>
∙∙[for (p:Package|self.ownedElement-
>filter(Package)->sortedBy(name))]∙
[p.name/]∙¶ ∙∙[/for]∙
</gendoc>
∙∙∙
Allocations∙¶ ∙∙∙
Context∙¶ ∙∙∙
LogicalView∙¶ ∙∙∙
PhysicalView∙¶ ∙∙∙
UseCases∙¶ ∙∙∙
Allocations∙
Context∙
LogicalView∙
PhysicalView∙
UseCases∙
16 Gendoc 0.6.0 tutorial
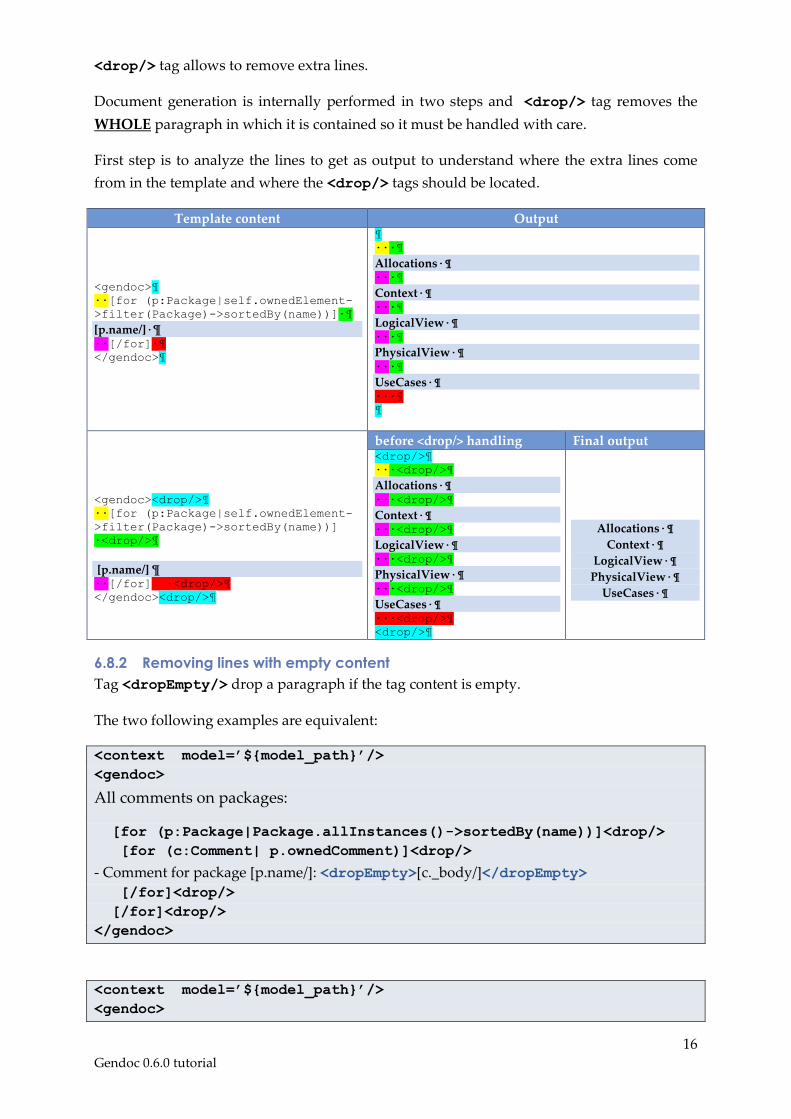
<drop/> tag allows to remove extra lines.
Document generation is internally performed in two steps and <drop/> tag removes the
WHOLE paragraph in which it is contained so it must be handled with care.
First step is to analyze the lines to get as output to understand where the extra lines come
from in the template and where the <drop/> tags should be located.
Template content Output
<gendoc>
∙∙[for (p:Package|self.ownedElement-
>filter(Package)->sortedBy(name))]∙
[p.name/]∙¶ ∙∙[/for]∙
</gendoc>
∙∙∙
Allocations∙¶ ∙∙∙
Context∙¶ ∙∙∙
LogicalView∙¶ ∙∙∙
PhysicalView∙¶ ∙∙∙
UseCases∙¶ ∙∙∙
<gendoc><drop/>
∙∙[for (p:Package|self.ownedElement-
>filter(Package)->sortedBy(name))]
∙<drop/>
[p.name/] ¶ ∙∙[/for] ∙<drop/>
</gendoc><drop/>
before <drop/> handling Final output <drop/>
∙∙∙<drop/>
Allocations∙¶ ∙∙∙<drop/>
Context∙¶ ∙∙∙<drop/>
LogicalView∙¶ ∙∙∙<drop/>
PhysicalView∙¶ ∙∙∙<drop/>
UseCases∙¶ ∙∙∙<drop/>
<drop/>
Allocations∙
Context∙
LogicalView∙
PhysicalView∙
UseCases∙
6.8.2 Removing lines with empty content
Tag <dropEmpty/> drop a paragraph if the tag content is empty.
The two following examples are equivalent:
<context model=’${model_path}’/>
<gendoc>
All comments on packages:
[for (p:Package|Package.allInstances()->sortedBy(name))]<drop/>
[for (c:Comment| p.ownedComment)]<drop/>
- Comment for package [p.name/]: <dropEmpty>[c._body/]</dropEmpty>
[/for]<drop/>
[/for]<drop/>
</gendoc>
<context model=’${model_path}’/>
<gendoc>

17 Gendoc 0.6.0 tutorial
All comments on packages:
[for (p:Package|Package.allInstances()->sortedBy(name))]<drop/>
[for (c:Comment| p.ownedComment)]<drop/>
[if (not(c._body.oclIsUndefined()))]<drop/>
- Comment for package [p.name/]: [c._body/]
[/if]<drop/>
[/for]<drop/>
[/for]<drop/>
</gendoc>
6.8.3 Removing line breaks
Using tag <nobr/> allows to make template scripts easier to maintain, because code can be
written on several paragraphs without displaying line breaks in output document, such as in
the following example.
Template content Output <gendoc>
[for (p:Package| … )]<drop/>
Name: <nobr/>
[if ( … )]<drop/>
[p.name/]
[else]<drop/>
Not found
[/if]<drop/> 
<<Other info on package>>¶ ¶ [/for]<drop/>
</gendoc>
Name: Actors
Name: DeploymentView
Name: Actors
<<Other info on package>>¶ 
Name: LogicalView
<<Other info on package>>¶ 
Name: UseCaseView
<<Other info on package>>¶ 
Name: Not found
<<Other info on package>>¶ 
6.9 Listing elements
By using the tag <list> you can also easily list the model elements.
Template content Output <gendoc>
<list>
[for (p:NamedElement |
self.ownedElement-
>filter(NamedElement))] 
o [p.name.clean()/]
[/for] 
</list>
</gendoc>
o Model2
o secondly
o Package2
18 Gendoc 0.6.0 tutorial
7 Reusing gendoc scripts inside the same document : <fragment>
tag
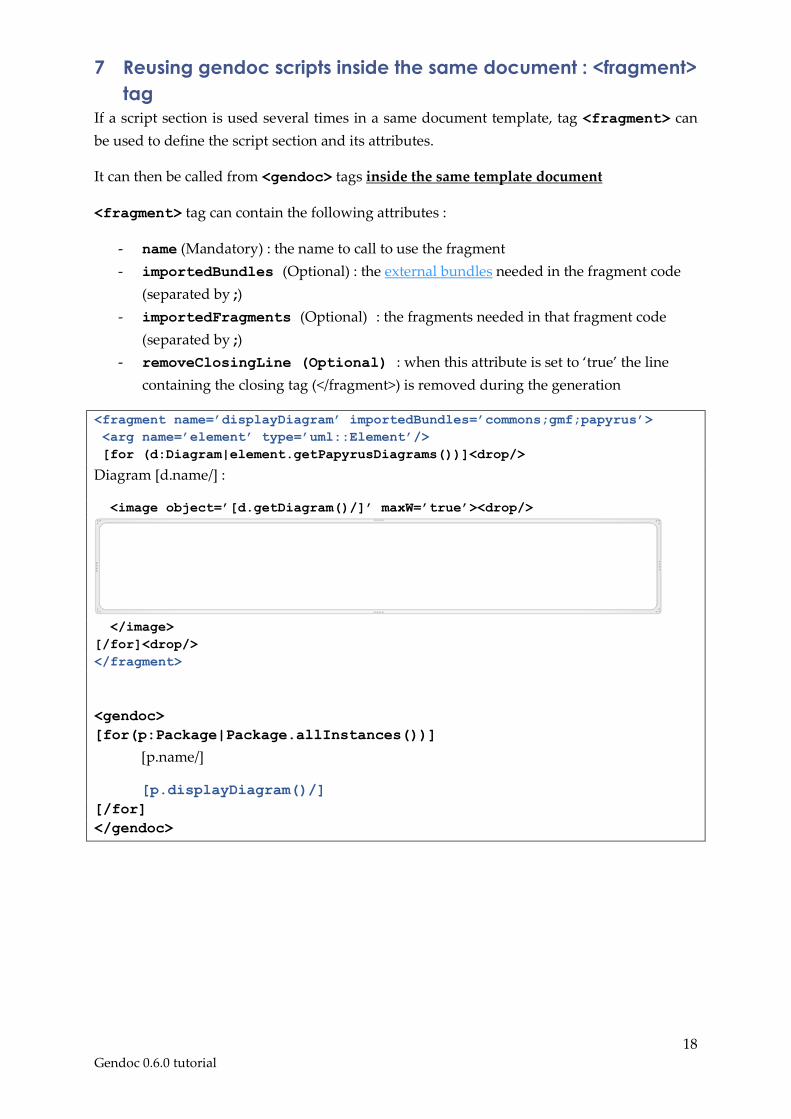
If a script section is used several times in a same document template, tag <fragment> can
be used to define the script section and its attributes.
It can then be called from <gendoc> tags inside the same template document
<fragment> tag can contain the following attributes :
- name (Mandatory) : the name to call to use the fragment
- importedBundles (Optional) : the external bundles needed in the fragment code
(separated by ;)
- importedFragments (Optional) : the fragments needed in that fragment code
(separated by ;)
- removeClosingLine (Optional) : when this attribute is set to ‘true’ the line
containing the closing tag (</fragment>) is removed during the generation
<fragment name=’displayDiagram’ importedBundles=’commons;gmf;papyrus’>
<arg name=’element’ type=’uml::Element’/>
[for (d:Diagram|element.getPapyrusDiagrams())]<drop/>
Diagram [d.name/] :
<image object=’[d.getDiagram()/]’ maxW=’true’><drop/>
</image>
[/for]<drop/>
</fragment>
<gendoc>
[for(p:Package|Package.allInstances())]
[p.name/]
[p.displayDiagram()/]
[/for]
</gendoc>
19 Gendoc 0.6.0 tutorial
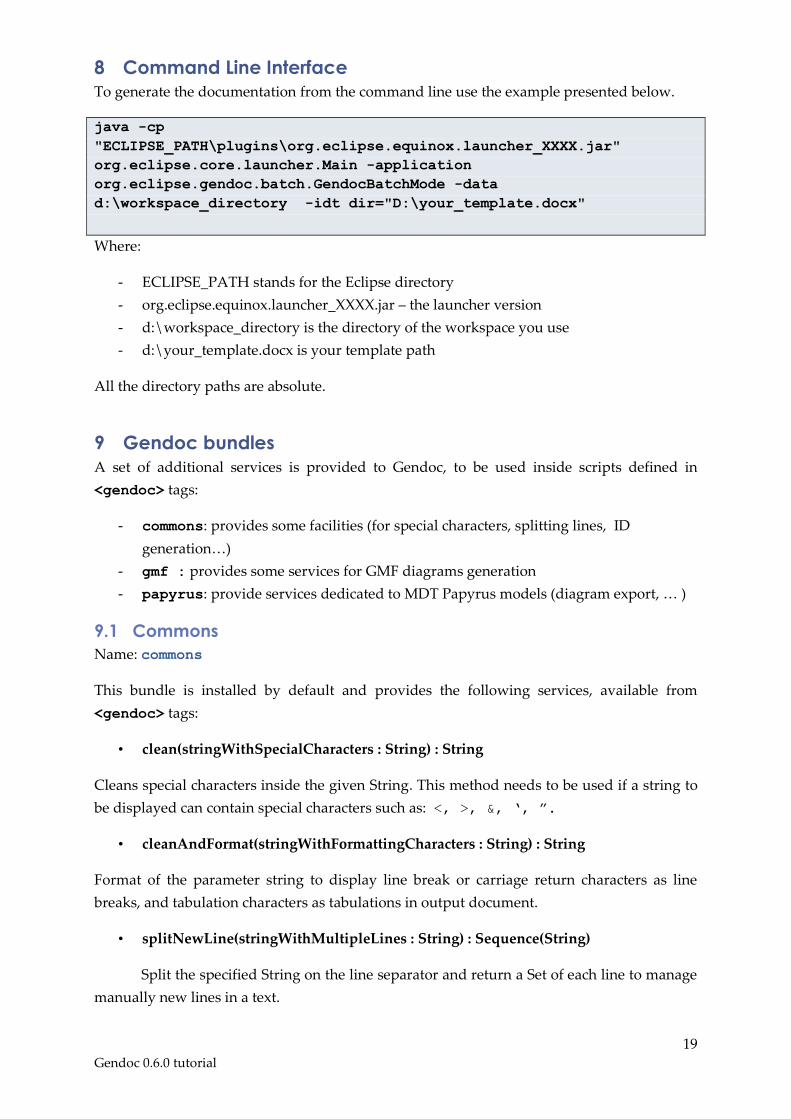
8 Command Line Interface
To generate the documentation from the command line use the example presented below.
java -cp
"ECLIPSE_PATH\plugins\org.eclipse.equinox.launcher_XXXX.jar"
org.eclipse.core.launcher.Main -application
org.eclipse.gendoc.batch.GendocBatchMode -data
d:\workspace_directory -idt dir="D:\your_template.docx"
Where:
- ECLIPSE_PATH stands for the Eclipse directory
- org.eclipse.equinox.launcher_XXXX.jar – the launcher version
- d:\workspace_directory is the directory of the workspace you use
- d:\your_template.docx is your template path
All the directory paths are absolute.
9 Gendoc bundles
A set of additional services is provided to Gendoc, to be used inside scripts defined in
<gendoc> tags:
- commons: provides some facilities (for special characters, splitting lines, ID
generation…)
- gmf : provides some services for GMF diagrams generation
- papyrus: provide services dedicated to MDT Papyrus models (diagram export, … )
9.1 Commons
Name: commons
This bundle is installed by default and provides the following services, available from
<gendoc> tags:
• clean(stringWithSpecialCharacters : String) : String
Cleans special characters inside the given String. This method needs to be used if a string to
be displayed can contain special characters such as: <, >, &, ‘, ”.
• cleanAndFormat(stringWithFormattingCharacters : String) : String
Format of the parameter string to display line break or carriage return characters as line
breaks, and tabulation characters as tabulations in output document.
• splitNewLine(stringWithMultipleLines : String) : Sequence(String)
Split the specified String on the line separator and return a Set of each line to manage
manually new lines in a text.
20 Gendoc 0.6.0 tutorial
• gPut (paramKey : OclAny, paramValue : OclAny) : String
Link a value to a specific key. This variable can be used all over the document
(including other gendoc parts) using gGet .
• gGet (paramKey : OclAny) : OclAny
Get a value already stored in Gendoc (by gPut or defined in param tags).
• getText (modelElement : OclAny) : String
Returns a generic String for the given model element.
• getId (modelElement : OclAny) : String
Get a unique id associated to the given model element (to be used for bookmarks for
example).
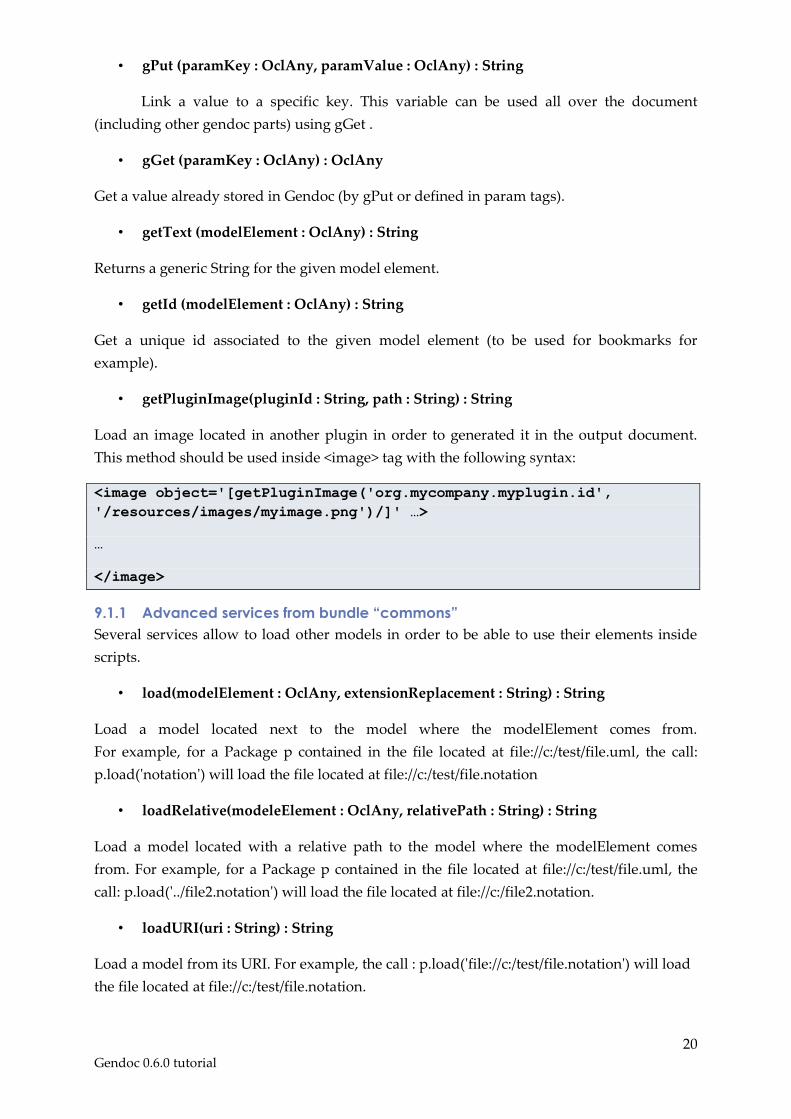
• getPluginImage(pluginId : String, path : String) : String
Load an image located in another plugin in order to generated it in the output document.
This method should be used inside <image> tag with the following syntax:
<image object='[getPluginImage('org.mycompany.myplugin.id',
'/resources/images/myimage.png')/]' …>
…
</image>
9.1.1 Advanced services from bundle “commons”
Several services allow to load other models in order to be able to use their elements inside
scripts.
• load(modelElement : OclAny, extensionReplacement : String) : String
Load a model located next to the model where the modelElement comes from.
For example, for a Package p contained in the file located at file://c:/test/file.uml, the call:
p.load('notation') will load the file located at file://c:/test/file.notation
• loadRelative(modeleElement : OclAny, relativePath : String) : String
Load a model located with a relative path to the model where the modelElement comes
from. For example, for a Package p contained in the file located at file://c:/test/file.uml, the
call: p.load('../file2.notation') will load the file located at file://c:/file2.notation.
• loadURI(uri : String) : String
Load a model from its URI. For example, the call : p.load('file://c:/test/file.notation') will load
the file located at file://c:/test/file.notation.
21 Gendoc 0.6.0 tutorial
Loading another model in order to be able to use its elements in script.
9.2 Gmf
This bundle provides a set of services available with all GMF models. This bundle is NOT
configured by default.
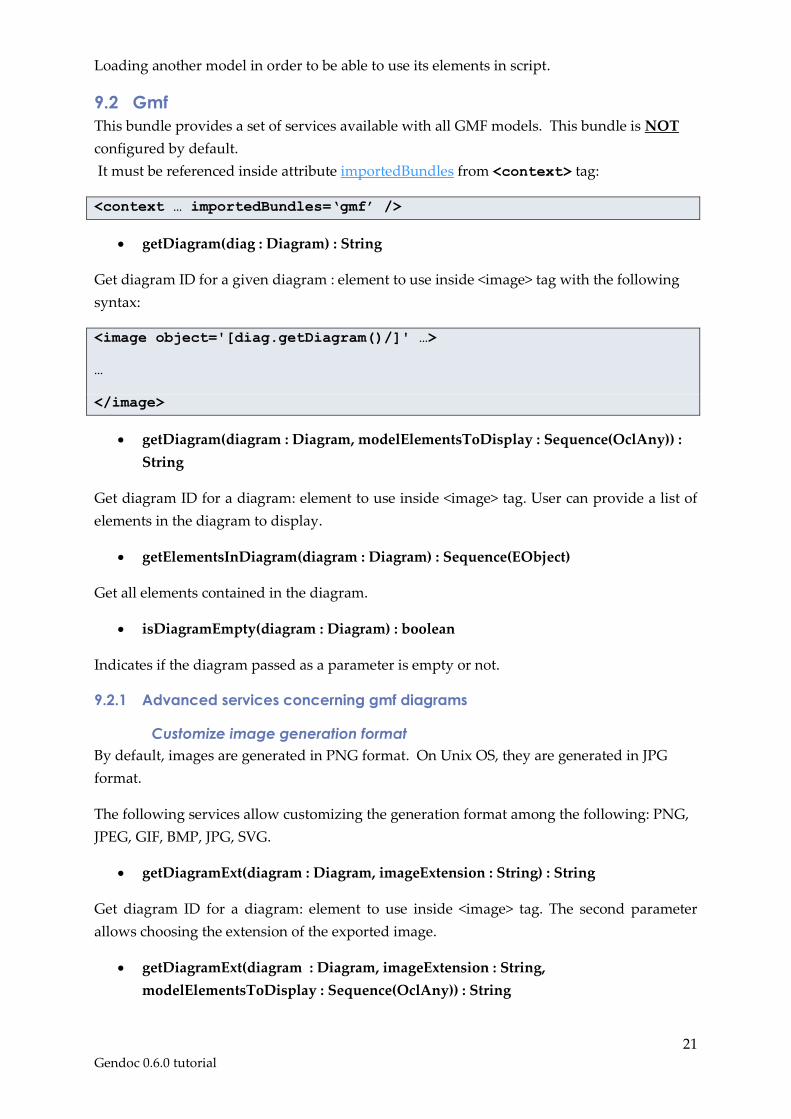
It must be referenced inside attribute importedBundles from <context> tag:
<context … importedBundles=‘gmf’ />
getDiagram(diag : Diagram) : String
Get diagram ID for a given diagram : element to use inside <image> tag with the following
syntax:
<image object='[diag.getDiagram()/]' …>
…
</image>
getDiagram(diagram : Diagram, modelElementsToDisplay : Sequence(OclAny)) :
String
Get diagram ID for a diagram: element to use inside <image> tag. User can provide a list of
elements in the diagram to display.
getElementsInDiagram(diagram : Diagram) : Sequence(EObject)
Get all elements contained in the diagram.
isDiagramEmpty(diagram : Diagram) : boolean
Indicates if the diagram passed as a parameter is empty or not.
9.2.1 Advanced services concerning gmf diagrams
Customize image generation format
By default, images are generated in PNG format. On Unix OS, they are generated in JPG
format.
The following services allow customizing the generation format among the following: PNG,
JPEG, GIF, BMP, JPG, SVG.
getDiagramExt(diagram : Diagram, imageExtension : String) : String
Get diagram ID for a diagram: element to use inside <image> tag. The second parameter
allows choosing the extension of the exported image.
getDiagramExt(diagram : Diagram, imageExtension : String,
modelElementsToDisplay : Sequence(OclAny)) : String
22 Gendoc 0.6.0 tutorial
Get diagram ID for a diagram: element to use inside <image> tag. The second parameter
allows choosing the extension of the exported image. User can provide a filtered list of
elements in the diagram to display.
Getting diagrams from models
getDiagramsInModel(modelElement : OclAny) : Sequence(Diagram)
Get all diagrams found in the model file resource the modelElement belongs to.
9.3 Papyrus
getPapyrusDiagrams(EObject) : Sequence(Diagram)
Get all the diagrams directly contained by an element.
9.4 Capella
To use Gendoc with Capella 1.0.X, you can use a 0.5.1 version available here.
23 Gendoc 0.6.0 tutorial
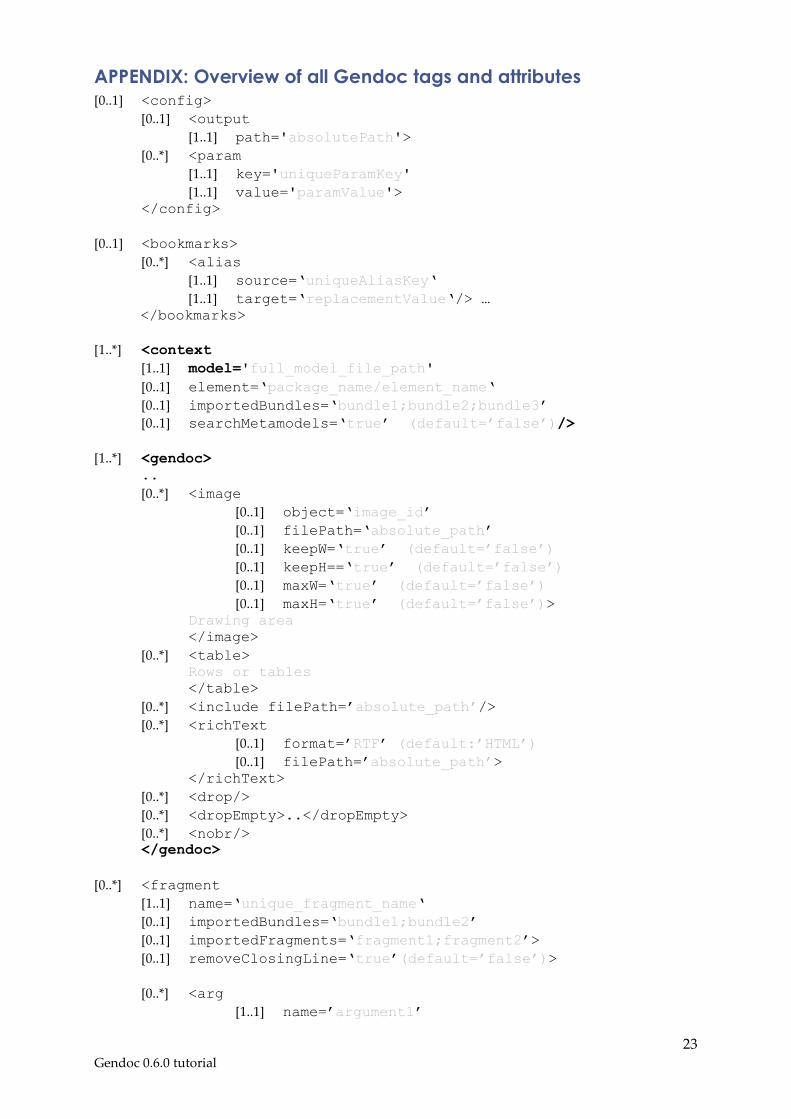
APPENDIX: Overview of all Gendoc tags and attributes [0..1] <config>
[0..1] <output
[1..1] path='absolutePath'>
[0..*] <param
[1..1] key='uniqueParamKey'
[1..1] value='paramValue'>
</config>
[0..1] <bookmarks>
[0..*] <alias
[1..1] source=‘uniqueAliasKey‘
[1..1] target=‘replacementValue‘/> …
</bookmarks>
[1..*] <context
[1..1] model='full_model_file_path'
[0..1] element=‘package_name/element_name‘
[0..1] importedBundles=‘bundle1;bundle2;bundle3’
[0..1] searchMetamodels=‘true’ (default=’false’)/>
[1..*] <gendoc>
..
[0..*] <image
[0..1] object=‘image_id’
[0..1] filePath=‘absolute_path’
[0..1] keepW=‘true’ (default=’false’)
[0..1] keepH==‘true’ (default=’false’)
[0..1] maxW=‘true’ (default=’false’)
[0..1] maxH=‘true’ (default=’false’)>
Drawing area
</image>
[0..*] <table>
Rows or tables
</table>
[0..*] <include filePath=’absolute_path’/>
[0..*] <richText
[0..1] format=’RTF’ (default:’HTML’)
[0..1] filePath=’absolute_path’>
</richText>
[0..*] <drop/>
[0..*] <dropEmpty>..</dropEmpty>
[0..*] <nobr/>
</gendoc>
[0..*] <fragment
[1..1] name=‘unique_fragment_name‘
[0..1] importedBundles=‘bundle1;bundle2’
[0..1] importedFragments=‘fragment1;fragment2’>
[0..1] removeClosingLine=‘true’(default=’false’)>
[0..*] <arg
[1..1] name=’argument1’
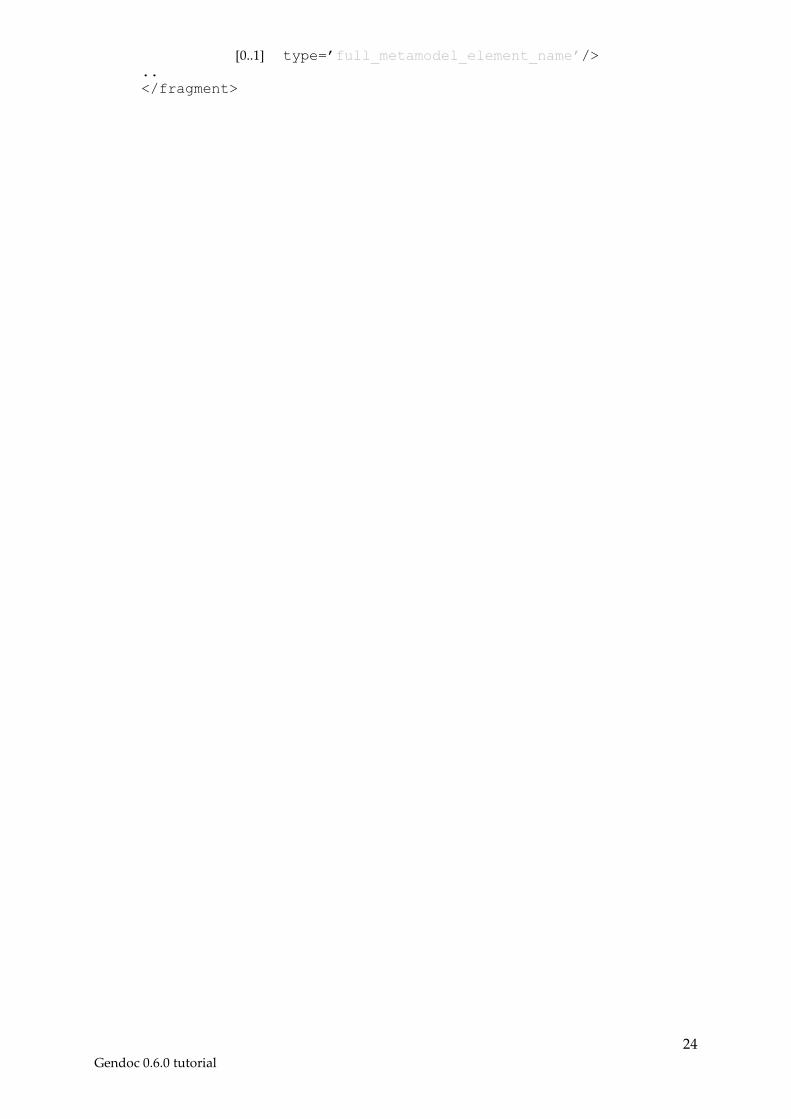
24 Gendoc 0.6.0 tutorial
[0..1] type=’full_metamodel_element_name’/>
..
</fragment>