Embed Size (px)
Citation preview

© Dianne Harrison Ferro Mesarch
Document Tools in Microsoft Word 2010
Table of Contents
INSERTING PAGE NUMBERS .............................................................................................................................................................. 2
MODIFYING PAGE NUMBERS ................................................................................................................................................................. 3
DELETING PAGE NUMBERS.................................................................................................................................................................... 3
INSERTING HEADERS OR FOOTERS .................................................................................................................................................... 4
MODIFYING HEADERS OR FOOTERS ......................................................................................................................................................... 5
DELETING HEADERS OR FOOTERS ............................................................................................................................................................ 5
INSERTING DIFFERENT TYPES OF PAGE NUMBERS ON DIFFERENT PAGES .......................................................................................... 6
INSERTING A SECTION BREAK ................................................................................................................................................................. 6
ADDING DIFFERENT TYPES OF PAGE NUMBERS TO DIFFERENT SECTIONS ........................................................................................................... 7
FOOTNOTES AND ENDNOTES ............................................................................................................................................................ 8
INSERTING FOOTNOTES ........................................................................................................................................................................ 8
INSERTING ENDNOTES .......................................................................................................................................................................... 8
EDITING NOTE TEXT ............................................................................................................................................................................ 9
CONVERTING NOTES ........................................................................................................................................................................... 9
DELETING NOTES ................................................................................................................................................................................ 9
INSERTING COLUMNS ...................................................................................................................................................................... 10
MODIFYING COLUMNS....................................................................................................................................................................... 10
DELETING COLUMNS ......................................................................................................................................................................... 10
INSERTING TABLES .......................................................................................................................................................................... 11
MODIFYING TABLES .......................................................................................................................................................................... 11
DELETING TABLES ............................................................................................................................................................................. 11
REVIEWING DOCUMENTS ................................................................................................................................................................ 12
ENABLING THE TRACK CHANGES FEATURE ............................................................................................................................................... 12
DETERMINING HOW YOUR EDITS APPEAR ............................................................................................................................................... 13
ACCEPTING EDITS ............................................................................................................................................................................. 15
REJECTING EDITS .............................................................................................................................................................................. 15
DISABLING THE TRACK CHANGES FEATURE .............................................................................................................................................. 15
COMPARING DOCUMENTS .................................................................................................................................................................. 16
COMBINING DOCUMENTS ................................................................................................................................................................... 17
THE MAIL MERGE FUNCTION ........................................................................................................................................................... 18
CREATING A LETTER AND A NEW DATA SOURCE ....................................................................................................................................... 18
EDITING YOUR DATA SOURCE .............................................................................................................................................................. 21
USING OTHER DATA SOURCES ............................................................................................................................................................. 22
CREATING LABELS ............................................................................................................................................................................. 23
Page | 2
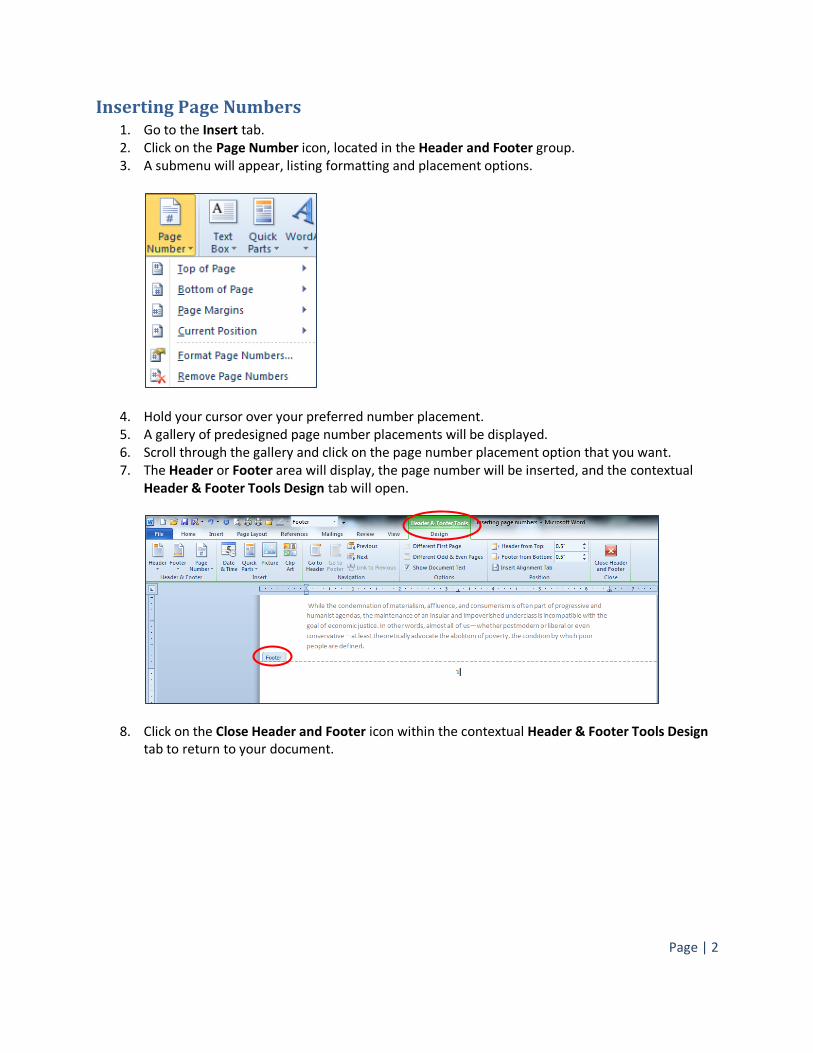
Inserting Page Numbers 1. Go to the Insert tab. 2. Click on the Page Number icon, located in the Header and Footer group. 3. A submenu will appear, listing formatting and placement options.
4. Hold your cursor over your preferred number placement. 5. A gallery of predesigned page number placements will be displayed. 6. Scroll through the gallery and click on the page number placement option that you want. 7. The Header or Footer area will display, the page number will be inserted, and the contextual
Header & Footer Tools Design tab will open.
8. Click on the Close Header and Footer icon within the contextual Header & Footer Tools Design tab to return to your document.

Page | 3
Modifying Page Numbers Once your page numbers have been inserted, you can change their formatting.
1. Double-click on the page number to open the Header or Footer area. 2. Select the page number. 3. Click on the Page Number icon within the contextual Header & Footer Tools Design tab and
choose the Format Page Numbers option. 4. The Page Numbers Format dialog will open.
5. Format your numbers and click on the OK button. 6. The formatting changes will go into effect immediately. 7. Click on the Close Header and Footer icon within the contextual Header & Footer Tools Design
tab to return to your document.
Deleting Page Numbers 1. Go to the Insert tab.
2. Click on the Page Number icon.
3. A submenu will appear, listing formatting and placement options.
4. Click on the Remove Page Numbers option.
5. The page numbers will be removed from your document.

Page | 4
Inserting Headers or Footers 1. Go to the Insert tab. 2. Click on the Header or Footer icon, located in the Header and Footer group. 3. A gallery of predesigned headers and footers will be displayed.
4. Scroll through the gallery and click on the header or footer design that you want. 5. The header or footer area will be displayed, along with the contextual Header & Footer Tools
Design tab.
6. Type your header or footer text where indicated. 7. Click on the Close Header and Footer icon. 8. The header or footer will be inserted on every page of the document.

Page | 5
Modifying Headers or Footers 1. Double-click on the header or footer to open the Header or Footer area. 2. Select the header text. 3. You can change the text itself, the text’s formatting, or use the contextual Header & Footer
Tools Design tab to change the header or footer’s actual settings (where it appears, its placement on the page, etc.)
4. When you are done formatting your header or footer, click on the Close Header and Footer icon
within the contextual Header & Footer Tools Design tab. 5. You will return to your document and your header or footer modifications will go into effect
immediately.
Deleting Headers or Footers 1. Go to the Insert tab. 2. Click on the Header or Footer icon, located in the Header and Footer group. 3. The Header or Footer gallery will appear. 4. Click on the Remove Header or Remove Footer option. 5. The headers or footers will be removed from your document.
Note: If you have inserted different sections into a document or if you have the Different First Page field or the Different Odd & Even Pages field enabled, you will need to delete your headers or footers number from each section.

Page | 6
Inserting Different Types of Page Numbers on Different Pages
Inserting a Section Break You can use section breaks to change the layout or formatting of a page or pages in your document. For example, you can lay out part of a single-column page as two columns. You can separate the chapters in your document so that the page numbering for each chapter starts at 1. You can also create a different header or footer for a section of your document. This exercise will focus on the headers and footers option, in particular, page numbering. You must divide the document into separate sections before you can insert different page numbers on different pages. To insert a section break, follow the instructions below.
1. Go to the Home tab and click on the Show/Hide icon, located in the Paragraph group, so that you can see the hidden formatting characters within your document.
2. Within your document, click where you want to insert the section break. 3. Go to the Page Layout tab. 4. Click on the Breaks icon, located in the Page Setup section. 5. The Break menu will appear.
6. Click on the Next Page option in the Section Break section. 7. A section break will be inserted.
8. Everything above the inserted section break will be Section 1 of the document; everything below will be Section 2 of the document.
9. You can format each of these sections separately. Note: You can always tell what section of your document you are in by looking at your Status bar, located at the bottom of your screen. If the Section option is not listed in your status bar, right-click on the bar and enable the Section option from the Customize Status Bar menu.

Page | 7
Adding Different Types of Page Numbers to Different Sections Once we have added the section break, we can now add differently formatted page numbers in each section.
1. Go to the first page of the document. 2. Go to the Insert tab, click on the Page Number icon and choose your preferred number
placement. 3. The page numbers will be inserted. 4. If desired, select the page number(s) and make any formatting changes. 5. Scroll to the footer area of Section 2 (below the section break). 6. Click on the Link to Previous icon in the Header and Footer Tools Design tab to break the
connection between the footer in Section 1 and the footer in Section 2. (Once the section connection has been broken, the Link to Previous icon will appear in the standard blue-gray and the Same as Previous tab will no longer appear in the upper-right corner of the header or footer area.)
7. Delete any page numbers that appear in the footer in Section 2. 8. Click on the Page Number icon in the Header and Footer Tools Design tab. 9. Choose the desired page number placement option. 10. If desired, select the page number(s) and make any formatting changes. 11. Your new page numbering will begin on the first page of Section 2. 12. Click on the Close Header and Footer icon.
Note: The Different First Page option is located in the Options group of the Header and Footer Tools Design tab. Note 2: The Link to Previous icon is a toggle. Click on it once to disable the feature, click on it again to enable it.

Page | 8
Footnotes and Endnotes
Inserting Footnotes 1. Open your document. 2. Place your cursor where you want to insert your first footnote. 3. Go to the References tab. 4. Click on the Insert Footnote icon.
5. Your cursor will automatically move to the bottom of the page, under the footnote line and to the right of the appropriate footnote number.
6. Type your footnote. 7. When you are done typing your footnote, click anywhere in the document. 8. When you are ready to add another footnote, place your cursor accordingly and click on the
Insert Footnote icon again.
Inserting Endnotes 1. Open your document. 2. Place your cursor where you want to insert your first endnote. 3. Go to the References tab. 4. Click on the Insert Endnote icon.
5. Your cursor will automatically move to the end of the document, under the endnote line and to the right of the appropriate endnote number.
6. Type your endnote. 7. When you are done typing your endnote, click anywhere in the document. 8. When you are ready to add another endnote, place your cursor accordingly and click on the
Insert Endnote icon again.

Page | 9
Editing Note Text To edit a note, place your cursor within the note text and edit away. Note: NEVER try to change note formatting this way or you run the risk of corrupting all of your notes. To change note-text or note-number formatting, you must use styles.
Converting Notes 1. Open your document. 2. Go to the References tab 3. Click on the dialog box launcher of the Footnotes group. 4. The Footnote and Endnote dialog will appear.
5. Click on the Convert button. 6. You will be asked if you want to convert all notes. 7. Click on the OK button. 8. All of your footnotes will be converted to endnotes or vice versa. 9. Close out of the Footnote and Endnote dialog.
Note: Sometimes, when you convert footnotes to endnotes, the note number formatting changes. If this happens, simply open the Footnote and Endnote dialog and use the Number Format field to change the note number formatting.
Deleting Notes THIS IS VERY IMPORTANT: You must delete any and all footnotes and/or endnotes from within the body of your text or you run the risk of corrupting all of your notes! To delete a note, select its reference number from within the body of the text. Press the Delete key on your keyboard (you may have to press the Delete key twice). If you correctly delete an automatically numbered note, Word will renumber the remaining notes.

Page | 10
Inserting Columns 1. Open a new document. 2. Go to the Page Layout tab. 3. Click on the Columns icon. 4. Choose the number of columns you want from the Column gallery. 5. Voila! Your document will have that many columns.
Note: To quickly enter sample text, to see what your column formatting looks like, type the formula =rand(3,4), in which the number three (3) refers to the number of paragraphs and the number four (4) refers to the number of sentences within each paragraph.
Modifying Columns 1. Go to the Page Layout tab. 2. Click on the Columns icon. 3. Click on the More Columns option. 4. The Columns dialog will appear.
5. You can choose the number of columns, whether you want a line between your columns, specify the column width, and determine the spacing between the columns.
6. Once you have determined your columns’ properties, click on the OK button. 7. Your column formatting will go into immediate effect.
Note: To insert a column break, click where you want the break, go to the Page Layout tab, click on the Breaks icon, and choose the Column option.
Deleting Columns 1. Go to the Page Layout tab. 2. Click on the Columns icon. 3. Choose the One option.

Page | 11
Inserting Tables 1. Open a new document. 2. Place your cursor where you want the table to appear. 3. Go to the Insert tab. 4. Click on the Table icon. 5. A grid will appear. 6. Highlight the number of columns and rows you want. 7. The table will be inserted at the cursor position in your document. 8. The contextual Table Tools Design tab and the Table Tools Layout tab will also appear. 9. You can switch between the two contextual tabs to format your table.
Note: To format text within your table, you will need to go to the Home tab.
Modifying Tables
The Table Tools Design Tab
Use the Table Tools Design tab to add a style (colors, lines) your table. The Table Styles group offers a myriad of style choices.
The Table Tools Layout Tab
Use the Table Tools Layout tab to view gridlines, insert rows, insert columns, split cells, adjust the height of your rows and the widths of your columns, align text, sort text and convert the data in your table to plain text.
Note: Since the Table Tools Design tab and the Table Tools Layout tab are contextual, they will only appear if you select your table or are working within it. Note 2: To select your table, click on the Select Table icon, which is located in the upper left-hand corner of your table when you hover over it.
Deleting Tables 1. Go to the Table Tools Layout tab. 2. Click on the Delete icon. 3. Choose the option Delete Table.

Page | 12
Reviewing Documents
Enabling the Track Changes Feature 1. Open the document to be edited. 2. Go to the Review tab. 3. Click on the top half of the Track Changes icon, located in the Tracking group. 4. The icon will change to a golden color, indicating that the Track Changes feature is enabled.
5. Start editing. 6. All edits that you make will appear in a different color from the text.
7. Depending on your settings, deletions will be struck through or appear in balloons to the right of the text.
8. Additions will be underlined. 9. When you have completed the editing, save your document. 10. The tracked changes will save with it.

Page | 13
Determining How Your Edits Appear 1. Go to the Review tab….
The Show Markup Icon
2. Click on the Show Markup icon. 3. A Markup Display gallery will appear.
4. You can determine what, other than text, you want the Track Changes feature to track, such as comments, drawings, and formatting.
5. Use the Balloons option to determine how you want your revisions displayed. 6. Use the Reviewers option to determine whose edits you want to view.
The Reviewing Pane Icon
1. Click on the Reviewing Pane icon to display a list all of the changes and who made them.
2. This icon is a toggle, click on it again to remove the Reviewing Pane.
The Reviewing Pane

Page | 14
The Bottom Half of the Track Changes Icon
1. Click on the bottom half of the Track Changes icon and choose the Change User Name option to change your user name and initials so that they will be reflected correctly within your documents.
2. Click on the bottom half of the Track Changes icon and choose the Change Tracking Options option to display the Track Changes Options dialog.
3. You can determine how your insertions, deletions and comments appear. You can also change the color that the computer assigns to each author.

Page | 15
Accepting Edits 1. Open the document that contains the edits. 2. Place your cursor in front of the first edit. 3. Go to the Review tab. 4. Click on the downward pointing arrow located at the bottom of the Accept icon.
5. Click on the Accept and Move to Next option to accept one edit at a time. 6. Click on the Accept All Changes in Document button to accept all of the edits. 7. You will have a “clean” document, in which all of your accepted edits have been incorporated.
Note: Different people’s edits will appear in different colors.
Rejecting Edits 1. Open the document that contains the edits. 2. Go to the Review tab. 3. Click on the downward pointing arrow located at the bottom of the Reject icon.
4. Click on the Reject and Move to Next option to reject one edit at a time. 5. Click on the Reject All Changes in Document button to reject all of the edits. 6. You will have a “clean” document, in which all of your accepted edits have been incorporated.
Note: You can also right-click on each edit to accept or reject it.
Disabling the Track Changes Feature Once you have completed accepting or rejecting edits, remember to disable the Track Changes feature. Otherwise, every time you make a change to the document, it will appear as a tracked edit. To disable the Track Changes feature, click on the top part of the Track Changes icon. The icon will change back to its original blue-gray color, indicating that the Track Changes feature is disabled.
Page | 16
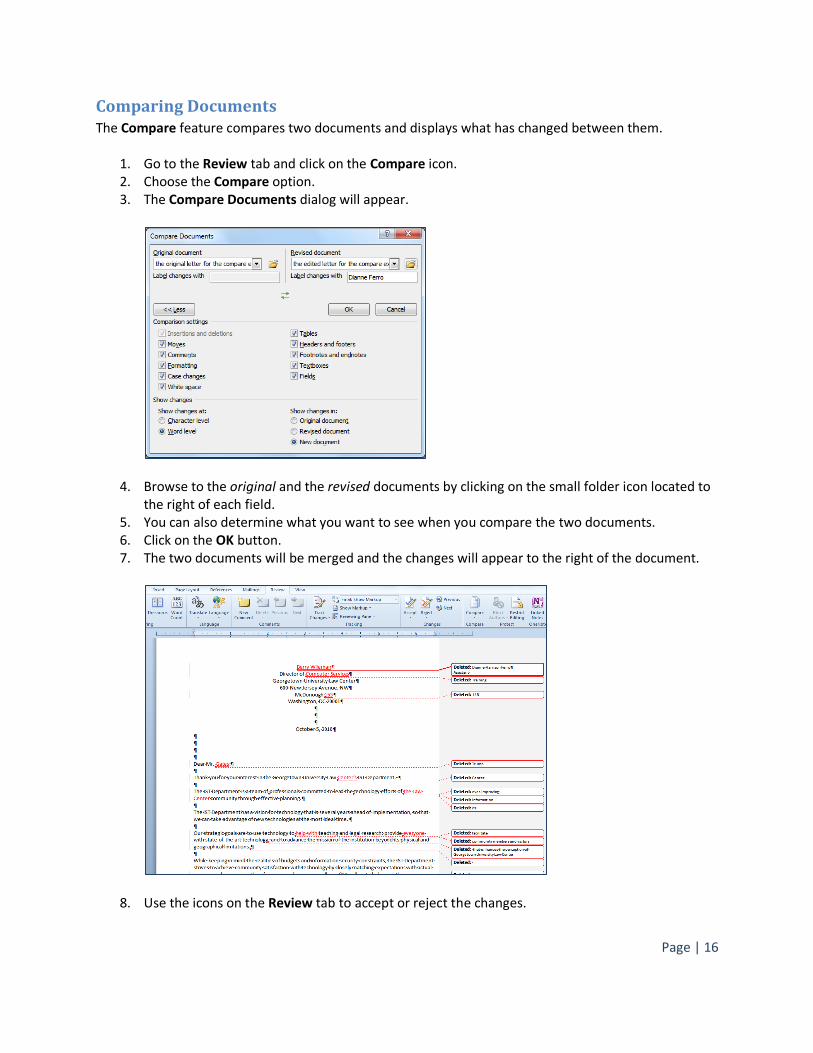
Comparing Documents The Compare feature compares two documents and displays what has changed between them.
1. Go to the Review tab and click on the Compare icon. 2. Choose the Compare option. 3. The Compare Documents dialog will appear.
4. Browse to the original and the revised documents by clicking on the small folder icon located to the right of each field.
5. You can also determine what you want to see when you compare the two documents. 6. Click on the OK button. 7. The two documents will be merged and the changes will appear to the right of the document.
8. Use the icons on the Review tab to accept or reject the changes.
Page | 17
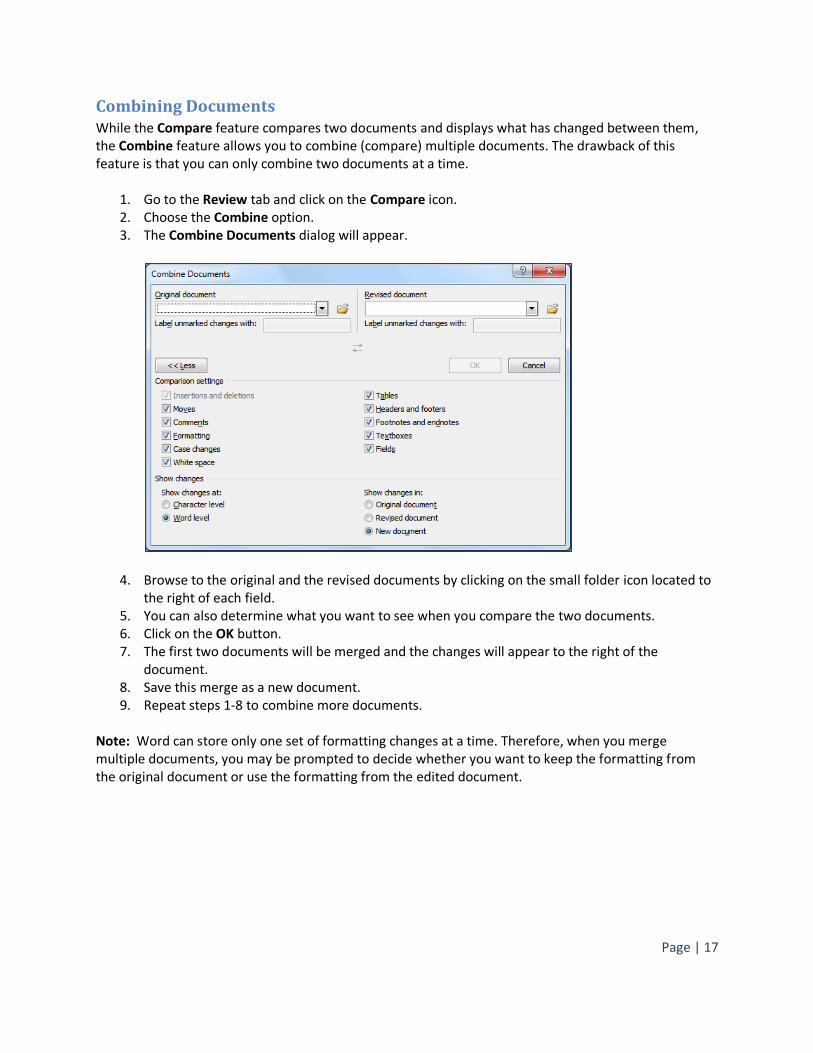
Combining Documents While the Compare feature compares two documents and displays what has changed between them, the Combine feature allows you to combine (compare) multiple documents. The drawback of this feature is that you can only combine two documents at a time.
1. Go to the Review tab and click on the Compare icon. 2. Choose the Combine option. 3. The Combine Documents dialog will appear.
4. Browse to the original and the revised documents by clicking on the small folder icon located to the right of each field.
5. You can also determine what you want to see when you compare the two documents. 6. Click on the OK button. 7. The first two documents will be merged and the changes will appear to the right of the
document. 8. Save this merge as a new document. 9. Repeat steps 1-8 to combine more documents.
Note: Word can store only one set of formatting changes at a time. Therefore, when you merge multiple documents, you may be prompted to decide whether you want to keep the formatting from the original document or use the formatting from the edited document.

Page | 18
The Mail Merge Function The important thing to remember about merges is that you are dealing with three documents: the data source (where you enter and store the data information), the main document (the letter or form into which you will place your data), and the final merged document. For this example, a letter and some labels will serve as main documents, and the list of addresses will be the data source.
Creating a Letter and a New Data Source 1. Open a new or pre-existing document that will serve as your letter. 2. Go to the Mailings tab. 3. Click on the Start Mail Merge icon and choose the Letters option. 4. Click on the Select Recipients icon and choose the Type New List option. 5. The New Address List dialog will appear.
6. Click on the Customize Columns button. 7. The Customize Address List dialog will appear.
8. In the Field Names section, select a field you wish to remove. 9. Click on the Delete button. 10. Remove all unwanted field names. 11. Click on the Add button if you want to add a new field. 12. You can select a field and click on the Rename button if you wish to change a field’s name.

Page | 19
13. You can also change the order of your field names by using the Move Up and Move Down buttons.
14. When you have your desired fields, click on the OK button. 15. You will return to the New Address List dialog, where the field name changes you made will be
visible.
16. Start entering the data for the first person by clicking in the space under the first field name and typing.
17. Press the Tab key on your keyboard or click on the New Entry button to add another person. 18. When you are done entering your data, click on the OK button. 19. The Save Address List dialog will appear.
20. Navigate to the desired folder, type a name for your address list in the File Name field, and click on the Save button.

Page | 20
21. You will return to your letter. 22. Click on the Select Recipients icon again, but this time choose the Use Existing List option. 23. The Select Data Source dialog will open. 24. Browse to your newly created list and click on the Open button. 25. Place your cursor where you want the first field to appear within your letter and click once
there. 26. Click on the bottom half of the Insert Merge Field icon. 27. Click on a field name to insert it into the letter. 28. Continue to add field names by clicking where you want the field to be and using the Insert
Merge Field icon. 29. When you are done adding field names, save the document. 30. Click on the Finish and Merge icon and choose the Edit Individual Documents option. 31. The Merge To New Document dialog will appear.
32. Choose the records you want to merge and click on the OK button. 33. The merged letters will appear on the screen in a new document.

Page | 21
Editing Your Data Source 1. Open your main document. 2. Go to the Mailings tab and click on the Edit Recipients List icon. 3. The Mail Merge Recipients dialog will appear.
4. To change your data, select the name of your address list in the Data Source section and click on the Edit button.
5. The Edit Data Source dialog will open.
6. Click on the data that you want to change and make the edits. 7. When you have finished making your edits, click on the OK button. 8. A dialog will appear, asking if you want to save your changes. Click on the Yes button. 9. You will return to the Mail Merge Recipients dialog. Click on its OK button. 10. You will return to your document. 11. Save it.

Page | 22
Using Other Data Sources Microsoft Word 2010 makes it extremely easy to use Outlook Contacts, an Excel spreadsheet or a Microsoft Word Table as a data source. It is very easy to enter data into a table format, the only thing you need to remember is to format the first row separately from the rest of the text, so that the mail merge function will recognize the information in that row as merge fields. In the table below, the text in the first row is bold and white, while the background is purple.
1. To use a different type of data source, open your document, click on the Select Recipients icon, and choose the Use Existing List option.
2. The Select Data Source dialog will open. 3. Browse to your other data source and click on the Open button. 4. Place your cursor where you want the first field to appear within your letter and click once
there. 5. Click on the bottom half of the Insert Merge Field icon. 6. Click on a field name to insert it into the letter. 7. Continue to add field names by clicking where you want the field to be and using the Insert
Merge Field icon. 8. When you are done adding field names, save the document. 9. Click on the Finish and Merge icon and choose the Edit Individual Documents option. 10. The Merge To New Document dialog will appear. 11. Choose the records you want to merge and click on the OK button. 12. The merged letters will appear on the screen in a new document.
Note: If you want to use your Outlook contacts as your data source, select the Select From Outlook Contacts option when you click on the Select Recipients icon.

Page | 23
Creating Labels 1. Open a blank document. 2. Go to the Mailings tab. 3. Click on the Start Mail Merge icon and choose the Labels option. 4. The Label Options dialog will appear.
5. Select your label vendor and number and click on the OK button. 6. You will return to your blank document, which will be formatted for the label type you chose. 7. Click on the Select Recipients icon and choose the Use Existing List option. 8. The Select Data Source dialog will open. 9. Browse to your data source and click on the Open button. 10. You will return to your label sheet, where you will find the Next Record field in all of the labels
but the first one in the top left corner.
11. Click in the first label in the top left corner. 12. Click on the bottom half of the Insert Merge Field icon. 13. Click on a field name to insert it into the label. 14. Continue to add field names by clicking where you want the field to be and using the Insert
Merge Field icon. 15. Click on the Update Labels icon, which is located in the Write & Insert Fields group. 16. The rest of the labels will be populated with the fields that you inserted into the first label. 17. Save the document. 18. Click on the Finish and Merge icon and choose the Edit Individual Documents option. 19. The Merge To New Document dialog will appear. 20. Choose the records you want to merge and click on the OK button. 21. The merged labels will appear on the screen.
Note: If you do not see the label gridlines, go to the Table Tools Layout tab and click on the View Gridlines icon, which is located on the far left-hand side of the tab.