Embed Size (px)
Citation preview

http://www.visualsc.com/monaco_parts.php Brought to you by the Monaco Parts List Project:
Door Bushing Replacement & Latch Adjustment
Monaco Group Coaches
Contents Door Latch Adjustment & Repair .......................................................................................................................... 1
Symptoms: ....................................................................................................................................................... 1
Replacing the bushing VS. Adjusting the latch rods. ......................................................................................... 1
How the bushing works. ................................................................................................................................ 3
Replacing the bushing................................................................................................................................... 3
Door Latch Rod Adjustment .............................................................................................................................. 6
Check Striker Bolts ....................................................................................................................................... 6
Adjusting the Entry Door Latch: ..................................................................................................................... 6
How the Door Latch Rods Work .................................................................................................................... 8
Materials & Tools Needed ............................................................................................................................. 8
Remove Door Panel, End Plate and Inside Door Skin ................................................................................... 8
Reassembly ................................................................................................................................................ 10
Alternate Entry Point (Optional) ...................................................................................................................... 10
Symptoms:
To open the door, you find that you need to pull the handle out and then all the way to the left. This
gets progressively worse over time.
You may need to push on the door while pulling on the door handle to get the latches to fully release.
Replacing the bushing VS. Adjusting the latch rods.
The above symptoms can be a result of 2 different problems:
1) Worn or damaged bushing.
2) Door Latch Rods out of adjustment.
Before adjusting the actuator rods, it is recommended to check the condition of the brass/copper bushing on the
lock mechanism. The reason for this is:
If the bushing is worn, it will result in the symptoms listed above.
The bushing serves to protect the hard steel parts (lock tab and bushing spindle) from wear.
If the bushing fails, the steel parts will wear excessively, resulting in permanent damage and
ultimately the failure of the mechanism.

http://www.visualsc.com/monaco_parts.php Brought to you by the Monaco Parts List Project:
The bushing can be easily inspected by removing the door access panel. It is not necessary to remove the inside
door skin at this point.
Remove deadbolt if installed.
Remove 6 screws on door panel.
Remove inside handle back plate.
CAUTION: When operating the entry door, ensure the dead bolt latch is
fully unlocked prior to closing. Failure to do so can result in damage to
the dead bolt and or entry door.
Inspect bushing for damage or excessive wear.
Note: Note the wear starting on the lock tab against the top of the failed bushing.

http://www.visualsc.com/monaco_parts.php Brought to you by the Monaco Parts List Project:
Example of Damaged Bushing
If the bushing is found to be in good condition, proceed to “Door Latch Rod Adjustment” Section.
How the bushing works.
If the lock engagement
bar is in the locked
position (to the left), it
pulls the bushing out of
the lock tab and the door
handle will not actuate
the latches.
When the lock
engagement bar is
moved to the right to the
unlocked position, the
bushing engages the lock
tab. When the door
handle is opened, the
bushing pushes up on the
lock tab, which in turn
moves the actuator rods
which unlatch to door.
If the bushing is damaged, then the door handle has to move further to move the lock tab. A
damaged bushing also creates more wear on the lock tab resulting in more play in the mechanism
over time. Due to the design of the mechanism, even a small amount of wear on the internal parts
will result in a noticeable change in how far the exterior handle has to be moved.
Replacing the bushing.
Replacing the bushing is a very simple job. However, I have not found a source for the bushing so it must be
fabricated.
http://www.visualsc.com/monaco_parts.php Brought to you by the Monaco Parts List Project:
Check and/or remove the old bushing.
The bushing is a friction fit.
Remove dead bolt inside cover if so equipped. Once the access cover is removed, replace the
deadbolt inside cover so that the deadbolt is kept in place.
Remove the inside door handle and lock bar face plate.
Remove the door access panel. At this point, do not remove the inside door skin until the condition of
the bushing has been determined.
Slide the door lock tab to the left to disengage the bushing from the lock tab.
Inspect the bushing for noticeable wear. If no wear is detected, continue to adjust the latch actuator
nut(s).
Using a small flat screwdriver, pry the rear of the bushing outward. If necessary, use plyers to pull
the bushing off. Take care not to crush the bushing if you are going to use it as a template to have a
replacement fabricated.
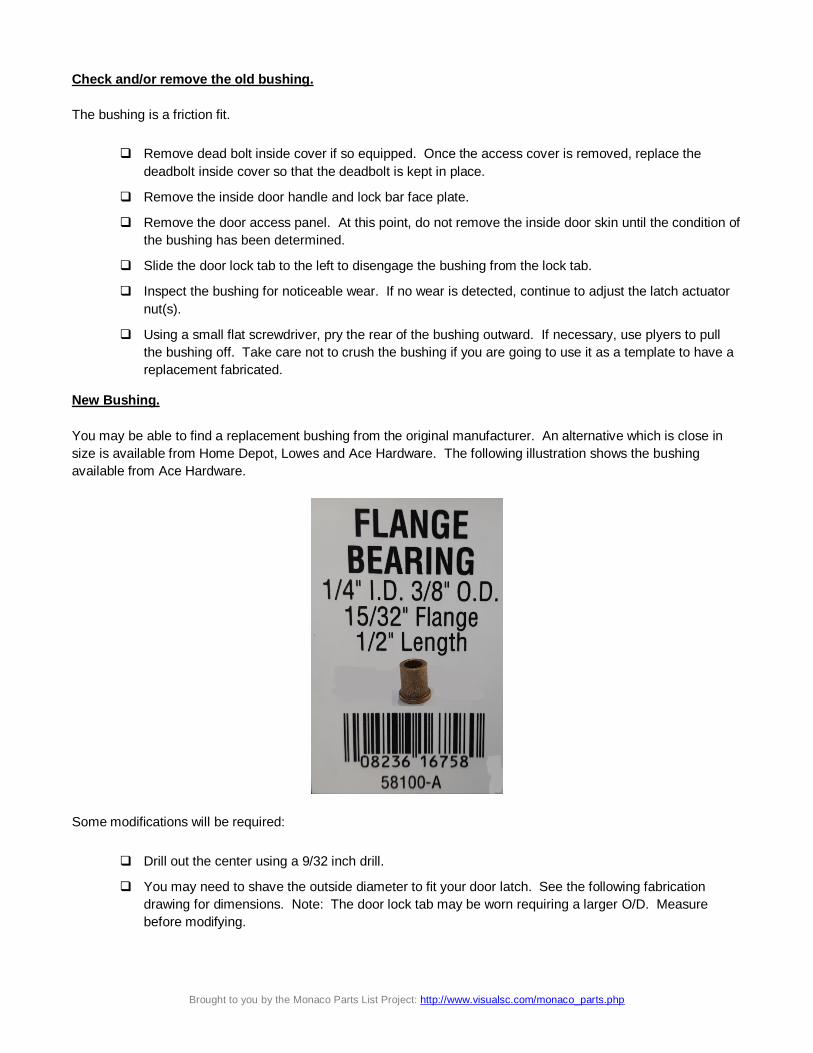
New Bushing.
You may be able to find a replacement bushing from the original manufacturer. An alternative which is close in
size is available from Home Depot, Lowes and Ace Hardware. The following illustration shows the bushing
available from Ace Hardware.
Some modifications will be required:
Drill out the center using a 9/32 inch drill.
You may need to shave the outside diameter to fit your door latch. See the following fabrication
drawing for dimensions. Note: The door lock tab may be worn requiring a larger O/D. Measure
before modifying.

http://www.visualsc.com/monaco_parts.php Brought to you by the Monaco Parts List Project:
If you can find a replacement, then proceed to installing the bushing. If not, then use the following drawing to
have a new bushing fabricated. Any machine shop can do this. The cost should not be excessive as the time
required to fabricate on a lathe is less than 15 minutes. I would recommend that you have several made so you
have a spare.
Notes:
1) The bushing design is different from the original because in my case, the bushing was so badly damaged that it was not possible to
use it as a template. In your case, you may be able to take the old bushing to the machine shop and have it duplicated. If so, the
important dimension is the inside diameter so that it is a friction fit and will not slip off the spindle.
2) If your lock tab is worn excessively, it may be necessary to increase the outside diameter from 0.32” as necessary to compensate.
The idea is that the bushing should connect with the locking tab with as tight a fit as possible without affecting the abilit y to lock and
unlock the door
3) The purpose of the larger section on the bushing in the drawing is to keep the bushing from sliding off the spindle. I built my
bushing on a cheap Harbor Freight hobby lathe and did not have the tools to create a reliable friction fit.
Installing the new bushing.
Slide the door lock tab to the left to disengage the bushing from the lock tab.
Slide the new bushing on to the spindle. If the bushing was fabricated using the above drawing, you
may need to push the lock tab to the right
Test both the lock function and observe how far the door handle needs to be pulled to open the door.
In my case, I had to work the lock back and forth to seat the bushing into the lock tab.
Using white lithium grease, lubricate the outside of the bushing and inside of the locking tab.
Summary
Replacing the bushing may correct the door problem, and adjustment of the latch rods may not be necessary.
If the door still does not open easily without requiring the outside door handle to be pulled too far, continue with
the next steps.

http://www.visualsc.com/monaco_parts.php Brought to you by the Monaco Parts List Project:
Door Latch Rod Adjustment
The following information is based on a document that has been posted on multiple forums. I have been unable to locate
the original author. If you recognize it and are the original author, please contact
mailto:[email protected]?subject=Author of door latch rod adjustment procedure.
Check Striker Bolts
The two striker bolts which protrude from the door frame
should be tight.
Tighten them down, then back off a quarter turn
but make sure they move up and down.
Once they are tight you should be able to grab
either striker bolt and with some effort, the bolts,
along with the back plate, should move up and
down.
If the bolts are too tight they will not 'float' and won't properly
adjust and align with the door when closed.
Check door operation, then proceed to next step.
Adjusting the Entry Door Latch:
Determine which latch, top or bottom, needs adjustment.
Slowly close each latch to the first position. Now pull the outside handle slowly to see if the two
latches open at the same time.
If they do not, or if the handle is at the fully pulled position, the latches need adjustment.
Take note of which latch releases last.
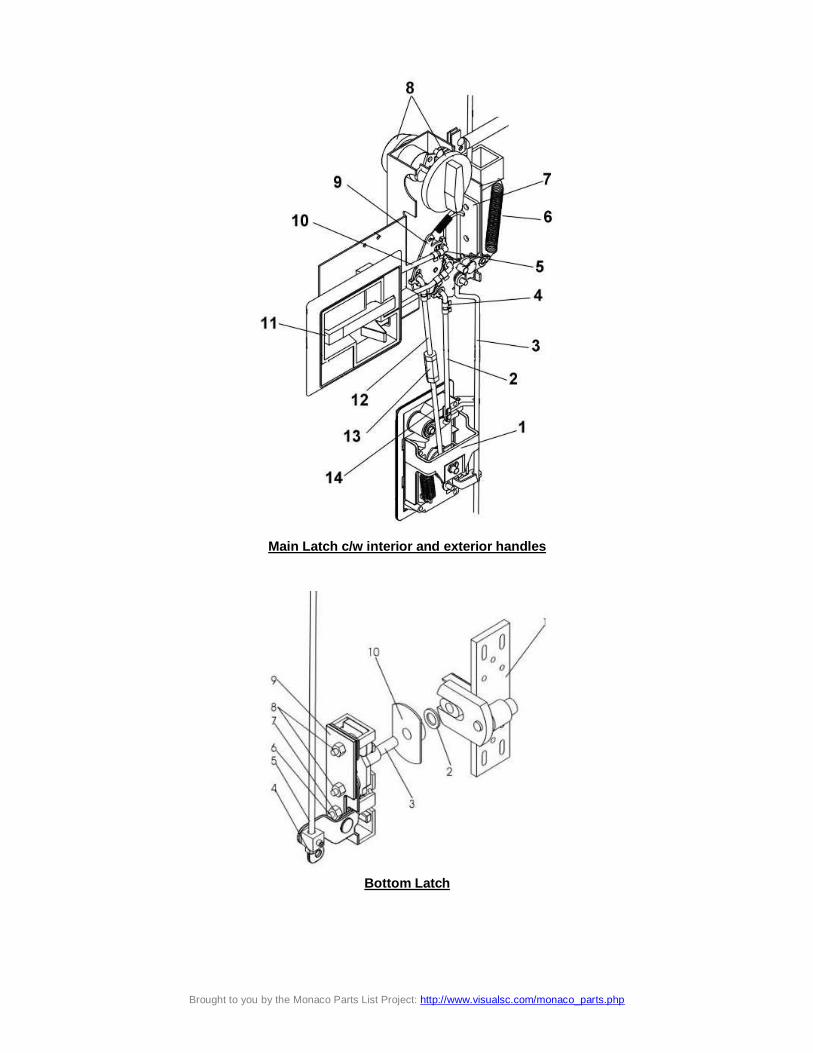
Top Latch
http://www.visualsc.com/monaco_parts.php Brought to you by the Monaco Parts List Project:
Main Latch c/w interior and exterior handles
Bottom Latch

http://www.visualsc.com/monaco_parts.php Brought to you by the Monaco Parts List Project:
How the Door Latch Rods Work
The top and bottom latch have a nut on the end of a long connecting rod. This nut is what is adjusted using a
7/16” open end wrench. You will not need to turn the nut much to reach adjustment.
Whichever latch releases last (as noted above) is the one you need to adjust. Normally it is not necessary to
adjust both top and bottom latches.
You want the latches to release when the handle still has a little travel left.
Materials & Tools Needed
Contact cement to glue door gasket corners during reassembly.
Painters tape (3”)
7/16” wrench
Phillips screw driver.
Remove Door Panel, End Plate and Inside Door Skin
Open the door and remove the end plate by removing 8 screws. Note there is a rubber gasket on the
outer edge of the door and at the top and bottom corners of the end plate the gasket is cut at a 45-
degree angle and then glued to a similar gasket along the top and bottom of the door. Use a sharp
razor and cut the gasket along the 45-degree glue line, and remove the end plate.
Remove all the remaining screws as pictured below.
Using ‘painters’ tape secure outside window frame to prevent it from falling out after inside screws are
removed.
http://www.visualsc.com/monaco_parts.php Brought to you by the Monaco Parts List Project:
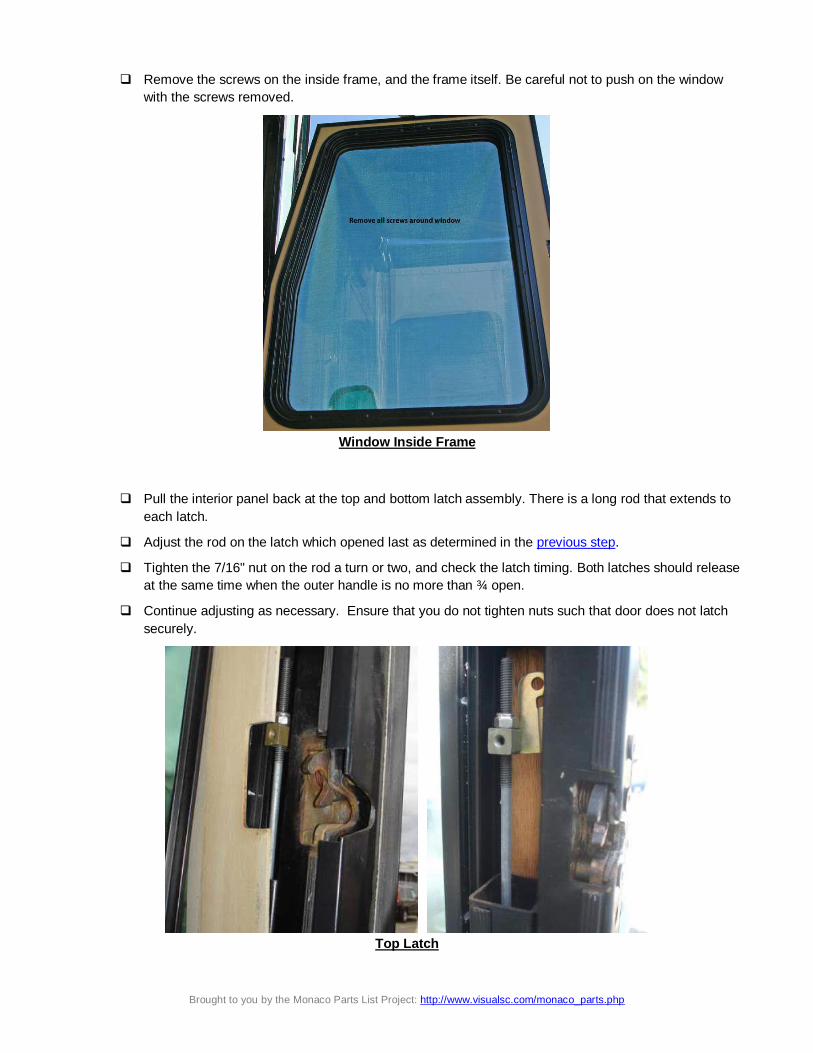
Remove the screws on the inside frame, and the frame itself. Be careful not to push on the window
with the screws removed.
Window Inside Frame
Pull the interior panel back at the top and bottom latch assembly. There is a long rod that extends to
each latch.
Adjust the rod on the latch which opened last as determined in the previous step.
Tighten the 7/16" nut on the rod a turn or two, and check the latch timing. Both latches should release
at the same time when the outer handle is no more than ¾ open.
Continue adjusting as necessary. Ensure that you do not tighten nuts such that door does not latch
securely.
Top Latch

http://www.visualsc.com/monaco_parts.php Brought to you by the Monaco Parts List Project:
Bottom Latch
Reassembly
Reinstall inside window frame. Remove painters tape.
Apply contact cement on the door gasket 45o corners to glue the gasket back together. Allow to dry
as per directions on glue package.
Replace the door edge plate.
Press the door gasket corners together tightly for a few seconds. The contact cement should hold the
gasket immediately.
Check operation of door latch to ensure it is functioning correctly.
Check remote lock function to ensure that door locks and unlocks without binding.
Replace inside door panel c/w 6 screws and covers.
Replace inside door handle backing plate.
Replace dead bolt and ensure that it functions correctly.
Alternate Entry Point (Optional)
Because there is only one entrance door, some people will modify one window so that in an emergency, the
window can be opened to give access to the coach if the door latch fails and cannot be opened.
Select a window that can be reached and is not blocked on the inside such that it would prevent
someone entering the coach.
Inspect the window latch to locate a place that a hole could be drilled in the outside frame such that a
small rod could be inserted to push the latch open.
Locate a small rod or screwdriver that could be used to push open the window latch. Locate where it
can be accessed from outside the coach. The smaller the diameter, but better.
Drill a small hole in the outside frame as determined above.
After testing to ensure the window latch can be released through the small hole, use black silicone to
seal the hole to minimize detection by others.